
ULTRASONIC CLEANER
USER MANUAL
Read Carefully Before Use
Keep for Future Reference
V20220250
1
Introduction
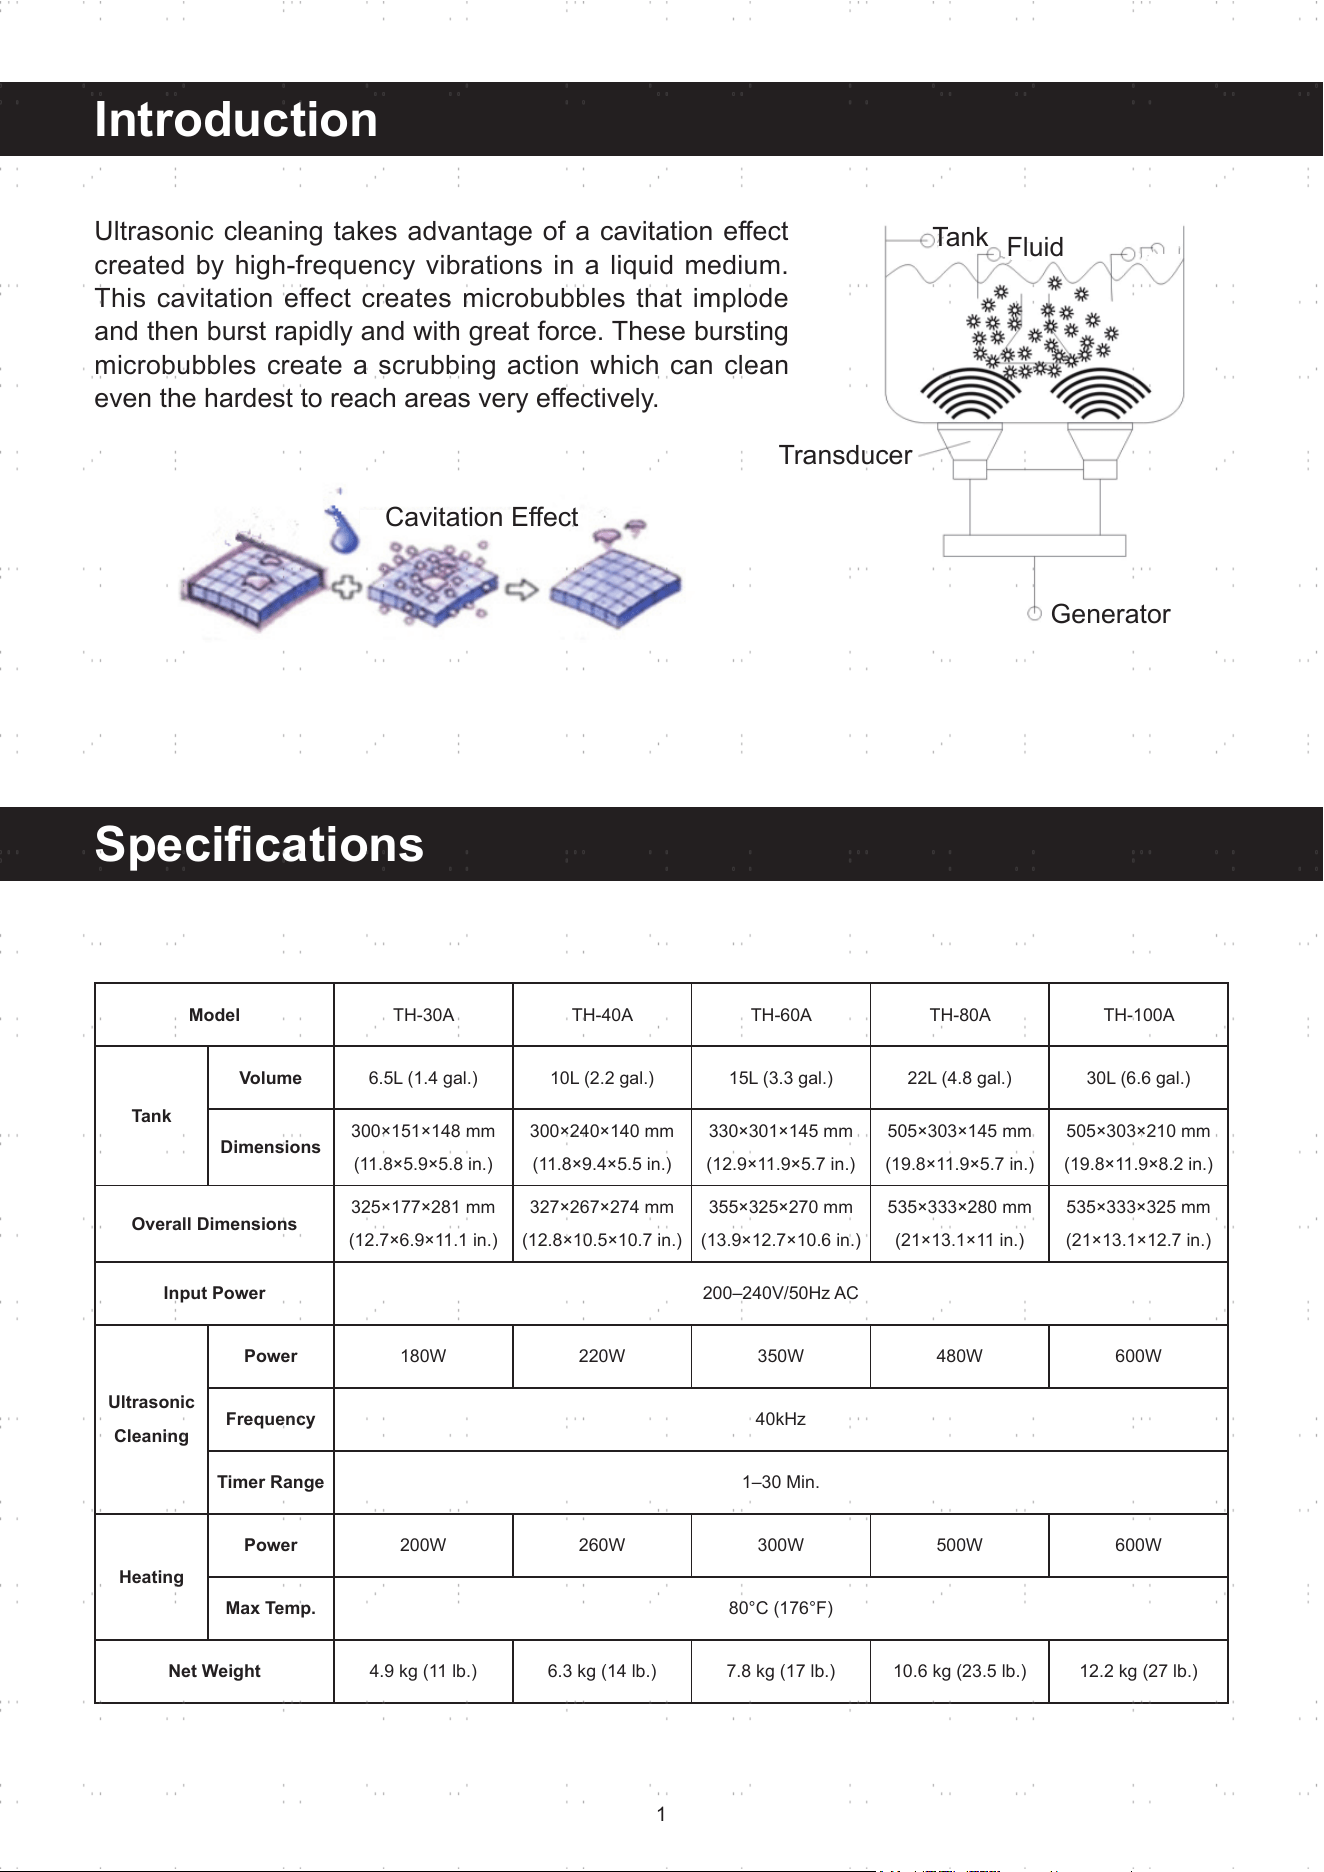
Ultrasonic cleaning takes advantage of a cavitation eect
created by high-frequency vibrations in a liquid medium.
This cavitation effect creates microbubbles that implode
and then burst rapidly and with great force. These bursting
microbubbles create a scrubbing action which can clean
even the hardest to reach areas very eectively.
Cavitation Eect
Transducer
Generator
Specications
Model
TH-30A TH-40A TH-60A TH-80A TH-100A
Tank
Volume
6.5L (1.4 gal.) 10L (2.2 gal.) 15L (3.3 gal.) 22L (4.8 gal.) 30L (6.6 gal.)
Dimensions
300×151×148 mm
(11.8×5.9×5.8 in.)
300×240×140 mm
(11.8×9.4×5.5 in.)
330×301×145 mm
(12.9×11.9×5.7 in.)
505×303×145 mm
(19.8×11.9×5.7 in.)
505×303×210 mm
(19.8×11.9×8.2 in.)
Overall Dimensions
325×177×281 mm
(12.7×6.9×11.1 in.)
327×267×274 mm
(12.8×10.5×10.7 in.)
355×325×270 mm
(13.9×12.7×10.6 in.)
535×333×280 mm
(21×13.1×11 in.)
535×333×325 mm
(21×13.1×12.7 in.)
Input Power
200–240V/50Hz AC
Ultrasonic
Cleaning
Power
180W 220W 350W 480W 600W
Frequency
40kHz
Timer Range
1–30 Min.
Heating
Power
200W 260W 300W 500W 600W
Max Temp.
80°C (176°F)
Net Weight
4.9 kg (11 lb.) 6.3 kg (14 lb.) 7.8 kg (17 lb.) 10.6 kg (23.5 lb.) 12.2 kg (27 lb.)
Tank
Fluid
2
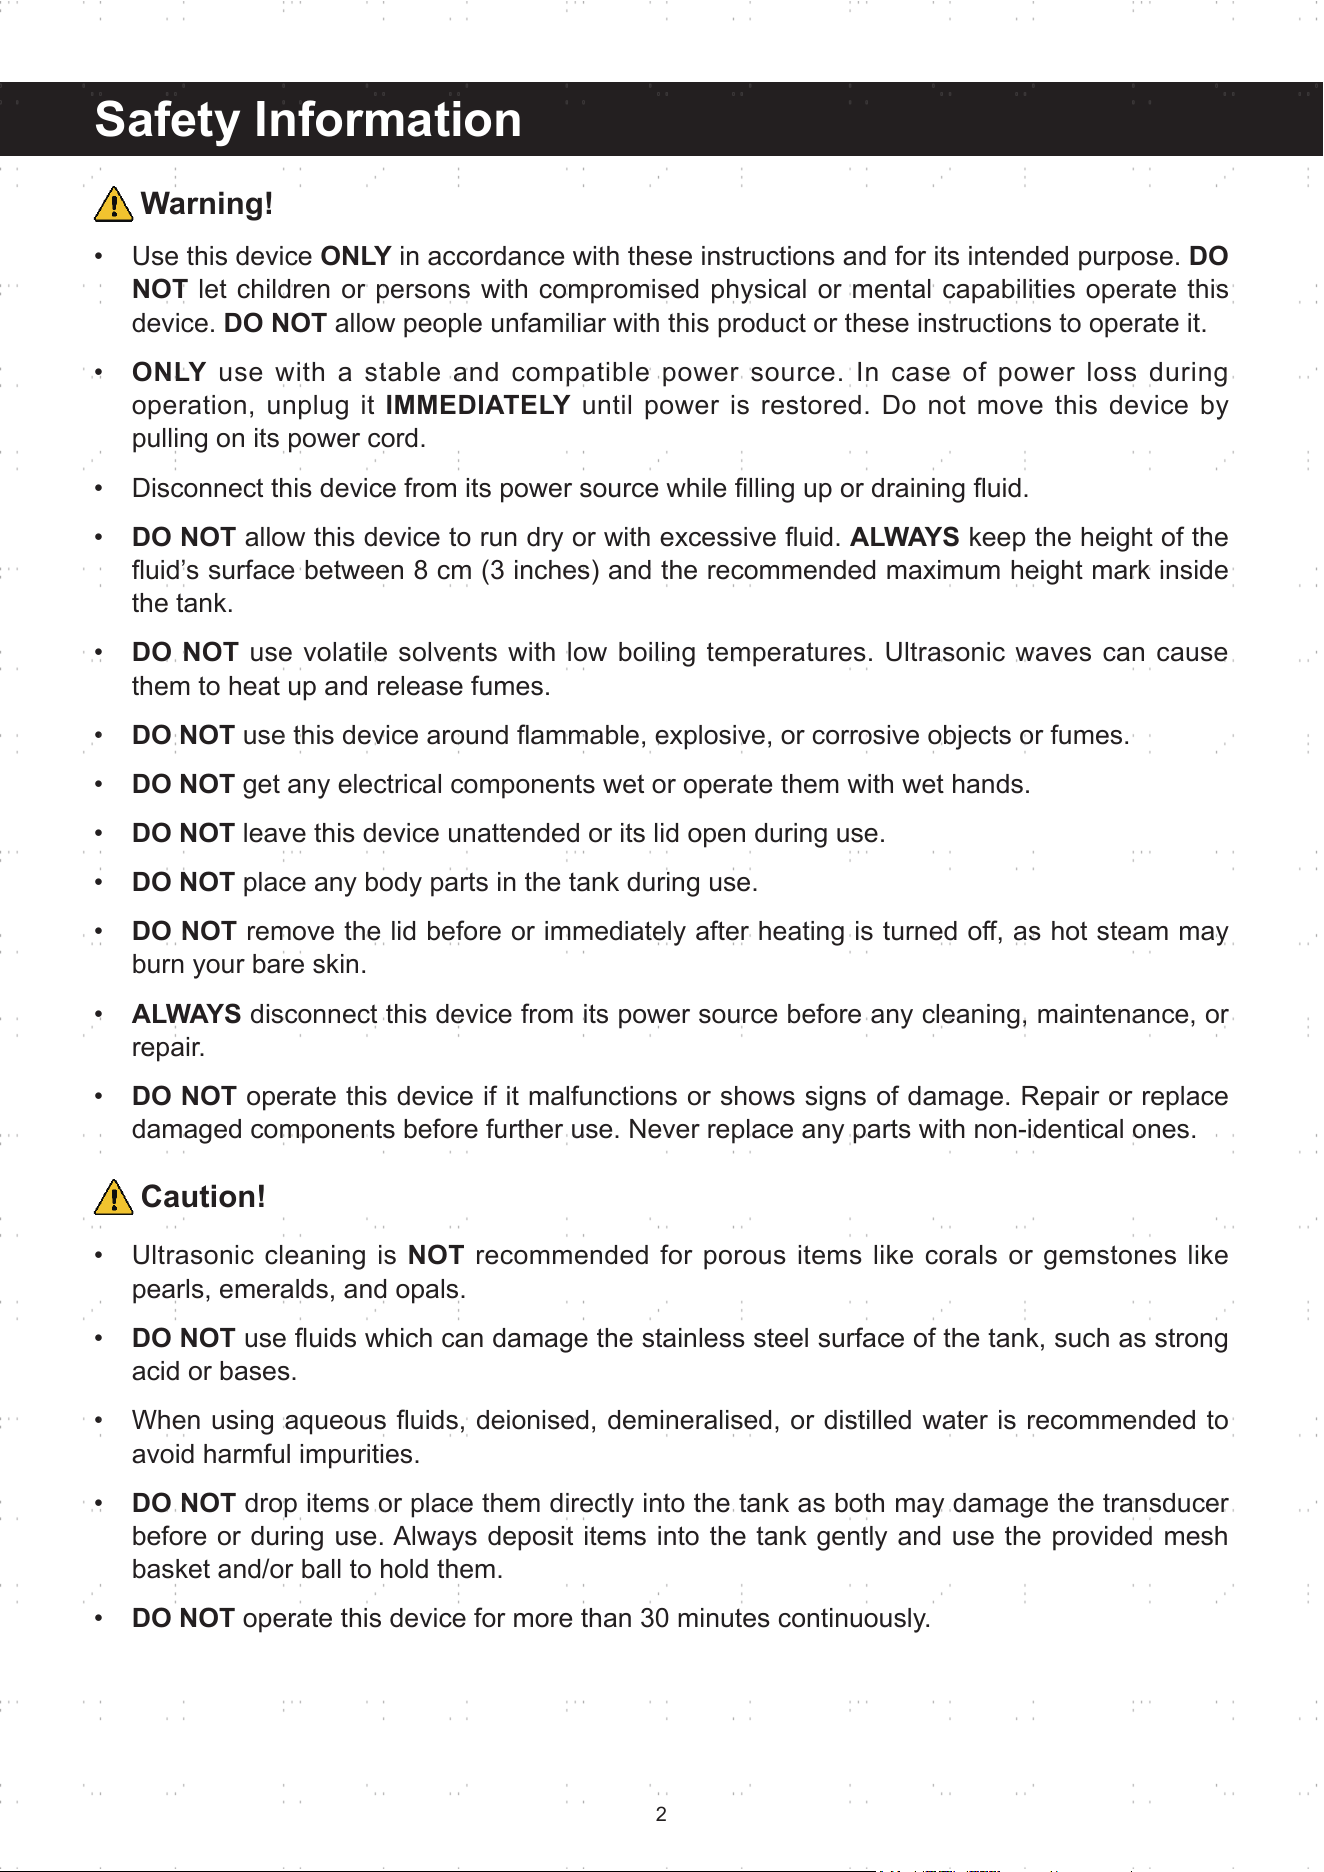
Safety Information
• Use this device
ONLY
in accordance with these instructions and for its intended purpose.
DO
NOT
let children or persons with compromised physical or mental capabilities operate this
device.
DO NOT
allow people unfamiliar with this product or these instructions to operate it.
•
ONLY
use with a stable and compatible power source. In case of power loss during
operation, unplug it
IMMEDIATELY
until power is restored. Do not move this device by
pulling on its power cord.
• Disconnect this device from its power source while lling up or draining uid.
•
DO NOT
allow this device to run dry or with excessive uid.
ALWAYS
keep the height of the
uid’s surface between 8 cm (3 inches) and the recommended maximum height mark inside
the tank.
•
DO NOT
use volatile solvents with low boiling temperatures. Ultrasonic waves can cause
them to heat up and release fumes.
•
DO NOT
use this device around ammable, explosive, or corrosive objects or fumes.
•
DO NOT
get any electrical components wet or operate them with wet hands.
•
DO NOT
leave this device unattended or its lid open during use.
•
DO NOT
place any body parts in the tank during use.
•
DO NOT
remove the lid before or immediately after heating is turned o, as hot steam may
burn your bare skin.
•
ALWAYS
disconnect this device from its power source before any cleaning, maintenance, or
repair.
•
DO NOT
operate this device if it malfunctions or shows signs of damage. Repair or replace
damaged components before further use. Never replace any parts with non-identical ones.
• Ultrasonic cleaning is
NOT
recommended for porous items like corals or gemstones like
pearls, emeralds, and opals.
•
DO NOT
use uids which can damage the stainless steel surface of the tank, such as strong
acid or bases.
• When using aqueous uids, deionised, demineralised, or distilled water is recommended to
avoid harmful impurities.
•
DO NOT
drop items or place them directly into the tank as both may damage the transducer
before or during use. Always deposit items into the tank gently and use the provided mesh
basket and/or ball to hold them.
•
DO NOT
operate this device for more than 30 minutes continuously.
Warning!
Caution!
3
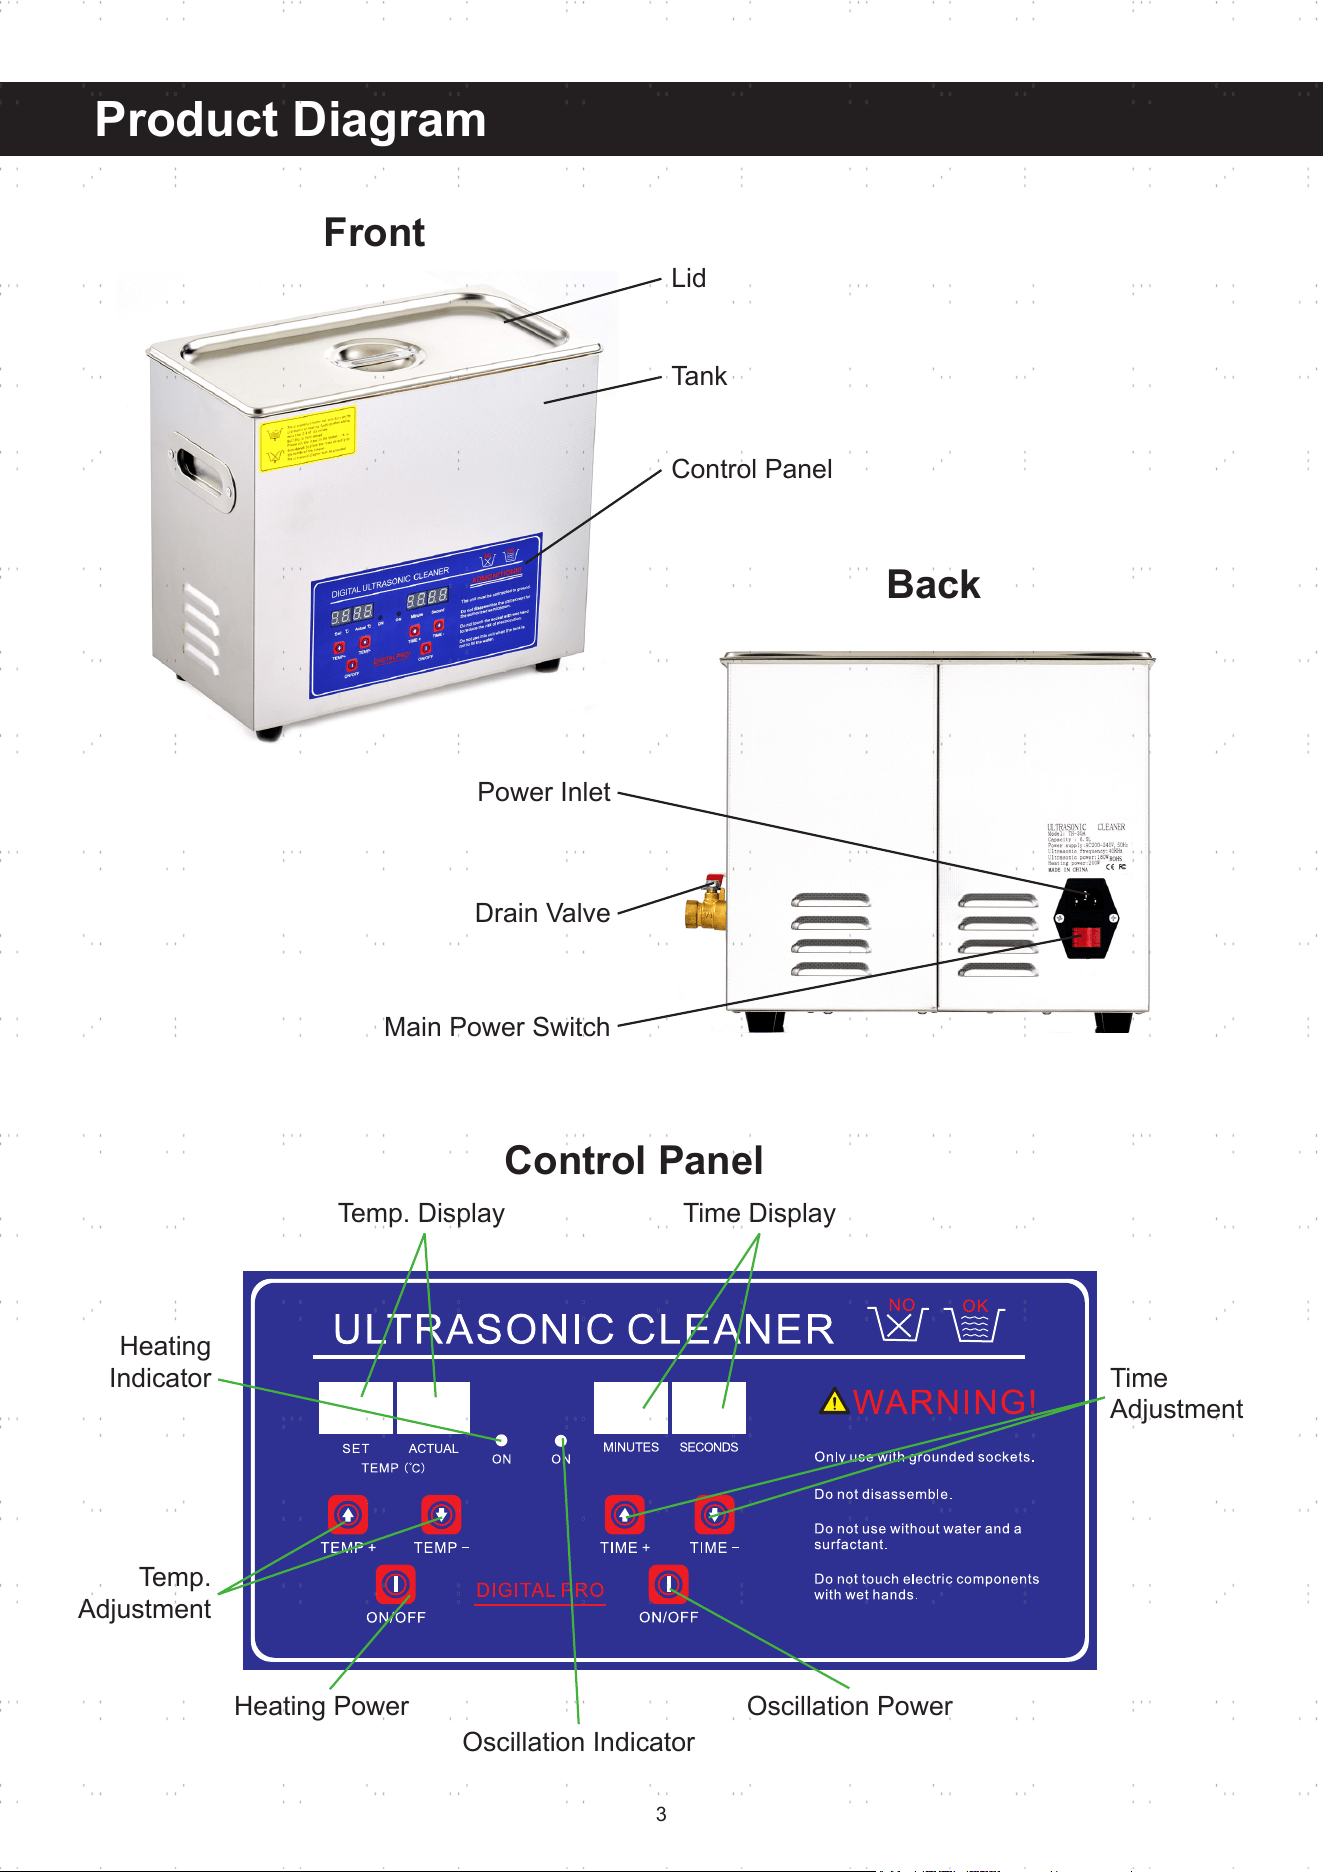
Product Diagram
Front
Back
Control Panel
Lid
Tank
Power Inlet
Drain Valve
Main Power Switch
Control Panel
Temp. Display Time Display
Heating
Indicator
Oscillation Indicator
Time
Adjustment
Oscillation PowerHeating Power
Temp.
Adjustment
4
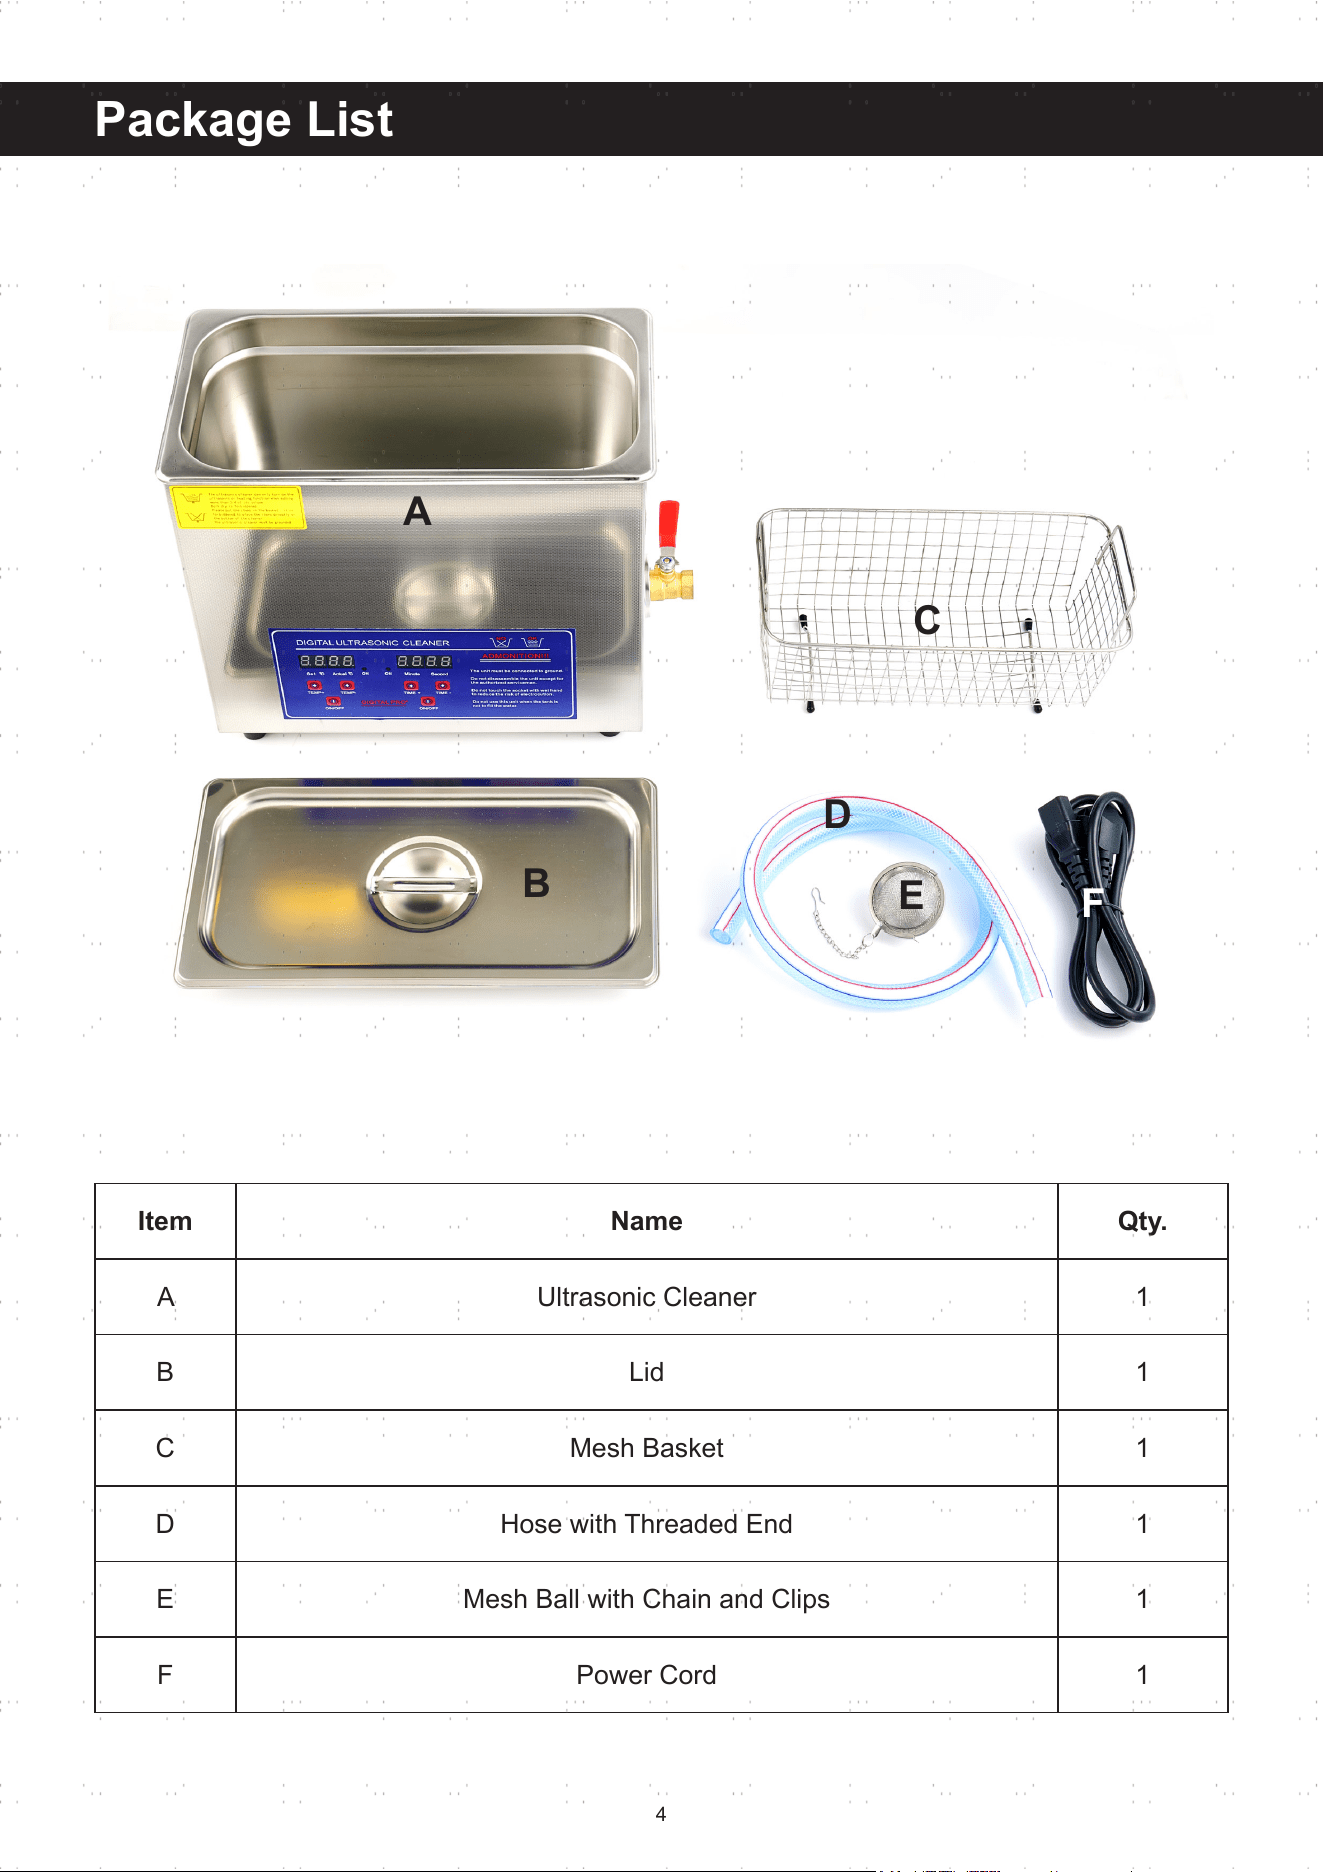
Package List
Item Name Qty.
A Ultrasonic Cleaner 1
B Lid 1
C Mesh Basket 1
D Hose with Threaded End 1
E Mesh Ball with Chain and Clips 1
F Power Cord 1
A
B
C
D
E
F
5
Operation
1. Make sure the drain valve at the side of the ultrasonic cleaner (A) is closed by turning its
handle left or right completely.
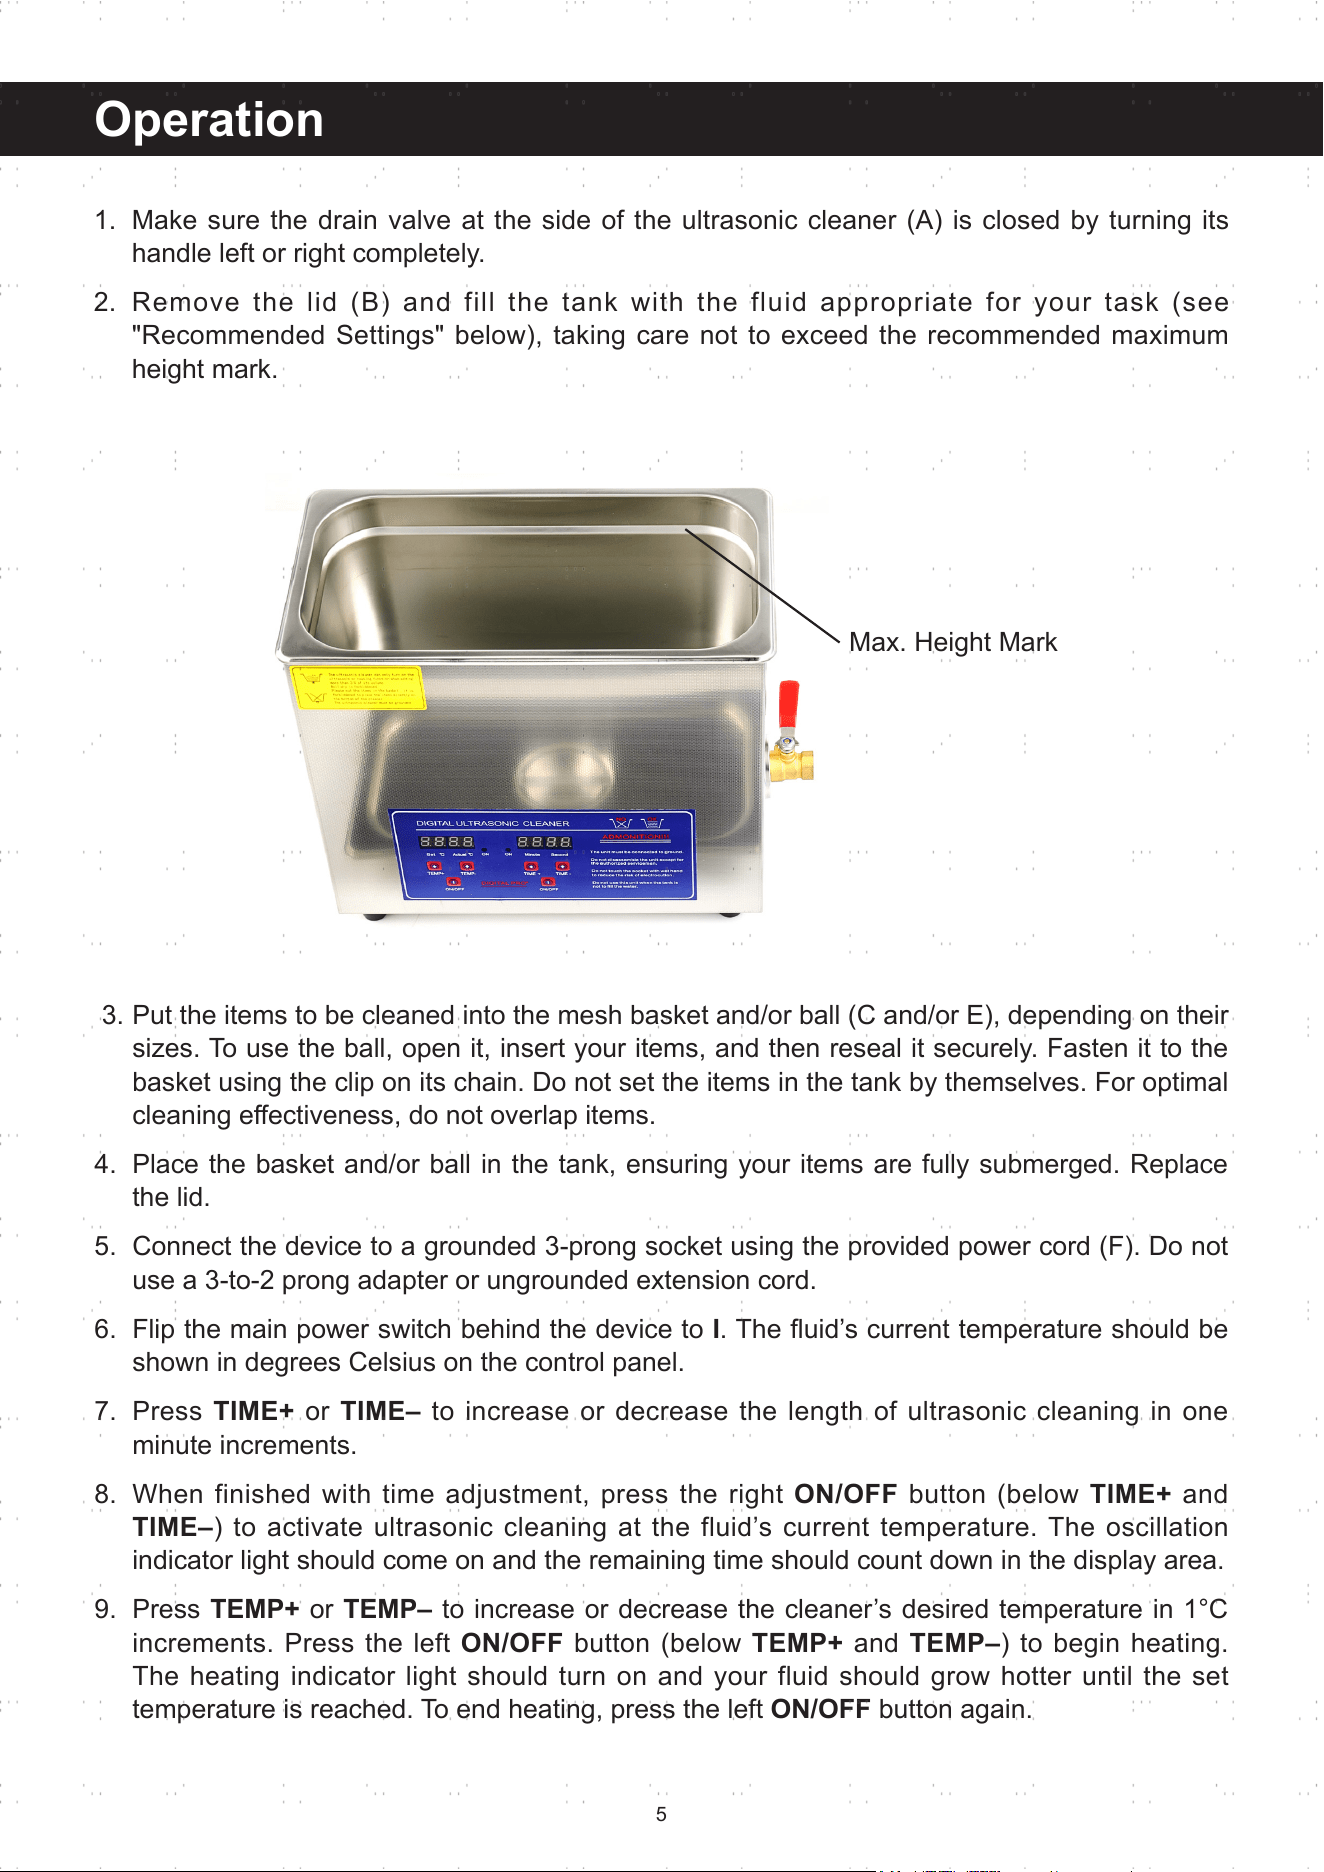
2. Remove the lid (B) and fill the tank with the fluid appropriate for your task (see
"Recommended Settings" below), taking care not to exceed the recommended maximum
height mark.
3. Put the items to be cleaned into the mesh basket and/or ball (C and/or E), depending on their
sizes. To use the ball, open it, insert your items, and then reseal it securely. Fasten it to the
basket using the clip on its chain. Do not set the items in the tank by themselves. For optimal
cleaning eectiveness, do not overlap items.
4. Place the basket and/or ball in the tank, ensuring your items are fully submerged. Replace
the lid.
5. Connect the device to a grounded 3-prong socket using the provided power cord (F). Do not
use a 3-to-2 prong adapter or ungrounded extension cord.
6. Flip the main power switch behind the device to
I
. The uid’s current temperature should be
shown in degrees Celsius on the control panel.
7. Press
TIME+
or
TIME–
to increase or decrease the length of ultrasonic cleaning in one
minute increments.
8. When finished with time adjustment, press the right
ON/OFF
button (below
TIME+
and
TIME–
) to activate ultrasonic cleaning at the fluid’s current temperature. The oscillation
indicator light should come on and the remaining time should count down in the display area.
9. Press
TEMP+
or
TEMP–
to increase or decrease the cleaner’s desired temperature in 1°C
increments. Press the left
ON/OFF
button (below
TEMP+
and
TEMP–
) to begin heating.
The heating indicator light should turn on and your fluid should grow hotter until the set
temperature is reached. To end heating, press the left
ON/OFF
button again.
Max. Height Mark
6
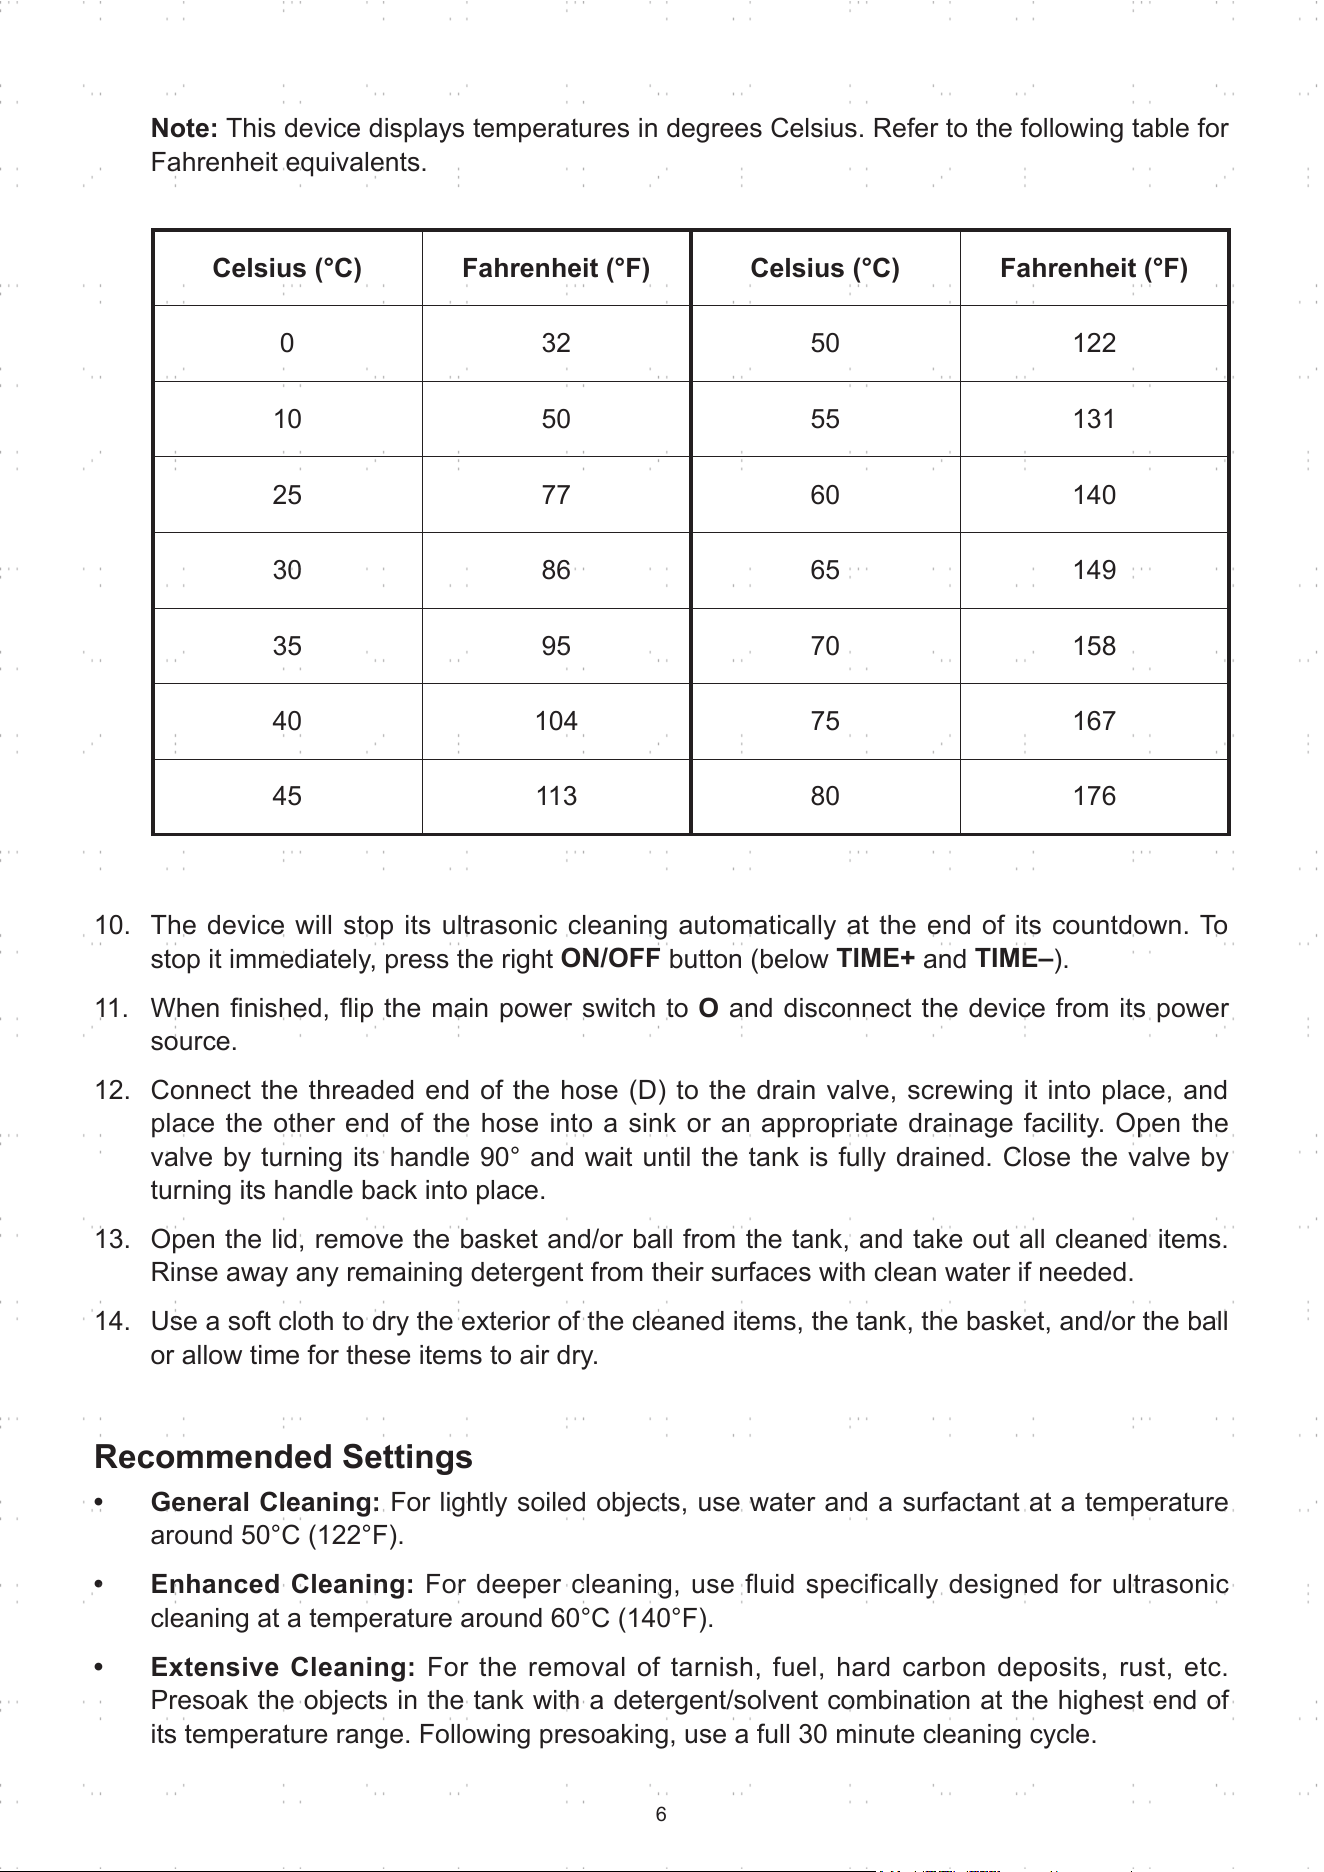
Note:
This device displays temperatures in degrees Celsius. Refer to the following table for
Fahrenheit equivalents.
10. The device will stop its ultrasonic cleaning automatically at the end of its countdown. To
stop it immediately, press the right
ON/OFF
button (below
TIME+
and
TIME–
).
11. When nished, ip the main power switch to
O
and disconnect the device from its power
source.
12. Connect the threaded end of the hose (D) to the drain valve, screwing it into place, and
place the other end of the hose into a sink or an appropriate drainage facility. Open the
valve by turning its handle 90° and wait until the tank is fully drained. Close the valve by
turning its handle back into place.
13. Open the lid, remove the basket and/or ball from the tank, and take out all cleaned items.
Rinse away any remaining detergent from their surfaces with clean water if needed.
14. Use a soft cloth to dry the exterior of the cleaned items, the tank, the basket, and/or the ball
or allow time for these items to air dry.
Recommended Settings
• General Cleaning:
For lightly soiled objects, use water and a surfactant at a temperature
around 50°C (122°F).
• Enhanced Cleaning:
For deeper cleaning, use fluid specifically designed for ultrasonic
cleaning at a temperature around 60°C (140°F).
• Extensive Cleaning:
For the removal of tarnish, fuel, hard carbon deposits, rust, etc.
Presoak the objects in the tank with a detergent/solvent combination at the highest end of
its temperature range. Following presoaking, use a full 30 minute cleaning cycle.
Celsius (°C) Fahrenheit (°F) Celsius (°C) Fahrenheit (°F)
0 32 50 122
10 50 55 131
25 77 60 140
30 86 65 149
35 95 70 158
40 104 75 167
45 113 80 176
7
Contact Us
Thank you for choosing our products! If you have any questions or
comments, contact us at
and we'll resolve your
issue ASAP!
For a .pdf copy of the latest version of these instructions, use the
appropriate app on your smartphone to scan the QR code to the right.
Maintenance
• Turn o and unplug this device prior to any draining, cleaning, maintenance, or repair.
• Replace the cleaning uid between uses.
• Check the parts of this device for any wear or damage after use. Repair or replace any
problematic parts before further use.
• If this device will not be used for an extended period of time, unplug and drain it and allow it
to fully dry before storing in a cool, dry, and clean place.

DUC-E065-UK
DUC-E100-UK
DUC-E150-UK
DUC-E300-UK
Rev. 3 Mar. 2022
