1
Smart Control
Pro Touch
ENGLISH
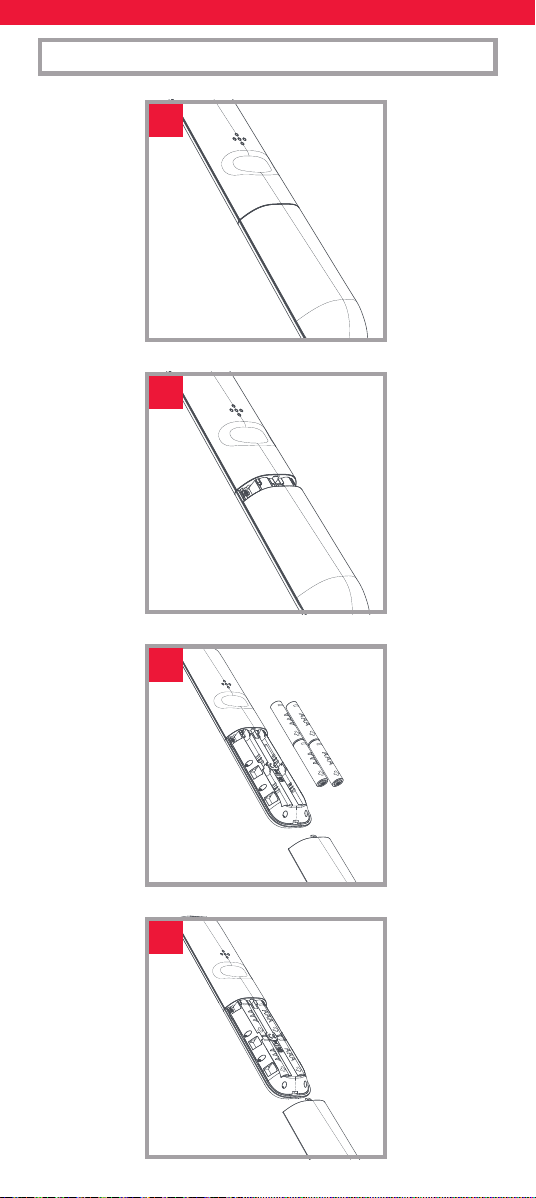
2
BATTERIES
1
4
3
4x AAA
2
3
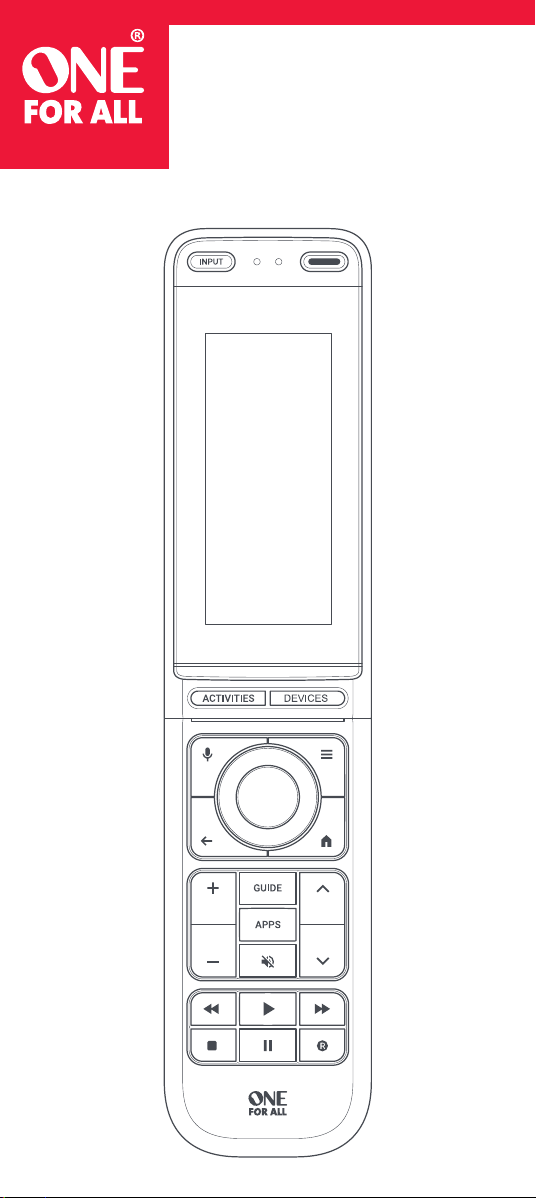
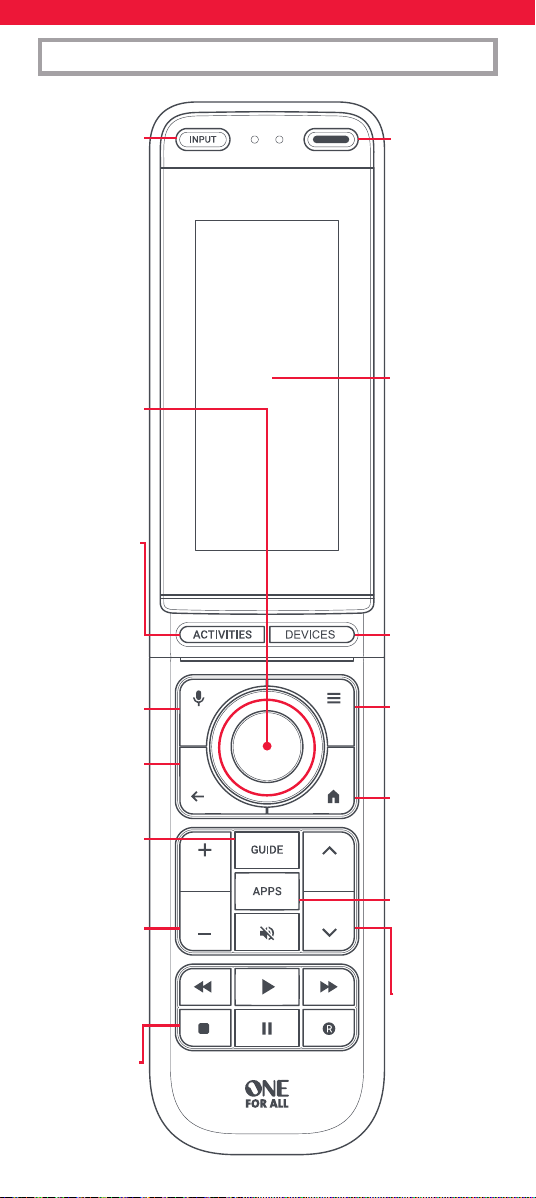
KEY DESCRIPTIONS | URC7985
POWER –
Power on/o
Power on and o
your devices. In
Activity mode,
hold down for 3
seconds to power
o all the devices
in that Activity.
Input
Change the input
on your TV or
Audio Device
Activities
Direct Access to all
your Activities
Menu
Directions
Used to navigate
the Menu of the
current device
Back
Go back one step
in the Menu of the
current device
Guide
Access the TV
Guide of the
current device
Volume Up,
Down and Mute
Control the volume of
the current device. The
volume can also be
locked to control one
device in every mode
Playback Keys
Control
the playback of
the current device
or app
Voice
Hold down to
use Voice search
on Android or
Google TV
Devices
Direct Access to the
Devices screen
Menu
Settings Menu
or Options on
the current device
Home
Access the Home
Menu of
the current device
Apps
Access the Apps
menu of the
current device
Channel Up
and Down
Browse through
the channels of
the current device
Screen
The main screen
will display
Devices, Activities
and extra keys
per Device, for
example the digits
0-9 for channel
selection
4
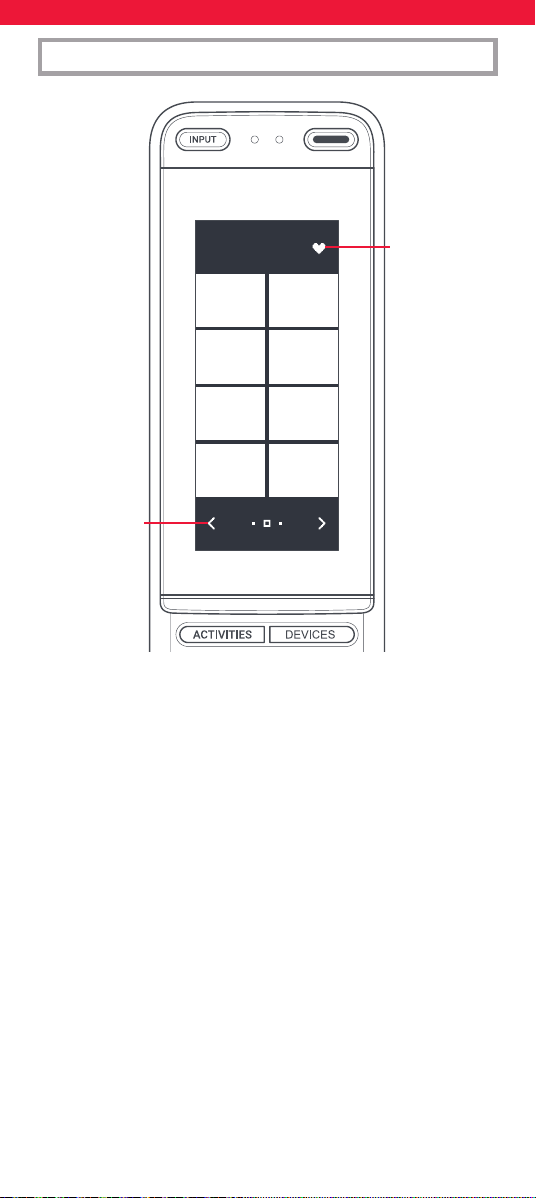
DISPLAY DESCRIPTIONS | URC7985
Favourite
Press this icon
to access the
Favourite Screen.
The Favourite
Screen can be
programmed to
combine your
favourite Devices,
macros and
Activities
Left and
Right Arrows
When more than
one screen is
available for the
current mode,
scroll through
them using the
Left and Right
Arrows
5
INTRODUCTION
ONE FOR ALL ADVANCED APP
The One For All Smart Control Pro Touch is a Universal
Remote Control capable of controlling up to 12 Audio
Video devices, including one Bluetooth controlled
device such as a Google TV, Apple TV or Amazon Fire
stick.
Once the remote has been set up to control these
devices, you will have access to a wealth of useful
extra features including Macros, Activity control,
Remote Finder and more. The purpose of this online
manual is to help discover those features, how to
set them up and to personalise the remote so it’s
perfectly suited to your home entertainment area.
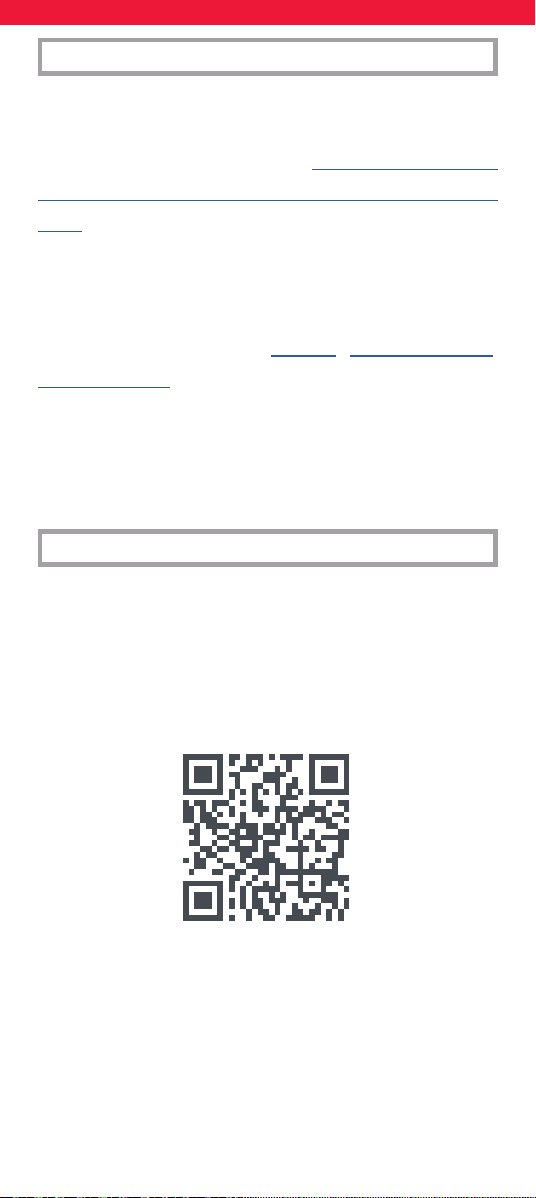
Programming the remote is done entirely using
the One For All Advanced app, so rst make sure
to download it from the Apple App Store or the
Google Play Store by scanning the below code
with your phone.
www.oneforall.com/advancedapp
Once downloaded, you will be asked to pair the
remote with your phone by holding the Activities
and Devices keys down until the LED underneath
them blinks. Once it is paired, you should start by
setting up your devices.

6
DEVICE SETUP
The rst screen you will see on the app is the
Devices screen. This is where you add the devices
you want to control using the Smart Pro Touch. It
can control up to 12 IR (infrared) controlled devices
including TVs, Sound Bars and Set Top Boxes,
and one via Bluetooth Low Energy (BLE). A good
example of a BLE controlled device would be an
Apple TV, a TV running the Google TV Operating
System or an Amazon Fire Stick.
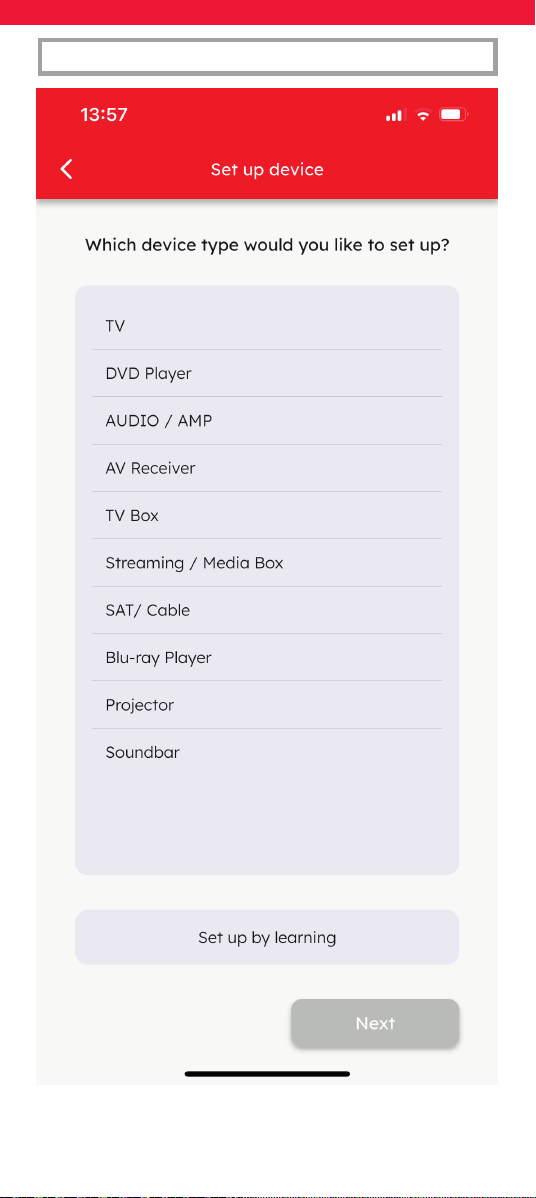
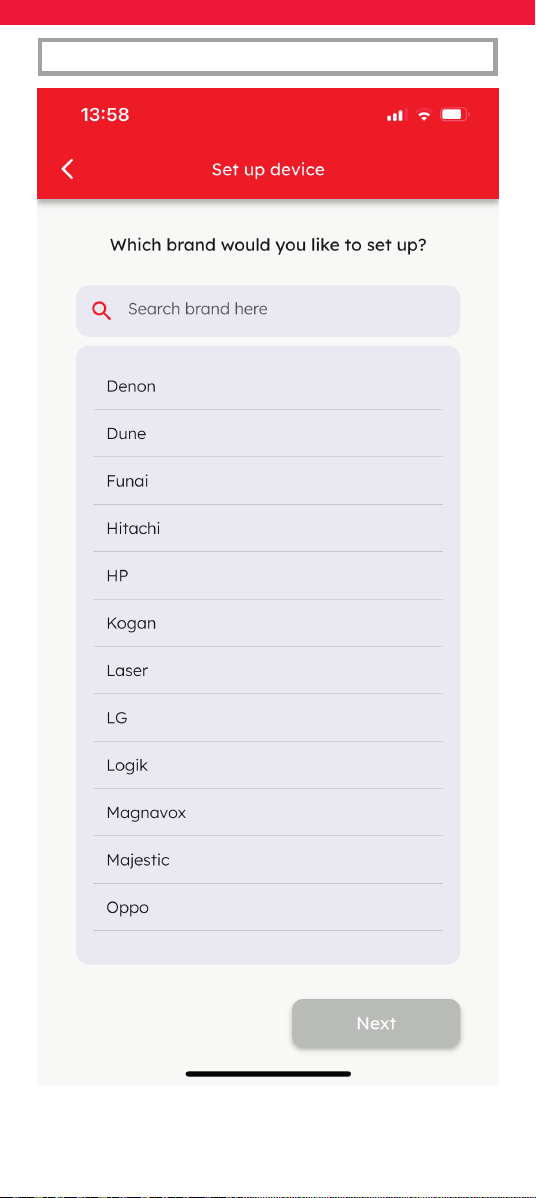
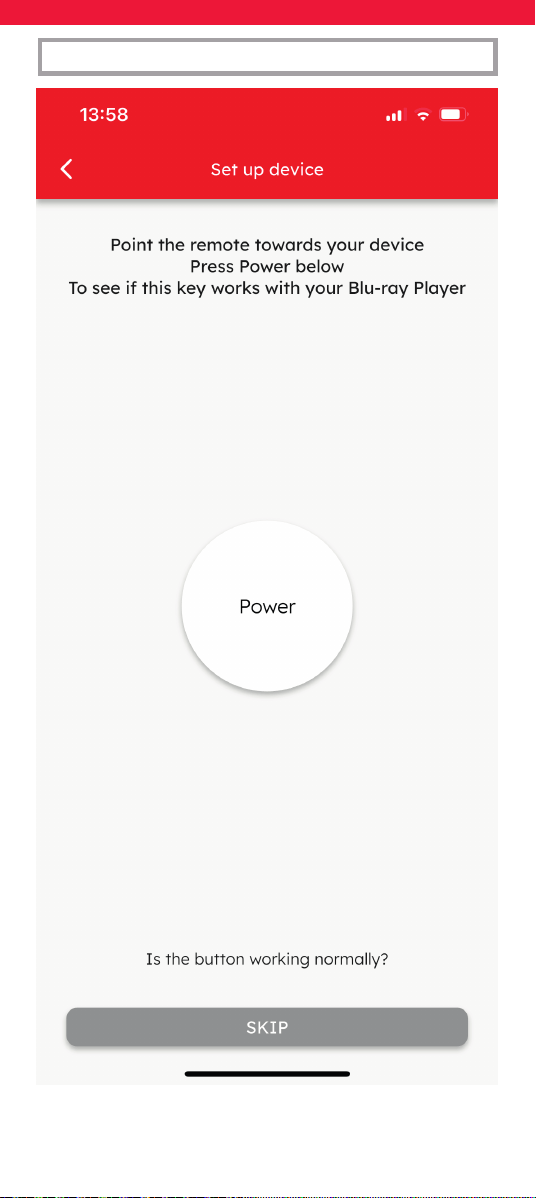
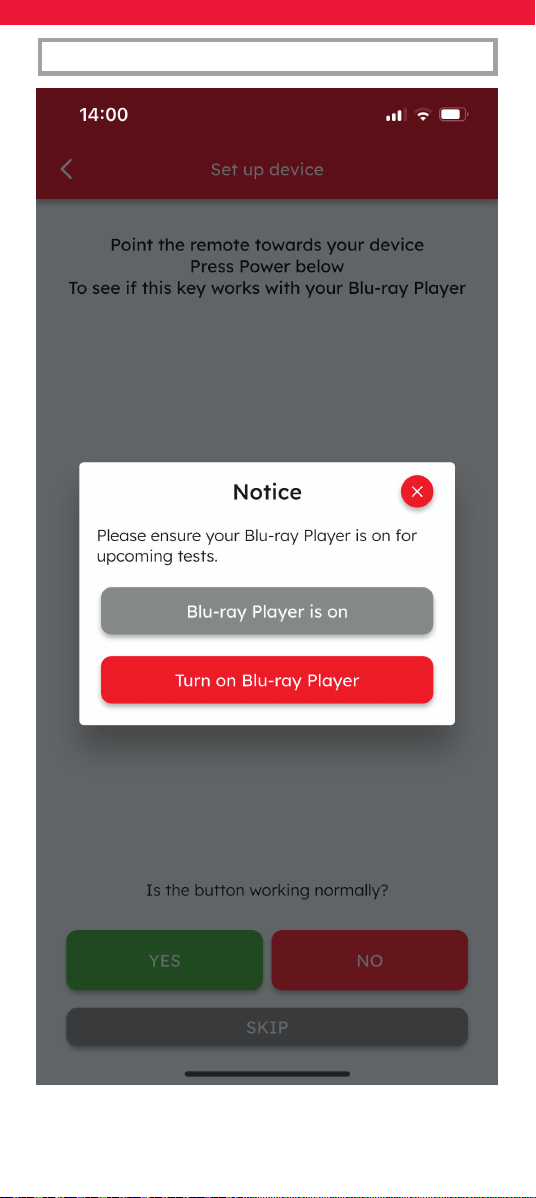
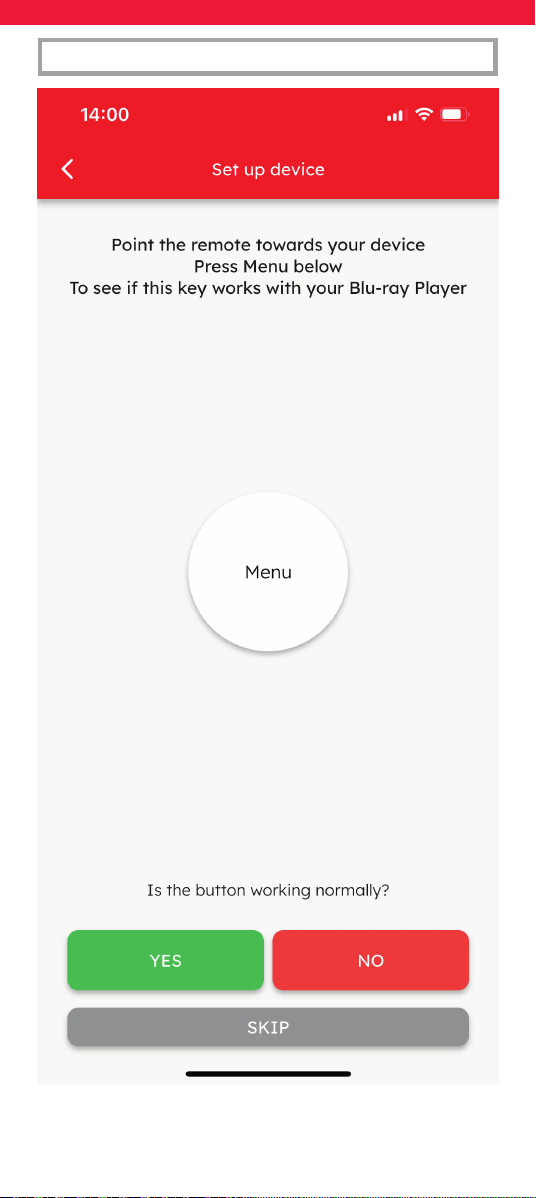
Firstly make sure the device you want to set up is
turned on, and not in Standby. We recommend
you set up your TV rst. To set it up rst select
the device type, then enter the brand. The app
will then lead you through a process where you
will test a function or two by pointing the remote
towards the device and seeing if it reacts.
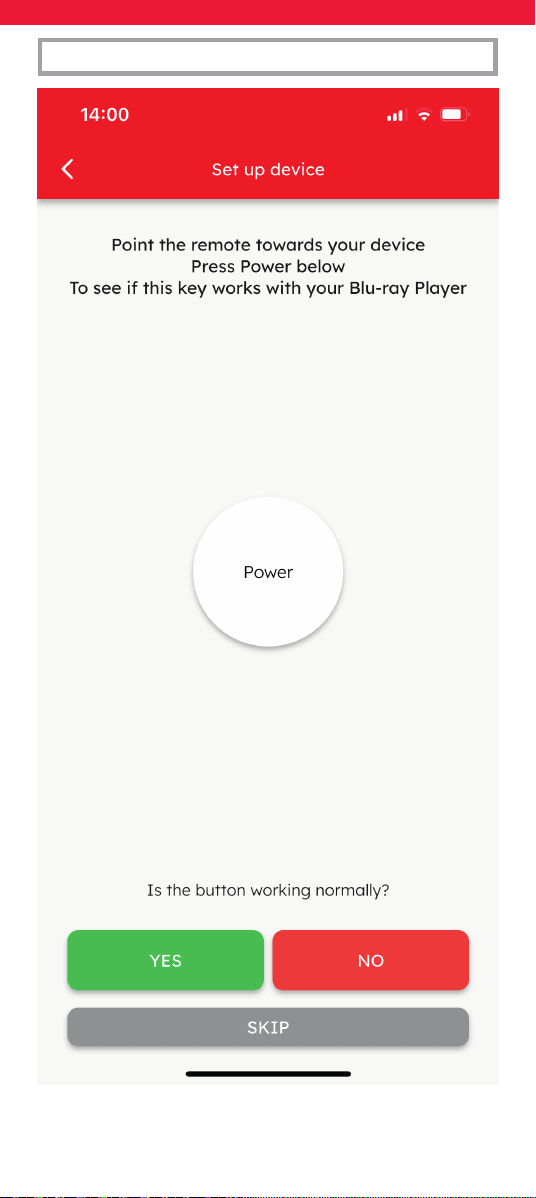
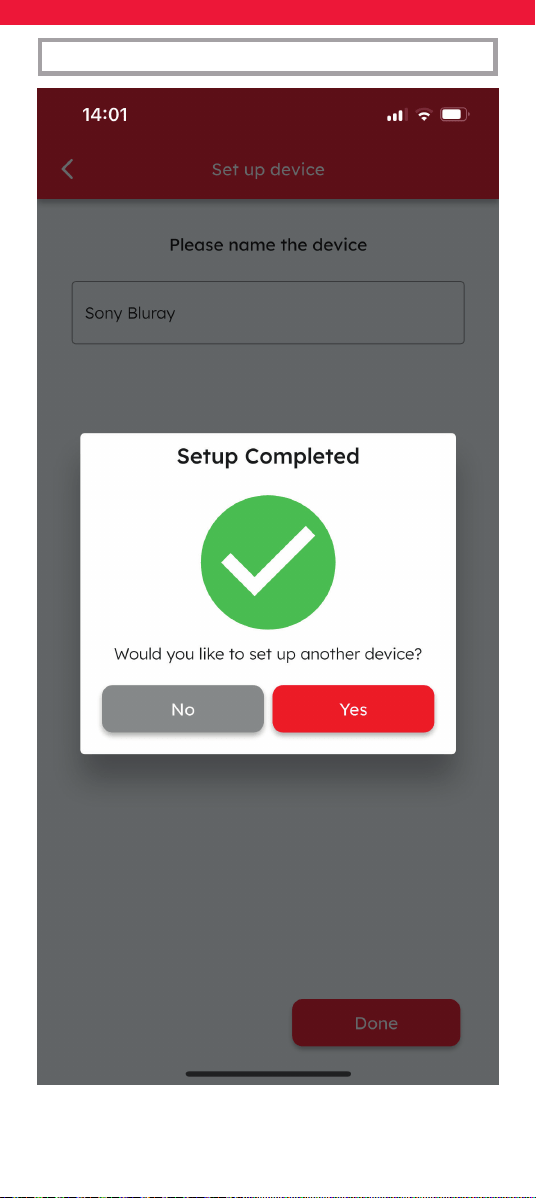
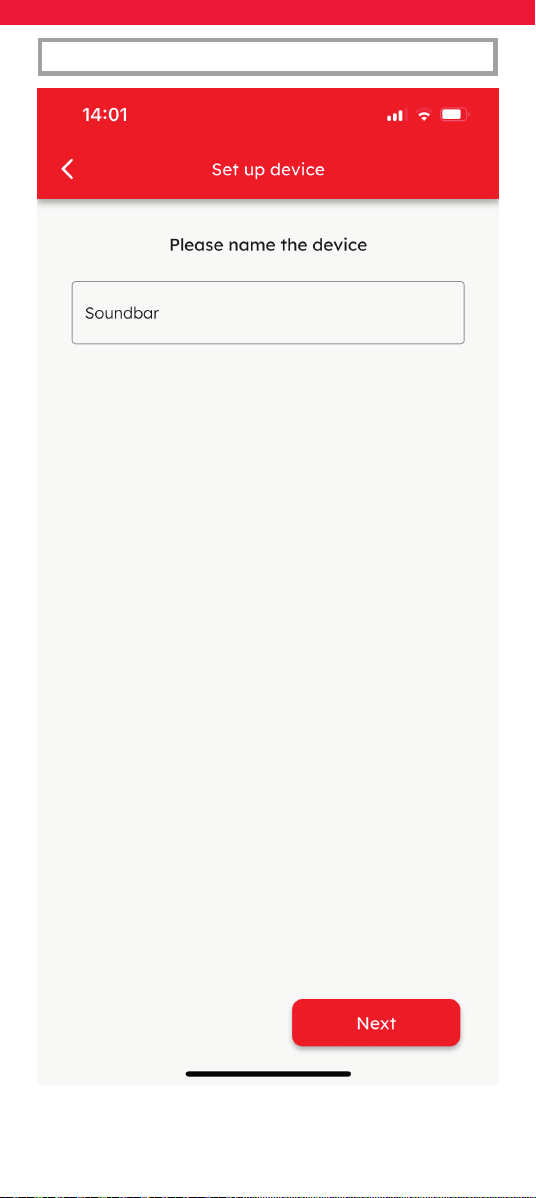
When you conrm that the functions are working,
you will be able to choose the name of the device,
for example Samsung TV, and it will be download-
ed to the remote. Repeat this for each device you
want to control.
7
DEVICE SETUP
8
DEVICE SETUP
9
DEVICE SETUP
10
DEVICE SETUP
11
DEVICE SETUP
12
DEVICE SETUP

13
DEVICE SETUP
14
DEVICE SETUP

15
Tip:
If you nd that no functions tested worked, or you
cannot locate the brand of your devices at all, you
can still set it up using the original remote control
by selecting “Set up by Learning” at the device
type screen. For more information on Learning,
check the Learning section.
Setup by Learning
If the original remote for your devices is working,
you can use it to set up a device. When at the
device select screen, select “Set up by Learning”
and the app will guide you through the process,
using the original remote to teach the One For All
one key at a time. Some tips to help you through
the process:
• Do not learn under a direct incandescent light
or in bright sunlight
• Keep the 2 remotes 2 to 5 cm apart and facing
each other
• If pressing and releasing a key on the original
remote doesn’t work, try holding it down for
slightly longer
• You can learn onto the physical keys, or create
custom keys with their own name and they will
be displayed on the screen
DEVICE SETUP
16
DEVICE SETUP
17
DEVICE SETUP

18
DEVICE SETUP
Set up a Bluetooth device
If your device is capable of being controlled by
Bluetooth Low Energy (BLE), you can program
the Smart Control to use BLE when controlling
that device. If you would like to do so the app will
lead you through the process of pairing with the
device.
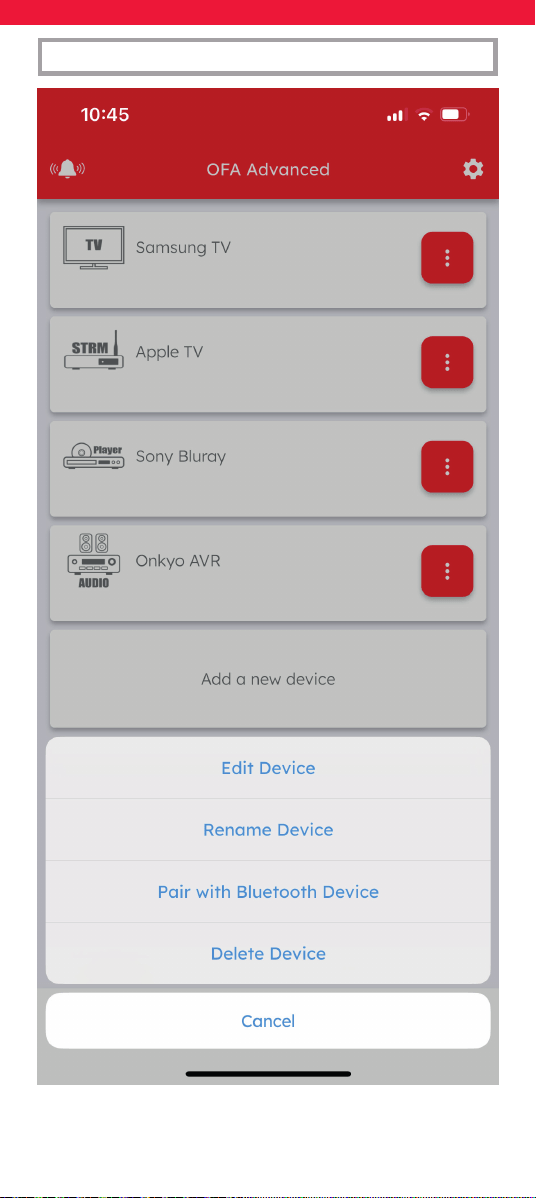
This can dier per device; here we show an Apple
TV. This can be controlled via IR as well, so when
you rst set it up you will test some functions and
it will be added to the Device screen. From here
you can click the icon with the 3 dots and choose
the option Pair with Bluetooth Device.
For Bluetooth only devices such as an Amazon
Fire TV stick, the app will prompt you to pair the
device automatically.
19
DEVICE SETUP
20
DEVICE SETUP

21
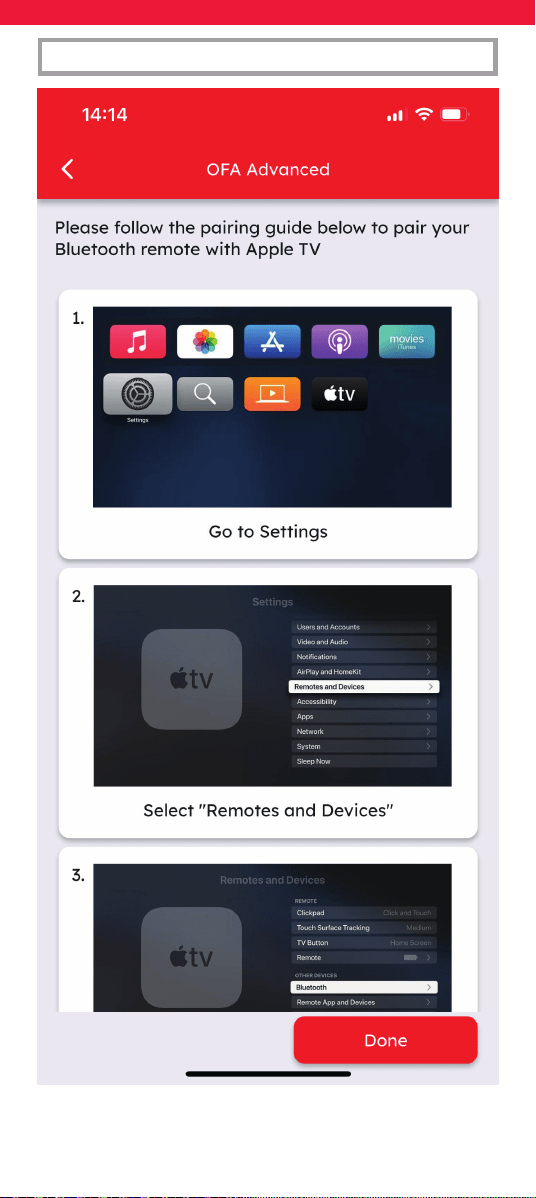
Follow the on screen instructions in the app and
when prompted on the OFA remote select the
device from the touch screen and the remote
will enter pairing mode - the LEDs will ash blue.
Follow the instructions on the device to pair the
remote, and the LEDs will blink green twice to
conrm success. The Smart Control Pro Touch is
now paired with the device.
If you wish to carry on programming the remote,
you will need to briey hold Activities and Devices
on the OFA remote to swap the pairing back to
your phone.
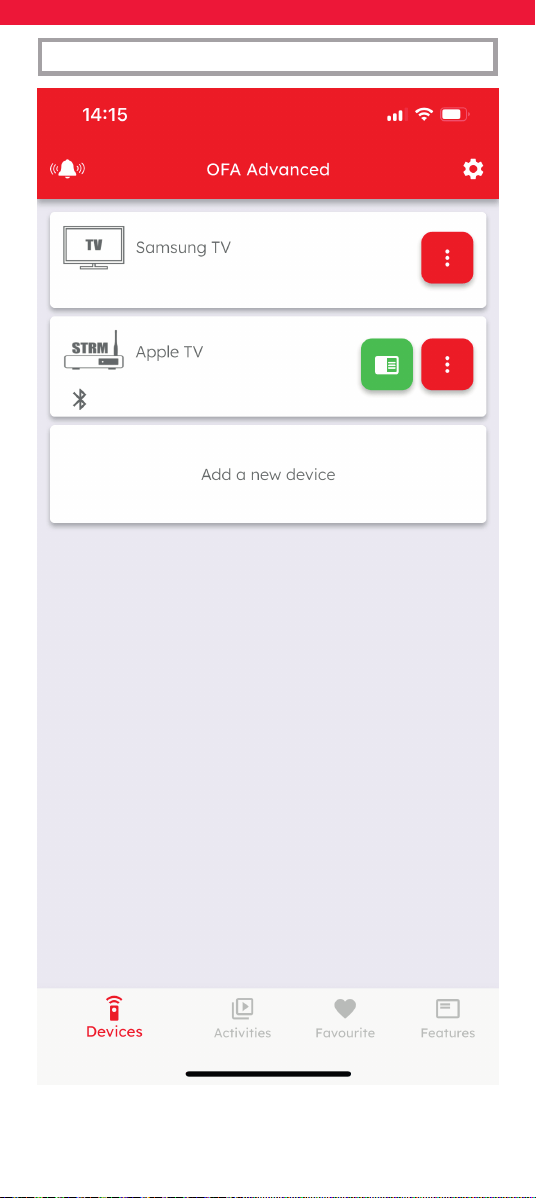
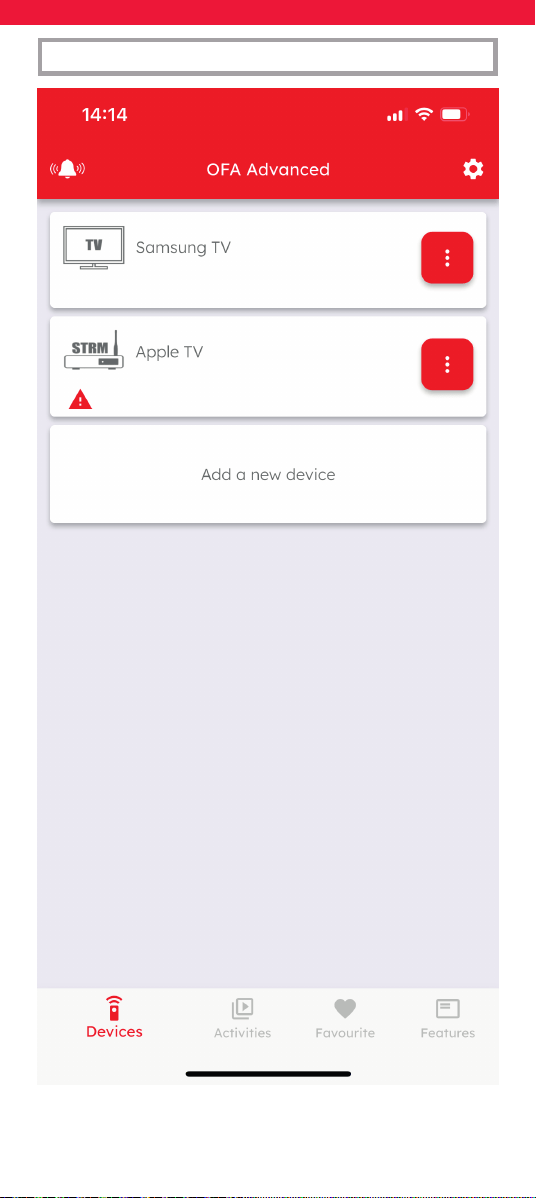
When your device has successfully been paired
with the remote via Bluetooth, you will see a green
icon under the device in the Devices screen. If it
is not paired you will see a red exclamation mark.
DEVICE SETUP
22
DEVICE SETUP
23
DEVICE SETUP

24
DEVICE SETUP
Bluetooth Control
If the device paired is a Google or Android TV
device, you will also be able to use voice control
using the voice (microphone) key.
When you select the device from the Devices or
Activities screens on the remote, it will automat-
ically connect and you will see 2 green blinks.
When you change the device or activity you are
controlling, the connection will be dropped until
the next time you select the device.
Note that the OFA Remote can only be paired with
one AV Device using Bluetooth, so if you have mul-
tiple you should choose the device you use most.

25
ACTIVITIES
Activities
An Activity is a combination of multiple devices
into a single mode. For example, when you are
watching a show on your Set Top Box, you are also
controlling the input of your television and the
volume of your Sound Bar. You can combine this
into an Activity called for example Watch TV.
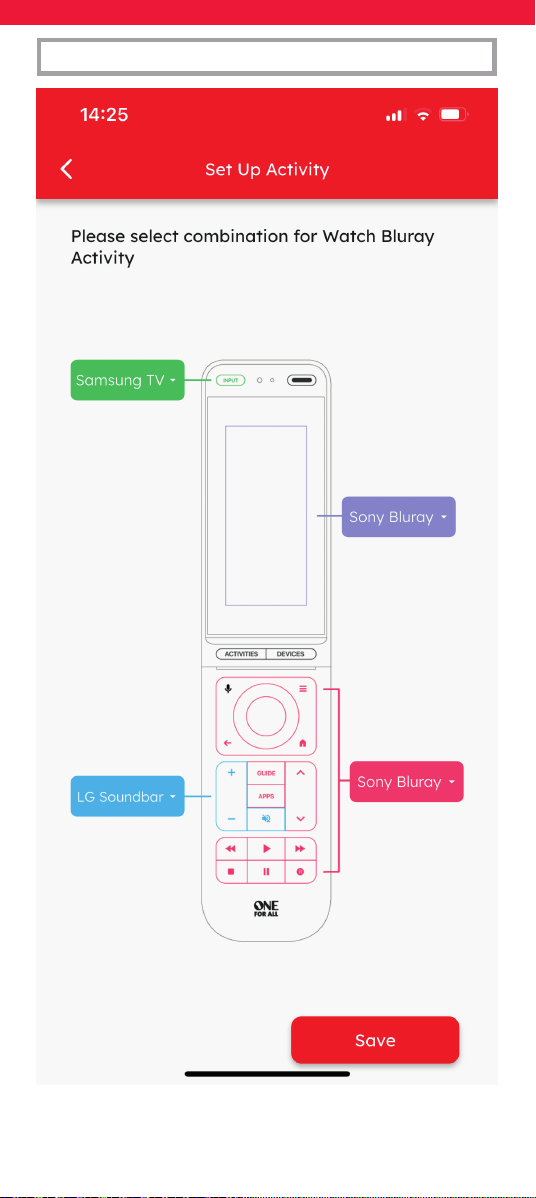
In the Activity mode, you can assign groups of keys
to dierent devices. The groups are the input key,
the keys displayed on the screen, the keys except
for the Volume controls, and the Volume Up, Down
and Left. So when you select this Activity on the
remote, you can control the relevant functions
for the relevant device without having to swap
devices.
26
ACTIVITIES
27
ACTIVITIES

28
ACTIVITIES
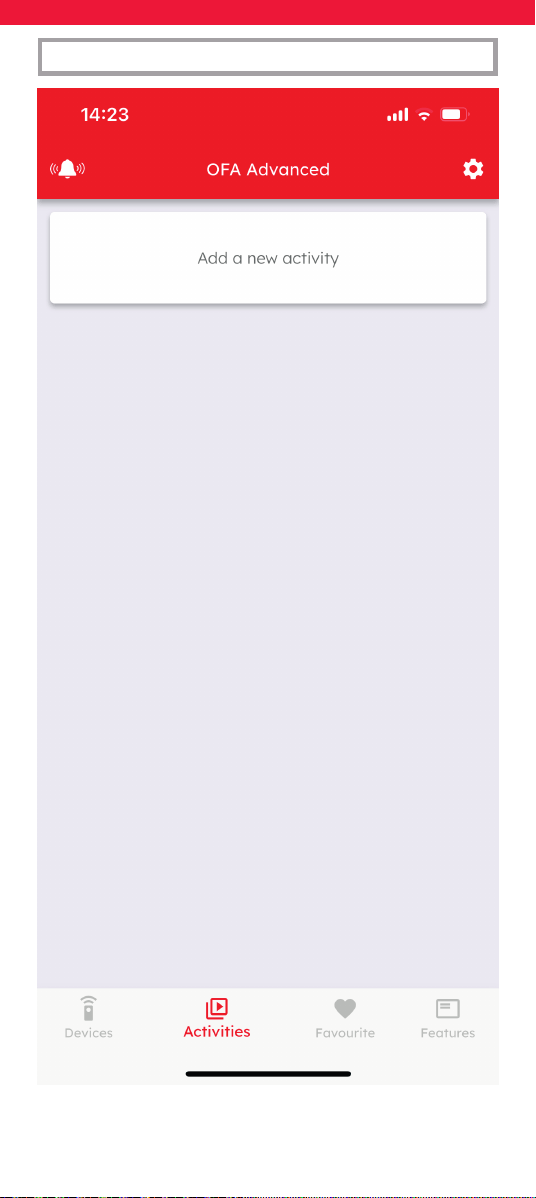
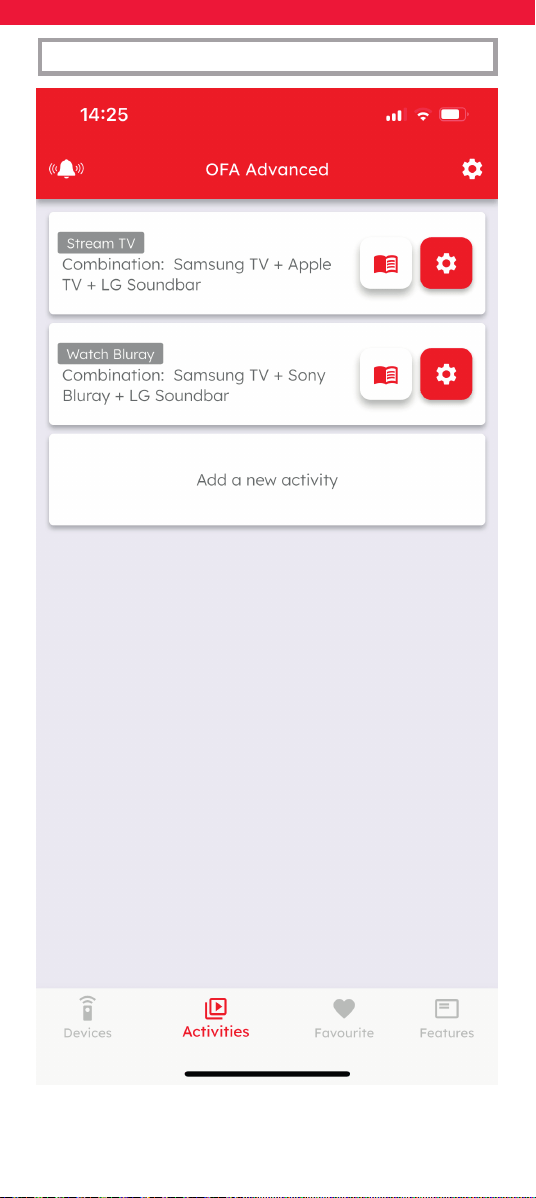
To set up an Activity, rstly ensure that you have
already set up the OFA remote to control all the
devices you wish to control. Next select the
Activities screen in the app, and tap “Add a new
activity”. You can now name the Activity and select
which key groups can control which devices. This
will then be downloaded to your remote and
added to the Activities screen on the remote.
Select the activity by clicking on the name, and the
keys will now behave as you have programmed.
As the activity is a combination of devices, the
power key behaves slightly dierently. Holding
down the Power key for 2 seconds will send Power
to all the devices contained within the Activity.
We recommend you use this when you have
nished using the activity, for example you have
nished watching TV for the evening, just hold
down the Power key and turn everything o.
You can also a macro to an Activity, which can turn
on devices and select input when you choose the
Activity from the screen of the remote. For more
information, see the section “Macros”.
29
ACTIVITIES

31
FAVOURITE
32
FAVOURITE

33
FAVOURITE
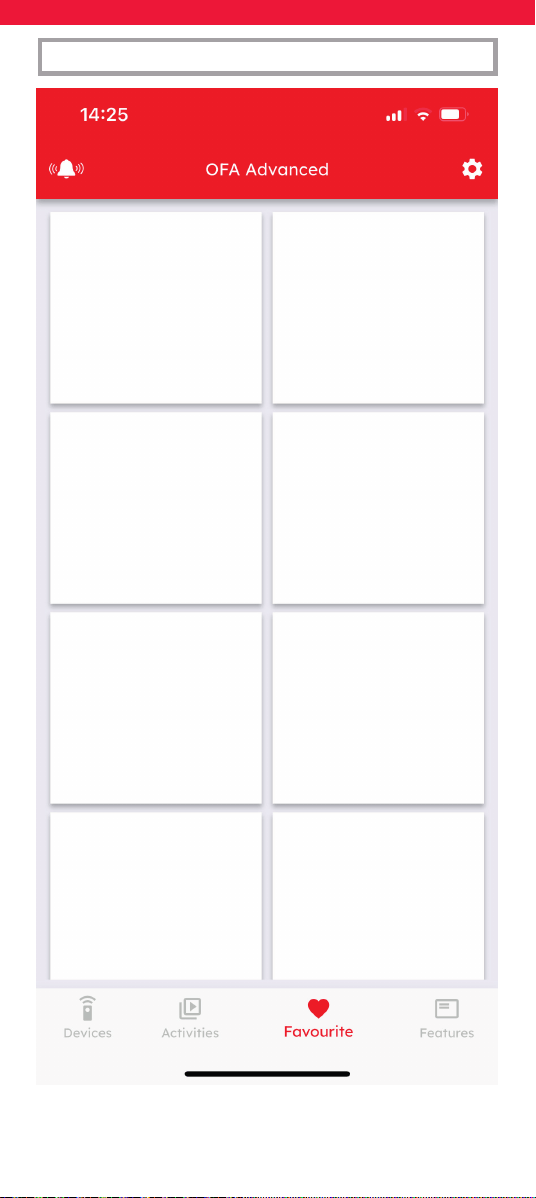
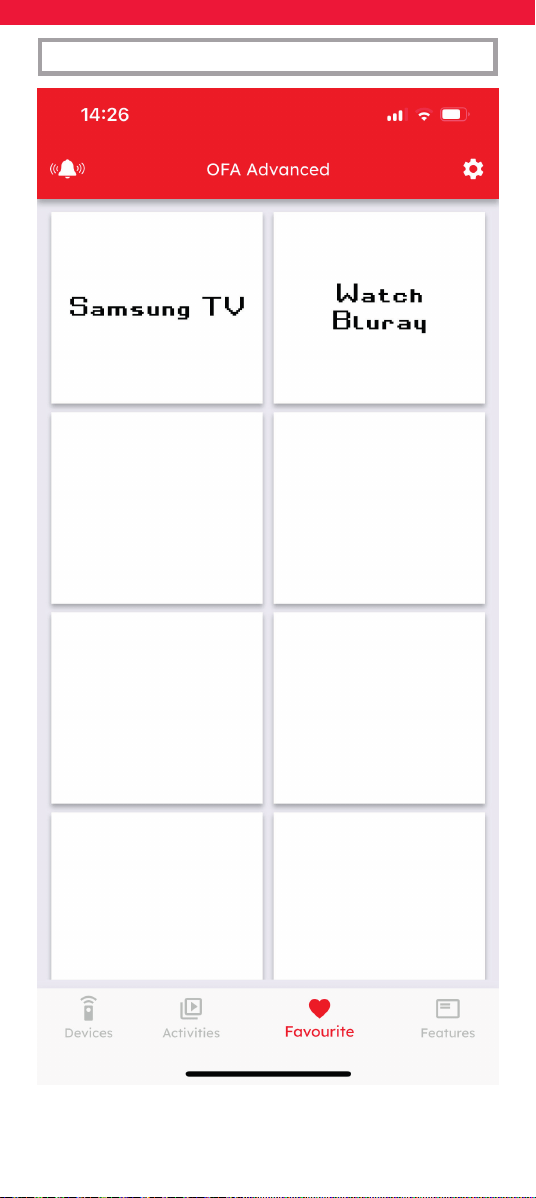
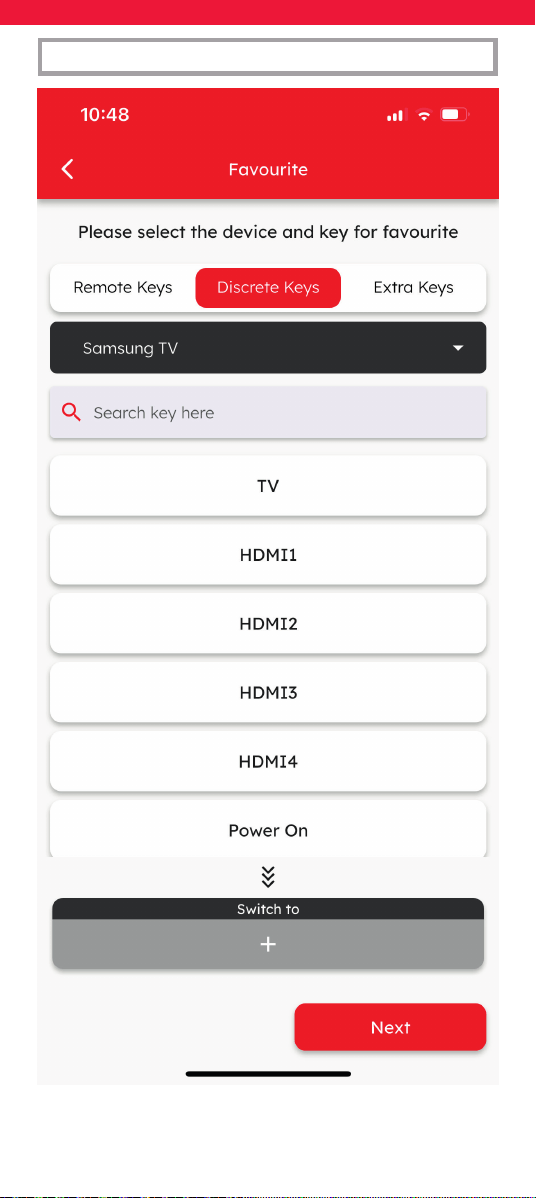
To assign Favourites, simply go to the Favourite
page in the app, and select a blank square to ll.
If you select a macro or a function, you will be able
assign a device or activity that the remote will end
up in after sending that macro or function, for
instance sending a 3 digit channel number and
then controlling your Set Top Box. This can be set
up by tapping the “Switch To” link at the bottom of
the screen.
34
FAVOURITE

35
FAVOURITE

36
When using the remote, the Favourite screen
can be accessed from any screen by pressing the
heart icon on the top right of the screen. As well as
your Favourites, the screen also give access to the
on-remote settings, by selecting the settings icon
on the top right. For more on this, see the section
Remote Settings.
FAVOURITE

37
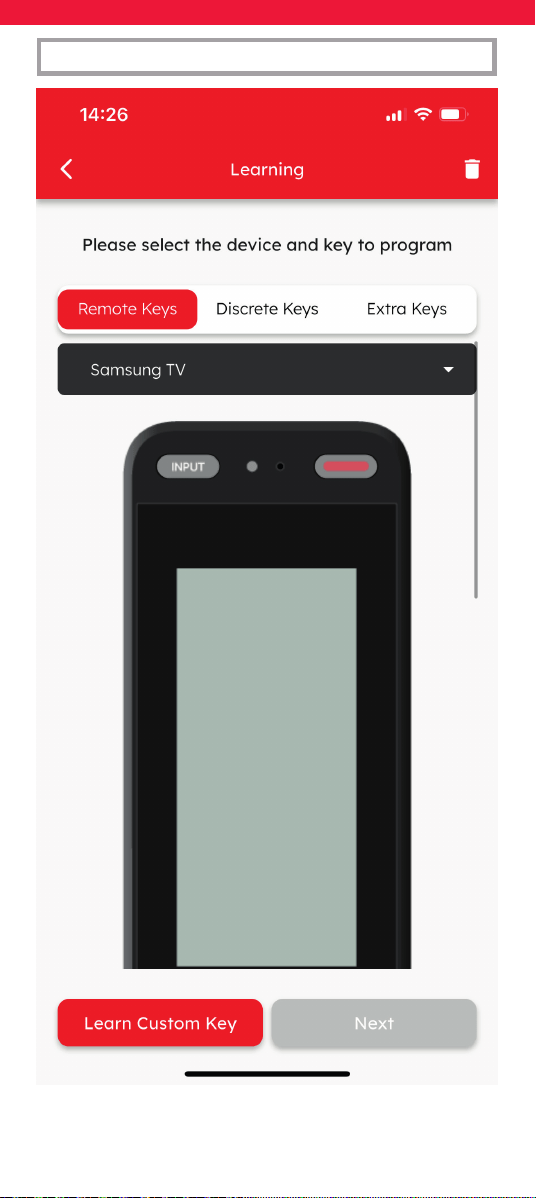
Learning
The Smart Control Pro Touch is capable of learning
keys from original infrared remote controls. You
can choose to learn a function or two, or learn
an entire remote control. This can be useful if the
standard Device Setup doesn’t work. Learning is
initiated by the app, but to prepare make sure you
have the original working remote to hand as well
the Smart Control.
The app will guide you through the procedure, but
basically it involves pointing the original remote
towards the OFA remote, selecting a destination
key on the app, and then pressing the desired key
on the original remote. You can learn onto a key
on the remote or select Learn Custom key, and you
will be able to name that key and it will appear on
the screen of the remote under the device you
selected.
FEATURES
38
FEATURES
39
FEATURES

40
FEATURES
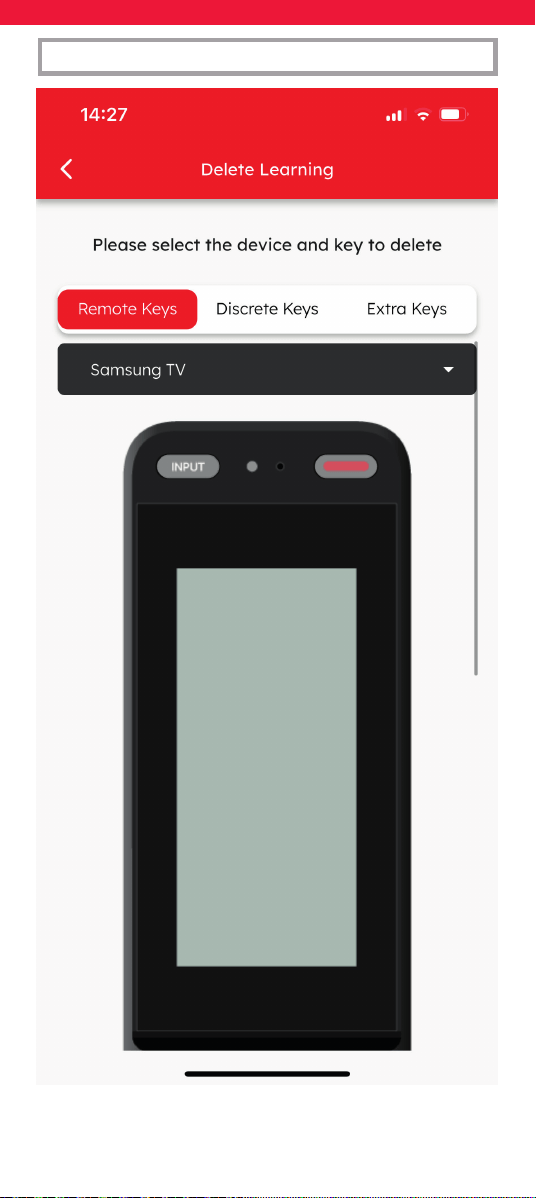
It is possible to delete learned functions also by
selecting the trash can icon on the top right. Some
tips for learning are:
• Do not learn under a direct incandescent light
or in bright sunlight
• Keep the 2 remotes 2 to 5 cm apart and facing
each other
• If pressing and releasing a key on the original
remote doesn’t work, try holding it down for
slightly longer

41
FEATURES
Macros
A macro is a series of key presses assigned to a
single key. For example a 3 digit channel number
could be programmed onto one key for easy
access. Even more usefully, macros can be assigned
to Activities, so that when the Activity is selected,
the remote can turn on the relevant devices and
select any relevant inputs. An example would be
creating a macro for a Watch TV Activity which
turns on the TV, STB and Sound Bar, then waits 5
seconds and selects HDMI 1 on the TV, and then
enters the Watch TV mode, ready to control the
Activity.
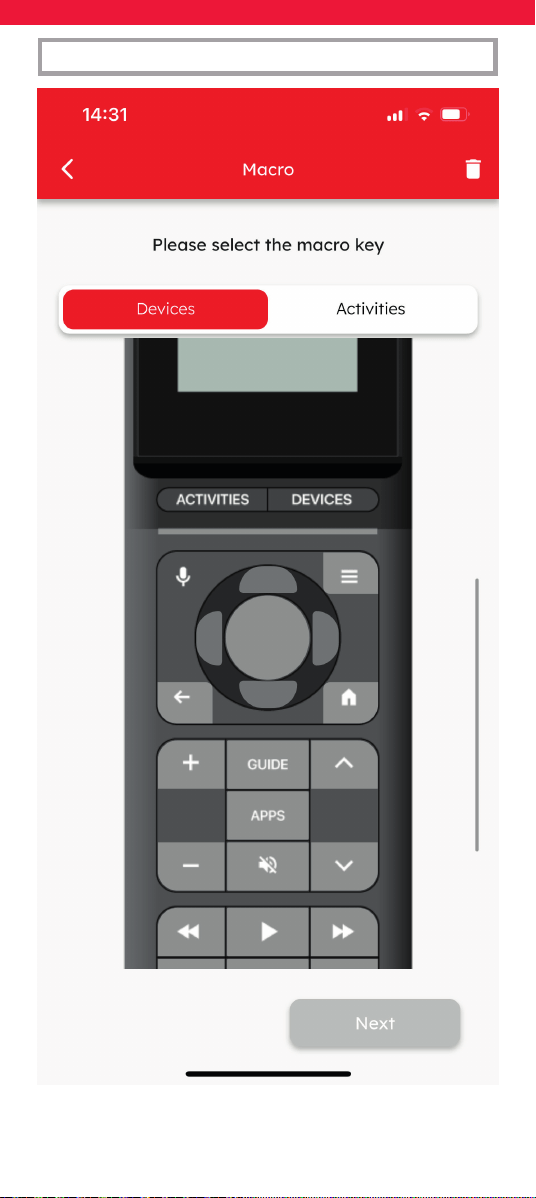
To program a macro, select Macro from the
Features Page of the app. Then you will be asked
to select either a key on the remote or an Activity.
You will then see a brief explanation of how to
build a macro.
42
FEATURES
43
FEATURES

44
FEATURES
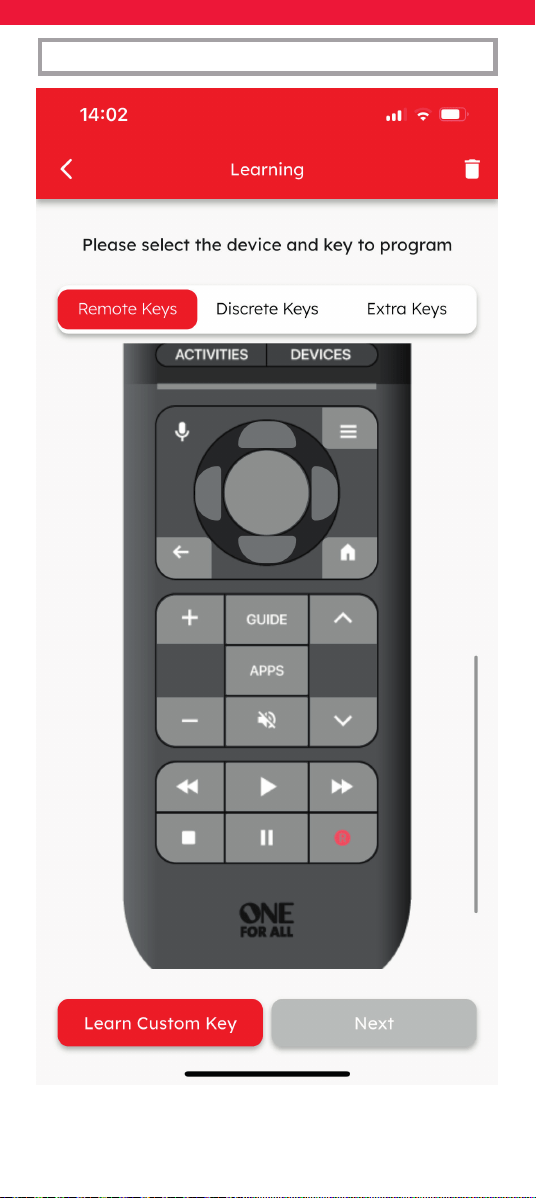
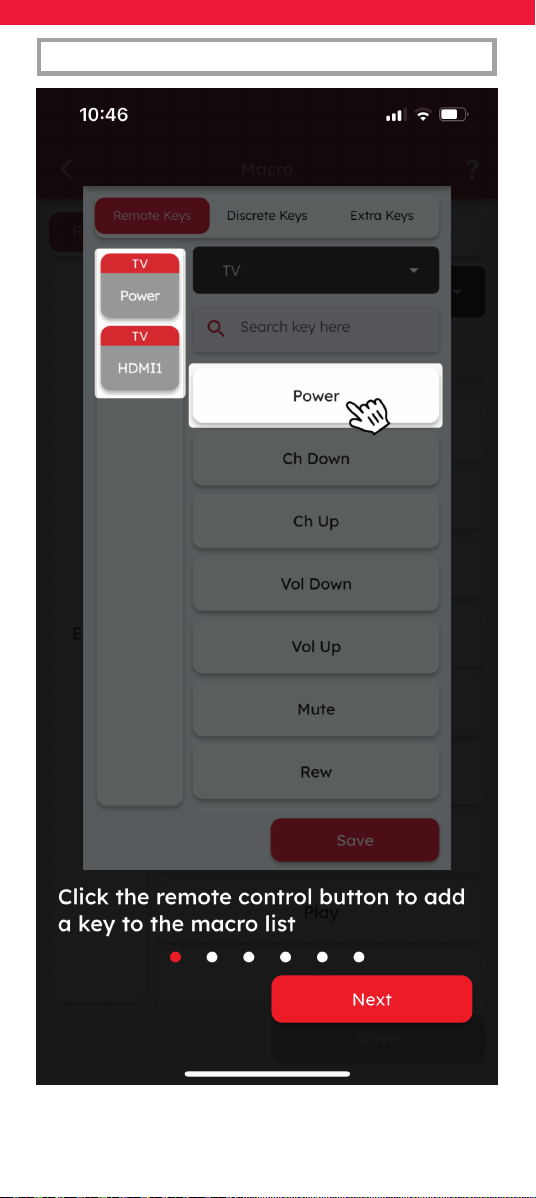
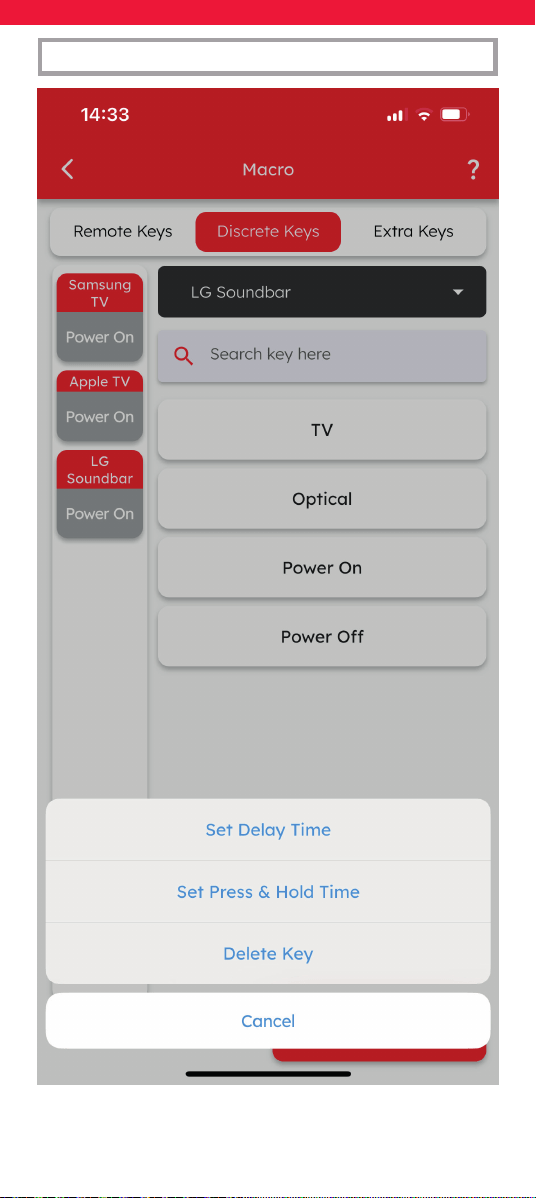
You can build a list of keys on the left of the screen
by selecting the device and then the key on right
hand side. You will notice that there are 3 types of
keys.
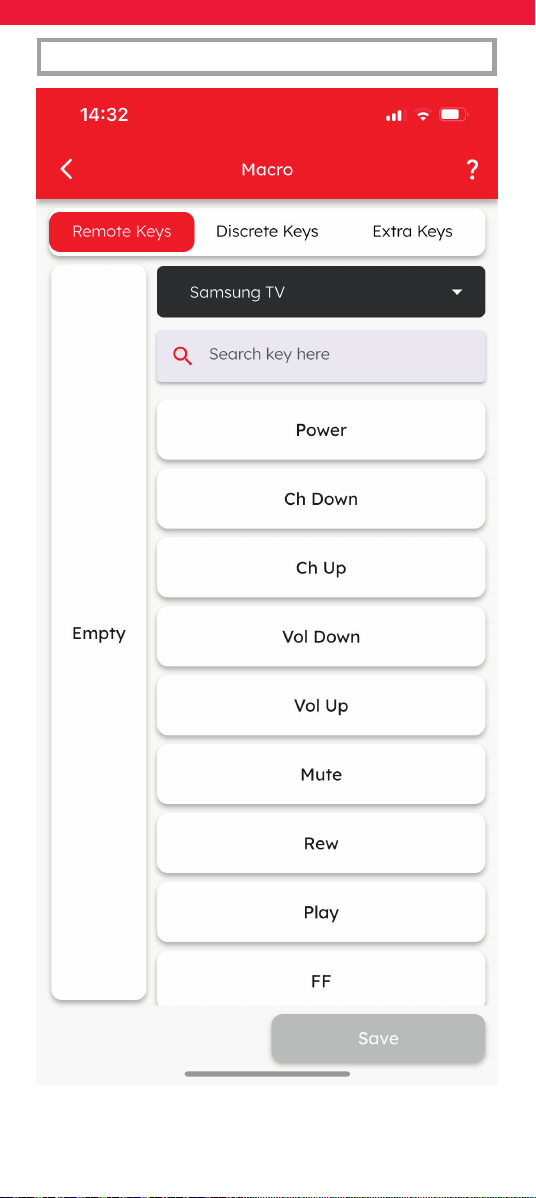
Remote Keys
Remote Keys are the physical keys on the Smart
Control, as well as those shown on the screen.
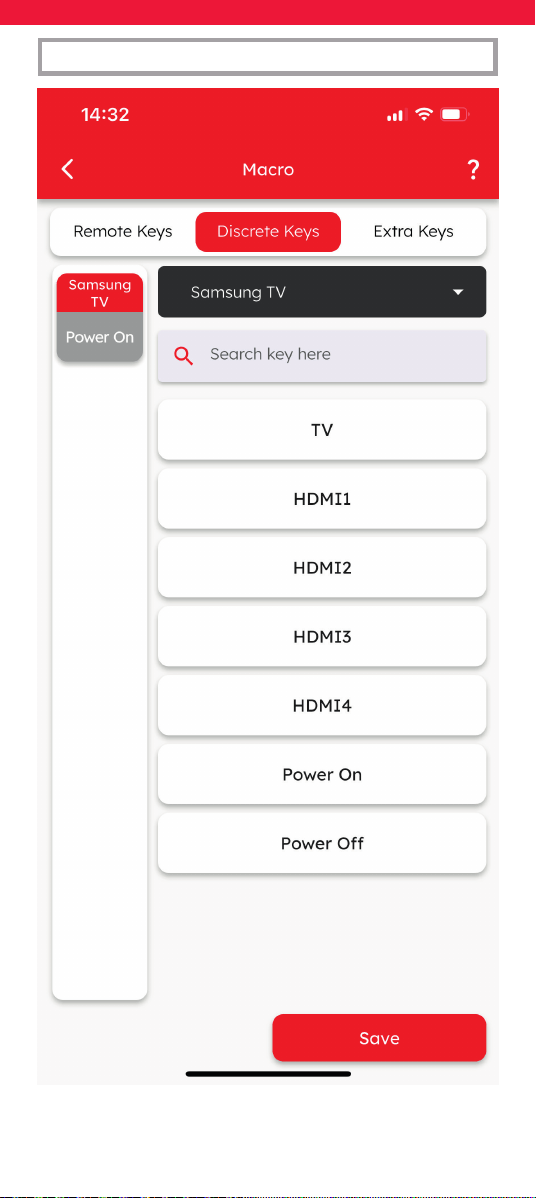
Discrete Keys
Discrete Keys are keys that perform a direct func-
tion, which may not be available on your original
remote, but come in very useful when building a
macro. For example, the Power key on your origi-
nal remote turns the TV On and O. But for some
major manufacturers, there are discrete keys for
Power On and Power O. These will only turn the
TV on or o respectively, and not toggle between
the two. So no matter how many times you send
the Power On function, the TV will never turn o,
unlike the standard Power button.
Similarly using the original remote, pressing the
Input key will normally bring up a menu where
you can choose which HDMI Input you want to
select. But some brands of TV support discrete
keys for HDMI 1, HDMI 2 etc. These are also useful
in a macro as you can be sure which input you are
selecting and therefore which device’s picture will
be shown.
45
FEATURES
46
FEATURES

47
FEATURES
It is important to note that not all manufacturers
support discrete keys, so they may not be availa-
ble for your specic device.
Extra Keys
Extra keys are keys that may have been on your
original remote, but are not featured on the stand-
ard keys of the OFA Remote. Examples of these
would be Subtitles or Settings Menu.
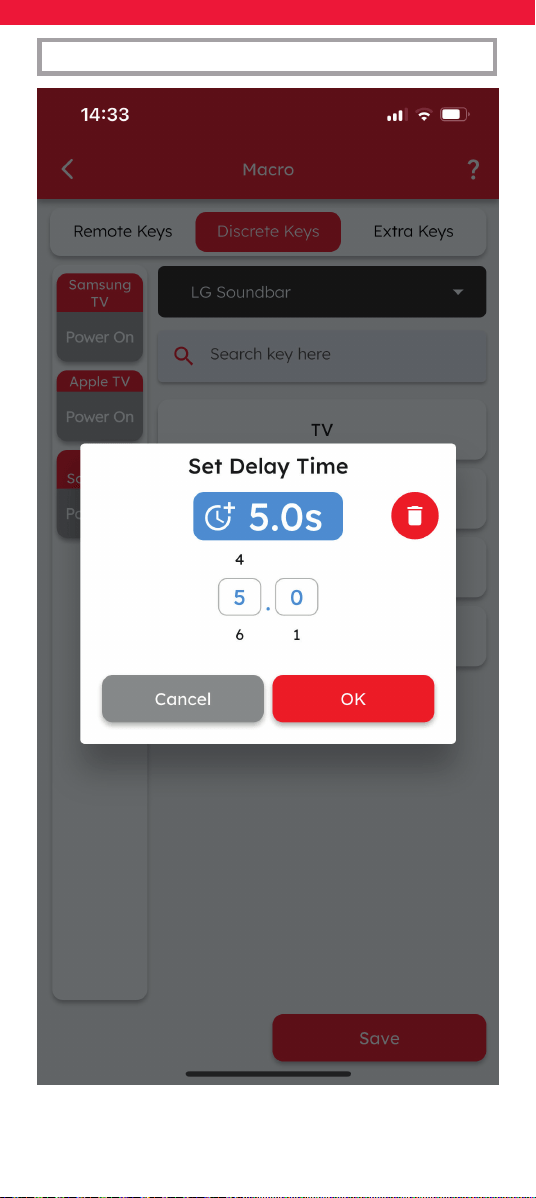
Once a key has been added to the list on the left,
tapping on it will give some extra options. You can
set a delay before the next key in the list is sent. This
is useful if you need wait for a few seconds – for
example if you turn a TV on, it will generally take
a few seconds before it can respond to another
command such as selecting HDMI Input. You can
also set an amount of time a key is held down for.
All of these options combine to give you the
opportunity to create smart macros for starting
an Activity. For example if you have created a
Watch TV Activity that combines control of your
TV, Set Top Box and Sound Bar, you could program
a macro onto it that would turn on your TV, turn
on your Set Top Box, turn on your Sound Bar, wait
for 5 seconds and then select HDMI 1 on the TV.
The devices would then be in the correct state,
and the remote would be in the Watch TV mode
combining control of them.
And remember an Activity has an automatic Power
O macro when you hold down the Power key for
2 seconds in the Activity mode.
48
FEATURES
49
FEATURES

51
FEATURES
52
FEATURES

53
FEATURES
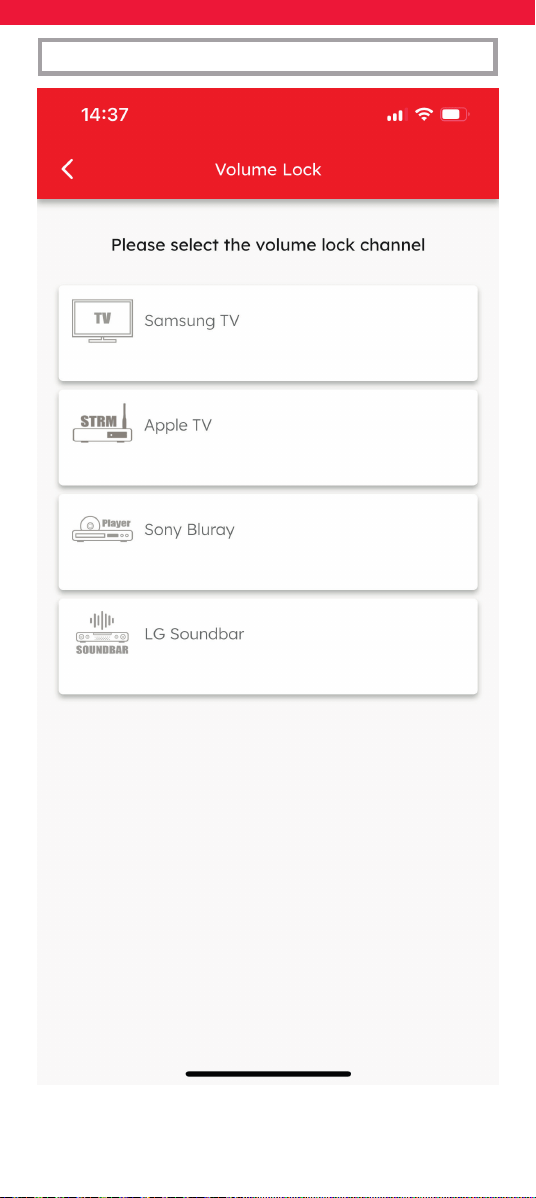
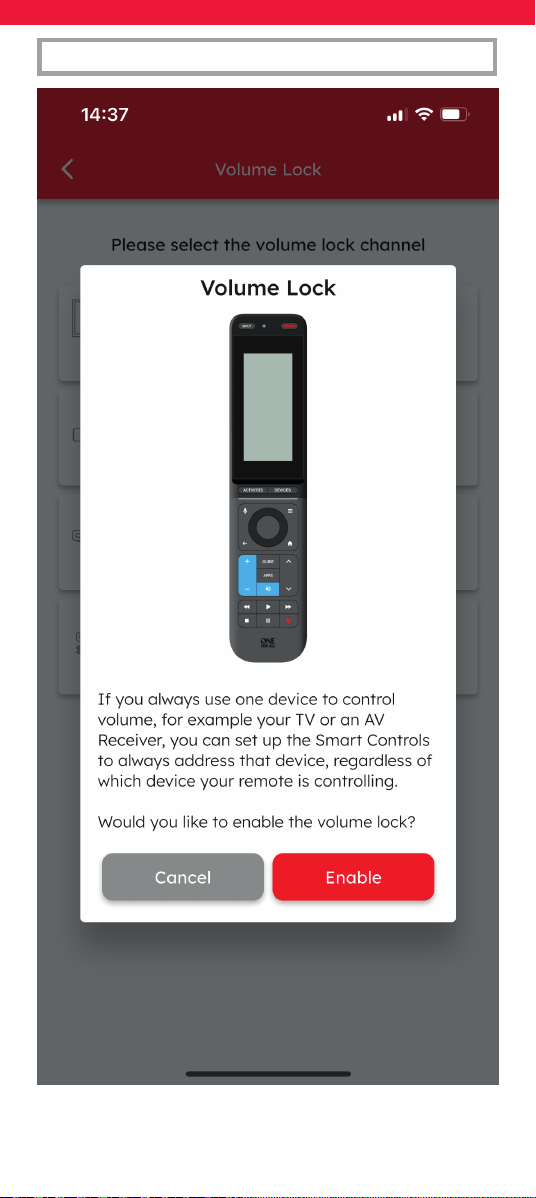
Volume Lock
The Volume Lock feature allows you to lock the
Volume Up, Down and Mute keys so that they
always control one particular device no matter
which device mode you are in. So if you use a
Sound Bar, for example, you will want to control
the volume of that always without having to
switch to the Sound Bar device.
Note that Volume Lock is not applicable for
Activities, which can have a dedicated volume
control per Activity.
54
FEATURES
55
FEATURES

56
FEATURES
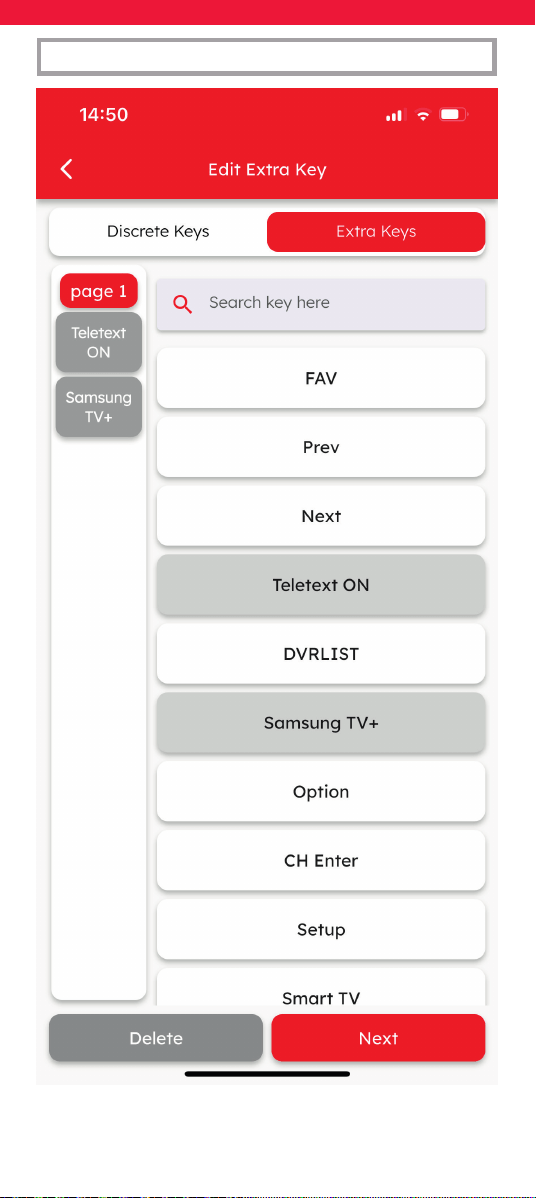
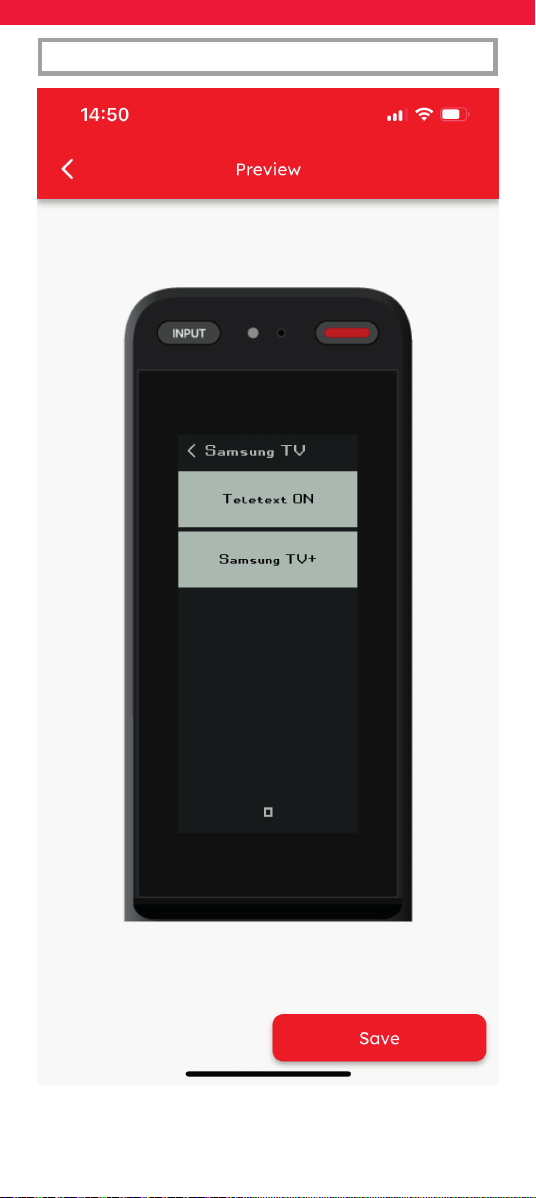
Edit Extra Keys
The Edit Extra Keys feature allows you to add
keys to the screen for each device. Once you
have selected the device, you will see a list of
functions which are available for your device that
do not currently have a key on the Smart Control.
Selecting the keys will add them to keys shown on
the screen in the device mode.
57
FEATURES
58
FEATURES

59
FEATURES
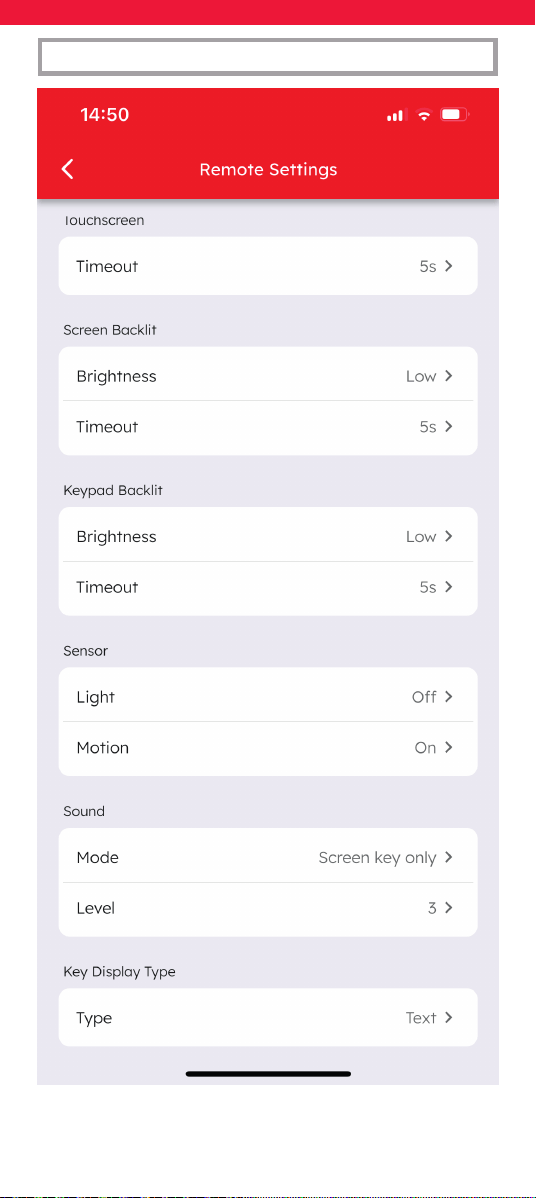
Remote Settings
The Remote Settings screen is a mirror of the
settings which are also accessible on the remote
itself, from the Favourite screen. The settings are:
Touch screen
Here you can adjust the brightness of the screen
backlight, along with its duration. The brightness
options are O, Low, Medium and High. The
Timeout options are 5s, 10s, 15s, 30s and 60s.
Keypad Backlight
Here you can adjust the brightness of the keypad
backlight, along with its duration. The brightness
options are O, Low, Medium and High. The
Timeout options are 5s, 10s, 15s, 30s and 60s.
Sensor
The Smart Control features an Ambient Light
Sensor to dim the backlight when the room is well
lit, and a motion sensor to activate the screen
when the remote is picked u.
Light
In the section the user can set the light sensor to
o, low, medium or high.
Motion
The motion sensor can be turned on or o.

60
FEATURES
Touchscreen
To save battery, the touch screen is deactivated
after a number of seconds. Here you can adjust
the timeout for this. Timeout options are 5s, 10s,
15s, 30s and 60s.
Sound
In this section the you can adjust the settings of
the sound made when a key is pressed.
Mode
You can choose between hearing the beep on the
screen keys only, the hard keys only or both.
Level
Here you can choose one of 5 volume settings,
with 1 being lowest and 5 highest.
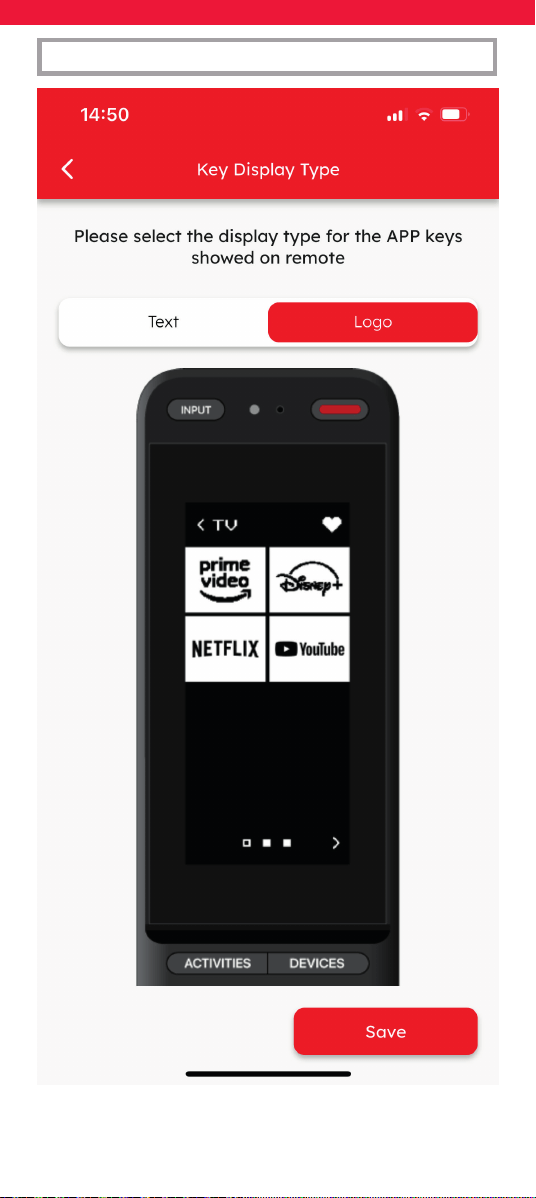
Key Display Type
For certain streaming apps such as Netix, there
are custom icons available. Here you can choose
between showing these icons or displaying the
name in text.
61
FEATURES
62
FEATURES

64
FEATURES

66
FEATURES
RDN1021025