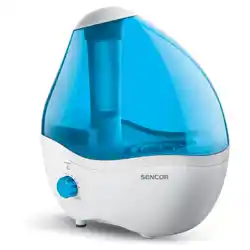
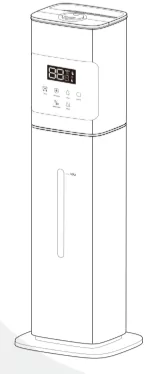
USER MANUAL
Cool & Warm Mist Ultrasonic Humidifier
AKA-MH-2407
Need Assistance? We're here to help!
[email protected]
Your support means the world to us. We hope you enjoy our product as much as we enjoyed creating it.
Please read this manual carefully before use and keep it for future reference. All images shown are for illustration purposes only. The actual product may vary due to enhancements.
For more installation details, visit our website or scan the QR code: https://lacidoll.com/pages/user-manual
Important Safety Instructions
1. General Safety
Placement
- Place the humidifier on a firm, flat, and waterproof surface to ensure stability and prevent tipping.
- If using on a wooden floor, a waterproof mat is recommended to prevent excessive moisture buildup.
- Keep the humidifier at least 12 inches (30 cm) away from walls or wooden furniture.
- Place the humidifier where children and pets cannot access it. Children should not operate or clean the humidifier without supervision.
- Do not place the humidifier near heat sources such as stoves, ovens, radiators, or direct sunlight.
- Do not use outdoors. Intended for indoor household use only.
Temperature
- Before first use, let the humidifier sit at room temperature for 30 mins to prevent potential damage to the water tank caused by sudden temperature changes.
- Operate the humidifier within a room temperature range of 41°F - 104°F (5°C - 40°C).
- If the temperature drops below 32°F (0°C), empty the water tank to prevent freezing and potential damage.
Operation
- The water temperature inside the tank will heat up during the heater operation of the warm mist function. Do not touch it directly as there is a risk of burns.
- Do not clean the humidifier immediately after turning it off, especially if it has been diffusing warm mist. Allow the humidifier to cool down completely before cleaning.
- Avoid running it in a closed room for extended periods without supervision.
2. Power and Cord Safety
- Do not handle the power cord or plug with wet hands.
- Do not damage, bend, pull, twist, bundle, or attempt to modify the power cord.
- Do not let power cord hang over the edge of a table or counter or touch hot surfaces.
- Do not immerse the humidifier main unit, power cord, or plug in water.
- Ensure the plug fits securely into the outlet to prevent overheating.
- Always unplug the humidifier before refilling, moving, cleaning, or when not in use for an extended period.
3. Special Precautions
Avoid Over-Humidification
- If condensation appears on walls, windows, or around the device, turn off the humidifier or lower the mist output.
Do Not Inhale Mist Directly
- Avoid inhaling mist directly or directing mist toward people or objects.
Do Not Add Substances
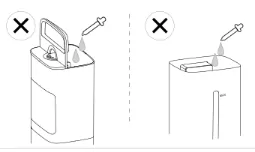
- Do not add essential oils, medications, or other additives to the water tank or mist outlet, as this may damage the unit or affect health.
4. Maintenance and Repairs
No Self-Repair
- Do not disassemble, modify, or repair the humidifier yourself. Repairs should only be performed by the manufacturer or a qualified professional.
Routine Inspections
- Regularly check the power cord, plug, and water tank for any signs of damage. If any issues are detected, stop using the humidifier and contact customer service.
Package Contents
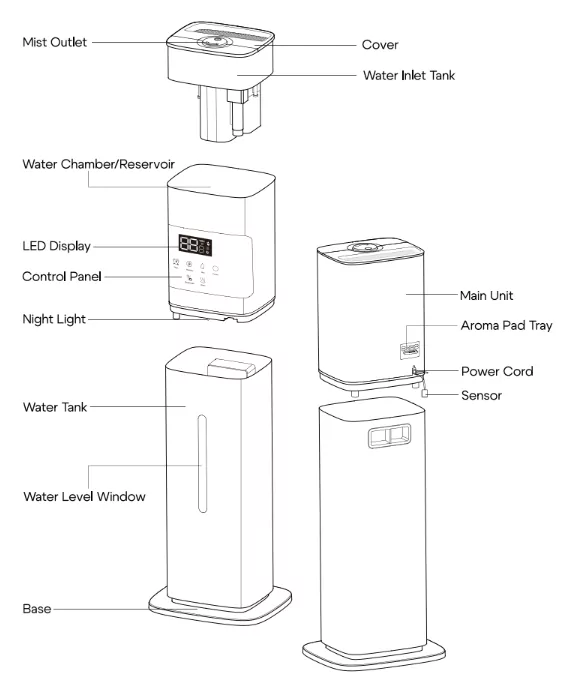
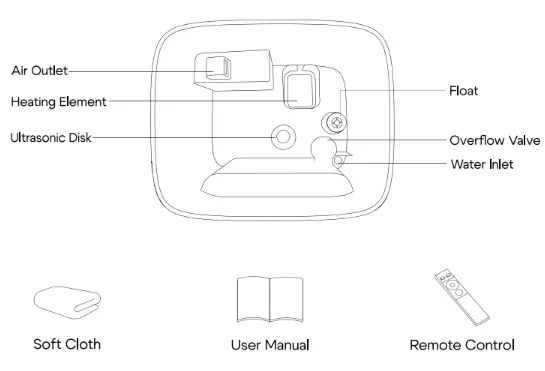
- Mist Outlet Cover
- Water Inlet Tank
- LED Display
- Control Panel
- Night Light Aroma Pad Tray
- Power Cord
- Water Tank
- Water Level Window
- Air Outlet
- Silicone Tube
- Heating Element
- Ultrasonic Disk
- Soft Cloth
- Overflow Valve
- User Manual
- Water Inlet
- Remote Control
Specifications
| Product Name |
Cool and Warm Mist Humidifier |
| Model Number |
AKA-MH-2407 |
| Mist level |
Low Medium High |
| Rated Power |
25W (Cool Mist)
130W (Warm Mist) |
| Rated Voltage |
120V~ |
| Rated Frequency |
60Hz |
| Noise |
<35 dB |
| Safety Functions |
1-12 Hours Timer |
| Waterless Auto Shut-off |
| Automatic Shutdown When Falling |
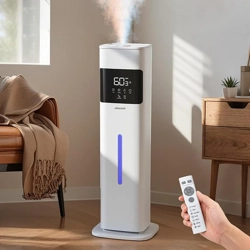
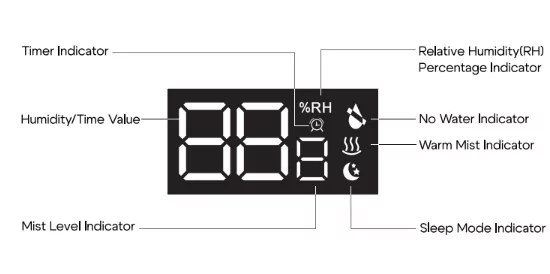
LED Display & Control Panel
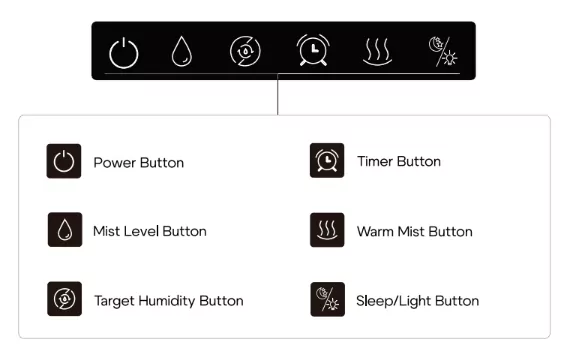
Power (ON/OFF)
Press the button to turn the humidifier on or off. The device defaults to cool mist when powered on. If the tank is empty, the "No Water" icon will blink, and the humidifier will shut off automatically.
If the humidifier has been in storage or transit for a long time, the sensor may briefly display a "No Water" warning—even when the tank is full. Restart the humidifier 2-3 times to reset the sensor.
Mist Level
Press repeatedly to cycle through mist level settings: low(1), medium(2), and high(3) mist.
The room may be too humid if you see water pooling near the humidifier. Lower the mist setting to avoid excess moisture.
Target Humidity
Press the button to set your desired humidity level (adjustable between 45% - 95%). To cancel this function, press the button repeatedly until the screen displays "- -". The target humidity function is off by default when the humidifier is turned on.
A comfortable humidity range is 40% - 60%.
After setting a target humidity, the display will show the current ambient humidity, not the target. The humidifier will automatically pause misting when reaching target humidity and resume when humidity falls below the set level.
Timer
Press the button to set your desired time (adjustable between 1-12 hours). The "Timer" icon will light up or turn off accordingly.
To cancel or reset the timer, press button repeatedly until the screen displays "Timer off". The timer function is off by default when the humidifier is turned on.
Night Light
Press the button to enable or disable night light function. The night light also helps you see water level more clearly. The night light function is off by default when the humidifier is turned on.
Sleep Mode
Press and hold for 3 seconds to turn sleep mode on. When sleep mode is enabled, the "Sleep" icon remains dimly lit and the screen will turn off. Press any button to reactivate the screen. The sleep mode function is off by default when the humidifier is turned on.
Warm Mist
Press the button to enable or disable warm mist function. The "Warm Mist" icon will light up or turn off accordingly.
The humidifier may take 15 minutes to warm up before producing warm mist. When warm mist is turned off, the unit operates in cool mist mode.
Mist may be hot. Do not place your bare hands, face, or other exposed skin over the nozzles while using warm mist.
Remote Control
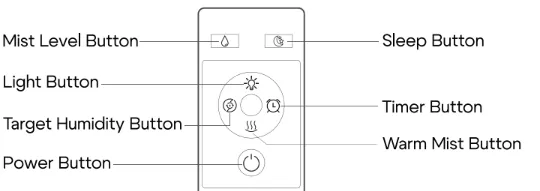
| Power Button |
Turn the humidifier on or off. |
| Mist Level Button |
Adjust the mist level (low, medium, and high). |
| Target Humidity Button |
Adjust the desired humidity level (45%-95%). |
| Timer Button |
Set the misting duration (1-12 hours). |
| Warm Mist Button |
Turn the warm mist on or off. |
| Sleep Button |
Enable or disable the sleep mode. |
| Light Button |
Turn the night light on or off. |
For safety during transportation, the remote control does not include batteries. Please install AAA 1.5V batteries before use.
Battery Safety Instructions
- Install dry batteries strictly according to the polarity indication (+ and -) in the battery compartment.
- Incorrect installation may cause device malfunction or battery leakage.
- Do not mix new and used dry batteries, or different brands/types (e.g., alkaline, carbon - zinc). Mixed use may reduce performance and increase leakage risk.
- Replace depleted dry batteries promptly. Recycle or dispose of used batteries following local regulations. Do not discard them in household trash.
- If battery leakage occurs, remove batteries from the remote control immediately and keep them away from the device. If skin or eyes contact the leakage, rinse with clean water thoroughly and seek medical help if needed.
Before Use
When using your humidifier for the first time, remove the wraps and follow the steps below.
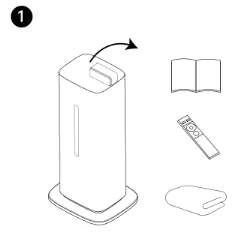
Remove the remote control, and user manual from the water tank.
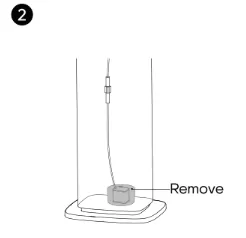
Place the main unit onto the tank. No need to secure the water pump to the bottom of the tank.
Remove the protective packaging from the water pump.

Place on a flat surface 12+ inches from walls. Use a waterproof mat underneath to catch spills.
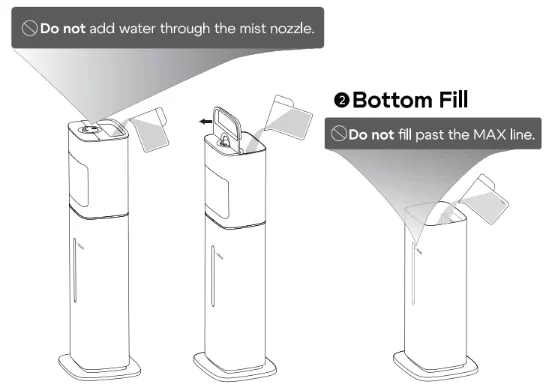
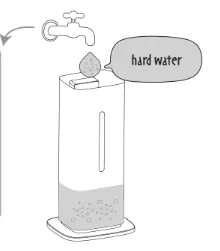
Filling Water
There are two ways to add water:
1 Top Fill
Do not add water through the mist nozzle.
Note
- Use purified or distilled water to minimize white dust accumulation.
- Place a waterproof mat beneath the humidifier to contain spills.
- Fill with room-temperature water only - never use hot water, boiling water, or other liquids.
- Avoid pouring water through the mist outlet to prevent internal damage and operational failure.
- Never add essential oils directly to the water tank as this may damage the tank components.
White Dust (Mineral Residue)
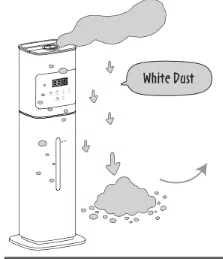
What Is White Dust?
White dust, also called mineral residue, is a powdery buildup that can appear near your humidifier. It's caused by minerals (like calcium and magnesium) in your water—a common issue in areas with "hard water." The harder your water, the more likely you'll see this dust.
Why Does It Happen?
- The humidifier doesn't create this dust—it simply releases minerals that are already in your water.
- If you live in a hard water area, switching to distilled water can greatly reduce or even eliminate white dust.
- It's a natural process, not a problem with your humidifier.
How To Reduce It?
The demineralization cartridge can minimize white dust buildup.
- Replace the cartridge every 30-40 water refills
- Replace more often if you have very hard water
- Switch to distilled water if dust persists after replacement
- To purchase replacement cartridges, contact our customer support team.
Still Experiencing Issues?
Contact our customer support team.
Adding Essential Oil
- Locate & Remove - Slide out the aroma pad tray.
- Insert Pad - Place an aroma pad inside the tray.
- Add Oil - Add 2-5 drops of essential oil directly onto the pad.
- Reinsert - Slide the aroma pad tray back into place securely.
- Activate - Turn on the humidifier to release scented mist.
- Only use the aroma pad tray. Never add oils directly to the water tank or other components.
- No pad? Use a same-sized sponge or folded paper towel as a substitute.
- Scent intensity This humidifier is not a dedicated diffuser; fragrance will be subtle.
Cleaning & Maintenance
Before You Begin
Always unplug the unit before maintenance. Work on a waterproof surface.
Cleaning Do's
- Wipe surfaces with a damp cloth.
- Clean the mist nozzle regularly with a soft tissue
- Change water regularly to prevent bacteria.
- For storage: Empty all water and dry completely.
Cleaning Don'ts
- Never submerge or rinse the main unit.
- Keep water away from air outlet.
- Avoid using detergents, gasoline, thinners, solvents, or other chemicals for cleaning.
Mold Buildup
Mold spores naturally exist in air and water. When water sits in tanks for >48 hours, spores multiply rapidly.
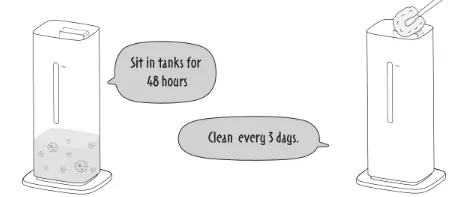
Regular cleaning is one of the most important steps you can take. According to the Environmental Protection Agency (EPA), homeowners should clean their humidifiers at least every 3 days to prevent mold buildup.
- Use distilled or demineralized water (reduces mineral deposits that mold thrives on).
- Dry the tank completely between uses.
- Deep clean weekly with white vinegar.
1. Regular Cleaning
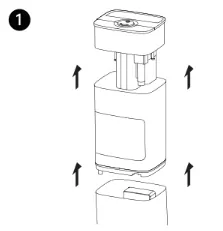
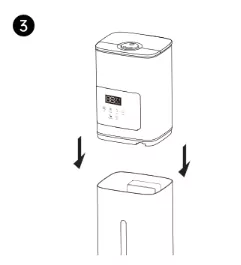
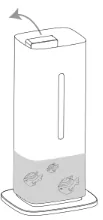
Remove the humidifier main unit from the water tank and empty any remaining water.

Clean the water inlet tank, and water tank using a soft cloth or brush.
Gently clean the water chamber interior with a soft brush, ensuring no water enters the air outlet.
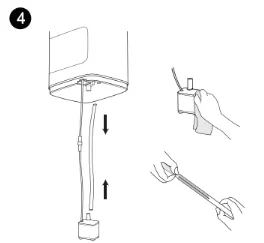
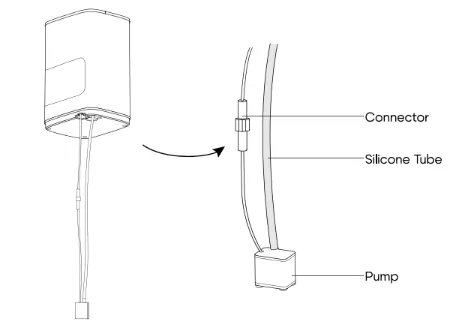
Clean the water pump with a soft brush and use a long, narrow brush to clean the silicone tube.
Note: Ensure all parts are fully dry before reassembling or storing the humidifier.
2. Descaling Instructions
[IMAGE]
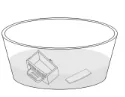
- Pour white vinegar into the water chamber and water tank.
- Soak the water inlet tank, water pump and silicone tube in white vinegar.
- Let the solution sit for 20-30 minutes.
- Scrub away scale buildup with a soft cloth or brush.
- Rinse thoroughly with clean water
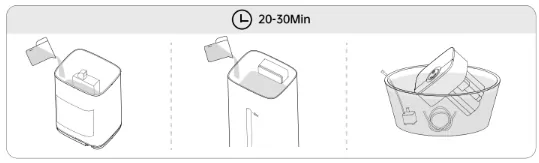
- Do not allow water to enter the air outlet during cleaning.
- Avoid harsh scrubbing of the ultrasonic disk to prevent damage.
- White vinegar may leave a slight odor—ensure proper ventilation and let all parts air-dry completely before reuse.
- Citric acid can be used as an alternative descaler; follow the product instructions for proper usage.
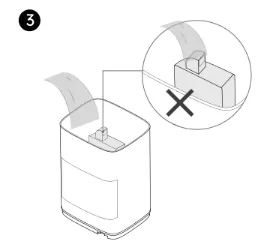
3. Aroma Pad Tray Cleaning
- Pull out the aroma pad tray from the back of the humidifier.
- Rinse the tray and pad with water and dry it before placing it back.
- If the aroma pad remains stiff after cleaning, it needs to be replaced.
- No pad? Use a same-sized sponge or folded paper towel as a substitute.
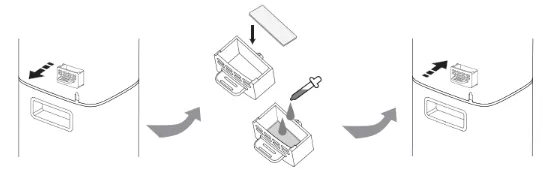
4. Pump Check And Replacement
If the water pump stops working, first try removing and reinstalling it.
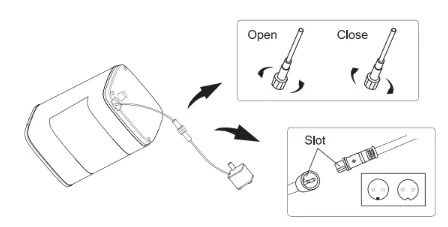
- Disconnect: Turn the locking nut counterclockwise, hold the cable near the connector, and firmly pull to separate the plug (pin end) from the socket (jack).
- Reconnect: Align the plug and socket, push in until secure, then tighten the locking nut clockwise.
If the pump is damaged, contact our customer support team to purchase a replacement.
5. Seasonal Storage
- Before storing the humidifier at the end of the season, follow the above cleaning steps.
- Ensure all parts are completely dry before storing.
- Pack the unit securely and store it in a cool, dry place.
Troubleshooting
No Power / Unable To Turn On
- Check Power Supply: Make sure the humidifier is plugged into a working electrical outlet.
- If Recently Cleaned: Water may have entered the unit during cleaning, preventing startup. Place in a well-ventilated area to dry for at least 24 hours before retrying.
- Still Getting Weak Mist? Contact customer support.
Low Mist Output
- Check Water Level: Make sure the tank is filled with enough water.
- Adjust Mist Settings: Turn up the mist level if set too low.
- Check Humidity Setting: In Auto Mode, misting stops when target humidity is reached, increase mist level or raise target humidity setting.
- Clean Ultrasonic Disk: If clogged, follow cleaning steps in "Descaling Instructions" (Page 17)
- Still Getting Weak Mist? Contact customer support.
Mist Escaping From The Water Tank
- Check Tank Installation: Ensure the tank is properly placed.
- Adjust Mist Level: Reduce the mist output to prevent excessive mist buildup.
No Mist Output With Red Light Flashing
- Water Level: Ensure water tank is adequately filled.
- Sensor Reset: After long storage/transit, sensor may falsely show "No Water". Restart unit 2-3 times to recalibrate.
If Issue Persists:
- Inspect Water Pump: If failing to move water from tank to water chamber: Follow "Descaling Instructions" & "Pump Check And Replacement" (Page 17-18) procedures.
- Check Main Unit Float: Clean with cotton swab if stuck to verify float moves freely up/down.
- Examine Ultrasonic Disk: Clean per "Descaling Instructions" (Page 17) if clogged. Pour water into water chamber while powered on - check for mist production.
- Still Not Working? Contact customer support for pump or main unit replacement options.
Insufficient Humidification
- Adjust Mist Level: Increase the mist output.
- Check Room Size: If the room is too large, the humidifier may not effectively increase humidity. Consider using a larger unit.
- Check Environmental Humidity: If the air is very dry, it may take longer for humidity levels to rise.
Inaccurate Humidity Reading
- Normal Range: A difference of 5-10% between displayed and actual humidity is normal.
- Check The Humidity Sensor: Ensure the sensor is free from dust or moisture; wipe it dry if necessary.
- Check Placement: Avoid placing the humidifier in corners or near walls. Ensure good airflow.
- For Large Errors: If the humidity reading is significantly inaccurate, contact customer support.
Water Leakage
- Inspect Water Tank: Check for cracks/damage. Never fill water past the MAX line.
- Verify Placement: Place on perfectly flat, level surface.
Water Accumulation Around Unit
- Check Humidity Settings: If set too high, excess moisture may form. Use extension tube / Reduce mist level. For smallest settings: Move to larger space or use waterproof mat.
- Verify Placement: Place on flat, stable surface. Keep minimum 12 inches from walls/furniture for proper airflow.
- Inspect Water Tank: Ensure proper installation to prevent leaks. Never fill past MAX water line.
Scale buildup / Unpleasant Odor
- Clean Regularly: Clean the water tank and main unit frequently to remove scale buildup.
- Use White Vinegar: Soak parts with mineral deposits in distilled white vinegar for 20-30 minutes, then rinse thoroughly.
- Check The Aroma Pad: If using essential oils, clean or replace the aroma pad regularly. See the “Aroma Pad Tray Cleaning" (Page 17) section for details.
White Mist Or White Dust
- Check Water Quality: Use purified or distilled water instead of tap water with high mineral content.
- Clean The Humidifier: Regularly clean the water tank and base to remove mineral deposits. See the "White Dust" (Page 13) section for details.
Furnace Malfunctions
- Tap Water Minerals Dispersed As "White Dust" Can: Clog furnace air filters faster. Coat sensitive sensors/electronics.
How To Prevent It
- Only use distilled/demineralized water.
- Replace furnace filter monthly during humidifier use.
- Wipe down furnace exterior weekly.
Noisy Sound
- A slight noise during water intake is normal.
- If the noise is excessive, Contact customer support.
Warranty Policy
Warranty Coverage
- We warrants to the original purchaser that this product shall be free from defects in material and workmanship under normal use and conditions for a period of 1 year from the date of purchase.
- During the warranty period, we will, at its sole discretion, repair or replace the product if such defects occur.
Warranty Exclusions
This warranty does not cover the following:
- Unauthorized repairs/modifications: Any repair, modification, or disassembly not authorized by the manufacturer voids the warranty.
- Misuse or abuse: Damage caused by accidents, misuse, improper maintenance, or failure to follow instructions in the user manual.
- Commercial use: Products used for commercial, rental, or non-household purposes.
- Normal wear & tear: Deterioration due to regular use or consumable parts (e.g., filters, bulbs).
- External factors: Damage from natural disasters, shipping, power surges, or other external causes.
- Unauthorized sellers: Products purchased from unauthorized dealers or distributors.
Warranty Claim Process
If your product exhibits a defect during the warranty period:
- Contact Customer Support: Provide the product model, proof of purchase (invoice/order number), and photos/videos of the issue.
- Repair or Replacement: We will evaluate the claim and provide a repair or replacement if eligible.
Product Registration
- To streamline warranty services, register your product promptly on the manufacturer's official website.
- Registration is quick, optional, and does not affect warranty rights.
Customer Support
For warranty claims or inquiries: [email protected]
Important Notes
- Voiding conditions: Unauthorized repairs, use of chemicals/oils, or improper cleaning void the warranty.
- Safety alert: Discontinue use and contact support if the product exhibits abnormal noise, odors, or malfunction.
- Your Rights: This warranty provides specific legal protections. Additional rights may apply under your state's consumer laws.