1
Adult assembly required.
Small parts may present choking hazard prior to assembly.
Enclosed please find simple step-by-step instructions to help you
quickly assemble your products. Before you begin we recommend
that you following the steps below:
1. Please read the instructions thoroughly.
2. Identify all parts and hardwares.
3. You will need the following tools:
Philips head screw driver
Flat head screw driver
Hammer
Do Not Use Power Drills or Drivers
To protect your parts during assembly please place them on a soft
surface.
To clean surface use only water on a damp cloth. Do not use
window cleaners or cleaning abrasives as it will scratch the surface
and could damage the protective coating.
ASSEMBLY INSTRUCTIONS
ITEM NO:652
Dream On Me Inc.
1532 S WASHINGTON AVE
PISCATAWAY TWP NJ 08854
Email: [email protected]
www.dreamonme.com
2
Scan the QR code to register your product
https://dreamonme.com/customercare/registration/

3
WARNING !
· FAILURE TO FOLLOW THESE WARNINGS AND THE ASSEMBLY INSTRUCTIONS
COULD RESULT IN SERIOUS INJURY OR DEATH.
· READ ALL INSTRUCTIONS BEFORE ASSEMBLING CRIB. KEEP INSTRUCTIONS
FOR FUTURE USE.
· UPON COMPLETION OF ASSEMBLY, MAKE SURE ALL SCREWS,BOLTS AND
FASTENERS HAVE BEEN SECURELY TIGHTENED.
A FREQUENT AND PEDRIODICALLY CHECK SHOULD BE MADE TO CONFIRM ALL
THE SCREWS AND NUTS REMAIN TIGHT.
· NEVER USE THIS PRODUCT IF THERE ARE ANY LOOSE, MISSING FASTENERS,
LOOSE JOINTS,BROKEN PARTS, OR TORN MESH/FABRIC.CONTACT DREAM ON ME
· NEVER SUBSTITUTE PARTS, THE PRODUCT INCLUDING SIDE RAILS,MUST BE
FULLY ERECTED PRIOR TO USE.
· NEVER USE BED FOR INFANTS, THIS TODDLER BED IS NOT A SUBSITITUTE FOR A
CRIB,THE TODDLER BED IS USED FOR A CHILD BETWEEN THE AGE OF 15MONTHS
TO 5 YEARS WITH A MAXIMUM WEIGHT OF 50 POUNDS(22.7KG).
· NEVER USE PLASTIC SHIPPING BAGOR OTHER PLASTIC FILM AS A MATTRESS
COVERS NOT SOLD AND INTENDED FOR THAT PURPOSE,THEY CAN CAUSE
SUFFOCATION.
· CAUTION ENTRAPMENT HAZARD:TO AVOID DANGEROUS GAPS,ANY MATTRESS
USED IN THIS BED SHALL BE FULL SIZE CRIB MATTRESS AT LEAST 51-58IN
(1310MM) IN LENGTH, 27-1/4IN(690MM) IN WIDTH AND 4IN(100M) IN THICKNESS,OR
GREATER,BUT NOT EXCEED 5IN.
· NEVER USE A WATER MATTRESS WITH THIS TODDLER BED.
· WARNING STRANGULATION HAZARD:STRINGS CAN CAUSE STRANGULATION!
NEVER PLACE BED NEAR WINDOW WHERE CORDS FROM BLINDS OR DRAPES
MAY STRANGLE A CHILD.NEVER SUSPEND STRINGS OVER BED.
NEVER PLACE ITEMS WITH A STRING CORD,OR RIBBON,SUCH AS HOOD STRINGS,
PACIFIER CORDS AOUND A CHILS’S NECK.THESES ITEMS MAY CATCH ON BED
PARTS.
· WARNING: INFANTS HAVE DIED IN TODDLER BEDS FROM ENTRAPMENT.
OPENINGS IN AND BETWEEN BED PARTS CAN ENTRAP HEAD AND NECK OF A
SMALL CHILD. NEVER USE BED WITH CHILDREN UNDER 15MONTHS.ALWAYS
FOLLOW THE ASSEMBLY INSTRUCTIONS.
· TO REDUCE THE RISK OF SIDS,PEDIASTRICIANS RECOMMED HEALTHY INFANTS
BE PLACED ON THEIRE BACK TO SLEEP,OR ADVISED BY YOUR PHYSICIAN.
· DO NOT USE BED IF THE SPACE BETWEEN BED AND SOLID OBJECTS IS LESS
THAN 12IN(31CM), A CHILD COULD SLID INTO THE SPACE AND SUFFOCATE.
· IF REFINISHING,USE A NON-TOXIC FINISH SPECIFIED FOR CHILDREN’S PRODUCTS.
TO WASH,CLEAN WITH MILD SOAP AND DAMP CLOTH.
TO STORE,PLEASE KEEP IN A COOL PLACE.
MADE IN CHINA
1532 S WASHINGTON AVE PISCATAWAY TWP NJ 08854 732-366-1788 FOR
REPLACEMENT PARTSAND INSTRUCTIONAL LITERATURE IF NEEDED.
P
P
4
1532 S WASHINGTON AVE PISCATAWAY TWP NJ 08854 732-366-1788.
5
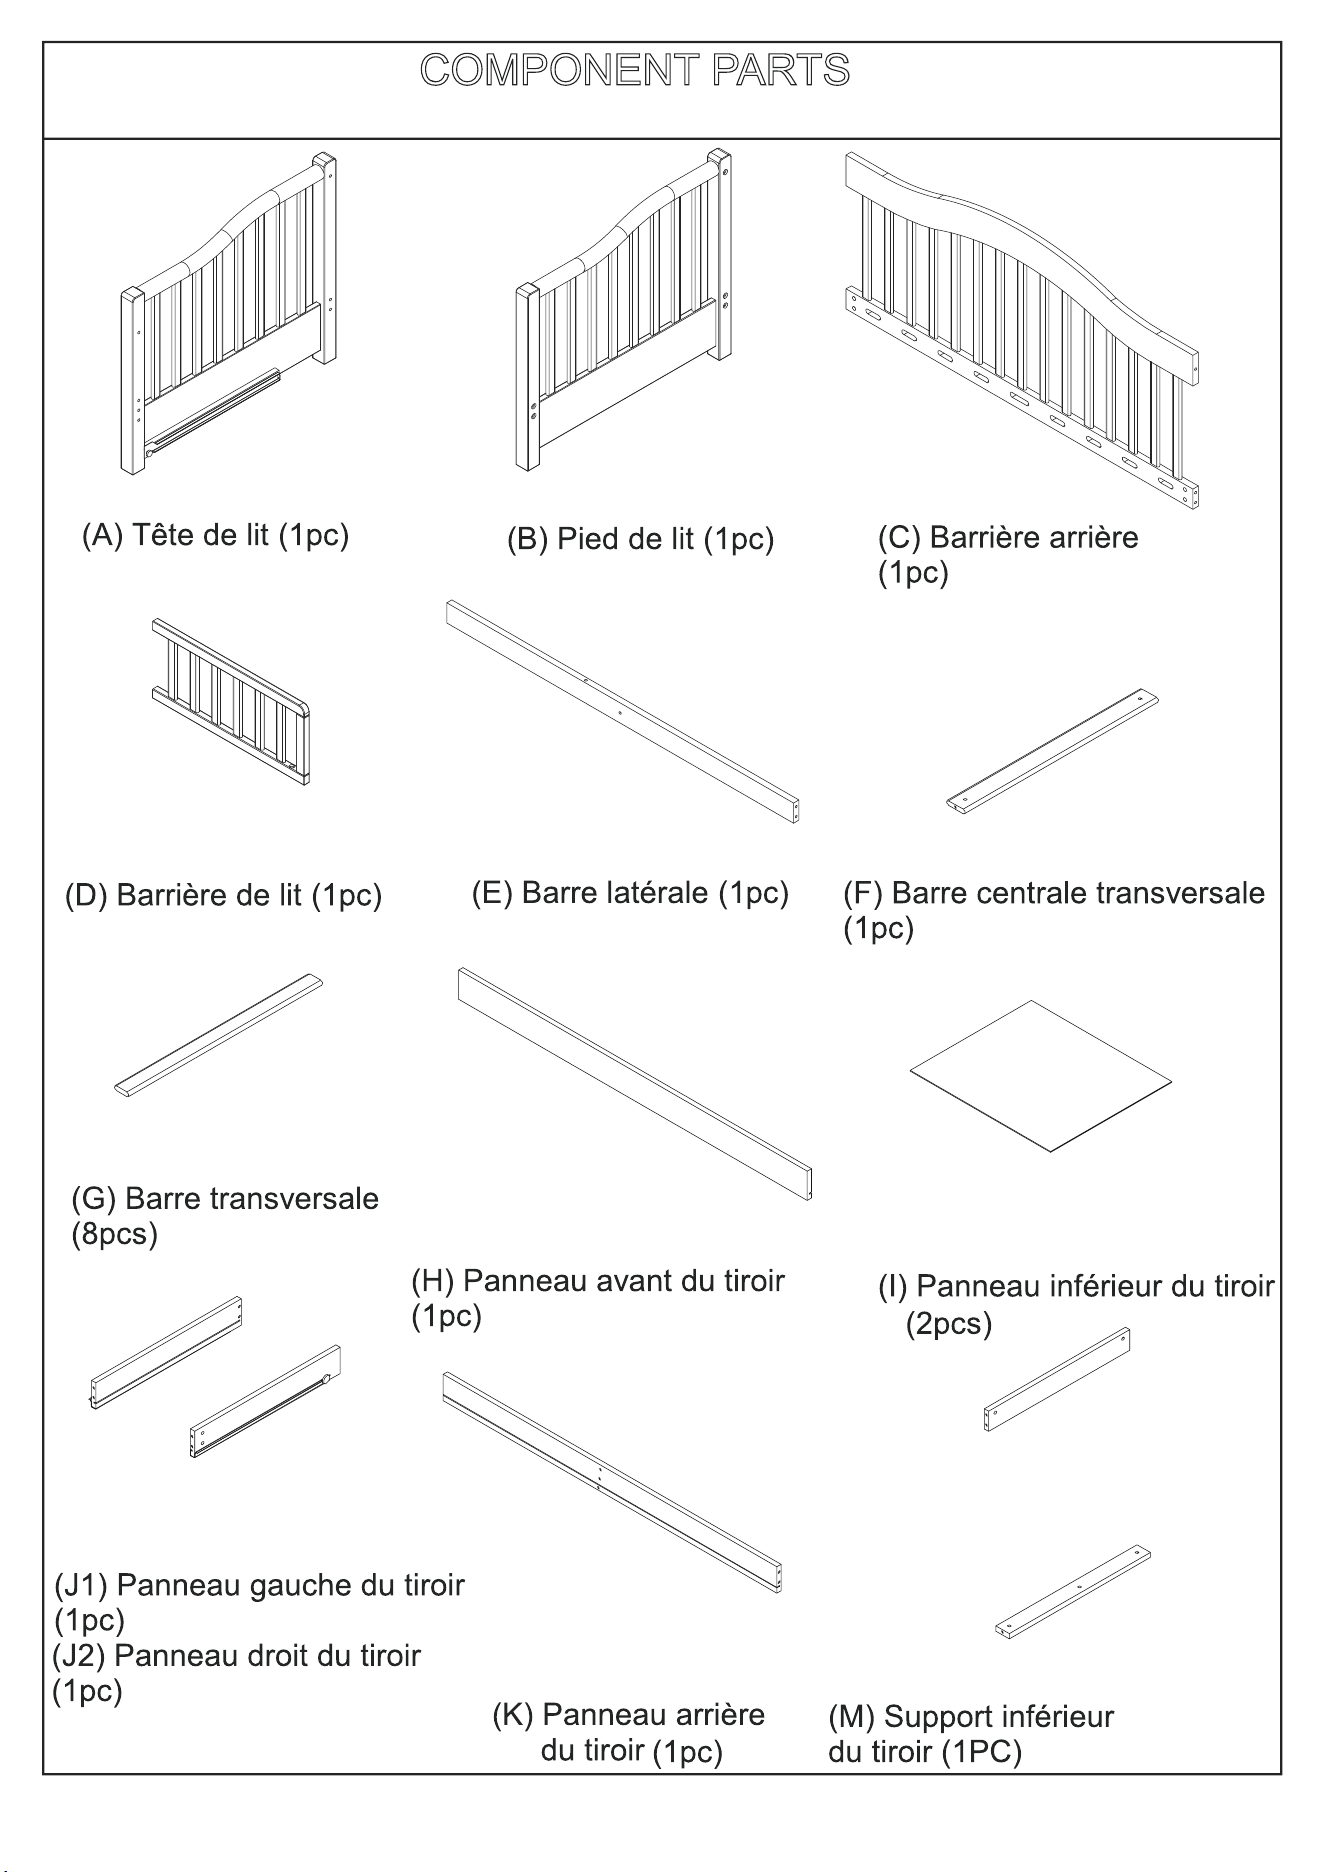
COMPONENT PARTS
(A) Headboard (1pc)
(B) Footboard (1pc)
(C) Back Rail (1pc)
(D) Bed Rail (1pc)
(E) Side Bar (1pc)
(H) Drawer Front Panel (1pc)
(G) Cross Bar (8pcs)
(K) Drawer Back Panel
(1pc)
(I) Drawer Bottom panel
(2pcs)
(L) Drawer Middle Panel
(1pc)
(M) Drawer Bottom Support
(1pc)
(F) Cross Middle Bar (1pc)
J2
J1
(J1) Drawer Left panel(1pc)
(J2) Drawer Right panel(1pc)
6
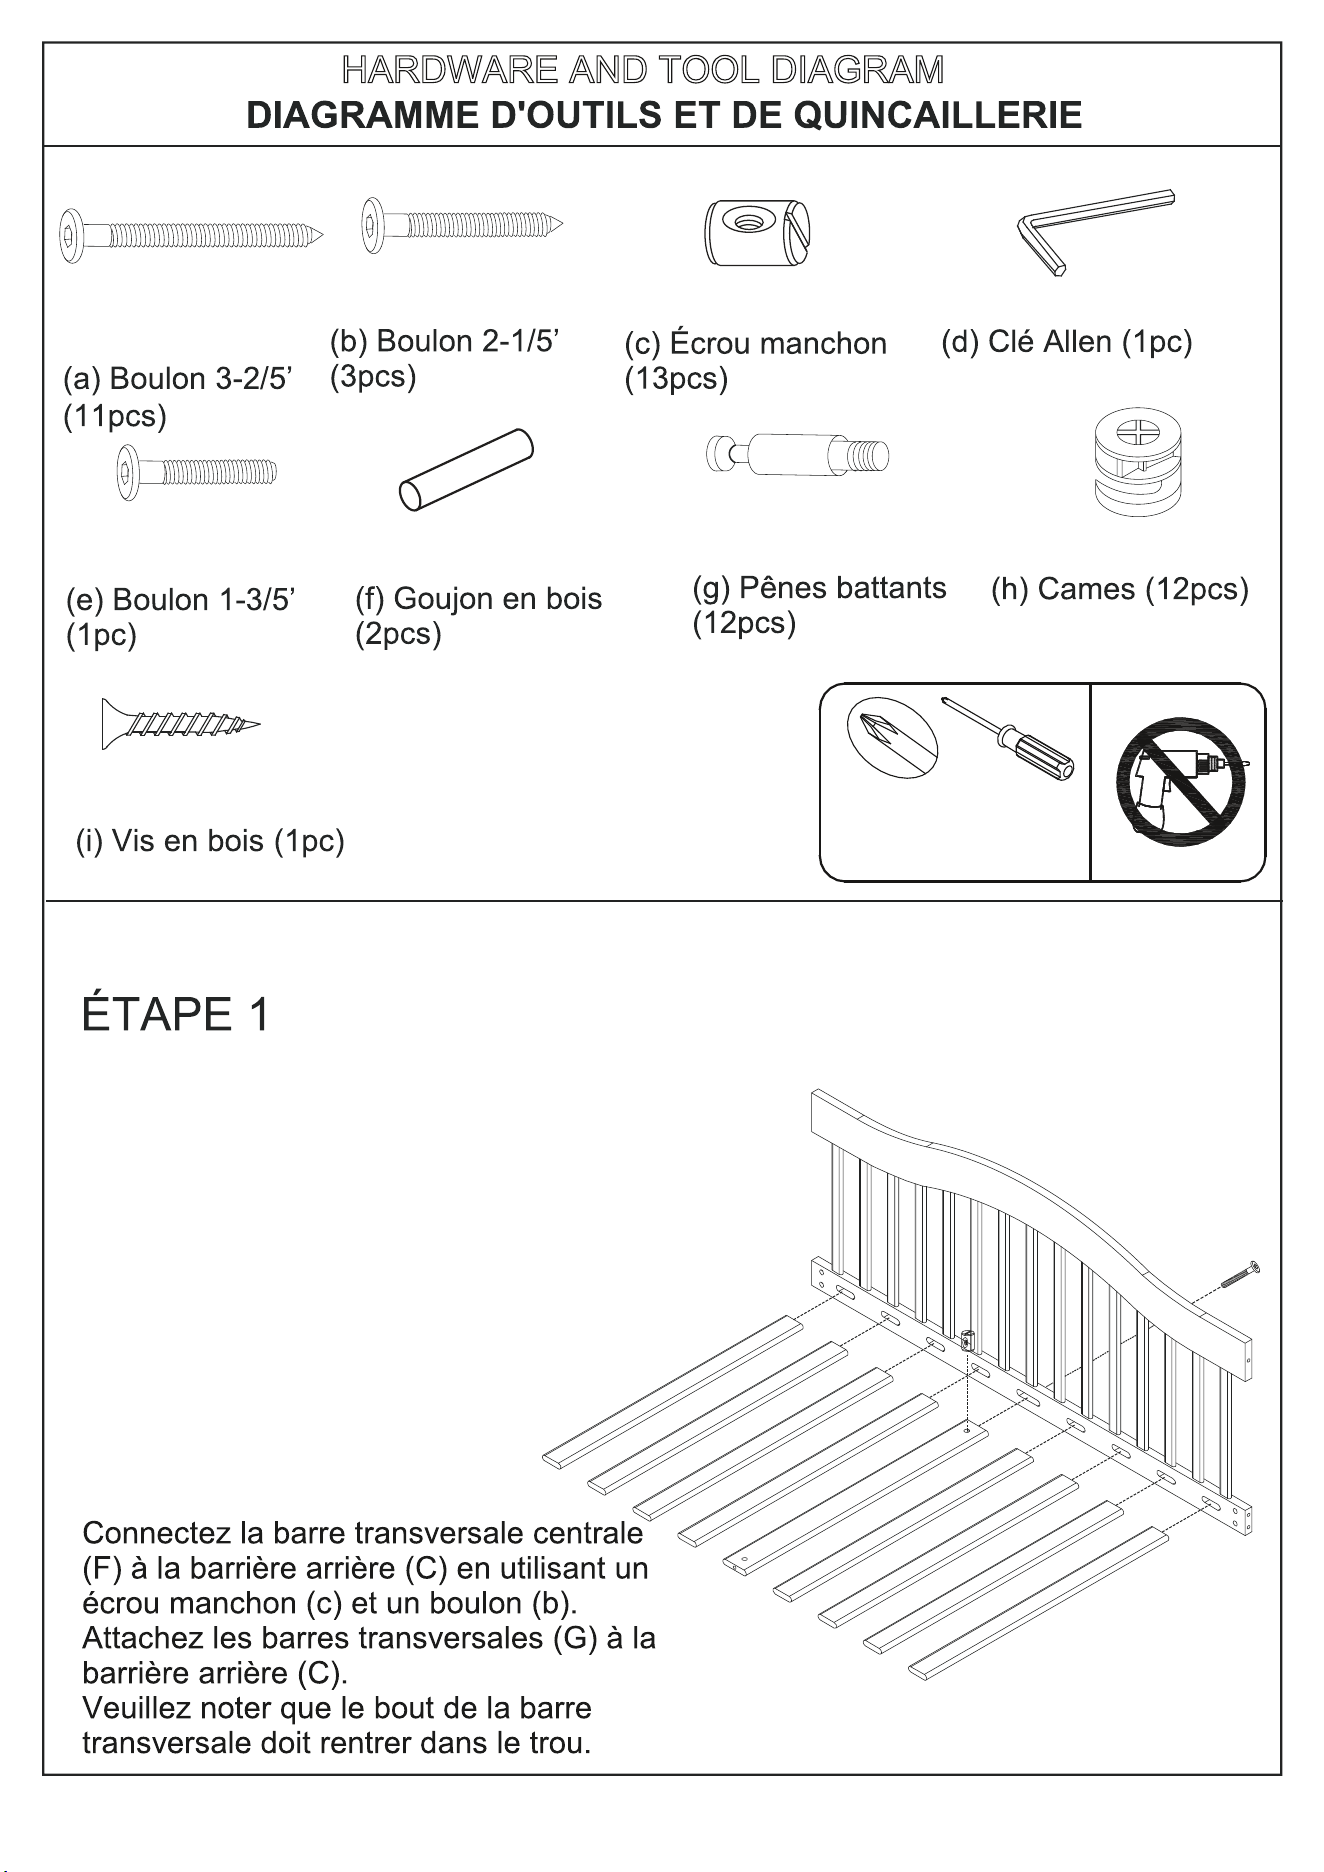
STEP 1
b
c
HARDWARE AND TOOL DIAGRAM
(a) Bolt 3-2/5’
(11pcs)
(b) Bolt 2-1/5’ (3pcs)
(c) Barrel nut (13pcs)
(d) Allen Wrench (1pc)
(e) Bolt 1-3/5’ (1pc)
(f) Wood Dowel (2pcs)
(i) Wood Screw (1pc)
Connect Cross middle bar (F) to the bac
k
rail (C) using barrel nut (c) and bolt (b).
Attach cross bar (G) to the back rail (C).
Please note: the cross end should fit
into hole.
C
F
G
G
G
G
G
G
G
G
(g) Cam Bolt (12pcs)
(h) Cams (12pcs)
PHILLIPS--HEAD SCREWDRIVER
REQUIRED FOR ASSEMBLY
----NOT INCLUDE
Do Not Use Power Drills or Drivers
7
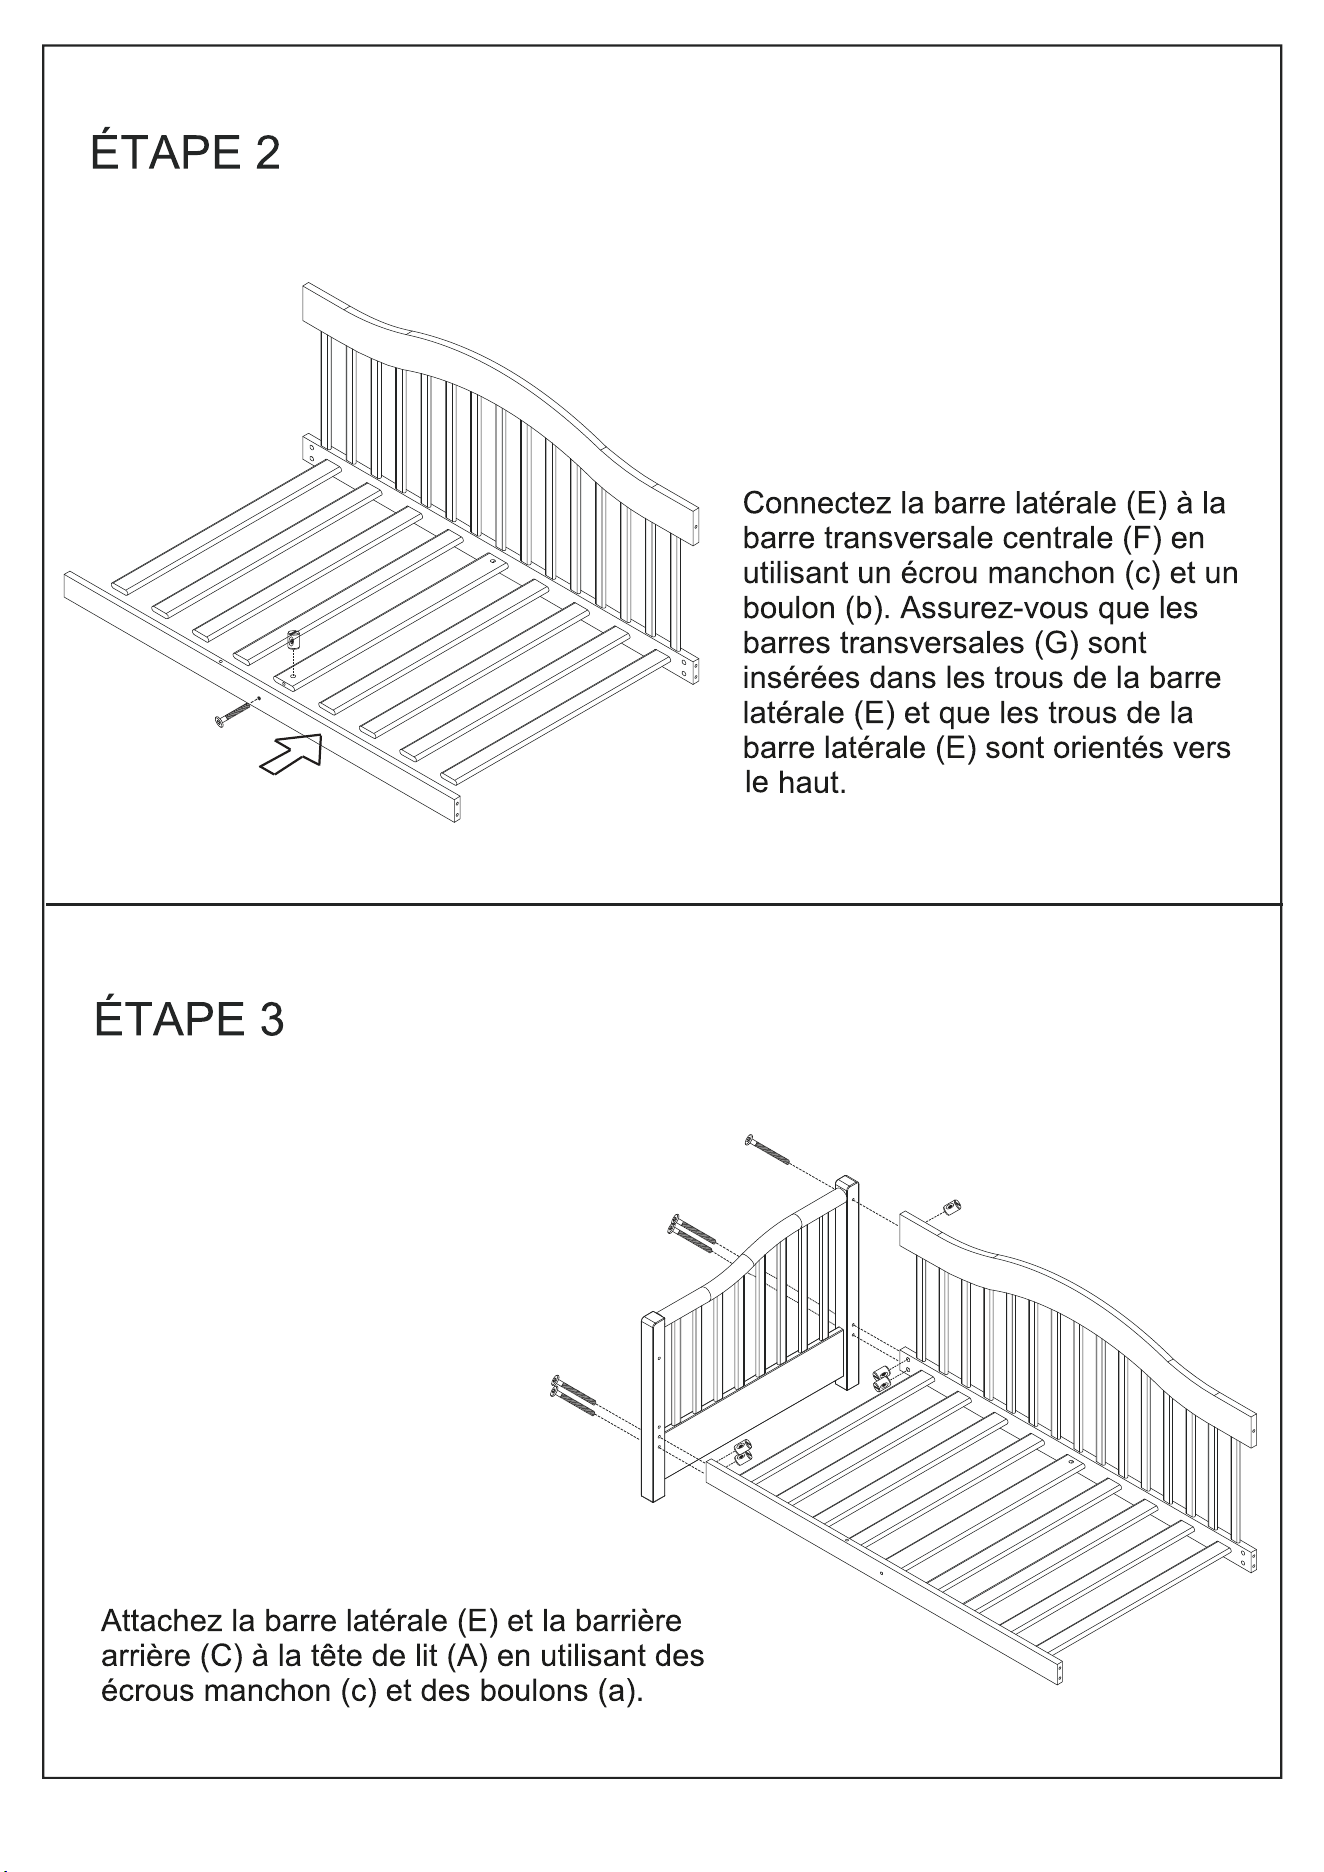
STEP 2
STEP 3
b
c
a
Connect the Side bar (E) to the Cross
middle bar (F) using barrel nut (c) and
bolt (b). Make sure cross bar (G) are
connected to the hole on the side
bar (E) and the hole on the side bar
(E) are facing up.
Please note: the cross end should fit
into hole.
F
G
G
G
G
G
G
G
G
E
Attach the side bar (E) and the back rail(C)
to the headboard (A) using barrel nuts(c)
and bolts (a).
a
a
E
A
C
c
c
c
8
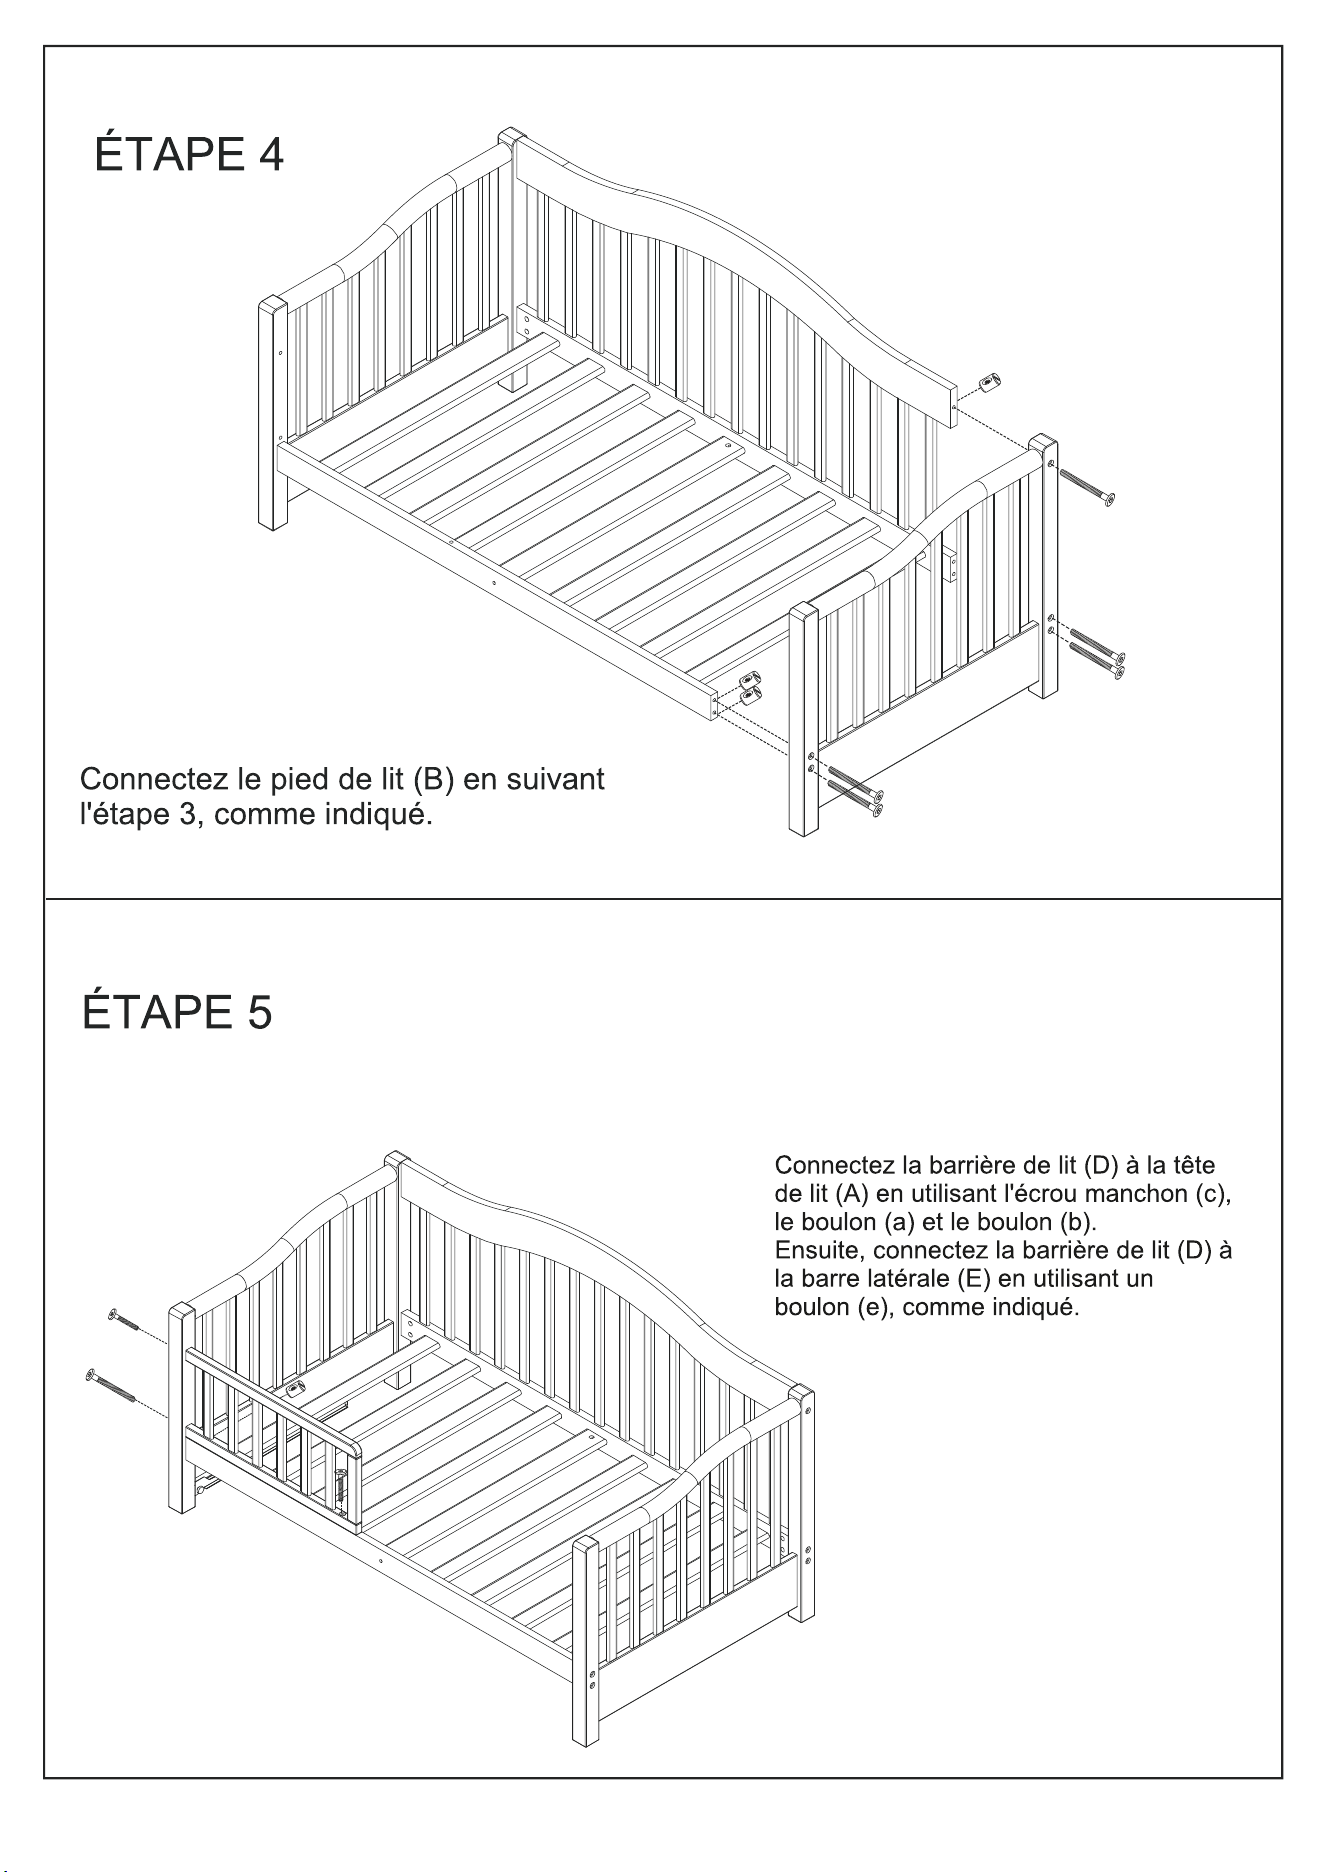
Repeat step 3 for the Footboard
(B) as shown .
STEP 4
STEP 5
a
a
a
a
a
e
a
c
c
E
B
C
b
c
E
A
D
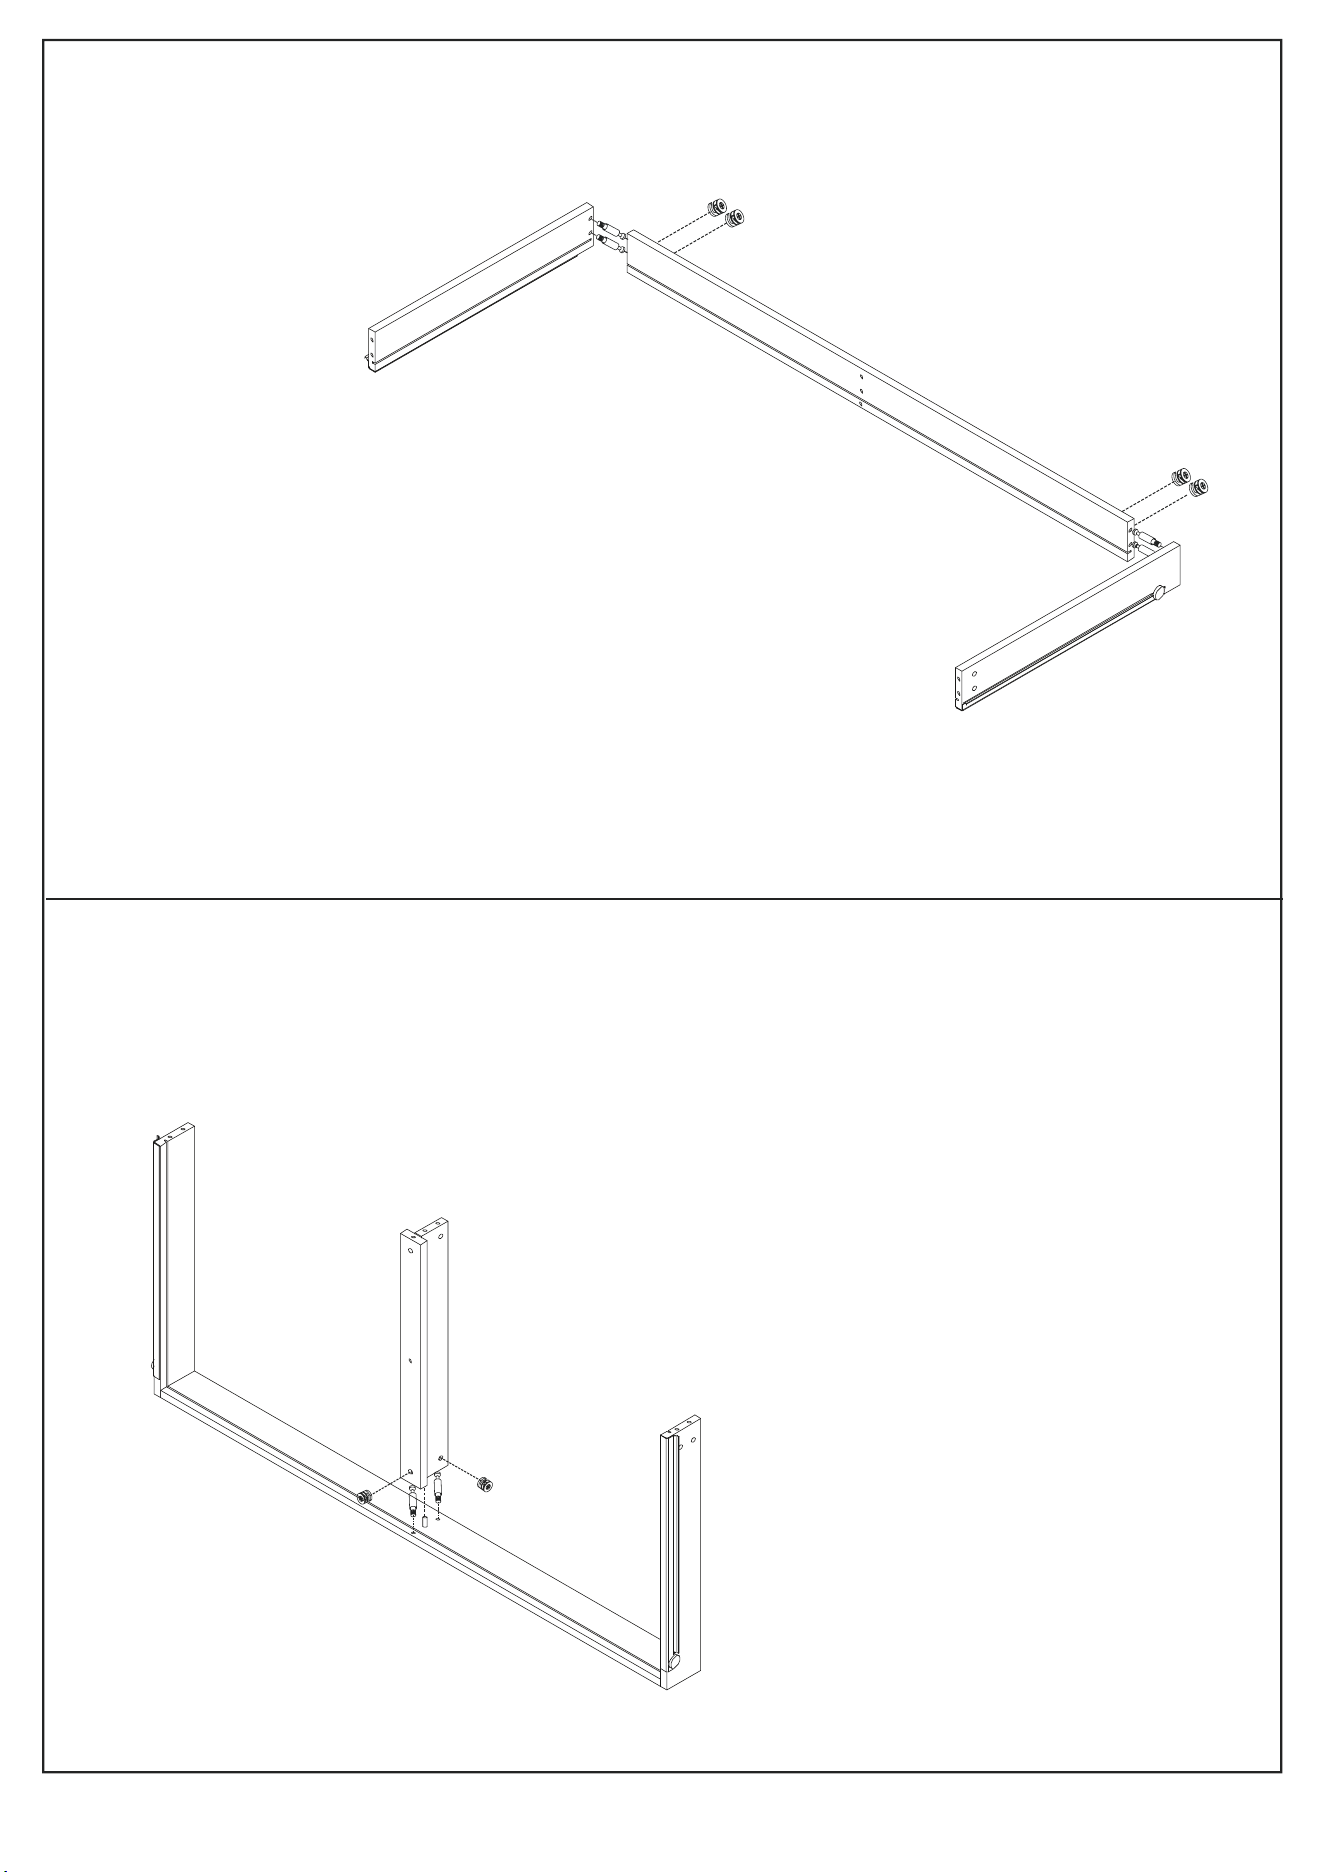
Connect the bed rail(D) to the headboard
(A) using the barrel nut (c) and the bolt(a)
and bolt (b).
Then connect the bed rail(D) to the
side bar(E) using bolt(e) as shown.
9
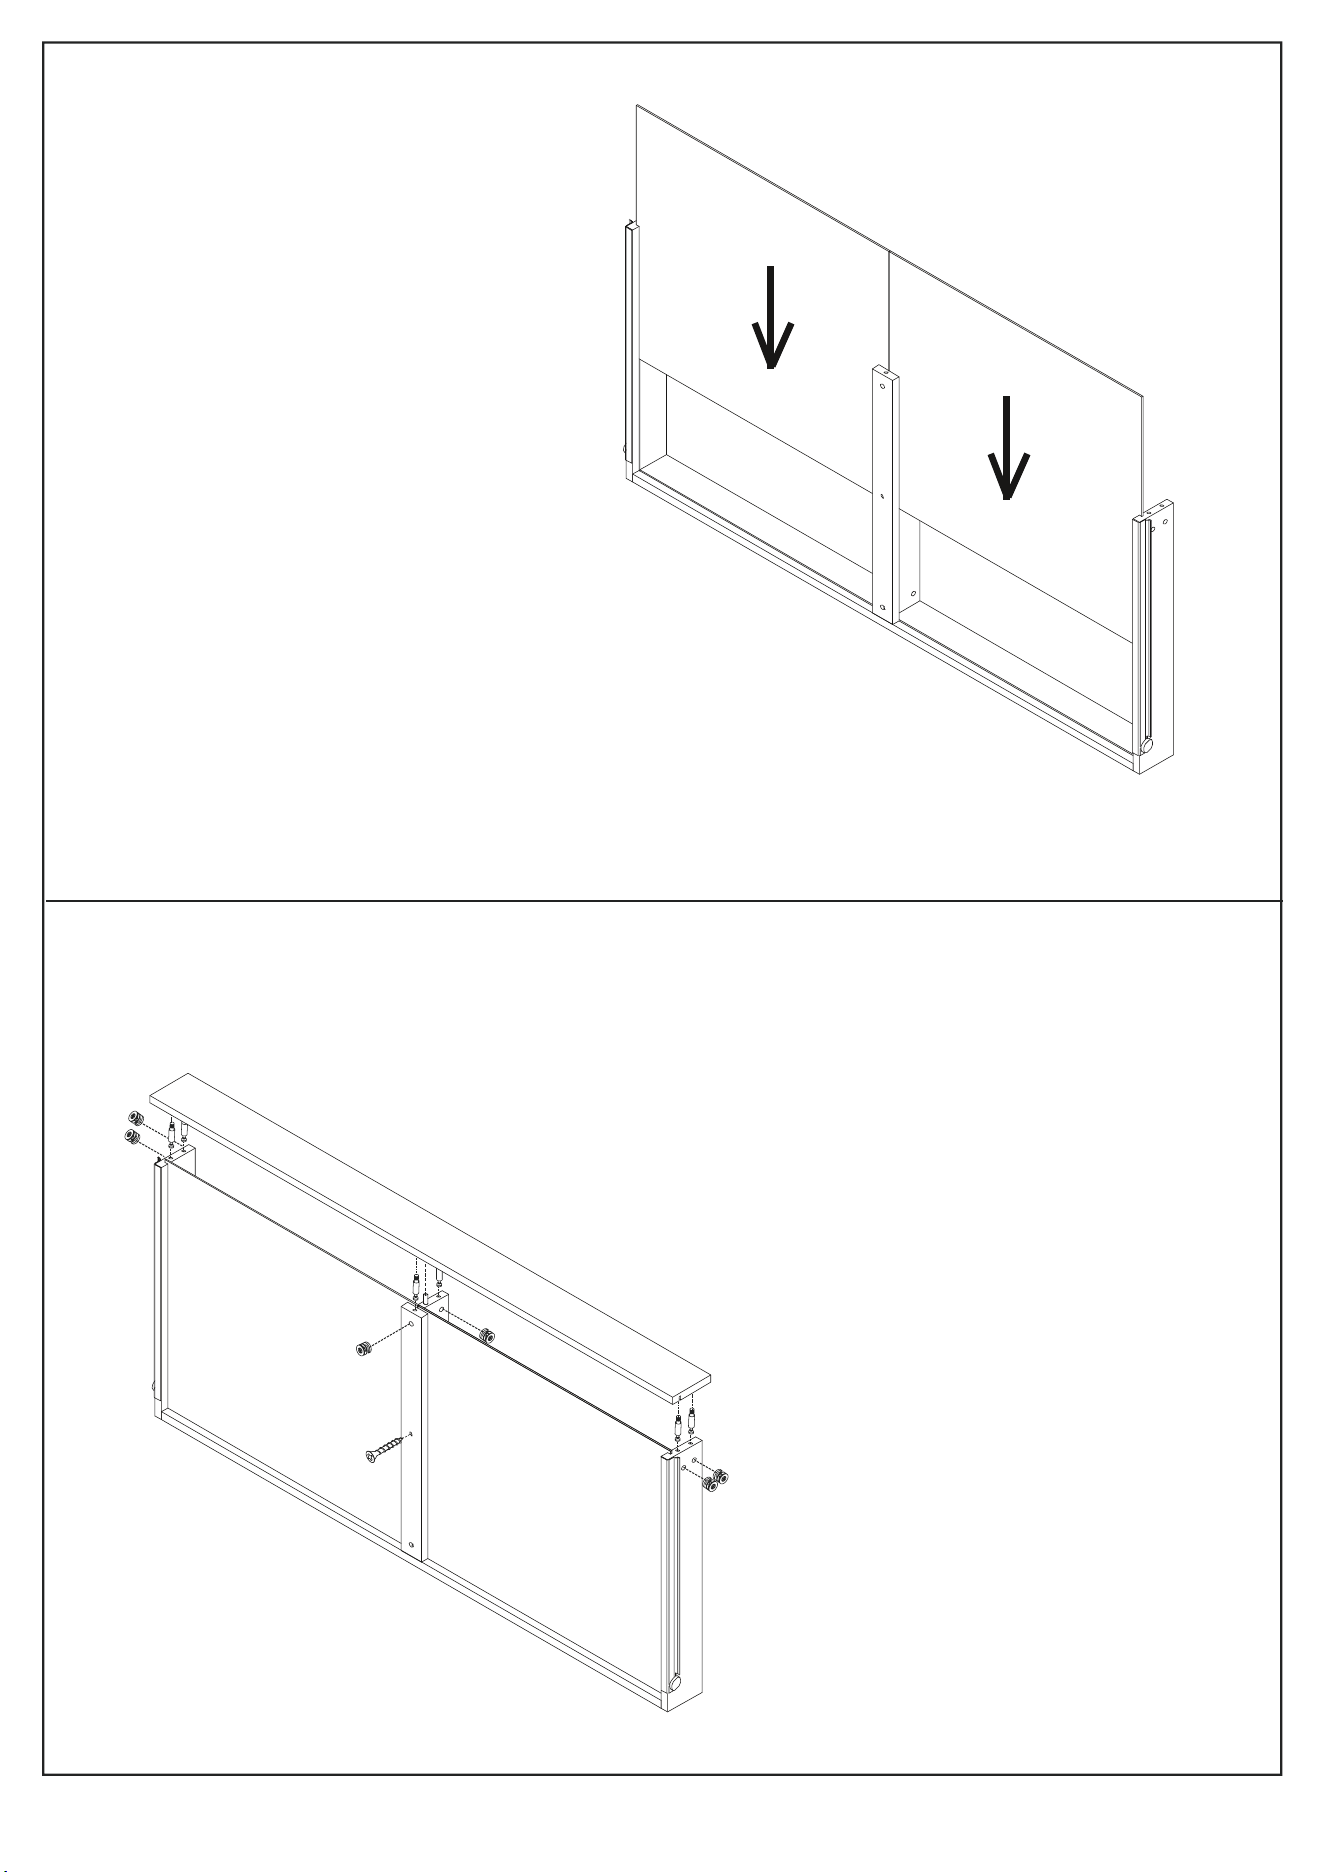
Attach the Middle Panel (L) to the
center of the Drawer Back Panel
(K) using 1pc Wood Dowel (c) , 1pc
Cam Bolt (g) and 1pc Cam (h) .
Attach the Bottom Support Bar (M)
to the center of the Drawer Back
Panel (K) using 1pc Cam Bolt (g)
and 1pc Cam (h) .
STEP 7
Attach Drawer Left Side (J1)
and Drawer Right Side (J2) to the
Drawer Back Panel (K) by inserting
4pcs Cam Bolts (g) to the end holes
of the Drawer Side Panel (J1&J2) as
shown . Make sure the grooves
line up and face inside.Insert 4pcs
Cams (h) into the holes of Drawer
Back Panel (K) . Lock the Cams (h)
in the Drawer Back Panel (K) using
phillips-head screwdriver .
STEP 6
K
J2
J1
g
h
h
h
h
g
f
K
M
L
10
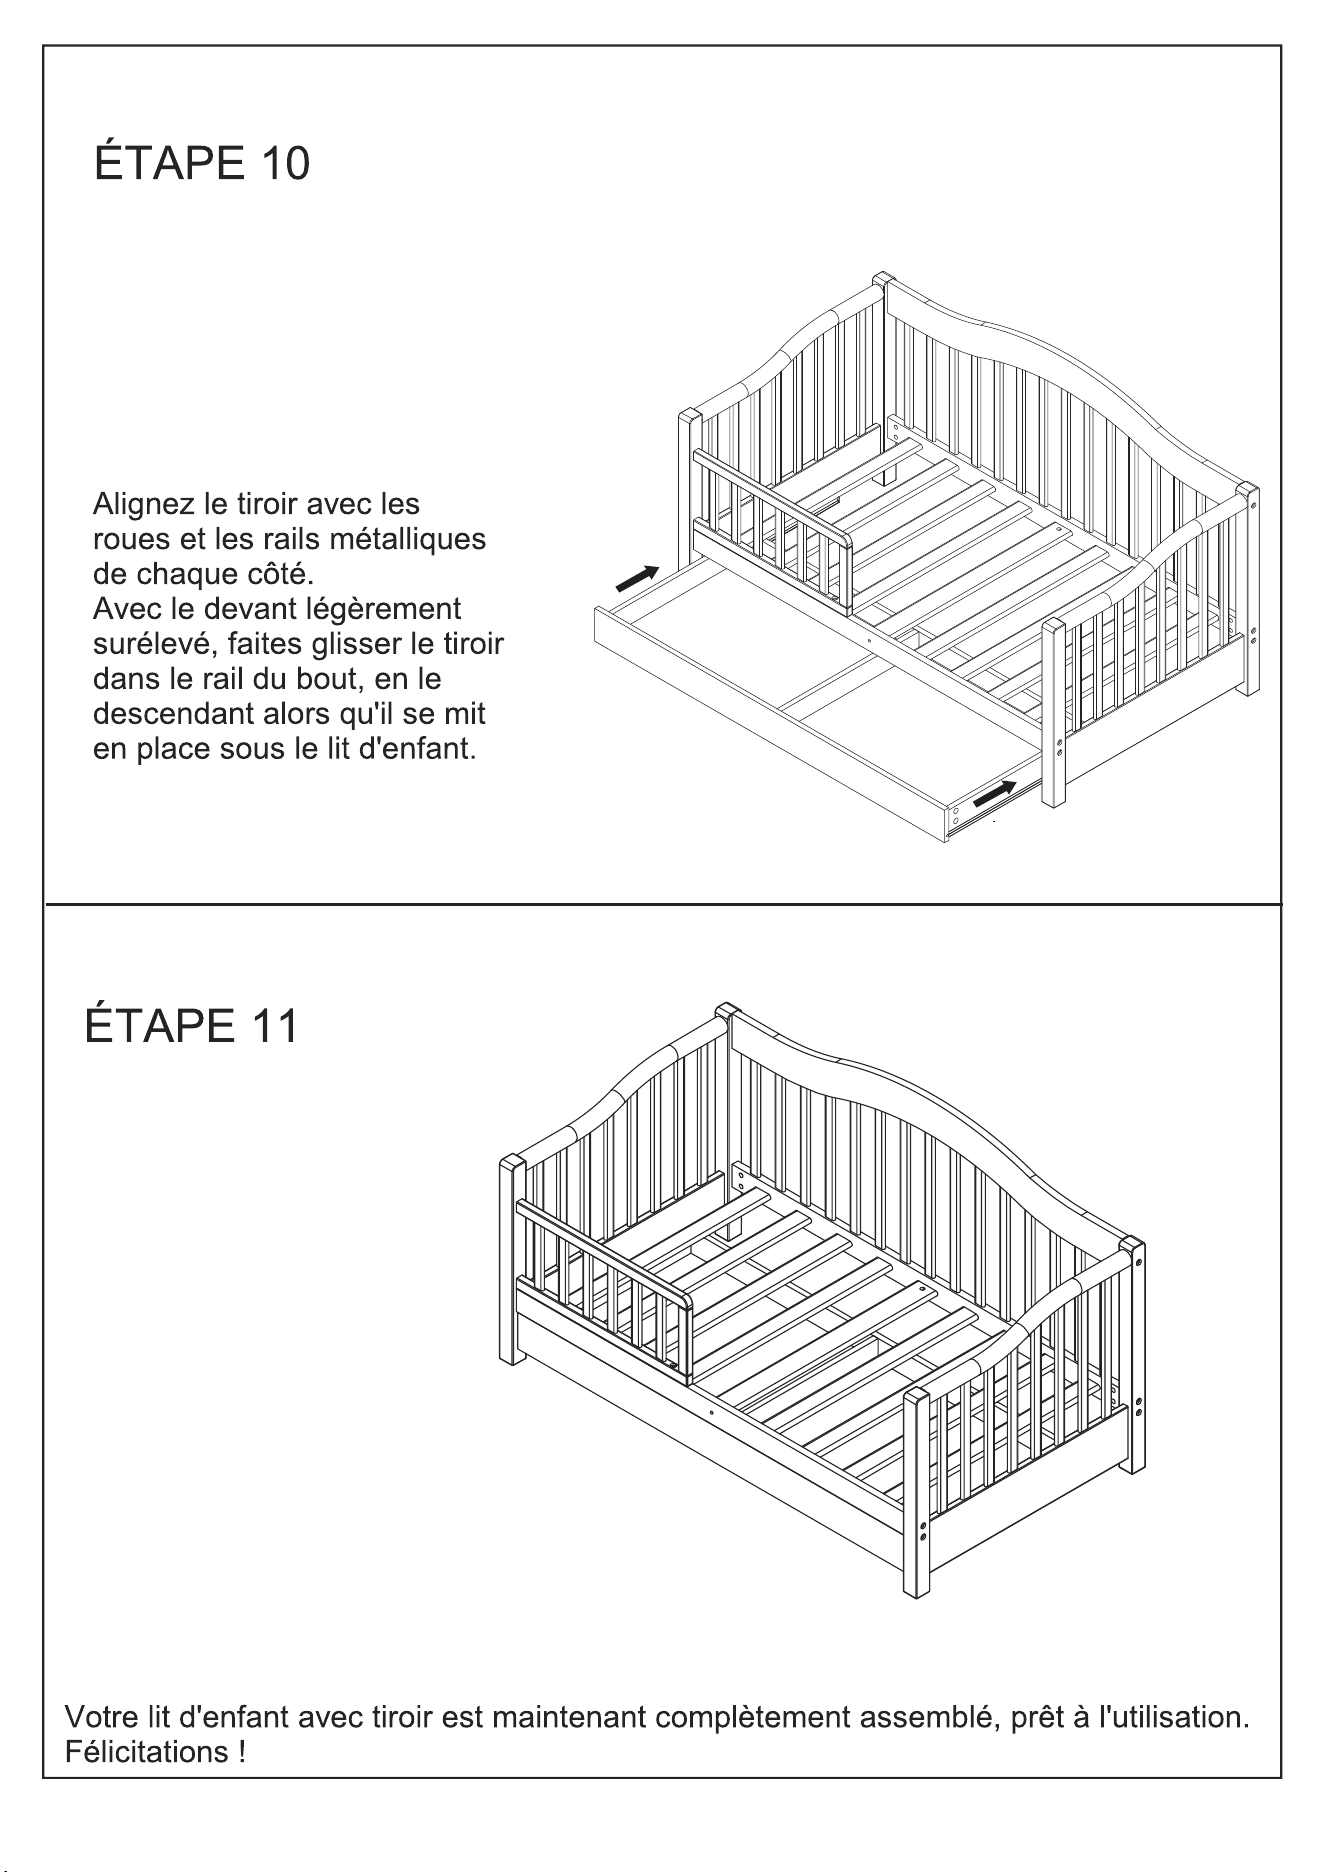
Attach Drawer Front Panel (H) by
inserting Cam Bolts (g) into their
corresponding Cam Bolts holes on
ends of Drawer Side Panel (J1&J2),
the Bottom Support Bar (M) and the
Middle Panel (L) . Make sure the
Drawer Bottom Panels (I) are also
inserted into grooves of Drawer
Front Panel (H) . Lock Cams (h) by
turning them clockwise .
Place the whole drawer flat on the
floor with the back up . Screw the
screw (i) from the middle of the
Bottom Support Bar (M) to the
Middle Panel (L) , as the image
shown .
STEP 9
Slide Drawer Bottom Panels (I)
painted side up , into grooves of
Drawer Side Panel (J1&J2), the
Bottom Support Bar (M) and the
Middle Panel (L) as shown.
STEP 8
I
I
M
L
J2
J1
H
M
I
I
J2
J1
g
g
g
h
h
h
i
h
11
Congratulations , your toddler bed with drawer is ready to use .
STEP 11
STEP 10
Line up the drawer with the
wheels and mental tracks on
With the front slightly elevated ,
slide into the track on the end ,
lowering the front as it rolls into
place under the toddler bed .

12
LIMITED WARRANTY
workmanship and agrees to remedy any such defect.
This is solely limited to the repair or replacement of defective furniture
components and no assembly labor is included.
assembled, subjected to misuse or abuse or which has been altered or
repaired in any way.
rights which vary from State to State.
WARNING: Should this product become damaged, and/or components
are broken or missing, DO NOT USE
Enter our monthly giveaway!
Simply scan the QRcode to register.
Chat with us!
For any questions or concerns or feedback.
1532, S. Washington Avenue
Piscataway, NJ 08854
E-mail: [email protected]
www.dreamonme.com
Follow us on
to get your nursery featured on our social media.
@dreamonmeinc
@dreamonmeinc