英
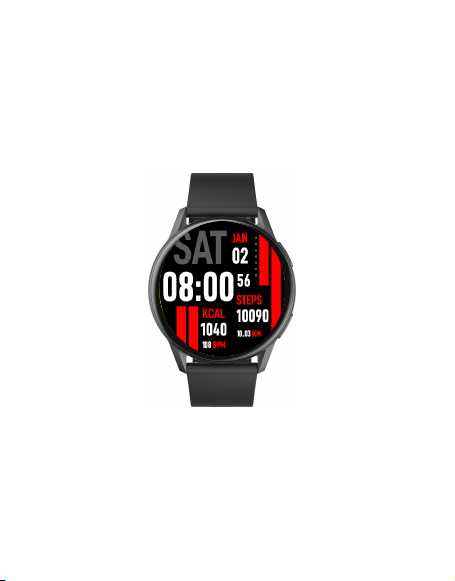
K11 Smart Watch
User Manual
Please refer to this manual before using the product.
V1.0
Notes:
1.The company reserves the right to modify the contents of
this manual without any further notification. It is normal
that some functions may vary in dierentsoftwareversions.
2.Please charge the smart watchwith configured charger
for no less than 2 hours before use.
3.Please install and connect to suggested App and set
personal informationbefore use. Please refer tobelow
guidance and use the smart watch properly.
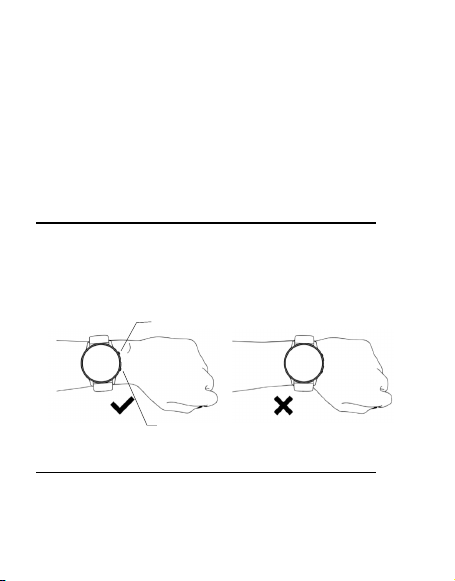
01 Wearing method
Please wear the device on your wrist horizontally, about
one finger from the carpal and adjust to a comfortable
position. Below picture for reference.
Note: Please wear the device a bit tighter when making
heart rate testing.
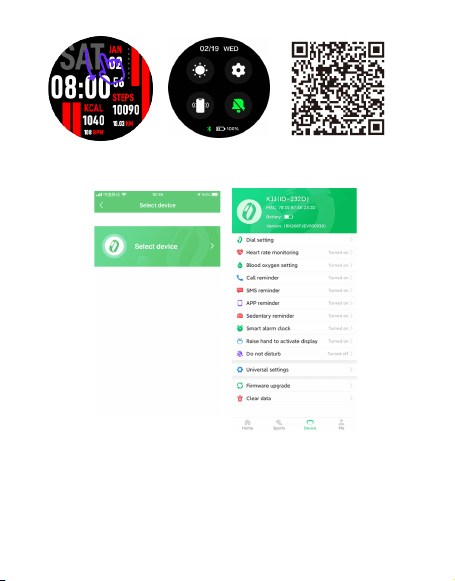
02 Download App and Pairing
1.Long press the power button to turn on the device, slide
down from main interface, open setting- App QR code, and
use the mobile phone to scan the code. Or you can also
scan below QR code or search for “GloryFit” in App store.
2. Open the App and BT, search and select the correspond-
ing device on App as guided.
Notes:
1.Please keep BT on during paring to ensure successful
connection.
2.Please long press power button 3s to reboot the device if
couldn’t find the device during paring. Or choose reset on
the device and search the device again.
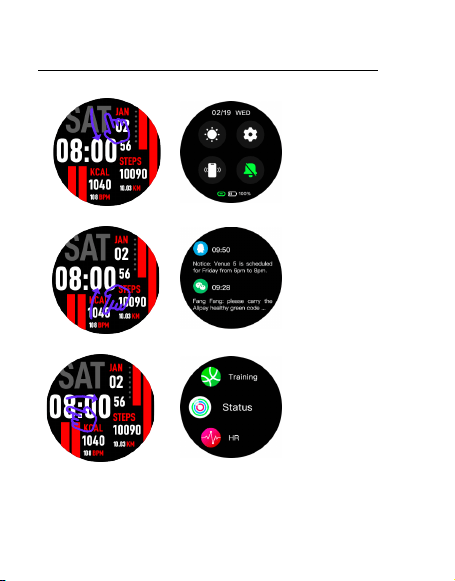
03 Operation
a.Shortcut Setting Page: Swipe down from homepage.
b.Message: Swipe up from homepage.
c.Main Menu: Swipe right from homepage.
d.Function Shortcut Interface: Swipe left from homepage.
e.Watch Dial Setting: Long press dial for 3s and slide left or
right to choose.
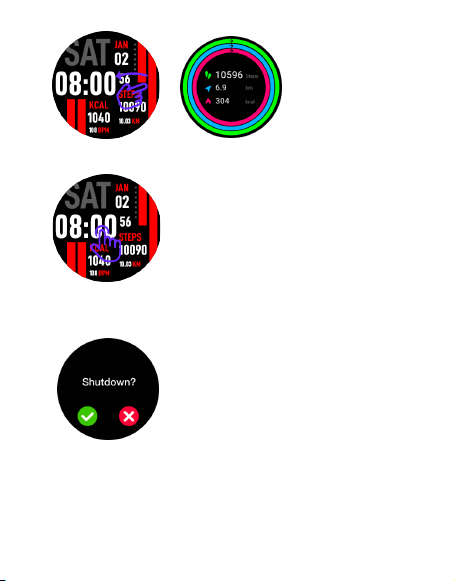
f.Power ON/OFF: Long press power button for 3s to power
on; From home page, long press power button 3s, and tap√
to power o.
g.Return Previous Menu/ Screen On or O: Press power
button.
h.Sports Shortcut key: Press the below side button to quickly
switch to training interface.
05 Other functions
Sedentary reminder, Smart alarm clock, Low battery
Reminder, Call reminder, Find the device, Watch face push/
Customize watch face, 12H/ 24H time format, Metric/
Imperial unit setting, Raise hand to activate display,
Physiological cycle reminder, Goal achieved reminder.
06 Charging
1.Attach the charging cable to the watch charging port,
ensuring the metal pins fully connected.
2.Please use the correct charging adapters which are 5V 1A
.
Note: If smart watch can not be powered on after being left
unused for long time, please clean up the charging metal
pins to make sure connecting well.
07 Warranty
1. One year warranty for default hardware defectives, half of
year for battery and charging cable.
2. Below reasons cause to defectives are not included in
free warranty service:
1) Personal assemble or disassemble.
2) Falling damage during use.
3) All man-made damage or due to the third party's fault,
improper use(such as: water in the smart watch, external
force shattering, scratch during use etc.
3. Please provide a warranty card with the details filled
when request for after selling service.
4. Please contact with direct dealers for warranty service.
5. Please note all functions of the product are based on
physical objects.
Notes:
1.To ensure waterproof, please DO NOT:
1)Wear the watch during hot shower or in hot spring.
2)Remove any screws or buttons.
2.Products with batteries cannot be disposed with
household waste. Please send this product to WEEE
collecting points near you.
power button
workout mode button
Notes:
1.The company reserves the right to modify the contents of
this manual without any further notification. It is normal
that some functions may vary in dierentsoftwareversions.
2.Please charge the smart watchwith configured charger
for no less than 2 hours before use.
3.Please install and connect to suggested App and set
personal informationbefore use. Please refer tobelow
guidance and use the smart watch properly.
01 Wearing method
Please wear the device on your wrist horizontally, about
one finger from the carpal and adjust to a comfortable
position. Below picture for reference.
Note: Please wear the device a bit tighter when making
heart rate testing.
02 Download App and Pairing
1.Long press the power button to turn on the device, slide
down from main interface, open setting- App QR code, and
use the mobile phone to scan the code. Or you can also
scan below QR code or search for “GloryFit” in App store.
2. Open the App and BT, search and select the correspond-
ing device on App as guided.
Notes:
1.Please keep BT on during paring to ensure successful
connection.
2.Please long press power button 3s to reboot the device if
couldn’t find the device during paring. Or choose reset on
the device and search the device again.
03 Operation
a.Shortcut Setting Page: Swipe down from homepage.
b.Message: Swipe up from homepage.
c.Main Menu: Swipe right from homepage.
d.Function Shortcut Interface: Swipe left from homepage.
e.Watch Dial Setting: Long press dial for 3s and slide left or
right to choose.
f.Power ON/OFF: Long press power button for 3s to power
on; From home page, long press power button 3s, and tap√
to power o.
g.Return Previous Menu/ Screen On or O: Press power
button.
h.Sports Shortcut key: Press the below side button to quickly
switch to training interface.
05 Other functions
Sedentary reminder, Smart alarm clock, Low battery
Reminder, Call reminder, Find the device, Watch face push/
Customize watch face, 12H/ 24H time format, Metric/
Imperial unit setting, Raise hand to activate display,
Physiological cycle reminder, Goal achieved reminder.
06 Charging
1.Attach the charging cable to the watch charging port,
ensuring the metal pins fully connected.
2.Please use the correct charging adapters which are 5V 1A
.
Note: If smart watch can not be powered on after being left
unused for long time, please clean up the charging metal
pins to make sure connecting well.
07 Warranty
1. One year warranty for default hardware defectives, half of
year for battery and charging cable.
2. Below reasons cause to defectives are not included in
free warranty service:
1) Personal assemble or disassemble.
2) Falling damage during use.
3) All man-made damage or due to the third party's fault,
improper use(such as: water in the smart watch, external
force shattering, scratch during use etc.
3. Please provide a warranty card with the details filled
when request for after selling service.
4. Please contact with direct dealers for warranty service.
5. Please note all functions of the product are based on
physical objects.
Notes:
1.To ensure waterproof, please DO NOT:
1)Wear the watch during hot shower or in hot spring.
2)Remove any screws or buttons.
2.Products with batteries cannot be disposed with
household waste. Please send this product to WEEE
collecting points near you.
Notes:
1.The company reserves the right to modify the contents of
this manual without any further notification. It is normal
that some functions may vary in dierentsoftwareversions.
2.Please charge the smart watchwith configured charger
for no less than 2 hours before use.
3.Please install and connect to suggested App and set
personal informationbefore use. Please refer tobelow
guidance and use the smart watch properly.
01 Wearing method
Please wear the device on your wrist horizontally, about
one finger from the carpal and adjust to a comfortable
position. Below picture for reference.
Note: Please wear the device a bit tighter when making
heart rate testing.
02 Download App and Pairing
1.Long press the power button to turn on the device, slide
down from main interface, open setting- App QR code, and
use the mobile phone to scan the code. Or you can also
scan below QR code or search for “GloryFit” in App store.
2. Open the App and BT, search and select the correspond-
ing device on App as guided.
Notes:
1.Please keep BT on during paring to ensure successful
connection.
2.Please long press power button 3s to reboot the device if
couldn’t find the device during paring. Or choose reset on
the device and search the device again.
03 Operation
a.Shortcut Setting Page: Swipe down from homepage.
b.Message: Swipe up from homepage.
c.Main Menu: Swipe right from homepage.
d.Function Shortcut Interface: Swipe left from homepage.
e.Watch Dial Setting: Long press dial for 3s and slide left or
right to choose.
f.Power ON/OFF: Long press power button for 3s to power
on; From home page, long press power button 3s, and tap√
to power o.
g.Return Previous Menu/ Screen On or O: Press power
button.
h.Sports Shortcut key: Press the below side button to quickly
switch to training interface.
05 Other functions
Sedentary reminder, Smart alarm clock, Low battery
Reminder, Call reminder, Find the device, Watch face push/
Customize watch face, 12H/ 24H time format, Metric/
Imperial unit setting, Raise hand to activate display,
Physiological cycle reminder, Goal achieved reminder.
06 Charging
1.Attach the charging cable to the watch charging port,
ensuring the metal pins fully connected.
2.Please use the correct charging adapters which are 5V 1A
.
Note: If smart watch can not be powered on after being left
unused for long time, please clean up the charging metal
pins to make sure connecting well.
07 Warranty
1. One year warranty for default hardware defectives, half of
year for battery and charging cable.
2. Below reasons cause to defectives are not included in
free warranty service:
1) Personal assemble or disassemble.
2) Falling damage during use.
3) All man-made damage or due to the third party's fault,
improper use(such as: water in the smart watch, external
force shattering, scratch during use etc.
3. Please provide a warranty card with the details filled
when request for after selling service.
4. Please contact with direct dealers for warranty service.
5. Please note all functions of the product are based on
physical objects.
Notes:
1.To ensure waterproof, please DO NOT:
1)Wear the watch during hot shower or in hot spring.
2)Remove any screws or buttons.
2.Products with batteries cannot be disposed with
household waste. Please send this product to WEEE
collecting points near you.
Notes:
1.The company reserves the right to modify the contents of
this manual without any further notification. It is normal
that some functions may vary in dierentsoftwareversions.
2.Please charge the smart watchwith configured charger
for no less than 2 hours before use.
3.Please install and connect to suggested App and set
personal informationbefore use. Please refer tobelow
guidance and use the smart watch properly.
01 Wearing method
Please wear the device on your wrist horizontally, about
one finger from the carpal and adjust to a comfortable
position. Below picture for reference.
Note: Please wear the device a bit tighter when making
heart rate testing.
02 Download App and Pairing
1.Long press the power button to turn on the device, slide
down from main interface, open setting- App QR code, and
use the mobile phone to scan the code. Or you can also
scan below QR code or search for “GloryFit” in App store.
2. Open the App and BT, search and select the correspond-
ing device on App as guided.
Notes:
1.Please keep BT on during paring to ensure successful
connection.
2.Please long press power button 3s to reboot the device if
couldn’t find the device during paring. Or choose reset on
the device and search the device again.
03 Operation
a.Shortcut Setting Page: Swipe down from homepage.
b.Message: Swipe up from homepage.
c.Main Menu: Swipe right from homepage.
d.Function Shortcut Interface: Swipe left from homepage.
e.Watch Dial Setting: Long press dial for 3s and slide left or
right to choose.
f.Power ON/OFF: Long press power button for 3s to power
on; From home page, long press power button 3s, and tap√
to power o.
g.Return Previous Menu/ Screen On or O: Press power
button.
h.Sports Shortcut key: Press the below side button to quickly
switch to training interface.
05 Other functions
Sedentary reminder, Smart alarm clock, Low battery
Reminder, Call reminder, Find the device, Watch face push/
Customize watch face, 12H/ 24H time format, Metric/
Imperial unit setting, Raise hand to activate display,
Physiological cycle reminder, Goal achieved reminder.
06 Charging
1.Attach the charging cable to the watch charging port,
ensuring the metal pins fully connected.
2.Please use the correct charging adapters which are 5V 1A
.
Note: If smart watch can not be powered on after being left
unused for long time, please clean up the charging metal
pins to make sure connecting well.
07 Warranty
1. One year warranty for default hardware defectives, half of
year for battery and charging cable.
2. Below reasons cause to defectives are not included in
free warranty service:
1) Personal assemble or disassemble.
2) Falling damage during use.
3) All man-made damage or due to the third party's fault,
improper use(such as: water in the smart watch, external
force shattering, scratch during use etc.
3. Please provide a warranty card with the details filled
when request for after selling service.
4. Please contact with direct dealers for warranty service.
5. Please note all functions of the product are based on
physical objects.
Notes:
1.To ensure waterproof, please DO NOT:
1)Wear the watch during hot shower or in hot spring.
2)Remove any screws or buttons.
2.Products with batteries cannot be disposed with
household waste. Please send this product to WEEE
collecting points near you.
Notes:
1.The company reserves the right to modify the contents of
this manual without any further notification. It is normal
that some functions may vary in dierentsoftwareversions.
2.Please charge the smart watchwith configured charger
for no less than 2 hours before use.
3.Please install and connect to suggested App and set
personal informationbefore use. Please refer tobelow
guidance and use the smart watch properly.
01 Wearing method
Please wear the device on your wrist horizontally, about
one finger from the carpal and adjust to a comfortable
position. Below picture for reference.
Note: Please wear the device a bit tighter when making
heart rate testing.
02 Download App and Pairing
1.Long press the power button to turn on the device, slide
down from main interface, open setting- App QR code, and
use the mobile phone to scan the code. Or you can also
scan below QR code or search for “GloryFit” in App store.
2. Open the App and BT, search and select the correspond-
ing device on App as guided.
Notes:
1.Please keep BT on during paring to ensure successful
connection.
2.Please long press power button 3s to reboot the device if
couldn’t find the device during paring. Or choose reset on
the device and search the device again.
03 Operation
a.Shortcut Setting Page: Swipe down from homepage.
b.Message: Swipe up from homepage.
c.Main Menu: Swipe right from homepage.
d.Function Shortcut Interface: Swipe left from homepage.
e.Watch Dial Setting: Long press dial for 3s and slide left or
right to choose.
f.Power ON/OFF: Long press power button for 3s to power
on; From home page, long press power button 3s, and tap√
to power o.
g.Return Previous Menu/ Screen On or O: Press power
button.
h.Sports Shortcut key: Press the below side button to quickly
switch to training interface.
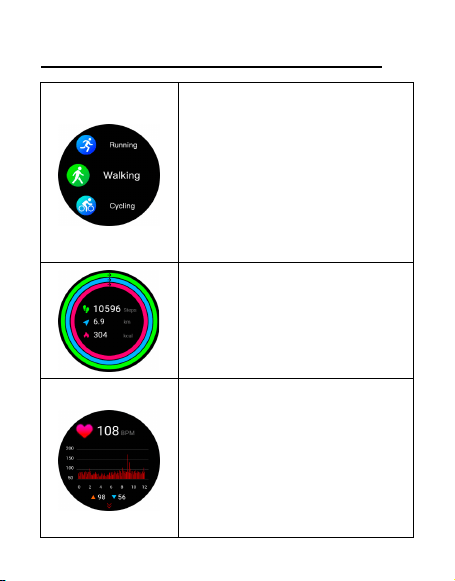
Training:
20 sports modes
Running, Walking, Cycling,
Climbing, Spinning Bike, Yoga,
Skipping, Gymnastic,
Badminton, Ping-pong,
Boating, Sit-ups and Free
training, etc.
Sports records are visible on the
App.
Heart Rate Monitor:
Click and show real-time heart
rate.
Auto test open on App.
Intermittent automatic
detection generate histogram,
interval unit is 10 minutes.
Historical data and analysis
are visible on the App.
Pedometer:
Record daily steps, distance,
and calories.
Historical data are visible on
the App.
05 Other functions
Sedentary reminder, Smart alarm clock, Low battery
Reminder, Call reminder, Find the device, Watch face push/
Customize watch face, 12H/ 24H time format, Metric/
Imperial unit setting, Raise hand to activate display,
Physiological cycle reminder, Goal achieved reminder.
06 Charging
1.Attach the charging cable to the watch charging port,
ensuring the metal pins fully connected.
2.Please use the correct charging adapters which are 5V 1A
.
Note: If smart watch can not be powered on after being left
unused for long time, please clean up the charging metal
pins to make sure connecting well.
07 Warranty
1. One year warranty for default hardware defectives, half of
year for battery and charging cable.
2. Below reasons cause to defectives are not included in
free warranty service:
1) Personal assemble or disassemble.
2) Falling damage during use.
3) All man-made damage or due to the third party's fault,
improper use(such as: water in the smart watch, external
force shattering, scratch during use etc.
3. Please provide a warranty card with the details filled
when request for after selling service.
4. Please contact with direct dealers for warranty service.
5. Please note all functions of the product are based on
physical objects.
Notes:
1.To ensure waterproof, please DO NOT:
1)Wear the watch during hot shower or in hot spring.
2)Remove any screws or buttons.
2.Products with batteries cannot be disposed with
household waste. Please send this product to WEEE
collecting points near you.
04 Functions
Notes:
1.The company reserves the right to modify the contents of
this manual without any further notification. It is normal
that some functions may vary in dierentsoftwareversions.
2.Please charge the smart watchwith configured charger
for no less than 2 hours before use.
3.Please install and connect to suggested App and set
personal informationbefore use. Please refer tobelow
guidance and use the smart watch properly.
01 Wearing method
Please wear the device on your wrist horizontally, about
one finger from the carpal and adjust to a comfortable
position. Below picture for reference.
Note: Please wear the device a bit tighter when making
heart rate testing.
02 Download App and Pairing
1.Long press the power button to turn on the device, slide
down from main interface, open setting- App QR code, and
use the mobile phone to scan the code. Or you can also
scan below QR code or search for “GloryFit” in App store.
2. Open the App and BT, search and select the correspond-
ing device on App as guided.
Notes:
1.Please keep BT on during paring to ensure successful
connection.
2.Please long press power button 3s to reboot the device if
couldn’t find the device during paring. Or choose reset on
the device and search the device again.
03 Operation
a.Shortcut Setting Page: Swipe down from homepage.
b.Message: Swipe up from homepage.
c.Main Menu: Swipe right from homepage.
d.Function Shortcut Interface: Swipe left from homepage.
e.Watch Dial Setting: Long press dial for 3s and slide left or
right to choose.
f.Power ON/OFF: Long press power button for 3s to power
on; From home page, long press power button 3s, and tap√
to power o.
g.Return Previous Menu/ Screen On or O: Press power
button.
h.Sports Shortcut key: Press the below side button to quickly
switch to training interface.
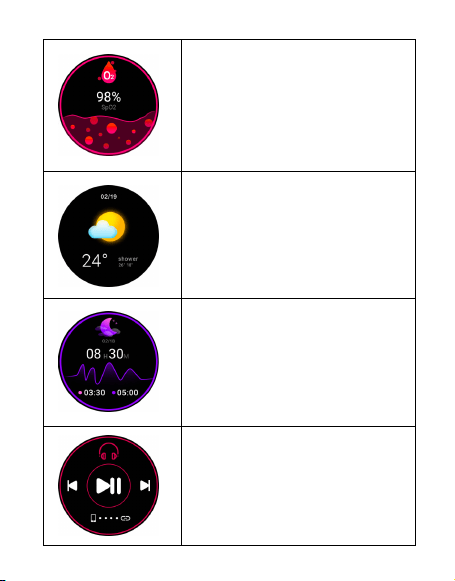
BT Music Control:
Remote control the music
player of mobile phone, Play/
Pause/ Switch to previous or
next song.
Blood Oxygen Monitor:
Test the blood pressure.
Historical data and analysis
are visible on the App.
(Data cannot be used for
medical purpose)
Weather:
After connected with App,
Show daily weather and next 4
days’ weather forecast.
Sleep Monitor:
Record daily sleep time and
deep or light sleep duration.
History records are visible on
the App.
05 Other functions
Sedentary reminder, Smart alarm clock, Low battery
Reminder, Call reminder, Find the device, Watch face push/
Customize watch face, 12H/ 24H time format, Metric/
Imperial unit setting, Raise hand to activate display,
Physiological cycle reminder, Goal achieved reminder.
06 Charging
1.Attach the charging cable to the watch charging port,
ensuring the metal pins fully connected.
2.Please use the correct charging adapters which are 5V 1A
.
Note: If smart watch can not be powered on after being left
unused for long time, please clean up the charging metal
pins to make sure connecting well.
07 Warranty
1. One year warranty for default hardware defectives, half of
year for battery and charging cable.
2. Below reasons cause to defectives are not included in
free warranty service:
1) Personal assemble or disassemble.
2) Falling damage during use.
3) All man-made damage or due to the third party's fault,
improper use(such as: water in the smart watch, external
force shattering, scratch during use etc.
3. Please provide a warranty card with the details filled
when request for after selling service.
4. Please contact with direct dealers for warranty service.
5. Please note all functions of the product are based on
physical objects.
Notes:
1.To ensure waterproof, please DO NOT:
1)Wear the watch during hot shower or in hot spring.
2)Remove any screws or buttons.
2.Products with batteries cannot be disposed with
household waste. Please send this product to WEEE
collecting points near you.
Notes:
1.The company reserves the right to modify the contents of
this manual without any further notification. It is normal
that some functions may vary in dierentsoftwareversions.
2.Please charge the smart watchwith configured charger
for no less than 2 hours before use.
3.Please install and connect to suggested App and set
personal informationbefore use. Please refer tobelow
guidance and use the smart watch properly.
01 Wearing method
Please wear the device on your wrist horizontally, about
one finger from the carpal and adjust to a comfortable
position. Below picture for reference.
Note: Please wear the device a bit tighter when making
heart rate testing.
02 Download App and Pairing
1.Long press the power button to turn on the device, slide
down from main interface, open setting- App QR code, and
use the mobile phone to scan the code. Or you can also
scan below QR code or search for “GloryFit” in App store.
2. Open the App and BT, search and select the correspond-
ing device on App as guided.
Notes:
1.Please keep BT on during paring to ensure successful
connection.
2.Please long press power button 3s to reboot the device if
couldn’t find the device during paring. Or choose reset on
the device and search the device again.
03 Operation
a.Shortcut Setting Page: Swipe down from homepage.
b.Message: Swipe up from homepage.
c.Main Menu: Swipe right from homepage.
d.Function Shortcut Interface: Swipe left from homepage.
e.Watch Dial Setting: Long press dial for 3s and slide left or
right to choose.
f.Power ON/OFF: Long press power button for 3s to power
on; From home page, long press power button 3s, and tap√
to power o.
g.Return Previous Menu/ Screen On or O: Press power
button.
h.Sports Shortcut key: Press the below side button to quickly
switch to training interface.
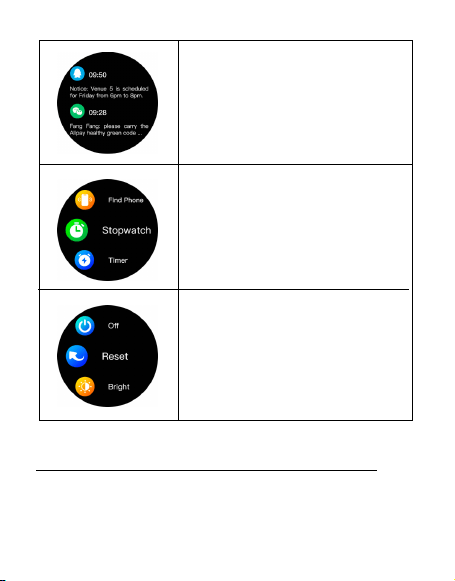
Message:
Notifications push sync, show 8
latest messages on watch. Turn
on/o SMS reminder and SNS
App reminder on App.
More:
Find Phone, Stopwatch, Timer.
Settings:
Power o/ Reset/ Brightness
/Dial / App download/ About
the watch.
05 Other functions
Sedentary reminder, Smart alarm clock, Low battery
Reminder, Call reminder, Find the device, Watch face push/
Customize watch face, 12H/ 24H time format, Metric/
Imperial unit setting, Raise hand to activate display,
Physiological cycle reminder, Goal achieved reminder.
06 Charging
1.Attach the charging cable to the watch charging port,
ensuring the metal pins fully connected.
2.Please use the correct charging adapters which are 5V 1A
.
Note: If smart watch can not be powered on after being left
unused for long time, please clean up the charging metal
pins to make sure connecting well.
07 Warranty
1. One year warranty for default hardware defectives, half of
year for battery and charging cable.
2. Below reasons cause to defectives are not included in
free warranty service:
1) Personal assemble or disassemble.
2) Falling damage during use.
3) All man-made damage or due to the third party's fault,
improper use(such as: water in the smart watch, external
force shattering, scratch during use etc.
3. Please provide a warranty card with the details filled
when request for after selling service.
4. Please contact with direct dealers for warranty service.
5. Please note all functions of the product are based on
physical objects.
Notes:
1.To ensure waterproof, please DO NOT:
1)Wear the watch during hot shower or in hot spring.
2)Remove any screws or buttons.
2.Products with batteries cannot be disposed with
household waste. Please send this product to WEEE
collecting points near you.

Notes:
1.The company reserves the right to modify the contents of
this manual without any further notification. It is normal
that some functions may vary in dierentsoftwareversions.
2.Please charge the smart watchwith configured charger
for no less than 2 hours before use.
3.Please install and connect to suggested App and set
personal informationbefore use. Please refer tobelow
guidance and use the smart watch properly.
01 Wearing method
Please wear the device on your wrist horizontally, about
one finger from the carpal and adjust to a comfortable
position. Below picture for reference.
Note: Please wear the device a bit tighter when making
heart rate testing.
02 Download App and Pairing
1.Long press the power button to turn on the device, slide
down from main interface, open setting- App QR code, and
use the mobile phone to scan the code. Or you can also
scan below QR code or search for “GloryFit” in App store.
2. Open the App and BT, search and select the correspond-
ing device on App as guided.
Notes:
1.Please keep BT on during paring to ensure successful
connection.
2.Please long press power button 3s to reboot the device if
couldn’t find the device during paring. Or choose reset on
the device and search the device again.
03 Operation
a.Shortcut Setting Page: Swipe down from homepage.
b.Message: Swipe up from homepage.
c.Main Menu: Swipe right from homepage.
d.Function Shortcut Interface: Swipe left from homepage.
e.Watch Dial Setting: Long press dial for 3s and slide left or
right to choose.
f.Power ON/OFF: Long press power button for 3s to power
on; From home page, long press power button 3s, and tap√
to power o.
g.Return Previous Menu/ Screen On or O: Press power
button.
h.Sports Shortcut key: Press the below side button to quickly
switch to training interface.
05 Other functions
Sedentary reminder, Smart alarm clock, Low battery
Reminder, Call reminder, Find the device, Watch face push/
Customize watch face, 12H/ 24H time format, Metric/
Imperial unit setting, Raise hand to activate display,
Physiological cycle reminder, Goal achieved reminder.
06 Charging
1.Attach the charging cable to the watch charging port,
ensuring the metal pins fully connected.
2.Please use the correct charging adapters which are 5V 1A
.
Note: If smart watch can not be powered on after being left
unused for long time, please clean up the charging metal
pins to make sure connecting well.
07 Warranty
1. One year warranty for default hardware defectives, half of
year for battery and charging cable.
2. Below reasons cause to defectives are not included in
free warranty service:
1) Personal assemble or disassemble.
2) Falling damage during use.
3) All man-made damage or due to the third party's fault,
improper use(such as: water in the smart watch, external
force shattering, scratch during use etc.
3. Please provide a warranty card with the details filled
when request for after selling service.
4. Please contact with direct dealers for warranty service.
5. Please note all functions of the product are based on
physical objects.
Notes:
1.To ensure waterproof, please DO NOT:
1)Wear the watch during hot shower or in hot spring.
2)Remove any screws or buttons.
2.Products with batteries cannot be disposed with
household waste. Please send this product to WEEE
collecting points near you.

Notes:
1.The company reserves the right to modify the contents of
this manual without any further notification. It is normal
that some functions may vary in dierentsoftwareversions.
2.Please charge the smart watchwith configured charger
for no less than 2 hours before use.
3.Please install and connect to suggested App and set
personal informationbefore use. Please refer tobelow
guidance and use the smart watch properly.
01 Wearing method
Please wear the device on your wrist horizontally, about
one finger from the carpal and adjust to a comfortable
position. Below picture for reference.
Note: Please wear the device a bit tighter when making
heart rate testing.
02 Download App and Pairing
1.Long press the power button to turn on the device, slide
down from main interface, open setting- App QR code, and
use the mobile phone to scan the code. Or you can also
scan below QR code or search for “GloryFit” in App store.
2. Open the App and BT, search and select the correspond-
ing device on App as guided.
Notes:
1.Please keep BT on during paring to ensure successful
connection.
2.Please long press power button 3s to reboot the device if
couldn’t find the device during paring. Or choose reset on
the device and search the device again.
03 Operation
a.Shortcut Setting Page: Swipe down from homepage.
b.Message: Swipe up from homepage.
c.Main Menu: Swipe right from homepage.
d.Function Shortcut Interface: Swipe left from homepage.
e.Watch Dial Setting: Long press dial for 3s and slide left or
right to choose.
f.Power ON/OFF: Long press power button for 3s to power
on; From home page, long press power button 3s, and tap√
to power o.
g.Return Previous Menu/ Screen On or O: Press power
button.
h.Sports Shortcut key: Press the below side button to quickly
switch to training interface.
05 Other functions
Sedentary reminder, Smart alarm clock, Low battery
Reminder, Call reminder, Find the device, Watch face push/
Customize watch face, 12H/ 24H time format, Metric/
Imperial unit setting, Raise hand to activate display,
Physiological cycle reminder, Goal achieved reminder.
06 Charging
1.Attach the charging cable to the watch charging port,
ensuring the metal pins fully connected.
2.Please use the correct charging adapters which are 5V 1A
.
Note: If smart watch can not be powered on after being left
unused for long time, please clean up the charging metal
pins to make sure connecting well.
07 Warranty
1. One year warranty for default hardware defectives, half of
year for battery and charging cable.
2. Below reasons cause to defectives are not included in
free warranty service:
1) Personal assemble or disassemble.
2) Falling damage during use.
3) All man-made damage or due to the third party's fault,
improper use(such as: water in the smart watch, external
force shattering, scratch during use etc.
3. Please provide a warranty card with the details filled
when request for after selling service.
4. Please contact with direct dealers for warranty service.
5. Please note all functions of the product are based on
physical objects.
Notes:
1.To ensure waterproof, please DO NOT:
1)Wear the watch during hot shower or in hot spring.
2)Remove any screws or buttons.
2.Products with batteries cannot be disposed with
household waste. Please send this product to WEEE
collecting points near you.
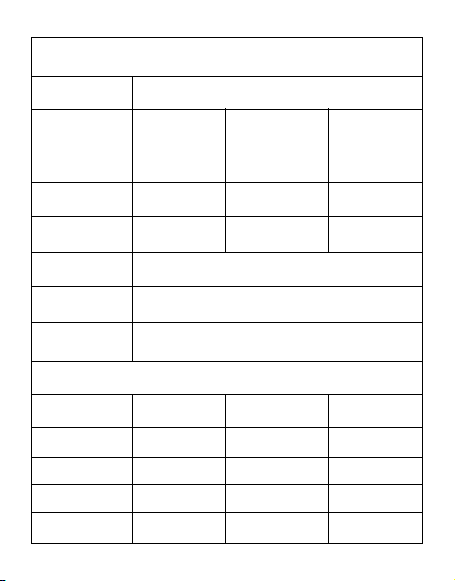
Warranty Certificate
Client Name
Vendor’s Contact
Product IMEI Code
Client’s Address
Vendor’s Address
Client Info
Vendor
Contact Info
Purchase Date
Product Type (Stamp)
Warranty Record
Date Problems Diagnosis More Info