vCam Wi-Fi Adapter
User Manual
Vivax-Metrotech Corporation
4.04.000268 01/21/2026 V1.0
Used with the vCam
Mobile Controller App

Scan the QR code to obtain the
latest online manual
Check for the latest
online manual
Knowledge Center
https://vivax-metrotech.com/support/
knowledge-center/
Vivax-Metrotech Corporation


General Safety & Care Information
Health and Safety
This equipment is primarily used by professionals in the
sewer and plumbing industry to inspect sewer pipes. It
is maintained by professionals familiar with the health
risks of maintaining equipment in a sewer.
Such professionals will be protected by their company’s
recommendations and work practices. If, for any reason,
they are not or are not familiar with such practices,
please check our website or email SalesUSA@vxmt.
com for a copy of the Health and Safety Document
used by Vivax-Metrotech for employees involved in the
demonstration, maintenance, and handling of sewer
camera systems.
• Keep all electrical connections dry and off the ground.
• Be aware of your surroundings at all times. Cover off
open utility holes and follow traffic control regulations.
• Use personal protection such as eyewear, rubber
gloves, and non-skid safety shoes.
Worksite Safety
• Use your company’s or other applicable safety
codes and rules when using this equipment.
• Do not use this equipment in explosive areas –
such as in the presence of flammable liquids, gases,
and heavy dust.
Equipment Safety
• Do not open the enclosures (housings) of the reel
or camera heads.
• Opening the housing or camera head will void any
warranty.
• Use only the leads supplied with the control module
for AC or DC operation and charging.
Batteries and the Environment
This Vivax-Metrotech product uses a rechargeable
Lithium-Ion battery and a Lithium metal watch battery.
Heat from camera head LEDs
High-Pressure Water or Pressure Washers
Do not use pressure washers to clean
the reel or other camera system parts.
Intended Use
This product is designed to inspect sewer laterals and
basic indoor and outdoor plumbing. This product is not
designed for and should not be used to inspect oil or
other petrochemical pipes.
FCC & IC Statement
Please note that changes or modifications not
expressly approved by the party responsible for
compliance could void the user’s authority to operate
the equipment.
This device complies with Part 15 of the FCC Rules.
Operation is subject to the following two conditions:
(1) This device may not cause harmful interference,
and
(2) This device must accept any interference received,
including interference that may cause undesired
operation.
This device complies with Industry Canada license-
exempt RSS standard(s). Operation is subject to the
following two conditions:
(1) This device may not cause interference, and
(2) This device must accept any interference, including
interference that may cause undesired operation.
Le présent appareil est conforme aux CNR d'Industrie
Canada applicables aux appareils radioexempts
de licence. L'exploitation est autorisée aux deux
conditions suivantes:
(1) l'appareil ne doit pas produire de brouillage, et
(2) l'utilisateur de l'appareil doit accepter tout brouillage
radioélectrique subi, même si le brouillage est
susceptible d'en compromettre le fonctionnement.
Camera LEDs may
become hot if left on
while not performing
an inspection.
periods. We recommend using the camera skid and
turning down the LEDs. The camera's LEDs will
automatically turn off after 5 minutes without activity.
No activity is triggered if the pushrod drum does not
spin after 5 minutes.
The camera head may
become hot when left on
and unused. Handle the
camera head with care
when it is sitting outside
of the pipe for extended
Under Industry Canada regulations, this radio
transmitter may only operate using an antenna of a
type and maximum (or lesser) gain approved for the
transmitter by Industry Canada. To reduce potential
radio interference to other users, the antenna type
and its gain should be chosen so that the equivalent
isotropically radiated power (e.i.r.p.) is not more than
necessary for successful communication.
Conformément à la réglementation d'Industrie Canada,
le présent émetteur radio peut fonctionner avec une
antenne d'un type et d'un gain maximal (ou inférieur)
approuvé pour l'émetteur par Industrie Canada.
Dans le but de réduire les risques de brouillage
radioélectrique à l'intention des autres utilisateurs, il
faut choisir le type d'antenne et son gain de sorte que
la puissance isotrope rayonnée équivalente (p.i.r.e.) ne
dépasse pas l'intensité nécessaire à l'établissement
d'une communication satisfaisante.
This equipment complies with FCC radiation exposure limits
set forth for an uncontrolled environment. This equipment
should be installed and operated with minimum distance
20cm between the radiator & your body.
This equipment complies with IC RSS-102 radiation
exposure limits set forth for an uncontrolled environment.
This equipment should be installed and operated with
minimum distance 20cm between the radiator & your body.
ce matériel est conforme aux limites de dose d'exposition
aux rayonnements, CNR-102 énoncée dans un autre
environnement.cette eqipment devrait être installé et
exploité avec distance minimale de 20 entre le radiateur et
votre corps.
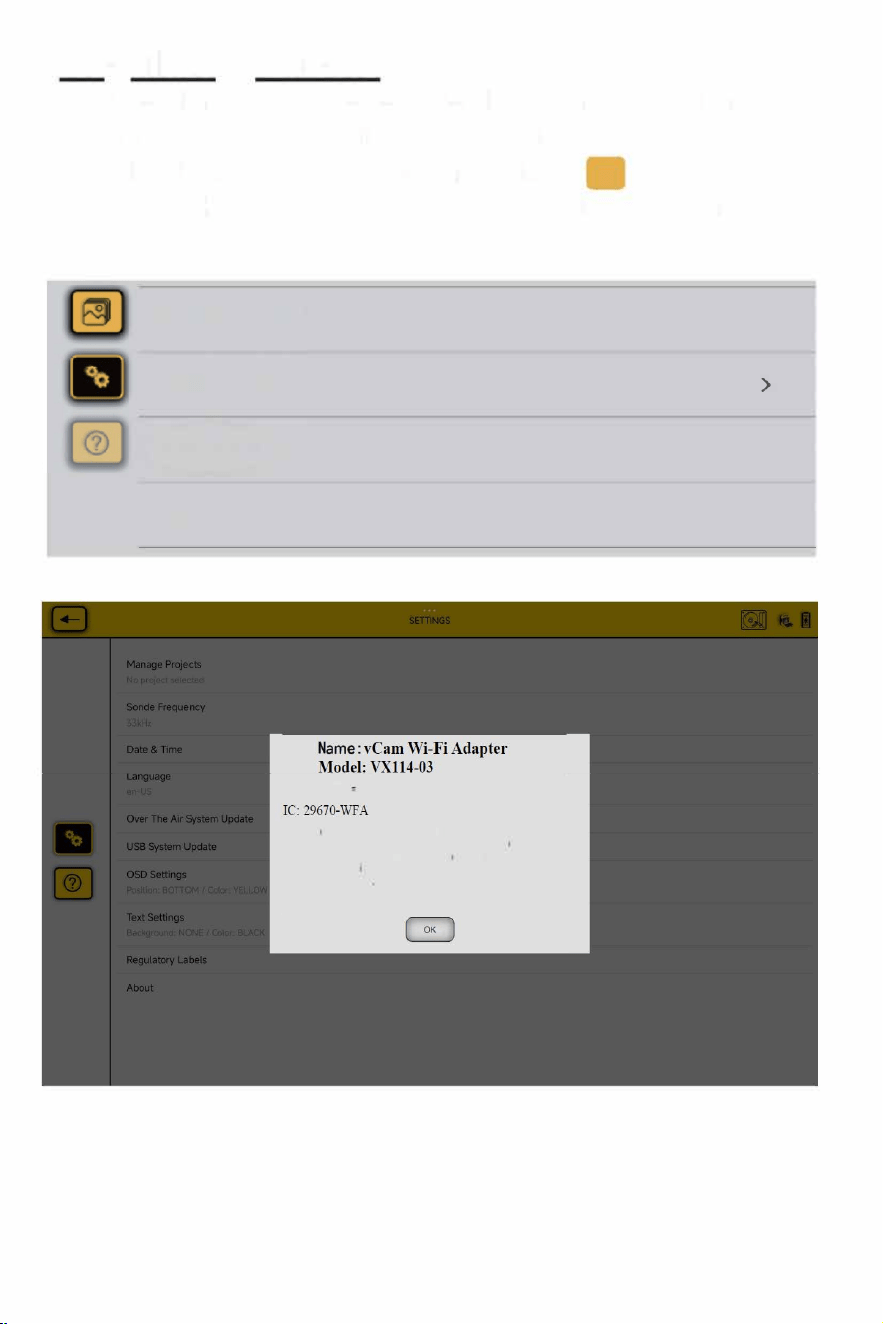
Requla
.
to Labels
This section shows the required FCC and IC information.
To access this information do the following:
1. At the Main screen select the Setting压icon.
2. Tap on the Regulato Labels to find the FCC and
IC information.
T凇U心妇
U m Ute
>
至
户
FCC: 2A826-\VF A
Thls dewce complles mlh Part 15 of lhe FCC凡les. Operat,on,s
sub丿eel to the fo(lowlng two conditions (1) this deCce may not
OUse harmful,nterference. and (2l th
l
s dev,ce must accepl any
mlerference飞ce
i
v ed. including inte,fecen~that may立use
undes心dop的llon
Warning: Occupational use only

Table of Content
Table of Contents
1. Service & Support.............................................................................................................................1
1.1 Model and Serial Number Location............................................................................................1
1.2 Worldwide Sales Oces and Service Centers...........................................................................2
2. Introduction.......................................................................................................................................3
2.1 The vCam Wi-Fi Adapter............................................................................................................3
2.2 What's in the Box.......................................................................................................................3
3. vCam Wi-Fi Adapter (WFA) Setup....................................................................................................4
3.1 Mount the vCam Wi-Fi Adapter to the Reel................................................................................4
3.2 Install the cable plug holder........................................................................................................5
4. Using the Wi-Fi Adapter....................................................................................................................7
4.1 The vCam Wi-Fi Adapter............................................................................................................7
4.2 Charge the Internal Battery........................................................................................................7
4.3 Download and install the vCam Mobile Controller App...............................................................8
4.4 Connect to the VMC App............................................................................................................8
4.5 Select the Reel Type..................................................................................................................9
5. Care and Maintenance...................................................................................................................10
5.1 Control Module / Wi-Fi Adapter................................................................................................10
6. Troubleshooting..............................................................................................................................11

Service & Support
1
1
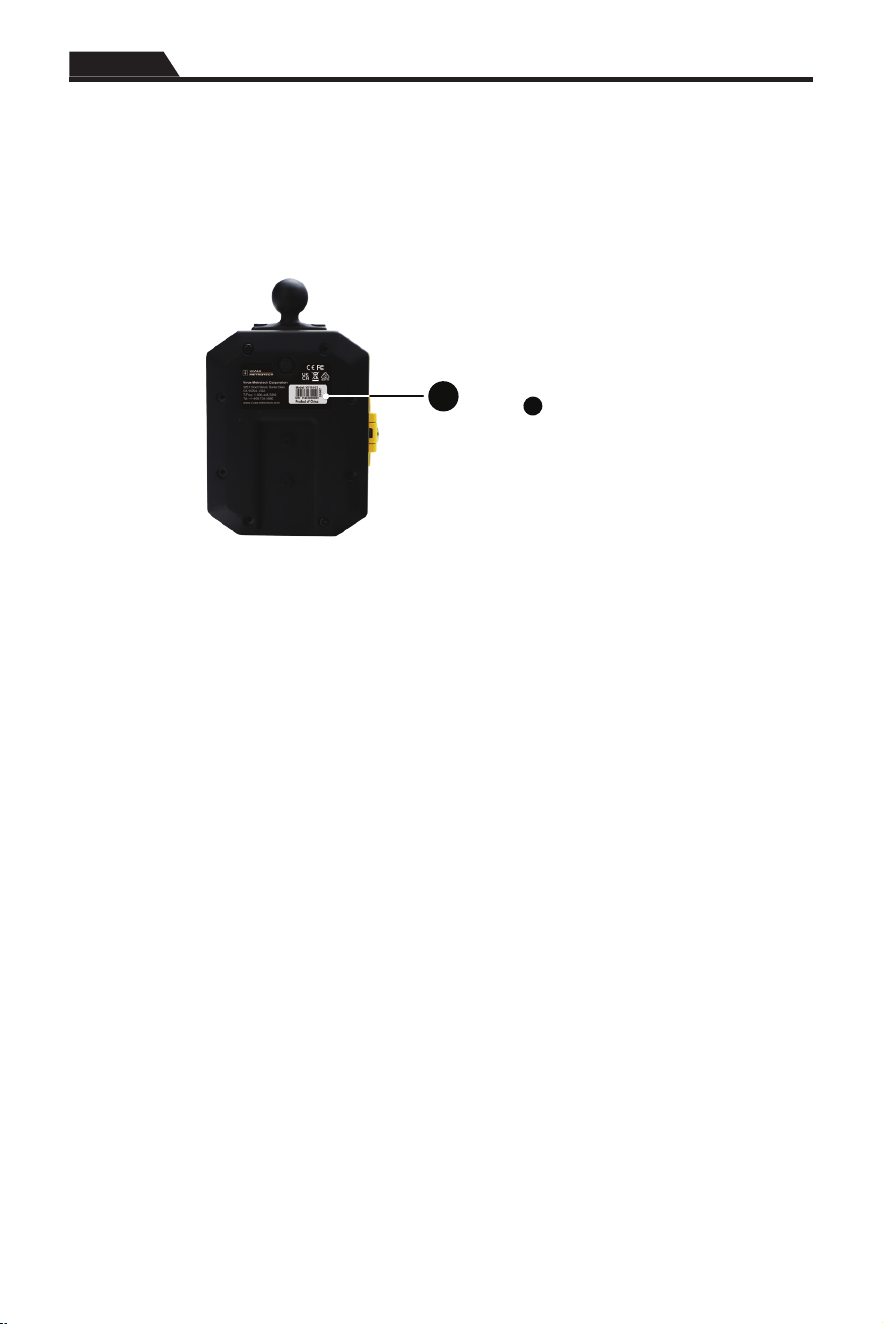
1. Service & Support
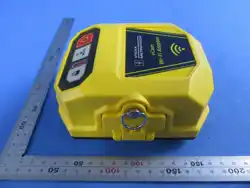
1.1 Model and Serial Number Location
When requesting product support provide the units model and serial number.
1
1
Serial number location

Service & Support
1
2
1.2 Worldwide Sales Oces and Service Centers
Worldwide Sales Oces and Service Centers
World Headquarters,
United States of America
Vivax-Metrotech Corporation
3251 Olcott Street, Santa Clara,
CA 95054, USA
T/Free: 1-800-446-3392
Tel: +1-408-734-3880
Fax: +1-408-904-4964
Website: www.vivax-metrotech.com
Email: [email protected]
Central/South America
and the Caribbean
Ventas para América Latina
3251 Olcott Street,
Santa Clara, CA 95054, USA
T/Free: 1-800-446-3392
Tel: +1-408-734-3880
Fax: +1-408-743-5597
Website: www.vivax-metrotech.com
Email: [email protected]
Canada
Vivax Canada Inc.
41 Courtland Ave Unit 8,
Vaughan, ON L4K 3T3, Canada
Tel: +1-289-846-3010
Fax: +1-905-752-0214
Website: www.vivax-metrotech.ca
Email: [email protected]
France
Vivax-Metrotech SAS
Technoparc - 1 allée du Moulin Berger,
69130 Ecully, France
Tel: +33(0)4 72 53 03 03
Fax: +33(0)4 72 53 03 13
Website: www.vivax-metrotech.fr
Email: [email protected]
Germany
Metrotech Vertriebs GmbH
Am steinernen Kreuz 10a,
96110 Schesslitz, Germany
Tel: +49 9542 77227-43
Website: www.vivax-metrotech.de
Email: [email protected]
United Kingdom
Vivax-Metrotech Ltd.
Unit 1, B/C Polden Business Centre,
Bristol Road, Bridgwater, Somerset,
TA6 4WA, UK
Tel: +44(0)1793 822679
Website: www.vivax-metrotech.co.uk
Email: [email protected]
China
Vivax-Metrotech (Shanghai) Ltd.
Building 10, Lane 1158 Zhongxin Rd.,
Songjiang District, Shanghai, China, 201615
Tel: +86-21-5109-9980
Website: www.vivax-metrotech.com
Email: [email protected]
Introduction
2
3
2. Introduction
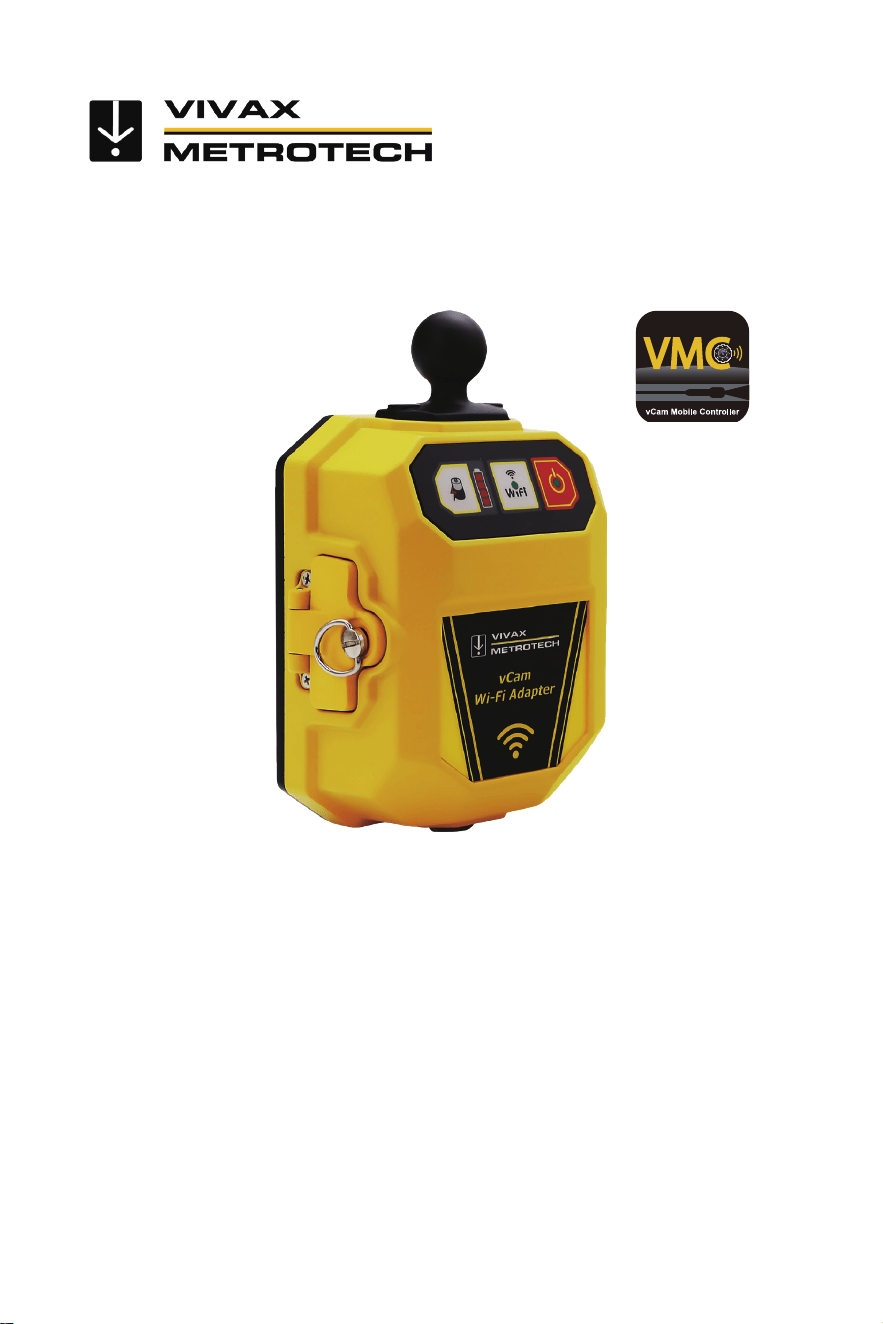
2.1 The vCam Wi-Fi Adapter
The vCam Wi-Fi Adapter connects to a tablet or smartphone via Wi-Fi and streams the video from
the reel into the vCam Mobile Controller app. The video stream can be viewed and recorded into the
app and copied onto a USB thumb drive. Audio and text commentary can be added to videos, and
text commentary can be added to captured pictures. The current time, date, and pushrod deployment
distance are timestamped and added to both the video and pictures. The captured video and pictures
can be reviewed in the VMC app and exported or shared.
Please read this section!
Vivax-Metrotech provides technical support for the vCam Mobile Controller (VMC) app, our
vCam series camera systems and our locators.
Vivax-Metrotech cannot supply technical support or training for smartphones, tablets or file-
sharing apps on your phones and tablets.
Please refer to the help screens and documentation included with your file-sharing apps, as
well as the operating system on your phone or tablet (Android and iOS).
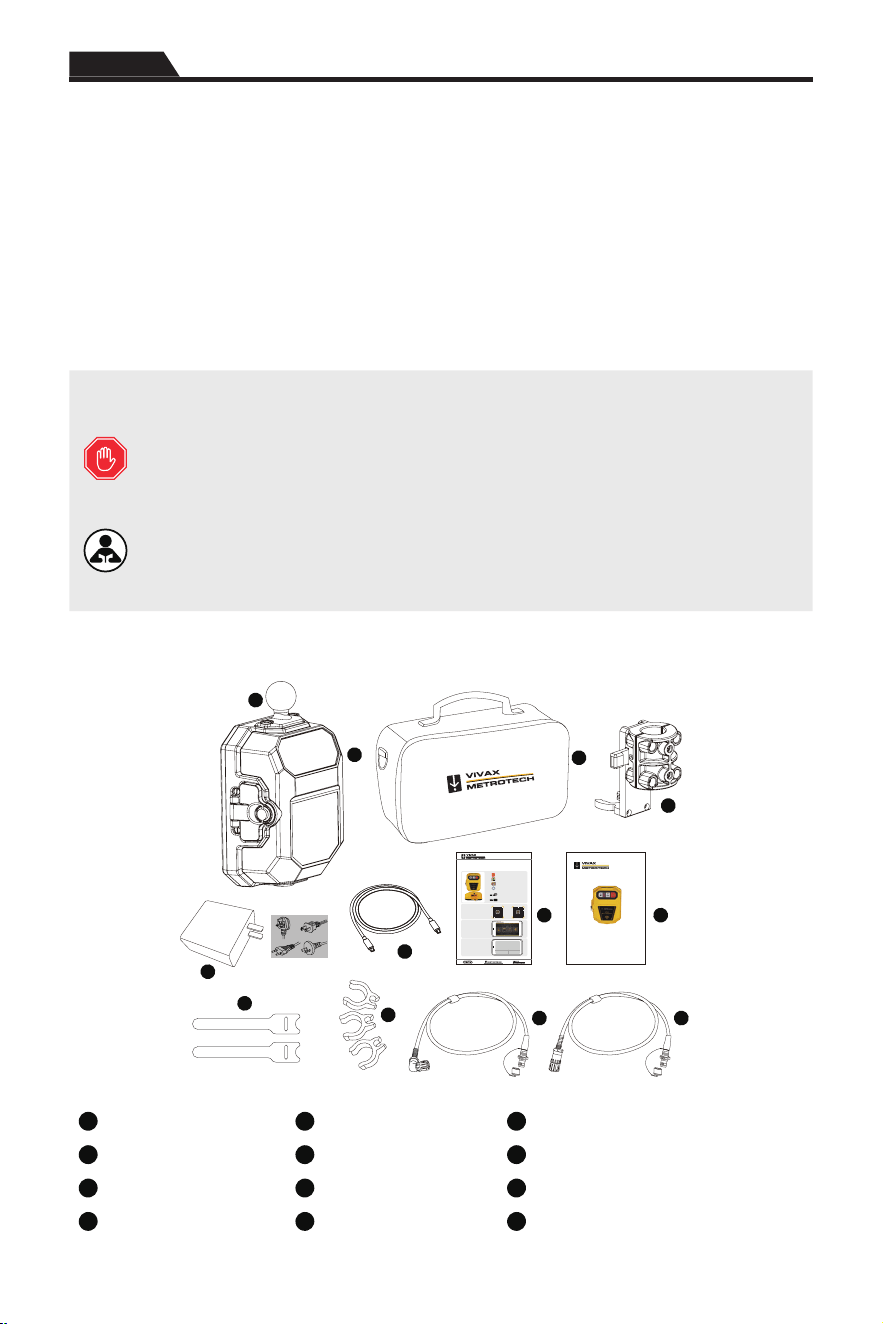
2.2 What's in the Box
2
1
3
5
4
11
7 8
6
10
9
vCam WiFi Adapter
User Manual
Vivax-Metrotech Corporation
4.04.000268 05/01/2025 V1.0
1
4.04.000xxx
vCam Wi-Fi Adapter (WFA)
Quick Setup and Connect Guide V1.0
“vCamMobileController”
Wants to Join WLAN Network
“vCamWiFiAdapter_A362”?
Cancel Join
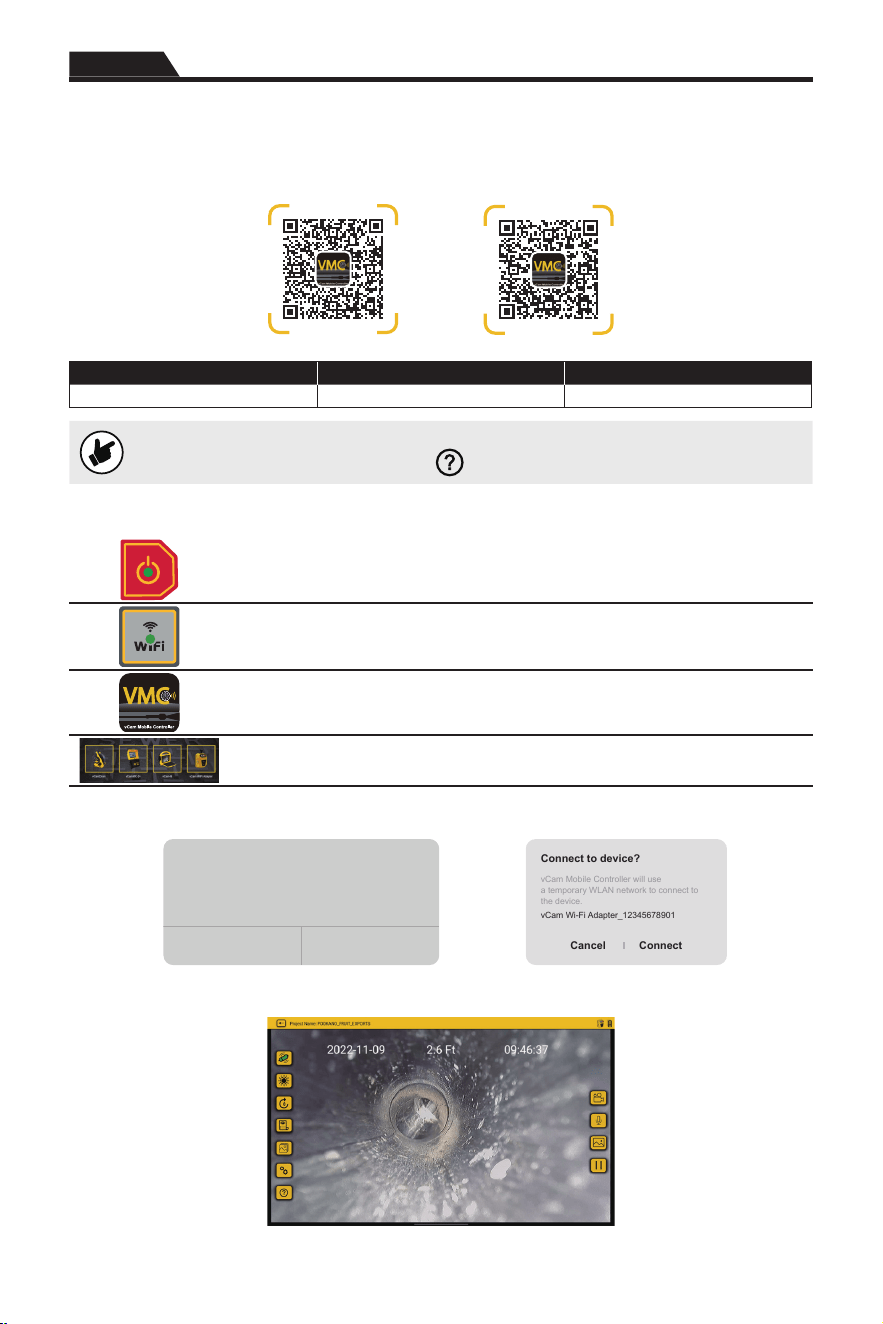
Step 3
Select the vCam WiFi Adapter
WLAN network connect to
vCam WiFi Adapter.
Or
Android
iOS
Scan the QR code to
download the vCam
Mobile Controller (VMC) App.
Step 1
Step 2
Select vCam WiFi Adapter
(WFA) to enter the vCam
WiFi Adapter application.
Power on/off
Wi-Fi Status indicator
Charge for 3-hours to a full charge
6-Hr
Battery status indicator
USB-A socket
USB-C AC/DC Charging socket
12
1
vCam Wi-Fi Adapter
5
Multi-plug AC Charger
9
Velcro tie
2
Ball Mount
6
USB-C Power Cable
10
Interconnect Cable Clips
3
Accessory Bag
7
Quick Guide
11
Type-CP Reel Interconnect Cable
4
Reel Mounting Bracket
8
Manual
12
Type-MX Mini Reel Interconnect Cable
vCam Wi-Fi Adapter (WFA) Setup
3
4
3. vCam Wi-Fi Adapter (WFA) Setup
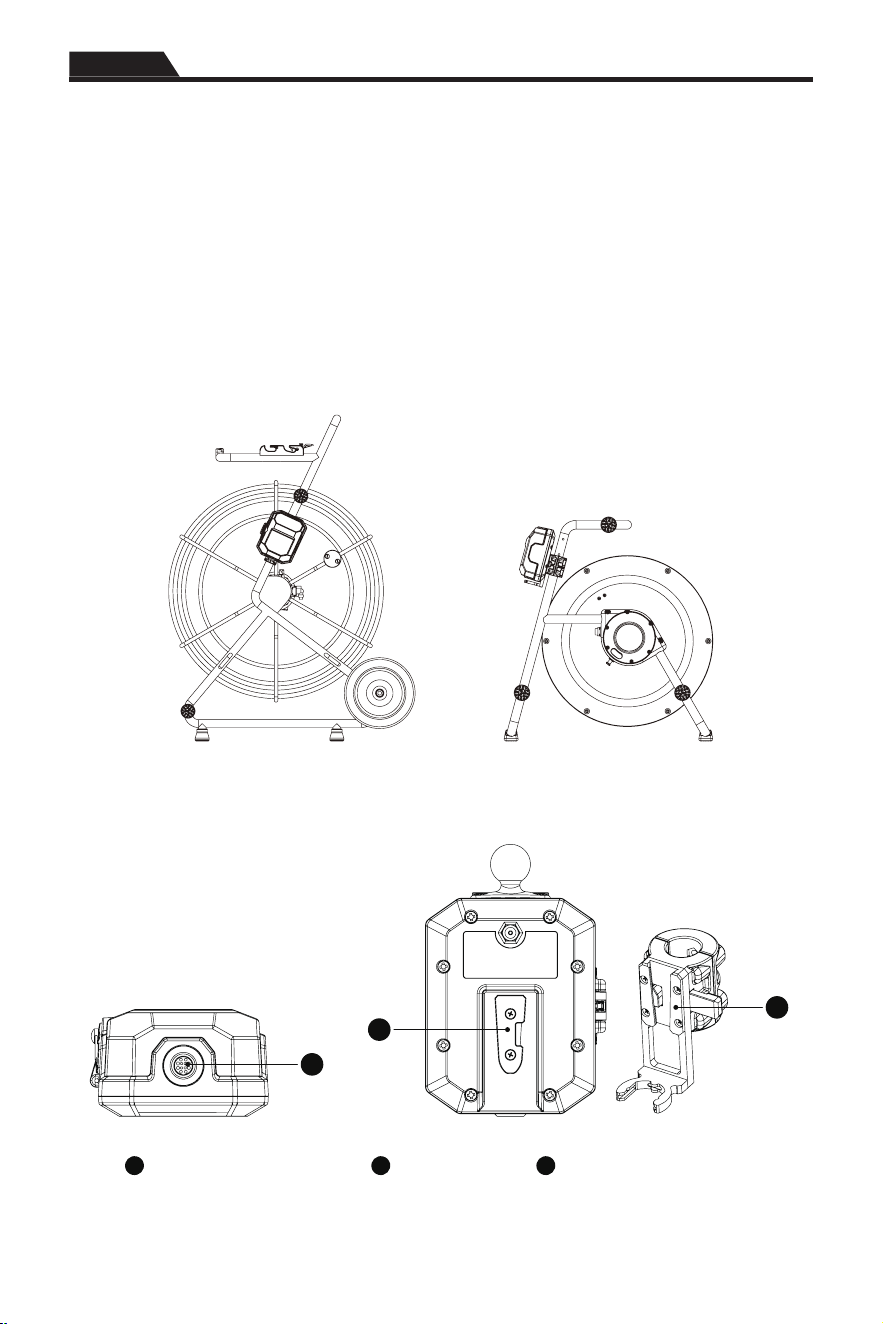
3.1 Mount the vCam Wi-Fi Adapter to the Reel
Select a mounting spot that:
• Is out of the way and will not interfere with the operation of the reel.
• It is easy to attach and detach the WFA from the reel.
• Will not damage the WFA during transport and storage.
• Gives access to the power button and USB compartment.
• Gives a visual to the WFA controls.
Suggested Placement
Type-CP Reel Type-MX Reel
1
3
2
1
Interconnect cable socket
2
Mounting plate
3
Mounting plate receptacle
vCam Wi-Fi Adapter (WFA) Setup
3
5
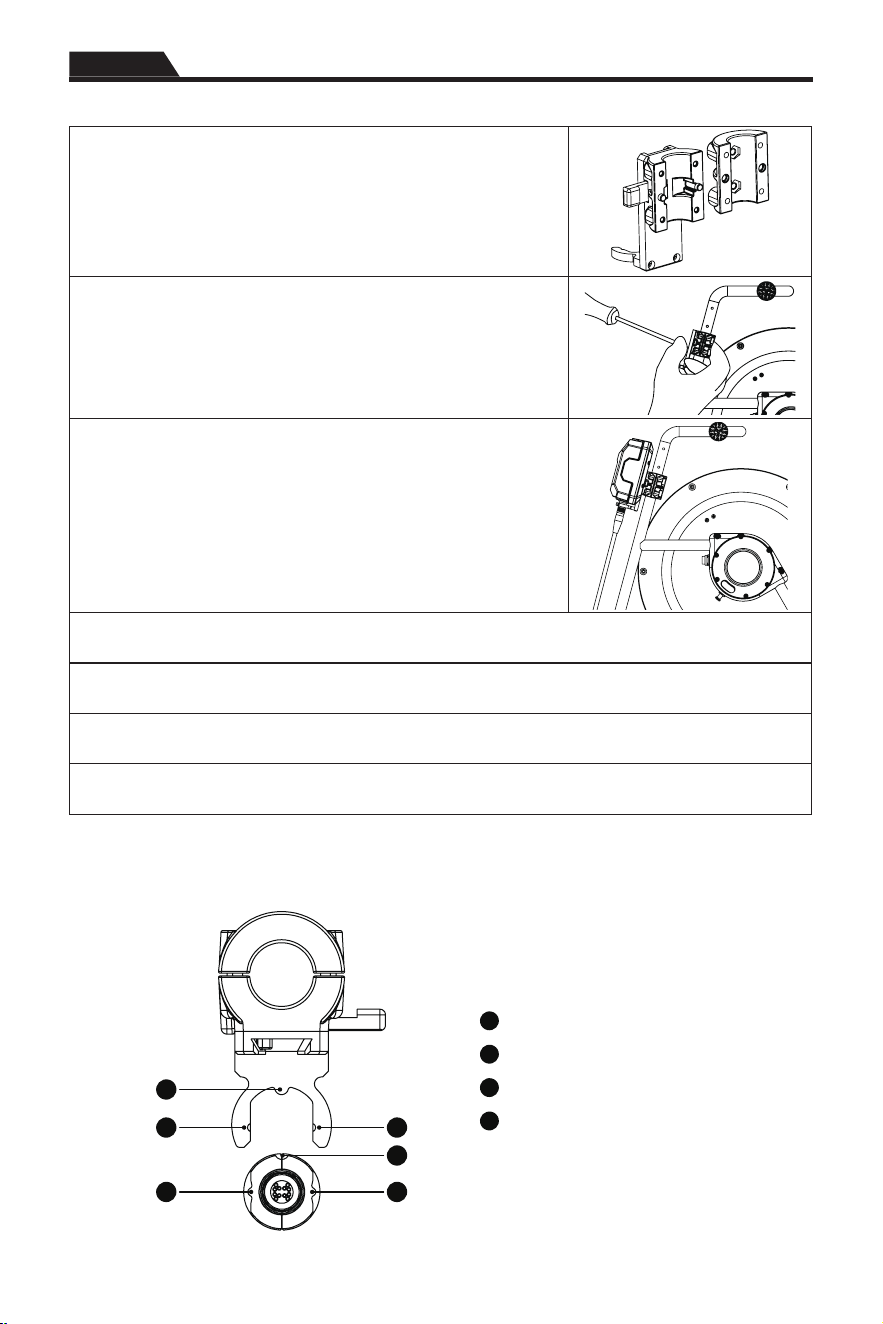
1. Remove the four screws to separate the halves of the bracket.
2. Install the two halves around the reel's frame and screw in at
least two screws.
3. Attach the WFA and move it to its desired location.
4. If the location is good, remove the WFA and tighten all four screws to hold the mounting bracket
in place.
5. Install the WFA in the mount and plug in both ends of the interconnect cable.
6. Use the supplied cable clips to organize the interconnect cable.
NOTE: If desired screw in the two setscrews to create a dimple in the reel frame for permanent
placement.
3.2 Install the cable plug holder
When the WFA is not connected to the reel, place the protective cap over the plug.
2
4
1
2
3
4
1
Rear orientation tab
2
Side orientation tab receptacle
3
Rear orientation tab receptacle
4
Side orientation tab
vCam Wi-Fi Adapter (WFA) Setup
3
6
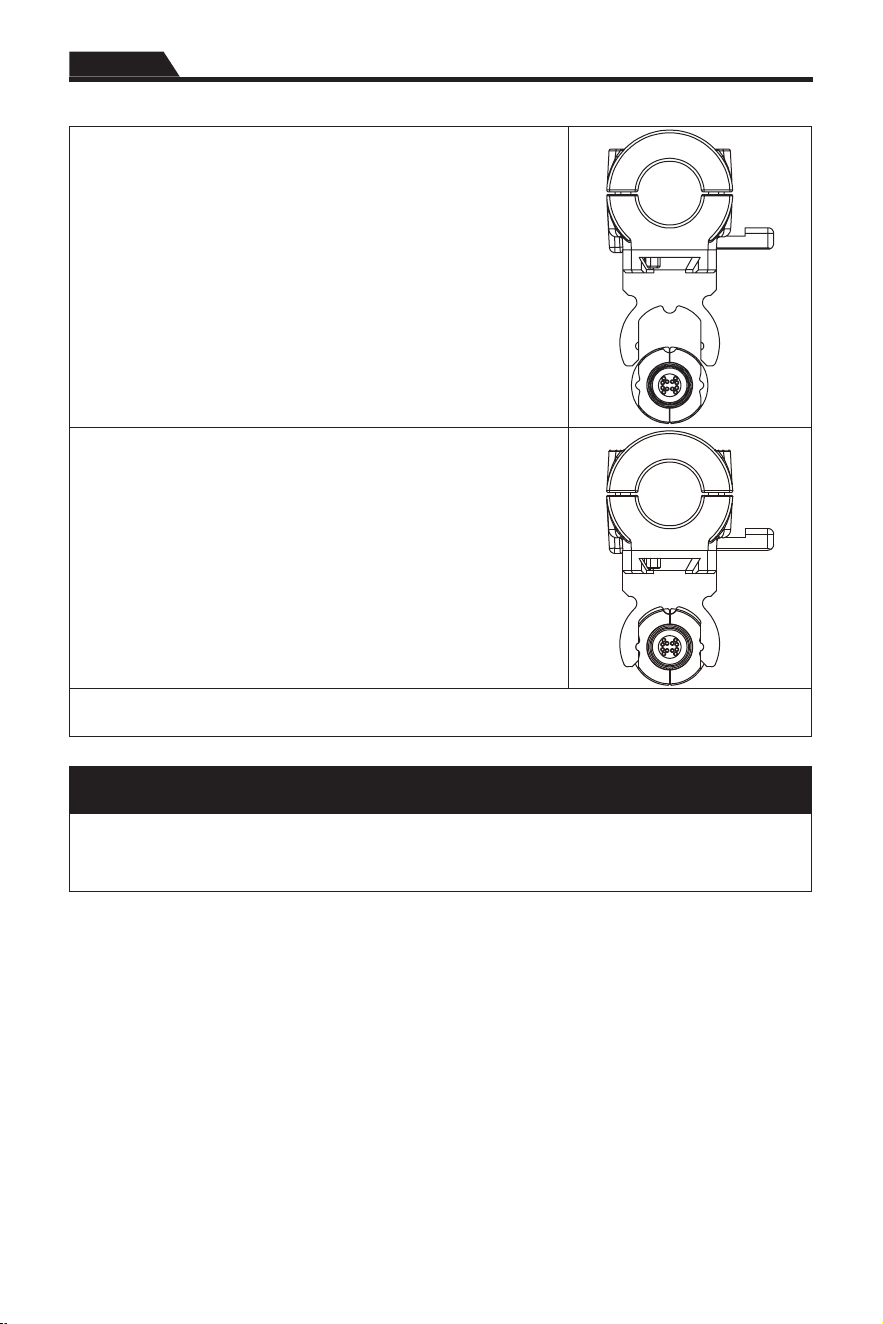
1. Line up the plug collar to the bracket making sure the red dot
on the plug is facing forward (toward you).
2. Push the plug into the bracket so that it locks in place.
3. Use the supplied cable clips and Velcro ties secure the interconnect cable in place.
Install the steel cap over the plug when the Wi-Fi Adapter is not mounted.
Install the cap by lining the red dot on the cap with the dot on the plug then pressing it in place.
To remove the cap you may need to gently push up on the base of the plug to release its locking
ns.
Using the Wi-Fi Adapter
4
7
4. Using the Wi-Fi Adapter
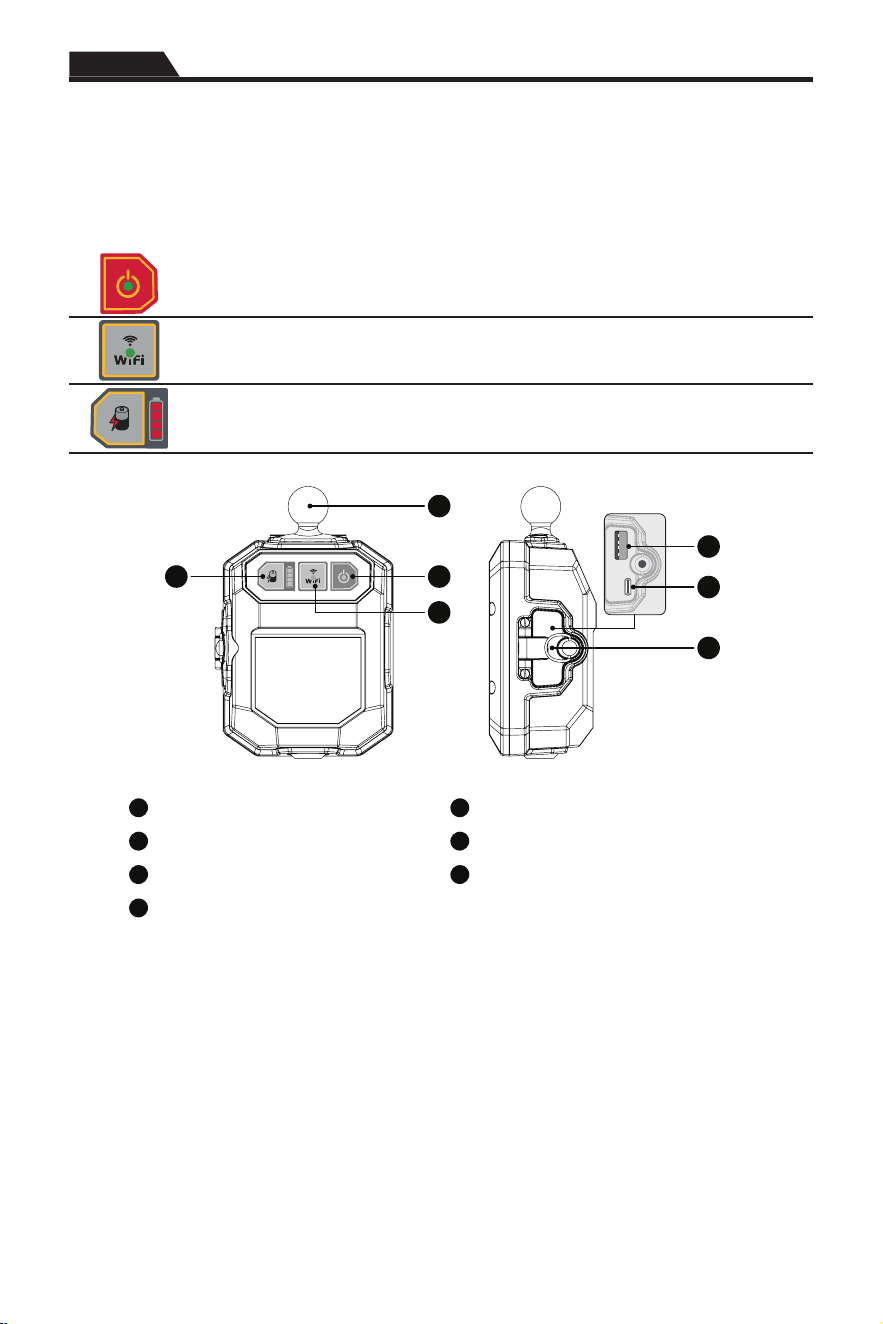
4.1 The vCam Wi-Fi Adapter
Control Panel Buttons
On/Off Button - Press and release to turn the unit on. This button will glow while
the unit is turned on. Press and hold to turn the unit off.
Wi-Fi - The Wi-Fi button shows the vCam Wi-Fi Adapter's connection status. When
the LED is solid the Adapter is ready to connect.
Battery Status - Press and release this button to see the reel's internal battery
status. The indicator is shown in four segments representing 25% of the reel's
battery life.
1
3
4
2
7
5
6
1
Mounting ball
5
USB-A Data Port
2
Battery status indicator
6
USB-C Charging Port
3
On O button
7
Charging/USB Compartment
4
Wi-Fi status indicator
4.2 Charge the Internal Battery
Plug the supplied battery charger into the USB-C charging socket. The charging indicators' red LED
segments will show the percentage change as a solid and the charging status as a ashing LED.
When fully charged all the LED segments will be solid. It typically takes about three hours to fully
charge a discharged battery, which provides about six hours of intermittent use.
Using the Wi-Fi Adapter
4
8
4.3 Download and install the vCam Mobile Controller App
Follow the QR codes below to download and install the app. Use the links below or search for “vCam
Mobile Controller”.
Android
iOS
Platform Apple Android
Minimum operating system 14.0 or greater 10 or greater
Detailed instructions on the operation of the vCam Mobile Controller apps are found
inside the app by pressing on the Help
icon.
4.4 Connect to the VMC App
Press and release to turn the unit on. When on this button glows green.
Wait approximately 20 seconds for the Wi-Fi indicator button to glow.
Launch the vCam Mobile Controller App.
Tap on the product icon at the Start Screen.
In iOS tap on Join. In Android tap the unit's Serial Number.
“vCamMobileController”
Wants to Join WLAN Network
“vCam Wi-Fi Adapter_12345678901”?
Cancel Join
Connect to device?
vCam Mobile Controller will use
a temporary WLAN network to connect to
the device.
vCam Wi-Fi Adapter_12345678901
Cancel Connect
iOS Android
You are now connected to the vCam Mobile Controller App.
Using the Wi-Fi Adapter
4
9
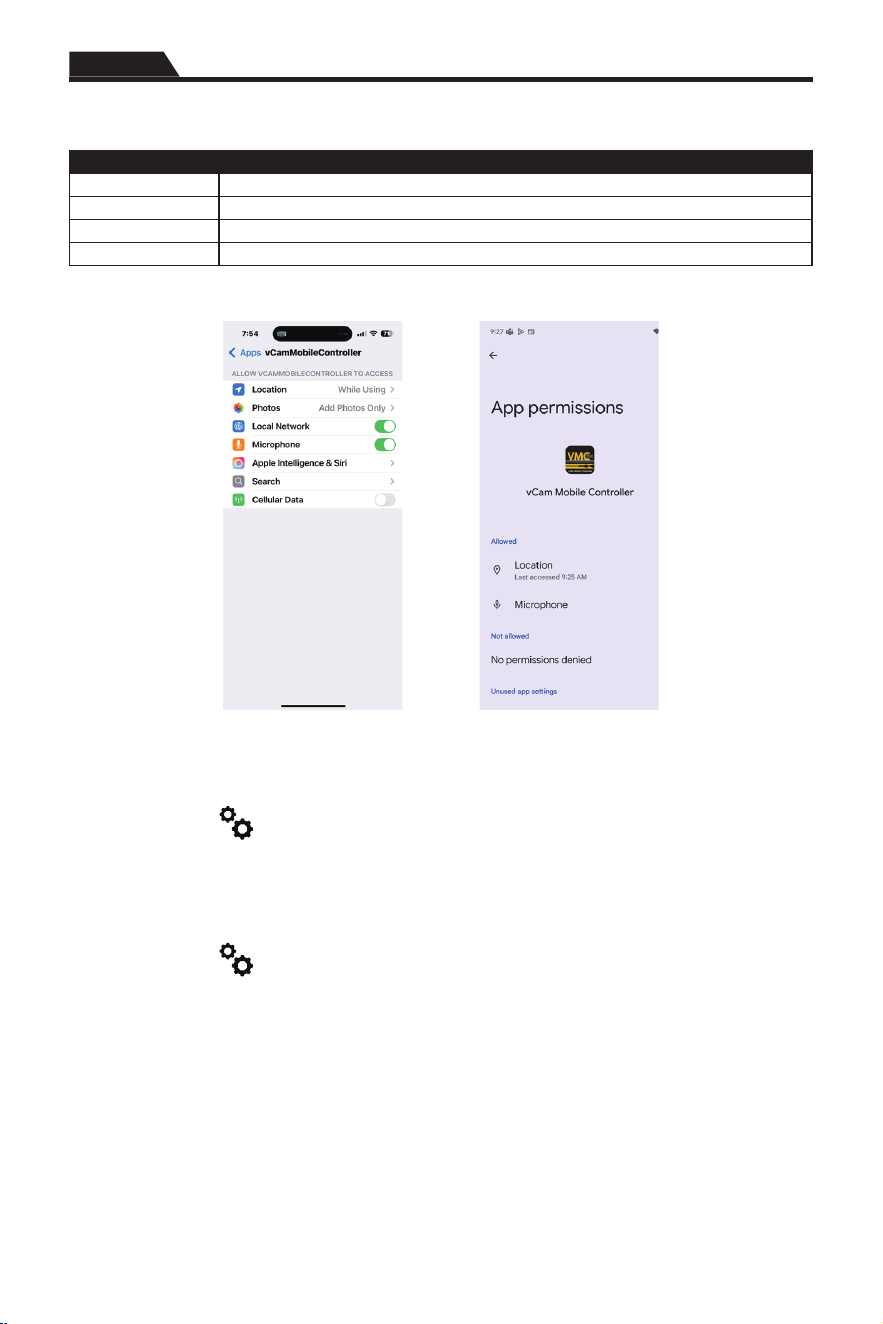
For optimal app performance give the app the following permissions.
Access and permissions:
Location Allow for Wi-Fi scanning.
Microphone Allow adding audio to recording videos.
Gallery Allow for the exporting of pictures and videos.
Storage Allow modification or deletion of files.
iOS Android
4.5 Select the Reel Type
In the vCam Mobile Controller app
1. Tap on Settings
.
2. Tap on REEL SETTINGS.
3. Tap on the Reel Type and its length.
This setting will be stored in the app to help provide an accurate distance count of the reel.
This setting will be saved in the app and only needs to be updated if the reel length is changed or
the app is reset to factory defaults.
4. Tap on Settings
to return to the main viewing screen.

Care and Maintenance
5
10
5. Care and Maintenance
The vCam camera systems are designed to inspect and not to move debris, waste, or objects.
The vCam camera systems are not designed for use in areas where ammable liquids are present.
Drains and sewers can carry bacteria and other infectious micro-organisms or materials which can
cause death or severe illness. Avoid exposing eyes, nose, mouth, ears, hands, cuts and abrasions to
wastewater. To further help protect against exposure to infectious materials, wash hands, arms and
other body areas, as needed, with hot, soapy water and always wear rubber gloves when performing
inspections and during clean-up.
When performing maintenance ensure that proper workwear is used. Use protective waterproof
gloves, goggles or a face shield to prevent water from splashing in the eyes, face and mouth.
Cleaning supplies:
• Disinfectant wipes for the pushrod, camera head, skids, reel frame, and WFA housing.
• Disinfecting spray for the spring assembly, pushrod, and frame parts.
• Rags for the reel frame, pushrod, spring and camera.
• Low-pressure garden hose for pushrod and spring assembly.
Use the protective cap on the mounting assembly. Do not use a power washer.
• Lens wipes for the camera head lens.
• Microber cloth to clean the housing screen.
Bleach - Do not use bleach on the pushrod, spring assembly or camera head. Doing so may degrade
the pushrod jacket and cable inside the spring assembly.
Steam cleaning: We do not recommend it.
5.1 Control Module / Wi-Fi Adapter
Do not store vCam inspection products outdoors or allow them to sit for extended periods in direct
sunlight or hot environments.
Do not store vCam inspection products in vehicles below freezing temperatures overnight.
Use a wet microber cloth to remove splashed particles from the housing.
The Lithium-ion battery life can be extended by performing shallow discharges and recharges rather
than fully discharging the battery pack before recharging. For maximum battery life recharge the
battery when it reaches 50% charge and charge between 80% and 90% of the maximum capacity.
Do not leave the charger plugged into the battery once fully charged as this will also degrade the
battery life.
Troubleshooting
6
11
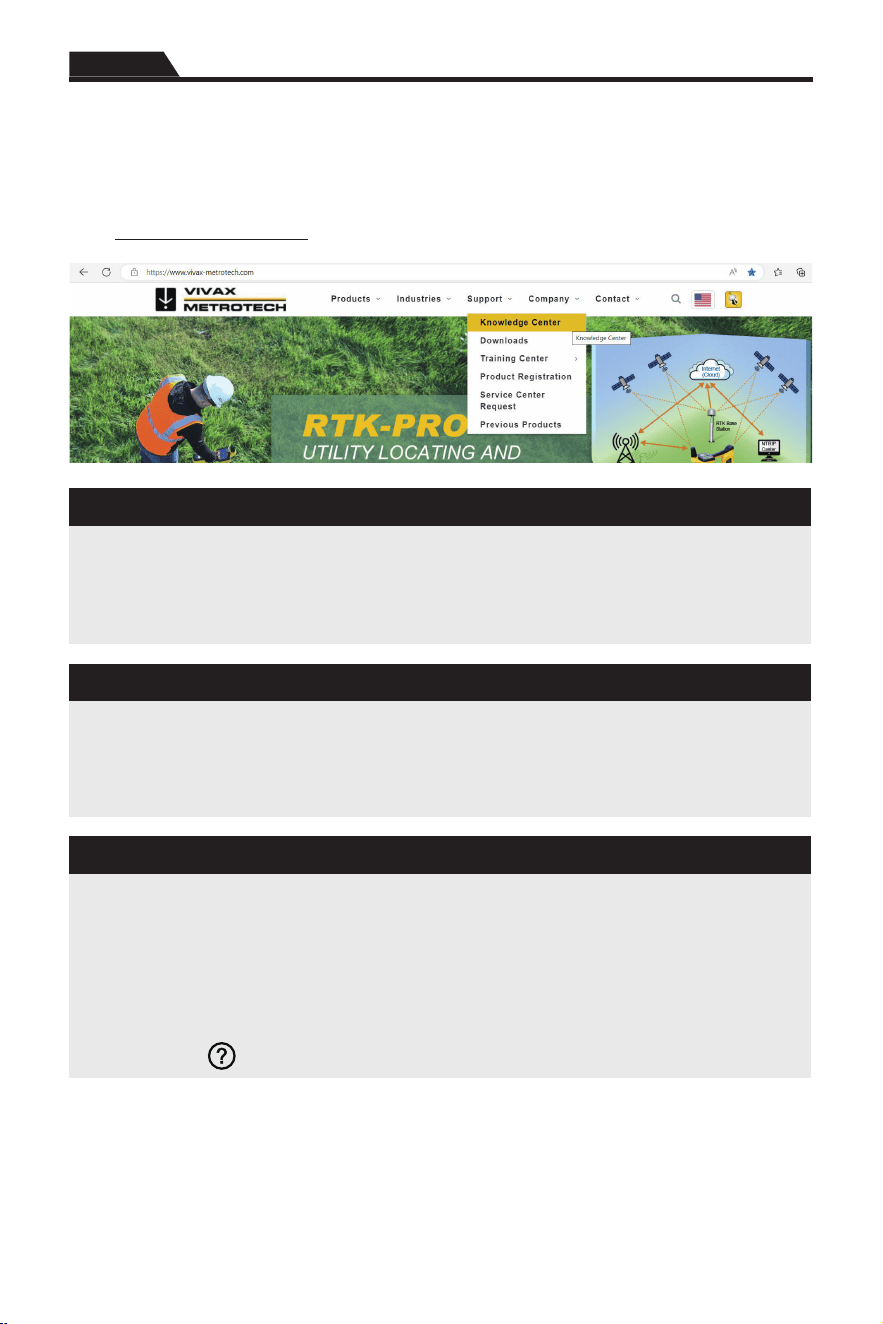
6. Troubleshooting
Please check the Knowledge Center on the Vivax-Metrotech website for the latest support information.
Go to www.vivax-metrotech.com and then click Support, Knowledge Center.
Problem: The battery will not charge
Check:
1. Plug the AC charger in and connect the USB-C cable from the charger to the unit. The charging
indicator should immediately start ashing.
2. Make sure the factory-provided charger is being used. The vCam Wi-Fi Adapter requires a 65W
USB-C Charger to charge the unit.
Problem: The unit will not turn on.
Check:
1. Ensure that the Wi-Fi Adapter is charged. Plug in the AC charger and connect the USB-C cable
from the charger to the unit. The charging indicator should immediately start ashing.
2. If the battery indicator does not ash when the unit is connected to AC power a problem may
exist with the unit. Contact the factory or authorized repair center.
Problem: Cannot connect to the vCam Mobile Controller App.
Check:
1. Ensure that the unit is turned on and the Wi-Fi Indicator light is green before attempting to
connect.
2. Do not open the app until the unit is powered on and the Wi-Fi Indicator is green.
3. Close the app. On the phone go to list of available networks. Look for the vCamWiFiAdapter in
the list of networks. Tap on it to connect. Now launch the app, select the vCam Mobile Controller
and give it up to one minute to connect.
Please refer to the detailed vCam Mobile Controller manual app found in the VMC app by
tapping on the
icon.

12
Illustrations used in preparing this manual will inevitably resemble those of other manufacturers.
These manufacturers have permitted the use of their graphics, and this statement is intended to
attribute such credit.
The Bluetooth
®
word mark and logos are registered trademarks owned by Bluetooth SIG, Inc.
iOS is a registered trademark of Cisco Systems, Inc. in the U.S.
Android, Google and Google Maps are registered trademarks of Google LLC.
DROPBOX is a registered trademark of DROPBOX, Inc.
BOX Software is a registered trademark of BOX, Inc.
OneDrive and OneNote are registered trademarks of Microsoft.
Wi-Fi is a trademark of the Wi-Fi Alliance.
Disclaimer: Product and accessory specications and availability information are subject to change
without prior notice.


Vivax-Metrotech Corporation
3251 Olcott Street, Santa Clara, CA 95054, USA
Toll-Free: 1-800-446-3392
Phone: +1-408-734-3880
Website: www.vivax-metrotech.com
© 2026 Vivax-Metrotech Corporation