
R
! For installation help, missing or replacement parts -
PLEASE CONTACT KARRAN FIRST
1-866-452-7726
info@karran.com
Installation Guide
Register Online:
www.karran.com/productregistration
Save this instruction sheet for future reference
Tools you may need:
Karran USA - 1291 East Ramsey Rd, Vincennes, IN 47591 - T: 866.452.7726 F: 812.885.2440 - www.karran.com
We reserve the right to update product installation
instructions without notice. Please visit karran.com
for the most current installation instructions.
3 BOLT GARBAGE DISPOSAL
KGD230, KGD250, KGD270, KGD290
Image is for reference only
REV. 01/21/2025
Screwdriver Phillips
Screwdriver
Hacksaw Plumber's Putty
Hammer
Pipe Wrench

R
Read these instructions thoroughly before you begin.
! WARNING – When using electric disposers, basic precautions are always to be followed, including the
following:
1. Read all the instructions before using the disposer.
2. To reduce the risk of injury, close supervision is required when a disposer is used near children.
3. Do not put fingers or hands into a disposer.
4. Turn the power switch to the off position before attempting to clear a jam or remove an object from the
disposer.
5. When attempting to loosen a jam in a disposer, use a long wooden object such as a wooden spoon or
the wooden handle of a broom or mop.
6. When attempting to remove objects from a disposer use long-handled tongs or pliers. For a disposer that
is magnetically actuated, use nonmagnetic tools.
7. To reduce the risk of injury by materials that are expellable by a disposer, do not put the following into a
disposer:
a. Clam or oyster shells.
b. Caustic drain cleaners or similar products.
c. Glass, porcelain, or plastic.
d. Large whole bones.
e. Metal, such as bottle caps, tin cans, or utensils
f. Hot grease or other hot liquids.
8. When not operating a disposer, leave the drain cover in place to reduce the risk of objects falling into the
disposer.
2
This disposer must be grounded to reduce the risk of electric shock in the event of a malfunction or breakdown.
Grounding provides a path of least resistance for electric current. This disposer is equipped with a cord having
an equipment-grounding conductor and a grounding plug. The plug must be plugged into an outlet that is
properly installed and grounded in accordance with all local codes and ordinances. WARNING – Improper
connection of the equipment-grounding conductor can result in a risk of electric shock.
Check with a qualified electrician or serviceman if you are in doubt as to whether the disposer is properly
grounded. If the plug provided with the disposer does not fit the outlet, do not modify it.
Grounding Instructions

3
See insert for specific information about your new disposer
NOTE: This Food Waste Disposer has been designed to operate on 110 Volt, 60 Hz exclusively. Using
any other voltage or Hz adversely affects performance.
IMPORTANT: Read all instructions thoroughly. Keep this guide for future reference.
CAUTION: Be sure to review SAFETY INSTRUCTIONS FIRST PERTAINING TO A RISK OF FIRE,
ELECTRICAL SHOCK OR INJURY TO PERSONS before using disposer.
Important Safety Instructions
INSTRUCTIONS PERTAINING TO A RISK OF FIRE, ELECTRIC SHOCK OR INJURY TO
PERSONS. SAVE THESE INSTRUCTIONS.
WARNING – When using electrical appliances, basic precautions should always be followed, including
the following:
1. Read all instructions before using the appliance.
2. To reduce the risk of injury, close supervision is necessary when an appliance is used near children.
3. Do not put fingers or hands into a waste disposer.
4. Turn the power switch to the off position before attempting to clear a jam or remove an object
from the disposer.
5. When attempting to loosen a jam in a waste disposer, use a long wooden object such as a wooden
spoon or the wooden handle of a broom or mop.
6. When attempting to remove objects from a waste disposer use long-handled tongs or pliers. If the
disposer is magnetically actuated, non-magnetic tools should be used.
7. To reduce the risk of injury by materials that may be expelled by a waste disposer, do not put the
following into a disposer: clam or oyster shells; caustic drain cleaners or similar products; glass,
porcelain or plastic; large whole bones; metal, such as bottle caps, tin cans, aluminum foil or utensils;
hot grease or other hot liquids; whole cornhusks.
8. When not operating a disposer, leave the stopper (KPGDDS01) in place to reduce the risk of objects
falling into the disposer.
9. DO NOT operate disposer unless splash guard (KPGDSG01) is in place. (Does not apply to the Top
Control/Batch Feed units.)
10. For proper grounding instructions see the ELECTRICAL CONNECTION portion of this manual
.
R
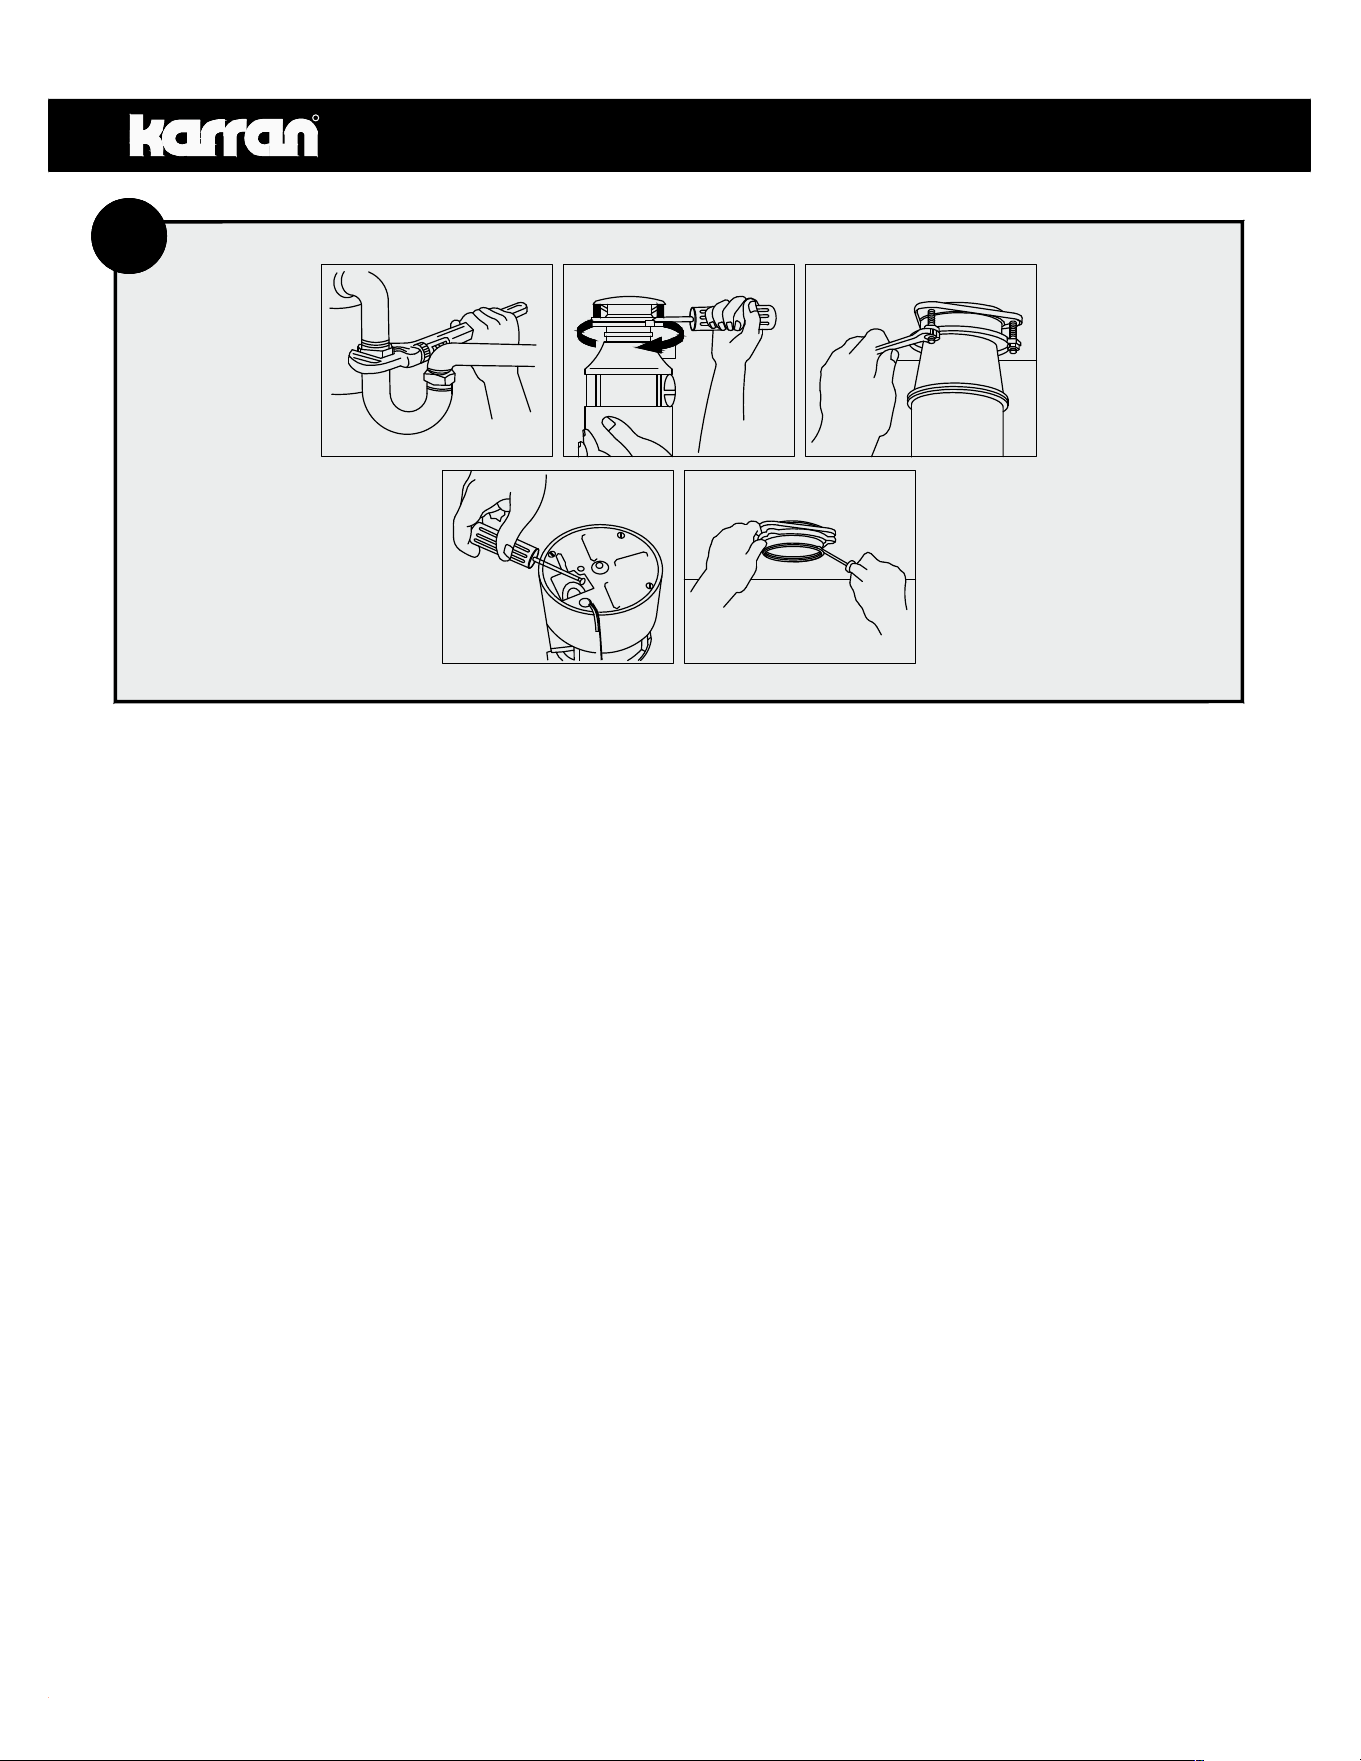
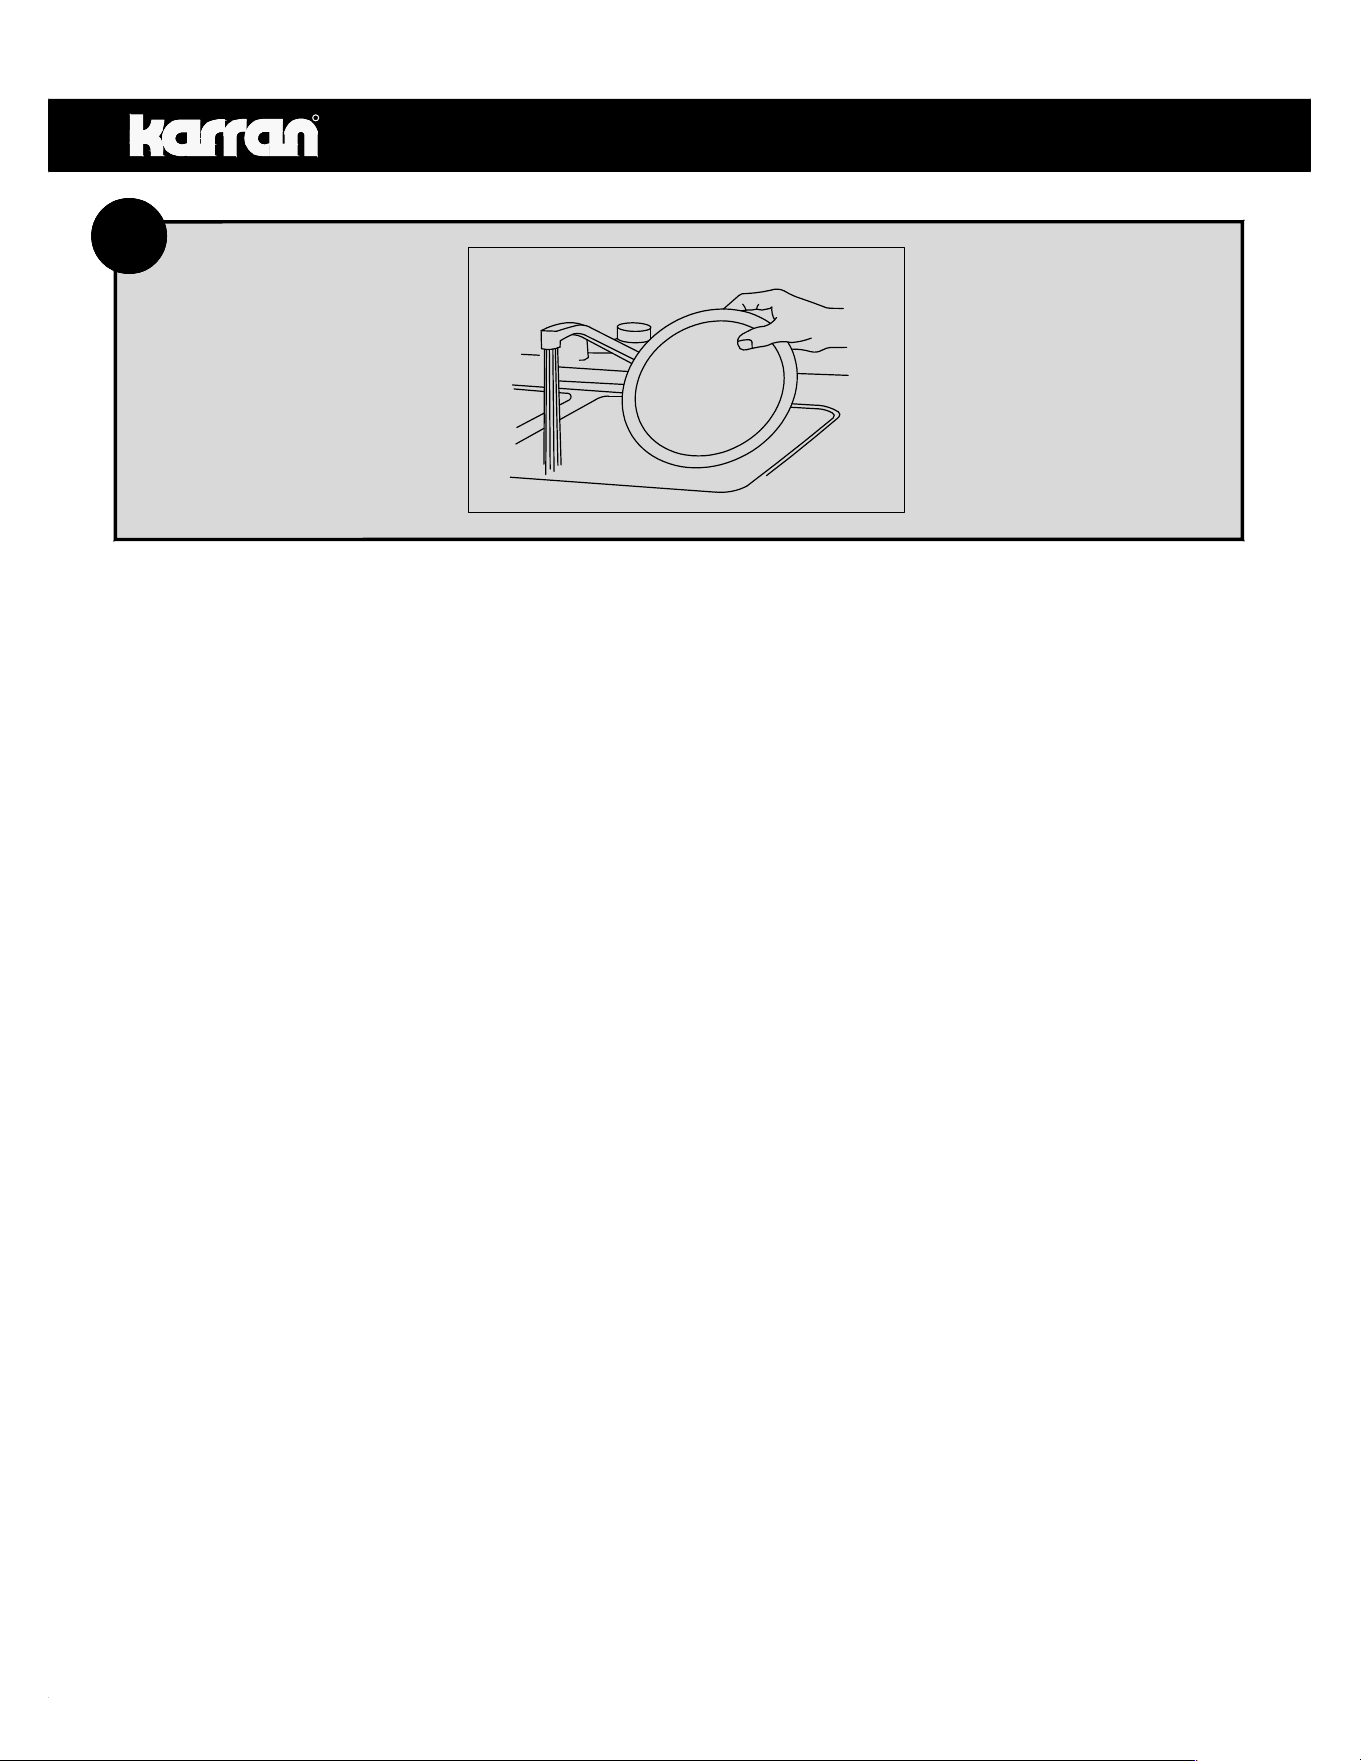
Removal of Old Unit
Before starting this step, turn off electrical power at the circuit breaker or fuse box. If your old mount is the
same as the mount on your new disposer, just reverse the assembly instructions found in section 3. If your
new mount system is different, follow these instructions:
A. Use a pipe wrench to disconnect drain line where it attaches to disposer discharge tube
(see 1A).
B. Remove disposer from sink flange by turning mounting ring to the left clockwise (see 1B). If you
are unable to turn the mounting ring, tap on one of the extensions from the ring with a hammer.
Some mounting systems have tubular extensions. Inserting a screwdriver into one tube will
provide additional leverage for turning the mount ring (see 1B). Some disposers may require
the removal or loosening of nuts from the mounting screws (see 1C). Some disposers may
require the removal of a clamp.
CAUTION: Be sure to support the disposer while performing this step or it may fall when the
mounting ring is disconnected from the mounting assembly. If your disposer is hard wired
(metal shielded cable not utilizing a wall plug), complete steps C and D. If you utilize a plug-in
cord, go on to step E.
C. When disposer is removed, turn up side down and remove electrical cover plate (see 1D).
D. Use screwdriver to remove green ground wire. Remove wire nuts from black and white
power wires and separate disposer wires from power cable wires. Loosen screws on cable
clamp and separate cable from disposer.
E. To remove remaining mount system from the sink, loosen mount screws, push mount ring
up. Under it is the snap ring. Use screwdriver to pop off ring (see 1E). Remove mount ring,
protector ring and gasket from sink flange. Some mounts will require the unscrewing of a
large ring holding the sink flange in place. Pull sink flange up through sink and clean off old
putty from sink.
IMPORTANT: Unless you have a new home, this is a good time to clean out the trap and drain lines by
running a drain auger or plumber’s snake before installing your new disposer.
1
R
4
1A 1B
1E1D
1C
R
5
2B
UNTHREAD
PLUG
2
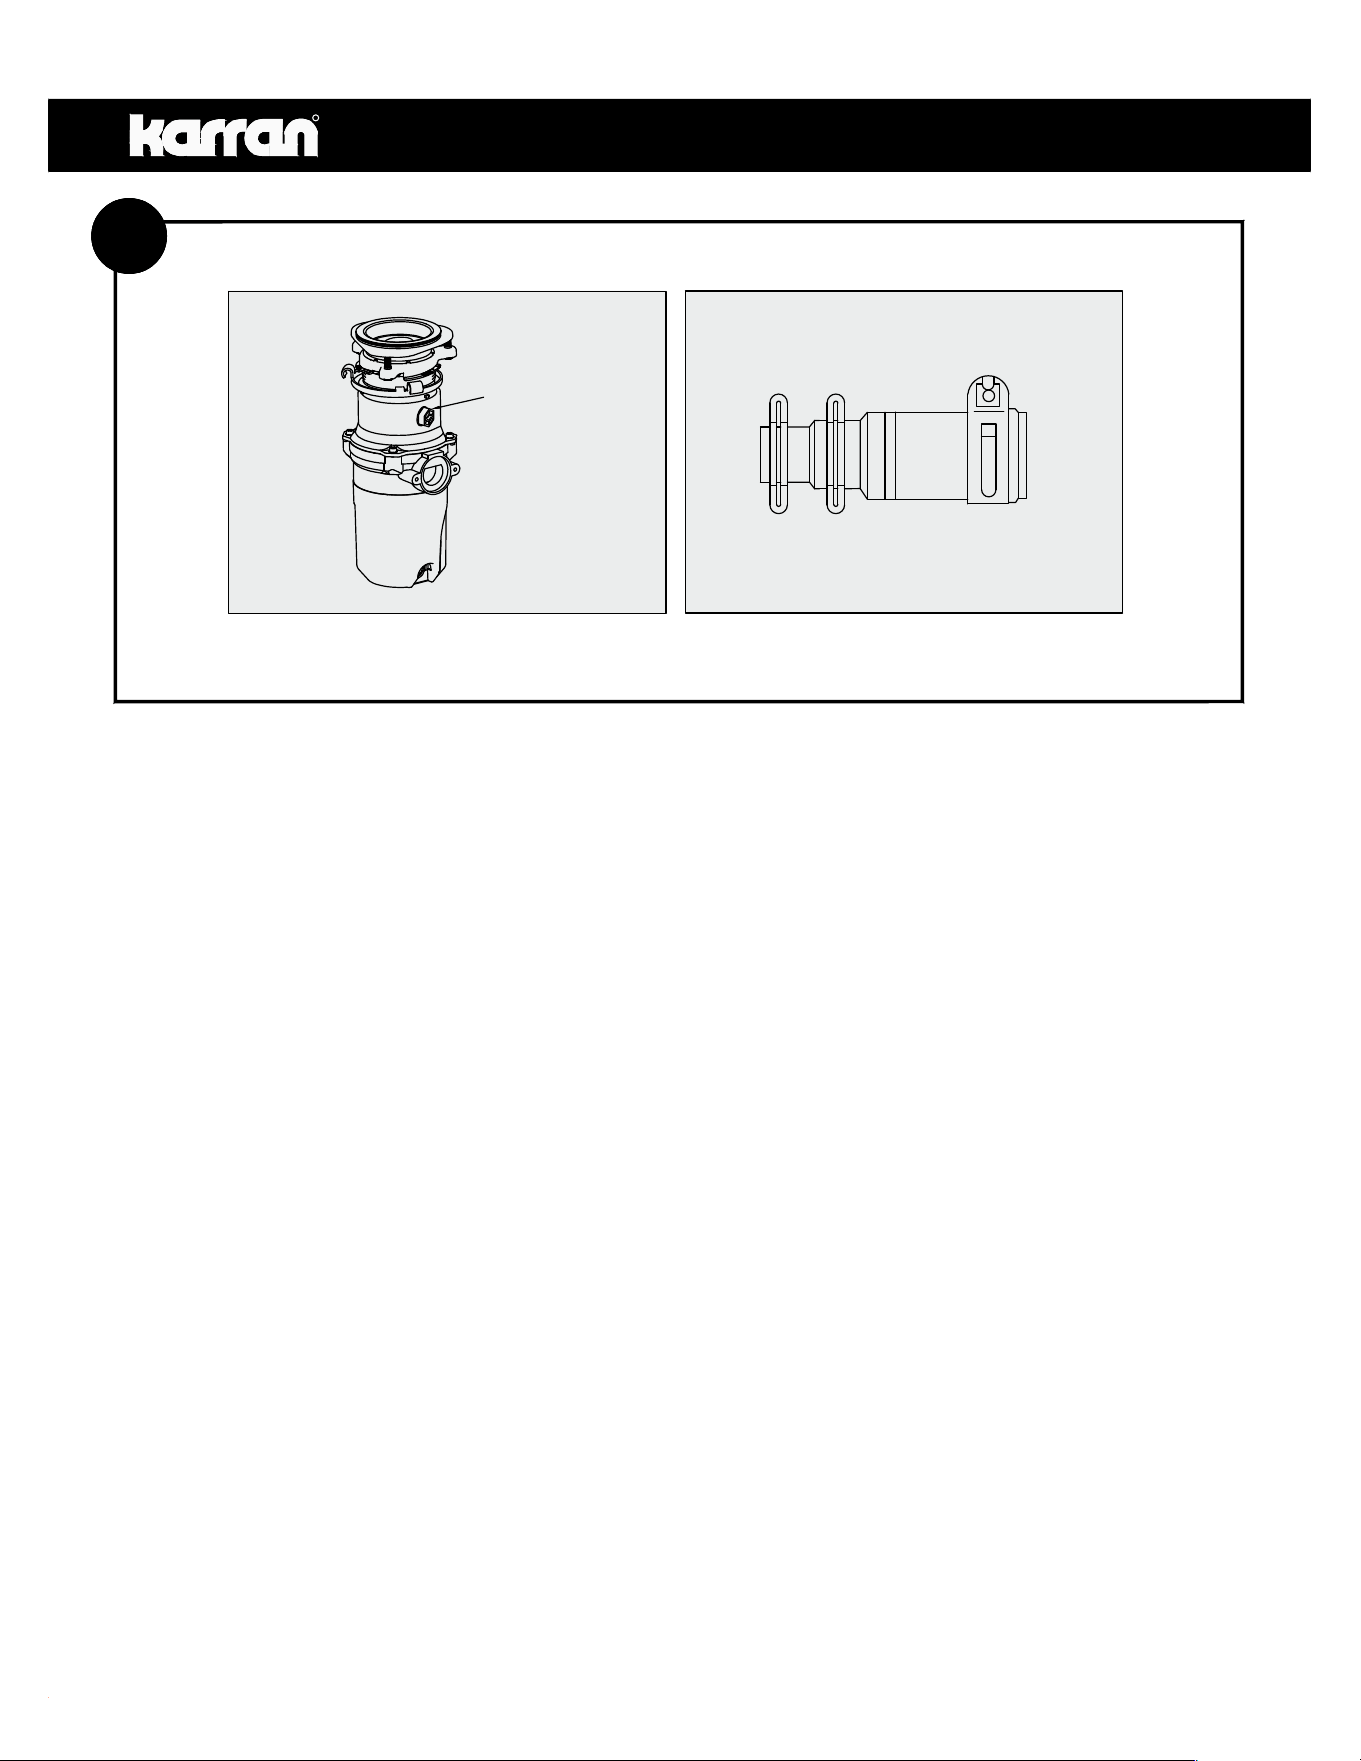
Dishwasher Connection
If you are utilizing a dishwasher, complete the following procedure. If dishwasher is not to be
connected go on to section 3.
A. Unthread the disposal plug (KPGDP01) on the inner body (see 2A).
B. Connect dishwasher hose using the dishwasher connector with o-ring (KPGDDC01). If the
hose size is different, you will need the provided dishwasher connector kit (KPGDDCK01)
(see 2B). There are 3 sizes options in the connector - 21mm, 26mm and 31mm. Make sure
all plumbing connections are tight and in accordance with all plumbing codes and ordinances.
2A

R
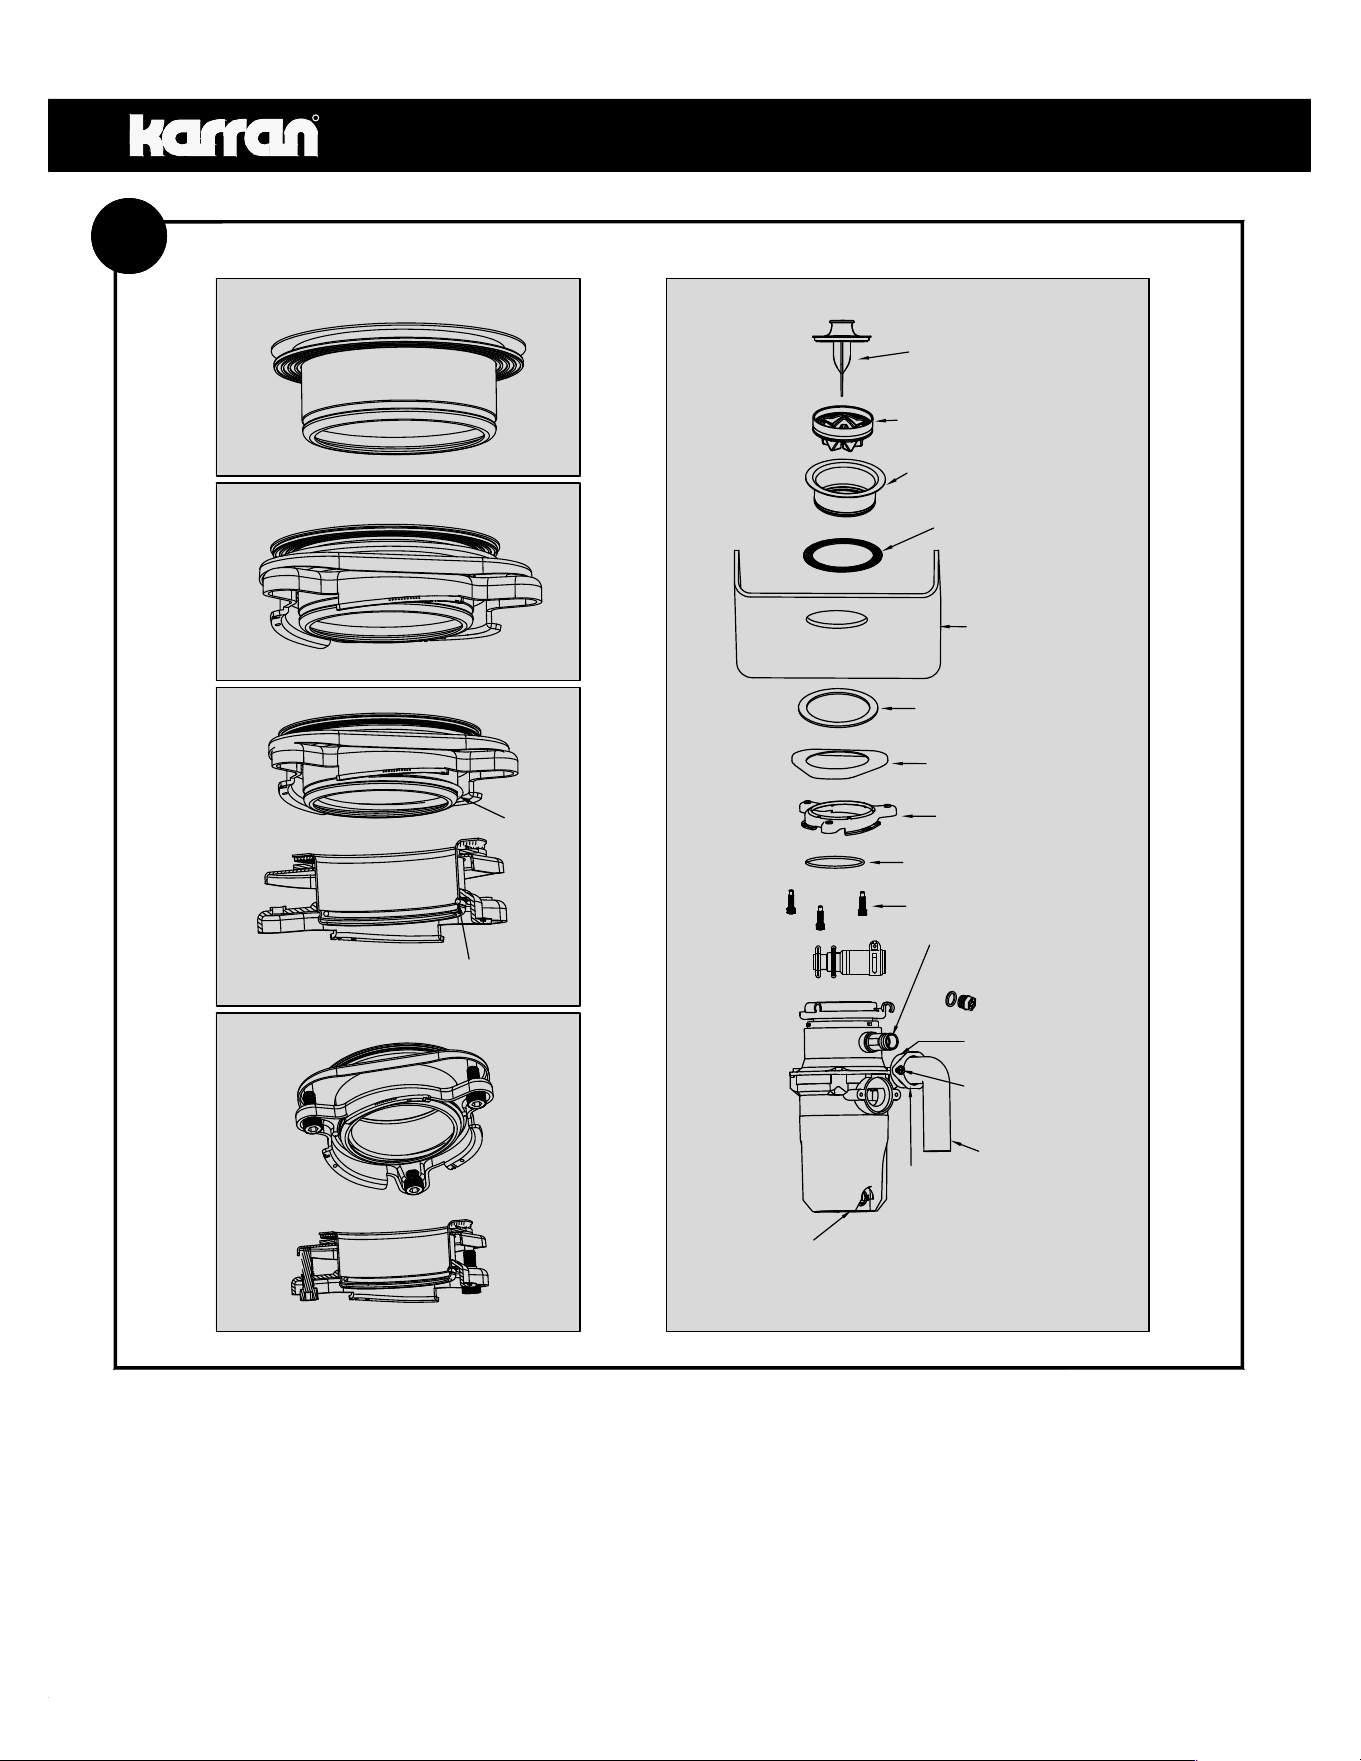
6
READ COMPLETELY BEFORE STARTING
NOTE: Pay close attention to the order of mount assembly parts, as they have been correctly assembled
by the factory. Also, reference the cushion mount detail in illustration 3D below for the proper orientation of
the cushion mount.
NOTE: Try practicing this assembly before you get under the sink to get the “feel” of how the parts fit
together.
A. Disassemble mount assembly from disposer by turning mounting ring (KPGDMR01) to the left
(counterclockwise) and remove.
B. Raise mounting ring (KPGDMR01) toward top of sink flange (KPGDSF01). Remove mounting seal
ring. Remove mounting ring. You may want to practice installing the mounting seal ring at this point
before you are under the sink. See paragraph H. Also see the “Important Notice: Mounting Seal Ring
Detail.”
C. Unscrew mounting nut from sink flange (KPGDSF01) and remove fiber washer (KPGDFW01). You
are now left with sink flange and rubber washer (KPGDRW01).
D. The rubber washer (KPGDRW01) is used instead of plumbers putty with stainless steel sinks. Other
sinks will require putty.
E. If no putty is used, insert sink flange (KPGDSF01) through rubber washer (KPGDRW01) into sink
opening. Do not rotate sink flange once it is seated.
F. If you use putty instead of the washer, form a ring around underside of sink flange. Insert flange
into sink opening, press down hard to squeeze out excess putty. From under sink, trim off excess
putty flush with bottom edge of sink opening.
G. From underneath sink, slip fiber washer (KPGDFW01) onto exposed sink flange (KPGDSF01) (see
3A). With arrows pointing up, insert backup flange (KPGDBF01) and mounting ring (KPGDMR01)
onto the sink flange (see 3B). Install the snap ring (KPGDSR01) onto the sink flange (see 3C). Hand
tighten the screws until the sink flange will not move. Tighten mounting screws with the included hex
wrench (KPGDHW01) (see 3D). At this point you may want to insert stopper (KPGDDS01) in sink
and fill with water to check sink flange seal and insure there are no leaks.
H. Place mounting ring (KPGDMR01) over sink flange (KPGDSF01) and hold in place while installing
mounting seal ring (large side down) so the groove on the inside of mounting seal ring fits over lip on
sink flange, similar to putting the lid on a plastic container (see 3B, 3C & 3D). Please read important
notice below.
Important Notice: Mounting Seal Ring Detail
When the mounting seal ring is installed correctly, the lip of the sink flange (KPGDSF01) fits into the
groove on the inside of the mounting seal ring and mounting ring can be pulled downward over mounting
seal ring and will be free to rotate. The bottom bead of the mounting seal ring acts as a gasket between
the bottom of the sink flange and the top of the disposer. See illustration 3D.
R
7
SINK FLANGE
KPGDSF01
STOPPER
KPGDDS01
REMOVABLE SPLASH
GUARD KPGDSG01
SINK
RUBBER WASHER
KPGDRW01
FIBER WASHER
KPGDFW01
ELBOW GASKET
KPGDDMK01
DRAIN ELBOW
MOUNT SCREWS
KPGDDMK01
DRAIN ELBOW
KPGDDE01
ELBOW
FLANGE
KPGDDMK01
ENDBELL
(ELECTRICAL
CONNECTIONS)
3A
3B
3C
3D
截面XSEC0001-XSEC0001
BACKUP FLANGE
KPGDBF01
MOUNTING RING
KPGDMR01
SNAP RING
KPGDSR01
MOUNTING SCREWS
KPGDMR01
DISHWASHER
CONNECTOR KPGDDC01
SNAP
RING
SNAP
RING
Installation of Mounting Assembly
A. Install the sink flange (KPGDSF01) and rubber washer (KPGDRW01) (see 3A).
B. Install the fiber washer (KPGDFW01), backup flange (KPGDBF01) and mounting ring (KPGDMR01)
(see 3B).
C. Install the snap ring (KPGDSR01) (see 3C).
D. Screw in the 3 mounting screws (KPGDMR01) from the bottom (see 3D).
3
DISHWASHER
CONNECTOR
KIT KPGDDCK01
GARBAGE DISPOSAL
PLUG KPGDP01
R
8
4A 4B
4C
WIRE
NUTS
GROUND
RESET
BUTTON
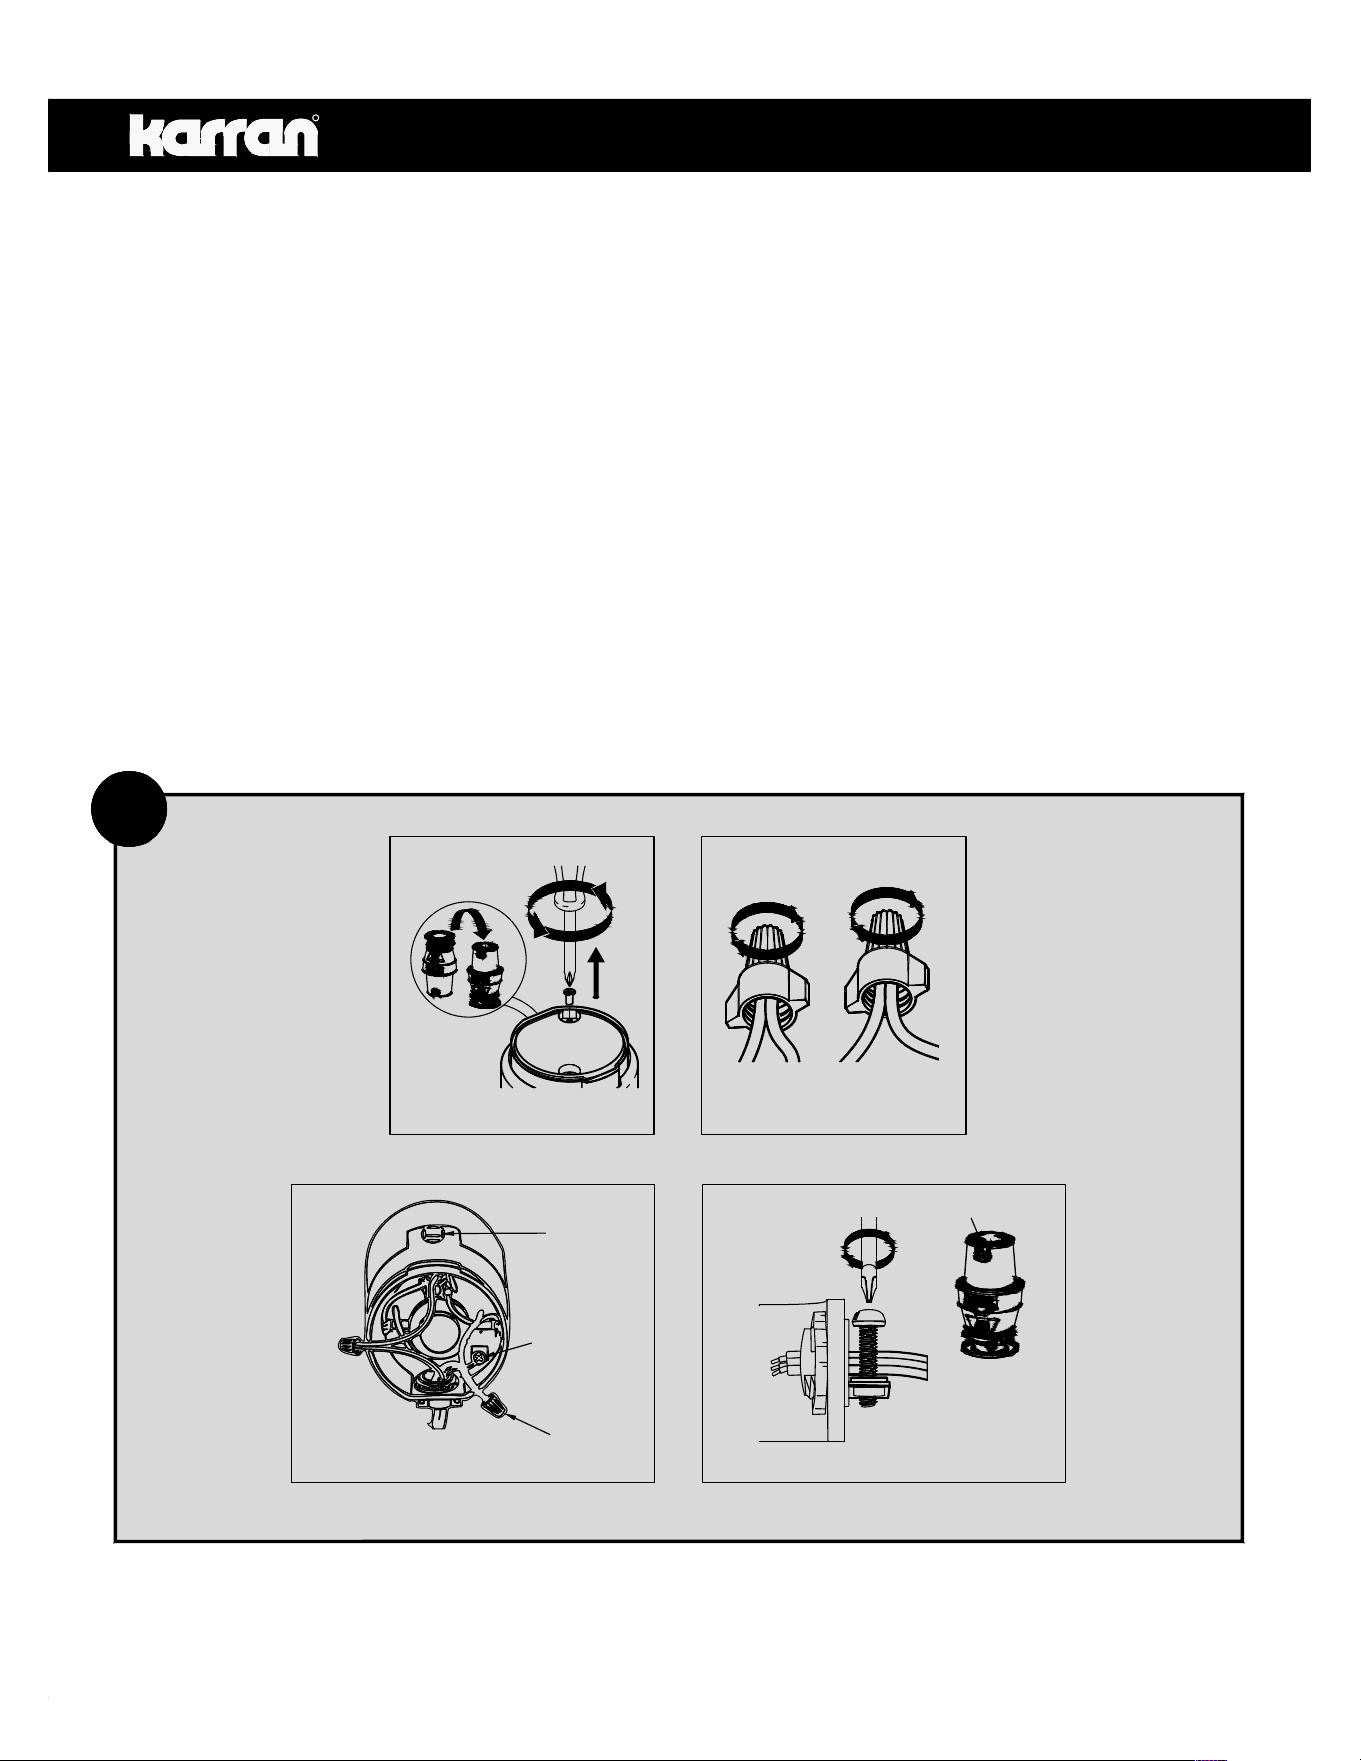
Electrical Connections
IF YOU ARE NOT FAMILIAR WITH ELECTRICAL POWER AND PROCEDURES, CALL A QUALIFIED
ELECTRICIAN.
WARNING: Improper connection of the equipment grounding conductor can result in a risk of electric
shock. Check with a qualified electrician or service man if you are in doubt as to whether the appliance is
properly grounded. Do not modify the plug provided with the appliance if it will not fit the outlet, have a
proper outlet installed by a qualified electrician.
The garbage disposal comes with the power cord installed. To remove the power cord and install the
disposal hardwired please perform the following steps:
A. After turning off the power supply, unscrew the two screws and remove the end plate (see 4A).
B. Unscrew the wire nuts from the black and white wires (see 4B).
C. Remove the ground nut and remove the green circular wire piece over the screw (see 4C).
D. Loosen the strain relief connector on the side of the disposal and remove the wires through the
connector (see 4D).
4
4D
Connector
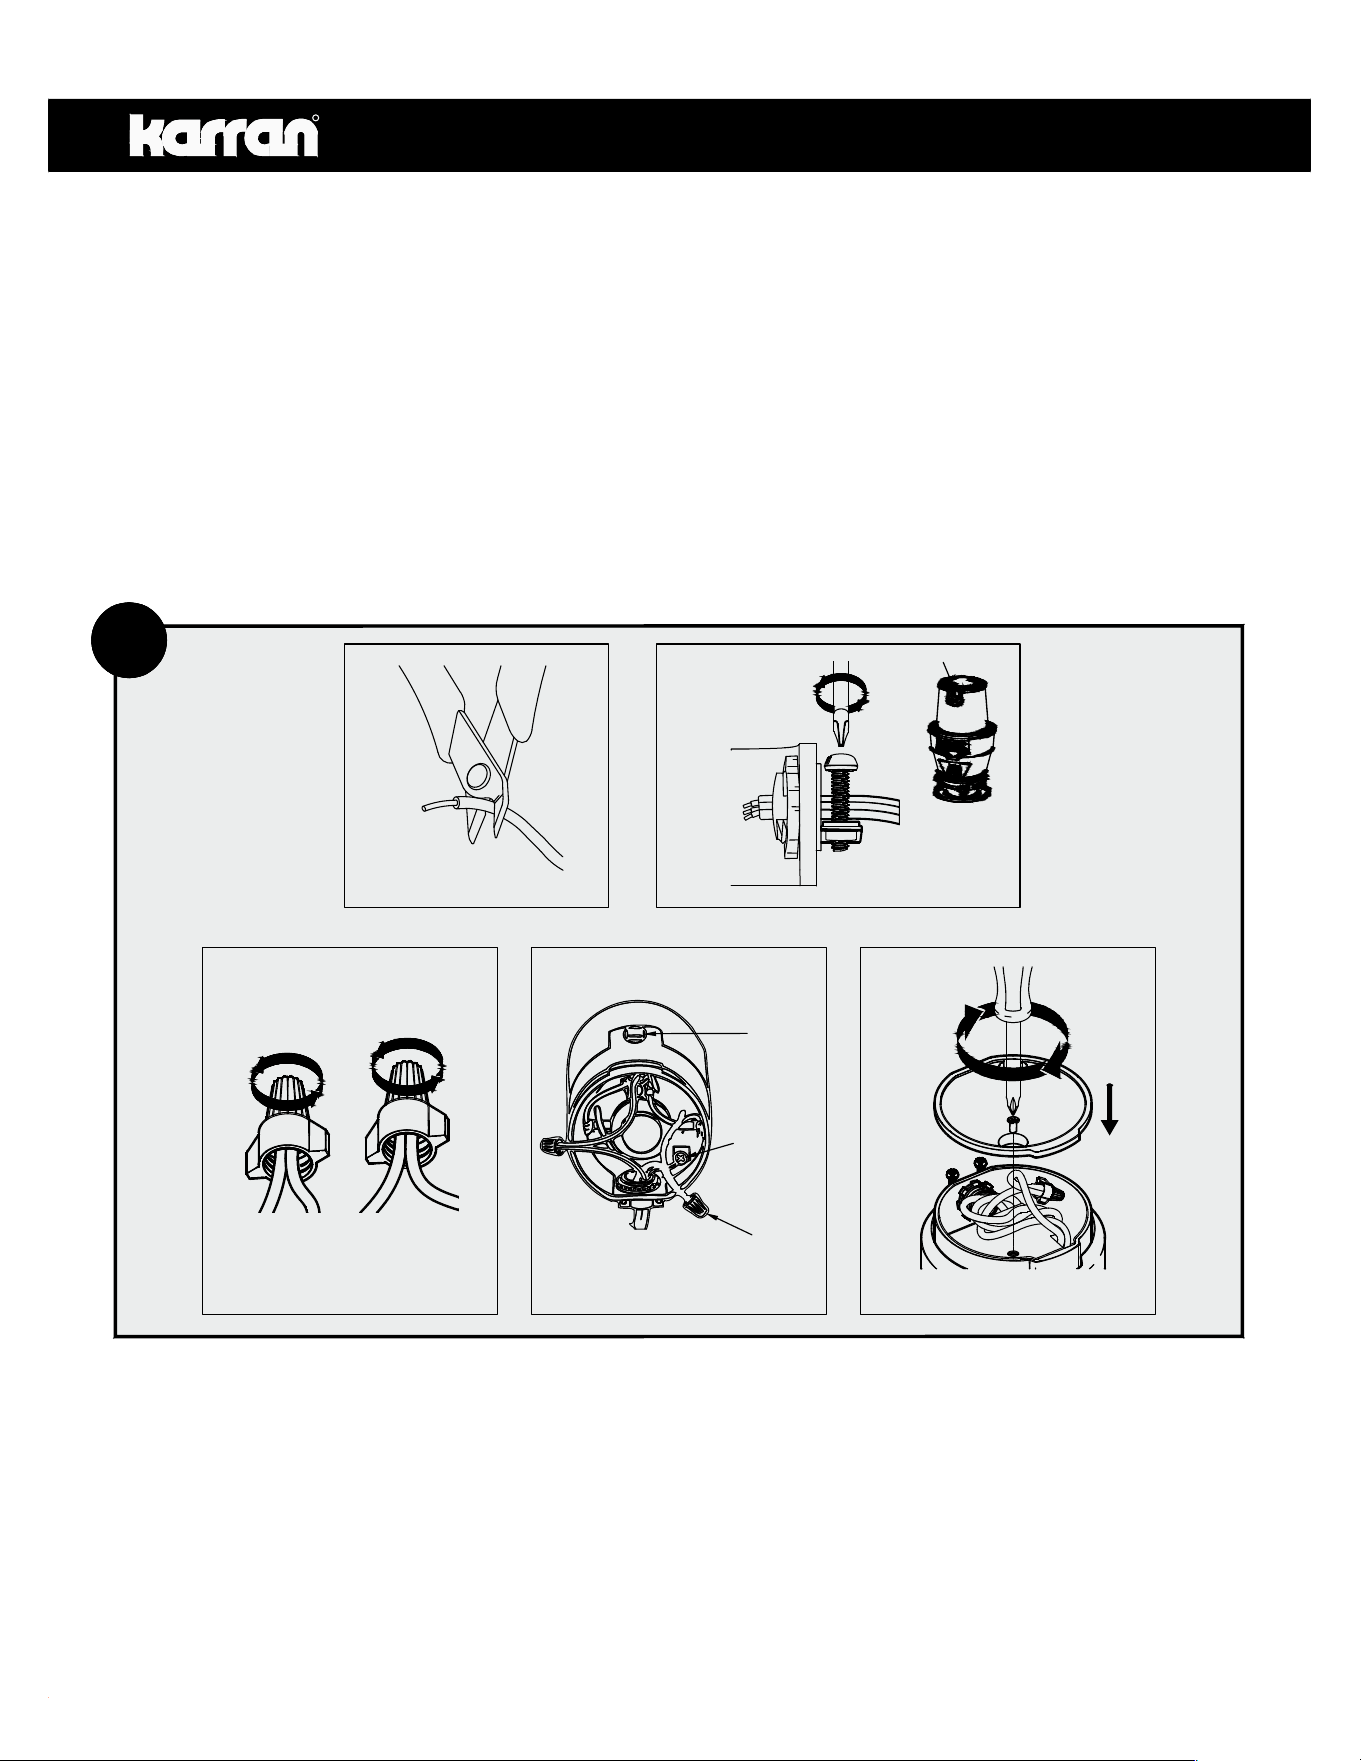
4E 4F
WIRE
NUTS
GROUND
RESET
BUTTON
4G
4H 4I
R
9
Now you are ready to hardwire.
E. Strip the black and white insulation from the end of each wire (see 4E).
F. Insert the wires through the strain relief connector, leaving enough wire through to work with.
Tighten the connector (see 4F).
G. Connect the disposal wire leads (black and white) to the corresponding wire leads of the power
supply cable (see 4G).
H. Remove the ground nut and place the green circular wire piece over the screw. Lock it in place by
tightening the ground nut back on (see 4H).
I. Set the wires back into the endbell and place the end plate back on. Tighten the two bolts
(see 4I).
4
Connector
RUBBER
WASHER
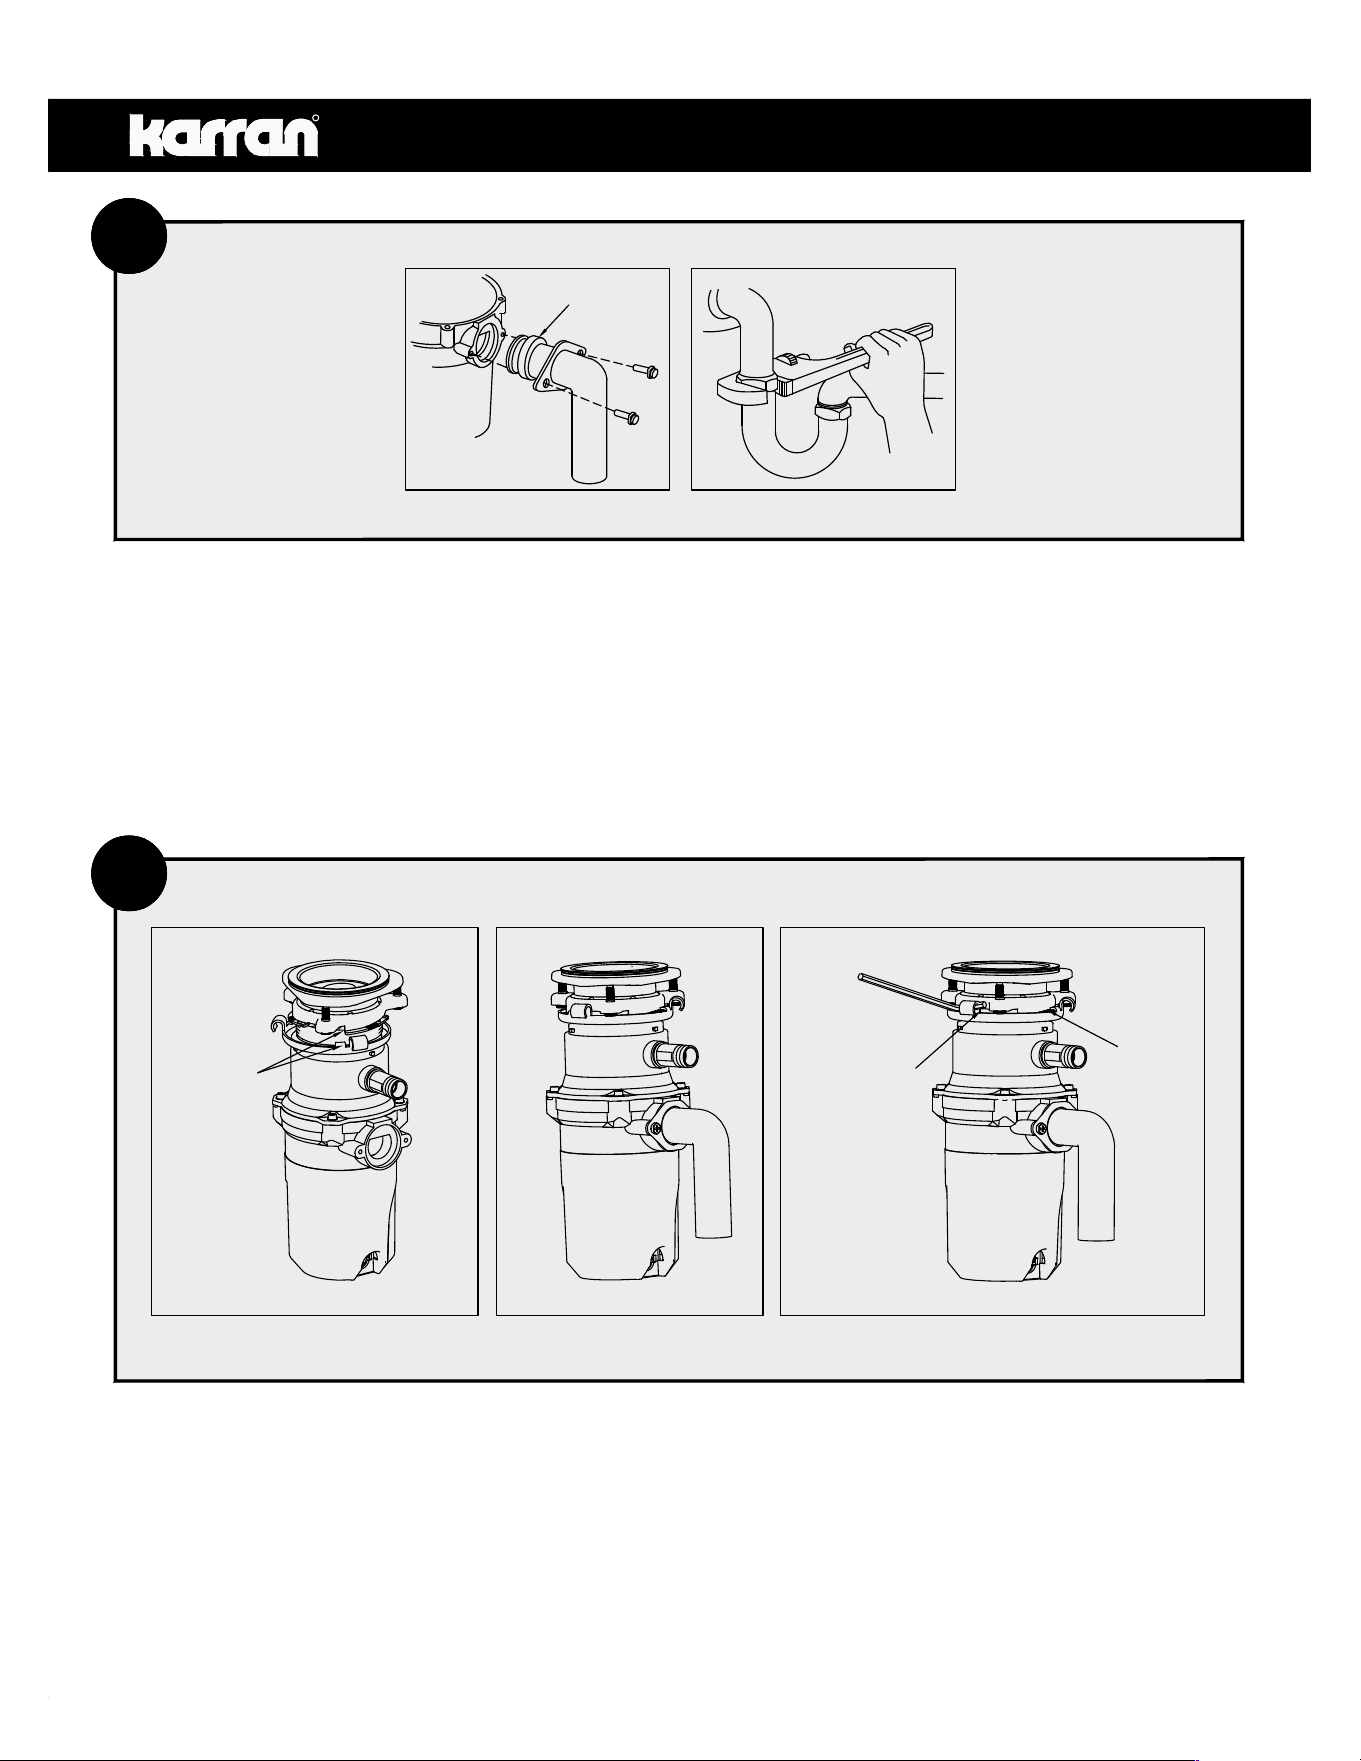
5A 5B
6B 6C6A
MOUNTING
RING
STOP
POINT
LINE UP
HERE
R
10
5
Attaching Drain Elbow
A. Connect drain elbow (KPGDDE01) to the disposer (see 5A), proceed to step 6 and then connect
bottom of the elbow by tightening the slip nut (see 5B).
B. If you are connecting to a dishwasher, return to section 2B. If not, make sure all plumbing
connections are tight and in accordance with all plumbing codes and ordinances. Run water and
check for leaks.
6
Connecting Disposer to Mount Assembly
A. Line up disposer under mounting assembly (see 6A).
B. Turn mounting ring (KPGDMR01) and disposer until drain elbow (KPGDDE01) lines up with trap
(see 6B).
C. Turn mounting ring (KPGDMR01) to the right (clockwise) until it locks up tight (see 6C).
7A
R
11
7
Operating Instructions
The Anti-Jam Swivel Impellers make a clicking sound as they swing into place. This indicates normal
operation.
A. Remove sink stopper (KPGDDS01). Turn on a medium flow of cold water and check for leaks.
B. Turn switch to ON position; your motor is turning at full speed and ready to use.
C. Scrape in food waste. Down the drain go table scraps, peelings, rinds, seeds, pits, small bones and
coffee grounds. To speed up food waste disposal, cut or break up large bones, rinds and cobs.
Large bones and fibrous husks require considerable grinding time and are more easily thrown
away with other trash. Do not be alarmed that the disposer slows down while grinding. The
disposer is actually increasing torque (grinding power) and is operating under normal conditions.
D. Before turning disposer off, let water and disposer run for approximately 15 seconds after
shredding stops. This assures that all waste is thoroughly flushed through trap and drain.
E. It is not recommended to use hot water while running disposer. Cold water will keep waste and
fats solid so disposer can flush away particles.
TIPS FOR SUCCESSFUL OPERATION
A. Be sure disposer is empty before using your dishwasher so it may drain properly.
B. You may want to leave the stopper (KPGDDS01) in the drain when not in use to prevent utensils and
foreign objects from falling into the disposer.
C. Your disposer is ruggedly built to give you many years of trouble free service. It will handle all
normal food wastes, but it will NOT grind or dispose of such items as plastic, tin cans, bottle caps,
glass, china, leather, cloth, rubber, string, clam and oyster shells, aluminum foil or feathers.
R
12
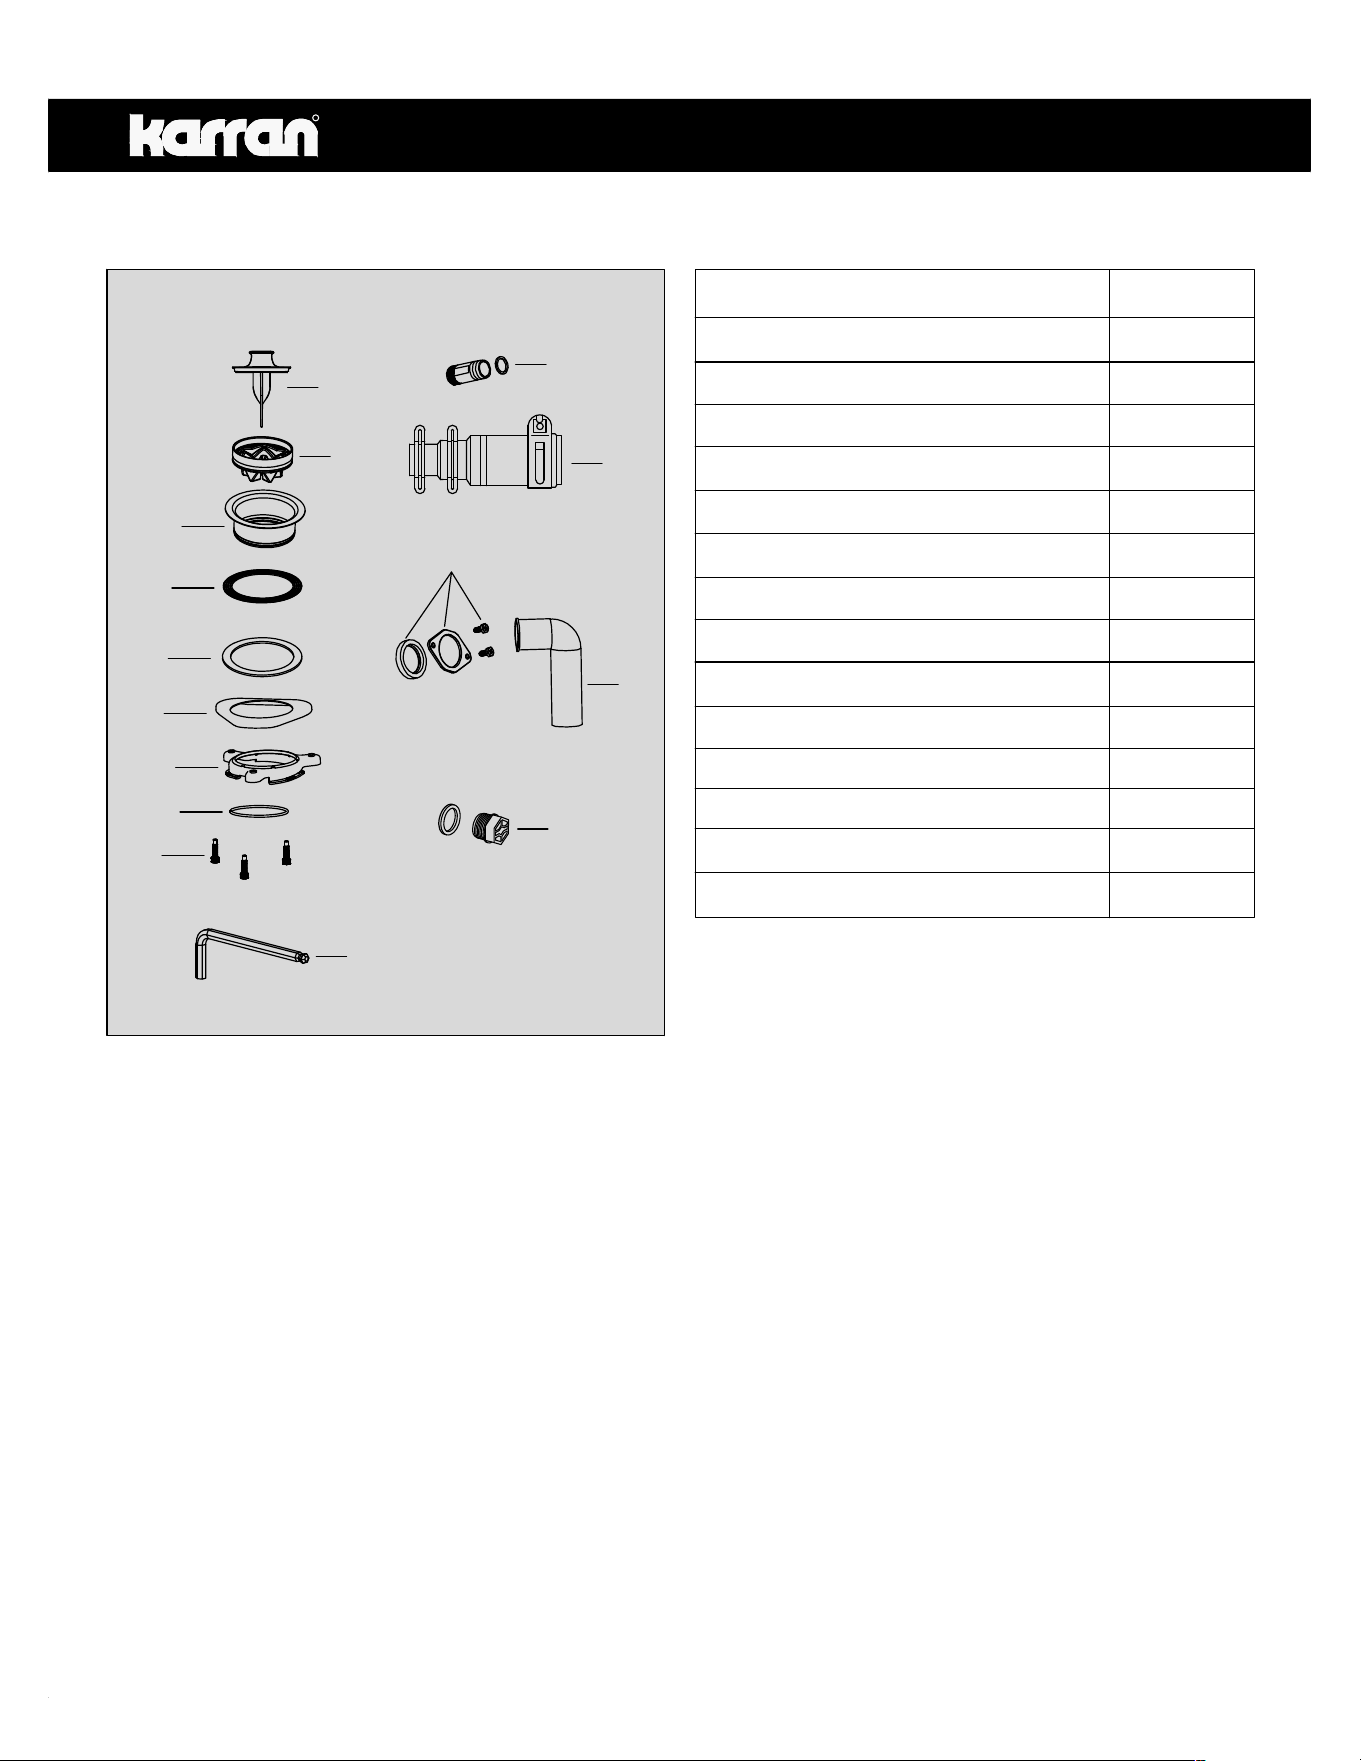
Description Item No.
KPGDSF01
Replacement parts
KPGDRW01
KPGDFW01
KPGDBF01
KPGDMR01
KPGDSR01
KPGDDMK01
KPGDP01
KPGDHW01
KPGDDCK01
KPGDSG01
KPGDDS01
KPGDDC01
KPGDDE01
1. Sink Flange
2. Rubber Washer
3. Fiber Washer
4. Backup Flange
6. Snap Ring
7. Drain Elbow Mounting Kit
8. Drain Elbow
9. ABS Dishwasher Connector w/ O-Ring
10. Drain Stopper/Pusher
5. Mounting Ring and Screws x 3
1
2
3
4
5
6
5
7
8
9
10
截面XSEC0001-XSEC0001
11
11. Splash Guard
12. Dishwasher Connector Kit
13
13. Hex Wrench
12
14
* Garbage disposal plug comes already installed
14. Garbage Disposal Plug*
Troubleshooting
Before seeking repair or replacement, we recommend that you review the following:
LOUD NOISES: (Other than those during grinding of small bones and fruit pits): These are usually caused
by accidental entry of a spoon, bottle cap or other foreign objects. To correct this, turn off electrical switch
and water. After disposer has stopped, remove *splash guard (KPGDSG01), remove object with long
handled tongs, and replace *splash guard.
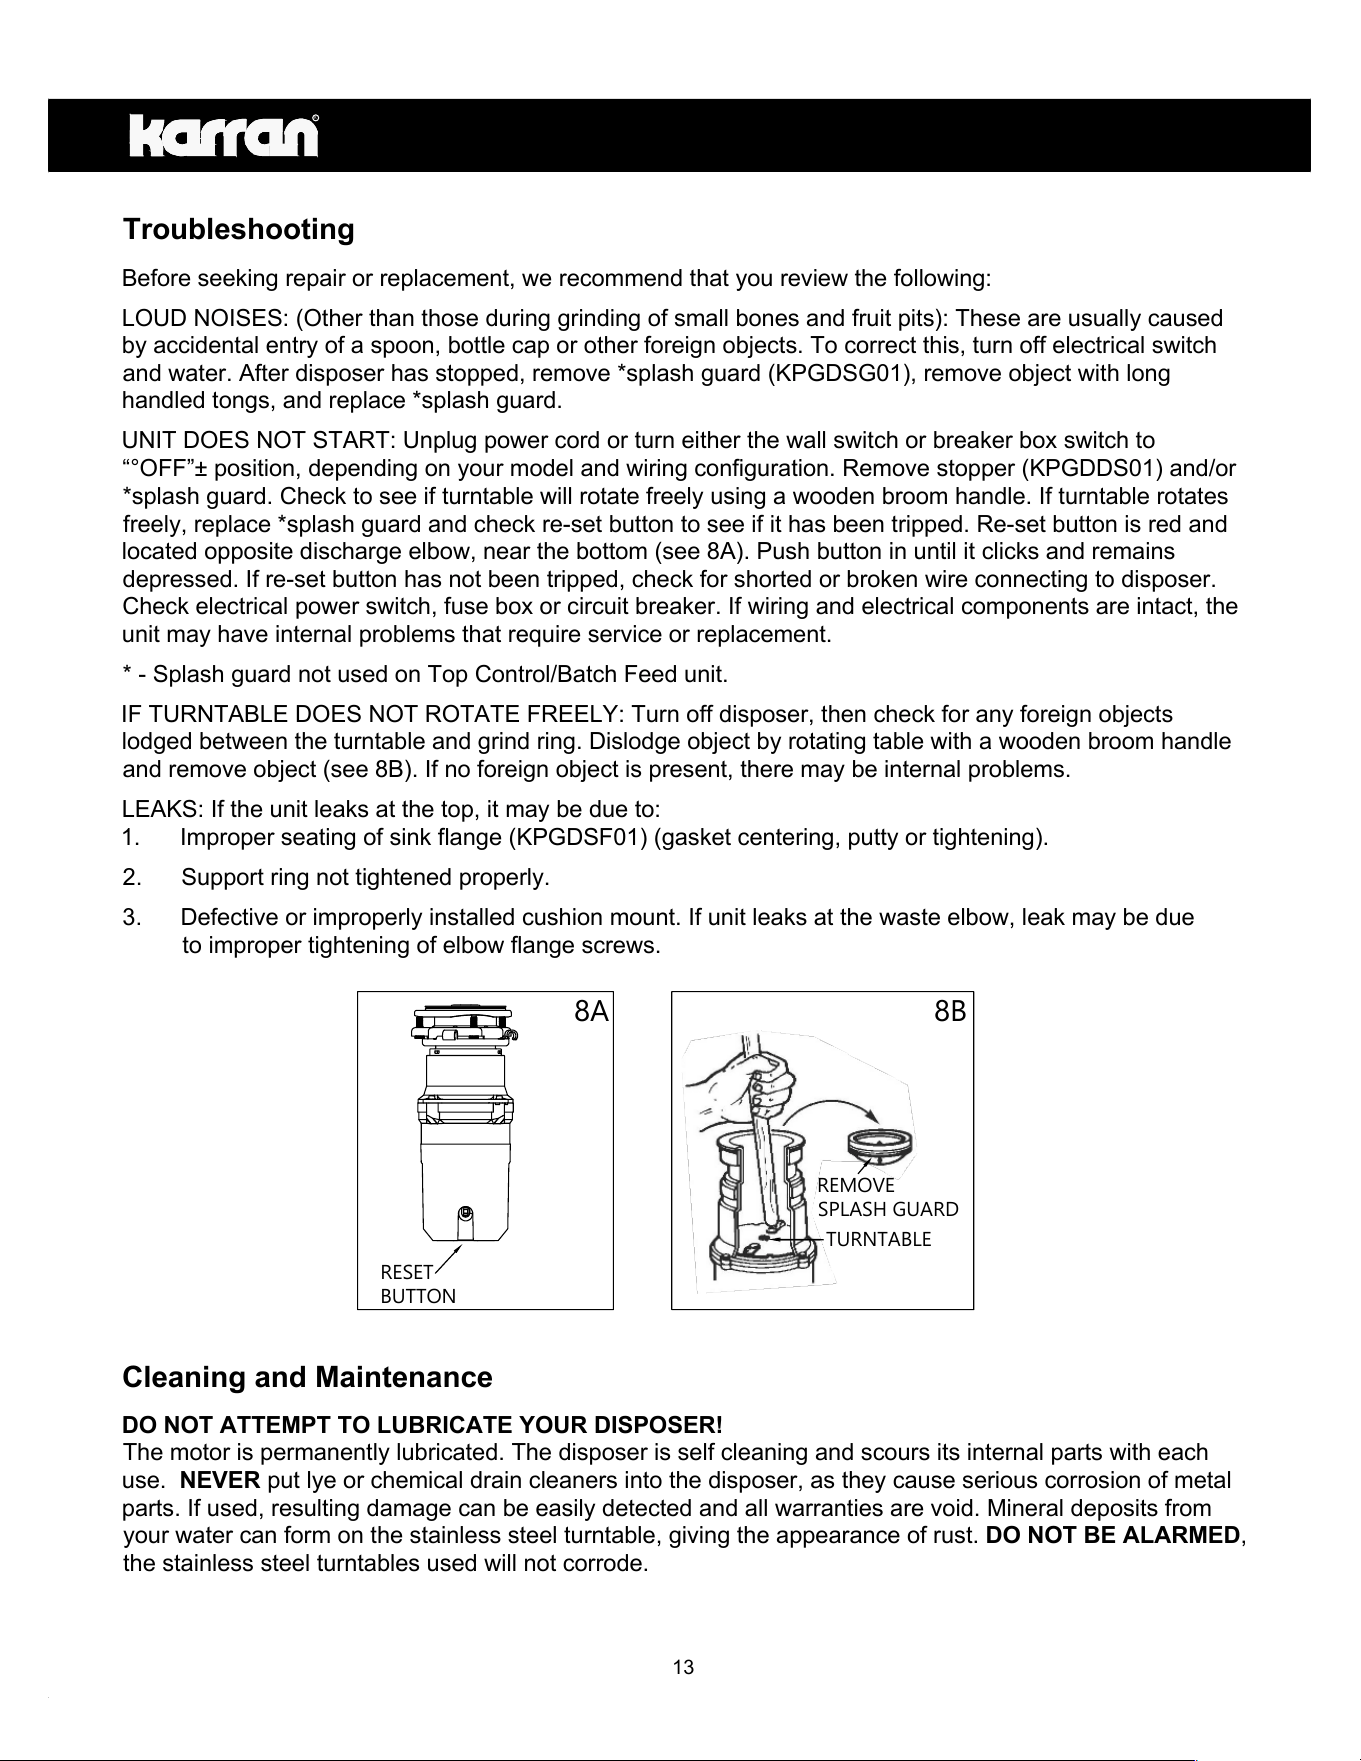
UNIT DOES NOT START: Unplug power cord or turn either the wall switch or breaker box switch to
“°OFF”± position, depending on your model and wiring configuration. Remove stopper (KPGDDS01) and/or
*splash guard. Check to see if turntable will rotate freely using a wooden broom handle. If turntable rotates
freely, replace *splash guard and check re-set button to see if it has been tripped. Re-set button is red and
located opposite discharge elbow, near the bottom (see 8A). Push button in until it clicks and remains
depressed. If re-set button has not been tripped, check for shorted or broken wire connecting to disposer.
Check electrical power switch, fuse box or circuit breaker. If wiring and electrical components are intact, the
unit may have internal problems that require service or replacement.
* - Splash guard not used on Top Control/Batch Feed unit.
IF TURNTABLE DOES NOT ROTATE FREELY: Turn off disposer, then check for any foreign objects
lodged between the turntable and grind ring. Dislodge object by rotating table with a wooden broom handle
and remove object (see 8B). If no foreign object is present, there may be internal problems.
LEAKS: If the unit leaks at the top, it may be due to:
1. Improper seating of sink flange (KPGDSF01) (gasket centering, putty or tightening).
2. Support ring not tightened properly.
3. Defective or improperly installed cushion mount. If unit leaks at the waste elbow, leak may be due
to improper tightening of elbow flange screws.
8A
TURNTABLE
8B
Cleaning and Maintenance
DO NOT ATTEMPT TO LUBRICATE YOUR DISPOSER!
The motor is permanently lubricated. The disposer is self cleaning and scours its internal parts with each
use. NEVER put lye or chemical drain cleaners into the disposer, as they cause serious corrosion of metal
parts. If used, resulting damage can be easily detected and all warranties are void. Mineral deposits from
your water can form on the stainless steel turntable, giving the appearance of rust. DO NOT BE ALARMED,
the stainless steel turntables used will not corrode.
REMOVE
SPLASH GUARD
RESET
BUTTON
R
13

R
14
Warranty - 5 Year Limited
Products Subject to this Limited Warranty
This Warranty applies only to Food Waste Disposer models KGD230 and KGD250 manufactured and sold by Karran USA (the “Company”) (the “Products”).
Who is Entitled to this Warranty
The Company grants this Warranty solely in favor of the original purchaser of the Products (the “Original Purchaser”), but to no other person or entity whatsoever. No person or entity, other than the Original Purchaser, shall
have any right to assert any claim under this Warranty, or otherwise, in connection with the Products. This Warranty is personal to the Original Purchaser and may not be transferred by the Original Purchaser to any other
person or entity, by contract, operation of law, transfer of the property into which the Products are installed, or otherwise.
Commercial Warranty
The Company warrants its Products for a period of (1) year to commercial purchasers of Products used in industrial, commercial and business applications.
Length of this Warranty
This Warranty shall begin on the date the Products are purchased from an authorized Company dealer. The design and manufacture of the product are warranted to be free from defects in material and workmanship under
normal usage for a period of five (5) years from the date of purchase (such period of time, the “Warranty Period”), after which this Limited Warranty shall expire and be of no further force or effect. Proof of purchase is required
for all warranty claims. THIS LIMITED WARRANTY IS IN LIEU OF ALL OTHER WARRANTIES, EXPRESS OR IMPLIED, INCLUDING BUT NOT LIMITED TO THE IMPLIED WARRANTIES OF FITNESS FOR A PARTICULAR
PURPOSE AND MERCHANTABILITY.
Please note that some states/provinces (including Quebec) do not allow limitations on how long an implied warranty lasts, so the below limitations may not apply to you. TO THE MAXIMUM EXTENT PERMITTED
BY APPLICABLE LAW, ANY IMPLIED WARRANTY, INCLUDING THE IMPLIED WARRANTIES OF MERCHANTABILITY AND OF FITNESS FOR A PARTICULAR PURPOSE, IS LIMITED TO THE STATUTORY PERIOD
OR THE DURATION OF THIS WARRANTY, WHICHEVER IS SHORTER.
What is Warranted
Subject to the conditions and limitations set forth in this Warranty, the Company warrants to the Original Purchaser that during the Warranty Period the Products will be free from manufacturing and design defects when used
under normal conditions and maintained properly.
What the Company Will Do
In the event that any Product fails to comply with this Warranty, the Company will, free of any cost to you:
1. Provide a replacement part, or component that proves to be defective, or
A. If the product cannot be economically repaired, replace the product with the same or a comparable product, or
B. If the same or a comparable model product is not available, make a reasonable monetary adjustment, taking into account the age of the defective product; provided that
C. In no event will our liability exceed the price you paid for the product (including tax and shipping).
2. We will pay all shipping costs of returning a product to us for inspection (if we make that request) and of sending replacement parts, components, or products to you.
THE FOREGOING DESCRIBES THE COMPANY'S SOLE LIABILITY, AND THE ORIGINAL PURCHASER'S SOLE REMEDY, FOR ANY BREACH OF WARRANTY IN RESPECT OF THE PRODUCTS. THE COMPANY SHALL
NOT BE LIABLE FOR, ANY SPECIAL, INCIDENTAL OR CONSEQUENTIAL DAMAGES (INCLUDING LABOR CHARGES TO REPAIR, REPLACE, INSTALL OR REMOVE THIS PRODUCT), WHETHER ARISING OUT OF
BREACH OF ANY EXPRESS OR IMPLIED WARRANTY, BREACH OF CONTRACT, TORT, OR OTHERWISE.
How to Make a Claim
To make a claim under this Warranty, the Original Purchaser must notify the Company in writing or by phone of any claimed defect in a Product. Such notice must be given promptly following discovery of the claimed defect and
in any event prior to the expiration of the applicable Warranty Period. The Original Purchaser must submit with such notice proof of purchase and proof of the date of purchase of the Product claimed to be defective. Notification
shall be provided to:
Email: warranty@karran.com USPS
Phone: 866-452-7726 Karran USA
Attention: CLAIMS
PO Box 667
Vincennes, IN 47591
The Company shall then promptly inspect, by means of digital photography or video supplied by the customer, the claimed defect and if such examination does disclose a defect covered by this warranty, shall, within thirty (30)
days after inspection replace or repair the defective Product (as it shall elect in its sole and absolute discretion), subject to the terms set forth above.
Limitations
1. The Company shall not be liable under this Warranty for any of the following:
A. Accidents; abuse; misuse; negligence; lack of or improper cleaning or maintenance; damage from incorrect installation or mounting (other than by an authorized service professional) such as electrical connections due
to improper installation, leaks at the sink flange, dishwasher inlet or discharge elbow, or damage from excessive torqueing of manufacturer's screws; any operation inconsistent with Karran's recommendations and
instructions that are generally available in Karran's Product Owner's Guide.. NOTE: to reduce the risk of damage to the Products and personal injury, do not put into the Product items such as large whole bones, clams
or oyster shells, whole corn husks, glass, china, plastic, metal such as bottle caps, tin, aluminum foil, utensils, hot grease, or other hot liquids. READ INSTALLATION AND USE INSTRUCTIONS CAREFULLY BEFORE
INSTALLATION AND USE. AND NOTE further: DO NOT attempt to lubricate your Product and NEVER put lye or caustic chemical drain cleaners into the Product, as they are considered improper maintenance and
may cause corrosion of metal parts which damage will be detectable and not covered by this warranty.
D.Excessive wear beyond normal wear and tear from private household use; damage from fire, flood, or other acts of God.
E. Outdoor installations or use with yard or planting debris or soil.
F. Repair or replacement service performed by other than by an authorized service professional.
G.Removal of any other materials (such as sinks, counters, tiles, flooring or other plumbing fixtures), reinstallation, refinishing, or additional labor if and to the extent required or provided by an authorized service
professional in order to repair or replace the Product or part under warranty.
H.Installations in commercial, industrial, or investment property, or in multi-resident facilities except to purchasers who qualify as Residential Consumers or Commercial Holders, as defined above.
I. Damage to the Products caused by alteration after completion of their installation by anyone who is not authorized by the Company in writing, whether such alteration be by structural additions, changes, replacements
or by equipment installation.
J. This warranty does not cover Products that were discontinued when purchased or display Products, whether such Products were purchased at discount outlets, unauthorized dealers, and/or sold on clearance. This
warranty does not cover any free gifts included with purchase.
2. IN NO EVENT SHALL THE COMPANY BE LIABLE FOR CONSEQUENTIAL OR INCIDENTAL DAMAGES OF ANY KIND, INCLUDING, BUT NOT LIMITED TO, ANY DAMAGE TO THE PROPERTY IN WHICH A
PRODUCT IS INSTALLED, ITS CONTENTS OR ANY PERSON THEREIN. NO FIELD REPRESENTATIVE, DISTRIBUTOR OR DEALER OF THE COMPANY IS AUTHORIZED TO MAKE ANY CHANGE OR MODIFICATION
TO THIS LIMITED WARRANTY. SOME STATES/PROVINCES (INCLUDING QUEBEC) MAY NOT ALLOW LIMITATIONS ON OR THE EXCLUSION OF INCIDENTAL OR CONSEQUENTIAL DAMAGES, SO THE ABOVE
EXCLUSIONS MAY NOT APPLY TO YOU.
The invalidity, illegality or unenforceability of any one or more provisions of this Limited Warranty shall in no way affect or impair the validity, legality or enforceability of the remaining provisions, which shall remain in full force
and effect.
Legal Remedies
This warranty gives you specific legal rights, and you may also have other rights which vary from state to state and province to province. 01-29-2025

R
15
Warranty - 10 Year Limited
Products Subject to this Limited Warranty
This Warranty applies only to Food Waste Disposer models KGD270 and KGD290 manufactured and sold by Karran USA (the “Company”) (the “Products”).
Who is Entitled to this Warranty
The Company grants this Warranty solely in favor of the original purchaser of the Products (the “Original Purchaser”), but to no other person or entity whatsoever. No person or entity, other than the Original Purchaser, shall
have any right to assert any claim under this Warranty, or otherwise, in connection with the Products. This Warranty is personal to the Original Purchaser and may not be transferred by the Original Purchaser to any other
person or entity, by contract, operation of law, transfer of the property into which the Products are installed, or otherwise.
Commercial Warranty
The Company warrants its Products for a period of (1) year to commercial purchasers of Products used in industrial, commercial and business applications.
Length of this Warranty
This Warranty shall begin on the date the Products are purchased from an authorized Company dealer. The design and manufacture of the product are warranted to be free from defects in material and workmanship under
normal usage for a period of ten (10) years from the date of purchase (such period of time, the “Warranty Period”), after which this Limited Warranty shall expire and be of no further force or effect. Proof of purchase is required
for all warranty claims. THIS LIMITED WARRANTY IS IN LIEU OF ALL OTHER WARRANTIES, EXPRESS OR IMPLIED, INCLUDING BUT NOT LIMITED TO THE IMPLIED WARRANTIES OF FITNESS FOR A PARTICULAR
PURPOSE AND MERCHANTABILITY.
Please note that some states/provinces (including Quebec) do not allow limitations on how long an implied warranty lasts, so the below limitations may not apply to you. TO THE MAXIMUM EXTENT PERMITTED
BY APPLICABLE LAW, ANY IMPLIED WARRANTY, INCLUDING THE IMPLIED WARRANTIES OF MERCHANTABILITY AND OF FITNESS FOR A PARTICULAR PURPOSE, IS LIMITED TO THE STATUTORY PERIOD
OR THE DURATION OF THIS WARRANTY, WHICHEVER IS SHORTER.
What is Warranted
Subject to the conditions and limitations set forth in this Warranty, the Company warrants to the Original Purchaser that during the Warranty Period the Products will be free from manufacturing and design defects when used
under normal conditions and maintained properly.
What the Company Will Do
In the event that any Product fails to comply with this Warranty, the Company will, free of any cost to you:
1. Provide a replacement part, or component that proves to be defective, or
A. If the product cannot be economically repaired, replace the product with the same or a comparable product, or
B. If the same or a comparable model product is not available, make a reasonable monetary adjustment, taking into account the age of the defective product; provided that
C. In no event will our liability exceed the price you paid for the product (including tax and shipping).
2. We will pay all shipping costs of returning a product to us for inspection (if we make that request) and of sending replacement parts, components, or products to you.
THE FOREGOING DESCRIBES THE COMPANY'S SOLE LIABILITY, AND THE ORIGINAL PURCHASER'S SOLE REMEDY, FOR ANY BREACH OF WARRANTY IN RESPECT OF THE PRODUCTS. THE COMPANY SHALL
NOT BE LIABLE FOR, ANY SPECIAL, INCIDENTAL OR CONSEQUENTIAL DAMAGES (INCLUDING LABOR CHARGES TO REPAIR, REPLACE, INSTALL OR REMOVE THIS PRODUCT), WHETHER ARISING OUT OF
BREACH OF ANY EXPRESS OR IMPLIED WARRANTY, BREACH OF CONTRACT, TORT, OR OTHERWISE.
How to Make a Claim
To make a claim under this Warranty, the Original Purchaser must notify the Company in writing or by phone of any claimed defect in a Product. Such notice must be given promptly following discovery of the claimed defect and
in any event prior to the expiration of the applicable Warranty Period. The Original Purchaser must submit with such notice proof of purchase and proof of the date of purchase of the Product claimed to be defective. Notification
shall be provided to:
Email: warranty@karran.com USPS
Phone: 866-452-7726 Karran USA
Attention: CLAIMS
PO Box 667
Vincennes, IN 47591
The Company shall then promptly inspect, by means of digital photography or video supplied by the customer, the claimed defect and if such examination does disclose a defect covered by this warranty, shall, within thirty (30)
days after inspection replace or repair the defective Product (as it shall elect in its sole and absolute discretion), subject to the terms set forth above.
Limitations
1. The Company shall not be liable under this Warranty for any of the following:
A. Accidents; abuse; misuse; negligence; lack of or improper cleaning or maintenance; damage from incorrect installation or mounting (other than by an authorized service professional) such as electrical connections due
to improper installation, leaks at the sink flange, dishwasher inlet or discharge elbow, or damage from excessive torquing of manufacturer's screws; any operation inconsistent with Karran's recommendations and
instructions that are generally available in Karran's Product Owner's Guide.. NOTE: to reduce the risk of damage to the Products and personal injury, do not put into the Product items such as large whole bones, clams
or oyster shells, whole corn husks, glass, china, plastic, metal such as bottle caps, tin, aluminum foil, utensils, hot grease, or other hot liquids. READ INSTALLATION AND USE INSTRUCTIONS CAREFULLY BEFORE
INSTALLATION AND USE. AND NOTE further: DO NOT attempt to lubricate your Product and NEVER put lye or caustic chemical drain cleaners into the Product, as they are considered improper maintenance and may
cause corrosion of metal parts which damage will be detectable and not covered by this warranty.
B. Excessive wear beyond normal wear and tear from private household use; damage from fire, flood, or other acts of God.
C. Outdoor installations or use with yard or planting debris or soil.
D. Repair or replacement service performed by other than by an authorized service professional.
E. Removal of any other materials (such as sinks, counters, tiles, flooring or other plumbing fixtures), reinstallation, refinishing, or additional labor if and to the extent required or provided by an authorized service
professional in order to repair or replace the Product or part under warranty.
F. Installations in commercial, industrial, or investment property, or in multi-resident facilities except to purchasers who qualify as Residential Consumers or Commercial Holders, as defined above.
G. Damage to the Products caused by alteration after completion of their installation by anyone who is not authorized by the Company in writing, whether such alteration be by structural additions, changes, replacements
or by equipment installation.
H. This warranty does not cover Products that were discontinued when purchased or display Products, whether such Products were purchased at discount outlets, unauthorized dealers, and/or sold on clearance. This
warranty does not cover any free gifts included with purchase.
2. IN NO EVENT SHALL THE COMPANY BE LIABLE FOR CONSEQUENTIAL OR INCIDENTAL DAMAGES OF ANY KIND, INCLUDING, BUT NOT LIMITED TO, ANY DAMAGE TO THE PROPERTY IN WHICH A
PRODUCT IS INSTALLED, ITS CONTENTS OR ANY PERSON THEREIN. NO FIELD REPRESENTATIVE, DISTRIBUTOR OR DEALER OF THE COMPANY IS AUTHORIZED TO MAKE ANY CHANGE OR MODIFICATION
TO THIS LIMITED WARRANTY. SOME STATES/PROVINCES (INCLUDING QUEBEC) MAY NOT ALLOW LIMITATIONS ON OR THE EXCLUSION OF INCIDENTAL OR CONSEQUENTIAL DAMAGES, SO THE ABOVE
EXCLUSIONS MAY NOT APPLY TO YOU.
The invalidity, illegality or unenforceability of any one or more provisions of this Limited Warranty shall in no way affect or impair the validity, legality or enforceability of the remaining provisions, which shall remain in full force
and effect.
Legal Remedies
This warranty gives you specific legal rights, and you may also have other rights which vary from state to state and province to province. 01-29-2025