Solvia 8×32
User Guide
Manuel del usuario
Guide de l’utilisateur
Benutzerhandbuch
Manuale dell’utente
Gebruikershandleiding
用户手册
用戶手冊
ユーザーガイド
사용자 가이드


Contents
Product Introduction
First-Time Use
Basic Operations
Specifications and Parameters
Solvia App
Maintenance and Care
Important Safety Instructions
Warranty Policy
Support & Service
Compliance Statement and
Environmental Standards
EN
Contenido
Descripción del producto
Primer uso
Funciones básicas
Especificaciones y parámetros
Aplicación Solvia
Mantenimiento y cuidado
Instrucciones importantes sobre la seguridad
Política sobre la garantía
Soporte y servicio
Declaración de cumplimiento y normas
ambientales
ES
Table de matières
Présentation du produit
Première utilisation
Opérations de base
Spécifications et paramètres
Application Solvia
Entretien et soin
Instructions importantes de sécurité
Politique de garantie
Assistance et service
Déclaration de conformité et normes
environnementales
FR
DE IT NL
Contenuti
Introduzione al prodotto
Primo utilizzo
Funzionamento di base
Specifiche e parametri
App Solvia
Manutenzione e cura
Importanti istruzioni di sicurezza
Politica di garanzia
Supporto e assistenza
Dichiarazione di conformità e
standard ambientali
Inhalt
Produktbeschreibung
Erstmaliger Einsatz
Grundlegende Funktionen
Spezifikationen und Parameter
Solvia-App
Wartung und Pflege
Wichtige Sicherheitshinweise
Garantiebestimmungen
Support & Service
Konformitätserklärung und
Umweltstandards
Inhoudsopgave
Productintroductie
Eerste gebruik
Basisbediening
Specificaties en parameters
Solvia-app
Onderhoud en verzorging
Belangrijke veiligheidsinstructies
Garantievoorwaarden
Klantenservice & Ondersteuning
Conformiteitsverklaring en
milieunormen
9
10
11
13
13
14
15
15
15
15
17
18
19
21
21
22
23
23
23
23
1
2
3
5
5
6
7
7
7
7
33
34
35
37
37
38
39
39
39
39
41
42
43
45
45
46
47
47
47
47
25
26
27
29
29
30
31
31
31
31
目录
产品介绍
首次使用
基础操作
规格参数
Solvia App
维护与保养
警告信息
保修条款
售后服务说明
合规性声明与环境规范
zh-CN
目錄
產品介紹
首次使用
基本操作
規格和參數
Solvia App
維護與保養
警告資訊
保固條款
售後服務說明
法遵聲明與環境規範
zh-Hant JP
KR
目次
製品概要
初回使用時の準備
基本操作
仕様とパラメータ
Solvia アプリ
メンテナンスと手入れ
安全にお使いいただくために
保証について
サポートとサービス
各種規制への適合および環境基準
목차
제품 소개
첫 사용
기본 작동
사양 및 파라미터
솔비아 앱
유지보수 및 관리
중요 안전 지침
보증 정책
지원 및 서비스
규정 준수 및 환경 표준
49
50
51
53
53
54
55
55
55
55
81
82
83
85
85
86
87
87
87
87
57
58
59
61
61
62
63
63
63
63
65
66
67
69
69
70
71
71
71
71

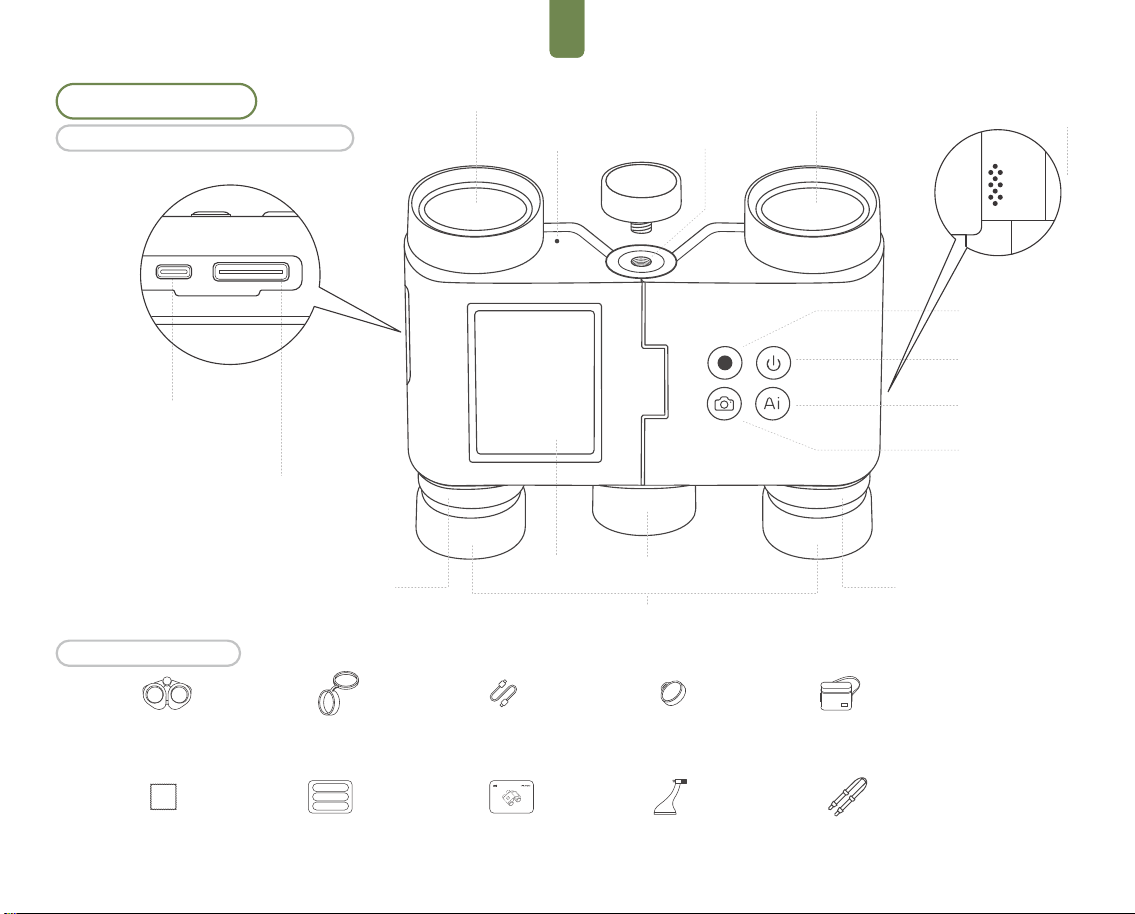
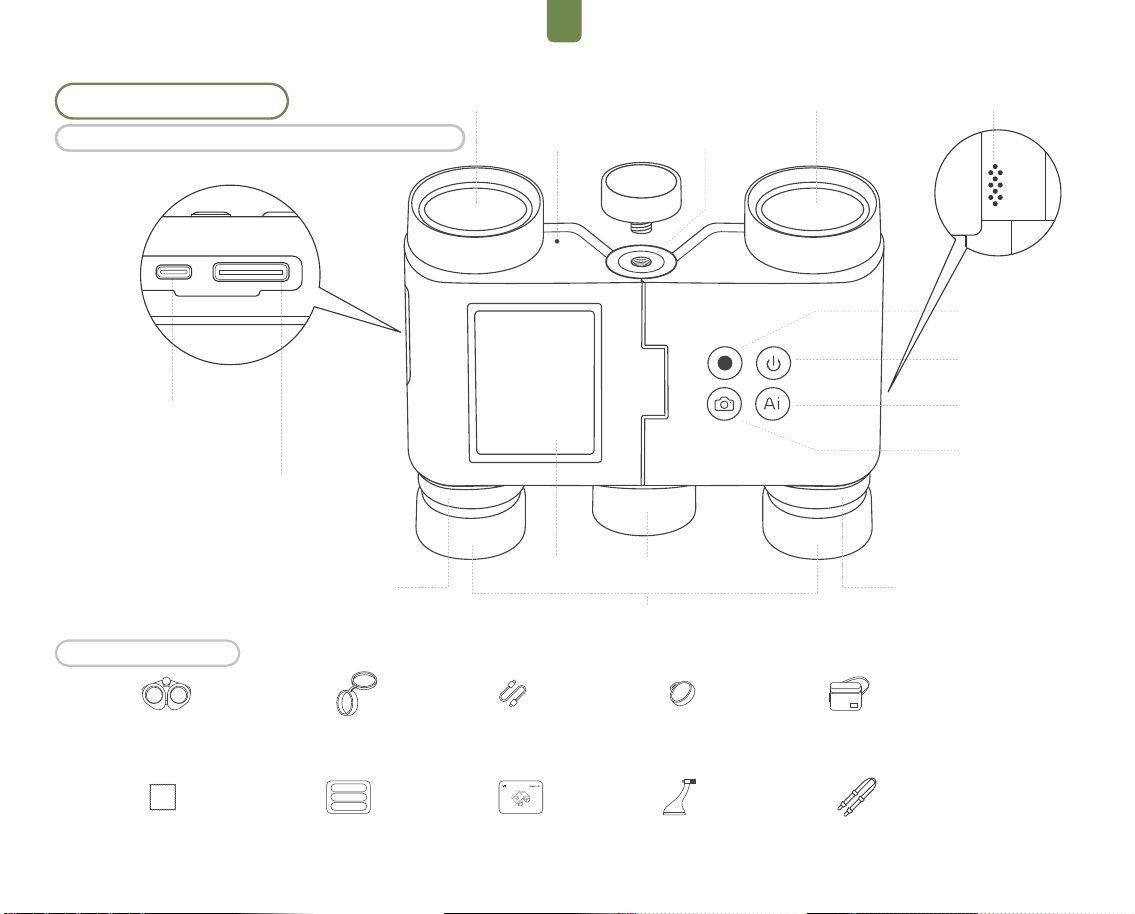
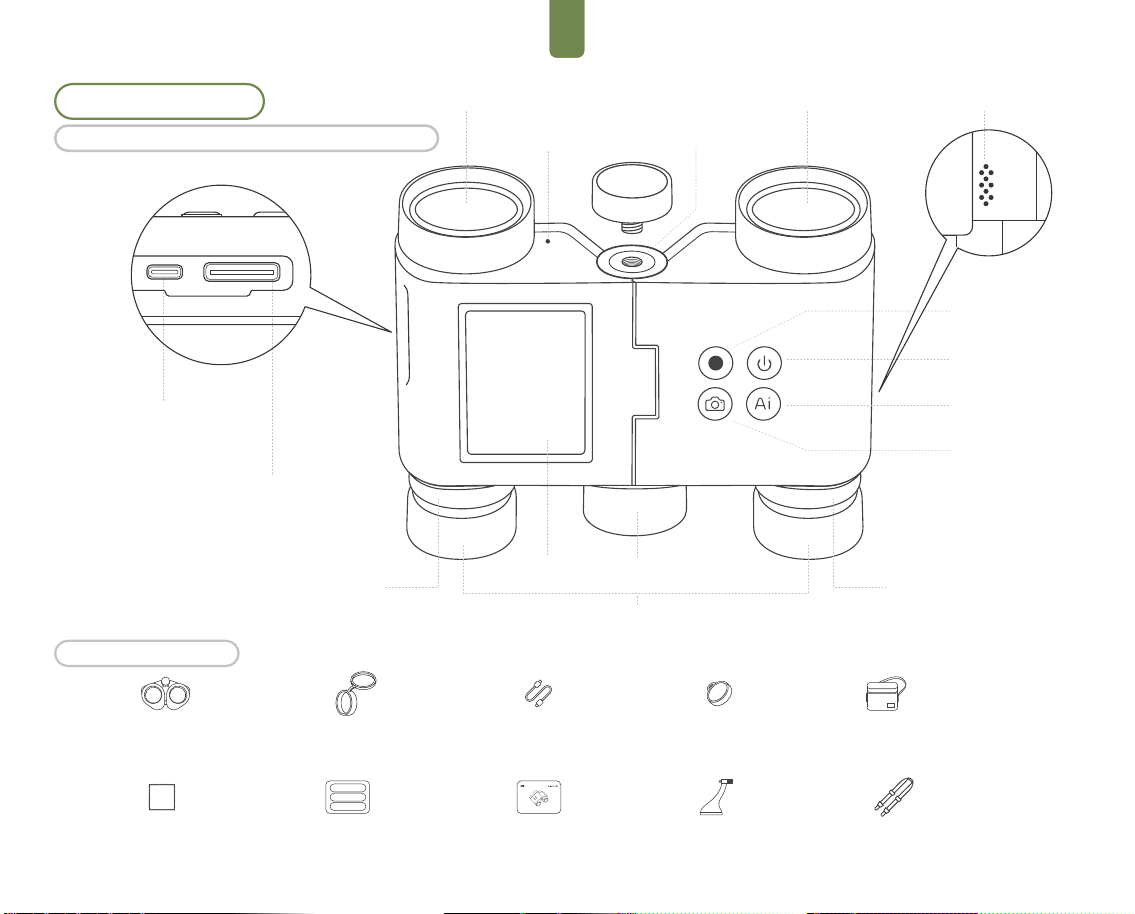
Product Introduction
Standard Accessories
Meet the Solvia 8×32 AI Binoculars
Video
microSD Card Slot
Right Eyepiece Diopter Ring
Focusing KnobDisplay
Power On/Off
AI Recognition
Photo
Eyepiece
Objective Lens
Microphone
1/4'' Threaded Hole
Objective Lens
Speaker
Objective Lens Covers ×2 USB-C Charging/Data
Cable ×1
Eyepiece Covers ×2 Carrying Case ×1
Lens Cleaning Cloth ×1
Quick Start Guide ×1 User Guide ×1 Neck Strap ×1Tripod Adapter ×1
AI Binoculars ×1
USB-C Charging/Data Port
Left Eyepiece
Diopter Ring
ENEN
1
EN
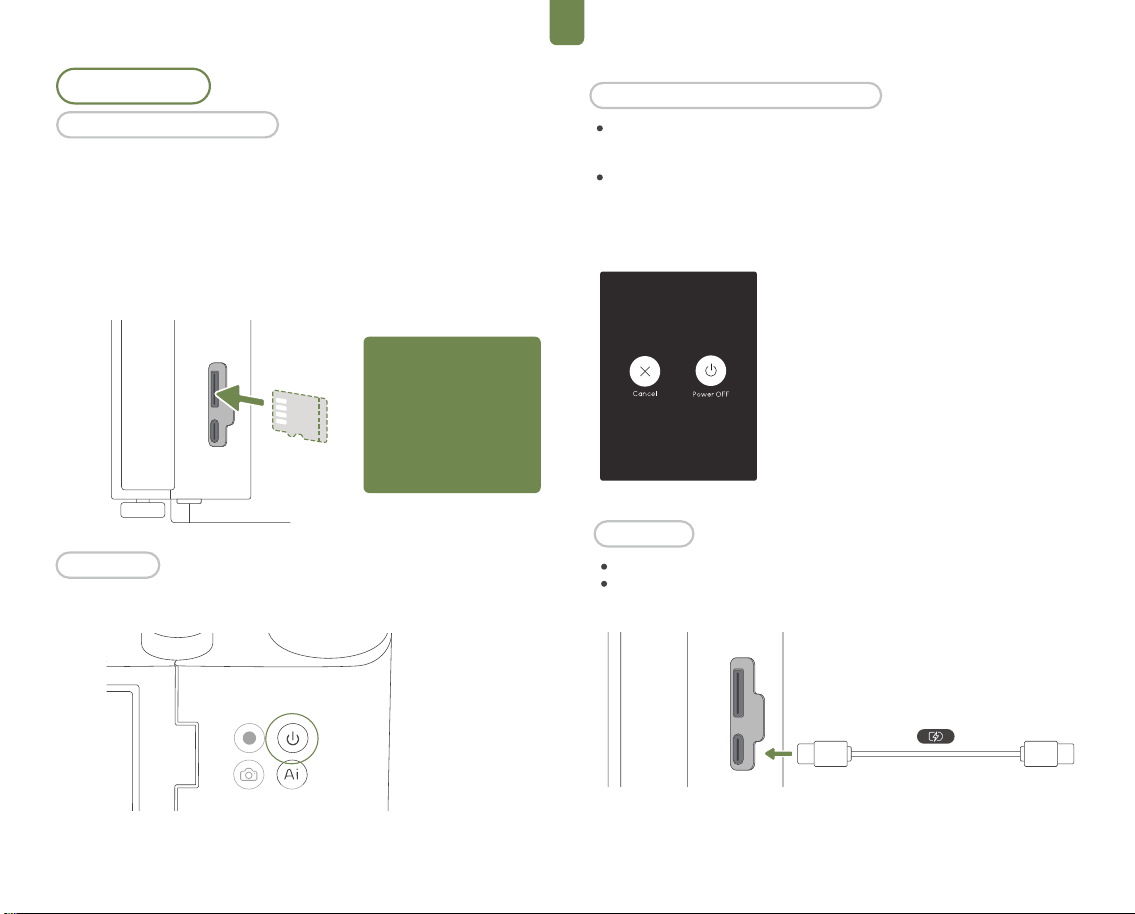
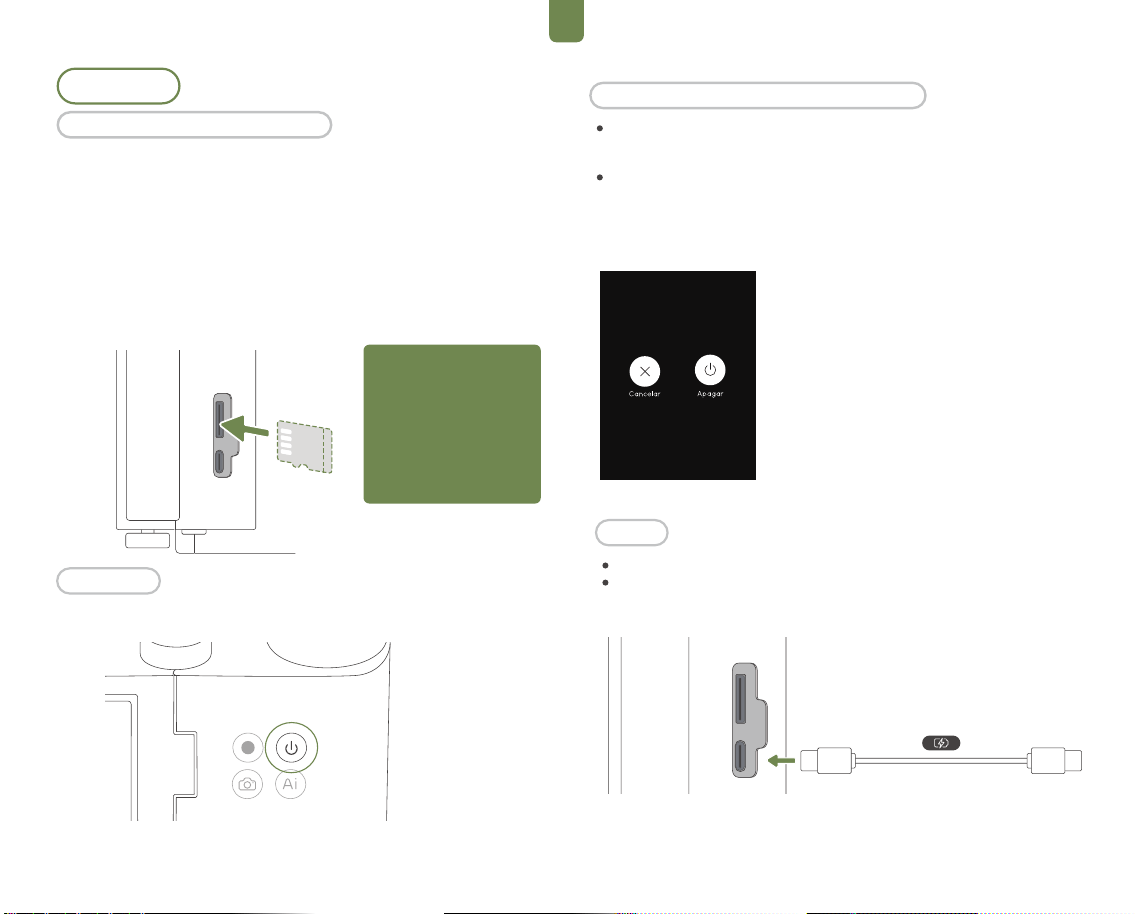
Press and hold the power button for 3 seconds to
bring up the on-screen options.
Power Off and Sleep Management
Power Off
- Completely shuts down the device.
- If the device freezes or becomes unresponsive, press and hold
the power button for 8 seconds to force a shutdown.
First-Time Use
The Solvia 8×32 AI Binoculars do not have built-in storage. You must install
a microSD card to store captured images and videos. It is recommended
to use a microSD card with a UHS-I Speed Grade 3 rating and formatted
in exFAT . (A standard 64 GB microSD card is included in the kit. Please
refer to the“Specifications”section for a list of recommended card
models.)
Insert the microSD card into the slot, ensuring the orientation matches the
diagram. To eject the microSD card, gently push it inwards until it clicks
and is partially released from the slot.
Press the power button for 2 seconds to turn on the device.
Open the USB port cover outward.
Connect a power adapter using a USB-C cable to charge the device
(Recommended input: DC 5V/2A).
Note: To protect your cap-
tured data and extend the
lifespan of the microSD
card, avoid hot-plugging. It
is recommended to insert
or remove the card only
when the Solvia 8×32 AI
Binoculars are powered off.
Power On
Charging
microSD Card Installation
2
EN
1
5
5
5
5
7
4
8 9
2 2
4
Device Status
Powered-on State
Button Operation
Single Press
Button Operation
Start/stop recording. Videos are
automatically saved in 5-minute
segments to ensure file safety.
Recording will stop automatically
when storage space is insufficient.
1
6
10
11
12
5
5
5
15
7
5
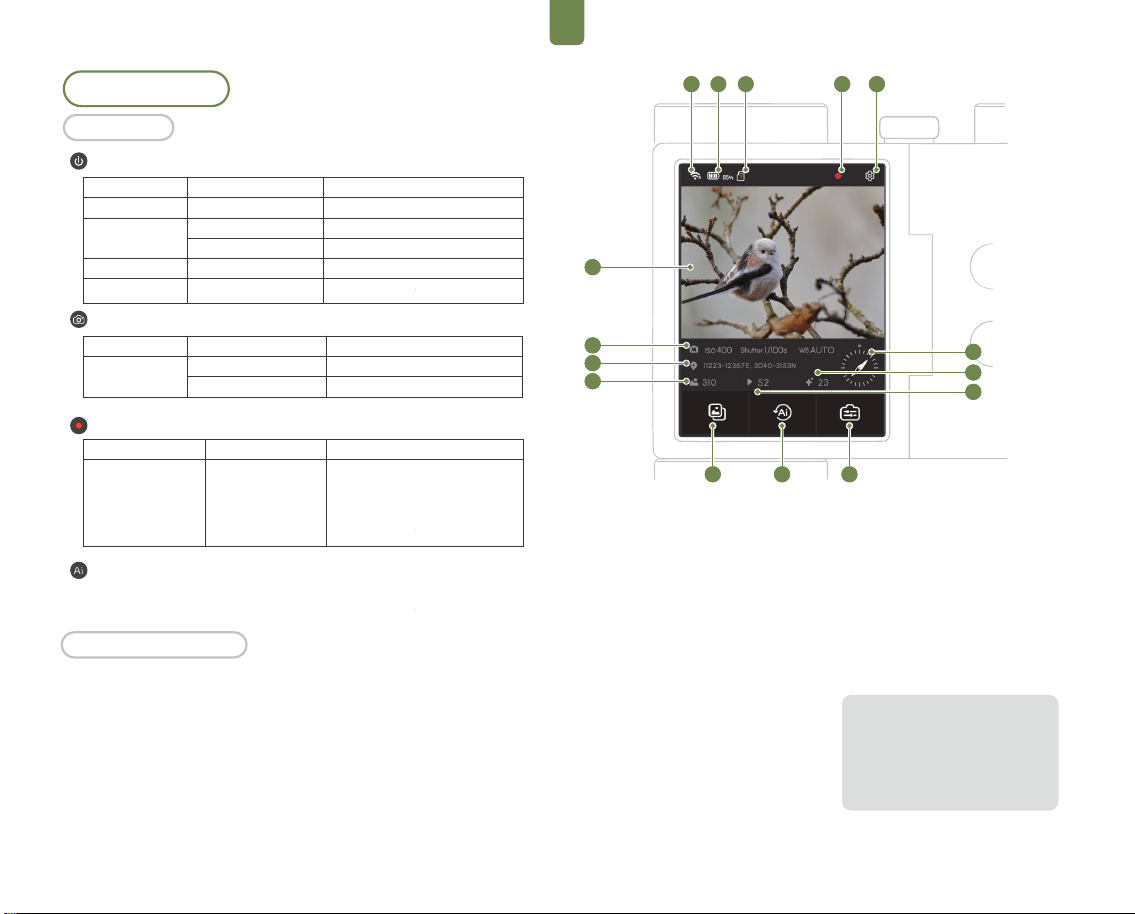
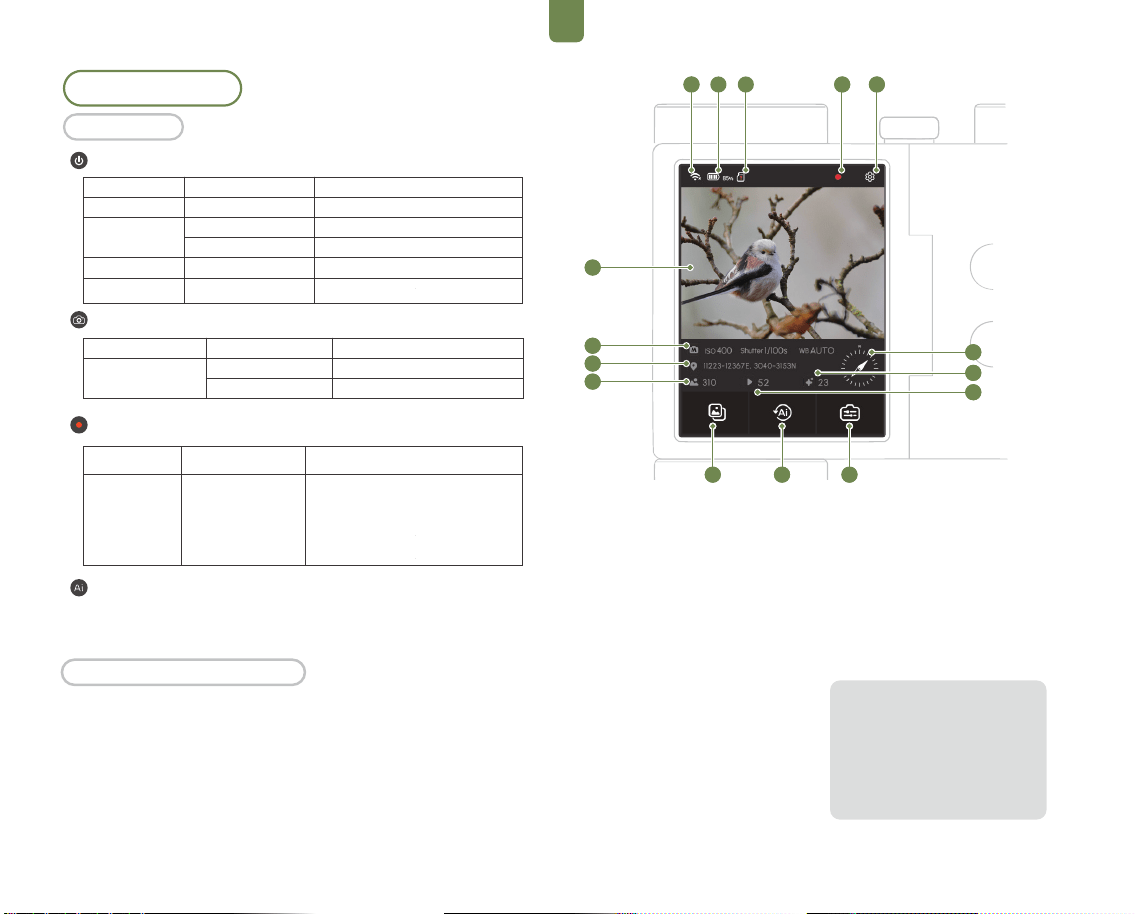
When powered on, the touchscreen displays the binoculars' viewfinder
interface. The menu bar shows information such as Wi-Fi connection,
battery level, and storage capacity.
Tap or swipe on the touchscreen to access functions.
Touchscreen Controls
Basic Operations
Operations
Device Status
Off
On
Sleep Mode
Not Responding
Operations
Short Press for 2s
Press
Long Press for 3s
Press
Long Press for 8s
Functions
Power On
Lock & Turn Off Screen
Power Off / Sleep selection
Unlock & Turn On Screen
Force Shutdown
Power Button
Device Status
On
Operations
Press
Long Press
Functions
Start Capture
Start Burst Shot
Photo Button
Video Button
- In the Photo Detail View, pressing the AI Recognition button triggers
on-device AI bird recognition and displays the results.
AI Recognition
8 9
2 3
4
14
13
1. Wi-Fi status
2. Battery level
3. SD card statu
4. Recording status
5. System settings
6. Live view and image preview with
swipe and pinch to zoom
7. Media library and gallery
8. AI log center
9. Settings access
10. Shooting parameters
11. GPS data
(requires Solvia Field Kit)
12. Photo count
13. Video count
14. AI recognition statistics
15. Electronic compass
(requires Solvia Field Kit)
Please note that under certain
lighting angles, glare or dark spots
may appear during shooting or
observation. You can change the
angle for better viewing or shooting.
This is not a product quality issue.
3
EN
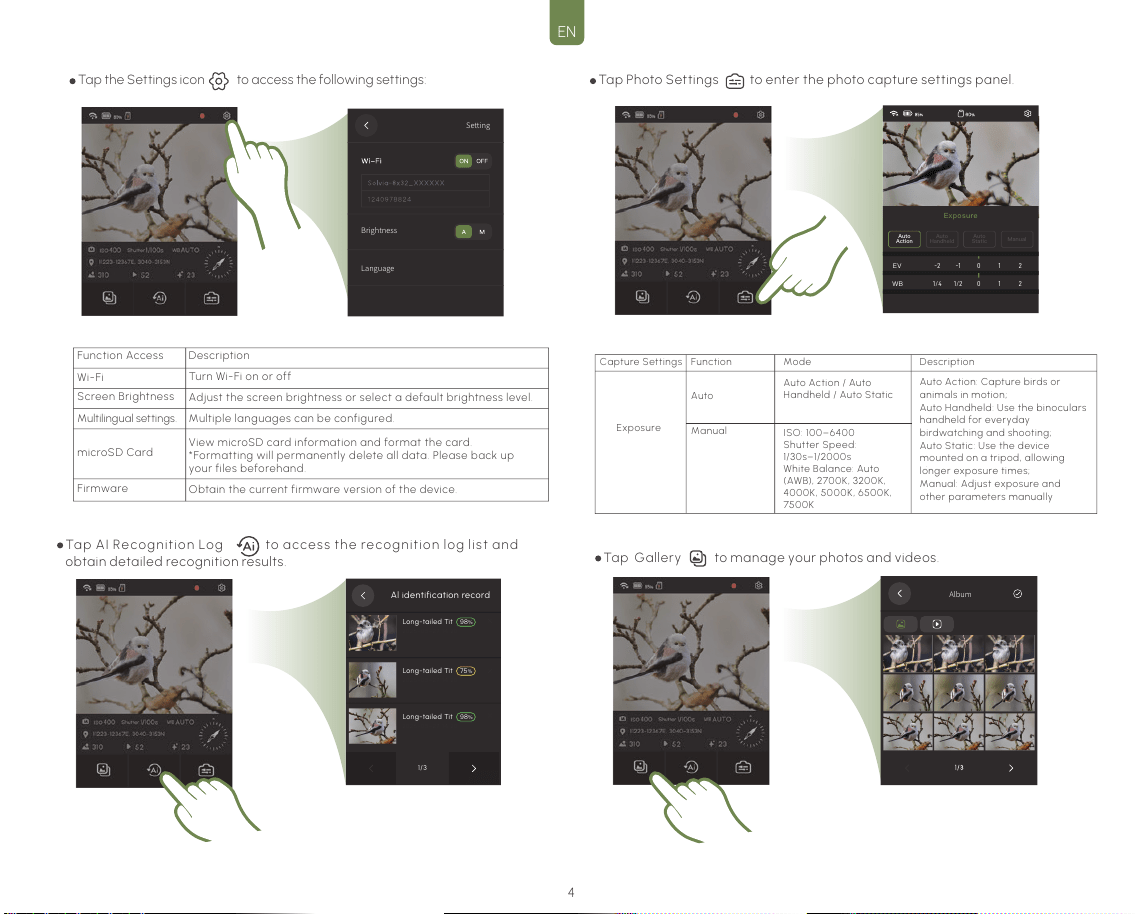
Tap the Settings icon to a ccess the following settings:
Tap AI Recognition Log to access the recognition log list and
obtain detailed recognition results.
Tap Gallery to manage your photos and videos.
Function Access
Wi-Fi
Screen Brightness
Multilingual settings.
microSD Card
Firmware
Description
Turn Wi-Fi on or off
Adjust the screen brightness or select a default brightness level.
Multiple languages can be configured.
Obtain the current firmware version of the device.
View microSD card information and format the card.
*Formatting will permanently delete all data. Please back up
your files beforehand.
Capture Settings Function Mode Description
Auto Action: Capture birds or
animals in motion;
Auto Handheld: Use the binoculars
handheld for everyday
birdwatching and shooting;
Auto Static: Use the device
mounted on a tripod, allowing
longer exposure times;
Manual: Adjust exposure and
other parameters manually
Auto Action / Auto
Handheld / Auto Static
ISO: 100–6400
Shutter Speed:
1/30s–1/2000s
White Balance: Auto
(AWB), 2700K, 3200K,
4000K, 5000K, 6500K,
7500K
Manual
Exposure
Tap Photo Settings to enter the photo capture settings panel.
Auto
Long-tailed Tit
98
%
75
%
2025-05-27 14:20
Long-tailed Tit
2025-05-27 14:20
Long-tailed Tit
98
%
2025-05-27 14:20
1/3
Al identification record
Album
Exposure
0
1
2
-2
-1
EV
Auto
Action
Auto
Handheld
Auto
Static
Manual
0
1
2
1/4
1/2
WB
Setting
Brightness
Language
4
EN
Status Indicator:
Blue Solid: The device is connected and functioning properly.
Blue Flashing: Video is being recorded.
Battery/Charging Indicator:
Off: The device is out of power or not connected to a power source.
Red Solid: The device is charging.
Green Solid: Indicates that the device is sufficiently charged or fully
charged.
Indicator Light Status
Specifications and Parameters
Binoculars Technical Specifications
Solvia App
When used with the Solvia App, the Solvia 8×32 AI Binoculars can stream
high-definition live footage directly to your mobile device. This allows you to
adjust camera parameters and control the binoculars remotely. The app also
offers a suite of features, including media export, cloud-based AI recognition,
and image enhancement, significantly improving the overall user experience.
Recommended microSD Card List
Magnification
Objective Lens Diameter
Prism System
Field of View (m/1000m)
Field of View (Degrees)
Exit Pupil Diameter
Eye Relief
Close Focus Distance
Weight
Dimensions
Battery Type
Battery Life
Sensor
Photo/Video Resolution
Environmental Protection
Connection Methods
Operating Temperature
Storage Temperature
8 x
32 mm
Roof Prism
129.5 m / 388.5 ft
7.6°
4.24 mm
16 mm
3.7 m
680 g
116.5 mm × 120.8 mm × 68 mm
Li-ion 2600 mAh
12 h (standard use); 4 h (under full load) With Extended
Module: 20 h (standard use); 8 h (under full load)
1/2.7" CMOS
2592 (H)x1944(V)
IP 64, Nitrogen Purged
Wi-Fi Fast Transfer, USB Export
−10°C to +50°C
−20°C to +60°C
Brand & Series
SanDisk Extreme V30 A1
SanDisk Extreme Pro V30 A1
SanDisk Extreme V30 A2
SanDisk Extreme Pro V30 A2
Lexar 1066x microSD UHS-I
SILVER Series
Model
SDSQXVF-032G-GN6MA
SDSQXCG-064G-GN6MA
SDSQXAH-064G-GN6GN
SDSQXAA-128G-GN6GN
SDSQXCU-064G-GN6MA
SDSQXCY-128G-ZN6MA
LMS1066064G-BN
LMS1066128G-BN
Capacity
32 GB
64 GB
64 GB
128 GB
64 GB
128 GB
64 GB
128 GB
Speed Ratings
V30
V30
U3, A2, V30
U3, A2, V30
U3, A2, V30
U3, A2, V30
V30
V30
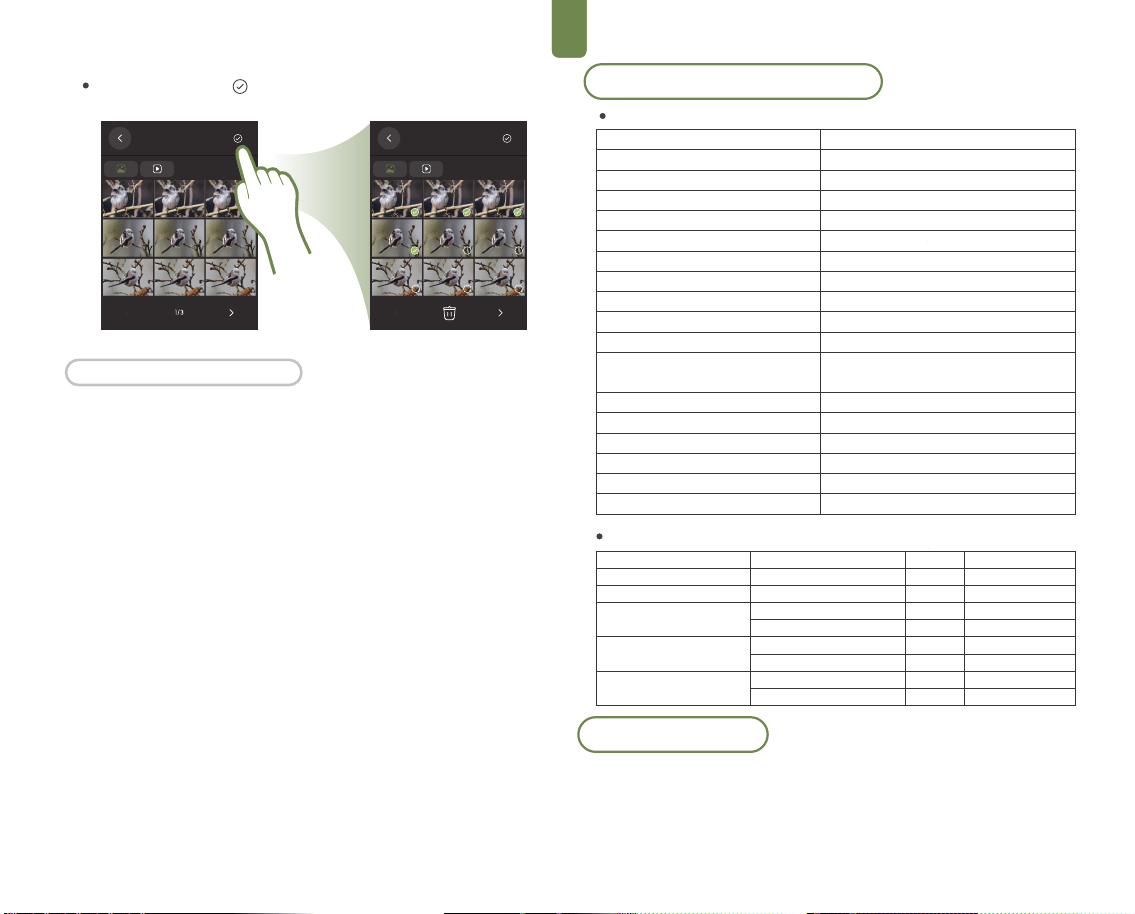
Album
Album
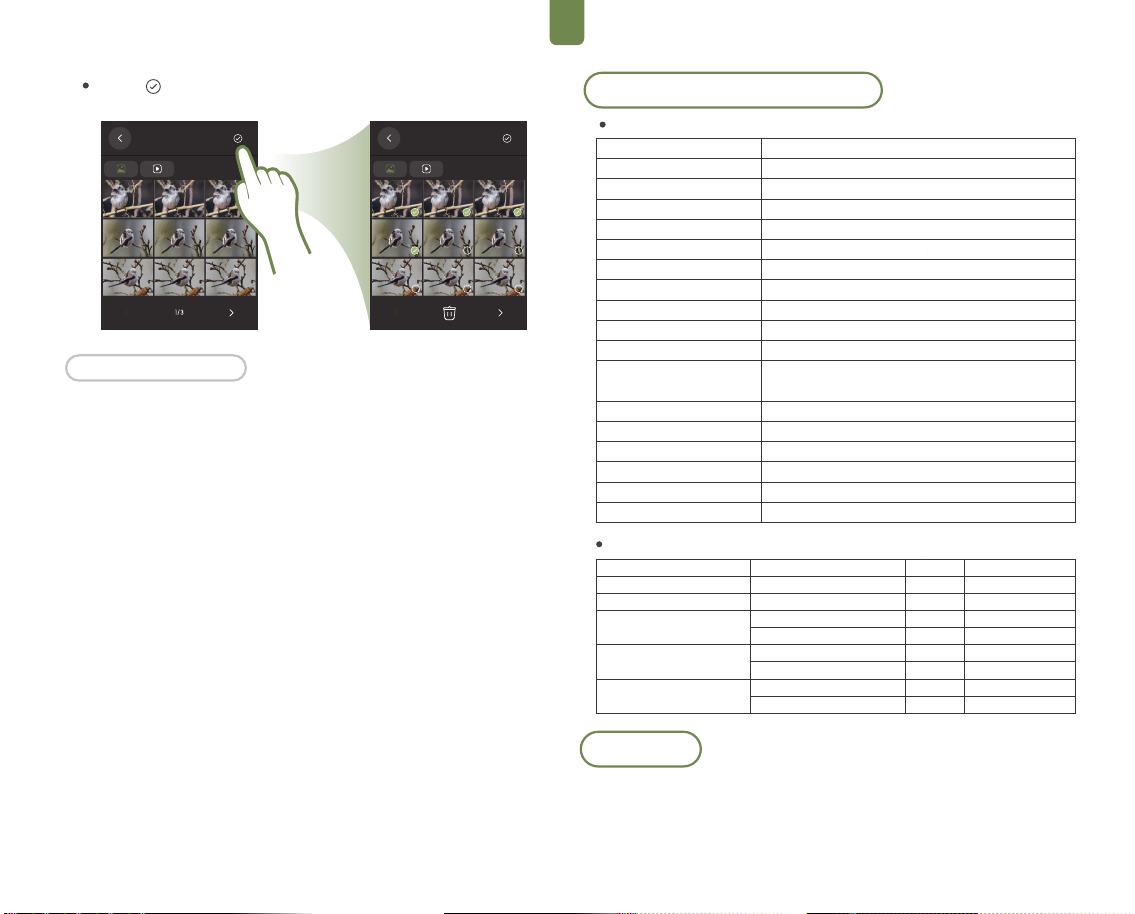
Tap the icon to enter the photo deletion interface.
5
EN
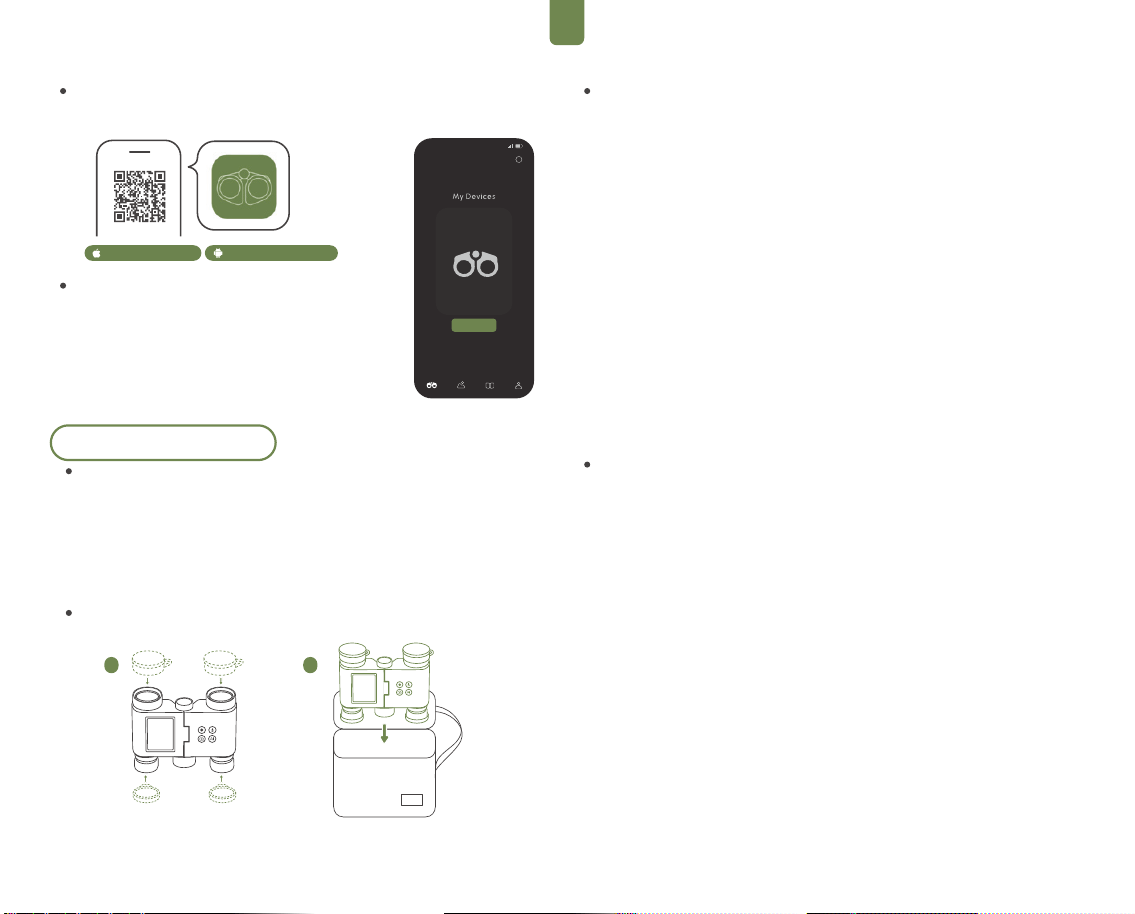
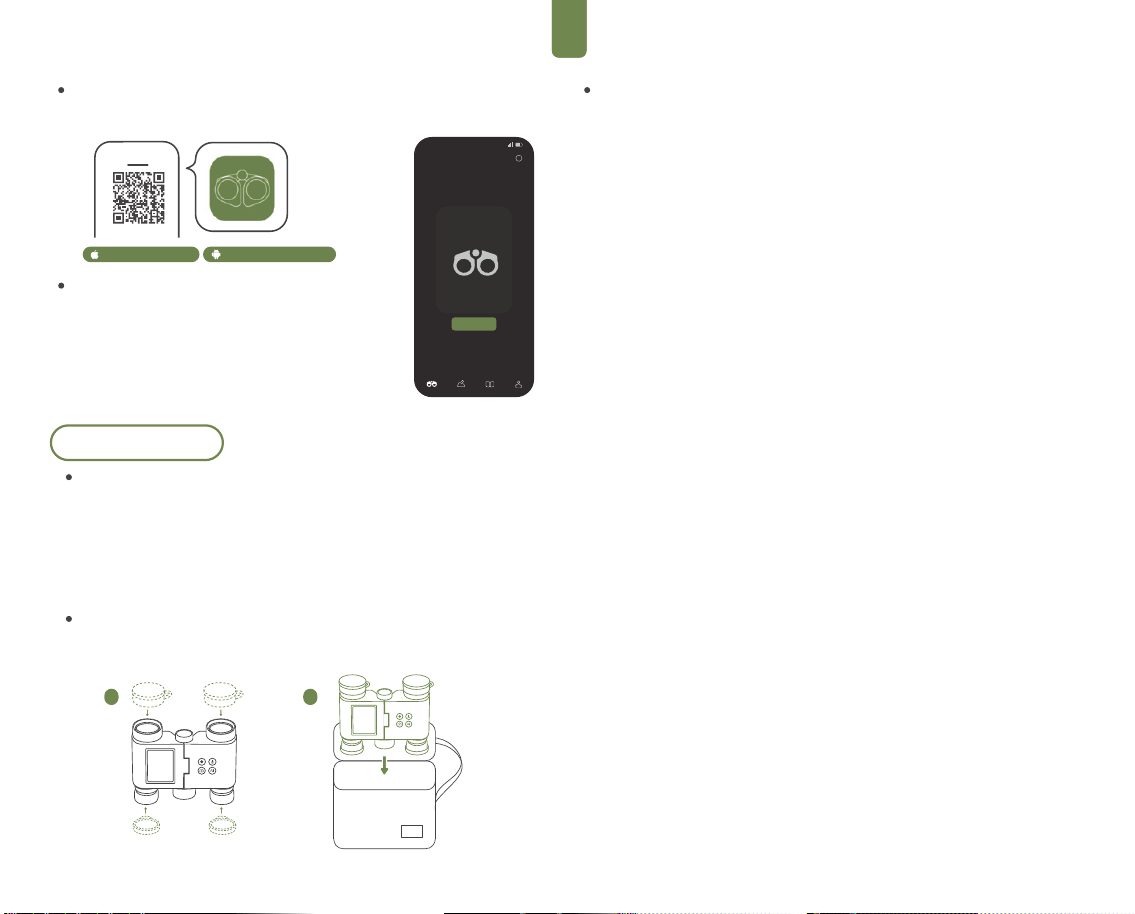
Download the Solvia App
Search for the Solvia App in your phone’s app store, or scan the
QR code to download it.
Connecting to the Solvia App:
1. Press the power button to turn on the Solvia 8×32
AI Binoculars
2. Tap the Settings icon in the top-right corner of
the screen, then go to Wi-Fi to enable Wi-Fi and view
the device’s Wi-Fi name and password.
3. Open the Solvia App, tap the Connect button on
its home screen, and follow the on-screen
instructions to connect to the device’s Wi-Fi network.
iOS 15.0 and above Android 7.0 and above
Maintenance and Care
Firmware Upgrade
Before upgrading the firmware, ensure that the binoculars have a
battery level above 20%.
Connect the binoculars to the Solvia App.
When the App indicates that a new firmware version is available, tap to
begin the update and follow the on-screen instructions. The firmware
update process typically takes approximately 3 minutes.
Storage
After using the Solvia 8×32 AI Binoculars, cover the eyepieces and
objective lenses with the protective caps, and store the binoculars in the
dedicated carrying case.
Usage Precautions
Age Restriction
This product is not suitable for children under 3 years old.
Adapter Usage
The charging adapter for this product (not included) is not a toy and must
be kept out of reach of children.
It is recommended to use a 5V/2A charging adapter to ensure safe and
stable charging.
Single Power Connection:
The product can only be charged using a single power adapter.
Cleaning Method
Wipe the surface of the device with a clean, soft, dry cloth.
Child Supervision
Children should use this product under adult supervision to ensure safety.
Prevent Drops
- Dropping the device or subjecting it to heavy impacts may permanently
damage the optics or internal components.
- Keep the device protected from dust and sand, as contamination may
damage the lenses and cause malfunction.
Unauthorized Disassembly Prohibited
- Do not disassemble, modify, or attempt to repair the product yourself.
Unauthorized repairs may cause malfunction and will void the warranty.
Temperature Usage Range
- Do not operate or charge the device outside the recommended
temperature range of − 10°C to +50°C.
Long-term Storage Precautions
- If the product will not be used for an extended period, fully charge it before
storage and recharge it at least once every three months to maintain
battery health.
Do Not Look at Bright Light Sources
- Never look at the sun or other strong light sources through the binoculars,
as this may result in serious eye injury.
Do Not Use While Walking
- Maintain a stable stance while using the device. Avoid using it while walking
to prevent tripping or collisions.
Water, Dust, and Impact Resistance
- The product offers basic splash resistance, but avoid exposing it to heavy
impacts or immersing it in water.
Maintenance and Warranty Tips
- Contact authorized service centers for maintenance and repairs.
Unauthorized repairs by non-professional institutions may void the
warranty.
1 2
ProfileLogAlbumObser vation
Done
Solvia
i
6
EN
To ensure the your safety and others, please carefully read the following
warnings before using this product:
1. Do Not Look Directly at Bright Light Sources
Never look directly at the sun or other bright light sources through the
binoculars to avoid irreversible eye damage or retinal burns.
2. Do Not Disassemble or Modify Without Authorization
Do not disassemble, modify, or attempt to repair the product yourself.
Unauthorized handling may damage internal components, create electric
shock hazards, and will void the warranty.
3. Keep Away from High Temperature, Humidity, and Strong Magnetic
Fields
Keep the product away from high temperatures, high humidity, strong
magnetic fields, and flammable or explosive environments.
Exposure to such conditions may cause battery swelling, explosions, or
damage to internal circuits.
4. Do Not Use Underwater
This device is splash-resistant but not submersible. Do not use the device
underwater or expose it to heavy rain. If the device comes into contact
with water, immediately turn it off and contact customer support.
5. Ensure proper ventilation during charging.
Do not charge the device in enclosed or poorly ventilated areas, as this
may cause overheating or a fire hazard.
6. Use Compliant Power Sources and Accessories
Use only the recommended power adapters that meet the required
specifications (5V / 2A).
Do not use uncertified or low-quality chargers, as they may cause
damage or pose safety risks.
Important Safety Instructions
Compliance Statement and Environmental Standards
CE and RoHS Compliance Declaration
WEEE Environmental Recycling Declaration
- CE:
This product complies with the essential requirements of
2014/30/EU (EMC) and 2014/35/EU (LVD).
- RoHS Directive (2011/65/EU):
The device does not contain hazardous substances such as lead, mercury,
cadmium, or hexavalent chromium beyond the specified limits.
The device is marked with the appropriate CE and RoHS compliance
labels on the housing or nameplate.
This product complies with the Waste Electrical and
Electronic Equipment Directive (WEEE, 2012/19/EU):
- Do not dispose of this device as household waste.
- When disposing of this device, please ensure it is handled by a
designated electronic waste recycling facility.
- The crossed-out trash bin symbol indicates that the product must be
recycled separately.
Thank you for your participation in environmental responsibility and for
contributing to a sustainable future.
This product is covered by the following warranty policies, effective from
the original date of purchase:
Functional failures not caused by human factors are eligible for free repair
or replacement under the following warranty periods: 3 years for the
optical system, and 1 year for the main unit (including electronics and
software).
Accessories Warranty: Accessories (e.g., neck strap, carrying case, lens
caps) are not covered under the standard warranty. However, If a quality
issue is found upon receipt, a replacement request may be submitted
within 7 days.
Proof of Purchase: A valid proof of purchase (such as an order screenshot,
invoice, or receipt) is required to obtain warranty service.
Warranty coverage does not apply to:
Damage caused by improper use such as dropping, impact, immersion in
water, or exposure to high-temperature environments.
Damage caused by unauthorized disassembly, repair, or modifications.
Products purchased from unauthorized retailers or without valid proof of
purchase.
Normal wear and tear, aging, scratches, stains, and other non-functional issues.
Warranty Policy
For technical support and after-sales service, please contact us through
the following channels:
Official website:www.matataxplore.com
Customer service email: suppor[email protected]
Please prepare the following information before contacting us:
Product model and serial number located on the back of the device or the
packaging box;
Screenshot of your proof of purchase.
A brief description of the issue, along with any supporting photos or videos.
Support & Service
7

FCC Warning Statement
Changes or modifications not expressly approved by the party
responsible for compliance could void the user’s authority to operate the
equipment. This equipment has been tested and found to comply with the
limits for a Class B digital device, pursuant to Part 15 of the FCC Rules.
These limits are designed to provide reasonable protection against
harmful interference in a residential installation. This equipment
generates uses and can radiate radio frequency energy and, if not
installed and used in accordance with the instructions, may cause harmful
interference to radio communications. However, there is no guarantee
that interference will not occur in a particular installation. If this
equipment does cause harmful interference to radio or television
reception, which can be determined by turning the equipment off and on,
the user is encouraged to try to correct the interference by one or more of
the following measures:
‐‐ Reorient or relocate the receiving antenna.
‐‐ Increase the separation between the equipment and receiver.
‐‐ Connect the equipment into an outlet on a circuit different from that
to which the receiver is connected.
‐‐ Consult the dealer or an experienced radio/TV technician for help.
FCC Radiation Exposure Statement
The device has been evaluated to meet general RF exposure requirement.
The device can be used in portable exposure condition without restriction.
This device complies with Part 15 of the FCC Rules. Operation is subject to
the following two conditions:
(1)This device may not cause harmful interference, and
(2)This device must accept any interference received, including
interference that may cause undesired operation.
This device meets the government's requirements for exposure to
radiowaves. The guidelines are based on standards that were developed
by independent scientific organizations through periodic and thorough
evaluation of scientific studies. The standards include a substantial safety
margin designed to assure the safety of all persons regardless of age or
health. FCC RF Exposure Information and Statement the SAR limit of USA
(FCC) is 1.6W/kg averaged over one gram of tissue. Device types: device
has also been tested against this SAR limit. This device was tested for
typical body-worn operations with the back of the tablet kept 0mm from
the body. To maintain compliance with FCC RF exposure requirements,
use accessories that maintain a 0mm separation distance between the
user's body and the back of the tablet. The use of belt clips, holsters and
similar accessories should not contain metallic components in its
assembly. The use of accessories that do not satisfy these requirements
may not comply with FCC RF exposure requirements, and should be
avoided.
Operation of this device is restricted to indoor use only. (5180-5240MHz)
This manual contains important product
information and should be retained.
EN
8
Descripción del producto
Accesorios estándar
Le presentamos los binoculares con IA Solvia 8×32
Vídeo
Ranura para la
tarjeta microSD
Anillo de dioptría del
ocular derecho
Perilla de enfoquePantalla
Encendido/
Apagado
Reconocimiento
mediante IA
Foto
Ocular
Lente objetivo
Micrófono
Orificio roscado de 1/4''
Lente objetivo
Altavoz
Protector para la lente
objetivo x2
Cable de datos/carga
USB-C x1
Protector para el
ocular x2
Estuche de
transporte x1
Paño para limpiar
las lentes x1
Guía de inicio rápido x1 Manual del
usuario x 1
Correa para el cuello x1Adaptador para
trípode x1
Binoculares con IA x1
Puerto de datos/carga USB-C
Anillo de dioptría
del ocular izquierdo
ES
9
ES
Mantenga presionado el botón de encendido durante 3segundos
para ver las opciones en la pantalla.
Apagado y control del modo de suspensión
Apagado
- Apaga completamente el dispositivo.
- Si el dispositivo se congela o no responde, mantenga presionado el
botón de encendido durante 8segundos para forzar el apagado.
Primer uso
Los binoculares con IA Solvia 8×32 no tienen almacenamiento integrado.
Debe instalar una tarjeta microSD para guardar las imágenes y vídeos
capturados. Se recomienda utilizar una tarjeta microSD con una clasifi-
cación UHS-I con velocidad de grado 3 y formateada en exFAT. (El kit in-
cluye una tarjeta microSD estándar de 64GB. Consulte la sección
¨Especificaciones¨ para obtener una lista de los modelos de tarjetas
recomendados).
Inserte la tarjeta microSD en la ranura, asegurándose de que la orient-
ación coincida con el diagrama. Para extraer la tarjeta microSD, empújela
suavemente hacia adentro hasta que haga clic y se libere parcialmente de
la ranura.
Presione el botón de encendido por 2segundos para encender el dispositivo.
Abra la tapa del puerto USB hacia afuera.
Conecte un adaptador de corriente con un cable USB-C para cargar
el dispositivo (entrada recomendada: 5V de CC/2A).
Nota: para proteger los
datos recopilados y
extender la vida útil de la
tarjeta microSD, evite la
conexión en caliente. Se
recomienda insertar o
extraer la tarjeta solo
cuando los binoculares con
IA Solvia 8×32 estén
apagados.
Encendido
Carga
Instalación de la tarjeta microSD
10
ES
1
5
5
5
5
7
4
8 9
2 2
4
1
6
10
11
12
5
5
5
15
7
5
8 9
2 3
4
14
13
1. Estado del Wi-Fi
2. Nivel de batería
3. Estado de la tarjeta SD
4. Estado de grabación
5. Ajustes del sistema
6. Vista en vivo y previa de imagen
7. Galería y biblioteca de medios
8. Centro de registros de IA
9. Acceso a ajustes
10. Parámetros de disparo
11. Los datos de GPS
(requieren el Solvia Field Kit)
12. Recuento de fotos
13. Recuento de videos
14. Estadísticas de reconocimiento de IA
15. La brújula electrónica
(requiere el Solvia Field Kit)
Tenga en cuenta que, bajo ciertos
ángulos de luz, pueden aparecer
reflejos o puntos oscuros durante la
observación o la grabación. Puede
cambiar el ángulo para mejorar la
visualización o la captura. Esto no es
un problema de calidad del
producto.
Estado del
dispositivo
Estado encendido
Funcionamiento de los
botones
Presionar una vez
Funcionamiento de los botones
Iniciar/detener la grabación Los vídeos se
guardan automáticamente en segmentos
de 5minutos para garantizar la
seguridad de los archivos. La grabación
se detendrá automáticamente cundo el
espacio de almacenamiento no sea
suficiente.
Cuando se enciende, la pantalla táctil muestra la interfaz del visor de
los binoculares. La barra del menú muestra información como la
conexión Wi-Fi, el nivel de la batería y la capacidad de
almacenamiento.
Toque o deslice el dedo sobre la pantalla táctil para acceder a las
funciones.
Controles de la pantalla táctil
Funciones básicas
Operaciones
Estado del dispositivo
Apagado
Encendido
Modo de Suspensión
No responde
Operaciones
Presionar por 2s
Presionar
Mantener presionado por 3 s
Presionar
Mantener presionado por 8s
Funciones
Encendido
Bloqueo y apagado de pantalla
Apagado / Selección del modo de suspensión
Desbloqueo y encendido de pantalla
Forzar apagado
Botón de encendido
Estado del dispositivo
Encendido
Operaciones
Presionar
Mantener presionado
Funciones
Iniciar captura
Iniciar captura en ráfaga
Botón de foto
Botón de vídeo
- En Vista detallada de la foto, al presionar el botón "Reconocimiento
mediante IA" se activa el reconocimiento de aves mediante IA en el
dispositivo y se muestran los resultados.
Reconocimiento mediante IA
11
ES
Long-tailed Tit
98
%
75
%
2025-05-27 14:20
Long-tailed Tit
2025-05-27 14:20
Long-tailed Tit
98
%
2025-05-27 14:20
1/3
Registro de
identificación de IA
Álbum
Setting
Brillo
Idioma
Exposición
0
1
2
-2
-1
EV
Auto
Acción
Auto
Portátil
Auto
Estático
Manual
0
1
2
1/4
1/2
WB
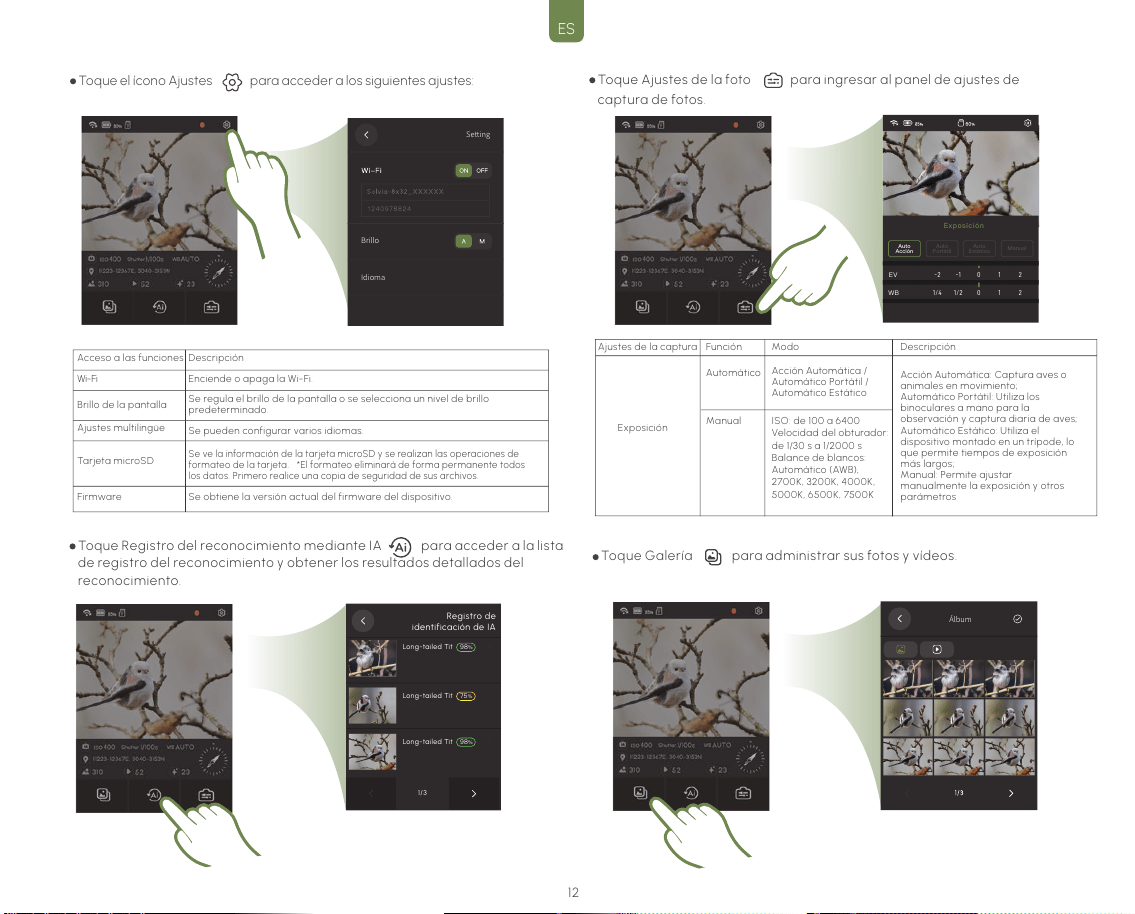
Toque e l ícono Ajustes para acceder a los siguientes ajustes:
Toque Registro del reconocimiento mediante IA para acceder a la lista
de registro del reconocimiento y obtener los resultados detallados del
reconocimiento.
Toque Galería para administrar sus fotos y vídeos.
Acceso a las funciones
Wi-Fi
Brillo de la pantalla
Ajustes multilingüe
Tarjeta mic roSD
Firmware
Descripción
Enciende o apaga la Wi-Fi.
Se regula el brillo de la pantalla o se selecciona un nivel de brillo
predeterminado.
Se pueden configurar varios idiomas.
Se obtiene la versión actual del firmware del dispositivo.
Se ve la información de la tarjeta microSD y se realizan las operaciones de
formateo de la tarjeta. *El formateo eliminará de forma permanente todos
los datos. Primero realice una copia de seguridad de sus archivos.
Ajustes de la captura Función Modo Descripción
Acción Automática: Captura aves o
animales en movimiento;
Automático Portátil: Utiliza los
binoculares a mano para la
observación y captura diaria de aves;
Automático Estático: Utiliza el
dispositivo montado en un trípode, lo
que permite tiempos de exposición
más largos;
Manual: Permite ajustar
manualmente la exposición y otros
parámetros
Acción Automática /
Automático Portátil /
Automático Estático
ISO: de 100 a 6400
Velocidad del obturador:
de 1/30s a 1/2000s
Balance de blancos:
Automático (AWB),
2700K, 3200K, 4000K,
5000K, 6500K, 7500K
Automático
Manual
Exposición
Toque Ajustes de la foto para ingresar al panel de ajustes de
captura de fotos.
12
ES
Álbum
Álbum
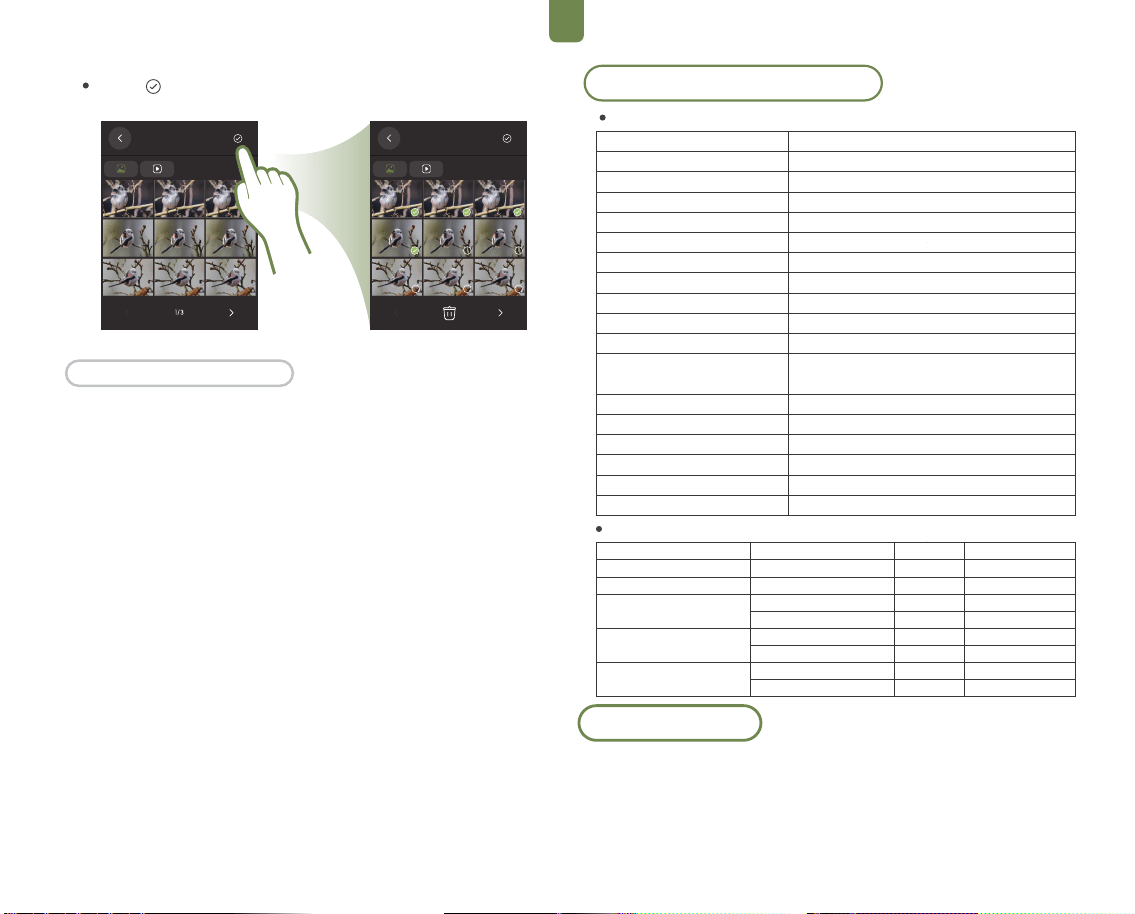
Tap the icon to enter the photo deletion interface.
Indicador de estado:
Azul sólido: el dispositivo está conectado y funcionando
correctamente.
Azul intermitente: se está grabando un vídeo.
Indicador de carga/batería:
Apagado: el dispositivo no tiene energía o no está conectado a una
fuente de alimentación.
Rojo sólido: el dispositivo se está cargando.
Verde sólido: indica que el dispositivo tiene suficiente carga o está
completamente cargado.
Estados de la luz indicadora
Especificaciones y parámetros
Especificaciones técnicas de los binoculares
Aumento
Diámetro de la lente objetivo
Sistema de prismas
Campo de visión (m/1000m)
Campo de visión (grados)
Diámetro de la pupila de salida
Alivio ocular
Distancia mínima de enfoque
Peso
Dimensiones
Tipo de batería
Vida útil de la batería
Sensor
Resolución de foto/vídeo
Protección ambiental
Métodos de conexión
Temperatura de funcio namiento
Temperatura de alma cenamiento
8 x
32mm
Prisma de techo
129,5m / 388,5pies
7,6°
4,24mm
16mm
3,7m
680g
116,5mm × 120,8mm × 68mm
Ion de litio de 2600mAh
12horas (uso estándar); 4horas (a plena carga) Con módulo
extendido: 20horas (uso estándar); 8horas (a plena carga)
1/2,7" CMOS
2592 × 1944px
IP64, purgado con nitrógeno
Transferencia rápida por Wi-Fi, exporta ción por USB
Entre -10°C y +50°C
Entre -20°C y +60°C
Lista de tarjetas microSD recomendadas
Marca y serie
SanDisk Extreme V30 A1
SanDisk Extreme Pro V30 A1
SanDisk Extreme V30 A2
SanDisk Extreme Pro V30 A2
Lexar 1066x microSD UHS-I
Serie SILVER
Modelo
SDSQXVF-032G-GN6MA
SDSQXCG-064G-GN6MA
SDSQXAH-064G-GN6GN
SDSQXAA-128G-GN6GN
SDSQXCU-064G-GN6MA
SDSQXCY-128G-ZN6MA
LMS1066064G-BN
LMS1066128G-BN
Capacidad
32 GB
64 GB
64 GB
128 GB
64 GB
128 GB
64 GB
128 GB
Índice de velocidad
V30
V30
U3, A2, V30
U3, A2, V30
U3, A2, V30
U3, A2, V30
V30
V30
Aplicación Solvia
Cuando se utilizan con la aplicación Solvia, los binoculares con IA Solvia 8×32 pueden
transmitir imágenes en vivo de alta definición directamente a su dispositivo móvil.
Esto le permite configurar los parámetros de la cámara y controlar los binoculares de
forma remota. La aplicación también cuenta con una gran variedad de funciones
que incluyen exportación de archivos multimedia, reconocimiento mediante IA
basado en la nube y mejora de imágenes, lo que mejora notablemente la
experiencia general del usuario.
13
ES
PerfilRegistroÁlbumObservación
Hecho
Solvia
Mis dispositivos
i
1 2
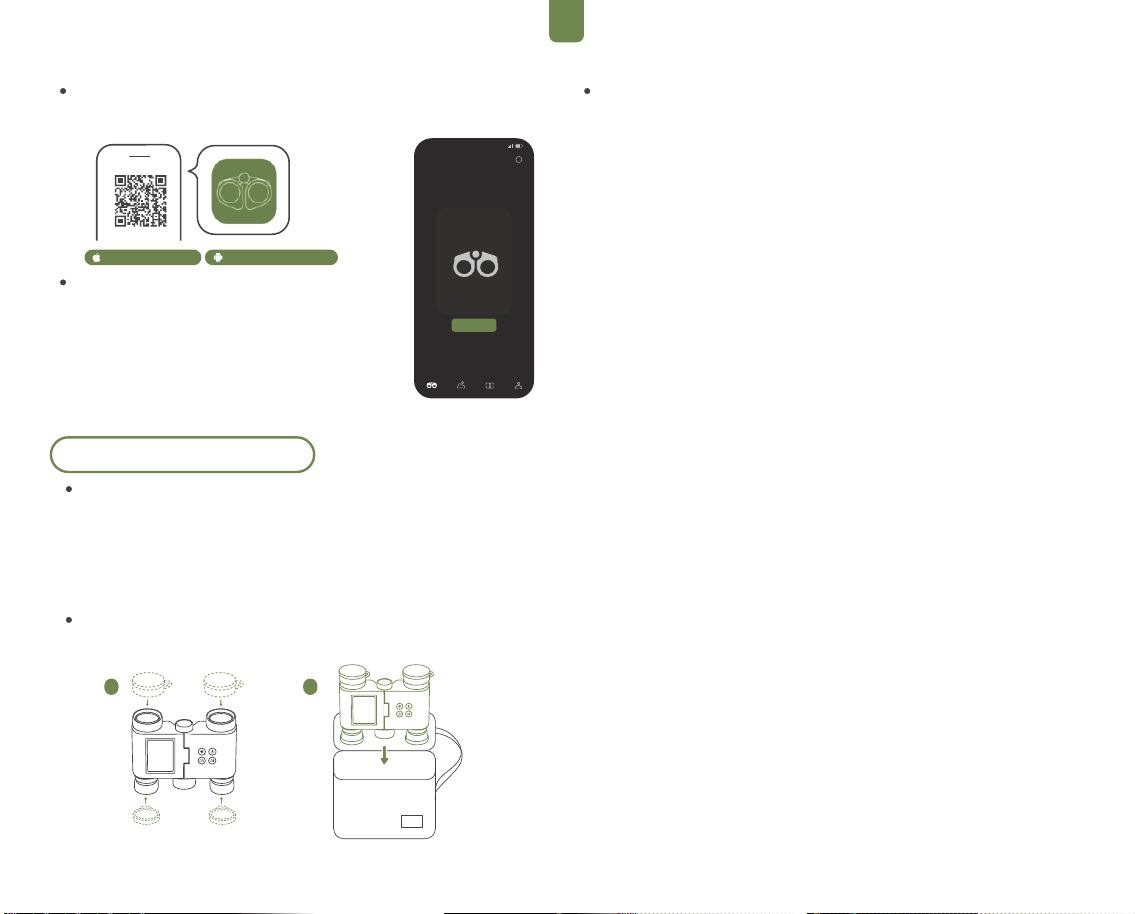
Descargar la aplicación Solvia
Busque la aplicación Solvia en la tienda de aplicaciones de su teléfono o
escanee el código QR para descargarla.
Conectar a la aplicación Solvia:
1. Presione el botón de encendido para encender los
binoculares con IA Solvia 8x32.
2. Toque el ícono “Ajustes” que se encuentra en la
esquina superior derecha de la pantalla y vaya a “Wi-Fi”
para habilitar la Wi-Fi y ver el nombre y la contraseña de
la red Wi-Fi del dispositivo.
3. Abra la aplicación Solvia, toque el botón “Conectar”
en la página de inicio y siga las instrucciones que
aparecen en la pantalla para conectarse a la Wi-Fi del
dispositivo.
iOS 15.0 y superior Android 7.0 y superior
Mantenimiento y cuidado
Actualización del firmware
Antes de actualizar el firmware, asegúrese de que los binoculares tengan un
nivel de batería superior al 20%.
Conecte los binoculares a la aplicación Solvia.
Cuando la aplicación indique que hay una nueva actualización del firmware
disponible, toque para comenzar la actualización y siga las instrucciones que
aparecen en la pantalla. El proceso de actualización del firmware tardará
aproximadamente 3minutos.
Almacenamiento
Después de utilizar los binoculares con IA Solvia 8x32, cubra los oculares y las
lentes objetivo con las tapas protectoras y guarde los binoculares en el estuche
de transporte correspondiente.
Precauciones de uso
Restricción de edad
Este producto no es apto para niños menores de 3años.
Uso del adaptador
El adaptador de carga de este producto (no incluido) no es un juguete y
debe mantenerse fuera del alcance de los niños.
Se recomienda utilizar un adaptador de carga de 5V / 2A para garantizar
una carga estable y segura.
Conexión de alimentación exclusiva:
El producto solo se debe cargar utilizando un único adaptador de
corriente.
Método de limpieza
Limpie la superficie del dispositivo con un paño suave, limpio y seco.
Supervisión infantil
Para garantizar la seguridad, los niños deben utilizar este producto bajo
la supervisión de un adulto.
Evitar caídas
- Si el dispositivo se cae o se somete a fuertes golpes, se pueden dañar la
óptica y los componentes internos de forma permanente.
- Proteja el dispositivo del polvo y la arena, ya que la contaminación podría
dañar las lentes y provocar un mal funcionamiento.
Prohibido desarmarlo sin autorización
- No desarme, modifique ni intente reparar el producto. Las reparaciones
que se realizan sin autorización pueden provocar un mal funcionamiento y
anularán la garantía.
Rango de temperatura de uso
- No utilice ni cargue el dispositivo en entornos que superen el rango de
temperatura recomendado, entre -10°C y +50°C
Precauciones para el almacenamiento a largo plazo
- Si no va a utilizar el producto durante un largo periodo, cárguelo por
completo antes de guardarlo y recárguelo al menos una vez cada tres
meses para conservar el buen estado de la batería.
No se debe mirar fuentes de luz brillante
- Nunca mire al sol u a otras fuentes de luz fuerte con los binoculares, ya
que pueden provocar lesiones oculares graves.
No utilizar mientras se camina
- Mantenga una posición estable mientras utiliza el dispositivo. Para evitar
tropiezos o choques, evite utilizarlo mientras camina.
Resistencia al agua, polvo y golpes
- El producto ofrece una resistencia básica a las salpicaduras; evite golpes
fuertes o la inmersión en agua.
Consejos para el mantenimiento y la garantía
- Comuníquese con los centros de servicio autorizados para recibir los
servicios de mantenimiento y reparación. Las reparaciones no autorizadas
realizadas por instituciones no profesionales pueden anular la garantía.
14
ES
Para garantizar su seguridad y la de los demás, lea atentamente las siguientes
advertencias antes de utilizar este producto:
1. No mirar directamente a fuentes de luz brillante
Nunca mire directamente al sol ni a otras fuentes de luz brillante con los
binoculares para evitar lesiones oculares irreversibles o quemaduras en la retina.
2. No desarmar ni realizar modificaciones sin autorización
No desarme, modifique ni intente reparar el producto.
Las operaciones realizadas sin autorización pueden dañar los componentes
internos, crear riesgos de descarga eléctrica y afectará los derechos que le
otorga la garantía.
3. Mantener alejado de altas temperaturas, humedad y campos magnéticos
fuertes
Mantenga este producto lejos de entornos con altas temperaturas, humedad,
campos magnéticos fuertes y materiales inflamables o explosivos.
La exposición a dichas condiciones puede hacer que la batería se hinche, explote
o se dañen los circuitos internos.
4. No utilizar bajo el agua
Este dispositivo es resistente a las salpicaduras, pero no es sumergible. No utilice
el dispositivo bajo el agua ni
lo exponga a lluvias fuertes. Si el dispositivo entra en contacto con el agua,
apáguelo inmediatamente y comuníquese con el servicio de atención al cliente.
5. Garantizar una ventilación adecuada durante la carga
No cargue el dispositivo en un espacio cerrado o en áreas con poca ventilación, ya
que esto podría causar riesgo de sobrecalentamiento o de incendio.
6. Utilizar fuentes de alimentación y accesorios que cumplan con la normativa
Utilice únicamente los adaptadores de corriente recomendados que cumplan con
las especificaciones requeridas (5V / 2A).
No utilice cargadores no homologados o de baja calidad, ya que pueden causar
daños o suponer riesgos para la seguridad.
Instrucciones importantes sobre la seguridad
Este producto cuenta con las siguientes políticas de garantía, vigentes desde la
fecha original de compra:
Las fallas funcionales que no sean causadas por factores humanos pueden
repararse o sustituirse de forma gratuita dentro de los siguientes períodos de
garantía: 3años para el sistema óptico y 1año para la unidad principal (incluidos
los componentes electrónicos y el software).
Garantía de los accesorios: los accesorios (por ejemplo, la correa para el cuello, el
estuche de transporte, el protector para la lente) no están cubiertos por la
garantía estándar. Sin embargo, puede solicitar un cambio en un plazo de 7días si
detecta un problema relacionado con la calidad al momento de la entrega.
Prueba de compra: para acceder a los servicios de garantía, es necesario
presentar una prueba de compra válida (como la captura de pantalla del pedido,
una factura o un recibo).
La garantía no cubre lo siguiente:
Daños causados por un uso inadecuado, como caídas, golpes, inmersión en agua o
exposición a entornos con altas temperaturas;
Daños causados por reparaciones, modificaciones o desmantelamiento no
autorizados;
Productos comprados en comercios no autorizados o sin la prueba de compra
válida;
Uso y desgaste normal, deterioro, rayones, manchas y otros problemas no
relacionados con el funcionamiento.
Política sobre la garantía
Para obtener asistencia técnica y acceder al servicio de postventa, comuníquese
con nosotros a través de los siguientes canales:
Sitio web oficial:www.matataxplore.com
Correo electrónico del servicio de atención al cliente: suppor[email protected]
Prepare la siguiente información antes de ponerse en contacto con nosotros:
Modelo del producto y número de serie que aparecen en la parte posterior del
dispositivo o en la caja de empaque;
Captura de pantalla de su prueba de compra;
Breve descripción del problema, junto con cualquier foto o vídeo que lo respalde.
Soporte y servicio
Declaración de cumplimiento y normas ambientales
Declaración de conformidad de la Directiva RoHS y CE
Declaración de reciclaje medioambiental WEEE
- CE:
Este producto cumple con los siguientes requisitos
esenciales: 2014/30/EU (Directiva de Compatibilidad
Electromagnética) y 2014/35/EU (Directiva de Baja
Tensión).
Directiva RoHS (2011/65/EU):
El dispositivo no contiene sustancias peligrosas como plomo, mercurio, cadmio o
cromo hexavalente que excedan los límites especificados.
El dispositivo cuenta con las etiquetas de conformidad de la Directiva RoHS y CE
en la carcasa o en la placa de características.
Este producto cumple con la Directiva de Residuos de Aparatos
Eléctricos y Electrónicos (WEEE, 2012/19/EU):
- No deseche este dispositivo como residuo doméstico.
- Cuando deseche este dispositivo, asegúrese de que sea entregado a una
instalación designada para el reciclaje de residuos electrónicos.
- El símbolo del contenedor de basura tachado indica que el producto debe
reciclarse por separado.
Agradecemos su participación en la responsabilidad ambiental y su contribución
a un futuro sustentable.
En este manual encontrará información
importante sobre el producto. Guárdelo.
15

Declaración de Advertencia de la FCC
Los cambios o modificaciones que no hayan sido expresamente aprobados
por la parte responsable del cumplimiento normativo podrían invalidar la
autorización del usuario para operar este equipo.
Este equipo ha sido probado y cumple con los límites establecidos para un
dispositivo digital de Clase B, de conformidad con la Parte 15 de las normas de
la FCC. Estos límites están diseñados para proporcionar una protección
razonable contra interferencias perjudiciales en instalaciones residenciales.
Este equipo genera, utiliza y puede irradiar energía de radiofrecuencia y, si no
se instala y utiliza de acuerdo con las instrucciones, puede causar
interferencias perjudiciales en las comunicaciones por radio. Sin embargo, no
se garantiza que no se produzcan interferencias en una instalación
determinada.
Si este equipo causa interferencias perjudiciales en la recepción de radio o
televisión, lo cual puede determinarse apagando y encendiendo el equipo, se
recomienda al usuario intentar corregir la interferencia mediante una o varias
de las siguientes medidas:
• Reorientar o reubicar la antena receptora.
• Aumentar la distancia entre el equipo y el receptor.
• Conectar el equipo a una toma de corriente perteneciente a un circuito
diferente al que está conectado el receptor.
• Consultar al distribuidor o a un técnico experimentado en radio/televisión
para obtener ayuda.
Declaración de Exposición a Radiación de la FCC
Este dispositivo ha sido evaluado y cumple con los requisitos generales de
exposición a radiofrecuencia (RF). El dispositivo puede utilizarse en
condiciones de exposición portátil sin restricciones.
Este dispositivo cumple con la Parte 15 de las normas de la FCC. Su
funcionamiento está sujeto a las dos condiciones siguientes:
(1) Este dispositivo no puede causar interferencias perjudiciales.
(2) Este dispositivo debe aceptar cualquier interferencia recibida, incluidas
aquellas que puedan provocar un funcionamiento no deseado.
Este dispositivo cumple con los requisitos gubernamentales relativos a la
exposición a ondas de radio. Las directrices se basan en normas
desarrolladas por organizaciones científicas independientes mediante
evaluaciones periódicas y exhaustivas de estudios científicos. Estas normas
incluyen un amplio margen de seguridad diseñado para garantizar la
protección de todas las personas, independientemente de su edad o estado
de salud.
Información y Declaración sobre la Exposición a RF de la FCC:
El límite SAR establecido por la FCC (Estados Unidos) es de 1,6 W/kg,
promediado sobre un gramo de tejido. Este tipo de dispositivo también ha
sido probado conforme a este límite SAR.
Este dispositivo fue probado en condiciones típicas de uso junto al cuerpo,
manteniendo la parte posterior del dispositivo a una distancia de 0 mm del
cuerpo. Para garantizar el cumplimiento de los requisitos de exposición a RF
En este manual encontrará información
importante sobre el producto. Guárdelo.
de la FCC, deben utilizarse accesorios que mantengan una distancia de
separación de 0 mm entre el cuerpo del usuario y la parte posterior del
dispositivo.
Los clips para cinturón, fundas u otros accesorios similares no deben contener
componentes metálicos en su estructura. El uso de accesorios que no
cumplan estos requisitos podría no satisfacer los requisitos de exposición a RF
de la FCC y debe evitarse.
El funcionamiento de este dispositivo está restringido exclusivamente al uso
en interiores dentro de la banda de frecuencia de 5180–5240 MHz.
ES
16
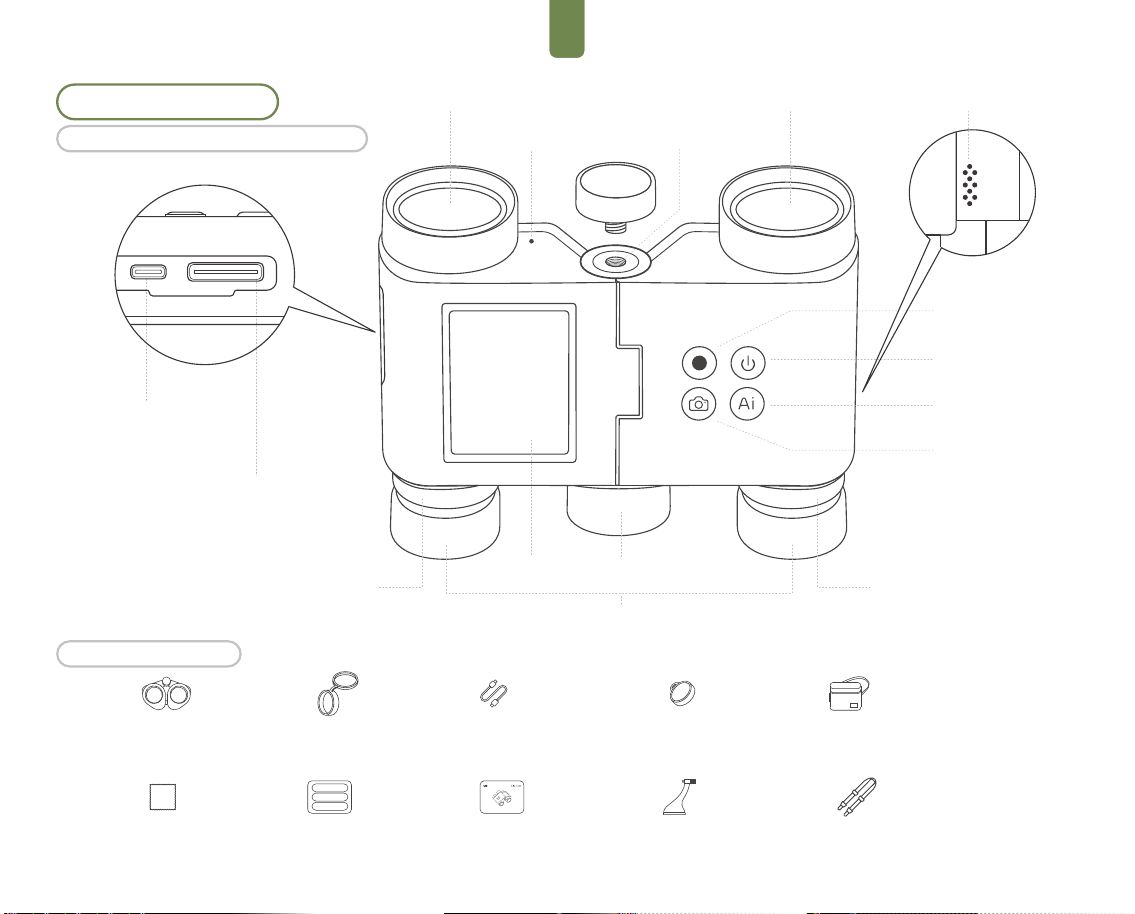
Présentation du produit
Accessoires standard
Découvrir les jumelles Solvia 8×32 AI
Vidéo
Fente pour carte microSD
Bague dioptrique de
l'oculaire droit
Bouton de focalisationAffichage
Marche/Arrêt
Reconnaissance de l'IA
Photo
Oculaire
Lentilles d'objectif
Microphone
Trou fileté 1/4' '
Lentilles d'objectif
Haut-parleur
Cache-objectifs ×2 Câble de charge/données
USB-C ×1
Cache-oculaires ×2 Étui de transport ×1
Chiffon de nettoyage
des lentilles ×1
Guide de démarrage
rapide ×1
Manuel
d'utilisation ×1
Sangle de cou ×1Adaptateur de
trépied ×1
Jumelles IA ×1
Port USB-C de
chargement/transfert de
données
Bague dioptrique
de l'oculaire gauche
FRFR
17
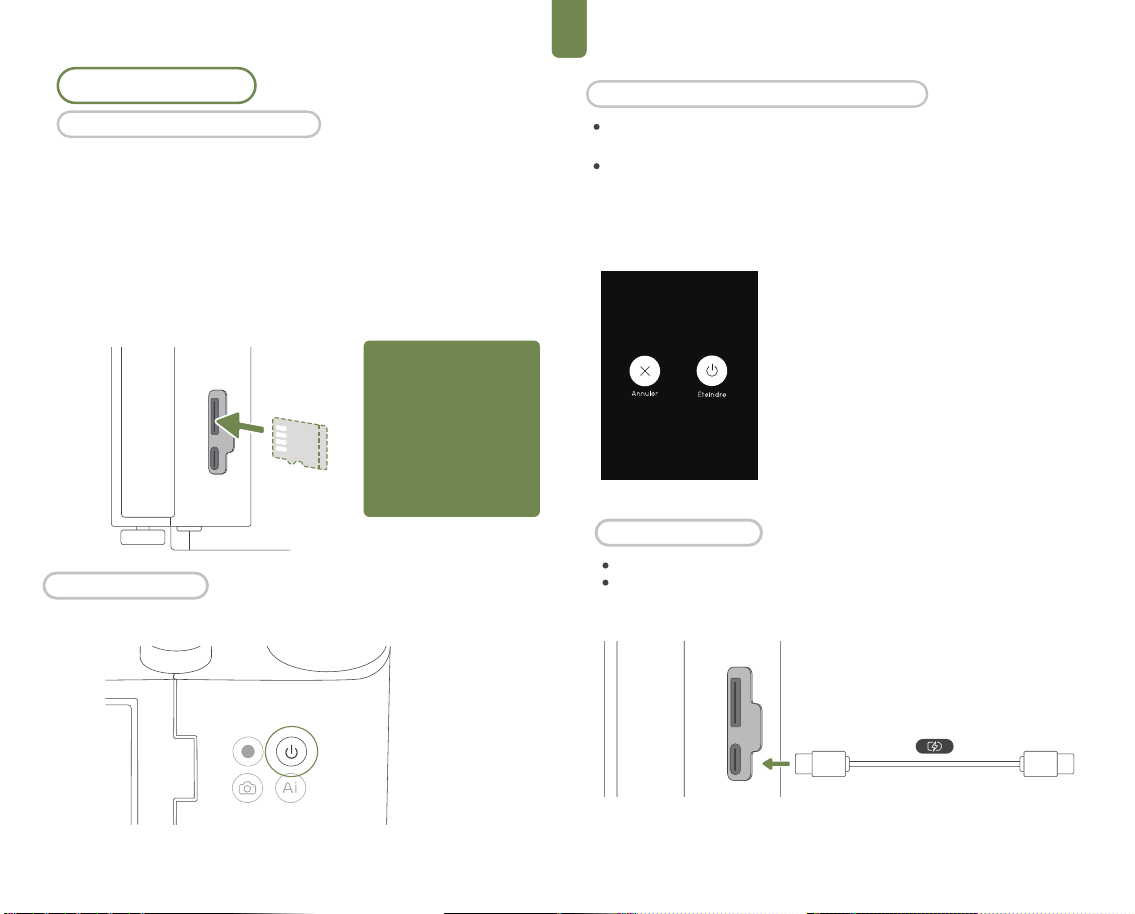
FRFR
Appuyez sur le bouton d'alimentation et maintenez-le enfoncé
pendant 3 secondes pour afficher les options à l'écran.
Gestion de la mise hors tension et de la veille
Mise hors tension
- Éteint complètement le dispositif.
- Si le dispositif se bloque ou ne répond plus, appuyez
sur le bouton d'alimentation et maintenez-le enfoncé
pendant 8 secondes pour forcer l'arrêt.
Première utilisation
Les jumelles Solvia 8× 32 AI ne disposent pas de mémoire intégrée. Vous
devez installer une carte microSD pour stocker les images et les vidéos
capturées. Il est recommandé d'utiliser une carte microSD avec une vitesse
UHS-I de classe 3 et formatée en exFAT. (Une carte microSD standard de
64 GB est incluse dans le kit. Veuillez vous reporter à la section
"Spécifications” pour obtenir la liste des modèles de cartes
recommandés.)
Insérez la carte microSD dans la fente en veillant à ce que son orientation
corresponde au schéma. Pour éjecter la carte microSD, poussez-la
doucement vers l'intérieur jusqu'à ce qu'elle s'enclenche et se libère
partiellement de la fente.
Appuyez sur le bouton d'alimentation pendant 2 secondes pour activer le
dispositif.
Ouvrez le cache du port USB vers l'extérieur.
Connectez un adaptateur secteur à l'aide d'un câble USB-C pour charger le
dispositif (entrée recommandée : DC 5V/2A).
Remarque : Pour protéger vos
données enregistrées et
prolonger la durée de vie de la
carte microSD, évitez de la
brancher à chaud. Il est
recommandé d'insérer ou de
retirer la carte uniquement
lorsque les jumelles Solvia 8×32
AI sont éteintes.
Mise sous tension
Recharge en cours
Installation de la carte microSD
18
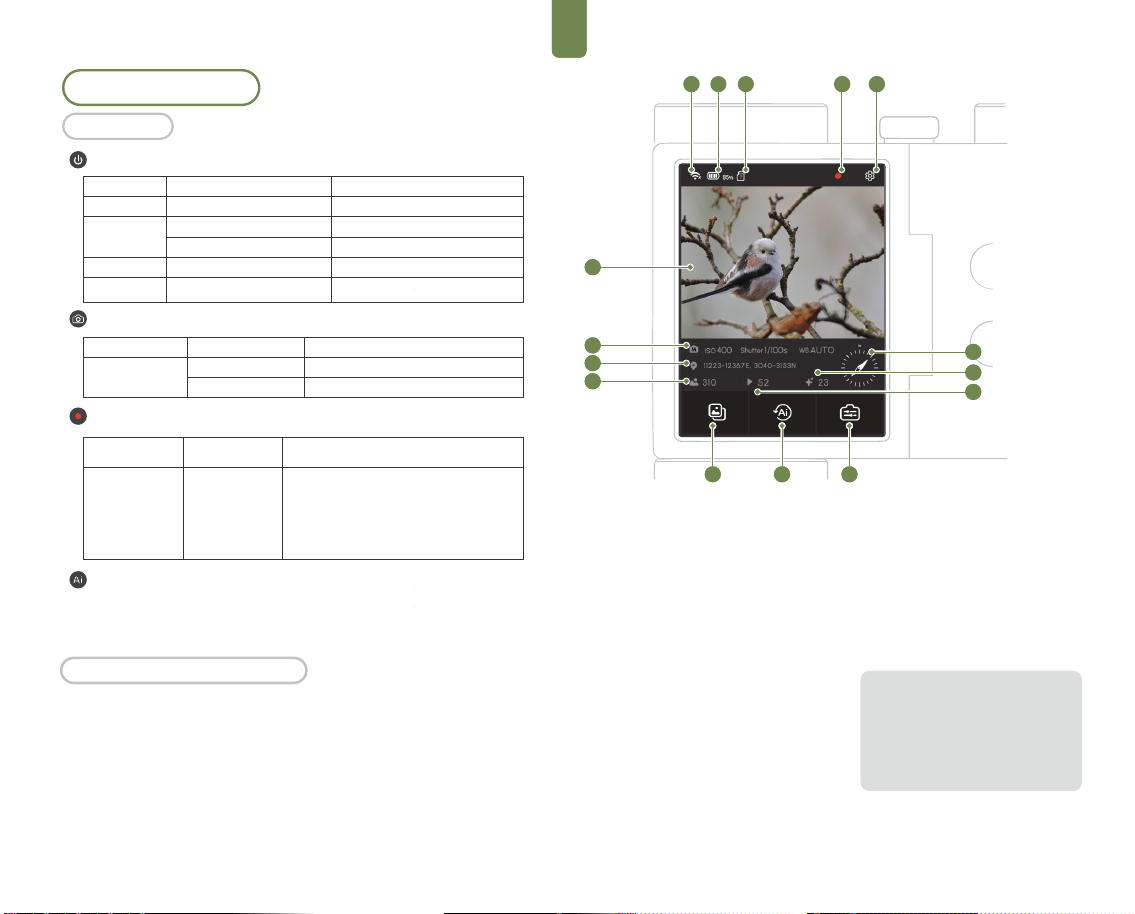
FRFR
État du dispositif
Sous tension
Fonctionnement
des boutons
Appui unique
Fonctionnement des boutons
Démarrer/arrêter l'enregistrement. Les
vidéos sont automatiquement enregistrées
par segments de 5 minutes afin de garantir
la sécurité des fichiers. L'enregistrement
s'arrête automatiquement lorsque l'espace
de stockage est insuffisant.
Une fois allumé, l'écran tactile affiche l'interface du viseur des jumelles.
La barre de menu affiche des informations telles que la connexion Wi-Fi,
le niveau de batterie et la capacité de stockage.
Tapez ou glissez sur l'écran tactile pour accéder aux fonctions.
Commandes de l'écran tactile
Opérations de base
Opérations
État du dispositif
Arrêt
Marche
Mode veille
Ne répond pas
Opérations
Appuyer brièvement pendant 2s
Appuyer
Appuyer longuement pendant 3s
Appuyer
Appuyer longuement pendant 8s
Fonctions
Mise sous tension
Verrouiller et éteindre l'écran
Sélectionner Mise hors tension / Veille
Déverrouiller et allumer l'écran
Forcer l'arrêt
Bouton d'alimentation
État du dispositif
Marche
Mode veille
Opérations
Appuyer
Appuyer longuement
Fonctions
Lancer la capture
Démarrer le mode rafale
Bouton Photo
Bouton Vidéo
- Dans le mode Affichage détaillé des photos, appuyez sur le bouton
Reconnaissance IA pour lancer la reconnaissance IA intégrée et afficher
les résultats.
Reconnaissance de l'IA
1
5
5
5
5
7
4
8 9
2 2
4
1
6
10
11
12
5
5
5
15
7
5
8 9
2 3
4
14
13
1. État du Wi-Fi
2. Niveau de batterie
3. État de la carte SD
4. État d’enregistrement
5. Paramètres système
6. Vue en direct et aperçu d'image
7. Galerie et biblioth èque multimé dia
8. Centre de journaux d'IA
9. Accès aux paramètres
10. Paramètres de prise de vue
11. Données GPS
(nécessite Solvia Field Kit)
12. Compteur de photos
13. Compteur de vidéos
14. Statistiques de reconnaissance d'IA
15. Boussole électronique
(nécessite Solvia Field Kit)
Veuillez noter que, sous certains angles
de lumière, des reflets ou des zones
sombres peuvent apparaître lors de
l’observation ou de la prise de vue. Vous
pouvez changer l’angle pour améliorer
l’observation ou la capture. Il ne s’agit pas
d’un problème de qualité du produit.
19
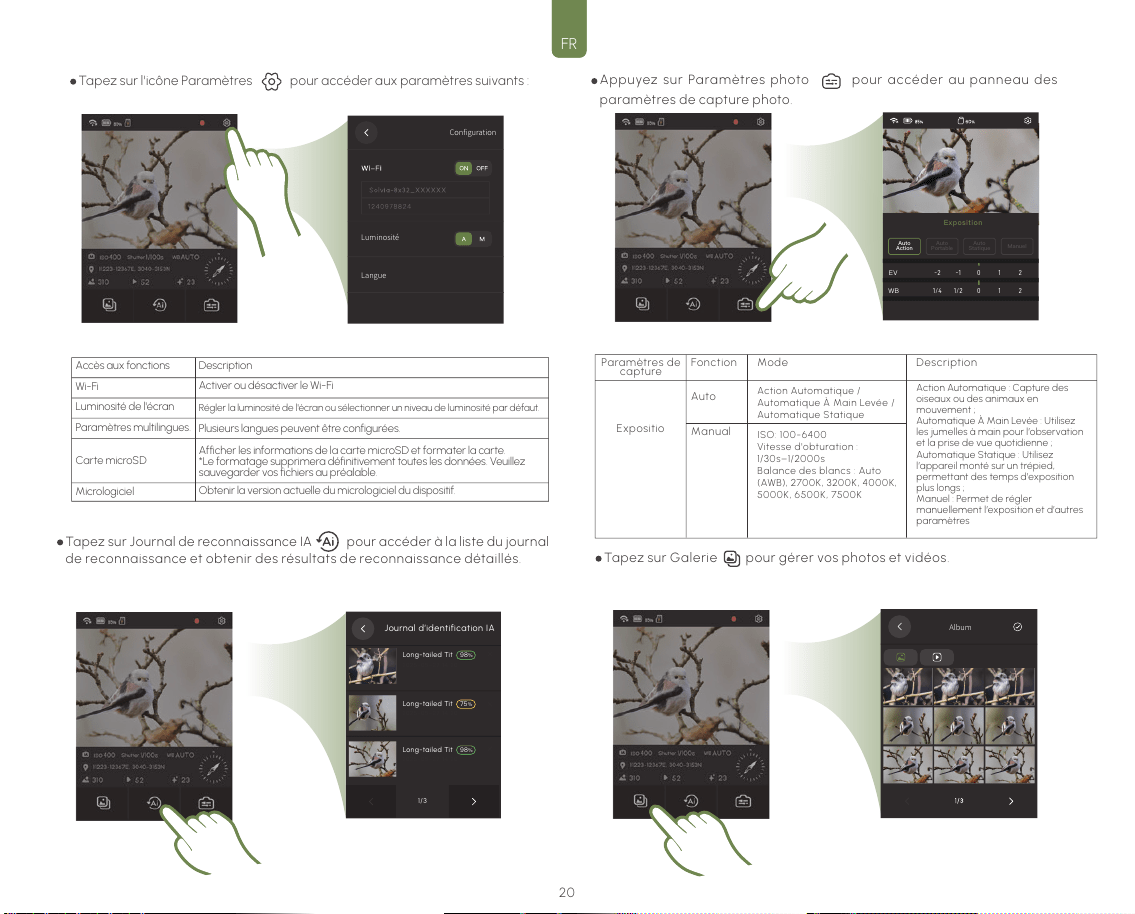
FRFR
Tapez sur l 'icôn e Pa ramètres pour accéder a ux pa ramètres suivants :
Configuration
Luminosité
Langue
Exposition
0
1
2
-2
-1
EV
Auto
Action
Auto
Portable
Auto
Statique
Manuel
0
1
2
1/4
1/2
WB
Long-tailed Tit
98
%
75
%
2025-05-27 14:20
Long-tailed Tit
2025-05-27 14:20
Long-tailed Tit
98
%
2025-05-27 14:20
1/3
Journal d’identification IA
Album
Tapez sur Journal de reconnaissance IA pour accéder à la liste du journal
de reconnaissance et obtenir des résultats de reconnaissance détaillés.
Accès aux fonctions
Wi-Fi
Luminosité de l'écran
Paramètres multilingues.
Carte microSD
Micrologiciel
Description
Activer ou désactiver le Wi-Fi
Régler la luminosité de l'écran ou sélectionner un niveau de luminosité par défaut.
Plusieurs langues peuvent être configurées.
Obtenir la version actuelle du micrologiciel du dispositif.
Afficher les informations de la carte microSD et formater la carte.
*Le formatage supprimera définitivement toutes les données. Veuillez
sauvegarder vos fichiers au préalable.
Appuyez sur Paramètres photo pour accéder au panneau des
paramètres de capture photo.
Paramètres de
capture
Fonction Mode Description
Action Automatique : Capture des
oiseaux ou des animaux en
mouvement ;
Automatique À Main Levée : Utilisez
les jumelles à main pour l’observation
et la prise de vue quotidienne ;
Automatique Statique : Utilisez
l’appareil monté sur un trépied,
permettant des temps d’exposition
plus longs ;
Manuel : Permet de régler
manuellement l’exposition et d’autres
paramètres
Action Automatique /
Automatique À Main Levée /
Automatique Statique
ISO: 100-6400
Vitesse d'obturation :
1/30s–1/2000s
Balance des blancs : Auto
(AWB), 2700K, 3200K, 4000K,
5000K, 6500K, 7500K
Manual
Expositio
Auto
Tapez sur Galerie pour gérer vos photos et vidéos.
20
FRFR
Album
Album
Appuyez sur l’icône pour accéder à l’interface de
suppression des photos.
Indicateur d'état :
Bleu fixe : Le dispositif est connecté et fonctionne correctement.
Bleu clignotant : La vidéo est en cours d'enregistrement.
Indicateur de charge/de batterie :
Éteint : Le dispositif est déchargé ou n'est pas connecté à une source
d'alimentation.
Rouge fixe : Le dispositif est en cours de chargement.
Vert fixe : Indique que le dispositif est suffisamment chargé ou
complètement chargé.
État de l'indicateur lumineux
Spécifications et paramètres
Spécifications techniques des jumelles
Grossissement
Diamètre de l'objectif
Système prismatice
Champ visuel (m/1000m)
Champ visuel (degrés)
Diamètre pupille de sortie
Dégagement oculaire
Distance de mise au point rapprochée
Poids
Dimensions
Typ e de ba tterie
Durée de vie de la batterie
Capteur
Résolution photo/vidéo
Protection environnementale
Méthodes de connexion
Température de fonctionn ement
Température de stockage
8 x
32 mm
Prisme de toit
129.5 m / 388.5 ft
7, 6°
4,24 mm
16 mm
3,7 m
680 g
116,5 mm × 120,8 mm × 68 mm
Li-ion 2600 mAh
12 h (utilisation standard) ; 4 h (à pleine charge) Avec
module étendu : 20 h (utilisation standard) ; 8 h (à pleine
charge)
1/2,7" CMOS
2592 × 1944 px
IP 64, purge d'azote
Tran sfe rt ra pi de W i- Fi , exp orta ti on U SB
−10°C à +50°C
-20°C à +60°C
Liste des cartes microSD recommandées
Marque et série
SanDisk Extreme Pro V30 A1
SanDisk Extreme V30 A2
SanDisk Extreme Pro V30 A2
1066x microSD UHS-I
Série SILVER
Modèle
SDSQXVF-032G-GN6MA
SDSQXCG-064G-GN6MA
SDSQXAH-064G-GN6GN
SDSQXAA-128G-GN6GN
SDSQXCU-064G-GN6MA
SDSQXCY-128G-ZN6MA
LMS1066064G-BN
LMS1066128G-BN
Capacité
32 GB
64 GB
64 GB
128 GB
64 GB
128 GB
64 GB
128 GB
Vitesses nominales
V30
V30
U3, A2, V30
U3, A2, V30
U3, A2, V30
U3, A2, V30
V30
V30
Application Solvia
Lorsqu'ils sont utilisés avec l'application Solvia, les jumelles Solvia 8×32 AI peuvent
diffuser des images haute définition en direct directement sur votre dispositif mobile.
Cela vous permet de régler les paramètres de la caméra et de contrôler les jumelles à
distance. L'application offre également une série de fonctionnalités, notamment
l'exportation de médias, la reconnaissance IA basée sur le cloud et l'amélioration des
images, ce qui améliore considérablement l'expérience utilisateur globale.
21
FRFR
1 2
Télécharger l'application Solvia
Recherchez l'application Solvia dans la boutique d'applications de votre
téléphone ou scannez le code QR pour la télécharger.
Connexion à l'application Solvia :
1. Appuyez sur le bouton d'alimentation pour activer les
jumelles Solvia 8×32 AI.
2. Tapez sur l'icône Paramètres dans le coin supérieur
droit de l'écran, puis accédez Wi-Fi pour activer le Wi-Fi
et afficher le nom et le mot de passe Wi-Fi du dispositif.
3. Ouvrez l'application Solvia, tapez sur le bouton
Connect sur l'écran d'accueil, puis suivez les instructions à
l'écran pour vous connecter au réseau Wi-Fi du dispositif.
iOS 15.0 et supérieur Android 7.0 et supérieur
Entretien et soin
Mise à jour du micrologiciel
Avant de mettre à jour le micrologiciel, assurez-vous que le niveau de batterie des
jumelles est supérieur à 20 %.
Connectez les jumelles à l'application Solvia.
Lorsque l'application indique qu'une nouvelle version du micrologiciel est
disponible, appuyez pour lancer la mise à jour et suivez les instructions à l'écran.
Le processus de mise à jour du micrologiciel dure généralement environ 3 minutes.
Stockage
Après avoir utilisé les jumelles Solvia 8×32 AI, couvrez les oculaires et les lentilles de
l'objectif avec les capuchons de protection, puis rangez les jumelles dans leur étui
de transport dédié.
Précautions d'utilisation
Restriction d'âge
Ce produit ne convient pas aux enfants de moins de 3 ans.
Utilisation de l'adaptateur
L' ad ap tat eu r d e ch ar ge po u r ce pr od u it (n o n i nc l us) n 'e s t p as u n jo ue t et d oit êt re te n u ho rs
de portée des enfants.
Il est recommandé d'utiliser un adaptateur de charge 5V/2A pour garantir une charge sûre
et stable.
Connexion électrique unique:
Le produit ne peut être chargé qu'à l'aide d'un seul adaptateur secteur.
Méthode de nettoyage
Essuyez la surface du dispositif avec un chiffon propre, doux et sec.
Surveillance d'enfants
Les enfants doivent utiliser ce produit sous la surveillance d'un adulte afin de garantir leur
sécurité.
Prévenir les chutes
- La chute du dispositif ou des chocs violents peuvent endommager de manière irréversible
les composants optiques ou internes.
- Protégez le dispositif de la poussière et du sable, car toute contamination peut endommager
les lentilles et entraîner un dysfonctionnement.
Démontage non autorisé interdit
- Ne pas démonter, modifier ou tenter de réparer le produit vous-même. Les réparations non
autorisées peuvent entraîner un dysfonctionnement et annuler la garantie.
Plage de température d'utilisation
- Ne pas utiliser ou charger le dispositif en dehors de la plage de température recommandée
de −10°C à +50°C
Précautions pour le stockage à long terme
- Si le produit n'est pas utilisé pendant une période prolongée, le charger complètement avant
de le stocker et le recharger au moins une fois tous les trois mois afin de préserver la santé de
la batterie.
Ne pas regarder des sources de lumière vive
- Ne jamais regarder le soleil ou d'autres sources lumineuses intenses par les jumelles, car cela
pourrait entraîner de graves lésions oculaires.
Ne pas utiliser en marchant
- Maintenir une position stable pendant l'utilisation du dispositif. Éviter de l'utiliser en marchant
afin d'éviter les chutes ou les collisions.
Résistance à l'eau, à la poussière et aux chocs
- Le produit offre une résistance de base aux éclaboussures, mais évitez de l'exposer à des
chocs violents ou de le plonger dans l'eau.
Conseils d'entretien et de garantie
- Contactez les centres de service agréés pour l'entretien et les réparations. Les réparations
non autorisées effectuées par des institutions non professionnelles peuvent annuler la garantie.
ProfilJournalAlbumObservation
Terminé
Solvia
Mes appareils
i
22
FRFR
Pour assurer votre sécurité et celle des autres, veuillez lire attentivement les
avertissements suivants avant d'utiliser ce produit :
1. Ne pas regarder directement les sources de lumière vive
Ne jamais regarder directement le soleil ou d'autres sources de lumière intense par
les jumelles afin d'éviter des lésions oculaires irréversibles ou des brûlures de la
rétine.
2. Ne pas démonter ou modifier sans autorisation.
Ne pas démonter, modifier ou tenter de réparer le produit vous-même.
Une manipulation non autorisée peut endommager les composants internes, créer
des risques d'électrocution et annuler la garantie.
3. Éviter les températures élevées, l'humidité et les champs magnétiques puissants.
Éloigner le produit des températures élevées, de l'humidité, des champs
magnétiques puissants et des environnements inflammables ou explosifs.
L'exp osition à de telles conditi ons peut entraîner un gonfl ement de la batterie, des
explosions ou des dommages aux circuits internes.
4. Ne pas utiliser sous l'eau
Ce dispositif est résistant aux éclaboussures, mais n'est pas submersible. Ne pas
utiliser le dispositif sous l'eau ou
l'exposer à des pluies abondantes. Si le dispositif entre en contact avec de l'eau,
éteignez-le immédiatement et contactez le service clientèle.
5. Veillez à une bonne ventilation pendant la recharge.
Ne rechargez pas le dispositif dans des espaces clos ou mal ventilés, car cela
pourrait entraîner une surchauffe ou un risque d'incendie.
6. Utilisez des sources d'alimentation et des accessoires conformes.
Utilisez uniquement les adaptateurs secteur recommandés qui répondent aux
spécifications requises (5 V / 2 A).
N'utilisez pas de chargeurs non certifiés ou de mauvaise qualité, car ils peuvent
causer des dommages ou présenter des risques pour la sécurité.
Instructions importantes de sécurité
Ce produit est couvert par les politiques de garantie suivantes, en vigueur à compter
de la date d'achat initiale :
Les défaillances fonctionnelles non causées par des facteurs humains peuvent faire
l'objet d'une réparation ou d'un remplacement gratuit pendant les périodes de
garantie suivantes : 3 ans pour le système optique et 1 an pour l'unité principale (y
compris les composants électroniques et les logiciels).
Garantie des accessoires : Les accessoires (par exemple, la courroie, l'étui de
transport, les capuchons d'objectif) ne sont pas couverts par la garantie standard.
Toutefois, si un problème de qualité est constaté à la réception, une demande de
remplacement peut être soumise entro 7 jours.
Preuve d'achat : Une preuve d'achat valide (telle qu'une capture d'écran de la
commande, une facture ou un reçu) est requise pour bénéficier du service de
garantie.
La garantie ne couvre pas:
Dommages causés par une utilisation inappropriée, tels que les chutes, les chocs,
l'immersion dans l'eau ou l'exposition à des températures élevées.
Dommages causés par un démontage, une réparation ou des modifications non
autorisés.
Produits achetés auprès de revendeurs non agréés ou sans preuve d'achat valide.
Usure normale, vieillissement, rayures, taches et autres problèmes non fonctionnels.
Politique de garantie
Pour toute assistance technique et service après-vente, veuillez nous contacter via
les canaux suivants :
Site officiel:www.matataxplore.com
E-mail du service clientèle : support@matataxplore.com
Veuillez préparer les informations suivantes avant de nous contacter :
Le modèle et le numéro de série du produit, qui se trouvent à l'arrière du dispositif ou
sur l'emballage ;
Une capture d'écran de votre preuve d'achat.
Une brève description du problème, accompagnée de photos ou de vidéos à l'appui.
Assistance et service
Déclaration de conformité et normes
environnementales
Déclaration de conformité CE et RoHS
Déclaration de recyclage environnemental des DEEE
- CE:
Ce produit est conforme aux exigences essentielles des
Directives 2014/30/UE (CEM) et 2014/35/UE (VDE).
- Directive RoHS (2011/65/UE) :
Le dispositif ne contient pas de substances dangereuses telles que le plomb, le
mercure, le cadmium ou le chrome hexavalent au-delà des limites spécifiées.
Le dispositif est marqué avec les étiquettes de conformité CE et RoHS
appropriées sur le boîtier ou la plaque signalétique.
Ce produit est conforme à la Directive sur les déchets
d'équipements électriques et électroniques (DEEE, 2012/19/UE)
:
- Ne jetez pas ce dispositif avec les déchets ménagers.
- Lorsque vous jetez ce dispositif, veuillez vous assurer qu'il est traité par une
installation de recyclage des déchets électroniques désignée.
- Le symbole de la poubelle barrée indique que le produit doit être recyclé
séparément.
Nous vous remercions de votre participation à la responsabilité
environnementale et de votre contribution à un avenir durable.
23

Déclaration d'avertissement de la FCC
Les changements ou modifications qui ne sont pas expressément approuvés
par la partie responsable de la conformité peuvent annuler l'autorisation de
l'utilisateur d'utiliser cet équipement.
Cet équipement a été testé et déclaré conforme aux limites applicables aux
appareils numériques de Classe B, conformément à la Partie 15 des règles de
la FCC. Ces limites sont conçues pour fournir une protection raisonnable
contre les interférences nuisibles dans une installation résidentielle.
Cet équipement génère, utilise et peut émettre de l'énergie radioélectrique.
S'il n'est pas installé et utilisé conformément aux instructions, il peut
provoquer des interférences nuisibles aux communications radio. Toutefois,
il n'est pas garanti qu'aucune interférence ne se produira dans une
installation particulière.
Si cet équipement provoque des interférences nuisibles à la réception de la
radio ou de la télévision, ce qui peut être déterminé en éteignant puis en
rallumant l'équipement, l'utilisateur est encouragé à essayer de corriger ces
interférences en appliquant une ou plusieurs des mesures suivantes :
• Réorienter ou déplacer l'antenne de réception.
• Augmenter la distance entre l'équipement et le récepteur.
• Brancher l'équipement sur une prise appartenant à un circuit différent de
celui auquel le récepteur est connecté.
• Consulter le revendeur ou un technicien expérimenté en radio/télévision
pour obtenir de l'aide.
Déclaration relative à l'exposition aux rayonnements de la FCC
Cet appareil a été évalué et répond aux exigences générales en matière
d'exposition aux radiofréquences (RF). L'appareil peut être utilisé dans des
conditions d'exposition portables sans restriction.
Cet appareil est conforme à la Partie 15 des règles de la FCC. Son
fonctionnement est soumis aux deux conditions suivantes :
(1) Cet appareil ne doit pas provoquer d'interférences nuisibles.
(2) Cet appareil doit accepter toute interférence reçue, y compris les
interférences susceptibles de provoquer un fonctionnement indésirable.
Cet appareil répond aux exigences gouvernementales relatives à
l'exposition aux ondes radio. Les directives sont fondées sur des normes
élaborées par des organisations scientifiques indépendantes à la suite
d'évaluations périodiques et approfondies d'études scientifiques. Ces
normes intègrent une marge de sécurité importante destinée à garantir la
sécurité de toutes les personnes, quels que soient leur âge ou leur état de
santé.
Informations et déclaration de la FCC relatives à l'exposition aux
radiofréquences (RF)
La limite DAS (Débit d'Absorption Spécifique - SAR) fixée par la FCC aux
États-Unis est de 1,6 W/kg, moyennée sur un gramme de tissu.
Ce type d'appareil a également été testé conformément à cette limite DAS.
Cet appareil a été testé dans des conditions normales d'utilisation près du
corps, avec l'arrière de l'appareil maintenu à une distance de 0 mm du
corps. Afin de garantir la conformité aux exigences de la FCC relatives à
l'exposition aux radiofréquences, utilisez uniquement des accessoires
permettant de maintenir une distance de séparation de 0 mm entre le
corps de l'utilisateur et l'arrière de l'appareil.
Les clips de ceinture, étuis et accessoires similaires ne doivent pas
contenir de composants métalliques. L'utilisation d'accessoires ne
répondant pas à ces exigences peut ne pas être conforme aux exigences
de la FCC relatives à l'exposition aux radiofréquences et doit être évitée.
L'utilisation de cet appa reil est limitée à un usage intérieur uniqu ement
dans la bande de fréquences 5180–5240 MHz.
Ce manuel contient des informations
importantes sur le produit et doit être conservé.
FRFR
24
FRDE
Produktbeschreibung
Standardzubehör
Lernen Sie das Fernglas Solvia 8×32 AI kennen
Video
microSD-Kartensteckplatz
Dioptrienring für
rechtes Okular
FokussierknopfDisplay
Power Ein/Aus
KI-Erkennung
Foto
Okular
Objektiv
Mikrofon
1/4'' Gewindeloch
Objektiv
Lautsprecher
Objektivabdeckungen ×2 USB-C-Lade-/
Datenkabel ×1
Okularabdeckungen ×2 Tragetasche ×1
Linsenreinigungstuch ×1
Schnellstartanleitung ×1 Benutzerhandbuch ×1 Umhängegurt ×1Stativadapter ×1
AI-Fernglas ×1
USB-C-Aufladen-/Datenanschluss
Dioptrienring für
linkes Okular
25
FRDE
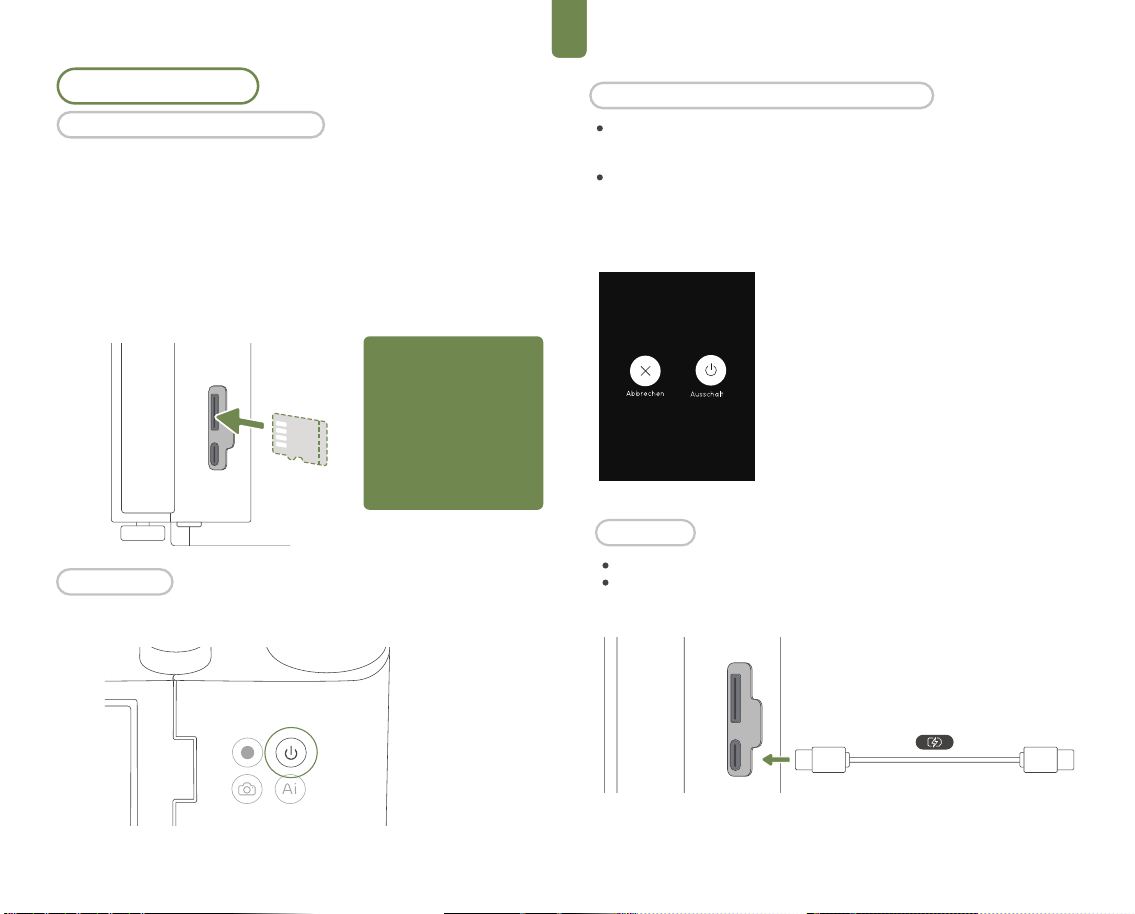
Halten Sie die Ein-/Aus-Taste 3 Sekunden lang gedrückt,
um die Optionen auf dem Bildschirm anzuzeigen.
Ausschalten und Ruhemodus-Einstellungen
Ausschalten
- Schaltet das Gerät vollständig aus.
- Wenn das Gerät einfriert oder nicht mehr reagiert, halten Sie die
Ein-/Aus-Taste ca.8 Sekunden lang gedrückt, um das Ausschalten des
Gerätes zu erzwingen.
Erstmaliger Einsatz
Das Solvia 8×32 AI Fernglas verfügt über keinen integrierten Speicher. Sie
müssen eine microSD-Karte einlegen, um aufgenommene Bilder und Videos
zu speichern. Es wird empfohlen, eine microSD-Karte mit UHS-I-Geschwin-
digkeitsklasse 3 zu verwenden, die mit exFAT formatiert ist. (Eine standard-
mäßige 64-GB-microSD-Karte ist im Lieferumfang enthalten. Eine Liste der
empfohlenen Kartenmodelle finden Sie im Abschnitt „Technische Daten“.)
Legen Sie die microSD-Karte in den Steckplatz ein und achten Sie dabei
darauf, dass die Ausrichtung mit der Abbildung übereinstimmt. Um die mi-
croSD-Karte auszuwerfen, drücken Sie sie vorsichtig in den Steckplatz bis
Sie einen Klick hören, worauf diese teilweise aus dem Steckplatz herausragt.
Drücken Sie die Ein-/Aus-Taste 2 Sekunden lang, um das Gerät
einzuschalten.
Öffnen Sie die Abdeckung des USB-Anschlusses nach außen.
Schließen Sie ein Netzteil mit einem USB-C-Kabel an, um das Gerät aufzu-
laden (Empfohlene Eingangsleistung: DC 5V/2A).
Hinweis: Um Ihre erfassten
Daten zu schützen und die
Lebensdauer der
microSD-Karte zu verlängern,
vermeiden Sie die
Karteninstallation während des
Betriebs (Hot-plugging). Es wird
empfohlen, die Karte nur
einzulegen oder zu entfernen,
wenn das Solvia 8×32 AI
Fernglas ausgeschaltet ist.
Einschalten
Aufladen
Installation der microSD-Karte
26
FRDE
1
5
5
5
5
7
4
8 9
2 2
4
1
6
10
11
12
5
5
5
15
7
5
8 9
2 3
4
14
13
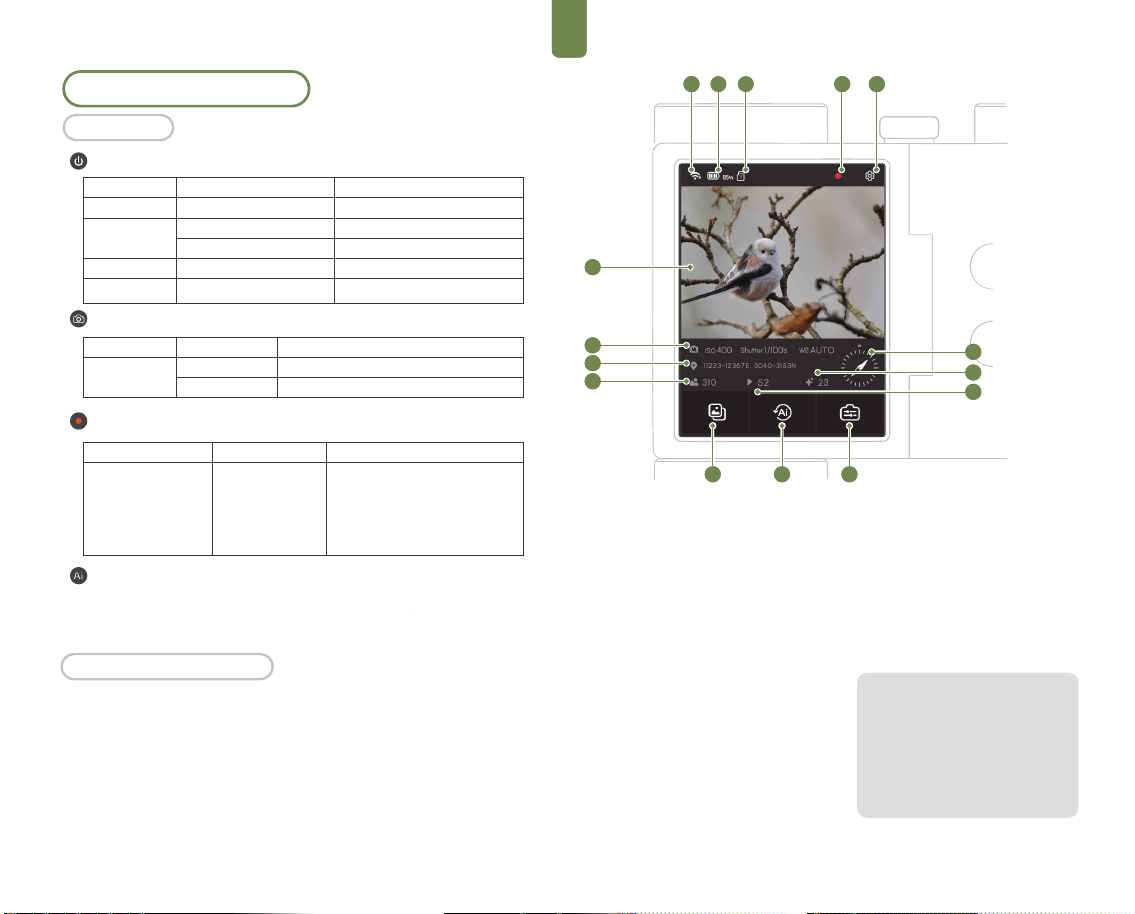
1. Wi-Fi-Status
2. Akkustand
3. SD-Karten-Status
4. Aufnahmestatus
5. Systemeinstellungen
6. Live-Ansicht und Bildvorschau
7. Galerie und Mediathek
8. KI-Protokollzentrum
9. Zugriff auf Einstellungen
10. Aufnahme-Parameter
11. GPS-Daten
(erfordert Solvia Field Kit)
12. Foto-Anzahl
13. Video-Anzahl
14. KI-Erkennungsstatistiken
15. Elektronischer Kompass
(erfordert Solvia Field Kit)
Bitte beachten Sie, dass bei bestim-
mten Lichtwinkeln während der Auf-
nahme oder Beobachtung Blend-
ungen oder dunkle Flecken auftreten
können. Sie können den Winkel
ändern, um die Sicht oder Aufnahme
zu verbessern. Dies ist kein Qual-
itätsproblem des Produkts.
Gerätestatus
Eingeschalteter Zustand
Ta ste nb edi en un g
Einmaliges Drücken
Ta ste nb edi en un g
Aufnahme Start/Stopp. Videos werden
automatisch in 5-Minuten-Segmenten
gespeichert, um die Sicherheit der
Dateien zu gewährleisten. Die
Aufnahme wird automatisch gestoppt,
wenn der Speicherplatz nicht ausreicht.
Beim Einschalten zeigt der Touchscreen die Sucheroberfläche des
Fernglases an. Die Menüleiste zeigt Informationen wie
WLAN-Verbindung, Akkustand und Speicherkapazität an.
Tippen oder wischen Sie auf dem Touchscreen, um auf Funktionen
zuzugreifen.
Touchscreen-Steuerung
Grundlegende Bedienung
Bedienung
Gerätestatus
Aus
Ein
Ruhemodus
Reagiert nicht
Bedienung
Kurz drücken für 2 Sekunden
Drücken
Lang drücken für 3 Sekunden
Drücken
Lang drücken für 8s Sekunden
Funktionen
Einschalten
Bildschirm sperren und ausschalten
Auswahl Ausschalten/Ruhemodus
Bildschirm entsperren & einschalten
Ausschalten erzwingen
Ein-/Aus-Taste
Gerätestatus
Ein
Bedienung
Drücken
Lang drücken
Funktionen
Aufnahme starten
Start Serienbildaufnahme
Foto-Taste
Video-Taste
- In der Detailansicht des Fotos wird durch Drücken der Taste „KI-Erkennung“
die KI-Vogelerkennungsfunktion des Gerätes aktiviert und die Ergebnisse
werden angezeigt.
KI-Erkennung
27
FRDE
Einstellungen
Helligkeit
Sprache
Belichtung
0
1
2
-2
-1
EV
Auto
Aktion
Auto
Handgeführt
Auto
Statisch
Manuell
0
1
2
1/4
1/2
WB
Long-tailed Tit
98
%
75
%
2025-05-27 14:20
Long-tailed Tit
2025-05-27 14:20
Long-tailed Tit
98
%
2025-05-27 14:20
1/3
JKI-Identifikationsprotokoll
Album
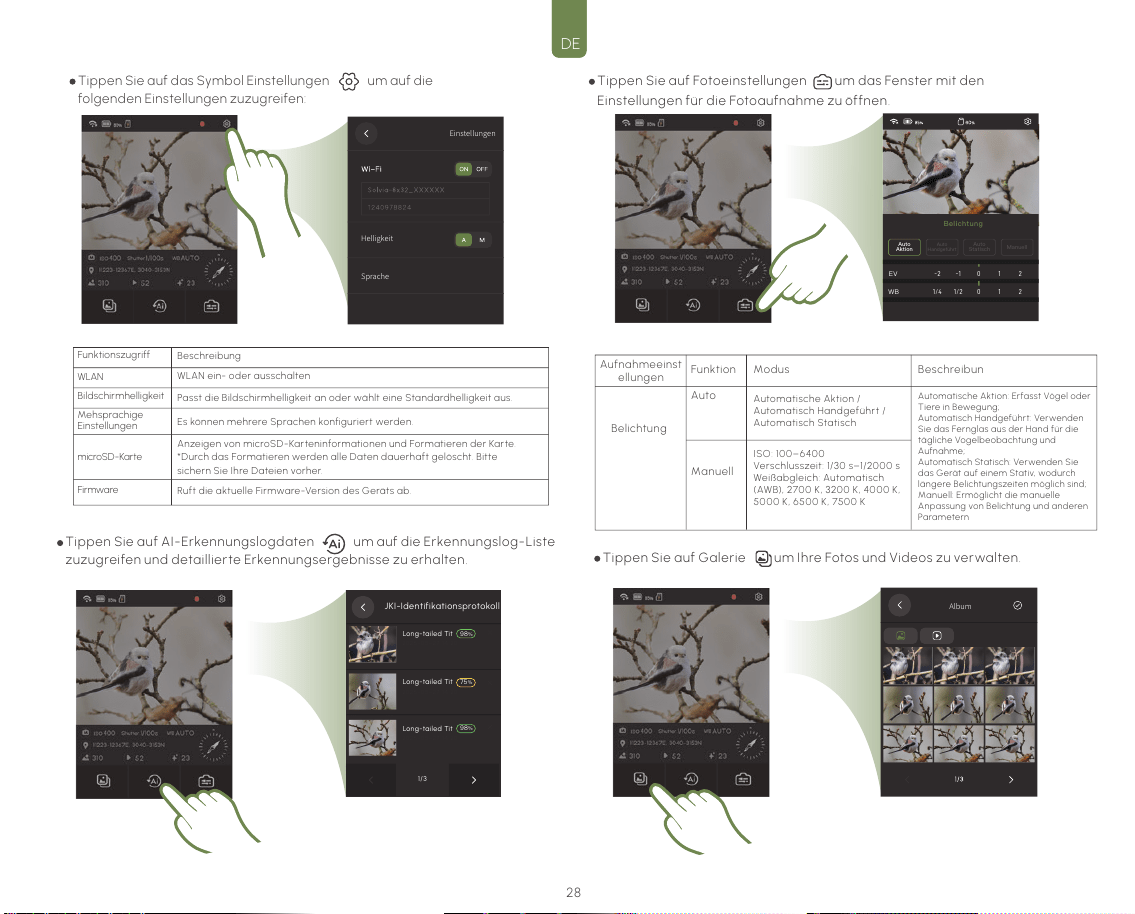
Tippen Sie auf das Symbol Einstellungen um auf die
folgenden Einstellungen zuzugreifen:
Funktionszugriff
WLAN
Bildschirmhelligkeit
Mehsprachige
Einstellungen
microSD-Karte
Firmware
Beschreibung
WLAN ein- oder ausschalten
Passt die Bildschirmhelligkeit an oder wählt eine Standardhelligkeit aus.
Es können mehrere Sprachen konfiguriert werden.
Ruft die aktuelle Firmware-Version des Geräts ab.
Anzeigen von microSD-Karteninformationen und Formatieren der Karte.
*Durch das Formatieren werden alle Daten dauerhaft gelöscht. Bitte
sichern Sie Ihre Dateien vorher.
Tippen Sie auf AI-Erkennungslogdaten um auf die Erkennungslog-Liste
zuzugreifen und detaillierte Erkennungsergebnisse zu erhalten.
Tippen Sie auf Fotoeinstellungen um das Fenster mit den
Einstellungen für die Fotoaufnahme zu öffnen.
Tippen Sie auf Galerie um Ihre Fotos und Videos zu verwalten.
Aufnahmeeinst
ellungen
Funktion Modus Beschreibun
Automatische Aktion: Erfasst Vögel oder
Tiere in Bewegung;
Automatisch Handgeführt: Verwenden
Sie das Fernglas aus der Hand für die
tägliche Vogelbeobachtung und
Aufnahme;
Automatisch Statisch: Verwenden Sie
das Gerät auf einem Stativ, wodurch
längere Belichtungszeiten möglich sind;
Manuell: Ermöglicht die manuelle
Anpassung von Belichtung und anderen
Parametern
Automatische Aktion /
Automatisch Handgeführt /
Automatisch Statisch
ISO: 100–6400
Verschlusszeit: 1/30 s–1/2000 s
Weißabgleich: Automatisch
(AWB), 2700 K, 3200 K, 4000 K,
5000 K, 6500 K, 7500 K
Manuell
Belichtung
Auto
28
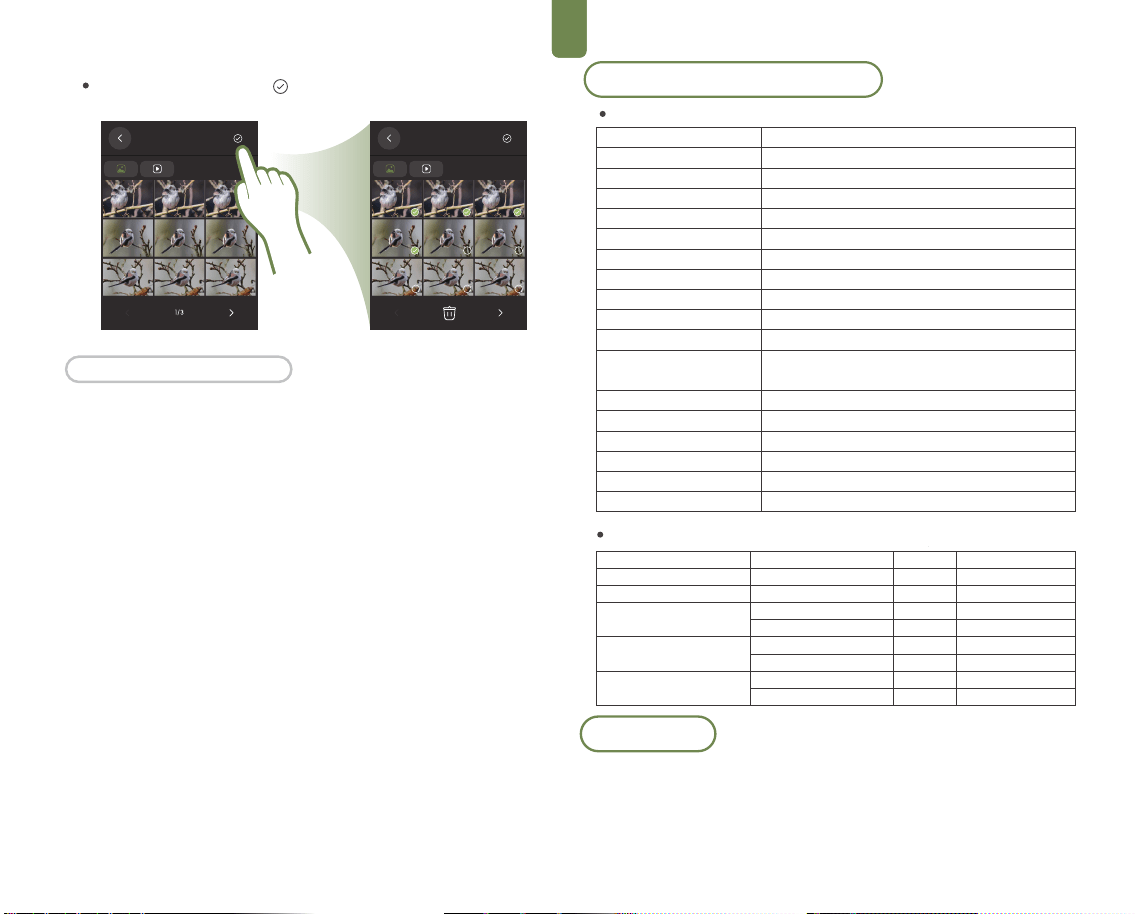
FRDE
Album
Album
Tippen Sie auf das Symbol um zur Foto-Löschoberfläche zu
gelangen.
Statusanzeige:
Blau leuchtend: Das Gerät ist angeschlossen und funktioniert ordnungs-
gemäß.
Blau blinkend: Es wird gerade ein Video aufgenommen.
Batterie-/Ladeanzeige:
Aus: Die Batterie des Gerätes ist leer, oder es ist nicht an eine Stromquelle
angeschlossen.
Rot leuchtend: Das Gerät wird aufgeladen.
Grün leuchtend: Zeigt an, dass das Gerät ausreichend oder vollständig
aufgeladen ist.
Status der Anzeigeleuchte
Spezifikationen und Parameter
Technische Daten des Fernglases
Vergrößerung
Objektivdurchmesser
Prismensystem
Sichtfeld (m/1000 m)
Sichtfeld (Grad)
Austrittlinsendurchmesser
Augenabstand
Naheinstellgrenze
Gewicht
Abmessungen
Batterietyp
Batterielebensdauer
Sensor
Foto-/Videoauflösung
Umweltschutz
Verbindungsmethoden
Betriebstemperatur
Aufbewahrungstemperatur
8 x
32 mm
Dachkantprisma
129.5 m / 388.5 ft
7, 6°
4,24 mm
16 mm
3,7 m
680 g
116,5 mm × 120,8 mm × 68 mm
Li-Ionen 2600 mAh
12 Std. (bei normaler Nutzung); 4 Std. (bei Volllast)
Mit Erweiterungsmodul: 20 Std. (bei normaler Nutzung); 8 Std.
(bei Volllast)
1/2,7" CMOS
2592 × 1944 px
IP 64, stickstoffgespült
Schnelle Übertragung über WLAN, USB-Export
−10°C bis +50°C
−20°C bis +60°C
Empfohlene microSD-Kartenliste
Marke & Serie
SanDisk Extreme V30 A1
SanDisk Extreme Pro V30 A1
SanDisk Extreme V30 A2
SanDisk Extreme Pro V30 A2
Lexar 1066x microSD UHS-I
SILVER Series
Modell
SDSQXVF-032G-GN6MA
SDSQXCG-064G-GN6MA
SDSQXAH-064G-GN6GN
SDSQXAA-128G-GN6GN
SDSQXCU-064G-GN6MA
SDSQXCY-128G-ZN6MA
LMS1066064G-BN
LMS1066128G-BN
Kapazität
32 GB
64 GB
64 GB
128 GB
64 GB
128 GB
64 GB
128 GB
Datentransfergeschwindigkeit
V30
V30
U3, A2, V30
U3, A2, V30
U3, A2, V30
U3, A2, V30
V30
V30
Solvia-App
In Verbindung mit der Solvia Happ kann das Fernglas Solvia 8×32 AI hochau-
flösende Live-Bilder direkt auf Ihr Mobilgerät streamen. So können Sie die
Kameraparameter einstellen und das Fernglas fernsteuern. Die App bietet
außerdem eine Reihe von Funktionen, darunter Medienexport, cloudbasierte
KI-Erkennung und Bildoptimierung, die das Benutzererlebnis insgesamt er-
heblich verbessern.
29
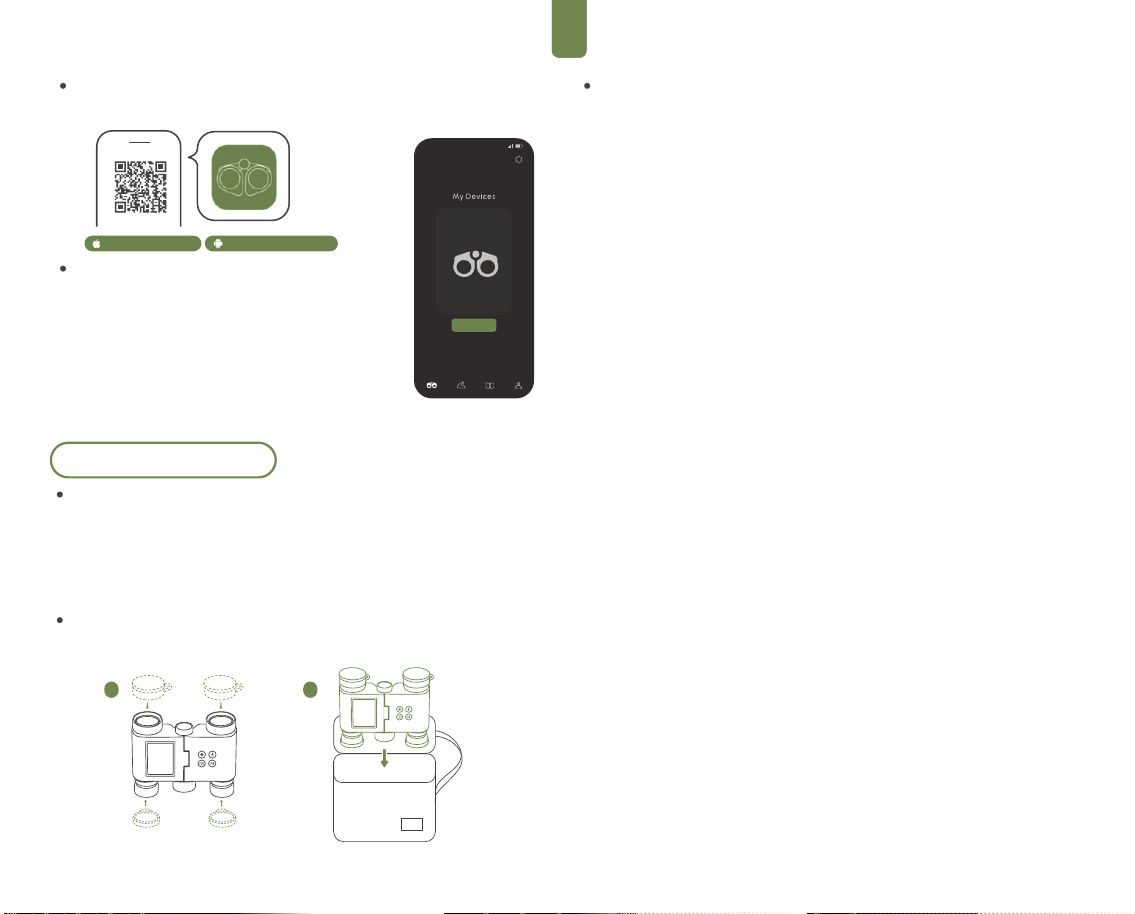
FRDE
ProfileLogAlbumObser vation
Done
Solvia
i
1 2
Laden Sie die Solvia-App herunter
Suchen Sie die Solvia-App im App Store Ihres Smartphones oder scannen Sie den
QR-Code, um sie herunterzuladen.
Verbindung mit der Solvia-App:
1. Drücken Sie die POWER Ein/Aus-Taste, um das Solvia
8×32 AI-Fernglas einzuschalten.
2. Tippen Sie auf Einstellungen in der oberen rechten
Ecke des Bildschirms und gehen Sie dann zu WLAN, um
WLAN zu aktivieren und den WLAN-Namen und das
Passwort des Geräts anzuzeigen.
3. Öffnen Sie die Solvia-App, tippen Sie auf Verbinden
auf dem Startbildschirm und befolgen Sie die
Anweisungen, um eine Verbindung zum WLAN-Netzwerk
des Geräts herzustellen.
iOS 15.0 und höher Android 7.0 und höher
Wartung und Pflege
Firmware-Upgrade
Stellen Sie vor dem Firmware-Update sicher, dass der Akkustand des Fernglases
über 20% liegt.
Verbinden Sie das Fernglas mit der Solvia-App.
Wenn die App anzeigt, dass eine neue Firmware-Version verfügbar ist, tippen Sie
auf „Update starten“ und folgen Sie den Anweisungen auf dem Bildschirm. Das
Firmware-Update dauert in der Regel etwa 3 Minuten.
Lagerung
Nach der Verwendung des Fernglases Solvia 8×32 AI decken Sie die Okulare und
Objektivlinsen mit den Schutzkappen ab und bewahren Sie das Fernglas in der
dafür vorgesehenen Tragetasche auf.
Vorsichtsmaßnahmen bei der Verwendung
Altersbeschränkung
Dieses Produkt ist nicht für den Gebrauch von Kindern im Alter unter 3 Jahren
geeignet
Verwendung des Adapters
Der Ladeadapter für dieses Produkt (nicht im Lieferumfang enthalten) ist kein
Spielzeug und muss außerhalb der Reichweite von Kindern aufbewahrt werden.
Es wird empfohlen, einen 5V/2A-Ladeadapter zu verwenden, um das sichere und
stabile Aufladen des Akkus zu gewährleisten.
Einzelner Stromanschluss:
Das Produkt darf nur mit einem einzigen Netzteil aufgeladen werden.
Reinigungsmethode
Wischen Sie die Oberfläche des Geräts mit einem sauberen, weichen und
trockenen Tuch ab.
Beaufsichtigung von Kindern
Kinder sollten dieses Produkt nur unter Aufsicht Erwachsener verwenden, um die
Sicherheit zu gewährleisten.
Verhindern Sie Stürze.
Wenn das Gerät herunterfällt oder starken Stößen ausgesetzt wird, können die
Optik oder interne Komponenten dauerhaft beschädigt werden.
- Schützen Sie das Gerät vor Staub und Sand, da Verunreinigungen die Linsen
beschädigen und zu Fehlfunktionen führen können.
Unbefugtes Zerlegen ist verboten
- Zerlegen, modifizieren oder reparieren Sie das Produkt nicht selbst. Unbefugte
Reparaturen können zu Fehlfunktionen führen und haben das Erlöschen der
Garantie zur Folge.
Temperaturbereich für den Gebra uch
- Betreiben oder Aufladen des Gerätes außerhalb des empfohlenen
Temperaturbereichs von −10°C bis +50°C ist zu vermeiden.
Vorsichtsmaßnahmen bei voraussichtlich längerer Lagerung
- Wenn das Produkt über einen längeren Zeitraum nicht verwendet wird, laden Sie
es vor der Lagerung vollständig auf und laden Sie es nachfolgend mindestens
einmal alle drei Monate auf, um den Akkus in funktionsfähigem Zustand zu erhalten.
Blicken Sie mit dem Gerät nicht in helle Lichtquellen
- Blicken Sie niemals durch das Fernglas in die Sonne oder andere starke
Lichtquellen, da dies zu schweren Augenverletzungen führen kann.
Nicht während des Gehens verwenden
- Achten Sie beim Gebrauch des Geräts auf Ihren stabilen Stand. Vermeiden Sie die
Verwendung während des Gehens, um Stolpern oder Zusammenstöße zu
verhindern.
Wasser-, staub- und stoßfest
- Das Produkt ist spritzwassergeschützt, sollte jedoch keinen starken Stößen
ausgesetzt oder in Wasser getaucht werden.
Tipps zu Wartung und Garantie
- Wenden Sie sich für Wartungs- und Reparaturarbeiten an autorisierte
Servicezentren. Nicht autorisierte Reparaturen durch nicht professionelle
Einrichtungen können zum Erlöschen der Garantie führen.
30
FRDE
Um Ihre Sicherheit und die Sicherheit anderer zu gewährleisten, lesen Sie bitte vor der
Verwendung dieses Produkts die folgenden Warnhinweise sorgfältig durch:
1. Blicken Sie nicht direkt in helle Lichtquellen.
Schauen Sie niemals direkt durch das Fernglas in die Sonne oder andere helle
Lichtquellen, um irreversible Augenschäden oder Verbrennungen der Netzhaut zu ver-
meiden.
2. Nicht ohne Genehmigung zerlegen oder modifizieren
Zerlegen, modifizieren oder reparieren Sie das Produkt nicht selbst.
Unautorisierte Eingriffe können interne Komponenten beschädigen, zu Stromschlag-
gefahr führen und zum Erlöschen der Garantie führen.
3. Von hohen Temperaturen, Feuchtigkeit und starken Magnetfeldern fernhalten
Halten Sie das Produkt von hohen Temperaturen, hoher Luftfeuchtigkeit, starken Mag-
netfeldern und brennbaren oder explosiven Umgebungen fern.
Die Einwirkung solcher Bedingungen kann zu einer Aufblähung der Batterie, Explosionen
oder Schäden an internen Schaltkreisen führen.
4. Nicht unter Wasser verwenden
Dieses Gerät ist spritzwasser-resistent, aber nicht tauchfähig. Verwenden Sie das
Gerät nicht unter Wasser oder setzen Sie es keinem starken Regen aus. Wenn das Gerät
mit Wasser in Berührung kommt, schalten Sie es sofort aus und wenden Sie sich unver-
züglich an den Kundendienst.
5. Stellen Sie während des Ladevorgangs eine ausreichende Belüftung sicher.
Laden Sie das Gerät nicht in geschlossenen oder schlecht belüfteten Orten, da dies
zu Überhitzung oder Brandgefahr führen kann.
6. Verwenden Sie nur die angegebenen Stromquellen und zugelassenes Zubehör.
Verwenden Sie nur empfohlenen Netzteile, die den erforderlichen Spezifikationen
entsprechen (5 V / 2 A).
Verwenden Sie keine nicht zertifizierten oder minderwertigen Ladegeräte, da diese
Schäden verursachen oder Sicherheitsrisiken darstellen können.
Wichtige Sicherheitshinweise
Für dieses Produkt gelten die folgenden Garantiebedingungen ab dem ursprüngli-
chen Kaufdatum:
Funktionsstörungen, die nicht durch menschliche Einflüsse verursacht wurden,
können innerhalb der folgenden Garantiezeiten kostenlos repariert oder ersetzt
werden: 3 Jahre für das optische System und 1 Jahr für das Hauptgerät (einschließlich
Elektronik und Software).
Garantie für Zubehör: Zubehör (z. B. Trageriemen, Tragetasche, Objektivdeckel) sind
nicht durch die Standardgarantie abgedeckt. Falls doch bei Erhalt des Gerätes ein
Qualitätsproblem festgestellt wird, kann innerhalb von 7 Tagen ein Ersatzantrag
gestellt werden.
Kaufbeleg: Um Garantieleistungen in Anspruch nehmen zu können, ist ein gültiger
Kaufnachweis (z. B. ein Screenshot der Bestellung, eine Rechnung oder eine Quittung)
erforderlich.
Die Garantie gilt nicht für:
Schäden, die durch unsachgemäßen Gebrauch verursacht wurden, wie z. B.
Herunterfallen, Stöße, Eintauchen in Wasser oder Einwirkung hoher Temperaturen.
Schäden, die durch unbefugtes Zerlegen, Reparaturen oder Modifikationen verur-
sacht wurden.
Produkte, die bei nicht autorisierten Händlern oder ohne gültigen Kaufbeleg erwor-
ben wurden.
Normale Abnutzung, Alterung, Kratzer, Flecken und andere nicht funktionale Prob-
leme.
Garantiebestimmungen
Für technischen Support und Kundendienst wenden Sie sich bitte über die folgenden
Kanäle an uns:
Offizielle Website:www.matataxplore.com
Kundendienst-E-Mail: support@matataxplore.com
Bitte halten Sie folgende Informationen bereit, bevor Sie uns kontaktieren:
Produktmodell und Seriennummer auf der Rückseite des Geräts oder der Verpack-
ung;
Screenshot Ihres Kaufbelegs.
Eine kurze Beschreibung des Problems sowie unterstützende Fotos oder Videos.
Support & Service
Konformitätserklärung und Umweltstandards
CE- und RoHS-Konformitätserklärung
WEEE-Umwelt-Recycling-Erklärung
- CE:
Dieses Produkt entspricht den grundlegenden An-
forderungen der Richtlinien 2014/30/EU (EMV) und
2014/35/EU (LVD).
- RoHS-Richtlinie (2011/65/EU):
Das Gerät enthält keine gefährlichen Stoffe wie Blei, Quecksilber, Cadmi-
um oder sechswertiges Chrom über die festgelegten Grenzwerte hinaus.
Das Gerät ist mit den entsprechenden CE- und RoHS-Konformitätskenn-
zeichnungen auf dem Gehäuse oder dem Typenschild versehen.
Dieses Produkt entspricht der Richtlinie über Elektro- und
Elektronik-Altgeräte (WEEE, 2012/19/EU):
- Entsorgen Sie dieses Gerät nicht über den Hausmüll.
- Wenn Sie dieses Gerät entsorgen, stellen Sie bitte sicher, dass Sie dieses
bei einer dafür ausgewiesenen Elektronik-Recyclinganlage entsorgen.
- Das Symbol der durchgestrichenen Mülltonne weist darauf hin, dass das
Produkt separat dem Recycling zugeführt werden muss.
Vielen Dank für Ihren Beitrag zum Umweltschutz und zu einer nachhaltigen
Zukunft.
31

FCC-Warnhinweis
Änderungen oder Modifikationen, die nicht ausdrücklich von der für die
Konformität verantwortlichen Partei genehmigt wurden, können dazu
führen, dass die Berechtigung des Benutzers zum Betrieb dieses Geräts
erlischt. Dieses Gerät wurde getestet und entspricht den Grenzwerten für
digitale Geräte der Klasse B gemäß Teil 15 der FCC-Vorschriften. Diese
Grenzwerte sollen einen angemessenen Schutz gegen schädliche
Störungen bei Installationen in Wohngebieten gewährleisten. Dieses
Gerät erzeugt, verwendet und kann Hochfrequenzenergie abstrahlen.
Wird es nicht gemäß den Anweisungen installiert und verwendet, kann es
schädliche Störungen der Funkkommunikation verursachen. Es kann
jedoch nicht garantiert werden, dass in einer bestimmten Installation
keine Störungen auftreten. Falls dieses Gerät schädliche Störungen beim
Radio- oder Fernsehempfang verursacht, was durch Aus- und Einschalten
des Geräts festgestellt werden kann, sollte der Benutzer versuchen, die
Störung durch eine oder mehrere der folgenden Maßnahmen zu beheben:
‐‐ Die Empfangsantenne neu ausrichten oder an einem anderen Ort
aufstellen.
‐‐ Den Abstand zwischen Gerät und Empfänger vergrößern.
‐‐ Das Gerät an eine Steckdose anschließen, die zu einem anderen
Stromkreis gehört als der, an den der Empfänger angeschlossen ist.
‐‐ Den Händler oder einen erfahrenen Radio-/Fernsehtechniker um Hilfe
bitten.
FCC-Erklärung zur HF-Strahlenbelastung
Das Gerät wurde bewertet und erfüllt die allgemeinen Anforderungen
hinsichtlich der Hochfrequenz-Exposition (RF). Das Gerät kann ohne
Einschränkungen unter tragbaren Expositionsbedingungen verwendet
werden.
Dieses Gerät entspricht Teil 15 der FCC-Vorschriften. Der Betrieb
unterliegt den folgenden zwei Bedingungen:
(1) Dieses Gerät darf keine schädlichen Störungen verursachen, und
(2) Dieses Gerät muss jede empfangene Störung akzeptieren,
einschließlich solcher Störungen, die einen unerwünschten Betrieb
verursachen können.
Dieses Gerät erfüllt die staatlichen Anforderungen hinsichtlich der
Exposition gegenüber Funkwellen. Die Richtlinien basieren auf Standards,
die von unabhängigen wissenschaftlichen Organisationen durch
regelmäßige und umfassende Bewertungen wissenschaftlicher Studien
entwickelt wurden. Die Standards enthalten einen erheblichen
Sicherheitsabstand, um die Sicherheit aller Personen unabhängig von
Alter oder Gesundheitszustand zu gewährleisten. FCC-Informationen und
Erklärung zur HF-Exposition: Der SAR-Grenzwert (Spezifische
Absorptionsrate) in den USA gemäß FCC beträgt 1,6 W/kg, gemittelt über
ein Gramm Gewebe. Dieser Gerätetyp wurde ebenfalls auf die Einhaltung
dieses SAR-Grenzwerts getestet. Dieses Gerät wurde für typische
körpernahe Anwendungen getestet, wobei die Rückseite des Geräts in
einem Abstand von 0 mm zum Körper gehalten wurde. Um die Einhaltung
der FCC-Anforderungen zur HF-Exposition sicherzustellen, sollten nur
Zubehörteile verwendet werden, die einen Abstand von 0 mm zwischen
dem Körper des Benutzers und der Rückseite des Geräts gewährleisten.
Gürtelclips, Halterungen und ähnliche Zubehörteile dürfen keine
Metallkomponenten enthalten. Die Verwendung von Zubehör, das diese
Anforderungen nicht erfüllt, entspricht möglicherweise nicht den
FCC-Anforderungen zur HF-Exposition und sollte vermieden werden.
Der Betrieb dieses Geräts ist ausschließlich für die Verwendung in
Innenräumen im Frequenzbereich von 5180–5240 MHz zugelassen.
Dieses Anleitung enthält wichtige
Produktinformationen und sollte für die
Bezugnahme in der Zukunft
aufbewahrt werden.
FRDE
32
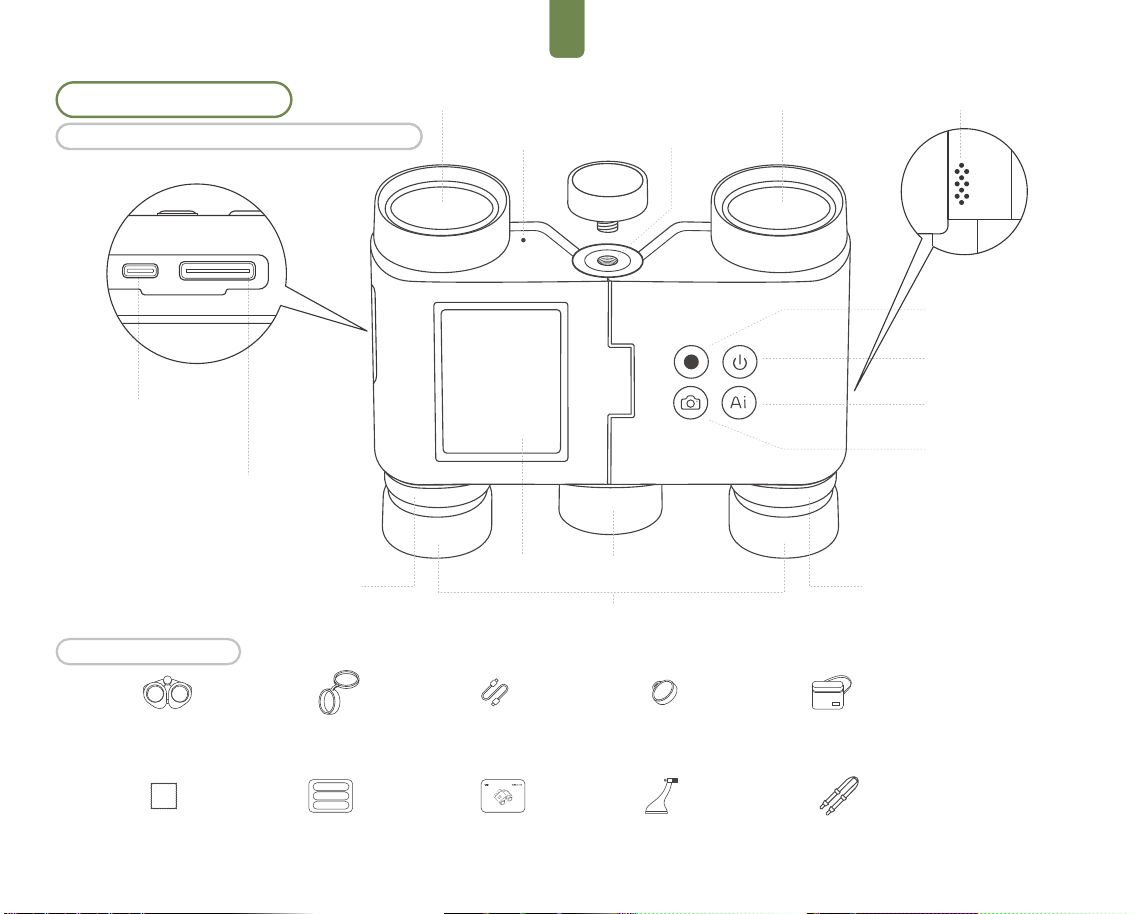
FRIT
Introduzione al prodotto
Accessori standard
Ti presentiamo il binocolo con IA Solvia 8×32
Video
Slot per scheda microSD
Anello diottrico per
oculare destro
Manopola di messa a fuocoDisplay
Accensione
/Spegnimento
Riconoscimento con IA
Foto
Oculare
Lente dell’obiettivo
Microfono
Foro filettato 1/4''
Lente dell’obiettivo
Altoparlante
Copriobiettivi × 2 Cavo di Ricarica/Dati
USB-C ×1
Coprioculari × 2 Custodia per il
trasporto ×1
Panno per la pulizia
delle lenti ×1
Guida rapida ×1 Guida dell'utente ×1 Cordino da collo ×1Adattatore per
treppiede ×1
Binocolo IA ×1
Porta di ricarica/dati USB-C
Anello diottrico
dell'oculare sinistro
33
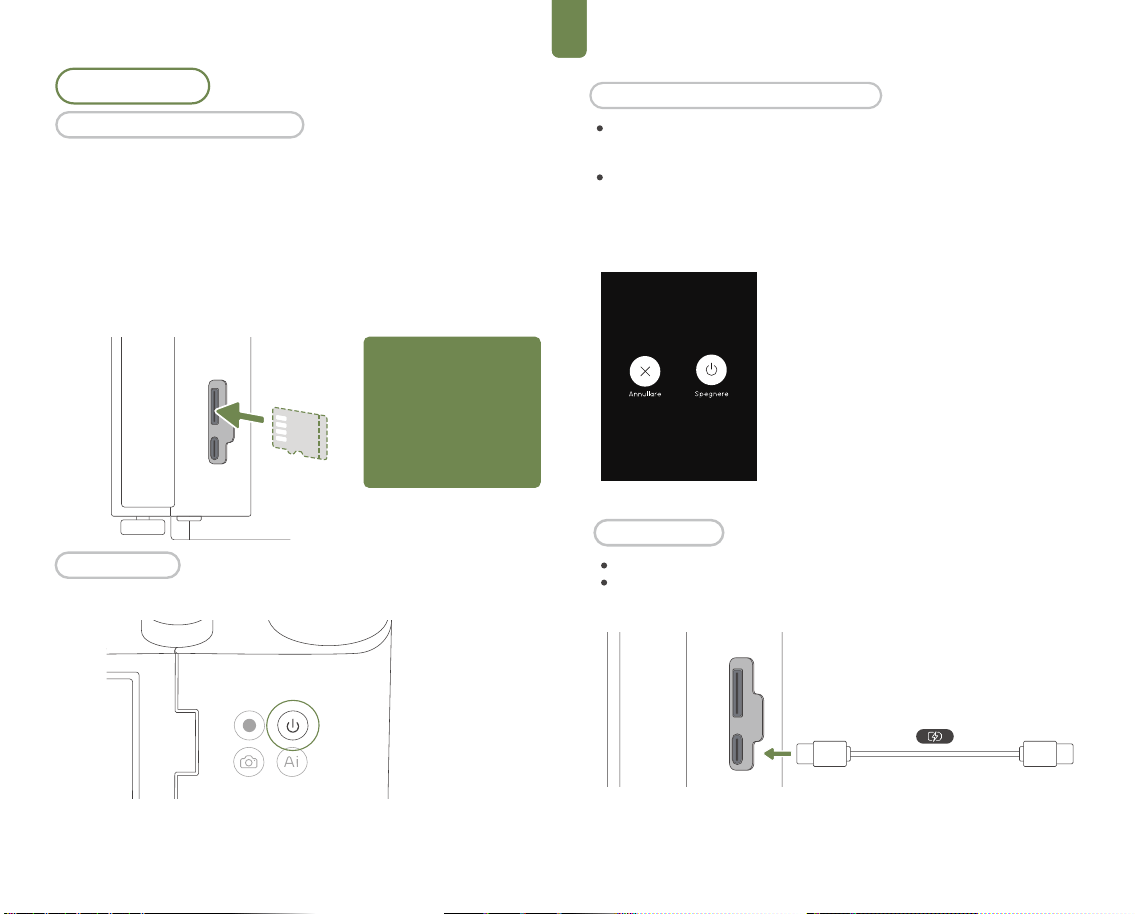
FRIT
Tenere premuto il pulsante di accensione per 3 secondi
per visualizzare le opzioni sullo schermo.
Spegnimento e gestione del sonno
Spegnimento
- Spegne completamente il dispositivo.
- Se il dispositivo si blocca o non risponde, tenere premuto il pulsante di accen-
sione per 8 secondi per forzare lo spegnimento.
Primo utilizzo
Il binocolo con IA Solvia 8×32 non ha spazio di archiviazione integrato. È nec-
essario installare una scheda microSD per archiviare immagini e video ac-
quisiti. Si consiglia di utilizzare una scheda microSD con una classificazione
UHS-I Speed Grade 3 e formattata in exFAT . (Una scheda microSD standard
da 64 GB è inclusa nel kit. Fare riferimento alla sezione "Specifiche" per un
elenco dei modelli di schede consigliati.)
Inserire la scheda microSD nello slot, assicurandosi che l'orientamento corris-
ponda allo schema. Per espellere la scheda microSD, spingerla delicata-
mente verso l'interno fino a quando non scatta e viene parzialmente rilasciata
dallo slot.
Premere il pulsante di accensione per 2 secondi per accendere il dispositivo.
Aprire il coperchio della porta USB verso l'esterno.
Collegare un adattatore di alimentazione utilizzando un cavo USB-C per
caricare il dispositivo (Ingresso consigliato: CC 5V/2A).
Nota: Per proteggere i dati
acquisiti e prolungare la
durata della scheda microSD,
evitare il collegamento a
caldo. Si consiglia di inserire o
rimuovere la scheda solo
quando il binocolo con IA
Solvia 8×32 è spento.
Accensione
Caricamento
Installazione scheda microSD
34
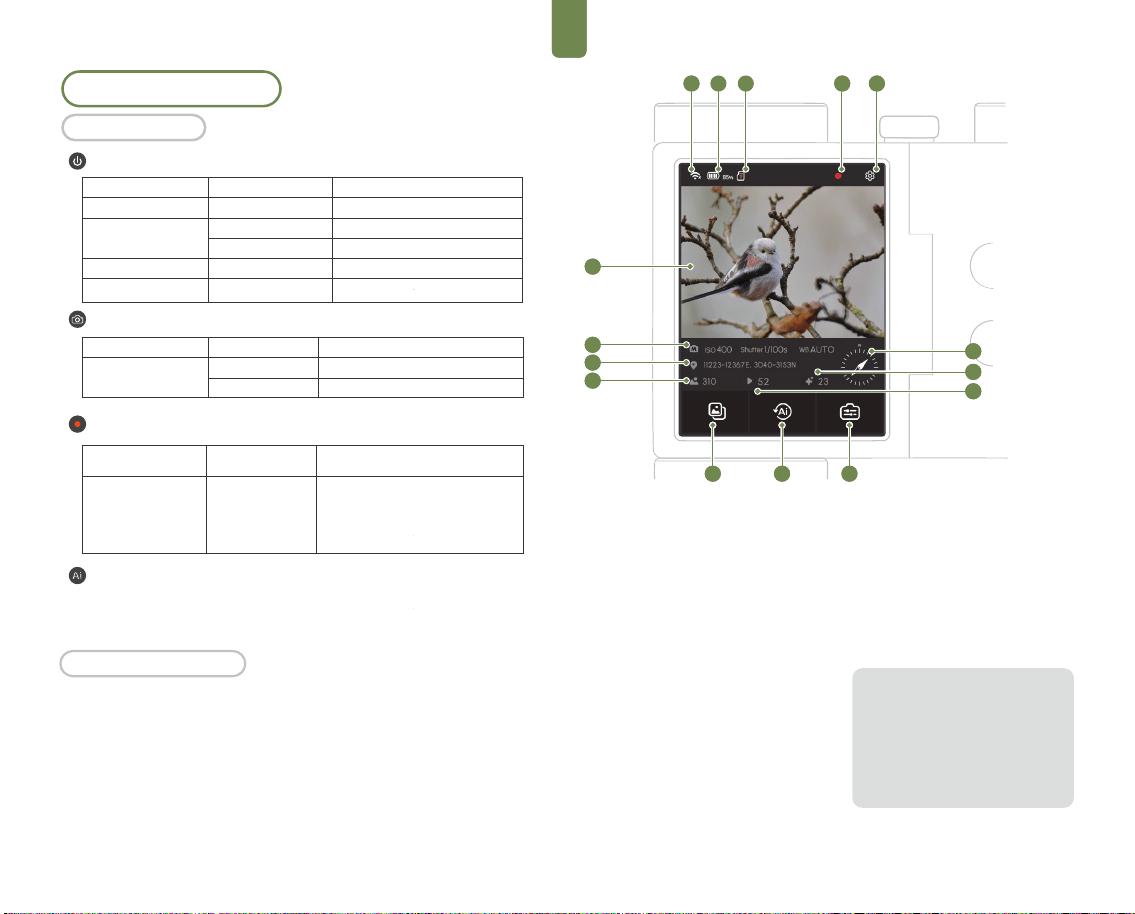
FRIT
1
5
5
5
5
7
4
8 9
2 2
4
1
6
10
11
12
5
5
5
15
7
5
8 9
2 3
4
14
13
1. Stato Wi-Fi
2. Livello batteria
3. Stato scheda SD
4. Stato di registrazione
5. Impostazioni di sistema
6. Vista dal vivo e anteprima immagine
7. Galleria e libreria multimediale
8. Centro registri IA
9. Accesso alle impostazioni
10. Parametri di scatto
11. Dati GPS
(richiede Solvia Field Kit)
12. Numero di foto
13. Numero di video
14. Statistiche di riconoscimento IA
15. Bussola elettronica
(richiede il kit da campo Solvia)
Si prega di notare che, sotto
determinati angoli di luce, durante
l’osservazione o la ripresa possono
comparire riflessi o punti scuri. È
possibile cambiare angolazione per
migliorare la visualizzazione o la
ripresa. Questo non è un difetto del
prodotto.
Stato del dispositivo
Stato accesoe
Funzionamento
dei pulsanti
Pressione singola
Funzionamento dei pulsanti
Avvia/interrompi la registrazione. I video
vengono salvati automaticamente in
segmenti di 5 minuti per garantire la
sicurezza dei file. La registrazione si
interromperà automaticamente quando
lo spazio di archiviazione è insufficiente.
All'accensione, il touchscreen mostra l'interfaccia del mirino del binocolo.
La barra dei menu mostra informazioni come la connessione Wi-Fi, il
livello della batteria e la capacità di archiviazione.
Tocca o scorri sul touchscreen per accedere alle funzioni.
Controlli touchscreen
Funzionamento di base
Funzionamento
Stato del dispositivo
Off
On
Modalità sospensione
Non risponde
Funzionamento
Pressione breve per 2s
Premi
Pressione lunga per 3s
Premi
Pressione lunga per 8s
Funzioni
Accensione
Blocca e spegni schermo
Selezione spegnimento/sospensione
Sblocca e attiva lo schermo
Forza l'arresto
Pulsante di accensione
Stato del dispositivo
On
Funzionamento
Premi
Premi a lungo
Funzioni
Avvia l'acquisizione
Avvia scatto a raffica
Pulsante foto
Pulsante video
- Nella vista Dettagli foto, premendo il pulsante Riconoscimento con IA si
attiva il riconoscimento degli uccelli con IA sul dispositivo e vengono
visualizzati i risultati.
Riconoscimento con IA
35
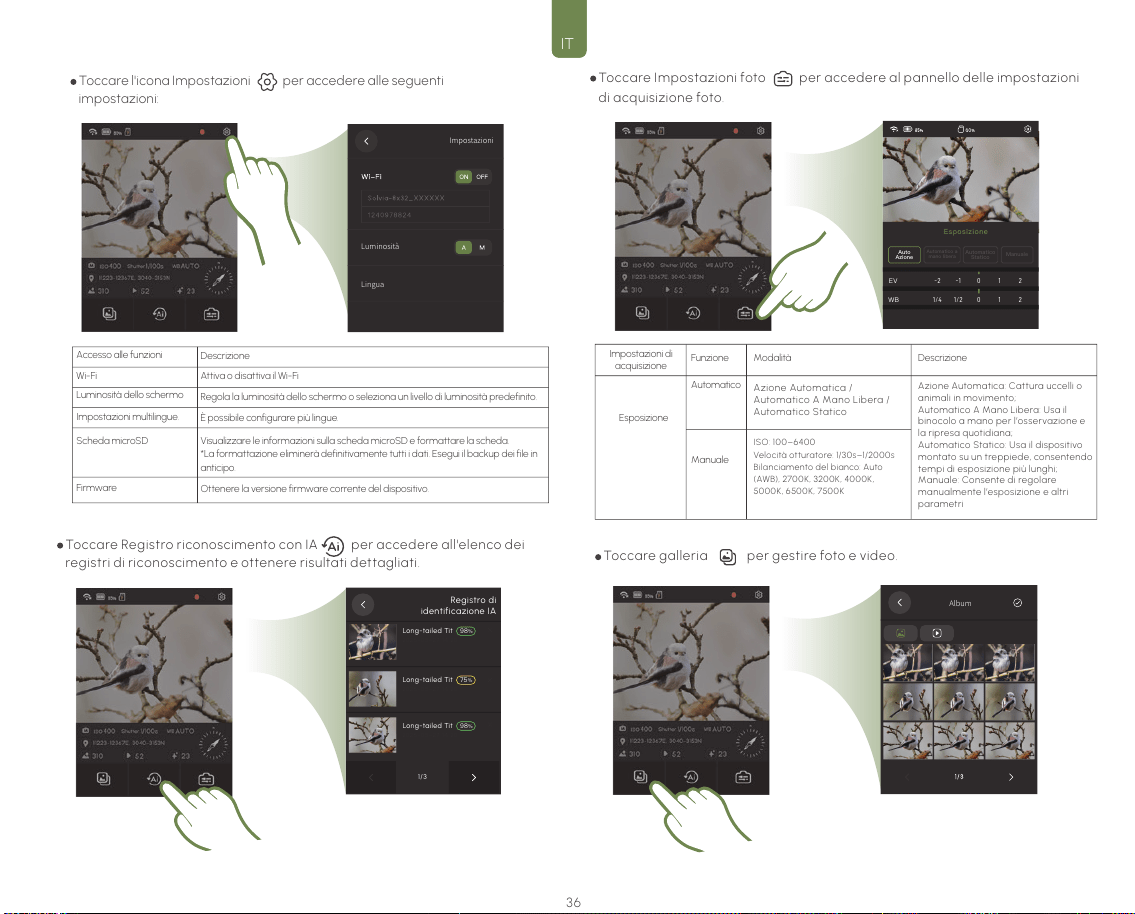
FRIT
Impostazioni
Luminosità
Lingua
Esposizione
0
1
2
-2
-1
EV
Auto
Azione
Automatico a
mano libera
Automatico
Statico
Manuale
0
1
2
1/4
1/2
WB
Long-tailed Tit
98
%
75
%
2025-05-27 14:20
Long-tailed Tit
2025-05-27 14:20
Long-tailed Tit
98
%
2025-05-27 14:20
1/3
Registro di
identificazione IA
Album
Impostazioni di
acquisizione
Funzione Modalità Descrizione
Azione Automatica: Cattura uccelli o
animali in movimento;
Automatico A Mano Libera: Usa il
binocolo a mano per l’osservazione e
la ripresa quotidiana;
Automatico Statico: Usa il dispositivo
montato su un treppiede, consentendo
tempi di esposizione più lunghi;
Manuale: Consente di regolare
manualmente l’esposizione e altri
parametri
Azione Automatica /
Automatico A Mano Libera /
Automatico Statico
ISO: 100–6400
Velocità otturatore: 1/30s–1/2000s
Bilanciamento del bianco: Auto
(AWB), 2700K, 3200K, 4000K,
5000K, 6500K, 7500K
Manuale
Esposizione
Automatico
Toccare l'icona Impostazio ni per acced ere alle seguenti
impostazioni:
Accesso alle funzioni
Wi-Fi
Luminosità dello schermo
Impostazioni multilingue.
Scheda microSD
Firmware
Descrizione
Attiva o disattiva il Wi-Fi
Regola la luminosità dello schermo o seleziona un livello di luminosità predefinito.
È possibile configurare più lingue.
Ottenere la versione firmware corrente del dispositivo.
Visualizzare le informazioni sulla scheda microSD e formattare la scheda.
*La formattazione eliminerà definitivamente tutti i dati. Esegui il backup dei file in
anticipo.
Toccare Registro riconoscimento con IA per accedere all 'elenco dei
registri di riconoscimento e ottenere risultati dettagliati.
Toccare Impostazioni foto per accedere al pannello delle impostazioni
di acquisizione foto.
Toccare galleria per gestire foto e video.
36
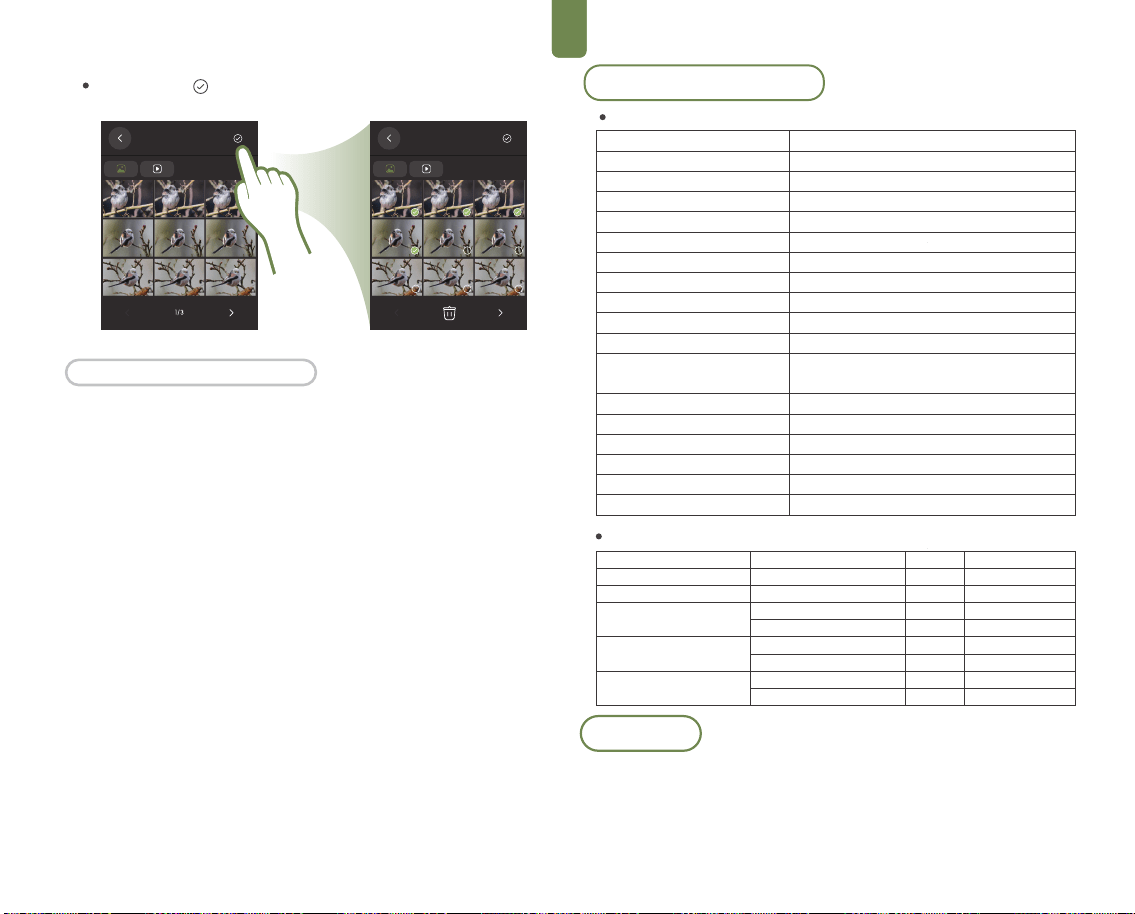
FRIT
Album
Album
Toccare l’icona per accedere all’interfaccia di eliminazione delle
foto.
Indicatore di stato:
Blu fisso: Il dispositivo è collegato e funziona correttamente.
Blu lampeggiante: Il video è in fase di registrazione.
Indicatore Batteria/Ricarica:
Spento: Il dispositivo non è alimentato o non è collegato a una fonte di
alimentazione.
Rosso fisso: Il dispositivo è in carica.
Verde fisso: Indica che il dispositivo è sufficientemente carico o
completamente carico.
Stato della luce dell'indicatore
Specifiche e parametri
Specifiche tecniche del binocolo
Ingrandimento
Diametro dell’obiettivo
Sistema a prisma
Campo visivo (m/1000 m)
Campo visivo (gradi)
Diametro della pupilla di uscita
Conchiglia oculare
Distanza minima di messa a fuoco
Peso
Dimensioni
Tipo di batteria
Durata della batteria
Sensore
Risoluzione Foto/Video
Tutel a d ell 'a mb ie nt e
Metodi di connessione
Te mp er at ura d i fu nzi on am ent o
Te mp er at ura d i sto cca gg io
8 x
32 mm
Prisma a tetto
129,5 m / 388,5 piedi
7, 6°
4,24 mm
16 mm
3,7 m
680 g
116,5 mm × 120,8 mm × 68 mm
Li-ion 2600 mAh
12 h (uso standard); 4 h (a pieno carico) Con modulo
esteso: 20 h (uso standard); 8 h (a pieno carico)
1/2,7" CMOS
2592 × 1944 px
IP 64, Riempito di azoto
Tras fe ri mento ve loce W i- Fi , es por ta zio ne U SB
da -10 °C a +50°C
da -20 °C a +60 °C
Elenco delle schede microSD consigliate
Marchio e serie
SanDisk Extreme V30 A1
SanDisk Extreme Pro V30 A1
SanDisk Extreme V30 A2
SanDisk Extreme Pro V30 A2
Lexar 1066x microSD UHS-I
Serie ARGENTO
Modello
SDSQXVF-032G-GN6MA
SDSQXCG-064G-GN6MA
SDSQXAH-064G-GN6GN
SDSQXAA-128G-GN6GN
SDSQXCU-064G-GN6MA
SDSQXCY-128G-ZN6MA
LMS1066064G-BN
LMS1066128G-BN
Capacità
32 GB
64 GB
64 GB
128 GB
64 GB
128 GB
64 GB
128 GB
Classificazioni di velocità
V30
V30
U3, A2, V30
U3, A2, V30
U3, A2, V30
U3, A2, V30
V30
V30
App Solvia
Se utilizzato con l'app Solvia, il binocolo AI Solvia 8×32 può trasmettere filmati
live ad alta definizione direttamente sul tuo dispositivo mobile. Ciò consente di
regolare i parametri della fotocamera e controllare il binocolo da remoto. L'app
offre anche una suite di funzionalità, tra cui l'esportazione dei media, il
riconoscimento AI basato su cloud e il miglioramento delle immagini,
migliorando significativamente l'esperienza complessiva dell'utente.
37
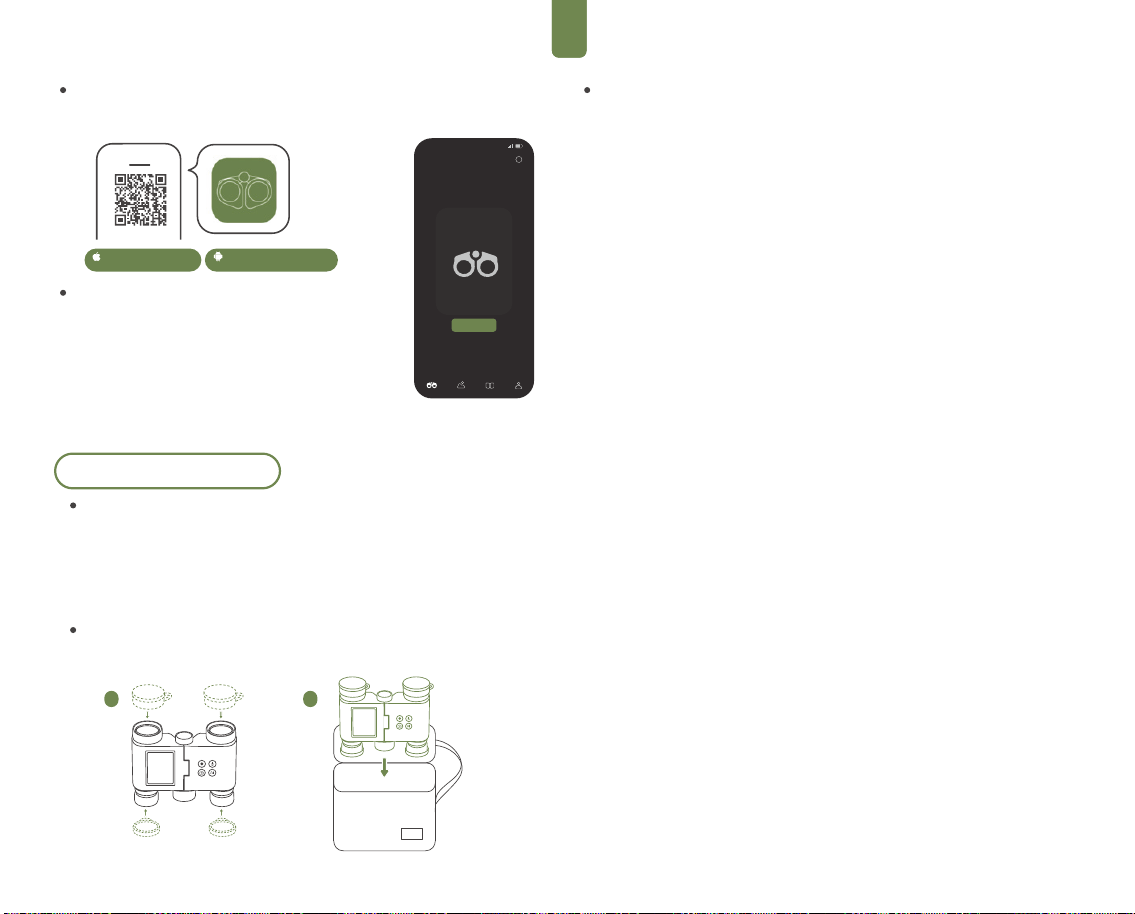
FRIT
ProfiloRegistroAlbumOsservazione
Fatto
Solvia
I miei dispositivi
i
1 2
Scarica l'app Solvia
Cercare l'app Solvia nell'app store del tuo telefono o
scansionare il codice QR per scaricarla.
Connessione all'app Solvia:
1. Premere il pulsante di accensione per accendere il
binocolo Solvia 8×32 AI
2. Toccare il tasto Impostazioni nell'angolo in alto a
destra dello schermo, quindi andare su Wi-Fi per
abilitare il Wi-Fi e visualizzare il nome e la password Wi-Fi
del dispositivo.
3. Aprire l'app Solvia, toccare Connetti nella schermata
iniziale e seguire le istruzioni sullo schermo per
connettersi alla rete Wi-Fi del dispositivo.
iOS 15.0 e versioni
successive
Android 7.0 e versioni
successive
Manutenzione e cura
Aggiornamento del firmware
Prima di aggiornare il firmware, assicurarsi che il binocolo abbia un livello della
batteria superiore al 20%.
Collegare il binocolo all'app Solvia.
Quando l'app indica che è disponibile una nuova versione del firmware, toccare per
avviare l'aggiornamento e seguire le istruzioni sullo schermo. Il processo di
aggiornamento del firmware richiede in genere circa 3 minuti.
Conservazione
Dopo aver utilizzato il binocolo Solvia 8×32 AI, coprire gli oculari e le lenti dell'obiettivo
con i cappucci protettivi e riporre il binocolo nell'apposita custodia per il trasporto.
Precauzioni d'uso
Limite di età
Questo prodotto non è adatto a bambini di età inferiore ai 3 anni.
Utilizzo dell'adattatore
L'adattato re d i ricari ca per qu esto prodotto (non i nclu so) n on è u n g iocatto lo
e deve essere tenuto fuori dalla portata dei bambini.
Si consiglia di utilizzare un adattatore di ricarica da 5V/2A per garantire una
ricarica sicura e stabile.
Connessione dell'alimentazione singola:
Il prodotto può essere ricaricato solo utilizzando un singolo adattatore di
alimentazione.
Metodo di pulizia
Pulire la superficie del dispositivo con un panno pulito, morbido e asciutto.
Supervisione dei bambini
I bambini devono utilizzare questo prodotto sotto la supervisione di un adulto
per garantire la sicurezza.
Prevenire le cadute
- Far cadere il dispositivo o sottoporlo a forti urti può danneggiare in modo
permanente le ottiche o i componenti interni.
- Tenere il dispositivo protetto da polvere e sabbia, poiché la contaminazione
può danneggiare le lenti e causare malfunzionamenti.
Vietato lo smontaggio non autorizzato
- Non smontare, modificare o tentare di riparare il prodotto da soli. Le
riparazioni non autorizzate possono causare malfunzionamenti e invalidare
la garanzia.
Intervallo di temperatura di utilizzo
- Non utilizzare o caricare il dispositivo al di fuori dell'intervallo di temperatura
consigliato di
da -10°C a +50°C
Precauzioni per la conservazione a lungo termine
- Se il prodotto non verrà utilizzato per un periodo prolungato, caricarlo
completamente prima dello stoccaggio e ricaricarlo almeno una volta ogni
tre mesi per mantenere la salute della batteria.
Non guardare le fonti di luce intensa
- Non guardare mai il sole o altre fonti di luce forte attraverso il binocolo, in
quanto ciò potrebbe causare gravi lesioni agli occhi.
Non utilizzare mentre si cammina
- Mantenere una posizione stabile durante l'utilizzo del dispositivo. Evitare di
usarlo mentre si cammina per evitare inciampi o collisioni.
Resistenza all'acqua, alla polvere e agli urti
- Il prodotto offre una resistenza agli spruzzi di base, ma evita di esporlo a
forti urti o di immergerlo in acqua.
Suggerimenti per la manutenzione e la garanzia
- Contattare i centri di assistenza autorizzati per la manutenzione e le
riparazioni. Le riparazioni non autorizzate da parte di istituzioni non
professionali possono invalidare la garanzia.
38
FRIT
Per garantire la propria sicurezza e quella degli altri, leggere attentamente le seguenti
avvertenze prima di utilizzare questo prodotto:
1. Non guardare direttamente le sorgenti luminose
Non guardare mai direttamente il sole o altre sorgenti di luce intensa attraverso il bino-
colo per evitare danni irreversibili agli occhi o ustioni retiniche.
2. Non smontare o modificare senza autorizzazione
Non smontare, modificare o tentare di riparare il prodotto da soli.
La manipolazione non autorizzata può danneggiare i componenti interni, creare rischi
di scosse elettriche e invalidare la garanzia.
3. Tenere lontano da alte temperature, umidità e forti campi magnetici
Ten ere il prodotto lontano da a lte temperatu re, umidità elevata, forti ca mpi magn etici
e ambienti infiammabili o esplosivi.
L'e sp osizione a tali co nd izi on i p uò ca us are gonf iore de lla b atte ria, esplosi on i o danni
ai circuiti interni.
4. Non usare sott'acqua
Questo dispositivo è resistente agli spruzzi ma non sommergibile. Non utilizzare il dis-
positivo sott'acqua o
esporlo a forti piogge. Se il dispositivo viene a contatto con l'acqua, spegnerlo imme-
diatamente e contattare l'assistenza clienti.
5. Garantire una corretta ventilazione durante la ricarica.
Non caricare il dispositivo in aree chiuse o scarsamente ventilate, poiché ciò potrebbe
causare surriscaldamento o pericolo di incendio.
6. Utilizzare fonti di alimentazione e accessori conformi
Utilizzare solo gli adattatori di alimentazione consigliati che soddisfano le specifiche
richieste (5V / 2A).
Non utilizzare caricabatterie non certificati o di bassa qualità, in quanto potrebbero
causare danni o rischi per la sicurezza.
Importanti istruzioni di sicurezza
Questo prodotto è coperto dalle seguenti polizze di garanzia, in vigore dalla data di
acquisto originale:
I guasti funzionali non causati da fattori umani possono essere riparati o sostituiti gra-
tuitamente entro i seguenti periodi di garanzia: 3 anni per il sistema ottico e 1 anno per
l'unità principale (inclusi elettronica e software).
Garanzia degli accessori: Gli accessori (ad esempio, tracolla, custodia per il trasporto,
copriobiettivo) non sono coperti dalla garanzia standard. Tuttavia, se viene rilevato un
problema di qualità al momento del ricevimento, è possibile inviare una richiesta di sos-
tituzione entro 7 giorni.
Prova di acquisto: Per ottenere il servizio di garanzia è necessaria una prova di acquisto
valida (come uno screenshot dell'ordine, una fattura o una ricevuta).
La copertura della garanzia non si applica a:
Danni causati da un uso improprio come cadute, urti, immersioni in acqua o esposizione
ad ambienti ad alta temperatura.
Danni causati da smontaggio, riparazione o modifiche non autorizzate.
Prodotti acquistati da rivenditori non autorizzati o senza una prova di acquisto valida.
normale usura, invecchiamento, graffi, macchie e altri problemi non funzionali.
Politica di garanzia
Per assistenza tecnica e assistenza post-vendita, vi preghiamo di contattarci attraverso
i seguenti canali:
Sito ufficiale:www.matataxplore.com
E-mail del servizio clienti: support@matataxplore.com
Si prega di preparare le seguenti informazioni prima di contattarci:
Modello del prodotto e numero di serie situati sul retro del dispositivo o della scatola di
imballaggio;
Screenshot della prova di acquisto.
Una breve descrizione del problema, insieme a eventuali foto o video di supporto.
Supporto e assistenza
Dichiarazione di conformità e standard ambientali
Dichiarazione di conformità CE e RoHS
Dichiarazione ambientale di riciclo RAEE
- CE:
Questo prodotto è conforme ai requisiti essenziali di
2014/30/UE (EMC) e 2014/35/UE (LVD).
- Direttiva RoHS (2011/65/UE):
Il dispositivo non contiene sostanze pericolose come piombo, mercurio,
cadmio o cromo esavalente oltre i limiti specificati.
Il dispositivo è contrassegnato con le etichette di conformità CE e RoHS
appropriate sull'alloggiamento o sulla targhetta.
Questo prodotto è conforme alla Direttiva sui rifiuti di ap-
parecchiature elettriche ed elettroniche (RAEE,
2012/19/UE):
- Non smaltire questo dispositivo come rifiuto domestico.
- Quando si smaltisce questo dispositivo, assicurarsi che sia gestito da un
impianto di riciclaggio dei rifiuti elettronici designato.
- Il simbolo del cestino barrato indica che il prodotto deve essere riciclato
separatamente.
Grazie per la partecipazione alla responsabilità ambientale e per con-
tribuire a un futuro sostenibile.
39

Dichiarazione di avvertenza FCC
Modifiche o cambiamenti non espressamente approvati dalla parte
responsabile della conformità potrebbero annullare l'autorizzazione
dell'utente a utilizzare l'apparecchiatura. Questa apparecchiatura è stata
testata ed è risultata conforme ai limiti previsti per un dispositivo digitale
di Classe B, ai sensi della Parte 15 delle normative FCC. Tali limiti sono
progettati per fornire una ragionevole protezione contro interferenze
dannose in installazioni residenziali. Questa apparecchiatura genera,
utilizza e può irradiare energia a radiofrequenza e, se non installata e
utilizzata secondo le istruzioni, può causare interferenze dannose alle
comunicazioni radio. Tuttavia, non vi è alcuna garanzia che non si
verifichino interferenze in una particolare installazione. Se questa
apparecchiatura causa interferenze dannose alla ricezione radiofonica o
televisiva, verificabili spegnendo e riaccendendo l'apparecchiatura, si
invita l'utente a tentare di correggere l'interferenza adottando una o più
delle seguenti misure:
‐‐ Riorientare o riposizionare l'antenna ricevente.
‐‐ Aumentare la distanza tra l'apparecchiatura e il ricevitore.
‐‐ Collegare l'apparecchiatura a una presa appartenente a un circuito
diverso da quello a cui è collegato il ricevitore.
‐‐ Consultare il rivenditore o un tecnico radio/TV esperto per assistenza.
Dichiarazione FCC sull'esposizione alle radiofrequenze
Il dispositivo è stato valutato e soddisfa i requisiti generali relativi
all'esposizione alle radiofrequenze (RF). Il dispositivo può essere utilizzato
in condizioni di esposizione portatile senza restrizioni.
Questo dispositivo è conforme alla Parte 15 delle normative FCC. Il
funzionamento è soggetto alle seguenti due condizioni:
(1) Questo dispositivo non deve causare interferenze dannose, e
(2) Questo dispositivo deve accettare qualsiasi interferenza ricevuta,
comprese quelle che potrebbero causare un funzionamento indesiderato.
Questo dispositivo soddisfa i requisiti governativi relativi all'esposizione
alle onde radio. Le linee guida si basano su standard sviluppati da
organizzazioni scientifiche indipendenti attraverso valutazioni periodiche
e approfondite degli studi scientifici. Tali standard includono un ampio
margine di sicurezza progettato per garantire la protezione di tutte le
persone, indipendentemente dall'età o dalle condizioni di salute.
Informazioni e dichiarazione FCC sull'esposizione alle radiofrequenze: il
limite SAR (Specific Absorption Rate) stabilito dalla FCC negli Stati Uniti è
di 1,6 W/kg, mediato su un grammo di tessuto. Questo tipo di dispositivo è
stato inoltre testato rispetto a tale limite SAR. Il dispositivo è stato testato
in condizioni tipiche di utilizzo a contatto con il corpo, mantenendo il retro
del dispositivo a una distanza di 0 mm dal corpo. Per garantire la
conformità ai requisiti FCC relativi all'esposizione alle radiofrequenze,
utilizzare accessori che mantengano una distanza di separazione di 0 mm
tra il corpo dell'utente e il retro del dispositivo. Clip da cintura, custodie e
accessori simili non devono contenere componenti metallici. L'utilizzo di
Questo manuale contiene importanti
informazioni sul prodotto e deve essere
conservato.
accessori che non soddisfano questi requisiti potrebbe non essere
conforme ai requisiti FCC relativi all'esposizione alle radiofrequenze e
dovrebbe essere evitato.
L'utilizzo di questo dispositivo è lim itato esclusiva mente a d ambienti
interni nella banda di frequenza 5180–5240 MHz.
FRIT
40
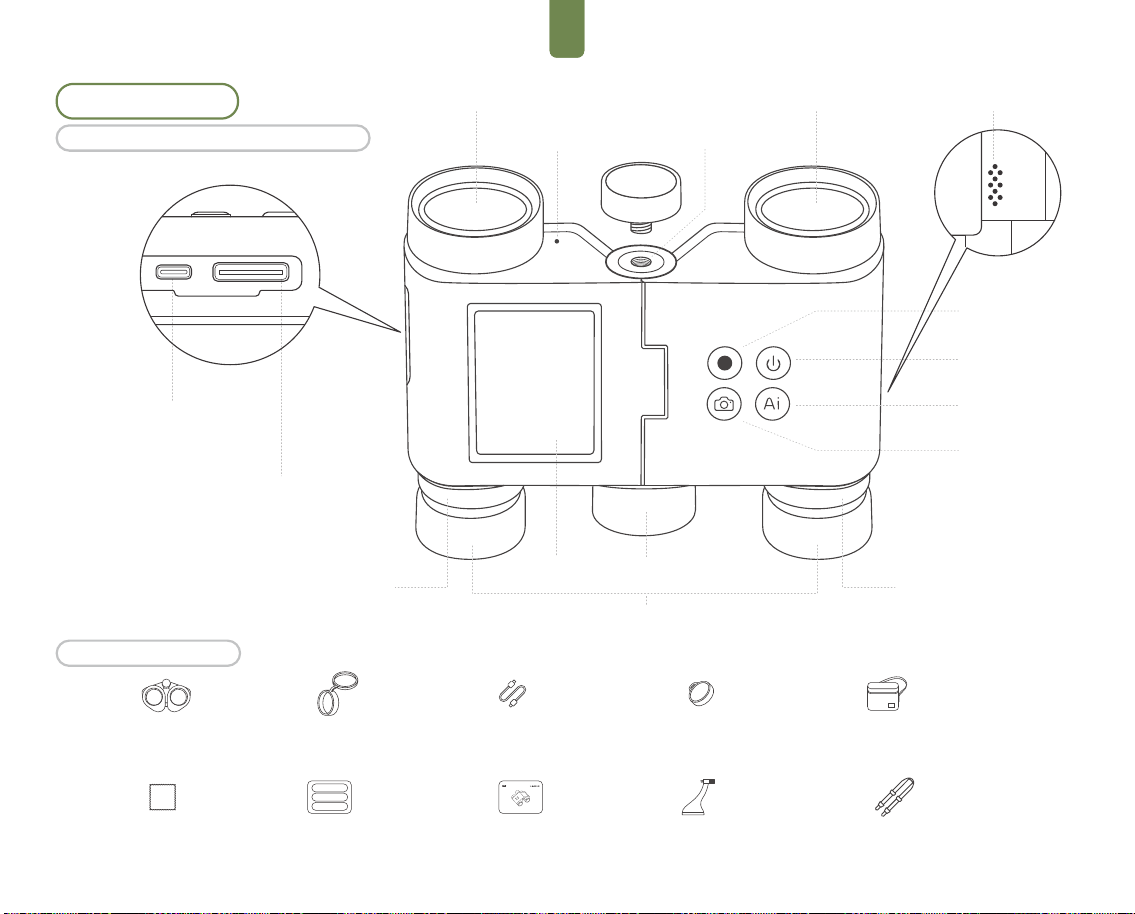
FRNL
Productintroductie
Standaardaccessoires
Ontdek de Solvia 8×32 AI-verrekijker
Video
MicroSD-kaartsleuf
Rechter ooglens
dioptrieknop
FocusknopDisplay
Aan-/uitknop
AI-herkenning
Foto
Ooglens
Objectieflens
Microfoon
1/4'' Schroefdraadgat
Objectieflens
Luidspreker
Objectieflensdoppen ×2 USB-C-oplaad-/gegev
enskabel ×1
Oculairbeschermhoesjes ×2 Draagtas ×1
Reinigingsdoekje
voor lens ×1
Snelstartgids ×1 Gebruikershandl
eiding ×1
Nekriem ×1Statiefadapter ×1
AI-verrekijker ×1
USB-C-poort voor
opladen/gegevensoverdracht
Linker ooglens
dioptrieknop
41
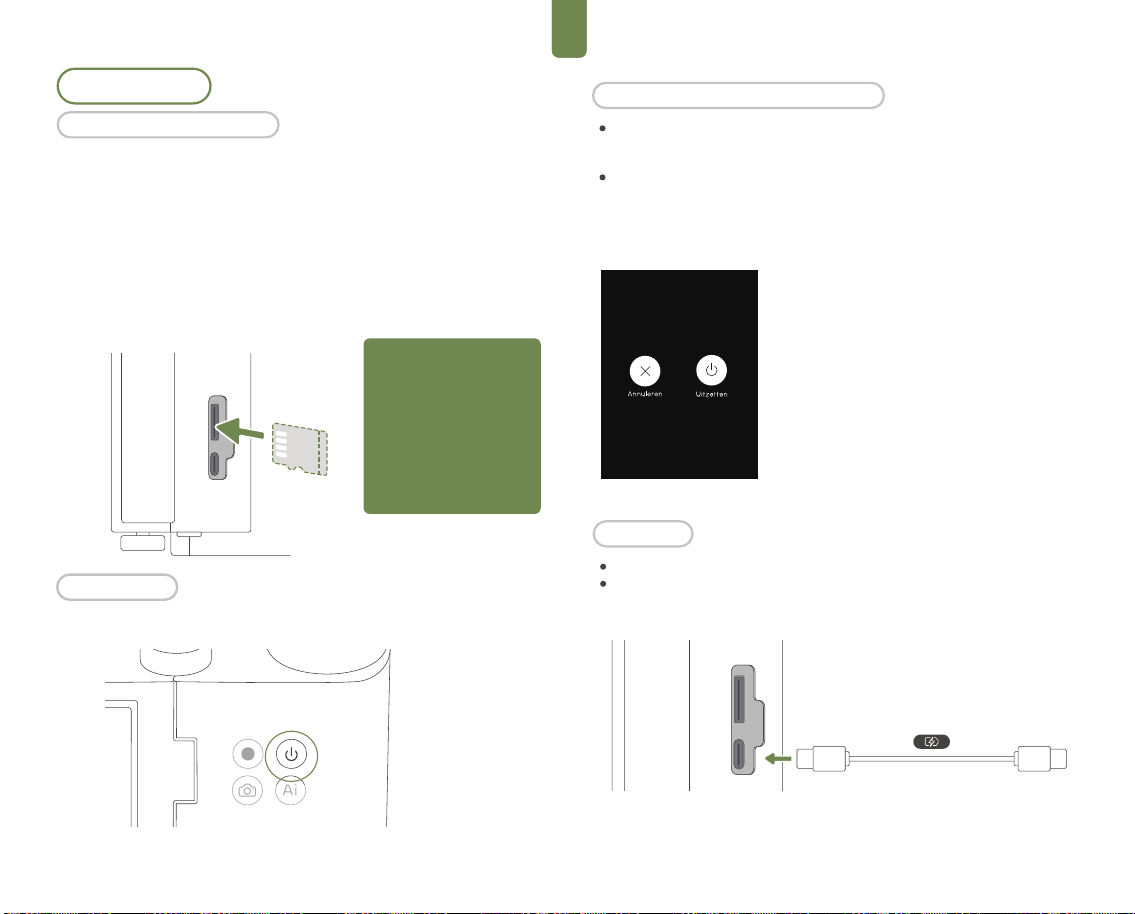
FRNL
Houd de aan-/uitknop 3 seconden ingedrukt om de
opties op het scherm weer te geven.
Uitschakelen en slaapstandbeheer
Uitschakelen
- Hiermee wordt het apparaat volledig uitgeschakeld.
- Als het apparaat vastloopt of niet meer reageert, houd dan
de aan-/uitknop 8 seconden ingedrukt om het apparaat
geforceerd uit te schakelen.
Eerste gebruik
De Solvia 8×32 AI-verrekijker heeft geen ingebouwd opslaggeheugen. U
moet een microSD-kaart installeren om opgenomen afbeeldingen en
video's op te slaan. Het wordt aangeraden om een microSD-kaart te
gebruiken met een UHS-I Speed Grade 3-classificatie en geformatteerd
in exFAT. (Een standaard microSD-kaart van 64 GB wordt meegeleverd in
de set. Raadpleeg het gedeelte “Specificaties” voor een lijst met aanbev-
olen kaartmodellen.)
Plaats de microSD-kaart in de sleuf en controleer of de richting overeen-
komt met de afbeelding. Om de microSD-kaart uit te werpen, duw deze
voorzichtig naar binnen totdat deze vastklikt en gedeeltelijk uit de sleuf
komt.
Druk 2 seconden op de aan-/uitknop om het apparaat in te schakelen.
Klap het klepje van de USB-poort naar buiten open.
Sluit een stroomadapter aan met een USB-C-kabel om het apparaat op
te laden (aanbevolen ingang: DC 5V/2A).
Opmerking: Om uw
opgenomen gegevens te
beschermen en de levensduur
van de microSD-kaart te
verlengen, moet hot-plugging
worden vermeden. Het wordt
aanbevolen om de kaart alleen
te plaatsen of te verwijderen
wanneer de Solvia 8×32
AI-verrekijker is uitgeschakeld.
Inschakelen
Opladen
microSD-kaart installeren
42
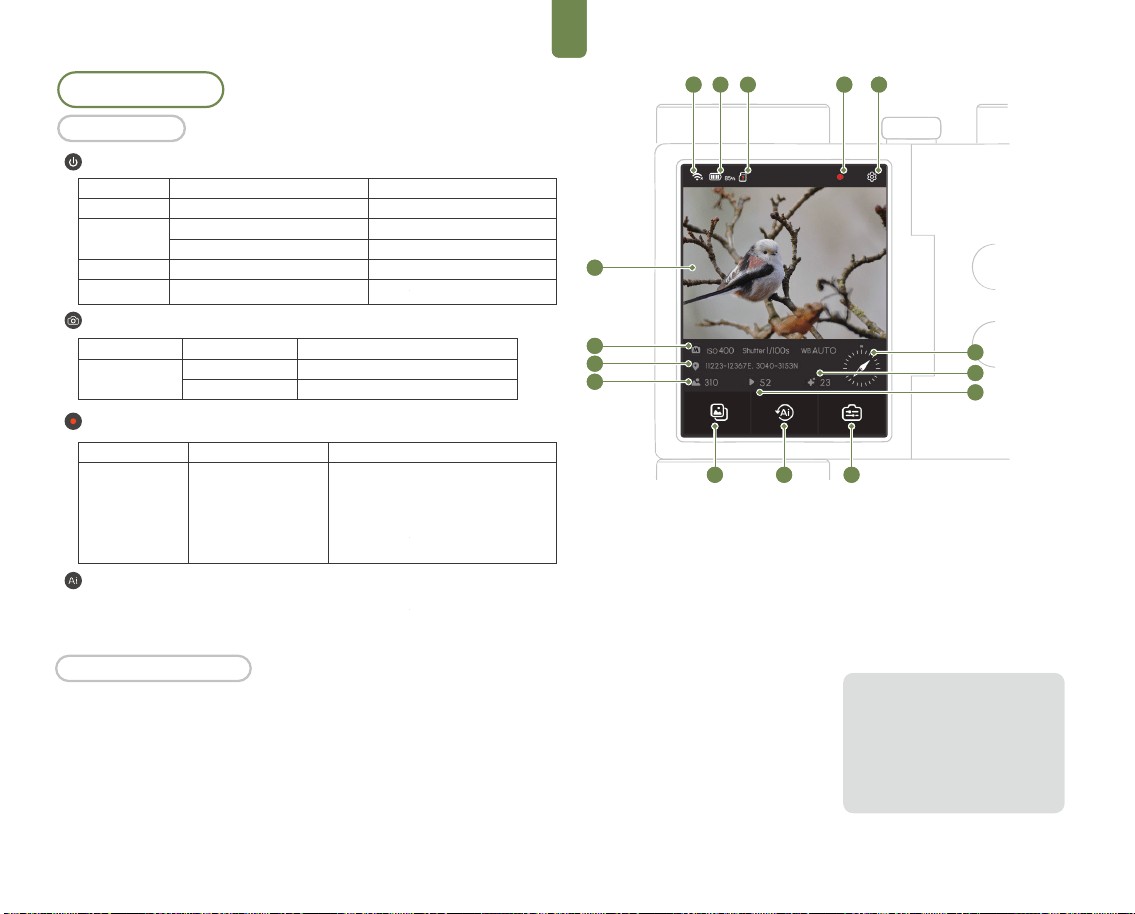
FRNL
1
5
5
5
5
7
4
8 9
2 2
4
1
6
10
11
12
5
5
5
15
7
5
8 9
2 3
4
14
13
1. Wi-Fi-status
2. Batterijniveau
3. SD-kaartstatus
4. Opnamestatus
5. Systeeminstellingen
6. Liveweergave en fotovoorver-
toning
7. Galerij en mediabibliotheek
8. AI-logcentrum
9. Toegang tot instellingen
10. Opnameparameters
11. GPS-gegevens
(Solvia Field Kit vereist)
12. Aantal foto's
13. Aantal video's
14. AI-herkenningsstatistieken
15.Elektronisch kompas
(Solvia Field Kit vereist)
Houd er rekening mee dat bij
bepaalde lichtinvalshoeken schittering
of donkere vlekken kunnen optreden
tijdens het observeren of opnemen. U
kunt de hoek aanpassen voor een
betere weergave of opname. Dit is
geen kwaliteitsprobleem van het
product.
Apparaatstatus
Ingeschakelde
toestand
Bediening van knoppen
Enkele druk
Bediening van knoppen
Opname starten/stoppen. Video's
worden automatisch opgeslagen in
segmenten van 5 minuten om de
veiligheid van de bestanden te
verzekeren. De opname stopt
automatisch wanneer er onvoldoende
opslagruimte is.
Als het touchscreen wordt ingeschakeld, wordt de zoekerinterface van de
verrekijker weergegeven. De menubalk geeft informatie weer zoals
Wi-Fi-verbinding, batterijniveau en opslagcapaciteit.
Tik of veeg op het touchscreen om functies te openen.
Touchscreenbediening
Basisbediening
Bewerkingen
Apparaatstatus
Uit
Aan
Slaapmodus
Niet antwoorden
Bewerkingen
Kort indrukken gedurende 2 seconden
Indrukken
Lang indrukken gedurende 3 seconden
Indrukken
Lang indrukken gedurende 8 seconden
Functies
Inschakelen
Vergrendelen en scherm uitschakelen
Uitschakelen / Slaapstand selecteren
Ontgrendelen en scherm inschakelen
Gedwongen uitschakeling
Aan-/uitknop
Apparaatstatus
Aan
Bewerkingen
Indrukken
Lang indrukken
Functies
Opname starten
Start burst-opname
Fotoknop
Videoknop
- In de foto detailweergave activeer met de knop AI-herkenning de
AI-vogelherkenning op het apparaat en worden de resultaten weergegeven.
AI-herkenning
43
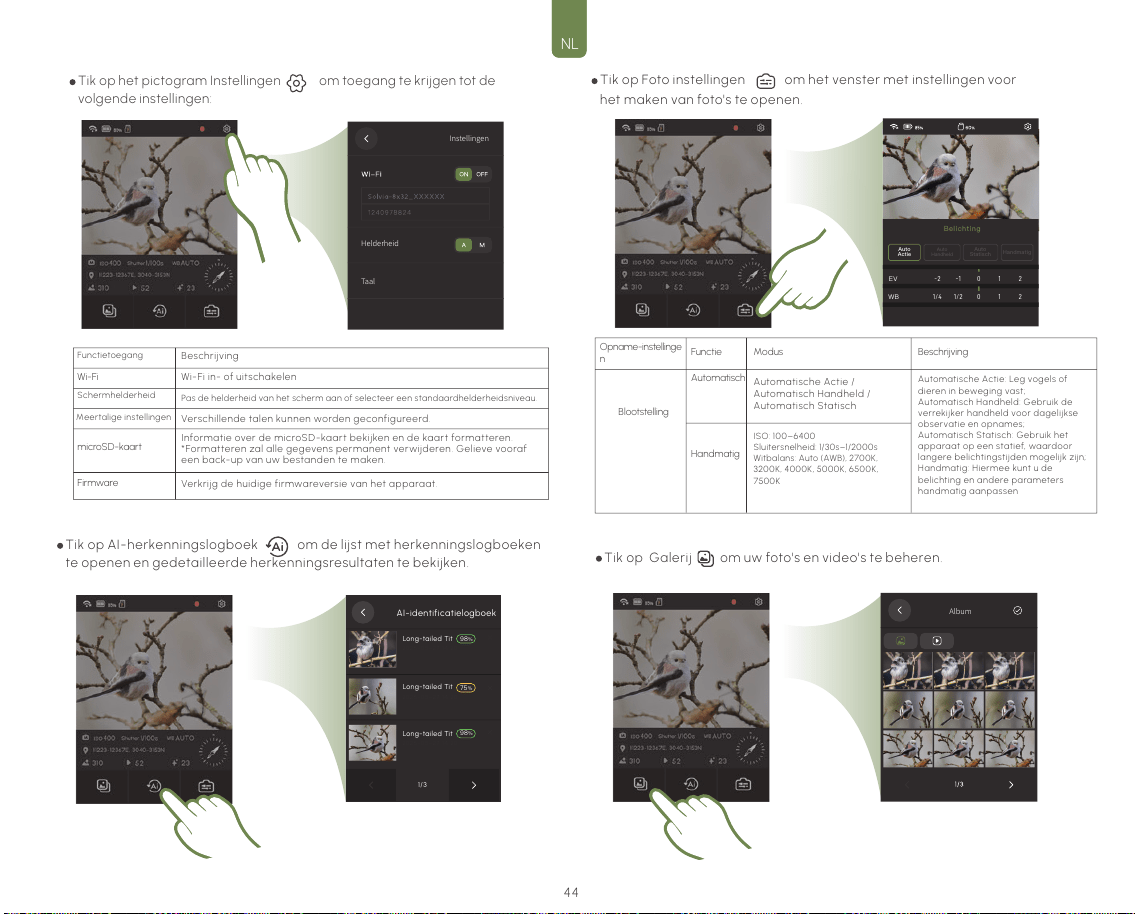
FRNL
Instellingen
Helderheid
Taal
Belichting
0
1
2
-2
-1
EV
Auto
Actie
Auto
Handheld
Auto
Statisch
Handmatig
0
1
2
1/4
1/2
WB
Long-tailed Tit
98
%
75
%
2025-05-27 14:20
Long-tailed Tit
2025-05-27 14:20
Long-tailed Tit
98
%
2025-05-27 14:20
1/3
AI-identificatielogboek
Album
Opname-instellinge
n
Functie Modus Beschrijving
Automatische Actie: Leg vogels of
dieren in beweging vast;
Automatisch Handheld: Gebruik de
verrekijker handheld voor dagelijkse
observatie en opnames;
Automatisch Statisch: Gebruik het
apparaat op een statief, waardoor
langere belichtingstijden mogelijk zijn;
Handmatig: Hiermee kunt u de
belichting en andere parameters
handmatig aanpassen
Automatische Actie /
Automatisch Handheld /
Automatisch Statisch
ISO: 100–6400
Sluitersnelheid: 1/30s–1/2000s
Witbalans: Auto (AWB), 2700K,
3200K, 4000K, 5000K, 6500K,
7500K
Handmatig
Blootstelling
Automatisch
Tik op het pictogram Instellingen om toegang te krijgen tot de
volgende instellingen:
Functietoegang
Wi-Fi
Schermhelderheid
Meertalige instellingen
microSD-kaart
Firmware
Beschrijving
Wi-Fi in- of uitschakelen
Pas de helderheid van het scherm aan of selecteer een standaardhelderheidsniveau.
Verschillende talen kunnen worden geconfigureerd.
Verkrijg de huidige firmwareversie van het apparaat.
Informatie over de microSD-kaart bekijken en de kaart formatteren.
*Formatteren zal alle gegevens permanent verwijderen. Gelieve vooraf
een back-up van uw bestanden te maken.
Tik op AI-herkenningslogboek om de lijst met herkenningslogboeken
te openen en gedetailleerde herkenningsresultaten te bekijken.
Tik op Foto instellingen om het venster met instellingen voor
het maken van foto's te openen.
Tik op Galerij om uw foto's en video's te beheren.
44
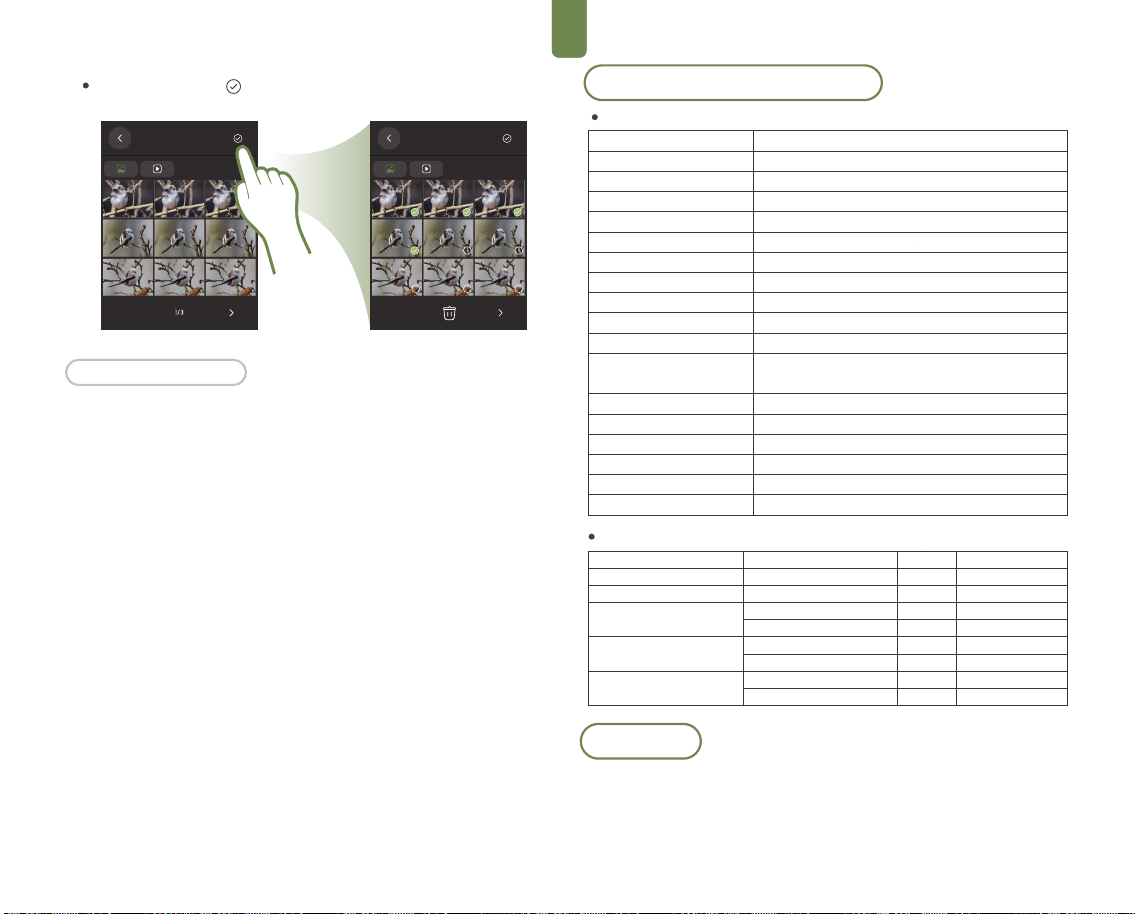
FRNL
Album
Album
Tik op het pictogram om naar de interface voor het verwijderen van
foto’s te gaan.
Statusindicator:
Constant blauw: Het apparaat is aangesloten en werkt goed.
Knipperend blauw: Er wordt een video opgenomen.
Batterij-/oplaad indicatielmapje:
Uitgeschakeld: Het apparaat heeft geen stroom of is niet aangesloten
op een stroombron.
Constant rood: Het apparaat wordt opgeladen.
Constant groen: Duidt aan dat het apparaat voldoende of volledig is
opgeladen.
Status indicatielampje
Specificaties en parameters
Technische specificaties verrekijker
Vergroting
Diameter objectief
Prism Systeem
Gezichtsveld (m/1000 m)
Gezichtsveld (graden)
Diameter pupilopening
Oogontlasting
Minimale focusafstand
Gewicht
Afmetingen
Typ e bat te rij
Levensduur batterij
Sensor
Foto-/videoresolutie
Milieubescherming
Aansluitingsmethoden
Bedrijfstemperatuur
Opslagtemperatuur
8 x
32 mm
Dakkant Prisma
129,5 m / 388,5 ft
7,6°
4,24 mm
16 mm
3,7 m
680 g
116,5 mm × 120,8 mm × 68 mm
Li-ion 2600 mAh
12uur (normaal gebruik); 4uur (bij volledige belasting)
Met uitgebreide module: 20 uur (normaal gebruik); 8 uur
(bij volledige belasting)
1/2.7" CMOS
2592 × 1944 px
IP 64, stikstofgespoeld
Snelle Wi-Fi-overdracht, USB-export
−10°C tot +50°C
−20°C tot +60°C
Aanbevolen lijst met microSD-kaarten
Merk en serie
SanDisk Extreme V30 A1
SanDisk Extreme Pro V30 A1
SanDisk Extreme V30 A2
SanDisk Extreme Pro V30 A2
Lexar 1066x microSD UHS-I
SILVER serie
Model
SDSQXVF-032G-GN6MA
SDSQXCG-064G-GN6MA
SDSQXAH-064G-GN6GN
SDSQXAA-128G-GN6GN
SDSQXCU-064G-GN6MA
SDSQXCY-128G-ZN6MA
LMS1066064G-BN
LMS1066128G-BN
Capacity
32 GB
64 GB
64 GB
128 GB
64 GB
128 GB
64 GB
128 GB
Speed Ratings
V30
V30
U3, A2, V30
U3, A2, V30
U3, A2, V30
U3, A2, V30
V30
V30
Solvia-app
Bij gebruik met de Solvia-app kan de Solvia 8×32 AI-verrekijker livebeelden in
hoge resolutie rechtstreeks naar uw mobiele apparaat streamen. Hierdoor
kunt u de cameraparameters aanpassen en de verrekijker op afstand
bedienen. De app biedt ook een aantal functies, zoals media-export,
cloudgebaseerde AI-herkenning en beeldverbetering, waardoor de algehele
gebruikerservaring aanzienlijk wordt verbeterd.
45
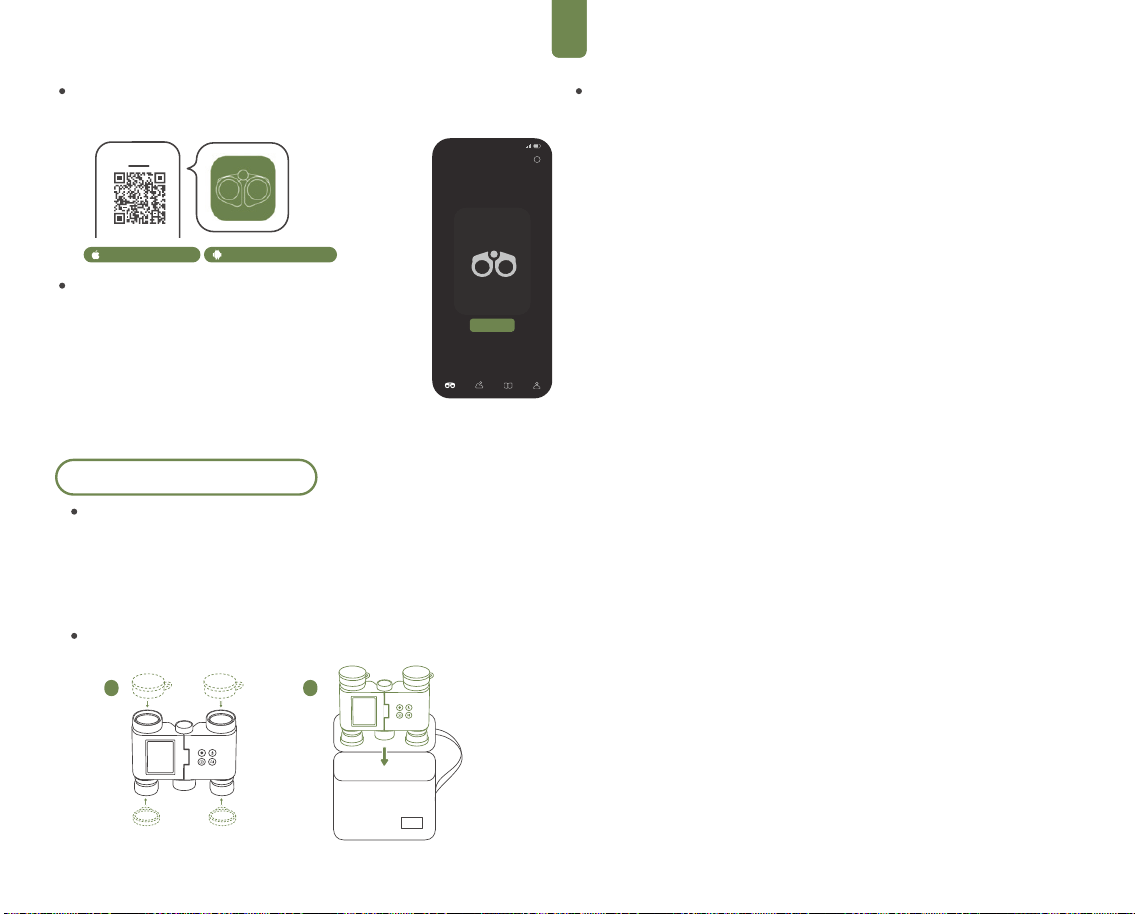
FRNL
ProfielLogboekAlbumObservatie
Gereed
Solvia
Mijn apparaten
i
1 2
Download de Solvia-app
Zoek naar de Solvia-app in de app store van uw telefoon of scan de
QR-code om deze te downloaden.
Verbinding maken met de Solvia-app:
1. Druk op de aan-/uitknop om de Solvia 8×32 AI-verrekijker in
te schakelen.
2. Tik op het pictogram voor instellingen in de
rechterbovenhoek van het scherm, ga vervolgens naar Wi-Fi
om Wi-Fi in te schakelen en de Wi-Fi-naam en het
wachtwoord van het apparaat te bekijken.
3. Open de Solvia-app, tik op de Verbind knop op het
startscherm en volg de instructies op het scherm om
verbinding te maken met het Wi-Fi-netwerk van het
apparaat.
iOS 15.0 en hoger Android 7.0 en hoger
Onderhoud en verzorging
Firmware-upgrade
Controleer vóór het upgraden van de firmware of het batterijniveau van de
verrekijker hoger is dan 20%.
Verbind de verrekijker met de Solvia-app.
Op het moment dat de app aangeeft dat er een nieuwe firmwareversie
beschikbaar is, tik om de update te starten en volg de instructies op het scherm.
Het firmware updateproces duurt doorgaans ongeveer 3 minuten.
Opslag
Bedek na gebruik van de Solvia 8×32 AI-verrekijker de oculairs en objectieven met
de beschermdoppen en berg de verrekijker op in de speciale draagtas.
Voorzorgsmaatregelen bij gebruik
Leeftijdsgrens
Dit product is niet geschikt voor kinderen jonger dan 3 jaar.
Gebruik van de adapter
De oplaadadapter voor dit product (niet meegeleverd) is geen speelgoed en dient
buiten het bereik van kinderen te worden gehouden.
Het wordt aanbevolen om een 5V/2A-oplaadadapter te gebruiken om veilig en stabiel
opladen te garanderen.
Enkele stroomaansluiting:
Het product kan slechts met één enkele stroomadapter worden opgeladen.
Reinigingsmethode
Veeg het oppervlak van het apparaat af met een schone, zachte, droge doek.
Toezicht op kinderen
Kinderen moeten dit product onder toezicht van een volwassene gebruiken om de
veiligheid te garanderen.
Voorkom laten vallen
- Door het apparaat te laten vallen of aan zware schokken bloot te stellen, kunnen de
optische onderdelen of interne componenten permanent beschadigd raken.
- Houd het apparaat beschermd tegen stof en zand, aangezien vervuiling de lenzen
kan beschadigen en storingen kan veroorzaken.
Ongeautoriseerde demontage is verboden.
- Demonteer, wijzig of probeer het product niet zelf te repareren. Niet-geautoriseerde
reparaties kunnen storingen veroorzaken en maken de garantie ongeldig.
Temperatuurbereik voor gebruik
- Het apparaat niet gebruiken of opladen buiten het aanbevolen temperatuurbereik
van −10°C tot +50°C
Voorzorgsmaatregelen voor langdurige opslag
- Indien het product gedurende langere tijd niet wordt gebruikt, moet het volledig
worden opgeladen alvorens het te worden opgeborgen en moet het minstens om de
drie maanden opnieuw worden opgeladen om de batterij in goede staat te houden.
Kijk niet in felle lichtbronnen
- Staar nooit door de verrekijker naar de zon of andere sterke lichtbronnen, aangezien
dit ernstig oogletsel kan veroorzaken.
Niet gebruiken tijdens het lopen
- Houd een stabiele houding aan tijdens het gebruik van het apparaat. Vermijd het
gebruik tijdens het lopen om struikelen of botsingen te voorkomen.
Water-, stof- en schokbestendig
- Het product biedt minimale bescherming tegen spatwater, maar vermijd
blootstelling aan zware schokken of onderdompeling in water.
Tips voor onderhoud en garantie
- Contacteer erkende servicecentra voor onderhoud en reparaties. Ongeautoriseerde
reparaties door niet-professionele instellingen kunnen de garantie ongeldig maken.
46
FRNL
Neem voor uw eigen veiligheid en die van anderen de volgende waarschuwin-
gen zorgvuldig door alvorens dit product te gebruiken:
1. Kijk niet rechtstreeks in felle lichtbronnen
Kijk nooit recht in de zon of andere felle lichtbronnen door de verrekijker om on-
herstelbare oogschade of brandwonden aan het netvlies te voorkomen.
2. Niet demonteren of wijzigen zonder toestemming
Demonteer, wijzig of probeer het product niet zelf te repareren.
Niet-toegestane handelingen kunnen interne onderdelen beschadigen, gevaar
voor elektrische schokken opleveren en de garantie ongeldig maken.
3. Uit de buurt houden van hoge temperaturen, vochtigheid en sterke magne-
tische velden.
Houd het product uit de onmiddellijke nabijheid van hoge temperaturen, hoge
luchtvochtigheid, sterke magnetische velden en brandbare of explosieve om-
gevingen.
Bij blootstelling aan dergelijke omstandigheden kan de batterij opzwellen, ont-
ploffen of interne circuits beschadigen.
4. Niet onder water gebruiken
Dit apparaat is spatwaterbestendig, maar niet onderdompelbaar. Gebruik het
apparaat niet onder water of blootstellen aan hevige regen. In het geval dag
het apparaat in contact met water komt, schakel het dan onmiddellijk uit en
neem contact op met de klantenservice.
5. Voorzie in goede ventilatie tijdens het opladen.
Het apparaat niet opladen in afgesloten of slecht geventileerde ruimtes,
aangezien dit oververhitting of brandgevaar kan veroorzaken.
6. Gebruik geschikte stroombronnen en accessoires
Gebruik uitsluitend de aanbevolen stroomadapters die voldoen aan de vereiste
specificaties (5V / 2A).
Gebruik geen laders die niet gecertificeerd zijn of van slechte kwaliteit zijn,
omdat deze schade kunnen veroorzaken of veiligheidsrisico's met zich mee-
brengen.
Belangrijke veiligheidsinstructies
Dit product wordt gedekt door de volgende garantievoorwaarden, die van
kracht zijn vanaf de oorspronkelijke aankoopdatum:
Functionele storingen die niet door menselijke factoren zijn veroorzaakt,
kunnen gratis worden gerepareerd of vervangen binnen de volgende garantie-
periodes: 3 jaar voor het optische systeem en 1 jaar voor het hoofdapparaat (
met inbegrip van elektronica en software).
Garantie op accessoires: Accessoires (bijv. nekriem, draagtas, lensdoppen)
vallen niet onder de basisgarantie. Als bij ontvangst echter een kwaliteitsprob-
leem wordt geconstateerd, kan binnen 7 dagen een vervangingsverzoek
worden ingediend.
Aankoopbewijs: Een geldig aankoopbewijs (zoals een screenshot van de
bestelling, factuur of kassabon) is vereist om aanspraak te kunnen maken op
garantieservice.
De garantie geldt niet voor:
Beschadiging door onjuist gebruik, zoals vallen, stoten, onderdompeling in water of
blootstelling aan hoge temperaturen.
Beschadiging veroorzaakt door ongeoorloofde demontage, reparatie of wijzigingen.
Producten die zijn gekocht bij niet-geautoriseerde verkopers of zonder geldig aan-
koopbewijs.
Gebruikelijke slijtage, veroudering, krassen, vlekken en andere niet-functionele prob-
lemen.
Garantievoorwaarden
Contacteer ons voor technische ondersteuning en dienst na verkoop via de volgende
kanalen:
Officiële website:www.matataxplore.com
E-mailadres klantenservice: support@matataxplore.com
Houd de volgende informatie bij de hand vooraleer u contact met ons opneemt:
Het productmodel en serienummer staan op de achterkant van het apparaat of op
de verpakking;
Screenshot van uw aankoopbewijs.
Een korte beschrijving van het probleem, met ondersteunende foto's of video's.
Klantenservice & Ondersteuning
Conformiteitsverklaring en milieunormen
Verklaring van overeenstemming met CE en RoHS
WEEE-verklaring inzake milieuvriendelijke recycling
- CE:
Dit product voldoet aan de fundamentele eisen van 2014/30/EU
(EMC) en 2014/35/EU (LVD).
- RoHS-richtlijn (2011/65/EU):
Het apparaat bevat geen gevaarlijke stoffen zoals lood, kwik, cadmium of
zeswaardig chroom boven de gespecificeerde limieten.
Het apparaat is aangeduid met de juiste CE- en RoHS-conformiteitslabels op de
behuizing of het typeplaatje.
Dit product voldoet aan de Richtlijn betreffende afgedankte elek-
trische en elektronische apparatuur (AEEA, 2012/19/EU):
- Gooi dit apparaat niet weg bij het huishoudelijk afval.
- Zorg ervoor dat dit apparaat bij het afvoeren wordt afgehandeld door een
erkende recyclingfaciliteit voor elektronisch afval.
- Het doorgestreepte afvalbakje geeft aan dat het product afzonderlijk moet
worden gerecycled.
Bedankt voor uw bijdrage aan milieuvriendelijk gedrag en aan een duurzame toe-
komst.
47

FCC-waarschuwingsverklaring
Wijzigingen of aanpassingen die niet uitdrukkelijk zijn goedgekeurd door
de partij die verantwoordelijk is voor de naleving, kunnen de bevoegdheid
van de gebruiker om dit apparaat te bedienen ongeldig maken. Dit
apparaat is getest en voldoet aan de limieten voor een digitaal apparaat
van Klasse B, overeenkomstig Deel 15 van de FCC-regels. Deze limieten
zijn ontworpen om redelijke bescherming te bieden tegen schadelijke
interferentie in een residentiële installatie. Dit apparaat genereert,
gebruikt en kan radiofrequente energie uitstralen en kan, indien het niet
volgens de instructies wordt geïnstalleerd en gebruikt, schadelijke
interferentie veroorzaken voor radiocommunicatie. Er is echter geen
garantie dat er in een specifieke installatie geen interferentie zal
optreden. Indien dit apparaat schadelijke interferentie veroorzaakt bij
radio- of televisieontvangst, wat kan worden vastgesteld door het
apparaat uit en weer in te schakelen, wordt de gebruiker aangeraden de
interferentie te verhelpen door een of meer van de volgende
maatregelen te nemen:
‐‐ Heroriënteer of verplaats de ontvangstantenne.
‐‐ Vergroot de afstand tussen het apparaat en de ontvanger.
‐‐ Sluit het apparaat aan op een stopcontact dat zich op een ander
stroomcircuit bevindt dan dat waarop de ontvanger is aangesloten.
‐‐ Raadpleeg de dealer of een ervaren radio-/televisiemonteur voor
hulp.
FCC-verklaring inzake blootstelling aan radiofrequenties
Het apparaat is beoordeeld en voldoet aan de algemene vereisten voor
blootstelling aan radiofrequentie-energie (RF). Het apparaat kan zonder
beperkingen worden gebruikt onder draagbare
blootstellingsomstandigheden.
Dit apparaat voldoet aan Deel 15 van de FCC-regels. De werking is
onderworpen aan de volgende twee voorwaarden:
(1) Dit apparaat mag geen schadelijke interferentie veroorzaken, en
(2) Dit apparaat moet elke ontvangen interferentie accepteren, inclusief
interferentie die een ongewenste werking kan veroorzaken.
Dit apparaat voldoet aan de overheidsvereisten met betrekking tot
blootstelling aan radiogolven. De richtlijnen zijn gebaseerd op normen die
zijn ontwikkeld door onafhankelijke wetenschappelijke organisaties via
periodieke en grondige evaluaties van wetenschappelijke onderzoeken.
Deze normen bevatten een ruime veiligheidsmarge die bedoeld is om de
veiligheid van alle personen te waarborgen, ongeacht leeftijd of
gezondheidstoestand. FCC-informatie en verklaring inzake
RF-blootstelling: de SAR-limiet (Specific Absorption Rate) die door de FCC
in de Verenigde Staten is vastgesteld, bedraagt 1,6 W/kg gemiddeld over
één gram weefsel. Dit type apparaat is eveneens getest op naleving van
deze SAR-limiet. Dit apparaat is getest voor typisch gebruik dicht bij het
lichaam, waarbij de achterzijde van het apparaat op een afstand van 0
mm van het lichaam werd gehouden. Om te voldoen aan de
Deze handleiding bevat belangrijke
productinformatie en dient bewaard te worden.
FCC-vereisten voor RF-blootstelling, dienen accessoires te worden
gebruikt die een afstand van 0 mm tussen het lichaam van de gebruiker
en de achterzijde van het apparaat handhaven. Riemclips, houders en
vergelijkbare accessoires mogen geen metalen onderdelen bevatten. Het
gebruik van accessoires die niet aan deze vereisten voldoen, voldoet
mogelijk niet aan de FCC-vereisten voor RF-blootstelling en dient te
worden vermeden.
Het gebruik van dit apparaat is uitsluitend toegestaan binnenshuis binnen
het frequentiebereik van 5180–5240 MHz.
FRNL
48
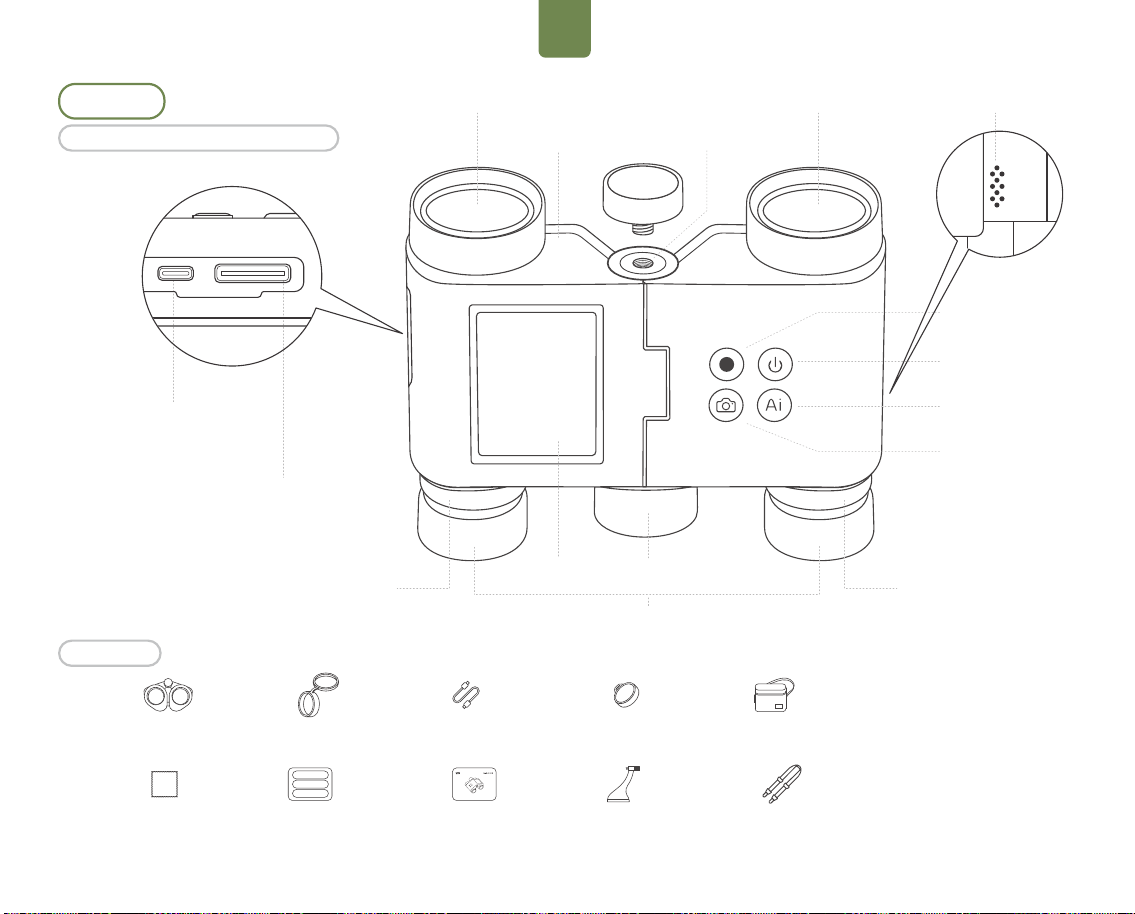
zh-CN
产品介绍
标准配件
认识Solvia 8× 32 AI Binoculars
录像
左视度圈
SD卡插槽
USB-C充电/
数据通讯接口
右视度圈
调焦手轮显示屏
开关机
AI识别
拍照
目镜
物镜 物镜
物镜盖 ×2
USB-C充电/数据线 ×1
目镜盖 ×2 收纳包 ×1
镜头清洁布 ×1
快速入门指南 ×1 用户手册 ×1 颈带 ×1三脚架适配器 ×1
智能望远镜 ×1
麦克风
1/4"螺纹孔
扬声器
49
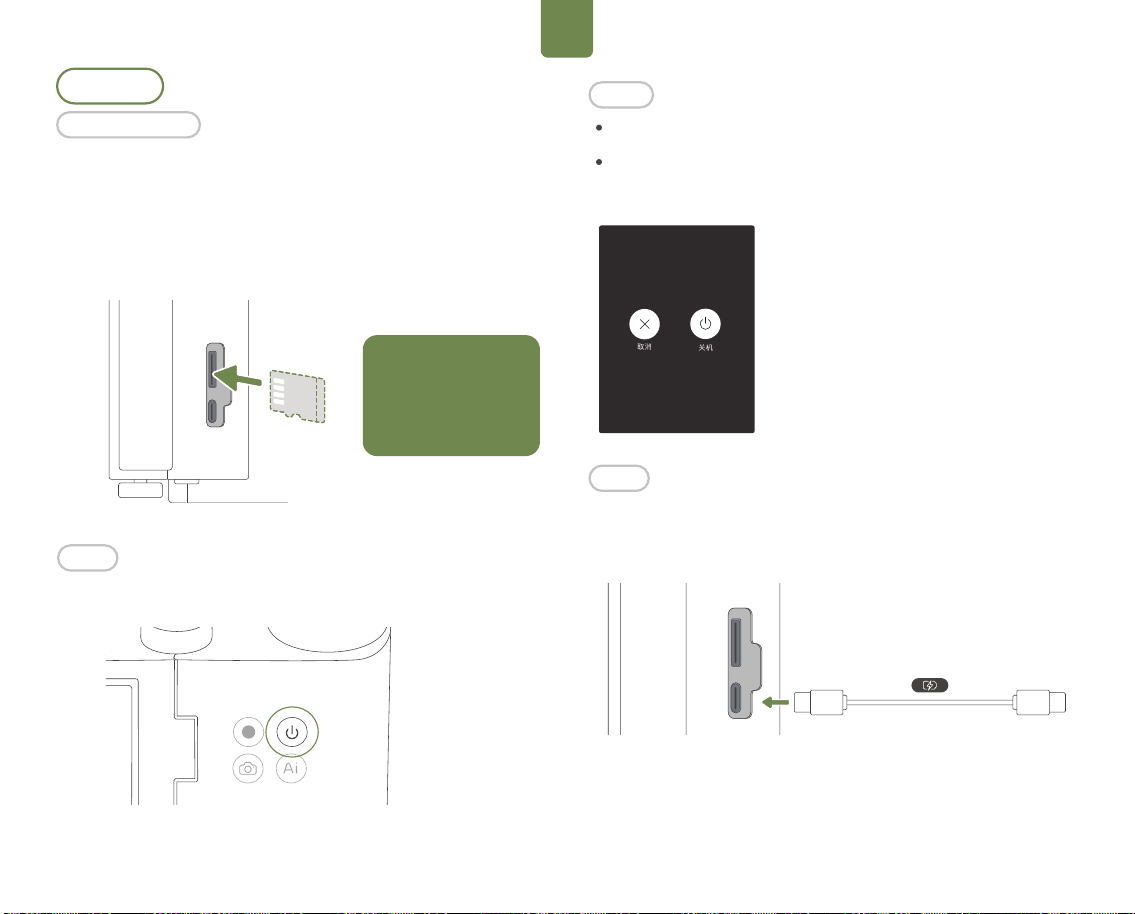
zh-CN
首次使用
Solvia 8×32 AI Binoculars没有内置存储空间,您必须安装 microSD 卡才能存
储拍摄的影像。推荐使用传输速度达到 U HS- I Sp eed Gra de 3 评级且带 ex FAT
格式的 microSD 卡( 套 件 已 标 配 � � G B 的 microSD 卡,请查阅“规格参数”以获
取推荐的卡型号列表)。
请按图示方向将 microSD 卡插入卡槽。如需取出 microSD 卡,请向内轻推,使
其稍微弹出即可。
短按�秒电源键即可启动设备系统。
长按电源键(3s)触 发 屏 幕 设 置 选 择 项 。
开机
关机
充电
安装microSD卡
关机
-彻底关闭设备电源。
-如遇到设备卡死无反应,可长按电源键8S进行强制关机。
向外打开望远镜USB保护盖
使用USB-C连接线为设备充电
(推荐输入规格:DC 5V / 2A)。
注意:为了保护您的拍摄数
据和 microSD 卡的寿命,请
避免热插拔,最好在Solvia
8×32 AI Binoculars关机状
态下进行插拔操作。
50
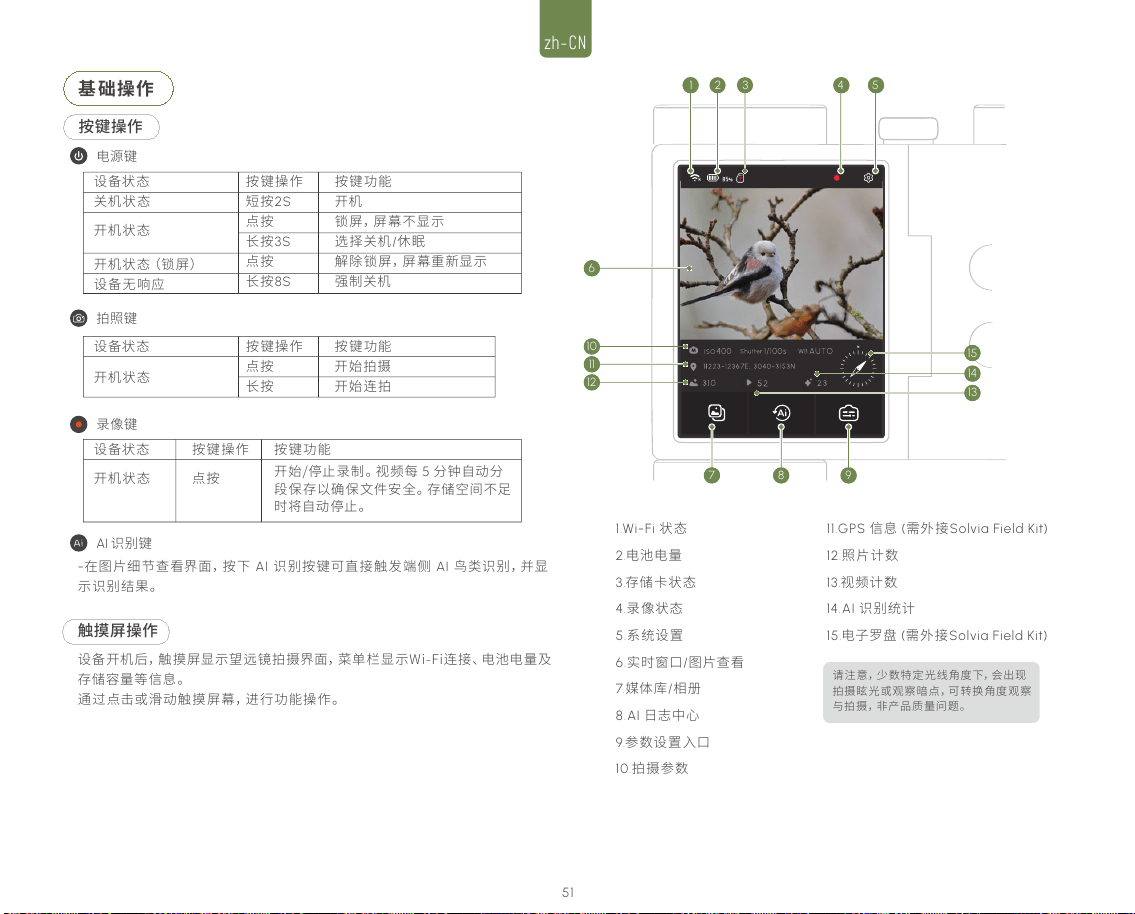
zh-CN
设备开机后,触摸屏显示望远镜拍摄界面,菜单栏显示Wi-Fi连接、电池电量及
存储容量等信息。
通过点击或滑动触摸屏幕,进行功能操作。
触摸屏操作
基础操作
按键操作
设备状态
关机状态
开机状态
开机状态(锁屏)
设备无响应
按键操作
短按2S
点按
长按3S
点按
长按8S
按键功能
开机
锁屏,屏幕不显示
选择关机/休眠
解除锁屏,屏幕重新显示
强制关机
电源键
设备状态
开机状态
按键操作
点按
长按
按键功能
开始拍摄
开始连拍
设备状态
开机状态
按键操作
点按
按键功能
开始/停止录制。视频每 � 分钟自动分
段保存以确保文件安全。存储空间不足
时将自动停止。
拍照键
录像键
-在图片细节查看界面,按下 AI 识别按键可直接触发端侧 AI 鸟类识别,并显
示识别结果。
AI 识别键
1
5
5
5
5
7
4
8 9
2 2
4
1
6
10
11
12
5
5
5
15
7
5
8 9
2 3
4
14
13
1.Wi-Fi 状态
2.电池电量
3.存储卡状态
4.录像状态
5.系统设置
6.实时窗口/图片查看
7.媒体库/相册
8.AI 日志中心
9.参数设置入口
10.拍摄参数
11.GPS 信息 (需外接Solvia Field Kit)
12.照片计数
13.视频计数
14.AI 识别统计
15.电子罗盘 (需外接Solvia Field Kit)
请注意,少数特定光线角度下,会出现
拍摄眩光或观察暗点,可转换角度观察
与拍摄,非产品质量问题。
51
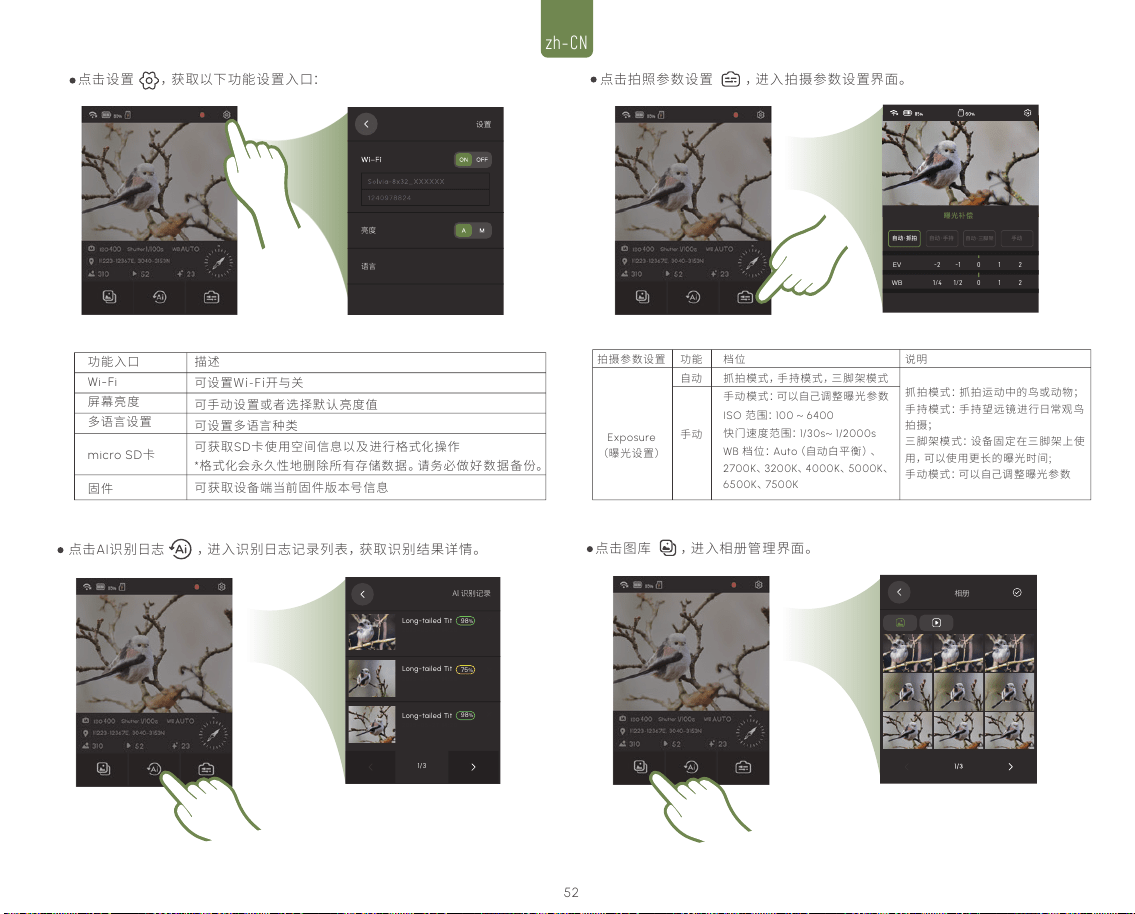
zh-CN
曝光补偿
0
1
2
-2
-1
EV
自动·抓拍
自动·手持
手动
自动·三脚架
0
1
2
1/4
1/2
WB
设置
亮度
语言
功能入口
Wi-Fi
屏幕亮度
多语言设置
micro SD卡
固件
描述
可设置Wi-Fi开与关
可手动设置或者选择默认亮度值
可设置多语言种类
可获取SD卡使用空间信息以及进行格式化操作
*格式化会永久性地删除所有存储数据。请务必做好数据备份。
可获取设备端当前固件版本号信息
点击设置 ,获取以下功能设置入口:
点击AI识别日志 ,进 入 识 别 日 志 记 录 列 表 ,获 取 识 别 结 果 详 情 。
点击拍照参数设置 ,进入拍摄参数设置界面。
点击图库 ,进入相册管理界面。
拍摄参数设置
Exposure
(曝光设置)
档位
抓拍模式,手持模式,三脚架模式
手动模式:可以自己调整曝光参数
ISO 范围:100 ~ 6400
快门速度范围:1/30s~ 1/2000s
WB 档位:Auto(自动白平衡)、
2700K、3200K、4000K、5000K、
6500K、7500K
功能
自动
手动
说明
抓拍模式:抓拍运动中的鸟或动物;
手持模式:手持望远镜进行日常观鸟
拍摄;
三脚架模式:设备固定在三脚架上使
用,可以使用更长的曝光时间;
手动模式:可以自己调整曝光参数
Al 识别记录
Long-tailed Tit
98
%
75
%
2025-05-27 14:20
Long-tailed Tit
2025-05-27 14:20
Long-tailed Tit
98
%
2025-05-27 14:20
1/3
相册
52
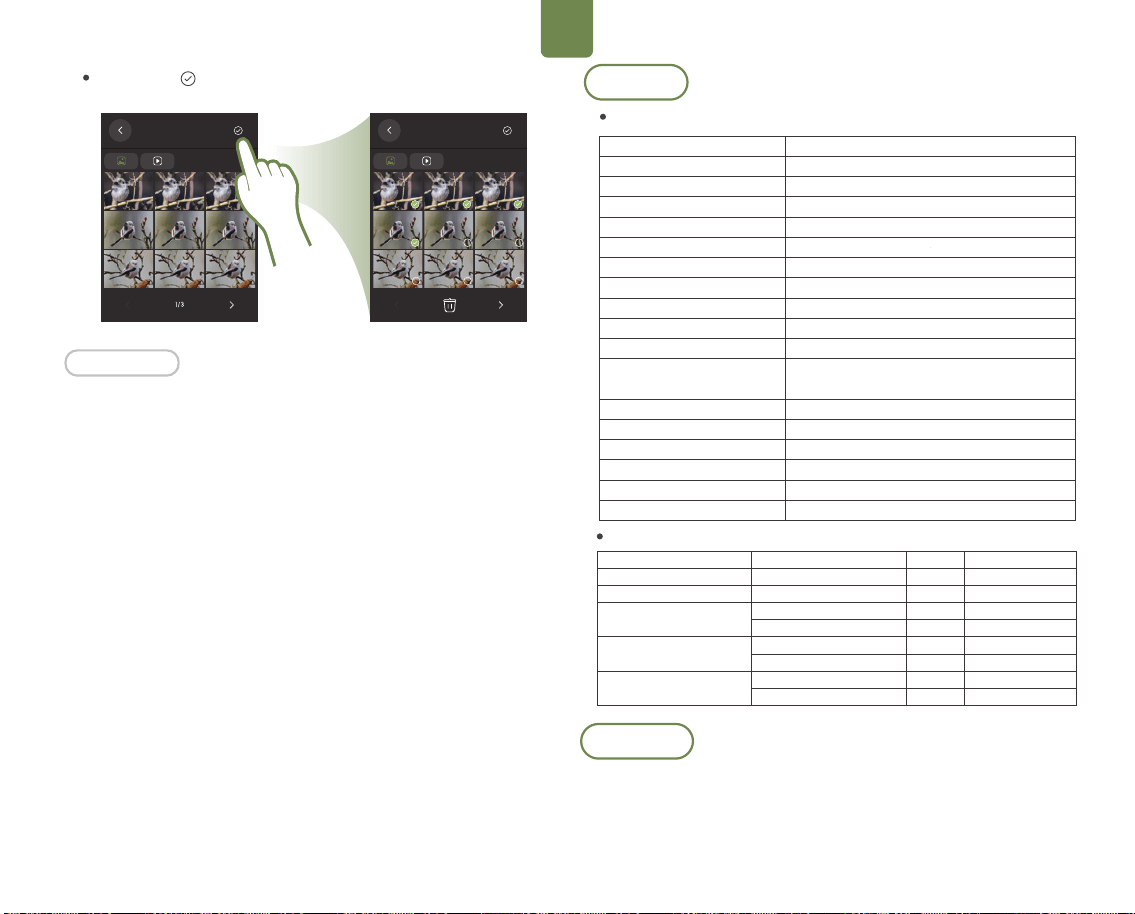
zh-CN
相册
相册
状态指示:
-蓝色常亮:表示设备已连接并正常工作。
-蓝灯闪烁:表示正在拍摄视频。
电量/充电指示:
-熄灭:表示无电或未连接电源。
-红色常亮:表示充电中。
-绿色常亮:表示电量充足或已充满。
指示灯状态
规格参数
望远镜技术规格表
Solvia App
Solvia 8× 32 AI Binoculars配合 Solvia APP使用,可在移动设备上实时显示高清
拍摄画面,进行设备端相机参数设置,并操控设备端相机。同时Solvia APP具备
素材导出、云端AI识别、图片增强等丰富功能,使得拍摄体验更加出色。
推荐 microSD 卡列表
放大倍率
物镜直径
棱镜系统
视场角 (m/1000m)
视场角 (度)
出瞳直径
出瞳距离
最近对焦距离
重量
尺寸
电池类型
电池续航
Sensor 传感器
照片/视频分辨率
防水/防雾
连接方式
工作温度
存储温度
8倍
32 mm
屋脊棱镜
129.5 m / 388.5 ft
7.6°
4.24mm
16mm
3.7m
680g
116.5 mm × 120.8 mm × 68 mm
Lion 2600 mAh
常规使用��h,极限使用4h。增 加 扩 展 模 块 常
规使用提升至20h,极 限 使 用 8h。
1/2.7" CMOS
2592(H)x1944(V)
IP 64,充 氮
Wi-Fi 快传,USB 导出
-10°C~+50°C
-20°C ~ +60°C
类型 型号 内存 速度等级
Sandisk Extreme V30 A1
Sandisk Extreme Pro V30
A1Sandisk Extreme V30 A2
Sandisk Extreme Pro V30 A2
Lexar 1066x microSD UHS-I
SILVER Series
SDSQXVF-032G-GN6MA
SDSQXCG-064G-GN6MA
SDSQXAH-064G-GN6GN
SDSQXAA-128G-GN6GN
SDSQXCU-064G-GN6MA
SDSQXCY-128G-ZN6MA
LMS1066064G-BN
LMS1066128G-BN
128 GB
64 GB
64 GB
128 GB
64 GB
128 GB
64 GB
128 GB
V30
V30
U3, A2, V30
U3, A2, V30
U3, A2, V30
U3, A2, V30
V30
V30
点击选择图标 ,进入照片删除界面。
53
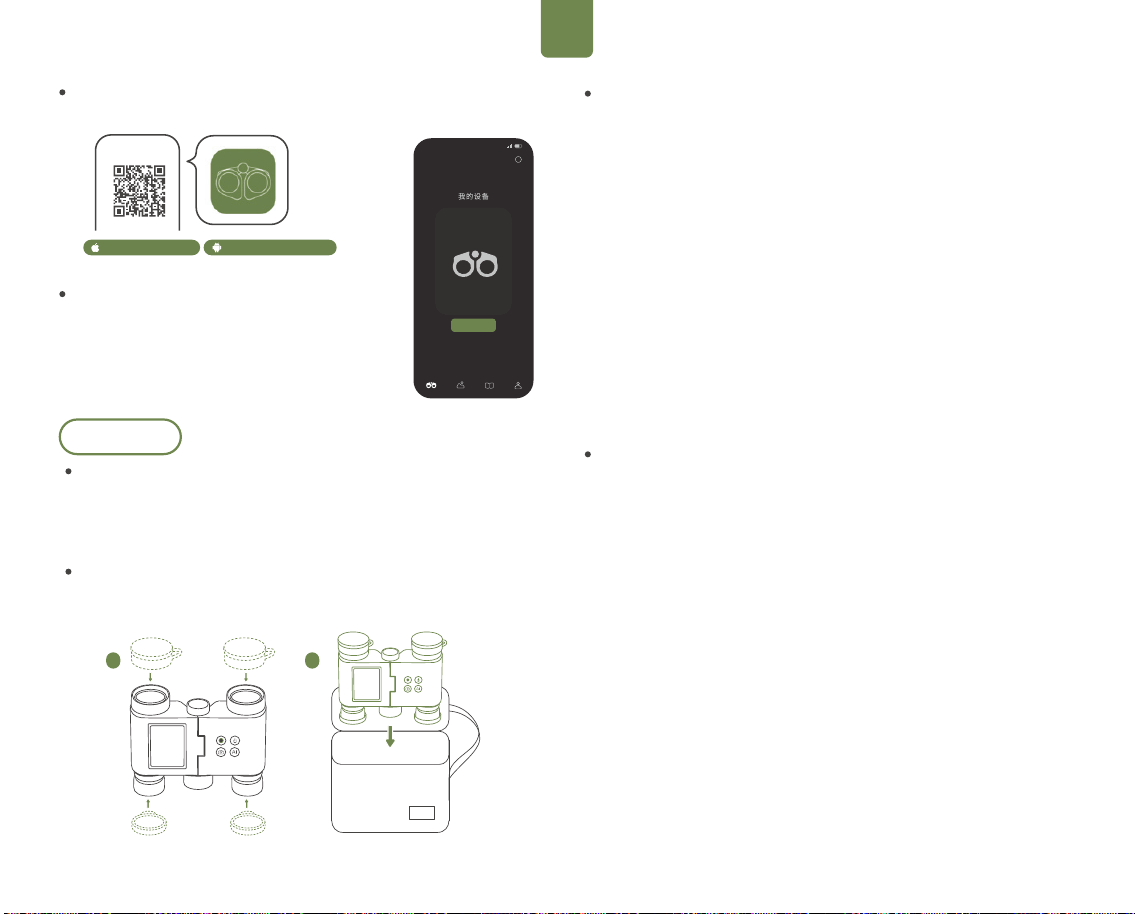
zh-CN
维护与保养
固件升级
Solvia 8× 32 AI Binoculars通过Solvia APP进行固件升级。
升级前请检查望远镜的电量,确保电量在 20% 以上。连接望远镜与 Solvia
APP后,若 App 提示可升级新固件,请点击并按照界面提示操作。固件升级
过程大约需要 3分钟。
收纳
在您使用完Solvia 8× 32 AI Binoculars之后,请盖好目镜与物镜端的保护盖,
并将其收纳至专属收纳包中。
下载Solvia App
在手机应用市场搜索下载或使用手机扫描二维码下载 Solvia APP。
连接Solvia App
1.点按电源键,开启Solvia 8×32 AI Binoculars;
2.点击屏幕右上角“设置”->“Wi-Fi”,开 启 Wi-Fi获取设
备Wi-Fi名称与密码;
3.运行Solvia APP,点 击 首 页 Connect按钮,根据界面
提示进行Wi-Fi连接操作。
iOS 15.0 and above Android 7.0 and above
1 2
使用注意事项
年龄限制
-本产品不适用于 � 岁以下儿童,以免发生意外。
适配器使用须知
-为本产品充电的适配器(不包含在包装内)非玩具,请勿让儿童把玩。
-建议使用 � V / � A 的充电适配器,以保证安全稳定充电。
单一电源连接
-产品只能连接一个电源适配器进行充电。
清洁方法
-使用干净的干布擦拭本体表面。
儿童陪同使用
-儿童使用本产品时,需在成年人陪同下进行,以确保安全。
防止跌落
-此设备为高精度控制装置。使用过程中,请避免摔落或受到外力碰撞挤压,同
时注意防尘防沙。否则可能会损坏光学镜片,导致工作异常。
禁止擅自拆装
-严禁自行拆卸、修理或改装,避免造成故障,且可能会影响保修。
温度使用范围
-请勿在超出产品工作温度范围(建议 -��°C~+��°C)的环境下使用或充电。
长期不使用注意事项
-若产品长期闲置,请存放前充满电,每 � 个月至少充一次电,以保护电池寿
命。
禁止直视强光/太阳
-严禁通过本产品直视太阳或强光源,避免对眼睛造成严重伤害。
行走中勿盲目使用
-使用过程中请保持稳定站立,不要边走边看,以免绊倒或撞击。
防撞击防水防尘
-本产品具备一定防溅性能,但仍应小心使用,避免剧烈冲击或浸水。
维修与保修提示
-维修保养请联系官方授权机构,非专业机构拆修会导致保修失效。
我
日志
相册发现
完成
Solvia
i
54
zh-CN
为确保您和他人的安全,在使用本产品前,请仔细阅读以下警告事项:
�.请勿直视强光源
切勿通过望远镜直视太阳或其他强光源,以免造成不可逆的眼部伤害或视
网膜灼伤。
�.请勿擅自拆卸或改装
产品内部结构精密,非专业人士拆装或改装会导致设备损坏或触电风险,且
将影响保修权益。
�.远离高温/高湿/强磁环境
请勿将产品置于高温、潮湿、强磁场或易燃易爆的环境中,以防引起电池鼓
包、爆炸或电路损坏。
�.请勿沉入水中使用
本设备非专业防水产品,严禁在水下或雨中长期使用。若设备进水,请立即
断电并联系售后。
�. 充电时请保持通风
在充电过程中请避免在密闭环境中长时间充电,以防过热或引发火灾。
�.使用合规电源与配件
请仅使用符合规格的官方推荐电源适配器(建议 �V / � A),避免使用劣质
充电设备导致损坏或安全隐患。
警告信息
本产品自购买之日起,享有如下保修政策:
-整机质保:自购买之日起 �� 个月内,产品因非人为损坏导致的功能故障,
可享免费维修或更换服务。(光学系统质保�年,主机(电子与软件)质保�
年)
-附件保修:附件(如挂带、保护袋、镜头盖等)不在保修范围内,但如收到
时有质量问题,可于�日内申请更换。
保修条款
为保障您的权益,您可通过以下方式获得技术支持或售后服务:
-官方网站:www.matataxplore.com
-客服邮箱:support@matatalab.com
请在联系时准备好以下信息:
-产品型号与序列号(可在设备背部或包装盒查找);
-购买凭证截图;
-故障简述或照片/视频辅助说明。
售后服务说明
合规性声明与环境规范
CE 与 RoHS 合规声明
WEEE环保回收声明
本产品符合以下欧盟指令与法规:
- 符合 2014/30/EU (EMC) 与 2014/35/EU (LVD) 的基本要求;
-RoHS(2011/65/EU)指 令 :
设备不含超过规定限值的铅、汞、镉、六价铬等有害物质。
设备外壳或铭牌上粘贴有相应 CE 与 RoHS 合规标志。
本产品符合《废弃电气电子设备指令》(WEEE, 2012/19/EU):
-请勿将本设备作为生活垃圾弃置;
-设备报废时请交由符合规定的电子废弃物回收机构处理;
-垃圾桶打叉标志代表产品需单独回收处理。
感谢您共同参与环保责任,共建可持续发展未来。
-发票与购买证明:保修服务须提供有效购买凭证(订单截图、发票或收据等)。
以下情况将不予保修:
-因跌落、撞击、浸水、高温环境等人为使用不当造成的损坏;
-私自拆解、维修、刷机或改装行为;
-非官方渠道购买或无有效凭证的产品;
-正常磨损、老化、划痕、污渍等非功能性问题。
55

FCC 警告声明
未经合规责任方明确批准的任何更改或修改,都可能导致用户失去操作本设备的权限。本设
备经测试,符合 FCC 规则第 �� 部分关于 B 类数字设备的限制要求。这些限制旨在为住宅环境
中的安装提供合理保护,以防止有害干扰。
本设备会产生、使用并可能辐射射频能量。如果未按照说明进行安装和使用,可能会对无线电
通信造成有害干扰。然而,无法保证在特定安装环境中不会发生干扰。如果本设备确实对无线
电或电视接收造成有害干扰(可通过关闭和开启设备来确定),建议用户尝试采取以下一种或
多种措施来消除干扰:
‐‐ 调 整 接 收 天 线 的 方 向 或 位 置 。
‐‐ 增 加 设 备 与 接 收 器 之 间 的 距 离 。
‐‐ 将 设 备 连 接 到 与 接 收 器 不 同 电 路 的 电 源 插 座 。
‐‐ 咨 询 经 销 商 或 有 经 验 的 无 线 电 / 电 视 技 术 人 员 寻 求 帮 助 。
FCC 射频辐射暴露声明
本设备经评估,符合一般射频(RF)暴露要求。该设备可在便携式暴露条件下不受限制地使
用。
本设备符合 FCC 规则第 �� 部分的要求。其运行须符合以下两项条件:
(�)本设备不得产生有害干扰;以及
(�)本设备必须接受任何接收到的干扰,包括可能导致设备非预期运行的干扰。
本设备符合政府关于无线电波暴露的要求。相关指南基于独立科学机构通过定期和全面评估
科学研究所制定的标准。这些标准包含充足的安全裕度,旨在确保所有人群(无论年龄或健康
状况)的安全。
FCC 射频暴露信息与声明:美国 FCC 规定的 SAR(比吸收率)限值为 �.� W/kg(以 � 克组织平
均计算)。本设备类型也已按照该 SAR 限值进行测试。
本设备已按照典型的贴身使用条件进行测试,测试时设备背面与人体保持 � mm 距离。为了持
续符合 FCC 射频暴露要求,请使用能够保持用户身体与设备背面之间 � mm 间距的配件。
腰夹、保护套及类似配件不应包含金属部件。使用不符合上述要求的配件可能无法满足 FCC 射
频暴露要求,应避免使用。
本设备仅限于室内使用(����‒���� MHz)。
本说明书含有产品重要信息,请予以保留。
zh-CN
56
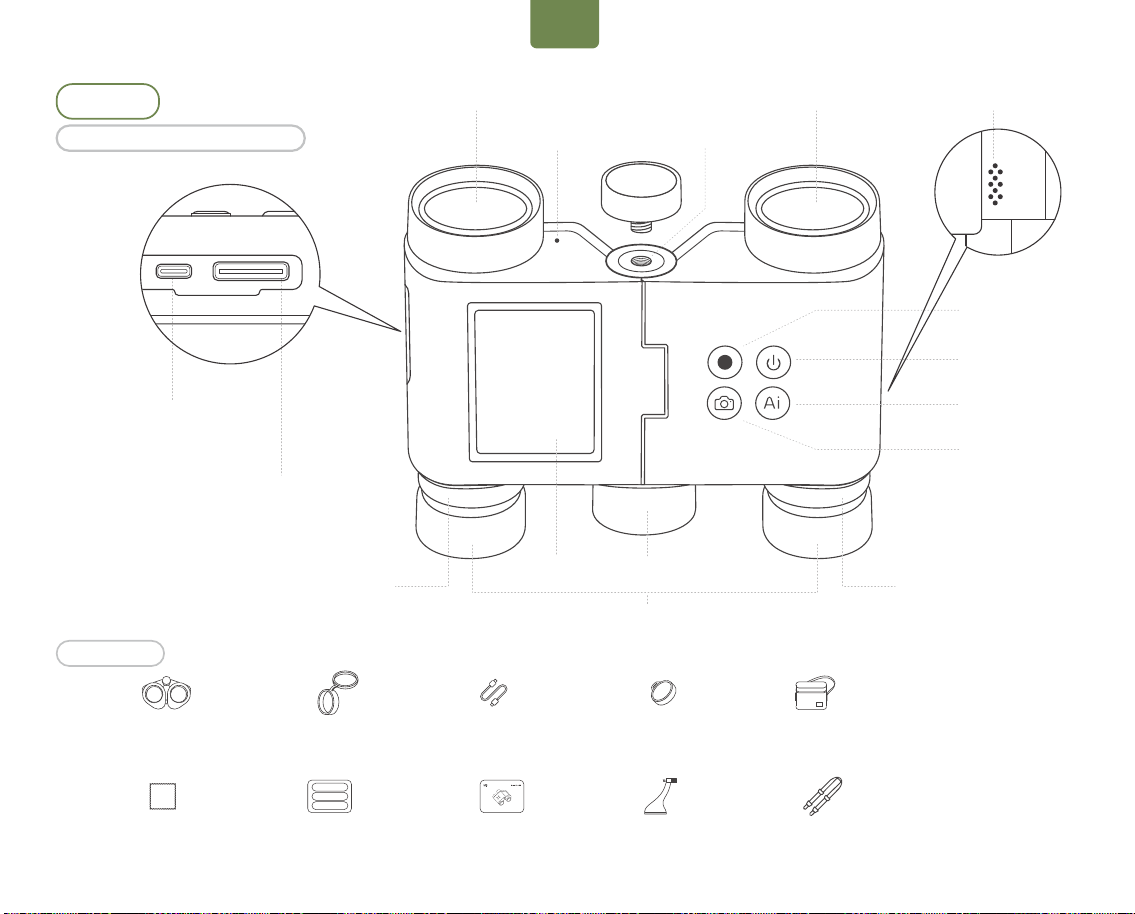
台繁zh-Hant
產品簡介
標準配件
符合 Solvia �×�� AI 望遠鏡
影片
microSD 記憶卡插槽
右目鏡屈光度調節環
對焦旋鈕顯示器
電源開/關
AI 辨識
相片
目鏡
物鏡蓋
麥克風
1/4'' 螺紋孔
物鏡蓋
喇叭
物鏡蓋 ×2 USB-C 充電/資料纜線 ×1 目鏡蓋 ×2 收納盒 ×1
鏡頭清潔布 ×1
快速入門指南 ×1 用戶指南 ×1 頸繩 ×1三角架轉接頭 ×1
AI 望遠鏡 ×1
USB-C 充電/資料連接埠
左目鏡屈光度
調節環
57
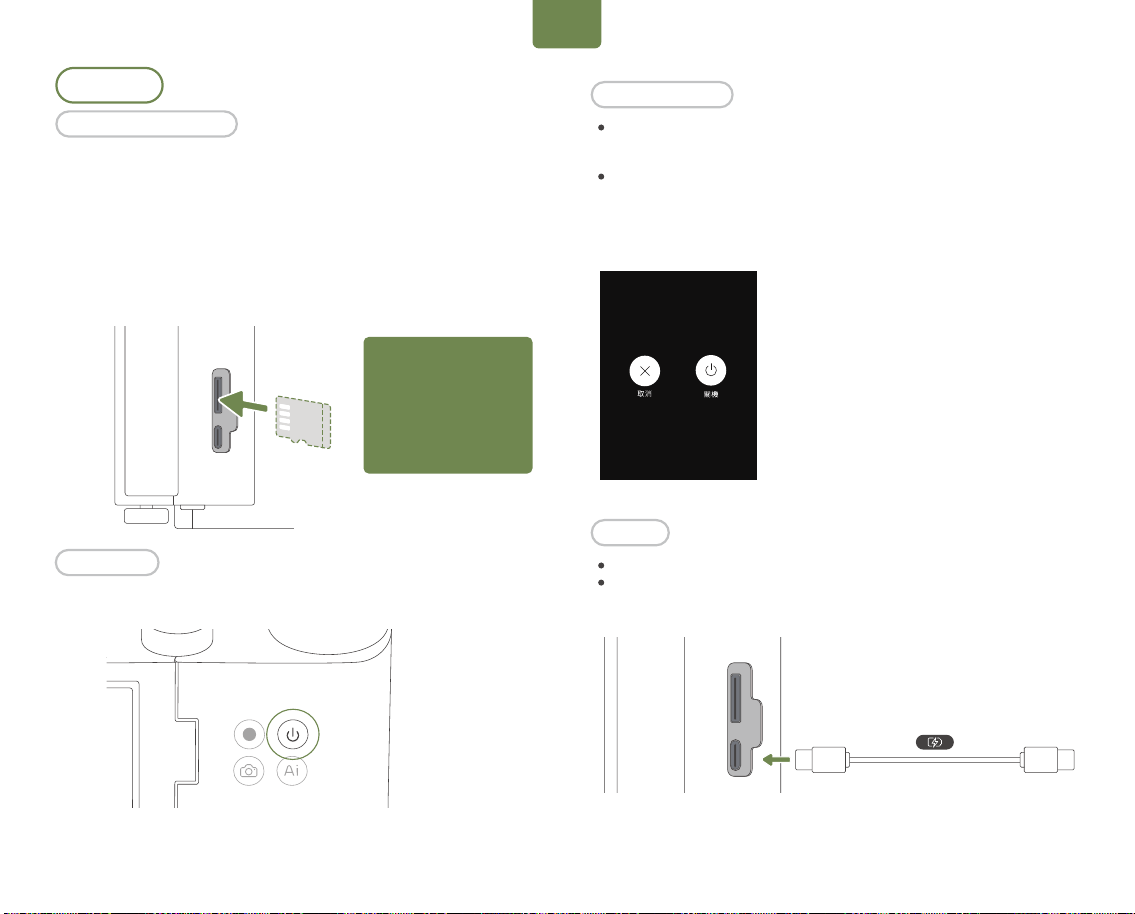
台繁zh-Hant
按住電源按鈕 3 秒鐘帶出螢幕選項。
關機和休眠管理
關機
- 本裝置完全關機。
- 如果本裝置卡住或無回應,請按住電源按鈕 8 秒鐘強制關機。
首次使用
Solvia 8× 32 AI 雙筒望遠鏡不內建儲存裝置。請務必加裝 microSD 記憶卡儲
存擷取的影像和影片。我們建議您使用有 UHS-I 速度級數 3 並已在 exFAT 格
式化的 microSD 記憶卡。(套件已標配 64 GB microSD 記憶卡。記憶卡建議
清單請參閱“規格”章節。)
將 microSD 記憶卡插入卡槽,確保方向與示意圖一致。若要彈出 microSD 記
憶卡,請輕輕將它向內推到聽見喀一聲而且已有部分脫離卡槽為止。
按下電源鍵 2 秒將本裝置開機。
向外打開 USB 連接埠蓋子。
使用 USB-C 線連接變壓器以便為本裝置充電 (建議輸入:DC 5V/2A)。
注意事項:為了保護擷取的
資料和延長 microSD 記憶
卡的使用壽命,請避免熱插
拔操作。我們建議只在
Solvia 8×32 AI 雙筒望遠鏡
關機時才插入或取出記憶
卡。
開機
充電中
microSD 記憶卡安裝
58
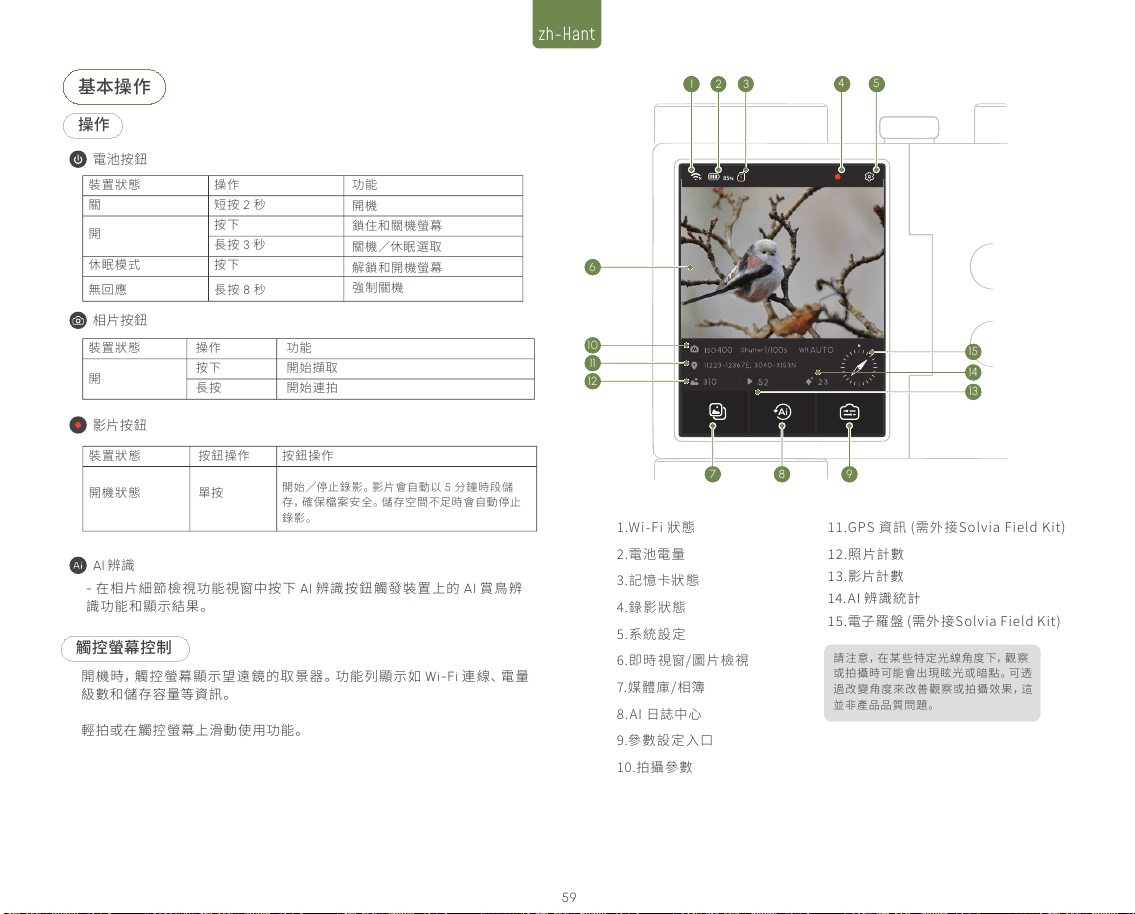
台繁zh-Hant
1
5
5
5
5
7
4
8 9
2 2
4
1
6
10
11
12
5
5
5
15
7
5
8 9
2 3
4
14
13
�.Wi-Fi 狀態
�.電池電量
�.記憶卡狀態
�.錄影狀態
�.系統設定
�.即時視窗/圖片檢視
�.媒體庫/相簿
�.AI 日誌中心
�.參數設定入口
��.拍攝參數
��.GPS 資訊 (需外接Solvia Field Kit)
��.照片計數
��.影片計數
��.AI 辨識統計
��.電子羅盤 (需外接Solvia Field Kit)
請注意,在某些特定光線角度下,觀察
或拍攝時可能會出現眩光或暗點。可透
過改變角度來改善觀察或拍攝效果,這
並非產品品質問題。
裝置狀態
開機狀態
按鈕操作
單按
按鈕操作
開始/停止錄影。影片會自動以 5 分鐘時段儲
存,確保檔案安全。儲存空間不足時會自動停止
錄影。
開機時,觸控螢幕顯示望遠鏡的取景器。功能列顯示如 Wi-Fi 連線、電量
級數和儲存容量等資訊。
輕拍或在觸控螢幕上滑動使用功能。
觸控螢幕控制
基本操作
操作
裝置狀態
關
開
休眠模式
無回應
操作
短按 2 秒
按下
長按 3 秒
按下
長按 8 秒
功能
開機
鎖住和關機螢幕
關機/休眠選取
解鎖和開機螢幕
強制關機
電池按鈕
裝置狀態
開
操作
按下
長按
功能
開始擷取
開始連拍
相片按鈕
影片按鈕
- 在相片細節檢視功能視窗中按下 AI 辨識按鈕觸發裝置上的 AI 賞鳥辨
識功能和顯示結果。
AI 辨識
59
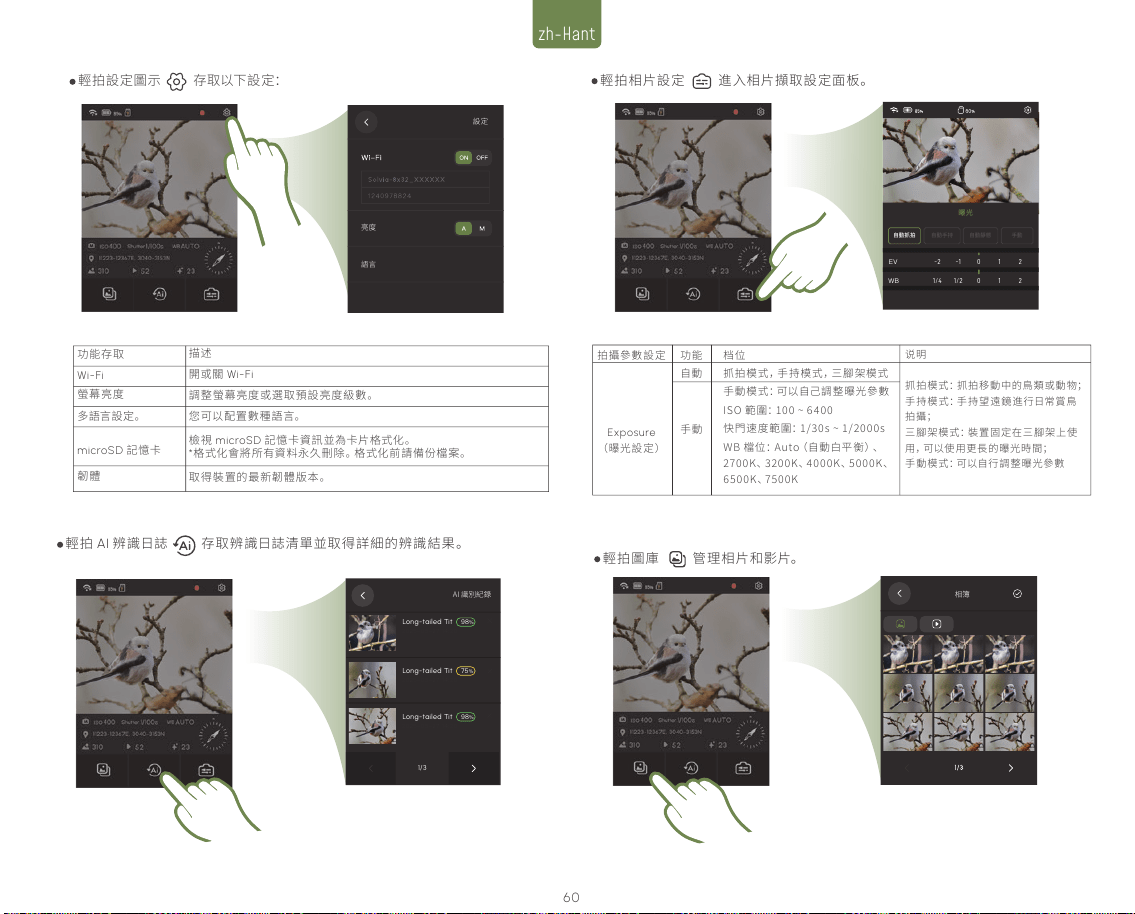
台繁zh-Hant
設定
亮度
語言
曝光
0
1
2
-2
-1
EV
自動抓拍
自動手持
自動靜態
手動
0
1
2
1/4
1/2
WB
AI 識別紀錄
Long-tailed Tit
98
%
75
%
2025-05-27 14:20
Long-tailed Tit
2025-05-27 14:20
Long-tailed Tit
98
%
2025-05-27 14:20
1/3
相簿
輕拍設定圖示 存取以下設定:
功能存取
Wi-Fi
螢幕亮度
多語言設定。
microSD 記憶卡
韌體
描述
開或關 Wi-Fi
調整螢幕亮度或選取預設亮度級數。
您可以配置數種語言。
取得裝置的最新韌體版本。
檢視 microSD 記憶卡資訊並為卡片格式化。
*格式化會將所有資料永久刪除。格式化前請備份檔案。
輕拍 AI 辨識日誌 存取辨識日誌清單並取得詳細的辨識結果。
輕拍相片設定 進入相片擷取設定面板。
輕拍圖庫 管理相片和影片。
拍攝參數設定
Exposure
(曝光設定)
档位
抓拍模式,手持模式,三腳架模式
手動模式:可以自己調整曝光參數
ISO 範圍:��� ~ ����
快門速度範圍:�/��s ~ �/����s
WB 檔位:Auto(自動白平衡)、
����K、����K、����K、����K、
����K、����K
功能
自動
手動
说明
抓拍模式:抓拍移動中的鳥類或動物;
手持模式:手持望遠鏡進行日常賞鳥
拍攝;
三腳架模式:裝置固定在三腳架上使
用,可以使用更長的曝光時間;
手動模式:可以自行調整曝光參數
60
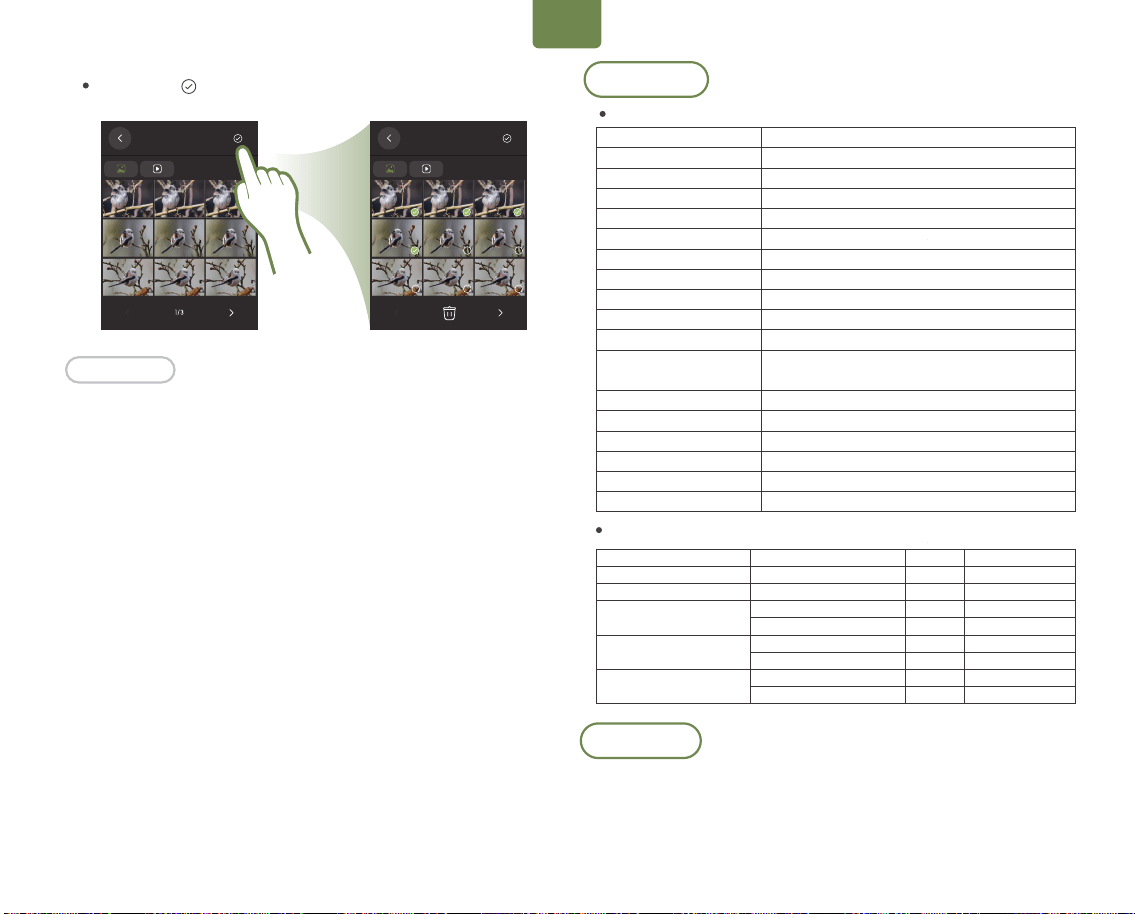
台繁zh-Hant
相簿
相簿
點擊選擇圖示 ,進入照片刪除介面。
狀態指示燈:
穩定藍燈:裝置已成功連線且功能正常。
閃爍藍燈:錄影中。
電池/充電指示燈:
關:裝置電力用盡或未連接電源。
穩定紅燈:充電中。
穩定綠燈:指出本裝置已充飽電力。
指示燈狀態
規格和參數
望遠鏡技術規格
放大
物鏡尺寸
稜鏡系統
視野範圍 (m/1000m)
視野範圍 (度數)
出瞳直徑
眼距
特寫距離
重量
尺寸
電池類型
電池使用壽命
感應器
相片/影片解析度
環保
連接方法
操作溫度
存放溫度
8 x
32 mm
屋脊式稜鏡
129.5 m / 388.5 ft
7.6°
4.24 mm
16 mm
3.7 m
680 g
116.5 mm × 120.8 mm × 68 mm
Li-ion 2600 mAh
12 h (標準使用); 4 h (全載下) 附擴充模組:20 h (標準使
用); 8 h (全載下)
1/2.7”CMOS
2592 × 1944 px
IP 64, 氮氣吹掃
Wi-Fi 快傳,USB 匯出
−10°C to +50°C
−20°C to +60°C
microSD 記憶卡建議清單
品牌與系列
SanDisk Extreme V30 A1
SanDisk Extreme Pro V30 A1
SanDisk Extreme V30 A2
SanDisk Extreme Pro V30 A2
Lexar 1066x microSD UHS-I
SILVER 系列
型號
SDSQXVF-032G-GN6MA
SDSQXCG-064G-GN6MA
SDSQXAH-064G-GN6GN
SDSQXAA-128G-GN6GN
SDSQXCU-064G-GN6MA
SDSQXCY-128G-ZN6MA
LMS1066064G-BN
LMS1066128G-BN
容量
32 GB
64 GB
64 GB
128 GB
64 GB
128 GB
64 GB
128 GB
速度級數
V30
V30
U3, A2, V30
U3, A2, V30
U3, A2, V30
U3, A2, V30
V30
V30
Solvia App
使用 Solvia App 時,Solvia 8× 32 AI 望遠鏡能直接將高畫質的現場影像串流至
您的行動裝置。這讓您能遠端調整相機參數和掌控望遠鏡。App 也含有一套
功能,包括媒體輸出、雲端人工智慧辨識與影像強化功能,大幅提升整體使用
者體驗。
61
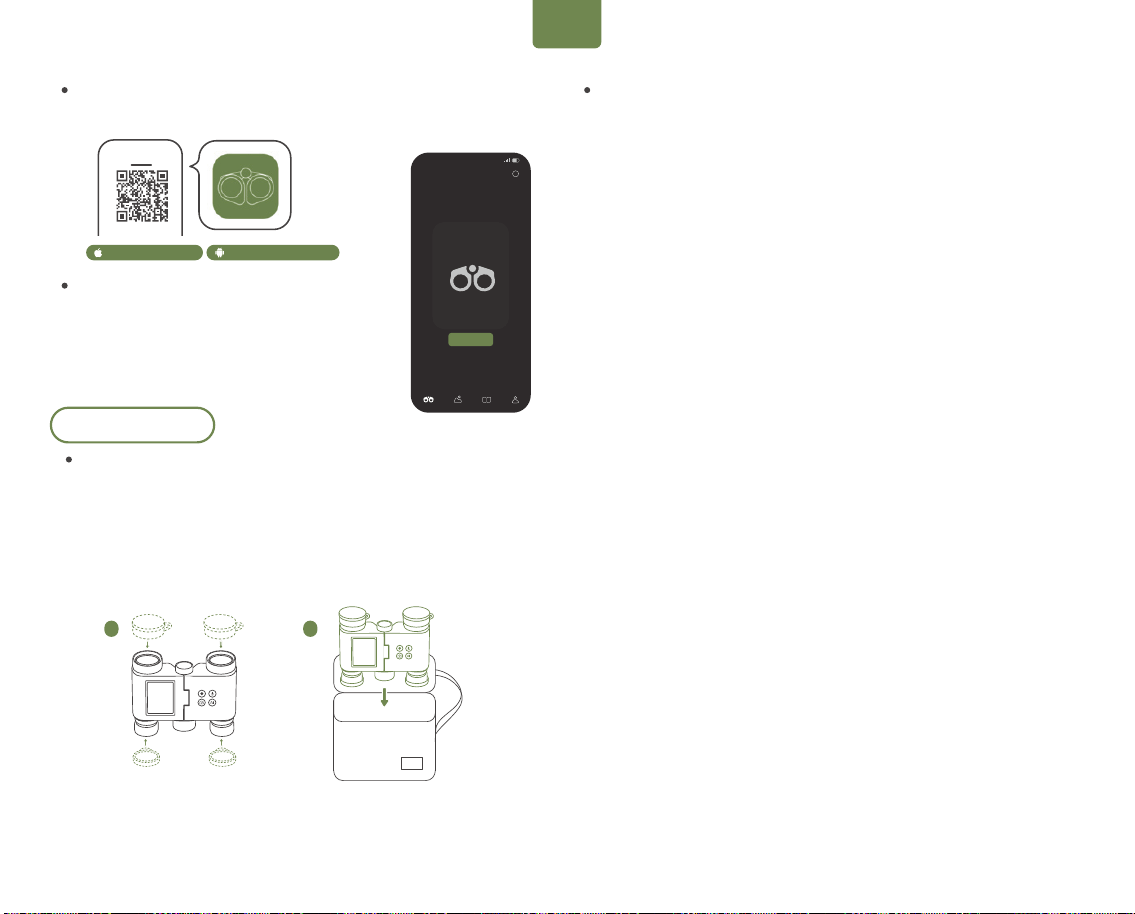
台繁zh-Hant
我日誌相簿觀察
完成
Solvia
我的设备
i
1 2
下載 Solvia App
在您的手機 APP 商店搜尋 Solvia App 或掃描 QR Code 下載。
連接 Solvia App:
1.按下電源按鈕打開 Solvia 8×32 AI 望遠鏡電源。
2.輕拍 螢幕右上角的 設定圖示,然後前往 Wi-Fi 啟用
Wi-Fi 並檢視本裝置的 Wi-Fi 名稱和密碼。
3.打開 Solvia App 並輕拍 首頁螢幕上的 連接鍵,然後
遵照螢幕指示連接本裝置的 Wi-Fi 網路。
iOS 15.0 及以上版本 Android 7.0 及以上版本
保養與日常維護
韌體升級
升級韌體前,請確保望遠鏡的電量已有 20% 以上。
將望遠鏡連接 Solvia App。
當 App 指出已有新韌體版本時,輕拍開始更新並遵守螢幕上的指示動作。
韌體更新過程一般花費大約 3 分鐘。
存放
使用 Solvia 8×32 AI 望遠鏡後,將目鏡和物鏡蓋上保護蓋並放入專用收納
盒。
用法警戒事項
使用年齡限制
本產品不適合 3 歲以下孩童使用。
變壓器用法
本產品的充電變壓器(不含)並非玩具,不得讓孩童拿到後把玩。
建議使用 5V/2A 充電變壓器,確保充電安全和穩定。
單一電源連接:
本產品限用一個變壓器充電。
清潔方法
請使用乾淨的乾軟布擦拭裝置表面。
孩童監督
為了確保安全,孩童應在大人從旁監看下使用本產品。
預防掉落
- 本裝置掉落或受到重大撞擊可能使光學鏡頭或內部零組件遭受永久的損
壞。
- 防止本裝置進沙和灰塵,因可能損壞鏡頭並造成功能故障。
禁止未經授權的拆解
- 切勿拆解、改裝或企圖自行維修本產品。未經授權的維修可能導致功能故
障並讓保固失效。
可用溫度範圍
- 切勿在超過建議的-10°C~+50°C 溫度範圍內操作本裝置或為本裝置充
電。
長期保存警戒事項
- 如果預計長期不用,存放前請充飽電力並至少每三個月充電一次,才能維持
電池的健康。
切勿看向亮光來源
- 切勿透過望遠鏡盯著太陽或其它強光來源,因可能造成眼睛重傷。
切勿邊走邊使用
- 使用本裝置時請保持步伐穩定。避免邊走邊使用,以免絆倒或撞擊。
防水、防塵和防撞
- 本產品有基本的防潑功能,但仍避免曝露在重大撞擊的危險中或浸入水
中。
維護和保固提示
- 連絡授權的維保送修中心。由專業度不足的人員未經授權的維修可能讓保
固失效。
62
台繁zh-Hant
出於確保安全和其它,使用本產品前請仔細閱讀警告事項:
1.切勿直視光源處。
切勿透過望遠鏡直視太陽或其它光源,才能有效避免不可逆的眼睛損害或瞳
孔灼傷。
2.切勿自行拆解或未經授權的改裝
切勿拆解、改裝或企圖自行維修本產品。
未經授權的搬運可能損壞內部零組件、造成電擊危害且讓保固失效。
3.遠離高溫、潮溼和磁性強大的磁區
讓本產品遠離高溫、潮溼、磁性強的磁區及易燃或易爆的環境。
讓本產品身處此類條件下可能導致電池膨脹、爆炸或內部電路損壞。
4.切勿在水下使用
本產品防潑濺但水下不防水。切勿在水下使用本裝置或曝光到傾盆大雨下。
如果裝置接觸到水,立刻關機並連絡客服。
5. 確保充電過程中適度通風。
切勿在封閉或通風不良區域充電,因可能導致過熱或起火危害。
6.使用相容電源和配件
限用符合必要規格(5V / 2A)推 薦 的 變 壓 器 。
切勿使用未經認證或品質差的充電器,因可能導致損害或構成安全風險。
重要安 全 說明
本產品受到以下保固政策的保護,自原始購買日起生效:
非因人為因素造成的功能故障可享有下列保固期間內的免費送修或更換服
務:3年的光學系統和 1 年的主機(包括電子和軟體)的保固服務。
配件保固:配件(如頸繩、收納盒與目鏡蓋)不在標準保固範圍內。然而如果
收到後發現有品質上的問題,可在 7 日內提出更換請求。
購買證明:請務必備妥有效的購買證明(例如訂單截取畫面、發票或收據)才
能享有保固服務。
保固範圍不適用:
使用不當造成的損害例如掉落、撞擊、浸入水中或曝露在高溫環境下。
因未經授權的拆解、維修或改裝造成的損害。
自未經授權的零售商購買產品或無法出示有效的購買證明。
正常磨損和撕裂、老化、刮痕、污漬及其它功能故障問題。
保固政策
有技術支援和售後服務需求者,請透過以下管道與我們連絡:
官網:www.matataxplore.com
客服電子郵件: support@matataxplore.com
與我們連絡之前請備妥下列資訊:
裝置背面或包裝箱上的產品型號與序號;
您的購買證明截圖。
簡單描述問題所在並放入佐證照片或影片。
支援和送修
法令遵循聲明與環境標準
CE 和 Ro HS 合 規公 告
- CE:
本產品符合 2014/30/EU (EMC) 和 2014/35/EU
(LVD) 的基本要求。
- RoHS 指令 (����/��/EU):
本產品不含危害物質如鉛、水銀、鎘或超過限值的六價鉻。
本裝置的外殼或名牌上已貼上適合的 CE 和 RoHS 合格標籤。
WEEE 環保回收公告
本產品符合 廢棄電子與電氣設備指令 (WEEE, 2012/19/EU):
- 切勿以家庭廢棄物清運。
- 本裝置欲清運時,請確保會由指定的電子廢棄回收設施處理。
- 加刪除線的垃圾桶符號指出產品務必分開回收。
感謝您在環保責任和永續未來貢獻一己之力。
63

FCC 警告聲明
未經合規責任方明確批准的任何變更或修改,都可能導致使用者喪失操作本設備的權限。本
設備經測試,符合 FCC 規則第 �� 部分關於 B 類數位設備的限制要求。這些限制旨在為住宅環
境中的安裝提供合理保護,以防止有害干擾。
本設備會產生、使用並可能輻射射頻能量。如果未按照說明進行安裝和使用,可能會對無線電
通訊造成有害干擾。然而,無法保證在特定安裝環境中不會發生干擾。如果本設備確實對無線
電或電視接收造成有害干擾(可透過關閉和開啟設備來判定),建議使用者嘗試採取以下一種
或多種措施來消除干擾:
‐‐ 調 整 接 收 天 線 的 方 向 或 位 置 。
‐‐ 增 加 設 備 與 接 收 器 之 間 的 距 離 。
‐‐ 將 設 備 連 接 到 與 接 收 器 不 同 電 路 的 電 源 插 座 。
‐‐ 諮 詢 經 銷 商 或 有 經 驗 的 無 線 電 / 電 視 技 術 人 員 尋 求 協 助 。
FCC 射頻輻射暴露聲明
本設備經評估,符合一般射頻(RF)暴露要求。該設備可在可攜式暴露條件下不受限制地使
用。
本設備符合 FCC 規則第 �� 部分的要求。其運作須符合以下兩項條件:
(�)本設備不得產生有害干擾;以及
(�)本設備必須接受任何接收到的干擾,包括可能導致設備非預期運作的干擾。
本設備符合政府關於無線電波暴露的要求。相關指南基於獨立科學機構透過定期及全面評估
科學研究所制定的標準。這些標準包含充足的安全裕度,旨在確保所有人群(無論年齡或健康
狀況)的安全。
FCC 射頻暴露資訊與聲明:美國 FCC 規定的 SAR(比吸收率)限值為 �.� W/kg(以 � 公克組織
平均計算)。本設備類型亦已依照該 SAR 限值進行測試。
本設備已按照典型的貼身使用條件進行測試,測試時設備背面與人體保持 � mm 距離。為了持
續符合 FCC 射頻暴露要求,請使用能夠保持使用者身體與設備背面之間 � mm 間距的配件。
腰夾、保護套及類似配件不應包含金屬零件。使用不符合上述要求的配件可能無法滿足 FCC
射頻暴露要求,應避免使用。
本設備僅限於室內使用(����‒���� MHz)。
本手冊包含重要的產品資訊,應善加保存。
台繁zh-Hant
64
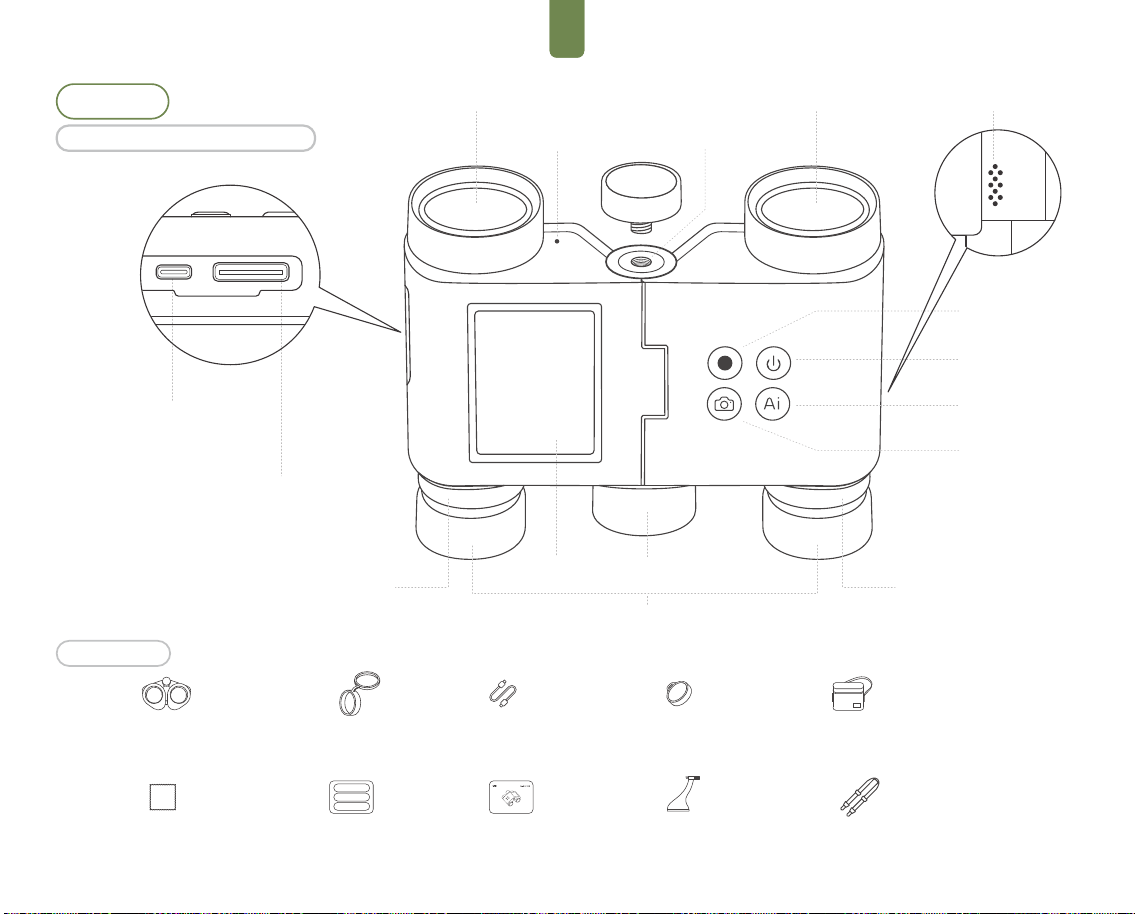
FRJP
製品概要
標準付属品
Solvia �×�� AI双眼鏡の紹介
動画
microSDカードスロット
右アイピース視度調整リング
フォーカスノブディスプレイ
パワーオン·オフ
AI認識
写真
アイピース
対物レンズ
マイク
1/4'' ネジ穴
対物レンズ
スピーカー
対物レンズカバー ×2 USB-C 充電·データ
ケーブル ×1
アイピースカバー ×2 キャリングケース ×1
レン ズの ク リー ニン グ 布 ×1
クイックスタートガイド ×1 ユーザーガイド ×1 ネックストラップ ×1三脚アダプター ×1
AI双眼鏡 ×1
USB-C 充電·データポート
左アイピースの視度
調整リング
65
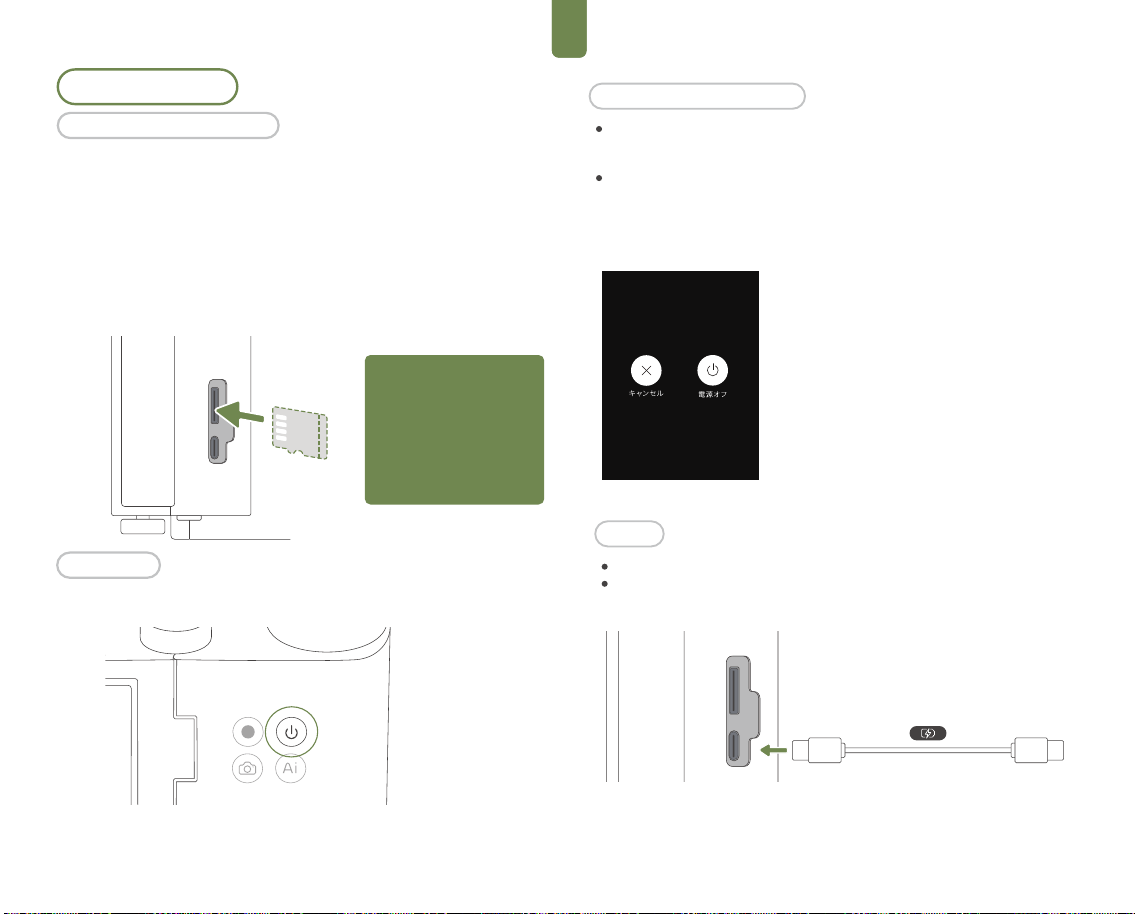
FRJP
パワーボタンを3秒間長押しすると、画面上にオプション
が表示されます。
パワーオフとスリープ管理
パワーオフ
· デバイスを完全にシャットダウンします。
· デバイスがフリーズしたり、応答しなくなった場合
は、電源ボタンを8秒間長押しして強制的にシャットダウ
ンします。
初回使用時の準備
Solvia �×�� AI双眼鏡には内蔵ストレージがありません。 撮影した画像や
動画を保存するためには、microSDカードを取り付ける必要があります。
UHS-I スピード グレード 3規格、かつ exFAT形式でフォーマットされた
microSDカードの使用を推奨します。(キットには標準の64GB microSDカー
ドが同梱されています。推奨カードモデルの一覧については、「仕様」セク
ションを参照してください。)
microSDカードをスロットに差し込みます。挿入方向は図の通りにしてくださ
い。microSDカードを取り外すには、カードを軽く奥へ押し込み、クリック音
がしたら部分的にスロットから浮き上がる状態になったのを確認して、引き出
してくだ さ い 。
電源ボタンを2秒間押して、デバイスの電源を入れます。
USBポートカバーを外側に開きます。
USB-Cケーブルで電源アダプターを接続し、デバイスを充電します
(推奨入力:DC 5V/2A)。
注意:撮影データを保護し、
microSDカードの寿命を延ば
すため、通電状態での抜き差
し( ホ ッ トプ ラ グ )を 避 け てく
ださい。Solvia 8×32 AI双眼
鏡の電源が切れている状態で
のみ、カードの挿入または取
り外しを行うことを推奨しま
す。
パワーオン
充電
microSDカードの取り付け
66
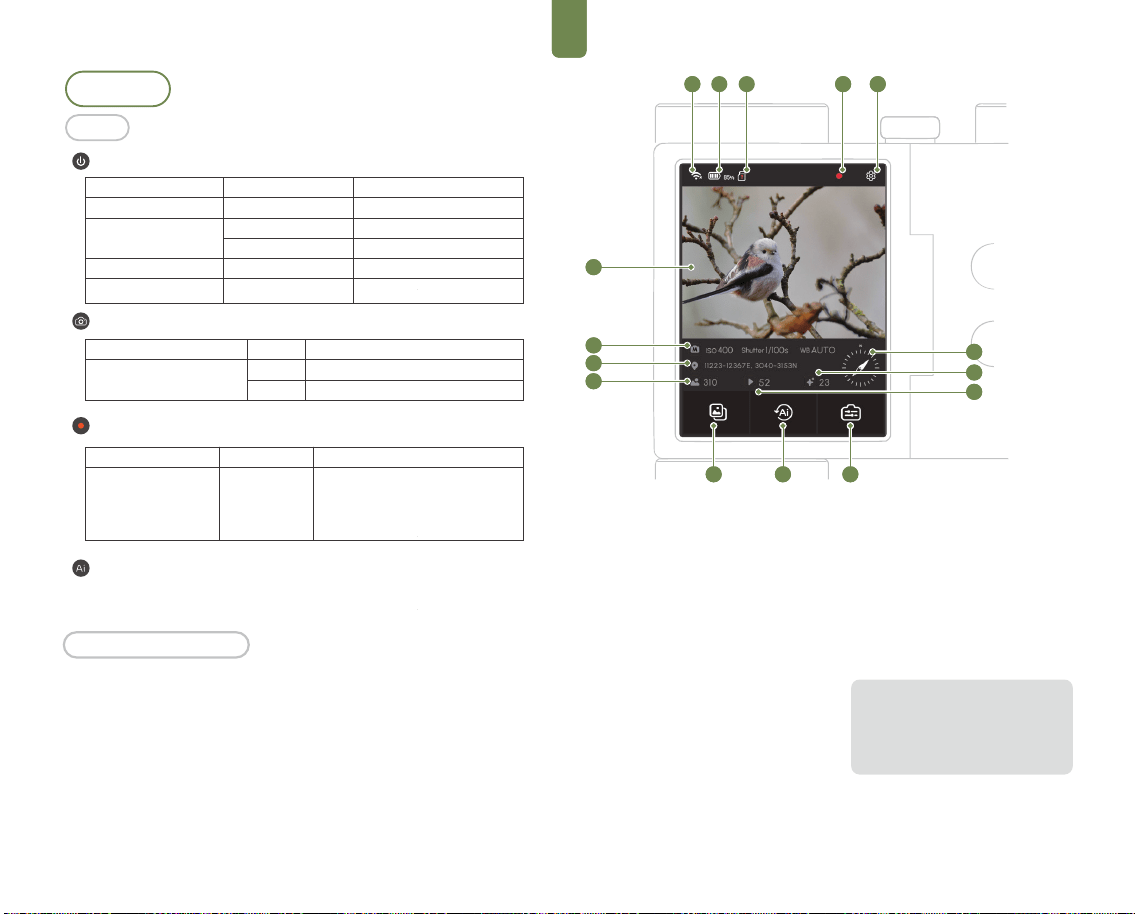
FRJP
1
5
5
5
5
7
4
8 9
2 2
4
1
6
10
11
12
5
5
5
15
7
5
8 9
2 3
4
14
13
1. Wi-Fi 接続状態
2. バッテリー残 量
3. 録画状態
4. 録画タイマーおよびステータス
5. システム設 定
6. ライブビューおよび 画像プレビュー
7. メディアライブラリとギャラリー
8. AIログセンター
9. 設定へアクセス
10. 撮影パラメータ
11. GPSデータには
(SolviaFieldKitが必要です)
12.写真枚数
13.動画数
14.AI認識 統計
15.電子コンパスには
(SolviaFieldKitが必要です)
ご注意ください。特定の光の角度によって
は、観察や撮影時にフレアや暗点が発生す
る場合があります。角度を変えることで改
善できます。これは製品の品質問題ではあ
りません 。
デバイスのステータス
電源オンの状態
ボタンの操 作
�回押し
ボタンの操 作
録画を開始·停止します。ファイルの安
全性を確保するため、動画は5分ごと
に自動的に分割して保存されます。ス
トレージ 容量 が 不足すると、録 画は自
動的に停止します。
電源を入れると、タッチスクリーンには双眼鏡のファインダー画面が表示
されます。メニューバーには、Wi-Fi接続状況、電池残量、ストレージ容量
などの情報が表示されます。
タッチスクリーンをタップし、またはスワイプして、各 機能にアクセスでき
ます。
タッチスクリーンの操作
基本操作
操作
デバイスのステータス
オフ
オン
スリープ モード
応答なし
操作
2秒間押す
押す
3秒間長押し
押す
8秒間長押し
機能
パワーオン
画面ロック&オフ
電源オフ / スリープ 選 択
画面ロック解除&オン
強制シャットダウン
「電源」ボタン
デバイスのステータス
オン
操作
押す
長押し
機能
撮影開始
連写開始
「写真 」ボタン
「動画」ボタン
· 写真詳細の画面では、「AI認識」ボタンを押して、デバイス上でAIに
よる鳥 の認 識 が開 始さ れ、認 識 結果 が表 示され ます。
AI認識
67
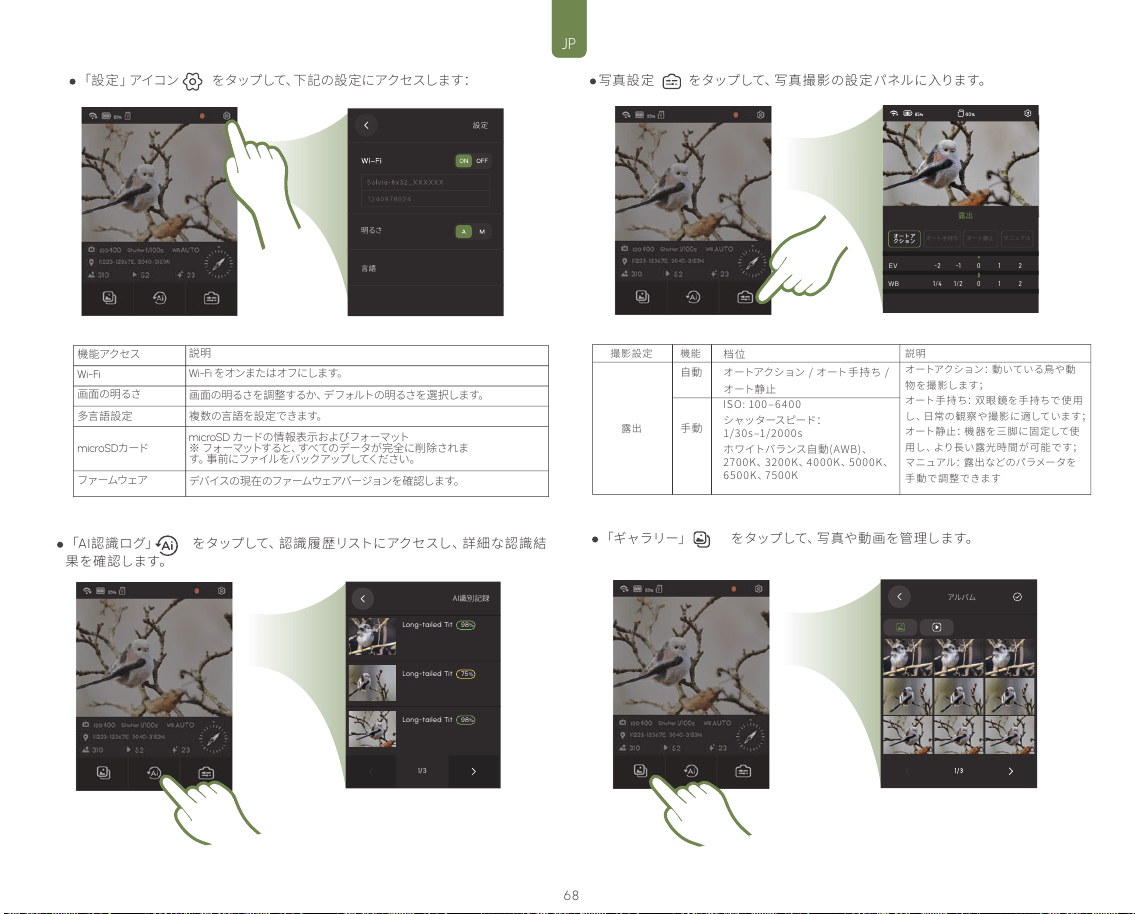
FRJP
設定
明るさ
言語
露出
0
1
2
-2
-1
EV
オートア
クション
オート手持ち
オート静止
マニュアル
0
1
2
1/4
1/2
WB
AI識別記録
Long-tailed Tit
98
%
75
%
2025-05-27 14:20
Long-tailed Tit
2025-05-27 14:20
Long-tailed Tit
98
%
2025-05-27 14:20
1/3
アルバ ム
撮影設定
露出
档位
オートアクション / オート手持ち /
オート静止
ISO: ���‒����
シャッタースピード:
�/��s‒�/����s
ホワイトバランス自動(AWB)、
����K、����K、����K、����K、
����K、����K
機能
自動
手動
説明
オートアクション:動いている鳥や動
物を撮影します;
オート手 持ち:双眼鏡を手持ちで使 用
し、日常の観察や撮影に適しています;
オート静止:機器を三脚に固定して使
用し、より長い露光時間が可能です;
マニュアル:露出などのパラメータを
手動で調整できます
「設定」アイコン をタップして、下記の設定にアクセスします:
機能アクセス
Wi-Fi
画面の明るさ
多言語設定
microSDカード
ファームウェア
説明
Wi-Fi をオンまたはオフにします。
画面の明るさを調整するか、デフォルトの明るさを選択します。
複数の言語を設定できます。
デバイスの 現 在 のファームウェアバージョン を確 認し ます。
microSD カードの情 報表示およびフォーマット
※ フォ ーマットすると 、すべ ての デ ー タ が 完 全 に 削 除 さ れ ま
す。事 前 に ファ イルを バッ ク アッ プしてくだ さ い 。
「AI認識ログ」 をタップして、認識履歴リストにアクセスし、詳細な認識結
果を確認します。
写真設定 をタップして、写真撮影の設定パネルに入ります。
「ギャラリー」 をタップして、写真や動画を管理します。
68
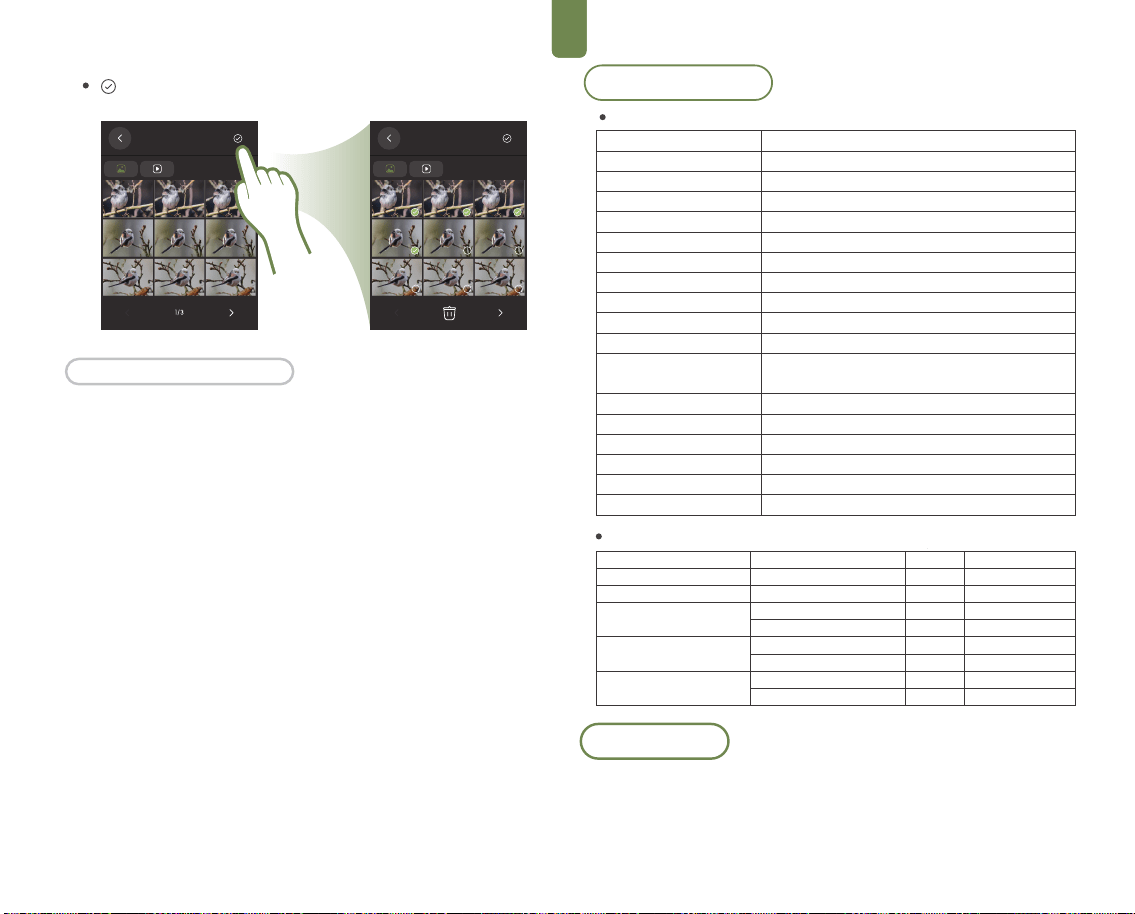
FRJP
アルバ ム
アルバ ム
アイコンをタップして、写真削除画面に入ります。
ステータスインジケーター:
青色点灯:デバイスが接続され、正常に動作しています。
青色点滅:動画を録画中です。
電池·充電インジケーター:
オフ:電源が切れているか、電源に接続されていません。
赤色点灯:充電中です。
緑色点灯:十分に充電されている、または完全に充電済みです。
インジケーターライトの状 態
仕様とパラメータ
双眼鏡の技術仕様
倍率
対物レンズ径
プリズムシステム
視野(m/1000m)
視野(度)
射出瞳径
アイレリーフ
最小フォーカス距離
重量
寸法
電池タイプ
電池寿命
センサー
写真·動画解像度
環境保護性能
接続方法
操作温度
保管温度
8 x
32 mm
ダハプリズム
129.5 m·388.5 ft
7.6°
4.24 mm
16 mm
3.7 m
680 g
116.5 mm x 120.8 mm x 68 mm
リチウムイオン電池 2600 mAh
標準使用時:12時間、フル負荷時:4時間(拡張モジュール
搭載時)標準使用時:20時間、フル負荷時:8時間
1/2.7" CMOS
2592 x 1944 px
IP64、窒 素 パ ー ジ 済 み
Wi-Fi高速転送、USBエクスポート
−10°C から +50°C
−20°C から +60°C
推奨のmicroSD カード一覧
ブランド、及び シリーズ
SanDisk Extreme V30 A1
SanDisk Extreme Pro V30 A1
SanDisk Extreme V30 A2
SanDisk Extreme Pro V30 A2
Lexar 1066x microSD UHS-I
シルバーシリーズ
モデル
SDSQXVF-032G-GN6MA
SDSQXCG-064G-GN6MA
SDSQXAH-064G-GN6GN
SDSQXAA-128G-GN6GN
SDSQXCU-064G-GN6MA
SDSQXCY-128G-ZN6MA
LMS1066064G-BN
LMS1066128G-BN
容量
32 GB
64 GB
64 GB
128 GB
64 GB
128 GB
64 GB
128 GB
速度等級
V30
V30
U3, A2, V30
U3, A2, V30
U3, A2, V30
U3, A2, V30
V30
V30
Solvia アプリ
Solviaアプリを使用すると、Solvia 8×32 AI双眼鏡は高画質のライブ映像を直
接お使いのモバイル端末に配信できます。これにより、カメラ設定の調整や双
眼鏡のリモート操作が可能です。また、アプリにはメディアのエクスポート、ク
ラウドベースのAI認識、画像強調などの、多彩な機能が搭載されており、ユー
ザー体験を大幅に向上させます。
69
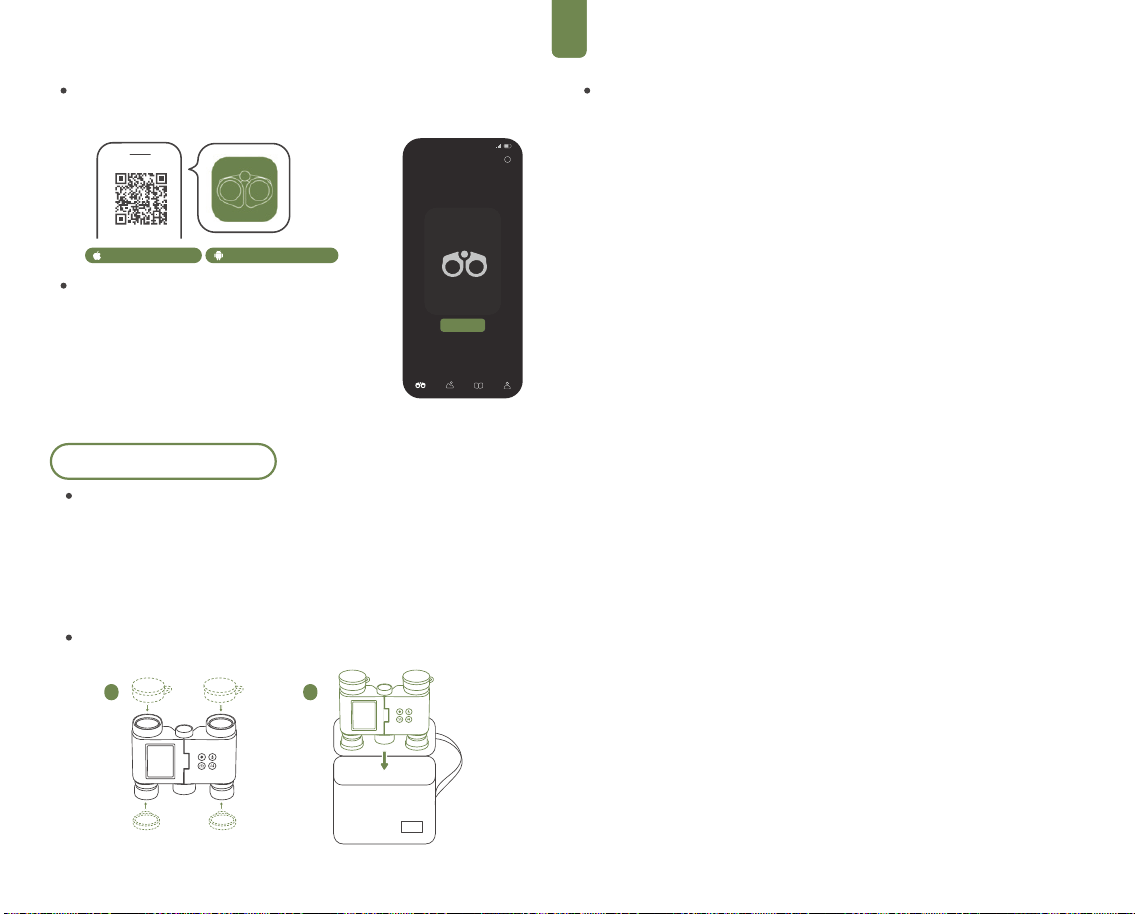
FRJP
プロフィールログアルバム観察
完了
Solvia
マイデバイス
i
1 2
Solviaアプリのダウンロード
お使いのスマートフォンのアプリストアで「Solvia App」を 検 索 す る
か、QRコードを読み取って、ダウンロードしてください。
Solviaアプリへの接続:
1.Solvia 8×32 AI双眼鏡の電源ボタンを押して電源をオンに
します。
2.画面右上の「設定」アイコンをタップし、 「Wi-Fi」に ア
クセスして、 Wi-Fiを有 効にし 、デバイスのWi-Fi名とパ ス
ワードが 表示されます。
3.Solviaアプリを開き、ホーム画面の「接続」ボタンをタッ
プし、画面の指示に従って、デバイスのWi-Fiネットワ ーク
に接続します。
iOS 15.0以降 Android 7.0以降
メンテナンスと手入れ
ファームウェアのアップグレード
ファームウェアをアップグレードする前に、双眼鏡の電池残量が20%以上である
ことを確 認してください 。
双眼鏡をSolviaアプリに接続します。
アプリで新しいファームウェアバージョンが利用可能と表示された場合、タップ
して、画 面 の 指 示 に 従 って ア ップ デ ート を 開 始 してくだ さ い 。フ ァ ームウ ェアの 更
新には通常、約3分かかります。
保管方法
Solvia 8× 32 AI双眼鏡をご使用後は、アイピースと対物レンズに保護キャップを
確実に装着し、専用のキャリングケースに収納してください。
使用上の注意事項
年齢制限
本製品は3歳未満の子供には適しません。
アダプター の取り扱い
本製品の充電用アダプター(付属していません)は玩具ではないため、子供の
手の届かない場所に保管してください。
安全で安定した充電のために、5V/2Aの充電アダプターを使用することを推
奨します。
単一電源での接続
本製品は1台の充電器のみで充電してください。
クリーニング方法
清潔で柔らかい乾いた布で、製品の表面を拭き取ってください。
子供の監督
子供が安全に使用できるよう、大人の監督下でご使用ください。
落下防止
· 製品を落としたり、強い衝撃を与えると、光学系や内部部品が永久に損傷
する可能性があります。
· ほこりや砂がレンズを傷付けたり、故障の原因となるおそれがあります。
無断での分解禁止
· 製品を分解、改造、またはご自身で修理しようとしないでください。無断
での修理は故障の原因となり、保証の対象外となります。
使用温度範囲
· 製品の使用·充電は、推奨の温度範囲の-10°C~+��°C内で行ってくださ
い。
長期保管時の注意事項
· 製品を長期間使用しない場合は、保管前に完全に充電し、その後も少なく
とも3か月に1回は充電して、電池の状態を維持してください。
明るい光源を直接に見ないこと
· 双眼鏡を通して太陽やその他の強い光源を直接見ないでください。重大な
視力障害を引き起こす恐れがあります。
歩行中の使用禁止
· 製品を使用する際は、安定した姿勢を保ってください。転倒や衝突を防ぐ
ため、歩行中の使用を避けてください。
耐水·防塵·耐衝撃性能について
· 本製品は基本的な防滴性能を備えていますが、強い衝撃を与えたり、水中
に沈めたりしないでください。
メンテナンスと保証について
· メンテナンスや修理は、必ず認定サービスセンターにご連絡ください。非
専門機関による無断の修理は、保証の対象外となります。
70
FRJP
お客様および周囲の方の安全を確保するため、本製品をご使用になる前
に、以下の注意事項を必ずお読みください。
1.明るい光源を直接見ないこと
双眼鏡を通して、太陽やその他の強い光源を直接見ないでください。眼に
不可逆的な損傷や網膜の火傷を引き起こす恐れがあります。
2.無断での分解·改造を行わないこと
本製品を無断で分解、改造したり、またはご自身で修理しようとしないで
ください。
無断での取り扱いは、内部部品の損傷、感電の危険を引き起こす可能性が
あり、保証の対象外となります。
3.高温、高湿度、強い磁場などの危険環境から遠ざけること
本製品を高温、高湿、強い磁場、可燃性または爆発性のある環境から遠ざ
けてください。
電池の膨張や爆発、内部回路の損傷を引き起こすおそれがあります。
4.水中での使用禁止
この製品は防滴構造ですが、防水ではありません。この製品を水中で使 用
しなく、または激しい雨にさらさないでください。万一、本体が水に濡れた
場合、直ちに電源を切り、カスタマーサービスまでご連絡ください。
5. 充電中は、十分に換気の良い場所で行ってください。
密閉された空間や換気の悪い場所で充電しないでください。過熱や発火の
原因となるおそれがあります。
6.適合する電源および付属品の使用
指定された仕様(5V / 2A)を 満 た す 推 奨 の 電 源 ア ダ プ タ ー の み を ご 使 用 く
ださい。
未認証、または品質の低い充電器を使用しないでください。故障の原因と
なったり、安全上のリスクを伴う恐れがあります。
安全にお使いいただくために
本製品には、ご購入日を起算日として、以下の保証条件が適用されます。
人的要因によらない機能上の不具合については、以下の保証期間内に限
り、無償修理または交換の対象となります。光学系は3年間、本体(電子部
品およびソフトウェアを含む)は1年間の保証期間となります。
付属品の保証について、付属品(ネックストラップ、キャリングケース、レン
ズキャップなど)は、標準保証の対象外となります。ただし、商品到着時に
初期不良が確認された場合に限り、受領後7日以内に交換対応を行いま
す。
購入証明について、保証サービスをご利用いただくには、有効な購入証明
(注文のスクリーンショット、請求書、または領収書など)の提示が必要で
す。
本製品には、ご購入日を起算日として、以下の保証条件が適用されます。
人的要因によらない機能上の不具合については、以下の保証期間内に限
り、無償修理または交換の対象となります。光学系は5年間、本体(電子部
品およびソフトウェアを含む)は1年間の保証期間となります。
購入証明について、保証サービスをご利用いただくには、有効な購入証明(注文のスクリー
ンショット、請求書、または領収書など)の提示が必要です。
保証の対象外となる場合、
落下、衝撃、水中の浸漬、高温環境の暴露などの不適切な使用よって生じた故障または損
傷。
無断での分解、修理、または改造が行われたことによる故障または損傷。
正規販売店以外で購入された製品、または有効な購入証明が確認できない製品。
通常使用による摩耗、経年劣化、外観上の傷や汚れなど、機能に影響しない事象。
保証について
技術サポートおよびアフターサービスについては、下記の窓口までお問い合わせくださ
い。
公式ウェブサイト:www.matataxplore.com
カスタマーサービスメール: support@matataxplore.com
お問い合わせの前に、以下の情報をご準備ください。
製品のモデルとシリアル番号が本体背面または外箱に記載されています。
購入証明のスクリーンショット。
不具合内容の簡単な説明、および必要に応じて写真または動画。
サポートとサービス
各種規制への適合および環境基準
CEおよびRoHSコンプライアンス宣言
WEEE 環境リサイクル宣言
· CE:
本製品は、2014/30/EU(EMC)お よ び 2014/35/EU(LVD)の 基
本要件に準拠しています。
· RoHS 指令 (����/��/EU):
本製品は、鉛、水銀、カドミウム、六価クロムなどの有害物質を規定値以下に抑え
ています。
本製品のハウジング、またはネームプレートには、適切なCEおよびRoHS適合ラベ
ルが表示されています。
この製品は、 電気·電子機器廃棄物指令(WEEE, 2012/19/EU)に
準拠しています:
· このデバイスは家 庭ごみとして廃 棄しないでください。
· このデバイスを廃棄する際は、指定の電子廃棄 物リサイクル施設で処理してくだ
さい。
· ゴミ箱に斜線の入ったマークは、この製品を個別にリサイクルする必要があるこ
とを示しています。
ご環境への配慮と持続可能な未来へのご協力に感謝いたします。
71

FCC警告声明
適合性責任者によって明示的に承認されていない変更または改造を行った場合、ユーザーの本
機器を操作する権限が無効となる可能性があります。本機器は試験の結果、FCC規則第��部に
基づくクラスBデジタル機器の制限に適合していることが確認されています。これらの制限は、
住宅環境において有害な電波干渉から合理的な保護を提供することを目的としています。
本機器は無線周波数エネルギーを生成、使用し、放射する可能性があります。取扱説明書に
従って設置および使用されない場合、無線通信に有害な干渉を引き起こすことがあります。た
だし、特定の設置環境において干渉が発生しないことを保証するものではありません。
本機器がラジオまたはテレビの受信に有害な干渉を引き起こしているかどうかは、本機器の電
源を切った後に再度入れることで確認できます。干渉が確認された場合は、以下のいずれか、
または複数の方法によって改善を試みてください。
‐‐ 受 信 ア ン テ ナ の 向 き や 設 置 場 所 を 変 更 す る 。
‐‐ 本 機 器 と 受 信 機 の 間 の 距 離 を 広 げ る 。
‐‐ 受 信 機 が 接 続 さ れ て い る 回 路 と は 異 な る 回 路 のコ ン セ ン ト に 本 機 器 を 接 続 す る 。
‐‐ 販 売 店 ま た は 経 験 豊 富 な ラ ジ オ/ テ レ ビ 技 術 者 に 相 談 する 。
FCC RF曝露に関する声明
本機器は、一般的なRF(無線周波数)曝露要件への適合性評価を受けています。本機器は、携
帯型使用条件において制限なく使用することができます。
本機器はFCC規則第��部に準拠しています。本機器の動作は、以下の2つの条件に従います。
(�)本機器は有害な干渉を発生させないこと。
(�)本機器は、望ましくない動作を引き起こす可能性のある干渉を含め、受信したあらゆる干
渉を受け入れなければならないこと。
本機器は、電波曝露に関する政府の要件を満たしています。これらのガイドラインは、独立した
科学機関が科学的研究を定期的かつ包括的に評価して策定した基準に基づいています。これ
らの基準には、年齢や健康状態にかかわらず、すべての人の安全を確保するための十分な安全
余裕が含まれています。
FCC RF曝露情報および声明:米国FCCが定めるSAR(比吸収率)の上限値は、1グラムの組織
あたり平均�.�W/kgです。本機器タイプは、このSAR基準に対する試験も実施されています。
本機器は、機器背面を身体から0mmの距離に保った状態での通常の身体装着使用条件につい
て試験されています。FCCのRF曝露要件への適合を維持するため、使用者の身体と機器背面と
の距離を0mmに保つアクセサリーを使用してください。
ベルトクリップ、ホルスター、および類似のアクセサリーには金属部品を含めないでください。
これらの要件を満たさないアクセサリーを使用した場合、FCCのRF曝露要件に適合しない可能
性があるため、使用を避けてください。
本機器は5180~5240MHz帯において、屋内でのみ使用することができます。
本取扱説明書には重要な製品情報が記載さ
れていますので、必ず保管してください。
FRJP
72
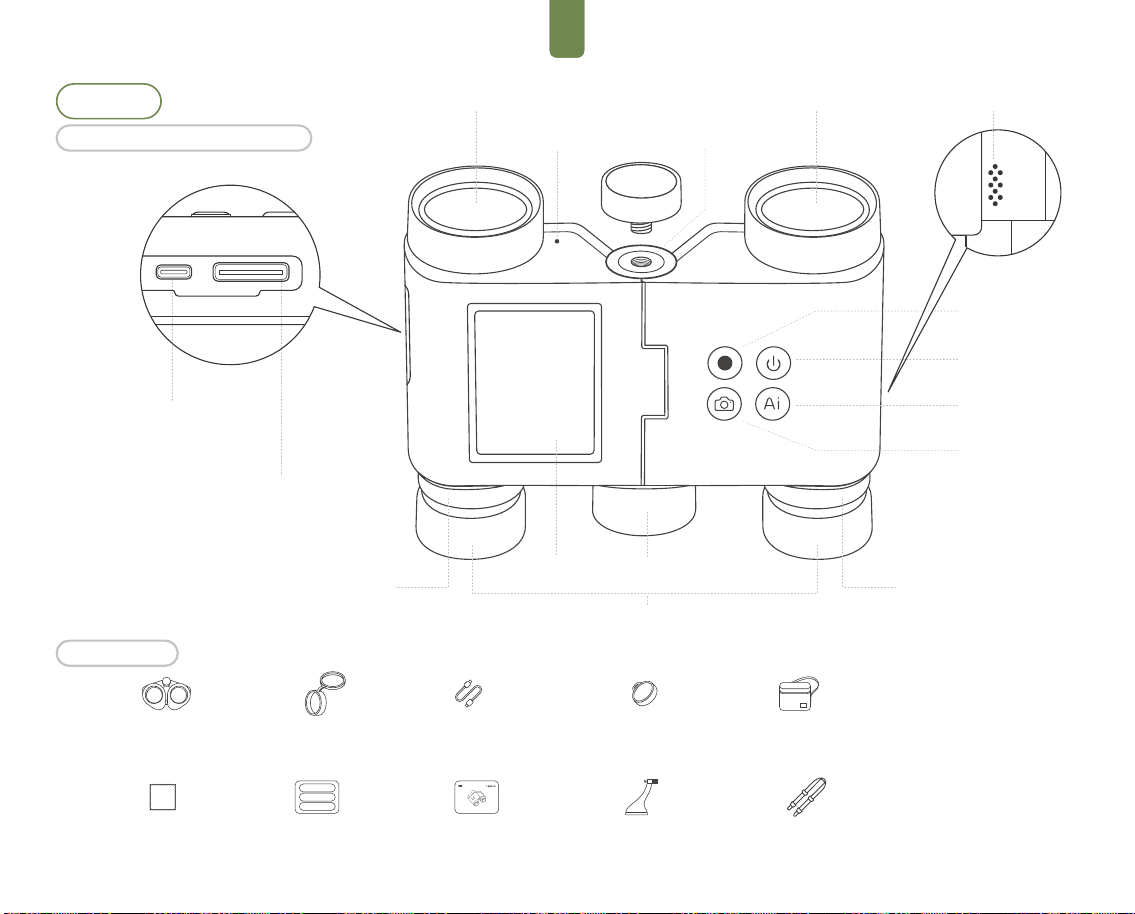
FRKR
제품 소개
표준 액세서리
솔비아 8×32 AI 쌍안경 소개
비디오
microSD 카드 슬롯
오른쪽 접안렌즈 디옵터 링
초점 조절 노브디스플레이
전원 켜기/끄기
AI 인식
사진
접안렌즈
대물렌즈
마이크
1/4인치 나사 구멍
대물렌즈
스피커
대물렌즈 커버×2 USB-C 충전/데이터
케이블×1
접안렌즈 커버×2 휴대용 케이스×1
렌즈 청소천×1
빠른 시작 가이드×1 사용자 가이드×1 목걸이 스트랩×1삼각대 어댑터×1
AI 쌍안경×1
USB-C 충전/데이터 포트
왼쪽 접안렌즈
디옵터 링
73
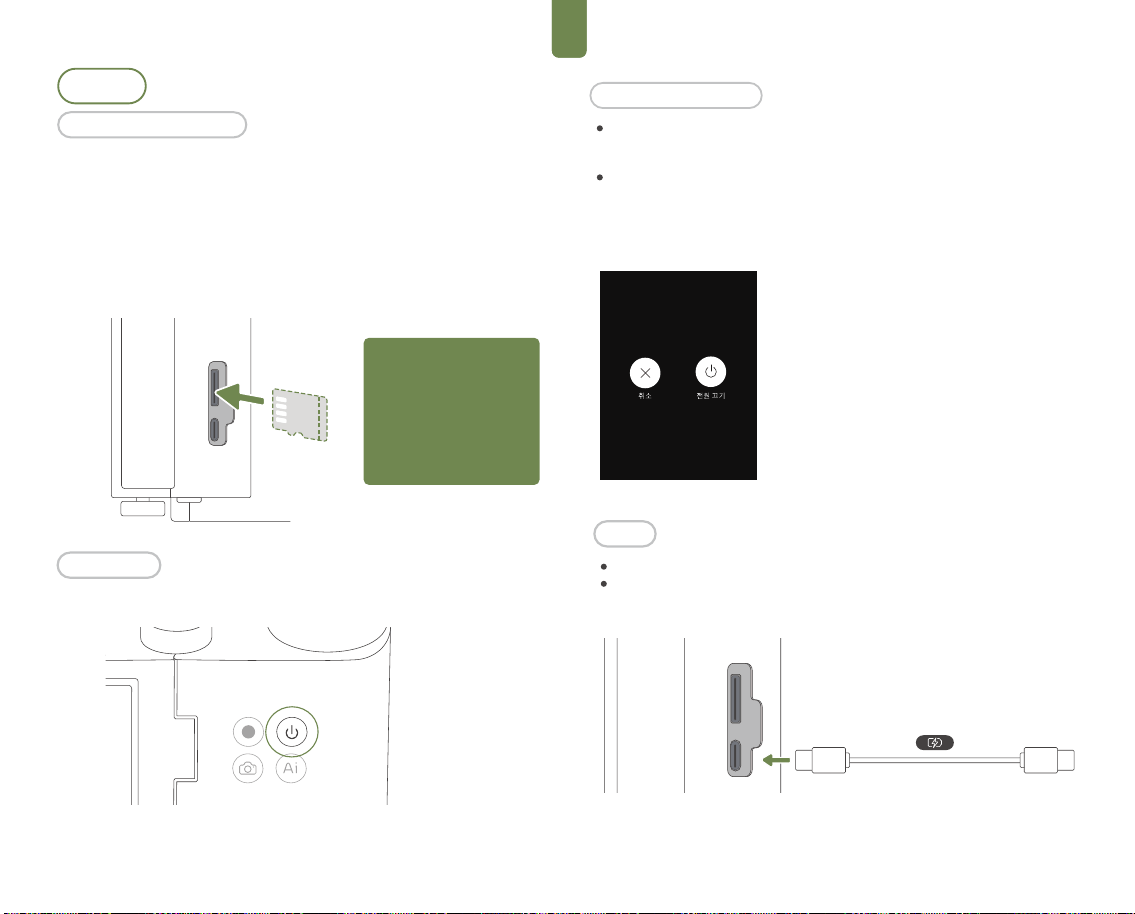
FRKR
전원 버튼을 3초간 길게 누르면 화면에 옵션이 표시됩니다.
전원 끄기 및 절전 관리
전원 끄기
- 기기를 완전히 종료합니다.
- 기기가 멈추거나 응답하지 않으면 전원 버튼을 8초간 길게
눌러 강제 종료하세요.
첫 사용
Solvia 8×32 AI 쌍안경에는 내장 저장 공간이 없습니다. 촬영한 이미지와 동영상을
저장하려면 microSD 카드를 설치해야 합니다. UHS-I Speed Grade 3 등급이며
exFAT으로 포맷된 microSD 카드 사용을 권장합니다. (기본 64GB microSD 카드가
제품에 포함되어 있습니다. 권장 카드 모델 목록은 ‘사양’ 섹션을 참조하세요.)
microSD 카드를 슬롯에 삽입할 때 그림과 같은 방향으로 맞춰 넣으세요. microSD
카드를 꺼내려면 카드를 안쪽으로 살짝 눌러 딸깍 소리가 나면서 슬롯에서 일부가
튀어나오게 하세요.
전원 버튼을 3초간 길게 누르면 화면에 옵션이 표시됩니다.
USB 포트 커버를 바깥쪽으로 열어주세요.
USB-C 케이블로 전원 어댑터를 연결하여 기기를 충전하세요(권장 입력: DC 5V/2A).
참고: 촬영 데이터를 보호하고
microSD 카드의 수명을
연장하려면 전원 켠 채로
연결하거나 분리하지 마세요.
솔비아 8×32 AI 쌍안경의
전원이 꺼진 상태에서만 카드를
삽입하거나 제거하는 것이
좋습니다.
전원 켜기
충전
마이크로SD 카드 설치
74
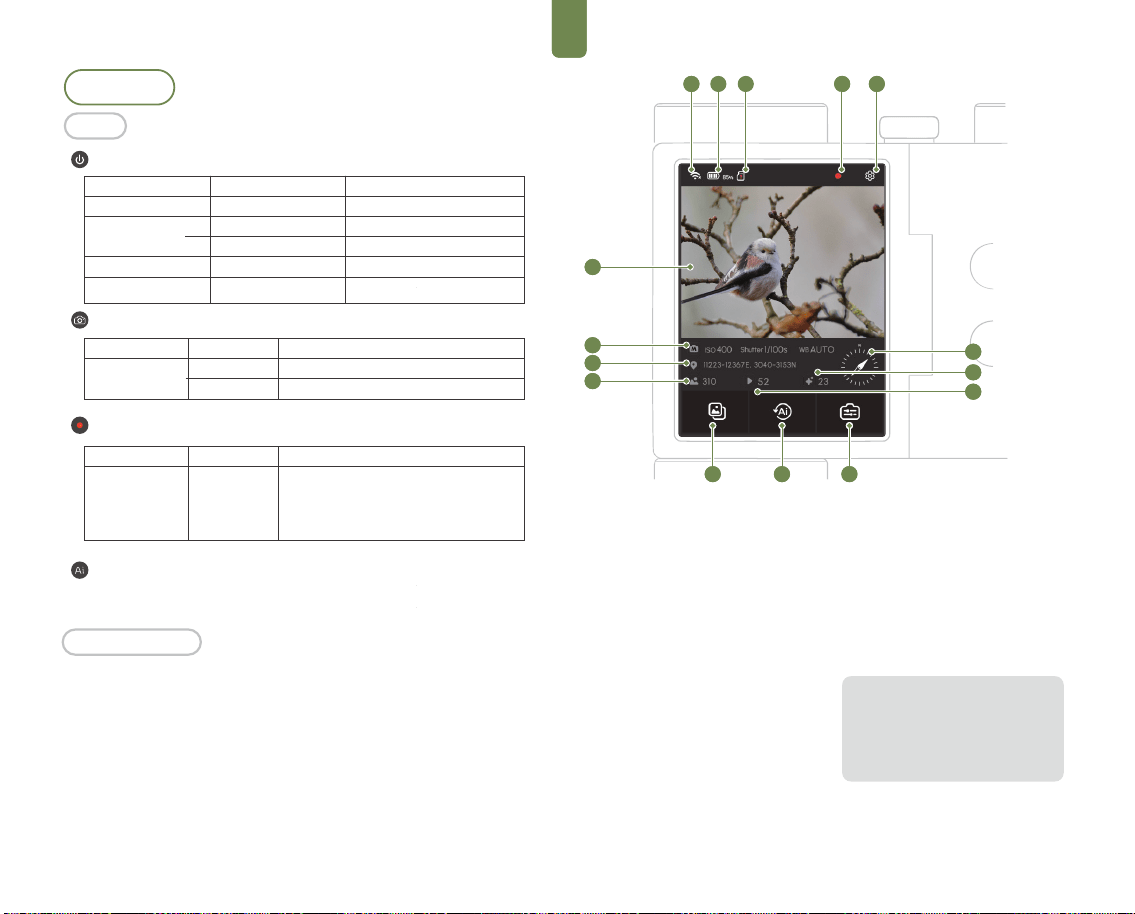
FRKR
1
5
5
5
5
7
4
8 9
2 2
4
1
6
10
11
12
5
5
5
15
7
5
8 9
2 3
4
14
13
�. Wi-Fi 상태
2. 배터리 잔량
�. SD 카드 상태
4. 녹화 상태
5. 시스템 설정
6. 라이브 뷰 및 이미지 미리보기
7. 미디어 라이브러리 및 갤러리
�. AI 로그 센터
9. 설정 액세스
10. 촬영 파라미터
��. GPS 데이터는
(Solvia Field Kit이 필요합니다)
12. 사진 수
13. 동영상 수
��. AI 인식 통계
15. 전자 나침반은
(Solvia Field Kit이 필요합니다)
주의해 주세요. 특정한 빛의 각도에서는
관찰이나 촬영 시 눈부심이나 어두운 점이
발생할 수 있습니다. 각도를 변경하여
개선할 수 있으며, 이는 제품의 품질 문제가
아닙니다.
장치 상태
버튼 조작
버튼 조작
녹화 시작/중지. 파일을 안전하게 저장하기
위해 동영상은 5분 단위로 자동 저장됩니다.
저장 공간이 부족하면 녹화가 자동으로
중지됩니다.
전원이 켜지면 터치스크린에 쌍안경의 뷰파인더 화면이 표시됩니다. 메뉴
바에는 무선 인터넷 연결, 배터리 잔량, 저장 용량 등의 정보가 표시됩니다.
터치스크린을 탭하거나 밀어서 기능을 이용하세요.
터치스크린 제어
기본 작동
작동
장치 상태
꺼짐
켜짐
절전 모드
응답 없음
작동
2초간 짧게 누르기
누르기
3초간 길게 누르기
누르기
8초간 길게 누르기
기능
전원 켜기
잠금 및 화면 끄기
전원 끄기/절전 선택
잠금 해제 및 화면 켜기
강제 종료
전원 버튼
장치 상태 작동
누르기
길게 누르기
기능
캡처 시작
연속 촬영 시작
사진 버튼
비디오 버튼
사진 상세 보기에서 AI 인식 버튼을 누르면 기기 내 AI 조류 인식이 실행되고
결과가 표시됩니다.
AI 인식
켜짐
전원 켜짐
상태
한 번 누르기
75
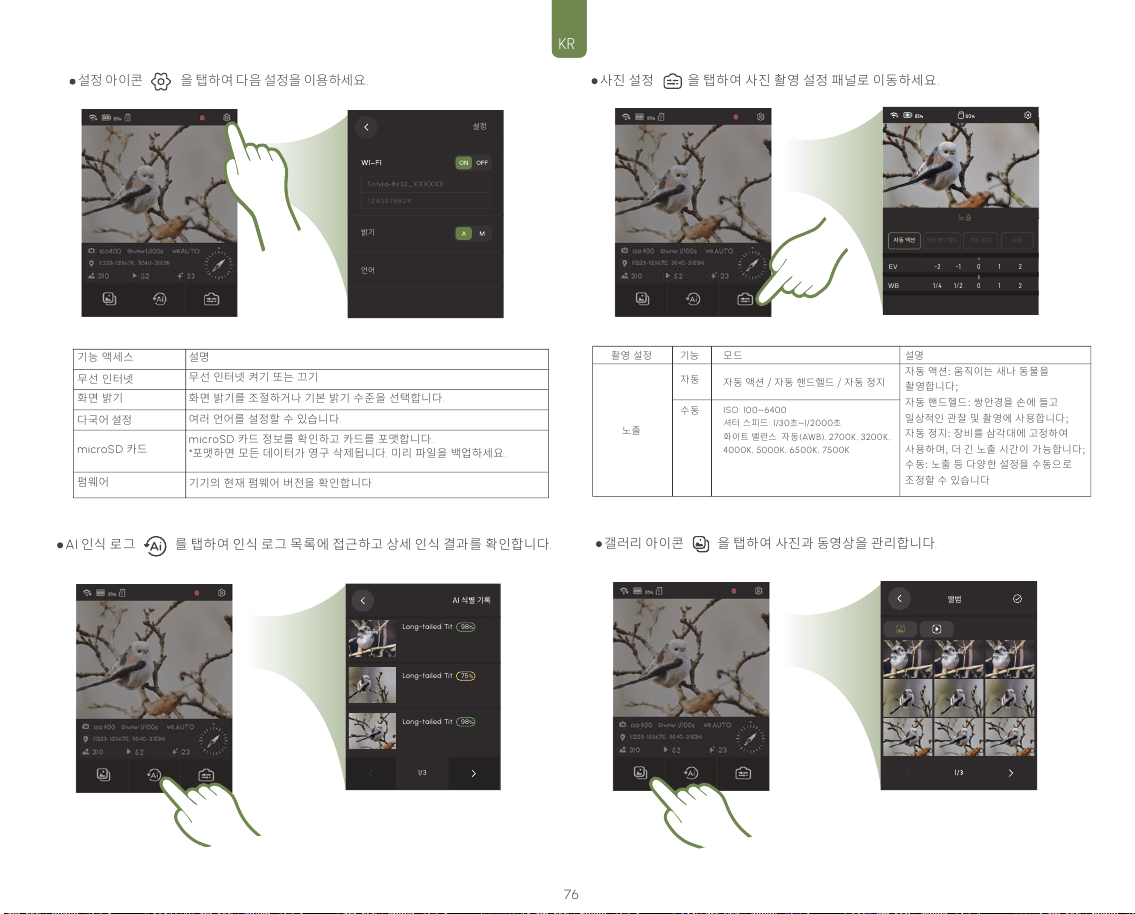
FRKR
설정
밝기
언어
노출
0
1
2
-2
-1
EV
자동 액션
자동 핸드헬드
자동 정지
수동
0
1
2
1/4
1/2
WB
AI 식별 기록
Long-tailed Tit
98
%
75
%
2025-05-27 14:20
Long-tailed Tit
2025-05-27 14:20
Long-tailed Tit
98
%
2025-05-27 14:20
1/3
앨범
촬영 설정
노출
모드
자동 액션 / 자동 핸드헬드 / 자동 정지
ISO: 100~6400
셔터 스피드: 1/30초~1/2000초
화이트 밸런스: 자동(AWB), 2700K, 3200K,
4000K, 5000K, 6500K, 7500K
기능
자동
수동
설명
자동 액션: 움직이는 새나 동물을
촬영합니다;
자동 핸드헬드: 쌍안경을 손에 들고
일상적인 관찰 및 촬영에 사용합니다;
자동 정지: 장비를 삼각대에 고정하여
사용하며, 더 긴 노출 시간이 가능합니다;
수동: 노출 등 다양한 설정을 수동으로
조정할 수 있습니다
설정 아이콘 을 탭하여 다음 설정을 이용하세요.
AI 인식 로그 를 탭하여 인식 로그 목록에 접근하고 상세 인식 결과를 확인합니다.
사진 설정 을 탭하여 사진 촬영 설정 패널로 이동하세요.
갤러리 아이콘 을 탭하여 사진과 동영상을 관리합니다.
기능 액세스
무선 인터넷
화면 밝기
다국어 설정
microSD 카드
펌웨어
설명
무선 인터넷 켜기 또는 끄기
화면 밝기를 조절하거나 기본 밝기 수준을 선택합니다.
여러 언어를 설정할 수 있습니다.
기기의 현재 펌웨어 버전을 확인합니다.
microSD 카드 정보를 확인하고 카드를 포맷합니다.
*포맷하면 모든 데이터가 영구 삭제됩니다. 미리 파일을 백업하세요.
76
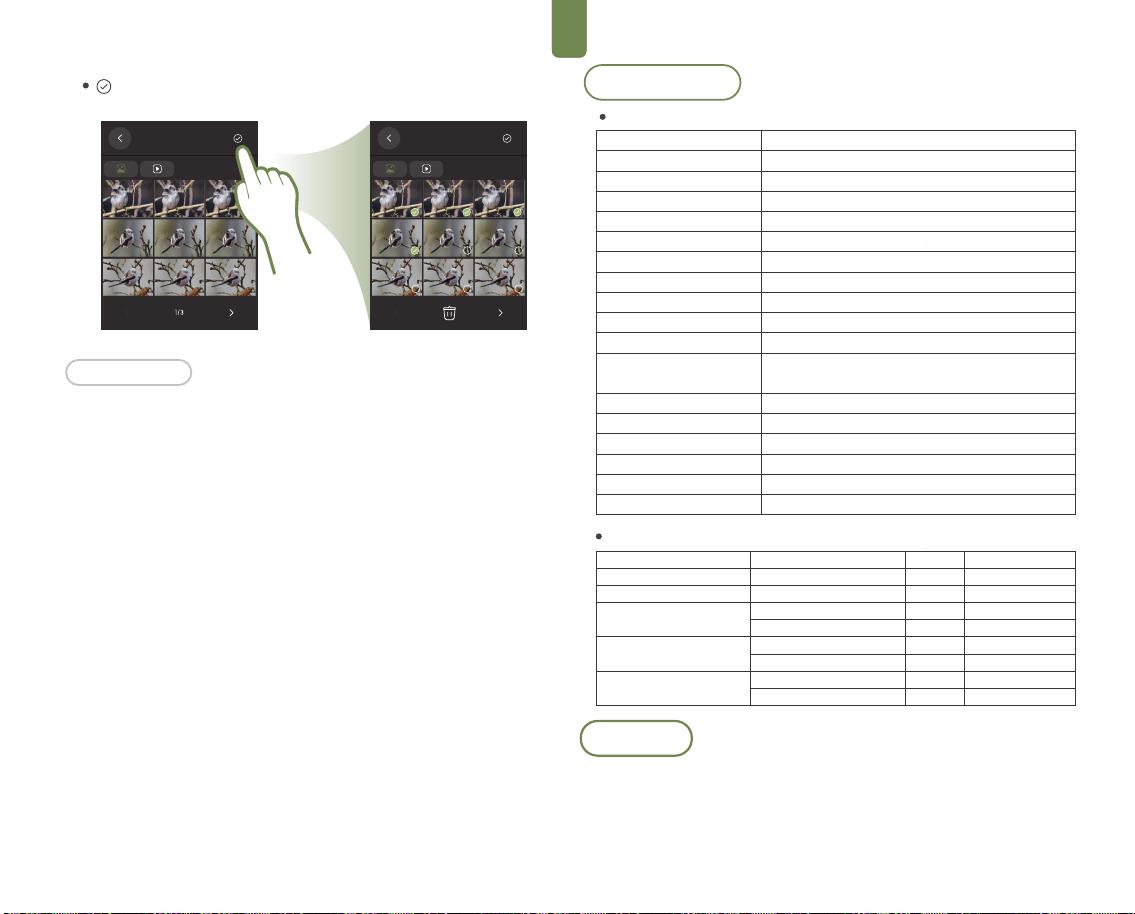
FRKR
앨범
앨범
아이콘을 탭하여 사진 삭제 화면으로 이동합니다。
상태 표시등:
파란색 점등: 기기가 연결되어 정상 작동 중입니다.
파란색 깜빡임: 동영상 녹화 중입니다.
배터리/충전 표시등:
꺼짐: 기기의 전원이 방전되었거나 전원에 연결되어 있지 않습니다.
빨간색 점등: 기기가 충전 중입니다.
녹색 점등: 기기가 충분히 충전되었거나 완전히 충전되었음을 나타냅니다.
표시등 상태
사양 및 매개변수
쌍안경 기술 사양
배율
대물렌즈 직경
프리즘 시스템
시야각(m/1000m)
시야각(도)
사출동공 직경
아이 릴리프
최단 초점 거리
무게
크기
배터리 유형
배터리 수명
센서
사진/비디오 해상도
환경 보호
연결 방법
작동 온도
보관 온도
8배
32mm
루프 프리즘
129.5m/388.5ft
7.6°
4.24mm
16mm
3.7m
680g
116.5mm×120.8mm×68mm
리튬 이온 2600mAh
12시간(일반 사용), 4시간(최대 부하) 확장 모듈 사용 시:
20시간(일반 사용), 8시간(최대 부하)
1/2.7" CMOS
2592× 1944px
IP 64, 질소 충전
무선 인터넷 고속 전송, USB 내보내기
−10°C~+50°C
-20°C~+60°C
권장 microSD 카드 목록
브랜드 및 시리즈
SanDisk Extreme V30 A1
SanDisk Extreme Pro V30 A1
SanDisk Extreme V30 A2
SanDisk Extreme Pro V30 A2
Lexar 1066x microSD UHS-I
SILVER 시리즈
모델
SDSQXVF-032G-GN6MA
SDSQXCG-064G-GN6MA
SDSQXAH-064G-GN6GN
SDSQXAA-128G-GN6GN
SDSQXCU-064G-GN6MA
SDSQXCY-128G-ZN6MA
LMS1066064G-BN
LMS1066128G-BN
용량
32 GB
64 GB
64 GB
128 GB
64 GB
128 GB
64 GB
128 GB
속도 등급
V30
V30
U3, A2, V30
U3, A2, V30
U3, A2, V30
U3, A2, V30
V30
V30
솔비아 앱
솔비아 앱과 함께 사용하면 솔비ᅡᄋ 8×32 AI 쌍안경은 고화질 실시간 영상을 모바일
기기로 직접 스트리밍할 수 있습니다. 이를 통해 카메라 파라미터를 조정하고
쌍안경을 원격으로 제어할 수 있습니다. 앱은 미디어 내보내기, 클라우드 기반 AI 인식,
이미지 향상 등의 다양한 기능을 제공하여 전반적인 사용자 경험을 크게
향상시킵니다.
77
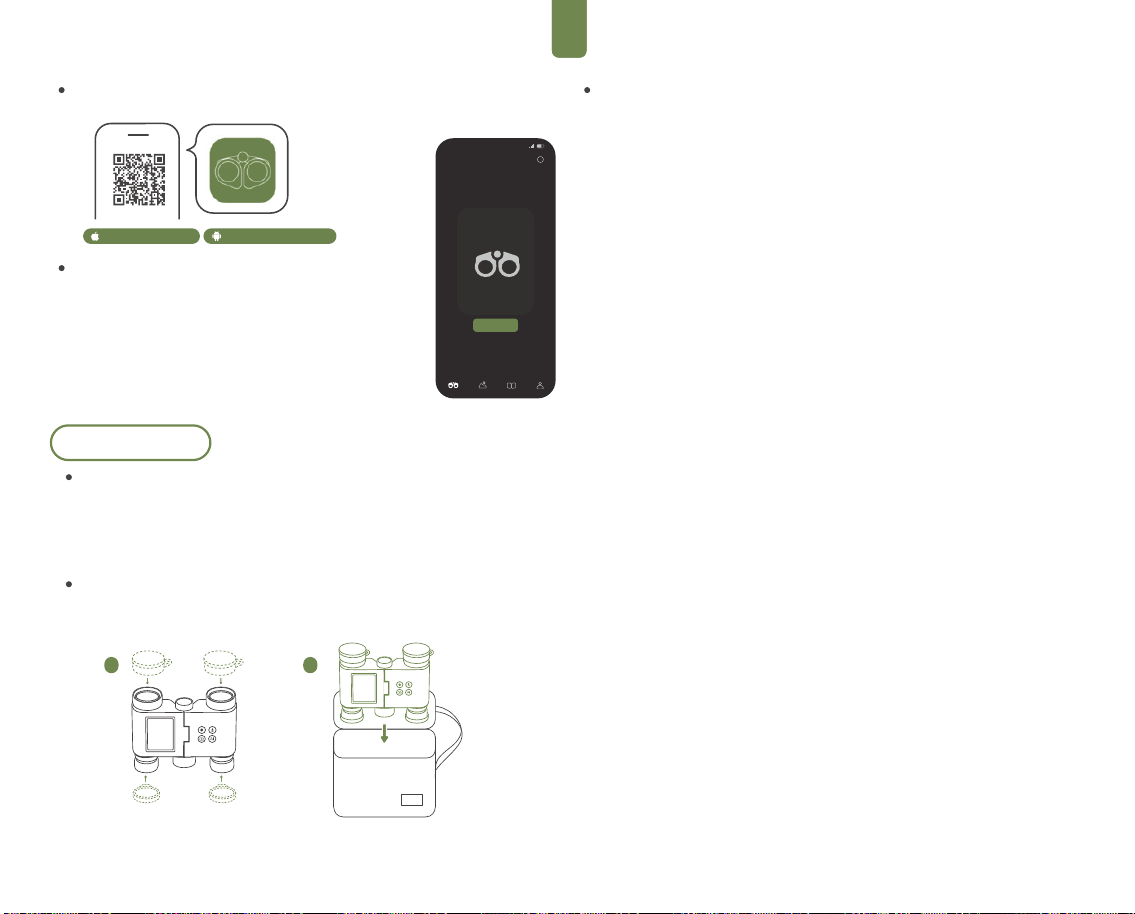
FRKR
프로필로그앨범관찰
완료
Solvia
내 기기
i
1 2
솔비아 앱 다운로드
휴대폰 앱 스토어에서 솔비아 앱을 검색하거나 QR 코드를 스캔하여 다운로드하세요.
솔비아 앱 연결 방법
1. 전원 버튼을 눌러 솔비아 8×32 AI 쌍안경을 켭니다
2. 화면 오른쪽 상단의 설정 아이콘을 탭한 다음 무선 인터넷으로
이동하여
무선 인터넷을 활성화하고 기기의 무선 인터넷 이름과 비밀번호를
확인합니다.
3. 솔비아 앱을 열고 홈 화면의 연결 버튼을 탭한 다음 화면의
안내에 따라
기기의 무선 인터넷 네트워크에 연결합니다.
iOS 15.0 이상 안드로이드 7.0 이상
유지보수 및 관리
펌웨어 업그레이드
펌웨어를 업그레이드하기 전에 쌍안경의 배터리 잔량이 20% 이상인지 확인하세요.
쌍안경을 솔비아 앱에 연결합니다.
앱에서 새 펌웨어 버전이 있다고 표시되면 탭하여 업데이트를 시작하고 화면의
안내를 따릅니다. 펌웨어 업데이트 과정은 보통 약 3분 정도 소요됩니다.
보관
솔비아 8×32 AI 쌍안경 사용 후에는 접안렌즈와 대물렌즈를 보호 캡으로 덮고 전용
휴대용 케이스에 보관하세요.
사용 주의사항
연령 제한
이 제품은 3세 미만의 어린이에게 적합하지 않습니다.
어댑터 사용
이 제품의 충전 어댑터(미포함)는 장난감이 아니므로 어린이의 손이 닿지 않는 곳에
보관해야 합니다.
안전하게 안정적으로 충전을 위해 5V/2A 충전 어댑터 사용을 권장합니다.
단일 전원 연결:
이 제품은 단일 전원 어댑터로만 충전할 수 있습니다.
청소 방법
깨끗하고 부드러운 마른 천으로 기기 표면을 닦으세요.
어린이가 사용할 경우 보호자의 감독
어린이는 안전을 위해 성인의 감독 하에 이 제품을 사용해야 합니다.
낙하 방지
기기를 떨어뜨리거나 강한 충격을 가하면 광학 장치나 내부 부품이 영구적으로
손상될 수 있습니다.
- 먼지와 모래로부터 기기를 보호하세요. 오염되면 렌즈가 손상되고 오작동이 발생할
수 있습니다.
무단 분해 금지
- 제품을 직접 분해, 개조 또는 수리하지 마세요. 무단 수리는 오작동을 일으킬 수
있으며 보증이 무효화됩니다.
사용 온도 범위
- 권장 온도 범위 -10°C~+��°C를 벗어난 환경에서 기기를 작동하거나 충전하지
마세요.
장기 보관 시 주의사항
- 제품을 장기간 사용하지 않을 경우 보관 전에 완전히 충전하고, 배터리 상태를
유지하기 위해 최소 3개월에 한 번씩 재충전하세요.
강한 광원을 보지 마세요
쌍안경으로 태양이나 기타 강한 광원을 절대 보지 마세요. 심각한 눈 부상을 입을 수
있습니다.
걸으면서 사용 금지
- 기기 사용 시 안정된 자세를 유지하세요. 넘어지거나 충돌을 방지하기 위해
걸으면서 사용하지 마세요.
방수, 방진, 내충격성
- 이 제품은 기본적인 생활 방수 기능을 제공하지만, 강한 충격이나 물에 담그는 것은
피하세요.
유지보수 및 보증
팁
- 유지보수 및 수리는 공인 서비스 센터에 문의하세요. 비전문 기관의 무단 수리는
보증을 무효화할 수 있습니다.
78
FRKR
귀하와 타인의 안전을 위해 이 제품을 사용하기 전에 다음 경고 사항을 주의 깊게
읽어주세요.
1. 강한 광원을 직접 보지 마세요
돌이킬 수 없는 눈 손상이나 망막 화상을 방지하기 위해 쌍안경을 통해 태양이나 다른
밝은 광원을 직접 보지 마십시오.
2. 무단 분해 또는 개조 금지
제품을 직접 분해, 개조 또는 수리하지 마세요.
무단 취급은 내부 부품 손상, 감전 위험을 초래할 수 있으며 보증이 무효화됩니다.
3. 고온, 습기, 강한 자기장 피하기
제품을 고온, 고습, 강한 자기장, 인화성 또는 폭발성 환경을 피해서 보관하세요.
이러한 조건에 노출되면 배터리 팽창, 폭발 또는 내부 회로 손상이 발생할 수 있습니다.
4. 수중 사용 금지
이 기기는 생활 방수는 되지만 수중에서 사용할 수 없습니다. 기기를 수중에서
사용하거나
폭우에 노출시키지 마십시오. 기기가 물에 닿았을 경우, 즉시 전원을 끄고 고객
지원팀에 문의하십시오.
5. 충전하는 동안에는 적절하게 환기하십시오.
밀폐되거나 환기가 잘 되지 않는 장소에서 기기를 충전하지 마십시오. 과열이나 화재의
위험이 발생할 수 있습니다.
6. 규정을 준수하는 전원 공급 장치 및 액세서리를 사용하십시오.
권장 사양(5V/2A)을 충족하는 전원 어댑터만 사용하세요.
인증되지 않거나 품질이 좋지 않은 충전기를 사용하면 손상이 발생하거나 안전 위험이
초래될 수 있습니다.
중요 안전 지침
이 제품에는 구매일로부터 유효한 다음 보증 정책이 적용됩니다.
사용자 과실이 아닌 기능 고장의 경우, 1년의 보증 기간 내에 무료 수리 또는 교체가 가능:
광학 시스템 3년, 본체(전자 장치 및 소프트웨어 포함)
액세서리 보증: 액세서리(예: 넥 스트랩, 휴대용 케이스, 렌즈 캡)는 표준 보증에
포함되지 않습니다. 단, 수령 시 품질 문제가 발견되면 7일 이내에 교체 요청을 제출할
수 있습니다.
구매 증빙: 보증 서비스를 받으려면 유효한 구매 증빙(주문 스크린샷, 송장 또는
영수증 등)이 필요합니다.
보증 적용 제외 사항:
낙하, 충격, 물에 담그기, 고온 환경 노출 등 부적절한 사용으로 인한 손상.
무단 분해, 수리 또는 개조로 인한 손상.
비공인 판매점에서 구매했거나 유효한 구매 증빙이 없는 제품.
일반적인 마모, 노화, 긁힘, 얼룩 및 기타 비기능적 문제
보증 정책
규정 준수 및 환경 표준
CE 및 Ro HS 준 수 선언
WEEE 환경 재활용 선언
- CE:
이 제품은 2014/3 0/EU(EMC) 및 2014/35/EU(LVD)의 필수
요구사항을 준수합니다.
- RoHS 지침(2011/65/EU):
이 기기에는 납, 수은, 카드뮴 또는 6가 크롬과 같은 유해 물질이 규정된 한도를
초과하여 포함되어 있지 않습니다.
장치는 하우징 또는 명판에 적절한 CE 및 RoHS 준수 라벨이 표시되어 있습니다.
이 제품은 폐전기전자제품 지침 (WEEE, 2012/19/EU)을
준수합니다.
- 이 기기를 일반 가정 쓰레기로 폐기하지 마세요.
- 이 기기를 폐기할 때는 지정된 전자 폐기물 재활용 시설에서 처리하도록
하세요.
- X 표시가 된 쓰레기통 기호는 제품을 별도로 재활용해야 함을 나타냅니다.
환경 책임에 대한 참여와 지속 가능한 미래에 기여해 주셔서 감사합니다.
기술 지원 및 사후 서비스가 필요하시면 다음 채널을 통해 문의하세요.
공식 웹사이트:www.matataxplore.com
고객 서비스 이메일: support@matataxplore.com
문의 전 다음 정보를 준비해 주세요.
기기 뒷면 또는 포장 상자에 있는 제품 모델 및 일련 번호
구매 증빙 스크린샷.
문제에 대한 간략한 설명 및 관련 사진 또는 동영상
지원 및 서비스
79

FCC 경고문
규정 준수 책임자의 명시적인 승인을 받지 않은 변경 또는 개조를 수행할 경우, 사용자의 장비 사용
권한이 무효화될 수 있습니다. 본 장치는 FCC 규정 제15조에 따른 Class B 디지털 장치의 기준을
충족하는 것으로 시험 및 검증되었습니다. 이러한 기준은 주거 환경에서 발생할 수 있는 유해한 전파
간섭으로부터 적절한 보호를 제공하기 위해 마련되었습니다.
본 장치는 무선 주파수(RF) 에너지를 생성, 사용 및 방출할 수 있으며, 지침에 따라 설치 및 사용하지
않을 경우 무선 통신에 유해한 간섭을 일으킬 수 있습니다. 그러나 특정 설치 환경에서 간섭이 발생하지
않는다고 보장할 수는 없습니다.
본 장치가 라디오 또는 TV 수신에 유해한 간섭을 일으키는 경우(장치를 껐다가 다시 켜서 확인 가능),
사용자는 다음 방법 중 하나 이상을 통해 간섭을 해결할 수 있습니다.
‐‐ 수 신 안 테 나 의 방 향 을 조 정 하 거 나 위 치 를 변 경 합 니 다 .
‐‐ 장 치 와 수 신 기 사 이 의 거 리 를 늘 립 니 다 .
‐‐ 수 신 기 가 연 결 된 회 로 와 다 른 전 기 회 로 의 콘 센 트 에 장 치 를 연 결 합 니 다 .
‐‐ 판 매 점 또 는 숙 련 된 라 디 오 / T V 기 술 자 에 게 도 움 을 요 청 합 니 다 .
FCC RF 노출 관련 성명
본 장치는 일반적인 RF(무선 주파수) 노출 요구 사항을 충족하는 것으로 평가되었습니다. 본 장치는
휴대형 사용 환경에서 별도의 제한 없이 사용할 수 있습니다.
본 장치는 FCC 규정 제15조를 준수합니다. 장치의 작동은 다음 두 가지 조건을 따릅니다.
(1) 본 장치는 유해한 간섭을 발생시키지 않아야 합니다.
(2) 본 장치는 원하지 않는 동작을 유발할 수 있는 간섭을 포함하여 수신되는 모든 간섭을 수용해야
합니다.
본 장치는 전파 노출에 관한 정부 요구 사항을 충족합니다. 관련 지침은 독립적인 과학 기관이 과학
연구를 정기적이고 철저하게 평가하여 수립한 기준에 기반합니다. 이러한 기준에는 연령이나 건강
상태와 관계없이 모든 사람의 안전을 보장하기 위한 충분한 안전 여유가 포함되어 있습니다.
FCC RF 노출 정보 및 성명: 미국 FCC에서 규정한 SAR(전자파 흡수율) 한도는 조직 1g당 평균
�.�W/kg입니다. 본 장치 유형 또한 해당 SAR 한도 기준에 따라 시험되었습니다.
본 장치는 장치 뒷면이 신체로부터 0mm 떨어진 상태에서 일반적인 신체 밀착 사용 조건으로
시험되었습니다. FCC RF 노출 요구 사항을 지속적으로 준수하기 위해서는 사용자의 신체와 장치 뒷면
사이의 거리를 0mm로 유지할 수 있는 액세서리를 사용해야 합니다.
벨트 클립, 홀스터 및 유사한 액세서리에는 금속 부품이 포함되어서는 안 됩니다. 이러한 요구 사항을
충족하지 않는 액세서리를 사용할 경우 FCC RF 노출 요구 사항을 충족하지 못할 수 있으므로 사용을
피해야 합니다.
본 장치는 5180~5240MHz 주파수 대역에서 실내 사용으로만 제한됩니다.
이 매뉴얼에는 중요한 제품 정보가 포함되어
있으며 보관해야 합니다.
FRKR
80


Designed by
MATATALAB CO., LTD