
1.1 Download App
1.2 Register and Log in to the App
Users can register an App account using a phone number or email.
After completing registration, they will be automatically logged in. Or
they can log in with third-party accounts such as WeChat or Apple.
Method 1: Scan the QR code below with your mobile phone to
download and install the App.
Method 2:Search for “LongVision”in major app stores, locate the
LongVision App, and click to download it.
Scan the QR code to download
“LongVision” APP
(*WiFi devices do not require a SIM card)
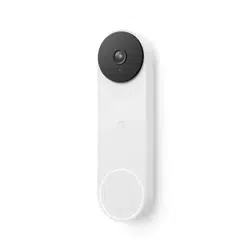
SD/TF Card Slot: To view local recordings, open the card slot cover
before installation and correctly insert the SD/TF card.
Reset Button: To restore factory settings, open the card slot cover on the
back of the device and press and hold the reset button for 3-5 seconds.
Power Button: The device is powered off by default. Press and hold the
power button for 3 seconds to turn on, or for 10 seconds to turn off.
Type-C Port: Charge the battery by connecting a DC 5V&1A power
adapter or the solar panel's Type-C charging cable to this port.
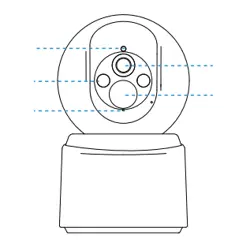
PIR Human Sensor: The default mode of the device when shipped from
the factory relies on PIR human infrared sensing to trigger and wake up
the device for video recording. Please refer to the detection distance
below, and try to aim the device toward the monitoring area.
The device is powered off by default. Press and hold the power button for 3
seconds to turn it on. A voice prompt will confirm successful startup.
。
Fully charge the battery before first use with a 5V&1A power adapter. The charging
indicator will glow solid red during charging. It turns off when fully charged.
Tap the "+" button in the top-right corner of the App home screen.
Select "Add WiFi Camera" or "Scan QR code on device body" and
follow the in-app instructions to configure the network.
1
After confirming the camera announces "Connection Complete",
proceed to complete adding the camera.
Follow these steps to install an SD/TF card for local recording:
STEP 1: Open the card slot cover on the bottom of the camera to
locate the SD/TF card slot.
STEP 2: Orient the SD/TF card correctly and carefully insert it into the
slot. Push the card in until you hear a click.
Quick Start Guide
*Go to Camera Settings > SD Card Recording in the SV360 App to check card
status or format the card.

Step 1: Drill holes according to the mounting sticker and install the
bracket base onto the wall.
Step 2: Install the threaded of the bracket base onto the camera.
Step 3: Adjust the camera angle for optimal view, then tighten the
bracket knob clockwise to complete installation.
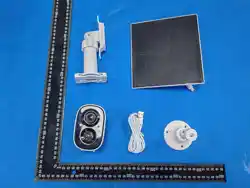
Step 1: Based on the bracket's through-hole positions, drill pilot holes
in the wall, insert plastic expansion tubes, pass self-tapping screws
through the bracket's through-holes, and secure the solar panel
bracket to a sun-facing wall.
Self-tapping Screws
Plastic Expansion
Step 2: Align the solar panel with the bracket's snap-fit position and
snap the panel into the bracket from top to bottom.
Step 3: Adjust the solar panel angle using the large knob on the bracket
to maximize light exposure area and duration based on local sunlight
conditions. Then connect the Type-C power supply interface on the solar
panel to the corresponding interface on the camera to complete installation.
Large Knob
Type-C Power Supply Interface
The operating temperature range of the camera is -10°C to 50°C.Do
not use the camcorder in temperatures above or below thespecified
range.
Do not allow children or pets to chew on the camera or its
accessories,as this may cause injury to them or result in equipment
failure.
For better image results, do not point the lens towards or nearreflec-
tive surfaces such as glass windows or white walls, as this maycause
the image to appear too bright in areas close to the camera
anddarker in areas farther away, or cause the camera to produce a
whiteout effect.
Make sure the camera is installed in an area with a strong Wi-Fi
signal.Do not place the camera near objects that may affect its Wi-Fi
signal,such as metal objects and microwave ovens.
When installing the camera, follow the installation guidelines to
securelyfasten the camera to the wall or ceiling to avoid the camera
falling offand causing damage.
* If you have further questions, please contact the sales store or
reach out to us via the “My-Feedback” channel in the app.
*Images are for reference only, please refer to the actual product.
determined by turning the equipment off and on, the user is
encouraged to try to correct the interference by one or more of the
following measures:
> Reorient or relocate the receiving antenna.
> Increase the separation between the equipment and receiver.
> Connect the equipment into an outlet on a circuit different from
that to which the receiver is connected.
> Consult the dealer or an experienced radio/TV technician for help.
This equipment complies with FCC radiation exposure limits set
forth for an uncontrolled environment. This equipment should be
installed and operated with minimum distance 20cm between the
radiator & your body.
This device complies with part 15 of the FCC Rules. Operation is
subject to the following two conditions: (1) This device may not
cause harmful interference, and (2) this device must accept any
interference received, including interference that may cause
undesired operation.
Any Changes or modifications not expressly approved by the party
responsible for compliance could void the user's authority to
operate the equipment.
Note: This equipment has been tested and found to comply with the
limits for a Class B digital device, pursuant to part 15 of the FCC
Rules. These limits are designed to provide reasonable protection
against harmful interference in a residential installation. This
equipment generates uses and can radiate radio frequency energy
and, if not installed and used in accordance with the instructions,
may cause harmful interference to radio communications.
However, there is no guarantee that interference will not occur in a
particular installation. If this equipment does cause harmful
interference to radio or television reception, which can be