Version: 2.7
How can we help you today?
Please kindly contact us if you have
any question or concern when installing and using
Scan the below QR code to talk with us
Customer Support
Scan or upload this QR code
using the WhatsApp camera
to add us
Customer Support
Enter your questions here
1-833-470-2950
support.jadens.com
Available Time:
Mon- Fri: EST 10AM-10PM
Sat- Sun: EST 1PM- 9PM
1. This warranty only applies to hardware components of the pro duct that are not subject to accident,
misuse, neglect, fire or damage from other external causes, al teration, repair or commercial use. Defects
that are the result of normal wear and tear will not be conside red manufacturing defects under this
warranty.
2. This warranty does not cover damage resulting from any unauthorized attempts to repair or from any
use not in accordance with the instruction manual.
4. Please read the Instruction Manual carefully before setting up or using this product. If you believe this
product to be suffering from a manufacturing fault, or if you have inquiries about this product, please
contact Customer Support:
ATTN: Customer Support
Email: [email protected]
Model:
Date of purchase:
Purchased from:
Order Number:
3. This warranty applies only to the original purchaser of this product from the original date of purchase.
This warranty applies only if the unit is purchased new from an authorized retailer and is non-transferable
from the original purchaser of the item. Any warranties accompanied with this product is only valid in the
country of purchase.
Warranty Information

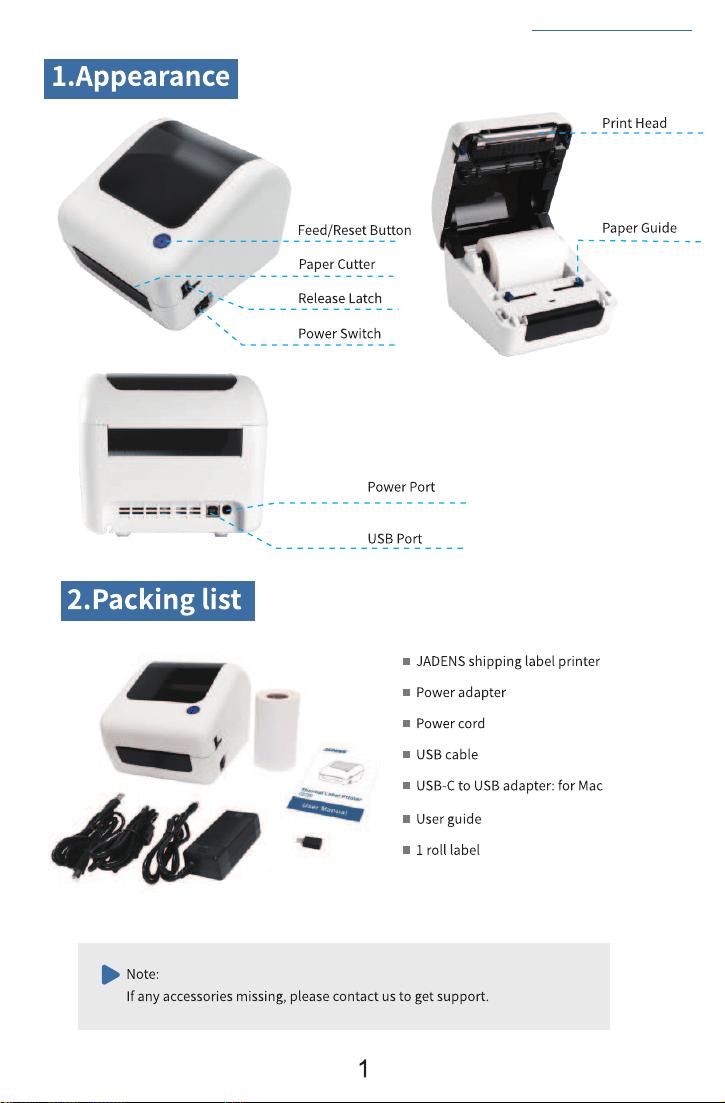
1. Appearance 1
1
2
3
3
4
8
20
20
23
23
23
25
25
25
2. Packing list
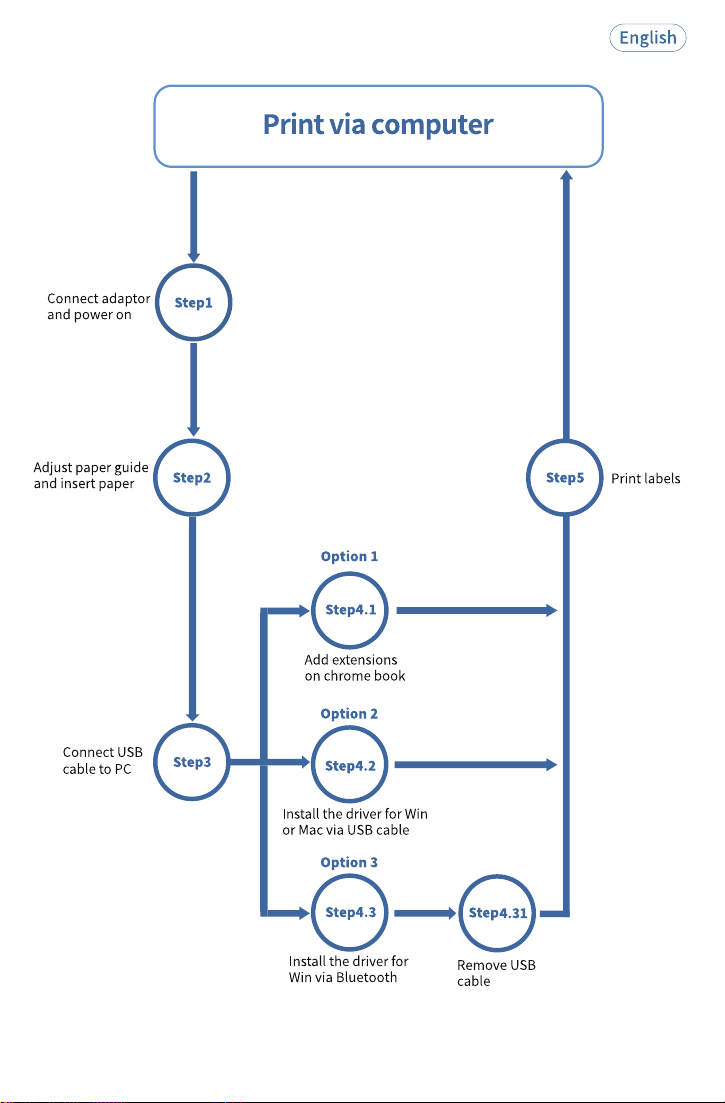
3. Printer connection
4. The suitable label size
5. How to feed label
6. Installation for Windows
7. Installation for Mac
16
10. Important Tips: Print label of multiple sizeusing “Take a snap shot”
16. Safety tips
12. Pro tips
23
11. Frequently asked question
14. Specifications
13. Driver removement
17. Maintenance
15. LED indicator
8.How to Use a label Printer with a “Chromebook”
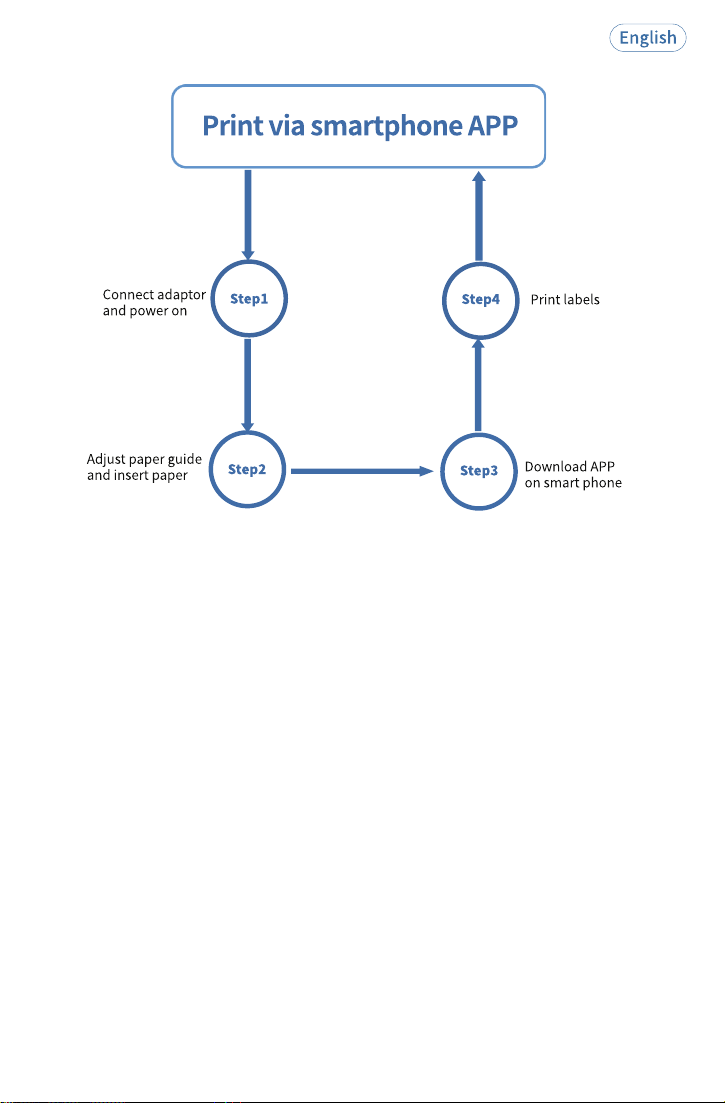
9.Smartphone APP Printing
See FAQ at support.jadens.com
1
3
5
7
6
2
4
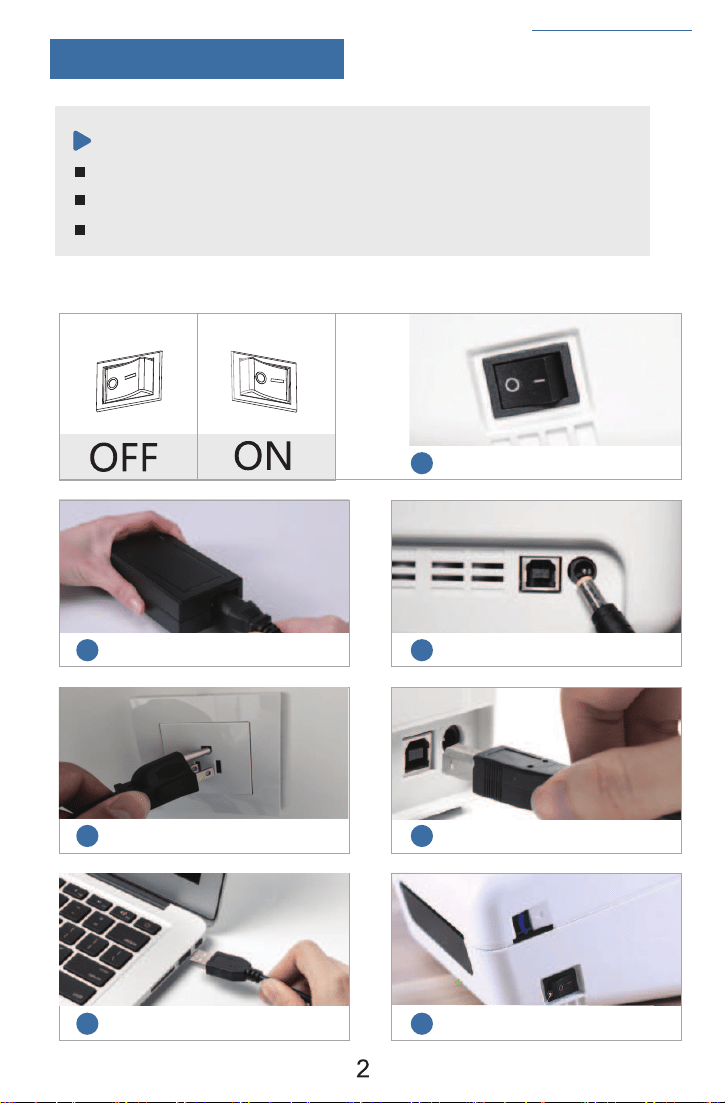
Ensure the printer is OFF.
Use original power adapter only in case harm or injure.
Unplug if no use in a long time.
Ensure the printer is off
Connect the powerAttach the power cord to the adapter
Plug the power cord into the socketConnect the USB cable to the printer
Connect the printer and computer
Turn the power on
Note:
See FAQ at support.jadens.com
3.Printer Connection
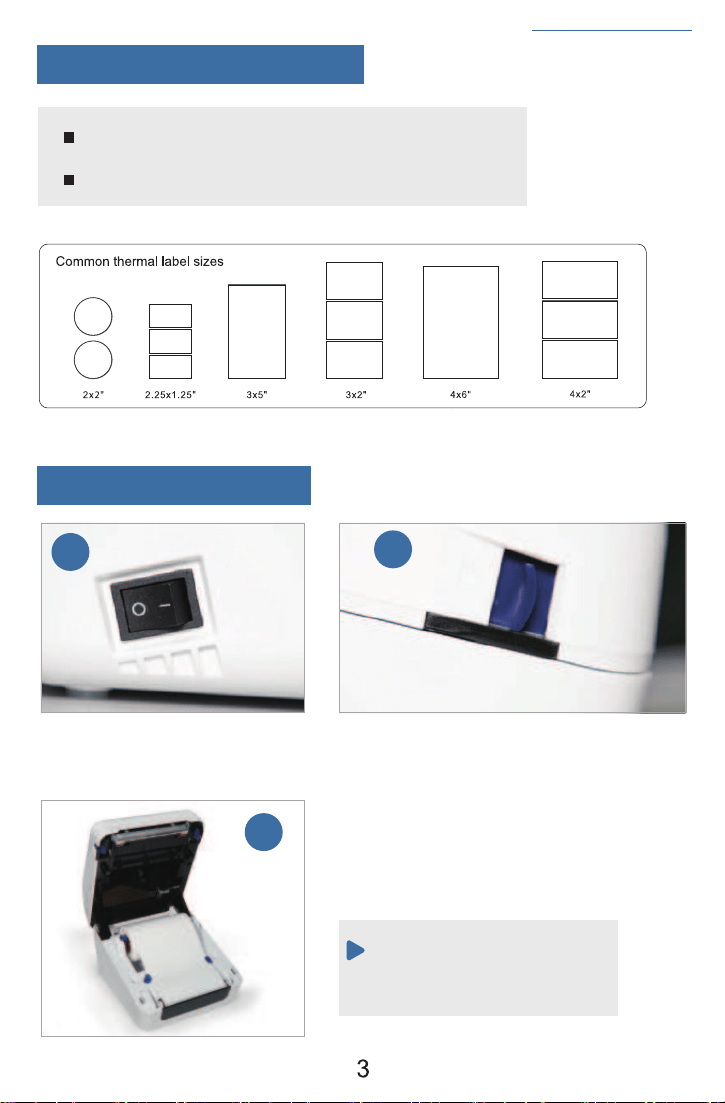
Ensure the printer is off
Pull the release latch to open the cover
1
2
Put the roll label in or insert the fan-fold
label from outside at the tear-off point,
adjust the paper guide to fit the width of
paper
Note:
See FAQ at support.jadens.com
5.How to feed label
The label you peel off should be facing
up (toward the ceiling)
3
Jadens printer works with any Thermal Direct Label, and compatible
with a width range from 1.89'' to 4.25'' and length over 0.79''
Ideal for 4''*6''
4.The suitable label size
See FAQ at support.jadens.com
Close the cover. Turn on power.
Jadens is ready to print.
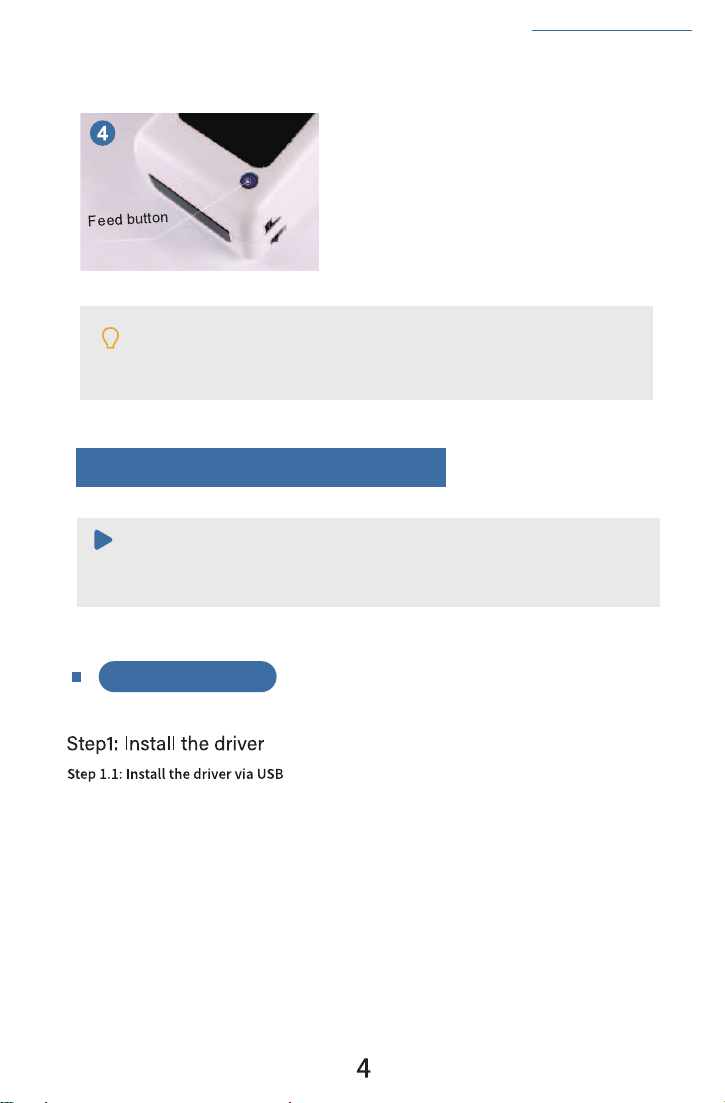
Tips:
Anytime you change your label, run the automatic label identification. Press and hold
the feed button until you hear one beep.
Win 7 or later
Note:
√
6.Installation for Windows
It is recommended to close security software before installation to prevent any issues,
and you can reopen it after the installation is complete.
a. Connect the power cable and turn on the printer (Please skip this step if you have already done it).
b. Connect the USB cable to your computer (Please skip this step if you have already done it).
c. Download the driver:
Download the driver (JADENS_Printer_Driver.exe) from https://jadens.com/pages/download-
video. Driver version may be updated. See the latest info at support.jadens.com.
d. Install the driver:
Copy the printer driver to your computer desktop, double click to open and install it as below:
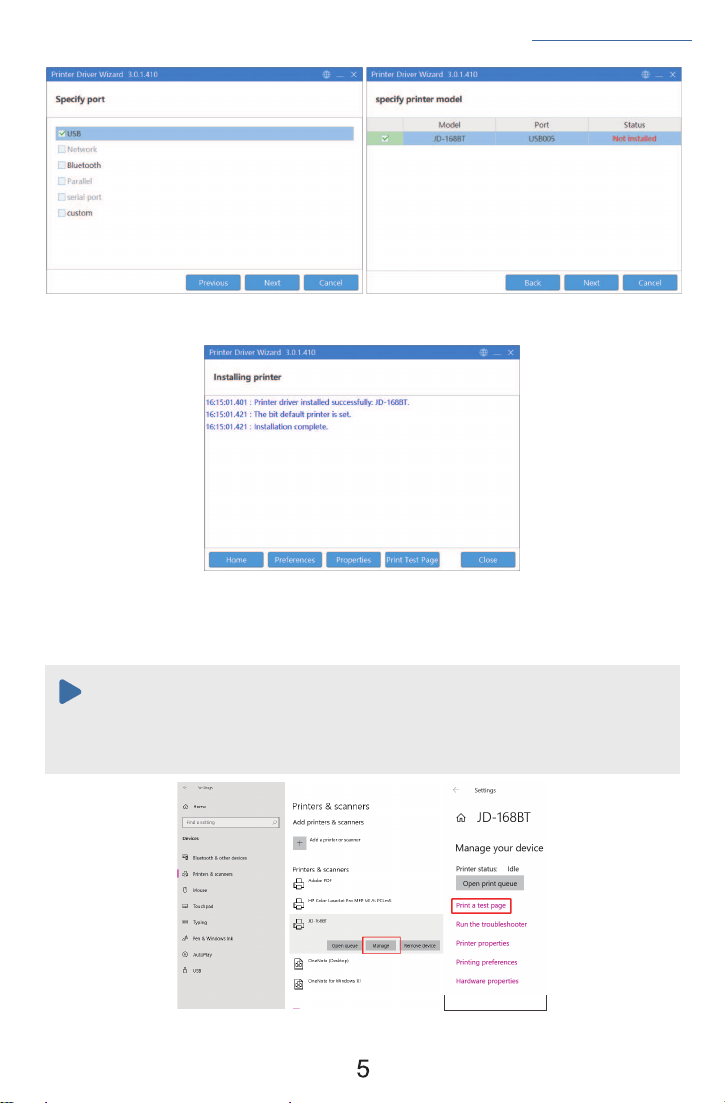
See FAQ at support.jadens.com
e.After setting up the printer, check your computer if the printer has installed or not.
If you can't print successfully, please restart your computer and printer, then install driver again.
Repeat installation will create duplicate copies of the printer in your operating system such as
'JD-168(copy 1, 2...)'
Note:
Go to the 'Setting' > 'Device' > 'Printer & scanner' > 'JD-168BT' > 'Manage' to print a test page and print
labels successfully, that means you have set up the printer successfully.
Finally, if you get to below step, that means you have installed via USB successfully.
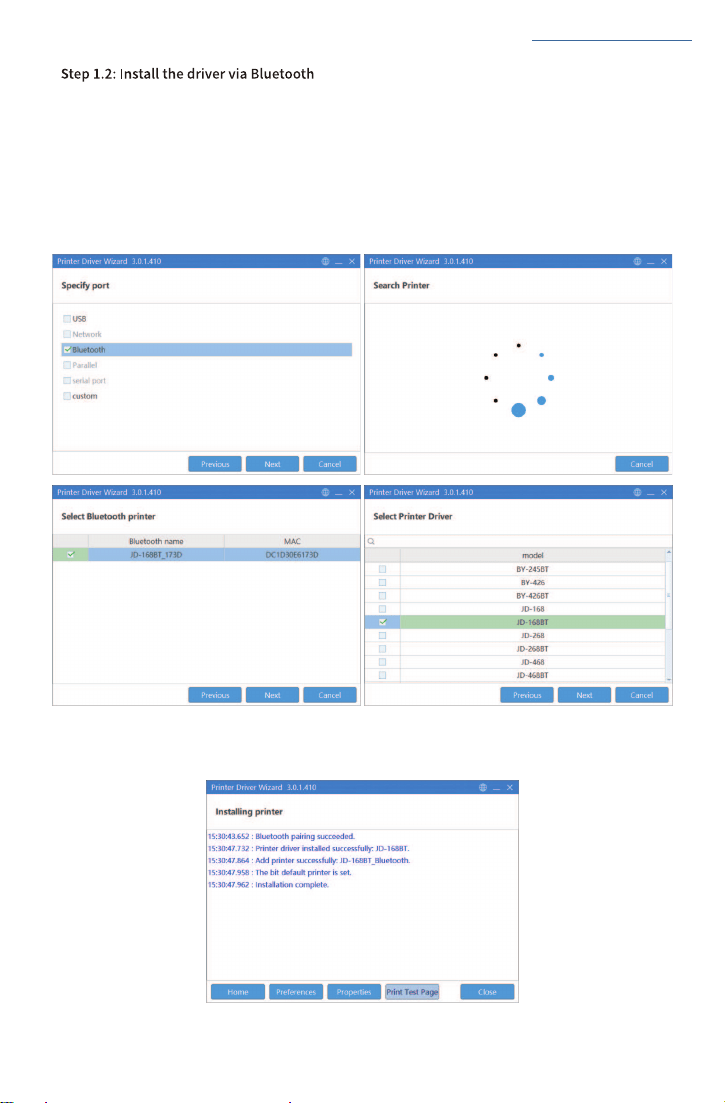
See FAQ at support.jadens.com
Search process will take about 40s, please kindly wait.
Finally, if you get to below step, that means you have installed via Bluetooth successfully. And you
can printer directly.
6
a. Connect the power cable and turn on the printer (It is not necessary to connect USB cable).
b. Download the driver:
Download the driver (JADENS_Printer_Driver.exe) from https://jadens.com/pages/download-
video. Driver version may be updated. See the latest info at support.jadens.com.
c. Install the driver:
Copy the printer driver to your computer desktop, double click to open and install it as below:
7
See FAQ at support.jadens.com
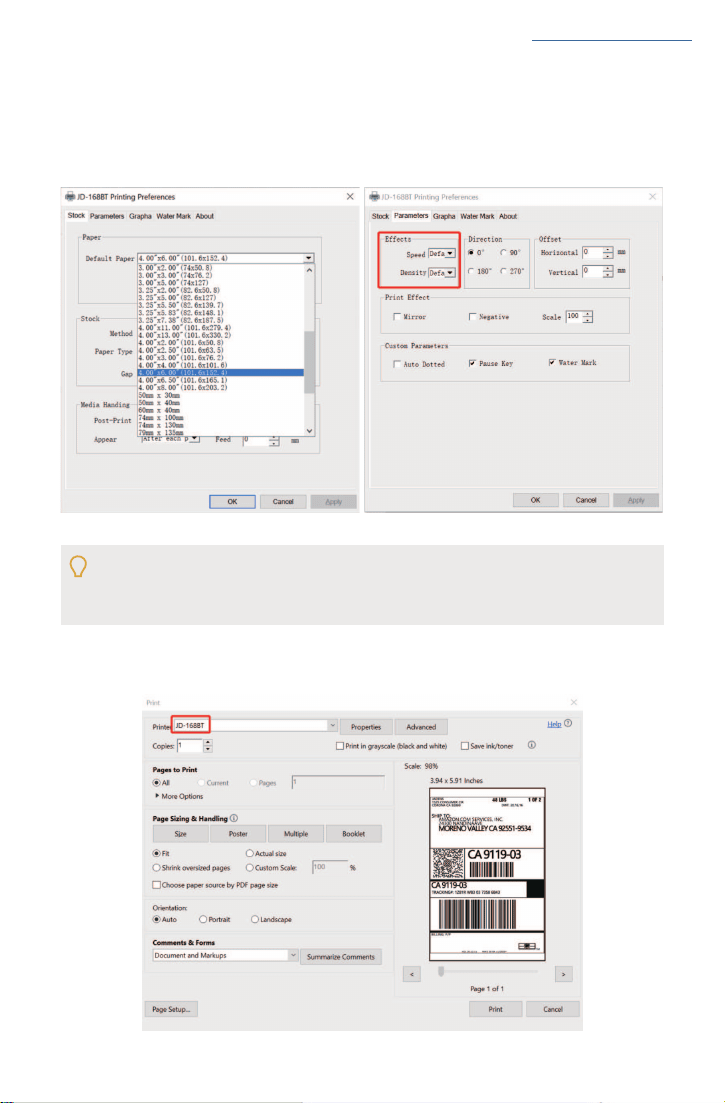
a. Go to 'Printing preferences'. In the 'Stock', according to the label size, choose the corresponding
page size. Generally, most shipping labels are 4"*6" size.
In this part, you can set the print page size and print speed and density of the label.
b. In the 'Parameters', you can change the printing speed and printing darkness.
Especially for density, if the labels print out light or not clear, you can change the density.
For Windows system please set the density at 8-12.
For Mac system please set the density at 8-12.
Step3: Print a sample file.
a. Open a PDF file with Adobe, click 'print', ensure you choose the right printer(JD-168BT).
Step2: Setting the paper quality
8
See FAQ at support.jadens.com
b. You can go to 'properties' , in this dashboard, you can set the page size, printing speed and
printing density too.
Before printing, please make sure the size of thermal labels you load, and the size
settings on devices are same.
Note:
c. Preview and check the setting you want, such as print size, print density. Then click 'print'.
If you don't have PDF Editor, please search 'Bartender' at support.jadens.com to get the
corresponding solution, or directly contact us .
Customer support is available for all your questions through email or hotline.
[email protected]phone:1-833-470-2950
7. Installation for Mac
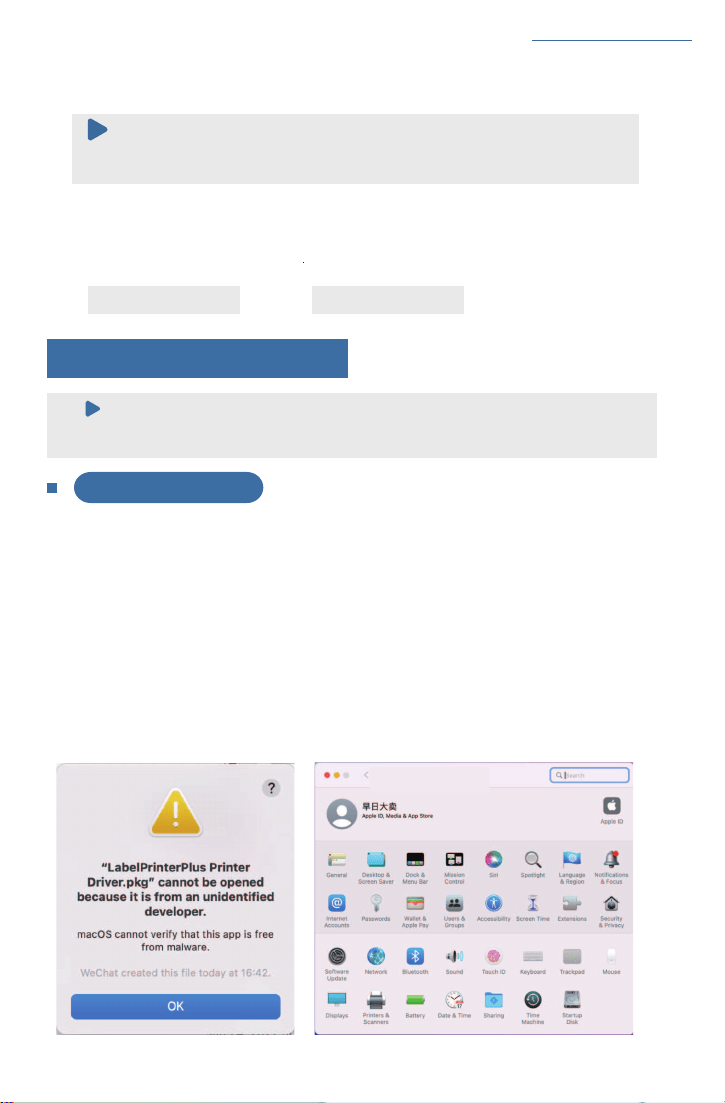
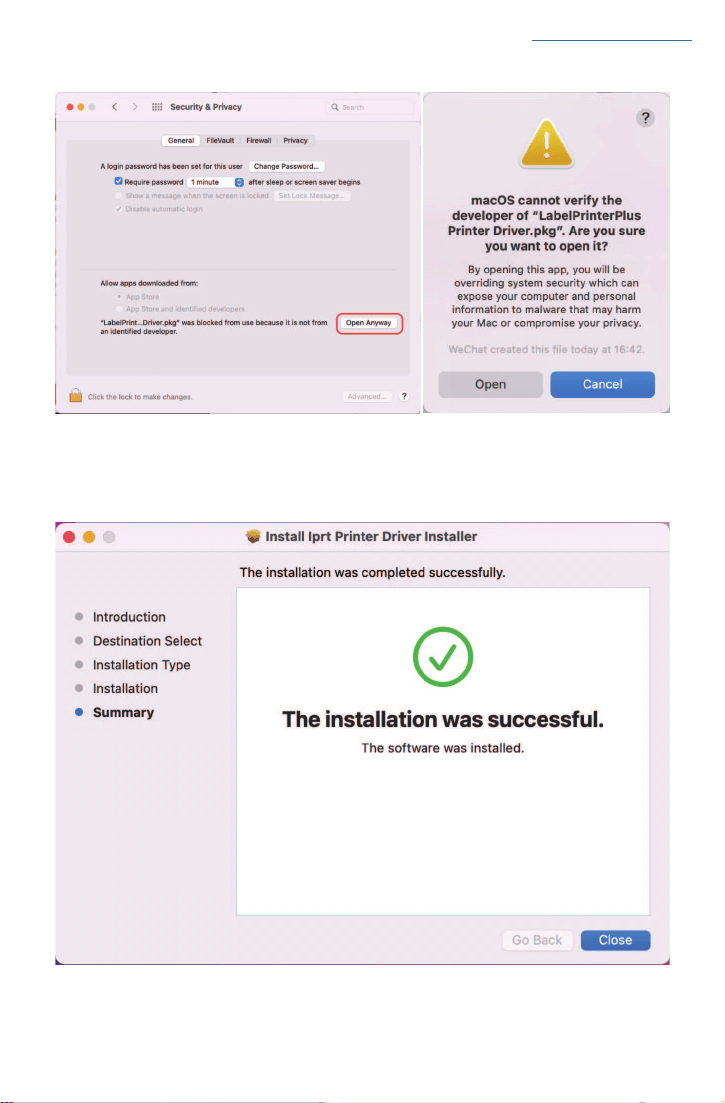
e. Click 'OK' and open 'System Preferences', and click on 'Security & Privacy'. (If you don't see the
warning, you can skip this step)
√
MacOS V10.9 or later
It is recommended to close security software before installation to prevent any issues,
and you can reopen it after the installation is complete.
Note:
a. Connect the power cable and turn on the printer (Please skip this step if you have already done it).
Install the driver via USB cable(MacBooks do not currently support installing
drivers via Bluetooth)
b. Connect the USB cable to your computer (Please skip this step if you have already done it).
c. Download the driver:
Download the driver (JADENS_Printer_Driver.pkg) from https://jadens.com/pages/download-
video. Driver version may be updated. See the latest info at support.jadens.com.
Step1: Install the driver
d. Install the driver:
Copy the printer driver to your computer desktop, double click to open and install it as below:
9
See FAQ at support.jadens.com
f. Click on 'Open AnyWay' button. Click on 'open' and continue to install the printer.
g. Follow the installation steps until you see 'The installation was successful' window.
10
See FAQ at support.jadens.com
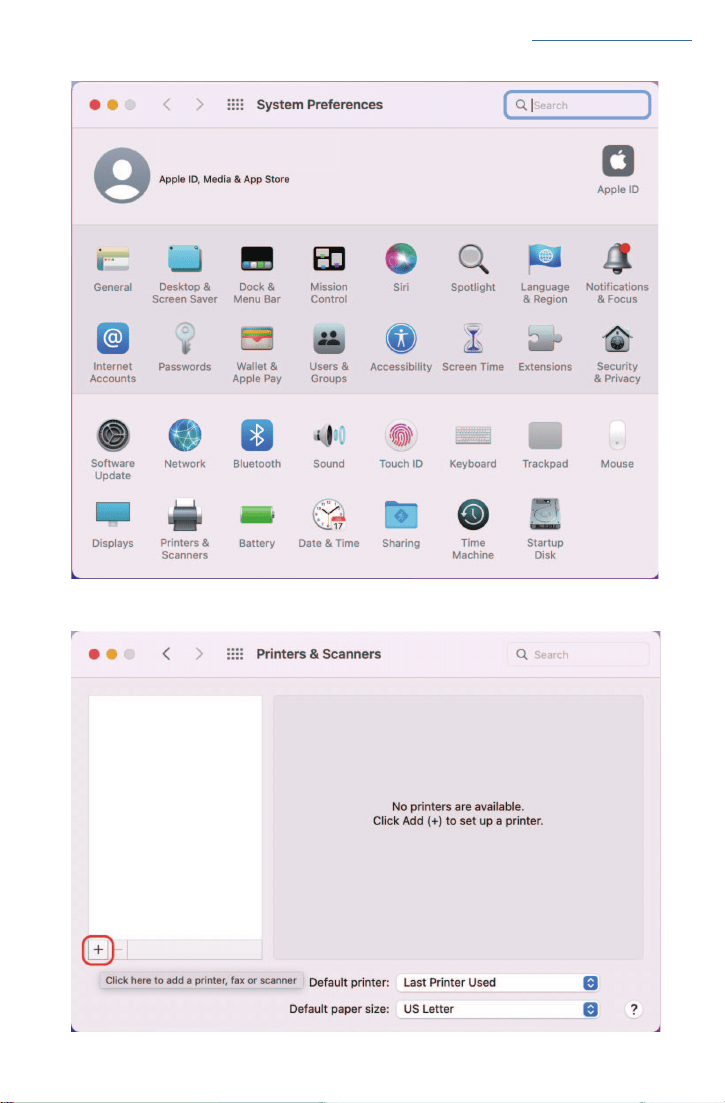
h. Open 'System Preferences' > click 'Printer and Scanners'.
i. Click '+' to add a new printer.
11
See FAQ at support.jadens.com
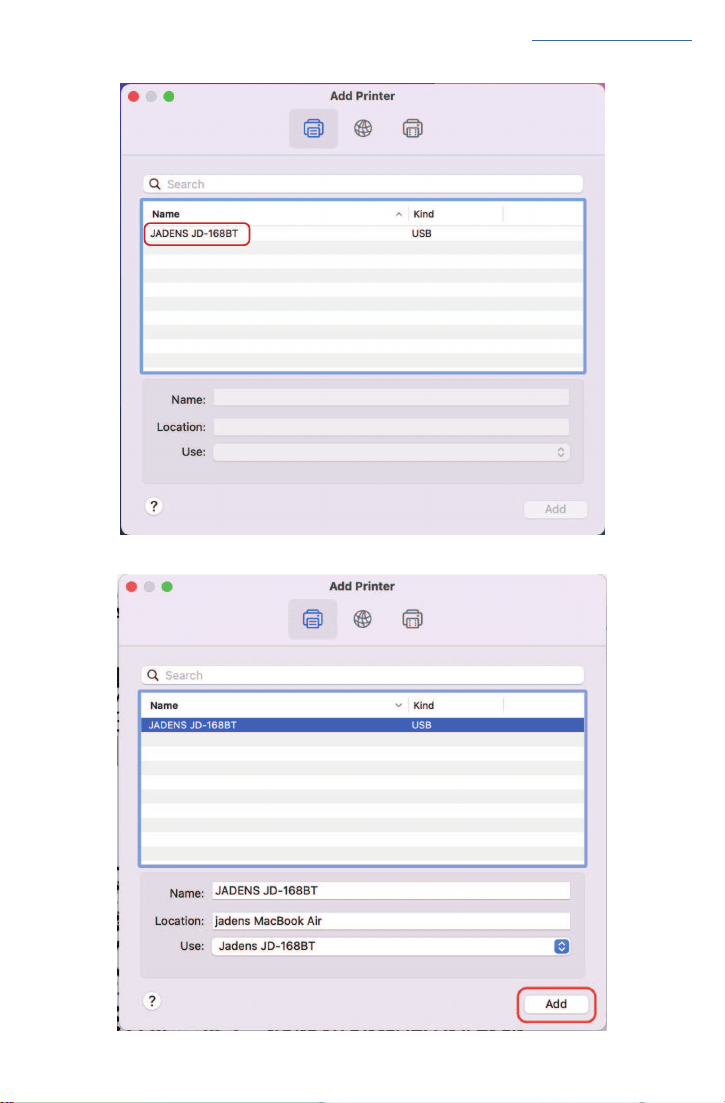
j. Click 'JADENS JD-168'.
k. Click 'Add', now the printer has been installed in your MacBook successfully.
12
See FAQ at support.jadens.com
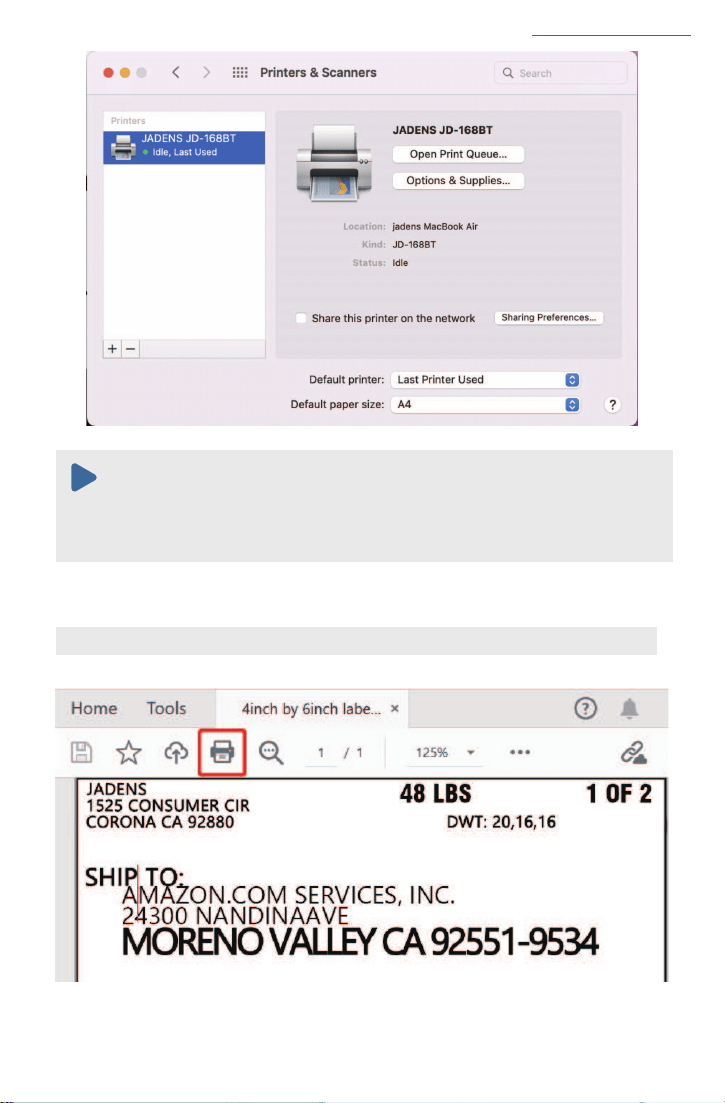
1. Now you can print directly, if you want to adjust the printing density, printing speed or
other parameter, please refer to 'part 9 Printer preference setting'.
2. If you can't print successfully, please restart your computer and install driver again.
Note:
Step2: Printer preference setting
In this step, we will show you how to set the print preference helping you print out well.
a. Open a sample PDF file , click print.
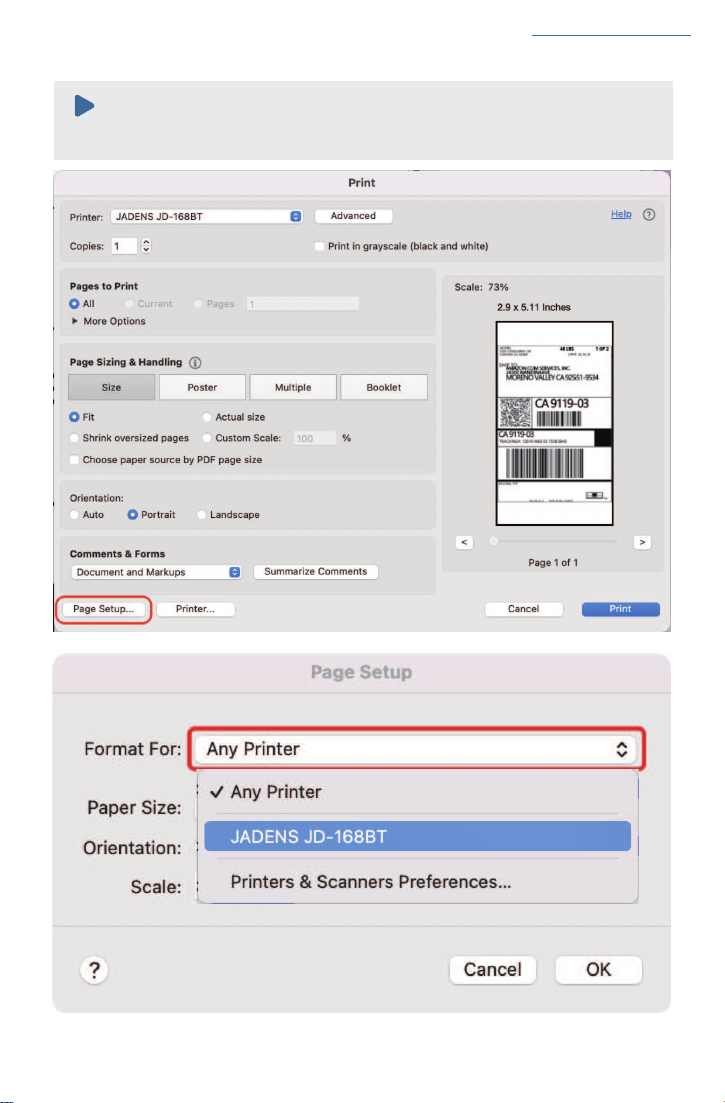
13
See FAQ at support.jadens.com
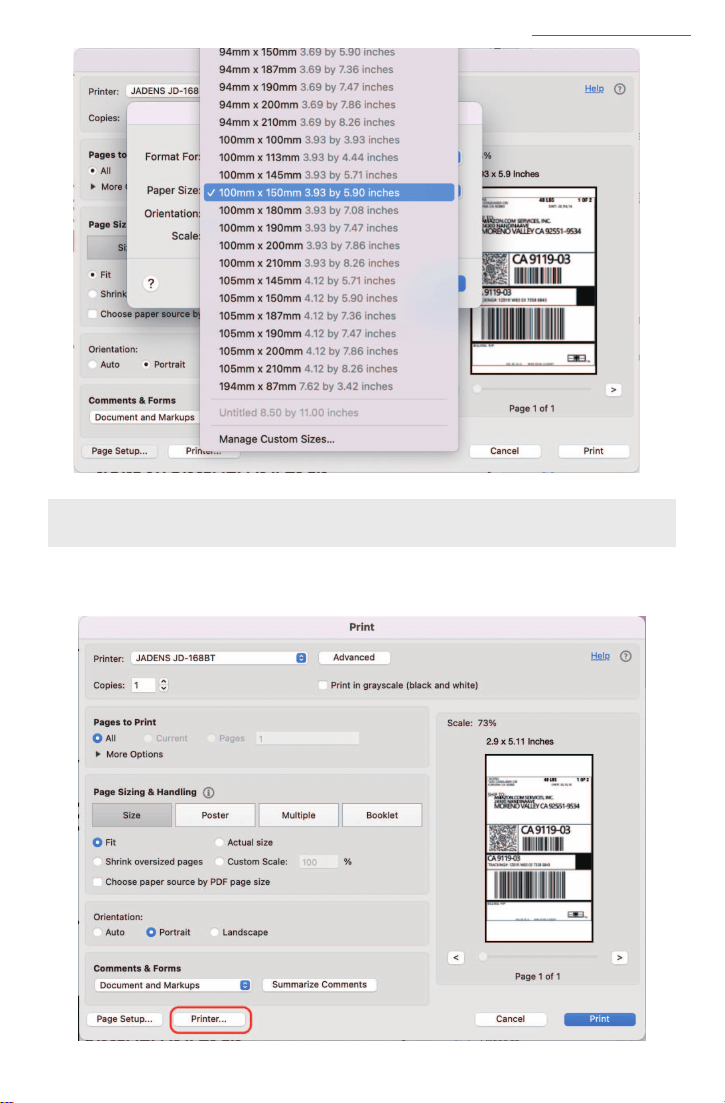
b. Click 'page setup' , you can select the page size you want to print.
Note:
Before printing, please make sure the size of thermal labels you load, and the size settings on
devices are same.
14
See FAQ at support.jadens.com
If there is no suitable size to choose 'Manage custom sizes' , input the width and height, then click
'ok'.
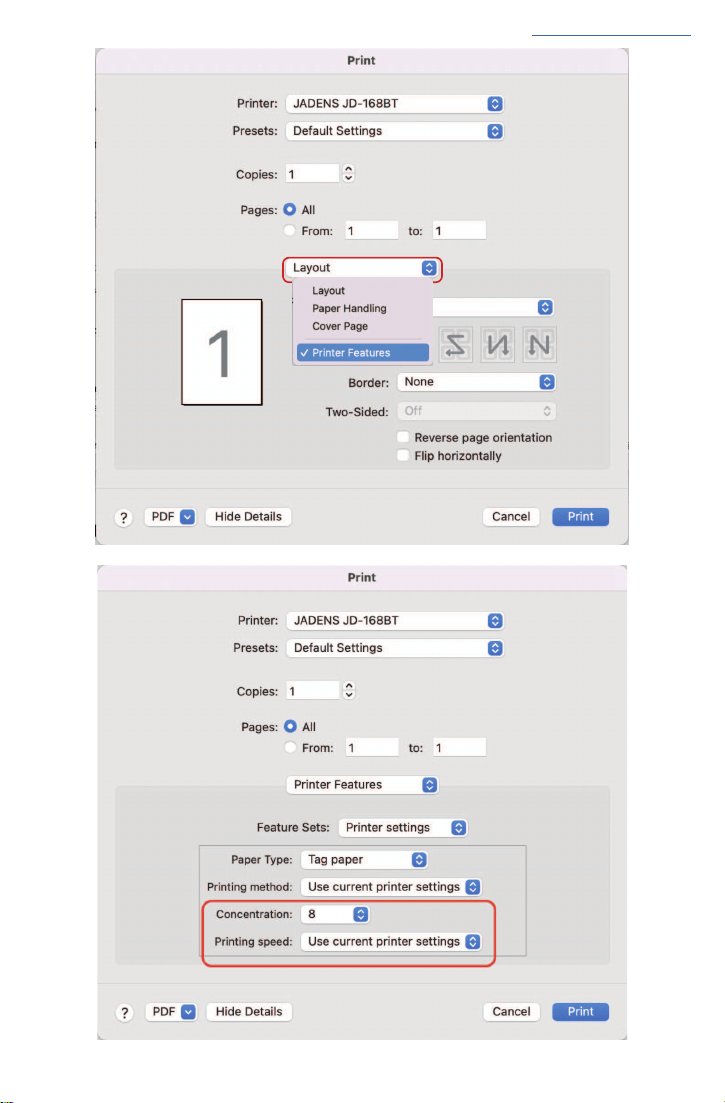
c. Click 'printer preference' > Choose 'Printer Feature' > set up 'Darkness' and 'Print Speed'.
15
See FAQ at support.jadens.com
See FAQ at support.jadens.com
16
See FAQ at support.jadens.com
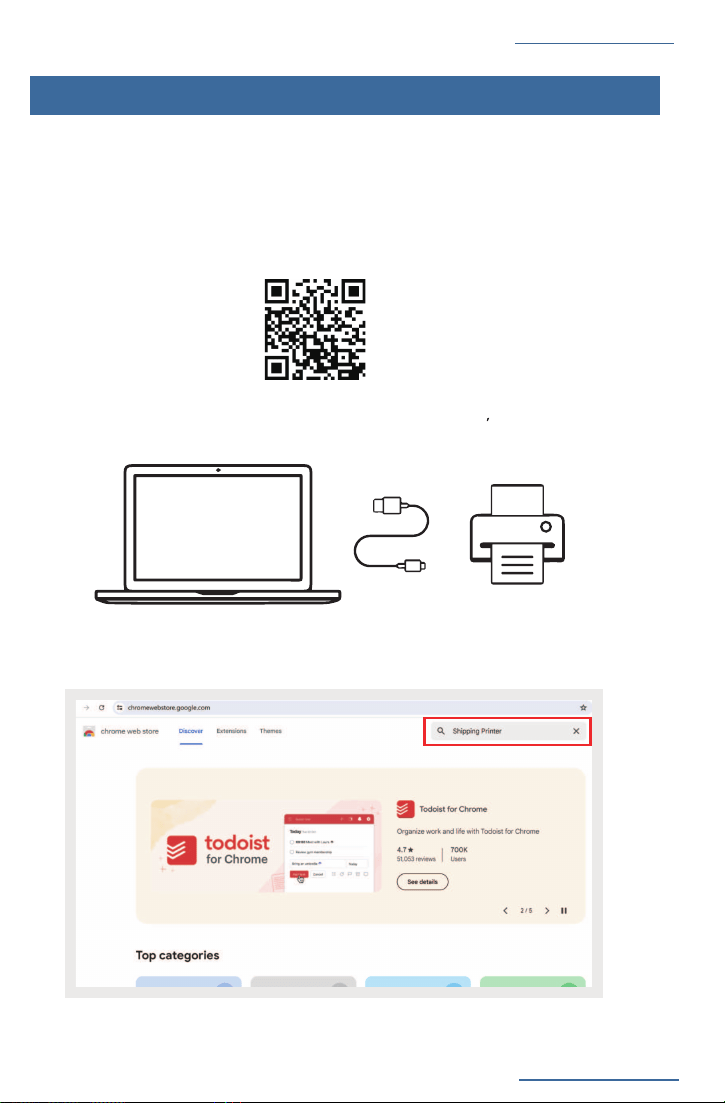
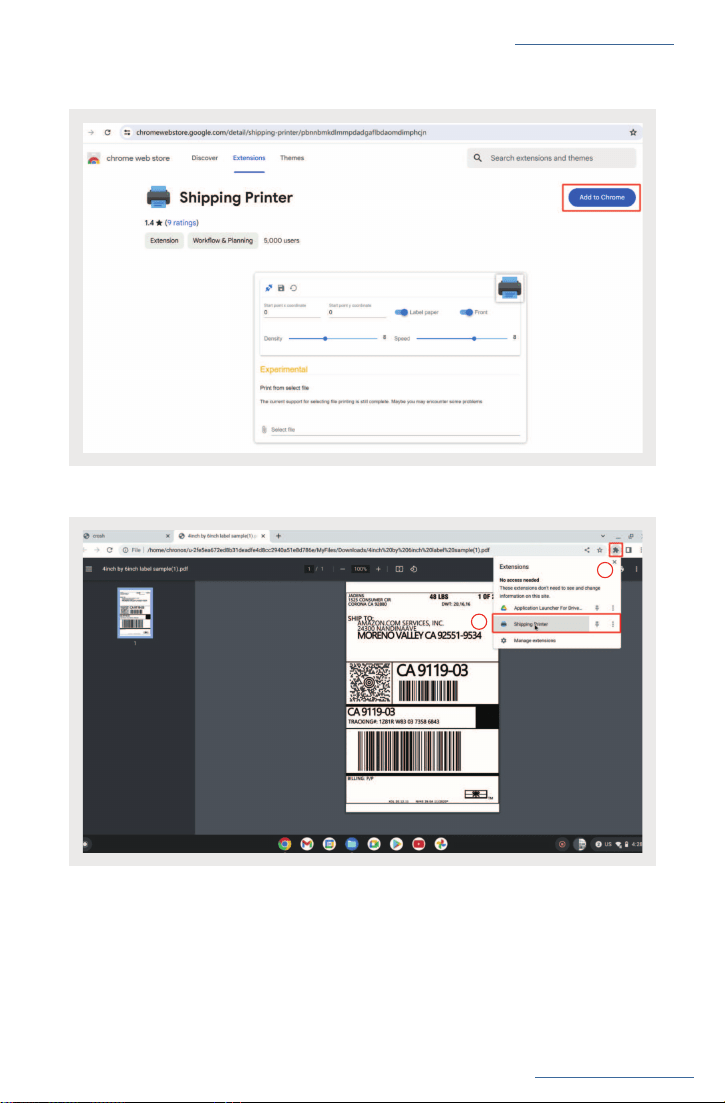
②/moc.elgoog.erotsbewemorhc//:sptth :erotS beW emorhC no ”retnirP gnippihS“ hcraeS
①
Connect the printer with your Chromebook with provided USB wire
and turn on
the printer.
8.How to Use a label Printer with a“Chromebook”
Scan the QR code below to view the guide video.
Scannen Sie den QR-Code unten, um das Anleitungsvideo anzuzeigen.
Scannez le code QR ci-dessous pour regarder la vid é o du guide.
Escanee el có digo QR a continuaci ó n para ver el video gu í a.
ガイドビデオを見るには、下のQRコ-ドをスキャンしてください。
See FAQ at support.jadens.com
17
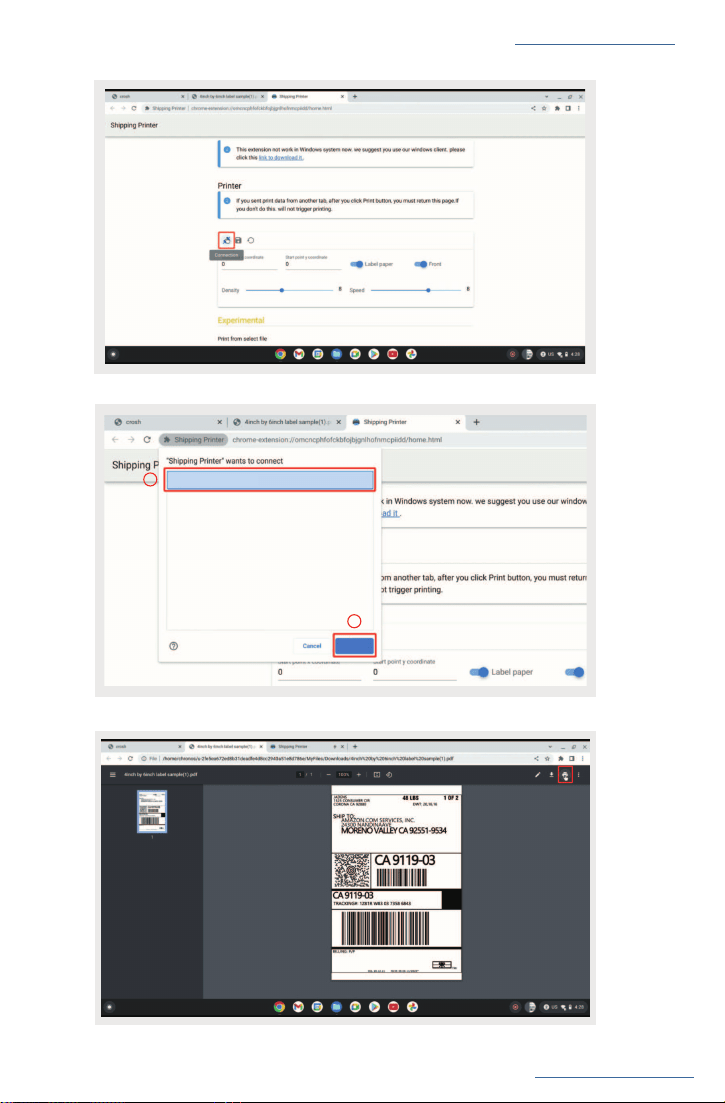
④.”retnirP gnippihS“ tceles ot noci noisnetxe kcilC
2
1
③.emorhC ruoy ot noisnetxe ”retnirP gnippihS“ daolnwoD
See FAQ at support.jadens.com
18
See FAQ at support.jadens.com
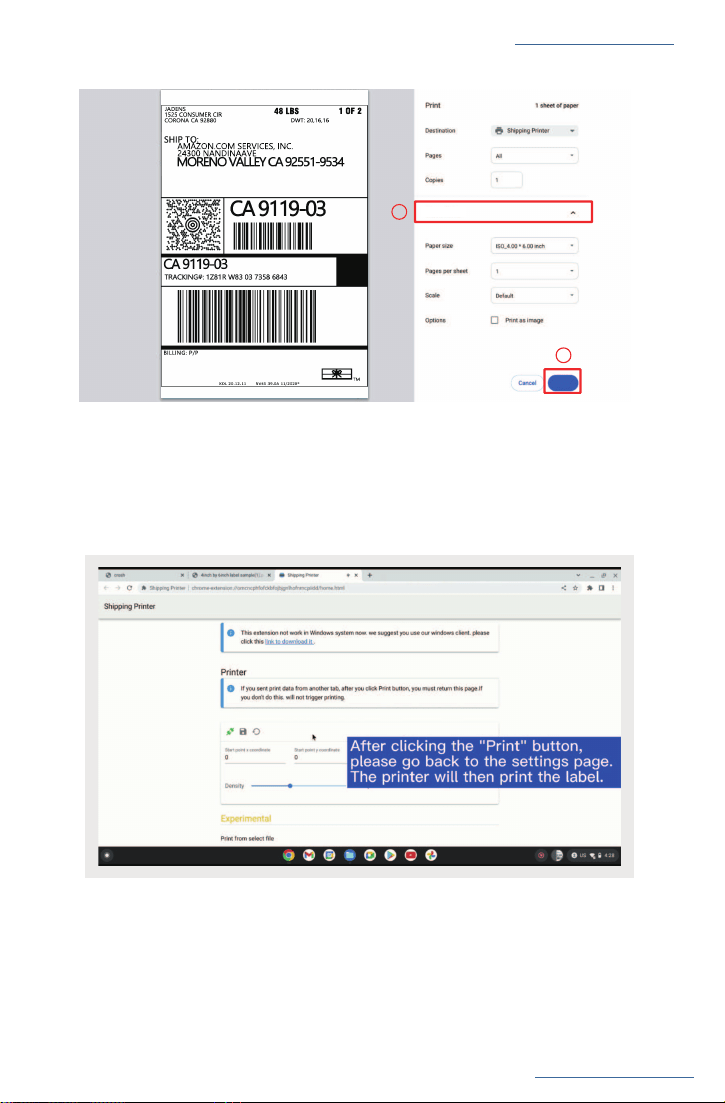
⑤.noci ”noitcennoc“ kcilC
⑦Open the file you need to print and click the the print icon.
⑥Choose your printer to conne
ct
.
1
2
Printer-Paired
Connect
See FAQ at support.jadens.com
19
See FAQ at support.jadens.com
⑧
1
2
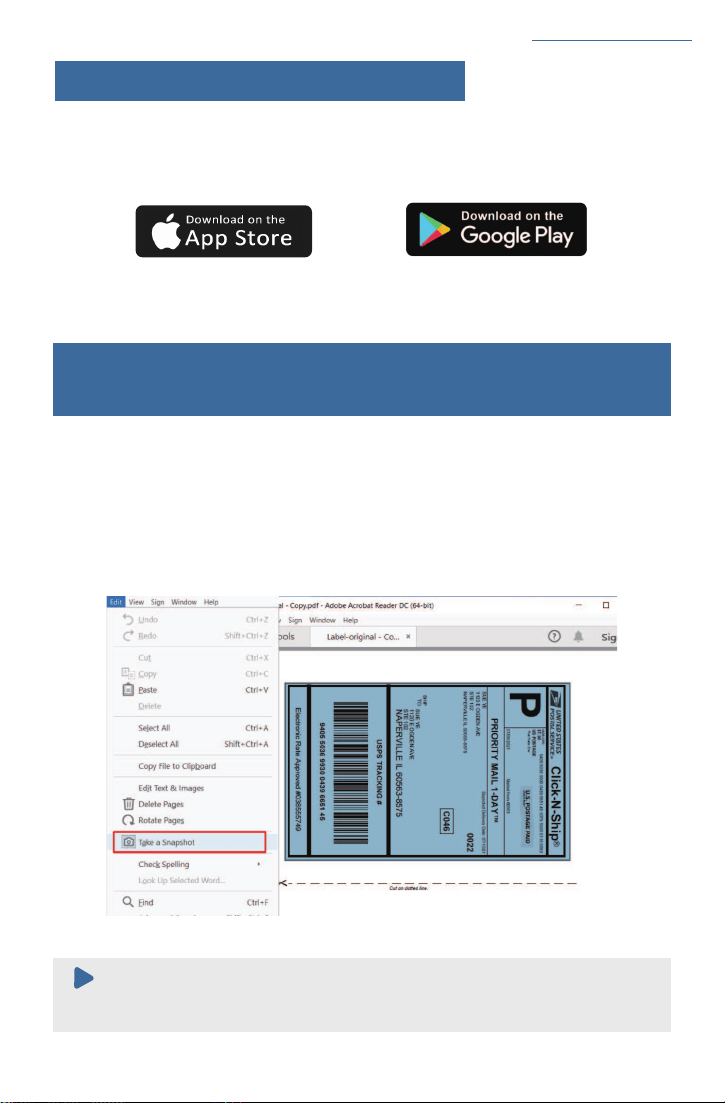
More settings
Print
⑨.egap gnittes noisnetx ”elebaL gnippihS“ eht ot kcab nruT
The printer will then print the label.
Click "More settings" to select the paper size and copies as you need, then click "Print".
See FAQ at support.jadens.com
See FAQ at support.jadens.com
10.Important Tips: Print Iabel of multiple size
using 'Take a snap shot'
The function of 'Take a snap shot' can solve most print problem. It enables you to print the area you
want . Now let us show you how to use it.
1.How to print your labels with nonstandard size.
If the printed PDF/file is unusual size such as A4 which can't be found the same size label. In this
situations, you have to use the function of 'take a snapshot' to print. Here are the steps to operate.
(1).For windows:
a. Open the PDF in Adobe Reader
b. From the top panel, select 'Edit' > 'Take a Snapshot'. choose the area you want to print.
c. Click 'Print' , set up the page size same as the labels you load, then print.
Note:
Please make sure the page size match to the loaded label size. Otherwise, it is possible that
it prints out over label or misaligned.
20
9.Smartphone APP Printing
APP download:Search for [Jadens Printer] on Google Play or App Store and download the app
for free. Please refer to the“APP Printing Quick Start Guide”for specific operating
instructions.
APP Store is a trademark of Apple Inc., registered in the U.S. and other countries.
Google Play and Google Play logo are trademarks of Google LLC.
See FAQ at support.jadens.com
.
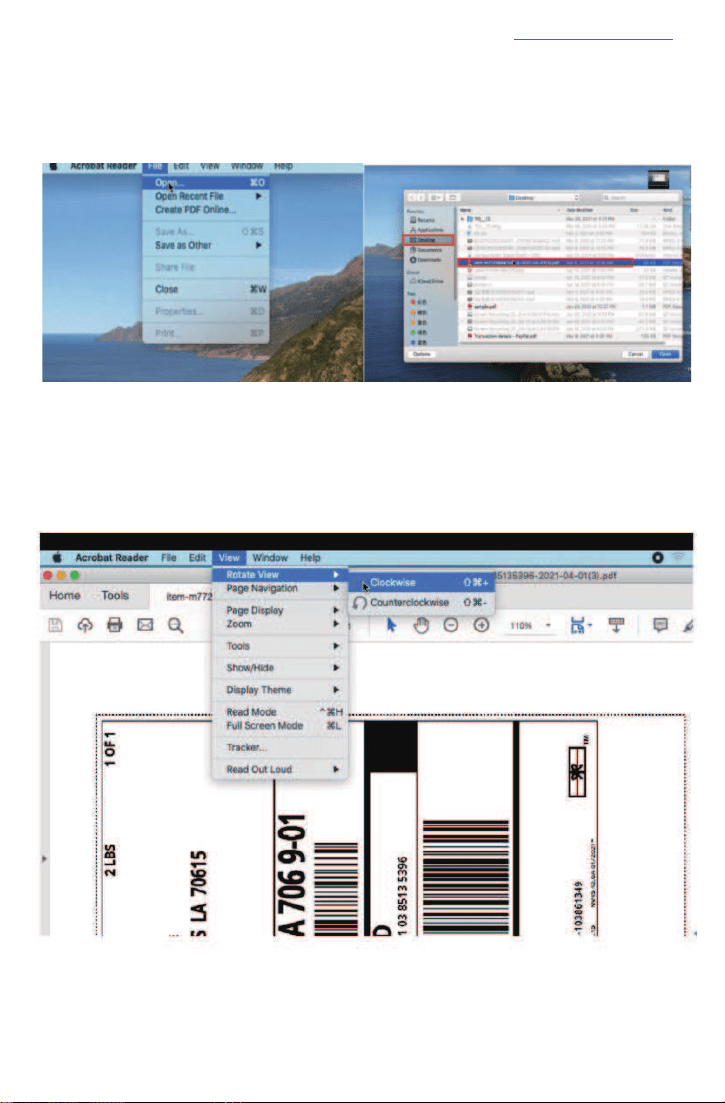
(2)For MAC
a. Find the 'File' in the top left corner of you desktop > Click 'Open' > Click 'Desktop' > Choose PDF file
(or you can open the file with Adobe)
b. From the top panel, select 'View' > 'Rotate View' > 'Clockwise' so that the labels are side by side.
(If the labels has laid vertically. please skip this step)
21
See FAQ at support.jadens.com
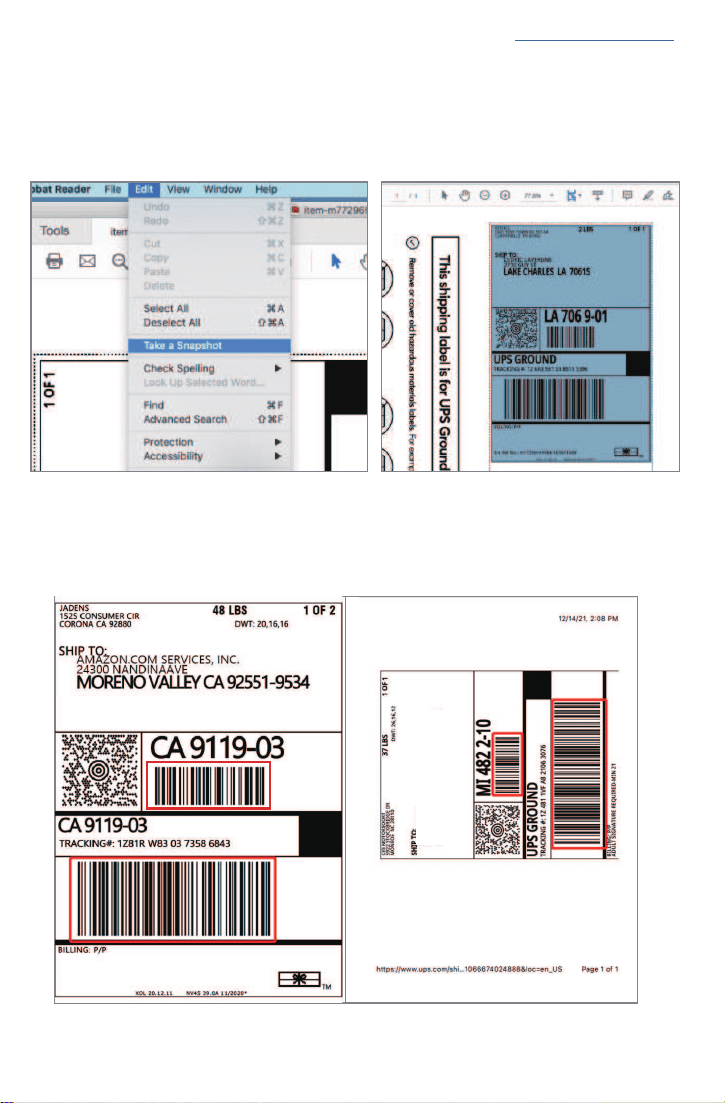
C. Next, from the top panel, select 'Edit' > 'Take a Snapshot'. Then click and drag over one of the labels
that you need, so that you can print a specific range of label.
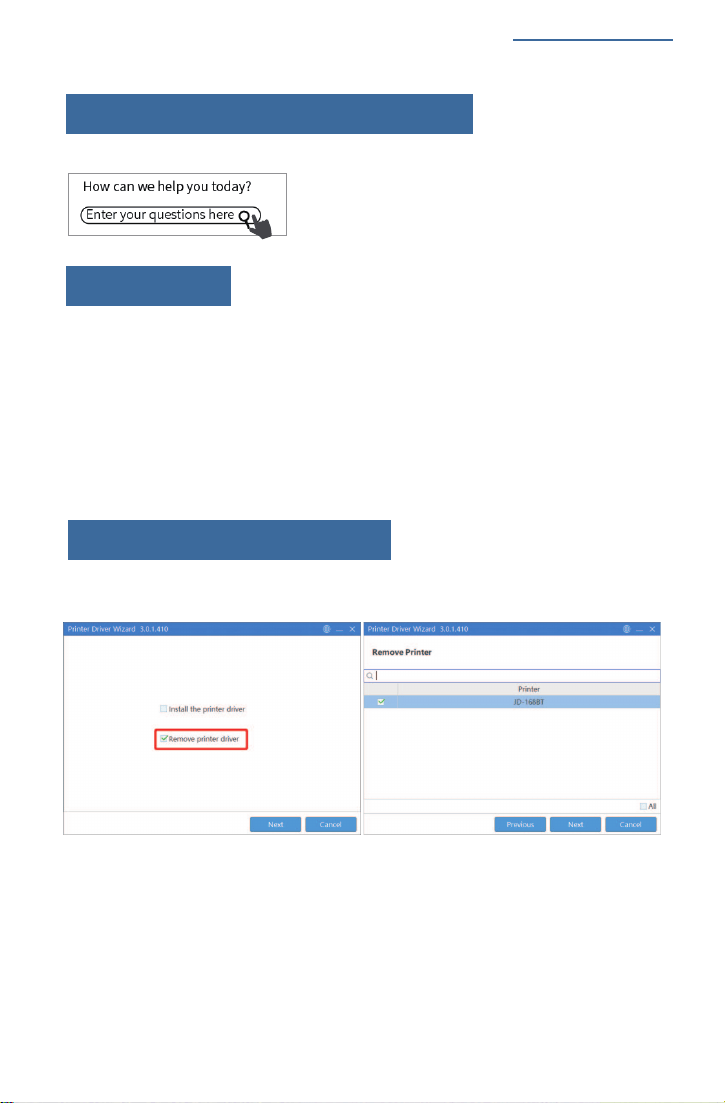
2. If you want to print the label that include barcode, please make sure print out the barcode vertically
in case the high temperature lead to the barcode print out blocks and can't be scanned.
×
√
22
23
See FAQ at support.jadens.com
- Avoid using poor quality labels as they can damage the printer.
- Regularly clean the printer head as described in 18. MAINTENANCE.
- If paper is jammed, turn off the printer, and allow the printer head to cool down. Open the cover
and ensure that the rubber is clean. lf dirty, use alcohol pad to clean. Allow the area to dry off
before turning the printer on.
Go to support.jadens.com to see FAQ
11. Frequently asked question
- Anytime you change label size, run the automatic label identification by pressing and holding
the feed button until you hear one short beep.
- Press the feed button on the printer to skip a blank label.
-To run a self-test, press and hold the feed button until you hear two short beeps.
12. Pro tips
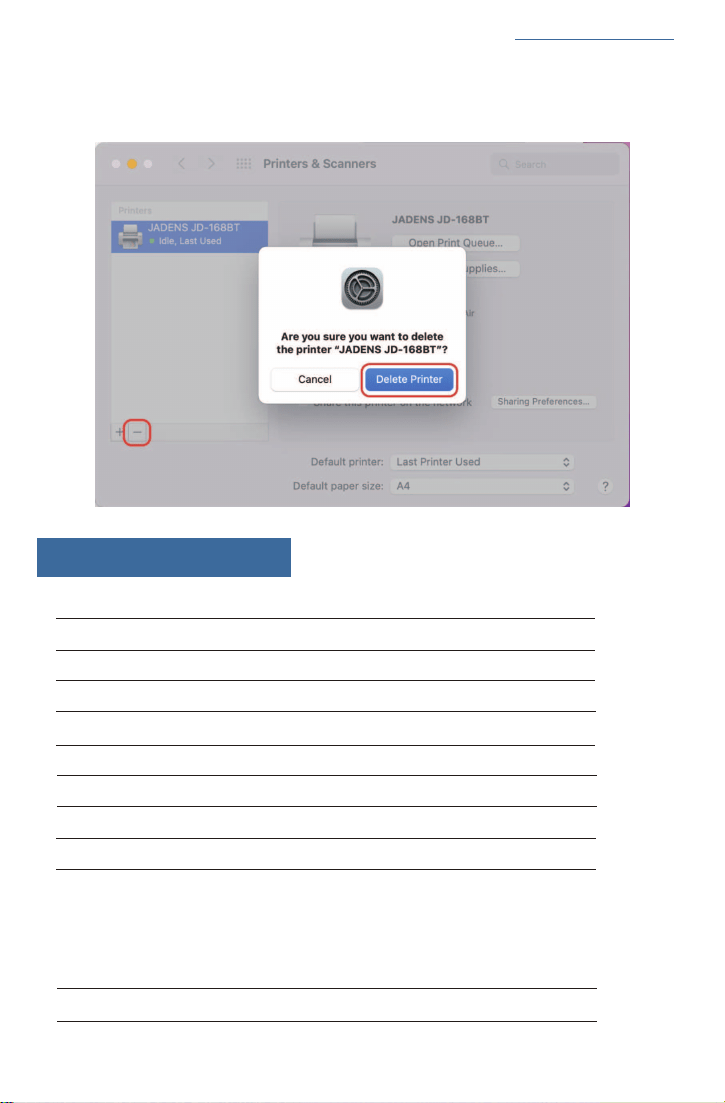
13. Driver removement
For windows:
Open the driver again and follow below steps to uninstall the driver.
24
See FAQ at support.jadens.com
14. Specifications
Printing Method Thermal
Resolution 203DPI
Max Printing Speed 150mm/s
Label Width 1.89''-4.25'' (48-108mm)
Label Thickness 0.08-0.2mm
Connection USB
Input Voltage 100-240V
Power Adapter 24V / 2A
Supported Paper Direct Thermal Labels / Paper
Supported Operating Systems
Printing Life About 700,000 Labels
Label Minimum Length 0.79''(20mm)
For Mac:
Click 'System Preferences' > 'Printer& Scanners', click 'JADENS JD-168' > '-' > 'Delete Pinter'.
Bluetooth Connection:
iOS, iPadOs, Android, Windows 7
or later
USB Connection:
MacOs V10.9 or later, ChromeOs,
Windows 7 or later

25
See FAQ at support.jadens.com
The printer head is a sensitive part of the printer and can be found on the upper part of the printer
when open.
Caution: While the printer is running, the printer head can be very hot.
1. Ensure that the power switch is OFF, remove the power cord, and open the cover. Wait several
moments to ensure that the printerhead cools down.
2. Completely clean the printer head using an alcohol swab. Any 70% Isopropyl Alcohol pad would
work. Please do not use water.
3. Wait 2-3 minutes until the alcohol has completely dried, then close the cover.
4. Connect the power cord and print a test page to check if it is clean.
17. Maintenance
CLEANING THE PRINT HEAD
16. Safety tips
- The printer head can become very hot after printing labels. Do not touch the printer head until
it has cooled.
- Do not bend the power cord excessively or place objects on the cord.
This could result in fire.
- Keep the printer out of reach of children.
- Use only approved accessories and do not try to disassemble or repair the unit by yourself.
- Keep the printer away from water and other objects that may destroy or damage the device.
- Printer should remain unplugged when not in use for long periods of time.
Green
Normal operation
Flashing Green
Flashing Red
(every 2 seconds)
Flashing Red
(2 times per second)
Printer Head is
overheated
1. Paper shortage
2.Wrong size paper
Printer cover is not
fully closed
Check that the printer
cover is completely closed.
Printer will automatically
resume once the printer
head has cooled down.
Light colorDescriptionTroubleshoot
15. LED indicator
Be sure that the labels are
loaded correctly. You may
need to run automatic label
identification(point5 at page3-4)
See FAQ at support.jadens.com
Can we help?
For further assistance please contact
1-833-470-2950
support.jadens.com
Scan the below QR code to talk with us
Customer Support
Scan or upload this QR code
using the WhatsApp camera
to add us
Available Time:
Mon- Fri: EST 10AM-10PM
Sat- Sun: EST 1PM- 9PM

FCC Caution:
FCC Radiation Exposure Statement:
Any Changes or modifications not expressly approved by the party responsible
for compliance could void the user's authority to operate the equipment.
This device complies with part 15 of the FCC Rules. Operation is subject to the
following two conditions: (1) This device may not cause harmful interference,
and (2) this device must accept any interference received, including interference
that may cause undesired operation.
IMPORTANT NOTE:
Note: This equipment has been tested and found to comply with the limits for a
Class B digital device, pursuant to part 15 of the FCC Rules. These limits are
designed to provide reasonable protection against harmful interference in a
residential installation. This equipment generates, uses and can radiate radio
frequency energy and, if not installed and used in accordance with the instructions,
may cause harmful interference to radio communications. However, there is no
guarantee that interference will not occur in a particular installation. If this
equipment does cause harmful interference to radio or television reception, which
can be determined by turning the equipment off and on, the user is encouraged to
try to correct the interference by one or more of the following measures:
—Reorient or relocate the receiving antenna.
—Increase the separation between the equipment and receiver.
—Connect the equipment into an outlet on a circuit different from that to which the
receiver is connected.
—Consult the dealer or an experienced radio/TV technician for help.
This equipment complies with FCC radiation exposure limits set forth for an
uncontrolled environment. This equipment should be installed and operated with
minimum distance 20cm between the radiator& your body.
ISED Warning
This device complies with Inovation, Science,and Economic Development
Canada licence-exempt RSS standard(s). Operation is subject to the following
two conditions:
(1) this device may not cause interference, and
(2) this device must accept any interference, including interference that may
cause undesired operation of the device.
Le présent appareil est conforme aux CNR d' Imnovation, Sciences et
Développement économique Canada applicables aux appareils radio exempts
de licence. L'exploitation est autorisée aux deux conditions suivantes:
(1)l'appareil nedoit pas produire de brouillage, et
(2)l'utilisateur de l'appareil doit accepter tout brouillage radioélectrique subi,
méme si le brouillage est susceptible d'en compromettre le fonctionnement.
The device is compliance with RF exposure guidelines, users can obtain Canadian
information on RF exposure and compliance.The minimum distance from body
to use the device is 20cm.
Le présent appareil est conforme Après examen de ce matériel aux conformité
ou aux limites d'intensité de champ RF, les utilisateurs peuvent sur l'exposition
aux radiofréquences et la conformité and compliance d'acquérir les informations
correspondantes. La distance minimale du corps à utiliser le dispositif est de 20cm.
FCC ID: 2BDL3-JD-268BT
IC: 28864-JD268BT
The crossed-out wheeled bin symbol indicates that the item should be disposed of
separately from household waste. This product complies with the 3R principles of the
EU WEEE Directive (recyclable, reused, recycled), The item should be handed in for
recycling in accordance with local environmental regulations for waste disposal. By separating
a marked item from household waste, you will help reduce the volume of waste sent to
incinerators or land-fill and minimize any potential negative impact on human health and the
environment. For more information, please contact us.