Find the right LED
lutron.com/LEDfinder
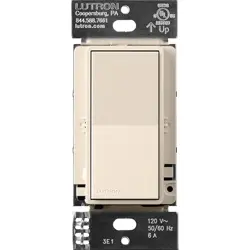
Sunnata LED
+
Dimmer Quick Install Guide
Install with
confidence
Use included diagrams
or visit our website for
step-by-step instructions.
®
Receive an Extended Warranty: lutron.com/SunnataSurvey
Support: 1.844.LUTRON1 (USA / Canada) +1.888.235.2910 (Mexico)
lutron.com/sunnatasupport
INSTALL WITH CONFIDENCE
English
lutron.com/SunnataWiring
VIDEO & STEP-BY-STEP INSTRUCTIONSVIDEO & STEP-BY-STEP INSTRUCTIONS
1. CAUTION: Use only with permanently installed
fixtures with dimmable screw-in compact fluorescent,
dimmable screw-in LED, halogen, or incandescent
lamps. To avoid overheating and possible damage to
other equipment, do not use to control receptacles,
motor-driven appliances, or transformer-supplied
appliances.
2. Install in accordance with all national and local
electrical codes.
3. When no “grounding means” exists in wallbox, the
National Electrical Code (NEC®) allows a control to be
installed as a replacement when a plastic faceplate with
plastic fasteners is used, or the circuit is protected by a
ground fault circuit interrupter (GFCI). Lutron wallplates
meet this requirement. Cap or remove green wire before
screwing control into wallbox.
4. Protect the dimmer from dust and dirt when painting or
spackling the wall.
5. It is normal for the dimmer to feel warm to the touch
during operation.
6. Clean the dimmer with a soft damp cloth only. Do
not use any chemical cleaners. For more information,
please see lutron.com/cleaning
7. For indoor use only.
Important Notes
Please read before installing
Ganging and Derating
Derating is necessary if mounting two
or more devices side by side (see
chart for new wattage rating).
Note: Derating not necessary for LED /
CFL loads.
STCL-153M
150 W
LED / CFL
600 W *
Incand. / Halogen
How-to videos
lutron.com/SunnataWiring
FCC Supplier Declaration of Conformity / IC:
This device complies with part 15 of the FCC Rules and
Industry Canada license-exempt RSS standard(s). Operation
is subject to the following two conditions:
(1) This device may not cause interference, and
(2) this device must accept any interference, including
interference that may cause undesired operation. Modifications
not expressly approved by Lutron Electronics Co., Inc. could
void the user’s authority to operate this equipment.
Note: This equipment has been tested and found to
comply with the limits for a Class B digital device, pursuant
to part 15 of the FCC Rules. These limits are designed to
provide reasonable protection against harmful interference
in a residential installation. This equipment generates, uses
and can radiate radio frequency energy and, if not installed
and used in accordance with the instructions, may cause
harmful interference to radio communications. However,
there is no guarantee that interference will not occur in a
particular installation. If this equipment does cause harmful
interference to radio or television reception, which can be
determined by turning the equipment off and on, the user
is encouraged to try to correct the interference by one or
more of the following measures:
• Reorient or relocate the receiving antenna
• Increase the separation between the equipment and receiver
• Connect the equipment into an outlet on a circuit
different from that to which the receiver is connected
• Consult the dealer or an experienced radio/TV
technician for help
CAN ICES-5 (B)/NMB-5(B)
*Maximum Allowable Inc. / Hal. Wattage
Single
Gang
End of Gang Middle of Gang
600 W 500 W 400 W
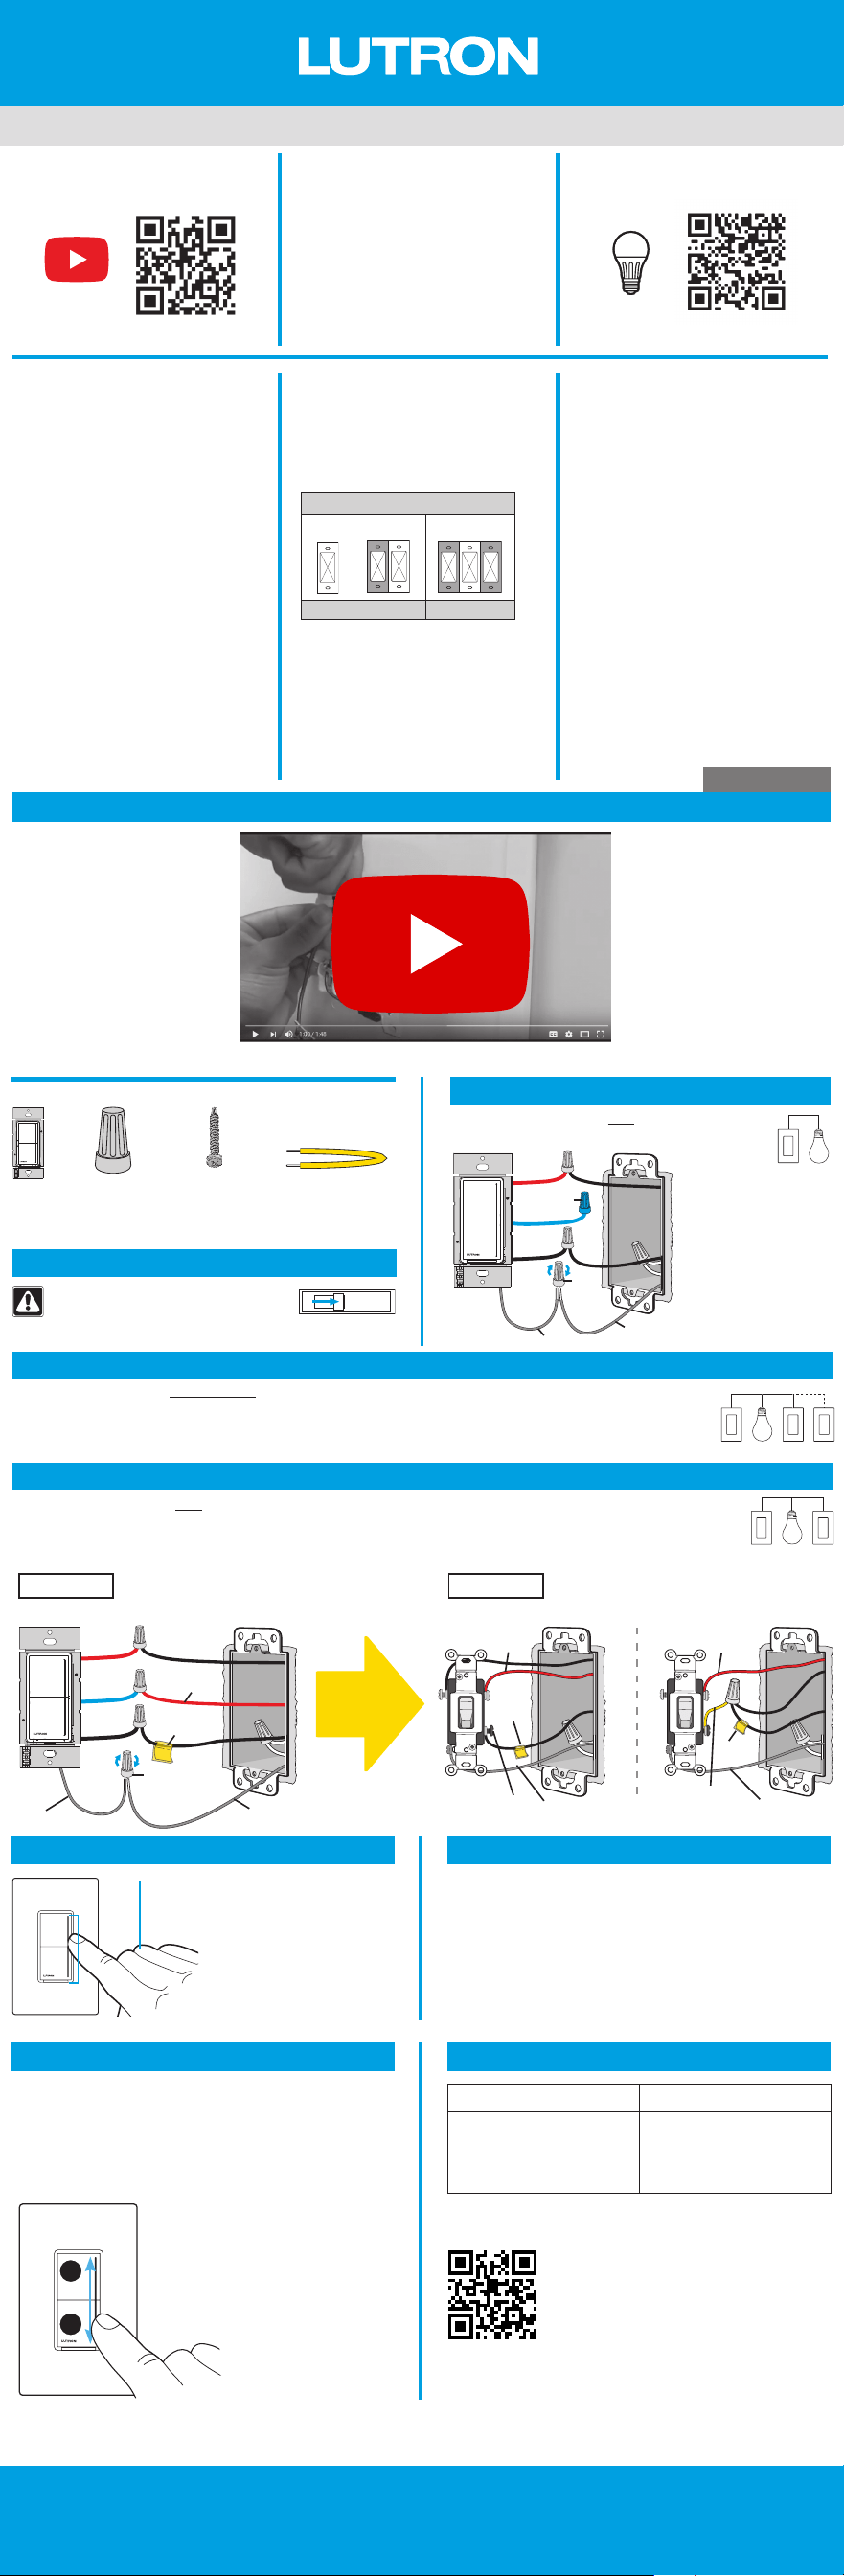
Option 1: Single Pole
For lights switched from one location:
Ground wire
(bare or green)
Insert
and
twist to
tighten
Use blue
connector
Green wire
NOTE: Red and black wires on dimmer are interchangeable.
Disconnect Power
WARNING: SHOCK HAZARD. May result
in serious injury or death. Turn off power at
circuit breaker or fuse before installing.
ON
OFF
Included Parts
Dimmer
Wire Nut
Yellow (x4)
Blue (x1)
Screws (x2) Jumper Wire
(Only needed for
Option 3. Not
included with
STCL-153MRH.)
Red
Blue
Black
Limited Warranty:
lutron.com/TechnicalDocumentLibrary/369-119_Wallbox_Warranty.pdf ©2019-2021 Lutron Electronics Co., Inc.
Lutron, LED+, and Sunnata are trademarks or registered trademarks of Lutron Electronics Co., Inc., in the U.S. and other countries.
The YouTube icon is a trademark of Google LLC.
1. Touch the middle of the light
bar until the light bar begins
to flash (~6 sec.).
2. Set lowest dimming
range where lights are on
and stable.
3. Tap the OFF button to save.
Visit lutron.com/SunnataMyLevel to learn how to adjust:
• High-end dimming range
• Preset light level
• Light bar brightness
• Locator light / Light level indicator
Option 2: 3-Way / 4-Way with Sunnata Accessory Switch(es)
For lights switched from two or more locations:
See Sunnata Accessory Switch Installation Guide (model ST-AS) for details.
Option 3: 3-Way with an Existing Switch
For lights switched from two locations:
120 V~ 60 Hz
Operation
IF LIGHTS ARE OFF, single tap top button for preset (default 100%).
Double tap for full brightness.
To change the preset, visit lutron.com/SunnataMyLevel.
IF LIGHTS ARE ON, single tap top button for full brightness.
Press and hold the bottom button (1 second) for a 30 second
delayed fade-to-off. Single tap bottom button for off.
Troubleshooting
On
Off
IMPORTANT: Before disconnecting the existing devices, tag the wire connected to the different colored screw (typically black,
but wire colors vary, and labeled COM). This is the Common wire.
QUESTIONS? See lutron.com/SunnataWiring
Adjust Low-End Trim MyLevel Personalization (optional)
Different
color screw
Ground wire
(bare or green)
Insert and
twist to
tighten
Green wire
Non-black
wire
Location 1
Location 2
Non-black
wire
Non-black
wire
Common
(tagged)
Ground wire
(bare or green)
Yellow
jumper
wire
Required
for 3-way
Ground wire
(bare or green)
BEFORE AFTER RE-WIRING
Red
Blue
Black
Common
(tagged)
Common
(tagged)
Symptom Possible Cause
Light have poor dimming
performance
Adjust low-end trim
Find best performing bulbs
at lutron.com/LEDFinder
For more information, please visit
lutron.com/SunnataSupport
Voir le Guide d’installation de l’interrupteur auxiliaire Sunnata (modèle ST-AS) pour plus de détails.
Para obtener más información consulte la Guía de instalación del interruptor accesorio Sunnata (modelo ST-AS).
*Puissance Inc. / Hal. maximale admissible
*Máxima potencia Inc./Hal. admisible
Compartiment simple
Dispositivo único
Fin du compartiment
Fin del grupo
Milieu du compartiment
Centro del grupo
600 W 500 W 400 W
Gradateur LED+ Sunnata
Atenuador Sunnata LED+
Guide d’installation rapide
Guía de instalación rápida
Installer en toute
confiance
Utilisez les schémas inclus ou
consultez notre site Web pour
obtenir des instructions étape
par étape.
Instale con confianza
Para obtener instrucciones paso a paso
utilice los diagramas incluidos o visite
nuestro sitio web.
1. AVERTISSEMENT: À utiliser seulement pour des luminaires installés de façon
permanente avec des lampes fluorescentes compactes, des ampoules DEL,
halogènes, ou incandescentes variables vissables. Pour éviter toute surchauffe et
d’endommager d’autres équipements, n’utilisez pas ce produit pour commander
des prises, des appareils motorisés ou des appareils alimentés par transformateur.
2. Effectuez l’installation en conformité avec les codes électriques en vigueur.
3. En l’absence de «moyens de mise à la terre» existant dans le boîtier d’encastrement,
le National Electrical Code (NEC®) autorise l’installation d’une commande en
remplacement lorsqu’une façade en plastique avec des fixations en plastique est
utilisée ou lorsque le circuit est protégé par un disjoncteur différentiel de fuite à la terre
(DDFT). Les plaques murales Lutron répondent à cette exigence. Capuchonnez ou
retirerez le fil vert avant de visser la commande dans le boîtier d’encastrement.
4. Protégez le gradateur afin d’éviter la poussière et la saleté lors de la peinture ou du
masticage du mur.
5. Il est normal que le gradateur soit chaud au toucher en fonctionnement.
6. Ne nettoyez le gradateur qu’avec un chiffon doux et humide. Ne pas utiliser
de nettoyants chimiques. Pour plus de renseignements, veuillez consulter
lutron.com/cleaning
7. Utilisation à l’intérieur seulement.
1. PRECAUCIÓN: Sólo utilizar con artefactos permanentemente instalados, con
lámparas de rosca fluorescentes compactas atenuables, LED de rosca atenuables o
lámparas halógenas o incandescentes. Para evitar el sobrecalentamiento y posibles
daños a otros equipos, no utilizar para controlar receptáculos, artefactos accionados
a motor o aparatos provistos de transformador.
2. Instale de acuerdo con todas las normativas eléctricas nacionales y locales.
3. Cuando no existe un “medio de puesta a tierra” en una caja de empotrar, el Código
Eléctrico Nacional (NEC®) permite instalar un control como reemplazo cuando se
utilice una placa frontal de plástico con elementos de fijación de plástico o el circuito
esté protegido por un interruptor de circuito contra fallas de tierra (GFCI). Las placas
de pared de Lutron satisfacen este requisito. Cubra o retire el cable verde antes de
atornillar el control en la caja de empotrar.
4. Al pintar o masillar proteja el atenuador contra el polvo y la suciedad.
5. Es normal que el atenuador se sienta caliente al tacto durante su operación.
6. Sólo limpie el atenuador con un paño suave y húmedo. No utilice ningún
limpiador químico. Para obtener más información, consulte en lutron.com/cleaning
7. Sólo para uso bajo techo.
Remarques importantes
Notas importantes
Encastrement et déclassement
Agrupamiento y reducción de potencia
Français
Pour recevoir une garantie prolongée | Reciba una garantía extendida:
lutron.com/SunnataSurvey
Assistance | Asistencia: 1.844.LUTRON1 (É.-U./ Canada | E.U.A. / Canadá) +1.888.235.2910 (Mexique | México)
lutron.com/sunnatasupport
Retirez les sections latérales en cas de montage de deux
appareils ou plus côte-à-côte (voir le tableau pour connaître les
nouvelles puissances nominales).
Remarque : Le déclassement n’est pas nécessaire pour les
charges DEL / AFC.
Si monta dos o más dispositivos uno al lado del otro retire las secciones laterales
(para la nueva especificación de potencia consulte el gráfico).
Nota: No es necesario reducir la potencia para cargas LED / LFCA.
Trouver la
bonne DEL
Encuentre el LED adecuado
lutron.com/LEDfinder
Ga rant ie l imit ée | Garantía limitada: lutron.com/TechnicalDocumentLibrary/369-119_Wallbox_Warranty.pdf
Lutron, LED+ et Sunnata sont des marques commerciales ou des marques déposées de Lutron Electronics Co., Inc. enregistrées aux
États-Unis et dans d’autres pays. L'icône YouTube est une marque commerciale de Google LLC. ©2019-2021 Lutron Electronics Co., Inc.
Lutron, LED+ Y Sunnata son marcas comerciales o marcas comerciales registradas de Lutron Electronics Co., Inc. en E.U.A. y/o en otros países. El icono de YouTube es una marca comercial de Google LLC.
Español
Vidéos
d’instructions
Videos explicativos
lutron.com/SunnataWiring
AVERTISSEMENT: RISQUE D’ÉLECTROCUTION.
Peut causer des blessures graves ou la mort. Coupez
l’alimentation au niveau du disjoncteur ou du fusible
avant l’installation.
ADVERTENCIA: PELIGRO DE DESCARGA ELÉCTRICA.
Podría ocasionar lesiones graves o la muerte. Antes de instalar
desconecte la alimentación eléctrica en el disyuntor o el fusible.
ON
OFF
Vis de couleur
différente
Tornillo de color
diferente
Étiquette
Etiqueta
Insérez et
tournez pour
serrer
Inserte y gire
para apretar
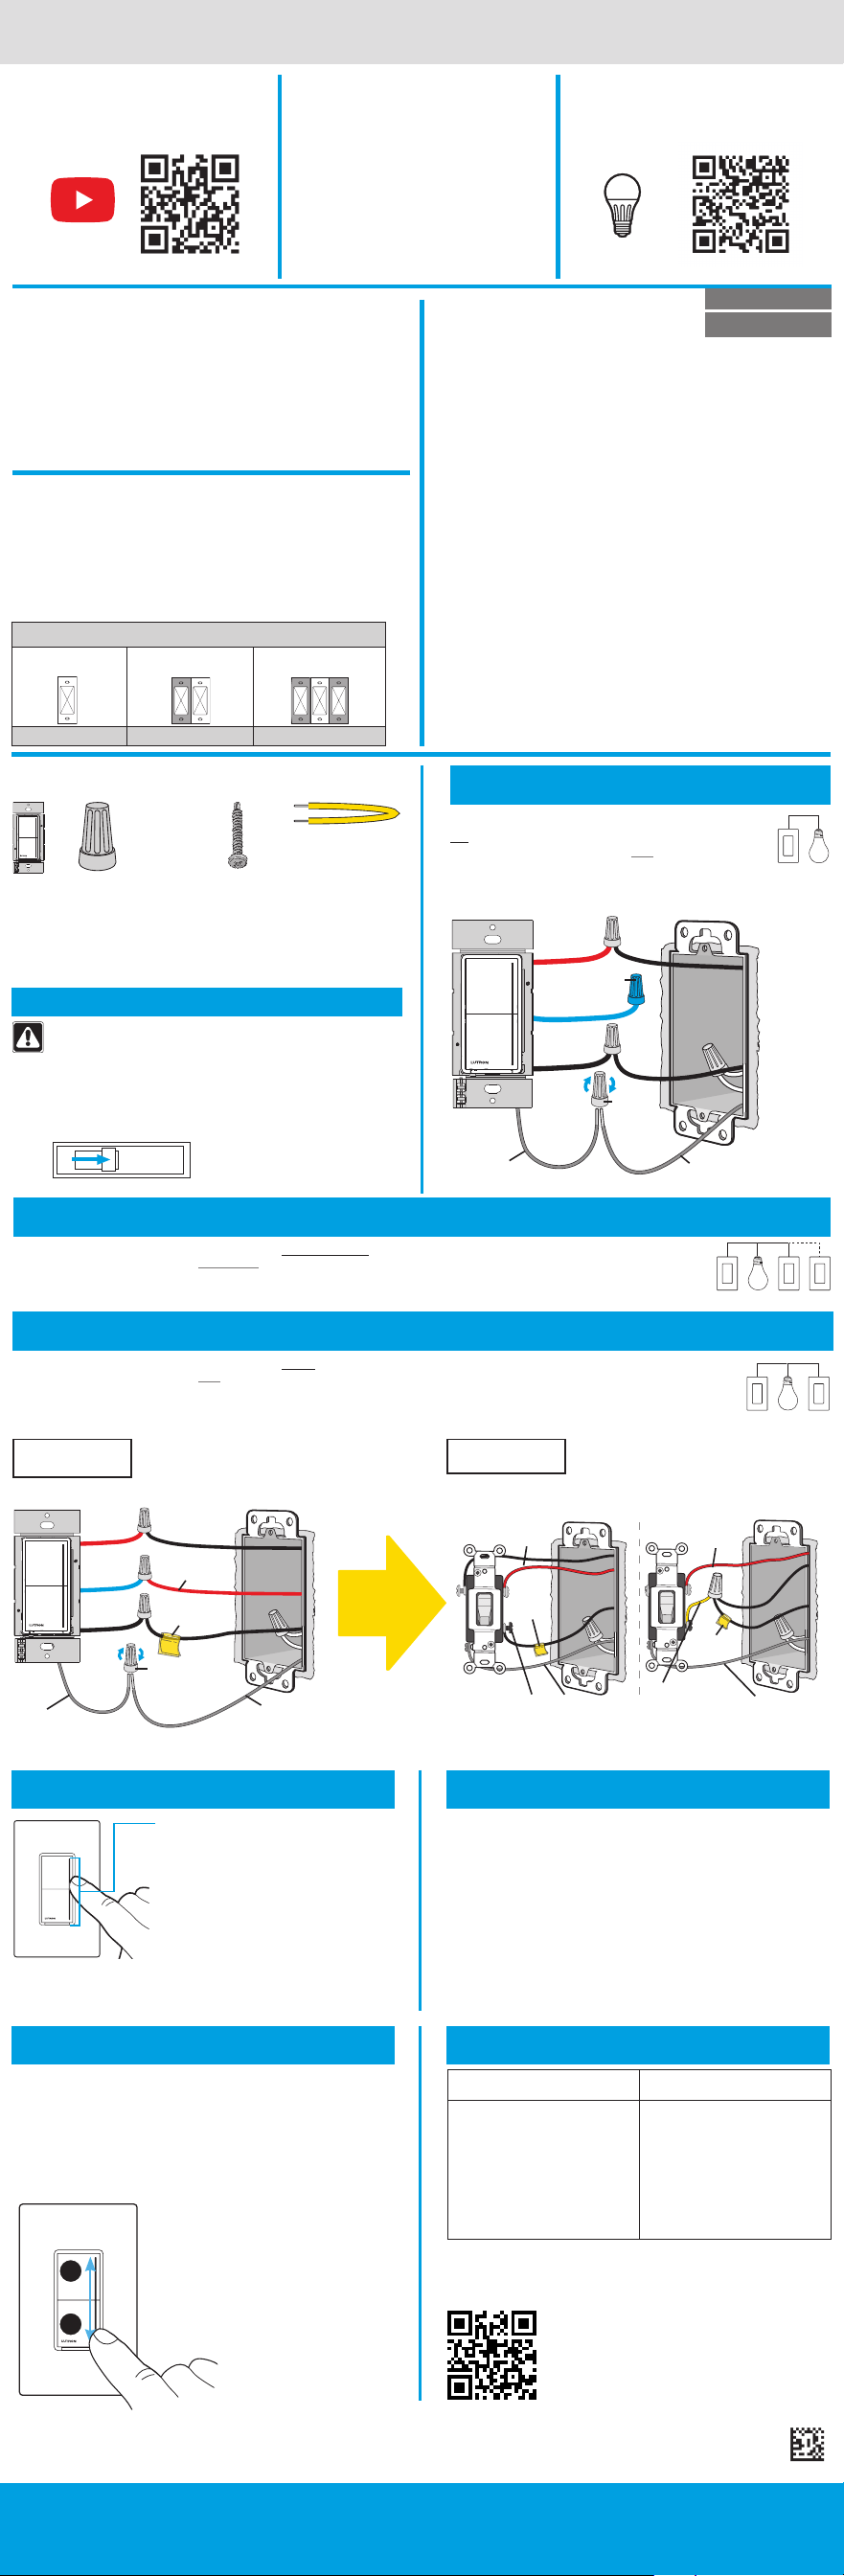
Option 2: Va-et-vient ou permutateur(s) avec interrupteur(s) auxiliaire(s) Sunnata
Opción 2: Tres vías / cuatro vías con interruptor(es) accesorio(s) Sunnata
Pour la commutation des lumières depuis deux ou plus emplacements:
Para las luces encendidas desde dos o mas ubicaciones:
Fil non noir
Cable no negro
Emplacement 1
Ubicación 1
Emplacement 2
Ubicación 2
Fil non noir
Cable
no negro
Étiquette
Etiqueta
Fil non noir
Cable
no negro
Étiquette
Etiqueta
Fil de terre
(dénudé ou vert)
Cable de puesta
a tierra (pelado
o verde)
Fil de
pontage
jaune
Cable de
puente
amarillo
Requis pour les
va-et-vient
Requerido para
tres vías
Fil de terre
(dénudé ou vert)
Cable de puesta
a tierra (pelado
o verde)
Option de câblage 1: Unipolaire
Opción de cableado 1: Unipolar
Pour la commutation des lumières depuis
un emplacement:
Para las luces encendidas desde una ubicación:
Fil de terre (dénudé ou vert)
Cable de puesta a tierra
(pelado o verde)
Insérez et
tournez pour
serrer
Inserte y gire
para apretar
Utilisez le
connecteur bleu
Utilice el
conector azul
Fil vert
Cable verde
REMARQUE: Les fils noir et rouge du gradateur sont interchangeables.
NOTA: Los cables rojo y negro del atenuador son intercambiables.
AVANT APRÈS LE RECÂBLAGE
ANTES DESPUÉS DE VOLVER A CABLEAR
Fil vert
Cable verde
Fil de terre
(dénudé ou vert)
Cable de puesta a tierra
(pelado o verde)
Pièces incluses | Piezas incluidas
Gradateur
Atenuador
Capuchon de connexion
Jaune (x4)
Bleu (x1)
Conector de cable
Amarillo (x4)
Azul (x1)
Vis (x2)
Tornillos (x2)
Fil de pontage
(nécessaire
uniquement pour
l’option de câblage3.
Non inclus avec
STCL-153MRH.)
Cable de puente
(sólo necesario para
la opción de cableado
3. No incluido con el
STCL-153MRH.)
Déconnecter l’alimentation Desconecte la energía
Rouge
Rojo
Bleu
Azul
Noir
Negro
Rouge
Rojo
Bleu
Azul
Noir
Negro
120 V~ 60 Hz
Option de câblage 3: Va-et-vient avec un interrupteur existant
Opción de cableado 3: Tres vías con un interruptor existente
Pour la commutation des lumières depuis deux emplacements:
Para las luces encendidas desde dos ubicaciones:
REMARQUE: Avant de déconnecter les fils des appareils existants, veuillez étiqueter les fils comme décrit ci-dessus pour l’option 2.
NOTA: Antes de desconectar los cables de los dispositivos existentes, rotúlelos como se describe más arriba para la opción 2.
P/N 0302030 REV A
Veuillez lire avant l’installation
Leer antes de instalar
STCL-153M
150 W
DEL / AFC
LED / LFCA
600 W *
Incand. / Hal.
SI LAS LUCES ESTUVIERAN APAGADAS, pulse
el botón superior para pasar al ajuste predefinido
(predeterminado 100%). Pulse dos veces para pasar
a brillo pleno.
Para modificar el ajuste predefinido, visite
lutron.com/SunnataMyLevel.
SI LAS LUCES ESTUVIERAN ENCENDIDAS,
pulse una vez el botón superior para pasar a brillo
pleno. Pulse y mantenga pulsado el botón inferior (1
segundo) para obtener un desvanecimiento diferido
de 30 segundos hasta el apagado. Pulse una vez el
botón inferior para apagar.
Fonctionnement
Operación
SI LES LUMIÈRES SONT ÉTEINTES, appuyez une fois sur le haut
du bouton pour le préréglage (à 100% par défaut). Appuyez deux
fois pour la pleine luminosité.
Pour modifier le préréglage, visitez lutron.com/SunnataMyLevel.
SI LES LUMIÈRES SONT ALLUMÉES, appuyez une fois sur le
haut du bouton pour la pleine luminosité. Appuyez sur le bouton
du bas et maintenez-le enfoncé (1 seconde) pour une extinction
progressive différée de 30 secondes. Appuyez une fois sur le
bouton du bas pour éteindre.
Dépannage
Solución de problemas
Symptôme
Síntoma
Cause possible
Causa probable
La lumière a une mauvaise
performance de gradation
Las luces tienen un desempeño
de atenuación deficiente
Ajustez le réglage du seuil bas
Configure el ajuste de la
intensidad mínima
Trouvez les ampoules les plus
performantes sur
lutron.com/LEDFinder
Encuentre las bombillas de mejor
desempeño en
lutron.com/LEDFinder
Pour plus d’informations, veuillez consulter
Para obtener más información, visite
lutron.com/SunnataSupport
On
Off
1. Touchez le milieu de la barre lumineuse
jusqu’à ce que la barre lumineuse
commence à clignoter (pendant environ
6secondes).
2. Réglez la plage de gradation la plus basse
où les lumières sont allumées et stables.
3. Appuyez sur le bouton ÉTEINDRE
pour quitter.
1. Toque el centro de la barra de luz durante
hasta que la misma comience a destellar
(aproximadamente 6 segundos).
2. Establezca el rango de atenuación más bajo donde
las luces estén encendidas y estables.
3. Toque el botón de APAGADO para salir.
Visitez lutron.com/SunnataMyLevel pour apprendre à régler:
• La plage de gradation du seuil haut
• Un niveau d’éclairage prédéfini
• La luminosité de la barre lumineuse
• Voyant de localisation / Indicateur de niveau d’éclairage
Visite lutron.com/SunnataMyLevel para aprender cómo ajustar:
• Rango de atenuación de la intensidad máxima
• Nivel de luz predefinido
• Brillo de la barra de luz
• Luz ubicadora / Indicador de nivel de luz
Régler la plage de gradation
Ajuste el rango de atenuación
Personnalisation MyLevel (Optionnel)
Personalización de MyLevel (Opcional)