
LCD display information management platform instruction manual
CONTENTS
Chapter 1 Overview
....................................................................................................................
2
1.System module
..................................................................................................................
2
Chapter 2 Module function introduction
...................................................................................
3
1.Login interface
.....................................................................................................................
3
1)Account log in
...............................................................................................................
3
2)Create an account
.........................................................................................................
3
3)Retrieve the password
..................................................................................................
4
2.Device management
............................................................................................................
4
1)Device grouping
........................................................................................................
5
2)Device details
................................................................................................................
7
3)Delete program
.............................................................................................................
8
4)Configure list Management
....................................................................................
8
5)Other settings
.............................................................................................................
10
3.Program management
.......................................................................................................
10
1)Program list
.................................................................................................................
10
2)New program
..............................................................................................................
11
3)Edit program
............................................................................................................
11
4)Release programs
....................................................................................................
16
6)Program list
............................................................................................................
18
4.Material management
....................................................................................................
20
5.Task list
........................................................................................................................
22
1)Post task list
........................................................................................................
22
2) List of pending tasks
........................................................................................
23
6.Settings management
....................................................................................................
24
1) My informartion
.................................................................................................
24
2) Account management
...........................................................................................
24
3)Role management
......................................................................................................
25
Attach:
....................................................................................................................................
26
Cloud platform device binding instructions
..............................................................
26
LCD display information management platform instruction manual
Chapter 1 Overview
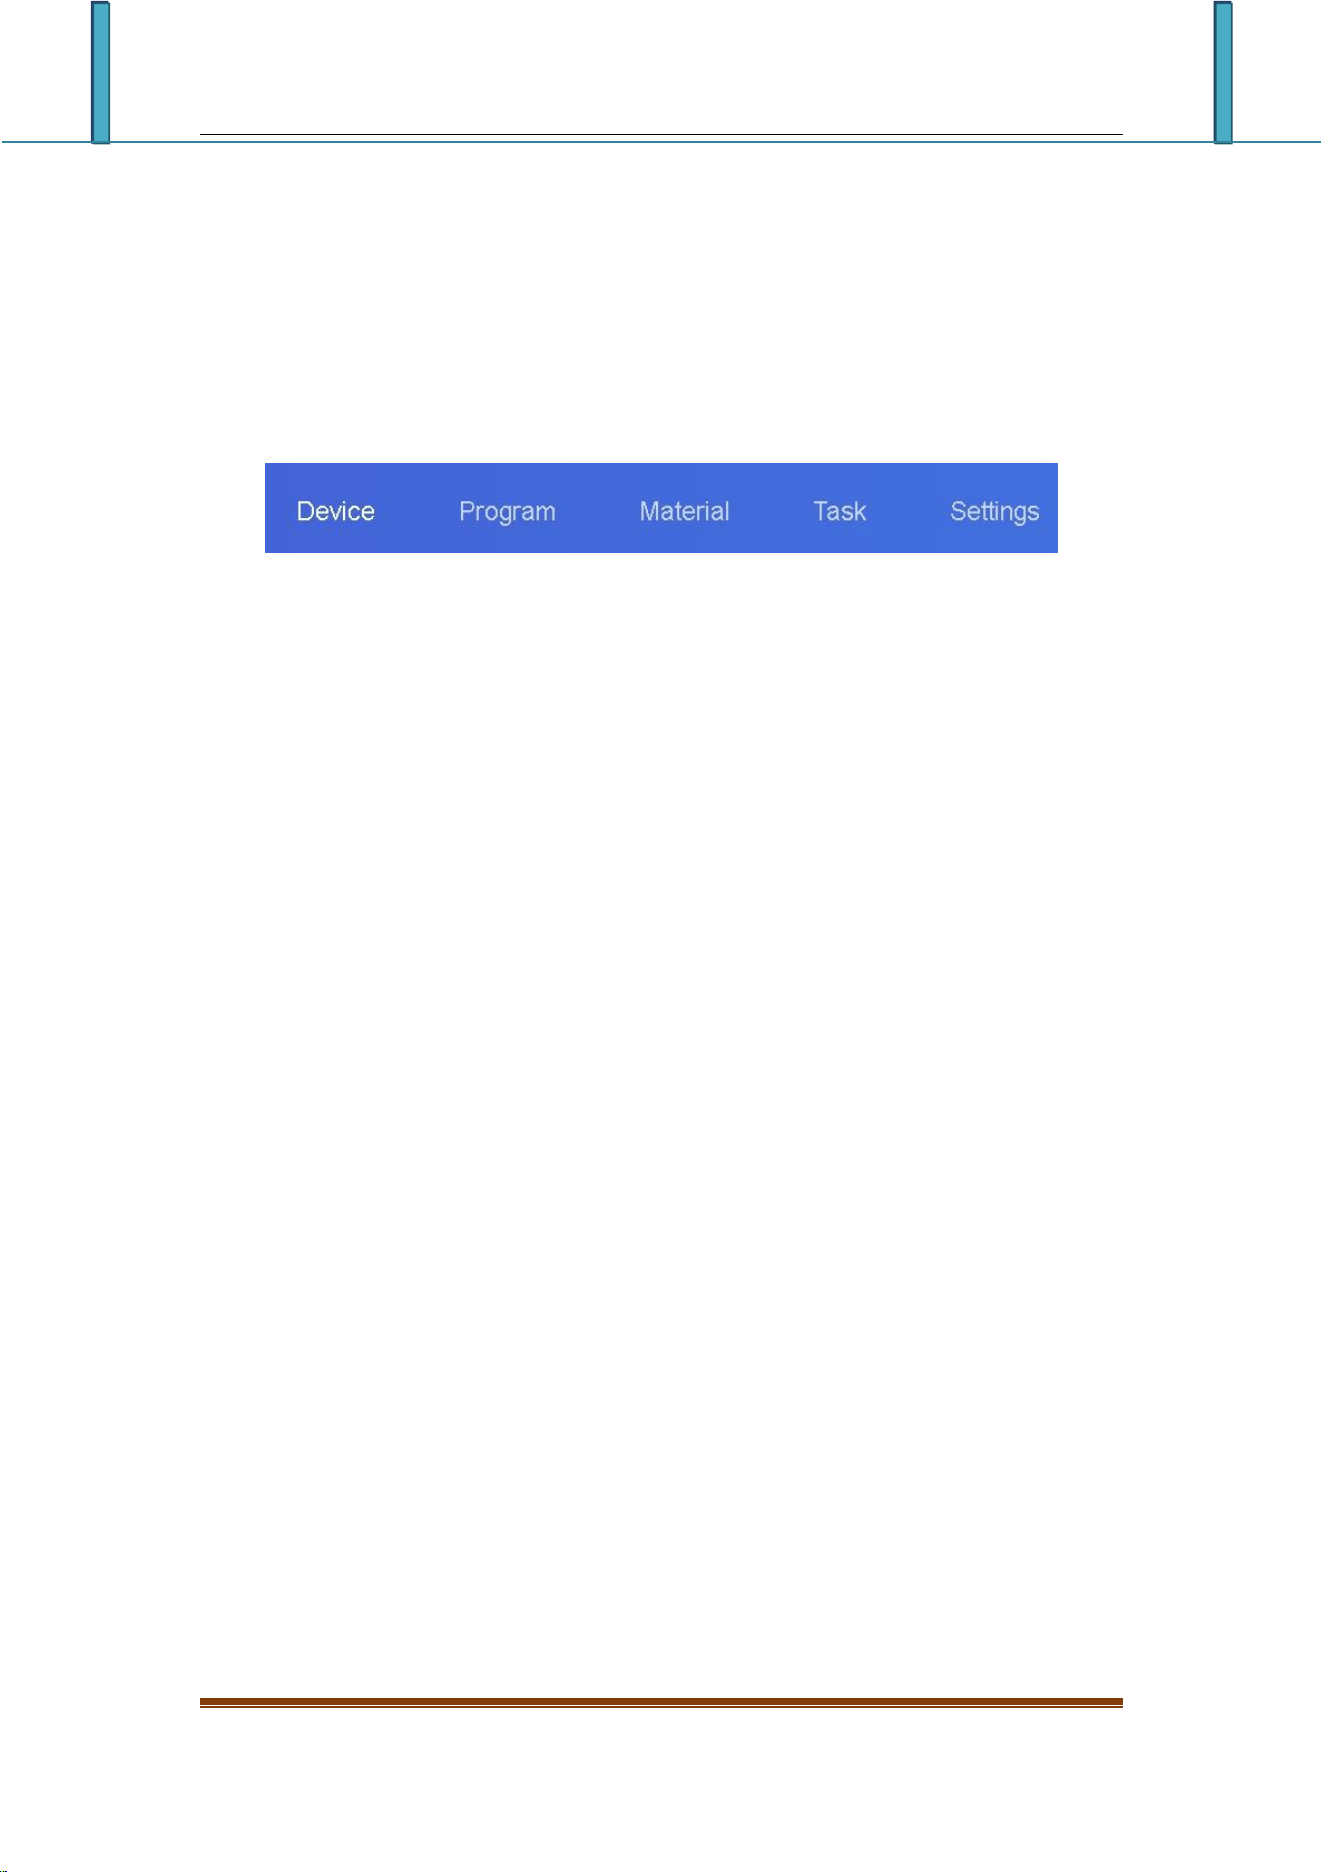
1.System module
The LCD display information management platform adopts the architecture of
B/S system, which contains Device, programs, Materials, tasks and setting
modules.
1-1 System Management Module
Login interface: user registration, login, password change, language
switching, etc.
Device: Device grouping, Device online/offline status, time correction,
brightness adjustment, firmware upgrade and other operations. In the "Details"
of the device, you can see the device's operating status information, program
information, release records, and online and offline records.
Programs: including single program and program list settings, new programs,
program editing, program preview, program release and other operations. In the
program list, you can view the program release record, broadcast control
settings and GPS fixed-point playback.
Materials: upload videos, pictures, GIF animations, Materials to be reviewed
Task: program release record, program task release status, and unreviewed
program record.
Settings: My account info, modify mobile phone number, account management, set
sub-users and role management, etc.
LCD display information management platform instruction manual
Chapter 2 Module function introduction
1.Login interface
1)Account log in
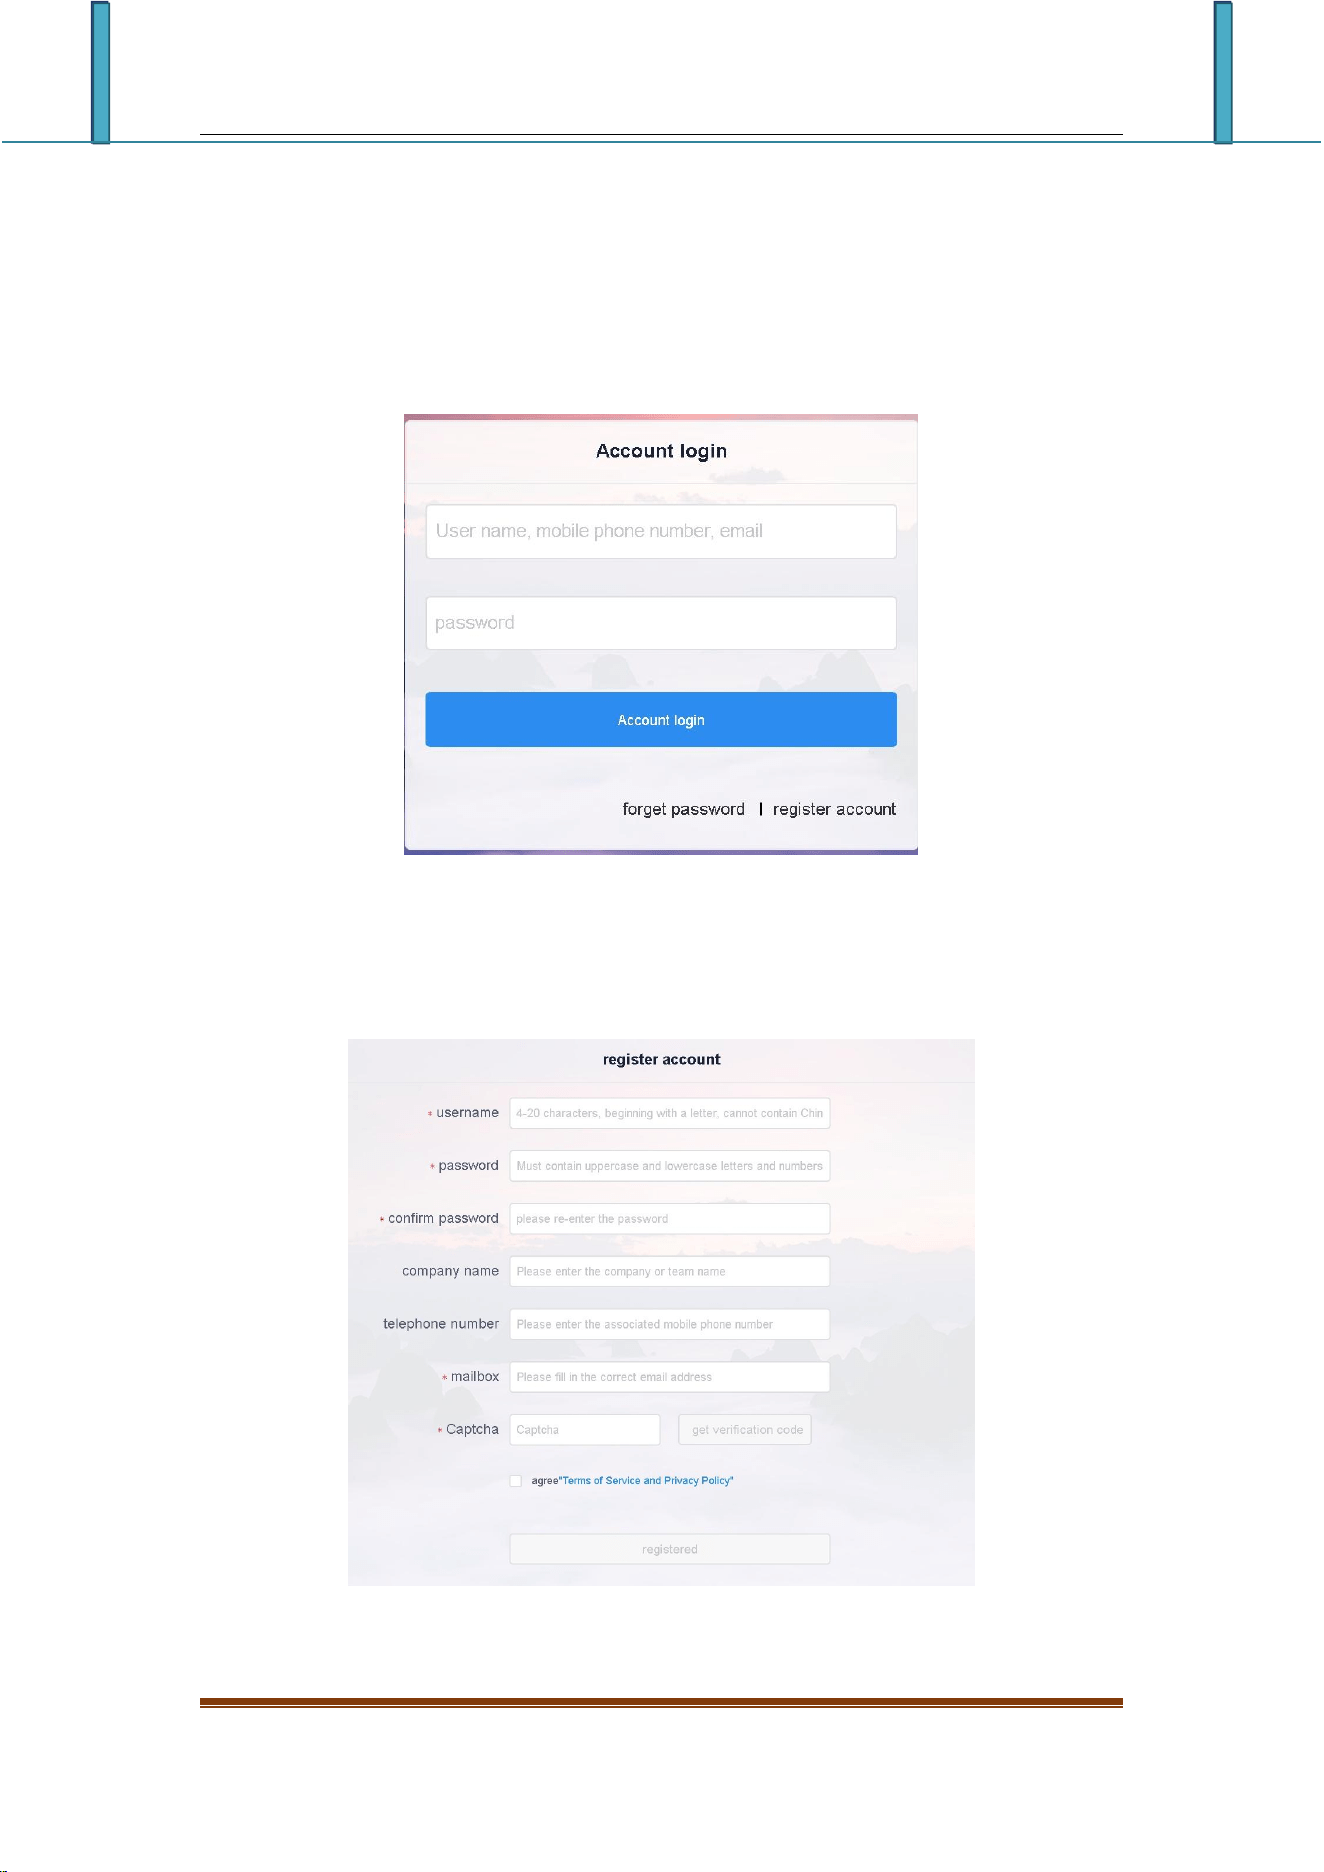
User can choose user name/email/mobile phone number to login
2-1 Login interface
2)Create an account
Click "Register Account" in the login window
2-2 Account registration interface
LCD display information management platform instruction manual
Notes:A.The verification code can be obtained by SMS or email
B.You must fill in the correct company name, mobile phone number, email address,
so that you can successfully pass the review of the platform administrator
3)Retrieve the password
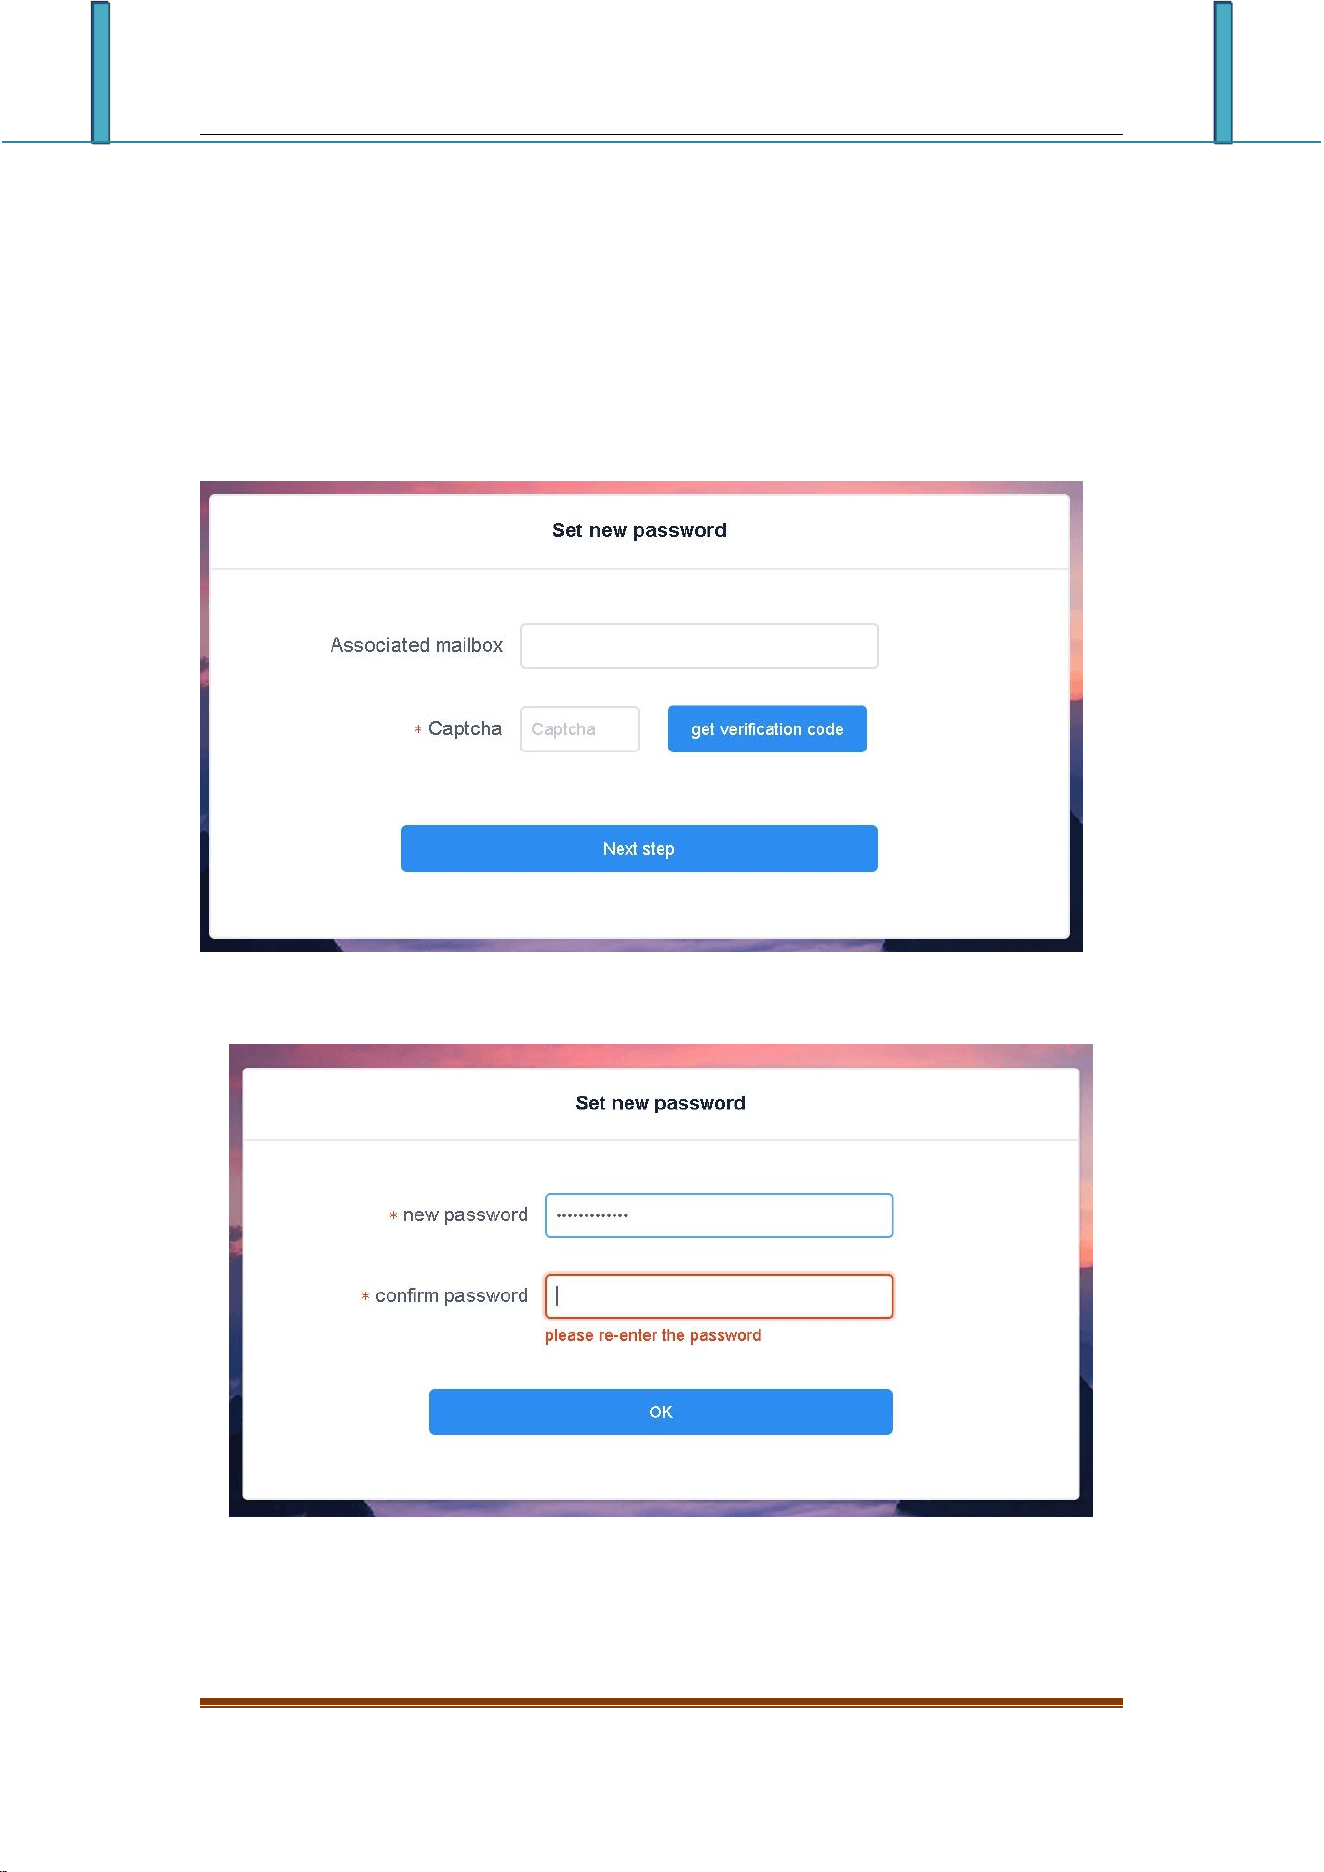
Click "Forgot Password" in the login window, enter the mobile phone number bound
to the account, the system will send a verification code to the mobile phone number,
enter the verification code, and then you can reset the password in the next step.
2-3 Get verification code
2-4 reset Password
2.Device management
LCD display information management platform instruction manual
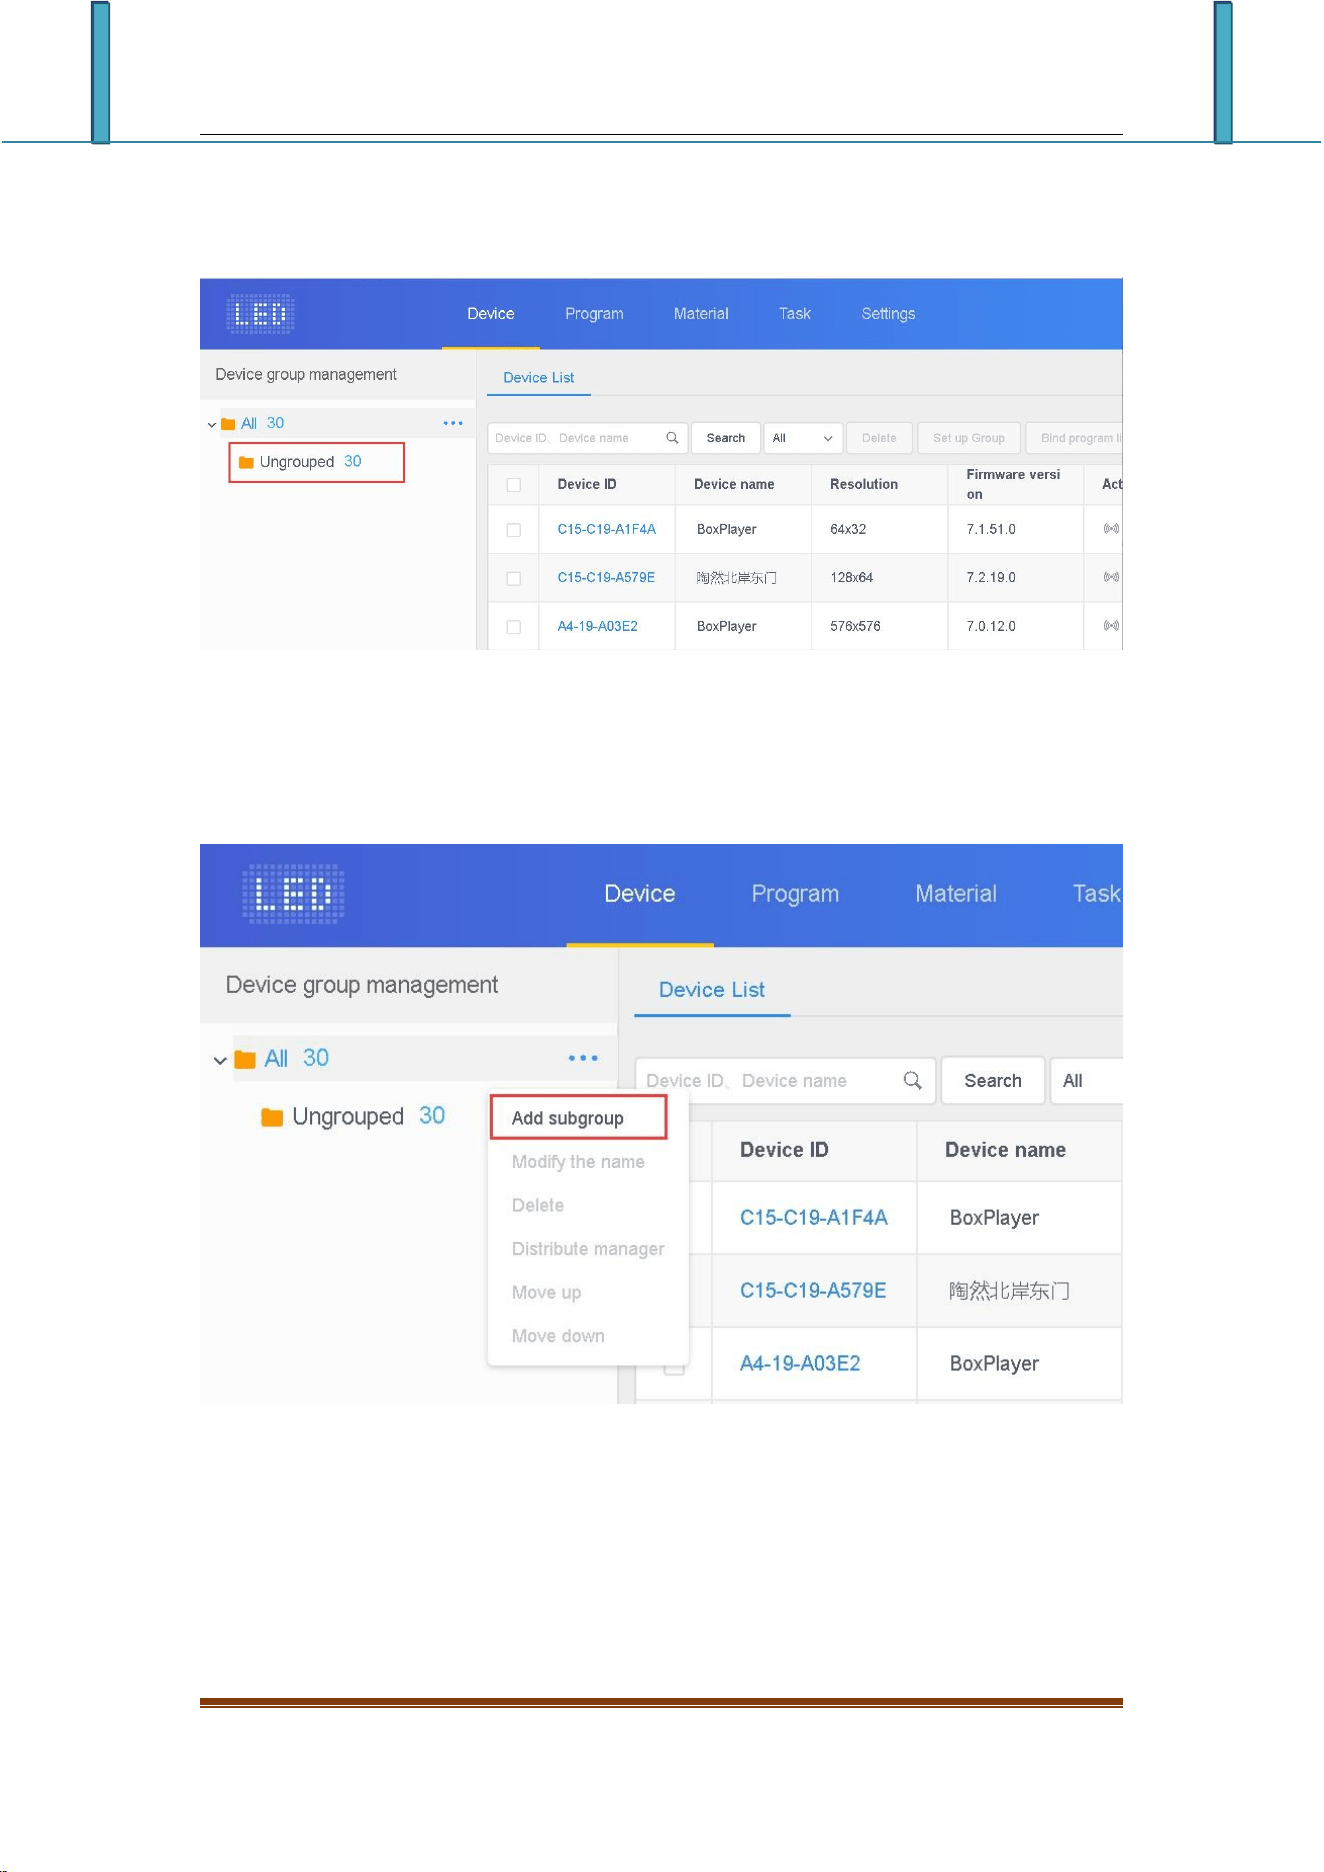
Device management is divided into two parts: device list and device map.
Each online device is on the ungrouped list by default.
2-5 Device List
1)Device grouping
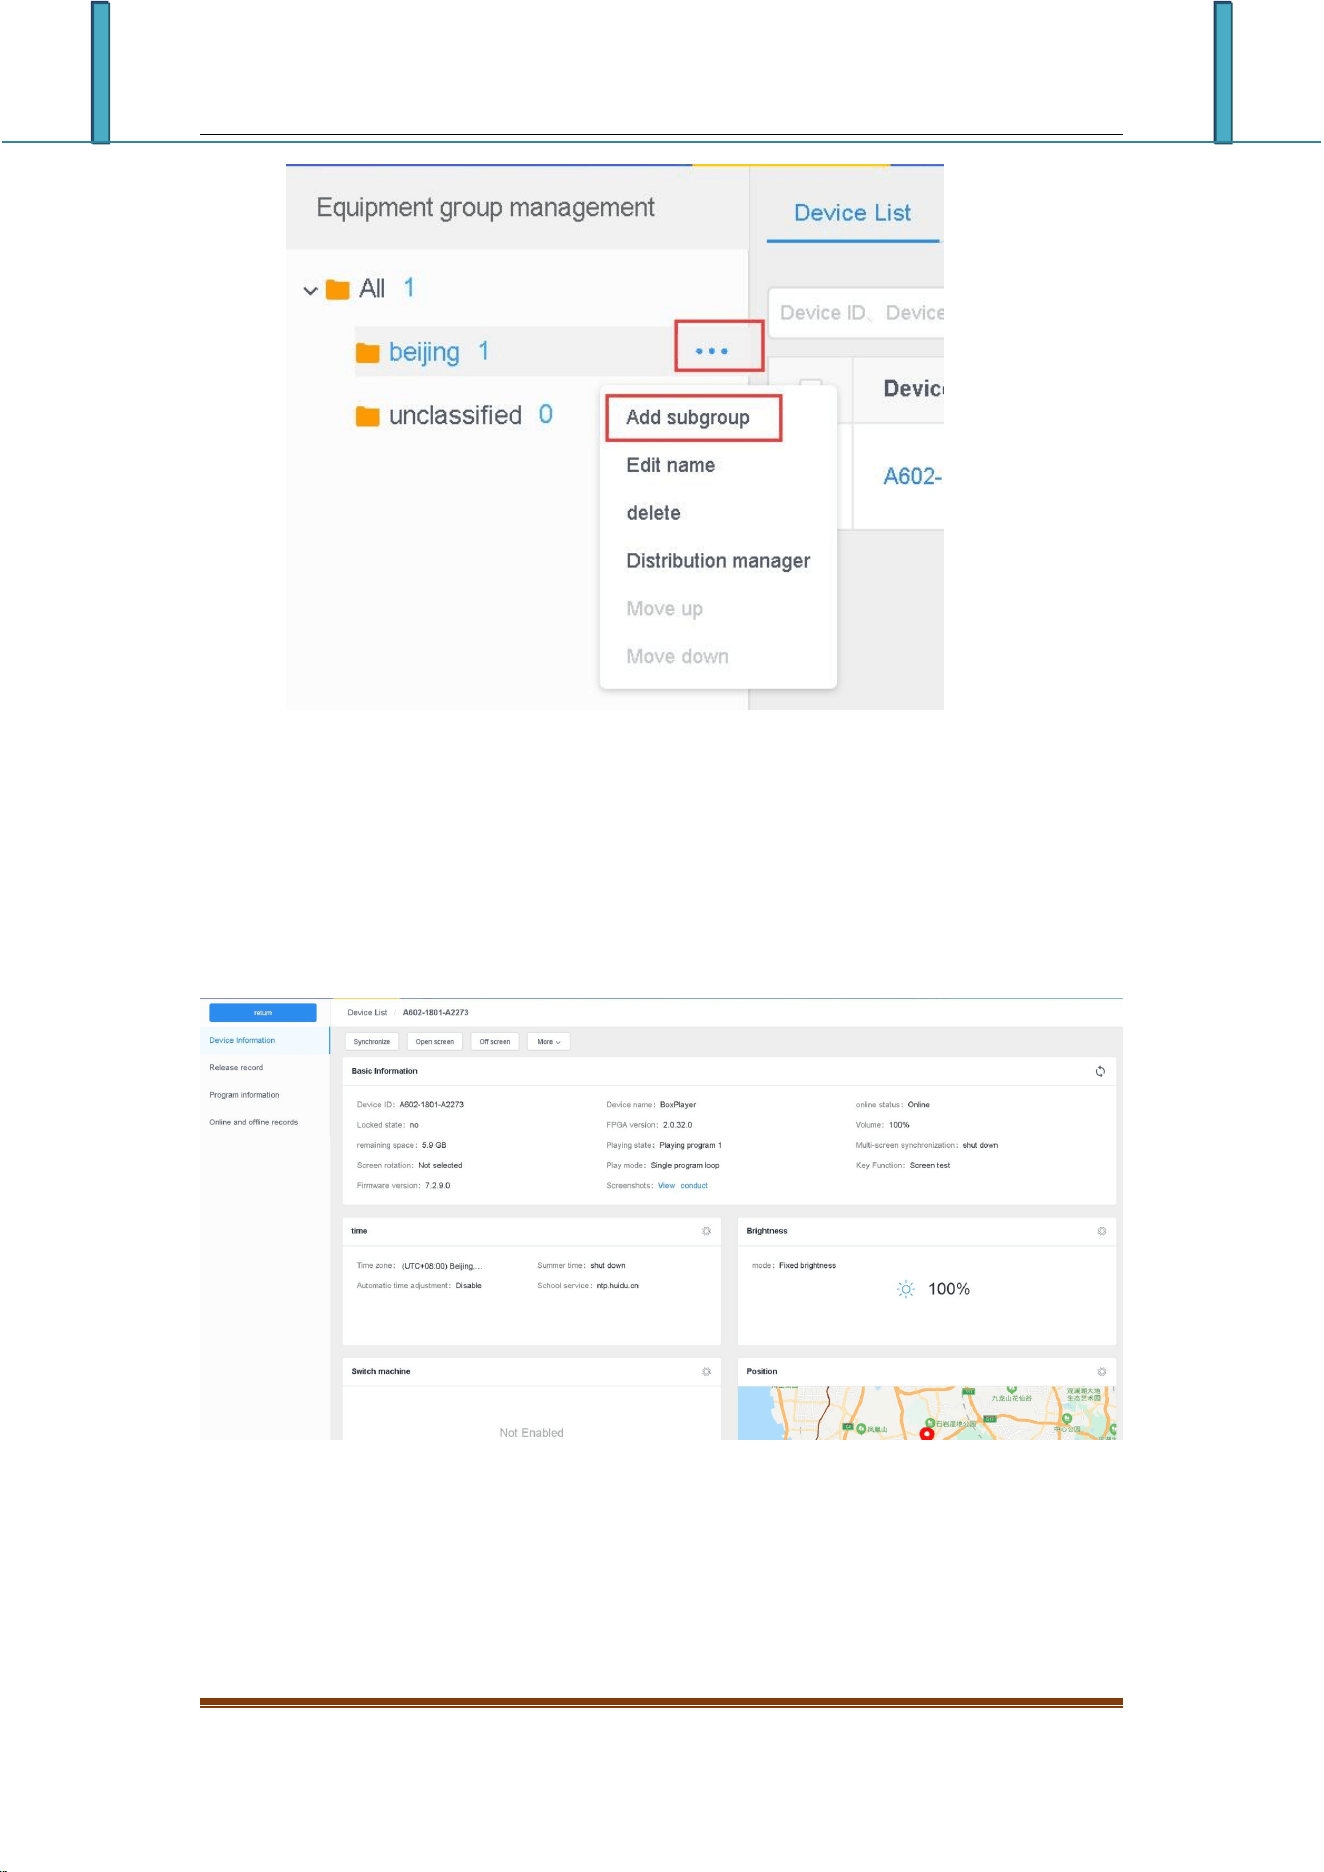
Click "..." in "All" to add subgroups
2-6 add subgroups
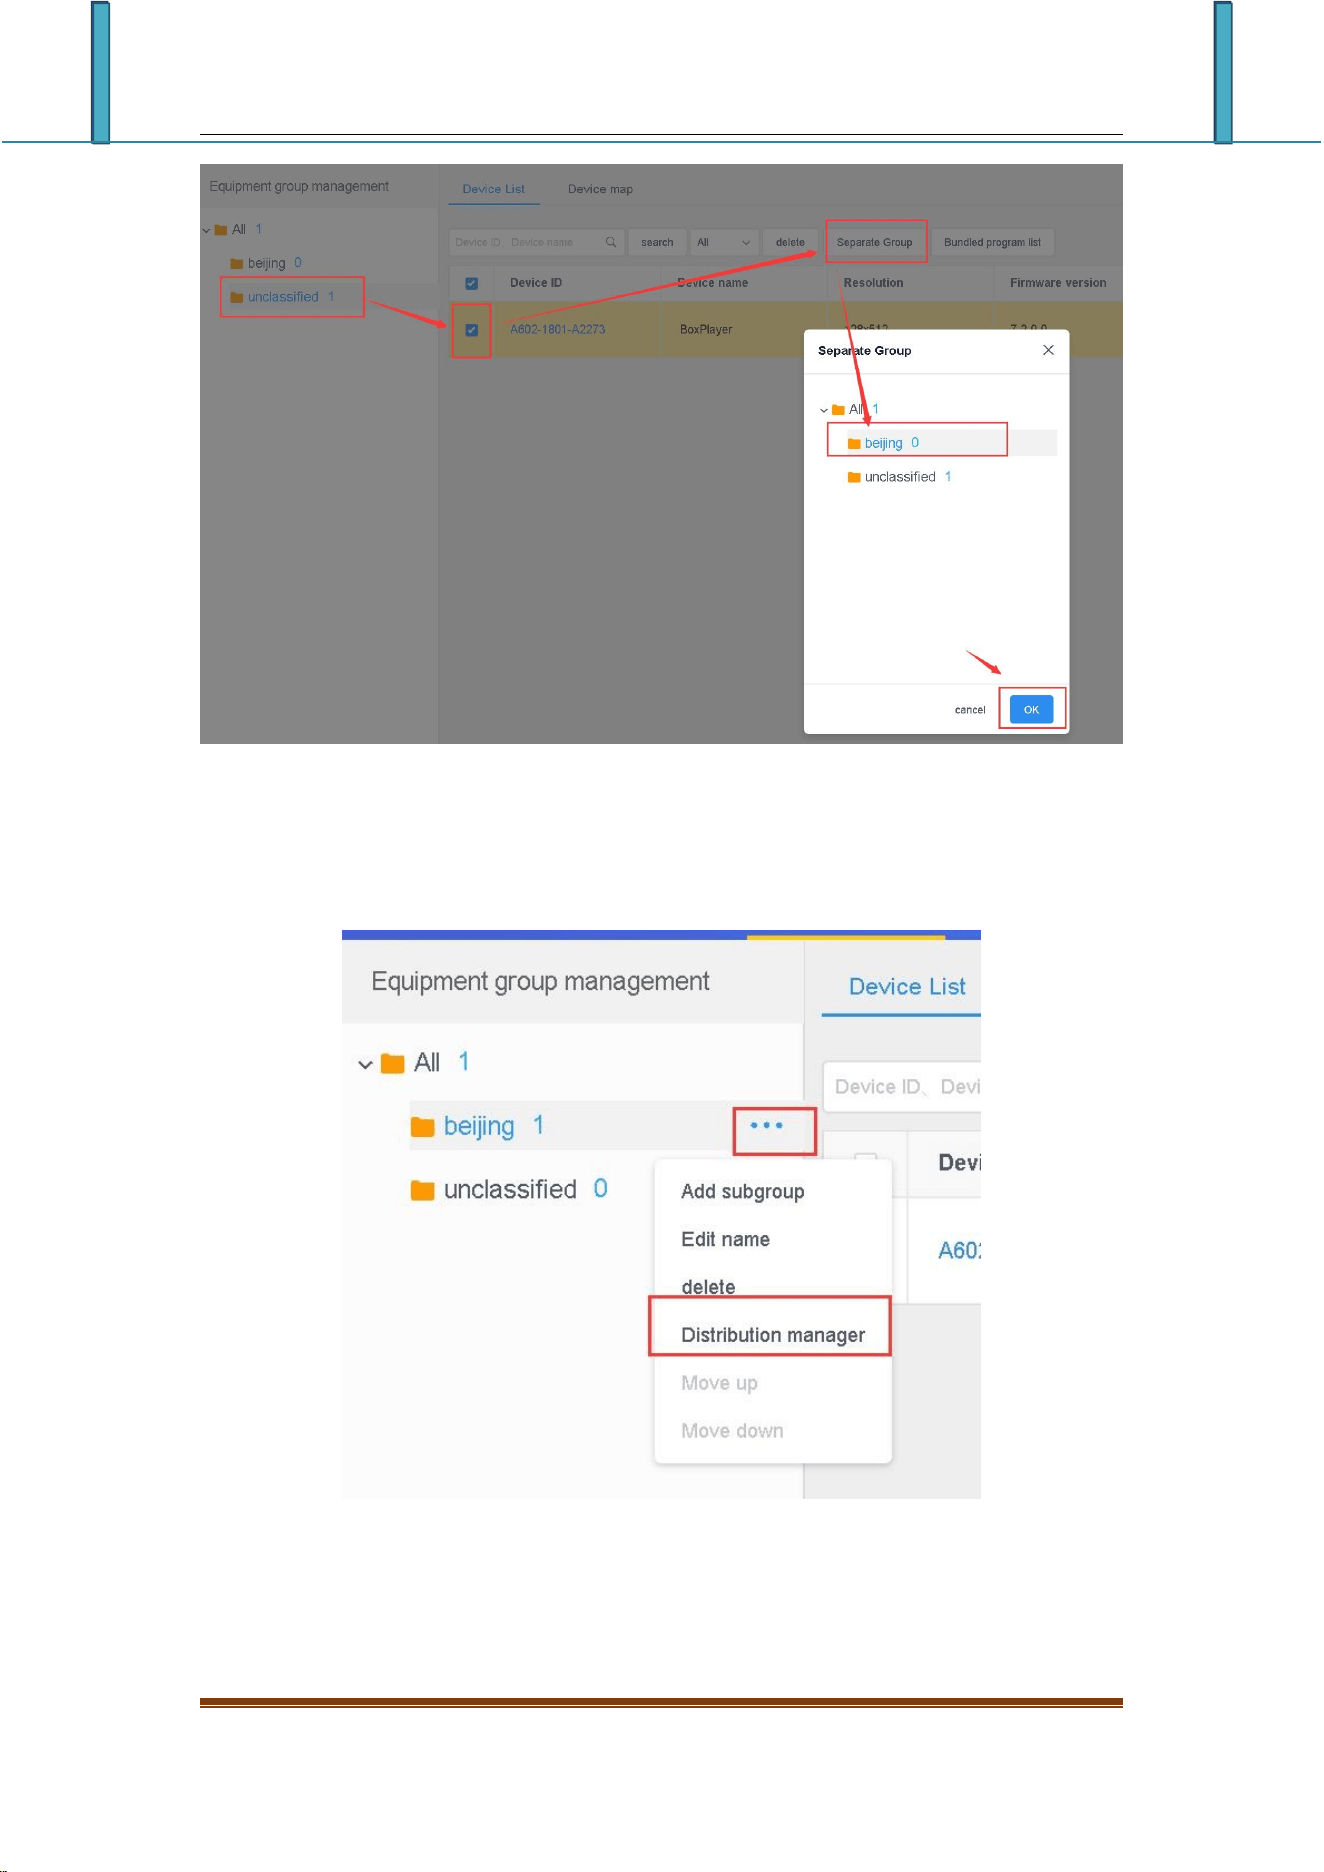
In Ungrouped, select the device, and then click "Set Group" above to assign to the
corresponding group
LCD display information management platform instruction manual
2-7 Set Group
After the devices are grouped, you can set the group to be controlled by a certain
sub-user
2-8 Assign managers to groups
In addition, in the group, you can also create sub-groups.
LCD display information management platform instruction manual
2-9 Group and subGroup
2)Device details
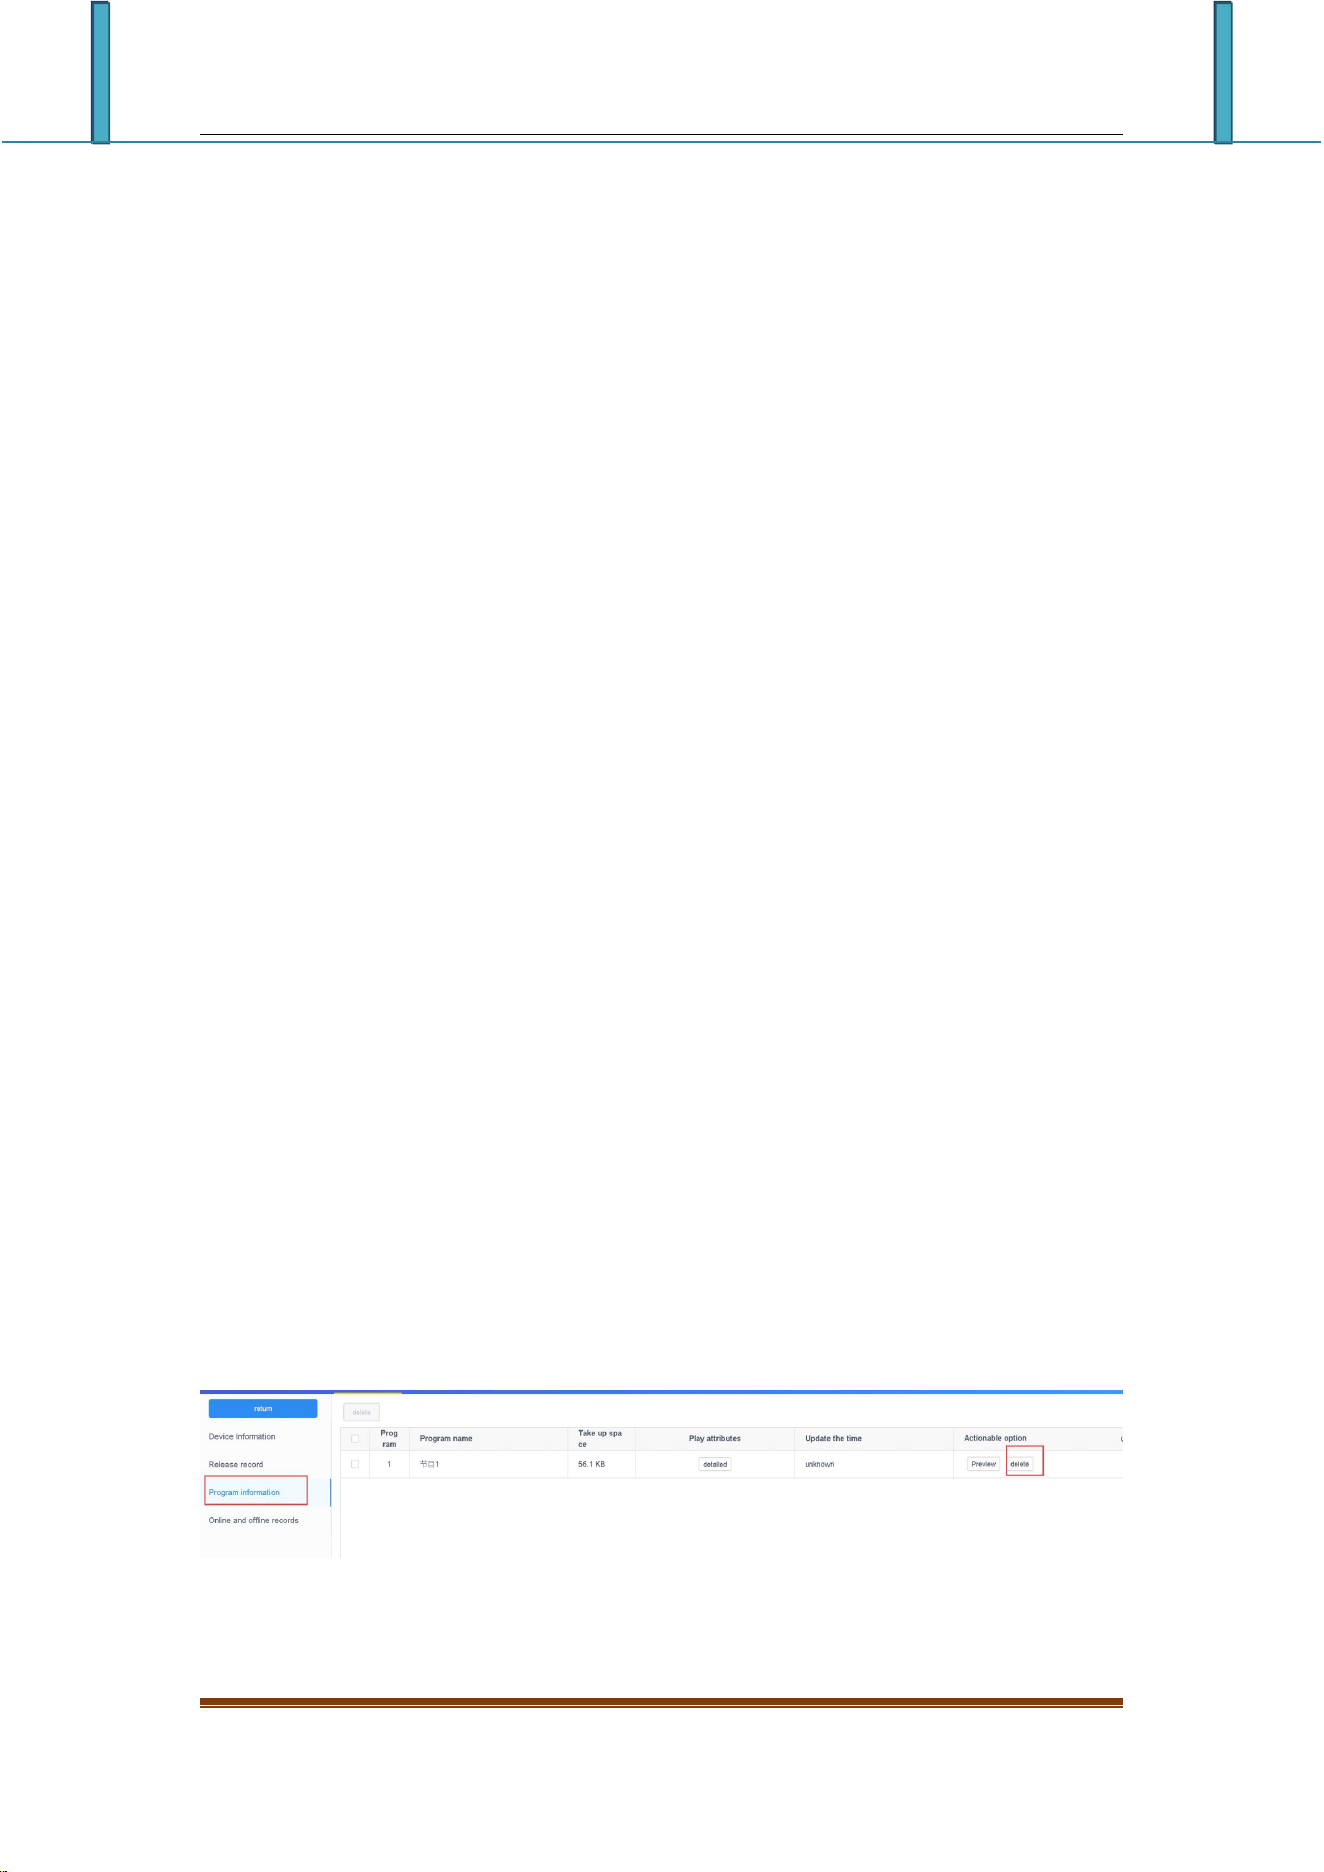
Click the "Details" button to enter the device details interface of the selected
device. On this interface, you can view the basic information of the device,
including information about the network connection mode, firmware version, playback
status, and remaining space.
2-10 Device details
Device ID:The ID of the currently selected device
Device name:The name of the currently selected device
Online status:Online means the device is connected, offline means the device
is disconnected
LCD display information management platform instruction manual
3
)
Delete progra
Firmware version:The firmware version of the current device, related to the
function
FPGA version:FPGA version of current device, related to display
Volume:Current device volume
Remaining space:The remaining space in the device
Playing state:Open screen is the LED screen power-on state, and off screen
is the LED screen power-off state
Multi-screen sync:The content in multiple screens is the same, and the playback
progress of the content is the same
Screen rotation:90°、180°and 270°
Play list:Sequential play or single program loop
Time:Time on device
Brightness:Brightness on the device
Switch machine:the time of switch machine
Position:If the device is equipped with a GPS module, the device can be
automatically positioned and displayed on the map
Networking information:Device access to the Internet: wired, Wi-Fi
Relay:If the device is equipped with a relay, you can set the screen power-on.
the time of power-on
Rename:Modify device name
Switch on/off setting:switch LED display with time
Firmware upgrade:Upgrade device firmware
Sync:Synchronously read back the status of the device's programs, networking
mode, remaining space, etc. (The default is automatic readback. When the
automatic readback is not possible, this function will be used: manual
readback.)
Release record:Can view the devices task release record
Program information:You can view the number of programs in the device, the
name of the program, the space occupied by the program, and can "delete" and
"preview" the program
Online and offline records:Can view the device is online and offline records
m
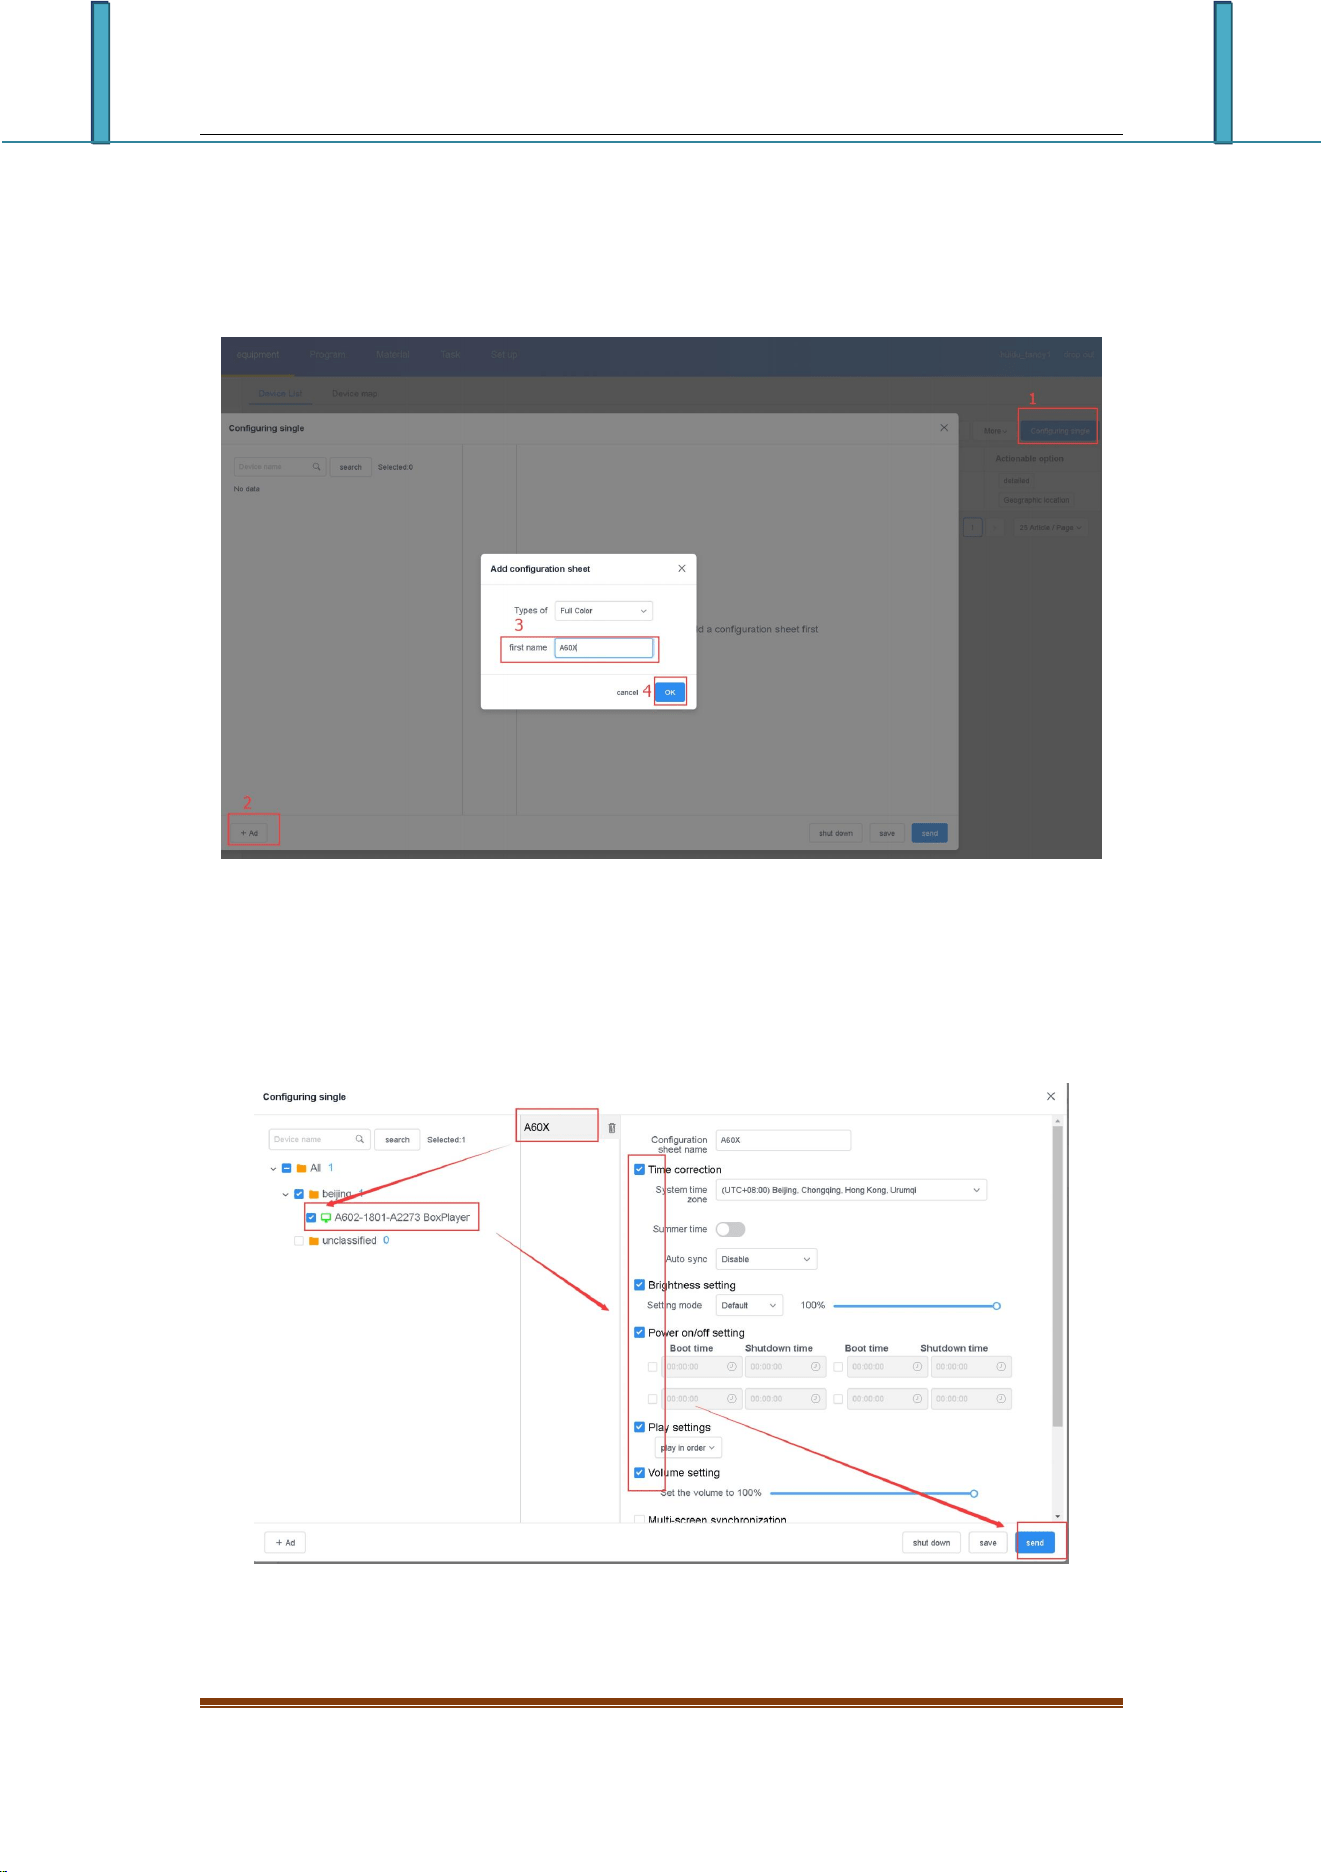
Click the "Details" of the device in the [Device] list, then select "Program
Information", select the corresponding program to delete.
2-11 delete the program
4)Configure list Management
LCD display information management platform instruction manual
The Configure list can set the timer switch, brightness setting and heartbeat
package settings. By configuring a single function, you can set the parameters of
the device's time correction, brightness setting, timer switch, volume adjustment,
heartbeat package, etc. in batches.
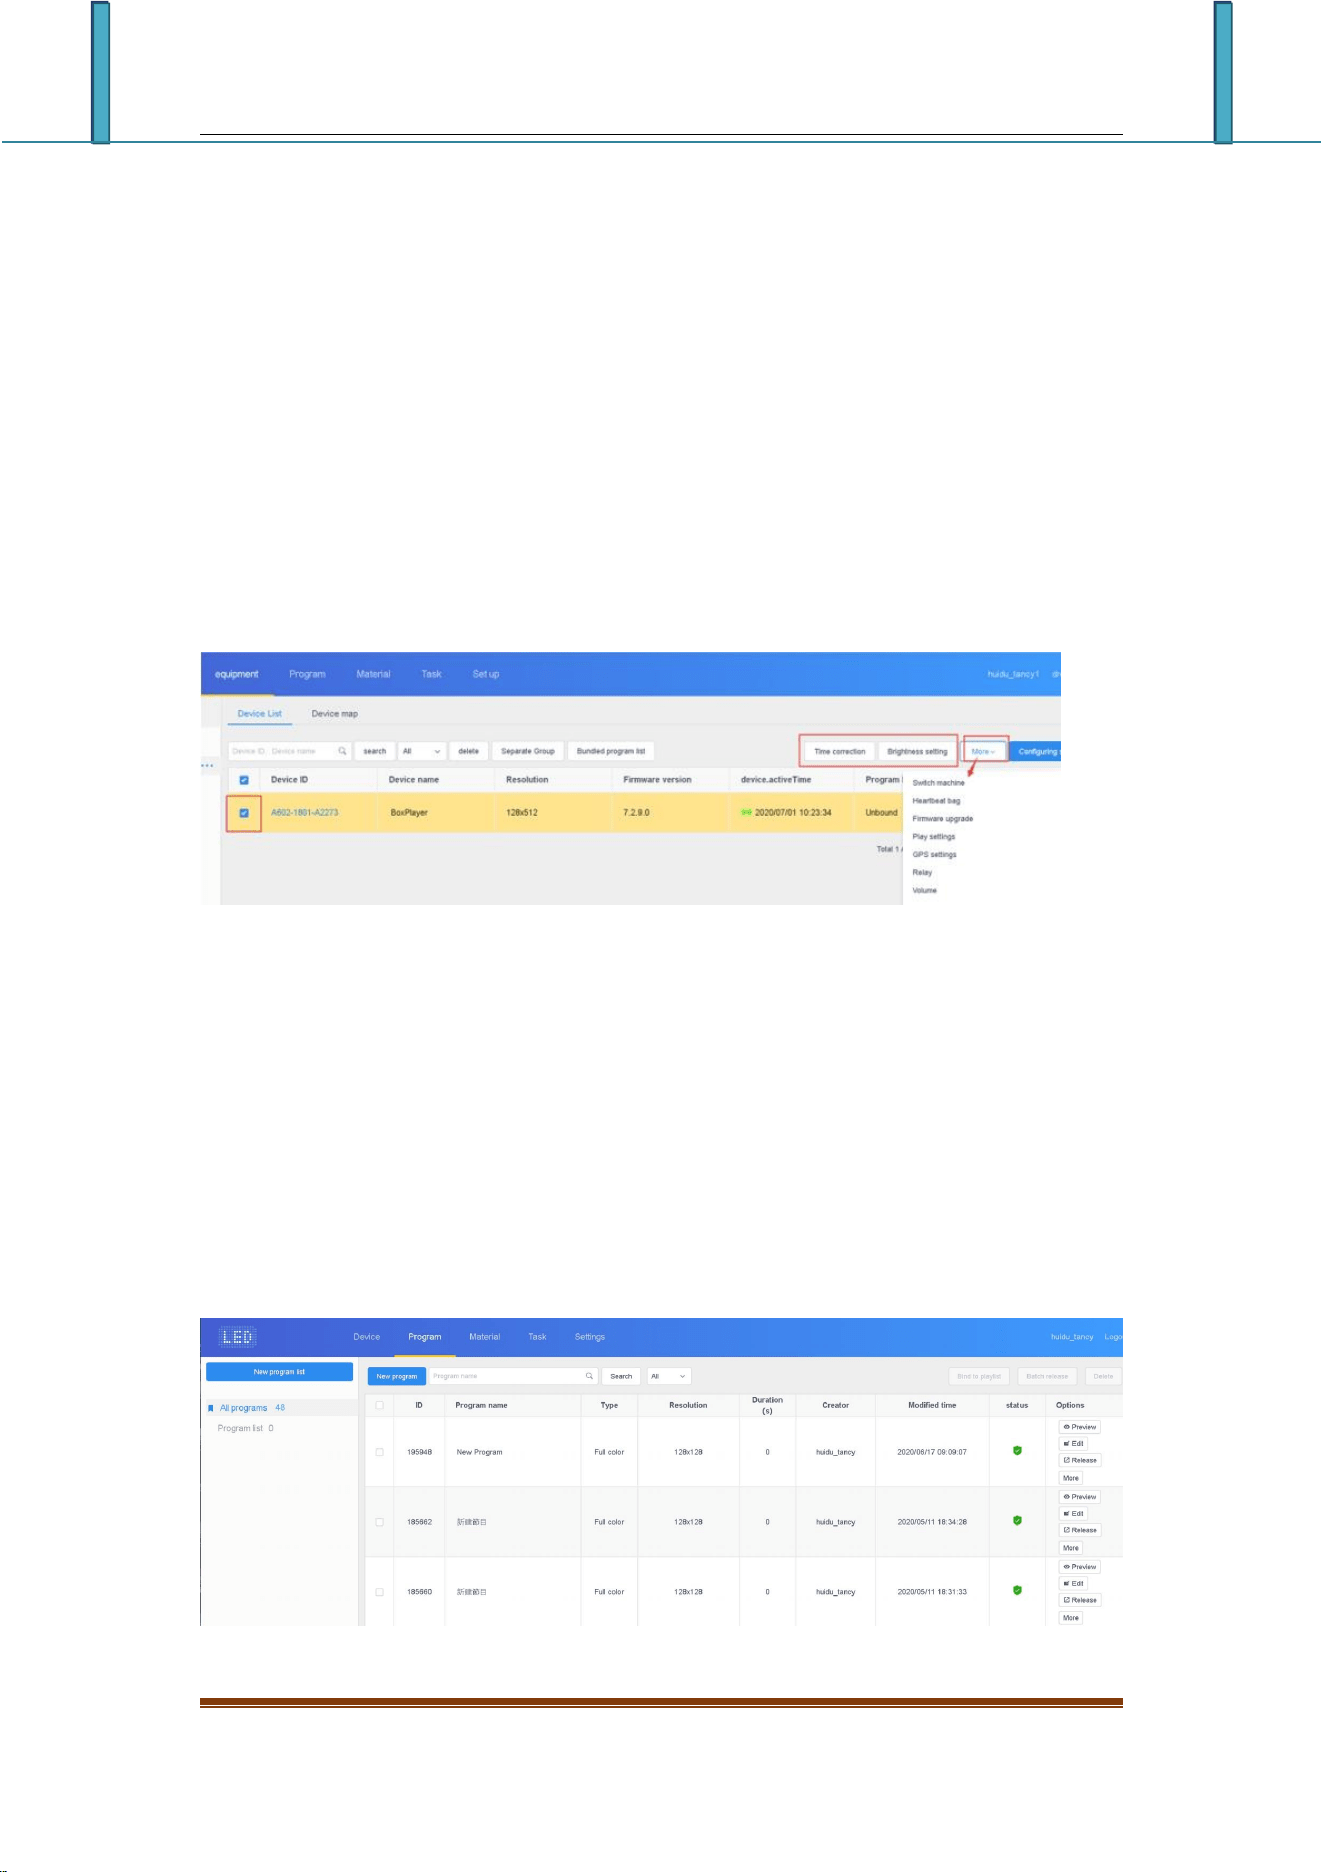
2-12 Add Configure list
After creating a new Configure list, select the device on the left, select the
corresponding Configure list in the middle, check the required settings on the right,
and finally click "Send".
2-13 Configure list Operation
LCD display information management platform instruction manual
○
1
:All devices that support this configuration list can be selected at will;
○
2
:Add a new configuration list;
○
3
:Configuration list;
○
4
:The setting options supported by the configuration list;
5
)
Other settings
Select a single or multiple devices in the device list to perform operations such
as time correction, brightness settings, power on/off, GPS settings, and playback
settings etc.
2-14 Other settings
3.Program management
1)Program list
Click [Program Management] to enter the program list, you can rename, preview,
edit, copy, publish, history, program creator, modification time and other
operations. If there are more programs, you can enter keywords in the text box behind
the program name and click the "Query" button.
3-1 Program list
LCD display information management platform instruction manual
Program type:Device type selected when creating a program, full color or
single and double color
Name of programme:Create a name for the program
Control range:The size of the analog display screen that creates the
program
Time:Total duration of the program
Creator:The name of the user who created the program
Change the time:Last time to edit the program
Status:If the content of the program does not contain violent terror,
illegal pornography or sensitive words, it will be a green icon. AI can
generally pass it; otherwise it is red, and it needs manual reaudit to pass
Operation items:Program preview, editing, publishing, renaming, GPS
fixed-point playback and broadcast control settings can be operated.
2
)
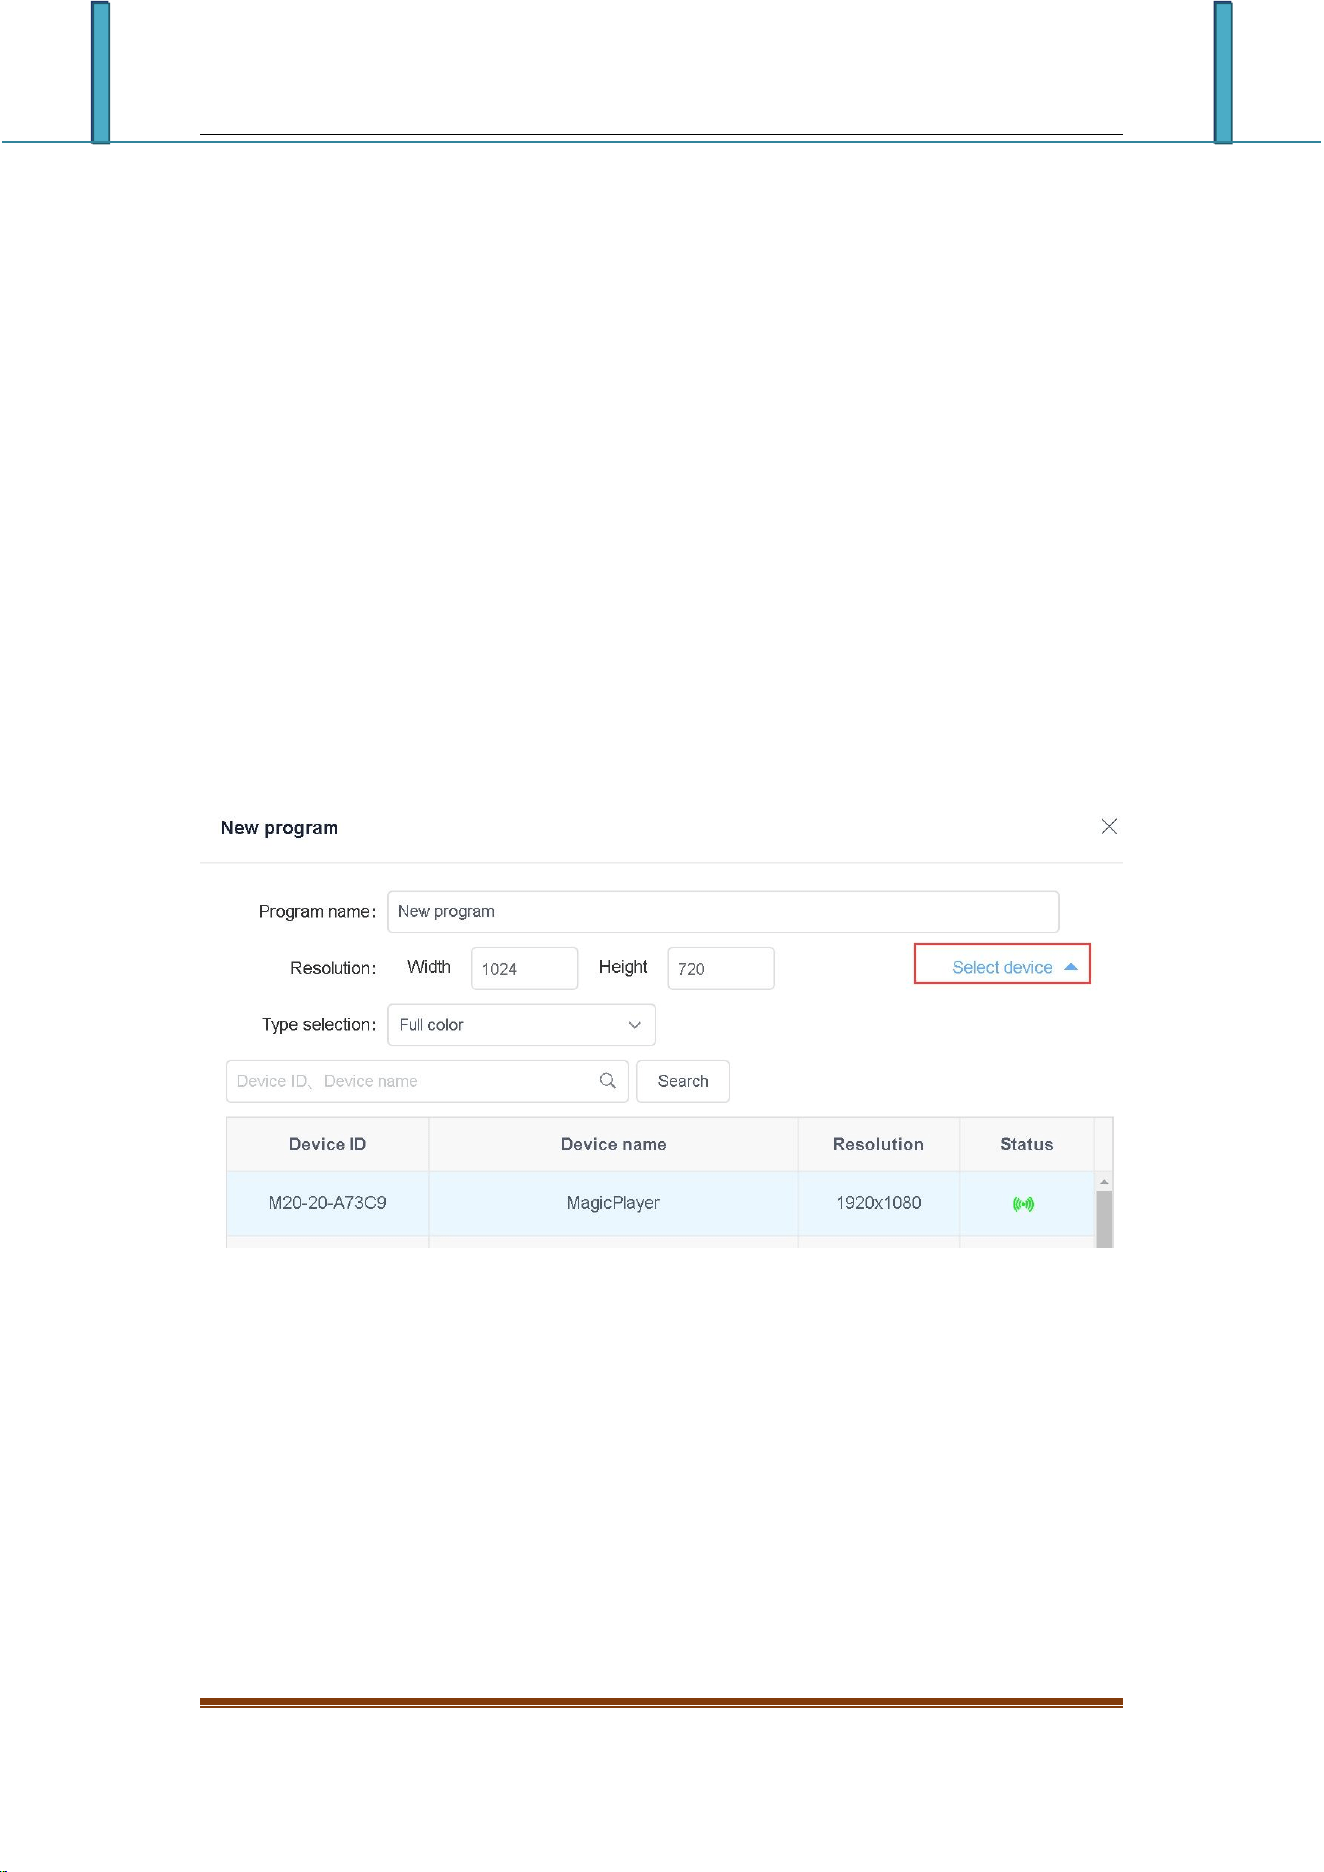
New program
Click "New Program", define the name of the program, set the width and height
of the screen in the New Program dialog box, or select the corresponding device to
read back the width and height of the screen, and click "OK".
3-2 New Program
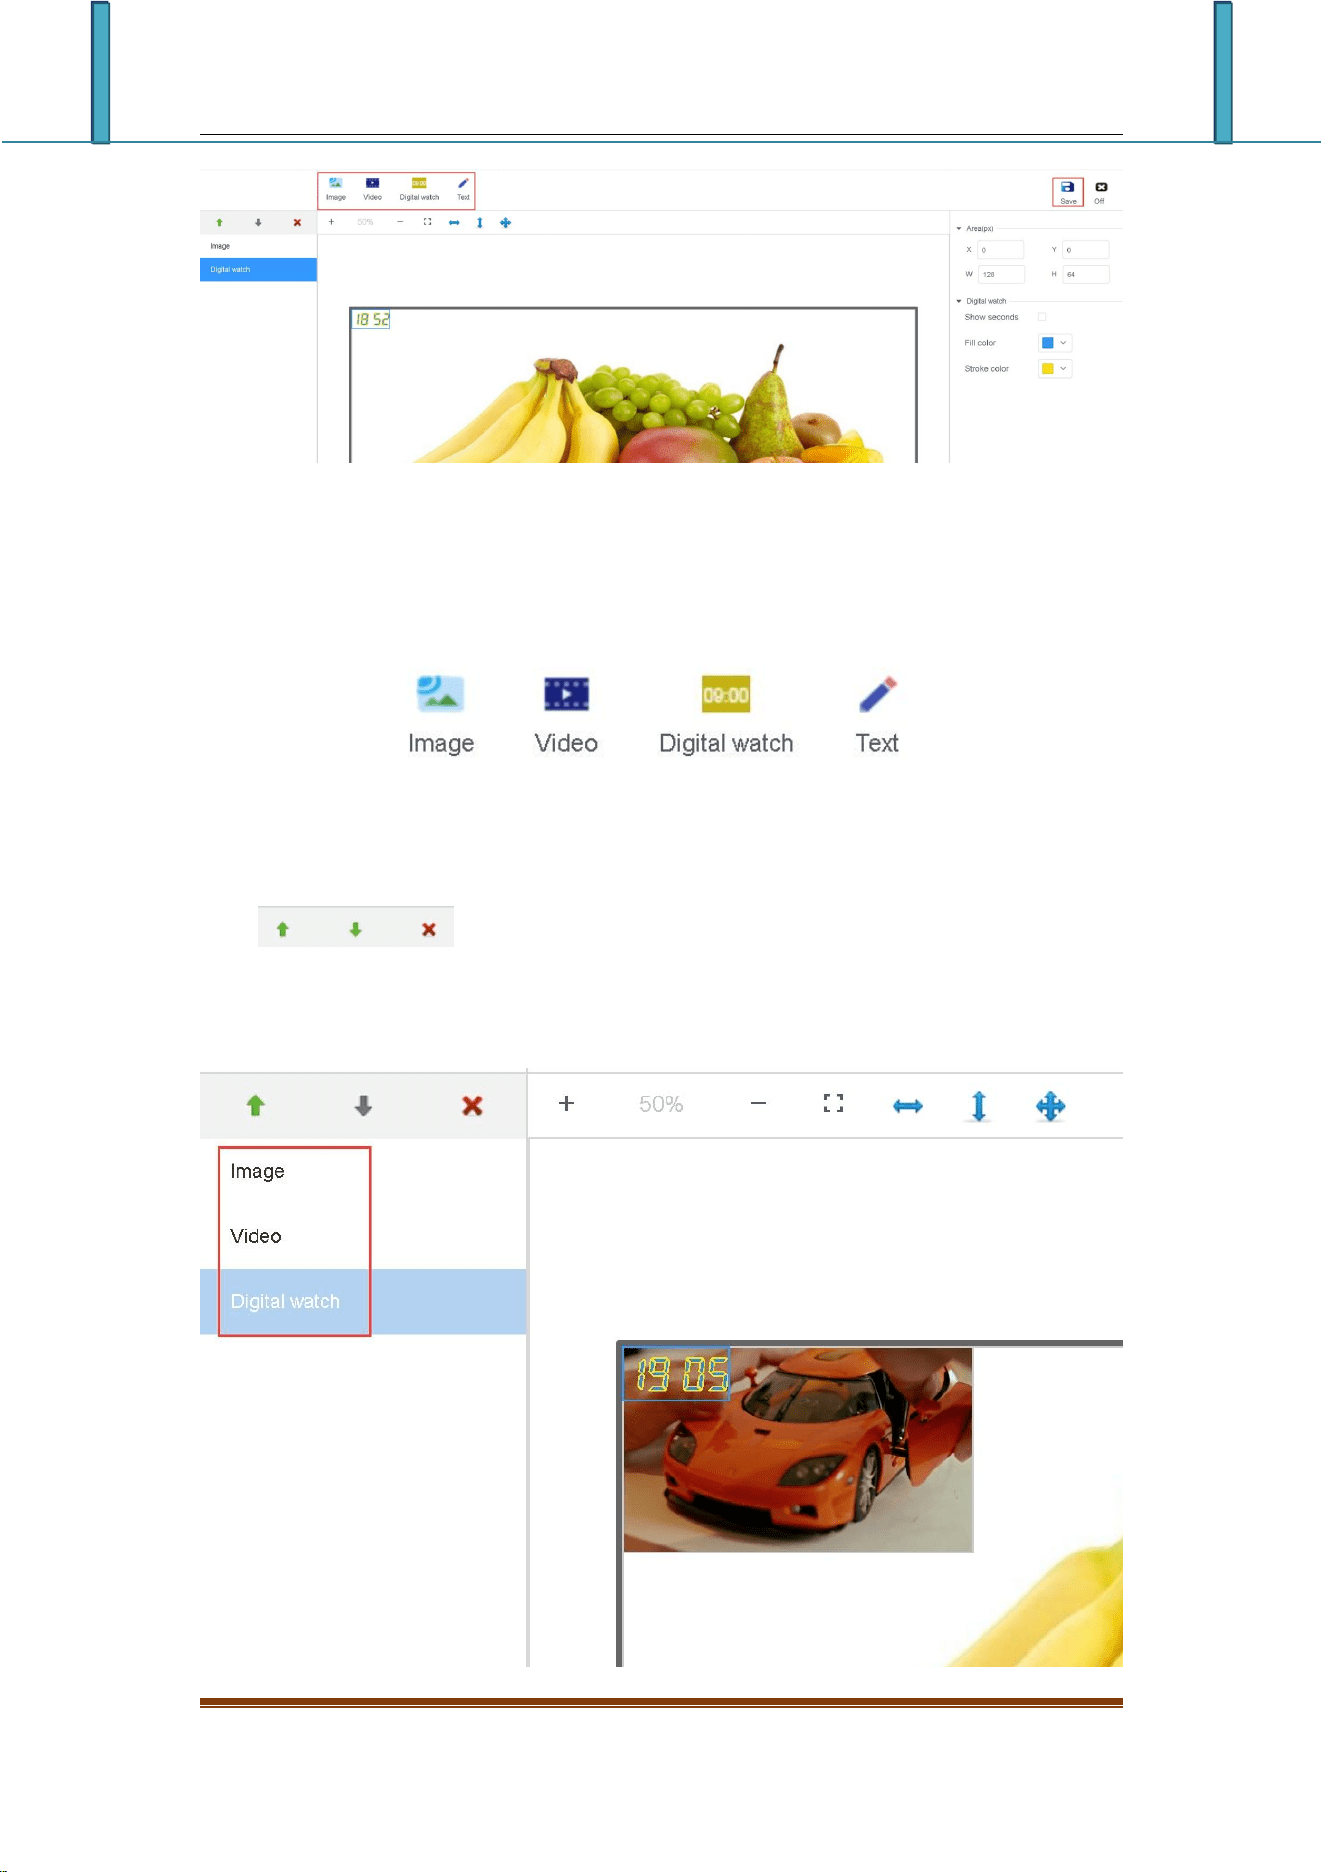
3)Edit program
On the edit program page, you can add multiple areas, pictures, videos, text,
etc. After editing, click "Save"
LCD display information management platform instruction manual
3-3 Program editing window
A. Click on the picture above to add a picture area. Video, text, and electronic
watches are the same.
3-4 add player
B.After adding areas such as pictures, videos and text, you can
click
The area is moved up and down or deleted. The top one is at the
bottom, as shown in the figure, the picture is at the bottom, the video is displayed on the
picture, and the electronic watch is displayed on the video.
LCD display information management platform instruction manual
3-5 Area overlay display
Of course, it can also be displayed in any partition, as shown below
3-6 Separate display
Notes:You can add multiple videos, pictures, texts and electronic tables, any
combination
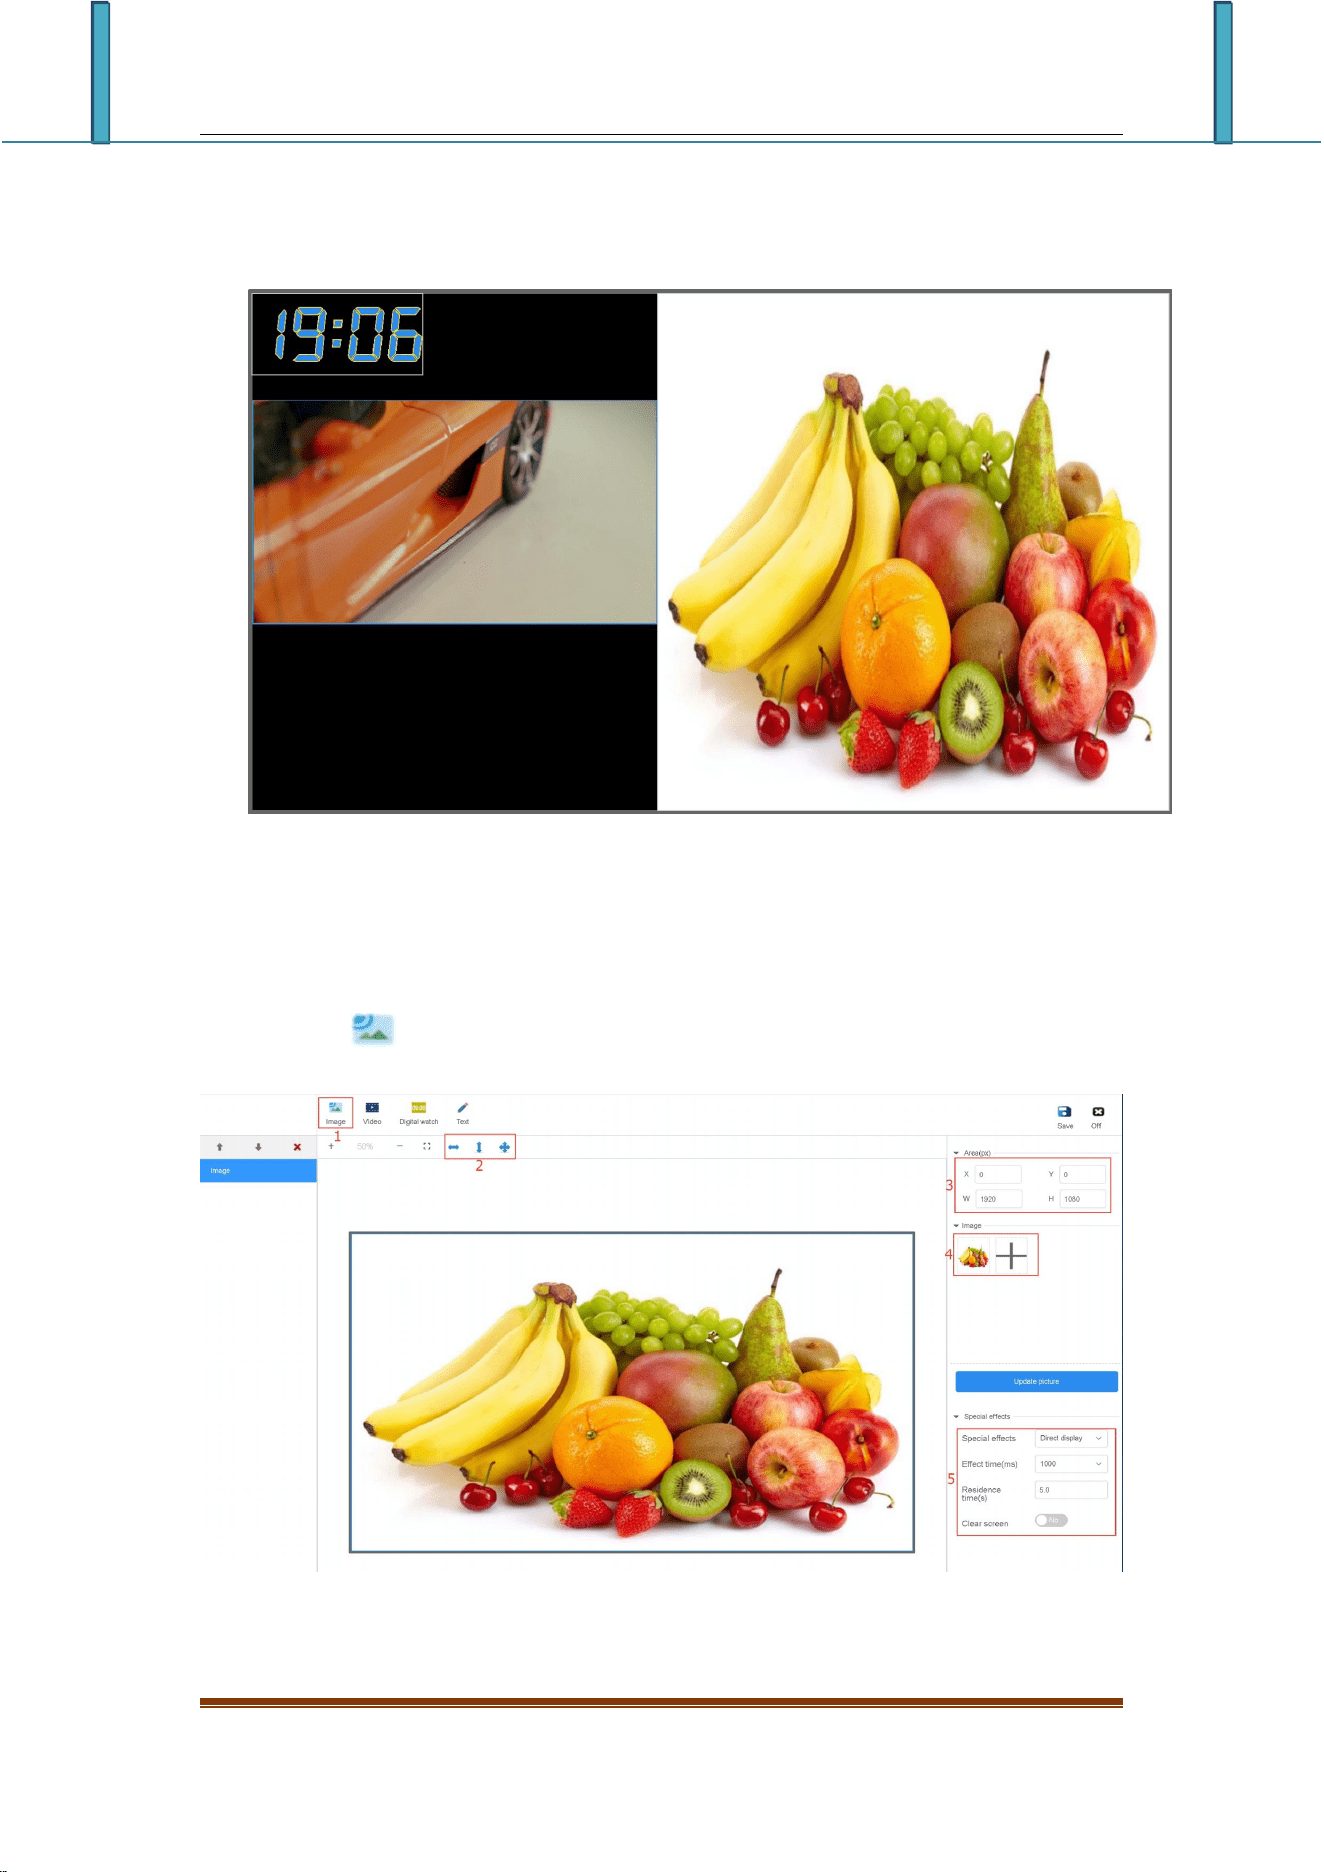
C.Click“ ”Button to enter the picture area 3-7。
Figure 3-7 Add picture window
LCD display information management platform instruction manual
○
1 :Click on ,Add video area;
○
2
:The area is stretched left and right, stretched up and down or maximized
(full screen);
○
3
:Or you can set the area X/Y coordinates and area width and height;
○
4
:Click “+”,add multiple pictures, drag the pictures, change the sequence
to change the play order;
○
5
:modify the effect type, effect time , and stop time , etc.;
Note:Support*.gif、*.jpg、*.jpeg、*.png、*.bmp、*.tiff、*.pbm、*.pgm、*.ppm、
*.xbm、*.xpm.
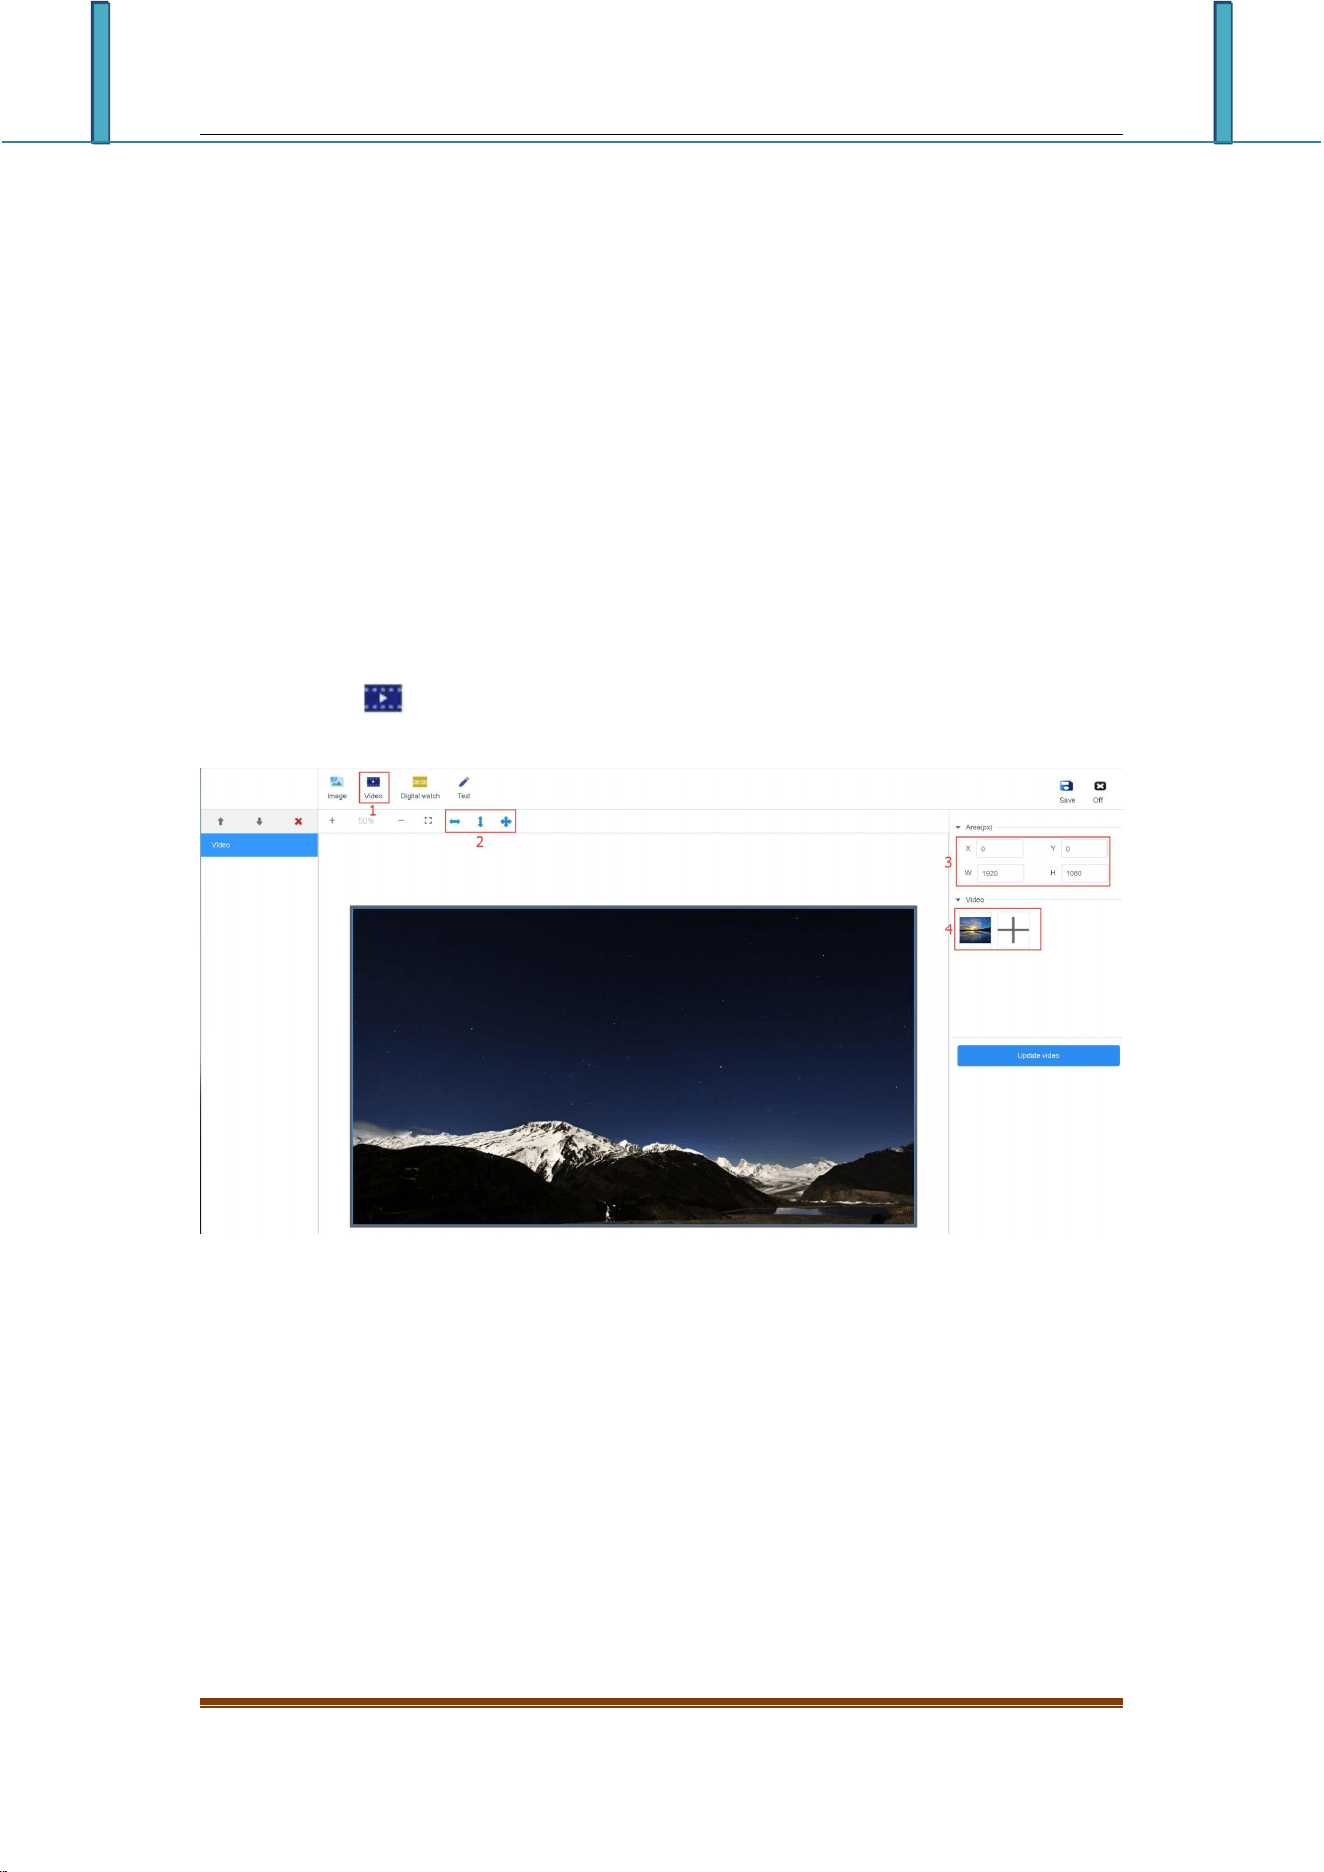
D. Click“ ”Button to enter the picture area 3-8;
Figure 3-8 add the video area
○
1 :Click on ,Add video area;
○
2 :The area is stretched left and right, stretched up and down or maximized
(full screen);
○
3 :Or you can set the area X/Y coordinates and area width and height;
○
4 :Click “+”,add multiple videos, drag the videos, change the sequence to
change the play order;
LCD display information management platform instruction manual
Note:
Support video:3GP、AVI、FLV、MP4、M3U8、MPG、ASF、WMV、MKV、MOV、TS、WebM、
MXF;
Support video encoding method:H.264/AVC、H.263、 H.263+、H.265、MPEG-1、MPEG-2、
MPEG-4、MJPEG、VP8、VP9、Quicktime、RealVideo、Windows Media Video
Support Audio encoding method:AAC、ADPCM、AMR、DSD、MP1、MP2、MP3、PCM、RealAudio、
Windows Media Audio
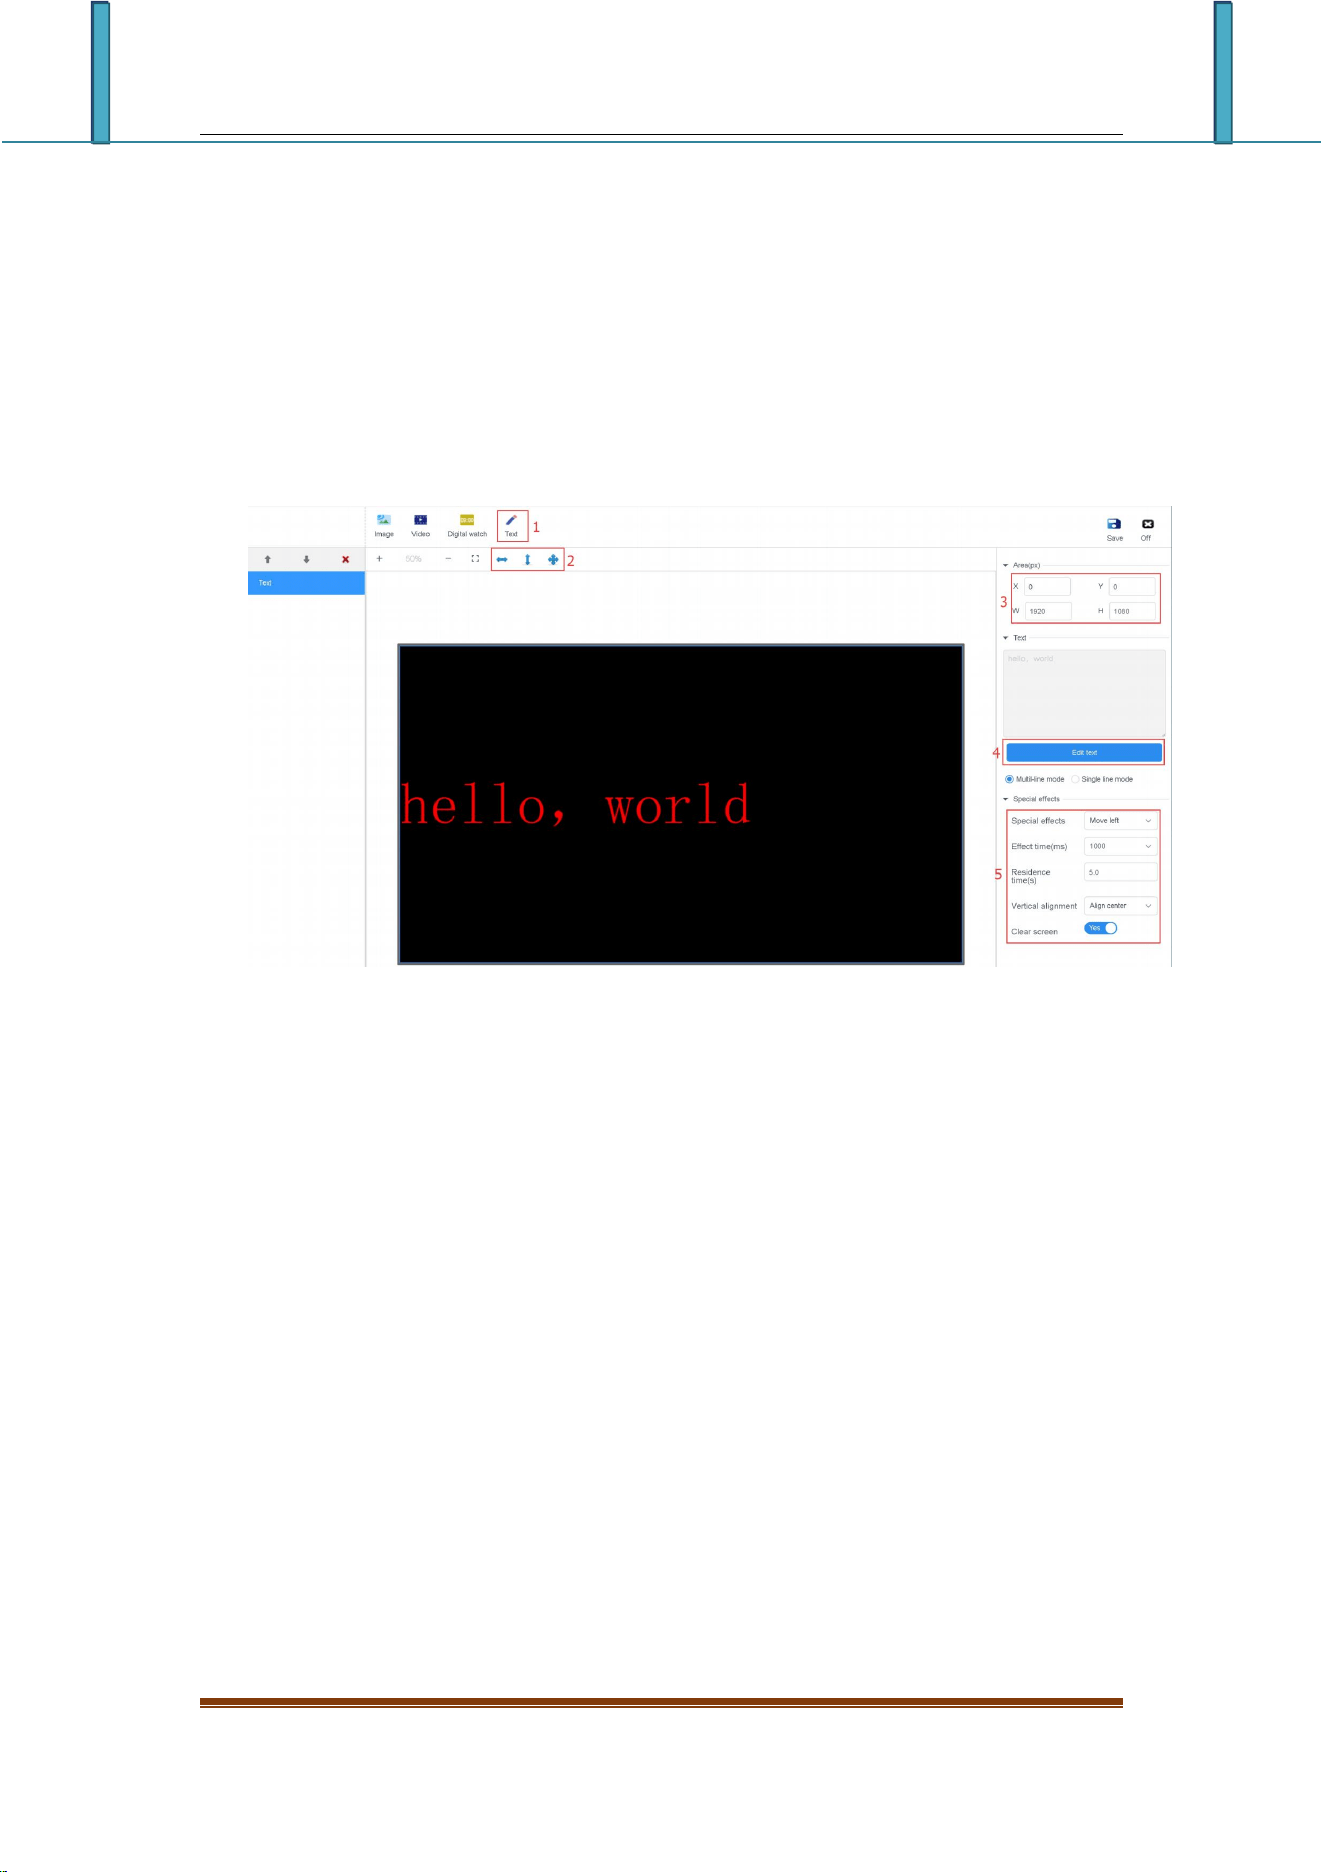
E. Click on the upper left corner“ ”,Enter the text area, Figure 3-9
Figure 3-9 Add text area
○
1 :Click on ,Add text area;
○
2
:The area is stretched left and right, stretched up and down or maximized
(full screen);
○
3
:Or you can set the area X/Y coordinates and area width and height;
○
4
:Click "Edit Text" to enter the text editing interface, you can edit the
text, modify the font size, color, type and text background color, etc.;
○
5
:Modify the text display special effects, special effect time and stay time,
etc.
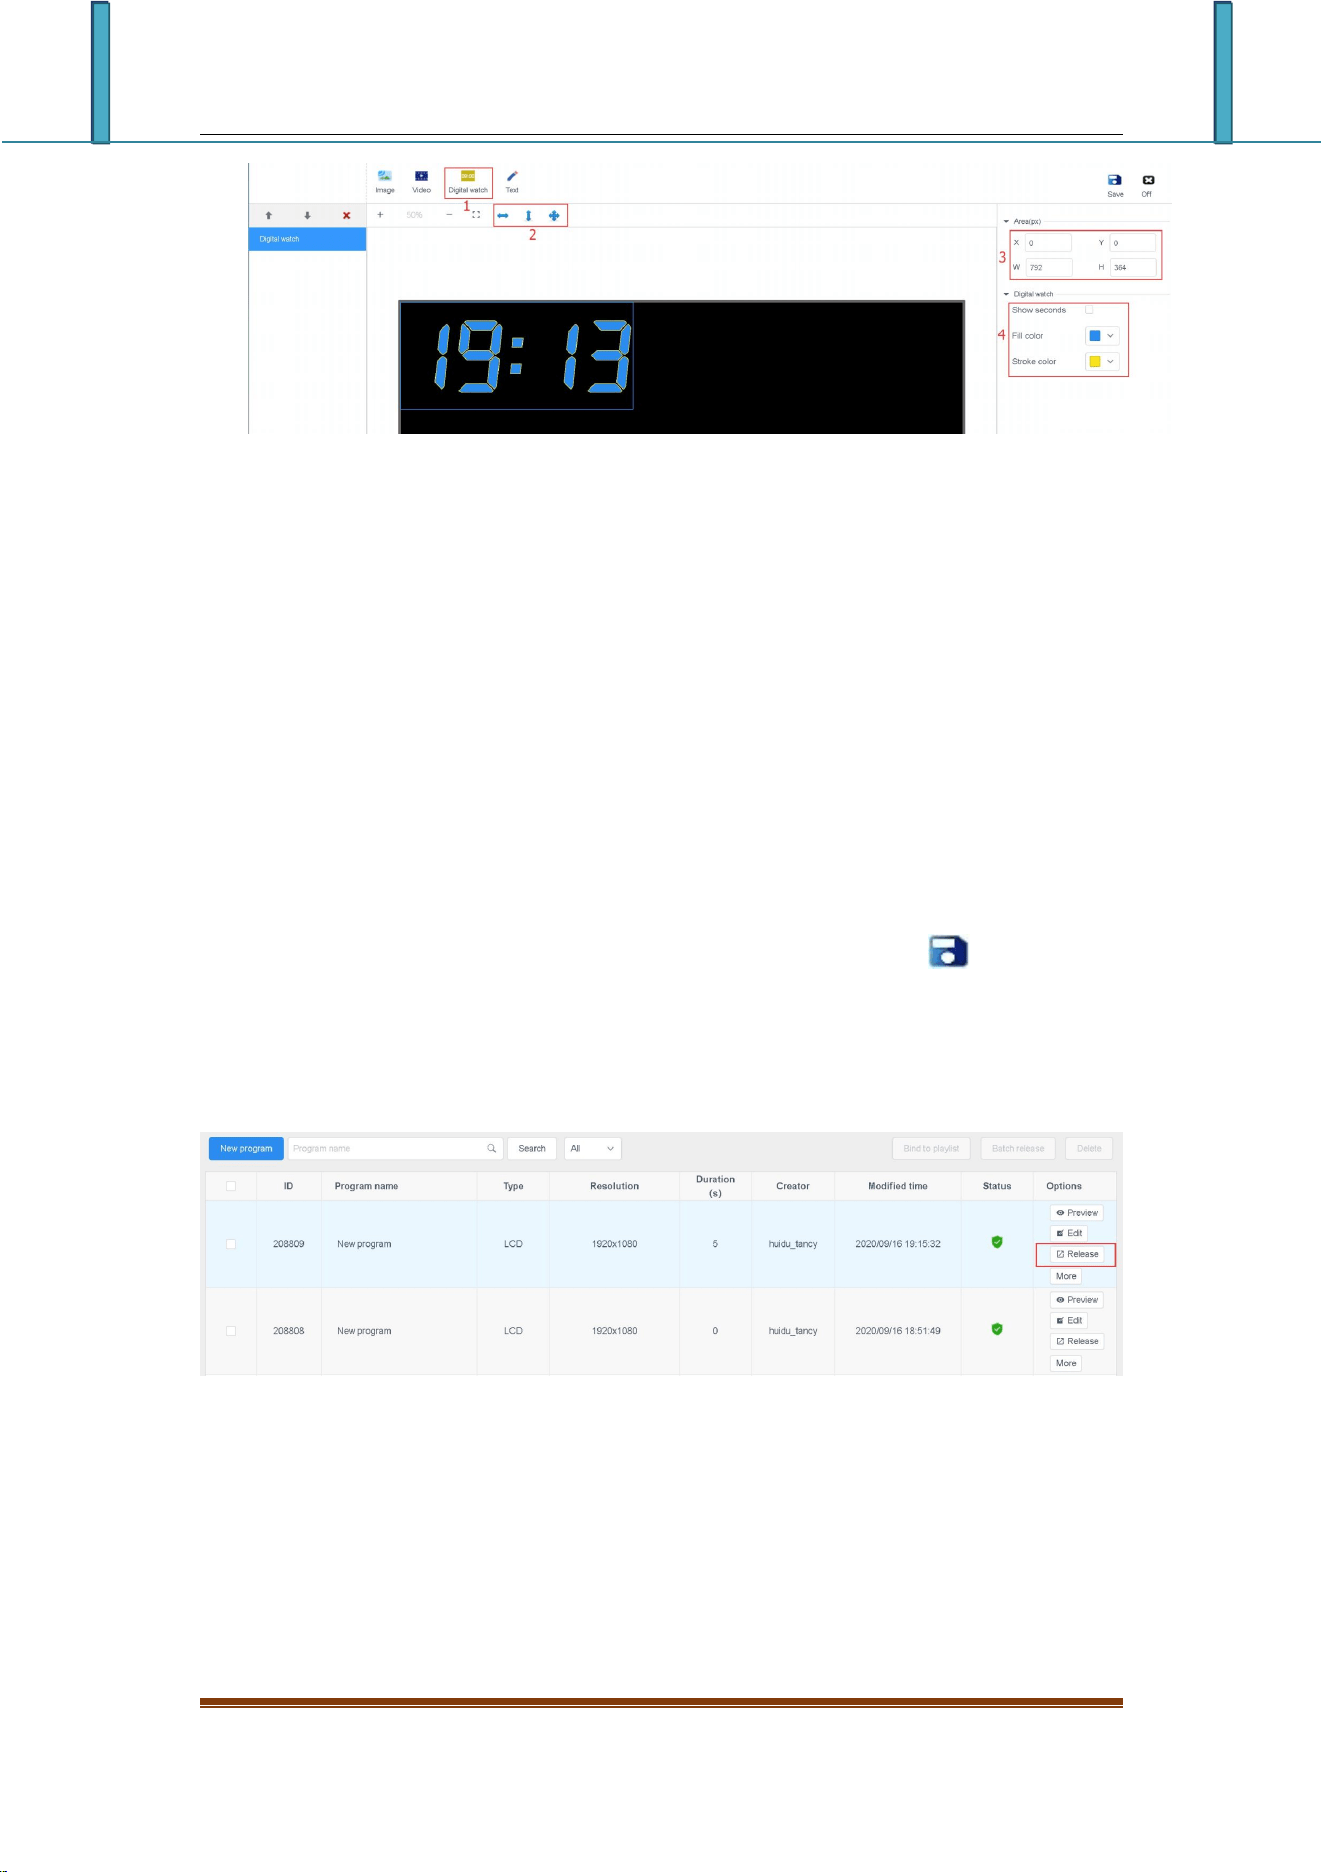
F. Click on the upper left corner “ ”,Enter the electronic watch area,
as shown in Figure 3-10.
LCD display information management platform instruction manual
Figure 3-10 Electronic meter area
○
1
:Click to Add the electronic watch area;
○
2
:The area is stretched left and right, stretched up and down or maximized
(full screen);
○
3
:Or you can set the area X/Y coordinates and area width and height;
○
4
:You can choose whether to check the display seconds and modify the color
4)Release programs
A.After editing the program, click on the upper right corner “ ” Save button,
then close the program editing, return to the program list, find the program to be
released (program name or program ID), click the "publish" button, as shown in Figure
3-11.
Figure 3-11 Program list
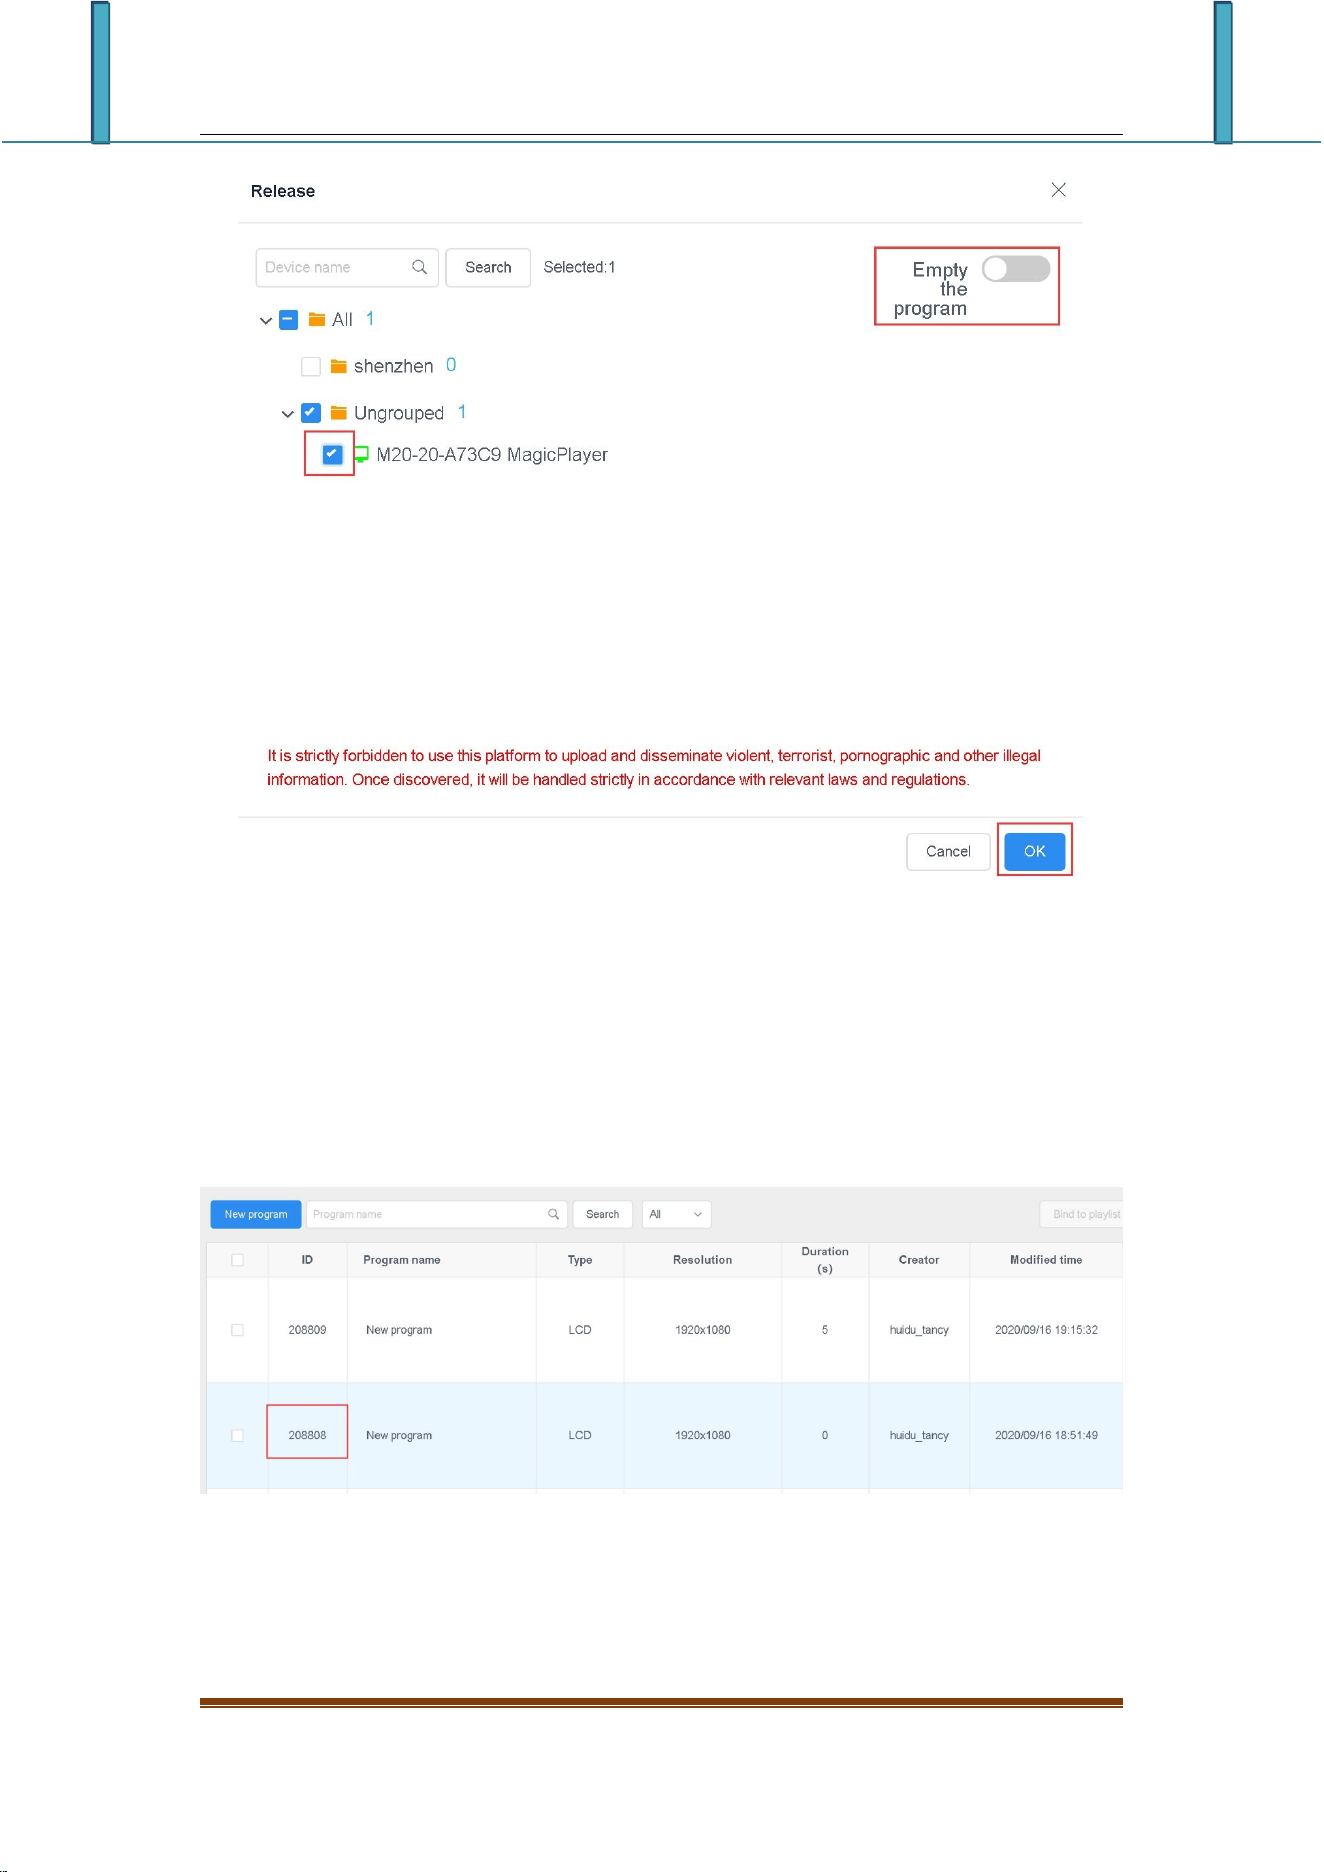
B. In the release dialog box, you can select the device or device group to be
released. Figure 3-12.
LCD display information management platform instruction manual
Figure 3-12 Release program
Note: 1. If you turn on Clear Programs, clear all programs on the device, and then
add programs; the default is not to turn on this option, the default is to add
programs;
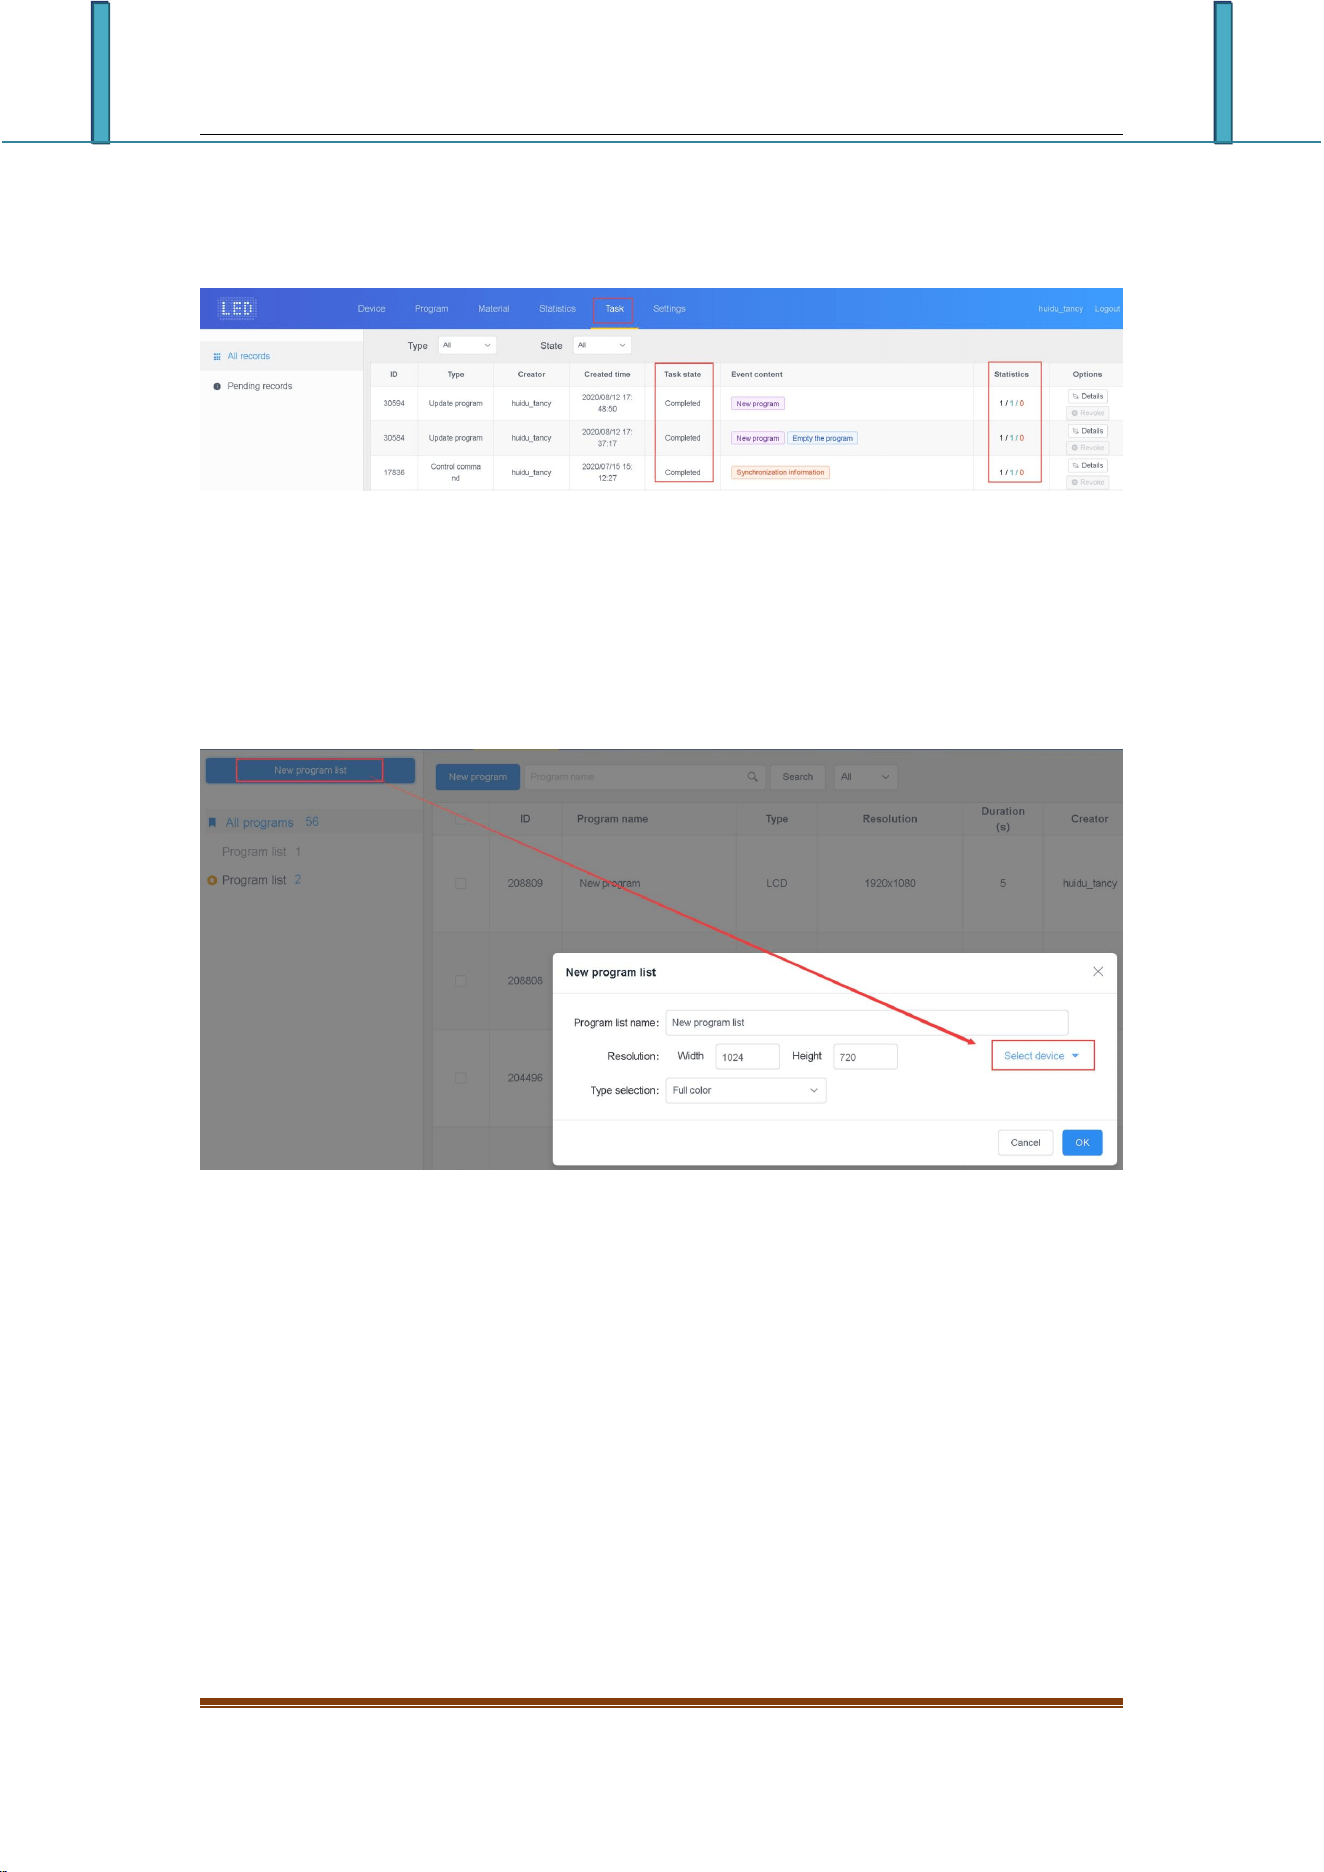
2. For the distributed program, if the device has the same ID number, it will replace
the program with the same ID number by default;
Figure 3-13 Program list
For example, the program ID-67974 has been sent to the device, and then I edit in
the program, add pictures or videos, etc., and then send it again. By default, the
previously sent program-67974 will be overwritten.
LCD display information management platform instruction manual
C. After the release is confirmed, check the sending status in the task, as shown
in Figure 3-14. (You can also click on the details in the device list or release
record to view the task release record)
Figure 3-14 Task release details
6)Program list
In the program management interface, click "New Program", as shown in Figure
3-15, set the program name, screen width and height or select the device to read
back the screen width and height, and then click "OK".
Figure 3-15 New program list
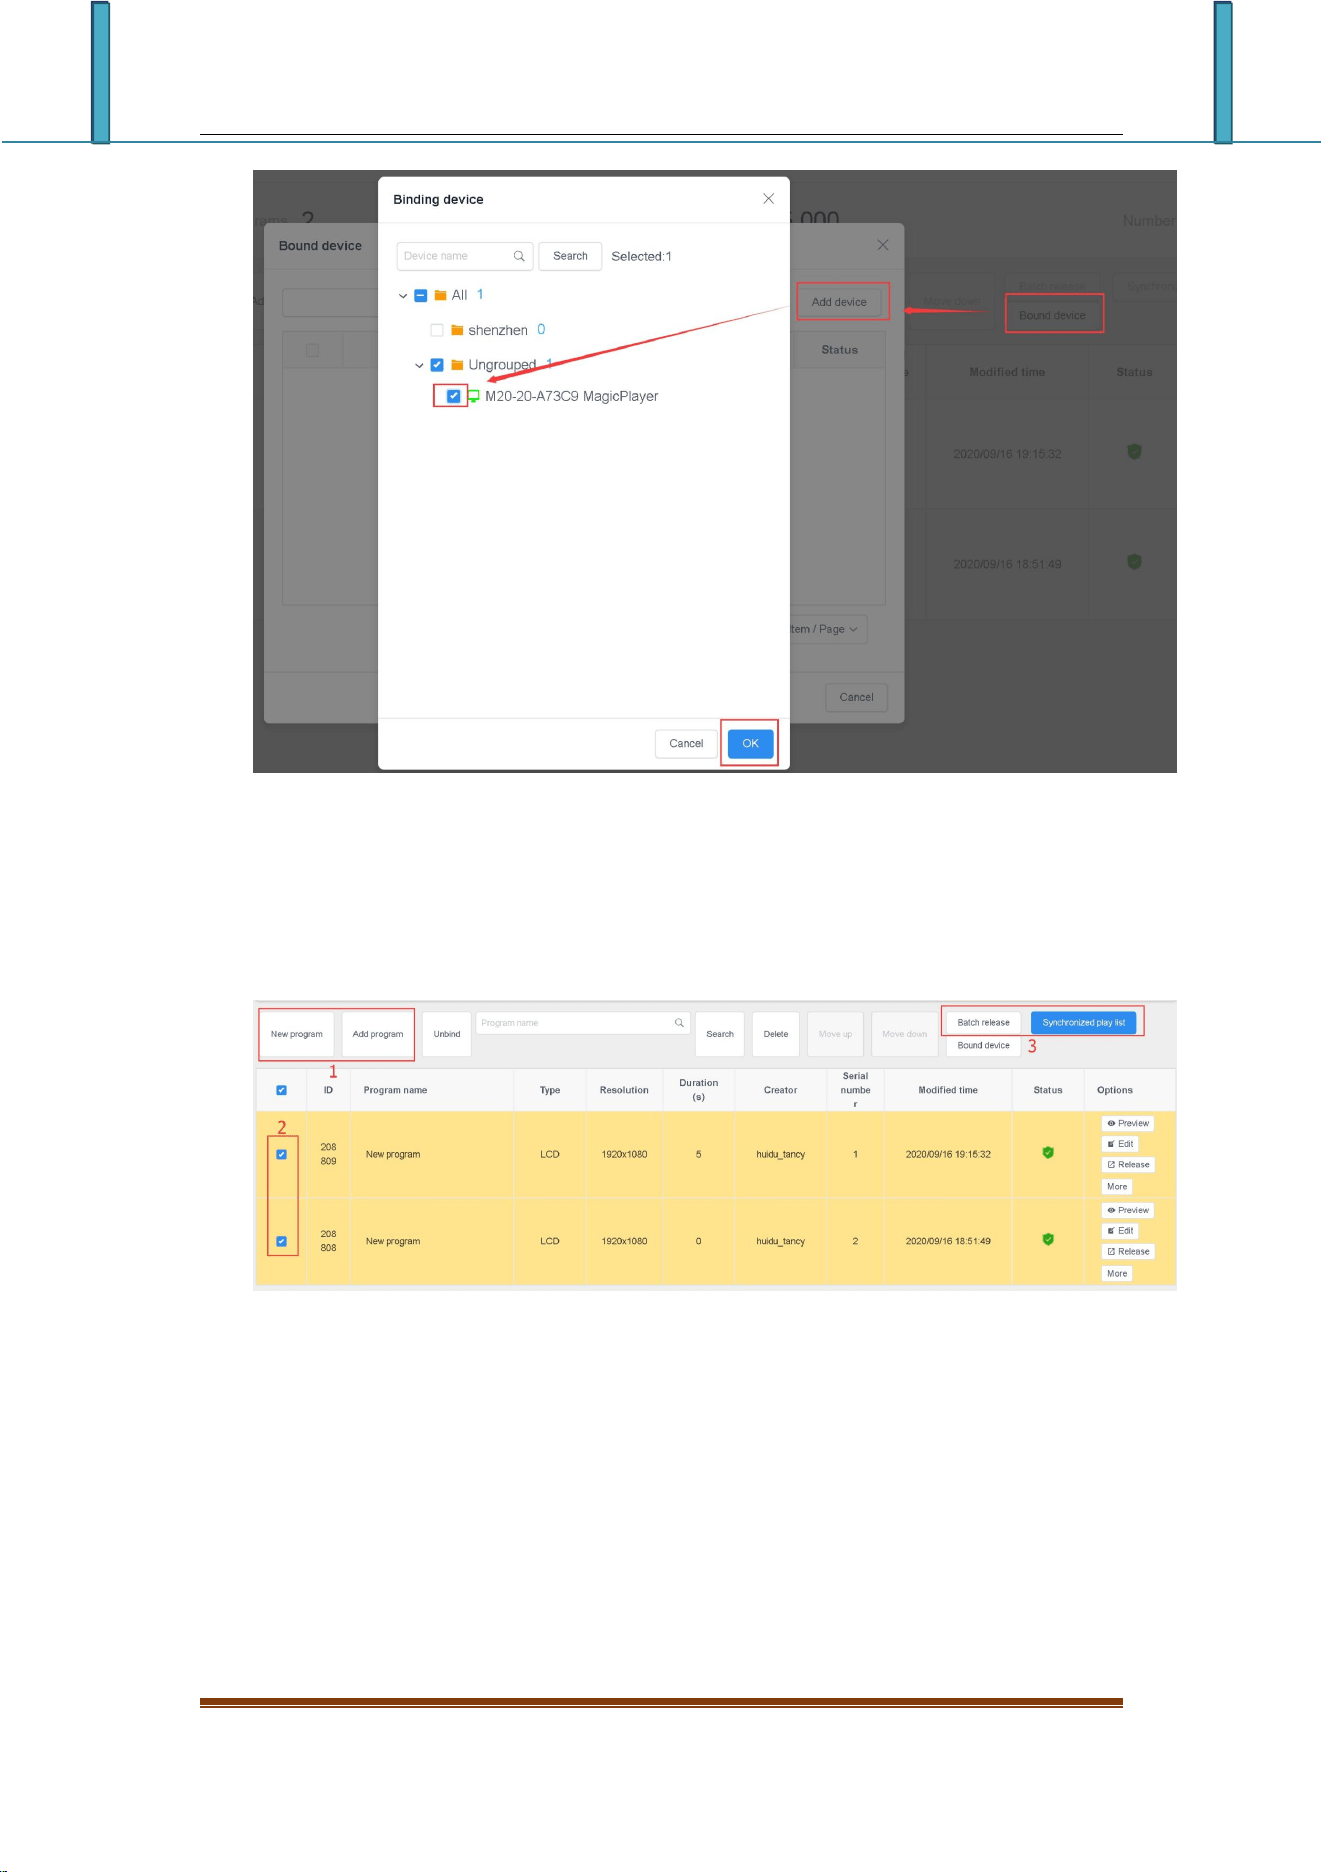
A. A. Click "Bind Device" → "Add Device" in the upper right corner, then
select the device and click "OK", as shown in Figure 3-16.
LCD display information management platform instruction manual
Figure 3-16 Add device
B. Creating a new program is the same as the program editing operation
introduced above. You can create multiple programs, and then publish or
synchronize these programs to the device, as shown in Figure 3-17.
Figure 3-17 Program list
Note: The difference between batch release and synchronized program list:
Batch release: The programs on the device (the program ID is different from the
current released program ID) will still be retained, and new programs (new ID) will
be added to the device;
Synchronized playbill: all programs on the device will be cleared, and only the
programs in the existing playbill will be kept;
7)Broadcast control
LCD display information management platform instruction manual
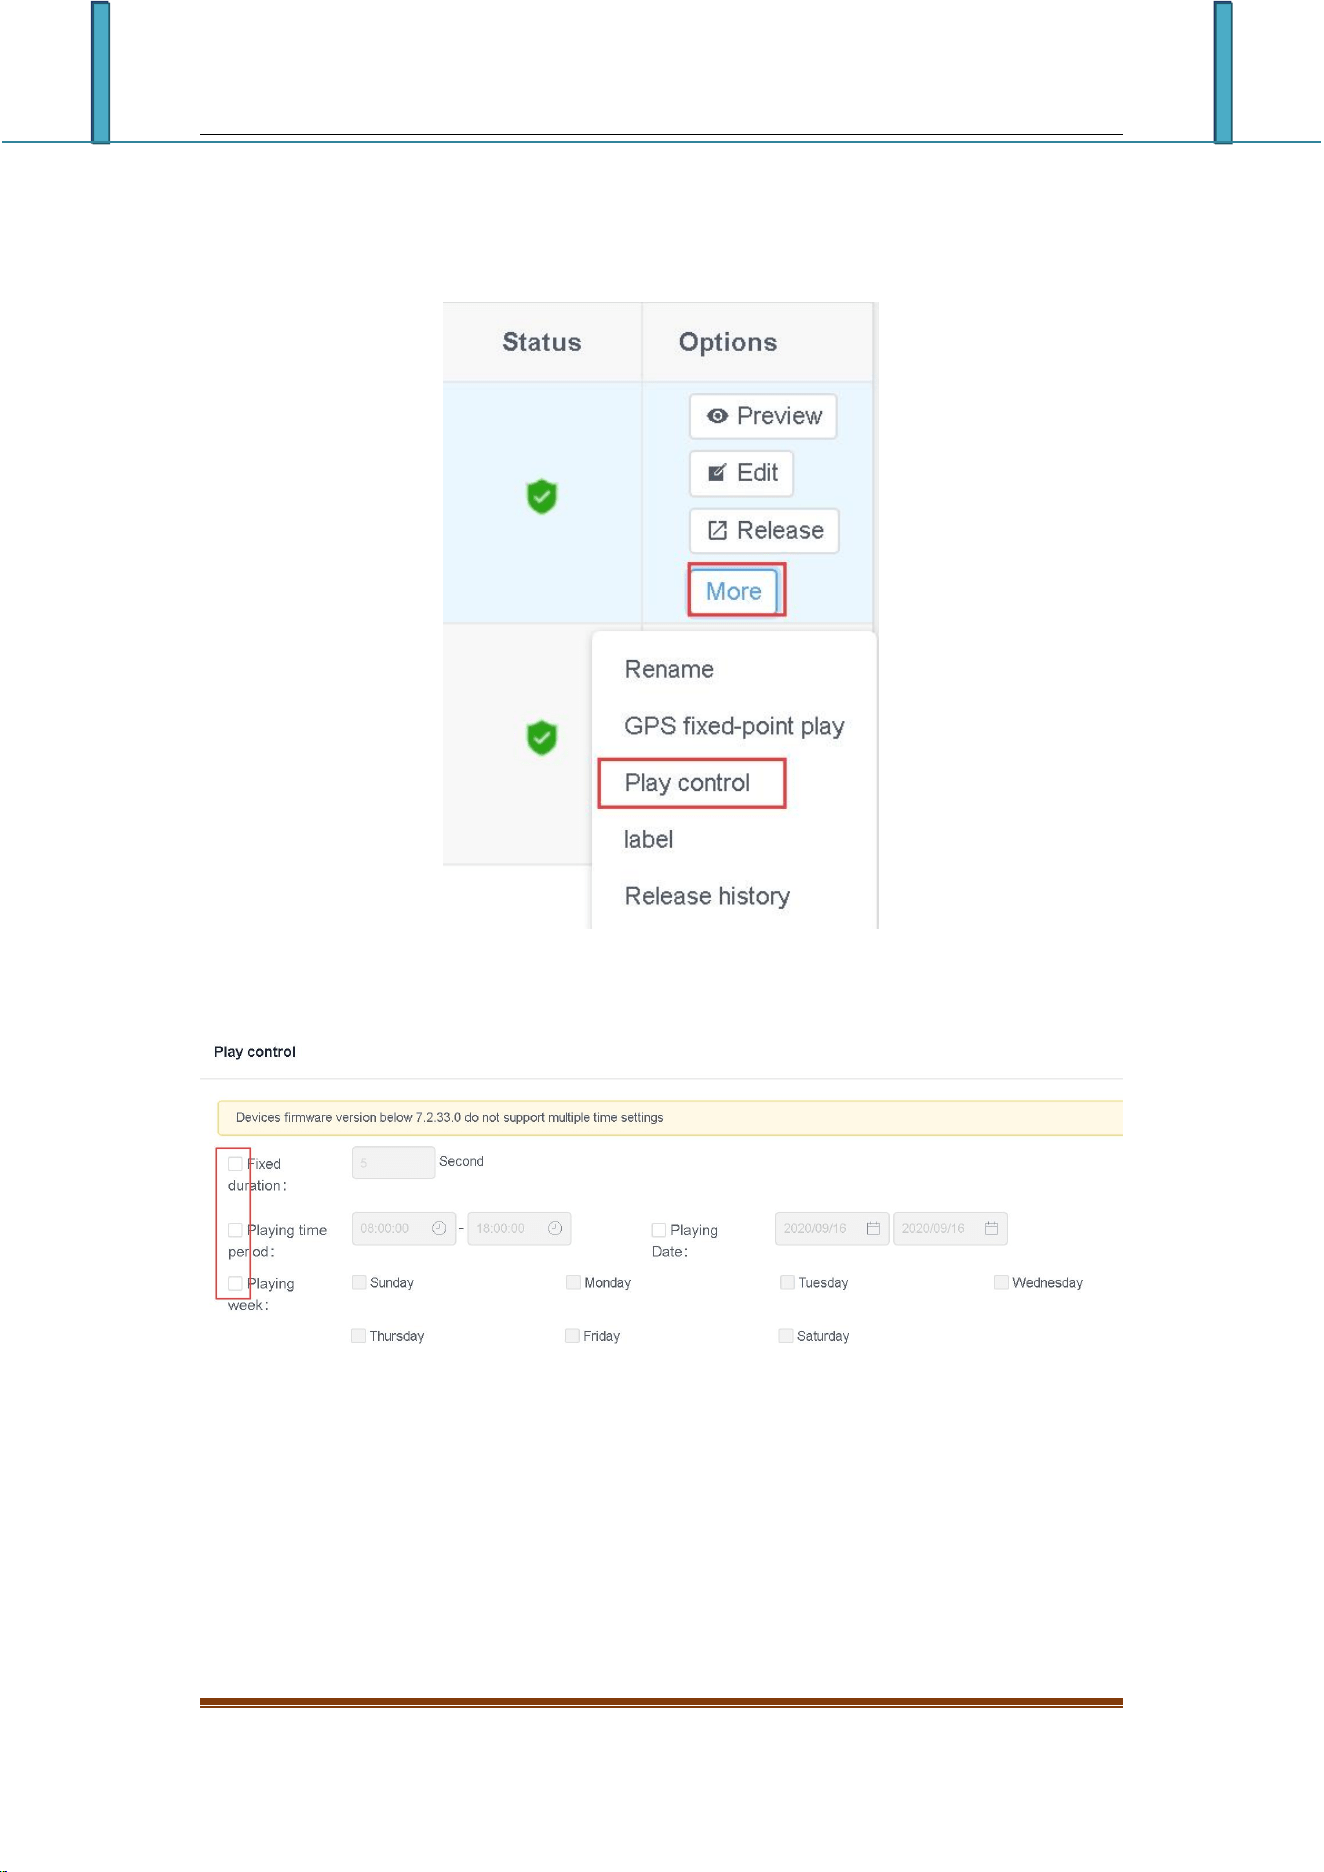
Click "More" on the right side of the program and select "Play Control", as shown
in Figure 3-18. Enter the play control, you can set the play time, time period, week
and date of the program, as shown in Figure 3-19.
Figure 3-18 Play control 1
Figure 3-19 Play control 2
Note: After modifying the playback control settings, you need to republish the
program.
4.Material management
In the material list, all resource information can be previewed by default, and
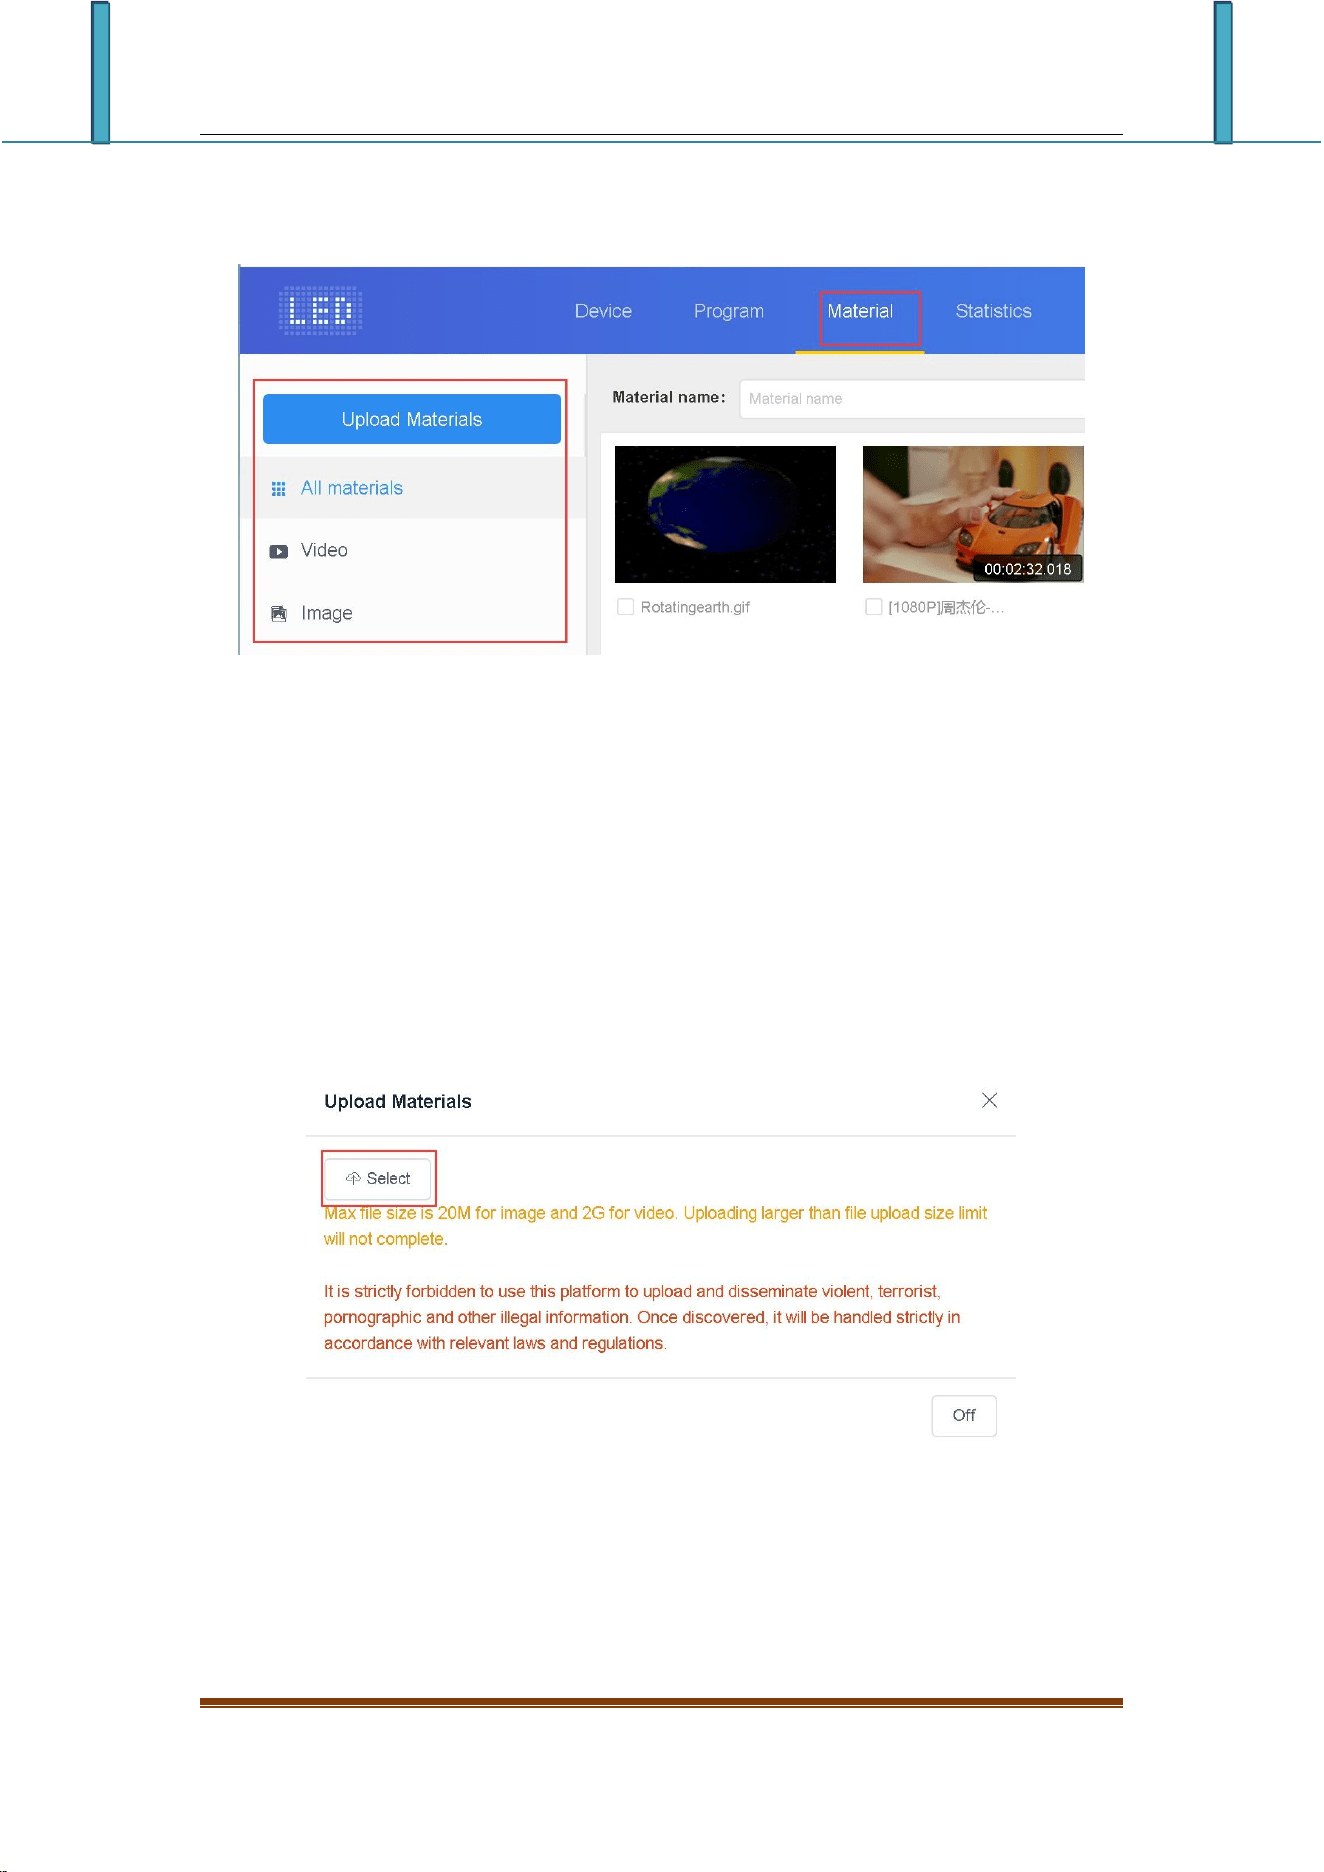
can also be filtered and previewed by pictures and videos, as shown in Figure 4-1.
LCD display information management platform instruction manual
Click on a picture or video to zoom in and preview. In unreviewed materials, you
can view the uploaded but unreviewed materials.
Figure 4-1 Resource management list
In order to save time, the resources to be played (pictures, videos) can be
uploaded to the server in advance, and the resources on the server can be called
directly during the editing process, which reduces the waiting time and effectively
improves the efficiency.
Click Button on the upper left corner of the material
list“ ”,Click the "Select" button in the pop-up
dialog box to select the material to be uploaded, as shown in Figure 4-2.
Figure 4-2 Upload resources
Find the file to be uploaded in the file selection dialog box. After clicking
"Open", the upload starts and the upload progress bar is displayed. After the upload
is successful, the prompt message is shown in Figure 4-4.

LCD display information management platform instruction manual
Figure 4-4 Upload result
5.Task list
All records and unapproved records can be viewed in the task list.
1)Post task list
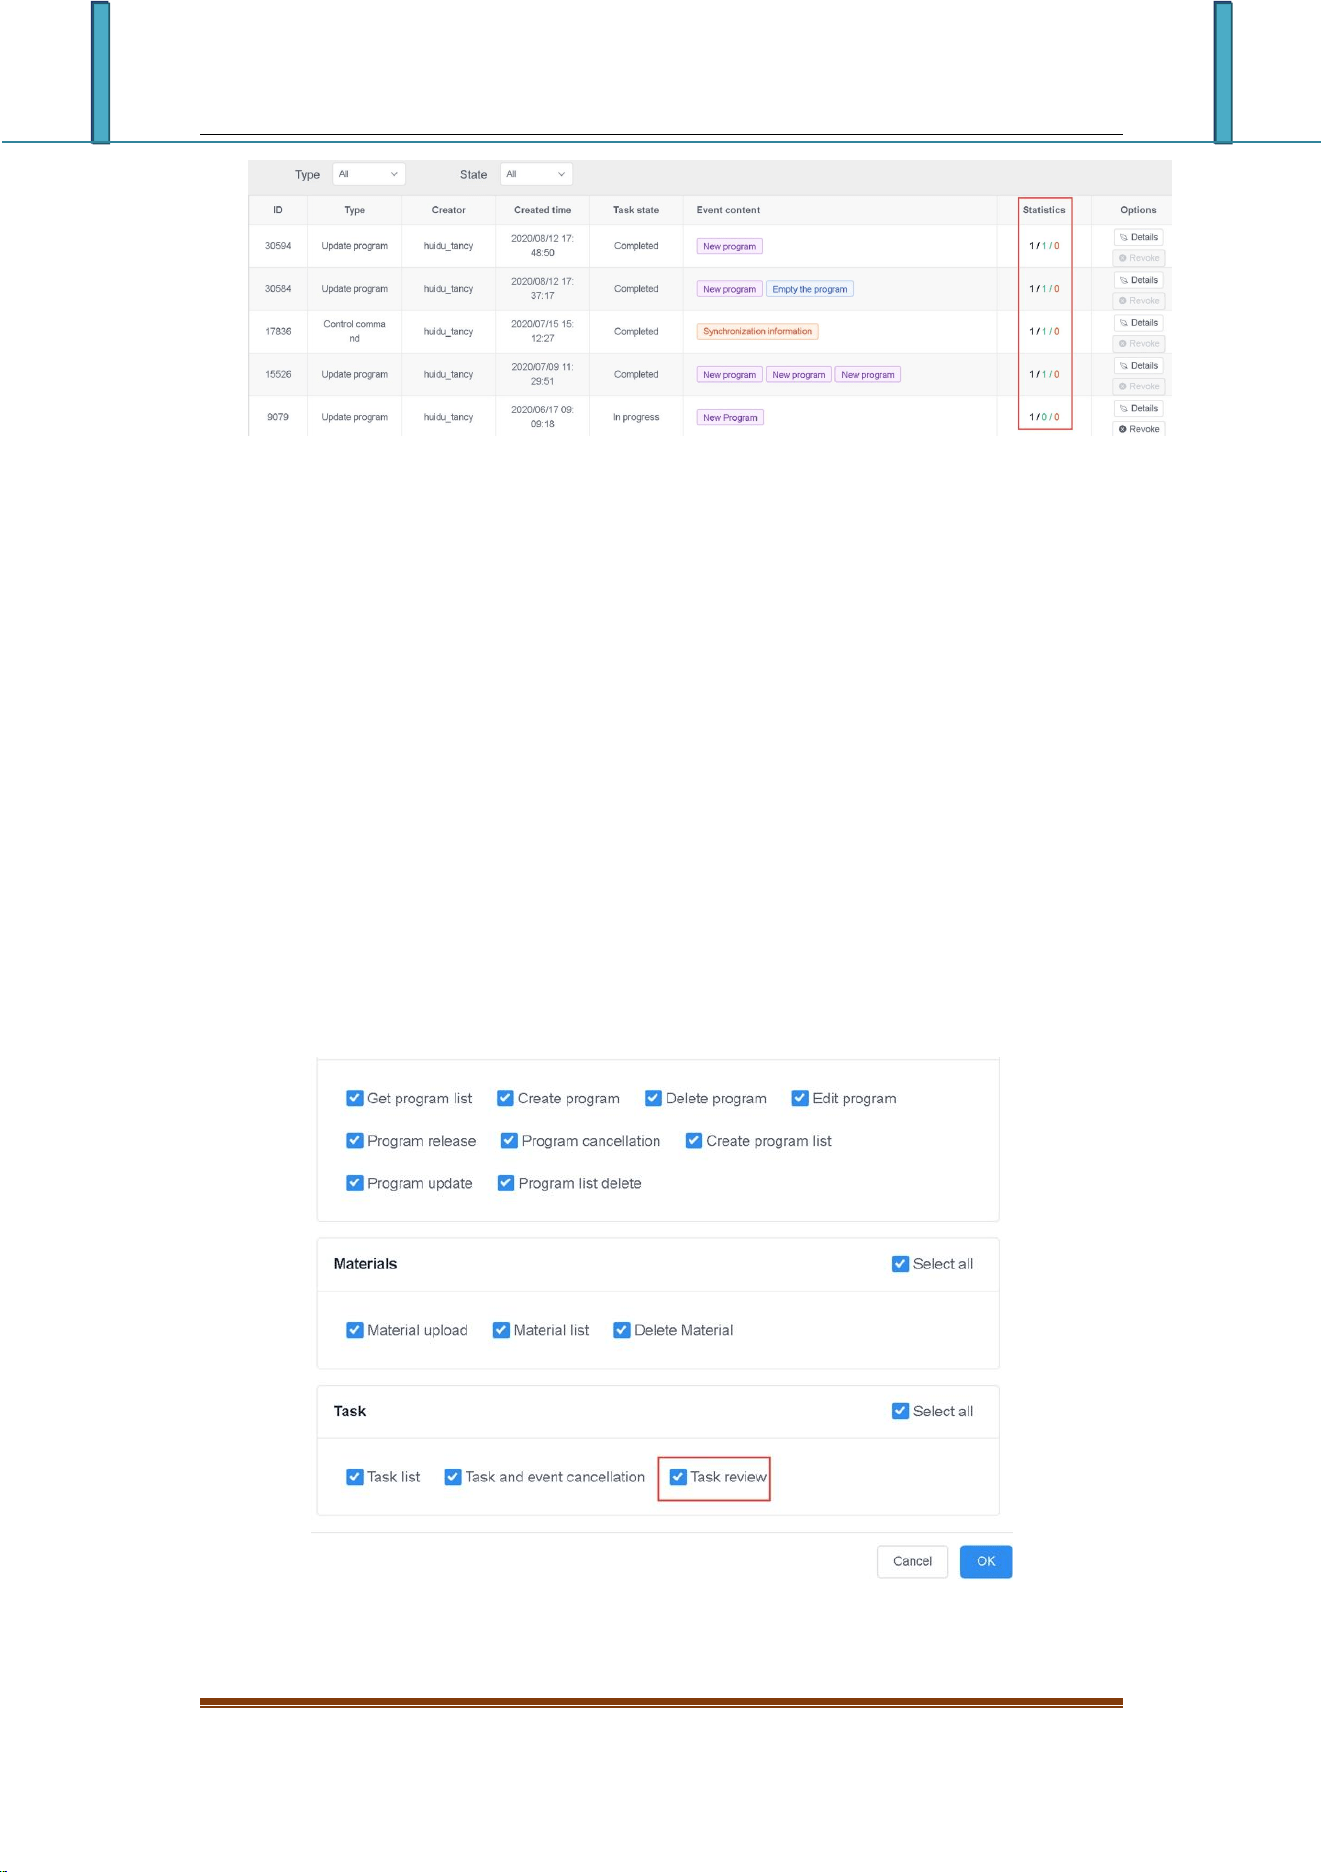
You can view the program creator, creation time, and task status in the
publishing task list, as shown in Figure 5-1.
LCD display information management platform instruction manual
Figure 5-1
mong them, the statistical status: A/B/C, A represents the total number of tasks
(devices); B represents the number of successfully sent; C represents the number
of failed publishing.
2)List of pending tasks
When the sub-user does not have the pass permission of the program management
module, the released program needs to pass the review, which is reviewed by the
registered user or the user who has the pass permission of the device, and then
submitted to the platform administrator for review.
Registered users have the right to review by default, and the posted tasks will
be directly submitted to the platform administrator for review;
Registered users can choose to grant or not grant audit rights to sub-users,
as shown in Figure 5-2.
Figure 5-2 Permission setting
LCD display information management platform instruction manual
6.Settings management
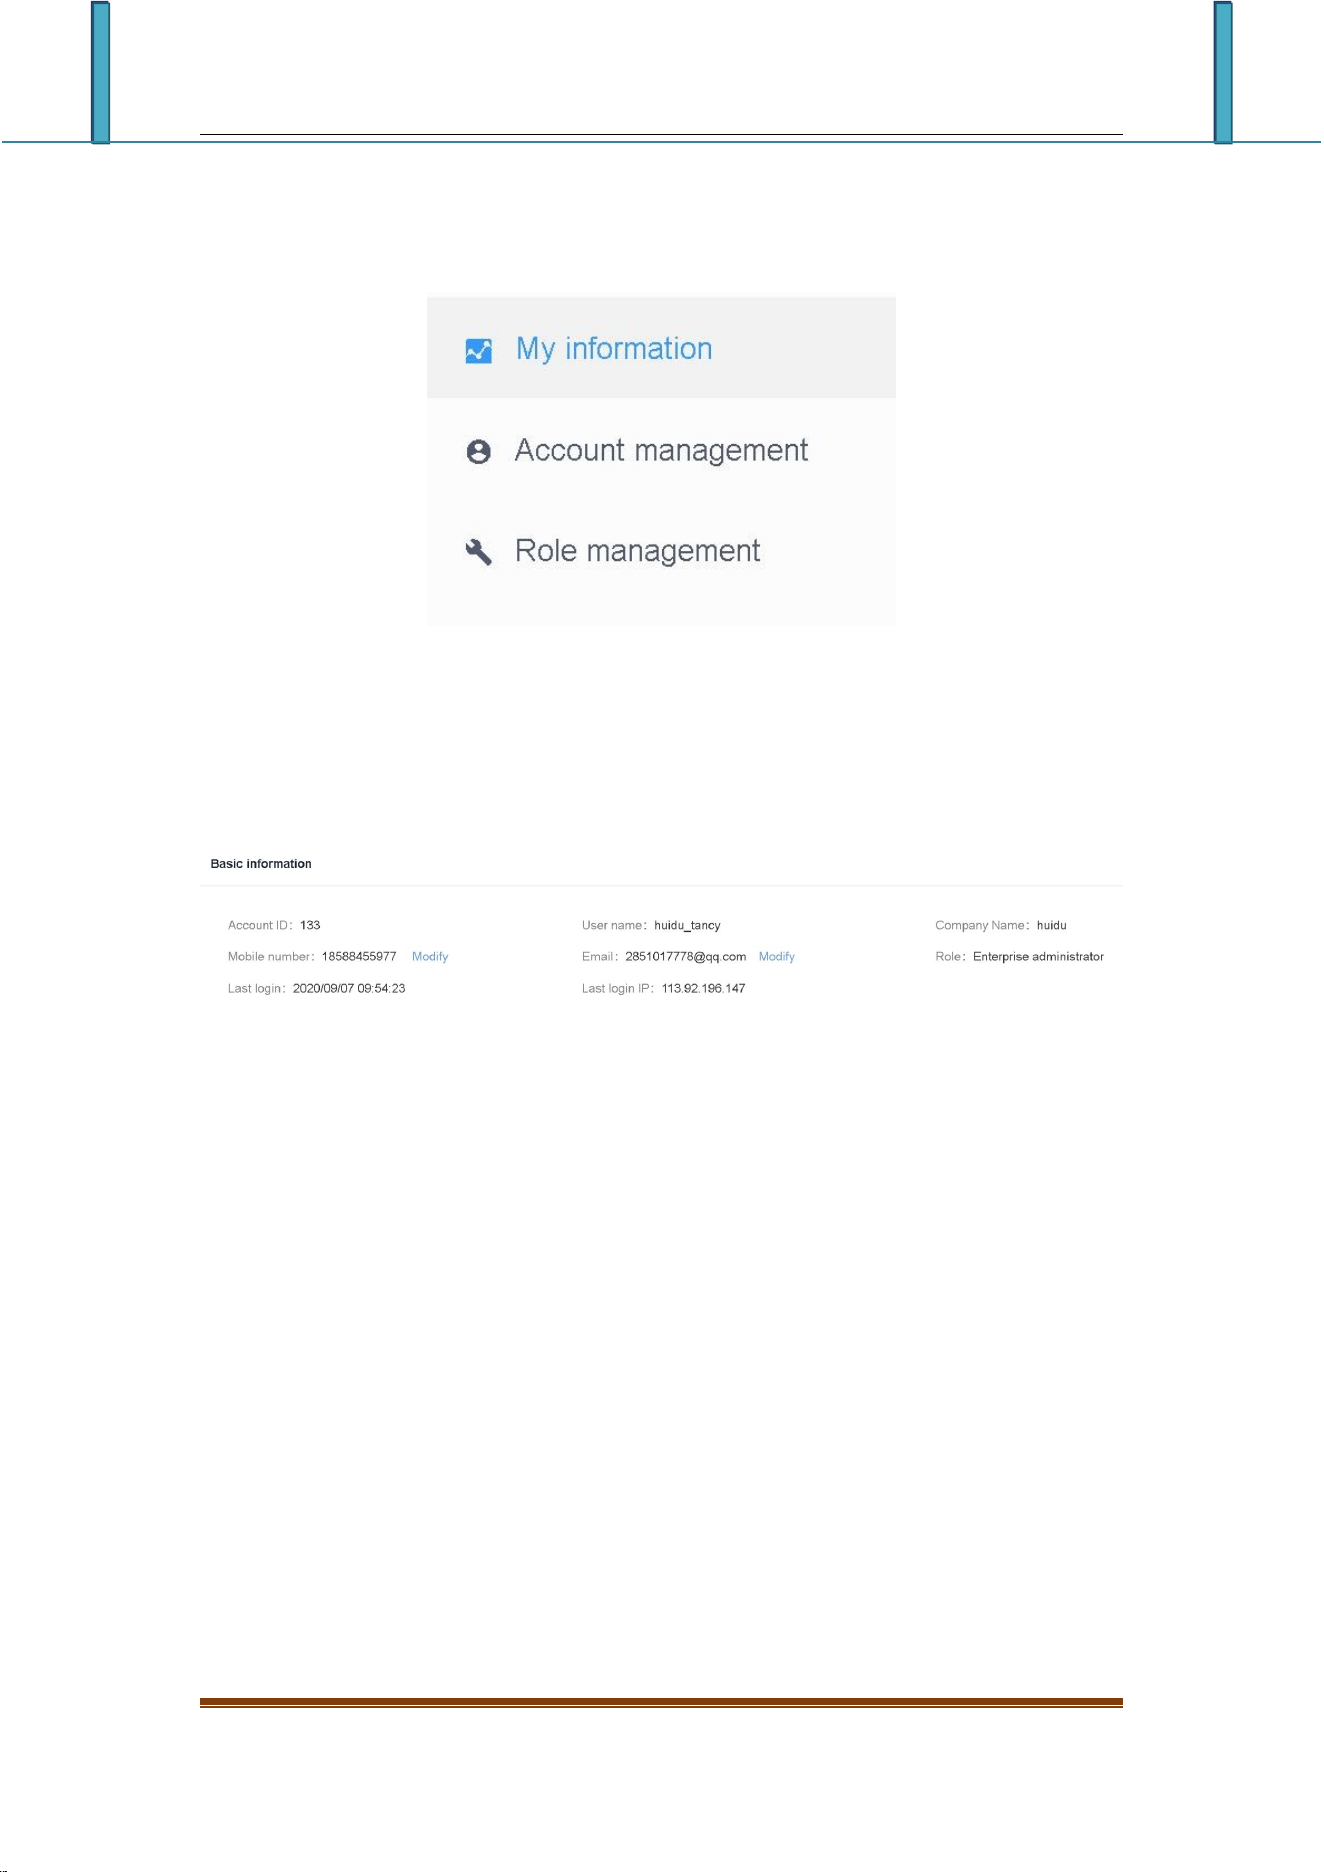
Setting management includes three parts: my information, account management and
role management, as shown in Figure 6-1.
Figure 6-1 Settings
1) My informartion
In my information, you can view my account ID, user name, company name, mobile phone
number, email address and authentication settings, etc., as shown in Figure 6-2.
Figure 6-2 My information
Among them, two-factor authentication, that is, login password + mobile phone/email
verification code can log in.
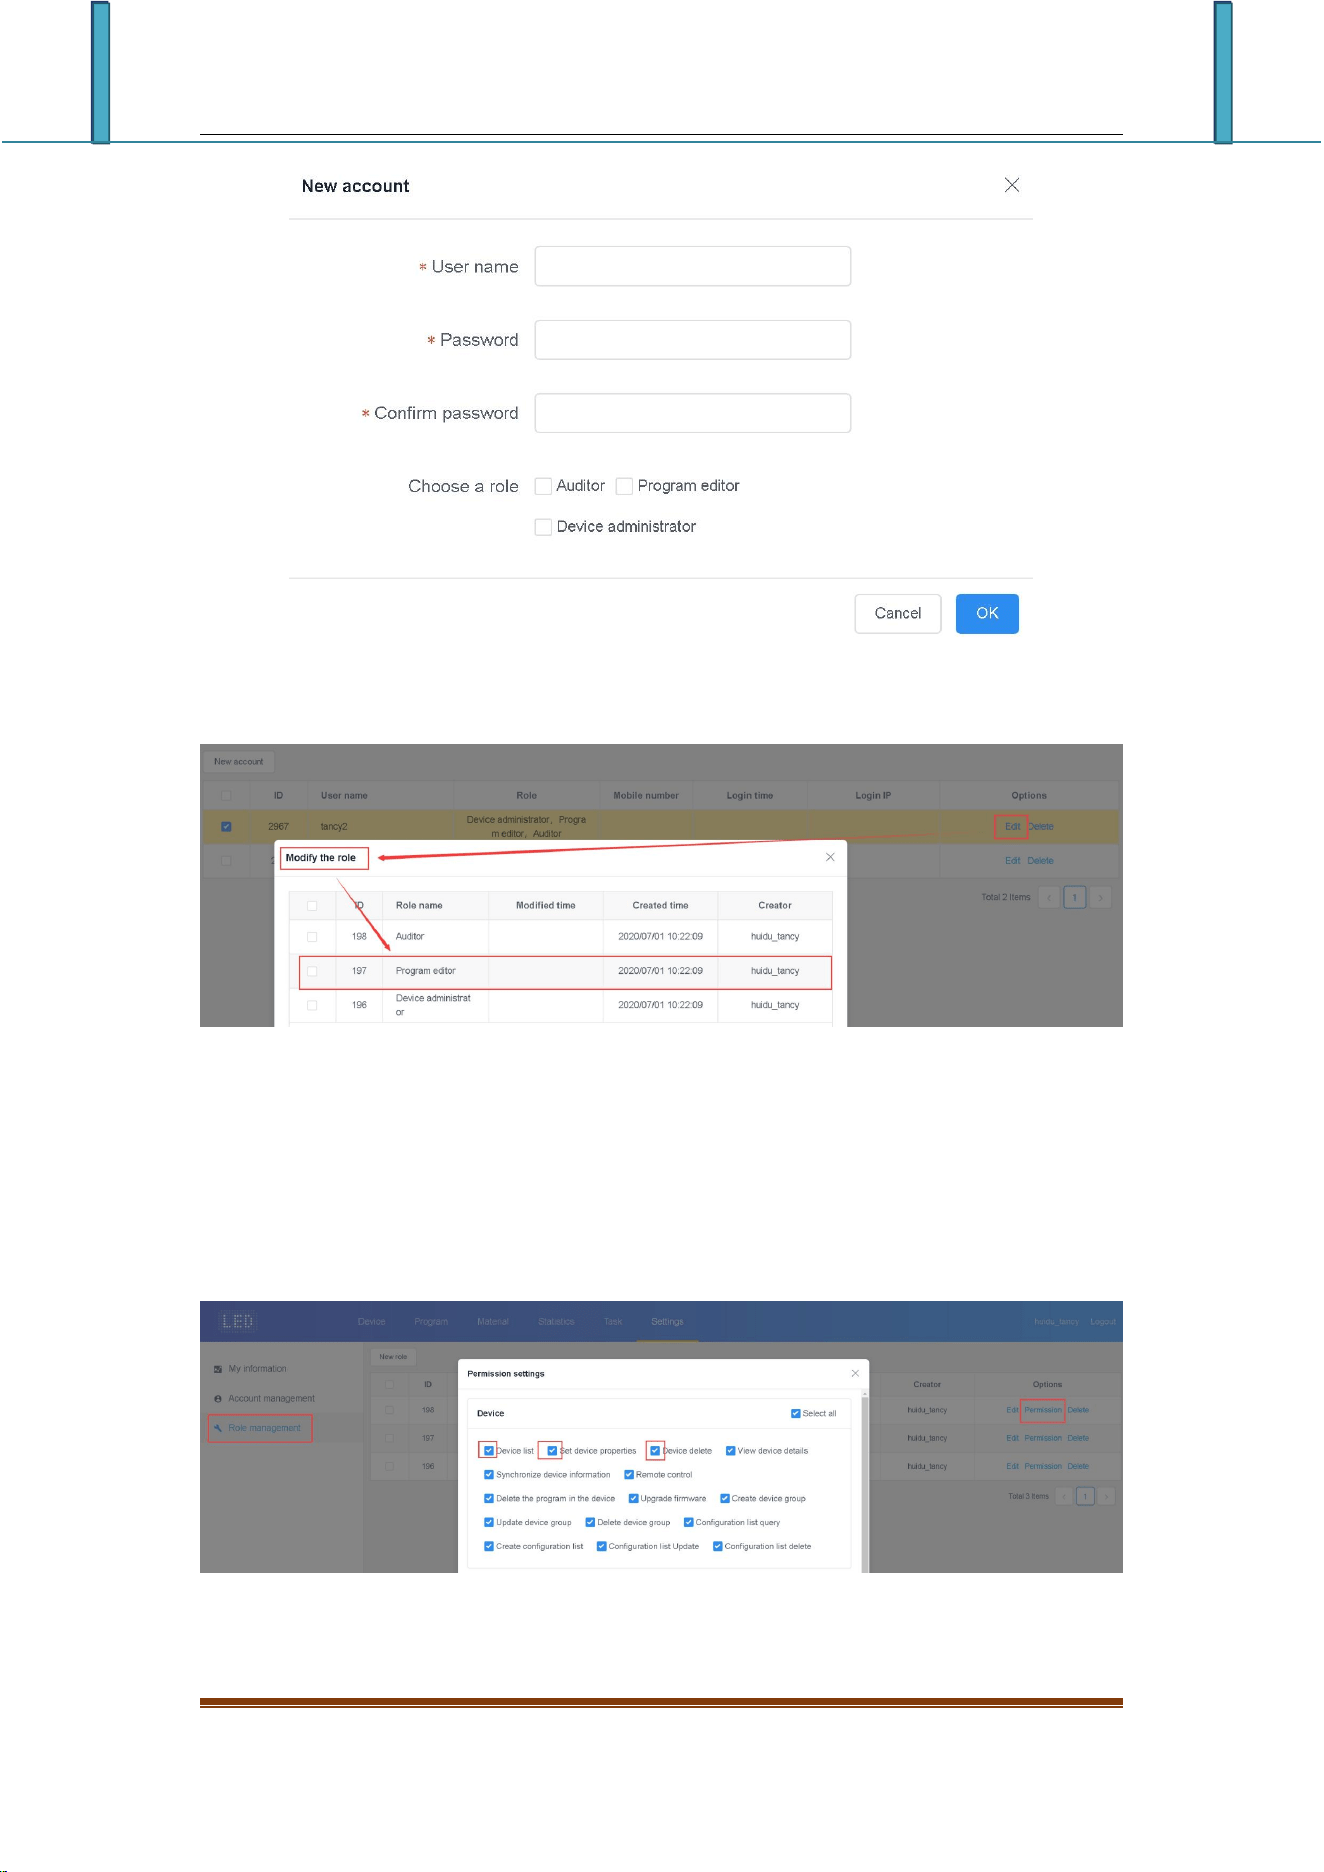
2) Account management
Click "New Account" in the upper left corner to create a new sub-user, as shown in
Figure 6-3, and then click Edit on the right of the user, select Modify Role, Figure
6-4, select the default role of the system—auditor/program editor/device
Administrator or a role created by yourself.
LCD display information management platform instruction manual
Figure 6-3 New sub user
Figure 6-4 Modify role
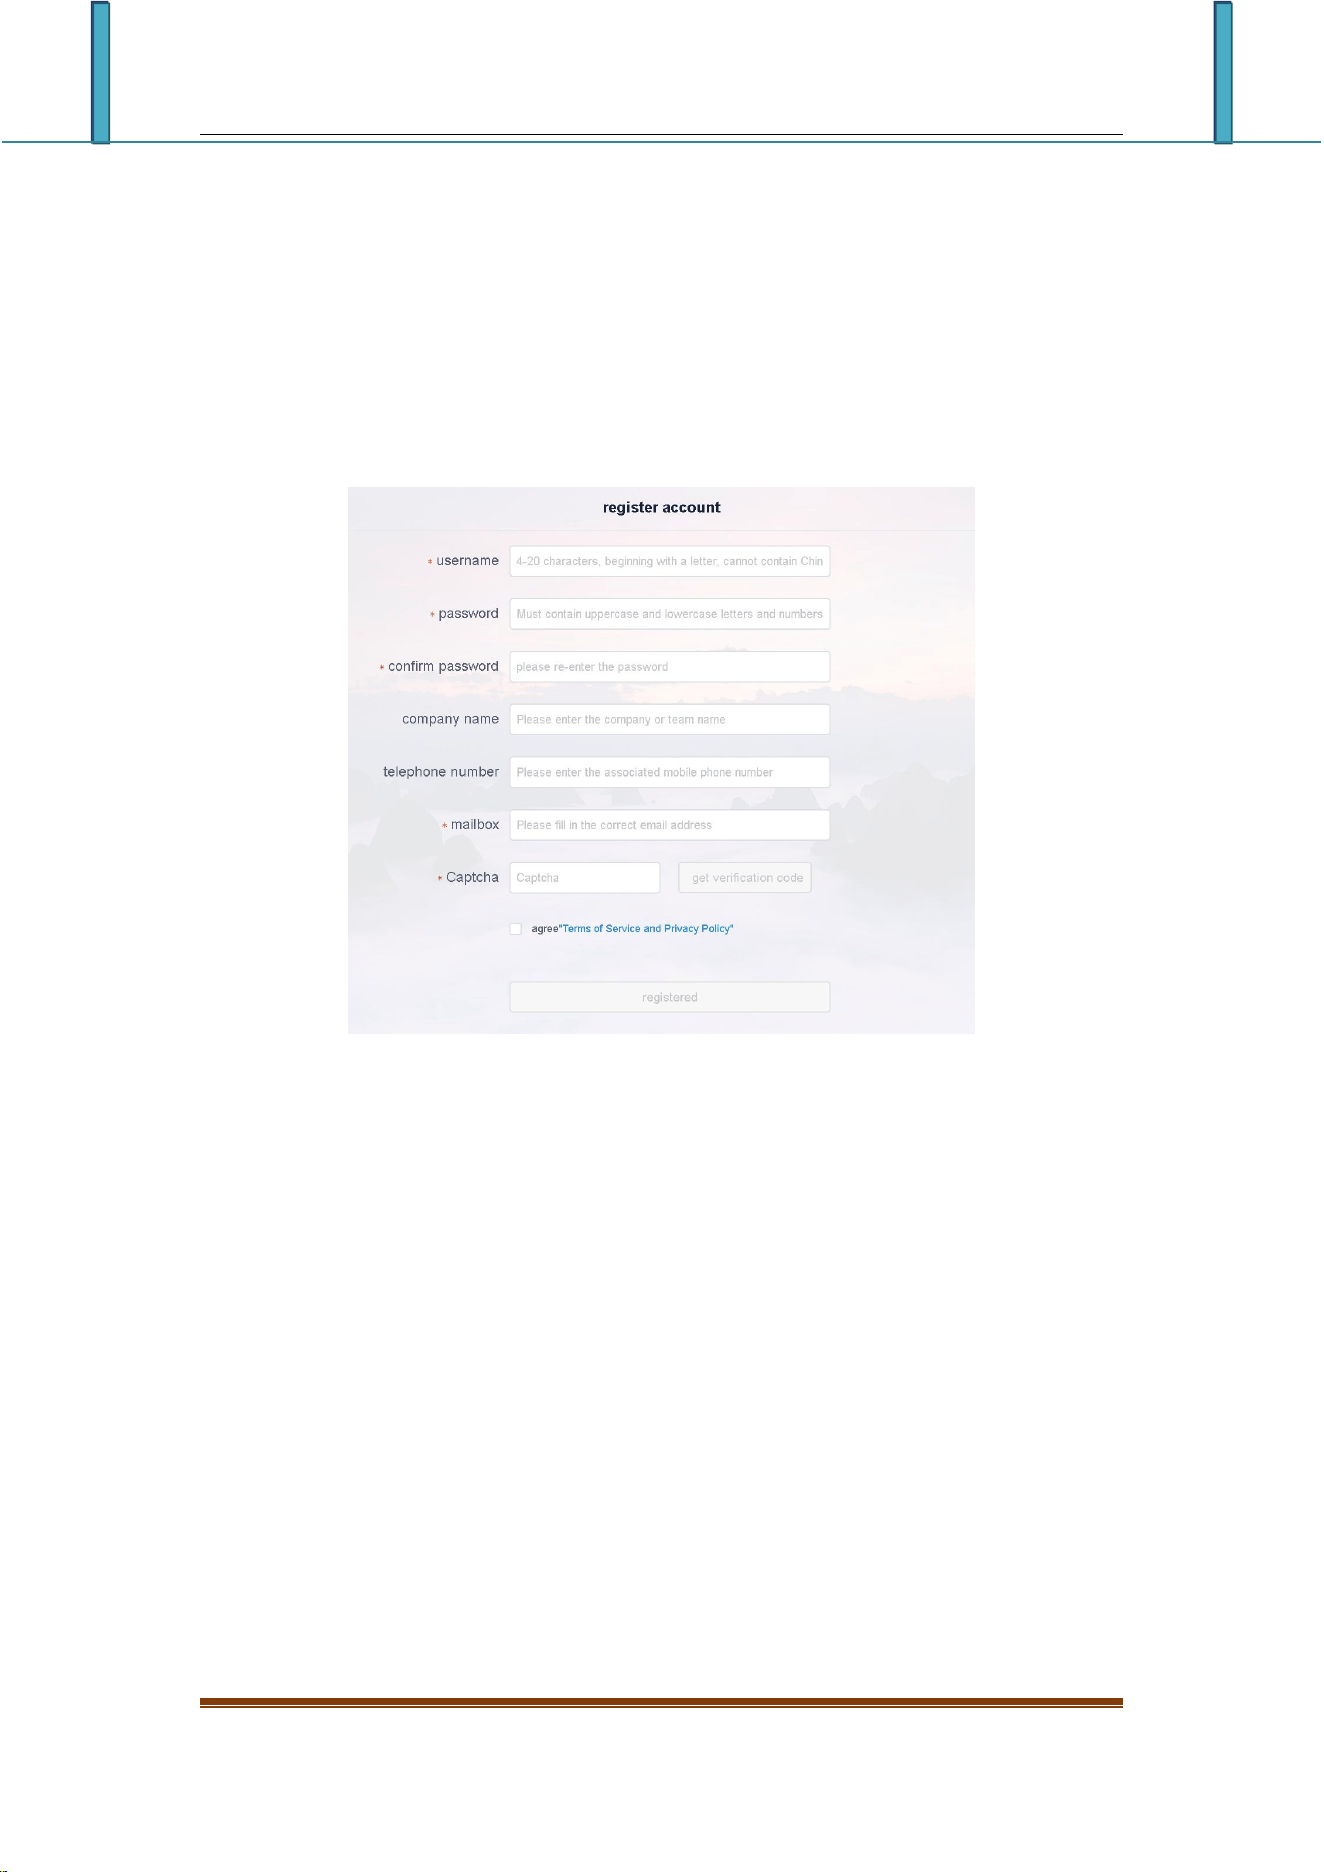
3)Role management
The user can use the default role of the system-auditor/program editor/device
administrator, and then modify the role permission which option is checked, which
permission is available for changing the role, as shown in Figure 6-5, or create
a new role and then Modify permissions.
Figure 6-5 Permission setting
LCD display information management platform instruction manual
Attach:
Cloud platform device binding instructions
1. Register an account
Access the cloud management platform server through a browser: www.led-cloud.cn,
register an account, and skip this step if you already have an account. (Note: One
account can be bound to multiple control cards, not one control card can only be
bound to one account)
2.LCD controller access to the Internet
How the LCD controller connects to the Internet: 1). The wired network cable
that can access the Internet is directly connected to the LCD controller; 2). Wi-Fi
bridges to the existing wireless network that can access the Internet. The operation
is as follows:
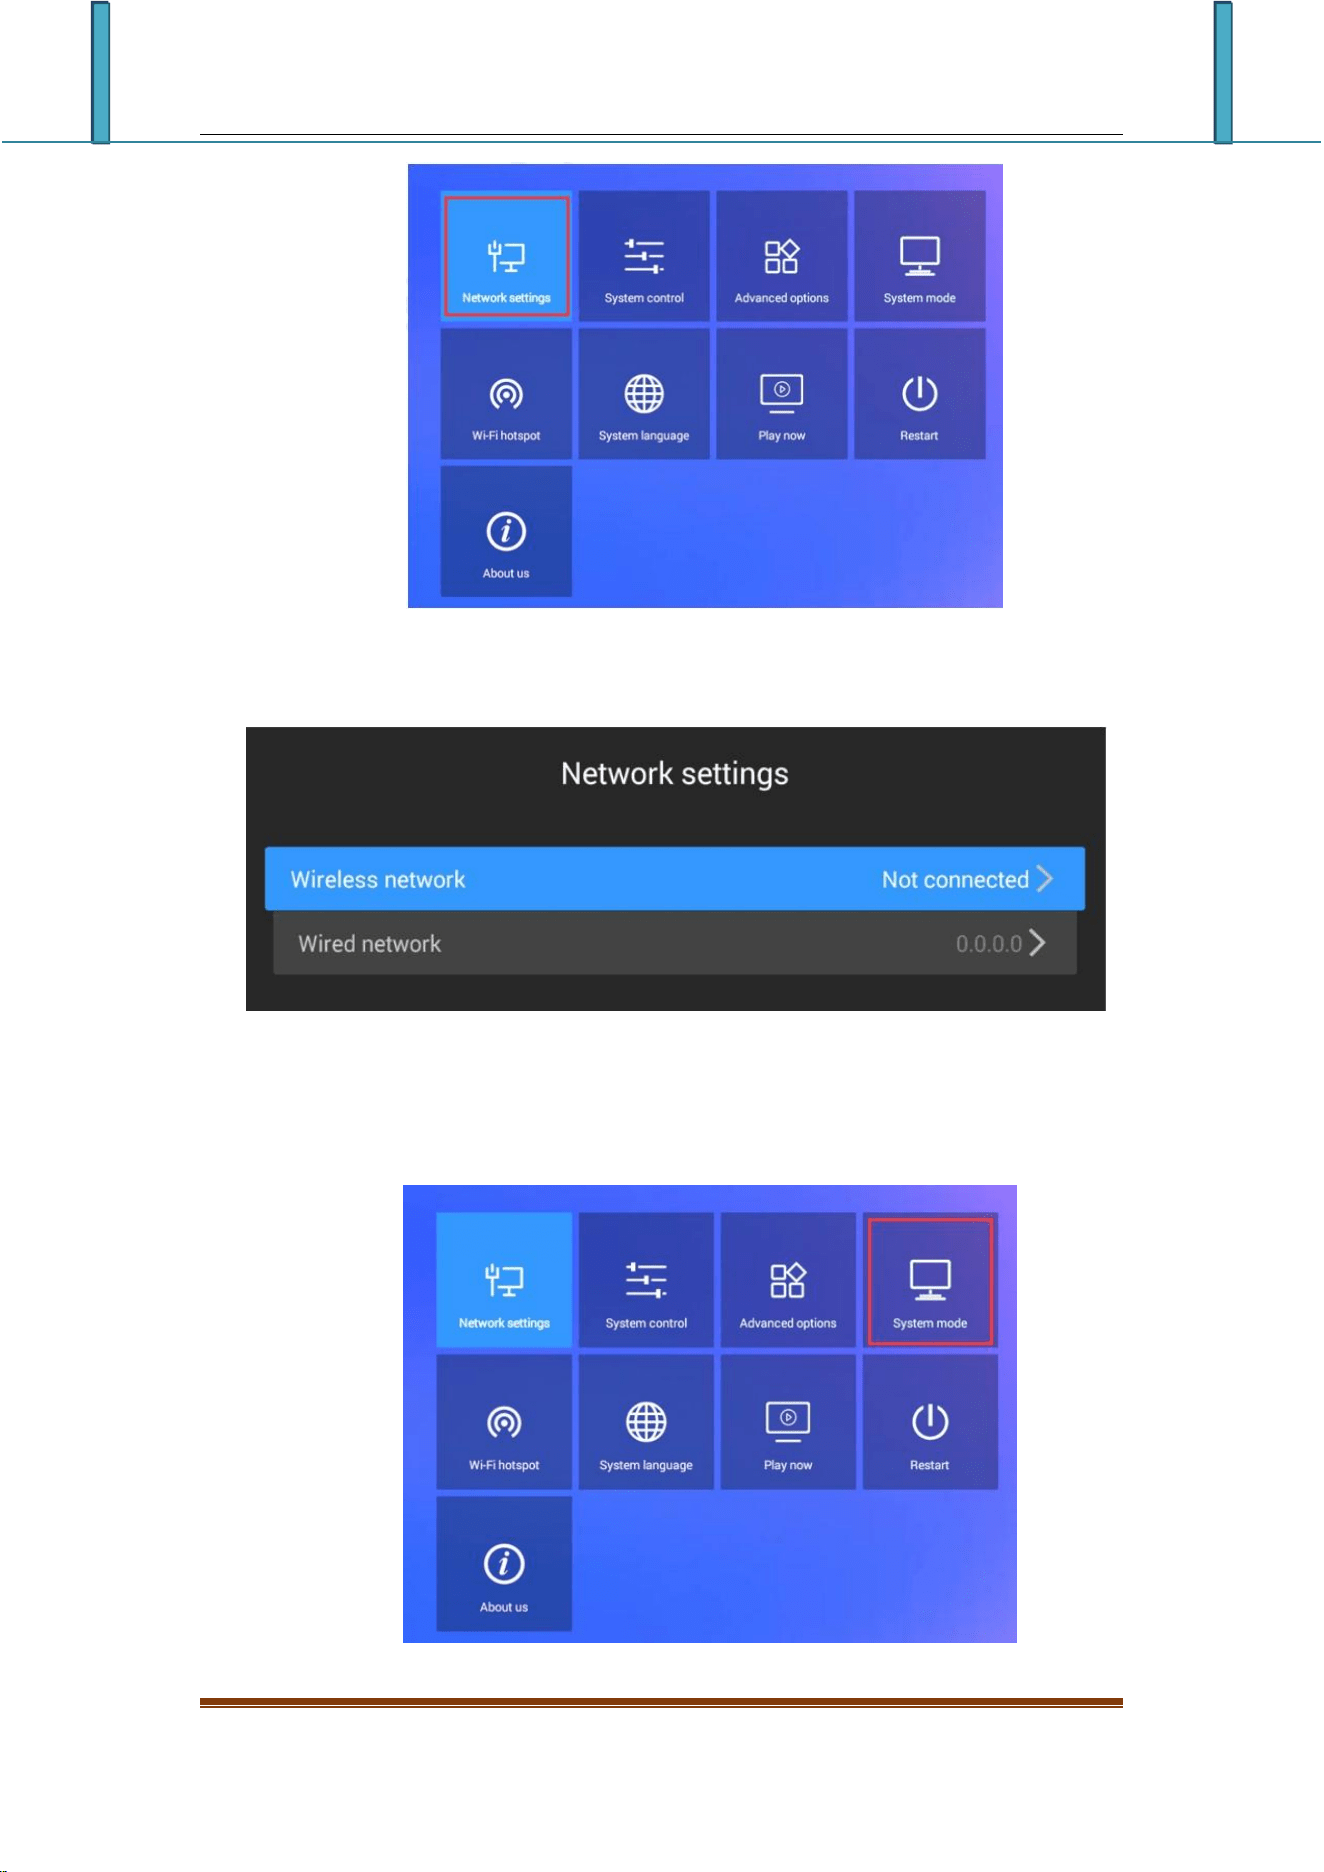
a. Wi-Fi antenna is connected to the LCD controller;
b. Press the button on the remote control or left-click 3-4 times in the upper
right corner with the mouse to enter the system settings, and then select
the network settings, as shown in the figure below:
LCD display information management platform instruction manual
c. Select the wireless network, and then connect to the relevant Wi-Fi; (if
connected with a network cable, select a wired network)
3.Bind account
a.Return to the system setting interface, select "System Mode"
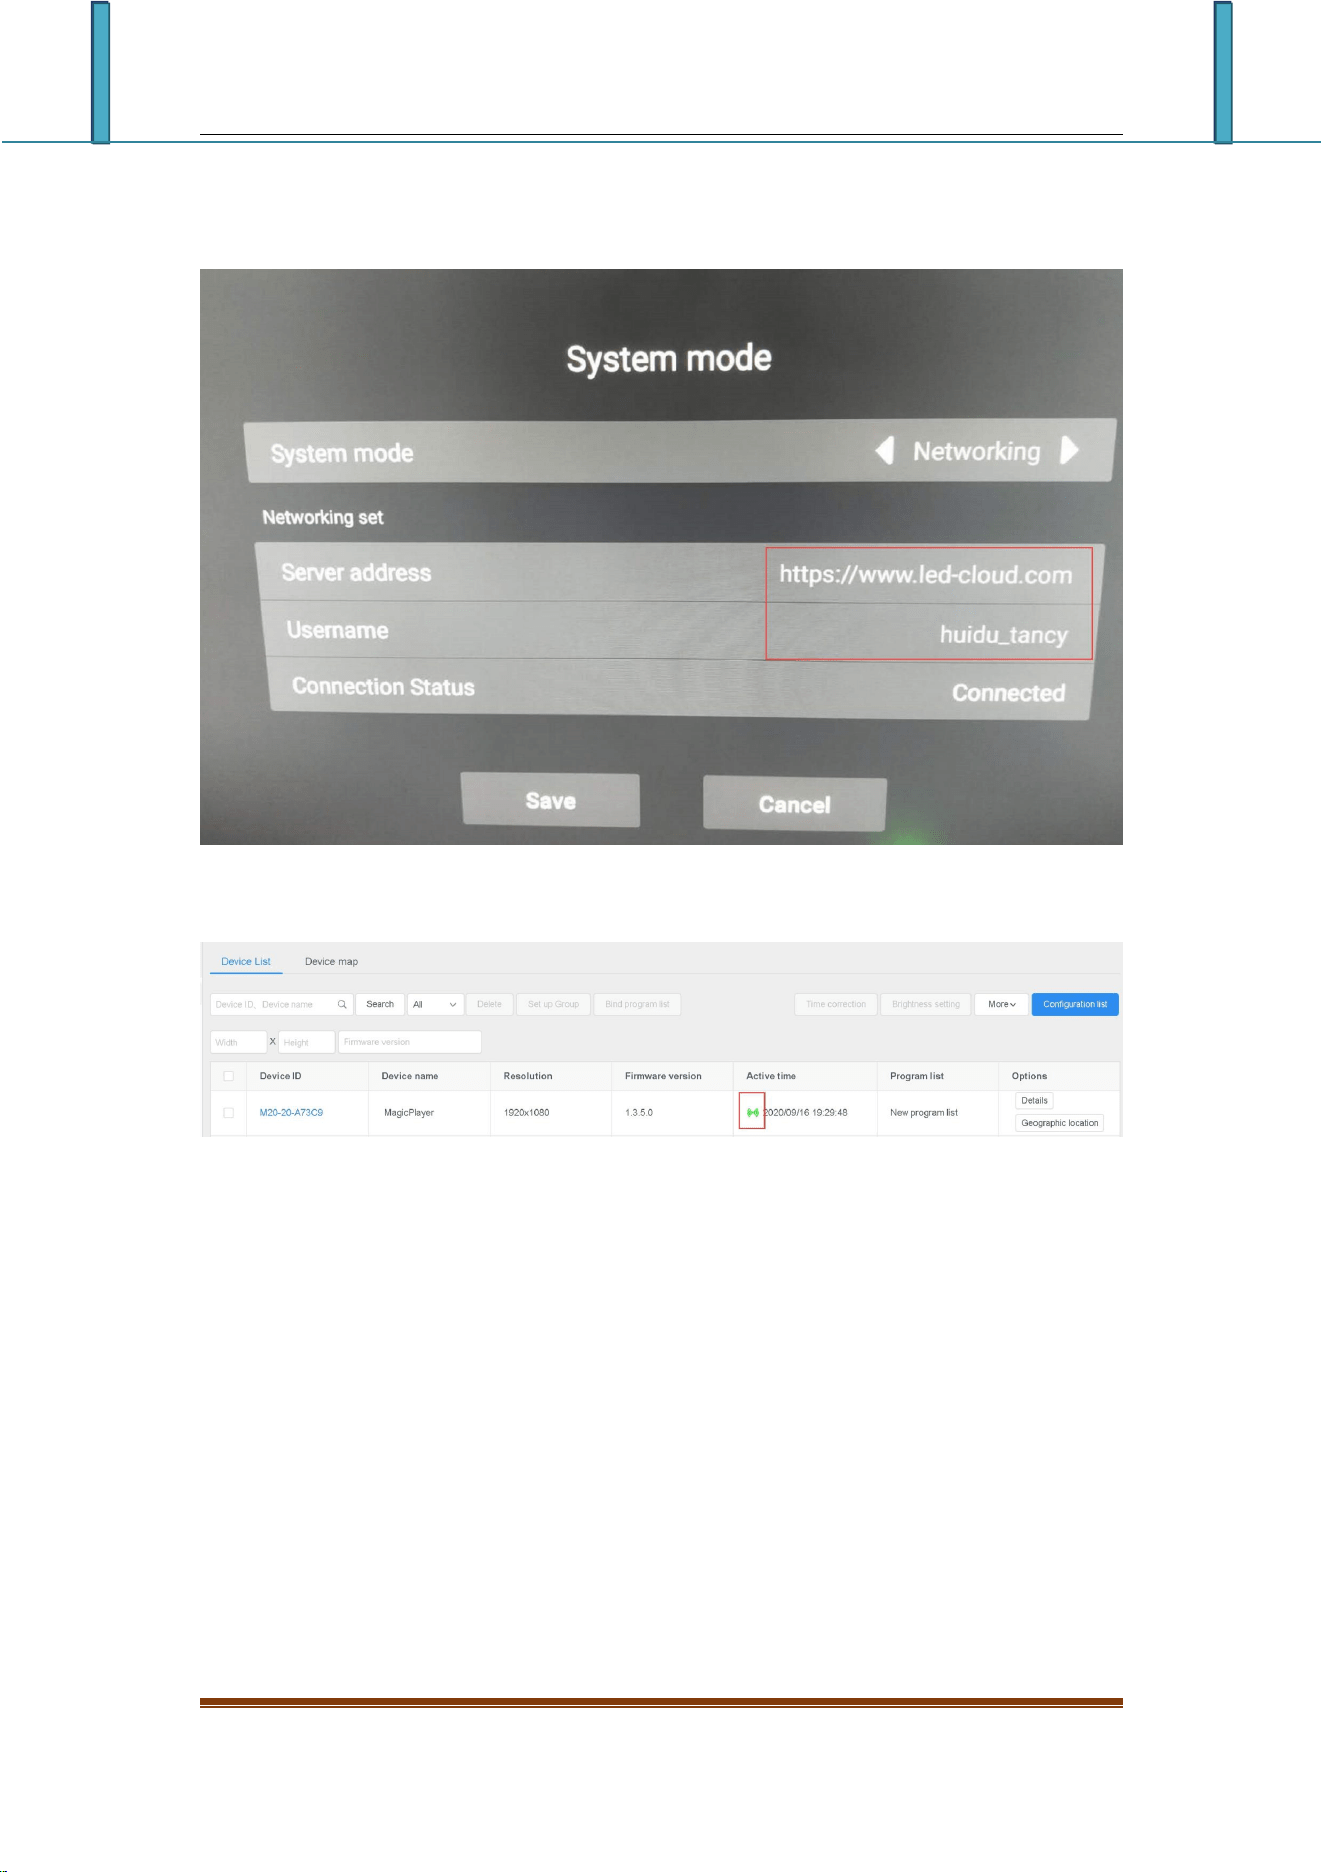
LCD display information management platform instruction manual
b.Change the system mode to "Networking" mode, and enter the server address
and user name, it is best to click "Save".
4.Log in to the cloud platform to discover the device.
Note: If you are worried about the controller being bound to other users by others,
you can set the password to enter the system settings. In the "Advanced Options",
set the control password, as shown in the figure below,
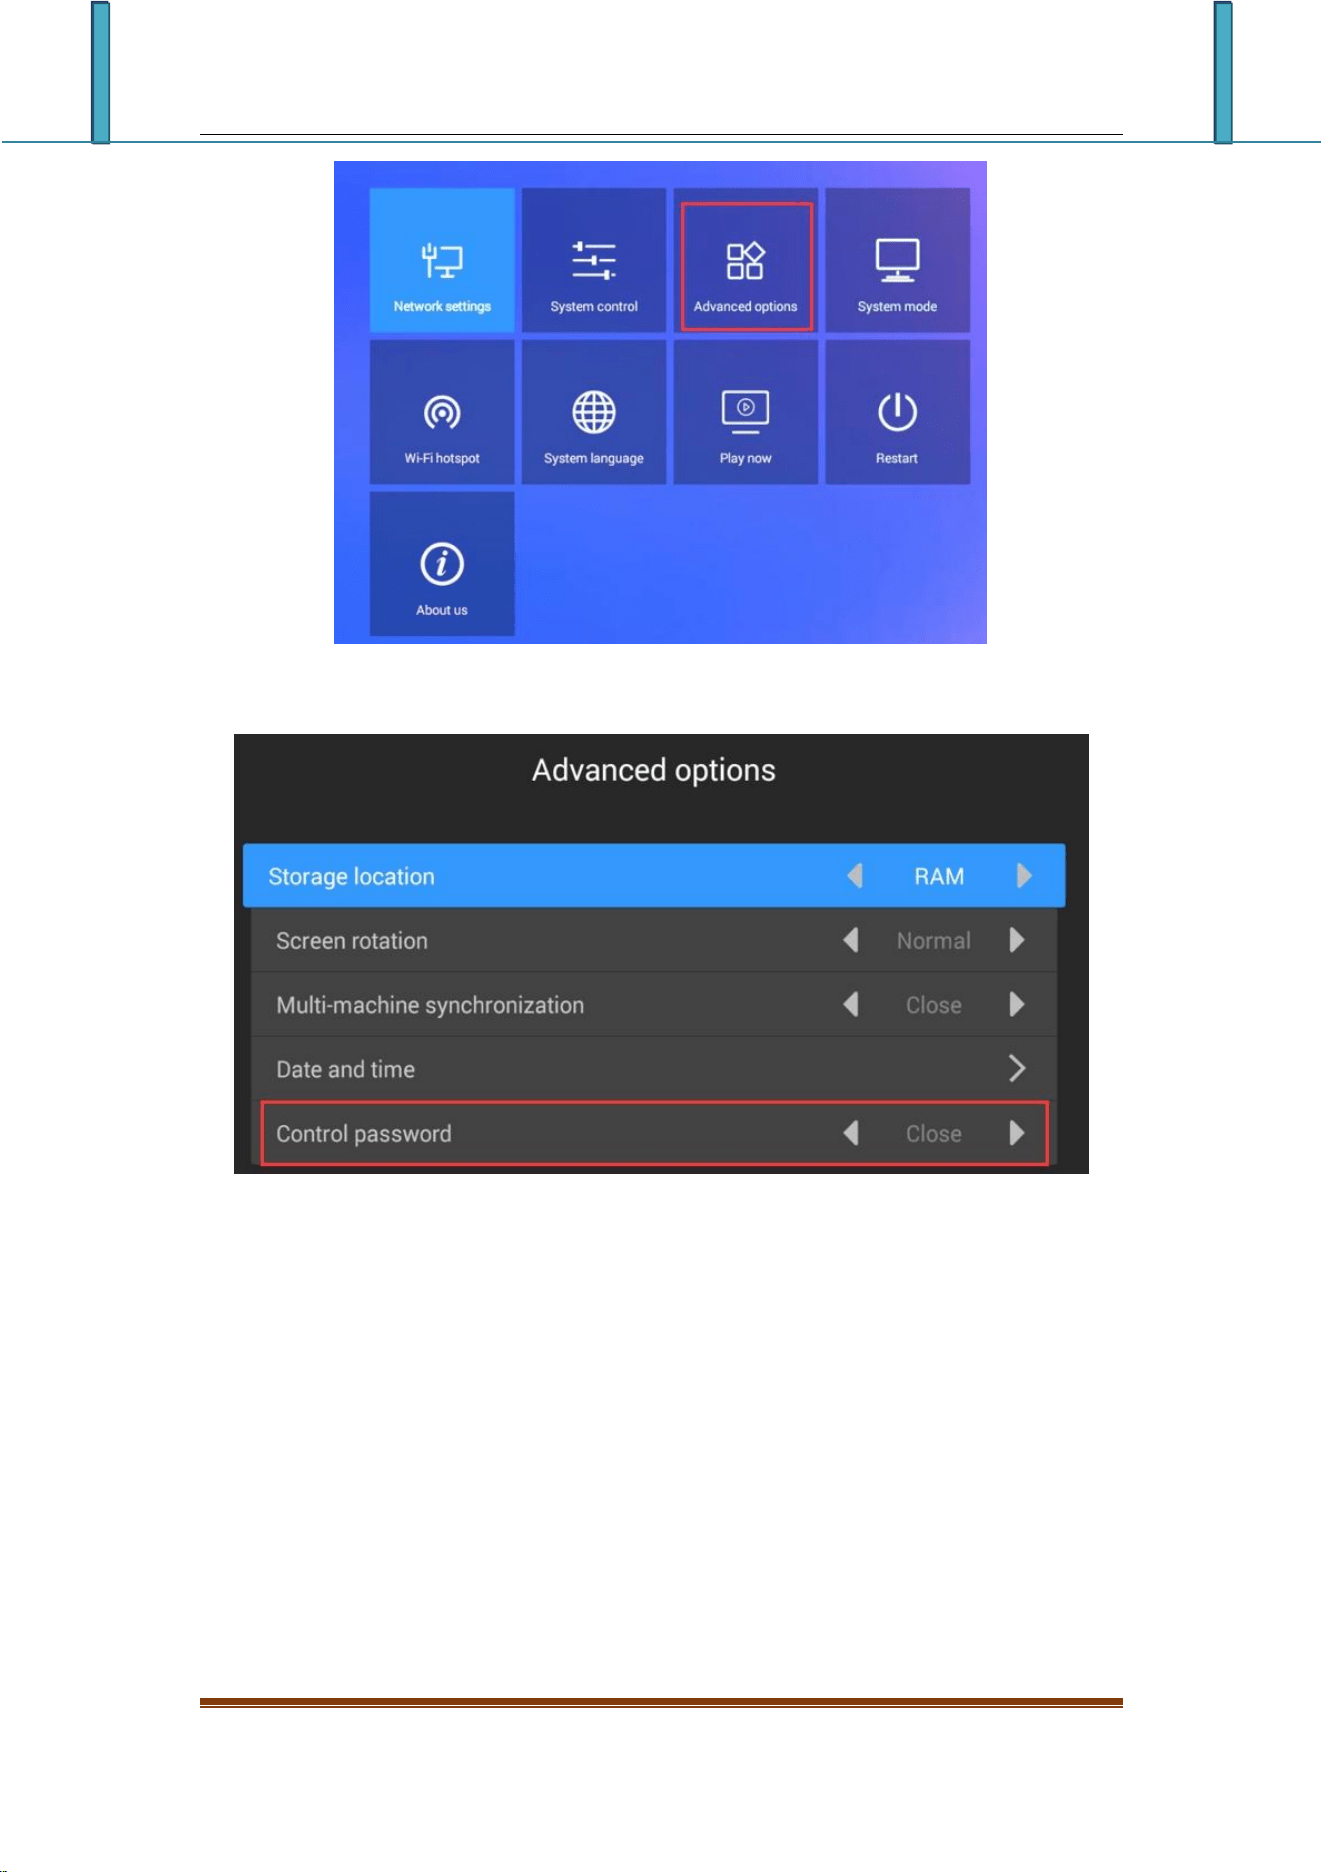
LCD display information management platform instruction manual
After entering the advanced options, turn on the control password.

This device complies with part 15 of the FCC Rules. Operation is subject to the following two conditions: (1) this device may
not cause harmful interference, and
(2) This device must accept any interference received, including interference that may cause undesired operation.
Changes or modifications not expressly approved by the party responsible for compliance could void the user’s authority to
operate the equipment. This equipment has been tested and found to comply with the limits for a Class B digital device,
pursuant to Part 15 of the FCC Rules. These limits are designed to provide reasonable protection against harmful interference
in a residential installation. This equipment generates uses and can radiate radio frequency energy and, if not installed and
used in accordance with the instructions, may cause harmful interference to radio communications. However, there is no
guarantee that interference will not occur in a particular installation. If this equipment does cause harmful interference to radio
or television reception, which can be determined by turning the equipment off and on, the user is encouraged to try to correct
the interference by one or more of the following measures:
‐‐ Reorient or relocate the receiving antenna.
‐‐ Increase the separation between the equipment and receiver.
‐‐Connect the equipment into an outlet on a circuit different from that to which the receiver is connected.
‐‐ Consult the dealer or an experienced radio/TV technician for help.ct.
This equipment complies with the FCC RF radiation exposure limits set forth for an uncontrolled environment. This equipment
should be installed and operated with a minimum distance of 20cm between the radiator and any part of your body.