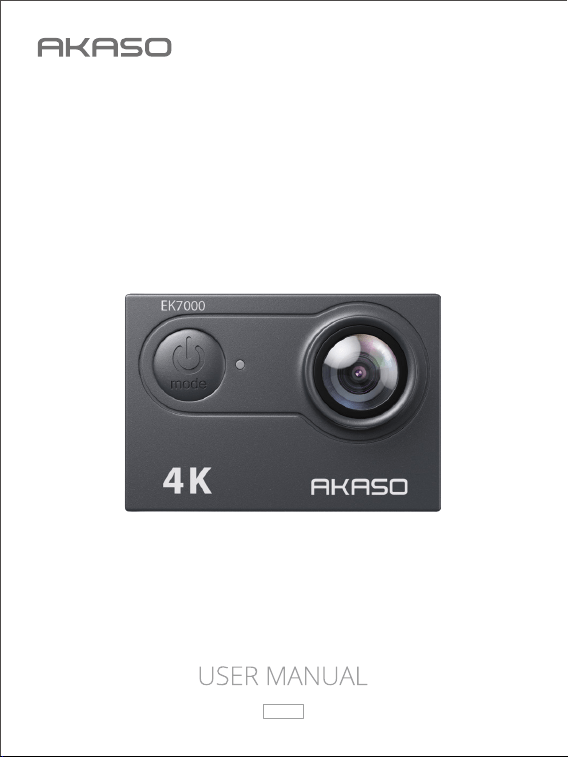
ACT ION CAMERA
EK7000
V316
01 02 03 04 05 06
07 08 09 10 11 12 13 14
15 16 17 18 19 20 21 22
23 24 25 26 27 28

Content
Important Messages ------------------------------------------------------------------------- 01
Notes on Using the Waterproof Housing--------------------------------------------- 02
What’s in the Box------------------------------------------------------------------------------ 04
Your EK7000 ------------------------------------------------------------------------------------ 05
Getting Started--------------------------------------------------------------------------------- 08
Overview of Modes--------------------------------------------------------------------------- 11
Customizing Your EK7000------------------------------------------------------------------ 13
Connecting to the AKASO GO App ------------------------------------------------------ 17
Playing Back Your Content----------------------------------------------------------------- 20
Transferring Your Content----------------------------------------------------------------- 21
Maintaining You Camera ------------------------------------------------------------------- 22
Maximizing Battery Life--------------------------------------------------------------------- 22
Battery Storage and Operation ---------------------------------------------------------- 23
Remote ------------------------------------------------------------------------------------------- 24
Mounting Your Camera--------------------------------------------------------------------- 26
Contact Us--------------------------------------------------------------------------------------- 28
EN
01 02 03 04 05 06
07 08 09 10 11 12 13 14
15 16 17 18 19 20 21 22
23 24 25 26 27 28

To get detailed instructions on operating this camera,
watch how-to videos by scanning the provided QR code
or visiting this link: https://www.akasotech.com/videos.
Congratulations on your new AKASO EK7000 Action Camera! You must be excited to
use your new camera, but please spend some time familiarizing yourself with this
manual first so that you get the most out of your camera’s features and use it safely.
It’s important to regularly update the camera’s firmware. Connect your camera to the
AKASO GO app through the camera’s Wifi to download and install the latest firmware.
1. This camera is a precision instrument. Safeguard it from drops or impacts to
prevent damage.
2. Ensure the camera operates within its recommended temperature range. Avoid
leaving it at high or low temperatures for extended periods, as this can reduce its
lifespan.
3. This camera body is waterproof, but make sure all covers are tightly closed and
the lens area is free from debris before immersing it underwater.
4. After using the camera in saltwater, rinse it with fresh water and gently dry it with
a soft cloth.
5. Avoid charging the camera for long periods of time. While charging, keep the
camera away from kids and pets to prevent accidents.
6. Remove the battery from the camera if you don’t plan to use it for an extended
period.
7. Store the camera away from devices or objects with strong magnetic fields or
power, like motors and magnets.
8. Store the camera away from sharp objects and moisture-prone areas.
Important Messages
EN
01 02 03 04 05 06
07 08 09 10 11 12 13 14
15 16 17 18 19 20 21 22
23 24 25 26 27 28

Notes on Using the Waterproof Housing
This camera is not waterproof, so it's essential to place it in the included waterproof
housing before using it in wet or underwater environments. The housing protects
your camera from mud, dirt, debris, and, most importantly, water during your
adventures. With the camera properly secured inside, you can safely dive up to 40
meters (132 feet) without concern.
To maximize the potential of the waterproof case, follow these guidelines:
Before Use
1. Carefully inspect the housing for any signs of wear, cracks, or damage. Replace or
repair it immediately if needed to ensure proper protection.
2. Check that all buttons on the housing function correctly and examine the rubber
seal for any damage or deformities that could cause leaks.
3. Clean the camera’s surface thoroughly to remove dust, dirt, or oil that could
compromise the waterproof seal.
4. Once the camera is inside the housing, ensure no foreign objects are trapped
around the rubber seal, and firmly close the backdoor to create a secure,
watertight seal.
During Use
1. Avoid prolonged submersion to minimize potential stress on the housing and
internal components.
2. Do not exceed the maximum depth rating, as excessive pressure could cause
leaks or cracks, endangering your camera.
After Use
1. Rinse the housing thoroughly with fresh water after each use to remove salt,
chlorine, or debris, then dry it completely to prevent stains or residue buildup.
2. Submerge the housing in clean water for 5–10 minutes, gently shaking it to help
dislodge any trapped residue.
3. Clean and dry both the interior and exterior with a soft cloth, then leave it in a
well-ventilated area to air dry completely before storing it.
EN
01 02 03 04 05 06
07 08 09 10 11 12 13 14
15 16 17 18 19 20 21 22
23 24 25 26 27 28

Warm tips:
1. Before using the housing, perform a waterproof test by submerging it in shallow
water to check for leaks.
2. Do not use heat sources such as hair dryers to dry the housing, as excessive heat
can compromise its waterproof integrity.
3. Avoid using the housing in hot springs, while bathing, or in extreme weather
conditions, as exposure to high temperatures and corrosive elements can shorten
its lifespan.
4. If there are sudden temperature or humidity changes, stop using the housing to
prevent condensation inside, which could affect image quality.
5. Protect the housing from strong vibrations or impacts, as these may damage the
seals and compromise waterproofing.
6. Never attempt to dismantle the housing, as this may impair its waterproof
performance.
EN
01 02 03 04 05 06
07 08 09 10 11 12 13 14
15 16 17 18 19 20 21 22
23 24 25 26 27 28
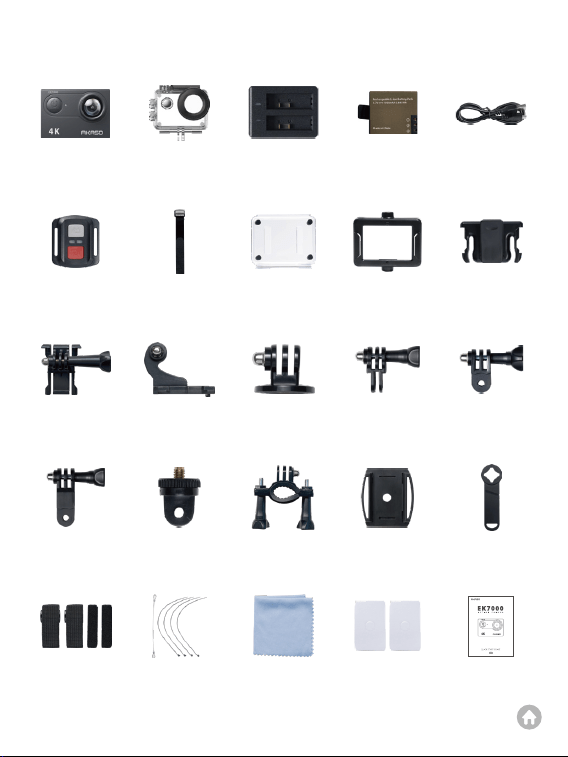
What’s in the Box
AKASO EK7000
Waterproof
Housing
Battery Charger Battery USB Cable
Remote Control Remote Control
Strap
ClipProtective
Backdoor
Clip 2
C MountBuckle Mount J-Hook Mount E Mount D Mount
SpannerA Mount H Mount Helmet MountsF Mount
Bandage
Tether Lens Cloth Double Sided
Adhesive Tape
Quick Start
Guide
01 02 03 04 05 06
07 08 09 10 11 12 13 14
15 16 17 18 19 20 21 22
23 24 25 26 27 28
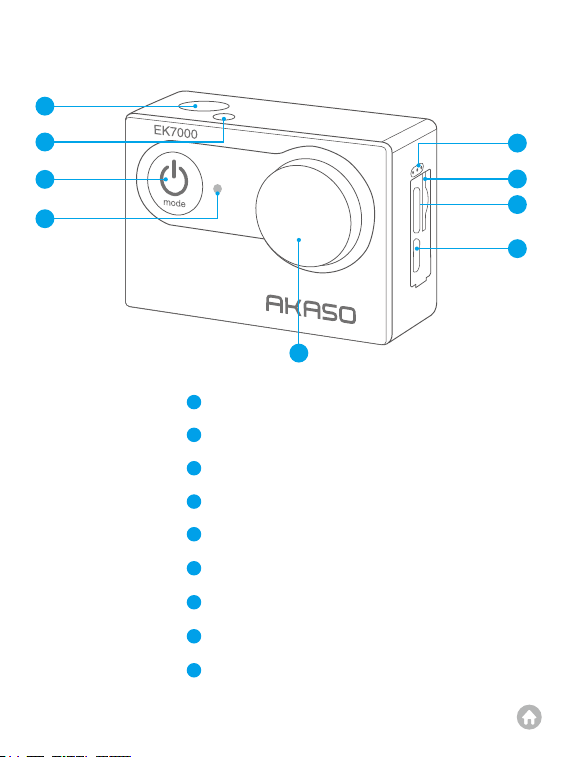
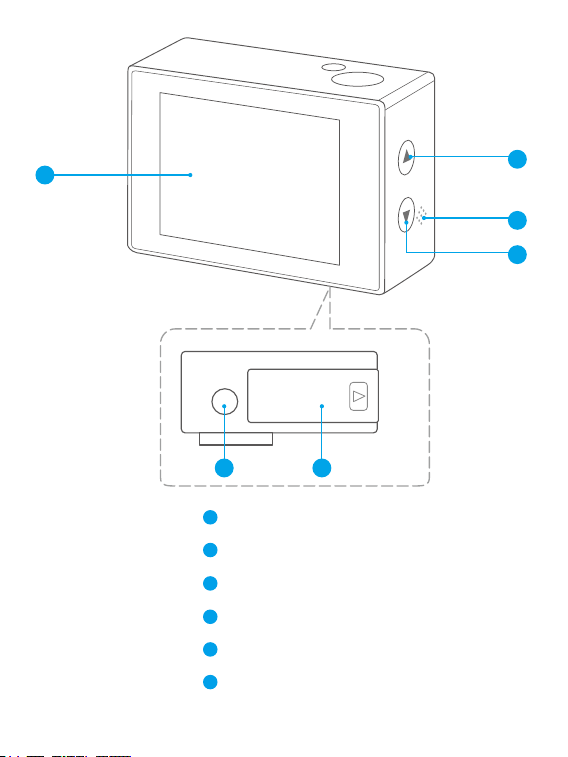
10
11
12
13
Display Screen
Up / Playback
Button Speaker
Down / Wifi
Button Battery Cover
1/4-Inch Nut Hole
10
12
13
14
15
11
15 14
01 02 03 04 05 06
07 08 09 10 11 12 13 14
15 16 17 18 19 20 21 22
23 24 25 26 27 28
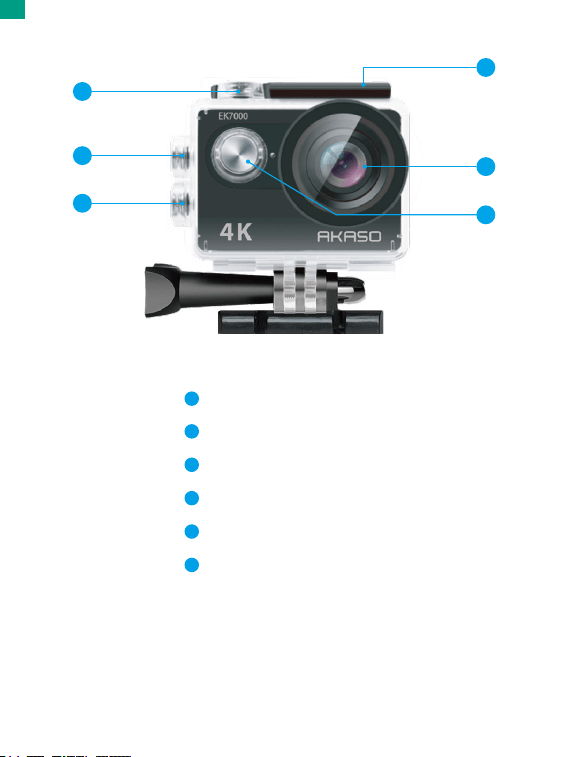
Shutter / Select
Button Up / Playback
Button Down / Wifi Button
Bolt
Lens
Power / Mode / Exit Button
1
3
4
5
2
Note: The camera does not record sound when it is in the waterproof case.
6
4
1
2
3
5
6
EN
01 02 03 04 05 06
07 08 09 10 11 12 13 14
15 16 17 18 19 20 21 22
23 24 25 26 27 28

Welcome to your new EK7000. To capture video and photos, you will need a memory
card (sold separately).
Using Memory Cards
Use brand name memory cards that meet these requirements:
• Class 10 or UHS-I rating
• Capacity up to 256GB (FAT32)
Note:
1. Format the memory card in the camera before using it to ensure compatibility.
2. Memory cards larger than the specified maximum capacity can cause issues like
non-recognition or even camera malfunctions like unresponsiveness or
firmware failure.
3. With FAT32, the card will stop recording and create a new file if the file size of a
recording reaches 4GB.
Installing the Memory Card
First locate the memory card slot, then insert the memory card in the illustrated
direction on the camera. To remove the card, simply press it into the slot with your
fingernail, and it will then pop out.
Note: Be sure to turn off the camera before installation.
Formatting the Memory Card
Before using the camera, format the memory card to ensure compatibility. Follow
these steps to format your card:
Step 1: When on the preview screen, press the Mode button multiple times, then
press the Shutter button to access the camera’s settings screen.
Step 2: Press the Down button repeatedly until you locate the "Format" option.
Step 3: Press the Shutter button to open the formatting screen.
Getting Started
EN
01 02 03 04 05 06
07
08 09 10 11 12 13 14
15 16 17 18 19 20 21 22
23 24 25 26 27 28

Step 4: Use the Down and Shutter buttons to select the "Yes" option and confirm
formatting.
Step 5: Wait a few seconds, and your card is formatted successfully.
Installing the Battery
Press down on the buckle of the battery cover to open it, insert the battery into its
slot, and close the cover. To remove the battery, pull the battery strip.
Charging the Camera
Before using the camera for the first time, please fully charge the camera. To do this,
locate the USB power port, and connect the camera to a USB adapter or computer
using the USB cable. The charging indicator stays solid while charging and goes out
when fully charged. Once fully charged, disconnect the cable and ensure the charging
cover is securely fastened.
Tip: You can also charge the battery on the battery charger before installing it onto
the camera.
Powering on or off
To power on: While the camera is off, press and hold the Power button for 3
seconds to turn it on. Once the display screen shows camera information and the
working indicator turns blue, you'll know that your camera is powered on.
To power off: While the camera is on, press and hold the Power button for 3
seconds to turn it off. The working indicator will also turn off.
Turning Wifi on or off
To turn on: On the preview screen, press the Down button to turn on Wifi. The Wifi
indicator will be flashing slowly.
Note: If the camera’s Wifi is activated but not linked to the app within 3 minutes, it
will auto-disable. Re-activate the camera’s Wifi to reconnect to the app.
To turn off: On the Wifi screen, press the Down button to turn off Wifi.
EN
01 02 03 04 05 06
07 08
09 10 11 12 13 14
15 16 17 18 19 20 21 22
23 24 25 26 27 28

Switching Modes
To switch mode: On the preview screen, press the Mode button to switch modes
between Video, Photo, Burst Photo, Time Lapse, and Settings.
To exit mode: Press the Mode button to exit the current mode. Zooming in or out
On the preview screen, press and hold the Up or Down button to zoom in or out.
Each press will incrementally zoom in or out by 0.5x. The EK7000 action camera
supports up to 4x zoom.
Using the Shutter Button
In Photo or Video mode, press the Shutter button to capture photos or start video
recording. To stop recording in Video mode, press the Shutter button again.
Tip: The working indicator will flash slowly during video recording and flash once
when capturing a photo.
Entering the Settings Screen
On the preview screen, press the Mode button multiple times to enter the camera's
settings screen. From there, you can configure the video, photo, and system settings.
To exit the settings screen, press the Mode button.
Entering the Playback Screen
On the preview screen, press the Up button to enter the playback screen. From there,
you can choose either video or photo files for playback.To exit the playback screen,
press the Up button.
X1.0
EN
01 02 03 04 05 06
07 08 09
10 11 12 13 14
15 16 17 18 19 20 21 22
23 24 25 26 27 28
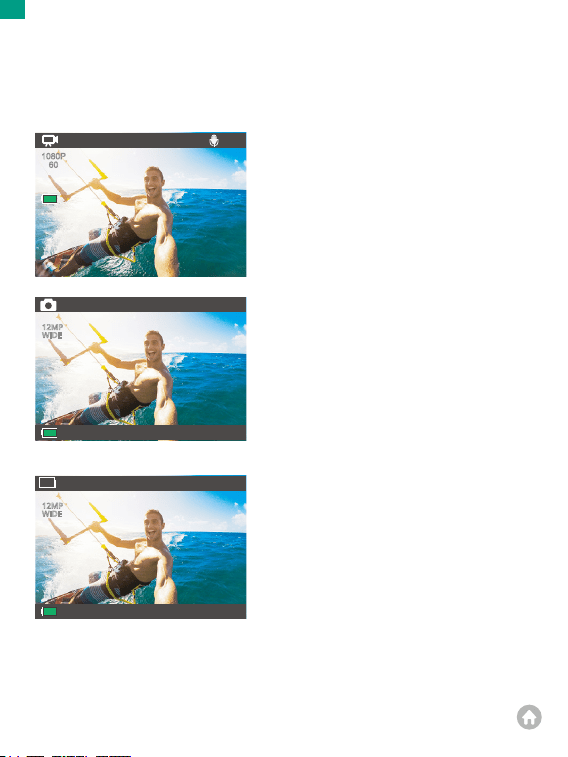
Burst Photo Mode
On the preview screen, press the Mode
button twice to switch to Burst Photo
Mode.
In this mode, press the Shutter button
to continuously take 3 photos per
second.
0004 | 30297
12MP
WIDE
X1.0
The camera boasts 5 modes: Video, Photo, Burst Photo, Time Lapse, and Settings.
On the preview screen, press the Mode button to switch modes.
Photo Mode
On the preview screen, press the
Mode button once to switch to Photo
Mode.
In this mode, press the Shutter
button to take a photo at the preset
photo resolution.
Overview of Modes
0004 | 30297
12MP
WIDE
X1.0
Video Mode
The camera is in Video mode by default
when turned on.
In this mode, press the Shutter button
to record normal video at the preset
resolution and frame rate. Press the
Shutter button again to stop recording.
00:00:00 | 00:00:00
EN
01 02 03 04 05 06
07 08 09 10
11 12 13 14
15 16 17 18 19 20 21 22
23 24 25 26 27 28
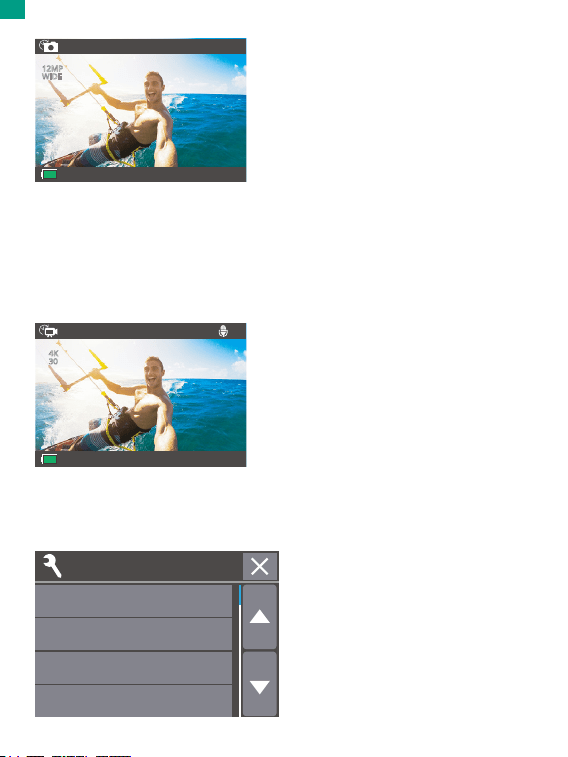
Settings Mode
On the preview screen, press the Mode
button several times till you see the
settings icon, and press the Shutter
button to enter Settings mode.
In this mode, press the Up or Down
button to browse through options, and
press the Shutter button to confirm
your selected option.
SETTINGS
Video Resolution
Image Stabilization
Loop Recording
Time Laspe Video
0004 | 30297
12MP
WIDE
Time Lapse Photo Mode
On the preview screen, enter the
camera's settings screen to enable
Time Lapse Photo, then press the
Shutter button followed by the Mode
button to return to the preview screen.
After doing so, press the Mode button
multiple times to switch to Time Lapse
Photo mode.
In this mode, press the Shutter button,
and the camera automatically starts the
preset countdown time to take a photo
and repeats this process continuously
until you press the Shutter button again.
Time Lapse Video Mode
On the preview screen, enter the
camera's settings screen to enable
Time Lapse Video, then press the
Shutter button followed by the Mode
button to return to the preview screen,
and the camera will enter Time Lapse
Video mode.
In this mode, press the Shutter button,
and the camera captures a series of
frames at the set interval and
condenses them into a short video clip.
4K
30
00:00:00 | 00:00:00
X1.0
X1.0
EN
01 02 03 04 05 06
07 08 09 10 11
12 13 14
15 16 17 18 19 20 21 22
23 24 25 26 27 28

Customizing Your EK7000
Video & Photo Settings
1. Video Resolution
4K30fps / 2.7K30fps / 1080P60fps / 1080P30fps / 720P120fps / 720P60fps (Default
setting: 1080P60fps)
Configure the resolution settings before recording videos. The camera records up
to 4K 30fps videos.
Note: Capturing high-resolution or high-fps videos in warm
2. Image Stabilization
Off / On (Default setting: Off)
Image Stabilization can efficiently smooth out the lens shakes, resulting in smooth
and pristine videos. This feature is ideal for capturing scenes involving activities like
riding, skating, and handheld use.
Note: This setting is automatically disabled when the Time Lapse Video setting is
enabled.
3. Loop Recording
Off / 1 Min / 3 Min / 5 Min (Default setting: Off)
Set the loop duration for the camera to capture short video clips. For instance, if
you select the "3 Min" option, the camera will save video files every 3 minutes.
When the memory is full, new video files will overwrite the old ones to ensure
continuous recording.
4. Time Lapse Video
Off / 1s / 3s / 5s / 10s / 20s / 30s / 60s (Default setting: Off)
Specify the frequency at which the video frames are captured and compiled. With
this setting enabled in Time Lapse Video Mode, the camera captures a series of
frames at the set interval and condenses them into a short video clip, making it ideal
for use in capturing dynamic or changing scenes, such as clouds, stars, sunsets, and
more.
Note: Time lapse videos are captured without audio. Image Stabilization is
automatically disabled this setting is enabled.
EN
01 02 03 04 05 06
07 08 09 10 11 12
13 14
15 16 17 18 19 20 21 22
23 24 25 26 27 28

5. Photo Resolution
20MP / 16MP / 14MP / 12MP / 8MP / 5MP / 4MP (Default setting: 20MP)
Set the photo resolution before capturing photos. This camera is capable of
capturing 20MP photos, with higher resolution offering greater clarity and detail
due to the increased number of pixels. However, higher resolution photos also
result in larger file sizes.
6. Self-timer
2s / 3s / 5s / 10s / 20s / 30s / 60s (Default setting: 5s)
Set the countdown time before the camera captures photos in Time Lapse Photo
mode.
7. Time Lapse Photo
Off / On (Default setting: Off)
Enable Time Lapse Photo mode. In this mode, the camera automatically starts the
preset countdown time to take a photo and repeats this process continuously until
you press the Shutter button again.
8. Burst Photo
3 Photos
Burst Photo continuously captures 3 photos in 1 second, making it ideal for
capturing fast-moving activities.
01 02 03 04 05 06
07 08 09 10 11 12 13
14
15 16 17 18 19 20 21 22
23 24 25 26 27 28

System Settings
1. Microphone
Built-in / External (Default setting: Built-in)
Choose to select either a built-in microphone or an external one. To use an
external microphone for better sound quality, select the “External” option first.
Then, connect a compatible external microphone to the camera’s USB port.
Tip: If you do not wish to use an external microphone, be sure to select the
"Built-in" in case the camera does not properly record sound during video
recording.
2. Special Effect
Normal / Black & White / Retro / Negative / Warm / Cool / Red / Green / Blue
(Default setting: Normal)
Choose an ideal special effect for your photos or videos to enhance their appeal.
3. Exposure
-3 / -2 / -1 / 0 / +3 / +2 / +1 (Default setting: 0)
EV (Exposure Value) lets you adjust the brightness of your photos and videos. A
higher EV value creates a brighter image, while a lower value results in a darker
image.
4. Upside Down
Off / On (Default setting: Off)
This setting determines the orientation of your videos or photos to prevent upside
down footage.
Note: The user interface will be upside-down when Upside Down is enabled.
5. Power Frequency
50Hz / 60Hz / Auto (Default setting: 60Hz)
Select the frequency for which the video recorded or played back on the TV
according to your region. If you live in the northeastern area, please set the power
frequency to 60Hz. If you live outside this area, set it to 50Hz. Be sure to select the
correct format to avoid the light waves while capturing indoors.
EN
01 02 03 04 05 06
07 08 09 10 11 12 13 14
15 16 17 18 19 20 21 22
23 24 25 26 27 28

6. Screen Saver
Off / 1 Min / 3 Min / 5 Min (Default setting: 1 Min)
Determine when the camera’s display should go dormant to conserve battery. If
you need the screen back on, just press any button.
7. Auto Power Off
Off / 1 Min / 3 Min / 5 Min (Default setting: 3 Min)
Set the duration of inactivity after which the camera automatically powers off. If
not operated within the chosen duration, the camera will shut down.
8. Date Stamp
Off / On (Default setting: On)
Turn this setting on or off. With Date Stamp enabled, the camera will add a
watermark to your videos or photos.
9. Volume
High / Middle / Low / Off (Default setting: Middle)
Adjust your camera's system volume to an acceptable level.
10. Beep
Off / On (Default setting: On)
Turn the key tone on or off. With Beep disabled, the camera will not emit any sound
when using its buttons.
11. Language
English / 简体中文 / 繁體中文 / Italiano / Español / Português / Deutsch / Dutch /
Français / Čestina / Polski / Türk / Pyccкий / Romaña / 日本語 / 한국어 / Thai
(Default setting: English)
Set the system language that appears on the camera.
12. Date & Time
DD / MM / YY HH / MM / SS
Manually set the camera's date and time according to your local time.
Tip: The date and time will also be automatically updated when you connect your
camera to the AKASO GO App.
EN
01 02 03 04 05 06
07 08 09 10 11 12 13 14
15
16 17 18 19 20 21 22
23 24 25 26 27 28

Connecting to AKASO GO App
SSID:
iCam-AKASO_****
PWD:1234567890
Waiting for Wifi Connection...
To sync your camera with the app, download the AKASO GO App from the App
Store (iOS) or Google Play (Android) by searching for “AKASO GO”. When your
camera is connected to the AKASO GO App, you can change its settings or control
it to capture using your phone. You can also live preview, playback, download, edit,
and share videos via this app. Follow the steps below to connect your camera to the
AKASO GO App. Note: For a successful connection, first allow the app to access your
Location and Local Network.
13. Format
No / Yes (Default setting: No)
Format your memory card before using it for better compatibility. To keep your
memory card in good condition, reformat it on a regular basis. Formatting will
delete all the media files stored in the memory card. Ensure important files are
saved elsewhere before proceeding.
14. Factory Reset
No / Yes (Default setting: No)
This option resets all settings to their default values.
15. Version
Model: EK7000
Version: SN_16_XXXXXX
Check the model and the updated time of your EK7000.
1. Turn on the camera, press the Down button to
turn on Wifi. The camera will enter Wifi mode
and display the Wifi information in 3 seconds.
Tip: The camera's Wifi will not be connected to the
Internet. You cannot operate the camera when it's
in Wifi mode. Exiting the Wifi screen disconnects
the camera Wifi automatically.
EN
01 02 03 04 05 06
07 08 09 10 11 12 13 14
15 16
17 18 19 20 21 22
23 24 25 26 27 28
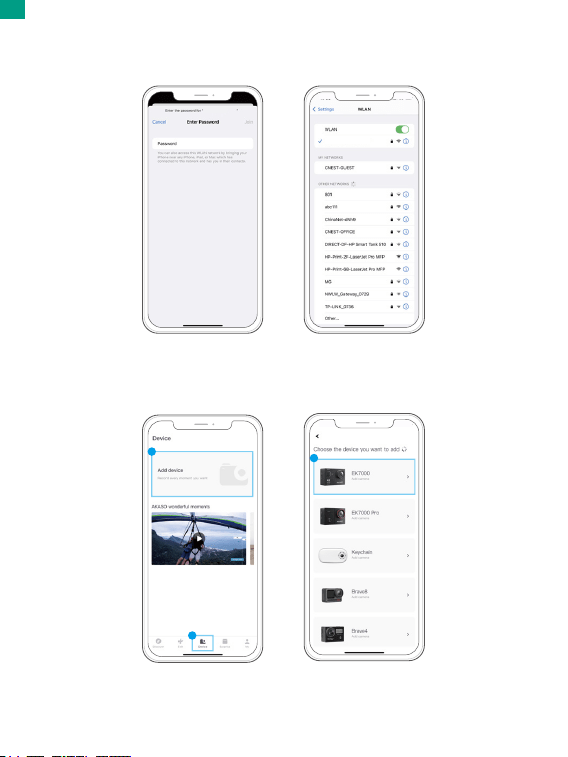
2. Enter your phone’s Wifi settings page, find the Wifi named “iCAM_AKAAO_A_XXXX”
in the list and tap on it, then enter the password 1234567890 for connection.
iCam-AKASO_
****
iCam-AKASO_
****
3. Open the AKASO GO App on your smartphone, then tap “Device” →“ Add Device”
to choose EK7000 from the options to establish a connection.
2
3
1
EN
01 02 03 04 05 06
07 08 09 10 11 12 13 14
15 16 17
18 19 20 21 22
23 24 25 26 27 28
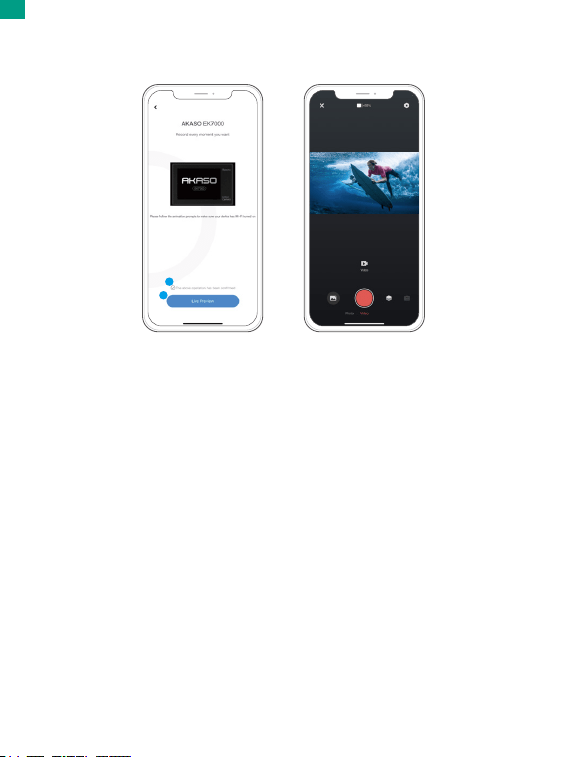
4. Tick "The above operation has been confirmed", and tap "Live Preview". Your
camera will be connected to the AKASO GO App in seconds.
1
2
➀ If you failed to connect the camera's Wifi, please make sure you successfully
turned on Wifi.
➁ While connecting the camera’s Wifi, a “No Internet Connection” or “Weak Security”
notification will appear since the phone’s data is paused. However, you can proceed
with the connection.
➂ The screenshots and steps above are for your reference only.
EN
01 02 03 04 05 06
07 08 09 10 11 12 13 14
15 16 17 18
19 20 21 22
23 24 25 26 27 28

You can play back your content on the camera, your computer, TV, smartphone or
tablet. You can also play back content by inserting the memory card directly into a
device, such as a computer or a compatible TV. With this method, playback
resolution depends on the resolution of the device and its ability to play back that
resolution.
Viewing Your Videos or Photos on the EK7000
1. On the preview screen, press the Up button to enter the playback screen.
Note: If your memory card contains a lot of content, it might take a minute for it to
load.
2. Enter the Video or Photo set, press the Up / Down button to scroll through the
video or photo files, and locate the file you want to view.
3. Press the Shutter/OK button to open the video or photo file in full-screen view.
And it will play.
4. To return to the thumbnails screen, press the Mode button.
5. To exit the album, press the Up button.
Deleting Videos or Photos on Your EK7000
1. On the preview screen, press the Up button to enter the playback screen.
Note: If your memory card contains a lot of content, it might take a minute for it to
load.
2. Enter the Video or Photo set, press the Up / Down button to scroll through the
video or photo files.
3. Press the Up or Down button to locate the file you want to delete.
4. Press and hold the Shutter button for 3 seconds, the screen shows “Delete this
file? No/Yes”.
5. Press the Up button followed by the Shutter button, and the selected file will be
deleted.
Playing Back Your Content
EN
01 02 03 04 05 06
07 08 09 10 11 12 13 14
15 16 17 18 19
20 21 22
23 24 25 26 27 28

Transferring Your Content to a Computer
You can transfer your content to a computer via a USB cable or a card reader (sold
separately). To transfer files to your computer via a USB cable, connect your
camera to the computer’s USB port using the USB cable. When prompted, select
“USB Storage” as your connection preference. To transfer files to the computer
using a card reader, insert a memory card into the card reader, then connect the
reader to your computer's USB port. After successful transmission, you can
transfer the files to your computer or delete selected files using File Explorer.
Downloading Your Content to a Smartphone
1. Open the AKASO GO App, then connect it to the camera.
2. Tap the “Album” icon in the bottom left corner to view videos and photos stored
on the SD card.
3. Tap the Select icon in the upper right corner to select the video or photo you
want to download.
4. Tap the Download icon in the bottom right corner and confirm the download.
5. Patiently wait for the download process to complete. The file will be successfully
saved to your phone's photo album.
Note:
1. To access files captured by the camera, first allow the app to access your phone's
album in Settings → AKASO GO → Photos → All Photos.
2. Please do not alter Wifi settings or disconnect from the app during the download
progress.
Transferring Your Content
EN
01 02 03 04 05 06
07 08 09 10 11 12 13 14
15 16 17 18 19 20
21 22
23 24 25 26 27 28

A message appears on the touch display if the battery drops below 10%. If the
battery reaches 0% while recording, the camera saves the file and powers off.
To maximize battery life, follow these guidelines when possible:
• Turn off Wireless Connections.
• Capture video at lower frame rates and resolutions.
• Use the Screen Saver setting.
Maximizing Battery Life
1. For optimal audio performance, gently shake the camera or blow on the
microphone to remove any debris from the microphone holes.
2. To clean the lens, use a soft, lint-free cloth to wipe it. Avoid inserting any foreign
objects near the lens.
3. Do not touch the lens with your fingers.
4. Store the camera away from drops and bumps, as this may cause damage to the
internal components.
5. Store the camera away from high temperatures and strong sunshine to protect
it from damage.
6. Store the camera away from sharp objects and moisture-prone areas.
Maintaining You Camera
01 02 03 04 05 06
07 08 09 10 11 12 13 14
15 16 17 18 19 20 21
22
23 24 25 26 27 28

1. If storing for extended periods, maintain a battery charge of 50-60%. Charge
every 3 months and discharge the battery every 6 months.
2. Do not store the battery with metal objects such as coins, keys, or necklaces. If
the battery terminals come close to metal objects, a short circuit may cause fire.
3. Store the battery in dry areas, safe from potential physical damage caused by
squeezing or collision.
4. Avoid using or storing the battery at high temperatures, such as in direct
sunlight or a hot compartment. The battery will heat up, malfunction, or have its
service life shortened in these conditions.
5. Avoid using or storing the battery in low-temperature environments, as this will
shorten the battery life or cause it to malfunction.
6. Avoid environments with strong static or magnetic fields; these can compromise
the battery’s protective unit, posing safety risks.
7. If the battery emits an odor, overheats, changes color, gets distorted, or exhibits
any anomalies, discontinue use and remove it immediately from the camera or
the battery charger whether it is being used, charged, or stored.
8. Safely insulate used electrodes to prevent potential hazards.
Battery Storage and Operation
EN
01 02 03 04 05 06
07 08 09 10 11 12 13 14
15 16 17 18 19 20 21 22
23 24 25 26 27 28
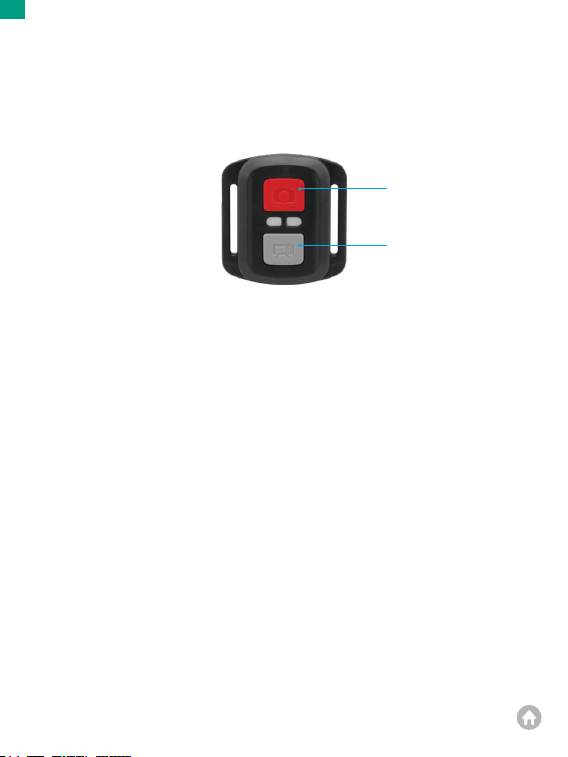
Video
To record video, first make sure the camera is in Video mode, then press the
Video button. The camera's working indicator will be flashing during video
recording. To stop recording, press the Video button again.
Photo
To capture a photo, first make sure the camera is in Photo mode, then press the
Photo button. The camera will emit a shutter sound indicating the completion of
the shot.
Burst Photo
To capture burst photos, first verify the camera is in Burst Photo mode, then press
the Photo button. The camera will emit a shutter sound indicating the completion
of the shot.
Time Lapse
To capture time lapse photos or videos, first verify the camera is in Time Lapse
mode, then press the Photo or Video button.
When the camera is turned on, it will be automatically connected to the remote
within a certain distance. You can control the camera to take photos or record
videos using the remote.
Photo Button
Video Button
Note: The remote is splashproof only.
Remote
EN
01 02 03 04 05 06
07 08 09 10 11 12 13 14
15 16 17 18 19 20 21 22
23
24 25 26 27 28
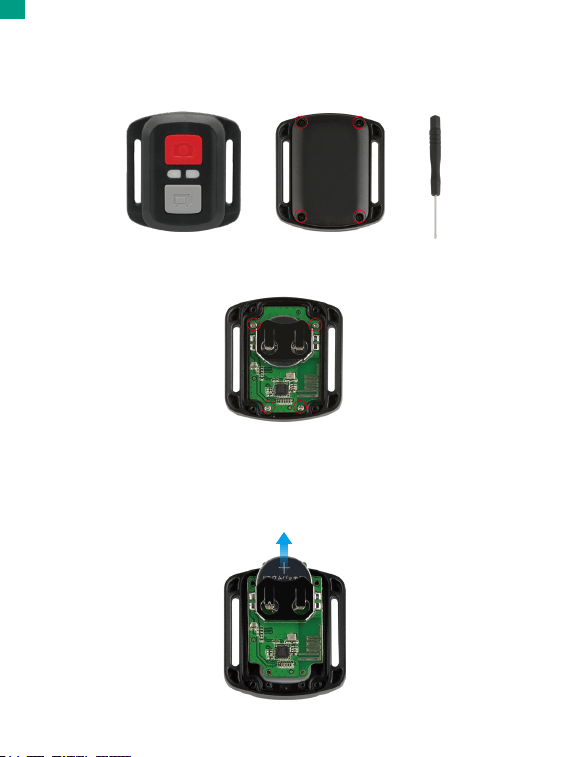
Replacing the CR2032 battery of the remote
1. Use a screwdriver to remove the 4 screws on the back cover of the remote,
allowing you to open it.
2. Remove another 4 screws on remote's circuit board.
3. Lift the circuit board and slide out the battery, as shown below.
Note: Avoid rotating the circuit board to prevent reversing the remote control
buttons.
EN
01 02 03 04 05 06
07 08 09 10 11 12 13 14
15 16 17 18 19 20 21 22
23 24
25 26 27 28
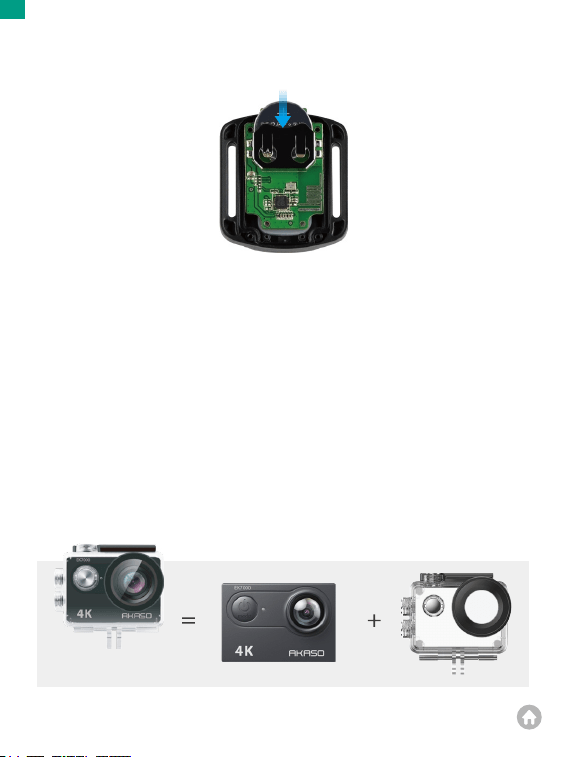
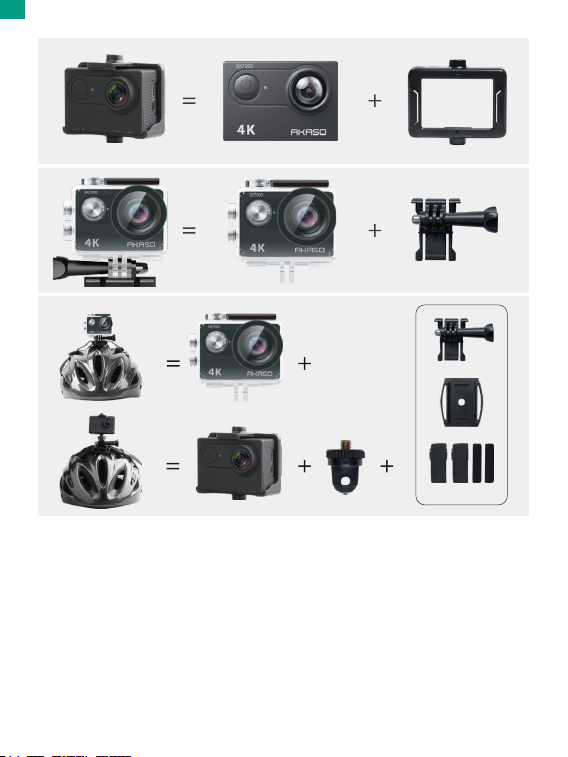
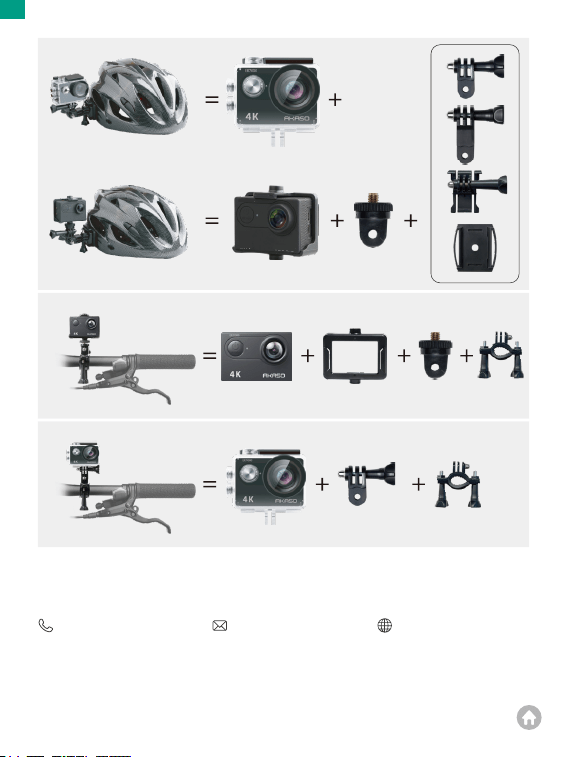
Enhance your user experience by mounting the camera to various gear like helmets
and more. Here’s a quick guide.
Note: If you plan diving with the EK7000 action camera, install it onto the waterproof
housing to prevent it from getting soaked.
Mounting Your Camera
4. Install the new battery, keeping the “+” pole facing up.
5. Install all 4 screws back onto the circuit board.
6. Install all 4 screws back into the cover.
EN
01 02 03 04 05 06
07 08 09 10 11 12 13 14
15 16 17 18 19 20 21 22
23 24 25
26 27 28
EN
01 02 03 04 05 06
07 08 09 10 11 12 13 14
15 16 17 18 19 20 21 22
23 24 25 26
27 28
For any inquiries with AKASO products, please feel free to contact us, we will
respond within 24 hours.
Contact Us
(888) 466-9222 (US) [email protected] www.akasotech.com
EN
01 02 03 04 05 06
07 08 09 10 11 12 13 14
15 16 17 18 19 20 21 22
23 24 25 26 27
28