
PREFACE
Thank you for purchasing this product. which is a dual band/dual display/dual watch. This easy-to-use radio will deliver
you secure, instant and reliable communica�ons at peak efficiency. Please read this manual carefully before use. The
informa�on presented herein will help you to derive maximum performance from your radio.
WARNING!
European Users should note that opera�on of this unit in Transmit mode requires the
operator to have a valid Amateur Radio License from their respec�ve Countries Amateur Radio Licensing
Authority for the Frequencies and Transmi�er Power levels that this Radio transmits on. Failure to
comply may be unlawful and liable for prosecu�on. At this subject, refer to the “EU” specifica�on guide 2014/53/EU.
ATTENTION! When programmin
g the radio, start by reading the factory so�ware data, and then rewrite
this data with your frequency etc., to a new saved code plug, otherwise errors may occur. You can use the
programming cable with a PC to program the authorized frequency, bandwidth, power, etc. your
programming must comply with your FCC (or EU other country) license cer�fica�on.
ATTENTION! Before using this product, read the RF Energy Exposure and Produ
ct Safety Guide that ship
with the radio which contains instructions for safe usage and RF energy awareness and control for
compliance with applicable standards and regulation.
PMR446, FRS, GMRS, MURS
You may be tempted to use PMR446 (in Europe) or FRS, GMRS, MURS (in the USA) frequencies. Do note
however that there are restric�ons on these bands that make this transceiver illegal for use.
1 •

Ge�ng Started
Regula�ons and Safety Warnings
■EU Regulatory Conformance
As cer�fied by the qualified laboratory, the product is in compliance with the essen�al requirements and other relevant
provisions of the Direc�ve 1999/5/EC (2014/53/EU). All applicable EU regula�ons are regarded (2006/66/EC,
2011/65/EU, 2012/19/EU). Please note that the above informa�on is applicable to EU countries
only.
■FCC Part15/IC Compliance
FCC Part 15 Compliance
This device complies with Part 15 of the FCC rules. Opera�on is subjected to the following two condi�ons: (1) this
device may not cause harmful interference, and (2) this device must accept any interference received, including
interference that may cause undesired opera�on.
Changes or modifica�ons not expressly approved by the party responsible for compliance could voi
d your authority to
operate the equipment.
Avis de conformité à la FCC : Ce disposi�f a été testé et s’avère conforme à l’ar�cle 15 des règlements de la Commission
fédérale des communica�ons (FCC). Ce disposi�f est soumis aux condi�ons suivantes: 1) Ce disposi�f ne doit pas
causer d’interférences nuisibles et; 2) Il doit pouvoir supporter les parasites qu’il reçoit, incluant les parasites pouvant
nuire à son fonc�onnement.
Tout changement ou modi
fica�on non approuvé expressément par la par�e responsable pourrait annuler le droit à
l’u�lisateur de faire fonc�onner cet équipement.
IC Compliance
This device complies with Industry Canada license-exempt RSS standard(s).Opera�on is subject to the following two
condi�ons: (1) this device may not cause interference, and (2) this device must accept any interference, including
2 •

interference that may cause undesired opera�on of the device.
Changes or modifica�ons not expressly approved by the party responsible for compliance could void your authority to
operate the equipment.
Cet appareil est conforme aux normes RSS exemptes de licences d’Industrie Canada. Son fonc�onnement est soumis
aux deux condi�ons suivantes : (1) cet appareil ne doit pas causer d’interférences nuisibles et (2), il doit pouvoir
accepter
les interférences, incluant celles pouvant nuire à son fonc�onnement normal.
Tout changement ou modifica�on non approuvé expressément par la par�e responsable pourrait annuler le droit à
l’u�lisateur de faire fonc�onner cet équipement.
■FCC RF Exposure
WARNING! It is up to the user to properly operate this radio transmi�er to insure safe opera�on. Please adhere to the
following:
Do not use the radio with a damaged antenna. If
a damaged antenna comes into contact with the skin, a minor burn
may result.
Please contact your local dealer for a replacement antenna.
Hand-Held Opera�on (Held-to-Face)
This device was evaluated for typical hand-held (held-to-face) opera�ons with a 1 inch spacing from the front of the
radio. For hand-held opera�on, the radio should be held 1 inch from the user's face in order to comply with FCC RF
exposure requirements.
Body-Worn Opera�on
This device was evaluated for body-worn opera�ons with the supplied belt-clip accessory. (All necessary accessories are
included in the package; any addi�onal or op�onal accessories are not required for compliance with the guidelines.)
Third party accessories (unless approved by the manufacturer) should be avoided as these might not comply with FCC
RF exposure guidelines.
3 •

For body worn opera�on, this device has been tested and meets the Industry Canada RF exposure guidelines when
used with our company accessories supplied or designated for this product. Use of other accessories may not ensure
compliance with Industry Canada RF exposure guidelines.
Fonc�onnement de l’appareil, lorsque porté sur le corps. Cet appareil a été testé et s’est avéré conforme aux normes
d’Industrie Canada et approuvé pour le port sur le corps à l’aide
des accessoires notre société inclus et conçus pour cet
appareil. L’u�lisa�on d'accessoires ne respectant pas les exigences d'exposi�on RF d’Industrie Canada doit être évitée.
■Precau�ons for Portable Terminals
Opera�ng Prohibi�ons
To protect you against any property loss, bodily injury or even death, be sure to observe the following safety
instruc�ons:
1. Do not operate the product in a loca�on containing fuels, chemicals, explosive atmos
pheres and other flammable
or explosive materials. In such loca�on, only an approved Ex-protec�on model is allowed for use, but any a�empt
to assemble or disassemble it is strictly prohibited.
2. Do not operate the product near or in any blas�ng area.
3. Do not operate the product near any medical or electronic equipment that is vulnerable to RF signals.
4. Do not hold the product while driving.
5. Do not operate the product in any area w
here use of wireless communica�on equipment is completely prohibited.
Important Tips
To help you make be�er use of the product, be sure to observe the following instruc�ons:
1. Do not use any unauthorized or damaged accessory.
2. Keep the product at least 2.5 cen�meters away from your body during transmission.
3. Do not keep the product receiving at high volume for a long �me.
4. For vehicles with an air bag, do not place the product in the ar
ea over the air bag or in the air bag deployment area.
5. Keep the product and its accessories out of reach of children and pets.
4

6. Please operate the product within the specified temperature range.
7. Con�nuous transmission for a long �me may lead to heat accumula�on within the product. In this case, please
keep it at a proper loca�on for cooling.
8. Handle the product with care.
9. Do not disassemble, modify or repair the product and its accessories without authoriza�on.
■Precau�ons for Ba�eries
Charging Prohibi�ons
To protect you against any property loss, bodily injury or even death, be sure to observe the following safety
instruc�ons:
1. Do not charge or replace your ba�ery in a loca�on containing fuels, chemicals, explosive atmospheres and other
flammable or explosive materials.
2. Do not charge your ba�ery that is wet. Please dry it with a so� and clean cloth prior to charge.
3. Do not charge your ba�ery suffering deforma�on, leakage and overheat.
4. Do not charge your ba�ery with a
n unauthorized charger.
5. Do not charge your ba�ery in a loca�on where strong radia�on is present.
6. Overcharge shall always be prohibited for it may shorten the life of your ba�ery.
Maintenance Instruc�ons
To help your ba�ery work normally or prolong its life, be sure to observe the following instruc�ons:
1. Accumulated dust on charging connector may affect normal charging. Please use a clean and dry cloth to wipe it on
a regu
lar basis.
2. It is recommended to charge the ba�ery under 5℃~40℃. Viola�on of the said limit may cause ba�ery life
reduc�on or even ba�ery leakage.
3. To charge a ba�ery a�ached to the product, turn it off to ensure a full charge.
4. Do not remove the ba�ery or unplug the power cord during charging to ensure a smooth charging process.
5

5. Do not dispose of the ba�ery in fire.
6. Do not expose the ba�ery to direct sunlight for a long �me nor place it close to other hea�ng sources.
7. Do not squeeze and penetrate the ba�ery, nor remove its housing.
Transporta�on Instruc�ons
1. Damaged ba�eries must not be transported.
2. To avoid short circuit, separate the ba�ery from metal pars or from each other if two or more ba�eries are
transported in one packaging.
3. The radi
o must be switched off and secured against switch-on, if the ba�ery is a�ached.
The content of the shipment must be declared in the shipping documents and by a Ba�ery Shipping Label on the
packaging. Contact your hauler for the local regula�ons and further informa�on.
Maintenance
Your Two Way Radio is an electronic product of exact design and should be treated with care.
The sugges�ons below will help you to fulfill any
warranty obliga�ons and to enjoy this product for many years.
• Do not a�empt to open the radio for any reason! The radio’s precision mechanics and electronics require experience
and specialized equipment; for the same reason, the radio should under no circumstances be realigned as it has
already been calibrated for maximum performance. Unauthorized opening of the transceiver will void the warranty.
• Do not store the Radio unde
r the sunshine or in hot areas.
• High temperatures can shorten the life of electronic devices, and warp or melt certain plas�cs.
• Do not store the radio in dusty and dirty areas.
• Keep the Radio dry. Rainwater or damp will corrode electronic circuits.
• If it appears that the Radio diffuses peculiar smell or smoke, please shut off its power immediately and take off the
charger or ba�ery from the radio.
• Do not transmit without antenn
a.
6

Functional features
-6 band scan receiver, FM78-108MHz; AM108-136MHz; VHF136-174MHz, UHF400 -
7
520MHz,350-390MHz
-Transmit frequency VHF; UHF
-5W/2W RF output, dual PTT transmitter
-Wireless read/write frequency
-1.44” TFT large screen, full keyboard, full open menu operation, local channel storage and deletion
-Full keyboard manual frequency input, 999 channel memory
-One-click frequency pairing, easy pairing and grouping.
-Relay function settings: frequency difference, frequency difference direction, relay activation audio settings
-Alarm function (three types of alarm settings), to protect your security
-Built-in input method, supports local editing of channel name, receiving frequency, transmitting frequency
-DTMF encoding and decoding function, 20 DTMF calls
-Frequency hopping function
-Side button function customizati
on: radio, scan, sweep, voice control, flashlight, alarm
-FM radio function (receive frequency 78~108MHz)
-Automatic or manual keypad lock, backlight selection
-Support Type-C charge, more convenient range
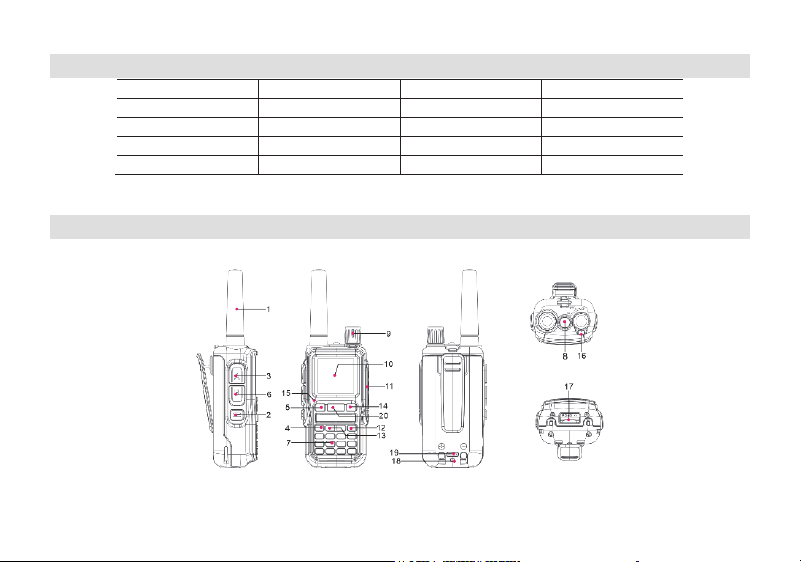
Items in the Package
Item Quantity (PCS) Item Quantity (PCS)
Radio 1 1
Battery 1
Antenna 1
Operation Manual
Belt Clip 1
*Charger and power adapter are subject to the final configuration of the dealer. Please understand that the charging instructions
in this manual may not be appropriate if Type-C charging method.
Product Overview
8
Side Key [SK1] Customization Function
The function of the “SideKey SK1” allows the setting of shortcut functions via the CPS programming software or via the menu -
Radio settings - “SideKey SK1”.
-FM Radio: Quickly turns the radio function on or off.
-Scan: Quickly turns the scanning function on or off. The scan function can also be turned on or off by long pressing the # key.
-SEARCH: Quickly turn on or off the one-touch sweep function.
-VOX: Quickly turn on or of
f the VOX function.
-LAMP: Quickly turn on or off the flashlight.
-SOS: Quickly turn on or off the alarm function.
LCD Display
Icon Description
RSSI
Squelch Open/ Close Indicator
H/L
Transmit power level indicator, According to Power
Make sure you can hear the DTMF side tone from the radio speaker, set to DT-ST, ANI-ST, DT+ANI.
DCS enabled
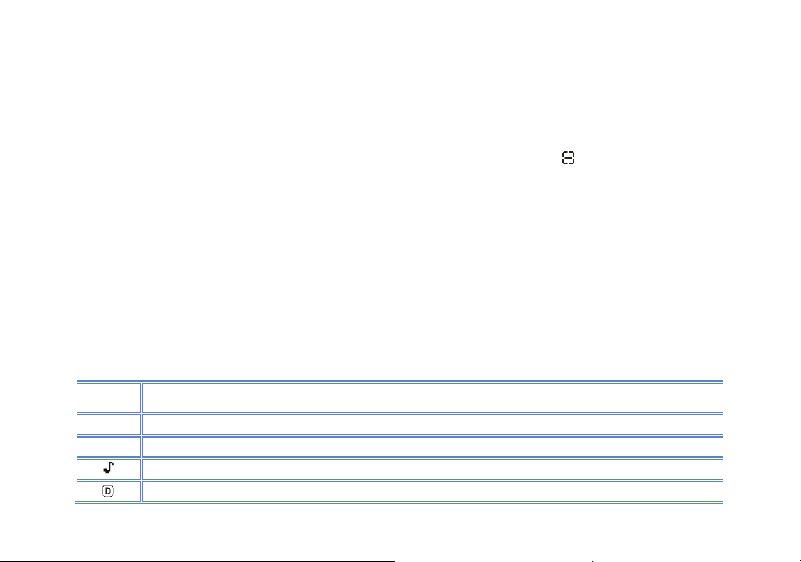
1.Antenne
2.SK1-Customized Function Keys/Monitor button
3.PTT-A Button
4.OK/Menu button
5.V/M-VFO/MR
6.PTT-B Button
7.Numeric Keypad
8.Flashlight
9.Volume/Power Knob
10.Screen
11.Accessory Port
12.Cancel/Back button
13.▲Up button/▼Down button
14.A/B
15.Microphone
16.LED Indicator
17.Battery Latch
18.Type-C Charging indicator light
19.Type-C Charging Port
20. Search/Flashlight button
9
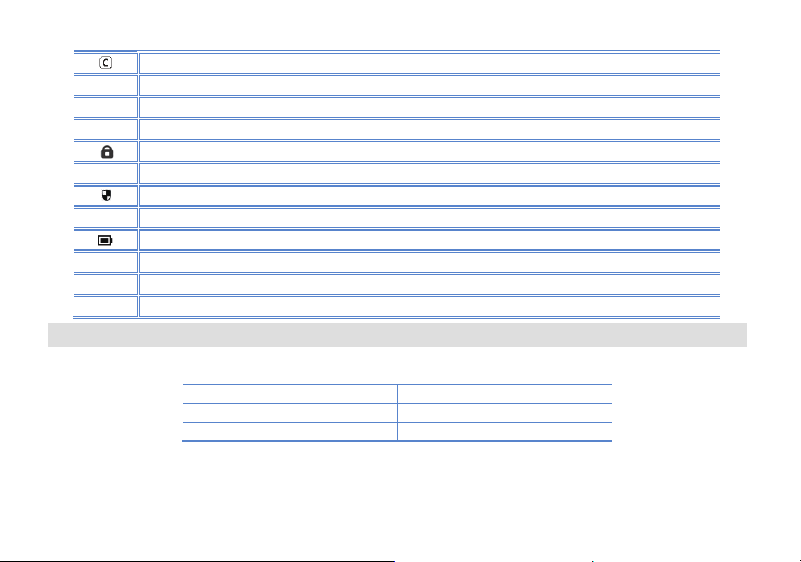
CTCSS enabled
+
Enables access of repeaters in VFO/Frequency Mode. TX will be shifted higher in frequency than RX.
-
Enables access of repeaters in VFO/Frequency Mode. TX will be shifted lower in frequency than RX
D
Dual watch enabled
Keypad lock enabled
V
VOX enabled
The confidential calling feature is activated
N
Narrowband enabled
Battery level indicator
R
Reverse function enabled
T
The terminal is switched from transit mode to pass-through mode.
SCR
The voice scramble function has been activated
Before Use
When using the terminal for the first time, a low battery warning may occur. It is recommended to turn off the radio during
charging. The battery's LEDs provide an indication of the current state of charge, as shown in the table below.
Indicator light
Charging status
Red light is always on
Charging
Green light is always on
Charging complete
Attaching the Antenna
Turn the antenna clockwise until it is tight. To remove the antenna, turn it counterclockwise.
10

CAUTION
Do not hold the radio antenna in your hand, as this will reduce the performance of the radio and the life of the antenna.
Do not shake the radio with the top of the antenna in your hand, as this will degrade the performance and life of the radio
antenna.
Attaching the Belt Clip
1. Use a Phillips screwdriver to turn the screw on the back of the radio counter-clockwise and remove it.
2. Align the screw holes on the belt clip with the screw holes on the back of the radio. Ali
gn the screw holes on the back of the
radio.
3. Put the screws back in place and use a Phillips screwdriver to turn the screws clockwise. Turn the screwdriver clockwise until it
is hand-tight.
Basic operations
Turning your Radio On and Off
To turn your radio ON, turn the [Volume/Power] rotaryknob clockwise.
To turn your radio OFF, turn the [Volume/Power] rotary knob counterclockwise.
Setting the Volume
Increase volume by turning the [Volume/Power] rotary knob clockwise.
To decrease volume, turn the [Volume/Power] rotary knob counterclockwise.
Do not hold the radio close to your ear. If the volume is set to an uncomfortable level, it could hurt your ear.
Locking or Unlocking Keypad
To avoid accidentally changing radio settings:
1. Press and hold the [* ] key to lock the keypad until the screen displays the “ ” icon.
2. In lock mode, you can turn the intercom on and off, adjust the volume, receive, transmit, send call tones, send emergency
alerts, and listen to channels. All other functions remain locked.
11

3. In lock mode, press and hold the [* ] key to unlock the keypad until the “ ” icon is no longer displayed to unlock the radio.
Keypad Entry
You can enter radio aliases, channel aliases, numbers, etc. using the radio's numeric keypad.
1. To switch between input methods, press [#↑
] key.
2. Press 1 to enter a special character (except in numeric input mode, where the number 1 is entered)
3. Press 0 to enter a space (except in the numeric input mode, in which special characters are entered).
Select a Channel
The channel is the channel through which the signal is transmitted. Press the [V/M] button to toggle between VFO and channel
mode to select channel mode.
Press the ▲/▼ buttons or the rotary encoder to select the desired chan
nel.
Enter the channel number using the keypad. For example, to switch to channel 64, enter 064 totaling 3 digits to switch to channel
64.
Channel Memory
In Frequency and in Standby mode, you can store frequencies and parameters.
Press [MENU] [3] [MENU] [1] [5], the screen will display “MEMCH”.
Press [MENU] to enter the function. Press the ▲/▼ buttons to select the channel, then press [MENU] to store it. A sound tone
will confirm that the storing succe
eded. Press [EXIT] to exit to return to standby mode.
NOTES
If you want to set CTCSS tones, DCS codes or the frequency offset, you have to do it before storing the channel. Stored
channels are displayed as CH-, other channels have no CH- display.
Delete a channel (DEL-CH)
VFO mode and in standby mode, press [MENU] [3] [MENU] [1] [6],the screen will display “DELCH”.
Press [MENU] to enter the function. Press the ▲/▼ buttons or rotate the encoder to select the channe
l you want to delete, then
12

press [MENU] to confirm.
To return to the standby mode press [EXIT] key.
NOTE: Channel 1 cannot be deleted.
Main Band/Sub Band Switch
In standby mode, press the [A/B] key to toggle between the A and B bands to switch between the main/sub bands.
The main band is the highlighted band. The darker displayed band is the sub-band.
VFO/Channel Switch
Press the [V/M] button to switch between VFO and channel display.
VFO mode will display the ‘VFO’ icon. MR mode will display the ch
annel serial number.
Setting the VFO Frequency
Turn the radio to VFO mode, then press the [A/B] key to switch to the main channel.
Operation 1: Input the VFO frequency directly with the keypad.
Operation 2: Press the ▲/▼ button or rotary encoder to adjust the VFO frequency in the set frequency step.
Call Service
All radios in the group must be set to the same channel and sub-code to communicate.
To ensure optimal reception volume, keep the distance betwe
en the microphone and your mouth at 2.5 cm to 5 cm when
transmitting.
-Initiate a call: Select a channel, press and hold the [PTT-A] key, the radio transmits on segment A (upper screen) and the red
indicator light is always on. Then speak into the microphone with normal voice tone.
Press and hold the [PTT-B] key, the radio transmits on the B segment (lower screen), and the red indicator light is always on. Then
speak into the micr
ophone in a normal voice tone.
-Receive a call: After releasing the [PTT] key, the radio is in a receivable state. When receiving a call, the green indicator light is
always on.
13

Note: In standby, press and hold the 8 key to toggle the transmission power.
Emergency Alarm
Emergency alarm means that the terminal can initiate an emergency alarm to seek help from the companion or the contr ol center
when it encounters an emergency.
In standby mode, press the preset [SOS] key to enable or disable the emergency alarm function.
Flashlight
In standby mode, press the preset key to turn the flashlight on or off.
FM Radio Function
Set the [SK1] key to the radio function via Menu >> Radio Set >> Press SK1.
Turn on the radio and press the SK1 key [FM Radio] to enter radio mode and the screen displays the tuning frequency. The
following operations can be performed:
-Press ▲/▼ key to search for radio channels at the preset step frequency.
-Press the [#↑
] key to search for radio channels automatically, the screen displays 'SEEK...'
-Press [EXIT] key to switch frequency band between 65.0/75.0MHz.
-Press SK1 key [FM Radio] to exit radio mode.
Monitor
Press and hold the pre-programmed [Monitor] key to enter monitor mode and listen for weak signals on the current channel.
You can also listen to the volume level of the radio when you are not receiving. This allows you to adjust the volume, if necessary
.
Release the [Monitor] key to exit the monitor mode.
Frequency Search
Press the pre-programmed [SEARCH] key or press and hold key, the radio enters into frequency search state, the screen
displays “SEARCH...”. Press [#↑
] key to switch the searching band, such as VHF/UHF, etc. The frequency and CTCSS/DCS code
14

will be displayed after searching is completed.
Press [MENU] to save the channel.
Reverse Frequency Function
Short press the [* ] key in relay mode can invert the receive frequency and transmit frequency, the screen shows ‘R’ icon.
-This function is often used in repeater channels, and is effective when there is a frequency difference between the receive
frequency and the transmit frequency.
Talk Around Function
In repeater mode, press [* ] to switch between Talkaround Mode and Repeater Mode, the screen displays between ‘T’ icon and
‘R’ icon.
-In Talkaround mode, the receive frequency is equal to the transmit frequency.
Repeater Activation Tone
Turn on the radio, press and hold the [PTT] key, then press the [SK1] to transmit 1750Hz audio to activate a repeater in hibernation.
Voice-activated transmit (VOX)
Enable VOX function, you don't need to press PTT key to transmit, through the voice of normal speech automatically transmit, after
the speech stops, it will stop transmitting automatically and wait for receiving. VOX function is enabled:
(1) Standby status, press [MENU][2][MENU][4] to enter Vox Switch;
(2) Press [MENU][2][MENU][5] to enter Vox Level, press ▲/▼ to select VOX level (level 1-9);
-Open VOX,select VOX level 1 level-9, the smaller the value, the higher the sensitivity, the ‘V’ icon is displayed at the top of the
screen. Default is off.
-Turn
off VOX, select OFF OFF, V icon disappears.
(3) Press [MENU] key to save the setting and return to the upper menu.
-Repeat the above operation and select OFF to turn off the VOX function.
15

Dual Watch
When in Dual watch mode, the radio can receive the frequency set for channel A or B. Operation is as follows:
1. Press [MENU] [2] to enter Radio Set.
2. Press [MENU] + ▲/▼ to select “15 Dual Watch”.
3. Press [MENU] key to enter Dual Watch Setting, press ▲/▼ key to select “On”.
4. Press [MENU] key to save and return to the upper menu. The dual watch function will be turned on, and the icon ' D' will be
displayed on the first line of the screen.
-R
epeat the above operation and select “Off”, the Dual Watch function is turned off and the icon 'D' disappears from the first line
of the screen. The sub-band displays the icon.
Stopwatch Function
Press and hold the [MENU] key to enable the stopwatch function. The stopwatch timing operates as follows:
-Press the [MENU] key to start the stopwatch.
-Press the [MENU] key again to stop the stopwatch.
-Press the [EXIT] key to exit the stopwatch functio
n.
Weather Radio/Scan Weather Channel
Your radio has a NOAA Weather Radio function, to enable the user to receive weather reports from designated NOAA sta tions.
Your radio also has a NOAA Weather Scan function, to enable the user to scan all 10 channels of the NOAA Weather Radio.
(1) To turn the NOAA Weather Scan on, press and hold the [0] key for 3 seconds , icon appears. The radio will go to Weather
band mode.
(2) Press and hold the [#↑
] key for 3 seconds to start automatic scanning of all 10 channels and stop on active channels.
Pressing and holding the [#↑
] key for 3 seconds during a NOAA weather scan will stop the scan.
(3) After stopping NOAA weather scan, it is allowed to manually select the weather channel by press the or key.
(4) To exit the Weather Radio broadcast mode, press the key or [PTT] key.
16
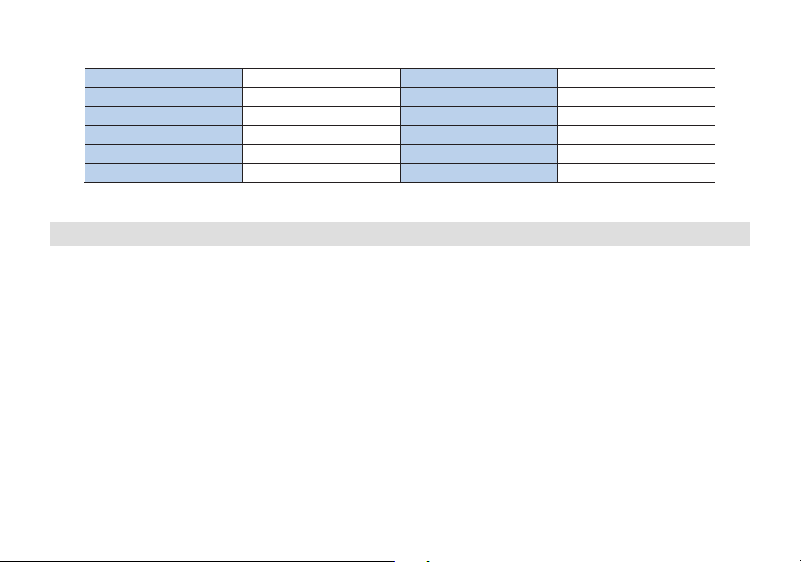
Weather channel frequencies and names
Channel Number
RX Frequency MHz
Channel Number
RX Frequency MHz
CH-01
162.550
CH-06
162.500
CH-02
162.400
CH-07
162.525
CH-03
162.475
CH-08
161.650
CH-04
162.425
CH-09
161.775
CH-05
162.450
CH-10
163.275
NOTE: Weather Channels Wx 1 Thru 10, Receive-only channels for NOAA and Canadian weather broadcasts. You cannot
transmit on these channels.
Use of menu functions
Basic use
Using the menu with arrow keys
1. Press the [MENU] button to enter the menu.
2. Use the ▼/▲ buttons or the encoder to navigate between menu items.
3. Once you find the desired menu item, press [MENU] again to select that menu item.
4. Use the ▼/▲ buttons or the encoder to select the desired parameter.
5. When you've selected the parameter you want to set for a given menu item;
A) To confirm your selection, press [MENU] and it will save your setting
and bring you back to the main menu.
B) To cancel your changes, press [EXIT] and it will reset that menu item and bring you out of the menu entirely.
6. To exit out of the menu at any time, press the [EXIT] button.
Using the menu with short-cuts
1. Press the [MENU] button to enter the menu.
2. Use the numerical keypad to enter the number of the menu item.
17
3. To enter the menu item, press the [MENU] button.
4. For entering the desired parameter you have two options:
A) Use the arrow buttons as we did in the previous section; or
B) Use the numerical keypad to enter the numerical short-cut code.
5. And just as in the previous section;
A) To confirm your selection, press [MENU] and it will save your setting and bring you back to the main menu.
B) To cancel your changes, press [EXIT] and it will
reset that menu item and bring you out of the menu entirely.
6. To exit out of the menu at any time, press the [EXIT] button.
Wireless Program Radio
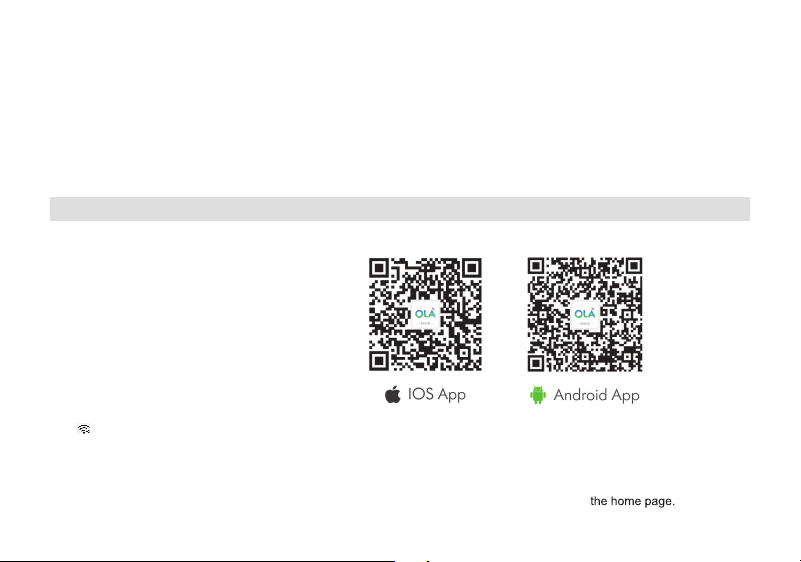
You can program the radio wirelessly. Before programming the radio wirelessly, you need to install the APP program. Download
at scan
The radio operates as follows:
1.Press [MENU] + [4] to enter Wireless
2. Press [MENU] + ▲/▼ to select “On”;
The icon will be displayed on the first line of the screen.
Download radio APP
You can program the terminal through the radio APP. Download and install radio APP on your Android phone.
After the APP is opened, allow the Bluetooth of the cell phone and open the location function, select the walkie-talkie model
5Rmini Series, connect the radio, click Walkie-talkie. prompt the connection success and return to
18

- Read the radio data: After finishing the frequency reading, click the program to enter the program details. In the program details
interface you can program channel information, frequency mode, optional functions.
- Save Profile: The programmed profile allows you to save the profile as a new profile and name the new profile.
If you select Replace Program, click Replace Program and save.
- Write data to radio: click home page, selec
t program, click 'Write' to enter write frequency, the radio will restart automatically
when finish writing frequency.
Technical Specifications
General
Receiver Frequency
Transmission Frequency
Channel Spacing
Memory Channel
Operation Voltage
Dimensions
Weight
Transmission current
Receive Sensitivity
Rated Audio Power Output
Receive current
Connection for accessories
Antenna impedance
FM 76-108 MHz;
VHF 136-174MHz, UHF 400-520MHz, 350-390MHz
VHF & UHF
25.0KHz(Wide)/12.5KHz(Narr)
999 Groups
DC 7.4 V ±10%
108mm×52mm×37mm (No antenna)
200g (Battery pac
k included)
≤1600mA
0.25μV (12dB SINAD)
1W @16 ohms
≤380mA
2 pin Kenwood jack
50 Ohm
NOTE: All specifications may be modified without prior notice or liability. Thank you.
19
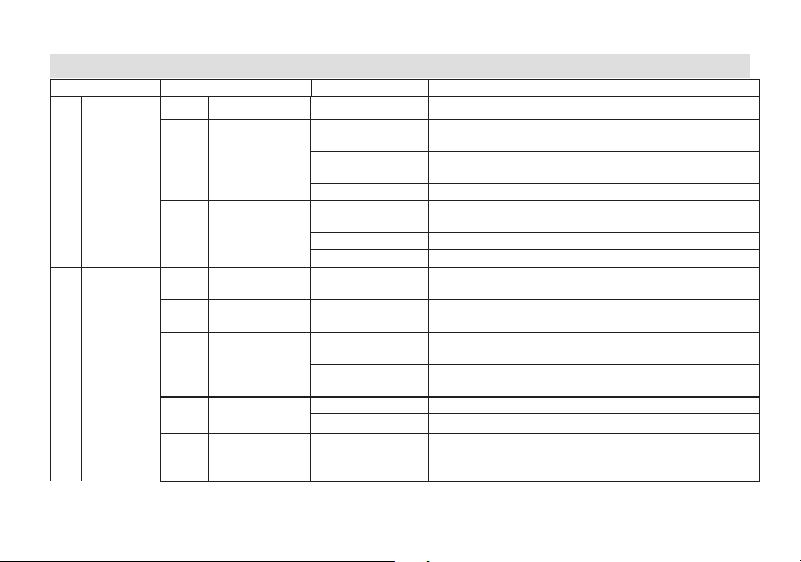
Shortcut Menu operations
Menu
Name
Setting
Description
1 SCAN
1 Freq Ranger NNNNnnn
Input VFO range lower and upper frequency
2 Scan Mode
Time
Time Operation - scanning will resume after a fixed time has
passed
Carrier
Carrier Operation -scanning will resume after the signal
disappears
Search
Search Operation -scanning will not resume
3 Scan Memory
ALL
RX_TX are saved (default is all, encoding and decoding are
the same)
DECODER
Save only in Transmitter CTCSS/DCS
ENCODER
Save only in Receiver CTCSS/DCS
2
Radio
Setting
1 Step 2.5-100K
Selects the amount of frequency change in VFO/Frequency
mode when scanning or pressing the or keys.
2 Squelch
OFF,LEVEL1-
LEVEL5
Squelch silences the receiver when there is no signal. Setting
the squelch to 0 will open up the squelch entirely.
3 Power Save
OFF
Turn off radio sleep. The battery consumption is large, and the
standby time may be shortened
ON
Turn on radio sleep. Turning on is more power efficient, but
you might miss the first few syllables before the RX turns on.
4 VOX Switch
OFF
Turn off the radio VOX.
ON
Turn on the radio VOX.
5 VOX Level
LEVEL1-
LEVEL9
When enabled it is not necessary to push the [PTT] button on
the transceiver. Adjust the gain level to an appropriate
sensitivity to allow smooth transmission.
20
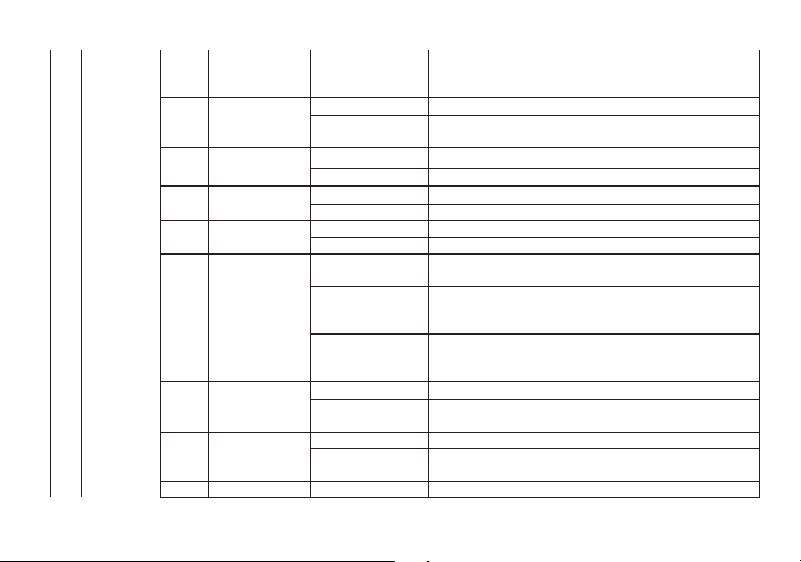
6 VOX Delay 0.5……2.0s
When the VOX is enabled, set up the VOX delay to help to
extend the transmission time to avoid stopping a transmission
too early. 0.5s-2s, Step 0.1 second. a total of 16 times offered.
7 TOT
OFF
Allow continuous launch, launch time is not limited
15;30;45…180
Maximum allowed time for transmission while holding down
the PTT key.
8 TOA
OFF
Disable TOA function
1……10
Activate TOA function. Range 0 – 10 seconds, Step 1 second.
9 Voice
OFF
Disable voice prompts
ON
Activate voice prompts
10 Language
Chinese
Display menus and voice prompts in Chinese language
English
Display menus and voice prompts in English language
11 ROGER
OFF
Disable ROGER function. Release PTT key without ROGER
audio.
BEEP
Activate the ROGER function. Sends an end-of-transmission
tone to indicate to other stations that the transmission has
ended.
TONE 1200
Activates the ROGER function. Sends the DMC1200
transmission end tone to indicate to other stations that the
transmission has ended.
12 Beep
OFF
Disable key confirmation tone.
ON
Activation key to confirm tone. Allows audible confirmation of
a key press
13 BackLight
ALWAYS ON
The backlight is always on.
5……20
Set the backlight off time in no-operation delay time. 5-20,
step value is 5.
14
Power on
PICTURE
Show preset picture when radio is on
21
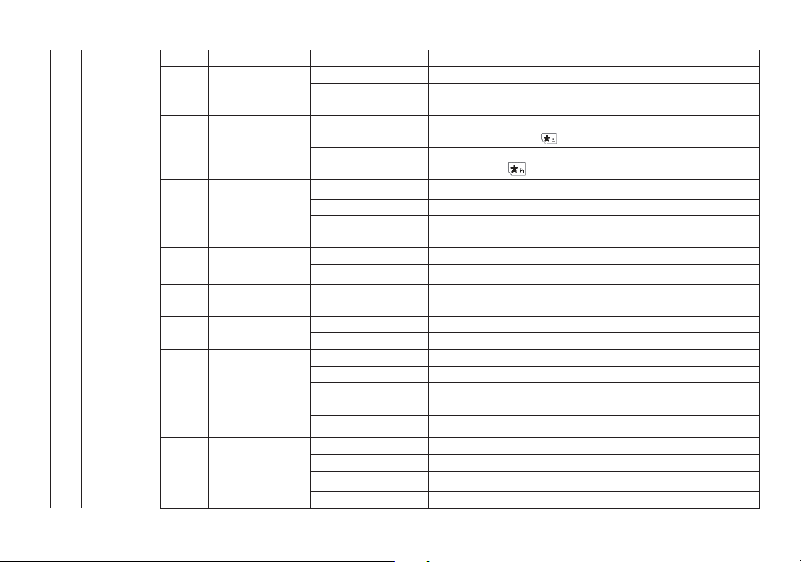
Image
VOLTAGE
Display battery voltage when radio is on
15 Dual Watch
OFF
Disable dual table, dual receive.
ON
Monitor [A] and [B] at the same time. The display with the
most recent activity ([A] or [B]) becomes the selected display.
16 AutoLock
OFF
Disable automatic keypad lock. Allow manual keypad lock
(press and hold the key to lock/unlock the keyboard)
ON
When ON, the keypad will be locked if not used in 8 seconds.
Pressing the key for 2 seconds will unlock the keypad.
17 Alarm Mode
On Site
Sounds alarm through your radio speaker only
Send Sound
Transmits a cycling tone over-the-air
Send Code
Transmits '119' (911 in reverse) followed by the ANI code
over-the-air
18 Alarm Tone
OFF
The radio speaker blocks the alarm sound.
ON
The radio speaker sounds an alarm
19 ANI-Edit 100
View the ANI ID, and if necessary, will allow to change the
ANI ID
20 Display ANI
OFF
Disable the ANI code display function
ON
Enable ANI code display
21 DTMF-ST
OFF
No DTMF Side Tones are heard
DT-ST
Side Tones are heard only from manually keyed DTMF codes
ANI-ST
Side Tones are heard only from automatically keyed DTMF
codes
DT+ANI All DTMF Side Tones are heard
22 PTT-ID
OFF
No ID is sent.
BOT
The selected S-CODE is sent at the beginning
EOT
The selected S-CODE is sent at the ending
BOTH
The selected S-CODE is sent at the beginning and ending
22
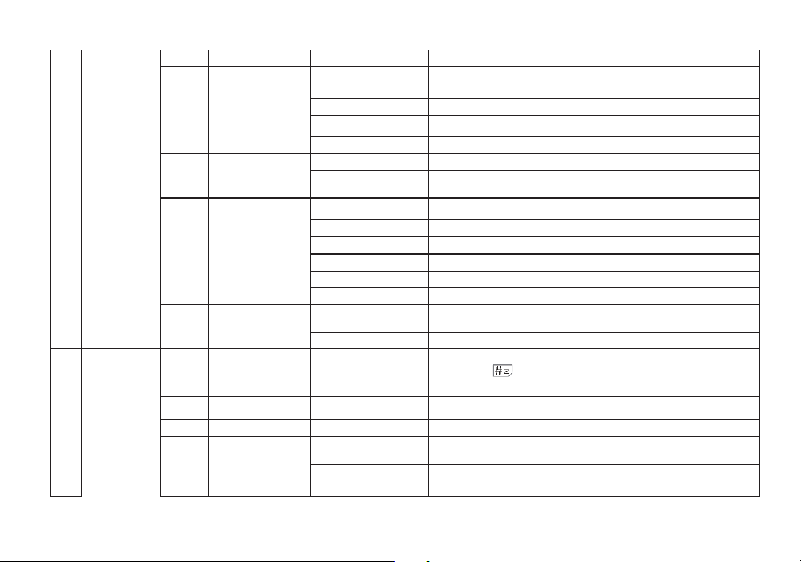
23
PTT-DLY
100-3000ms
Signal code sending delay. PTT-ID Delay (milliseconds)
24 ALERT
1000Hz
The following configurations will transmit accordingly:
PTT + SK1 = Transmits 1000Hz Tone Burst
1450Hz
PTT + SK1 = Transmits 1450Hz Tone Burst
1750Hz
PTT + SK1 = Transmits 1750Hz Tone Burst
2100Hz
PTT + SK1 = Transmits 2100Hz Tone Burst
25 TAIL
OFF
Disable Squelch Tail Elimination.
ON
Enable Squelch tail elimination. to prevent any squelch tails
from being heard.
26 Press SK1
FM Radio
FM Radio on/off
SCAN
SCA on/off
SEARCH
Search on/off
VOX
VOX on/off
LAMP
Flashlight on/off
SOS
SOS on/off
27 Reset
VFO MODE
Reset the radio's VFO menu to factory defaults (no reset for
bank, scan settings)
RESET ALL
Resets the radio to factory defaults, with some exceptions.
3
Program
Channel
1 CH.NAME Channel 1
View channel name, allows to rename the current channel.
Press the key to switch the input method, allowing the
input of letters, numbers and symbols.
2 RX Frequency View the current channel Receiver frequency.
3
TX Frequency
View the current channel Transmitter frequency.
4 Trans Power
High
Selects between HIGH transmitter power when in
VFO/Frequency mode.
Low
Selects between LOW transmitter power when in
VFO/Frequency mode.
23
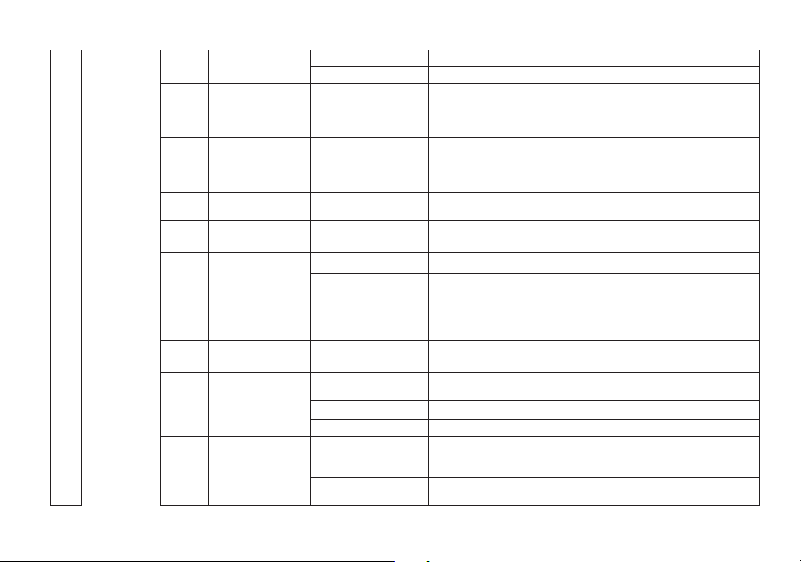
5 Bandwidth
Wide
Wideband (25 kHz bandwidth)
Narrow
narrowband (12.5 kHz bandwidth)
6 RX CTCSS OFF;67-254.1
Mutes the speaker of the transceiver in the absence of a
specific and continuous sub-audible signal. If the station you
are listening to does not transmit this specific and continuous
signal, you will not hear anything.
7 RX DCS OFF;023N-754I
Mutes the speaker of the transceiver in the absence of a
specific low-level digital signal. If the station you are listening
to does not transmit this specific signal, you will not hear
anything.
8 TX CTCSS OFF;67-254
Transmits a specific and continuous sub audible signal to
unlock the squelch of a distant receiver (usually a repeater).
9 TX DCS OFF;023N-754I
Transmits a specific low-level digital signal to unlock the
squelch of a distant receiver (usually a repeater).
10 Encryption
OFF
Disable encrypted mode, your conversations are not private.
ON
Activating encryption mode ensures the privacy of your
conversations.
To use the Encryption function, the other part of the radio
must also have Encryption activated and must be tuned on
the same DCS code.
11 Signaling 1-20
Selects 1 of 20 DTMF codes. The DTMF codes are
programmed with software and are up to 3 digits each.
12 CH-MDF
NAME
MR/Channel mode is displayed in NAME format. Note: NAME
allows CPS program or edit in the channel name(Munu 1).
FREQ
MR/Channel mode is displayed in frequency format.
CH
MR/Channel mode is displayed in CH format.
13 SP-Mute
QT
when radios is set in this mode, the monitor feature is
activated only when the radio receives the correct
CTCSS/DCS.
QT+DTMF
with this option, the monitor is activated when the radio
receives the correct CTCSS/DCS and the correct DTMF code.
24
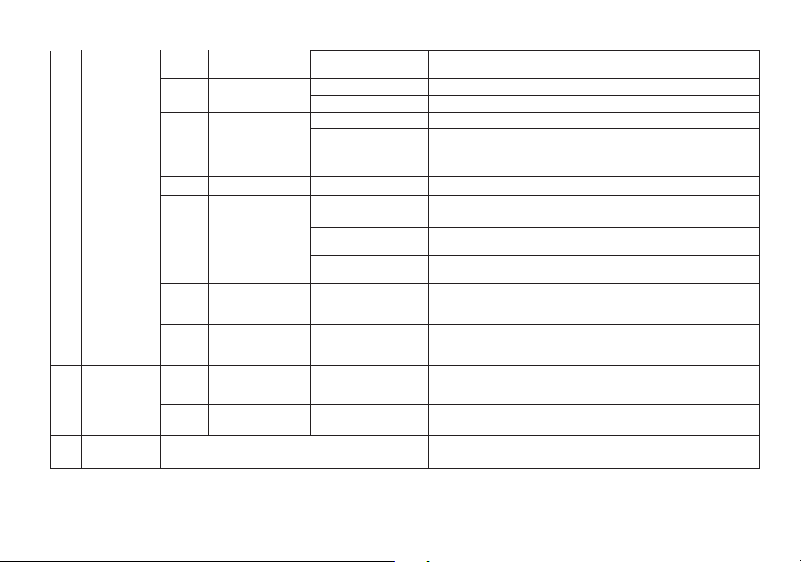
QT*DTMF
• QT*DTMF: the monitor is activated when the radio receives
the correct CTCSS/DCS or the correct DTMF code.
14 SCAN ADD
OFF
Forbid the current channel to join the scan group.
ON
Add the current channel to the scan group.
15 Busy Lockout
OFF
The [PTT] button on the channel is always allowed.
ON
Disables the [PTT] button on a channel that is already in use.
The transceiver will sound a beep tone and will not transmit if
the [PTT] button is pressed when a channel is already in use.
*13
OffSet
Specifies the difference between the TX and RX frequencies
*14 Direction
None
TX = RX (simplex). Disable access to repeaters in
VFO/Frequency mode
Plus
Plus frequency shift direction. TX will be shifted higher in
frequency than RX
Minus
Minus frequency shift direction. TX will be shifted lower in
frequency than RX
16 CH_Memory CH001-CH999
This menu is used to either create new or modify existing
channels (1 through 999) so that they can be accessed from
MR/Channel Mode.
17 CH_Delete CH001-CH999
This menu is used to delete the programmed information from
the specified channel (1 through 999) so that it can either be
programmed again or be left empty.
4
Wireless
CPS
1 OFF
Turn off Wireless CPS and disable the Wireless programming
function
2 ON Enable Wireless CPS to program the radio via Wireless
5
Radio
Info
Radio ID\Firmware\Hardware
Displays radio ID, firmware version, hardware version. to
check the radio information.
25
Disclaimer
The accuracy and completeness of the contents are sought in the process of compilation, but we do not bear any responsibility
for the possible errors or omissions. With the continuous development of technology, we reserve the right to change the desig n
and specification of the product without notice. No copy, modification, translation and dissemination of this handbook may be
made in any form without the prior written authorizatio
n of our department.
Print version: 5R Mini_V1.0
PO FUNG ELECTRONIC (HK) INTERNATONAL GROUP COMPANY LIMITED
ADD: Room 1508, 15/F, Office Tower II, Grand Plaza, 625 Nathan Road, Kowloon, Hong Kong
H�p://www.baofengradio.com