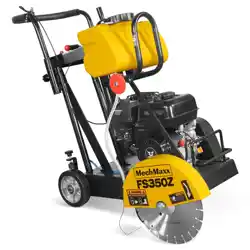

FS350H/FS350Z
FS480H/ FS480Z
Model:


TABLE OF CONTENTS
TABLE OF CONTENTS 1
SPECIFICATIONS 2
SAFETY LABELS 4
INTRODUCTION/DETERMINING THE RIGHT MACHINE
10
OPERATING PRINCIPLE
10
GENERAL SAFETY
7
DIAMOND BLADE SAFETY
8
FLOOR SAW TRANSPORTATION SAFETY
8
EMERGENCIES
8
MAINTENANCE SAFETY
9
DELIVERY CHECKS
10
LABEL LOCATIONS
4
SAFETY LABELS
4
OPERATING LABELS
4
INSTALLING BLADE
10
TYPES OF CUTTING
11
BEFORE STARTING
11
7
RULES FOR SAFE OPERATION
10
OPERATION
COLD START
11
HOT START
11
TO START CUTTING
11
CUTTING
12
BELTS & PULLEYS
12
DRY CUTTING
13
14
MAINTAINENACE - TROUBLESHOOTING
17
LUBRICATION AND SERVICE
17
TRANSPORTATION
18
PARTS DIAGRAM (Q350 ASSEMBLY)
PARTS LIST (Q350 ASSEMBLY) 19
22
PARTS DIAGRAM (Q480 ASSEMBLY)
PARTS LIST (Q480 ASSEMBLY) 23
1
www.mechmaxx.com
TABLE OF CONTENTS
SPECIFICATIONS
2
www.mechmaxx.com
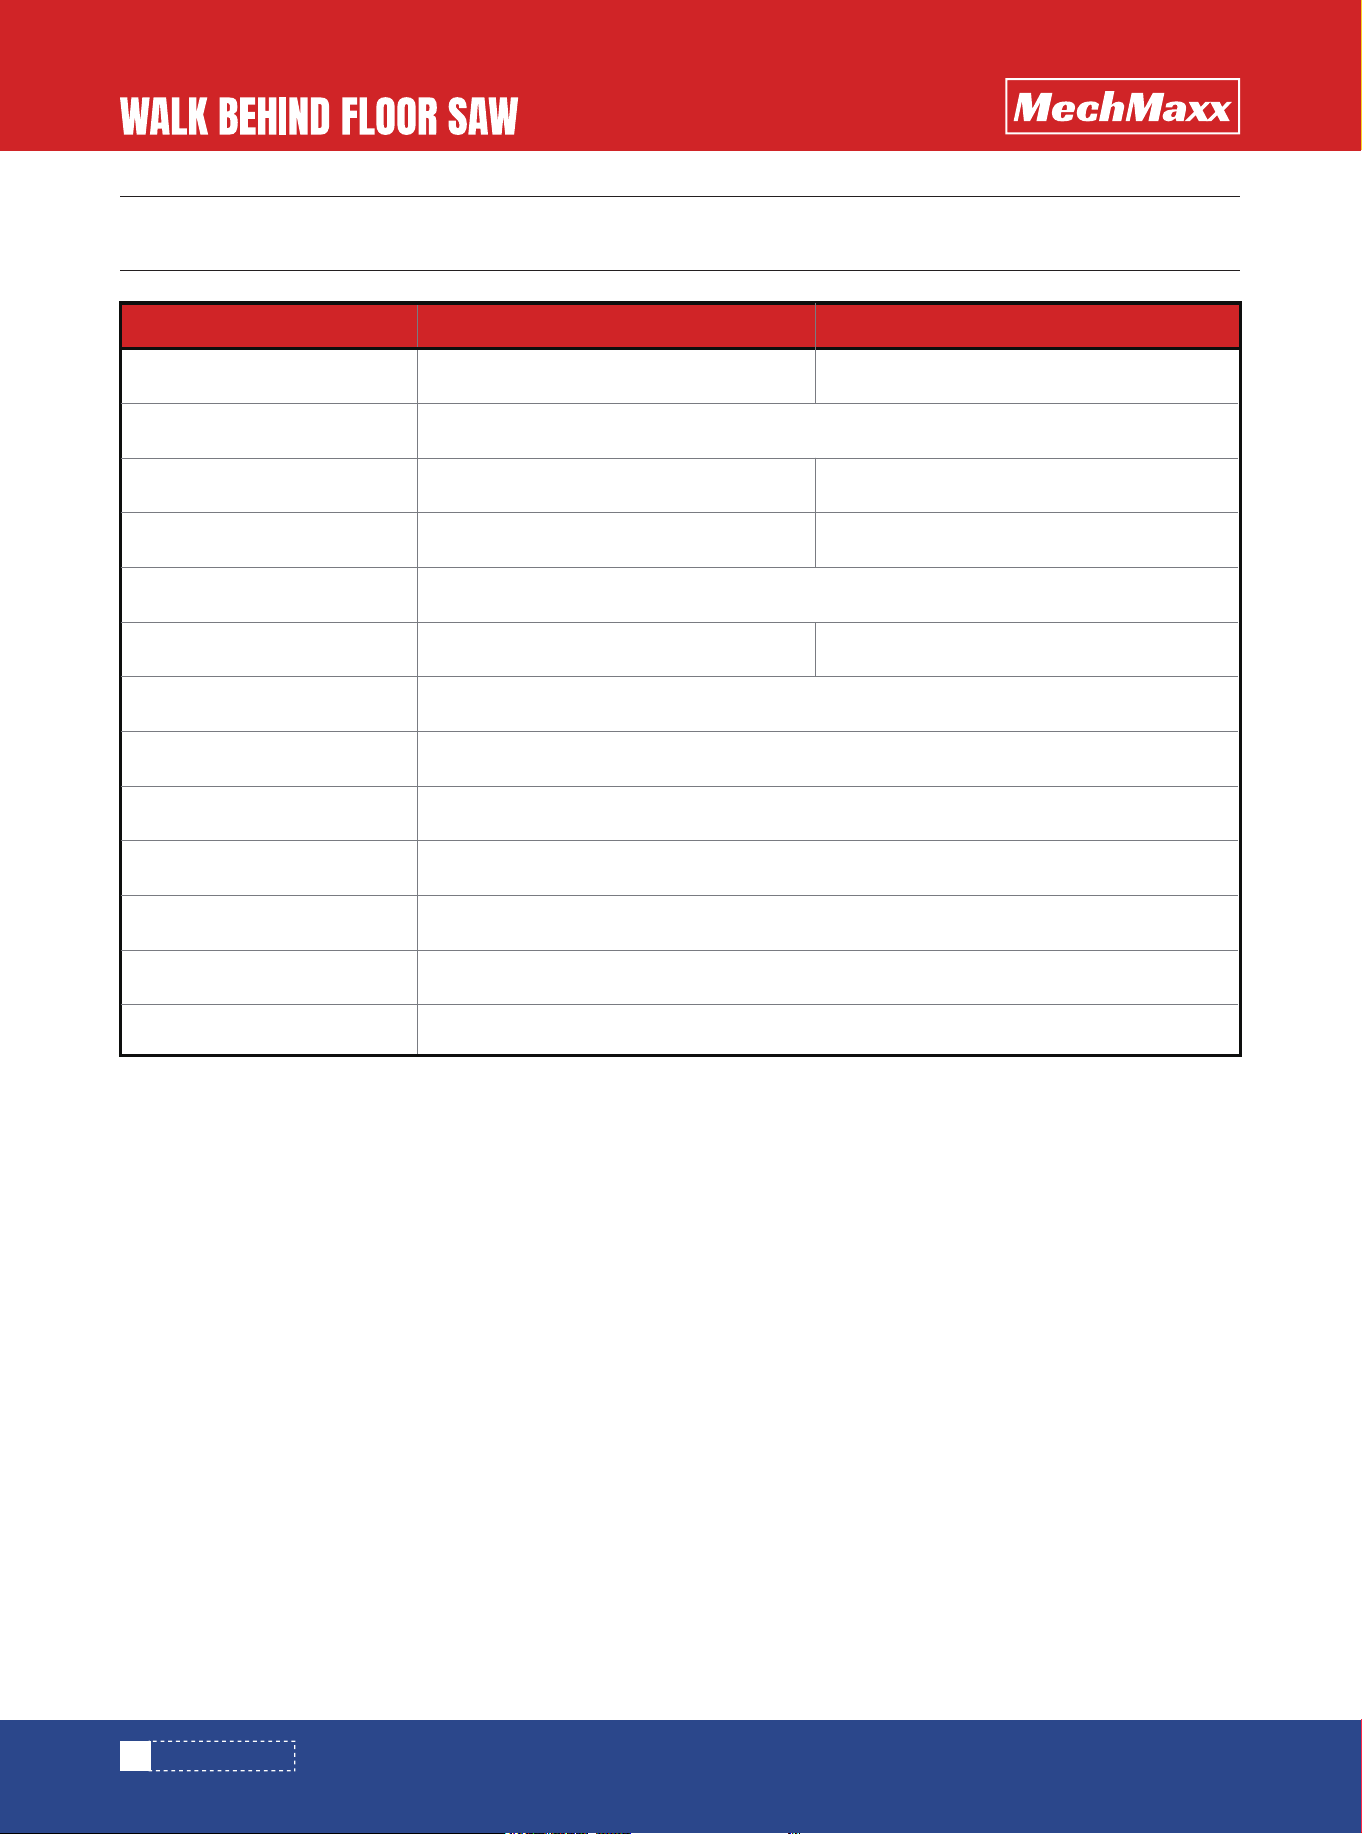
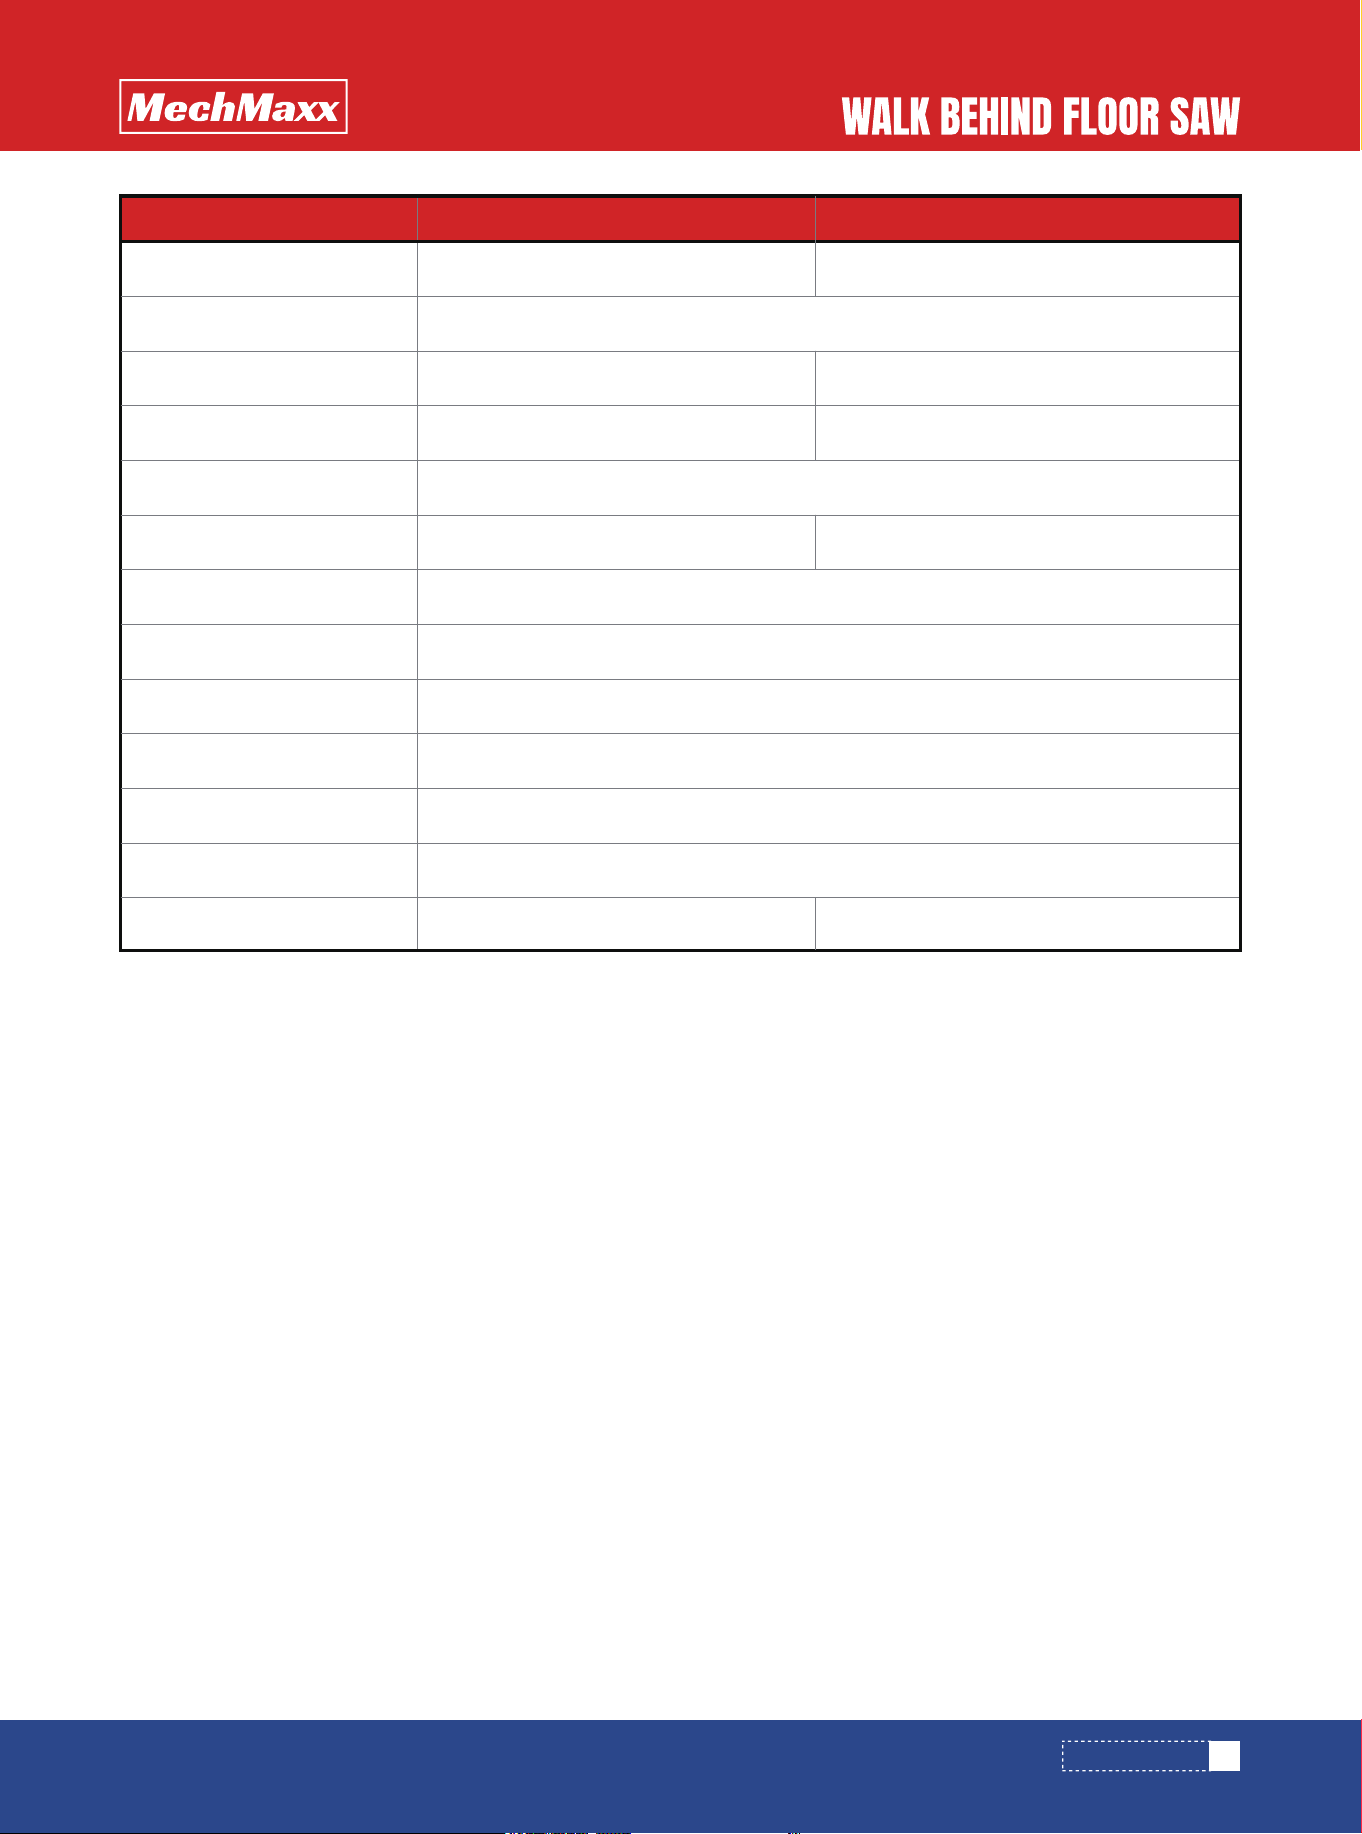
Model FS350H FS350Z
Engine
Engine Type
Engine Displacement
Horsepower
Start System
Fuel Tank Capacity
Engine Oil Capacity
Blade Diameter
Max Cutting Depth
Arbor Diameter
Water Tank Capacity
Overall Dimension (LxWxH)
Weight
Honda GX160
Single-Cylinder, 4-Stroke, Air-Cooled, OHV Gasoline Engine
163 cc
4.8 HP (3.6kW) @ 3600 RPM
Recoil
3.3 US qt (3.1L)
0.61 US qt (0.6L)
14 in
4 in
1 in
3.2 US gal
35 x 19 x 34 in
143/lbs
Zonsen GB210
208 cc
5.8 HP (4.3kW) @ 3600 RPM
2.8 US qt (2.6L)
SPECIFICATIONS
3
www.mechmaxx.com
Specifications are subject to change without notice.
Engine specifications may vary by configuration. Refer to the engine manufacturer’s manual for engine-specific service
information.
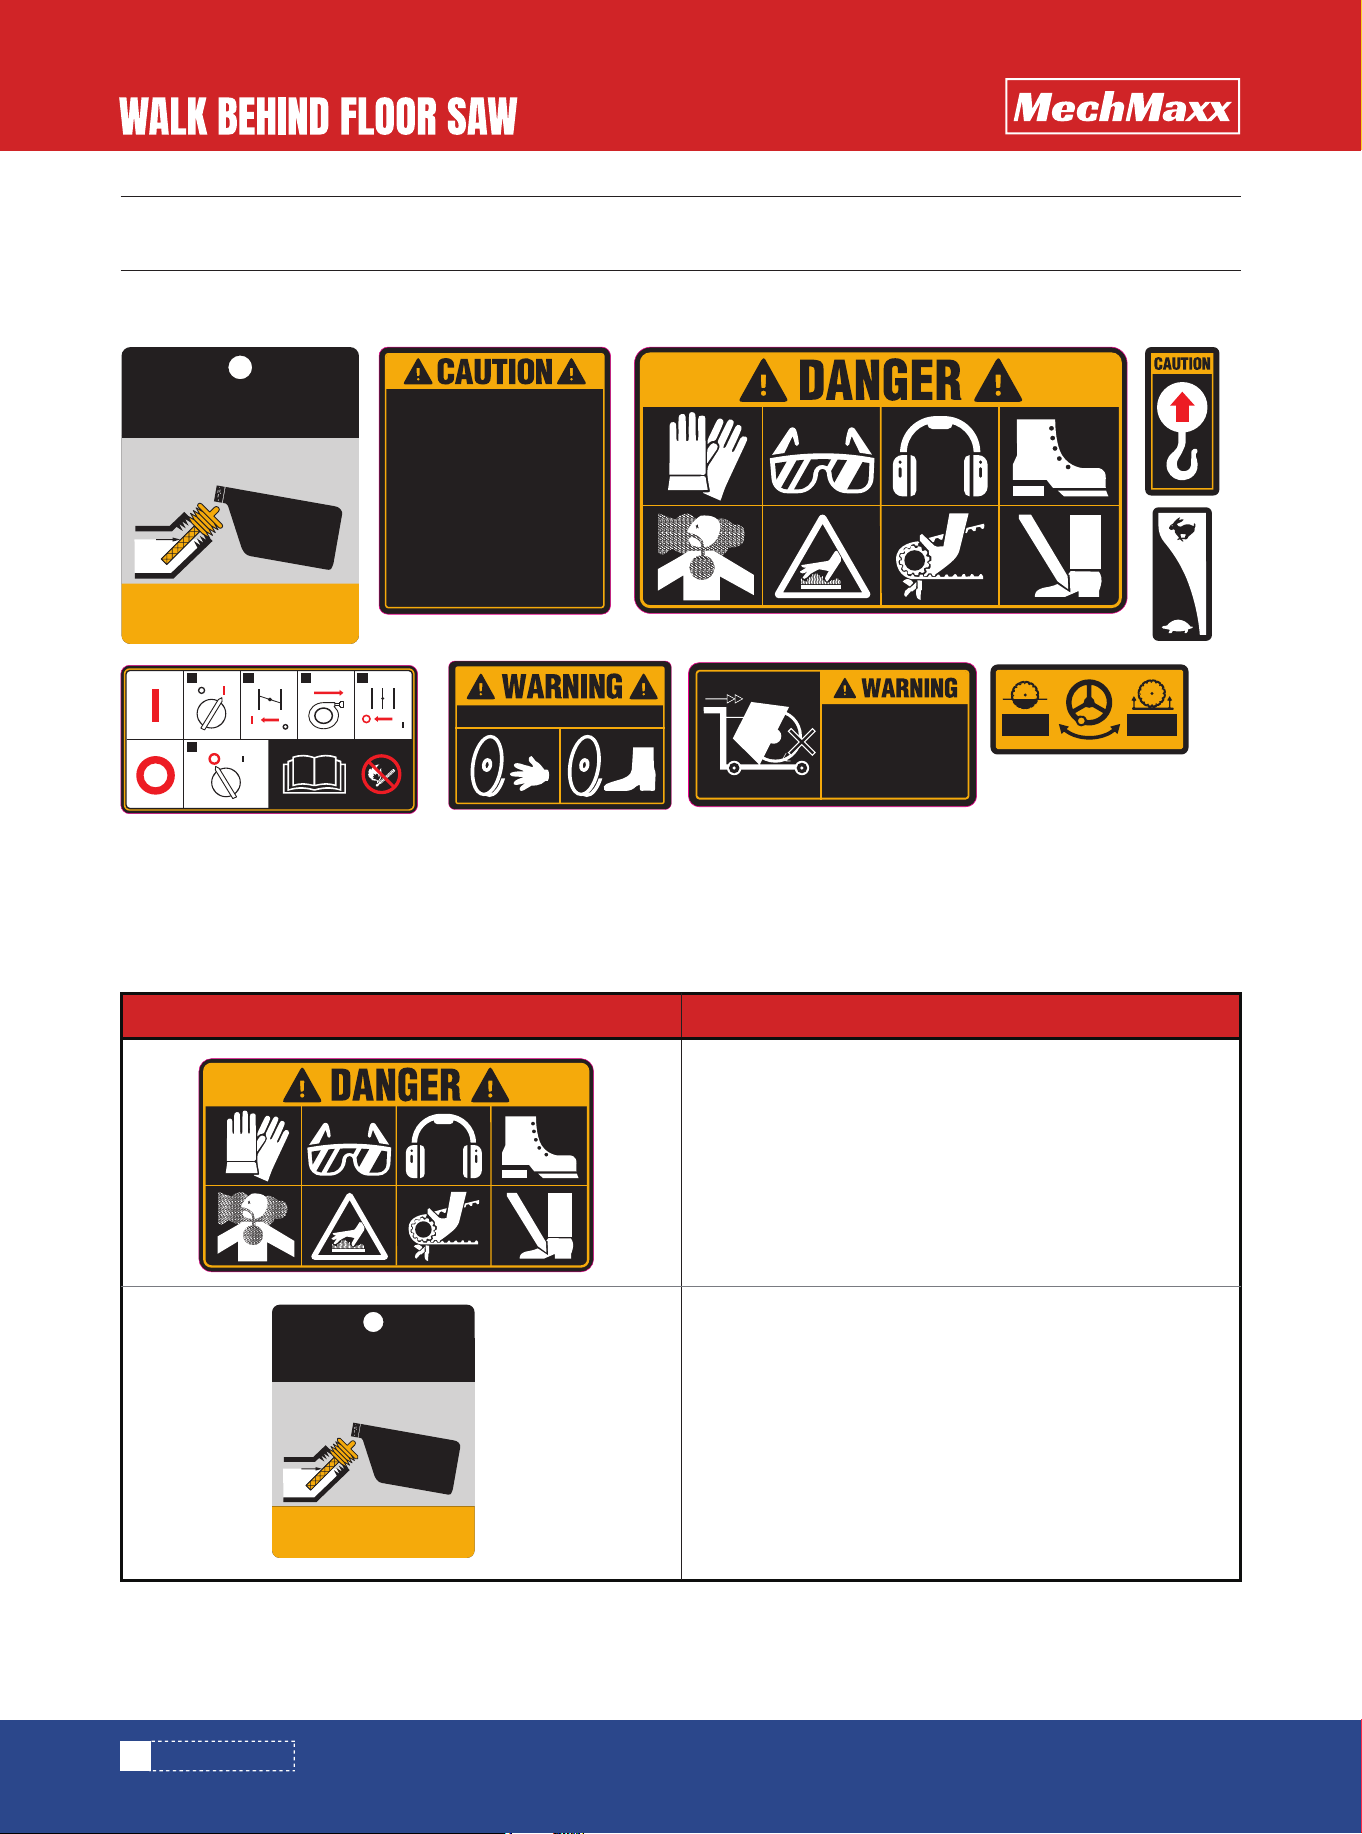
Model FS480H FS480Z
Engine
Engine Type
Engine Displacement
Horsepower
Start System
Fuel Tank Capacity
Engine Oil Capacity
Blade Diameter
Max Cutting Depth
Arbor Diameter
Water Tank Capacity
Overall Dimension (LxWxH)
Weight
Honda GX390
Single-Cylinder, 4-Stroke, Air-Cooled, OHV Gasoline Engine
389 cc
11.7 HP (8.7kW) @ 3600 RPM
Recoil
6.4 US qt (6.1 L)
1.16 US qt (1.1 L)
20 in
7 in
1 in
7.9 US gal
44 x 20 x 37 in
231lbs
Zonsen GB460B
459 cc
15.0 HP (11kW) @ 3600 RPM
6.3 US qt (6 L)
243lbs
SPECIFICATIONS
4
www.mechmaxx.com
SAFETY LABELS
SAFETY LABELS
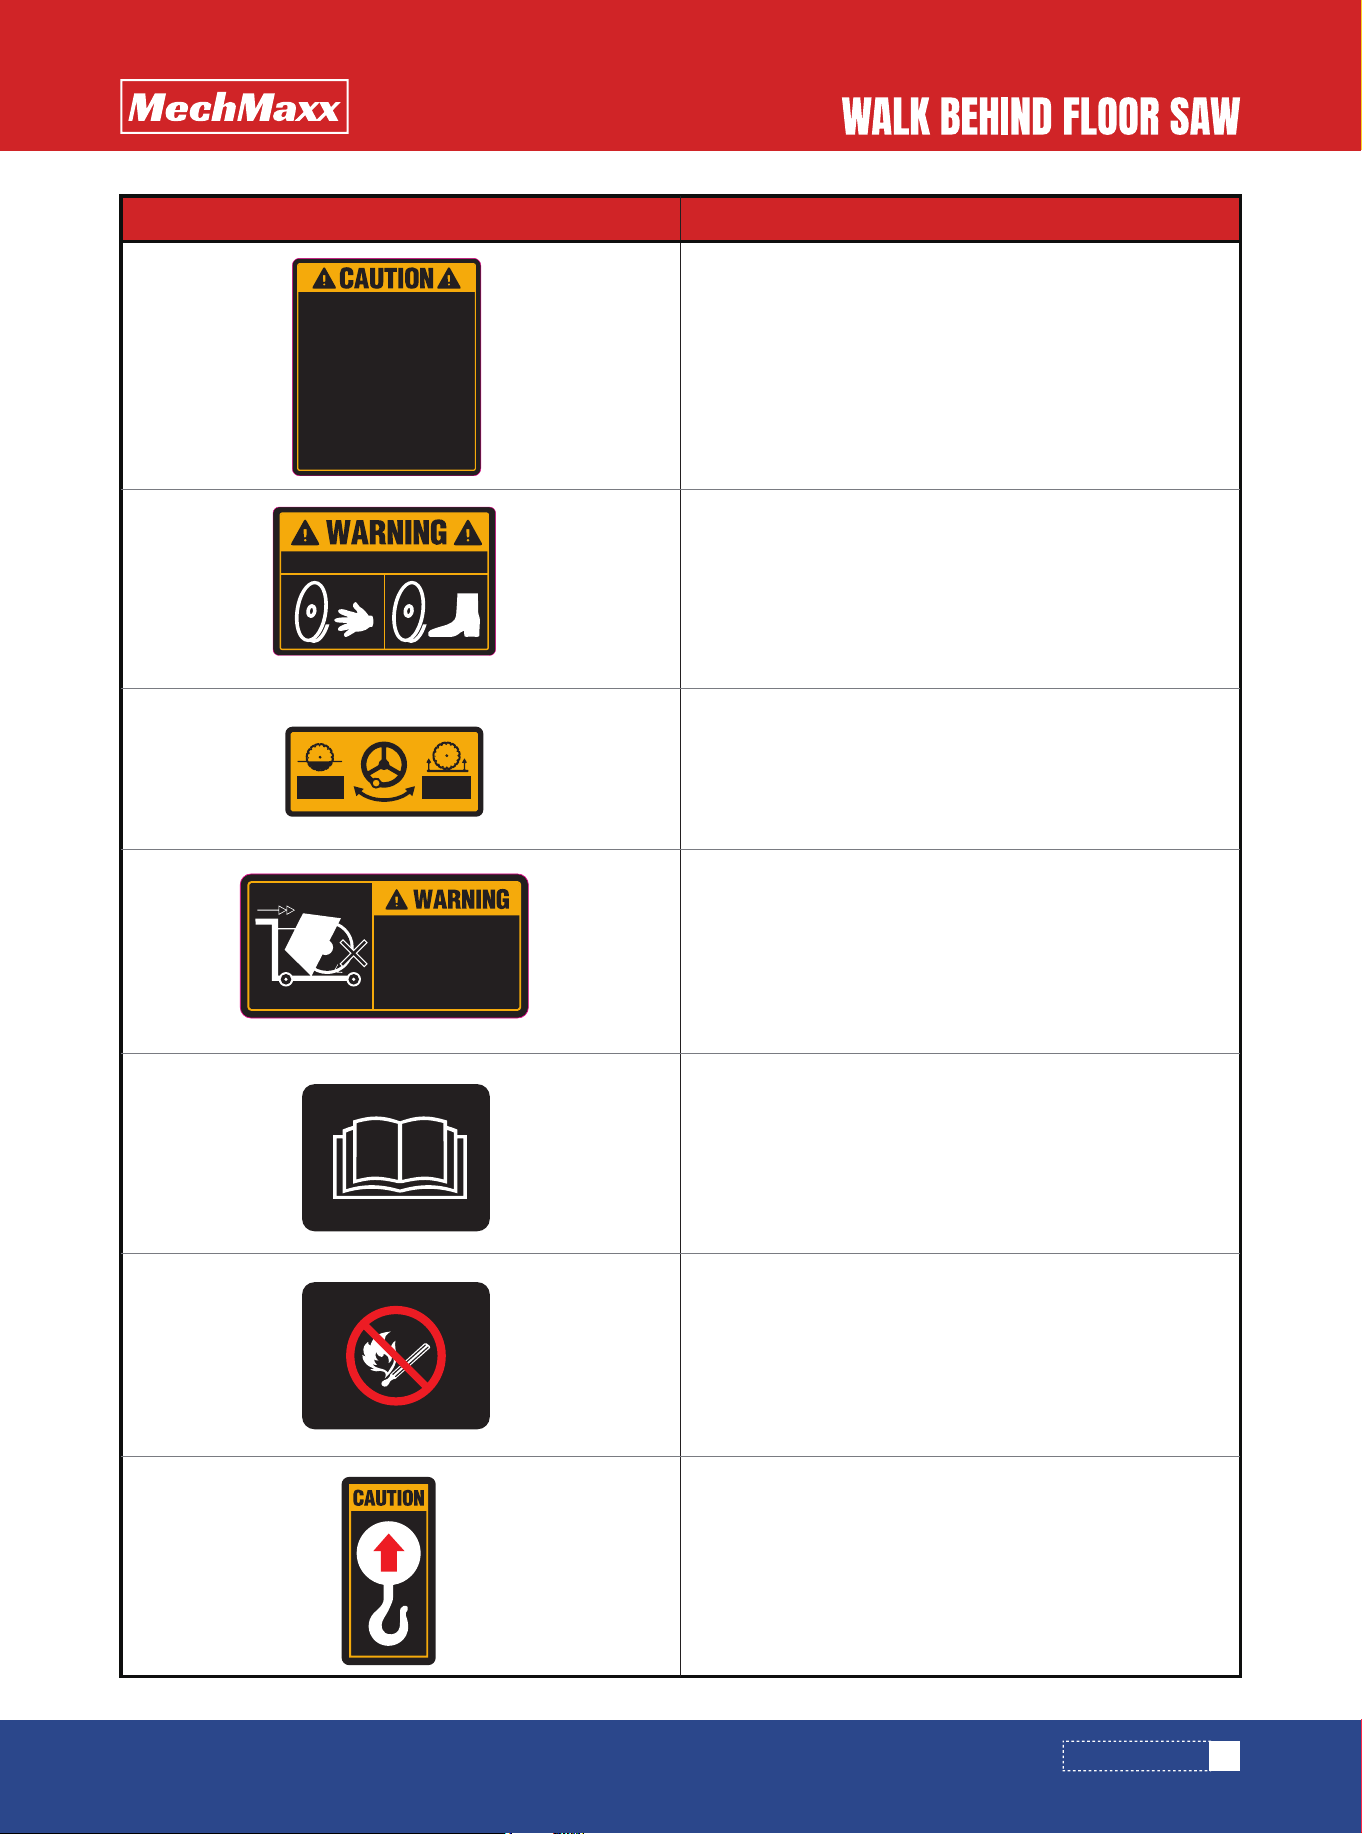
The machines use international pictorial labels where needed. These labels are described below:
NOTE:
These molded-in label contains important safety and operating information. If the label becomes illegible,
replace it immediately. Contact MechMaxx or an authorized service dealer for replacement labels.
DANGER!
Wear appropriate PPE including gloves, eye
protection, hearing protection, and safety footwear.
Do not touch the engine or muffler during or immediately
after operation—hot surfaces may cause burns.
Keep hands and feet away from moving parts.
Operate only in well-ventilated areas to avoid carbon
monoxide exposure.
WARNING!
Before use, fill the fuel tank with gasoline
and add engine oil to the proper level.
Operating the engine with low or no oil will cause
permanent engine damage and may void the warranty.
Refer to the engine manual for detailed instructions.
LABEL LOCATIONS
SAFETY LABELS
Label Meaning
BEFORE USE
• REFER TO THE ENGINE MANUAL FOR DETAILS.
• OPERATING WITH LOW OR NO ENGINE OIL
WILL CAUSE PERMANENT DAMAGE AND VOID
WARRANTY.
1. FILL GASOLINE.
2. ADD ENGINE OIL.
OIL
FULL
LOW
BEFORE USE
• REFER TO THE ENGINE MANUAL FOR DETAILS.
• OPERATING WITH LOW OR NO ENGINE OIL WILL
CAUSE PERMANENT DAMAGE AND VOID
WARRANTY.
1. FILL GASOLINE.
2. ADD ENGINE OIL.
OIL
FULL
LOW
• READ PRODUCT MANUAL BEFORE
OPERATING OR SERVICING THIS MACHINE.
• TRANSPORT THIS MACHINE IN THE UPRIGHT
POSITION. DO NOT TIP OVER THE MACHINE
AT ANY TIME. IMPROPER HANDLING MAY
CAUSE DAMAGE.
• ALWAYS KEEP UNAUTHORIZED,
INEXPERIENCED, UNTRAINED PEOPLE AWAY
FROM THIS MACHINE.
• MAKE SURE ALL SAFETY DEVICES ARE
OPERATIONAL BEFORE THIS MACHINE IS
STARTED. MAKE SURE ENGINE IS TURNED
OFF AND SPARK PLUG WIRE
DISCONNECTED BEFORE SERVISING THE
MACHINE OR COMING IN CONTACT WITH
ANY MOVING PART.
• NEVER LEAVE MACHINE UNATTENDED
WHEN OPERATING. ALWAYS STOP ENGINE
AND ALLOW ENGINE TO COOL BEFORE
ADDING FUEL OR OIL.
1
1
2 3 4
LOWER
BLADE
RAISE
BLADE
When moving the
machine outside the
cutting area. make
sure the cutting tool
is NOT rotating.
KEEP HANDS AND FEET CLEAR!
5
www.mechmaxx.com
SAFETY LABELS
• READ PRODUCT MANUAL BEFORE
OPERATING OR SERVICING THIS MACHINE.
• TRANSPORT THIS MACHINE IN THE
UPRIGHT POSITION. DO NOT TIP OVER THE
MACHINE AT ANY TIME. IMPROPER
HANDLING MAY CAUSE DAMAGE.
• ALWAYS KEEP UNAUTHORIZED,
INEXPERIENCED, UNTRAINED PEOPLE
AWAY FROM THIS MACHINE.
• MAKE SURE ALL SAFETY DEVICES ARE
OPERATIONAL BEFORE THIS MACHINE IS
STARTED. MAKE SURE ENGINE IS TURNED
OFF AND SPARK PLUG WIRE
DISCONNECTED BEFORE SERVISING THE
MACHINE OR COMING IN CONTACT WITH
ANY MOVING PART.
• NEVER LEAVE MACHINE UNATTENDED
WHEN OPERATING. ALWAYS STOP ENGINE
AND ALLOW ENGINE TO COOL BEFORE
ADDING FUEL OR OIL.
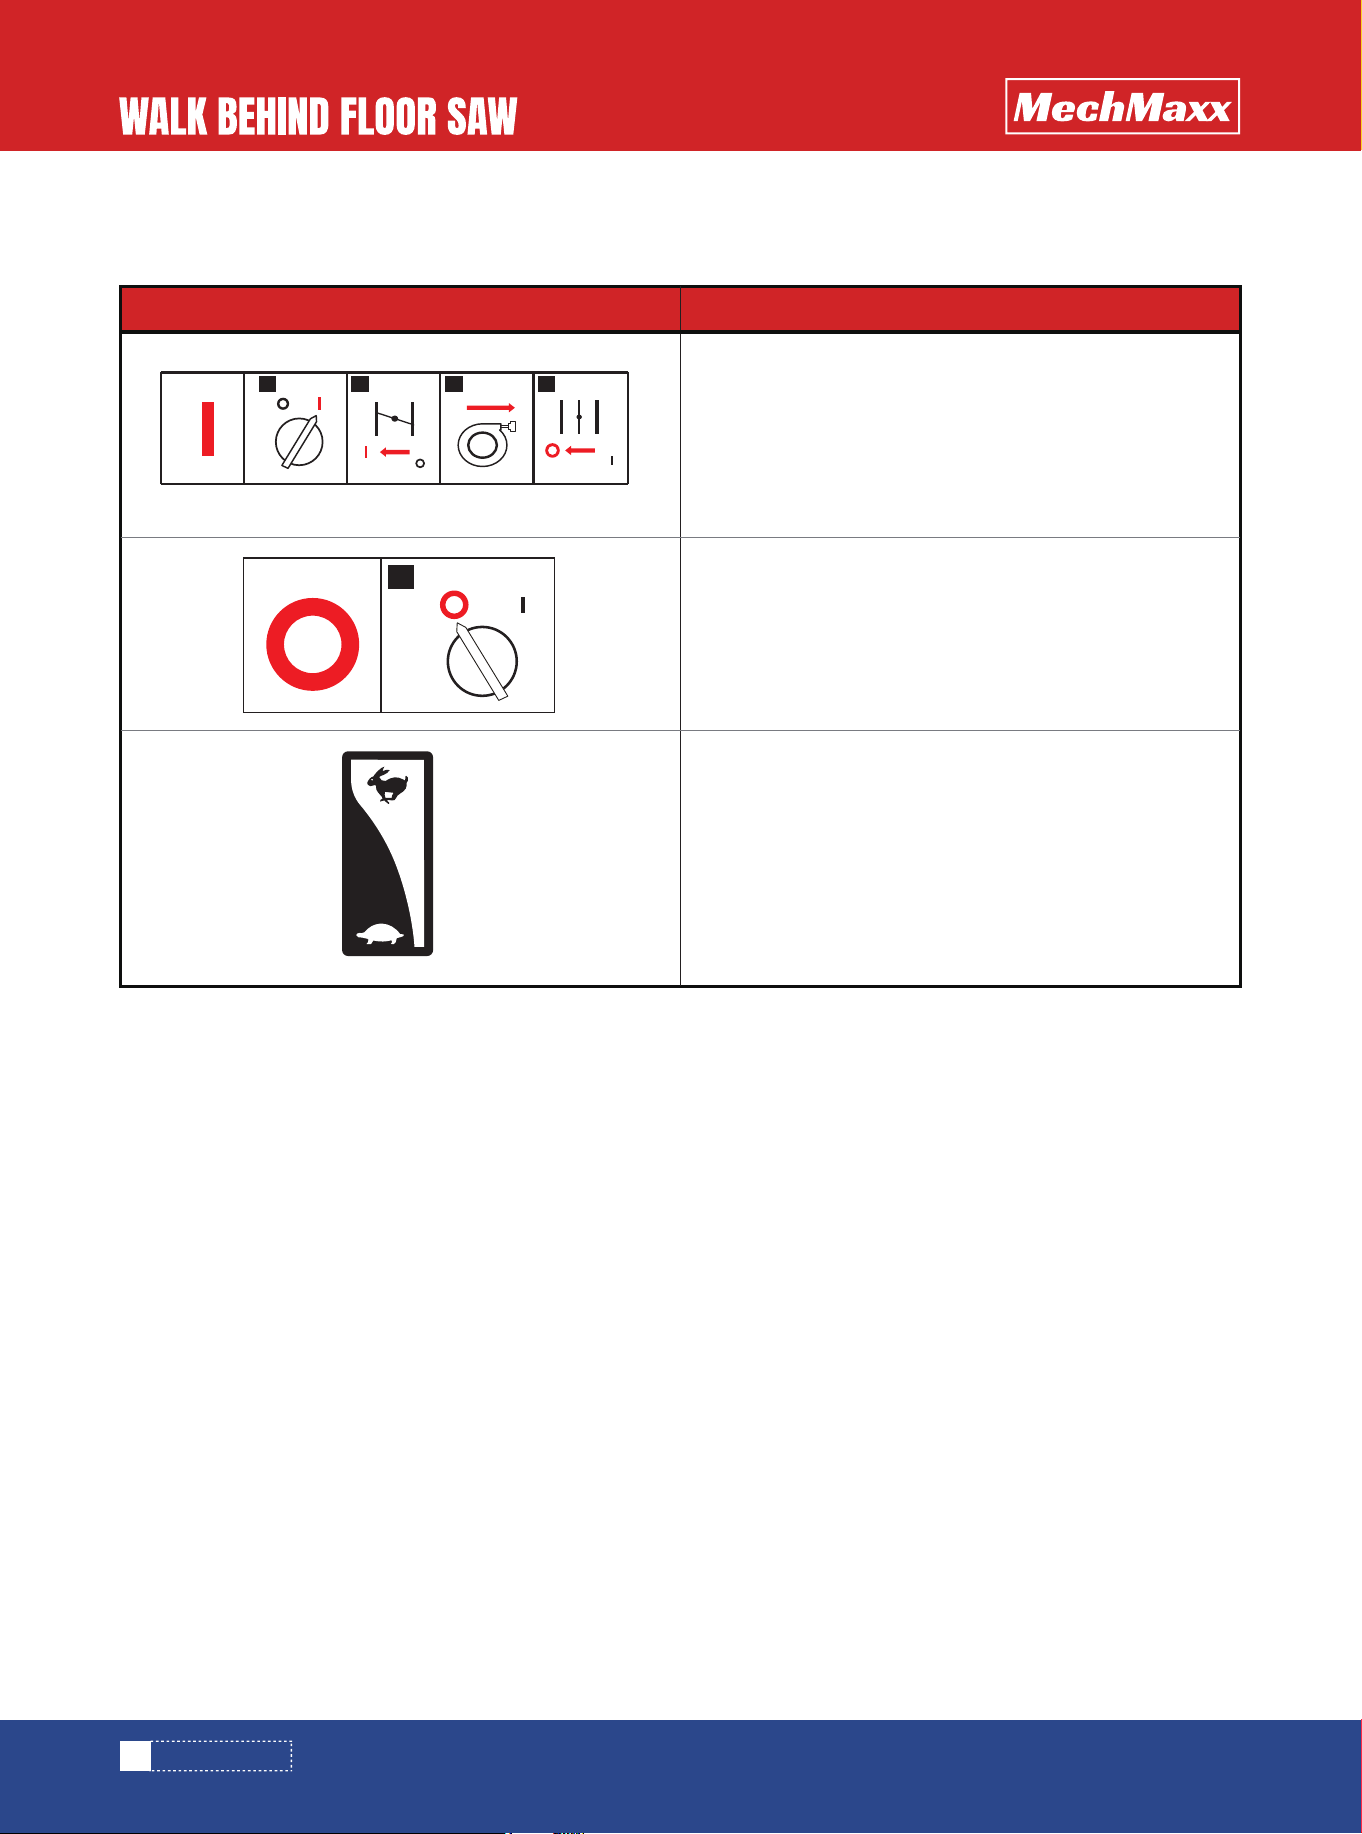
CAUTION!
Read the operator’s manual before operating
the machine. Transport only in the upright position. Keep
unauthorized persons away from the equipment. Ensure
all safety devices are in place before starting the engine.
Stop the engine and allow it to cool before servicing or
refueling. Never leave the machine running unattended.
NOTICE:
Use the blade depth control to raise or lower
the blade.
WARNING!
Keep hands and feet clear of the blade and
all moving parts during operation. Contact with moving
parts may cause serious injury.
WARNING!
Before moving the machine outside the
cutting area, make sure the blade is raised and the
cutting tool has stopped rotating.
CAUTION!
Read the operator's manual for machine
information.
DANGER!
Keep sparks, flames, and hot materials away
from the machine.
CAUTION!
Lifting point.
Label Meaning
LOWER
BLADE
RAISE
BLADE
When moving the
machine outside the
cutting area. make
sure the cutting tool
is NOT rotating.
KEEP HANDS AND FEET CLEAR!
6
www.mechmaxx.com
SAFETY LABELS
The machines use international pictorial labels where needed. These labels are described below:
OPERATING LABELS
1
1 2 3 4
START THE ENGINE
1. Turn the engine switch to the ON position
2. Close the choke
3. Pull the recoil starter
4. Open the choke.
Stop the engine:
Turn the engine switch to OFF position.
Throttle control lever:
Turtle = ldle or Slow
Rabbit = Full or Fast
Label Meaning

7
www.mechmaxx.com
RULES FOR SAFE OPERATION
RULES FOR SAFE OPERATION
GENERAL SAFETY
• DO NOT operate or service this equipment before reading the entire manual.
• This equipment should not be operated by persons under 18 years of age.
• NEVER operate this equipment without proper protective clothing, shatterproof glasses, steel-toed boots and other
protective devices required by the job.
• NEVER operate this equipment when not feeling well due to fatigue, illness or taking medicine.
• NEVER operate this equipment under the influence or drugs or alcohol.
• NEVER use accessories or attachments, which are not recommended by our company for this equipment. Damage to
the equipment and/or injury to user may result.
• The manufacturer does not assume responsibility for any accident due to equipment modifications.
• Whenever necessary, replace nameplate,operation and safety decals when they become difficult to read.
• ALWAYS check the machine for loosened threads or bolts before starting.
• NEVER touch the hot exhaust manifold, muffler or cylinder. Allow these parts to cool before servicing engine or saw.
• High Temperatures – Allow the engine to cool before adding fuel or performing service and maintenance functions.
Contact with hot components can cause serous bums.
• The engine section of this saw requires an adequate free flow of cooling air. NEVER operate the saw in any enclosed or
narrow area where free flow of the air is restricted. If the air flow is restricted it will cause serious damage to the saw
or engine and may cause injury to people. Remember the saw’s engine gives off DEADLY carbon monoxide gas.
• ALWAYS refuel in a well-ventilated area, away from sparks and open flames.
• ALWAYS use extreme caution when working with flammable liquids. When refueling, stop the engine and allow it to cool.
DO NOT smoke around or near the machine. Fire or explosion could result from fuel vapors, or if fuel is spilled on a hot
engine.
• NEVER operate the saw in an explosive atmosphere or near combustible materials. An explosion or fire could result
causing severe bodily harm or even death.
• Topping-off to the fuel filler port is dangerous, as it tends to spill fuel.
• NEVER use fuel as a cleaning agent.
• ALWAYS read, understand, and follow procedures in operator’s Manual before attempting to operate equipment.
• ALWAYS be sure to operator is familiar with proper safety precautions and operating techniques before using the saw.
• Stop the engine when leaving the saw unattended.
• Block the unit when leaving or when using on a slope.
• Maintain this equipment in a safe operating condition at all times.
• ALWAYS stop the engine before serving, adding fuel and oil.
• NEVER run engine without air filter. Severe engine damage may occur.
• ALWAYS service air cleaner frequently to prevent carburetor malfunction.
WARNING:
Failure to follow instructions in this manual may lead to serious injury or even death! This equipment
is to be operated by trained and qualified personnel only! This equipment is for industrial use only.
The following safety guidelines should always be used when operating these Floor Saws:
8
www.mechmaxx.com
RULES FOR SAFE OPERATION
DIAMOND BLADE SAFETY
FLOOR SAW TRANSPORTATION SAFETY
• ALWAYS store equipment properly when it is not being used. Equipment should be stored in a clean, dry location out of
the reach of children.
• NEVER operate this cutter in areas that contain combustible material or fumes. Fire and/or explosions may result from
errant sparks from the equipment.
• Use appropriate steel centered diamond blades manufactured for use on Floor Saws.
• ALWAYS inspect diamond blades before each use. The blade should exhibit no cracks, dings, or flaws in the steel
centered core and/or rim. Center (arbor) hole must be undamaged and true.
• Examine blade flanges for damage, excessive wear and cleanliness before mounting blade. Blade should fit snugly on
the shaft and against the inside/outside blade flanges.
• Ensure that the blade is marked with an operating speed greater than the blade shaft speed of the saw.
• Only cut the material that is specified by the diamond blade. Read the specifications of the diamond blade to ensure
the proper tool has been matched to the material being cut.
• ALWAYS keep blade guards in place. Exposure of the diamond blade must not exceed 180 degrees.
• Ensure that the diamond blade does not come into contact with ground or surface during transportation. DO NOT drop
the diamond blade on ground or surface.
• The engine governor is designed to permit maximum engine speed in a no-load condition. Speeds that exceed this limit
may cause the diamond blade to exceed the maximum safe allowable speed.
• Ensure that the blade is mounted for proper operating direction.
• Use the lifting bail and appropriate lifting equipment to ensure the safe movement of the saw.
• DO NOT use the handle bars and/or front pointer as lifting points.
• NEVER tow the saw behind a vehicle.
• Ensure that both pointer bars are positioned appropriately to minimize their exposure during transportation.
• Safeguard against extreme saw attitudes relative to level. Engines tipped to extreme angles may cause oil to gravitate
into the cylinder head making the engine difficult to start.
• NEVER transport the saw with the blade mounted.
EMERGENCIES
• ALWAYS know the location of the nearest fire extinguisher and first aid kit. Know the location of the nearest telephone.
Also know the phone numbers of the nearest ambulance, doctor and fire department. This information will be invaluable
in the case of an emergency.
WARNING:
• DO NOT operate this equipment unless all guards and safety devices are attached and in place.
• Caution must be exercised while servicing this equipment. Rotating and moving parts can cause
injury if contacted.
• Keep all inexperienced and unauthorized people away from the equipment at all times.
• Unauthorized equipment modifications will void all warranties.

9
www.mechmaxx.com
RULES FOR SAFE OPERATION
MAINTENANCE SAFETY
• NEVER lubricate components or attempt service on a running machine.
• ALWAYS allow the machine a proper amount of time to cool before servicing.
• Keep the machinery in running condition.
• Fix damage to the machine immediately and always replace broken parts.
• Dispose of hazardous waste properly. Examples of potentially hazardous waste are used motor oil, fuel and fuel filters.
• DO NOT use food or plastic containers to dispose of hazardous waste.

10
www.mechmaxx.com
• Read the handbook completely—it could save a great deal of unnecessary expense.
• Read the engine manual supplied.
• Check the general condition of the equipment—has it been damaged duringdelivery?
• Check engine oil level.
• Check fuel levels.
1. Be certain that the spark plug wire is disconnected before installing the blade.
2. Remove the blade shaft nut, and take off outside blade shaft flange.
3. Clean off any foreign particles on the clamping surfaces of flanges and on the mounting surface of the blade.
4. Place the blade on the blade shaft, lining up the offset drive pin in the blade with the drive pin in the mounting collar (if
the pin system is available on the machine). If your blade has a directional rotational arrow, position arrow for down cut
(diamond tail trailing for down cut).
5. Replace the outside blade shaft flange on the blade shaft. Drive pin on the inside collar must project through the drive
hole in the blade and into the outside collar (if the pin system is available on the machine).
6. Tighten the blade shaft nut securely against star washer and outside flange, using wrench supplied.
7. Reconnect the spark plug wire after installation is complete.
INTRODUCTION/DETERMINING THE RIGHT MACHINE
OPERATING PRINCIPLE
Congratulations on your purchase of our saw! You’ve made an excellent choice! Our floor saw has been specifically
designed as the ideal machine for the professional contractor who is engaged in concrete andasphalt flat cutting.
The machines used for the primary purpose of “flat” cutting.
This type of cutting is described as “flat” because the pavement is cut somewhere close to a horizontal plane. It is the
most common type of diamond blade cutting.
Floor saws in the industry are available in a variety of types, sizes and styles, they range from manual or self propelled in
horsepower from 7-72hp. It is possible to cut both concrete (green or cured, with or without rebar) or asphalt with a floor
saw. Our saw utilized for jobs requiring precision cutting including floors, pavements, walkways, ramps and other flat
sawing applications.
You will find a saw to fit a wide variety of job applications.
Upon receipt of your machine, CAREFULLY CHECK FOR ANY FREIGHT DAMAGE. Any damage should be immediately reported
to the carrier and a claim registered.
The following instructions were compiled to provide you information on how to obtain long and trouble free use of the unit.
Periodic maintenance of this unit is essential. Read the manual in its entirety and follow the instructions carefully. Failure
to do so may injure yourself or a bystander.
DELIVERY CHECKS
INSTALLING BLADE
Immediately upon taking delivery of your new equipment and before putting it into service:
Recommend lubricants are detailed in the CARE AND MAINTENANCE section.
OPERATION
OPERATION
11
www.mechmaxx.com
Cut speed depends entirely on using the correct blade for the material to be cut. Wet or dry, diamond blades of various
specifications are available for cutting concrete or asphalt.
TYPES OF CUTTING
1. Use correct blade for cutting conditions.
2. Ensure arbors and flanges are clean and undamaged.
3. Mount blade and tighten securely using wrench.
4. When wet cutting, check water jets for adequate flow.
5. Align pointer with cutter blade.
Open the fuel valve under the gas tank all the way. Position the engine stop switch, located on the engine, to run. Open
the throttle approximately half way and apply the choke. Pull the starter rope sharply. When the engine starts, open the
choke and adjust the throttle as necessary to keep it running. Allow the engine to warm up for a few minutes before
placing it under the load. If the engine doesn’t start after (3) pulls, open choke slightly to prevent flooding. Always operate
the engine at full throttle when under load.
NOTE:
These starting instructions are general guidelines only. Since many engine options are available, consult the
Engine Manual included with this unit for specific instructions.
BEFORE STARTING
COLD START
Open the valve under the gas tank all the way if it has been shut off. Open the throttle approximately half way. Do not
apply the choke. Pull the starter rope sharply until the engine starts. When the engine starts, adjust the throttle. Always
operate the engine at full throttle when under load.
1. Start engine and let engine warm up. All cutting is done at full throttle.
2. Align blade and saw with cut. If wet cutting, open water valve and turn water safety switch on.
3. Push and guide the saw manually using the handles. This machine is not self-propelled and does not have powered
forward or reverse travel. Keep both hands on the handles and maintain full control of the saw while following the cutting
line.
4. Lower blade into cut slowly.
5. Cut as fast as blade will allow. If blade climbs out of cut, reduce forward speed or depth of cut.
6. Use only enough side pressure on saw handles to follow cutting line.
HOT START
TO START CUTTING
OPERATION
CAUTION
Set unit up in an open area. Avoid close proximity to structures or other equipment. Failure to do so
may cause inadvertent injury to operator or other persons in the area.
CAUTION
Gasoline Engines – To improve the engine service life, allow the engine to idle without load for (2) to
(5) minutes before shutting it down. When the idling period is up, use the stop switch located on the
engine and turn it to stop. Close the fuel valve under the gas tank. Engine flooding can occur if the valve
is left open during transport.
12
www.mechmaxx.com
CUTTING
BELTS & PULLEYS
NEVER MAKE ADJUSTMENTS TO V-BELTS AND PULLEYS WHILE ENGINE IS RUNNING.
Lower the blade into concrete to required depth by turning the tilt crank counterclockwise. Ease the saw slowly forward.
Slow forward pressure if the saw begins to stall.
Push the saw steadily forward using the front pointer as a guide. Exert enough forward pressure so that the engine/motor
begins to labor, but does not slow down. If the saw begins to stall, retard forward movement until full RPM is restored to
the blade. If saw stalls, raise the blade out of the cut before restarting. Avoid excessive side pressure or twisting of the
blade in the cut.
1. The best tension for a v-belt drive is the lowest tension at which the belts will not slip under full load.
2. Take up tension until the belts are snug in the grooves. Run the drive for about five (5) minutes to “seat” the belts. The
impose the peak load. If the belts slip, tighten them until they no longer slip at peak load. Most new belts will need
additional tensioning after seating.
3. Remember, too much tension shortens belt and bearing life.
4. Check the belt tension frequently during the first day of operation. Check the belt tension periodically thereafter and
make any necessary adjustments.
5. The two most common causes of sheave misalignment are:
a) The engine drive shaft and the blade shaft are not parallel.
b) The pulleys are not located properly on the shafts.
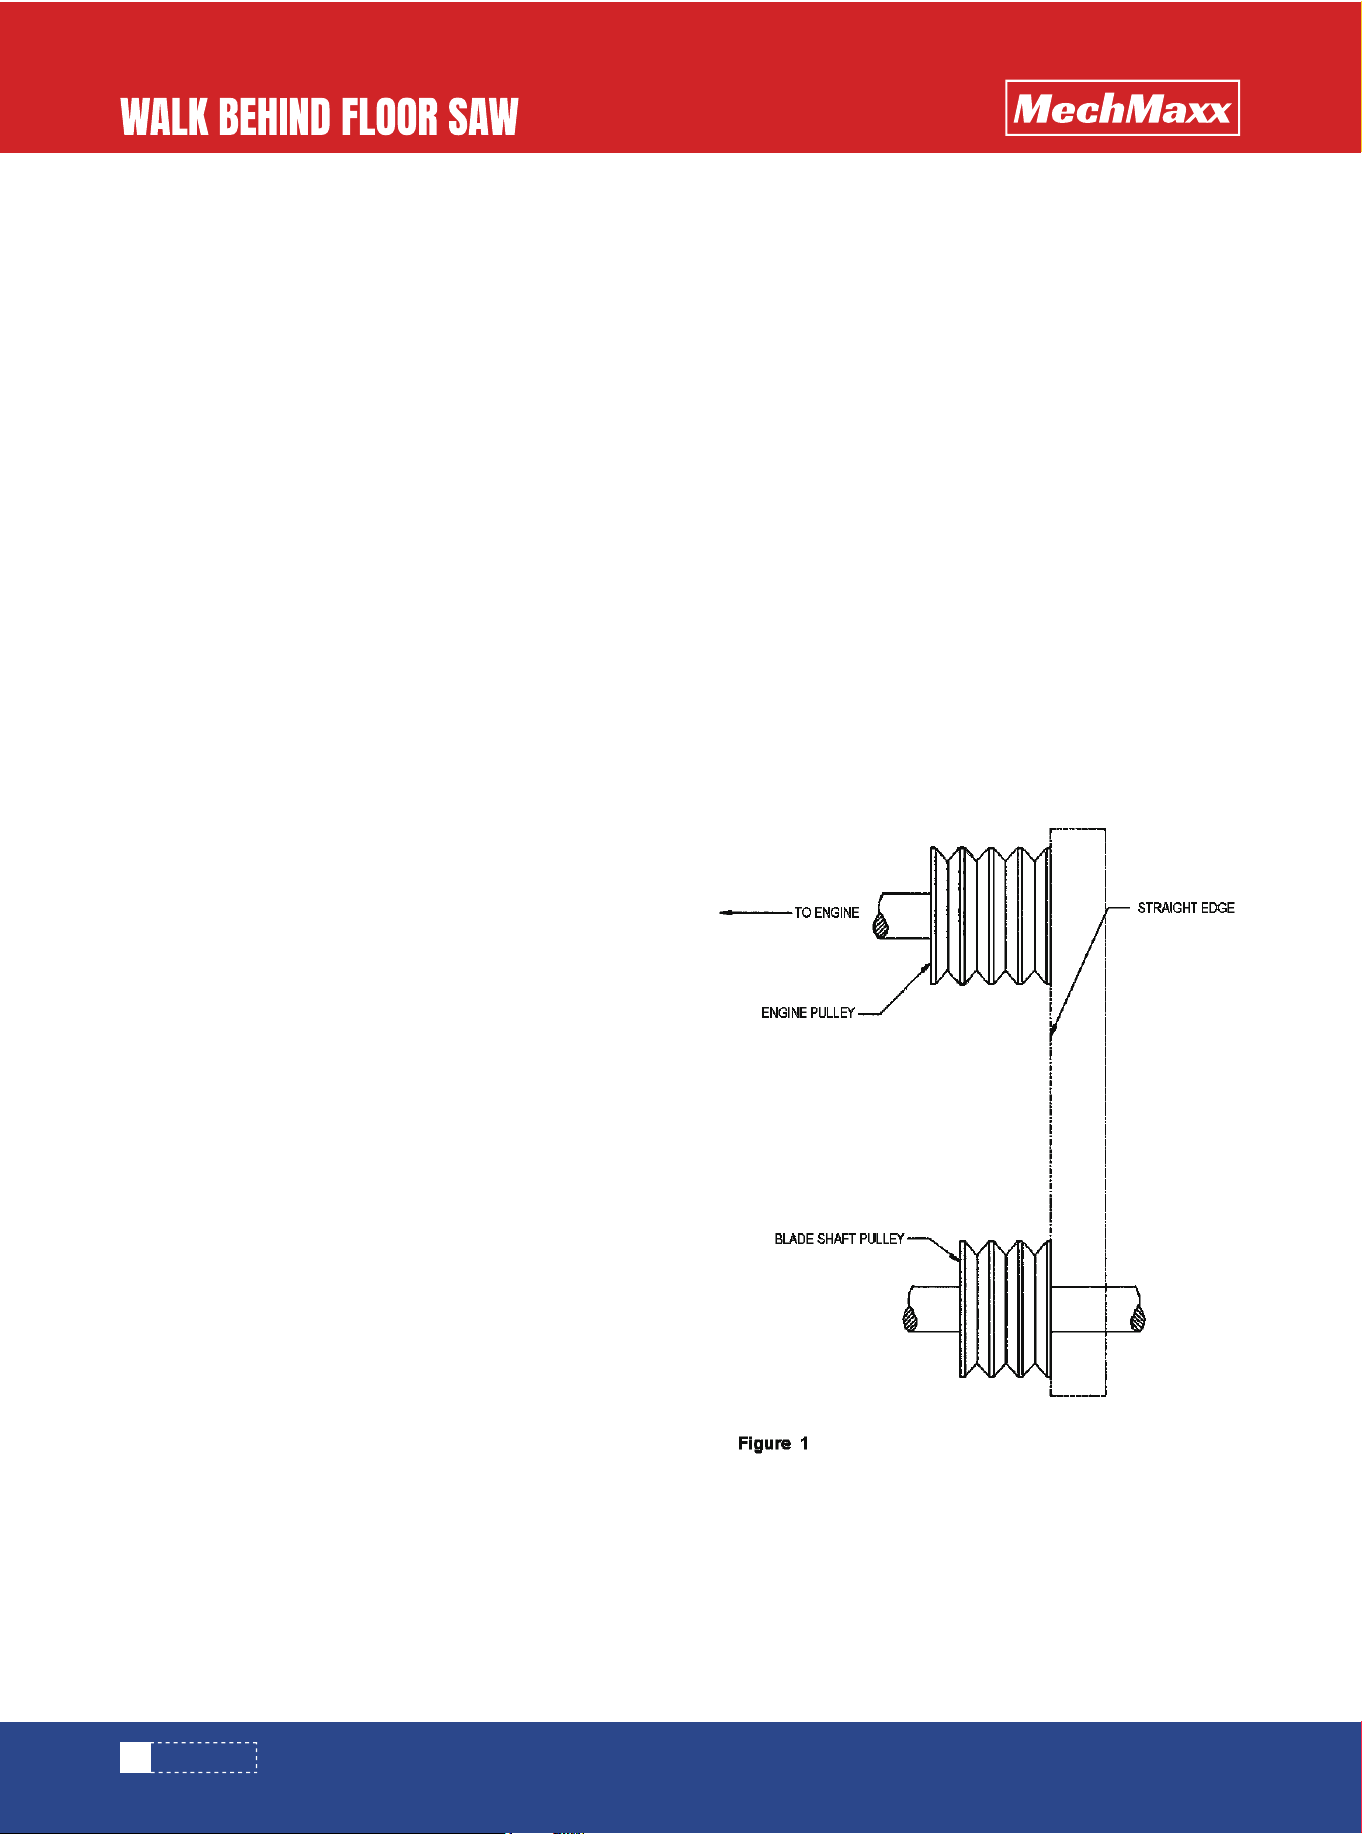
6. To check alignment, use a steel straight edge. See Figure 1.
7. Line up the straight edge along the outside face of both
pulleys shown in the drawing. All pulleys have (2) set screws
in the bottom of their grooves. Set screws require thread
locking lock title.
8. Misalignment will show up as a gap between the pulley
face and straight edge. Make sure there is clearance between
arbor pulley and saw base on both sides.
NOTE:
For deeper cuts (4 inches/102mm or more), several cuts should be made in incremental steps of 1-1/2 inch
(38mm) to 2 inches (51mm) until the desired depth is reached.
OPERATION

13
www.mechmaxx.com
DRY CUTTING
• Never operate any saw without safety guards in place.
• Do not exceed maximum operating speed established for blade diameter.
• Do not force blade into material: allow blade to cut at its own speed.
• Do not make long continuous cuts. Never dry cut for more than 30 seconds at a time. Allow blade to cool.
• Do not cut or grind with side of blade or cut a curve or radius. Do not cut dry with blades recommended for wet cutting.
• Do not operate saw with blade diameter larger than machine’s capacity.
OPERATION
14
www.mechmaxx.com
PROBLEM CAUSE REMEDY
UNEVEN SEGMENT WEAR
SEGMENT CRACKS
SEGMENT LOSS
• (In wet cutting) Insufficient water
(usually on one side of blade).
• Equipment defects also can cause the
segments to wear unevenly.
• Saw head is misaligned.
• Blade is too hard for material being
cut.
• Blade overheats because of lack of
coolant (water or air).
• Core is worn from undercutting.
• Defective collars/flanges set blade
out of alignment.
• Blade is too hard for material being cut.
• Blade is cutting out of round, causing
a pounding motion.
• Improper blade tension.
• Blade flutters in cut as a result of
losing blade tension.
• Blade specification is too hard for the
material being cut.
• (Wet Cutting) Check water lines.
• Make sure flow is adequate on both
sides of blade and there are no
blockages
• Use sufficient water to flush out the
cut.
• (Dry Cutting) Run blade free of cut
periodically to air cool.
• Clean collars/flanges or replace if
they are under recommended diameter.
• Use proper blade specification fing.
for material being cut.
• Replace wom bearings; realign blade
shaft or replace worn blade mounting
arbor.
• When ordering blades match shaft
speed of saw.
• Check spindle speed to ensure blade
is running at correct RPM.
• Avoid twisting or turning blade in the
cut.
• Tighten the blade shaft nut.
• Make sure blade is running at proper
speed and that drive pin is functioning
properly.
• Use a softer bond/matrix to eliminate
stress.
• Flush water system.
• Check flow to both sides of blade.
• Replace bad bearings, worn arbor
shaft or misalignment to spindle.
• Check alignment for squareness, both
vertically and horizontally, of the saw
blade.
• Use a blade with a softer bond/matrix.
MAINTAINENACE - TROUBLESHOOTING
MAINTAINENACE - TROUBLESHOOTING
CRACKS IN CORE
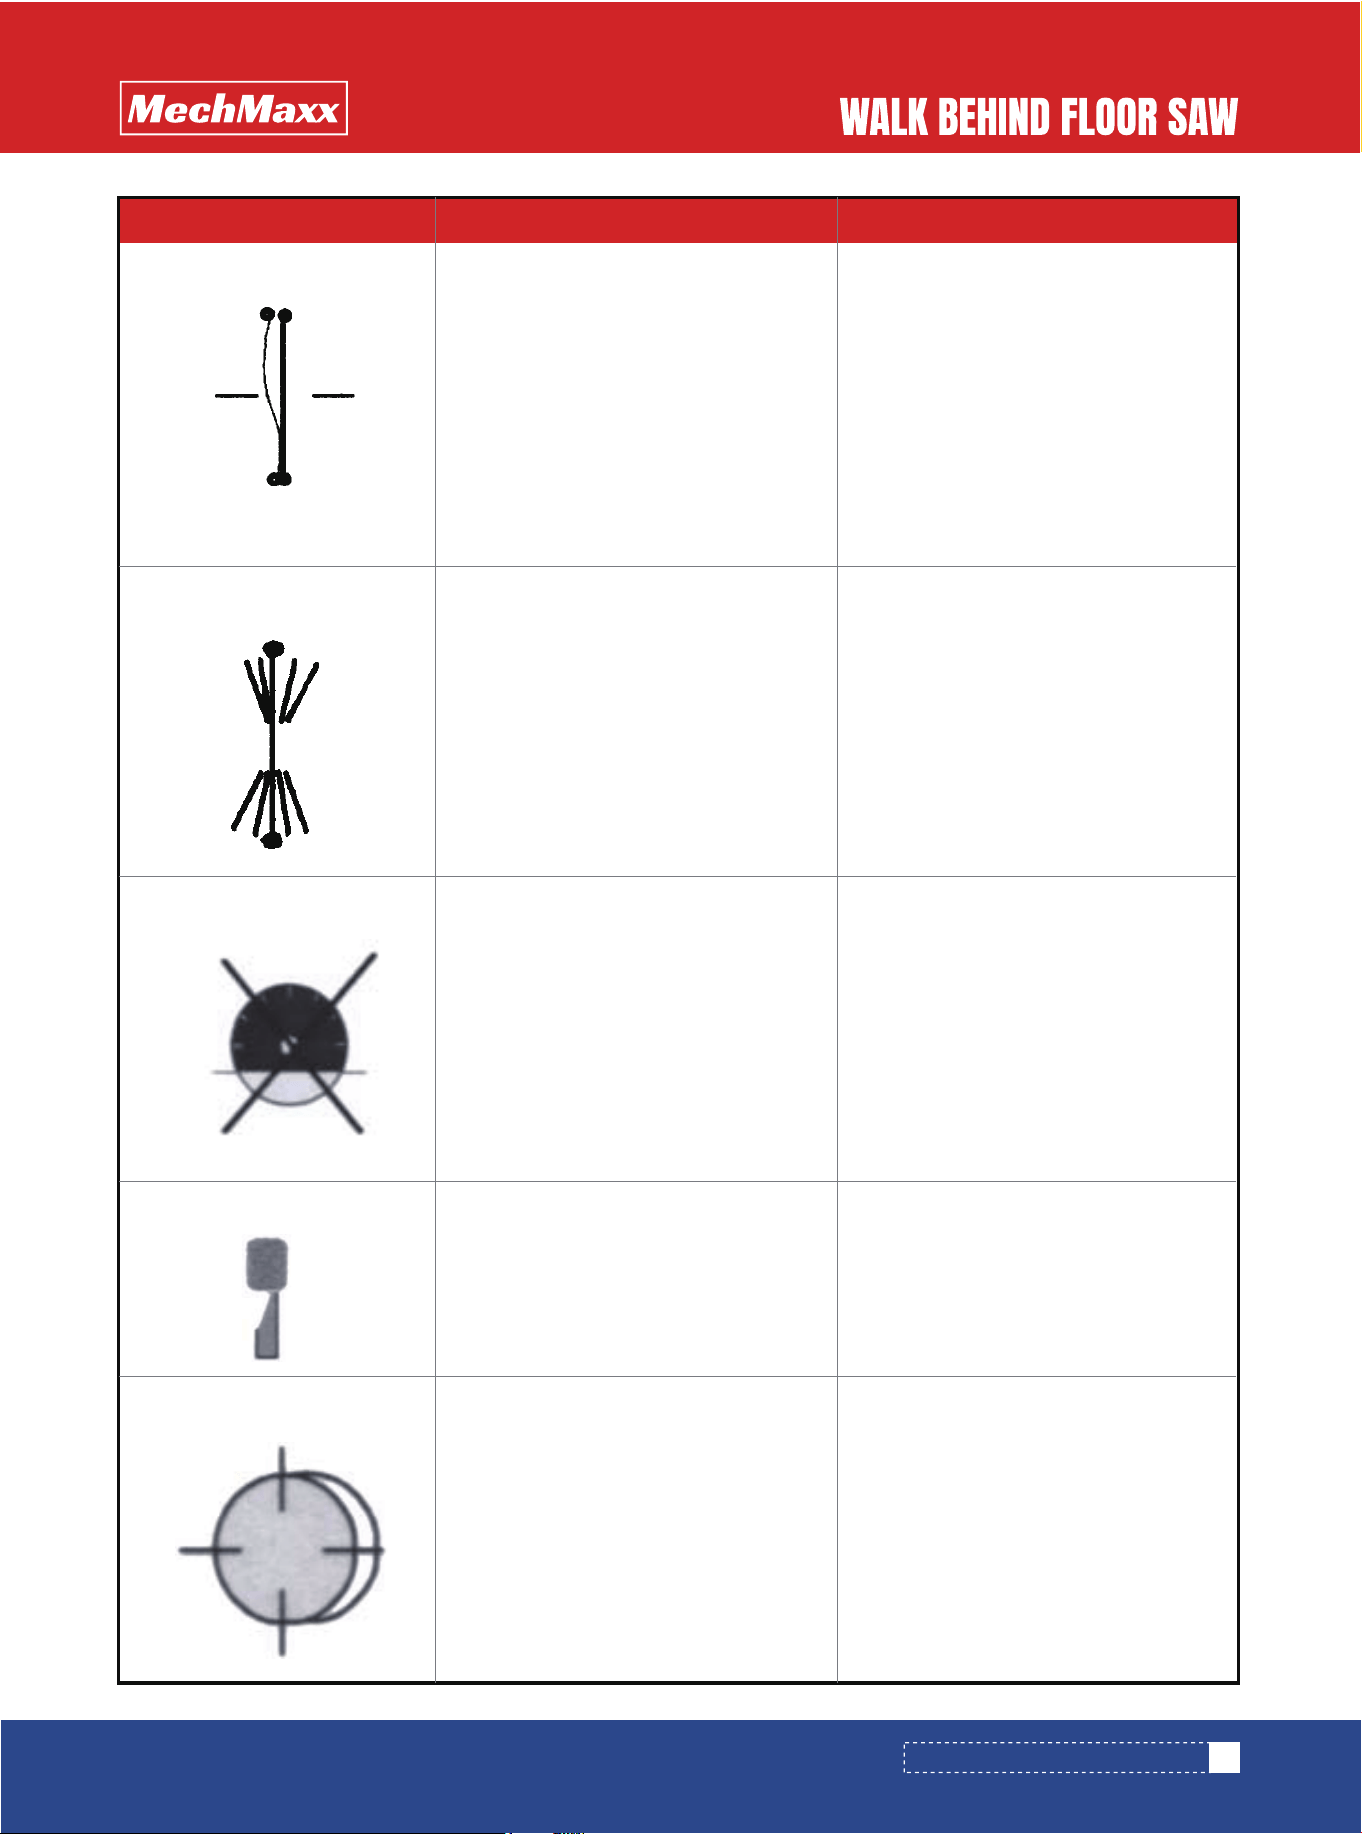
15
www.mechmaxx.com
MAINTAINENACE - TROUBLESHOOTING
PROBLEM CAUSE REMEDY
LOSS OF TENSION
BLADE WOBBLES
• Core overheating.
• Core overheating as a result of blade
spinning on arbor.
• Core overheating from rubbing the
material being cut.
• Unequal pressure at blade clamping
collars/flanges.
• Blade is too hard for the material being
cut.
• Blade is on a damaged or worn saw.
• Worn collar.
• Blade runs at an incorrect speed.
• Collar/flange diameters are not
identical.
• Blade is bent as a result of dropping or
twisting.
• Abrasive wearing of the core faster
than the segments.
• Collars/flanges are not properly
tightened, permitting blade to rotate
or vibrate on the shaft.
• Collars/flanges are worn or dirty.
Blade is not properly mounted.
• Make certain the blade is mounted on
the proper shaft diameter. Tighten the
shaft nut with a wrench to make
certain that the blade is secure.
• Clean collars/flanges, make sure they
are not worn. Tighten arbor nut.
• Make sure the pin hole slides over
drive pin.
• Check for bad bearings, bent shaft,
or worn mounting arbor.
• Check collars/flanges to make sure
they are clean, flat and of correct
diameter.
• Set engine at proper RPM.
• Use proper size blade collars/flanges.
• DO NOT use bent blade. Contact
blade manufacturer.
BLADE WILL NOT CUT
• Blade is too hard for material being cut.
• Blade has become dull.
• Blade does not cut material it was
specified for.
• Select proper blade for material being
cut.
• Sharpen by cutting on softer abrasive
material to expose diamonds. If
continually sharpening, the blade is
too hard for the material being cut.
• Break-in on the material to be cut. If
it does not dress itself, sharpen as
you would a dull blade.
• Use water to flush out fines
generated during cutting
• Use wear-resistant cores.
• Make certain blade RPM is correct.
• Check water flow, distribution and
lines.
• Tighten the blade shaft nut. Make
certain the drive pin is functioning.
• Properly align the saw to square cut.
• Collars/flanges must be identical in
diameter and the recommended size.
• Use a softer bond/matrix to reduce
stress.
UNDERCUTTING THE CORE
ARBOR HOLE OUT-OF ROUN
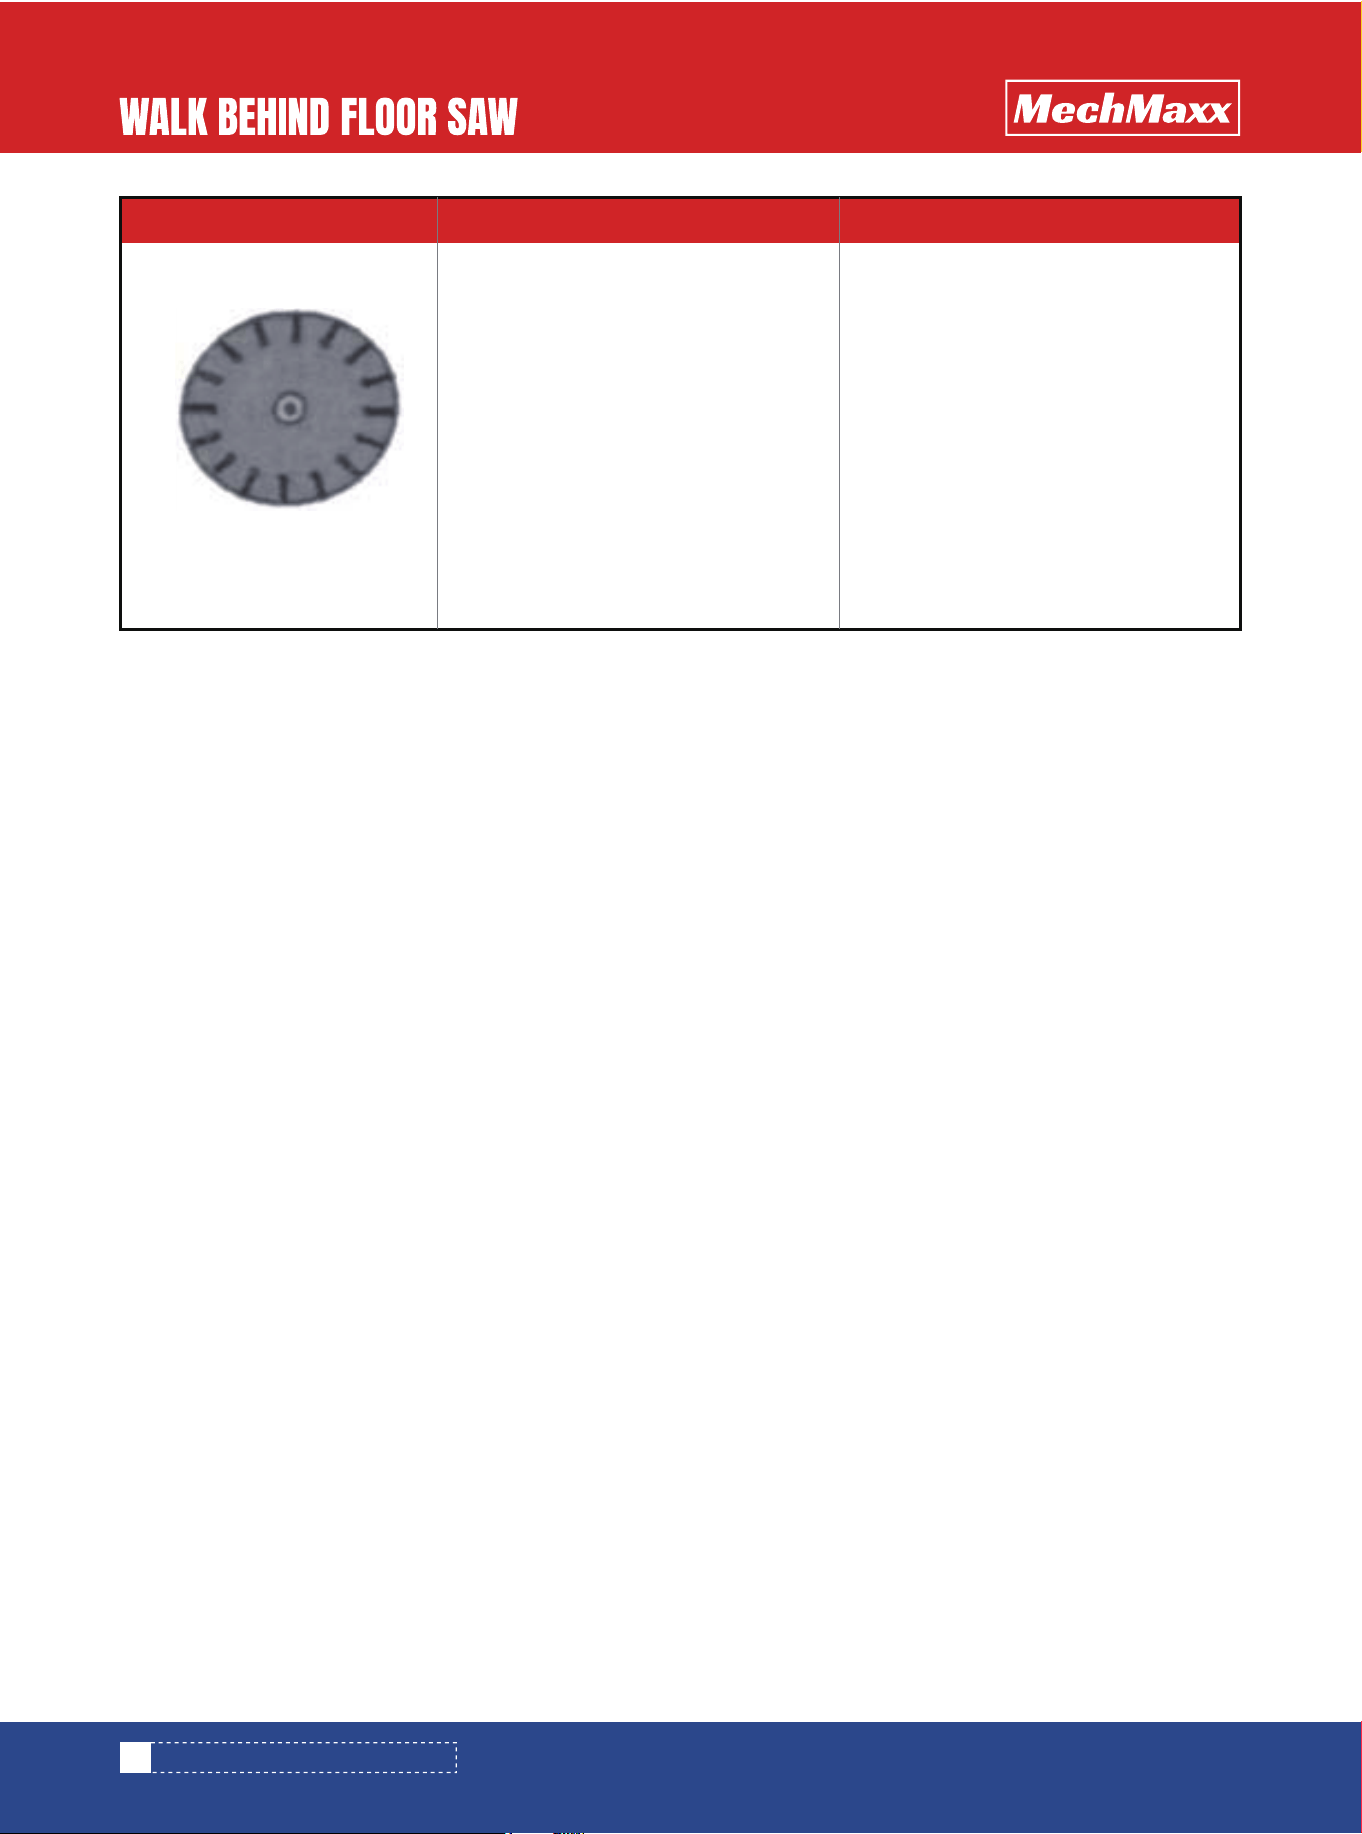
16
www.mechmaxx.com
MAINTAINENACE - TROUBLESHOOTING
PROBLEM CAUSE REMEDY
BLADE WORN OUT OF ROUND • Core overheating.
• Core overheating as a result of blade
spinning on arbor.
• Core overheating from rubbing the
material being cut.
• Unequal pressure at blade clamping
collars/flanges.
• Blade is too hard for the material
being cut.
• Install new blade shaft bearings or
blade shaft, as required.
• Tune engine according to
manufacturer's manual.
• If core is worn or arbor hole damaged,
DO NOT USE. Contact blade
manufacturer.
• Replace worn shaft or mounting arbor
bushing.
• Make certain that drive pin is
functioning.
• Tighten spindle nut.

17
www.mechmaxx.com
• Check oil levels, wiring, hoses (air, fuel, water) and lubricate machine daily.
• Repair or replace all worn or damaged components immediately.
• Check drive belt tension, do not over-tension.
• Make sure machine has full set of matched belts.
• Check blade shaft, make sure arbor and threads are not worn, damaged, or bent.
• Blade shaft bearings should be tight, no free play side-to-side or up and down.
• Grease blade shaft bearings daily.
• Blade collars should be clean, free of nicks and burrs. No diameter wear and not out of
round.
• Drive pin not excessively worn or bent and free of gouges.
• All guards in place and secure.
• All fasteners tight and secure.
• Air filter/oil filter (hydraulic or engine) clean.
• Flush clean water through the pump and spray the assembly every night. This prolongs
the pump and blade life.
Lubricants:
Engine Oil SAE 10W/30
General Grease #1 Lithium
• Clean machine before starting lubrication maintenance.
• Insure machine is on solid, level ground before starting maintenance.
• During lubrication maintenance insure strict cleanliness is observed at all times.
• To avoid the risk of accidents, use the correct tool for the job and keep tools clean.
• The draining of engine oil is best carried out when the oil is warm NOT hot.
• Any spilled oil must be cleaned up immediately.
• Use only clean containers for oil and only CLEAN, FRESH oils and grease of correct
grade.
• Contaminated Water/Fluids/Oils/Filters must Be Disposed of Safely.
1. Always shut off engine when transporting machine.
2. Make sure lifting device has enough capacity to hold machine (see identification plate on machine for weight).
3. Use lifting point when lifting machine.
4. Trolley wheel as optional is used for short distance transportation.
LUBRICATION AND SERVICE
LUBRICATION AND SERVICE
TRANSPORTATION
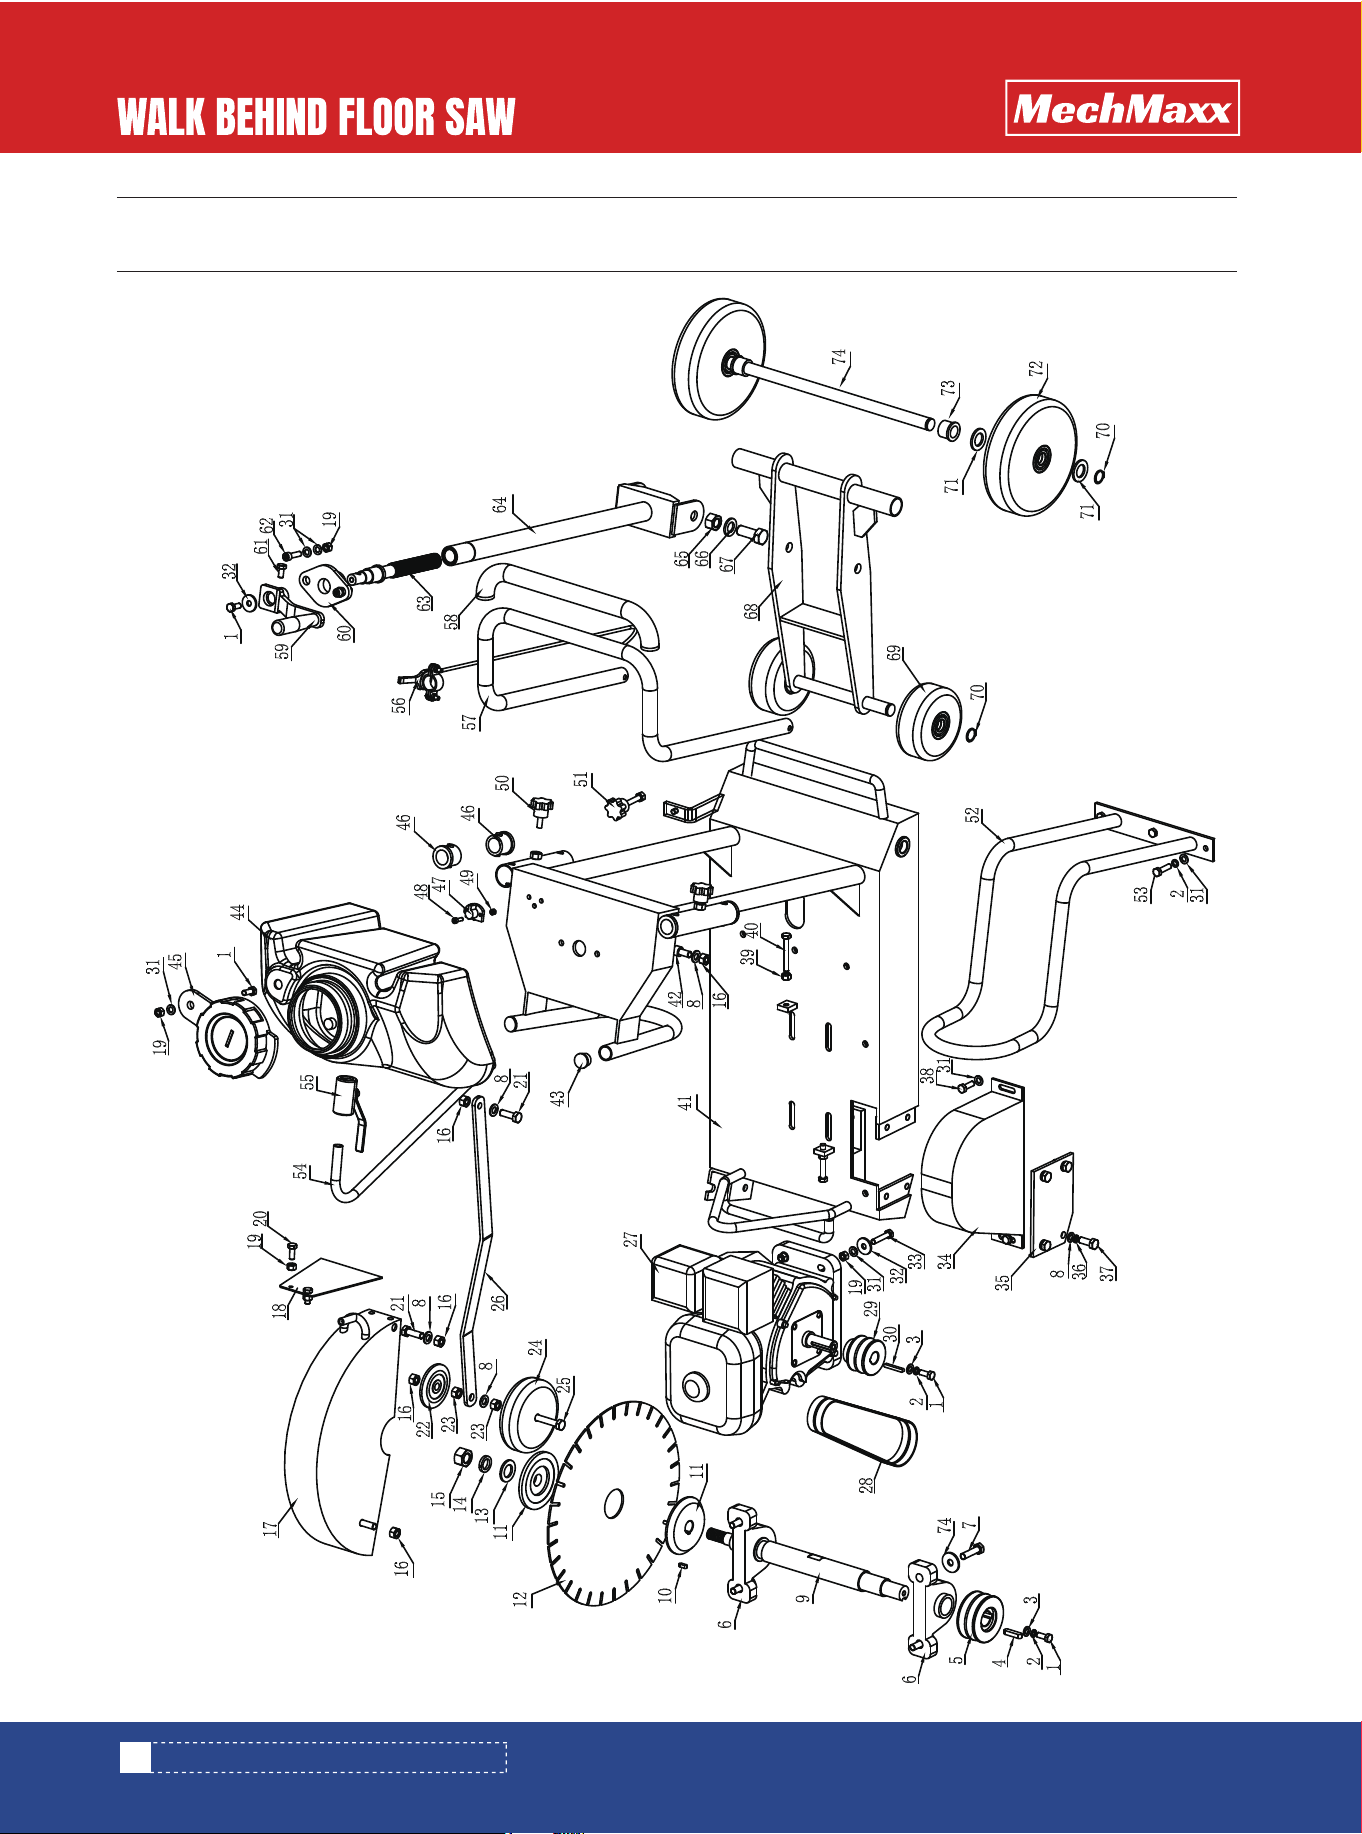
18
www.mechmaxx.com
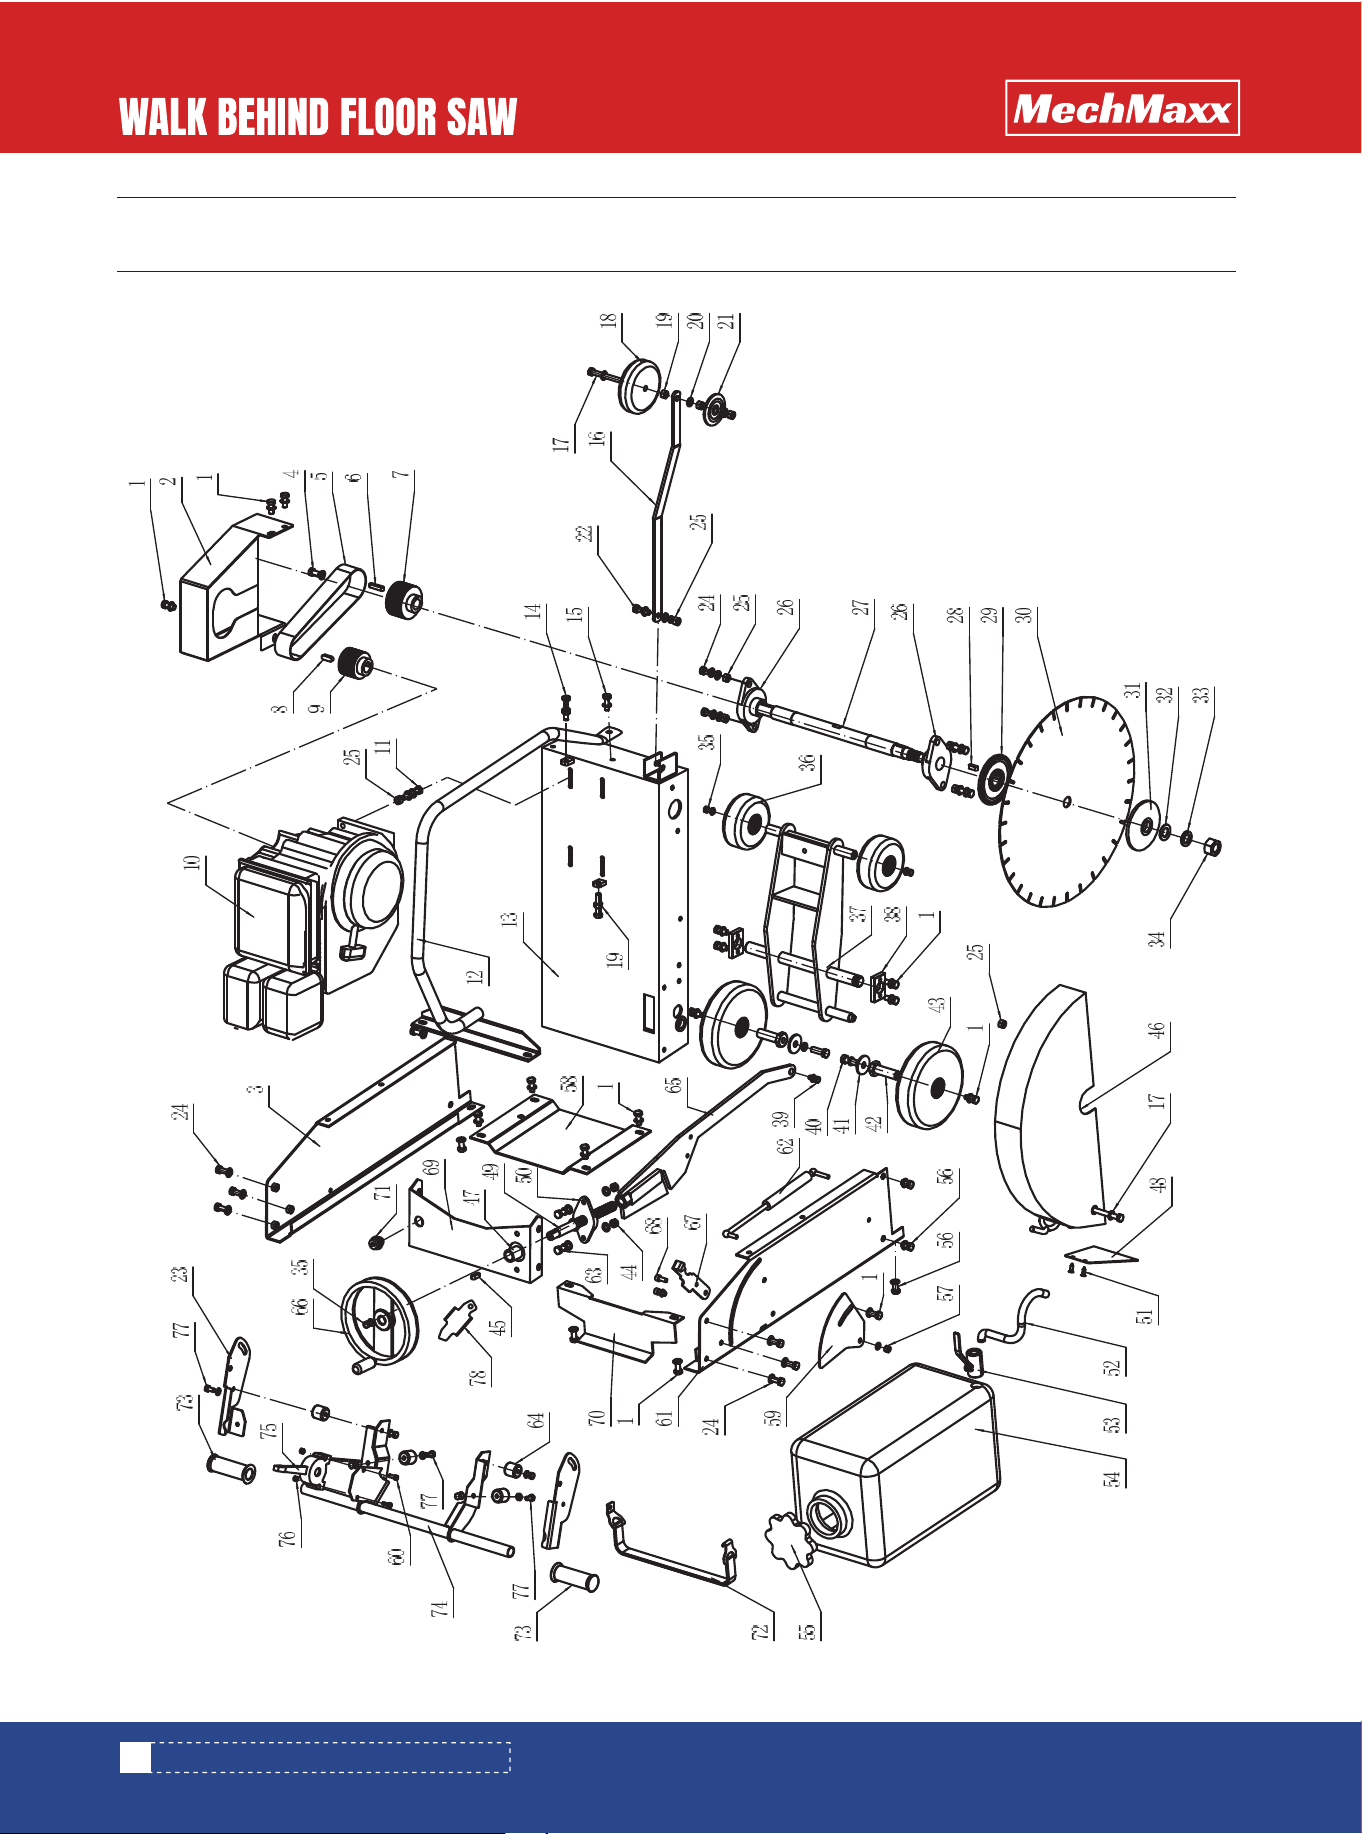
PARTS DIAGRAM (FS350Z/FS350H ASSEMBLY)
PARTS DIAGRAM (FS350Z/FS350H ASSEMBLY)
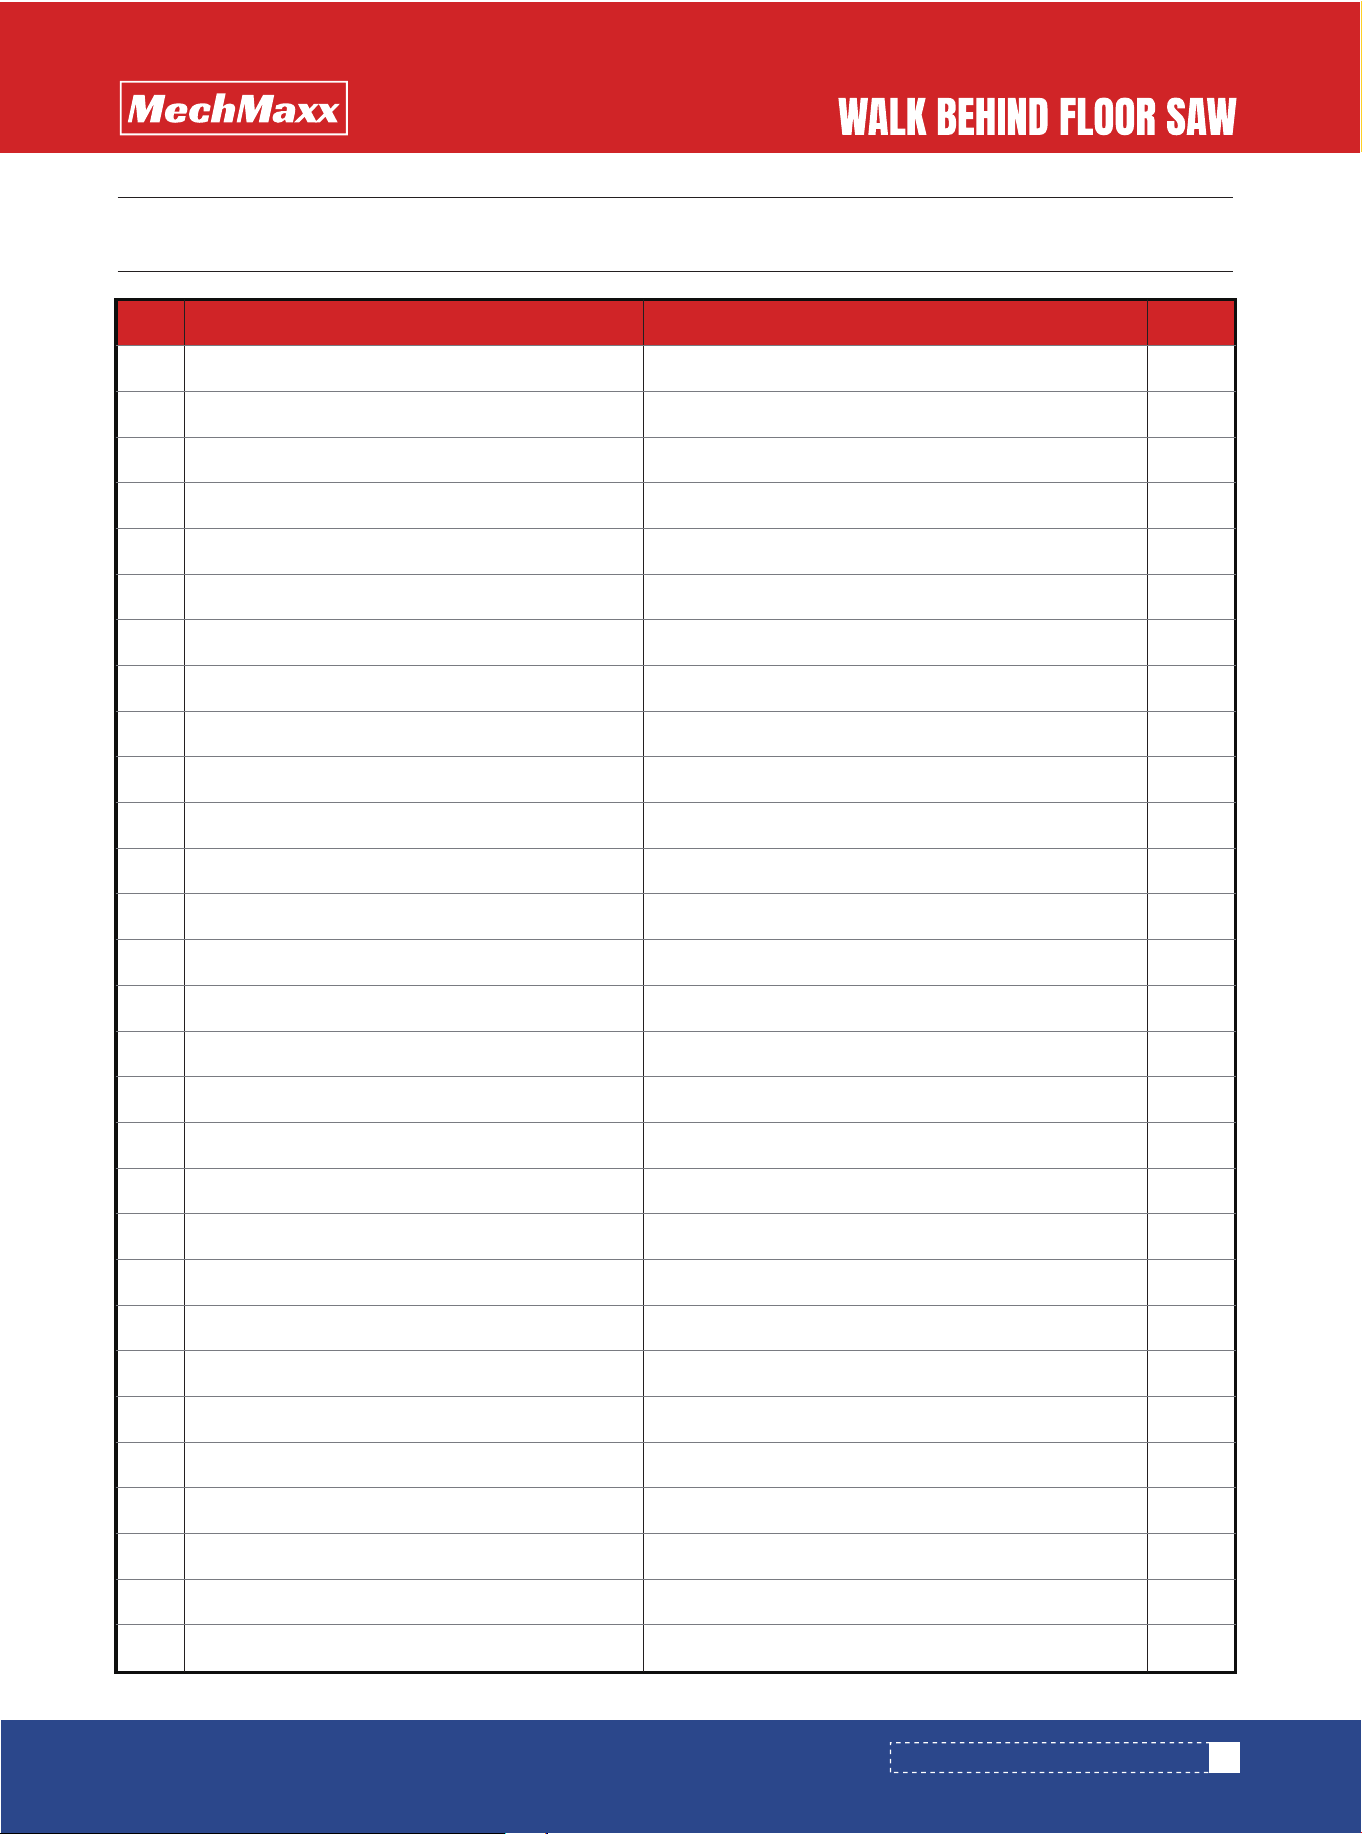
19
www.mechmaxx.com
PARTS LIST (FS350Z/FS350H ASSEMBLY)
PARTS LIST (FS350Z/FS350H ASSEMBLY)
No. Description Qty.Specification
1
2
3
4
5
6
7
8
9
10
11
12
13
14
15
16
17
18
19
20
21
22
23
24
25
26
27
28
29
M8*25
Ø8
Ø8
8*35
UCP206
M10*40
Ø10
5*16
Ø50/25.4
Ø50
Φ18
Φ18
M18*2.5
M10
M8
M6*12
M10*20
Ø125*12*35
M10
M10*100
13*584
bolt
spring washer
flat washer
flat key
rod shaft pulley
bearing block
bolt
flat washer
Blade shaft
flat key
Blade clip
blade
flat washer
spring washer
nut
nut
blade cover assembly
splash guard
nut
bolt
bolt
nylon wheel
nut
guide set
bolt
guide rod
engine
V-belt
Engine pulley
5
10
2
1
1
2
4
9
1
1
1
1
1
1
1
4
1
1
2
2
3
1
3
1
1
1
1
2
1
20
www.mechmaxx.com
PARTS LIST (FS350Z/FS350H ASSEMBLY)
1
13
6
4
1
1
60
4
4
2
2
1
3
2
1
1
4
1
2
2
2
1
1
5
1
1
1
1
1
1
1
No. Description Qty.Specification
30
31
32
33
34
35
36
37
38
39
40
41
42
43
44
45
46
47
48
49
50
51
52
53
54
55
56
57
58
59
60
5*40
Ø8
8*28*2
M8*40
Ø10
M10*40
M10*25
M8
M8*60
M10*20
C80T
M5*16
M5
M8*25
M8*50
M8*25
0.3m
C80T
0.9
0.55
LF205
flat key
flat washer
flat washer
bolt
belt cover
Belt baffle
spring washer
bolt
bolt
nut
bolt
mainframe
bolt
rubber plug
Water tank
cover of water tank
rubber plug
switch
bolt
nut
bolt
bolt
Fender bracket
bolt
Water pipe
copper valve
Throttle level assembly
handle
Handle cover
Folded handle
bearing block
21
www.mechmaxx.com
PARTS LIST (FS350Z/FS350H ASSEMBLY)
4
1
1
1
2
4
2
1
2
4
2
2
1
1
No. Description Qty.Specification
61
62
63
64
65
66
67
68
69
70
71
72
73
74
M8*40
M8*30
M16
Ø16
M16*40
Ø125*50
Ø20
20mm
Ø180*50
bolt
External hexagon bolt
Screw stem
lifting poker
nut
flat washer
bolt
Walk round frame
Black aluminium wheel
Shaft card
gasket
Black aluminium wheel
rubber mat
rear axle shaft
22
www.mechmaxx.com
PARTS DIAGRAM (FS480Z/FS480H ASSEMBLY)
PARTS DIAGRAM (FS480Z/FS480H ASSEMBLY)
23
www.mechmaxx.com
PARTS LIST (FS480Z/FS480H ASSEMBLY)
PARTS LIST (FS480Z/FS480H ASSEMBLY)
No. Description Qty.Specification
1
2
3
4
5
6
7
8
9
10
11
12
13
14
15
16
17
18
19
20
21
22
23
24
25
26
27
28
29
M10*25
Q480-00-003
M10*20
8*40
Q480-00-038
7*40
Q480-00-021
M10*55
Q480-00-004
Q480-00-034
M10*50
M10*40
Q480-00-013
M10*100
Ø125*12*35
M10
φ10
Q480-00-010
M10*35
M10*25
M10
UCFLU206
Q480-00-031
8*25
Q480-00-020
external hexagon bolt and flat gasket
belt cover for engine
Frame Left plate
external hexagon thin bolt and flat gasket
belt
key
pulley for blade
key
pulley for engine
engine
external hexagon bolt,flat gasket and nut
protective frame
frame
external hexagon bolt and nut
external hexagon bolt and falt gasket
guard
external hexagon bolt and gasket
Nylon wheels
nut
flat gasket
point wheel
external hexagon bolt and falt gasket
Handle supportor
external hexagon bolt and falt gasket
locked nut and flat gasket
bearing
shaft
key
balde flange
20
1
1
1
1
1
1
1
1
1
4
1
1
2
1
1
2
1
6
3
1
1
2
10
14
2
1
1
1
24
www.mechmaxx.com
1
1
1
1
1
3
2
1
2
1
2
2
2
2
4
1
1
1
1
2
1
2
1
1
1
1
6
2
1
1
2
No. Description Qty.Specification
30
31
32
33
34
35
36
37
38
39
40
41
42
43
44
45
46
47
48
49
50
51
52
53
54
55
56
57
58
59
60
Q480-00-002
Ø22
Ø22
M22*2.5
M8*20
Ø125*50
Q480-00-037
Q480-00-035
M8*20
M12*35
Ø12
Q480-00-033
Ø200*50
M8
6*20
Q480-00-016
Q480-00-015
UCFLU204
M6*16
Ø17*12
250*250*500
M10*20
M8
Q480-00-026
M6*30
blade
clamp
flat gasket
spring gasket
nut
external hexagon bolt and falt gasket
rubber wheel
lifting supporter
axle bearing supporter
internal hexagon bolt
external hexagon bolt and spring gasket
enlarge flat gasket
fender
rear wheel
Flange bolt
key
blade cover
lifter seat
fender
lifter seat
bearing
countersunk head bolt
tube
connector
water tank
water tank cap
external hexagon bolt and spring gasket
nut and spring gasket
protective frame
bottom plate
Inner hexagon bolt and spring gasket
PARTS LIST (FS480Z/FS480H ASSEMBLY)
25
www.mechmaxx.com
1
1
1
3
1
1
1
2
1
1
1
1
2
2
1
2
9
1
No. Description Qty.Specification
61
62
63
64
65
66
67
68
69
70
71
72
73
74
75
76
77
78
Q480-00-042
Ø22
Q480-00-032
M8*30
Q480-00-036
Ø200*Ø18
Q480-00-025
M8*25
Q480-00-028
LAY37(PBC)
Ø25
Q480-00-019
M6
M8*12
frame right board
Spring
spring plate
external hexagon bolt
lifting shaft
wheel
pointer
internal hexagon screw and spring gasket
Control panel
water tank board
switch
drawstring for water tank
handle cover
Grip handles
throttle lever assembly
Flange nut
external hexagon bolt and spring gasket
Limited plate
PARTS LIST (FS480Z/FS480H ASSEMBLY)