1
IMPORTANT: READ THESE INSTRUCTIONS CAREFULLY BEFORE STARTING INSTALLATION OR USE.
Robert H. Peterson Co. • 14724 East Proctor Avenue • City of Industry, CA 91746 Robert H. Peterson Co. • 14724 East Proctor Avenue • City of Industry, CA 91746
WARNINGS AND SAFETY CODES
Robert H. Peterson Co. • 14724 East Proctor Avenue • City of Industry, CA 91746
INSTALLATION INSTRUCTIONS
AND OWNER’S MANUAL
INSTALLER: Leave these instructions with consumer.
CONSUMER: Retain for future reference.
WARNING:
Improper installation, adjustment, alteration,
service, or maintenance can cause injury or
property damage. For proper installation, refer
to the installation instructions. For assistance
or additional information, consult a qualified
professional service technician, or service agency.
Proper operation of your grill requires prompt and
periodic maintenance. See the SERVICING AND
CLEANING section for details.
WARNING:
Do not store or use gasoline or other
ammable vapors and liquids, including
propane cylinders, in the vicinity of this
or any other appliance.
CODE REQUIREMENTS: This grill must be installed in accordance with local codes and ordinances.
WARNING:
All surfaces of the charcoal unit become HOT during use. Exercise
caution when using this unit, especially when adding charcoal or cranking
the charcoal pan up or down. Wear heat-resistant gloves as necessary.
ONLY TO BE USED OUTDOORS
Cooking Grid U.S.
Patent Nos.
D857,453
D862,984
REV 2 - B- 2408140950
L-C2-338
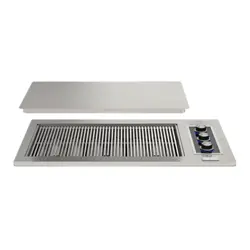
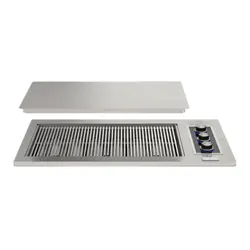
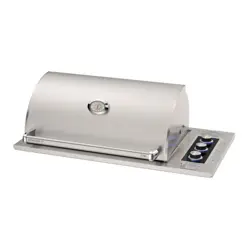
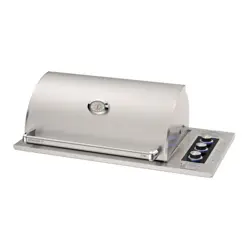
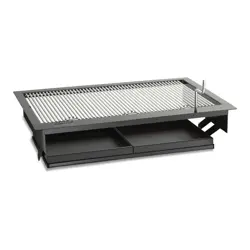
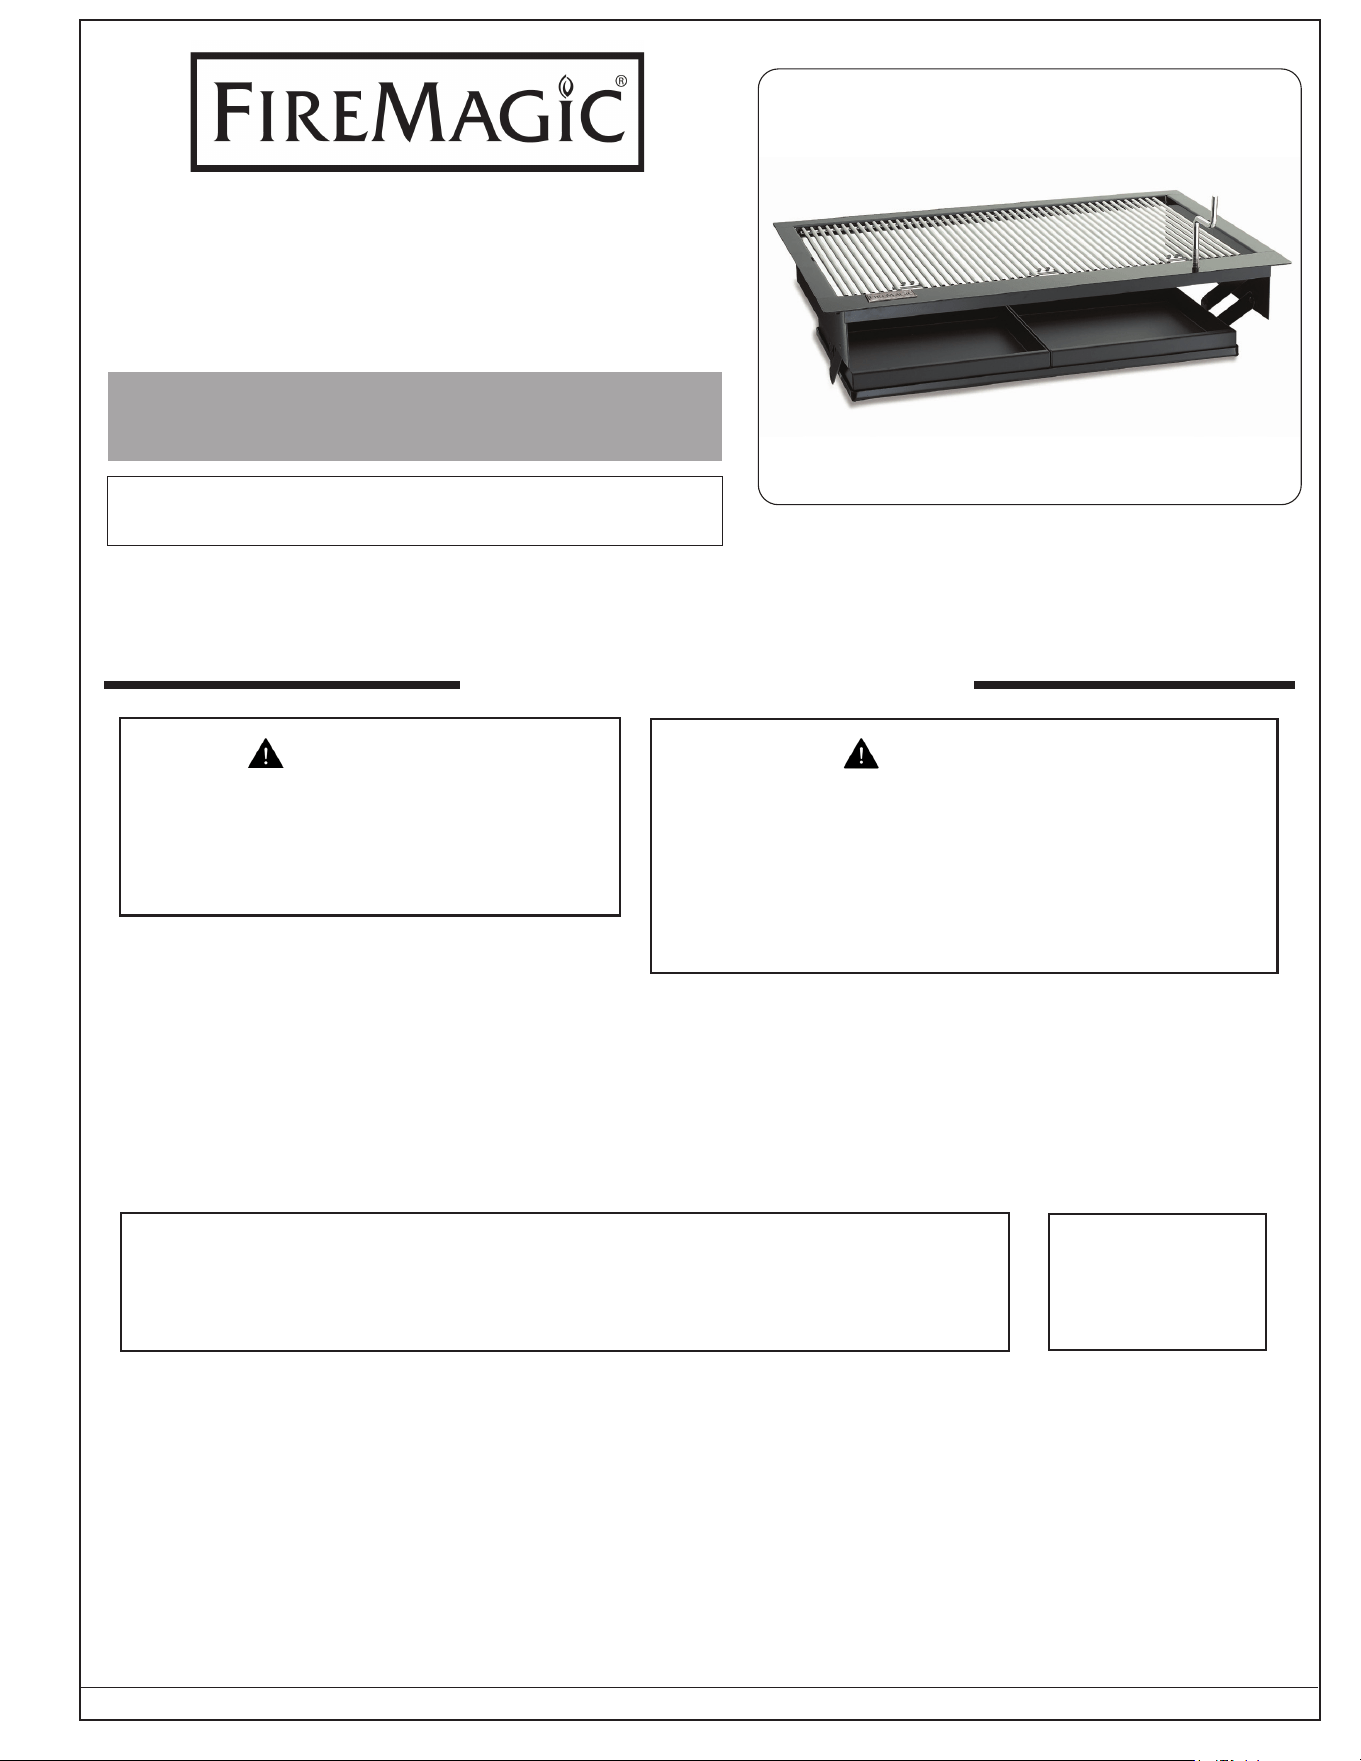
OUTDOOR COUNTERTOP CHARCOAL GRILL
Models 3324 and 3329
FIREMASTER

2
GETTING STARTED
INSTALLATION, OPERATION, AND SAFETY INFORMATION �������������������������������������������������������� 3
ENCLOSURE REQUIREMENTS�����������������������������������������������������������������������������������������������������������������4
ENCLOSURE PARAMETERS ��������������������������������������������������������������������������������������������������������������������� 4
INSTALLATION REQUIREMENTS ����������������������������������������������������������������������������������������������������������� 6
OVERHEAD CONSTRUCTION REQUIREMENTS ����������������������������������������������������������������������������������� 6
REAR WALL CLEARANCES �����������������������������������������������������������������������������������������������������������������������7
DIAGRAMMATICAL REPRESENTATIONS OF OUTDOOR AREAS ������������������������������������������������ 8
MODEL SPECIFICATIONS �������������������������������������������������������������������������������������������������������������������������� 9
REPLACEMENT PARTS LIST �������������������������������������������������������������������������������������������������������������������10
INSTALLATION
INSTALLATION ��������������������������������������������������������������������������������������������������������������������������������������������11
CONSTRUCT ENCLOSURE ���������������������������������������������������������������������������������������������������������������������11
LOWER UNIT INTO ENCLOSURE CUTOUT ����������������������������������������������������������������������������������������11
COMMON INSTALLATION ����������������������������������������������������������������������������������������������������������������������� 12
INSTALL CRANK ��������������������������������������������������������������������������������������������������������������������������������������12
INSTALL COOKING GRIDS���������������������������������������������������������������������������������������������������������������������12
USING THE GRILL ��������������������������������������������������������������������������������������������������������������������������������������13
USE, CARE, & SERVICE
OPERATION ���������������������������������������������������������������������������������������������������������������������������������������������������14
CHARCOAL INSTRUCTIONS ������������������������������������������������������������������������������������������������������������������14
SERVICING AND CLEANING ������������������������������������������������������������������������������������������������������������������15
CLEANING YOUR GRILL ������������������������������������������������������������������������������������������������������������������������15
TROUBLESHOOTING ���������������������������������������������������������������������������������������������������������������������������������17
NOTES PAGE ������������������������������������������������������������������������������������������������������������������������������������������������� 18
CONTENTS
REV 2 - B- 2408140950
L-C2-338
3
1. The outdoor appliance and surrounding area MUST remain clear of ammable substances such as gasoline,
yard debris, wood, etc. Maintain a minimum horizontal clearance of 18" (50 cm) (in all directions) from
combustible materials/items.
2. Wear gloves and use extreme caution whenever installing and handling this product and its accessories
as certain components have sharp edges that can cause personal injury.
3. Adults MUST be present when this cooking appliance is operating. This appliance MUST NOT be left burning
when unattended.
4. Do not store combustible materials in the enclosure directly beneath the appliance.
WARNING: NEVER cover more than 75% of the cooking or grill surface with griddles, pots, or pans. Overheating
will occur and will not perform properly when combustion heat is trapped below the cooking surface.
IMPORTANT
IN THE EVENT OF A GREASE FIRE, IMMEDIATELY CLOSE THE OVEN LID (IF EQUIPPED), MOVE TO A SAFE
DISTANCE, AND ALLOW THE FIRE TO EXTINGUISH ITSELF.
INSTALLATION, OPERATION, AND SAFETY INFORMATION
REV 2 - B- 2408140950
L-C2-338
4
For requirements regarding custom-built enclosures, see below.
To ensure proper operation and safety, the enclosure MUST comply with the following:
• Proper construction and cutout openings - see INSTALLATION REQUIREMENTS and ENCLOSURE
PARAMETERS sections.
• Proper clearances - see INSTALLATION REQUIREMENTS section.
You MUST read and follow these sections for complete enclosure requirement details.
ENCLOSURE PARAMETERS
General Guidelines
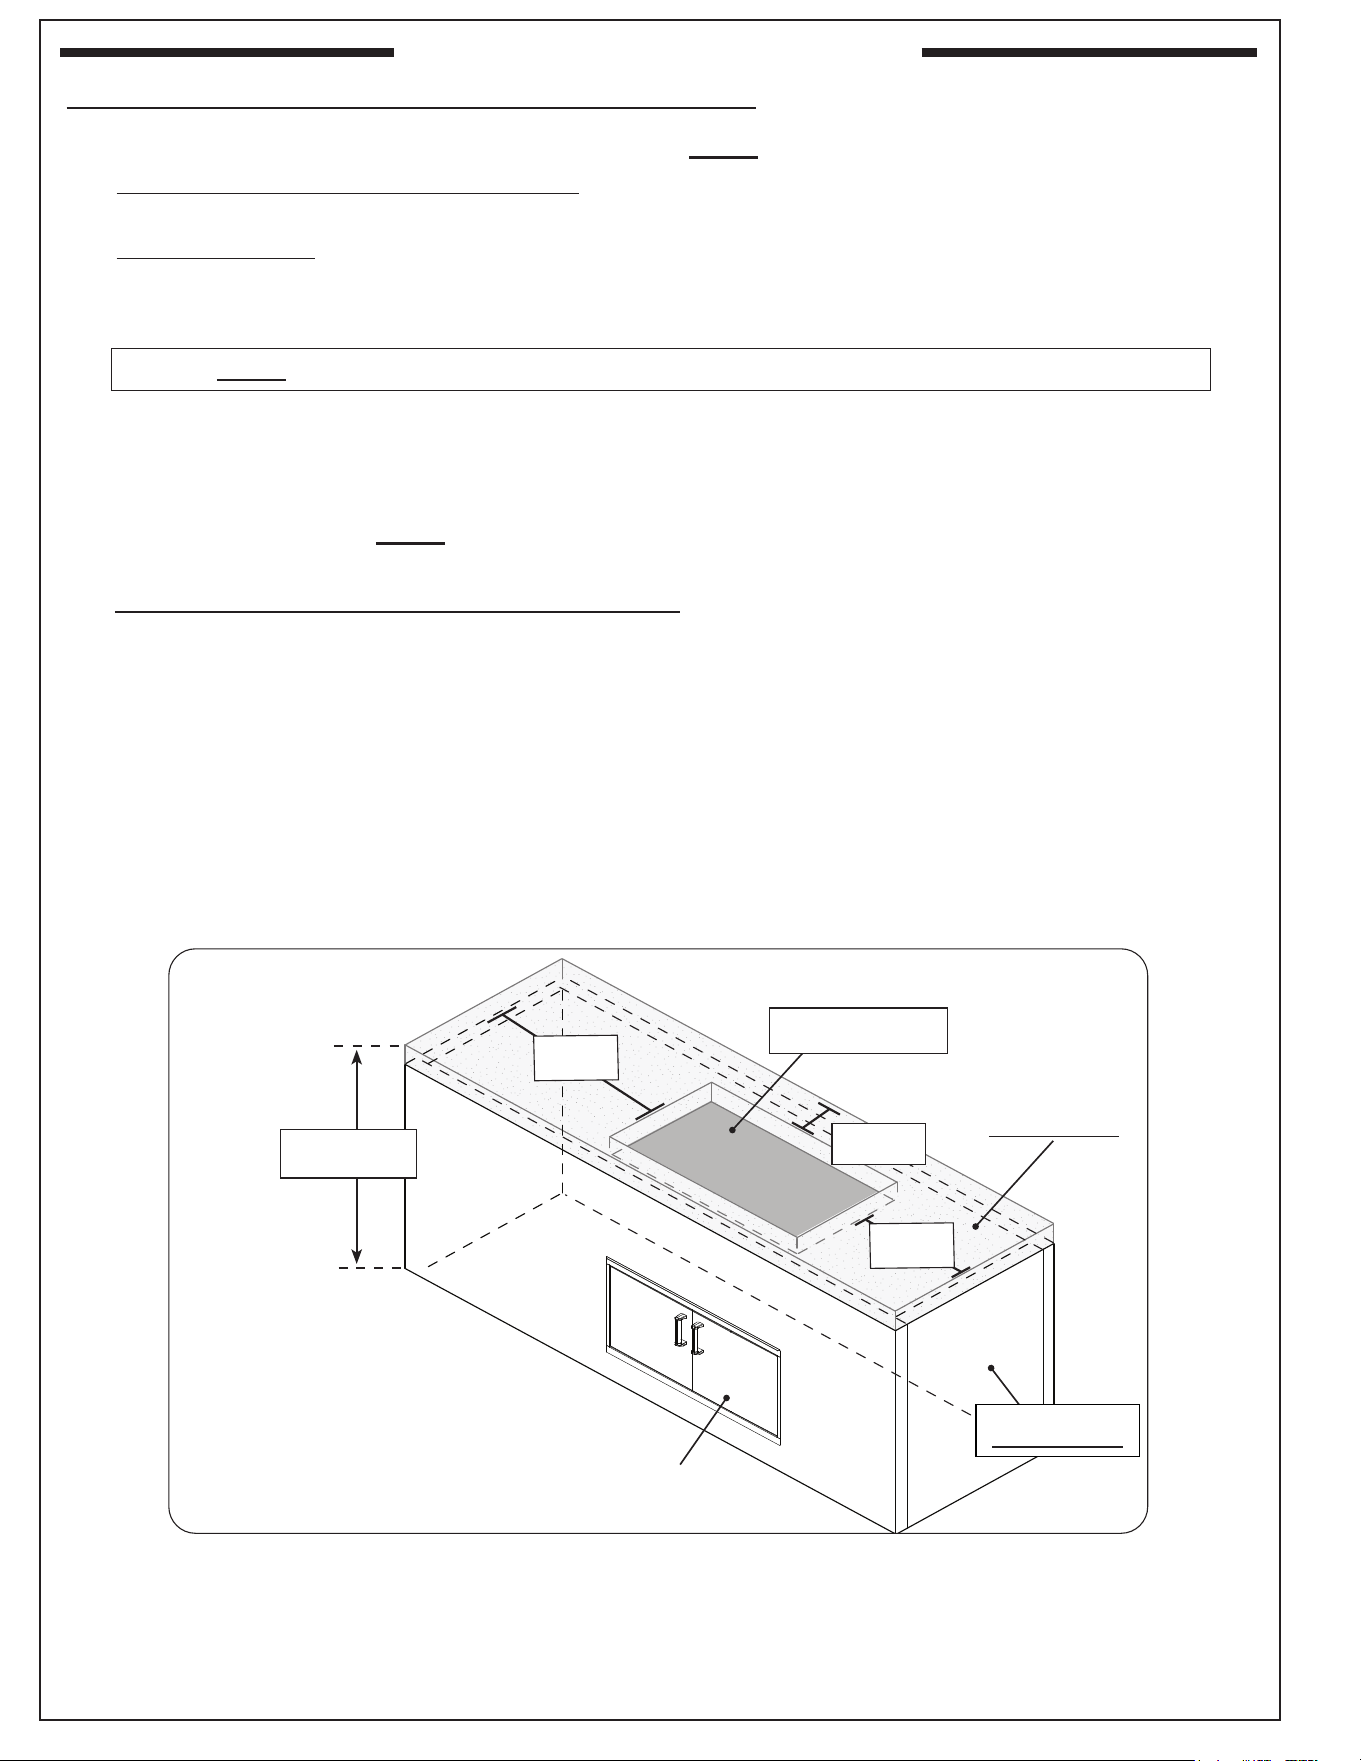
The enclosure can be constructed according to your individual preference, while following all guidelines found in
this manual. The enclosure MUST (see Fig. 4-1):
• be installed on a hard and level surface
• be built completely out of non-combustible materials (enclosures and countertop)- using masonry or other
types of non-combustible [reproof] materials.
• have the minimum dimensions specied in Fig. 4-1
• have the correct cutout dimensions (see CUTOUT DIMENSIONS section)
• be designed so that the grill is supported by the stainless-steel hanger extending from the upper portion of
the unit (rests on all four sides)- see INSTALLATION section
• have drainage cutouts (if needed) to prevent the accumulation of water within the enclosure
• meet all requirements found in Fig. 4-1 and the following sections
Fig. 4-1 Enclosure specications
Grill Cutout
(see following section)
• Not to scale
• Example shown, design and location
of enclosure and its items may vary
Access
door
32-40"
(81.3-101.6 cm)
Countertop
(non-combustible)
Enclosure
(non-combustible)
6" min.
(15.2 cm)
ENCLOSURE REQUIREMENTS
Rear clearances must be considered for this dimension
if a rear wall or blacksplash exists. See INSTALLATION
REQUIREMENTS section.
t Countertop minimum width measures from cutout
edge to side wall inner dimension
*
8" min.
(20.3 cm)
t
8" min.
(20.3 cm)
t
*
REV 2 - B- 2408140950
L-C2-338
5
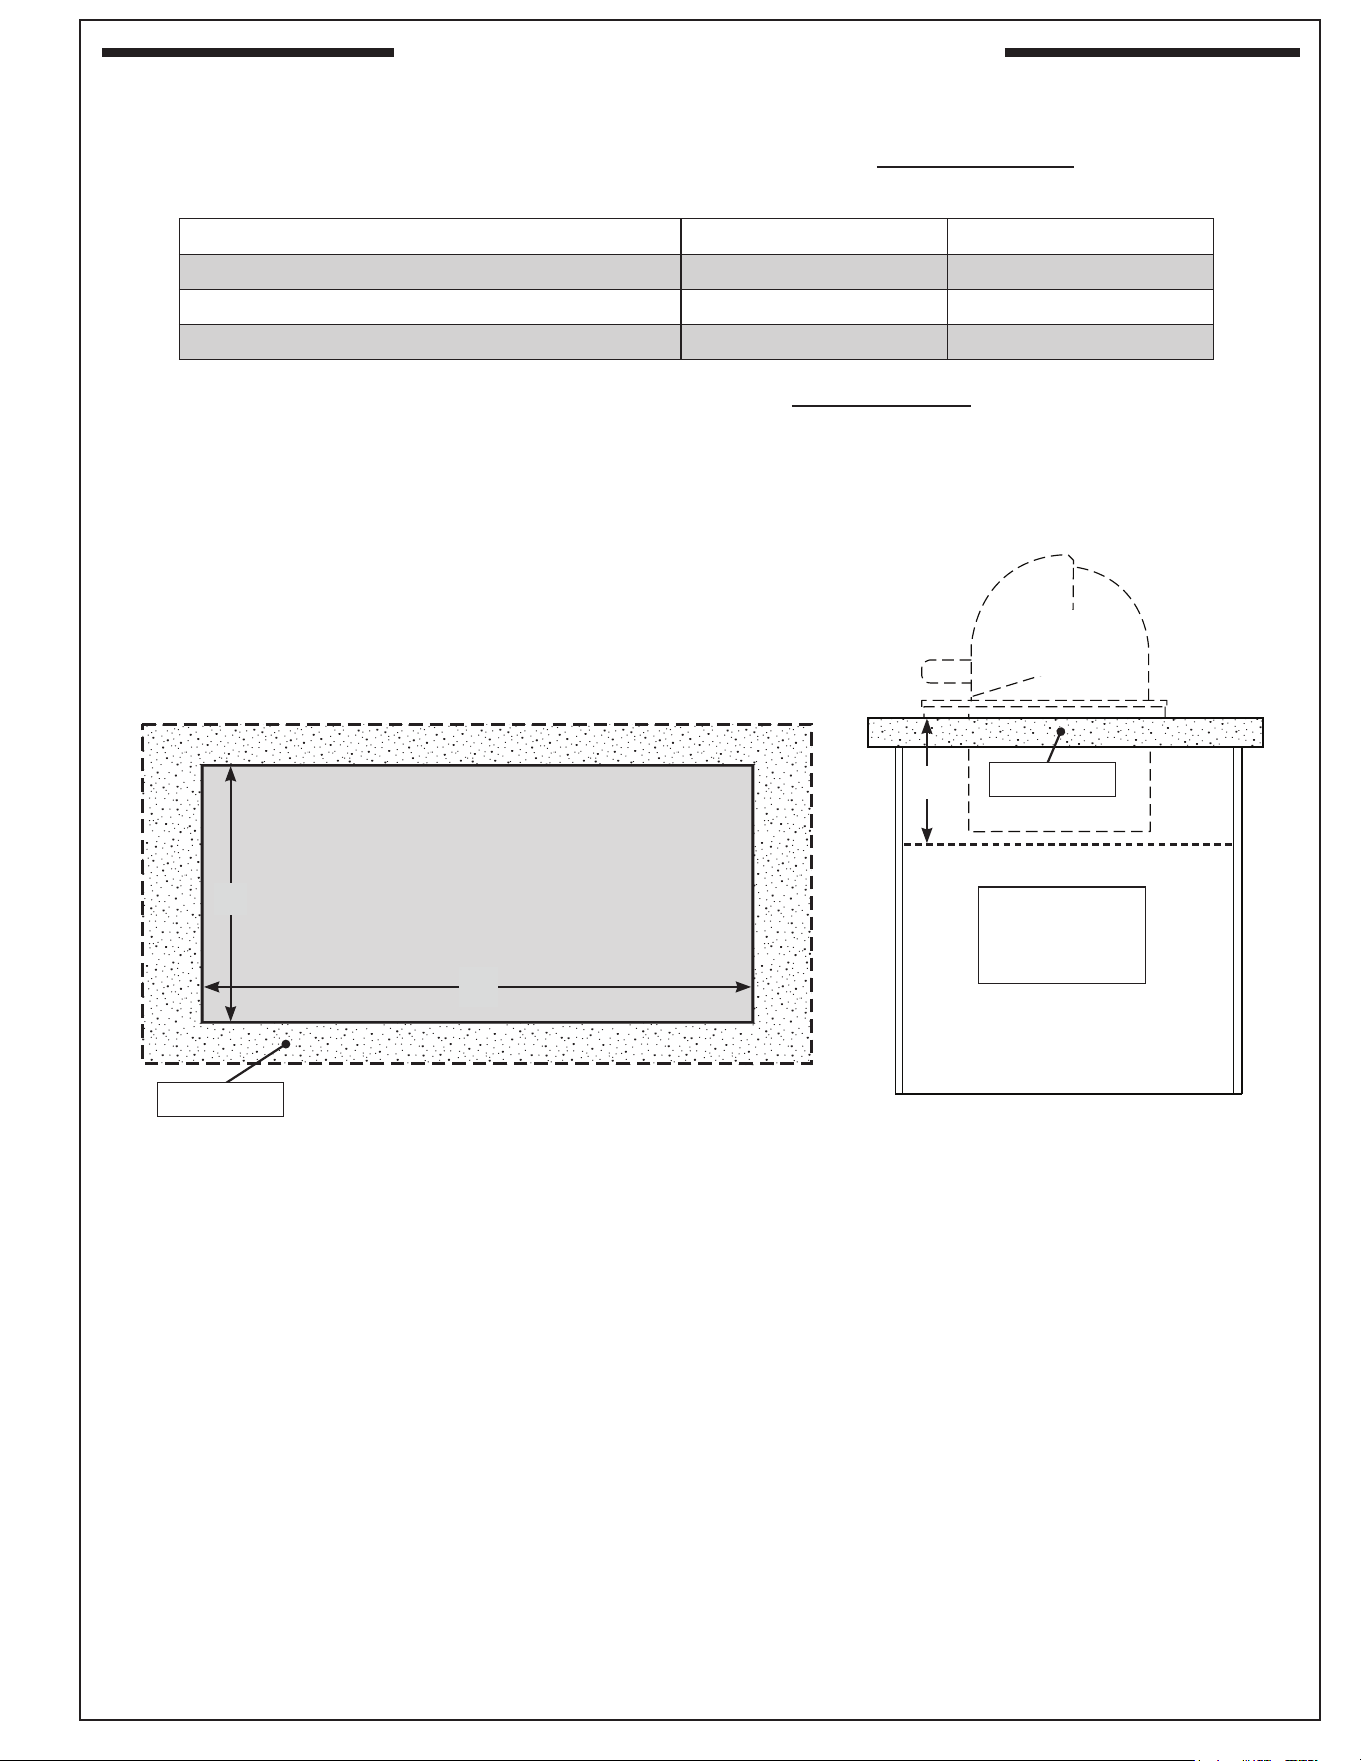
Description (non-combustible cutouts) 3324 series 3329 series
A Countertop to unit bottom clearance 12" 12"
B Side to side cutout 31
1
/4" 24
1
/4"
C Front to back cutout 21
1
/4" 19
1
/4"
SIDE
VIEW
Countertop
A
Do not store
combustible
materials directly
beneath grill
Cutout Dimensions
Important: These clearance and cutout dimensions below are for non-combustible enclosures.
TOP VIEW
Fig. 5-1
Table 1 - Clearance & Cutout Dimensions (for non-combustible enclosures)
C
B
NON-COMBUSTIBLE
GRILL ENCLOSURE
CUTOUT DIMENSIONS
Countertop
ENCLOSURE REQUIREMENTS (Cont.)
REV 2 - B- 2408140950
L-C2-338
6
Installation must be performed by a qualied professional
service technician.
This unit is designed for outdoor use only. DO NOT use this
unit inside a building, garage, or enclosed area, or under
overhead combustible construction. DO NOT install this
unit in or on a recreational vehicle or boat.
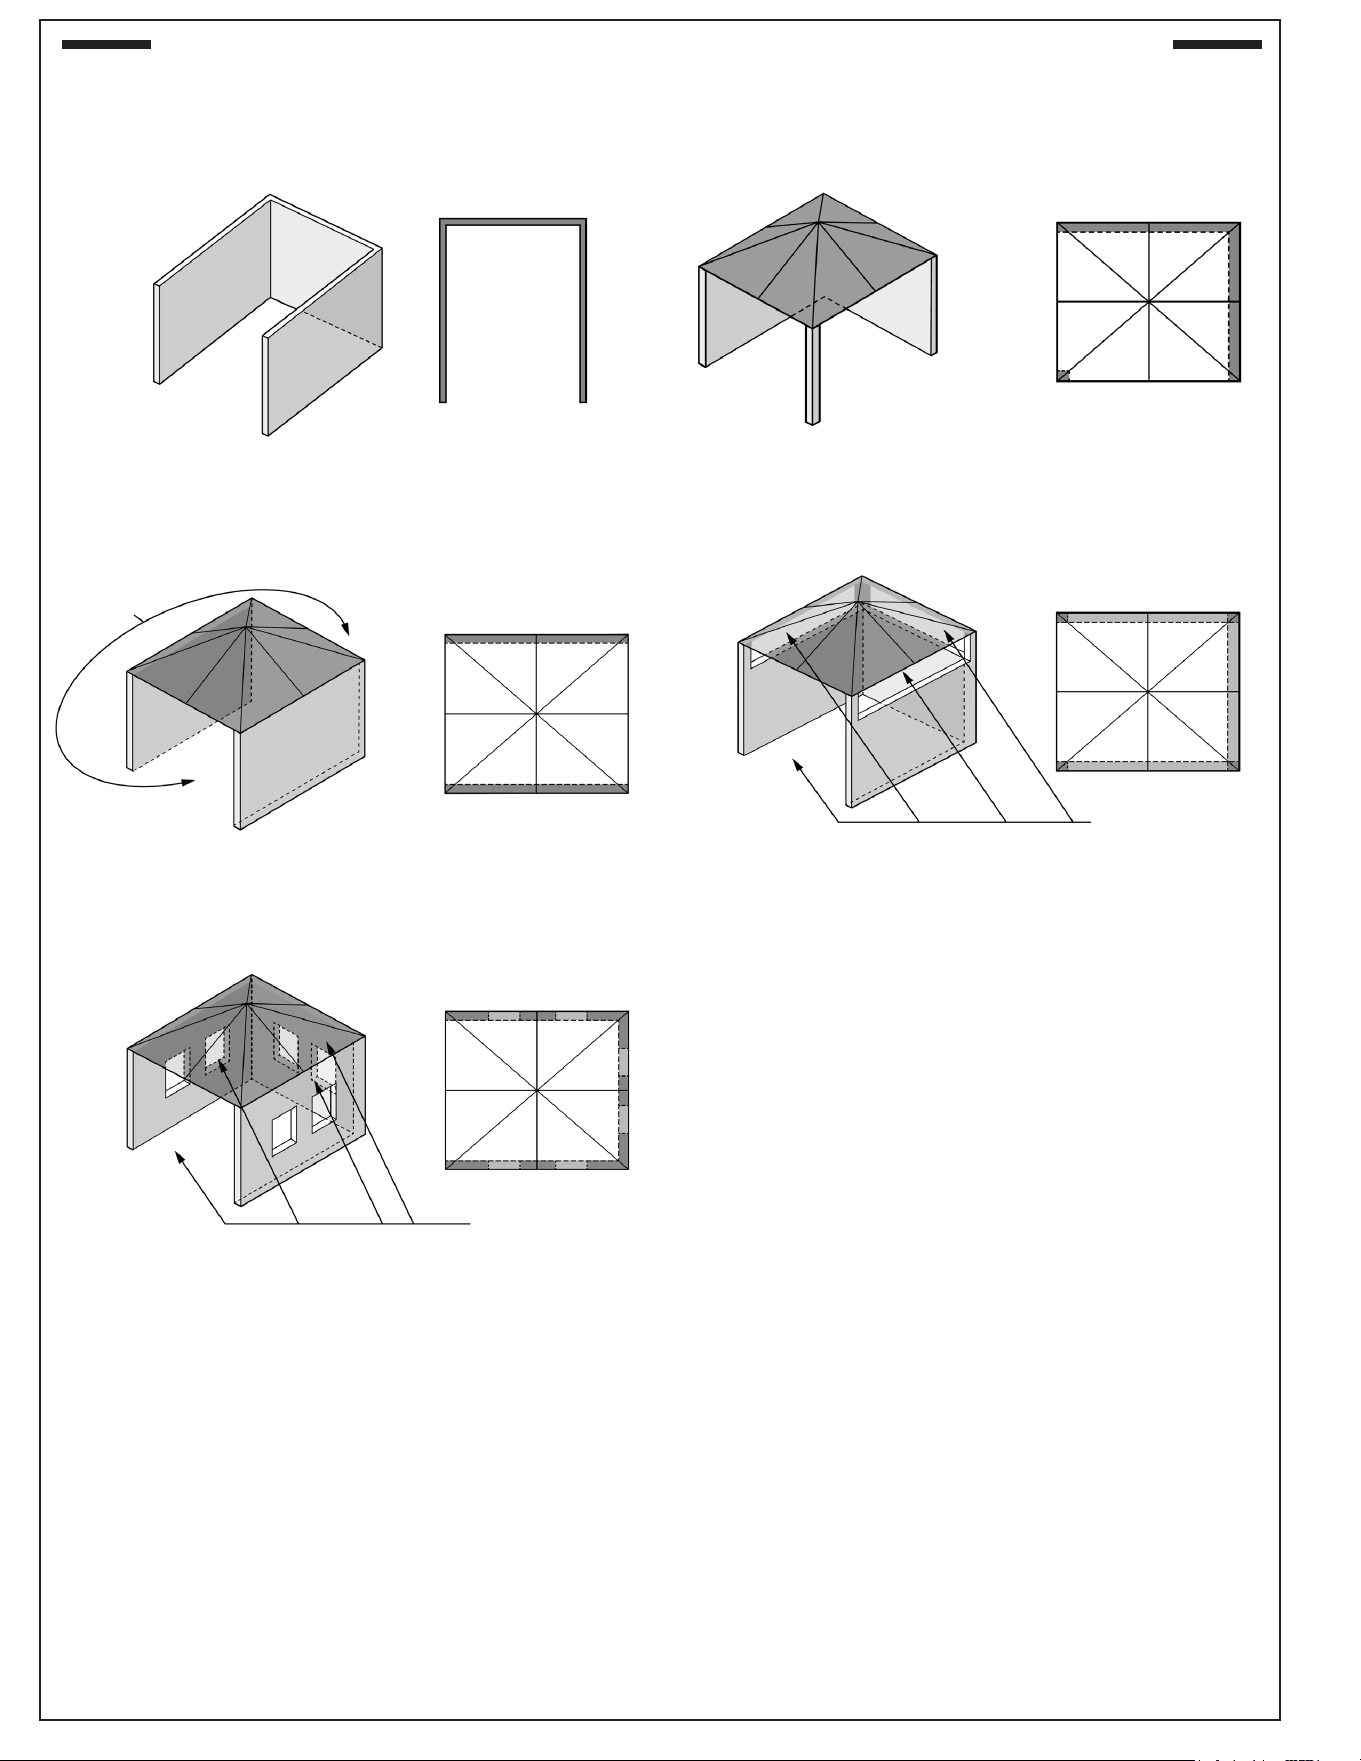
Any constructed outdoor area in which the appliance is
used shall comply with one of the following:
• An outdoor area with walls on three sides, and no
overhead cover
• Within a partial outdoor area that includes an overhead
cover and no more than two walls. The sidewalls may
be parallel, as in a breezeway, or at right angles to each
other
• Within a partial outdoor area that includes an overhead
cover with walls on three sides, and at least 30% or
more of the horizontal periphery of the enclosure that
is open and unrestricted
Note: All openings must be permanently open.
Note: Sliding doors, garage doors, windows, or screened
openings are not considered as permanent
openings.
Refer to DIAGRAMMATICAL REPRESENTATIONS OF
OUTDOOR AREAS section.
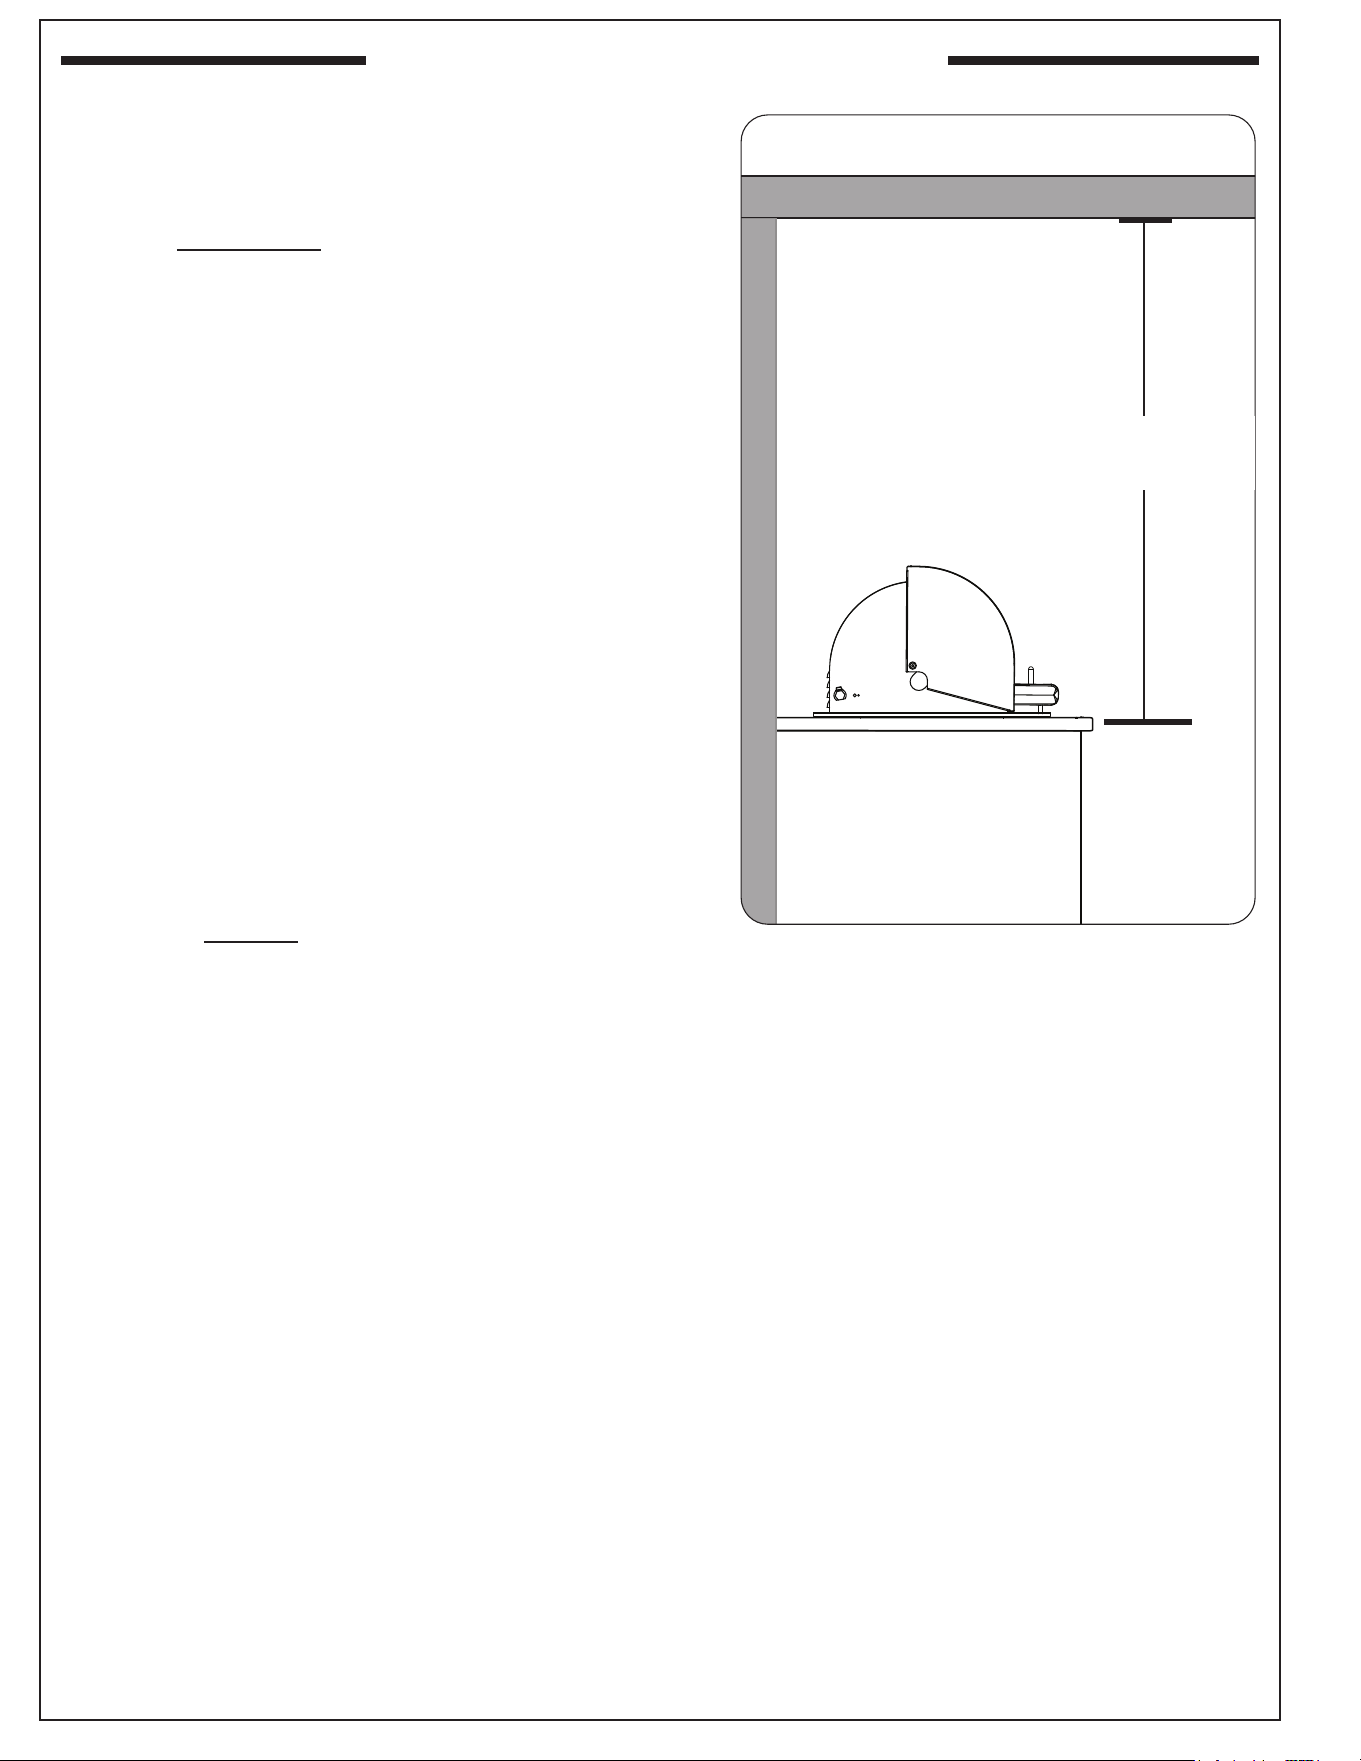
OVERHEAD CONSTRUCTION REQUIREMENTS
Important: DO NOT use this appliance under combustible
overhead construction.
A minimum 5 foot (1.5 meters) clearance is required
between the cooking surface and the non-combustible
overhead construction. (No combustible materials are allowed
within this area.)
Fig. 6-1 Overhead requirements
INSTALLATION REQUIREMENTS
N
O
N
C
O
M
B
U
S
T
I
B
L
E
W
A
L
L
NON-COMBUSTIBLE OVERHEAD CONSTRUCTION
Min. 5' (1.5 m)
(No combustible materials
allowed within this area)
REV 2 - B- 2408140950
L-C2-338
7
Important: The grill is not insulated. Refer to the information
below to ensure all required clearances are met.
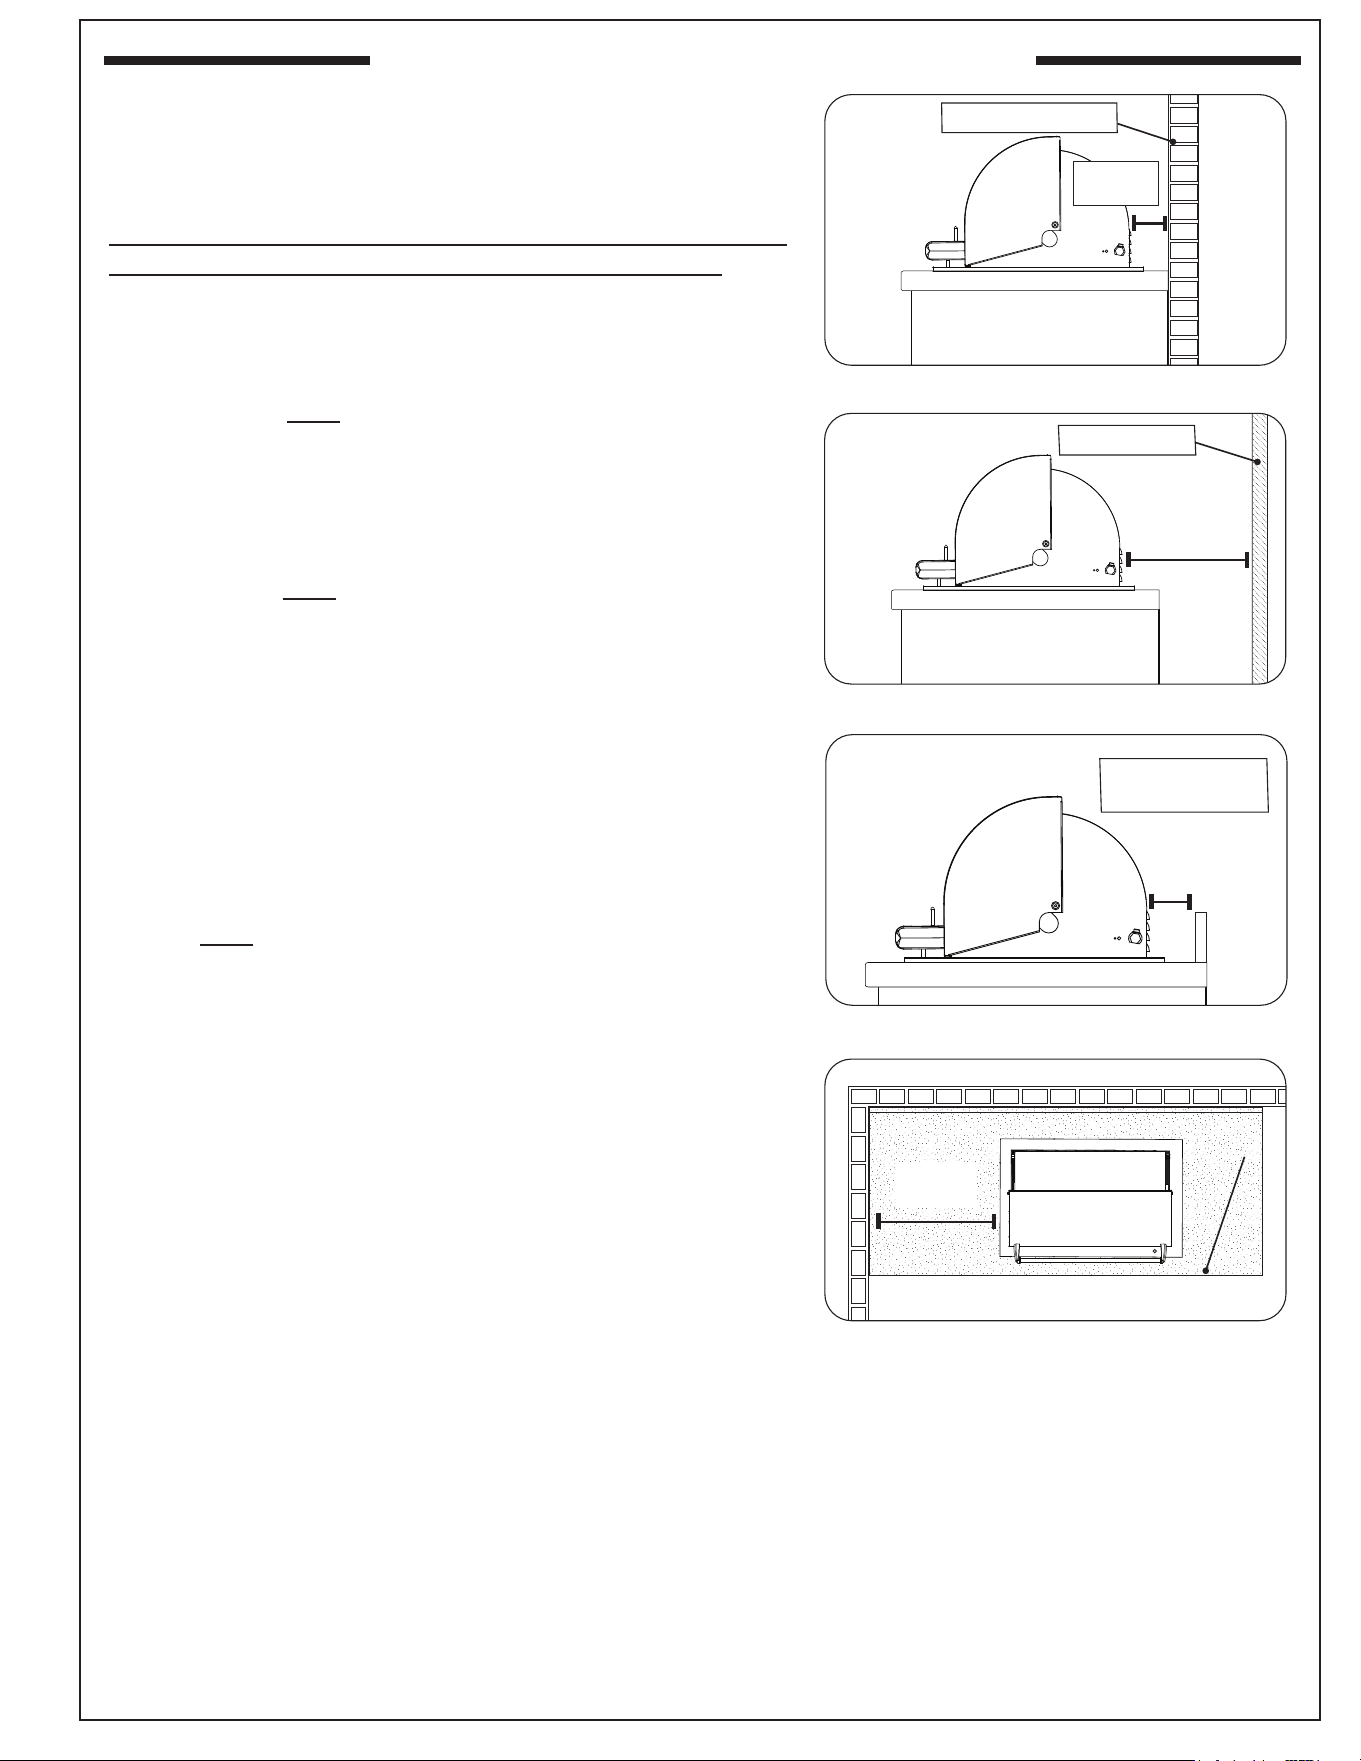
REAR WALL CLEARANCES
For the minimum clearances between the unit and rear walls,
your setup must fall within one (or more) of the following:
A. Clearance between unit and strictly non-combustible
rear wall
(i.e. brick wall, see Fig. 7-1)
• The unit must have a minimum clearance of 4"(10 cm)
from the non-combustible rear wall.
(To allow for proper ventilation and prevent dangerous
overheating.)
B. Clearance between unit and combustible rear wall
• The unit must have a minimum clearance of 18" (46 cm)
from the combustible rear wall (see Fig. 7-2).
BACKSPLASH CLEARANCE (if applicable)
If a non-combustible backsplash exists, it must have a minimum of
a 4" (10 cm) clearance from the rear of the unit (to allow for proper
ventilation and prevent dangerous overheating). See Fig. 7-3
Important: This 4" (10 cm) backsplash clearance must rst be
met prior to any non-combustible walls beginning
behind it.
SIDE / CORNER WALL CLEARANCES (if applicable)
The unit must have a minimum clearance of 24" (61cm) from any
side walls (to account for variables in airow that could aect
performance). See Fig. 7-4.
Fig. 7-3 Backsplash clearance
Non-combustible
Backsplash
Min. 4"
(10 cm)
Fig. 7-1 Clearance 'A' Diagram
Fig. 7-2 Clearance 'B' Diagram
Non-combustible
Min. 4"
(10 cm)
Combustible
Min.18"
(46 cm)
(Clearance required
for rear wall)
(Clearance required
for rear wall)
INSTALLATION REQUIREMENTS (Cont.)
Fig. 7-4 Side/corner wall clearance
Min. 24"
(61 cm)
REV 2 - B- 2408140950
L-C2-338
8
The following gures are diagrammatical representations of outdoor areas. See INSTALLATION REQUIREMENTS
section.
Fig. 8-1 Outdoor area - Example 1
Fig. 8-2 Outdoor area - Example 2
Fig. 8-3 Outdoor area - Example 3 Fig. 8-4 Outdoor area - Example 4
Fig. 8-5 Outdoor area - Example 5
Both ends open
30% or more of the horizontal
periphery of the enclosure is
open and unrestricted
30% or more of the horizontal
periphery of the enclosure is
open and unrestricted
DIAGRAMMATICAL REPRESENTATIONS OF OUTDOOR AREAS
REV 2 - B- 2408140950
L-C2-338
9
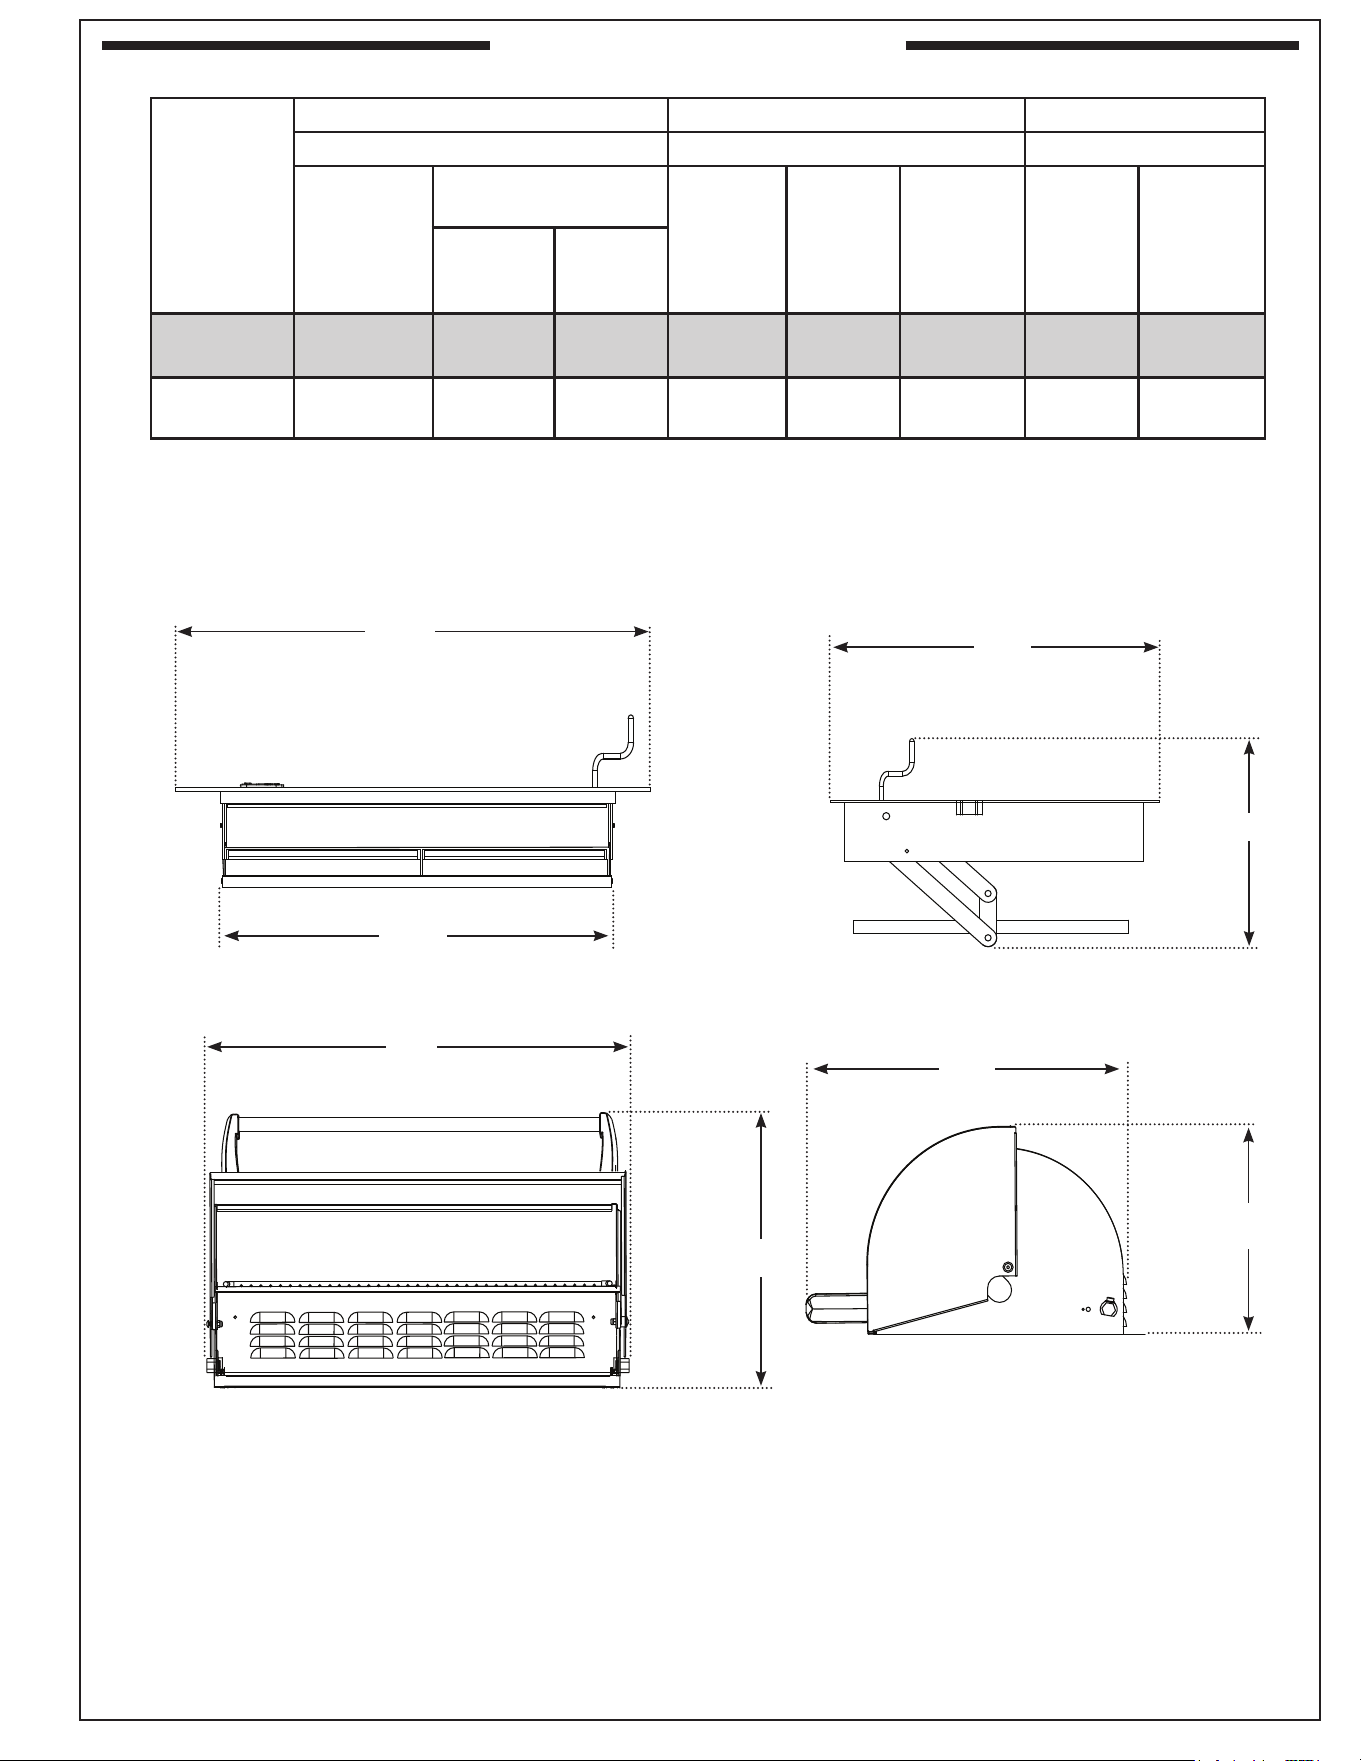
MODEL SPECIFICATIONS
Table 2 - Grill Dimensions
B
D
E
F
Fig. 9-1
G
H
A
C
Model
Height Width Depth
(Top to bottom) (Left to right) (Front to back)
Grill
maximum
height
(A)
Oven hood (if
applicable)
Grill
maximum
width
(D)
Grill body
frame (E)
Oven
hood (if
applicable)
(F)
Grill
maximum
depth
(G)
Oven
hood (if
applicable)
(H)
Open
(B)
Closed
(C)
3324 series
15
3
/4"
(40 cm)
21
1
/2"
(54.6 cm)
15
1
/2"
(39.4 cm)
33
3
/4"
(85.7 cm)
31
1
/4"
(79.4 cm)
29"
(73.7 cm)
23"
(58.4 cm)
23
1
/2"
(59.7 cm)
3329 series
15"
(38.1 cm)
21
1
/2"
(54.6 cm)
15
1
/2"
(39.4 cm)
26
1
/4"
(66.7 cm)
24
1
/4"
(61.6 cm)
24
3
/4"
(62.9 cm)
23"
(58.4 cm)
23
1
/2"
(59.7 cm)
REV 2 - B- 2408140950
L-C2-338
10
Robert H. Peterson Co. • 14724 East Proctor Avenue, • City of Industry, CA 91746
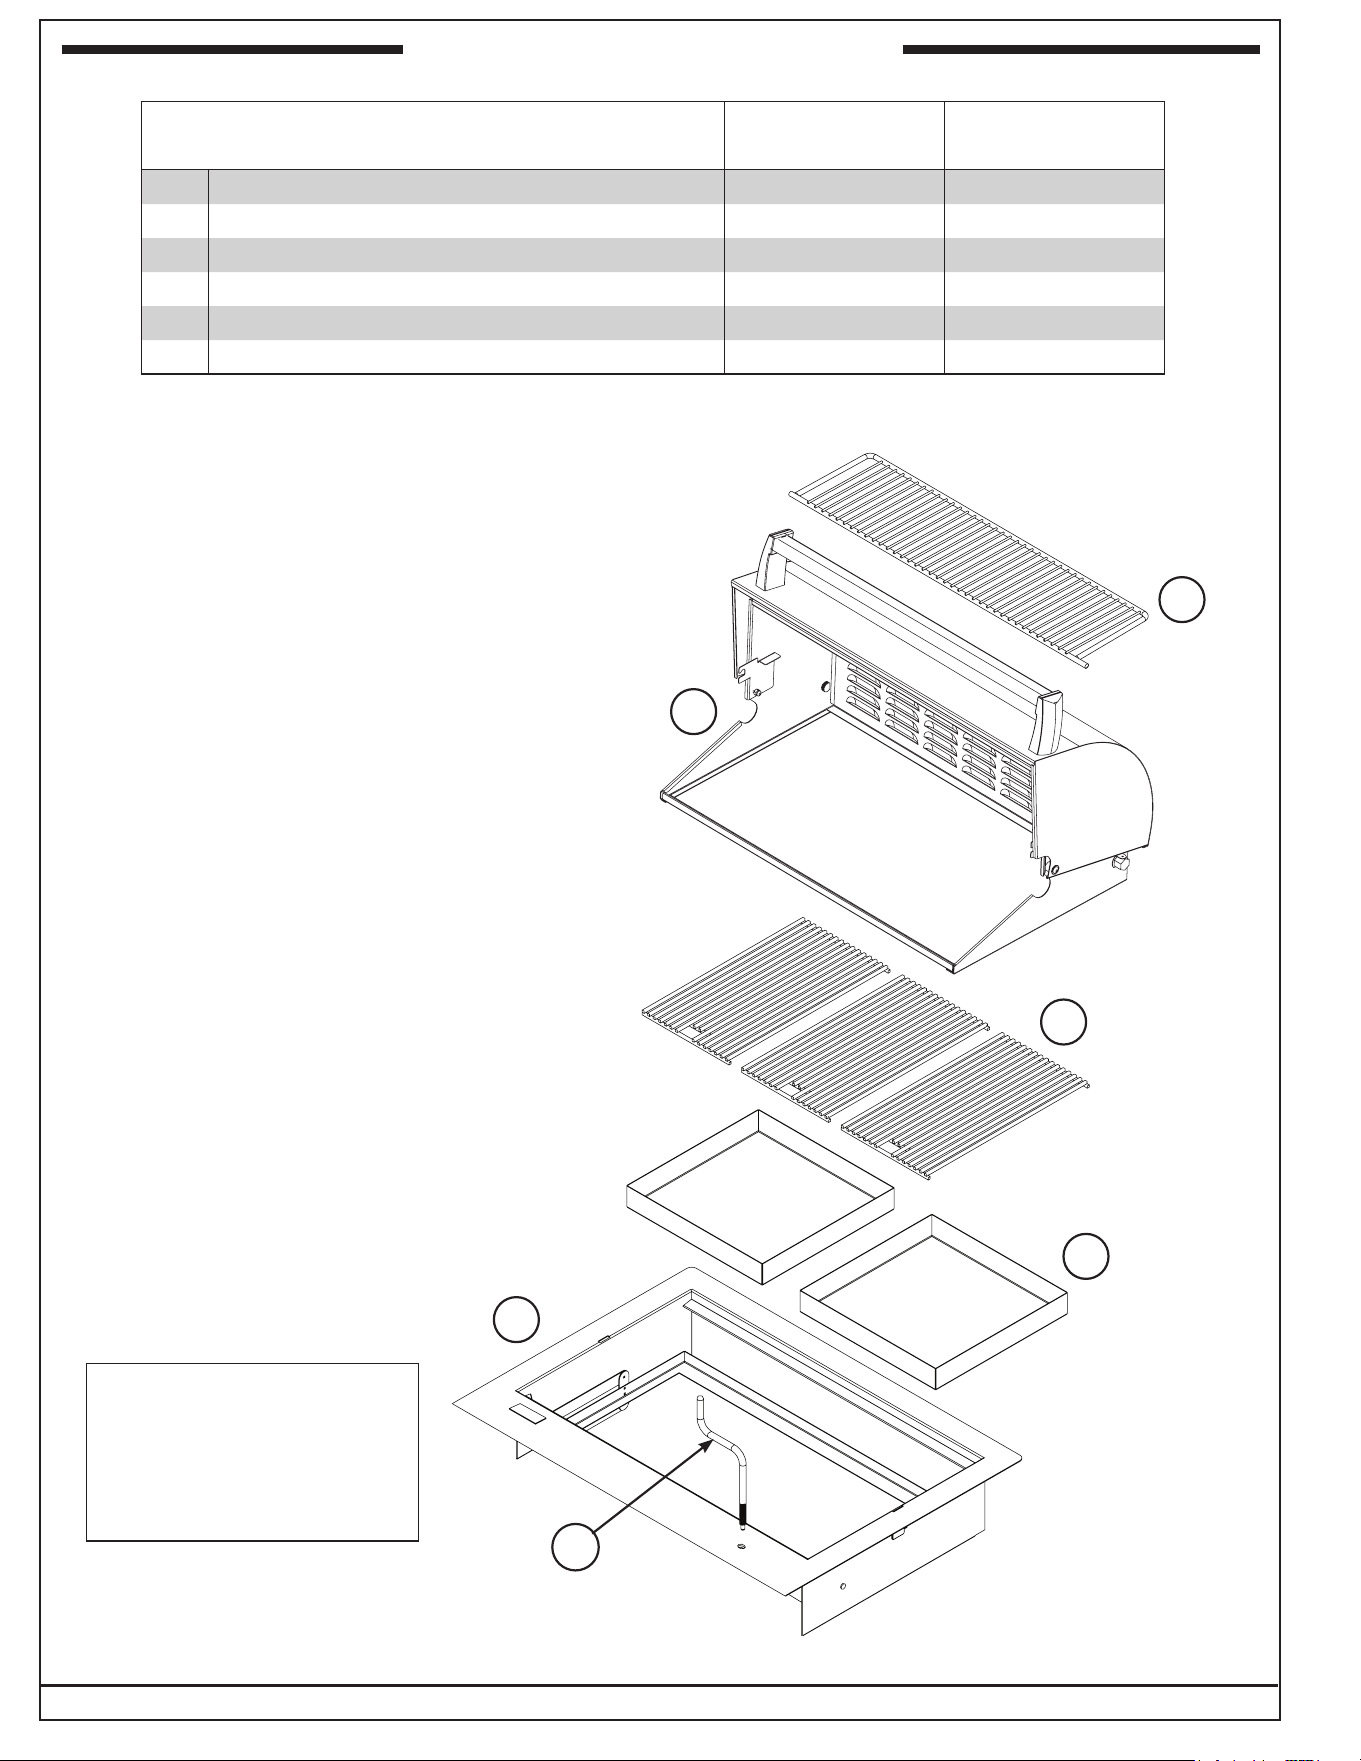
REPLACEMENT PARTS LIST
REV 2 - B- 2408140950
L-C2-338
3324 3329
Item Description Part No. Qty. Part No. Qty.
1. Stainless steel grill oven (optional) 23733 1 3731 1
2. Warming rack (optional) 3673S 1 3671S 1
3. Charcoal pan 3304 2 3302 1
4. Stainless steel cooking grids (set of 2 or 3) (optional) 3543-DS-3 1 3537-S-2 1
5. Grill assembly 3320-55 1 3325-55 1
6. Crank 3301 1 3301 1
2
Replacement parts can be
ordered from your local Fire
Magic
®
dealer.
5
4
1
3324 model shown
6
IMPORTANT
Remove all packing
material and discard
prior to use.
3
11
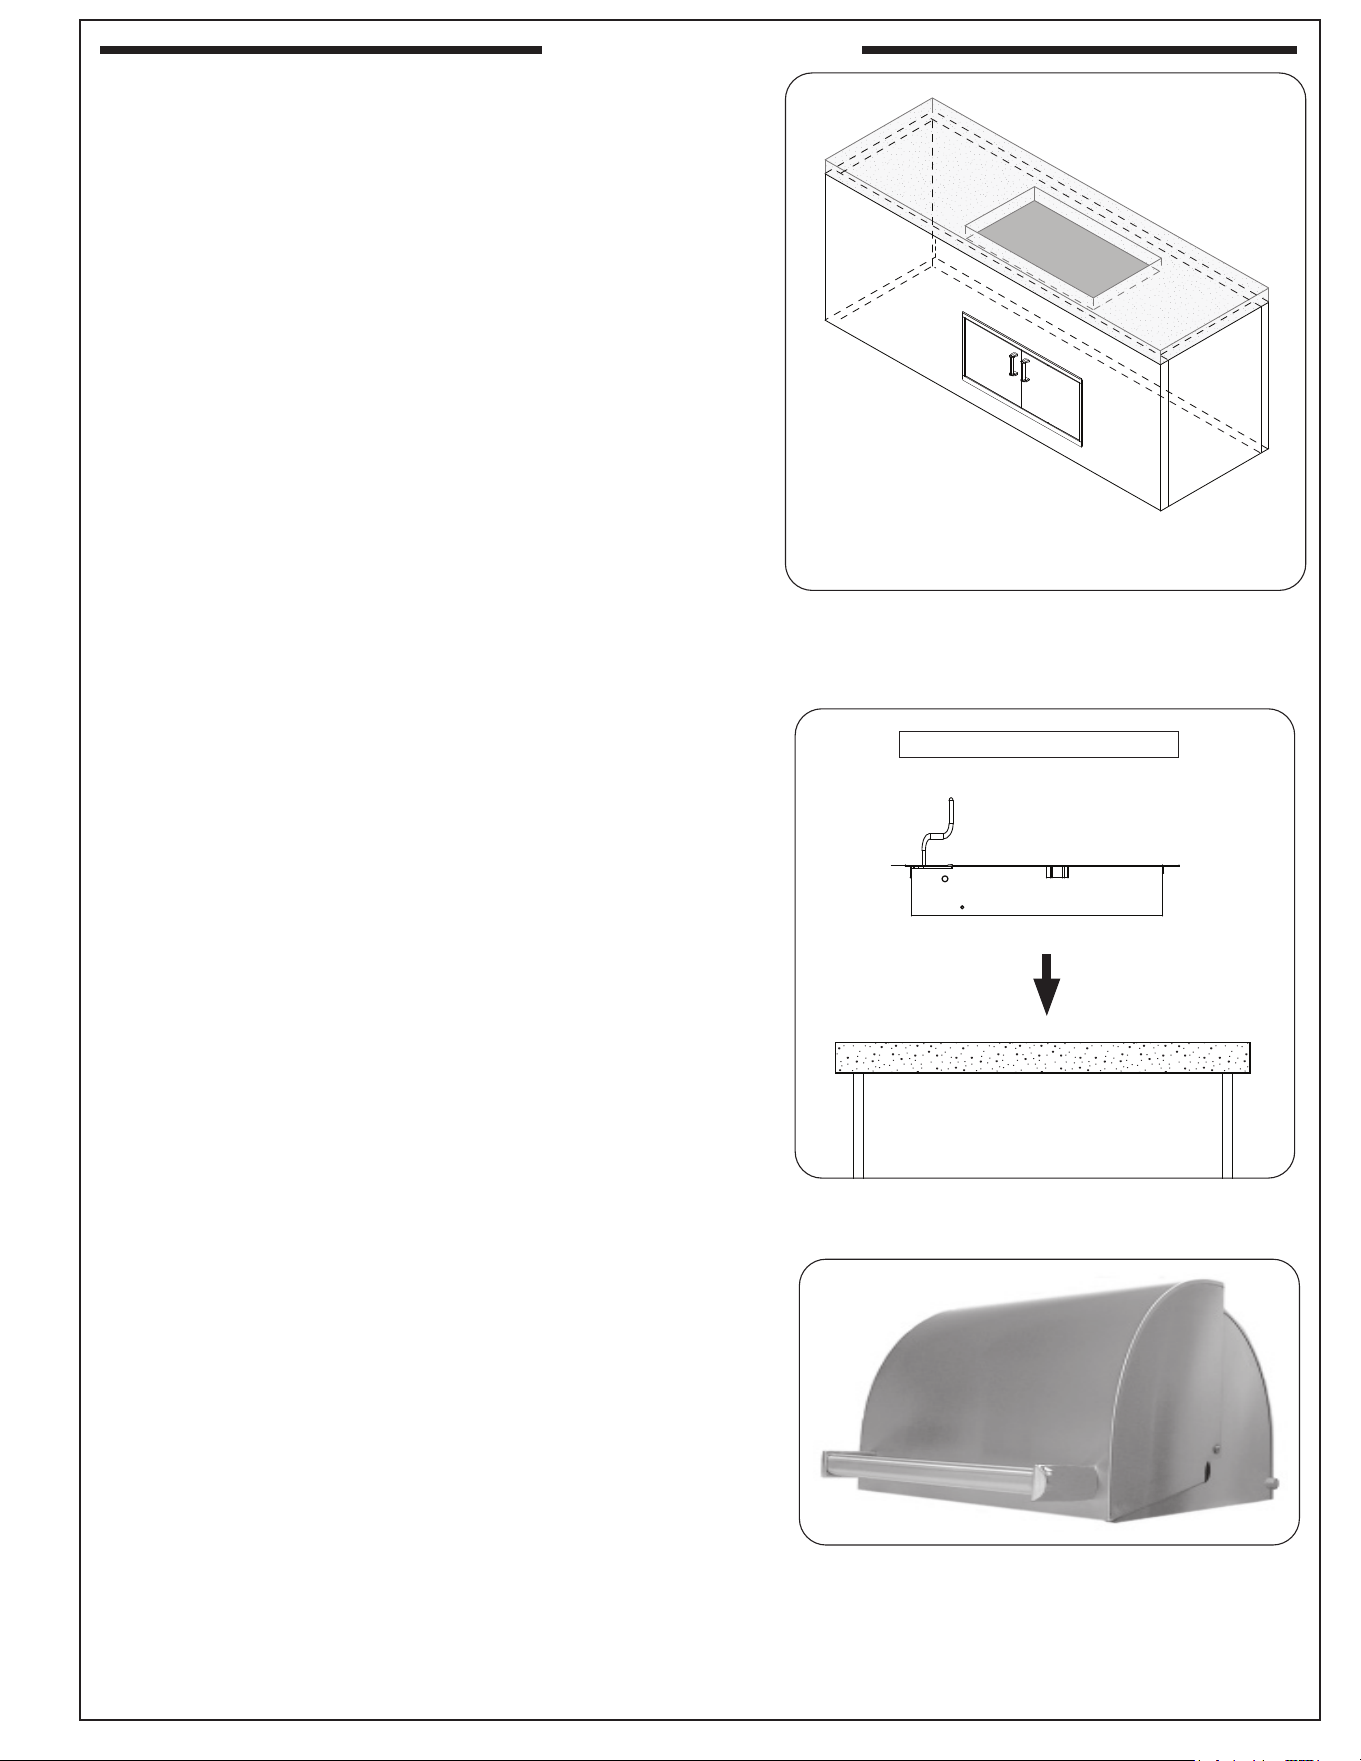
CONSTRUCT ENCLOSURE
A custom-built enclosure will need to be constructed. Construct
the enclosure according to your individual install preference,
while following the guidelines found in the ENCLOSURE
REQUIREMENTS and INSTALLATION REQUIREMENTS
sections.
• Construct the enclosure in an appropriate location
(ensure all requirements of this manual and all local codes
are met when determining location).
• Follow all information regarding enclosure parameters,
cutout dimensions, and clearances listed in the
ENCLOSURE REQUIREMENTS and INSTALLATION
REQUIREMENTS sections. Failure to do so will prevent
proper operation and can cause property damage or
personal injury.
LOWER UNIT INTO ENCLOSURE CUTOUT
Carefully place the unit into the cutout in the enclosure, making
sure not to damage any part of the unit (see Fig. 11-2).
• Ensure the unit is correctly inserted without any
obstructions between it and the countertop.
• Ensure the unit is placed so that it sits ush against
the enclosure front wall. See the COUNTERTOP
OVERHANG section in ENCLOSURE REQUIREMENTS
for details.
• If installing on a countertop with an irregular/textured
surface, a bead of silicone sealer rated for 500° F
(260° C) or higher is recommended to protect from the
elements.
GRILL OVEN (optional)
Align the grill oven (Fig. 11-2 and Fig. 11-3) over the grill and
rest it in place. Reference the PARTS LIST for orientation.
Note: The crank handle must be positioned with the arm
pointing from left to right in order for the oven hood
to close correctly.
INSTALLATION
Fig. 11-2 Lower in unit into cutout
Lower unit into cutout
Fig. 11-1 Enclosure construction overview
(if applicable)
• Not to scale
• Example shown, design and location of enclosure and its
items may vary
• See ENCLOSURE REQUIREMENTS section for details
Fig. 11-3 Grill oven (if applicable)
REV 2 - B- 2408140950
L-C2-338
12
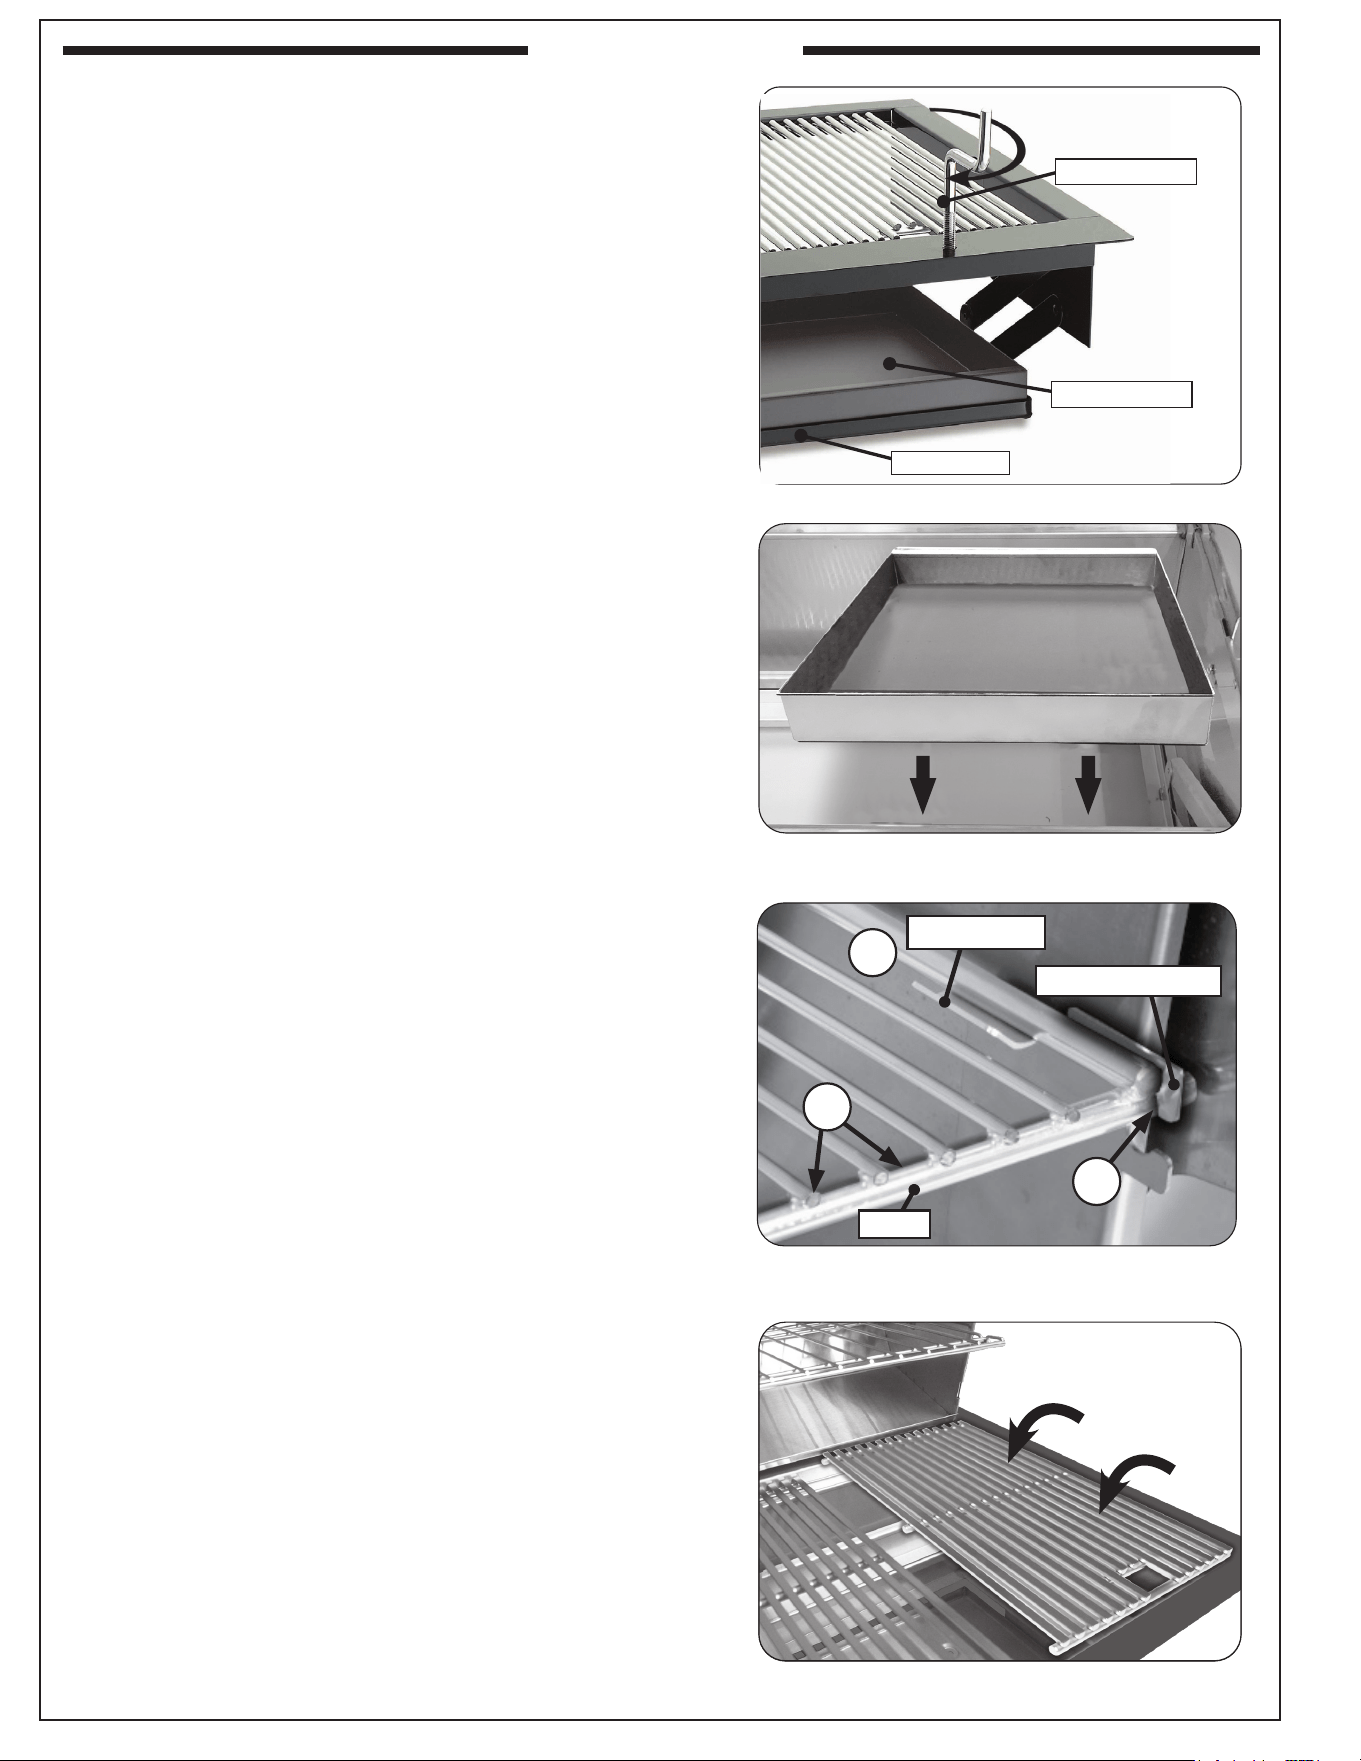
INSTALL CRANK
Fit the crank handle into the hole on the top right side of the
face. Aligning it carefully, screw it into the nut on the frame.
After installation, crank the handle in and out to raise and lower
the charcoal pan. See Fig. 12-1.
INSTALL CHARCOAL PAN
Carefully orient the charcoal pan(s) inside the grill, and rest on
the pan frame. See Fig. 12-2.
INSTALL WARMING RACK (If applicable)
Taking the warming rack, grip along the bottom edge and hold
the rack vertical so the rounded shoulders are topmost and the
rod bottommost. See Fig. 12-3, A:
• Carefully lift the warming rack up under the outer oven
edges and place the rod ends into the hanging brackets.
See Fig. 12-3, B.
• Allow the rack to rotate away from you so that the sides
rest on the support lip (Fig. 12-3, C). As the shelf rotates
into position it will lock into the holding bracket. Check
it is secure in position before use.
INSTALL COOKING GRIDS (if applicable)
Carefully place each cooking grid onto the front and rear grid
rests of the grill. See Fig. 12-4.
INSTALLATION
Fig. 12-2 Install charcoal pan(s)
Fig. 12-1 Installation
Fig. 12-4 Install cooking grids
Charcoal pan
Pan frame
Crank handle
Fig. 12-3 Install warming rack
Rod
Holding bracket
Support lip
B
C
A
REV 2 - B- 2408140950
L-C2-338

13
BEFORE INITIAL USE
Ensure that:
• the grill has been properly installed by a qualied professional service technician as instructed in this manual.
• you have read and understand all of the information in this manual.
BEFORE EACH USE
Ensure that:
• the surrounding area of the unit is clear and free at all times.
• the cooking area and drip tray are clean, and the drip tray is properly installed.
OPERATION
• The grill becomes HOT during use, INCLUDING THE CHARCOAL ACCESS DOOR HANDLE AND
CRANK. NEVER touch any part of the cooking area or surrounding hot surfaces with bare hands.
Use long-handled insulated BBQ tools and wear an insulated glove / oven mitt.
• Always keep your face and body as far from the grill as possible during use. Avoid wearing loose-
tting clothing as they could ignite.
• This appliance is designed as an attended appliance. DO NOT leave this appliance burning when unattended.
• NEVER cover more than 75% of the cooking or grill surface with griddles or pans to prevent
overheating.
After reading and understanding all bullets above, follow these steps to light and use your grill:
1. Load, light, and adjust the charcoal per the OPERATION section.
2. Allow the grill to preheat until the desired cooking temperature is reached.
3. Place the food on the grill and cook as desired. Monitor the charcoal and adjust the grilling heat if necessary
(see the CHARCOAL PAN section on the following page).
4. See the section below and the following pages for all other information regarding use.
AFTER EACH USE
1. Brush the cooking grids to remove all residue.
CAUTION: Use long-handled insulated BBQ tools and wear an insulated glove / oven mitt.
2. It is recommended to operate with high heat and hood closed for 10-15 minutes to burn o all grease.
3. Cover the grill once it has completely cooled.
Note: For additional cleaning, refer to the SERVICING AND CLEANING section.
USING THE GRILL
REV 2 - B- 2408140950
L-C2-338
14
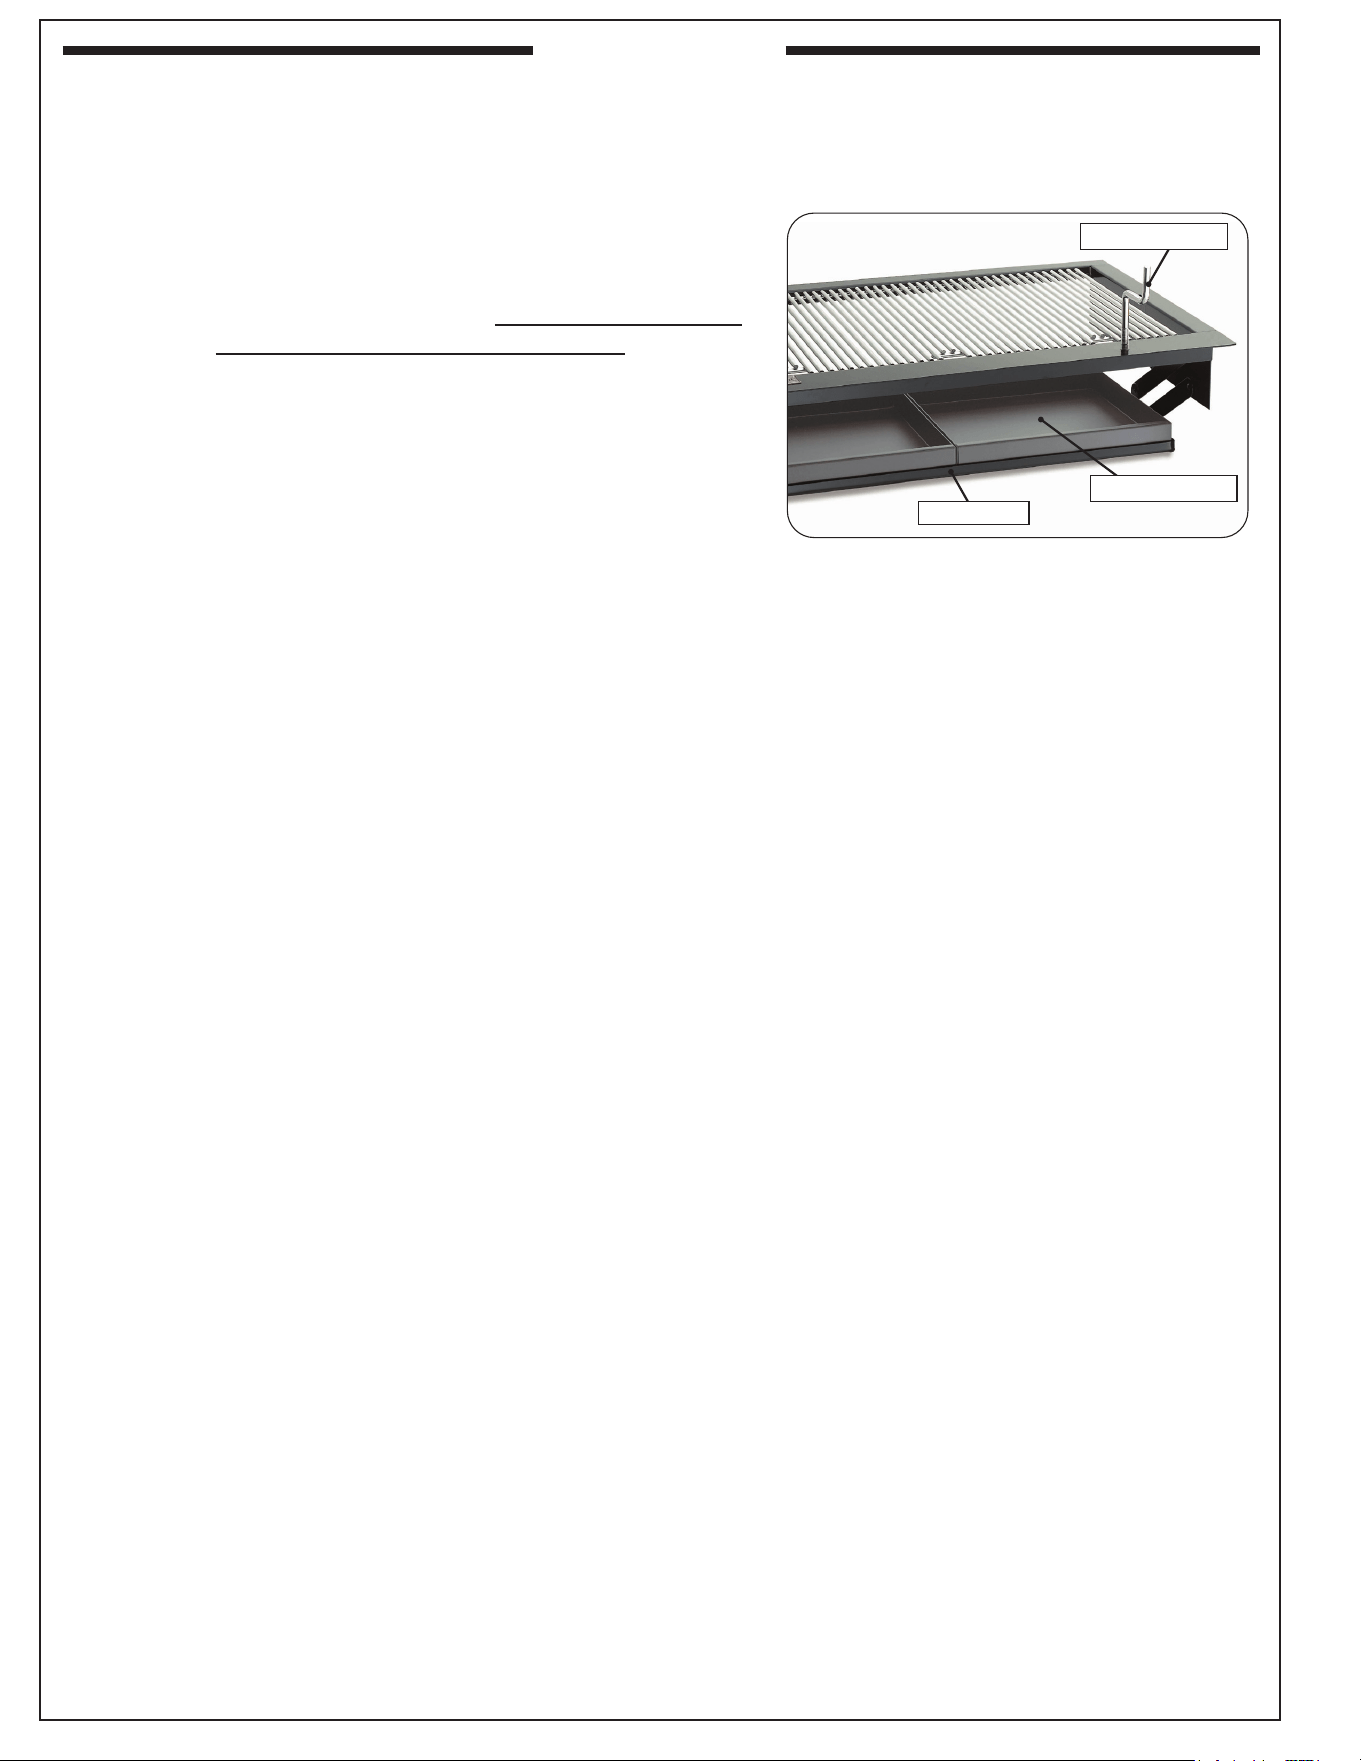
CHARCOAL INSTRUCTIONS
1. Remove the cooking grids and pile your charcoal on the
charcoal pan(s). Avoid spillage.
WARNING: When adding charcoal, spread it across the
charcoal pan evenly and DO NOT exceed a height
of 1" (2.5 cm) above the charcoal pan. Excessive
amounts of charcoal may cause over heating and
damage to your grill.
2. Follow the instructions supplied with your charcoal/fuel for
lighting.
WARNING: All surfaces of charcoal unit will become HOT
during use. Exercise caution when adding
charcoal or cranking the charcoal pan up/down.
Use long-handled insulated BBQ tools and wear
an insulated glove / oven mitt.
3. Turn the crank handle to raise or lower the charcoal pan to
increase or decrease the grill heat as needed.
OPERATION
Simple to use, this elegant stainless-steel charcoal grill has the added benet of an adjustable charcoal pan to
allow you to change the height of the charcoal while cooking.
Fig. 14-1 Operation
Crank handle
Charcoal pan
Pan frame
REV 2 - B- 2408140950
L-C2-338
15
Your grill requires regular cleaning and maintenance. Refer to these instructions for details. Performing
these procedures will ensure proper operation, appearance, and safety.
WARNINGS
• Prior to servicing or cleaning make sure the unit is completely cool.
• Wear appropriate gloves and safety glasses during any servicing or cleaning.
• DO NOT spray any cleaner or liquids on the grill when hot.
• The grill MUST be cleaned regularly to prevent grease build-up and other food deposits. A clean and well
maintained grill prevents the risk of grease build-up and grease res.
• Verify proper operation after servicing or deep cleaning.
• See INSTALLATION, OPERATION, AND SAFETY INFORMATION section for additional related information.
CLEANING YOUR GRILL
Before Each Use
1. Inspect and clean the exterior surfaces of the unit: With a cool grill, clean any dust, grease, splatter,
or spills as needed with a damp clean cloth.
After Each Use
1. Perform a burn-o and clean the cooking grids: Operate the grill hot with the hood closed for 15 minutes
to burn-o food and grease and allow for an easier cooking grid clean. Then extinguish the hot charcoal
and use a grill or scraper brush to clean the cooking grids of all residue. Use long-handled insulated BBQ
tools and wear an insulated glove / oven mitt.
2. Clean the charcoal pan: After each use, when the grill is cool, empty the charcoal pans of all ash and
drippings. Dispose of all ashes appropriately into a reproof container.
Clean the charcoal pan with a soapy water solution if needed. Rinse and dry completely. Replace the
charcoal pan back to the grill.
3. Cover your grill: Once the grill is dry and cool, cover your grill with a Fire Magic protective cover (not
included).
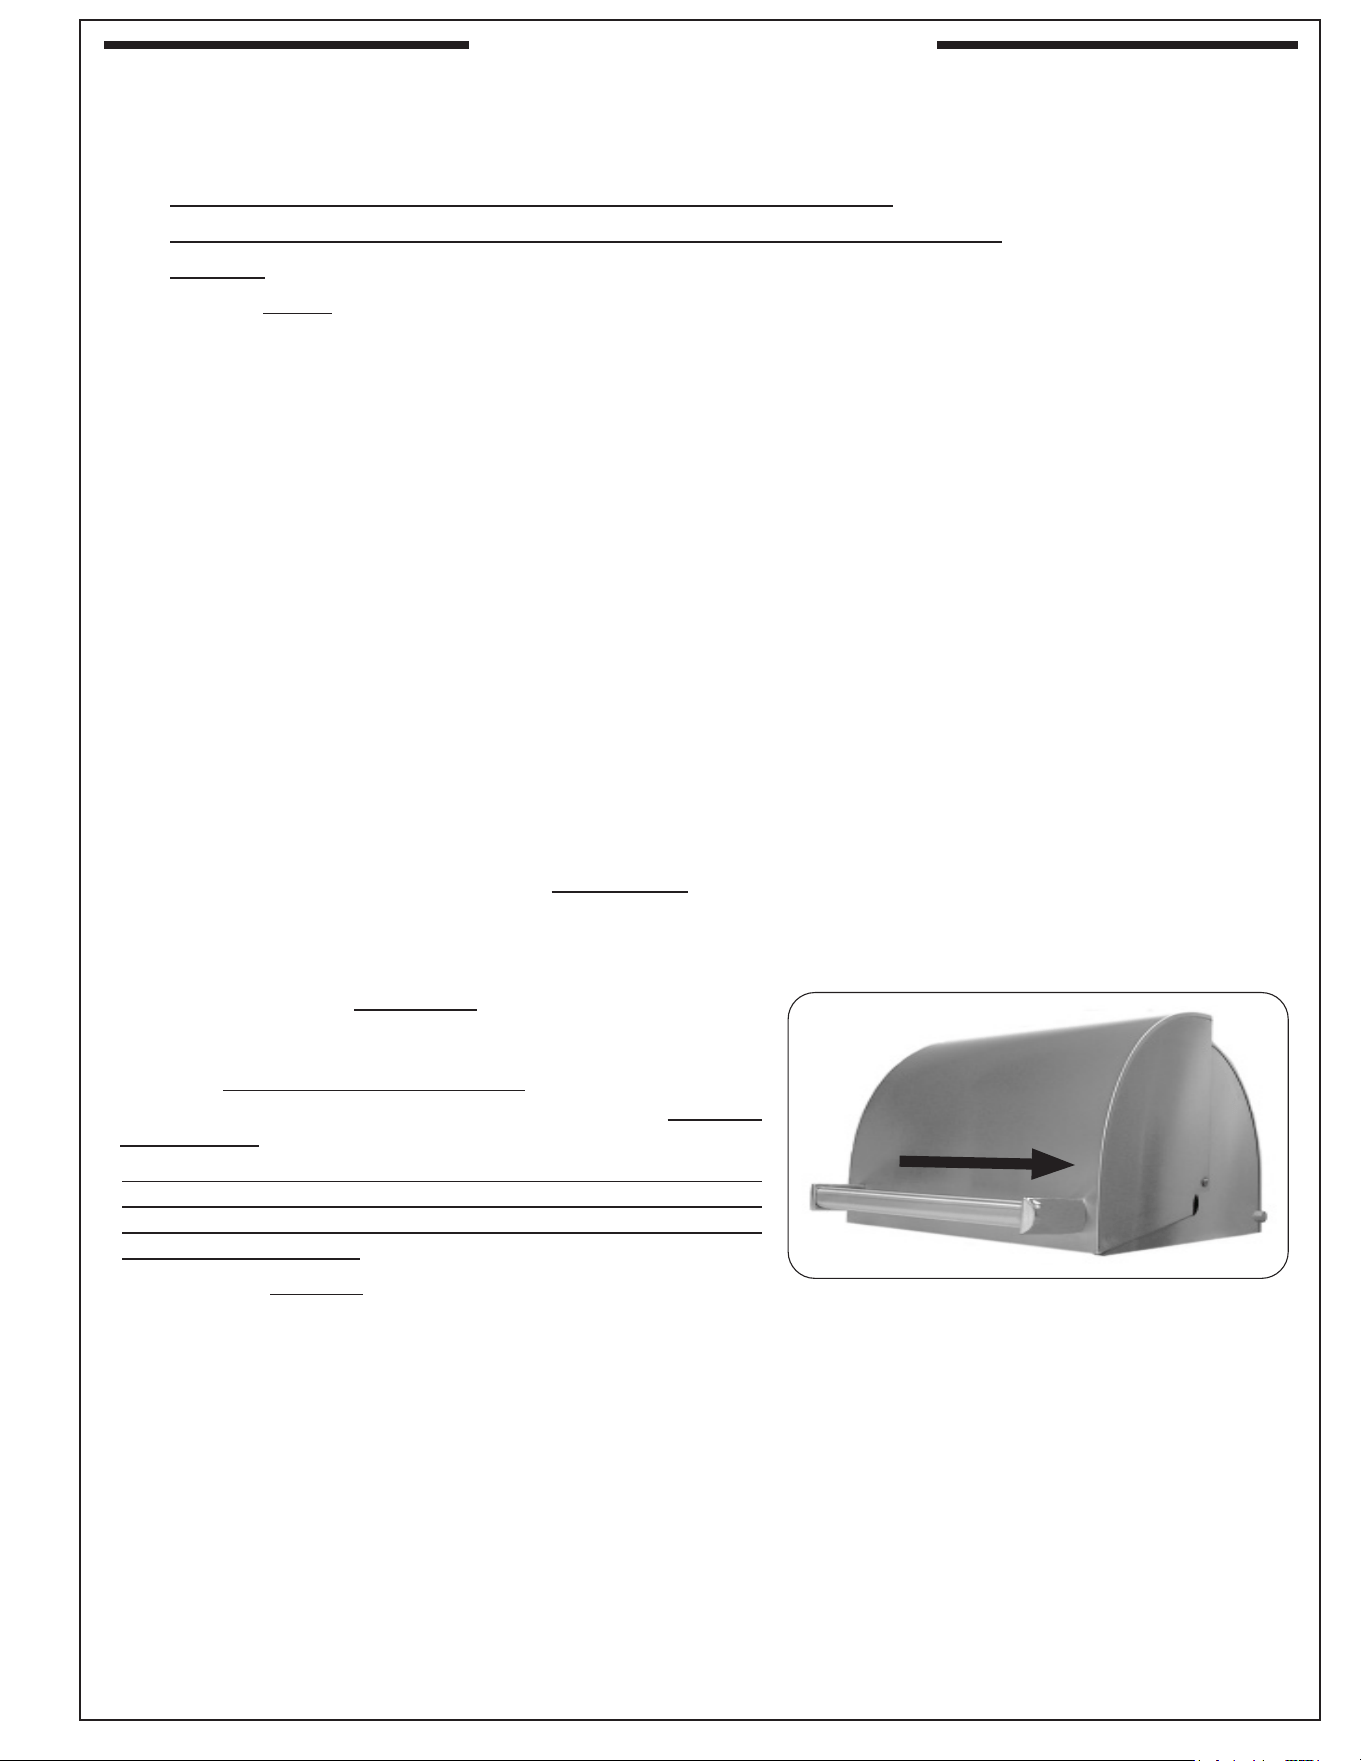
Optional Stainless Steel Grill Oven Hood
With a cool grill, use a grill cleaner (or a soapy water solution)
and a clean cloth to remove grease and dirt from the inside
and outside of the grill. For tough deposits, a copper pad can
be used. Always wipe with the grain. See Fig. 15-1. Rinse
and dry completely. For the exterior, follow up with a stainless
steel cleaner and a clean cloth.
If this routine cleaning is not performed, the stainless steel
may become dull and develop surface rust (due to use and
atmospheric conditions). If left uncleaned, signicant damage
and pitting may occur.
Important: DO NOT use steel wool, any other metal tools,
or any other cleaners/chemicals to clean the
exterior other than recommended above. Such
items promote rust.
Note: Due to the nature of stainless steel, temperatures produced by the grilling process will cause
discoloration. This can be reduced by routine cleaning.
SERVICING AND CLEANING
Fig. 15-1 Grill oven (if applicable)
Wipe with grain
REV 2 - B- 2408140950
L-C2-338

16
For Environments High In Salt, Chloride, Or Other Corrosive Chemicals
When this grill is installed in a corrosive environment such as near the ocean (salt air), poolside (chlorine and/or
pool chemicals) or any other location with exposure to high salt/chloride content or corrosive chemicals/solutions,
it will be more susceptible to corrosion and MUST be maintained/cleaned more frequently.
• DO NOT store any corrosive chemicals (chlorine, hydrochloric acid, fertilizer, etc.) near your stainless steel grill.
• DO NOT allow any corrosive materials (masonry dust, debris, etc.) to settle on your stainless steel grill.
• These environments, chemicals, and materials may cause the 304 stainless steel to develop surface rust and
consequently pitting. Under these conditions the grill exterior MUST be cleaned at least monthly. Inspect your grill
often and clean accordingly.
Protecting Your Grill
An optional protective cover will protect your grill when not in use. Install the cover on a cool and dry grill. DO NOT cover a
damp grill. During high humidity or after rainy conditions, remove the cover to dry trapped moisture if present. (If the cover
is installed over a damp grill it can cause surface rust.)
Ensure that the INSIDE of the cover is DRY before putting it back on the grill.
SERVICING AND CLEANING (cont.)
REV 2 - B- 2408140950
L-C2-338
17
If you have trouble with the unit, please use this list to identify the problem. By trying one or more of the solutions
to the possible cause, you should be able to solve the problem. If this list does not cover your present problem,
or if you have other technical diculties with the unit, please contact your local dealer.
PROBLEM POSSIBLE CAUSE CORRECTION
Charcoal grill is not
getting hot
1. Dirty grill 1. Remove ashes from previous grilling. Ashes
can trap moisture, causing diculty to light
charcoal.
2. Damp charcoal 2. Ensure your charcoal is dry when lighting.
3. Low quality charcoal 3. Use quality brand charcoal. Low quality
brands can struggle reaching temperature and
remaining lit.
4. Old or used charcoal 4. Use new charcoal. Old or used charcoal can
result in the grill not reaching temperature and
can burn out quicker giving inconsistent heat.
5. Charcoal went out 5. Carefully re-light your charcoal by following
the instructions supplied with your charcoal.
Ensure your charcoal is properly lit before
spreading to distribute heat.
6. Charcoal pan height is too low 6. Adjust the crank to raise the charcoal pan
closer to the cooking grids.
TROUBLESHOOTING
REV 2 - B- 2408140950
L-C2-338

18
NOTES PAGE
Please use this page to record any information that you may want to have at hand.
REV 2 - B- 2408140950
L-C2-338