EN
DUAL AIR FRYER
Translation of the original manual
SFR 9660BK
SFR 9660BK
A
1
2
3
4
5
6
7
8
B
2
5
15
3
4
6 7
9 11 12
14
1
8
10
13
C

- 1 -
03/2026
2026
EN
Dual Air Fryer
User Manual
Important Safety Instructions
READ CAREFULLY AND STORE FOR FUTURE USE.
General Warnings
• This appliance may only be used by children aged 8
years and older and by persons with physical, sensory or
mental impairments or lack of experience and knowledge,
if they are supervised or have been instructed on the safe
use of the appliance and understand the potential hazards.
• Children must not play with the appliance.
• Cleaning and user maintenance shall not be done
by children unless they are older than 8 years and
supervised.
• Children under 8 years of age must be kept away from the
appliance and its power cord.
• If the power cable is damaged, have it replaced in a
professional service centre in order to prevent a dangerous
situation. Never use the appliance if the power cable is
damaged.
• Do not immerse the appliance, power cord or plug in water
or any other liquid.
• Clean surfaces that come into contact with food according
to the instructions in this manual.
• This appliance is not intended for operation through an
external timer switch or a remote control.
- 2 -
03/2026
2026
WARNING. Hot surface.
• The temperature of accessible surfaces may be higher
if the appliance is in operation. The appliance may
remain hot even after being switched off. Before cleaning,
maintenance or other manipulation, make sure that the
appliance is completely cooled down.
. . . . . . . . . . . . . . . . . . . . . . . . . . . . . . . . . . . . . . . . . . . . . . . . . . . . . . . . . . . . . . . . . . . . . . . . . . . . . . . . . . . . . . . . . . . . . . . . . . . . . . . . . . . . . . . . . . . . . . . . . . . . . . . . . . . . . . . . . . . .
Additional Important Safety Instructions forUse of the Appliance
• Before connecting the appliance to the mains socket, make sure that the nominal voltage indicated on the appliance nameplate matches the voltage
of the socket to which you want to connect the appliance.
• Connect the appliance only to a properly earthed socket. We recommend connecting the appliance to an independent electrical circuit. Do not use
extension cords.
• Do not connect the appliance to a mains socket unless it is properly assembled.
• The mains socket must remain freely accessible so that the appliance can be disconnected from the power supply if necessary.
• Do not touch the power cord or plug with wet hands.
• This product is designed for household use only. It is also suitable for personal non-commercial use in spaces such as:
– staff kitchens in stores, offices and other workplaces;
– hotel or motel rooms andother living areas;
– agricultural farms;
– bed and breakfast establishments.
• Do not use the appliance in an industrial environment or outdoors.
• The appliance is designed for food preparation. Do not use it for any other purposes than those intended.
• Do not place the appliance on windowsills, sink drain trays or unstable surfaces. Always place the appliance on a stable, flat and dry surface.
• Do not place the appliance on or near an electric or gas stove, do not place it in the vicinity of naked fire or appliances that are sources of heat.
• Do not use the appliance near a bathtub, sink, swimming pool or other water source.
• Before using this appliance, check that the drip tray is located in its place.
• During operation, sufficient space for air circulation above and on all sides of the appliance should be provided. Do not use the appliance near
flammable materials such as curtains, kitchen towels, etc.
• Do not place the appliance on a cloth or tablecloth surface.
• Always prepare food in the frying pot provided.
• Filling the frying pot with oil can cause a fire hazard.
• Be especially careful when preparing fatty food to avoid being burnt by spluttering fat.
• Do not touch the anti-stick coating with sharp or metallic objects. This may lead to damage.
• Do not cover the vents while the appliance is in operation.
• Always switch the appliance off and unplug it from the mains socket when left unattended, after use and before cleaning or moving.
• Allow the appliance to fully cool down before moving, cleaning or storing. Use the thermally insulated handle for carrying the appliance.
• Do not use the appliance to support various items.
• Disconnect the mains cable from the socket by pulling the plug, not the cable. Otherwise, damage to the power cable or socket could occur.
• Make sure the power cord does not hang over the edge of a table and that it is not touching a hot surface.
• Do not use the appliance if it is not working correctly, if it was dropped on the floor, if it is damaged or has been submerged in water.
• To avoid the danger of injury by electrical shock, do not repair the appliance yourself or make any adjustments to it. All repairs should be carried out
by an authorised service centre. Tampering with the appliance may result in the loss of your legal rights regarding faulty performance or warranty
for quality.
. . . . . . . . . . . . . . . . . . . . . . . . . . . . . . . . . . . . . . . . . . . . . . . . . . . . . . . . . . . . . . . . . . . . . . . . . . . . . . . . . . . . . . . . . . . . . . . . . . . . . . . . . . . . . . . . . . . . . . . . . . . . . . . . . . . . . . . . . . . .
- 3 -
03/2026
2026
EXPLANATION OF SYMBOLS PLACED ON THE PRODUCT OR INTHE ACCOMPANYING DOCUMENTATION
This product meets all the basic requirements of the applicable EU directives.
This symbol on products or accompanying documents means that used electric or electronic products must not be added to ordinary
municipal waste.
. . . . . . . . . . . . . . . . . . . . . . . . . . . . . . . . . . . . . . . . . . . . . . . . . . . . . . . . . . . . . . . . . . . . . . . . . . . . . . . . . . . . . . . . . . . . . . . . . . . . . . . . . . . . . . . . . . . . . . . . . . . . . . . . . . . . . . . . . . . .
- 4 -- 4 -
03/2026
2026
• Thank you for purchasing our SENCOR product; we hope it will serve
to your satisfaction.
• Before using this appliance, please familiarise yourself with the user
manual, even if you are already familiar with using similar types of
appliances. Use the appliance only as described in this user manual.
Keep the manual for future reference.
• It is recommended to keep the original packaging, packing material,
receipt and confirmation of the extent of the seller's liability or warranty
certificate at least for the duration of the legal right to file defect
claims or the quality warranty. When transporting the appliance,
we recommend repackaging it in the original box provided by the
manufacturer.
. . . . . . . . . . . . . . . . . . . . . . . . . . . . . . . . . . . . . . . . . . . . . . . . . . . . . . . . . . . . . . . . . . . .
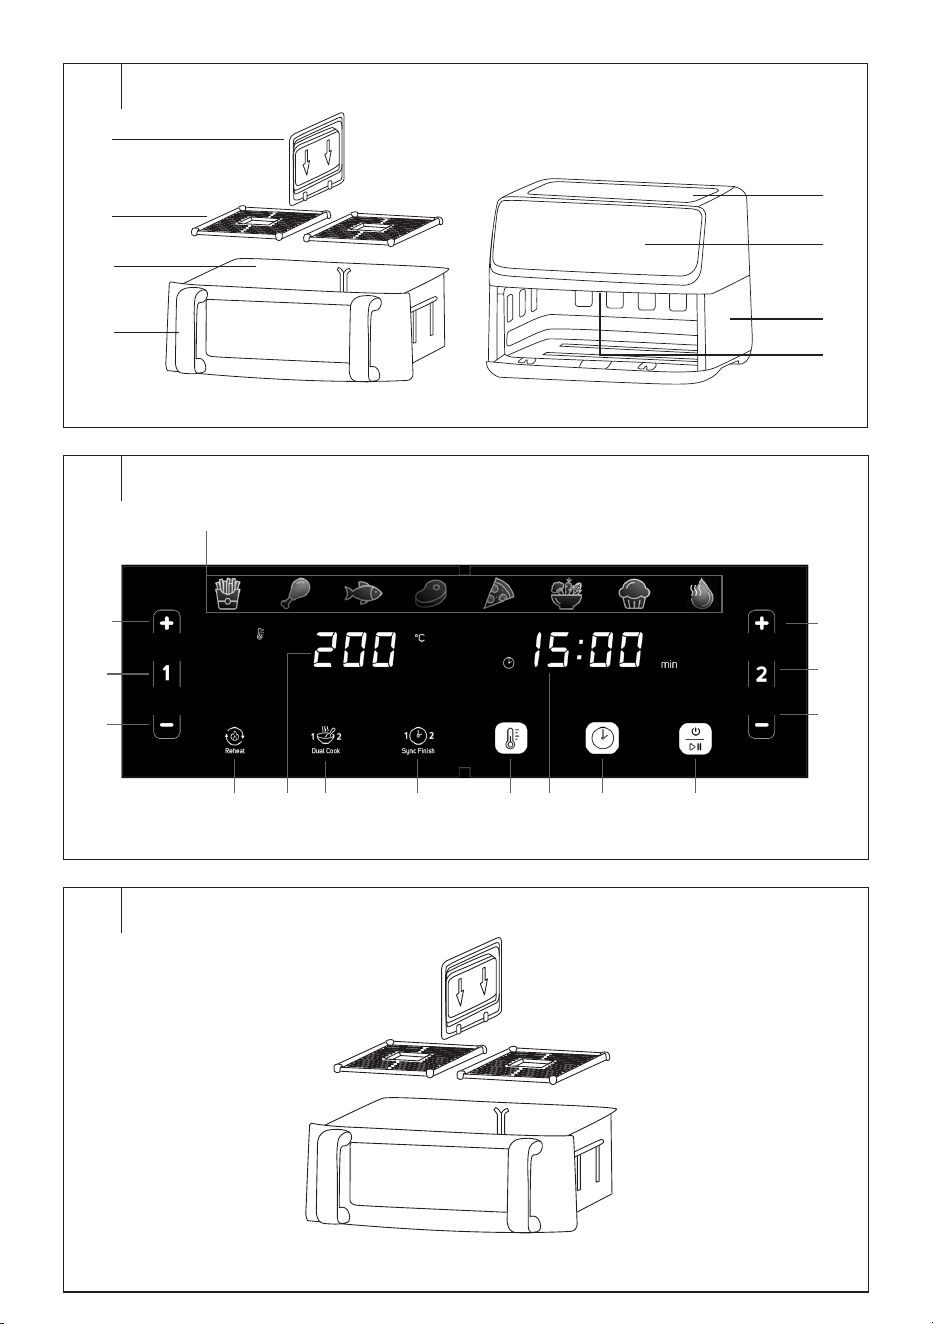
APPLIANCE DESCRIPTION
A1 Detachable partition
A2 Frying mats
A3 Frying pot with sight glass
A4 Handles
A5 Upper surface
A6 Control panel
A7 Fryer body
A8 Heating element
Not shown: ventilation openings (located at the rear)
. . . . . . . . . . . . . . . . . . . . . . . . . . . . . . . . . . . . . . . . . . . . . . . . . . . . . . . . . . . . . . . . . . . .
DESCRIPTION OF THE CONTROL PANEL
B1 Preparation programme
buttons
B2 + button (left side)
B3 1 button toselect the left frying
pot section
B4 − button (left side)
B5 Reheat button for heating food
B6 Left frying pot section display
B7 button toenable dual
frying
B8 button toenable
synchronised finishing
B9 button to set the
temperature
B10 Right frying pot section
display
B11 button to set the cooking
time
B12
button toswitch the
fryer on/off andto start the
program
B13 − button (right side)
B14 2 button toselect the right
frying pot section
B15 + button (right side)
The package contains 25 pieces of baking paper anda cookbook for easy
cooking.
. . . . . . . . . . . . . . . . . . . . . . . . . . . . . . . . . . . . . . . . . . . . . . . . . . . . . . . . . . . . . . . . . . . .
INTENDED USE
• The Sencor SFR 9660BK dual hot air fryer is designed for processing
food by heat. The treatment is carried out by “frying” with hot air witha
minimum amount of oil. The air is heated by the heating element and
distributed evenly through the frying pot interior with the internal fan.
. . . . . . . . . . . . . . . . . . . . . . . . . . . . . . . . . . . . . . . . . . . . . . . . . . . . . . . . . . . . . . . . . . . .
BEFORE FIRST USE
• Before first use, remove the appliance and its accessories from the
packaging and remove all labels and tags.
• Wipe the fryer outer surface with a soft sponge slightly moistened in
warm water. Wipe dry with a clean cloth.
• Remove the frying pot, mats and partition and wash them in warm
water with a little kitchen detergent. Rinse and wipe dry.
• Wipe the fryer interior with a soft sponge lightly dampened with warm
water. Wipe dry with a clean cloth.
• We recommend starting the air fryer for about 30 minutes at 200 °C.
During this time, you may notice slight smoke or a slight smell. This is
a normal occurrence and will disappear with use.
. . . . . . . . . . . . . . . . . . . . . . . . . . . . . . . . . . . . . . . . . . . . . . . . . . . . . . . . . . . . . . . . . . . .
AIR FRYER FEATURES AND FUNCTIONS
Frying pot
The frying pot is equipped with a sight glass that allows you to check
quickly and easily the status of food preparation inside the frying pan
without having to remove it.
Detachable partition
By inserting a removable partition, you can divide the interior of the frying
pan into two sections. Ineach section, you will be able to prepare different
foods, each for a different program and at a different temperature.
Interior lighting
The interior lighting makes it easy to check the food. Thanks to the
intelligent control, it will turn off automatically after removing the frying pot
and turn back on when the pot is inserted. When the program ends, the
light will turn off automatically. In addition, if you set the food preparation
in only one frying pan section, the lighting will turn on only inthat section.
The second section will remain unlit.
Hot air fryer function
The Sencor SFR 9660BK hot air fryer is equipped with the following
cooking functions:
– Dual frying: Food is prepared with the same program in theentire
frying pot. For more information see the Dual frying section.
– Synchronized frying: divide the frying pot into two sections
using a removable partition. The food will be finished in both
frying pot sections simultaneously. For more information, see the
Synchronized cooking completion section.
– independent frying: divide the frying pan into two sections using a
removable partition andset the cooking program for each section
separately. The food will be completed according to the cooking
time set independently of each other.
. . . . . . . . . . . . . . . . . . . . . . . . . . . . . . . . . . . . . . . . . . . . . . . . . . . . . . . . . . . . . . . . . . . .
USING THE REMOVABLE PARTITION
• The removable partition is designed toseparate the inside of the frying
pan. This is advisable to separate it if you want to set two different
cooking programs with a different temperature, or if you want to set
one cooking program for the left or right frying pan section (the other
one will be turned off). The partition will ensure that the food is not
mixed and prevent the food being cooked with a lower temperature
program from burning.
• Please remove the partition if the dual frying function is to be used –
see the Dual frying section later in theuser's manual.
When inserting the partition into the frying pan, proceed as follows:
1. Insert the pads into the frying pot.
2. Rotate the partition so that the marked arrows face down.
3. Align the partition with the groove on the rear wall of the frying pan
andinsert it into the groove – see Figure C. Push the partition down
until it’s seated on the frying bottom pan between the frying pads.
There is also a groove on the frying pan bottom into which the
partition should fit.
• If you need to remove the partition, pull it upwards from the frying pan.
Warning:
Before inserting or removing the partition, check
that the fryer is turned off andhas cooled down
completely. Keep in mind that after completing the
program run, the partition is very hot andthere is a
risk of serious burns if improperly handled. If you
need to remove the partition while it is hot, put on
protective kitchen gloves, remove andput it on a
cutting board or other heat-resistant surface.
. . . . . . . . . . . . . . . . . . . . . . . . . . . . . . . . . . . . . . . . . . . . . . . . . . . . . . . . . . . . . . . . . . . .
EN
Dual Air Fryer
User Manual
- 5 -- 5 -
03/2026
2026
FRYER PLACEMENT
• Place the hot air fryer on a flat, firm and stable surface well away from
the mains socket.
• Make sure to leave a sufficient clearance around the fryer to allow
proper air circulation. This is especially important in therear part,
where the ventilation openings are located. These must not be
covered during operation, even if the fryer cools down.
Warning:
Do not use the appliance near flammable materials
such as curtains, kitchen towels, etc. Do not place
the appliance on a surface covered with a cloth or
tablecloth.
. . . . . . . . . . . . . . . . . . . . . . . . . . . . . . . . . . . . . . . . . . . . . . . . . . . . . . . . . . . . . . . . . . . .
BASIC USE OF THE FRYER
1. Remove the frying pot from the fryer. Put the frying pads in the
frying pot. The pads are equipped with central handles.
These should point upwards after insertion. According to the
intended function of using the deep fryer, insert a partition – see the
user's manual previous sections.
2. Place the food you wish to cook inside andput the pot back in the
fryer.
3. Plug the power cord into a power socket.
4. A short sound alert will sound and the control panel will briefly light
up. It then goes out and the fryer switches to standby mode. Only
the
button will remain lit.
5. Press the button to turn on the fryer. The buttons 1 and2 will
light up.
6. Press 1 or 2 to select the left or right frying pan section to be used.
The selected section’s display will show the default temperature and
cooking time. The buttons of the selected fryer section and the
icon of the steak preparation program will flash.
7. Press the button for the selected preparation programme. Adjust
the cooking time or temperature as needed – for more information,
please refer to further sections of this user's manual.
8. To set the cooking program in thesecond frying pan section, press
button 1 or 2. Then press the button for the selected preparation
program. Adjust the cooking time or temperature as needed – for
more information, please refer to further sections of this user's
manual.
Note:
If the fryer is on but the frying pan is removed (both displays
show “OPEN”), no buttons will function. It will be necessary
to insert the pot into the fryer body so that you can turn it
on, select a program, etc.
9. Press the button to start the fryer. The display(s) will alternately
show the set cooking time countdown and temperature.
10. During cooking, check the baking status through the sight glass in
the frying pot. If it is necessary to mix the food, carefully remove the
frying pot, mix the food andput the pot back into the fryer body.
11. When the set cooking time has elapsed, an acoustic alert will sound
five times, both displays will show “OFF”, the frying pan light will go
out and the fryer will turn off andswitch into standby mode. The fan
will be running for about 15 seconds and then turns off too.
12. Remove the frying pot andcheck that the food is cooked. If the food
is not yet fully cooked, put the frying pot back andset the desired
temperature and cooking time. Start the fryer.
13. If the food is sufficiently cooked, remove the frying pot from thefryer
and put it on a heat-resistant surface. Using tongs or similar kitchen
utensils, remove the food, allow it to drain on a plate lined with a
paper kitchen towel andserve.
Note:
Do not turn the frying pot upside down. The oil that
accumulates on the bottom will leak out onto the food.
Note:
Always place the frying pot on a heat-resistant surface. Do
not place it on a plastic board, tablecloth or similar heat-
sensitive materials.
14. If you need to cancel the preparation at any time, long press the
button until both displays show “OFF”.
15. After use, unplug the power cord from the mains socket.
16. Prior to cleaning, maintenance or other handling, let the fryer cool
down.
Warning:
During use, the fryer is warmed up andmay reach
high temperatures. The fryer remains hot even after
use. Mishandling may lead to serious burns. Take
extra care while handling. We recommend using
protective kitchen gloves. Always use the thermally
insulated handle when handling the frying pot. Do not
place the frying pot on heat-sensitive surfaces!
Note:
Never use metal utensils or knives as they may scratch the
non-stick coating of the frying pot or mats.
Pausing the cooking process
• If you need to interrupt the fryer operation during food preparation,
press the button briefly.
• The display will start flashing andwill alternately show the set
temperature andthe remaining cooking time. The buttons
andselected sections of the deep fryer (1 or 2) and the icon of the
selected programme will flash.
• You can use the cooking interruption toadjust the cooking time or to
set a new temperature – follow the instructions below.
• You can also use pause to check whether the food is cooked. Carefully
remove the frying pan and “OPEN” will appear on both displays.
Check how well the food is cooked, then put the frying pot back inside.
• Press the button to continue the fryer operation.
• You can also pause the fryer by carefully removing the frying pot.
Both displays will show “OPEN”. When the frying pan is inserted, the
operation of the fryer will be restored automatically. However, inthis
case you will not be able to adjust the cooking time or temperature.
• If the cooking is interrupted for more than 20 seconds, the fan will
stop. After starting the fryer, the fan will restart.
• If the cooking is interrupted and no button is pressed for more than 5
minutes, the fryer will turn off and go into the standby mode, in which
, 1 and2 buttons light up. Insuch case it will be necessary to
select the cooking program again and restart the fryer.
Selecting a preset programme
The hot air fryer is equipped with eight pre-set cooking programmes. Each
has a preset temperature and cooking time that can be changed.
1. Turn on the fryer with the button.
2. Press 1 or 2 to select the left or right frying pan section to be used.
3. Press the button for the selected preparation programme. Each time
it is pressed, the icon for the selected program will flash.
4. Press the button to start the fryer.
- 6 -- 6 -
03/2026
2026
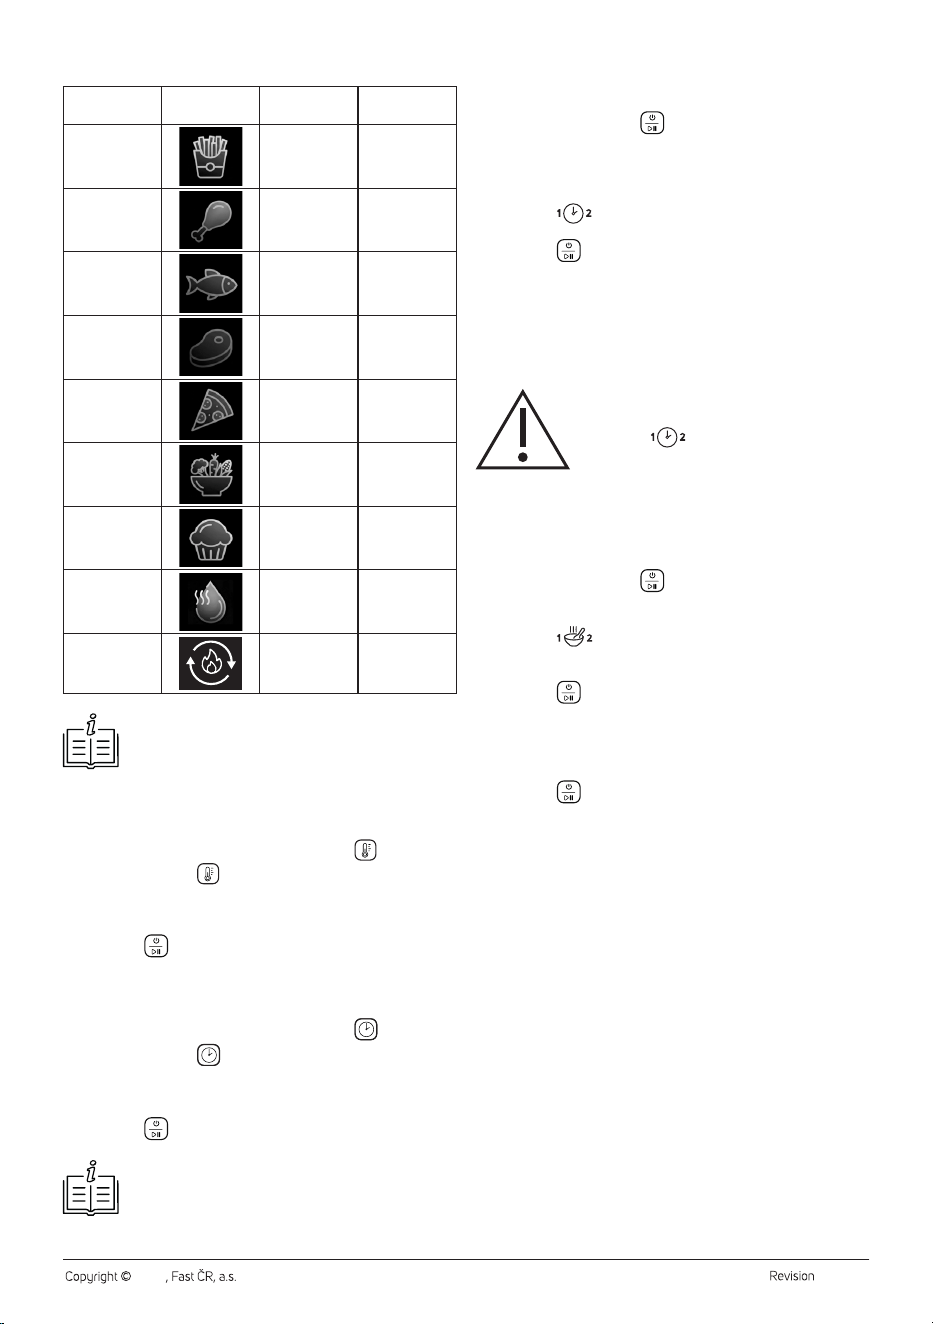
Preset programme table
Programme Icon
Default
temperature (°C)
Default cooking
time (min)
French fries 200 25
Chicken
drumsticks
200 30
Fish 180 25
Steak 200 15
Pizza 180 10
Vegetables 170 20
Baking 180 12
Drying 55 240
Reheat 160 5
Note:
You can set the drying time to up to 720 minutes in the
drying programmes.
Setting the temperature
If you want to change the selected program temperature, proceed as
follows:
1. When the cooking program is selected, press the button
repeatedly until the icon lights up on the display.
2. Repeatedly press the +/− buttons of the selected section to set
the temperature between 40 and 200 °C (except for the drying
programme).
3. Press the button to start the fryer.
Setting the cooking time
If you need to adjust the cooking time of the selected program, proceed
as follows:
1. When the cooking program is selected, press the
button
repeatedly until the
icon lights up on the display.
2. Press the +/− buttons of the selected section repeatedly to set the
cooking time ranging from 1 to 60 minutes (except for the drying
programme).
3. Press the
button to start the fryer.
Note:
You can change the cooking time andtemperature
evenwhen the fryer is inoperation in the same way as
described above.
Synchronised finish
Select this function if you need the food inboth frying pot sections to be
finished simultaneously.
1. Turn on the fryer with the button, then press the 1 button.
Select the cooking program andadjust the time andtemperature as
required as described above.
2. Then press the 2 button. Select the cooking program andadjust the
time andtemperature as required as described above.
3. Press the button. This will indicate that the preparation inboth
pot sections will be completed at thesame time.
4. Press the button to start the fryer. A program witha longer
cooking time will start, the display will start the cooking time
countdown, while a program with a shorter cooking time will remain
on hold andthe display will show “Hold”.
5. As soon as the difference between the program witha longer
cooking time and the program with ashorter cooking time has
elapsed, the second program will start along with the cooking time
countdown on display.
Important:
If you start the left or right frying pot section without
pressing the button, the synchronised finishing
function will not be active.
Dual Cook
Select this function if you need food to be cooked with the same program
the entire frying pot. Therefore, remove the partition from the frying pot.
Perform the program setting, temperature or cooking time adjustment
onone frying pot section only.
1. Turn on the fryer with the button, then press 1 or 2 button.
Select the cooking program andadjust the time andtemperature as
required as described above.
2. Press the button. The selected program, adjusted
temperature or cooking time is automatically set forthe entire frying
pot. The same value will be shown on both displays.
3. Press the button to start the fryer.
Reheating food
1. Place the cooked food you need to reheat in the fryer.
2. After turning on the fryer, press the Reheat button and adjust the
temperature and cooking time as needed.
3. Press the button to start the fryer.
. . . . . . . . . . . . . . . . . . . . . . . . . . . . . . . . . . . . . . . . . . . . . . . . . . . . . . . . . . . . . . . . . . . .
TIPS AND ADVICE
• Food prepared simultaneously should be ofthe same size. Smaller
pieces of food usually need less time to cook than larger ones.
• Adjust the cooking time dependingon the amount of food being
cooked. A larger amount needs more time to cook than a smaller
amount.
• Stir the food during preparation (especially smaller pieces). This will
give the best results and ensure that the food is evenly browned.
• Add a little oil to thefresh potato chips andfry until crispy.
• The optimal amount for making crispy chips is 0.5 kg.
• Do not prepare foods with avery high fat content, such as sausages,
in hot air fryers.
• Food usually prepared in the oven can also be prepared in the air fryer.
• When cooking dishes using pre-prepared dough, shorten the cooking
time.
• The air fryer can also be used toheat food. To heat the food, set the
temperature to 150 °C with the cooking time of 10 minutes.
Homemade French Fries
• To prepare homemade French fries, follow the steps below:
• Peel andslice the potatoes into fries.
• Wash the fries thoroughly anddry them with a paper kitchen towel.
- 7 -- 7 -
03/2026
2026
• Put 1 to 2 tablespoons of olive oil in a bowl, add the fries and stir well
until all the fries are coated with oil.
• Remove the fries from the tray andallow them to drain through the
sieve.
• Place the drained fries in the frying pot and select the frying
programme.
. . . . . . . . . . . . . . . . . . . . . . . . . . . . . . . . . . . . . . . . . . . . . . . . . . . . . . . . . . . . . . . . . . . .
CLEANING AND MAINTENANCE
Clean the fryer after each use. Before cleaning, the fryer must be switched
off, disconnected from the mains and left to completely cool down,
including accessories.
Warning:
To prevent the risk of electric shock, do not immerse
the appliance, power cable, or plug into water or any
other liquid.
Frying pot, pads andpartition
• Remove the mat from thefrying pot. Wash the frying pot and mat in
warm water with a little neutral kitchen detergent. Use a soft sponge.
Rinse and wipe dry.
• If the food gets toasted, pour hot water in the pot and add kitchen
detergent. Leave on for about 10 minutes and then cleanse.
• The frying container and mat can be washed in the dishwasher. The
washing programme temperature should not exceed 65°C. Do not
wash the frying basket or the trivet in the dishwasher if the surface
coating that comes into contact with food is impaired or damaged. This
could result in further damage or corrosion.
Interior
• After removing the frying pot, wipe the interior with a soft sponge
slightly dampened in warm water. Carefully wipe the heating element.
Wipe dry with a clean cloth.
Outer surface
• Use a dry or slightly dampened cloth to clean the outer surface. Then
thoroughly wipe until dry.
Warning:
Never use wire cloths, abrasive cleaners, petrol, etc.
for cleaning.
Storage
• If the appliance will not be used for an extended period, unplug it
from the power socket, let it cool down, and clean it following the
instructions provided above.
• Before storing, ensure that the appliance and all accessories are
thoroughly clean and dry.
• Store the appliance in a dry, clean, and well-ventilated place away
from extreme temperatures and out of the reach of children or pets.
. . . . . . . . . . . . . . . . . . . . . . . . . . . . . . . . . . . . . . . . . . . . . . . . . . . . . . . . . . . . . . . . . . . .
TECHNICAL SPECIFICATIONS
Rated voltage range ..............................................................................220–240 V~
Rated frequency ......................................................................................... 50−60 Hz
Rated input power ........................................................................................... 2700 W
Volume of frying pot ................................................................................................... 9 l
Temperature setting range ..................................................................... 40–200 °C
Setting the operating time ..................................................................1–60 minutes
We reserve the right to change the text and technical specifications.
Original Consumable Accessories
SFRXD 0018 Frying pot
SFRXD 0019 Frying mat
SFRXD 0020 Basket divider
SFRX 0003 Baking paper
Values Provided according to Commission Regulation EU
2023/826
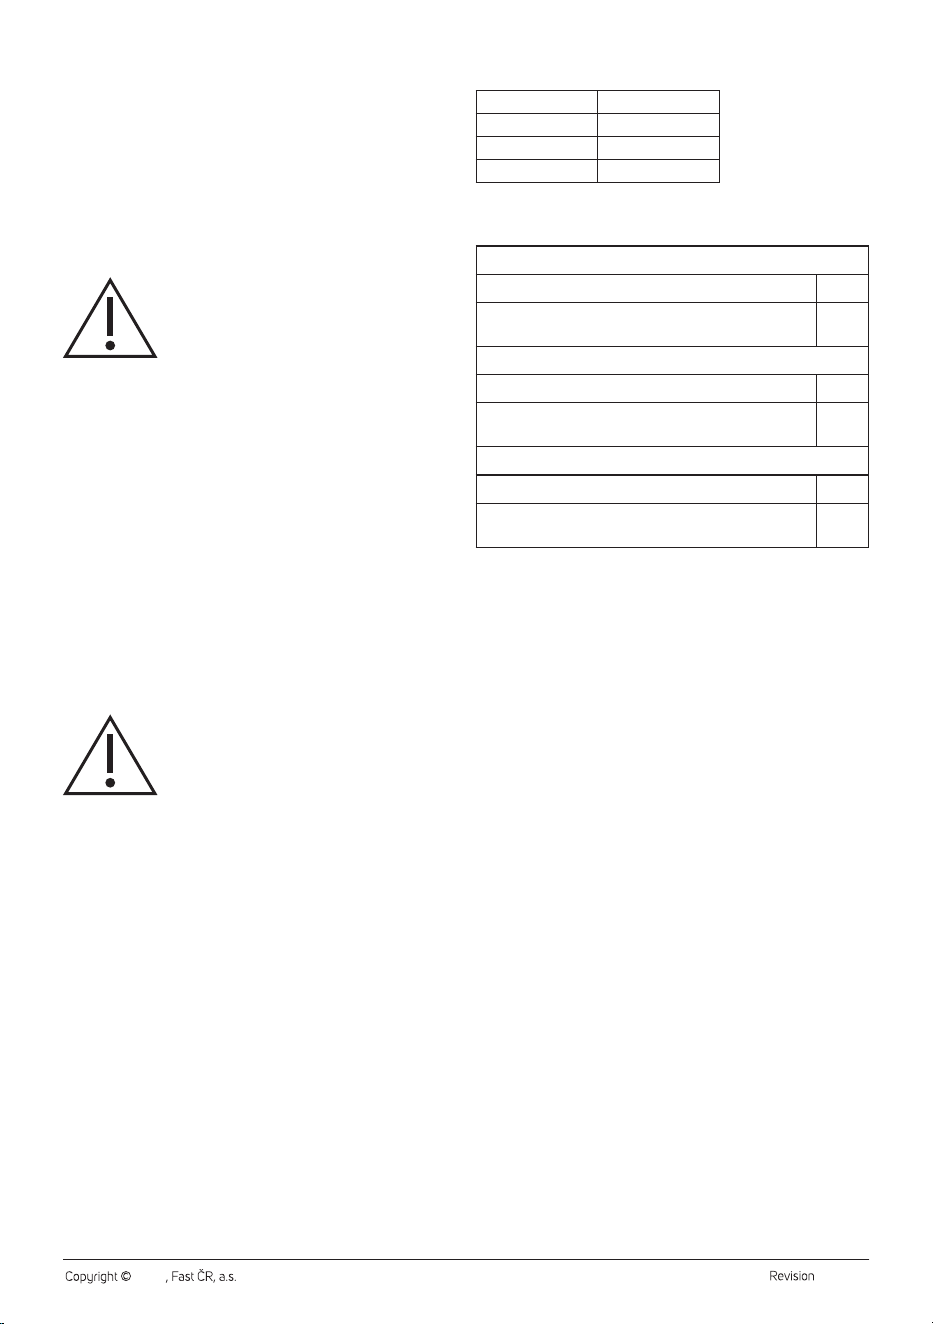
Off Mode
Power consumption in off mode
Time needed for the equipment to automatically reach off
mode
Standby Mode
Power consumption in standby mode 0.3 W
Time needed for the equipment to automatically reach
standby mode
0 min
Networked Standby Mode (Wi-Fi)
Power consumption in networked standby
Time needed for the equipment to automatically reach
networked standby mode
. . . . . . . . . . . . . . . . . . . . . . . . . . . . . . . . . . . . . . . . . . . . . . . . . . . . . . . . . . . . . . . . . . . .
INSTRUCTIONS AND INFORMATION ON DISPOSAL
OF USED PACKAGING MATERIAL
Dispose of used packaging material at the designated municipal waste
disposal site.
DISPOSAL OF USED ELECTRICAL AND ELECTRONIC
EQUIPMENT
To enable the proper disposal, renewal and recycling of these products,
deliver them to the designated collection points. Alternatively, in some
European Union states or other European countries the products can be
returned to the local retailer when buying an equivalent new product. By
disposing of this product correctly, you help to conserve valuable natural
resources and prevent any potential adverse impact on the environment
and human health that could result from improper waste disposal. For
more details, contact your local authority or nearest collection point. Fines
may be imposed for the improper disposal of this type of waste as per
national regulations.
For business entities in European Union States
If you wish to dispose of electrical and electronic equipment, please
request the necessary information from your retailer or supplier.
Disposal in other countries outside the European Union
To dispose of this product elsewhere, request the necessary information
on the correct disposal method from local authorities or your retailer.