Part No. 13693_RevA
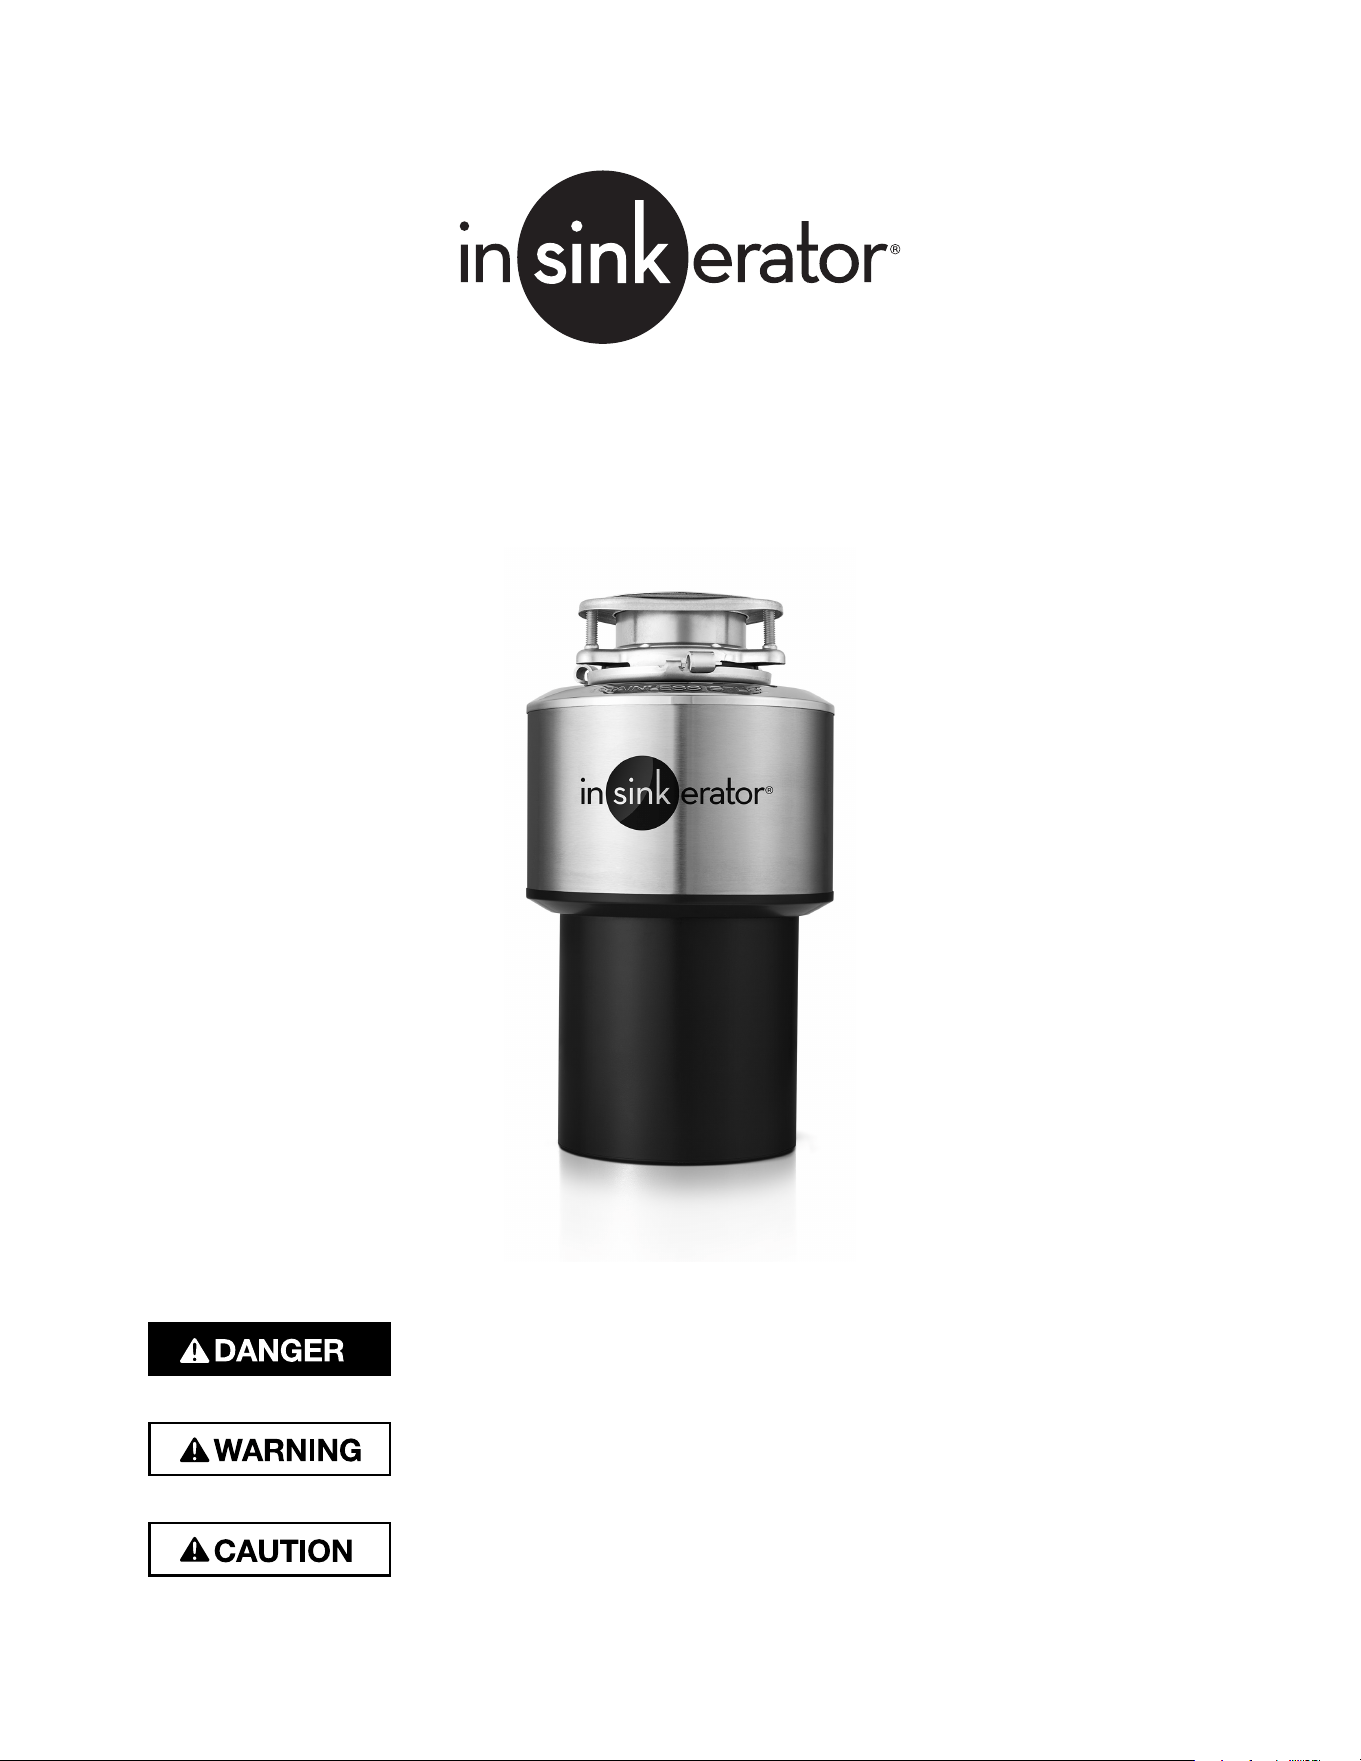
LC-50 FOOD WASTE DISPOSER
Installation Manual
www.insinkerator.com
Please be certain that the person who installs or uses this appliance carefully reads
and understands the Safety Instructions contained in this manual.
The Warning signal alerts you to potential hazards or unsafe practices which,
if not avoided, could result in severe personal injury or death.
The Caution signal alerts you to hazards of unsafe practices which, if not avoided,
may result in minor personal injury or property damage.
The Danger signal indicates an immediately hazardous situation which, if not
avoided, will result in death or serious injury.

2
Table of Contents
Introduction
Clean the Drain Line ....................................................................... 3
Required Tools/Materials ................................................................ 3
In This Package ............................................................................................ 3
Typical Installation ........................................................................................ 4
Installation with Wall Switch ........................................................... 4
Installation with Remote Air Switch ................................................ 4
Removing Existing Disposer ................................................................... 5-6
Installing the Disposer ............................................................................. 6-7
Electrical Connections ................................................................................. 8
Final Installation ........................................................................................... 9
Operating Instructions
Operating the Disposer ................................................................ 10
Do's and Dont's ........................................................................... 10
Operating Instructions .................................................................. 11
Troubleshooting
Troubleshooting ............................................................................ 12
For Dishwasher or Direct Water Connection ................................ 13
Warranty ..................................................................................................
.... 14
3
Introduction
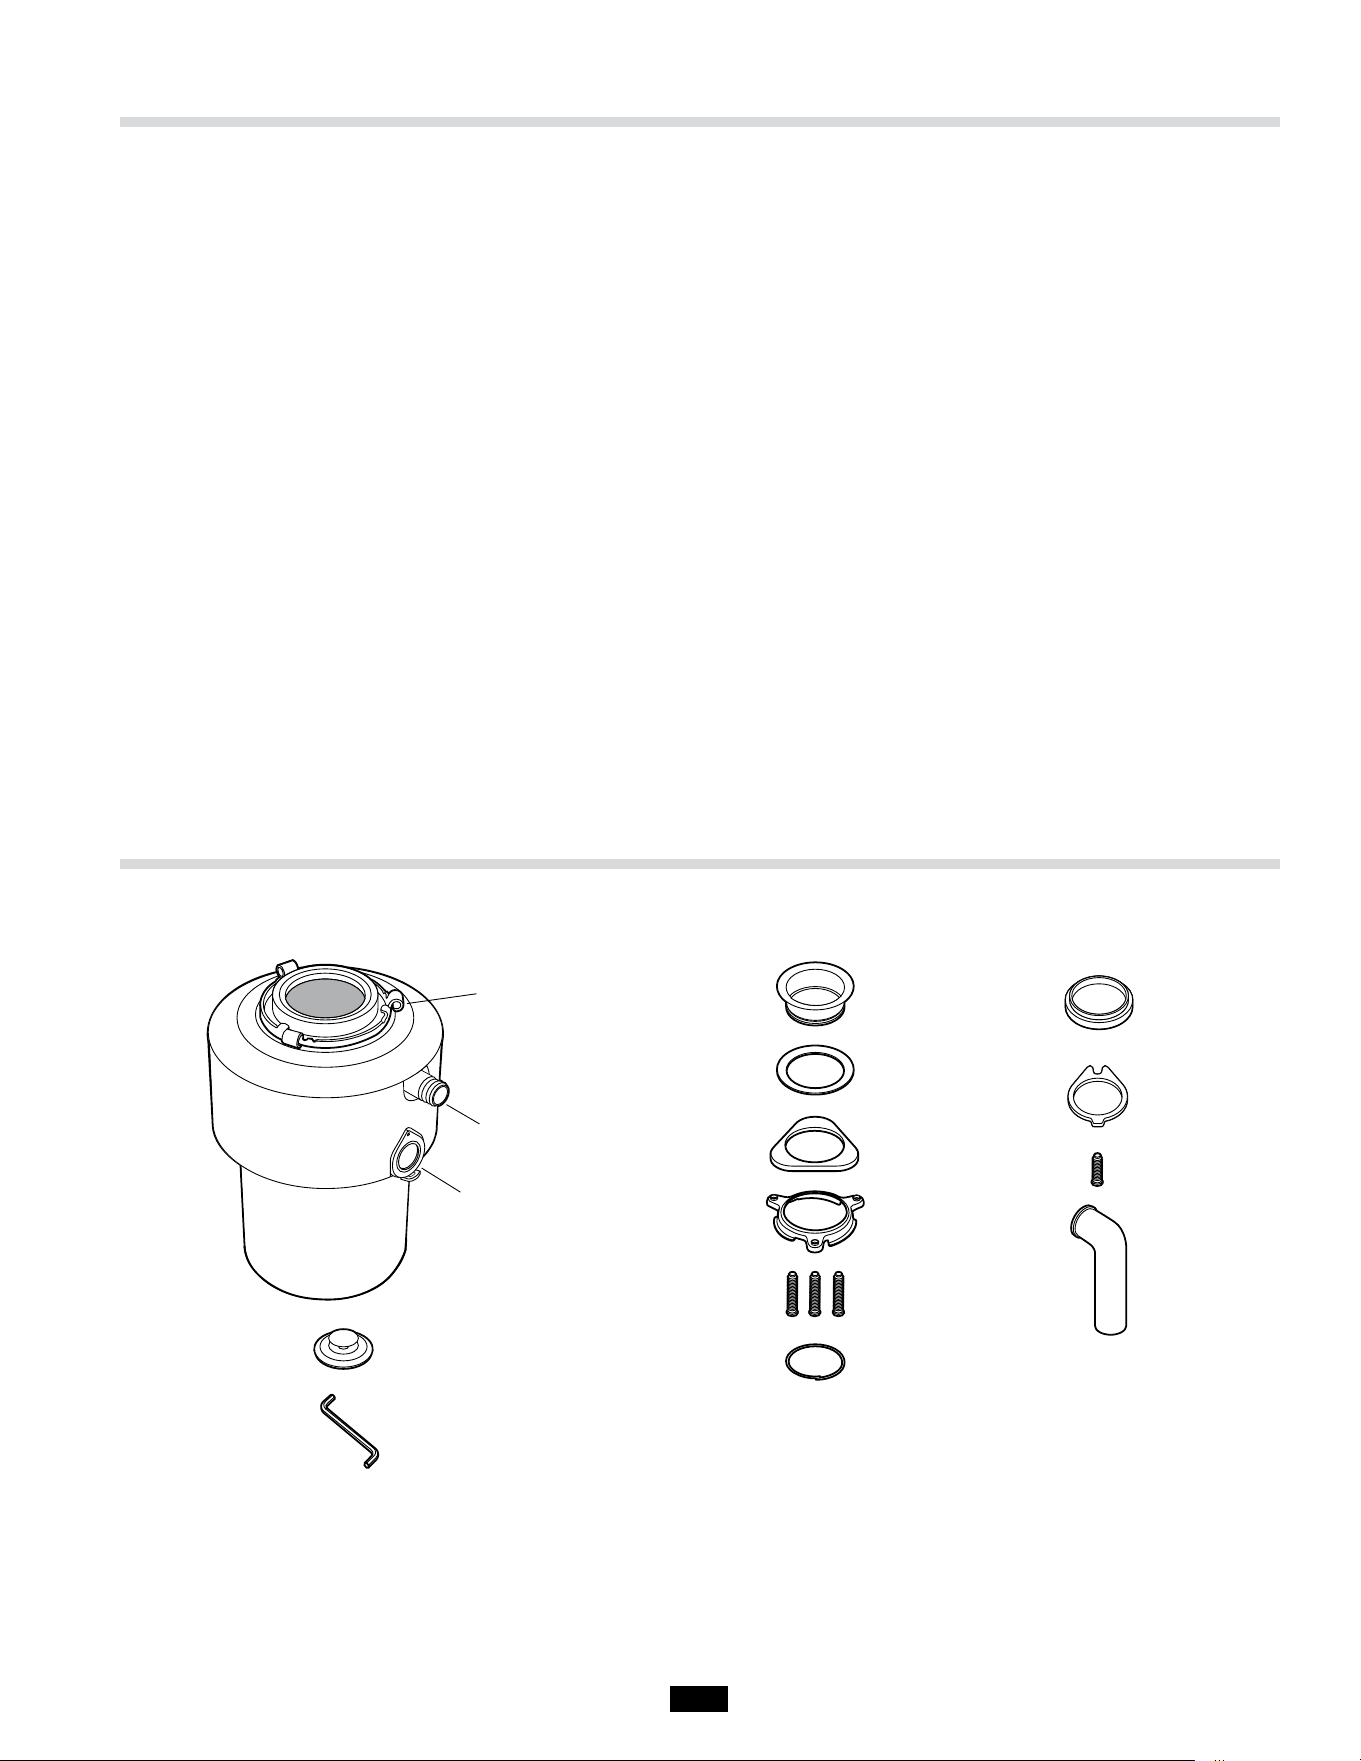
In This Package
REQUIRED TOOLS/MATERIALS
The following items are needed to install the disposer:
• Screwdriver
• Pipe wrench
• Hammer
The following items may be needed to install the disposer:
• Plumbing putty
• On/Off electrical switch (1/2 HP, 20A DP)
• Hacksaw
• Drain auger or rod
• Connector kit (Part #8301)
• Solenoid valve (Part #14495)
• Siphon breaker (Part #11477)
• Flow-control valve (Part #13763A)
Stopper
Sink Flange
Rubber Gasket
Fiber Gasket
Metal Flange
Backup Ring
Mounting Ring
Screws
Screw
Snap Ring
Discharge Tube
Lower Mounting Ring
Mounting AssemblyDisposer Discharge Tube Assembl
y
Dishwasher Inlet
Tailpipe Mount
Wrenchette
The model LC-50 food waste disposer is designed
specifically for light foodservice use in applications
such as:
• Grocery/convenience stores
• Office/church kitchens
• Fast food restaurants
• Bed and breakfast inns
Important – These installation instructions are for the
benefit of the installing contractor. InSinkErator and/or
InSinkErator Factory Authorized Service Centers do not
make original installations. For technical information not
covered in these instructions, contact the supplier, an
InSinkErator Field Sales Representative, or InSinkErator
Foodservice Sales and Service at 1-800-845-8345.
CLEAN THE DRAIN LINE
With a drain line auger, clear away all hardened waste
material in the horizontal drain pipe running from the
drain trap to the main waste line.
4
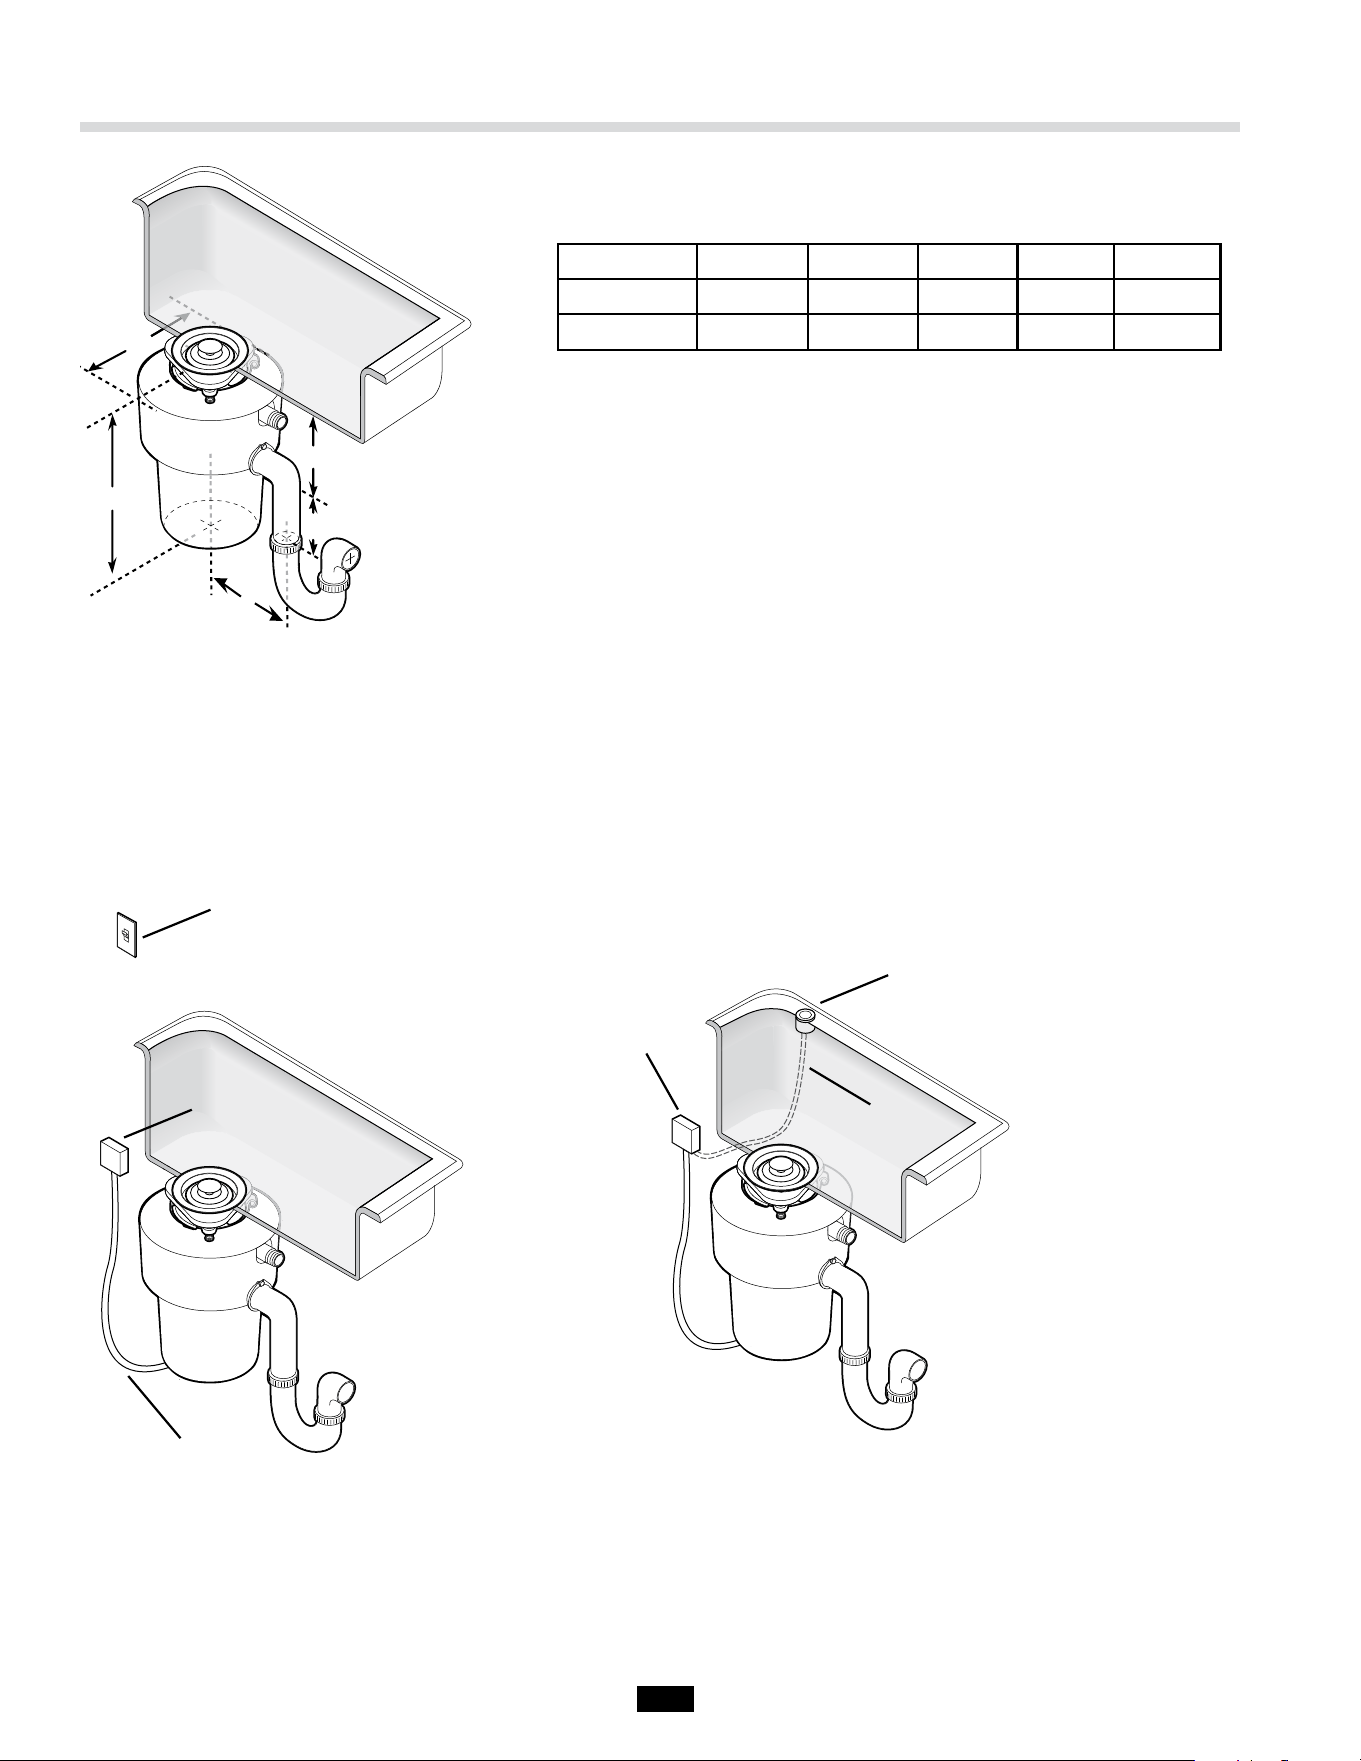
Wall Switch
Electric Supply
Push Button
Electrical
Junction Box
Air Hose
Air Switch
Power Junction
D
E
A
C*
B*
Dimension A B* C* D E
Inches
14-9/16 6-13/16 4 8 5-3/4
Cm
37.0 17.3 10.2 20.3 14.6
B* – Distance from bottom of sink to center line of disposer outlet.
Add 1/2" (13mm) when stainless steel sinks are used.
C* – Length of discharge tube from center line of disposer outlet to
end of discharge tube.
Important – Plumb waste line to prevent standing water in
disposer motor housing.
Typical Installation
INSTALLATION WITH WALL SWITCH INSTALLATION WITH REMOTE AIR
SWITCH AND OPTIONAL DIRECT
WATER CONNECTION
5
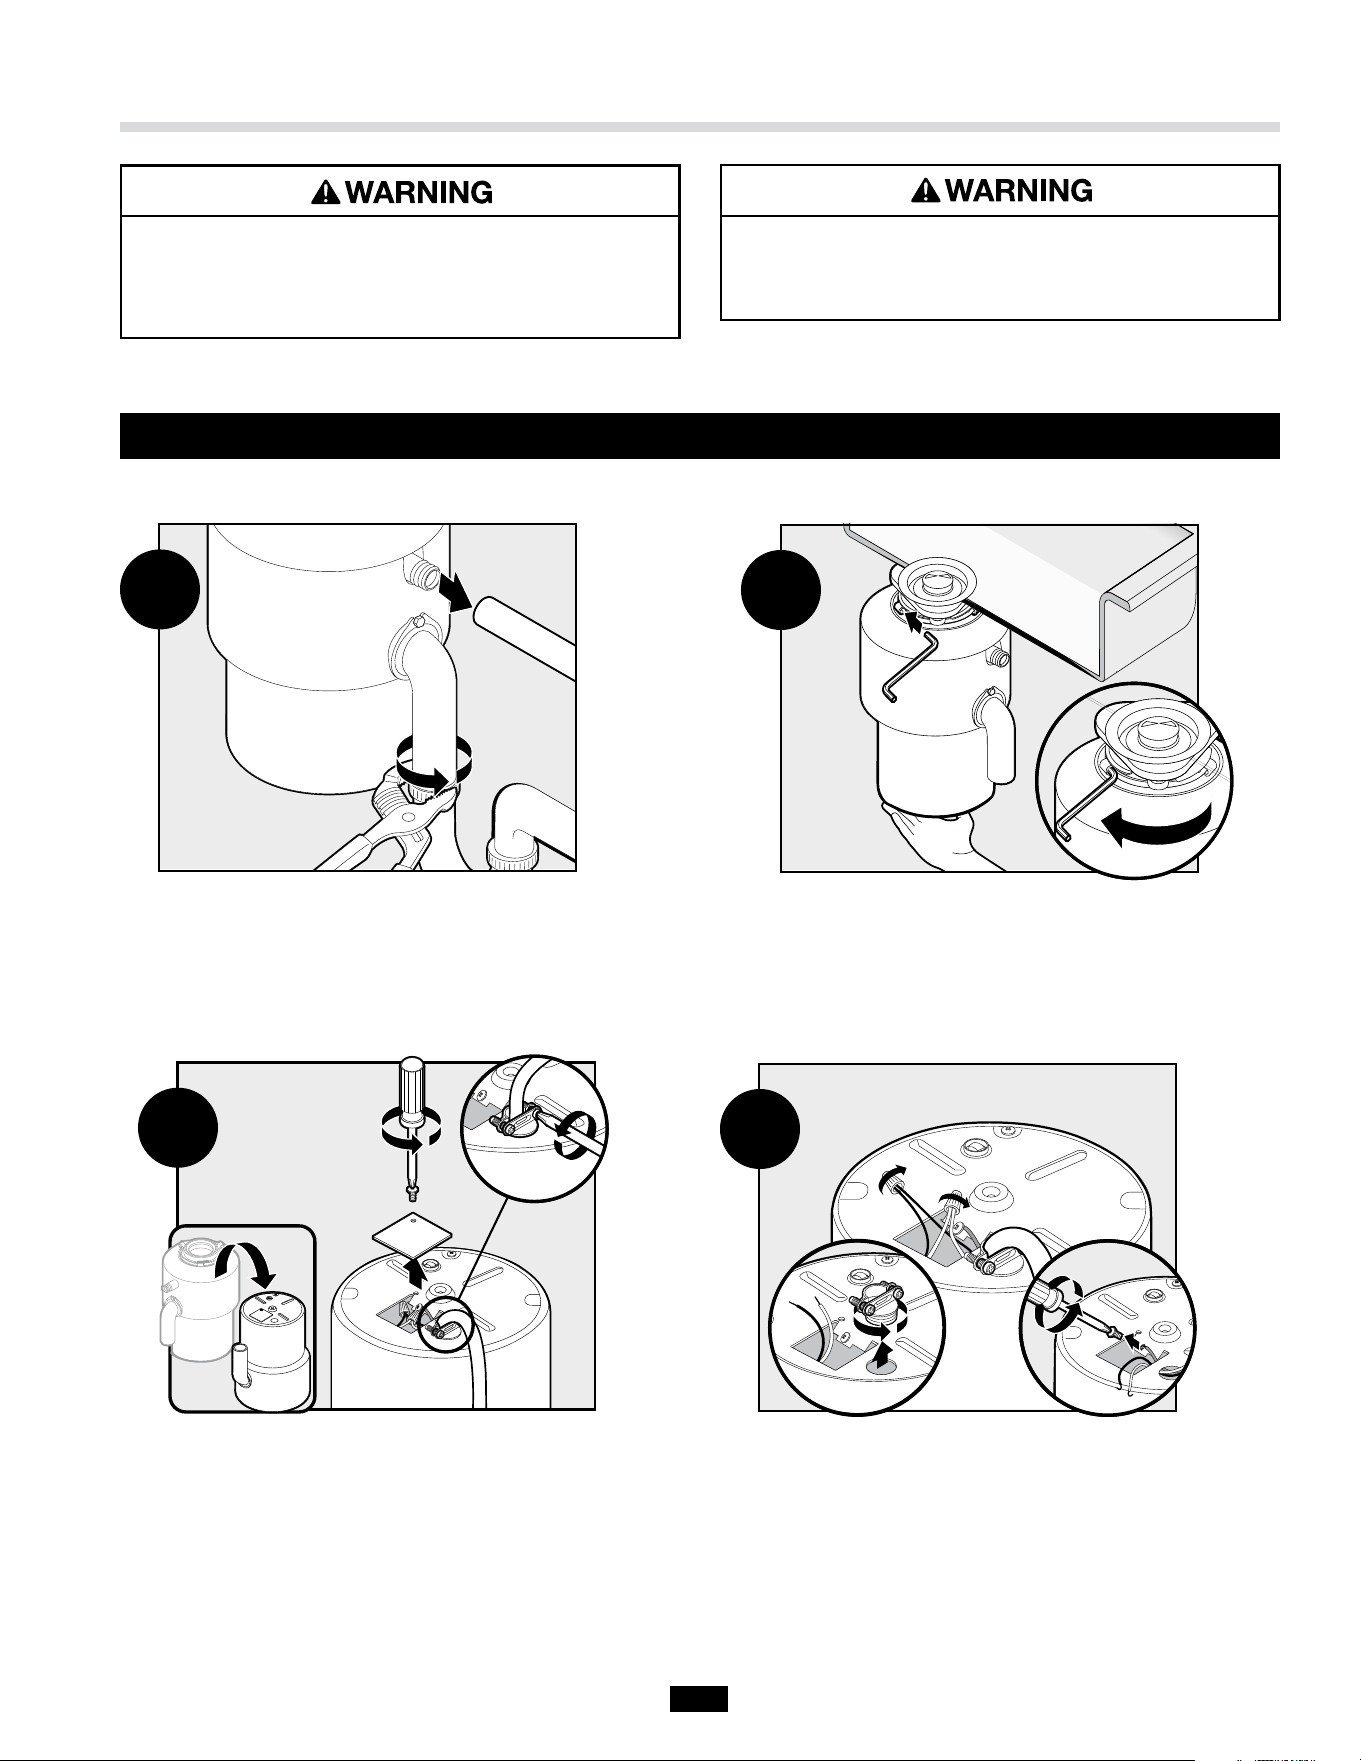
Disconnect drain trap from waste discharge tube.
Disconnect dishwasher or direct water connection if
connected to the disposer.
Support disposer, insert end of wrenchette into right
side of mounting lug, and turn. Disposer will fall free.
With the electrical supply turned off, flip disposer
over and remove electrical cover plate. Save cable
connector if applicable.
With the electrical supply turned off, disconnect the
disposer wires from the electrical supply.
Removing Existing Disposer
1
3
2
4
If there is no existing disposer, disconnect sink drain and skip to step 9.
FALLING HAZARD
Do not position your head or body under the
disposer. It could fall during installation.
ELECTRICAL SHOCK
Disconnect power before installing or servicing unit.
Test the circuit with a voltmeter or circuit tester to
ensure the power is off.
6
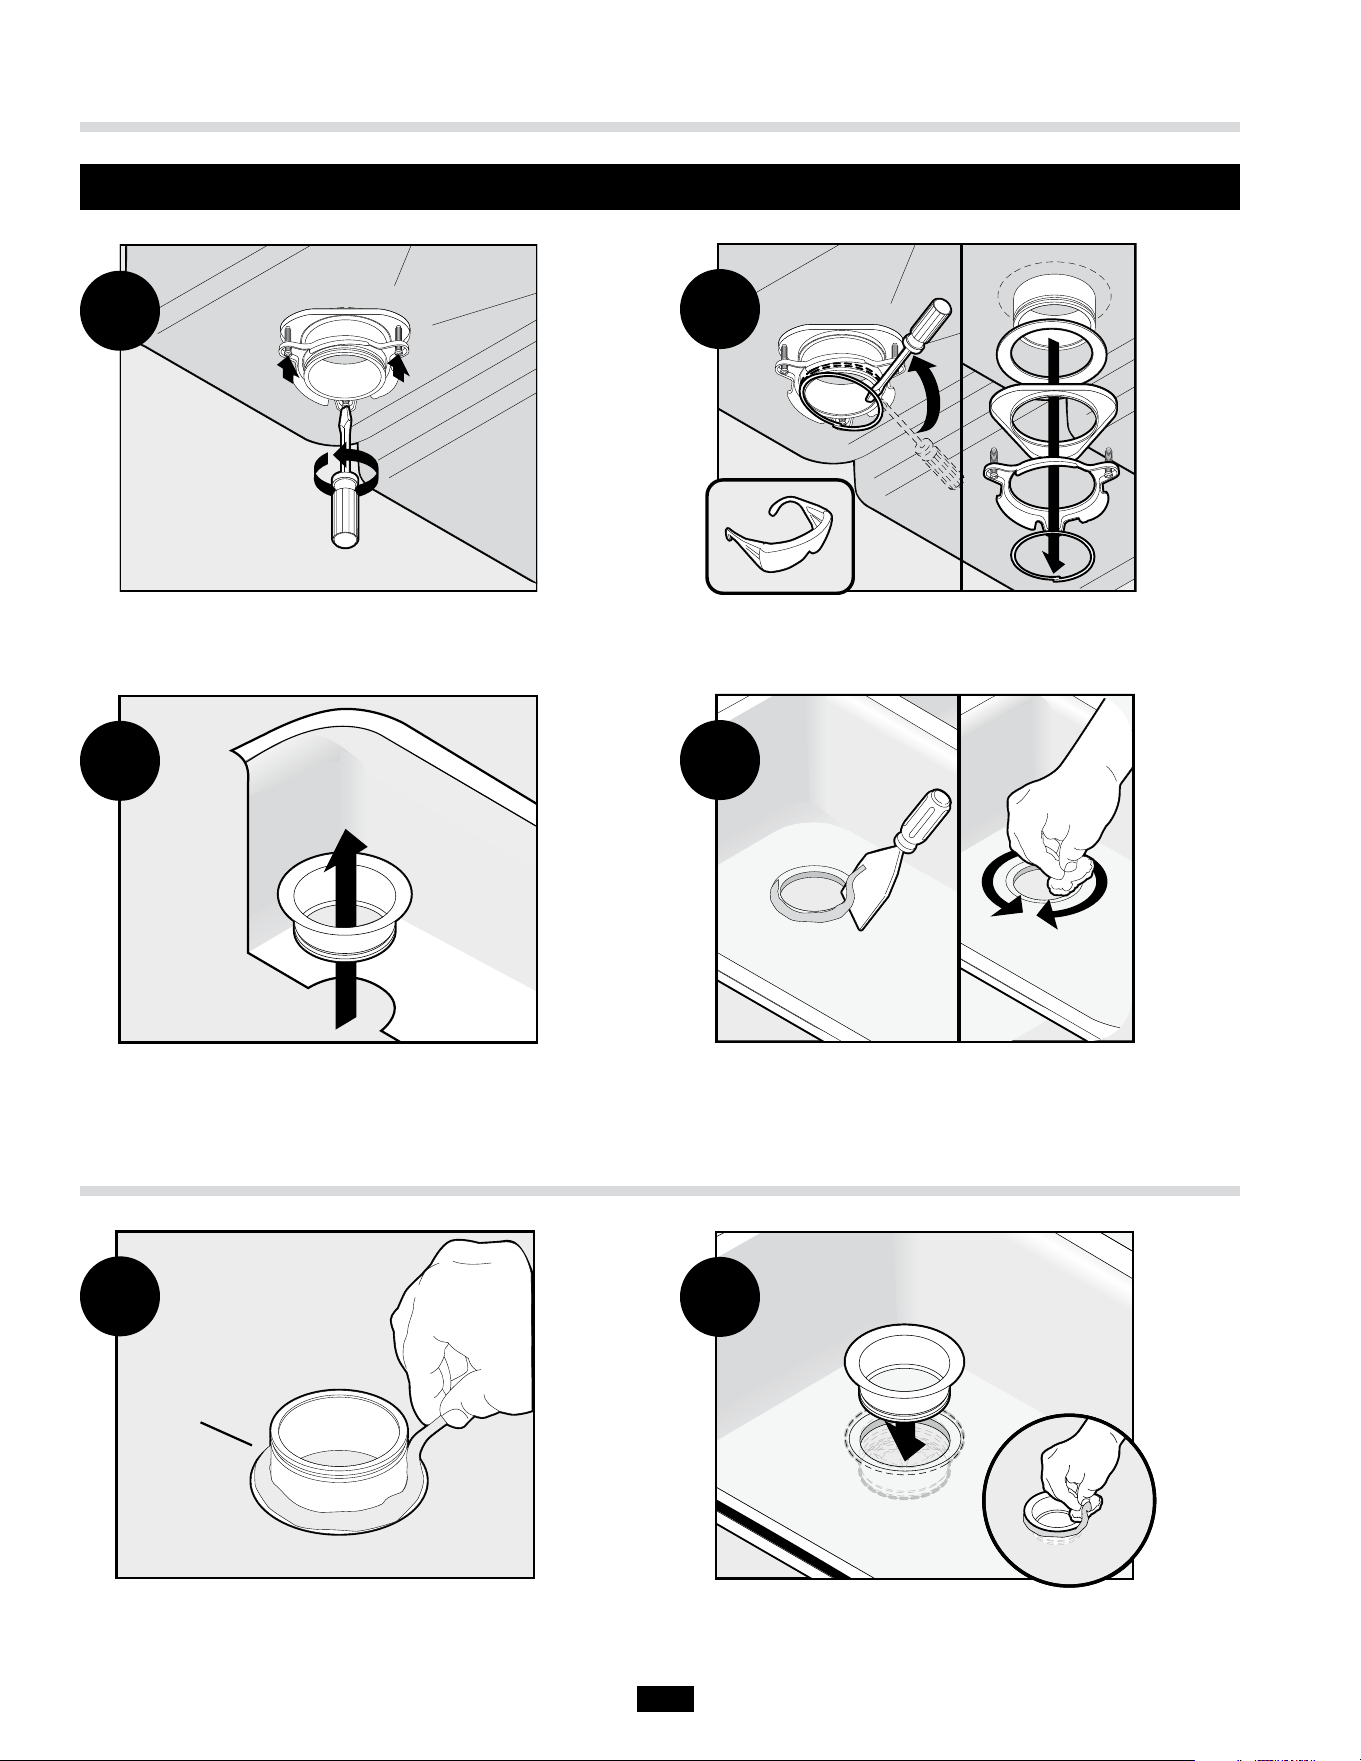
Loosen the 3 screws on the mounting assembly. Using a screwdriver, remove the snap ring.
Removing Existing Disposer
Evenly apply 1/2" thick rope of plumber’s putty around
new flange.
9
Press flange firmly into sink drain. Remove excess putty.
10
Remove flange from sink.
Remove old plumber’s putty from sink with putty knife.
7
8
Installing the Disposer
Sink Flange
5
6
If the new disposer mounting is the same as the old one, you can go to step 14.
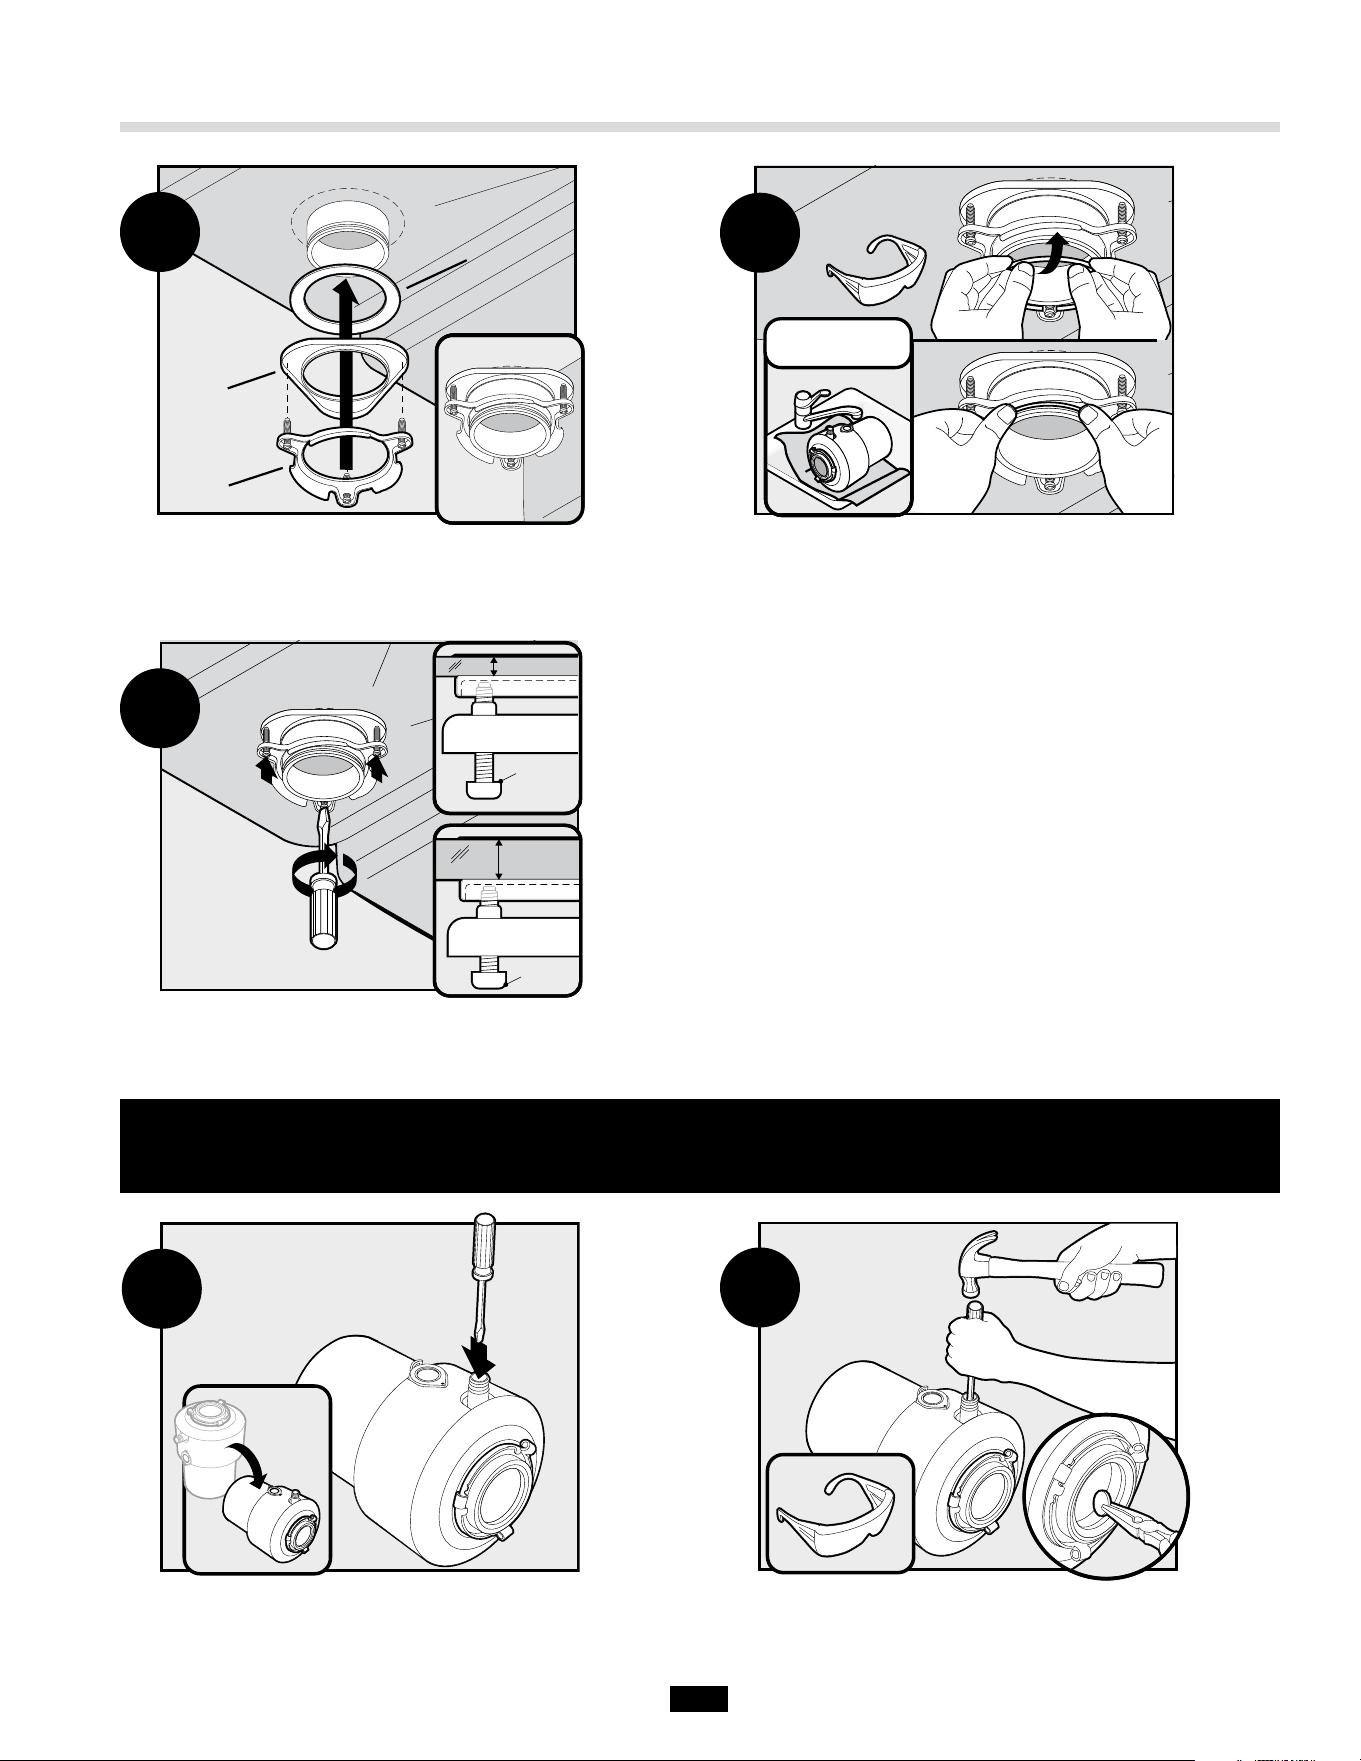
7
Installing the Disposer
Tighten screws evenly and firmly against backup flange.
Use shorter 1-1/8" screws if sink is more than 3/8"thick.
Turn disposer onto side and insert screwdriver into
dishwasher inlet.
Knock out drain plug and remove plug from inside
of disposer.
> 3/8"
1-1/8"
< 3/8"
1-1/2"
13
14
15
Insert fiber gasket, backup ring and mounting ring. Hold
in place while inserting snap ring.
Place a weight such as the disposer on the sink flange
to hold it in place. Use a towel to prevent scratching
sink. Pull snap ring open and press firmly until it snaps
into place.
11
12
OPTIONAL: DISHWASHER OR DIRECT WATER CONNECTION ONLY
If you do not need to attach the dishwasher or direction water connection, go to step 16.
Fiber Gasket
Backup Ring
Mounting Ring
Optional
8
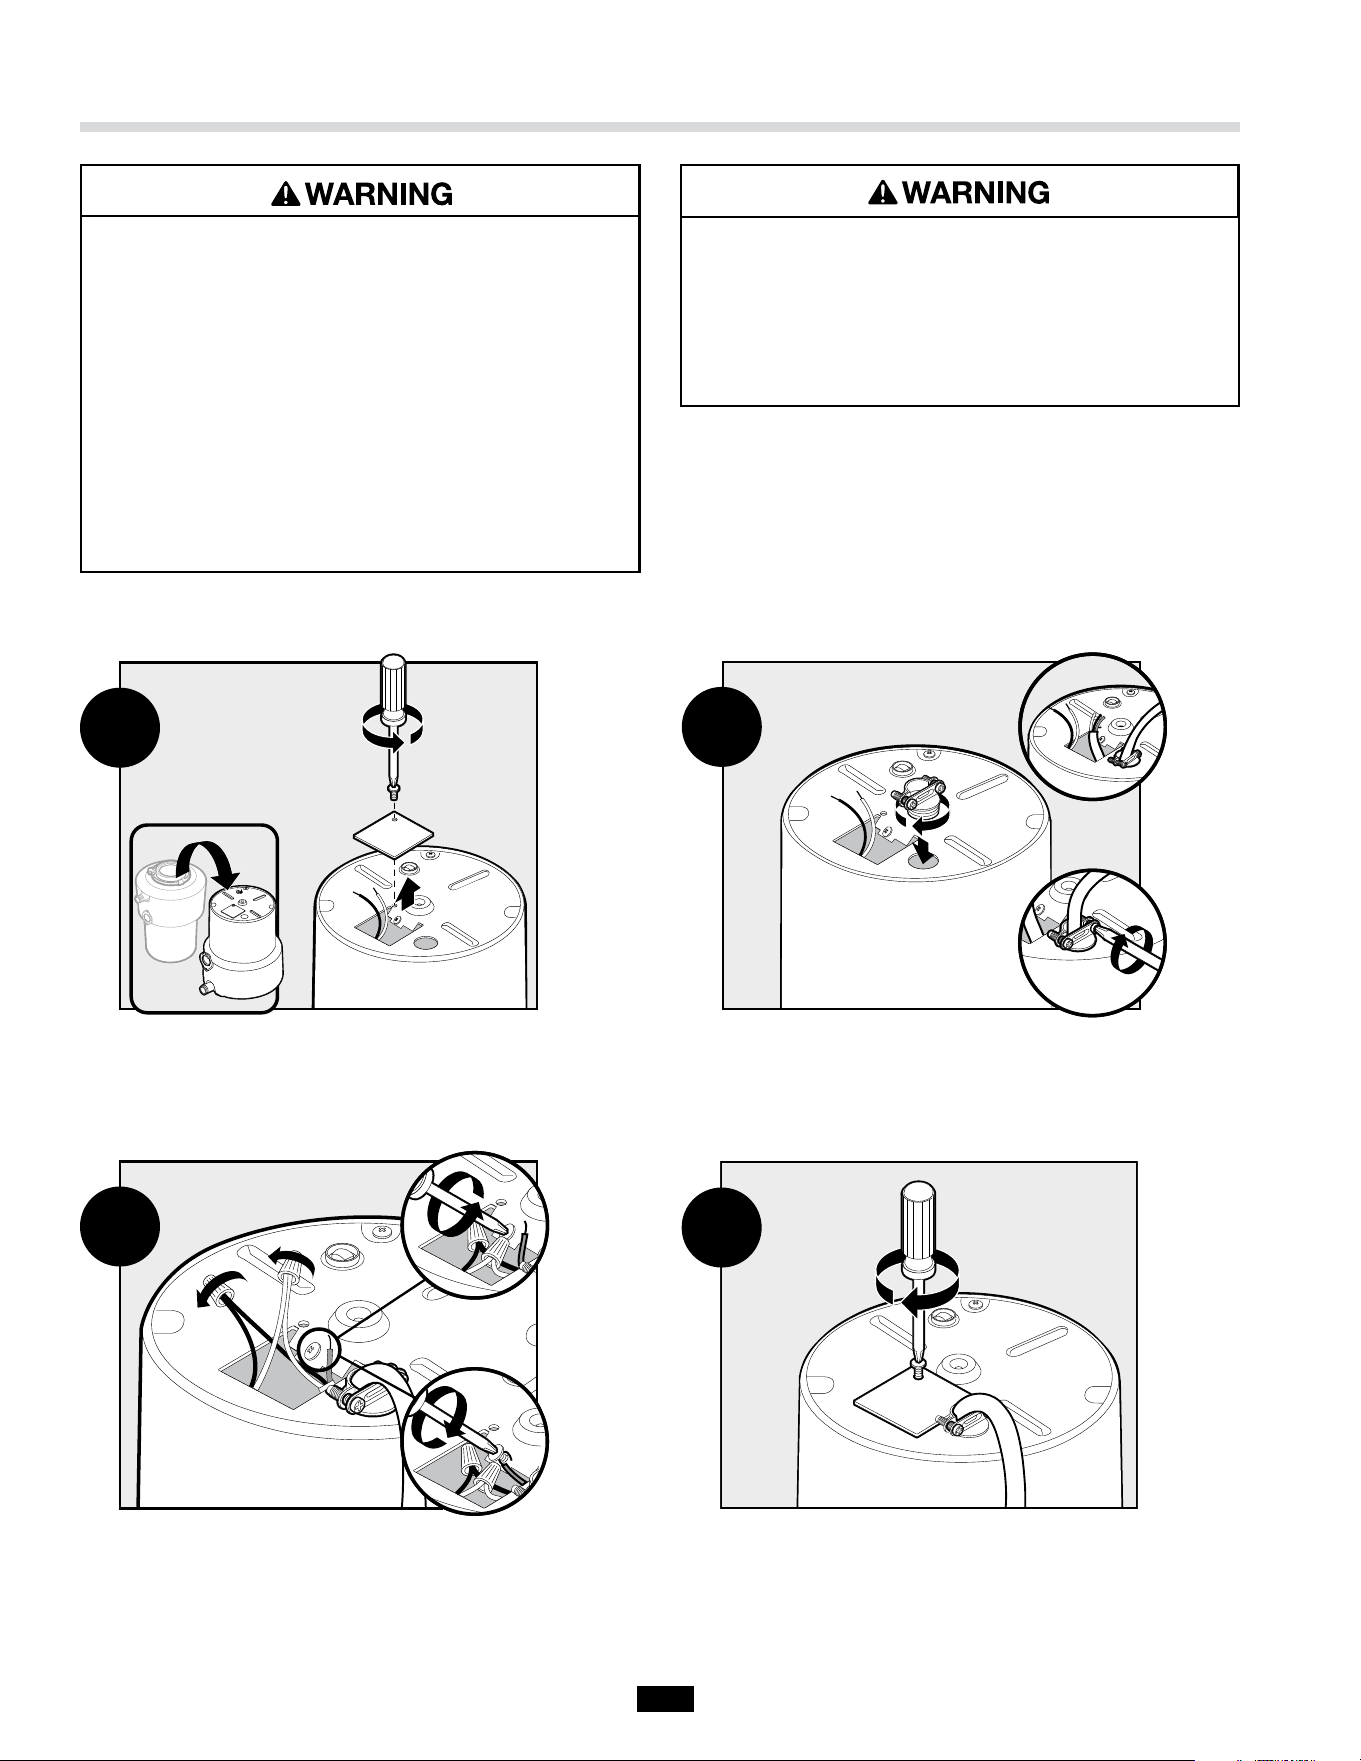
Electrical Connections
Push wires into disposer (do not displace cardboard
shield) and replace electrical cover plate.
19
Connect white to white and black to black or red
with wire nuts (not included); ground wire to green
grounding screw. Unit must be grounded for safe and
proper installation.
1
2
18
Turn disposer over and remove electrical cover plate.
Pull out wires. DO NOT REMOVE CARDBOARD SHIELD.
With electrical supply turned off, insert cable connector
(not included) and run electrical cable through access
hole on bottom of disposer. Tighten cable connector.
16
17
ELECTRICAL SHOCK
• Disconnect power before installing or servicing
unit. Test the circuit with a voltmeter or circuit
tester to ensure the power is off.
• Use only a properly grounded and polarized
electric outlet.
• Improper connection of the equipment-grounding
conductor can result in a risk of electric shock.
• Installation must conform to all local
electrical codes.
• All control centers and disposers must
be grounded.
PERSONAL INJURY/PROPERTY DAMAGE
If the electrical installer is not experienced in
electrical installation, we recommend seeking
competent professional assistance. Disposer or
accessory damage due to improper installation is
not covered under warranty. All installations must
comply with local electrical codes.
9
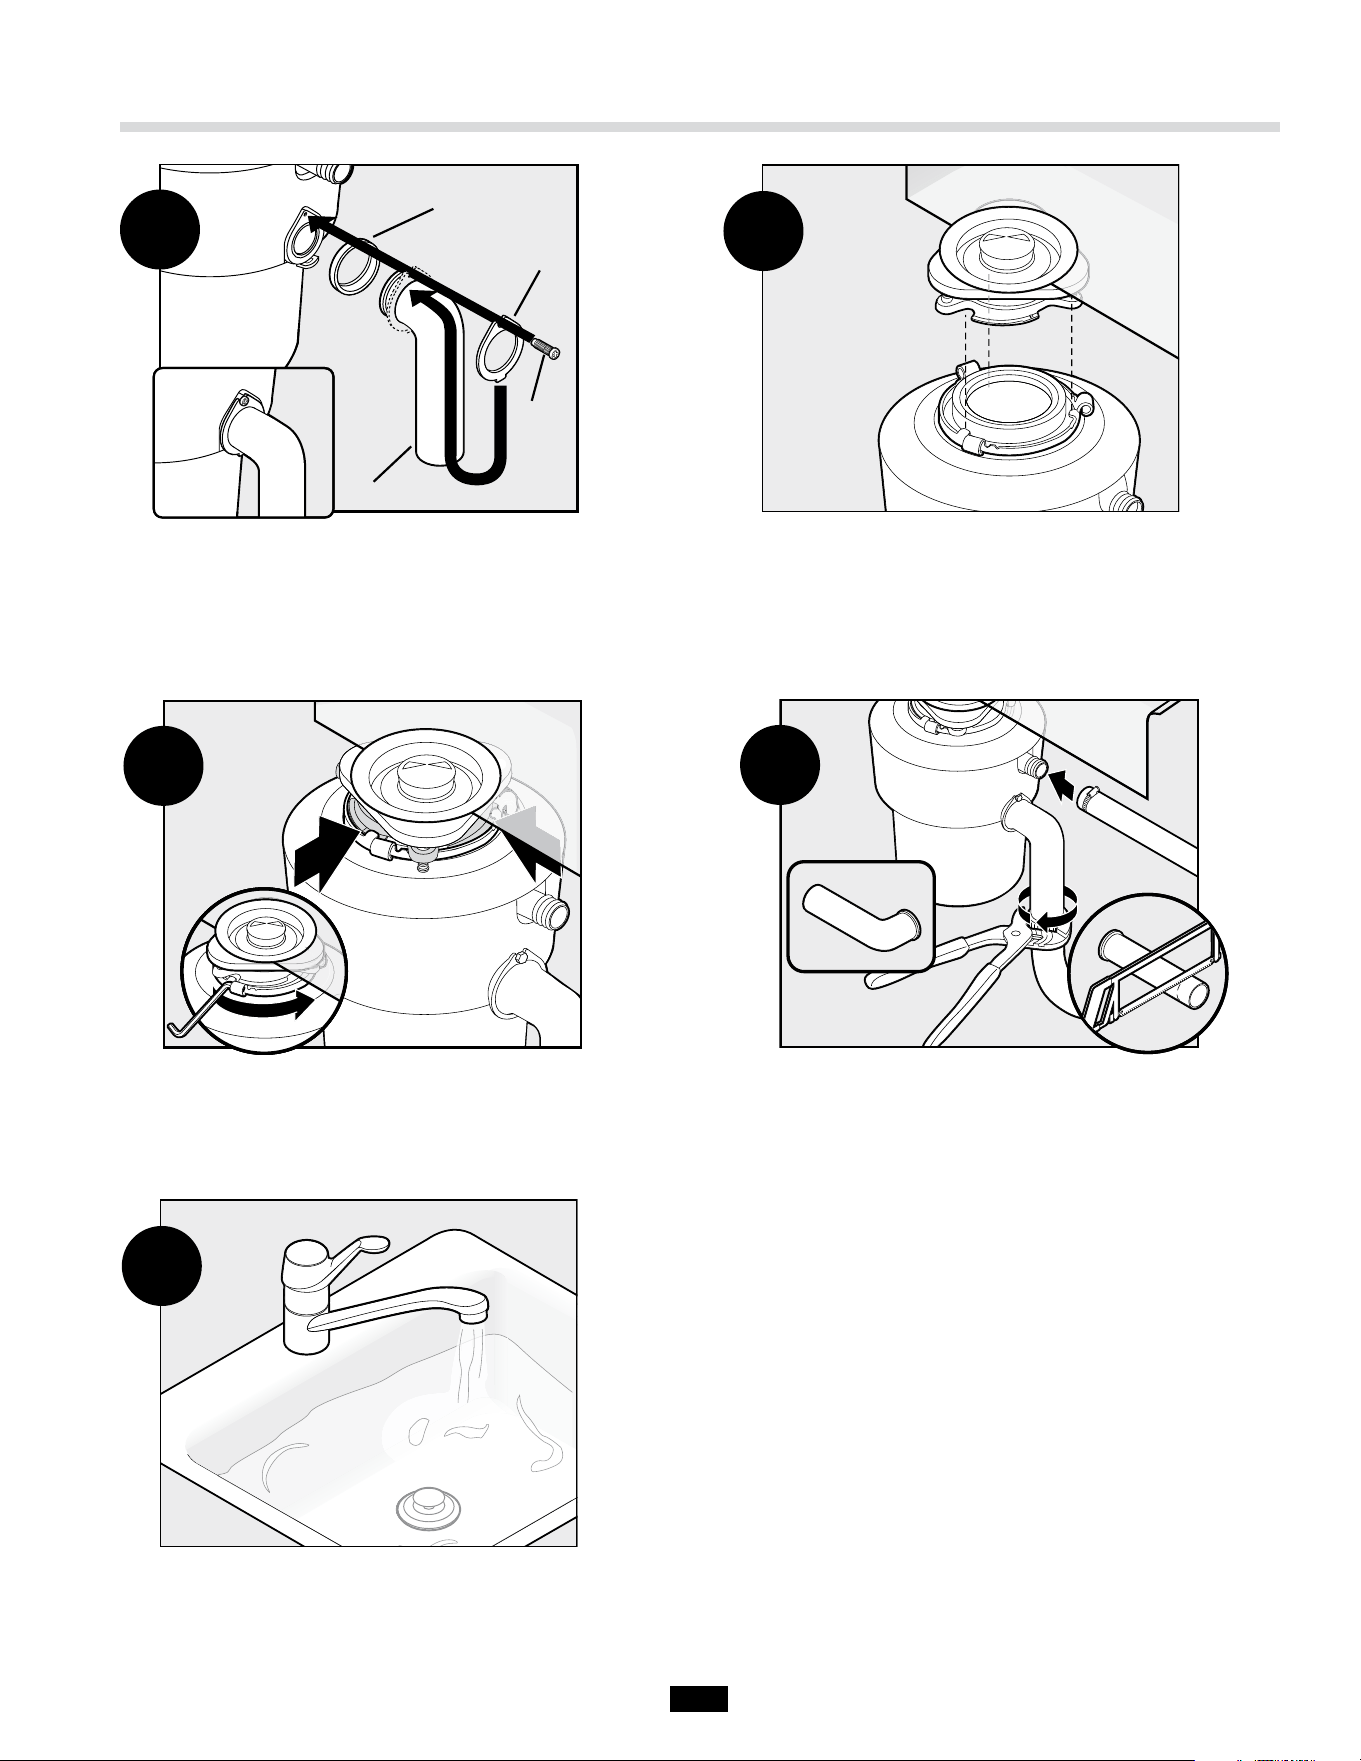
Final Installation
Hang disposer by aligning 3 mounting tabs with
slide-up ramps on mounting ring.
21
Turn mounting ring until all 3 mounting tabs lock over
the ridges on the slide-up ramps.
22
You may need to trim tube for proper fit. Reconnect
plumbing (and dishwasher or direct water connection if
used). Make sure tailpipe mount is straight.
Insert stopper into sink opening. Fill sink with water,
then test for leaks.
23
24
Rotate the disposer around. Place the rubber gasket
on the end of the discharge tube and slide on the metal
flange from the reverse end. Place assembled discharge
tube in the tailpipe mount opening and secure with
screw provided.
20
Discharge Tube
Rubber Gasket
Screw
Metal Flange

10
DO'S AND DON'TS
DO …
• First turn on a moderate to strong flow of cold water
and then turn on the disposer. Continue running cold
water for a few seconds after grinding is completed
to flush the drain line.
• Grind hard materials such as small bones, fruit pits,
and ice. A scouring action is created by the particles
inside the grind chamber.
• Grind peelings from citrus fruits to freshen up
drain smells.
Important – The model LC-50 is designed specifically for light commercial use. Examples of these applications
include: grocery/convenience store delis, fast food restaurants, office/church kitchens, and bed and breakfast inns.
Use of this disposer in applications other than those named above may void your warranty.
• Use a disposer cleaner, degreaser, or deodorizer as
necessary to relieve objectionable odors caused by
grease build-up.
OPERATING THE DISPOSER
1. Remove stopper from sink opening and run strong flow of cold water.
2. Turn on wall switch to start disposer.
3. Slowly insert food waste into disposer and position stopper to minimize possible ejection of material while
grinding. After grinding is complete, turn disposer off and run water for a few seconds to flush drain line.
DON'T …
• Don't pour grease or fat down your disposer or any
drain. It can build up in pipes and cause drain
blockages. Put grease in a jar or can and dispose in
the trash.
• Don't use hot water when grinding food waste. It
is OK to drain hot water into the disposer between
grinding periods.
• Don't fill disposer with a lot of vegetable peels all at
once. Instead, turn the water and disposer on first
and then feed the peels in gradually.
• Don't grind large amounts of egg shells or fibrous
materials like corn husks, artichokes, etc., to avoid
possible drain blockage.
• Don't turn off disposer until grinding is completed and
only sound of motor and water is heard.
Operating Instructions
11
Operating Instructions
PERSONAL INJURY
• Read all instructions before using the appliance.
• To reduce the risk of injury, close supervision is
required when an appliance is used near children.
• Do not put fingers or hands into a waste disposer.
• Turn the power switch to the off position before
attempting to clear a jam, removing an object from
the disposer or pressing reset button.
• When attempting to loosen a jam in a waste
disposer, use the self-service wrenchette.
• When attempting to remove objects from a waste
disposer, use long-handled tongs or pliers.
• To reduce the risk of injury by materials that are
expellable by a waste disposer, do not operate the
disposer without the Quiet Collar Sink Baffle
in place.
• Do not put the following into a disposer: clam or
oyster shells, caustic drain cleaners or similar
products, glass, china, or plastic, large (whole)
bones, metal (such as bottle caps, steel shot, tin
cans, or utensils), hot grease or other hot liquids.
• Do not dispose of the following in the disposer:
paints, solvents, household cleaners and
chemicals, automotive fluids, plastic wrap.
ELECTRICAL SHOCK
Improper connection of the equipment-grounding
conductor can result in a risk of electric shock.
• This disposer must be properly grounded.
• Do not attach ground wire to gas supply line.
• Disconnect power before installing or
servicing disposer.
• If three-prong grounded plug is used, plug must be
inserted into three-hole ground receptacle.
• All wiring must comply with local electrical codes.
• Do not reconnect electrical current at main service
panel until proper grounds are installed.
PROPERTY DAMAGE
Do not use plumber's putty on any other disposer
connection other than sink flange. Do not use thread
sealants or pipe dope. These may harm disposer and
cause property damage.
FIRE HAZARD
Do not store flammable items such as rags, paper or
aerosol cans near disposer. Do not store or use
gasoline or other flammable vapors and liquids in
vicinity of disposer.
12
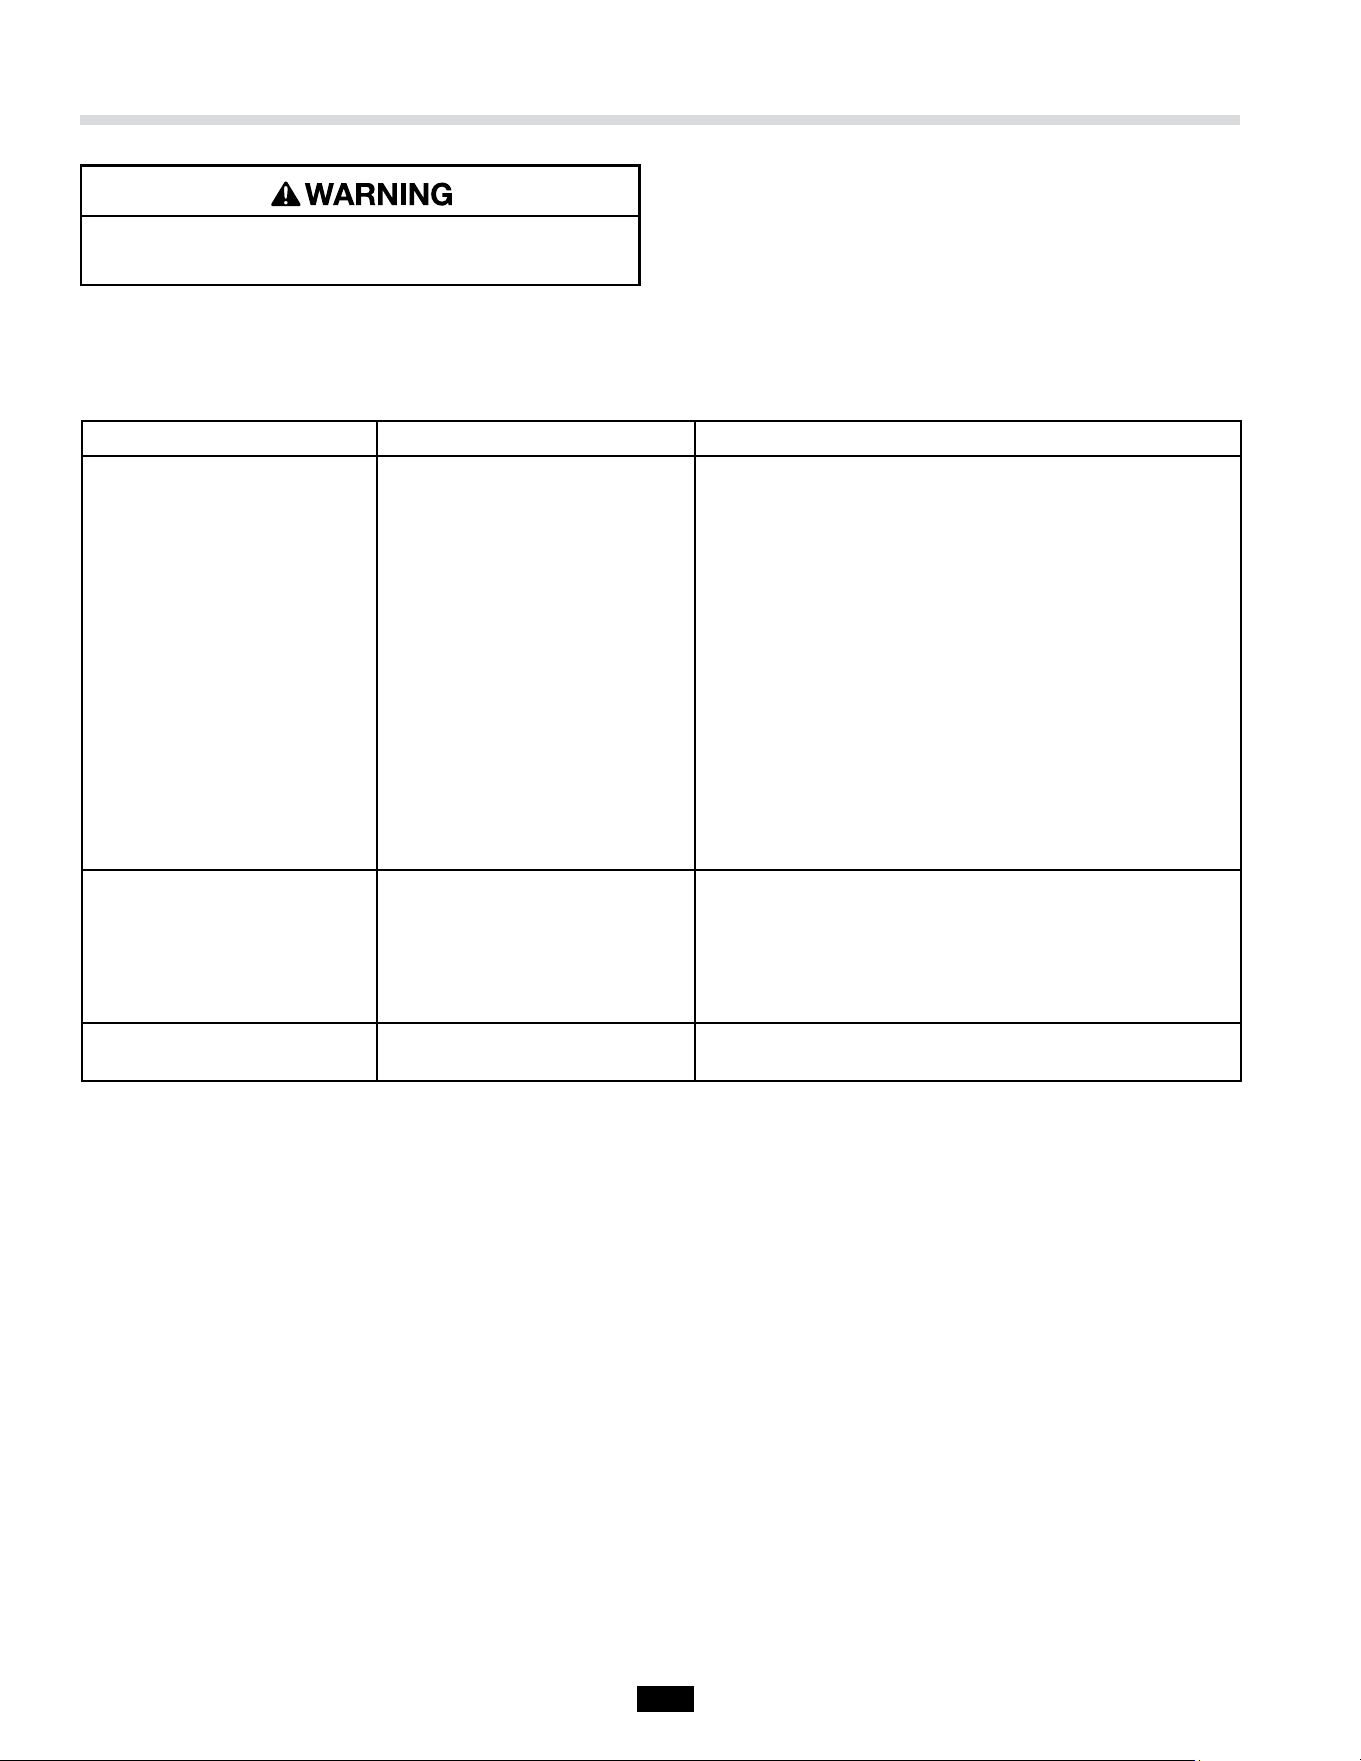
Troubleshooting
Troubleshooting for problems other than what is listed below should be performed by a qualified service person.
Troubleshooting performed by untrained personnel could result in electrical shock or damage to the disposer.
Disconnect power before servicing.
PROBLEM POSSIBLE CAUSE SOLUTION
Disposer will not start. • No electrical supply.
• Disposer overload protector
is tripped.
• Disposer is jammed.
• Turn on electrical supply.
• Turn control to off position and press red reset button
on disposer.
• Turn control to off position and complete
following steps:
1. Insert one end of self-service wrenchette into center
hole on bottom of disposer. Work wrenchette back
and forth until it turns one full revolution. Remove
wrenchette.
2. Reach into disposer with tongs and remove object(s).
Allow disposer motor to cool for 3-5 minutes, then
lightly push red reset button on disposer bottom. (If
motor remains inoperative, check service panel for
tripped circuit breakers or blown fuses.)
Disposer motor stops while
grinding.
• Disposer is jammed.
• Disposer overload protector
is tripped.
• See "Disposer is jammed," above.
• Turn control to off position and press red reset button on
disposer. If disposer was running, allow unit to cool 3-5
minutes before pressing red reset button. Never strike
reset button with objects.
Overload protector
trips frequently.
• Disposer is overloaded with
food waste.
• Do not overload disposer with excessive amounts of
food waste.
ELECTRICAL SHOCK
Disconnect power before servicing.
13
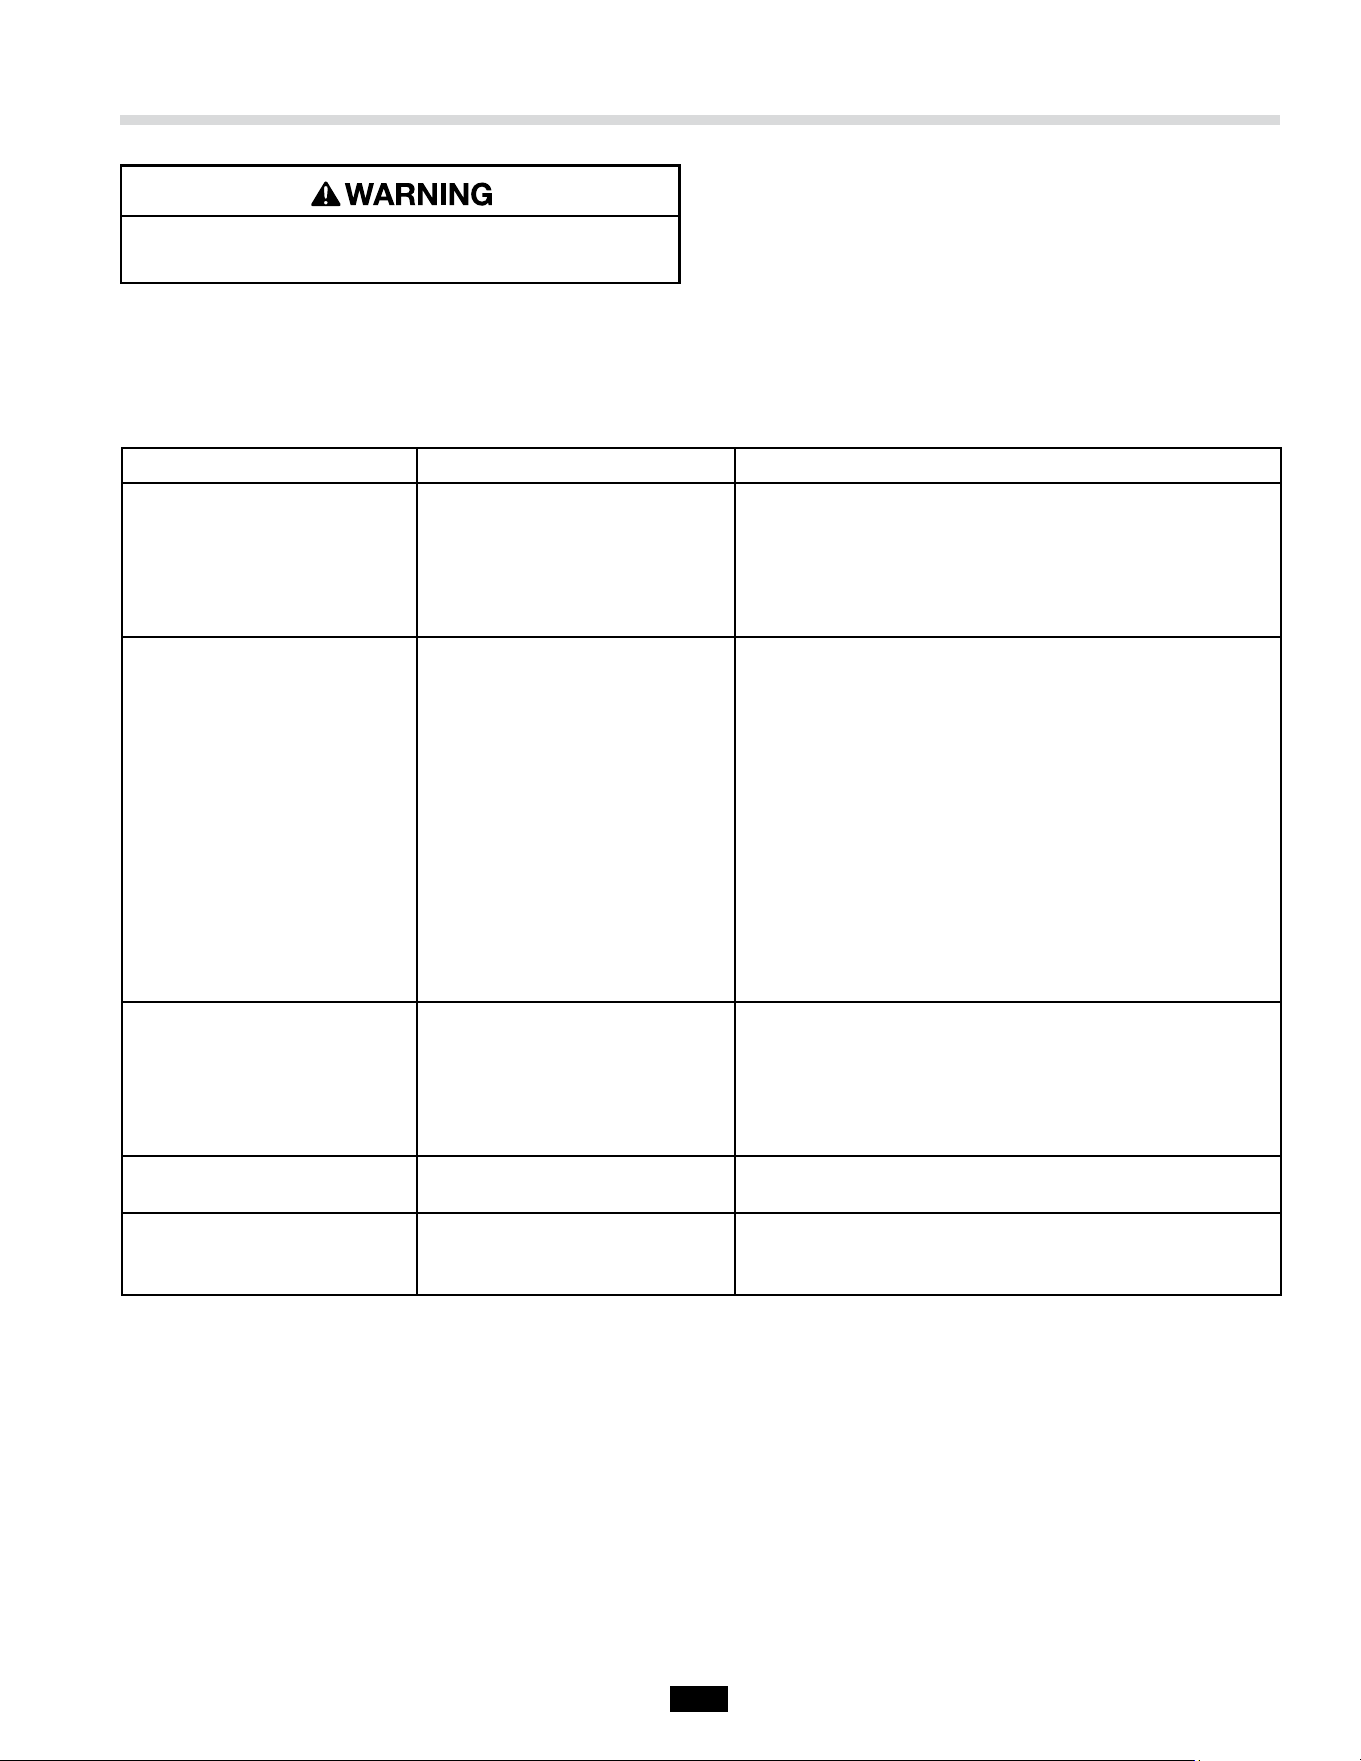
Troubleshooting
Troubleshooting for problems other than what is listed below should be performed by a qualified service person.
Troubleshooting performed by untrained personnel could result in electrical shock or damage to the disposer.
Disconnect power before servicing.
PROBLEM POSSIBLE CAUSE SOLUTION
Disposer will not start and
water does not flow.
• No electrical supply.
• Electrical disconnect switch
has been reactivated and
30-second delay has not
yet expired.
• Turn on electrical supply.
• Wait 30 seconds and try starting again.
Disposer will not start but
water flows.
• Disposer overload protector
is tripped.
• Disposer is jammed.
• Turn control to off position and press red reset button
on disposer.
• Turn control to off position and complete
following steps:
1. Insert one end of self-service wrenchette into center
hole on bottom of disposer. Work wrenchette back
and forth until it turns one full revolution. Remove
wrenchette.
2. Reach into disposer with tongs and remove object(s).
Allow disposer motor to cool for 3-5 minutes, then
lightly push red reset button on disposer bottom. (If
motor remains inoperative, check service panel for
tripped circuit breakers or blown fuses.)
Disposer motor stops while
grinding, but water continues
to flow.
• Disposer is jammed.
• Disposer overload protector
is tripped.
• See "Disposer is jammed," above.
• Turn control to off position and press red reset button on
disposer. If disposer was running, allow unit to cool 3-5
minutes before pressing red reset button. Never strike
reset button with objects.
Water flows continuously
before controls are turned on.
• Solenoid and valve are
installed improperly.
• Reinstall water solenoid valve with arrow on valve
pointing in direction of the water flow.
Disposer runs but no
water flows.
• No water supply.
• Solenoid valve isn't opening.
• Turn on water supply.
• Call qualified service personnel.
FOR OPTIONAL DISHWASHER OR DIRECT WATER CONNECTION
ELECTRICAL SHOCK
Disconnect power before servicing.

InSinkErator® may make improvements and changes in the specication at any time, in its sole
discretion, without notice or obligation and further reserves the right to change or discontinue models.
©2023 InSinkErator®. All rights reserved.
Limited Warranty
InSinkErator® (“InSinkErator” or “Manufacturer” or “we” or “our”
or “us”) warrants to the original purchaser only (“Customer” or “you”
or “your”), subject to the exclusions below, that your InSinkErator®
(the “InSinkErator Product”) will be free from defects in material
and workmanship for one year from the original date of purchase (the
“Warranty Period”). This limited warranty terminates if the original
purchaser transfers the InSinkErator Product to any other person or
entity.
What is Covered
This limited warranty includes repair or replacement of your
InSinkErator Product, accessories if included in the original
InSinkErator Product package, and all replacement parts and labor
costs if provided by an authorized InSinkErator service representative.
What is not Covered
This limited warranty does not extend to and expressly excludes:
• Losses or damages or the inability to operate your InSinkErator
Product resulting from conditions beyond the Manufacturer’s
control including, without limitation, accident, alteration, misuse,
abuse, neglect, or negligence (other than Manufacturer’s).
• Wear and tear expected to occur during the normal course of use,
including without limitation, cosmetic rust, scratches, dents or
comparable and reasonably expected losses or damages.
• Failure to install, maintain, assemble, or mount the InSinkErator
Product in accordance with Manufacturer’s instructions or local
electrical and plumbing codes, faulty or improper electrical
installation, faulty or improper plumbing installation, clogged drain
lines, or an improperly sized unit (as specied by InSinkErator).
What we will do to Correct Problems
To le a warranty claim during the Warranty Period, you may call Toll
Free 1-800-845-8345 for the nearest InSinkErator Authorized Service
Agency or to reach Technical Support, or you may visit our website at
www.insinkerator.com.
The following information must be provided as part of your warranty
claim: your name, address, phone number, your InSinkErator Product
model and serial number. You will be required to submit supporting
documentation of the date of purchase.
Manufacturer or its authorized service representative will determine,
in its sole and absolute discretion, if your InSinkErator Product is
covered under this limited warranty. Only an authorized InSinkErator
service representative may provide warranty service. InSinkErator
is not responsible for warranty claims arising from work performed
on your InSinkErator Product by anyone other than an authorized
InSinkErator service representative.
If a covered claim is made during the Warranty Period,
Manufacturer will, through its authorized service representative,
and at Manufacturer’s or its authorized service representative’s sole
discretion, either repair or replace your InSinkErator Product. If your
InSinkErator Product is replaced, the warranty on the replacement
InSinkErator Product will be limited to the unexpired term remaining
in the original Warranty Period. YOUR SOLE AND EXCLUSIVE
REMEDY UNDER THIS LIMITED WARRANTY SHALL BE LIMITED
TO REPAIR OR REPLACEMENT OF THE INSINKERATOR
PRODUCT. This limited warranty is valid only in the United States and
applies only when the InSinkErator Product is used in the country in
which it was purchased. If outside the 50 United States, contact your
authorized InSinkErator dealer to determine whether any warranty
applies.
No Other Express Warranty Applies
THE LIMITED WARRANTIES PROVIDED ABOVE ARE THE SOLE
AND EXCLUSIVE WARRANTIES PROVIDED BY MANUFACTURER
TO THE ORIGINAL PURCHASER, AND ARE IN LIEU OF ALL
OTHER WARRANTIES, WRITTEN OR ORAL, EXPRESS OR
IMPLIED, WHETHER ARISING BY OPERATION OF LAW OR
OTHERWISE, INCLUDING, WITHOUT LIMITATION, WARRANTIES
OF MERCHANTABILITY OR FITNESS FOR A PARTICULAR
PURPOSE, WHETHER OR NOT THE PURPOSE HAS BEEN
DISCLOSED AND WHETHER OR NOT THE INSINKERATOR
PRODUCT HAS BEEN SPECIFICALLY DESIGNED OR
MANUFACTURED FOR YOUR USE OR PURPOSE.
Limitation of Liability
TO THE EXTENT PERMITTED BY LAW, IN NO EVENT
SHALL MANUFACTURER OR ITS AUTHORIZED SERVICE
REPRESENTATIVES BE LIABLE FOR ANY INCIDENTAL, SPECIAL,
INDIRECT, OR CONSEQUENTIAL DAMAGES, INCLUDING
ANY ECONOMIC LOSS, WHETHER RESULTING FROM
NONPERFORMANCE, USE, MISUSE OR INABILITY TO USE THE
INSINKERATOR PRODUCT OR THE MANUFACTURER’S OR ITS
AUTHORIZED SERVICE REPRESENTATIVE’S NEGLIGENCE.
MANUFACTURER SHALL NOT BE LIABLE FOR DAMAGES
CAUSED BY DELAY IN PERFORMANCE AND IN NO EVENT,
REGARDLESS OF THE FORM OF THE CLAIM OR CAUSE OF
ACTION (WHETHER BASED IN CONTRACT, INFRINGEMENT,
NEGLIGENCE, STRICT LIABILITY, OTHER TORT OR
OTHERWISE), SHALL MANUFACTURER'S LIABILITY TO YOU
EXCEED THE PRICE PAID BY THE ORIGINAL OWNER FOR THE
INSINKERATOR PRODUCT.
The term "consequential damages" shall include, but not be limited
to, loss of anticipated profits, business interruption, loss of use or
revenue, cost of capital or loss or damage to property or equipment.
Some states do not allow the exclusion or limitation of incidental or
consequential damages, so the above limitation may not apply to you.
This warranty gives you specific legal rights and you may also have
other rights which vary from state to state.