
Technical Support and E-Warranty Certificate www.vevor.com/support
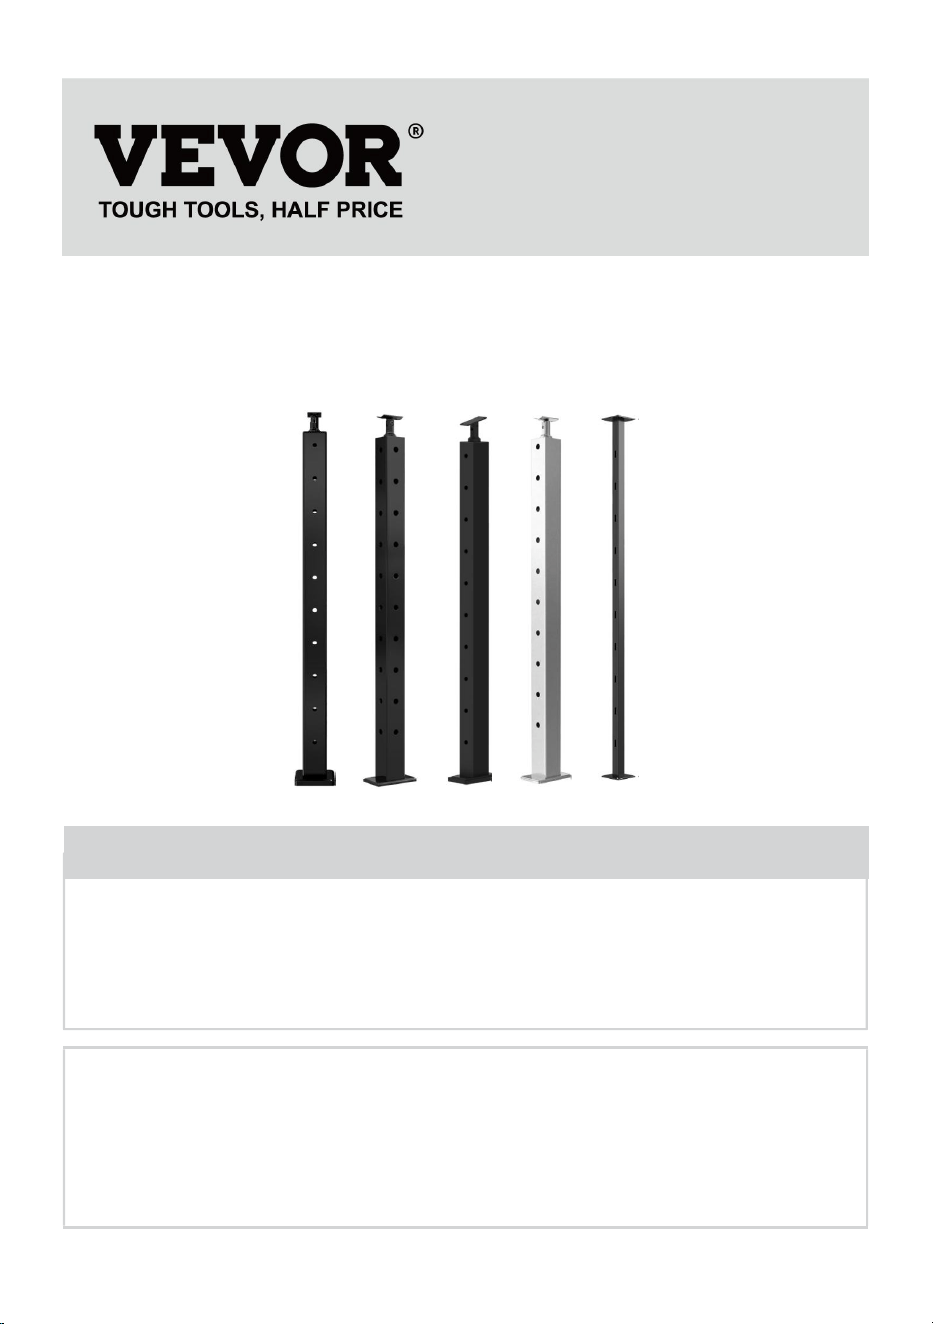
CABLE RAILING POST
MODEL:HR-001/HR-002/HR-003/HR-004/HR-005/HR-006/HR-007/
HR-008/HR-009/HR-010/HR-011/HR-012/HR-013/HR-014
HR-015/HR-016/HR-017/HR-018/HR-019/HR-020/HR-021/
HR-022/HR-023
We continue to be committed to provide you tools with competitive price.
"Save Half", "Half Price" or any other similar expressions used by us only represents an
estimate of savings you might benefit from buying certain tools with us compared to the major
top brands and does not necessarily mean to cover all categories of tools offered by us. You
are kindly reminded to verify carefully when you are placing an order with us if you are
actually saving half in comparison with the top major brands.
- 1 -
MODEL:HR-001/HR-002/HR-003/HR-004/HR-005/HR-006/HR-007/
HR-008/HR-009/HR-010/HR-011/HR-012/HR-013/HR-014
HR-015/HR-016/HR-017/HR-018/HR-019/HR-020/HR-021/
HR-022/HR-023
<Picture Only For Reference >
Have product questions? Need technical support? Please feel free to
contact us:
Technical Support and E-Warranty Certificate
www.vevor.com/support
NEED HELP? CONTACT US!
This is the original instruction, please read all manual instructions
carefully before operating. VEVOR reserves a clear interpretation of our
user manual. The appearance of the product shall be subject to the
product you received. Please forgive us that we won't inform you again if
there are any technology or software updates on our product.
CABLE RAILING POST

- 2 -
IMPORTANT SAFEGUARDS
WARNING: Read and understand this entire manual before
operating or servicing this product. Failure to follow these
warnings and instructions can cause personal injury or
damage to valuable property.
1.The warning indicates that appropriate action should be taken to avoid
the potential danger of personal injury.
2.Product capabilities apply to properly and completely assembled product
only.
3.Please keep small spare parts out of children's reach,it is not a toy, Do
not allow children to play.
4. For additional information regarding the parts listed in the following
pages, please refer to the Assembly Diagram of this manual. Unwrap and
separate all parts in a clean work area.
SAVE THESE INSTRUCTIONS
MAIN FEATRUES
This product is mainly used for column installation of wire functions and
decorative accessories.
VEVOR’s Cable Railing Post is made of all stainless steel materials, which
has great resistance to rust and corrosion. It will work for long life time for
interior and exterior railings with low maintenance. Please note that it is not
recommended for coastal projects.
We work with every effort to provide quality products and professional
service, and make VEVOR a reliable brand.
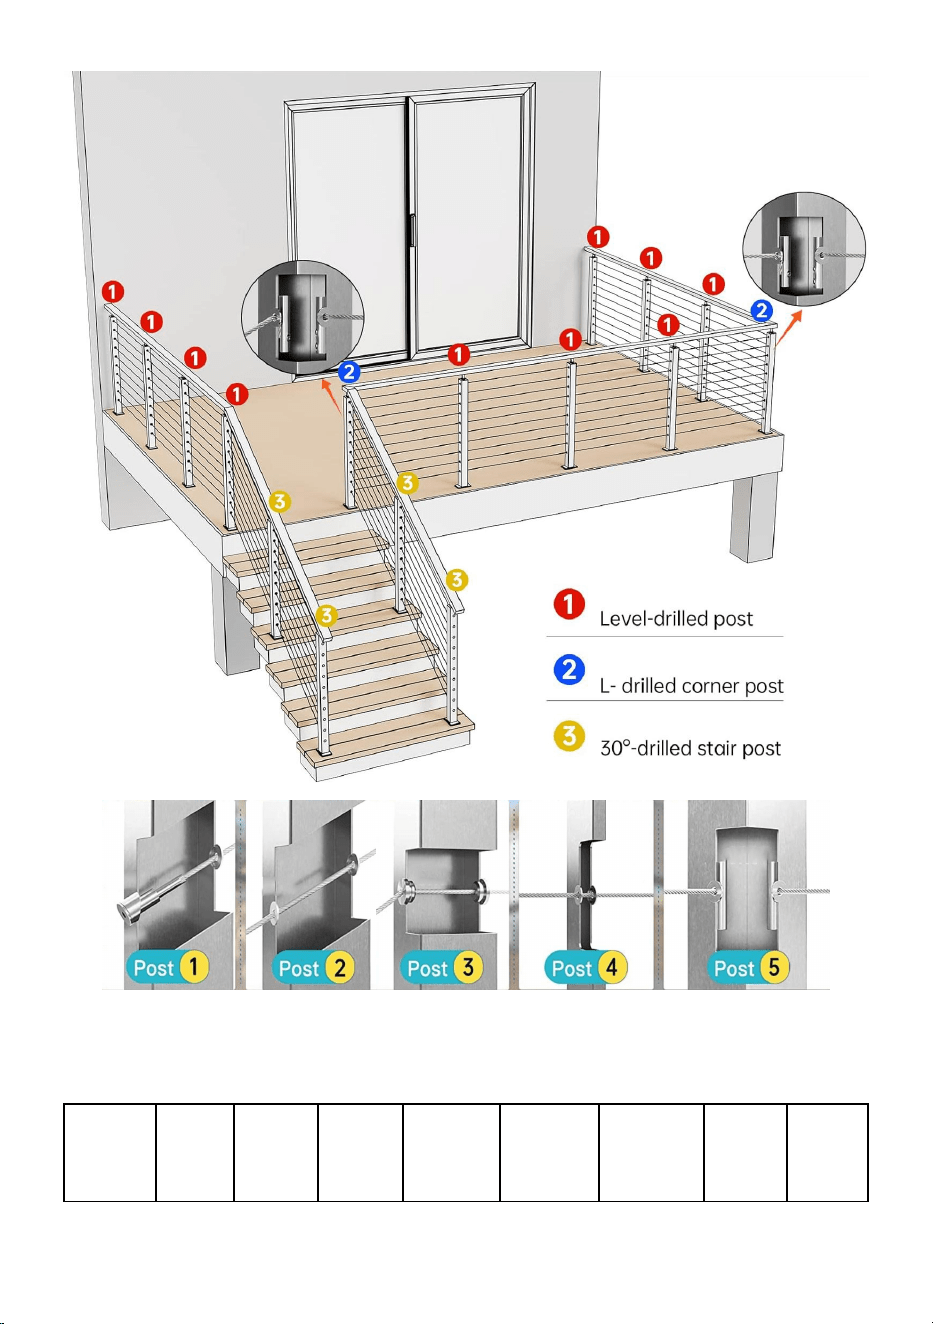
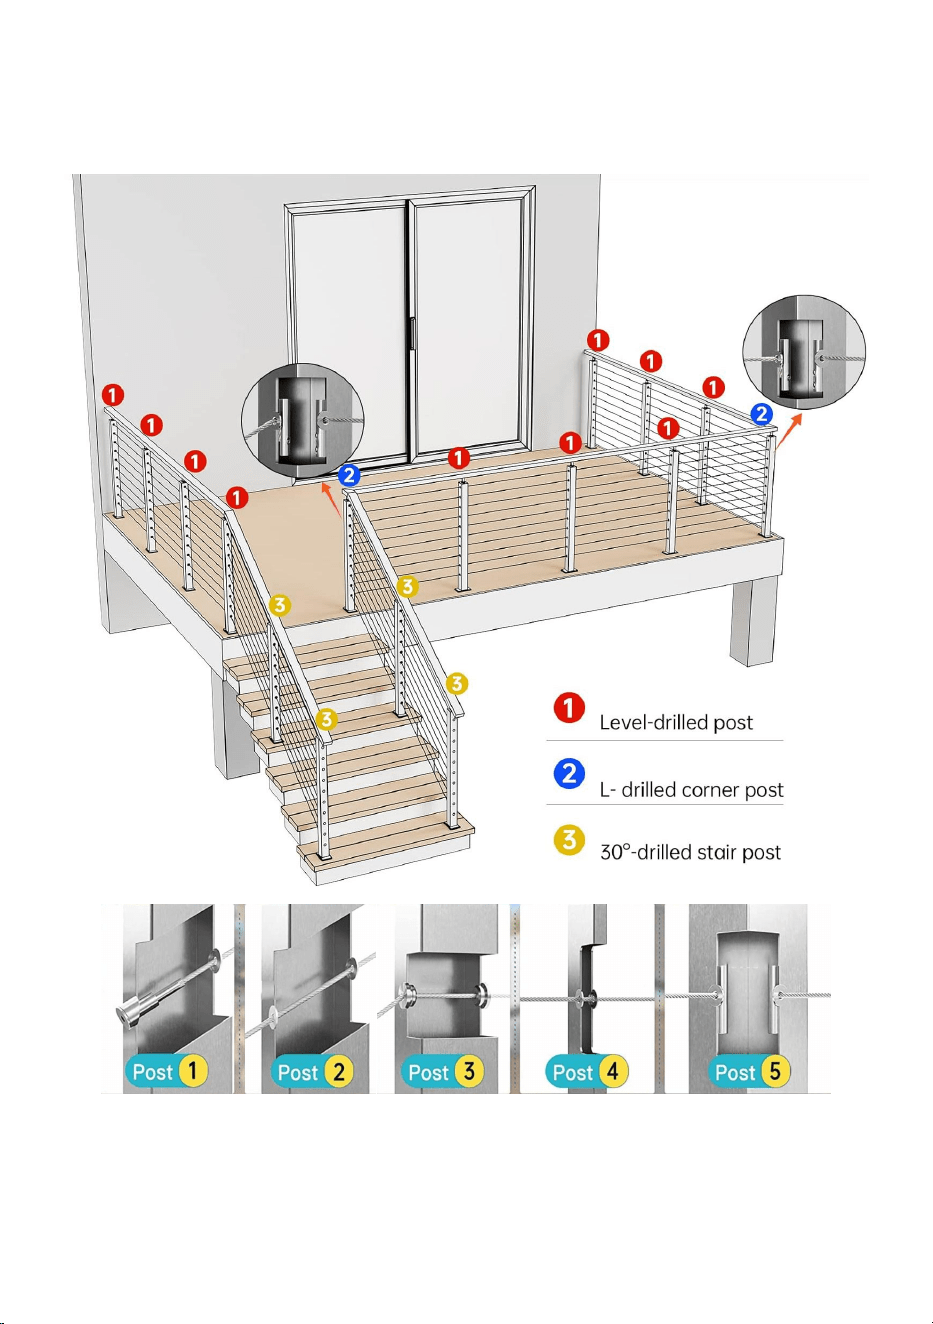
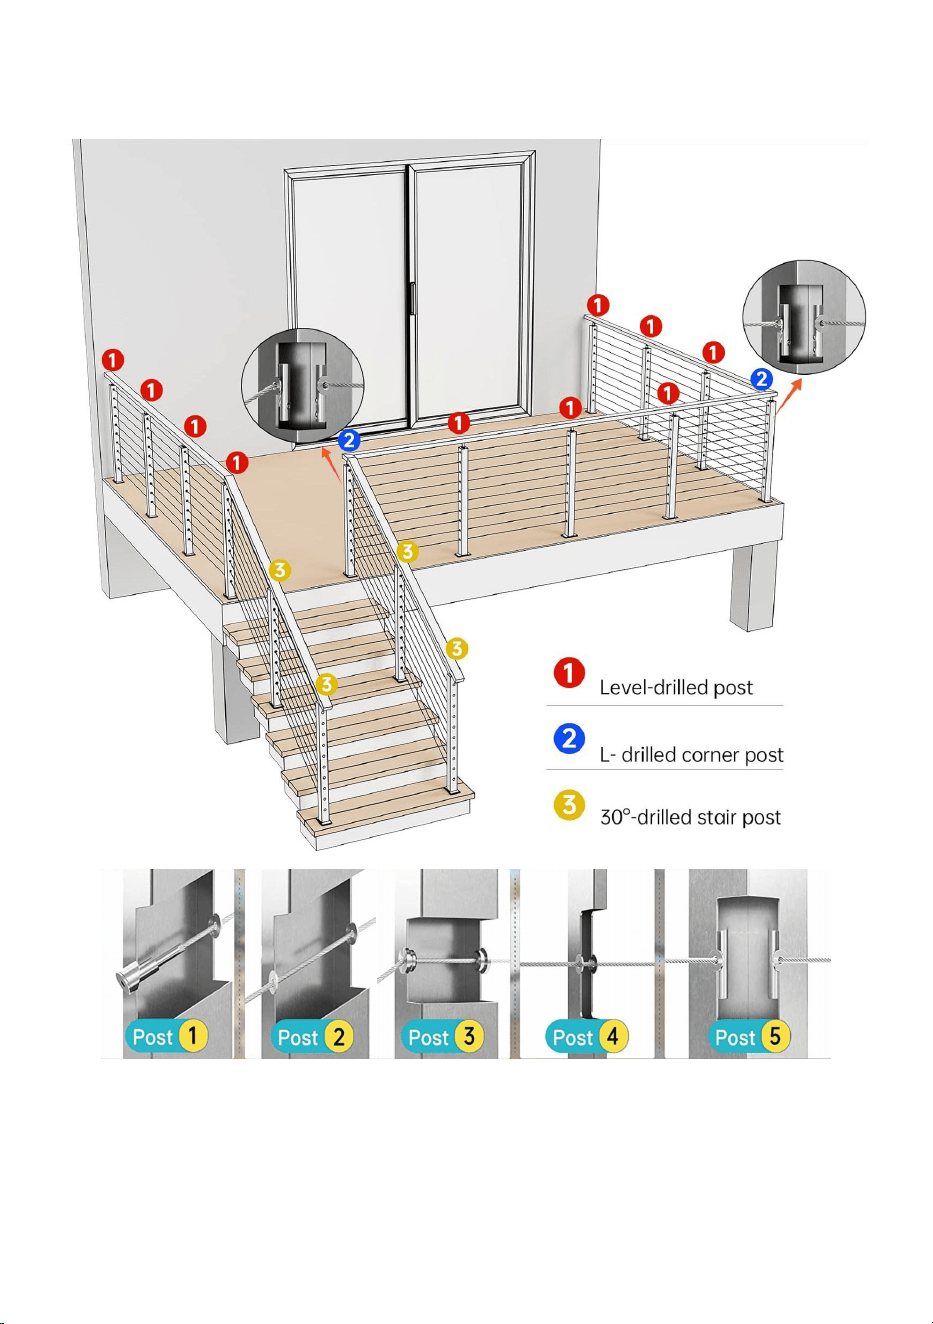
INSTALLATION INSTRUCTION
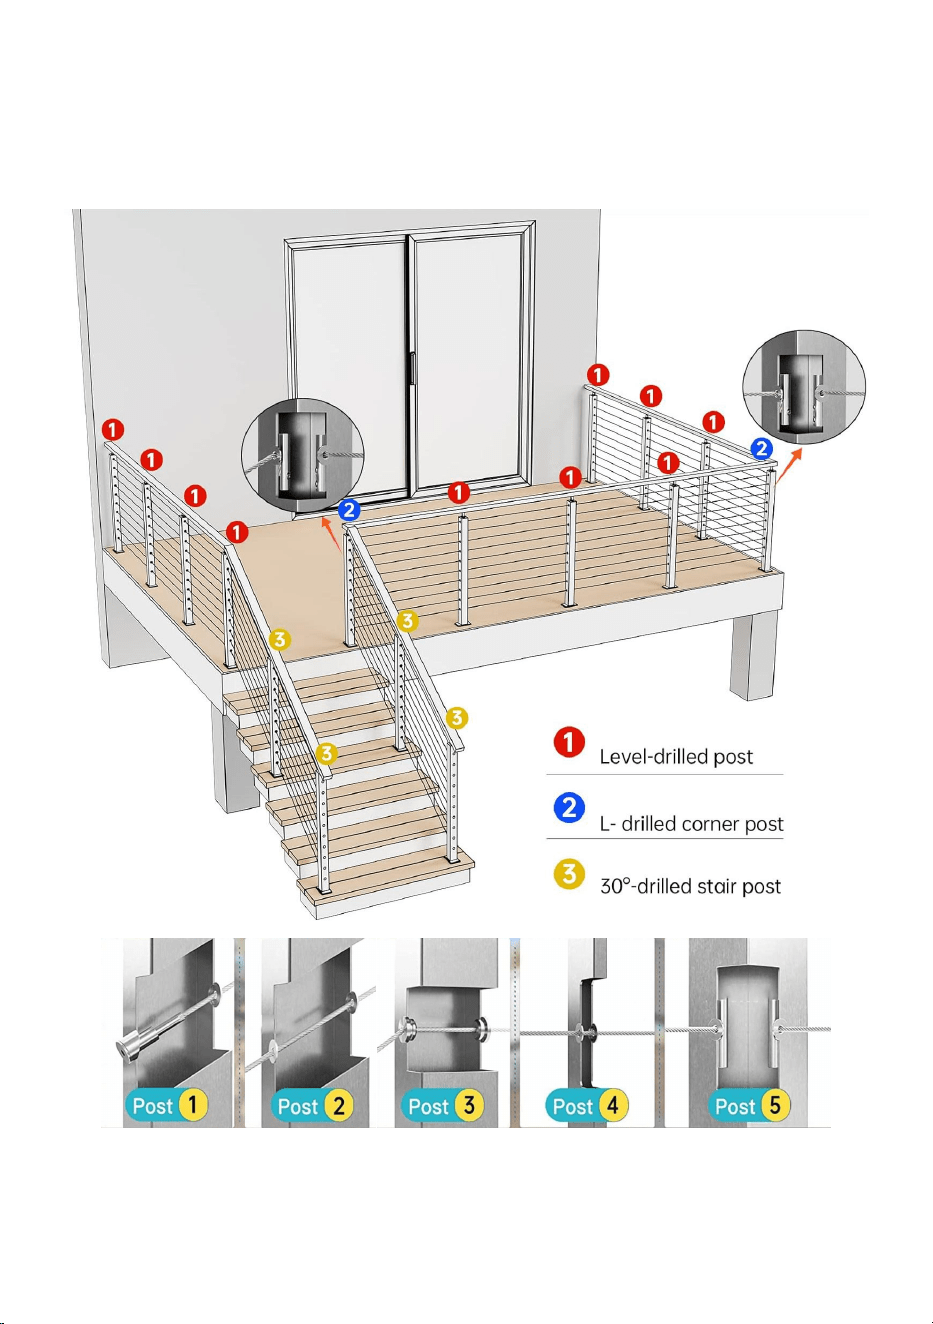
Installation indication and Applicable post
Applicable to all engineering installation scenarios.
Note: This product only includes the column and its installation fasteners,
excluding wire rope, Cable Railing Kit, handrail.
- 3 -
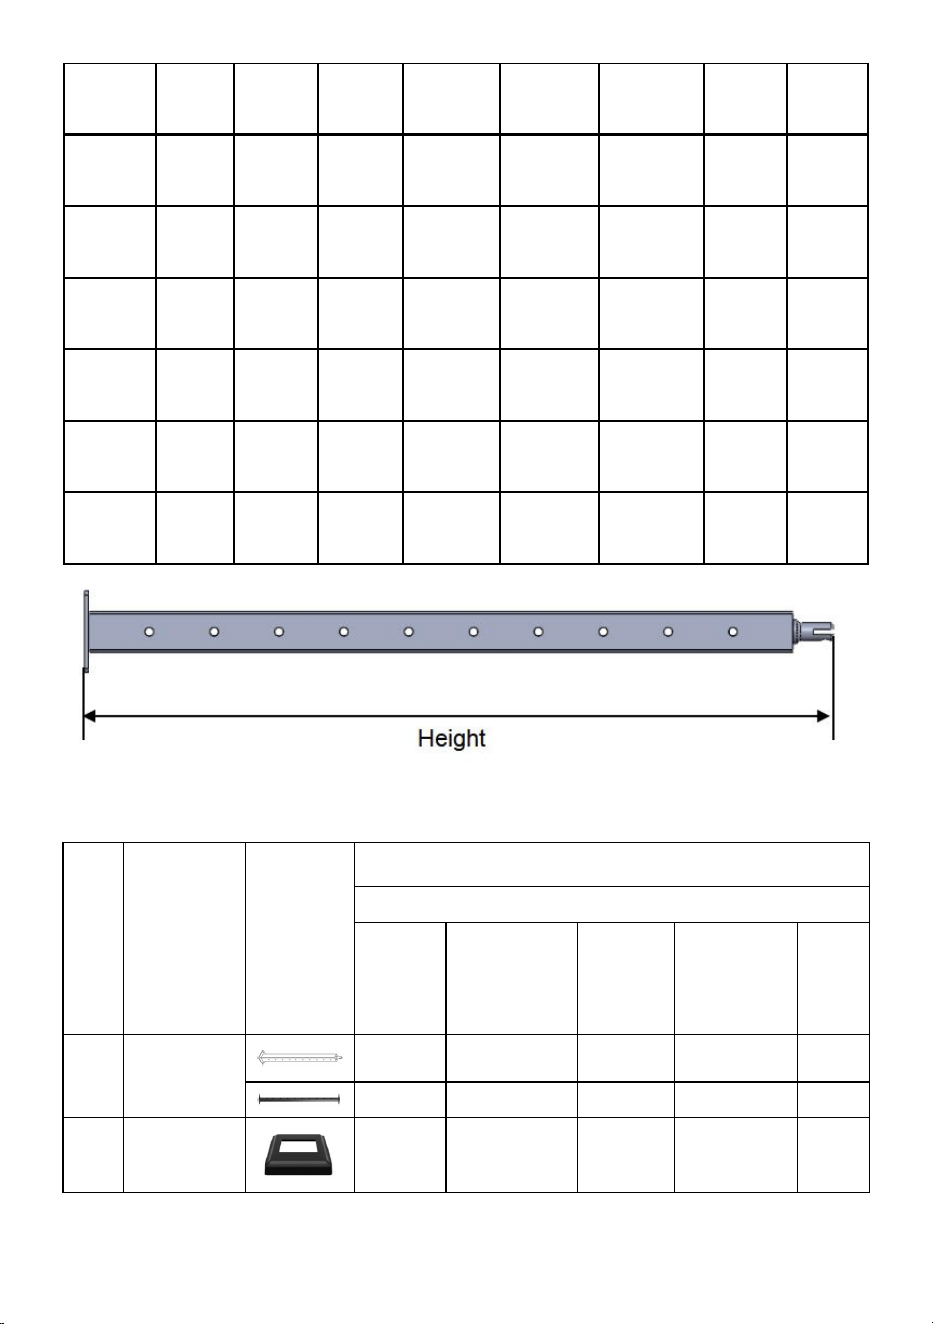
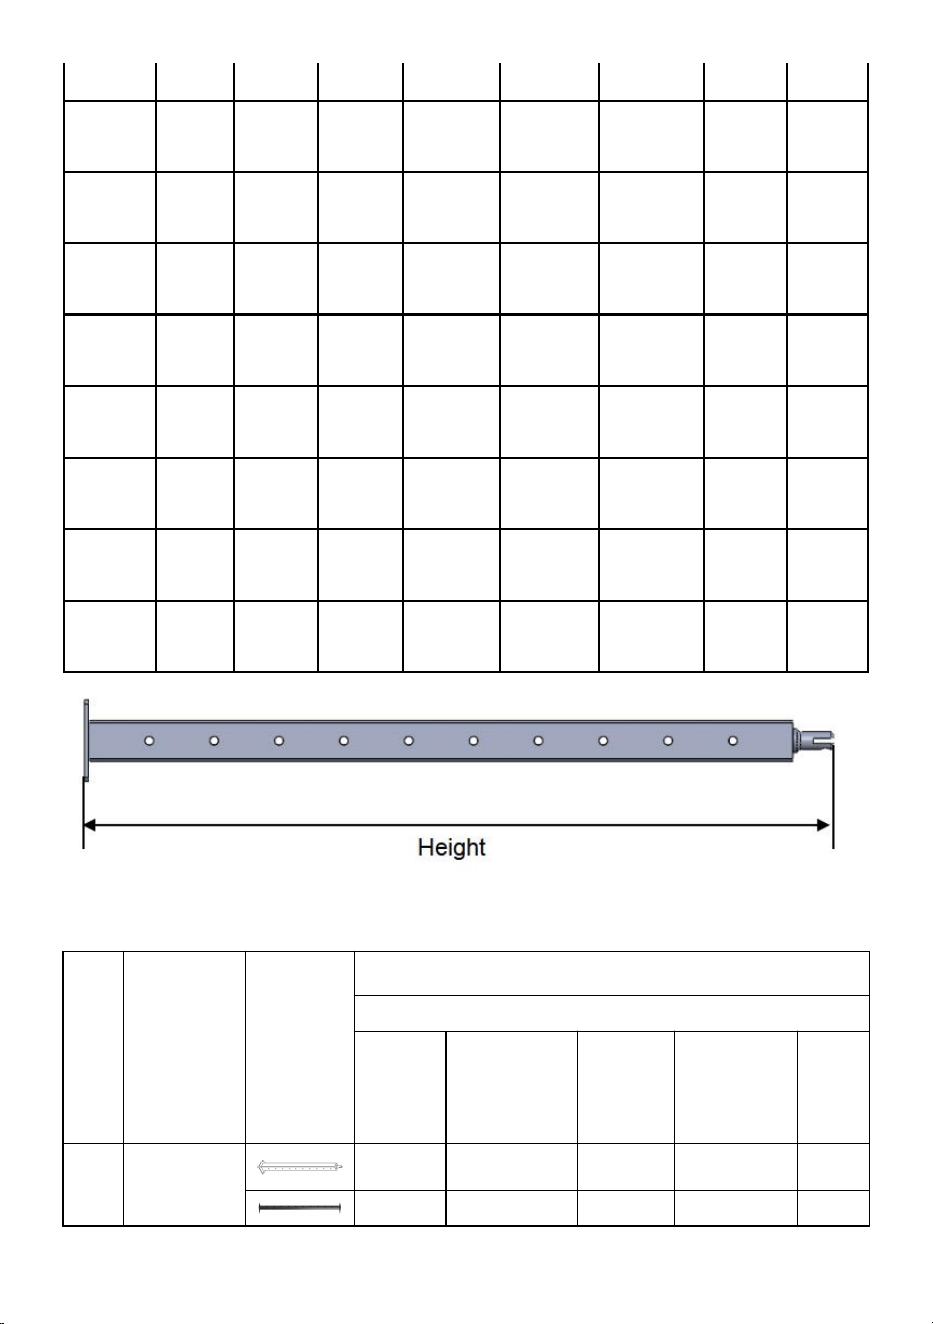
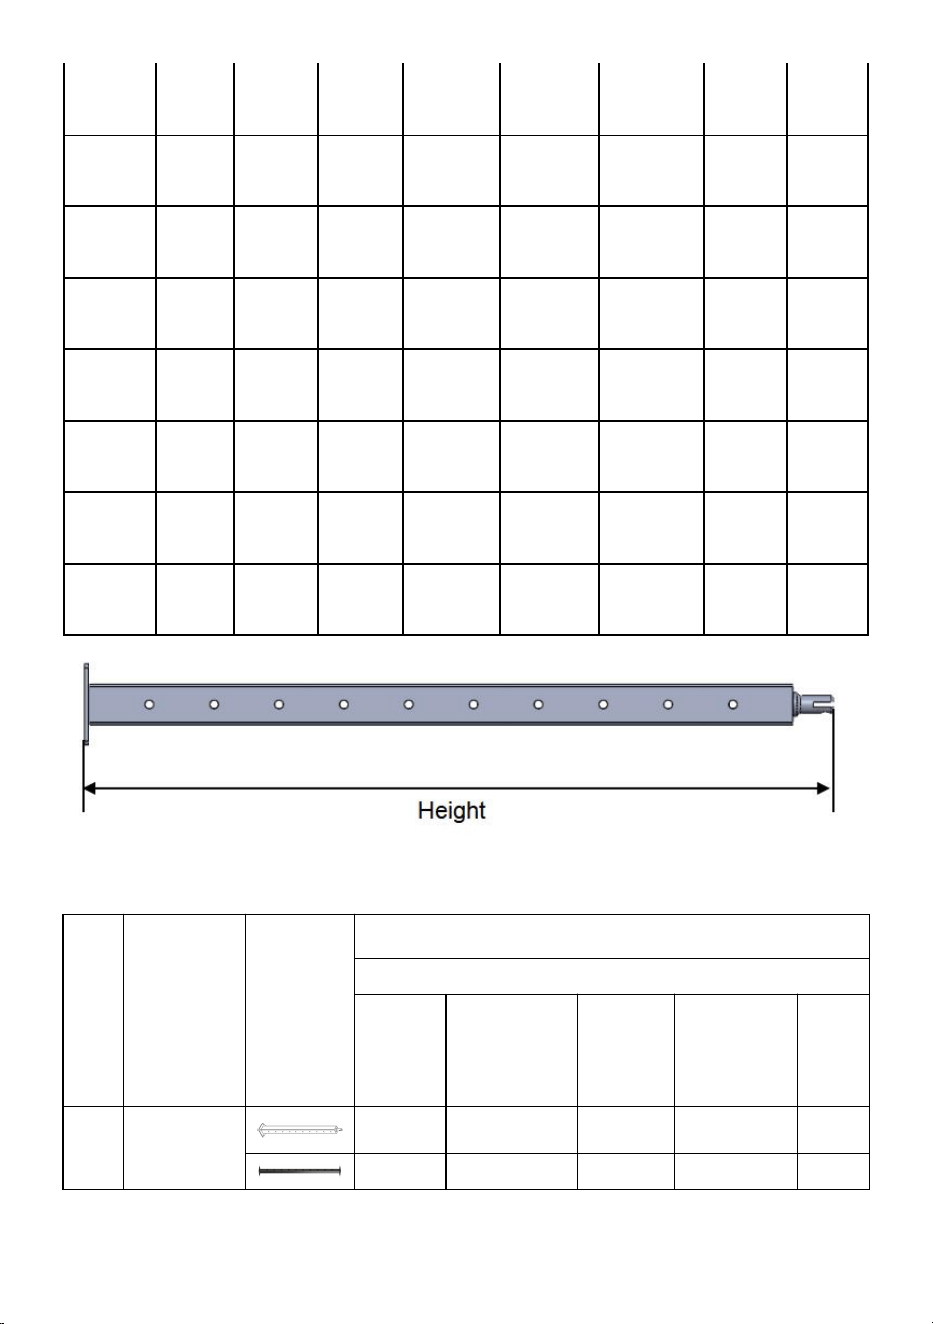
PRODUCT INFORMATION
Model
Drille
d
Heig
ht
(mm)
Drille
d
numb
er
Hole
diamet
er
(mm)
Pitch
of
holes
(mm)
Section
size
(mm)
Color
Inclu
de
(pcs)
A

- 4 -
HR-00
1
level
1067
12
φ10.5
80
50*50
Black
4
HR-00
2
level
914
10
φ10.5
80
50*50
Black
4
HR-00
3
level
1067
12
φ8
80
30*50
Black
4
HR-00
4
level
914
10
φ8
80
30*50
Black
4
HR-00
5
30°
1067
12
10.5×1
5
80
50*50
Silver
1
HR-00
6
30°
1067
12
10.5×1
5
80
50*50
Black
1
HR-00
7
L
1067
12
φ10.5
80
50*50
Black
1
HR-00
8
Non
914
/
/
/
50*50
Black
1
HR-00
9
level
914
10
φ10.5
80
50*50
Black
1
HR-01
0
30°
914
10
10.5×1
5
80
50*50
Black
1
HR-01
1
L
914
10
φ10.5
80
50*50
Black
1
HR-01
2
level
914
10
φ10.5
80
50*50
Silver
1
HR-01
3
30°
1067
12
8×13
80
30*50
Black
1
HR-01
4
L
1067
12
φ8
80
30*50
Black
1
HR-01
5
30°
914
10
8×13
80
30*50
Black
1
HR-01
6
L
914
10
φ8
80
30*50
Black
1
- 5 -
HR-01
7
Non
914
/
/
/
38*38
Black
1
HR-01
8
level
1067
12
φ8
80
30*50
Black
1
HR-01
9
Non
1067
/
/
/
50*50
Black
1
HR-02
0
level
914
10
φ8
80
30*50
Black
1
HR-02
1
level
1067
12
φ10.5
80
50*50
Black
1
HR-02
2
level
914
10
Φ8
80
30*50
Silver
1
HR-02
3
level
1067
12
φ10.5
80
50*50
Silver
1
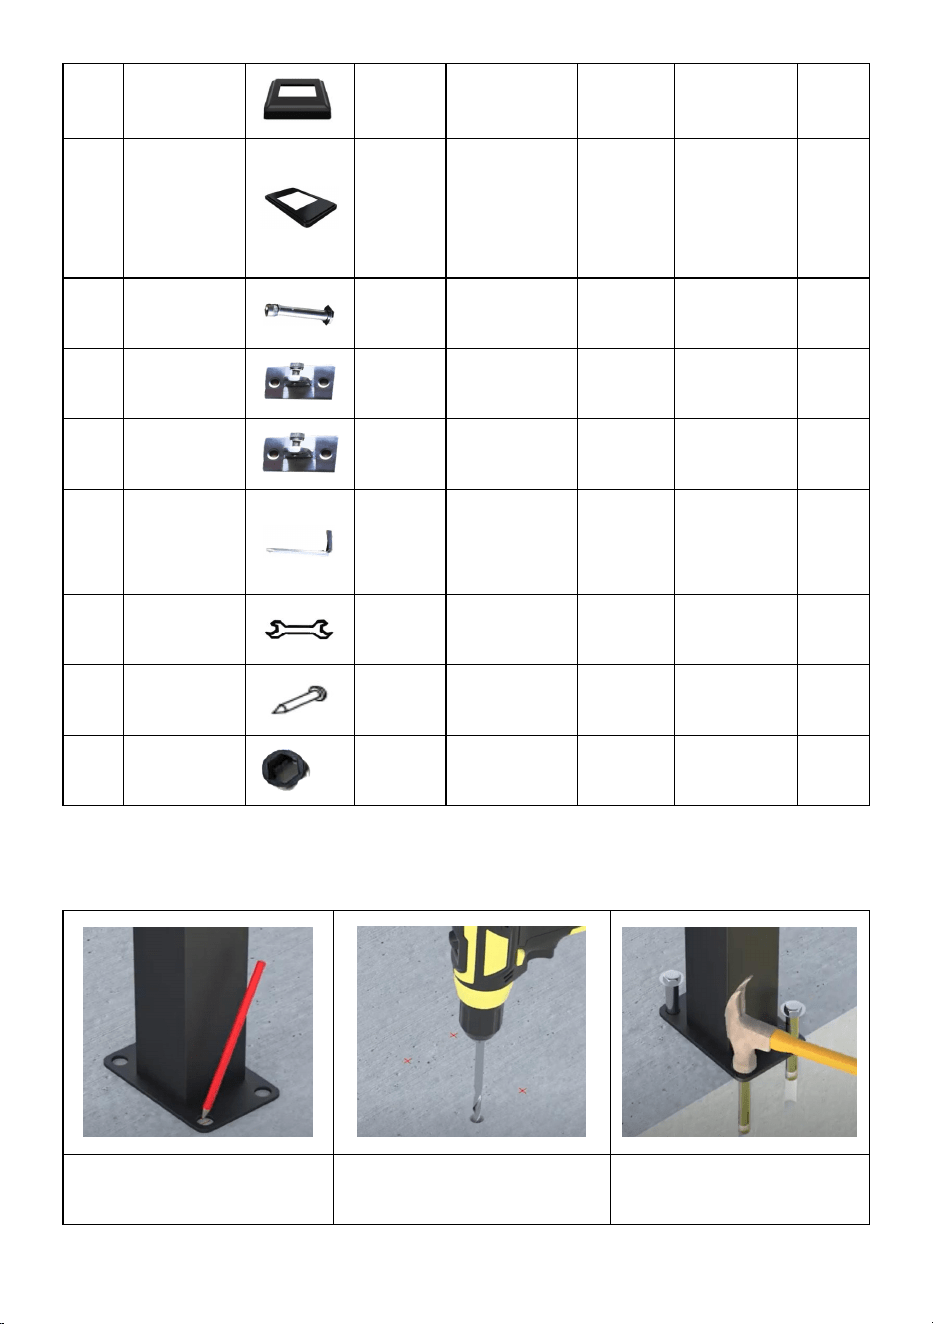
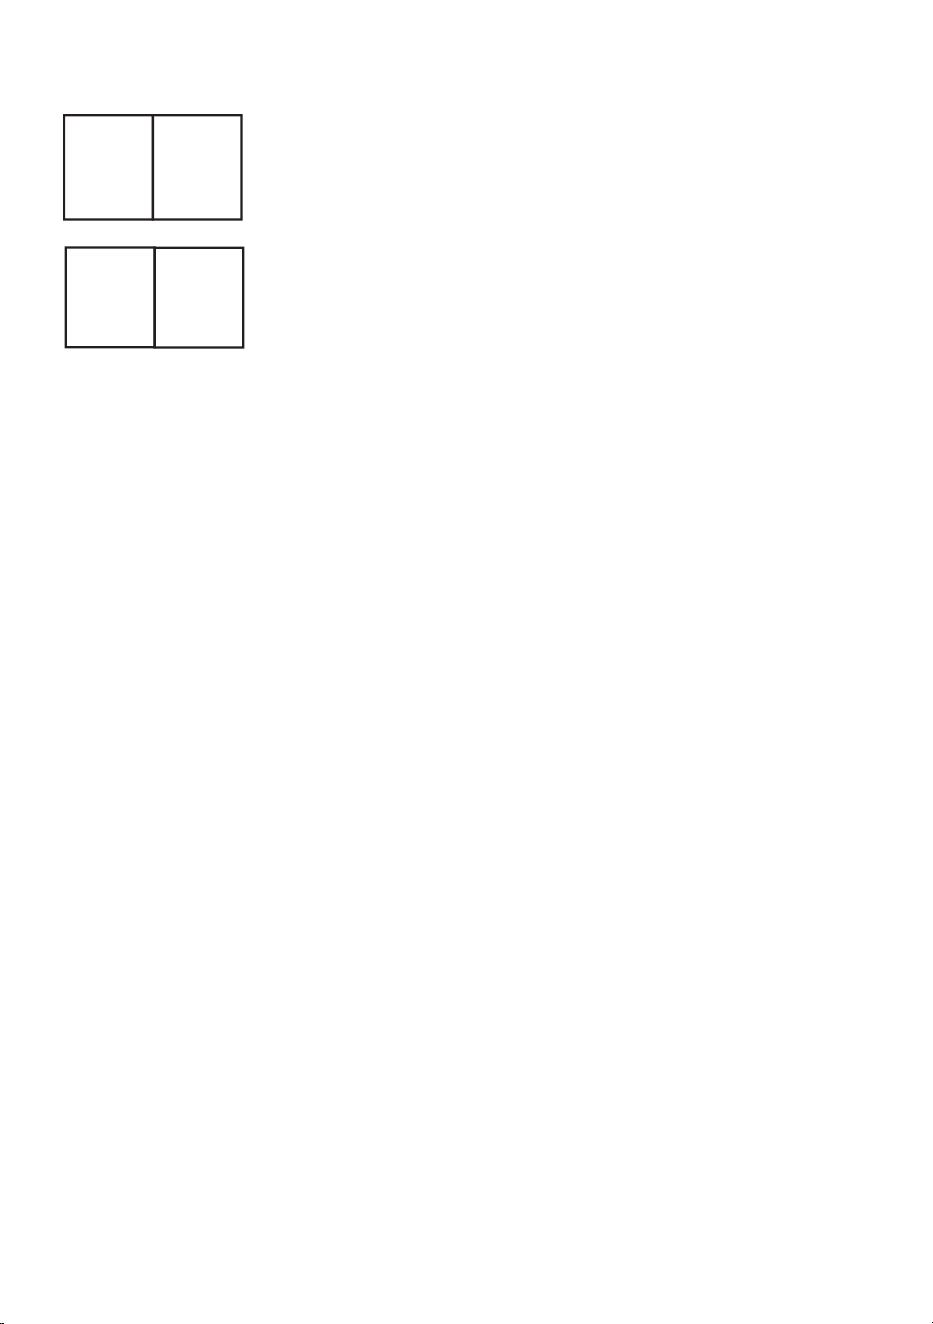
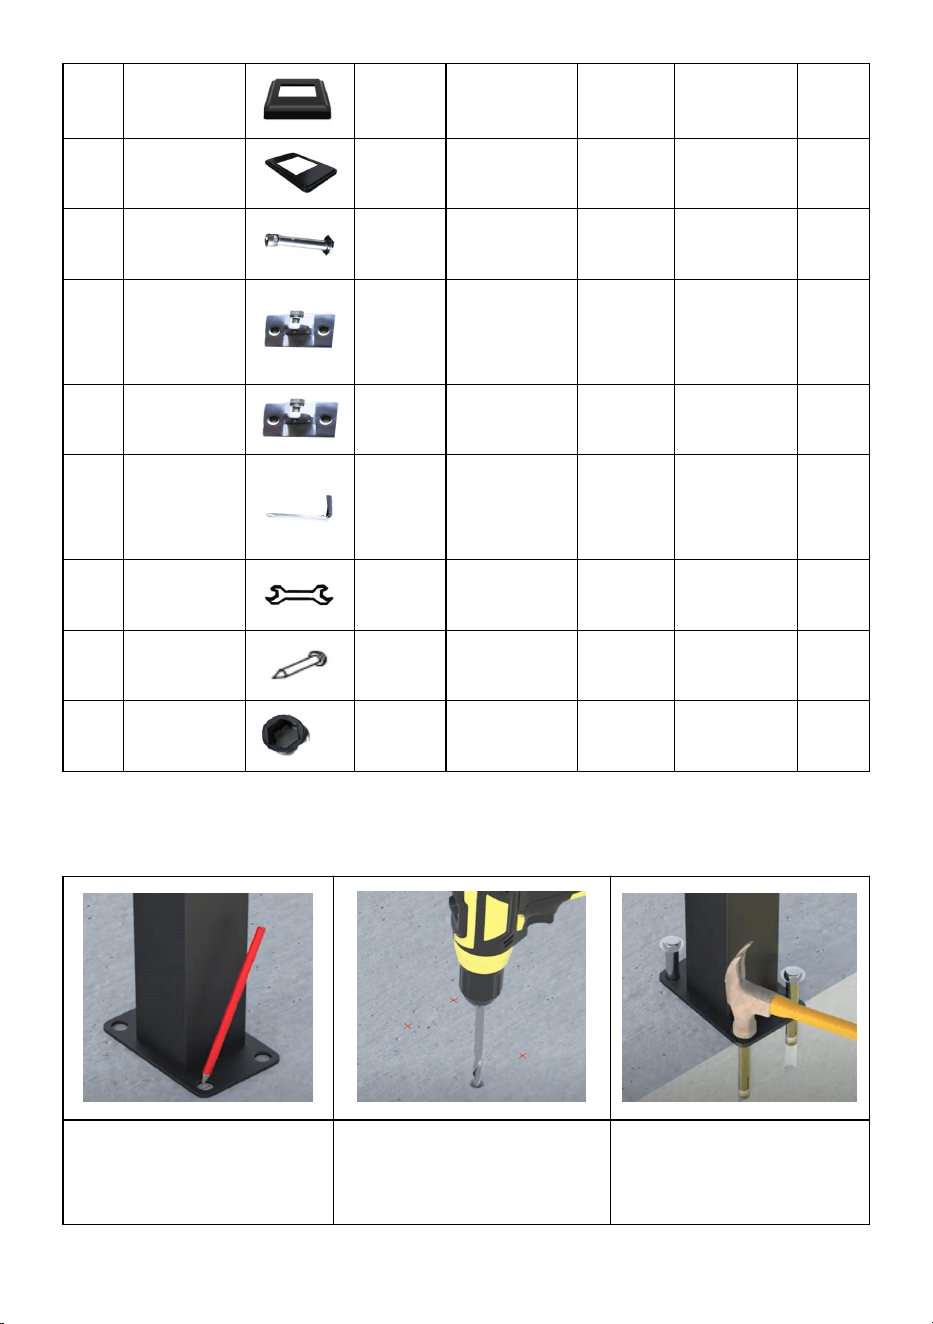
PACKAGE INCLUDE
No
Compone
nts
Picture
QTY
Fit model
HR-001/
HR-002
HR005~HR0
12/HR-019/H
R-021/HR-02
3/
HR-003/
HR-004
HR-013~
HR-016/
HR-018/
HR-020/
HR-022/
HR-0
17
1
post
4
1
4
1
/
/
/
/
/
1
2
Square
cover
4
1
/
/
/
- 6 -
3
Rectangul
ar cover
/
/
4
1
/
4
anchor
bolt
16
4
16
4
4
5
Curved
bracket
4
1
4
1
/
6
Horizontal
bracket
4
1
4
1
/
7
hex
wrench
4
1
4
1
1
8
Open end
wrench
4
1
4
1
1
9
Tapping
screw
8
2
8
2
4
10
Plastic
cover
/
/
/
/
1
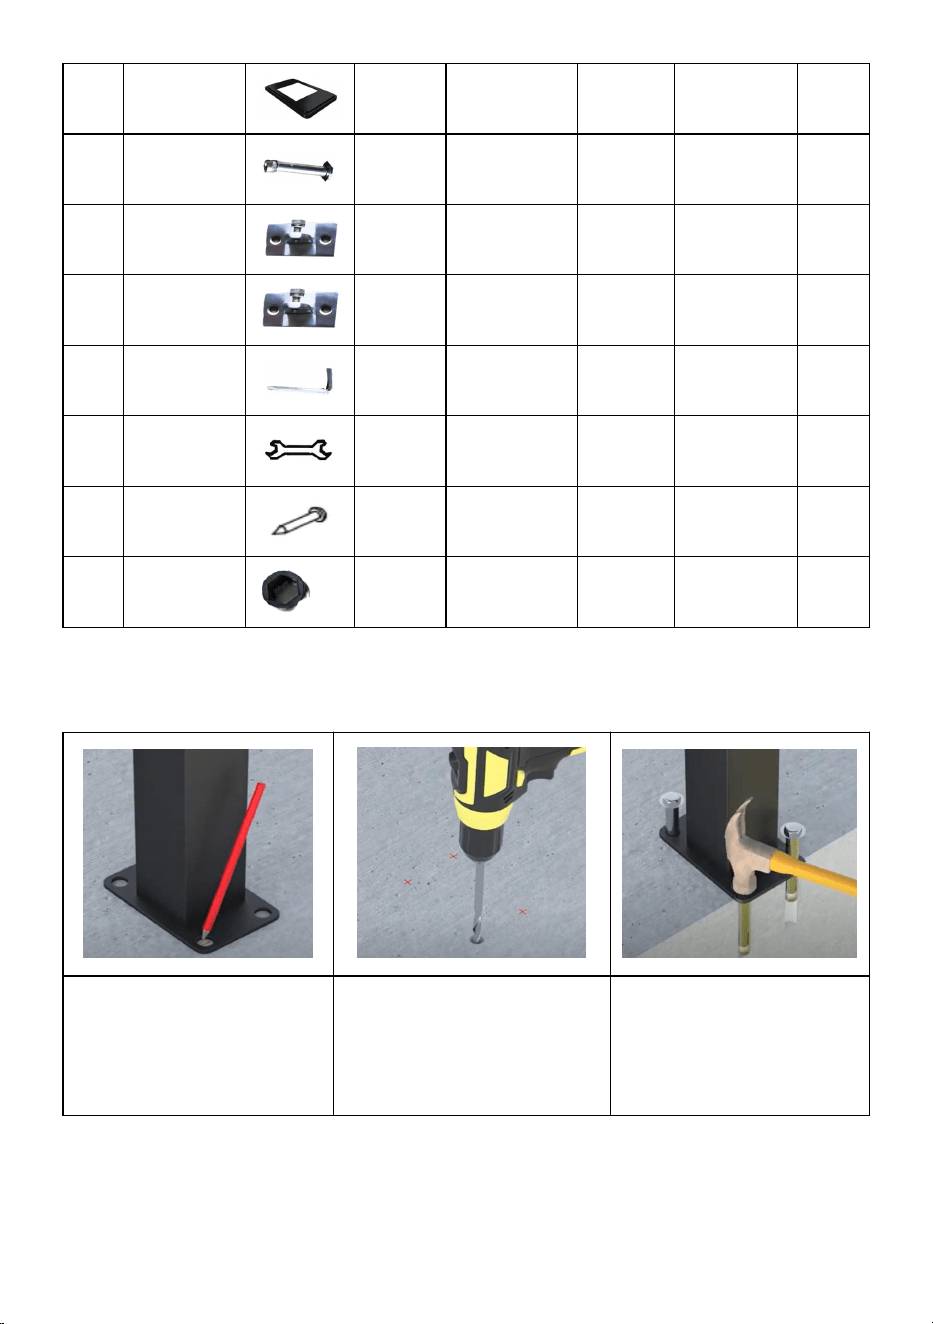
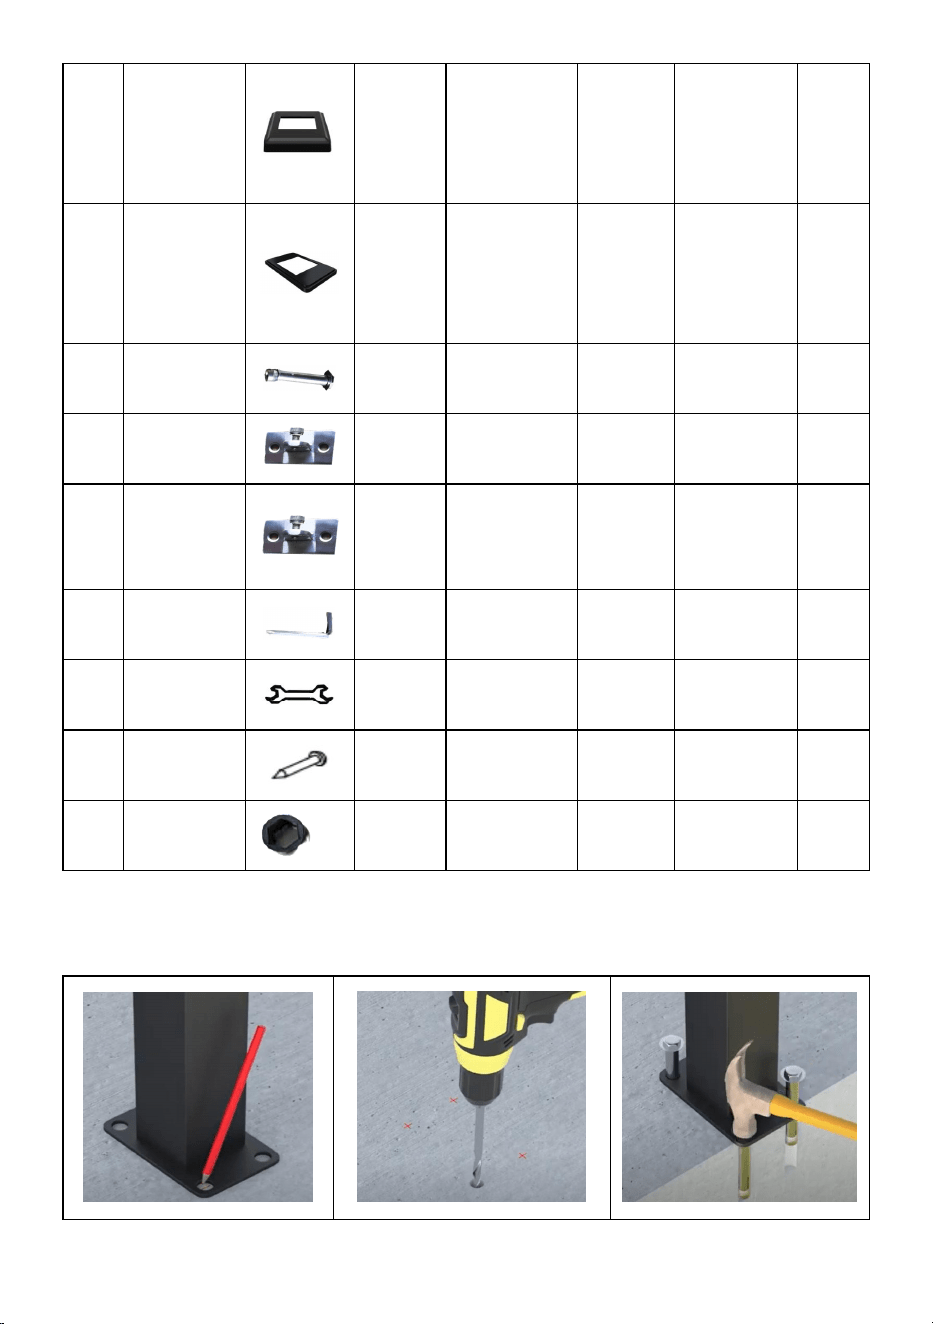
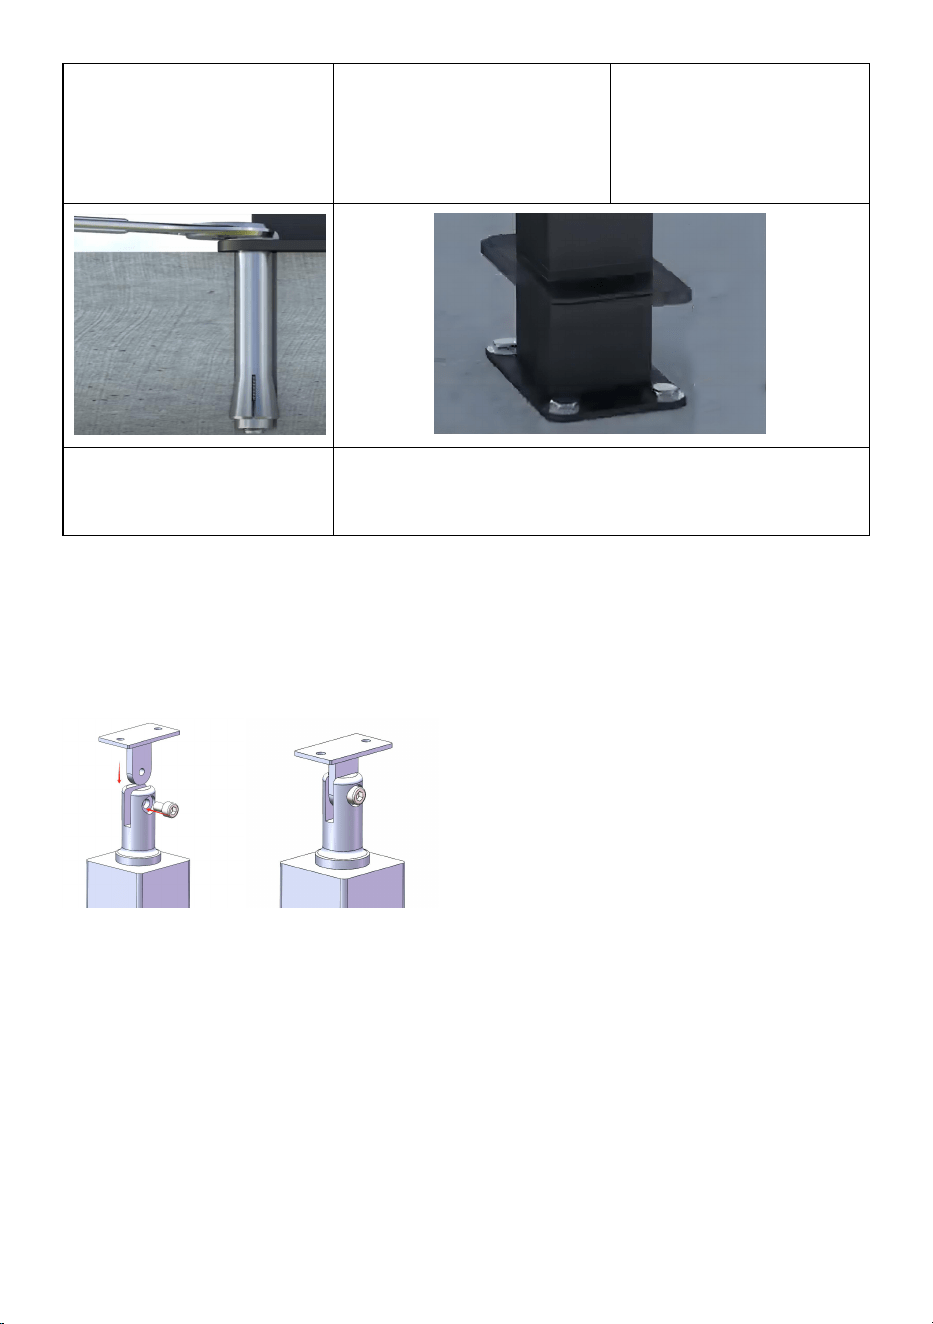
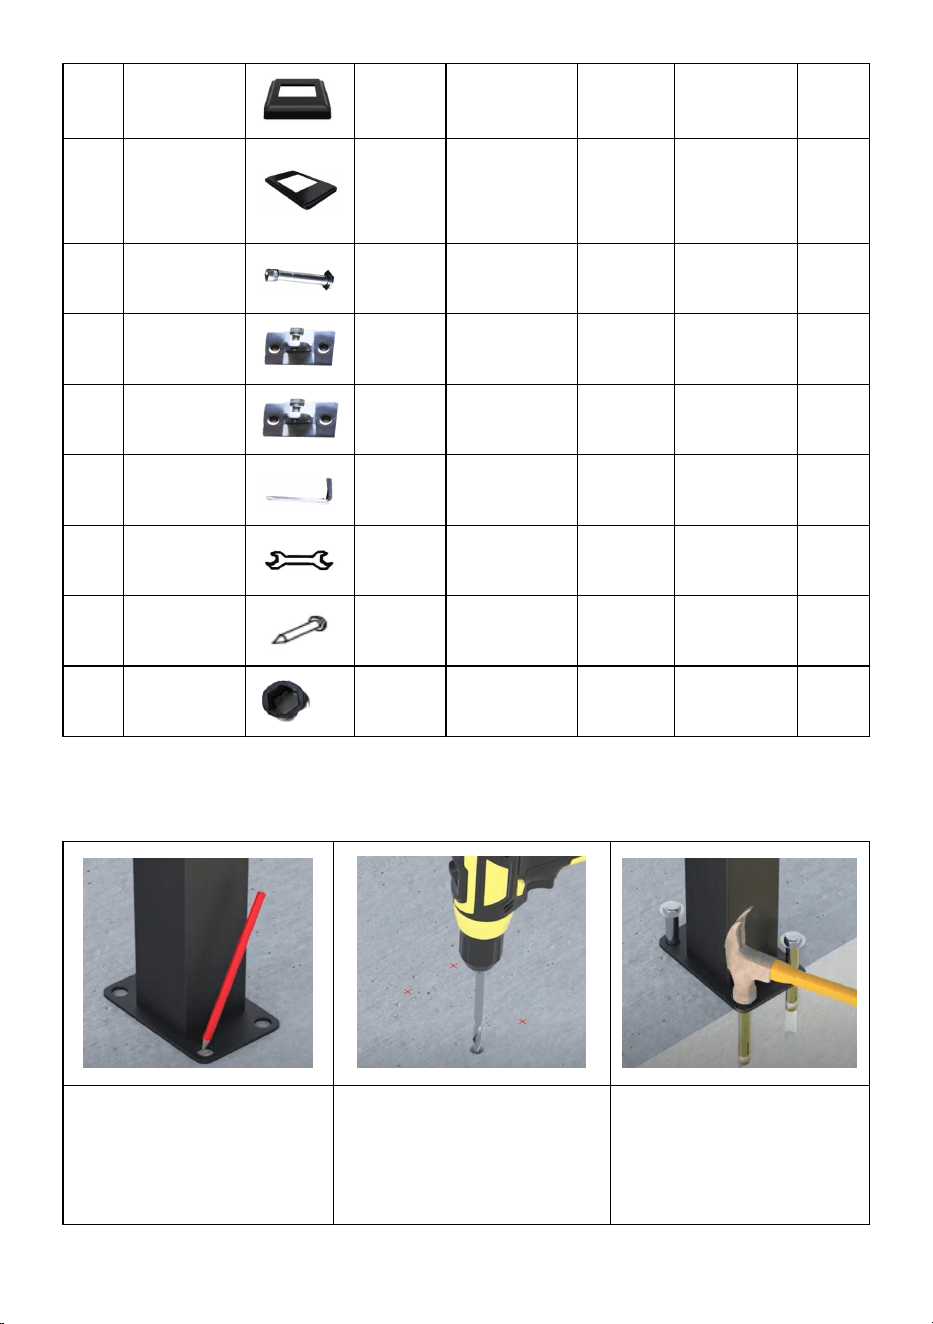
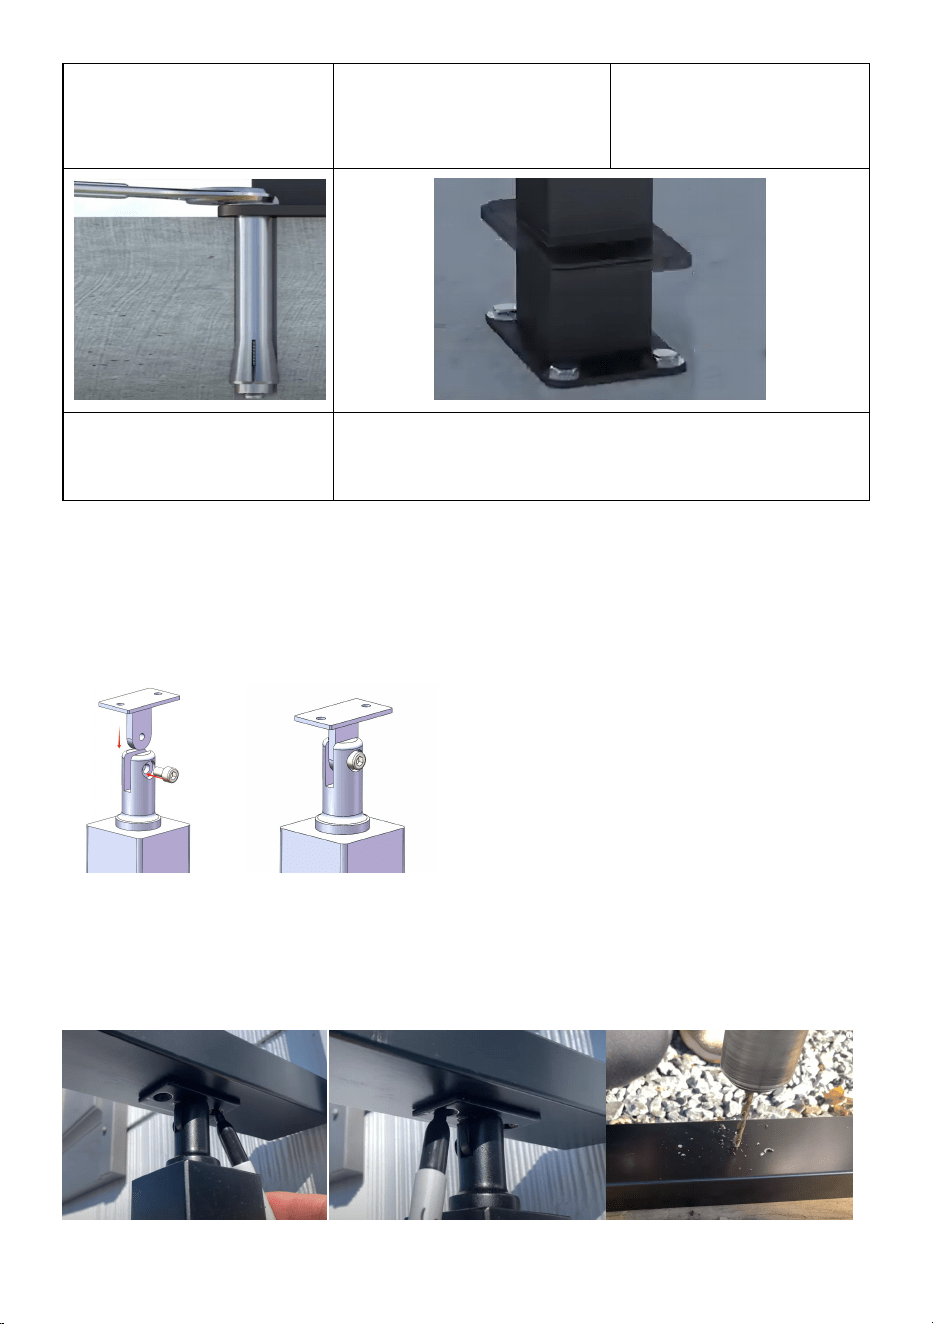
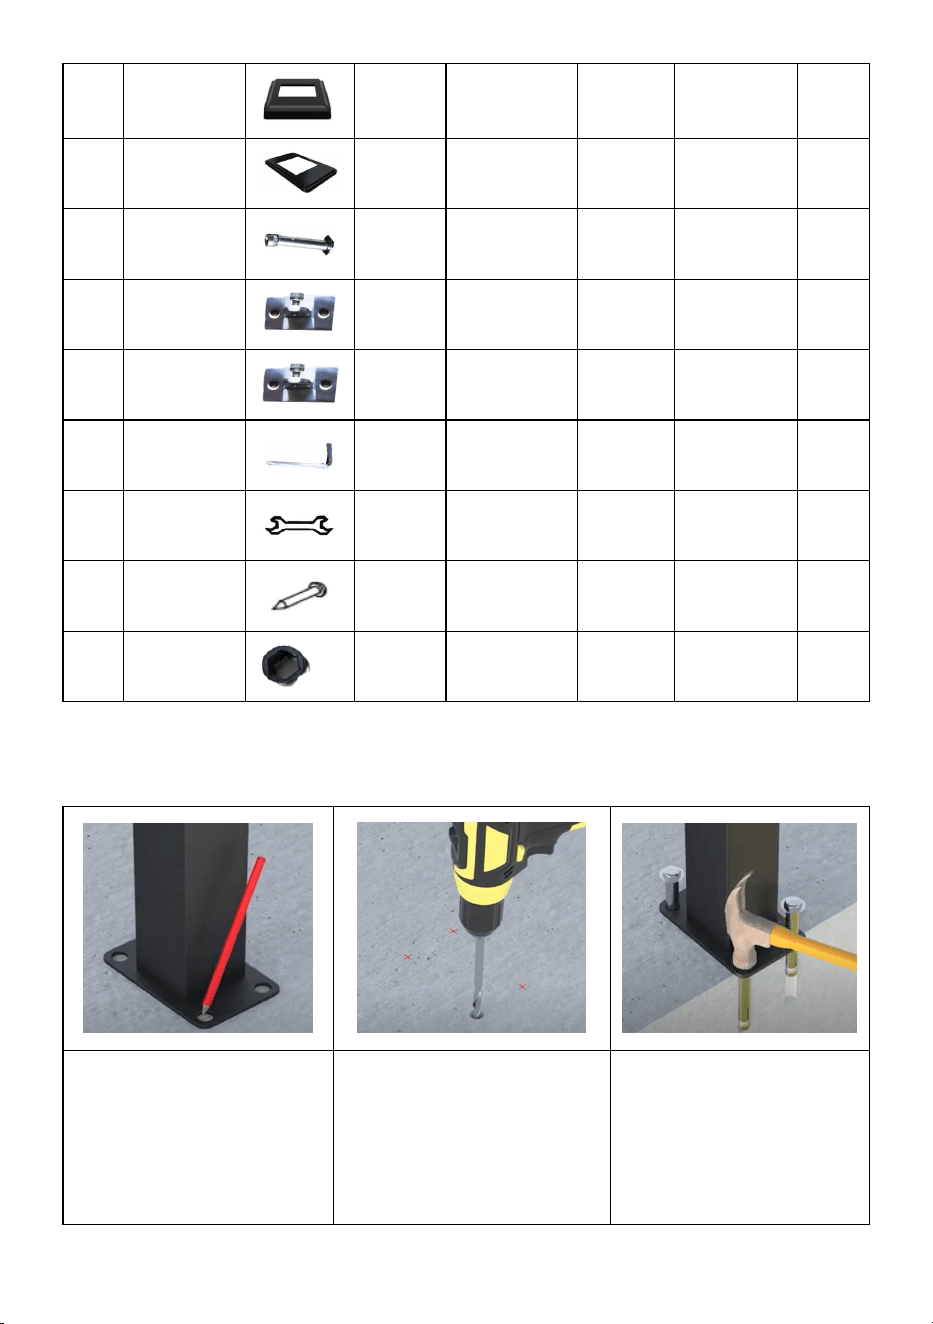
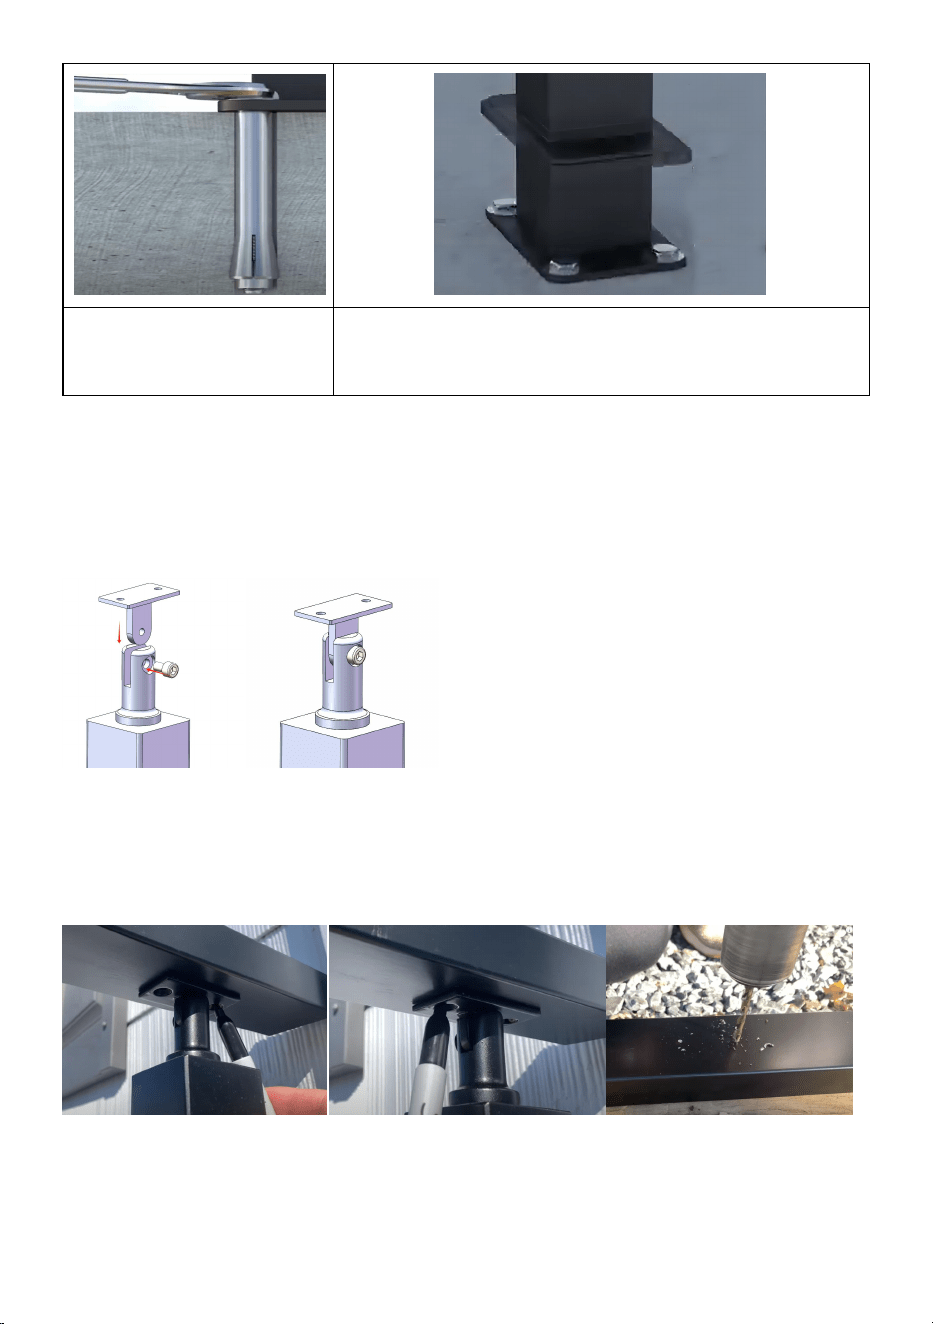
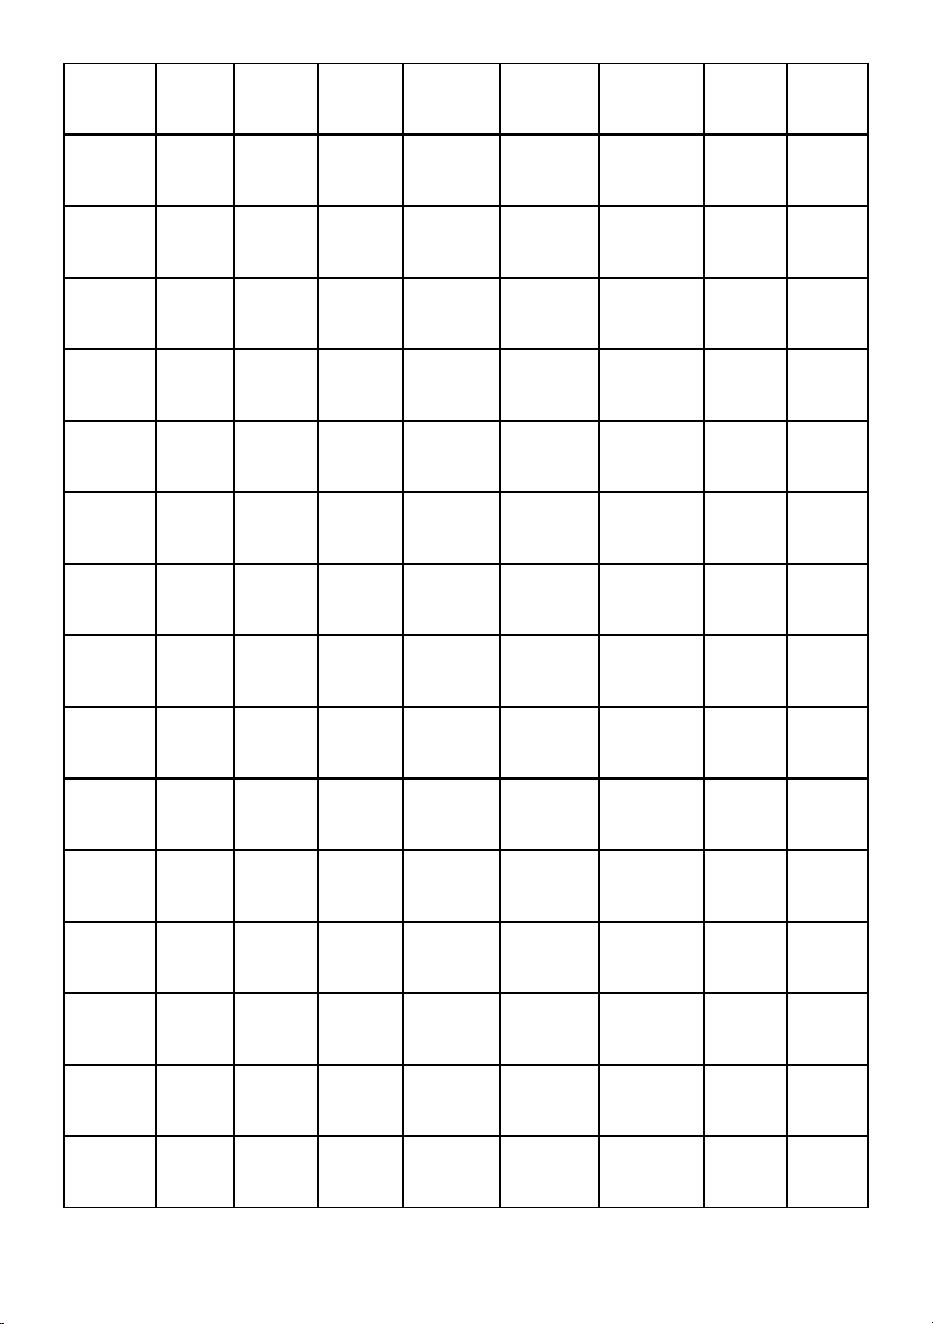
INSTALLATION
For concrete or wood floor
Step1.Mark the drilling
points at the
appropriate installation
locations.
Step2.use a hammer
drill to make a hole for
∅ 12 at the marked
points.
Step3.Hammer the
anchor screw into the
drilled hole.
- 7 -
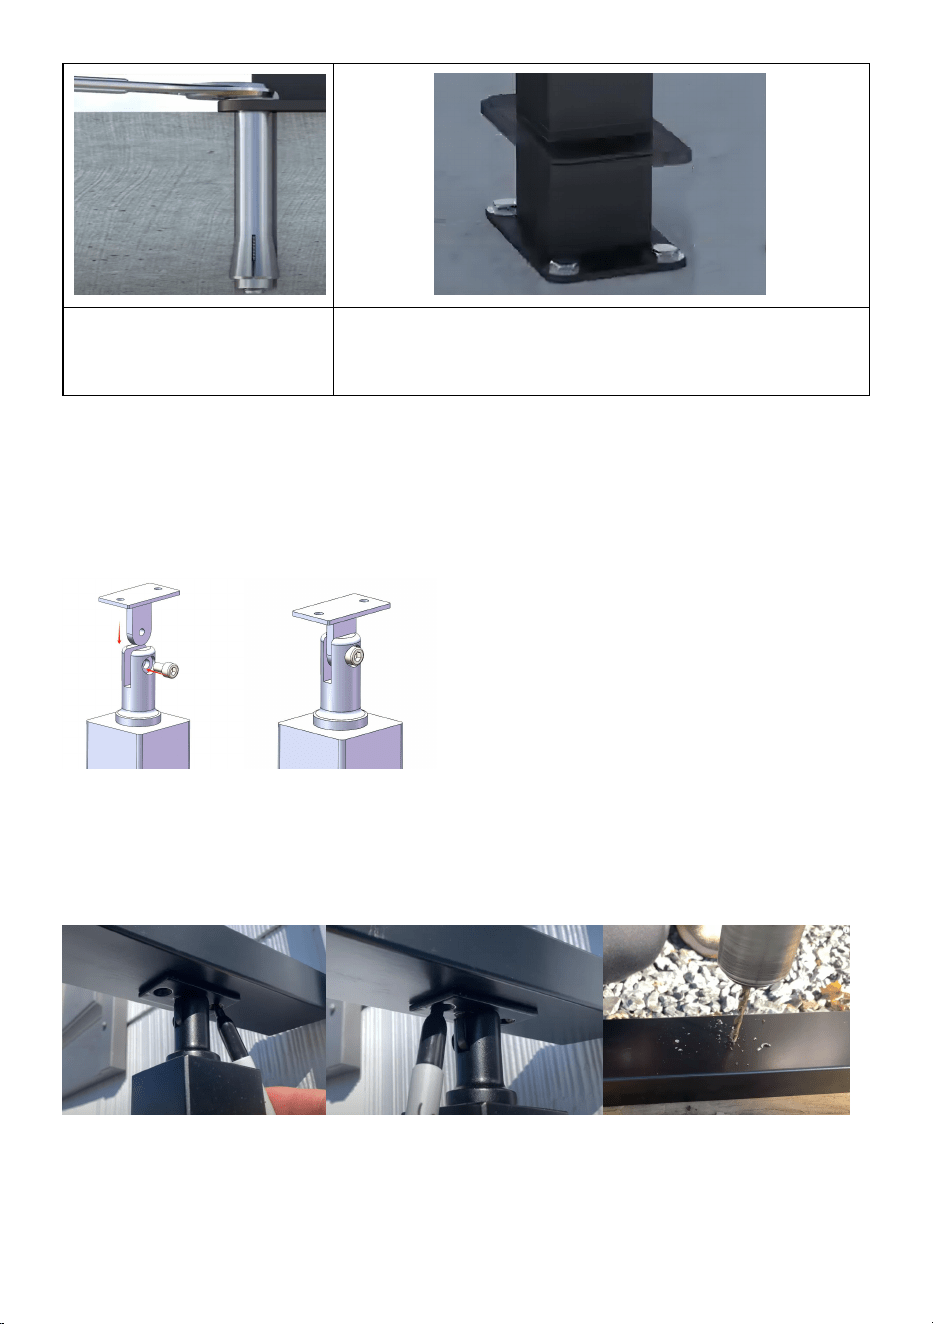
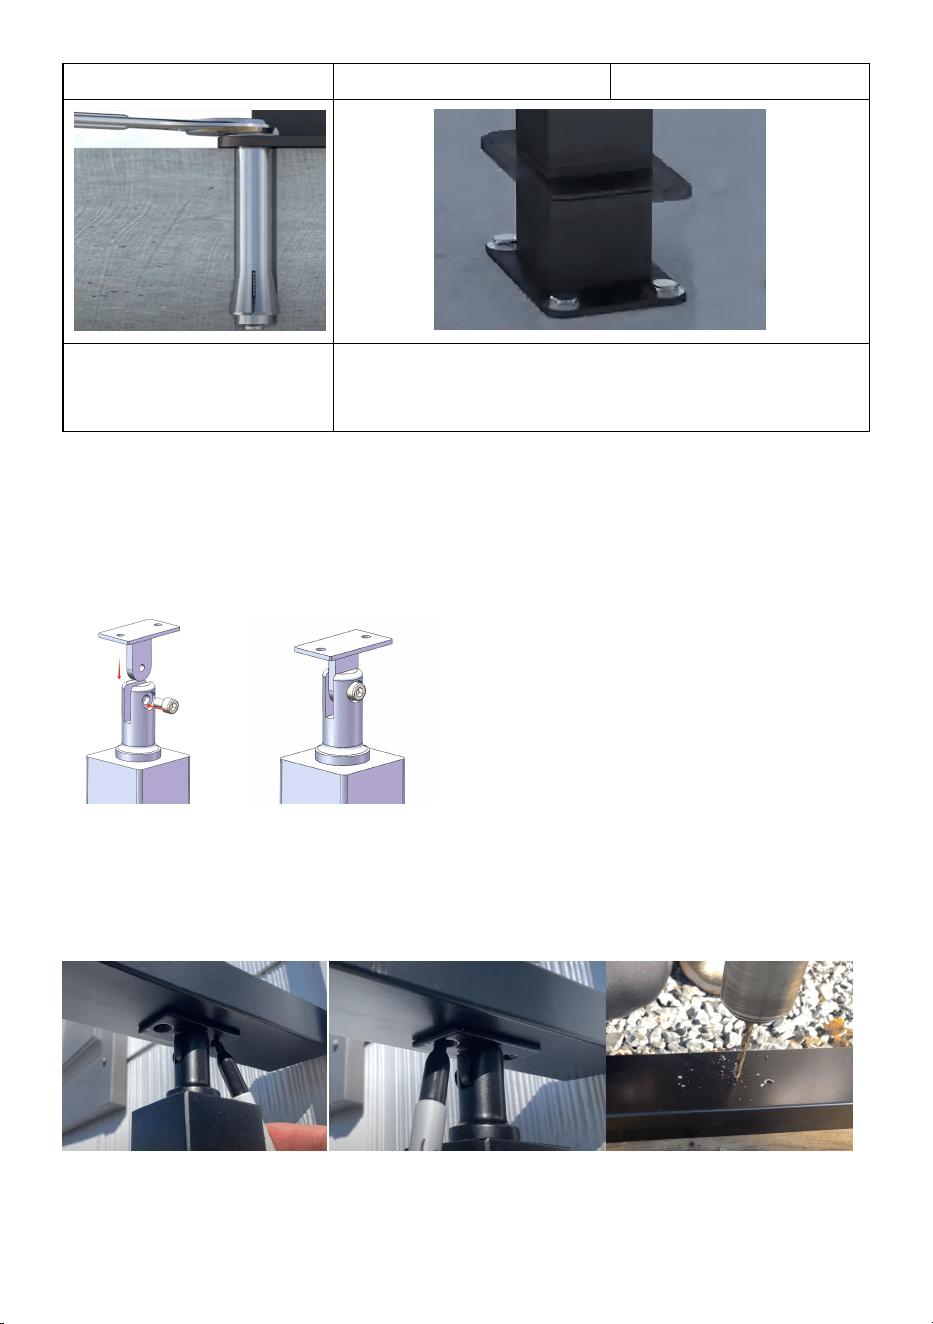
Step4.Tighten the
screws
Step5.Close the lid and finish fixing the post.
Note
:
Ensure that the column is upright when fixing the bottom plate of
the post.
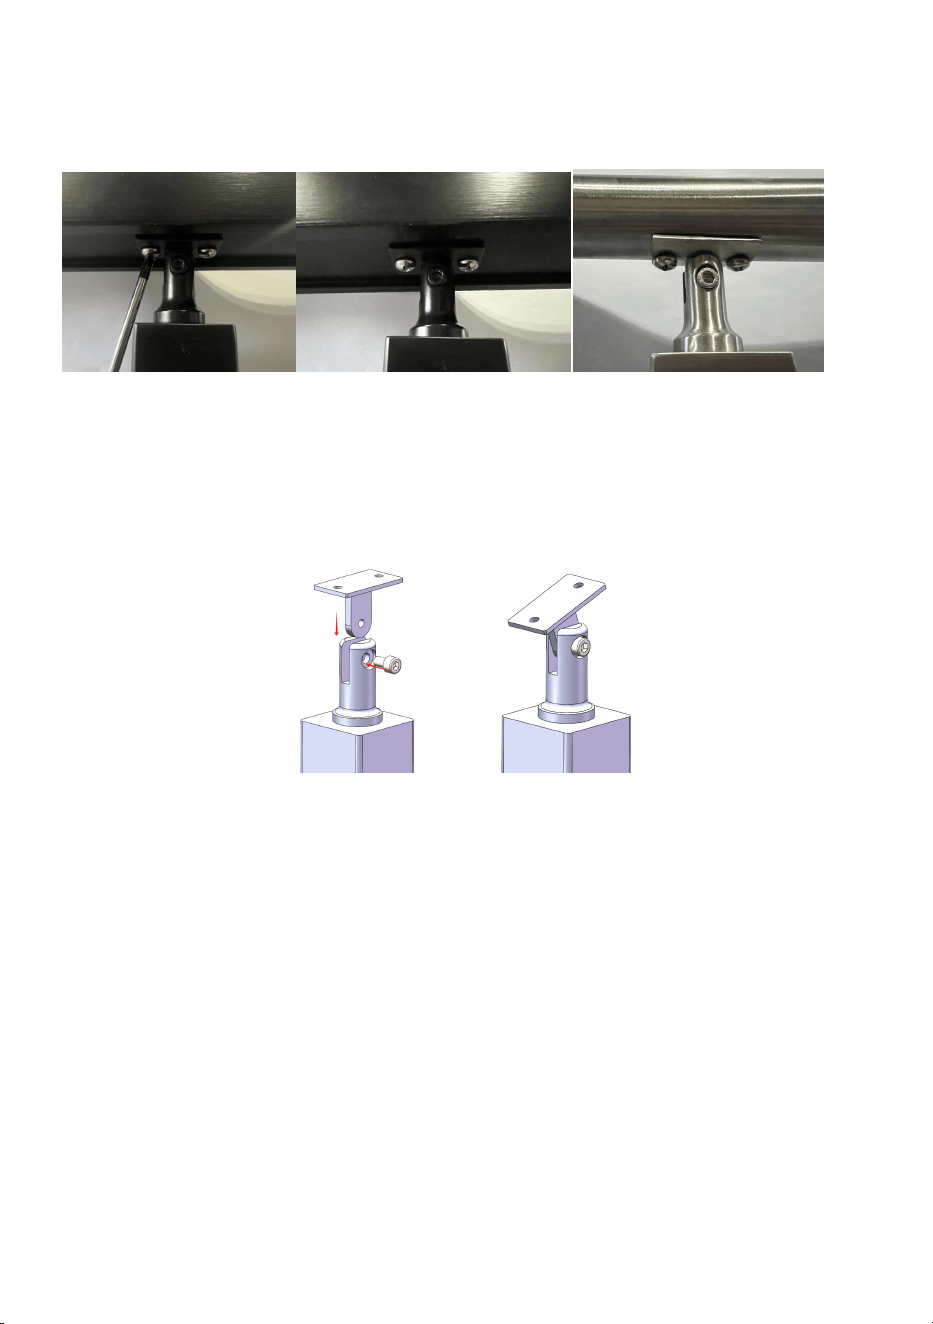
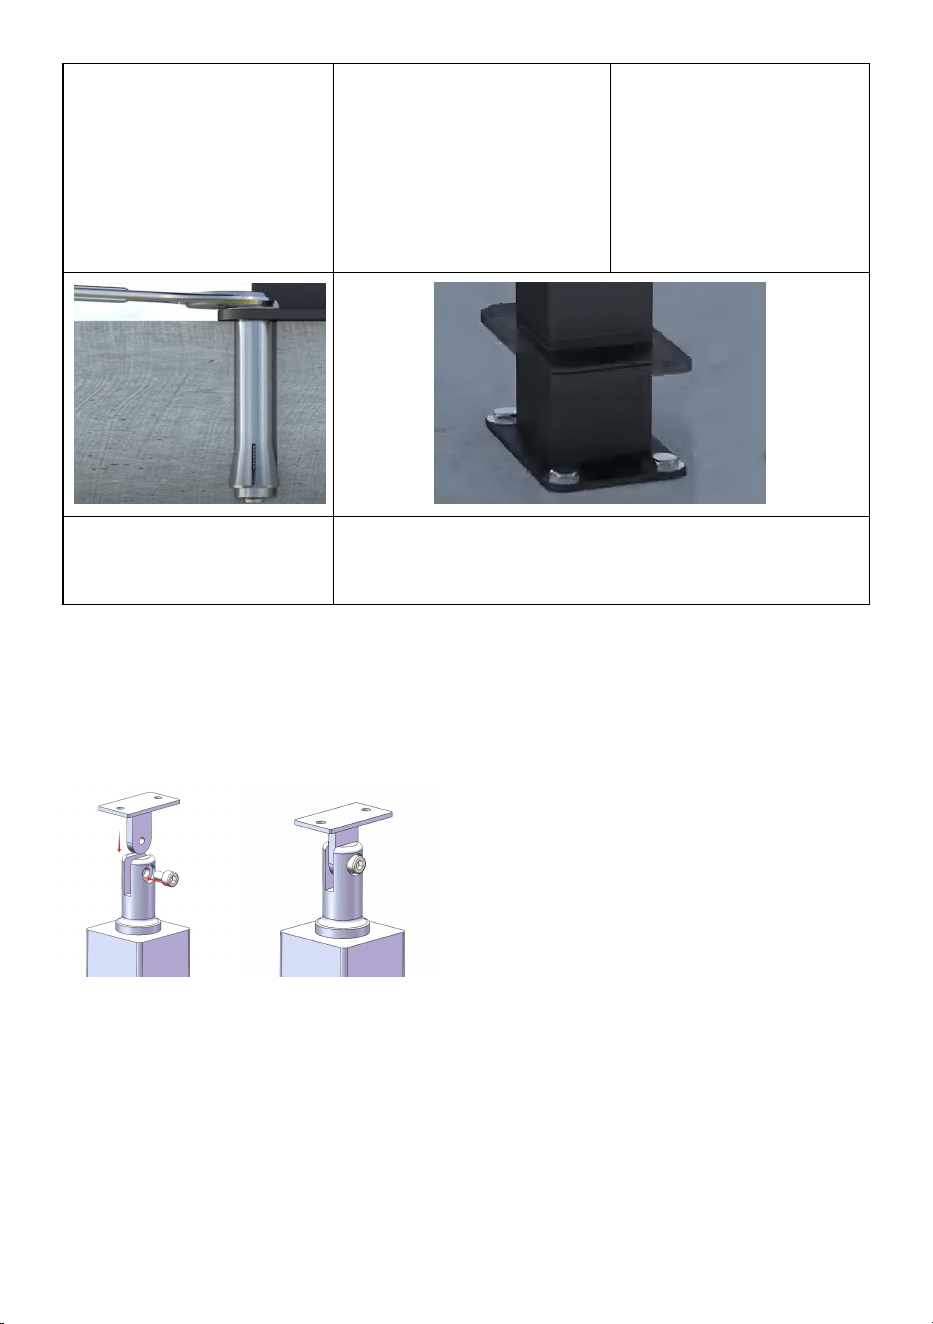
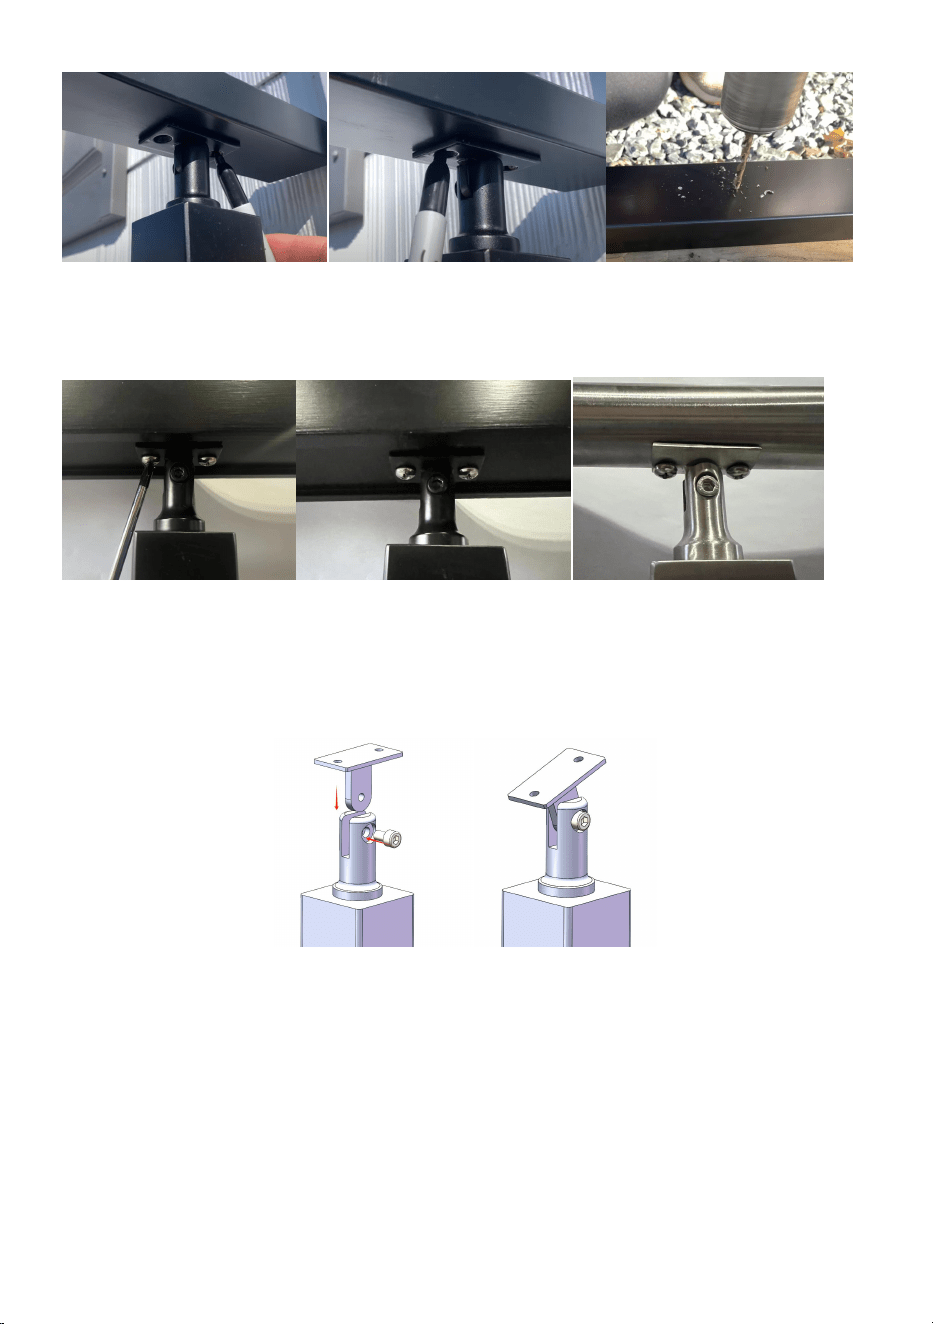
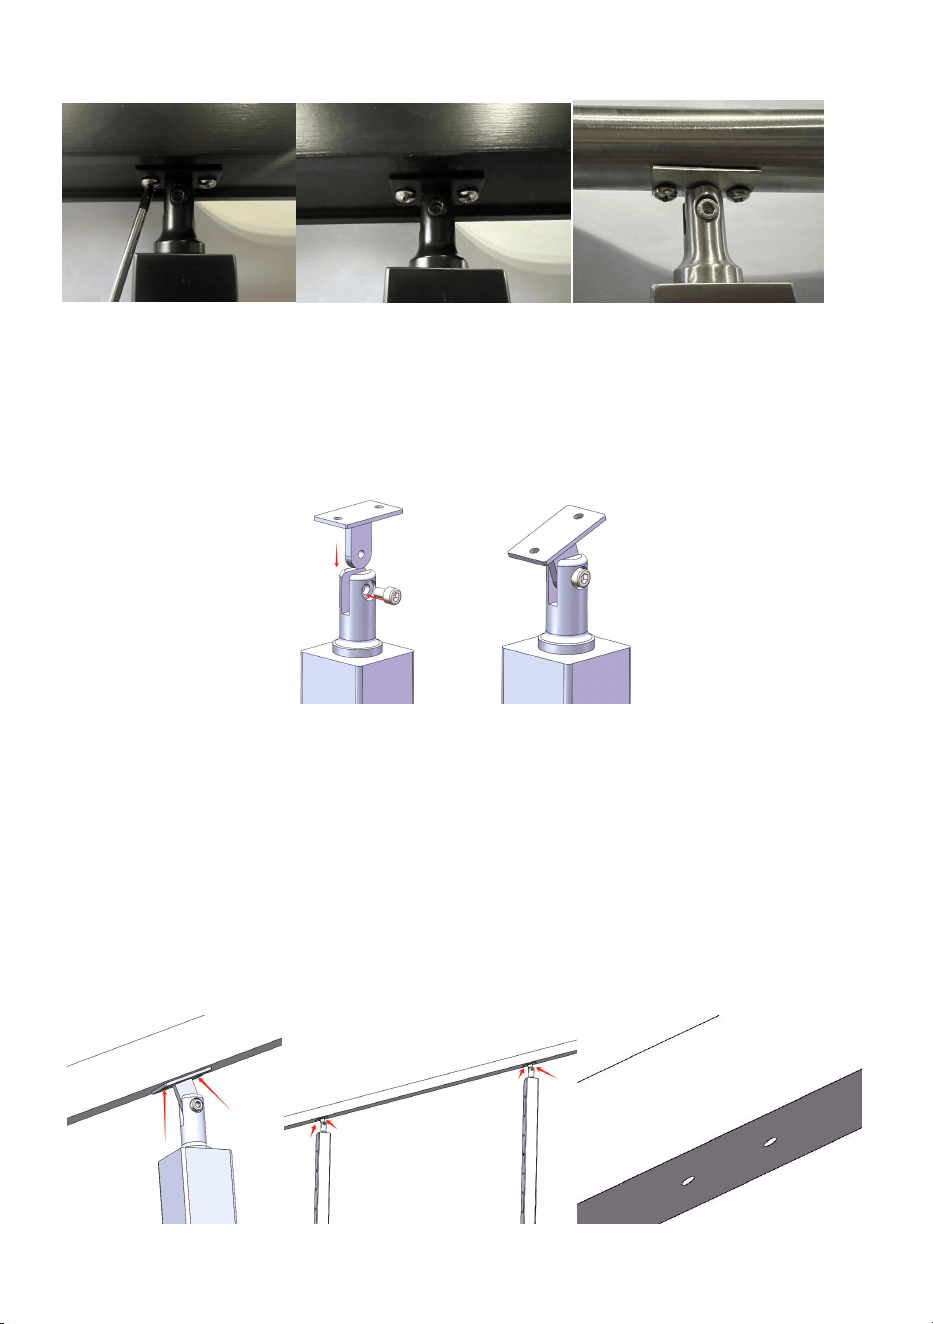
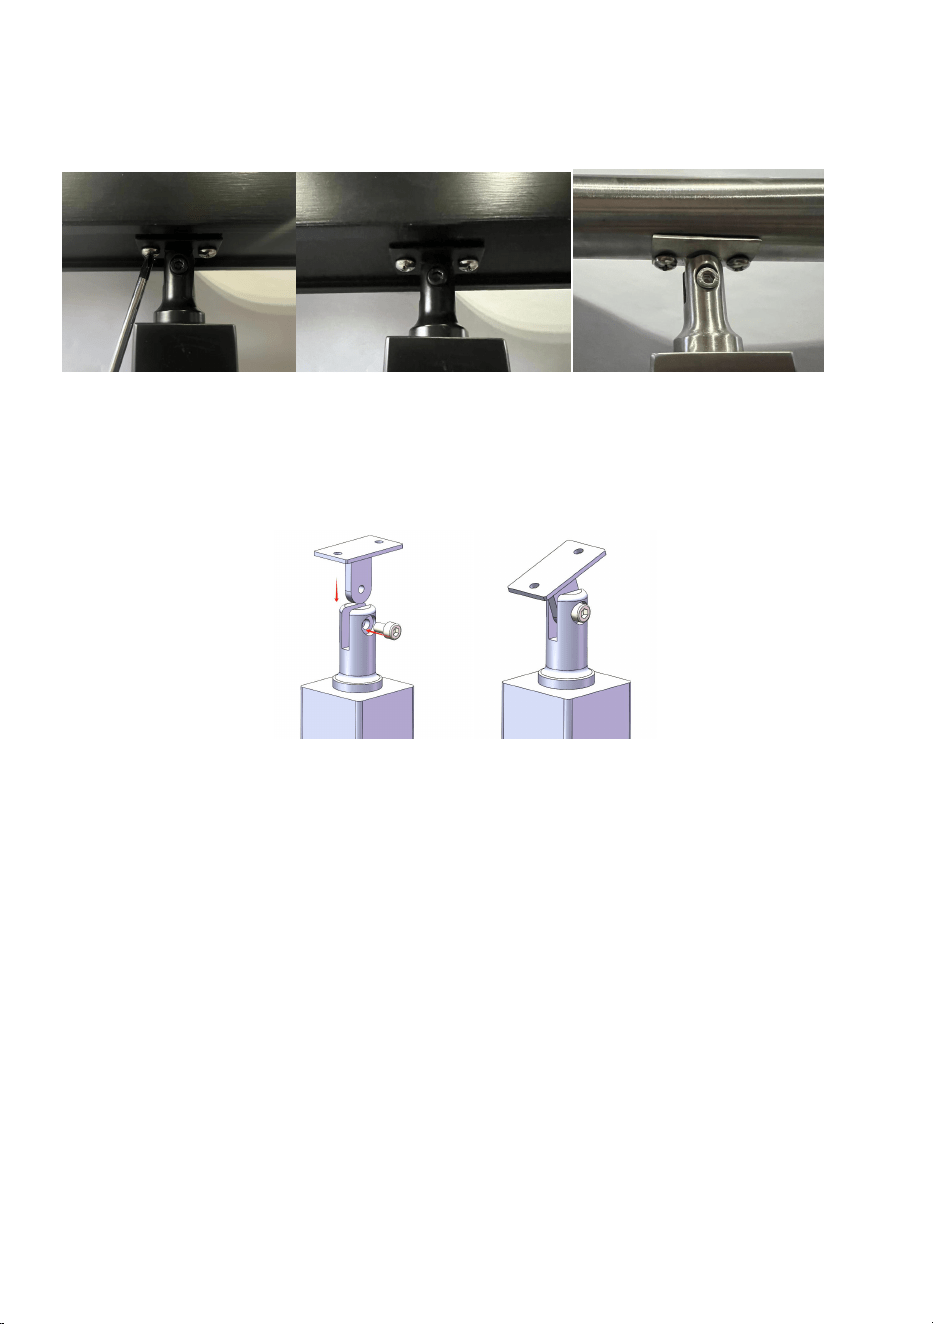
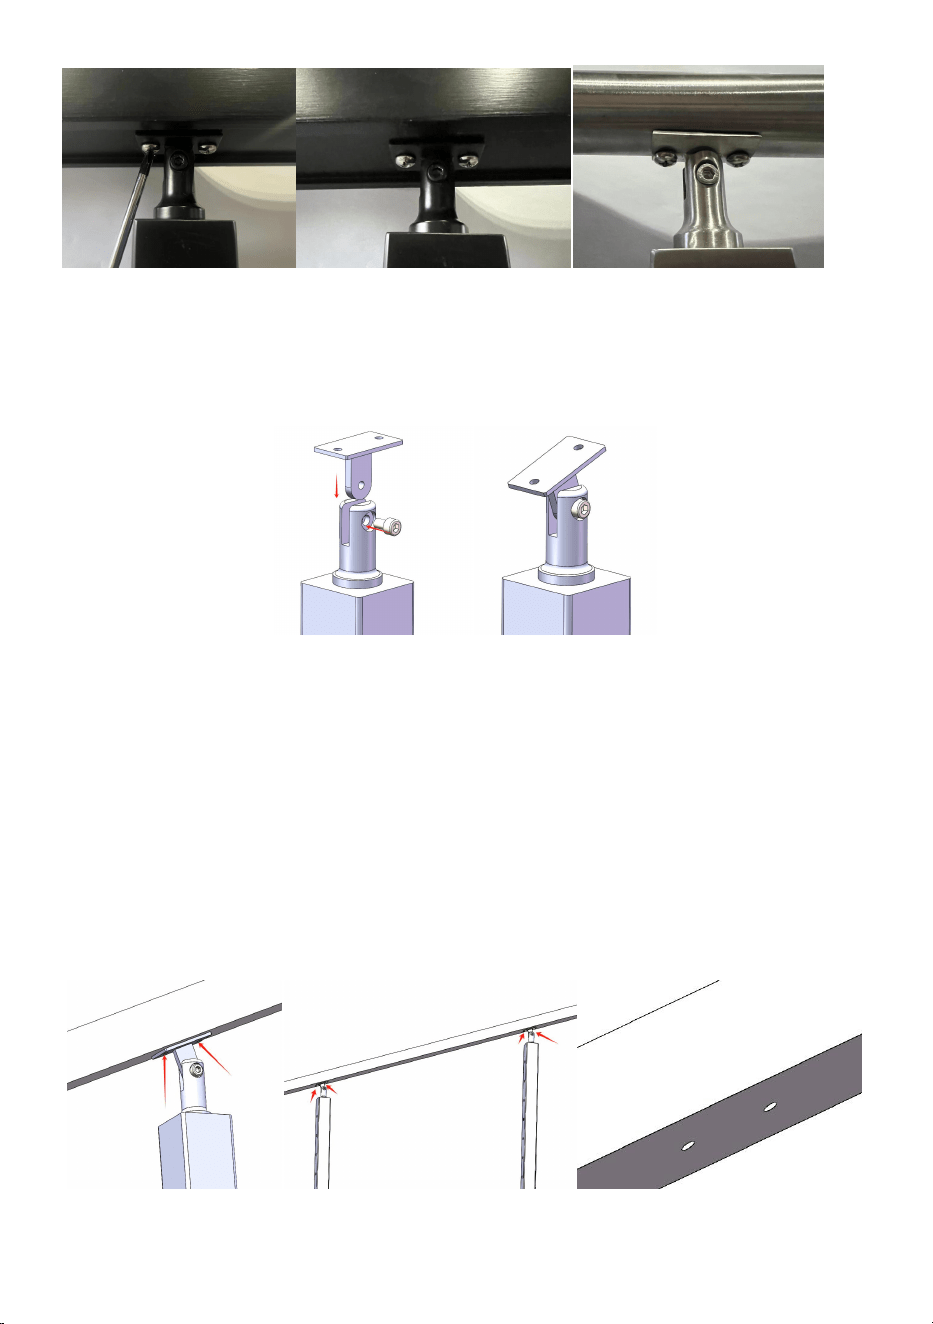
Mount with handrail(horizontal)
Step1: Fixed bracket
Step2: Determine the installation position of the handrail, and then mark
the position under the handrail and bracket holes and drill holes with a
∅ 5.5-∅ 5.6mm drill.
Step3: Use the self-tapping screws in the accessory to fix the handrail to
the support.
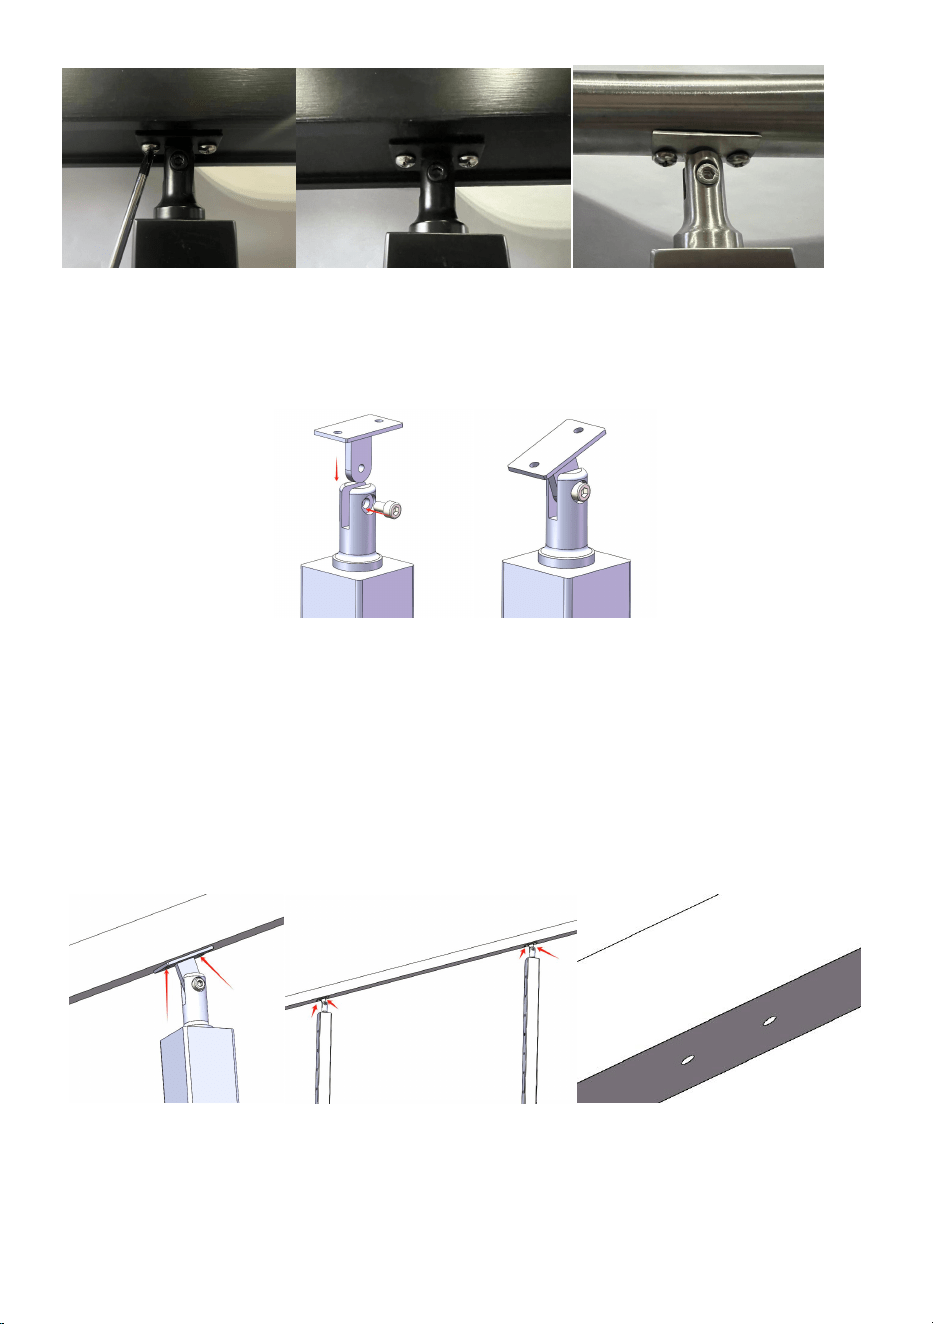
- 8 -
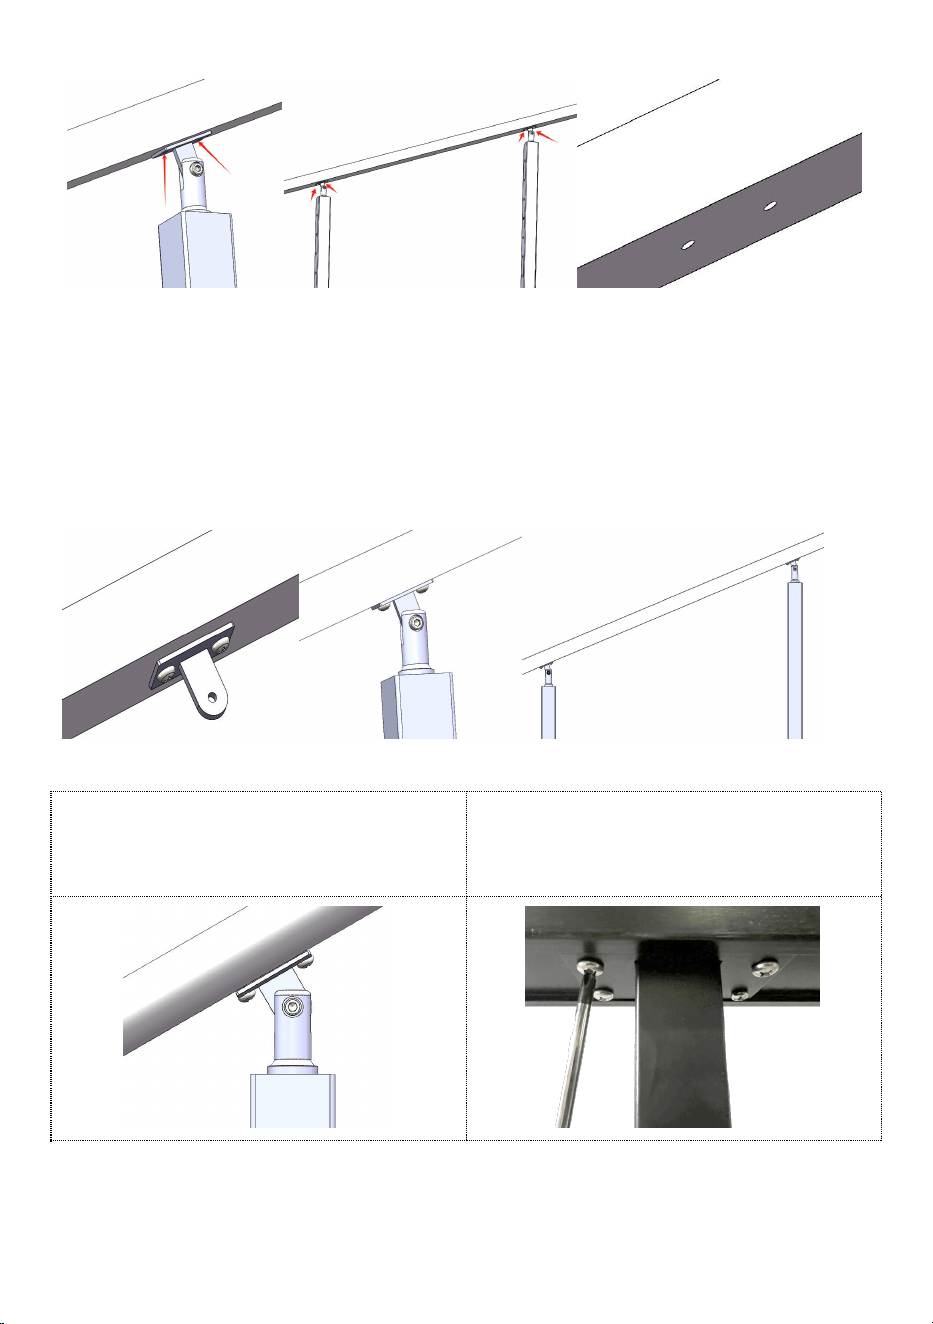
It is also suitable for the installation of arc handrails and brackets.
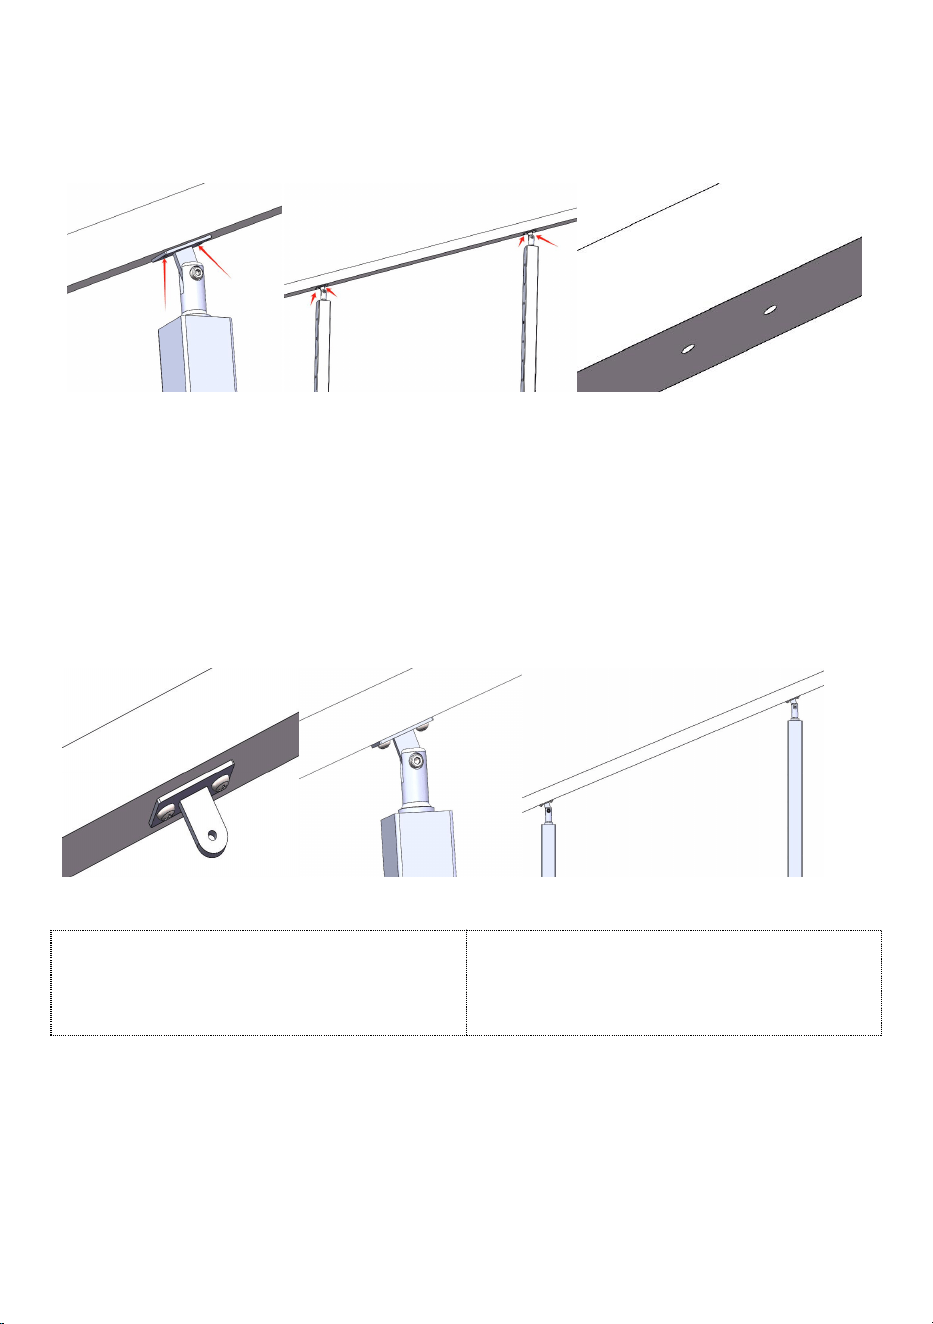
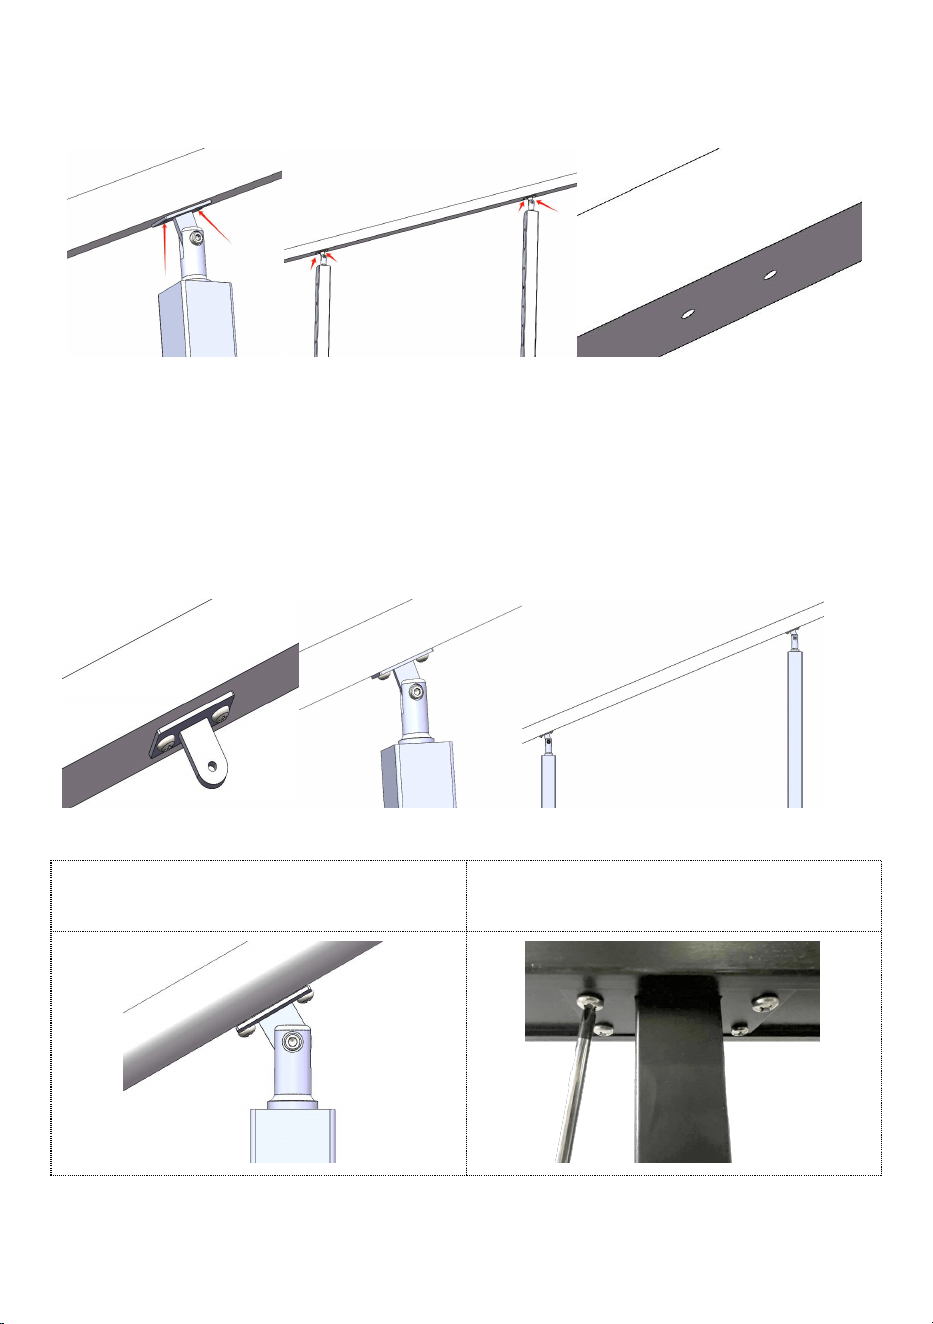
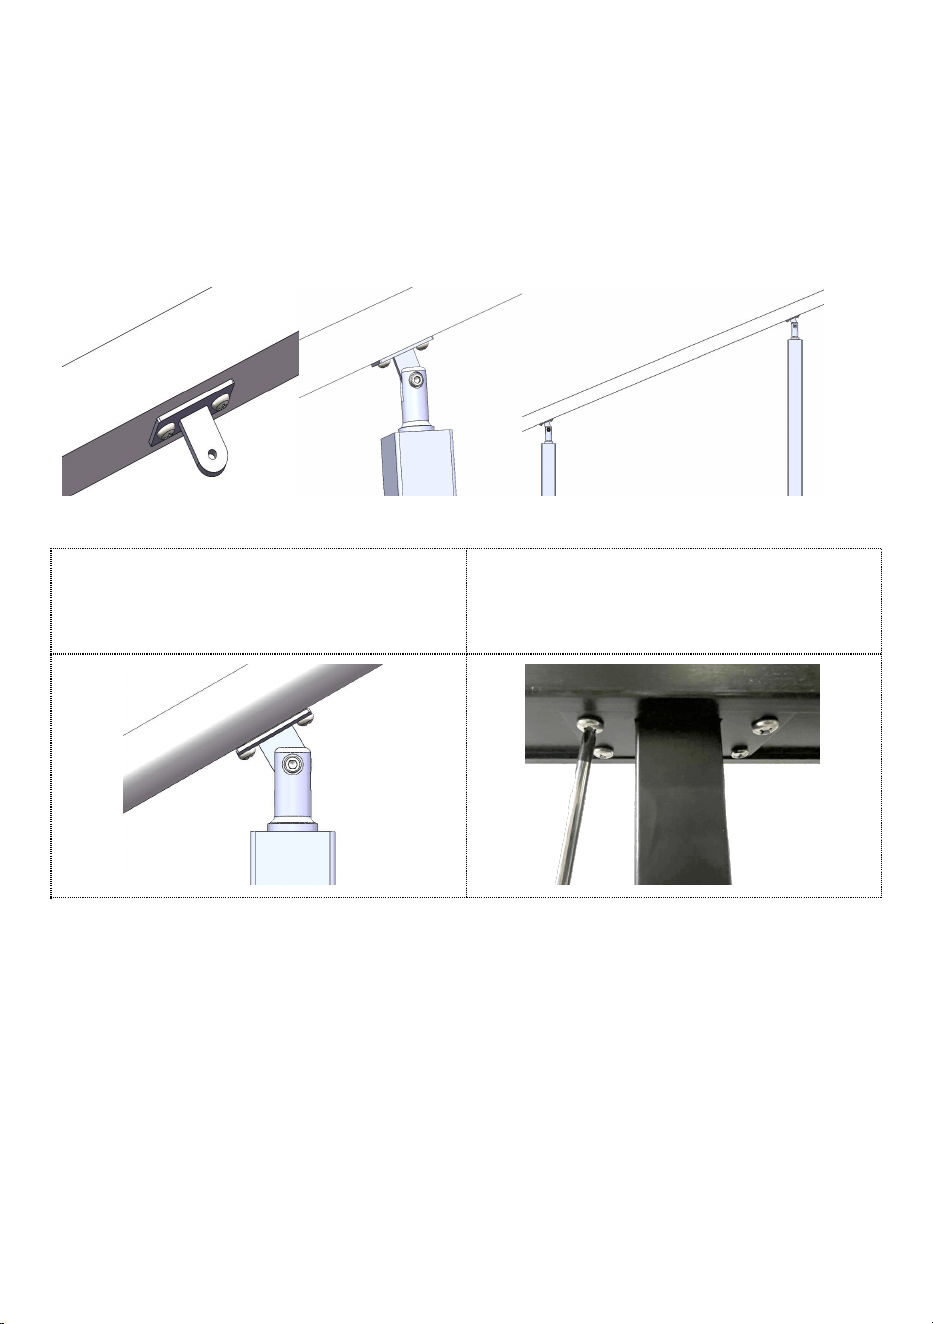
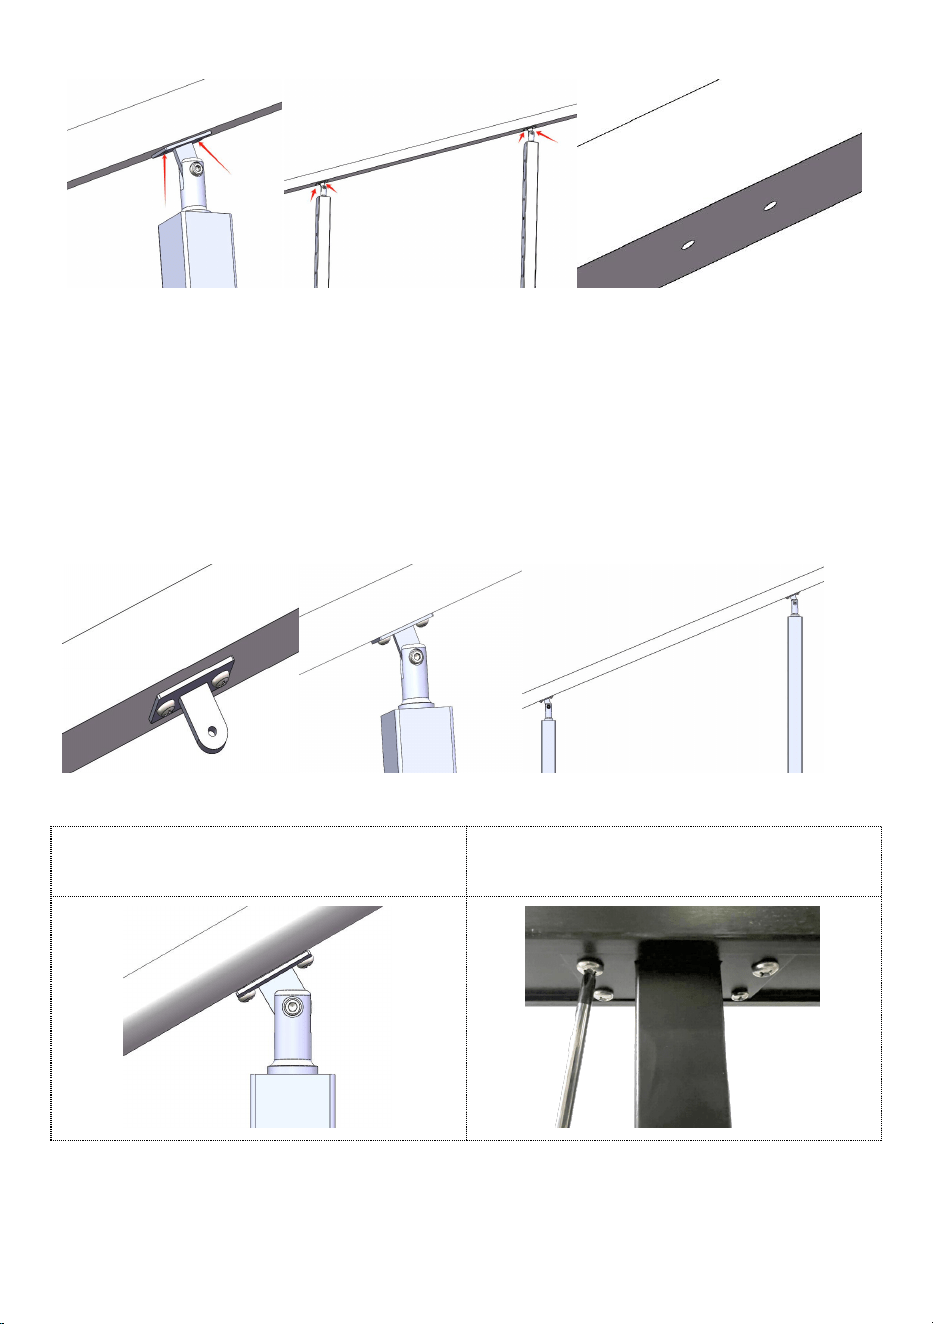
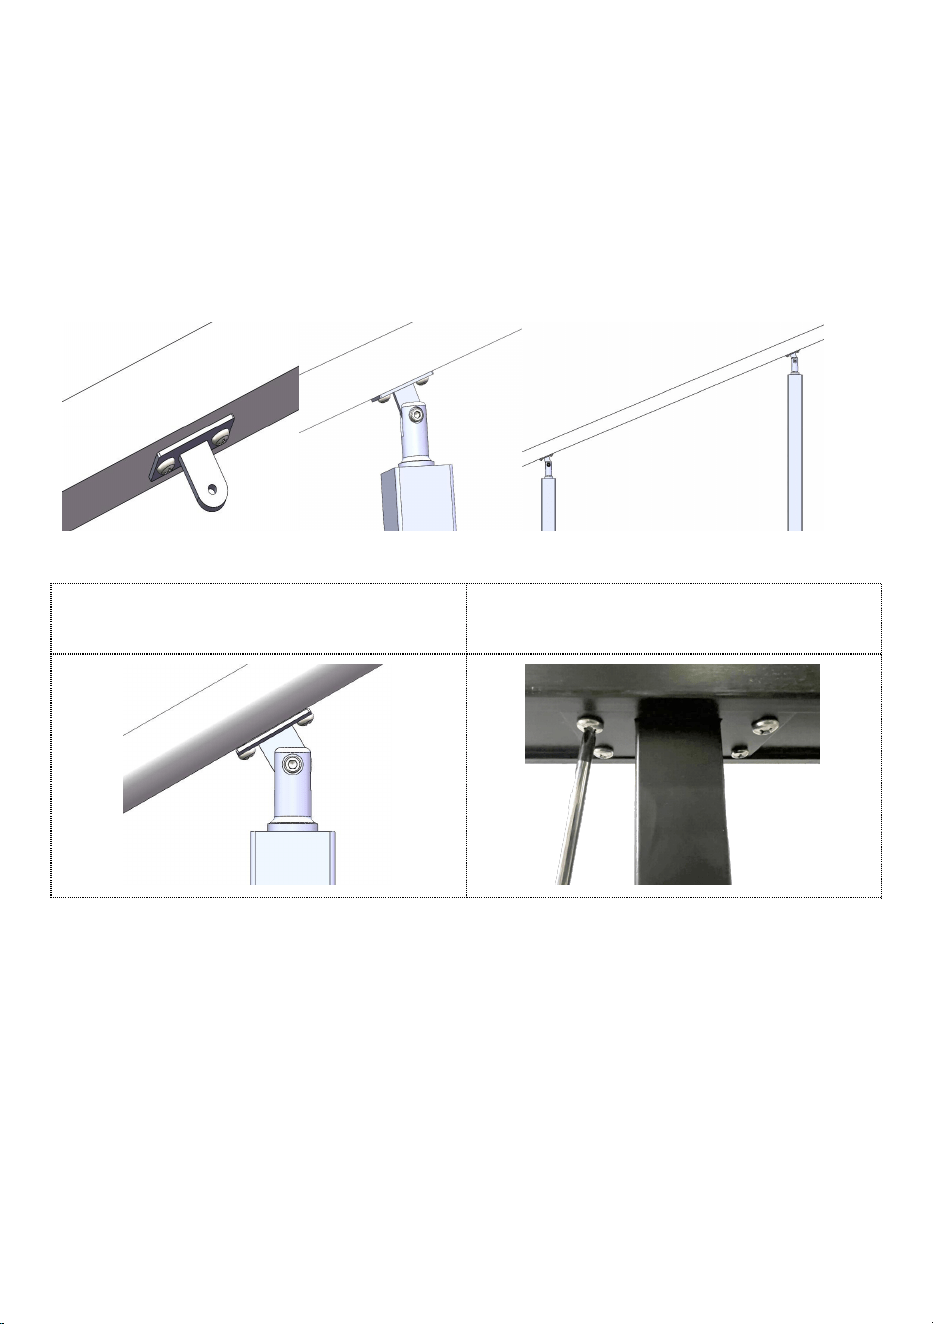
Mount with handrail(gradient)
Step1: Fixed bracket
Step2: Adjust the Angle of the bracket to fit the underside of the
handrail.Determine the installation position of the handrail, and then mark
the position under the handrail and bracket holes and drill holes with a ∅
5.5-∅ 5.6mm drill.
Note:The handrail and bracket can be pre-fixed with the help of
clamping tools, so that multiple bracket installation points can be
marked and positioned at the same time.
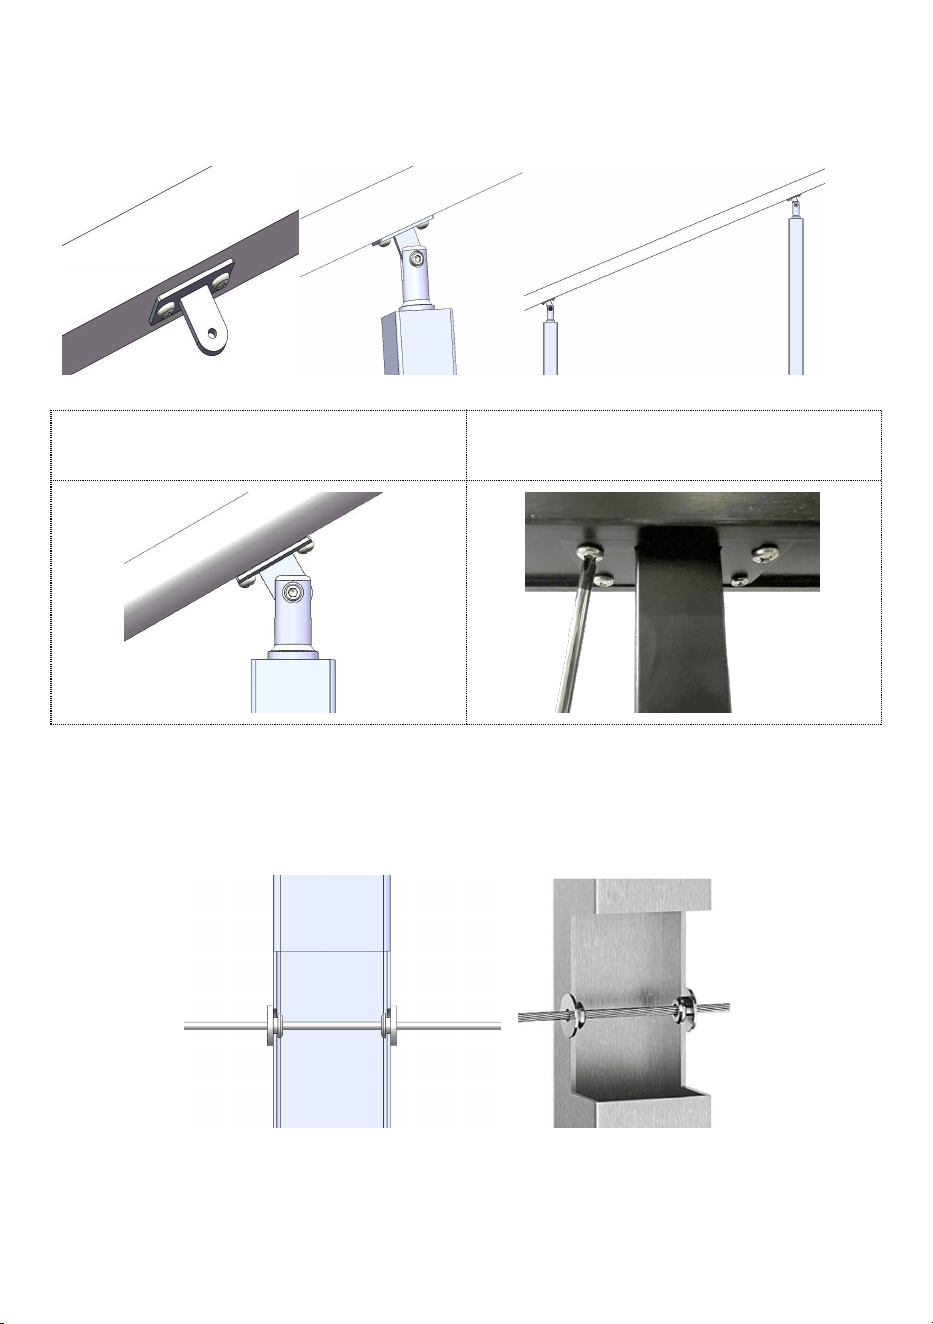
- 9 -
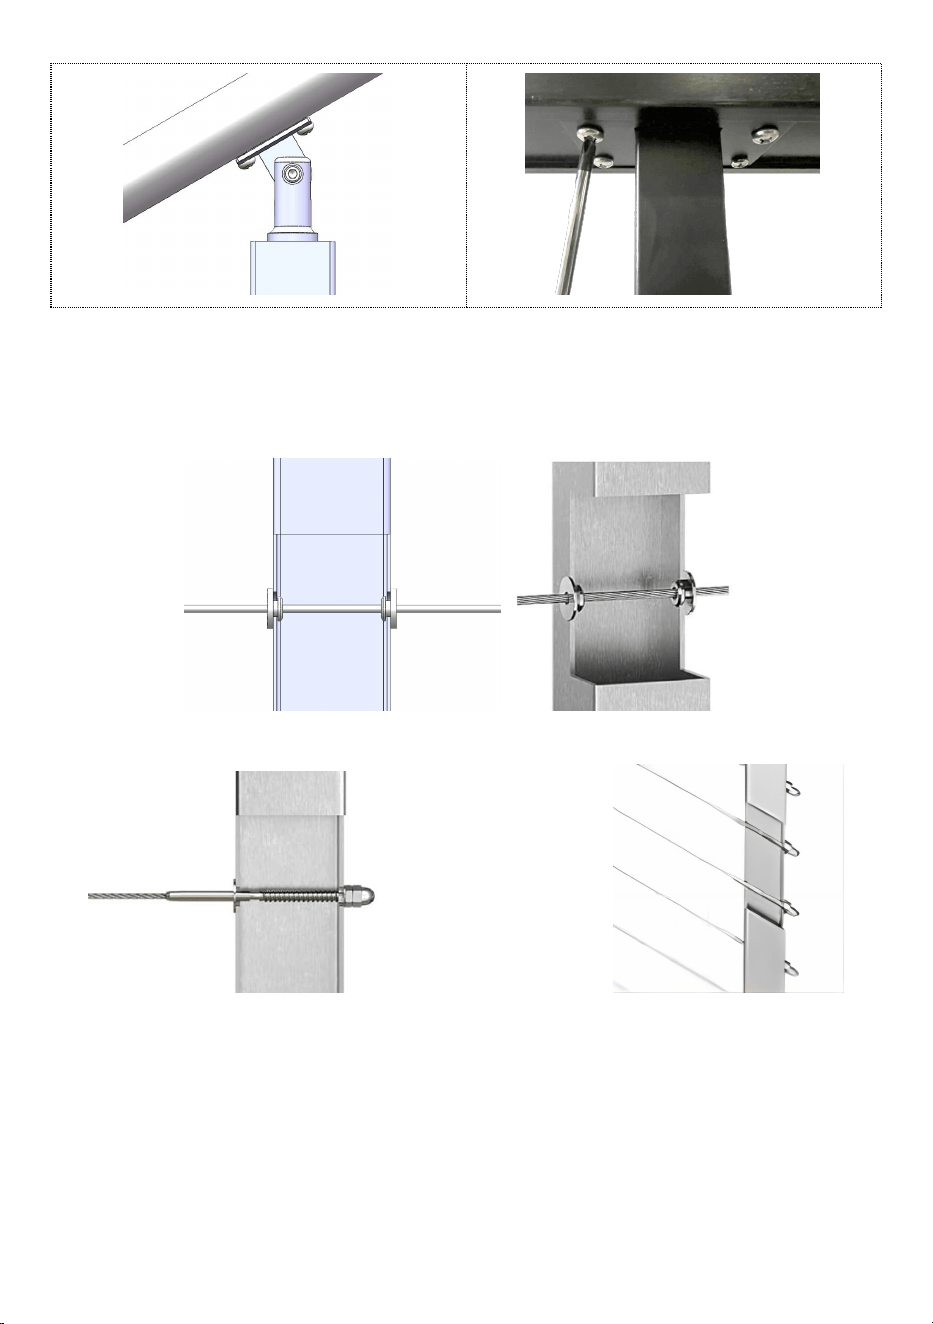
Step3:Remove the bracket from the post and then use the self-tapping
screws in the accessory to fix the bracket to the handrail.
Fix the post and bracket again.
It is also suitable for the installation
of arc handrails and brackets.
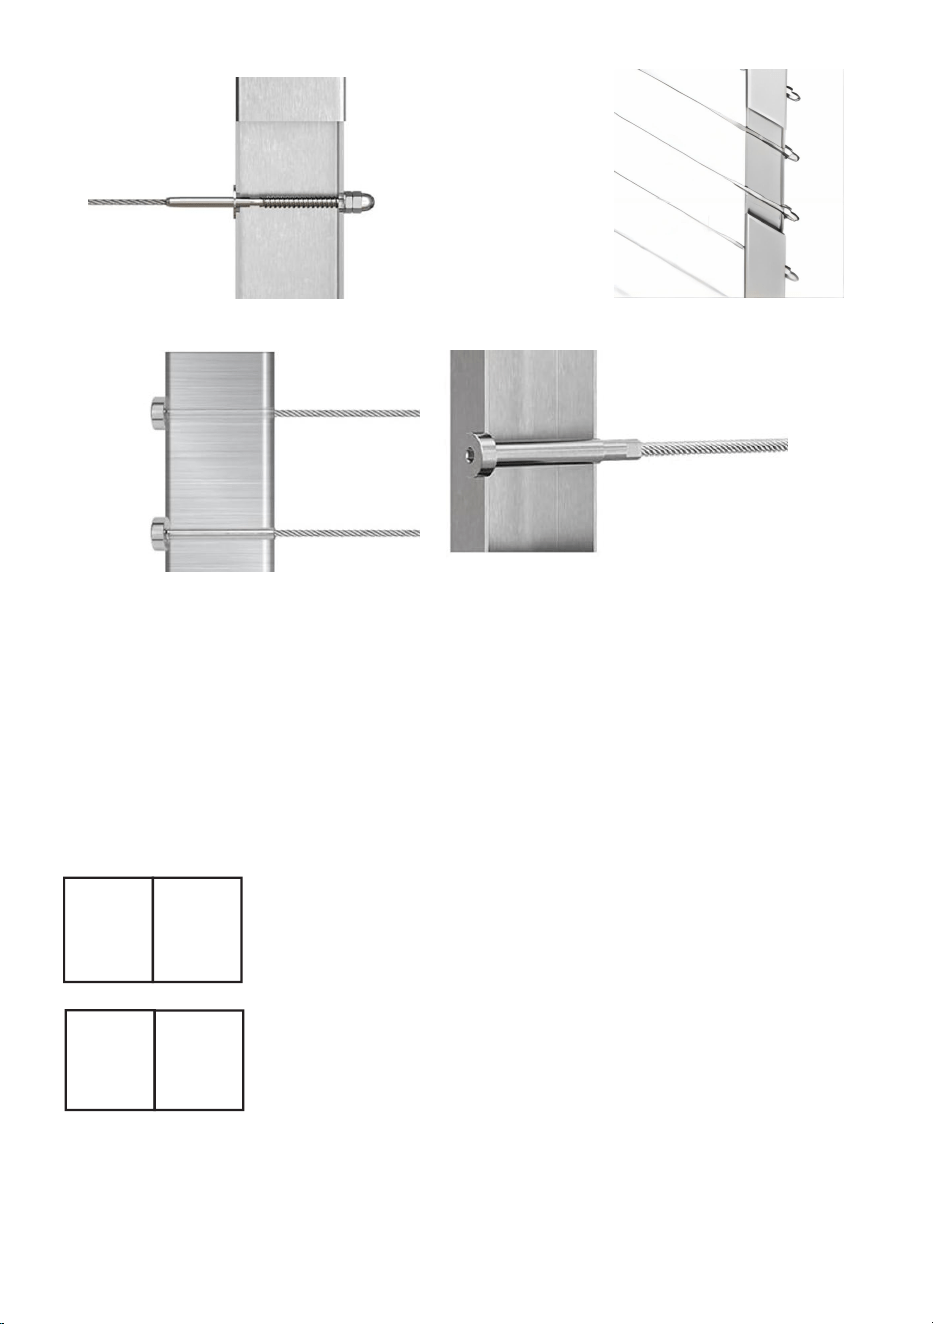
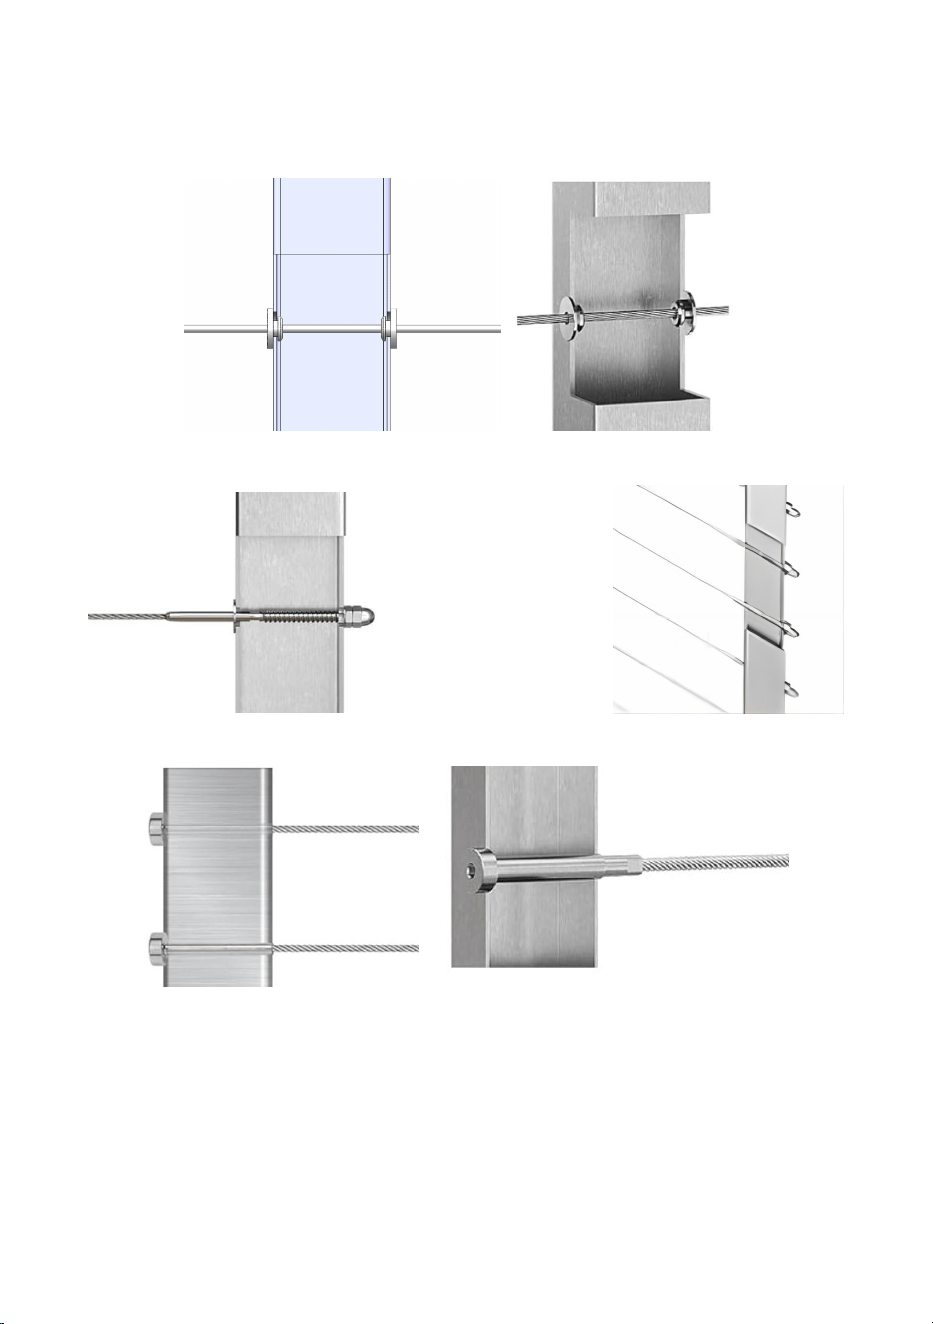
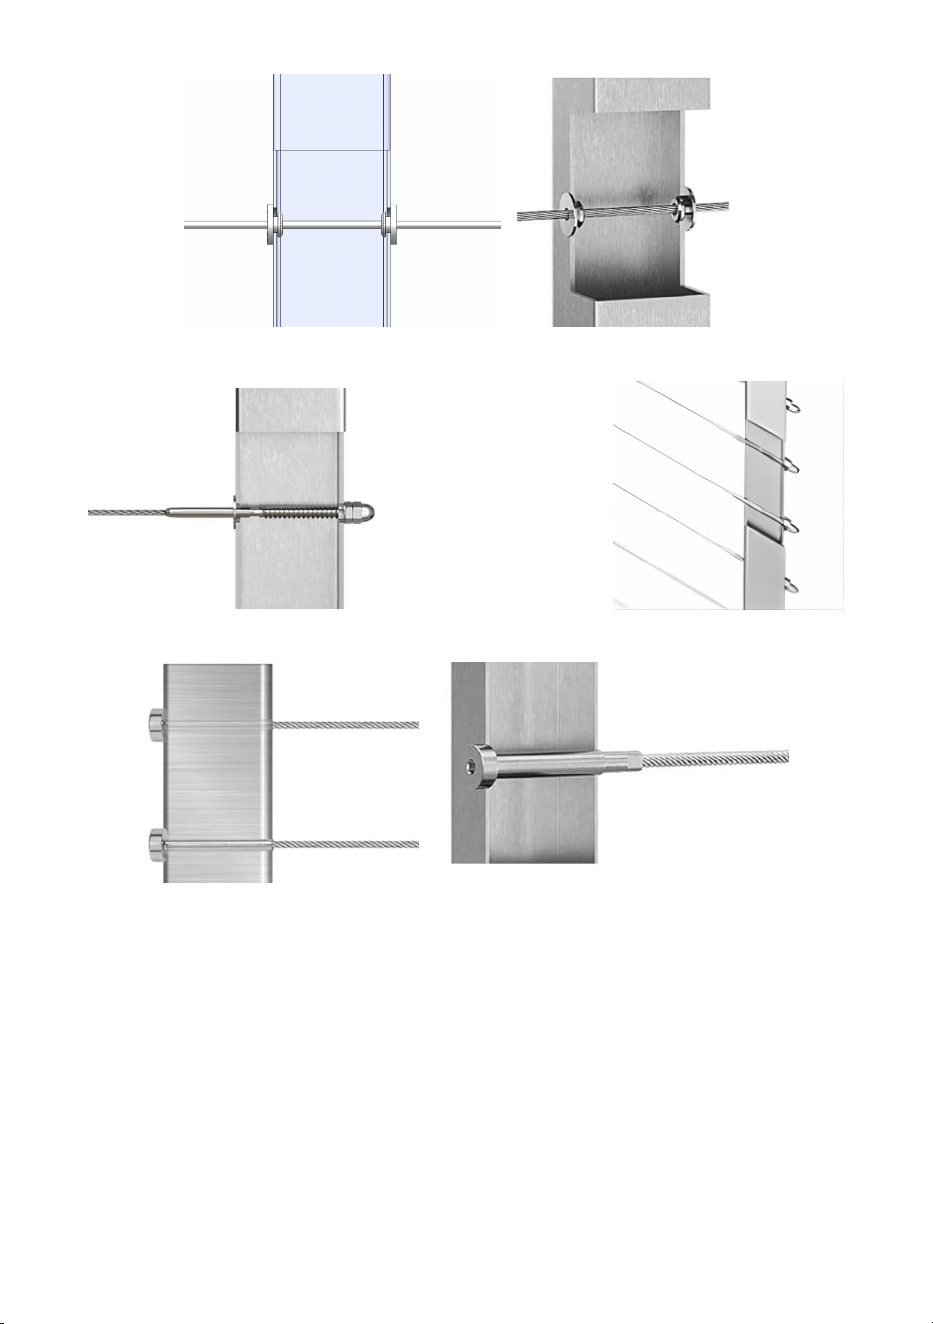
For model HR-017
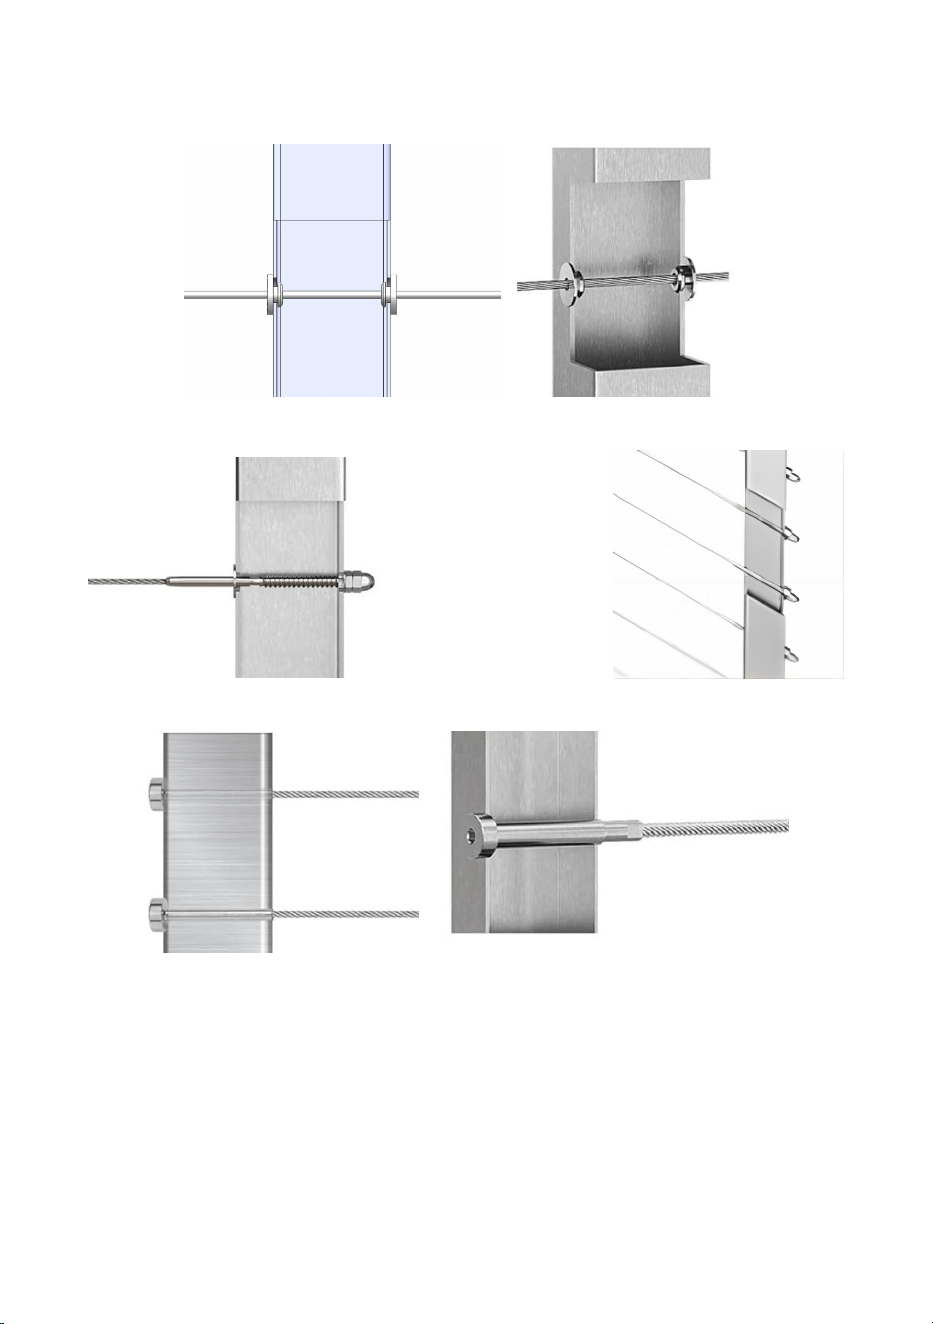
Install with wire rope and fittings
For Level Wheel Protector Sleeve
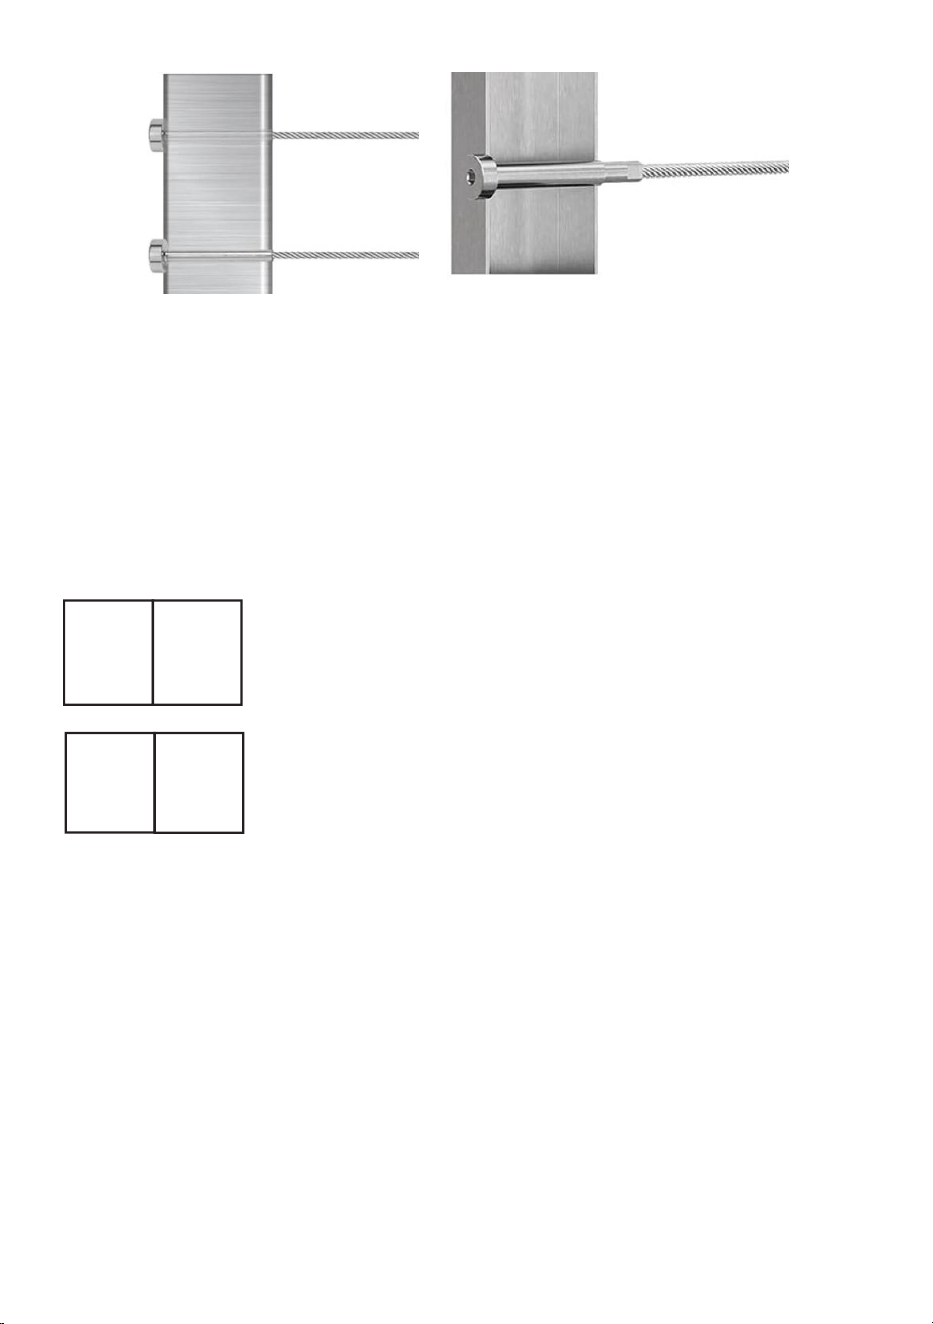
For Stud Tensioner Horizontal mounting and Angle
- 10 -
For Turnbuckle Tensioner and Fixed Terminal
Address:Baoshanqu Shuangchenglu 803long 11hao 1602A-1609shi
Shanghai
Imported to AUS: SIHAO PTY LTD, 1 ROKEVA STREETEASTWOOD
NSW 2122 Australia
Imported to USA: Sanven Technology Ltd. Suite 250, 9166 Anaheim
Place, Rancho Cucamonga, CA 91730
REP
UK
Pooledas Group Ltd
Unit 5 Albert Edward House, The Pavilions
Preston, United Kingdom
REP
EC
SHUNSHUN GmbH
Römeräcker 9 Z2021, 76351
Linkenheim-Hochstetten, Germany
Made In China


- 2 -
Technique Assistance et certificat de garantie électronique
www.vevor.com/support
POTEAU DE GARDE-CORPS À CÂBLE
MODÈLE : HR-001/HR-002/HR-003/HR-004/HR-005/HR-006/HR-007/
HR-008/HR-009/HR-010/HR-011/HR-012/HR-013/HR-014
HR-0 1 5 /HR-016/HR-017/HR-018/HR-019/HR-020/HR-021/
HR-022/HR-023
We continue to be committed to provide you tools with competitive price.
"Save Half", "Half Price" or any other similar expressions used by us only represents an
estimate of savings you might benefit from buying certain tools with us compared to the major
top brands and does not necessarily mean to cover all categories of tools offered by us. You
are kindly reminded to verify carefully when you are placing an order with us if you are
actually saving half in comparison with the top major brands.
- 1 -
MODÈLE : HR-001/HR-002/HR-003/HR-004/HR-005/HR-006/HR-007/
HR-008/HR-009/HR-010/HR-011/HR-012/HR-013/HR-014
HR-0 1 5 /HR-016/HR-017/HR-018/HR-019/HR-020/HR-021/
HR-022/HR-023
< Image uniquement pour référence > _
Have product questions? Need technical support? Please feel free to
contact us:
Technical Support and E-Warranty Certificate
www.vevor.com/support
NEED HELP? CONTACT US!
This is the original instruction, please read all manual instructions
carefully before operating. VEVOR reserves a clear interpretation of our
user manual. The appearance of the product shall be subject to the
product you received. Please forgive us that we won't inform you again if
there are any technology or software updates on our product.
CABLE RAILING POST

- 2 -
GARANTIES IMPORTANTES
AVERTISSEMENT : Lisez et comprenez l'intégralité de ce
manuel avant d'utiliser ou d'entretenir ce produit. Le
non-respect de ces avertissements et instructions peut
entraîner des blessures corporelles ou des dommages à des
biens de valeur.
1. L'avertissement indique que des mesures appropriées doivent être
prises pour éviter tout risque potentiel de blessure.
2. Les capacités du produit s'appliquent uniquement au produit
correctement et complètement assemblé.
3. Veuillez garder les petites pièces de rechange hors de portée des
enfants , ce n'est pas un jouet, ne laissez pas les enfants jouer .
4 . Pour plus d'informations concernant les pièces répertoriées dans les
pages suivantes, veuillez vous référer au schéma d'assemblage de ce
manuel. Déballez et séparez toutes les pièces dans une zone de travail
propre.
CONSERVEZ CES INSTRUCTIONS
CARACTÉRISTIQUES PRINCIPALES
Ce produit est principalement utilisé pour l'installation sur colonne de
fonctions filaires et d'accessoires décoratifs .
Le poteau de garde-corps à câble de VEVOR est fabriqué à partir de tous
les matériaux en acier inoxydable, qui présentent une grande résistance à
la rouille et à la corrosion. Il fonctionnera pendant une longue durée de vie
pour les garde-corps intérieurs et extérieurs nécessitant peu d'entretien.
Veuillez noter qu'il n'est pas recommandé pour les projets côtiers.
Nous travaillons avec tous les efforts pour fournir des produits de qualité et
un service professionnel, et faire de VEVOR une marque fiable.
INSTRUCTIONS D'INSTALLATION
Indication d'installation et poste applicable
Applicable à tous les scénarios d’installation technique .
- 3 -
Remarque : ce produit comprend uniquement la colonne et ses attaches
d'installation, à l'exclusion du câble métallique, du kit de garde-corps et de
la main courante.
INFORMATION PRODUIT
A

- 4 -
Modèl
e
Foré
Haut
eur
(mm)
Num
éro
percé
Diamè
tre du
trou
(mm)
Pas
des
trous
(mm)
Taille
de
section
(mm)
Coul
eur
Inclu
re
(pièc
es)
HR-0
01
nive
au
1067
12
φ10,5
80
50*50
Noir
4
HR-0
02
nive
au
914
dix
φ10,5
80
50*50
Noir
4
HR-0
03
nive
au
1067
12
φ8
80
30*50
Noir
4
HR-0
04
nive
au
914
dix
φ8
80
30*50
Noir
4
HR-0
05
30°
1067
12
10,5×1
5
80
50*50
Arge
nt
1
HR-0
06
30°
1067
12
10,5×1
5
80
50*50
Noir
1
HR-0
07
L
1067
12
φ10,5
80
50*50
Noir
1
HR-0
08
Non
914
/
/
/
50*50
Noir
1
HR-0
09
nive
au
914
dix
φ10,5
80
50*50
Noir
1
HR-0
10
30°
914
dix
10,5×1
5
80
50*50
Noir
1
HR-0
11
L
914
dix
φ10,5
80
50*50
Noir
1
HR-0
12
nive
au
914
dix
φ10,5
80
50*50
Arge
nt
1
HR-0
13
30°
1067
12
8×13
80
30*50
Noir
1
HR-0
14
L
1067
12
φ8
80
30*50
Noir
1
HR-0
15
30°
914
dix
8×13
80
30*50
Noir
1

- 5 -
HR-0
16
L
914
dix
φ8
80
30*50
Noir
1
HR-0
17
Non
914
/
/
/
38*38
Noir
1
HR-0
18
nive
au
1067
12
φ8
80
30*50
Noir
1
HR-0
19
Non
1067
/
/
/
50*50
Noir
1
HR-0
20
nive
au
914
dix
φ8
80
30*50
Noir
1
HR-0
21
nive
au
1067
12
φ10,5
80
50*50
Noir
1
HR-0
22
nive
au
914
dix
Φ 8
80
3 0*50
Arge
nt
1
HR-0
23
nive
au
1067
12
φ10,5
80
50*50
Arge
nt
1
EMBALLER INCLURE
No
n
Composa
nts
Image
QTÉ
Modèle adapté
HR-001
/
HR-002
HR005 ~
HR012/HR-0
19/ HR-0 21/
HR-0 23/
HR-00 3/
HR-00 4
HR-013 ~
HR-01 6/
HR-018 /
HR-0 20/
HR-0 22/
HR-0
17
1
poste
4
1
4
1
/
/
/
/
/
1
- 6 -
2
Couvertur
e carrée
4
1
/
/
/
3
Couvertur
e
rectangulai
re
/
/
4
1
/
4
boulon
d'ancrage
16
4
16
4
4
5
Support
incurvé
4
1
4
1
/
6
Support
horizontal
4
1
4
1
/
7
clé
hexagonal
e
4
1
4
1
1
8
Clé
ouverte
4
1
4
1
1
9
Taraudage
8
2
8
2
4
dix
Couvertur
e plastique
/
/
/
/
1
INSTALLATION
Pour sol en béton ou en bois
Étape 1. Marquez les
points de perçage aux
Étape 2.utilisez un
marteau perforateur
Étape 3. Martelez la
vis d'ancrage dans le

- 7 -
emplacements
d'installation
appropriés.
pour faire un trou de
∅ 12 aux points
marqués.
trou percé.
Étape 4. Serrez les vis
Étape 5. Fermez le couvercle et terminez de
fixer le poteau.
Remarque : Assurez-vous que la colonne est verticale lors de la fixation
de la plaque inférieure du poteau.
Montage avec main courante (horizontale)
Étape 1 : support fixe
Étape 2: Déterminez la position d'installation de la main courante, puis
marquez la position sous les trous de la main courante et du support et
percez des trous avec une perceuse de ∅ 5,5 à ∅ 5,6 mm.
- 8 -
Étape 3 : Utilisez les vis autotaraudeuses fournies dans l'accessoire pour
fixer la main courante au support.
Il convient également à l'installation de mains courantes et de supports en
arc.
Monter avec main courante (dégradé)
Étape 1 : support fixe
Étape 2 : Ajustez l'angle du support pour l'adapter au dessous de la main
courante. Déterminez la position d'installation de la main courante, puis
marquez la position sous la main courante et les trous du support et percez
des trous avec une perceuse de ∅ 5,5 à ∅ 5,6 mm.
Remarque : la main courante et le support peuvent être pré-fixés à
l'aide d'outils de serrage, de sorte que plusieurs points d'installation
du support puissent être marqués et positionnés en même temps.
- 9 -
Étape 3 : retirez le support du poteau, puis utilisez les vis autotaraudeuses
fournies dans l'accessoire pour fixer le support à la main courante.
Réparez le poteau et le support .
Il convient également à l'installation
de mains courantes et de supports
en arc.
Pour le modèle HR-017

- 10 -
Installer avec un câble métallique et des raccords
Pour manchon de protection de roue de niveau
Pour tendeur de goujon montage horizontal et angle
Pour tendeur de tendeur et borne fixe
Adresse : Baoshanqu Shuangchenglu 803long 11hao 1602A-1609shi
Shanghai
Importé en Australie : SIHAO PTY LTD, 1 ROKEVA STREETASTWOOD
NSW 2122 Australie
Importé aux États-Unis : Sanven Technology Ltd. Suite 250, 9166
- 11 -
Anaheim Place, Rancho Cucamonga, CA 91730
REP
UK
Pooledas Group Ltd
Unit 5 Albert Edward House, The Pavilions
Preston, United Kingdom
REP
EC
SHUNSHUN GmbH
Römeräcker 9 Z2021, 76351
Linkenheim-Hochstetten, Germany
Fabriqué en Chine


- 2 -
Technisch Support- und E-Garantie-Zertifikat www.vevor.com/support
KABELGELÄNDERPFOSTEN
MODELL: HR-001/HR-002/HR-003/HR-004/HR-005/HR-006/HR-007/
HR-008/HR-009/HR-010/HR-011/HR-012/HR-013/HR-014
HR-0 1 5 /HR-016/HR-017/HR-018/HR-019/HR-020/HR-021/
HR-022/HR-023
We continue to be committed to provide you tools with competitive price.
"Save Half", "Half Price" or any other similar expressions used by us only represents an
estimate of savings you might benefit from buying certain tools with us compared to the major
top brands and does not necessarily mean to cover all categories of tools offered by us. You
are kindly reminded to verify carefully when you are placing an order with us if you are
actually saving half in comparison with the top major brands.

- 1 -
MODELL: HR-001/HR-002/HR-003/HR-004/HR-005/HR-006/HR-007/
HR-008/HR-009/HR-010/HR-011/HR-012/HR-013/HR-014
HR-0 1 5 /HR-016/HR-017/HR-018/HR-019/HR-020/HR-021/
HR-022/HR-023
< Bild nur als Referenz > _
Have product questions? Need technical support? Please feel free to
contact us:
Technical Support and E-Warranty Certificate
www.vevor.com/support
NEED HELP? CONTACT US!
This is the original instruction, please read all manual instructions
carefully before operating. VEVOR reserves a clear interpretation of our
user manual. The appearance of the product shall be subject to the
product you received. Please forgive us that we won't inform you again if
there are any technology or software updates on our product.
CABLE RAILING POST

- 2 -
WICHTIGE SICHERHEITSMASSNAHMEN
WARNUNG : Lesen und verstehen Sie dieses gesamte
Handbuch, bevor Sie dieses Produkt in Betrieb nehmen oder
warten. Die Nichtbeachtung dieser Warnungen und
Anweisungen kann zu Verletzungen oder Sachschäden
führen.
1. Der Warnhinweis weist darauf hin, dass geeignete Maßnahmen ergriffen
werden sollten, um die potenzielle Gefahr einer Verletzung zu vermeiden.
2. Die Produkteigenschaften gelten nur für ordnungsgemäß und
vollständig montierte Produkte.
3. Bitte bewahren Sie kleine Ersatzteile außerhalb der Reichweite von
Kindern auf . Es handelt sich nicht um ein Spielzeug. Lassen Sie Kinder
nicht spielen .
4 . Weitere Informationen zu den auf den folgenden Seiten aufgeführten
Teilen finden Sie im Montagediagramm dieser Anleitung. Packen Sie alle
Teile aus und trennen Sie sie an einem sauberen Arbeitsplatz.
ANLEITUNG AUFBEWAHREN
HAUPTMERKMALE
Dieses Produkt wird hauptsächlich für die Säuleninstallation von
Drahtfunktionen und dekorativem Zubehör verwendet .
Der Kabelgeländerpfosten von VEVOR ist komplett aus Edelstahl gefertigt
und weist eine hohe Beständigkeit gegen Rost und Korrosion auf. Es
eignet sich für eine lange Lebensdauer von Innen- und Außengeländern
bei geringem Wartungsaufwand. Bitte beachten Sie , dass dies nicht für
Küstenprojekte empfohlen wird.
Wir arbeiten mit aller Kraft daran, Qualitätsprodukte und professionellen
Service anzubieten und VEVOR zu einer zuverlässigen Marke zu machen.
INSTALLATIONSANWEISUNG
Installationshinweis und anwendbarer Beitrag
Anwendbar auf alle technischen Installationsszenarien .

- 3 -
Hinweis: Dieses Produkt enthält nur die Säule und ihre
Montagebefestigungen, ausgenommen Drahtseil, Kabelgeländer-Kit und
Handlauf.
PRODUKTINFORMATION
A

- 4 -
Model
l
Geb
ohrt
Höhe
(mm)
Gebo
hrte
Num
mer
Lochd
urchm
esser
(mm)
Locha
bstand
(mm)
Abschn
ittsgröß
e
(mm)
Farb
e
Eins
chlie
ßen
(Stk.)
HR-0
01
Ebe
ne
1067
12
φ10,5
80
50*50
Schw
arz
4
HR-0
02
Ebe
ne
914
10
φ10,5
80
50*50
Schw
arz
4
HR-0
03
Ebe
ne
1067
12
φ8
80
30*50
Schw
arz
4
HR-0
04
Ebe
ne
914
10
φ8
80
30*50
Schw
arz
4
HR-0
05
30°
1067
12
10,5×1
5
80
50*50
Silbe
r
1
HR-0
06
30°
1067
12
10,5×1
5
80
50*50
Schw
arz
1
HR-0
07
L
1067
12
φ10,5
80
50*50
Schw
arz
1
HR-0
08
Nicht
914
/
/
/
50*50
Schw
arz
1
HR-0
09
Ebe
ne
914
10
φ10,5
80
50*50
Schw
arz
1
HR-0
10
30°
914
10
10,5×1
5
80
50*50
Schw
arz
1
HR-0
11
L
914
10
φ10,5
80
50*50
Schw
arz
1
HR-0
12
Ebe
ne
914
10
φ10,5
80
50*50
Silbe
r
1
HR-0
13
30°
1067
12
8×13
80
30*50
Schw
arz
1
HR-0
14
L
1067
12
φ8
80
30*50
Schw
arz
1
HR-0
15
30°
914
10
8×13
80
30*50
Schw
arz
1

- 5 -
HR-0
16
L
914
10
φ8
80
30*50
Schw
arz
1
HR-0
17
Nicht
914
/
/
/
38*38
Schw
arz
1
HR-0
18
Ebe
ne
1067
12
φ8
80
30*50
Schw
arz
1
HR-0
19
Nicht
1067
/
/
/
50*50
Schw
arz
1
HR-0
20
Ebe
ne
914
10
φ8
80
30*50
Schw
arz
1
HR-0
21
Ebe
ne
1067
12
φ10,5
80
50*50
Schw
arz
1
HR-0
22
Ebe
ne
914
10
Φ 8
80
3 0*50
Silbe
r
1
HR-0
23
Ebe
ne
1067
12
φ10,5
80
50*50
Silbe
r
1
PAKET ENTHALTEN
NEI
N
Kompone
nten
Bild
MENGE
Passendes Modell
HR-001
/
HR-002
HR005~HR0
12/HR-019/
HR-0 21/
HR-0 23/
HR-00 3/
HR-00 4
HR-013 ~
HR-01 6/
HR-018 /
HR-0 20/
HR-0 22/
HR-0
17
1
Post
4
1
4
1
/
/
/
/
/
1
- 6 -
2
Quadratisc
he
Abdeckun
g
4
1
/
/
/
3
Rechtecki
ge
Abdeckun
g
/
/
4
1
/
4
Ankerbolz
en
16
4
16
4
4
5
Gebogene
Halterung
4
1
4
1
/
6
Horizontal
e
Halterung
4
1
4
1
/
7
Sechskant
schlüssel
4
1
4
1
1
8
Gabelschl
üssel
4
1
4
1
1
9
Blechschr
aube
8
2
8
2
4
10
Plastikhüll
e
/
/
/
/
1
INSTALLATION
Für Beton- oder Holzböden
- 7 -
Schritt 1: Markieren
Sie die Bohrpunkte an
den entsprechenden
Installationsorten.
Schritt 2: Bohren Sie
mit einem Bohrhammer
an den markierten
Stellen ein Loch mit
einem Durchmesser
von ∅ 12.
Schritt 3. Schlagen
Sie die
Ankerschraube in
das Bohrloch.
Schritt 4. Ziehen Sie
die Schrauben fest
Schritt 5: Schließen Sie den Deckel und
schließen Sie die Befestigung des Pfostens ab.
Hinweis: Stellen Sie sicher, dass die Säule aufrecht steht, wenn Sie die
Bodenplatte des Pfostens befestigen.
Montage mit Handlauf (horizontal)
Schritt 1: Feste Halterung
Schritt 2: Bestimmen Sie die Installationsposition des Handlaufs,
markieren Sie dann die Position unter dem Handlauf und den
Halterungslöchern und bohren Sie Löcher mit einem
∅ 5,5-∅ 5,6-mm-Bohrer.

- 8 -
Schritt 3: Befestigen Sie den Handlauf mit den selbstschneidenden
Schrauben im Zubehör an der Stütze.
Es eignet sich auch für die Montage von Bogenhandläufen und Konsolen.
Montage mit Handlauf (Gefälle)
Schritt 1: Feste Halterung
Schritt 2: Passen Sie den Winkel der Halterung an die Unterseite des
Handlaufs an. Bestimmen Sie die Installationsposition des Handlaufs,
markieren Sie dann die Position unter dem Handlauf und den
Halterungslöchern und bohren Sie Löcher mit einem ∅ 5,5-∅
5,6-mm-Bohrer.
Hinweis: Der Handlauf und die Halterung können mit Hilfe von
Klemmwerkzeugen vorfixiert werden, so dass mehrere
- 9 -
Montagepunkte der Halterung gleichzeitig markiert und positioniert
werden können.
Schritt 3: Entfernen Sie die Halterung vom Pfosten und befestigen Sie die
Halterung dann mit den selbstschneidenden Schrauben im Zubehör am
Handlauf.
Befestigen Sie den Pfosten und die Halterung wieder .
Es eignet sich auch für die Montage
von Bogenhandläufen und
Konsolen.
Für Modell HR-017
- 10 -
Mit Drahtseil und Beschlägen installieren
Für Level-Radschutzhülle
Für Bolzenspanner horizontale Montage und Winkel
Für Spannschlossspanner und Festanschluss
- 11 -
Adresse: Baoshanqu Shuangchenglu 803long 11hao 1602A-1609shi
Shanghai
Importiert nach AUS: SIHAO PTY LTD, 1 ROKEVA STREETEASTWOOD
NSW 2122 Australien
In die USA importiert: Sanven Technology Ltd. Suite 250, 9166 Anaheim
Place, Rancho Cucamonga, CA 91730
REP
UK
Pooledas Group Ltd
Unit 5 Albert Edward House, The Pavilions
Preston, United Kingdom
REP
EC
SHUNSHUN GmbH
Römeräcker 9 Z2021, 76351
Linkenheim-Hochstetten, Germany
In China hergestellt


- 2 -
Tecnico Supporto e certificato di garanzia elettronica www.vevor.com/support
PALO PER RINGHIERA VIA CAVO
MODELLO: HR-001/HR-002/HR-003/HR-004/HR-005/HR-006/HR-007/
HR-008/HR-009/HR-010/HR-011/HR-012/HR-013/HR-014
HR-0 1 5 /HR-016/HR-017/HR-018/HR-019/HR-020/HR-021/
HR-022/HR-023
We continue to be committed to provide you tools with competitive price.
"Save Half", "Half Price" or any other similar expressions used by us only represents an
estimate of savings you might benefit from buying certain tools with us compared to the major
top brands and does not necessarily mean to cover all categories of tools offered by us. You
are kindly reminded to verify carefully when you are placing an order with us if you are
actually saving half in comparison with the top major brands.

- 1 -
MODELLO: HR-001/HR-002/HR-003/HR-004/HR-005/HR-006/HR-007/
HR-008/HR-009/HR-010/HR-011/HR-012/HR-013/HR-014
HR-0 1 5 /HR-016/HR-017/HR-018/HR-019/HR-020/HR-021/
HR-022/HR-023
< Immagine solo per riferimento > _
Have product questions? Need technical support? Please feel free to
contact us:
Technical Support and E-Warranty Certificate
www.vevor.com/support
NEED HELP? CONTACT US!
This is the original instruction, please read all manual instructions
carefully before operating. VEVOR reserves a clear interpretation of our
user manual. The appearance of the product shall be subject to the
product you received. Please forgive us that we won't inform you again if
there are any technology or software updates on our product.
CABLE RAILING POST

- 2 -
TUTELA IMPORTANTE
AVVERTENZA : leggere e comprendere l'intero manuale
prima di utilizzare o sottoporre a manutenzione questo
prodotto. La mancata osservanza di queste avvertenze e
istruzioni può causare lesioni personali o danni a beni di
valore.
1. L'avvertenza indica che è necessario adottare misure adeguate per
evitare il potenziale pericolo di lesioni personali.
2. Le funzionalità del prodotto si applicano solo al prodotto correttamente e
completamente assemblato.
3. Si prega di tenere piccoli pezzi di ricambio fuori dalla portata dei
bambini , non è un giocattolo, non permettere ai bambini di giocare .
4 . Per ulteriori informazioni riguardanti le parti elencate nelle pagine
seguenti, fare riferimento allo Schema di Montaggio di questo manuale.
Scartare e separare tutte le parti in un'area di lavoro pulita.
CONSERVA QUESTE ISTRUZIONI
CARATTERISTICHE PRINCIPALI
Questo prodotto viene utilizzato principalmente per l'installazione a
colonna di funzioni di filo e accessori decorativi .
Il palo per ringhiera per cavi VEVOR è realizzato con tutti i materiali in
acciaio inossidabile, che ha una grande resistenza alla ruggine e alla
corrosione. Funzionerà per una lunga durata di ringhiere interne ed
esterne con bassa manutenzione. Si tenga presente che non è consigliato
per progetti costieri.
Lavoriamo con ogni sforzo per fornire prodotti di qualità e un servizio
professionale e rendere VEVOR un marchio affidabile.
ISTRUZIONI PER L'INSTALLAZIONE
Indicazione di installazione e post applicabile
Applicabile a tutti gli scenari di installazione tecnica .
Nota: questo prodotto include solo la colonna e i relativi elementi di

- 3 -
fissaggio per l'installazione, esclusi il cavo metallico, il kit ringhiera per cavi
e il corrimano.
INFORMAZIONI SUL PRODOTTO
A

- 4 -
Model
lo
Fora
to
Altez
za
(mm)
Num
ero
forato
Diame
tro del
foro
(mm)
Passo
dei fori
(mm)
Dimens
ione
sezione
(mm)
Color
e
Inclu
dere
(pez
zi)
HR-
001
livell
o
1067
12
φ10,5
80
50*50
Nero
4
HR-
002
livell
o
914
10
φ10,5
80
50*50
Nero
4
HR-
003
livell
o
1067
12
φ8
80
30*50
Nero
4
HR-
004
livell
o
914
10
φ8
80
30*50
Nero
4
HR-
005
30°
1067
12
10,5×1
5
80
50*50
Arge
nto
1
HR-
006
30°
1067
12
10,5×1
5
80
50*50
Nero
1
HR-
007
l
1067
12
φ10,5
80
50*50
Nero
1
HR-
008
Non
914
/
/
/
50*50
Nero
1
HR-
009
livell
o
914
10
φ10,5
80
50*50
Nero
1
HR-0
10
30°
914
10
10,5×1
5
80
50*50
Nero
1
HR-0
11
l
914
10
φ10,5
80
50*50
Nero
1
HR-0
12
livell
o
914
10
φ10,5
80
50*50
Arge
nto
1
HR-0
13
30°
1067
12
8×13
80
30*50
Nero
1
HR-0
14
l
1067
12
φ8
80
30*50
Nero
1
HR-0
15
30°
914
10
8×13
80
30*50
Nero
1

- 5 -
HR-0
16
l
914
10
φ8
80
30*50
Nero
1
HR-0
17
Non
914
/
/
/
38*38
Nero
1
HR-0
18
livell
o
1067
12
φ8
80
30*50
Nero
1
HR-0
19
Non
1067
/
/
/
50*50
Nero
1
HR-0
20
livell
o
914
10
φ8
80
30*50
Nero
1
HR-0
21
livell
o
1067
12
φ10,5
80
50*50
Nero
1
HR-0
22
livell
o
914
10
Φ8 _
80
30 *50
Arge
nto
1
HR-0
23
livell
o
1067
12
φ10,5
80
50*50
Arge
nto
1
PACCHETTO INCLUDERE
NO
Compone
nti
Immagin
e
QUANTITÀ
Modello adatto
HR-001
/
HR-002
HR005~HR0
12/HR-019/
HR-0 21/
HR-0 23/
HR-00 3/
HR- 004
HR-013 ~
HR-01 6/
HR-018 /
HR-0 20/
HR-0 22/
HR-0
17
1
inviare
4
1
4
1
/
/
/
/
/
1

- 6 -
2
Copertura
quadrata
4
1
/
/
/
3
Copertura
rettangolar
e
/
/
4
1
/
4
bullone di
ancoraggi
o
16
4
16
4
4
5
Staffa
curva
4
1
4
1
/
6
Staffa
orizzontale
4
1
4
1
/
7
chiave
esagonale
4
1
4
1
1
8
Chiave
aperta
4
1
4
1
1
9
Vite
autofilettan
te
8
2
8
2
4
10
Cover di
plastica
/
/
/
/
1
INSTALLAZIONE
Per pavimenti in cemento o legno
Passaggio 1.Segnare i
punti di foratura nelle
Passaggio 2.utilizzare
un trapano a
Passaggio
3.Martellare la vite di
- 7 -
posizioni di
installazione
appropriate.
percussione per
realizzare un foro di
∅ 12 nei punti
contrassegnati.
ancoraggio nel foro
praticato.
Passaggio 4. Stringere
le viti
Passaggio 5.Chiudere il coperchio e
completare il fissaggio del montante.
Nota: assicurarsi che la colonna sia in posizione verticale quando si
fissa la piastra inferiore del montante.
Montaggio con corrimano (orizzontale)
Passaggio 1: staffa fissa
Passo 2: Determinare la posizione di installazione del corrimano, quindi
segnare la posizione sotto il corrimano e i fori della staffa e praticare i fori
con un trapano da ∅ 5,5-∅ 5,6 mm.
- 8 -
Passaggio 3: utilizzare le viti autofilettanti nell'accessorio per fissare il
corrimano al supporto.
È adatto anche per l'installazione di corrimano e staffe ad arco.
Montaggio con corrimano (gradiente)
Passaggio 1: staffa fissa
Passaggio 2: regolare l'angolo della staffa per adattarla alla parte inferiore
del corrimano. Determinare la posizione di installazione del corrimano,
quindi contrassegnare la posizione sotto il corrimano e i fori della staffa e
praticare i fori con un trapano da ∅ 5,5-∅ 5,6 mm.
Nota: il corrimano e la staffa possono essere prefissati con l'aiuto di
strumenti di serraggio, in modo che più punti di installazione della
staffa possano essere contrassegnati e posizionati
- 9 -
contemporaneamente.
Passaggio 3: rimuovere la staffa dal montante, quindi utilizzare le viti
autofilettanti nell'accessorio per fissare la staffa al corrimano.
Fissare nuovamente il montante e la staffa .
È adatto anche per l'installazione di
corrimano e staffe ad arco.
Per il modello HR-017
- 10 -
Installare con fune metallica e raccordi
Per la manica protettiva della ruota di livello
Per tensionatore a perno Montaggio orizzontale e angolare
Per tenditore a tenditore e terminale fisso
Indirizzo: Baoshanqu Shuangchenglu 803long 11hao 1602A-1609shi
Shanghai
Importato in AUS: SIHAO PTY LTD, 1 ROKEVA STREETEASTWOOD
NSW 2122 Australia

- 11 -
Importato negli Stati Uniti: Sanven Technology Ltd. Suite 250, 9166
Anaheim Place, Rancho Cucamonga, CA 91730
REP
UK
Pooledas Group Ltd
Unit 5 Albert Edward House, The Pavilions
Preston, United Kingdom
REP
EC
SHUNSHUN GmbH
Römeräcker 9 Z2021, 76351
Linkenheim-Hochstetten, Germany
Made in China


- 2 -
Técnico Soporte y certificado de garantía electrónica www.vevor.com/support
POSTE DE BARANDILLA DE CABLE
MODELO: HR-001/HR-002/HR-003/HR-004/HR-005/HR-006/HR-007/
HR-008/HR-009/HR-010/HR-011/HR-012/HR-013/HR-014
HR-0 1 5 /HR-016/HR-017/HR-018/HR-019/HR-020/HR-021/
HR-022/HR-023
We continue to be committed to provide you tools with competitive price.
"Save Half", "Half Price" or any other similar expressions used by us only represents an
estimate of savings you might benefit from buying certain tools with us compared to the major
top brands and does not necessarily mean to cover all categories of tools offered by us. You
are kindly reminded to verify carefully when you are placing an order with us if you are
actually saving half in comparison with the top major brands.

- 1 -
MODELO: HR-001/HR-002/HR-003/HR-004/HR-005/HR-006/HR-007/
HR-008/HR-009/HR-010/HR-011/HR-012/HR-013/HR-014
HR-0 1 5 /HR-016/HR-017/HR-018/HR-019/HR-020/HR-021/
HR-022/HR-023
< Imagen sólo como referencia > _
Have product questions? Need technical support? Please feel free to
contact us:
Technical Support and E-Warranty Certificate
www.vevor.com/support
NEED HELP? CONTACT US!
This is the original instruction, please read all manual instructions
carefully before operating. VEVOR reserves a clear interpretation of our
user manual. The appearance of the product shall be subject to the
product you received. Please forgive us that we won't inform you again if
there are any technology or software updates on our product.
CABLE RAILING POST

- 2 -
CONSIDERACIONES IMPORTANTES
ADVERTENCIA : Lea y comprenda este manual completo
antes de operar o reparar este producto. El incumplimiento de
estas advertencias e instrucciones puede provocar lesiones
personales o daños a bienes valiosos.
1. La advertencia indica que se deben tomar las medidas adecuadas para
evitar el peligro potencial de lesiones personales.
2. Las capacidades del producto se aplican únicamente al producto
ensamblado de manera adecuada y completa.
3. Mantenga las piezas de repuesto pequeñas fuera del alcance de los
niños , no es un juguete, no permita que los niños jueguen .
4 . Para obtener información adicional sobre las piezas enumeradas en las
siguientes páginas, consulte el diagrama de montaje de este manual.
Desenvuelva y separe todas las piezas en un área de trabajo limpia.
GUARDA ESTAS INSTRUCCIONES
CARACTERÍSTICAS PRINCIPALES
Este producto se utiliza principalmente para la instalación en columnas de
funciones de alambre y accesorios decorativos .
El poste de barandilla de cable de VEVOR está hecho completamente de
materiales de acero inoxidable, lo que tiene una gran resistencia al óxido y
la corrosión. Funcionará durante una larga vida útil para barandillas
interiores y exteriores con bajo mantenimiento. Tenga en cuenta que no se
recomienda para proyectos costeros.
Trabajamos con todo el esfuerzo para brindar productos de calidad y un
servicio profesional, y hacer de VEVOR una marca confiable.
INSTRUCCIONES DE INSTALACIÓN
Indicación de instalación y publicación aplicable
Aplicable a todos los escenarios de instalación de ingeniería .
Nota: Este producto solo incluye la columna y sus sujetadores de
instalación, excluyendo el cable metálico, el kit de barandilla de cable y el

- 3 -
pasamanos.
INFORMACIÓN DEL PRODUCTO
A
- 4 -
Model
o
perfo
rado
Altur
a
(mm)
Núm
ero
perfor
ado
Diáme
tro del
agujer
o
(mm)
Paso
de
agujer
os
(mm)
Tamañ
o de
sección
(mm)
Color
Inclu
ye
(piez
as)
HR-0
01
nivel
1067
12
φ10,5
80
50*50
Negr
o
4
HR-0
02
nivel
914
10
φ10,5
80
50*50
Negr
o
4
HR-0
03
nivel
1067
12
φ8
80
30*50
Negr
o
4
HR-0
04
nivel
914
10
φ8
80
30*50
Negr
o
4
HR-0
05
30°
1067
12
10,5×1
5
80
50*50
Plata
1
HR-0
06
30°
1067
12
10,5×1
5
80
50*50
Negr
o
1
HR-0
07
l
1067
12
φ10,5
80
50*50
Negr
o
1
HR-0
08
No
914
/
/
/
50*50
Negr
o
1
HR-0
09
nivel
914
10
φ10,5
80
50*50
Negr
o
1
HR-0
10
30°
914
10
10,5×1
5
80
50*50
Negr
o
1
HR-0
11
l
914
10
φ10,5
80
50*50
Negr
o
1
HR-0
12
nivel
914
10
φ10,5
80
50*50
Plata
1
HR-0
13
30°
1067
12
8×13
80
30*50
Negr
o
1
HR-0
14
l
1067
12
φ8
80
30*50
Negr
o
1
HR-0
30°
914
10
8×13
80
30*50
Negr
1
- 5 -
15
o
HR-0
16
l
914
10
φ8
80
30*50
Negr
o
1
HR-0
17
No
914
/
/
/
38*38
Negr
o
1
HR-0
18
nivel
1067
12
φ8
80
30*50
Negr
o
1
HR-0
19
No
1067
/
/
/
50*50
Negr
o
1
HR-0
20
nivel
914
10
φ8
80
30*50
Negr
o
1
HR-0
21
nivel
1067
12
φ10,5
80
50*50
Negr
o
1
HR-0
22
nivel
914
10
Φ 8
80
3 0*50
Plata
1
HR-0
23
nivel
1067
12
φ10,5
80
50*50
Plata
1
PAQUETE INCLUIR
No
Compone
ntes
Imagen
CANTIDAD
Modelo de ajuste
HR-001
/
HR-002
HR005~HR0
12/HR-019/
HR-0 21/
HR-0 23/
HR-00 3/
HR-00 4
HR-013 ~
HR-01 6/
HR-018 /
HR-0 20/
HR-0 22/
HR-0
17
1
correo
4
1
4
1
/
/
/
/
/
1
- 6 -
2
Tapa
cuadrada
4
1
/
/
/
3
Tapa
rectangula
r
/
/
4
1
/
4
perno de
anclaje
dieciséi
s
4
dieciséi
s
4
4
5
Soporte
curvo
4
1
4
1
/
6
soporte
horizontal
4
1
4
1
/
7
llave
hexagonal
4
1
4
1
1
8
Llave de
boca
4
1
4
1
1
9
Tornillo de
rosca
8
2
8
2
4
10
Cubierta
plástica
/
/
/
/
1
INSTALACIÓN
Para piso de concreto o madera
Paso 1. Marque los
puntos de perforación
en las ubicaciones de
instalación
Paso 2. Utilice un
taladro percutor para
hacer un agujero de
∅ 12 en los puntos
Paso 3. Martilla el
tornillo de anclaje en
el orificio perforado.
- 7 -
adecuadas.
marcados.
Paso 4. Apriete los
tornillos.
Paso 5. Cierra la tapa y termina de fijar el
poste.
Nota: Asegúrese de que la columna esté en posición vertical al fijar la
placa inferior del poste.
Montaje con pasamanos (horizontal)
Paso 1: soporte fijo
Paso 2: Determine la posición de instalación del pasamano y luego
marque la posición debajo de los orificios del pasamano y del soporte y
taladre los orificios con un taladro de ∅ 5,5-∅ 5,6 mm.
Paso 3: Utilice los tornillos autorroscantes del accesorio para fijar el
- 8 -
pasamanos al soporte.
También es adecuado para la instalación de pasamanos y soportes en
arco.
Montaje con pasamanos (gradiente)
Paso 1: soporte fijo
Paso 2: Ajuste el ángulo del soporte para que se ajuste a la parte inferior
del pasamano. Determine la posición de instalación del pasamano y luego
marque la posición debajo de los orificios del pasamano y del soporte y
perfore los orificios con un taladro de ∅ 5,5-∅ 5,6 mm.
Nota: El pasamanos y el soporte se pueden fijar previamente con la
ayuda de herramientas de sujeción, de modo que se puedan marcar y
colocar múltiples puntos de instalación del soporte al mismo tiempo.
- 9 -
Paso 3: Retire el soporte del poste y luego use los tornillos autorroscantes
del accesorio para fijar el soporte al pasamano.
a fijar el poste y el soporte .
También es adecuado para la
instalación de pasamanos y
soportes en arco.
Para el modelo HR-017
Instalar con cable metálico y accesorios.
Para funda protectora de rueda nivelada

- 10 -
Para montaje horizontal y ángulo del tensor de pernos
Para tensor tensor y terminal fijo
Dirección: Baoshanqu Shuangchenglu 803long 11hao 1602A-1609shi
Shanghai
Importado a AUS: SIHAO PTY LTD, 1 ROKEVA STREETEASTWOOD
NSW 2122 Australia
Importado a EE. UU.: Sanven Technology Ltd. Suite 250, 9166 Anaheim
Place, Rancho Cucamonga, CA 91730

- 11 -
REP
UK
Pooledas Group Ltd
Unit 5 Albert Edward House, The Pavilions
Preston, United Kingdom
REP
EC
SHUNSHUN GmbH
Römeräcker 9 Z2021, 76351
Linkenheim-Hochstetten, Germany
Hecho en china


- 2 -
Techniczny Certyfikat wsparcia i e-gwarancji www.vevor.com/support
SŁUPEK PORĘCZY KABLOWEJ
MODEL: HR-001/HR-002/HR-003/HR-004/HR-005/HR-006/HR-007/
HR-008/HR-009/HR-010/HR-011/HR-012/HR-013/HR-014
HR-0 1 5 /HR-016/HR-017/HR-018/HR-019/HR-020/HR-021/
HR-022/HR-023
We continue to be committed to provide you tools with competitive price.
"Save Half", "Half Price" or any other similar expressions used by us only represents an
estimate of savings you might benefit from buying certain tools with us compared to the major
top brands and does not necessarily mean to cover all categories of tools offered by us. You
are kindly reminded to verify carefully when you are placing an order with us if you are
actually saving half in comparison with the top major brands.

- 1 -
MODEL: HR-001/HR-002/HR-003/HR-004/HR-005/HR-006/HR-007/
HR-008/HR-009/HR-010/HR-011/HR-012/HR-013/HR-014
HR-0 1 5 /HR-016/HR-017/HR-018/HR-019/HR-020/HR-021/
HR-022/HR-023
< Zdjęcie wyłącznie w celach informacyjnych >
Have product questions? Need technical support? Please feel free to
contact us:
Technical Support and E-Warranty Certificate
www.vevor.com/support
NEED HELP? CONTACT US!
This is the original instruction, please read all manual instructions
carefully before operating. VEVOR reserves a clear interpretation of our
user manual. The appearance of the product shall be subject to the
product you received. Please forgive us that we won't inform you again if
there are any technology or software updates on our product.
CABLE RAILING POST

- 2 -
WAŻNI OCHRONIARZE
OSTRZEŻENIE : Przed przystąpieniem do obsługi lub
serwisowania tego produktu należy przeczytać i zrozumieć
całą niniejszą instrukcję. Niezastosowanie się do tych
ostrzeżeń i instrukcji może spowodować obrażenia ciała lub
uszkodzenie cennego mienia.
1. Ostrzeżenie wskazuje, że należy podjąć odpowiednie działania, aby
uniknąć potencjalnego niebezpieczeństwa obrażeń ciała.
2. Możliwości produktu dotyczą wyłącznie prawidłowo i całkowicie
zmontowanego produktu.
3. Małe części zamienne należy trzymać poza zasięgiem dzieci . To nie jest
zabawka. Nie pozwalaj dzieciom na zabawę .
4 . Dodatkowe informacje dotyczące części wymienionych na kolejnych
stronach można znaleźć w schemacie montażu w niniejszej instrukcji.
Rozpakuj i oddziel wszystkie części w czystym miejscu pracy.
ZACHOWAJ TE INSTRUKCJE
GŁÓWNE CECHY
Ten produkt jest używany głównie do montażu kolumn z funkcjami
drutowymi i akcesoriami dekoracyjnymi .
Słupek poręczy kablowych firmy VEVOR wykonany jest w całości ze stali
nierdzewnej, która charakteryzuje się dużą odpornością na rdzę i korozję.
Będzie działać przez długi czas w przypadku balustrad wewnętrznych i
zewnętrznych przy niewielkich wymaganiach konserwacyjnych. Należy
pamiętać , że nie jest on zalecany do projektów przybrzeżnych.
Dokładamy wszelkich starań, aby zapewnić wysoką jakość produktów i
profesjonalną obsługę oraz sprawić, że VEVOR będzie niezawodną
marką.
INSTRUKCJA INSTALACJI
Wskazanie instalacji i odpowiedni słupek
Ma zastosowanie do wszystkich scenariuszy instalacji inżynieryjnych .
- 3 -
Uwaga: ten produkt zawiera wyłącznie kolumnę i elementy mocujące do
niej, z wyłączeniem liny stalowej, zestawu poręczy kablowych i poręczy.
INFORMACJE O PRODUKCIE
A

- 4 -
Model
Wier
cone
Wyso
kość
(mm)
Wywi
ercon
y
nume
r
Średni
ca
otworu
(mm)
Rozsta
w
otworó
w
(mm)
Rozmia
r
przekro
ju
(mm)
Kolor
Uwz
ględ
nij
(szt.)
HR-0
01
pozi
om
1067
12
φ10,5
80
50*50
Czar
ny
4
HR-0
02
pozi
om
914
10
φ10,5
80
50*50
Czar
ny
4
HR-0
03
pozi
om
1067
12
φ8
80
30*50
Czar
ny
4
HR-0
04
pozi
om
914
10
φ8
80
30*50
Czar
ny
4
HR-0
05
30°
1067
12
10,5×1
5
80
50*50
Srebr
o
1
HR-0
06
30°
1067
12
10,5×1
5
80
50*50
Czar
ny
1
HR-0
07
L
1067
12
φ10,5
80
50*50
Czar
ny
1
HR-0
08
Nie
914
/
/
/
50*50
Czar
ny
1
HR-0
09
pozi
om
914
10
φ10,5
80
50*50
Czar
ny
1
HR-0
10
30°
914
10
10,5×1
5
80
50*50
Czar
ny
1
HR-0
11
L
914
10
φ10,5
80
50*50
Czar
ny
1
HR-0
12
pozi
om
914
10
φ10,5
80
50*50
Srebr
o
1
HR-0
13
30°
1067
12
8×13
80
30*50
Czar
ny
1
HR-0
14
L
1067
12
φ8
80
30*50
Czar
ny
1
HR-0
30°
914
10
8×13
80
30*50
Czar
1

- 5 -
15
ny
HR-0
16
L
914
10
φ8
80
30*50
Czar
ny
1
HR-0
17
Nie
914
/
/
/
38*38
Czar
ny
1
HR-0
18
pozi
om
1067
12
φ8
80
30*50
Czar
ny
1
HR-0
19
Nie
1067
/
/
/
50*50
Czar
ny
1
HR-0
20
pozi
om
914
10
φ8
80
30*50
Czar
ny
1
HR-0
21
pozi
om
1067
12
φ10,5
80
50*50
Czar
ny
1
HR-0
22
pozi
om
914
10
Φ 8
80
3 0*50
Srebr
o
1
HR-0
23
pozi
om
1067
12
φ10,5
80
50*50
Srebr
o
1
PAKIET WŁĄCZAĆ
NIE
składniki
Zdjęcie
ILOŚĆ
Dopasowany model
HR-001
/
HR-002
HR005~HR0
12/HR-019/
HR-0 21/
HR-0 23/
HR-00 3/
HR-00 4
HR-013 ~
HR-01 6/
HR-018 /
HR-0 20/
HR-0 22/
HR-0
17
1
post
4
1
4
1
/
/
/
/
/
1
- 6 -
2
Kwadrato
wa osłona
4
1
/
/
/
3
Prostokątn
a osłona
/
/
4
1
/
4
śruba
kotwowa
16
4
16
4
4
5
Zakrzywio
ny
wspornik
4
1
4
1
/
6
Wspornik
poziomy
4
1
4
1
/
7
klucz
sześciokąt
ny
4
1
4
1
1
8
Klucz
płaski
4
1
4
1
1
9
Śruba
gwintująca
8
2
8
2
4
10
Plastikowa
obudowa
/
/
/
/
1
INSTALACJA
Do podłóg betonowych lub drewnianych
Krok 1. Zaznacz
punkty wiercenia w
odpowiednich
Krok 2. Za pomocą
wiertarki udarowej
wykonaj w
Krok 3. Wbij śrubę
kotwową w
wywiercony otwór.
- 7 -
miejscach montażu.
zaznaczonych
punktach otwór o
średnicy ∅ 12.
Krok 4. Dokręć śruby
Krok 5. Zamknij pokrywę i dokończ mocowanie
słupka.
Uwaga: Podczas mocowania dolnej płyty słupka upewnij się, że
kolumna jest ustawiona pionowo.
Mocowanie z poręczą (poziomo)
Krok 1: Naprawiono wspornik
Krok 2: Określ pozycję montażową poręczy, a następnie zaznacz
położenie pod poręczą i otworami wspornika i wywierć otwory wiertłem
∅ 5,5-∅ 5,6mm.
- 8 -
Krok 3: Użyj wkrętów samogwintujących znajdujących się w akcesorium,
aby przymocować poręcz do wspornika.
Nadaje się również do montażu poręczy łukowych i wsporników.
Montaż z poręczą (gradient)
Krok 1: Naprawiono wspornik
Krok 2: Dostosuj kąt wspornika, aby dopasować go do spodniej strony
poręczy. Określ pozycję montażową poręczy, a następnie zaznacz pozycję
pod poręczą i otworami wspornika, a następnie wywierć otwory wiertłem
∅ 5,5–∅ 5,6 mm.
Uwaga: Poręcz i wspornik można wstępnie zamocować za pomocą
narzędzi zaciskowych, dzięki czemu można jednocześnie zaznaczyć i
ustawić wiele punktów montażowych wspornika.
- 9 -
Krok 3: Zdejmij wspornik ze słupka, a następnie użyj wkrętów
samogwintujących znajdujących się w akcesorium, aby przymocować
wspornik do poręczy.
Zamocuj ponownie słupek i wspornik .
Nadaje się również do montażu
poręczy łukowych i wsporników.
Dla modelu HR-017
- 10 -
Montaż za pomocą liny stalowej i okuć
Do tulei zabezpieczającej koło poziome
Do napinacza dwustronnego, montaż poziomy i kątowy
Do napinacza śruby rzymskiej i zacisku stałego
Adres: Baoshanqu Shuangchenglu 803long 11hao 1602A-1609shi
Szanghaj
Import do AUS: SIHAO PTY LTD, 1 ROKEVA STREETEASTWOOD NSW
2122 Australia
Import do USA: Sanven Technology Ltd. Suite 250, 9166 Anaheim Place,

- 11 -
Rancho Cucamonga, CA 91730
REP
UK
Pooledas Group Ltd
Unit 5 Albert Edward House, The Pavilions
Preston, United Kingdom
REP
EC
SHUNSHUN GmbH
Römeräcker 9 Z2021, 76351
Linkenheim-Hochstetten, Germany
Wyprodukowano w Chinach


- 2 -
Technisch Ondersteuning en e-garantiecertificaat www.vevor.com/support
KABELRAILINGPAAL
MODELLEN: HR-001/HR-002/HR-003/HR-004/HR-005/HR-006/HR-007/
HR-008/HR-009/HR-010/HR-011/HR-012/HR-013/HR-014
HR-0 1 5 /HR-016/HR-017/HR-018/HR-019/HR-020/HR-021/
HR-022/HR-023
We continue to be committed to provide you tools with competitive price.
"Save Half", "Half Price" or any other similar expressions used by us only represents an
estimate of savings you might benefit from buying certain tools with us compared to the major
top brands and does not necessarily mean to cover all categories of tools offered by us. You
are kindly reminded to verify carefully when you are placing an order with us if you are
actually saving half in comparison with the top major brands.

- 1 -
MODELLEN: HR-001/HR-002/HR-003/HR-004/HR-005/HR-006/HR-007/
HR-008/HR-009/HR-010/HR-011/HR-012/HR-013/HR-014
HR-0 1 5 /HR-016/HR-017/HR-018/HR-019/HR-020/HR-021/
HR-022/HR-023
< Afbeelding alleen ter referentie > _
Have product questions? Need technical support? Please feel free to
contact us:
Technical Support and E-Warranty Certificate
www.vevor.com/support
NEED HELP? CONTACT US!
This is the original instruction, please read all manual instructions
carefully before operating. VEVOR reserves a clear interpretation of our
user manual. The appearance of the product shall be subject to the
product you received. Please forgive us that we won't inform you again if
there are any technology or software updates on our product.
CABLE RAILING POST

- 2 -
BELANGRIJKE VEILIGHEIDSMAATREGELEN
WAARSCHUWING : Lees en begrijp deze gehele handleiding
voordat u dit product bedient of onderhoudt. Het niet opvolgen
van deze waarschuwingen en instructies kan persoonlijk letsel
of schade aan waardevolle eigendommen veroorzaken.
1. De waarschuwing geeft aan dat passende maatregelen moeten worden
genomen om het potentiële gevaar van persoonlijk letsel te voorkomen.
2. Productmogelijkheden zijn alleen van toepassing op correct en volledig
gemonteerde producten.
3. Bewaar kleine reserveonderdelen buiten het bereik van kinderen . Het is
geen speelgoed. Laat kinderen niet spelen .
4 . Voor aanvullende informatie over de onderdelen die op de volgende
pagina's worden vermeld, verwijzen wij u naar het montageschema van
deze handleiding. Pak alle onderdelen uit en scheid ze van elkaar op een
schone werkplek.
BEWAAR DEZE INSTRUCTIES
BELANGRIJKSTE KENMERKEN
Dit product wordt voornamelijk gebruikt voor kolominstallatie van
draadfuncties en decoratieve accessoires .
De kabelrailpaal van VEVOR is gemaakt van volledig roestvrijstalen
materialen, die een grote weerstand hebben tegen roest en corrosie. Het
zal een lange levensduur hebben voor binnen- en buitenleuningen met
weinig onderhoud. Houd er rekening mee dat dit niet wordt aanbevolen
voor kustprojecten.
We doen er alles aan om kwaliteitsproducten en professionele service te
leveren, en maken van VEVOR een betrouwbaar merk.
INSTALLATIE INSTRUCTIE
Installatie-indicatie en toepasselijke post
Van toepassing op alle technische installatiescenario's .
Opmerking: Dit product bevat alleen de kolom en de
- 3 -
installatiebevestigingen, exclusief staalkabel, kabelrailset en leuning.
PRODUCTINFORMATIE
A
- 4 -
Model
Geb
oord
Hoog
te
(mm)
Gebo
ord
num
mer
Gatdia
meter
(mm)
Gaten
afstan
d
(mm)
Sectieg
rootte
(mm)
Kleur
Inclu
sief
(stuk
s)
HR-0
01
nive
au
1067
12
φ10,5
80
50*50
Zwart
4
HR-0
02
nive
au
914
10
φ10,5
80
50*50
Zwart
4
HR-0
03
nive
au
1067
12
φ8
80
30*50
Zwart
4
HR-0
04
nive
au
914
10
φ8
80
30*50
Zwart
4
HR-0
05
30°
1067
12
10,5×1
5
80
50*50
Zilver
1
HR-0
06
30°
1067
12
10,5×1
5
80
50*50
Zwart
1
HR-0
07
L
1067
12
φ10,5
80
50*50
Zwart
1
HR-0
08
Niet
914
/
/
/
50*50
Zwart
1
HR-0
09
nive
au
914
10
φ10,5
80
50*50
Zwart
1
HR-0
10
30°
914
10
10,5×1
5
80
50*50
Zwart
1
HR-0
11
L
914
10
φ10,5
80
50*50
Zwart
1
HR-0
12
nive
au
914
10
φ10,5
80
50*50
Zilver
1
HR-0
13
30°
1067
12
8×13
80
30*50
Zwart
1
HR-0
14
L
1067
12
φ8
80
30*50
Zwart
1
HR-0
15
30°
914
10
8×13
80
30*50
Zwart
1
- 5 -
HR-0
16
L
914
10
φ8
80
30*50
Zwart
1
HR-0
17
Niet
914
/
/
/
38*38
Zwart
1
HR-0
18
nive
au
1067
12
φ8
80
30*50
Zwart
1
HR-0
19
Niet
1067
/
/
/
50*50
Zwart
1
HR-0
20
nive
au
914
10
φ8
80
30*50
Zwart
1
HR-0
21
nive
au
1067
12
φ10,5
80
50*50
Zwart
1
HR-0
22
nive
au
914
10
Φ 8
80
3 0*50
Zilver
1
HR-0
23
nive
au
1067
12
φ10,5
80
50*50
Zilver
1
PAKKET ERBIJ BETREKKEN
Ne
e
Compone
nten
Afbeeldi
ng
AANTAL
Passend model
HR-001
/
HR-002
HR005~HR0
12/HR-019/
HR-0 21/
HR-0 23/
HR-00 3/
HR-00 4
HR-013 ~
HR-01 6/
HR-018 /
HR-0 20/
HR-0 22/
HR-0
17
1
na
4
1
4
1
/
/
/
/
/
1
- 6 -
2
Vierkant
deksel
4
1
/
/
/
3
Rechthoek
ig deksel
/
/
4
1
/
4
verankerin
gsbout
16
4
16
4
4
5
Gebogen
beugel
4
1
4
1
/
6
Horizontal
e beugel
4
1
4
1
/
7
inbussleut
el
4
1
4
1
1
8
Steeksleut
el
4
1
4
1
1
9
Tapschroef
8
2
8
2
4
10
Plastic
hoesje
/
/
/
/
1
INSTALLATIE
Voor betonnen of houten vloeren
Stap 1. Markeer de
boorpunten op de
juiste
installatielocaties.
Stap 2.Gebruik een
boorhamer om op de
gemarkeerde punten
een gat van ∅ 12 te
maken.
Stap 3. Hamer de
ankerschroef in het
geboorde gat.
- 7 -
Stap 4. Draai de
schroeven vast
Stap 5. Sluit het deksel en voltooi het
bevestigen van de paal.
Opmerking: Zorg ervoor dat de kolom rechtop staat wanneer u de
bodemplaat van de paal bevestigt.
Montage met leuning (horizontaal)
Stap 1: Vaste beugel
Stap 2: Bepaal de installatiepositie van de leuning, markeer vervolgens de
positie onder de leuning en de beugelgaten en boor gaten met een boor
van ∅ 5,5-∅ 5,6 mm.
Stap 3: Gebruik de parkers in het accessoire om de leuning aan de steun
te bevestigen.
- 8 -
Het is ook geschikt voor de installatie van boogleuningen en beugels.
Monteer met leuning (gradiënt)
Stap 1: Vaste beugel
Stap 2: Pas de hoek van de beugel aan zodat deze op de onderkant van
de leuning past. Bepaal de installatiepositie van de leuning en markeer
vervolgens de positie onder de leuning en de beugelgaten en boor gaten
met een boor van ∅ 5,5-∅ 5,6 mm.
Opmerking:De leuning en beugel kunnen met behulp van
klemgereedschap vooraf worden bevestigd, zodat meerdere
montagepunten van de beugel tegelijkertijd kunnen worden
gemarkeerd en gepositioneerd.
- 9 -
Stap 3: Verwijder de beugel van de paal en gebruik vervolgens de
zelftappende schroeven in het accessoire om de beugel aan de leuning te
bevestigen.
Bevestig de paal en beugel opnieuw .
Het is ook geschikt voor de installatie
van boogleuningen en beugels.
Voor model HR-017
Installeren met staalkabel en fittingen
Voor Level wielbeschermerhuls
- 10 -
Voor noppenspanner Horizontale montage en hoek
Voor spanschroefspanner en vaste terminal
Adres: Baoshanqu Shuangchenglu 803long 11hao 1602A-1609shi
Shanghai
Geïmporteerd naar AUS: SIHAO PTY LTD, 1 ROKEVA
STREETEASTWOOD NSW 2122 Australië
Geïmporteerd naar de VS: Sanven Technology Ltd. Suite 250, 9166
Anaheim Place, Rancho Cucamonga, CA 91730

- 11 -
REP
UK
Pooledas Group Ltd
Unit 5 Albert Edward House, The Pavilions
Preston, United Kingdom
REP
EC
SHUNSHUN GmbH
Römeräcker 9 Z2021, 76351
Linkenheim-Hochstetten, Germany
Gemaakt in China


- 2 -
Teknisk Support och e-garanticertifikat www.vevor.com/support
KABELRÄCKESSTOLPE
MODELL: HR-001/HR-002/HR-003/HR-004/HR-005/HR-006/HR-007/
HR-008/HR-009/HR-010/HR-011/HR-012/HR-013/HR-014
HR-0 1 5 /HR-016/HR-017/HR-018/HR-019/HR-020/HR-021/
HR-022/HR-023
We continue to be committed to provide you tools with competitive price.
"Save Half", "Half Price" or any other similar expressions used by us only represents an
estimate of savings you might benefit from buying certain tools with us compared to the major
top brands and does not necessarily mean to cover all categories of tools offered by us. You
are kindly reminded to verify carefully when you are placing an order with us if you are
actually saving half in comparison with the top major brands.

- 1 -
MODELL: HR-001/HR-002/HR-003/HR-004/HR-005/HR-006/HR-007/
HR-008/HR-009/HR-010/HR-011/HR-012/HR-013/HR-014
HR-0 1 5 /HR-016/HR-017/HR-018/HR-019/HR-020/HR-021/
HR-022/HR-023
< Endast bild för referens > _
Have product questions? Need technical support? Please feel free to
contact us:
Technical Support and E-Warranty Certificate
www.vevor.com/support
NEED HELP? CONTACT US!
This is the original instruction, please read all manual instructions
carefully before operating. VEVOR reserves a clear interpretation of our
user manual. The appearance of the product shall be subject to the
product you received. Please forgive us that we won't inform you again if
there are any technology or software updates on our product.
CABLE RAILING POST

- 2 -
VIKTIGA SÄKERHETSÅTGÄRDER
VARNING : Läs och förstå hela denna manual innan du
använder eller servar denna produkt. Underlåtenhet att följa
dessa varningar och instruktioner kan orsaka personskada
eller skada på värdefull egendom.
1. Varningen anger att lämpliga åtgärder bör vidtas för att undvika den
potentiella faran för personskada.
2. Produktegenskaper gäller endast för korrekt och fullständigt monterad
produkt.
3. Förvara små reservdelar utom räckhåll för barn, det är inte en leksak, låt
inte barn leka .
4 . För ytterligare information om delarna som listas på följande sidor, se
monteringsdiagrammet i denna manual. Packa upp och separera alla delar
på ett rent arbetsområde.
SPARA DESSA INSTRUKTIONER
HUVUDFUNKTIONER
Denna produkt används huvudsakligen för pelarinstallation av
trådfunktioner och dekorativa tillbehör .
VEVORs kabelräckesstolpe är tillverkad av alla material i rostfritt stål, vilket
har stor motståndskraft mot rost och korrosion . Det kommer att fungera för
lång livslängd för inre och yttre räcken med lågt underhåll. Observera att
det inte rekommenderas för kustprojekt .
Vi arbetar med alla ansträngningar för att tillhandahålla kvalitetsprodukter
och professionell service, och göra VEVOR till ett pålitligt varumärke.
INSTALLATIONSANVISNING
Installationsindikation och tillämplig stolpe
Tillämplig för alla tekniska installationsscenarier .
Obs: Denna produkt inkluderar endast pelaren och dess monteringsfästen,
exklusive vajer, kabelräckessats, ledstång.

- 3 -
PRODUKTINFORMATION
Model
l
Borr
ad
Höjd
(mm)
Borra
t
num
mer
Håldia
meter
(mm)
Hålstig
ning
(mm)
Sektion
sstorlek
(mm)
Färg
Inklu
dera
(st)
A
- 4 -
HR-0
01
nivå
1067
12
φ10,5
80
50*50
Svart
4
HR-0
02
nivå
914
10
φ10,5
80
50*50
Svart
4
HR-0
03
nivå
1067
12
φ8
80
30*50
Svart
4
HR-0
04
nivå
914
10
φ8
80
30*50
Svart
4
HR-0
05
30°
1067
12
10,5×1
5
80
50*50
Silver
1
HR-0
06
30°
1067
12
10,5×1
5
80
50*50
Svart
1
HR-0
07
L
1067
12
φ10,5
80
50*50
Svart
1
HR-0
08
Ej
914
/
/
/
50*50
Svart
1
HR-0
09
nivå
914
10
φ10,5
80
50*50
Svart
1
HR-0
10
30°
914
10
10,5×1
5
80
50*50
Svart
1
HR-0
11
L
914
10
φ10,5
80
50*50
Svart
1
HR-0
12
nivå
914
10
φ10,5
80
50*50
Silver
1
HR-0
13
30°
1067
12
8×13
80
30*50
Svart
1
HR-0
14
L
1067
12
φ8
80
30*50
Svart
1
HR-0
15
30°
914
10
8×13
80
30*50
Svart
1
HR-0
16
L
914
10
φ8
80
30*50
Svart
1

- 5 -
HR-0
17
Ej
914
/
/
/
38*38
Svart
1
HR-0
18
nivå
1067
12
φ8
80
30*50
Svart
1
HR-0
19
Ej
1067
/
/
/
50*50
Svart
1
HR-0
20
nivå
914
10
φ8
80
30*50
Svart
1
HR-0
21
nivå
1067
12
φ10,5
80
50*50
Svart
1
HR-0
22
nivå
914
10
Φ 8
80
3 0*50
Silver
1
HR-0
23
nivå
1067
12
φ10,5
80
50*50
Silver
1
PAKET OMFATTA
Nej
Kompone
nter
Bild
ANTAL
Passande modell
HR-001
/
HR-002
HR005~HR0
12/HR-019/
HR-0 21/
HR-0 23/
HR-00 3/
HR-00 4
HR-013 ~
HR-01 6/
HR-018 /
HR-0 20/
HR-0 22/
HR-0
17
1
posta
4
1
4
1
/
/
/
/
/
1
2
Fyrkantigt
omslag
4
1
/
/
/
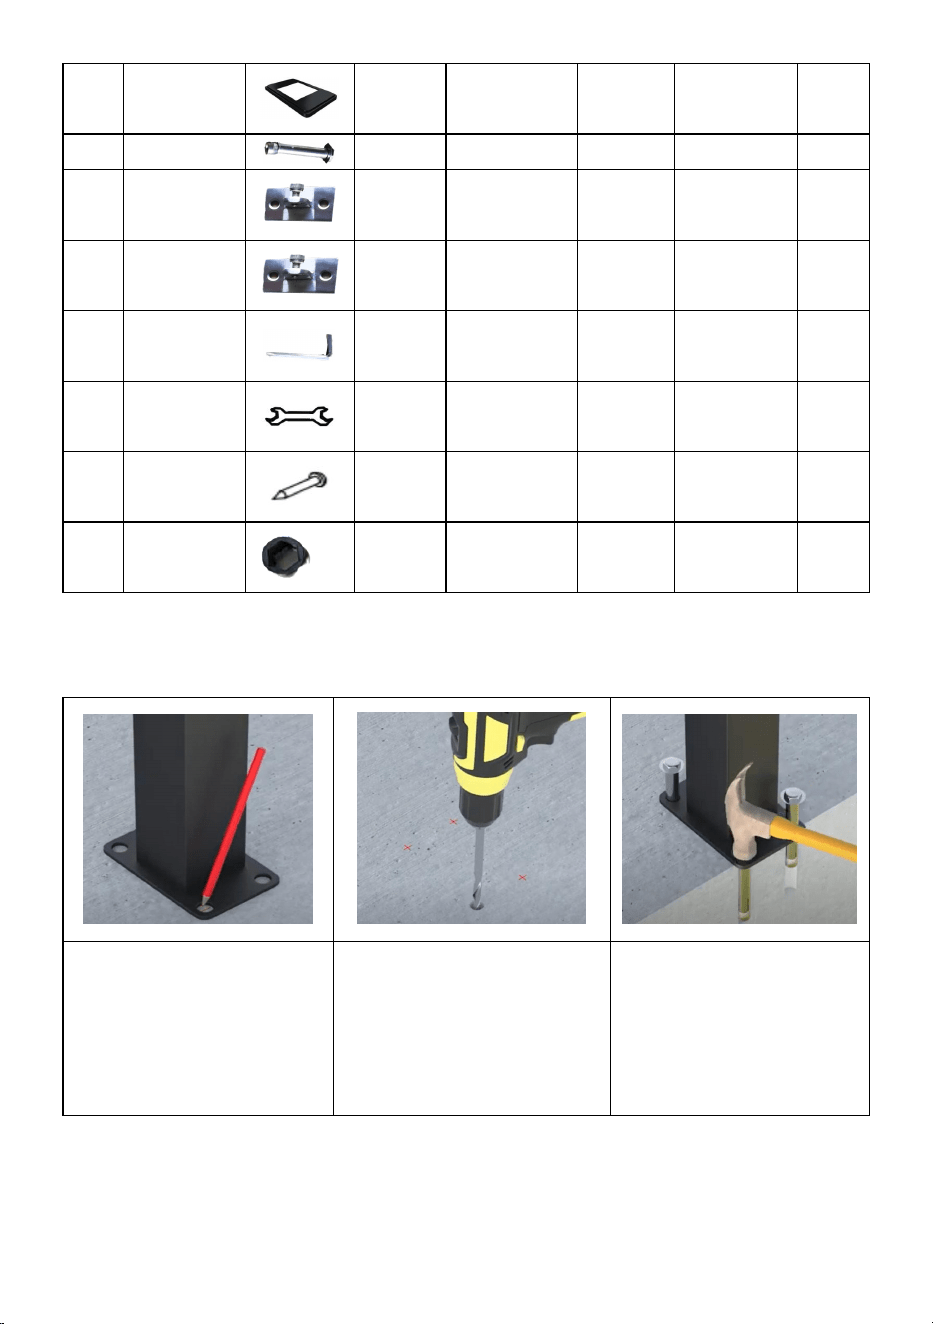
- 6 -
3
Rektangul
ärt omslag
/
/
4
1
/
4
ankarbult
16
4
16
4
4
5
Böjt fäste
4
1
4
1
/
6
Horisontell
t fäste
4
1
4
1
/
7
insexnyck
el
4
1
4
1
1
8
Öppen
skiftnyckel
4
1
4
1
1
9
Plåtskruv
8
2
8
2
4
10
Plastöverd
rag
/
/
/
/
1
INSTALLATION
För betong- eller trägolv
Steg 1. Markera
borrpunkterna på
lämpliga
installationsplatser.
Steg 2. Använd en
hammarborr för att
göra ett hål för ∅ 12 vid
de markerade
punkterna.
Steg 3. Slå in
ankarskruven i det
borrade hålet.
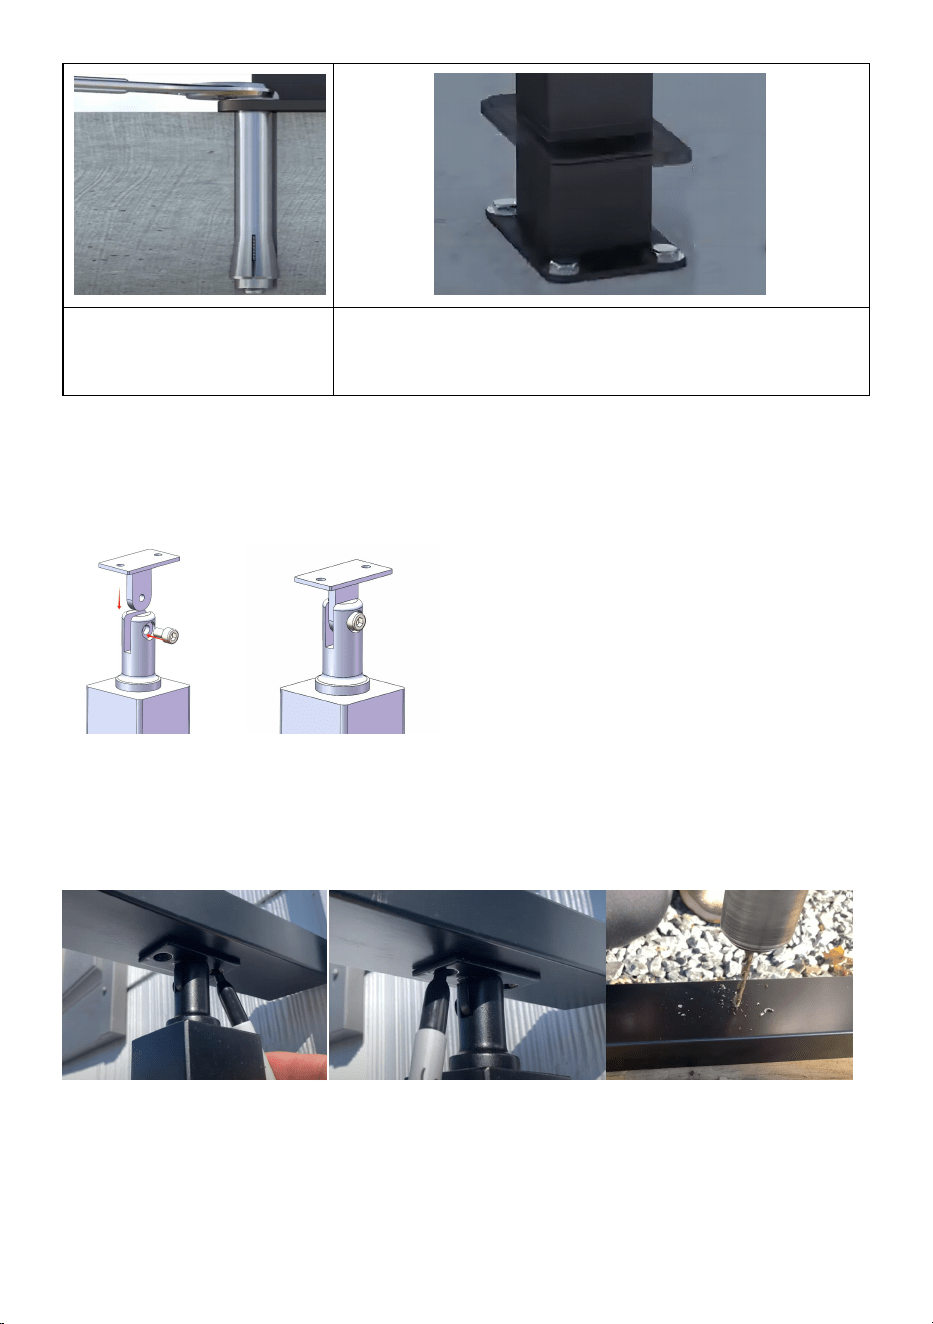
- 7 -
Steg 4. Dra åt
skruvarna
Steg 5. Stäng locket och slutför fixeringen av
stolpen.
Obs: Se till att pelaren är upprätt när du fäster stolpens bottenplatta.
Montera med ledstång (horisontell)
Steg 1: Fast fäste
Steg 2: Bestäm monteringspositionen för ledstången och markera sedan
positionen under ledstången och fästhålen och borra hål med en
∅ 5,5-∅ 5,6 mm borr.
Steg 3: Använd de självgängande skruvarna i tillbehöret för att fästa
ledstången på stödet.
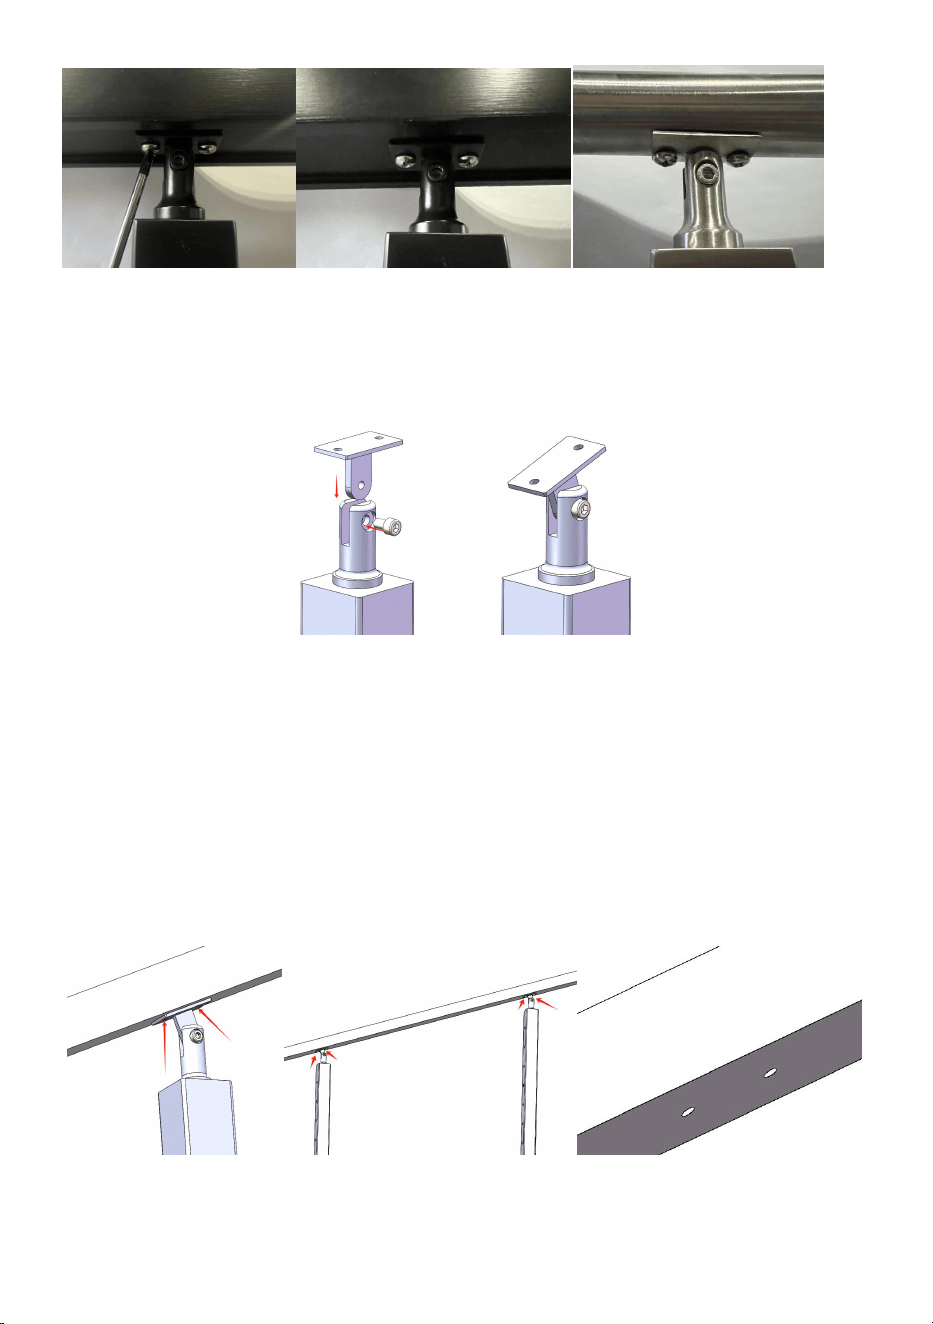
- 8 -
Det är också lämpligt för montering av bågsräcken och konsoler.
Montera med ledstång (lutning)
Steg 1: Fast fäste
Steg 2: Justera vinkeln på fästet så att det passar undersidan av
ledstången. Bestäm monteringspositionen för ledstången och markera
sedan positionen under ledstången och fästets hål och borra hål med en
∅ 5,5-∅ 5,6 mm borr.
Obs: Ledstången och fästet kan förfixeras med hjälp av spännverktyg,
så att flera monteringspunkter för fästet kan markeras och placeras
samtidigt.
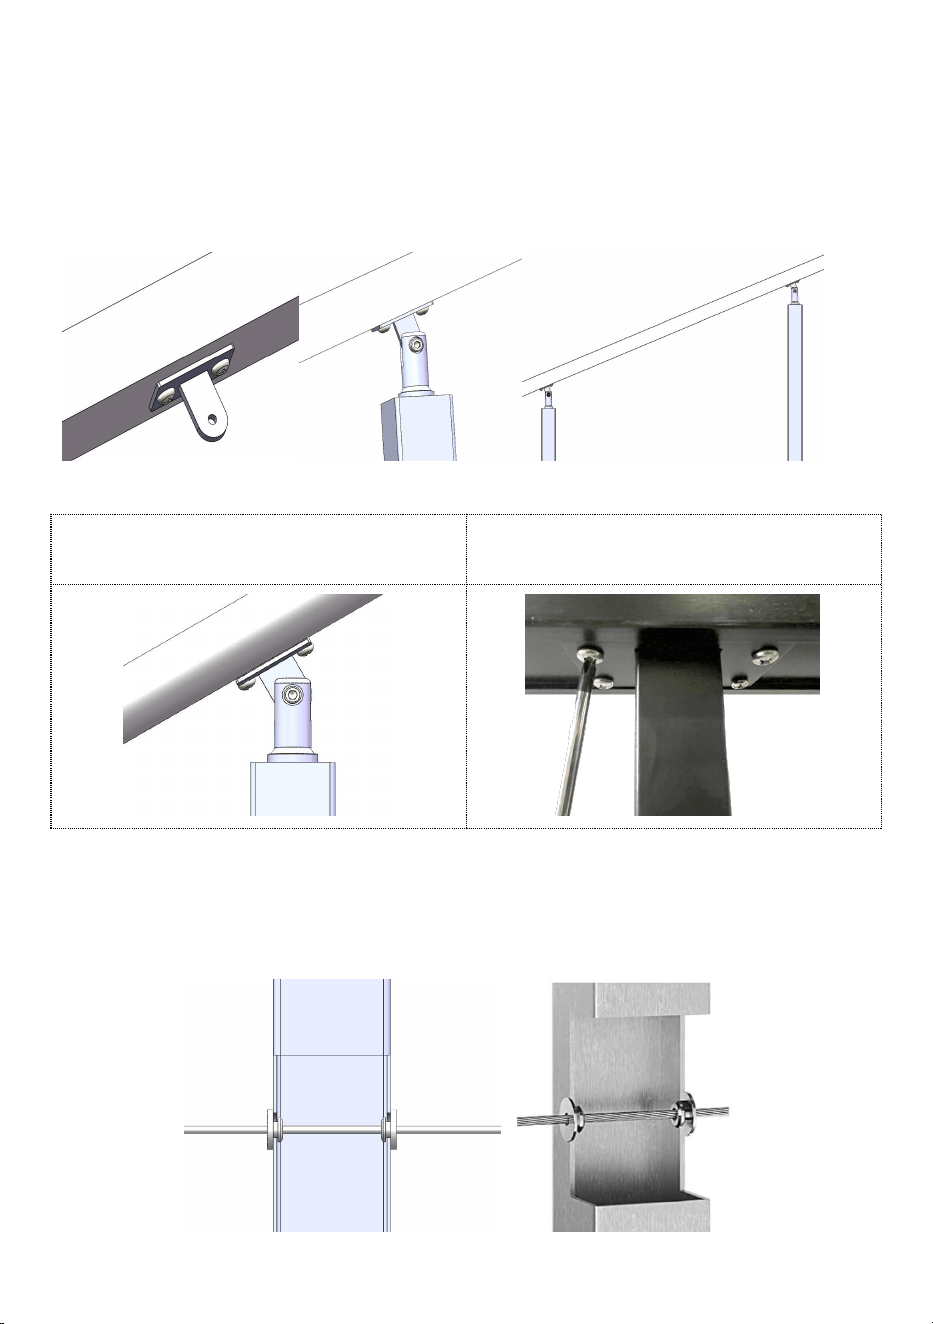
- 9 -
Steg 3: Ta bort fästet från stolpen och använd sedan de självgängande
skruvarna i tillbehöret för att fästa fästet på ledstången.
Fixa stolpen och fästet igen .
Det är också lämpligt för montering
av bågsräcken och konsoler.
För modell HR-017
Installera med stållina och beslag
För nivåhjulsskyddshylsa
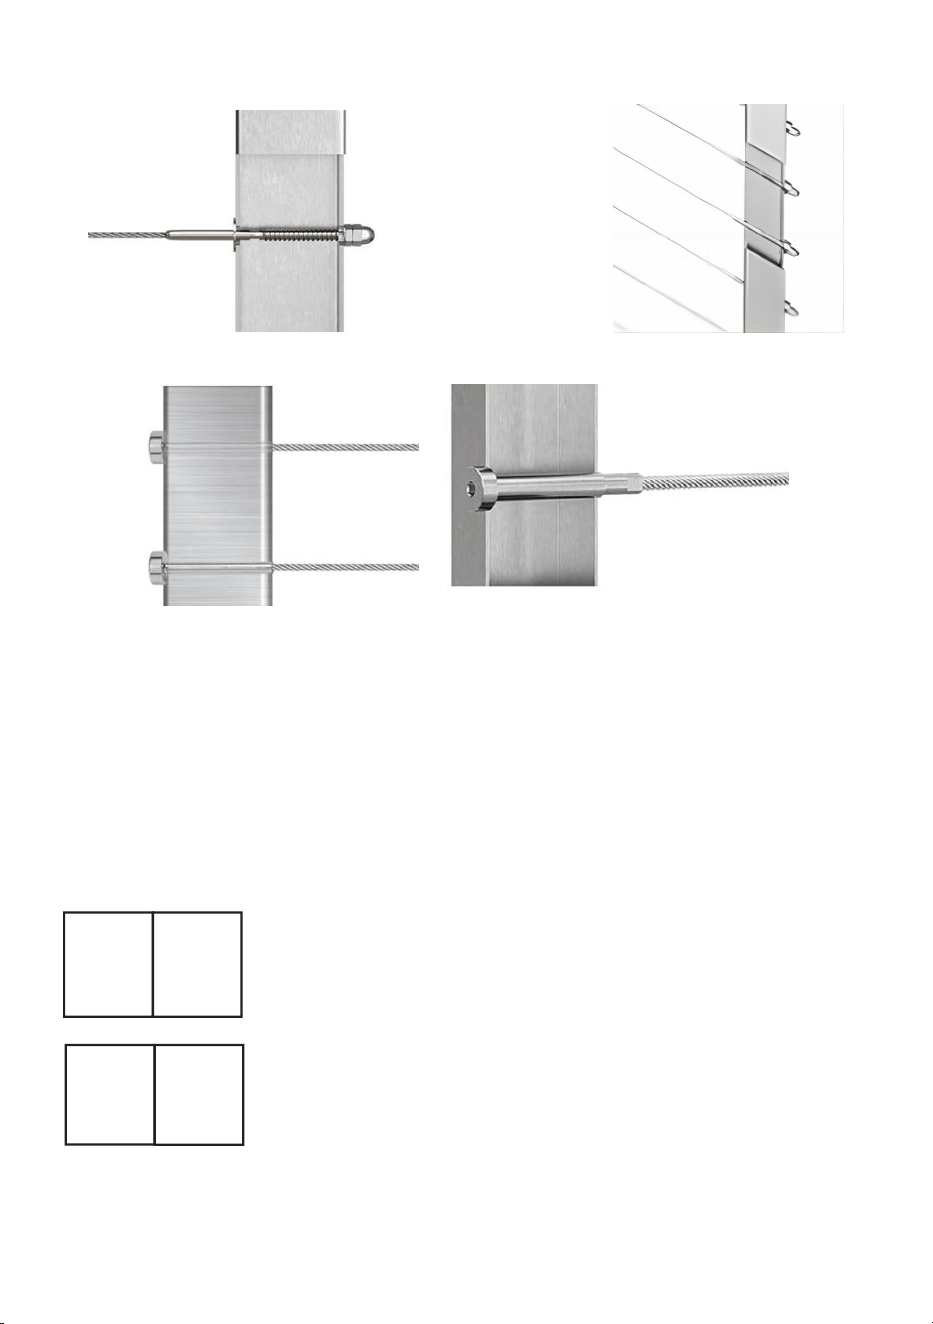
- 10 -
För Dubbspännare Horisontell montering och Vinkel
För spännskruv och fast anslutning
Adress: Baoshanqu Shuangchenglu 803long 11hao 1602A-1609shi
Shanghai
Importerad till AUS: SIHAO PTY LTD, 1 ROKEVA STREETEASTWOOD
NSW 2122 Australien
Importerad till USA: Sanven Technology Ltd. Suite 250, 9166 Anaheim
Place, Rancho Cucamonga, CA 91730
REP
UK
Pooledas Group Ltd
Unit 5 Albert Edward House, The Pavilions
Preston, United Kingdom
REP
EC
SHUNSHUN GmbH
Römeräcker 9 Z2021, 76351
Linkenheim-Hochstetten, Germany
Tillverkad i Kina

- 11 -

