
Technical Support and E-Warranty Certificate www.vevor.com/support
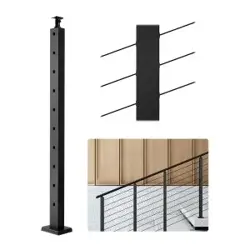
CABLE RAILING POST
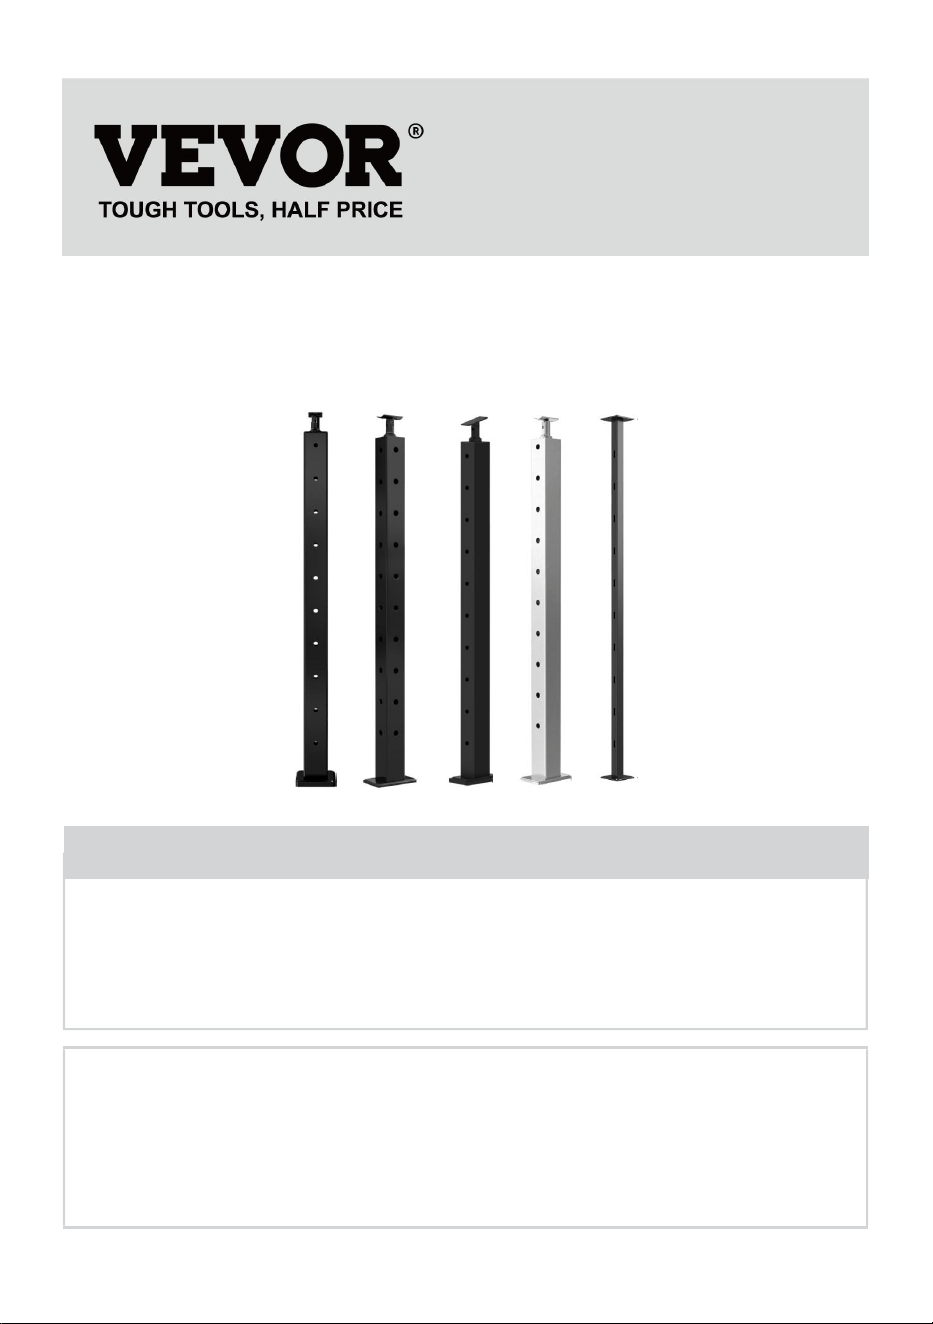
MODEL:HR-001/HR-002/HR-003/HR-004/HR-005/HR-006/HR-007/
HR-008/HR-009/HR-010/HR-011/HR-012/HR-013/HR-014
HR-015/HR-016/HR-017/HR-018/HR-019/HR-020/HR-021/
HR-022/HR-023
We continue to be committed to provide you tools with competitive price.
"Save Half", "Half Price" or any other similar expressions used by us only represents an
estimate of savings you might benefit from buying certain tools with us compared to the major
top brands and does not necessarily mean to cover all categories of tools offered by us. You
are kindly reminded to verify carefully when you are placing an order with us if you are
actually saving half in comparison with the top major brands.
- 1 -
MODEL:HR-001/HR-002/HR-003/HR-004/HR-005/HR-006/HR-007/
HR-008/HR-009/HR-010/HR-011/HR-012/HR-013/HR-014
HR-015/HR-016/HR-017/HR-018/HR-019/HR-020/HR-021/
HR-022/HR-023
<Picture Only For Reference >
Have product questions? Need technical support? Please feel free to
contact us:
Technical Support and E-Warranty Certificate
www.vevor.com/support
NEED HELP? CONTACT US!
This is the original instruction, please read all manual instructions
carefully before operating. VEVOR reserves a clear interpretation of our
user manual. The appearance of the product shall be subject to the
product you received. Please forgive us that we won't inform you again if
there are any technology or software updates on our product.
CABLE RAILING POST

- 2 -
IMPORTANT SAFEGUARDS
WARNING: Read and understand this entire manual before
operating or servicing this product. Failure to follow these
warnings and instructions can cause personal injury or
damage to valuable property.
1.The warning indicates that appropriate action should be taken to avoid
the potential danger of personal injury.
2.Product capabilities apply to properly and completely assembled product
only.
3.Please keep small spare parts out of children's reach,it is not a toy, Do
not allow children to play.
4. For additional information regarding the parts listed in the following
pages, please refer to the Assembly Diagram of this manual. Unwrap and
separate all parts in a clean work area.
SAVE THESE INSTRUCTIONS
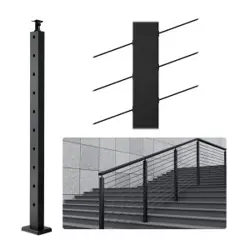
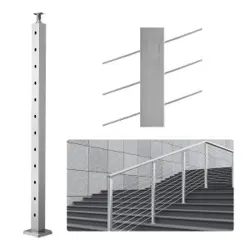
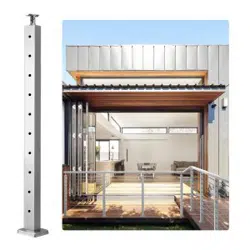
MAIN FEATRUES
This product is mainly used for column installation of wire functions and
decorative accessories.
VEVOR’s Cable Railing Post is made of all stainless steel materials, which
has great resistance to rust and corrosion. It will work for long life time for
interior and exterior railings with low maintenance. Please note that it is not
recommended for coastal projects.
We work with every effort to provide quality products and professional
service, and make VEVOR a reliable brand.
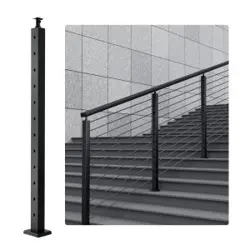
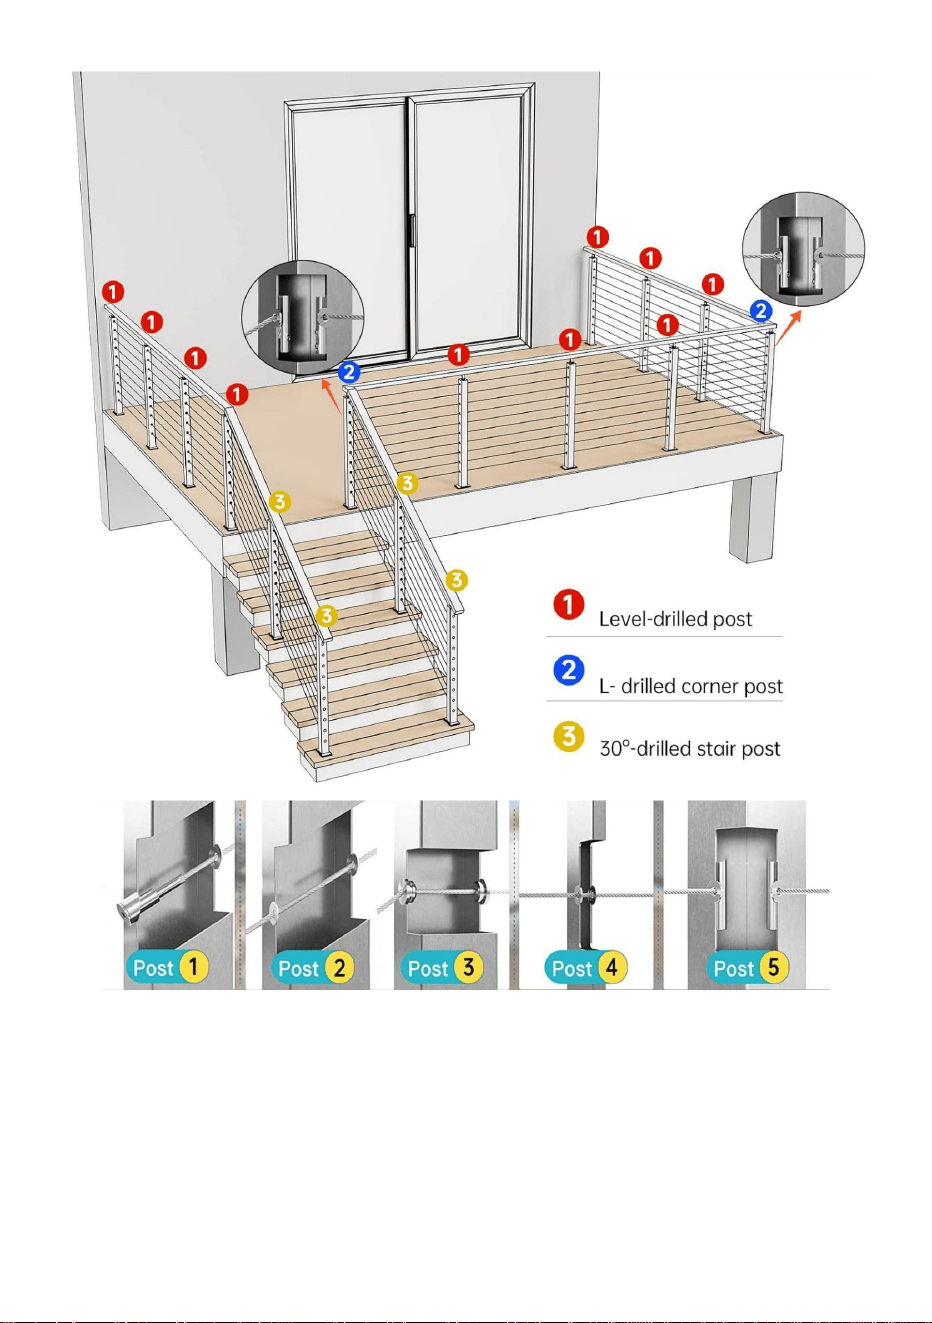
INSTALLATION INSTRUCTION
Installation indication and Applicable post
Applicable to all engineering installation scenarios.
Note: This product only includes the column and its installation
fasteners, excluding wire rope, Cable Railing Kit, handrail.

- 3 -
Note:The above figure is only an example of the installation layout
display, users need to layout according to their actual needs,
matching the structure of the column and wire rope, Cable Railing Kit,
handrail and other accessories.
A
- 4 -
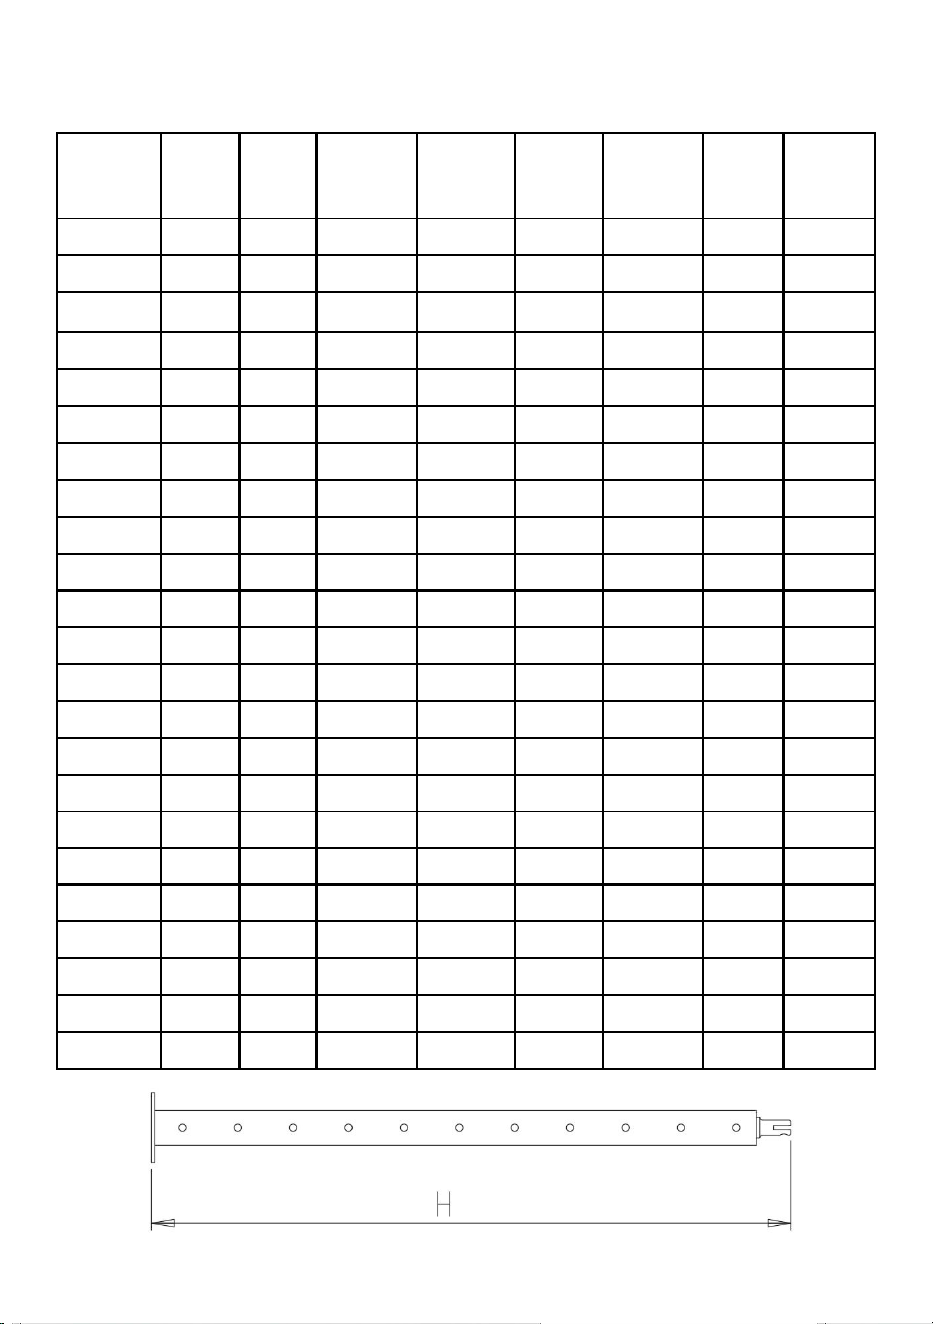
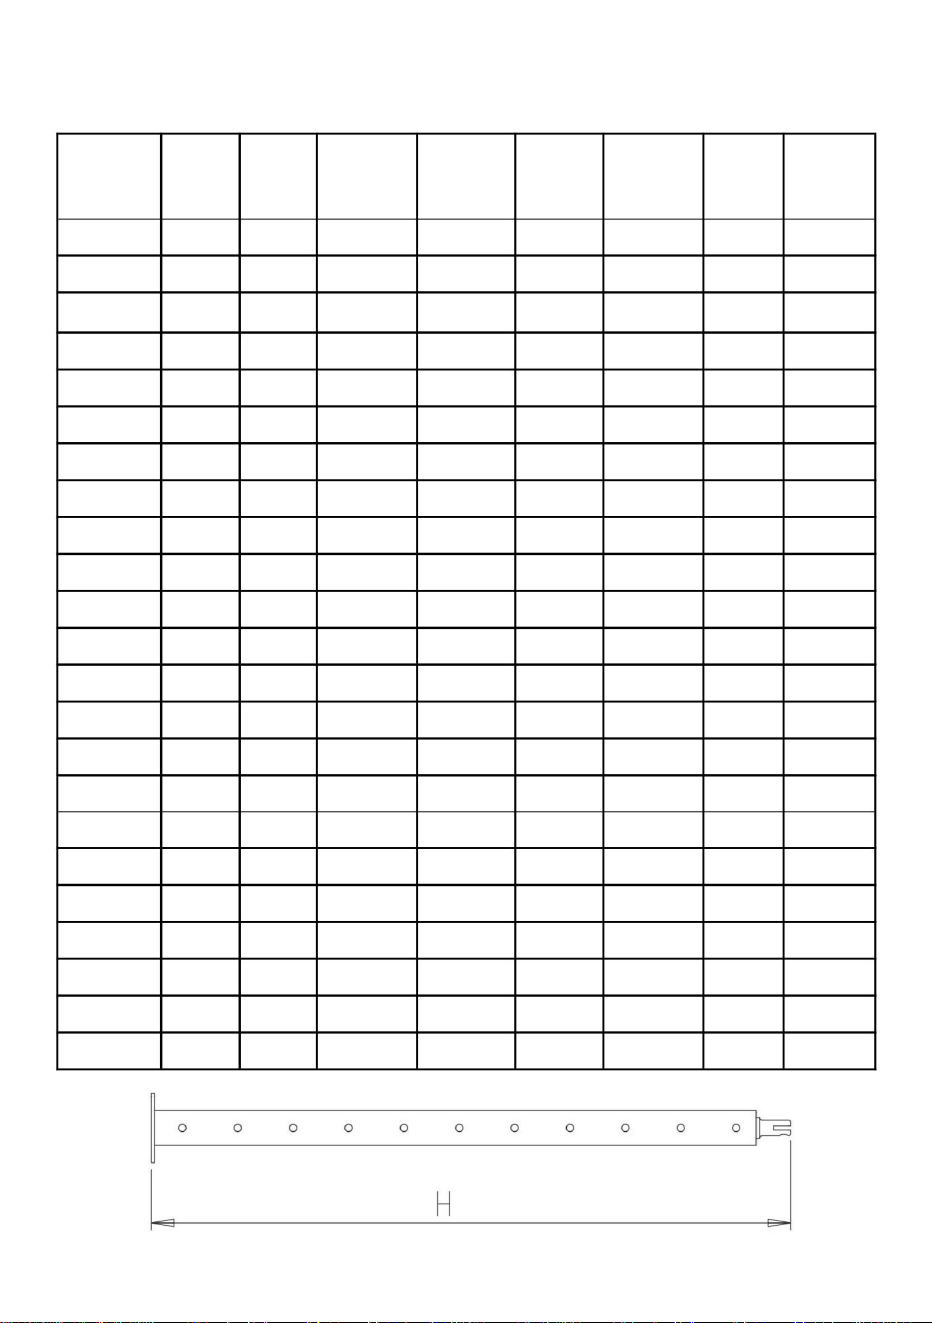
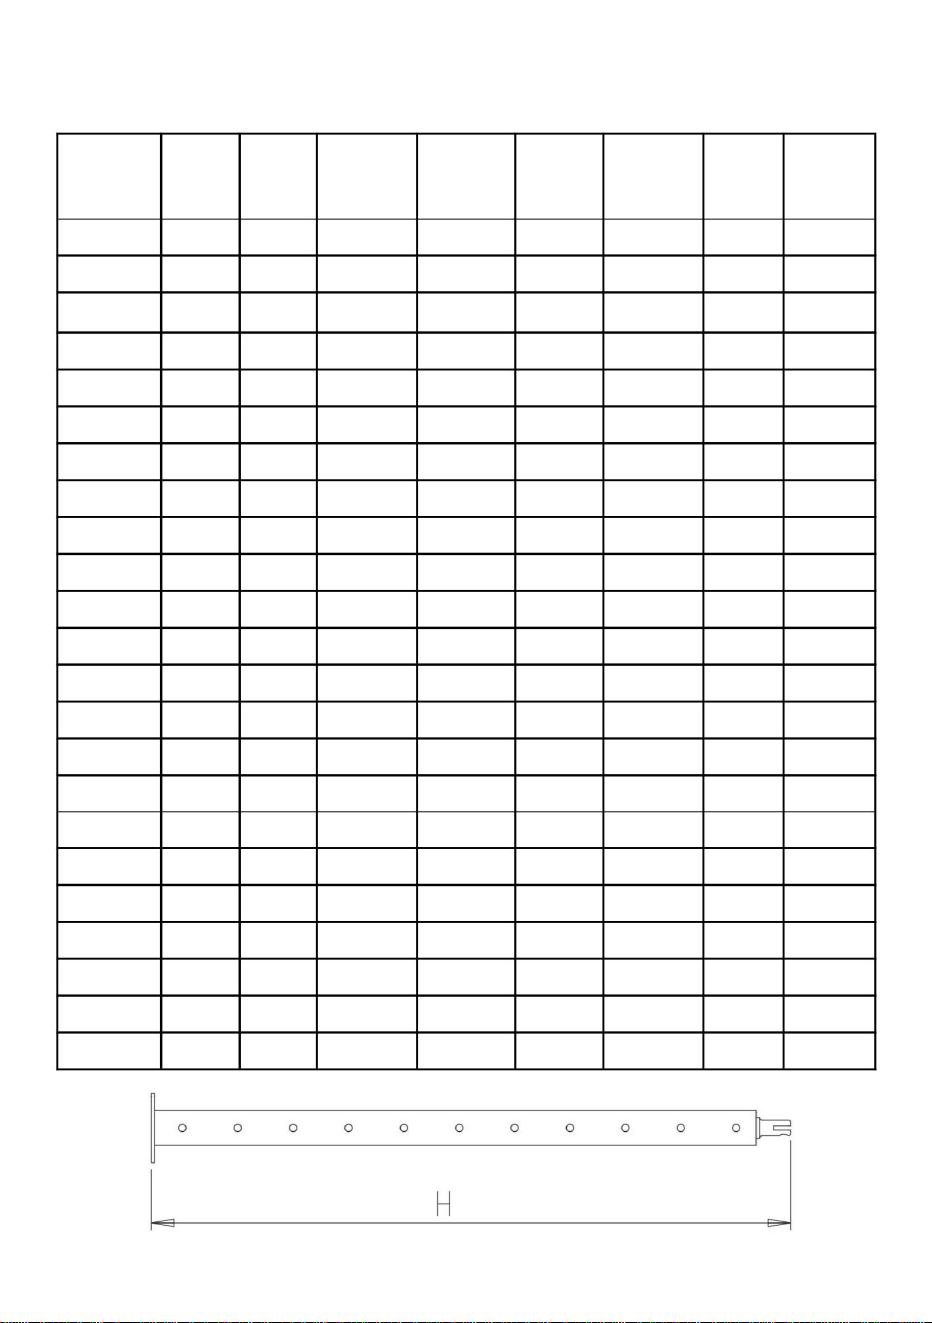
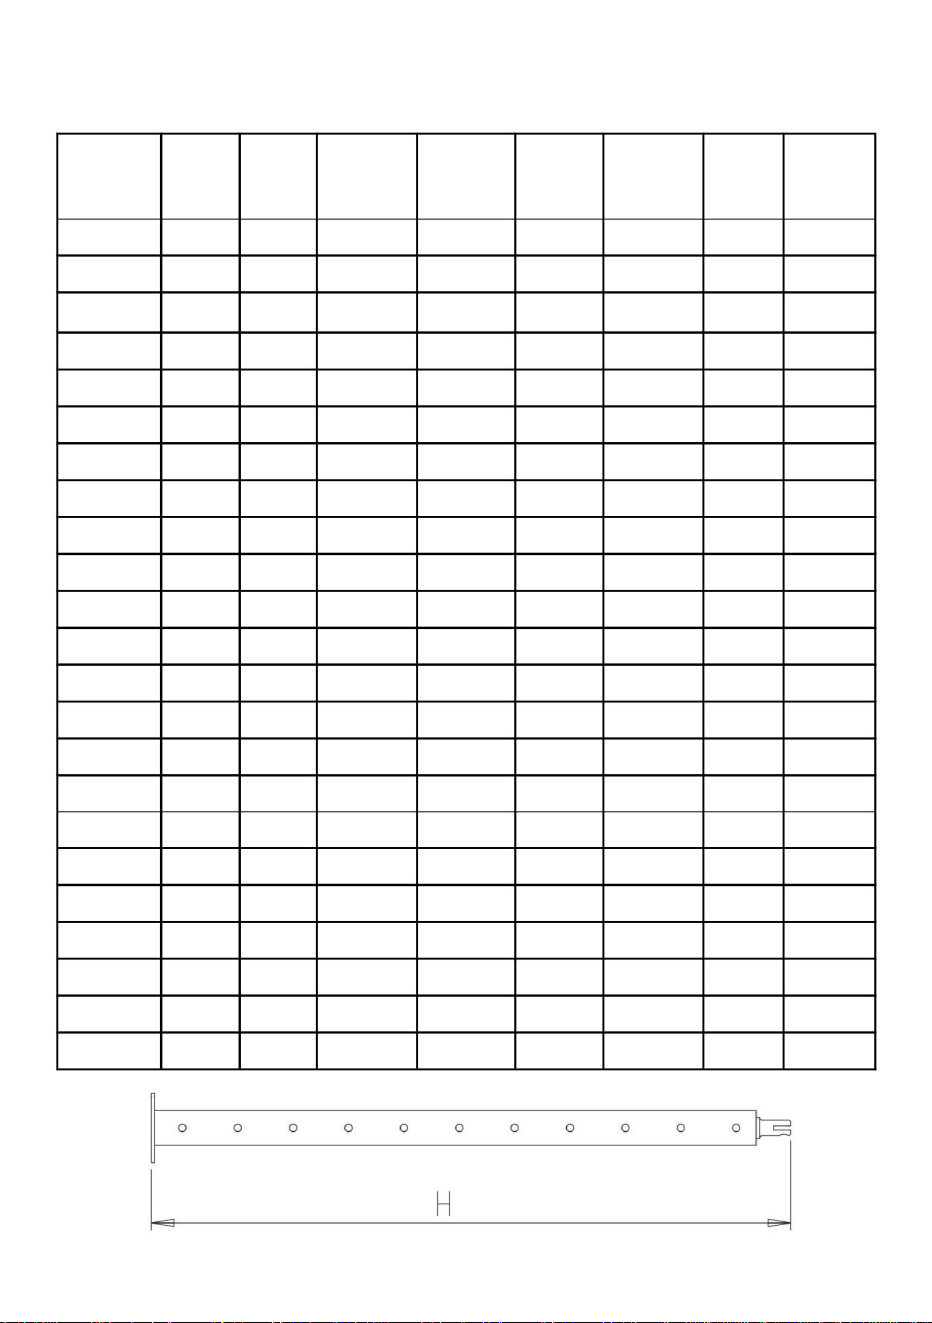
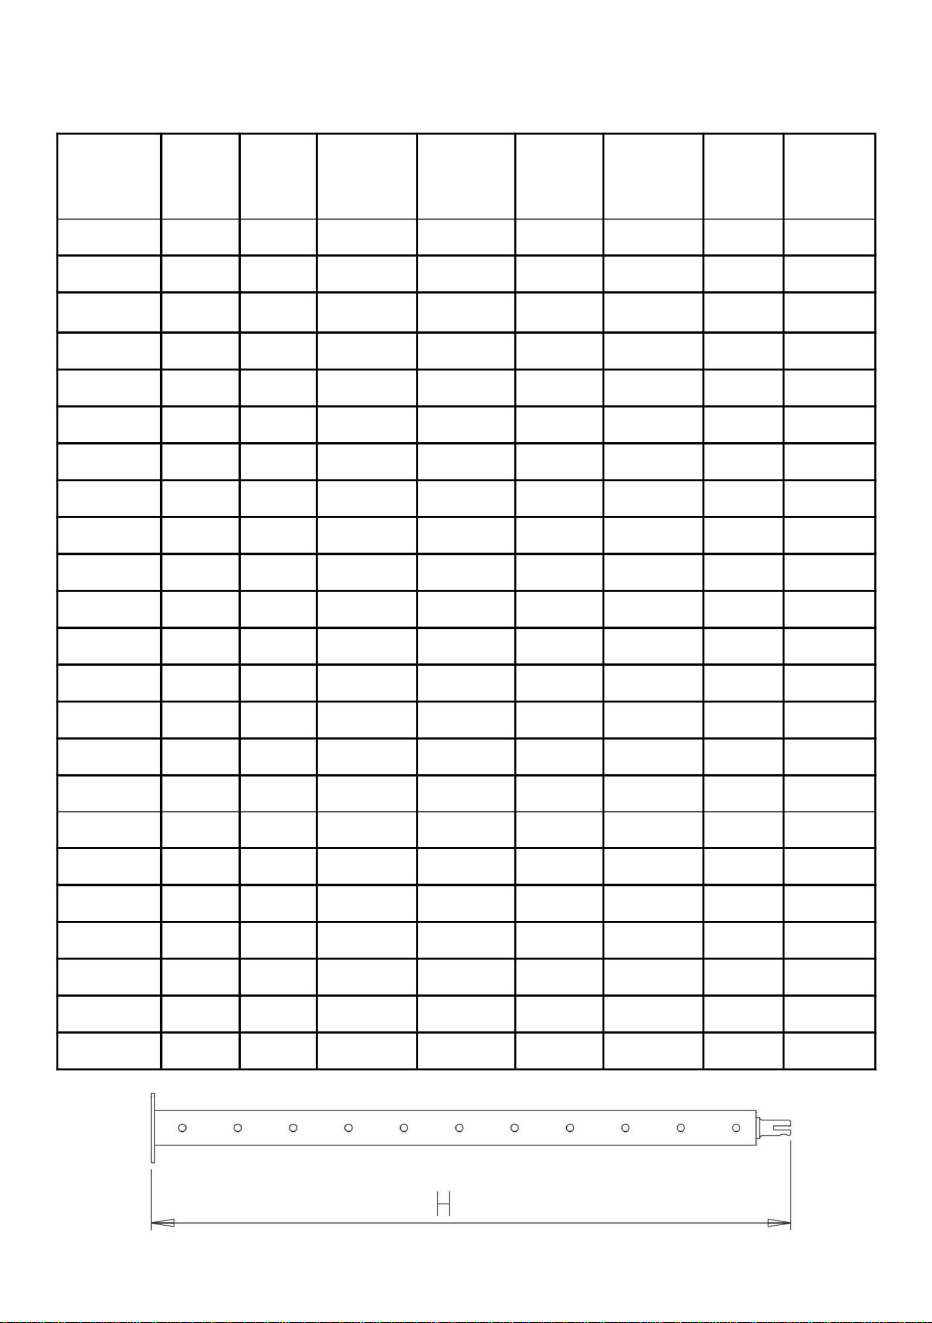
PRODUCT INFORMATION
Model
Drilled
H
(mm)
Drilled
number
Hole
diameter
(mm)
Pitch of
holes
(mm)
Section
size
(mm)
Color
Include
(pcs)
HR-001
level
1067
12
φ10.5
84
50*50
Black
4
HR-002
level
914
10
φ10.5
84
50*50
Black
4
HR-003
level
1067
12
φ10.5
84
30*50
Black
4
HR-004
level
914
10
φ10.5
84
30*50
Black
4
HR-005
30°
1067
12
10.5×12
84
50*50
Silver
1
HR-006
30°
1067
12
10.5×12
84
50*50
Black
1
HR-007
L
1067
12
φ10.5
84
50*50
Black
1
HR-008
Non
914
/
/
/
50*50
Black
1
HR-009
level
914
10
φ10.5
84
50*50
Black
1
HR-010
30°
914
10
10.5×12
84
50*50
Black
1
HR-011
L
914
10
φ10.5
84
50*50
Black
1
HR-012
level
914
10
φ10.5
84
50*50
Silver
1
HR-013
30°
1067
12
10.5×12
84
30*50
Black
1
HR-014
L
1067
12
φ10.5
84
30*50
Black
1
HR-015
30°
914
10
10.5×12
84
30*50
Black
1
HR-016
L
914
10
φ10.5
84
30*50
Black
1
HR-017
Non
914
/
/
/
38*38
Black
1
HR-018
level
1067
12
φ10.5
84
30*50
Black
1
HR-019
Non
1067
/
/
/
50*50
Black
1
HR-020
level
914
10
φ10.5
84
30*50
Black
1
HR-021
level
1067
12
φ10.5
84
50*50
Black
1
HR-022
level
914
10
φ10.5
84
30*50
Silver
1
HR-023
level
1067
12
φ10.5
84
50*50
Silver
1
- 5 -
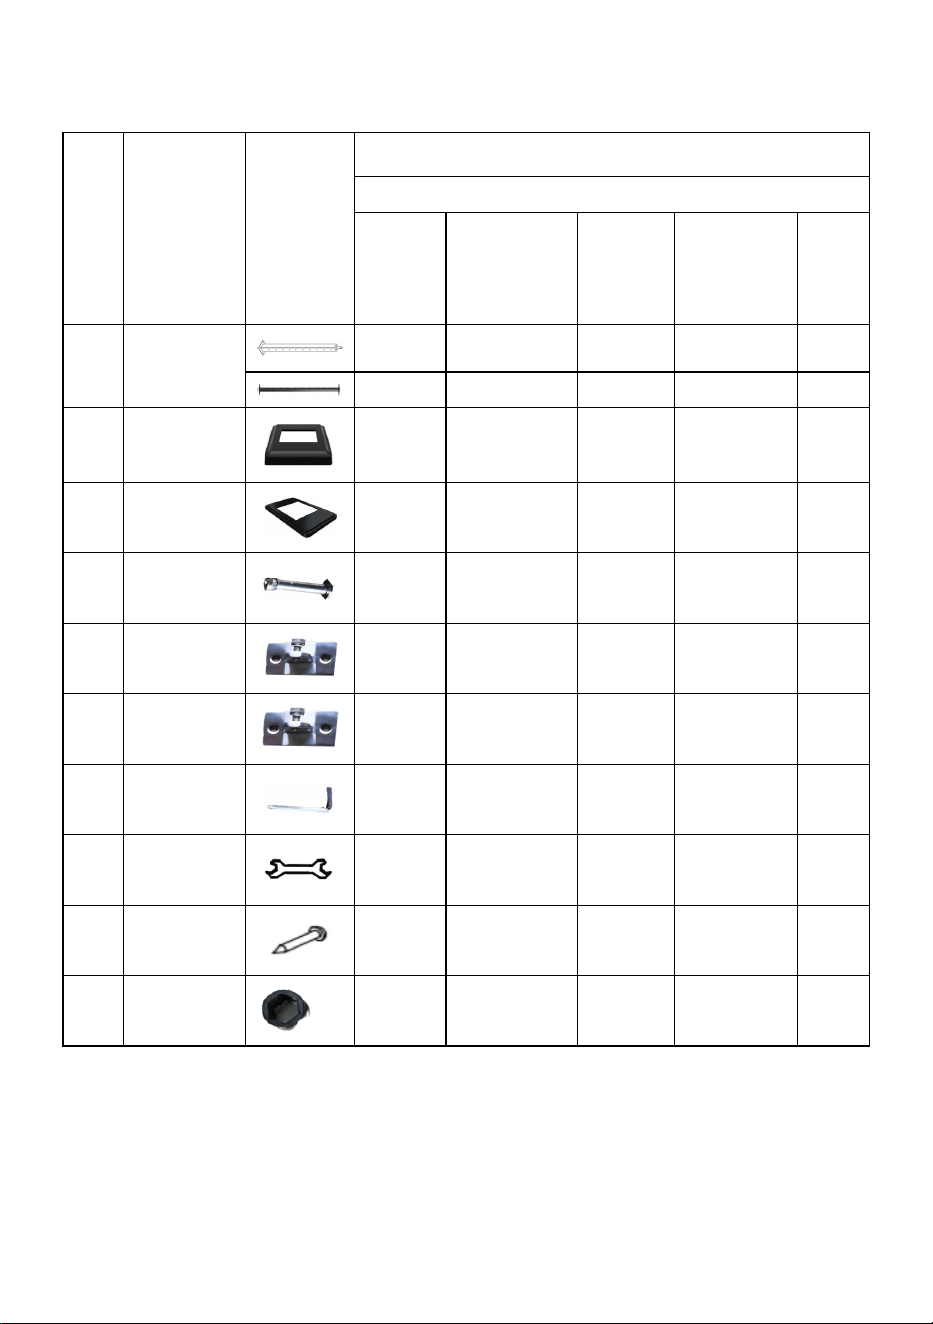
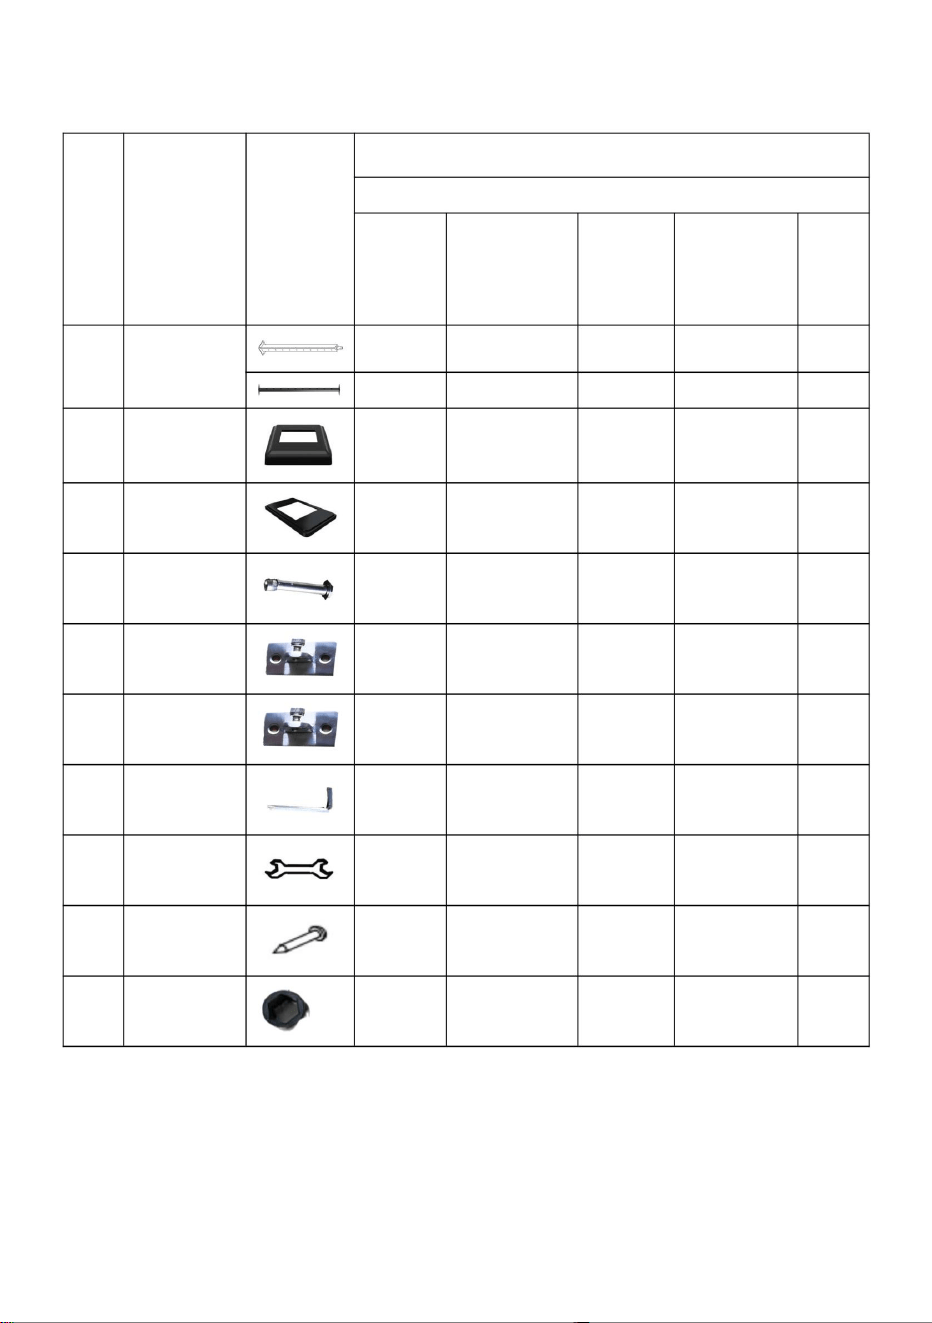
PACKAGE INCLUDE
No
Compone
nts
Picture
QTY
Fit model
HR-001/
HR-002
HR005~HR0
12/HR-019/H
R-021/HR-02
3/
HR-003/
HR-004
HR-013~
HR-016/
HR-018/
HR-020/
HR-022/
HR-0
17
1
post
4
1
4
1
/
/
/
/
/
1
2
Square
cover
4
1
/
/
/
3
Rectangul
ar cover
/
/
4
1
/
4
anchor
bolt
16
4
16
4
4
5
Curved
bracket
4
1
4
1
/
6
Horizontal
bracket
4
1
4
1
/
7
hex
wrench
4
1
4
1
1
8
Open end
wrench
4
1
4
1
1
9
Tapping
screw
8
2
8
2
4
10
Plastic
cover
/
/
/
/
1

- 6 -
INSTALLATION
For concrete or wood floor
Step1.Mark the drilling
points at the appropriate
installation locations.
Step2.use a hammer drill
to make a hole for ∅ 12 at
the marked points.
Step3.Hammer the
anchor screw into the
drilled hole.
Step4.Tighten the
screws
Step5.Close the lid and finish fixing the post.
Note:Ensure that the column is upright when fixing the bottom plate
of the post.
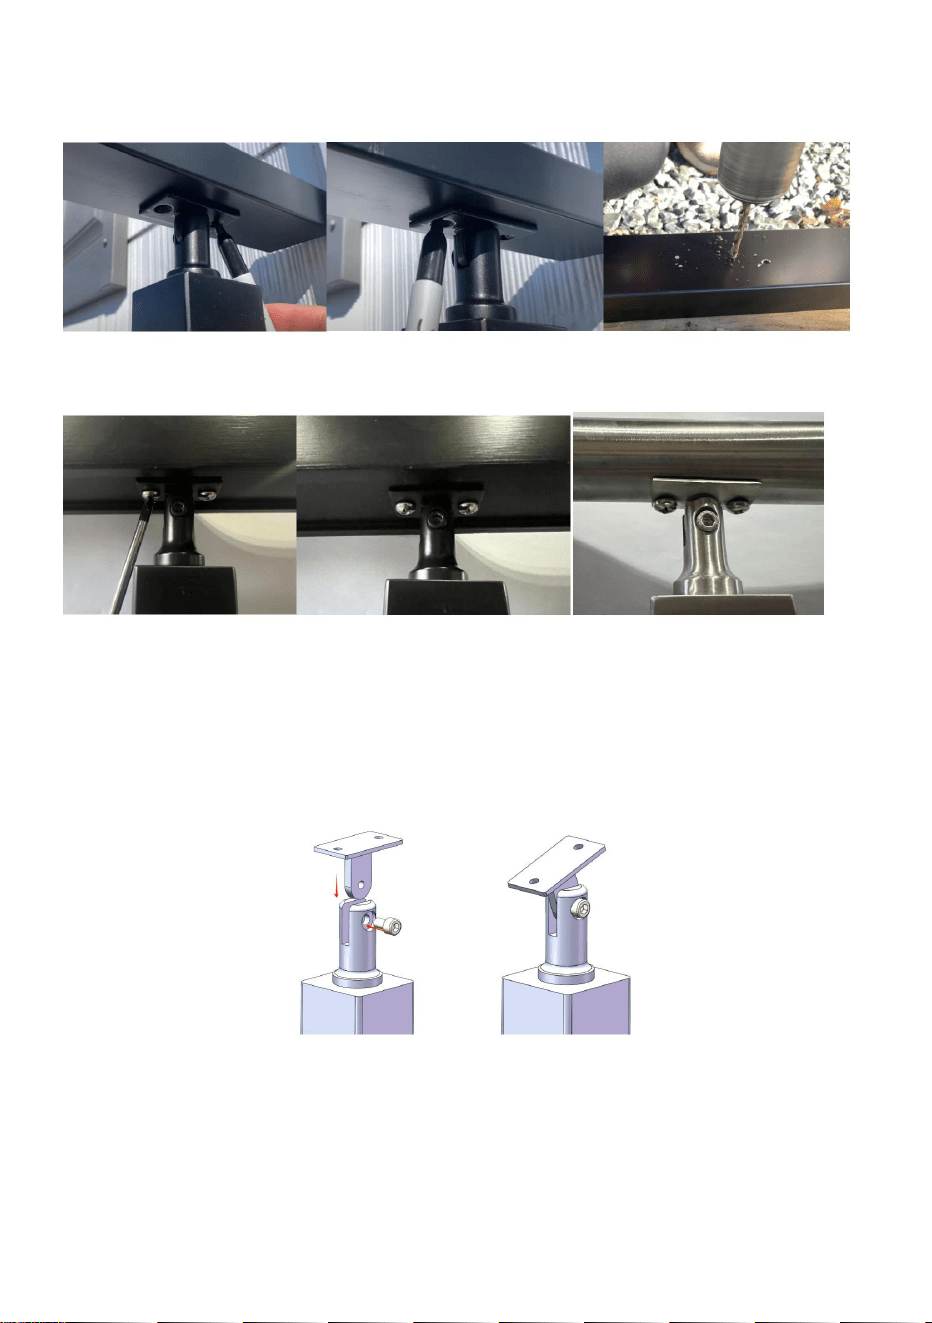
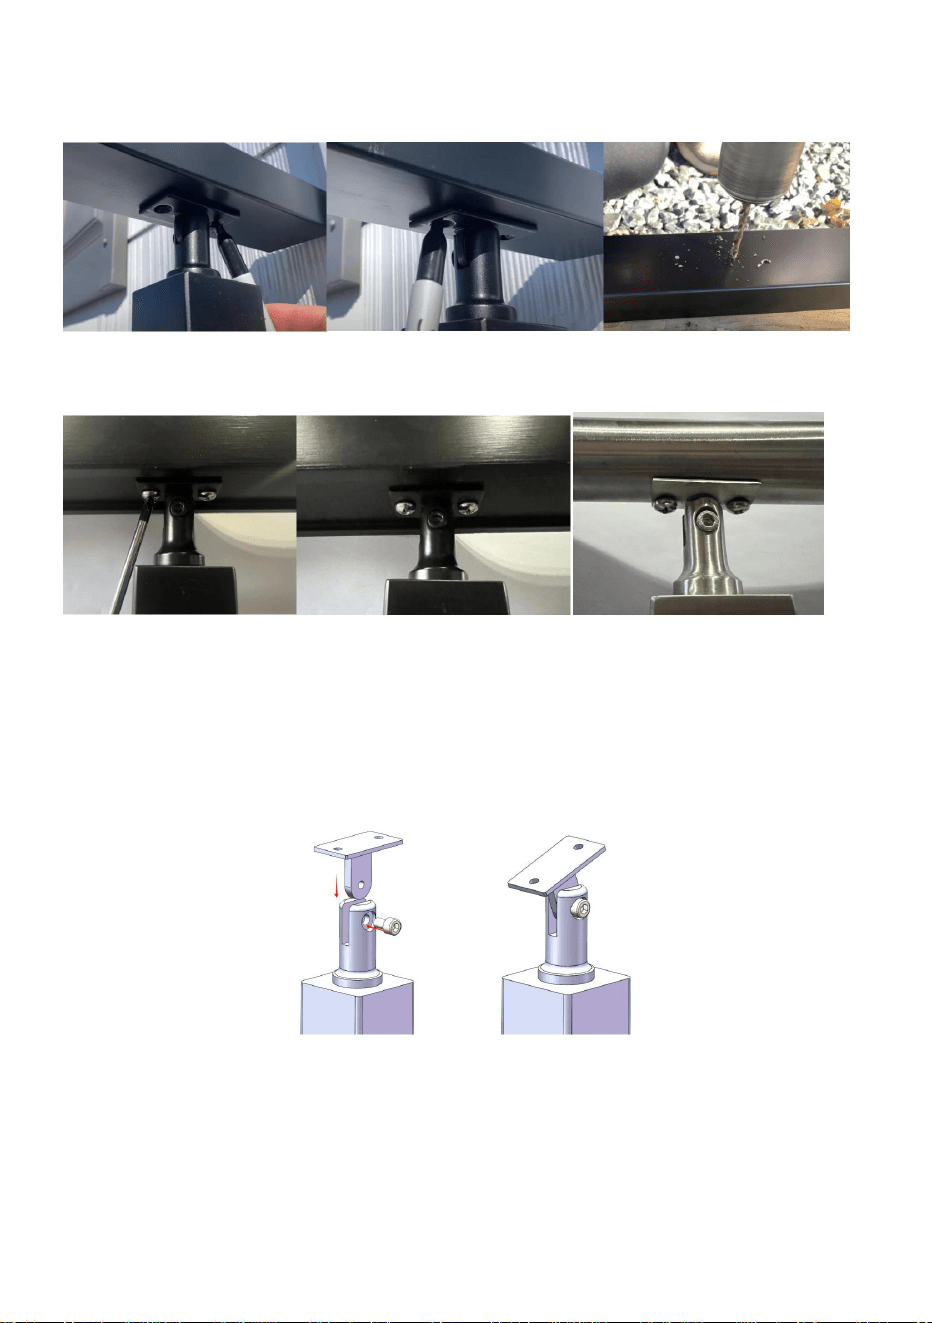
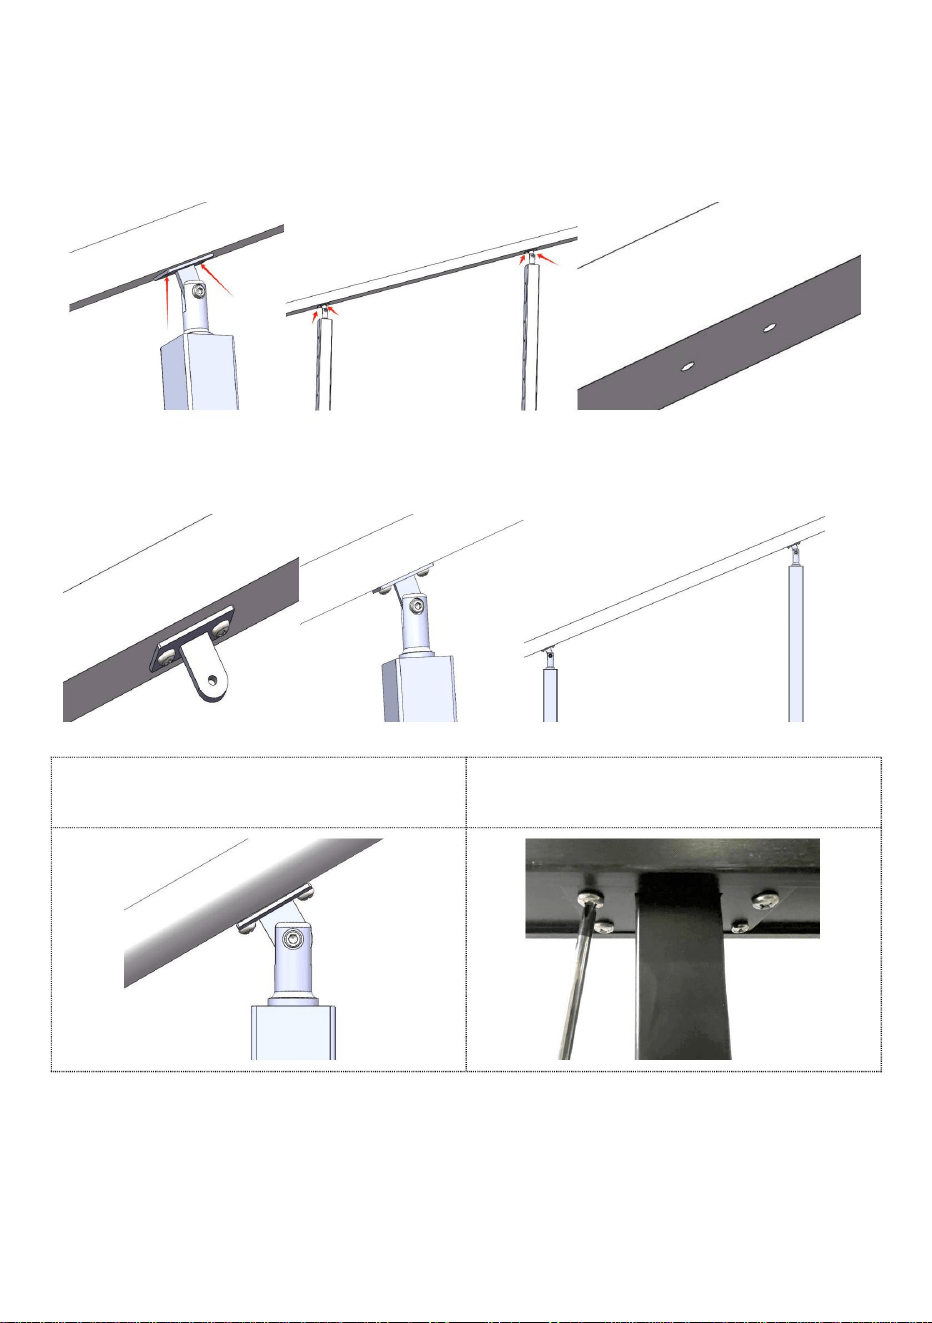
Mount with handrail(horizontal)
Step1: Fixed bracket
Step2: Determine the installation position of the handrail, and then mark
the position under the handrail and bracket holes, then drill holes.

- 7 -
★If the installation is a wooden handrail, you can directly screw in the
tapping screws.
Step3: Use the self-tapping screws in the accessory to fix the handrail to
the support.
It is also suitable for the installation of arc handrails and brackets.
Mount with handrail(gradient)
Step1: Fixed bracket
Step2: Adjust the Angle of the bracket to fit the underside of the
handrail.Determine the installation position of the handrail, and then mark
the position under the handrail and bracket holes, then drill holes.
★If the installation is a wooden handrail, you can directly screw in the
tapping screws.

- 8 -
Note:The handrail and bracket can be pre-fixed with the help of
clamping tools, so that multiple bracket installation points can be
marked and positioned at the same time.
Step3:Remove the bracket from the post and then use the self-tapping
screws in the accessory to fix the bracket to the handrail.
Fix the post and bracket again.
It is also suitable for the installation
of arc handrails and brackets.
For model HR-017
- 9 -
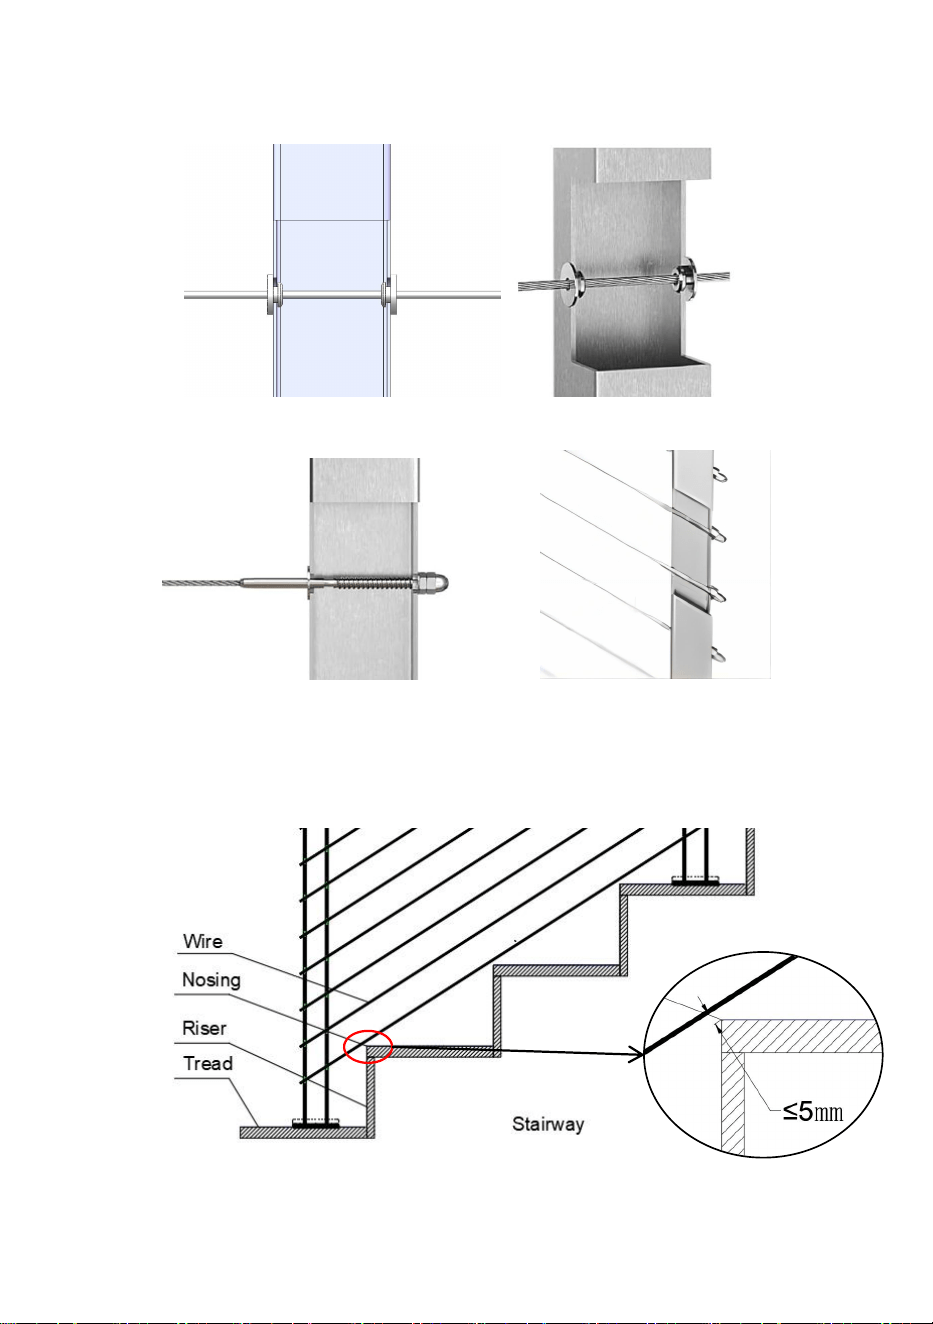
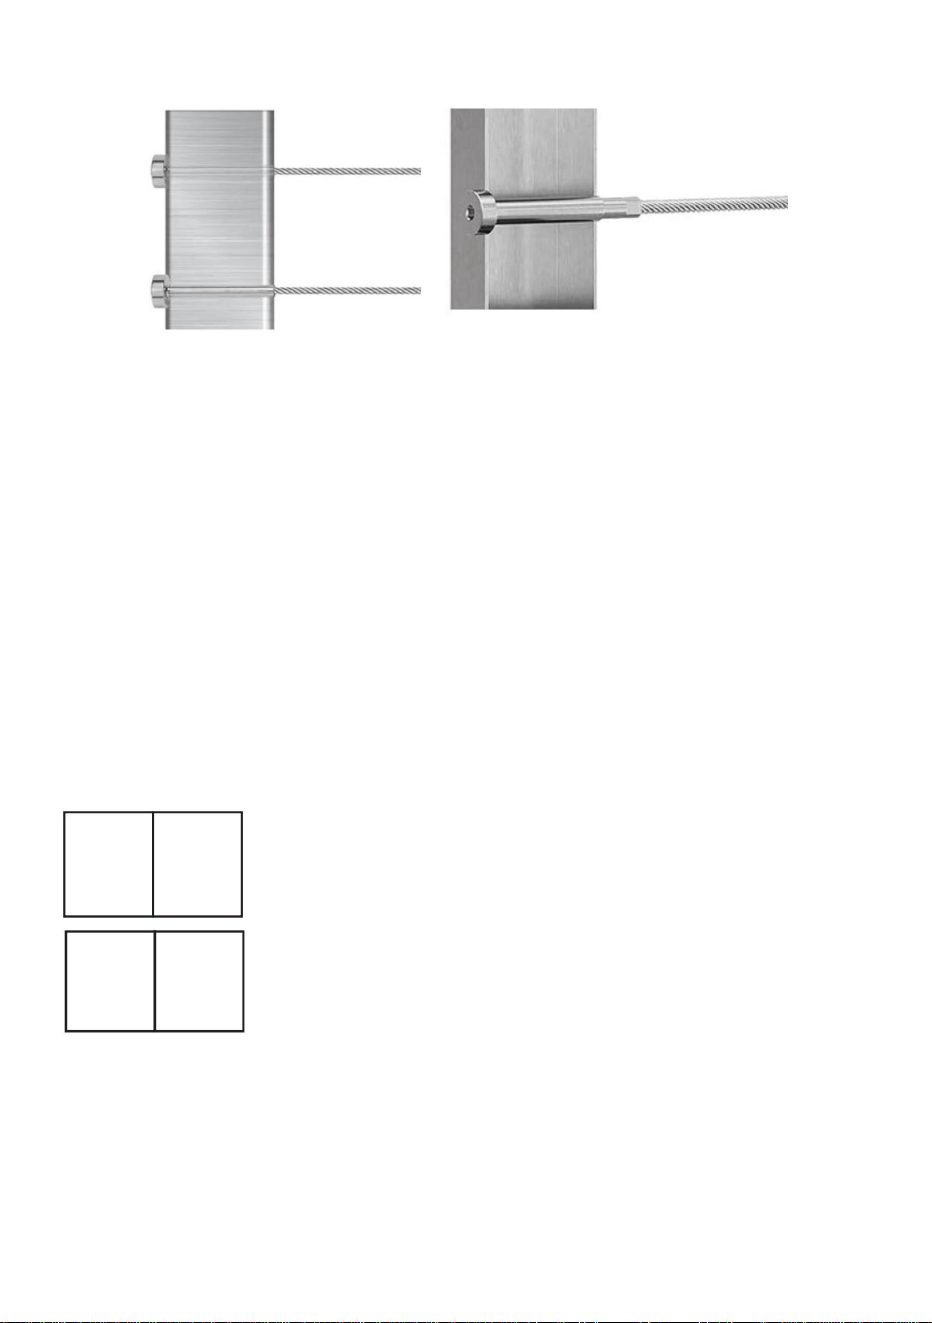
Install with wire rope and fittings
For Level Wheel Protector Sleeve
For Stud Tensioner Horizontal mounting and Angle
Caution:When installing the posts, adjust the position of the posts in
the step's tread, so that the wire is close to the position of the nosing,
and it is generally recommended that the spacing is less than 5mm.
As shown below.

- 10 -
For Turnbuckle Tensioner and Fixed Terminal
Manufacturer: Shanghaimuxinmuyeyouxiangongsi
Address: Shuangchenglu 803nong11hao1602A-1609shi, baoshanqu,
shanghai 200000 CN.
Imported to AUS: SIHAO PTY LTD. 1 ROKEVA STREETEASTWOOD
NSW 2122 Australia
Imported to USA: Sanven Technology Ltd. Suite 250, 9166 Anaheim
Place, Rancho Cucamonga, CA 91730
REP
UK
YH CONSULTING LIMITED. C/O YH Consulting
Limited Office 147, Centurion House, London
Road, Staines-upon-Thames, Surrey, TW18 4AX
REP
EC
E-CrossStu GmbH
Mainzer Landstr.69,
60329 Frankfurt am Main.


HR015/HR016/HR017/HR018/HR019/HR020/HR021/
HR022/HR023
HR008/HR009/HR010/HR011/HR012/HR013/HR014
MODÈLE:HR001/HR002/HR003/HR004/HR005/HR006/HR007/
Nouscontinuonsànousengageràvousfournirdesoutilsàdesprixcompétitifs.
«Économisezlamoitié»,«Moitiéprix»outouteautreexpressionsimilaireutiliséeparnousnereprésente
qu'uneestimationdeséconomiesquevouspourriezréaliserenachetantcertainsoutilscheznousparrapport
auxgrandesmarquesetnecouvrepasnécessairementtouteslescatégoriesd'outilsquenousproposons.
Nousvousrappelonsdebienvouloirvérifiersoigneusementlorsquevouspassezunecommandechez
noussivouséconomisezréellementlamoitiéparrapportauxgrandesmarques.
POTEAUDEGARDECÂBLE
Assistancetechniqueetcertificatdegarantieélectroniquewww.vevor.com/support
Machine Translated by Google

HR015/HR016/HR017/HR018/HR019/HR020/HR021/
HR022/HR023
HR008/HR009/HR010/HR011/HR012/HR013/HR014
MODÈLE:HR001/HR002/HR003/HR004/HR005/HR006/HR007/
<Photoàtitreindicatifseulement>
Ils'agitdelanoticed'utilisationd'origine.Veuillezlireattentivementtoutesles
instructionsdumanuelavantdel'utiliser.VEVORseréserveledroitd'interpréter
clairementnotremanueld'utilisation.L'apparenceduproduitdépendduproduit
quevousavezreçu.Veuilleznousexcuser,nousnevousinformeronsplussidesmises
àjourtechnologiquesoulogiciellessontdisponiblessurnotreproduit.
Vousavezdesquestionssurnosproduits?Vousavezbesoind'assistancetechnique?
N'hésitezpas
ànouscontacter:Assistancetechniqueetcertificatdegarantie
électroniquewww.vevor.com/support
POTEAUDEGARDECÂBLE
BESOIND'AIDE?CONTACTEZNOUS!
1
Machine Translated by Google

CONSERVEZCESINSTRUCTIONS
2
1.L'avertissementindiquequedesmesuresappropriéesdoiventêtreprisespouréviter
serviceetfairedeVEVORunemarquefiable.
dommagesauxbiensdevaleur.
séparertouteslespiècesdansunezonedetravailpropre.
Noustravaillonsavectousleseffortspossiblespourfournirdesproduitsdequalitéetprofessionnels
lesavertissementsetlesinstructionspeuvententraînerdesblessurescorporellesou
pages,veuillezvousréférerauschémad'assemblagedecemanuel.Déballezet
recommandépourlesprojetscôtiers.
fixations,horscâblemétallique,kitdegardecorpsàcâbles,maincourante.
d'utiliseroud'entretenirceproduit.Lenonrespectdeces
4.Pourplusd'informationssurlespiècesrépertoriéescidessous
LepoteaudegardecorpsàcâbledeVEVORestfabriquéàpartirdematériauxentièrementenacierinoxydable,cequi
gardecorpsintérieursetextérieursnécessitantpeud'entretien.Veuilleznoterqu'iln'estpas
Remarque:ceproduitcomprenduniquementlacolonneetsoninstallation
AVERTISSEMENT:Lisezetcomprenezl'intégralitédecemanuelavant
seulement.
nepaslaisserlesenfantsjouer.
accessoiresdécoratifs.
3.Veuillezgarderlespetitespiècesderechangehorsdeportéedesenfants,cen'estpasunjouet,ne
2.Lescapacitésduproduits'appliquentauproduitcorrectementetcomplètementassemblé
Ceproduitestprincipalementutilisépourl'installationdecolonnesdefonctionsdefilet
aunegranderésistanceàlarouilleetàlacorrosion.Ilfonctionnerapendantunelongueduréedevie
Indicationd'installationetposteapplicable
Applicableàtouslesscénariosd’installationd’ingénierie.
ledangerpotentieldeblessurescorporelles.
INSTRUCTIONSD'INSTALLATION
MESURESDESÉCURITÉIMPORTANTES
CARACTÉRISTIQUESPRINCIPALES
Machine Translated by Google

affichage,lesutilisateursdoiventdisposerenfonctiondeleursbesoinsréels,en
faisantcorrespondrelastructuredelacolonneetducâblemétallique,dukitdegardecorpsà
câbles,delamaincouranteetd'autresaccessoires.
Remarque:lafigurecidessusn'estqu'unexemplededispositiond'installation
UN
3
Machine Translated by Google
trous
Inclure
Hauteurde
nombre
(mm)
Foré
diamètre
(mm)
Trou
taille
H
Couleur
(mm)
Section
Modèlepercé
4
(mm)
(pièces)
INFORMATIONSSURLEPRODUIT
50*50Noir
12
HR01530°
1
HR019Non1067
10,5×1284
1
L
84
30*50Noir
L
10
12
/
1
10
HR001niveau1067
10,5×1284
φ10,5
4
HR020niveau914
10,5×1284
30*50Noir
84
30*50Noir
50*50Noir
φ10,5
φ10,5
914
/
84
1
1
914
84
HR002niveau914
4
1067
10
50*50Noir
12
84
φ10,5
φ10,5
HR016
HR021niveau1067
φ10,5
50*50ArgentHR012niveau914
1
10
φ10,5
50*50Argent
HR008Non914
12
84
1
12
84
/
4
HR003niveau1067
84
30*50Noir
30*50Noir
HR022niveau914
φ10,5
50*50Noir
1
φ10,5
φ10,5
L
84
1
HR01330°1067
12
1
HR004niveau914
12
HR009niveau914
/
50*50Noir
HR023niveau1067
12
10,5×1284
914
/
30*50Noir
HR014
10
φ10,5
50*50Noir
1
10
φ10,5
84
HR01030°
1
/
φ10,5
30*50Argent
1
HR00530°1067
/
30*50Noir
12
50*50Noir
1
HR017Non914
φ10,5
50*50Noir
1
914
L
12
1
10
HR00630°1067
10
84
10
84
50*50Argent
HR018niveau1067
84
φ10,5
30*50Noir
1067
84
50*50Noir
50*50Noir
1
/
/
1
HR011
10,5×1284
4
HR007
1
10
84
38*38Noir
Machine Translated by Google
clé
1
2
ancre
1
4
16
1
4
10
/
Ilcompose
7
vis
4
Horizontal
/
1
4
4
/
/
3
nts
4
/
4
Extrémitéouverte
4
8
Image
/
1
4
1
4
/
16
4
Plastique
/
Qté
boulon
poste
1
1
1
/
4
1
/
couverture
clé
/
1
support
6
9
/
4
5
/
/
4
1
1
2
Carré
Courbé
4
1
couverturear
5
8
/
couverture
Modèled'ajustement
hexagone
/
4
8
2
support
1
1
Non
1
Lerectangle
Tapotement
/
4
LEFORFAITCOMPREND
R021/HR02
HR013~
12/HR019/H
HR005~HR0
17
HR0HR003/
HR004
HR020/
HR002
HR022/
HR018/
HR001/
HR016/
3/
Machine Translated by Google

faireuntroude12à
Étape3.Enfoncezlemarteau
lespointsmarqués.
visd'ancragedansle
pointeverslebonendroit
Étape2.Utilisezuneperceuseàpercussion
emplacementsd'installation.
Étape1.Marquezleperçage
troupercé.
Étape4.Serrezle
vis
Étape5.Fermezlecouvercleetterminezdefixerlepoteau.
duposte.
Étape1:Supportfixe
Remarque:assurezvousquelacolonneestdroitelorsdelafixationdelaplaqueinférieure
lapositionsouslamaincouranteetlestrousdusupport,puispercezlestrous.
Étape2:Déterminezlapositiond'installationdelamaincourante,puismarquez
Supportavecmaincourante(horizontale)
Poursolenbétonouenbois
INSTALLATION
6
Machine Translated by Google
Supportavecmaincourante(dégradé)
lesoutien.
Ilconvientégalementàl'installationderampesetdesupportsenarc.
Étape1:Supportfixe
maincourante.Déterminezlapositiond'installationdelamaincourante,puismarquez
Étape3:Utilisezlesvisautotaraudeusesdel'accessoirepourfixerlamaincouranteà
Étape2:Ajustezl'angledusupportpourl'adapteraudessousdu
visautotaraudeuses.
Sil'installationestunemaincouranteenbois,vouspouvezdirectementvisserla
lapositionsouslamaincouranteetlestrousdusupport,puispercezlestrous.
Sil'installationestunemaincouranteenbois,vouspouvezvisserdirectementle
visautotaraudeuses.
7
Machine Translated by Google

8
Fixezànouveaulepoteauetlesupport.
PourlemodèleHR017
Étape3:Retirezlesupportdupoteau,puisutilisezlesvisautotaraudeusesdel'accessoire
pourfixerlesupportàlarampe.
Remarque:lamaincouranteetlesupportpeuventêtrepréfixésàl'aided'outilsde
serrage,desortequeplusieurspointsd'installationdusupportpeuventêtremarquéset
positionnésenmêmetemps.
Ilconvientégalementàl'installation
derampesetdesupportsenarc.
Machine Translated by Google

PourtendeurdegoujonMontagehorizontaletangulaire
labandederoulementdelamarche,desortequelefilsoitprochedelapositiondunez,etilest
généralementrecommandéquel'espacementsoitinférieurà5mm.
Attention:lorsdel'installationdespoteaux,ajustezlapositiondespoteauxen
Pourmanchondeprotectionderouedeniveau
Commeindiquécidessous.
Installationaveccâblemétalliqueetraccords
9
Machine Translated by Google

REPRÉSENTANTDELACE
REPRÉSENTANTDUROYAUMEUNI
ImportéenAustralie:SIHAOPTYLTD.1ROKEVASTREETEASTWOODNSW2122
Australie
MainzerLandstr.69,
60329FrancfortsurleMain.
Fabricant:ShanghaimuxinmuyeyouxiangongsiAdresse:
Shuangchenglu803nong11hao1602A1609shi,baoshanqu,shanghai200000CN.
Pourtendeuràvisetbornefixe
ImportéauxÉtatsUnis:SanvenTechnologyLtd.Suite250,9166AnaheimPlace,
RanchoCucamonga,CA91730
YHCONSULTINGLIMITED.C/OYHConsultingLimited
Bureau147,CenturionHouse,LondonRoad,Staines
uponThames,Surrey,TW184AX
ECrossStuGmbH
10
Machine Translated by Google


HR-015/HR-016/HR-017/HR-018/HR-019/HR-020/HR-021/
HR-008/HR-009/HR-010/HR-011/HR-012/HR-013/HR-014
MODELL:HR-001/HR-002/HR-003/HR-004/HR-005/HR-006/HR-007/
HR-022/HR-023
Wir sind weiterhin bestrebt, Ihnen Werkzeuge zu wettbewerbsfähigen Preisen anzubieten.
„Sparen Sie die Hälfte“, „Halber Preis“ oder andere ähnliche Ausdrücke, die wir verwenden, stellen nur eine
Schätzung der Ersparnis dar, die Sie beim Kauf bestimmter Werkzeuge bei uns im Vergleich zu den großen
Topmarken erzielen können, und decken nicht unbedingt alle von uns angebotenen Werkzeugkategorien ab. Wir
möchten Sie freundlich daran erinnern, bei Ihrer Bestellung bei uns sorgfältig zu prüfen, ob Sie im Vergleich
zu den großen Topmarken tatsächlich die Hälfte sparen.
KABELGELÄNDERPFOSTEN
Technischer Support und E-Garantie-Zertifikat www.vevor.com/support
Machine Translated by Google

- 1 -
KABELGELÄNDERPFOSTEN
Brauchen Sie Hilfe? Kontaktieren Sie uns!
HR-015/HR-016/HR-017/HR-018/HR-019/HR-020/HR-021/
HR-022/HR-023
HR-008/HR-009/HR-010/HR-011/HR-012/HR-013/HR-014
MODELL:HR-001/HR-002/HR-003/HR-004/HR-005/HR-006/HR-007/
Haben Sie Fragen zum Produkt? Benötigen Sie technischen Support? Bitte kontaktieren Sie
uns:
Technischer Support und E-Garantie-Zertifikat www.vevor.com/
support
Dies ist die Originalanleitung. Bitte lesen Sie alle Anweisungen sorgfältig durch,
bevor Sie das Gerät in Betrieb nehmen. VEVOR behält sich eine klare Auslegung unserer
Bedienungsanleitung vor. Das Erscheinungsbild des Produkts richtet sich nach
dem Produkt, das Sie erhalten haben. Bitte verzeihen Sie uns, dass wir Sie nicht erneut
informieren, wenn es Technologie- oder Software-Updates für unser Produkt gibt.
<Bild nur als Referenz>
Machine Translated by Google

1.Die Warnung weist darauf hin, dass geeignete Maßnahmen ergriffen werden sollten, um
Service und machen VEVOR zu einer zuverlässigen Marke.
Schäden an wertvollem Eigentum.
Trennen Sie alle Teile in einem sauberen Arbeitsbereich.
Wir arbeiten mit aller Kraft daran, qualitativ hochwertige Produkte und professionelle
empfohlen für Küstenprojekte.
Warnungen und Anweisungen können zu Verletzungen oder
Seiten finden Sie im Montagediagramm dieses Handbuchs. Auspacken und
Befestigungsmaterial, ausgenommen Drahtseil, Kabelgeländer-Set, Handlauf.
4. Weitere Informationen zu den im Folgenden aufgeführten Teilen finden Sie
Betrieb oder Wartung dieses Produkts. Die Nichtbeachtung dieser
Innen- und Außengeländer mit geringem Wartungsaufwand. Bitte beachten Sie, dass es nicht
Der Kabelgeländerpfosten von VEVOR besteht vollständig aus rostfreiem Stahl, der
WARNUNG: Lesen Sie das gesamte Handbuch sorgfältig durch, bevor Sie
Erlauben Sie Kindern nicht, damit zu spielen.
hat eine hohe Beständigkeit gegen Rost und Korrosion. Es wird für eine lange Lebensdauer funktionieren für
nur.
3.Bitte bewahren Sie kleine Ersatzteile außerhalb der Reichweite von Kindern auf, es ist kein Spielzeug.
dekorative Accessoires.
Dieses Produkt wird hauptsächlich für die Säuleninstallation von Drahtfunktionen verwendet und
2.Produktfunktionen gelten für ordnungsgemäß und vollständig montierte Produkte
Einbauhinweise und Anwendbare Pfosten
Anwendbar auf alle technischen Installationsszenarien.
die potenzielle Gefahr einer Verletzung.
Hinweis: Dieses Produkt umfasst nur die Säule und deren Montage
- 2 -
BEWAHREN SIE DIESE ANWEISUNGEN AUF
HAUPTMERKMALE
WICHTIGE SICHERHEITSHINWEISE
INSTALLATIONSANLEITUNG
Machine Translated by Google

- 3 -
A
Anzeige: Benutzer müssen das Layout entsprechend ihren tatsächlichen
Anforderungen erstellen und es an die Struktur der Säule und des Drahtseils, des
Kabelgeländer-Kits, des Handlaufs und anderer Zubehörteile anpassen.
Hinweis: Die obige Abbildung ist nur ein Beispiel für das Installationslayout
Machine Translated by Google

Löcher
Enthalten
Tonhöhe von
Nummer
(mm)
Gebohrt
Durchmesser
(mm)
Loch
Größe
H
Farbe
(mm)
Abschnitt
Modell gebohrt
- 4 -
(mm)
(Stück)
PRODUKTINFORMATIONEN
50*50 Schwarz
12
HR-015 30°
1
HR-019 Nr. 1067
10,5×12 84
1
M
84
30*50 Schwarz
M
10
12
/
1
10
HR-001 Ebene 1067
10,5×12 84
ÿ10,5
4
HR-020 Ebene 914
10,5×12 84
30*50 Schwarz
84
30*50 Schwarz
50*50 Schwarz
ÿ10,5
ÿ10,5
914
/
84
1
1
914
84
HR-002 Ebene 914
4
1067
10
50*50 Schwarz
12
84
ÿ10,5
ÿ10,5
HR-016
HR-021 Ebene 1067
ÿ10,5
50*50 SilberHR-012 Ebene 914
1
10
ÿ10,5
50*50 Silber
HR-008 Nr. 914
12
84
1
12
84
/
4
HR-003 Ebene 1067
84
30*50 Schwarz
30*50 Schwarz
HR-022 Ebene 914
ÿ10,5
50*50 Schwarz
1
ÿ10,5
ÿ10,5
M
84
1
HR-013 30° 1067
12
1
HR-004 Ebene 914
12
HR-009 Ebene 914
/
50*50 Schwarz
HR-023 Ebene 1067
12
10,5×12 84
914
/
30*50 Schwarz
HR-014
10
ÿ10,5
50*50 Schwarz
1
10
ÿ10,5
84
HR-010 30°
1
/
ÿ10,5
30*50 Silber
1
HR-005 30° 1067
/
30*50 Schwarz
12
50*50 Schwarz
1
HR-017 Nr. 914
ÿ10,5
50*50 Schwarz
1
914
M
12
1
10
HR-006 30° 1067
10
84
10
84
50*50 Silber
HR-018 Ebene 1067
84
ÿ10,5
30*50 Schwarz
1067
84
50*50 Schwarz
50*50 Schwarz
1
/
/
1
HR-011
10,5×12 84
4
HR-007
1
10
84
38*38 Schwarz
Machine Translated by Google

8
2
Offenes Ende
4
/
4
nts
1
/
1
Bild
/
4
Menge
Plastik
16
4
4
/
1
1
Bolzen
Post
1
Anker
1
2
Schlüssel
1
/
Es komponiert
4
10
4
16
1
/
4
Horizontal
1
7
schrauben
3
/
4
/
4
4
/
5
8
1
AR-Abdeckung
4
8
verhexen
/
Modell anpassen
Abdeckung
NEIN
1
Halterung
2
1
/
4
Das Rechteck
1
Tippen
Abdeckung
Schlüssel
/
1
/
/
4
/
6
9
Halterung
1
4
1
/
/
4
- 5 -
Gebogen
Quadrat
4
1
PAKET BEINHALTET
R-021/HR-02
HR-013~
12/HR-019/H
HR005~HR0
17
HR-0HR-003/
HR-004
HR-020/
HR-002
HR-022/
HR-018/
HR-001/
HR-016/
3/
Machine Translated by Google

Montage mit Handlauf (horizontal)
Für Beton- oder Holzboden
Schritt 1: Feste Halterung
des Beitrags.
Hinweis: Achten Sie darauf, dass die Säule aufrecht steht, wenn Sie die Bodenplatte befestigen.
die Position unter dem Handlauf und den Halterungslöchern, dann Löcher bohren.
Schritt 2: Bestimmen Sie die Einbauposition des Handlaufs und markieren Sie
ein Loch für ÿ 12 zu machen bei
Schritt 3.Hämmern Sie die
den markierten Punkten.
Schritt 5: Schließen Sie den Deckel und befestigen Sie den Pfosten endgültig.
Installationsorte.
Schritt 2. Verwenden Sie einen Bohrhammer
Punkte an den entsprechenden
Schritt 1.Markieren Sie die Bohrung
Schritt 4. Ziehen Sie die
Schrauben
gebohrtes Loch.
Ankerschraube in die
INSTALLATION
- 6 -
Machine Translated by Google

Montage mit Handlauf (Gefälle)
der Support.
Es eignet sich auch für die Montage von Bogenhandläufen und Halterungen.
Schritt 1: Feste Halterung
Handlauf.Bestimmen Sie die Einbauposition des Handlaufs und markieren Sie dann
Schritt 3: Befestigen Sie den Handlauf mit den selbstschneidenden Schrauben im Zubehör an
Schritt 2: Passen Sie den Winkel der Halterung an die Unterseite des
Blechschrauben.
ÿWenn es sich bei der Installation um einen Holzhandlauf handelt, können Sie den
die Position unter dem Handlauf und den Halterungslöchern, dann bohren Sie
Löcher. ÿWenn die Installation ein Holzhandlauf ist, können Sie direkt in die
Blechschrauben.
- 7 -
Machine Translated by Google

- 8 -
Schritt 3: Entfernen Sie die Halterung vom Pfosten und befestigen Sie die Halterung anschließend mit
den im Zubehör enthaltenen selbstschneidenden Schrauben am Handlauf.
Für Modell HR-017
Befestigen Sie Pfosten und Halterung wieder.
Hinweis: Handlauf und Halterung können mit Hilfe von Klemmwerkzeugen vorfixiert werden,
so dass mehrere Halterungsmontagepunkte gleichzeitig markiert und positioniert werden können.
Es eignet sich auch für die Installation
aus Bogenhandläufen und Konsolen.
Machine Translated by Google

Achtung: Passen Sie bei der Montage der Pfosten die Position der Pfosten an
der Trittfläche der Stufe, sodass sich der Draht in der Nähe der Position der Kantenkante
befindet. Generell wird empfohlen, dass der Abstand weniger als 5 mm beträgt.
Für Bolzenspanner Horizontale Montage und Winkel
Für Level-Radschutzhülse
Wie unten gezeigt.
Installation mit Drahtseil und Beschlägen
- 9 -
Machine Translated by Google
UK REP
Vertreter der EG
Nach AUS importiert: SIHAO PTY LTD. 1 ROKEVA STREETEASTWOOD NSW 2122
Australien
Mainzer Landstr.69,
60329 Frankfurt am Main.
Hersteller: Shanghaimuxinmuyeyouxiangongsi Adresse:
Shuangchenglu 803nong11hao1602A-1609shi, Baoshanqu, Shanghai 200000 CN.
Für Spannschlossspanner und Festterminal
Importiert in die USA: Sanven Technology Ltd. Suite 250, 9166 Anaheim Place,
Rancho Cucamonga, CA 91730
YH CONSULTING LIMITED. C/O YH Consulting Limited
Office 147, Centurion House, London Road, Staines-
upon-Thames, Surrey, TW18 4AX
E-CrossStu GmbH
- 10 -
Machine Translated by Google


HR-015/HR-016/HR-017/HR-018/HR-019/HR-020/HR-021/
Numero di modello: HR-008/HR-009/HR-010/HR-011/HR-012/HR-013/HR-014
MODELLO:HR-001/HR-002/HR-003/HR-004/HR-005/HR-006/HR-007/
HR-022/HR-023
Continuiamo a impegnarci per fornirvi strumenti a prezzi competitivi.
"Risparmia la metà", "Metà prezzo" o qualsiasi altra espressione simile da noi utilizzata rappresenta
solo una stima del risparmio che potresti ottenere acquistando determinati utensili con noi rispetto ai
principali marchi principali e non significa necessariamente coprire tutte le categorie di utensili da noi
offerti. Ti ricordiamo gentilmente di verificare attentamente quando effettui un ordine con noi se
stai effettivamente risparmiando la metà rispetto ai principali marchi principali.
MONTANTE PER RINGHIERA IN CAVO
Supporto tecnico e certificato di garanzia elettronica www.vevor.com/support
Machine Translated by Google

- 1 -
MONTANTE PER RINGHIERA IN CAVO
HAI BISOGNO DI AIUTO? CONTATTACI!
HR-015/HR-016/HR-017/HR-018/HR-019/HR-020/HR-021/
HR-022/HR-023
Numero di modello: HR-008/HR-009/HR-010/HR-011/HR-012/HR-013/HR-014
MODELLO:HR-001/HR-002/HR-003/HR-004/HR-005/HR-006/HR-007/
Hai domande sul prodotto? Hai bisogno di supporto tecnico? Non esitare a contattarci:
Supporto
tecnico e certificato di garanzia elettronica www.vevor.com/
support
Questa è l'istruzione originale, si prega di leggere attentamente tutte le
istruzioni del manuale prima di utilizzare. VEVOR si riserva una chiara
interpretazione del nostro manuale utente. L'aspetto del prodotto sarà
soggetto al prodotto ricevuto. Vi preghiamo di perdonarci se non vi informeremo
di nuovo se ci sono aggiornamenti tecnologici o software sul nostro prodotto.
<Immagine solo per riferimento>
Machine Translated by Google

1. L'avviso indica che è necessario adottare misure appropriate per evitare
servizio e rendono VEVOR un marchio affidabile.
danni a beni di valore.
separare tutte le parti in un'area di lavoro pulita.
Lavoriamo con ogni sforzo per fornire prodotti di qualità e professionalità
le avvertenze e le istruzioni possono causare lesioni personali o
pagine, fare riferimento allo schema di montaggio di questo manuale. Scartare e
consigliato per progetti costieri.
elementi di fissaggio, escluso cavo metallico, kit ringhiera in cavo, corrimano.
funzionamento o la manutenzione di questo prodotto. La mancata osservanza di queste
4. Per ulteriori informazioni sulle parti elencate di seguito
Il palo per ringhiere in cavo di VEVOR è realizzato interamente in acciaio inossidabile, che
ringhiere interne ed esterne con bassa manutenzione. Si prega di notare che non è
Nota: questo prodotto include solo la colonna e la sua installazione
ATTENZIONE: leggere e comprendere l'intero manuale prima
non permettere ai bambini di giocare.
soltanto.
accessori decorativi.
3. Si prega di tenere i piccoli pezzi di ricambio fuori dalla portata dei bambini, non è un giocattolo.
2. Le capacità del prodotto si applicano al prodotto correttamente e completamente assemblato
Questo prodotto è utilizzato principalmente per l'installazione di colonne di funzioni di filo e
ha una grande resistenza alla ruggine e alla corrosione. Funzionerà per una lunga durata per
Indicazioni di installazione e palo applicabile
Applicabile a tutti gli scenari di installazione ingegneristica.
il potenziale pericolo di lesioni personali.
- 2 -
SALVA QUESTE ISTRUZIONI
CARATTERISTICHE PRINCIPALI
IMPORTANTI MISURE DI SICUREZZA
ISTRUZIONI PER L'INSTALLAZIONE
Machine Translated by Google
display, gli utenti devono disporre in base alle loro effettive esigenze,
abbinando la struttura della colonna e del cavo metallico, il kit ringhiera in cavo, il
corrimano e altri accessori.
Nota: la figura sopra è solo un esempio del layout di installazione
UN
- 3 -
Machine Translated by Google

buchi
Include
Passo di
numero
(mm)
Forato
diametro
(mm)
Buco
misurare
H
Colore
(mm)
Sezione
Modello forato
- 4 -
(mm)
(pz)
INFORMAZIONI SUL PRODOTTO
50*50 Nero
12
HR-015 30°
1
HR-019 N. 1067
84
1
L
ÿ10.5
30*50 Nero
L
10
12
84
1
10
HR-001 livello 1067
Formato 10,5×12 84
/
4
HR-020 livello 914
/
30*50 Nero
ÿ10.5
30*50 Nero
50*50 Nero
ÿ10,5
ÿ10,5
914
/
84
1
1
914
ÿ10.5
HR-002 livello 914
4
1067
10
50*50 Nero
12
ÿ10.5
ÿ10,5
ÿ10,5
HR-016
HR-021 livello 1067
/
50*50 ArgentoHR-012 livello 914
1
10
ÿ10.5
50*50 Argento
HR-008 N. 914
12
84
1
12
84
84
4
HR-003 livello 1067
ÿ10.5
30*50 Nero
30*50 Nero
HR-022 livello 914
84
50*50 Nero
1
ÿ10,5
ÿ10,5
L
84
1
HR-013 30° 1067
12
1
HR-004 livello 914
12
HR-009 livello 914
/
50*50 Nero
HR-023 livello 1067
12
Formato 10,5×12 84
914
84
30*50 Nero
HR-014
10
Formato 10,5×12 84
50*50 Nero
1
10
/
84
HR-010 30°
1
/
ÿ10.5
30*50 Argento
1
HR-005 30° 1067
Formato 10,5×12 84
30*50 Nero
12
50*50 Nero
1
HR-017 N. 914
Formato 10,5×12 84
50*50 Nero
1
914
L
12
1
10
HR-006 30° 1067
10
84
10
84
50*50 Argento
HR-018 livello 1067
ÿ10.5
84
30*50 Nero
1067
ÿ10.5
50*50 Nero
50*50 Nero
1
/
84
1
HR-011
/
4
HR-007
1
10
84
38*38 Nero
Machine Translated by Google

8
2
Estremità aperta
4
/
4
nti
1
/
1
Immagine
/
4
Quantità
Plastica
16
4
4
/
1
1
bullone
inviare
1
ancorare
1
2
chiave
1
/
Compone
4
10
4
16
1
/
4
Orizzontale
1
7
vite
3
/
4
/
4
4
/
5
8
1
copertura ar
4
8
esadecimale
/
Modello in forma
copertina
NO
1
parentesi
2
1
/
4
Il rettangolo
1
toccando
copertina
chiave
/
1
/
/
4
/
6
9
parentesi
1
4
1
/
/
4
- 5 -
Curvo
Piazza
4
1
IL PACCHETTO INCLUDE
R-021/HR-02
HR-013~
12/HR-019/H
17
HR005~HR0
HR-0HR-003/
HR-004
HR-020/
HR-022/
HR-002
HR-001/
HR-018/
HR-016/
3/
Machine Translated by Google

per fare un foro per ÿ 12 a
Fase 3. Martellare il
i punti contrassegnati.
Fase 4. Stringere il
indica il punto appropriato
Fase 2. Utilizzare un trapano a percussione
luoghi di installazione.
Fase 1.Segnare la foratura
vite di ancoraggio nel
Fase 5. Chiudere il coperchio e completare il fissaggio del palo.
viti
foro praticato.
Passaggio 1: staffa fissa
del post.
Nota: assicurarsi che la colonna sia in posizione verticale quando si fissa la piastra inferiore
la posizione sotto il corrimano e i fori della staffa, quindi praticare i fori.
Fase 2: determinare la posizione di installazione del corrimano, quindi contrassegnare
Montare con corrimano (orizzontale)
Per pavimenti in cemento o legno
INSTALLAZIONE
- 6 -
Machine Translated by Google
- 7 -
il supporto.
Adatto anche per l'installazione di corrimano ad arco e staffe.
Passaggio 1: staffa fissa
Fase 3: Utilizzare le viti autofilettanti nell'accessorio per fissare il corrimano a
Passaggio 2: regolare l'angolazione della staffa per adattarla alla parte inferiore del
viti autofilettanti.
ÿSe l'installazione è un corrimano in legno, è possibile avvitare direttamente il
viti autofilettanti.
corrimano. Determinare la posizione di installazione del corrimano, quindi contrassegnare
la posizione sotto il corrimano e i fori della staffa, quindi praticare i fori. ÿSe
l'installazione è un corrimano in legno, è possibile avvitare direttamente il
Montare con corrimano (pendenza)
Machine Translated by Google

- 8 -
Fissare nuovamente il palo e la staffa.
Per il modello HR-017
Fase 3: rimuovere la staffa dal palo e utilizzare le viti autofilettanti fornite con
l'accessorio per fissare la staffa al corrimano.
Nota: il corrimano e la staffa possono essere prefissati con l'ausilio di utensili
di serraggio, in modo da poter contrassegnare e posizionare contemporaneamente
più punti di installazione della staffa.
Adatto anche per l'installazione
di corrimano ad arco e staffe.
Machine Translated by Google

Attenzione: quando si installano i pali, regolare la posizione dei pali in
la pedata del gradino, in modo che il filo sia vicino alla posizione del gradino; in genere si
consiglia che la spaziatura sia inferiore a 5 mm.
Per il montaggio orizzontale e angolare del tenditore per perni
Per manicotto di protezione della ruota di livello
Come mostrato di seguito.
Installare con fune metallica e raccordi
- 9 -
Machine Translated by Google

RAPPRESENTANZA DEL REGNO UNITO
Rappresentante della CE
Importato in AUS: SIHAO PTY LTD. 1 ROKEVA STREETEASTWOOD NSW 2122
Australia
Mainzer Landstr.69,
60329 Francoforte sul Meno.
Produttore: Shanghaimuxinmuyeyouxiangongsi Indirizzo:
Shuangchenglu 803nong11hao1602A-1609shi, baoshanqu, shanghai 200000 CN.
Per tenditore a vite e terminale fisso
Importato negli USA: Sanven Technology Ltd. Suite 250, 9166 Anaheim Place,
Rancho Cucamonga, CA 91730
YH CONSULTING LIMITED. C/O YH Consulting Limited
Ufficio 147, Centurion House, London Road, Staines-
upon-Thames, Surrey, TW18 4AX
E-CrossStu GmbH
- 10 -
Machine Translated by Google


POSTEDEBARANDILLADECABLE
"Ahorrelamitad","mitaddeprecio"ocualquierotraexpresiónsimilarqueutilicemossolorepresenta
unaestimacióndelahorroquepodríaobteneralcomprarciertasherramientasconnosotrosencomparación
conlasprincipalesmarcasynonecesariamentesignificaquecubratodaslascategoríasdeherramientas
queofrecemos.Lerecordamosque,alrealizarunpedidoconnosotros,verifiquecuidadosamentesi
realmenteestáahorrandolamitadencomparaciónconlasprincipalesmarcas.
Seguimoscomprometidosabrindarleherramientasaprecioscompetitivos.
HR015/HR016/HR017/HR018/HR019/HR020/HR021/
HR022/HR023
HR008/HR009/HR010/HR011/HR012/HR013/HR014
MODELO:HR001/HR002/HR003/HR004/HR005/HR006/HR007/
Soportetécnicoycertificadodegarantíaelectrónicawww.vevor.com/support
Machine Translated by Google

HR015/HR016/HR017/HR018/HR019/HR020/HR021/
HR022/HR023
HR008/HR009/HR010/HR011/HR012/HR013/HR014
MODELO:HR001/HR002/HR003/HR004/HR005/HR006/HR007/
<Imagensolocomoreferencia>
¿Tienepreguntassobreelproducto?¿Necesitaasistenciatécnica?Nodudeenponerseen
contactocon
nosotros:Asistenciatécnicaycertificadodegarantíaelectrónica
www.vevor.com/support
Estassonlasinstruccionesoriginales,leaatentamentetodaslas
instruccionesdelmanualantesdeutilizarelproducto.VEVORsereservauna
interpretaciónclaradenuestromanualdeusuario.Laaparienciadel
productoestarásujetaalproductoquerecibió.Perdónenospornoinformarle
nuevamentesihayactualizacionesdetecnologíaosoftwareennuestroproducto.
¿NECESITASAYUDA?¡CONTÁCTANOS!
POSTEDEBARANDILLADECABLE
1
Machine Translated by Google

GUARDEESTASINSTRUCCIONES
2
Nopermitirquelosniñosjueguen.
Tieneunagranresistenciaalóxidoylacorrosión.Funcionarádurantemuchotiempo.
4.Paraobtenerinformaciónadicionalsobrelaspiezasenumeradasacontinuación
operarorepararesteproducto.Elincumplimientodeestas
Barandillasinterioresyexterioresdebajomantenimiento.Tengaencuentaquenoes
Nota:Esteproductosoloincluyelacolumnaysuinstalación.
Recomendadoparaproyectoscosteros.
Lasadvertenciaseinstruccionespuedencausarlesionespersonaleso
Dañosapropiedadvaliosa.
páginas,consulteeldiagramadeensamblajedeestemanual.Desenvuelvay
sujetadores,excluyendocabledeacero,kitdebarandilladecable,pasamanos.
Separartodaslaspiezasenunáreadetrabajolimpia.
1.Laadvertenciaindicaquesedebentomarlasmedidasadecuadasparaevitarlo.
Trabajamoscontodoelesfuerzoparaofrecerproductosdecalidadyprofesionalismo.
servicioyhacendeVEVORunamarcaconfiable.
elpeligropotencialdelesionespersonales.
Esteproductoseutilizaprincipalmenteparalainstalacióndecolumnasconfuncionesdecabley
2.Lascapacidadesdelproductoseaplicanaproductosensambladosdemaneracorrectaycompleta.
Indicacióndeinstalaciónypuestoaplicable
Aplicableatodoslosescenariosdeinstalacióndeingeniería.
solo.
3.Mantengalaspiezasderepuestopequeñasfueradelalcancedelosniños,noesunjuguete.
Accesoriosdecorativos.
ElpostedebarandilladecabledeVEVORestáhechocompletamentedematerialesdeaceroinoxidable,loque
ADVERTENCIA:Leaycomprendatodoestemanualantesde
CARACTERÍSTICASPRINCIPALES
MEDIDASDESEGURIDADIMPORTANTES
INSTRUCCIONESDEINSTALACIÓN
Machine Translated by Google

Pantalla,losusuariosdebendiseñarladeacuerdoconsusnecesidadesreales,
haciendocoincidirlaestructuradelacolumnayelcabledeacero,elkitdebarandillade
cable,elpasamanosyotrosaccesorios.
Nota:Lafiguraanterioressolounejemplodeldiseñodeinstalación.
A
3
Machine Translated by Google
yo
(mm)
diámetro
(mm)
Tonode
Perforado
número
agujeros
Incluir
(mm)
(piezas)
Modeloperforado
Sección
4
tamaño
(mm)
Color
Agujero
INFORMACIÓNDELPRODUCTO
10
1
HR011
/
84
50*50Negro
1
1067
φ10,5
50*50Negro
12
84
38*38Negro
1
HR007
10
/
4
10
84
1
HR00630°1067
10
yo
12
50*50Negro
1
914
84
30*50Negro
HR018nivel1067
φ10,5
84
50*50Plata
10
1
HR00530°1067
/
φ10,5
30*50Plata
84
1
HR01030°
10
/
HR017N°914
10,5×1284
50*50Negro
1
12
10,5×1284
30*50Negro
12
10,5×1284
50*50Negro
HR023nivel1067
HR009nivel914
12
/
1
HR004nivel914
10,5×1284
50*50Negro
1
HR014
10
84
30*50Negro
914
30*50Negro
HR022nivel914
φ10,5
30*50Negro
84
4
HR003nivel1067
12
84
HR01330°1067
12
84
1
φ10,5
φ10,5
yo
84
50*50Negro
1
HR021nivel1067
/
50*50Plata
φ10,5
φ10,5
HR016
12
φ10,5
50*50Negro
84
1
HR008N°914
12
φ10,5
50*50Plata
1
HR012nivel914
10
50*50Negro
φ10,5
φ10,5
914
φ10,5
30*50Negro
30*50Negro
HR020nivel914
/
1067
10
φ10,5
4
HR002nivel914
1
914
/
84
1
φ10,5
30*50Negro
1
yo
HR019Nro.1067
84
50*50Negro
1
HR01530°
/
4
HR001nivel1067
10
10,5×1284
12
84
1
yo
Machine Translated by Google

1
/
3
cubiertadear
4
4
4
/
4
Horizontal
/
7
1
tornillo
Secompone
/
1
4
16
4
10
1
ancla
llaveinglesa
1
2
1
1
1
correo
tornillo
Plástico
CANTIDAD
4
/
16
1
4
4 1
/
Imagen
/
Extremoabierto
4
8
nts
4
/
Cuadrado
Curvo
4
1
2
/
/
4
1
4
5
/
1
soporte
6
9
/
cubrir
/
llaveinglesa
4
1
/
4
/
1
Elrectángulo
Tocando
1
No
2
soporte
1
/
maleficio
4
8
cubrir
Modelodeajuste
5
8
/
ELPAQUETEINCLUYE
HR0
17
HR005~HR0
12/HR019/H
HR013~
R021/HR02
3/
HR016/
HR001/
HR018/
HR020/
HR022/
HR002
HR003/
HR004
Machine Translated by Google

lospuntosmarcados.
Paso3.Martillarel
parahacerunagujeropara12en
Paso4.Aprieteel
Ubicacionesdeinstalación.
Paso2.Utiliceuntaladropercutor.
apuntaallugarapropiado
Paso1.Marcarlaperforación
Paso5.Cierrelatapayterminedefijarelposte.
tornillodeanclajeenel
tornillos
Agujeroperforado.
Paso1:Soportefijo
Paso2:Determinelaposicióndeinstalacióndelpasamanosyluegomarque
delpuesto.
Nota:Asegúresedequelacolumnaestéenposiciónverticalalfijarlaplacainferior.
laposicióndebajodelosagujerosdelpasamanosydelsoporte,luegotaladrelosagujeros.
Montajeconpasamanos(horizontal)
Parasuelodehormigónomadera
INSTALACIÓN
6
Machine Translated by Google

Montajeconpasamanos(gradiente)
Paso1:Soportefijo
Paso2:Ajusteelángulodelsoporteparaqueseajustealaparteinferiordel
Tambiénesadecuadoparalainstalacióndepasamanosysoportesdearco.
Pasamanos.Determinelaposicióndeinstalacióndelpasamanosyluegomarque
Paso3:Utilicelostornillosautorroscantesdelaccesorioparafijarelpasamanosa
Elapoyo.
tornillosderosca.
Silainstalaciónesunpasamanosdemadera,puedesatornillarlodirectamente.
Coloquelosagujerosdebajodelpasamanosyelsoporte,luegotaladrelos
agujeros.Silainstalaciónesunpasamanosdemadera,puedeatornillarlodirectamente
tornillosderosca.
7
Machine Translated by Google
8
Fijenuevamenteelposteyelsoporte.
Tambiénesadecuadoparalainstalación.
Paso3:Retireelsoportedelposteyluegouselostornillosautorroscantesenelaccesorio
parafijarelsoportealpasamanos.
Nota:Elpasamanosyelsoportesepuedenfijarpreviamenteconlaayudade
herramientasdesujeción,demodoquesepuedanmarcaryposicionarvariospuntosde
instalacióndelsoportealmismotiempo.
ParaelmodeloHR017
depasamanosysoportesdearco.
Machine Translated by Google

Precaución:Alinstalarlospostes,ajustelaposicióndelosmismosen
Paratensordepernos,montajehorizontalyenángulo.
Parafundaprotectoraderuedadenivel
Comosemuestraacontinuación.
lahuelladelescalón,demodoqueelalambreestécercadelaposicióndelborde,y
generalmenteserecomiendaqueelespaciadoseainferiora5mm.
Instalarconcabledeaceroyaccesorios.
9
Machine Translated by Google

10
ImportadoaAUS:SIHAOPTYLTD.1ROKEVASTREETEASTWOODNSW2122Australia
ImportadoaEE.UU.:SanvenTechnologyLtd.Suite250,9166AnaheimPlace,Rancho
Cucamonga,CA91730
Fabricante:ShanghaimuxinmuyeyouxiangongsiDirección:
Shuangchenglu803nong11hao1602A1609shi,baoshanqu,shanghai200000CN.
Paratensoresdetensoryterminalesfijos
YHCONSULTINGLIMITED.ALADIRECCIÓNDEYH
ConsultingLimitedOficina147,CenturionHouse,London
Road,StainesuponThames,Surrey,TW184AX
ECrossStuGmbH
MainzerLandstr.69,
60329FráncfortdelMeno.
REPRESENTANTECE
REPRESENTANTEDELREINOUNIDO
Machine Translated by Google


SŁUPEK BARIERY KABLOWEJ
HR-015/HR-016/HR-017/HR-018/HR-019/HR-020/HR-021/
HR-022/HR-023
HR-008/HR-009/HR-010/HR-011/HR-012/HR-013/HR-014
MODEL:HR-001/HR-002/HR-003/HR-004/HR-005/HR-006/HR-007/
Wsparcie techniczne i certyfikat gwarancji elektronicznej www.vevor.com/support
Nadal staramy się oferować Państwu narzędzia w konkurencyjnych cenach.
„Oszczędź połowę”, „Połowa ceny” lub inne podobne wyrażenia używane przez nas stanowią
jedynie szacunkowe oszczędności, jakie możesz uzyskać, kupując u nas określone narzędzia w
porównaniu z głównymi markami i niekoniecznie oznaczają one objęcie wszystkich kategorii narzędzi
oferowanych przez nas. Uprzejmie przypominamy, aby dokładnie sprawdzić, czy składając u nas
zamówienie faktycznie oszczędzasz połowę w porównaniu z głównymi markami.
Machine Translated by Google

- 1 -
POTRZEBUJESZ POMOCY? SKONTAKTUJ SIĘ Z NAMI!
SŁUPEK BARIERY KABLOWEJ
HR-015/HR-016/HR-017/HR-018/HR-019/HR-020/HR-021/
<Zdjęcie tylko w celach informacyjnych>
HR-008/HR-009/HR-010/HR-011/HR-012/HR-013/HR-014
MODEL:HR-001/HR-002/HR-003/HR-004/HR-005/HR-006/HR-007/
Masz pytania dotyczące produktu? Potrzebujesz wsparcia technicznego? Skontaktuj się z
nami: Wsparcie
techniczne i certyfikat E-Gwarancji www.vevor.com/support
HR-022/HR-023
To jest oryginalna instrukcja, przed użyciem należy uważnie przeczytać
wszystkie instrukcje. VEVOR zastrzega sobie jasną interpretację naszej instrukcji
obsługi. Wygląd produktu będzie zależał od produktu, który otrzymałeś.
Prosimy o wybaczenie, że nie poinformujemy Cię ponownie, jeśli w naszym
produkcie pojawią się jakiekolwiek aktualizacje technologiczne lub oprogramowania.
Machine Translated by Google

2. Możliwości produktu odnoszą się do produktu prawidłowo i całkowicie zmontowanego
oddzielić wszystkie części w czystym miejscu pracy.
uszkodzenie cennego mienia.
Dokładamy wszelkich starań, aby dostarczać produkty wysokiej jakości i profesjonalną obsługę.
Wskazania dotyczące instalacji i odpowiedni słupek
serwis i sprawiają, że VEVOR jest marką godną zaufania.
1. Ostrzeżenie wskazuje, że należy podjąć odpowiednie działania w celu uniknięcia
4. Aby uzyskać dodatkowe informacje dotyczące części wymienionych poniżej,
obsługi lub serwisowania tego produktu. Nieprzestrzeganie tych
wewnętrzne i zewnętrzne balustrady o niskich kosztach utrzymania. Należy pamiętać, że nie jest to
elementy złączne, z wyłączeniem liny stalowej, zestawu balustrad kablowych, poręczy.
polecane dla projektów nadmorskich.
ostrzeżenia i instrukcje mogą spowodować obrażenia ciała lub
strony, zapoznaj się ze schematem montażu w tym podręczniku. Rozpakuj i
3. Trzymaj małe części zamienne poza zasięgiem dzieci, to nie jest zabawka.
Dotyczy wszystkich scenariuszy instalacji inżynieryjnych.
tylko.
OSTRZEŻENIE: Przed przystąpieniem do użytkowania należy przeczytać i zrozumieć całą instrukcję.
nie pozwalaj dzieciom na zabawę.
akcesoria dekoracyjne.
Słupek balustrady kablowej firmy VEVOR wykonany jest w całości ze stali nierdzewnej,
ma dużą odporność na rdzę i korozję. Będzie działać przez długi czas
Uwaga: Produkt obejmuje wyłącznie kolumnę i jej montaż.
potencjalne niebezpieczeństwo obrażeń ciała.
Produkt ten jest głównie stosowany do montażu kolumnowego funkcji przewodowych i
ZAPISZ TE INSTRUKCJE
GŁÓWNE CECHY
WAŻNE ZABEZPIECZENIA
INSTRUKCJA INSTALACJI
- 2 -
Machine Translated by Google

wyświetlacz, użytkownicy muszą dokonać układu zgodnie ze swoimi rzeczywistymi
potrzebami, dopasowując strukturę słupa i liny stalowej, zestawu balustrad kablowych, poręczy
i innych akcesoriów.
Uwaga: Powyższy rysunek przedstawia jedynie przykład układu instalacji.
A
- 3 -
Machine Translated by Google
12
L
914
50*50 Czarny
1
84
10
HR-006 30° 1067
10
1
50*50 Srebro
84
10
30*50 Czarny
φ10,5
84
HR-018 poziom 1067
1
50*50 Czarny
84
50*50 Czarny
1067
HR-011
1
/
/
10
HR-007
1
4
10,5×12 84
12
84
38*38 Czarny
/
HR-009 poziom 914
12
HR-004 poziom 914
1
10,5×12 84
12
HR-023 poziom 1067
50*50 Czarny
30*50 Czarny
/
914
1
φ10,5
50*50 Czarny
10
HR-014
HR-010 30°
1
84
φ10,5
10
HR-005 30° 1067
1
φ10,5
30*50 Srebrny
/
12
30*50 Czarny
/
φ10,5
HR-017 nr 914
1
50*50 Czarny
84
12
50*50 Czarny
φ10,5
50*50 Srebro
HR-021 poziom 1067
HR-016
φ10,5
φ10,5
50*50 Srebro
φ10,5
10
HR-012 poziom 914
1
1
84
12
HR-008 nr 914
HR-003 poziom 1067
/
4
84
12
HR-022 poziom 914
30*50 Czarny
30*50 Czarny
84
L
φ10,5
φ10,5
50*50 Czarny
1
φ10,5
12
HR-013 30° 1067
1
84
10,5×12 84
HR-019 nr 1067
1
HR-015 30°
50*50 Czarny
30*50 Czarny
84
L
1
/
1
12
10
L
4
φ10,5
10,5×12 84
HR-001 poziom 1067
10
30*50 Czarny
10,5×12 84
HR-020 poziom 914
914
50*50 Czarny
φ10,5
φ10,5
30*50 Czarny
84
914
1
1
/
84
10
1067
HR-002 poziom 914
4
84
INFORMACJE O PRODUKCIE
Sekcja
numer
Wysokość
- 4 -
dziury
Włączać
(mm)
średnica
(mm)
Wywiercony
(mm)
rozmiar
Otwór
H
Kolor
(mm)
(szt.)
Model wiercony
Machine Translated by Google

HR-018/
12/HR-019/H
R-021/HR-02
HR-013~
HR-0
17
HR005~HR0
HR-022/
HR-020/
HR-002 HR-004
HR-003/
HR-016/
3/
HR-001/
ZAWARTOŚĆ PAKIETU
4
nt
4
/
Otwarty koniec
4
8
Zdjęcie
/
1
4
1
/
4
/
16
4
Plastikowy
ILOŚĆ
post
śruba
1
1
1
klucz
1
2
1
kotwica
1
4
16
4
10
To komponuje
/
7
śruba
4
Poziomy
/
1
4
4
/
/
3
4
1
okładka ar
5
8
/
okładka
Dopasowany model
/
klątwa
4
2
8
nawias
1
1
NIE
1
Prostokąt
Stukający
/
4
/
4
1
/
/
okładka
klucz
1
nawias
6
9
/
4
- 5 -
/
4
/
1
1
2
Kwadrat
Zakrzywiony
Machine Translated by Google

oznaczone punkty.
zrobić otwór o średnicy 12
Krok 3. Wbijaj młotkiem
Krok 5. Zamknij pokrywę i zakończ mocowanie słupka.
miejsca instalacji.
Krok 2. Użyj wiertarki udarowej
wskazuje na właściwe
Krok 1. Zaznacz miejsce wiercenia
Krok 4. Dokręć
wywiercony otwór.
śruby
śruba kotwiczna w
Montaż z poręczą (poziomy)
Do podłóg betonowych lub drewnianych
INSTALACJA
- 6 -
Krok 1: Stały wspornik
Krok 2: Określ miejsce montażu poręczy, a następnie zaznacz
postu.
Uwaga: Upewnij się, że kolumna jest ustawiona pionowo podczas mocowania płyty dolnej.
pozycję pod poręczą i otworami wspornika, a następnie wywierć otwory.
Machine Translated by Google

Montaż z poręczą (gradient)
Krok 2: Dostosuj kąt uchwytu tak, aby pasował do spodniej części
Nadaje się również do montażu poręczy łukowych i wsporników.
Krok 1: Stały wspornik
poręcz. Określ miejsce montażu poręczy, a następnie zaznacz
Krok 3: Za pomocą wkrętów samogwintujących z akcesorium przymocuj poręcz do
wsparcie.
wkręty samogwintujące.
Jeśli instalacją jest poręcz drewniana, można ją przykręcić bezpośrednio
pozycję pod poręczą i otworami na wspornik, a następnie wywierć otwory. Jeśli
instalacja obejmuje drewnianą poręcz, możesz bezpośrednio wkręcić w nią śruby
wkręty samogwintujące.
- 7 -
Machine Translated by Google

- 8 -
Krok 3: Zdejmij uchwyt ze słupka i za pomocą wkrętów samogwintujących z akcesorium
przymocuj uchwyt do poręczy.
Nadaje się również do instalacji
Ponownie zamocuj słupek i wspornik.
Uwaga: Poręcz i uchwyt można wstępnie zamocować za pomocą zacisków, co
umożliwia jednoczesne oznaczenie i ustawienie wielu punktów montażu uchwytu.
Dla modelu HR-017
poręczy łukowych i wsporników.
Machine Translated by Google

Uwaga: Podczas montażu słupków należy dostosować ich położenie
Jak pokazano poniżej.
Do poziomego i kątowego montażu napinacza szpilek
Do tulei ochronnej koła poziomego
stopnia tak, aby drut znajdował się blisko krawędzi stopnia, przy czym zaleca się, aby odstęp
między drutami był mniejszy niż 5 mm.
Montaż za pomocą liny stalowej i elementów mocujących
- 9 -
Machine Translated by Google

REP WIELKIEJ BRYTANII
Przedstawiciel UE
Producent: Shanghaimuxinmuyeyouxiangongsi Adres:
Shuangchenglu 803nong11hao1602A-1609shi, Baoshanqu, Szanghaj 200000 CN.
Importowane do USA: Sanven Technology Ltd. Suite 250, 9166 Anaheim Place, Rancho
Cucamonga, CA 91730
Importowane do AUS: SIHAO PTY LTD. 1 ROKEVA STREETEASTWOOD NSW 2122 Australia
Do napinacza śruby rzymskiej i zacisku stałego
Mainzer Landstr.69,
60329 Frankfurt nad Menem.
YH CONSULTING LIMITED. C/O YH Consulting Limited Biuro
147, Centurion House, London Road, Staines-upon-
Thames, Surrey, TW18 4AX
E-CrossStu GmbH
- 10 -
Machine Translated by Google


HR-015/HR-016/HR-017/HR-018/HR-019/HR-020/HR-021/
HR-008/HR-009/HR-010/HR-011/HR-012/HR-013/HR-014
MODEL: HR-001/HR-002/HR-003/HR-004/HR-005/HR-006/HR-007/
HR-022/HR-023
Wij streven er voortdurend naar om u gereedschappen tegen concurrerende prijzen te leveren.
"Save Half", "Half Price" of andere soortgelijke uitdrukkingen die wij gebruiken, geven alleen een schatting van de
besparingen die u kunt behalen door bepaalde gereedschappen bij ons te kopen in vergelijking met de grote topmerken
en betekent niet noodzakelijkerwijs dat alle categorieën gereedschappen die wij aanbieden, worden gedekt. Wij
herinneren u eraan om zorgvuldig te controleren of u daadwerkelijk de helft bespaart in vergelijking met de grote
topmerken wanneer u een bestelling bij ons plaatst.
KABELLEUNING PAAL
Technische ondersteuning en e-garantiecertificaat www.vevor.com/support
Machine Translated by Google

HR-015/HR-016/HR-017/HR-018/HR-019/HR-020/HR-021/
HR-022/HR-023
HR-008/HR-009/HR-010/HR-011/HR-012/HR-013/HR-014
MODEL: HR-001/HR-002/HR-003/HR-004/HR-005/HR-006/HR-007/
<Afbeelding alleen ter referentie>
Dit is de originele instructie, lees alle handleidingen zorgvuldig door
voordat u het product gebruikt. VEVOR behoudt zich een duidelijke interpretatie
van onze gebruikershandleiding voor. Het uiterlijk van het product is
afhankelijk van het product dat u hebt ontvangen. Vergeef ons dat we u niet
opnieuw zullen informeren als er technologie- of software-updates voor ons product zijn.
Heeft u vragen over het product? Heeft u technische ondersteuning nodig? Neem dan gerust
contact met
ons op: Technische ondersteuning en E-garantiecertificaat
www.vevor.com/support
KABELLEUNING PAAL
HULP NODIG? NEEM CONTACT MET ONS OP!
- 1 -
Machine Translated by Google

BEWAAR DEZE INSTRUCTIES
- 2 -
4. Voor aanvullende informatie over de onderdelen die in de volgende lijst staan vermeld,
De kabelleuningpaal van VEVOR is gemaakt van roestvrij staal, wat
binnen- en buitenleuningen met weinig onderhoud. Let op, het is niet
WAARSCHUWING: Lees en begrijp deze hele handleiding voordat u
kinderen niet laten spelen.
alleen.
decoratieve accessoires.
3. Houd kleine reserveonderdelen buiten bereik van kinderen, het is geen speelgoed.
2. Producteigenschappen zijn van toepassing op een correct en volledig gemonteerd product
Dit product wordt voornamelijk gebruikt voor kolominstallatie van draadfuncties en
heeft een grote weerstand tegen roest en corrosie. Het zal een lange levensduur hebben voor
Installatie-indicatie en Toepasselijke post
Toepasbaar op alle technische installatiescenario's.
het potentiële gevaar van persoonlijk letsel.
Let op: Dit product omvat alleen de kolom en de installatie ervan
1. De waarschuwing geeft aan dat er passende maatregelen moeten worden genomen om te voorkomen
service en maken van VEVOR een betrouwbaar merk.
schade aan waardevolle eigendommen.
Scheid alle onderdelen in een schone werkruimte.
Wij doen er alles aan om kwaliteitsproducten en professionele service te leveren
waarschuwingen en instructies kunnen persoonlijk letsel of
pagina's, raadpleeg dan het montageschema van deze handleiding. Uitpakken en
aanbevolen voor kustprojecten.
bevestigingsmiddelen, exclusief staalkabel, kabelleuningset, leuning.
het bedienen of onderhouden van dit product. Het niet naleven van deze
BELANGRIJKSTE KENMERKEN
BELANGRIJKE VEILIGHEIDSMAATREGELEN
INSTALLATIE-INSTRUCTIES
Machine Translated by Google

- 3 -
A
Om het display te kunnen gebruiken, moeten gebruikers de indeling aanpassen
aan hun werkelijke behoeften, waarbij de structuur van de kolom en de staalkabel,
kabelrailset, leuning en andere accessoires moet worden afgestemd.
Let op: de bovenstaande afbeelding is slechts een voorbeeld van de installatie-indeling
Machine Translated by Google
(mm)
Gat
H
maat Kleur
(mm)
Sectie
Model geboord
- 4 -
(mm)
(stuks)
gaten
Erbij betrekken
Toonhoogte van
nummer
Geboord
(mm)
diameter
PRODUCTINFORMATIE
10
84
50*50 Zilver
HR-018 niveau 1067
ÿ10,5
84
30*50 Zwart
1
50*50 Zwart
914
Ik
12
1
10
HR-006 30° 1067
10
84
/
4
HR-007
1
10
38*38 Zwart
84
12
1067
50*50 Zwart
ÿ10,5
50*50 Zwart
1
/
84
1
HR-011
914
84
30*50 Zwart
HR-014
10
50*50 Zwart
10,5×12 84
1
1
HR-004 niveau 914
12
HR-009 niveau 914
/
50*50 Zwart
HR-023 niveau 1067
12
10,5×12 84
10,5×12 84
30*50 Zwart
12
50*50 Zwart
1
HR-017 nr. 914
10,5×12 84
10
/
84
HR-010 30°
1
/
30*50 Zilver
ÿ10,5
1
HR-005 30° 1067
HR-012 niveau 914
1
10
ÿ10,5
50*50 Zilver
HR-008 nr. 914
12
84
1
50*50 Zwart
12
ÿ10,5
ÿ10,5
ÿ10,5
HR-016
HR-021 niveau 1067
50*50 Zilver
/
84
1
50*50 Zwart
ÿ10,5
ÿ10,5
Ik
84
1
HR-013 30° 1067
12
12
84
4
84
HR-003 niveau 1067
ÿ10,5
30*50 Zwart
30*50 Zwart
HR-022 niveau 914
Ik
10
12
1
84
10
HR-001 niveau 1067
10,5×12 84
/
4
50*50 Zwart
HR-015 30°
1
HR-019 nr. 1067
84
1
Ik
ÿ10,5
30*50 Zwart
84
/
1
1
914
ÿ10,5
HR-002 niveau 914
4
1067
10
HR-020 niveau 914
/
30*50 Zwart
ÿ10,5
30*50 Zwart
ÿ10,5
ÿ10,5
50*50 Zwart
914
Machine Translated by Google

/
4
nt's
8
4
Open einde
Afbeelding
/
/
1
4
1
4
16
4
/
Hoeveelheid
Plastic
bout
na
1
1
1
2
1
moersleutel
anker
1
10
4
4
1
/
Het componeert
16
7
1
/
4
Horizontaal
schroef
/
4
4
4
3
/
1
ar-cover
/
8
5
Pasmodel
omslag
4
zeshoek
/
1
beugel
2
8
Nee
1
Tikken
De rechthoek
1
4
/
1
4
/
omslag
/
moersleutel
/
9
6
beugel
1
/
- 5 -
4
1
4
/
/
2
1
4
Gebogen
Vierkant
PAKKET INBEGREPEN
HR-003/ HR-0
HR-004
HR-020/
HR-002
HR-022/
HR-018/
HR-001/
HR-016/
3/
HR-013~
R-021/HR-02
12/UUR-019/U
HR005~HR0
17
Machine Translated by Google

om een gat te maken voor ÿ 12 bij
Stap 3. Sla deStap 2. Gebruik een boorhamer
ankerschroef in de
installatielocaties.
de gemarkeerde punten.
wijst op de juiste plaats
Stap 1. Markeer de boring
Stap 4. Draai de
Stap 5. Sluit het deksel en maak de paal vast.
geboord gat.
schroeven
Stap 1: Vaste beugel
Stap 2: Bepaal de installatiepositie van de leuning en markeer vervolgens
van de post.
Let op: Zorg ervoor dat de kolom rechtop staat bij het bevestigen van de bodemplaat
de positie onder de gaten voor de leuning en de beugel en boor vervolgens de gaten.
Montage met leuning (horizontaal)
Voor beton- of houten vloeren
INSTALLATIE
- 6 -
Machine Translated by Google

Montage met leuning (helling)
Het is ook geschikt voor de installatie van boogleuningen en beugels.
de ondersteuning.
Stap 1: Vaste beugel
Stap 3: Gebruik de zelftappende schroeven in het accessoire om de leuning te bevestigen
Stap 2: Pas de hoek van de beugel aan zodat deze op de onderkant van de
schroeven vasttappen.
ÿAls de installatie een houten leuning betreft, kunt u de
schroeven vasttappen.
leuning. Bepaal de installatiepositie van de leuning en markeer vervolgens
de positie onder de leuning en de beugelgaten, boor vervolgens gaten. ÿAls de
installatie een houten leuning is, kunt u de
- 7 -
Machine Translated by Google

Bevestig de paal en de beugel opnieuw.
Stap 3: Verwijder de beugel van de paal en gebruik vervolgens de zelftappende schroeven
in het accessoire om de beugel aan de leuning te bevestigen.
Let op: De leuning en de beugel kunnen met behulp van klemgereedschap vooraf
worden bevestigd, zodat meerdere montagepunten voor de beugel tegelijkertijd
kunnen worden gemarkeerd en gepositioneerd.
van boogleuningen en beugels.
Het is ook geschikt voor de installatie Voor model HR-017
- 8 -
Machine Translated by Google

- 9 -
Installeren met staaldraad en fittingen
Let op: Pas bij het plaatsen van de palen de positie van de palen aan
de aantrede van de trede, zodat de draad zich dicht bij de positie van de neus
bevindt. Over het algemeen wordt aanbevolen dat de afstand kleiner is dan 5 mm.
Voor horizontale montage van de spanner en hoekmontage
Voor Level Wheel Protector Sleeve
Zoals hieronder weergegeven.
Machine Translated by Google

- 10 -
Geïmporteerd naar AUS: SIHAO PTY LTD. 1 ROKEVA STREETEASTWOOD NSW
2122 Australië
Mainzer Landstr.69,
60329 Frankfurt am Main.
Fabrikant: Shanghaimuxinmuyeyouxiangongsi Adres:
Shuangchenglu 803nong11hao1602A-1609shi, baoshanqu, shanghai 200000 CN.
Voor spanschroef en vaste aansluiting
YH CONSULTING LIMITED. C/O YH Consulting Limited
Kantoor 147, Centurion House, London Road, Staines-
upon-Thames, Surrey, TW18 4AX
Geïmporteerd naar de VS: Sanven Technology Ltd. Suite 250, 9166 Anaheim Place,
Rancho Cucamonga, CA 91730
E-CrossStu GmbH
VK REP
EC-REP
Machine Translated by Google


KABELRÄCKESPOST
"Spara halva", "halva priset" eller andra liknande uttryck som används av oss representerar bara
en uppskattning av besparingar du kan dra nytta av att köpa vissa verktyg hos oss jämfört med de
stora toppmärkena och betyder inte nödvändigtvis att täcka alla kategorier av verktyg som erbjuds av
oss. Du påminns vänligen om att noggrant kontrollera när du gör en beställning hos oss om du
faktiskt sparar hälften i jämförelse med de främsta stora varumärkena.
Vi fortsätter att vara engagerade i att ge dig verktyg till konkurrenskraftiga priser.
HR-008/HR-009/HR-010/HR-011/HR-012/HR-013/HR-014
HR-015/HR-016/HR-017/HR-018/HR-019/HR-020/HR-021/
MODELL:HR-001/HR-002/HR-003/HR-004/HR-005/HR-006/HR-007/
HR-022/HR-023
Teknisk support och e-garanticertifikat www.vevor.com/support
Machine Translated by Google

HR-015/HR-016/HR-017/HR-018/HR-019/HR-020/HR-021/
HR-022/HR-023
HR-008/HR-009/HR-010/HR-011/HR-012/HR-013/HR-014
MODELL:HR-001/HR-002/HR-003/HR-004/HR-005/HR-006/HR-007/
Har du produktfrågor? Behöver du teknisk support? Kontakta oss gärna: Teknisk support och
e-
garanticertifikat www.vevor.com/support
<Endast bild för referens>
Detta är den ursprungliga instruktionen, läs alla instruktioner
noggrant innan du använder den. VEVOR reserverar sig för en tydlig
tolkning av vår användarmanual. Utseendet på produkten är beroende
av den produkt du fått. Ursäkta oss att vi inte kommer att informera dig igen
om det finns någon teknik eller mjukvaruuppdateringar på vår produkt.
BEHÖVER HJÄLP? KONTAKTA OSS!
KABELRÄCKESPOST
- 1 -
Machine Translated by Google

SPARA DESSA INSTRUKTIONER
- 2 -
VARNING: Läs och förstå hela denna manual innan
inte låta barn leka.
har stor motståndskraft mot rost och korrosion. Det kommer att fungera under lång livslängd för
VEVORs Kabelräckesstolpe är tillverkad av alla material i rostfritt stål, vilket
3. Förvara små reservdelar utom räckhåll för barn, det är ingen leksak, gör det
Obs: Denna produkt inkluderar endast kolonnen och dess installation
Tillämplig för alla tekniska installationsscenarier.
endast.
dekorativa tillbehör.
fästelement, exklusive stållina, kabelräckessats, ledstång.
Denna produkt används främst för pelarinstallation av trådfunktioner och
2. Produktegenskaper gäller för korrekt och fullständigt monterad produkt
Installationsindikation och tillämplig stolpe
den potentiella faran för personskada.
service och gör VEVOR till ett pålitligt varumärke.
1.Varningen anger att lämpliga åtgärder bör vidtas för att undvika
separera alla delar i ett rent arbetsområde.
skada på värdefull egendom.
Vi arbetar med alla ansträngningar för att tillhandahålla kvalitetsprodukter och professionella
rekommenderas för kustprojekt.
varningar och instruktioner kan orsaka personskada eller
sidorna, se monteringsdiagrammet i denna manual. Packa upp och
4. För ytterligare information om delarna som listas nedan
använda eller serva denna produkt. Underlåtenhet att följa dessa
invändiga och yttre räcken med lågt underhåll. Observera att det inte är det
HUVUDFUNKTIONER
VIKTIGA SÄKERHETSÅTGÄRDER
INSTALLATIONSANVISNING
Machine Translated by Google

- 3 -
A
skärm, användare måste layouta enligt deras faktiska behov, matcha strukturen
på pelaren och stållinan, kabelräckessats, ledstång och andra tillbehör.
Obs: Ovanstående figur är endast ett exempel på installationslayouten
Machine Translated by Google

Hål
H
(mm)
storlek Färg
Modell Borrad
Avsnitt
- 4 -
(mm)
(st)
hål
Omfatta
antal
Pitch av
(mm)
Borrad
(mm)
diameter
PRODUKTINFORMATION
10
1
HR-012 nivå 914
1
50*50 Silver
ÿ10,5
12
HR-008 nr 914
1
84
50*50 Svart
84
12
HR-016
ÿ10,5
ÿ10,5
50*50 Silver
ÿ10,5
HR-021 nivå 1067
1
50*50 Svart
ÿ10,5
L
ÿ10,5
ÿ10,5
1
84
12
HR-013 30° 1067
84
12
HR-003 nivå 1067
4
/
30*50 Svart
84
HR-022 nivå 914
30*50 Svart
10
L
1
/
12
10,5×12 84
10
HR-001 nivå 1067
4
ÿ10,5
HR-015 30°
1
50*50 Svart
10,5×12 84
HR-019 nr 1067
L
1
30*50 Svart
84
1
84
/
914
1
HR-002 nivå 914
4
84
10
1067
10,5×12 84
HR-020 nivå 914
30*50 Svart
30*50 Svart
84
914
ÿ10,5
ÿ10,5
50*50 Svart
10
50*50 Silver
84
84
HR-018 nivå 1067
30*50 Svart
ÿ10,5
914
1
50*50 Svart
12
L
10
HR-006 30° 1067
1
84
10
4
10,5×12 84
10
HR-007
1
38*38 Svart
84
12
50*50 Svart
84
1067
1
50*50 Svart
/
/
HR-011
1
914
30*50 Svart
/
10
HR-014
1
50*50 Svart
ÿ10,5
HR-004 nivå 914
1
/
12
HR-009 nivå 914
HR-023 nivå 1067
50*50 Svart
10,5×12 84
12
30*50 Svart
/
12
1
50*50 Svart
ÿ10,5
HR-017 nr 914
ÿ10,5
10
HR-010 30°
1
84
30*50 Silver
ÿ10,5
/
HR-005 30° 1067
Machine Translated by Google

/
/ /
4
1
4
- 5 -
Fyrkant
4
Böjd
2
1
täcka
/
rycka
/
4
1
/
/
konsol
1
9
6
1
Inga
2
1
konsol
4
/
1
Tappning
Rektangeln
8
5
/
1
ar omslag
hex
/
4
8
täcka
Passande modell
4
Horisontell
1
/
7
skruva
/
4
3
4
4
/
förankra
1
1
rycka
2
/
Den komponerar
4
1
16
4
10
Plast
ANTAL
4
/
4
16
1
1
1
bult
posta
4
Öppen ände
8
nts
/
4
4
1
/
1
Bild
PAKET INGÅR
HR-004
HR-003/
HR-022/
HR-020/
HR-002
HR-001/
HR-018/
HR-016/
3/
HR-013~
R-021/HR-02
12/HR-019/H
17
HR005~HR0
HR-0
Machine Translated by Google

de markerade punkterna.
Steg 2. Använd en borrhammare Steg 3.Hammare
borrat hål.installationsplatser.
att göra ett hål för ÿ 12 kl
pekar på lämpligt
Steg 1. Markera borrningen
Steg 4. Dra åt
Steg 5. Stäng locket och slutför fixeringen av stolpen.
skruvar
ankarskruven i
Steg 1: Fast fäste
läget under ledstången och hålen för fästet, borra sedan hål.
av posten.
Obs: Se till att pelaren är upprätt när du fäster bottenplattan
Steg 2: Bestäm monteringspositionen för ledstången och markera sedan
Montera med ledstång (horisontell)
För betong- eller trägolv
INSTALLATION
- 6 -
Machine Translated by Google

Montera med ledstång (lutning)
Steg 1: Fast fäste
Steg 2: Justera vinkeln på fästet för att passa undersidan av
stödet.
Steg 3: Använd de självgängande skruvarna i tillbehöret för att fästa ledstången på
Det är också lämpligt för montering av bågsräcken och konsoler.
gängskruvar.
ÿOm installationen är en trähandledare kan du direkt skruva i
räcke. Bestäm monteringspositionen för räcket och markera sedan
läget under ledstången och hålen för fästet, borra sedan hål. ÿOm
installationen är en trähandledare kan du direkt skruva i
gängskruvar.
- 7 -
Machine Translated by Google

Fixa stolpen och fästet igen.
av bågsräcken och fästen.
Steg 3: Ta bort fästet från stolpen och använd sedan de självgängande skruvarna i
tillbehöret för att fästa fästet på ledstången.
Obs: Ledstången och fästet kan förfixeras med hjälp av spännverktyg, så att flera
monteringspunkter för fästet kan markeras och placeras samtidigt.
För modell HR-017Den är också lämplig för installationen
- 8 -
Machine Translated by Google

- 9 -
Installera med stållina och beslag
För Dubbspännare Horisontell montering och Vinkel
stegets slitbana, så att vajern är nära nospositionen, och det rekommenderas generellt
att avståndet är mindre än 5 mm.
Varning: När du installerar stolparna, justera positionen för stolparna in
För nivåhjulsskyddshylsa
Som visas nedan.
Machine Translated by Google

- 10 -
Importerad till AUS: SIHAO PTY LTD. 1 ROKEVA STREETEASTWOOD NSW 2122
Australien
YH CONSULTING LIMITED. C/O YH Consulting Limited
Office 147, Centurion House, London Road, Staines-upon-
Thames, Surrey, TW18 4AX
Tillverkare: Shanghaimuxinmuyeyouxiangongsi Adress:
Shuangchenglu 803nong11hao1602A-1609shi, baoshanqu, shanghai 200000 CN.
För spännskruv och fast anslutning
E-CrossStu GmbH
Mainzer Landstr.69,
60329 Frankfurt am Main.
Importerad till USA: Sanven Technology Ltd. Suite 250, 9166 Anaheim Place, Rancho
Cucamonga, CA 91730
UK REP
EC REP
Machine Translated by Google