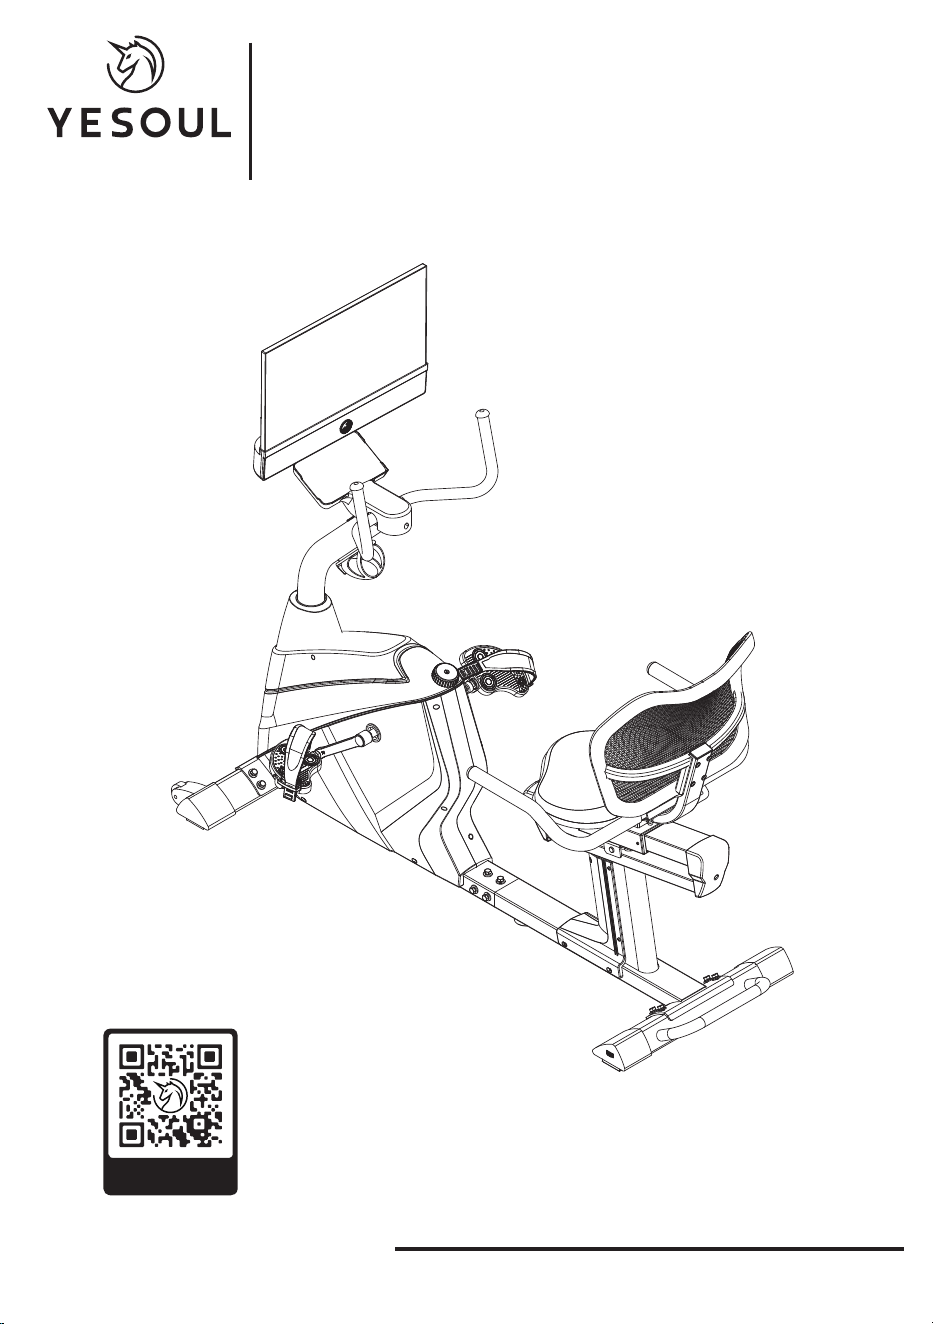
Scan for Installation Guide
Scan the QR code to get the
installation guide video to watch
Product model:YS-BJ1PLUS
Item NO.:J1PLUST
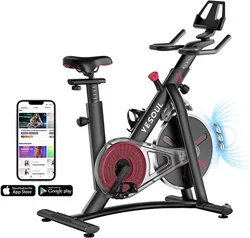
J1 PLUST
EXERCISEBIKE
YESOUL EXERCISEBIKE
J1 PLUST Product Manual
Please read all the details of
this manual before use,
and keep it for future reference.
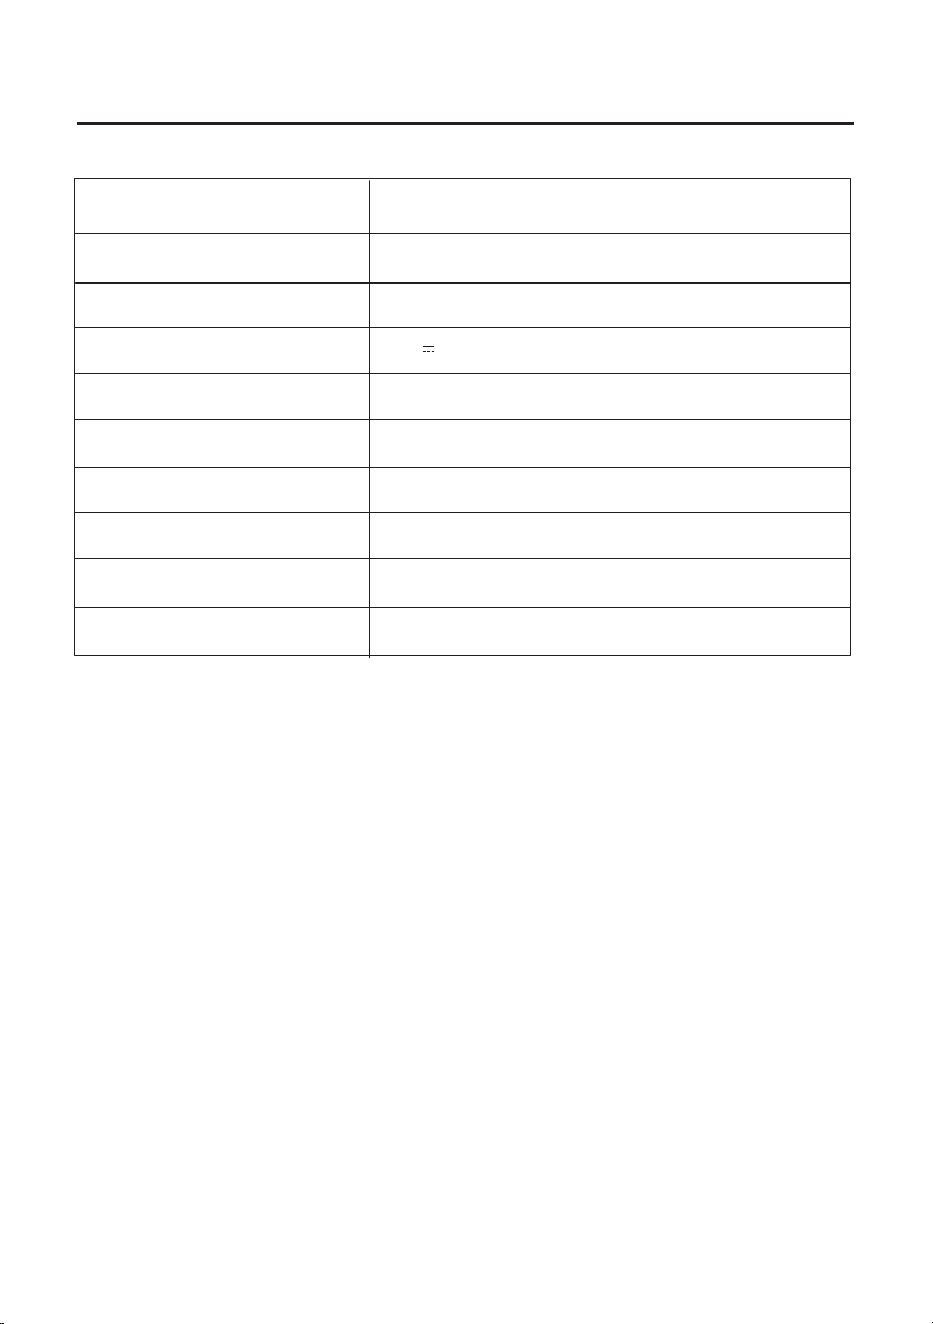
Product Specifications
Power supply input
Applicable Height
Rated maximum load
Net weight
Gross weight
Overall dimensions
Supported software version
iOS 12.0 or above, Android 5.1 or above (inclusive)
24V 2A
Wireless connection method
WiFi2.4Ghz/BT/BLE
140 ~ 195cm
120kg
44.8kg
50kg
(Length) 1570mm × (Width) 600mm × (Height) 1380mm
EN ISO 20957-1:2013 EN ISO 20957-10:2017
Bluetooth
Executive standards
Exercisebike: V4.2, Speaker: V5.3
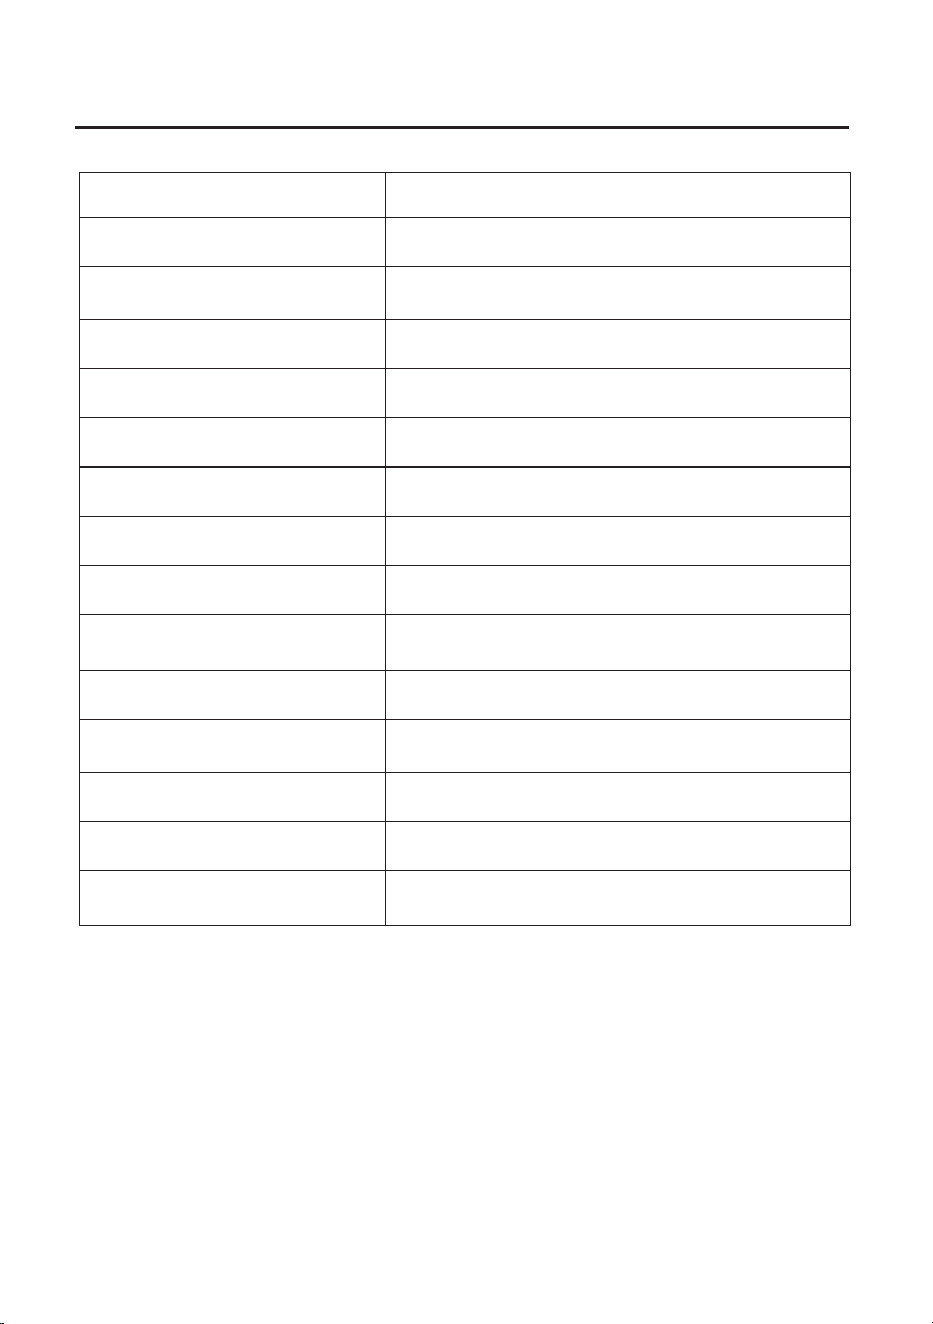
Panel type
Curvature
Aspect ratio
Size
Backlight type
Display size (H*V)
Resolution
Refresh rate
Port version
Indicator mode (power on, standby)
Storage temperature
Operating temperature
Operating humidity
Storage humidity
Control method
Monitor Specifications
VA
Flat screen
16:9
21.5 inches
LED
476mm*268mm
1920*1080
Max:60HZ
1*USB+Type-c+TTL+Audio out+DC-IN
Blue light indicates power on, light turns off when power
is off, and blinks every 0.5 seconds in standby mode.
-20ºC~60ºC
0ºC~40ºC
10~90%RH
10~90%RH
Five-way joystick buttons
◆This equipment is only suitable for indoor and household use. Maximum user
weight and load capacity is 120kg.
◆This equipment is classified as Class H and is not suitable for medical use.
◆This equipment is for adults only. Children and pets should stay away from this
equipment. It can only be operated under the guidance of adults.
◆Before assembly, you need to fully understand this manual and check the
parts list provided with this equipment, and install it in full accordance with
the instruction manual.
◆The product must be installed carefully by adults. Under uncertainty,
please ask someone with mechanical experience to help.
◆Applicable tools must be used during installation. If necessary, ask a other
people other people to assist you in the installation.
◆Fitness equipment needs to be placed on a flat, non-slip floor. If placed in a
humid space, the long-term use of the equipment will be affected by corrosion.
◆Please check whether each screw component is tight before use, and ensure
that there is a 0.6-meter space around the equipment, and there should be no
protruding adjustable devices.
◆Regularly check whether all connecting parts of the equipment are tight and in
normal condition to ensure the safety level of the equipment.
◆Do not use corrosive cleaning agents during maintenance and cleaning to
avoid liquid entering the equipment from the tail or gaps.
◆Replace defective parts immediately. Do not use the equipment until it is
replaced. If you have any questions, please consult a professional after-sales
service or dealer.
◆This equipment can only be used by one person at a time. Please alert possible
dangers to those around you, such as the dangers caused by moving parts during
exercise.
◆Please use this equipment according to the instructions in the manual and
warm up fully before exercising.
◆Wear well-fitting clothes when exercising to prevent baggy clothes from being
caught by equipment or restricting movement.
◆Please do not exercise before or after meals.
◆Please pay attention to the exercise methods and resistance adjustment
methods in the instructions.
◆Lift the rear tube, and the rollers on the front tube can move the product freely
or place it in a suitable position.
◆The resistance of this equipment has nothing to do with speed. The resistance
has nothing to do with the rotation speed during the driving process of the
equipment and remains constant.
Important Safety Instructions
Please read them carefully. Improper use may result in body
injury or death!
◆During exercise, your hands need to be firmly held on the fixed armrests (or
movable handles).
◆Please follow the installation instructions and only use the components
configured with this equipment.
◆If you feel dizziness, nausea, chest pain or other abnormal symptoms, please
stop exercising immediately and consult your doctor.
◆Patients with high blood pressure, heart disease, lumbar spondylosis, pregnant
women, people with limited mobility, etc., please obtain the consent of a doctor
before use.
◆Children or people with disabilities must use this equipment under the guid-
ance of skilled personnel.
◆Do not put any part of your body into the sports area.
◆In the adjustable parts of the equipment, pay special attention to the marked
maximum limit adjustment.
◆Check whether all components are not missing according to the parts list.
◆Before starting assembly, please read the installation instructions thoroughly
and understand the corresponding schematic diagram.
◆Please note that when using tools and assembling, there may be a risk of injury,
so be careful when installing the product.
◆After assembling the product according to the instructions, please carefully
check whether the screws, nuts, and knobs are installed correctly and tightened
in place.
◆After installation, please do not place the tools randomly.
◆It is recommended that you place a protective pad (not included in the product
scope) under the product to protect the floor, because the rubber of the product
will inevitably leave traces.
Important Safety Instructions
Please read them carefully. Improper use may result in body
injury or death!
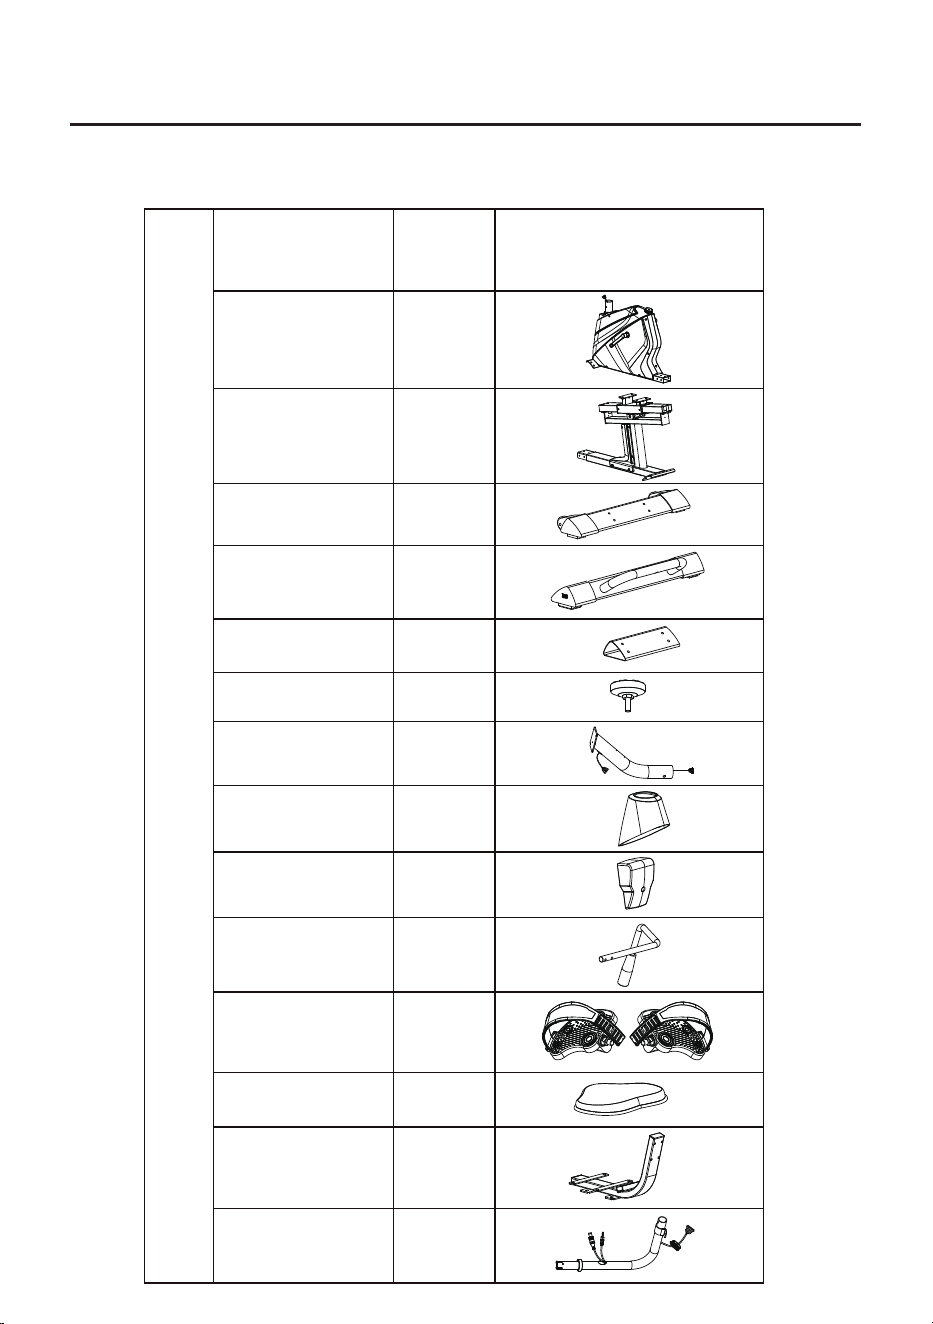
Adjustment handle
Pedal set left/right
Seated cushion
Back tube
Monitor holder
1
Main frame
Bottom tube
Sitting frame
Front foot tube
Rear foot tube
(Right)
(Left)
1
1
1
1
1
1
1
1
2
1
1
1
1
Handlebar riser
Adjustable foot pad
Riser cover
Slide rail cover
Installation Guide - List of Parts
STEP1: Check of parts
Parts List (Components List)
Name Quantity Picture
1
1
1
1
1
1
1
1
1
1
1
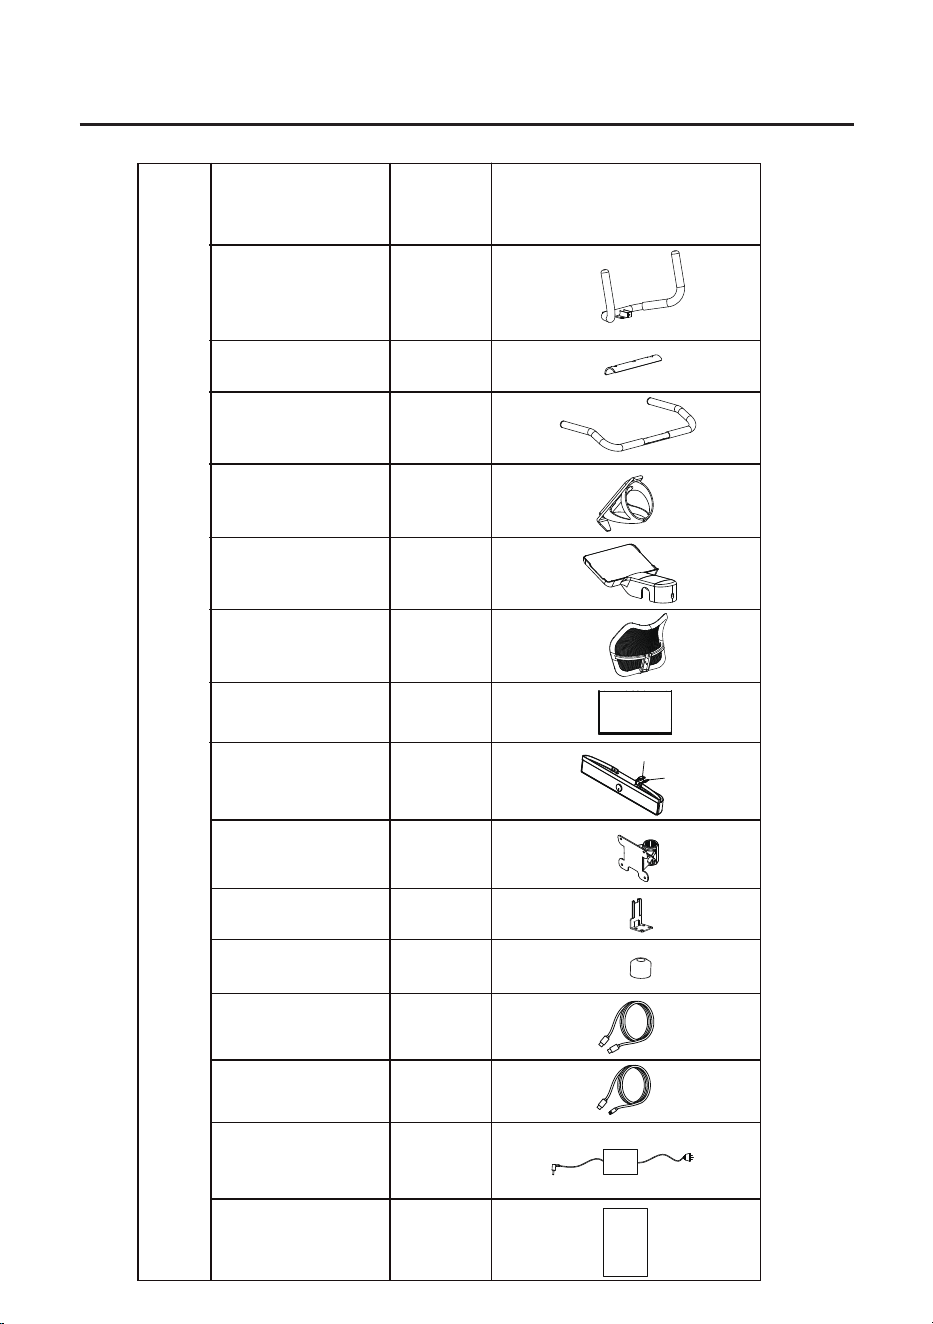
Monitor fixing
element
Armrest assembly
One-piece hood
Handlebar cover
Handlebar
1
Backrest
1
1
1
Installation Guide - List of Parts
Parts List (Components List)
Name Quantity Picture
Speaker
Screen
Power adapter
C to C data cable
C to Lightning
data cable
Instructions
Instructions
Speaker mount
Power port
Signal port
Water bottle cage
Upper connection seat
Installation Guide - List of Parts
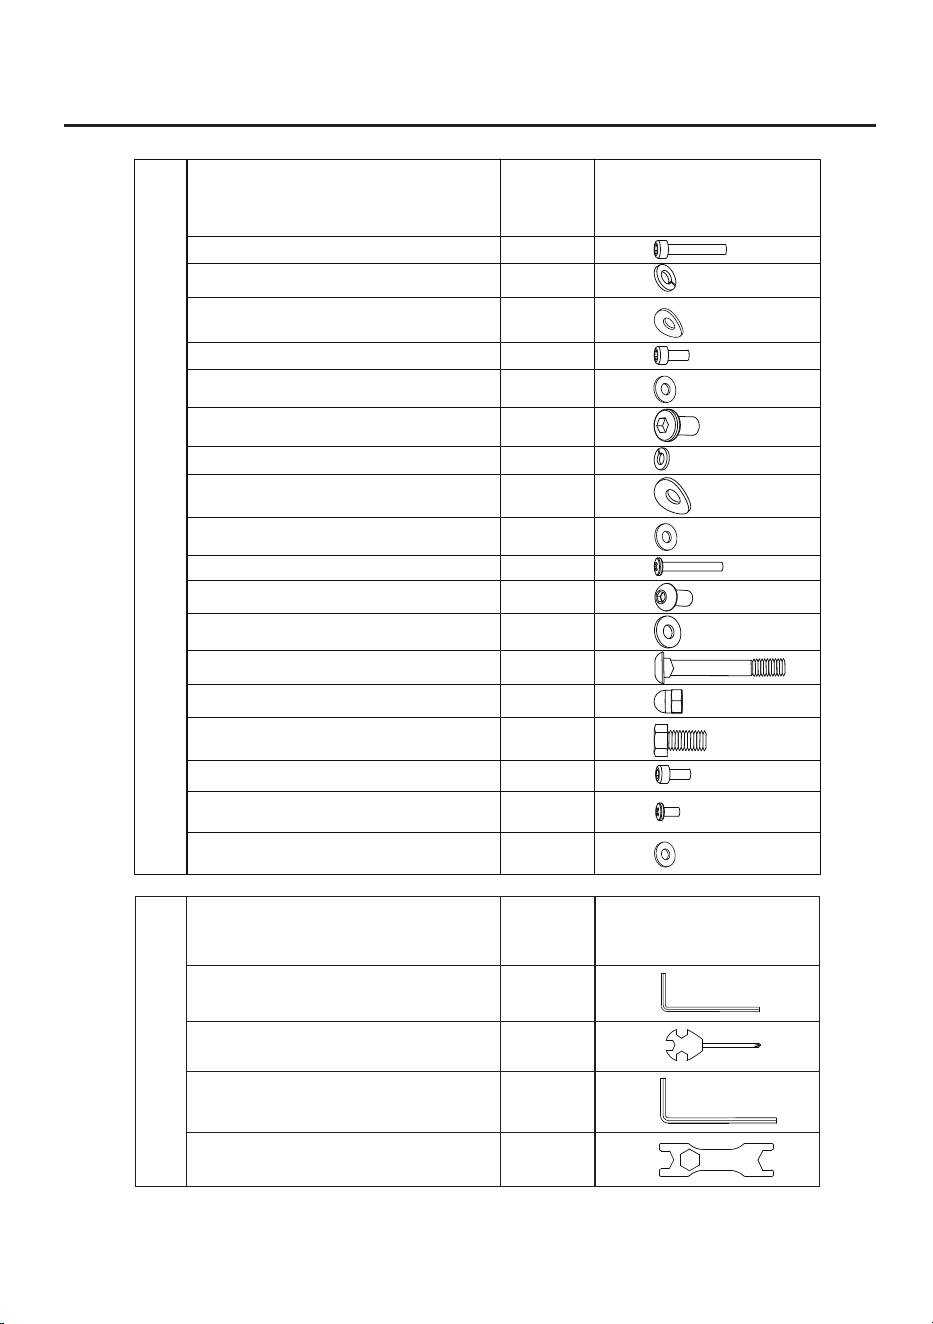
Cross wrench S13-14-15
1
1
1
1
Allen wrench S5
Allen wrench S8
Multi functional wrench S17-18-19
Hexagon socket head screw M6*45*S5
Arc washer d6*Φ16*1.5*R16
1
9
1
4
5
4
12
4
2
4
4
8
2
2
4
1
8
Spring pad d6
Hexagon socket head screw M6*16*S5
Hexagon socket pan head screw M8*16*S5
Washer d6*Φ12*1.5
Spring pad d8
Washer d8*Φ16*1.5
Arc washer d8*Φ20*2*R30
Cross recessed pan head screw M6*40*Φ12
Washer d8*Φ20*2
Hexagon socket pan head screw M8*20*S5
Square neck bolt M8 * 47 * 20 * H5
Cap nut d8*H16*S13
Hexagonal bolt M8*20*S13
Cross recessed pan head screws with
pad M4*10*Φ10.5
Hexagon socket head screw M6*20*S5
4
Washer d6*Φ12*1.2
Parts List (Components List)
Name Quantity Picture
Name Quantity Picture
Implements List (Tools List)
stalled on *In order to facilitate assembly, some accessories have been in
the body before delivery.
Installation Guide
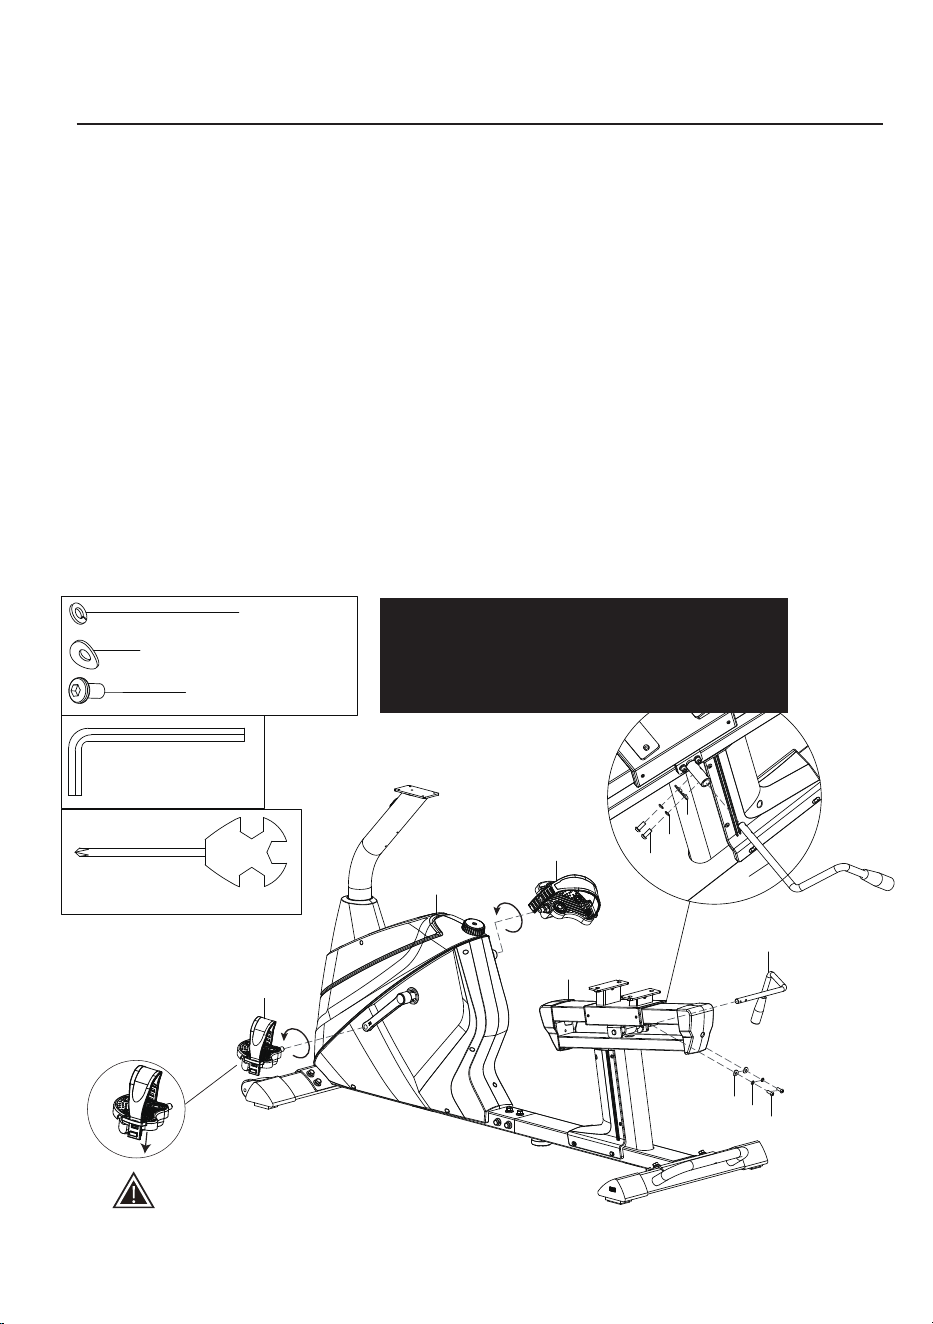
Step 2:
1. First put the riser cover (27) into the handlebar riser (22), then connect the trunk line (116) to the trunk line (117),
and then put the handlebar riser (22) into the main frame (111);
2. Use an allen wrench S5(A) to tighten the riser (22) on the main frame (111) with the allen screws (23), spring
washers (24) and washers (25);
3. Buckle the riser cover (27) into the main frame assembly (111);
4. Use a cross wrench (B) to remove the cross recessed pan head screws (20) pre-installed on the seat frame (112),
and use a cross wrench (B) to secure the slide rail cover (55) with the cross recessed pan head screws (20) tightly
locked on the seat frame (112).
117
22
27
116
116
117
23
24
25
23
24
25
25
24
23
111
55
55
20
20
112
#A S5 1PC
# B S13-14-15 1PC
S13
#24 d8 4PCS
#23 M8*16*S5 4PCS
#25 d8*∅20*2*R30 4PCS
#27 1PC
#20 M5*10*∅10 2PCS
#55 2PCS
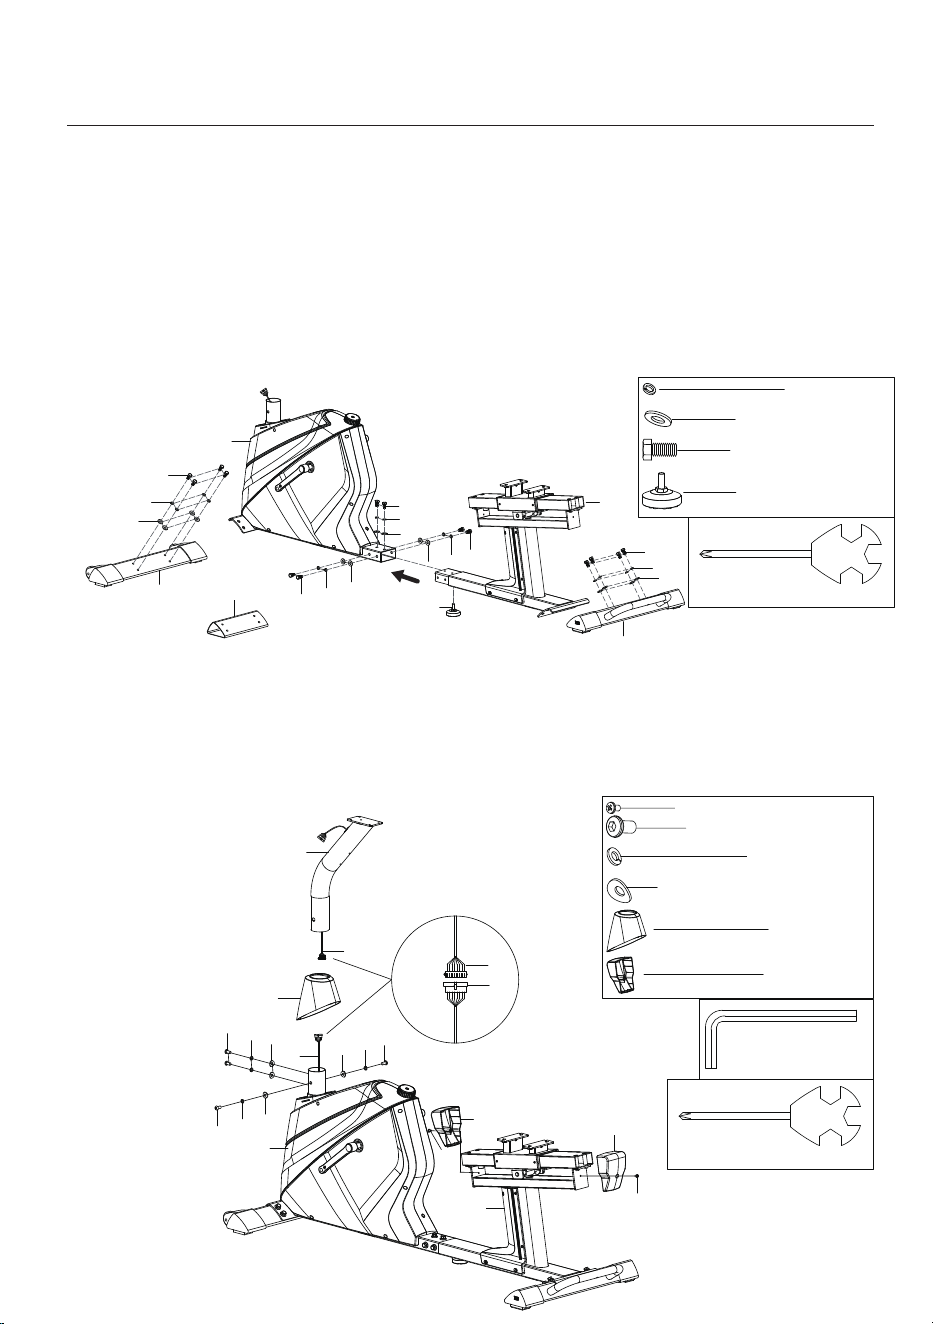
Step 1:
1. Use the cross wrench (B) to remove the bottom tube (114), hexagonal bolt (58), spring washer (24) and washers (34)
pre-installed on the main frame (111);
2. Screw the adjusting foot pad (113) clockwise into the seat frame (112) as shown in the figure;
3. Use a cross wrench (B) to secure the front bottom tube (59) and rear bottom tube (61) with the hexagonal
bolts (58), spring washers (24) and washers (34).Lock on the main frame (111) and the seat frame (112) respectively;
4. Use a cross wrench (B) to remove the hexagonal bolts (58), spring washers (24) and washers (34) pre-installed on
the seat frame (112);
5. First insert the sitting frame (112) into the main frame (111) in the direction shown by the arrow in the figure,
and then use the cross wrench (B) to secure the sitting frame (112),The main frame (111) locked together with
hexagonal bolts (58), spring washers (24) and washers (34).
58
24
34
59
58
24
34
111
61
58
24
34
58
24
34
34
24
58
114
112
113
# 34 d8*Ф20*2 14PCS
#58 M8*20*S13 14PCS
#113 1PC
#24 d8 14PCS
# B S13-14-15 1PC
S13
Align the port to connect to the
screen connection cable,
and retract the excess wire
into the tube.
* Please make sure that the
connection direction is correct.
Please do not connect it with
violence!
Installation Guide
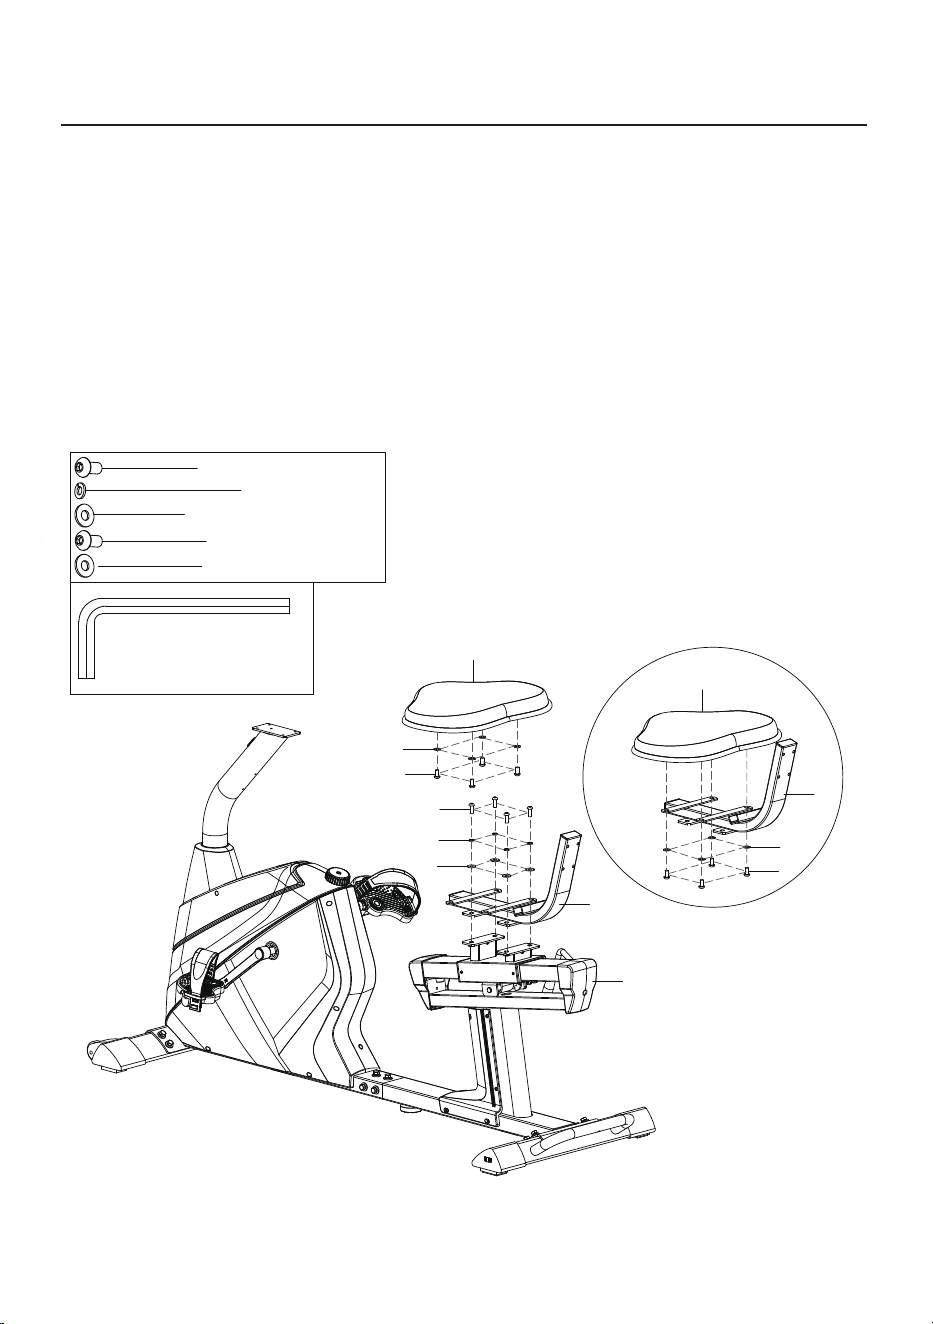
Step 3:
# B S13-14-15 1PC
#A S5 1PC
S13
#12 d6 2PCS
#50 M6*16*S5 2PCS
#13 d6* ∅16 * 1.5 *R16 2PCS
Left pedal
assembly
Right pedal
assembly
63L
63R
48
50
12
13
50
12
13
48
112
111
Note: Check whether the
pedal straps are tightened
before riding. Tighten them
by pulling them down.
Safety tips:
Reverse riding is not recommended, as it is likely to loosen pedals. After reverse
riding, check whether the pedals are locked, in order to avoid safety issues arising
from loose pedals.
Screw the pedal into the crank manually first, and then
tighten the pedal assemblies L/R ④ with the cross
wrench (B). (Note: The tightening directions for both the
left pedal and the right pedal are towards the head
1. Take the pedals from the package(63L/R);
2. Distinguish between the left and right pedals. The right pedal is marked with a "R"
and the left pedal is marked with a "L". (Pay attention to distinguishing the left and
right pedals. If they are installed incorrectly, the crank threads will be damaged!);
3. Stand behind the seat and face the handlebar. Install the right pedal on the right
crank, and ensure that the pedal is vertical to the crank mounting hole.Use a cross
wrench (B) to lock it by turning it towards the front of the bike.Install the left pedal
to the left crank, and ensure that the pedal is vertical to the crank mounting hole.
Use a cross wrench (B) to lock it by turning it towards the front of the bike;
Note: During installation, correspond the L mark on the crank to the L mark on the
pedal, and the R mark on the crank to the R mark on the pedal;
4.Use the allen wrench S5(A) to remove the allen pan head screws (50), spring
washers (12) and washer(13) pre-installed on the adjustment handle (48);
5. Use the allen wrench S5(A) to tighten the adjustment handle (48) on the seat
frame (112) with the allen pan head screw (50), spring washer (12), and washer (13).
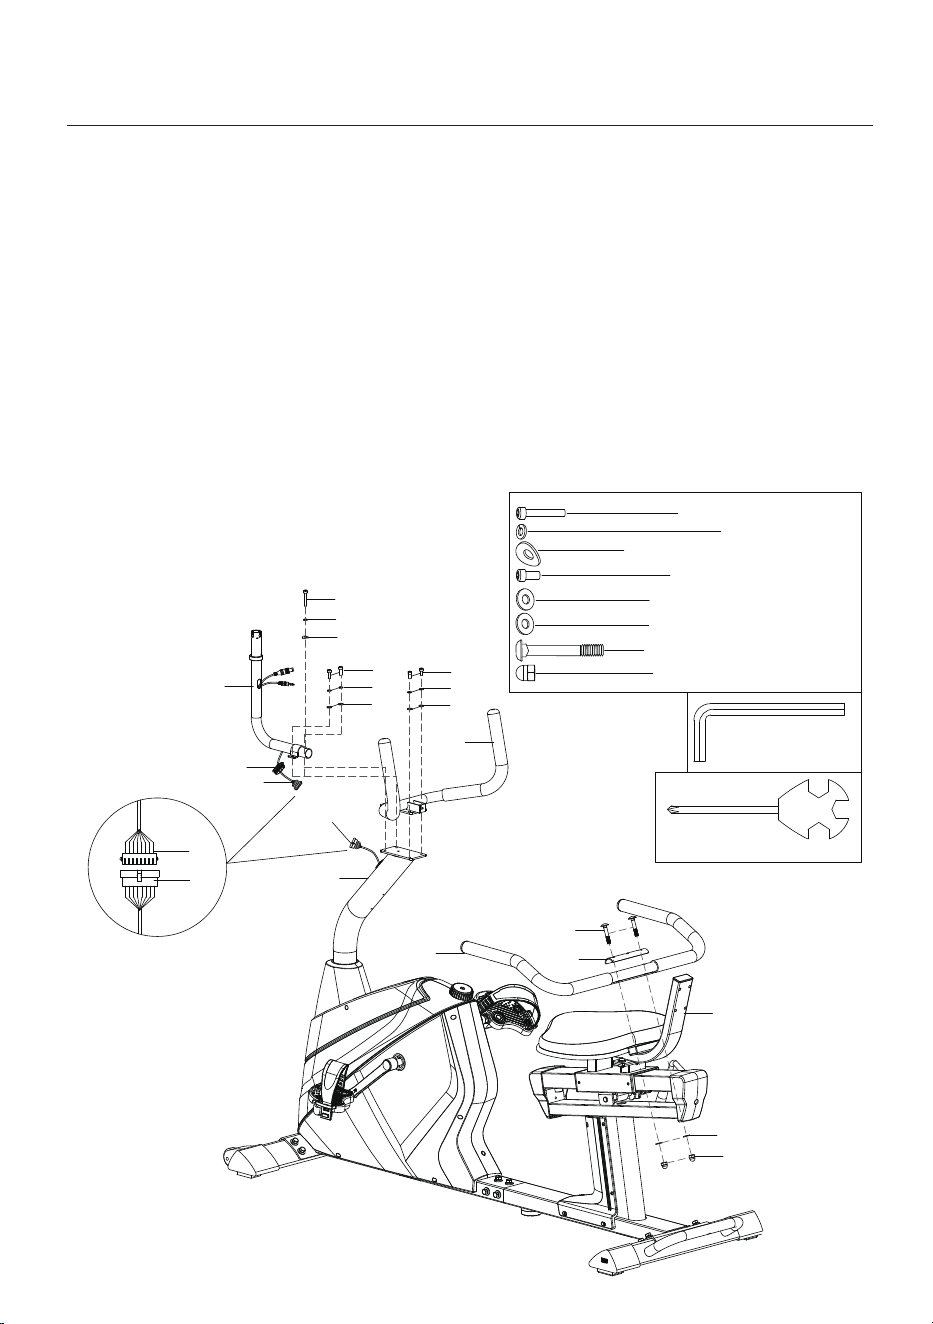
Step 4:
1. Use the allen wrench S5 (A) to remove the allen screws (33), spring washers (24)
and washers (34) pre-installed on the seat frame (112);
2.Use the allen wrench S5(A) to secure the back tube (35) to the seat frame (112)
with the allen screws (33), spring washers (24), and washers (34). Ensure everything
is tightened securely;
3.Use the allen wrench S5(A) to remove the allen screws (23) and washers (29)
pre-installed on the seat cushion (28);
4.Use the allen wrench S5(A) to attach the seat cushion (28) on the back tube (35)
with the allen screws (23) and washers (29).
#23 M8*16*S5 4PCS
#24 d8 4PCS
#29 d8*∅16*1.5 4PCS
#33 M8*20*S5 4PCS
#34 d8*∅20*2 4PCS
28
29
23
33
24
34
35
35
28
29
23
112
#A S5 1PC
Installation Guide
Step 5:
1. Use an allen wrench S5(A) to tighten the armrest assembly (18) on the handlebar
riser (22) with the allen cylindrical head screws (15), spring washers (12),
and washers (16);
2. Use the allen wrench S5(A) to secure the watch tube (5) to the handlebar riser (22)
with the hexagon socket head screws (11), spring washers (12), washers (13),
allen socket head screws (15), and another set of spring washers (12). Ensure the
washer (16) is tightly locked in place;
3. Use a cross wrench (B) to attach the handlebar (38) to the backrest tube (35) with
the square neck bolt (36), handlebar cover (37), washer (29), and cap nut (39)superior;
4. Connect trunk line 1 (115) to trunk line 2 (116), then insert the connector into the
cable hole on the handlebar riser (22), finally, secure the cable hole plug (21).
36
37
38
29
39
18
11
12
13
15
12
16
15
12
16
5
22
35
115
116
21
115
116
Installation Guide
Align the port to connect to the
screen connection cable,
and retract the excess wire
into the tube.
* Please make sure that the
connection direction is correct.
Please do not connect it with
violence!
#A S5 1PC
# B S13-14-15 1PC
S13
#11 M6*45*S5 1PC
#12 d6 5PCS
#13 d 6*∅16*1.5 *R16 1PC
#15 M6*16*S5 2PCS
#16 d6*∅12*1.5 4PCS
#36 M8*47*20*H5 2PCS
#29 d8*∅16*1.5 2PCS
#39 d8*H16*S13 2PCS
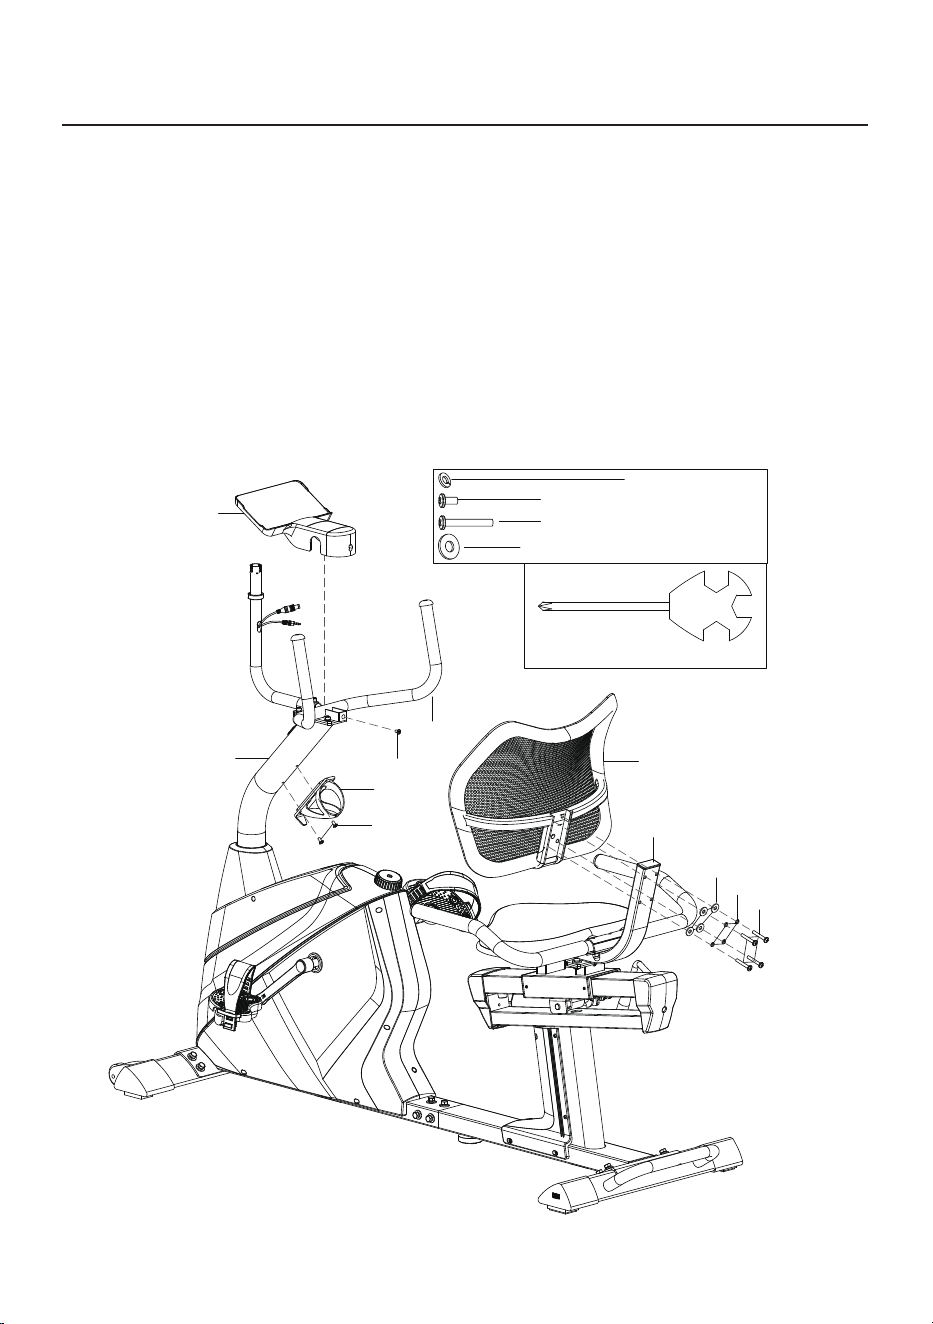
Step 6:
1. Use a cross wrench (B) to remove the cross-recessed pan head screws (20)
pre-installed on the handlebar riser (22)、center armrest (18);
2. Use a cross wrench (B) to remove the cross recessed pan head screws (31),
spring washers (12) and washers (123) pre-installed on the backrest (16);
3. Use a cross wrench (B) to secure the backrest (30) to the backrest tube (35)
with the cross-recessed pan head screws (31), spring washers (12), and washers (123);
4.Use a cross wrench (B) to tighten the water bottle cage (26) on the handlebar
riser (22) with the cross recessed pan head screws (20);
5. Snap the one-piece hood(14) onto the enter armrest (18), then use the
cross wrench (B) to tighten it to the stem with the cross-recessed pan head
screws (20) on the enter armrest (18).
30
31
35
26
20
22
# B S13-14-15 1PC
14
20
18
123
12
S13
#20 M5*10*∅10 3PCS
#31 M6*40*∅12 4PCS
#12 d 6 4PCS
#123 d 6*∅12*1.2 4PCS
Installation Guide
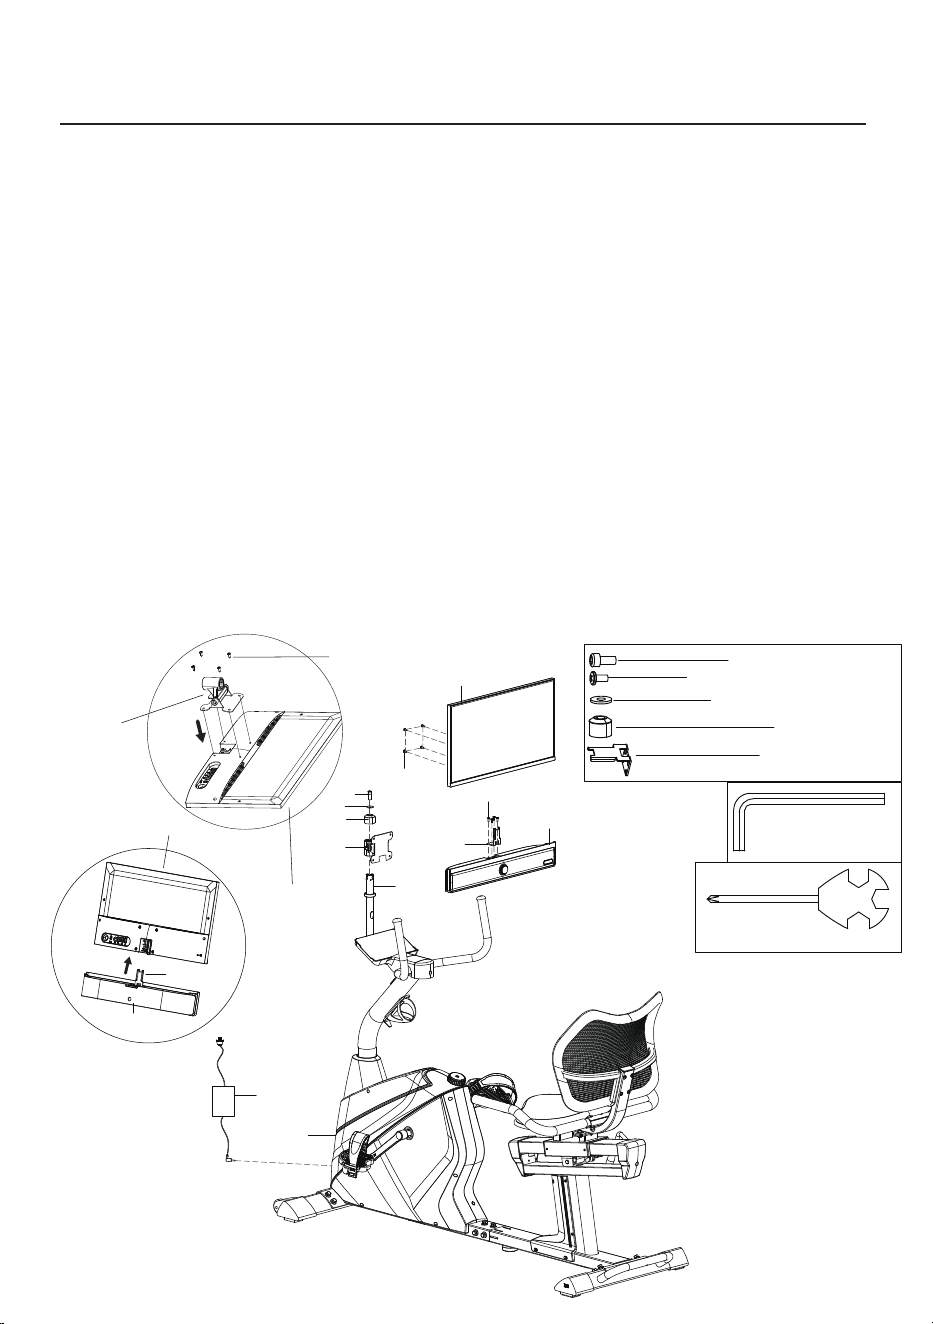
Step 7:
1. Use a cross wrench (B) to remove the cross-recessed pan-head padded screws (120)
pre-installed on the back of the screen (1), and take out the screen fixing piece (10)
(make sure the side with the sticker faces up!), such as as shown in figure A,
use a cross wrench (B) to tighten the cross-recessed pan-head padded screws (120)
to the screen (1) (Place the screen flat on a surface and avoid pressing it with hard
objects to prevent damage);
2. Use a cross wrench (B) to align the speaker connection base (121) with the slot of
the speaker holder (2), tighten it with a cross-recessed pan head padded screw (120),
Then, as shown in f igure B, align the speaker holder (2) with the slot on the screen (1)
and insert it;
3. Insert the screen and speaker components assembled in the previous step into
the monitor bracket (5), then put in the upper connecting seat (3) ,washer (16)and
hexagonal cylinder head screws (119) in sequence, tighten everything using a allen
wrench S5(A) ;
4. Insert the round plug of the power adapter (118) into the corresponding port of the
main frame (111), connect the other end to the power supply, and start using it.
Please store the power adapter (118) when not in use.
2
120
118
121
1
120
111
119
3
10
5
B
1
2
121
A
1
120
10
Installation Guide
#A S5 1PC
# B S13-14-15 1PC
S13
#120 M4*10*∅10.5 8PCS
#119 M6*20*S5 1PC
16
#3
#121 1PC
1PC
#16 d6*∅12*1.5 1PC
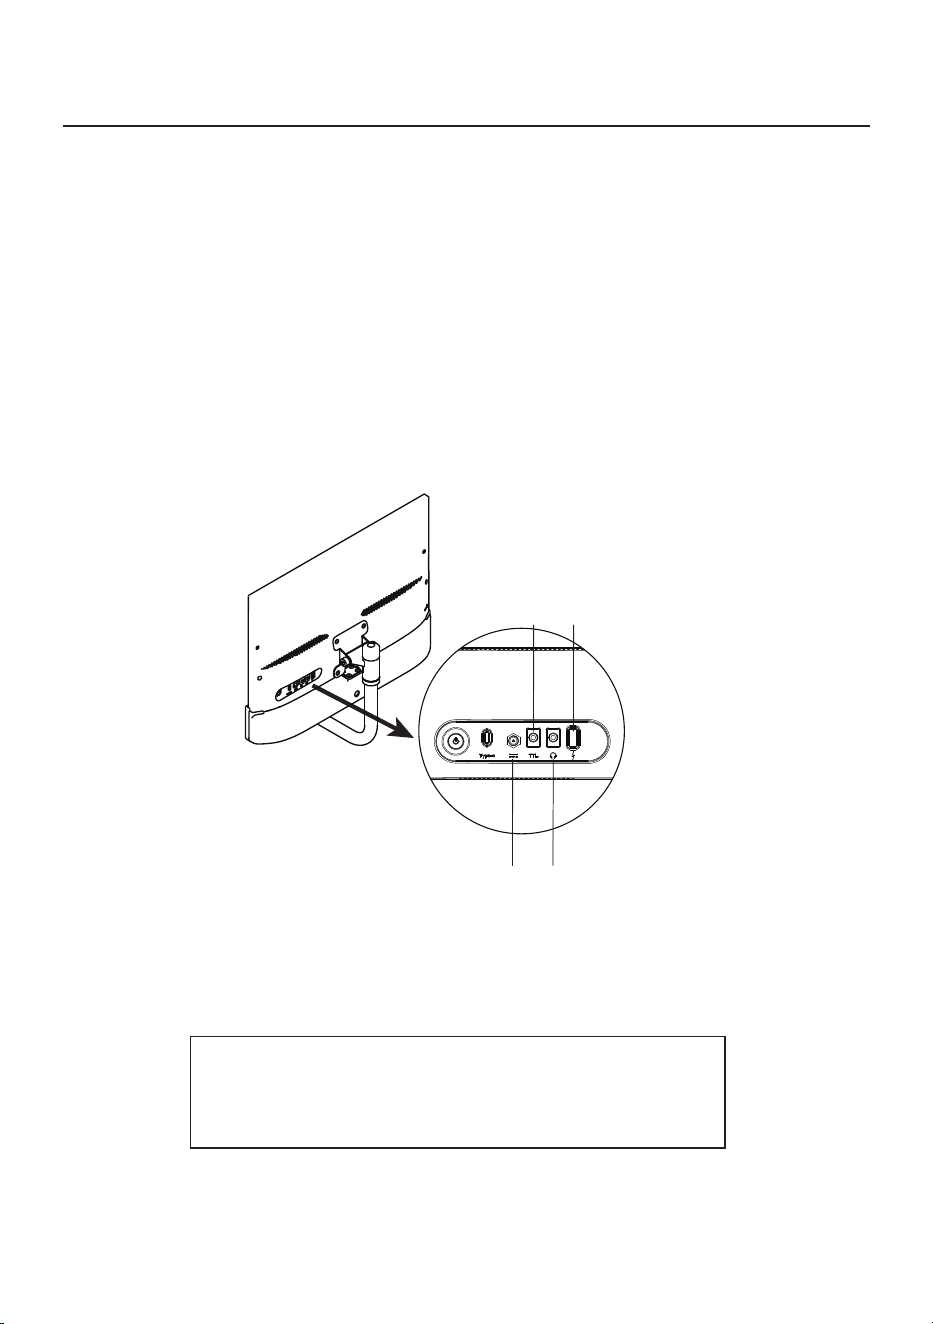
Step 8:
Installation Guide
1.Insert the monitor's power port (a)、signal port (b)、audio's signal port (c) and
power port (d) into the jacks at the bottom of the back of the monitor. Be sure to
plug them in securely (Matching the colors and specifications of the sockets.
Ensure that the power cord is properly inserted and securely fastened);
2. Select the appropriate full-featured C to C data cable (which supports DisplayPort
(DP) signal output)and insert it into the Type C jack under the monitor(Secure any
excess wire with Velcro).
Monitor's power port(a)
Audio's signal port(c)
Signal port(b) Power port (d)
Note: Do not plug or unplug the monitor's
interface without cutting off the power supply.
Please unplug the power when not in use.
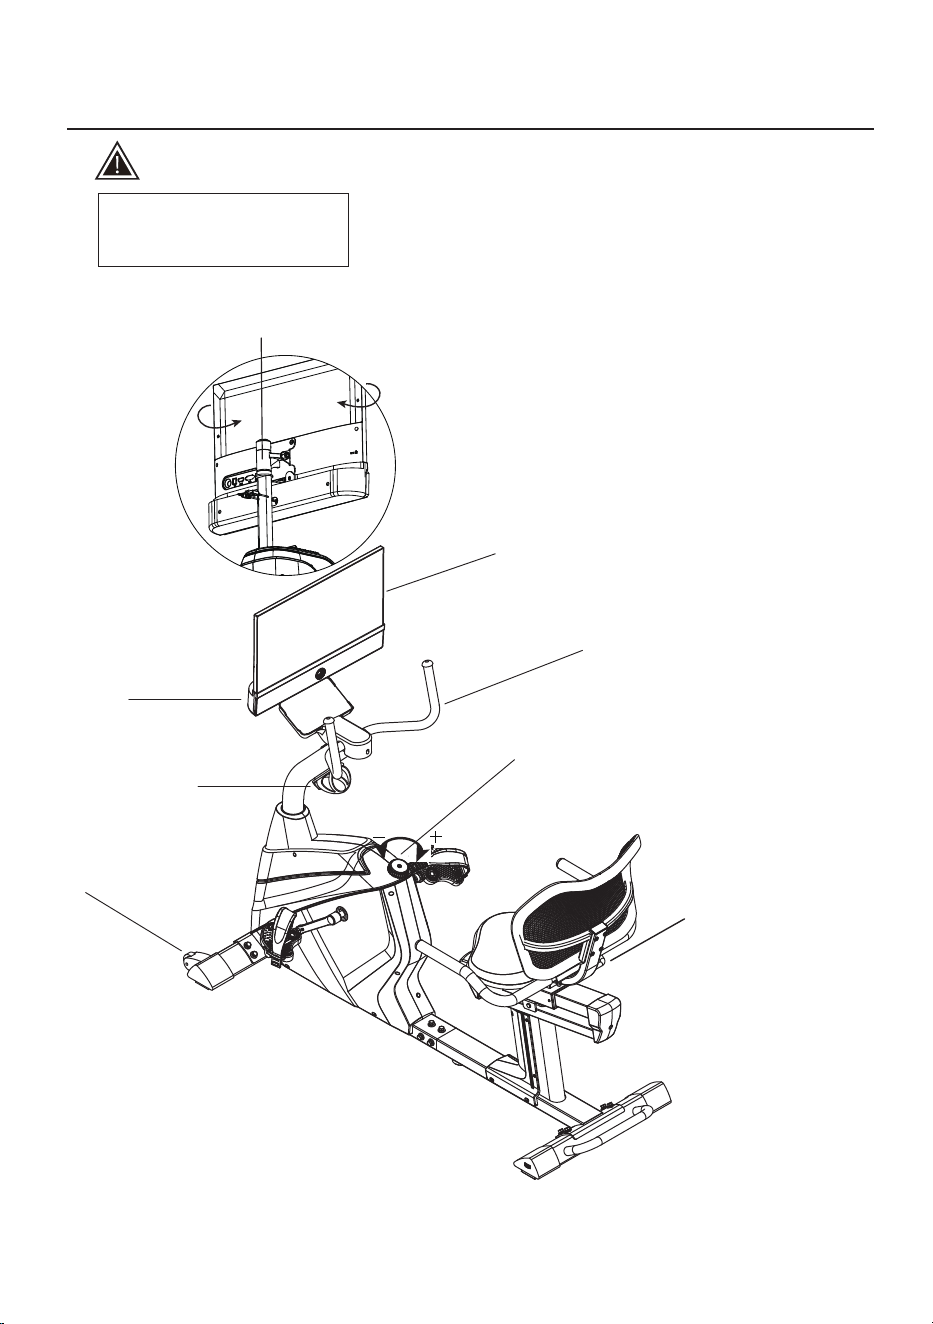
Moving pulley
Handlebar
Resistance adjustment knob
(Reasonably adjust the resistance
according to your riding needs.)
When using it for the first time,
please loosen the resistance
adjustment knob counterclockwise,
otherwise it may not be possible to pedal!
Safety tips: Please adjust the exercise bike according to your
own conditions before use, and tighten the body fastening knob.
Seat cushion adjustment handle
(Adjust the seat cushion front
and rear)
Installation Guide
(for reference only, subject to the actual product)
Statement:
This manual provides a comprehensive provides to the product's functions and
operating instructions as of the time of printing. However, due to continuous
improvements in hardware, software, and design, there may be differences between
this manual and the product you purchased. In the event of any discrepancies in
appearance, interface, or color, please refer to the actual product.
Display screen
Speaker
Water bottle cage
The screen supports 360 degrees of rotation,
allowing it to rotate 180 degrees clockwise or
counterclockwise.
180 degrees clockwise
180 degrees
counterclockwise
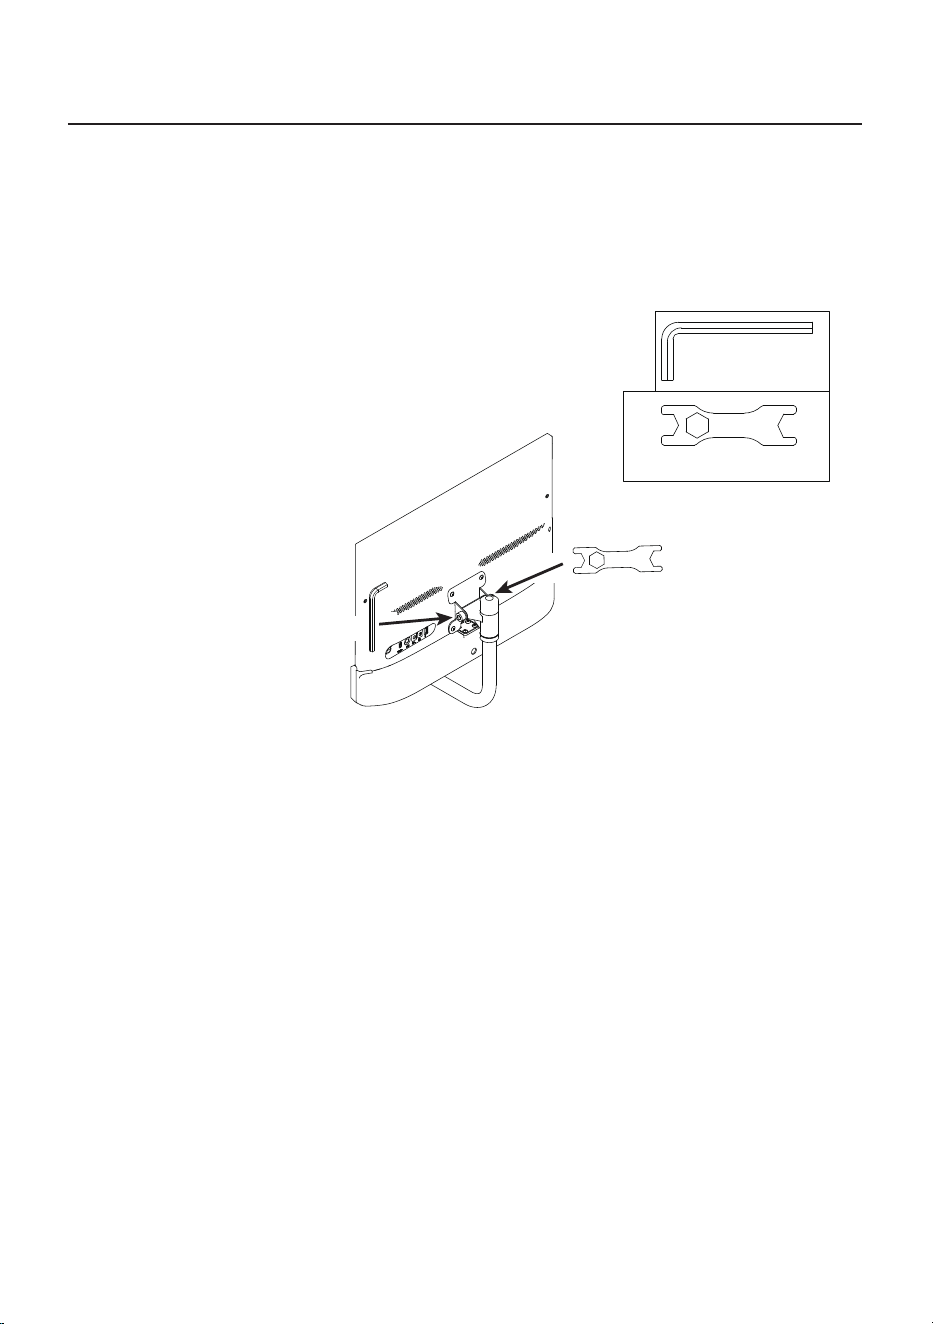
Precautions
Check screen
After installation, check if the screen falls when turned upside down.
If it falls, use the allen wrench S8(C)and the Multi functional wrench(D) to tighten
it as shown in the figure. (If the screen becomes loose during use or if the
joint needs adjustment, follow these steps to make the necessary corrections)
S17
S18
S19
#C S8 1PC
# D S17-18-19 1PC
Allen wrench S8(C)
Multi functional wrench(D)
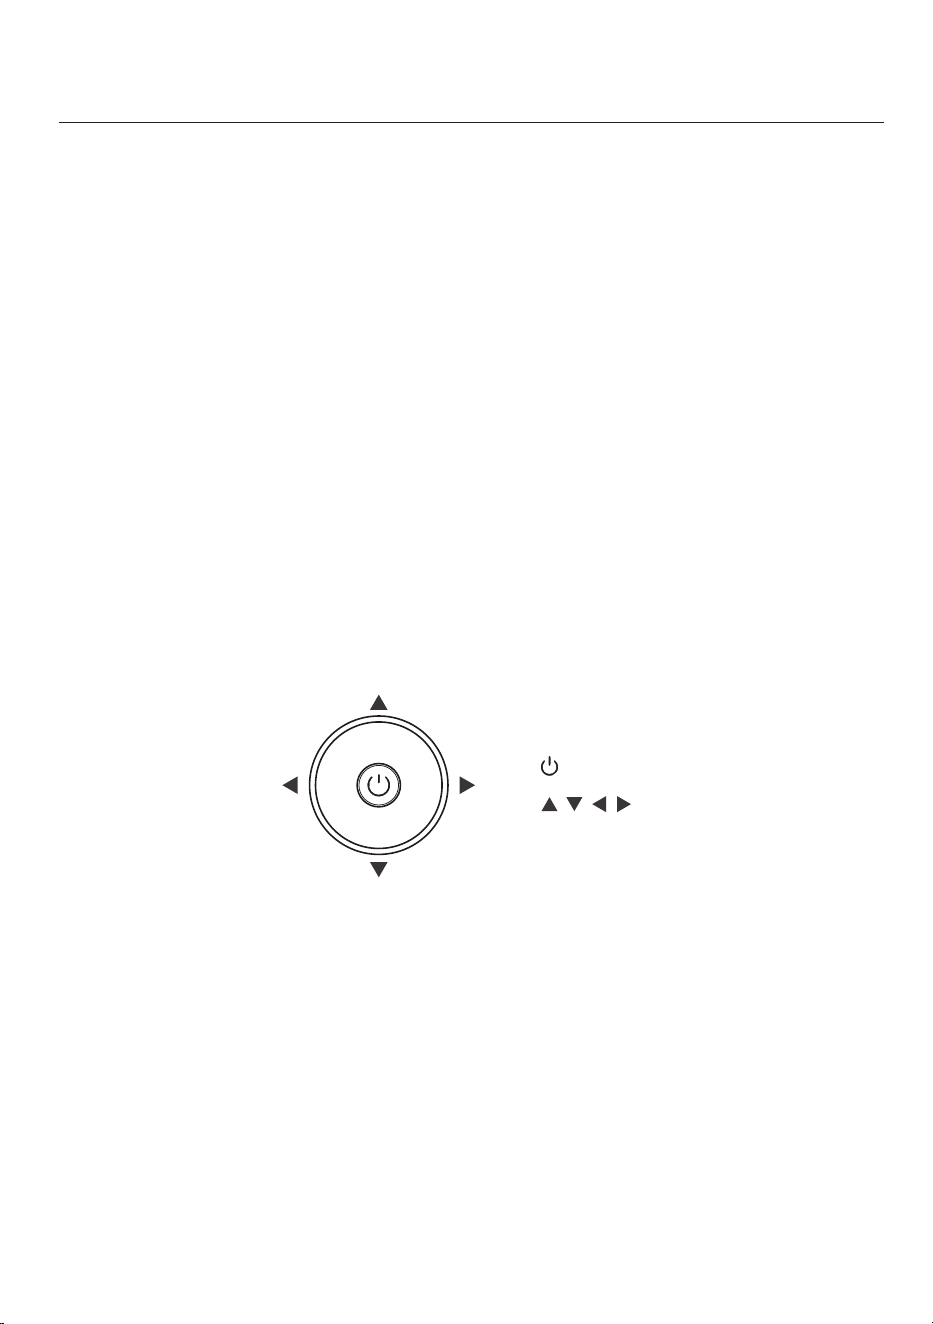
How to adjust the screen
Screen Adjustment:
1. Press and hold the "OK" button for 6 seconds to power off the phone, and
for 1-2 seconds to power it on.
2. Press the “OK” button when the display is powered on and a signal is detected.
Press the “OK” button within 1 second to open the main menu.
3. Use the “arrow”button to navigate through the main menu and select the desired
item for adjustment. After selecting the item, press the "OK" button to adjust it.
Press the "OK" button again to save changes and return to the previous menu.
4.Press and hold the left shortcut key for 10 seconds to display the version number.
Operations to close the data window during screen projection:
1. Connect the screen projector and start projecting.
2. Press the "Confirm" button to access the main menu.
3. Scroll down and select "Settings," then scroll right to
enter the settings menu.
4.Scroll down and select "BikeOsd," and then scroll right to enter the
"BikeOsd" setting interface.
5. Choose "OFF" and press the "Confirm" button to select this option.
6. Scroll left three times in a row to exit the main menu.
(Five-way joystick buttons)
(OK key)
②
①
(Arrow key)
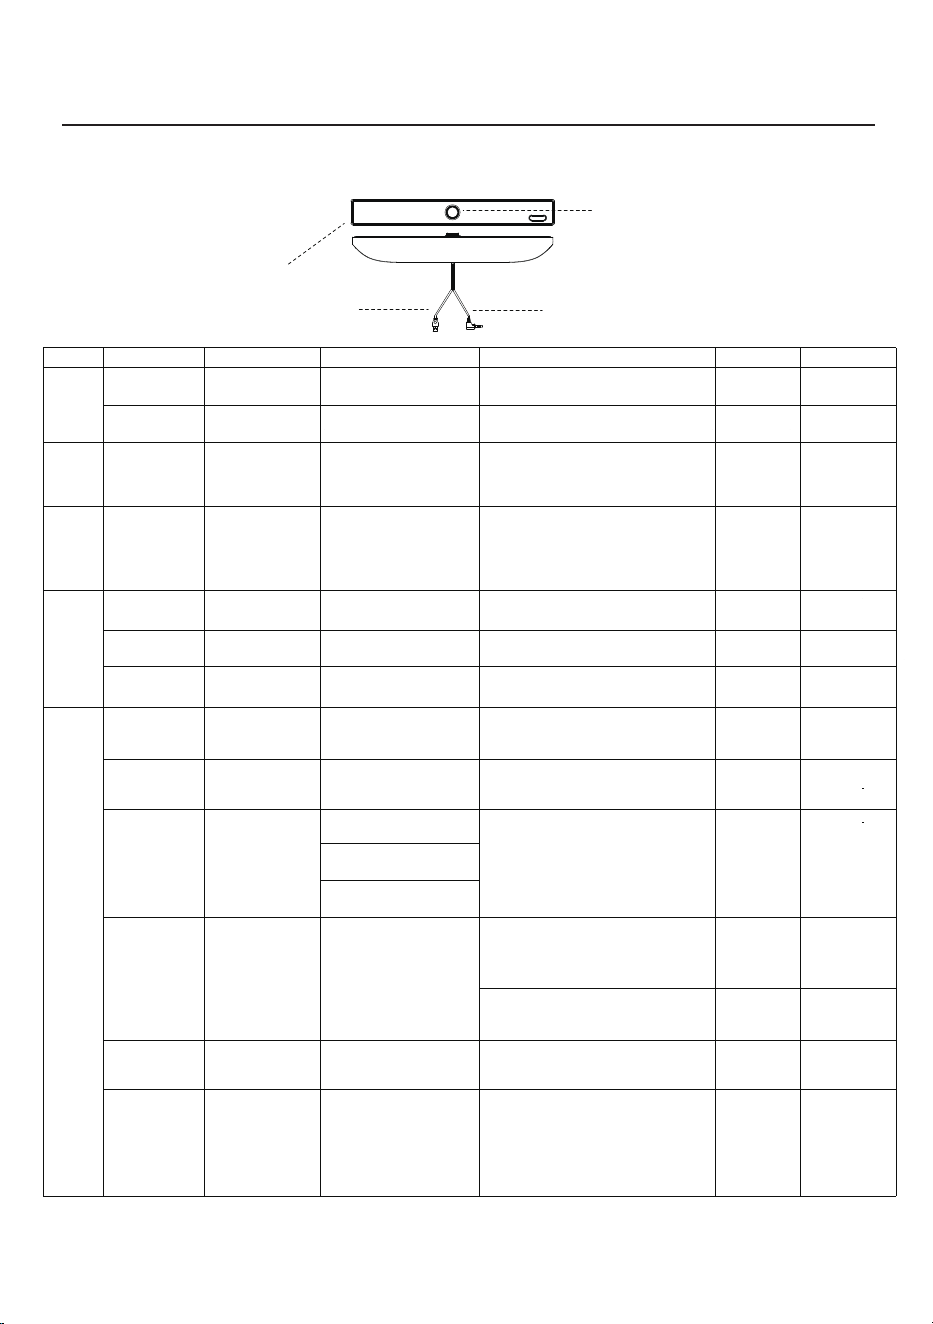
Audio function operation
How to adjust the speakers
Disconnect tone
(Pairing)
Disconnect tone
(Pairing)
Red LED
flash quickly
Red LED
flash quickly
Red LED
flash quickly
The tone of
successful
connection
(Paired (dong))
The tone of
successful
connection
(Paired )
The tone of
successful
connection
(Paired)
Red LED
always on
Red LED
always on
Red LED
always on
Red LED
always on
Red LED
always on
Red LED
always on
Red LED
always on
Red LED
always on
Red LED
goes out
Red LED
goes out
Volume up to
maximum with
a tone (beep)
/
/
/
Switch to Bluetooth
mode with beep
(Bluetooth pairing on)
1.AUX mode: red light
always on
2. Bluetooth mode:
red light flashes quickly
Power-on beep
(hello)
Shutdown tone
(Shutdown sound
effect)
Shutdown tone
(Shutdown sound)
Knob keys
AUX audio input cable
USB 5V power cable
Front speaker
/
/
/
/
/
Short press the
Rotary switch
Power On
Sleep
state
On/Off
Sleep mode Sleep state
Wake-up
function
Volume up
Turn the switch Clockwise
The volume increases
gradually as your rotation
Volume down
Turn the switch anticlockwise
The volume decreases
gradually as your rotation
Mode Switch
Power on
Short press the Rotary switch
Switch AUX mode and Bluetooth mode
Power on
Click the knob button to
switch the mode to
Bluetooth mode
1. Pairing search status, red light flashes quickly
2. If pairing times out in 10mins, it will enter
sleep state
S
witch to Pairing mode
(
the bluetooth can be
f
ound by other devise)
Power on
Open the bluetooth and
Search on the devise
Bluetooth device searches for "Speaker"
and connects, successful pairing
announces a tone
Close your devise
bluetooth function
Cancel the pairing
by the devise
Disconnect the bluetooth
connection by Devise
1. After over-distance disconnection,
the speaker enters the pairing state and
the red light flashe quickly
2. After 10 mis, no device is connected and
the speaker enters sleep state
Reconnected successful with devise
Reconnected
Bluetooth mode
(paired with
devise before)
Switch to bluetooth mode,
spkeaker try to reconnect
with the last devise
If unable to reconnect within 10mins,
enter sleep state
F
(In Bluetooth
mode)
actory Reset
Power On
In Bluetooth mode,
triple-click the button on
one of the front and rear
speakers
1. Restore to the default boot state
(enter AUX mode)
2. Clear Bluetooth connection records and
clear front and rear speakers
Pairing record, volume restored to default
volume (maximum volume 50%)
3. Enter AUX state
Power On
Power On
Tone
LED
Pre-Condition
Effect
Control
Fuction
Pairing
function
Disconnected
Reconnected-
back to BT range
Connected
Disconnected
1. Connected with devise,
the bluetooth disconnected
after move the devise out
of the BT range
2. It reconnected successful if
back in BT range within 10mins
1. Announcement tone (
Pairing
)
2. Speaker enter the pairing mode
Power ffO
Press and hold the
knob button for 3 seconds
The speaker has no AUX
signal or Bluetooth signal
input for more than
10 mis
When clicking the knob
button (clicking will not
switch modes), inputting
audio signals、adjusting
the volume and connecting
Bluetooth can wake up
Power off
The speaker goes to sleep
Enter pre-wake state
Recovery
success tone
(hello)
Note: When your phone is connected to the speaker via Bluetooth and connected to wired screen projection,
please switch the speaker to AUX mode.
Operation steps
Project
Bluetooth
pairing
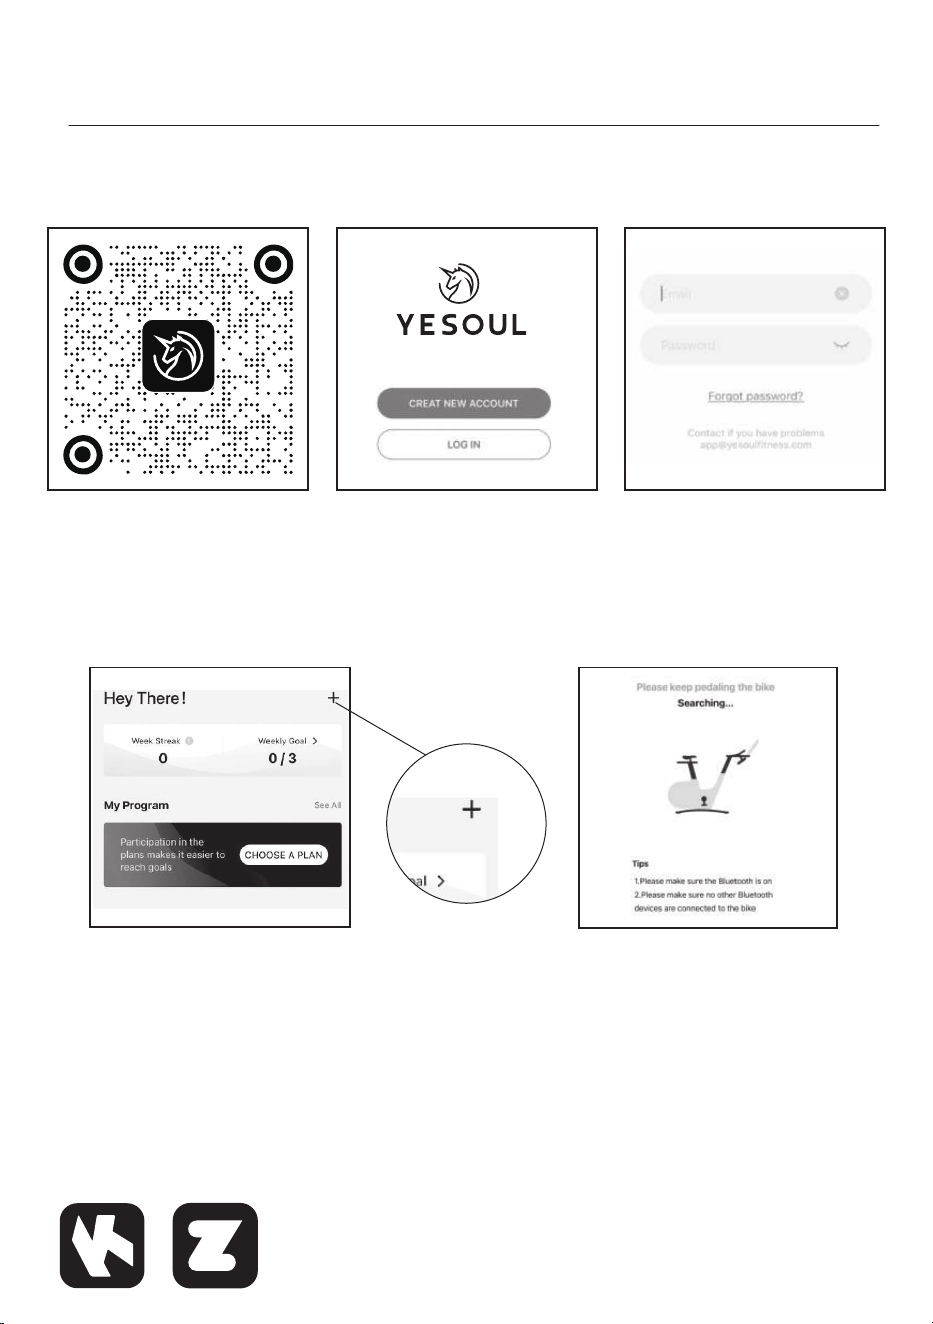
APP usage instructions
Connect devices
·When using for the first time, click the 「+」 in the upper right corner of the「Home」
or enter the course and connect the device according to the interface prompts.
APP installation registration
·You can scan the QR code below to download the APP and register an APP account.
·For subsequent use, simply step on the device and open the exercise mode or course
of the APP can be connected automatically.
·The device does not support connecting multiple cell phones at the same time.
Please make sure the device is not connected to other users before use.
·After shutting down, Bluetooth will be automatically disconnected.
·In addition to connecting with YESOUL FITNESS APP, Bluetooth can also be connected
with Kinomap and Zwift software.
2. Enter the APP login page
1.Scan the QR code and
download the APP
4. Enter the APP homepage
3. Register an APP account
5.Search for devices
Zwift
Kinomap
APP usage instructions
*The above illustrations are for reference only. As the software is
constantly updated and iterated, please refer to actual use.
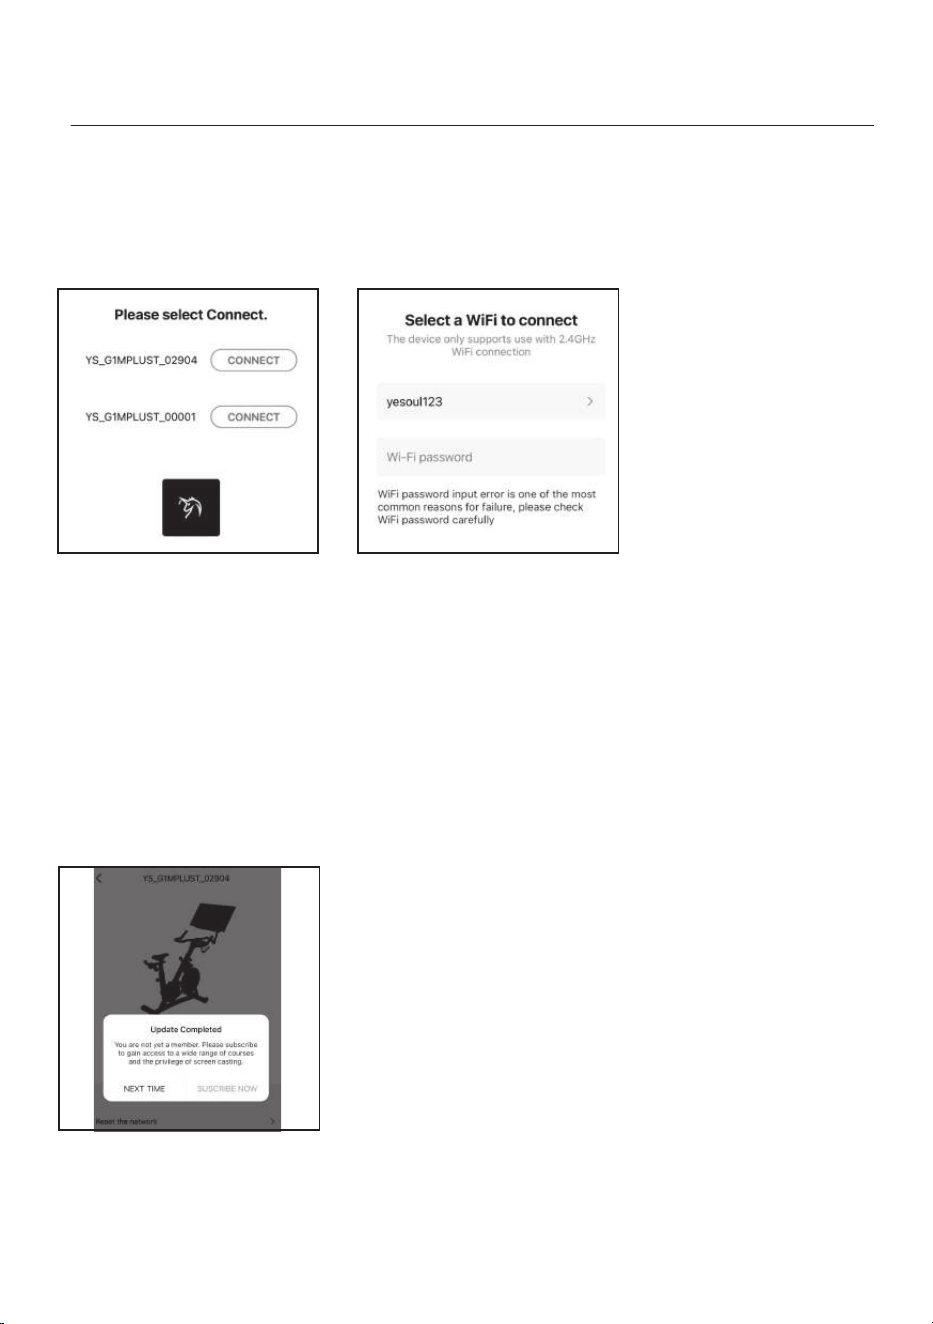
Device connected to Wi-Fi
·After connecting the device, follow the page prompts and select the corresponding
Wi-Fi to complete the network connection to the device.
·The device only supports connecting to 2.4G networks.
Purchase APP membership
·For first time use, the page will automatically jump to the membership purchase
page after completing the network settings, and follow the page prompts to complete
the membership purchase.
·If you need to purchase a membership again in the future, please open the APP
and find 「Homepage」 - 「Settings」 - 「Member Rights」, and follow the interface
prompts to complete the membership purchase.
6. Select the device to connect 7. Select the corresponding
Wi-Fi connection device
8. Follow the interface prompts to complete the membership purchase.
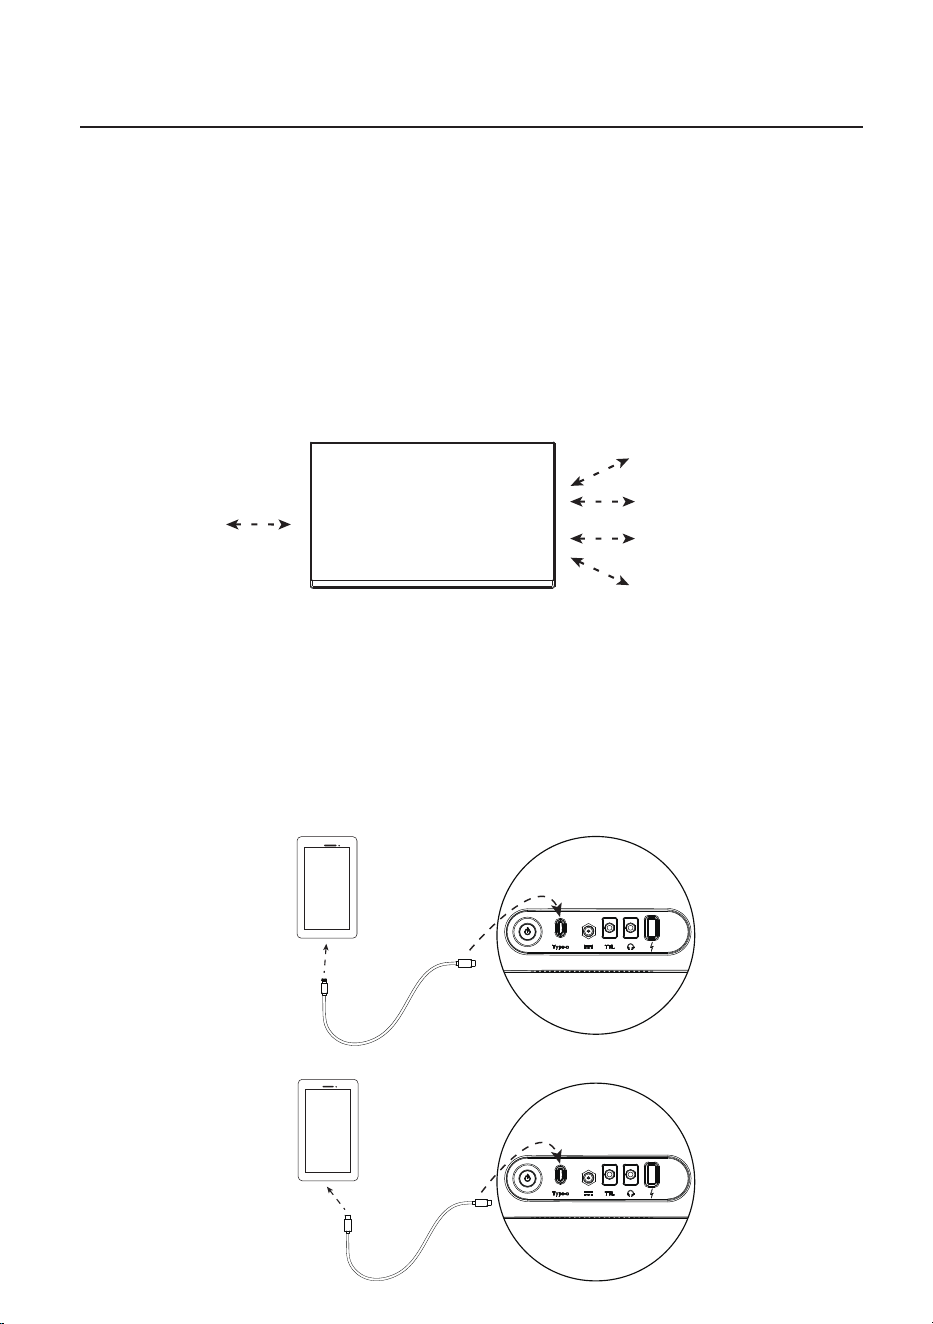
About wired projection screen
Installation instructions for wired screen projection:
1. Remove the data cable,
Note: There are two data cables for Android and iOS included in the package.
Please use the appropriate cable according to your cell phone model;
2. Connect the Type-C interface of the data cable to the screen;
3. Connect the Type-C or Lightning interface of the data cable to the phone.
Note: Android phones need to support DisplayPort (DP) signal output in order
to use the wired screen projection function properly.
Android:
IOS:
Screen casting permissions (Membership):
1. After registering on the app and becoming a member, connecting the equipment
will activate screen casting permissions, allowing you to use the screen casting
function.
2. Once the equipment has activated screen casting permissions, the feature can
be shared with up to 4 other non-member accounts (for a total of 5 shared accounts).
Note: (1) At least one of the 5 accounts most recently paired with the equipment
must be a member, otherwise the screen cast function will be disabled.
(2) Member accounts can only activate the exercisebike they are initially
paired with.For any changes, please contact customer service.
Non-member 1
Member
Non-member 2
Non-member 3
Non-member 4
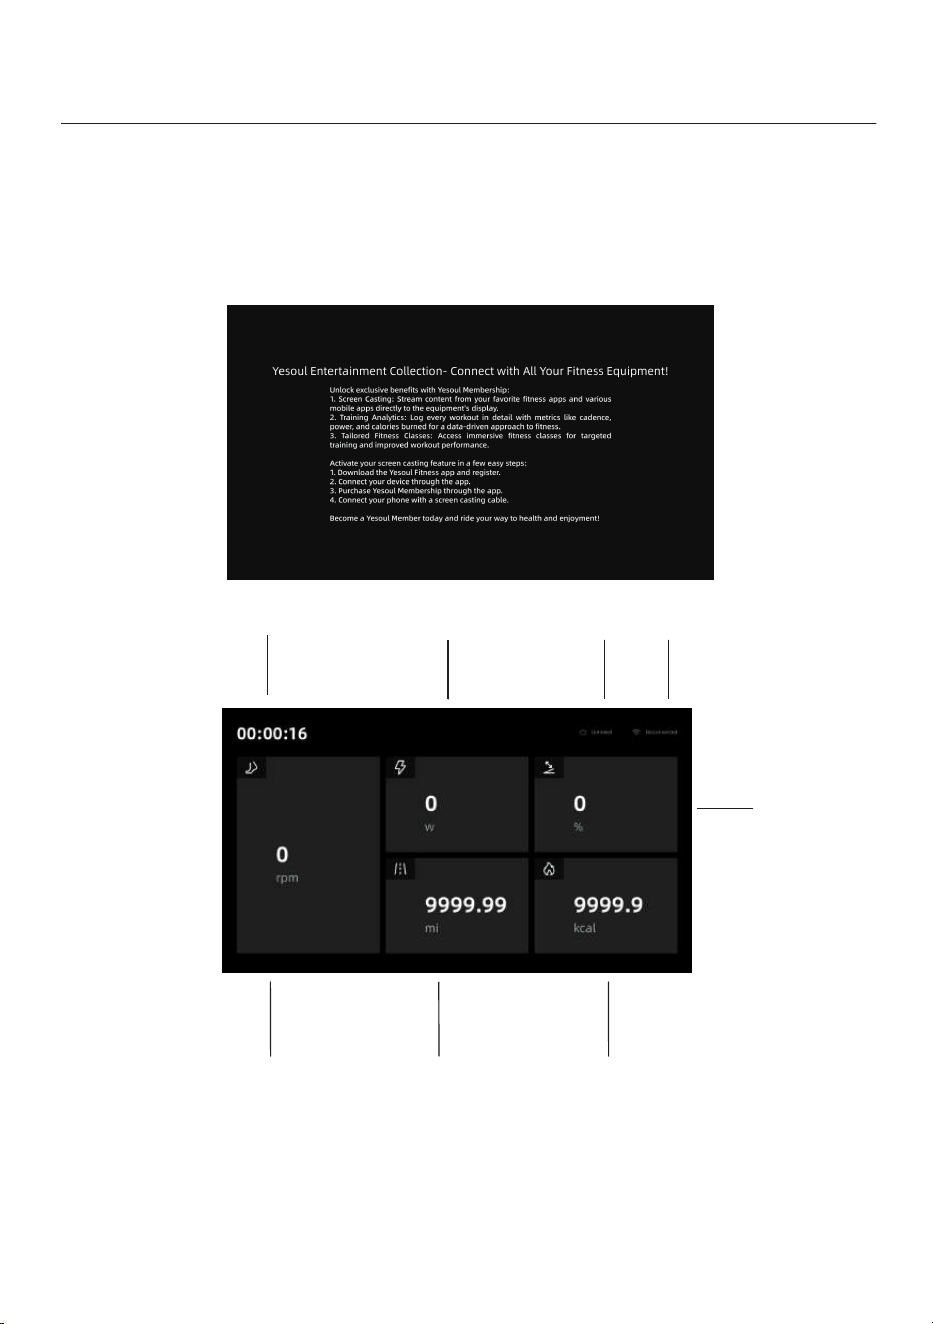
Instantaneous power
Cadence
Single exercise mileage
About display interface
Display interface description:
The screencasting device
has been connected.
No membership
purchased
No screen projection
interface
Calories per exercise
WI-FI signalNon-member ID
Resistance
Excercise time
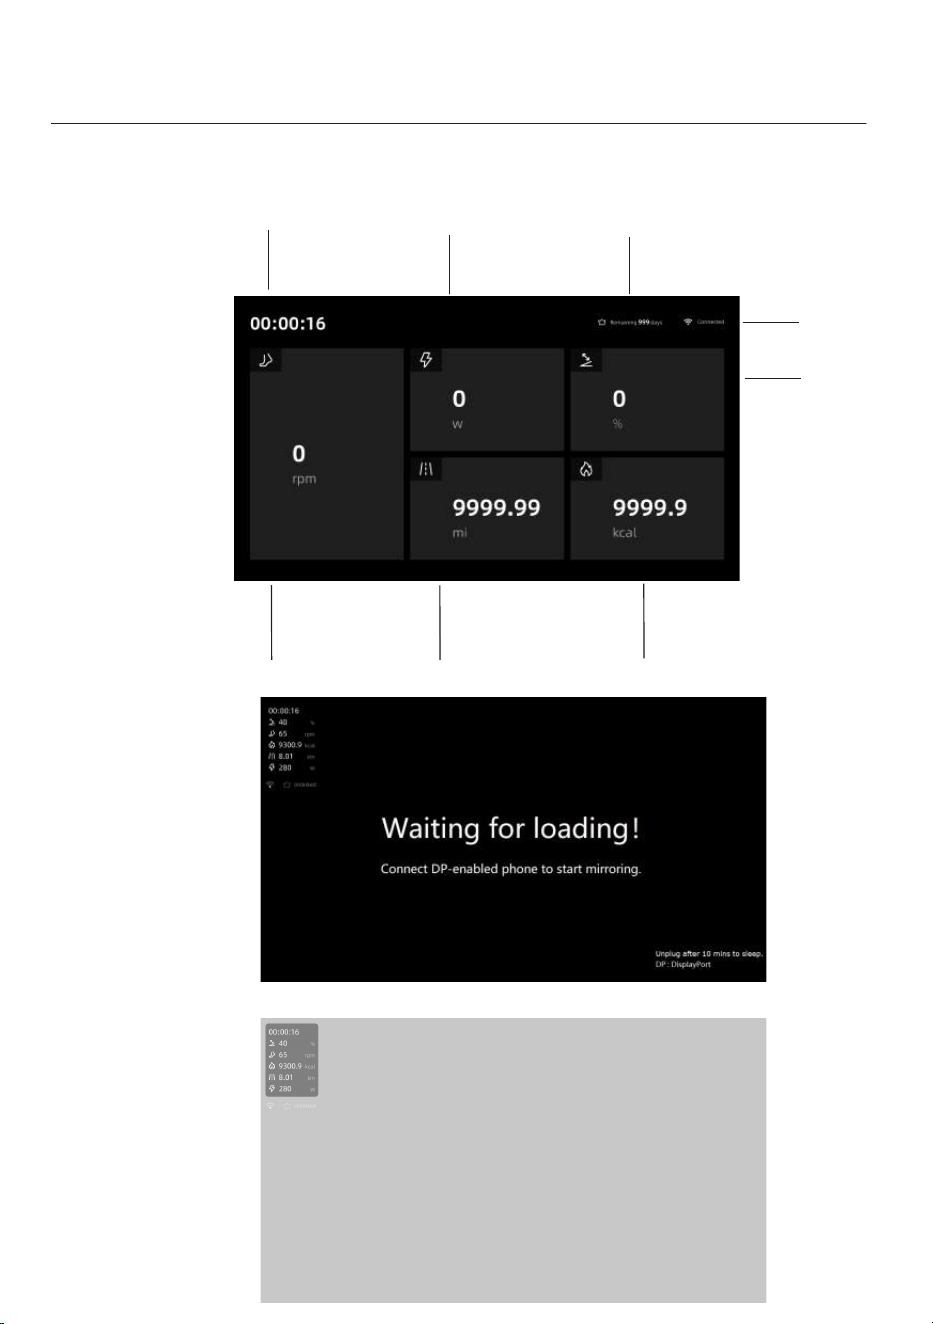
About display interface
Display interface description:
Calories per exercise
Resistance
Instantaneous power
Cadence
Single exercise mileage
Excercise time
No screen projection
interface
Member screen mirroring
connection
This interface will appear under
the following circumstances:
1. Waiting for screen casting.
2. The access device does not
support screencasting.
3.ipad or iPhone first time
access untrusted devices.
Number of remaining days of membership
WI-FI signal
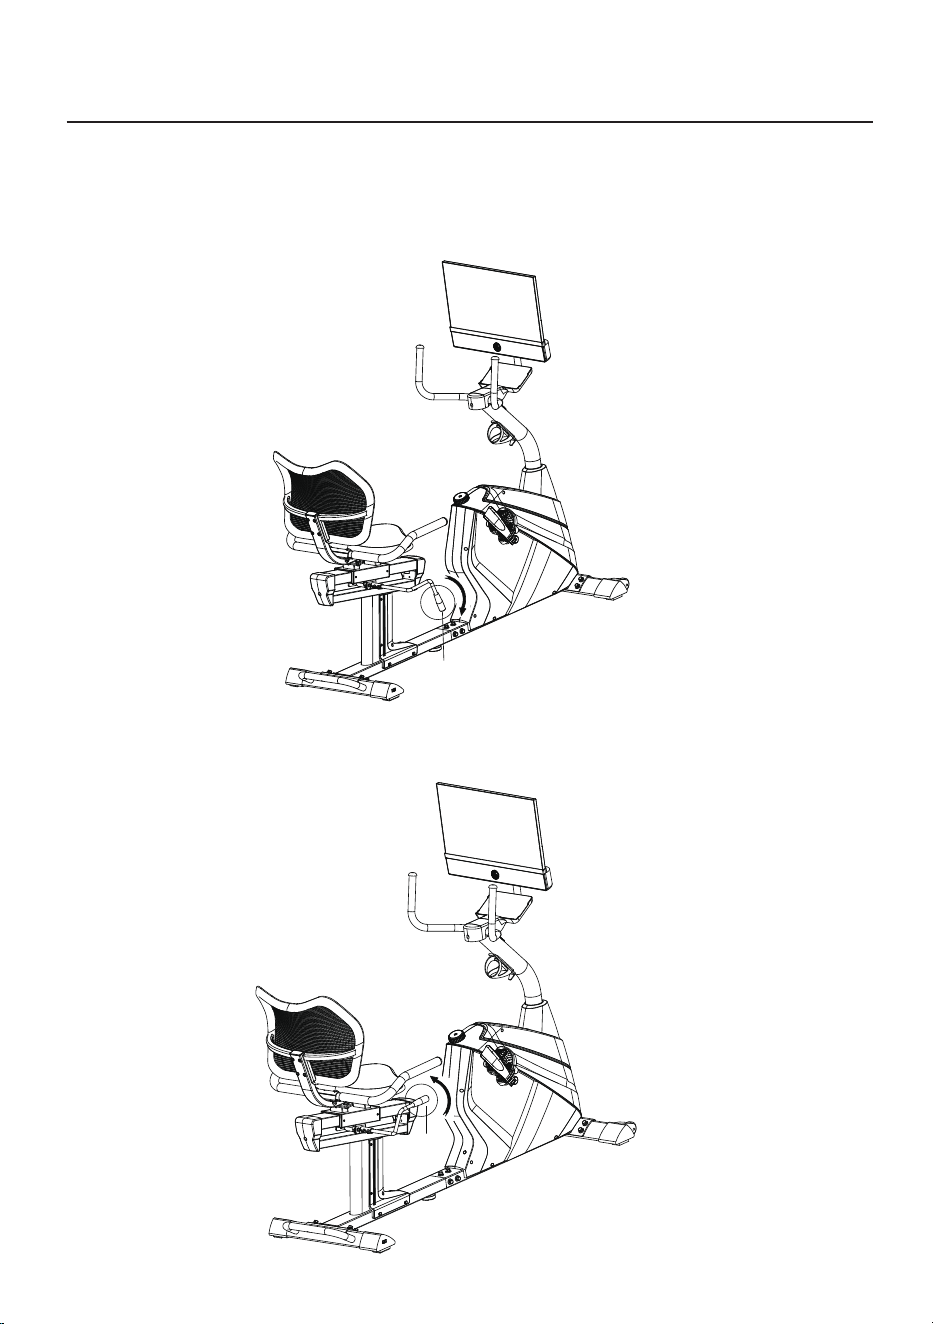
1. Adjust the seat cushion front and back:
How to adjust exercise bike
Adjust the seat cushion to the appropriate position, pull up the
adjustment handle (48) to the horizontal position, and then lock it.
Press down the adjustment handle (48), step on the pedals, and the
saddle can move forward and backward.
48
48
Number of remaining days of membership
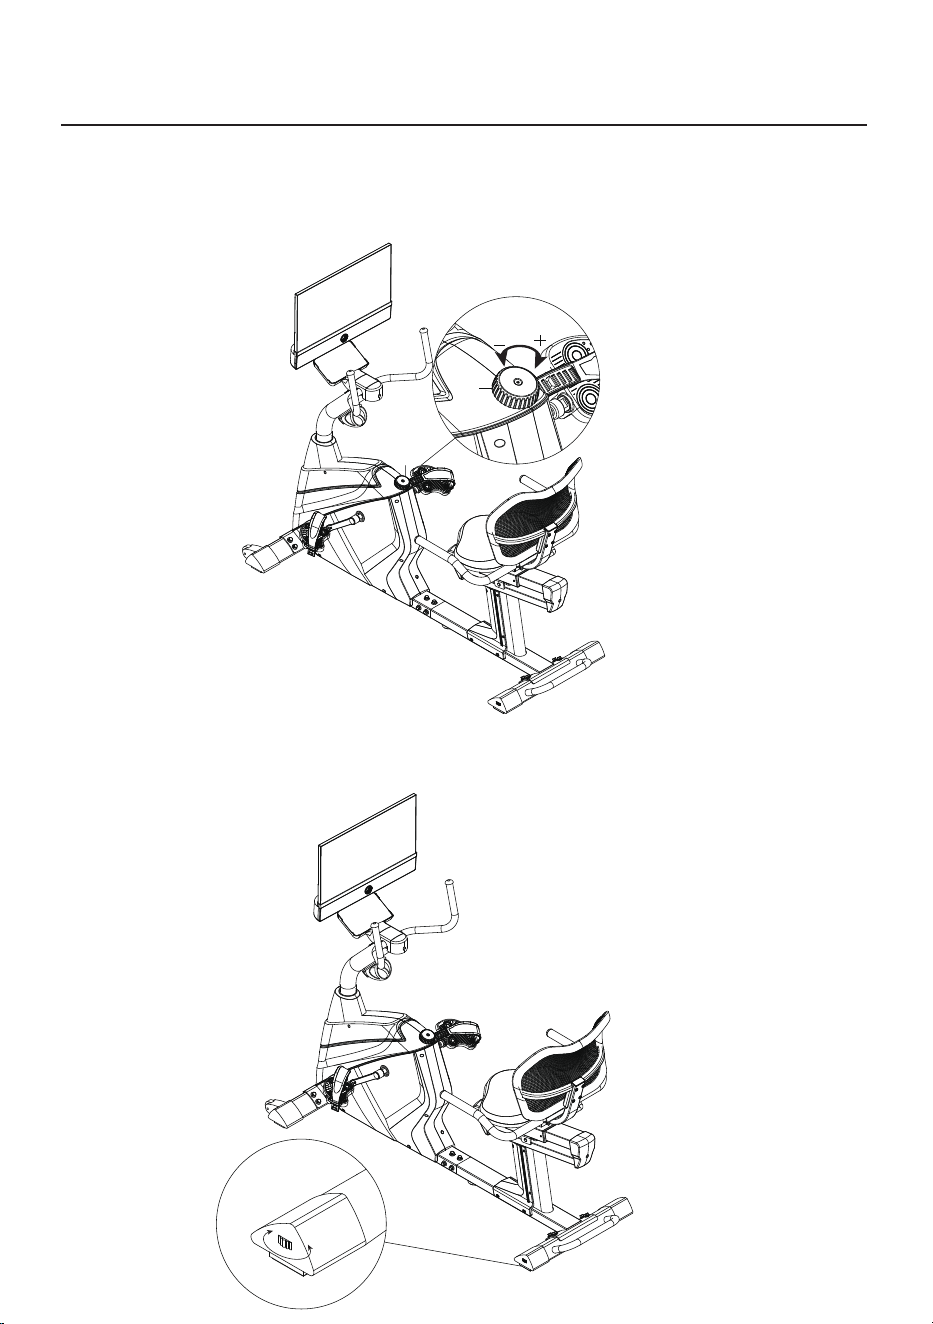
2. Adjust the resistance:
How to adjust exercise bike
Turn the knob (83) clockwise to increase the resistance, and turn the knob (83)
counterclockwise to decrease the resistance.
83
83
3. Adjust the body level:
There are two adjustment foot pads at the bottom of the rear leg tube.
Rotate the foot pads to keep them close to the ground until the body
stops shaking.
High
Low
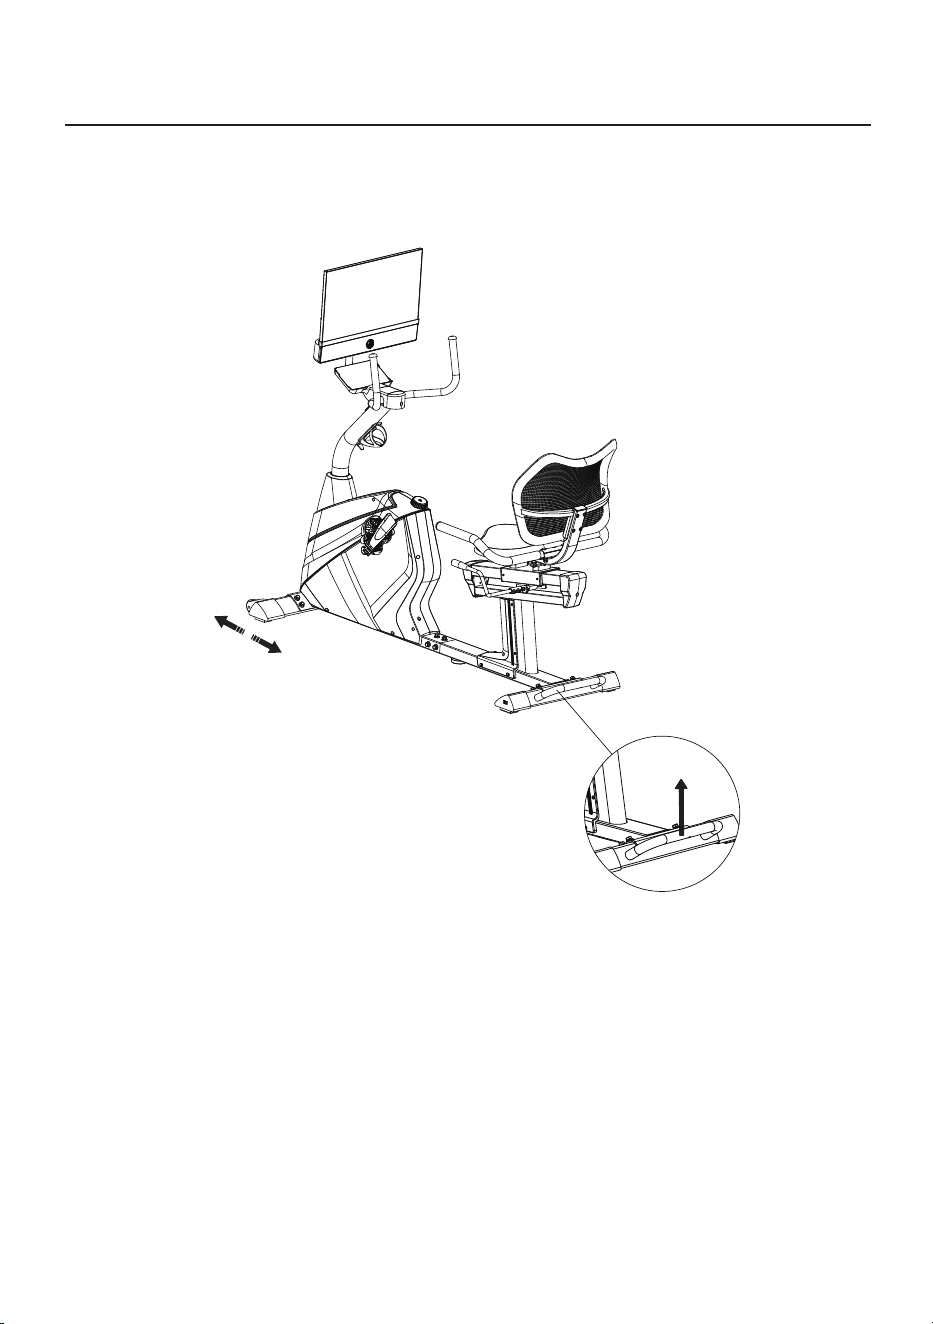
How to adjust exercise bike
4. Adjust the position:
Lift the rear tube and use the moving pulley of the front tube to move the
product freely or place it in a suitable position.
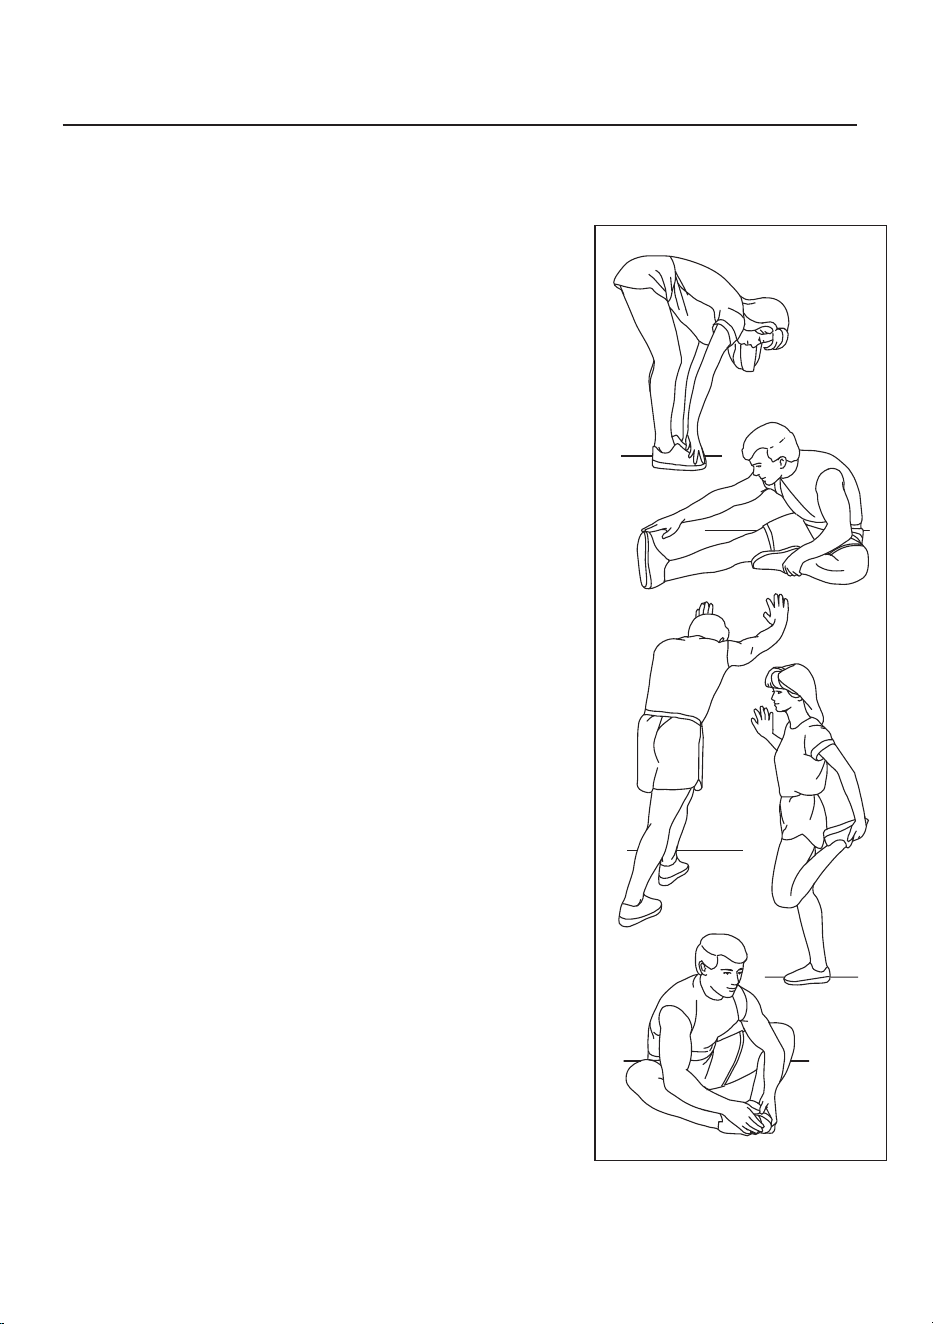
Warm up
Before exercising, it is best to do stretching exercises.
Warm muscles stretch more easily, so warm up for 5
to 10 minutes first. Then stop and stretch as follows -
5 times for 10 seconds or more on each leg, then do it
again at the end of the exercise.
1.Stretching by touching toes
Stand with your knees slightly bent and your hips moving
slowly forward. Touch yourtoes as far as possible, while
relaxing your back and shoulders. Keep this posture for 15s
and thenrelax. Repeat the exercise three times.
Stretched parts: Ligaments,internal parts of knees, andback.
(See Figure 1)
2.Ligament stretching exercise
Sit with one leg stretched forward.Put the other sole close
to your body andon the inner side of the thigh of the stretched
leg. Touch your toes as far as possible. Keep thisposture for 15s
and then relax. Exercise both legs three times, respectively.
Stretched parts:Ligaments, back and groin.(See Figure 2)
Stand with one hand against the wall for balance and the other
hand reaching back to grab your foot. Pull your heel as close to
your buttocks as possible. Keep this posture for 15 seconds and
then relax. Repeat the exercise three times for each leg.
Stretched parts: Quadriceps and hip muscles. (See Figure 3)
3.Calf/heel stretching exercise
Stand with one hand against the wall for balance and the other
hand reaching back to grab your foot. Pull your heel as close to
your buttocks as possible. Keep this posture for 15 seconds and
then relax. Repeat the exercise three times for each leg.
Stretched parts: Quadriceps and hip muscles. (See Figure 4)
4.Quadriceps femoris stretching exercise
Sit with the soles of your feet together and your knees turned out.
Make your feet asclose as possible to the groin. Keep this posture
for 15s and then relax. Repeat the exercise threetimes.
Stretched parts: Ouadriceps and hip muscles. (See Figure 5)
5.Inner thigh stretching exercise
Note: This product is a full-body training equipment,
please follow the above steps to perform warm-up exercises.
1
2
3
4
5
Routine Maintenance
Daily use:
Keep the bike on a dry, ventilated and flat floor. If not used in a long time,
the bike should becovered to keep its body clean and tidy.
Frame maintenance:
Wipe off sweat on the frame with a dry cloth after exercise. Do not wipe the
bike with wet cloth, in orderto avoid rusting.
Belt maintenance:
Adjust or replace the belt timely if the belt pulley is cracked and deviated.
Regularly clean the belt groove to prevent the belt from jumping out of the groove.
Inspection of body screws:
Regularly check the screws of all body parts for loosening or falling, and tighten or
replace them in time.
Inspection of resistance adjustment knob:
Regularly check the resistance knob for looseness or dislodgement and reasonable
resistance values so that the resistance value can be calibrated in time.
lnspection of pedals and cranks:
Regularly check if the screws between the pedals and the crank are loose.
Tighten them promptly if necessary.
Saddle maintenance:
Regularly check if the saddle is loose. Tighten it promptly if necessary.
Use a cotton cloth to wipe the saddle and keep it dry.
Check the power cord:
Check the power cord frequently to see if it is cracked or damaged, and replace
it in time.