
Technical Support and E-Warranty Certificate www.vevor.com/support
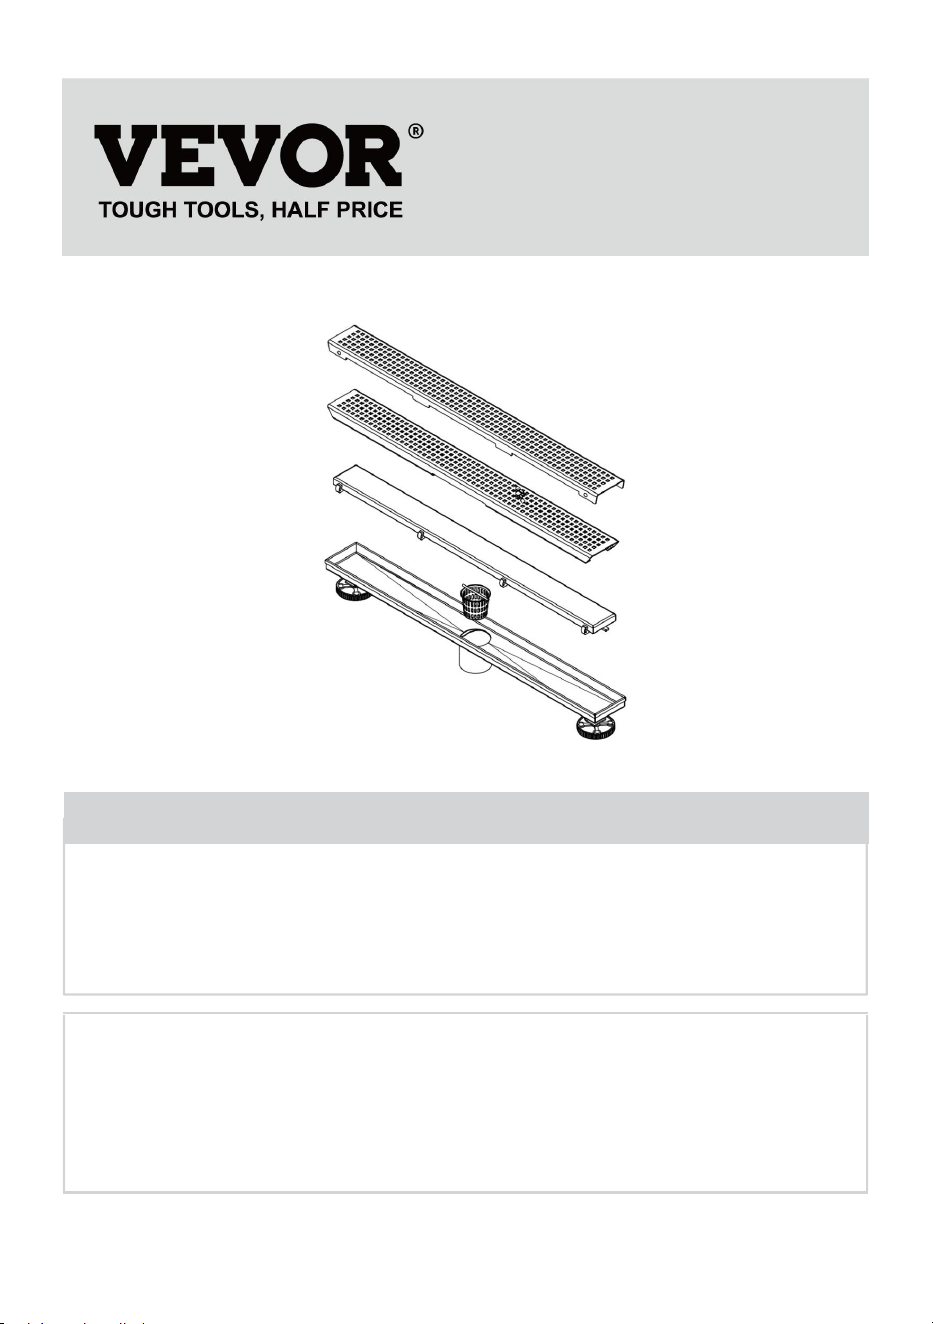
LINEAR DRAIN
MODEL:ZA3
We continue to be committed to provide you tools with competitive price.
"Save Half", "Half Price" or any other similar expressions used by us only represents an
estimate of savings you might benefit from buying certain tools with us compared to the major
top brands and does not necessarily mean to cover all categories of tools offered by us. You
are kindly reminded to verify carefully when you are placing an order with us if you are
actually saving half in comparison with the top major brands.


- 1 -
MODEL:ZA3
Have product questions? Need technical support? Please feel free to
contact us:
Technical Support and E-Warranty Certificate
www.vevor.com/support
NEED HELP? CONTACT US!
This is the original instruction, please read all manual instructions
carefully before operating. VEVOR reserves a clear interpretation of our
user manual. The appearance of the product shall be subject to the
product you received. Please forgive us that we won't inform you again if
there are any technology or software updates on our product.
LINEAR DRAIN

- 2 -
Warning-To reduce the risk of injury, user must read
instructions manual carefully.
Check carefully to make sure there are no missing or defective parts.
Improper installation may cause damage or serious injury. We cannot be
liable for damage or injury caused by improper mounting, incorrect
assembly, or inappropriate use.
WARNING:
1. Do not allow children to climb on the unit.
2. Keep children and pets away during assembly.
3. To avoid the danger of suffocation, always keep plastic bags away from
children and pets.
ASSEMBLY PRECAUTIONS
1. Please assemble the product in strict accordance with the instructions.
Incorrect assembly could be hazardous.
2. Please wear safety goggles and work gloves properly during assembly.
3. Do not try to assemble the product when feeling tired or when under the
influence of alcohol, drugs or medication.
4.Waterflow capacity and other product parameters are applied to the
properly and completely assembled product only.
5. Separate and count all parts and hardware.
6. Prepare the following tool: Philips Head Screwdriver.
7. If using power tools, please be careful to slow down and stop when
needed.
8. Two people are required for assembly.
9. Follow the intended uses only. Do not sit or stand on the above.
Save these instructions.
- 3 -
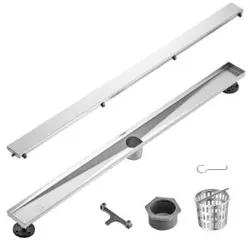
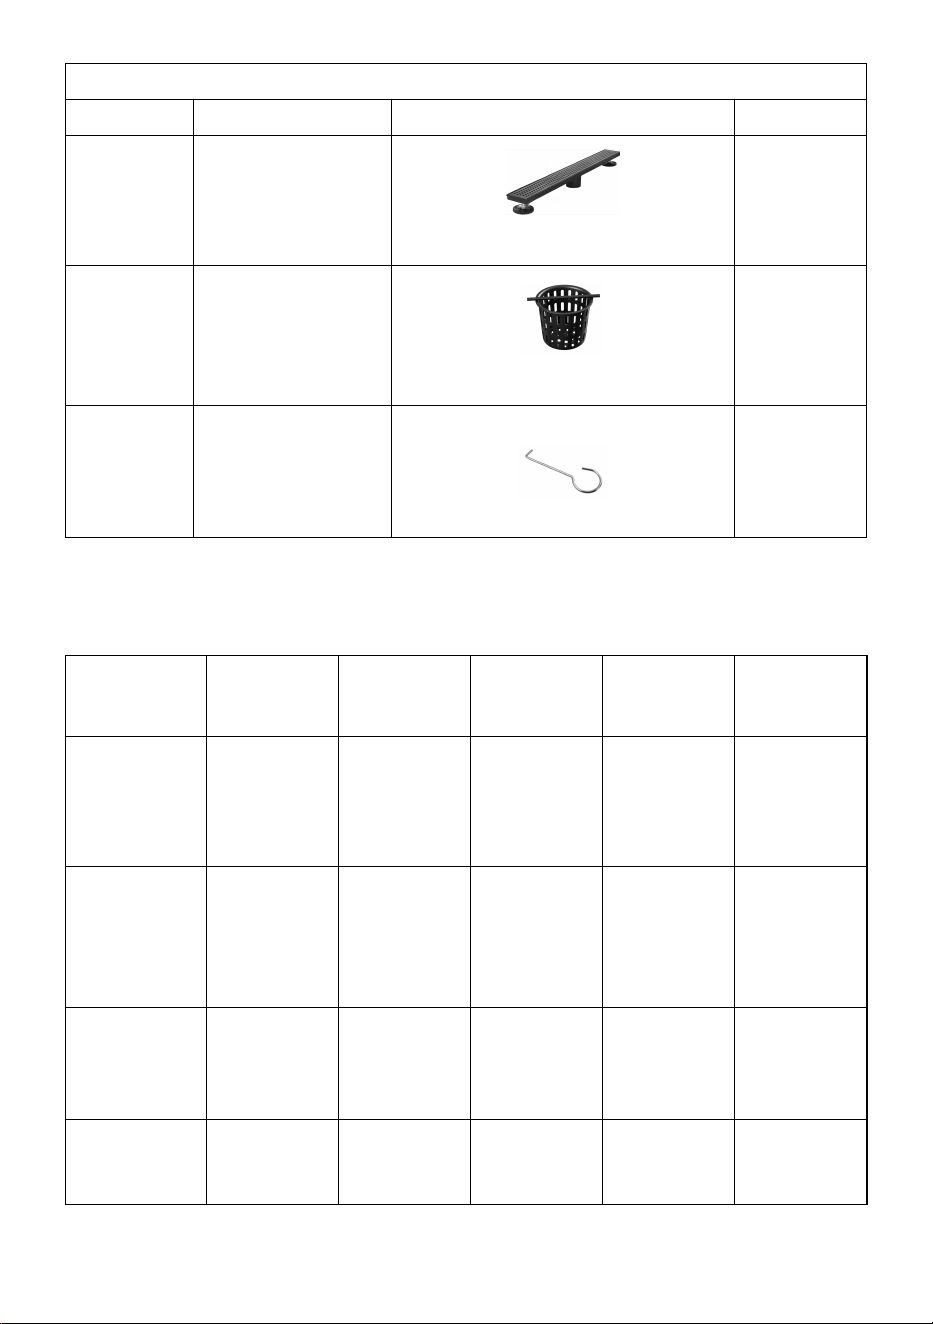
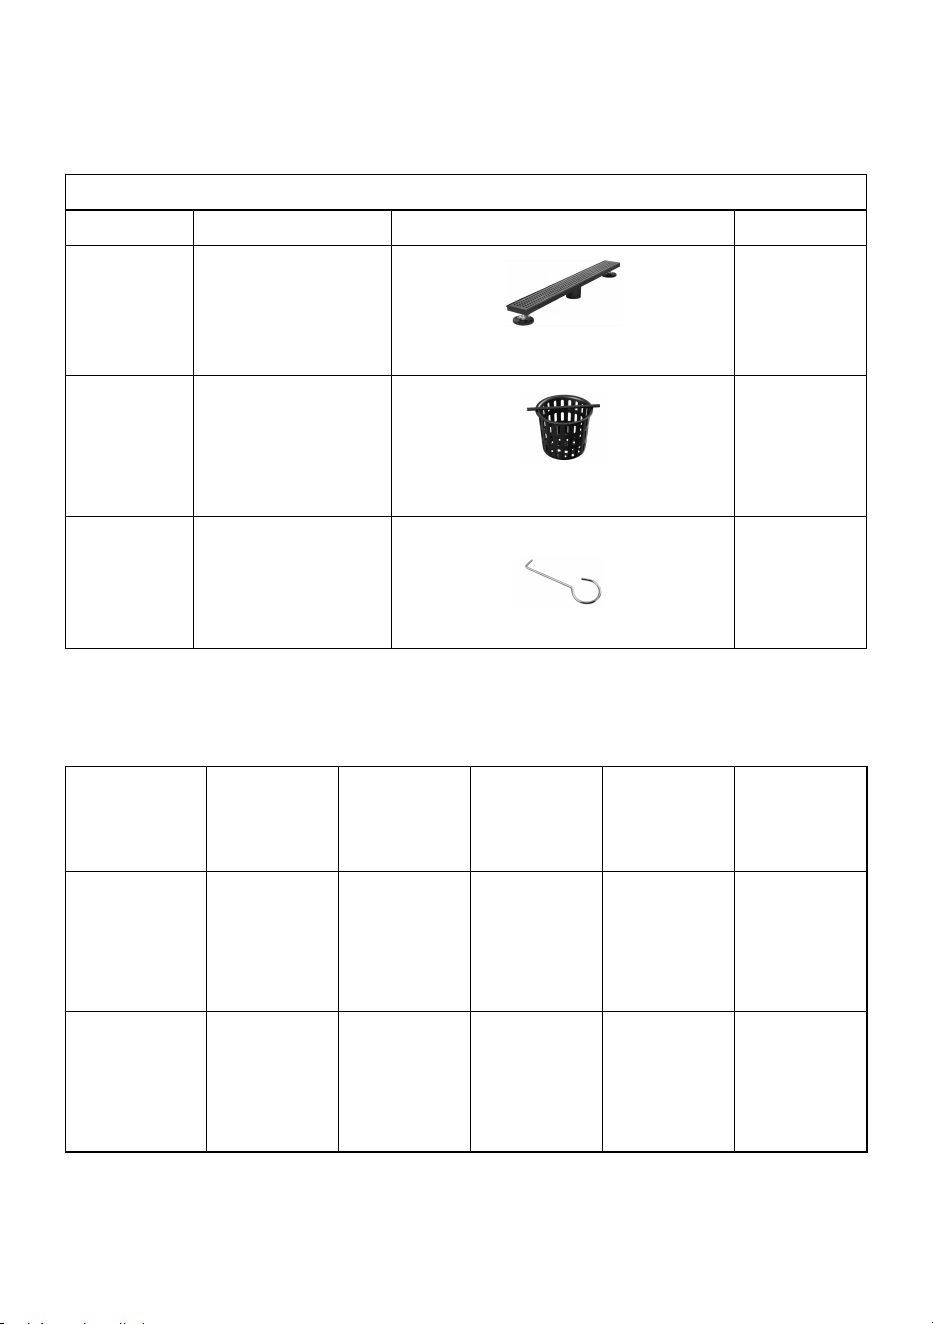
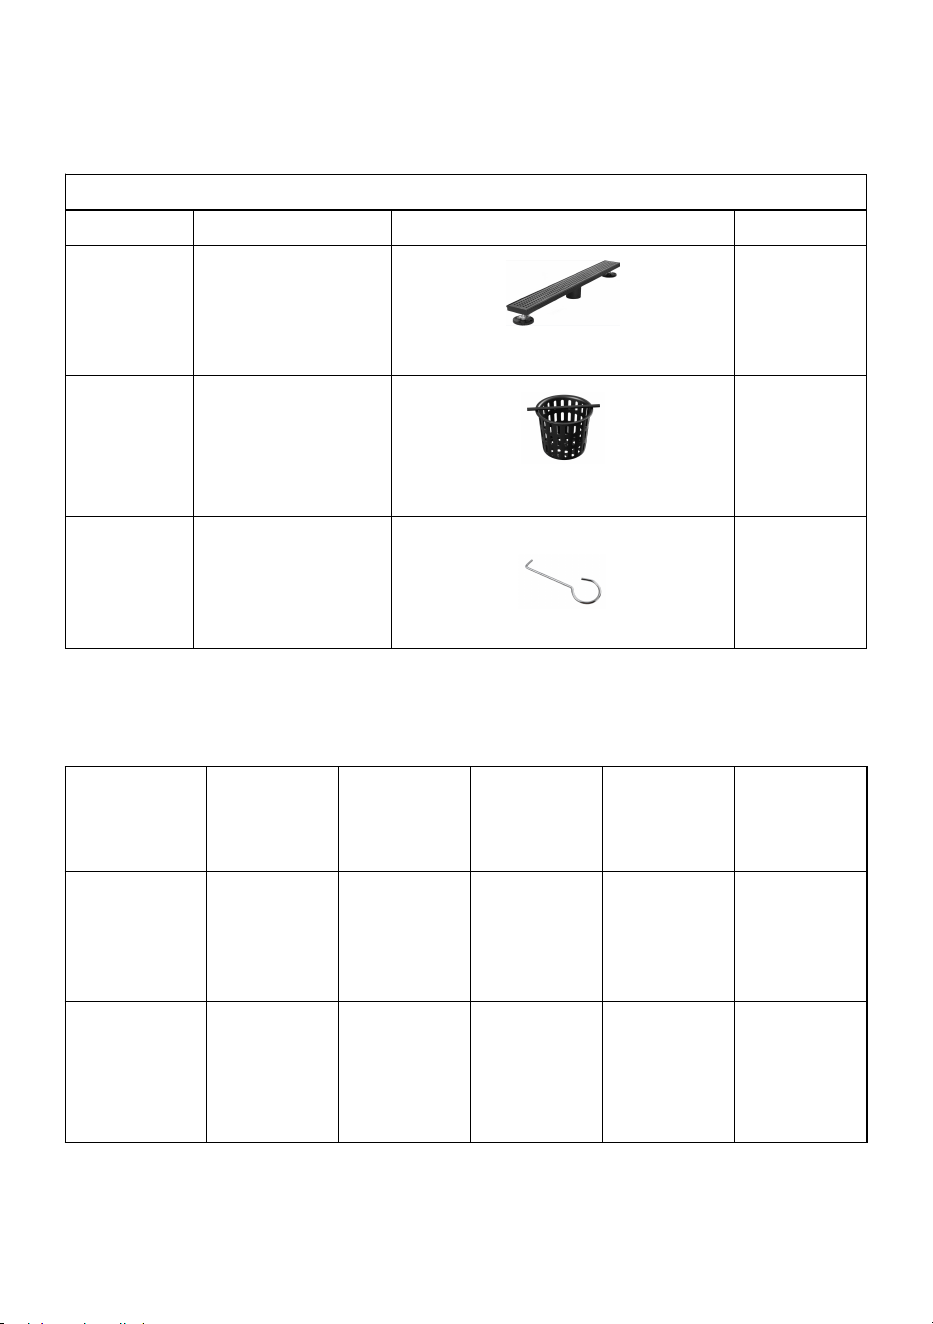
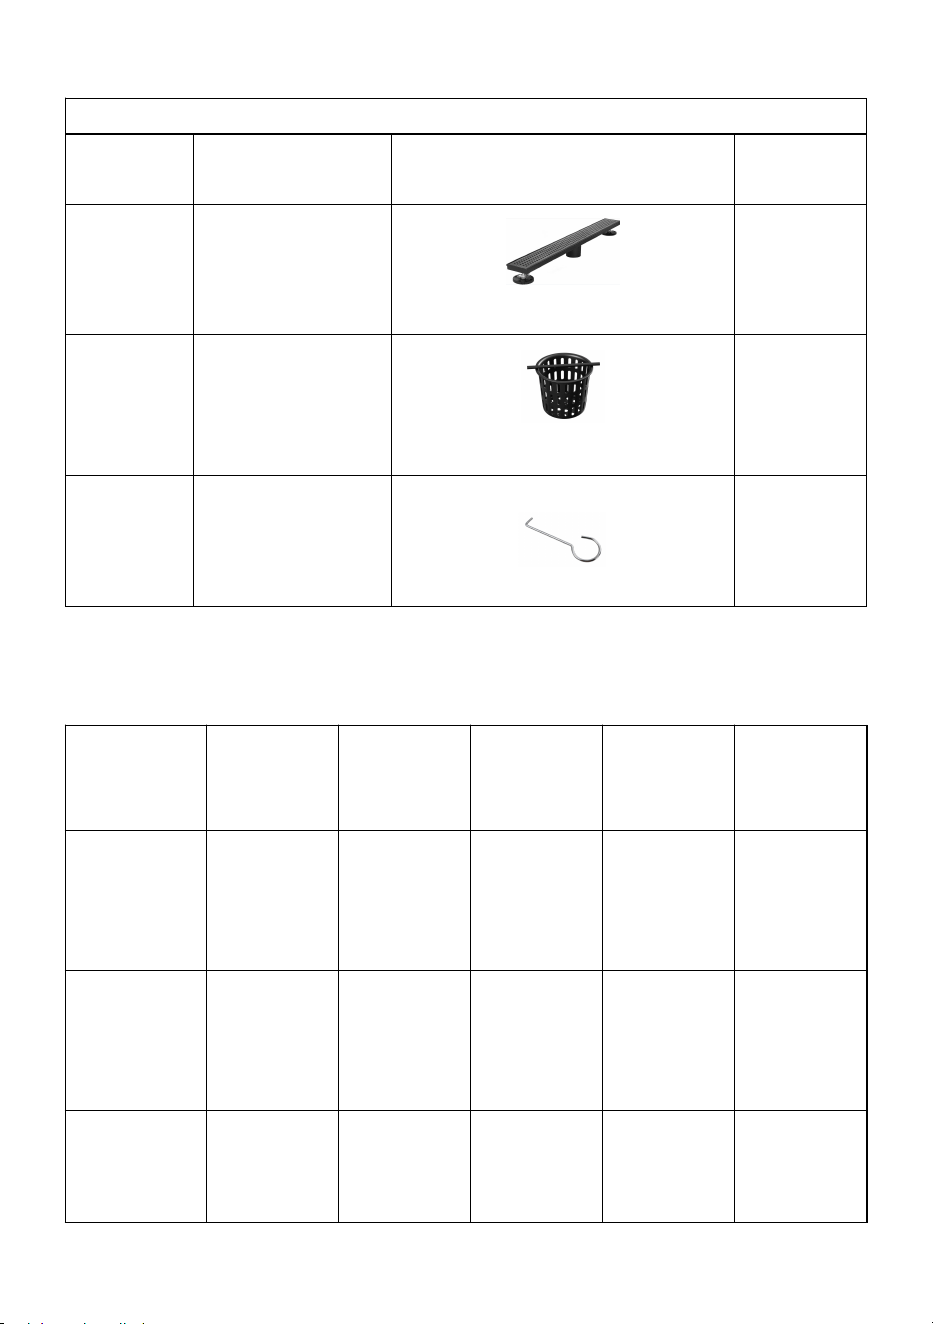
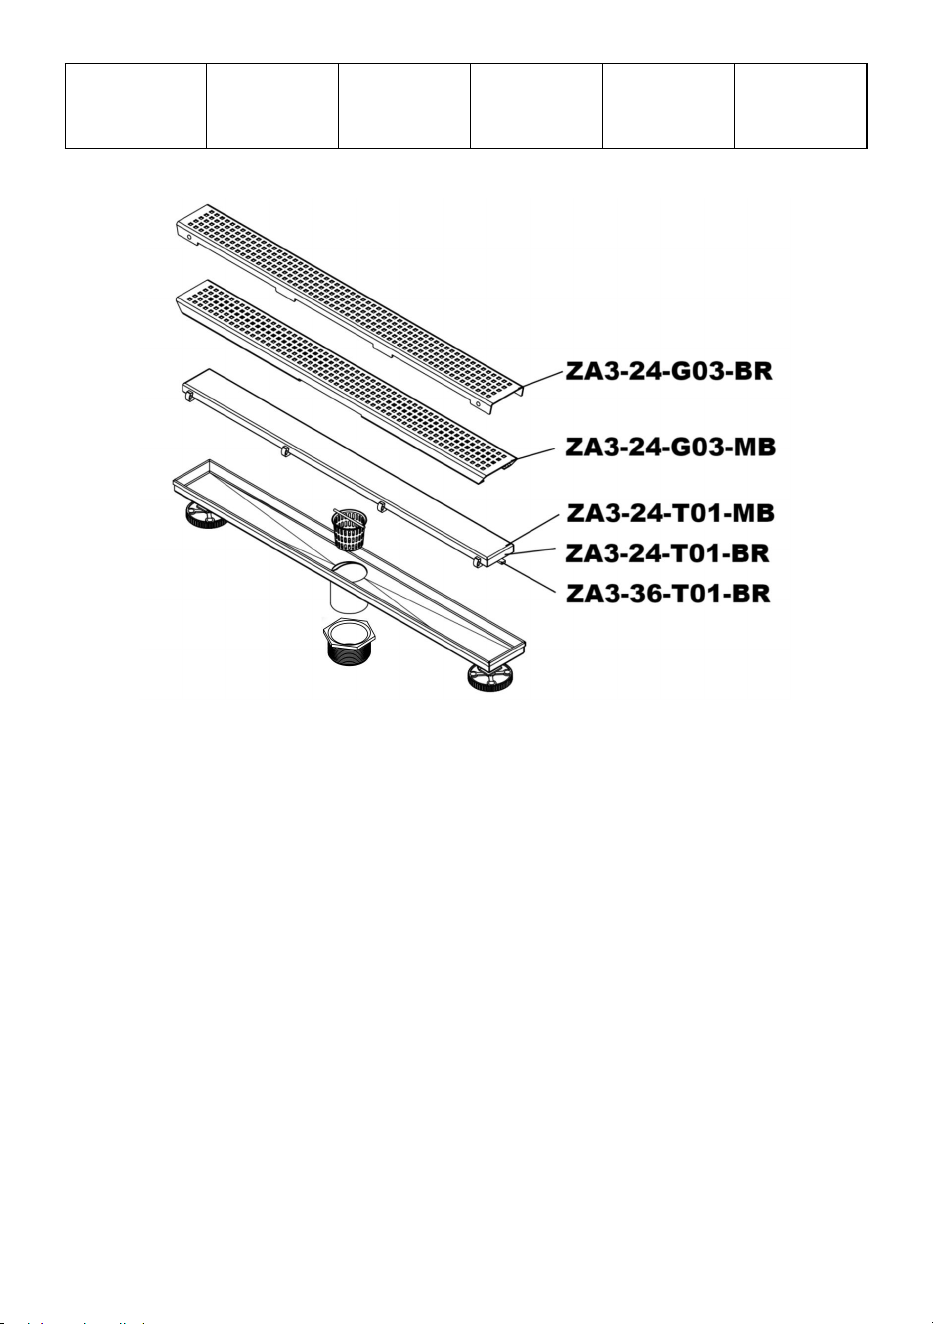
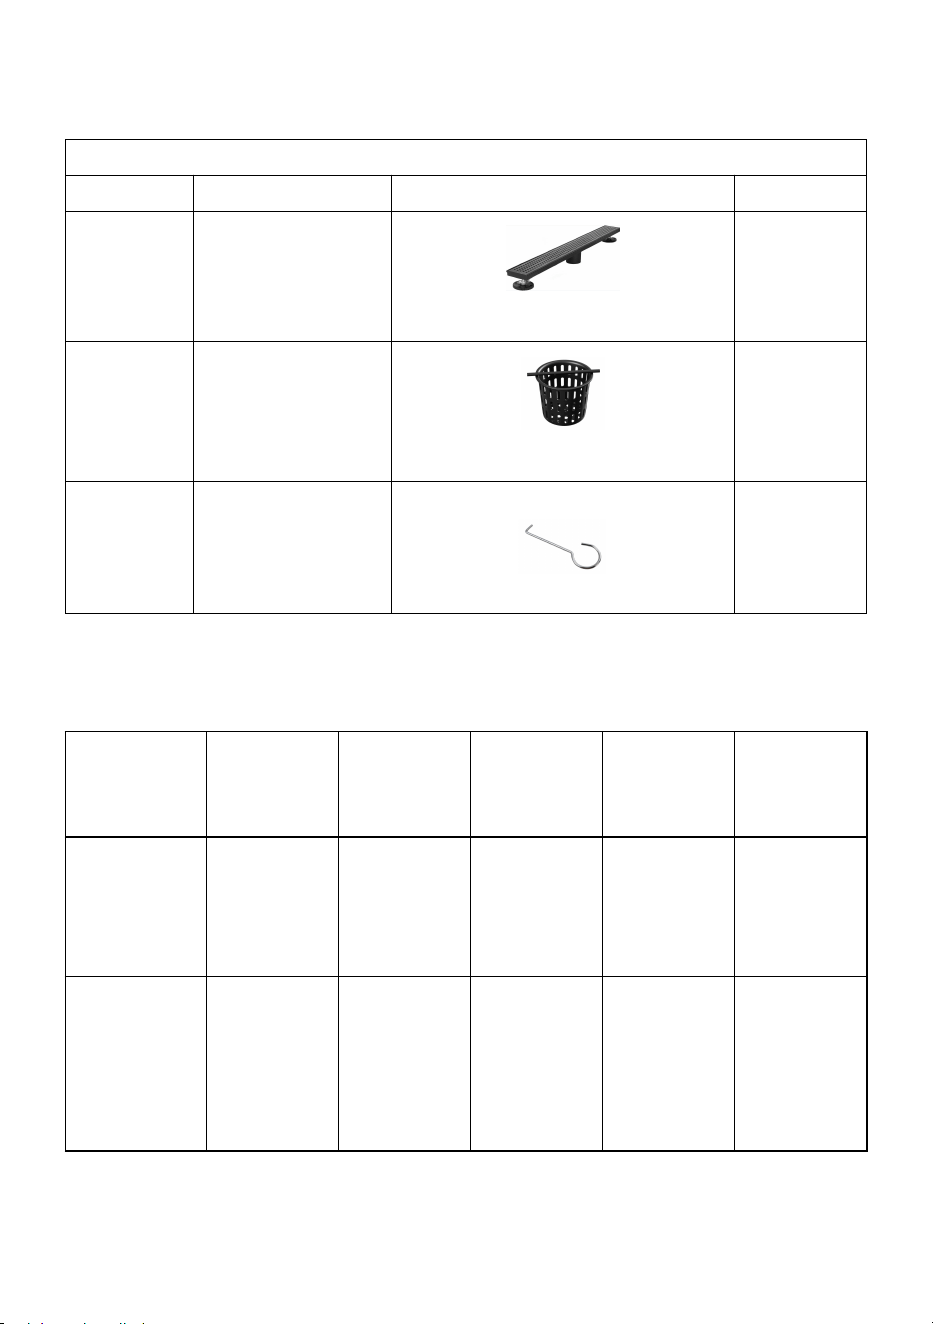
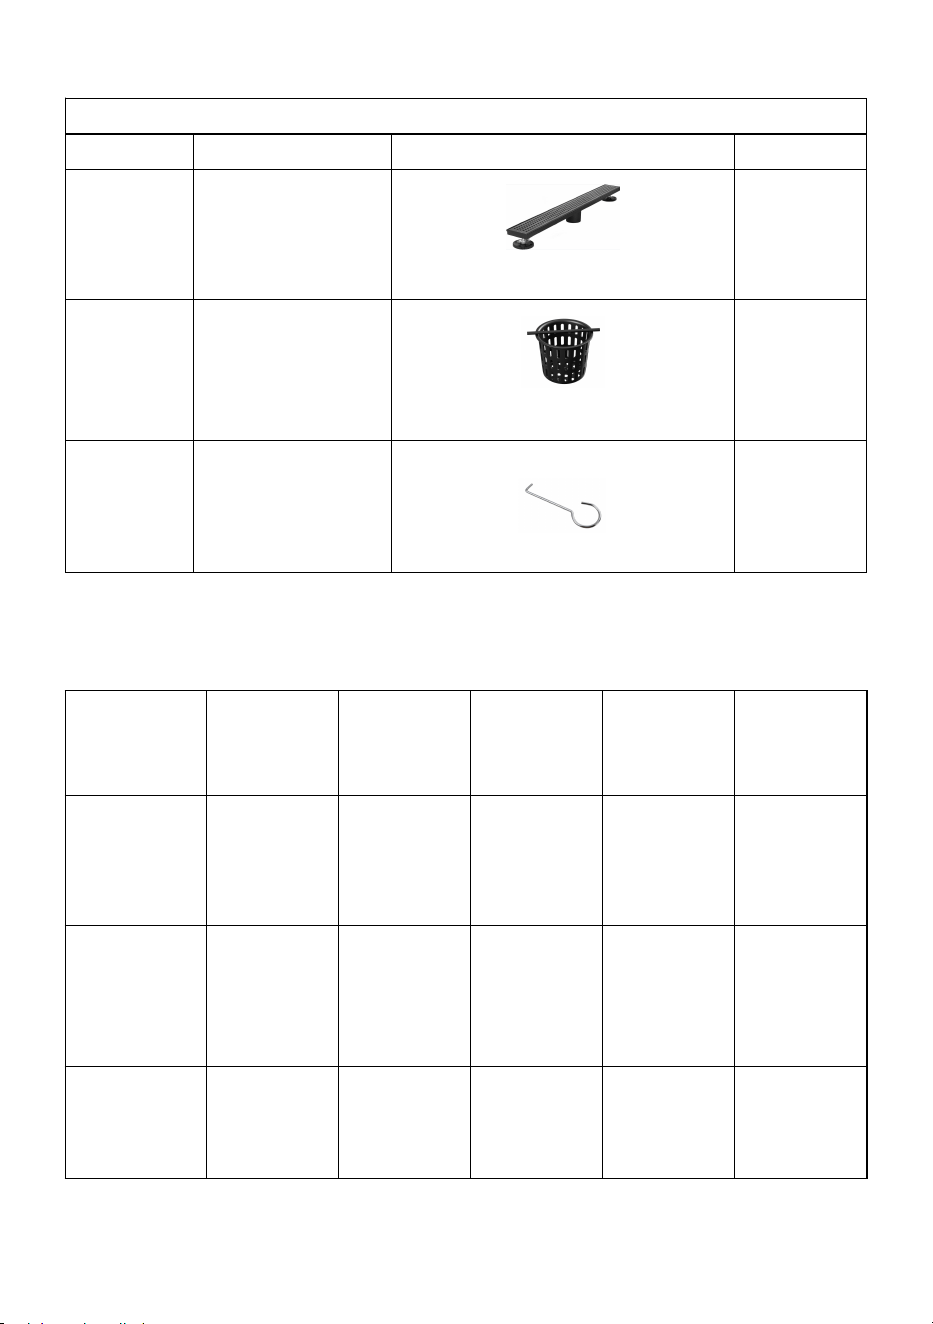
Part List
NO.
Name
Picture
QTY.
1
Gutter Group
(Representative picture)
1
2
Filter Screen
(Representative picture)
1
3
Hook
1
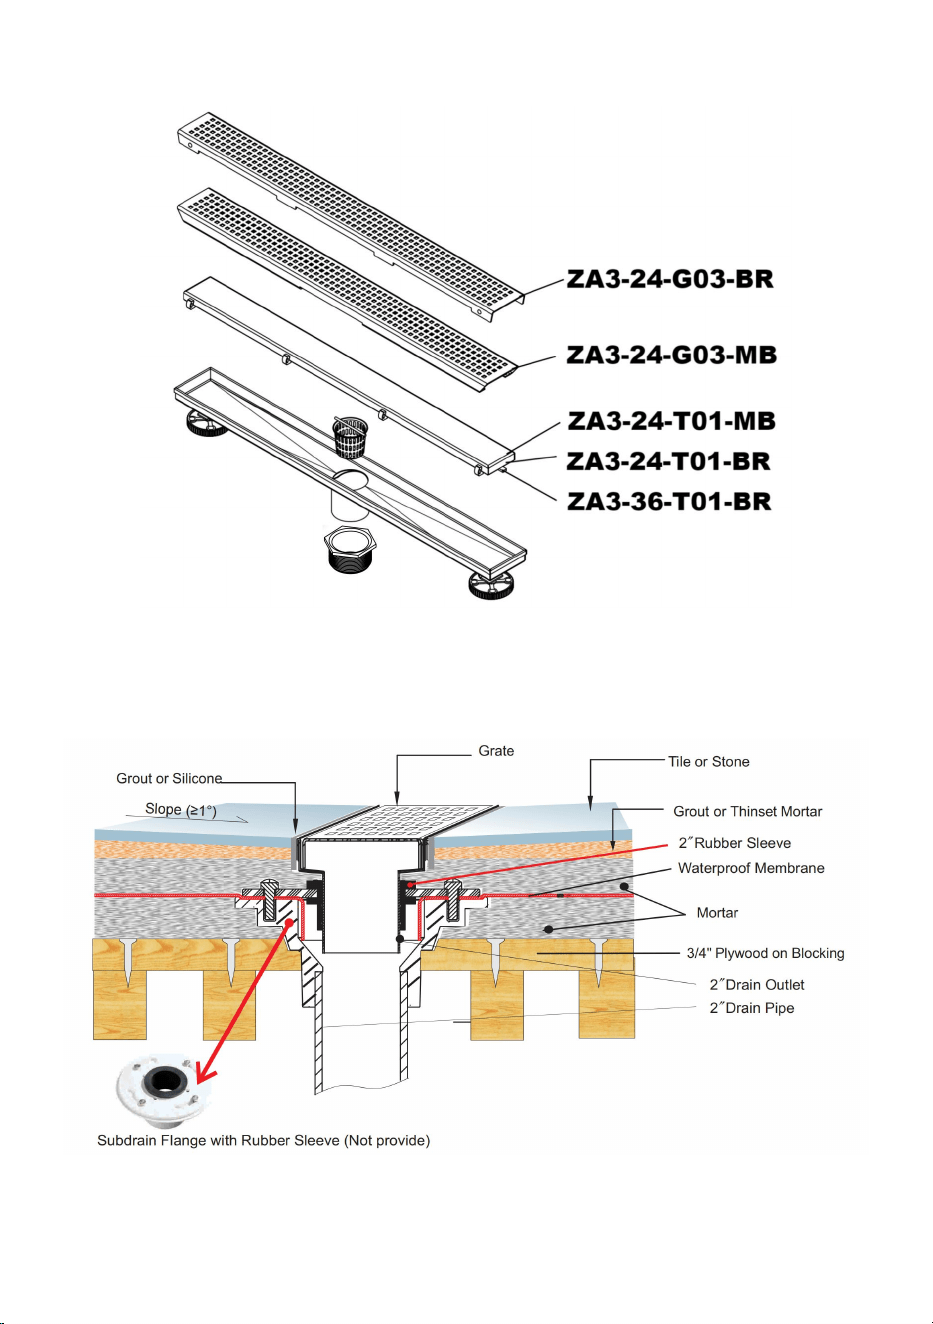
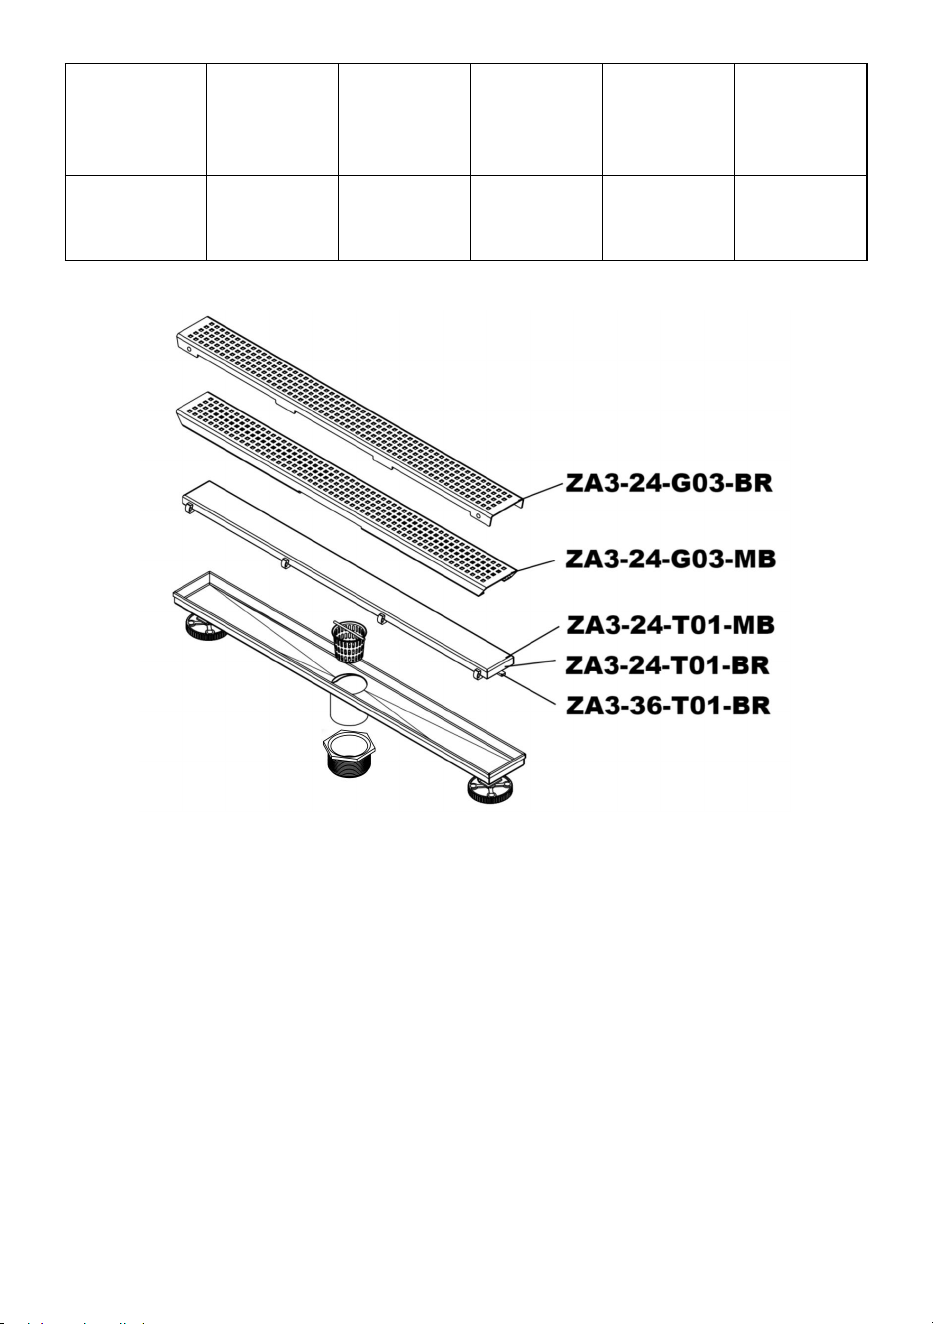
Product introduction
Model
ZA3-24-
G03-MB
ZA3-24-
T01-MB
ZA3-24-
G03-BR
ZA3-36-
T01-BR
ZA3-24-T
01-BR
Product
Specificati
on (inch)
24
24
24
36
24
Max.
Waterflow
Rate
(L/min)
42.5
42.5
42.5
42.5
42.5
Cover
Form
Punching
Face
Tile
Surface
Punching
Face
Tile
Surface
Tile
Surface
Colour
Black
Black
Silver
Silver
Silver
- 4 -
Standard Installation
For Wood Slab
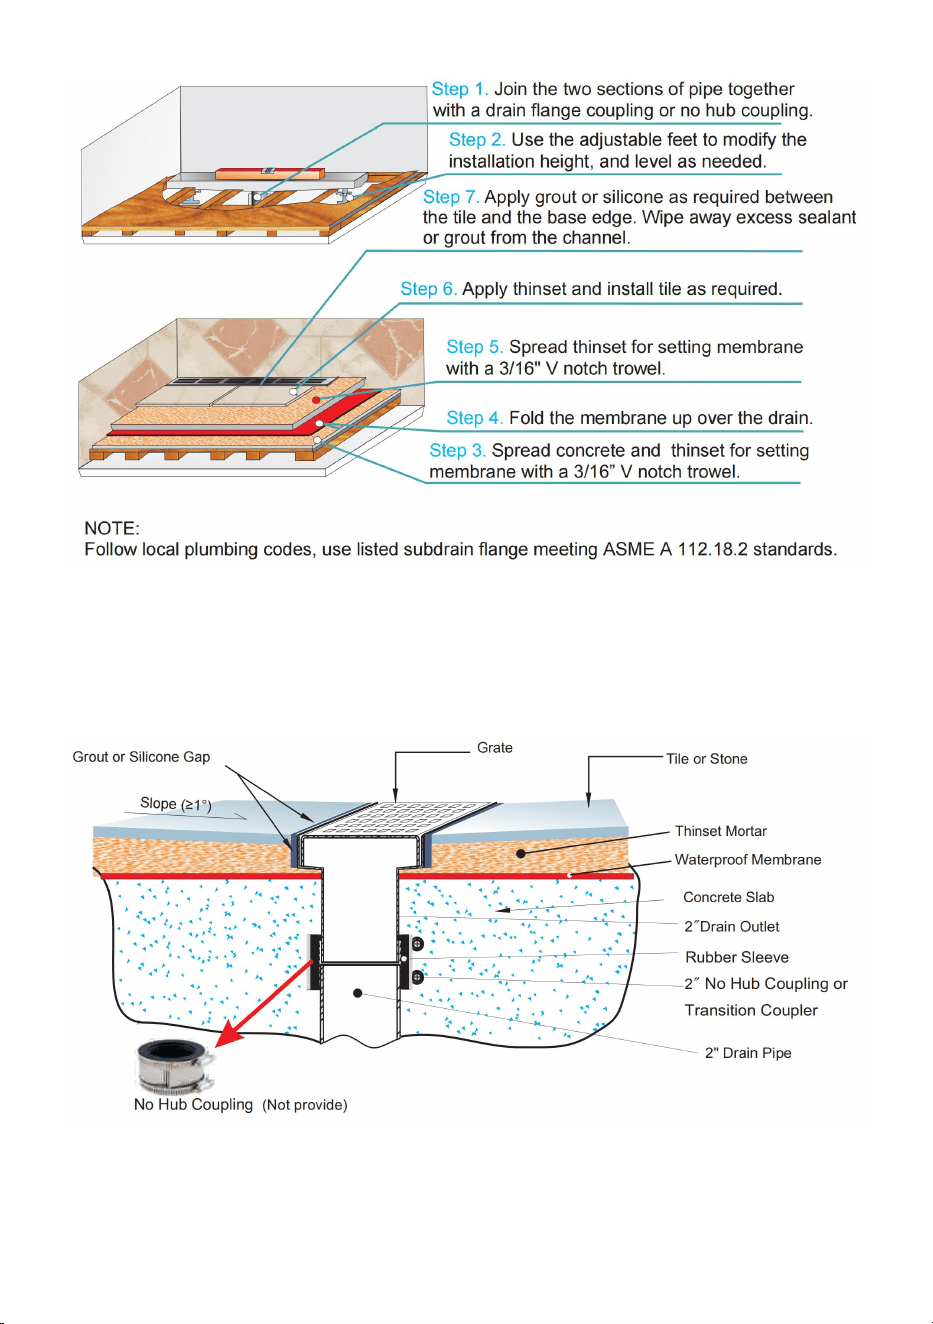
- 5 -
For Concrete Slab
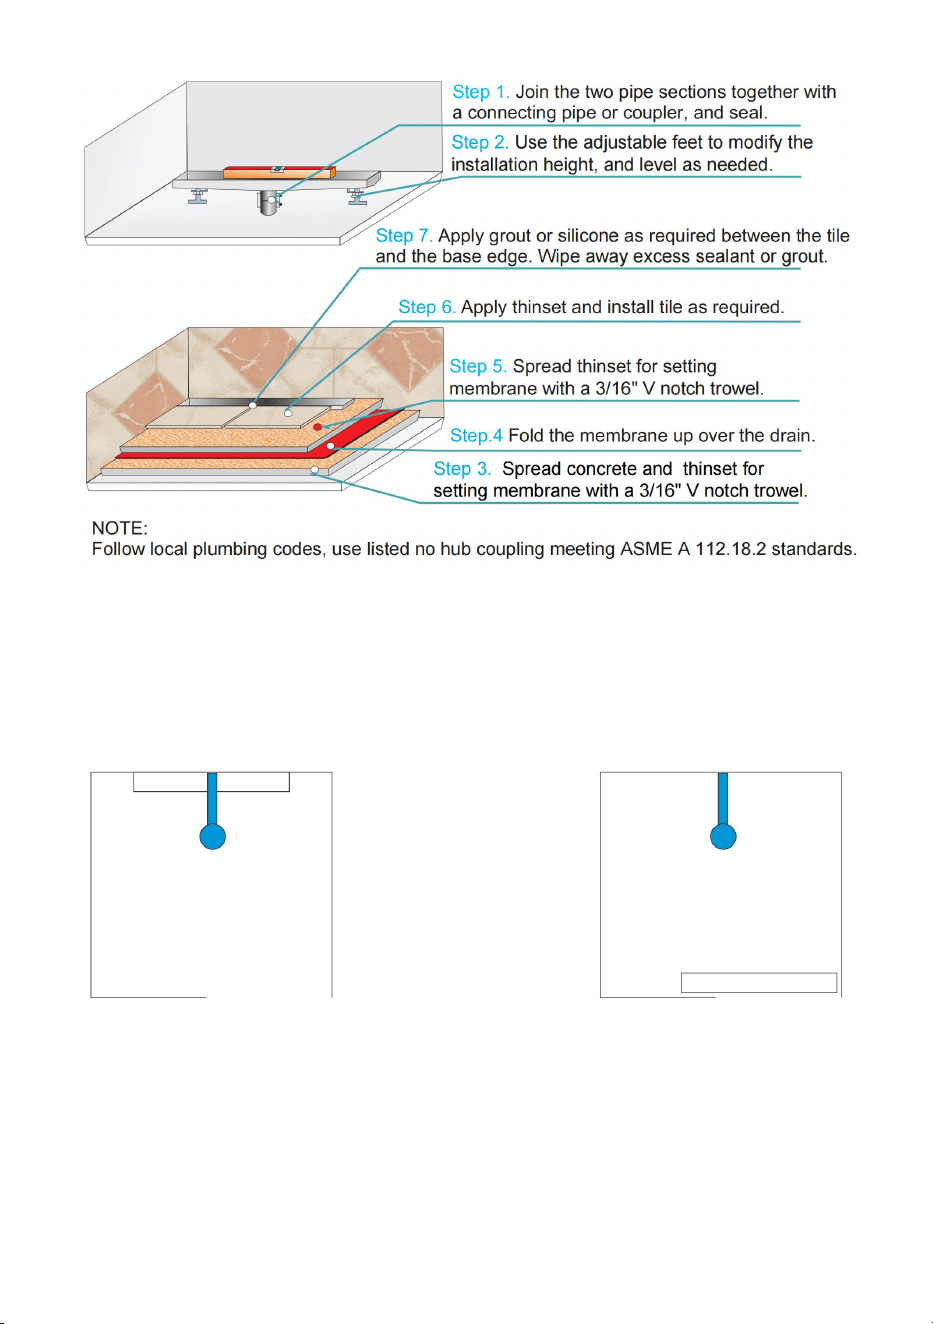
- 6 -
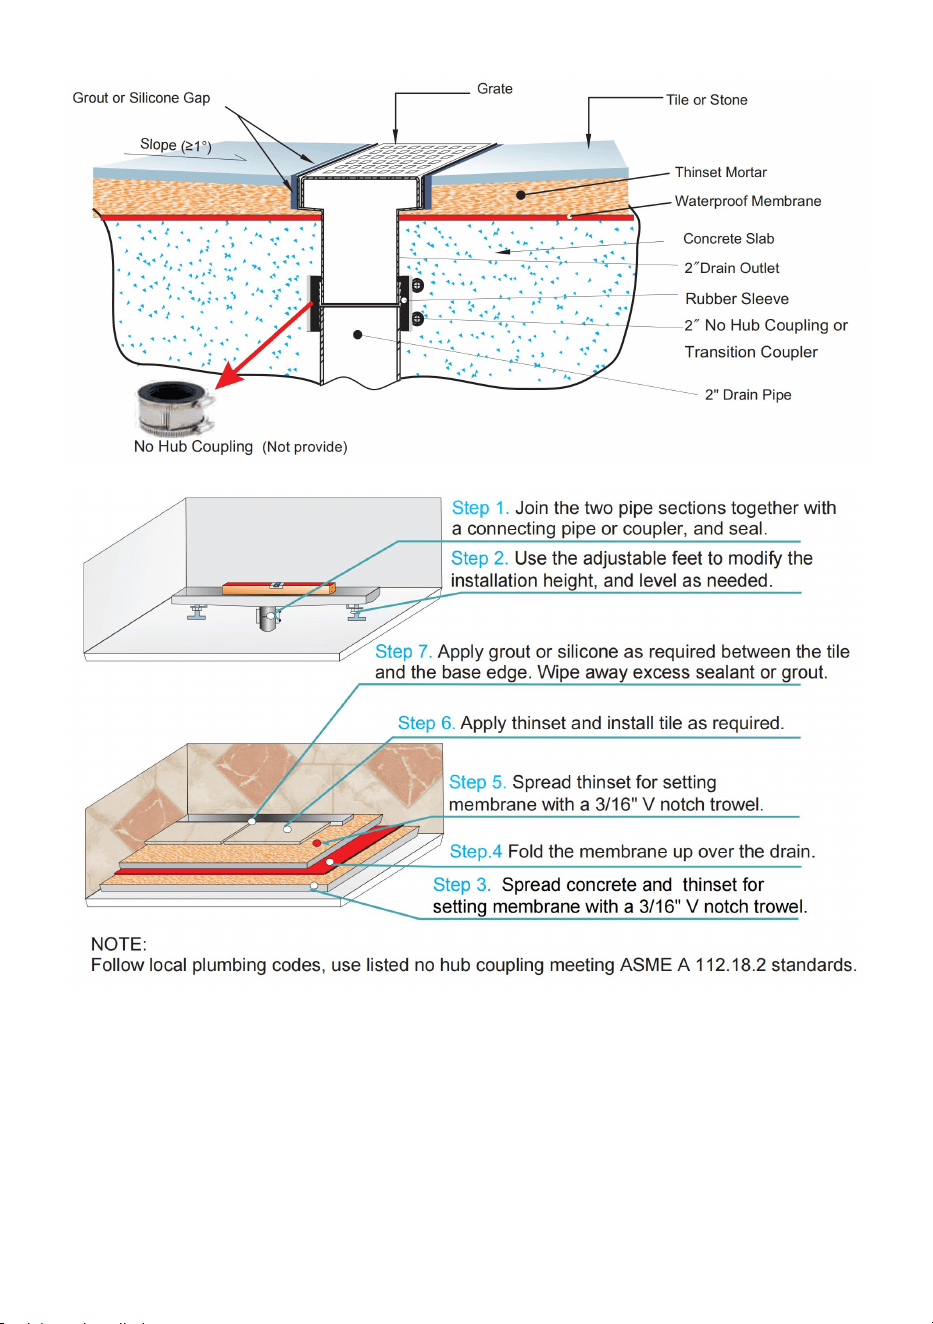
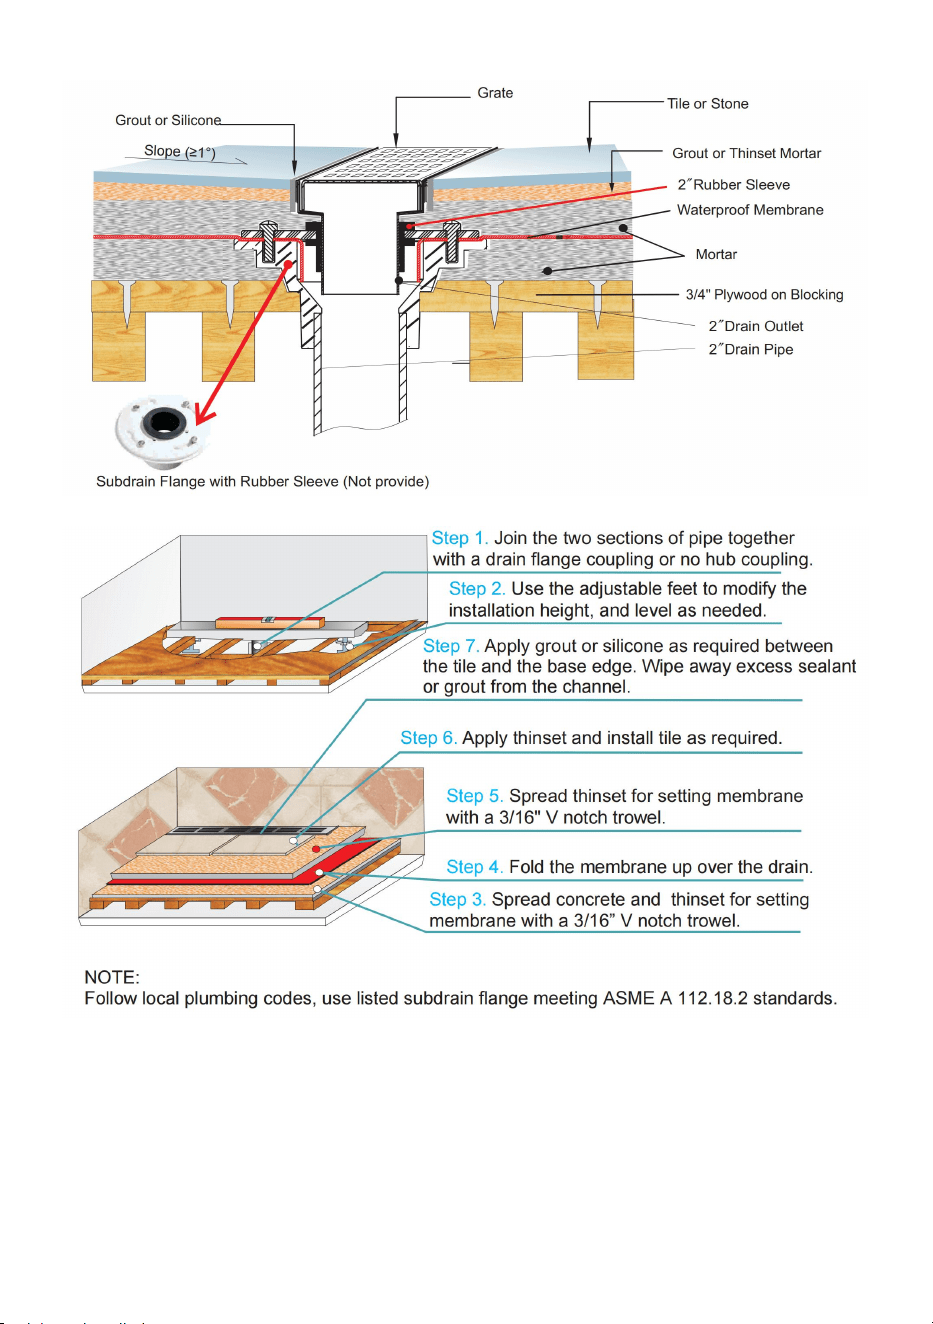
Installation Location & Notes:

- 7 -
1. Made of genuine stainless steel.
2. The shower tray can be installed in a new or existing shower. The floor
should have enough space for the trap and drain area so the two can be
properly connected.
3. The shower channel trench envelope should be "blocked out" with wood
blocking while pouring the concrete slab to allow the shower channel to be
installed separately from the main structural floor slab.
4. The pipe stub should be fully accessible to allow the transition coupler to
be installed before the finished concrete pour around the shower channel
body.
5. The tiles should be installed considering the slope of the shower floor in
the direction of the drain trench. The tiles should be 1mm higher than the
trench and drains so no puddle forms in the shower tray.
Address:Baoshanqu Shuangchenglu 803long 11hao 1602A-1609shi
Shanghai
Imported to AUS: SIHAO PTY LTD. 1 ROKEVA STREETEASTWOOD
NSW 2122 Australia
Imported to USA: Sanven Technology Ltd. Suite 250, 9166 Anaheim

- 8 -
Place, Rancho Cucamonga, CA 91730
REP
UK
Pooledas Group Ltd
Unit 5 Albert Edward House, The Pavilions
Preston, United Kingdom
REP
EC
SHUNSHUN GmbH
Römeräcker 9 Z2021, 76351
Linkenheim-Hochstetten, Germany
Made In China


Technique Assistance et certificat de garantie électronique
www.vevor.com/support
DRAIN LINÉAIRE
MODÈLE : ZA3
We continue to be committed to provide you tools with competitive price.
"Save Half", "Half Price" or any other similar expressions used by us only represents an
estimate of savings you might benefit from buying certain tools with us compared to the major
top brands and does not necessarily mean to cover all categories of tools offered by us. You
are kindly reminded to verify carefully when you are placing an order with us if you are
actually saving half in comparison with the top major brands.


- 1 -
MODÈLE : ZA3
Have product questions? Need technical support? Please feel free to
contact us:
Technical Support and E-Warranty Certificate
www.vevor.com/support
NEED HELP? CONTACT US!
This is the original instruction, please read all manual instructions
carefully before operating. VEVOR reserves a clear interpretation of our
user manual. The appearance of the product shall be subject to the
product you received. Please forgive us that we won't inform you again if
there are any technology or software updates on our product.
LINEAR DRAIN

- 2 -
Avertissement : Pour réduire le risque de blessure, l'utilisateur
doit lire attentivement le manuel d'instructions.
Vérifiez soigneusement qu'il n'y a aucune pièce manquante ou
défectueuse. Une installation incorrecte peut causer des dommages ou
des blessures graves. Nous ne pouvons être tenus responsables des
dommages ou des blessures causés par un montage incorrect, un
assemblage incorrect ou une utilisation inappropriée.
AVERTISSEMENT:
2. Ne laissez pas les enfants grimper sur l'appareil.
2. Éloignez les enfants et les animaux domestiques pendant l'assemblage.
3. Pour éviter tout risque d'étouffement, gardez toujours les sacs en
plastique hors de portée des enfants et des animaux domestiques.
PRÉCAUTIONS DE MONTAGE
1. Veuillez assembler le produit en stricte conformité avec les instructions.
Un assemblage incorrect pourrait être dangereux.
2. Veuillez porter correctement des lunettes de sécurité et des gants de
travail pendant l'assemblage.
3. N'essayez pas d'assembler le produit lorsque vous vous sentez fatigué
ou sous l'influence de l'alcool, de drogues ou de médicaments.
4. La capacité de débit d
’
eau et les autres paramètres du produit
s’appliquent uniquement au produit correctement et complètement
assemblé.
5. Séparez et comptez toutes les pièces et le matériel.
6. Préparez l'outil suivant : Tournevis cruciforme.
7. Si vous utilisez des outils électriques, veillez à ralentir et à vous arrêter
si nécessaire.
8. Deux personnes sont nécessaires pour le montage.
- 3 -
9. Suivez uniquement les utilisations prévues. Ne vous asseyez pas et ne
vous tenez pas debout sur ce qui précède.
Enregistrez ces instructions.
Liste des pièces
NON.
Nom
Image
QTÉ.
1
Groupe de
gouttières
( Photo représentative )
1
2
Écran filtrant
( Photo représentative )
1
3
Crochet
1
Présentation du produit
Modèle
Z
A3-24-G0
3-MB
ZA3-24-
T01-MB
ZA3-24-
G03-BR
ZA3-36-
T01-BR
ZA3-24-T
01-BR
Spécificati
on du
produit
( pouces )
24
24
24
36
24
Max. Débit
d'eau
( L/min )
42,5
42,5
42,5
42,5
42,5
- 4 -
Formulaire
de
couverture
Visage de
frappe
Surface
du
carrelage
Visage de
frappe
Surface
du
carrelage
Surface
du
carrelage
Couleur
Noir
Noir
Argent
Argent
Argent
Installation standard
Pour dalle de bois

- 5 -
Pour dalle de béton

- 6 -
Emplacement d'installation et remarques :

- 7 -
1. Fabriqué en véritable acier inoxydable.
2. Le receveur de douche peut être installé dans une douche neuve ou
existante. Le sol doit avoir suffisamment d'espace pour le siphon et la zone
de drainage afin que les deux puissent être correctement connectés.
3. L'enveloppe de la tranchée du caniveau de douche doit être « bloquée »
avec des blocs de bois lors du coulage de la dalle de béton pour permettre
au caniveau de douche d'être installé séparément de la dalle de plancher
structurelle principale.
4. Le bout de tuyau doit être entièrement accessible pour permettre
l'installation du coupleur de transition avant que le béton fini ne soit coulé
autour du corps de la rigole de douche.
- 8 -
5. Les carreaux doivent être installés en tenant compte de la pente du sol
de la douche en direction de la tranchée de drainage. Les carreaux doivent
être 1 mm plus hauts que la tranchée et les drains afin qu'aucune flaque
d'eau ne se forme dans le receveur de douche.
Adresse : Baoshanqu Shuangchenglu 803long 11hao 1602A-1609shi
Shanghai
Importé en Australie : SIHAO PTY LTD . 1 ROKEVA STREETASTWOOD
NSW 2122 Australie
Importé aux États-Unis : Sanven Technology Ltd. Bureau 250, 9166
Anaheim Place, Rancho Cucamonga, CA 91730
REP
UK
Pooledas Group Ltd
Unit 5 Albert Edward House, The Pavilions
Preston, United Kingdom
REP
EC
SHUNSHUN GmbH
Römeräcker 9 Z2021, 76351
Linkenheim-Hochstetten, Germany
Fabriqué en Chine


Technisch Support- und E-Garantie-Zertifikat www.vevor.com/support
LINEARER ABFLUSS
MODELL: ZA3
We continue to be committed to provide you tools with competitive price.
"Save Half", "Half Price" or any other similar expressions used by us only represents an
estimate of savings you might benefit from buying certain tools with us compared to the major
top brands and does not necessarily mean to cover all categories of tools offered by us. You
are kindly reminded to verify carefully when you are placing an order with us if you are
actually saving half in comparison with the top major brands.


- 1 -
MODELL: ZA3
Have product questions? Need technical support? Please feel free to
contact us:
Technical Support and E-Warranty Certificate
www.vevor.com/support
NEED HELP? CONTACT US!
This is the original instruction, please read all manual instructions
carefully before operating. VEVOR reserves a clear interpretation of our
user manual. The appearance of the product shall be subject to the
product you received. Please forgive us that we won't inform you again if
there are any technology or software updates on our product.
LINEAR DRAIN

- 2 -
Warnung: Um das Verletzungsrisiko zu verringern, muss der
Benutzer die Bedienungsanleitung sorgfältig lesen.
Überprüfen Sie sorgfältig, ob Teile fehlen oder defekt sind. Eine
unsachgemäße Installation kann zu Schäden oder schweren Verletzungen
führen. Wir können nicht für Schäden oder Verletzungen haftbar gemacht
werden, die durch unsachgemäße Montage, falsche Montage oder
unsachgemäßen Gebrauch entstehen.
WARNUNG:
3. Erlauben Sie Kindern nicht, auf das Gerät zu klettern.
2. Halten Sie Kinder und Haustiere während der Montage fern.
3. Um Erstickungsgefahr zu vermeiden, halten Sie Plastiktüten immer von
Kindern und Haustieren fern.
VORSICHTSMASSNAHMEN BEI DER MONTAGE
1. Bitte bauen Sie das Produkt unter strikter Einhaltung der Anweisungen
zusammen. Eine falsche Montage kann gefährlich sein.
2. Bitte tragen Sie bei der Montage ordnungsgemäß eine Schutzbrille und
Arbeitshandschuhe.
3. Versuchen Sie nicht, das Produkt zusammenzubauen, wenn Sie sich
müde fühlen oder unter dem Einfluss von Alkohol, Drogen oder
Medikamenten stehen.
4. Die Wasserdurchflusskapazität und andere Produktparameter gelten nur
für das ordnungsgemäß und vollständig montierte Produkt.
5. Trennen und zählen Sie alle Teile und Hardware.
6. Bereiten Sie das folgende Werkzeug vor: Kreuzschlitzschraubendreher.
7. Wenn Sie Elektrowerkzeuge verwenden, achten Sie bitte darauf,
langsamer zu fahren und bei Bedarf anzuhalten.
8. Für den Aufbau sind zwei Personen erforderlich.
- 3 -
9. Befolgen Sie nur die vorgesehenen Verwendungszwecke. Setzen oder
stehen Sie nicht darauf.
Anleitung aufbewahren.
Stückliste
NEIN.
Name
Bild
MENGE.
1
Gutter-Gruppe
( Repräsentatives Bild )
1
2
Filterbildschirm
( Repräsentatives Bild )
1
3
Haken
1
Produkteinführung
Modell
Z
A3-24-G0
3-MB
ZA3-24-
T01-MB
ZA3-24-
G03-BR
ZA3-36-
T01-BR
ZA3-24-T
01-BR
Produktsp
ezifikation
( Zoll ) _ _
24
24
24
36
24
Max.
Wasserdur
chflussrat
e ( l/min )
42,5
42,5
42,5
42,5
42,5

- 4 -
Deckungsf
ormular
Schlagge
sicht _ _
Fliesenob
erfläche _
_
Schlagge
sicht _ _
Fliesenob
erfläche _
_
Fliesenob
erfläche _
_
Farbe
Schwarz
Schwarz
Silber
Silber
Silber
Standardinstallation _
Für Holzplatte

- 5 -
Für Betonplatte
- 6 -
Installationsort und Hinweise:

- 7 -
1. Aus echtem Edelstahl.
2. Die Duschwanne kann in eine neue oder bestehende Dusche eingebaut
werden. Der Boden sollte genügend Platz für den Siphon- und
Abflussbereich bieten, damit beide ordnungsgemäß verbunden werden
können.
3. Die Grabenhülle der Duschrinne sollte beim Gießen der Betonplatte mit
Holzblöcken „ausgeblockt“ werden, damit die Duschrinne getrennt von der
Hauptbodenplatte installiert werden kann.
4. Der Rohrstutzen sollte vollständig zugänglich sein, damit die
Übergangskupplung installiert werden kann, bevor der fertige Beton um
den Duschrinnenkörper gegossen wird.

- 8 -
5. Die Fliesen sollten unter Berücksichtigung der Neigung des
Duschbodens in Richtung des Abflussgrabens verlegt werden. Die Fliesen
sollten 1 mm höher sein als der Graben und die Abflüsse, damit sich keine
Pfützen in der Duschwanne bilden.
Adresse: Baoshanqu Shuangchenglu 803long 11hao 1602A-1609shi
Shanghai
Importiert nach AUS: SIHAO PTY LTD . 1 ROKEVA
STREETEASTWOOD NSW 2122 Australien
Importiert in die USA: Sanven Technology Ltd. Suite 250, 9166 Anaheim
Place, Rancho Cucamonga, CA 91730
REP
UK
Pooledas Group Ltd
Unit 5 Albert Edward House, The Pavilions
Preston, United Kingdom
REP
EC
SHUNSHUN GmbH
Römeräcker 9 Z2021, 76351
Linkenheim-Hochstetten, Germany
In China hergestellt


Tecnico Supporto e certificato di garanzia elettronica www.vevor.com/support
DRENAGGIO LINEARE
MODELLO: ZA3
We continue to be committed to provide you tools with competitive price.
"Save Half", "Half Price" or any other similar expressions used by us only represents an
estimate of savings you might benefit from buying certain tools with us compared to the major
top brands and does not necessarily mean to cover all categories of tools offered by us. You
are kindly reminded to verify carefully when you are placing an order with us if you are
actually saving half in comparison with the top major brands.

- 1 -
MODELLO: ZA3
Have product questions? Need technical support? Please feel free to
contact us:
Technical Support and E-Warranty Certificate
www.vevor.com/support
NEED HELP? CONTACT US!
This is the original instruction, please read all manual instructions
carefully before operating. VEVOR reserves a clear interpretation of our
user manual. The appearance of the product shall be subject to the
product you received. Please forgive us that we won't inform you again if
there are any technology or software updates on our product.
LINEAR DRAIN

- 2 -
Avvertenza: per ridurre il rischio di lesioni, l'utente deve
leggere attentamente il manuale di istruzioni.
Controllare attentamente per assicurarsi che non vi siano parti mancanti o
difettose. Un'installazione non corretta può causare danni o lesioni gravi.
Non possiamo essere responsabili per danni o lesioni causati da
montaggio improprio, assemblaggio errato o uso inappropriato.
AVVERTIMENTO:
4. Non permettere ai bambini di salire sull'unità.
2. Tenere lontani i bambini e gli animali domestici durante il montaggio.
3. Per evitare il pericolo di soffocamento, tenere sempre i sacchetti di
plastica lontano dalla portata dei bambini e degli animali domestici.
PRECAUZIONI DI MONTAGGIO
1. Si prega di assemblare il prodotto attenendosi rigorosamente alle
istruzioni. Un montaggio errato potrebbe essere pericoloso.
2. Indossare correttamente occhiali protettivi e guanti da lavoro durante il
montaggio.
3. Non tentare di montare il prodotto quando ci si sente stanchi o sotto
l'effetto di alcol, droghe o farmaci.
4. La capacità del flusso d'acqua e altri parametri del prodotto vengono
applicati solo al prodotto correttamente e completamente assemblato.
5. Separare e contare tutte le parti e l'hardware.
6. Preparare il seguente strumento: cacciavite a croce.
7. Se si utilizzano utensili elettrici, fare attenzione a rallentare e fermarsi
quando necessario.
8. Per il montaggio sono necessarie due persone.
9. Seguire solo gli usi previsti. Non sedersi o stare in piedi su quanto sopra.
- 3 -
Conserva queste istruzioni.
Elenco delle parti
NO.
Nome
Immagine
QUANTI
TÀ.
1
Gruppo di
grondaie
( Immagine rappresentativa )
1
2
Schermata filtro
( Immagine rappresentativa )
1
3
Gancio
1
Introduzione al prodotto
Modello
Z
A3-24-G0
3-MB
ZA3-24-
T01-MB
ZA3-24-
G03-BR
ZA3-36-
T01-BR
ZA3-24-T
01-BR
Specifiche
del
prodotto
( pollici )
24
24
24
36
24
Massimo.
Portata
dell'acqua
( l/min )
42,5
42,5
42,5
42,5
42,5
Modulo di
copertura
Dare un
pugno in
faccia
Superfici
e della
piastrella
Dare un
pugno in
faccia
Superfici
e della
piastrella
Superfici
e della
piastrella
- 4 -
Colore
Nero
Nero
Argento
Argento
Argento
Installazione standard
Per lastra di legno

- 5 -
Per lastra di cemento

- 6 -
Posizione e note di installazione:

- 7 -
1. Realizzato in vero acciaio inossidabile.
2. Il piatto doccia può essere installato su una doccia nuova o già esistente.
Il pavimento dovrebbe avere spazio sufficiente per il sifone e l'area di
scarico in modo che i due possano essere collegati correttamente.
3. L'involucro della canalina della doccia deve essere "bloccato" con un
blocco di legno durante il getto della lastra di cemento per consentire
l'installazione della canalina della doccia separatamente dalla soletta
strutturale principale.
4. Il tronchetto del tubo deve essere completamente accessibile per
consentire l'installazione del raccordo di transizione prima che il
calcestruzzo finito venga versato attorno al corpo della canaletta doccia.

- 8 -
5. Le piastrelle devono essere posate considerando la pendenza del piatto
doccia in direzione del canale di scarico. Le piastrelle devono essere 1 mm
più alte della fossa e degli scarichi in modo che non si formino
pozzanghere nel piatto doccia.
Indirizzo: Baoshanqu Shuangchenglu 803long 11hao 1602A-1609shi
Shanghai
Importato in AUS: SIHAO PTY LTD . 1 ROKEVA STREETEASTWOOD
NSW 2122 Australia
Importato negli Stati Uniti: Sanven Technology Ltd. Suite 250, 9166
Anaheim Place, Rancho Cucamonga, CA 91730
REP
UK
Pooledas Group Ltd
Unit 5 Albert Edward House, The Pavilions
Preston, United Kingdom
REP
EC
SHUNSHUN GmbH
Römeräcker 9 Z2021, 76351
Linkenheim-Hochstetten, Germany
Made in China


Técnico Soporte y certificado de garantía electrónica www.vevor.com/support
DRENAJE LINEAL
MODELO: ZA3
We continue to be committed to provide you tools with competitive price.
"Save Half", "Half Price" or any other similar expressions used by us only represents an
estimate of savings you might benefit from buying certain tools with us compared to the major
top brands and does not necessarily mean to cover all categories of tools offered by us. You
are kindly reminded to verify carefully when you are placing an order with us if you are
actually saving half in comparison with the top major brands.


- 1 -
MODELO: ZA3
Have product questions? Need technical support? Please feel free to
contact us:
Technical Support and E-Warranty Certificate
www.vevor.com/support
NEED HELP? CONTACT US!
This is the original instruction, please read all manual instructions
carefully before operating. VEVOR reserves a clear interpretation of our
user manual. The appearance of the product shall be subject to the
product you received. Please forgive us that we won't inform you again if
there are any technology or software updates on our product.
LINEAR DRAIN

- 2 -
Advertencia: para reducir el riesgo de lesiones, el usuario
debe leer atentamente el manual de instrucciones.
Verifique cuidadosamente para asegurarse de que no falten piezas o estén
defectuosas. Una instalación incorrecta puede causar daños o lesiones
graves. No podemos ser responsables de daños o lesiones causados por
un montaje inadecuado, montaje incorrecto o uso inadecuado.
ADVERTENCIA:
5. No permita que los niños se suban a la unidad.
2. Mantenga alejados a los niños y las mascotas durante el montaje.
3. Para evitar el peligro de asfixia, mantenga siempre las bolsas de
plástico fuera del alcance de los niños y las mascotas.
PRECAUCIONES DE MONTAJE
1. Ensamble el producto estrictamente de acuerdo con las instrucciones.
El montaje incorrecto podría ser peligroso.
2. Utilice gafas de seguridad y guantes de trabajo correctamente durante
el montaje.
3. No intente montar el producto cuando se sienta cansado o bajo la
influencia del alcohol, drogas o medicamentos.
4. La capacidad de flujo de agua y otros parámetros del producto se
aplican únicamente al producto ensamblado de manera adecuada y
completa.
5. Separe y cuente todas las piezas y herrajes.
6. Prepare la siguiente herramienta: Destornillador Philips.
7. Si utiliza herramientas eléctricas, tenga cuidado de reducir la velocidad
y detenerse cuando sea necesario.
8. Para el montaje se necesitan dos personas.

- 3 -
9. Siga únicamente los usos previstos. No se siente ni se pare sobre lo
anterior.
Guarda estas instrucciones.
Lista de
NO.
Nombre
Imagen
CANT.
1
Grupo de
canalones
( Imagen representativa )
1
2
Pantalla de filtro
( Imagen representativa )
1
3
Gancho
1
Introducción del producto
Modelo
Z
A3-24-G0
3-MB
ZA3-24-
T01-MB
ZA3-24-
G03-BR
ZA3-36-
T01-BR
ZA3-24-T
01-BR
Especifica
ción del
producto
( pulgadas
)
24
24
24
36
24
Máx. Tasa
de flujo de
agua
( l/min )
42,5
42,5
42,5
42,5
42,5

- 4 -
Formulario
de portada
Cara de
puñetazo
Superfici
e del
azulejo
Cara de
puñetazo
Superfici
e del
azulejo
Superfici
e del
azulejo
Color
Negro
Negro
Plata
Plata
Plata
Instalación estándar
Para losa de madera

- 5 -
Para losa de hormigón

- 6 -
Ubicación de instalación y notas:

- 7 -
1. Hecho de acero inoxidable auténtico.
2. El plato de ducha se puede instalar en una ducha nueva o existente. El
piso debe tener suficiente espacio para el área de trampa y drenaje para
que ambos puedan conectarse correctamente.
3. La envolvente de la zanja del canal de ducha debe "bloquearse" con
bloques de madera mientras se vierte la losa de concreto para permitir que
el canal de ducha se instale por separado de la losa del piso estructural
principal.
4. El trozo de tubería debe ser completamente accesible para permitir que
se instale el acoplador de transición antes de que se vierta el concreto
terminado alrededor del cuerpo del canal de ducha.

- 8 -
5. Las losetas deben instalarse considerando la pendiente del piso de la
ducha en dirección a la zanja de drenaje. Las baldosas deben estar 1 mm
por encima de la zanja y los desagües para que no se formen charcos en
el plato de ducha.
Dirección: Baoshanqu Shuangchenglu 803long 11hao 1602A-1609shi
Shanghai
Importado a AUS: SIHAO PTY LTD . 1 ROKEVA STREET ASTWOOD
NSW 2122 Australia
Importado a EE. UU.: Sanven Technology Ltd. Suite 250, 9166 Anaheim
Place, Rancho Cucamonga, CA 91730
REP
UK
Pooledas Group Ltd
Unit 5 Albert Edward House, The Pavilions
Preston, United Kingdom
REP
EC
SHUNSHUN GmbH
Römeräcker 9 Z2021, 76351
Linkenheim-Hochstetten, Germany
Hecho en china


Techniczny Certyfikat wsparcia i e-gwarancji www.vevor.com/support
DRENAŻ LINIOWY
MODEL: ZA3
We continue to be committed to provide you tools with competitive price.
"Save Half", "Half Price" or any other similar expressions used by us only represents an
estimate of savings you might benefit from buying certain tools with us compared to the major
top brands and does not necessarily mean to cover all categories of tools offered by us. You
are kindly reminded to verify carefully when you are placing an order with us if you are
actually saving half in comparison with the top major brands.


- 1 -
MODEL: ZA3
Have product questions? Need technical support? Please feel free to
contact us:
Technical Support and E-Warranty Certificate
www.vevor.com/support
NEED HELP? CONTACT US!
This is the original instruction, please read all manual instructions
carefully before operating. VEVOR reserves a clear interpretation of our
user manual. The appearance of the product shall be subject to the
product you received. Please forgive us that we won't inform you again if
there are any technology or software updates on our product.
LINEAR DRAIN

- 2 -
Ostrzeżenie — aby zmniejszyć ryzyko obrażeń, użytkownik
musi uważnie przeczytać instrukcję obsługi.
Sprawdź dokładnie, aby upewnić się, że nie brakuje żadnych lub nie ma
uszkodzonych części. Nieprawidłowa instalacja może spowodować
uszkodzenie lub poważne obrażenia. Nie ponosimy odpowiedzialności za
szkody lub obrażenia spowodowane nieprawidłowym montażem,
nieprawidłowym montażem lub niewłaściwym użytkowaniem.
OSTRZEŻENIE:
6. Nie pozwalaj dzieciom wspinać się na urządzenie.
2. Podczas montażu trzymaj dzieci i zwierzęta z daleka.
3. Aby uniknąć niebezpieczeństwa uduszenia, plastikowe torby należy
zawsze trzymać z dala od dzieci i zwierząt domowych.
ŚRODKI OSTROŻNOŚCI PRZY MONTAŻU
1. Prosimy o złożenie produktu ściśle według instrukcji. Nieprawidłowy
montaż może być niebezpieczny.
2. Podczas montażu należy nosić okulary ochronne i rękawice robocze.
3. Nie przystępuj do składania produktu będąc zmęczonym, pod wpływem
alkoholu, narkotyków lub leków.
4. Przepływ wody i inne parametry produktu odnoszą się wyłącznie do
prawidłowo i całkowicie zmontowanego produktu.
5. Oddziel i policz wszystkie części i osprzęt.
6. Przygotuj następujące narzędzie: Śrubokręt Philips.
7. Jeśli korzystasz z elektronarzędzi, pamiętaj, aby zwolnić i zatrzymać się,
jeśli zajdzie taka potrzeba.
8. Do montażu potrzebne są dwie osoby.
9. Postępuj zgodnie z przeznaczeniem. Nie siadaj ani nie stawaj na
- 3 -
powyższym.
Zapisz te instrukcje.
Lista części
NIE.
Nazwa
Zdjęcie
ILOŚĆ.
1
Grupa Gutter
( Reprezentatywne zdjęcie )
1
2
Ekran filtra
( Reprezentatywne zdjęcie )
1
3
Hak
1
Wprowadzenie produktów
Model
Z
A3-24-G0
3-MB
ZA3-24-
T01-MB
ZA3-24-
G03-BR
ZA3-36-
T01-BR
ZA3-24-T
01-BR
Specyfika
cja
produktu
( cale ) _
24
24
24
36
24
Maks.
Natężenie
przepływu
wody
( l/min )
42,5
42,5
42,5
42,5
42,5

- 4 -
Formularz
okładki
Uderzeni
e w twarz
Powierzc
hnia
płytek _
Uderzeni
e w twarz
Powierzc
hnia
płytek _
Powierzc
hnia
płytek _
Kolor
Czarny
Czarny
Srebro
Srebro
Srebro
Instalacja standardowa
Do płyty drewnianej

- 5 -
Do płyty betonowej

- 6 -
Lokalizacja instalacji i uwagi:

- 7 -
1. Wykonane z prawdziwej stali nierdzewnej.
2. Brodzik można zamontować w nowym lub istniejącym prysznicu.
Podłoga powinna zapewniać wystarczającą ilość miejsca na syfon i obszar
odpływowy, aby można było je prawidłowo połączyć.
3. Obudowę kanału prysznicowego należy „zablokować” drewnianą
blokadą podczas wylewania płyty betonowej, aby umożliwić montaż kanału
prysznicowego oddzielnie od głównej płyty stropowej konstrukcyjnej.
4. Króciec rury powinien być w pełni dostępny, aby umożliwić montaż
łącznika przejściowego przed wylaniem gotowego betonu wokół korpusu
odpływu.
- 8 -
5. Płytki należy układać uwzględniając spadek posadzki prysznica w
kierunku rowu odpływowego. Płytki powinny znajdować się 1 mm nad
rowem i odpływami, tak aby na brodziku nie tworzyły się kałuże.
Adres: Baoshanqu Shuangchenglu 803long 11hao 1602A-1609shi
Szanghaj
Import do AUS: SIHAO PTY LTD . 1 ROKEVA STREETEASTWOOD
NSW 2122 Australia
Import do USA: Sanven Technology Ltd. Apartament 250, 9166 Anaheim
Place, Rancho Cucamonga, Kalifornia 91730
REP
UK
Pooledas Group Ltd
Unit 5 Albert Edward House, The Pavilions
Preston, United Kingdom
REP
EC
SHUNSHUN GmbH
Römeräcker 9 Z2021, 76351
Linkenheim-Hochstetten, Germany
Wyprodukowano w Chinach


Technisch Ondersteuning en e-garantiecertificaat www.vevor.com/support
LINEAIRE AFVOER
MODEL: ZA3
We continue to be committed to provide you tools with competitive price.
"Save Half", "Half Price" or any other similar expressions used by us only represents an
estimate of savings you might benefit from buying certain tools with us compared to the major
top brands and does not necessarily mean to cover all categories of tools offered by us. You
are kindly reminded to verify carefully when you are placing an order with us if you are
actually saving half in comparison with the top major brands.


- 1 -
MODEL: ZA3
Have product questions? Need technical support? Please feel free to
contact us:
Technical Support and E-Warranty Certificate
www.vevor.com/support
NEED HELP? CONTACT US!
This is the original instruction, please read all manual instructions
carefully before operating. VEVOR reserves a clear interpretation of our
user manual. The appearance of the product shall be subject to the
product you received. Please forgive us that we won't inform you again if
there are any technology or software updates on our product.
LINEAR DRAIN

- 2 -
Waarschuwing-Om het risico op letsel te verminderen, moet
de gebruiker de handleiding zorgvuldig lezen.
Controleer zorgvuldig of er geen ontbrekende of defecte onderdelen zijn.
Onjuiste installatie kan schade of ernstig letsel veroorzaken. Wij kunnen
niet aansprakelijk worden gesteld voor schade of letsel veroorzaakt door
onjuiste montage, onjuiste montage of oneigenlijk gebruik.
WAARSCHUWING:
7. Laat kinderen niet op het apparaat klimmen.
2. Houd kinderen en huisdieren tijdens de montage uit de buurt.
3. Houd plastic zakken altijd uit de buurt van kinderen en huisdieren om
verstikkingsgevaar te voorkomen.
MONTAGEVOORZORGSMAATREGELEN
1. Monteer het product strikt volgens de instructies. Een onjuiste montage
kan gevaarlijk zijn.
2. Draag tijdens de montage een veiligheidsbril en werkhandschoenen.
3. Probeer het product niet in elkaar te zetten als u zich moe voelt of onder
invloed bent van alcohol, drugs of medicijnen.
4. Waterstroomcapaciteit en andere productparameters worden alleen
toegepast op het correct en volledig gemonteerde product.
5. Scheid en tel alle onderdelen en hardware.
6. Houd het volgende gereedschap gereed: kruiskopschroevendraaier.
7. Als u elektrisch gereedschap gebruikt, zorg er dan voor dat u langzamer
gaat rijden en stopt wanneer dat nodig is.
8. Voor de montage zijn twee personen nodig.
9. Volg uitsluitend het beoogde gebruik. Ga niet op het bovenstaande
zitten of staan.
- 3 -
Bewaar deze instructies.
Onderdelen lijst
NEE.
Naam
Afbeelding
AANTAL.
1
Goot Groep
( Representatieve foto )
1
2
Filterscherm
( Representatieve foto )
1
3
Haak
1
Product Introductie
Model
Z
A3-24-G0
3-MB
ZA3-24-
T01-MB
ZA3-24-
G03-BR
ZA3-36-
T01-BR
ZA3-24-T
01-BR
Productsp
ecificatie
( inch ) _ _
24
24
24
36
24
Max.
Waterstro
omsnelhei
d ( l/min )
42,5
42,5
42,5
42,5
42,5
Omslagfor
mulier
Ponsen
gezicht _
Tegelopp
ervlak _ _
Ponsen
gezicht _
Tegelopp
ervlak _ _
Tegelopp
ervlak _ _

- 4 -
Kleur
Zwart
Zwart
Zilver
Zilver
Zilver
Standaard installatie
Voor houten plaat
- 5 -
Voor betonplaat

- 6 -
Installatielocatie en opmerkingen:

- 7 -
1. Gemaakt van echt roestvrij staal.
2. De douchebak kan in een nieuwe of bestaande douche worden
geïnstalleerd. De vloer moet voldoende ruimte hebben voor het sifon- en
afvoergebied, zodat de twee goed met elkaar kunnen worden verbonden.
3. De sleufomhulling van de douchegoot moet worden "afgedicht" met
houtblokken tijdens het storten van de betonplaat, zodat de douchegoot
afzonderlijk van de structurele vloerplaat kan worden geïnstalleerd.
4. De leidingstomp moet volledig toegankelijk zijn zodat de
overgangskoppeling kan worden geïnstalleerd voordat het afgewerkte
beton rond de douchegoot wordt gestort.

- 8 -
5. Bij het plaatsen van de tegels moet rekening worden gehouden met de
helling van de douchevloer in de richting van de afvoergoot. De tegels
moeten 1 mm hoger zijn dan de sleuf en de afvoer, zodat er geen plas in
de douchebak ontstaat.
Adres: Baoshanqu Shuangchenglu 803long 11hao 1602A-1609shi
Shanghai
Geïmporteerd naar AUS: SIHAO PTY LTD . 1 ROKEVA
STREETEASTWOOD NSW 2122 Australië
Geïmporteerd naar de VS: Sanven Technology Ltd. Suite 250, 9166
Anaheim Place, Rancho Cucamonga, CA 91730
REP
UK
Pooledas Group Ltd
Unit 5 Albert Edward House, The Pavilions
Preston, United Kingdom
REP
EC
SHUNSHUN GmbH
Römeräcker 9 Z2021, 76351
Linkenheim-Hochstetten, Germany
Gemaakt in China


Teknisk Support och e-garanticertifikat www.vevor.com/support
LINJÄR DRÄNERING
MODELL: ZA3
We continue to be committed to provide you tools with competitive price.
"Save Half", "Half Price" or any other similar expressions used by us only represents an
estimate of savings you might benefit from buying certain tools with us compared to the major
top brands and does not necessarily mean to cover all categories of tools offered by us. You
are kindly reminded to verify carefully when you are placing an order with us if you are
actually saving half in comparison with the top major brands.


- 1 -
MODELL: ZA3
Have product questions? Need technical support? Please feel free to
contact us:
Technical Support and E-Warranty Certificate
www.vevor.com/support
NEED HELP? CONTACT US!
This is the original instruction, please read all manual instructions
carefully before operating. VEVOR reserves a clear interpretation of our
user manual. The appearance of the product shall be subject to the
product you received. Please forgive us that we won't inform you again if
there are any technology or software updates on our product.
LINEAR DRAIN

- 2 -
Varning - För att minska risken för skada måste användaren
läsa instruktionerna noggrant.
Kontrollera noga för att säkerställa att det inte finns några delar som
saknas eller är defekta. Felaktig installation kan orsaka skador eller
allvarliga skador. Vi kan inte hållas ansvariga för skador som orsakats av
felaktig montering, felaktig montering eller olämplig användning.
VARNING:
8. Låt inte barn klättra på enheten.
2. Håll barn och husdjur borta under monteringen.
3. För att undvika risken för kvävning, förvara alltid plastpåsar borta från
barn och husdjur.
FÖRSIKTIGHETSÅTGÄRDER FÖR MONTERING
1. Vänligen montera produkten i strikt enlighet med instruktionerna.
Felaktig montering kan vara farligt.
2. Använd skyddsglasögon och arbetshandskar ordentligt under
monteringen.
3. Försök inte att sätta ihop produkten när du känner dig trött eller är
påverkad av alkohol, droger eller medicin.
4. Vattenflödeskapacitet och andra produktparametrar tillämpas endast på
den korrekt och färdigmonterade produkten.
5. Separera och räkna alla delar och hårdvara.
6. Förbered följande verktyg: Philips huvudskruvmejsel.
7. Om du använder elverktyg, var noga med att sakta ner och stanna vid
behov.
8. Två personer krävs för montering.
9. Följ endast avsedd användning. Sitt eller stå inte på ovanstående.

- 3 -
Spara dessa instruktioner.
Dellista
NEJ.
namn
Bild
ANTAL.
1
Gutter Group
( Representativ bild )
1
2
Filterskärm
( Representativ bild )
1
3
Krok
1
Produkt introduktion
Modell
Z
A3-24-G0
3-MB
ZA3-24-
T01-MB
ZA3-24-
G03-BR
ZA3-36-
T01-BR
ZA3-24-T
01-BR
Produktsp
ecifikation
( tum ) _ _
24
24
24
36
24
Max.
Vattenflöd
e ( L/min )
42,5
42,5
42,5
42,5
42,5
Omslagsfo
rmulär
Stansand
e ansikte
_
Kakel S
yta
Stansand
e ansikte
_
Kakel S
yta
Kakel S
yta

- 4 -
Färg
Svart
Svart
Silver
Silver
Silver
Standardinstallation _
För träskiva

- 5 -
För betongplatta

- 6 -
Installationsplats och anmärkningar:
- 7 -
1. Tillverkad av äkta rostfritt stål.
2. Duschkaret kan monteras i en ny eller befintlig dusch. Golvet bör ha
tillräckligt med utrymme för fällan och avloppsområdet så att de två kan
anslutas ordentligt.
3. Duschkanalens hölje bör "blockeras ut" med träblockering medan
betongplattan hälls för att tillåta duschkanalen att installeras separat från
den huvudsakliga strukturella golvplattan.
4. Rörtappen ska vara fullt åtkomlig så att övergångskopplingen kan
installeras innan den färdiga betongen gjuter runt duschkanalkroppen.

- 8 -
5. Plattorna bör monteras med hänsyn till duschgolvets lutning i riktning
mot avloppsdiket. Plattorna ska vara 1 mm högre än diket och avloppet så
att det inte bildas en pöl i duschkaret.
Adress: Baoshanqu Shuangchenglu 803long 11hao 1602A-1609shi
Shanghai
Importerad till AUS: SIHAO PTY LTD . 1 ROKEVA STREETEASTWOOD
NSW 2122 Australien
till USA: Sanven Technology Ltd. Suite 250, 9166 Anaheim Place, Rancho
Cucamonga, CA 91730
REP
UK
Pooledas Group Ltd
Unit 5 Albert Edward House, The Pavilions
Preston, United Kingdom
REP
EC
SHUNSHUN GmbH
Römeräcker 9 Z2021, 76351
Linkenheim-Hochstetten, Germany
Tillverkad i Kina


