
Technical Support and E-Warranty Certificate www.vevor.com/support
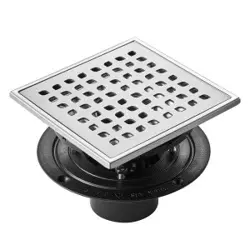
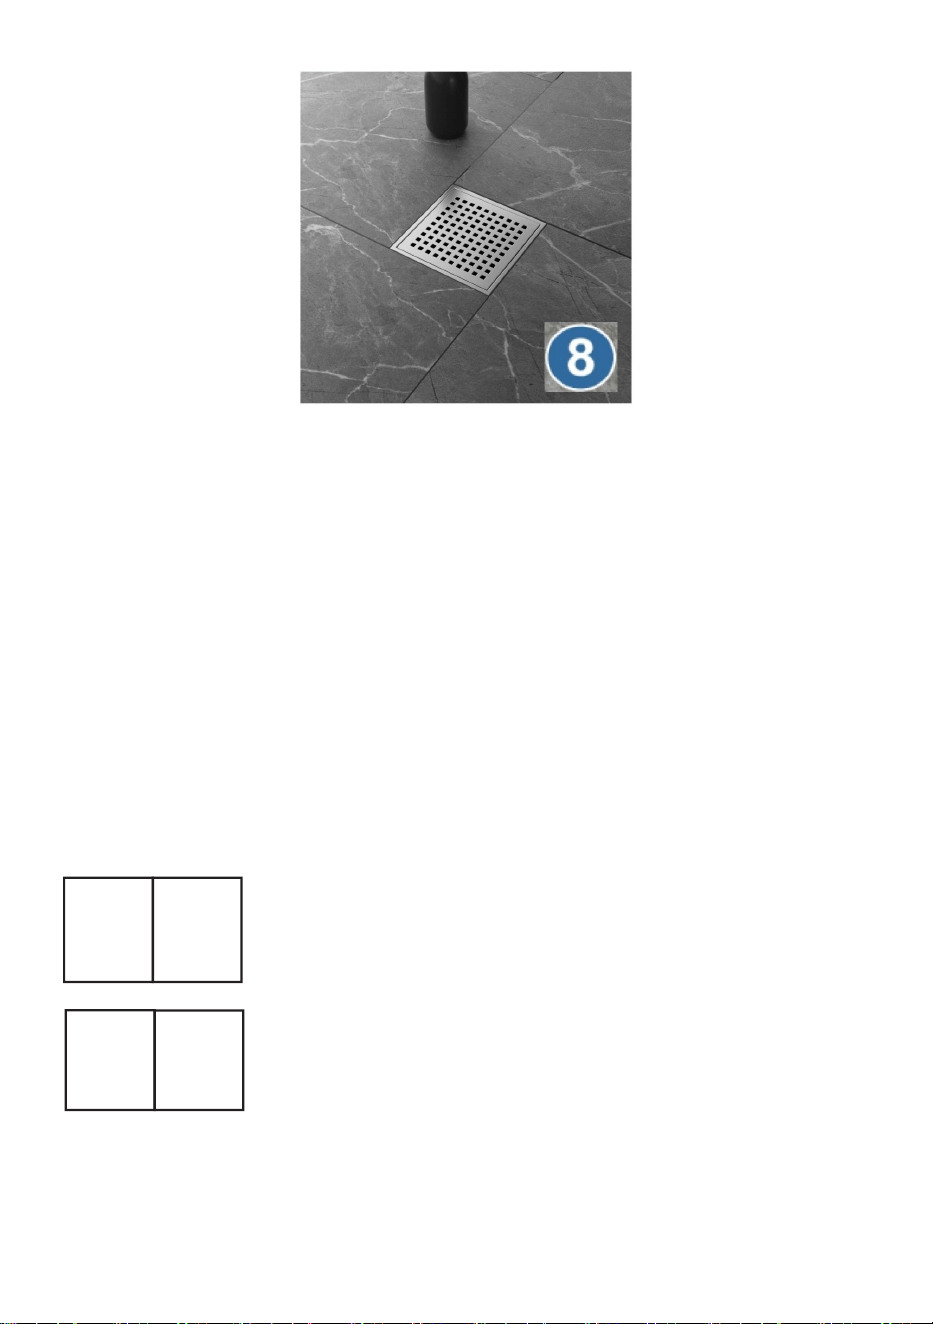
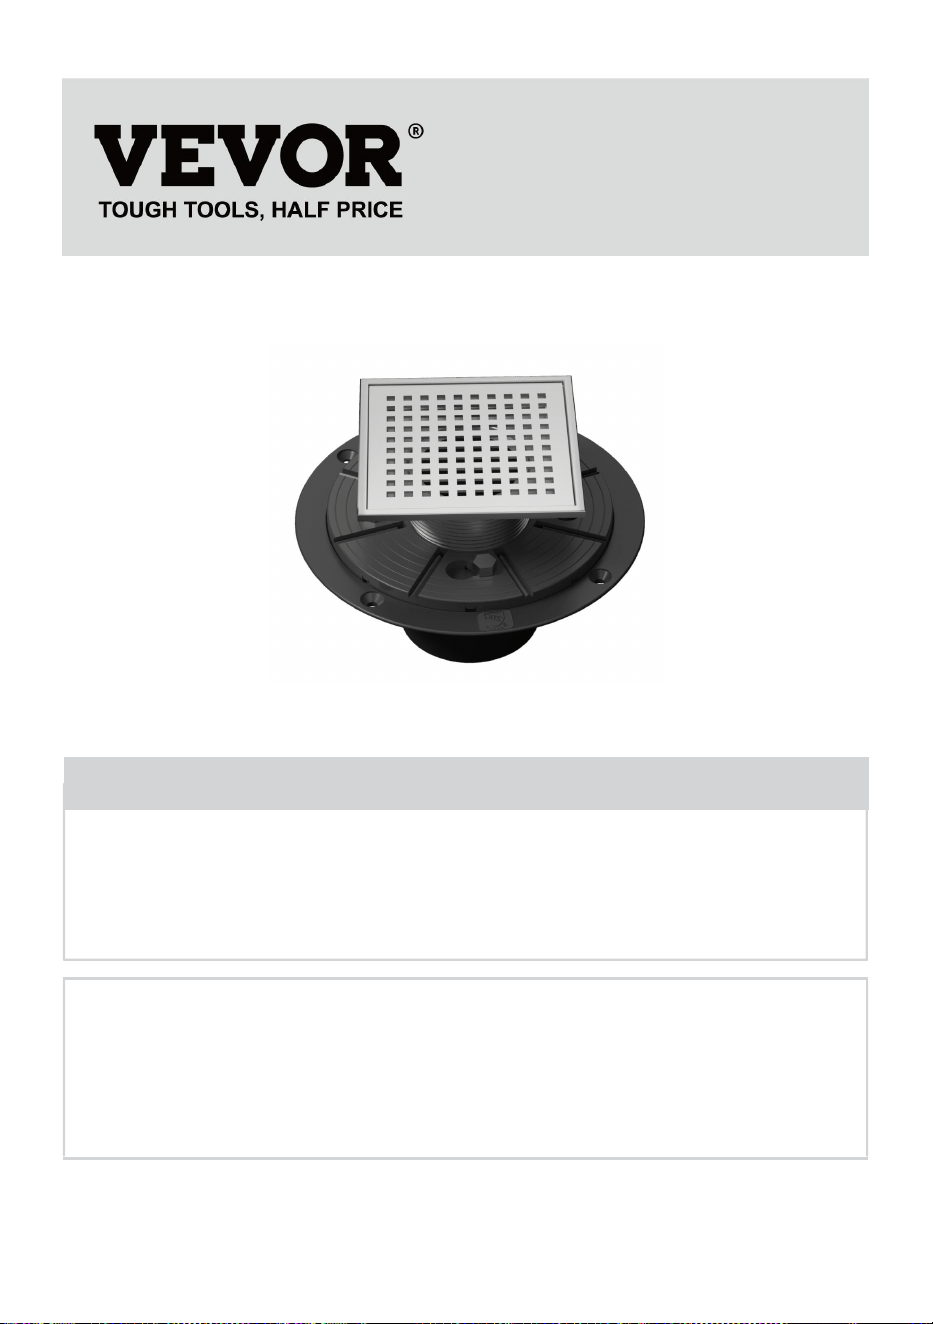
LINEAR DRAIN
MODEL:COU-6
We continue to be committed to provide you tools with competitive price.
"Save Half", "Half Price" or any other similar expressions used by us only represents an
estimate of savings you might benefit from buying certain tools with us compared to the major
top brands and does not necessarily mean to cover all categories of tools offered by us. You
are kindly reminded to verify carefully when you are placing an order with us if you are
actually saving half in comparison with the top major brands.

- 1 -
MODEL:COU-6
Have product questions? Need technical support? Please feel free to
contact us:
Technical Support and E-Warranty Certificate
www.vevor.com/support
NEED HELP? CONTACT US!
This is the original instruction, please read all manual instructions
carefully before operating. VEVOR reserves a clear interpretation of our
user manual. The appearance of the product shall be subject to the
product you received. Please forgive us that we won't inform you again if
there are any technology or software updates on our product.
LINEAR DRAIN

- 2 -
Warning-To reduce the risk of injury, user must read
instructions manual carefully.
Check carefully to make sure there are no missing or defective parts.
Improper installation may cause damage or serious injury. We cannot be
liable for damage or injury caused by improper mounting, incorrect
assembly, or inappropriate use.
WARNING:
1. Do not allow children to climb on the unit.
2. Keep children and pets away during assembly.
3. To avoid the danger of suffocation, always keep plastic bags away from
children and pets.
ASSEMBLY PRECAUTIONS
1. Please assemble the product in strict accordance with the instructions.
Incorrect assembly could be hazardous.
2. Please wear safety goggles and work gloves properly during assembly.
3. Do not try to assemble the product when feeling tired or when under the
influence of alcohol, drugs or medication.
4.Waterflow capacity and other product parameters are applied to the
properly and completely assembled product only.
5. Separate and count all parts and hardware.
6. Prepare the following tool: Philips Head Screwdriver.
7. If using power tools, please be careful to slow down and stop when
needed.
8. Two people are required for assembly.
9. Follow the intended uses only. Do not sit or stand on the above.
Save these instructions.
- 3 -
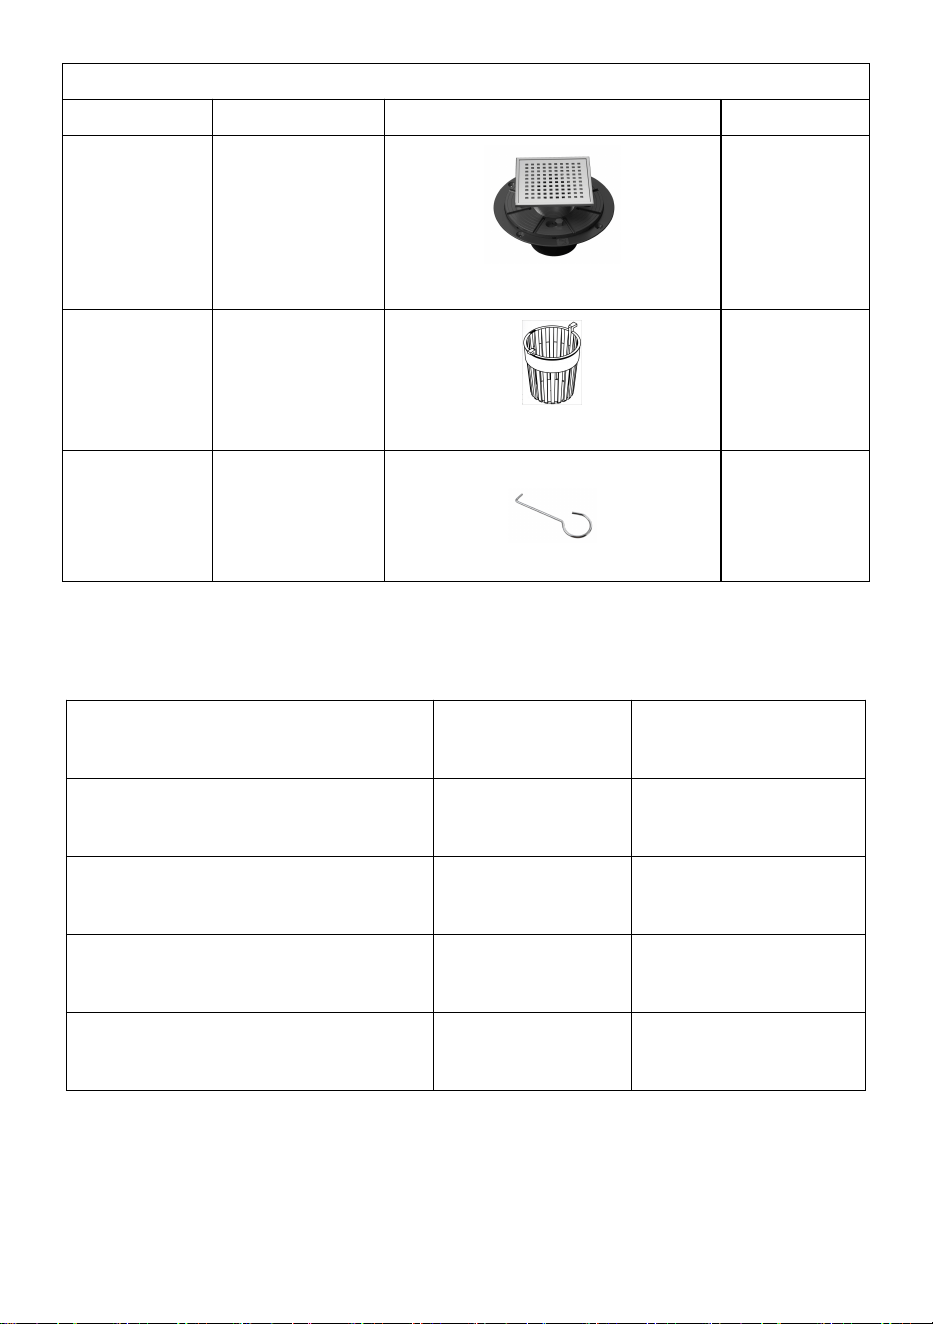
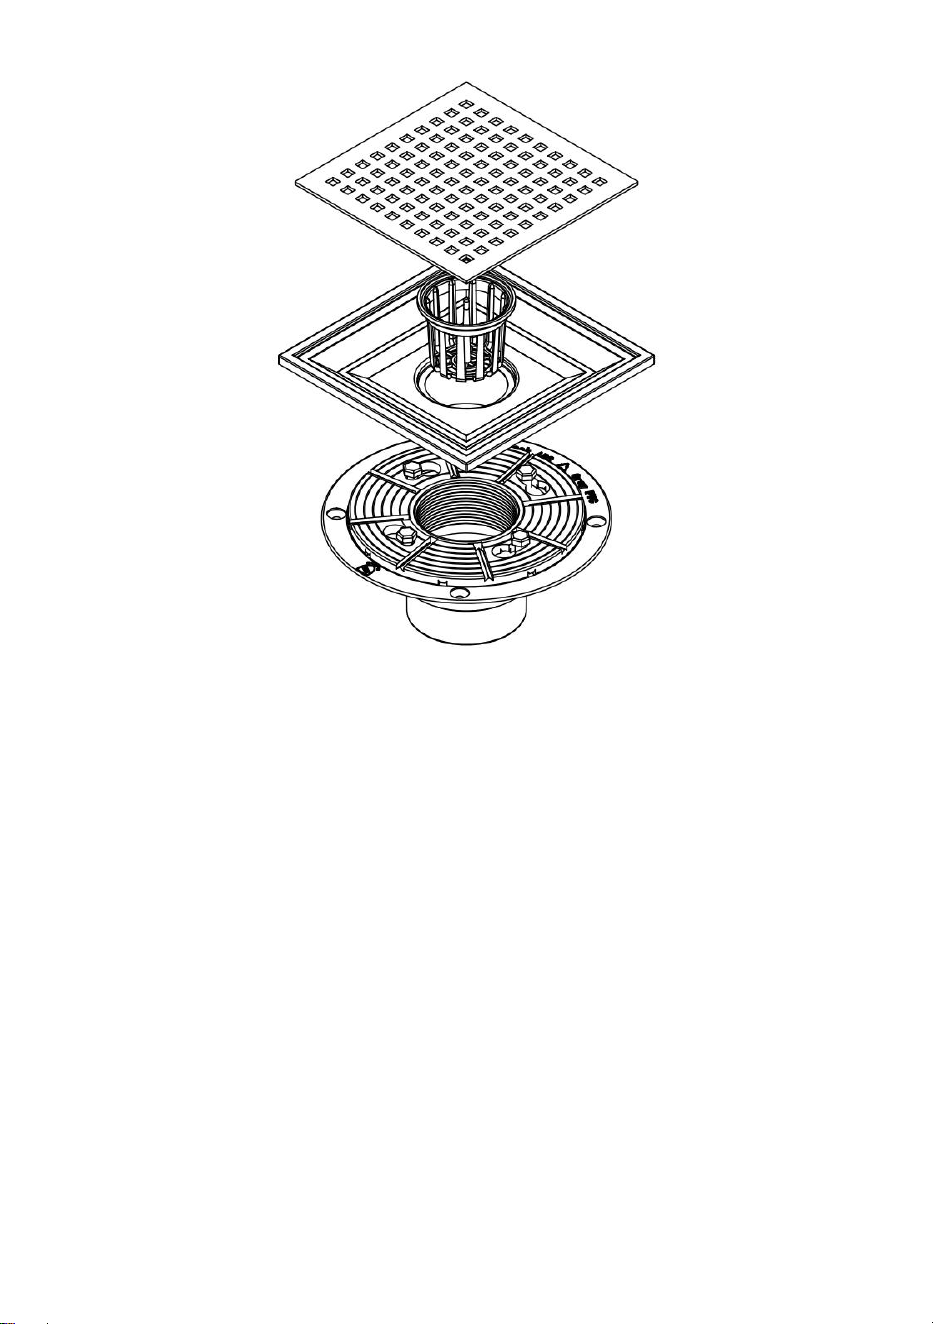
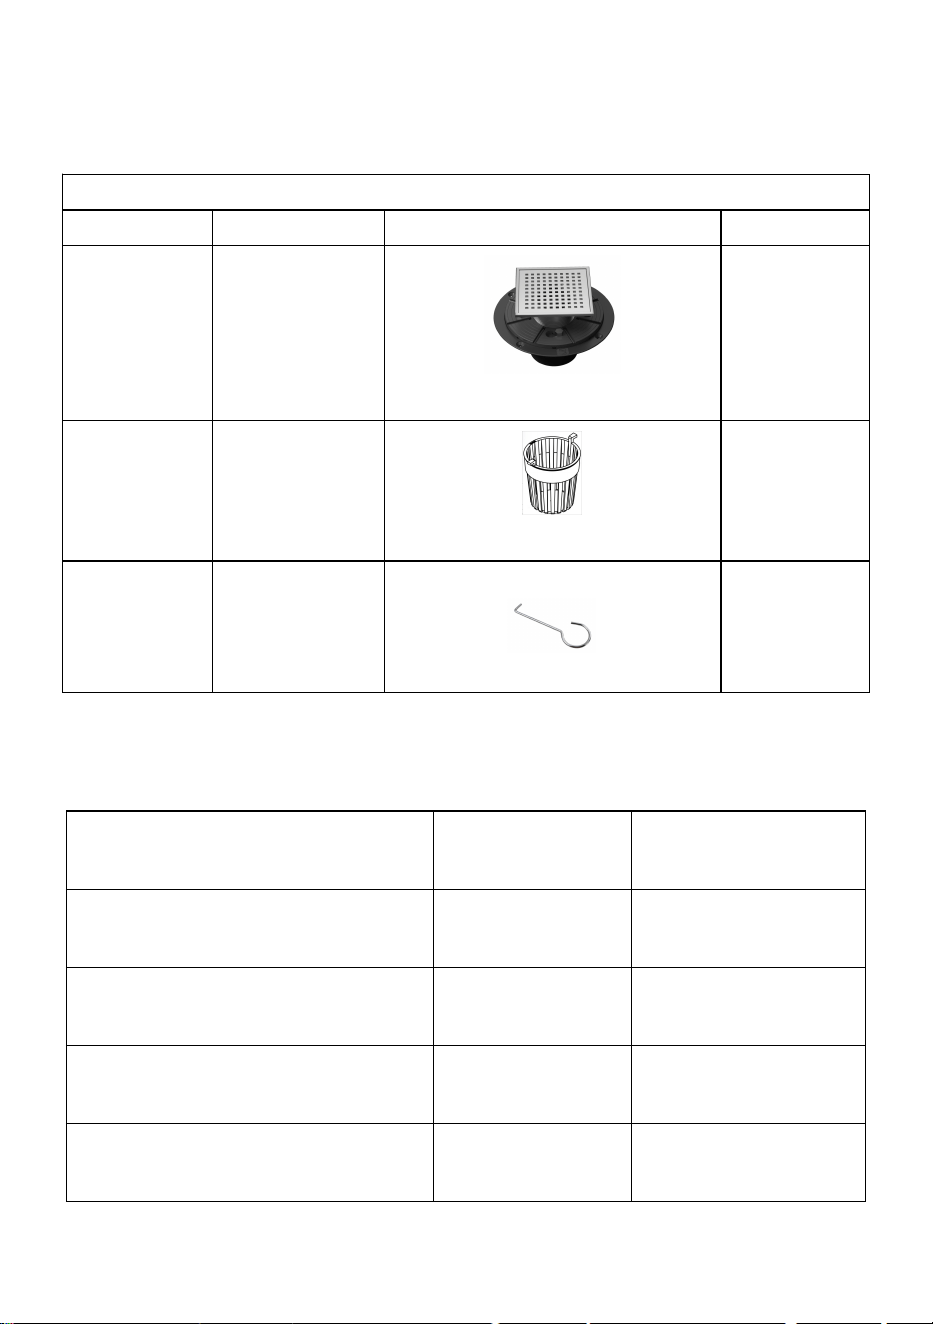
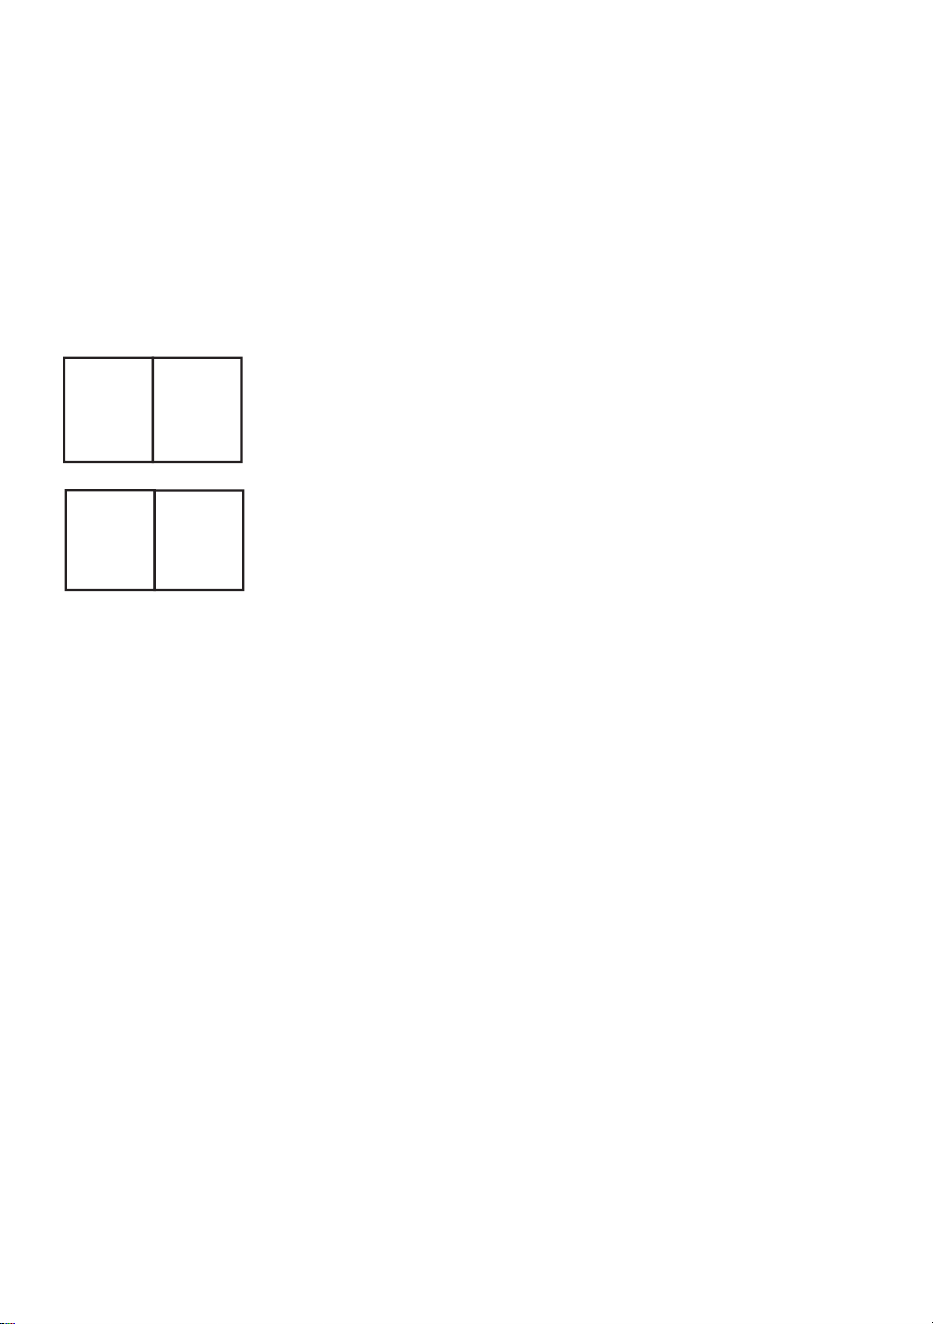
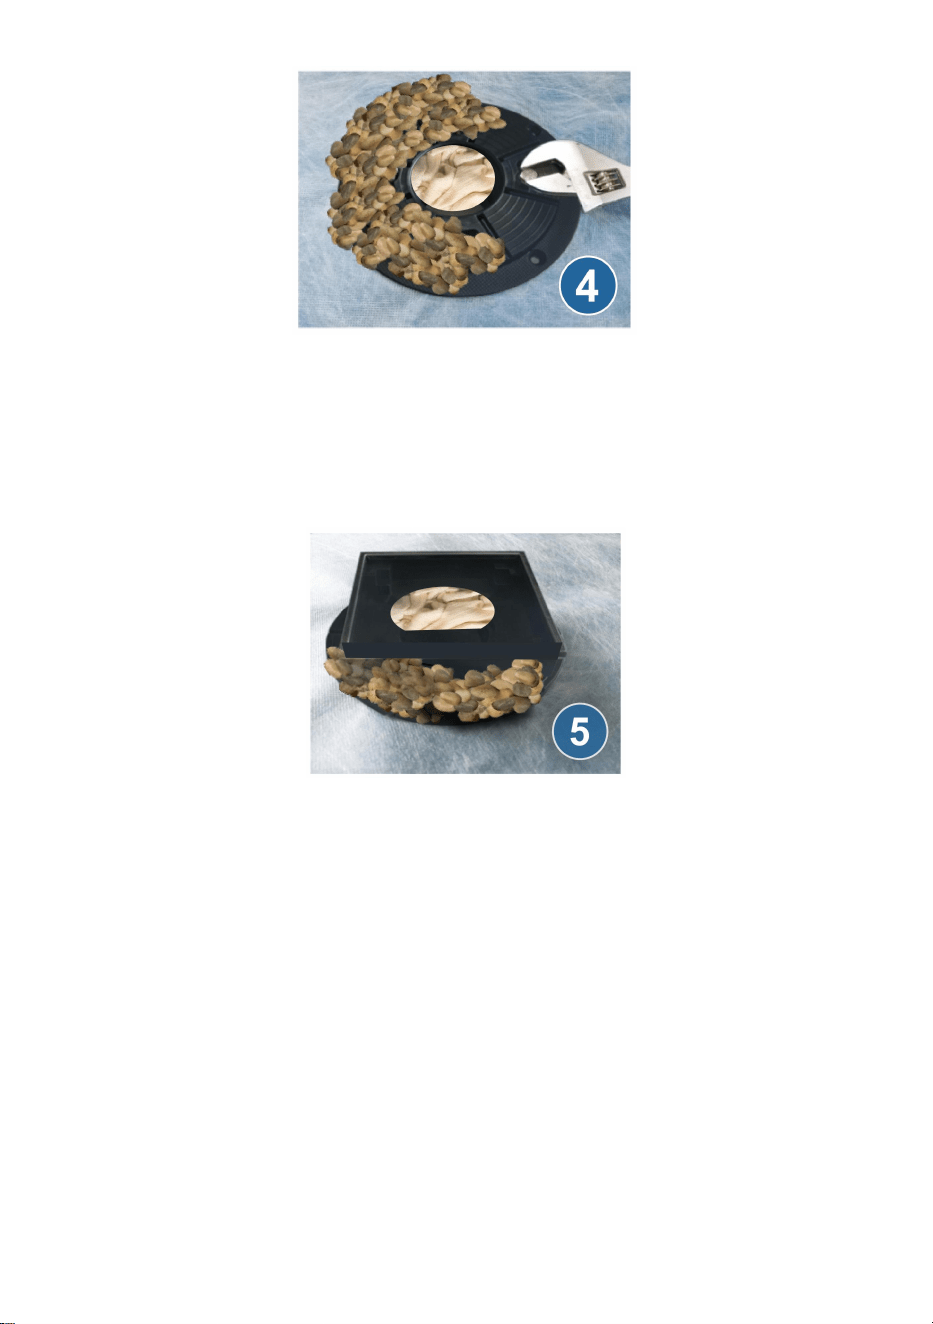
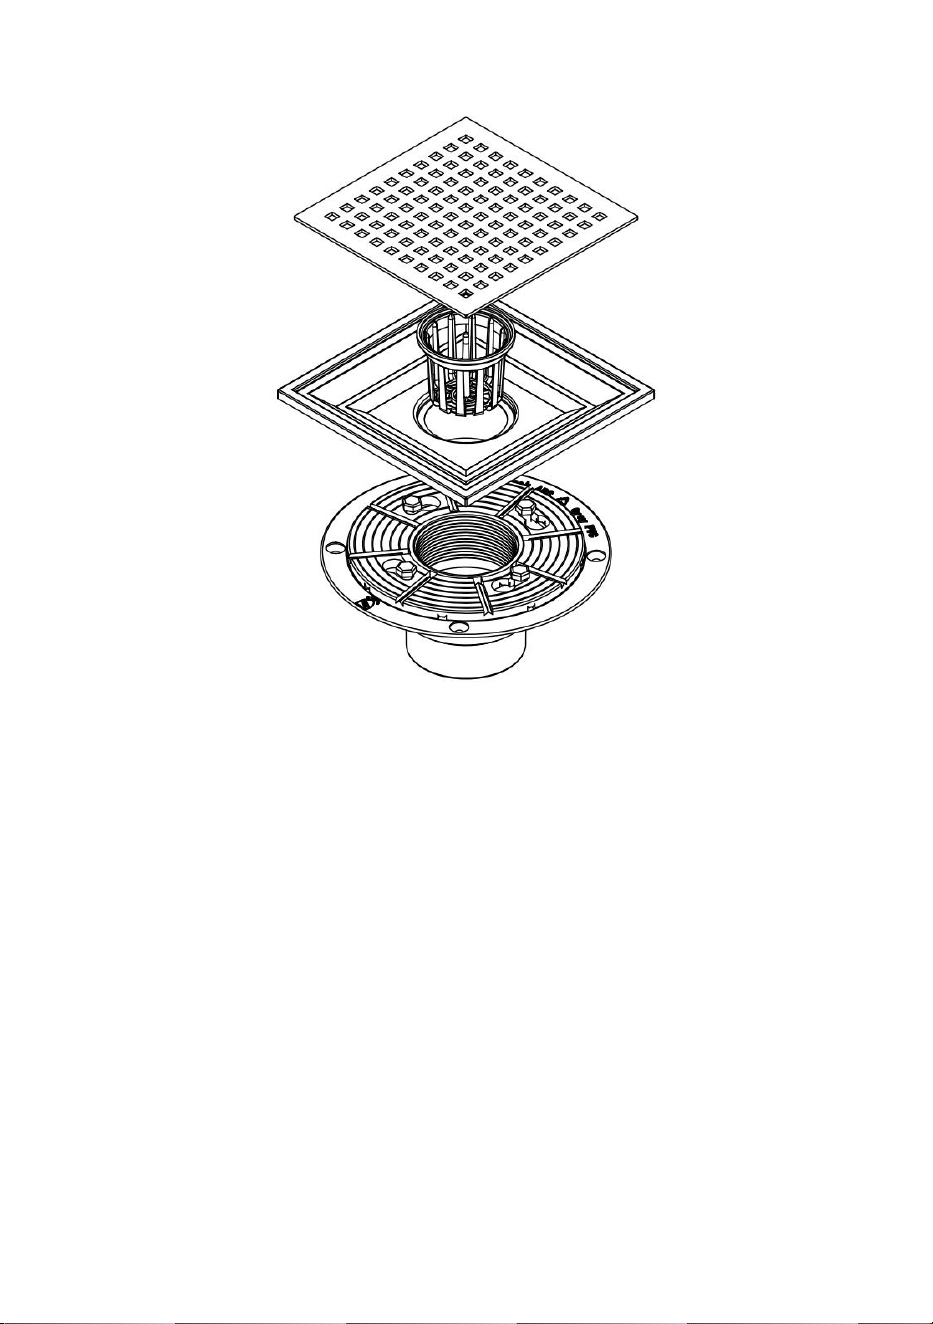
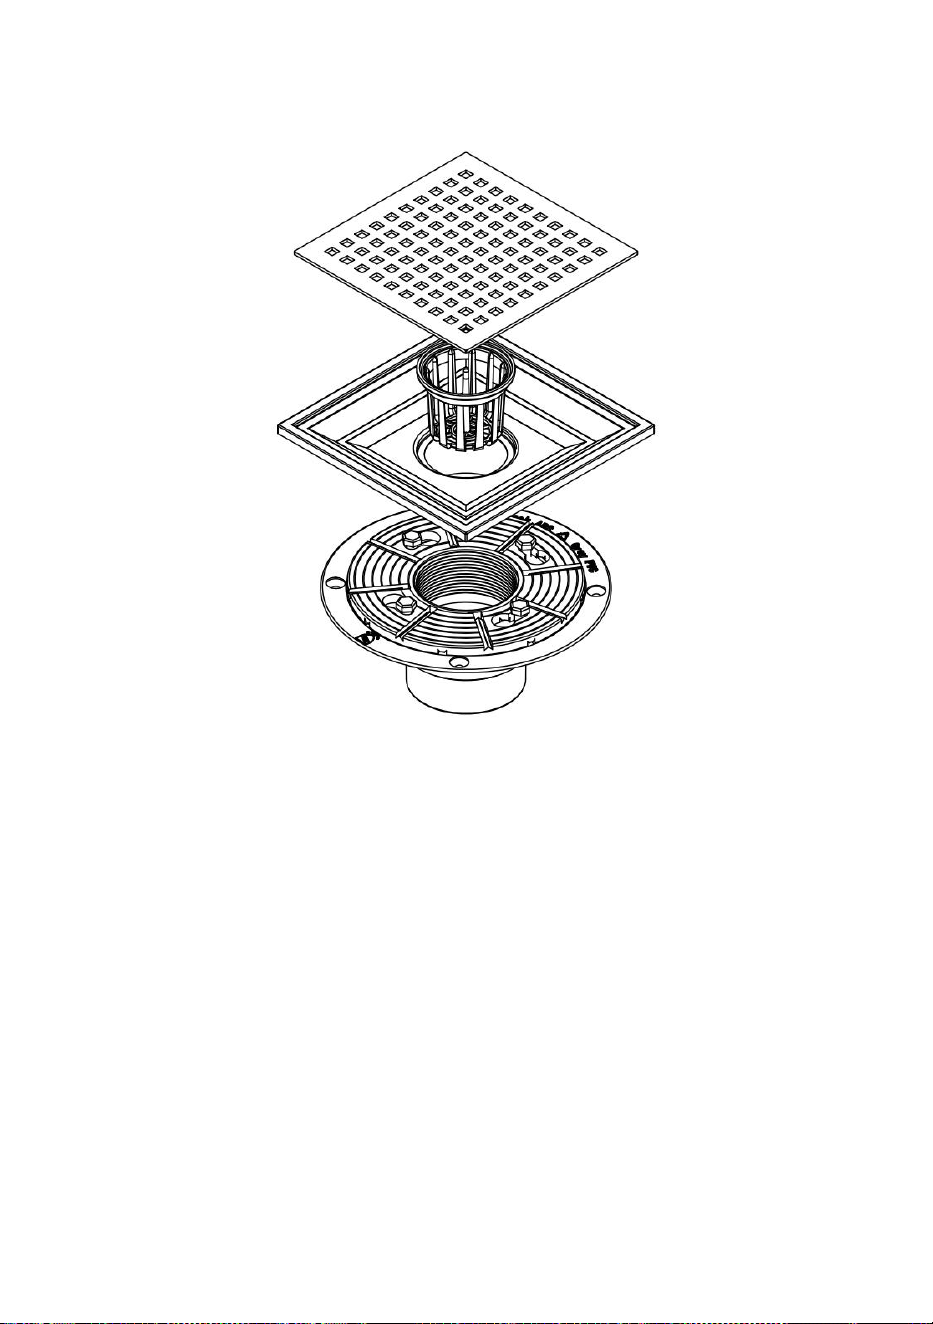
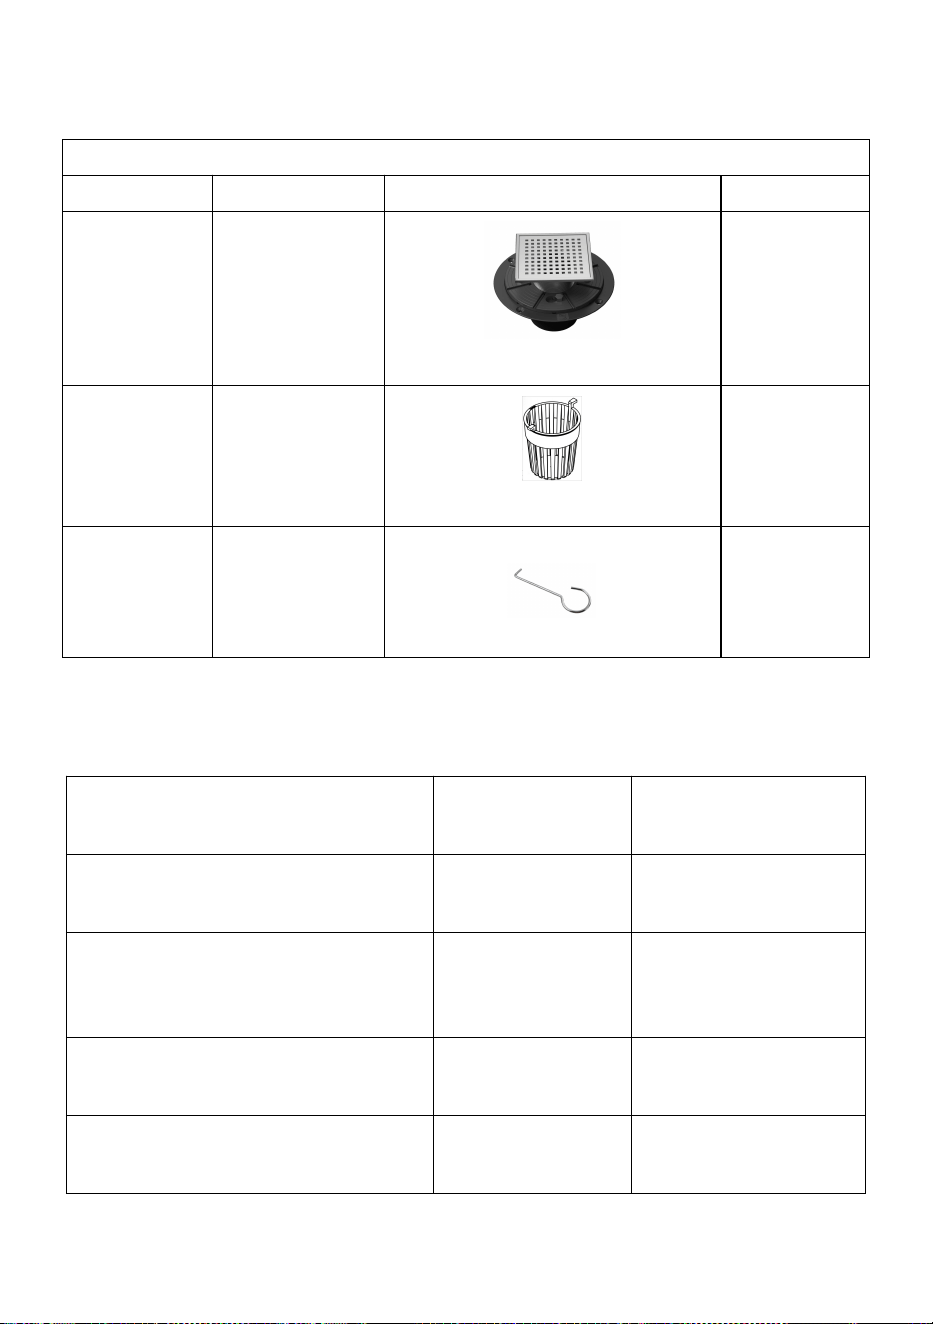
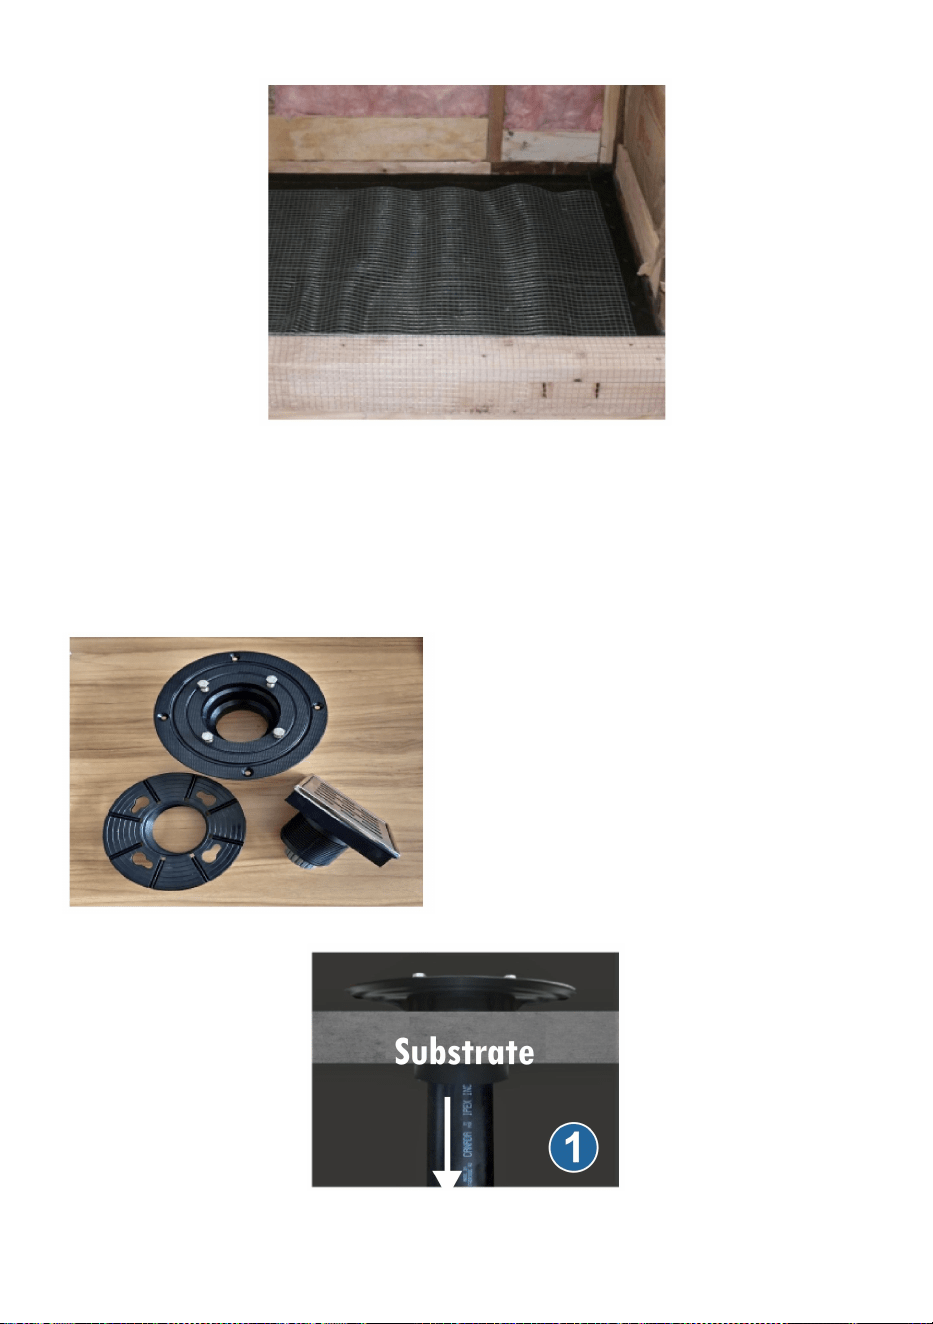
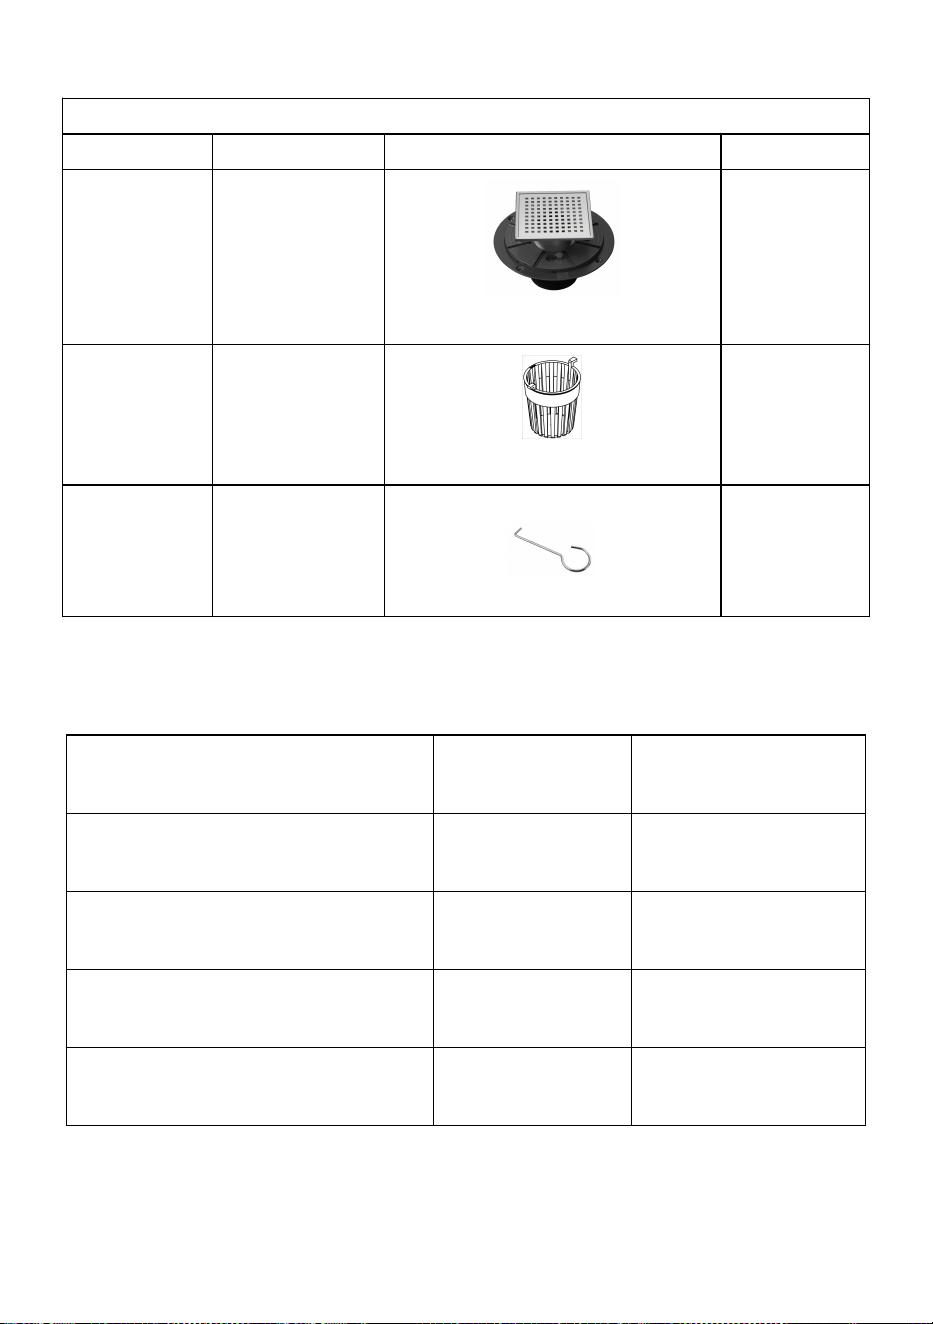
Part List
NO.
Name
Picture
QTY.
1
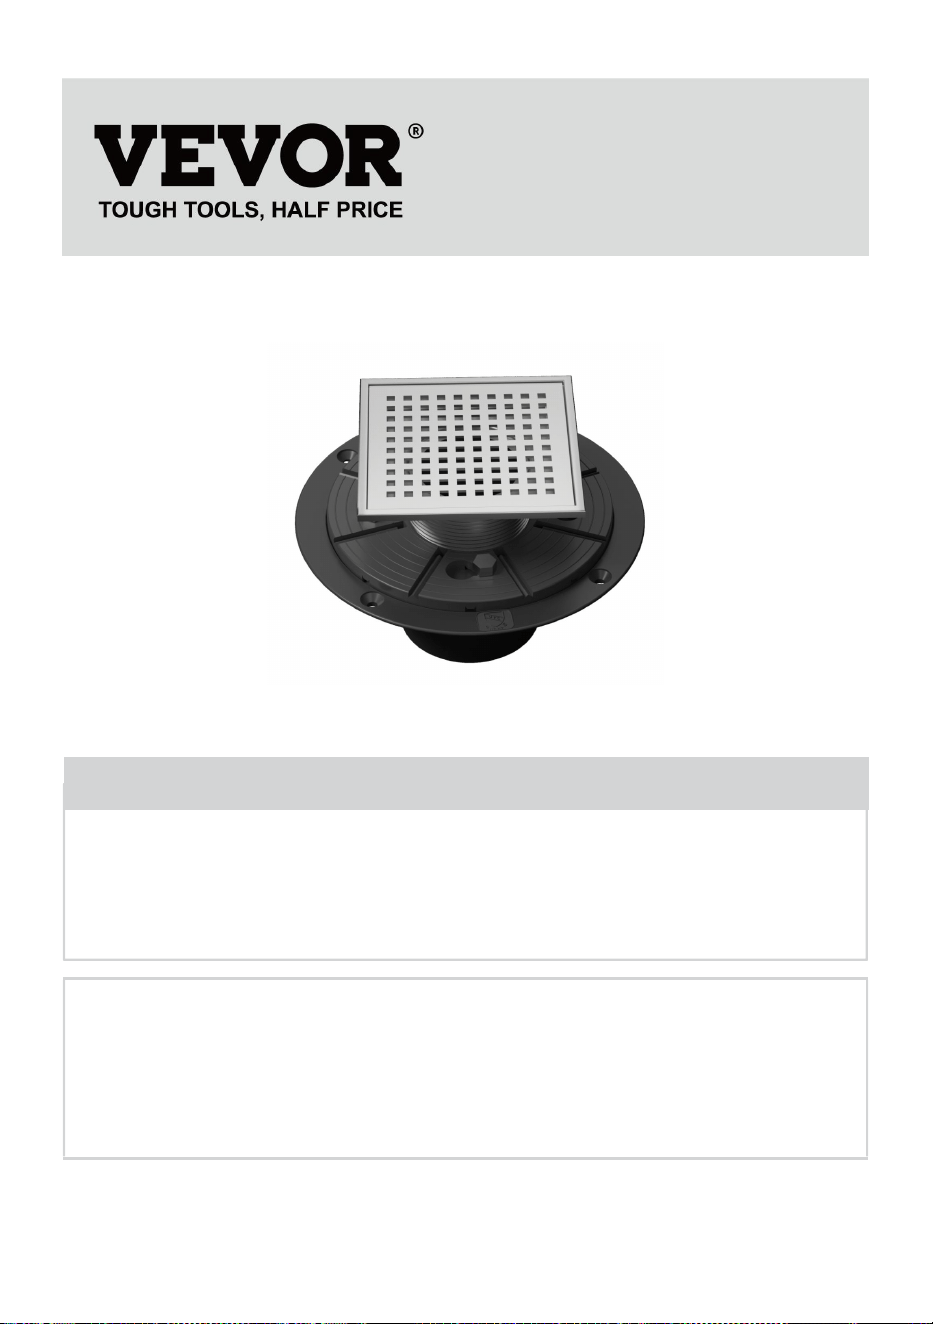
Gutter Group
(Representative picture)
1
2
Filter Screen
(Representative picture)
1
3
Hook
1
Product introduction
Model
COU-6-S04-MB
COU-6-S04-BR
Product Specification
(inch)
6
6
Max. Waterflow Rate
(L/min)
48
48
Cover Form
Punching Face
Punching Face
Colour
Black
Sliver
- 4 -
S
tandard
Installation
It is strongly recommended that a professional mason and
plumber install this product. Observe all local plumbing and
building codes.
Some external factors such as sealant, adhesive, mortar or any
aggressive substance may cause “surface” rust on the grating.
After installation, it is recommended to remove such “rust” using
a scour pad, always brushing in the direction of the gain.
Wipe surfaces clean and rinse completely with water
immediately after applying cleaner. Do not allow cleaners to
soak on surfaces. Use a soft, dampened sponge or cloth. Never
use an abrasive material such as a brush or scouring pad to
clean surfaces.
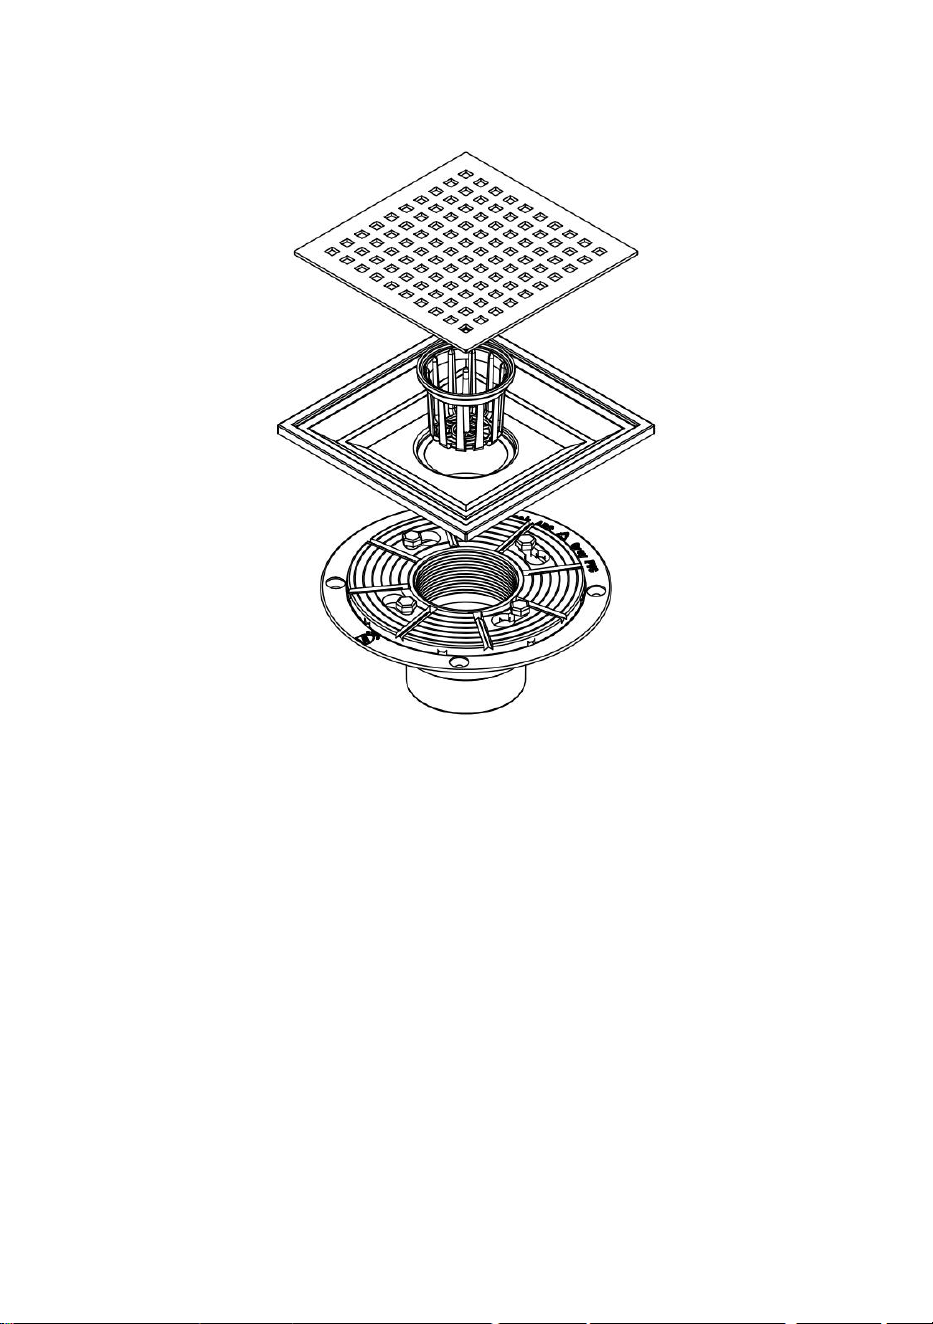
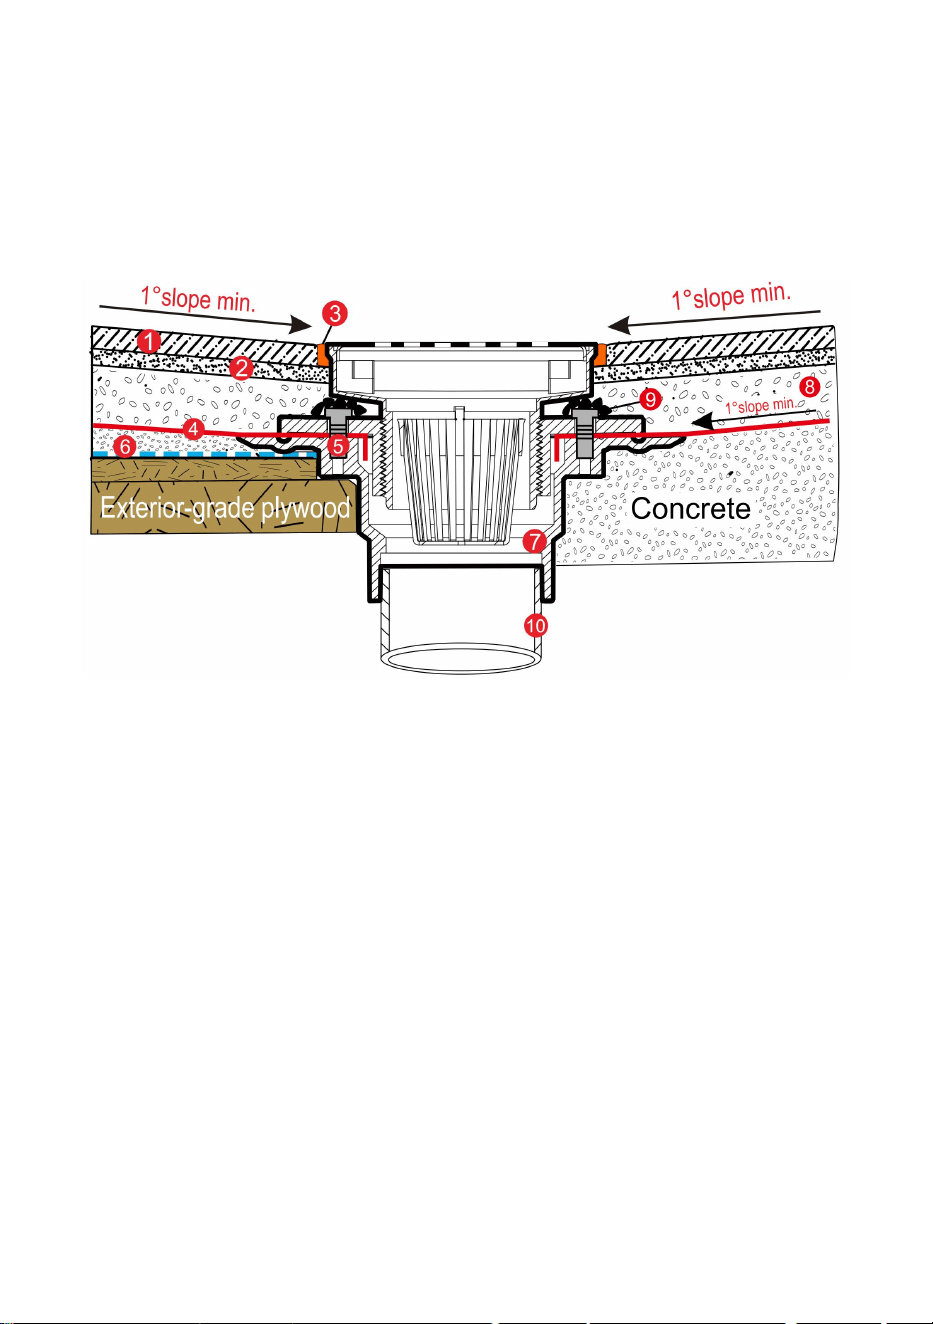
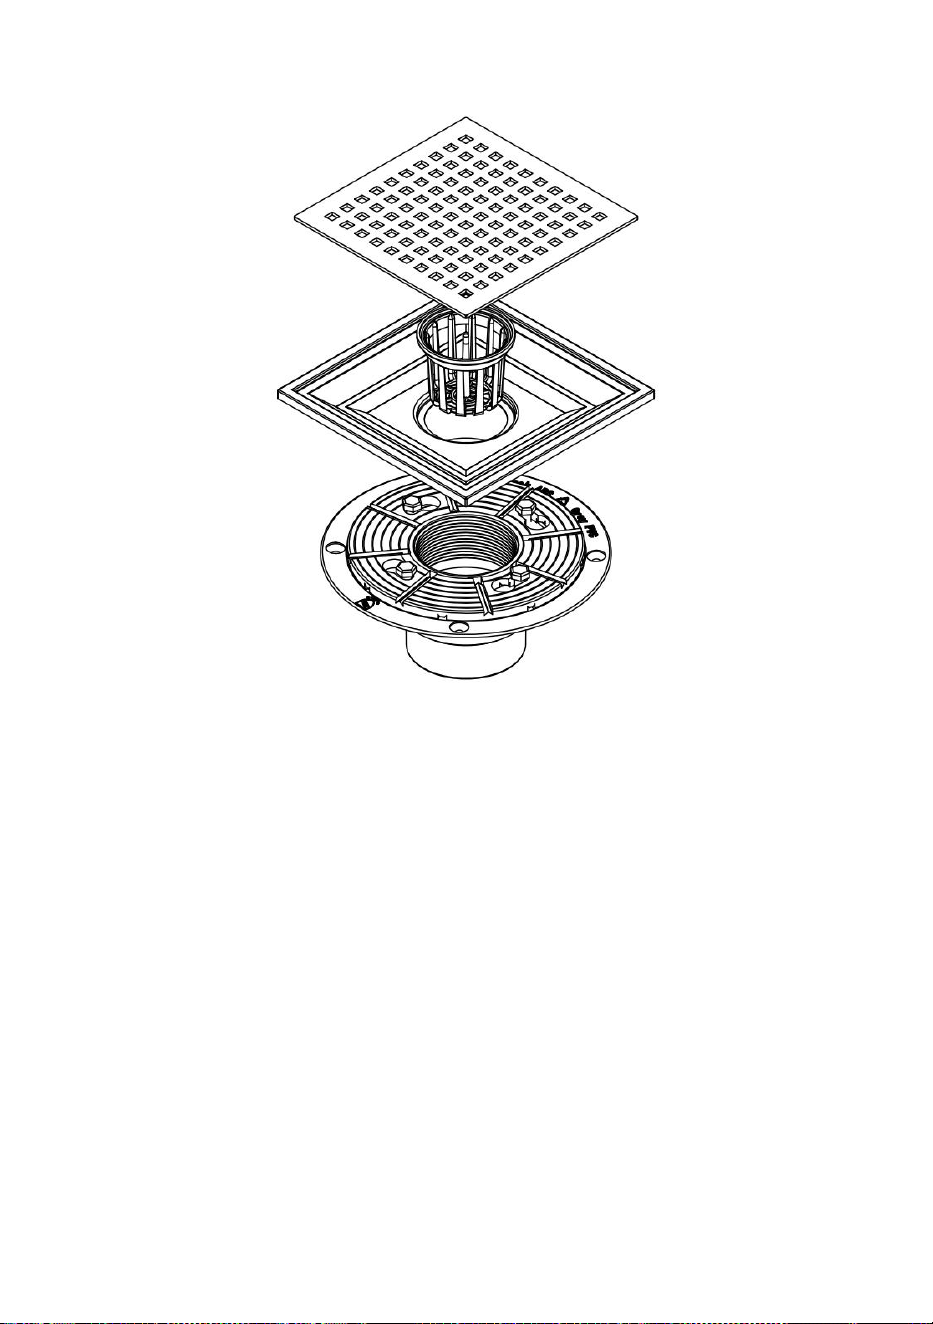
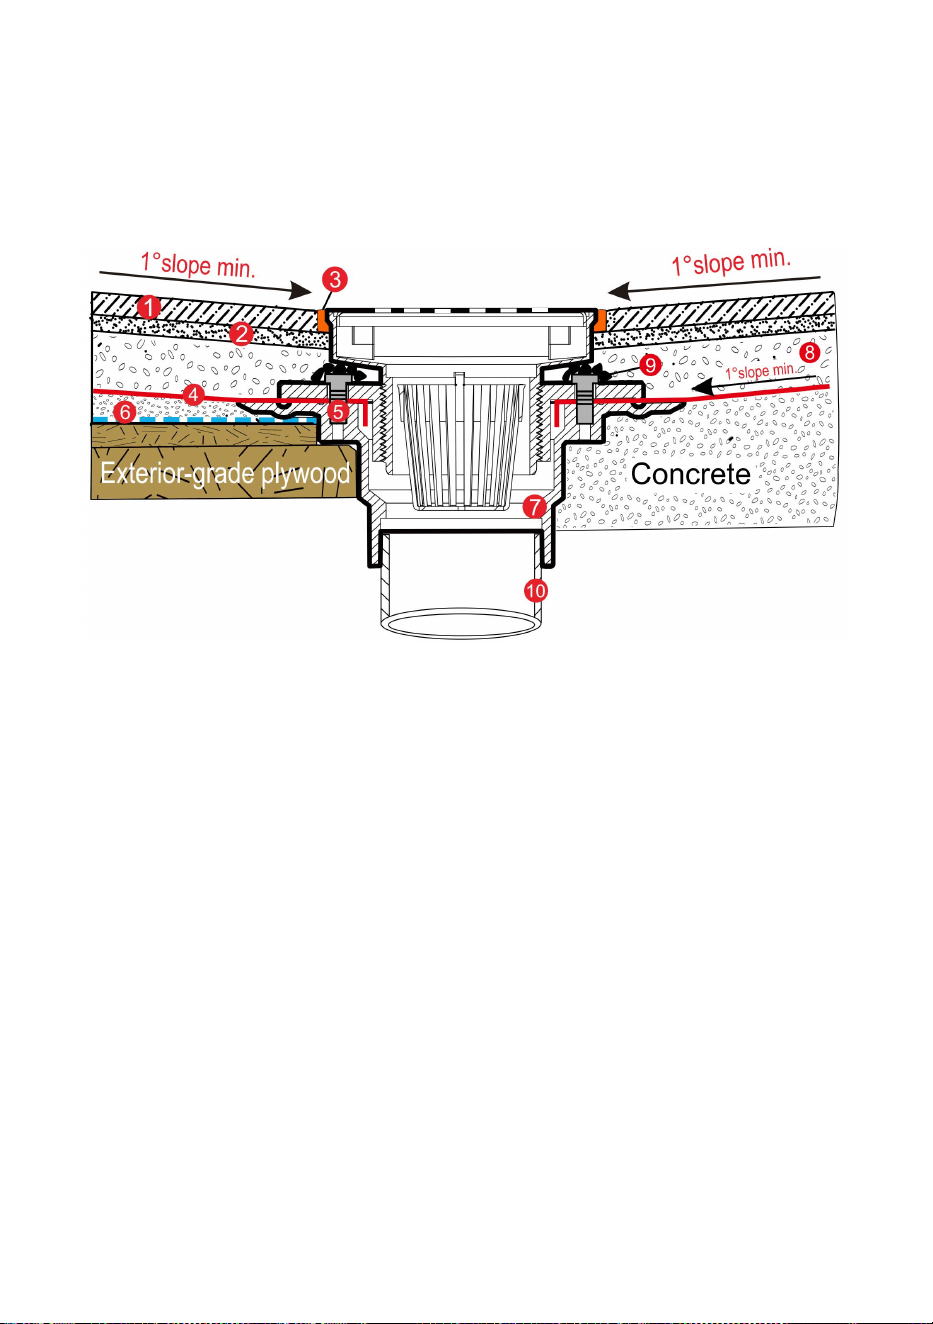
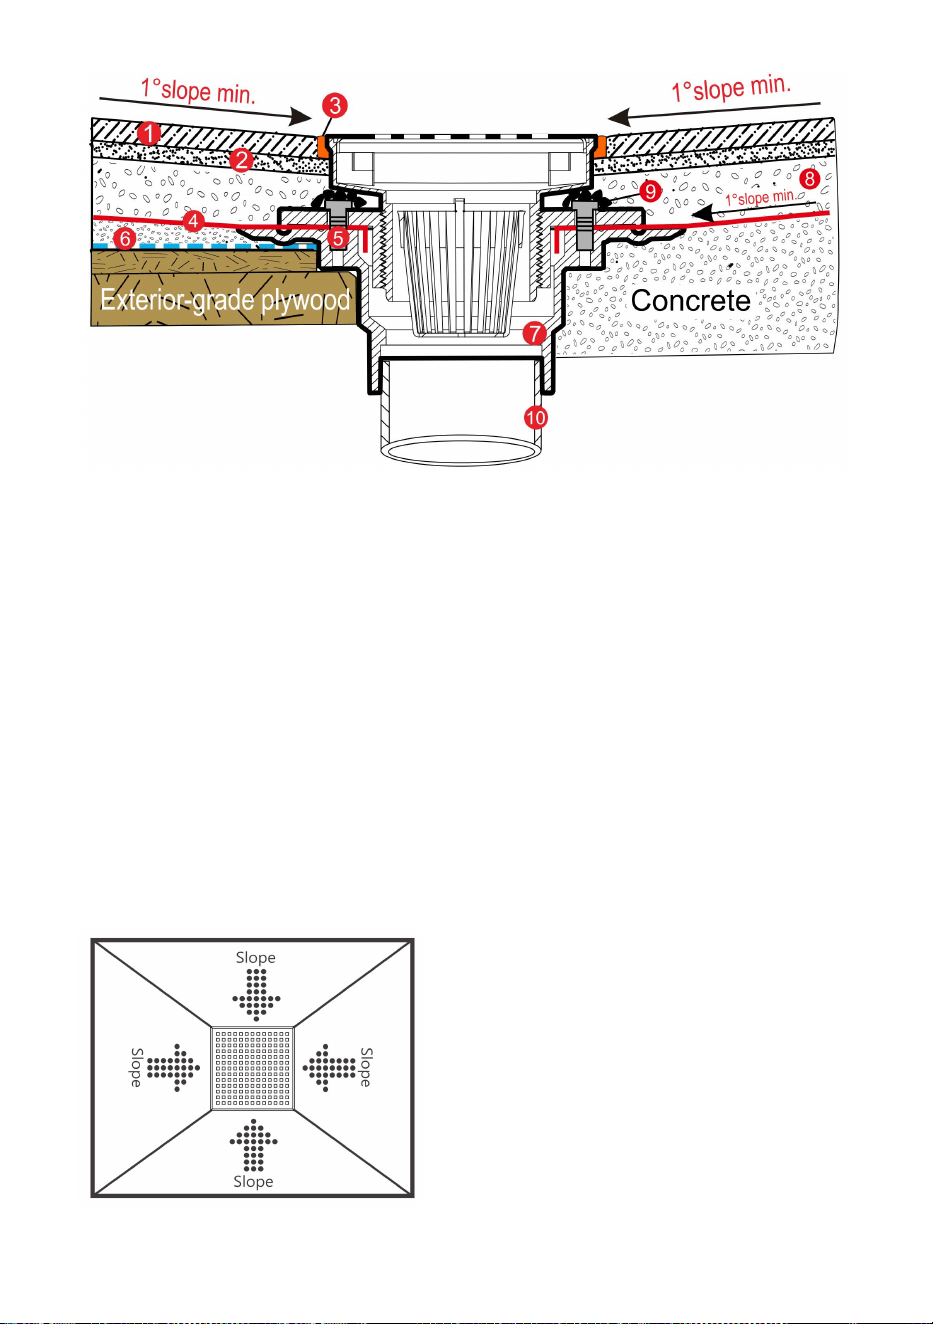
Installation Overview
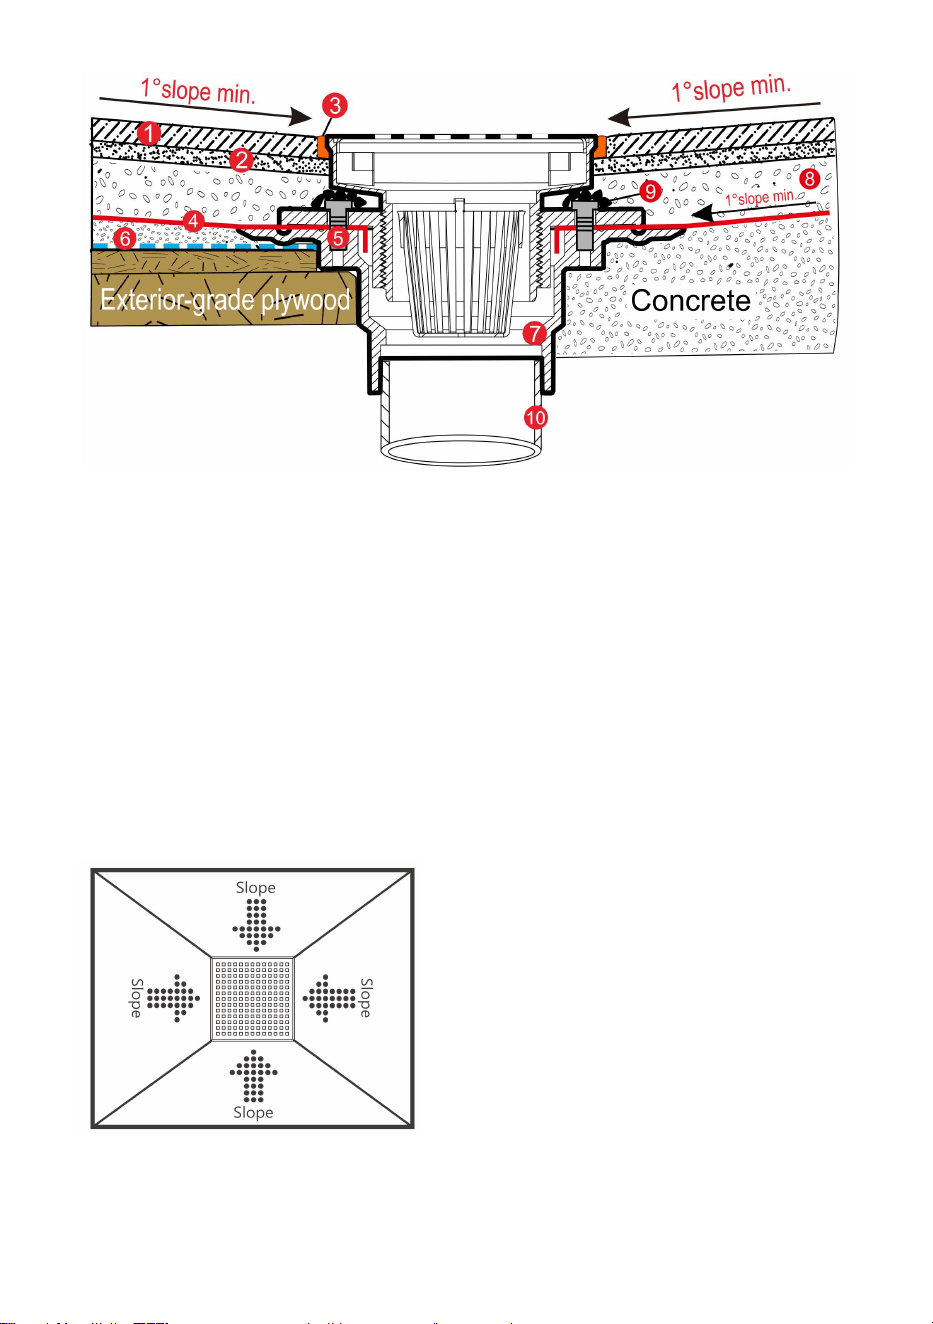
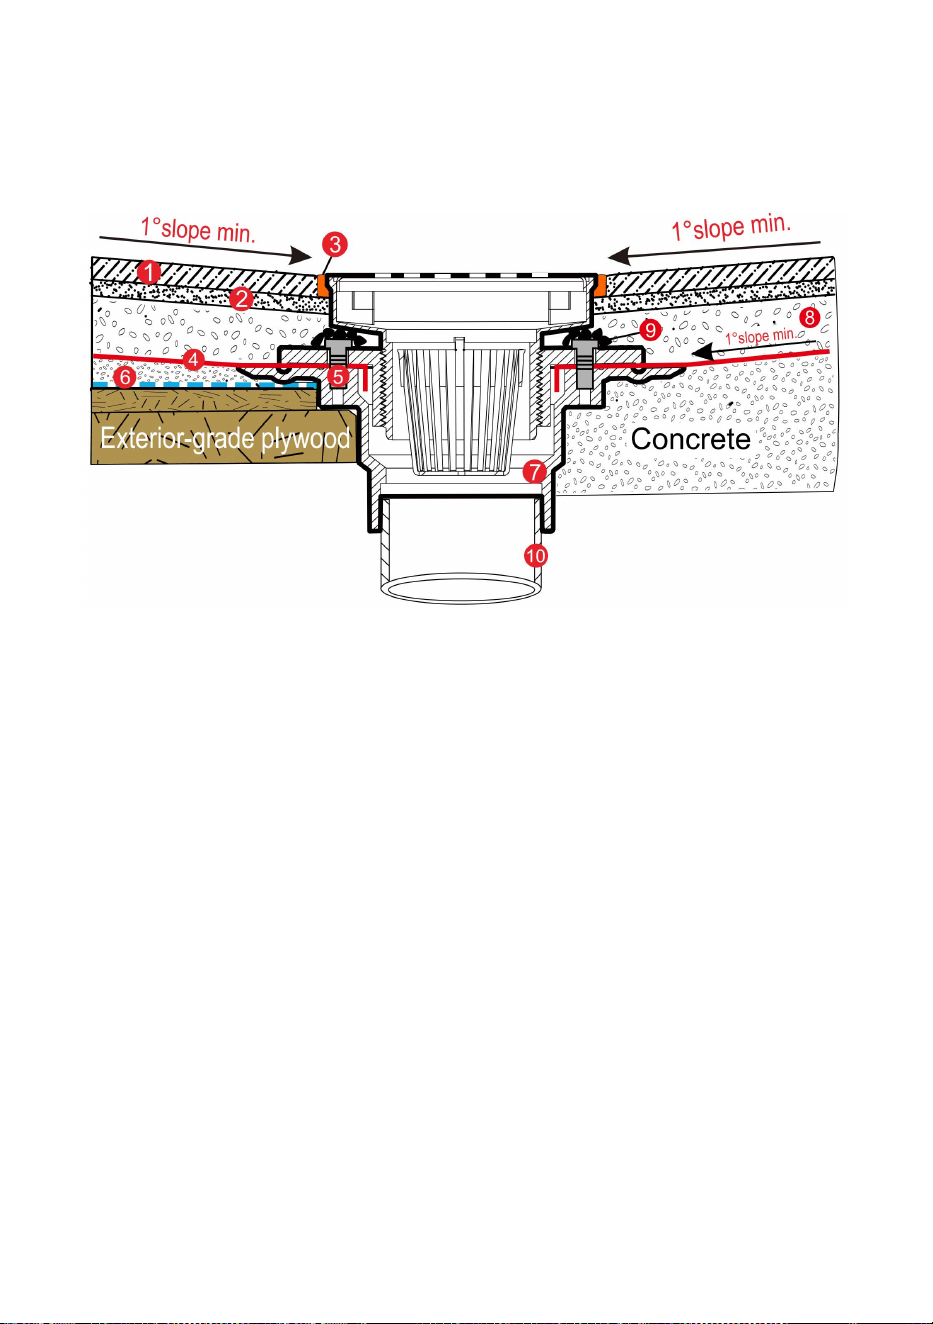
- 5 -
1. Ceramic tile 2. Tile adhesive or thinset
3. Grout or sealant 4. Waterproof membrane
5. Screw bolts 6. Tar paper & wire lath
7. Drain base assembly 8. Floor mortar
9. Pea gravel or tile spacer
10. The outer diameter of the waste pipe is φ60mm
Do not use Interior-grade plywood, OSB sheets,Drywall or
greenboard as underlayments for ceramic tile.
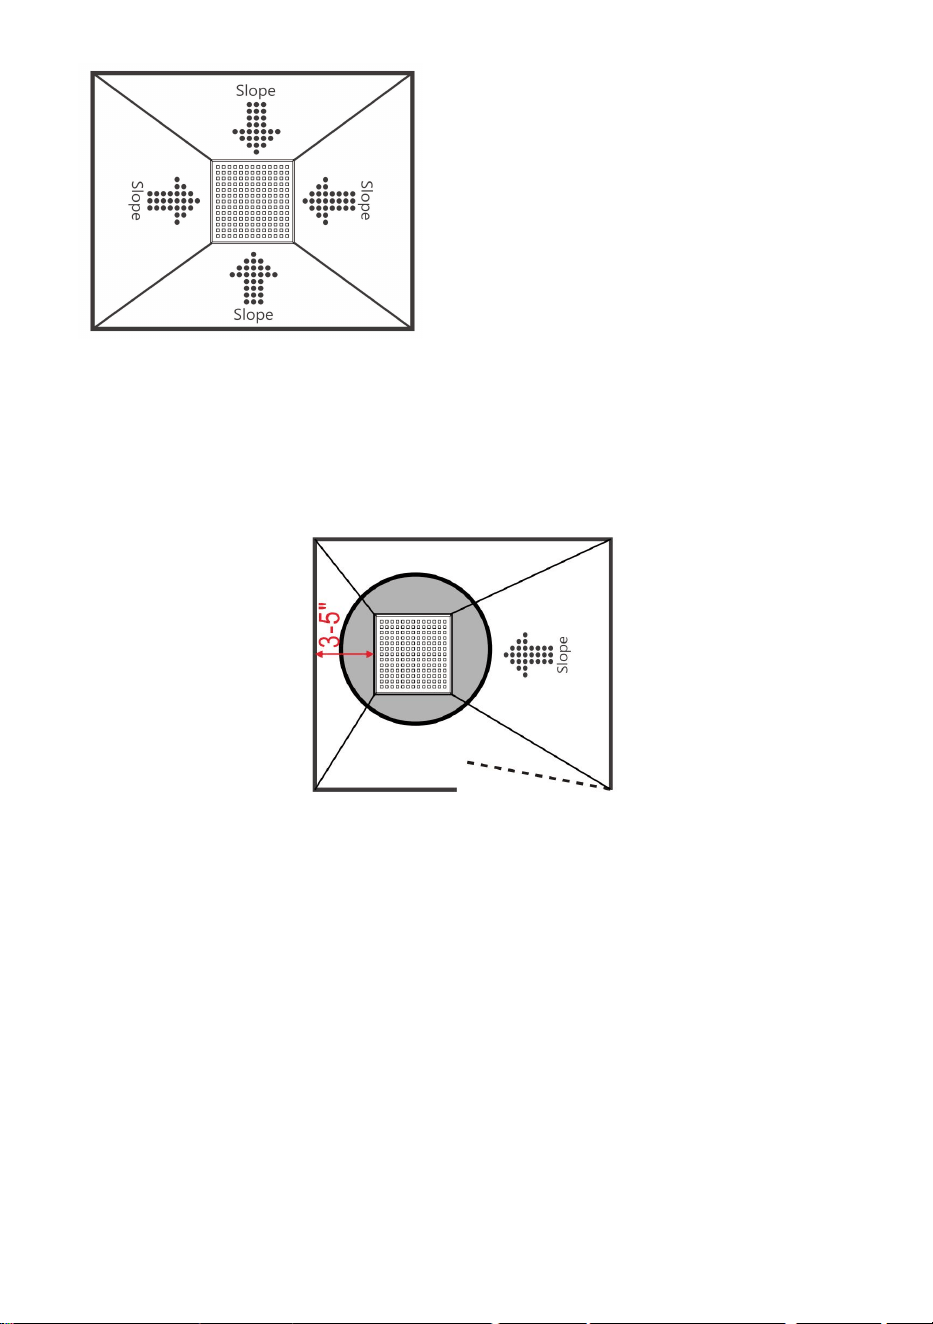
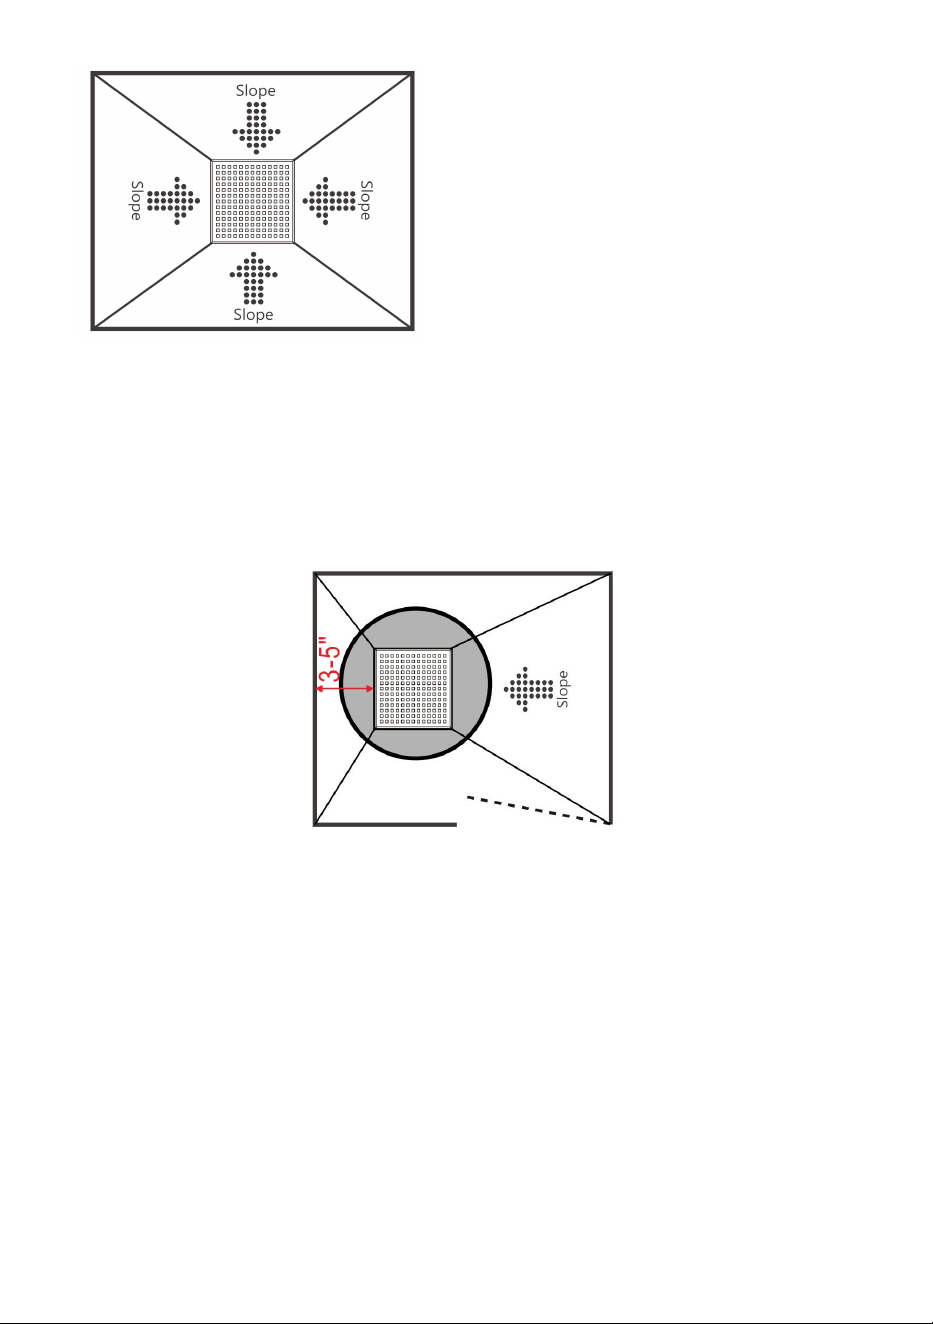
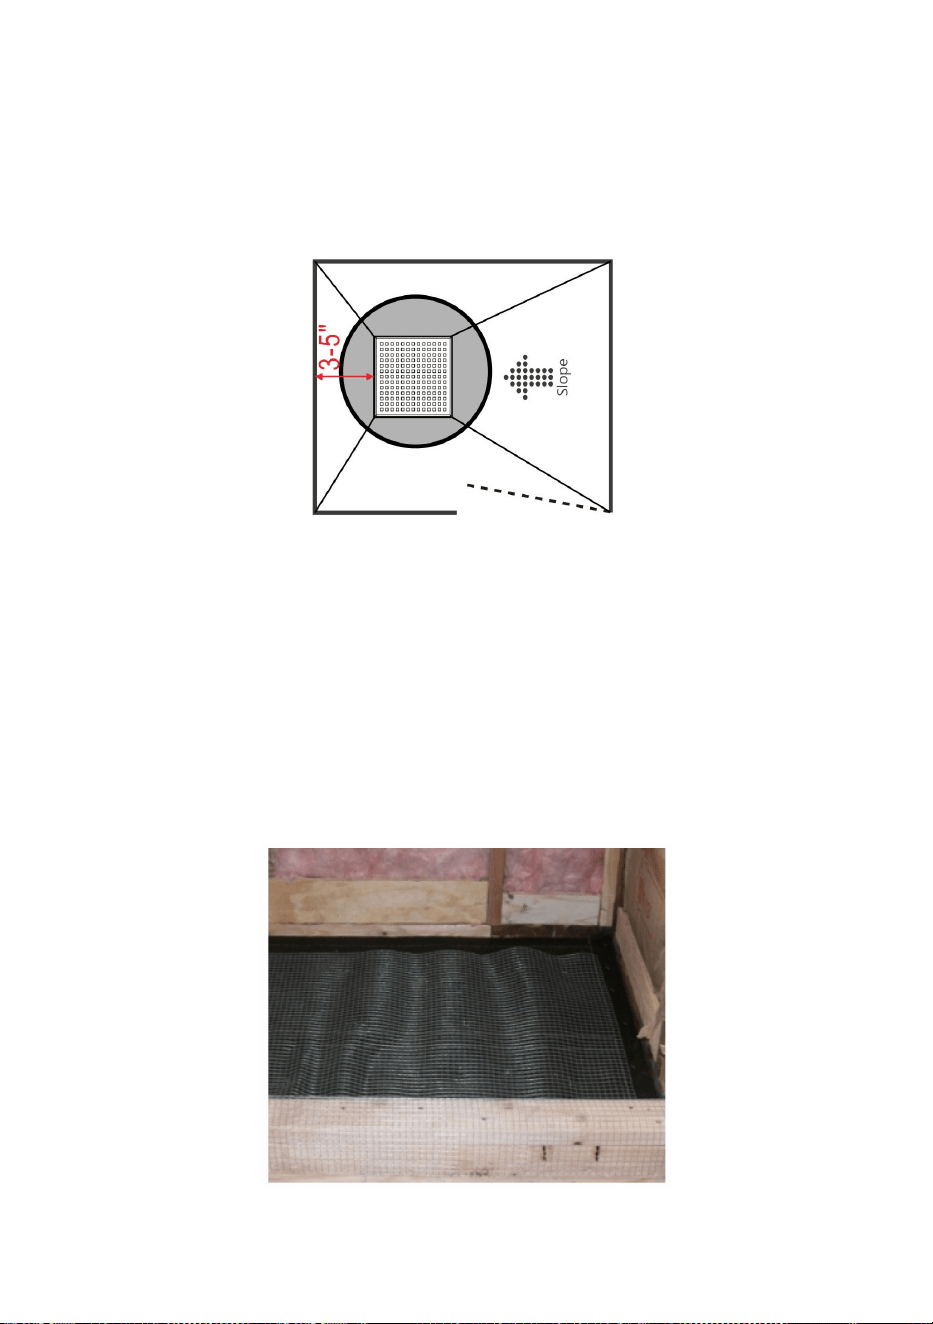
Placement in Bath Room:
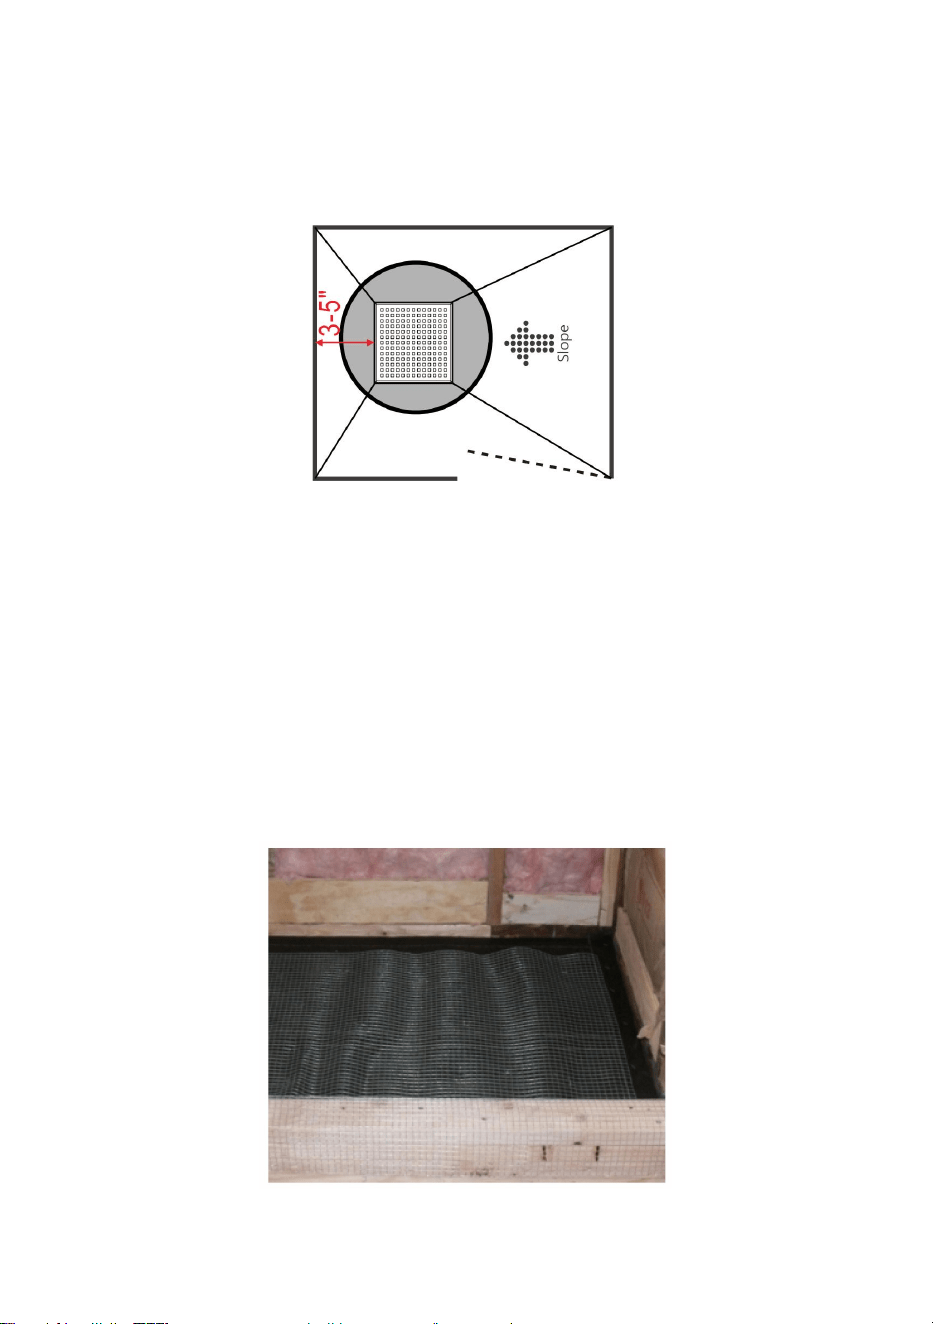
- 6 -
Identity drain placement center pitch installation is recommended. The
floor is pitched in four directions towards the drain. Floors must be graded
appropriately, or other barriers must be used to prevent water from flowing
into the dry area.
Note:
The clamping ring has to be 2-3" from the wall,so the drain will
typically locate 3-5" away from the back wall. Please measure this distance
if the plumbing pipe close to the wall.
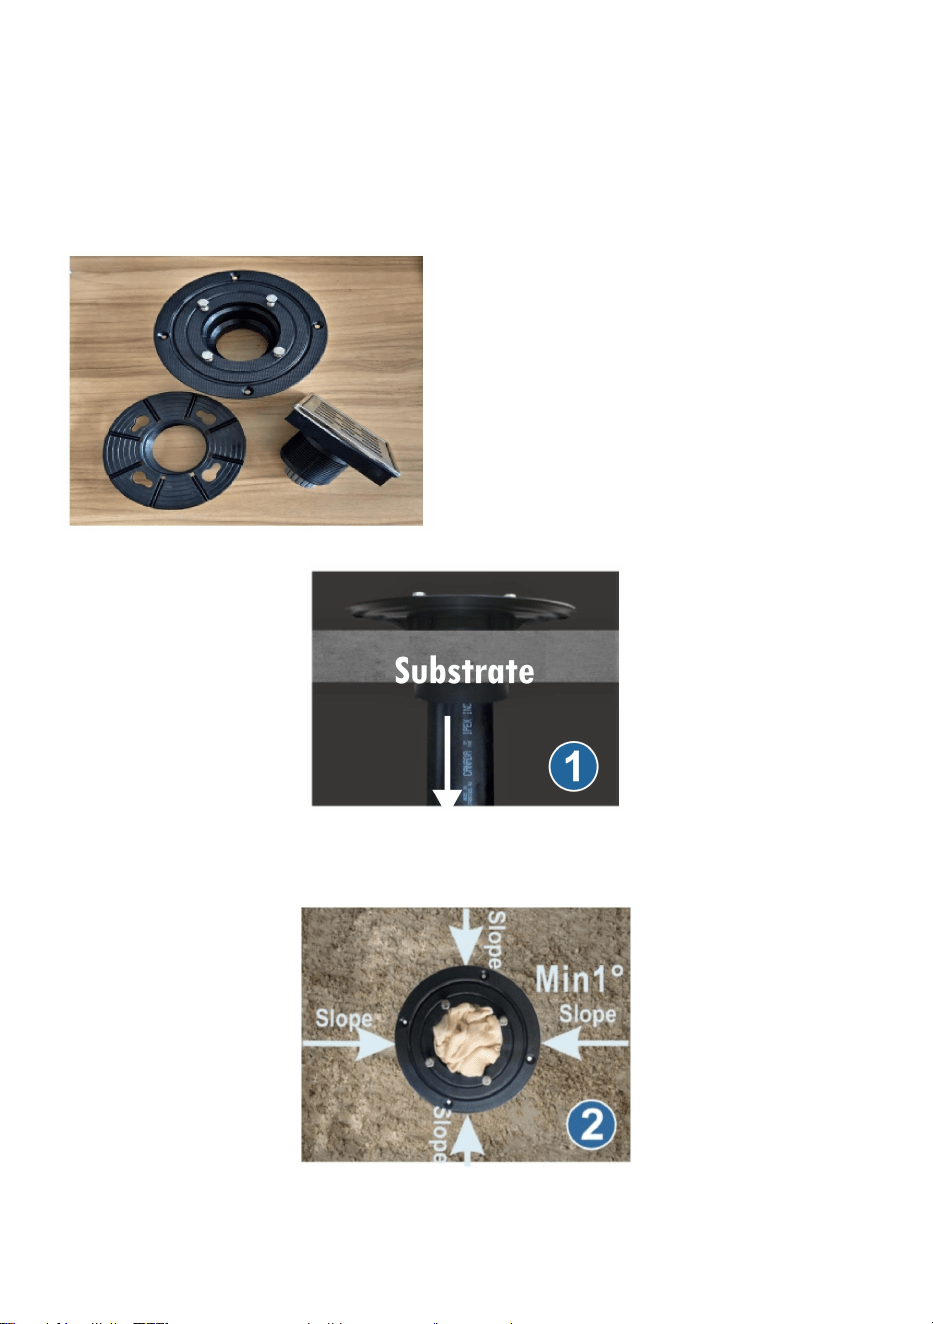
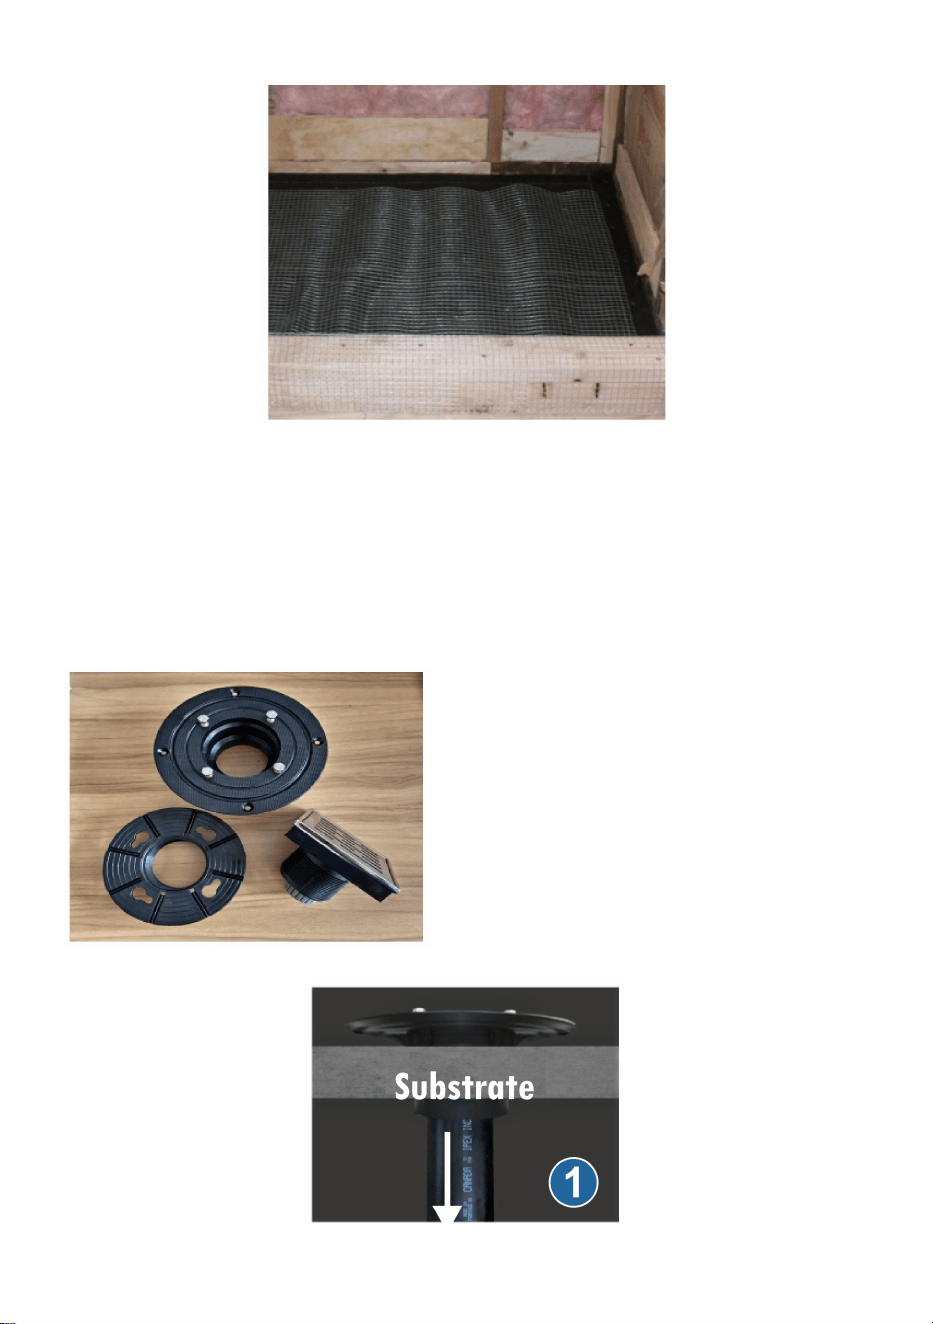
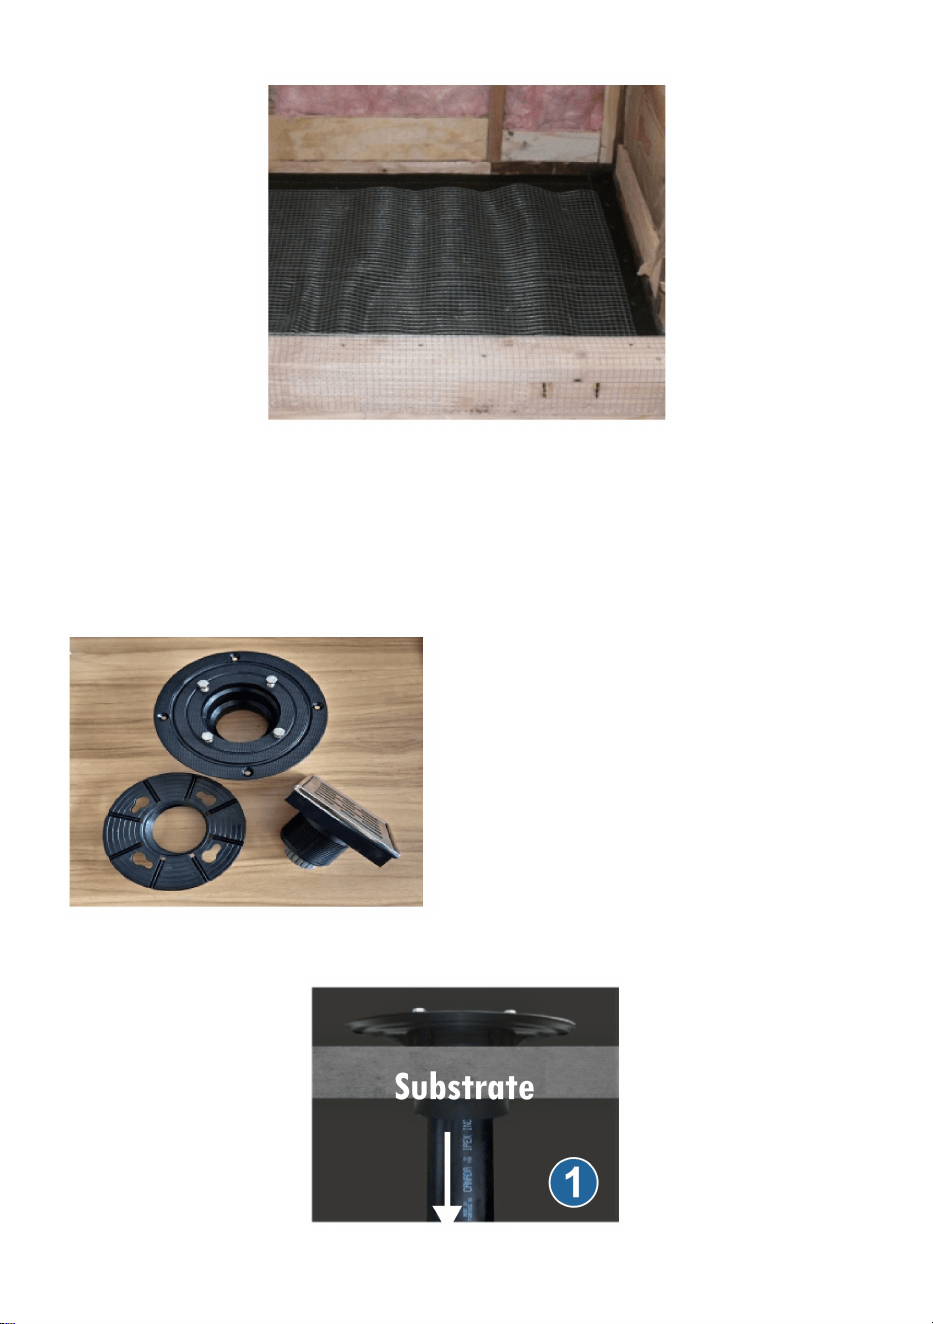
Substrate Isolation (Particular for wood substrate.)
Staple building paper and wire lath to the subfloor,cutting around the outlet
opening.
- 7 -
The tar paper will serve as a moisture barrier for the first layer of
mud helping the mortar to retain moisture while curing. It will also help to
isolate the substrate from the shower pan.
The wire lath will reinforce the base floor mud layer of mortar and help hold
the mortar to the shower curb.
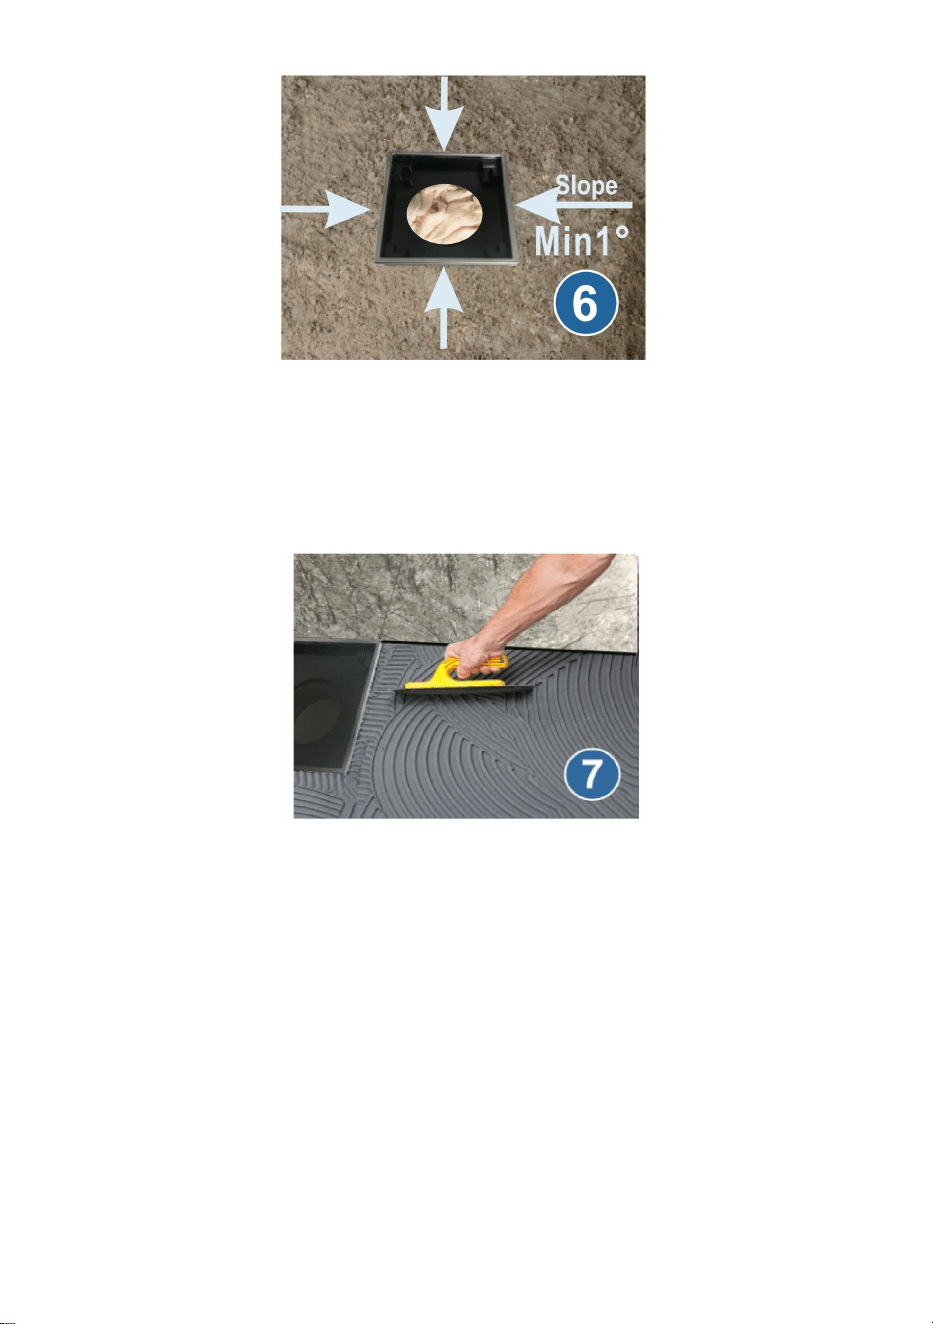
Spin off the drain body,loose
thescrews to remove the clamping
ringand set them aside.
1.Apply PVC cement to connect the adapter to pipe system, then glue the
adapter bottom to the subfloor. Stuff a rag into the drain opening.
2. Trowel mortar over the wire lath from the outside of the adapter to the
- 8 -
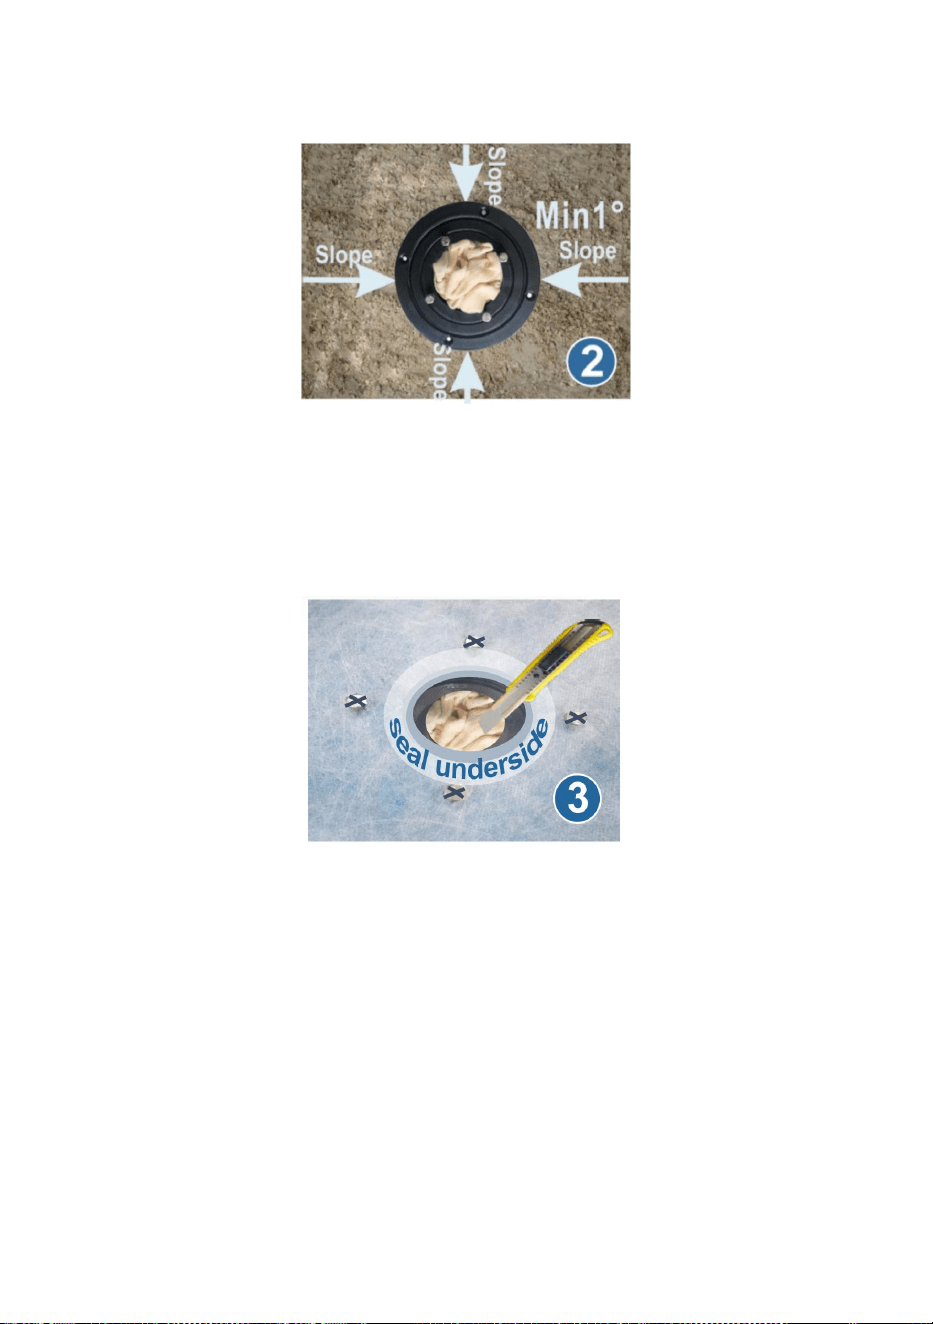
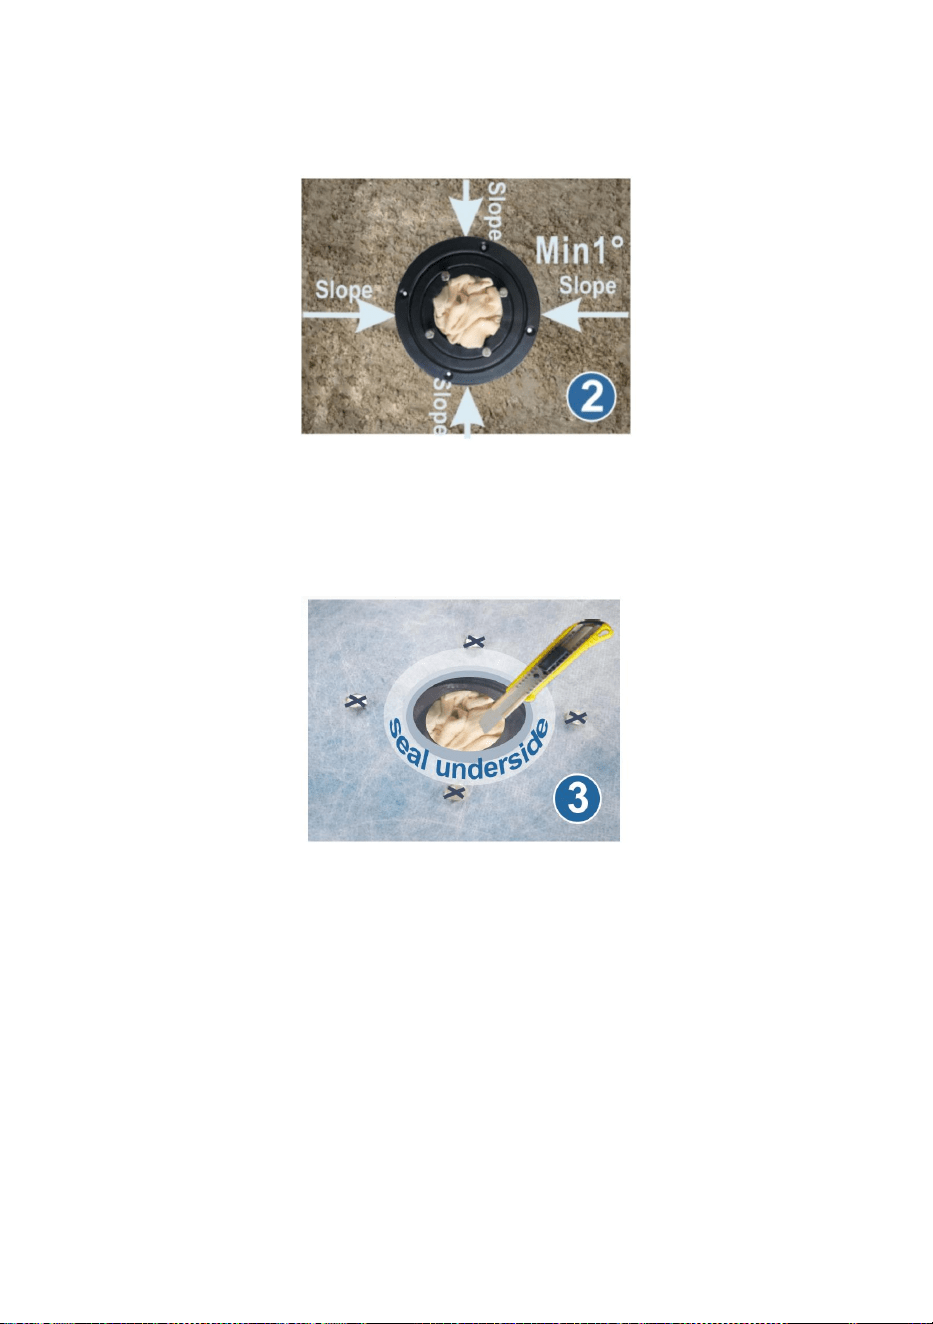
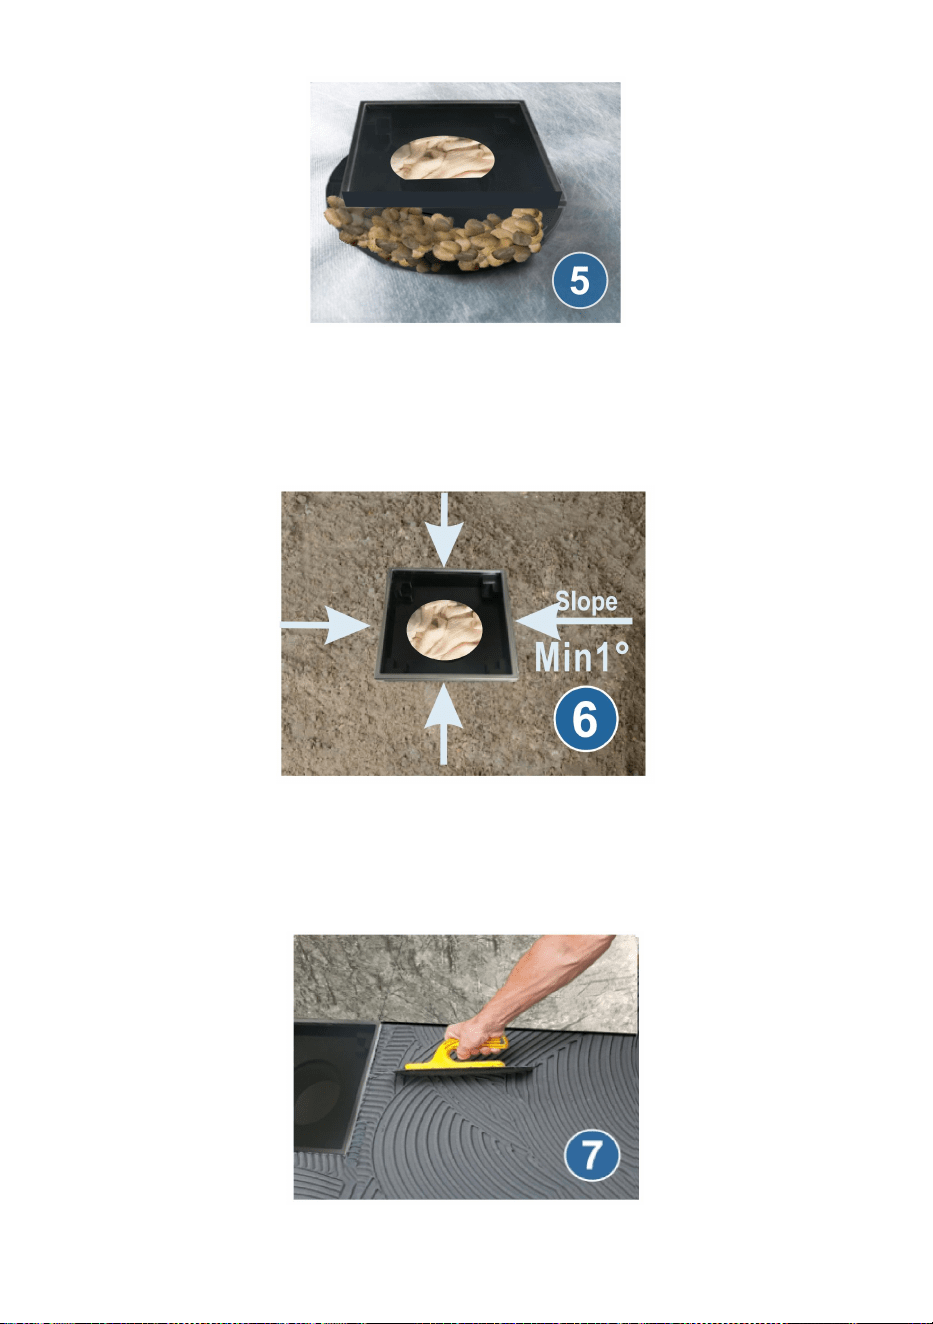
perimeter of the shower base, using wood float and level to grade the
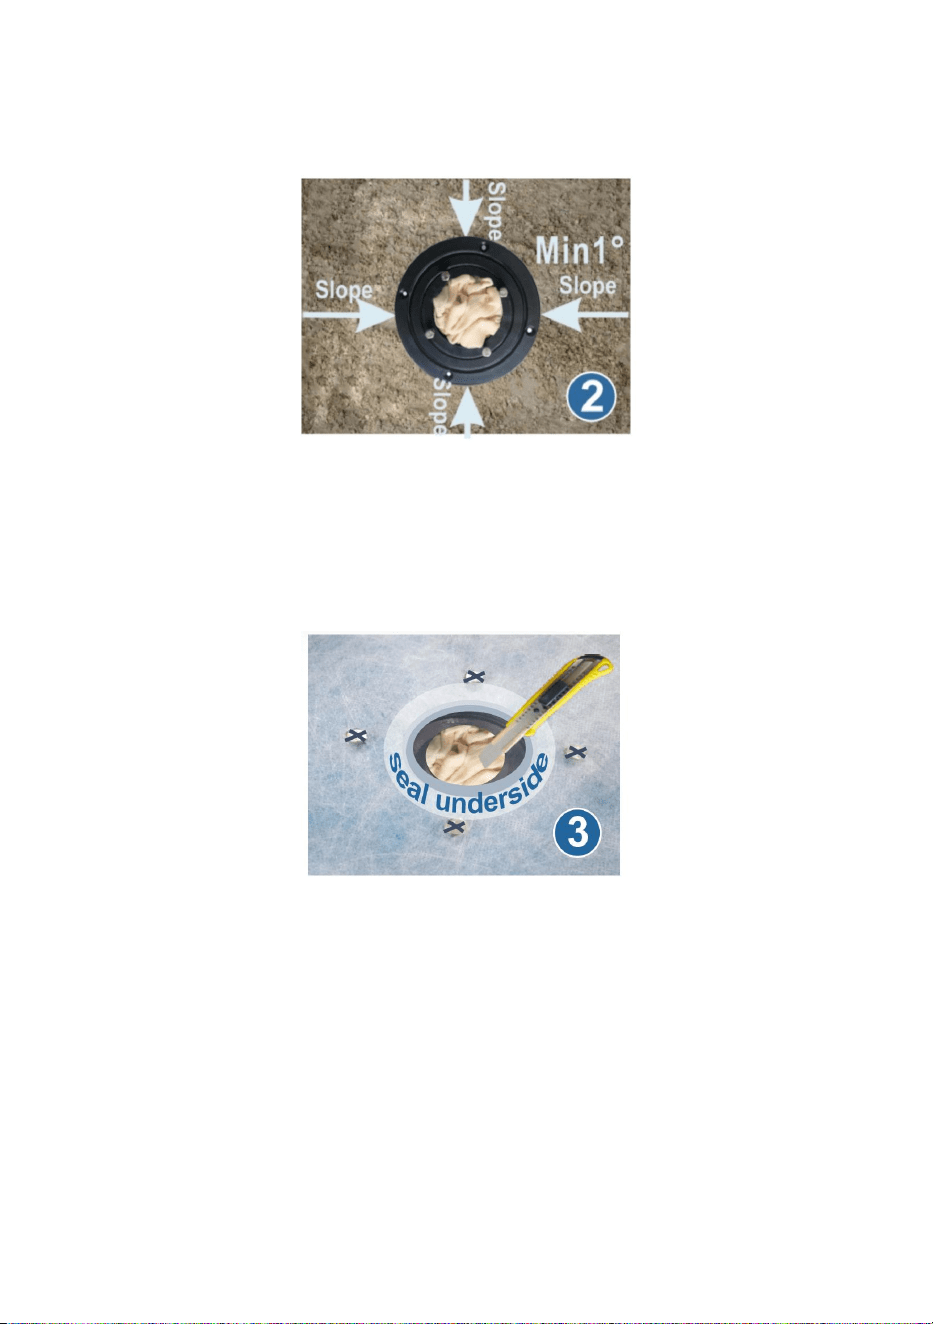
mortar to create minimum 1°slope towards the drain in four directions.
Allow the mortar to cure overnight.
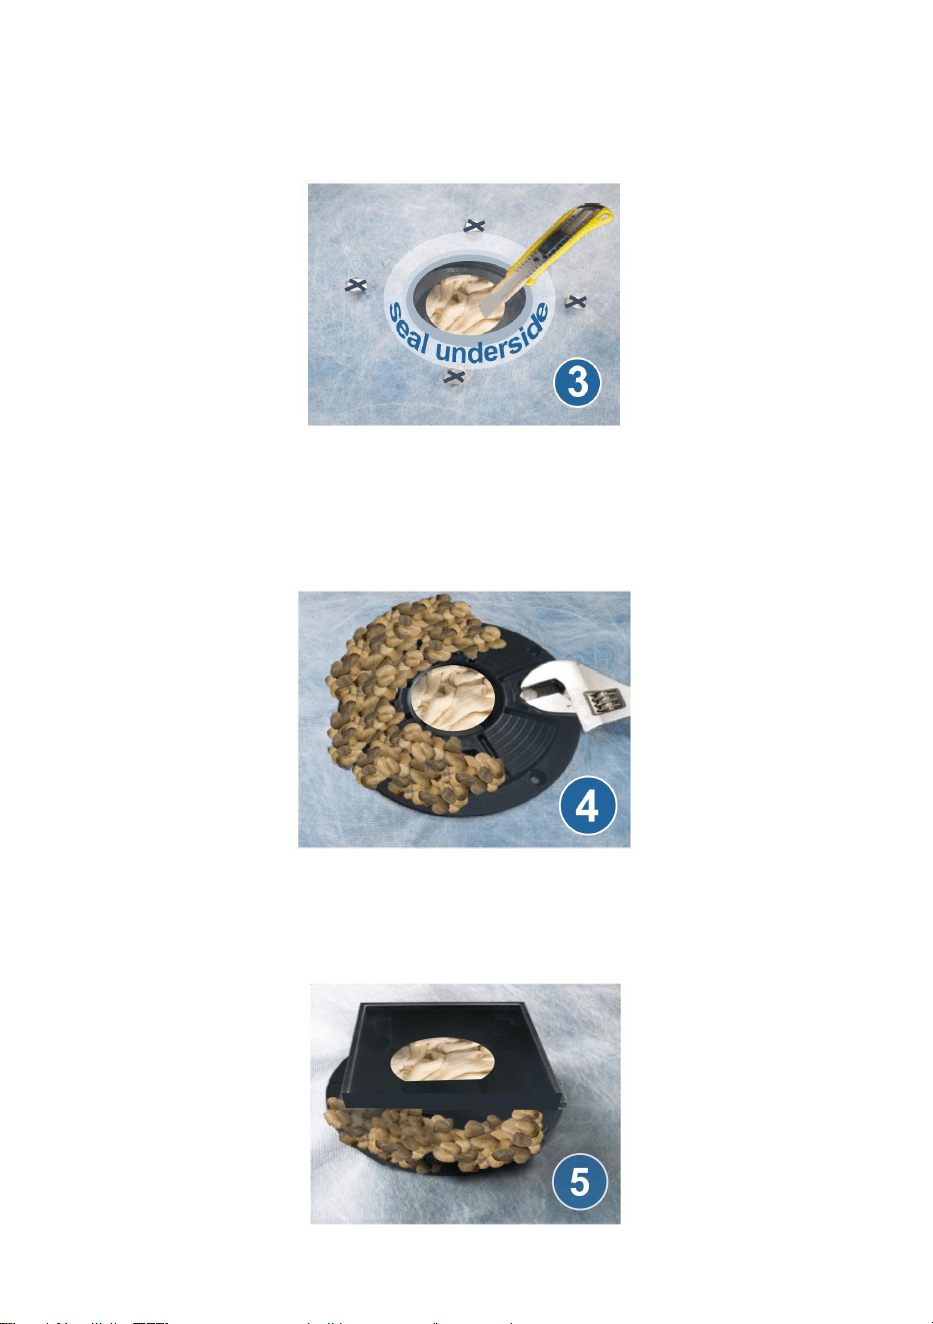
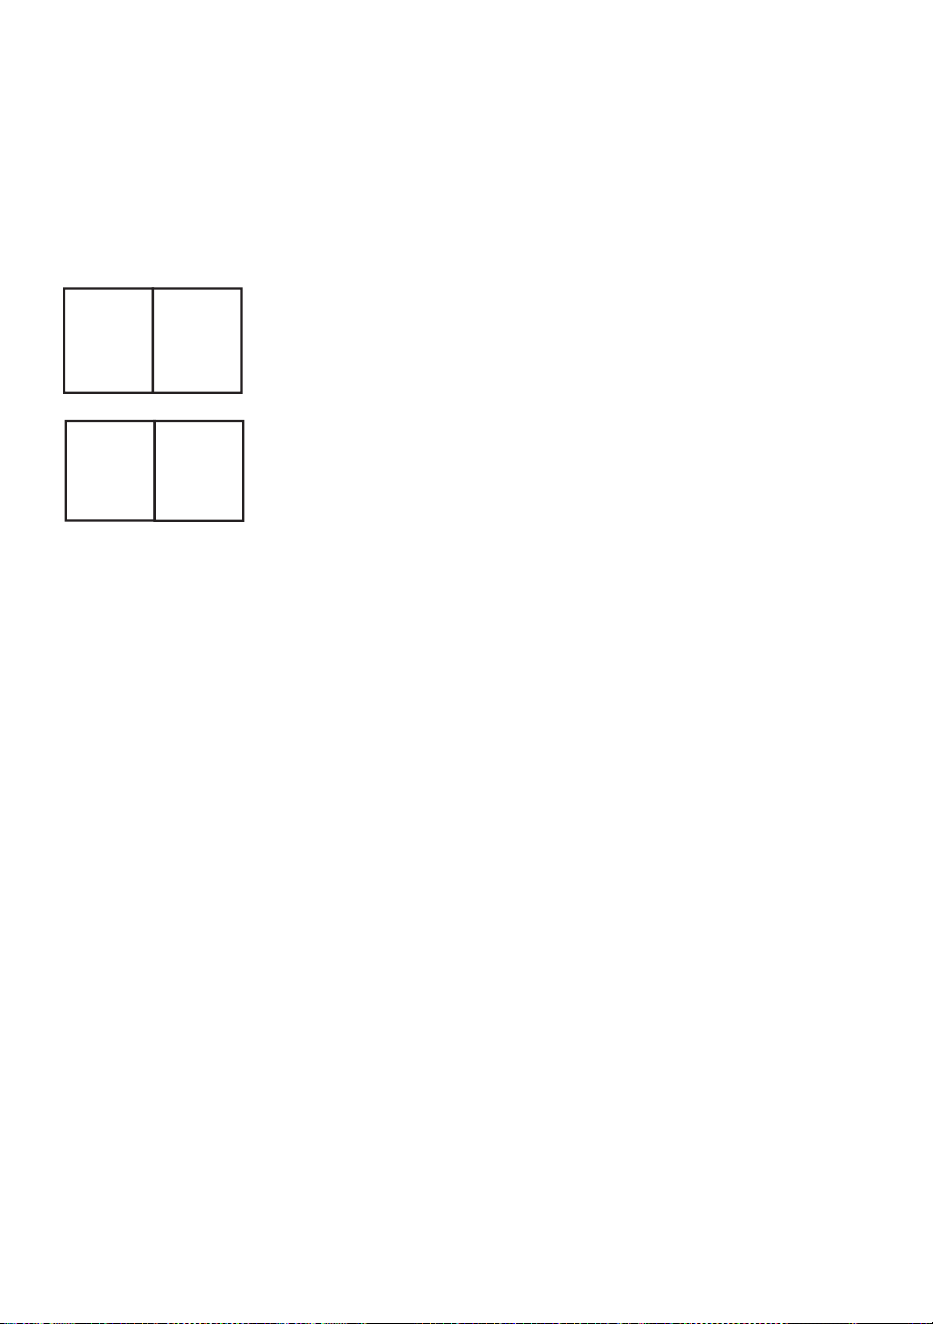
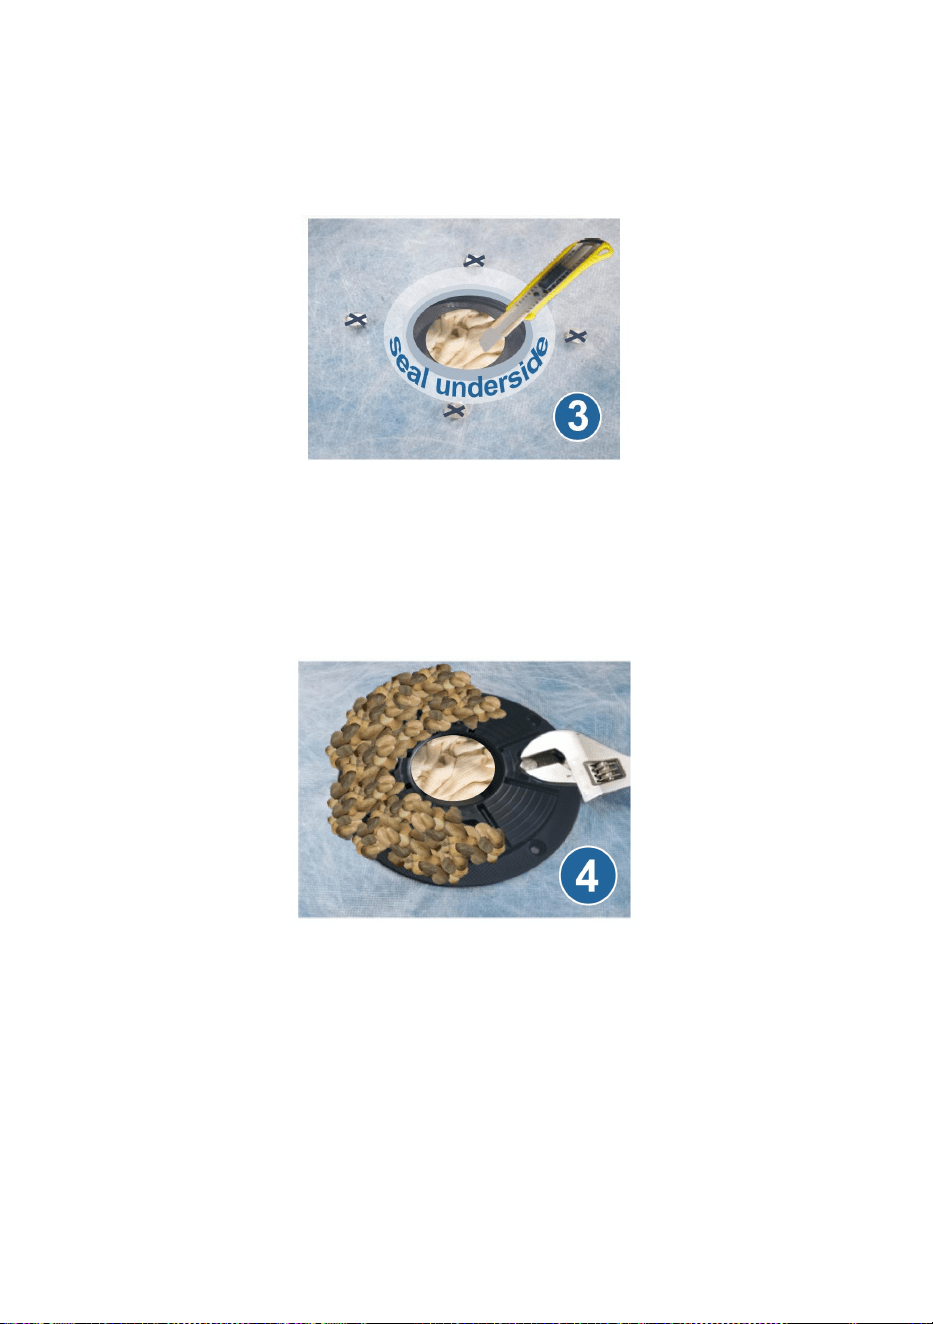
3.Apply waterproof membrane on the shower area and up to 8" on each
wall, cut a slit on the bolts to poke through,cut away the drain hole in the
center.Seal the underside of the membrane to the flange adapter with
silicon. Ensure the membrane is tight in each corner of the floor.
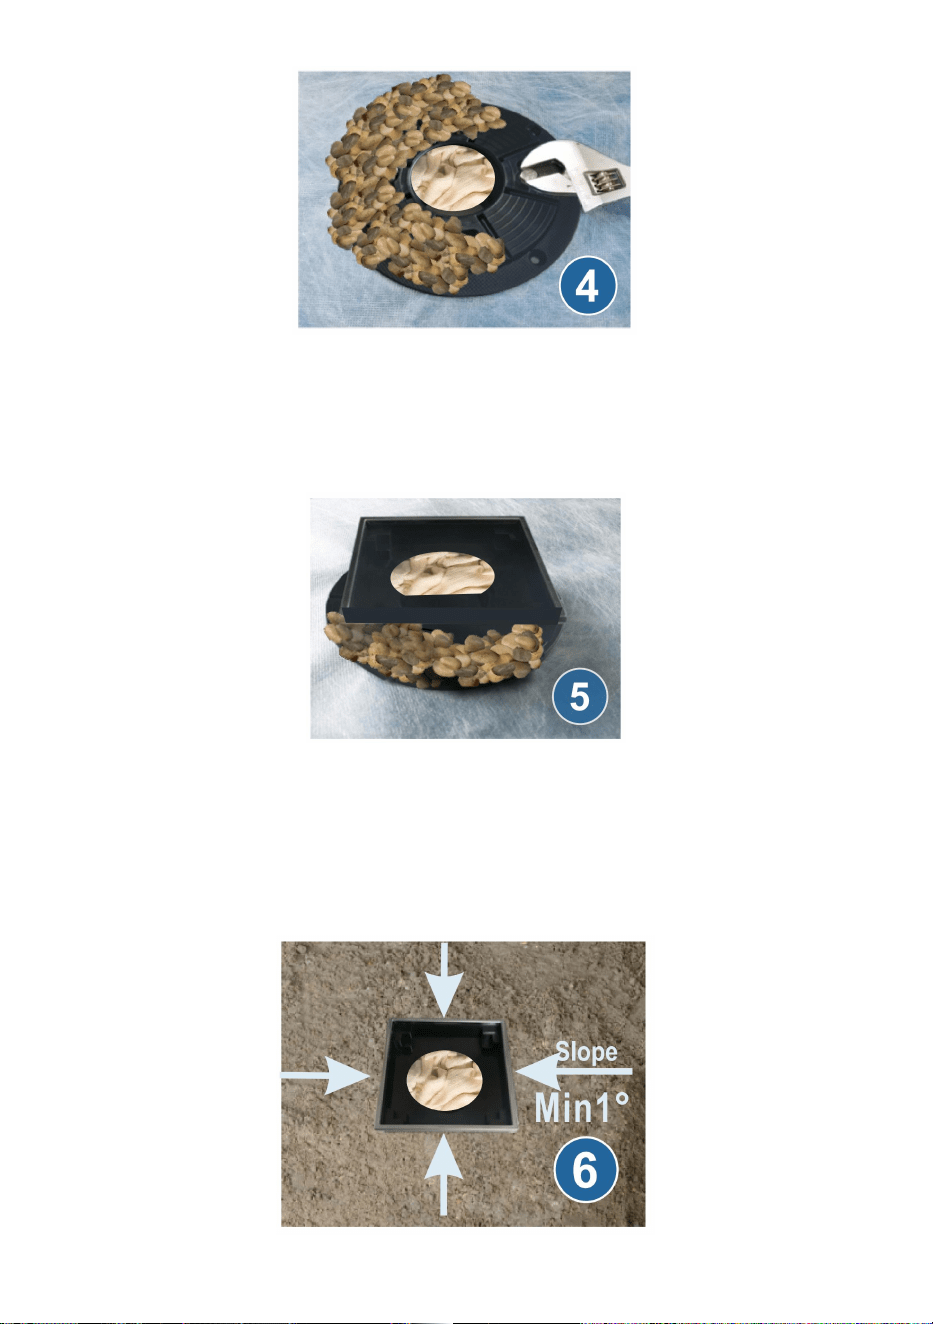
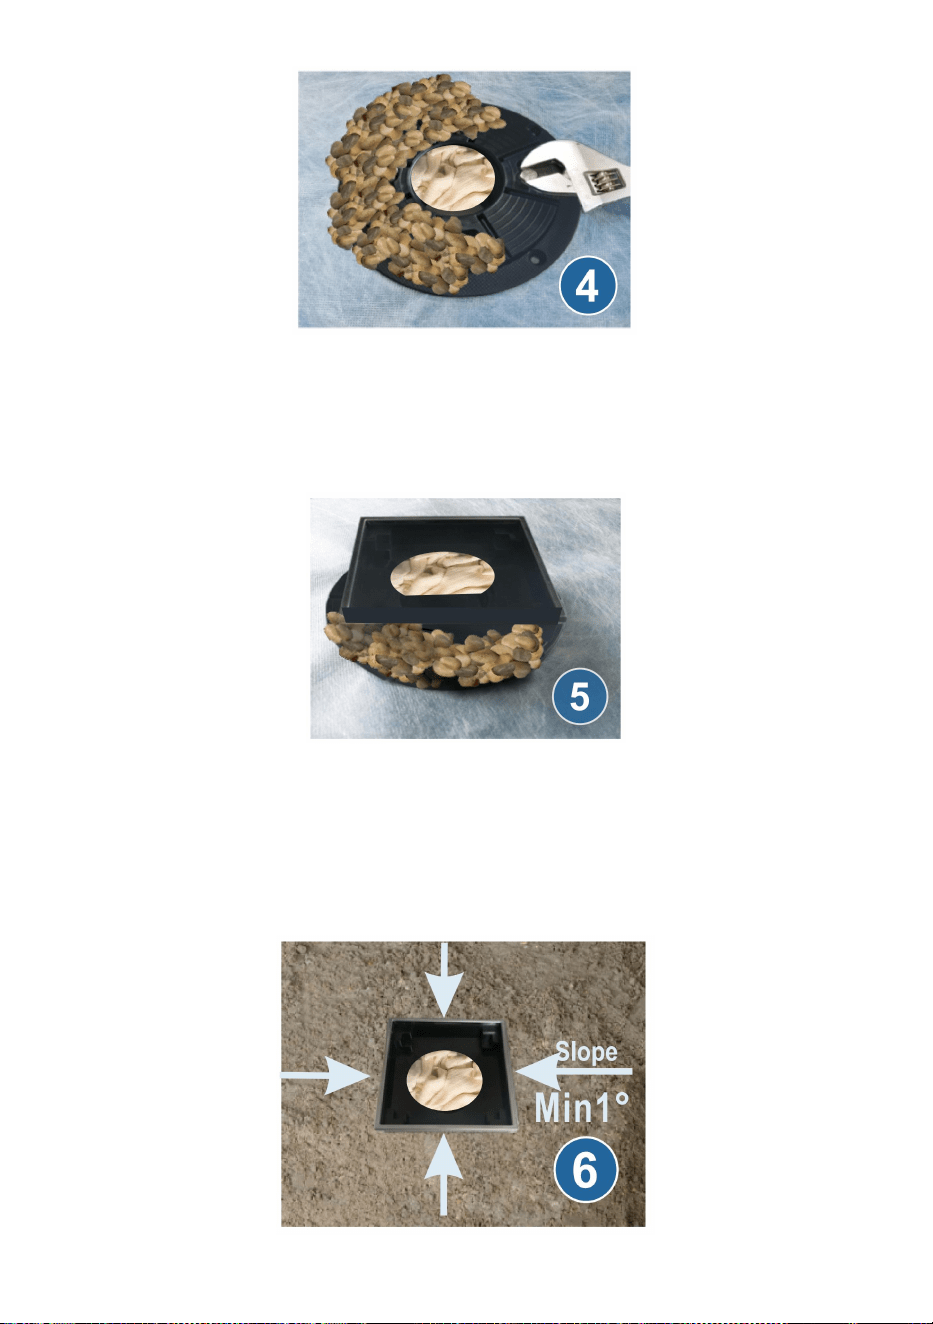
4.Install the clamp ring, carefully tightening the bolts to create watertight
seal once the membrane installed. Spread pea gravel or tile spacer over
the weep slots to prevent mortar from plugging the weep hole.
- 9 -
5.Spin drain body into the clamp ring, adjust the height to correspond to
desired thickness of mortar and tile, set four sides to parallel to the tile
edge. Make sure the height from the top to the drain base not less than
1.5". Plug the outlet and test leaking overnight.
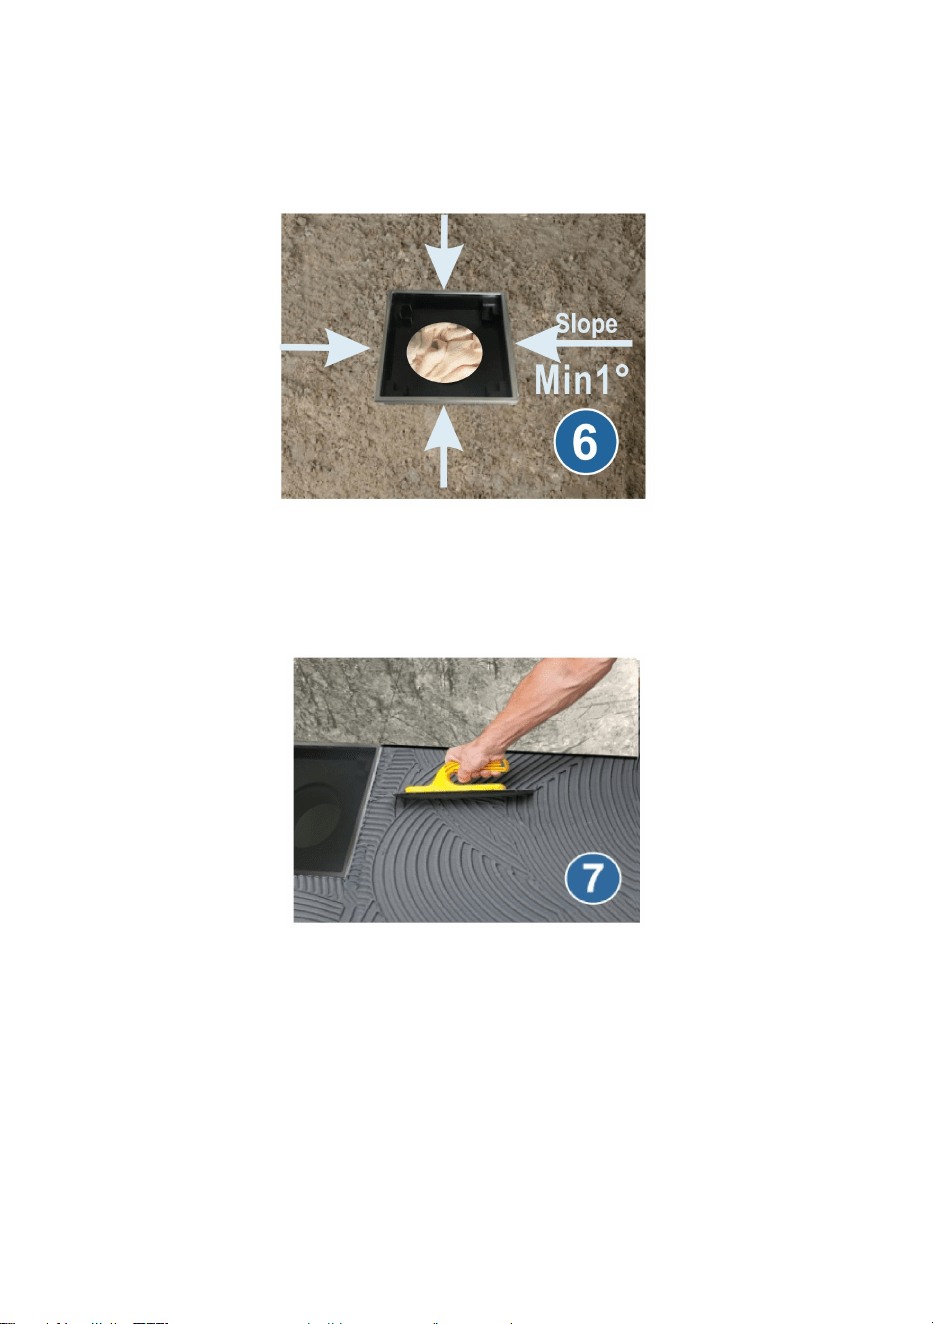
6.Apply dry pack mortar to build up the second mortar bed, the whole floor
must be graded to create minimum 1º slope, approximately 1/4" per foot
toward the drain in four directions. Leaving space of tile thickness and
thin-set along the drain body.
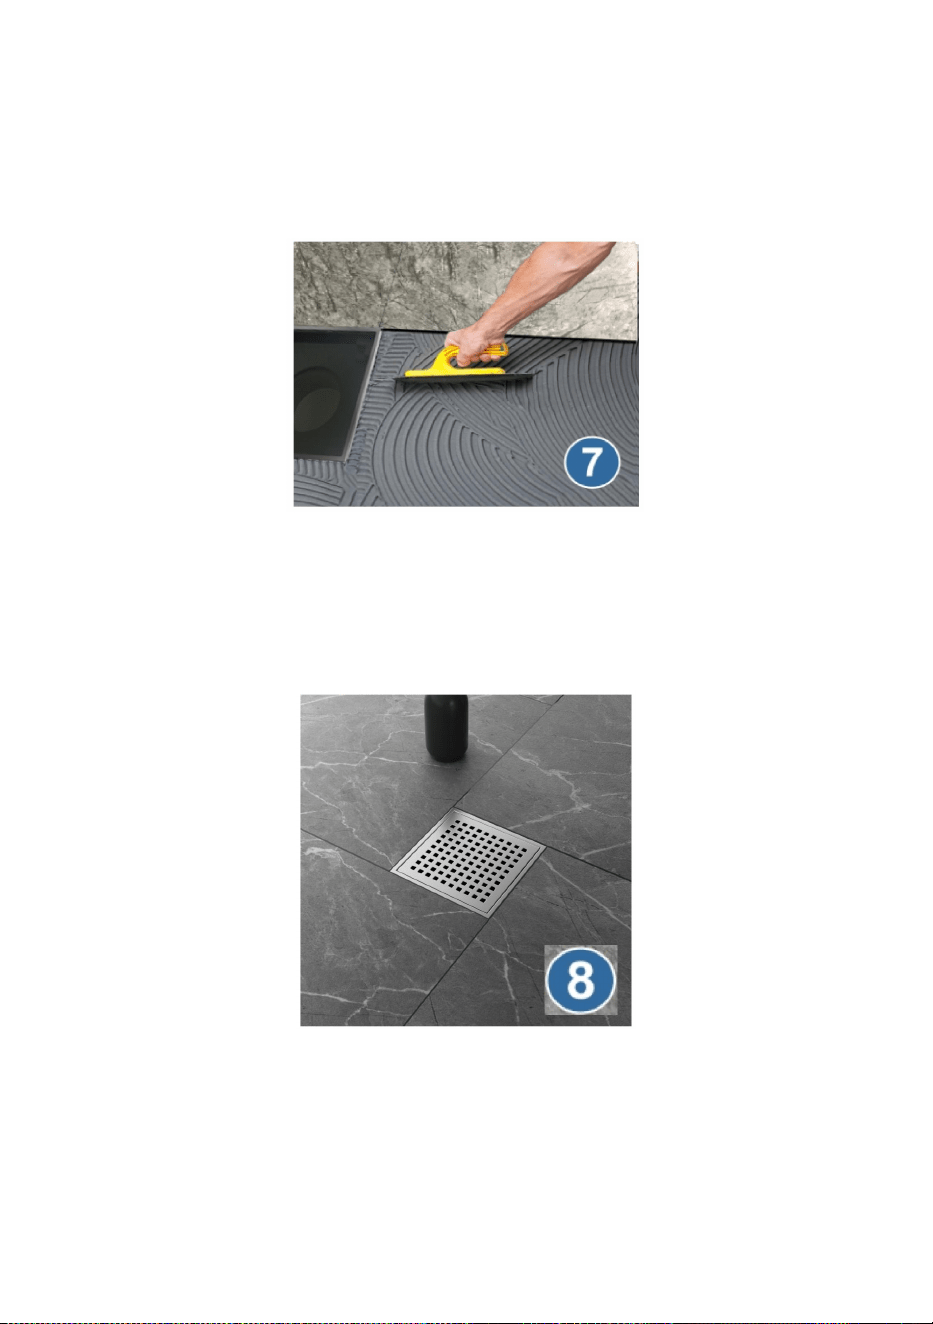
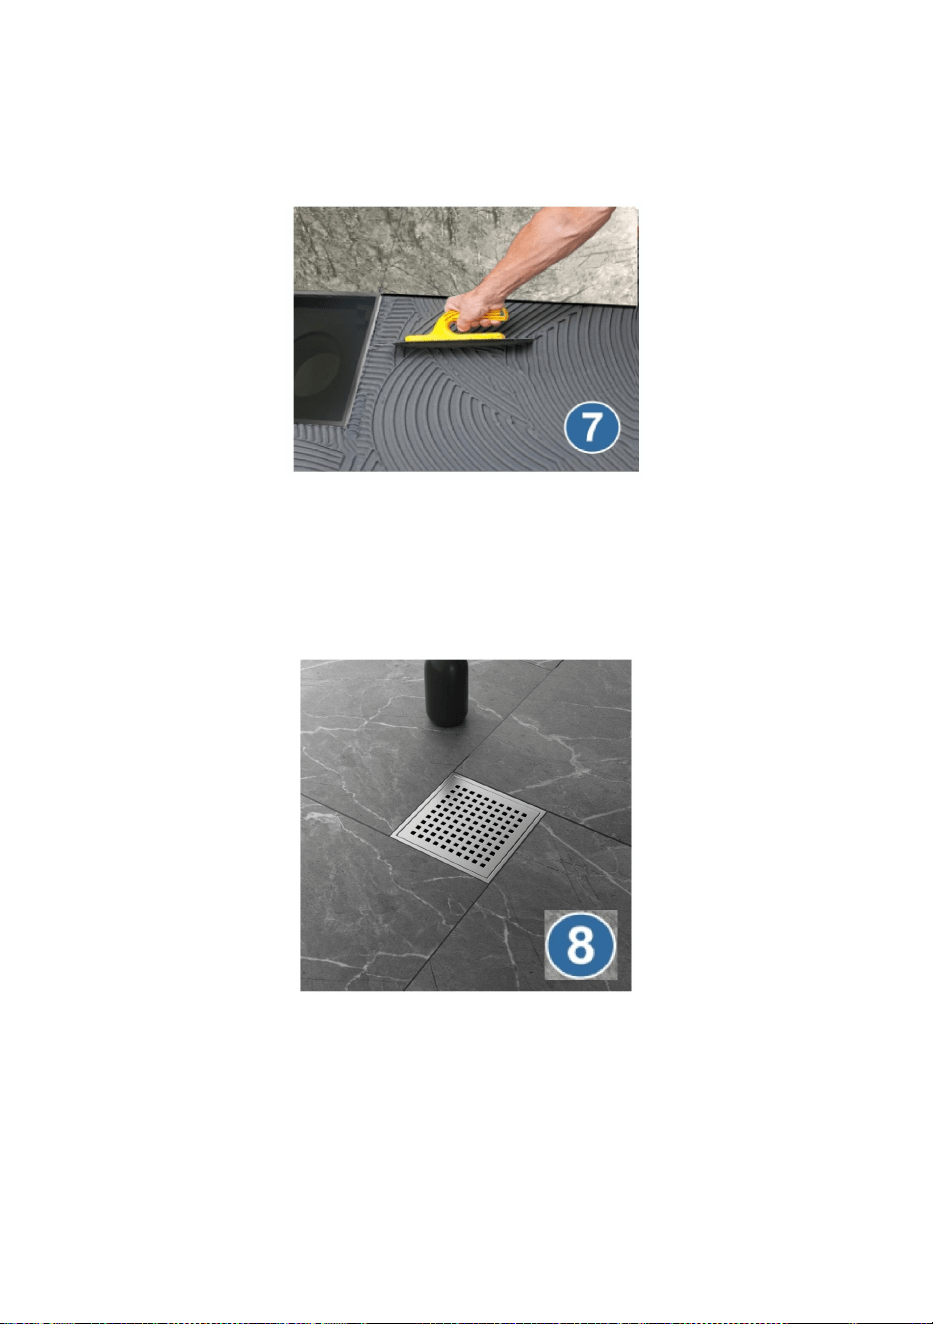
7.After the second mortar bed cured for 12 hours, install the floor tile with
thinset or tile adhesive.Tile floor should follow the 1° slope towards the
drain in four directions. The drain should be level or slightly lower than the
finished tile surface.
- 10 -
8.Allow the thin-set to cure for 24-48 hours, apply the sealant to the grout
seams using sponge. Wipe off the excess sealant, take out the rag and
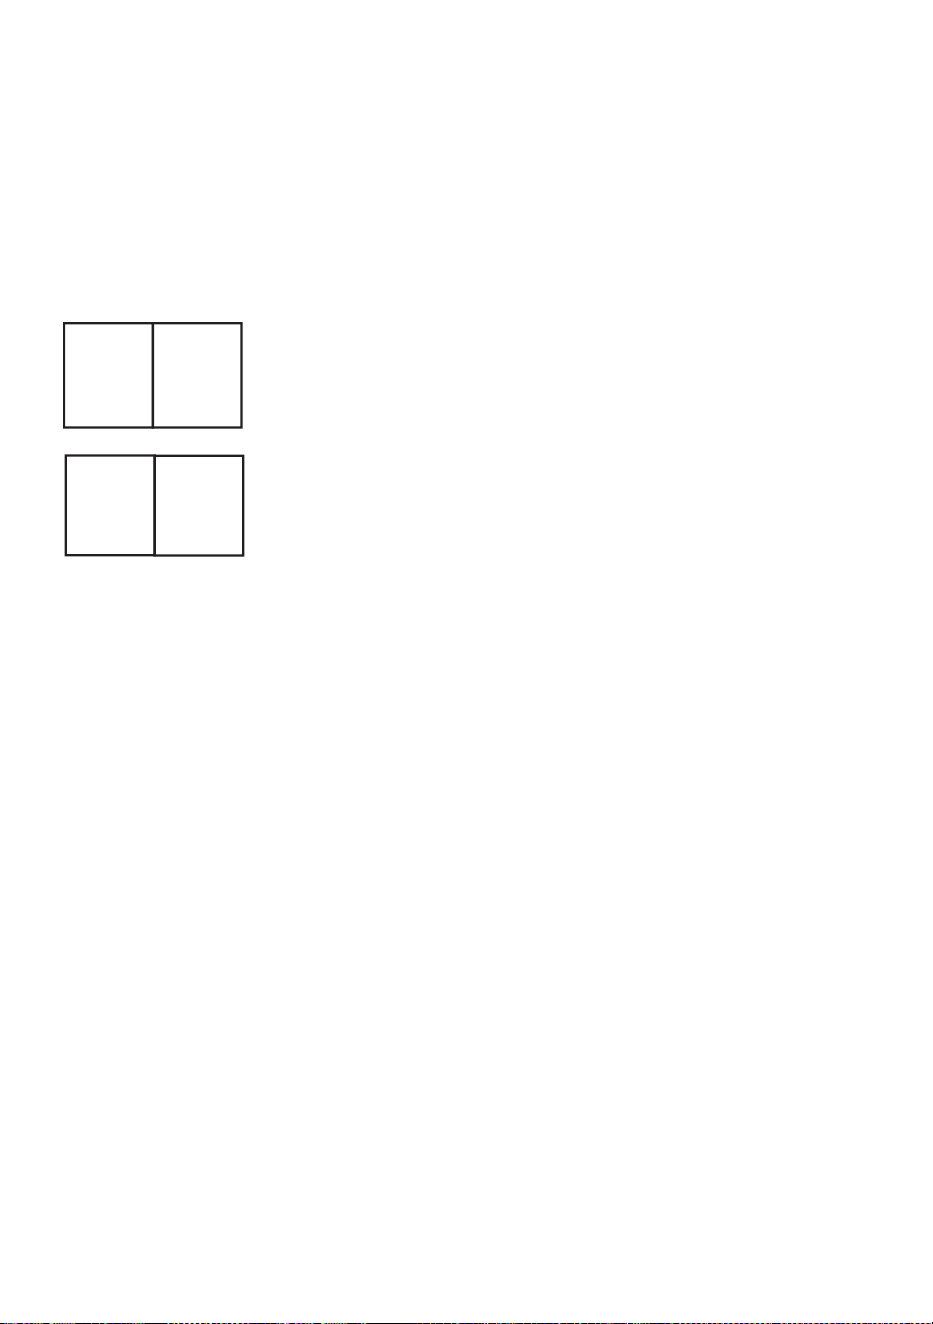
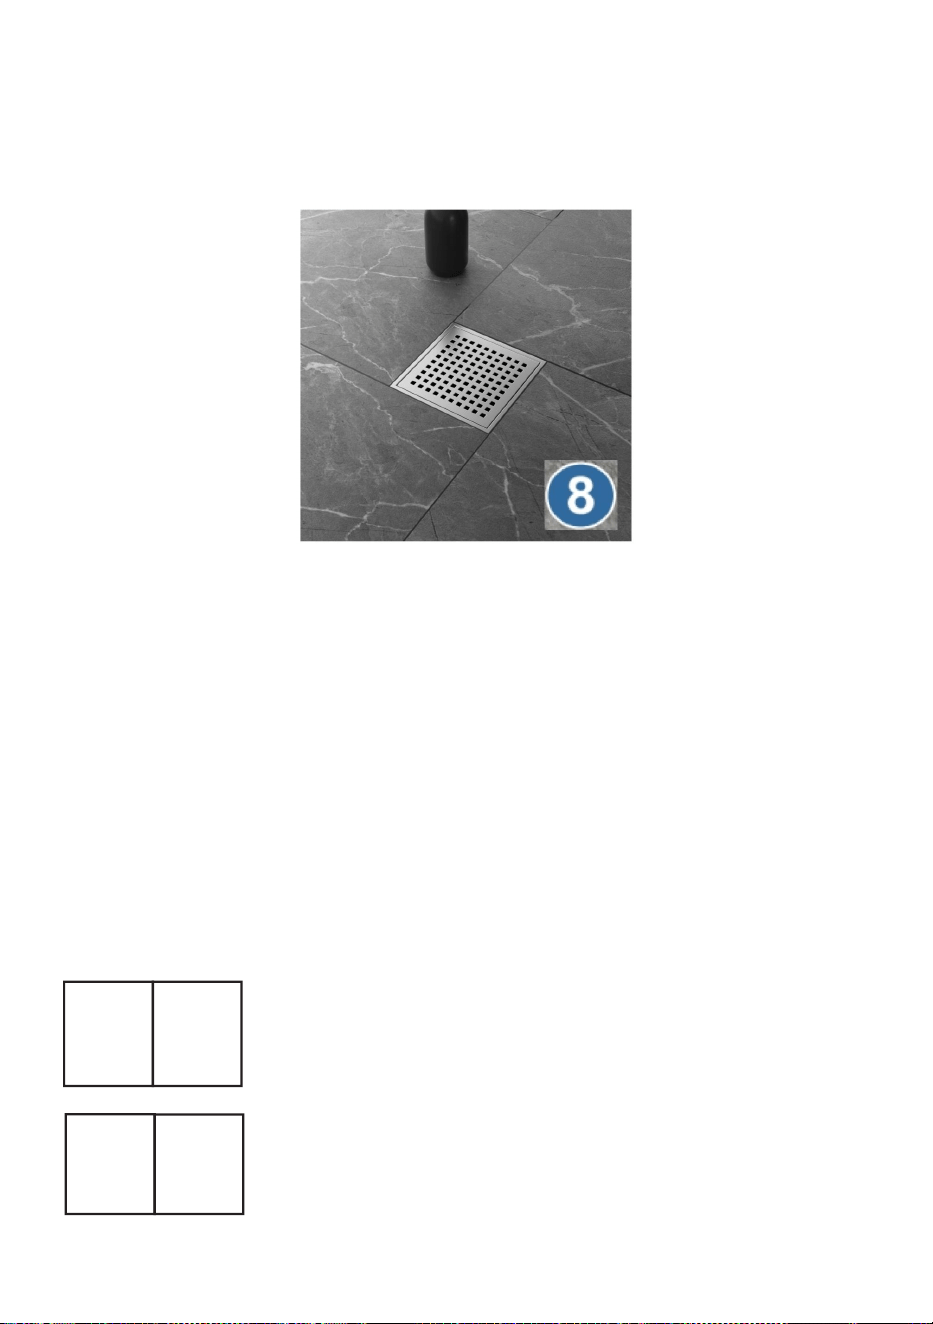
snap the grating plate into the drain body.
Note:Wait for 24 hours before using your shower.
Address:Building 10, No.300 DeSheng Rd, Yinzhou, Ningbo, China
315145
Imported to AUS: SIHAO PTY LTD. 1 ROKEVA STREETEASTWOOD
NSW 2122 Australia
Imported to USA: Sanven Technology Ltd.Suite 250, 9166 Anaheim Place,
Rancho Cucamonga, CA 91730
REP
UK
Pooledas Group Ltd
Unit 5 Albert Edward House, The Pavilions
Preston, United Kingdom
REP
EC
SHUNSHUN GmbH
Römeräcker 9 Z2021, 76351
Linkenheim-Hochstetten, Germany
Made In China


- 12 -
Technique Assistance et certificat de garantie électronique
www.vevor.com/support
DRAIN LINÉAIRE
MODÈLE : COU-6
We continue to be committed to provide you tools with competitive price.
"Save Half", "Half Price" or any other similar expressions used by us only represents an
estimate of savings you might benefit from buying certain tools with us compared to the major
top brands and does not necessarily mean to cover all categories of tools offered by us. You
are kindly reminded to verify carefully when you are placing an order with us if you are
actually saving half in comparison with the top major brands.
- 1 -
MODÈLE : COU-6
Have product questions? Need technical support? Please feel free to
contact us:
Technical Support and E-Warranty Certificate
www.vevor.com/support
NEED HELP? CONTACT US!
This is the original instruction, please read all manual instructions
carefully before operating. VEVOR reserves a clear interpretation of our
user manual. The appearance of the product shall be subject to the
product you received. Please forgive us that we won't inform you again if
there are any technology or software updates on our product.
LINEAR DRAIN

- 2 -
Avertissement : Pour réduire le risque de blessure, l'utilisateur
doit lire attentivement le manuel d'instructions.
Vérifiez soigneusement qu'il n'y a aucune pièce manquante ou
défectueuse. Une installation incorrecte peut causer des dommages ou
des blessures graves. Nous ne pouvons être tenus responsables des
dommages ou des blessures causés par un montage incorrect, un
assemblage incorrect ou une utilisation inappropriée.
AVERTISSEMENT:
2. Ne laissez pas les enfants grimper sur l'appareil.
2. Éloignez les enfants et les animaux domestiques pendant l'assemblage.
3. Pour éviter tout risque d'étouffement, gardez toujours les sacs en
plastique hors de portée des enfants et des animaux domestiques.
PRÉCAUTIONS DE MONTAGE
1. Veuillez assembler le produit en stricte conformité avec les instructions.
Un assemblage incorrect pourrait être dangereux.
2. Veuillez porter correctement des lunettes de sécurité et des gants de
travail pendant l'assemblage.
3. N'essayez pas d'assembler le produit lorsque vous vous sentez fatigué
ou sous l'influence de l'alcool, de drogues ou de médicaments.
4. La capacité de débit d
’
eau et les autres paramètres du produit
s’appliquent uniquement au produit correctement et complètement
assemblé.
5. Séparez et comptez toutes les pièces et le matériel.
6. Préparez l'outil suivant : Tournevis cruciforme.
7. Si vous utilisez des outils électriques, veillez à ralentir et à vous arrêter
si nécessaire.
8. Deux personnes sont nécessaires pour le montage.
- 3 -
9. Suivez uniquement les utilisations prévues. Ne vous asseyez pas et ne
vous tenez pas debout sur ce qui précède.
Enregistrez ces instructions.
Liste des pièces
NON.
Nom
Image
QTÉ.
1
Groupe de
gouttières
( Photo représentative )
1
2
Écran filtrant
( Photo représentative )
1
3
Crochet
1
Présentation du produit
Modèle
COU-6-S04-MB
COU-6-S04-BR
Spécification du produit
( pouce)
6
6
Max. Débit d'eau
(L/min)
48
48
Formulaire de couverture
Visage de
frappe
Visage de frappe
Couleur
Noir
Mèche

- 4 -
Installation standard
_
Il est fortement recommandé qu'un maçon et un plombier
professionnels installent ce produit. Respectez tous les codes
locaux de plomberie et de construction.
Certains facteurs extérieurs tels que le mastic, la colle, le mortier
ou toute substance agressive peuvent provoquer une rouille «
superficielle » sur la grille. Après l'installation, il est recommandé
d' éliminer cette « rouille » à l'aide d'un tampon à récurer, en
brossant toujours dans le sens du gain.
Essuyez les surfaces et rincez-les complètement à l'eau
immédiatement après avoir appliqué le nettoyant. Ne laissez pas
les nettoyants pénétrer sur les surfaces. Utilisez une éponge ou

- 5 -
un chiffon doux et humide. N'utilisez jamais de matériau abrasif
tel qu'une brosse ou un tampon à récurer pour nettoyer les
surfaces.
Aperçu de l'installation
1. Carreaux de céramique 2. Colle à carrelage ou
Thinset
3. Coulis ou scellant 4. Membrane imperméable
5. Boulons à vis 6. Papier goudronné et latte métallique
7. Ensemble de base de vidange 8. Mortier de sol
9. Du gravier ou un espaceur de carrelage
10. Le diamètre extérieur du tuyau d'évacuation est de φ 60 mm
N'utilisez pas de contreplaqué de qualité intérieure, de feuilles
OSB, de cloisons sèches ou
panneau vert comme sous-couche pour les carreaux de céramique .
Placement dans la salle de bain :
- 6 -
Identity est recommandée. Le sol est incliné dans quatre directions vers le
drain. Les sols doivent être nivelés de manière appropriée ou d'autres
barrières doivent être utilisées pour empêcher l'eau de s'écouler dans la
zone sèche.
Note:
L'anneau de serrage doit être à 2-3" du mur pour que le drain
généralement situé à 3-5" du mur arrière. Veuillez mesurer cette distance
si le tuyau de plomberie est proche du mur.
Isolation du substrat (Particulier pour substrat bois. )
Agrafer du papier de construction et des lattes métalliques au
sous-plancher, en coupant autour du ouverture de sortie.
- 7 -
Le papier goudronné servira de barrière contre l'humidité pour la première
couche de
boue aidant le mortier à retenir l’humidité pendant le durcissement. Cela
aidera également à isoler le substrat du receveur de douche.
La latte métallique renforcera la couche de mortier de boue du sol de base
et aidera à maintenir le mortier à la bordure de la douche.
Dévissez le corps du drain, desserrez
les vis pour retirer la bague de
serrage et mettez-les de côté.

- 8 -
1. Appliquez de la colle PVC pour connecter l'adaptateur au système de
canalisations, puis collez le bas de l'adaptateur au sous-plancher. Insérez
un chiffon dans l'ouverture du drain.
3. Appliquez du mortier à la truelle sur la latte métallique depuis l'extérieur
de l'adaptateur jusqu'au périmètre de la base de douche, à l'aide d'une
taloche en bois et d'un niveau pour niveler le mortier afin de créer une
pente minimale de 1° vers le drain dans quatre directions. Laissez le
mortier durcir toute la nuit.
3. Appliquez une membrane imperméable sur la zone de douche et jusqu'à
8" sur chaque mur, coupez une fente sur les boulons pour percer , coupez
le trou de vidange dans le
centre . Scellez le dessous de la membrane sur l'adaptateur à bride avec
du silicone. Assurez-vous que la membrane est bien serrée dans chaque
coin du plancher.

- 9 -
4. Installez l'anneau de serrage en serrant soigneusement les boulons
pour créer un joint étanche une fois la membrane installée . Étalez du
gravier ou un espaceur pour carrelage sur les fentes d'évacuation pour
empêcher le mortier de boucher le trou d'évacuation.
5. Faites tourner le corps du drain dans l'anneau de serrage , ajustez la
hauteur pour correspondre à l'épaisseur souhaitée du mortier et du
carrelage, placez les quatre côtés parallèles au bord du carrelage.
Assurez-vous que la hauteur entre le haut et la base du drain n'est pas
inférieure à 1,5 ". Branchez la prise et testez les fuites pendant la nuit.

- 10 -
6. Appliquez du mortier sec pour construire le deuxième lit de mortier. Tout
le sol doit être nivelé pour créer une pente minimale de 1º , environ 1/4 "
par pied vers le drain dans quatre directions . Laisser un espace
d'épaisseur de carrelage et une couche mince le long . le corps de
vidange.
7. Une fois le deuxième lit de mortier durci pendant 12 heures , installez le
carrelage avec du Thinset ou de la colle à carrelage. Le carrelage doit
suivre la pente de 1° vers le drain dans quatre directions. Le drain doit être
de niveau ou légèrement plus bas que le
surface de carrelage finie.
8. Laissez la couche mince durcir pendant 24 à 48 heures, appliquez le
scellant sur les joints de coulis à l'aide d'une éponge . Essuyez l'excédent
de mastic, retirez le chiffon et enclenchez la plaque de grille dans le corps
du drain.
Remarque : Attendez 24 heures avant en utilisant votre douche.
- 11 -
Adresse : Bâtiment 10, No.300 DeSheng Rd, Yinzhou, Ningbo, Chine
315145
Importé en Australie : SIHAO PTY LTD . 1 ROKEVA STREETASTWOOD
NSW 2122 Australie
Importé aux États-Unis : Sanven Technology Ltd. Bureau 250, 9166
Anaheim Place, Rancho Cucamonga, CA 91730
REP
UK
Pooledas Group Ltd
Unit 5 Albert Edward House, The Pavilions
Preston, United Kingdom
REP
EC
SHUNSHUN GmbH
Römeräcker 9 Z2021, 76351
Linkenheim-Hochstetten, Germany
Fabriqué en Chine


- 13 -
Technisch Support- und E-Garantie-Zertifikat www.vevor.com/support
LINEARER ABFLUSS
MODELL: COU-6
We continue to be committed to provide you tools with competitive price.
"Save Half", "Half Price" or any other similar expressions used by us only represents an
estimate of savings you might benefit from buying certain tools with us compared to the major
top brands and does not necessarily mean to cover all categories of tools offered by us. You
are kindly reminded to verify carefully when you are placing an order with us if you are
actually saving half in comparison with the top major brands.

- 1 -
MODELL: COU-6
Have product questions? Need technical support? Please feel free to
contact us:
Technical Support and E-Warranty Certificate
www.vevor.com/support
NEED HELP? CONTACT US!
This is the original instruction, please read all manual instructions
carefully before operating. VEVOR reserves a clear interpretation of our
user manual. The appearance of the product shall be subject to the
product you received. Please forgive us that we won't inform you again if
there are any technology or software updates on our product.
LINEAR DRAIN

- 2 -
Warnung: Um das Verletzungsrisiko zu verringern, muss der
Benutzer die Bedienungsanleitung sorgfältig lesen.
Überprüfen Sie sorgfältig, ob Teile fehlen oder defekt sind. Eine
unsachgemäße Installation kann zu Schäden oder schweren Verletzungen
führen. Wir können nicht für Schäden oder Verletzungen haftbar gemacht
werden, die durch unsachgemäße Montage, falsche Montage oder
unsachgemäßen Gebrauch entstehen.
WARNUNG:
3. Erlauben Sie Kindern nicht, auf das Gerät zu klettern.
2. Halten Sie Kinder und Haustiere während der Montage fern.
3. Um Erstickungsgefahr zu vermeiden, halten Sie Plastiktüten immer von
Kindern und Haustieren fern.
VORSICHTSMASSNAHMEN BEI DER MONTAGE
1. Bitte bauen Sie das Produkt unter strikter Einhaltung der Anweisungen
zusammen. Eine falsche Montage kann gefährlich sein.
2. Bitte tragen Sie bei der Montage ordnungsgemäß eine Schutzbrille und
Arbeitshandschuhe.
3. Versuchen Sie nicht, das Produkt zusammenzubauen, wenn Sie sich
müde fühlen oder unter dem Einfluss von Alkohol, Drogen oder
Medikamenten stehen.
4. Die Wasserdurchflusskapazität und andere Produktparameter gelten nur
für das ordnungsgemäß und vollständig montierte Produkt.
5. Trennen und zählen Sie alle Teile und Hardware.
6. Bereiten Sie das folgende Werkzeug vor: Kreuzschlitzschraubendreher.
7. Wenn Sie Elektrowerkzeuge verwenden, achten Sie bitte darauf,
langsamer zu fahren und bei Bedarf anzuhalten.
8. Für den Aufbau sind zwei Personen erforderlich.

- 3 -
9. Befolgen Sie nur die vorgesehenen Verwendungszwecke. Setzen oder
stehen Sie nicht darauf.
Anleitung aufbewahren.
Stückliste
NEIN.
Name
Bild
MENGE.
1
Gutter-Grupp
e
( Repräsentatives Bild )
1
2
Filterbildschir
m
( Repräsentatives Bild )
1
3
Haken
1
Produkteinführung
Modell
COU-6-S04-MB
COU-6-S04-BR
Produktspezifikation _ _
( Zoll)
6
6
Max. Wasserdurchflussrate
(L/min)
48
48
Deckungsformular
Schlaggesicht _
_
Schlaggesicht _ _
Farbe
Schwarz
Splitter
- 4 -
Standardinstallation
_
_
Es wird dringend empfohlen, dieses Produkt von einem
professionellen Maurer und Klempner installieren zu lassen.
Beachten Sie alle örtlichen Sanitär- und Bauvorschriften.
Einige äußere Faktoren wie Dichtmittel, Kleber, Mörtel oder
andere aggressive Substanzen können zu „Oberflächenrost“ am
Gitterrost führen. Nach der Installation wird empfohlen , solchen
„Rost“ mit einem Scheuerschwamm zu entfernen und dabei
immer in Richtung der Verstärkung zu bürsten.
Wischen Sie die Oberflächen sauber und spülen Sie sie sofort
nach dem Auftragen des Reinigers vollständig mit Wasser ab.
Lassen Sie Reinigungsmittel nicht auf Oberflächen einwirken.
- 5 -
Verwenden Sie einen weichen, angefeuchteten Schwamm oder
ein Tuch. Verwenden Sie zum Reinigen von Oberflächen
niemals scheuernde Materialien wie eine Bürste oder einen
Scheuerschwamm.
Installationsübersicht
1. Keramikfliesen 2. Fliesenkleber oder
Dünnschichtkleber
3. Fugenmörtel oder Dichtmittel 4. Wasserdichte Membran
5. Schrauben festschrauben 6. Teerpappe und
Drahtlatte
7. Zusammenbau des Ablaufsockels 8. Bodenmörtel
9. Erbsenkies oder Fliesenabstandshalter
10. Der Außendurchmesser des Abflussrohrs beträgt φ 60 mm
Verwenden Sie kein Sperrholz für den Innenbereich, keine
OSB-Platten, Trockenbauplatten usw
Greenboard als Unterlage für Keramikfliesen .
Platzierung im Badezimmer:

- 6 -
den Identitätsablauf mittig zu platzieren. Der Boden ist zum Abfluss hin in
vier Richtungen geneigt. Die Böden müssen entsprechend abgestuft sein
oder es müssen andere Barrieren verwendet werden, um zu verhindern,
dass Wasser in den Trockenbereich fließt.
Notiz:
Der Klemmring muss 2 bis 3 Zoll von der Wand entfernt sein, damit der
Abfluss vorhanden ist
Normalerweise sollte der Abstand zwischen 3 und 5 Zoll von der
Rückwand betragen. Bitte messen Sie diesen Abstand, wenn sich das
Wasserrohr in der Nähe der Wand befindet.
Substratisolierung (Besonders für Holzuntergründe. )
Heften Sie Baupapier und Drahtlatten zum Unterboden, herumschneiden
Auslassöffnung.
- 7 -
Die Teerpappe dient als Feuchtigkeitsbarriere für die erste Schicht
Schlamm hilft dem Mörtel, beim Aushärten Feuchtigkeit zu speichern. Es
hilft auch dabei, den Untergrund von der Duschwanne zu isolieren.
Die Drahtlatte verstärkt die Schlammschicht des Mörtels auf dem Boden
und hilft dabei, den Mörtel am Duschrand zu halten.
Drehen Sie das Ablaufgehäuse ab,
lösen Sie die Schrauben, um den
Klemmring zu entfernen, und legen
Sie sie beiseite.

- 8 -
1. Tragen Sie PVC-Zement auf, um den Adapter mit dem Rohrsystem zu
verbinden, und kleben Sie dann die Unterseite des Adapters auf den
Unterboden. Stecken Sie einen Lappen in die Abflussöffnung.
4. Tragen Sie Mörtel über die Drahtlatte von der Außenseite des Adapters
bis zum Umfang der Duschwanne auf. Verwenden Sie dabei einen
Holzspachtel und eine Wasserwaage, um den Mörtel so zu glätten, dass in
vier Richtungen ein Gefälle von mindestens 1° zum Abfluss entsteht.
Lassen Sie den Mörtel über Nacht aushärten.
3. Bringen Sie eine wasserdichte Membran im Duschbereich und bis zu 20
cm an jeder Wand an, schneiden Sie einen Schlitz in die Schrauben, um
sie durchzustecken , und schneiden Sie das Abflussloch in der Wand aus
Zentrum . Dichten Sie die Unterseite der Membran mit Silikon am
Flanschadapter ab. Stellen Sie sicher, dass die Membran in jeder Ecke des
Bodens fest sitzt.
- 9 -
4. Installieren Sie den Klemmring und ziehen Sie die Schrauben vorsichtig
fest, um nach der Installation der Membran eine wasserdichte Abdichtung
zu gewährleisten . Verteilen Sie Erbsenkies oder Fliesenabstandshalter
über den Sickerschlitzen, um zu verhindern, dass Mörtel das Sickerloch
verstopft.
5. Drehen Sie den Ablaufkörper in den Klemmring , stellen Sie die Höhe so
ein, dass sie der gewünschten Mörtel- und Fliesendicke entspricht, und
stellen Sie die vier Seiten parallel zur Fliesenkante ein. Stellen Sie sicher,
dass die Höhe von der Oberseite bis zur Ablaufbasis nicht weniger als 1,5
Zoll beträgt. Verschließen Sie den Auslass und testen Sie die Leckage
über Nacht.
- 10 -
6. Tragen Sie Trockenmörtel auf, um das zweite Mörtelbett aufzubauen.
Der gesamte Boden muss abgestuft sein , um eine Neigung von
mindestens 1° zu erzeugen , etwa 1/4 Zoll pro Fuß in Richtung des
Abflusses in vier Richtungen . Lassen Sie Platz in Fliesenstärke und
dünner Schicht entlang Der Ablaufkörper.
7. Nachdem das zweite Mörtelbett 12 Stunden lang ausgehärtet ist ,
verlegen Sie die Bodenfliese mit Dünnbettmörtel oder Fliesenkleber. Der
Fliesenboden sollte in vier Richtungen einer Neigung von 1° zum Abfluss
folgen. Der Abfluss sollte eben oder etwas niedriger sein
fertige Fliesenoberfläche.

- 11 -
8. Lassen Sie die Dünnschichtmasse 24 bis 48 Stunden lang aushärten
und tragen Sie die Dichtmasse mit einem Schwamm auf die Fugenfugen
auf . Wischen Sie überschüssiges Dichtmittel ab, nehmen Sie den Lappen
heraus und lassen Sie die Gitterplatte im Abflussgehäuse einrasten.
Hinweis: Warten Sie vorher 24 Stunden wenn Sie Ihre Dusche
benutzen.
Adresse: Gebäude 10, No.300 DeSheng Rd, Yinzhou, Ningbo, China
315145
Importiert nach AUS: SIHAO PTY LTD . 1 ROKEVA
STREETEASTWOOD NSW 2122 Australien
Importiert in die USA: Sanven Technology Ltd. Suite 250, 9166 Anaheim
Place, Rancho Cucamonga, CA 91730
REP
UK
Pooledas Group Ltd
Unit 5 Albert Edward House, The Pavilions
Preston, United Kingdom
REP
EC
SHUNSHUN GmbH
Römeräcker 9 Z2021, 76351
Linkenheim-Hochstetten, Germany

- 12 -
In China hergestellt


- 14 -
Tecnico Supporto e certificato di garanzia elettronica www.vevor.com/support
DRENAGGIO LINEARE
MODELLO: COU-6
We continue to be committed to provide you tools with competitive price.
"Save Half", "Half Price" or any other similar expressions used by us only represents an
estimate of savings you might benefit from buying certain tools with us compared to the major
top brands and does not necessarily mean to cover all categories of tools offered by us. You
are kindly reminded to verify carefully when you are placing an order with us if you are
actually saving half in comparison with the top major brands.

- 1 -
MODELLO: COU-6
Have product questions? Need technical support? Please feel free to
contact us:
Technical Support and E-Warranty Certificate
www.vevor.com/support
NEED HELP? CONTACT US!
This is the original instruction, please read all manual instructions
carefully before operating. VEVOR reserves a clear interpretation of our
user manual. The appearance of the product shall be subject to the
product you received. Please forgive us that we won't inform you again if
there are any technology or software updates on our product.
LINEAR DRAIN

- 2 -
Avvertenza: per ridurre il rischio di lesioni, l'utente deve
leggere attentamente il manuale di istruzioni.
Controllare attentamente per assicurarsi che non vi siano parti mancanti o
difettose. Un'installazione non corretta può causare danni o lesioni gravi.
Non possiamo essere responsabili per danni o lesioni causati da
montaggio improprio, assemblaggio errato o uso inappropriato.
AVVERTIMENTO:
4. Non permettere ai bambini di salire sull'unità.
2. Tenere lontani i bambini e gli animali domestici durante il montaggio.
3. Per evitare il pericolo di soffocamento, tenere sempre i sacchetti di
plastica lontano dalla portata dei bambini e degli animali domestici.
PRECAUZIONI DI MONTAGGIO
1. Si prega di assemblare il prodotto attenendosi rigorosamente alle
istruzioni. Un montaggio errato potrebbe essere pericoloso.
2. Indossare correttamente occhiali protettivi e guanti da lavoro durante il
montaggio.
3. Non tentare di montare il prodotto quando ci si sente stanchi o sotto
l'effetto di alcol, droghe o farmaci.
4. La capacità del flusso d'acqua e altri parametri del prodotto vengono
applicati solo al prodotto correttamente e completamente assemblato.
5. Separare e contare tutte le parti e l'hardware.
6. Preparare il seguente strumento: cacciavite a croce.
7. Se si utilizzano utensili elettrici, fare attenzione a rallentare e fermarsi
quando necessario.
8. Per il montaggio sono necessarie due persone.
9. Seguire solo gli usi previsti. Non sedersi o stare in piedi su quanto sopra.
- 3 -
Conserva queste istruzioni.
Elenco delle parti
NO.
Nome
Immagine
QUANTIT
À.
1
Gruppo di
grondaie
( Immagine rappresentativa )
1
2
Schermata
filtro
( Immagine rappresentativa )
1
3
Gancio
1
Introduzione al prodotto
Modello
COU-6-S04-MB
COU-6-S04-BR
Specifiche del prodotto
( pollici)
6
6
Massimo. Tasso del flusso
d'acqua
(L/min)
48
48
Modulo di copertura
Dare un pugno
in faccia
Dare un pugno in
faccia
Colore
Nero
Nastro
- 4 -
Installazione standard
_
Si consiglia vivamente di far installare questo prodotto da un
muratore e da un idraulico professionisti. Rispettare tutte le
normative idrauliche e edilizie locali.
Alcuni fattori esterni come sigillanti, adesivi, malte o qualsiasi
sostanza aggressiva possono causare ruggine “superficiale”
sulla griglia. Dopo la posa si consiglia di rimuovere tale “ruggine”
utilizzando una paglietta, spazzolando sempre nel senso del
guadagno.
Pulisci le superfici e risciacquale completamente con acqua
subito dopo aver applicato il detergente. Non lasciare che i
detergenti si impregnino sulle superfici. Utilizzare una spugna o
un panno morbido e inumidito. Non utilizzare mai un materiale

- 5 -
abrasivo come una spazzola o una spugnetta abrasiva per pulire
le superfici.
Panoramica dell'installazione
1. Piastrella di ceramica 2. Adesivo per piastrelle o
thinset
3. Malta o sigillante 4. Membrana impermeabile
5. Avvitare i bulloni 6. Carta catramata e assicella
metallica
7. Drenare il gruppo della base 8. Malta per pavimenti
9. Ghiaia o distanziatore per piastrelle
10. Il diametro esterno del tubo di scarico è φ 60 mm
Non utilizzare compensato per interni, lastre OSB, cartongesso o
altro
greenboard come sottostrati per piastrelle di ceramica .
Posizionamento nel bagno:
- 6 -
Si consiglia l'installazione a passo centrale del posizionamento dello
scarico Identity . Il pavimento è inclinato in quattro direzioni verso lo
scarico. I pavimenti devono essere adeguatamente dimensionati oppure
devono essere utilizzate altre barriere per impedire all'acqua di fluire
nell'area asciutta.
Nota:
L'anello di bloccaggio deve essere a 2-3 pollici dal muro, così lo scarico
generalmente posizionarlo a 3-5" di distanza dalla parete posteriore.
Misurare questa distanza se il tubo idraulico è vicino alla parete.
Isolamento del substrato (Particolarmente per substrato di legno. )
Fissare la carta da costruzione e l'assicella metallica al sottopavimento,
tagliando attorno al apertura di uscita.

- 7 -
La carta catramata fungerà da barriera contro l'umidità per il primo strato di
fango che aiuta la malta a trattenere l'umidità durante la stagionatura.
Aiuterà anche a isolare il substrato dal piatto della doccia.
La rete metallica rinforzerà lo strato di malta di fango del pavimento base e
aiuterà a trattenere la malta sul cordolo della doccia.
Svitare il corpo dello scarico, allentare
le viti per rimuovere l'anello di
bloccaggio e metterle da parte.
- 8 -
1.Applicare cemento in PVC per collegare l'adattatore al sistema di
tubazioni, quindi incollare la parte inferiore dell'adattatore al
sottopavimento. Metti uno straccio nell'apertura di scarico.
5. Applicare la malta sulla rete metallica dall'esterno dell'adattatore al
perimetro del piatto della doccia, utilizzando un frattazzo di legno e una
livella per livellare la malta in modo da creare una pendenza minima di 1°
verso lo scarico in quattro direzioni. Lasciare che la malta si indurisca
durante la notte.
3.Applicare una membrana impermeabile sulla zona della doccia e fino a 8
pollici su ciascuna parete, tagliare una fessura sui bulloni per farli passare ,
tagliare il foro di scarico nella
centro . Sigillare la parte inferiore della membrana sull'adattatore della
flangia con silicone. Assicurarsi che la membrana sia tesa in ogni angolo
del pavimento.
- 9 -
4.Installare l'anello di serraggio , serrando attentamente i bulloni per creare
una tenuta stagna una volta installata la membrana . Distribuire la ghiaia di
pisello o il distanziatore per piastrelle sulle fessure di scarico per evitare
che la malta ostruisca il foro di scarico.
5. Ruotare il corpo dello scarico nell'anello di bloccaggio , regolare l'altezza
in modo che corrisponda allo spessore desiderato di malta e piastrella,
impostare i quattro lati paralleli al bordo della piastrella. Assicurarsi che
l'altezza dalla parte superiore alla base dello scarico non sia inferiore a 1,5
pollici. Collegare la presa e verificare la perdita durante la notte.
- 10 -
6. Applicare malta a secco per costruire il secondo letto di malta, l'intero
pavimento deve essere livellato per creare una pendenza minima di 1º ,
circa 1/4 " per piede verso lo scarico in quattro direzioni . Lasciare spazio
per lo spessore delle piastrelle e un impasto sottile lungo il corpo dello
scarico.
7. Dopo che il secondo letto di malta si è indurito per 12 ore , installare la
piastrella del pavimento con thinset o adesivo per piastrelle. Il pavimento
della piastrella deve seguire la pendenza di 1° verso lo scarico in quattro
direzioni. Lo scarico dovrebbe essere a livello o leggermente più basso del
superficie della piastrella finita.
8. Lasciare polimerizzare lo strato sottile per 24-48 ore, applicare il
sigillante sulle giunture della malta utilizzando una spugna . Rimuovere il
sigillante in eccesso, togliere lo straccio e inserire la piastra della griglia nel
corpo dello scarico.
Nota: attendere 24 ore prima usando la doccia.
- 11 -
Indirizzo: Edificio 10, No.300 DeSheng Rd, Yinzhou, Ningbo, Cina 315145
Importato in AUS: SIHAO PTY LTD . 1 ROKEVA STREETEASTWOOD
NSW 2122 Australia
Importato negli Stati Uniti: Sanven Technology Ltd. Suite 250, 9166
Anaheim Place, Rancho Cucamonga, CA 91730
REP
UK
Pooledas Group Ltd
Unit 5 Albert Edward House, The Pavilions
Preston, United Kingdom
REP
EC
SHUNSHUN GmbH
Römeräcker 9 Z2021, 76351
Linkenheim-Hochstetten, Germany
Made in China


- 13 -
Técnico Soporte y certificado de garantía electrónica www.vevor.com/support
DRENAJE LINEAL
MODELO: COU-6
We continue to be committed to provide you tools with competitive price.
"Save Half", "Half Price" or any other similar expressions used by us only represents an
estimate of savings you might benefit from buying certain tools with us compared to the major
top brands and does not necessarily mean to cover all categories of tools offered by us. You
are kindly reminded to verify carefully when you are placing an order with us if you are
actually saving half in comparison with the top major brands.

- 1 -
MODELO: COU-6
Have product questions? Need technical support? Please feel free to
contact us:
Technical Support and E-Warranty Certificate
www.vevor.com/support
NEED HELP? CONTACT US!
This is the original instruction, please read all manual instructions
carefully before operating. VEVOR reserves a clear interpretation of our
user manual. The appearance of the product shall be subject to the
product you received. Please forgive us that we won't inform you again if
there are any technology or software updates on our product.
LINEAR DRAIN

- 2 -
Advertencia: para reducir el riesgo de lesiones, el usuario
debe leer atentamente el manual de instrucciones.
Verifique cuidadosamente para asegurarse de que no falten piezas o estén
defectuosas. Una instalación incorrecta puede causar daños o lesiones
graves. No podemos ser responsables de daños o lesiones causados por
un montaje inadecuado, montaje incorrecto o uso inadecuado.
ADVERTENCIA:
5. No permita que los niños se suban a la unidad.
2. Mantenga alejados a los niños y las mascotas durante el montaje.
3. Para evitar el peligro de asfixia, mantenga siempre las bolsas de
plástico fuera del alcance de los niños y las mascotas.
PRECAUCIONES DE MONTAJE
1. Ensamble el producto estrictamente de acuerdo con las instrucciones.
El montaje incorrecto podría ser peligroso.
2. Utilice gafas de seguridad y guantes de trabajo correctamente durante
el montaje.
3. No intente montar el producto cuando se sienta cansado o bajo la
influencia del alcohol, drogas o medicamentos.
4. La capacidad de flujo de agua y otros parámetros del producto se
aplican únicamente al producto ensamblado de manera adecuada y
completa.
5. Separe y cuente todas las piezas y herrajes.
6. Prepare la siguiente herramienta: Destornillador Philips.
7. Si utiliza herramientas eléctricas, tenga cuidado de reducir la velocidad
y detenerse cuando sea necesario.
8. Para el montaje se necesitan dos personas.
- 3 -
9. Siga únicamente los usos previstos. No se siente ni se pare sobre lo
anterior.
Guarda estas instrucciones.
Lista de
NO.
Nombre
Imagen
CANT.
1
Grupo de
canalones
( Imagen representativa )
1
2
Pantalla de
filtro
( Imagen representativa )
1
3
Gancho
1
Introducción del producto
Modelo
COU-6-S04-MB
COU-6-S04-BR
Especificación del producto
( pulgadas)
6
6
Máx. Tasa de flujo del agua
(l/min)
48
48
Formulario de portada
Cara de
puñetazo
Cara de puñetazo
Color
Negro
Astilla
- 4 -
Instalación estándar
_
Se recomienda encarecidamente que un albañil y un fontanero
profesional instalen este producto. Observe todos los códigos
locales de plomería y construcción.
Algunos factores externos como selladores, adhesivos,
morteros o cualquier sustancia agresiva pueden provocar
oxidación “superficial” en la rejilla. Después de la instalación, se
recomienda eliminar dicho “óxido” utilizando un estropajo,
cepillando siempre en el sentido de la ganancia.
Limpie las superficies y enjuáguelas completamente con agua
inmediatamente después de aplicar el limpiador. No permita que
los limpiadores empapen las superficies. Utilice una esponja o
- 5 -
un paño suave y humedecido. Nunca utilice un material abrasivo
como un cepillo o un estropajo para limpiar las superficies.
Descripción general de la instalación
1. Baldosa cerámica 2. Adhesivo para azulejos o capa
delgada
3. Lechada o sellador 4. Membrana impermeable
5. Tornillos 6. Papel alquitranado y listones de alambre
7. Conjunto de base de drenaje 8. Mortero para suelos
9. Gravilla o espaciador de baldosas
10. El diámetro exterior de la tubería de desagüe es φ 60 mm .
No utilice madera contrachapada para interiores, láminas OSB,
paneles de yeso ni
Pizarra verde como base para baldosas cerámicas .
Colocación en el baño:

- 6 -
Se recomienda la instalación del drenaje de identidad con paso central.
El suelo está inclinado en cuatro direcciones hacia el desagüe. Los pisos
deben tener una nivelación adecuada o se deben usar otras barreras para
evitar que el agua fluya hacia el área seca.
Nota:
El anillo de sujeción debe estar a 2-3" de la pared, para que el drenaje
normalmente se ubica a 3-5" de distancia de la pared posterior. Mida esta
distancia si la tubería de plomería está cerca de la pared.
Aislamiento de sustrato (Especial para sustrato de madera ) .
Engrape el papel de construcción y el listón de alambre al subsuelo,
cortando alrededor del apertura de salida.

- 7 -
El papel alquitranado servirá como barrera contra la humedad para la
primera capa de
barro que ayuda al mortero a retener la humedad durante el curado.
También ayudará a aislar el sustrato del plato de ducha.
El listón de alambre reforzará la capa de mortero del piso base y ayudará a
sujetar el mortero a la acera de la ducha.
Desenrosque el cuerpo del drenaje,
afloje los tornillos para quitar el anillo
de sujeción y déjelos a un lado.
- 8 -
1.Aplique cemento de PVC para conectar el adaptador al sistema de
tuberías, luego pegue la parte inferior del adaptador al contrapiso.
Introduce un trapo en la abertura del desagüe.
6. Aplique mortero con llana sobre la malla de alambre desde el exterior
del adaptador hasta el perímetro de la base de la ducha, usando una llana
de madera y un nivel para nivelar el mortero y crear una pendiente mínima
de 1° hacia el desagüe en cuatro direcciones. Deje que el mortero cure
durante la noche.
3. Aplique una membrana impermeable en el área de la ducha y hasta 8"
en cada pared, corte una hendidura en los pernos para atravesarla , corte
el orificio de drenaje en la
centro . Selle la parte inferior de la membrana al adaptador de brida con
silicona. Asegúrese de que la membrana esté apretada en cada esquina
del piso.
- 9 -
4.Instale el anillo de sujeción , apretando con cuidado los pernos para
crear un sello hermético una vez instalada la membrana . Extienda gravilla
o espaciador para baldosas sobre las ranuras de drenaje para evitar que el
mortero tape el orificio de drenaje.
5. Gire el cuerpo del drenaje en el anillo de sujeción , ajuste la altura para
que corresponda al espesor deseado de mortero y loseta, coloque los
cuatro lados paralelos al borde de la losa. Asegúrese de que la altura
desde la parte superior hasta la base del drenaje no sea inferior a 1,5 ".
Tape el tomacorriente y pruebe la fuga durante la noche.

- 10 -
6.Aplique mortero seco para construir el segundo lecho de mortero, se
debe nivelar todo el piso para crear una pendiente mínima de 1º ,
aproximadamente 1/4 " por pie hacia el drenaje en cuatro direcciones .
Deje espacio para el espesor de las losetas y la capa delgada a lo largo el
cuerpo del drenaje.
7. Después de que la segunda capa de mortero haya curado durante 12
horas , instale la loseta con adhesivo para baldosas o adhesivo para
baldosas. El piso de baldosas debe seguir una pendiente de 1° hacia el
drenaje en cuatro direcciones. El drenaje debe estar nivelado o
ligeramente más bajo que el
superficie de azulejo terminada.
8. Deje que la capa delgada se seque durante 24 a 48 horas, aplique el
sellador a las uniones de la lechada con una esponja . Limpie el exceso de
sellador, saque el trapo y encaje la placa de rejilla en el cuerpo del drenaje.
Nota: Espere 24 horas antes usando tu ducha.
- 11 -
Dirección: Edificio 10, No.300 DeSheng Rd, Yinzhou, Ningbo, China
315145
Importado a AUS: SIHAO PTY LTD . 1 ROKEVA STREET ASTWOOD
NSW 2122 Australia
Importado a EE. UU.: Sanven Technology Ltd. Suite 250, 9166 Anaheim
Place, Rancho Cucamonga, CA 91730
REP
UK
Pooledas Group Ltd
Unit 5 Albert Edward House, The Pavilions
Preston, United Kingdom
REP
EC
SHUNSHUN GmbH
Römeräcker 9 Z2021, 76351
Linkenheim-Hochstetten, Germany
Hecho en china


- 13 -
Techniczny Certyfikat wsparcia i e-gwarancji www.vevor.com/support
DRENAŻ LINIOWY
MODEL: COU-6
We continue to be committed to provide you tools with competitive price.
"Save Half", "Half Price" or any other similar expressions used by us only represents an
estimate of savings you might benefit from buying certain tools with us compared to the major
top brands and does not necessarily mean to cover all categories of tools offered by us. You
are kindly reminded to verify carefully when you are placing an order with us if you are
actually saving half in comparison with the top major brands.
- 1 -
MODEL: COU-6
Have product questions? Need technical support? Please feel free to
contact us:
Technical Support and E-Warranty Certificate
www.vevor.com/support
NEED HELP? CONTACT US!
This is the original instruction, please read all manual instructions
carefully before operating. VEVOR reserves a clear interpretation of our
user manual. The appearance of the product shall be subject to the
product you received. Please forgive us that we won't inform you again if
there are any technology or software updates on our product.
LINEAR DRAIN

- 2 -
Ostrzeżenie — aby zmniejszyć ryzyko obrażeń, użytkownik
musi uważnie przeczytać instrukcję obsługi.
Sprawdź dokładnie, aby upewnić się, że nie brakuje żadnych lub nie ma
uszkodzonych części. Nieprawidłowa instalacja może spowodować
uszkodzenie lub poważne obrażenia. Nie ponosimy odpowiedzialności za
szkody lub obrażenia spowodowane nieprawidłowym montażem,
nieprawidłowym montażem lub niewłaściwym użytkowaniem.
OSTRZEŻENIE:
6. Nie pozwalaj dzieciom wspinać się na urządzenie.
2. Podczas montażu trzymaj dzieci i zwierzęta z daleka.
3. Aby uniknąć niebezpieczeństwa uduszenia, plastikowe torby należy
zawsze trzymać z dala od dzieci i zwierząt domowych.
ŚRODKI OSTROŻNOŚCI PRZY MONTAŻU
1. Prosimy o złożenie produktu ściśle według instrukcji. Nieprawidłowy
montaż może być niebezpieczny.
2. Podczas montażu należy nosić okulary ochronne i rękawice robocze.
3. Nie przystępuj do składania produktu będąc zmęczonym, pod wpływem
alkoholu, narkotyków lub leków.
4. Przepływ wody i inne parametry produktu odnoszą się wyłącznie do
prawidłowo i całkowicie zmontowanego produktu.
5. Oddziel i policz wszystkie części i osprzęt.
6. Przygotuj następujące narzędzie: Śrubokręt Philips.
7. Jeśli korzystasz z elektronarzędzi, pamiętaj, aby zwolnić i zatrzymać się,
jeśli zajdzie taka potrzeba.
8. Do montażu potrzebne są dwie osoby.
9. Postępuj zgodnie z przeznaczeniem. Nie siadaj ani nie stawaj na
- 3 -
powyższym.
Zapisz te instrukcje.
Lista części
NIE.
Nazwa
Zdjęcie
ILOŚĆ.
1
Grupa Gutter
( Reprezentatywne zdjęcie )
1
2
Ekran filtra
( Reprezentatywne zdjęcie )
1
3
Hak
1
Wprowadzenie produktów
Model
COU-6-S04-MB
COU-6-S04-BR
Specyfikacja produktu _
( cal)
6
6
Maks. Szybkość przepływu
wody
(L/min)
48
48
Formularz okładki
Uderzenie w
twarz
Uderzenie w twarz
Kolor
Czarny
Drzazga
- 4 -
Instalacja standardowa
_
Zdecydowanie zaleca się, aby montaż tego produktu wykonał
profesjonalny murarz i hydraulik. Należy przestrzegać
wszystkich lokalnych przepisów dotyczących instalacji
wodno-kanalizacyjnych i budowlanych.
Niektóre czynniki zewnętrzne, takie jak uszczelniacz, klej,
zaprawa lub inna agresywna substancja, mogą powodować rdzę
„powierzchniową” na kratce. Po montażu zaleca się usunąć taką
„rdzę” za pomocą czyścika, zawsze szczotkując w kierunku
wzmocnienia.
Natychmiast po zastosowaniu środka czyszczącego wytrzyj
powierzchnie do czysta i dokładnie spłucz wodą. Nie dopuścić
do nasiąknięcia środków czyszczących na powierzchniach.
- 5 -
Używaj miękkiej, zwilżonej gąbki lub szmatki. Do czyszczenia
powierzchni nigdy nie używaj materiałów ściernych, takich jak
szczotka lub gąbka do szorowania.
Przegląd instalacji
1. Płytka ceramiczna 2. Klej do płytek lub cienki
3. Zaprawa lub uszczelniacz 4. Wodoodporna membrana
5. Wkręcić śruby 6. Papier smołowy i listwa druciana
7. Zespół podstawy spustowej 8. Zaprawa podłogowa
9. Żwir grochowy lub przekładka do płytek
10. Zewnętrzna średnica rury kanalizacyjnej wynosi φ 60mm
Nie należy używać sklejki do wnętrz, płyt OSB, płyt
kartonowo-gipsowych ani
greenboard jako podkład pod płytki ceramiczne .
Umieszczenie w pokoju kąpielowym:

- 6 -
Zalecana jest instalacja odpływu identyfikacyjnego z podziałką
środkową. Podłoga jest nachylona w czterech kierunkach w stronę
odpływu. Podłogi muszą być odpowiednio wypoziomowane lub należy
zastosować inne bariery, aby zapobiec przedostawaniu się wody do
suchego obszaru.
Notatka:
Pierścień zaciskowy musi znajdować się 2-3 cale od ściany, tak aby
odpływ był
zazwyczaj umieszcza się je w odległości 3–5 cali od tylnej ściany. Należy
zmierzyć tę odległość, jeśli rura instalacyjna znajduje się blisko ściany.
Izolacja podłoża (Szczególnie w przypadku podłoża drewnianego. )
Zszyj papier budowlany i listwę drucianą do podłoża, wycinając wokół
otwór wylotowy.
- 7 -
Papa smołowa będzie służyć jako bariera dla wilgoci dla pierwszej warstwy
błoto pomagające zaprawie zatrzymać wilgoć podczas utwardzania.
Pomoże także odizolować podłoże od brodzika.
Listwa druciana wzmocni warstwę zaprawy błotnej podłogi i pomoże
utrzymać zaprawę do krawężnika prysznica.
Odkręć korpus odpływu, poluzuj śruby,
aby zdjąć pierścień zaciskowy i odłóż
je na bok.
- 8 -
1. Nałóż cement PCV, aby połączyć adapter z systemem rur, a następnie
przyklej spód adaptera do podłoża. Włóż szmatkę do otworu spustowego.
7. Zacierać zaprawę po listwie drucianej od zewnętrznej strony adaptera
do obwodu brodzika, używając drewnianej pacy i poziomnicy, aby
wyrównać zaprawę tak, aby uzyskać nachylenie co najmniej 1° w kierunku
odpływu w czterech kierunkach. Pozostawić zaprawę do stwardnienia na
noc.
3. Nałóż wodoodporną membranę na obszar prysznica do 8 cali na każdą
ścianę, wytnij szczelinę na śrubach, aby przebić się przez nie , odetnij
otwór odpływowy w
centrum . Uszczelnij dolną część membrany do adaptera kołnierzowego za
pomocą silikonu. Upewnij się, że membrana jest szczelna w każdym
narożniku podłogi.

- 9 -
4. Zamontuj pierścień zaciskowy , ostrożnie dokręcając śruby, aby po
zamontowaniu membrany zapewnić wodoszczelność . Rozłóż żwir
grochowy lub przekładkę do płytek na szczelinach odprowadzających, aby
zapobiec zatykaniu otworów odprowadzających przez zaprawę.
5. Okręcić korpus odpływu w pierścieniu zaciskowym , wyregulować
wysokość tak, aby odpowiadała żądanej grubości zaprawy i płytki, ustawić
cztery boki równolegle do krawędzi płytki. Upewnij się, że wysokość od
góry do podstawy odpływu nie jest mniejsza niż 1,5 cala. Podłącz gniazdko
i sprawdź szczelność przez noc.
- 10 -
6. Nałóż zaprawę na sucho, aby ułożyć drugą warstwę zaprawy. Całą
podłogę należy wyrównać , aby utworzyć nachylenie co najmniej 1° , około
1/4 cala na stopę w kierunku odpływu w czterech kierunkach . Pozostawić
odstęp grubości płytek i cienką warstwę wzdłuż korpus odpływowy.
Po 12 godzinach schnięcia drugiej zaprawy należy ułożyć płytkę
podłogową za pomocą cienkiej masy lub kleju do płytek. Podłoga z płytek
powinna być układana ze spadkiem 1° w kierunku odpływu w czterech
kierunkach. Odpływ powinien znajdować się na poziomie lub nieco niżej
wykończona powierzchnia płytek.
8. Pozostawić cienką warstwę do utwardzenia na 24-48 godzin, nałożyć
uszczelniacz na spoiny za pomocą gąbki . Wytrzyj nadmiar szczeliwa,
wyjmij szmatkę i zatrzaśnij płytkę kratową w korpusie odpływu.
Uwaga: odczekaj 24 godziny wcześniej korzystania z prysznica.
- 11 -
Adres: Budynek 10, nr 300 DeSheng Rd, Yinzhou, Ningbo, Chiny 315145
Import do AUS: SIHAO PTY LTD . 1 ROKEVA STREETEASTWOOD
NSW 2122 Australia
Import do USA: Sanven Technology Ltd. Apartament 250, 9166 Anaheim
Place, Rancho Cucamonga, Kalifornia 91730
REP
UK
Pooledas Group Ltd
Unit 5 Albert Edward House, The Pavilions
Preston, United Kingdom
REP
EC
SHUNSHUN GmbH
Römeräcker 9 Z2021, 76351
Linkenheim-Hochstetten, Germany
Wyprodukowano w Chinach


- 13 -
Technisch Ondersteuning en e-garantiecertificaat www.vevor.com/support
LINEAIRE AFVOER
MODEL: COU-6
We continue to be committed to provide you tools with competitive price.
"Save Half", "Half Price" or any other similar expressions used by us only represents an
estimate of savings you might benefit from buying certain tools with us compared to the major
top brands and does not necessarily mean to cover all categories of tools offered by us. You
are kindly reminded to verify carefully when you are placing an order with us if you are
actually saving half in comparison with the top major brands.
- 1 -
MODEL: COU-6
Have product questions? Need technical support? Please feel free to
contact us:
Technical Support and E-Warranty Certificate
www.vevor.com/support
NEED HELP? CONTACT US!
This is the original instruction, please read all manual instructions
carefully before operating. VEVOR reserves a clear interpretation of our
user manual. The appearance of the product shall be subject to the
product you received. Please forgive us that we won't inform you again if
there are any technology or software updates on our product.
LINEAR DRAIN

- 2 -
Waarschuwing-Om het risico op letsel te verminderen, moet
de gebruiker de handleiding zorgvuldig lezen.
Controleer zorgvuldig of er geen ontbrekende of defecte onderdelen zijn.
Onjuiste installatie kan schade of ernstig letsel veroorzaken. Wij kunnen
niet aansprakelijk worden gesteld voor schade of letsel veroorzaakt door
onjuiste montage, onjuiste montage of oneigenlijk gebruik.
WAARSCHUWING:
7. Laat kinderen niet op het apparaat klimmen.
2. Houd kinderen en huisdieren tijdens de montage uit de buurt.
3. Houd plastic zakken altijd uit de buurt van kinderen en huisdieren om
verstikkingsgevaar te voorkomen.
MONTAGEVOORZORGSMAATREGELEN
1. Monteer het product strikt volgens de instructies. Een onjuiste montage
kan gevaarlijk zijn.
2. Draag tijdens de montage een veiligheidsbril en werkhandschoenen.
3. Probeer het product niet in elkaar te zetten als u zich moe voelt of onder
invloed bent van alcohol, drugs of medicijnen.
4. Waterstroomcapaciteit en andere productparameters worden alleen
toegepast op het correct en volledig gemonteerde product.
5. Scheid en tel alle onderdelen en hardware.
6. Houd het volgende gereedschap gereed: kruiskopschroevendraaier.
7. Als u elektrisch gereedschap gebruikt, zorg er dan voor dat u langzamer
gaat rijden en stopt wanneer dat nodig is.
8. Voor de montage zijn twee personen nodig.
9. Volg uitsluitend het beoogde gebruik. Ga niet op het bovenstaande
zitten of staan.

- 3 -
Bewaar deze instructies.
Onderdelen lijst
NEE.
Naam
Afbeelding
AANTAL.
1
Goot Groep
( Representatieve foto )
1
2
Filterscherm
( Representatieve foto )
1
3
Haak
1
Product Introductie
Model
COU-6-S04-MB
COU-6-S04-BR
Productspecificatie _ _
( inch)
6
6
Max. Waterstroomsnelheid
(L/min)
48
48
Omslagformulier
Ponsen gezicht
_
Ponsen gezicht _
Kleur
Zwart
Splinter

- 4 -
Standaard installatie
_
Het wordt sterk aanbevolen dat een professionele metselaar en
loodgieter dit product installeert. Neem alle plaatselijke
loodgieters- en bouwvoorschriften in acht.
Sommige externe factoren zoals kit, lijm, mortel of een
agressieve substantie kunnen “oppervlakte” roest op het rooster
veroorzaken. Na installatie wordt aanbevolen dergelijke “roest”
te verwijderen met een schuursponsje, waarbij u altijd in de
richting van de versterking borstelt.
Veeg de oppervlakken schoon en spoel ze onmiddellijk na het
aanbrengen van het reinigingsmiddel volledig af met water. Zorg
ervoor dat schoonmaakmiddelen niet op oppervlakken kunnen
trekken. Gebruik een zachte, vochtige spons of doek. Gebruik

- 5 -
nooit schurend materiaal zoals een borstel of schuursponsje om
oppervlakken schoon te maken.
Installatieoverzicht
1. Keramische tegel 2. Tegellijm of thinset
3. Voeg of kit 4. Waterdicht membraan
5. Schroefbouten 6. Teerpapier en draadlat
7. Basismontage afvoer 8. Vloermortel
9. Erwtengrind of tegelafstandhouder
10. De buitendiameter van de afvoerleiding is φ 60 mm
Gebruik geen multiplex van binnenkwaliteit, OSB-platen,
gipsplaten of
Greenboard als onderlaag voor keramische tegels .
Plaatsing in badkamer:

- 6 -
Identiteitsafvoerplaatsing middenafstand installatie wordt aanbevolen.
De vloer loopt in vier richtingen richting de afvoer af. Vloeren moeten op de
juiste manier worden gegradueerd, of er moeten andere barrières worden
gebruikt om te voorkomen dat water in het droge gebied stroomt.
Opmerking:
De klemring moet zich 5-8 cm van de muur bevinden, zodat de afvoer dat
ook doet
Plaats deze doorgaans op een afstand van 3-5 inch van de achterwand.
Meet deze afstand als de afvoerleiding zich dicht bij de muur bevindt.
Substraat isolatie (Speciaal voor houtsubstraat. )
Nieten bouwpapier en draadlat naar de ondervloer, snijd rond de
uitlaatopening.

- 7 -
Het teerpapier zal dienen als vochtbarrière voor de eerste laag
modder die de mortel helpt vocht vast te houden tijdens het uitharden. Het
zal ook helpen om het substraat van de douchebak te isoleren.
De draadlat versterkt de modderlaag van de mortel op de basisvloer en
helpt de mortel tegen de doucherand te houden.
Draai het afvoerlichaam los, maak de
schroeven los om de klemring te
verwijderen en leg ze opzij.
- 8 -
1. Breng PVC-cement aan om de adapter op het leidingsysteem aan te
sluiten en lijm vervolgens de onderkant van de adapter op de ondervloer.
Stop een doek in de afvoeropening.
8. Breng mortel aan op de draadlat vanaf de buitenkant van de adapter tot
aan de omtrek van de douchebak, gebruik een houten vlotter en waterpas
om de mortel te egaliseren, zodat een helling van minimaal 1° richting de
afvoer in vier richtingen ontstaat. Laat de mortel een nacht uitharden.
3. Breng een waterdicht membraan aan op de doucheruimte en tot 20 cm
op elke muur, snij een spleet in de bouten om er doorheen te steken , knip
het afvoergat in de
centrum . Dicht de onderkant van het membraan met de flensadapter af
met siliconenkit. Zorg ervoor dat het membraan in elke hoek van de vloer
strak zit.

- 9 -
4.Installeer de klemring en draai de bouten zorgvuldig aan om een
waterdichte afdichting te creëren zodra het membraan is geïnstalleerd .
Verspreid erwtengrind of een afstandsstuk voor tegels over de sleuven om
te voorkomen dat mortel het kruipgat verstopt.
5. Draai het afvoerlichaam in de klemring , pas de hoogte aan zodat deze
overeenkomt met de gewenste dikte van de mortel en de tegel, plaats de
vier zijden evenwijdig aan de tegelrand. Zorg ervoor dat de hoogte van de
bovenkant tot de onderkant van de afvoer niet minder dan 1,5 inch
bedraagt. Sluit het stopcontact aan en test de lekkage 's nachts.

- 10 -
het tweede mortelbed op te bouwen . De hele vloer moet worden
gegradueerd om een helling van minimaal 1 graden te creëren , ongeveer
1/4 " per voet in de richting van de afvoer in vier richtingen . Laat ruimte vrij
van tegeldikte en dun uitgezet het afvoerlichaam.
7. Nadat het tweede mortelbed 12 uur heeft uitgehard , installeert u de
vloertegel met thinset- of tegellijm. De tegelvloer moet de helling van 1°
richting de afvoer in vier richtingen volgen. De afvoer moet waterpas of iets
lager zijn dan de afvoer
afgewerkt tegeloppervlak.
8. Laat de thinset 24-48 uur uitharden, breng de kit met een spons aan op
de voegennaden . Veeg het overtollige afdichtmiddel weg, haal de doek
eruit en klik de roosterplaat in het afvoerlichaam.
Let op: Wacht 24 uur voordat u dit doet gebruik van uw douche.
- 11 -
Adres: Gebouw 10, No.300 DeSheng Rd, Yinzhou, Ningbo, China 315145
Geïmporteerd naar AUS: SIHAO PTY LTD . 1 ROKEVA
STREETEASTWOOD NSW 2122 Australië
Geïmporteerd naar de VS: Sanven Technology Ltd. Suite 250, 9166
Anaheim Place, Rancho Cucamonga, CA 91730
REP
UK
Pooledas Group Ltd
Unit 5 Albert Edward House, The Pavilions
Preston, United Kingdom
REP
EC
SHUNSHUN GmbH
Römeräcker 9 Z2021, 76351
Linkenheim-Hochstetten, Germany
Gemaakt in China


- 13 -
Teknisk Support och e-garanticertifikat www.vevor.com/support
LINJÄR DRÄNERING
MODELL: COU-6
We continue to be committed to provide you tools with competitive price.
"Save Half", "Half Price" or any other similar expressions used by us only represents an
estimate of savings you might benefit from buying certain tools with us compared to the major
top brands and does not necessarily mean to cover all categories of tools offered by us. You
are kindly reminded to verify carefully when you are placing an order with us if you are
actually saving half in comparison with the top major brands.

- 1 -
MODELL: COU-6
Have product questions? Need technical support? Please feel free to
contact us:
Technical Support and E-Warranty Certificate
www.vevor.com/support
NEED HELP? CONTACT US!
This is the original instruction, please read all manual instructions
carefully before operating. VEVOR reserves a clear interpretation of our
user manual. The appearance of the product shall be subject to the
product you received. Please forgive us that we won't inform you again if
there are any technology or software updates on our product.
LINEAR DRAIN

- 2 -
Varning - För att minska risken för skada måste användaren
läsa instruktionerna noggrant.
Kontrollera noga för att säkerställa att det inte finns några delar som
saknas eller är defekta. Felaktig installation kan orsaka skador eller
allvarliga skador. Vi kan inte hållas ansvariga för skador som orsakats av
felaktig montering, felaktig montering eller olämplig användning.
VARNING:
8. Låt inte barn klättra på enheten.
2. Håll barn och husdjur borta under monteringen.
3. För att undvika risken för kvävning, förvara alltid plastpåsar borta från
barn och husdjur.
FÖRSIKTIGHETSÅTGÄRDER FÖR MONTERING
1. Vänligen montera produkten i strikt enlighet med instruktionerna.
Felaktig montering kan vara farligt.
2. Använd skyddsglasögon och arbetshandskar ordentligt under
monteringen.
3. Försök inte att sätta ihop produkten när du känner dig trött eller är
påverkad av alkohol, droger eller medicin.
4. Vattenflödeskapacitet och andra produktparametrar tillämpas endast på
den korrekt och färdigmonterade produkten.
5. Separera och räkna alla delar och hårdvara.
6. Förbered följande verktyg: Philips huvudskruvmejsel.
7. Om du använder elverktyg, var noga med att sakta ner och stanna vid
behov.
8. Två personer krävs för montering.
9. Följ endast avsedd användning. Sitt eller stå inte på ovanstående.
- 3 -
Spara dessa instruktioner.
Dellista
NEJ.
namn
Bild
ANTAL.
1
Gutter Group
( Representativ bild )
1
2
Filterskärm
( Representativ bild )
1
3
Krok
1
Produkt introduktion
Modell
COU-6-S04-MB
COU-6-S04-BR
Produkt S- specifikation
( tum)
6
6
Max. Vattenflöde
(L/min)
48
48
Omslagsformulär
Stansande
ansikte _
Stansande ansikte
_
Färg
Svart
Flisa

- 4 -
Standardinstallation
_
_
Det rekommenderas starkt att en professionell murare och
rörmokare installerar denna produkt. Följ alla lokala VVS- och
byggregler.
Vissa yttre faktorer som tätningsmedel, lim, murbruk eller något
aggressivt ämne kan orsaka "ytrost" på gallret. Efter
installationen rekommenderas det att ta bort sådan "rost" med
hjälp av en skursvamp, alltid borsta i riktning mot förstärkningen.
Torka av ytor rena och skölj helt med vatten omedelbart efter
applicering av rengöringsmedel. Låt inte rengöringsmedel
blötläggas på ytor. Använd en mjuk, fuktad svamp eller trasa.
Använd aldrig ett slipande material som en borste eller
skursvamp för att rengöra ytor.
Installationsöversikt
- 5 -
1. Keramiska plattor 2. Kakellim eller thinset
3. Injekteringsbruk eller tätningsmedel 4. Vattentätt
membran
5. Skruva fast bultarna 6. Tjärpapper & trådlist
7. Dränera basenheten 8. Golvbruk
9. Ärtgrus eller kakeldistans
10. Den yttre diametern på avloppsröret är φ 60 mm
Använd inte plywood av interiörkvalitet, OSB-skivor, gipsskivor
eller
greenboard som underlag för keramiska plattor .
Placering i badrum:
- 6 -
Identitetsavloppsplacering installation i mitten rekommenderas. Golvet
lutar i fyra riktningar mot avloppet. Golv måste graderas på lämpligt sätt,
eller så måste andra barriärer användas för att förhindra att vatten rinner in
i det torra området.
Notera:
Klämringen måste vara 2-3" från väggen, så avloppet kommer
placeras vanligtvis 3-5" bort från bakväggen. Mät detta avstånd om
VVS-röret är nära väggen.
Isolering av underlag (Särskilt för träsubstrat. )
Häfta byggpapper och trådlist till undergolvet, skär runt utloppsöppning.
- 7 -
Tjärpappret kommer att fungera som en fuktspärr för det första lagret av
lera som hjälper murbruket att behålla fukten under härdningen. Det
kommer också att hjälpa till att isolera substratet från duschkärlet.
Trådlisten kommer att förstärka bottengolvets lera lager av murbruk och
hjälpa till att hålla murbruket till duschkanten.
Snurra av dräneringskroppen, lossa
skruvarna för att ta bort klämringen
och lägg dem åt sidan.
1. Applicera PVC-cement för att ansluta adaptern till rörsystemet, lim
sedan fast adapterns botten på undergolvet. Stoppa in en trasa i
avloppsöppningen.
- 8 -
9. Spackla murbruk över trådribban från utsidan av adaptern till
duschbasens omkrets, använd träflottör och nivå för att gradera murbruket
för att skapa minst 1° lutning mot avloppet i fyra riktningar. Låt morteln
härda över natten.
3. Applicera vattentätt membran på duschområdet och upp till 8" på varje
vägg, skär en slits på bultarna för att sticka igenom, skär bort
dräneringshålet i
mitten . Täta undersidan av membranet till flänsadaptern med silikon. Se till
att membranet är tätt i varje hörn av golvet.
4. Installera klämringen och dra försiktigt åt bultarna för att skapa en
vattentät tätning när membranet har installerats . Sprid ärtgrus eller
kakelmellanlägg över gråskårorna för att förhindra att murbruk täpper igen
gråthålet.
- 9 -
5. Snurra avloppskroppen i klämringen , justera höjden så att den
motsvarar önskad tjocklek på murbruk och kakel, ställ in fyra sidor
parallella med kakelkanten. Se till att höjden från toppen till avloppsbasen
inte är mindre än 1,5 " .
6. Applicera torrpackbruk för att bygga upp den andra murbruksbädden ,
hela golvet måste graderas för att skapa en lutning på minst 1º, cirka 1/4 "
per fot mot avloppet i fyra riktningar . Lämna utrymme med kakeltjocklek
och tunna sättningar längs med avloppskroppen.
- 10 -
7. Efter att den andra murbruksbädden har härdat i 12 timmar , montera
golvplattorna med thinset eller kakellim. Klinkergolvet ska följa 1°-lutningen
mot avloppet i fyra riktningar. Avloppet ska vara plant eller något lägre än
färdig kakelyta.
8. Låt det tunna setet härda i 24-48 timmar, applicera tätningsmedlet på
fogarna med svamp . Torka bort överflödigt tätningsmedel, ta ut trasan och
snäpp fast gallerplattan i avloppskroppen.
Obs: Vänta i 24 timmar innan använda din dusch.
Adress: Building 10, No.300 DeSheng Rd, Yinzhou, Ningbo, Kina 315145
Importerad till AUS: SIHAO PTY LTD . 1 ROKEVA STREETEASTWOOD
NSW 2122 Australien
till USA: Sanven Technology Ltd. Suite 250, 9166 Anaheim Place, Rancho
Cucamonga, CA 91730
REP
UK
Pooledas Group Ltd
Unit 5 Albert Edward House, The Pavilions
Preston, United Kingdom
REP
EC
SHUNSHUN GmbH
Römeräcker 9 Z2021, 76351
Linkenheim-Hochstetten, Germany

- 11 -
Tillverkad i Kina

