
User’s Guide
CMP0521-00 EN

Copyrights and Trademarks
No part of this publication may be reproduced, stored in a retrieval system, or transmitted in any form or by any means, electronic, mechanical,
photocopying, recording, or otherwise, without the prior written permission of Seiko Epson Corporation. The information contained herein is
designed only for use with this Epson printer. Epson is not responsible for any use of this information as applied to other printers.
Neither Seiko Epson Corporation nor its affiliates shall be liable to the purchaser of this product or third parties for damages, losses, costs, or expenses
incurred by the purchaser or third parties as a result of accident, misuse, or abuse of this product or unauthorized modifications, repairs, or alterations
to this product, or (excluding the U.S.) failure to strictly comply with Seiko Epson Corporation’s operating and maintenance instructions.
Seiko Epson Corporation shall not be liable for any damages or problems arising from the use of any options or any consumable products other than
those designated as Original Epson Products or Epson Approved Products by Seiko Epson Corporation.
Seiko Epson Corporation shall not be held liable for any damage resulting from electromagnetic interference that occurs from the use of any interface
cables other than those designated as Epson Approved Products by Seiko Epson Corporation.
Microsoft and Windows are trademarks of the Microsoft group of companies.
Apple and Mac are trademarks of Apple Inc., registered in the U.S. and other countries.
Intel and Intel Core are trademarks of Intel Corporation or its subsidiaries.
Adobe, Illustrator, Photoshop and Reader are either registered trademarks or trademarks of Adobe in the United States and/or other countries.
The SuperSpeed USB Trident Logo is a registered trademark of USB Implementers Forum, Inc.
General Notice: All other trademarks are the property of their respective owners and used for identification purposes only.
Printer Summary
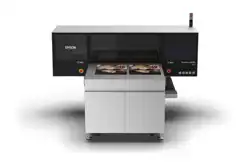
The SC-V4000 is a flatbed printer equipped with UV ink. The 10-color ink set enables delicate, vivid, high-quality
output.
With a supported media size of up to 980 mm (38.58 in.) (W) x 700 mm (27.56 in.) (D), it is suitable for a wide
range of applications, including fine art production and mass production of acrylic goods.
Before using this printer, be sure to receive safety and operation training from our service support.
©2025 Seiko Epson Corporation
SC-V4000 User's Guide
Copyrights and Trademarks
2

Note for North American and Latin American Users
IMPORTANT: Before using this product, make sure you read the safety instructions in the online Notices.
SC-V4000 User's Guide
Copyrights and Trademarks
3

Contents
Copyrights and Trademarks
Printer Summary.......................... 2
Note for North American and Latin American Users 3
Notes on Manuals
Meaning of Symbols........................ 6
Screenshots.............................. 6
Illustrations.............................. 6
Notes on Operating Systems.................. 6
Manual Organization....................... 7
Viewing PDF Manuals....................... 7
Introduction
Checking Included Items. . . . . . . . . . . . . . . . . . . . . 9
Printer Parts............................. 10
Front................................ 10
Interior............................... 13
Back................................. 16
Control Panel.......................... 18
Emergency Stop and Release................. 19
Emergency Stop Procedure................ 19
Releasing an Emergency Stop............... 19
Understanding the Signal Lamp............... 20
Notes on Handling........................ 22
Notes for Using the Printer................ 22
Notes on Long-term Storage............... 22
Notes on Handling Ink Bottles.............. 23
Handling Media........................ 24
Supported Media.......................... 24
Supported Thickness, Weight, and Size........ 24
Unusable (Restricted) Media............... 25
Flatbed Specifications...................... 26
Flatbed Size and Maximum Printable Area. . . . . 26
Flatbed Illustration...................... 27
Software Supplied......................... 28
Using Epson Edge Print PRO................. 29
Starting Procedure...................... 29
Closing Procedure....................... 29
Using UV Flatbed Controller................. 29
Starting Procedure...................... 29
Notes when Using the UV Flatbed Controller. . . 29
Screen Composition..................... 29
Details of the Menu...................... 30
Function Button Explanations.............. 32
Status Information Explanations............ 33
Closing Procedure....................... 35
Basic Operations
Print Job Workflow........................ 36
Turning on and Performing Pre-work Inspections. . 37
Turning on the Printer.................... 37
Pre-work Inspections..................... 37
Creating Print Data........................ 38
Print Layer Order and Print Results.......... 38
Braille Printing......................... 46
Types and Overview of Thickness Detection
Settings................................. 47
Manual Overview....................... 47
Auto Overview......................... 47
Loading Media (For Flat Media such as Acrylic
Board and Film).......................... 48
Notes on Loading Media.................. 48
Loading Media......................... 48
Loading Media (for Media with Spherical or
Curved Surfaces).......................... 50
Notes on Creating Jigs.................... 50
Notes on Loading Media.................. 50
Loading Media......................... 50
Print Settings............................ 51
Setting Thickness Detection................ 51
Automatic Operation.................... 52
Setting Multi-layer Printing................ 53
Starting and Canceling Printing............... 54
Starting.............................. 54
Pausing/Canceling...................... 54
Printing Stopped Due to Foreign Object
Detection............................. 54
Removing Media........................ 55
Cleaning and Turning Off after Finishing Work. . . 56
Cleaning after Finishing Work.............. 56
Periodic Maintenance.................... 62
Turning Off........................... 63
Various Printing
Multi-layer Printing....................... 64
Before Making Print Settings............... 64
Layer Setting.......................... 65
Printing Using Horizontal Mirroring........... 68
SC-V4000 User's Guide
Contents
4

Printing Images Repeatedly (Step & Repeat). . . . . . 69
Printing Only Necessary Parts of an Image (Crop). 70
Printing at a Higher Print Quality............. 71
Improving the Image Quality of Text or Fine
Lines................................ 71
Reducing Banding or Color Unevenness in
the X-direction......................... 72
Improving Print Quality with Print Quality
Settings in Epson Edge Print PRO............. 73
Reprinting a Previously Printed Job............ 73
Useful Functions.......................... 74
Changing the Screen Display Language....... 74
Changing the Display of Task History......... 75
Backing Up Adjustment Results............. 75
Nozzle Compensation.................... 76
Status Sheet (CSV File)................... 80
Export Maintenance Information Sheet (CSV
File)................................. 80
Periodic Maintenance
When to Perform Various Maintenance
Operations.............................. 81
Maintenance Areas and Timing............. 81
Preparation.............................. 84
Cleaning the Laser........................ 85
Cleaning the UV light...................... 85
Cleaning the Ionizer....................... 87
Refilling Ink............................. 88
Disposing of Waste Ink..................... 89
Replacing the Wiper Unit................... 92
Cleaning the print head..................... 94
Checking for Clogged Nozzles.............. 94
Clearing Clogged Nozzles................. 95
Cleaning the Vents........................ 97
Replacing the Mist Filters................... 97
Replacement Time...................... 97
Procedure............................. 97
Disposal of Used Consumables............... 99
Disposal.............................. 99
Problem Solver
Checking Messages....................... 100
Troubleshooting......................... 101
You Cannot Print (Because the Printer Does
Not Work)........................... 101
The Printer Operates, but Does Not Print. . . . . 102
Print Results Are Not What You Expected..... 102
Size of Print Data and Print Results Do Not
Match/Step & Repeat Print Position has Shifted 107
Switching between Print Task List and Task
History in the UV Flatbed Controller takes
time................................ 107
Appendix
Options and Consumable Products........... 109
Ink Bottles........................... 109
Maintenance Items..................... 109
Moving and Transporting.................. 111
Notes When Moving or Transporting the
Printer.............................. 111
System Requirements..................... 112
UV Flatbed Controller................... 112
Epson Edge Print PRO................... 112
Specifications Table....................... 114
SC-V4000 User's Guide
Contents
5
Notes on Manuals
Meaning of Symbols
This manual uses the following symbols to indicate
dangerous operations or handling procedures to
prevent harm to users or other people or damage to
property. Make sure you understand these warnings
before reading the content of this manual.
War ning :
Warnings must be followed to
avoid serious bodily injury.
Caution:
Cautions must be followed to
avoid bodily injury.
c
Important:
Important must be followed to
avoid damage to this product.
Note:
Notes contain useful or
additional information on the
operation of this product.
U
Indicates related content.
Screenshots
❏ The screenshots used in this manual may differ
slightly from the actual screens.
❏ Unless otherwise stated, the Windows screenshots
used in this manual are from Windows 11.
Illustrations
The illustrations may differ slightly from the model
you are using. Please be aware of this when using the
manual.
Notes on Operating
Systems
Windows
In this manual, terms such as "Windows
11","Windows 10", "Windows 8.1", "Windows 8",
"Windows 7", "Windows Server 2022", "Windows
Server 2019", "Windows Server 2016", "Windows
Server 2012 R2", "Windows Server 2012", "Windows
Server 2008 R2", and "Windows Server 2008" refer to
the following operating systems. Additionally,
"Windows" is used to refer to all versions and
"Windows Server" is used to refer to "Windows Server
2022", "Windows Server 2019", "Windows Server
2016", "Windows Server 2012 R2", "Windows Server
2012", "Windows Server 2008 R2", and "Windows
Server 2008".
❏ Microsoft
®
Windows
®
11 operating system
❏ Microsoft
®
Windows
®
10 operating system
❏ Microsoft
®
Windows
®
8.1 operating system
❏ Microsoft
®
Windows
®
8 operating system
❏ Microsoft
®
Windows
®
7 operating system
❏ Microsoft
®
Windows Server
®
2022 operating
system
❏ Microsoft
®
Windows Server
®
2019 operating
system
❏ Microsoft
®
Windows Server
®
2016 operating
system
❏ Microsoft
®
Windows Server
®
2012 R2 operating
system
❏ Microsoft
®
Windows Server
®
2012 operating
system
❏ Microsoft
®
Windows Server
®
2008 R2 operating
system
❏ Microsoft
®
Windows Server
®
2008 operating
system
SC-V4000 User's Guide
Notes on Manuals
6
Manual Organization
U.S., Canada, and Latin America
To view user manuals, visit the support site for your
region and search for your product:
❏ https://epson.com/support (U.S.)
❏ https://epson.ca/support (Canada)
❏ https://latin.epson.com/support (Latin America)
Other Regions
The manuals for the product are organized as shown
below.
You can view the PDF manuals using Adobe Reader or
Preview (Mac OS).
Standards and Appro-
vals
This section explains safety
standards and legal approvals
for each country.
Make sure you read this
manual to perform operations
safely.
Epson Support (PDF) Provides information about
Epson Support for each region.
Online Manual
User's Guide
(this manual)
Explains how to use and
maintain this printer.
Safety Precautions This booklet explains how to
handle the printer safely. Make
sure you read this before you
start using the printer.
Braille Printing
Guide
Explains how to print braille
using this printer.
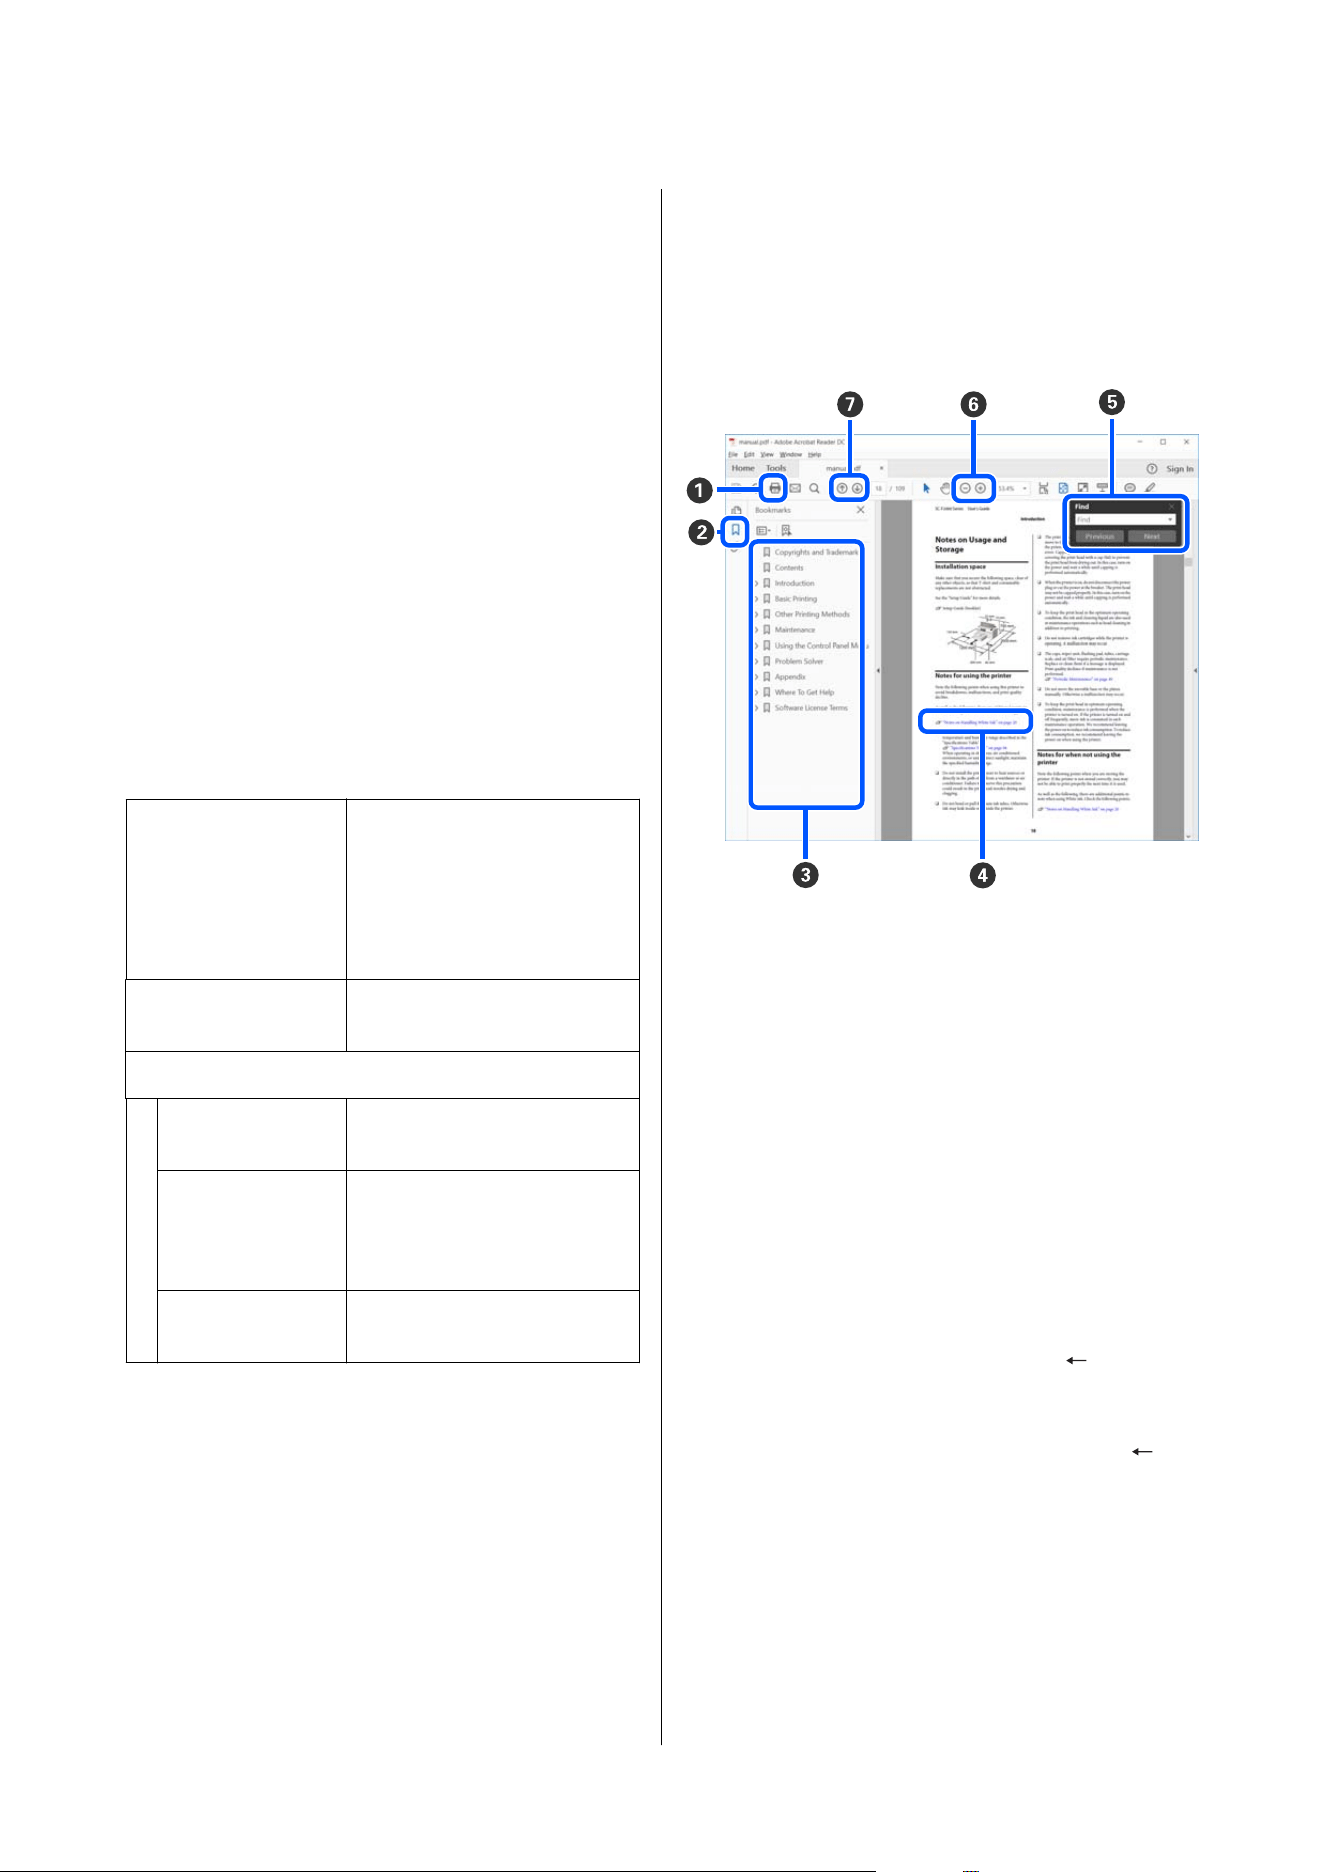
Viewing PDF Manuals
This section uses the Adobe Acrobat Reader as an
example to explain the basic operations for viewing
the PDF in Adobe Acrobat Reader DC.
A
Click to print the PDF manual.
B
Each time it is clicked the bookmarks are hidden
or shown.
C
Click the title to open the relevant page.
Click [+] to open the titles lower in the hierarchy.
D
If the reference is in blue text, click the blue text to
open the relevant page.
To return to the original page, do the following.
For Windows
While pressing the Alt key, press the key.
For Mac OS
While pressing the command key, press the
key.
SC-V4000 User's Guide
Notes on Manuals
7

E
You can input and search for keywords, such as the
names of items you want to confirm.
For Windows
Right click on a page in the PDF manual and select
Find in the menu that is displayed to open the
search toolbar.
For Mac OS
Select Find in the Edit menu to open the search
toolbar.
F
To enlarge the text in the display that is too small
to see well, click
. Click to reduce the size.
To specify a part of an illustration or screenshot to
enlarge, do the following.
For Windows
Right click on the page in the PDF manual and
select Marquee Zoom in the menu that is
displayed. The pointer changes to a magnifying
glass, use it to specify the range of the place you
want to enlarge.
For Mac OS
Click View menu - Zoom - Marquee Zoom in this
order to change the pointer to a magnifying glass.
Use the pointer as a magnifying glass to specify the
range of the place you want to enlarge.
G
Opens the previous page or next page.
SC-V4000 User's Guide
Notes on Manuals
8
Introduction
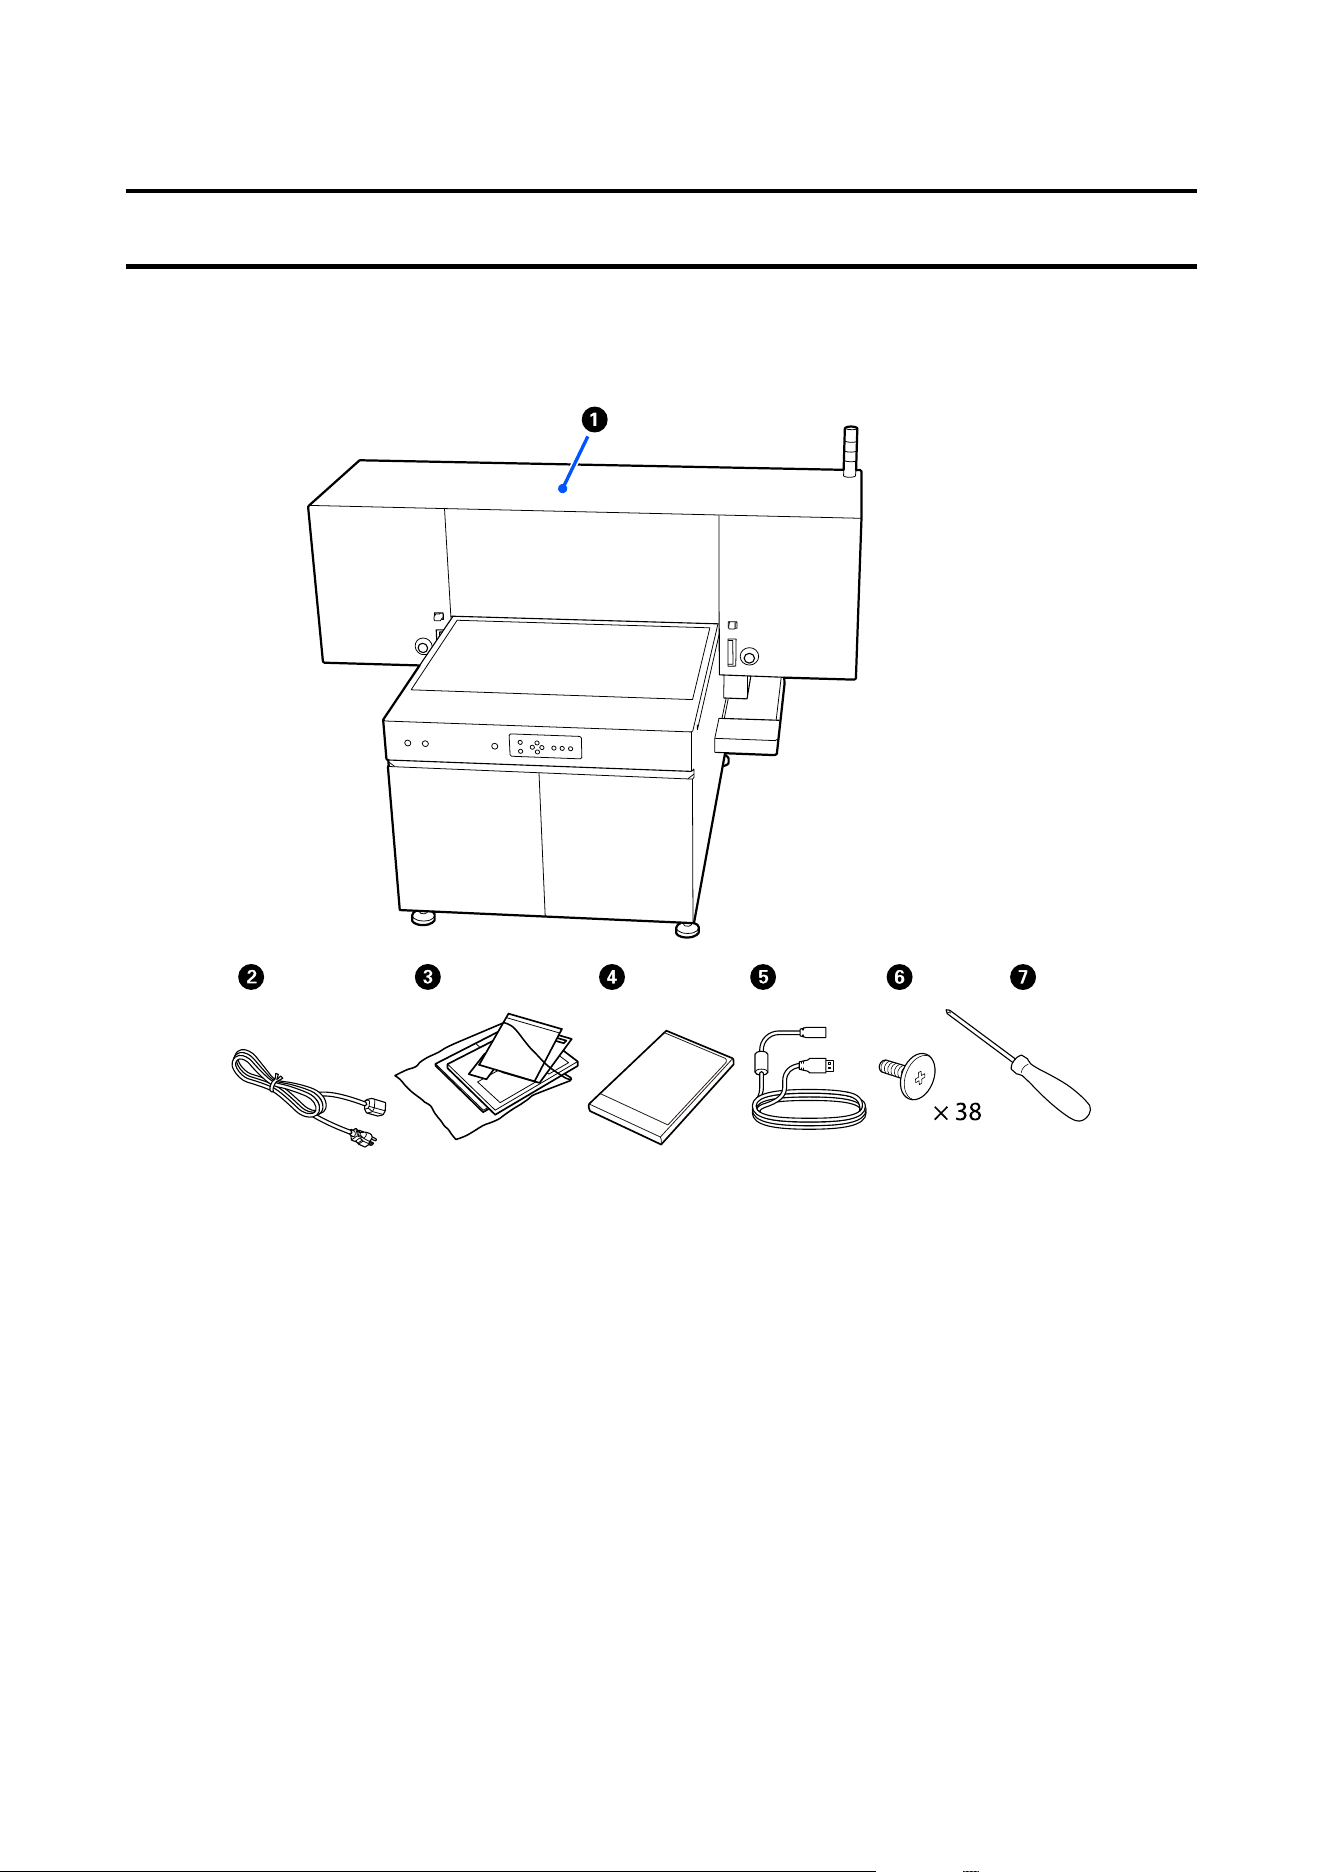
Checking Included Items
A Printer
See the following for the functions of each part.
U “Printer Parts” on page 10
B Power cable
C Manual
D Epson Edge Print PRO
This is genuine Epson RIP software.
E USB cable
F Screws
Use when loading media. You can also use these to secure the jigs.
SC-V4000 User's Guide
Introduction
9
G Screwdriver
Use when tightening screws.
c
Important:
Always use the included power cable and USB cable.
Note:
Ink bottles are not included. Purchase them separately.
U “Options and Consumable Products” on page 109
Printer Parts
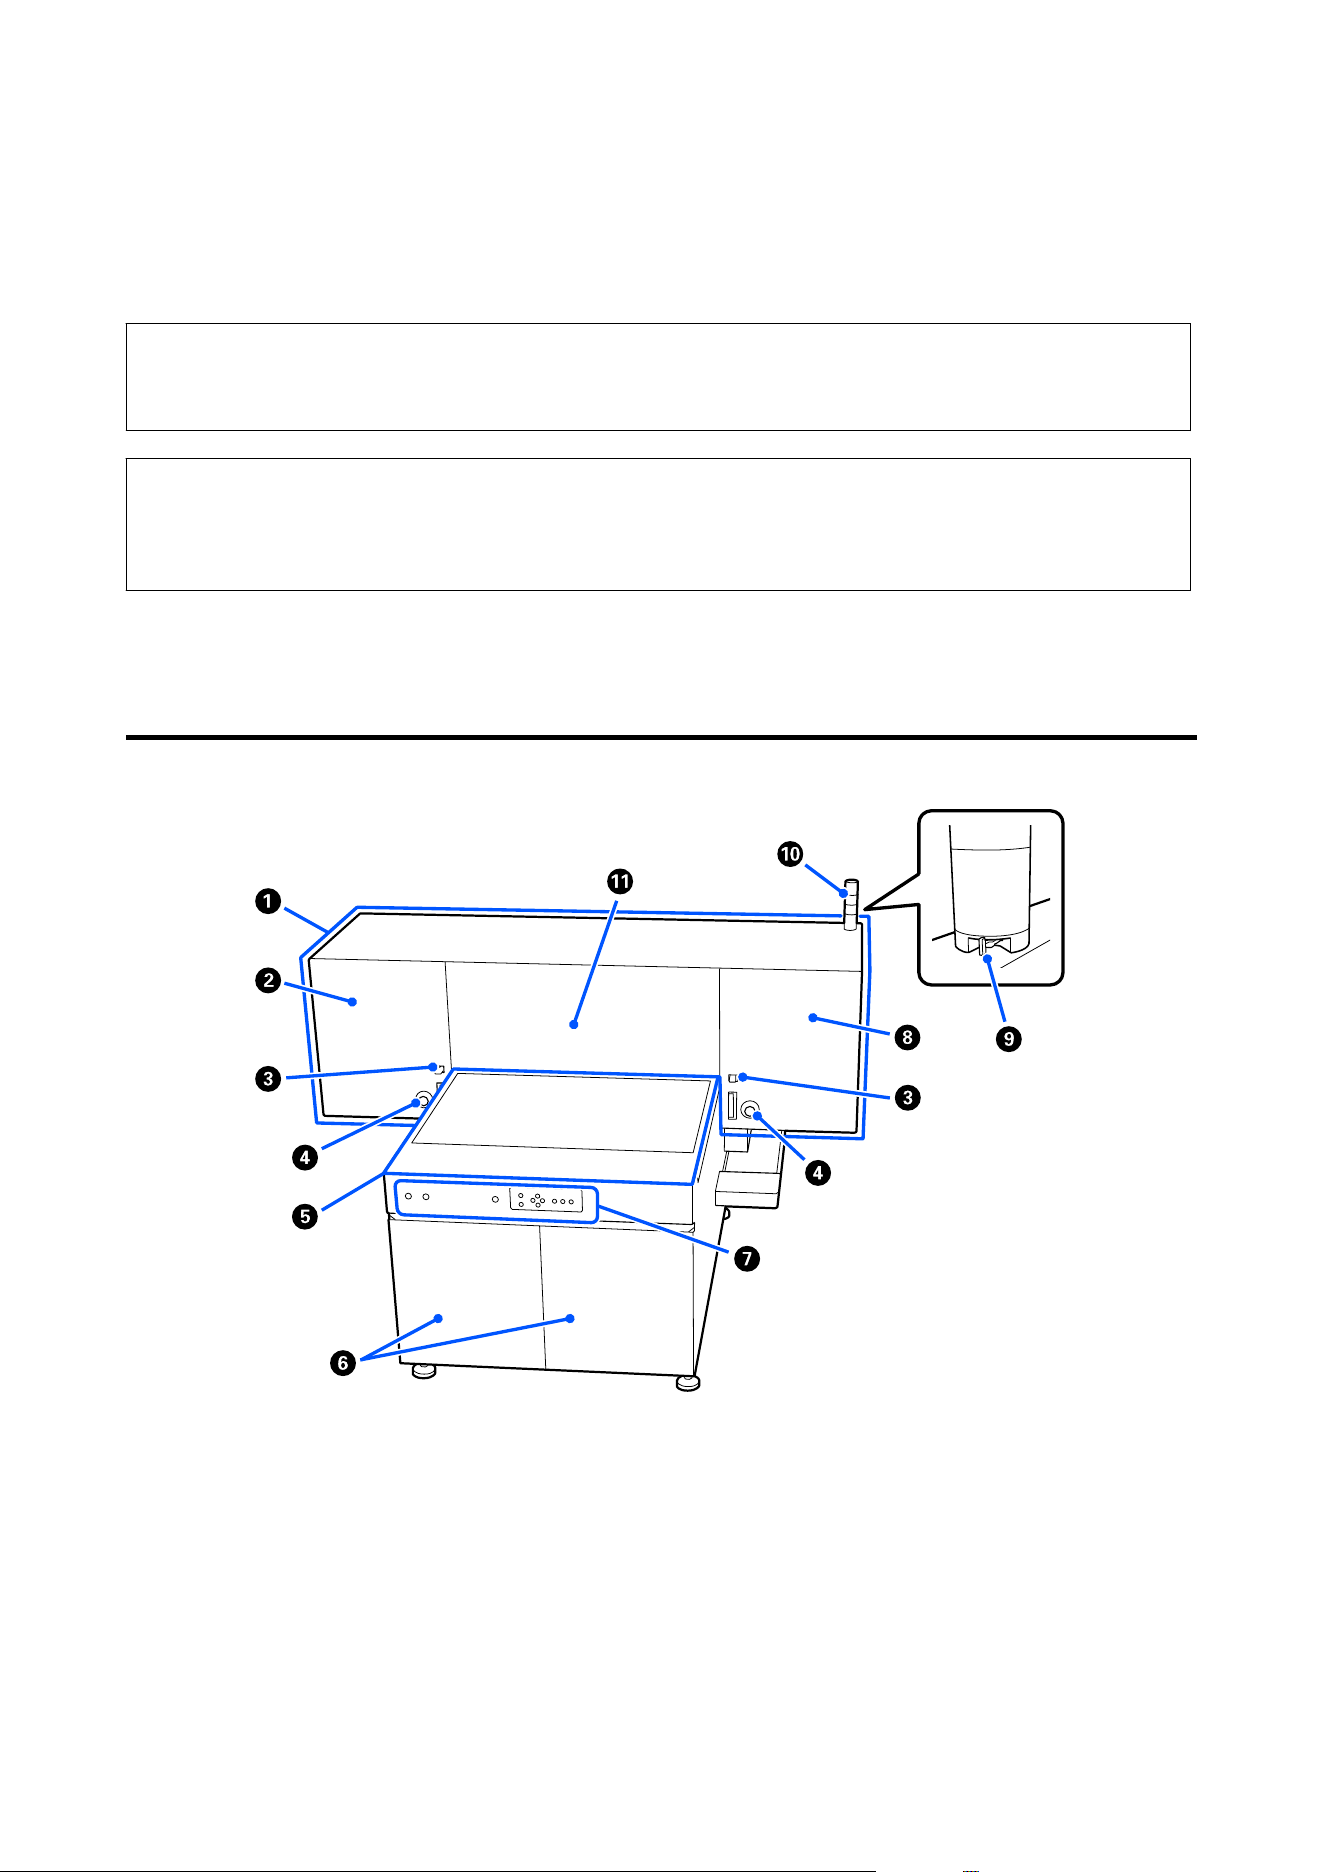
Front
A Gantry
The print head moves along this.
B Maintenance cover (left side)
Not used during normal operation. This is used by service engineers during maintenance.
SC-V4000 User's Guide
Introduction
10

C Laser
Measures media thickness. Also detects obstacles on the flatbed and immediately stops operation. See the fol‐
lowing for how to respond when operation stops.
U “Printing Stopped Due to Foreign Object Detection” on page 54
D Emergency stop button
Press to stop the printer immediately.
U “Emergency Stop Procedure” on page 19
E Flatbed
Place the media you want to print.
For flat media such as acrylic board and film U “Loading Media” on page 48
For media with spherical or curved surfaces U “Loading Media” on page 50
F Cover
Open when refilling ink or disposing of waste ink.
G Control Panel
U “Control Panel” on page 18
H Maintenance cover (right side)
Open when cleaning or replacing the wiper unit, or when cleaning around the flushing box and suction cap.
U “Periodic Maintenance” on page 81
I Adjustment lever
Adjusts the volume of the warning sound.
Caution:
Keep the warning sound volume at the maximum setting.
Reducing the volume may prevent you from noticing gantry movements and other operations, which
could result in injury.
J Signal lamp
The lamp uses three colors to indicate the printer status by lighting or flashing.
U “Understanding the Signal Lamp” on page 20
SC-V4000 User's Guide
Introduction
11

K Front cover
This cover protects the print head from collisions during printing. Do not open or close.
SC-V4000 User's Guide
Introduction
12
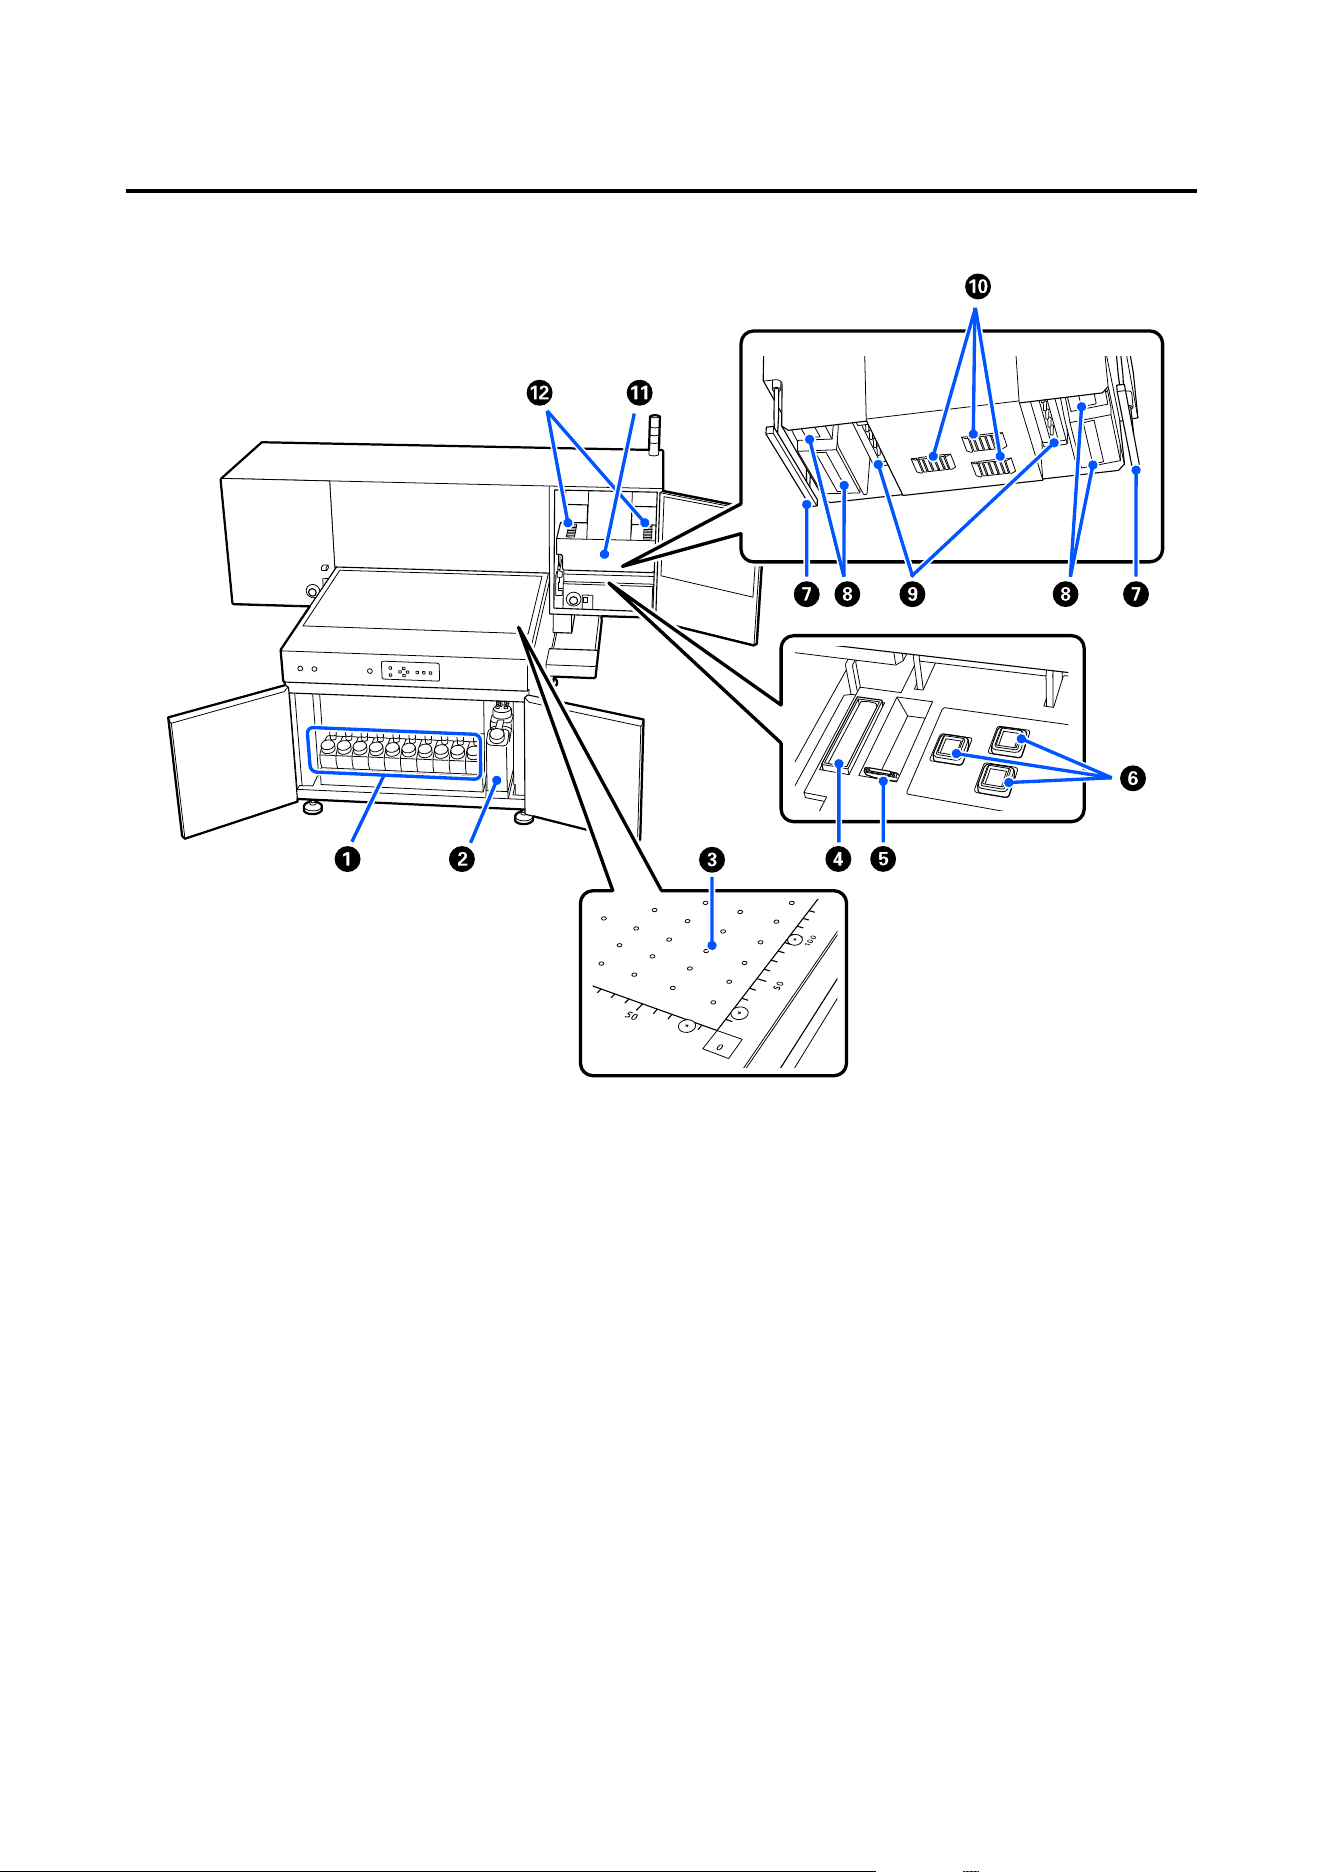
Interior
A Ink tank
Fill with ink for printing. Refill when an ink low error is displayed.
U “Refilling Ink” on page 88
B Waste ink bottle
This is a container that stores waste ink. When a waste ink full error is displayed, dispose of the waste ink.
Replace the waste ink bottle when it is noticeably dirty.
U “Disposing of Waste Ink” on page 89
C Media suction holes
Air is sucked in from the media suction holes to suction the media.
SC-V4000 User's Guide
Introduction
13

D Flushing box
Ink is discharged here during flushing operations to prevent nozzle clogging.
Clean at the end of each working day.
U “Cleaning after Finishing Work” on page 56
E Wiper unit
Wipes off ink from the nozzle surface of the print head.
Clean at the end of each working day. Also, replace it when a replacement notification message is displayed.
U “Cleaning after Finishing Work” on page 56
U “Replacing the Wiper Unit” on page 92
F Suction caps
These caps suck ink from the print head nozzles.
Clean at the end of each working day.
U “Cleaning after Finishing Work” on page 56
G Jam detection sensor
Operation stops immediately when media or foreign objects come into contact with the bar. See the following
for how to respond when operation stops.
U “Printing Stopped Due to Foreign Object Detection” on page 54
H UV Light
Emits UV light on the ink to cure it during printing.
Clean when a cleaning notification message is displayed.
U “Cleaning the UV light” on page 85
I Ionizer
Disperses static electricity from the media to reduce print quality issues such as blurring or lack of sharpness.
Clean when a cleaning notification message is displayed.
U “Cleaning the Ionizer” on page 87
J Nozzles
Fires ink through high density nozzles to print.
SC-V4000 User's Guide
Introduction
14

K Print head
Sprays ink while moving left and right to print. In this manual, the unit that includes the UV light, nozzles, and
ionizers is referred to as the print head.
L Mist filter
Removes dust, ink, and other foreign objects when cooling the UV light.
U “Replacing the Mist Filters” on page 97
SC-V4000 User's Guide
Introduction
15
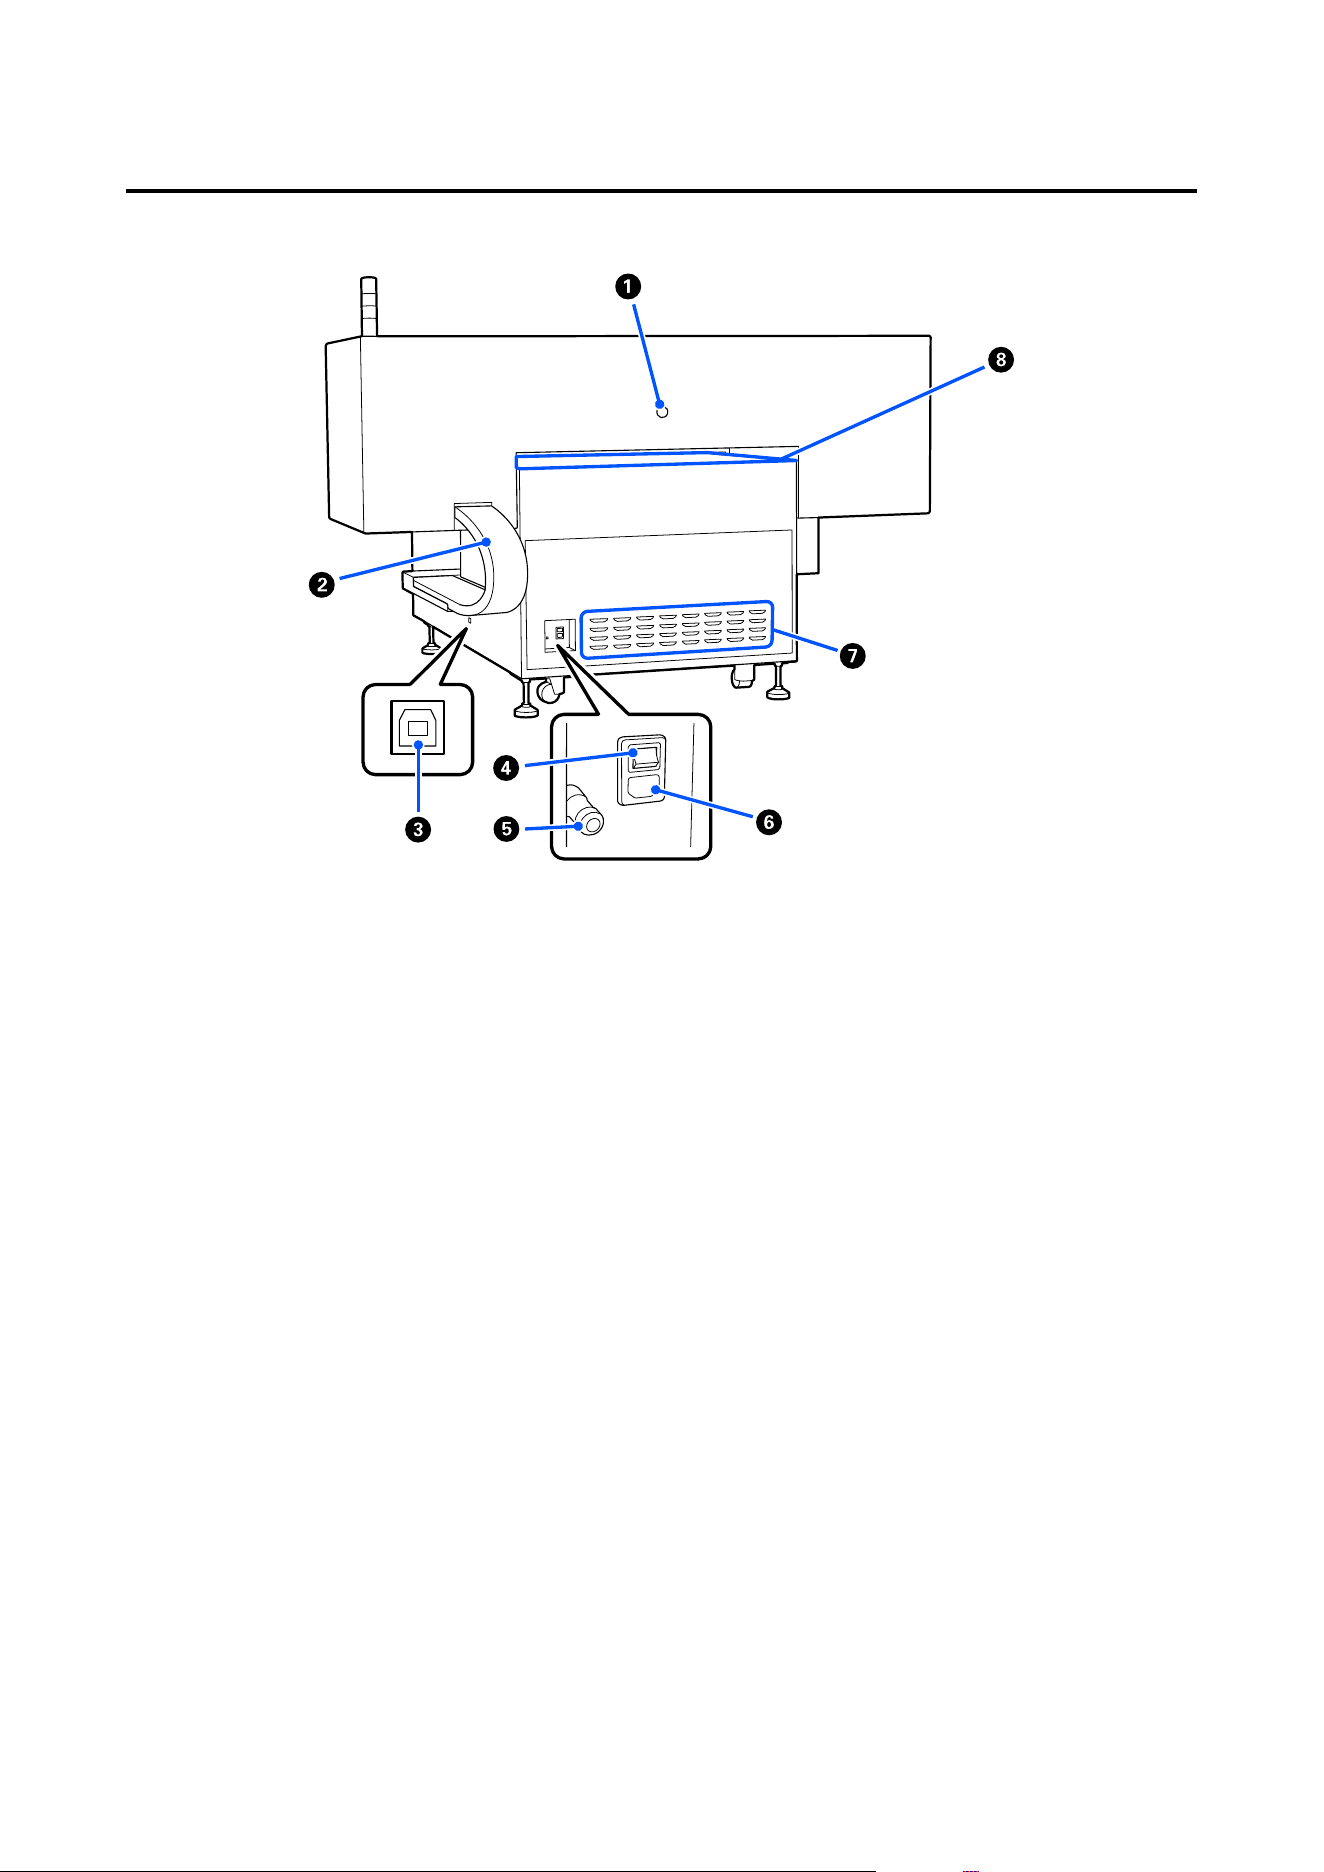
Back
A Emergency stop button
Press to stop the printer immediately.
U “Emergency Stop and Release” on page 19
B Cable carrier
Routes and secures cables and ink tubes to prevent damage from external impacts and other sources.
C USB port
Connects to the computer on which the UV Flatbed Controller installed using the USB cable supplied with this
printer.
D Main power switch
Turns on/off the main power for the printer.
E Option connector
Not used on this printer.
F AC inlet
Insert the power cable supplied with this printer.
G Vent
Blocking the vent causes heat to build up inside the printer, and a malfunction may occur. Do not place objects
in front of the vent.
SC-V4000 User's Guide
Introduction
16

H Gantry start position
When you exit the UV Flatbed Controller, the gantry returns to the start position.
SC-V4000 User's Guide
Introduction
17

Control Panel
A Power button ( )
To turn on the printer, turn on the main power switch on the back panel, and then press this button.
B Power button ( )
To turn off the printer, press this button, and then turn off the main power switch on the back panel.
C Suction button
Turns the media suction fan on or off.
D Height adjustment button
Press to move the gantry up or down.
For example, use this when you want to check the nozzle surface of the print head.
E Print head positioning button
Press to move the print head left or right. It cannot move during maintenance work or print head cleaning.
For example, use this when you want to check the condition of the caps.
F Nozzle check button
Press to print a nozzle check pattern.
U “Cleaning the print head” on page 94
G Print head cleaning button
Press to clean the print head.
U “Cleaning the print head” on page 94
H Pause button
Press to stop printing. Press again while stopped to resume printing.
SC-V4000 User's Guide
Introduction
18
I Gantry positioning button
Press to move the gantry forward or backward. It cannot be moved while in maintenance mode.
For example, use this when you want to load or remove media, or check print results.
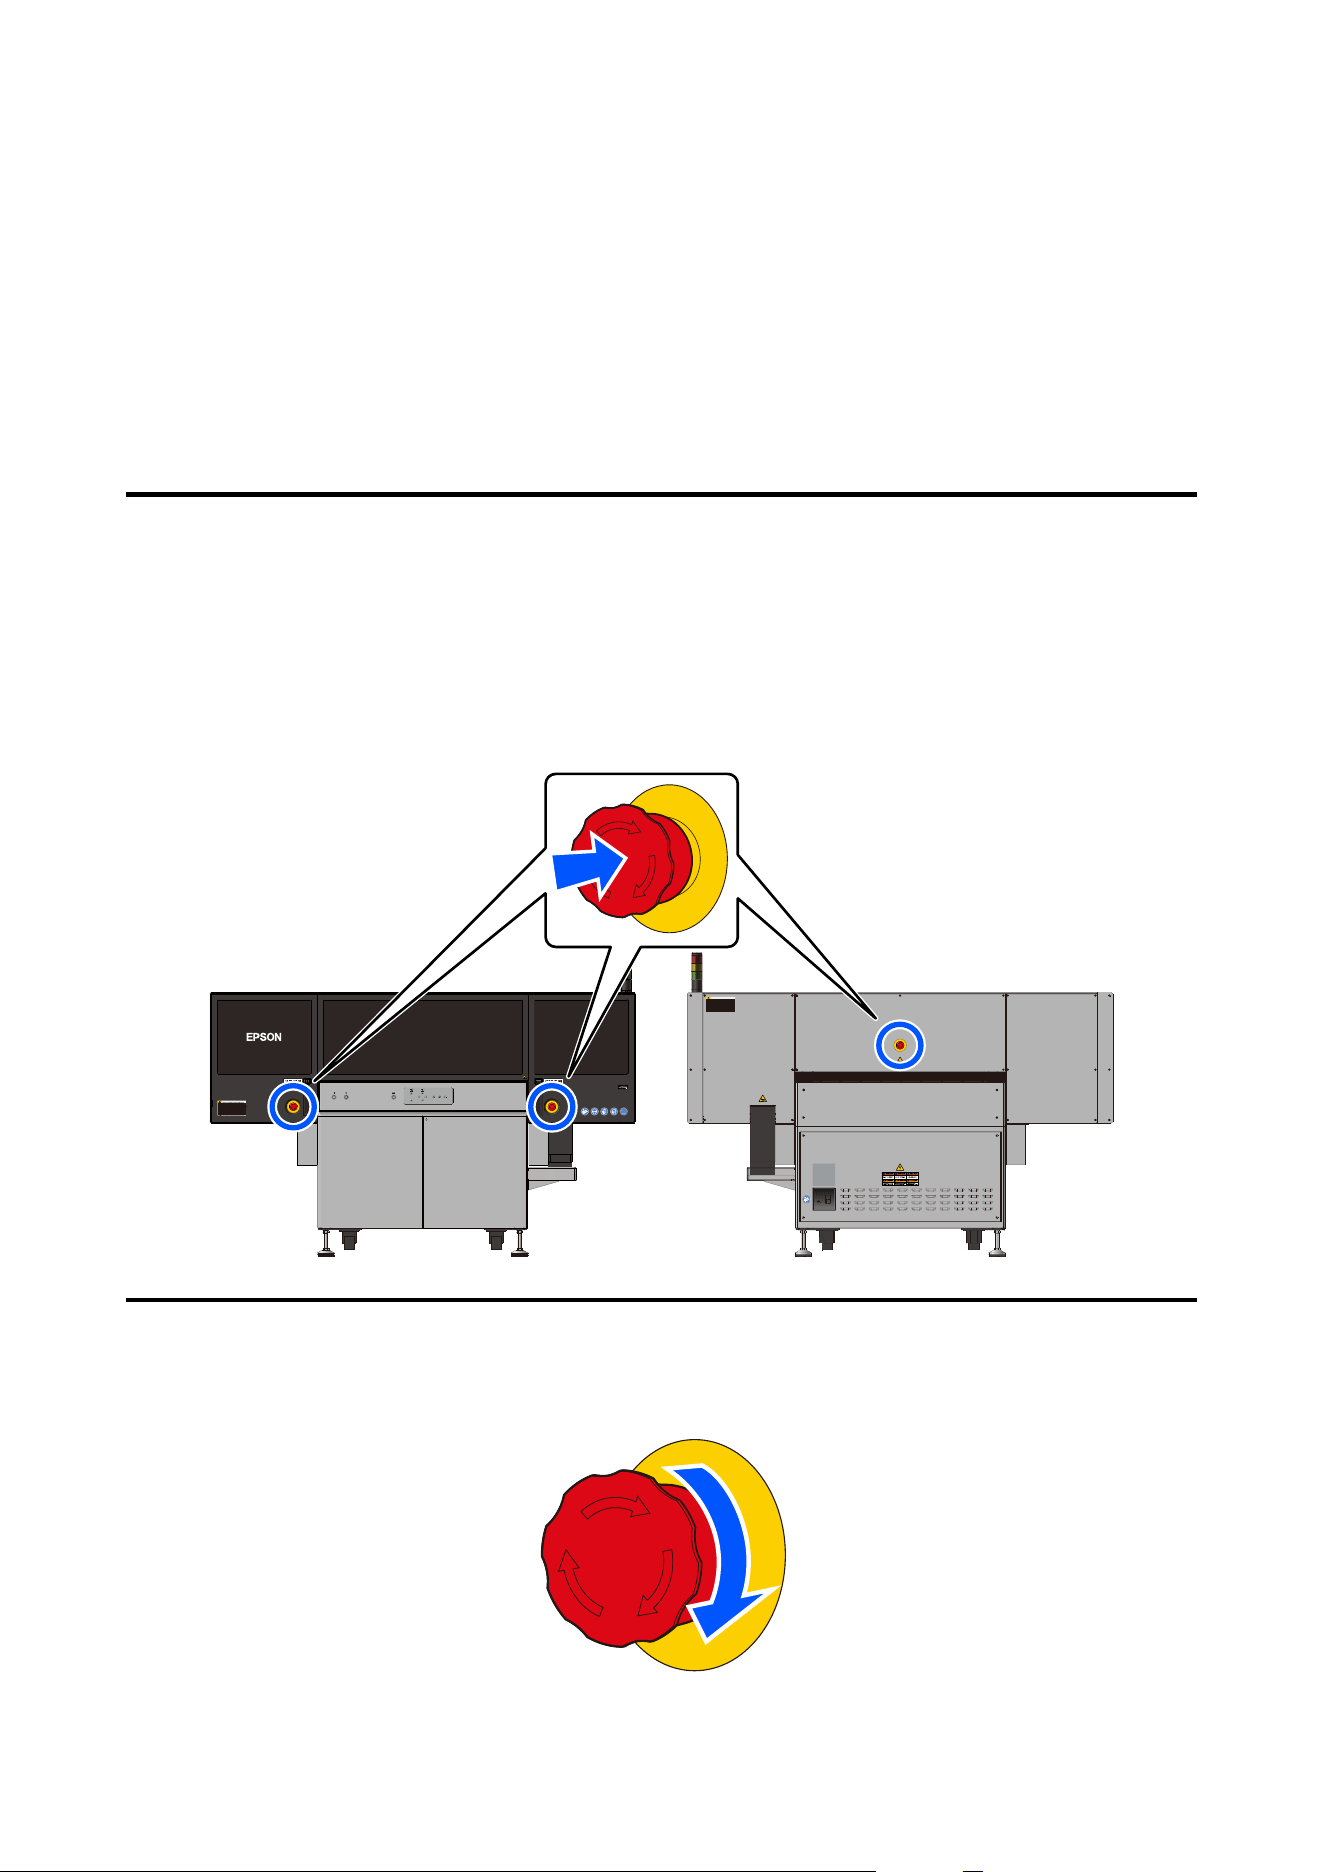
Emergency Stop and Release
Emergency Stop Procedure
Press the emergency stop button.
As shown below, the printer has emergency stop buttons on the front and back.
When an emergency stop button is pressed, the printer will not operate until the release procedure described in the
next section is performed.
Releasing an Emergency Stop
A
Turn the emergency stop button to the right.
SC-V4000 User's Guide
Introduction
19
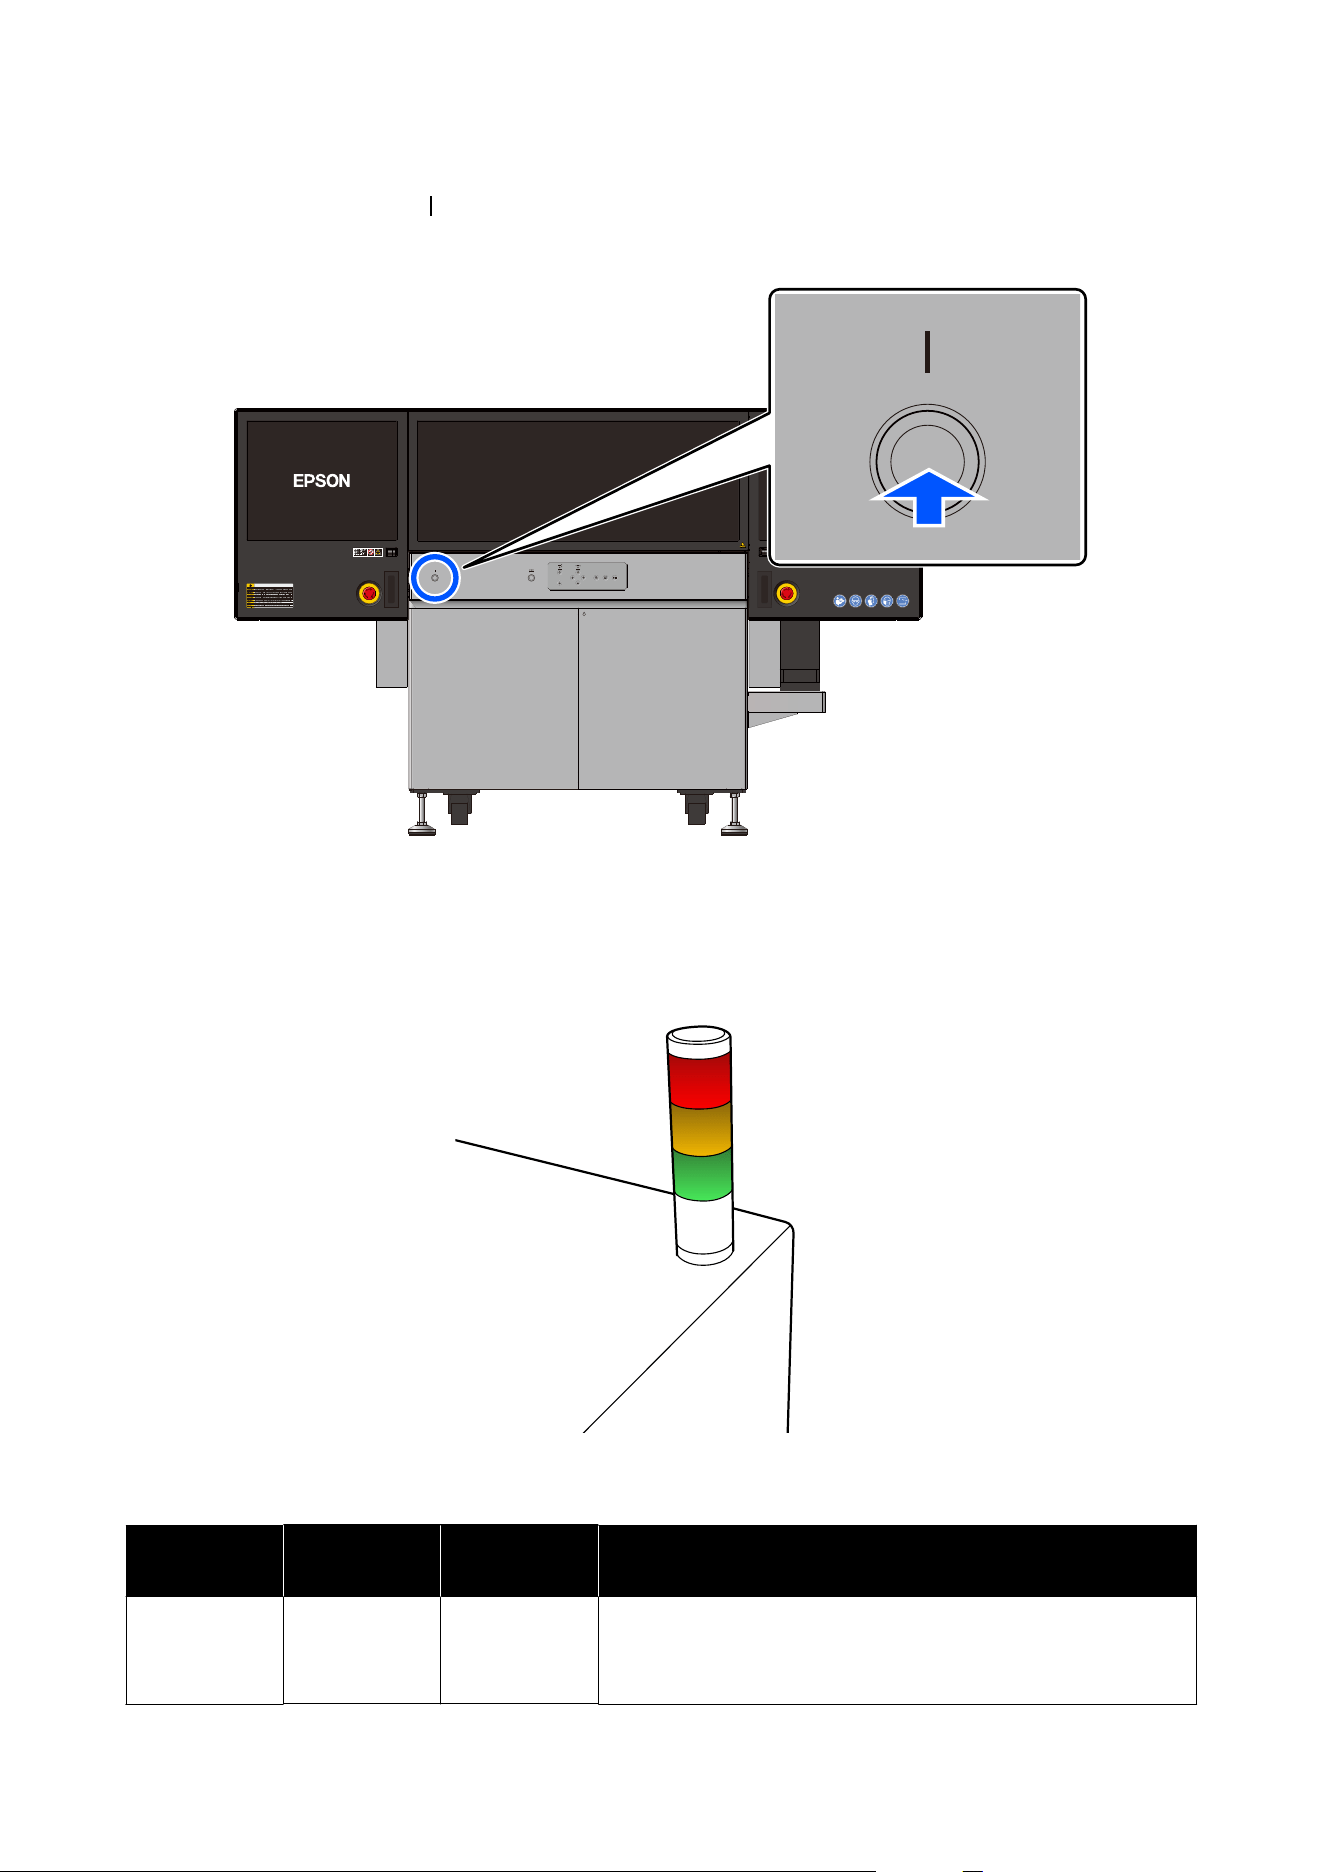
B
Press the power button ( ) to turn on the power.
When you turn on the power, the printer restarts and initialization begins.
Understanding the Signal Lamp
Turns on or flashes in the following situations.
Lamp Color Status Warning
Sound
Meaning
Red On Yes An emergency has occurred.
(Example: The emergency stop button has been pressed or a service
call error has occurred.)
SC-V4000 User's Guide
Introduction
20

Lamp Color Status Warning
Sound
Meaning
Yellow On Yes An error has occurred.
(Example: The amount of ink remaining has fallen below the
minimum allowed, or the print head has stopped mid-operation.)
Green On No Normal status
(Example: Standing by or printing)
Flashing Yes Normal status
(Example: Print head/gantry operation has started or print data is
being received.)
SC-V4000 User's Guide
Introduction
21

Notes on Handling
c
Important:
To use this printer safely and correctly, read the
Safety Precautions before starting operation.
Notes for Using the Printer
Note the following points when using this printer to
avoid breakdowns, malfunctions, and print quality
decline.
❏ When operating this printer, make sure there are
no objects in the surrounding area. If there are
objects there, workers may collide with the gantry,
or objects may interfere with maintenance work.
❏ The UV ink used in the printer will cure when
exposed to sunlight or fluorescent lights. Do not
use the printer in direct sunlight. Not doing so
could cause the print head nozzles to clog.
❏ When using the printer, observe the operating
temperature and humidity range described in the
"Specifications Table".
U “Specifications Table” on page 114
However, you may not be able to print correctly
even if the above criteria are met, but if the
environmental requirements of the media you are
using are not met. Use the printer in an
environment that meets the media's requirements.
Also, when operating in dry areas, or in air
conditioned environments, be careful of dryness
and maintain the specified humidity range.
❏ Do not install the printer next to heat sources or
directly in the path of air from a ventilator, air
conditioner, or treatment machine. Failure to
observe this precaution could result in the print
head nozzles drying and clogging.
❏ Turning off the power while an error has occurred
could cause the print head nozzles to clog. Check
the UV Flatbed Controller log for errors and
solutions.
❏ When the power is on, do not remove the power
plug or cut the power at the breaker, especially
during maintenance. Doing so may cause ink to
be consumed, and the print head nozzles may
become clogged. If the power turns off, turn it on
again.
❏ Even when not printing, ink is consumed during
maintenance operations to keep the print head in
optimum condition.
❏ The print head may move even when not printing.
Do not put your hands inside the front cover.
❏ Do not move the print head by hand. Doing so
can cause malfunctions.
❏ You need to perform maintenance, such as
cleaning or replacement, at the recommended
time or sooner depending on the frequency of use.
Failure to perform maintenance can cause print
quality to decline. Continuing to use the printer
without performing proper maintenance can
damage the print head.
U “Periodic Maintenance” on page 81
❏ Do not print on mirrors, glass, or glossy metal.
UV light reflected by materials such as these can
cure the ink around the print head, causing a
malfunction to occur.
Notes on Long-term Storage
When storing this printer for an extended period
without using it, the procedures differ depending on
whether the storage period is 10 days or more or 45
days or more.
If the printer is not stored correctly, you may not be
able to print properly the next time it is used.
Preparations before storage
Do the following before turning off the printer and
storing it.
❏ Confirm that the print head is in the standby
position (right side).
If the print head is not in the standby position,
turn the printer off and back on, and then check
that the print head has moved to the standby
position.
SC-V4000 User's Guide
Introduction
22

❏ Confirm that all covers on the printer are closed.
Storing the printer with the covers open allows
dust to enter, which can cause malfunctions.
❏ In Advanced in UV Flatbed Controller, set the
print head cleaning level performed from the
printer's control panel to Level 2.
U “Cleaning from the printer's control panel”
on page 96
❏ Perform capping.
Capping protects the nozzle surface by covering it
with the suction cap.
See the next section for the detailed capping
procedure.
Capping procedure
c
Important:
After capping, immediately exit the UV Flatbed
Controller and turn off the printer. Leaving the
printer on after capping can cause malfunctions.
A
Click Maintenance on the UV Flatbed
Controller menu.
B
Click Long-term storage - Execute.
C
An information message is displayed. Check it
and click OK.
Capping is performed.
D
Immediately exit the UV Flatbed Controller
and turn off the printer.
When storing for 10 days or more
Once every 10 days, turn on the printer and perform
Level 2 print head cleaning from the printer's control
panel.
Leaving the printer unused for more than 10 days
without cleaning the print head can cause
malfunctions.
U “Cleaning from the printer's control panel” on
page 96
When storing for 45 days or more
By having a service engineer perform long-term
storage preparation, you can eliminate the need to
turn on the printer once every 10 days.
For long-term storage preparation, contact your dealer
or Epson Support.
You also need a service engineer to perform
preparations when resuming use after long-term
storage.
Notes on Handling Ink Bottles
Notes on Handling and Storing
❏ Read the safety data sheet before use.
You can download it at your local Epson Web site.
❏ Store ink bottles at room temperature and out of
direct sunlight.
❏ When installing ink supply units for the first time,
a lot of ink is consumed to fill all parts of print
head nozzles to get the printer ready for printing.
Prepare replacement ink bottles as soon as
possible.
❏ Do not subject the ink bottles to powerful impacts
such as dropping them. Ink may leak from the ink
bottles, and you could slip and fall on ink that has
spilled on the floor.
❏ Do not open the lid of the ink bottle until just
before refilling the ink tank.
Notes on Maintaining Good Print
Quality
❏ Use the ink within the recommended expiration
date indicated on the ink bottle.
❏ When moving the ink bottles from a cold to a
warm location, leave them at room temperature
for at least three hours before use.
SC-V4000 User's Guide
Introduction
23

❏ When refilling the ink tank, do not leave any ink
in the ink bottle; instead, pour it all into the tank.
If ink remains in the ink bottle, use it as soon as
possible. Using ink that has been open for a long
time can cause print quality to decline.
Handling Media
Note the following when handling or storing media.
Media that are in poor condition will not produce
good quality prints.
Notes on Handling and Storing
❏ Do not bend the media or damage the printing
surface.
❏ Wear gloves when handling media. Handling the
media with bare hands may leave fingerprints and
marks on the media.
❏ Keep the media dry.
❏ Avoid locations that are subject to direct sunlight,
excessive heat, or humidity.
❏ Store the media so that dust does not adhere to it.
Dust can cause print quality to decline.
❏ When media is not being used, remove it from the
printer and store it. If you leave media loaded for
an extended period, dust may adhere to it, which
can cause print quality to decline.
Handling Media After Printing
To maintain long lasting, high quality print results,
note the following points.
❏ The abrasion resistance and flexibility of cured
ink, and the adhesion of the ink to the media
varies depending on the printed media and print
data.
Check the printed results yourself and handle
them with care.
❏ Rubbing or scratching the print surface forcefully
may damage it.
Printing varnish ink on the top surface may
improve resistance to print surface damage.
❏ If the ink has not been cured sufficiently, expose it
to additional UV light. Uncured ink that comes
into contact with the skin may cause allergic
reactions and other harmful effects on the body.
U “When the ink or varnish is not sufficiently
cured” on page 103
❏ Print outs may contain un-reacted ink
components. Unreacted ink components may
cause allergic reactions and other harmful effects
on the body. Do not use printed materials for the
following purposes.
❏ For food wrappers
❏ For items that children may accidentally put
in their mouths
❏ For fabric or leather that directly touches the
body (such as clothes or accessories)
❏ For any items that touch or are inserted into
the body such as medical instruments
Supported Media
Supported Thickness, Weight,
and Size
This printer can print on media with the following
specifications.
Maximum
media
thickness
200 mm (7.87 in.)
Maximum
media
weight
50 kg (110.2 lbs) (including jig)
Maximum
media size
X direction (left-right) 1033 mm (40.67
in.)
Y direction (front-back) 1600 mm (63.0
in.)
Maximum
print area
X direction (left-right) 980 mm (38.58 in.)
Y direction (front-back) 700 mm (27.56
in.)
SC-V4000 User's Guide
Introduction
24
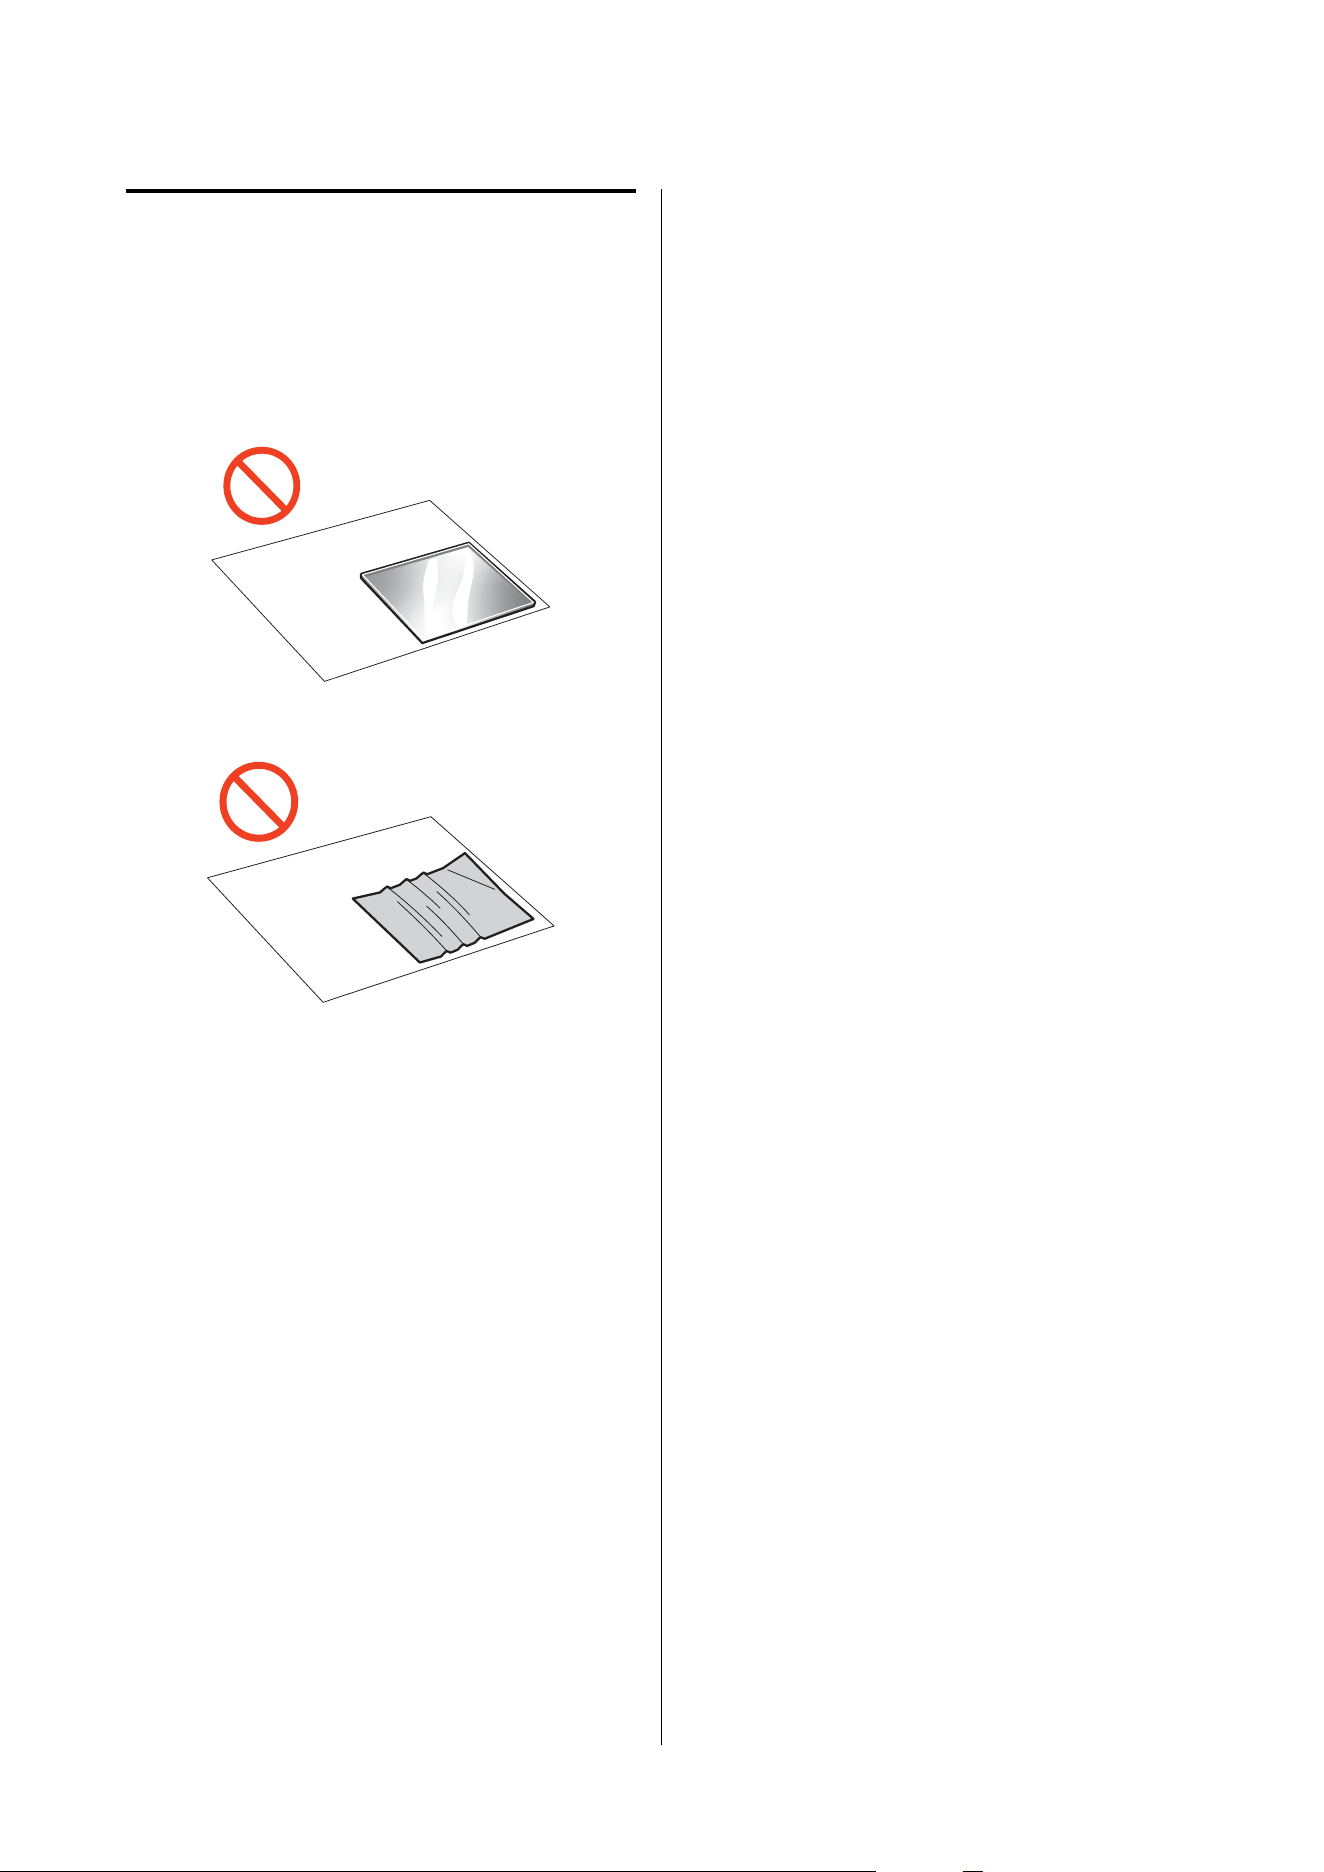
Unusable (Restricted) Media
❏ You cannot use media in the following conditions.
Doing so can cause clogged nozzles or
malfunctions.
❏ Highly reflective media (mirrors, glass, glossy
metal)
❏ Media with wrinkles or folds
❏ Depending on the media material, some media
cannot be printed on this printer. Before
production printing, always perform a test print
using the same media you will use for the actual
job to confirm the print quality in advance.
SC-V4000 User's Guide
Introduction
25
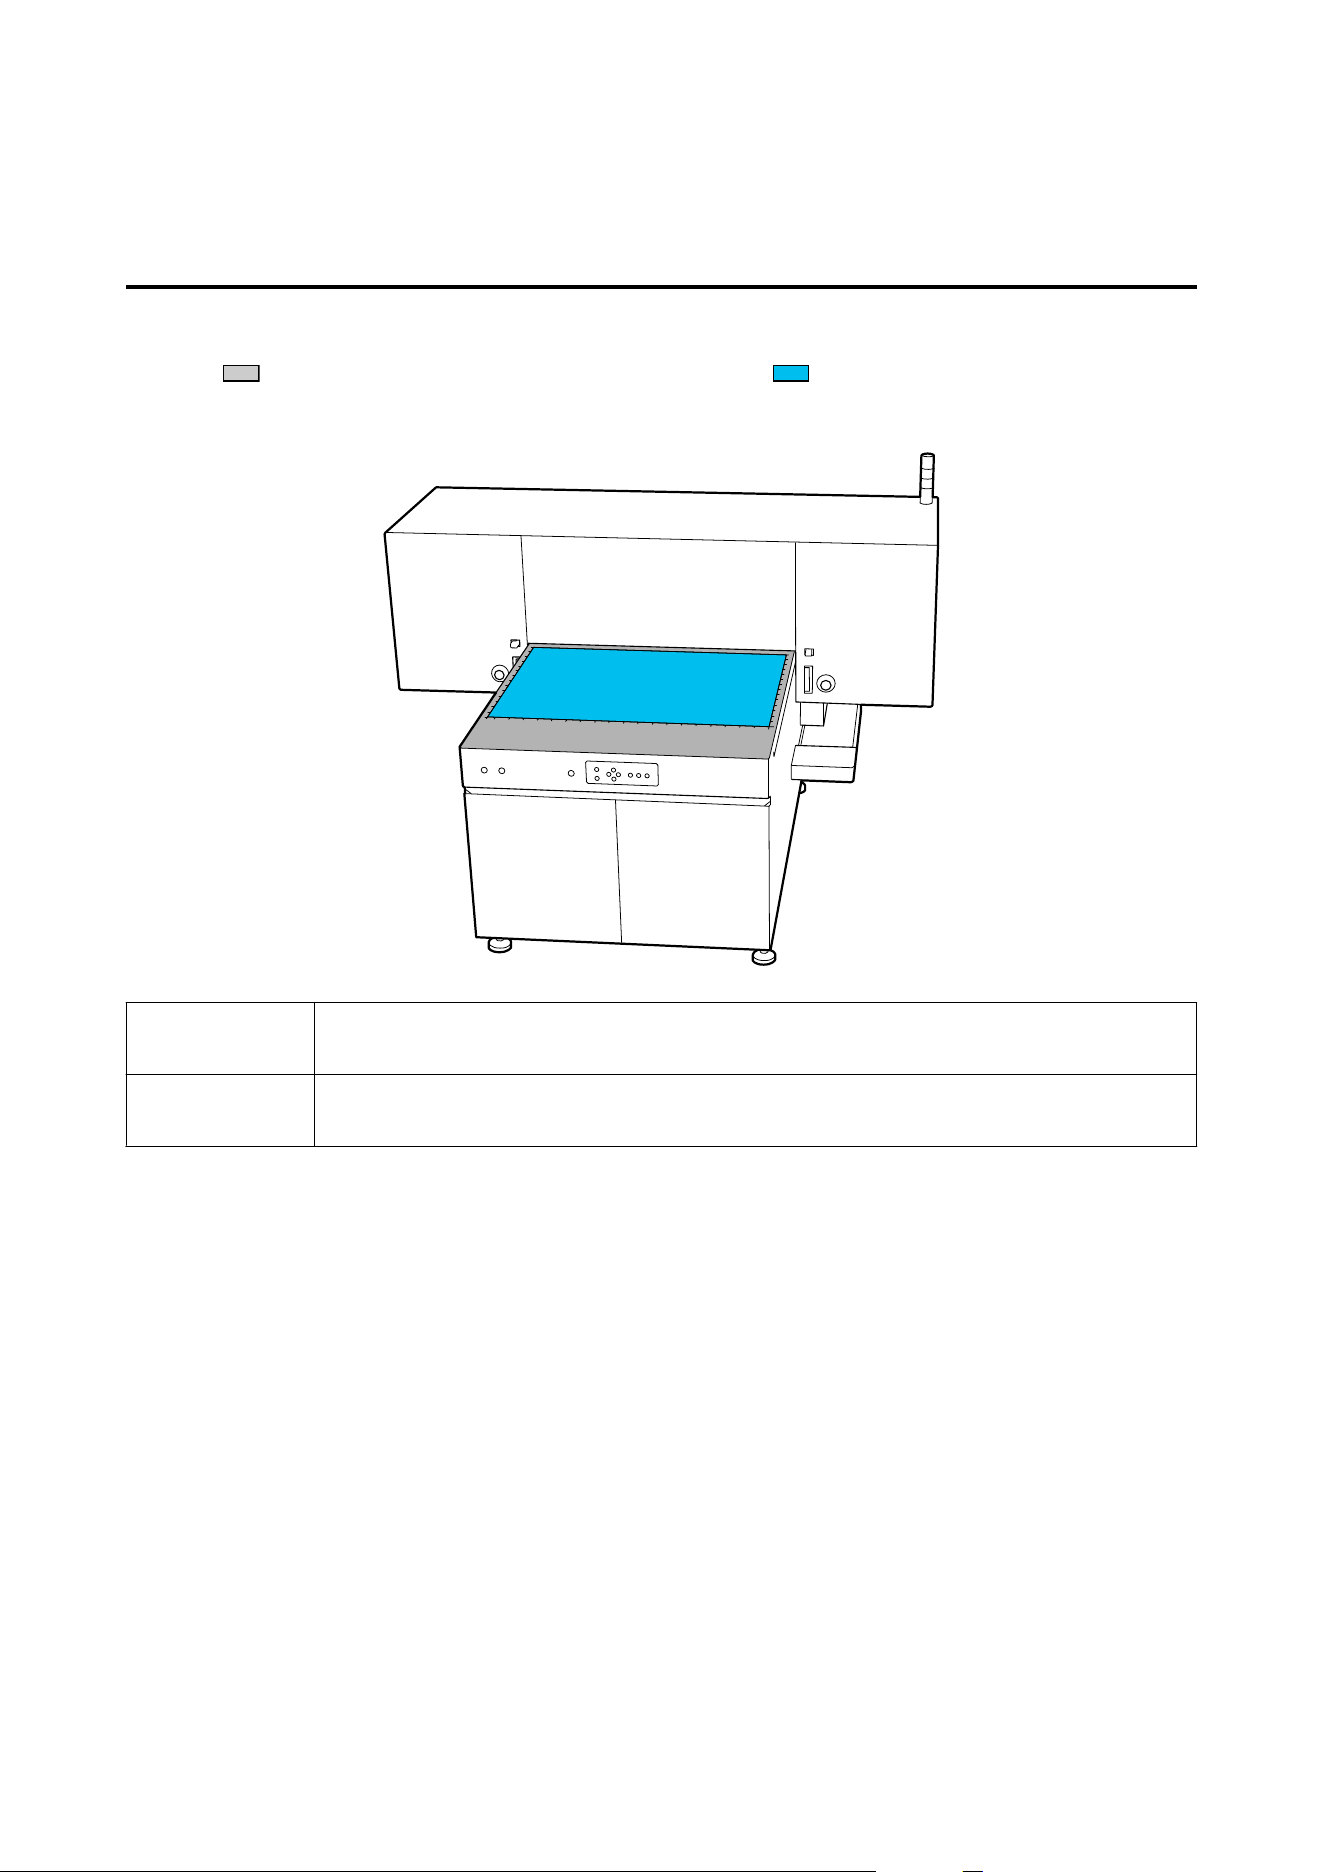
Flatbed Specifications
Flatbed Size and Maximum Printable Area
The gray ( ) area in the illustration below is the flatbed. The blue ( ) area is the printable area. The size of
each area is shown in the following table.
Flatbed size X direction (left-right) 1033 mm (40.67 in.)
Y direction (front-back) 996 mm (39.21 in.)
Maximum
printable area
X direction (left-right) 980 mm (38.58 in.)
Y direction (front-back) 700 mm (27.56 in.)
SC-V4000 User's Guide
Introduction
26
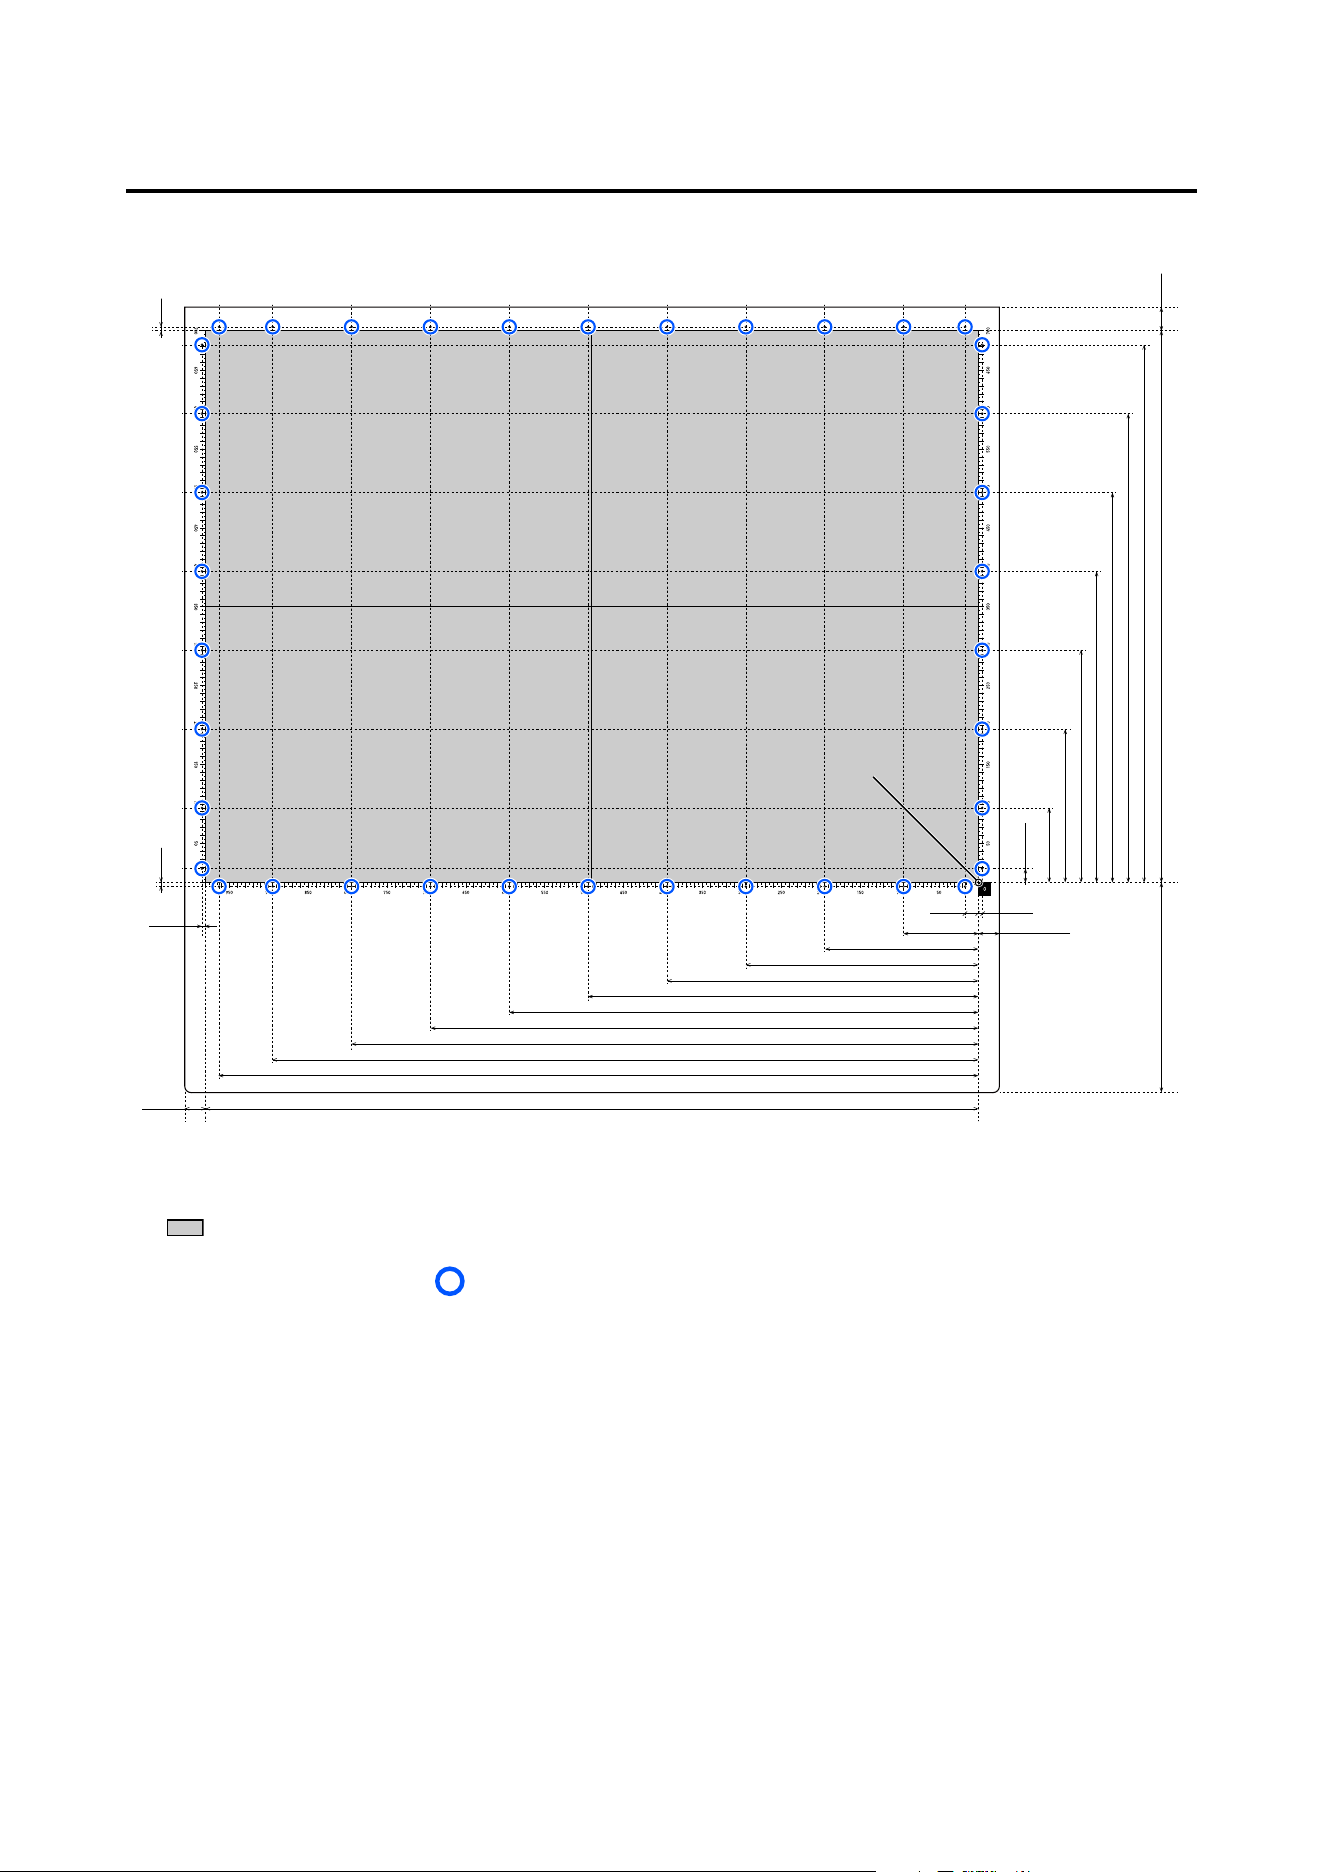
Flatbed Illustration
5 mm
0.20 in
5 mm
0.20 in
5 mm
0.20 in
5 mm
0.20 in
16.7 mm
0.66 in
26.5 mm / 1.04 in94.7 mm / 3.73 in
194.7 mm / 7.67 in
95 mm / 3.74 in
195 mm / 7.68 in
295 mm / 11.61 in
395 mm / 15.55 in
495 mm / 19.49 in
595 mm / 23.43 in
682.3 mm / 26.86 in
700 mm / 27.56 in266 mm / 10.47 in
30 mm
1.18 in
17.7 mm
0.70 in
294.7 mm / 11.60 in
394.7 mm / 15.54 in
494.7 mm / 19.48 in
594.7 mm / 23.41 in
694.7 mm / 27.35 in
794.7 mm / 31.29 in
894.7 mm / 35.22 in
963.3 mm / 37.93 in
980 mm / 38.58 in
26.5 mm
1.04 in
A
A
❏ (A) indicates the home position.
❏
indicates the printable area.
❏ In the illustration above, the
indicate the locations of holes that can be used to attach supplied screws or
jigs. The dotted lines in the illustration above connect the centers of the holes. The size of the holes is M3 and
the depth of the holes is 10 mm (0.39 in.).
❏ The solid lines within the printable area indicate suction area divisions.
SC-V4000 User's Guide
Introduction
27

Software Supplied
Epson Edge Print PRO
Epson Edge Print PRO is RIP software that is easy to use with straightforward operations.
Install it by accessing the URL specified on the sheet in the Epson Edge Print PRO package.
This printer can print braille by applying multiple layers of varnish ink. When you use Epson Edge Print PRO, you
can print data for braille printing created in Adobe Illustrator.
For details on braille printing, see the Braille Printing Guide (Online Manual).
See the following for more details on Epson Edge Print PRO.
U “Using Epson Edge Print PRO” on page 29
UV Flatbed Controller
The UV Flatbed Controller is control software that receives job files from Epson Edge Print PRO and sends print
data to this printer.
SC-V4000 User's Guide
Introduction
28

Using Epson Edge Print PRO
Starting Procedure
The application can be launched using any of the following methods.
❏ Double-click the desktop shortcut icon
.
❏ Click the Windows Start button - All Programs - Epson Software - Epson Edge Print PRO.
For more information, see the Epson Edge Print PRO online help.
Closing Procedure
Select Done from File at the top left of the screen.
Using UV Flatbed Controller
Starting Procedure
The application can be launched using any of the following methods.
❏ Double-click the desktop shortcut icon
.
❏ Click the Windows Start button - All Programs - UV Flatbed Controller.
Notes when Using the UV Flatbed Controller
Note the following two points.
❏ The UV Flatbed Controller registers the first connected printer as the target printer.
If you connect a printer other than the registered printer later, you cannot print correctly from Epson Edge
Print PRO. Do not connect any printer other than the one you connected initially.
❏ Start UV Flatbed Controller with administrator privileges.
Screen Composition
When you start this software, the following print menu screen is displayed.
The screen layout and functions are as follows.
SC-V4000 User's Guide
Introduction
29
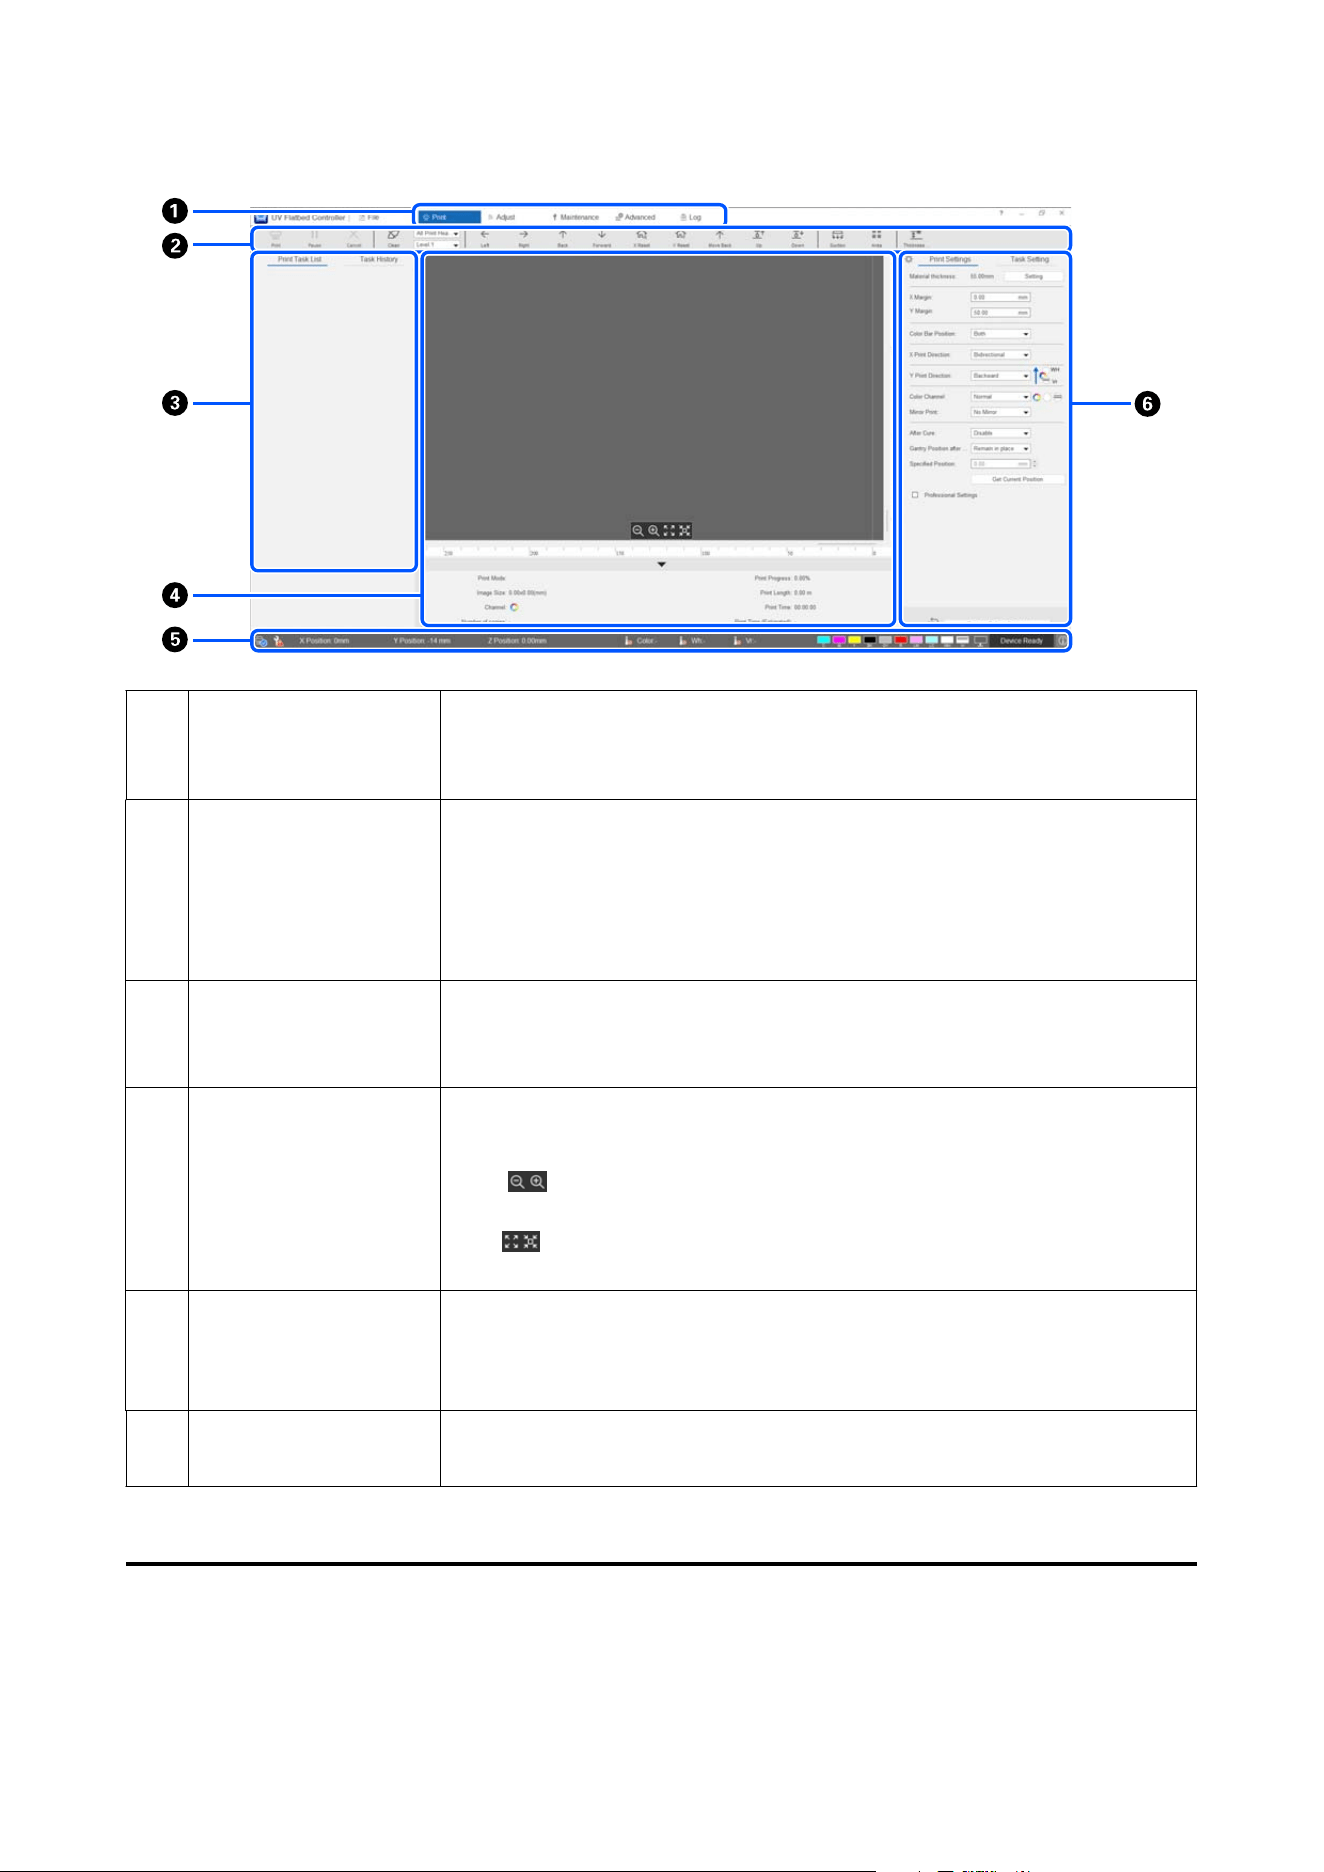
A
Menu Allows you to make and execute various settings. The following describes the functions
of each menu.
U “Details of the Menu” on page 30
B
Function buttons The printer executes operations when buttons are clicked.
Depending on the printer's operating status, some operations may not be available. In
such cases, the icon turns gray (grayed out) to indicate that the function is disabled.
The functions are as follows.
U “Function Button Explanations” on page 32
C
Print Task List/Task
History
*
The Print Task List displays thumbnails, original names, status, and other information
for jobs that are waiting to print or currently printing.
Jobs that have completed printing are automatically moved to the Task History.
D
Preview Area
*
You can check a preview of the job selected in the Print Task List.
You can also drag the preview image to change the print position.
Click
at the bottom of the preview area to reduce/enlarge the preview area
display.
Click
to automatically reduce or enlarge the display so that the currently set
media width fills the entire width of the preview area.
E
Status display area Allows you to check the printer's operating status.
The following describes each display status.
U “Status Information Explanations” on page 33
F
Print Settings/Task
Settings
*
Sets the Thickness Detection, layout, margins, print direction, and other settings for the
stand by job selected in the Print Task List.
*Displayed when the print menu is selected. Not displayed in other menus.
Details of the Menu
The following items and parameters can be set and executed in the Menu.
SC-V4000 User's Guide
Introduction
30

Item Explanation
File Select print jobs and add them to the Print Task List.
Print You can configure print settings and task settings for the print job selected in
the Print Task List. You can also check the Task History.
Adjust
Basic Adjustment
Nozzle Check Prints a check sheet to check for clogged nozzles in the print head.
U “Cleaning the print head” on page 94
Nozzle Compensation Compensates for ink ejection from clogged nozzles by using the surrounding
functioning nozzles. By using nozzle compensation, you can achieve print
results with no visible effects from nozzle clogging. However, depending on the
conditions, Nozzle Compensation may not work effectively.
U “Nozzle Compensation” on page 76
Advanced Adjustment
Head Interval Checks the horizontal and vertical spacing between each print head. A service
engineer performs the adjustment.
Color Adjustment Checks the position where ink droplets from each color nozzle land. A service
engineer performs the adjustment.
Adjustment Mode
Select Adjustment Mode Used to select the target adjustment mode and perform the desired
adjustment when executing bidirectional adjustment or step adjustment.
U “When there is horizontal line misalignment or graininess” on page 102
Bidirectional Adjust Adjust this when horizontal line misalignment or graininess occurs in print
results.
U “When there is horizontal line misalignment or graininess” on page 102
Step Adjust Adjust this when banding occurs in print results.
U “When banding occurs” on page 105
Maintenance
Maintenance Record Check the maintenance history and timing for the next maintenance.
User Maintenance Use this when performing cleaning after work or periodic maintenance.
U “Cleaning after Finishing Work” on page 56
U “Periodic Maintenance” on page 81
Ink refill date and time Check the history of when the ink was refilled.
Long-term storage Use this when storing for 10 days or more.
SC-V4000 User's Guide
Introduction
31
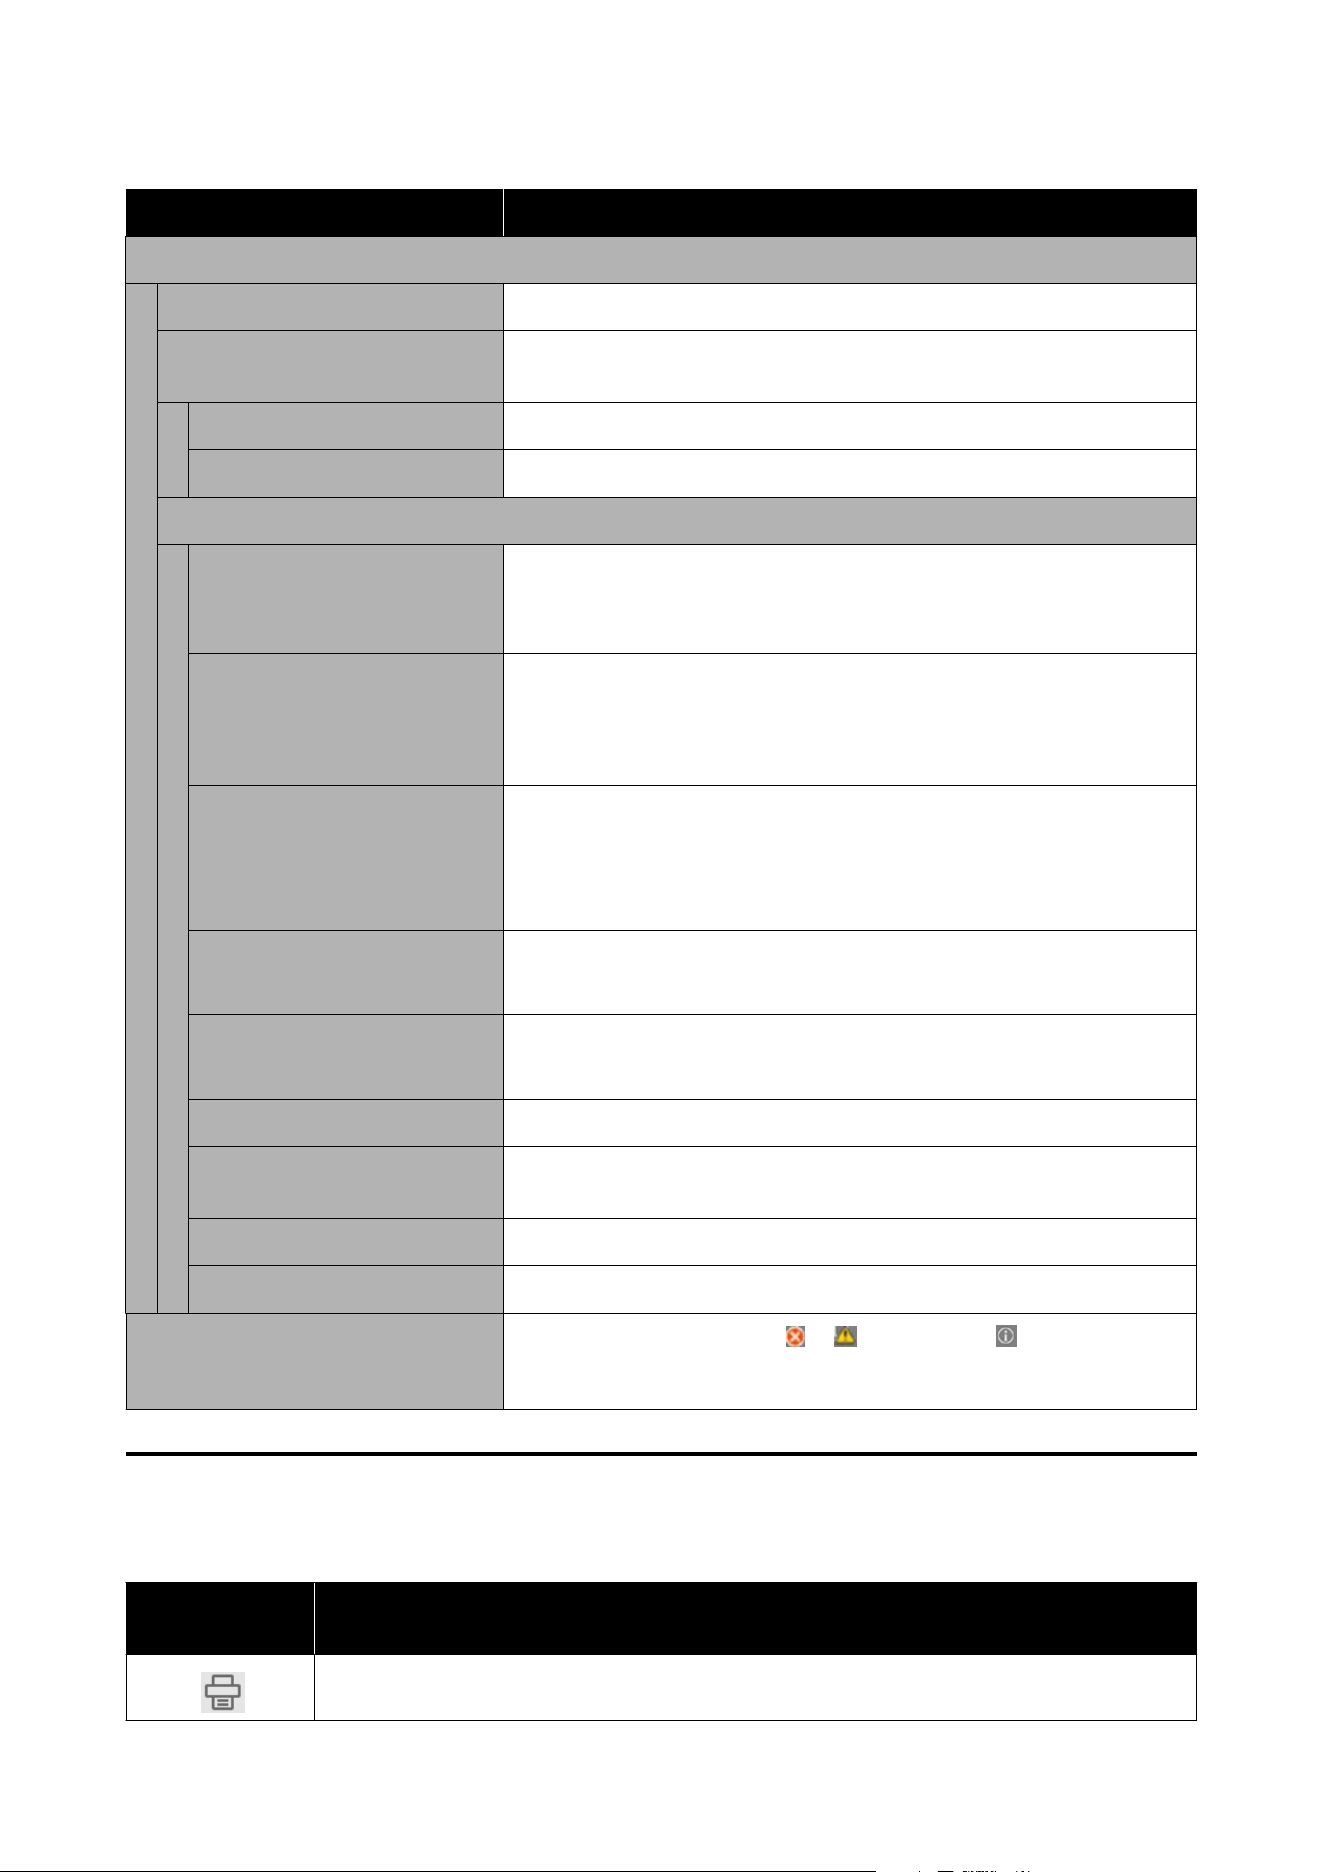
Item Explanation
Advanced
Service This mode cannot be used as it is reserved for service engineers.
Version Info Allows you to check the printer's Device Serial Number, Firmware Version,
Software Version, Firmware Config Info, and Firmware Parameter Info.
Refresh This function is for service engineers only.
Detail This function is for service engineers only.
Advanced
Language Sets the display language. After changing the language, restart the UV Flatbed
Controller.
U “Changing the Screen Display Language” on page 74
Statistical info Allows you to check Base Info (Device Name, Serial Number, and so on), Print
Info (print area, print time, and so on), and the update date/time for each
firmware.
You can also update the statistical information by clicking Refresh.
Print while Ripping Set the Port to 9100.
If problems occur due to interference from other applications, take the
following measures.
U “An error has occurred in the printer.” on page 101
Step-and-Repeat Interval You can set the interval when printing images arranged in a repeated pattern.
U “Printing Images Repeatedly (Step & Repeat)” on page 69
Display of Task History You can display the task history by grouped jobs or arranged in print order.
U “Changing the Display of Task History” on page 75
Change layer display order You can change the display order of the layers in the Print Task List.
Printer Control Panel Settings You can set the nozzle check pattern and cleaning execution process for panel
operations on this printer.
Printer Status Information You can output maintenance information for service engineers to a file.
UV Light Intensity You can change the UV light intensity.
Log When warnings or errors occur,
or are displayed in at the
bottom-right corner of the screen. Click this when you want to check the
content of warnings or errors and how to resolve them.
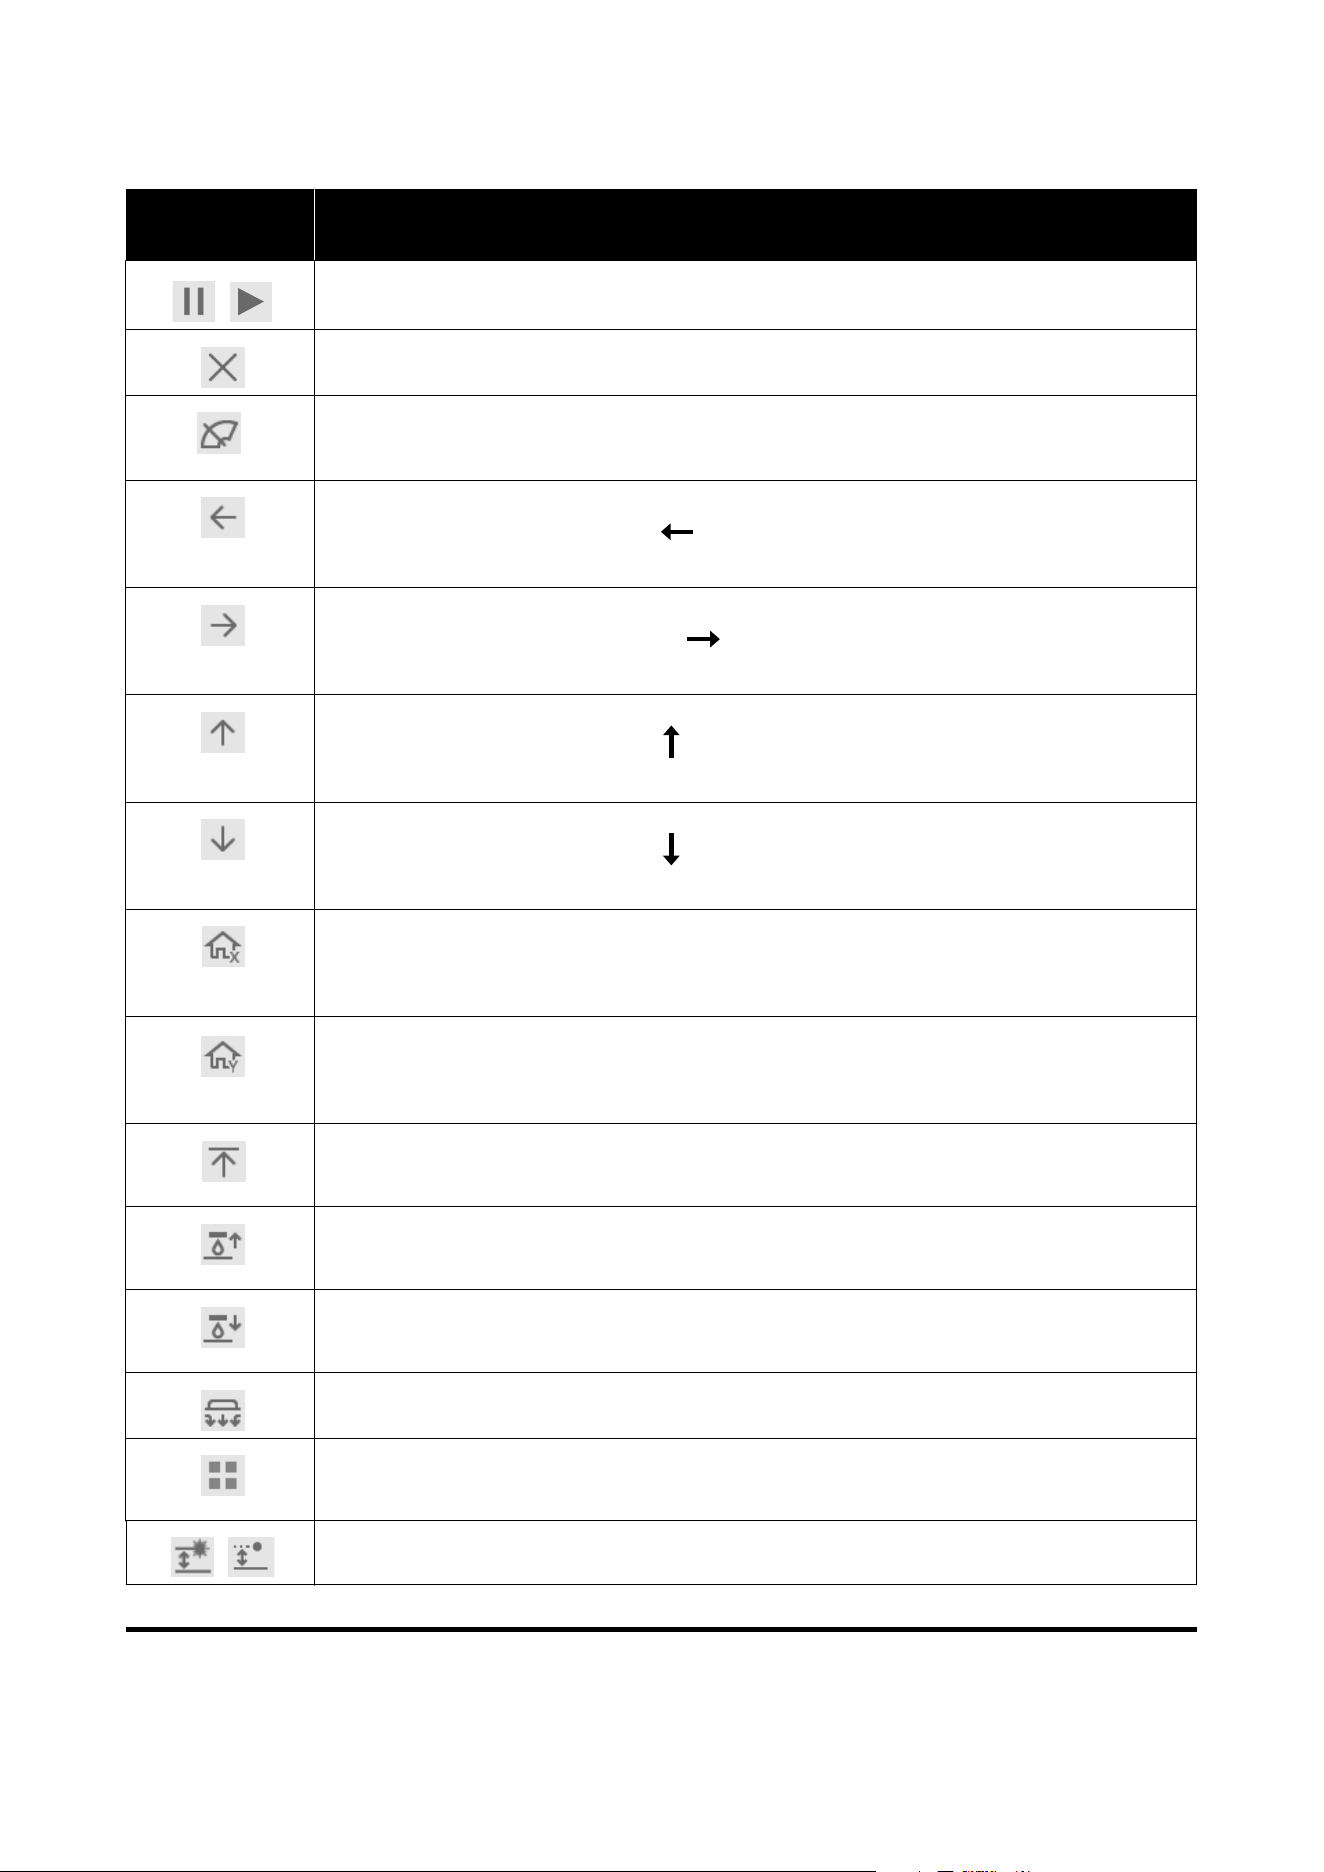
Function Button Explanations
You can perform the following operations using the function buttons.
Function
Buttons
Explanation
Performs printing.
SC-V4000 User's Guide
Introduction
32
Function
Buttons
Explanation
Pauses or resumes printing during a print job.
Cancels printing during a print job.
Performs print head cleaning if there are gaps in the nozzle check pattern.
U “Cleaning the print head” on page 94
Moves the print head to the left. You can also move in the same way by holding down the [ctrl] key on
your computer keyboard and pressing [
]. It cannot be moved while in maintenance mode.
For example, move this when you want to check the condition of the caps.
Moves the print head to the right. You can also move in the same way by holding down the [ctrl] key
on your computer keyboard and pressing [
]. It cannot be moved while in maintenance mode.
For example, move this when you want to check the condition of the caps.
Moves the gantry to the back. You can also move in the same way by holding down the [ctrl] key on
your computer keyboard and pressing [
]. It cannot be used during printing.
For example, move this when you want to load or remove media, or check print results.
Moves the gantry to the front. You can also move in the same way by holding down the [ctrl] key on
your computer keyboard and pressing [
]. It cannot be used during printing.
For example, move this when you want to load or remove media, or check print results.
Moves the print head to the X direction (left-right) reset position (the rightmost position within the
print head's range of motion).
Once you activate this operation, it continues moving until it reaches the reset position.
Moves the gantry to the Y direction (front-back) reset position (the frontmost position within the
gantry's range of motion).
Once you activate this operation, it continues moving until it reaches the reset position.
Moves the gantry to the backmost position.
Once you activate this operation, it continues moving until it reaches the backmost position.
Moves the gantry upward.
For example, move this when you want to check the nozzle surface of the print head.
Moves the gantry downward.
For example, move this when you want to check the nozzle surface of the print head.
Sucks in air through the media suction holes to grip and hold the media in place.
Selects the suction area.
When you turn On suction, the selected suction area is displayed in blue.
Set whether foreign object detection by laser is on or off.
Status Information Explanations
The icons indicate the following content.
SC-V4000 User's Guide
Introduction
33
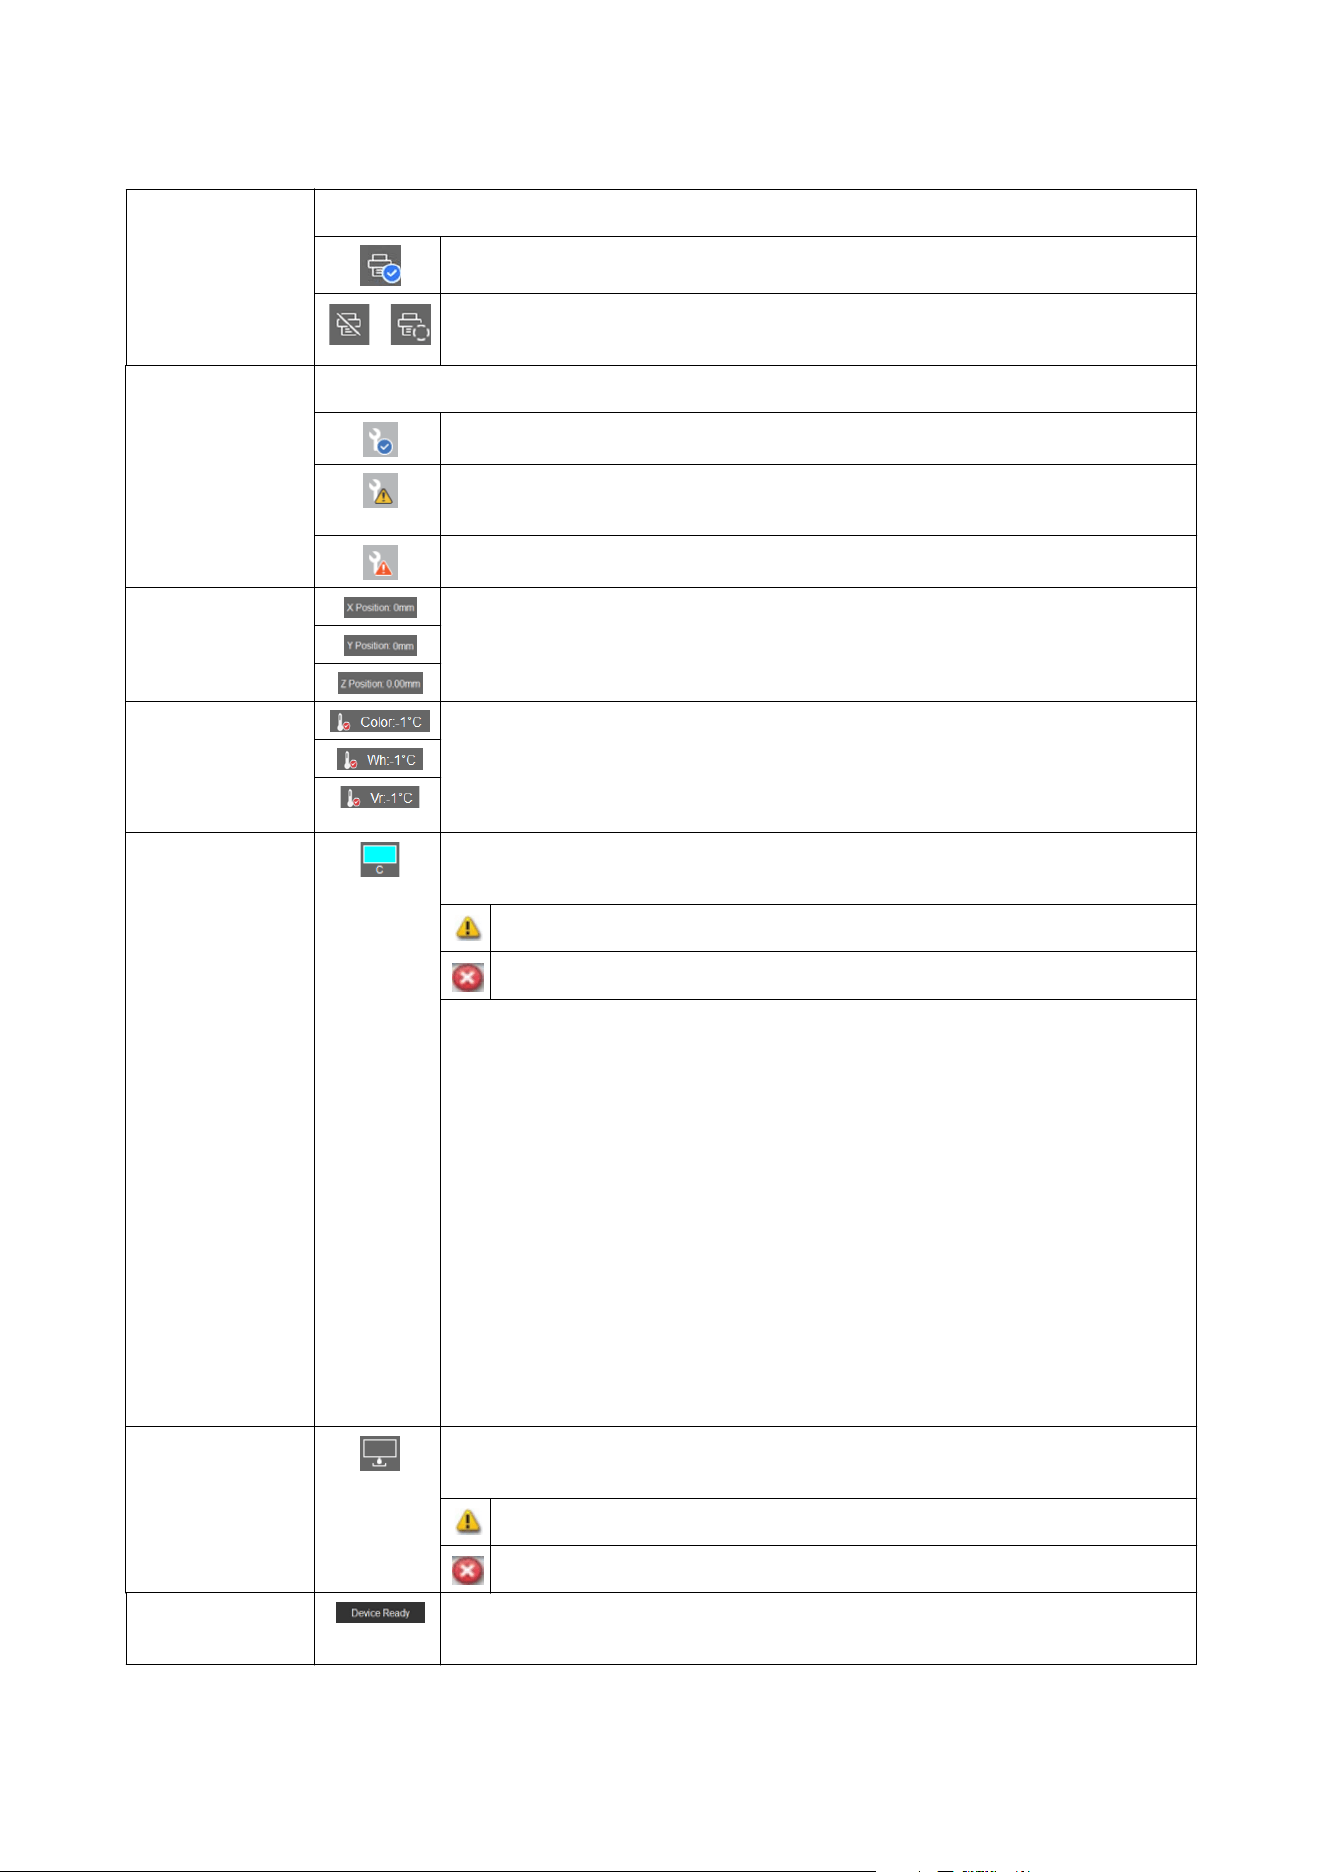
Connection
information
The following icons allow you to check the printer's connection status.
Normal operation.
Cannot receive data. Disconnect the USB cable, and then reconnect it to the printer
and computer. Also, check that the printer is turned on.
Maintenance
information
The following icons allow you to check the maintenance status.
No user maintenance or service maintenance is required.
It is nearly time for user maintenance or service maintenance. Click the icon for more
details.
User maintenance or service maintenance is required. Click the icon for more details.
Coordinate
position
information
Displays the coordinate position of the print head or gantry.
Print head
temperature
information
Displays the plate temperature around the print head.
Immediately after turning on the power, the temperature has not warmed up suffi-
ciently, so printing will not produce accurate print results. Print after the temperature
reaches the appropriate level.
Ink level
information
Displays the approximate amount of ink remaining for each ink. The following icons are
displayed based on ink level status.
Ink is low. You need to prepare a new ink bottle.
Ink level is below the minimum limit. Refill the ink.
The following letters indicate the ink colors. The following shows the relationship be-
tween the symbols and the ink colors.
C: Cyan
M: Magenta
Y: Yellow
BK: Black
GY: Gray
R: Red
LM: Light Magenta
LC: Light Cyan
WH: White
Vr: Varnish
Waste ink amount
information
Displays the approximate remaining free space of the waste ink bottle. The following
icons are displayed depending on the waste ink bottle status.
The waste ink bottle is nearly full. You need to dispose of waste ink.
The waste ink bottle is full. Dispose of the waste ink.
Operating status
information
Displays the operating status of the printer. Start printing when Device Ready is dis-
played.
SC-V4000 User's Guide
Introduction
34
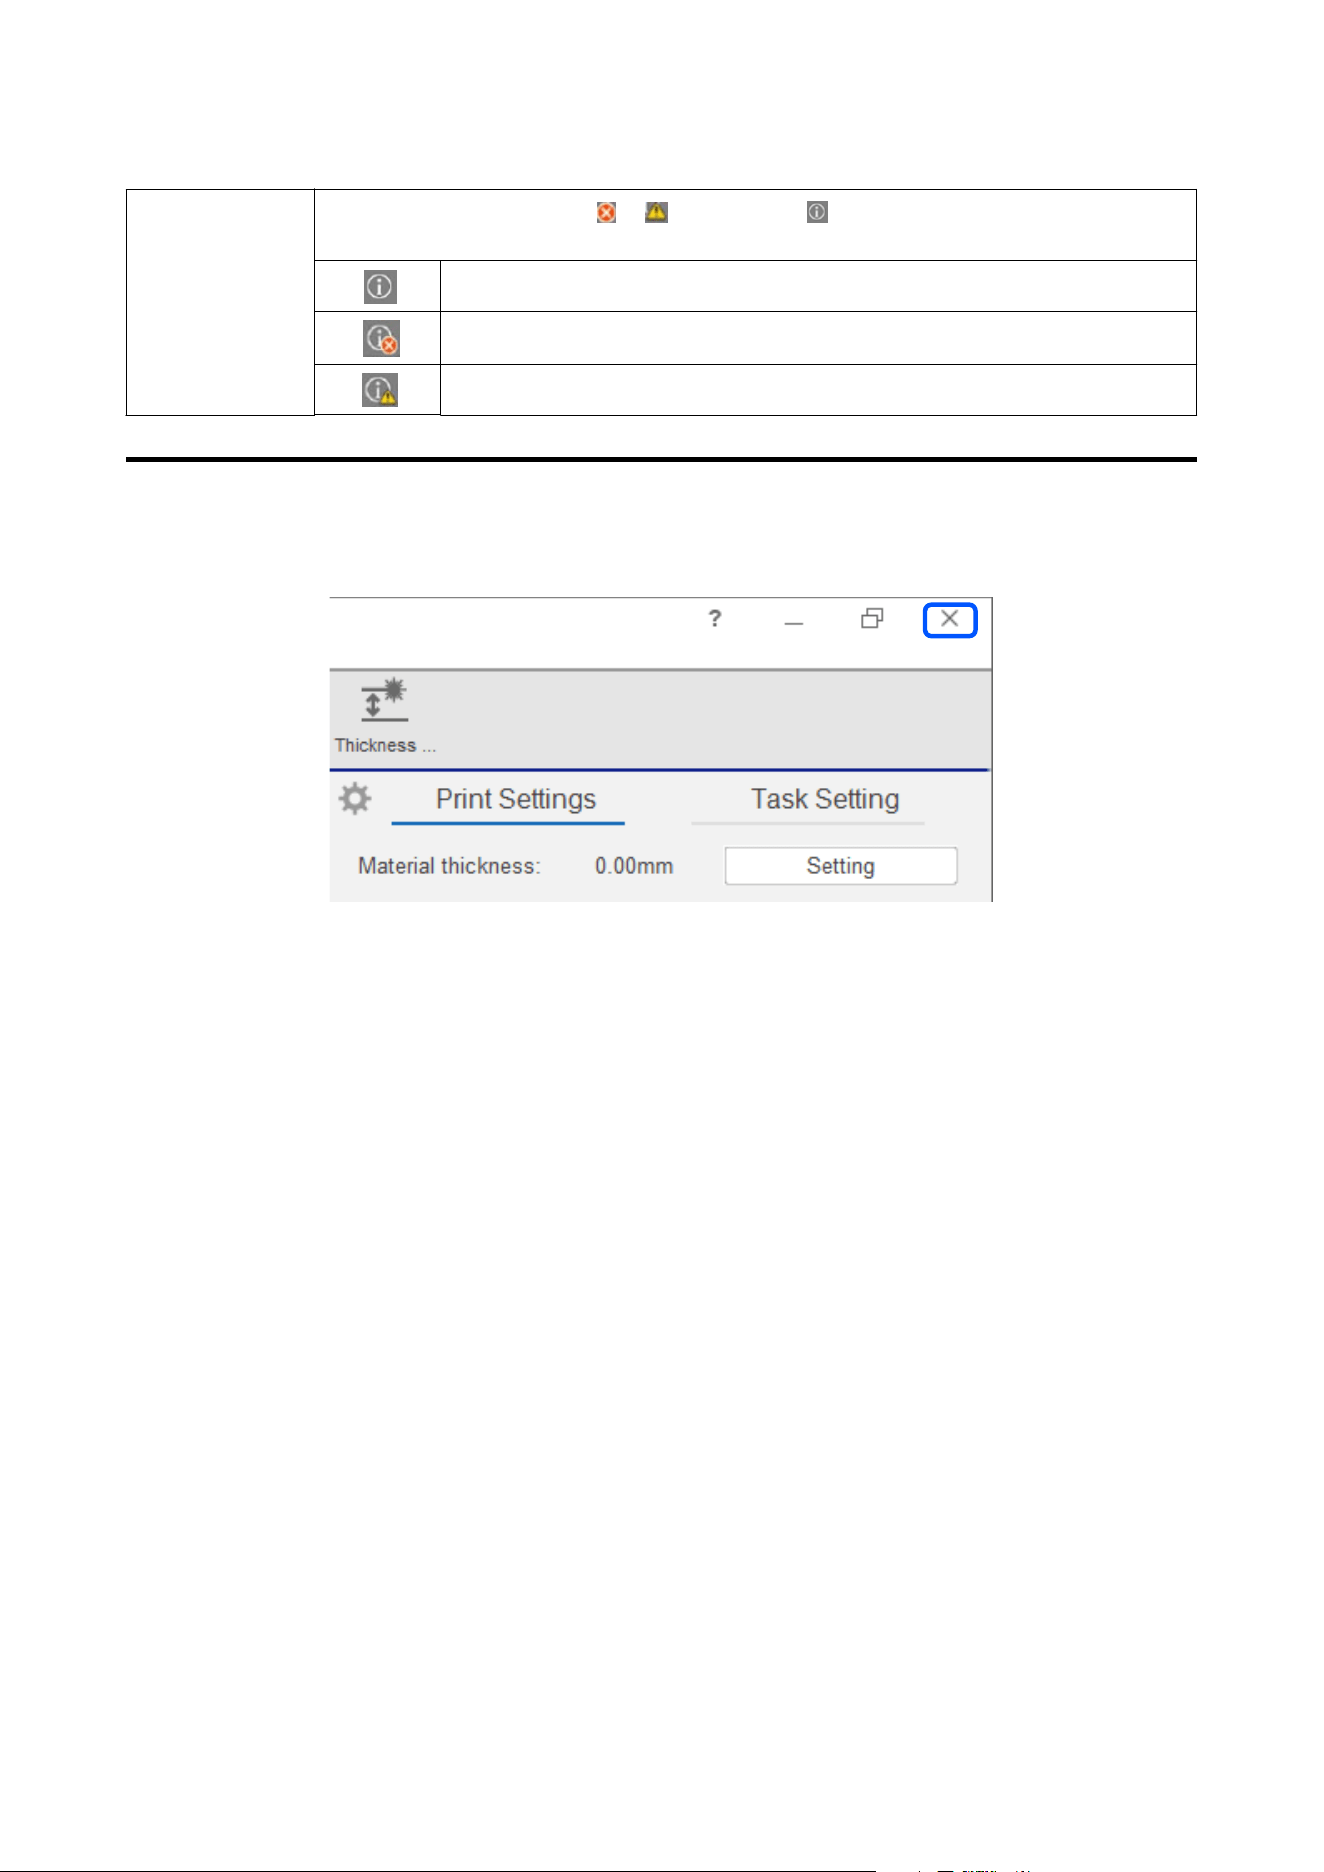
Printer status
information
When warnings or errors occur, or are displayed in at the bottom-right corner of the screen.
Click this when you want to check the content of warnings or errors and how to resolve them.
Normal operation.
An error has occurred.
A warning has occurred.
Closing Procedure
Click the × at the top-right corner of the screen.
SC-V4000 User's Guide
Introduction
35
Basic Operations
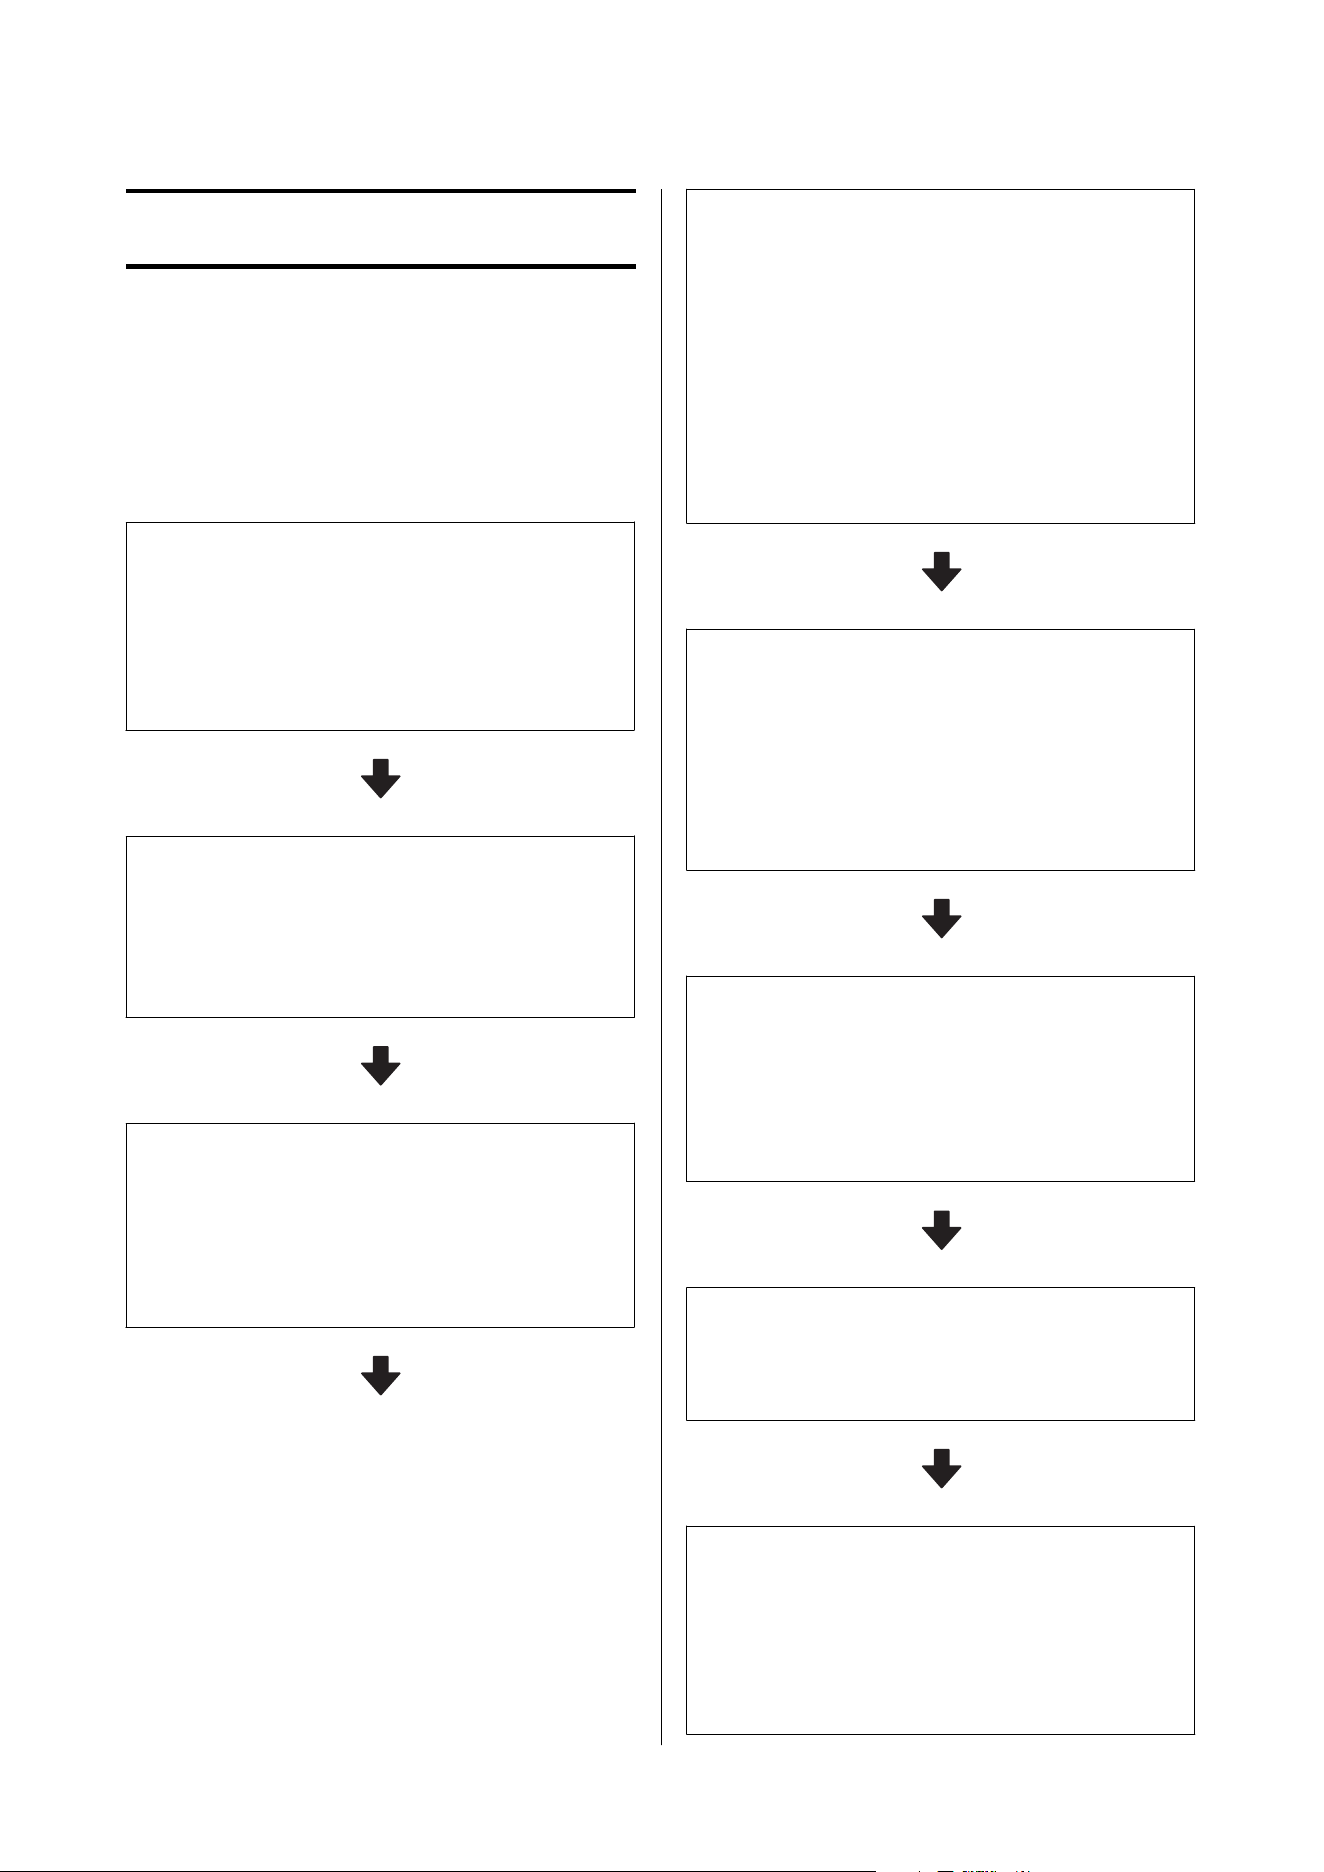
Print Job Workflow
The following provides the basic workflow from
starting work operations to loading media into the
printer and printing.
1. Turning on and Performing Pre-work
Inspections
Turn on the printer, start the UV Flatbed Controller, and
prepare for work.
U “Turning on and Performing Pre-work Inspections”
on page 37
2. Creating Image or Illustration Files
Create the image you want to print using graphic
software such as Adobe Illustrator or Adobe Photoshop
and save it as a PDF.
U “Creating Print Data” on page 38
3. Sending Print Data (Jobs)
Load the PDF you created above into Epson Edge Print
PRO, make the print settings, and create a print job (.prn).
When you execute Print in Epson Edge Print PRO, the
print job is sent to the UV Flatbed Controller.
See the Epson Edge Print PRO manual for more details.
4. Checking and Preparing the Media
❏ Check the type of media that can be used with this
printer.
U “Supported Media” on page 24
❏ Check the precautions for loading media into this
printer. Depending on the media, you may need jigs
or tape for attachment.
For flat media such as acrylic board and film
U “Notes on Loading Media” on page 48
For media with spherical or curved surfaces
U “Notes on Loading Media” on page 50
5. Loading the Media
Load the media on the flatbed/gantry start position.
For flat media such as acrylic board and film
U “Loading Media” on page 48
For media with spherical or curved surfaces
U “Loading Media” on page 50
6. Making Print Settings
Make print settings in the UV Flatbed Controller, such as
Thickness Detection, Margin, and Y Print Direction.
Incorrect settings may cause malfunctions or reduced
print quality.
U “Print Settings” on page 51
7. Start Printing
Click Print in the UV Flatbed Controller to start printing.
U “Starting” on page 54
8. Cleaning and Turning Off After Finishing
Work
After finishing work operations, perform maintenance
before turning off the printer.
U “Cleaning and Turning Off after Finishing Work” on
page 56
SC-V4000 User's Guide
Basic Operations
36
Turning on and
Performing Pre-work
Inspections
Turning on the Printer
Before starting, be sure to read the included Safety
Precautions.
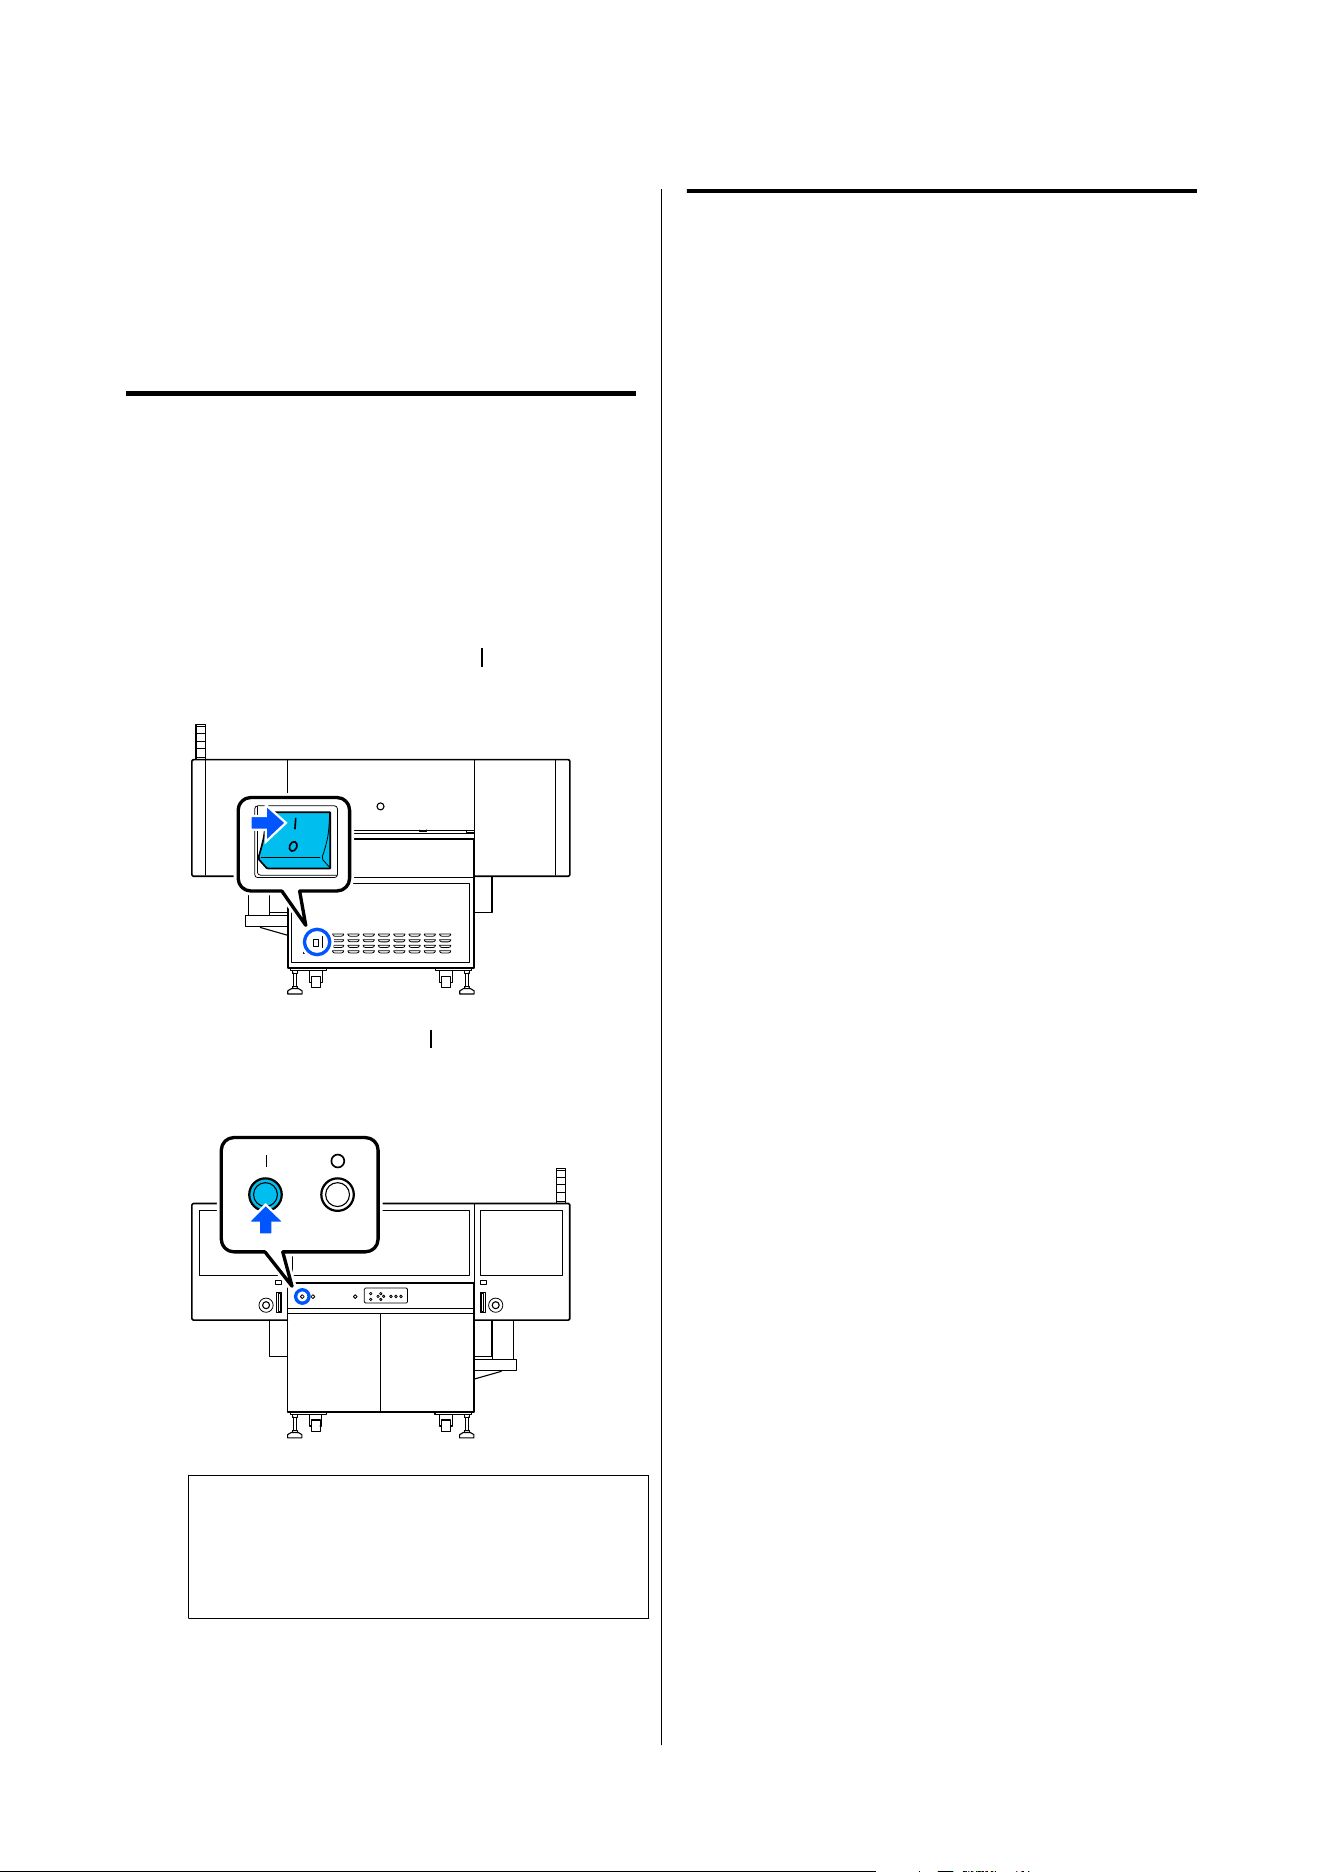
A
Make sure there is nothing on the flatbed/
gantry start position.
B
Press the main power switch ( ) on the back
of the printer to turn it on.
C
Press the power button ( ) on the control
panel on the front of the printer to begin the
initialization process.
Note:
Initialization does not begin if the maintenance
cover is open. Make sure the maintenance cover is
closed.
D
Start UV Flatbed Controller.
Pre-work Inspections
We recommend performing the following inspections
before starting daily operations to maintain print
quality.
Check the amount of ink remaining:
Check the amount of ink remaining from the UV
Flatbed Controller, and refill with new ink if the
remaining ink is below the limit.
U “Refilling Ink” on page 88
When ink is running low, we recommend refilling as
soon as possible.
If the ink level falls below the limit during printing,
you can continue printing by refilling the ink.
However, if you do refill ink during printing, colors
may look different depending on how the ink dries.
Checking for Clogged Nozzles
We recommend printing a nozzle check pattern to
confirm that nozzles are not clogged.
Perform Clean if there are any faded or missing
segments in the printed nozzle check pattern.
Note that heater warm-up
*
occurs immediately after
turning on the printer. Printing during heater
warm-up will reduce the accuracy of the print results.
Print the nozzle check pattern after the heater has
finished warming up.
U “Checking for Clogged Nozzles” on page 94
U “Clearing Clogged Nozzles” on page 95
*The internal heater warms to the appropriate
temperature to raise the UV ink temperature.
SC-V4000 User's Guide
Basic Operations
37

Creating Print Data
This printer can perform multi-layer printing by stacking multiple print layers. Multi-layer printing enables
expressive printing that takes advantage of the characteristics of Varnish ink and White ink.
This section explains how to create print data using multi-layer printing expressions as examples.
Print Layer Order and Print Results
Types of Print Layers
This section explains using examples of print results based on the stacking order of the following three types of
print layers.
❏ Color print layer (hereafter referred to as the "color layer")
This layer prints images and illustrations created with graphic software.
❏ White ink print layer (hereafter referred to as the "white layer")
This layer prints using only White ink as a base for the color layers.
❏ Varnish ink print layer (hereafter referred to as the "varnish layer")
This layer prints using only Varnish ink. When creating print data (jobs) in Epson Edge Print PRO, you can
select either a gloss or matte finish.
Multi-layer Printing Process
The following outlines the general process for multi-layer printing on this printer.
Creating Images and Illustrations for Printing
Create images using graphic software such as Adobe Illustrator or Adobe Photoshop.
Creating White Layers and Varnish Layers
You can automatically generate White layers and Varnish layers from color plates in Epson Edge Print PRO. You can also create
them using graphic software such as Adobe Illustrator or Adobe Photoshop.
Printing using Epson Edge Print PRO
The print job is sent to the UV Flatbed Controller.
SC-V4000 User's Guide
Basic Operations
38
Loading Media
U “Loading Media (For Flat Media such as Acrylic Board and Film)” on page 48
U “Loading Media (for Media with Spherical or Curved Surfaces)” on page 50
Making Multi-layer Print Settings in the UV Flatbed Controller
Make the settings for correct multi-layer printing on this printer.
U “Print Settings” on page 51
U “Multi-layer Printing” on page 64
Printing
U “Starting and Canceling Printing” on page 54
For detailed information on how to use Epson Edge Print PRO, on the Epson Edge Print PRO main screen, click
the Help menu - Help.
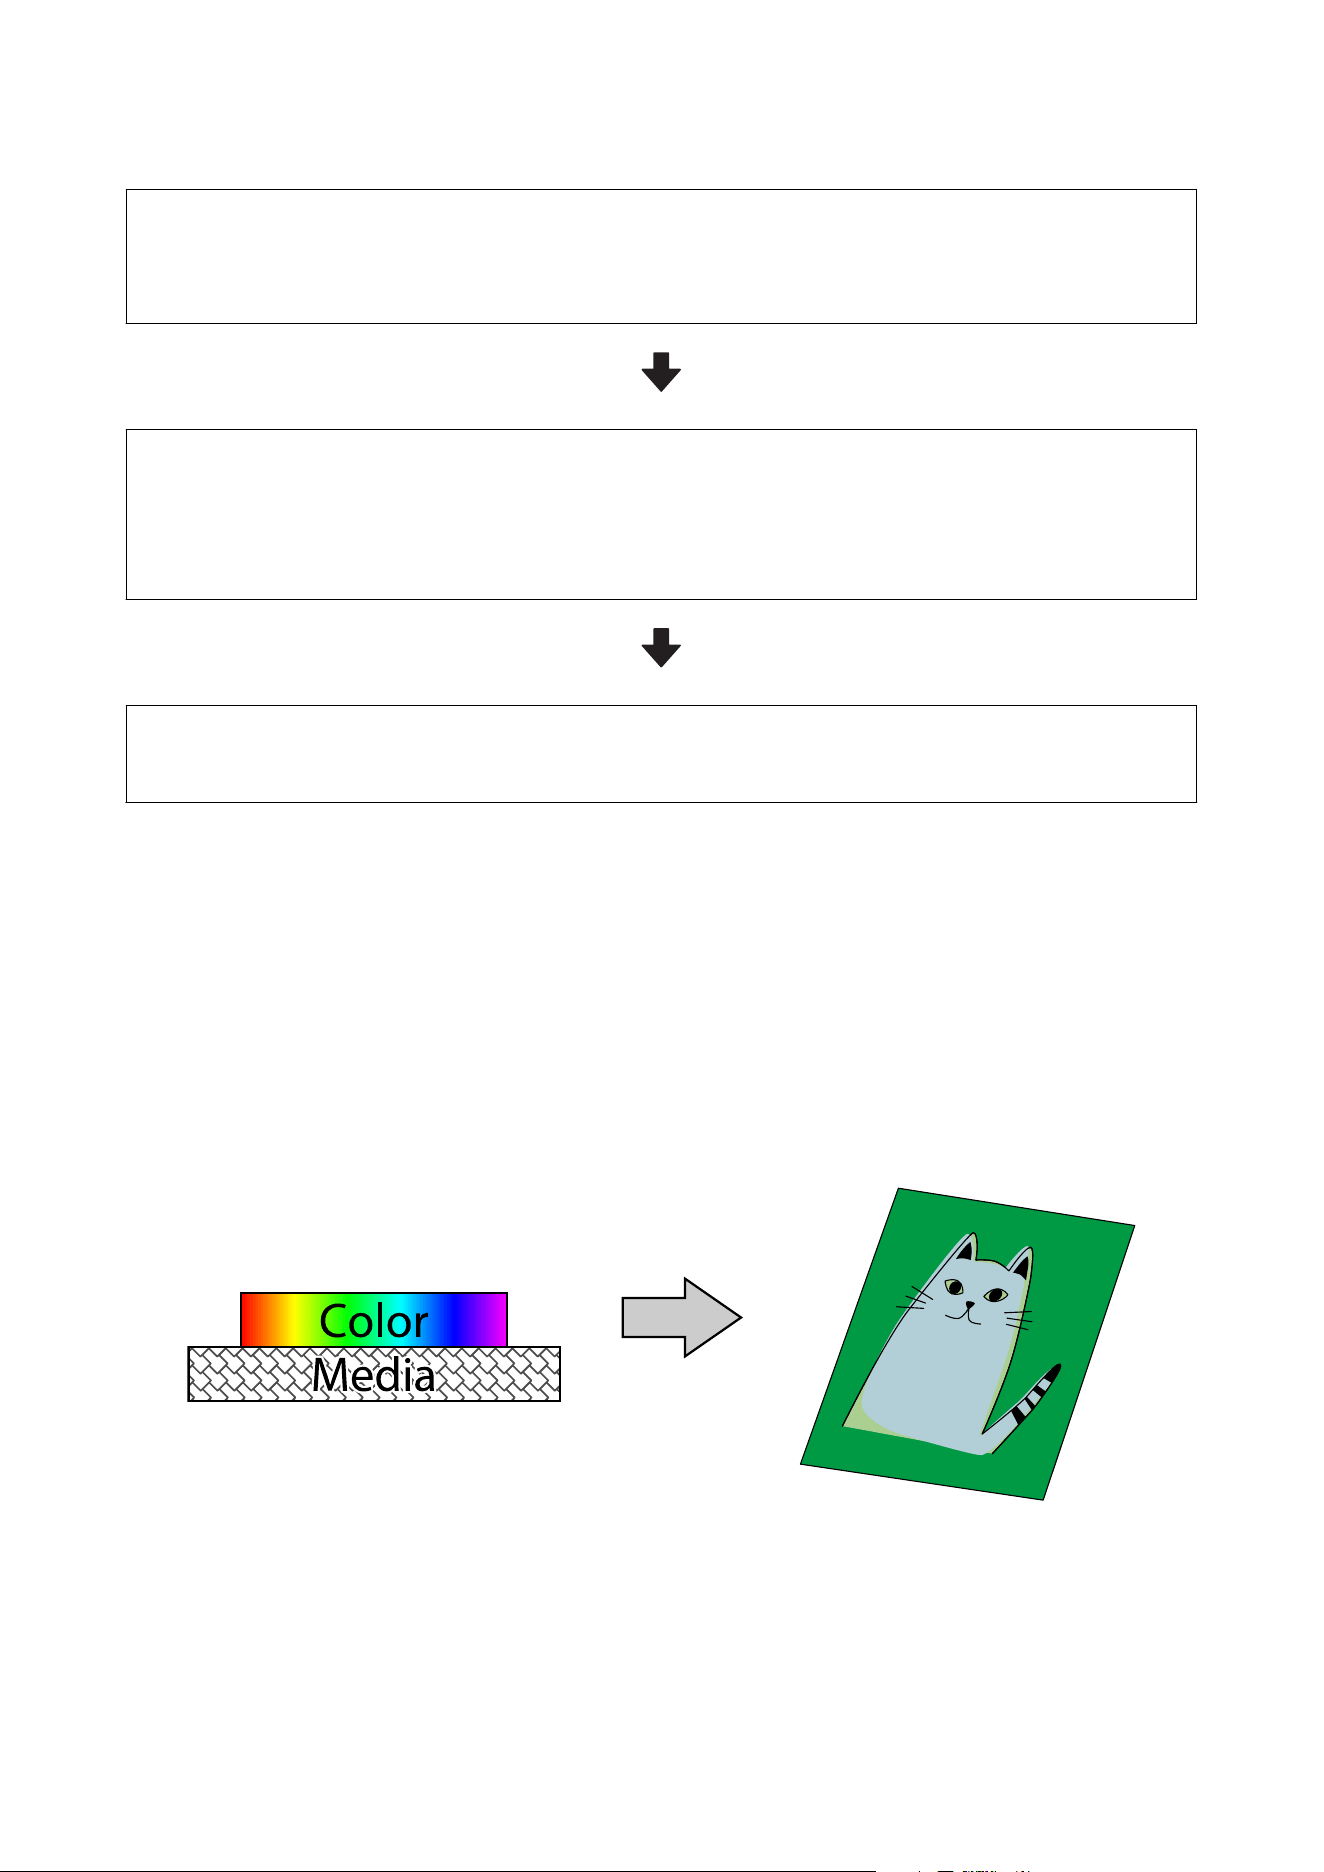
When you want to print images without being affected by the media color
When printing only the color layer on dark media, the media's color affects the print results, causing the color tone
to differ from the print data, as shown in the following example. Printing a White layer as an under-base allows
you to print without being affected by the media color.
Example) When printing only the color layer on green media
SC-V4000 User's Guide
Basic Operations
39
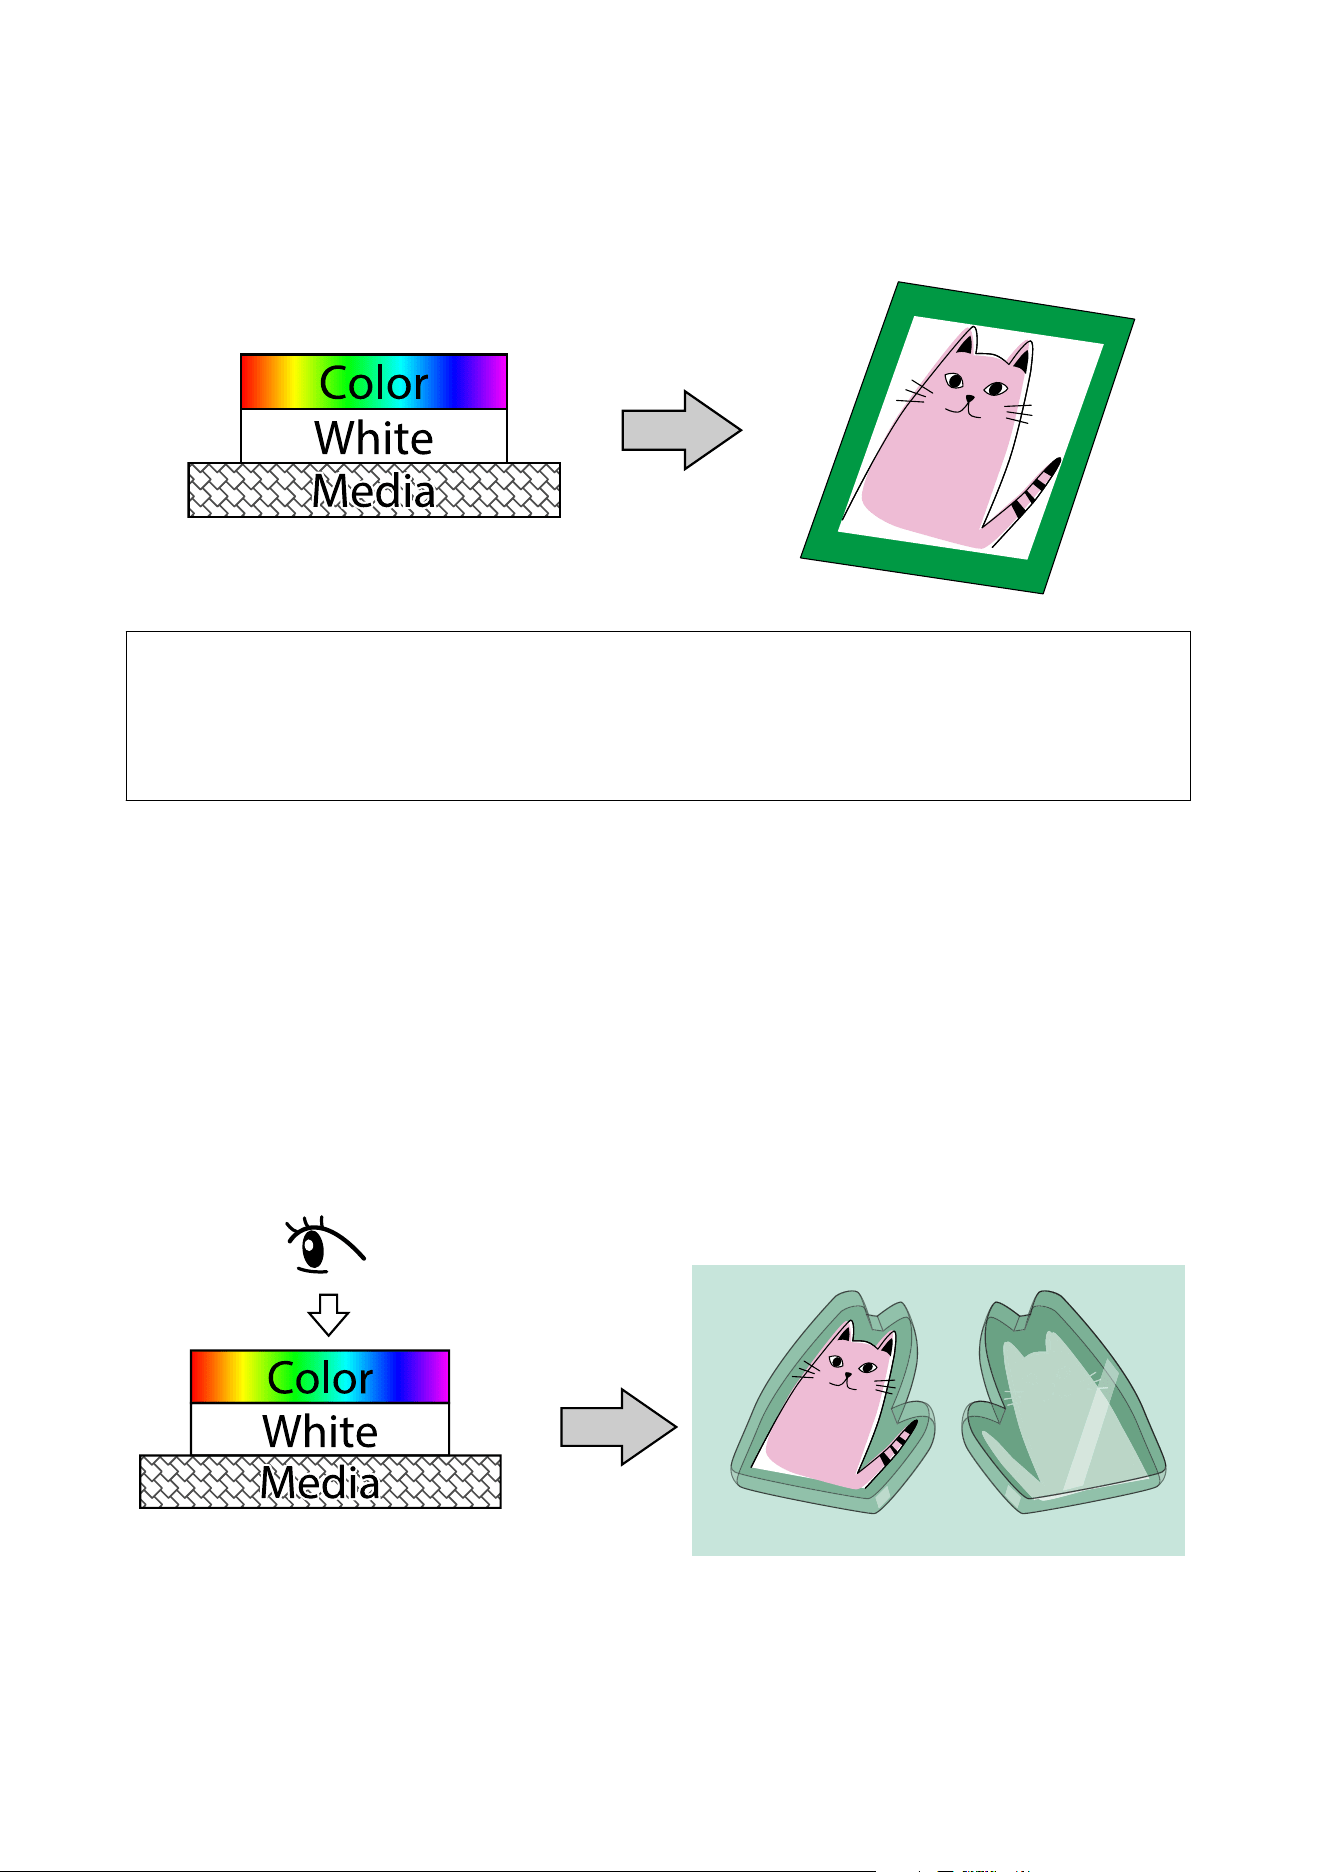
Example) When printing on green media with White as the first layer and color as the second layer
Note:
When images appear transparent, make the following settings and try printing again
❏ Increase the White ink density of the first White layer
❏ Print the White layer twice (two layers)
When you want to print images clearly without being affected by light
passing through the media
When printing only one color layer on transparent media, such as film or acrylic board, light passes through and
the image does not appear clearly. In this case, printing a White layer as an under-base prevents light from passing
through the media and allows the image to be seen clearly.
The stacking order of each layer differs as follows, depending on the direction in which the image is viewed.
When viewing the image from the printed surface side
As with the item above, print with White as the first layer and color as the second layer.
SC-V4000 User's Guide
Basic Operations
40
Note:
When images appear transparent, make the following settings and try printing again
❏ Increase the White ink density of the first White layer
❏ Print the White layer twice (two layers)
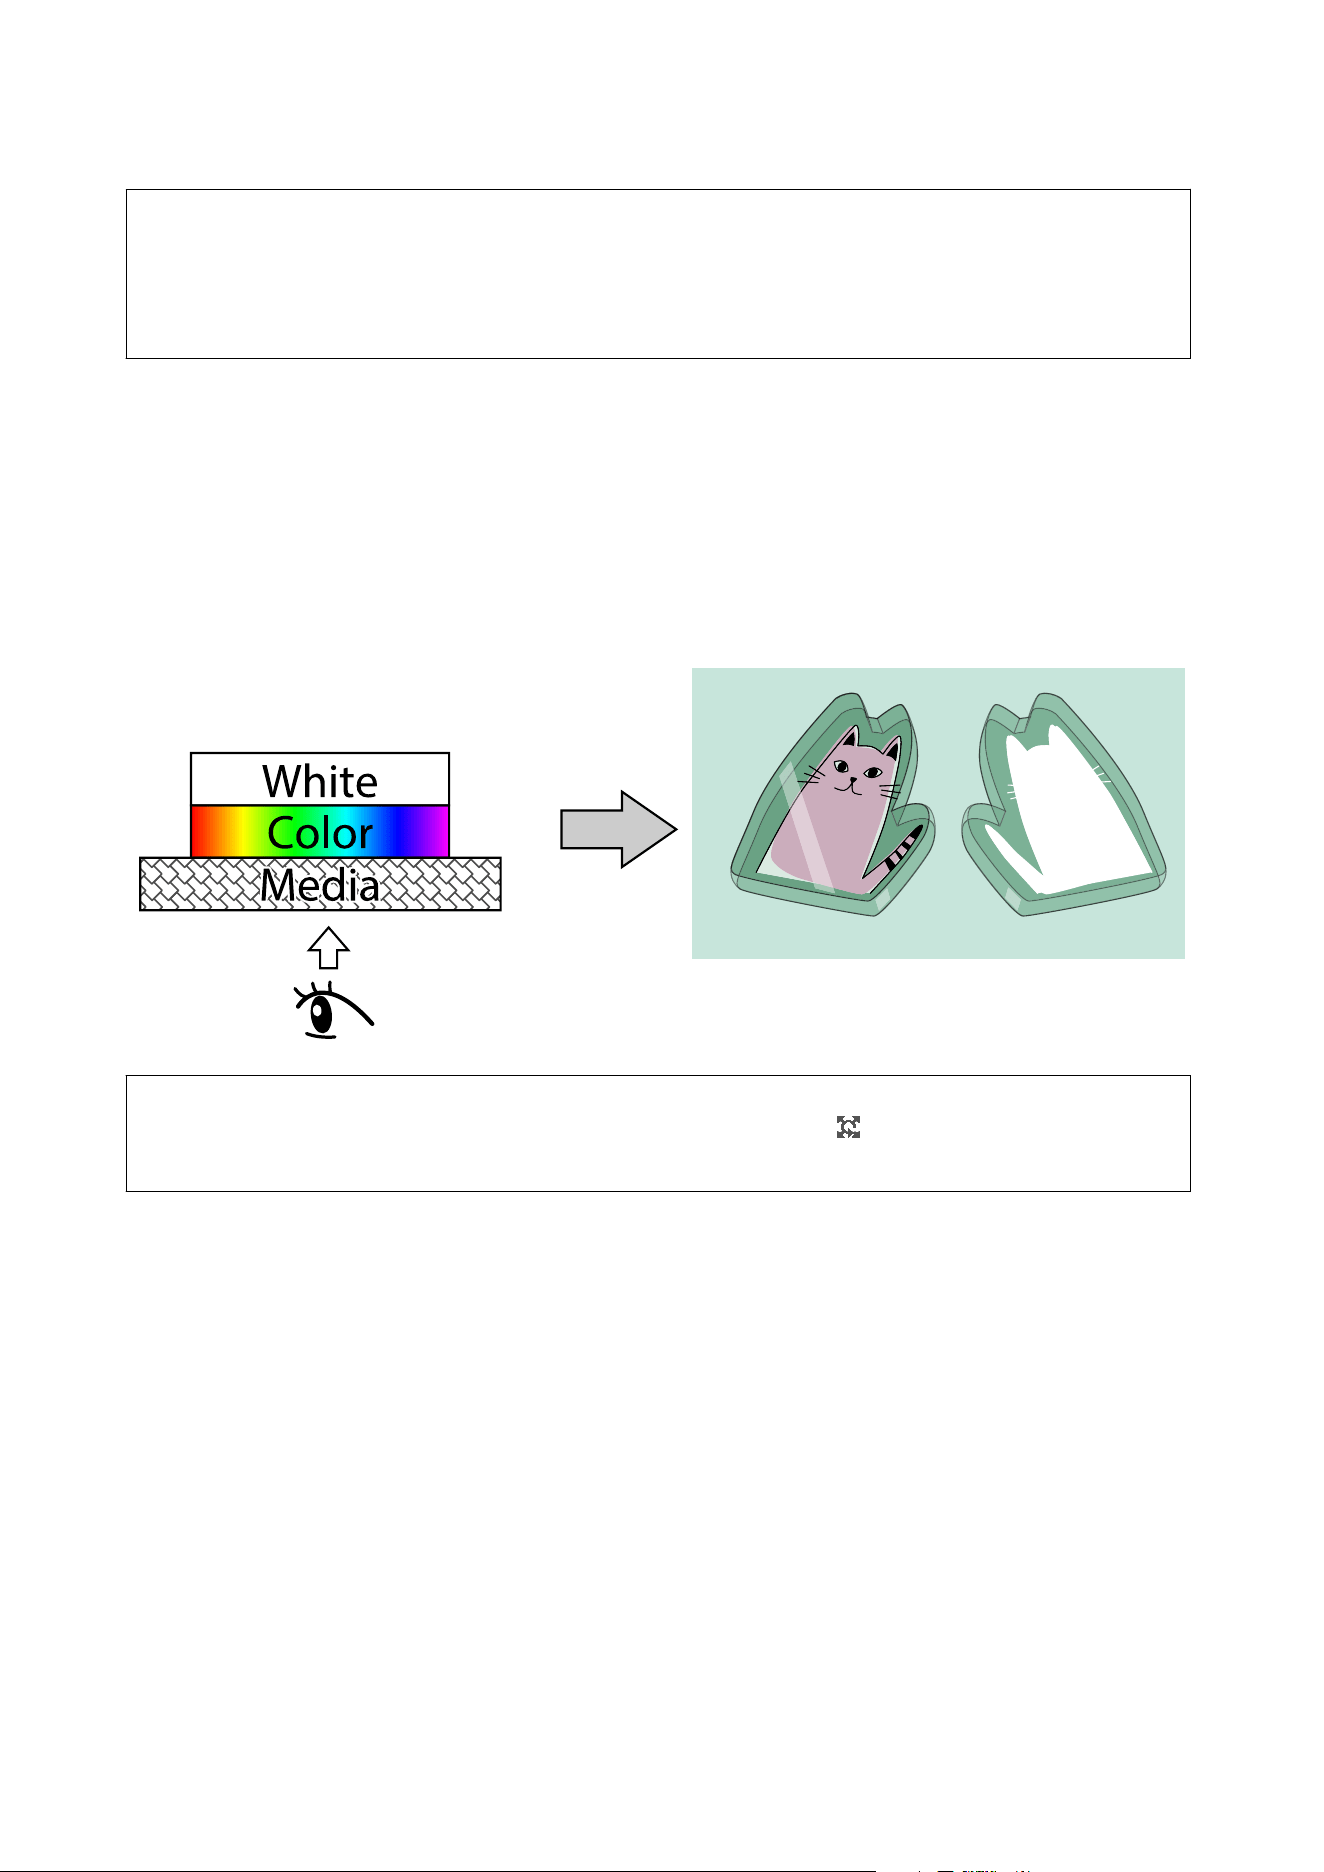
When viewing the image from the opposite side of the printed surface
When viewing images through film or acrylic board, print with color as the first layer and White as the second
layer.
To view the printed image in reverse, create print data by horizontally mirroring text or images with a fixed
left-right orientation.
Example) When printing on transparent media with color as the first layer and White as the second layer
Note:
You can create horizontally mirrored print data by selecting Mirror Image from
(Layout) in the Job Settings menu
of Epson Edge Print PRO.
When you want to show printed images from both sides of transparent media
(printing on one side)
When you want to print on only one side of transparent media, such as film or acrylic board, and show the printed
images from both sides of the media, print three layers as shown in the following example.
For the first layer, to view the printed image in reverse through the media, create print data by horizontally
mirroring text or images with a fixed left-right orientation.
SC-V4000 User's Guide
Basic Operations
41
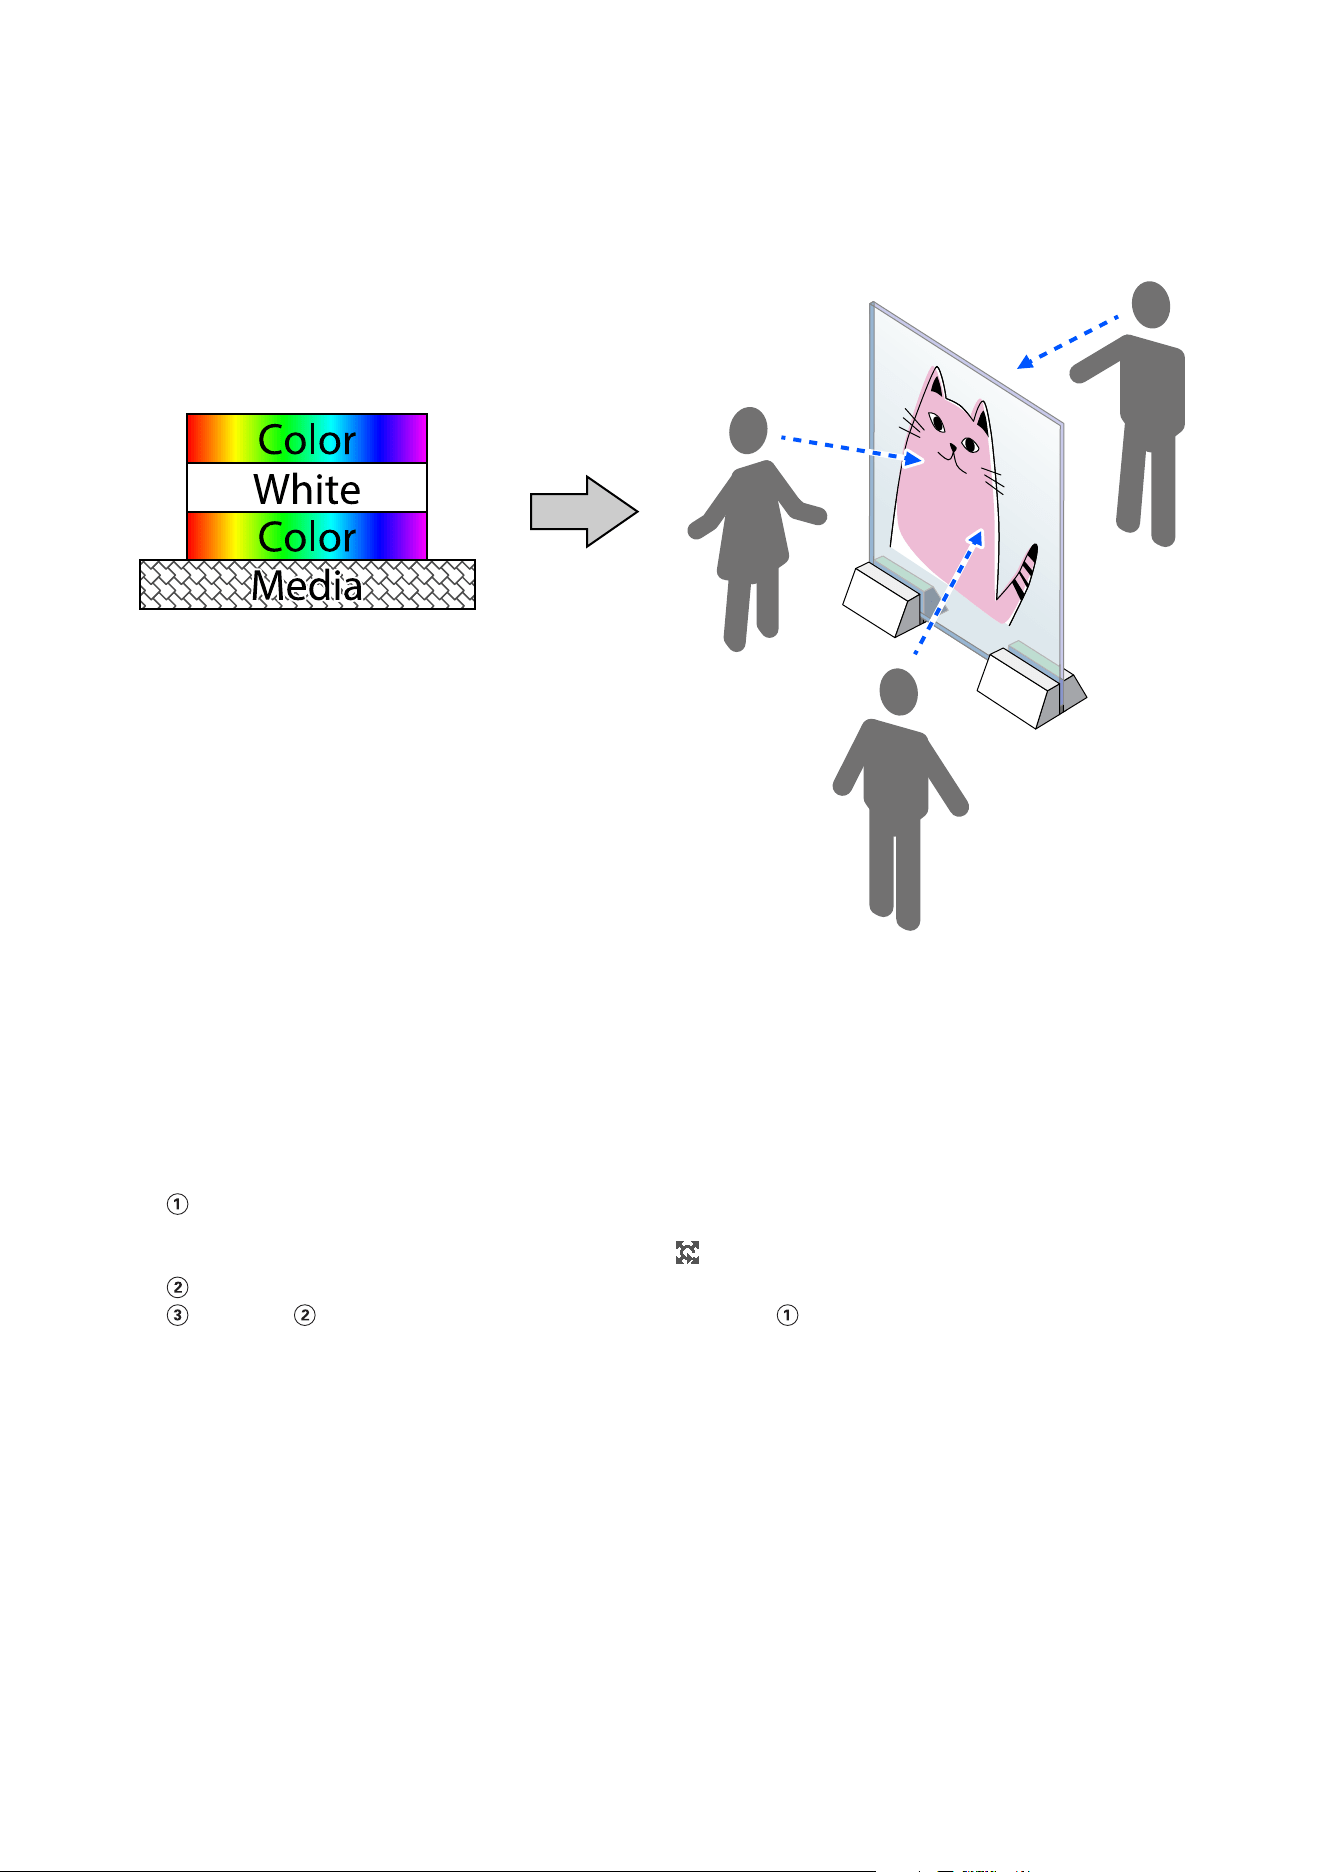
Example) When printing with color as the first layer, White as the second layer, and color as the third layer
The following outlines the steps for creating the three-layered job mentioned above in Epson Edge Print PRO. For
details, see the Epson Edge Print PRO Operation Guide.
❏ Use the No. of Layers and Layer Order customization function to create the number of layers and stacking
order for the following three layers.
First layer color, second layer White, third layer color
❏ Follow the steps below to combine the jobs.
Add the print data for the first layer to the Job List and select Triple Layer (Color -> White -> Color) in
Number and Order of Layering.
When horizontally mirroring, select Mirror Image in
(Layout).
Add the print data for the third layer to the Job List.
Select the print job and drag & drop it to the third layer of .
When you want to show printed images from both sides of transparent media
(printing on both sides)
When printing on both sides of transparent media, such as film or acrylic board, print a white layer as an
under-base on both sides, or on one side, to prevent images on the opposite side from showing through.
SC-V4000 User's Guide
Basic Operations
42
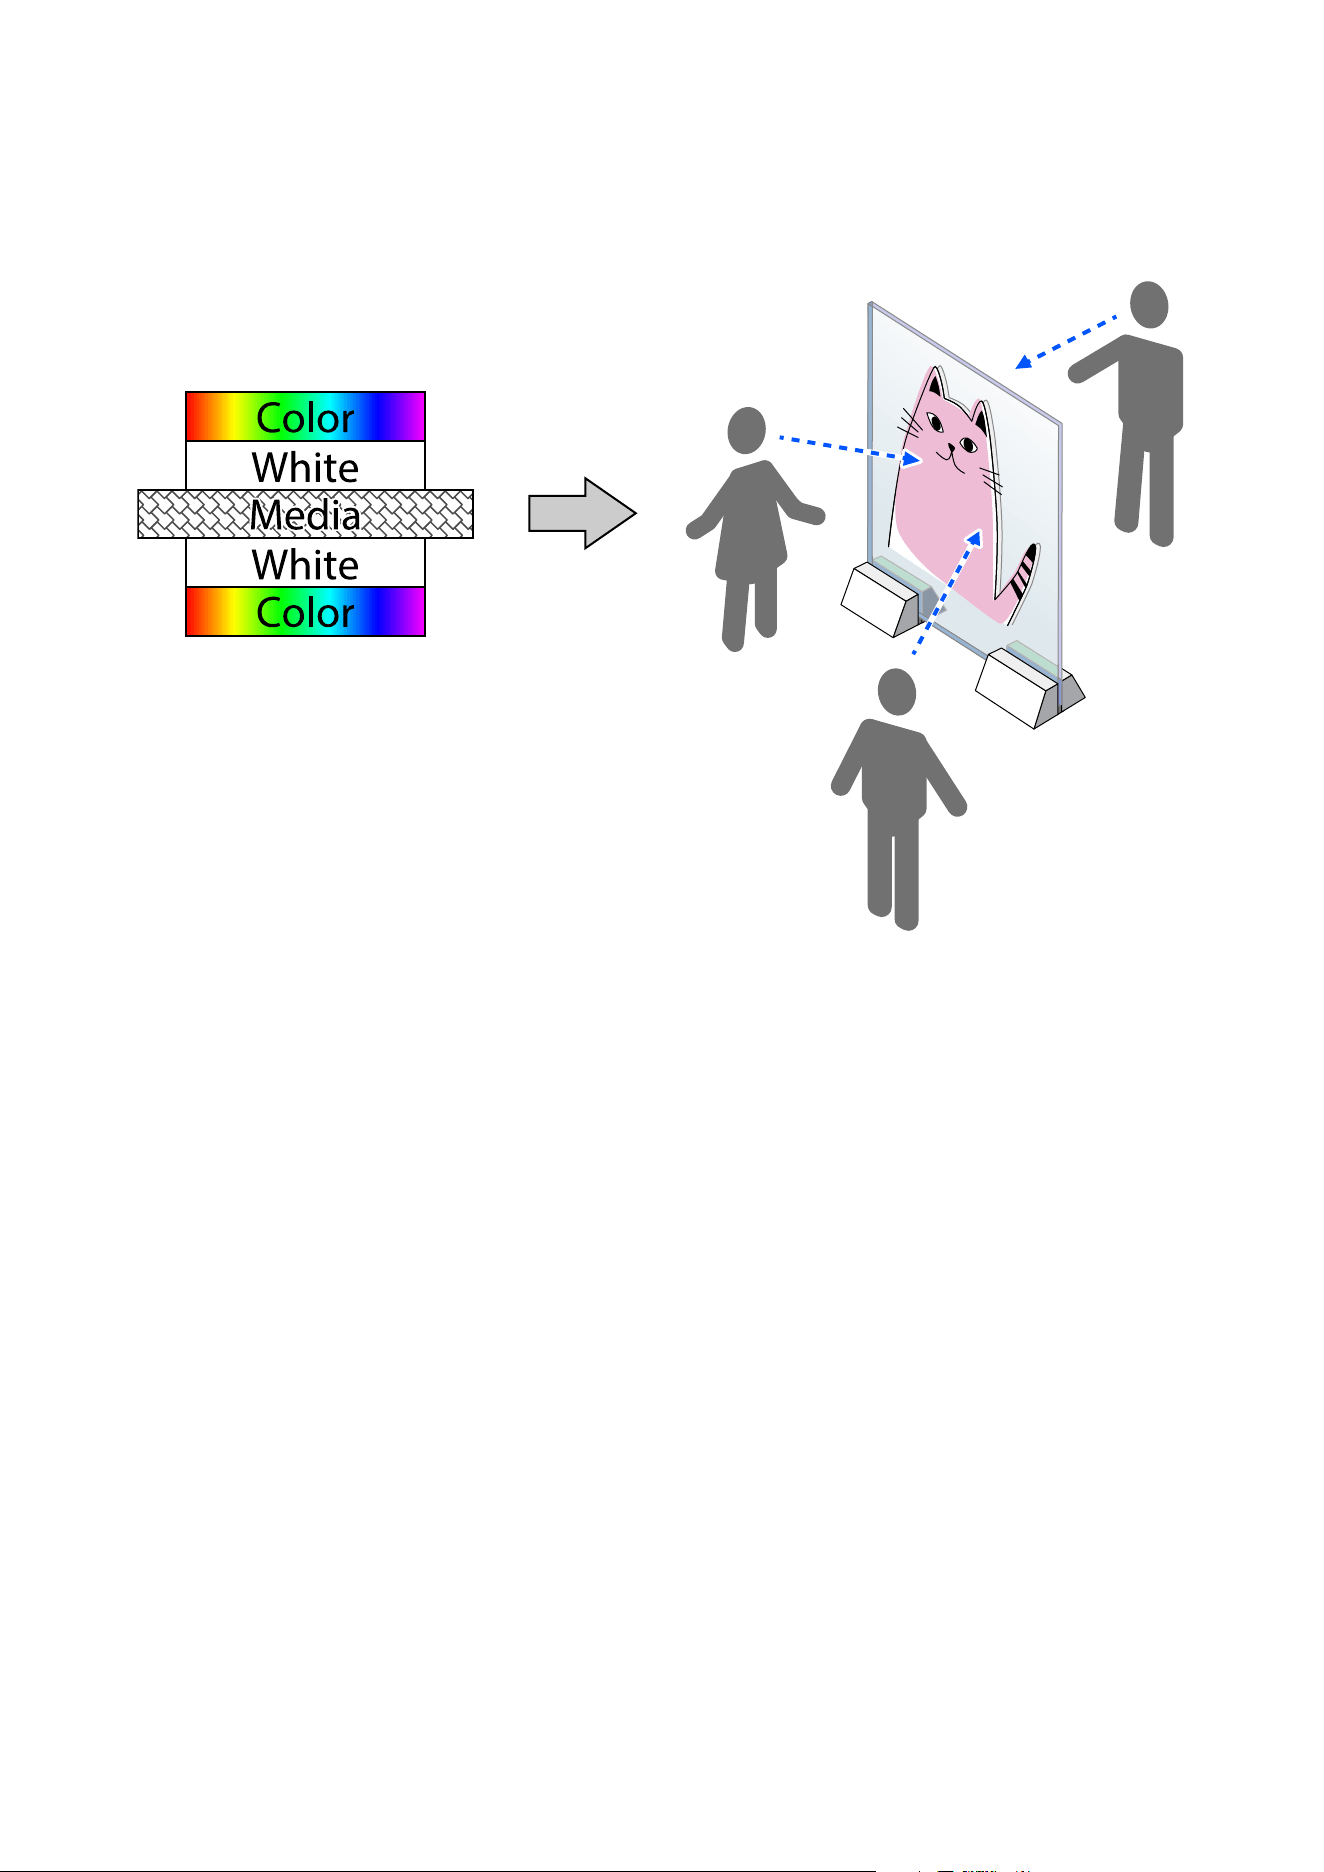
Example) When printing on both sides with White as the first layer and color as the second layer
When you want to express depth on transparent media
By printing two different jobs, A and B, on opposite sides of the media as shown in the following example, you can
create a sense of three-dimensionality and depth when viewing the image from side A. Since the printed image on
side B is viewed from the opposite side, create print jobs by horizontally mirroring text or images with a fixed
left-right orientation.
Example)
SC-V4000 User's Guide
Basic Operations
43
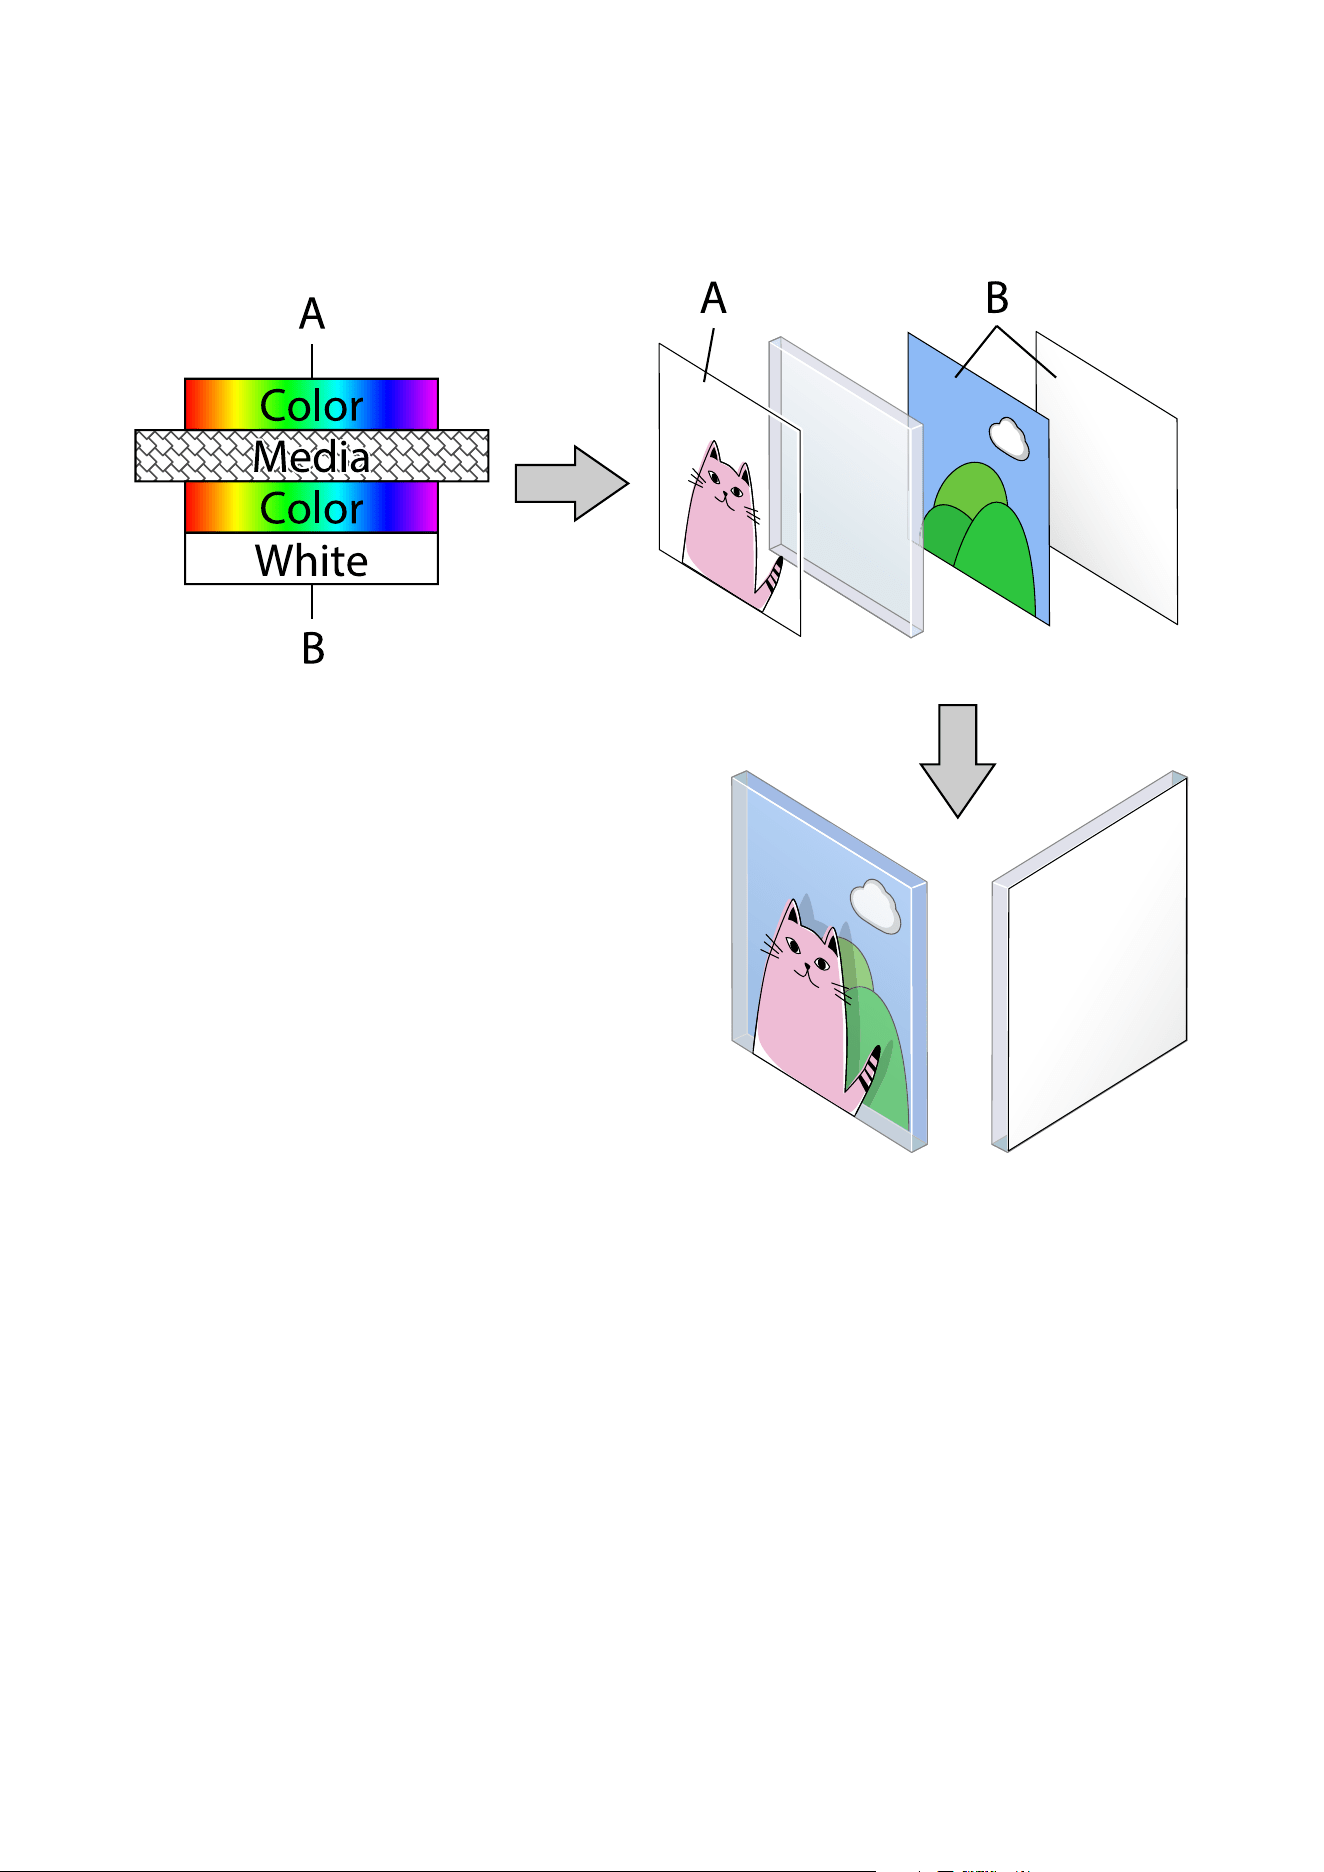
Side A: Print with one color layer
Side B: Print with color for the first layer and White for the second layer
When you want to add a glossy finish to the print surface or print transparent
patterns
Printing by overlaying a Varnish layer on top of a color layer can express the unique glossy characteristics of
Varnish ink on the print surface. You can set the glossy characteristics of the Varnish layer to either a glossy or
matte finish in Number and Order of Layering in Epson Edge Print PRO.
SC-V4000 User's Guide
Basic Operations
44
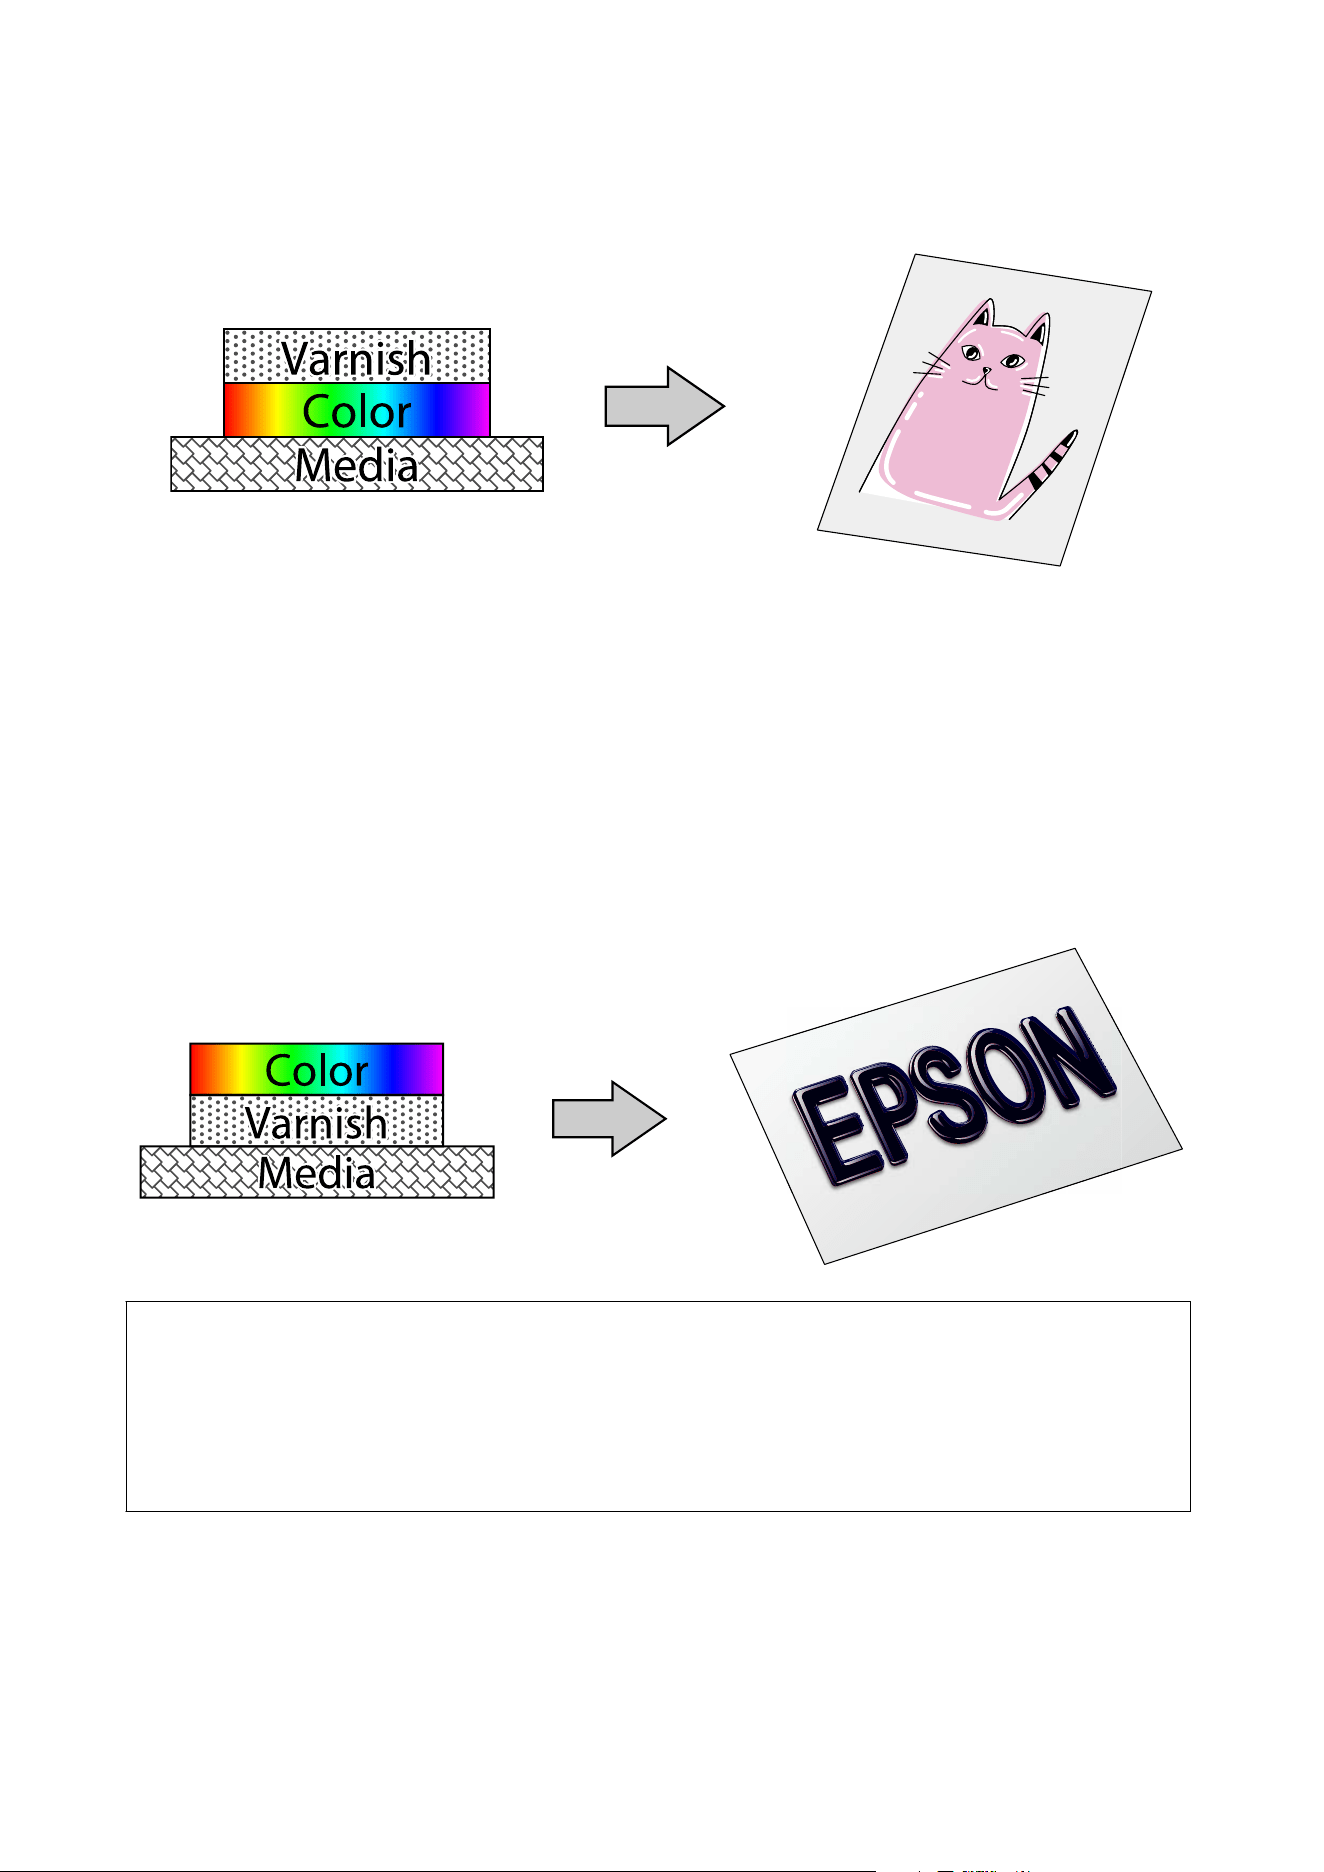
Example) When printing with color as the first layer and varnish as the second layer
When you want to add a three-dimensional feel to images
Printing a Varnish layer that prints only specific parts of the image under a color layer creates a raised texture on
the print surface of the color layer producing a three-dimensional feel.
Use the No. of Layers and Layer Order customization function in Epson Edge Print PRO to create the number of
layers and stacking order with a Varnish - Matte layer under the Color layer. When setting a Varnish layer under a
Color or White layer, always select Varnish - Matte. Selecting Varnish - Glossy prevents Varnish ink from curing.
Example) When printing Varnish as the first layer and color as the second layer
Note:
In addition to the layer combinations introduced in this section, you can perform a wide variety of multi-layer printing
by combining color layers, White layers, and Varnish layers. You can also print each layer multiple times (multiple
layers).
Using the multi-layer printing function in Epson Edge Print PRO, you can add up to 10 layers. For details, see the Epson
Edge Print PRO Operation Guide.
SC-V4000 User's Guide
Basic Operations
45

Braille Printing
EPSON
You can print braille using Varnish ink. The shape of the braille dots conforms to the following standards.
❏ JIS Standard: UV-Curable Resin Ink Braille - Quality and Test Methods (JIS T9253)
❏ ADA (Americans with Disabilities Act)
However, print results may not meet these standards.
Notes on braille printing
❏ Use media that is 199.5 mm or less in thickness.
❏ When setting the media thickness, add 0.5 mm to the actual media thickness.
For details on braille printing methods, see the Braille Printing Guide (Online Manual).
SC-V4000 User's Guide
Basic Operations
46
Types and Overview of
Thickness Detection
Settings
If the print head height is not set correctly for the
thickness of the media being printed on, the print
head may come into contact with the media, causing a
malfunction or blurred text and images, which can
reduce print quality.
Therefore, you need to set Thickness Detection
correctly when printing for the first time or each time
you print a different job.
There are two methods for setting Thickness
Detection: Manual and Auto. The following provides
an overview of each method. See the following for
details on setting Thickness Detection.
U “Setting Thickness Detection” on page 51
Manual Overview
The print head is adjusted to the appropriate height
based on the Thickness Detection you enter. When
printing, the process starts immediately without laser
measurement.
The value you enter is saved for each job. Therefore,
when you print the same job on media with the same
specifications, you do not need to set Thickness
Detection from the second time onward.
Manual is suitable in the following cases.
❏ When the media used for each job is fixed.
❏ When the thickness is clearly marked on
packages, such as for acrylic boards.
❏ When using media for which Auto Thickness
Detection cannot be accurately measured.
Auto Overview
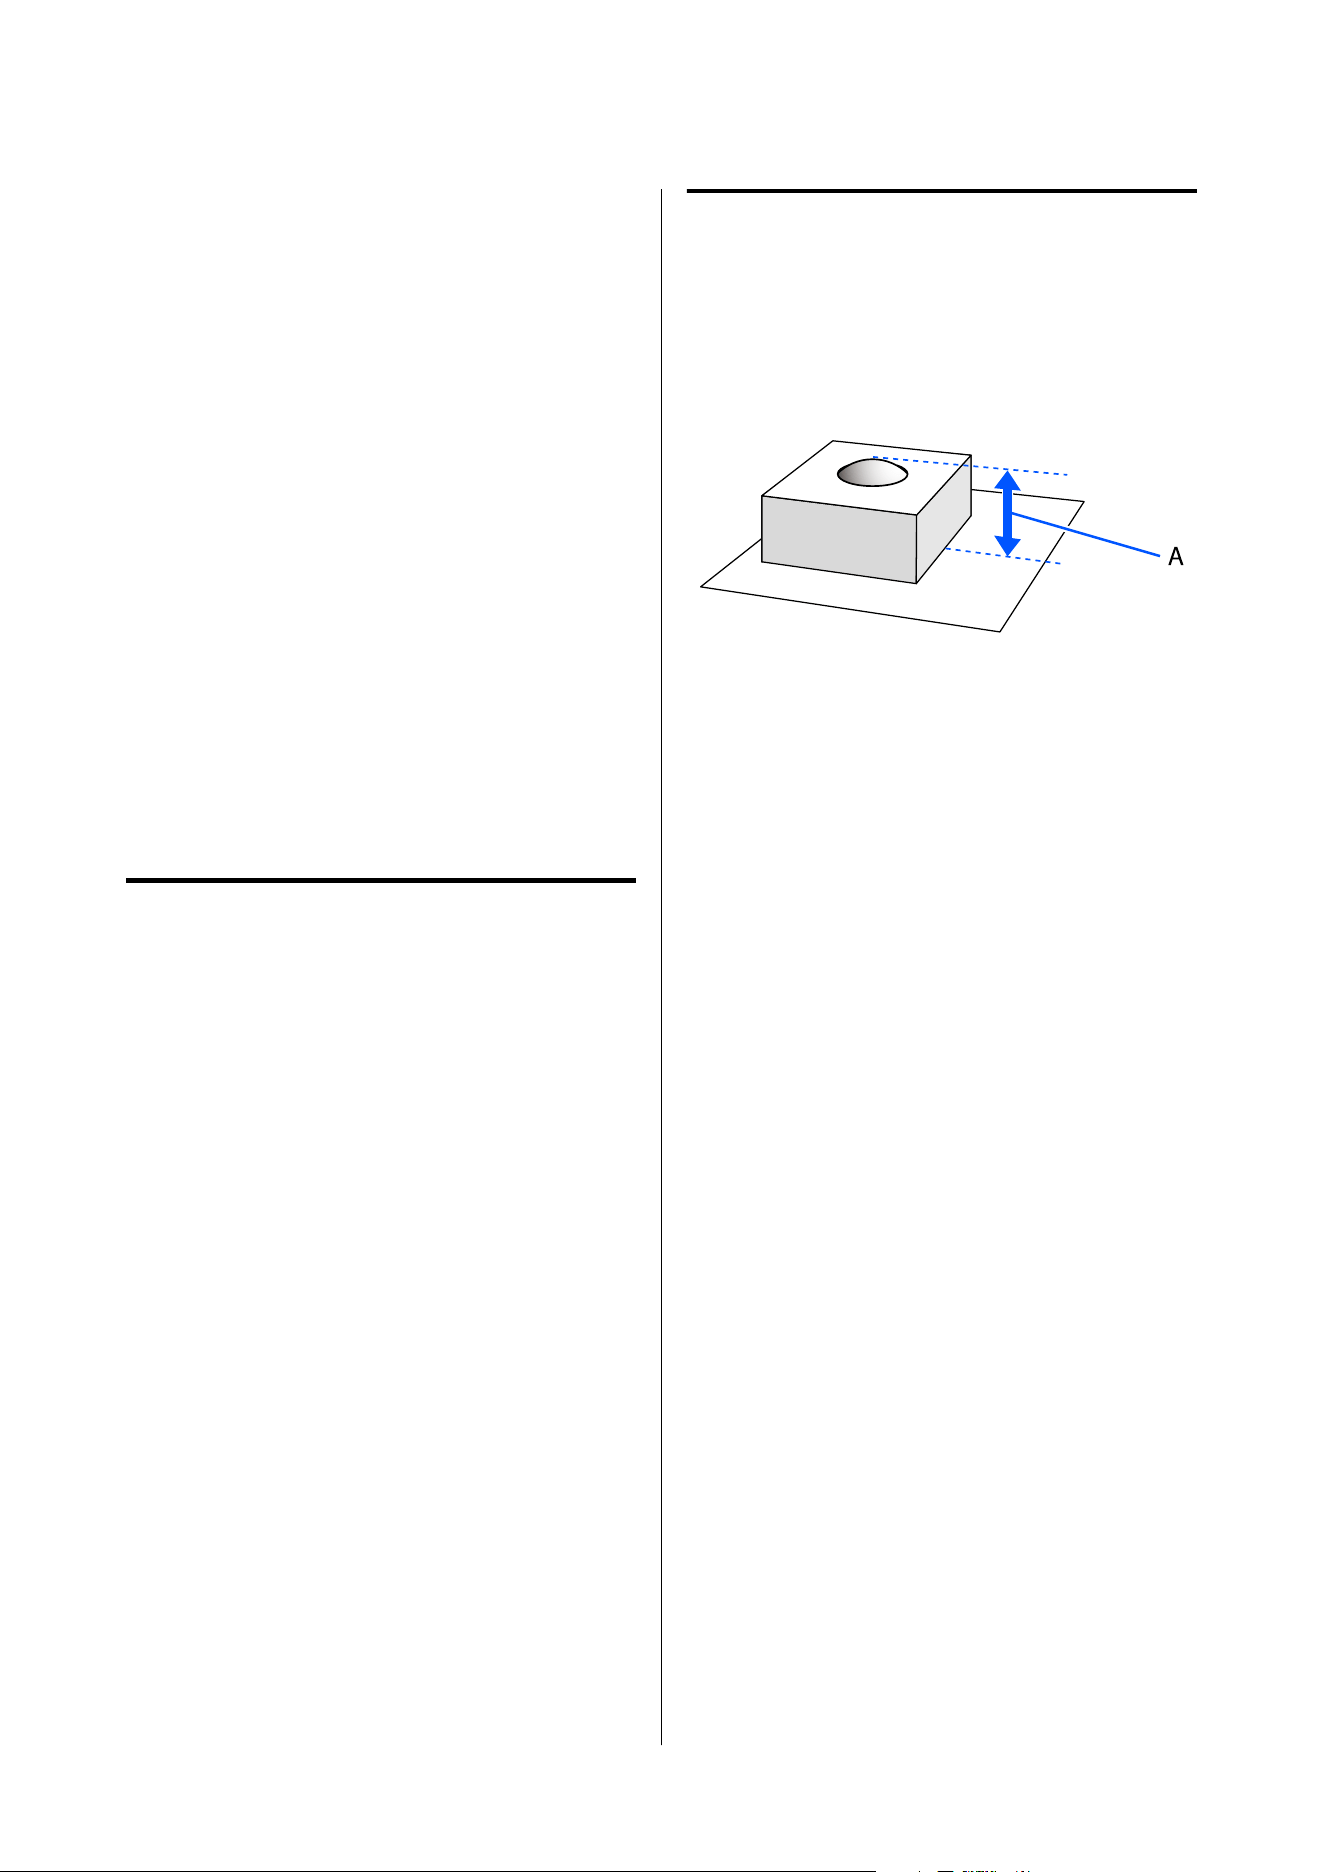
When set to Auto, the printer uses the
standard-equipped laser to measure the highest point
(A in the illustration below) of the media loaded on
the flatbed and sets the print head to the appropriate
height.
Auto is suitable in the following cases.
❏ When making short-run, diverse printing jobs
where media shapes differ for each print job.
❏ When the media surface is not flat and the height
cannot be measured accurately.
When set to Auto, the laser measures the entire flatbed
or a specified range to determine the media thickness
and Thickness Detection. Therefore, it takes time
before printing starts.
The measured media thickness is saved for each job.
Therefore, when you print the same job on media with
the same specifications, you do not need to set Auto
from the second time onward.
Depending on the media type or shape, Auto may not
measure the media height correctly. In particular,
transparent media cannot be measured correctly due
to the laser's characteristics, so specify the height
using Manual.
SC-V4000 User's Guide
Basic Operations
47
Loading Media (For Flat
Media such as Acrylic
Board and Film)
Notes on Loading Media
See the following for supported media specifications
(thickness, weight, and size) and unsupported media.
U “Supported Media” on page 24
❏ Always turn on suction to secure the media firmly
to the flatbed.
U “Loading Media” on page 48
❏ In the following cases, secure the outer edges of
the media to the flatbed with masking tape or a
similar material.
❏ When the edges of the media lift up, even
with suction turned on
❏ When printing on media up to approximately
3 mm (0.12 in.) thick that is prone to wrinkles
or warping due to heat
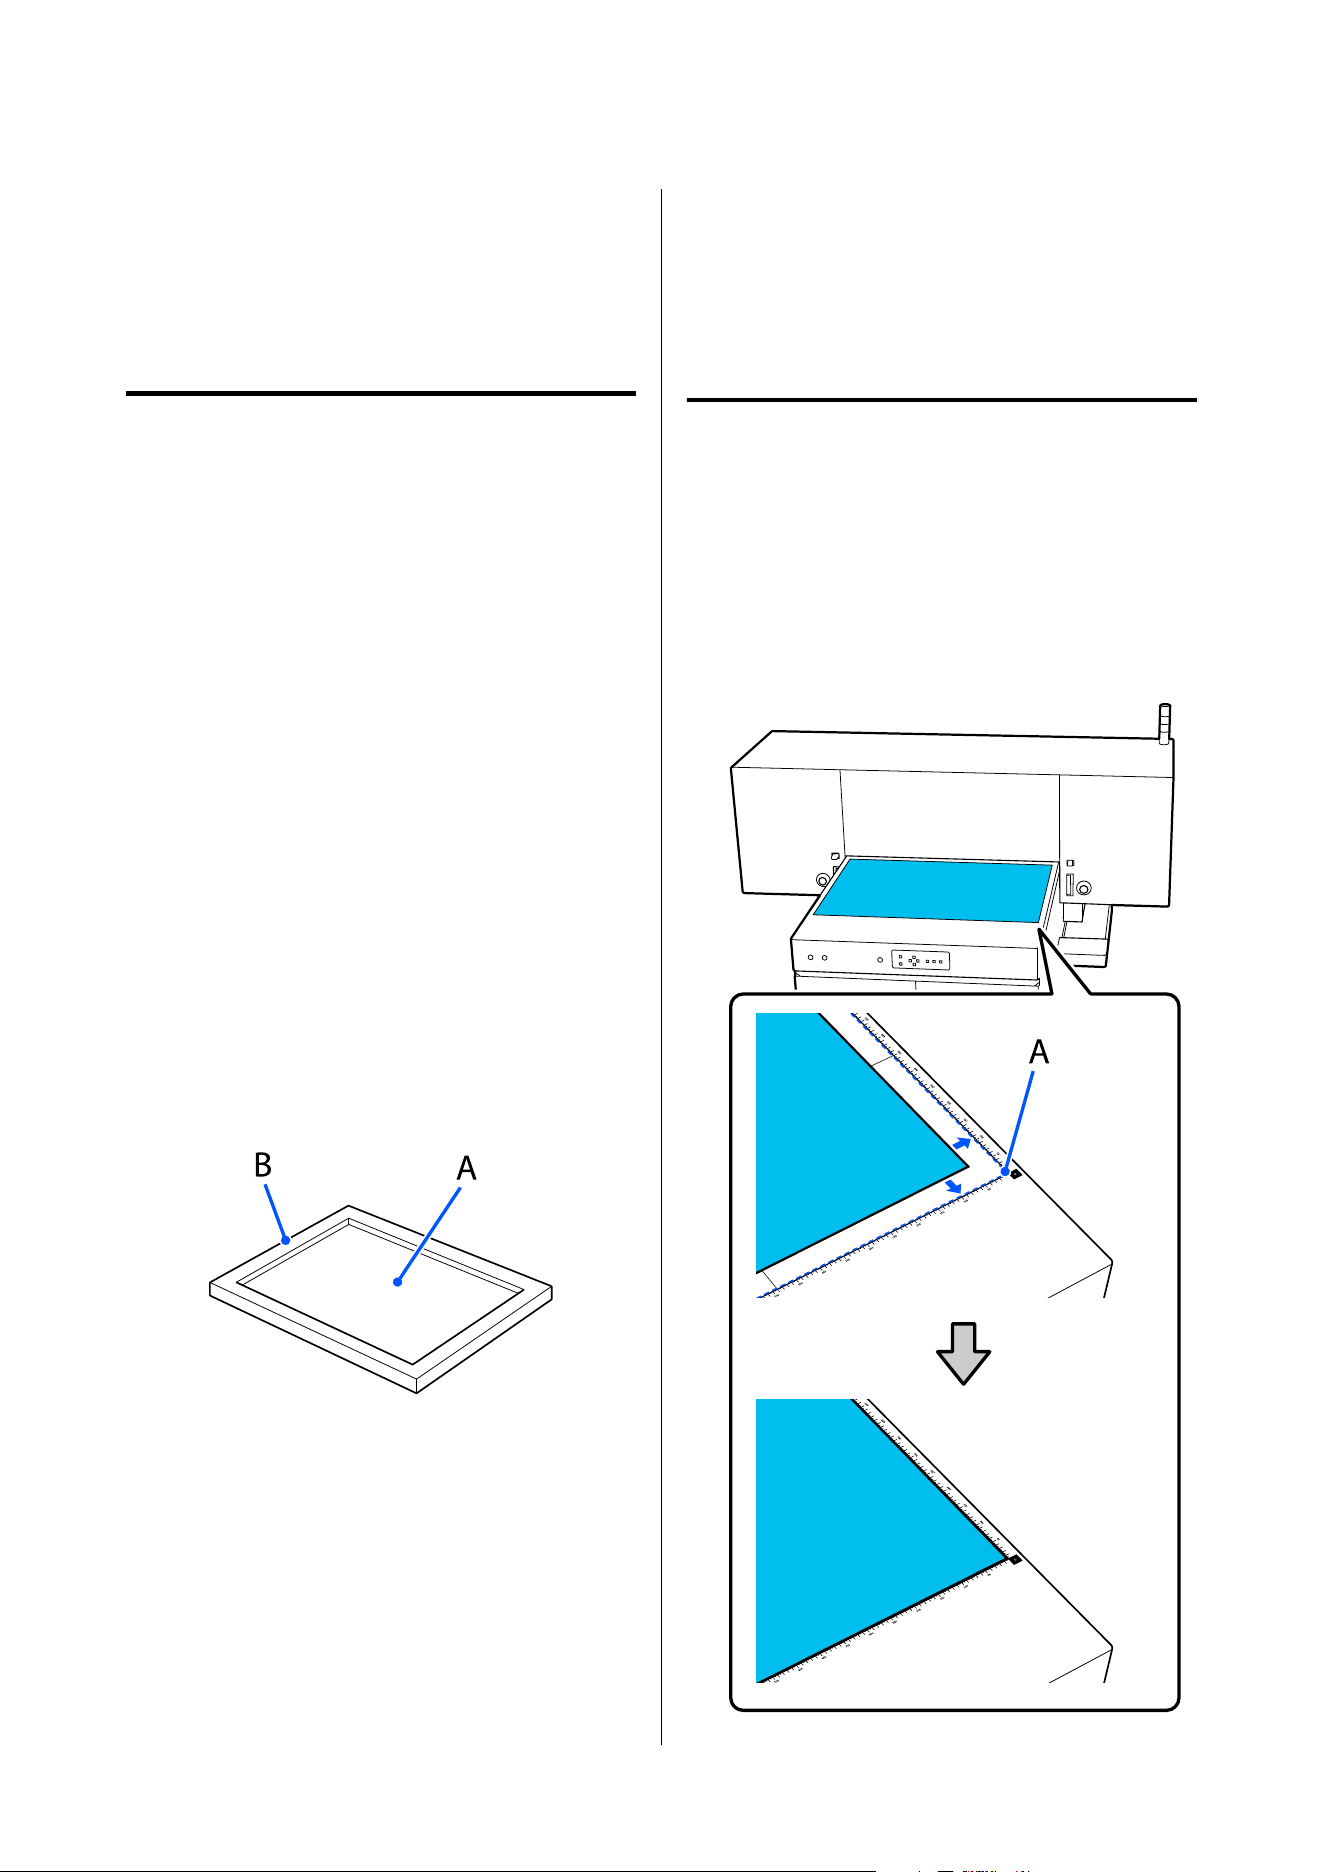
❏ When printing on a recessed surface (A) as shown
in the illustration, you cannot print if the height
(B) exceeds 1.5 mm (0.059 in.). Also, you cannot
print on the inner surface of (B).
❏ Borderless printing or printing beyond the edge of
the media will stain the flatbed. Take measures
such as placing paper or cloth on the flatbed and
loading the media on it before printing.
❏ Do not place anything other than media on the
flatbed/gantry start position.
Printing while something is there can cause a
malfunction.
❏ Media may expand or contract due to room
temperature and humidity.
Therefore, do not use media immediately after
opening. After opening, place it near the printer
for at least 30 minutes before loading it into the
printer.
Loading Media
A
Check that Device Ready is displayed in the
lower right of the UV Flatbed Controller
screen.
B
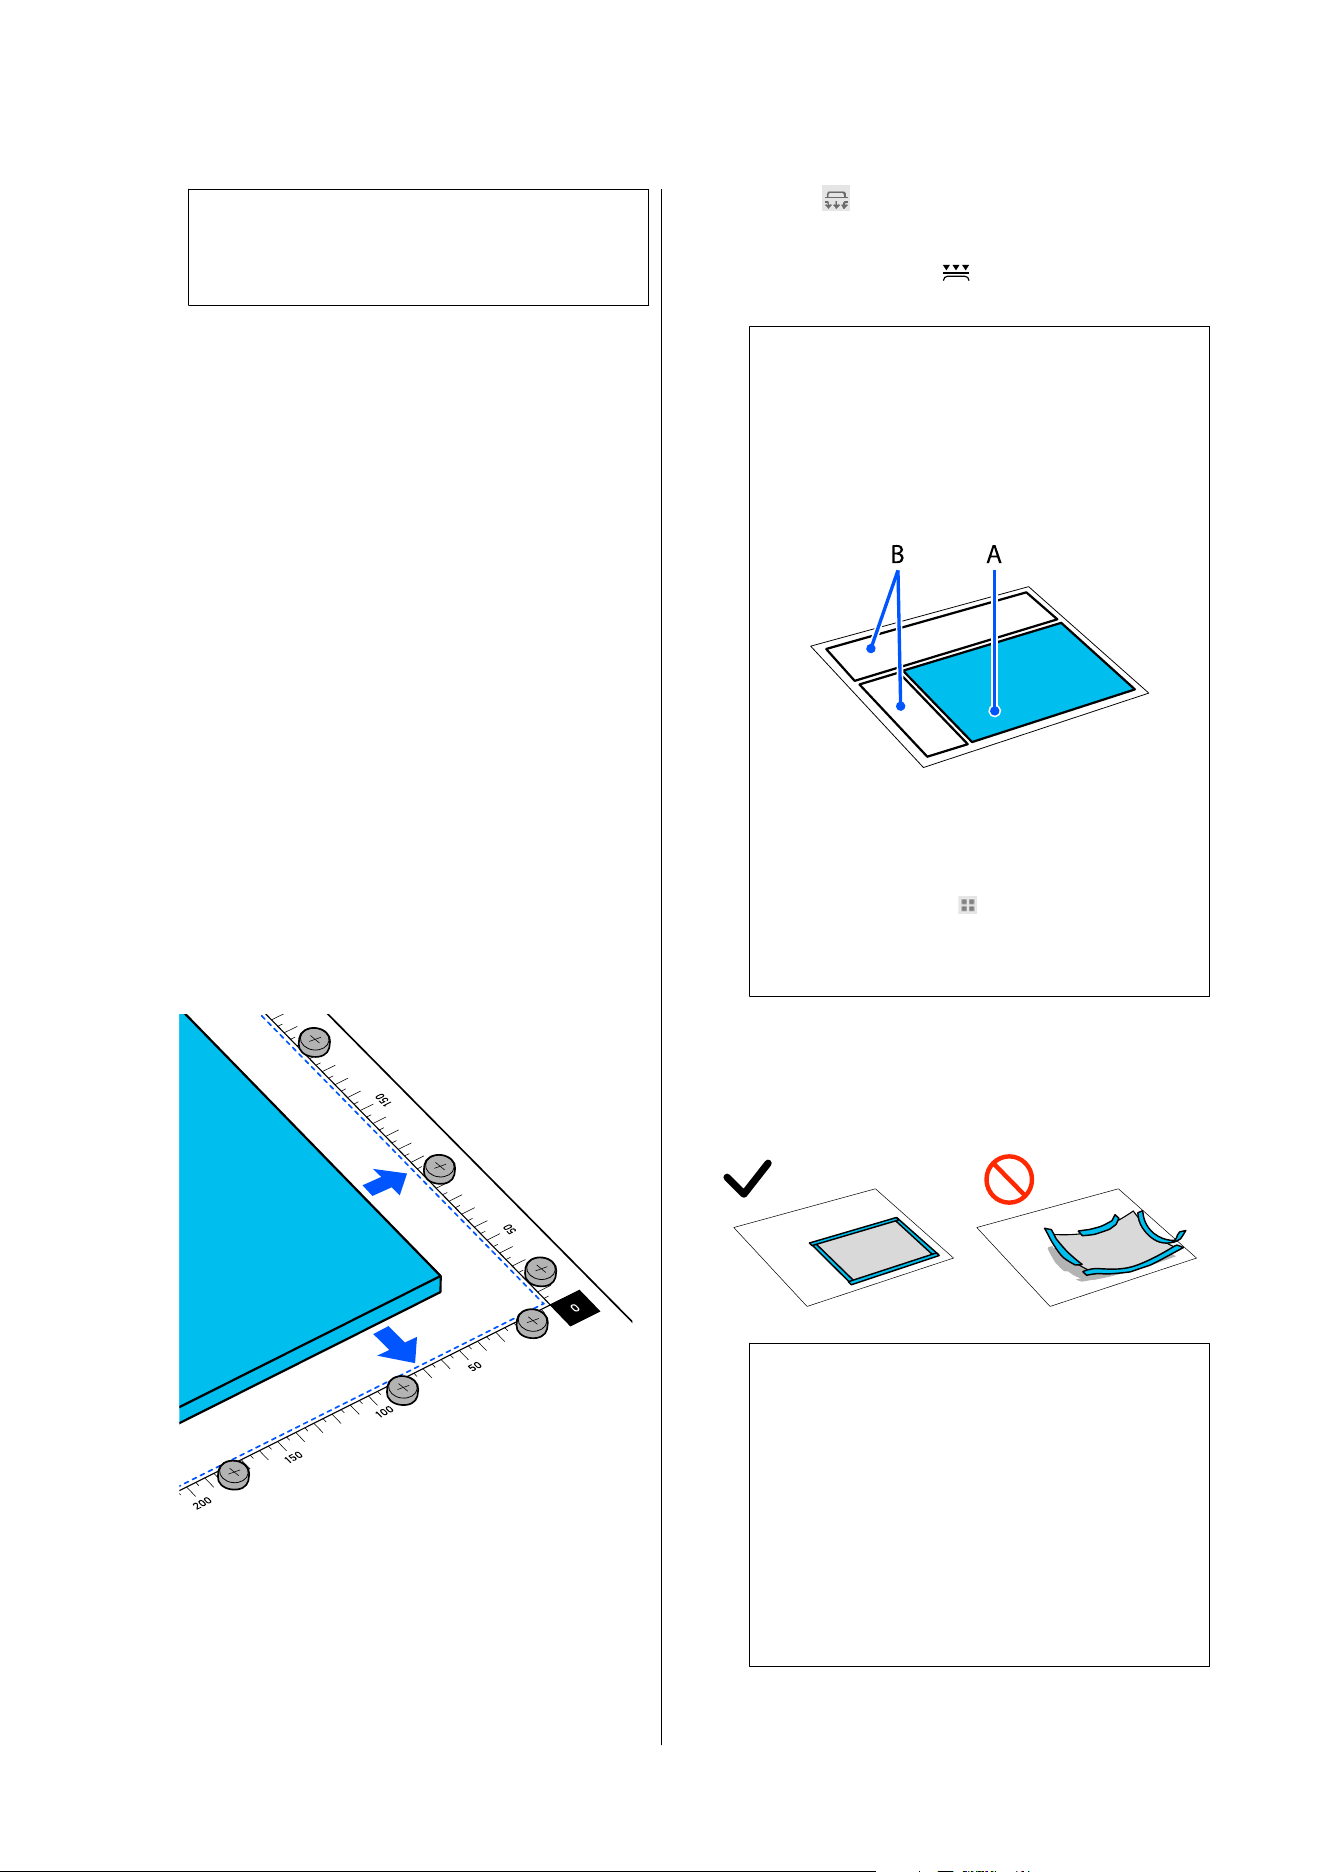
Place the media on the flatbed and align the
corner of the media with the home position
(A).
SC-V4000 User's Guide
Basic Operations
48
Note:
The media can extend into the gantry start
position without causing problems.
Specifying the print start position
❏ When printing at the print position shown on
the Epson Edge Print PRO preview screen
Set X Margin and Y Margin to 0.00 mm in
the UV Flatbed Controller.
❏ When specifying the print start position in
the UV Flatbed Controller
Set Horizontal and Ve rtic al in Layout - Left
Top Position to 00 in Epson Edge Print PRO.
Using the supplied screws
Use the supplied screws for media that is 1 mm
(0.039 in.) or thicker.
You cannot print correctly if the screw heads
protrude above the media.
Tighten the screws firmly until they cannot be
turned. If they are not tightened firmly, the
media will not be secured correctly.
Install the supplied screws into the holes on the
flatbed, and then press the media against the
screws.
C
Secure the media to the flatbed.
Use the printer's suction function to hold and
secure the media.
Start suction using one of the following
methods.
❏ Press on the UV Flatbed Controller
screen
❏ Press the suction (
) button on the control
panel
c
Important:
❏ Position the media (A) so that it covers
all media suction holes in the suction
area. Cover any uncovered areas with a
sheet (B) to prevent a decrease in the
suction force.
❏ The suction area is divided into four
sections that you can select based on the
media size and loading position. Make
selections using
on the UV Flatbed
Controller screen. The suction areas are
indicated by solid lines on the flatbed.
When the media is warped
In addition to suction, secure the outer edges of
the media to the flatbed using masking tape.
c
Important:
❏ If the masking tape on the outer edges of
the media is uneven, remove that
masking tape and reapply new masking
tape.
❏ If the media is warped so severely that
the corners lift up even after taping with
masking tape, do not use that media.
Doing so can cause malfunctions.
SC-V4000 User's Guide
Basic Operations
49
Loading Media (for Media
with Spherical or Curved
Surfaces)
We recommend using jigs when printing on the
following media.
❏ When printing on multiple pieces of media
arranged side by side
❏ Lightweight media or unstable media, such as
spheres, pens, or miniature toy cars
These may move at unintended times during
printing.
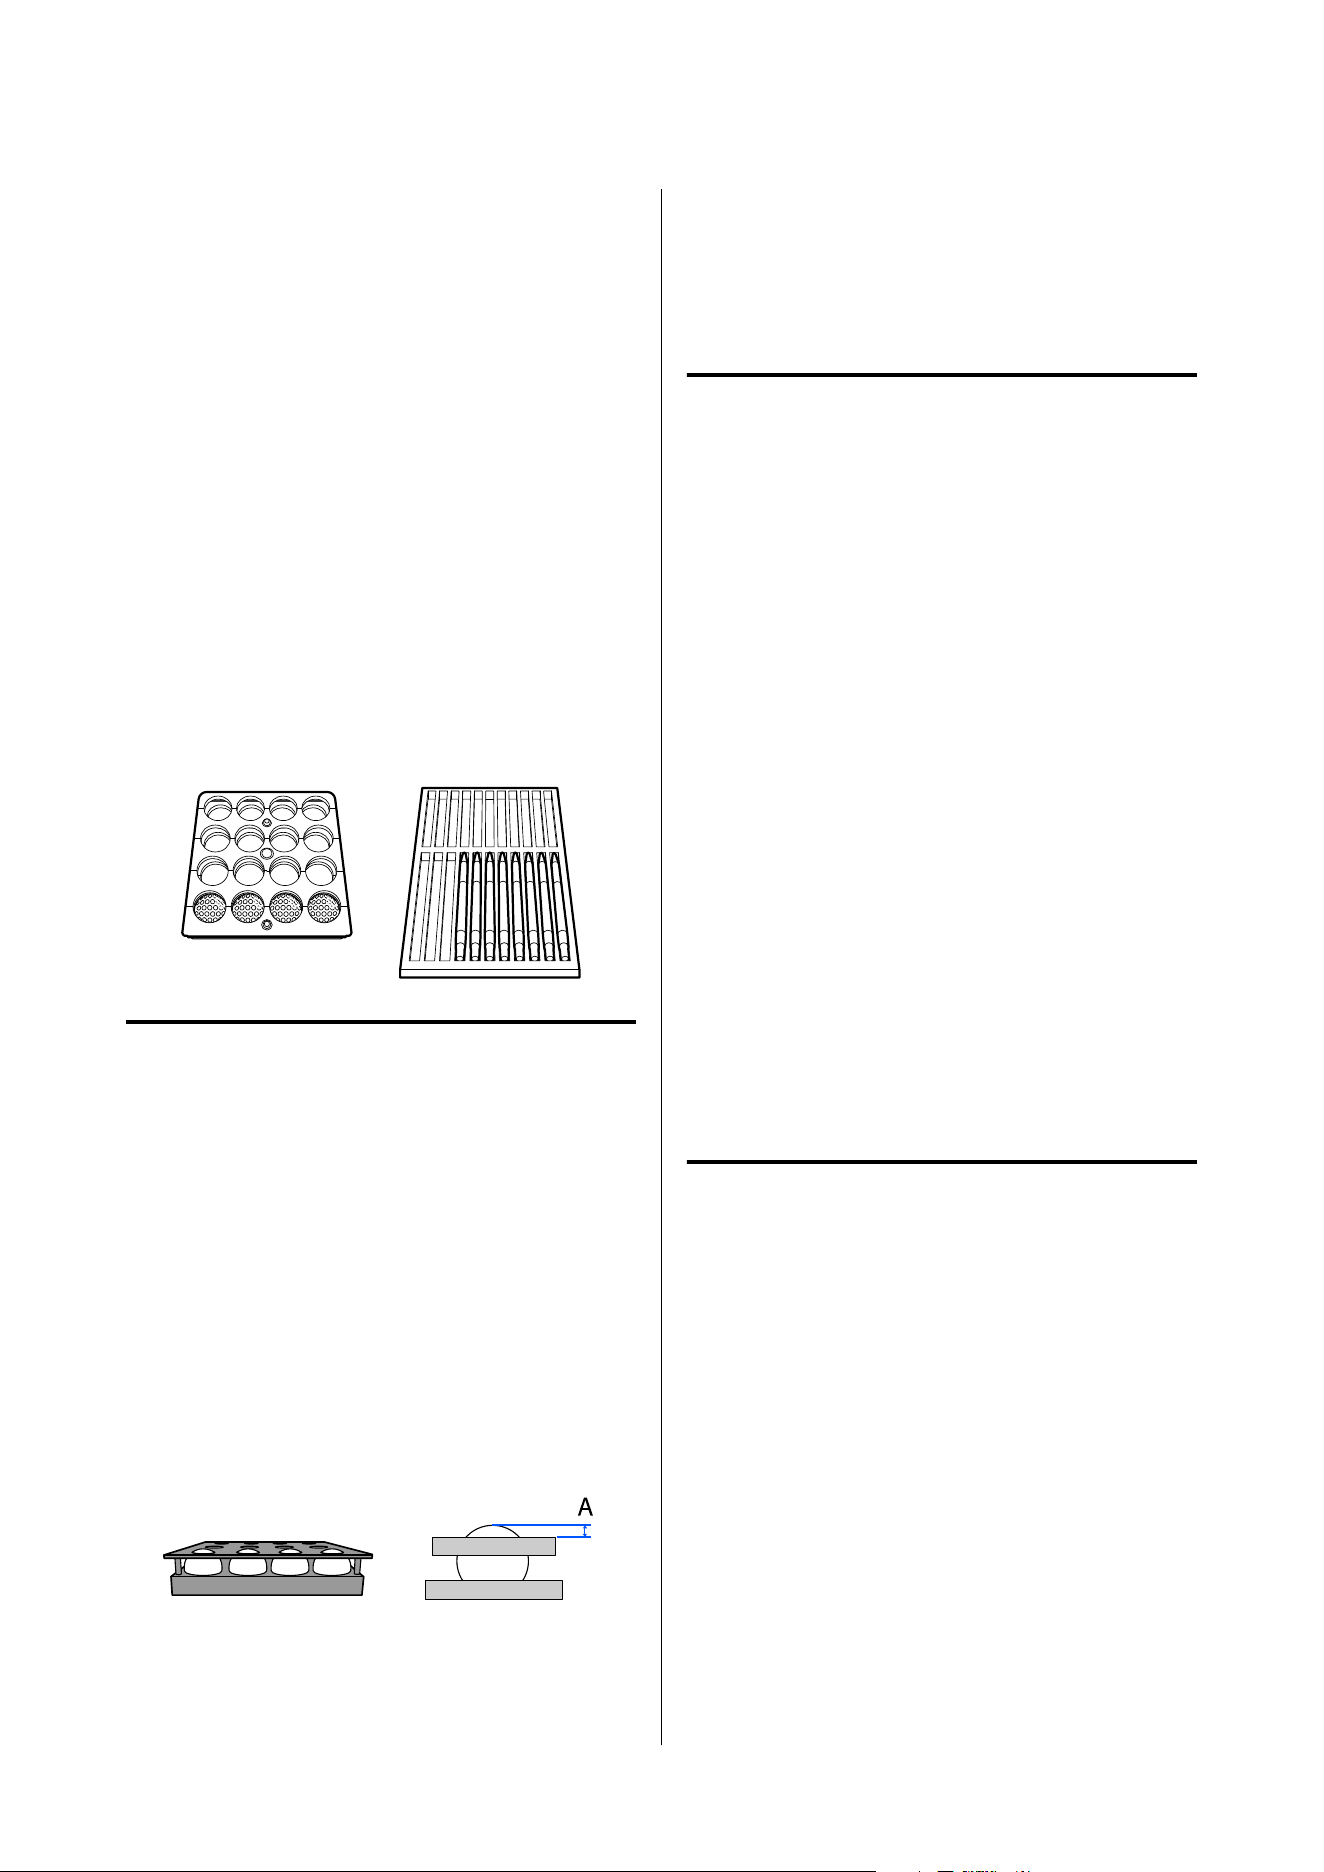
Example of jigs:
Notes on Creating Jigs
❏ Jigs should not be made of materials that are
transparent or that reflect light. UV light emitted
during printing can reflect off the jig and strike
the nozzle surface, increasing the risk of nozzle
clogging.
❏ Do not make jigs larger than the flatbed size.
❏ Cover curved surfaces so that the height of the
printing surface (A) is within 1.5 mm (0.059 in.).
If you do not cover curved surfaces, UV light
emitted during printing can reflect off the media
and strike the nozzle surface, increasing the risk of
nozzle clogging.
❏ The flatbed has holes for securing the jigs. When
using the holes, be sure to create jigs that align
with the hole positions. See the following for the
hole positions.
U “Flatbed Specifications” on page 26
Notes on Loading Media
See the following for supported media specifications
(thickness, weight, and size) and unsupported media.
U “Supported Media” on page 24
❏ Media may expand or contract due to room
temperature and humidity.
Therefore, do not use media immediately after
opening. After opening, place it near the printer
for at least 30 minutes before loading it into the
printer.
❏ Secure the jigs to the flatbed using screws or
masking tape.
❏ Borderless printing or printing beyond the edge of
the media will stain the jigs or the flatbed. Take
measures such as placing paper or cloth on the
flatbed and loading the jigs on it before printing.
❏ Do not place anything other than jigs with loaded
media on the flatbed/gantry start position.
Printing while something is there can cause a
malfunction.
Loading Media
A
Check that Device Ready is displayed in the
lower right of the UV Flatbed Controller
screen.
B
Secure the jigs to the flatbed.
There are three methods of securing jigs.
SC-V4000 User's Guide
Basic Operations
50
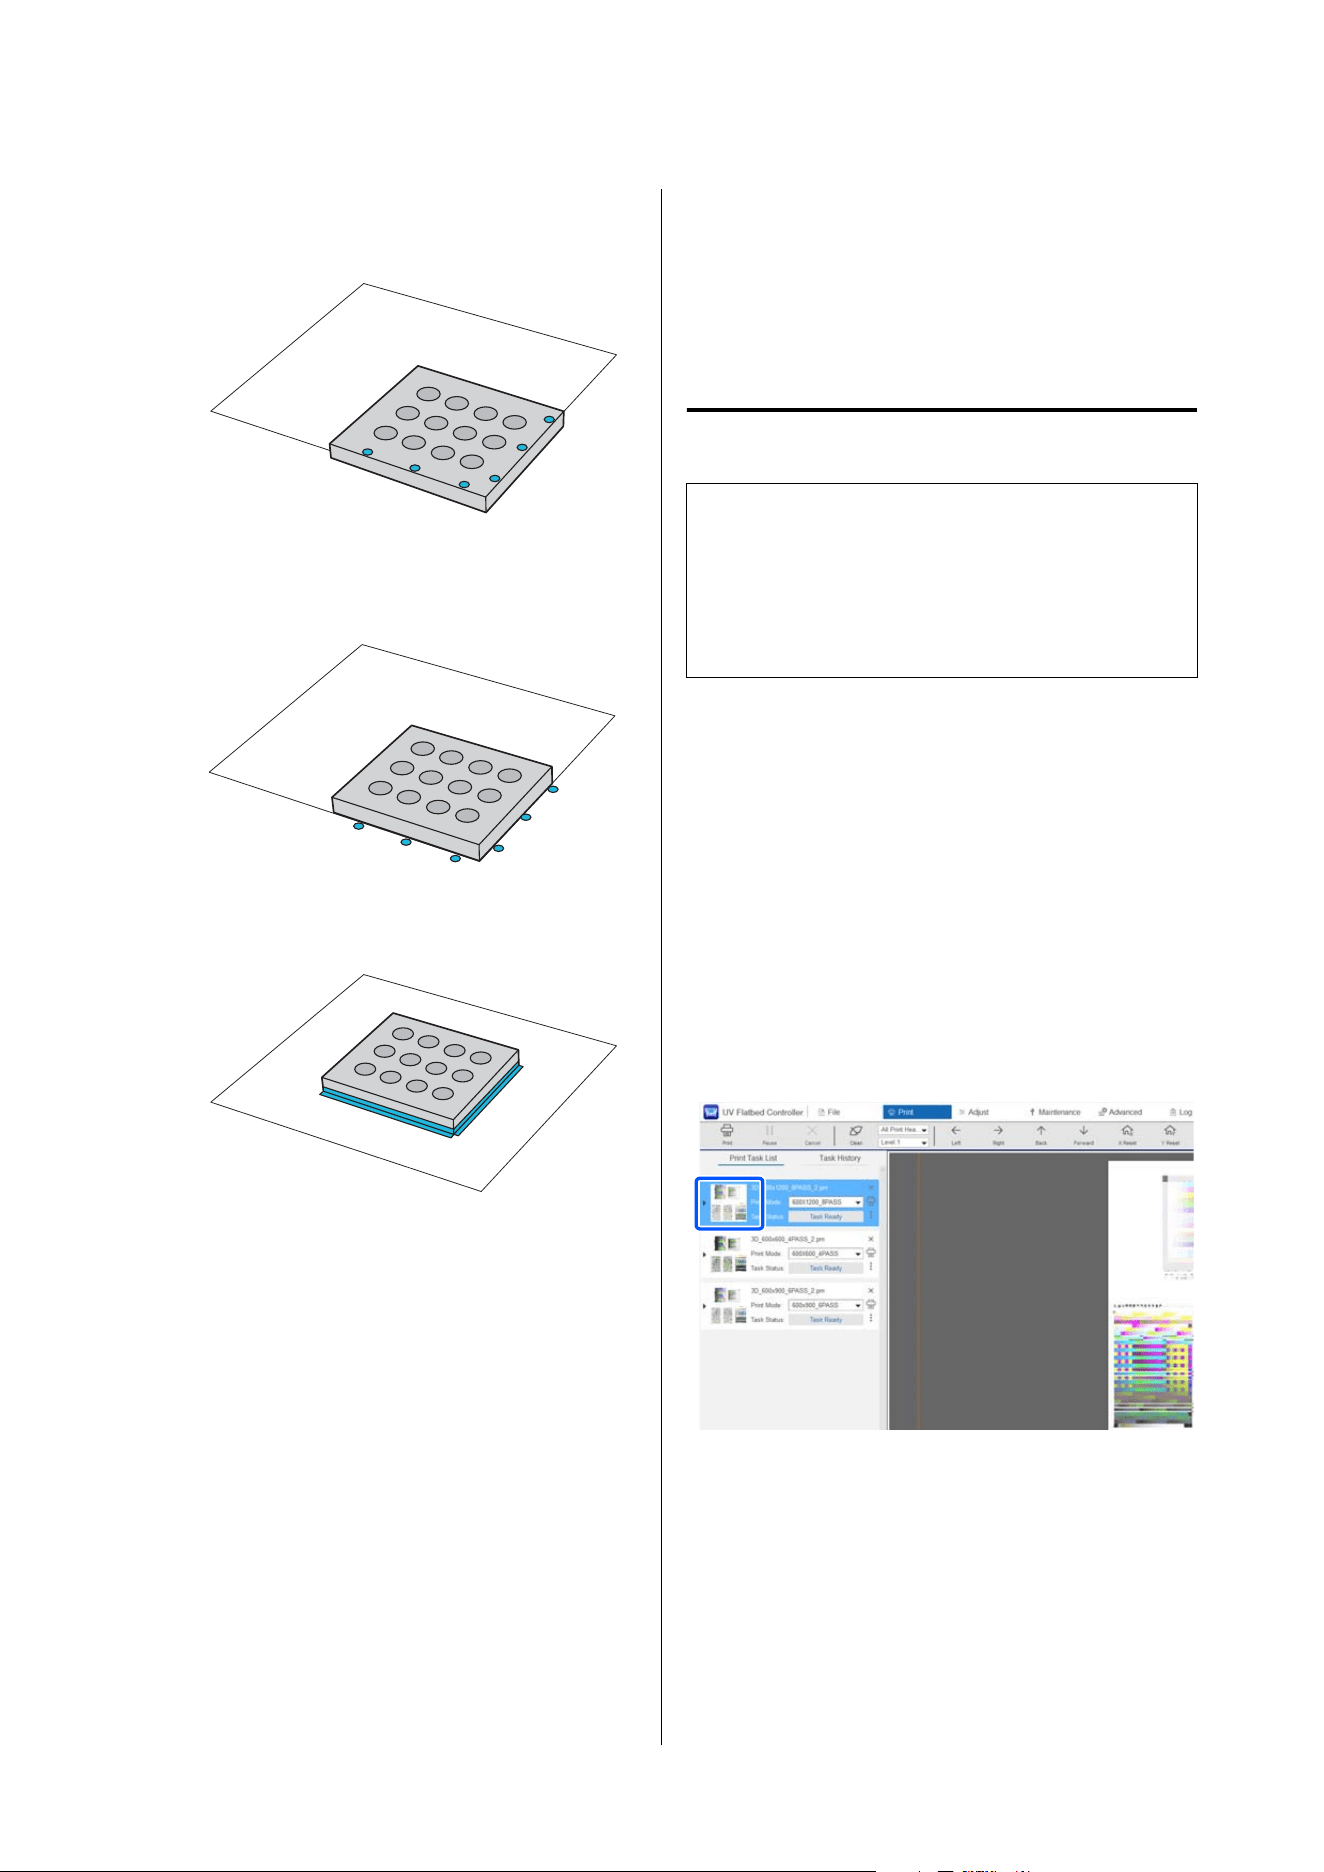
❏ Align the holes in the flatbed with the holes
in the jigs and secure using the supplied
screws or similar fasteners.
❏ Install the supplied screws into the holes on
the flatbed, and secure the jig by pressing it
against the screws.
❏ Secure the jig by attaching its outer edges to
the flatbed using masking tape.
C
Load the media on the jigs.
Specifying the print start position
❏ When printing at the print position shown on
the Epson Edge Print PRO preview screen
Set X Margin and Y Margin to 0.00 mm in
the UV Flatbed Controller.
❏ When specifying the print start position in
the UV Flatbed Controller
Set Horizontal and Ve rtic al in Layout - Left
Top Position to 00 in Epson Edge Print PRO.
Print Settings
Before starting printing, set Thickness Detection in
the UV Flatbed Controller. For multi-layer printing,
set Y Print Direction as needed.
Setting Thickness Detection
c
Important:
If the Thickness Detection is not set correctly, the
print head may come into contact with the media,
causing a malfunction or blurred text and images,
which can reduce print quality.
There are two methods for setting Thickness
Detection: Manual and Auto. Manual is selected when
the UV Flatbed Controller starts.
Manual operation
A
Check that the job you printed using Epson
edge Print PRO is displayed in Print - Print
Task List in the UV Flatbed Controller.
B
Select the job you want to print.
Click the image area of the target job.
SC-V4000 User's Guide
Basic Operations
51
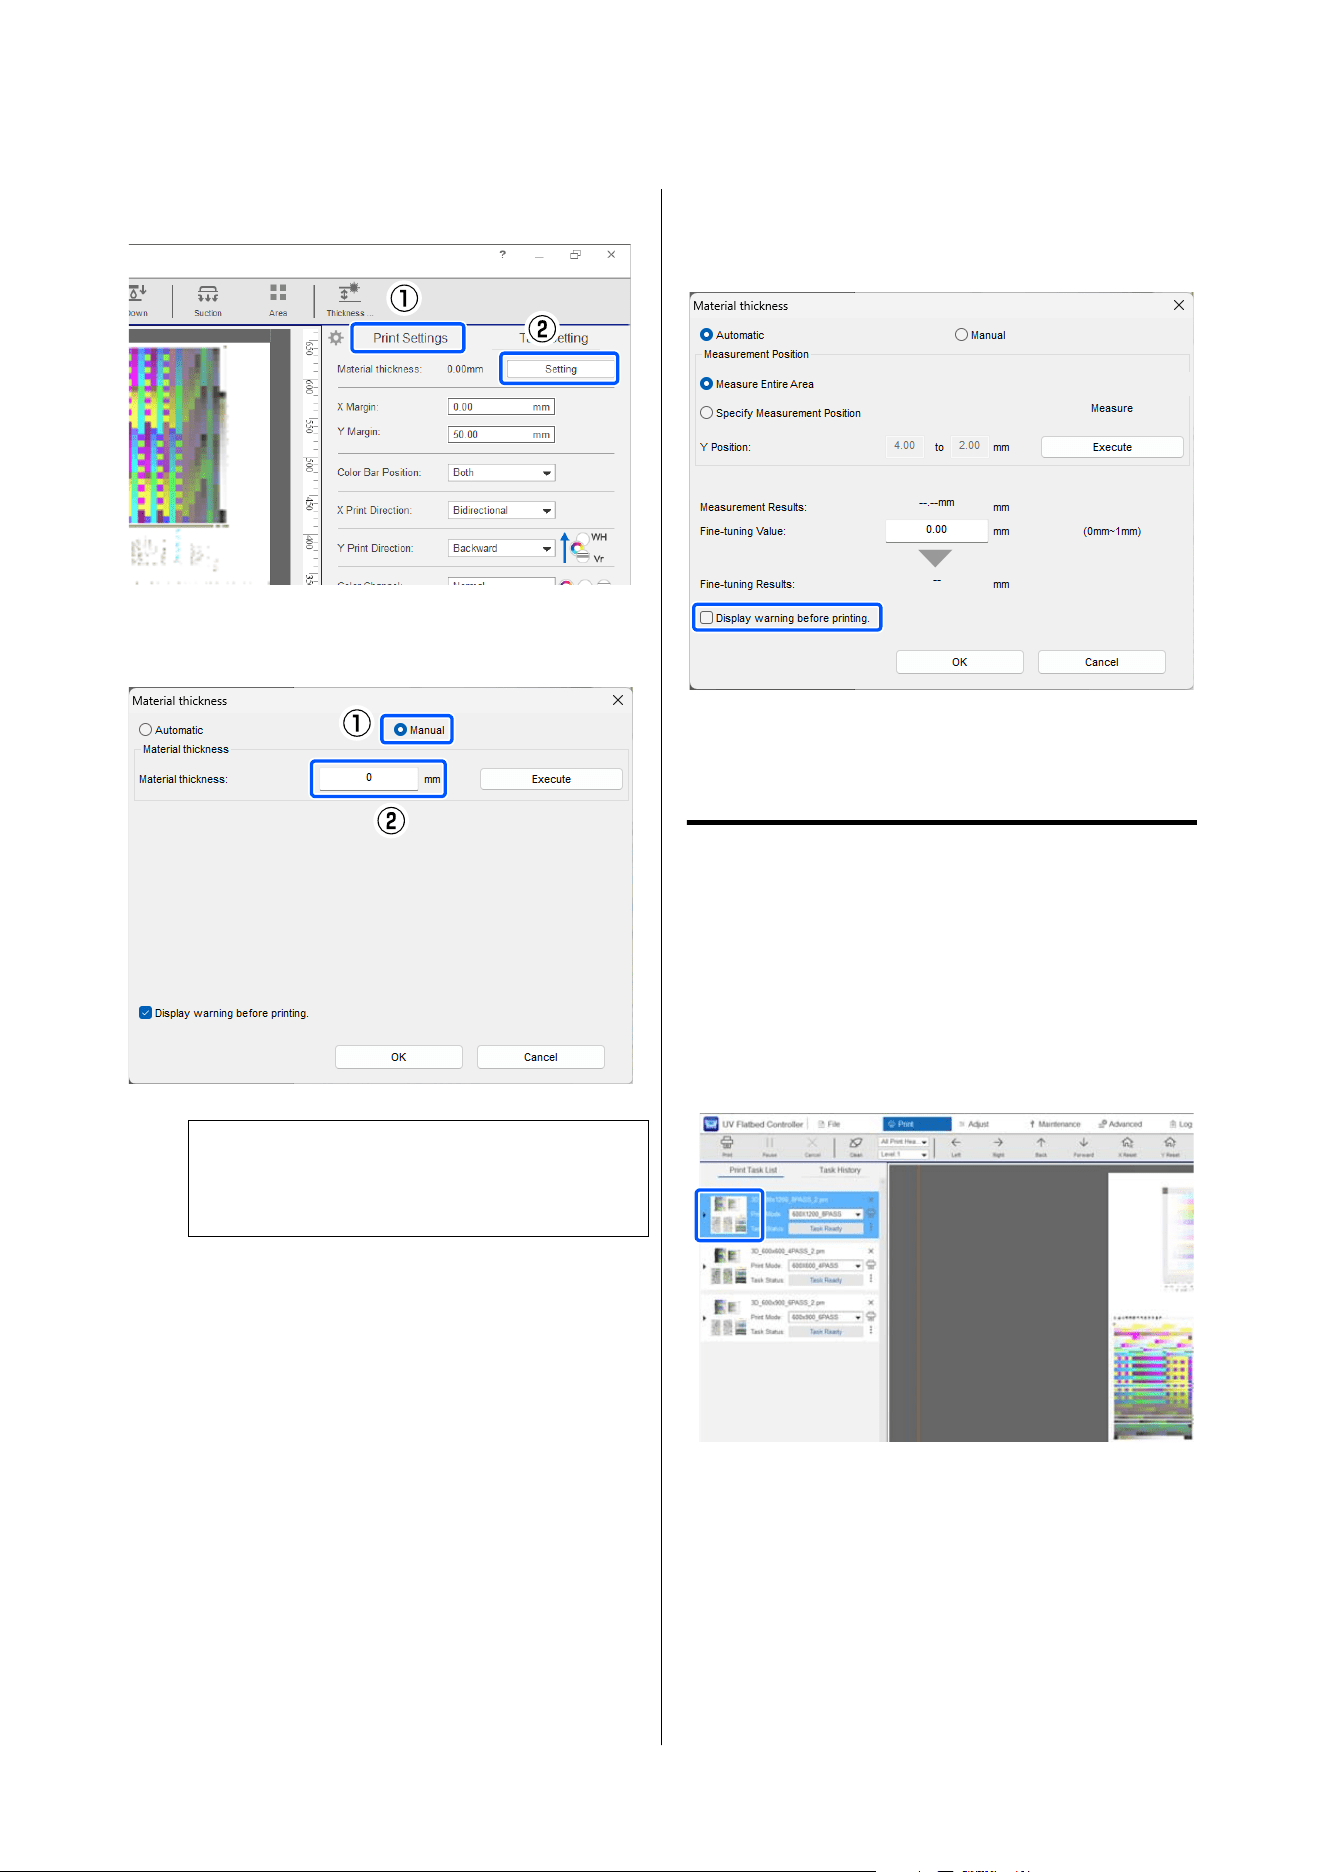
C
Click Setting in Print Settings.
D
Select Manual and enter a value in Material
thickness.
Note:
When you click Execute, the print head height
changes to match the Thickness Detection setting.
E
Select the following if you want to display a
confirmation message before printing to verify
that Thickness Detection is set correctly.
F
When the Thickness Detection settings are
complete, click OK.
Automatic Operation
A
Check that the job you printed using Epson
edge Print PRO is displayed in Print - Print
Task List in the UV Flatbed Controller.
B
Select the job you want to print.
Click the image area of the target job.
SC-V4000 User's Guide
Basic Operations
52
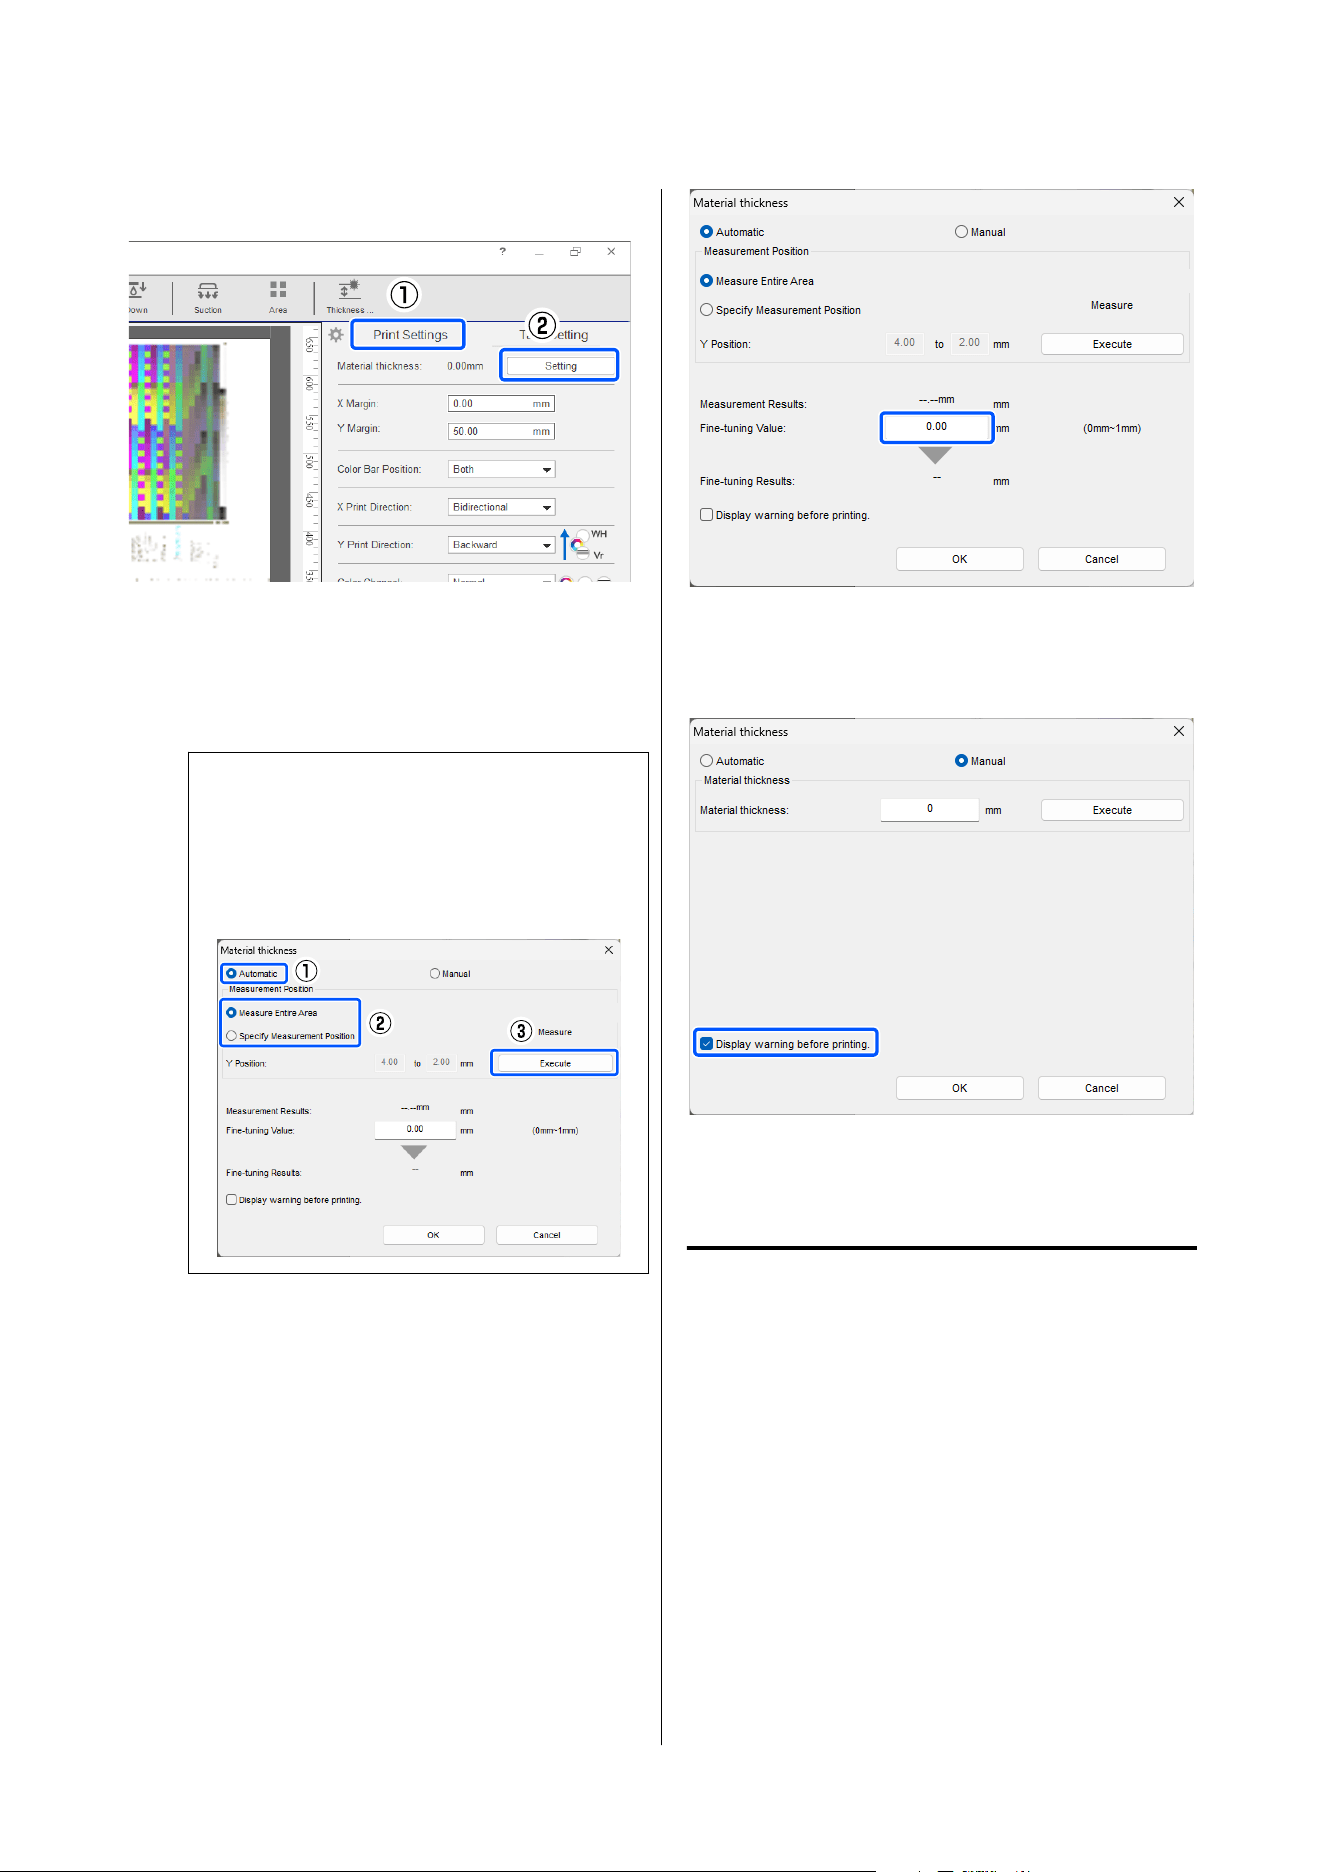
C
Click Setting in Print Settings.
D
Select Auto, select either Measure Entire Area
or Specify Measurement Position, and then
click Execute.
Thickness Detection for the media begins.
Note:
❏ Measure Entire Area measures the entire
flatbed area.
❏ Specify Measurement Position measures a
specified area within the printable area.
E
For fuzzy media or media that is sensitive to
heat, you can fine-tune the measured value to
increase it.
Enter an adjustment value within the range of 0
to 1 mm in Fine-tuning Value and click d. The
final media thickness is displayed in
Fine-tuning Results.
F
Select the following if you want to display a
confirmation message before printing to verify
that the media thickness is set correctly.
G
When the Thickness Detection settings are
complete, click OK.
Setting Multi-layer Printing
When performing multi-layer printing, you cannot
print correctly if Y Print Direction is not set correctly.
See the following for more details.
U “Multi-layer Printing” on page 64
SC-V4000 User's Guide
Basic Operations
53
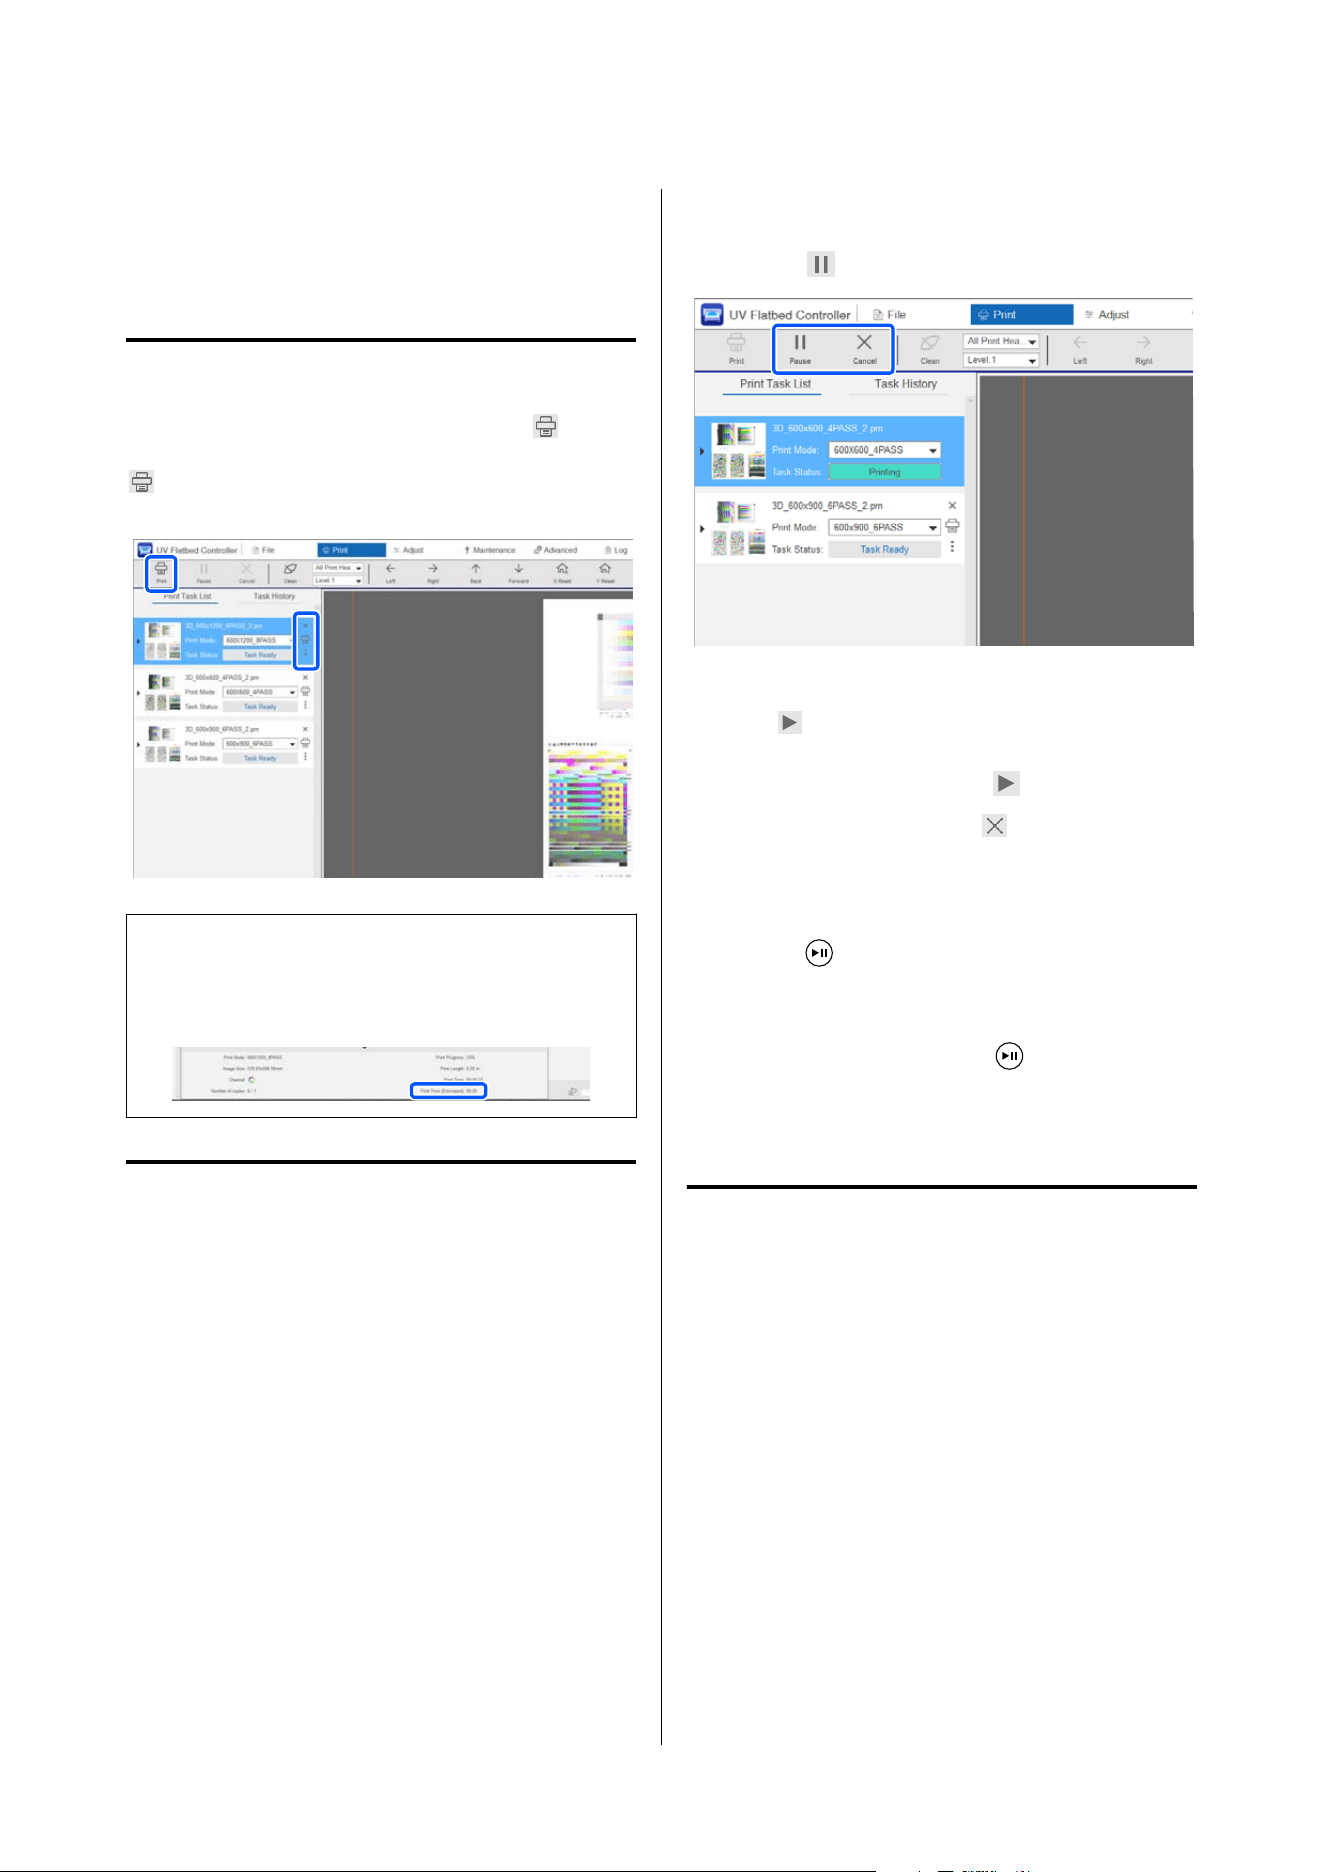
Starting and Canceling
Printing
Starting
When the print settings are complete, click from
the function buttons on the UV Flatbed Controller or
in the Print Task List to start printing.
Note:
When printing starts, the estimated print time is
displayed at the bottom of the preview area. If After
Cure is enabled, the curing time will also be included.
Pausing/Canceling
You can pause and resume printing using either the
UV Flatbed Controller or the printer's control panel.
When printing is paused and then resumed, colors
may look different depending on how the ink dries.
Using the UV Flatbed Controller
A
Click from the function buttons.
Printing stops, and the function button changes
to
.
B
To resume printing, click .
To cancel printing, click
.
Using the printer control panel
A
Press .
Printing stops.
B
To resume printing, press again.
You cannot cancel printing from the control
panel.
Printing Stopped Due to
Foreign Object Detection
This printer detects foreign objects with the laser
during printing. When a foreign object is detected, an
error is displayed, and printing stops. See the
following for how to respond when this error occurs.
SC-V4000 User's Guide
Basic Operations
54
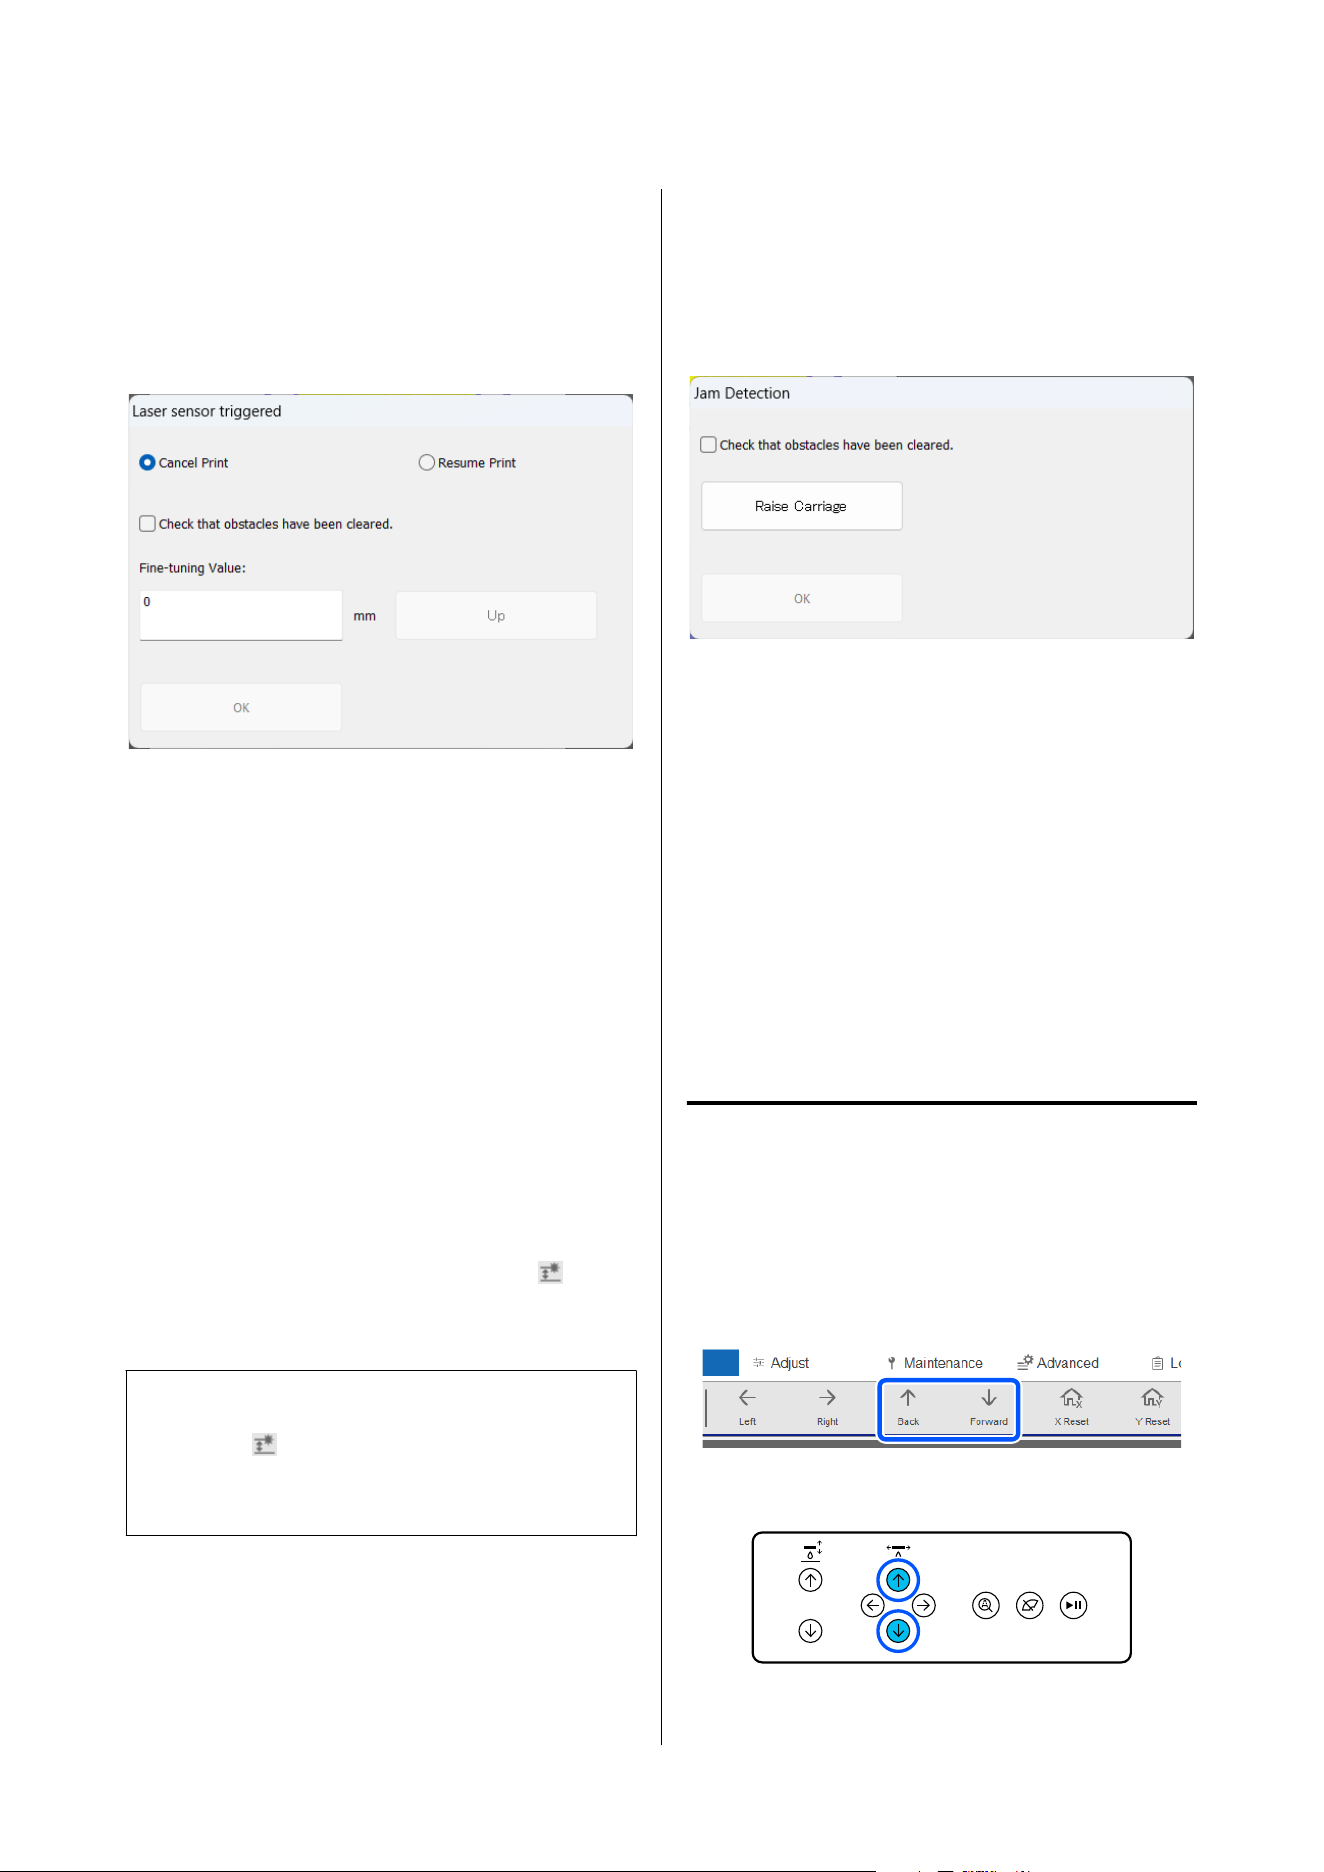
Foreign object detection by laser
When the laser misidentifies the thickness of masking
tape securing the media as a foreign object, or when a
foreign object is detected, the following screen is
displayed, and printing stops.
A
Select Cancel Print or Resume Print.
If you resume printing, colors may look
different depending on how dry the ink is.
B
If there is a foreign object, remove it. If there
are no foreign objects, enter a value in
Fine-tuning Value, and click Up to adjust the
print head height.
C
After confirming there are no foreign objects,
select Check that obstacles have been cleared.
D
Click OK.
If misidentification occurs frequently, press
on the
UV Flatbed Controller screen to turn off foreign
object detection by laser.
c
Important:
Even when
on the UV Flatbed Controller is
turned off, the laser light is still emitted. Do not
look directly into the laser.
Foreign object detection by jam
detection sensor
When a foreign object is detected, printing is canceled,
and the following screen is displayed.
A
Remove the foreign object.
If the foreign object is difficult to remove, click
Raise Carriage to raise the gantry to a height
where the foreign object can be removed.
B
After confirming there are no foreign objects,
select Check that obstacles have been cleared.
C
Click OK.
D
Try printing again.
Removing Media
A
After printing is complete, if the gantry remains
over the media, use the following buttons to
move the gantry.
UV Flatbed Controller
Control Panel
SC-V4000 User's Guide
Basic Operations
55
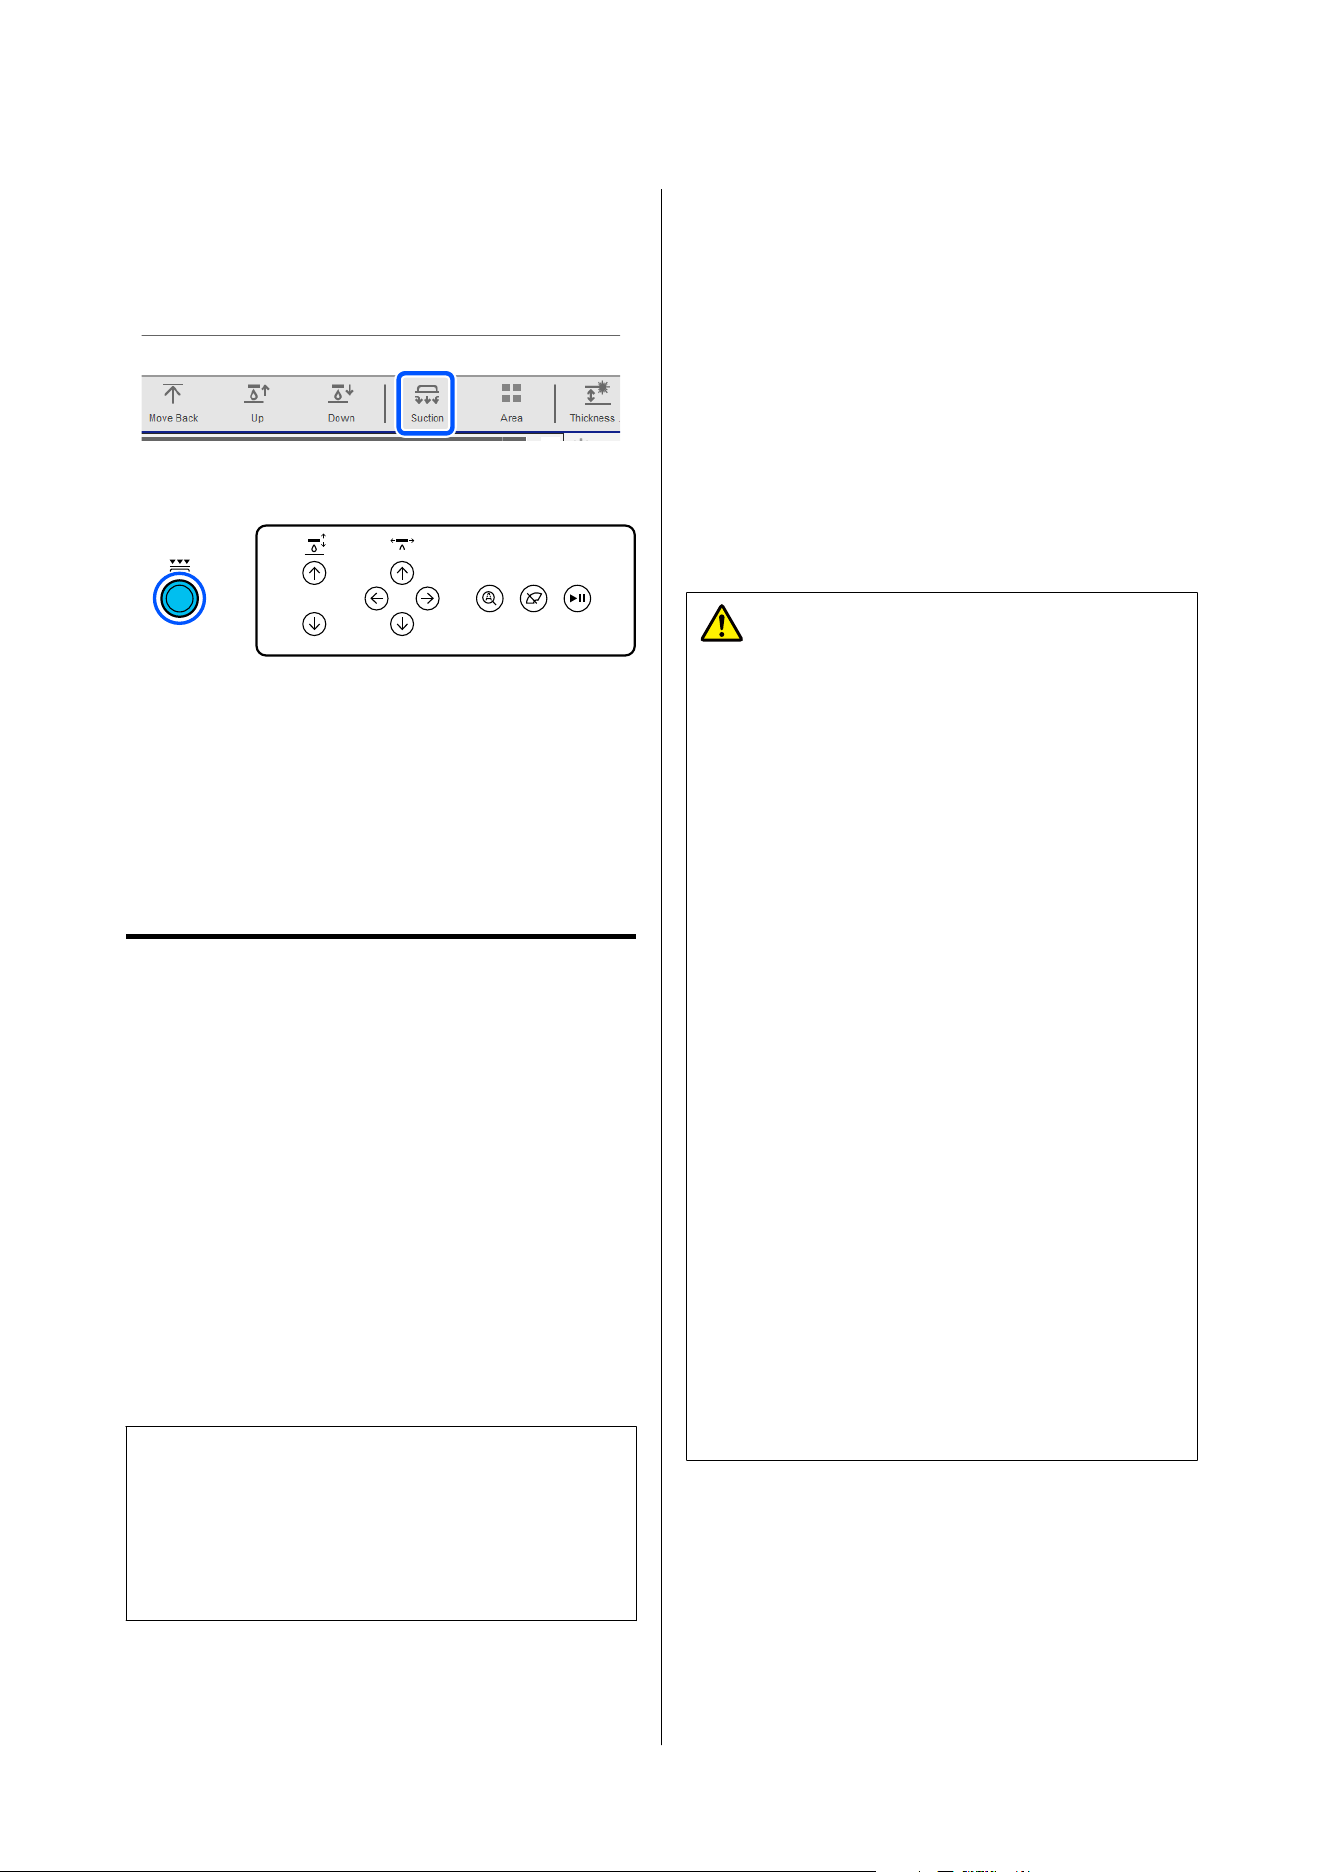
B
If suction is turned on, use the following button
to turn it off.
UV Flatbed Controller
Control Panel
C
Remove the media.
Cleaning and Turning Off
after Finishing Work
Cleaning after Finishing Work
After daily work is complete, perform cleaning in the
following order. Continuing to use the printer without
cleaning can cause clogged nozzles or stains on the
printed materials.
❏ Suction caps
❏ Wiper unit
❏ Flushing box
❏ Around the print head
❏ Flatbed
c
Important:
Do not leave the printer unused for more than 50
minutes during daily or periodic maintenance. Ink
may be affected by fluorescent light or sunlight and
cause malfunctions to occur.
Tools required for cleaning
The following consumables are required for cleaning.
Cleaning liquid, cleaning sticks
The following commercially available tools are also
required.
Tray, cup, dropper, scraper, polyester/nylon knit
woven fabric
See the following for more details.
U “Preparation” on page 84
Cautions when Operating
Caution:
❏ Wear the same protective equipment used
during printer operation when performing
maintenance or refilling the ink.
Should any ink, waste ink, or cleaning liquid
come into contact with your skin or enter your
eyes or mouth, immediately take the following
actions.
❏ If fluid adheres to your skin, immediately
wash it off using large volumes of soapy
water. Consult a physician if the skin
appears irritated or inflamed.
❏ If fluid enters your eyes, rinse immediately
with water. Failure to observe this
precaution could result in bloodshot eyes
or mild inflammation. If problems persist,
consult a physician.
❏ If any enters your mouth, consult a
physician immediately.
❏ If fluid is swallowed, do not force the
person to vomit and consult a physician
immediately. If the person is forced to
vomit, fluid may get caught in the trachea
which can be dangerous.
❏ Store ink bottles, waste ink, and cleaning
liquid out of the reach of children.
❏ Remove the media from the printer before
starting work.
❏ Do not touch any parts, belts, or circuit boards
other than the parts that need to be cleaned. It
may cause a malfunction or decline of the print
quality.
SC-V4000 User's Guide
Basic Operations
56
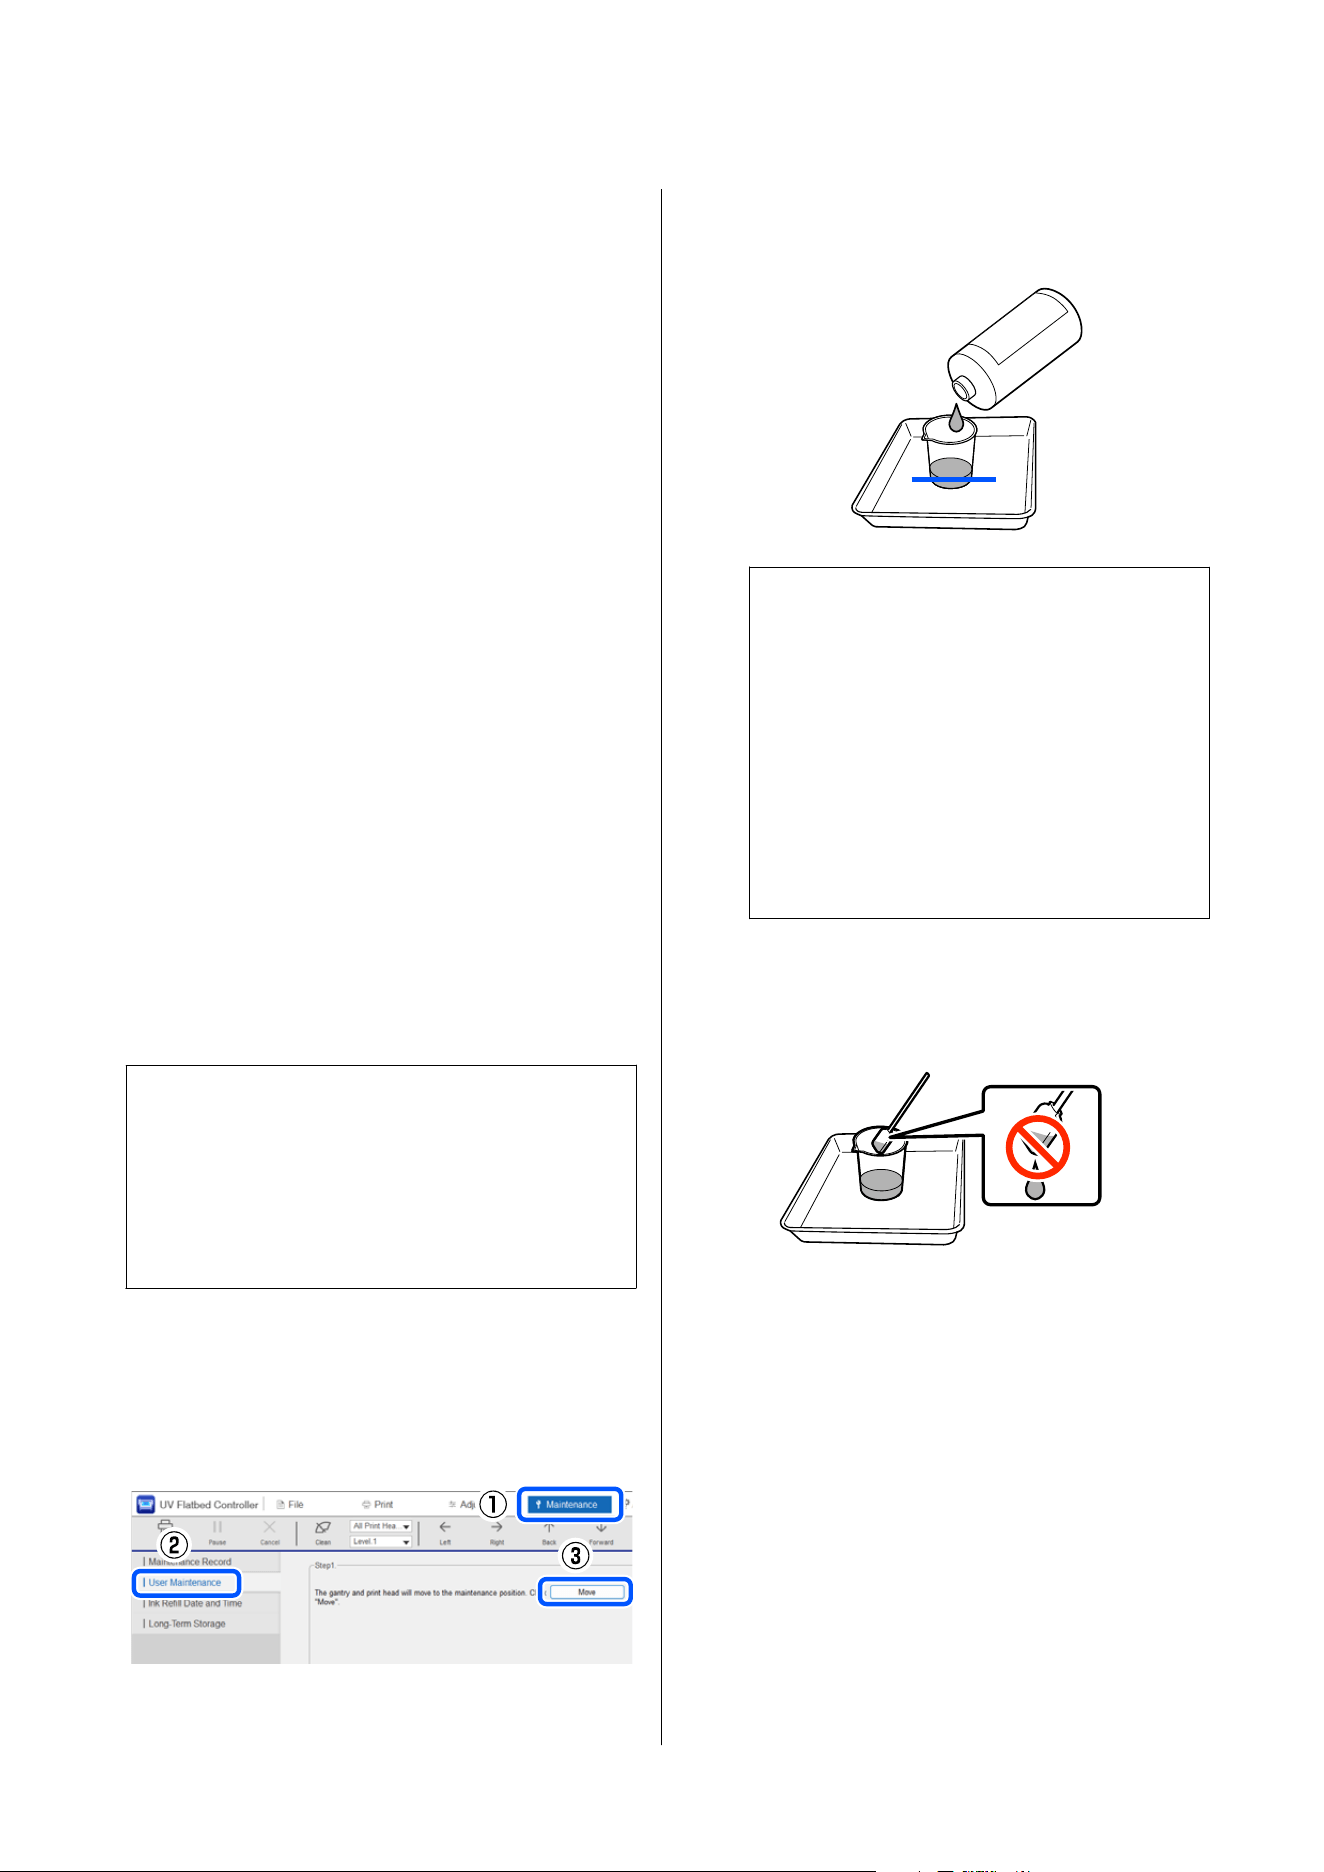
❏ Do not use any cleaning sticks other than the
consumables supplied. Using items that produce
lint can damage the print head.
❏ Use new cleaning sticks and polyester/nylon knit
woven fabric each time. Reusing items that have
been used once can cause contamination.
❏ Do not touch the tips of the cleaning sticks with
your hands. Oils from skin can adhere to them
and damage the print head.
❏ Do not use anything other than the specified
cleaning liquid to clean around the print head,
suction caps, or flushing box. Using anything
other than what is specified can cause printer
malfunctions or print quality to decline.
❏ Cleaning sticks, cleaning liquid, fabric, and other
items used for cleaning that have ink on them
should be disposed of as industrial waste.
U “Disposal of Used Consumables” on page 99
❏ Touch a metal object before starting operations to
disperse any static electricity.
Clean around the print head
The following procedures use cleaning liquid, a tray, a
cup, and polyester/nylon knit woven fabric.
c
Important:
The gantry may move. Before starting the
procedure, make sure no one is in the gantry's
range of motion. Until maintenance work is
complete, make sure no one enters the gantry's
range of motion.
A
In the UV Flatbed Controller, select the
Maintenance menu and click User
Maintenance - Move.
The print head moves to the maintenance
position.
B
Place the cup on the tray and pour in
approximately 20 ml (approximately 0.68 oz) of
cleaning liquid.
c
Important:
❏ Do not reuse cleaning liquid from a
previous cleaning session in the next
cleaning session. Using dirty cleaning
liquid can cause contamination.
❏ After using the cleaning liquid, close the
lid tightly and store it at room
temperature away from high
temperatures, high humidity, and direct
sunlight.
C
Soak a cleaning stick with cleaning liquid.
At this time, be careful not to let cleaning liquid
drip from the cleaning stick.
SC-V4000 User's Guide
Basic Operations
57
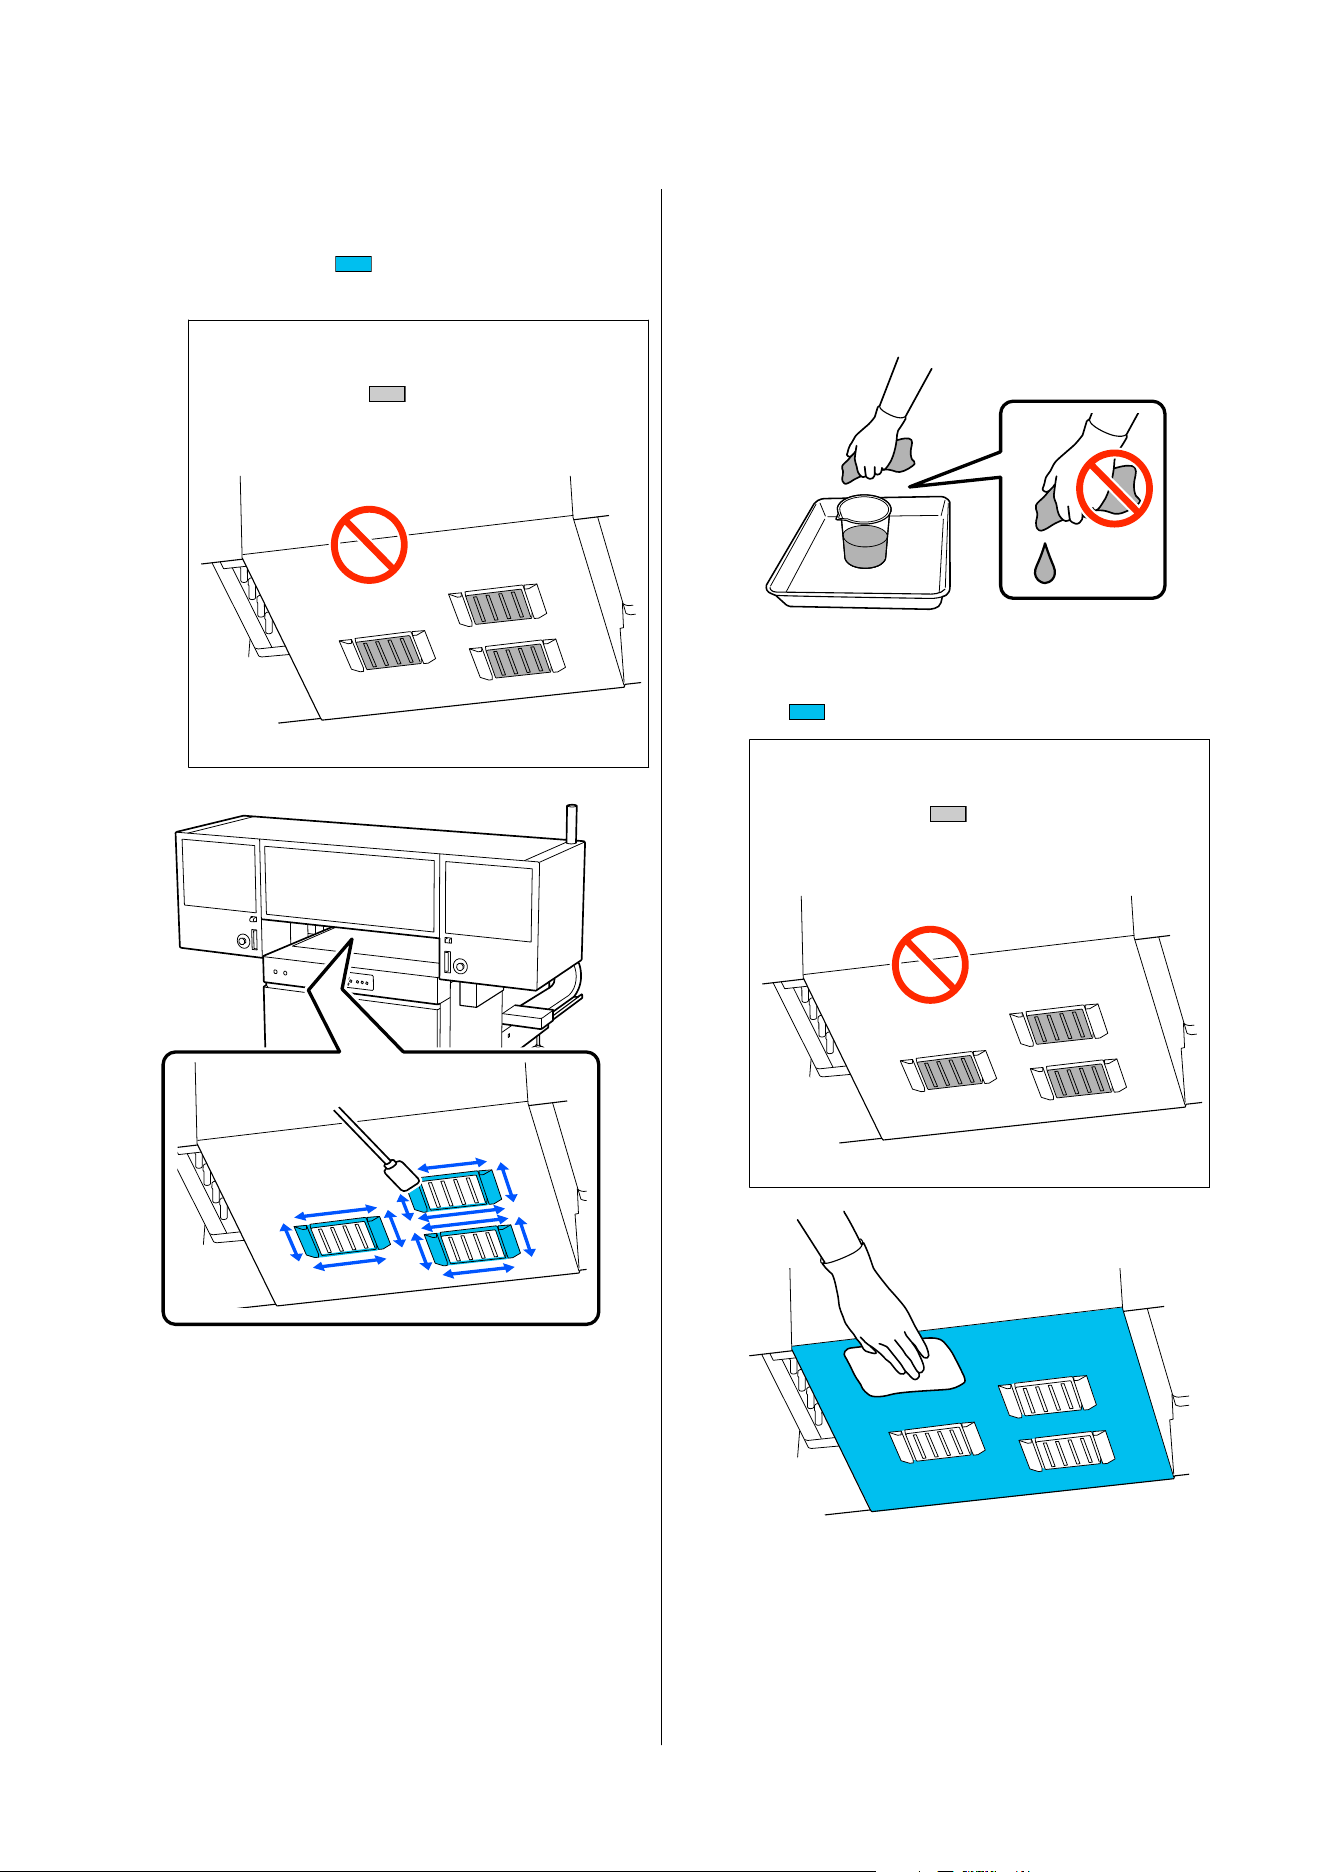
D
From under the front cover, use the cleaning
stick to wipe off ink, lint, and dust that have
built up on the
area (nozzle side) shown in
the illustration.
c
Important:
Do not touch the
area shown in the
following illustration. Doing so can cause
malfunctions.
E
Soak the polyester/nylon knit woven fabric in
cleaning liquid.
At this time, gently wring it out so that cleaning
liquid does not drip from the polyester/nylon
knit woven fabric.
F
Use the polyester/nylon knit woven fabric to
wipe off ink, lint, and dust that have built up on
the
area shown in the illustration.
c
Important:
Do not touch the
area shown in the
following illustration. Doing so can cause
malfunctions.
Next, clean the suction caps, wiper unit, and flushing
box.
SC-V4000 User's Guide
Basic Operations
58
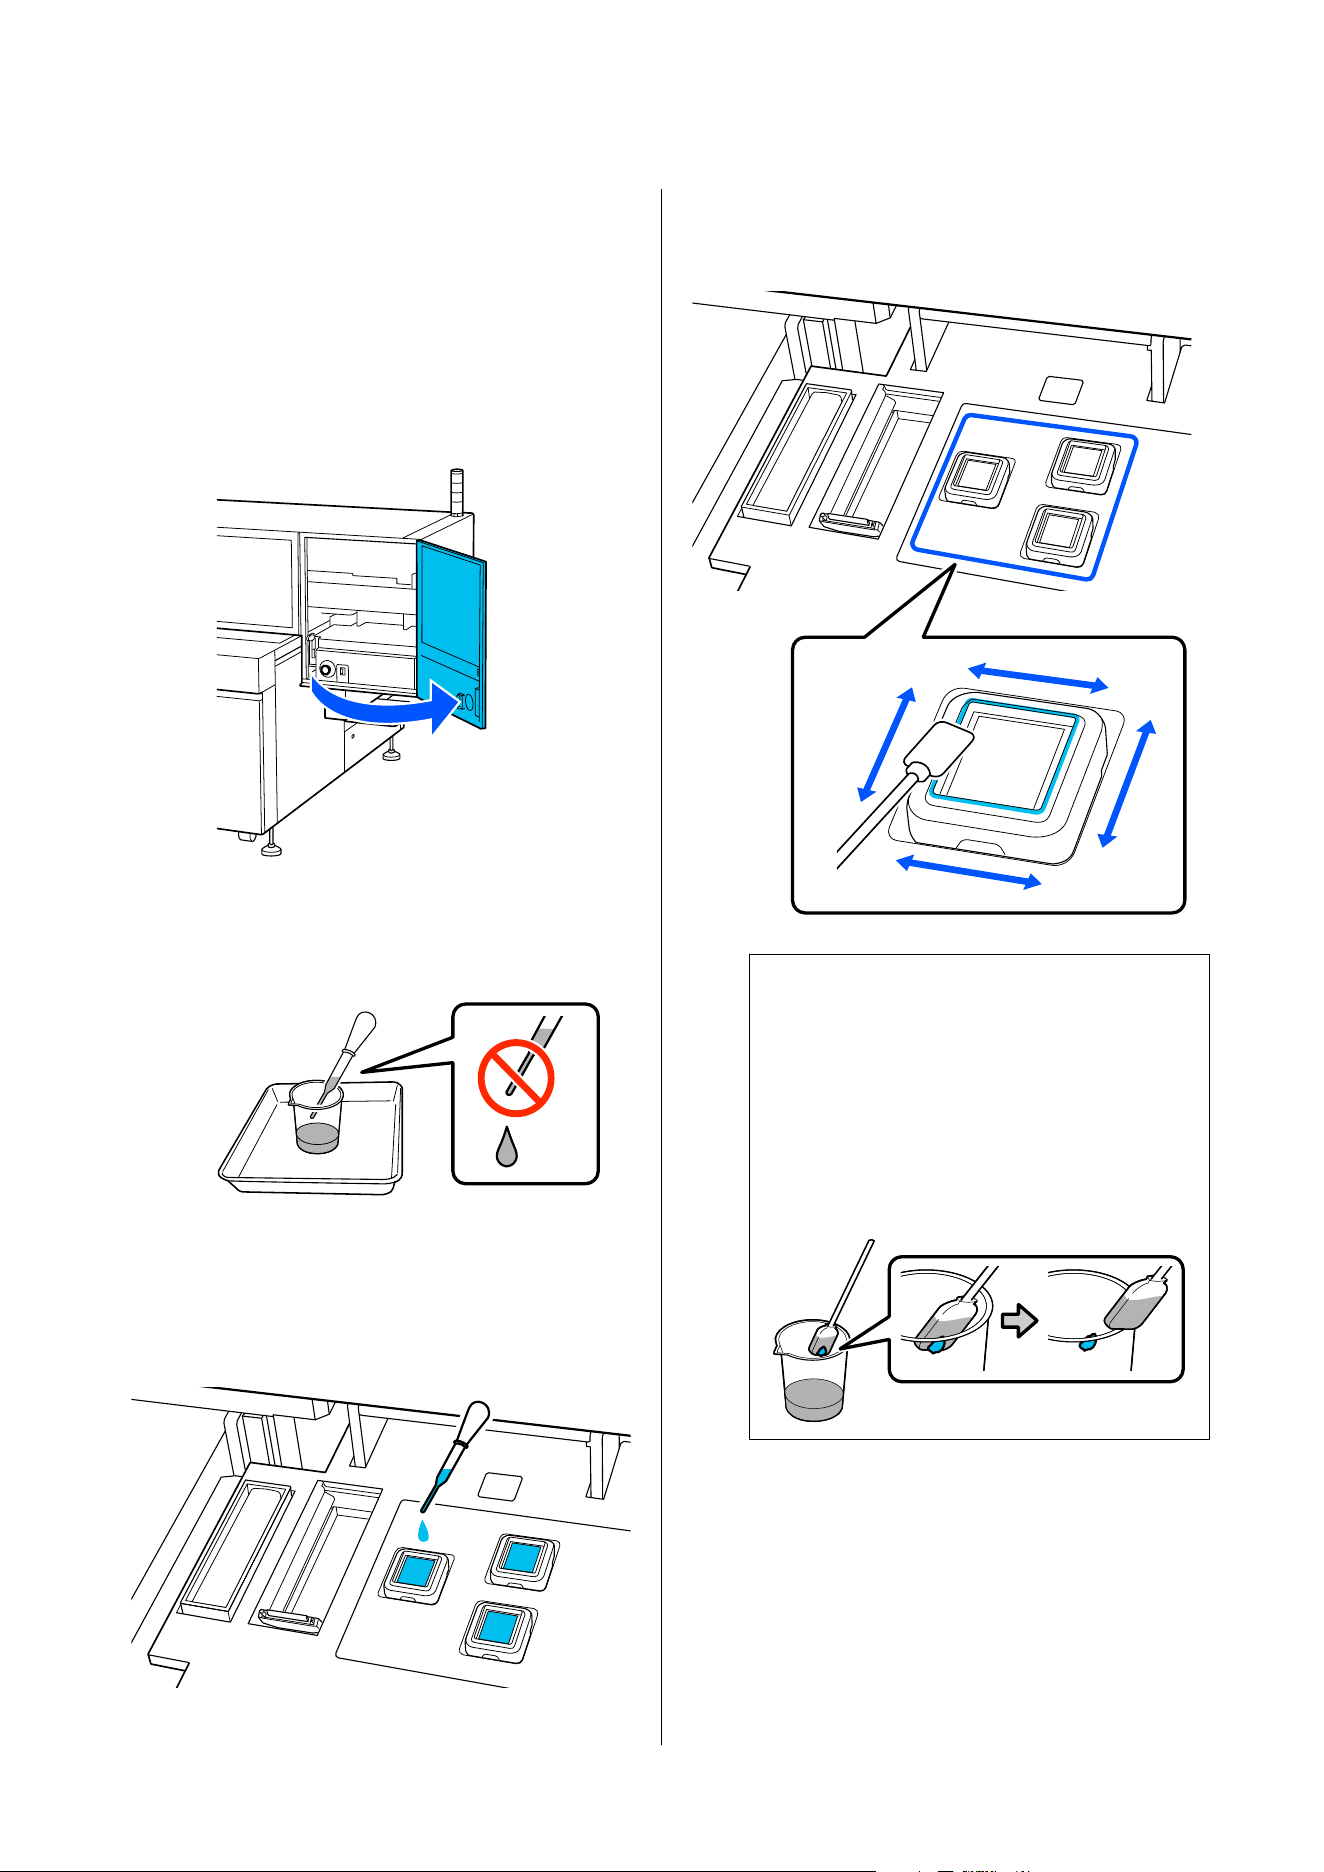
Cleaning the suction caps, wiper
unit, and flushing box
The following procedure uses a dropper in addition to
the cleaning liquid, cleaning sticks, tray, cup and
polyester/nylon knit woven fabric used for cleaning
around the print head.
A
Open the maintenance cover on the right.
B
Use the dropper to draw up cleaning liquid.
At this time, be careful not to let cleaning liquid
drip from the dropper.
C
Apply 2 to 3 ml (0.07 to 0.10 oz) of cleaning
liquid for each suction cap to the positions
shown in the following illustration (enough to
sufficiently fill the suction caps without
overflowing).
D
Flatten the cleaning stick used for cleaning
around the print head and wipe the edges of the
top surface of all suction caps.
c
Important:
❏ If the cleaning stick becomes dirty, rinse
it with cleaning liquid and then wipe it
clean.
❏ When you remove deposits of ink with
the cleaning stick, use the edge of the cup
to remove the deposits adhering to the
cleaning stick.
SC-V4000 User's Guide
Basic Operations
59
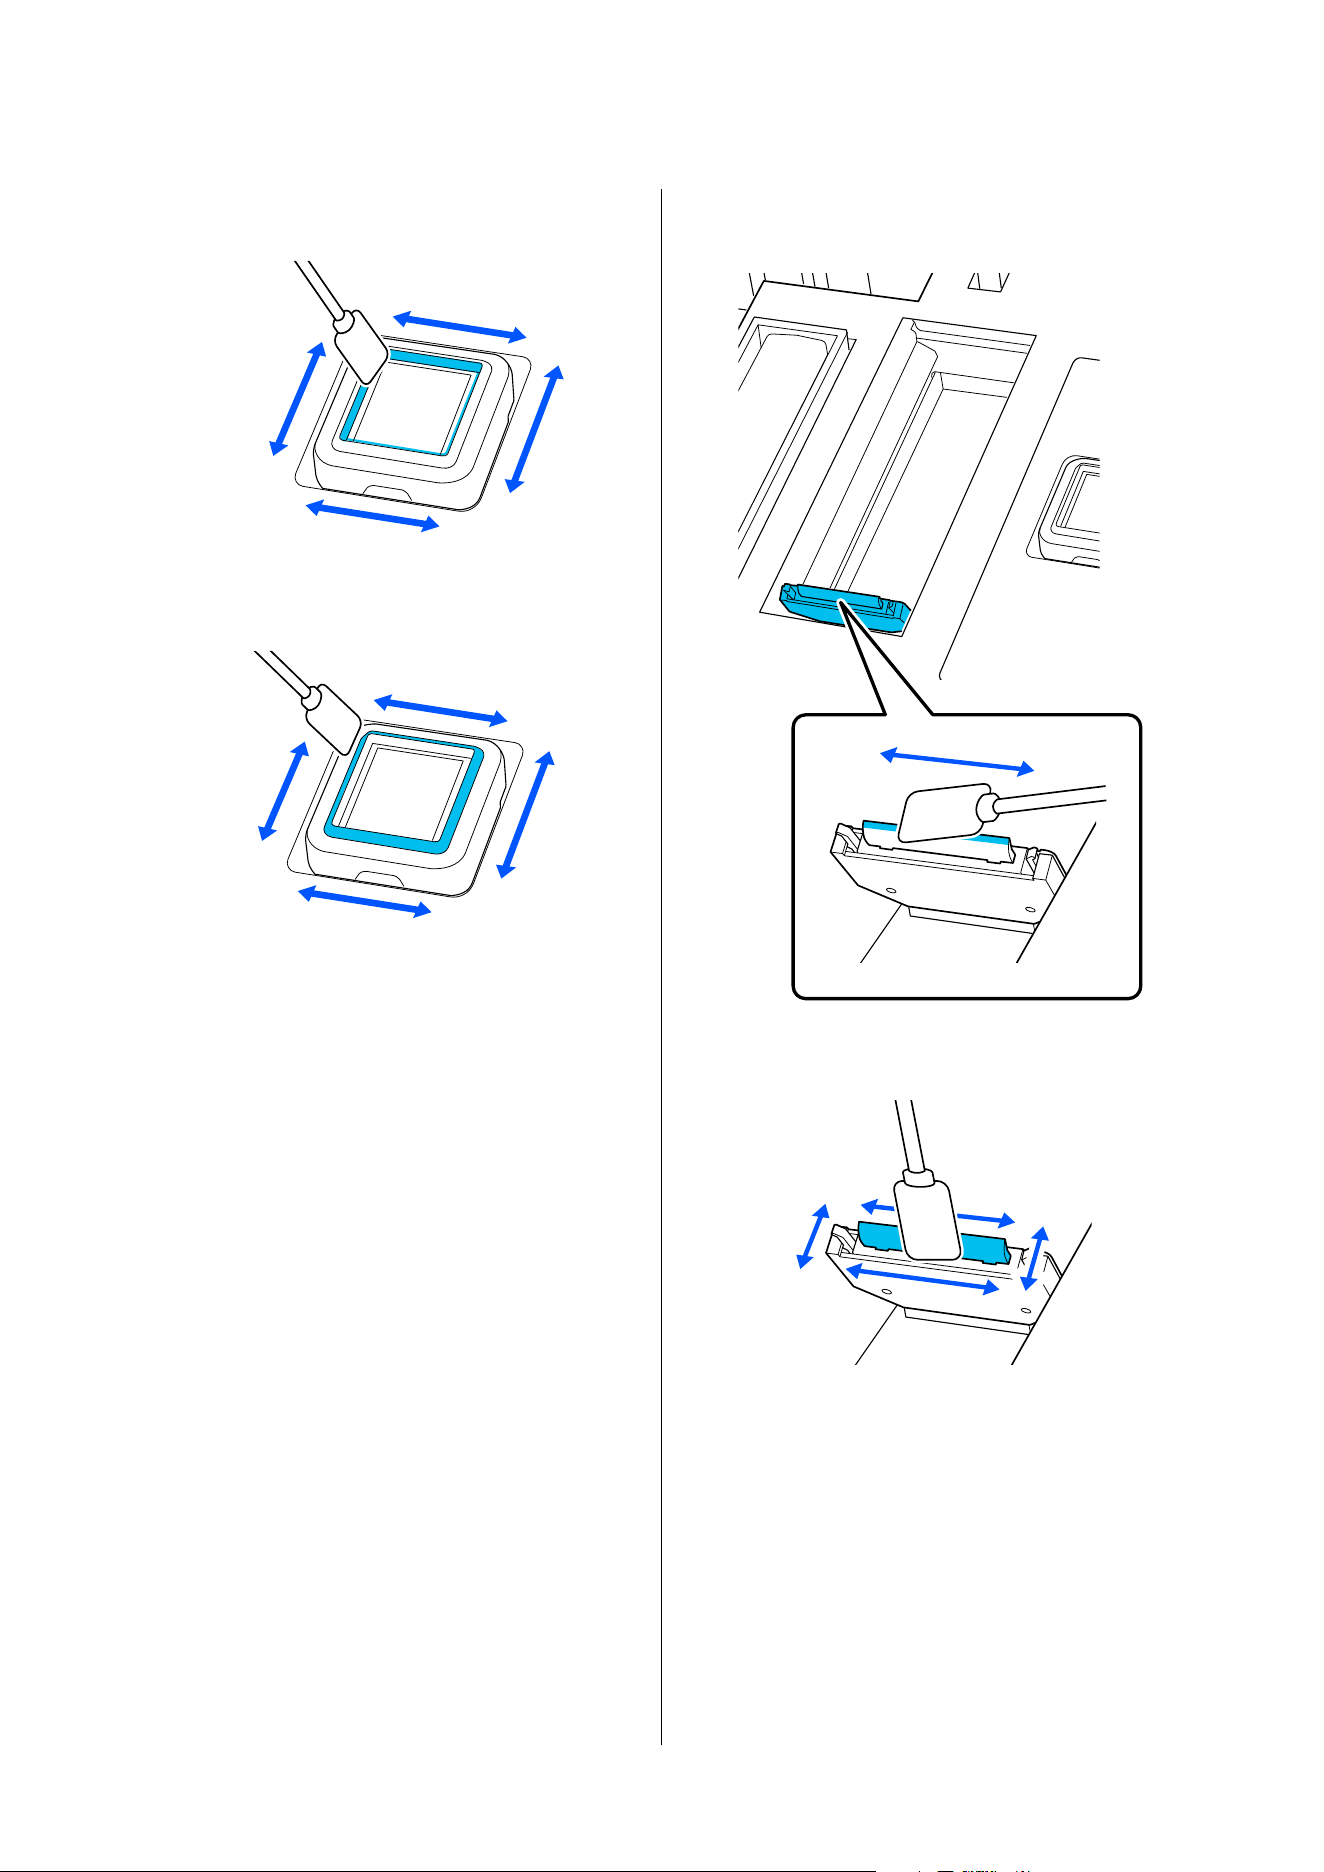
E
Hold the cleaning stick vertically and wipe the
inner circumference of all suction caps.
F
Hold the cleaning stick vertically and wipe the
outer circumference of all suction caps.
G
Flatten the cleaning stick and wipe the edges of
the top surface of the wiper unit.
H
Hold the cleaning stick vertically and wipe the
outer circumference of the wiper unit.
SC-V4000 User's Guide
Basic Operations
60
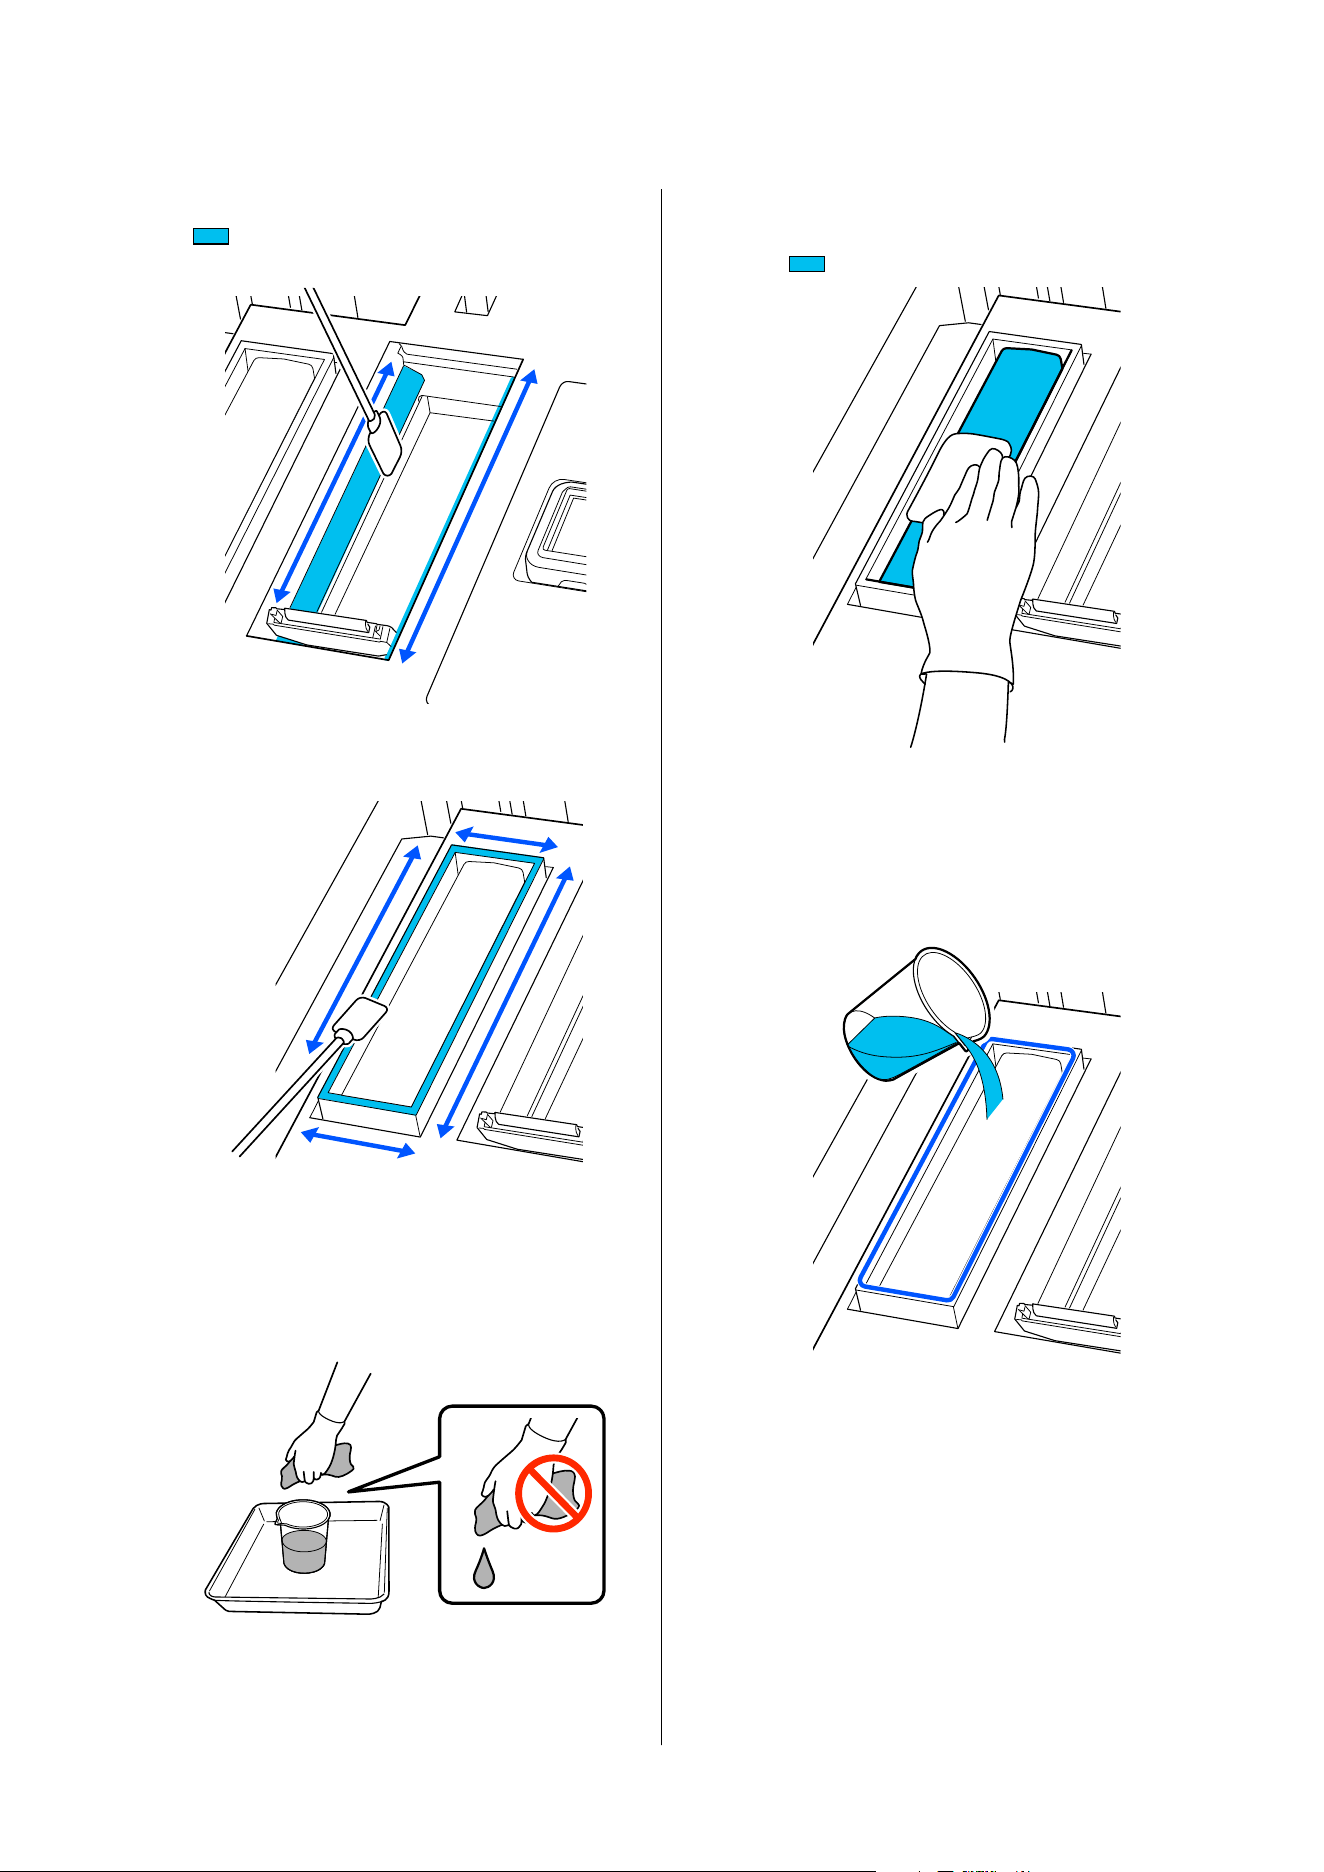
I
Hold the cleaning stick vertically and wipe the
area on the inner circumference of the
guide section.
J
Flatten the cleaning stick and wipe the edges of
the top surface of the flushing box.
K
Soak the polyester/nylon knit woven fabric in
cleaning liquid.
At this time, gently wring it out so that cleaning
liquid does not drip from the polyester/nylon
knit woven fabric.
L
Use the polyester/nylon knit woven fabric to
wipe off ink, lint, and dust that have built up on
the
area shown in the illustration.
M
Pour approximately 10 ml (0.34 oz) of used
cleaning liquid into the positions shown in the
following illustration.
Dispose of the remaining cleaning liquid in the
waste ink bottle.
SC-V4000 User's Guide
Basic Operations
61
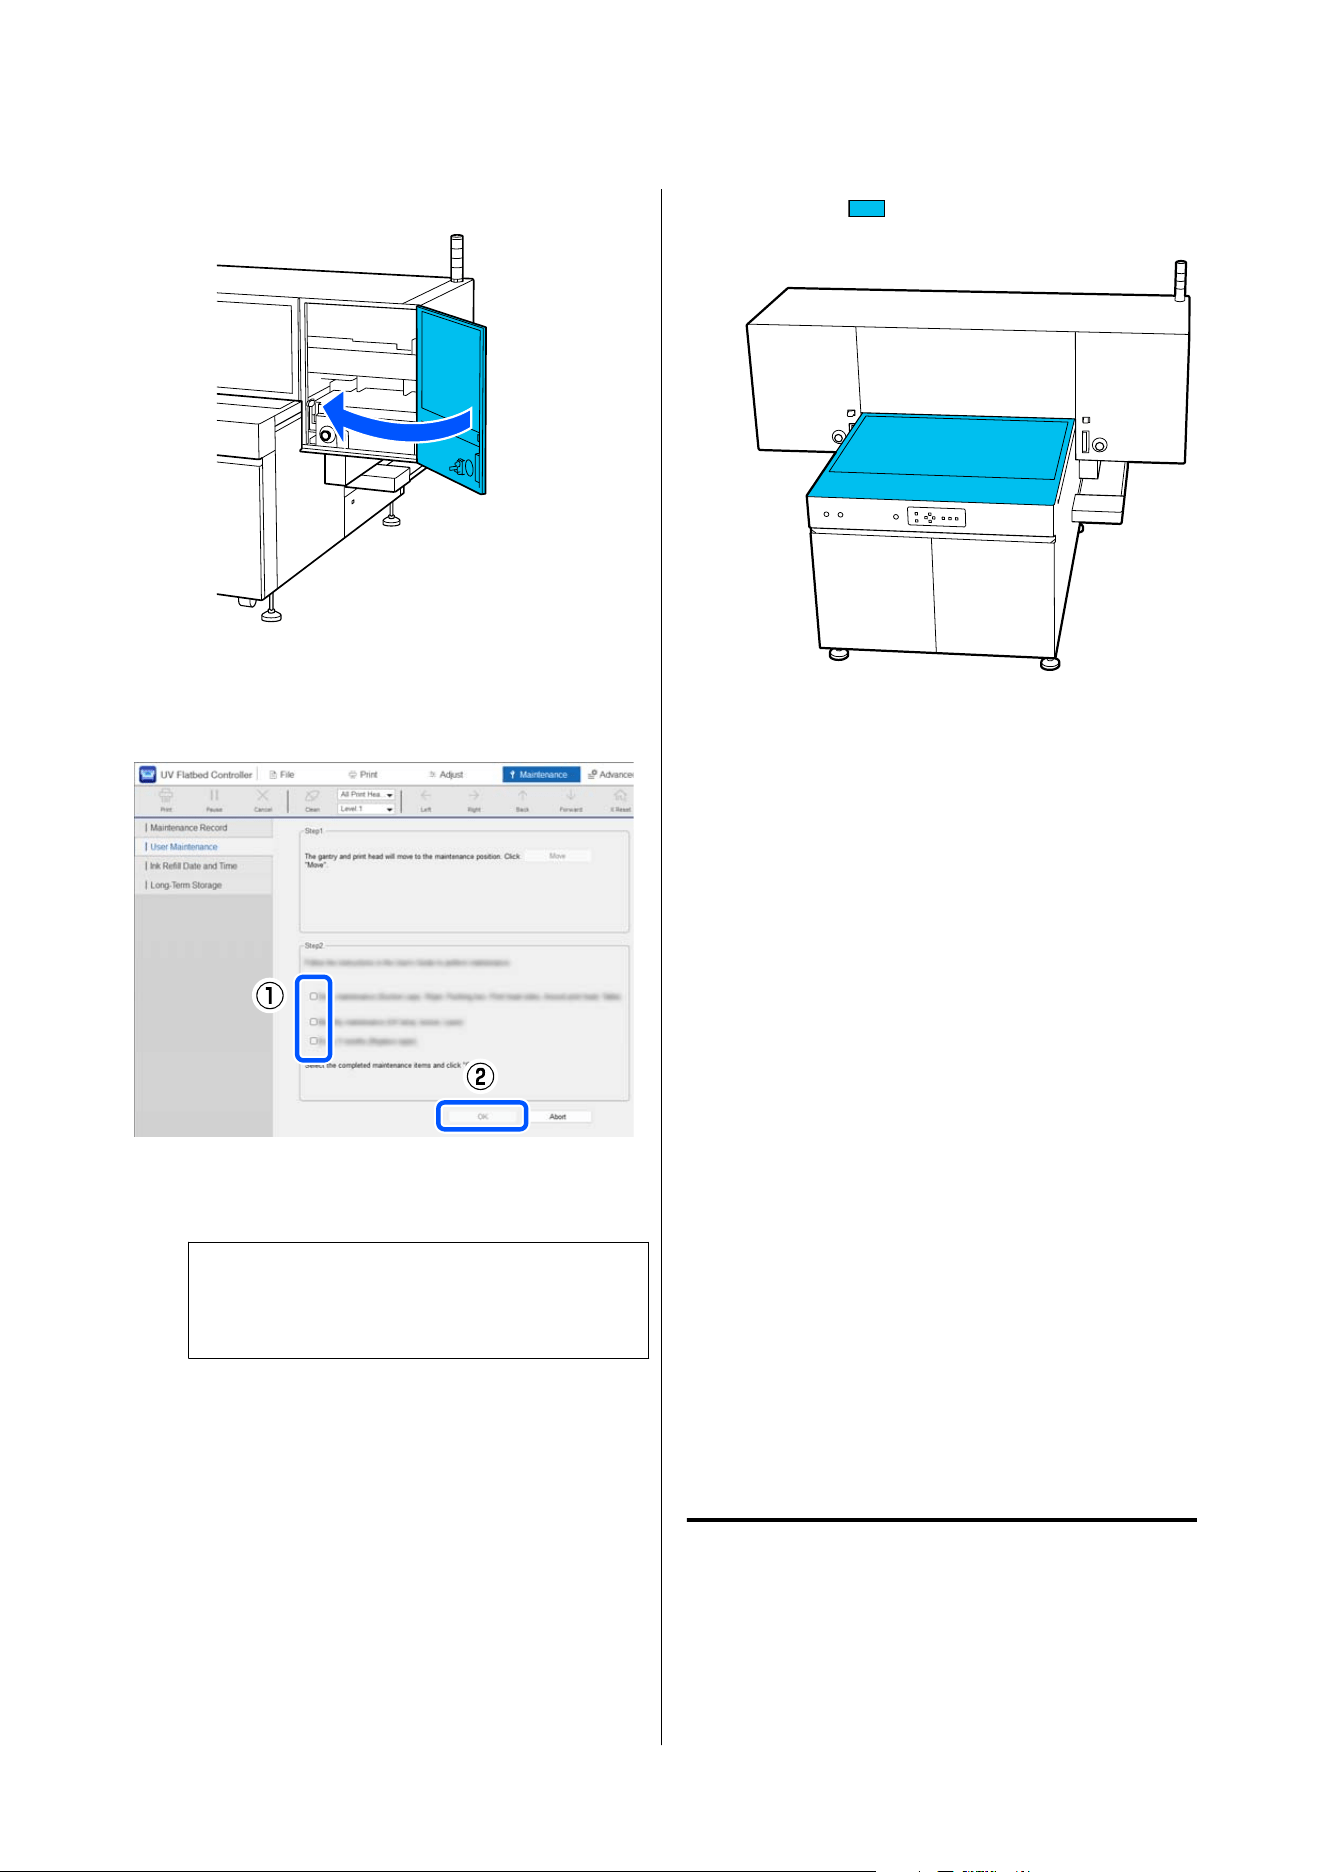
N
Close the maintenance cover on the right.
O
When cleaning is complete, select the target
areas in the UV Flatbed Controller and click
OK.
The maintenance counter is reset, and the print
head moves to the home position.
Note:
If you click Cancel, the maintenance counter is
not reset.
Next, clean the flatbed.
Cleaning the flatbed
Use new polyester/nylon knit woven fabric and a
scraper.
A
Clean the area (flatbed) shown in the
illustration.
If dust or dirt accumulates
Use the polyester/nylon knit woven fabric to
wipe away dust, as it can cause clogged nozzles.
If it is particularly dirty, dampen the polyester/
nylon knit woven fabric with water containing a
small amount of neutral detergent, and then
firmly wring it dry before wiping. Then use the
dry polyester/nylon knit woven fabric to wipe
off moisture.
If there are ink stains
❏ If ink has not cured, wipe it off with the dry
polyester/nylon knit woven fabric. Next,
dampen the polyester/nylon knit woven fabric
with water containing a small amount of
neutral detergent, and then firmly wring it
dry before wiping. Finally, use the dry
polyester/nylon knit woven fabric to wipe off
moisture.
❏ If ink has cured, use a scraper to remove it.
Next, dampen the polyester/nylon knit woven
fabric with water containing a small amount
of neutral detergent, and then firmly wring it
dry before wiping. Finally, use the dry
polyester/nylon knit woven fabric to wipe off
moisture.
Periodic Maintenance
In addition to cleaning after work, perform the
following maintenance according to the time periods.
SC-V4000 User's Guide
Basic Operations
62
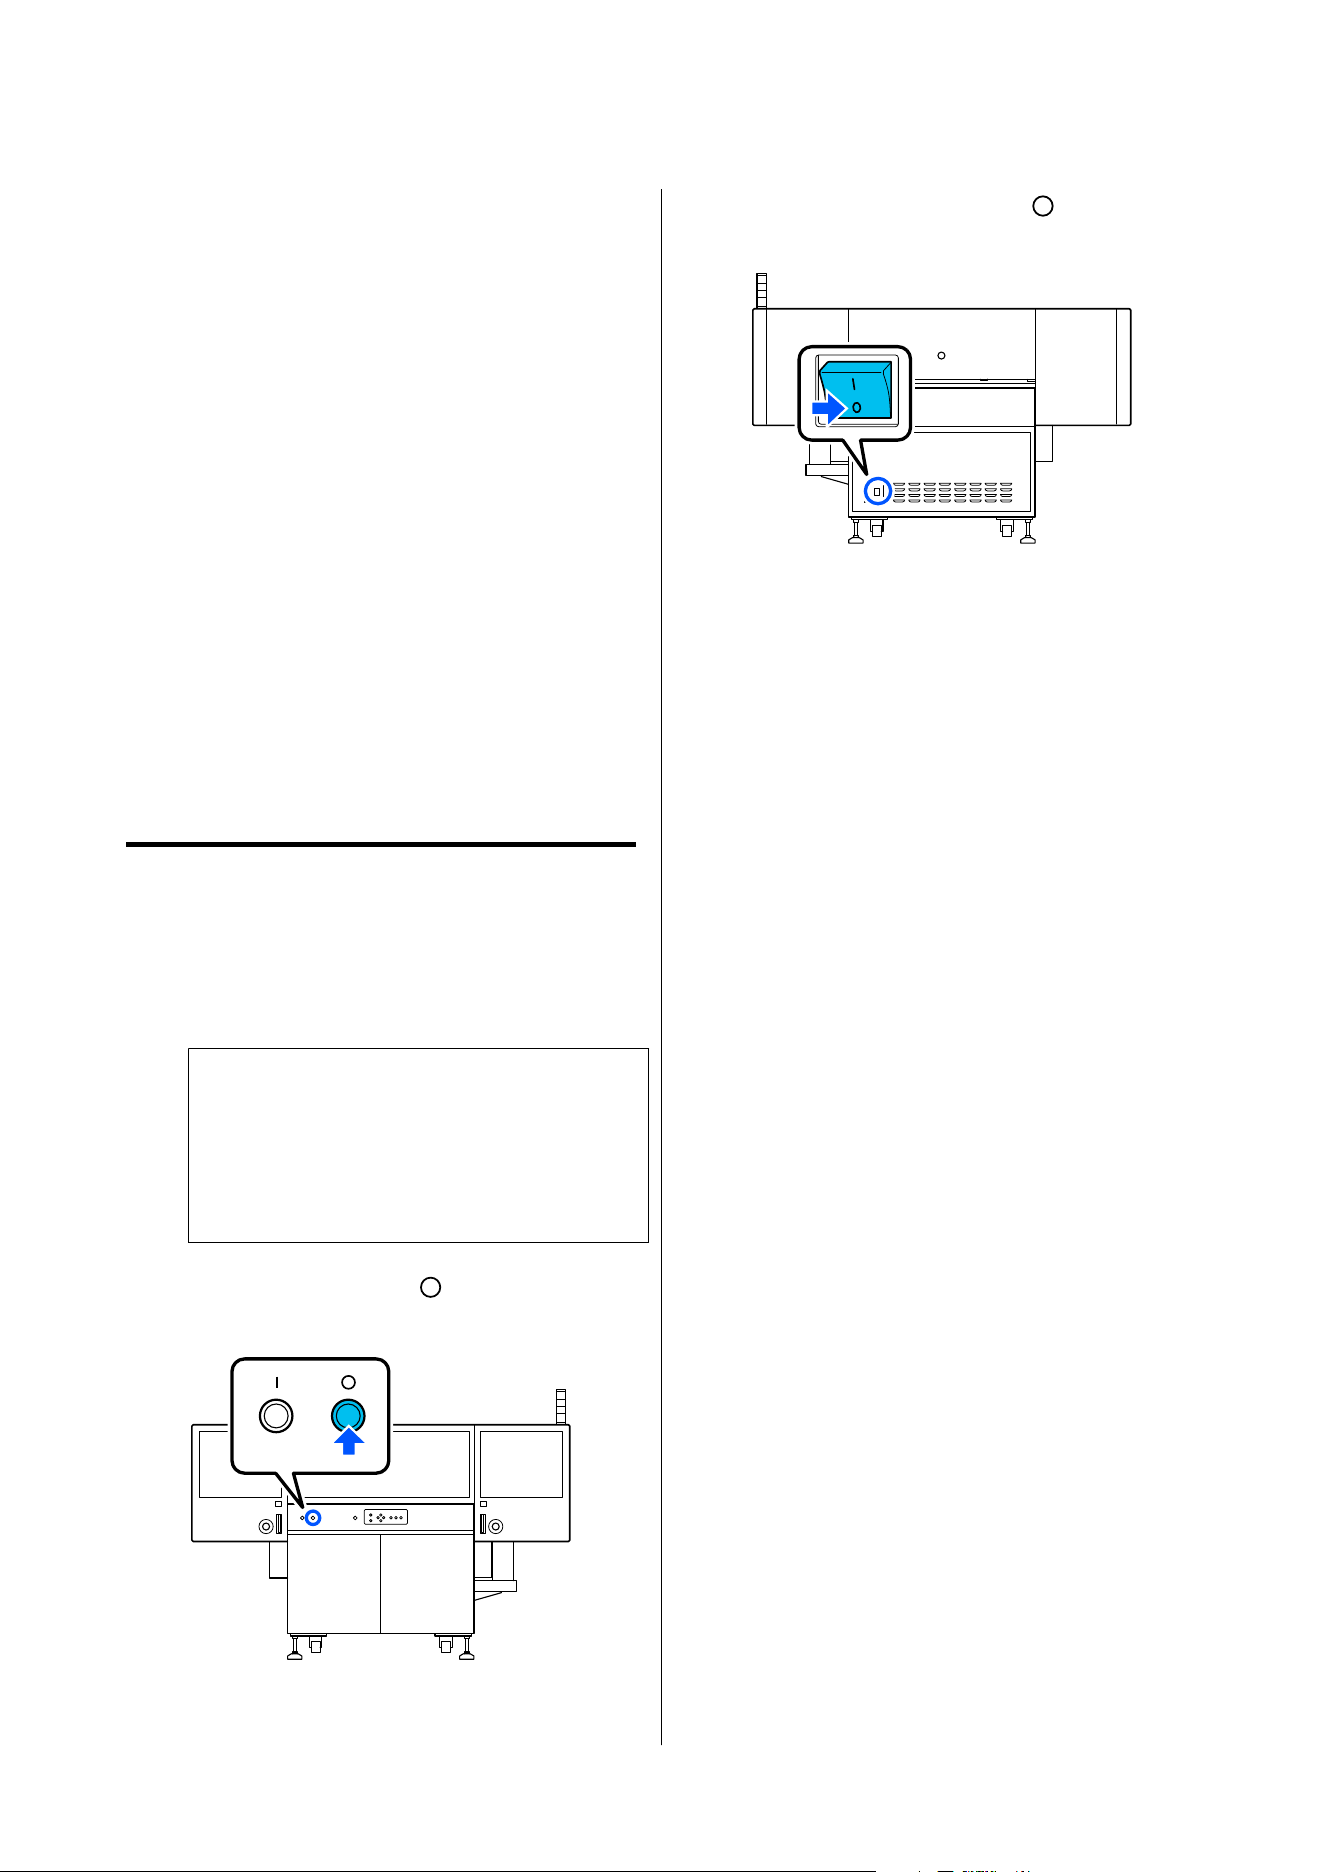
Once a Month
Clean the following parts. See the following for
detailed cleaning procedures.
❏ Laser
U “Cleaning the Laser” on page 85
❏ UV Light
U “Cleaning the UV light” on page 85
❏ Ionizer
U “Cleaning the Ionizer” on page 87
Every three months
Replace the following parts. See the following for
detailed replacement procedures.
Wiper unit
U “Replacing the Wiper Unit” on page 92
Turning Off
This section explains the procedure for turning off this
printer.
A
Close UV Flatbed Controller.
c
Important:
When you exit the UV Flatbed Controller, the
gantry may move. Before starting the
procedure, make sure no one is in the gantry's
range of motion.
B
Press the power button ( ) on the control
panel on the front of the printer.
C
Press the main power switch ( ) on the back
of the printer to turn it off.
SC-V4000 User's Guide
Basic Operations
63
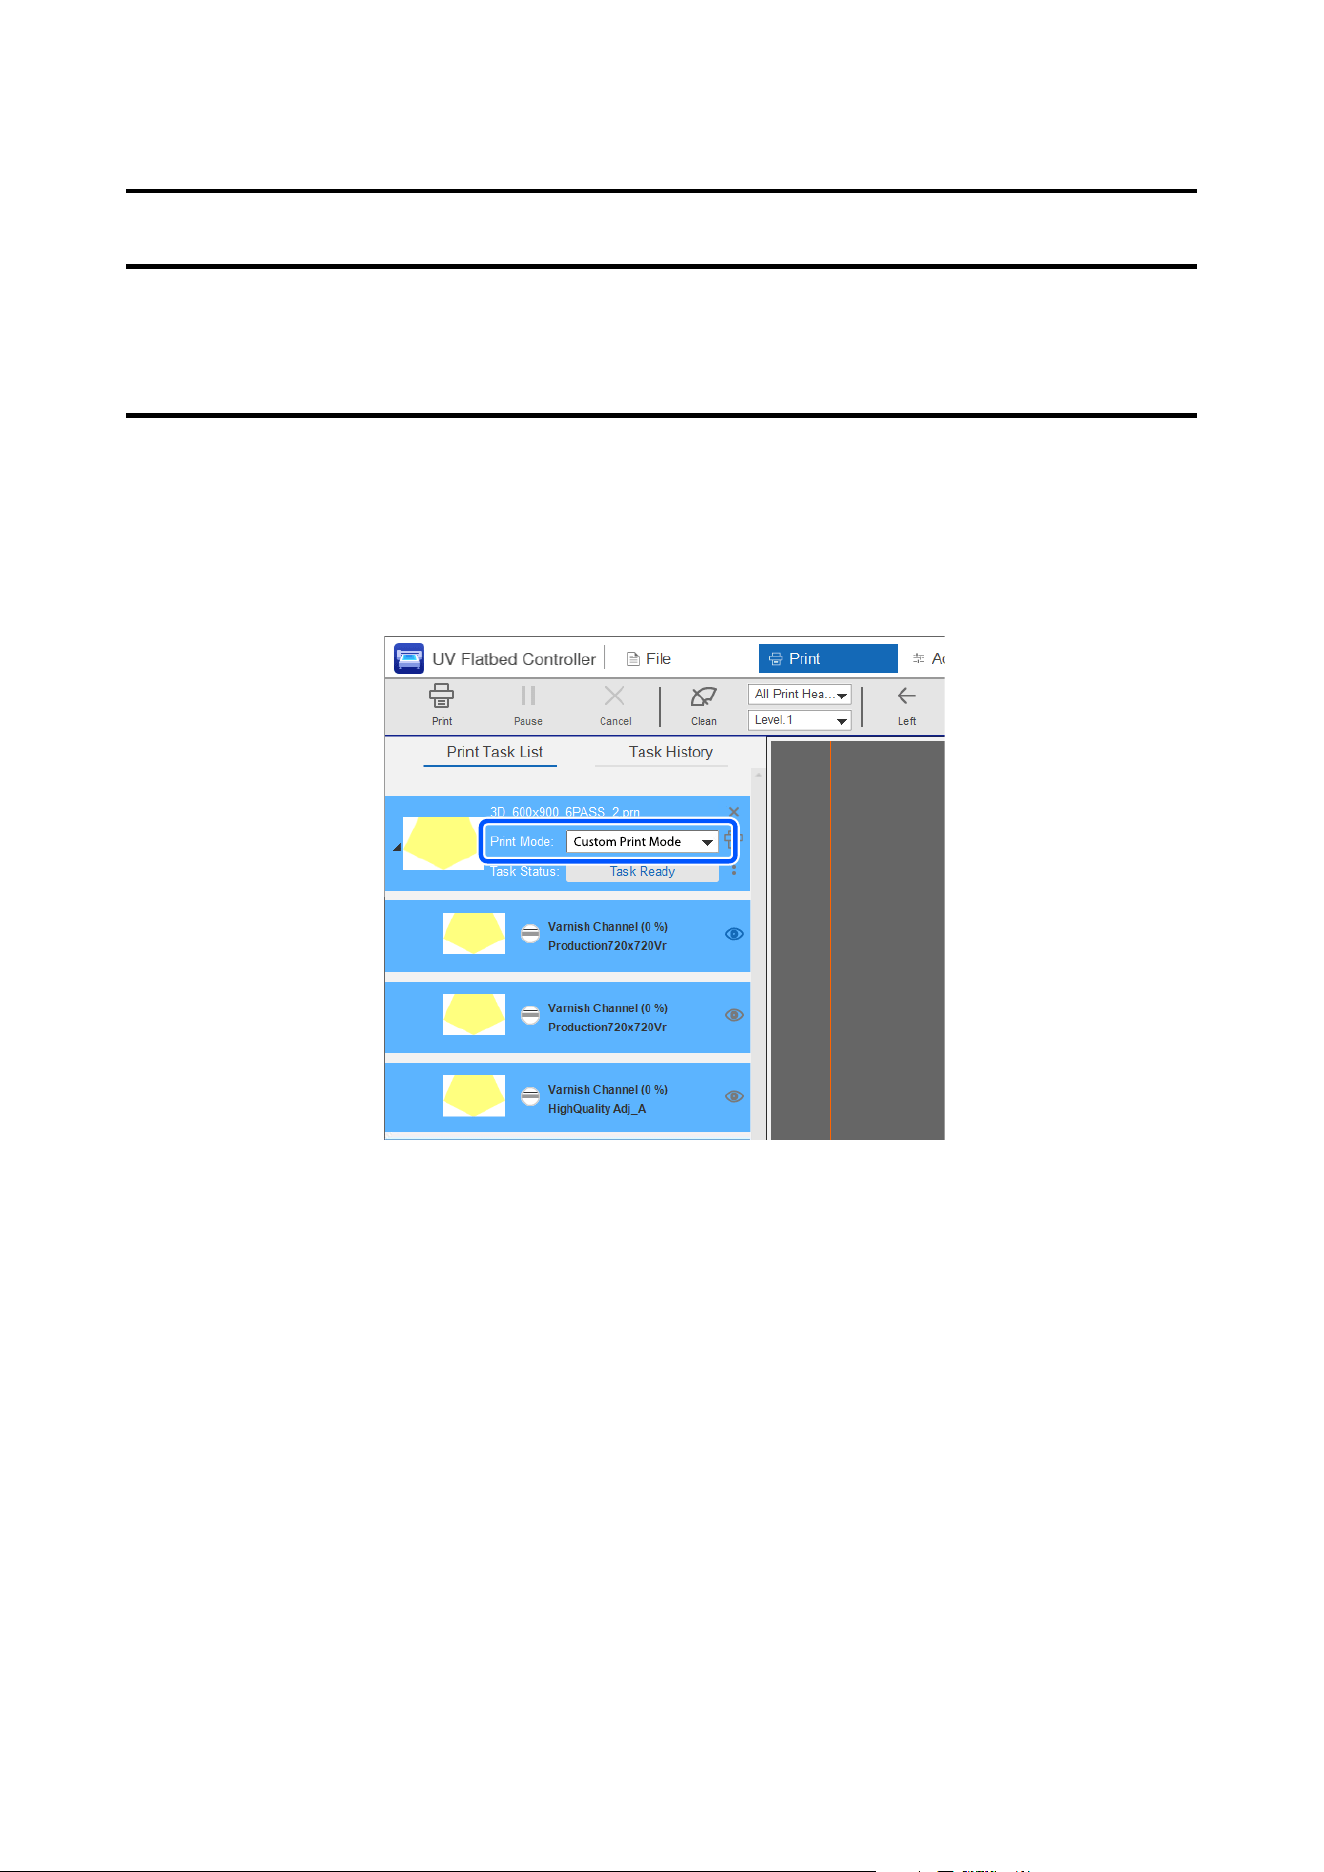
Various Printing
Multi-layer Printing
Before Making Print Settings
Multi-layer printing settings differ depending on the job type.
Check the following to determine whether the job was created in normal mode or custom print mode.
Jobs created in normal mode:
You need to set the Y Print Direction and Color Channel. Make settings according to the multi-layer printing
procedure.
U “Layer Setting” on page 65
Jobs created in custom print mode:
You c a nno t ch a nge t he Y Print Direction or Color Channel. Since the number of layers and stacking order are set
in Epson Edge Print PRO, you can print as is.
SC-V4000 User's Guide
Various Printing
64
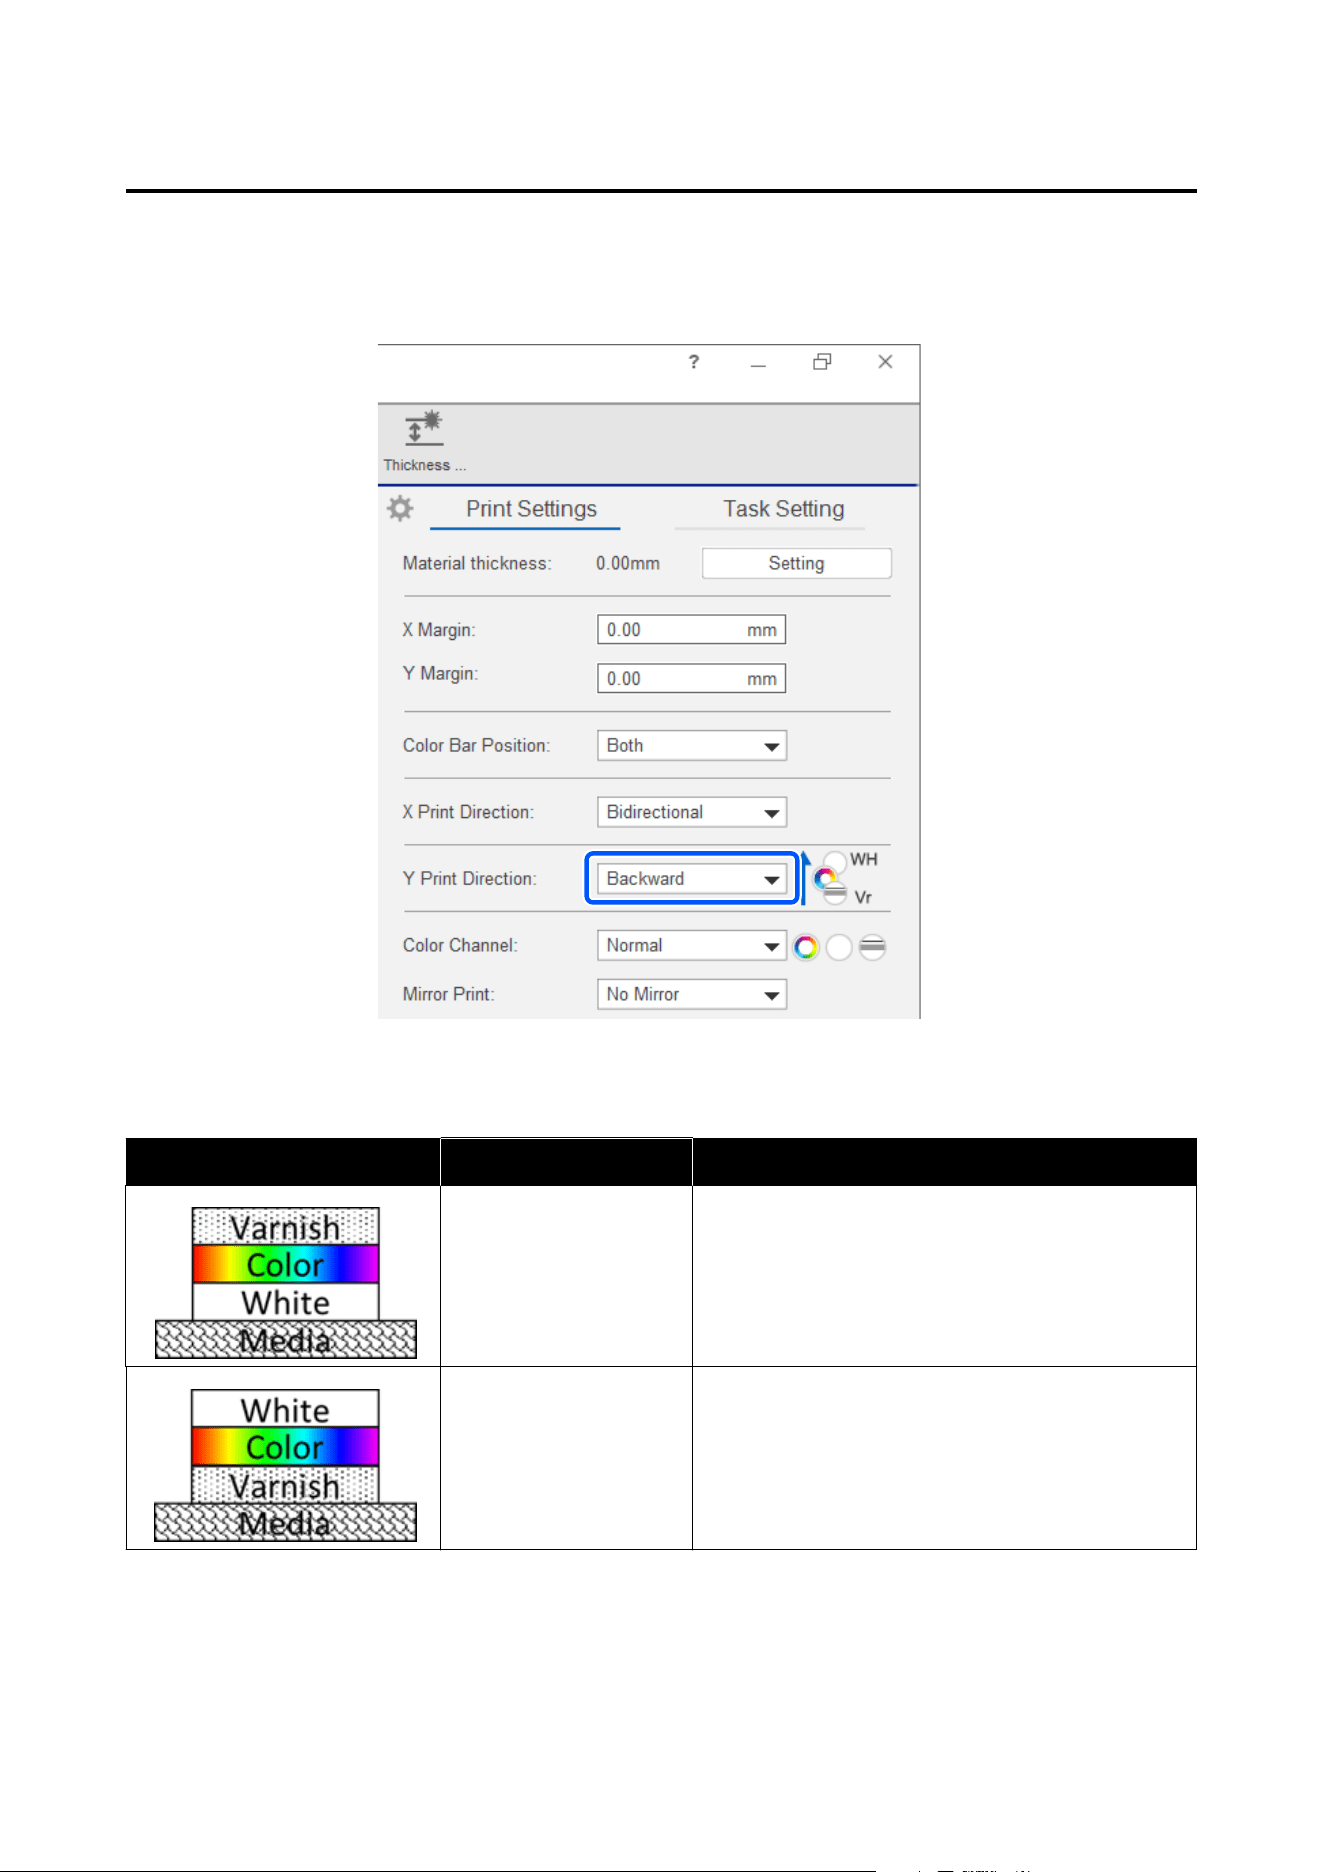
Layer Setting
Set the Y Print Direction.
Y Print Direction settings differ depending on the printed material. The following shows an image with all layers
printed: White, Color, and Varnish.
Finished image Y Print Direction Print order
Backward The gantry moves from front to back and prints in the
order of White, Color, and Varnish.
Forward The gantry moves from back to front and prints in the
order of Varnish, Color, and White.
SC-V4000 User's Guide
Various Printing
65

Note:
The print heads are arranged as shown in the illustration below. (Print heads viewed from above)
When you set Y Print Direction to Forward, the gantry moves from back to front and prints in the order of Varnish,
Color, and White.
When you set Y Print Direction to Backward, the gantry moves from front to back and prints in the order of White,
Color, and Varnish.
Back
VR
WH
CLR
Front
SC-V4000 User's Guide
Various Printing
66
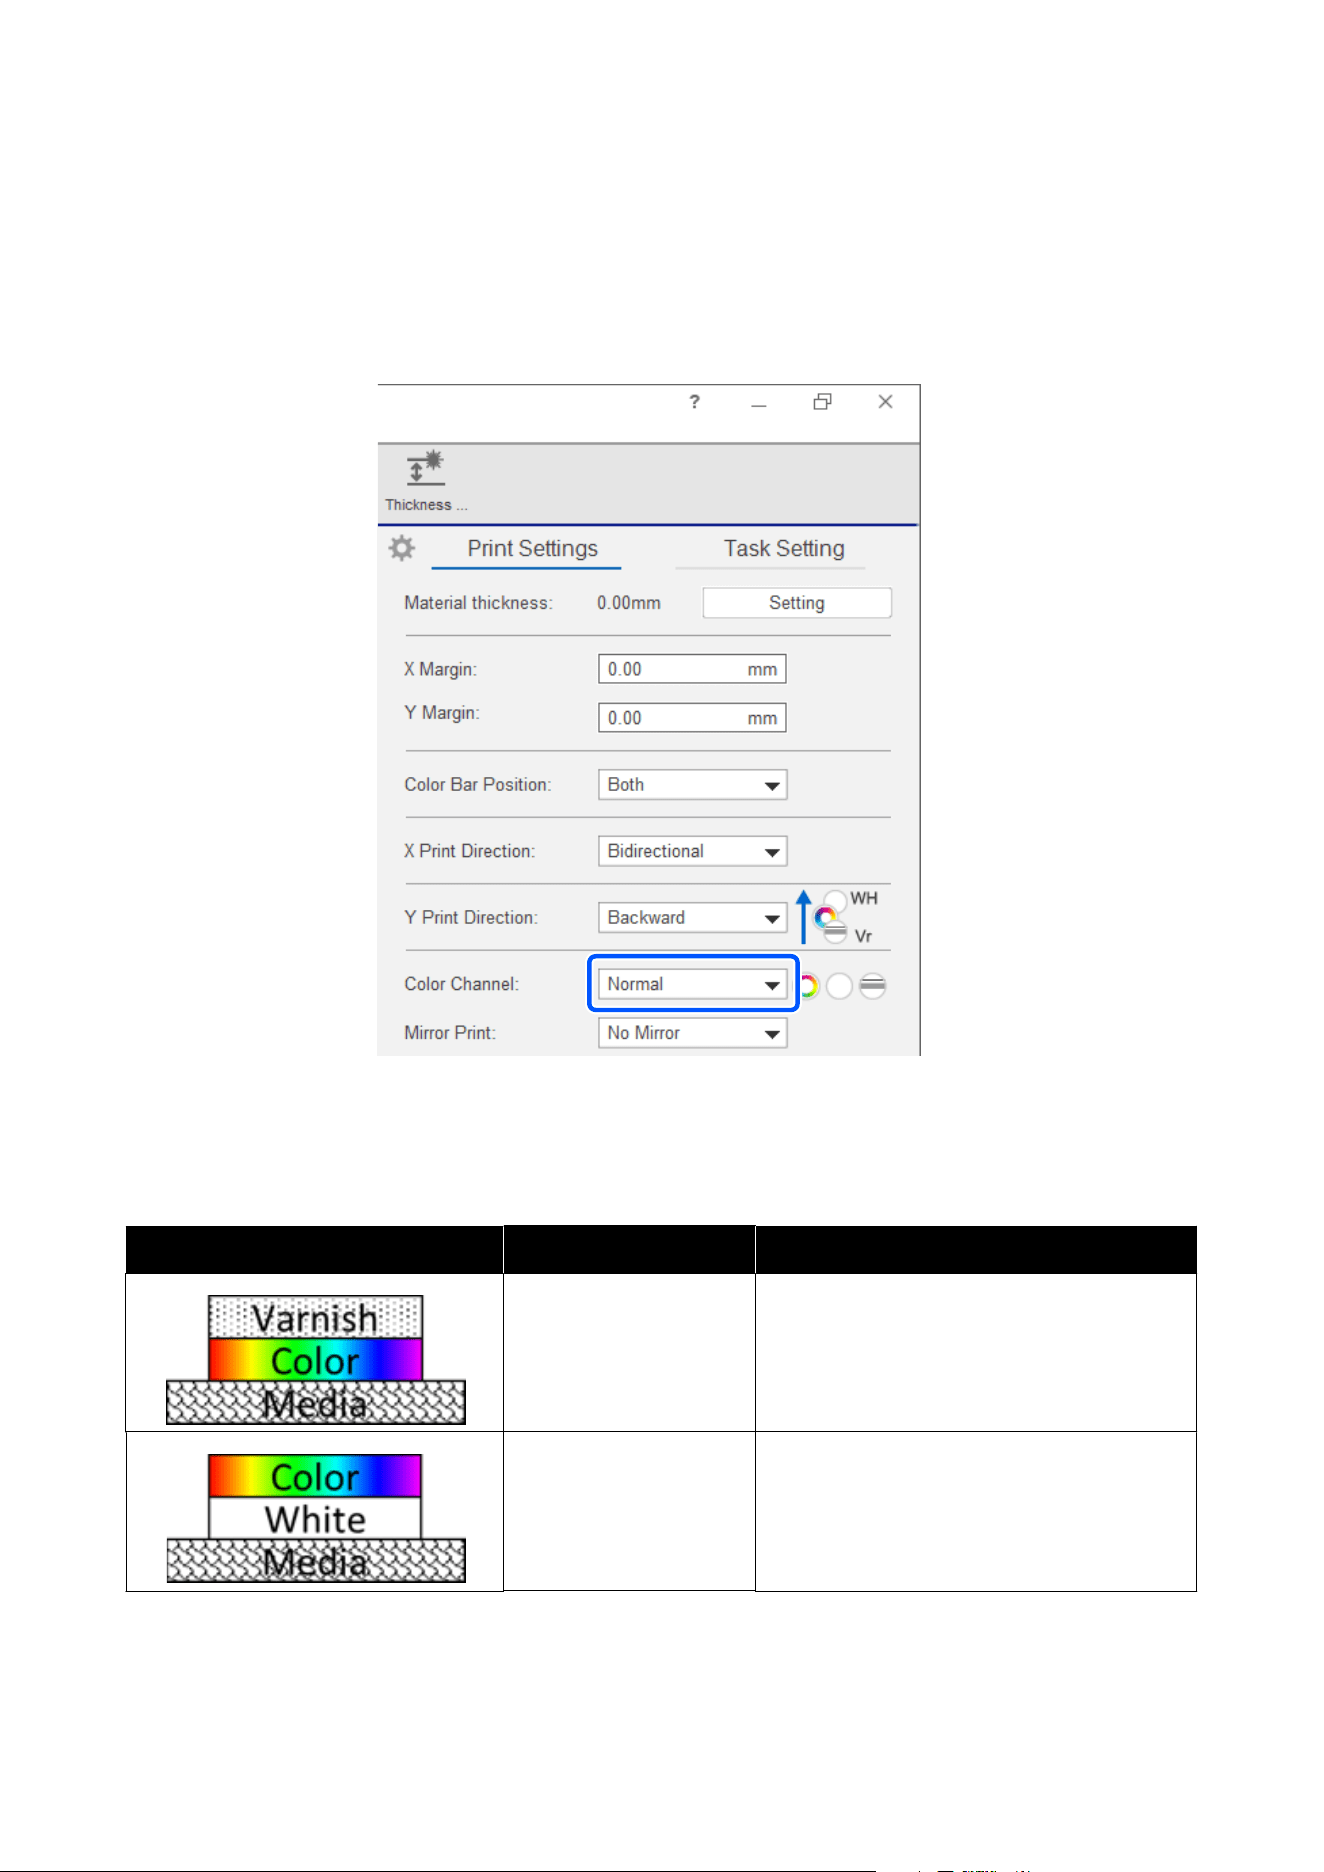
Print a specific layer from multiple layers
You can use Color Channel to specify the layer you want to print. Select from Normal, Color Only, WH Only, Vr
Only, Color and WH, Color and Vr, and WH and Vr according to your printing needs. If you select Normal,
layers are printed according to the data sent.
Example of multi-layer print setting
By using print data containing the same three layers and simply setting the color channels, you can obtain different
print results.
Finished image Y Print Direction Color Channel
Backward Color and Vr
Forward Color and WH
SC-V4000 User's Guide
Various Printing
67
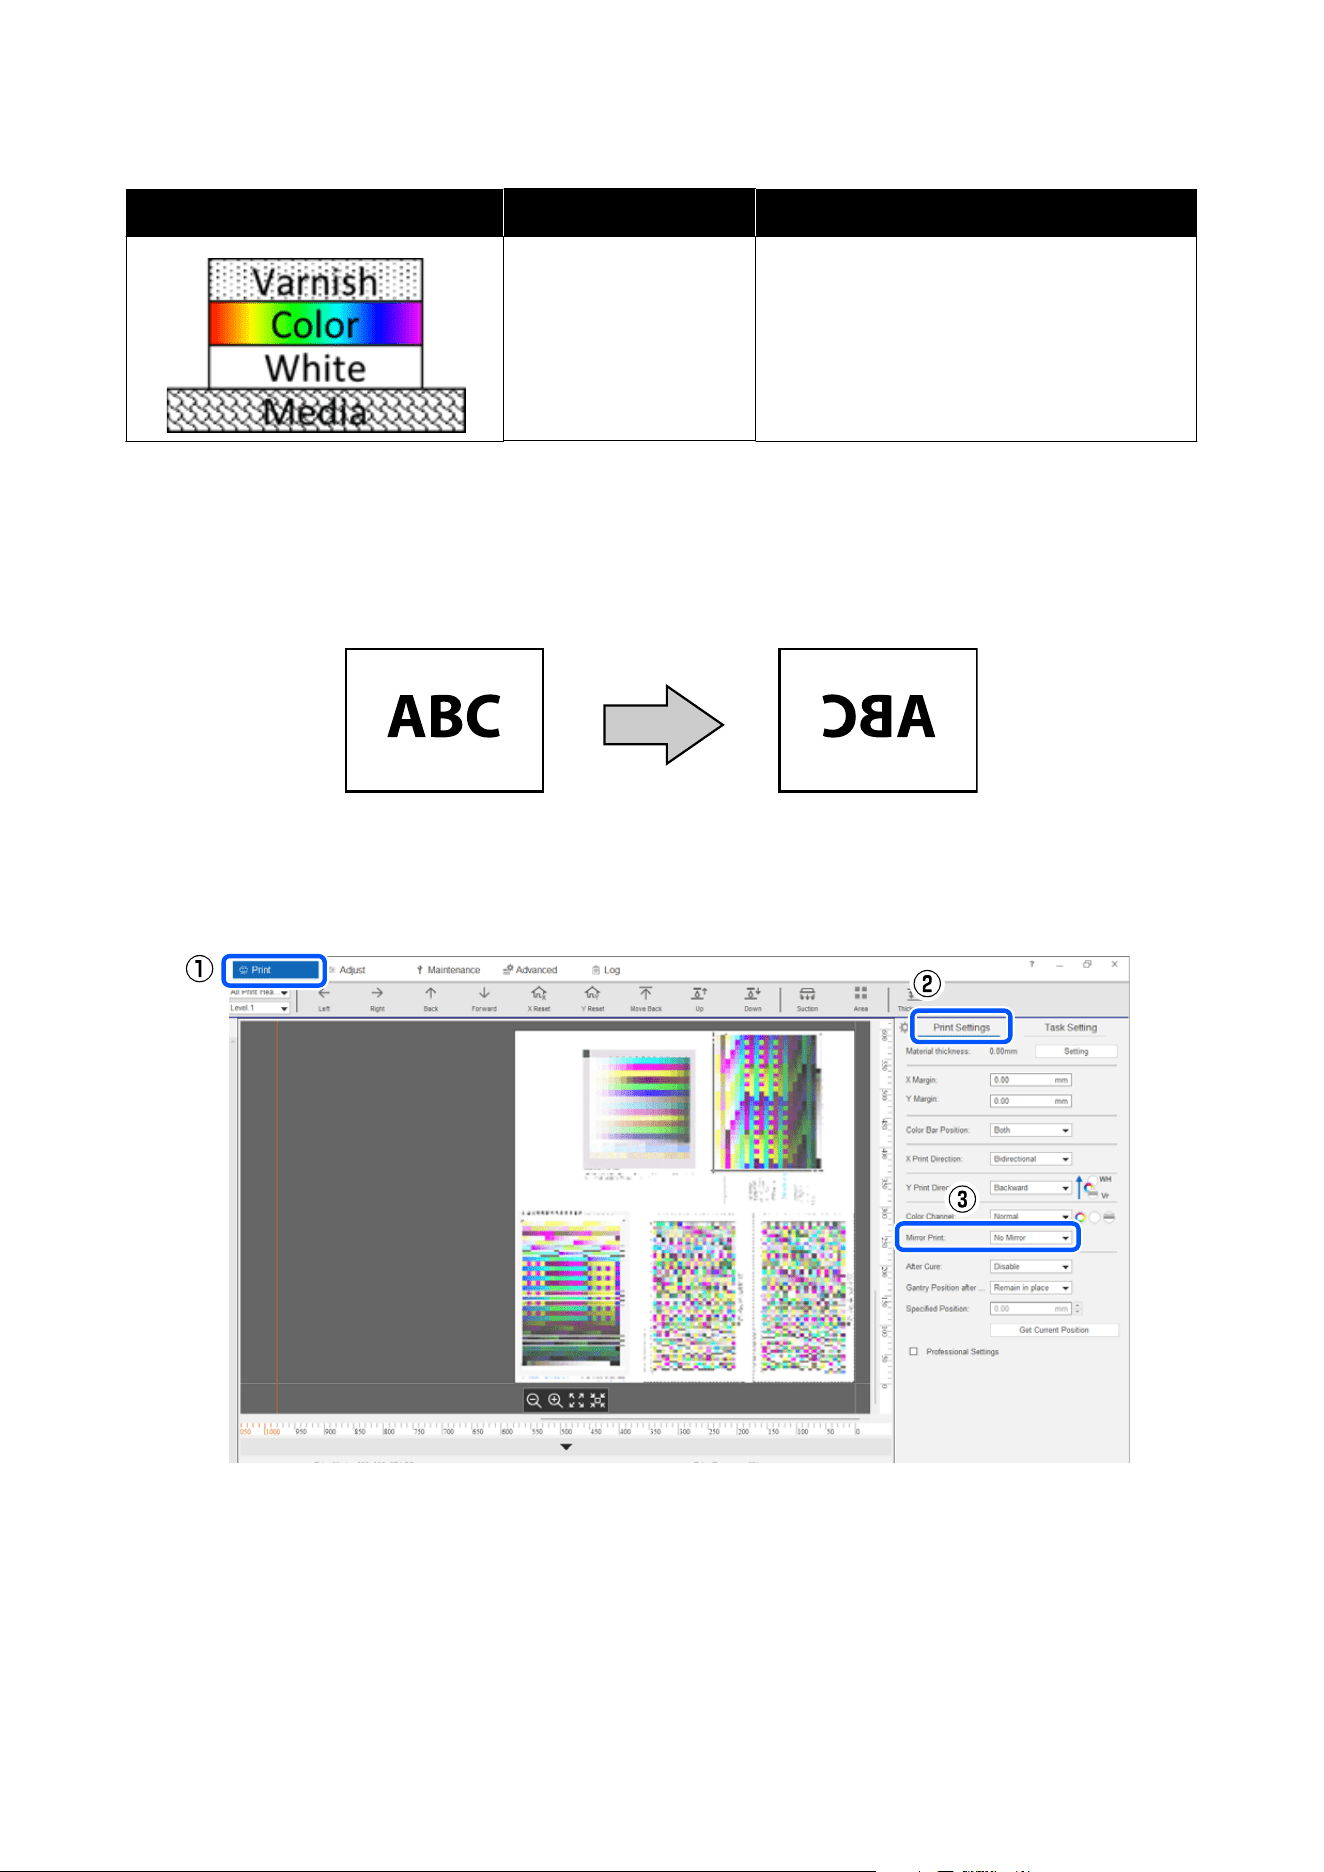
Finished image Y Print Direction Color Channel
Backward Normal
Printing Using Horizontal Mirroring
When printing on the back of transparent media, mirror the print job horizontally.
Select Print – Print Settings – Mirror Print – Mirror Image.
The image is mirrored horizontally.
SC-V4000 User's Guide
Various Printing
68
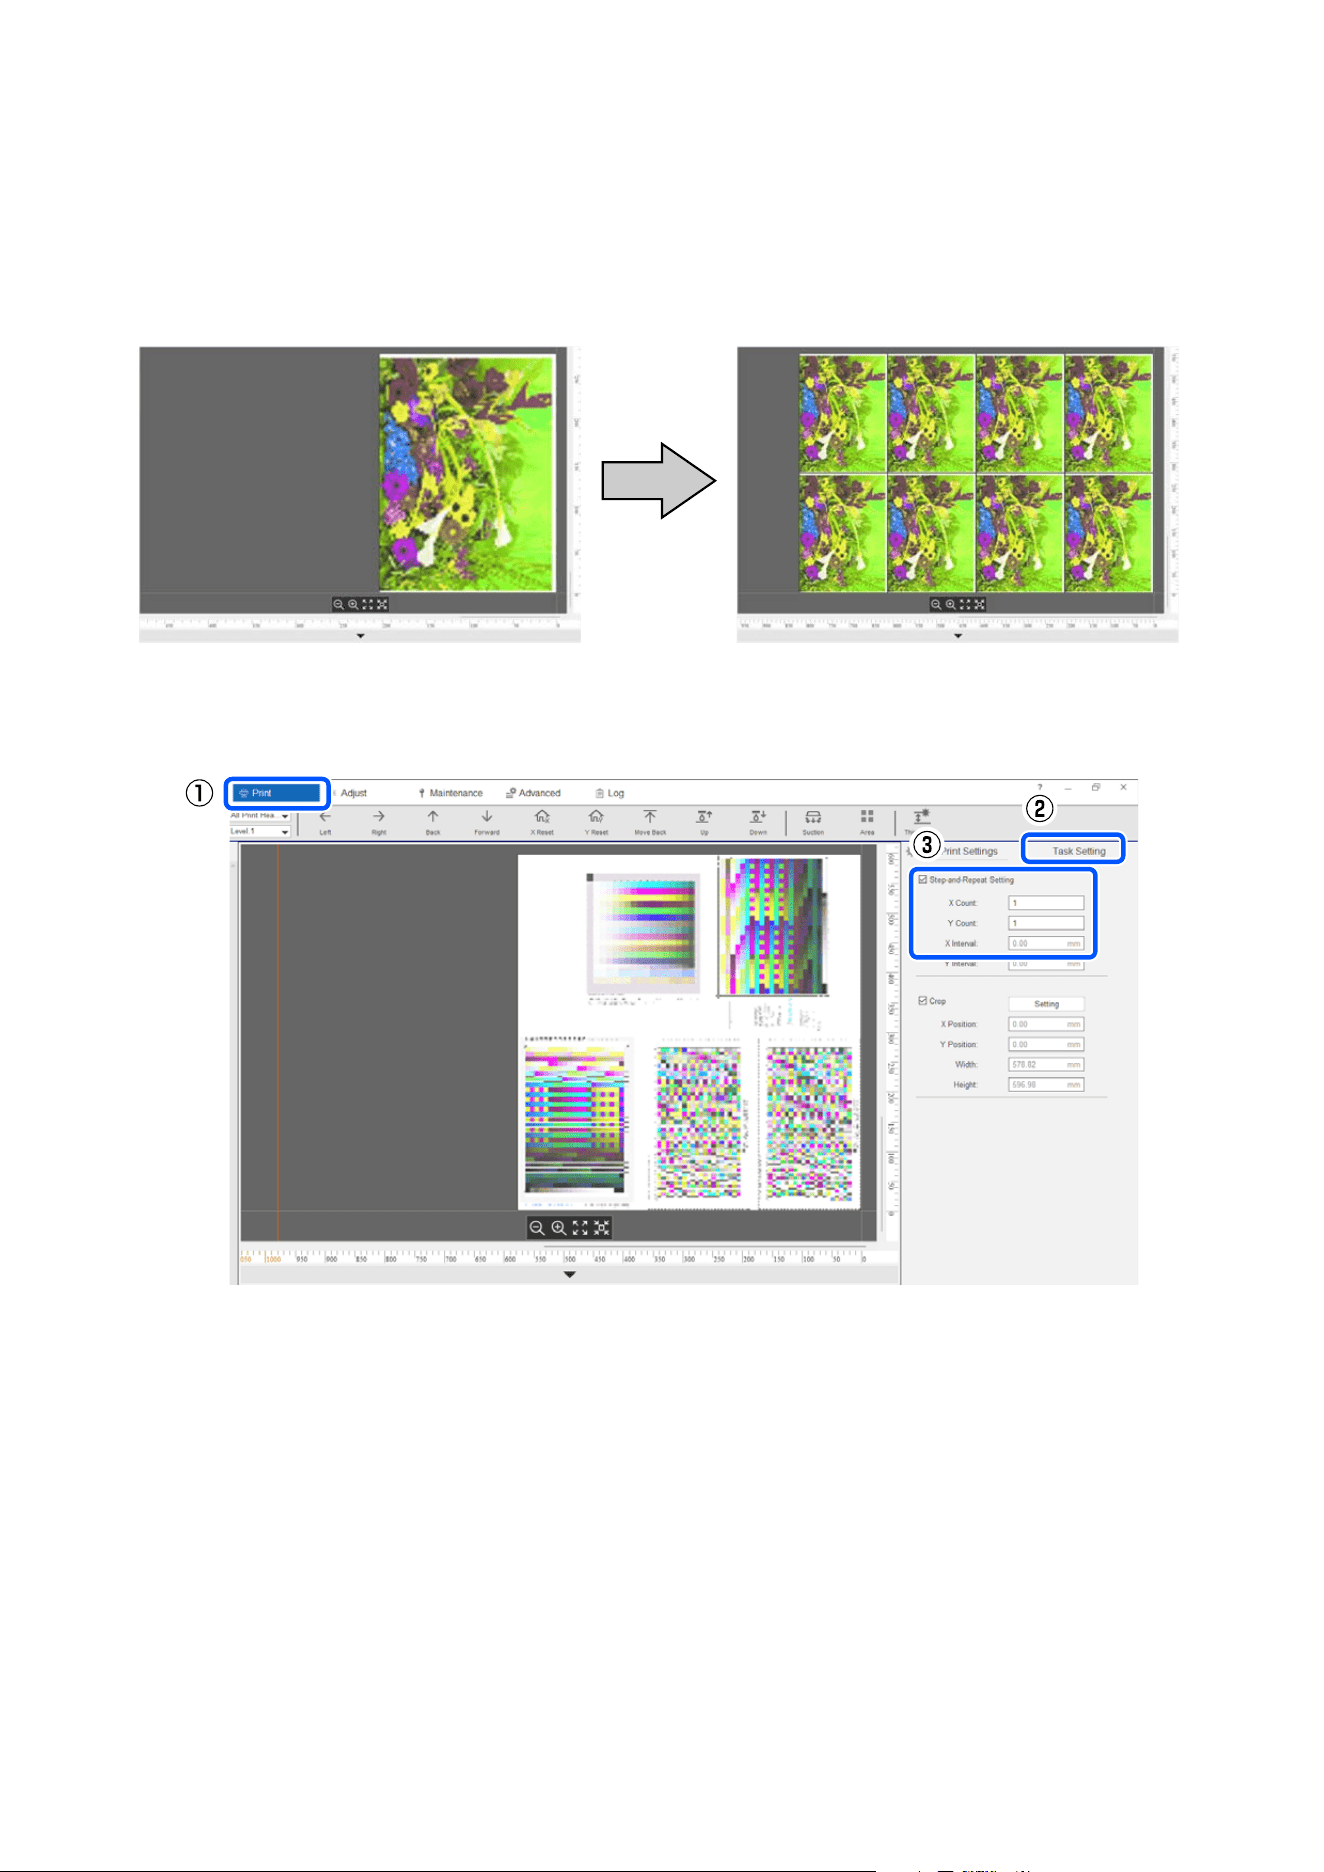
Printing Images Repeatedly (Step & Repeat)
When printing multiple copies of the same image, use the step-and-repeat printing function.
Select Print ‒ Task Setting. Select Step-and-Repeat Setting and enter the number of repetitions in the X and Y
directions. Also, enter the image spacing.
SC-V4000 User's Guide
Various Printing
69
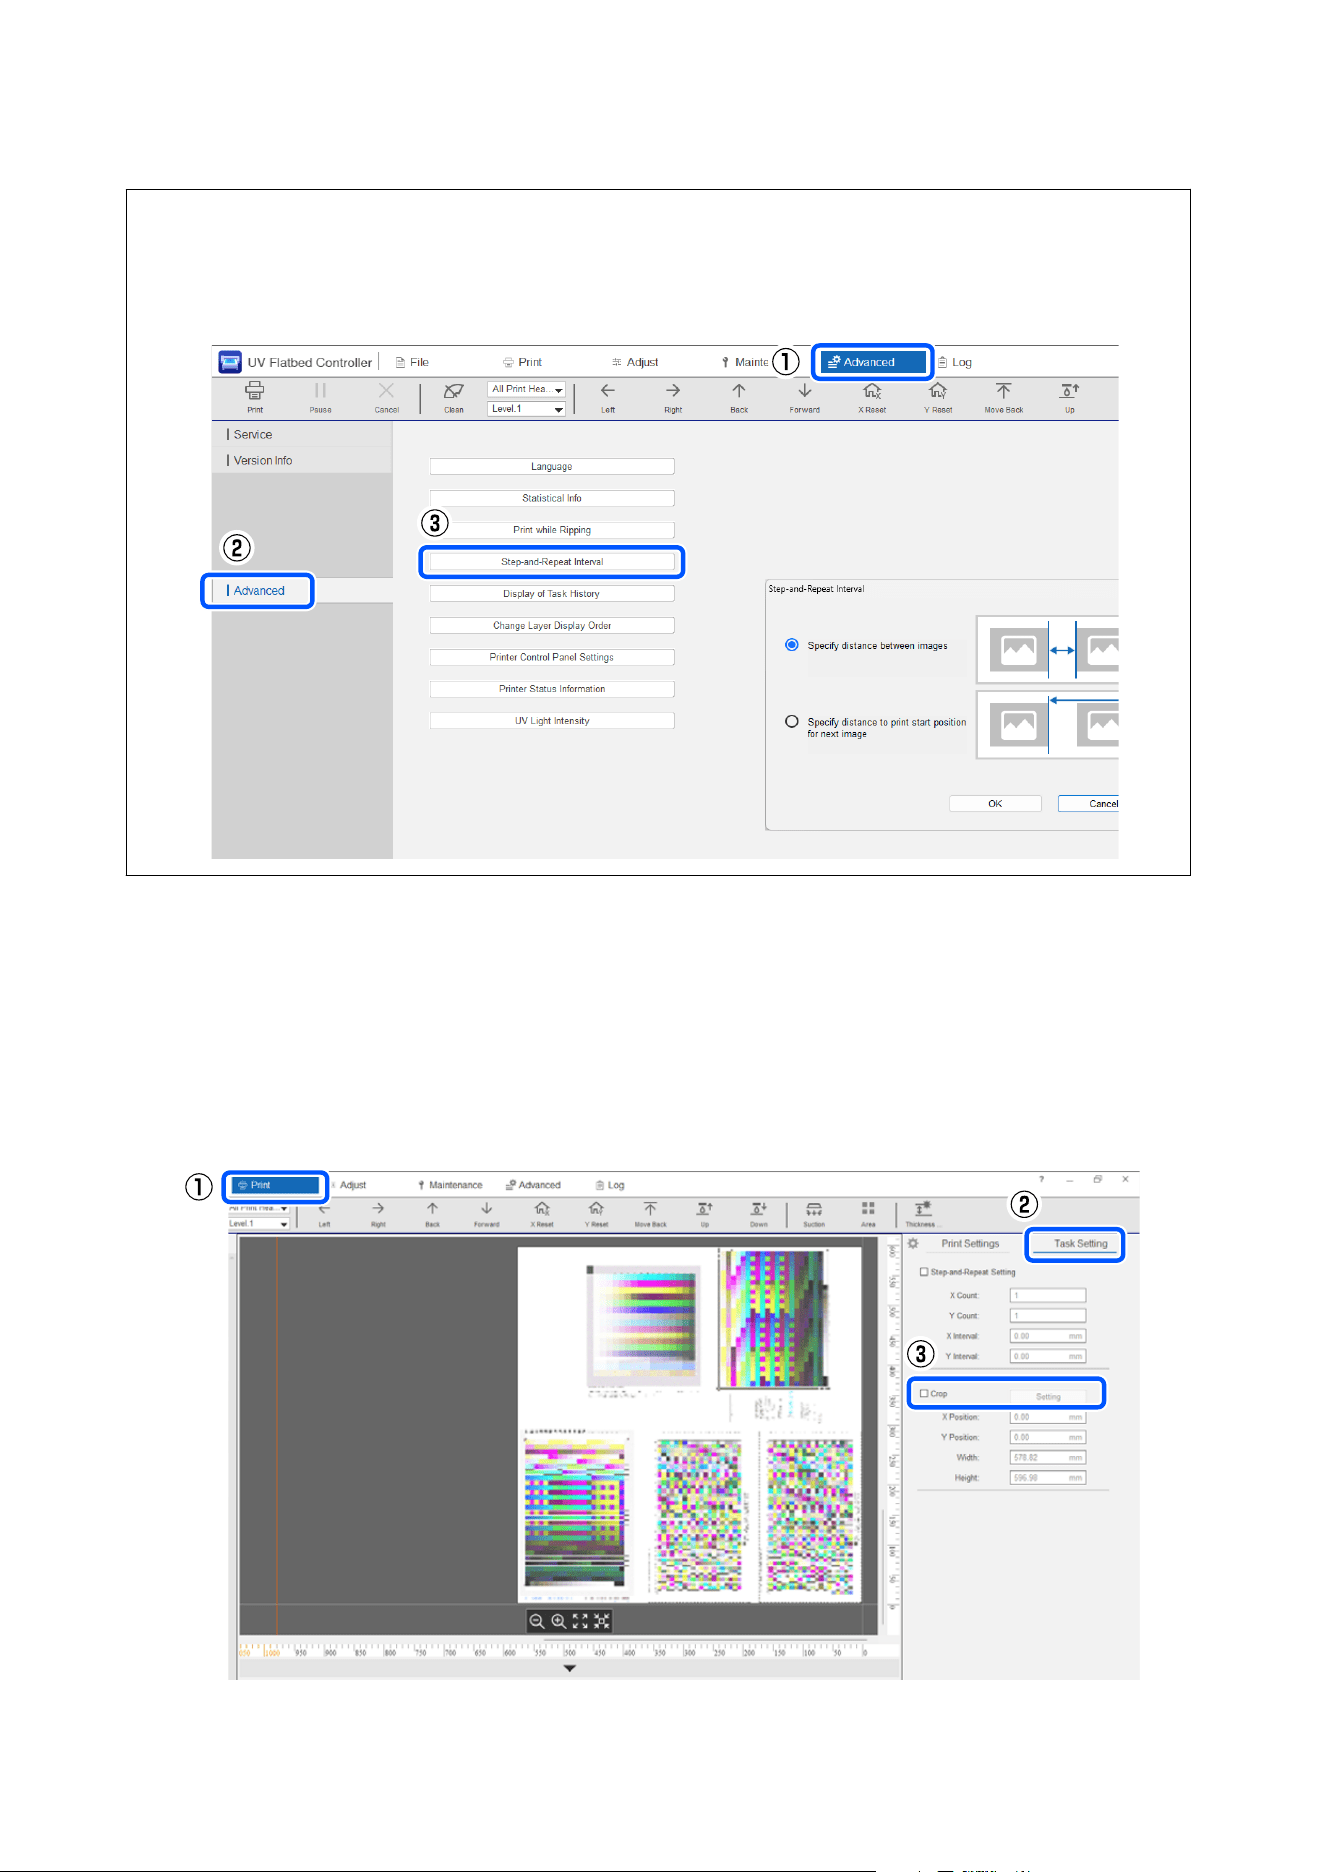
Note:
For image spacing, you can specify either the distance between the images or the distance to the print start position of the
next image. The default setting is the distance between images. You can change the setting in Advanced - Advanced -
Step-and-Repeat Interval on the screen.
Printing Only Necessary Parts of an Image (Crop)
When printing only part of an image, use the Crop function.
Select Print ‒ Task Setting. Select Crop and then Setting to display the settings screen.
SC-V4000 User's Guide
Various Printing
70
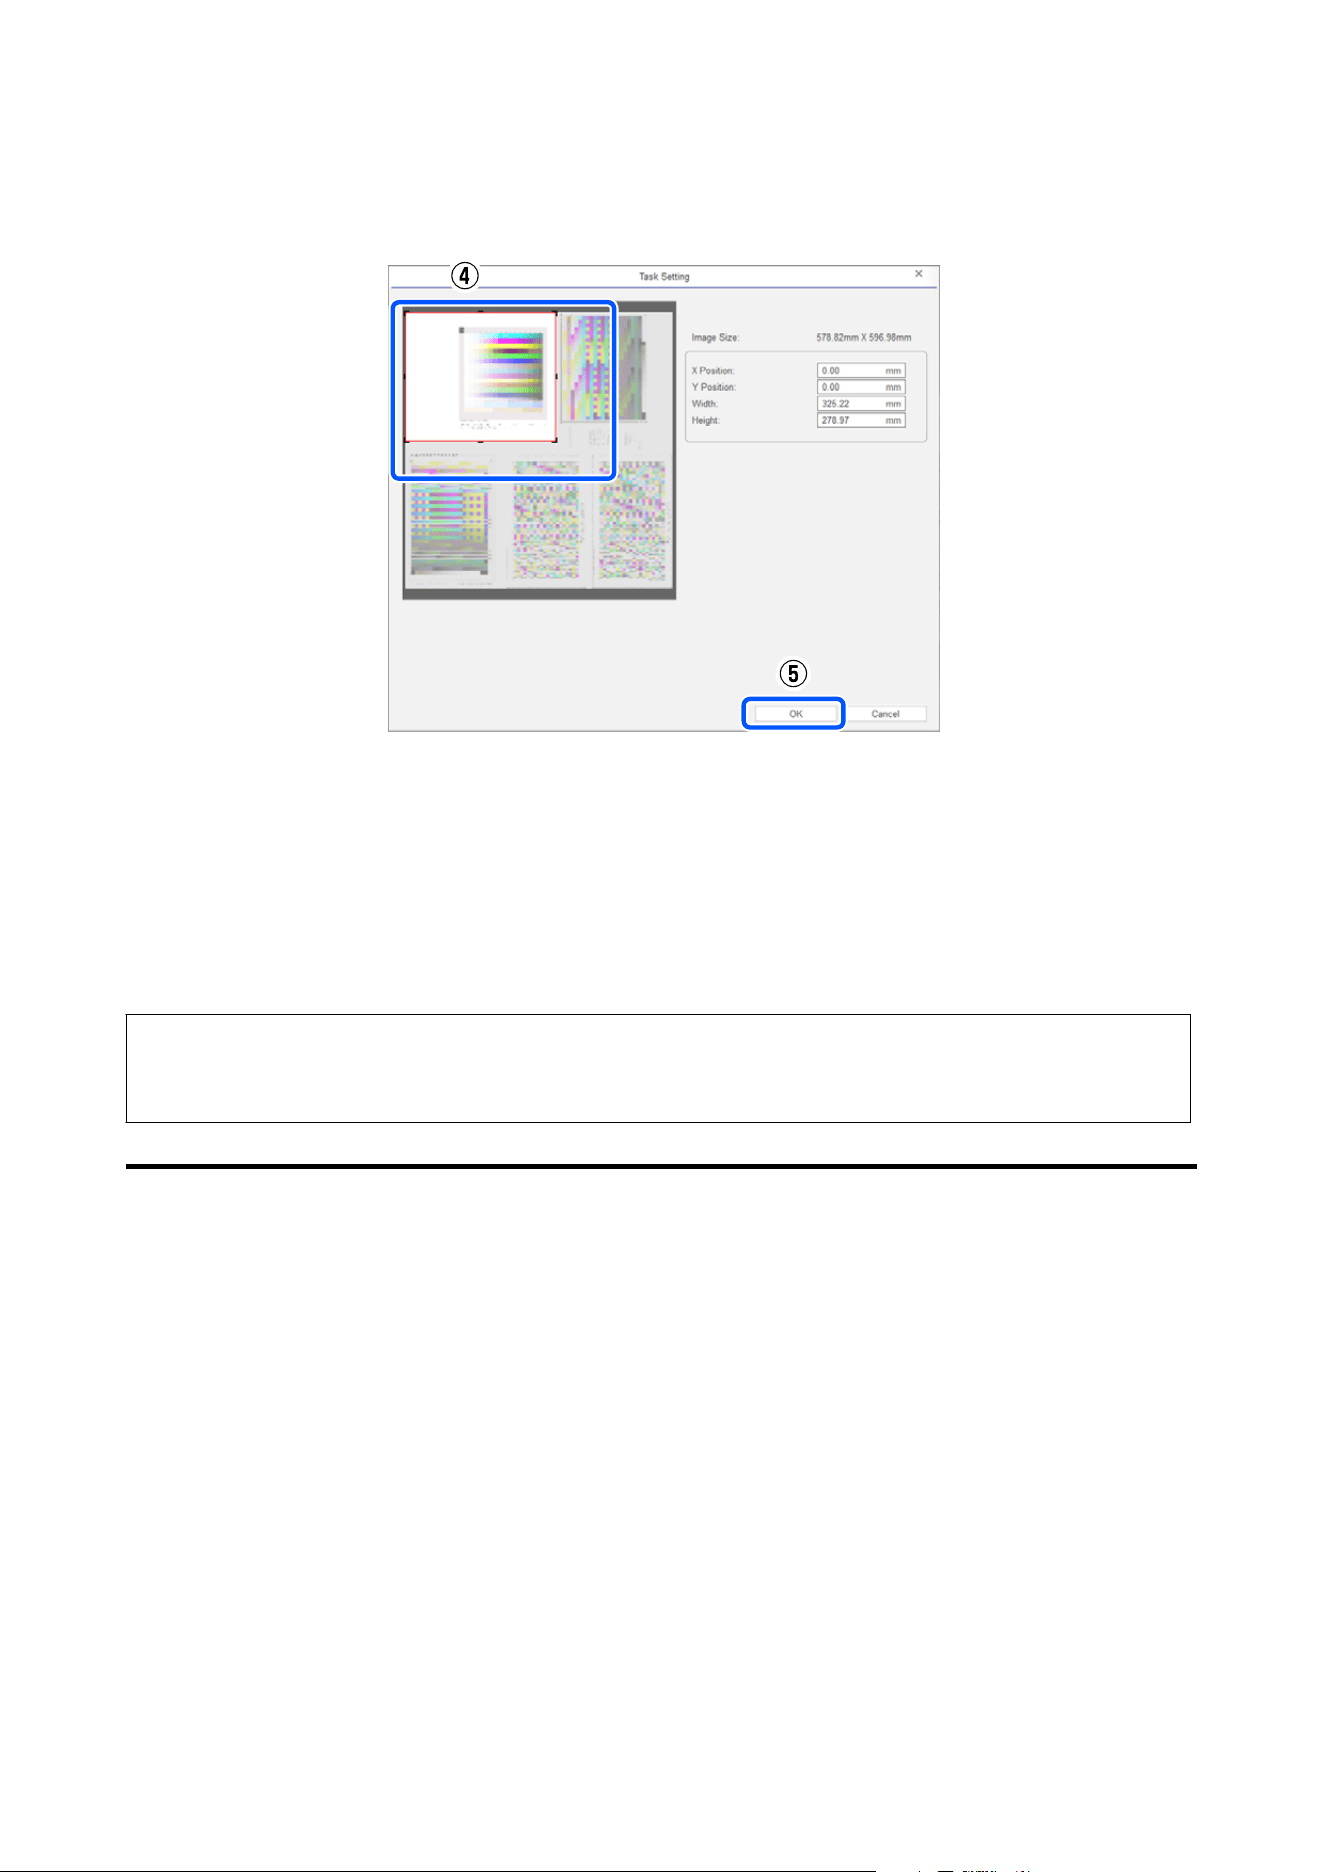
Drag the red frame on the preview screen to select the area you want to print. Press OK.
Printing at a Higher Print Quality
You can improve the print quality without recreating the RIP file (.prn) by changing the carriage movement speed
and the number of print passes. When you want to improve the image quality of text or fine lines, or when you
want to reduce banding or color unevenness in the X-direction, change the carriage movement speed and the
number of print passes.
c
Important:
For some Print Mode items, you cannot change the Carriage Movement Speed or the Num of Print Pass.
Improving the Image Quality of Text or Fine Lines
Adjust the carriage movement speed.
SC-V4000 User's Guide
Various Printing
71
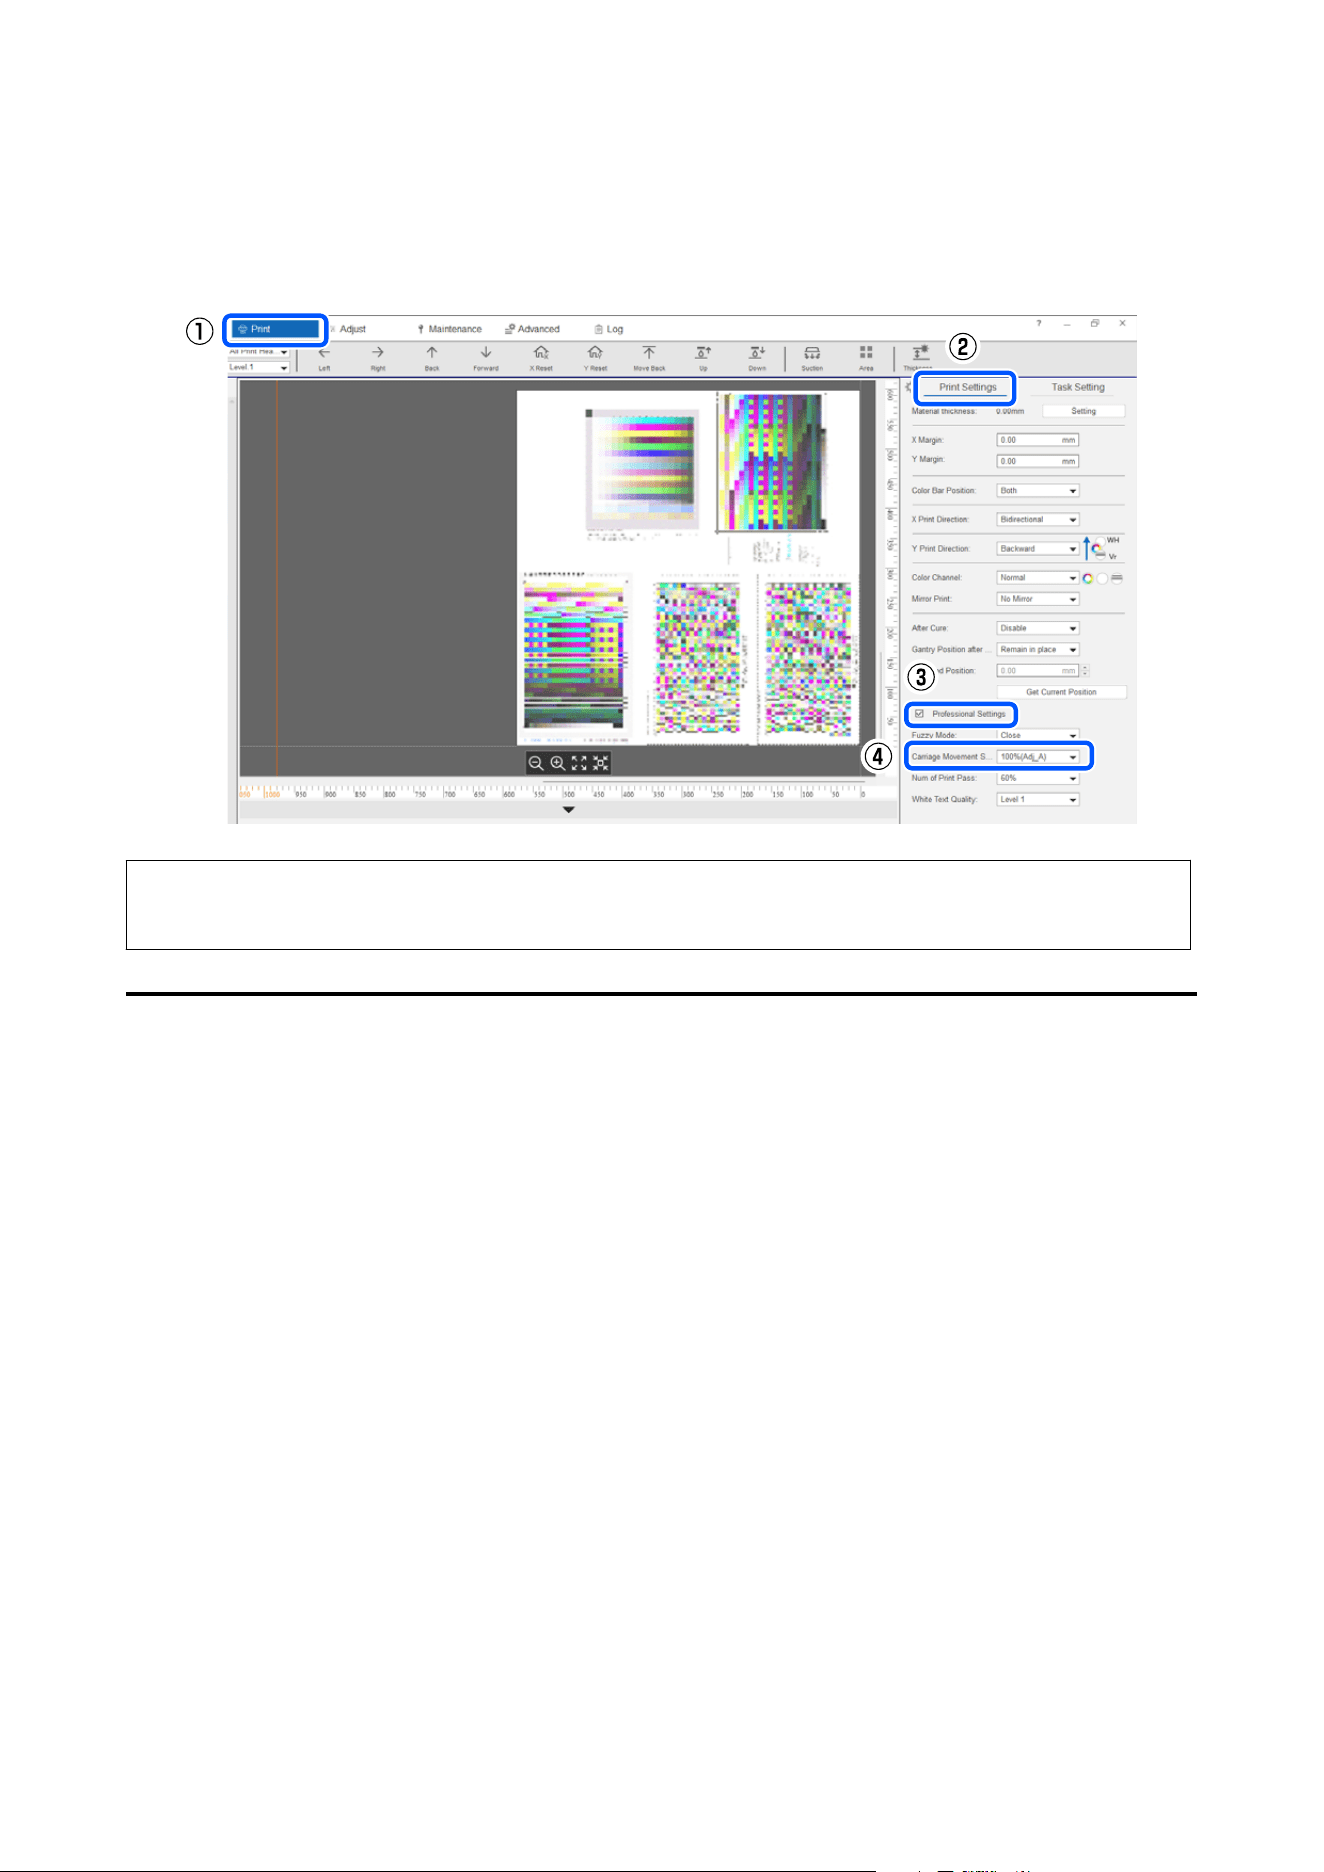
Select Print ‒ Print Settings. Select Professional Settings and select a value lower than the currently selected value
to reduce the Carriage Movement Speed. Note that the Auto value for the carriage movement speed differs
depending on the print mode. Set a value lower than the Auto setting.
Note:
Lowering the carriage movement speed increases the printing time.
Reducing Banding or Color Unevenness in the X-direction
Adjust the number of print passes.
SC-V4000 User's Guide
Various Printing
72
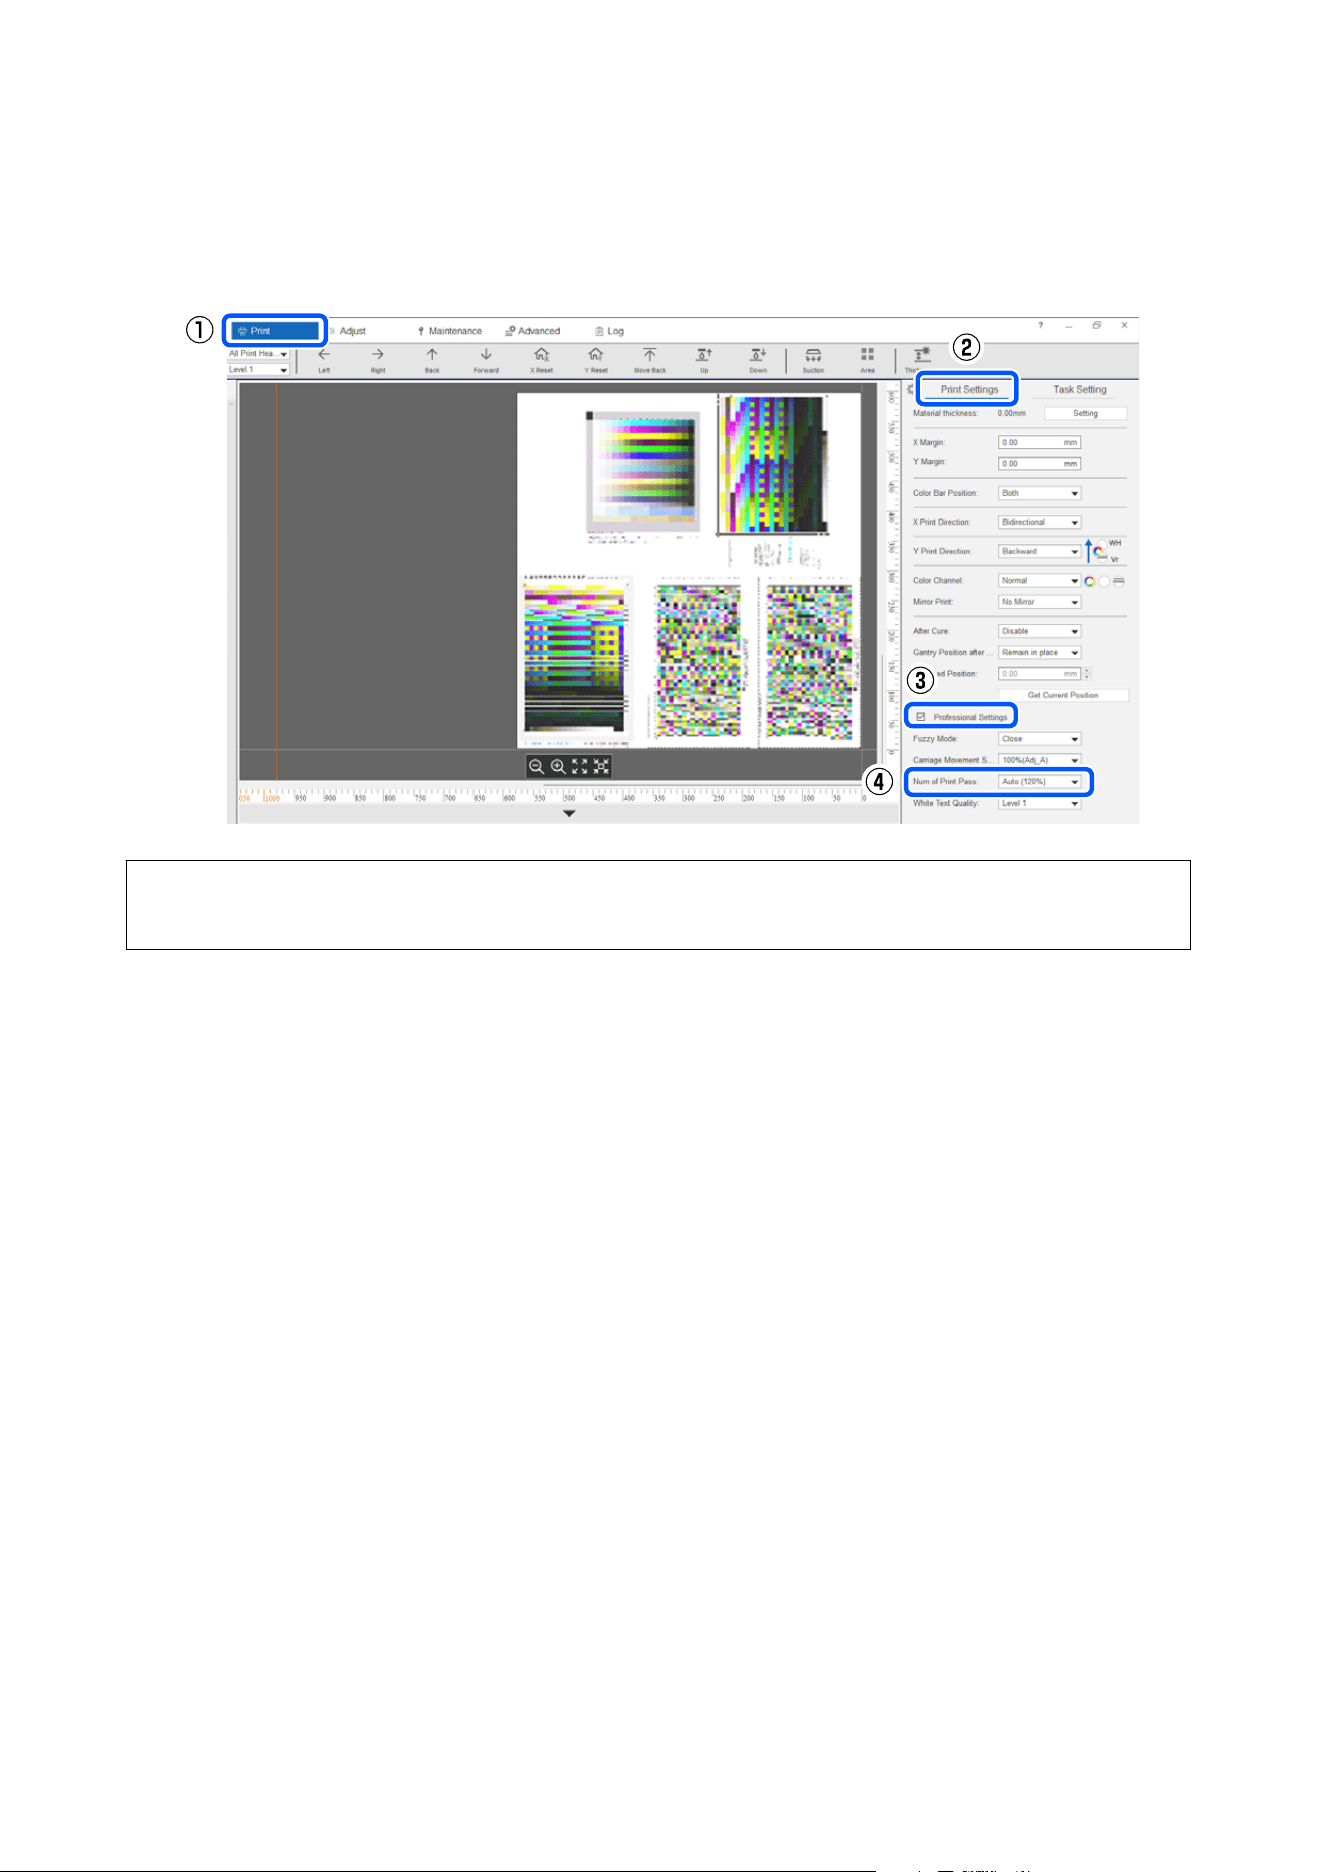
Select Print ‒ Print Settings. Select Professional Settings and select a value higher than the currently selected
value to increase the Num of Print Pass. Note that the Auto value for the number of print passes differs depending
on the print mode. Set a value higher than the Auto setting.
Note:
Increasing the number of print passes increases the printing time.
Improving Print Quality with Print Quality Settings in
Epson Edge Print PRO
When printing on media with curved or uneven surfaces, text and images may appear blurred. Also, small text or
fine lines may appear blurred when printed.
In such cases, you can improve print quality by selecting a mode that includes "WG" (Wide Gap) in the Epson
Edge Print PRO Print Quality settings.
Reprinting a Previously Printed Job
Print data remains in the task history. If you want to print again, you can print from the task history.
SC-V4000 User's Guide
Various Printing
73
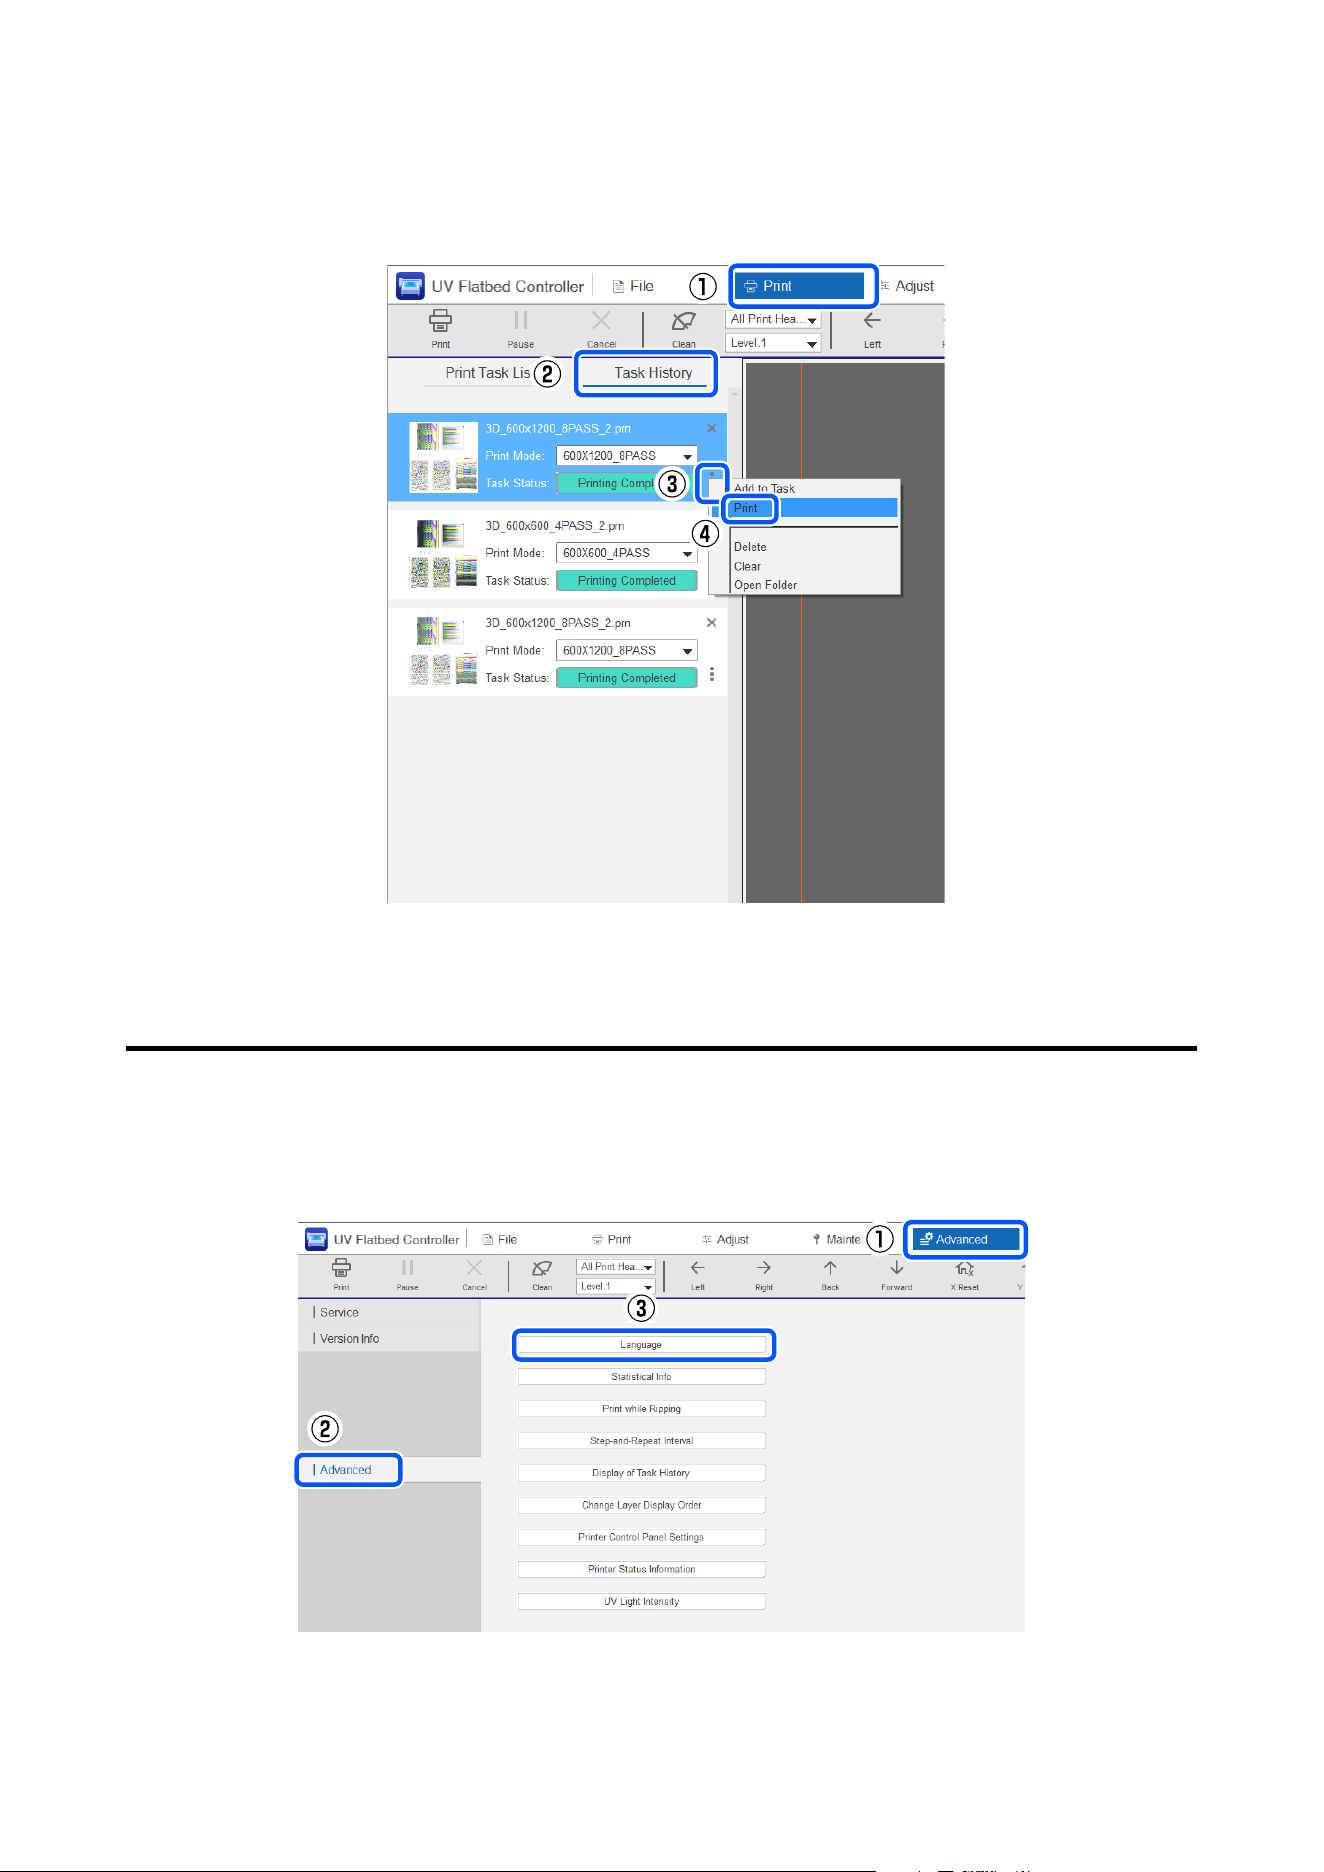
You can reprint by pressing Print - Task History - ... - Print.
Useful Functions
Changing the Screen Display Language
You can change the language displayed by pressing Advanced – Advanced – Language. After selecting the
language, restart the UV Flatbed Controller to change the display language.
SC-V4000 User's Guide
Various Printing
74
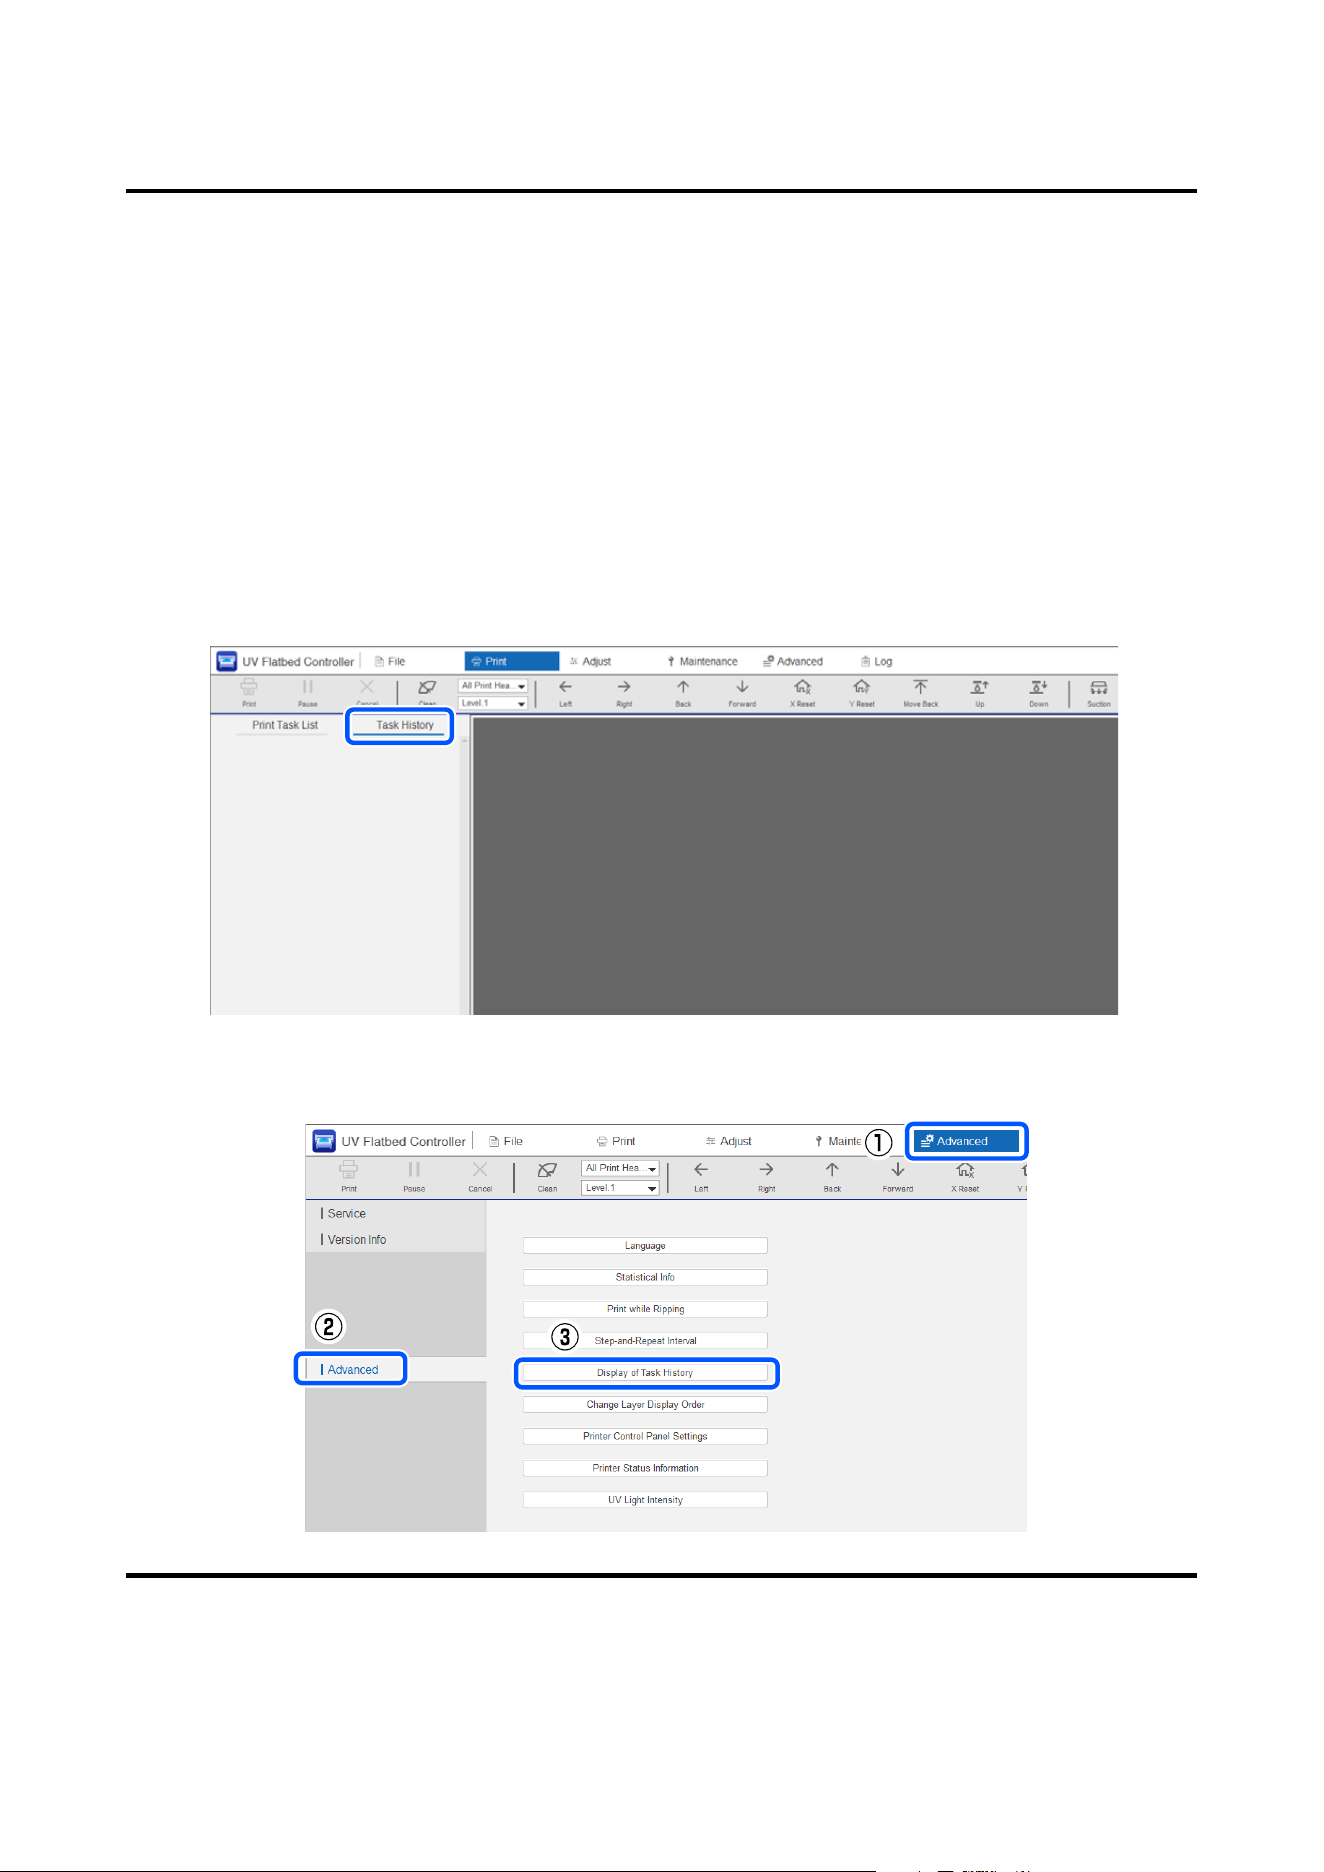
Changing the Display of Task History
The following shows how you can change the task history display.
❏ Basic display in print order: Task Histor y is displayed in print order. This display is the default setting.
❏ Grouped by job: When you reprint the same job from Task History, the number of prints by job, the number
of errors or cancellations, and the time required to print are displayed. When you reprint the same job from
Task Histor y, the aggregated records, such as the time required to print, the total number of prints, successes,
failures, interruptions, and so on, are displayed as a group. Click the r on the left of the job preview image in
Task Histor y to display the information.
When a job is re-sent from Epson Edge Print PRO, it is counted as a separate group even if it is the same job.
However, when a job is re-sent from Epson Edge Print PRO, even the same jobs are not grouped together.
They are aggregated as separate groups.
You can change the Task History display in Advanced ‒ Advanced ‒ Display of Task History.
Backing Up Adjustment Results
You can save all the adjustment results made on the adjustments screen as a file. By loading this saved file, you can
reproduce the adjustment results from the saved file. We recommend backing up your data regularly in case your
PC fails or is replaced.
SC-V4000 User's Guide
Various Printing
75
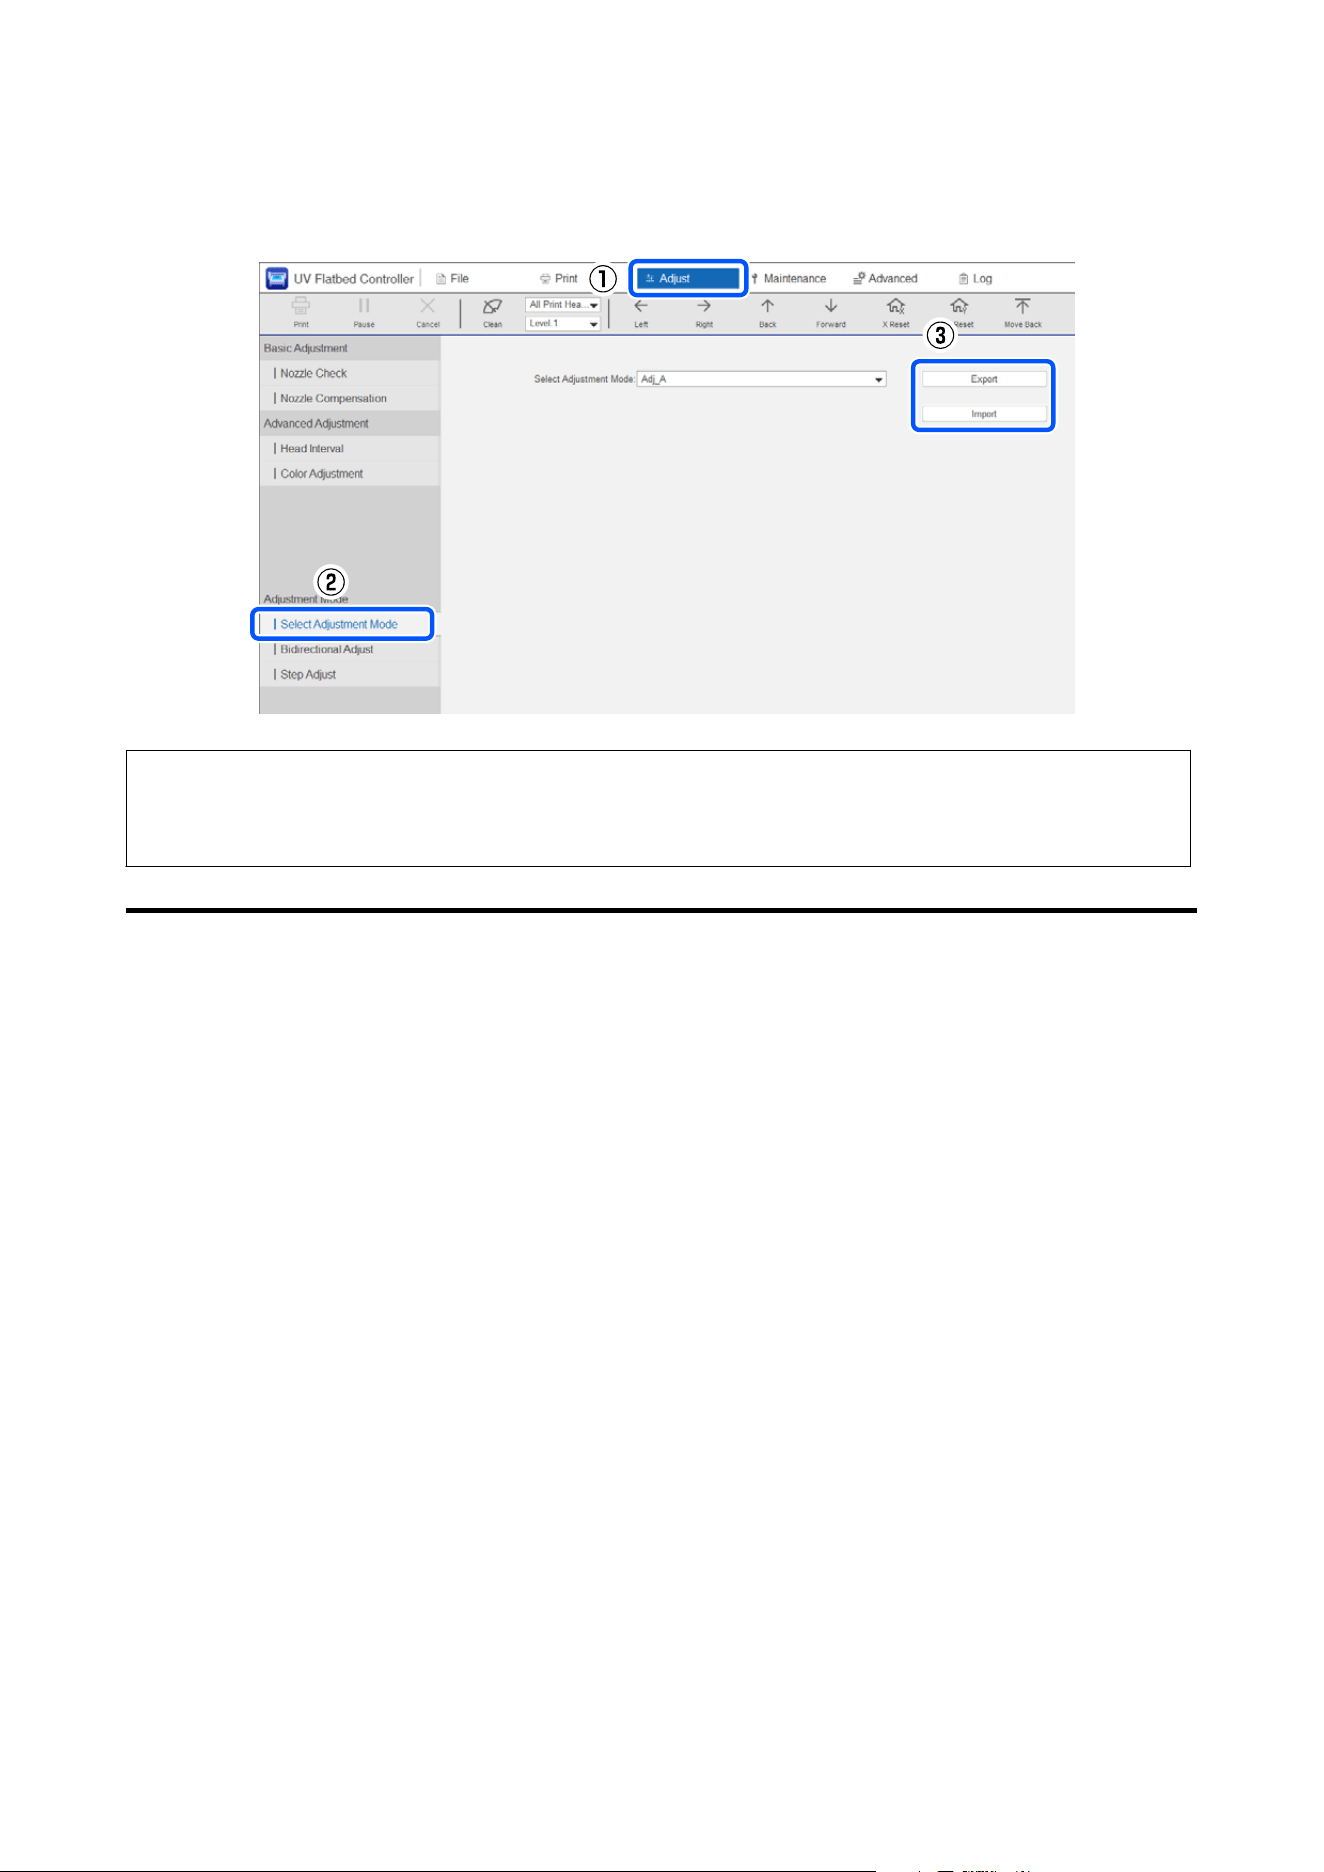
Press Export to save the adjustment results or Import to load the adjustment results.
Note:
When you select Export, all items in Adjustment Mode are exported at once. You do not need to export each adjustment
mode individually.
Nozzle Compensation
When you use Nozzle Compensation, the printer uses normal nozzles to compensate for missing ink ejection due
to clogged nozzles.
However, Nozzle Compensation may not work effectively under the following conditions.
❏ When two or more consecutive nozzles are clogged
❏ When nozzles in the center of the array are clogged
Nozzle Compensation prints a check pattern to identify the nozzles to be compensated for. When printing the
check pattern, prepare the following media.
Recommended media
Transparent sheet that supports inkjet printing
Size
Printable size of 450 mm (17.72 in.) wide × 120 mm (4.72 in.) long
SC-V4000 User's Guide
Various Printing
76
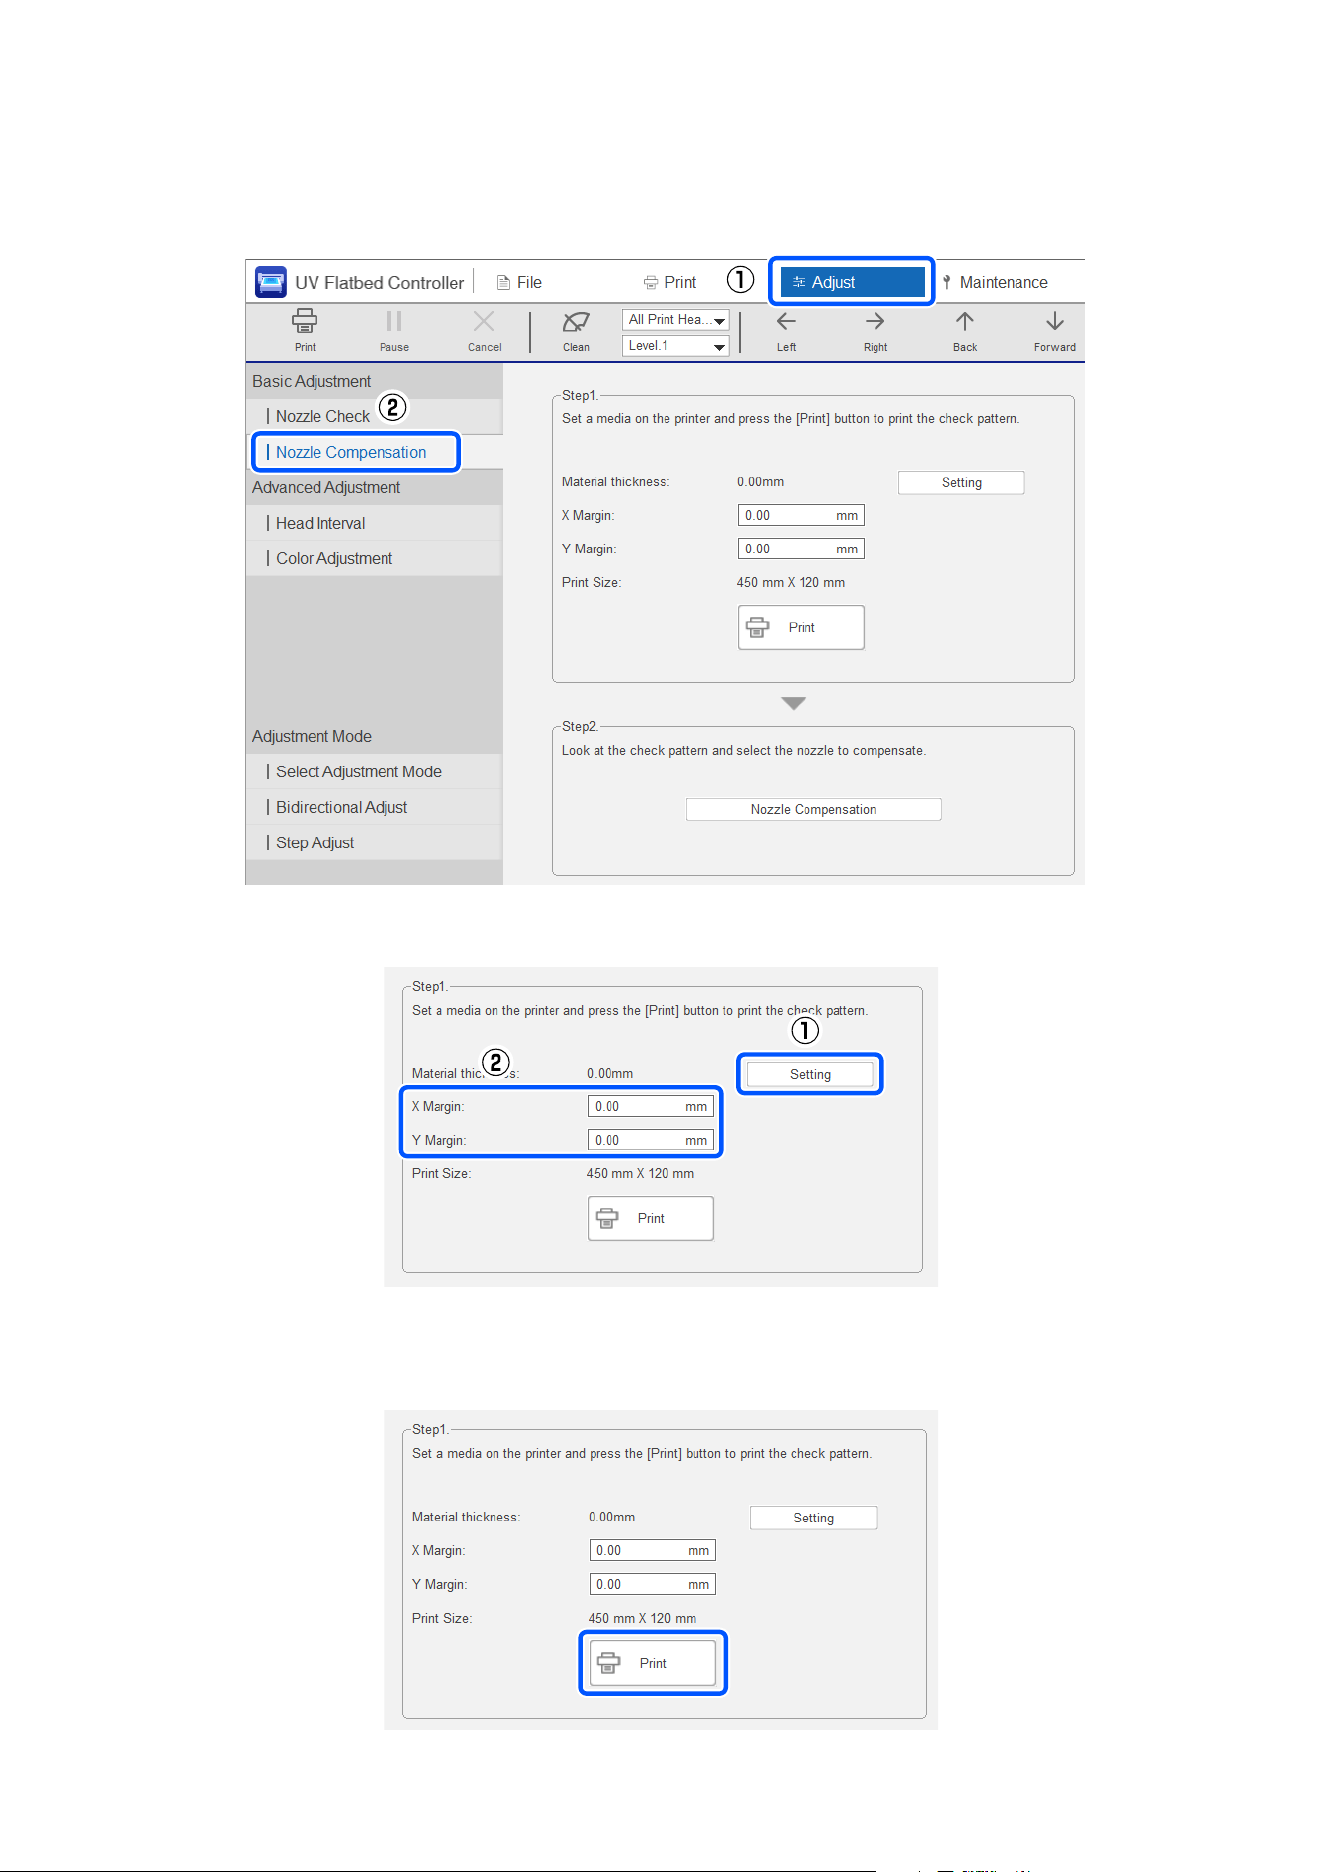
A
Click the Adjust menu – Nozzle Compensation in the UV Flatbed Controller.
B
Set Thickness Detection to Auto and X Margin and Y Margin to 0 mm.
C
Click Print.
The check pattern is printed.
SC-V4000 User's Guide
Various Printing
77
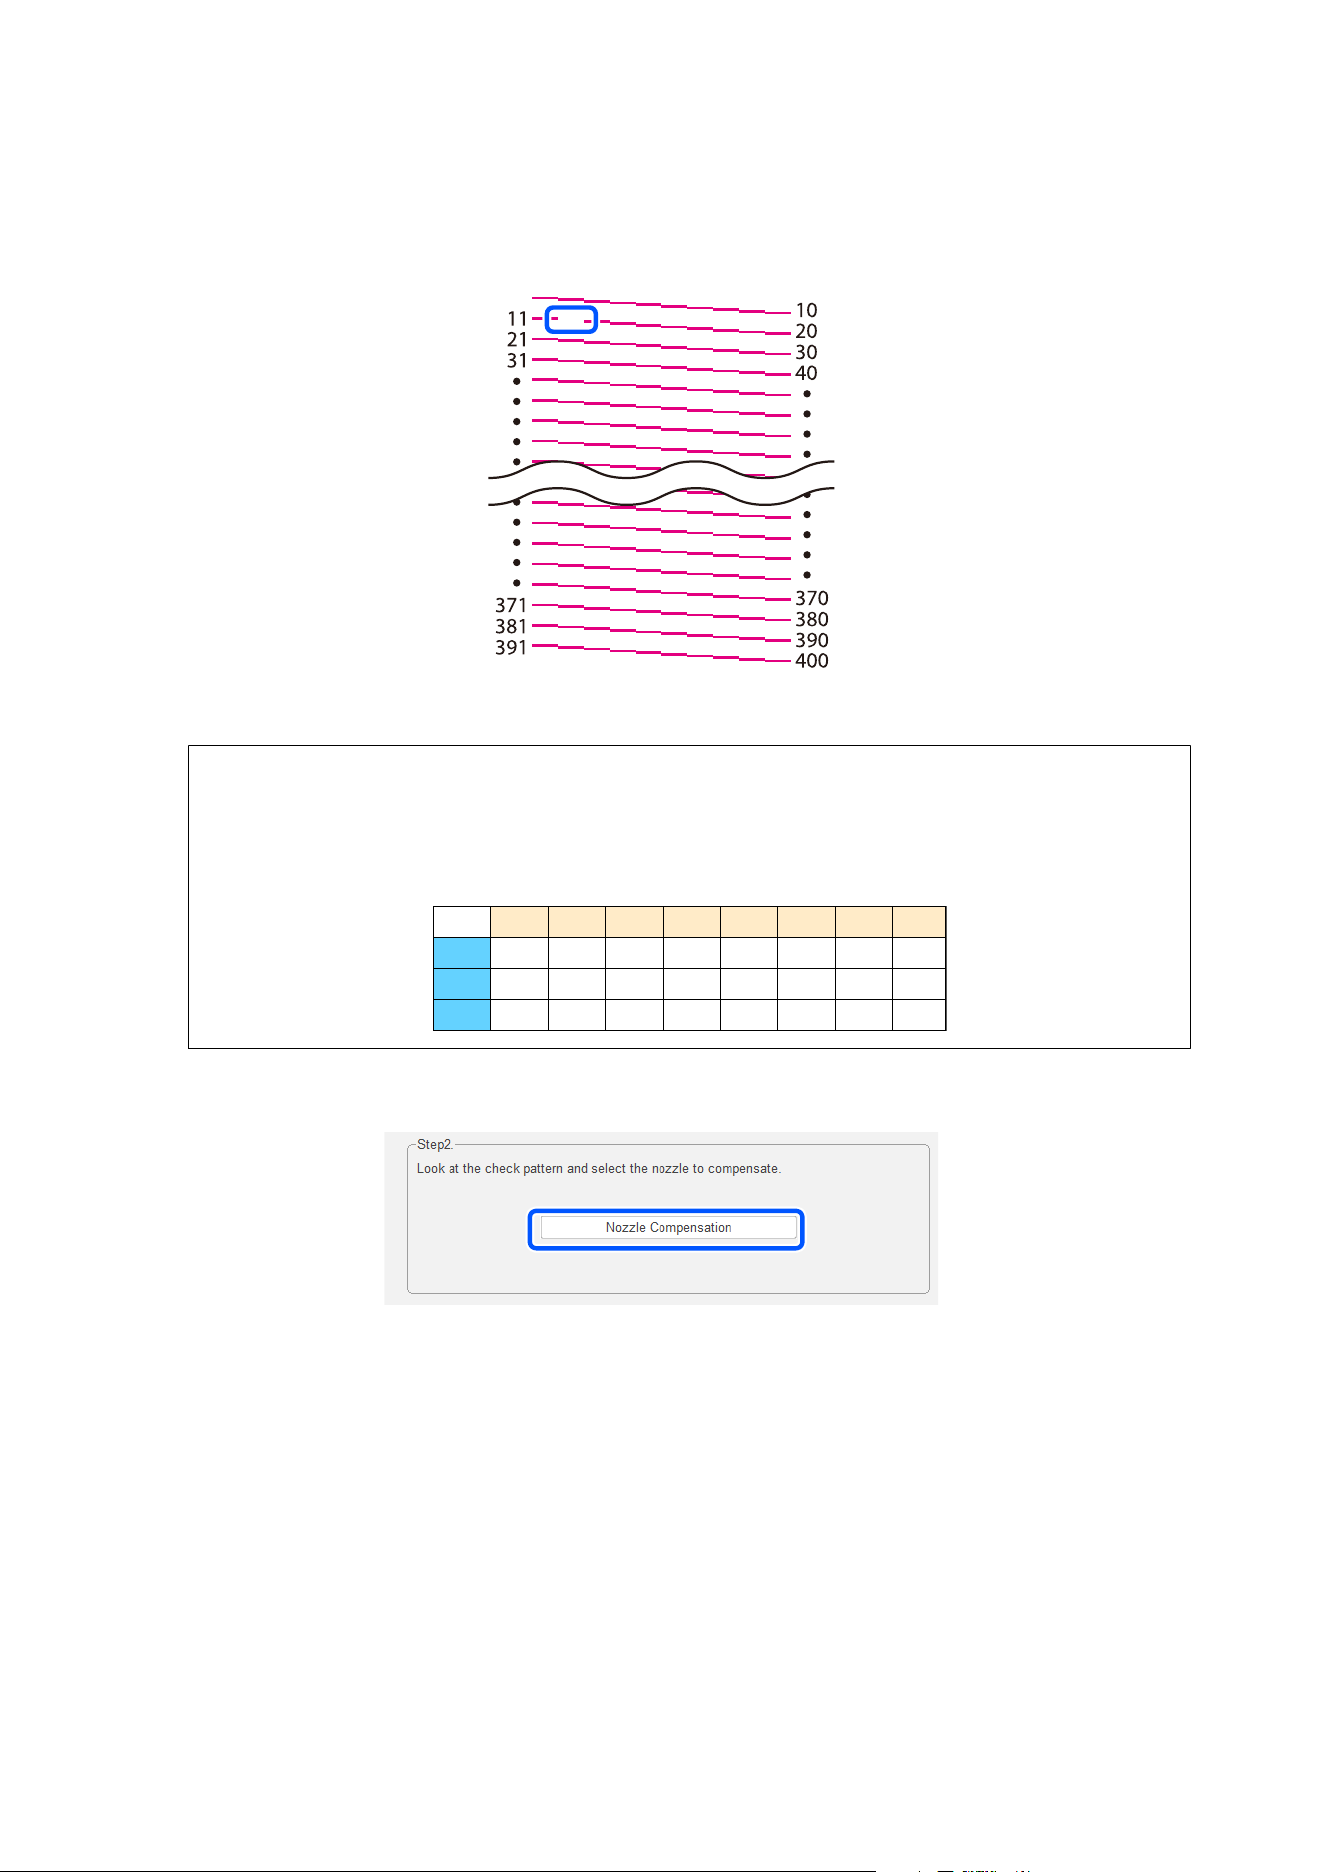
D
Inspect the check pattern and identify the number of clogged nozzles.
Example when there are gaps
Check the number with the gap.
Note:
The following explains the meanings of the symbols on the check pattern and the ink colors for each nozzle.
H1 to H3 are print head numbers.
CH01 to CH08 are nozzle row numbers for each print head.
H1
H2
H3
CH1
C
WH
Vr
CH2
M
WH
Vr
CH3
Y
WH
Vr
CH4
BK
WH
Vr
CH5
GY
WH
Vr
CH6
R
WH
Vr
CH7
LM
WH
Vr
CH8
LC
WH
Vr
E
Click Nozzle Compensation.
SC-V4000 User's Guide
Various Printing
78
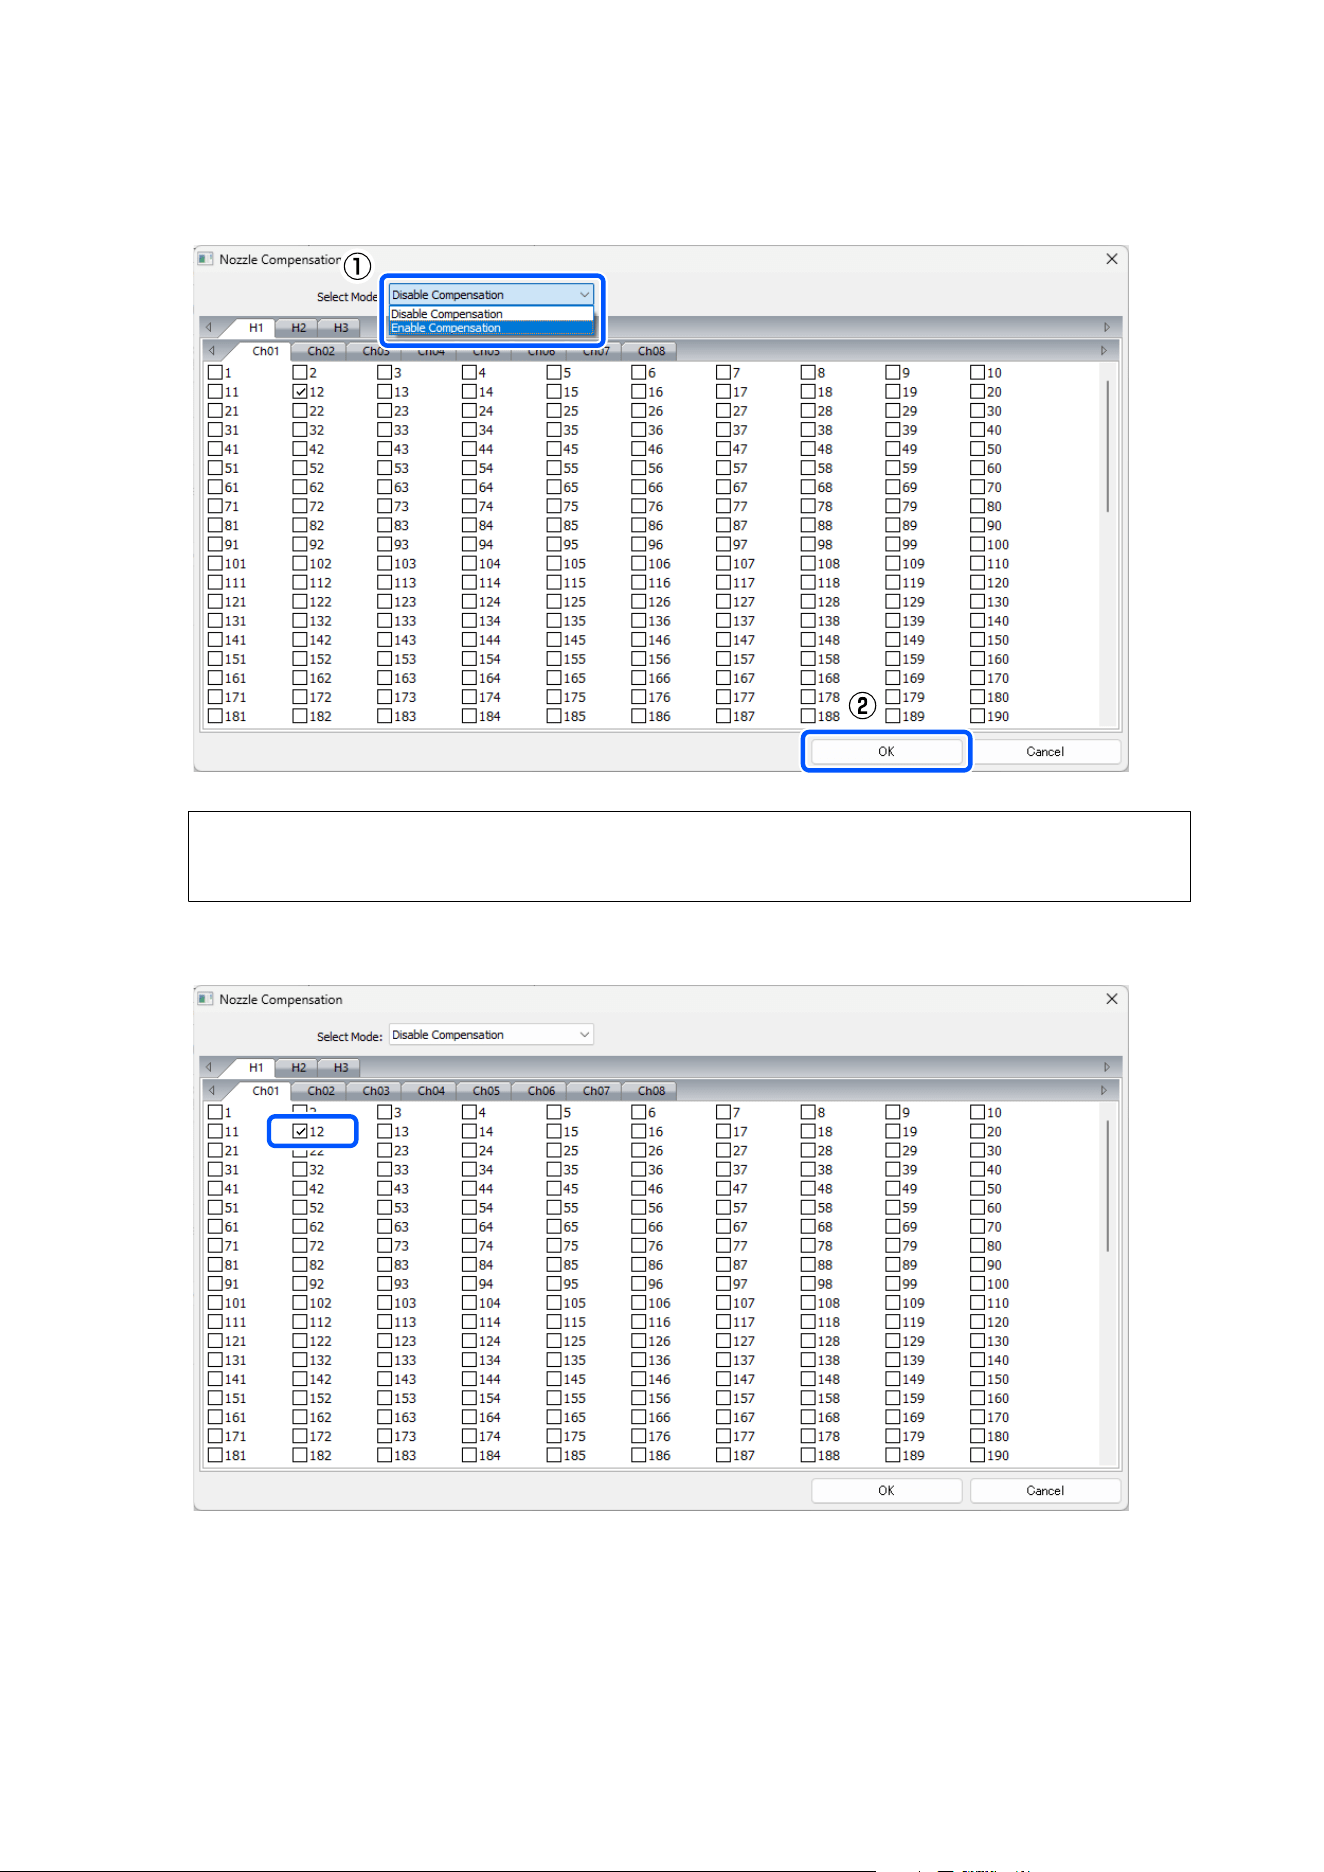
F
Select Enable from Select Mode and press OK.
Note:
To disable Nozzle Compensation, select Disable.
G
Select the boxes for the nozzle numbers you want to compensate for.
H
Perform a test print.
When the compensation function is enabled
If you do not see unevenness or banding, you can continue using the printer as it is.
SC-V4000 User's Guide
Various Printing
79
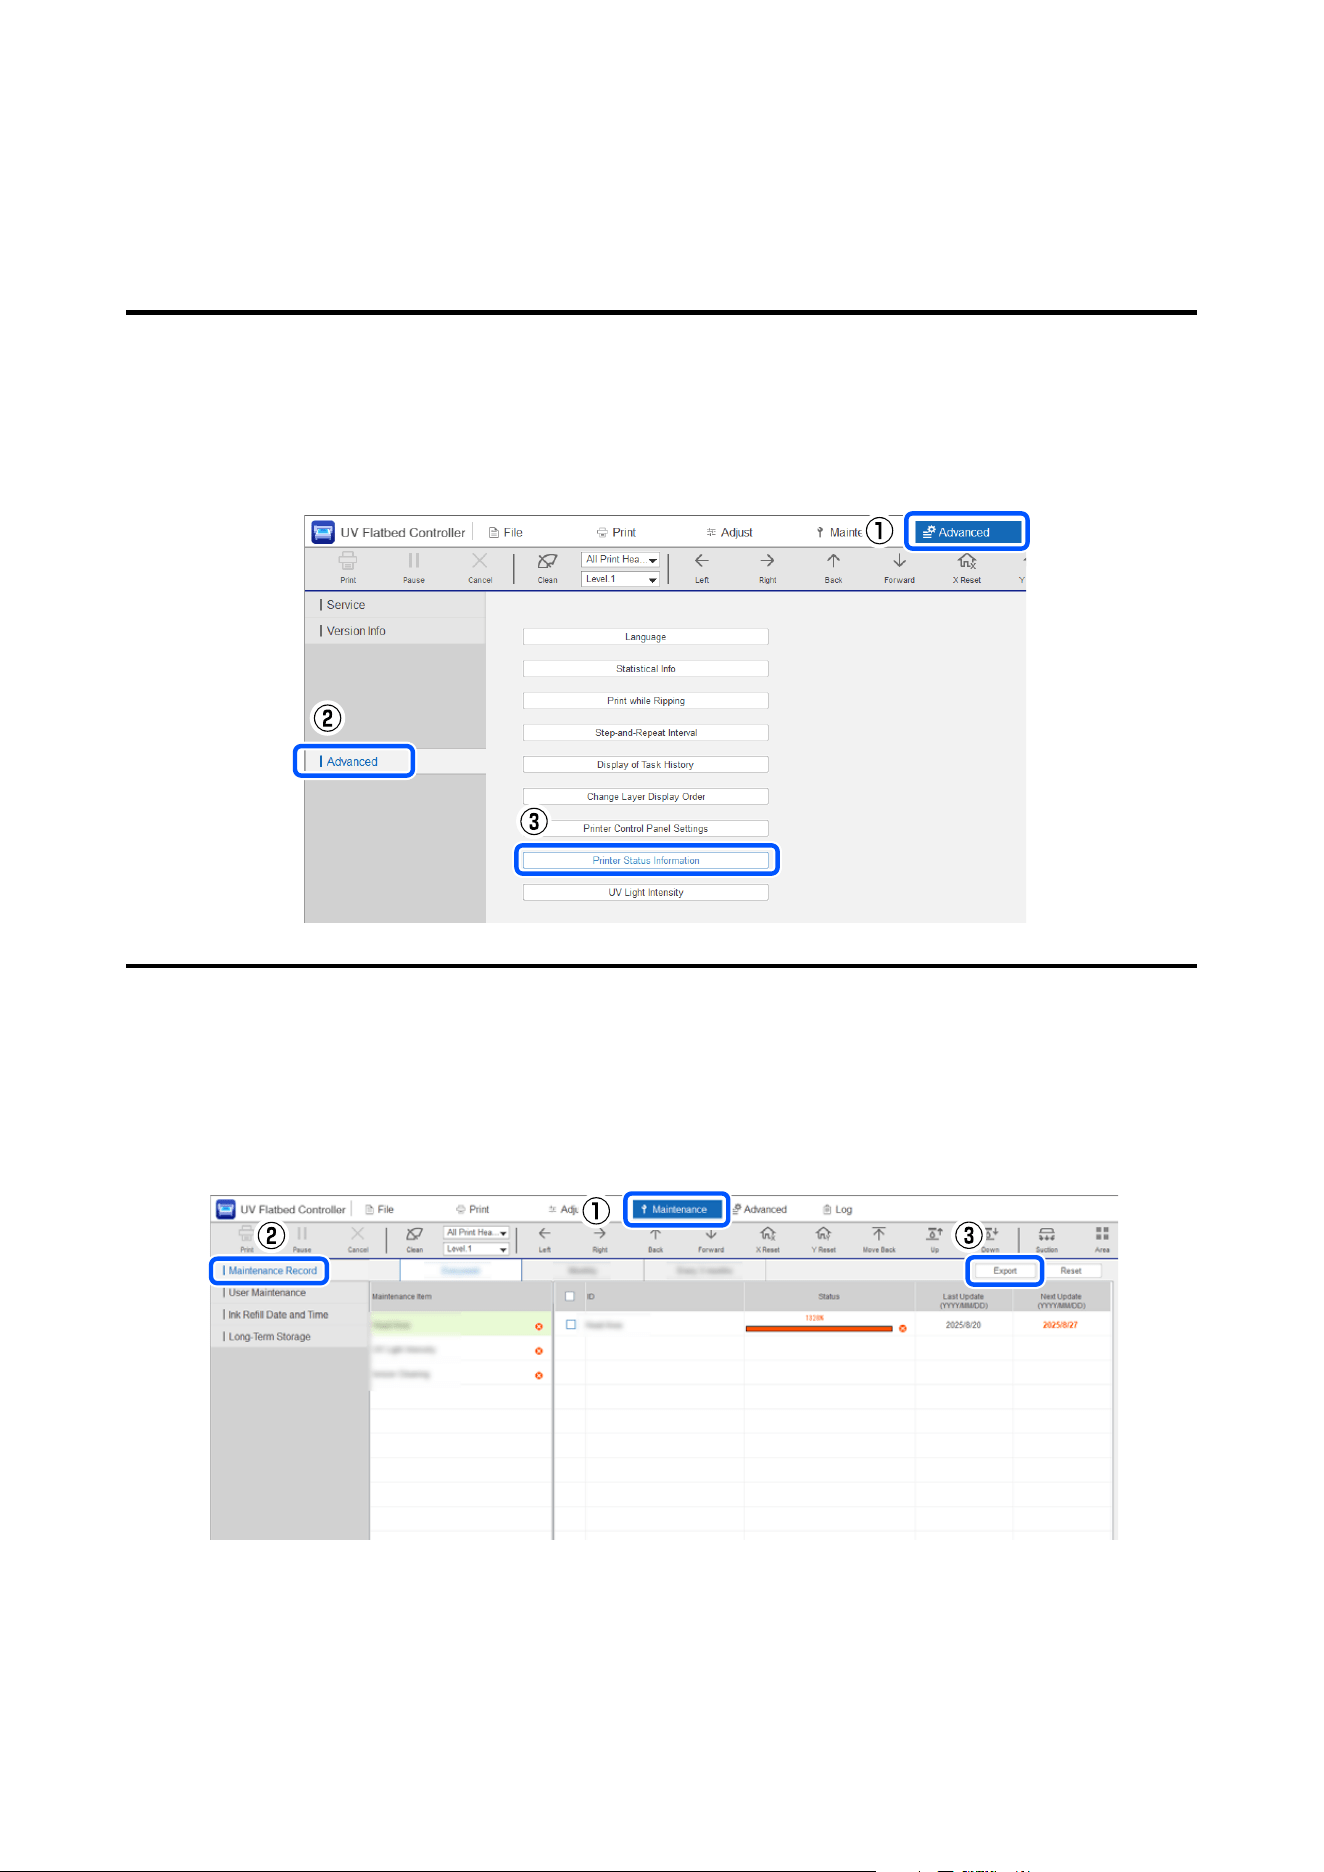
When the compensation function is insufficient
If you still see unevenness or banding, contact your dealer or Epson Support.
Status Sheet (CSV File)
The status sheet is for service engineers. Exports a status sheet showing the printer's status as a .csv file.
Select Advanced ‒ Advanced on the screen, and then press Printer Status Information.
Export Maintenance Information Sheet (CSV File)
The export maintenance information sheet is for service engineers. Exports a status sheet showing the printer's
status as a .csv file.
Select Maintenance ‒ Maintenance Record on the screen, and then press Export.
SC-V4000 User's Guide
Various Printing
80
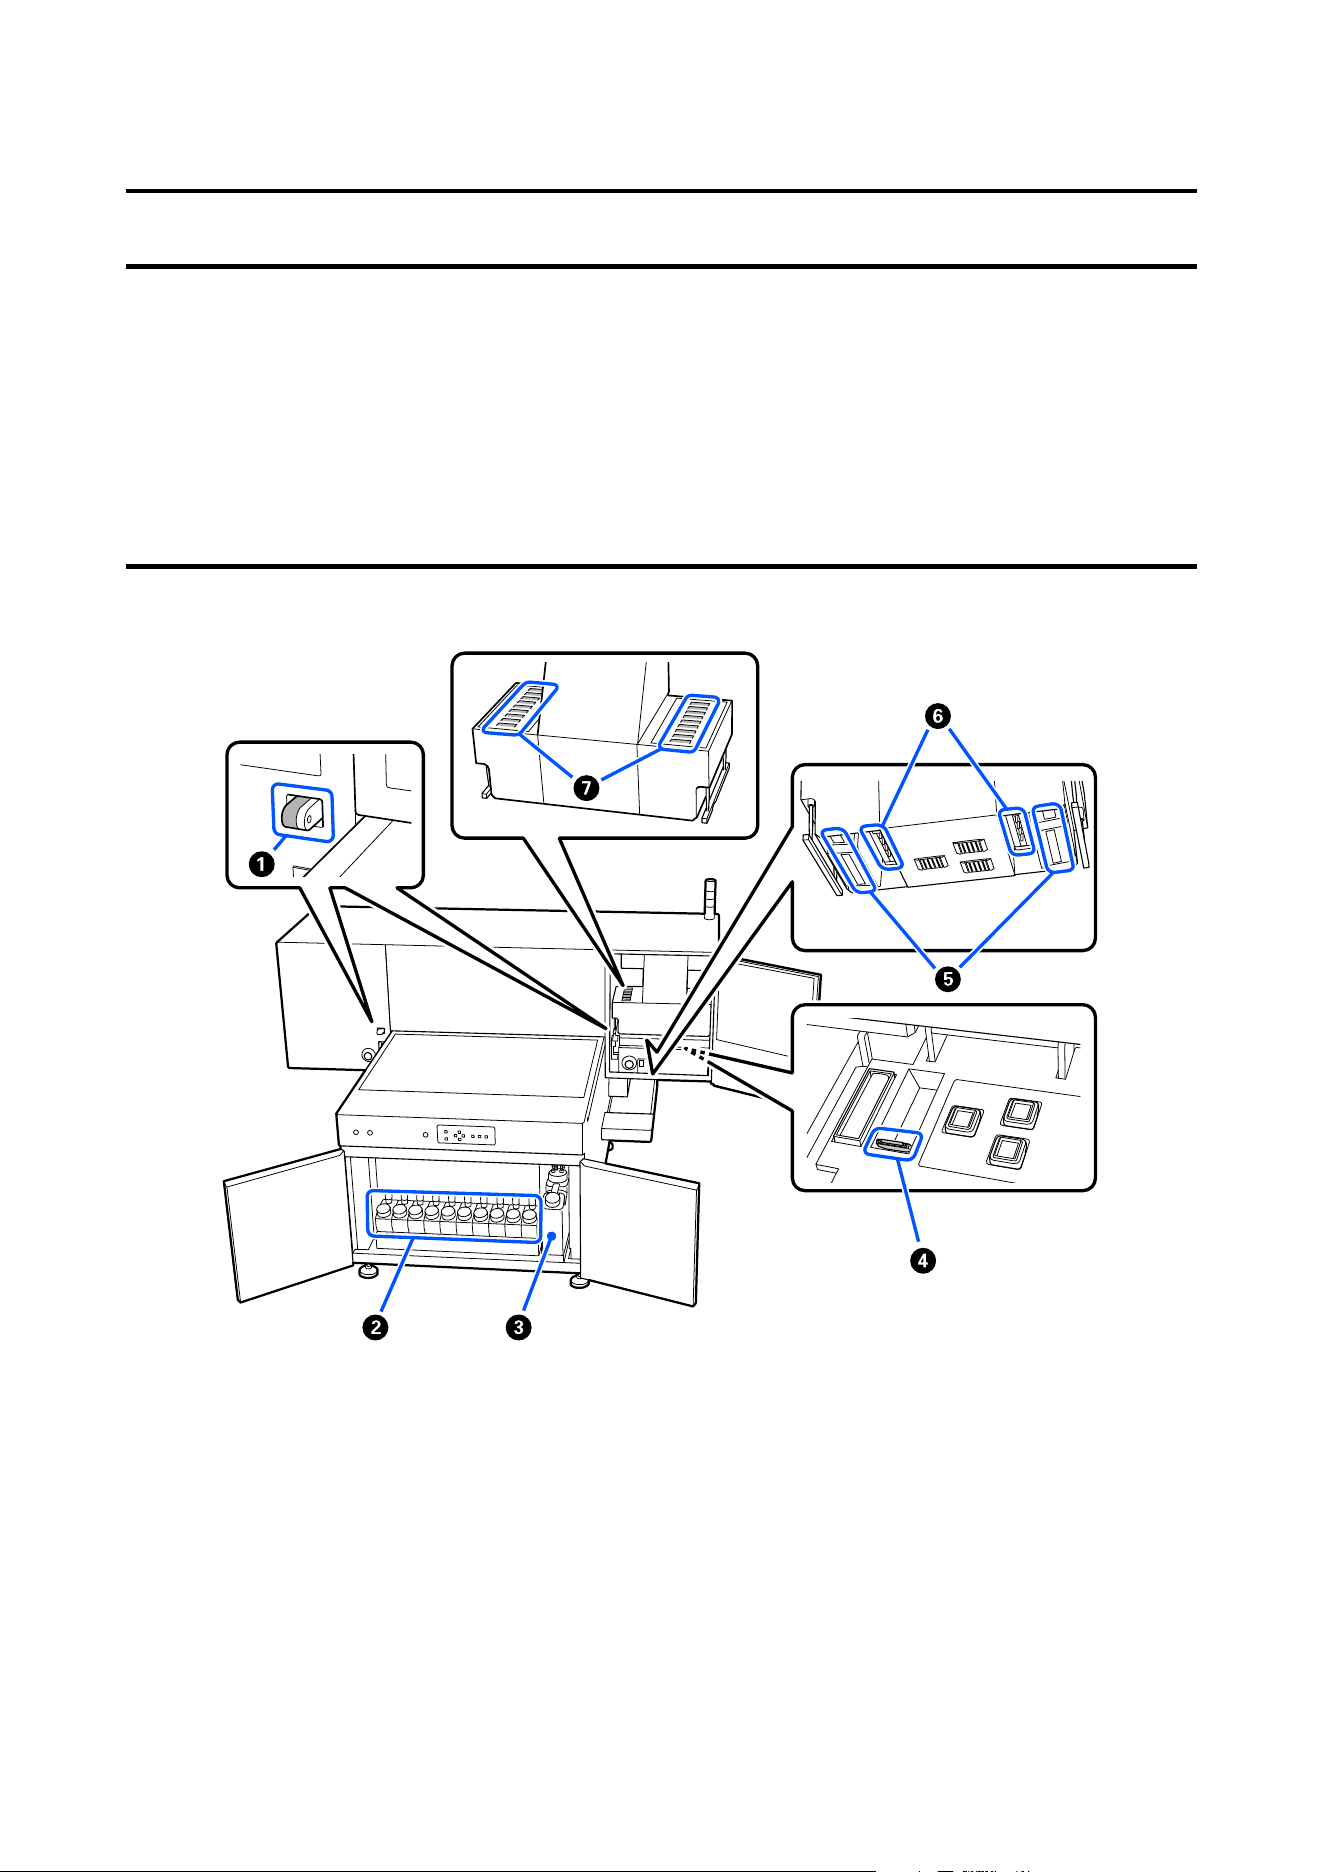
Periodic Maintenance
When to Perform Various Maintenance Operations
To maintain the print quality of the printer, you need to perform cleaning and replace consumables.
If maintenance is not performed, print quality may decline, the printer's service life may be reduced, or you may be
liable for the cost of any repairs. Perform maintenance according to the schedule.
Maintenance Areas and Timing
SC-V4000 User's Guide
Periodic Maintenance
81
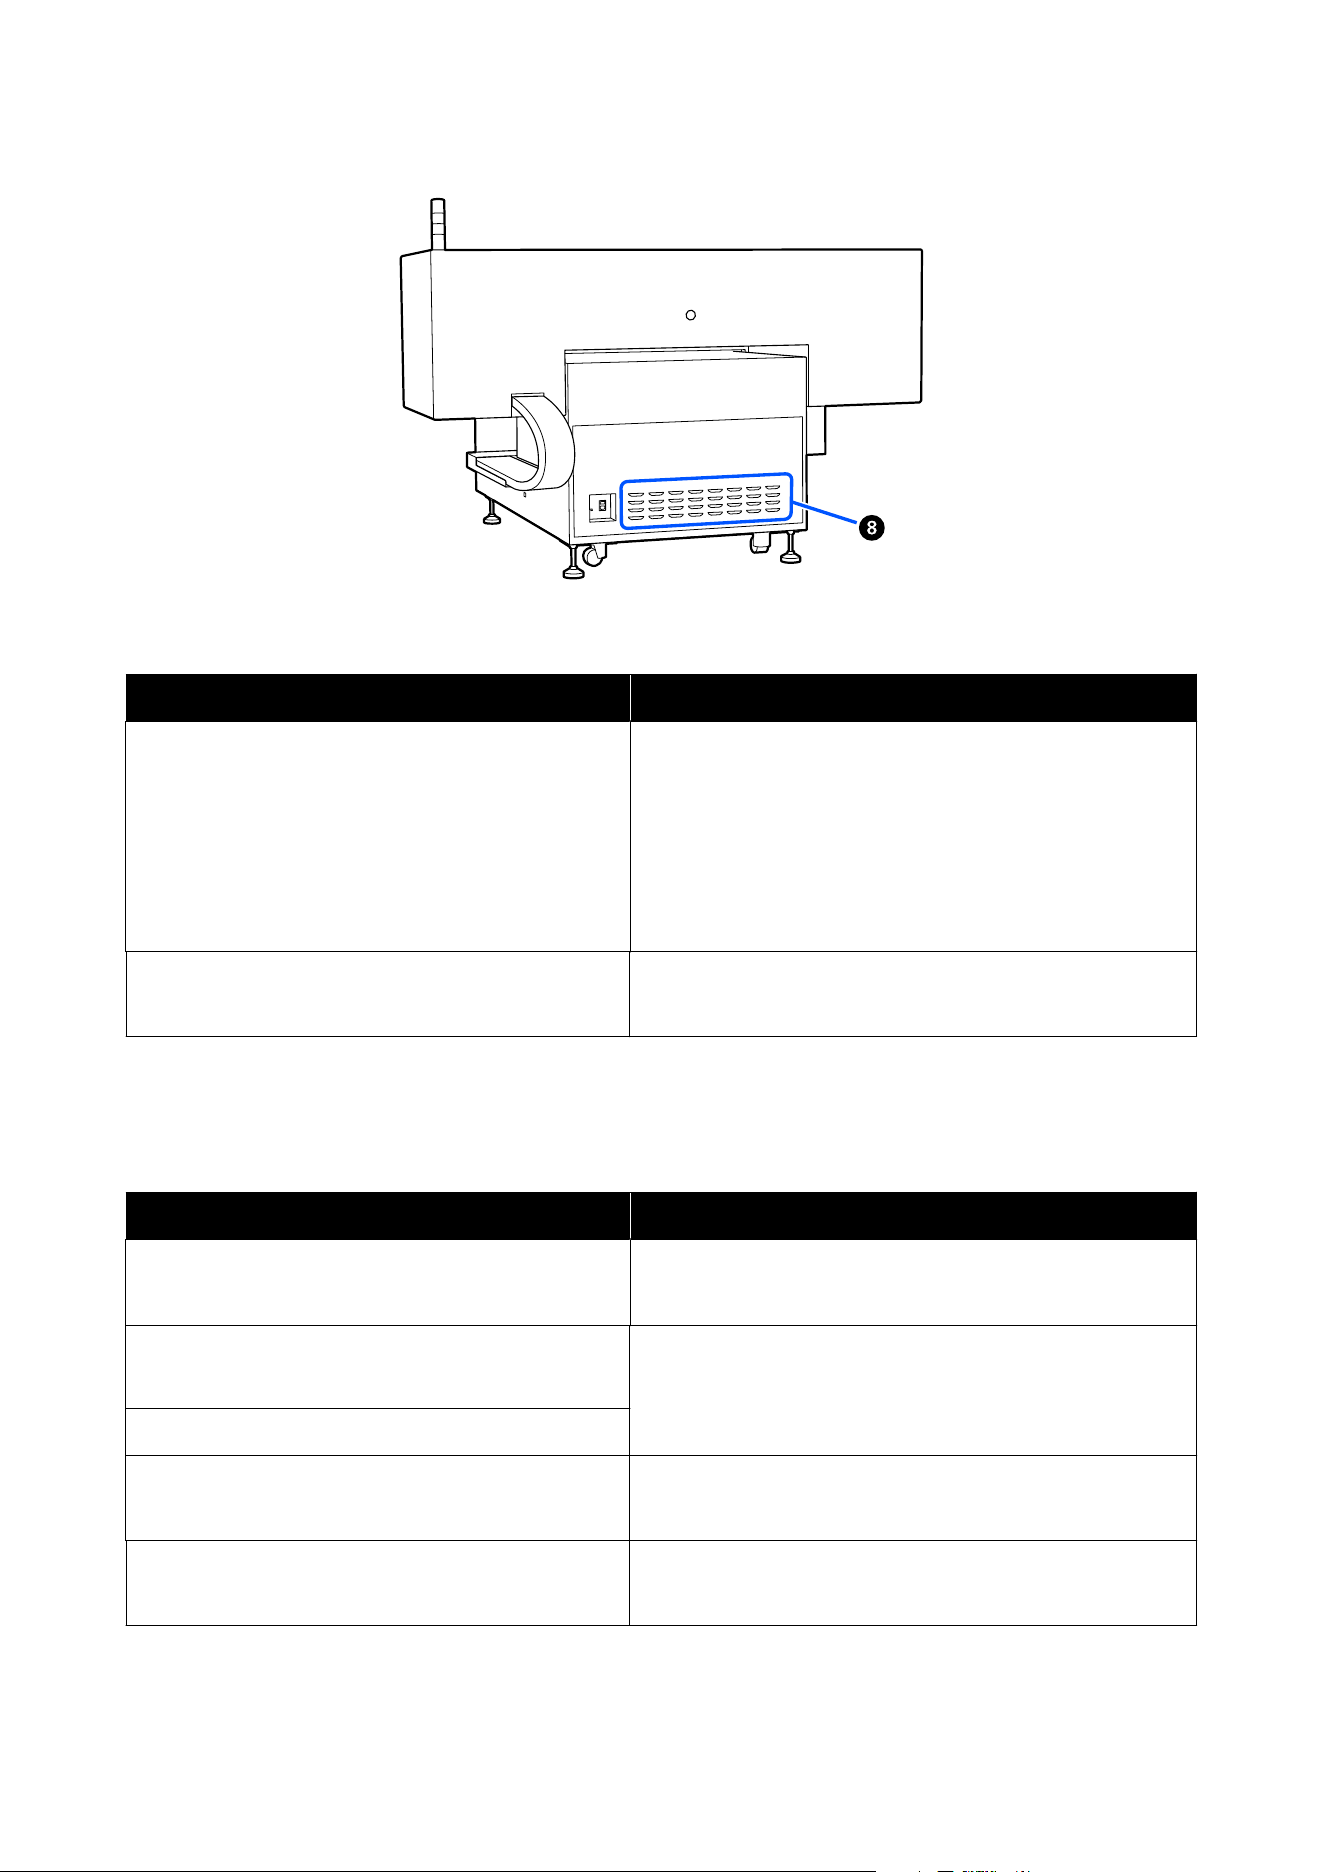
Periodic cleaning areas and timing
When to perform Target area
When a message is displayed
*
(Displayed once a month)
A Laser
U “Cleaning the Laser” on page 85
E UV light
U “Cleaning the UV light” on page 85
F Ionizer
U “Cleaning the Ionizer” on page 87
When noticeably dirty H Vent
U “Cleaning the Vents” on page 97
* The message is always displayed as User maintenance necessary. See the following for how to check the target areas.
U “Checking the target areas” on page 83
When to replenish, replace, or dispose of waste ink
When to perform Target area
When an error message is displayed
XXX ink is out
*1
B Ink tank
U “Refilling Ink” on page 88
When an error message is displayed
The waste ink bottle is full
C Waste ink bottle
U “Disposing of Waste Ink” on page 89
When ink has accumulated in the waste ink bottle
When a message is displayed
*2
(Displayed once every three months)
D Wiper unit
U “Replacing the Wiper Unit” on page 92
When noticeably dirty I Mist filter
U “Replacing the Mist Filters” on page 97
*1 Where XXX is the name of the ink color.
*2 The message is always displayed as User maintenance necessary. See the following for how to check the target areas.
U “Checking the target areas” on page 83
SC-V4000 User's Guide
Periodic Maintenance
82
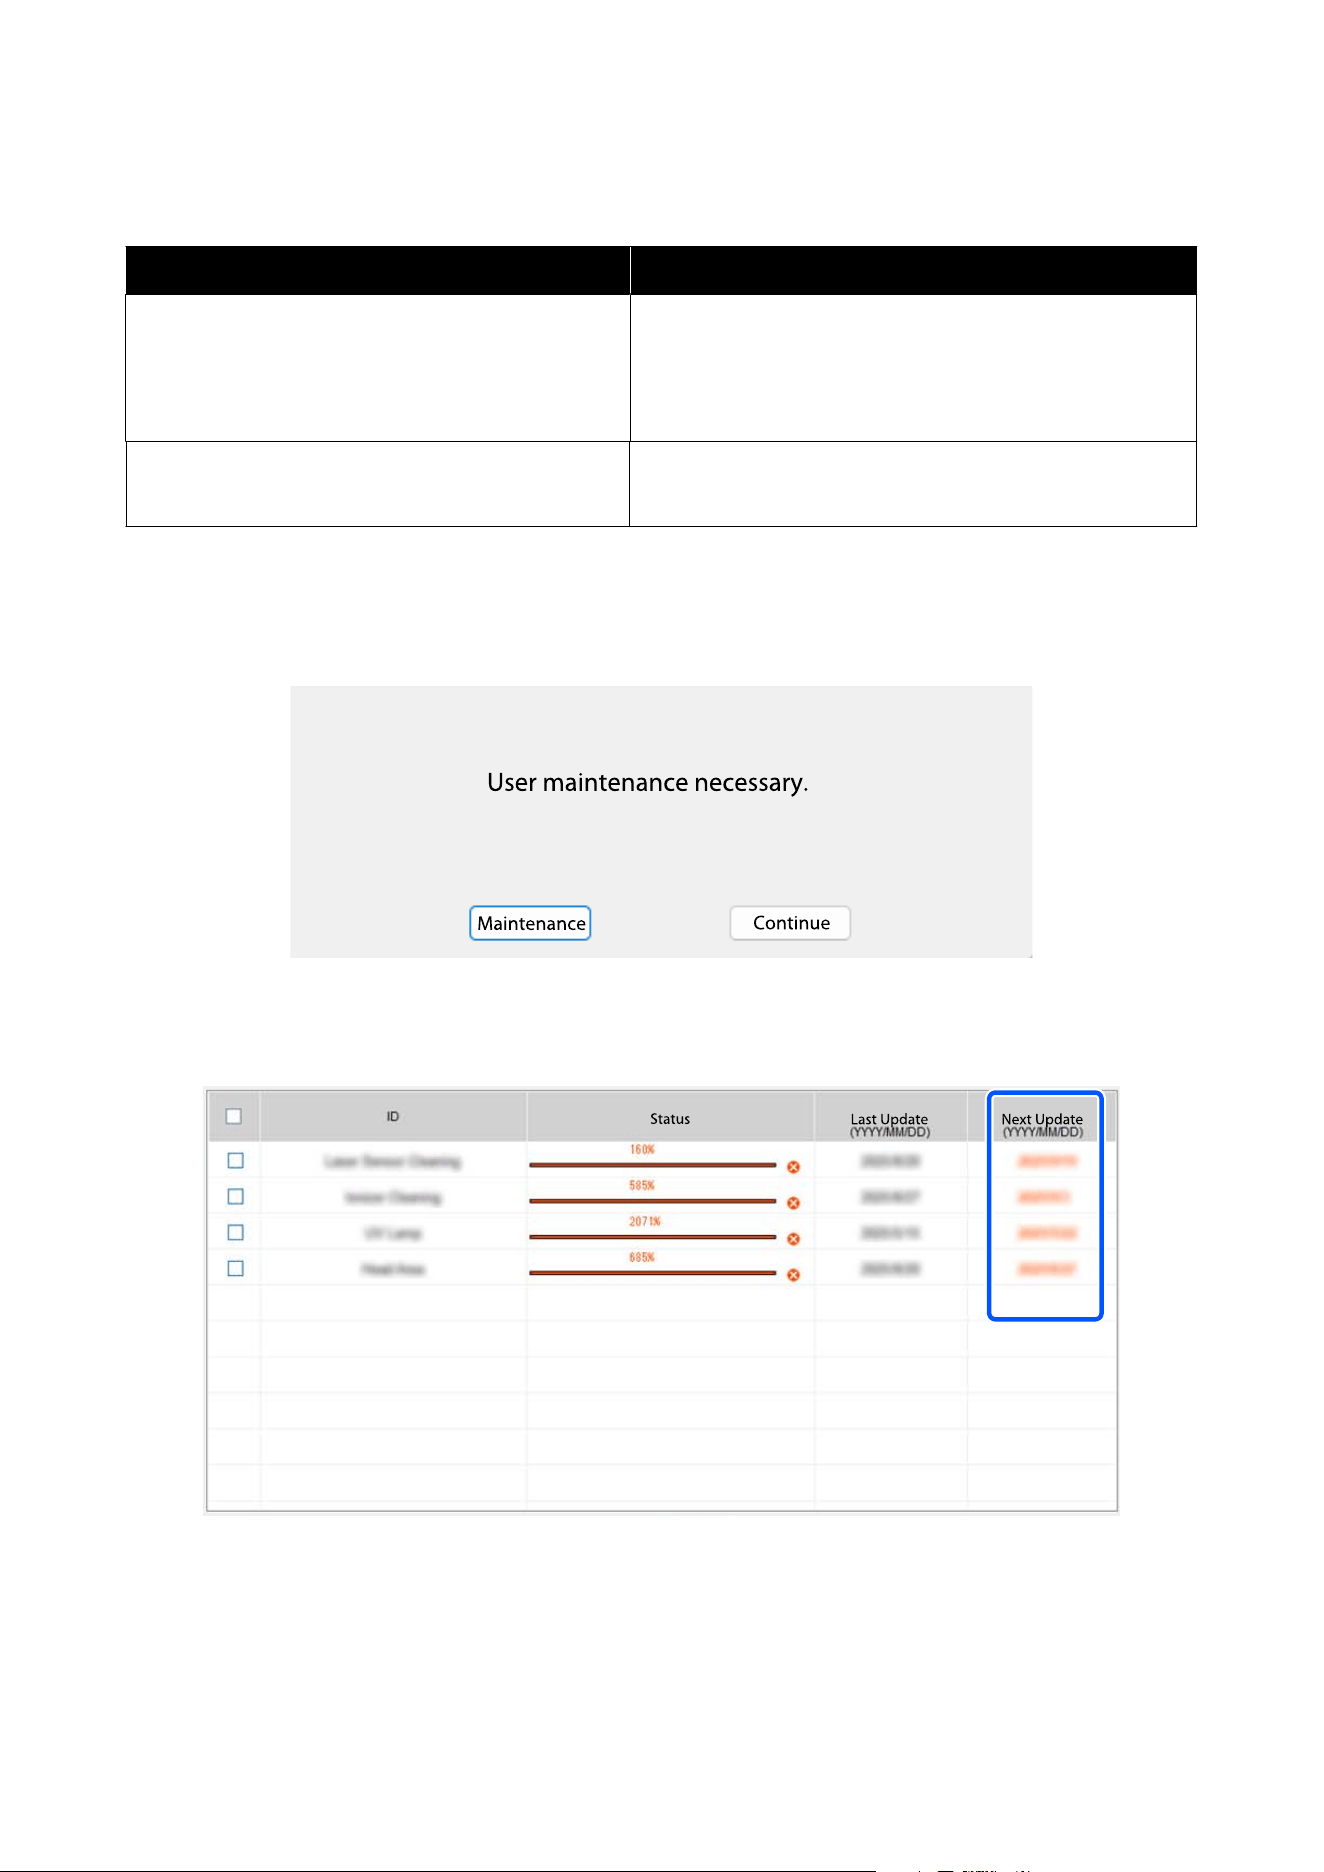
Other Maintenance
When to perform Operation
❏ When checking if nozzles are clogged
❏ Horizontal stripes or tint unevenness (banding) are
appeared.
❏ When colors look wrong
Checking for clogged nozzles
U “Checking for Clogged Nozzles” on page 94
When clogging is found after checking for clogged
nozzles
Cleaning the print head
U “Clearing Clogged Nozzles” on page 95
Checking the target areas
The message is always displayed as User maintenance necessary.
When you click Maintenance, the following Maintenance Record screen is displayed. Parts with the Next Update
date displayed in red require maintenance.
SC-V4000 User's Guide
Periodic Maintenance
83
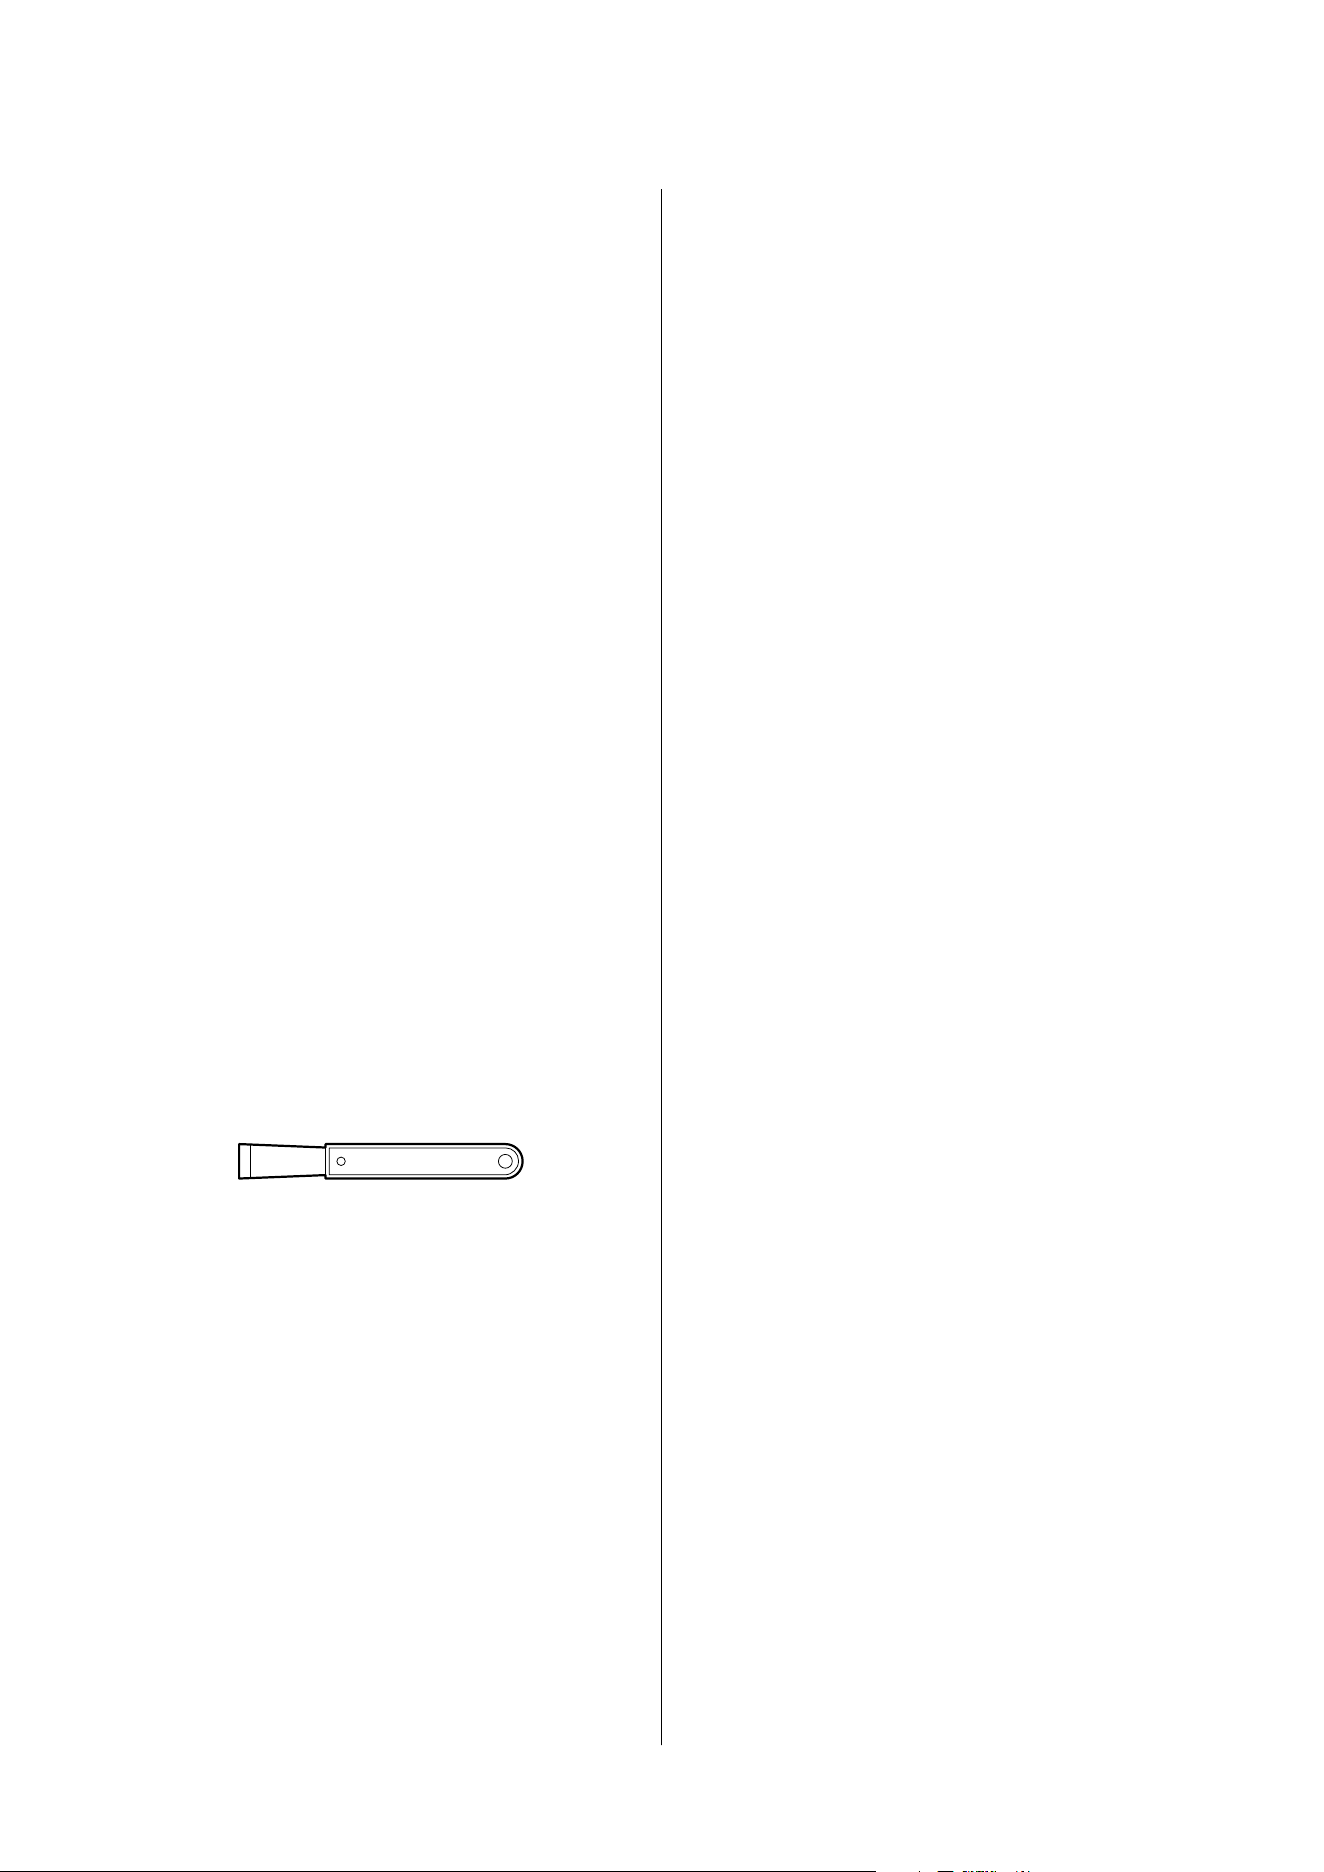
Preparation
Ready the following items before beginning cleaning
and replacement.
Make sure you prepare ink bottles and replacement
parts specifically for this printer.
U “Options and Consumable Products” on page 109
Polyester/nylon knit woven fabric (commercially
available)
Purchase lint-free fabric.
Example: Berkshire SuperPolx
®
Use when cleaning the following.
❏ Around the print head
❏ Flushing box
❏ UV Light
❏ Laser
❏ Flatbed
Metal scraper (commercially available)
Use when cleaning the flatbed.
Vacuum cleaner (commercially available)
Use when cleaning the vents.
Cotton swabs (commercially available)
Use when cleaning the ionizer. We recommend using
white cotton swabs to confirm that dirt has been
removed.
Dropper (commercially available)
Use when cleaning the suction caps and flushing box.
Cup (commercially available)
Use when pouring the cleaning liquid into the cup. We
recommend a cup with a capacity of approximately
100 ml (approximately 3.4 oz).
Metal or plastic (PP/PE) tray (commercially
available)
Use this to hold cleaning tools, removed consumables,
and cleaning liquid that has been transferred to the
cup.
Ink bottles (consumable)
Use these to refill the ink tank when ink is running
low.
Cleaning sticks (consumable)
Use when cleaning the following.
❏ Flushing box
❏ Wiper unit
❏ Around the suction caps
❏ Around the print head
Cleaning liquid (consumable)
Use when cleaning the following.
❏ Flushing box
❏ Wiper unit
❏ Suction caps
❏ Around the print head
❏ UV Light
❏ Flatbed
Waste ink bottle (consumable)
Use when replacing the waste ink bottle.
Mist filter (consumable)
Use when replacing the mist filter.
Wiper unit (consumable)
Use when replacing the wiper unit.
SC-V4000 User's Guide
Periodic Maintenance
84
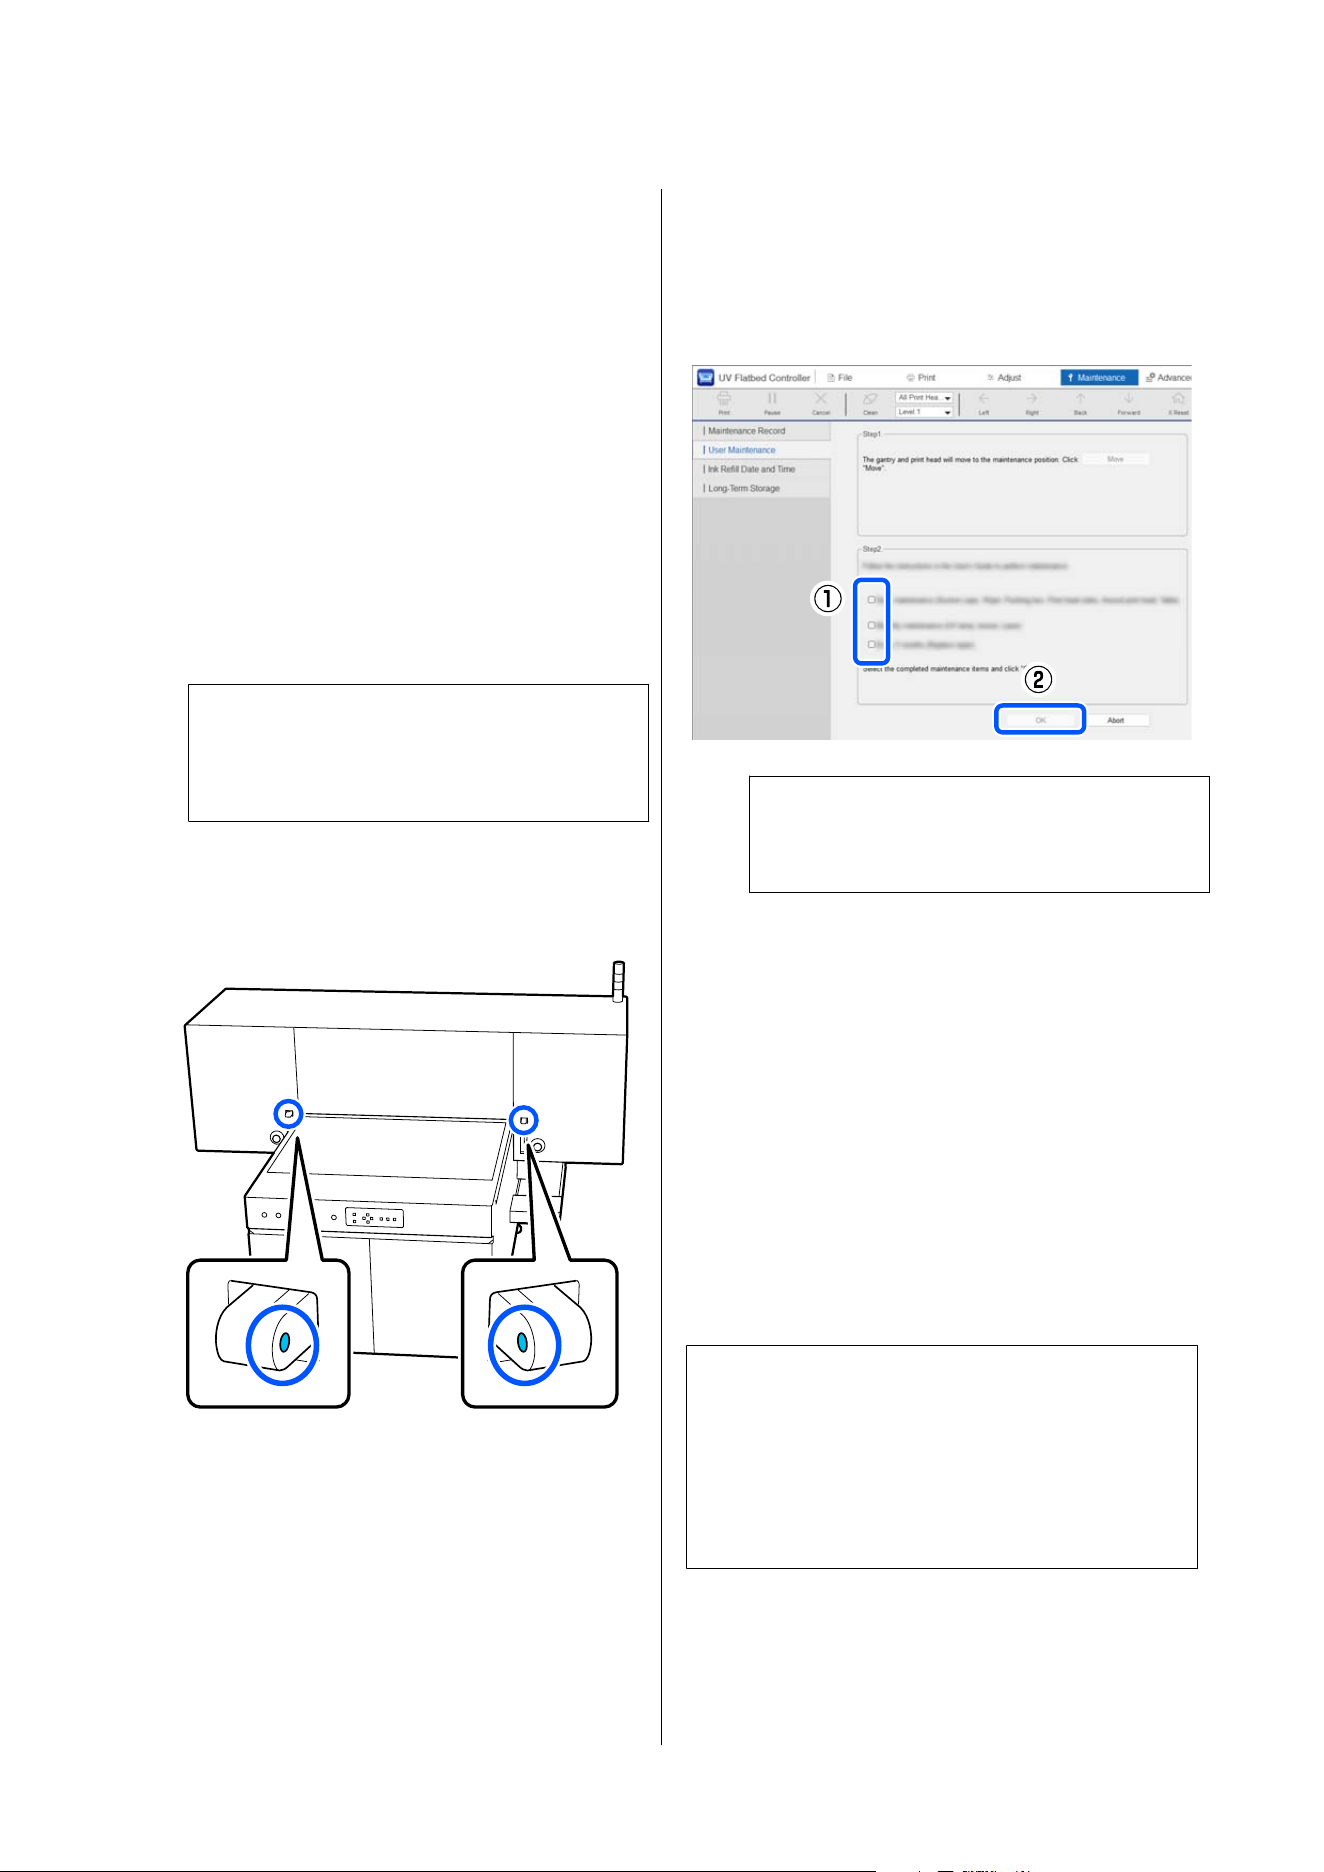
Cleaning the Laser
If the laser emitter becomes dirty, media thickness
detection or foreign object detection may not work
correctly.
Before starting this procedure, be sure to read the
following:
U “Preparation” on page 84
U “Cautions when Operating” on page 56
A
Turn off the pr inter.
U “Turning Off” on page 63
c
Important:
If you clean with the power on, laser light will
be emitted.
B
Use a polyester/nylon knit woven fabric to wipe
off dust and lint that may be adhering to the
laser.
C
When cleaning is complete, select the target
areas in the UV Flatbed Controller and click
OK.
The maintenance counter is reset, and the print
head moves to the home position.
Note:
If you click Cancel, the maintenance counter is
not reset.
Cleaning the UV light
If the UV light is dirty, the UV light intensity
decreases, and the ink may not cure sufficiently, which
can affect print quality.
Before starting this procedure, be sure to read the
following:
U “Preparation” on page 84
U “Cautions when Operating” on page 56
c
Important:
The gantry may move. Before starting the
procedure, make sure no one is in the gantry's
range of motion. Until maintenance work is
complete, make sure no one enters the gantry's
range of motion.
SC-V4000 User's Guide
Periodic Maintenance
85
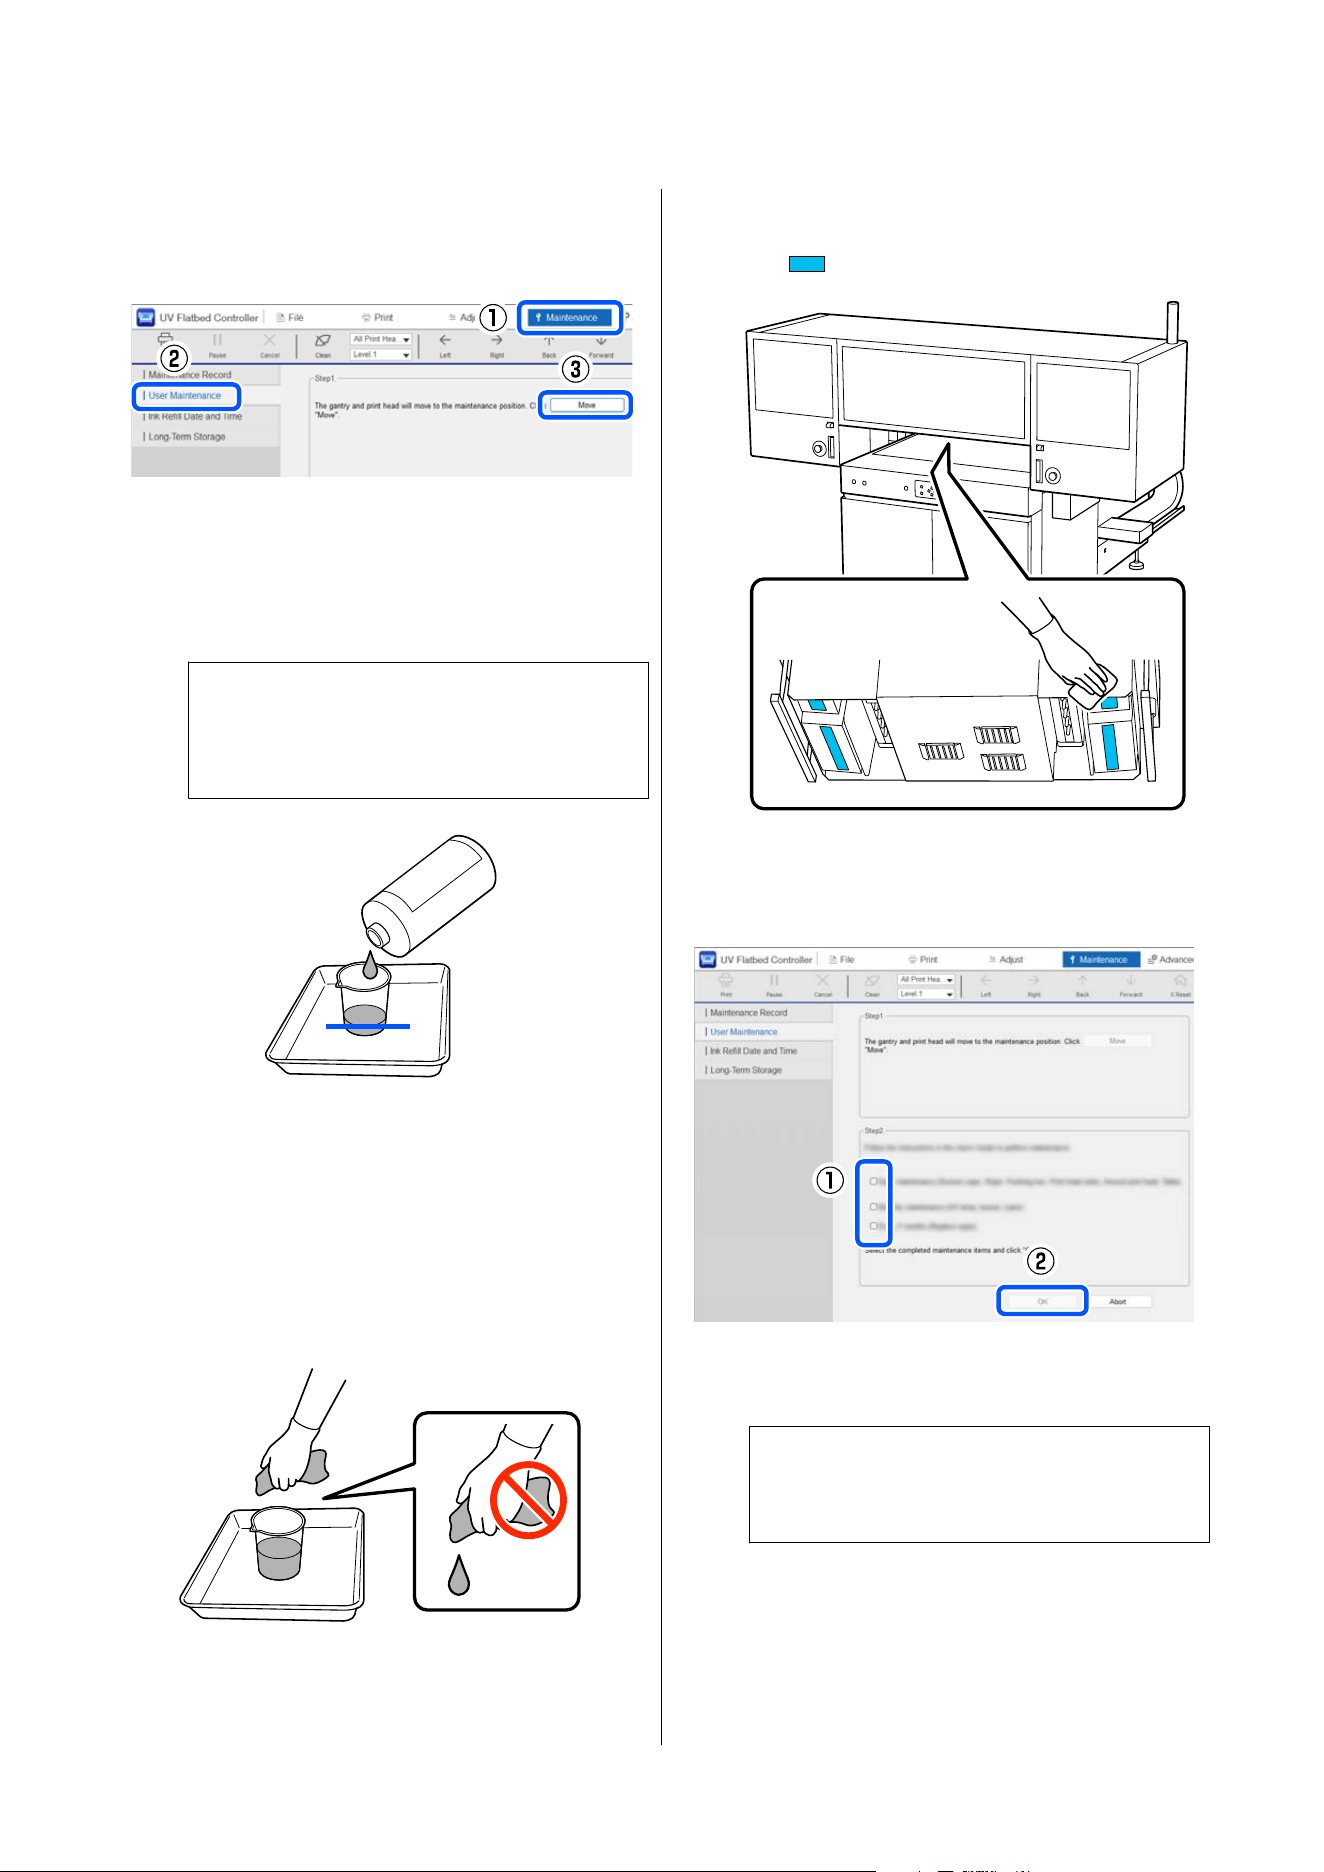
A
In the UV Flatbed Controller, select the
Maintenance menu and click User
Maintenance - Move.
B
When continuing from daily cleaning, dispose
of the remaining cleaning liquid in the waste
ink bottle. Place the cup on the tray and pour in
approximately 20 ml (approximately 0.68 oz) of
new cleaning liquid.
c
Important:
Using dirty cleaning liquid can cause
contamination.
C
When continuing from daily cleaning, dispose
of the polyester/nylon knit woven fabric used
for daily cleaning.
Soak a new polyester/nylon knit woven fabric
in cleaning liquid.
At this time, gently wring it out so that cleaning
liquid does not drip from the polyester/nylon
knit woven fabric.
D
Use the polyester/nylon knit woven fabric to
wipe off ink, lint, and dust that have built up on
the
area shown in the illustration.
E
When cleaning is complete, select the target
areas in the UV Flatbed Controller and click
OK.
The maintenance counter is reset, and the print
head moves to the home position.
Note:
If you click Cancel, the maintenance counter is
not reset.
SC-V4000 User's Guide
Periodic Maintenance
86
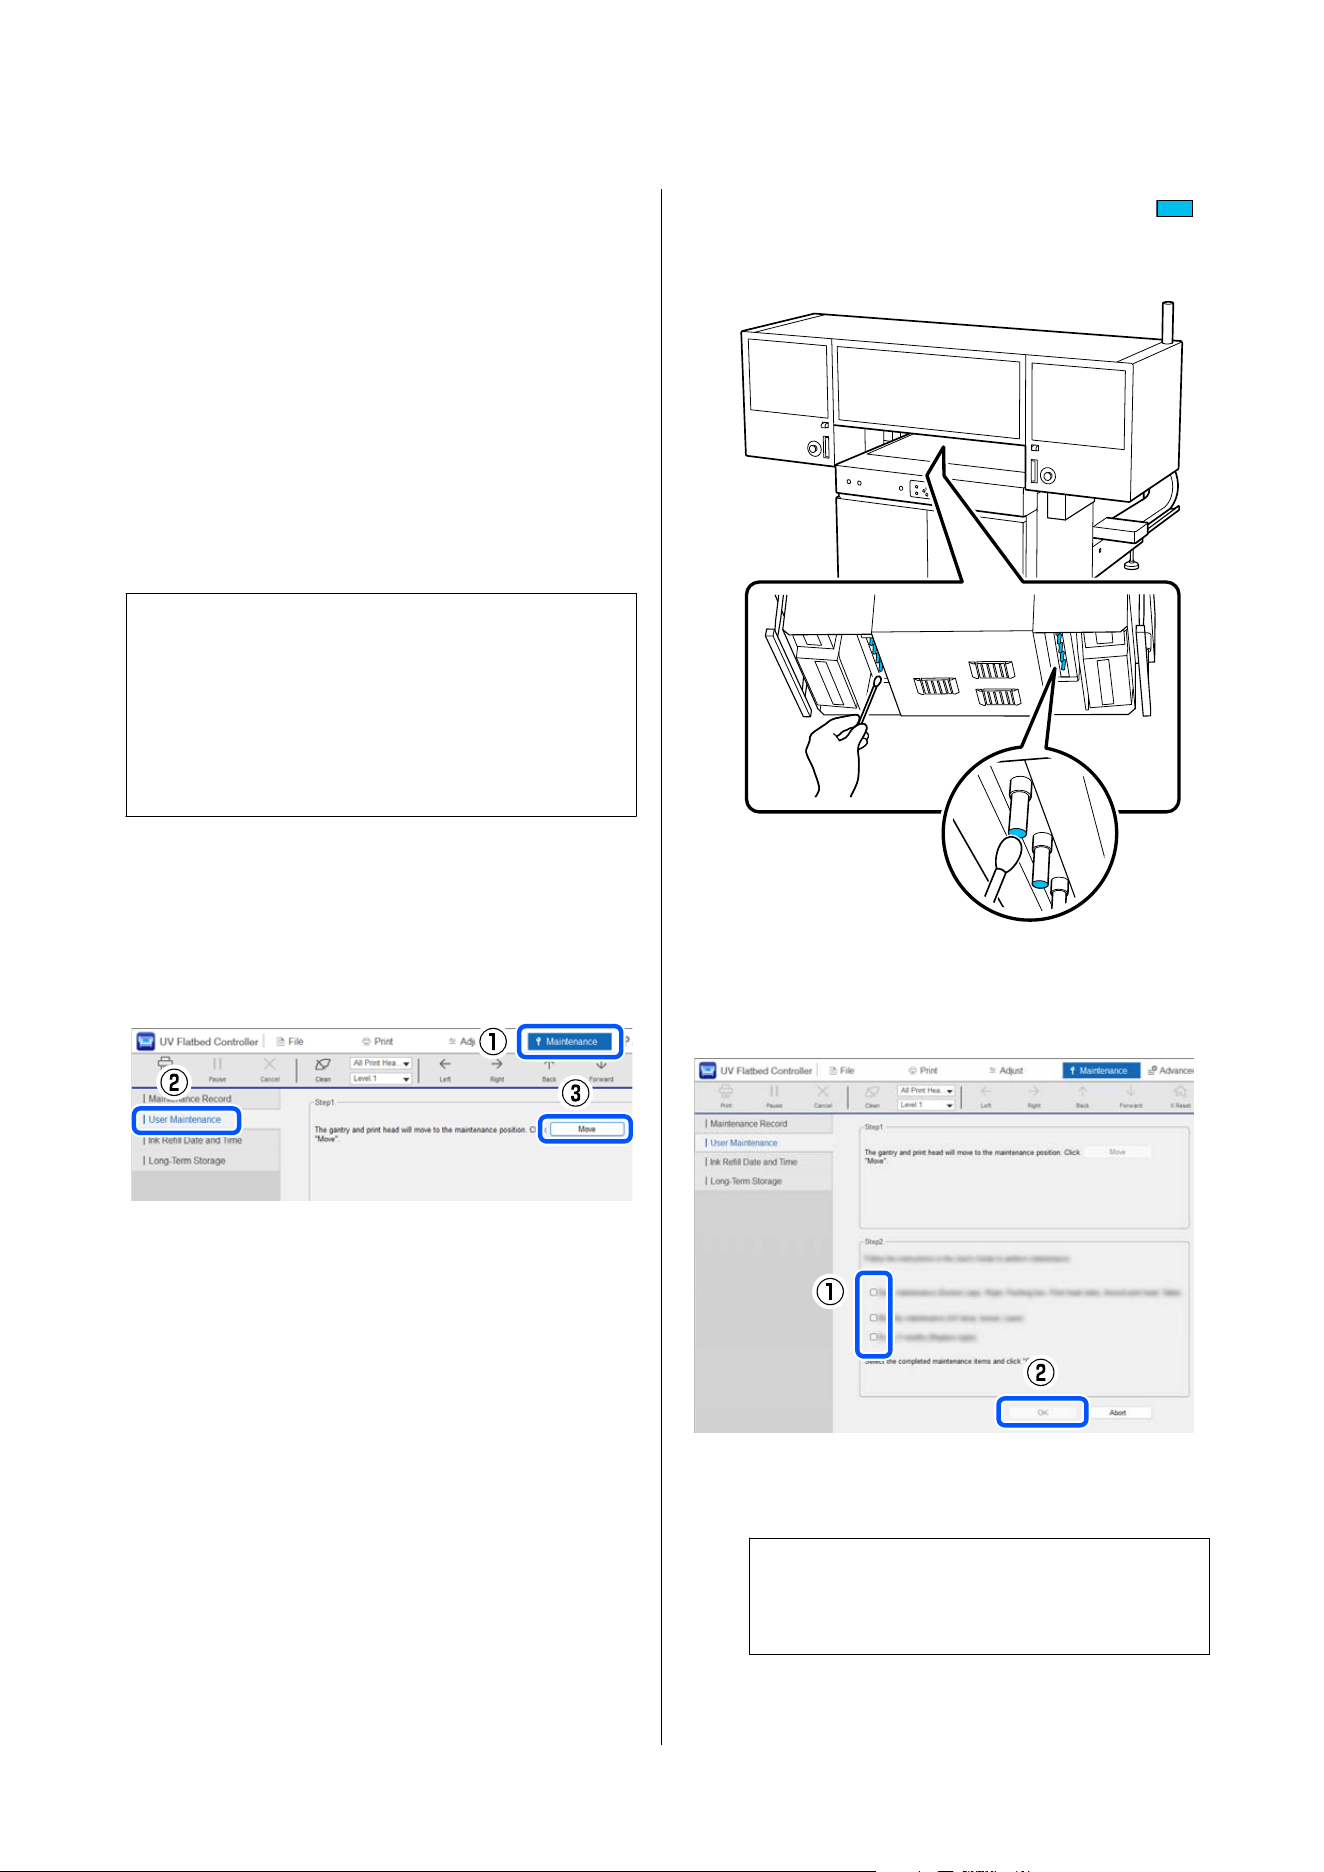
Cleaning the Ionizer
If the ionizer is dirty, static electricity causes ink
droplets to land in the wrong positions, causing
unclear print results.
Before starting this procedure, be sure to read the
following:
U “Preparation” on page 84
U “Cautions when Operating” on page 56
c
Important:
The gantry may move. Before starting the
procedure, make sure no one is in the gantry's
range of motion. Until maintenance work is
complete, make sure no one enters the gantry's
range of motion.
A
In the UV Flatbed Controller, select the
Maintenance menu and click User
Maintenance - Move.
The print head moves to the maintenance
position.
B
Insert a cotton swab into the ionizer holes (
parts in the illustration) and wipe off ink, lint,
and dust that have built up.
C
When cleaning is complete, select the target
areas in the UV Flatbed Controller and click
OK.
The maintenance counter is reset, and the print
head moves to the home position.
Note:
If you click Cancel, the maintenance counter is
not reset.
SC-V4000 User's Guide
Periodic Maintenance
87
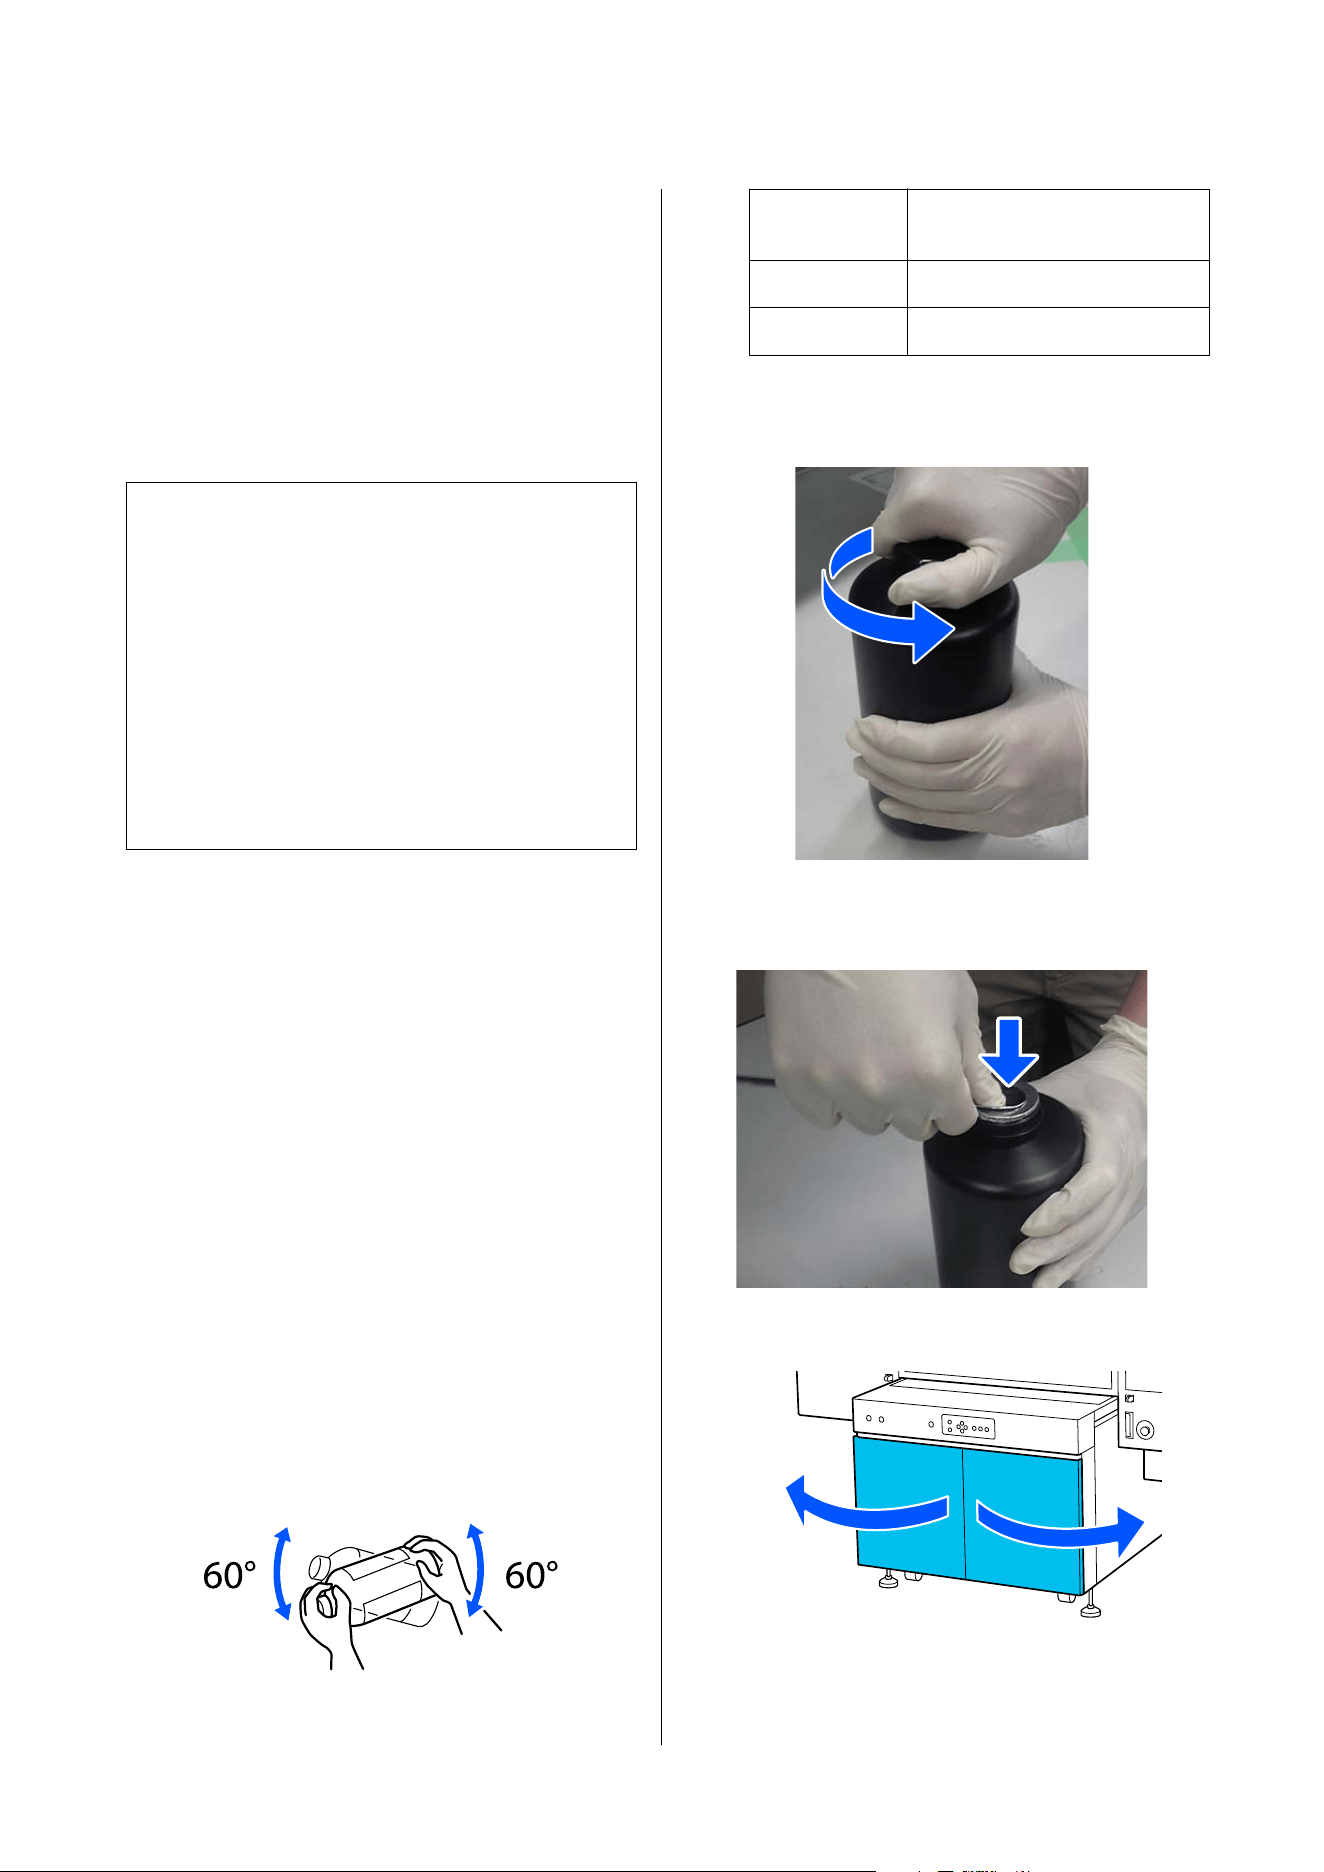
Refilling Ink
Before starting this procedure, be sure to read the
following:
U “Preparation” on page 84
U “Cautions when Operating” on page 56
c
Important:
We recommend using genuine Epson ink bottles to
get the full performance from your printer. Using
non-genuine products may adversely affect the
printer and print quality, and may prevent it from
performing to its full potential. We cannot
guarantee the quality or reliability of non-genuine
products. Repairs for damage or malfunctions
caused by the use of non-genuine products will
incur a repair fee, even during the warranty
period.
You cannot print if even one color's ink level falls
below the limit. If you continue to use the printer with
low ink levels, you may need to refill ink during
printing. If the ink level falls below the limit during
printing, printing stops. You can continue printing by
refilling the ink for colors that have fallen below the
limit. However, if you do refill ink during printing,
colors may look different depending on how the ink
dries. If this is not acceptable, we recommend refilling
ink before printing.
Refill ink using the following procedure.
Procedure
A
Take out the ink bottle of the color you want to
refill from the bag, and then shake it as shown
in the illustration.
The number of times you shake the bottle
depends on the color of the ink.
Ink bottle 1000 ml (33.8 oz)
C, M, Y, BK, GY,
R, LM, LC
20 times in 20 seconds
WH 100 times in 100 seconds
Vr No need to shake
B
With the ink bottle standing upright, slowly
turn the cap to remove it.
C
Take a firm grip on the ink bottle, and use a
spoon-shaped tool to punch a hole in the lid.
D
Open the left and right covers.
SC-V4000 User's Guide
Periodic Maintenance
88
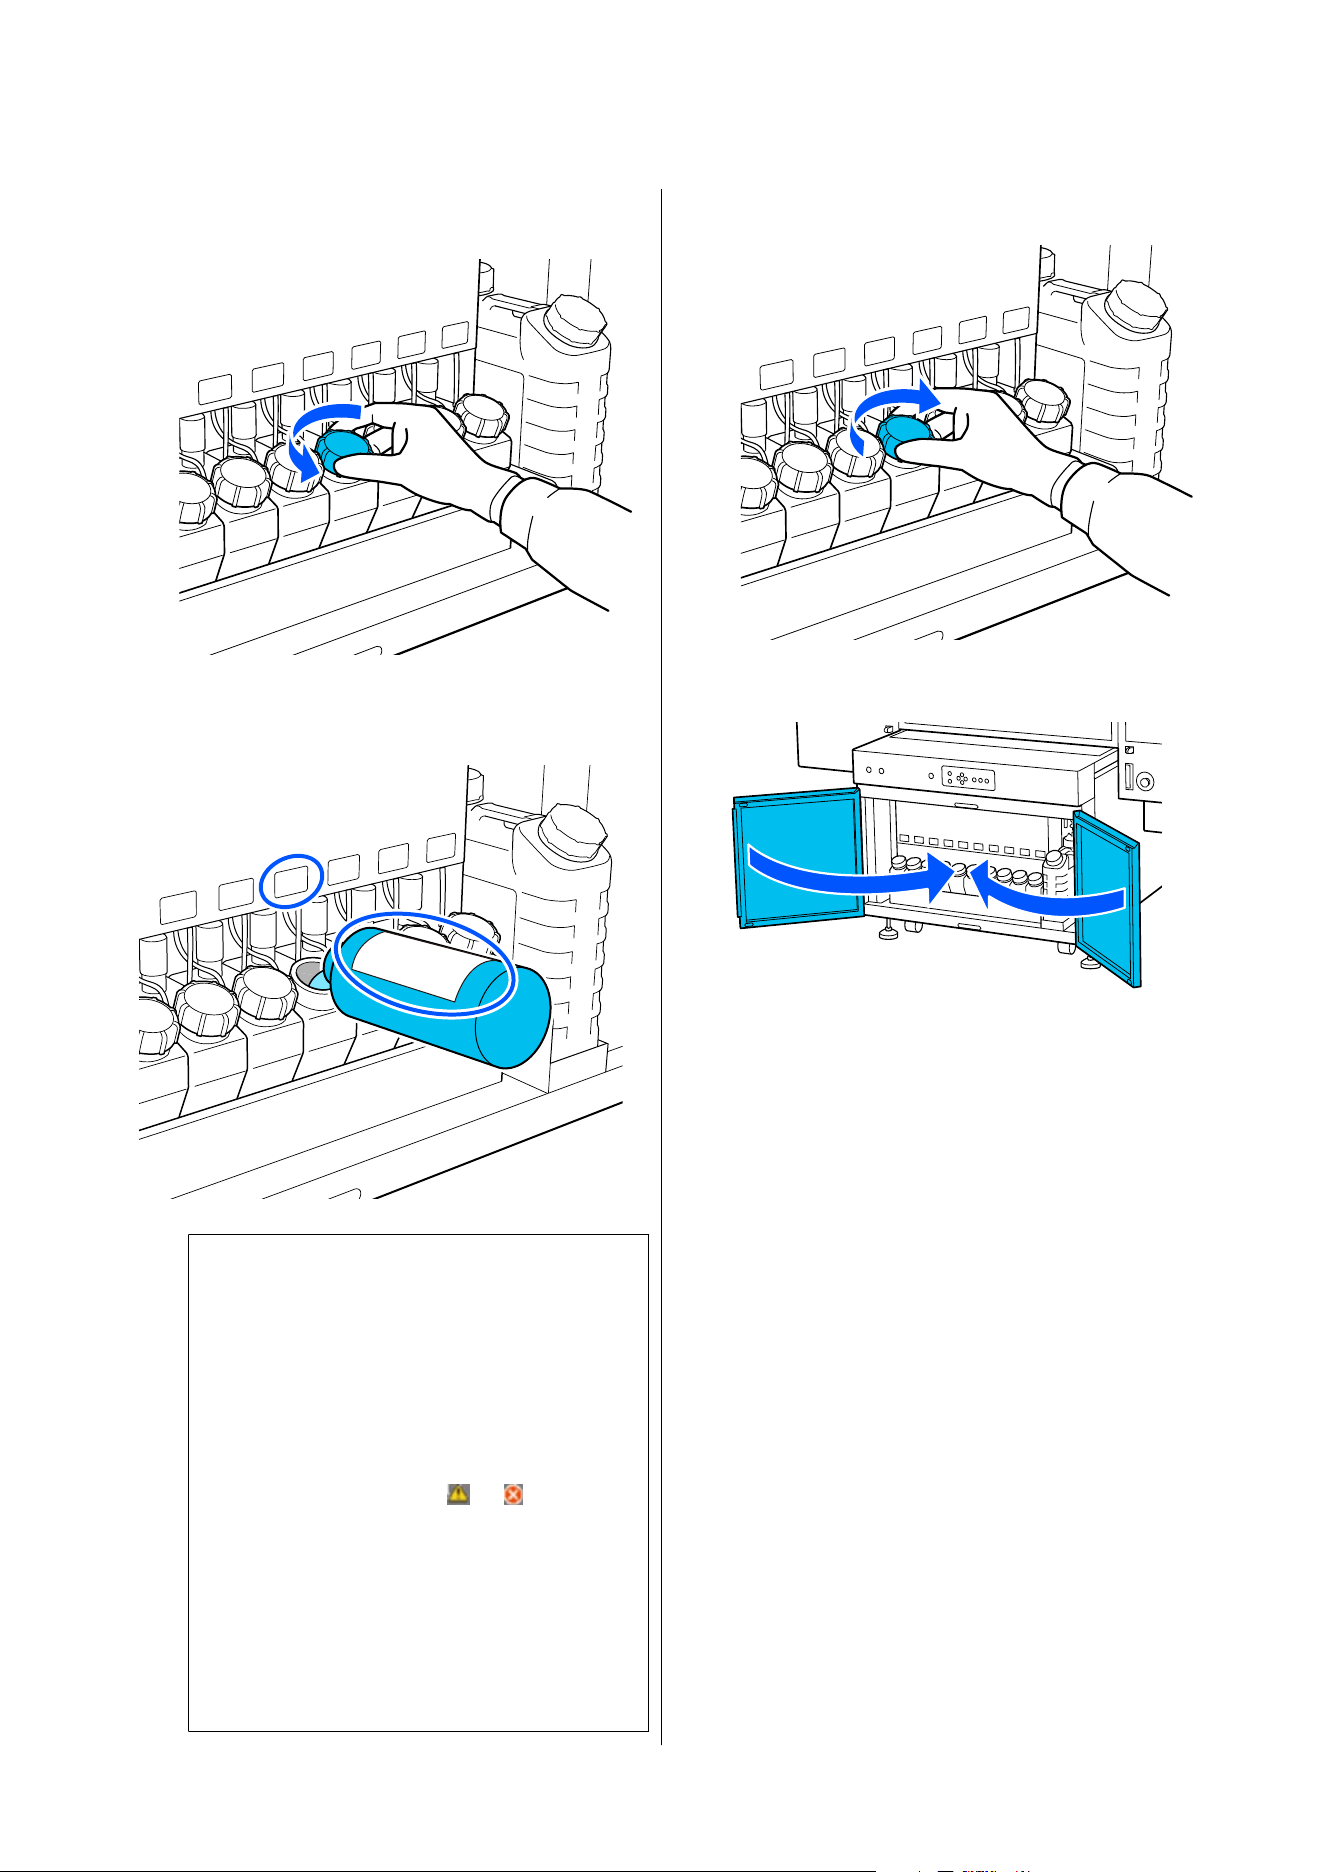
E
Check the color of the ink tank that needs to be
refilled, and turn the cap to remove it.
F
Make sure the label color on the ink tank
matches the ink bottle, and then refill the ink.
c
Important:
❏ Do not leave any ink in the ink bottle,
instead pour it all into the tank. If ink
remains in the ink bottle, use it as soon
as possible. Using ink that has been open
for a long time can cause print quality to
decline.
❏ If you refill ink when
or is
displayed in the ink level information at
the bottom of the UV Flatbed Controller
screen, a warning sound may occur
during refilling. This warning sound
indicates that the tank is nearly full.
When the warning sound occurs, slow
the pouring rate.
G
Close the ink tank cap.
H
Close the left and right covers.
Disposing of waste ink bottles U “Disposal of
Used Consumables” on page 99
Disposing of Waste Ink
When the message Waste in k bottle is nearly ful l is
displayed, transfer the waste ink from the waste ink
bottle to another container.
If you continue to use it as is, the message The waste
ink bottle is full will be displayed. You cannot print
while this message is displayed.
Before starting this procedure, be sure to read the
following:
U “Preparation” on page 84
U “Cautions when Operating” on page 56
A
Check that the printer is turned on.
SC-V4000 User's Guide
Periodic Maintenance
89
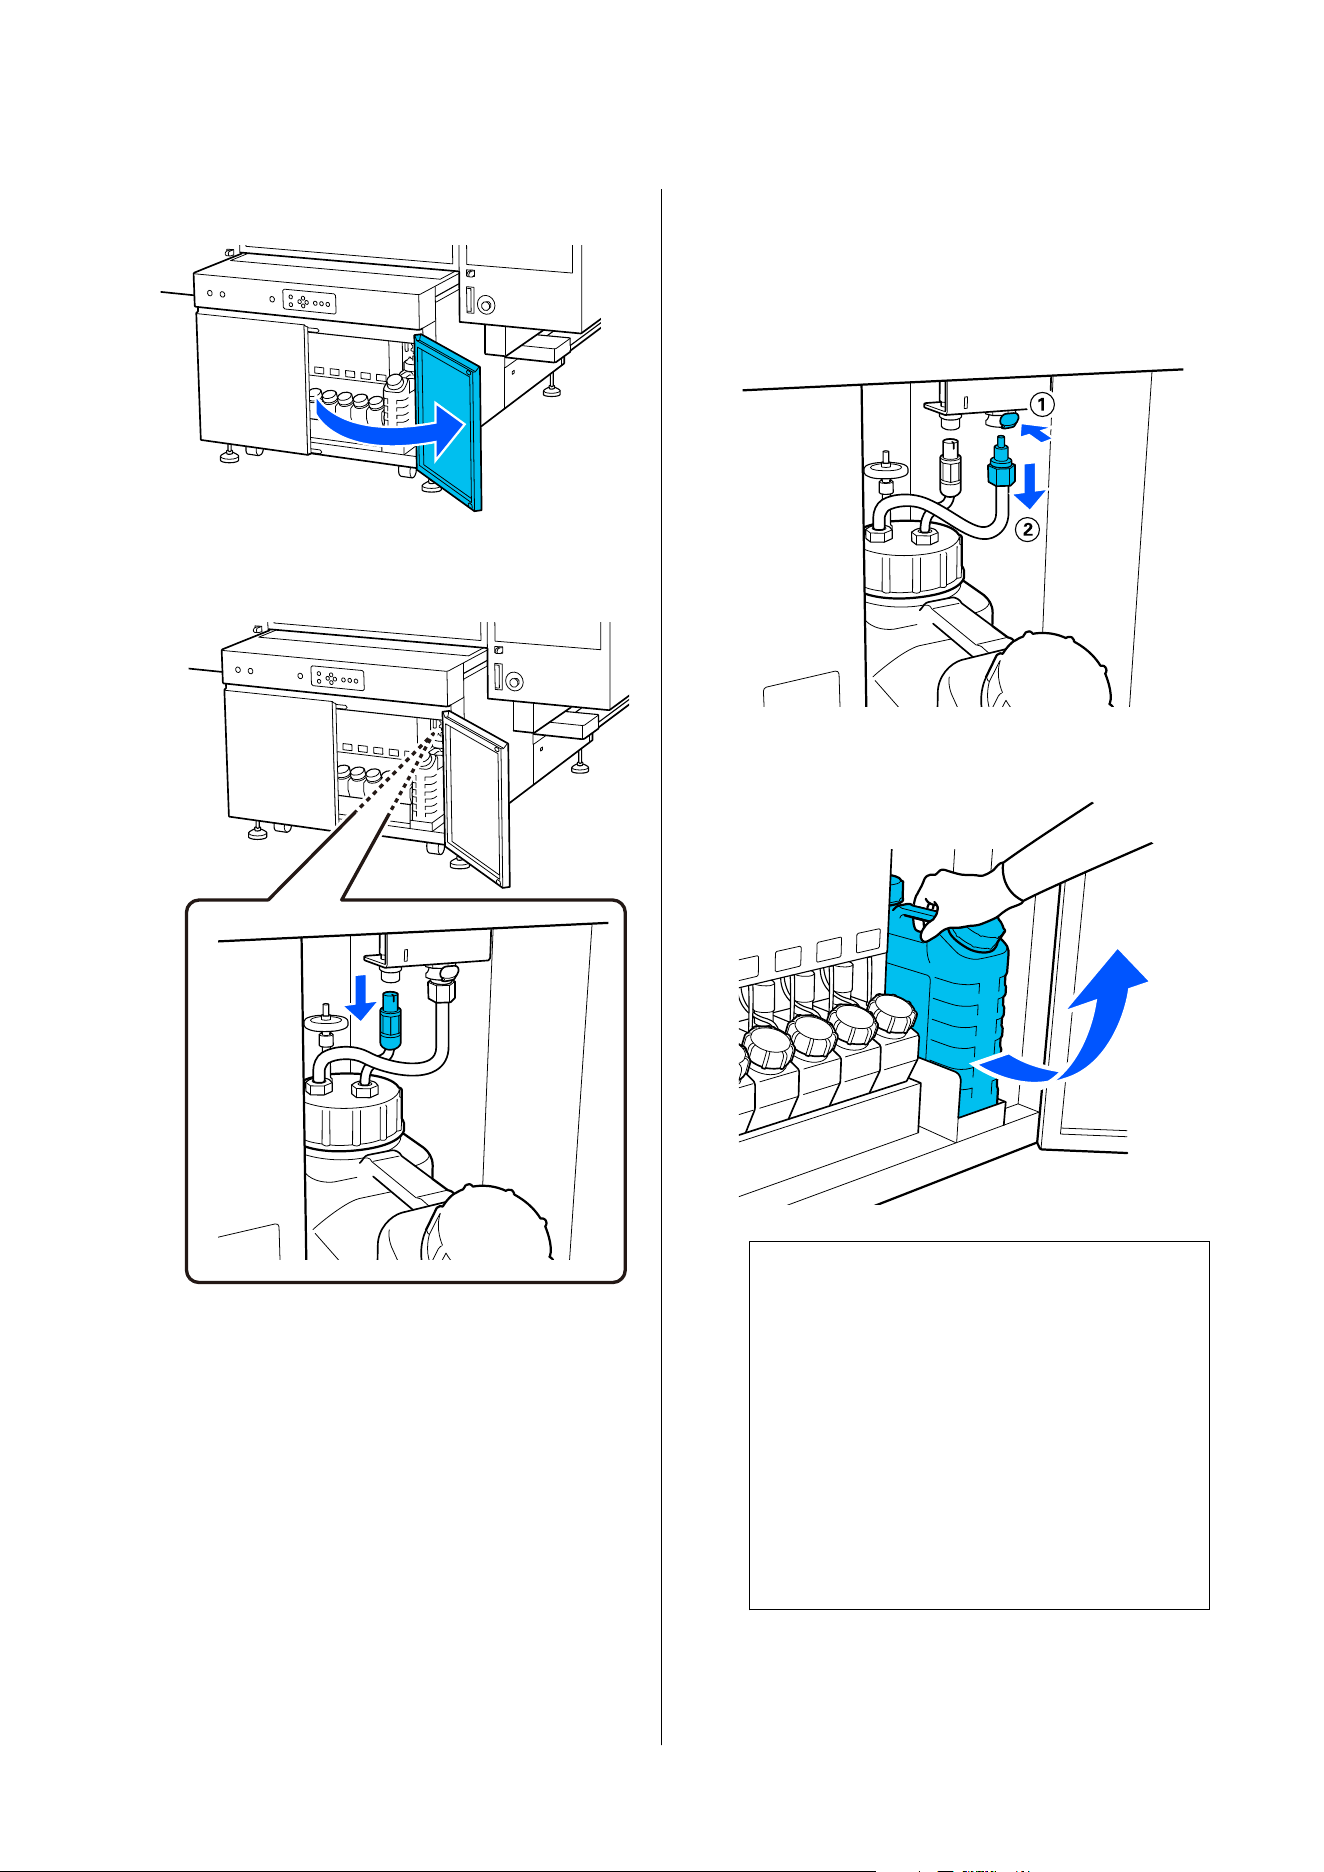
B
Open the right cover.
C
Pull the plug down from the left jack.
D
While pressing the part shown in the
illustration on the right jack, pull the plug
down.
E
Remove the waste ink bottle.
c
If waste ink has accumulated beyond the
yellow tape wrapped around the body of the
waste ink bottle, the waste ink bottle is
damaged.
In step 7 below, install a new waste ink bottle.
If you continue to use a damaged waste ink
bottle, waste ink will spill into the
surrounding area.
U
SC-V4000 User's Guide
Periodic Maintenance
90
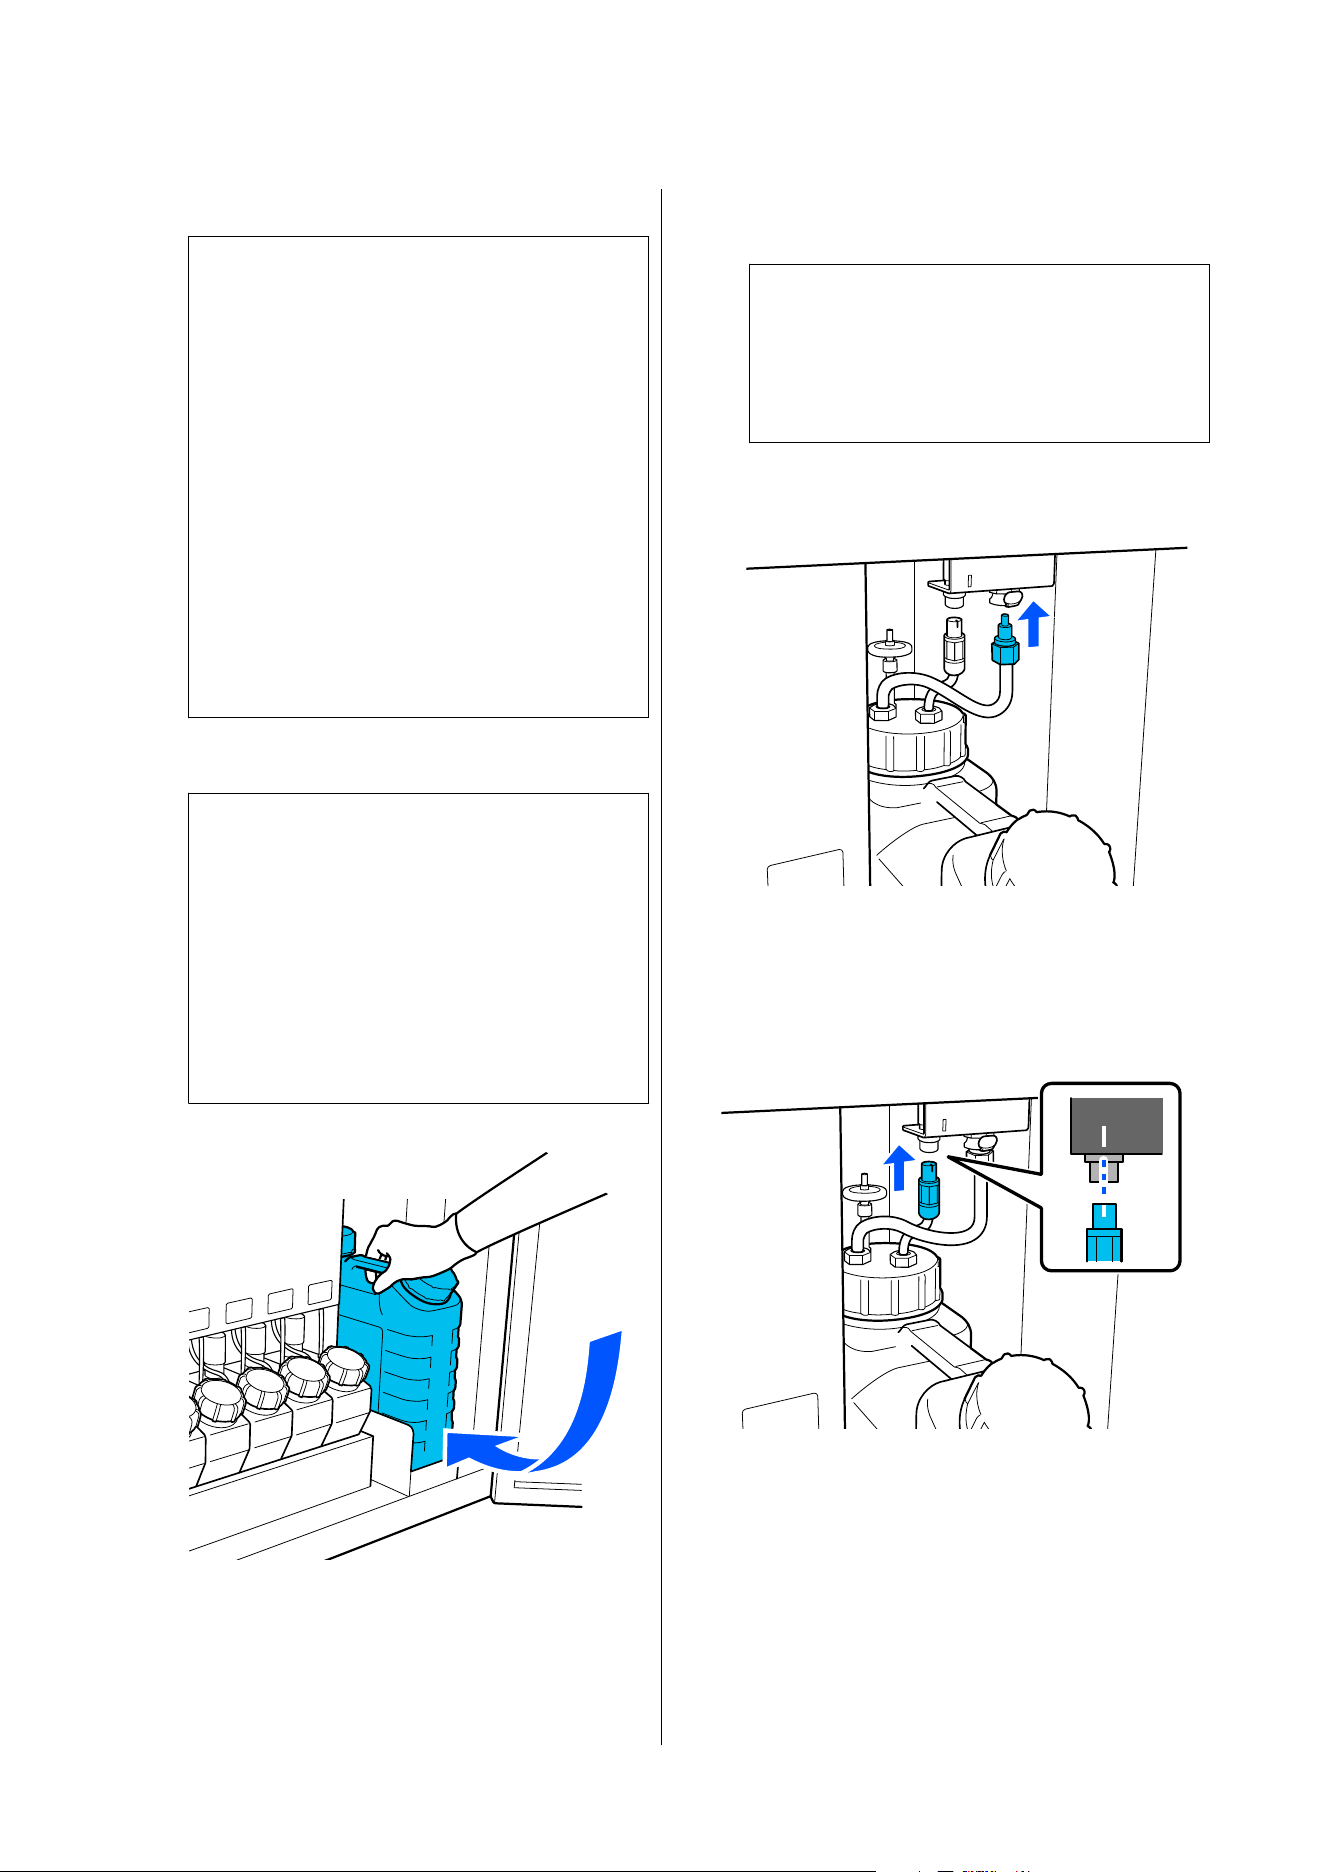
F
Transfer the waste ink to another container.
c
Note the following points when transferring
waste ink to another container.
❏ Use a PE container for the destination
container.
❏ Pour carefully. If you pour too vigorously,
waste ink may spill or splash.
❏ Close the lid of the container holding the
transferred waste ink tightly and store it
in a location away from fire.
❏ See the following for waste ink disposal.
U “Disposal of Used Consumables” on
page 99
G
Install the waste ink bottle.
c
Important:
If ink has accumulated in the waste ink
bottle, replace it with a new one.
If you continue to use it with accumulated
ink, the waste ink amount will not be
measured correctly and can cause
malfunctions.
U
H
Insert the plug of the left cable into the right
jack until it clicks.
c
Be sure to insert the cable plug until it clicks.
If the plug is not connected correctly, waste
ink will spill into the surrounding area.
I
As shown in the illustration below, align the
white line on the left jack with the white line on
the right cable plug and insert it.
SC-V4000 User's Guide
Periodic Maintenance
91
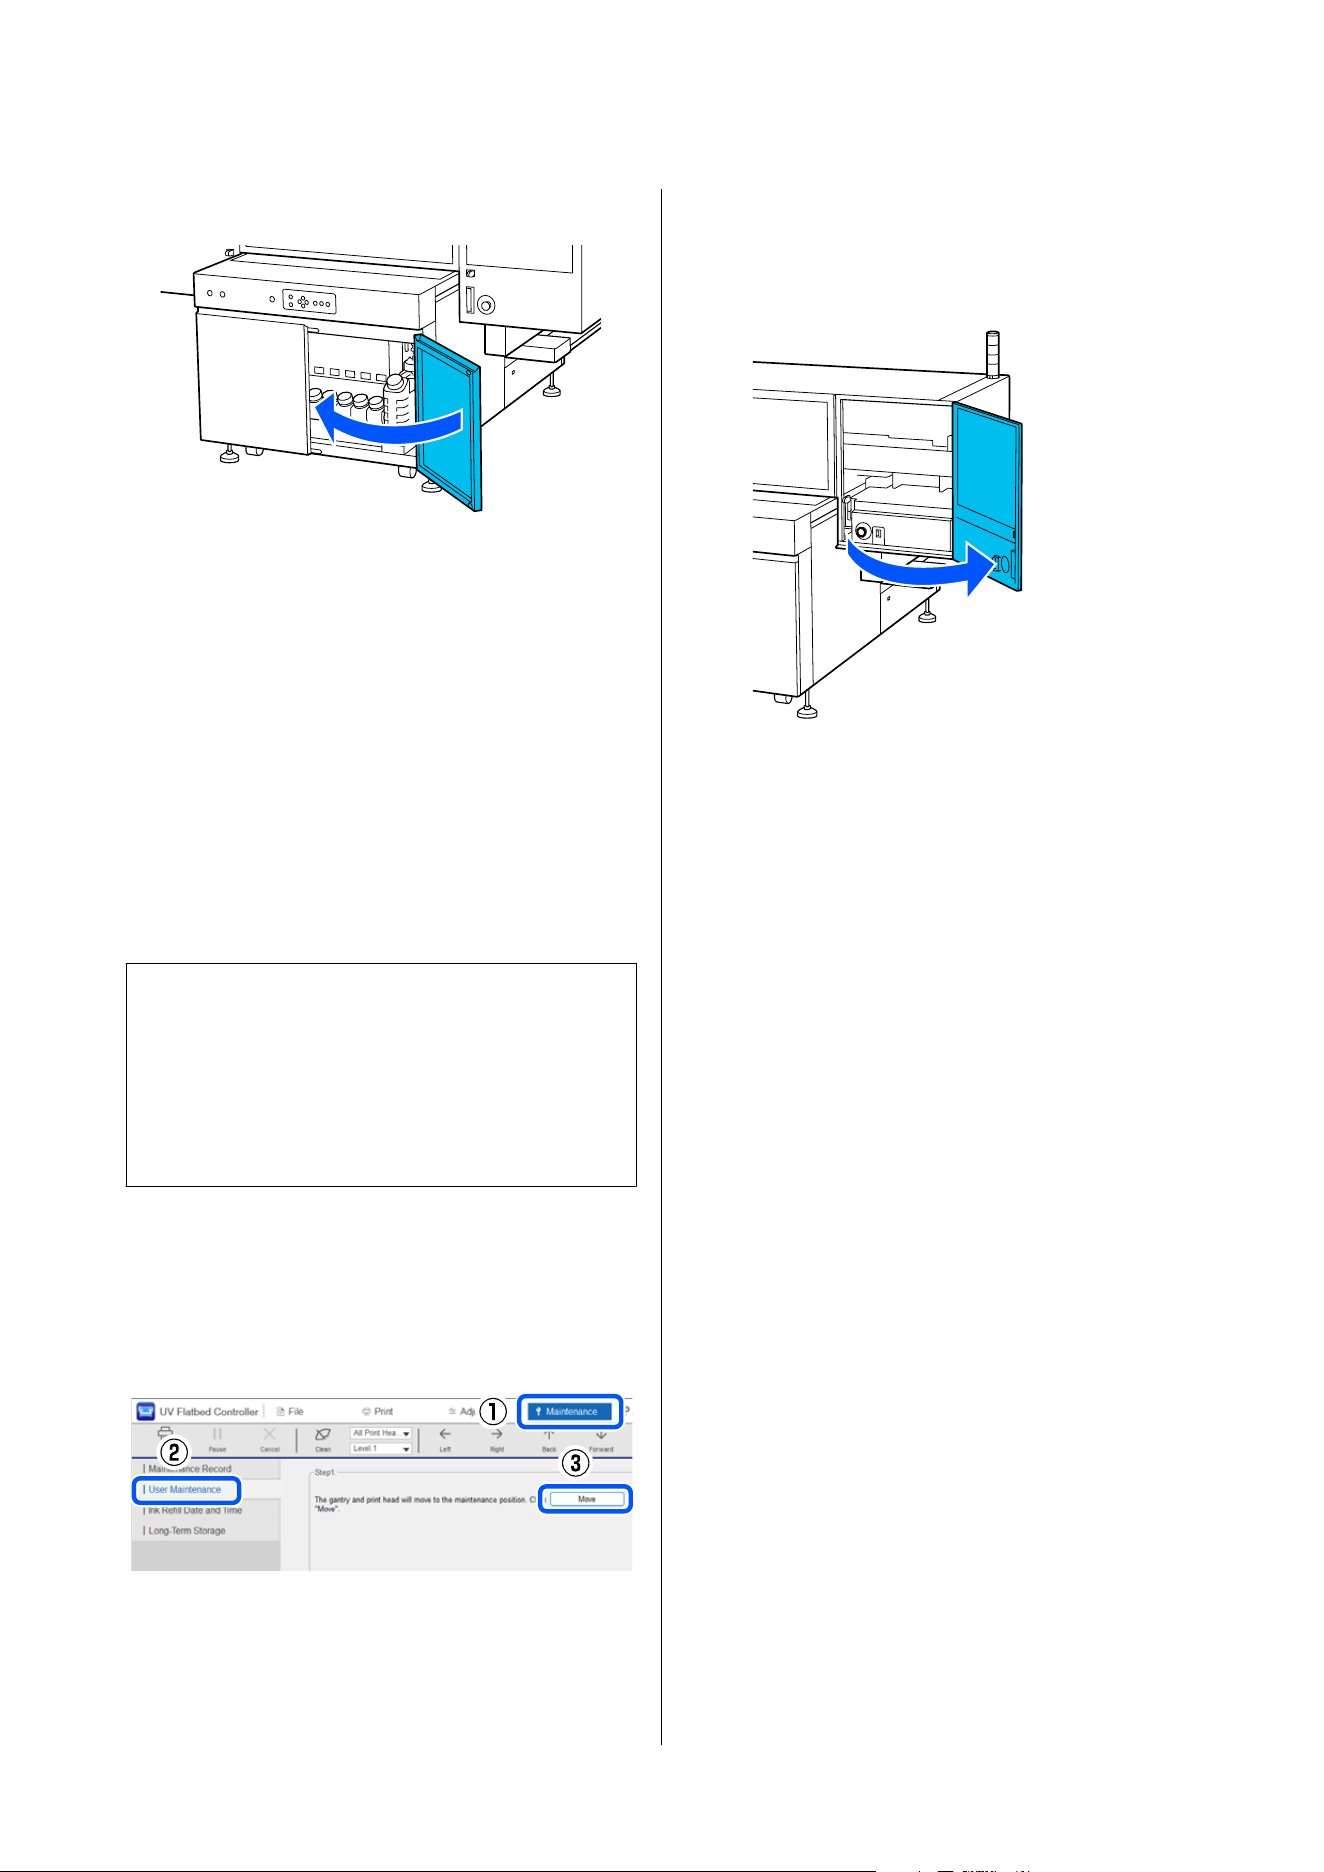
J
Close the right cover.
Replacing the Wiper Unit
Continuing to use a worn-out wiper unit can lead to
frequent clogged nozzles and dirty print results.
Before starting this procedure, be sure to read the
following:
U “Preparation” on page 84
U “Cautions when Operating” on page 56
c
Important:
The gantry may move. Before starting the
procedure, make sure no one is in the gantry's
range of motion. Until maintenance work is
complete, make sure no one enters the gantry's
range of motion.
A
In the UV Flatbed Controller, select the
Maintenance menu and click User
Maintenance - Move.
The print head moves to the maintenance
position.
B
When the print head stops moving and a
message is displayed on the UV Flatbed
Controller, open the maintenance cover on the
right.
SC-V4000 User's Guide
Periodic Maintenance
92
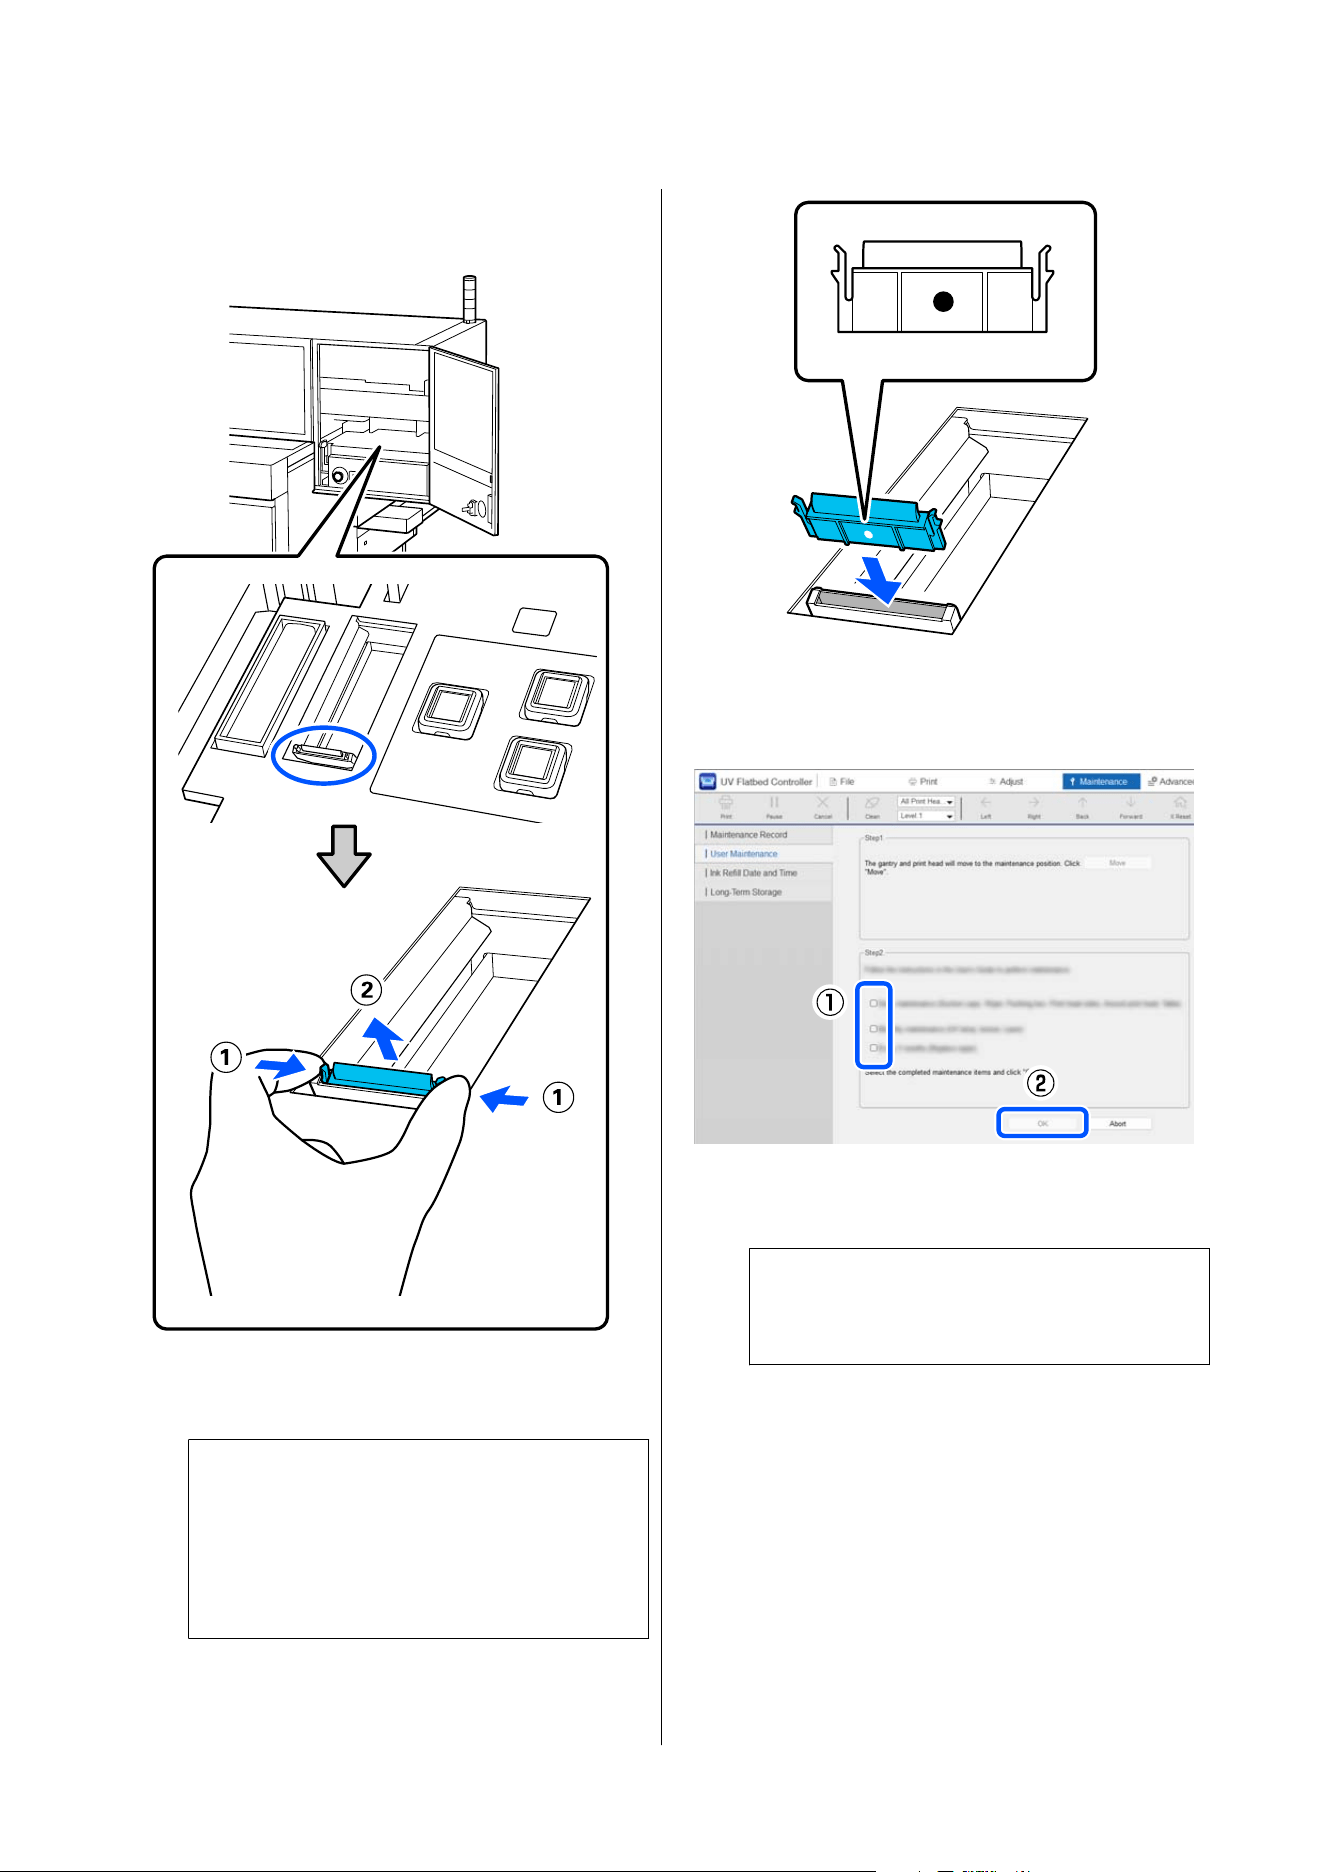
C
Pinch the left and right tabs of the wiper unit,
and pull it up to remove it.
D
Push in the new wiper unit with the side
marked with O facing forward until it clicks.
c
Important:
Be sure to install the wiper unit with the side
marked with O facing forward. Installing it
in the wrong direction can cause print quality
to decline.
E
When replacement is complete, select the target
areas in the UV Flatbed Controller and click
OK.
The maintenance counter is reset, and the print
head moves to the home position.
Note:
If you click Cancel, the maintenance counter is
not reset.
Disposing of used wiper units U “Disposal of Used
Consumables” on page 99
SC-V4000 User's Guide
Periodic Maintenance
93
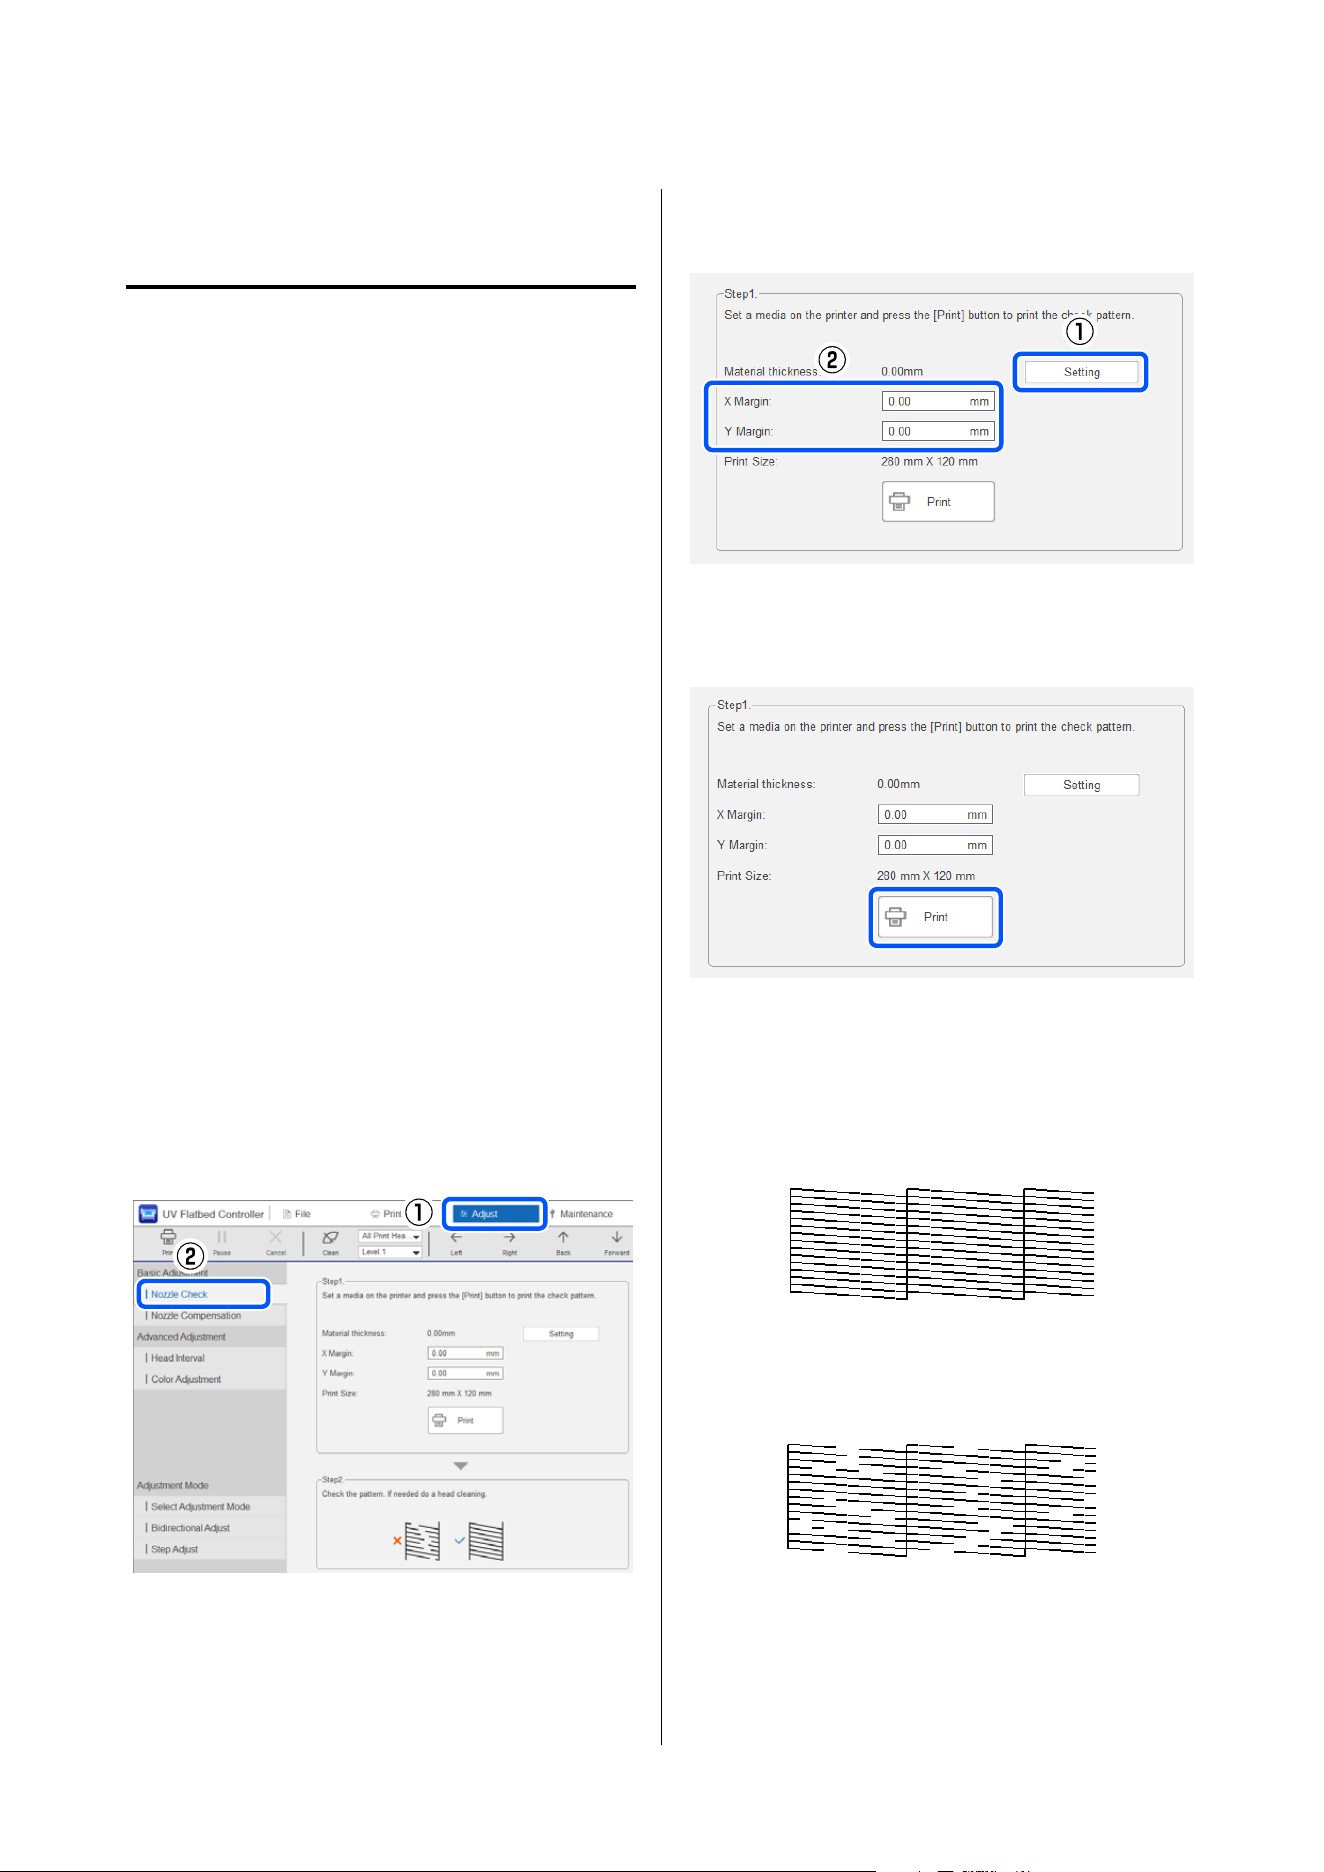
Cleaning the print head
Checking for Clogged Nozzles
When you want to check the condition of the nozzles
before starting work, or when you notice stripes or
unevenness in print results, print a check pattern and
examine it to assess the condition of the nozzles.
When printing the nozzle check pattern, prepare the
following media.
Recommended media
Transparent sheet that supports inkjet printing
Size
A4
Nozzle check pattern size: Printable size of 280 mm
(11.02 in.) wide × 120 mm (4.72 in.) long
Printing a check pattern from the UV
Flatbed Controller
A
Load the media so that it is aligned with the
home position in the printable area.
U “Loading Media” on page 48
B
Click the Adjust menu – Nozzle Check in the
UV Flatbed Controller.
C
Set Thickness Detection to Auto and X Margin
and Y Margin to 0 mm.
D
Click Print.
The nozzle check pattern is printed.
E
Check the nozzle check pattern.
Varnish is printed as a transparent pattern.
Check these by using reflected light.
Example of clean nozzles
There are no gaps in the check pattern.
Example of clogged nozzles
Perform print head cleaning if there are gaps in
the nozzle check pattern.
U “Clearing Clogged Nozzles” on page 95
SC-V4000 User's Guide
Periodic Maintenance
94
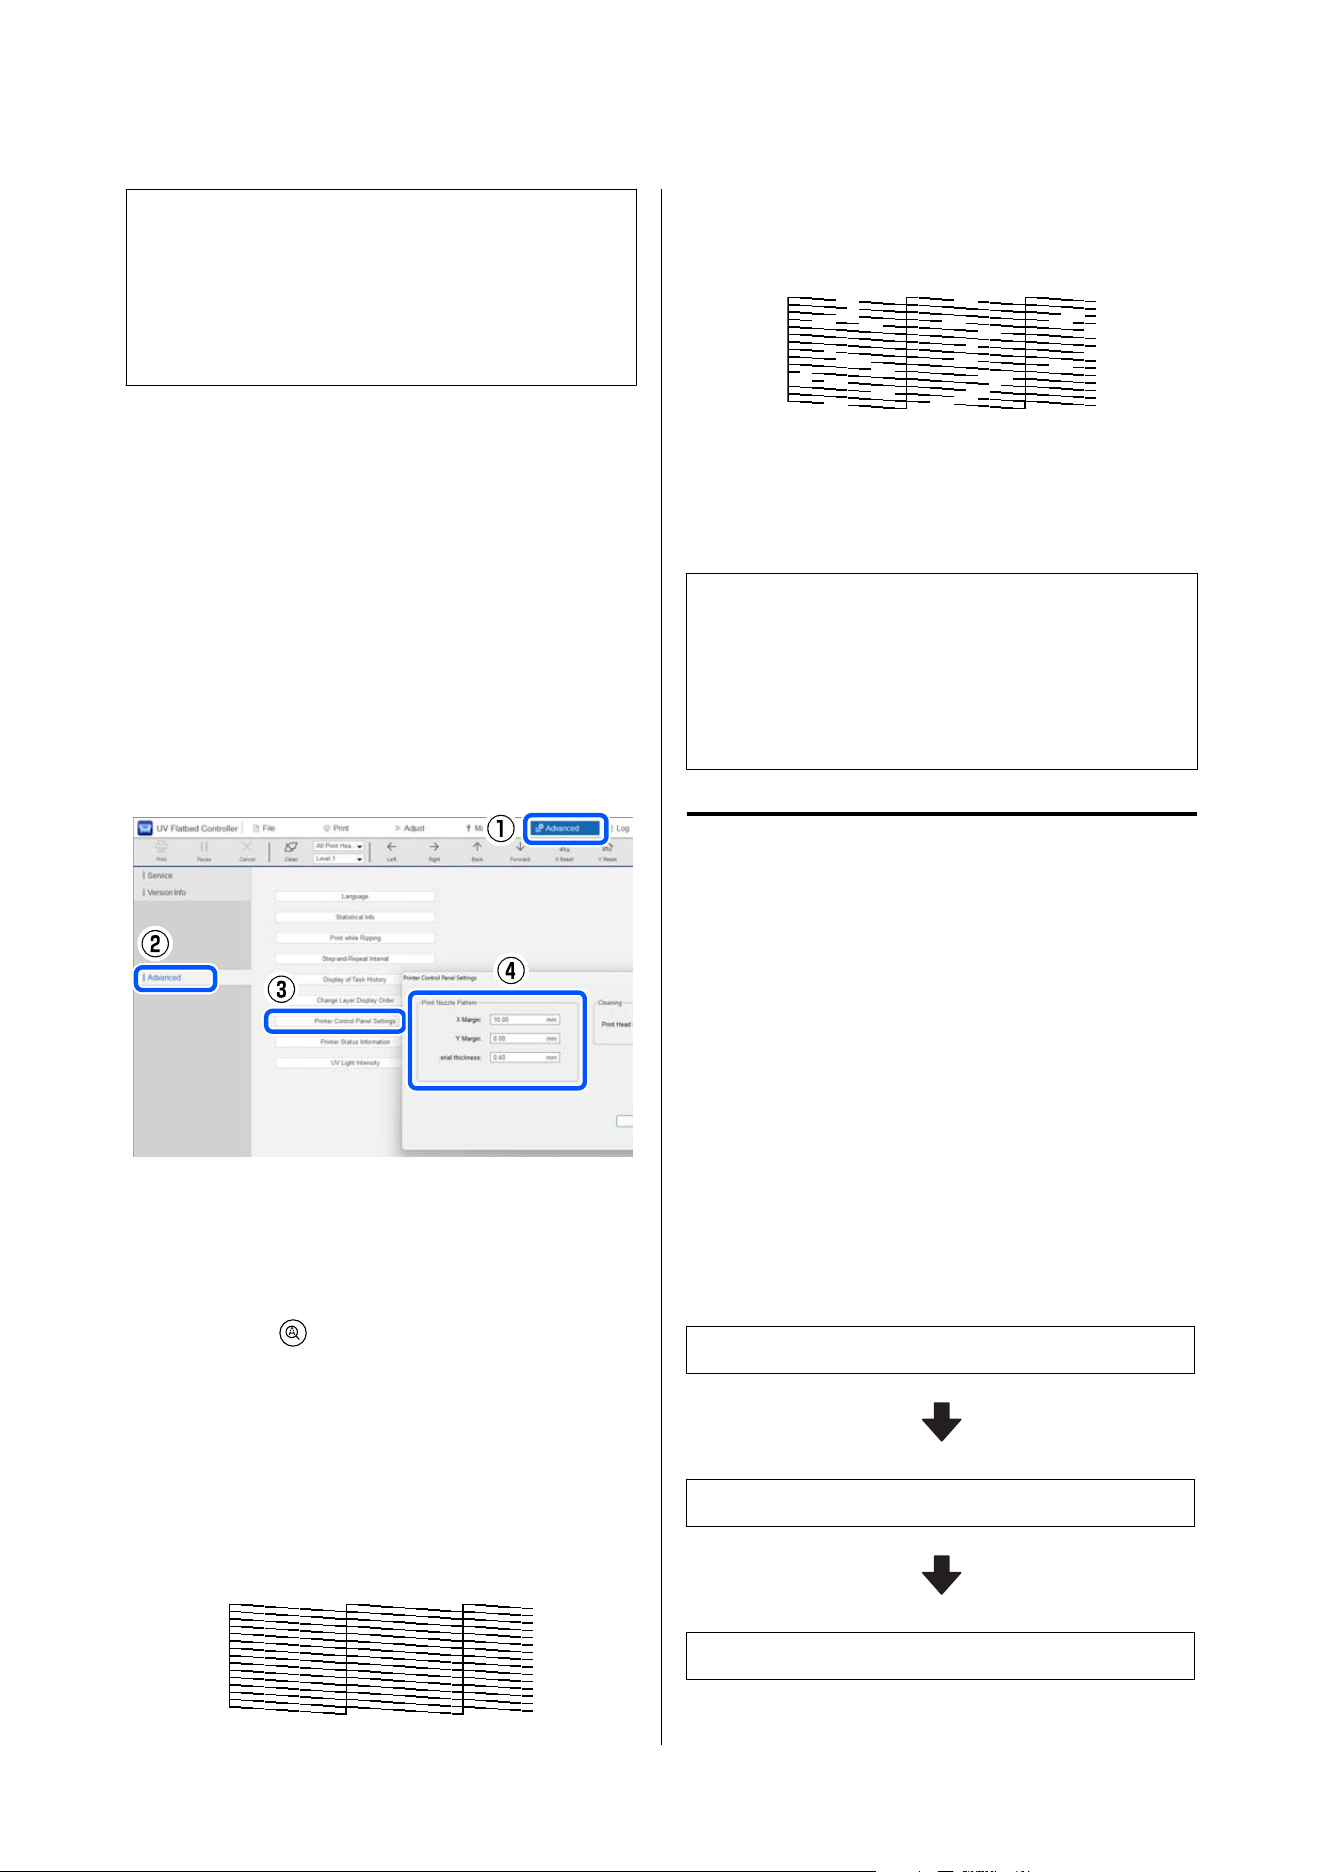
Note:
Even with Nozzle Compensation, the compensated
parts of the nozzle check pattern will be missing. If you
can determine from actual print results that Nozzle
Compensation has cleared the effects of the clogged
nozzles, continue using the printer as it is.
Printing a check pattern from the
printer's control panel
A
Set the nozzle pattern print position and media
thickness in advance in Advanced - Advanced
- Printer Control Panel Settings in the UV
Flatbed Controller.
When loading media aligned with the home
position, set X Margin (left-right) and Y
Margin (front-back) to 0.00 mm.
This setting is retained until the next time you
change the setting.
B
Load the media so that it is aligned with the
home position in the printable area.
U “Loading Media” on page 48
C
Press the button on the control panel.
The nozzle check pattern is printed.
D
Check the nozzle check pattern.
Varnish is printed as a transparent pattern.
Check these by using reflected light.
Example of clean nozzles
There are no gaps in the check pattern.
Example of clogged nozzles
Perform print head cleaning if there are gaps in
the nozzle check pattern.
U “Clearing Clogged Nozzles” on page 95
Note:
Even with Nozzle Compensation, the compensated
parts of the nozzle check pattern will be missing. If you
can determine from actual print results that Nozzle
Compensation has cleared the effects of the clogged
nozzles, continue using the printer as it is.
Clearing Clogged Nozzles
Perform print head cleaning if the nozzle check
pattern has missing lines, print results have stripes,
colors look wrong, or ink drops are falling.
After print head cleaning is complete, print a nozzle
check pattern again and check the condition of the
nozzles.
Cleaning levels and order
There are four cleaning levels: Level 1 to Level 4.
If there are still gaps when you print a nozzle check
pattern after cleaning, try increasing the cleaning level
in the following order.
Level 1
Level 2
Level 3
SC-V4000 User's Guide
Periodic Maintenance
95
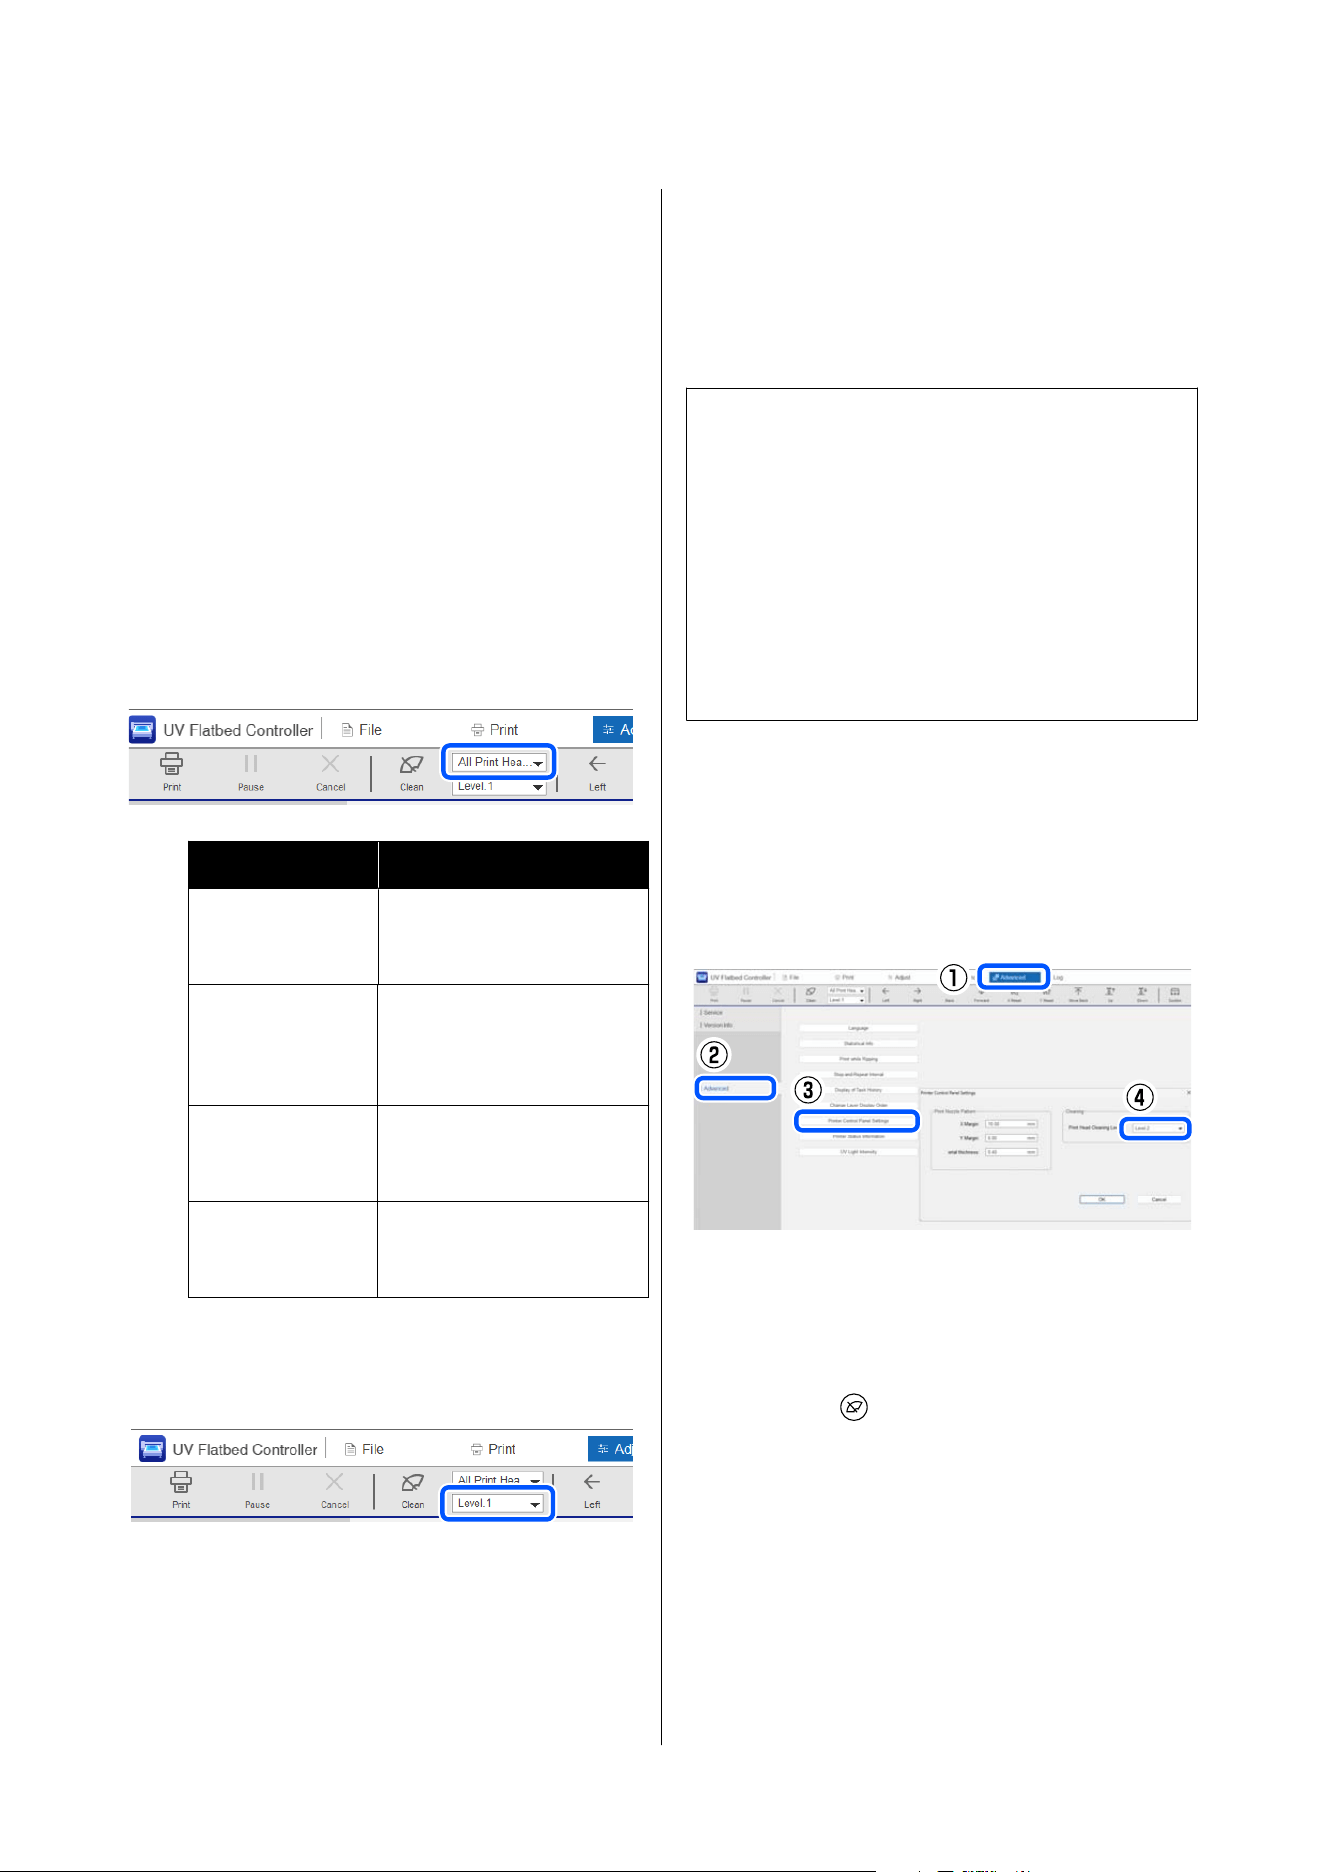
If there are still gaps in the printed nozzle check
pattern after performing Level 3
Perform Level 4.
Level 4 consumes more ink than other cleaning levels,
and cleaning takes longer. Only perform this level
after confirming that there is sufficient ink remaining
in the ink tanks, and only when clogging is not cleared
even after cleaning up to Level 3.
Cleaning from the UV Flatbed
Controller
A
Select the color of the print head to be cleaned
from the drop-down menu next to the function
buttons in the UV Flatbed Controller.
Item Content
All Print Heads Select when the check
pattern has missing sections
or gaps evenly throughout.
Print Head for
Color Ink
Select when there are
missing sections or gaps
other than in the VR and WH
columns.
Print Head for
White Ink
Select when there are
missing sections or gaps
only in the WH column
Print Head for
Varnish
Select when there are
missing sections or gaps
only in the VR column
B
Select the cleaning level.
First, select Level 1.
C
Click the Clean button.
Cleaning starts.
When cleaning is finished, print a nozzle check
pattern to confirm that the clogging has been
cleared.
If clogging is cleared
Resume printing.
If clogging is not cleared
Perform cleaning at one level higher.
Note:
This printer is equipped with a Nozzle Compensation
function that prints by using normal nozzles to
compensate for missing ink ejection due to clogged
nozzles. When you use Nozzle Compensation, even if
nozzles are clogged, it will only have a minimal impact
on print results.
If clogging is not cleared even after performing Level 4,
try using Nozzle Compensation.
U “Nozzle Compensation” on page 76
Cleaning from the printer's control
panel
A
Set the level for Cleaning in advance in
Advanced - Advanced - Printer Control Panel
Settings in the UV Flatbed Controller.
Normally, set Level 2.
This setting is retained until the next time you
change the setting.
B
Press the button on the control panel.
Cleaning starts at the level set in step 1. When
cleaning is finished, print a nozzle check
pattern to confirm that the clogging has been
cleared. If the clogging has been cleared,
resume printing.
SC-V4000 User's Guide
Periodic Maintenance
96
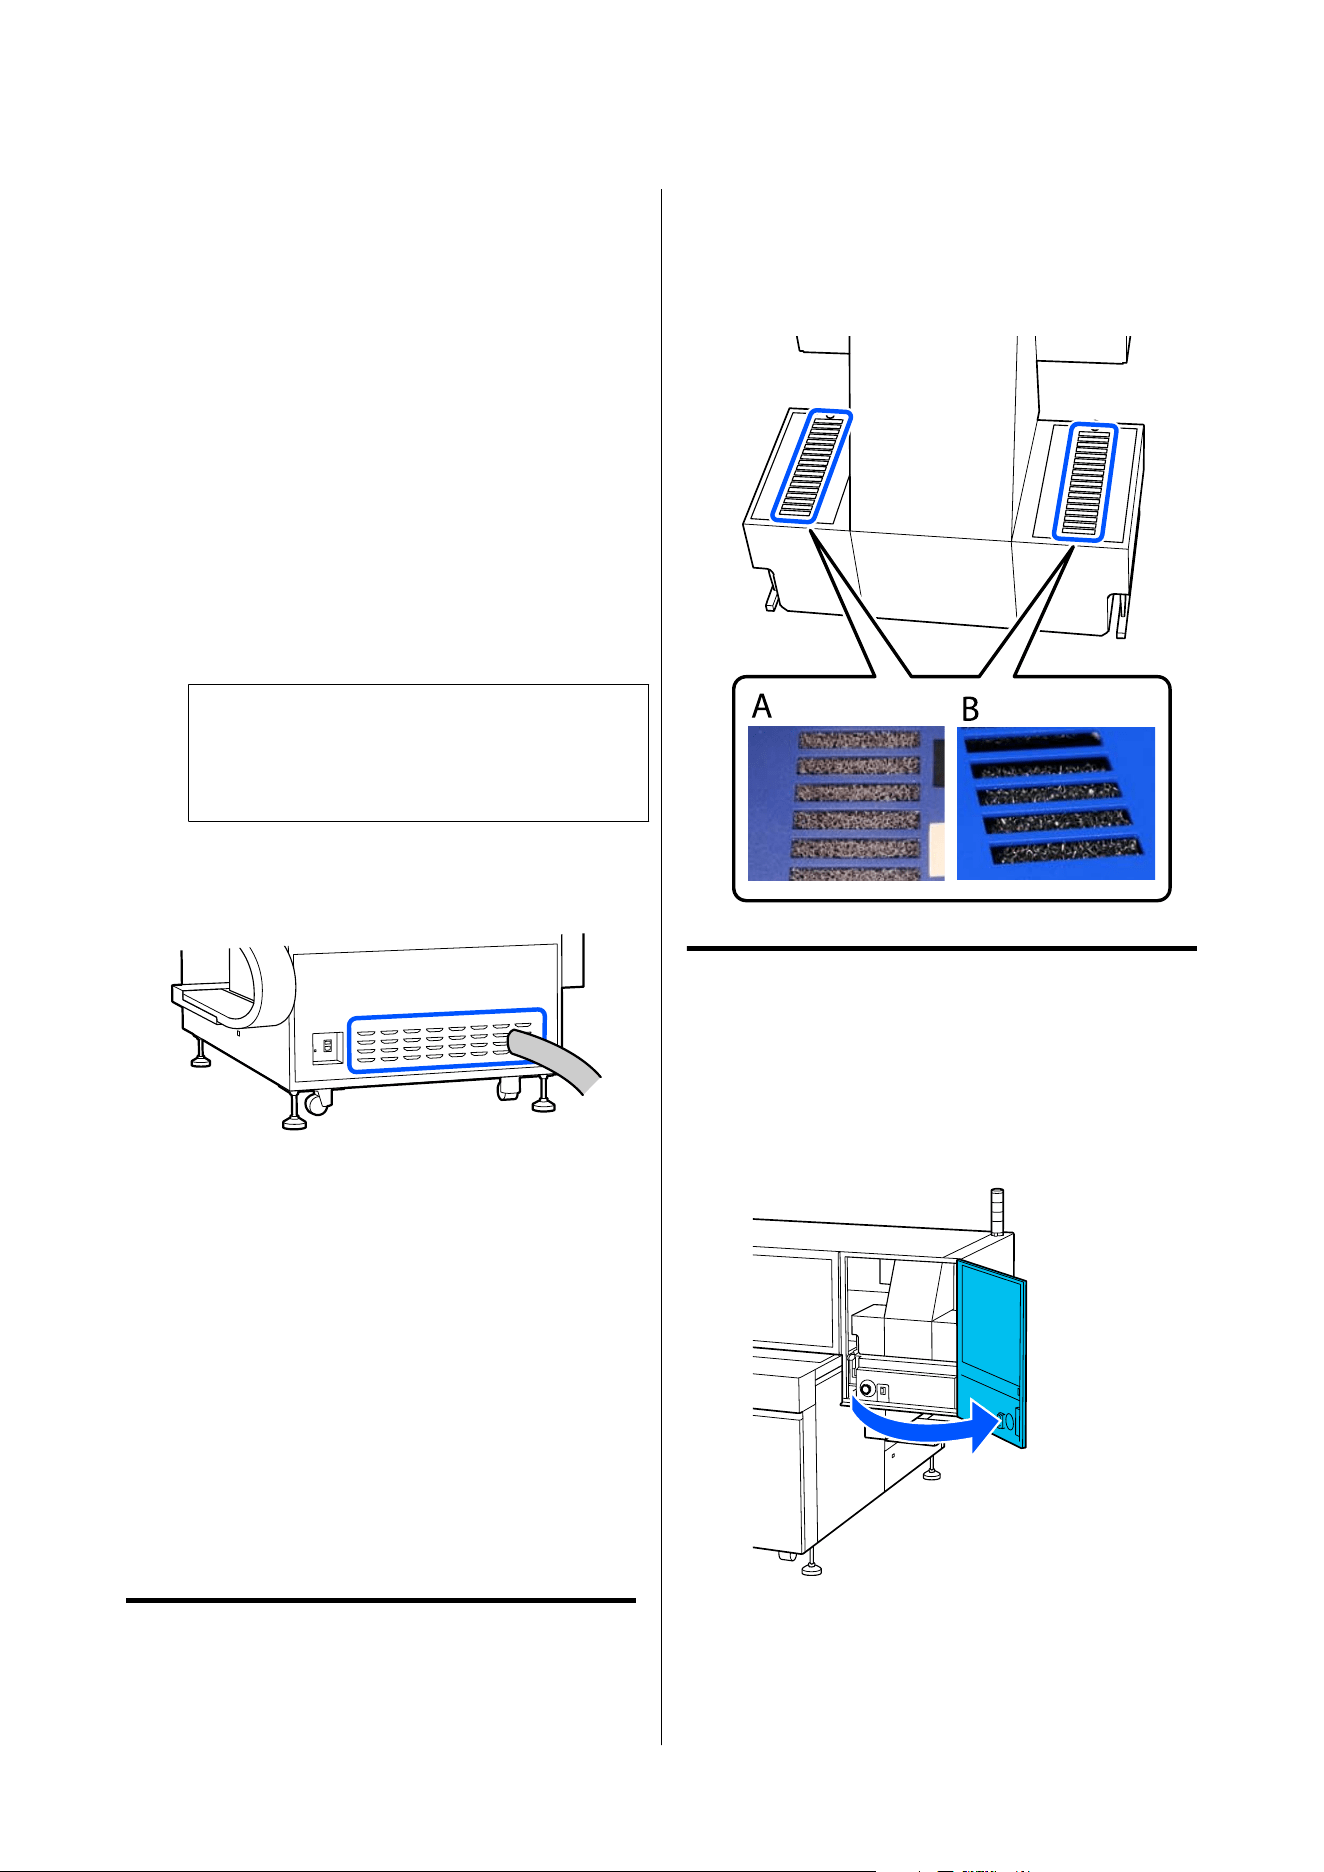
Cleaning the Vents
Continuing to use the printer when the vents are dirty
causes heat to build up inside the printer, and a
malfunction may occur.
Before starting this procedure, be sure to read the
following:
U “Preparation” on page 84
U “Cautions when Operating” on page 56
A
Turn off the pr inter.
U “Turning Off” on page 63
c
Important:
If you clean with the power on, a malfunction
may occur.
B
Use a vacuum cleaner to remove dust from the
vents.
Replacing the Mist Filters
Continuing to use the printer when the mist filters are
dirty causes heat to build up inside the UV light, and a
malfunction may occur.
Before starting this procedure, be sure to read the
following:
U “Preparation” on page 84
U “Cautions when Operating” on page 56
Replacement Time
Check the following photos to determine if
replacement is necessary.
A: Replacement is necessary. Ink is adhering to the
mist filters.
B: Replacement is not necessary.
Procedure
A
Turn off the printer.
U “Turning Off” on page 63
B
Open the maintenance cover on the right.
SC-V4000 User's Guide
Periodic Maintenance
97
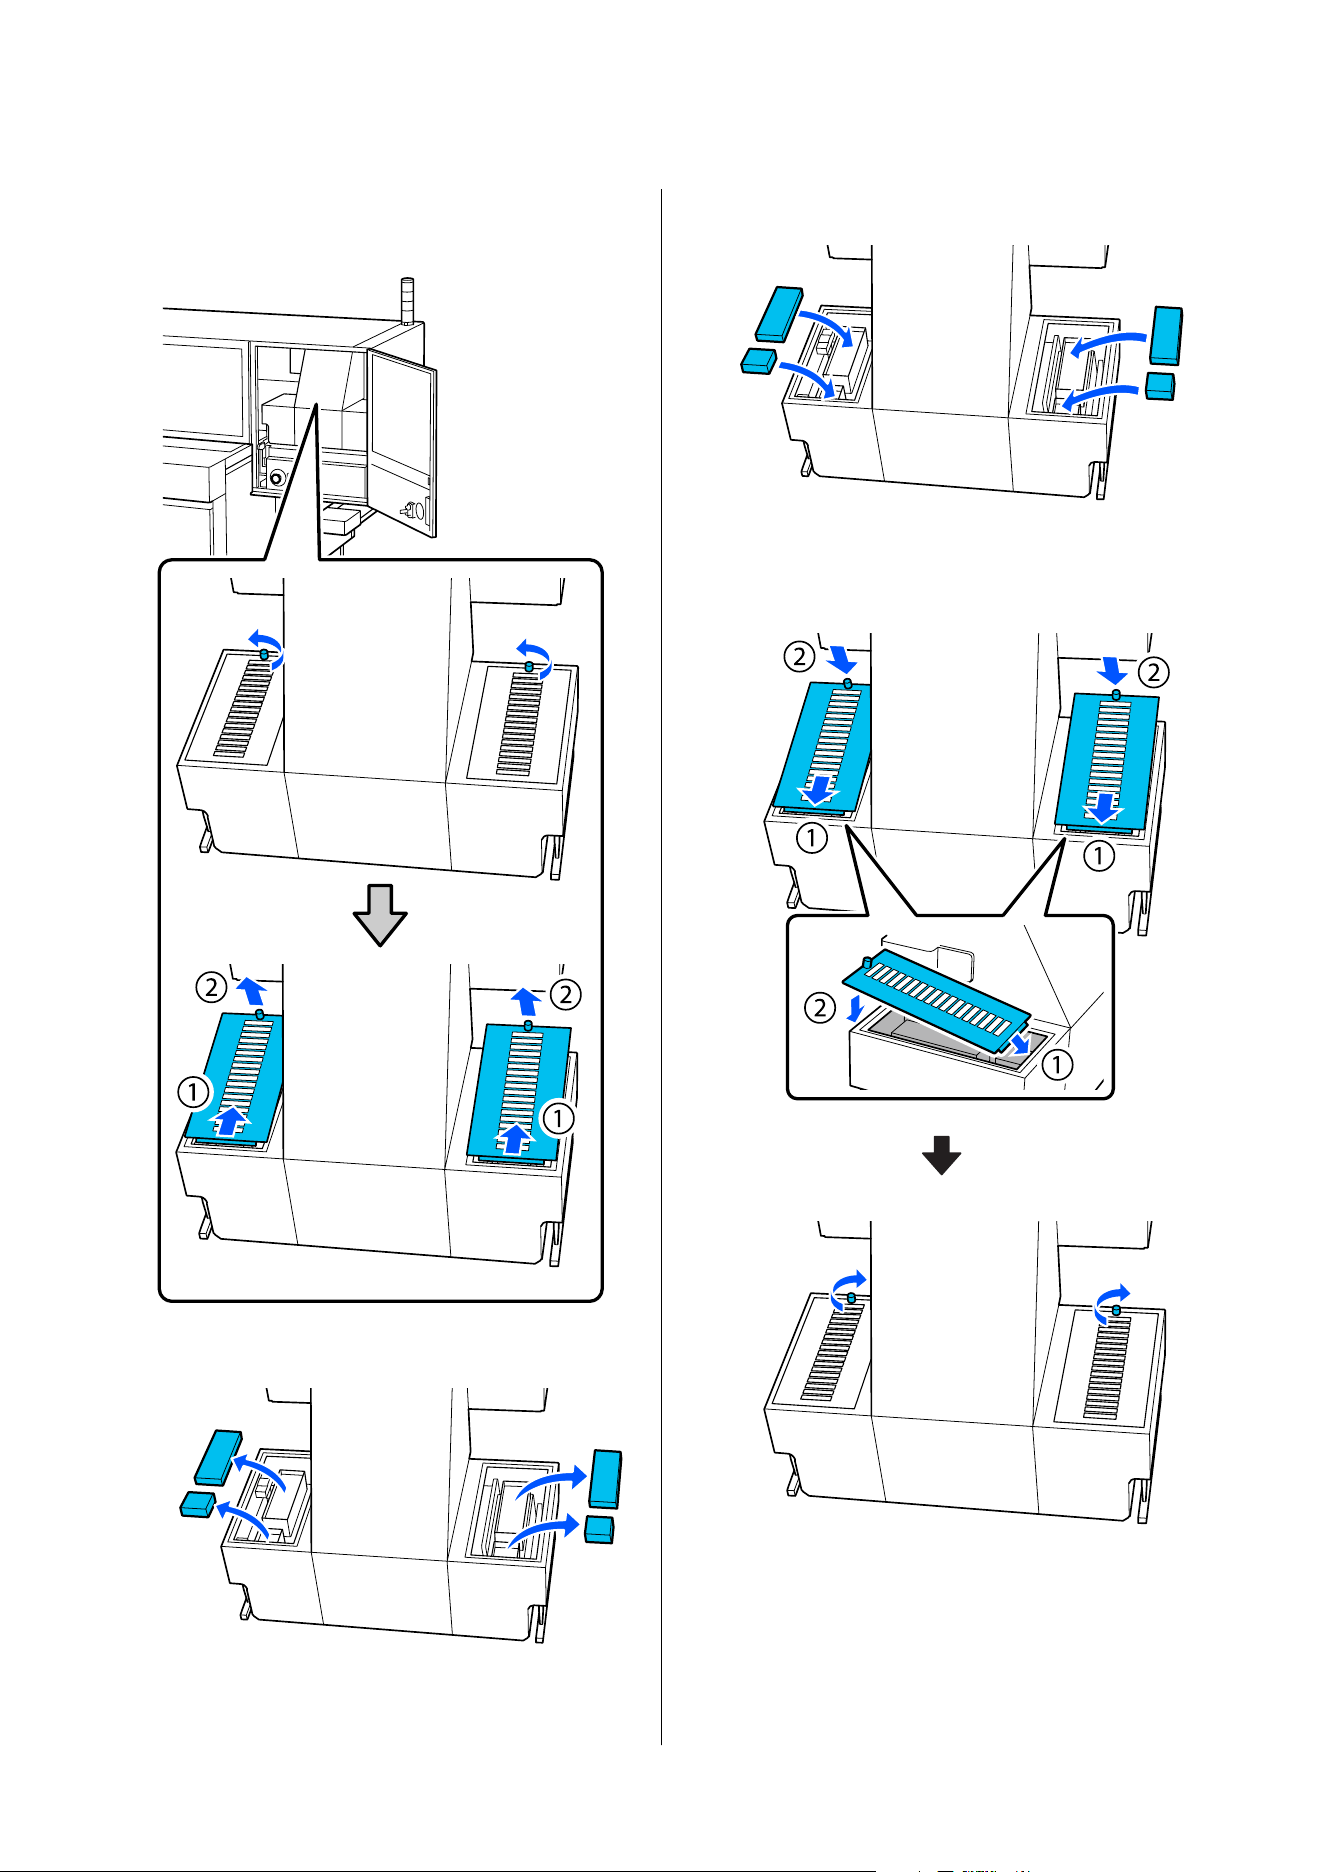
C
Loosen the screws at the locations shown in the
illustration and remove the mist filter covers.
D
Remove the mist filters.
E
Install new mist filters.
F
Replace the covers as shown in the illustration
and tighten the screws.
SC-V4000 User's Guide
Periodic Maintenance
98
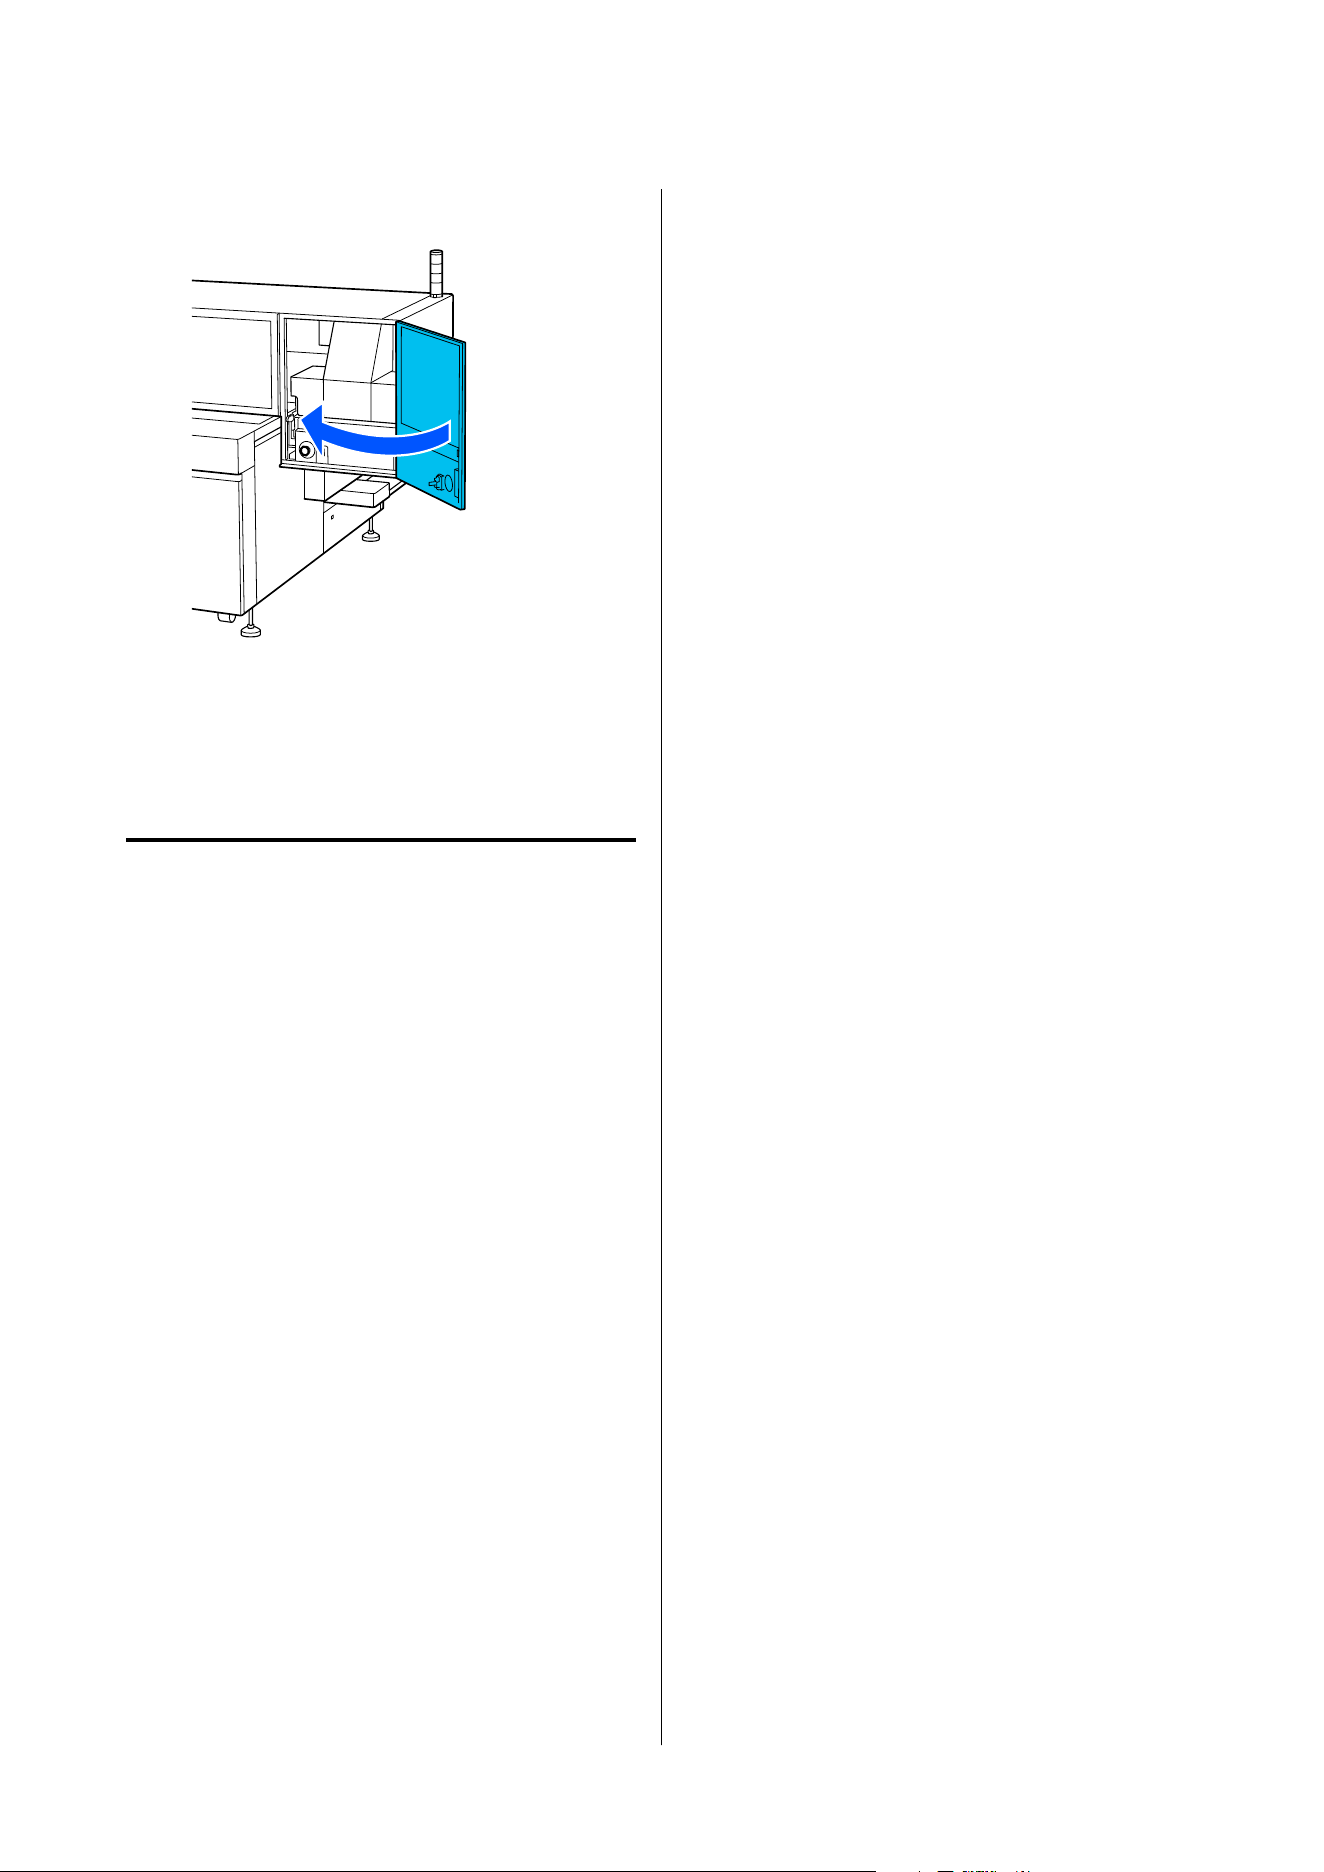
G
Close the maintenance cover on the right.
Disposal of Used
Consumables
Disposal
The following used parts on which there is ink are
classified as industrial waste.
❏ Empty ink bottles
❏ Wiper unit
❏ Mist filter
❏ Cleaning liquid
❏ Waste ink
❏ Waste ink bottle
❏ Cleaning sticks
❏ Polyester/nylon knit woven fabric
❏ Media after printing
Dispose of tube cleaning liquid according to your local
laws and statutes such as entrusting it to an industrial
waste disposal company. A material Safety Data Sheet
must be submitted to the industrial waste disposal
company at the time of commission.
Dispose of items according to local laws and
regulations. For example, contract an industrial waste
disposal company for disposal. In such cases, submit
the “Safety data sheet” to the industrial waste disposal
company. You can download it at your local Epson
Web site.
SC-V4000 User's Guide
Periodic Maintenance
99
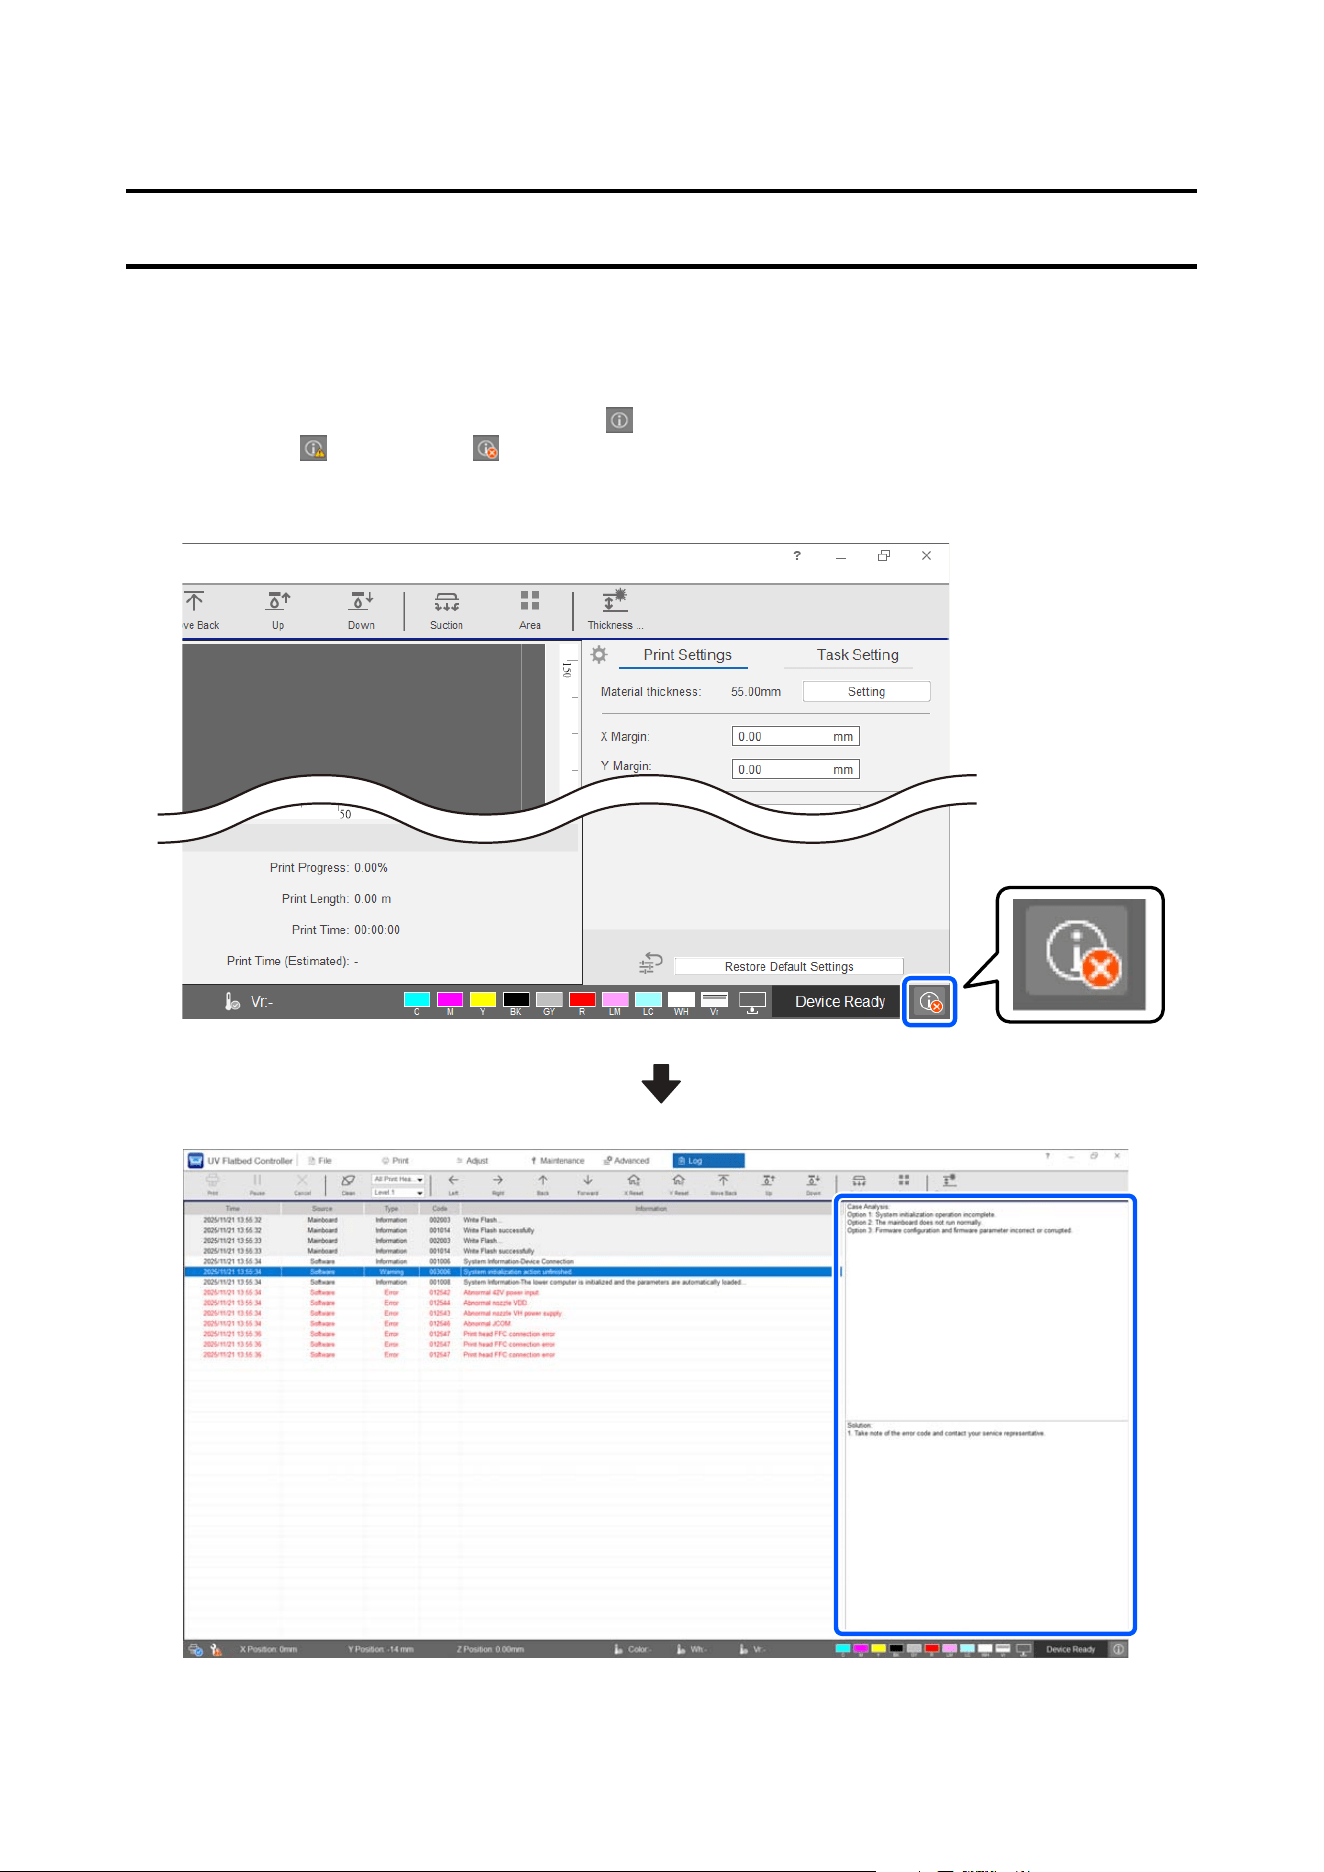
Problem Solver
Checking Messages
When a warning or error occurs in the printer, the icon at the bottom right of the UV Flatbed Controller
screen changes to
(Warning) or (Error). Click the icon to check the content of the message and the
solutions.
SC-V4000 User's Guide
Problem Solver
100
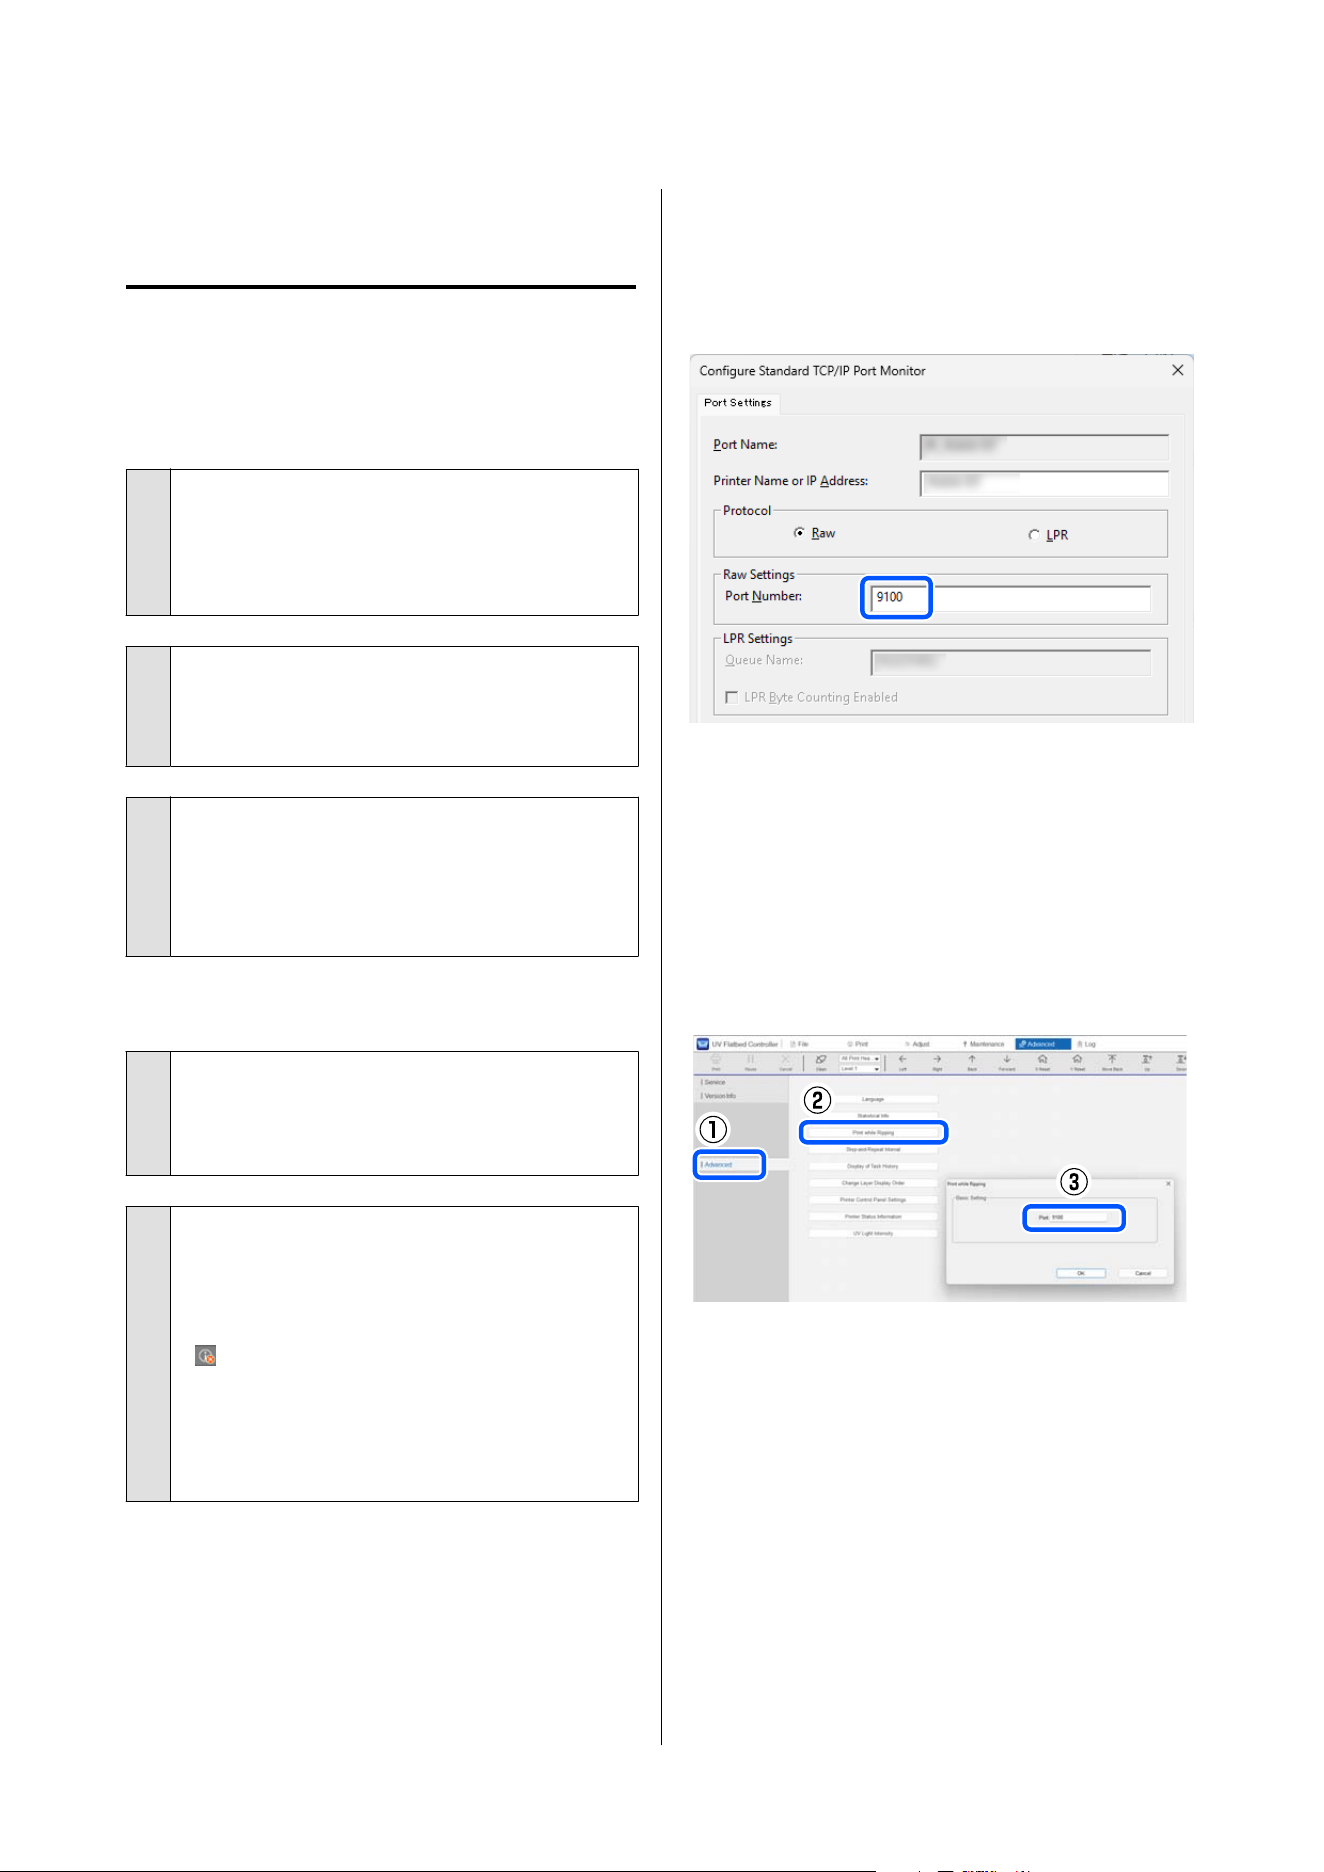
Troubleshooting
You Cannot Print (Because the
Printer Does Not Work)
The printer does not turn on.
o
Is the power cable plugged into the
electrical outlet and the printer?
Make sure the power cable is securely plugged into
the printer.
o
Is there a problem with the power outlet?
Make sure your outlet works by connecting the
power cable for another electric product.
o
Has the emergency stop button been
pressed?
Release the emergency stop.
U “Releasing an Emergency Stop” on page 19
An error has occurred in the printer.
o
Check the content of the error and the
solutions in the UV Flatbed Controller.
U “Checking Messages” on page 100
o
Is the message The port for communicating
with the software RIP is not available.
displayed?
If the message above is displayed when you click
at the bottom right of the UV Flatbed Controller
screen to display the Log screen, Epson edge Print
PRO and third-party software are using the same
communication port. Follow the steps below to
change the communication port used by Epson
edge Print PRO.
Changing the communication port
A
On the computer where Epson edge Print PRO
is installed, click Start - Settings - Bluetooth &
devices - Printers & scanners - SC-V4000 -
Printer properties to open the SC-V4000
properties screen.
B
Click the Ports tab - Configure Port.
C
Change the Port in Raw Settings to 9101 or
9102, and then click OK.
D
Click Apply to close the properties screen.
E
Click Advanced from the menu in the UV
Flatbed Controller.
F
Click Advanced - Print while Ripping and
enter the port number that you changed in step
3 in Port.
G
Click OK.
SC-V4000 User's Guide
Problem Solver
101
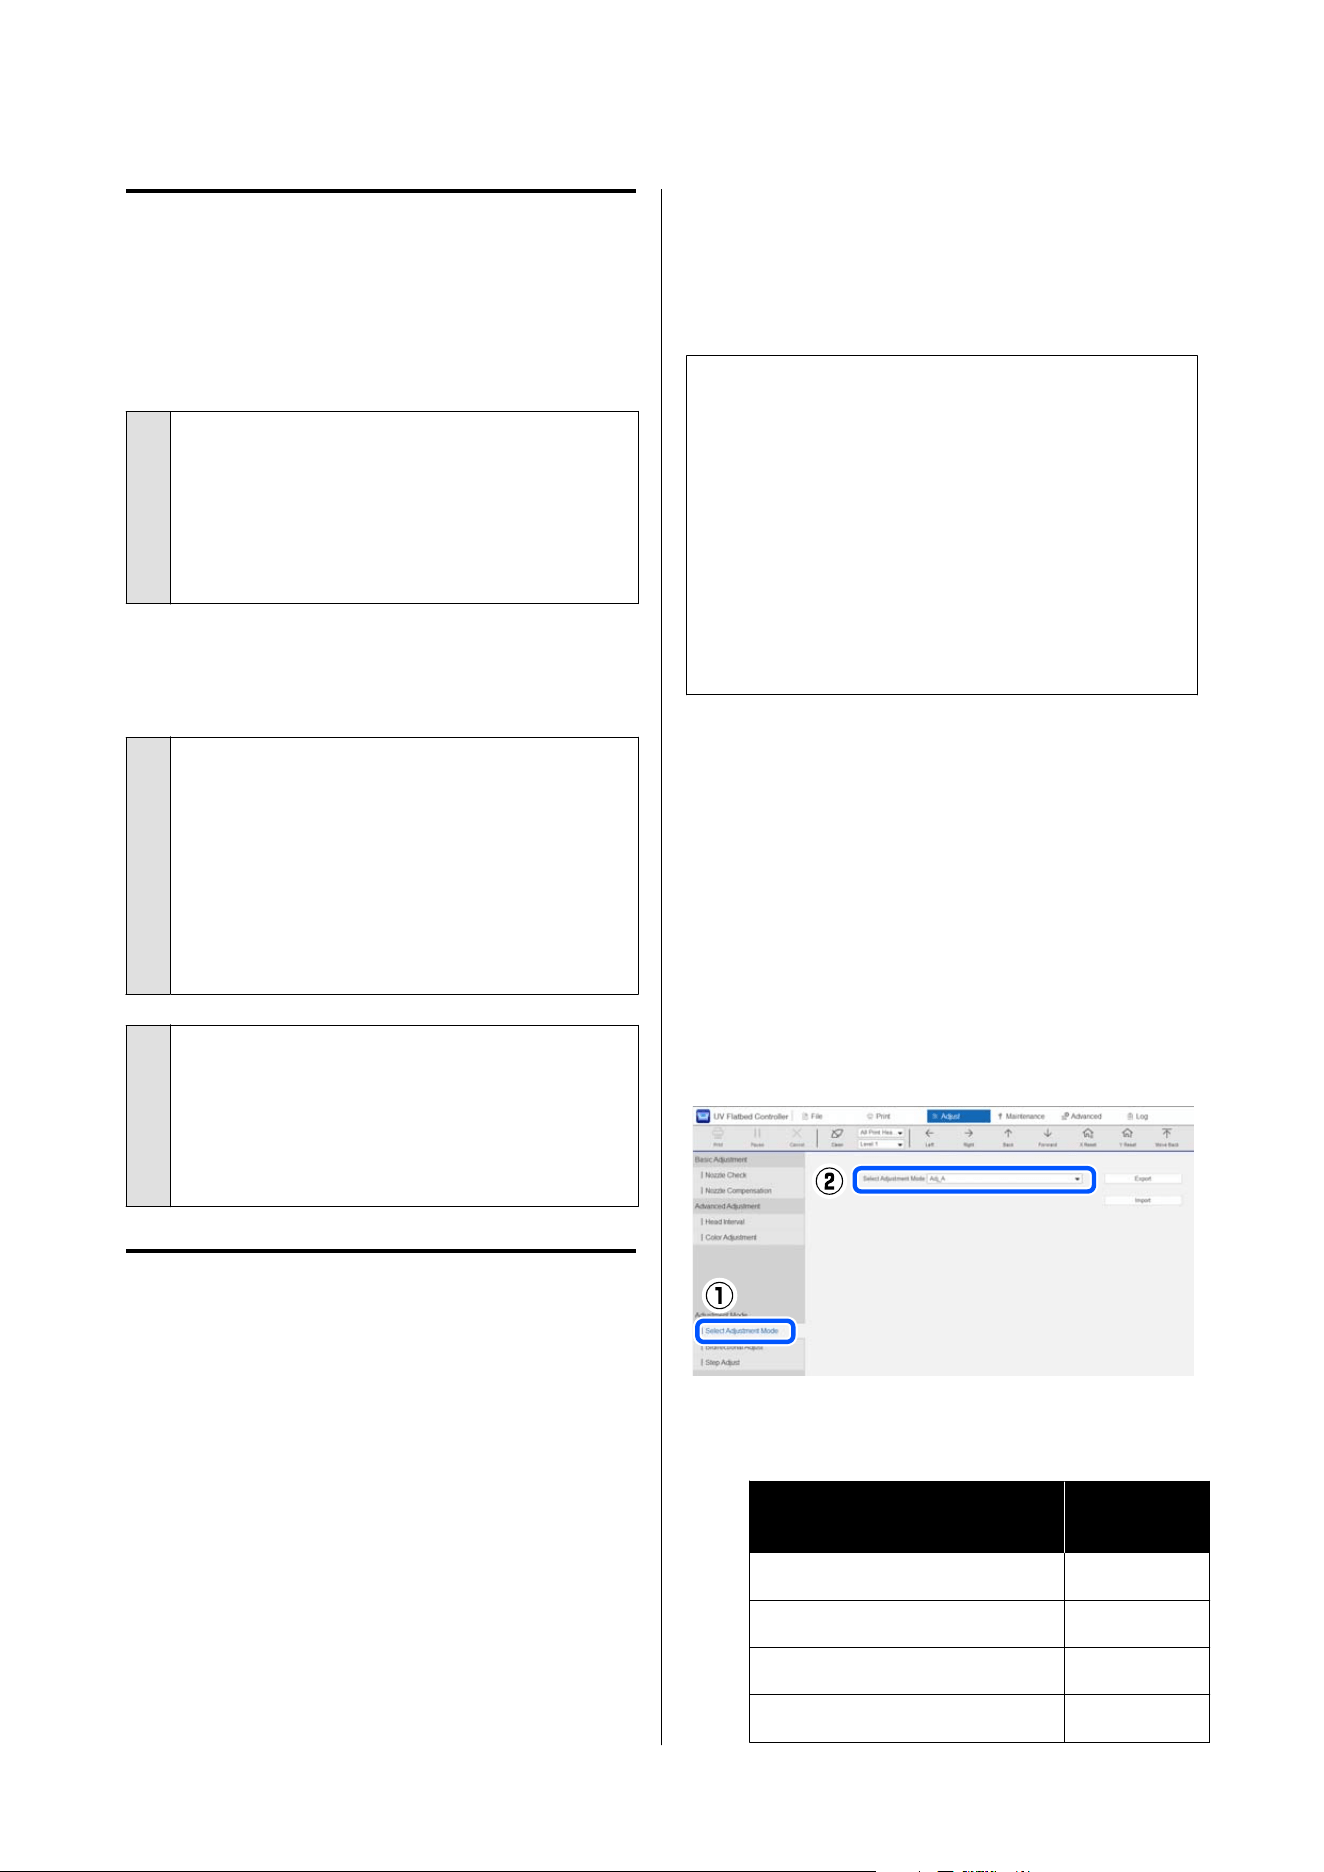
The Printer Operates, but Does
Not Print
The print head moves, but does not
print.
o
Check the printer operations.
Print a nozzle check pattern.
U “Cleaning the print head” on page 94
Check the next section if the nozzle check pattern is
not printed correctly.
The nozzle check pattern is not
printed correctly.
o
Has the printer been left unused for a long
time?
Print head nozzles may be dried and clogged if the
printer is not used for a long time (more than 2
weeks).
Steps to take when the printer has not been used for
a long time U “Notes on Long-term Storage” on
page 22
o
Perform print head cleaning.
The nozzles may be clogged. Perform print head
cleaning, and then print a nozzle check pattern
again.
U “Clearing Clogged Nozzles” on page 95
Print Results Are Not What You
Expected
When there is horizontal line
misalignment or graininess
This may be improved by performing Bidirectional
Adjust in the UV Flatbed Controller.
For Bidirectional Adjust, visually check the printed
adjustment pattern and make adjustments. Prepare the
following media to print the adjustment pattern.
❏ Transparent sheet for inkjet printing
❏ A size that can print a 110 × 40 mm adjustment
pattern
The following outlines the adjustment procedure.
c
Important:
To adjust correctly, check the following points
before printing the adjustment pattern.
❏ Nozzles are not clogged.
U “Cleaning the print head” on page 94
❏ Check the temperature information at the
bottom of the UV Flatbed Controller screen
and confirm it has reached the appropriate
temperature.
A
Place the media for printing the pattern on the
flatbed.
U “Loading Media (For Flat Media such as
Acrylic Board and Film)” on page 48
B
Click Adjust from the menu.
C
Click Select Adjustment Mode from
Adjustment Mode and select the adjustment
mode according to the print mode of the target
print job.
See the table below for the relationship between
the Print Mode and Adjustment Mode.
Print Mode Adjustment
Mode
High Speed Adj_A Adj_A
Speed 600x600 Adj_A Adj_A
Production 600x900 Adj_A Adj_A
Quality 600x1200 Adj_A Adj_A
SC-V4000 User's Guide
Problem Solver
102
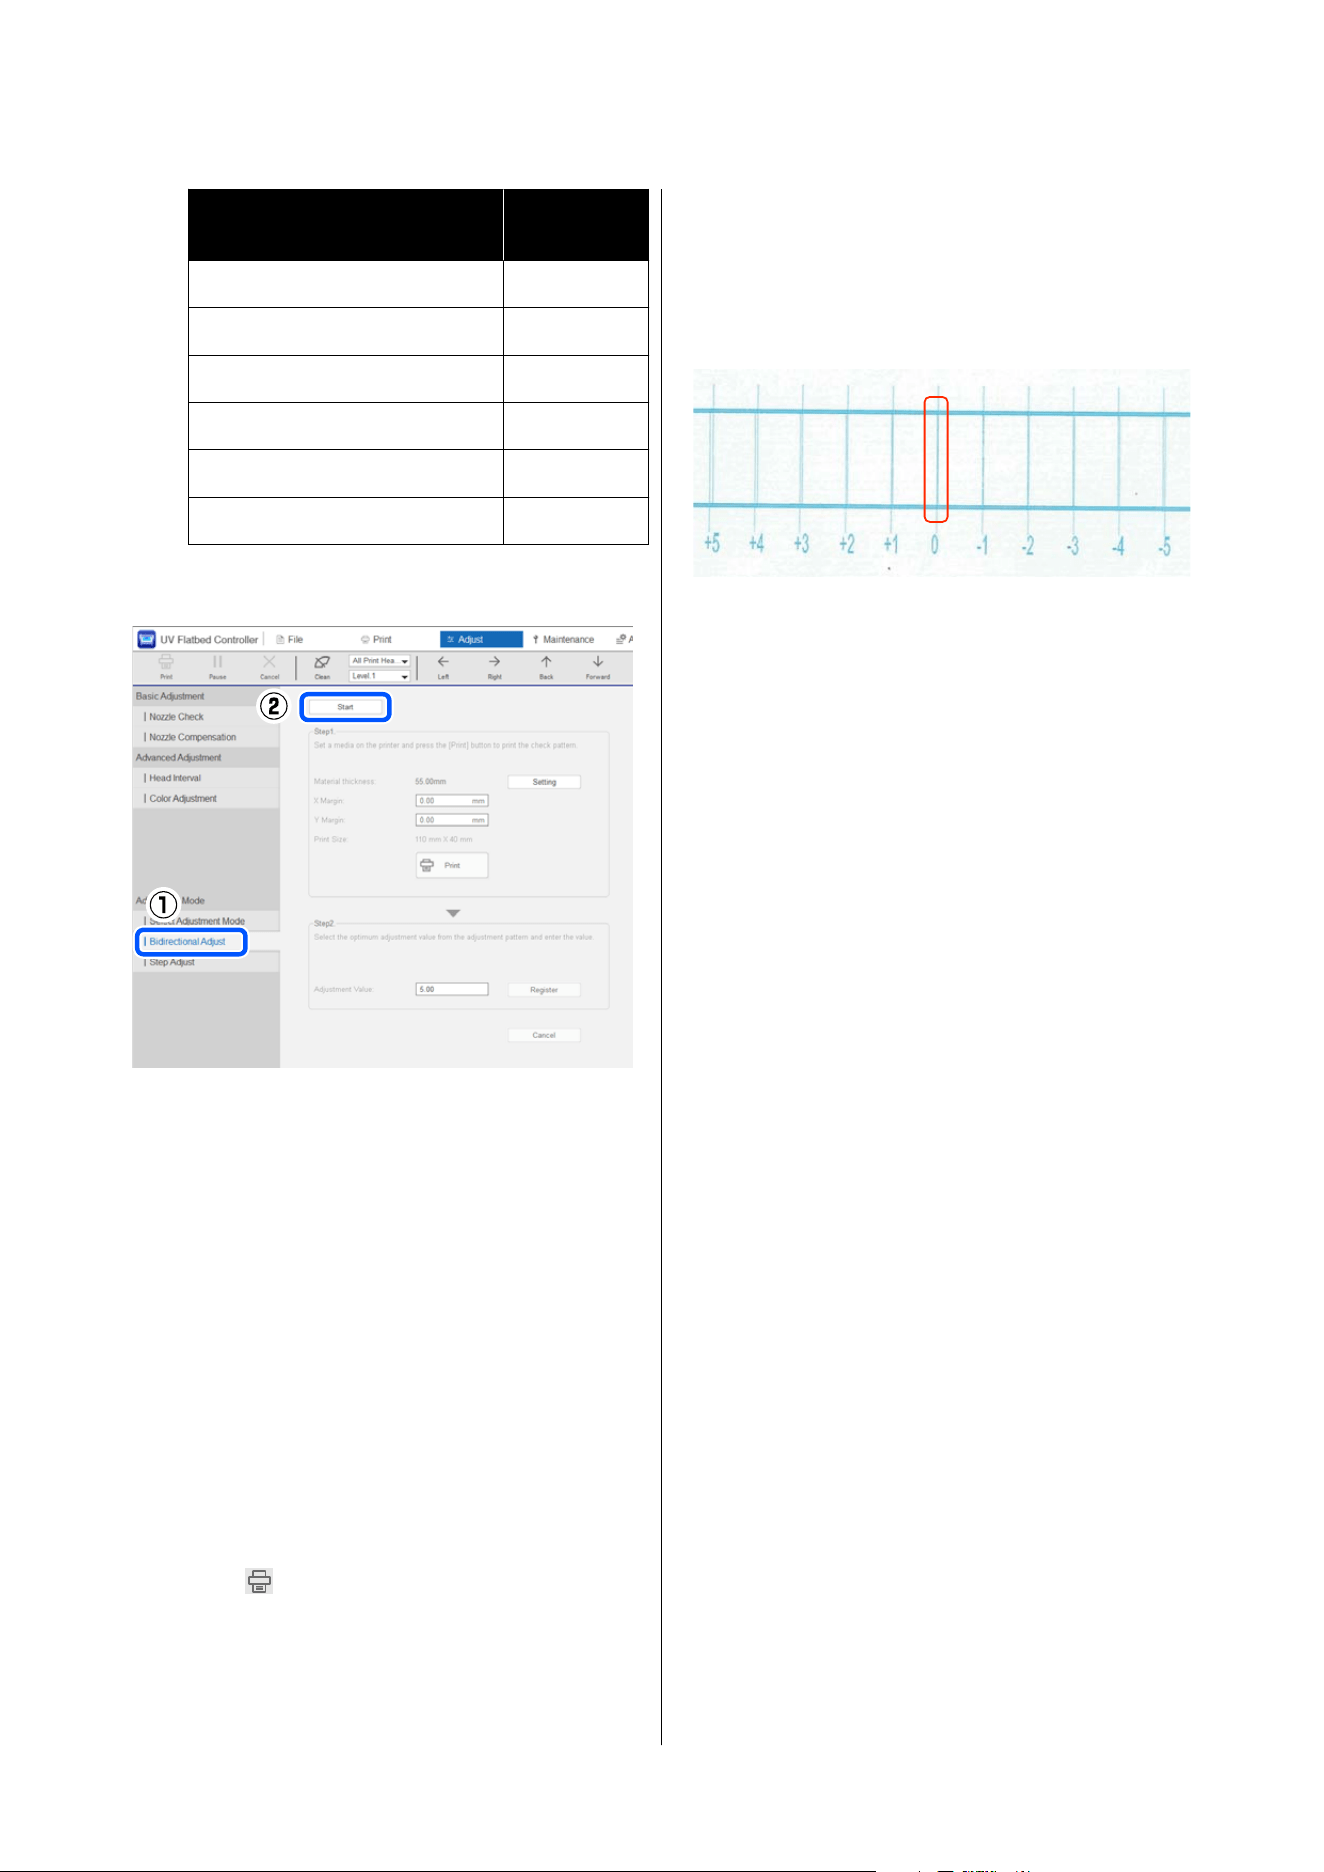
Print Mode Adjustment
Mode
High Quality 600x1200 Adj_C Adj_C
WG High Speed 300x600 Adj_C Adj_C
WG Speed 600x600 Adj_C Adj_C
WG Production 600x900 Adj_C Adj_C
WG Quality 600x1200 Adj_C Adj_C
WG High Quality 600x1200 Adj_H Adj_H
D
Click Bidirectional Adjust - Start.
E
Click Setting from Thickness Detection to
select whether to perform print head height
adjustment using Auto or Manual, and then
click OK.
See the following for detailed instructions on
adjusting the print head height.
U “Print Settings” on page 51
When you select Auto, Thickness Detection
begins. Wait until the measurement is complete.
F
Set the print start position (X Margin
(left-right) and Y Margin (front-back)) to 0.00
mm.
G
Click .
The adjustment pattern starts printing.
Wait until printing is complete.
H
Check the printed adjustment pattern and enter
the adjustment value.
The "0" line in the adjustment pattern (the
vertical line in the red box) is straight, which is
normal.
For example, if the "0" line is not straight and
the "+1" line is the straightest, add "+1" to the
number already entered in Adjustment Value,
and enter that value.
<Example>
Screen value: 25.50
Value selected for the pattern: +1
Entered value: 26.50
I
Click Register to register the adjustment value
you entered.
When the ink or varnish is not
sufficiently cured
When the ink or varnish is not sufficiently cured,
perform additional UV light curing after printing is
complete.
The following outlines the procedure for additional
curing.
When additional UV light curing is performed
during printing
A
Load the media on the flatbed.
U “Loading Media (For Flat Media such as
Acrylic Board and Film)” on page 48
U “Loading Media (for Media with Spherical
or Curved Surfaces)” on page 50
B
Click Print from the UV Flatbed Controller
menu to move the job for additional curing
from Task Histor y to Print Task List.
Double-click the image area of the target job.
SC-V4000 User's Guide
Problem Solver
103
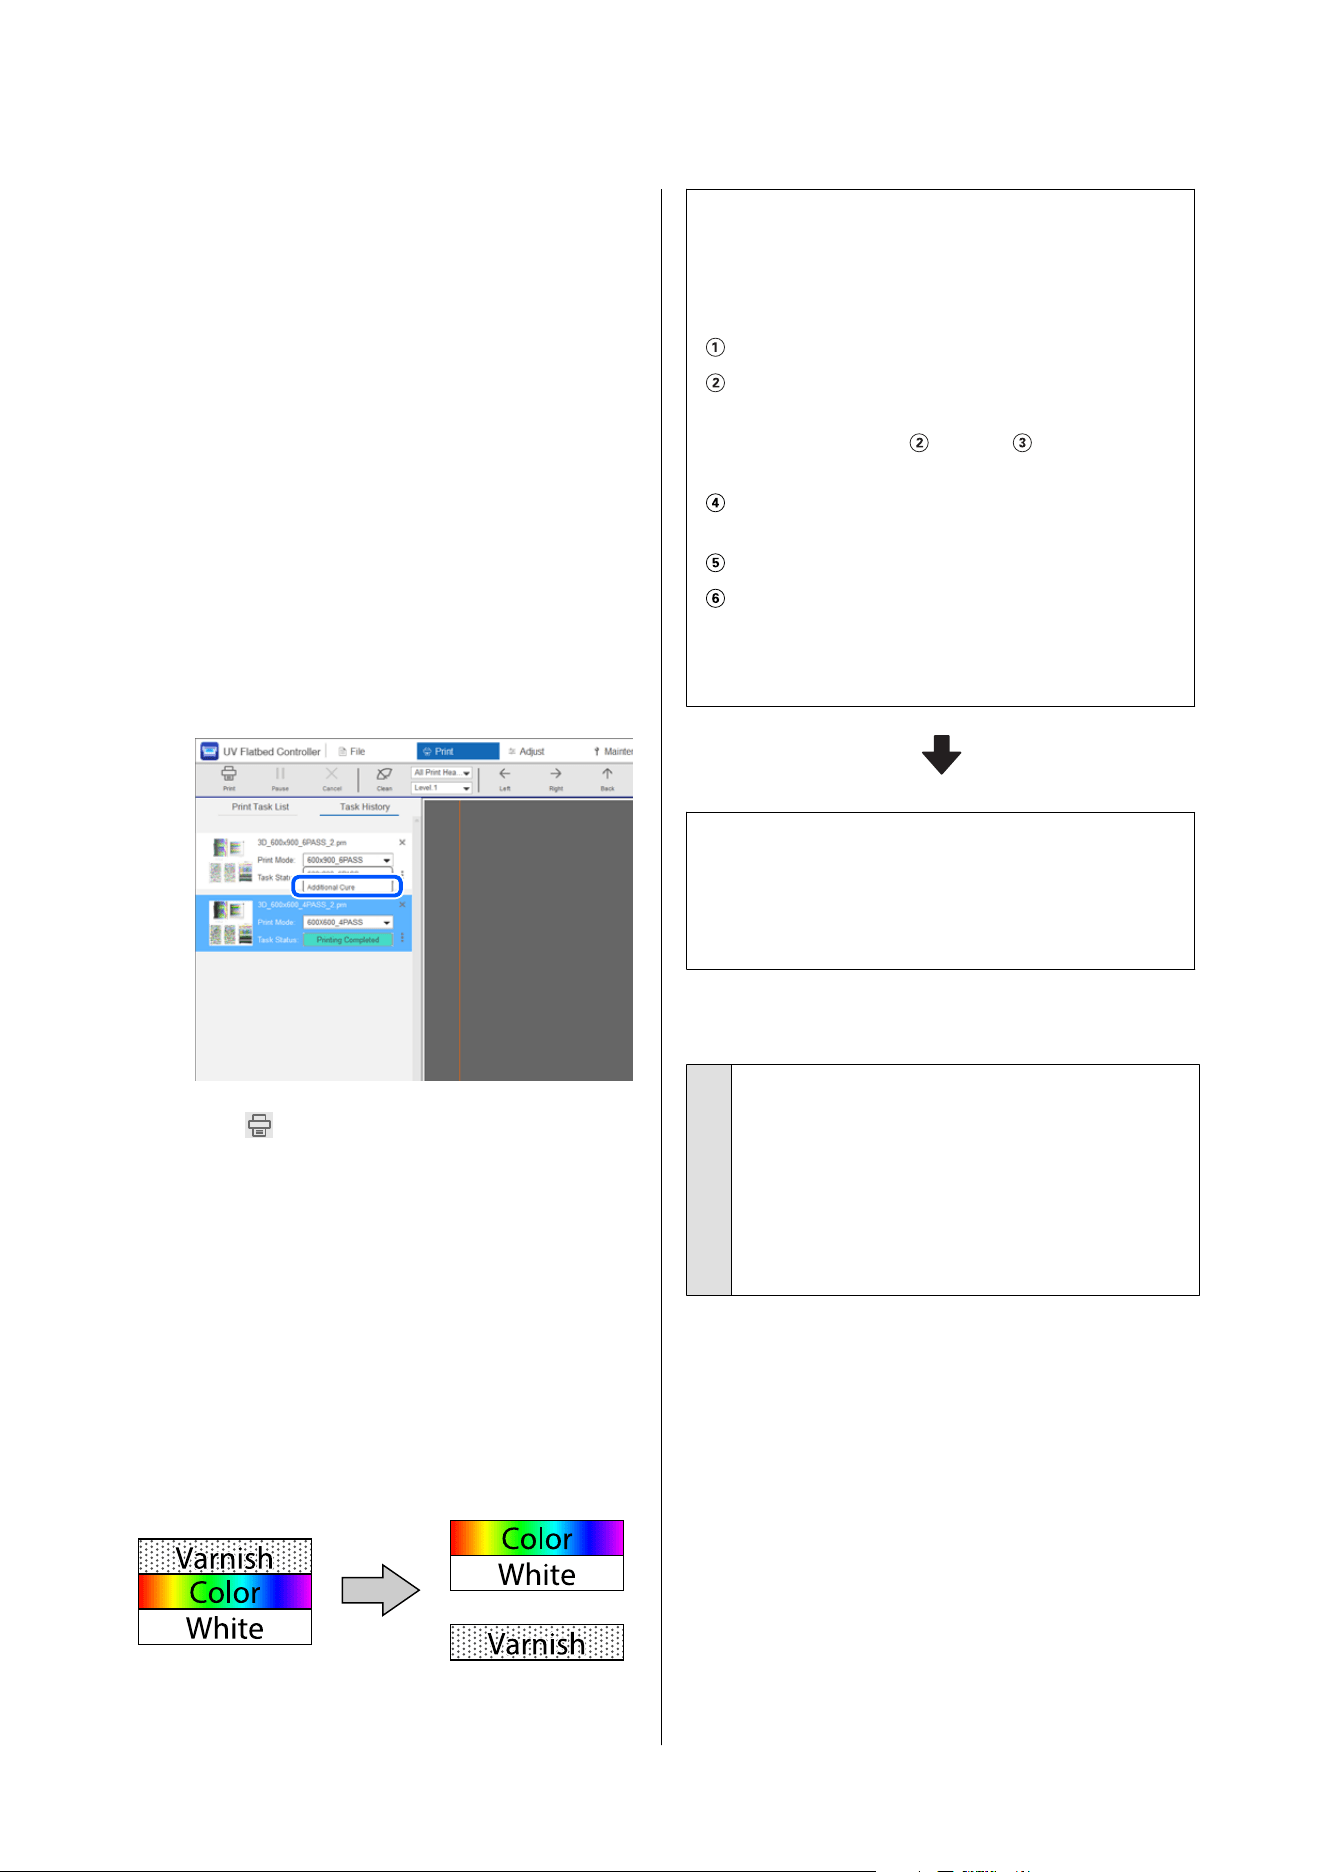
C
From Print Settings, select Enable in After
Cure and perform printing.
After printing, additional UV light curing
starts.
When additional UV light curing is performed after
printing is complete
After printing, perform additional UV light curing
only while the media remains placed on the flatbed.
A
Click Print from the UV Flatbed Controller
menu, and then select the target job in Task
History.
B
Select Additional Cure from the Print Mode
drop-down menu and execute Print.
C
Click to print.
UV irradiation begins.
If varnished surfaces are noticeably
rough
Instead of printing the color layers and varnish layer
in a single job, print them as separate jobs.
For example, for the three-layer multi-layer print job
shown below, split it into two jobs: one for varnish and
one for the other layers, and then print them.
The following outlines the workflow.
Create two jobs in Epson edge Print PRO: one
for varnish and one for the other layers
The following outlines the procedure for creating two
jobs.
Add the file to be printed to the Job List
Make the necessary print settings in Basic Settings
and print
Select the file printed in
from the printed job list
and move it to the Job List
Select Number and Order of Layering and Single
Layer (Varnish Only) from Basic Settings
Set Density Control to 100% in Color Settings
Select Whole Area or Image in Creating Method
from Multi Layer Print, and then print
To view the manual, on the Epson edge Print PRO main
screen, click the Help menu - Help.
Print received jobs in the UV Flatbed Controller
Print the color job and then the varnish job on the same
media in that order.
U “Basic Operations” on page 36
Varnish print quality is poor
o
Are you using a print mode that does not
support varnish printing?
The following Print Mode does not support varnish
printing.
Fine Production Adj_B, Fine Standard Adj_C, Fine
Quality Adj_H, Fine Quality Adj_B, Fine High Quality
Adj_H
When unevenness occurs
You can reduce print unevenness by making Fuzzy
mode settings in Print Settings in the UV Flatbed
Controller. However, the print quality will be reduced.
A
Click Print from the menu.
B
Select the target print job in Print Task List.
C
Select Professional Settings in Print Settings.
SC-V4000 User's Guide
Problem Solver
104
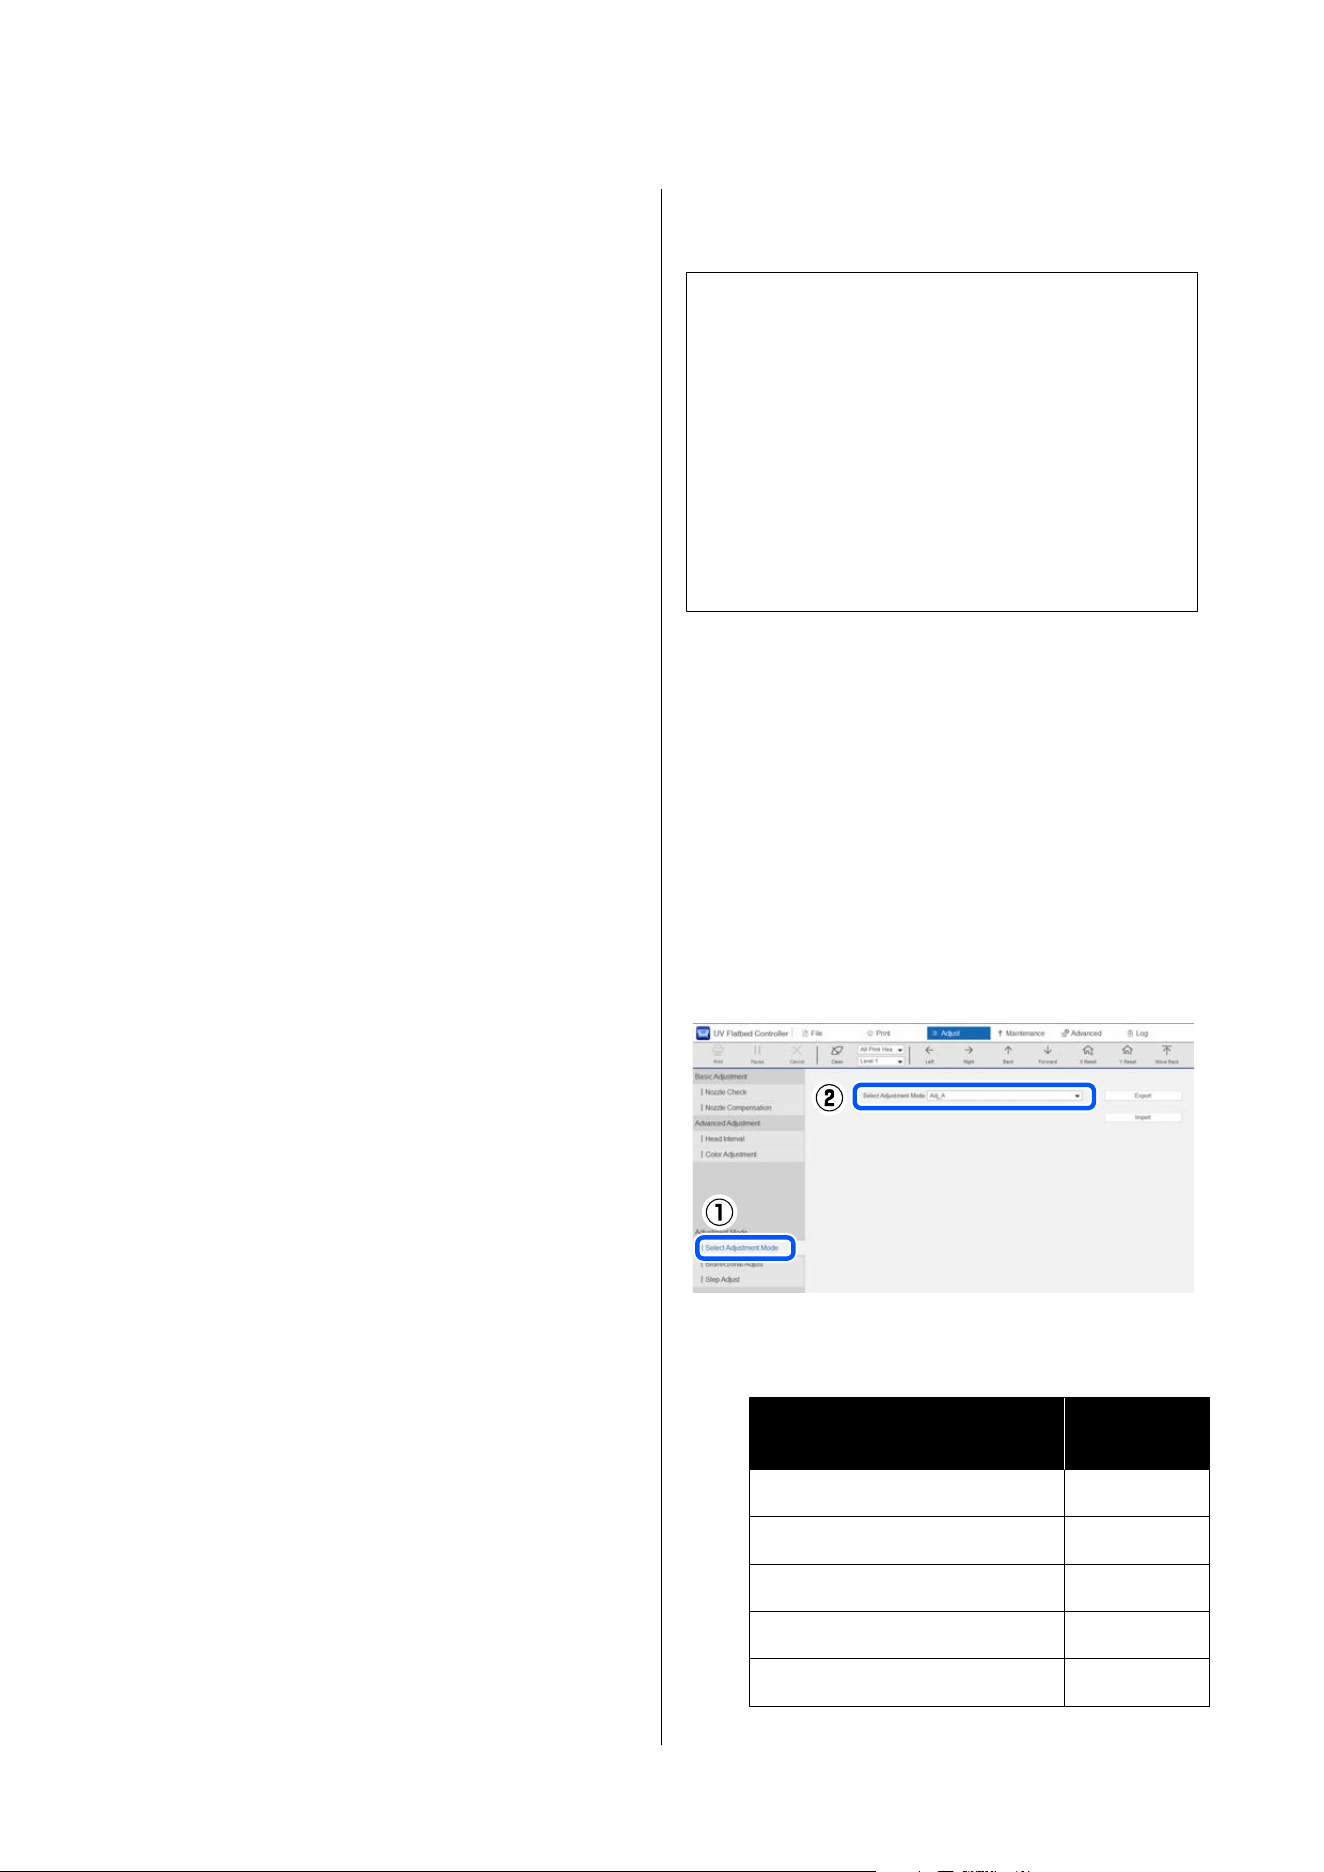
D
Select the level in Fuzzy mode.
First, select Level 1.
If you feel unevenness has not improved after
reprinting, repeat steps 1 to 4 and select Level
2.
If you feel unevenness has not improved after
reprinting, repeat steps 1 to 4 and select Level
3.
Note that selecting Close prints the data as it is
without applying fuzzy effects.
Normally, keep this set to Auto.
When white text or lines appear
blurry
If you notice that white text or lines appear blurry
when printing with white ink, you can improve their
clarity by adjusting the White Text Quality setting in
Print Settings.
A
Click Print from the menu.
B
Select the target print job in Print Task List.
C
Select Professional Settings in Print Settings.
D
Select the level in White Text Quality.
The default is Level 1, so try selecting Level 2.
If you feel blurriness has not improved after
reprinting, repeat steps 1 to 4 and select Level
3.
When banding occurs
When banding (horizontal banding, tint unevenness,
or stripes) occurs in print results, perform Step Adjust
in Adjust to adjust the gantry feed rate.
For Step Adjust, visually check the printed adjustment
pattern and make adjustments. Prepare the following
media to print the adjustment pattern.
❏ Transparent sheet for inkjet printing
❏ A size that can print a 265 × 40 mm adjustment
pattern
The following outlines the adjustment procedure.
c
Important:
To adjust correctly, check the following points
before printing the adjustment pattern.
❏ Nozzles are not clogged.
U “Cleaning the print head” on page 94
❏ Check the temperature information at the
bottom of the UV Flatbed Controller screen
and confirm it has reached the appropriate
temperature.
A
Place the media for printing the pattern on the
flatbed.
U “Loading Media (For Flat Media such as
Acrylic Board and Film)” on page 48
B
Click Adjust from the menu.
C
Click Select Adjustment Mode from
Adjustment Mode and select the adjustment
mode according to the print mode of the target
print job.
See the table below for the relationship between
the Print Mode and Adjustment Mode.
Print Mode Adjustment
Mode
High Speed Adj_A Adj_A
Speed 600x600 Adj_A Adj_A
Production 600x900 Adj_A Adj_A
Quality 600x1200 Adj_A Adj_A
High Quality 600x1200 Adj_C Adj_C
SC-V4000 User's Guide
Problem Solver
105
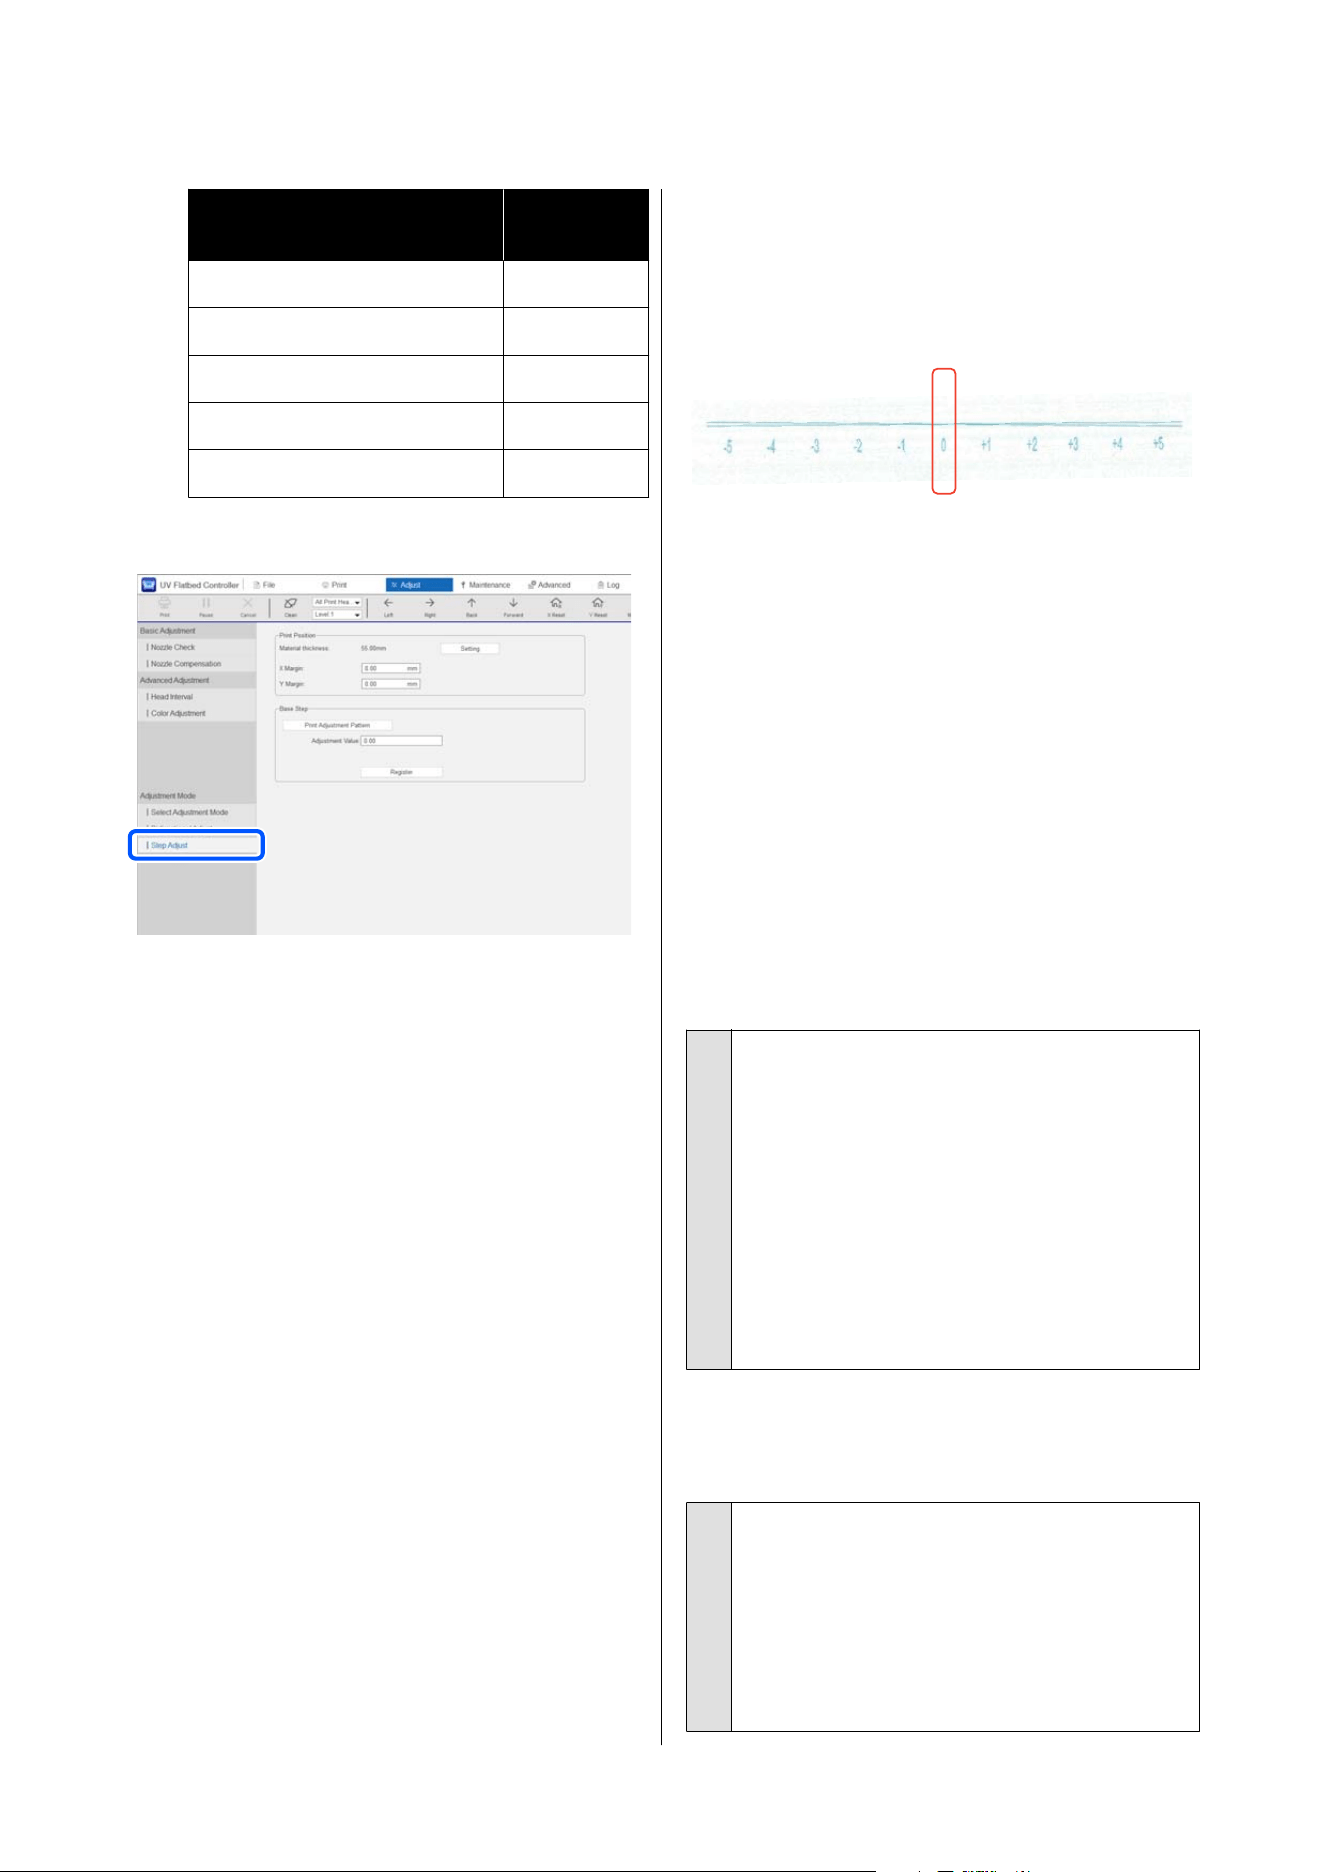
Print Mode Adjustment
Mode
WG High Speed 300x600 Adj_C Adj_C
WG Speed 600x600 Adj_C Adj_C
WG Production 600x900 Adj_C Adj_C
WG Quality 600x1200 Adj_C Adj_C
WG High Quality 600x1200 Adj_H Adj_H
D
Click Step Adjust.
E
Click Setting from Thickness Detection to
select whether to perform print head height
adjustment using Auto or Manual, and then
click OK.
See the following for detailed instructions on
adjusting the print head height.
U “Print Settings” on page 51
When you select Auto, Thickness Detection
begins. Wait until the measurement is complete.
F
Set the print start position (X Margin
(left-right) and Y Margin (front-back)) to 0.00
mm.
G
Click Print Adjustment Pattern.
The adjustment pattern starts printing.
Wait until printing is complete.
H
Check the printed adjustment pattern and enter
the adjustment value.
Check the number with the least amount of
deviation from the reference line (horizontal
line). In the following illustration, this is "0".
For example, if "+1" had the least amount of
deviation instead of "0", add "+1" to the number
already entered in Adjustment Value, and enter
that value.
<Example>
Screen value: 0.00
Value selected for the pattern: +1
Entered value: 1.00
I
Click Register to register the adjustment value
you entered.
When ink droplets are sprayed like a
mist making images unclear
o
Is the media charged with static electricity?
This printer uses a built-in ionizer to remove static
electricity from the printing surface during printing.
However, if the media is charged with an excessive
amount of static electricity that cannot be removed
entirely, the landing positions of ink droplets
become disrupted, resulting in unclear print results.
When printing on such media, use commercially
available anti-static agents or ionizers beforehand to
remove static electricity from the printing surface.
Use an anti-static agent that is suitable for the
media material.
When the surface looks uneven or
appears to have air bubbles
o
Are you printing on dusty media?
When printing on dusty media, ink may be drawn to
the dust, causing an uneven surface.
If there is dust on the media surface, wipe it off with
a commercially available anti-static cleaner before
printing. Use an anti-static agent that is suitable for
the media material.
SC-V4000 User's Guide
Problem Solver
106
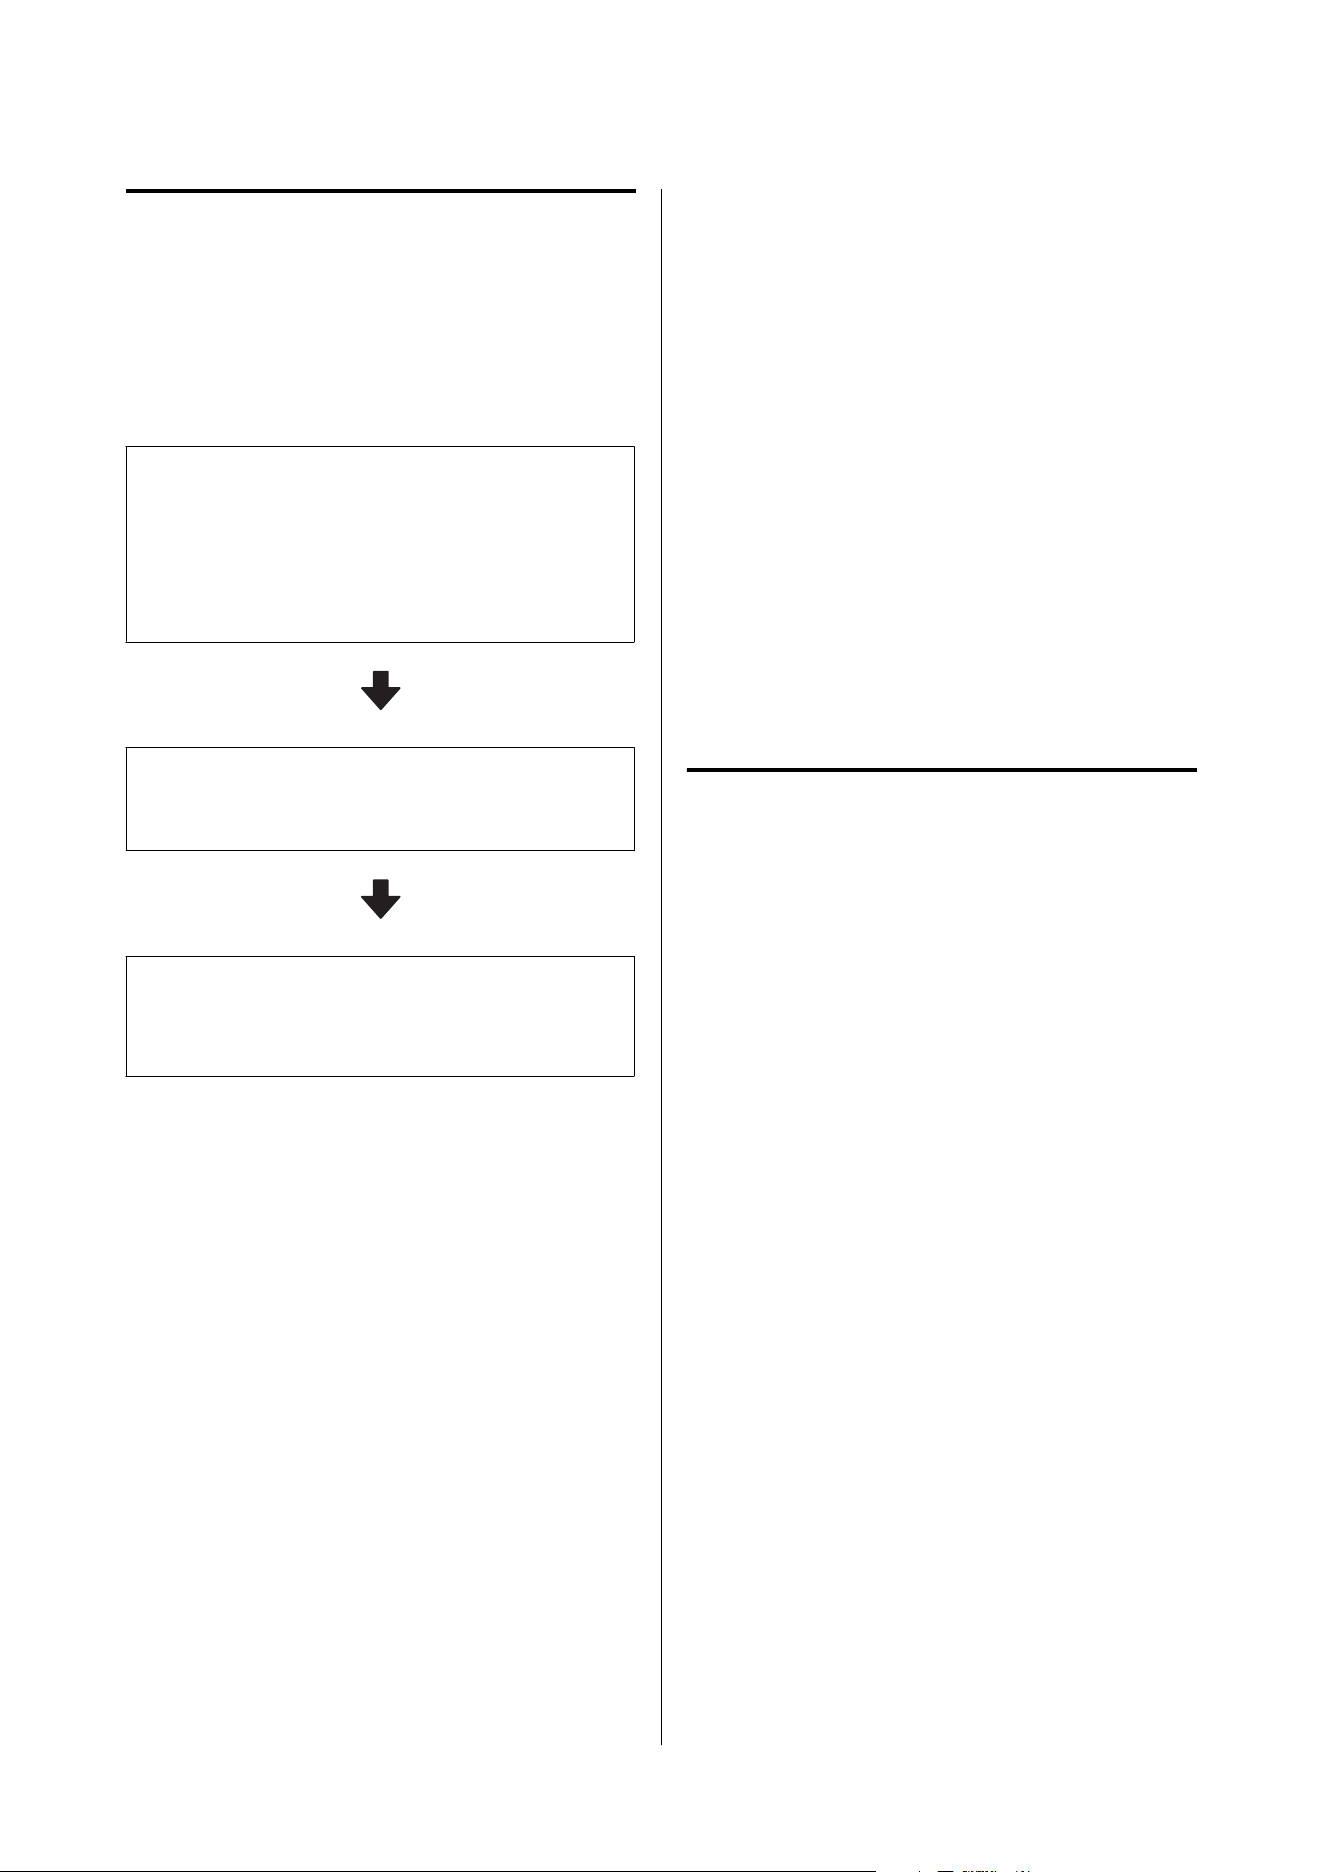
Size of Print Data and Print
Results Do Not Match/Step &
Repeat Print Position has
Shifted
The following outlines the workflow.
Measure the print area of the print results with a
tape measure
If printing was performed with the media print position
not aligned to the home position (0,0), reprint with the
print start position aligned to the home position (0,0),
and then measure those results.
Calculate the correction values in Epson edge
Print PRO and create a print job with the
corrections applied
Perform printing on the printer
When printing, place the media so that the print position
aligns with the home position (0,0).
The following provides detailed instructions.
A
Measure the image size of the print results.
Measure the width and height of the image in
mm.
If printing was performed with the media print
start position not aligned to the home position
(0,0), reprint with the print start position
aligned to the home position (0,0), and then
measure those results.
B
Calculate the correction values in Epson edge
Print PRO, create print data (RIP file) with the
corrections applied, and then execute Print.
See the following for detailed instructions.
UEpson edge Print PROOperation
Guide"When the Size of the Print Data and the
Print Results are Different"
C
Place the media you want to print on the
printer's flatbed.
Make sure the media is placed so that the print
start position is aligned with the home position
(0,0).
U “Loading Media (For Flat Media such as
Acrylic Board and Film)” on page 48
U “Loading Media (for Media with Spherical
or Curved Surfaces)” on page 50
D
Select the target print job in Print Task List
from the print menu in the UV Flatbed
Controller.
E
Enter 0.00 in X Margin (left-right) and Y
Margin (front-back) from Print Settings, and
then print.
Switching between Print Task
List and Task History in the UV
Flatbed Controller takes time
When there are too many jobs registered in Print Task
List and Task History, it takes time to display the job
list when you select Print on the UV Flatbed
Controller menu and switch from Print Task List to
Task Histor y or the other way around.
Use the following procedure to delete unnecessary
jobs.
We recommend organizing so that the total number of
combined jobs in Print Task List and Task History is
100 or fewer.
The deletion procedure is the same for Print Task List
and Task Histor y. This procedure explains how to
delete from the Task Histor y list.
Deleting jobs one at a time
A
Click Task Histor y.
SC-V4000 User's Guide
Problem Solver
107
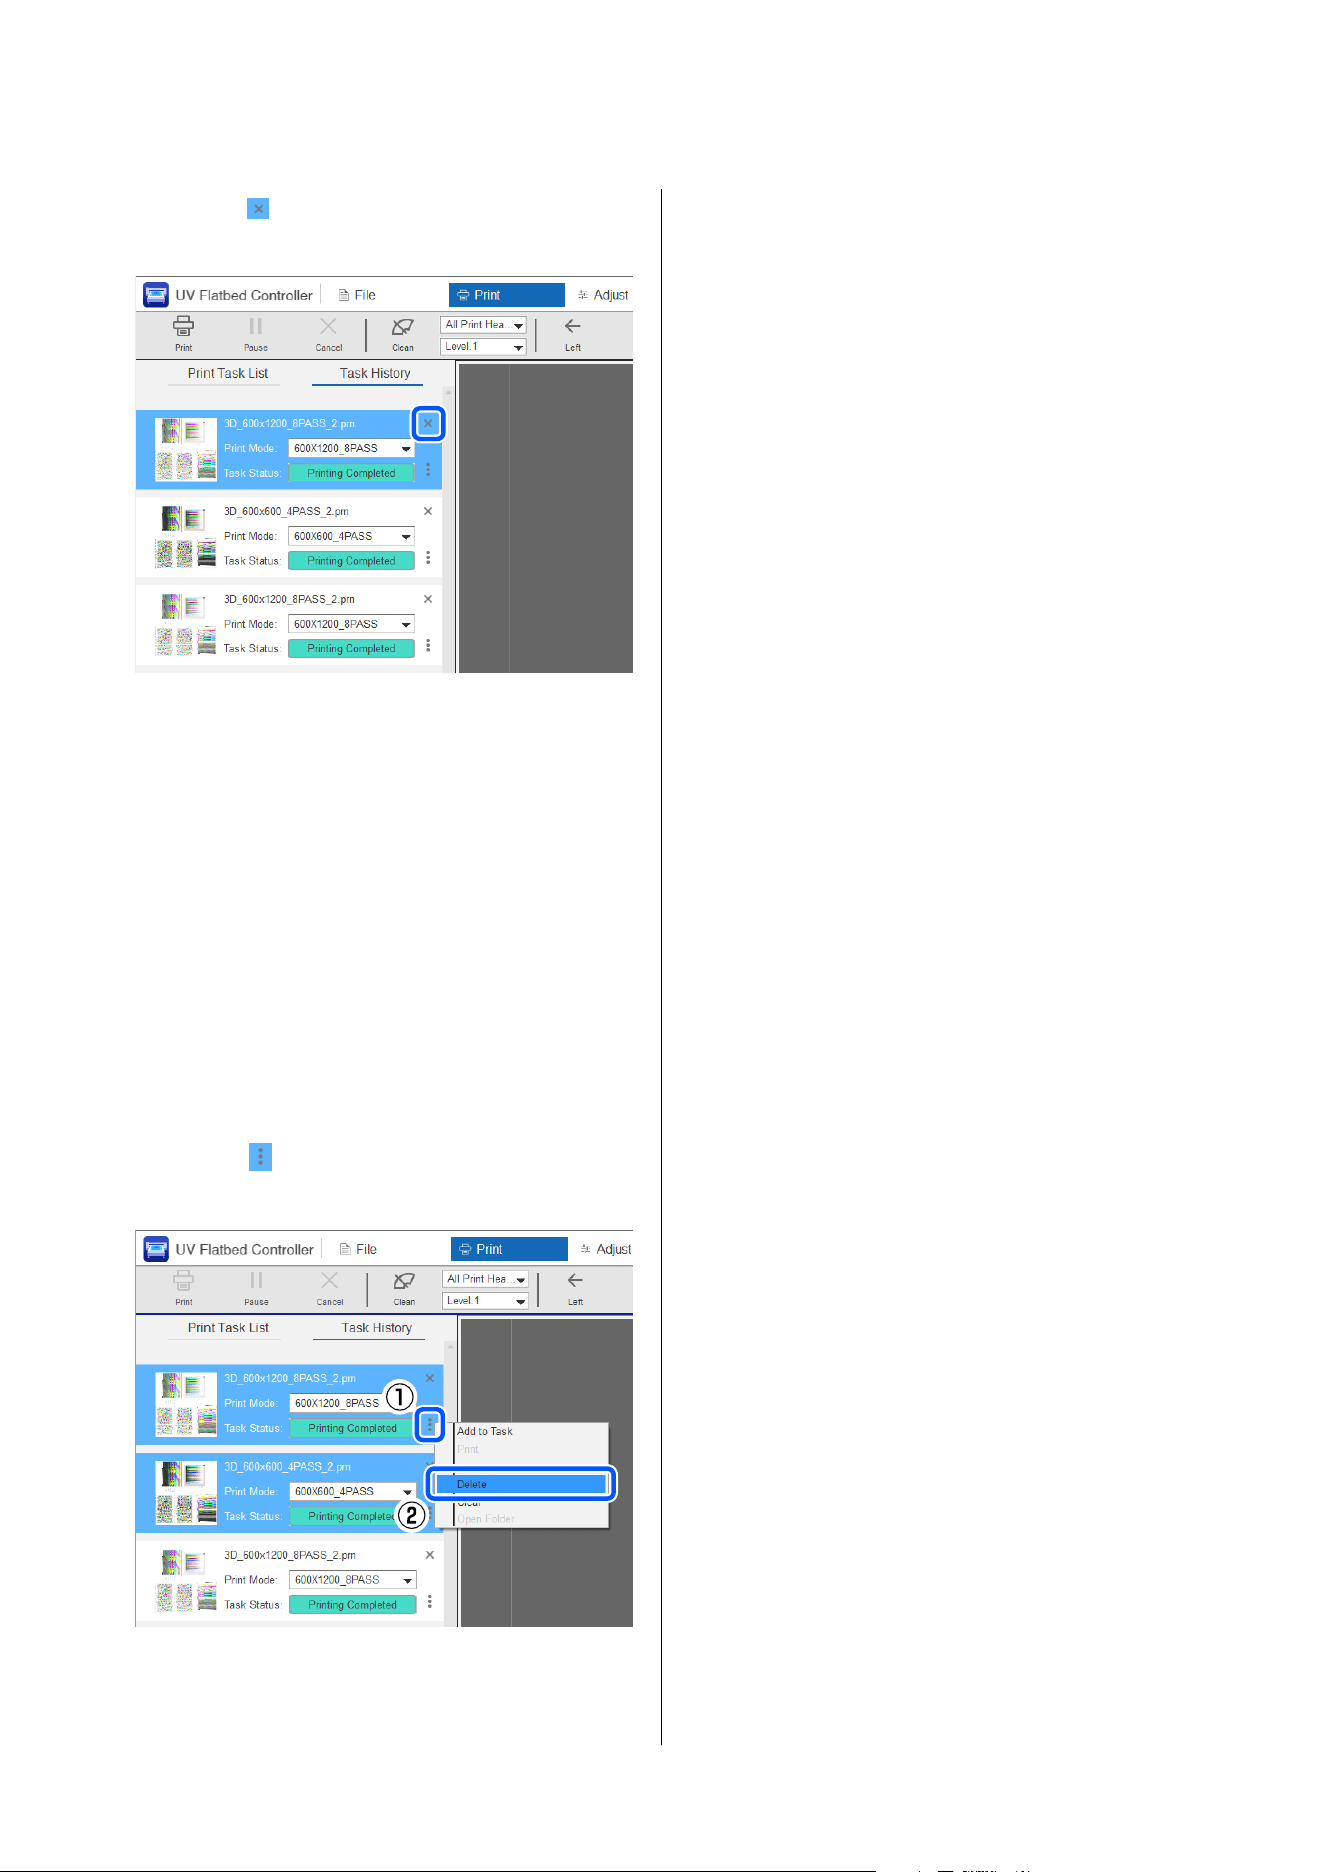
B
Click at the top-right corner of the job you
want to delete in the list.
C
A confirmation screen is displayed; click Ye s .
Repeat steps 2 and 3 to delete each job.
Deleting multiple jobs at once
A
Click Task History.
B
Select the jobs you want to delete from the list.
As with normal file selection, hold down the
Shift key or Ctrl key and select the target jobs.
C
Click on the right side of any job and click
Delete in the menu displayed.
D
A confirmation screen is displayed; click Ye s .
SC-V4000 User's Guide
Problem Solver
108
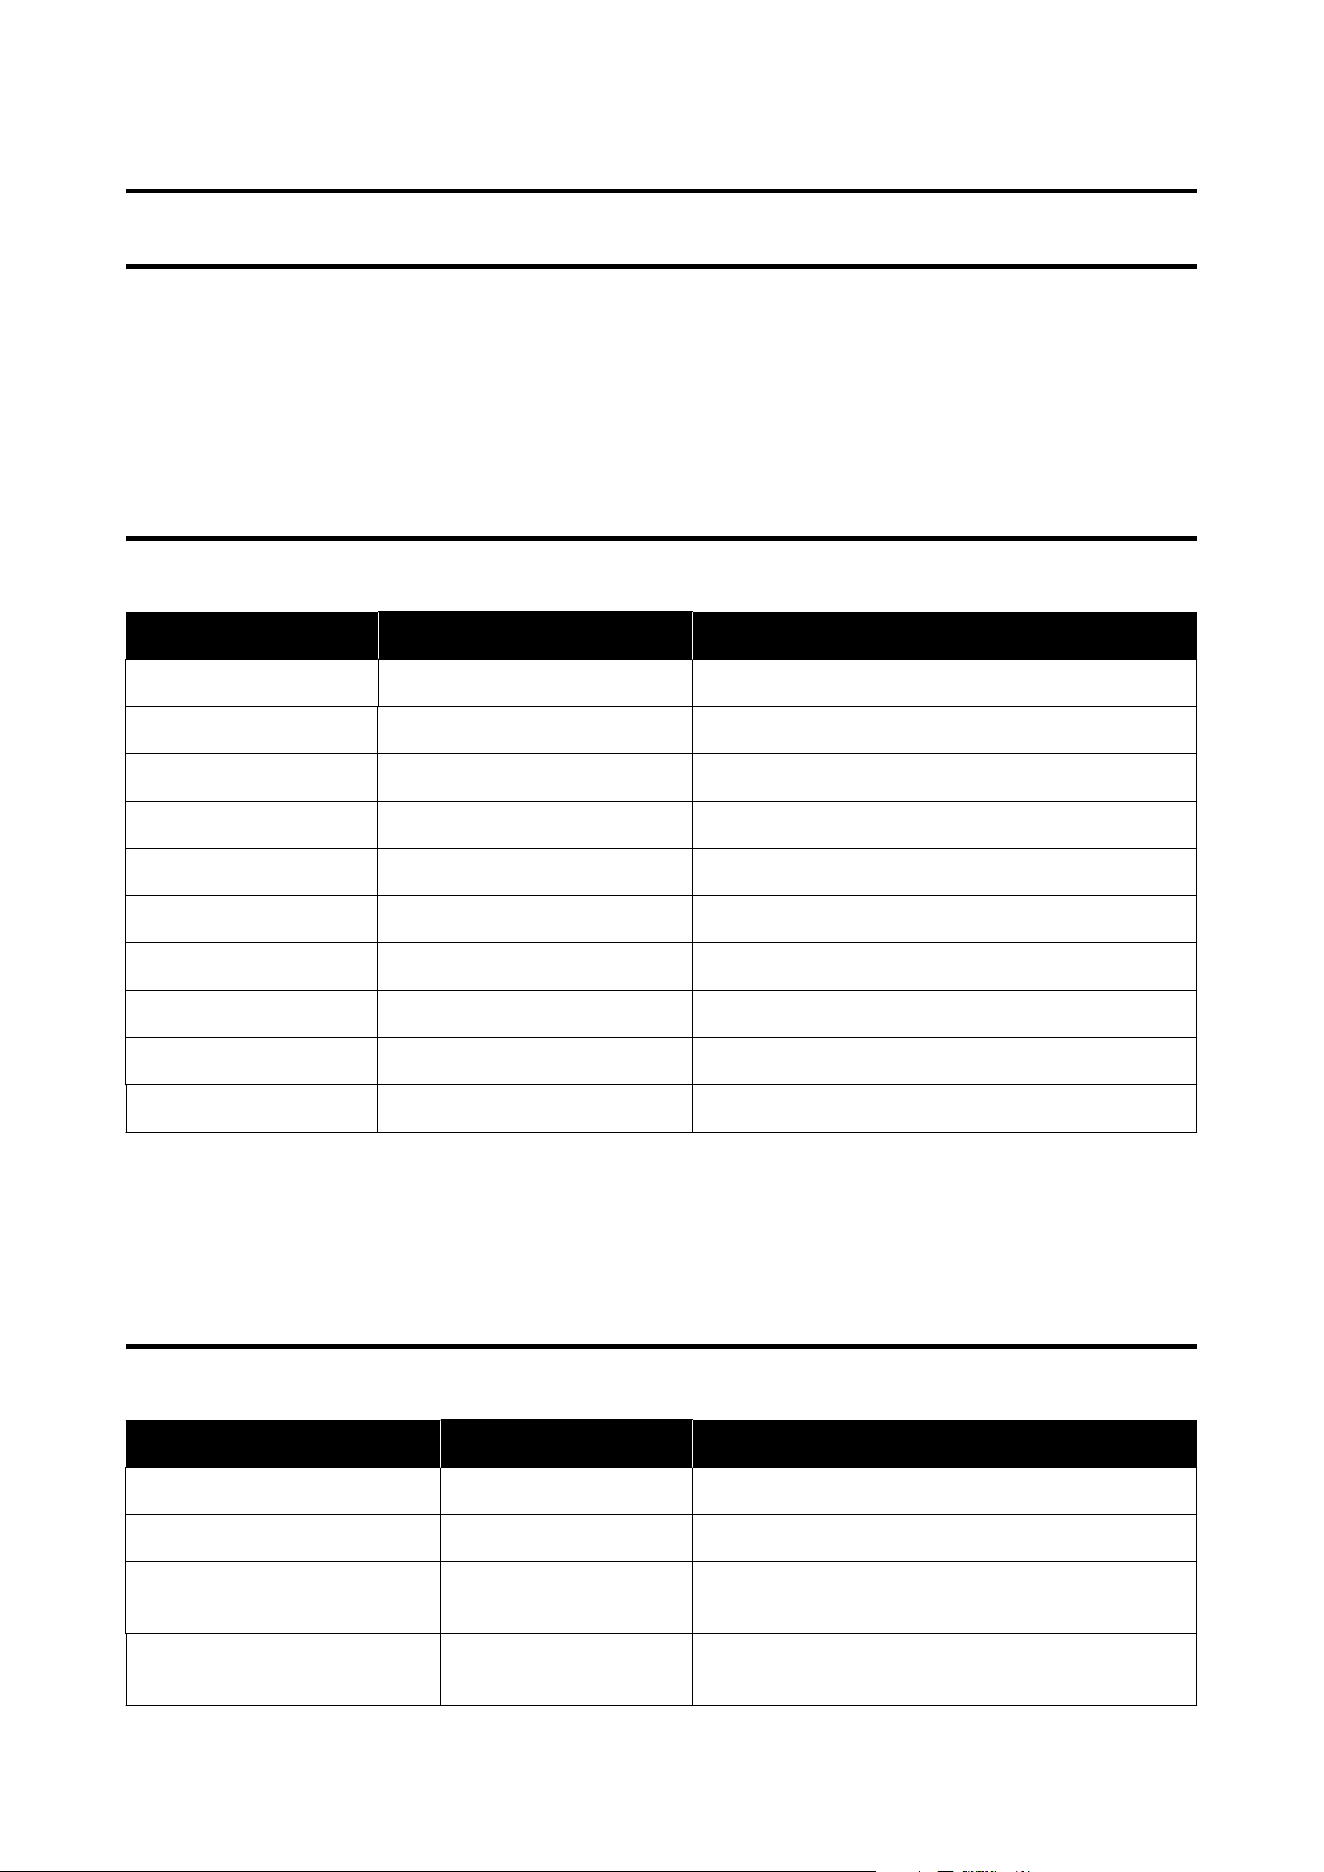
Appendix
Options and Consumable Products
The following options and consumable products are available for use with your printer. (As of December, 2025)
For the latest information, see the Epson Web site.
Ink Bottles
Name Part Number Notes
Black C13T52C100
Cyan C13T52C200
Magenta C13T52C300
Yellow C13T52C400
Light Cyan C13T52C500
Light Magenta C13T52C600
Gray C13T52C700
Red C13T52C900
White C13T52CA00
Varnish C13T52CV00
Epson recommends the use of genuine Epson ink bottles. Epson cannot guarantee the quality or reliability of
nongenuine ink. The use of non-genuine ink may cause damage that is not covered by Epson’s warranties, and
under certain circumstances, may cause erratic printer behavior.
Information about non-genuine ink levels may not be displayed, and use of non-genuine ink is recorded for
possible use in service support.
Maintenance Items
Product name Product number Explanation
Wiper Unit C13S400275 The same as the wiper unit supplied with the printer.
Mist Filter C13S400274 The same as the mist filter supplied with the printer.
Waste Ink Bottle C13S400273 The same as the waste ink bottle supplied with the
printer. 1 item.
Cleaning Stick C13S090013 Use these to clean around the print head and other
areas.
SC-V4000 User's Guide
Appendix
109

Product name Product number Explanation
Cleaning C13T49V010/
C13T52B080
*
Use this to clean the area around the print head.
(In this guide, this item is described as "cleaning liquid".)
Cleaning(small) C13T52AL00/
C13T51RL80
*
Use this to clean the area around the print head.
(In this guide, this item is described as "cleaning liquid".)
* The product number may differ depending on your region.
SC-V4000 User's Guide
Appendix
110

Moving and Transporting
The definitions of moving and transporting are
explained in the following table.
Moving Changing the installation location on
the same floor without having to use
any steps.
Transporting Changing the installation location to
another floor or building. This includes
situations in which the printer is
outsourced to a carrier.
Notes When Moving or
Transporting the Printer
Contact your local dealer or Epson support for
assistance.
SC-V4000 User's Guide
Appendix
111
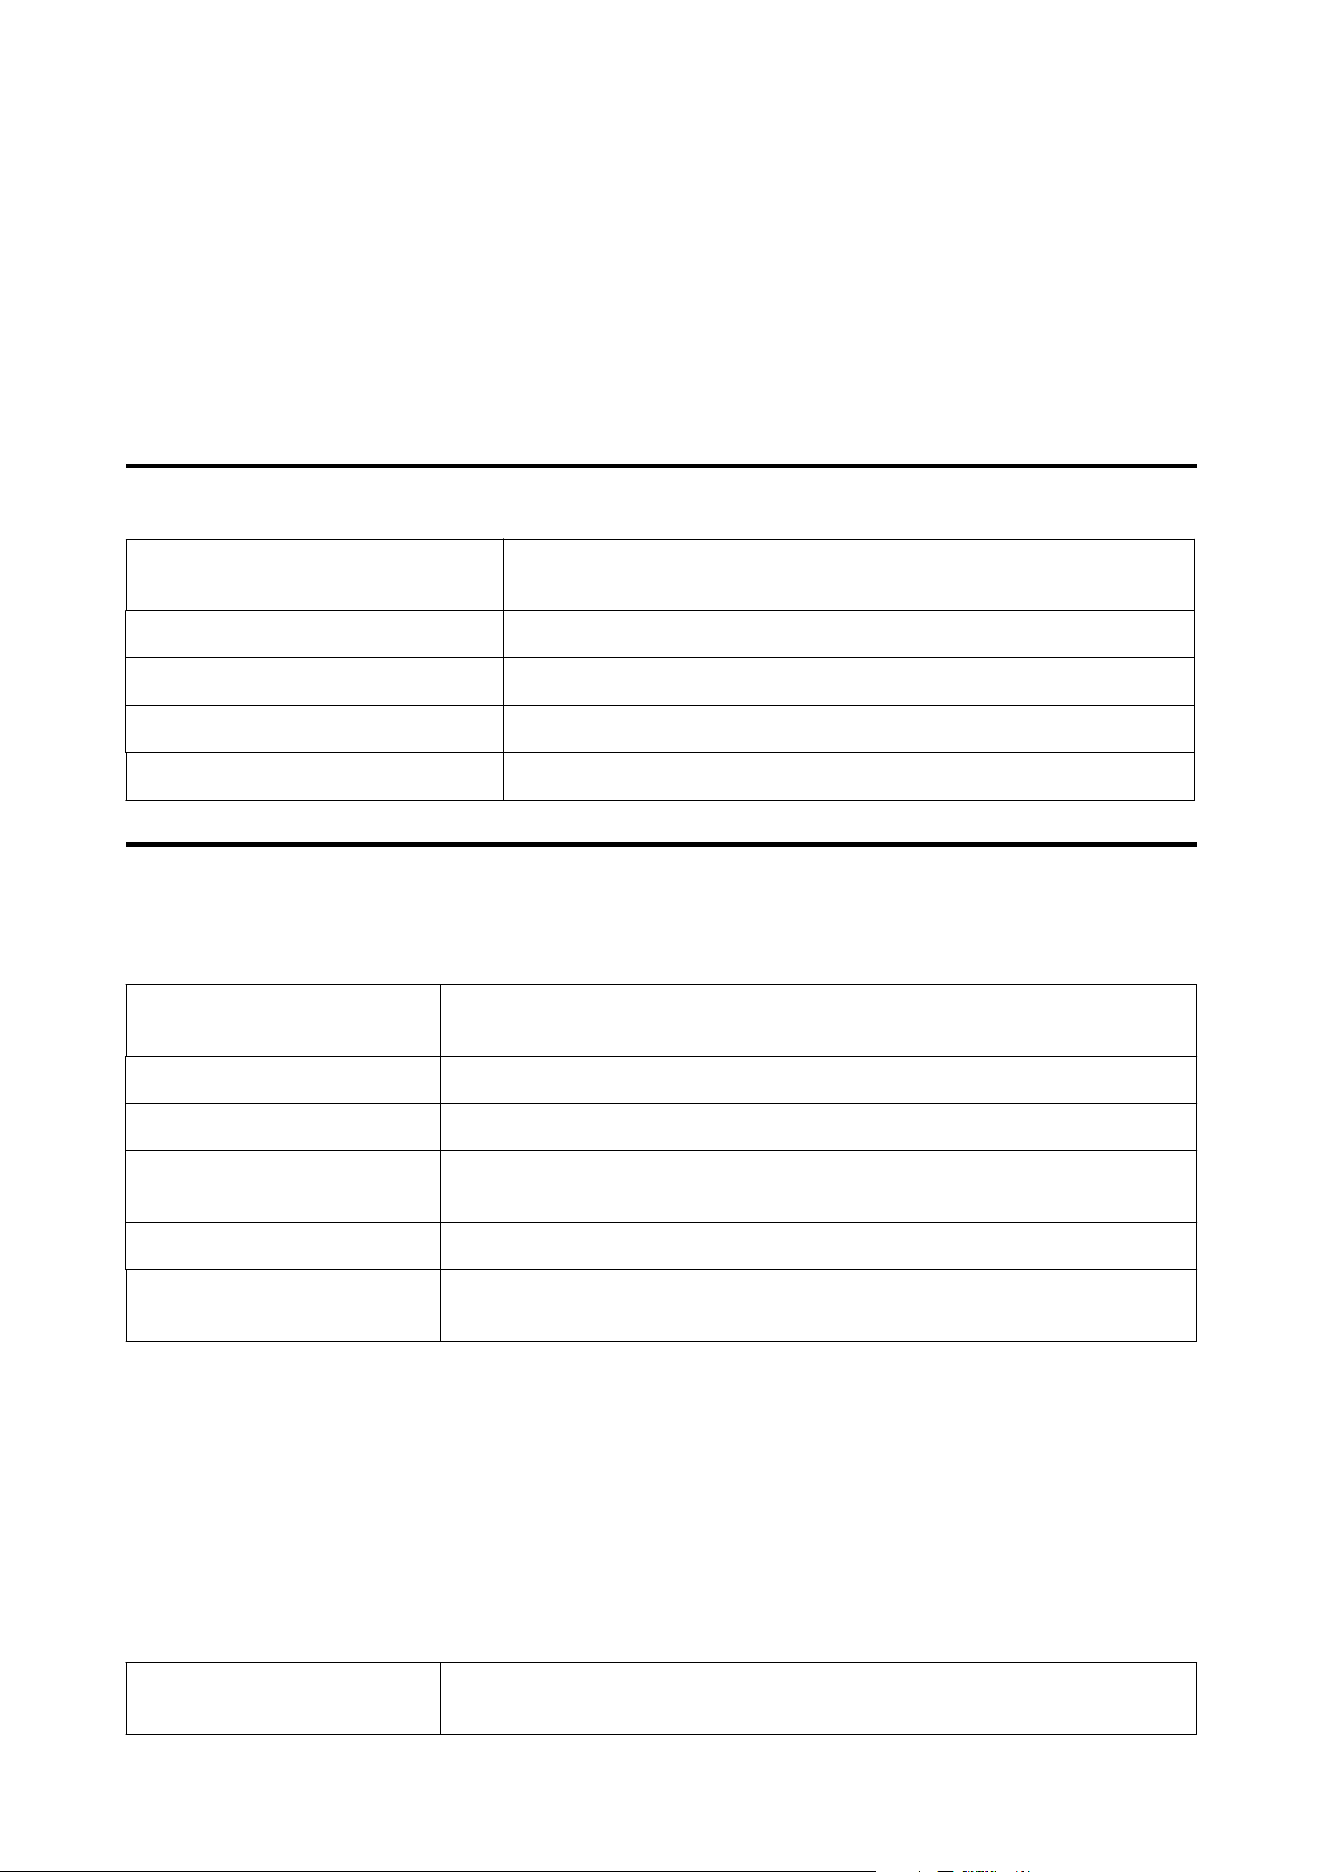
System Requirements
Each software can be used in the following environments. (As of December, 2025)
The supported operating systems may change.
For the latest information, see the Epson Web site.
UV Flatbed Controller
Operating systems (OS) Windows 11
Windows 10 x 64
CPU Intel Core i7 2.0 GHz or faster
Free memory 8 GB or more/4th generation
Storage SSD 100 GB or more
Display resolution Full HD (1920 x 1080) recommended
Epson Edge Print PRO
Operating environment
Operating systems (OS) Windows 11
Windows 10 x 64
CPU Intel Core i3 3.0 GHz or faster (released after April 2014)
Available memory capacity 8 GB or more
Storage
(free space during installation)
50 GB or more
Display resolution 1280 x 1024 or better
Communication interface Hi-Speed USB
Ethernet 100Base-TX/1000Base-T
The computer on which this software is installed is expected to be able to simultaneously use other applications,
such as Adobe Illustrator. Therefore, we recommend using a computer with the highest specifications available.
In addition, the data that this software handles is normally several GB, and could reach several tens of GB for long,
high-quality print jobs. Because of this, we recommend a computer that has storage with sufficient free memory.
The following is the recommended environment for using this software.
Recommended environment
Operating systems (OS) Windows 11
Windows 10 x 64
SC-V4000 User's Guide
Appendix
112

CPU Intel Core i7-14700 processor or faster
Available memory capacity 32GB or more
Storage
(free space during installation)
SSD 1 TB or more
Display resolution 1280 x 1024 or better
Communication interface Hi-Speed USB
Gigabit Ethernet
SC-V4000 User's Guide
Appendix
113
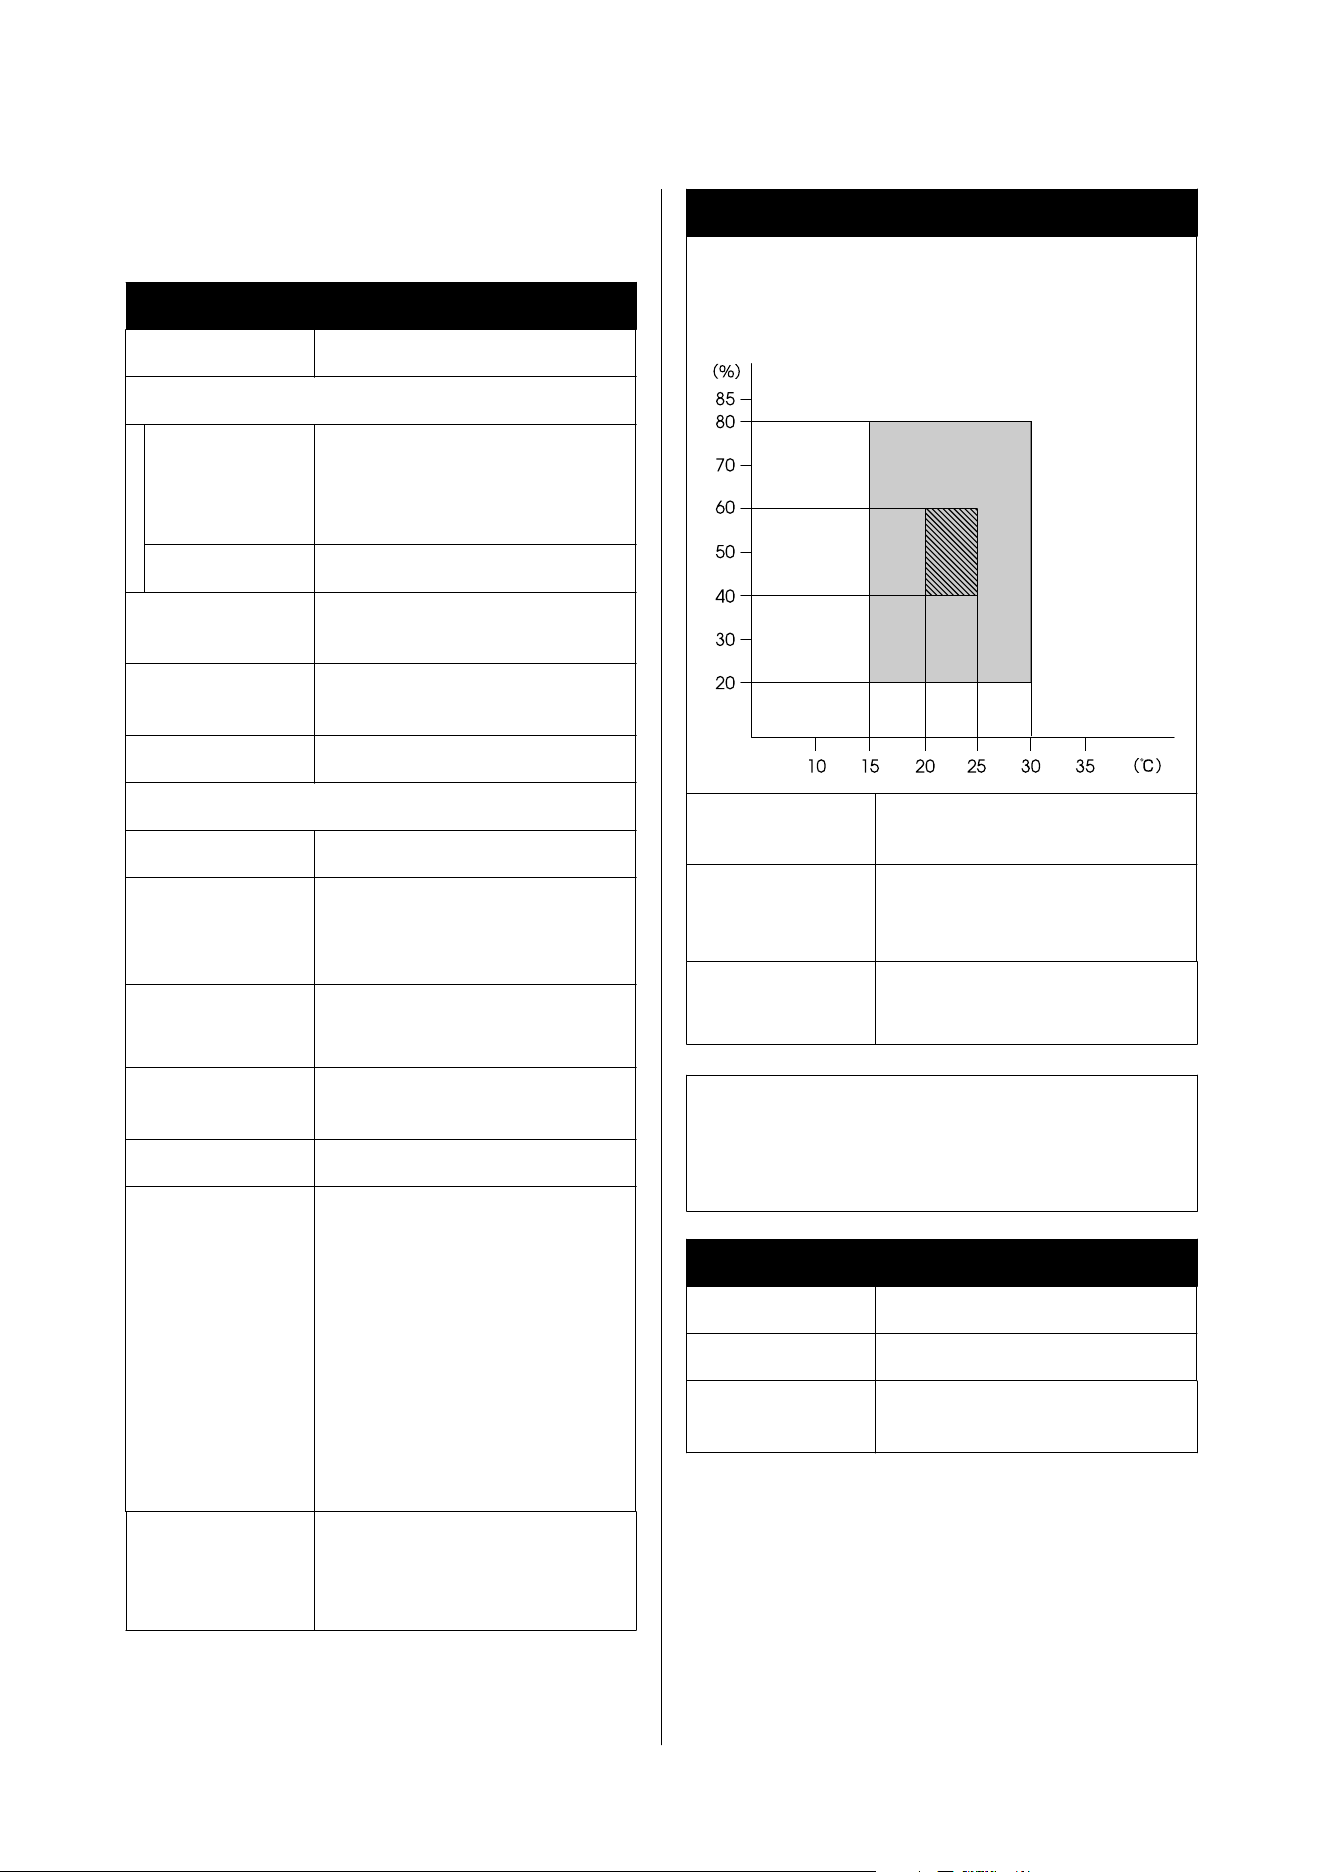
Specifications Table
Printer Specifications
Printing method On-demand ink jet
Nozzle configuration
Except White
and Varnish
400 nozzles × 2 rows × 4 chips 8
colors (Black, Cyan, Magenta,
Yellow, Light Cyan, Light Magenta,
Gray, Red)
White, Varnish 400 nozzles × 2 rows × 4 chips
Resolution (maxi-
mum)
600 x 1200 dpi
Platen feed meth-
od
Gantry type
Built-in memory 1 GB
Interface
USB SuperSpeed USB
Rated voltage AC 115–120 V (for U.S. and
Canada)
AC 100–240 V (for other regions)
Rated frequency 60Hz (for U.S. and Canada)
50 / 60Hz (for other regions)
Rated short-circuit
current
5 kA
Rated current 10 A or less
Temperature Recommended: 20 to 25˚C (68 to
77˚F)
Operating: 15 to 30˚C (59 to 86˚F)
Storage (before ink filling): -20 to
40˚C (-4 to 104˚F) (within 96 hours
at -20˚C [-4˚F], within 1 month at
40˚C [104˚F], within 120 hours at
60˚C [140˚F])
Storage (after ink filling): -20 to
40˚C (-4 to 104˚F) (within one
month at 40˚C /104˚F)
Humidity
(without conden-
sation)
Recommended: 40 to 60%
Operating: 20 to 80%
Storage: 5 to 85%
Printer Specifications
Operating temperature/humidity
Gray area: When in use
Diagonal line area: Recommended
Sound pressure
level
When printing: Less than 60 dB(A)
Dimension (W) 2100 × (D) 1600 × (H) 1255
mm
([W] 82.7 x [D] 63.0 x [H] 49.4 in.)
Weight
(Without ink)
Approx. 602 kg (approx. 1,327 lb)
c
Important:
Use this printer at altitudes below 2000 m (6562
ft.).
Ink Bottle Specifications
Type Dedicated ink bottles
Types of ink UV-curable ink
Printing guarantee
period
Expiration date on ink bottle
(stored at room temperature)
SC-V4000 User's Guide
Appendix
114
Ink Bottle Specifications
Temperature When packed for transport: -30 to
60˚C (-22 to 140˚F)
(Within 24 hours at -30 to -10˚C
[-22 to 14˚F], within 1 month at -10
to 40˚C [14 to 104˚F], within 120
hours at 50˚C [122˚F], and within
24 hours at 60˚C [140˚F])
When packed for storage: -30 to
40˚C (-22 to 104˚F)
(Within 24 hours at -30 to -20˚C
[-22 to -4˚F] and within 1 month at
30 to 40˚C [86 to 104˚F])
Ink freezing temperature: -30˚C
(-22˚F) or colder
Capacity 1000 ml (33.8 oz)
SC-V4000 User's Guide
Appendix
115