MANUAL 10211 REV 0 (04/21)
$21.00
ELECTRIC COUNTER PAN STEAMERS
MANUAL SECTION CO
IMPORTANT FOR FUTURE REFERENCE
Please complete this information and retain this
manual for the life of the equipment:
Model #:
___________________________
Serial #:
___________________________
Date Purchased:
_____________________
WARNING
Improper installation, adjustment, alteration, service or maintenance can cause property damage, injury
or death. Read the installation, operating and maintenance instructions thoroughly before installing or
servicing this equipment.
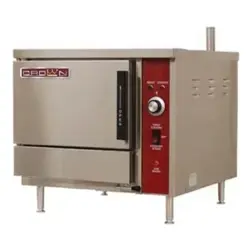
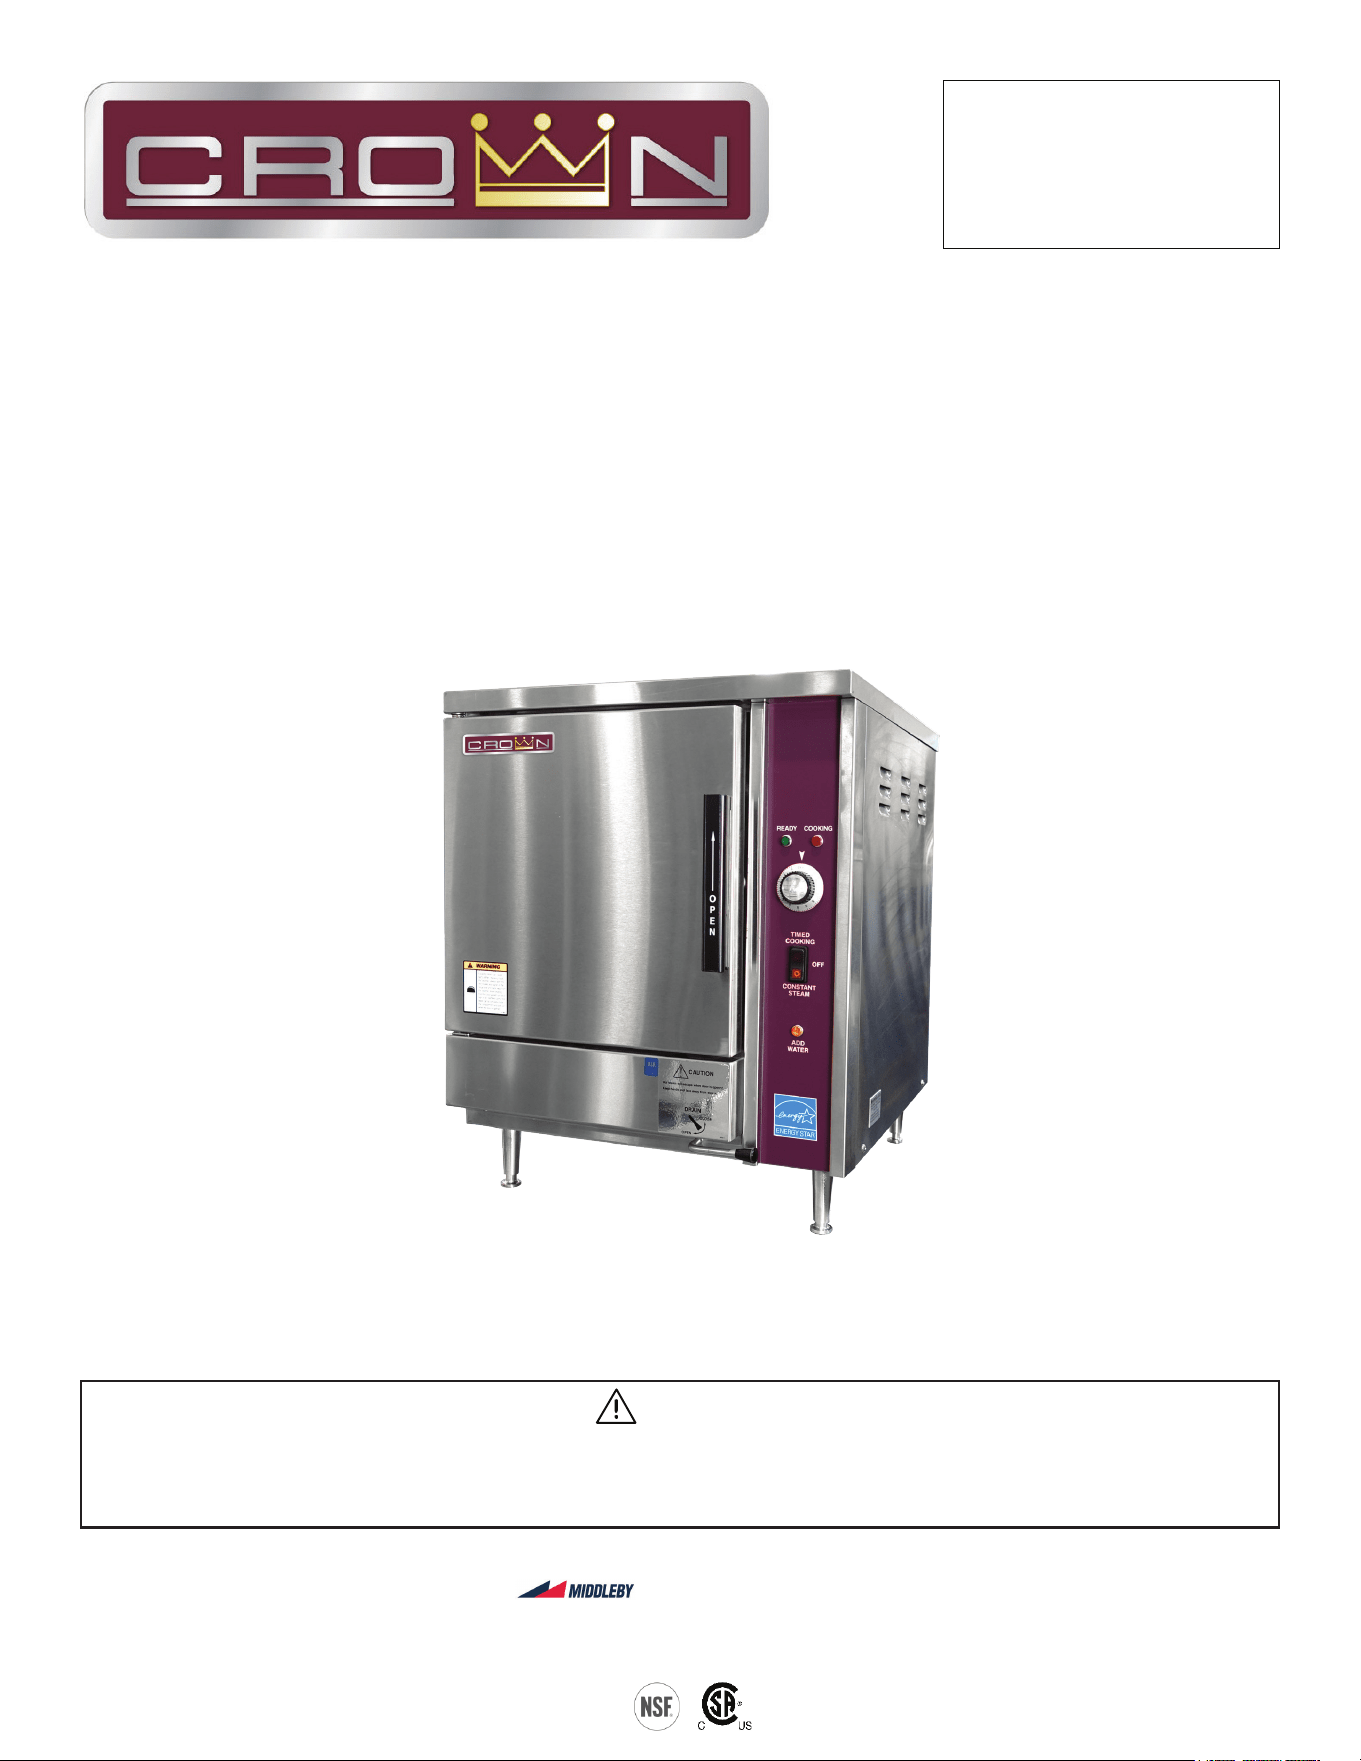
Model EPX-5
CROWN FOOD SERVICE EQUIPMENT
A Middleby Company
70 Oakdale Road, Downsview (Toronto) Ontario, Canada, M3N 1V9
Telephone: 919-762-1000 www.crownsteamgroup.com
Electric
Counter Pan Steamers
EPX-3 & EPX-5
Installation & Operation Manual
INSTALLATION & OPERATION MANUAL 10211 REV 0 (04/21)
PAGE
2
OF 20
Electric Counter Pan Steamers
SAFETY PRECAUTIONS
Before installing and operating this equipment, be sure everyone involved in its operation is fully trained and aware of
precautions. Accidents and problems can be caused by failure to follow fundamental rules and precautions.
The following symbols, found throughout this manual, alert you to potentially dangerous conditions to the operator,
service personnel, or to the equipment.
CAUTION
WARNING
NOTICE
This symbol warns of immediate hazards that will result in severe injury or death.
This symbol refers to a potential hazard or unsafe practice that could result in injury or death.
This symbol refers to a potential hazard or unsafe practice that could result in injury, product
damage, or property damage.
This symbol refers to information that needs special attention or must be fully
understood, even though not dangerous.
DANGER
WARNING
WARNING: Improper installation, operation, adjustment, alteration, service or maintenance can cause property
damage, injury or death. Read the installation, operating and maintenance instructions thoroughly before installing,
operating or servicing this equipment.
NOTICE
Unit must be level to assure proper performance.
NOTICE
This product is intended for commercial use only. NOT FOR HOUSEHOLD USE.
Copyright © 2021 by Crown. All rights reserved. Published in the United States of America.
SPECIFICATIONS
IMPORTANT NOTES FOR INSTALLATION AND OPERATION
WARNING
This is the safety alert symbol. It is used to alert you to potential personal injury hazards. Obey all safety messages
that follow this symbol to avoid possible injury or death.
WARNING
Never spray water in electrical components.
NOTICE
This manual should be retained for future reference.
It is recommended that this manual be read thoroughly and that all instructions be followed carefully.

INSTALLATION & OPERATION MANUAL 10211 REV 0 (04/21)
PAGE
3
OF 20
Electric Counter Pan Steamers
RETAIN THIS MANUAL FOR FUTURE REFERENCE.
Table of Contents
Important Notes For Installation and Operation .................................................................... 2
Service Connections ............................................................................................................. 4
Introduction ........................................................................................................................... 5
Installation Instructions ......................................................................................................... 6
Testing Procedures ............................................................................................................... 8
Operation .............................................................................................................................. 9
Cleaning ................................................................................................................................ 11
Cooking Guidelines ............................................................................................................... 12
Preventive Maintenance ....................................................................................................... 13
Troubleshooting .................................................................................................................... 15
Table of Contents
INSTALLATION & OPERATION MANUAL 10211 REV 0 (04/21)
PAGE
4
OF 20
Electric Counter Pan Steamers
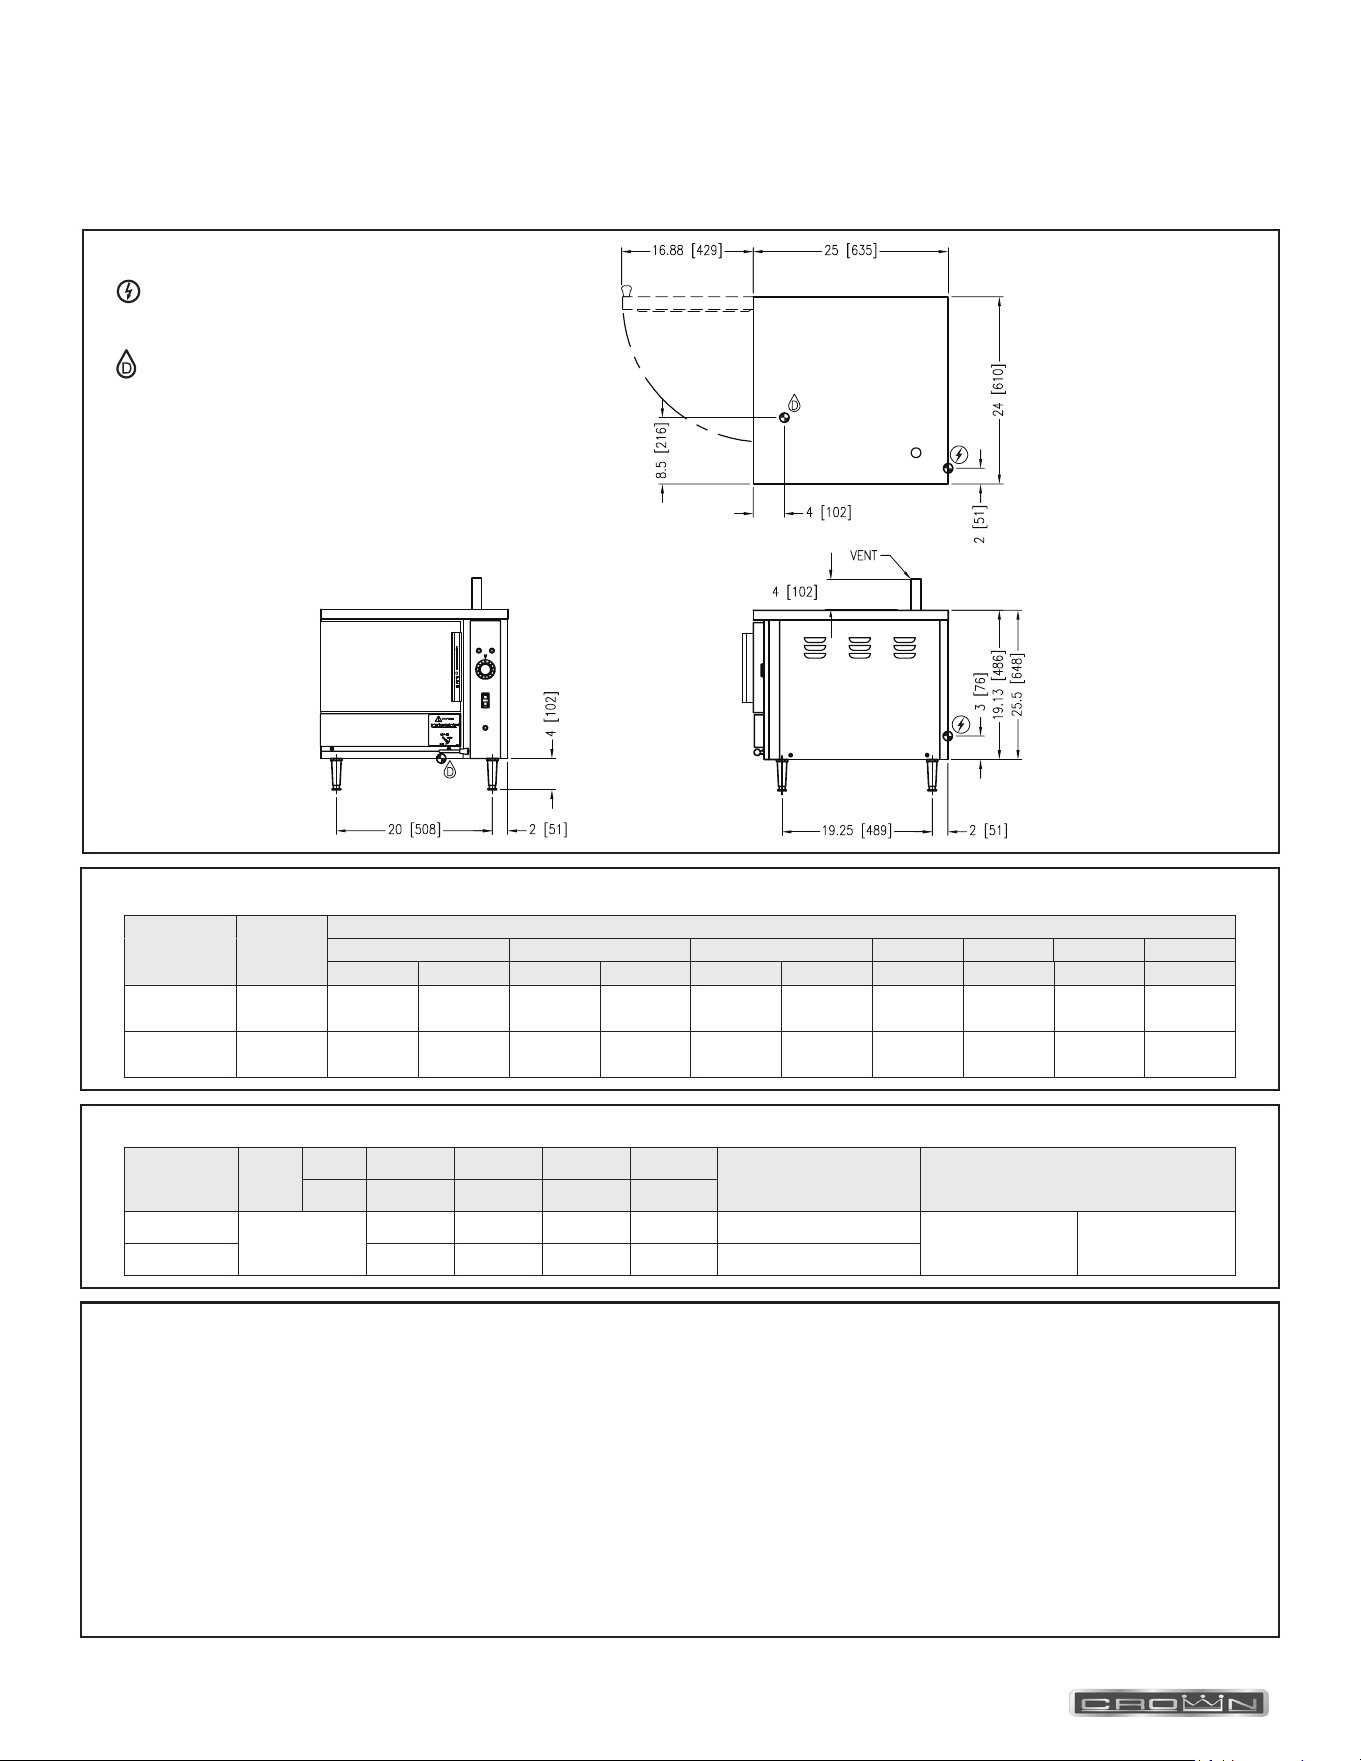
SERVICE CONNECTIONS
SERVICE CONNECTIONS
ELECTRICAL CHARACTERISTICS
WATER QUALITY STATEMENT
Water is the essential ingredient in steam equipment, water quality is the major factor aecting the performance of your appliance. Crown Steam
Group oers a Comprehensive Water Treatment System which exceeds our minimum water requirements. Proof of installation and proper
cartridges replacement is required for warranty coverage. Water supply to Crown Steam Group steamers must be within these guidelines.
Total dissolved solids.......................Less than 60 PPM
Total alkalinity ................................ Less than 20 PPM
Silica ............................................... Less than 13 PPM
Chlorine ......................................... Less than 1.5 PPM
pH Factor ......................................6.8 - 7.3
Water which does not meet these standards should be treated with the installation of Middleby’s Water Treatment System. Call 919-762-1000
if you have questions concerning your water meeting these parameters.
*Failure or malfunction of this appliance due to poor water quality is not covered under warranty.
Reference www.crownsteamgroup.com for complete warranty details and instructions.
COMPARTMENT PAN CAPACITY
Model kW
AMPS/PHASE
208V 220V 240V 380V 415V 480 V 600V
1 PH 3 PH 1 PH 3 PH 1 PH 3 PH 3 PH 3 PH 3 PH 3 PH
EPX-3
9
6
43.3
28.9
25.0
N/A
40.9
27.3
23.6
N/A
37.5
25.0
21.7
N/A
13.7
N/A
12.5
N/A
10.8
N/A
8.7
N/A
EPX-5
15
10
72.1
48.1
41.6
N/A
68.2
45.5
39.4
N/A
62.5
41.7
36.0
N/A
22.8
N/A
20.9
N/A
18.0
N/A
14.4
N/A
Model
Pan
Depth
Inches 1” 2.5” 4” 6”
Shipping Weight Minimum Clearance
mm 25 64 102 152
EPX-3
Total Quantity of
Pans
6 3 2 1 161 lbs. [73 kg]
SIDES
BACK
0
3
EPX-5 10 5 3 2 183 lbs. [83 kg]
READYCOOKING
COOKING
CONSTANT
OFF
STEAM
TIMED
ADD
WATER
EZ24-3
EZ24-5
SERVICE CONNECTIONS
– ELECTRICAL CONNECTION: Ø 1 1/8”
(29 mm) hole for electrical connection. Rating to
be specied on data plate.
– DRAIN: 1/2” NPT
As continued product improvement is a policy of Crown, specications are subject to changge without notice.

INSTALLATION & OPERATION MANUAL 10211 REV 0 (04/21)
PAGE
5
OF 20
Electric Counter Pan Steamers
Description
The model EPX-3 steamer comes equipped with a standard 9.0 kW heating block that can be reduced to 6 kW on
single phase supplies. Model EPX-5 steamer comes equipped with a standard 15.0 kW heating block that can be
reduced to 10 kW on single phase supplies.
Your new steamer has been designed and manufactured to meet the toughest industry standards. The best possible
workmanship and materials along with laboratory tests have been utilized in its design.
Proper installation, care and maintenance will give you years of reliable, trouble free operation.
The EPX-3 and EPX-5 are electric red pressureless steam cookers. The cooking compartments are equipped with
a three-piece door with inner gasket plate isolated from the exterior surface. Door latch operates by slam action for
positive sealing of the door. Operating controls are displayed on a front-mounted panel and include indicator lights
for ready and cooking modes, a timer to set cook times and an illuminated rocker mode selection switch for TIMED
COOKING, OFF and CONSTANT STEAM.
Basic Functioning
The cooker is ready for operation when the READY light comes on.
At the end of the set interval, timer contacts switch to shut o the cooking operation and sounds a signal buzzer and will
maintain a safe food holding temperature at or above 150F. The buzzer is silenced by returning the timer dial to the OFF
position. The READY light will be illuminated.
INTRODUCTION
INtroduction
INSTALLATION & OPERATION MANUAL 10211 REV 0 (04/21)
PAGE
6
OF 20
Electric Counter Pan SteamersINSTALLATION
Unpacking
IMMEDIATELY INSPECT FOR SHIPPING DAMAGE
Immediately after unpacking the steamer, check for possible shipping damage. If the steamer is found to be damaged
after unpacking, save the packaging materials and contact the carrier within 15 days of delivery. File a claim
regardless of extent of damage.
We cannot assume responsibility for damage or loss incurred in transit.
Prior to installation, verify that the electrical service agrees with the specications on the machine data plate which is
located on the left side panel.
INSTALLATION INSTRUCTIONS
Location
Allow space for vent and electrical connection. Minimum clearances for proper air circulation is 2” on the sides and 6” on
the back. Allow adequate access for servicing.
Levelling
Using a spirit level, adjust the feet to level the unit, front to back and side to side. The unit must be level for proper
operation. Warranty will be void for improper installation.
Electrical Connections
WARNING
The unit must be electrically grounded and comply with local codes, or in the absence of local codes with the
national electrical code ANSI/NFPA to latest edition. Canadian installation must comply with CSA Standard
(C22.2 No. 109-M1981 General Requirements Canadian Electrical Code, Part II 109-M1981) for commercial
cooking appliances.
WARNING
Disconnect electrical power supply and place a tag at the disconnect switch to indicate that you are
working on circuit.
Use copper wire suitable for at least 200E Fahrenheit (90° Celsius). The steamer must be grounded. The
wiring diagram is located on the right side panel as you face the unit.
Make electrical connection through the 1-1/8” (29 mm) diameter hole provided using 3/4” (19 mm) trade size conduit.
Refer to the wiring diagram located inside the right side panel. Use 90°C minimum insulated wire.
INSTALLATION & OPERATION MANUAL 10211 REV 0 (04/21)
PAGE
7
OF 20
Electric Counter Pan Steamers
No plumbing connections are required as steamer is lled manually.
Drain Connections
No drain connection is required.
Water Condition
For best results Crown recommends that the water supply meet the following specication:
Hardness: ................................... Less than 2 grains or 35 ppm.
Total Dissolved Solids (TDS): ..... Less than 60 ppm.
PH Factor: ................................... 7.0 to 7.5
This degree of hardness can easily be obtained with the use of a properly maintained water softener.
Vent Hood
Some local codes may require the steamer to be located under an exhaust hood. It is recommended that this steamer be
located under an exhaust hood to remove excess steam during cooking operations.
Information on the construction and installation of ventilating hood may be obtained from the standard for “Vapor Removal
for Cooking Equipment”, NFPA No. 96 (Latest Edition).
INSTALLATION
Plumbing Connections
WARNING
For an appliance equipped with casters, the installation shall be made with an adequate exible electrical conduit;
adequate means must be provided to limit the movement of the appliance without depending on or transmitting
stress to the electrical conduit; the location where restraining means may be attached is to the rear of the stand,
below power supply connection.
INSTALLATION & OPERATION MANUAL 10211 REV 0 (04/21)
PAGE
8
OF 20
Electric Counter Pan SteamersTESTING PROCEDURES
TESTING PROCEDURES
Once the steamer is installed, thoroughly test the steamer before operation.
1. Check that door opens and closes for proper operation.
2. Inspect the door gasket to ensure there is no damage.
3. Check without water in the steamer and with “CONTINUOUS” cooking mode selected, that the “LOW WATER”
indicator and alarm comes on within 10 minutes of a cold start.
4. Open compartment door and pour in water up to the “Water Level” mark located at back of compartment.
5. Select TIMED COOKING mode with the power switch and set the timer to the OFF position.
6. Close door and wait approximately 10 minutes for the READY indicator to illuminate which will indicate the unit is up
to proper operating temperature.
7. Open the door to verify the cavity has reached cooking temperature. Water in the bottom of the cooking cavity should
be between 200 to 210°F.
8. Set the timer to 5 minutes and close the door to initiate the cooking cycle. The COOKING indicator should illuminate.
Allow the timed cooking cycle to complete, verifying that the end of cycle buzzer sounds and the COOKING indicator
is out. The ‘READY’ light will illuminate.
Before First Use
Clean the protective oils from all surfaces of the steamer. Use a non-corrosive, grease dissolving commercial cleaner,
following manufacturer’s directions. Rinse thoroughly and wipe dry with a soft clean cloth.
WARNING
The steamer and its parts are hot. Use care when operating, cleaning or servicing the steamer. The cooking
compartment contains live steam and hot water. Stay clear while opening the door.
WARNING
The steamer and its parts are hot. Use care when operating, cleaning or servicing the steamer. The cooking
compartment contains live steam and hot water. Stay clear while opening the door.
INSTALLATION & OPERATION MANUAL 10211 REV 0 (04/21)
PAGE
9
OF 20
Electric Counter Pan Steamers OPERATION
OPERATION
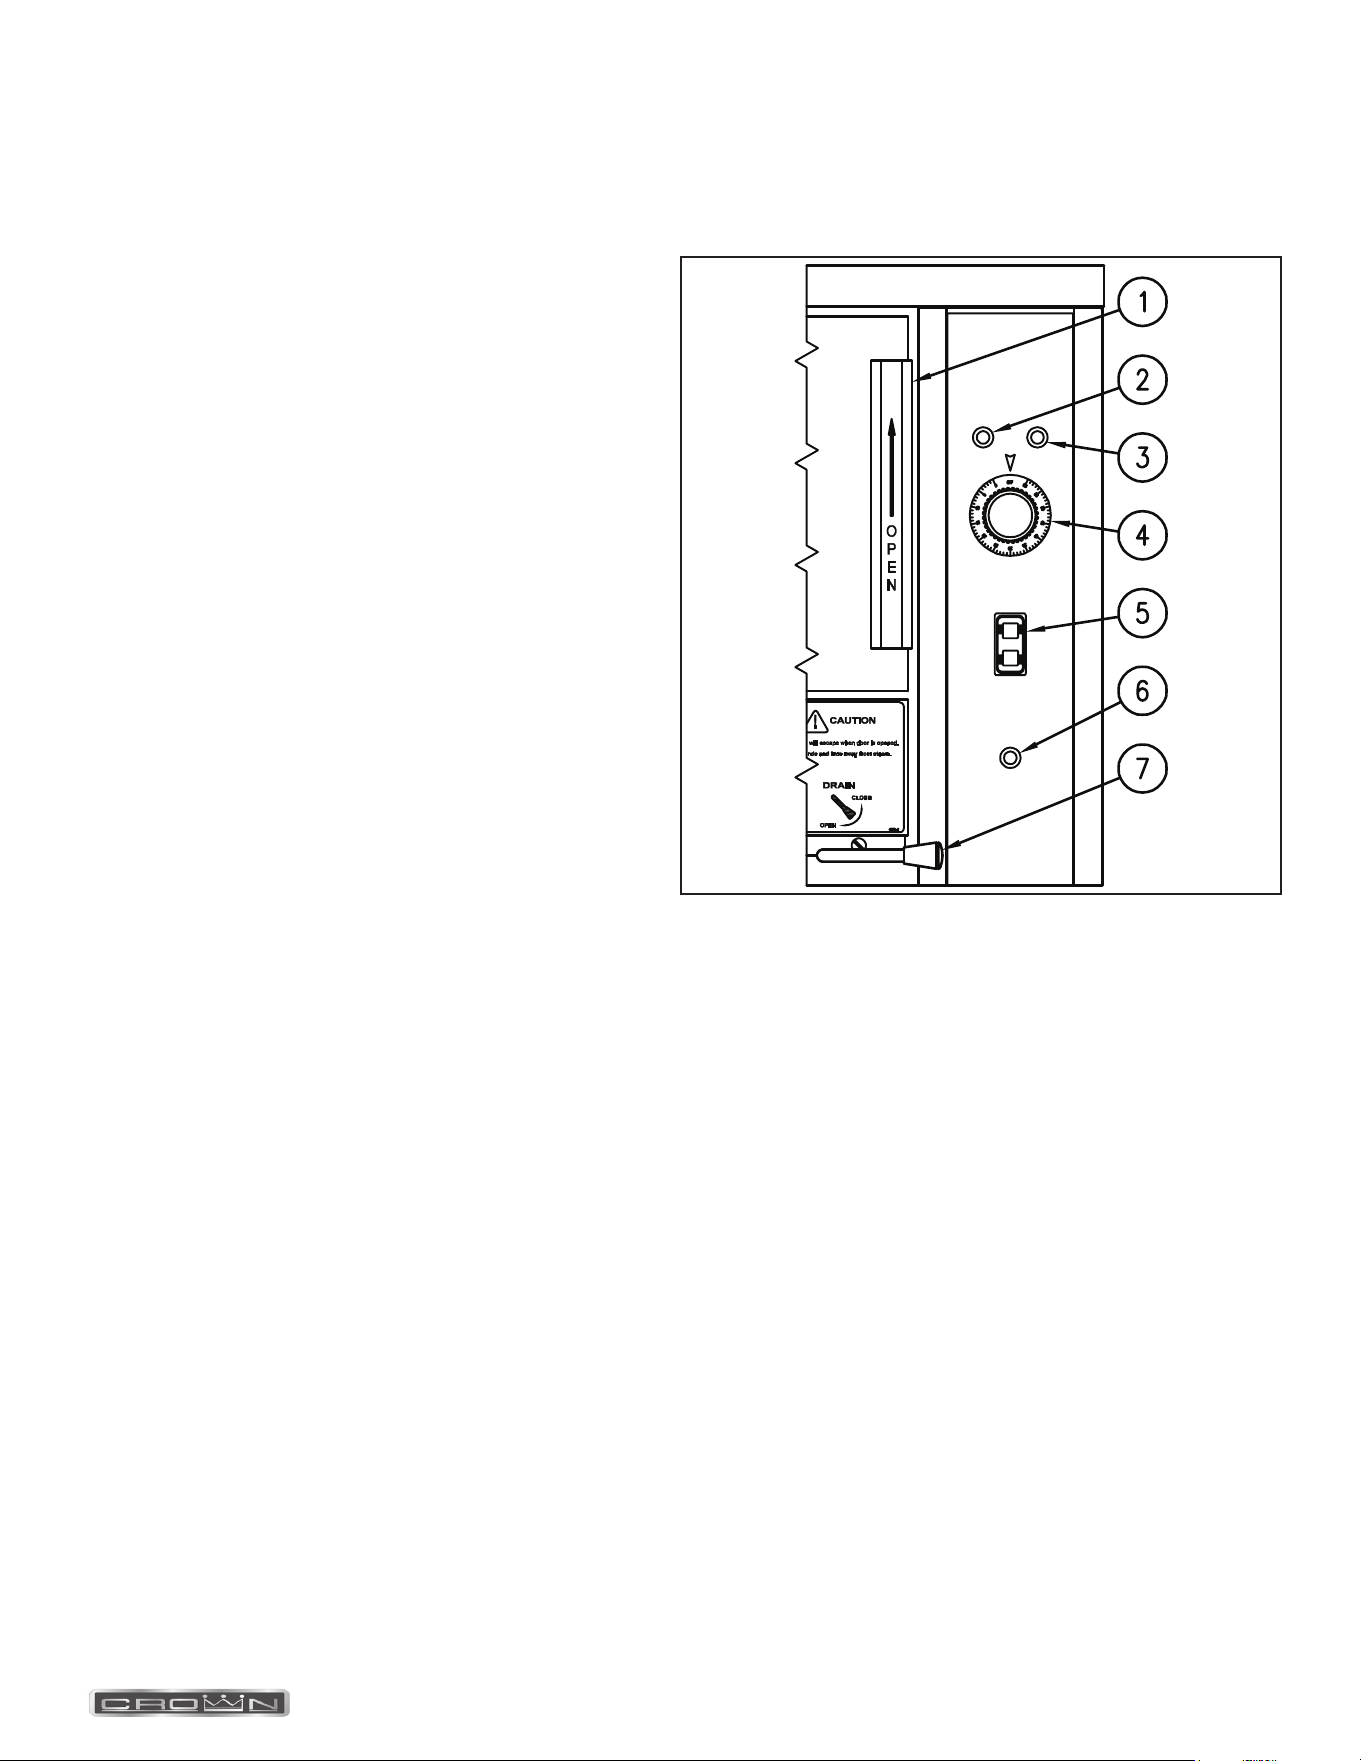
Controls
1. Door Handle
Move handle up to open door to cooking cavity.
2. Ready Pilot Light
When lit, indicates the steamer cavity is above 150°F
(65°C) and is ready for the cooking cycle.
3. Cooking Pilot Light
When lit, indicates that a cooking cycle is in progress.
4. Timer Dial
Set the cooking time (0 to 60 minutes) - steam cooking
will begin after the door is closed. The cooking cycle
will be interrupted if the door is opened during the
cooking cycle; resume cooking by closing the door.
Holding temperature in the cavity will keep cooked
foods warm after cooking cycle, at or above 150°F
(65°C).
5. Main Power Switch
TIMED COOKING - The steamer will begin heating
to the pre-set temperature for standby. Red light will
illuminate on the main power switch. Cooking cycle is
determined by timer dial.
OFF - The steamer is powered o.
CONTINUOUS STEAM - Steamer will heat to enter into a continuous cooking cycle. Both indicator lights will remain
o during continuous steam cooking cycles.
6. Add Water Pilot Light
Illuminates to indicate a low water condition or that the temperature of the heater element is above normal. A buzzer
will also sound an audible alarm.
7. Drain Handle
Use to drain the steamer at end of day.
OFF
READY COOKING
CONSTANT
STEAM
ADD
WATER
TIMED
COOKING
INSTALLATION & OPERATION MANUAL 10211 REV 0 (04/21)
PAGE
10
OF 20
Electric Counter Pan SteamersOPERATION
Cooking
1. Close drain valve.
2. Remove the deector plate to expose the bottom of the cavity.
3. Pour water through the door up to the “WATER LEVEL” mark on the back wall of the cavity and then replace the
deector plate.
4. Close the door, select “TIMED COOKING” mode with the power switch and set the timer to one minute position. The
unit will be ready for operation in approximately ten minutes when the “READY” indicator lamp is illuminated and the
buzzer sounds.
5. Turn the timer to “OFF” position to silence the buzzer, slide pans of food into cooking compartment pan supports and
close cooking compartment door.
6. Select “CONSTANT STEAM” or “TIMED COOKING” mode.
7. In “CONSTANT STEAM” mode the unit will begin the cooking cycle and continue indenitely until user intervention or
unit runs out of water. There are no indicator lights illuminated in this mode.
8. In “TIMED COOKING” mode the unit will run through the cooking cycle determined by number of minutes selected
with the timer. The end of the cooking cycle is indicated by the buzzer and the illuminated “READY” lamp. The unit will
hold the cooked foods in a warm state and will maintain the cooking cavity at or above 150°F (65°C) with the timer set
to the “OFF” position.
9. The cooking cycle may be interrupted at any time by opening the compartment door. To resume operation, close the
door.
10. Open door slightly at rst letting most of the steam out of the compartment and then fully open the door.
11. Unload by sliding pans of food from pan supports.
12. Close the door to ensure the unit is ready for the next cook cycle.
Shutdown
1. Drain the steamer after each day’s use.
2. Set the power switch to “OFF”.
3. Drain the steamer into a suitable receptacle capable of holding 3 gallons of boiling water.
4. Thoroughly clean the unit.
CAUTION
Live steam and accumulated hot water in the compartment may be released when the door is opened.
CAUTION
When the unit is not in use, leave the cooking compartment doors ajar to prolong the life of the door gasket.
CAUTION
Drain water is very hot and can cause severe personal injury.
INSTALLATION & OPERATION MANUAL 10211 REV 0 (04/21)
PAGE
11
OF 20
Electric Counter Pan Steamers CLEANING
CLEANING
After each period of daily operation (more frequently as required to maintain cleanliness), the cooker should be thoroughly
cleaned by completing the following steps:
1. Perform SHUTDOWN procedure.
2. Remove the deector plate and pan supports by lifting up and o mounting studs and wash with a mild detergent.
3. When the unit has cooled, use hot soapy water to clean the interior of the steamer and thoroughly rinse and dry all
surfaces with a clean dry cloth.
4. Inspect the drain opening to assure there are no obstructions.
5. Replace the pan supports and deector in compartment and leave door ajar.
WARNING
Disconnect the power supply to the appliance before cleaning or servicing.
WARNING
Never use chlorine or bleach solution for cleaning door gasket.
Never use steel wool or other metallic pads to clean the steamer.
Weekly, or more often if necessary, clean the exterior with damp cloth and polish with soft dry cloth.
Use a non-abrasive cleaner to remove discolourations.
WARNING
When this appliance is installed with casters and is connected to the supply service with exible electrical conduit,
a restraint to prevent damage to the electrical conduit should have been installed. If disconnection of the restraint is
necessary, reconnect this restraint after the appliance has been returned to its originally installed position.
INSTALLATION & OPERATION MANUAL 10211 REV 0 (04/21)
PAGE
12
OF 20
Electric Counter Pan SteamersCOOKING GUIDELINES
COOKING GUIDELINES
1. Frozen vegetables should always be cooked in perforated 12” x 20” x 2-1/2 “ (1/1 65 mm) pans, 7-1/2 lbs. (3.4 kg) maximum per pan.
2. Frozen entrees should be underlined with a perforated pan for best results. If they are defrosted rst, the heating time
will be decreased.
3. Fresh foods may also be cooked in this unit. Vegetables and other foods where the stock is not to be retained should
be cooked in perforated 12” x 20” x 2-1/2” (1/1 65 mm) pans for the most nutritious results.
4. Total cooking time will vary depending on the load, even though the timer setting is the same.
5. All foods, except cakes and pastry, can be cooked in a steam cooking unit.
6. Steam cooked meals have greater nutritional value since they retain most of their vitamins and minerals.
7. Because foods are cooked faster by the higher temperatures of steam cooking, they can be prepared closer to
serving time, insuring maximum freshness.
8. Steam cooked foods have a higher percent yield more portions per dollar spent.
9. Food may be served from the same pan in which it is steam cooked, thus reducing food breakage since there is no
extra handling or transferring of food from cooking pans to serving pans. It also reduces pot washing tasks.
10. Some important advantages of steam cooking are labour saving, reduced operating costs, space saving, and the
lifting of heavy stock pots is eliminated.
11. Rice and pasta products, if thoroughly wet at the start of the cooking process, are very easily prepared.
12. Food such as potatoes, poultry, seafood, and some meats may be blanched in the steam cooker, thus reducing the
total cooking time and grease absorption.
13. The steam cooker will loosen foods burned on pans making washing easier.
14. Solid pans are recommended when liquid is to be retained and perforated pans when the liquid is not to be retained.
15. Eggs may be cooked out of the shell if they are to be chopped which eliminates peeling after steaming.
16. The steam cooker can be opened during the cooking period to add or remove items.
Steam Cooking
Your steamer eciently cooks vegetables or other foods for immediate serving. Steam cooking should be carefully time controlled.
Keep hot food holding time to a minimum to produce the most appetizing results. Prepare small batches, cook only enough to start
serving, then cook additional amounts to meet demand. Separate frozen foods into smaller pieces to allow more ecient cooking.
Use a pan cover for pre-cooked frozen dishes that cannot be cooked in the covered containers in which they are packed if they
require more than 15 minutes of cooking time. When cover is used, approximately one-third additional cooking time is necessary.
Cooking time for frozen foods depends on amount of defrosting required. If time permits, allow frozen foods to partially
thaw overnight in a refrigerator. This will reduce their cooking time.
Preparation
Prepare vegetables, fruits, meats, seafood and poultry normally by cleaning, separating, cutting, emoving stems, etc. Cook root
vegetables in a perforated pan unless juices are being saved. Liquids can be collected in a solid 12” x 20” pan placed under a
perforated pan. Perforated pans are used for frankfurters, wieners and similar items when juices do not need to be preserved.
Solid pans are good for cooking puddings, rice and hot breakfast cereals. Vegetables and fruits are cooked in solid pans in their
own juices. Meats and poultry are cooked in solid pans to preserve their own juices or to retain broth. Canned foods can be
heated in their opened cans (cans placed in 12” x 20” solid pans) or the contents may be poured into solid pans.
The steamer compartment is designed to accept combinations of the pan of 12” x 20” (either solid or perforated) as shown
on the following table.
DEPTH OF PAN
NUMBER OF PANS
EPXN-3 EPXN-5
1” 6 10
2 ½” 3 5
4” 2 3
6” 1 2
INSTALLATION & OPERATION MANUAL 10211 REV 0 (04/21)
PAGE
13
OF 20
Electric Counter Pan Steamers PREVENTIVE MAINTENANCE
PREVENTIVE MAINTENANCE
A good preventive maintenance program begins with the daily cleaning procedure. Additional preventive maintenance
operations are presented in this section. In establishments that employ full-time maintenance personnel, the tasks
described can be assigned to them. For other installations, tasks requiring mechanical or electrical experience should be
performed by an authorized service agency.
The following paragraphs are set for minimum preventive maintenance procedures that must be completed periodically to
assure continued trouble-free operation of the cooker.
WARNING
Disconnect the power supply to the appliance before cleaning or servicing.
CAUTION
Under no circumstances should hardware (or parts) be replaced with a dierent length, size, or type other than
as specied in the parts list. The hardware used in the cooker has been selected or designed specically for its
application, and the use of other hardware may damage the equipment and will void any warranty.
CAUTION
The steamer and its parts are hot. Use care when operating, cleaning or servicing the steamer. The cooking
compartment contains live steam. Stay clear when opening door.
NOTICE
Contact the factory, the factory representative or a local service company to perform
maintenance and repairs should the appliance malfunction. Refer to warranty terms.
CAUTION
Do not use cleaning agents that are corrosive.
Cleaning
At the end of each day, or between cooking cycles if necessary:
Weekly, or more often if necessary:
1. Clean exterior with a damp cloth and polish with a soft dry cloth.
2. Use a non-abrasive cleaner to remove discolourations.
It is NOT RECOMMENDED to use cleaning agents that are corrosive.
Use of cleaning agents that contain chloride, acids or salts which are corrosive may cause pitting and corrosion when
used over a period of time; this will reduce the life of the appliance.
Should pitting or corrosion occur, this is not covered by warranty.
Follow the recommended cleaning instructions. Use a mild detergent, warm water and rinse thoroughly.
WARNING
NEVER SPRAY WATER INTO ELECTRIC CONTROLS OR LOUVRES.
INSTALLATION & OPERATION MANUAL 10211 REV 0 (04/21)
PAGE
14
OF 20
Electric Counter Pan Steamers
Removal of Scale Deposits
It is recommended that your steamer be descaled once a week.
Your steamer comes with a sixteen weeks supply of Middleby QuickClean Scale Control product (16 oz. container).
QuickClean is a safe and ecient way to maintain a scale-free environment for your steamer. Weekly descaling will
enhance the life of your steamer. Scale build up can damage your steamer and expose you to costly repairs. Failure or
malfunction of this appliance due to scale build up is not covered under warranty. Read and follow instructions on the
QuickClean bottle.
To order QuickClean or if you have questions about this product call 480-591-4073.
Descaling Procedure
WARNING
Disconnect the power supply to the appliance before cleaning or servicing.
WARNING
Read and follow instructions on the QuickClean bottle. Use plastic or rubber gloves to avoid skin contact.
If QuickClean comes in contact with skin, rinse with clean water.
1. Set power switch to “OFF”.
2. Remove diuser plate and pan support racks.
3. Fill the cavity with water up to the “WATER LEVEL” line.
4. Spread one scoop of QuickClean (1 oz) evenly to the water.
5. Allow 8 to 16 hours to clean.
6. Drain, rinse and wipe the bottom of the cavity.
PREVENTIVE MAINTENANCE
INSTALLATION & OPERATION MANUAL 10211 REV 0 (04/21)
PAGE
15
OF 20
Electric Counter Pan Steamers TROUBLESHOOTING
Troubleshooting
General
PROBLEM PROBABLE CAUSE REMEDY
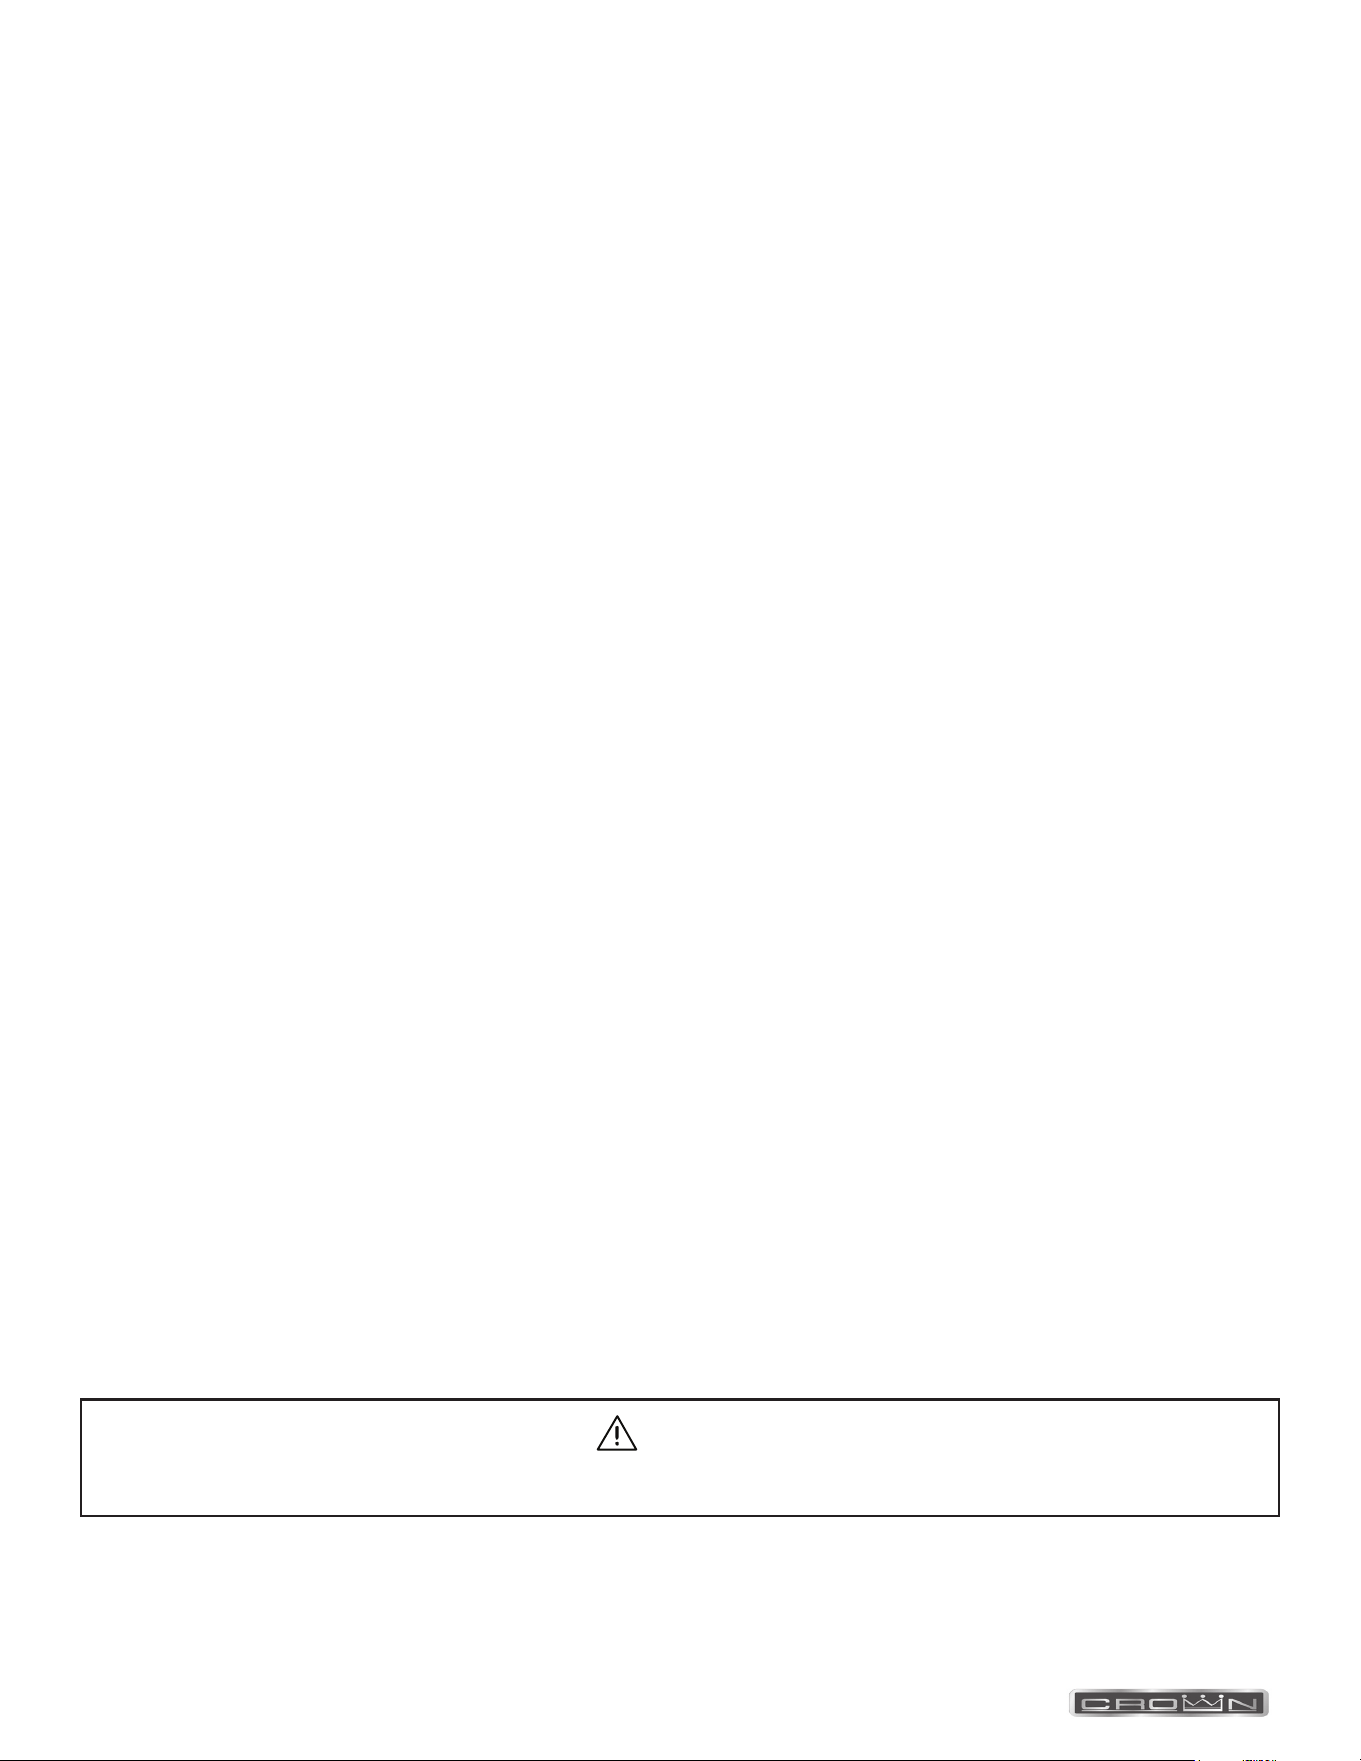
1. COOKING INDICATOR LIGHT FAILS TO
LIGHT WITH TIMER SET.
a. Main power circuit breaker tripped.
Locate external circuit breaker for incoming
power and place in ON position.
b. Door interlock switch contacts not closed.
Shut cooker door to close switch contacts.
Check alignment of door with switch.
c. Door interlock switch faulty. Replace switch.
d. Indicator light burned out. Replace light.
e. Faulty timer contacts. Replace timer.
f. Faulty wiring.
Inspect condition of wire and tightness of all
connections. Correct as needed.
g. Fuse blown. Replace with same rated fuse.
2. STEAM FAILS TO GENERATE WITH
COOKING INDICATOR LIGHT ON.
a. Faulty wiring.
Inspect condition of wire and tightness of all
connections. Correct as needed.
3. STEAMS CONTINUOUSLY WITHOUT
THE COOKING OR READY LIGHT ON .
a. Faulty thermostatic switch. Replace thermostat.
b. Power switch - continuous steam setting is
selected.
This is normal operation when “continuous
steam” is selected.
4. TIMER DIAL NOT TURNING. a. Faulty timer motor. Replace timer.
b. Faulty wiring.
Inspect condition of wire and tightness of all
connections. Correct as needed.
5. BUZZER FAILS TO SOUND AT END OF
TIMER SETTING.
a. Timer contacts faulty. Replace timer.
b. Buzzer faulty. Replace buzzer.
c. Faulty wiring.
Inspect condition of wire and tightness of all
connections. Correct as needed.
WARNING
Use care while working with control panel. Terminals carry 240 Volts.
Component Testing
60-MINUTE TIMER
Timer Contacts
Defective timer contacts will result in failure of cooker compartment to operate. When this occurs, remove the side panel
and proceed as follows:
1. Turn o power to the cooker at external circuit breaker.
2. Disconnect all three wires from timer terminals.
3. Connect an ohmmeter between terminals 1 and 3.
4. Rotate timer dial beyond the “0 - Minute” point (any setting) to obtain a reading of zero ohms on the ohmmeter. If zero
ohm reading cannot be obtained, timer contacts are defective and the timer must be replaced.
5. Move ohmmeter leads to terminals 1 and 4.
6. Rotate timer dial to “0 - Minute” position. (An audible click indicates correct position). If zero ohm reading cannot be
obtained, the timer is defective and must be replaced.
7. Remove ohmmeter and replace all three leads on timer terminals.
INSTALLATION & OPERATION MANUAL 10211 REV 0 (04/21)
PAGE
16
OF 20
Electric Counter Pan Steamers
Timer Motor
A defective timer motor will cause continuous operation in the TIME mode, with the timer dial failing to return to the
“0 - Minute” position.
To conrm timer motor condition, proceed as follows:
1. Carefully check motor wire leads and tighten loose connections.
2. Turn on power to the steamer.
3. Set timer dial (any setting beyond “0 - Minute”). If operation is correct, the motor will turn the dial toward “0 - Minute”. If
the motor fails to operate, it is defective and the entire timer must be replaced.
4. Shut o power to the cooker.
Door Interlock Switch
Malfunction of the cooker door interlock switch prevents timer indicator lights from turning on and steam generator from
operating when the timer dial is set. If steam does not enter the compartment and the cooking indicator light fails to turn
on with the door latch securely engaged, the fault may be in the door interlock switch. Proceed as follows:
1. Turn o power to the cooker.
2. Disconnect wires to the door switch terminals.
3. Connect an ohmmeter between the terminals of the switch. The switch is marked “C” for common, “NC” for normally
closed and “NO” for normally open.
4. Actuate the switch by closing the cooking compartment door. If a zero reading cannot be obtained between the C and
NO terminals, the switch is defective and must be replaced.
5. Remove the ohmmeter and replace the leads on switch terminals.
Indicator Lights
If the cooker compartment functions correctly, with the single exception that the indicator light fails to light during
operation, the fault is a defective indicator light. A “burned out” or defective light is veried by using an AC voltmeter at
the leads, with input power on the selector switch in the correct position for that timer, the timer set, and the door latches
closed. If 240 volts is present, the fault is in the indicator light and requires replacement. If 240 volts is not present, the
fault is in the wiring or control components (selector switch, timer or door switch).
Buzzer
If the buzzer does not sound at the termination of the operator-selected timer setting (timer dial returned to “0 - Minute”
position), the fault may be a defective buzzer. Buzzer operation is veried using an AC voltmeter at buzzer coil
connections with input power on and selector switch and coinciding timer dial set at the “0 - Minute” position. If voltage is
240 volts, the fault is in the buzzer, which must be replaced. If 240 volts is not present, the fault is in the wiring or control
components (timer or selector switch).
Wiring
WARNING
Disconnect the power supply to the appliance before cleaning or servicing.
Using an ohmmeter, wiring continuity between the connections shown on the wiring diagram is readily veried. This is
best done in stages, removing only those wires required for each continuity check. As each lead is replaced, it should be
checked for evidence of corrosion, and cleaned if necessary. All leads must be tightly attached so as to provide a good
electrical connection.
TROUBLESHOOTING
INSTALLATION & OPERATION MANUAL 10211 REV 0 (04/21)
PAGE
17
OF 20
Electric Counter Pan Steamers
Door Gasket
Check gasket for cuts and replace if necessary.
Door Gasket Replacement
The cooking compartment door gaskets are made of a silicone-type rubber material that is very durable but subject to
wear during normal operation. Should the gasket leak replace it.
1. Open the cooking compartment door.
2. Remove the six or eight screws from the gasket plate in the door panel assembly.
3. Remove the gasket plate and the door gasket from door panel.
4. Install the new door gasket to the door panel. Replace the gasket plate and six or eight screws.
5. Gasket replacement is now complete.
Door may be dicult to close until gasket has compressed to conform to opening. Leaving door closed overnight will
compress gasket.
Exterior Panel Removal
WARNING
To prevent hazard in servicing the cooker, be certain that the electrical disconnect circuit breaker for the steamer
is OFF before removing side panels.
Access to all internal plumbing and electrical assemblies is from the right side. The right-sidepanel is removed by
removing the bottom screws from panel.
Stainless Steel
To remove normal dirt, grease or product residue from stainless steel, use ordinary soap and water (with or without
detergent) applied with a sponge or cloth. Dry thoroughly with a clean cloth. Never use vinegar or any corrosive cleaner.
To remove grease and food splatters or condensed vapours that have baked on the equipment, apply cleanser to a damp
cloth or sponge and rub cleanser on the metal in the direction of the polishing lines on the metal. Rubbing cleanser as
gently as possible in the direction of the polished lines will not mar the nish of the stainless steel. NEVER RUB WITH A
CIRCULAR MOTION.
Soil and burnt deposits which do not respond to the above procedure can usually be removed by rubbing the surface
with SCOTCH-BRITE scouring pads or STAINLESS scouring pads. DO NOT USE ORDINARY STEEL WOOL as any
particles left on the surface will rust and further spoil the appearance of the nish. NEVER USE A WIRE BRUSH, STEEL
SCOURING PADS (EXCEPT STAINLESS), SCRAPER, FILE OR OTHER STEEL TOOLS. Surfaces which are marred
collect dirt more rapidly and become more dicult to clean. Marring also increases the possibility of corrosive attack.
Renishing may then be required.
TO REMOVE HEAT TINT
Darkened areas sometimes appear on the stainless steel surface where the area has been subjected to excessive heat.
These darkened areas are caused by thickening of the protective surface of the stainless steel and are not harmful. Heat
tint can normally be removed by the foregoing, but tint which does not respond to this procedure calls for a vigorous
scouring in the direction of the polish lines using SCOTCH-BRITE scouring pads or a STAINLESS scouring pad in
combination with a powdered cleanser. Heat tint action may be lessened by not applying or by reducing heat to equipment
during slack periods.
TROUBLESHOOTING

INSTALLATION & OPERATION MANUAL 10211 REV 0 (04/21)
PAGE
18
OF 20
Electric Counter Pan Steamers
Notes

INSTALLATION & OPERATION MANUAL 10211 REV 0 (04/21)
PAGE
19
OF 20
Electric Counter Pan Steamers
Notes
INSTALLATION & OPERATION MANUAL 10211 REV 0 (04/21)
PAGE
20
OF 20
Electric Counter Pan Steamers
EPX-3 & EPX-5
Electric
Counter Pan Steamers
A product with the Crown name incorporates the best in durability and low maintenance. We all recognize, however,
that replacement parts and occasional professional service may be necessary to extend the useful life of this appliance.
When service is needed, contact a Crown Authorized Service Agency, or your dealer. To avoid confusion, always refer
to the model number, serial number, and type of your appliance.
CROWN FOOD SERVICE EQUIPMENT
A Middleby Company
70 Oakdale Road, Downsview (Toronto) Ontario, Canada, M3N 1V9
Telephone: 919-762-1000 www.crownsteamgroup.com

