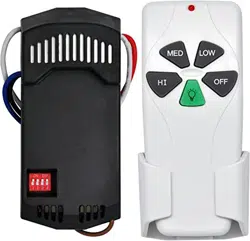
Remote controller
GENERAL INFORMATION
A. Safety precautions:
WARNING: HIGH VOLTAGE! Disconnect power by
removing fuse or switching off circuit breaker.
Do not use with solid state fans.
Electrical wire must meet all local and national
electrical code requirements.
Supply for fan must be 110/120 volt, 60Hz. Maximum fan
motor amps: 1.0, Maximum light watts: 300
dimmable LED or incandescent only.
Otherwise power can cause serious injury or death.
B. Installing receiver in fan:
a.
Remove power from the circuit.
b.
Remove ceiling fan canopy from the mounting
bracket.
c.
Disconnect existing wiring between ceiling fan and
Supply in electrical junction box.
d.
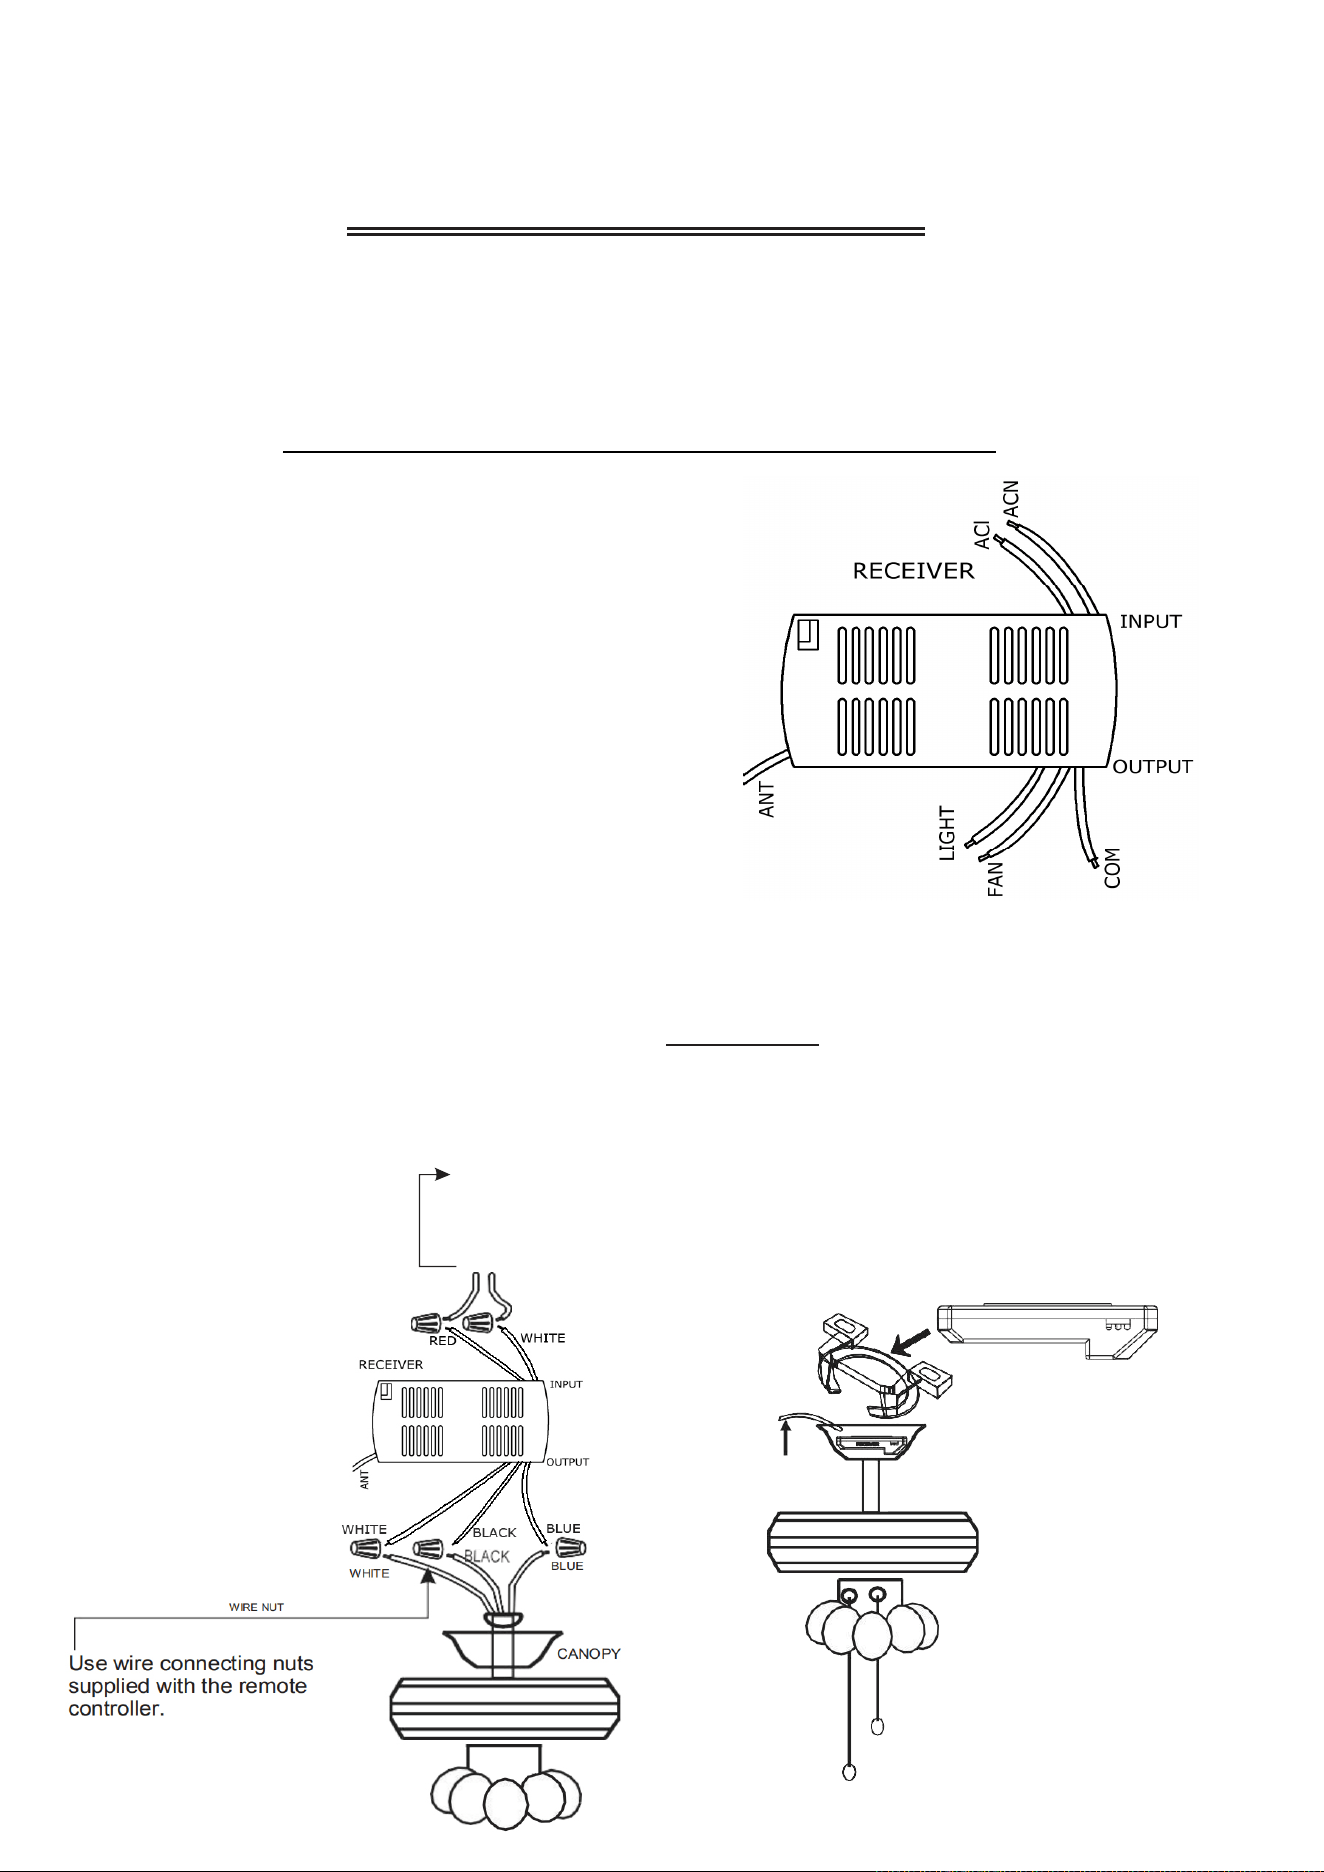
Make connections as follows, using the wire nuts
supplied:
Mounting Controller
CONNECT TO
Red receiver wire(AC IN L).................... Red supply wire
White receiver wire(AC IN N).............. White supply wire
White receiver wire(TO MOTOR N)..White com(FAN/LIGHT N) wire
Black receiver wire(TO MOTOR L)........... Black fan wire
Blue receiver wire(TO LIGHT L)
...............
Blue light wir
CAUTION: Ceiling Angle Shall Not Exceed 30 Degrees, Fo
Model: FAN-05R(Black)
r
e
RECEIVER
(FIG.4)
ANTENNA PUT ATOUTSIDE
OF CANOPY BOX CAN GET
MORE OPERATION
DISTANCE
CANOPY
LIGHT MUST BE KEPT AT THE ON POSITION
FAN MUST BE KEPT AT THE HIGH SPEED
receiver Model:
FAN-05R(Black)
FROM POWER SOURCE
AC 110~120 VOLT 60Hz
3.5AMPS.
Use wire connecting nuts supplied with the fan
(FIG.3)
INSTRUCTION OF INSTALLATION AND OPERATION
This remote controller is designed for 3-speed ceiling fan to separately control your ceiling fan speed and light brightness
There are four buttons (
0,1,2,3
) to control the speed of the fan andoff.
The light dimmer button will control the light brightness dimmer and off (dimmable LED or incandescent only).
The blue indicator on the transmitter will light when one of the five buttons is pressed.
1. INSTALLING RECEIVER IN CEILING FAN
http://www.ceilingfanremote.com SN:050-01
Model:RC-5T&RC-5R
If other fans or supply wires are different color, have this unit installed by qualified licensed electrician.
e.
Push all connected wires up into junction box.
f.
Lay the brown antenna wire on top of the receiver, and put the receiver into the mounting bracket.
g.
Reinstall the canopy on the mounting bracket.
h.
Restore power.
1.
Fails to operate
a.
Power to receiver ?
b.
Receiver wired correctly ?
c.
Fan manual speed control in highest position ?
d.
Light kit switch turned on ?
e.
Good battery in the transmitter ?
2.
Won
'
t operate at distance
If transmitter operates fan/light kit when up close, but not at 20 feet away.
Try placing the brown antenna wire higher, up through ceiling/outside the junction box.
Your ceiling fan and light kit assembly must meet the following requirements:
1.
Do not use with solid state fans.
2.
Electrical rating: 120v 60Hz 3.5A
MAX. Motor amps: 1.0
MAX. Light watts: 300-(dimmable LED or incandescent only)
1 year warranty and free 1 month replacement (non-human damage). For more information, please contact the custome
TO REDUCE THE RISK OF SHOCK, THE POWER MUST BE DISCONNECTED DURING INSTALLATION.
r
service of the store you purchased, or mail to: Support@ceilingfanremote.com.
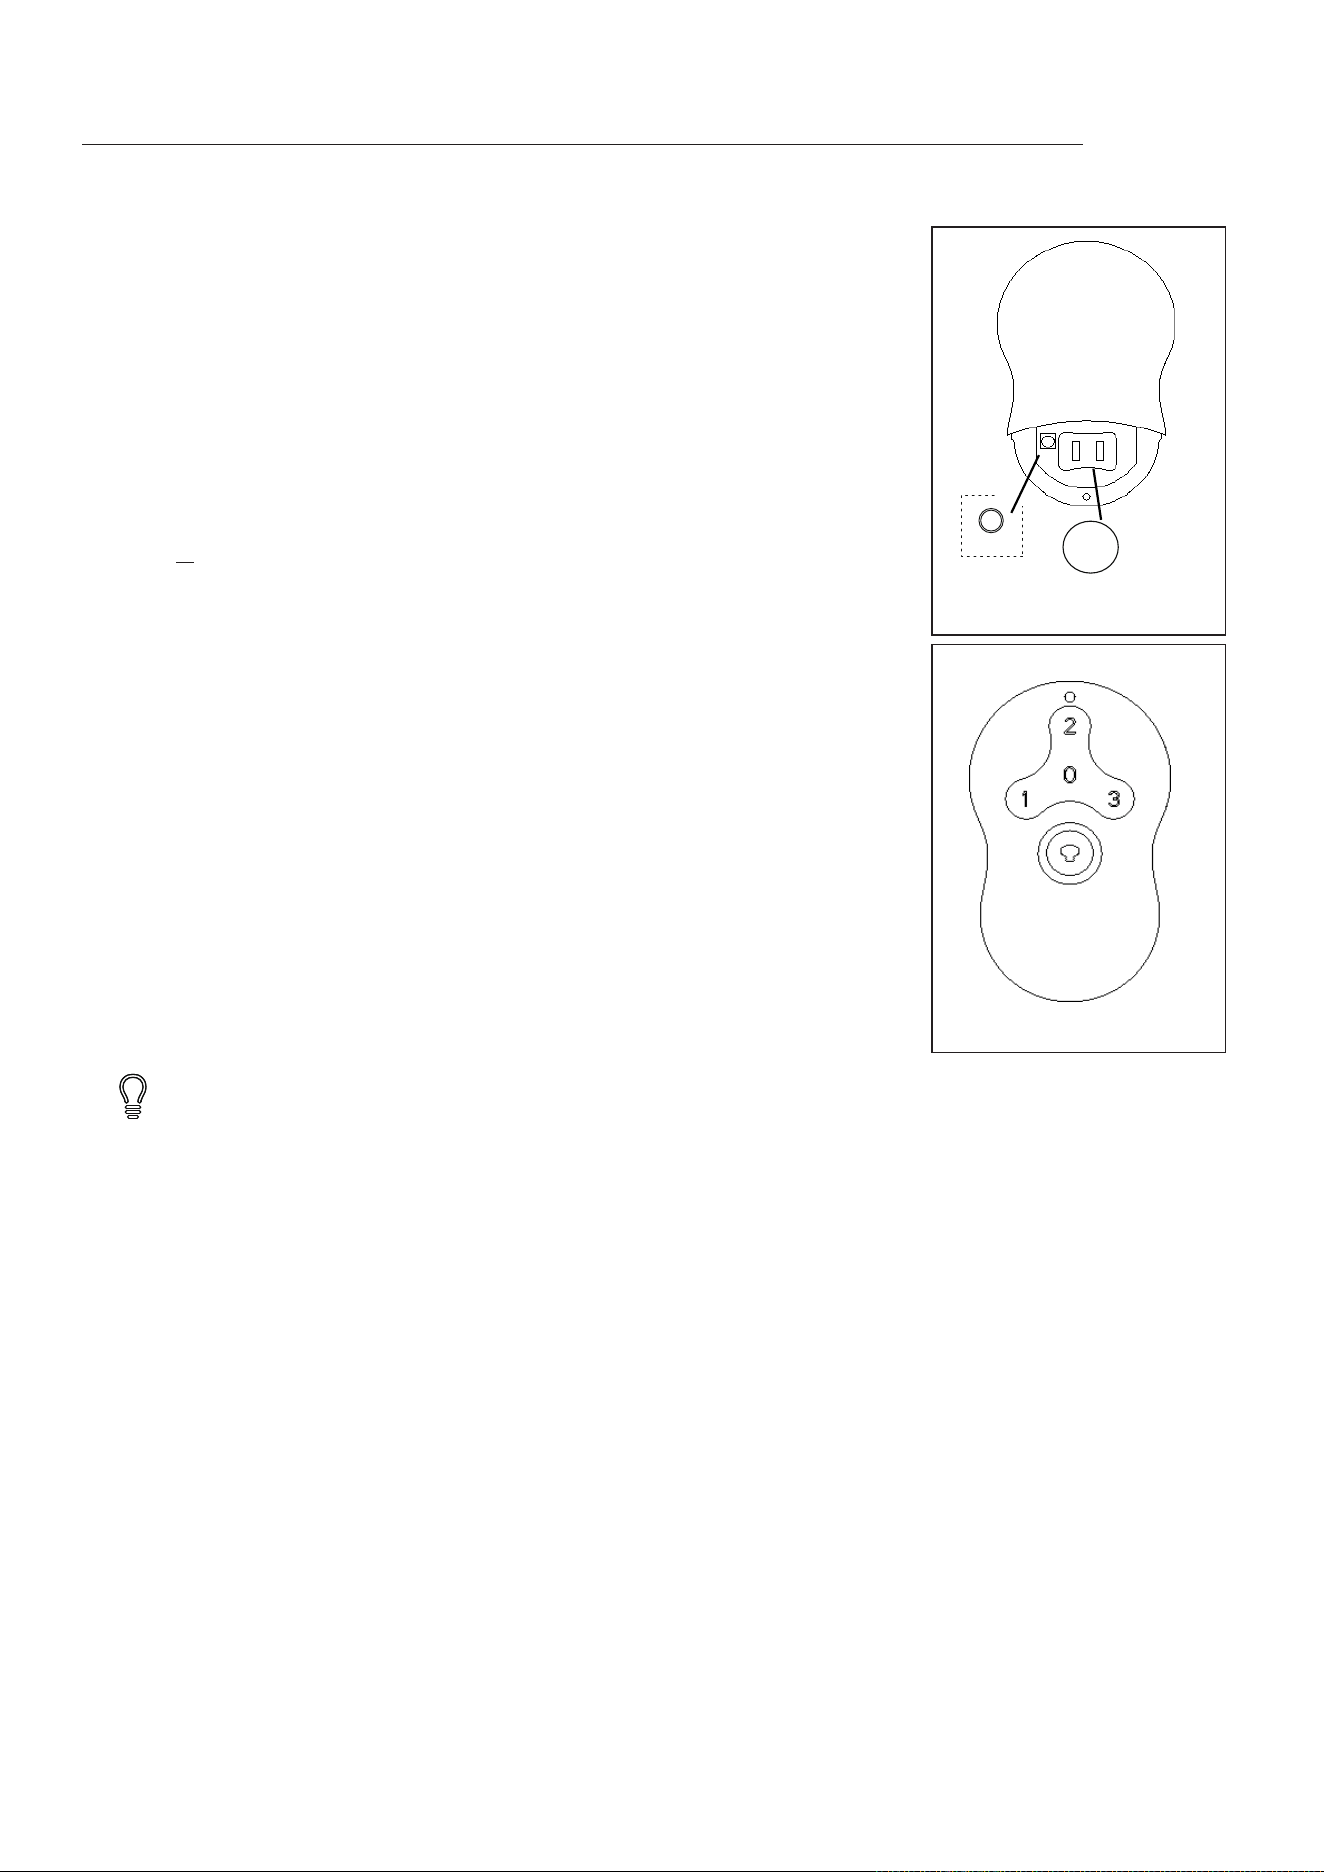
2. Install battery
3. Learning Mode
remove switch cover by finger or using a small pointed object and place batteries
as shown in figure 3. Use a 3V,
2032 batteries. The battery will weaken with age and
should be replaced before leaking as this will damage the transmitter. Dispose of
used battery properly, keep the battery out of reach for children.
Note: If you want to control the fan with another transmitter, make the same setting.
A fan can be controlled by 2 transmitters maximum. Turning the power of the first
fan off when you make a learn function setting for the second fan.
Press the O button to turn fan off.
Press this button quickly to turn light on or off. To dim light
, hold down the button, the light will
cycle from bright to dim to bright until button is released.
The buttons on the remote control the fan speed and light as follows.
(Fig. 2)
Fan speed
1 =
low speed
2 = medium speed
3 = high speed
4. Operating Transmitter
Your remote now has full control of the fan and light.
5. Trouble Shooting Guide
Figure 1
LEARN
3V2032
+
Install battery
+
Figure.2
6. Warranty Policy
NOTICE!
WARNING
Make "
Learn function setting",
Restore power source to your fan, press and hold the
"LEARN" button for about 4 seconds until light flashes (If the fan installed with a light.
For fans without light, check operation using remote transmitter). Your remote controller is
ready to operate the fan. You must press the "LEARN" button within 1 minute of restoring
power to the fan. (Fig.1)
Note:
If the power is on already, you must turn the power off for 5 seconds at least.
http://www.ceilingfanremote.com