

https://ium-pim.bsh-digital.com/8001370819
[en]
You can find additional information and explanations online. Scan the QR code on the title page.
2
1
2
3
4
5
6
7
8
9
10
12
11
13
14
15
16
17
18
19
1
2
3
4
5 6
7 8
9 10
11
12
13
14
15 16
17 18
19 20
21 22
23
24
25
26
27 28
29 30
31
32
33
34
35 36
37 38
39
40
41 42
43
44
45
46

en Table of contents
Table of contentsTable of contents
Safety ...................................................... 10
Preventing material damage ................. 12
Familiarising yourself with your appli-
ance ........................................................ 12
Appliance .................................................... 12
Battery status display ................................ 12
Controls and cleaning modes .................. 13
Battery runtimes ......................................... 13
Operation ................................................ 13
Assembling the appliance before using
for the first time ........................................... 13
Charging the battery .................................. 13
Vacuuming with the cordless vacuum
cleaner ......................................................... 14
Vacuuming using the handheld device .. 14
Vacuuming with accessories ................... 14
Cleaning and servicing .......................... 14
Cleaning products ...................................... 14
Cleaning the appliance ............................. 14
Emptying the dust container and clean-
ing the filter unit .......................................... 14
Cleaning the power brush ........................ 14
Troubleshooting .................................... 14
Carrying out maintenance ..................... 16
Replacing the exhaust filter ...................... 16
Replacing the battery ................................ 16
Disposing of old appliance .................... 16
Disposing of batteries ........................... 16
Customer Service .................................. 16
Safety Safety
¡ Read this instruction manual carefully.
¡ Keep the instruction manual and the product information safe for
future reference or for the next owner.
¡ Do not connect the appliance if it has been damaged in transit.
Only use this appliance:
¡ with genuine parts and accessories. Damage caused by using
third-party products is not covered under the warranty.
¡ With the power supply unit provided.
¡ For cleaning dry surfaces.
¡ in private households and in enclosed spaces in a domestic en-
vironment at room temperature.
¡ up to an altitude of max. 2000m above sea level.
Do not use the appliance:
¡ for vacuum-cleaning persons or animals.
¡ for vacuuming up harmful, sharp-edged, hot or burning sub-
stances.
¡ for vacuuming up damp substances or liquids.
¡ for vacuuming up highly flammable or explosive materials and
gases.
¡ for vacuuming up ash or soot from stoves and central heating
systems.
¡ for vacuuming up toner dust from printers and photocopiers.
¡ for vacuuming up building rubble.
10

Safety en
Disconnect the appliance from the power supply when:
¡ cleaning the appliance.
This appliance may be used by children aged 8 or over and by
people who have reduced physical, sensory or mental abilities or
inadequate experience and/or knowledge, provided that they are
supervised or have been instructed on how to use the appliance
safely and have understood the resulting dangers.
Do not let children play with the appliance.
Cleaning and user maintenance must not be performed by children
unless they are being supervised.
Repairs to the appliance should only be carried out by trained
specialist staff.
Only use genuine spare parts when repairing the appliance.
Never operate a damaged appliance.
Never operate an appliance with a cracked or fractured surface.
Never pull on the power cord to unplug the appliance. Always
unplug the appliance at the mains.
Never pull or carry the appliance by the power cord.
If the appliance or the power cord is damaged, immediately un-
plug the power cord or switch off the fuse in the fuse box.
Call customer service.
Page16
Only use the appliance in enclosed spaces.
Never expose the appliance to intense heat or humidity.
Do not use steam- or high-pressure cleaners to clean the appli-
ance.
Only connect and operate the power supply unit according to the
data on the rating plate.
Connect the power supply unit to a power supply with alternating
current only via a properly installed socket with earthing.
The appliance should only be connected and charged with the
power supply provided (type: K20E300050B).
Do not apply flammable substances or substances containing al-
cohol to the filter.
When cleaning the appliance, do not use flammable substances
or substances that contain alcohol.
Keep clothing, hair, fingers and other body parts away from the
openings on the appliance and the moving parts.
Never point the pipe or the nozzles towards eyes, hair, ears or
mouths.
11
en Preventing material damage
Before attempting any maintenance or cleaning of the appliance,
remove the motor unit (handheld device) and disconnect the ap-
pliance from the power supply.
When vacuuming stairs, ensure that there are no persons under-
neath the appliance.
Keep packaging material away from children.
Do not let children play with packaging material.
Protect the battery against fire, heat and constant sunlight.
Protect the battery against water and penetrating moisture.
Never open the battery.
When not in use, keep the battery away from metal objects, e.g.
paper clips, coins, keys, nails or screws.
Never charge the battery outside of the appliance.
If fumes are escaping from a damaged battery, supply fresh air.
If there are any problems, seek medical advice from a doctor.
If liquids are escaping from a damaged battery and they come
into contact with the skin, rinse immediately with water.
If these come into contact with the eyes, seek medical help.
Preventing material damagePreventing material damage
If liquid escapes from a damaged bat-
tery, check and clean any wet objects.
Replace damaged objects.
Regularly check the running surfaces of
the nozzles for wear.
Replace worn nozzles.
Never use the nozzle without the brush
roller in place.
Never operate the appliance without the
filter unit.
Familiarising yourself with your applianceFamiliarising yourself with
your appliance
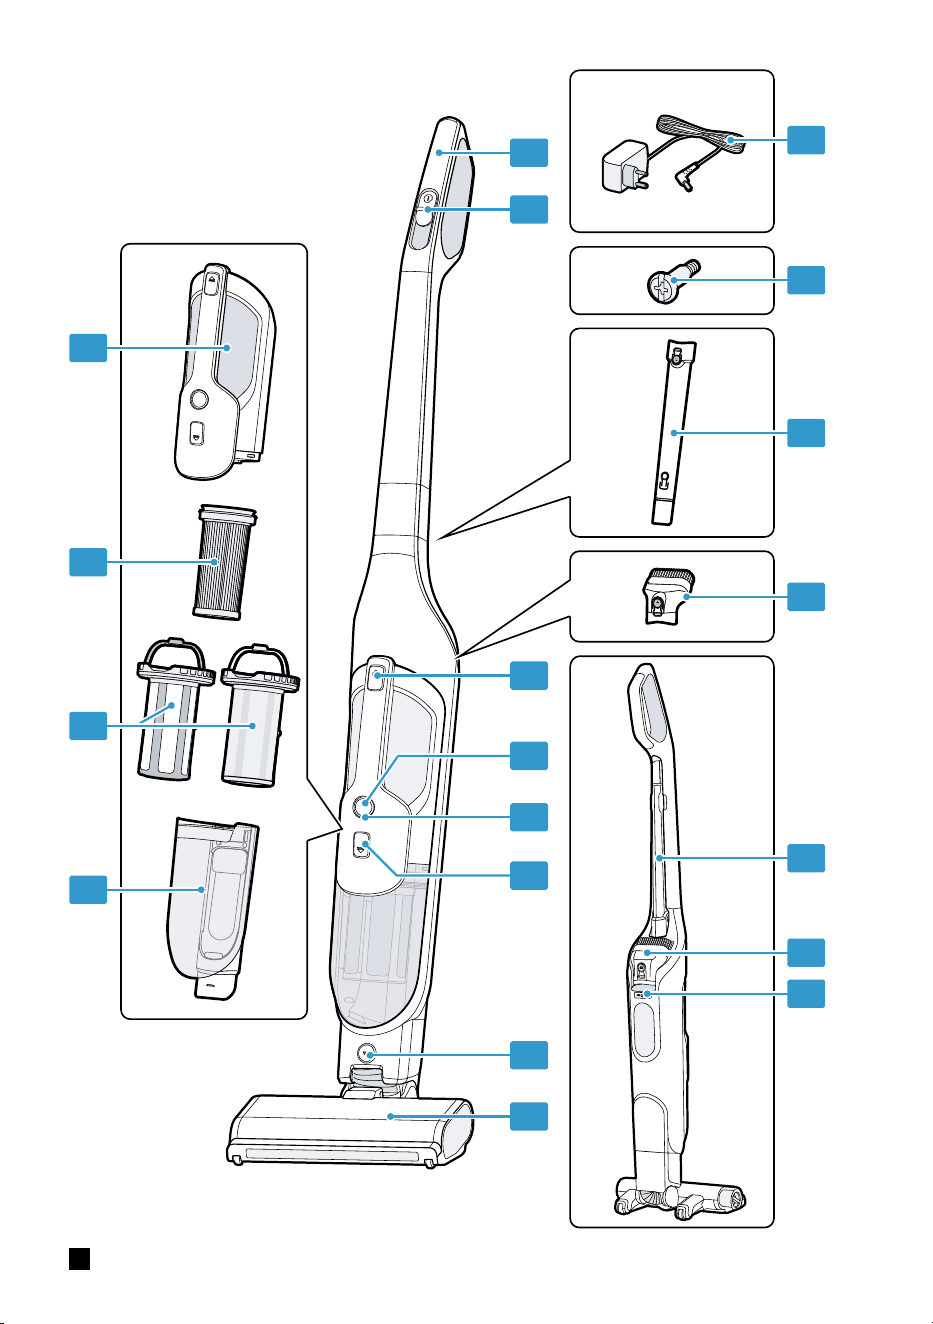
Appliance
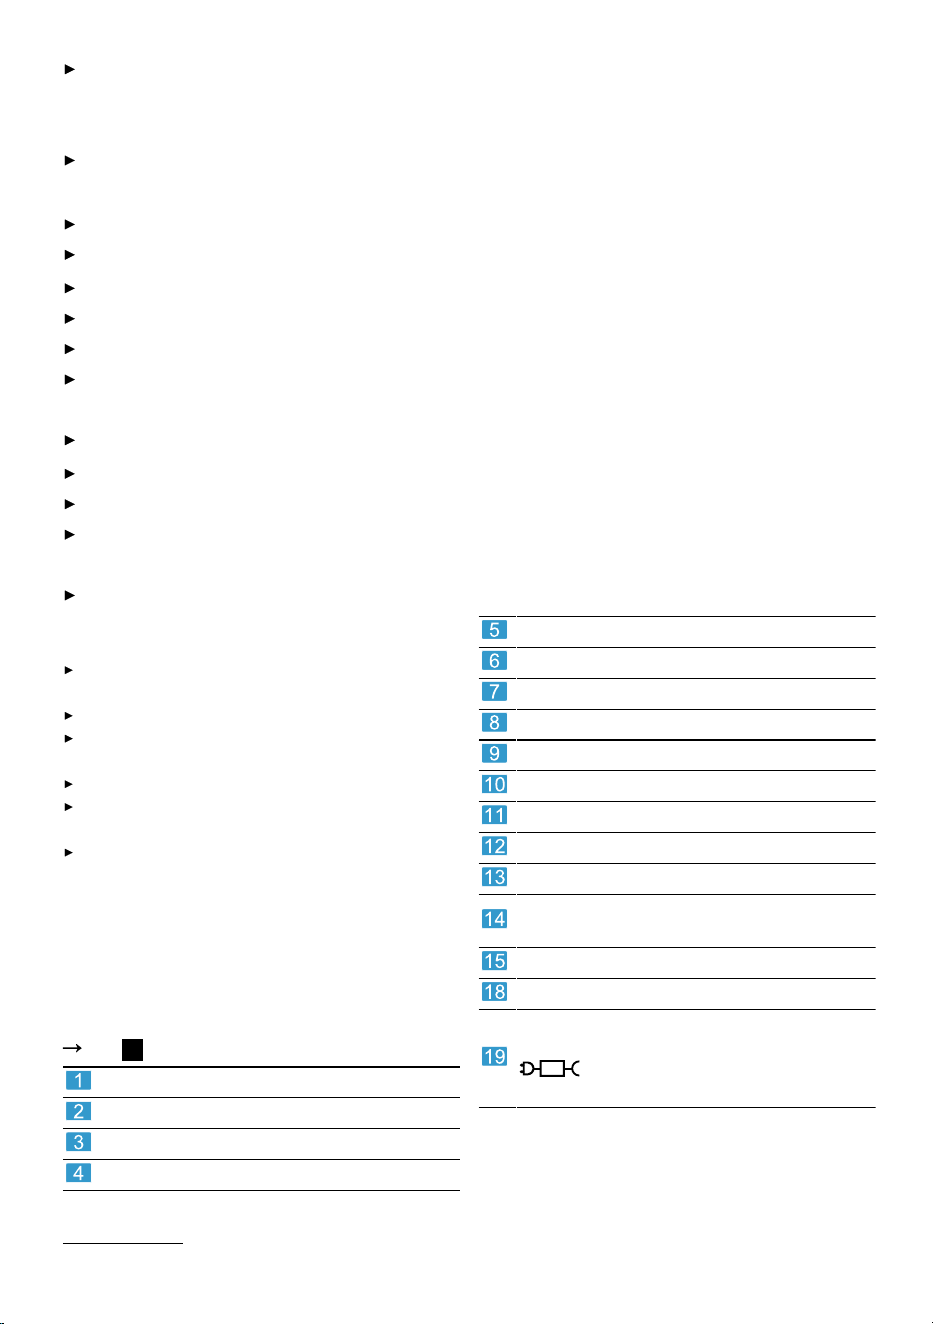
You can find an overview of the parts of
your appliance here.
Fig.
1
Dust container
Fluff filter
1
Cartridge filter
Motor unit
Handle
Cordless vacuum sliding switch
Handheld device release button
Handheld device push button
Battery status display
Dust container release button
Floor nozzle release button
Floor nozzle with power brush
Charging cable connection
2-in-1 furniture brush with upholstery
nozzle
1
Extendable crevice nozzle
1
Handle fastening screw
Separate power supply unit with char-
ging cable
1
Power supply model identifier:
K20E300050B
Battery status display
The illuminated ring indicates the battery
status and various error statuses.
1
Depending on the appliance specifications
12
Operation en
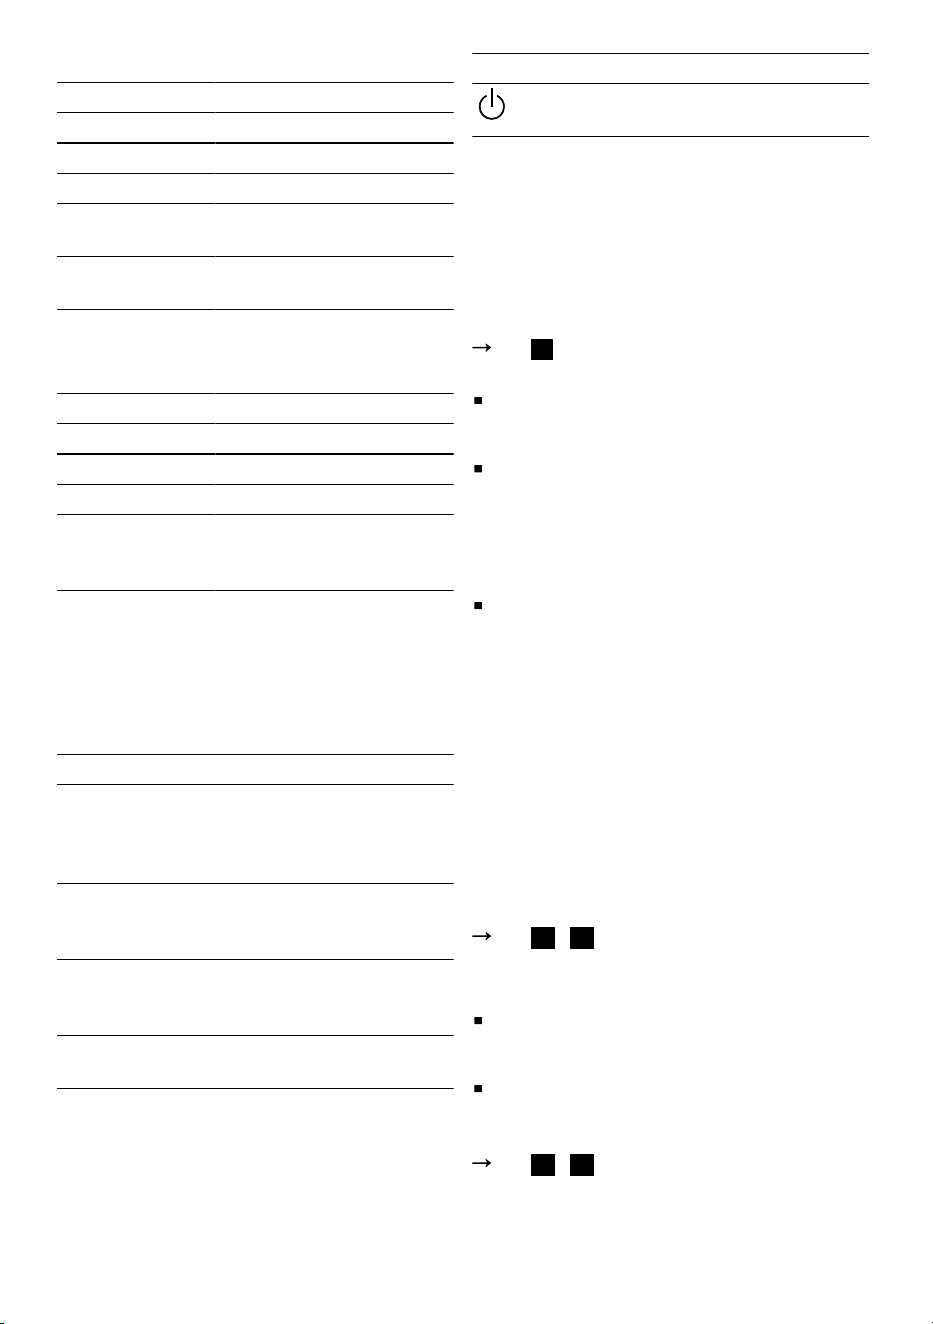
Status display during operation
Battery charge Illuminated ring
100% - 50% Display lights up white.
50% - 25% Display lights up yellow.
25% - 15% Display lights up orange.
Below 15% or
empty
Display flashes orange.
Error status Display rapidly flashes
red.
Charging status display
The illuminated ring pulses during the char-
ging process.
Battery charge Illuminated ring
0% - 50% Display pulses orange.
50% - 80% Display pulses yellow.
80% - 100% Display pulses white.
Battery is fully
charged
Display lights up white
and goes out after ap-
prox. 2 minutes.
Controls and cleaning modes
You can set the suction power using the
cleaning modes.
Cordless vacuum cleaner modes
Set the modes using the slide switch on the
handle.
Mode Use
Eco In Eco mode, the appliance con-
sumes less energy due to lower
suction power, and therefore has a
longer runtime.
Turbo In Turbo mode, the appliance
achieves the best cleaning results
with a shorter runtime.
Auto In Auto mode, the appliance op-
timises the ratio between runtime
and suction power.
Off In the off position, vacuuming is
stopped.
Hand-held device mode
To switch the hand-held device on and off,
use the push button switch on the hand-
held device.
Note: To vacuum with the hand-held
device, it must be removed from the cord-
less vacuum cleaner.
Mode Use
Handheld mode for routine clean-
ing tasks.
Note: The maximum battery runtime spe-
cified for each cleaning mode refers to va-
cuuming hard floors.
When vacuuming other surfaces or floor
coverings, the battery runtimes may vary.
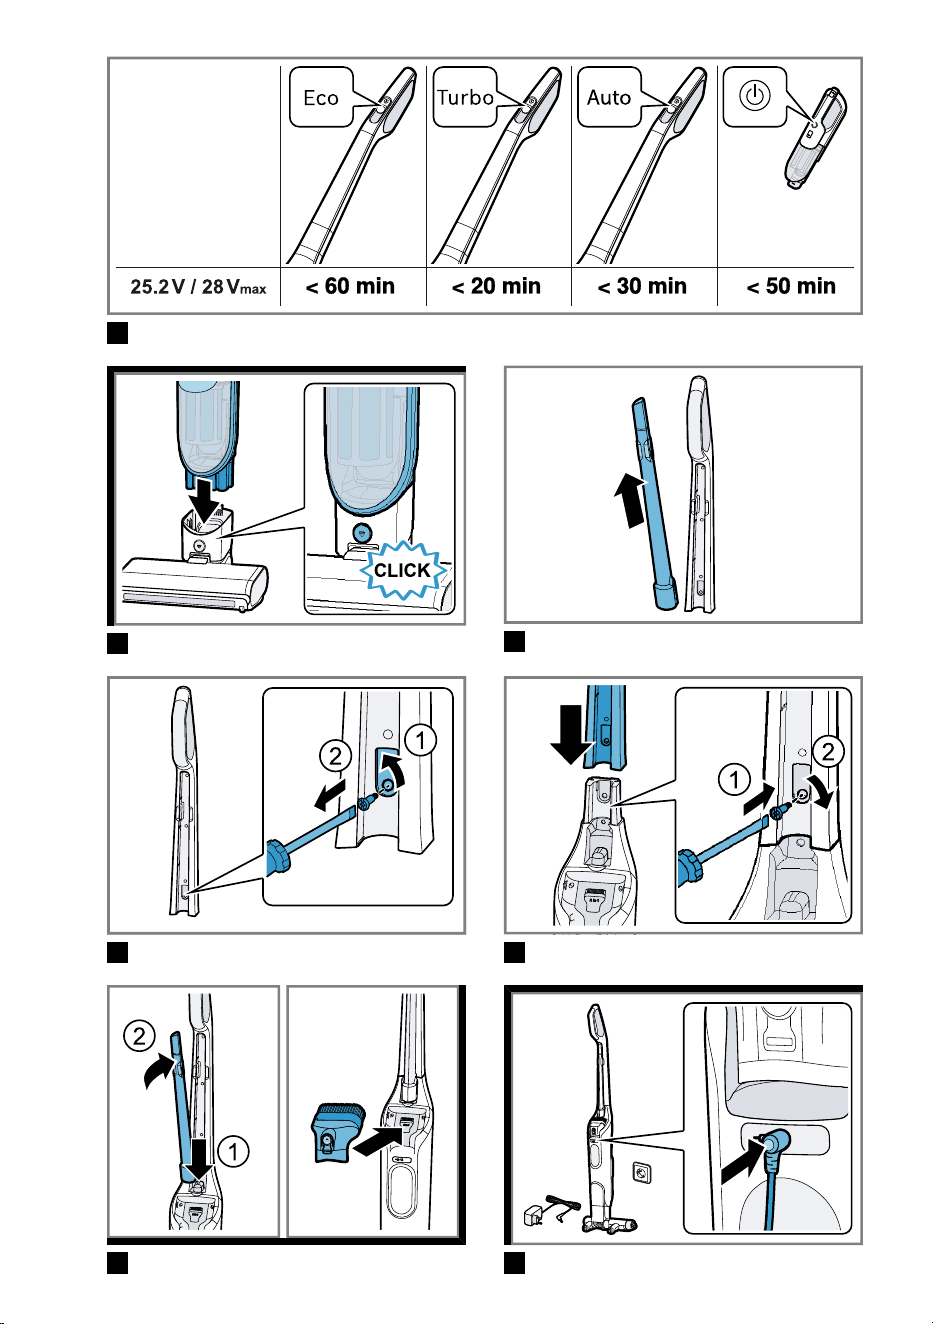
Battery runtimes
You can find information about battery
runtimes here.
Fig.
2
Notes
The maximum battery runtimes differ de-
pending on the selected power level and
type of battery installed.
Like every Li-ion battery, the batteries
wear out over time, meaning that the bat-
tery capacity and the runtime decrease.
This is a natural aging process and not
the result of a material error, manufactur-
ing error or material defect.
You can delay the natural wear by using
the following measures:
– Only charge the appliance in the tem-
perature range between 3°C and
40°C.
– Only store the battery in the temperat-
ure range between 0°C and 40°C.
– Do not store the battery for an exten-
ded period of time if it is fully charged
or fully discharged.
OperationOperation
Assembling the appliance before us-
ing for the first time
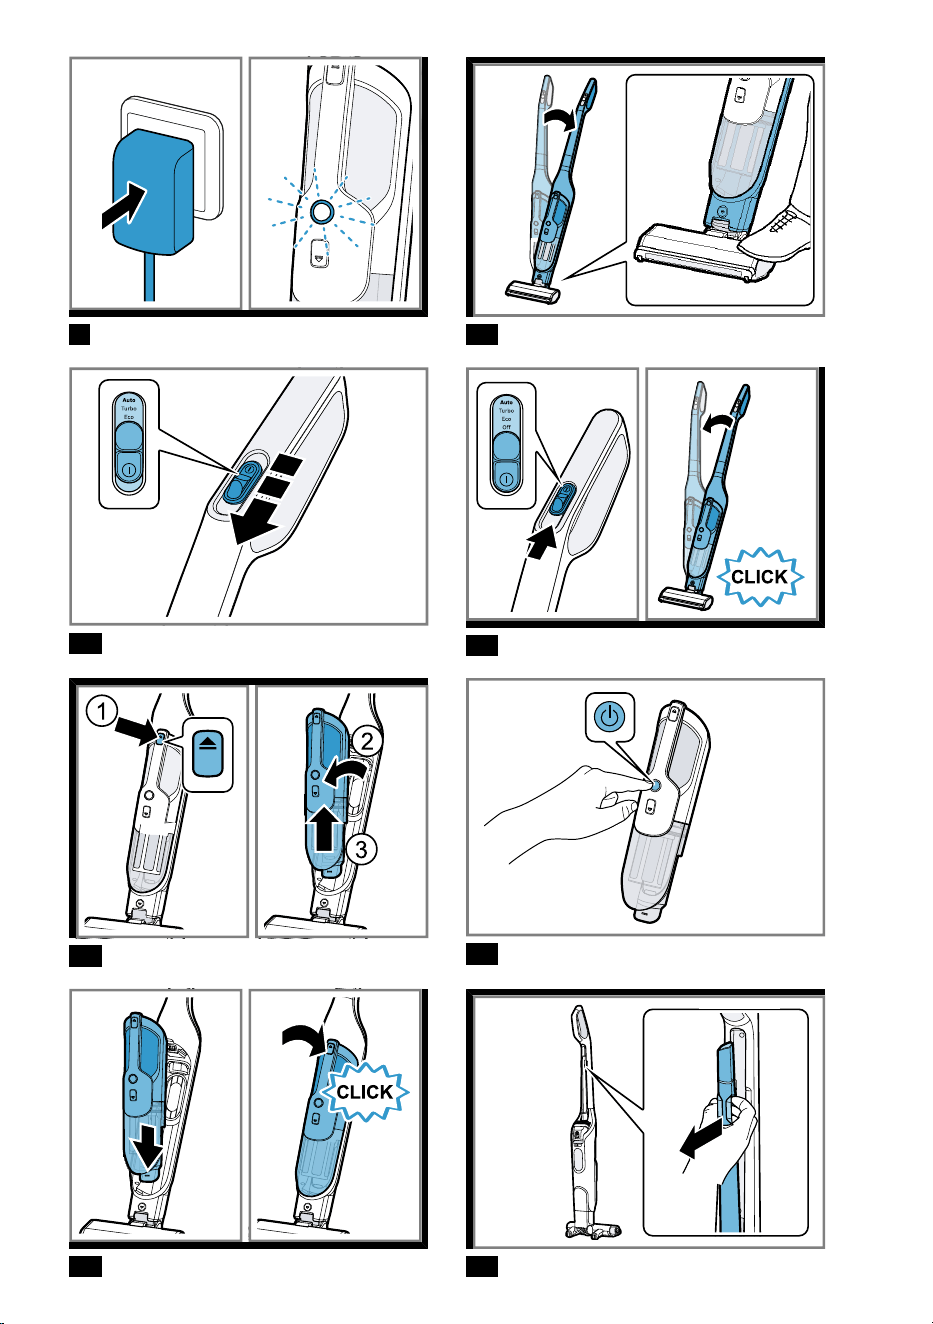
Fig.
3
-
7
Charging the battery
Notes
The cordless vacuum cleaner can only
be charged and used with the correct
handheld device inserted.
Only charge the appliance using the
power supply unit K20E300050B
provided.
Fig.
8
-
9
Note: The power supply unit on the char-
ging cable and the appliance heat up while
charging. This is normal and harmless.
13

en Cleaning and servicing
Tip: To check that the battery is full, briefly
disconnect it from the mains and then re-
connect it. The status display then lights up
white.
Vacuuming with the cordless vacuum
cleaner
Fig.
10
-
12
Vacuuming using the handheld
device
Note: If the handheld device is removed
from the switched-on vacuum cleaner, the
vacuum cleaner stops vacuuming and the
handheld device is switched off.
If the handheld device is reinserted into the
switched-on vacuum cleaner, the vacuum
cleaner continues vacuuming in the clean-
ing mode selected.
Fig.
13
-
15
Note: If the switched-on handheld device is
inserted into the switched-off vacuum
cleaner, the handheld device remains
switched on.
The handheld device must be switched off
using the push button on the hand-held
device or by briefly switching the slide
switch on the vacuum cleaner on and off.
Vacuuming with accessories
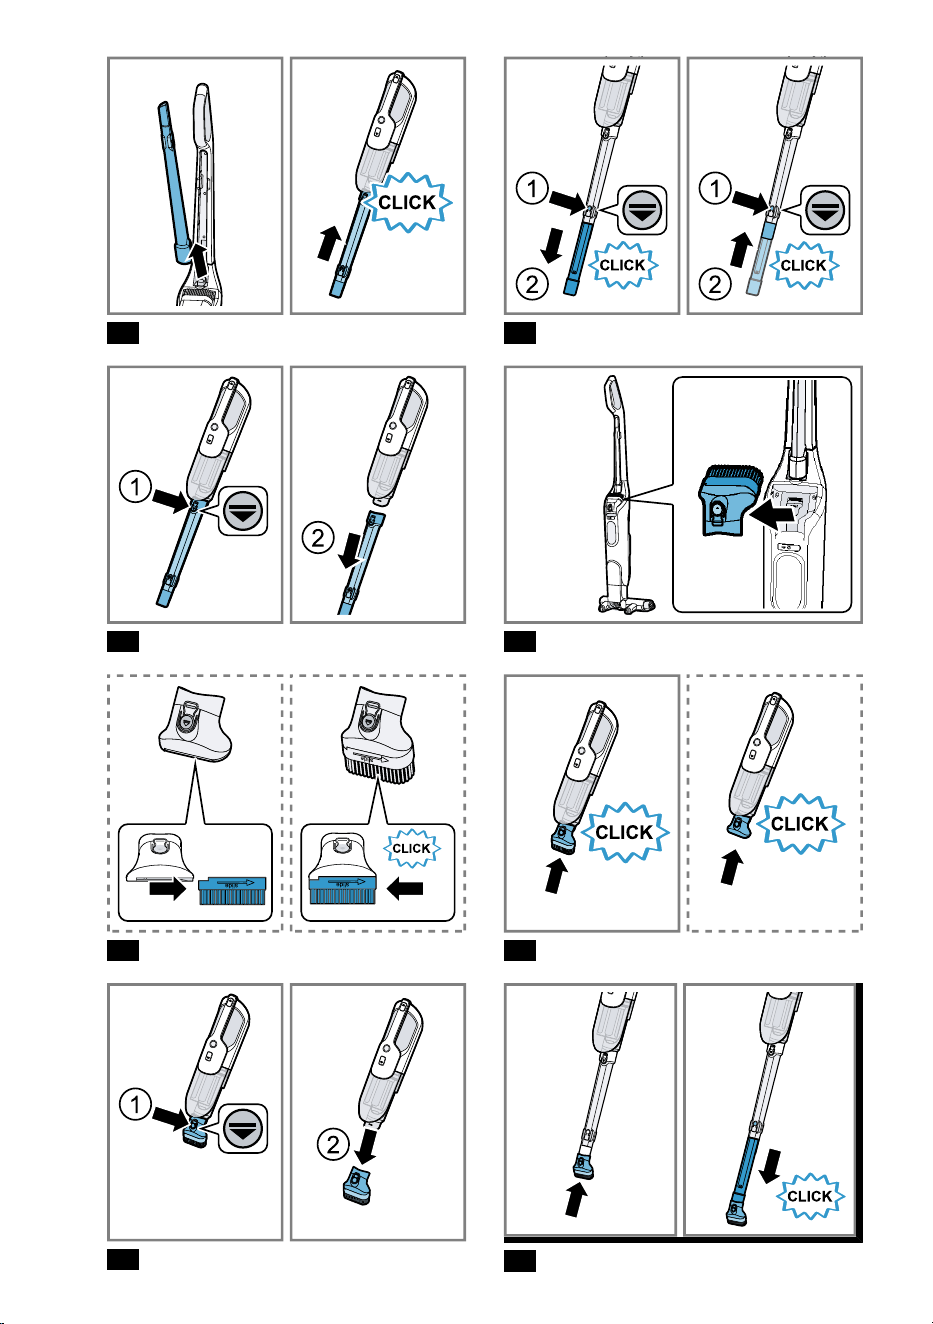
Fig.
16
-
24
Cleaning and servicingCleaning and servicing
Cleaning products
Only use suitable cleaning products.
Do not use harsh or abrasive detergents.
Do not use cleaning products with a high
alcohol content.
Do not use hard scouring pads or clean-
ing sponges.
Wash sponge cloths thoroughly before
use.
Cleaning the appliance
Requirement: The appliance is switched off
and the charging cable has been un-
plugged.
1.
Remove the handheld device and the ac-
cessory nozzles.
2.
Clean the appliance and the accessory
using a soft cloth and a commercially
available plastic cleaner.
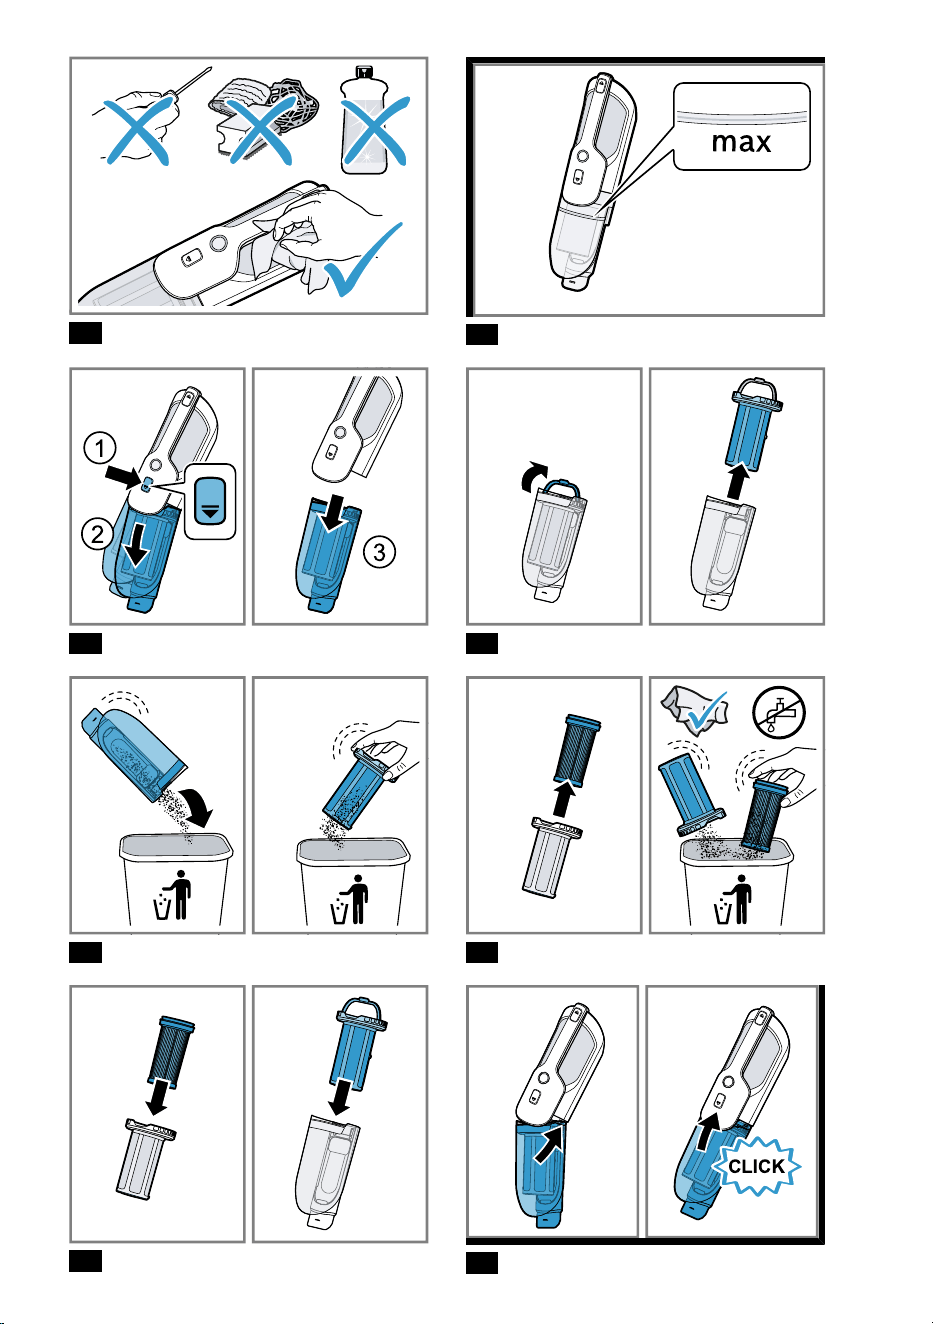
Fig.
25
Emptying the dust container and
cleaning the filter unit
Empty the dust container at the latest when
the fill level has reached the mark. In order
to achieve the best possible vacuuming
results, empty the dust container after every
use.
Requirement: The handheld device is re-
moved from the vacuum cleaner.
Fig.
26
-
32
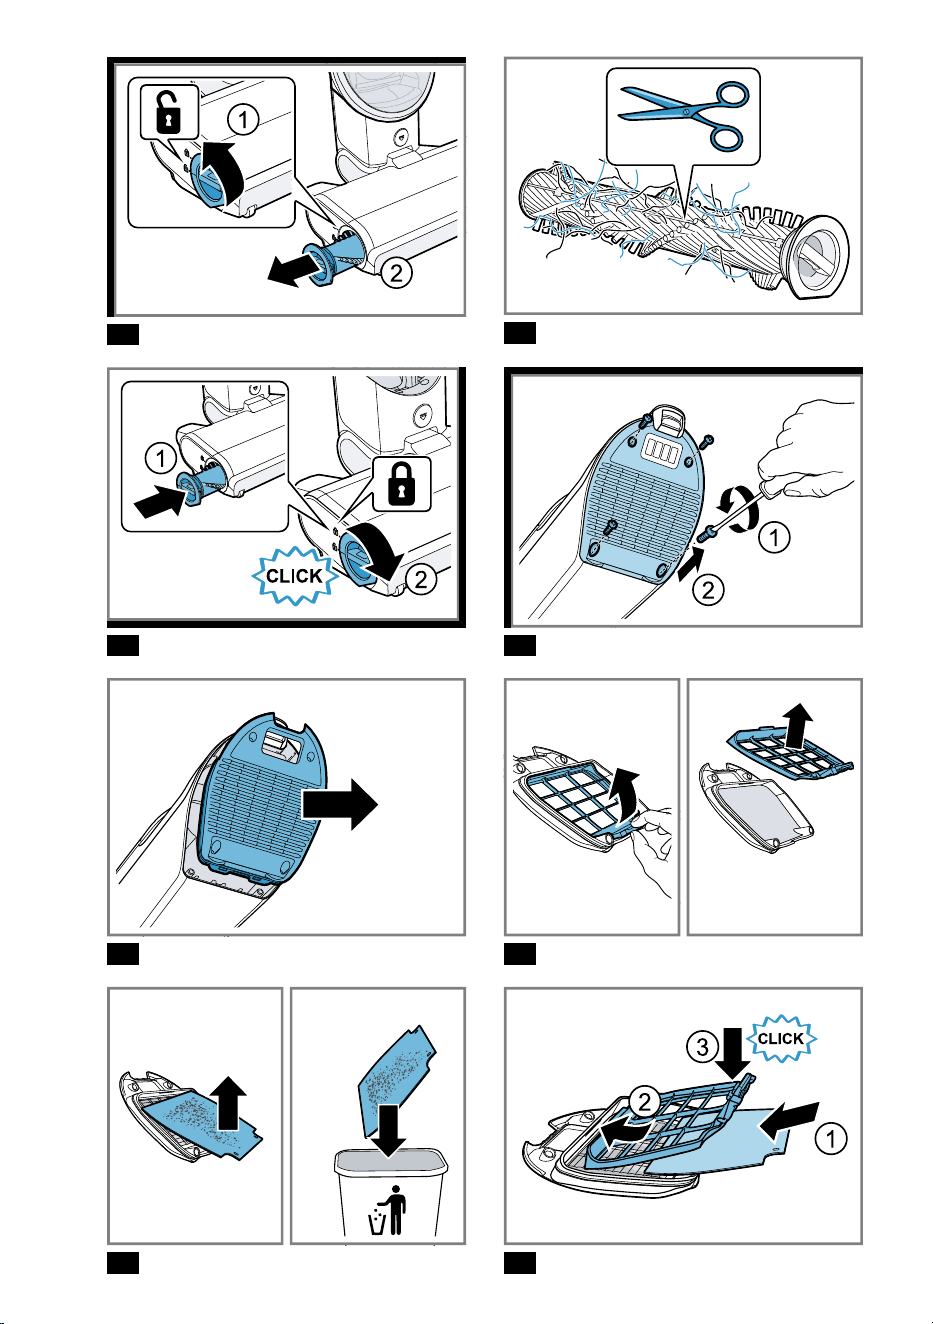
Cleaning the power brush
Fig.
33
-
35
Note: To clean the appliance properly, reg-
ularly cut through hair and threads along
the grooves using scissors. First, remove
any larger pieces by hand. Any remaining
smaller hairs and threads will be automatic-
ally vacuumed up when you switch on the
appliance.
TroubleshootingTroubleshooting
Repairs to the appliance should only be carried out by trained specialist staff.
Only use genuine spare parts when repairing the appliance.
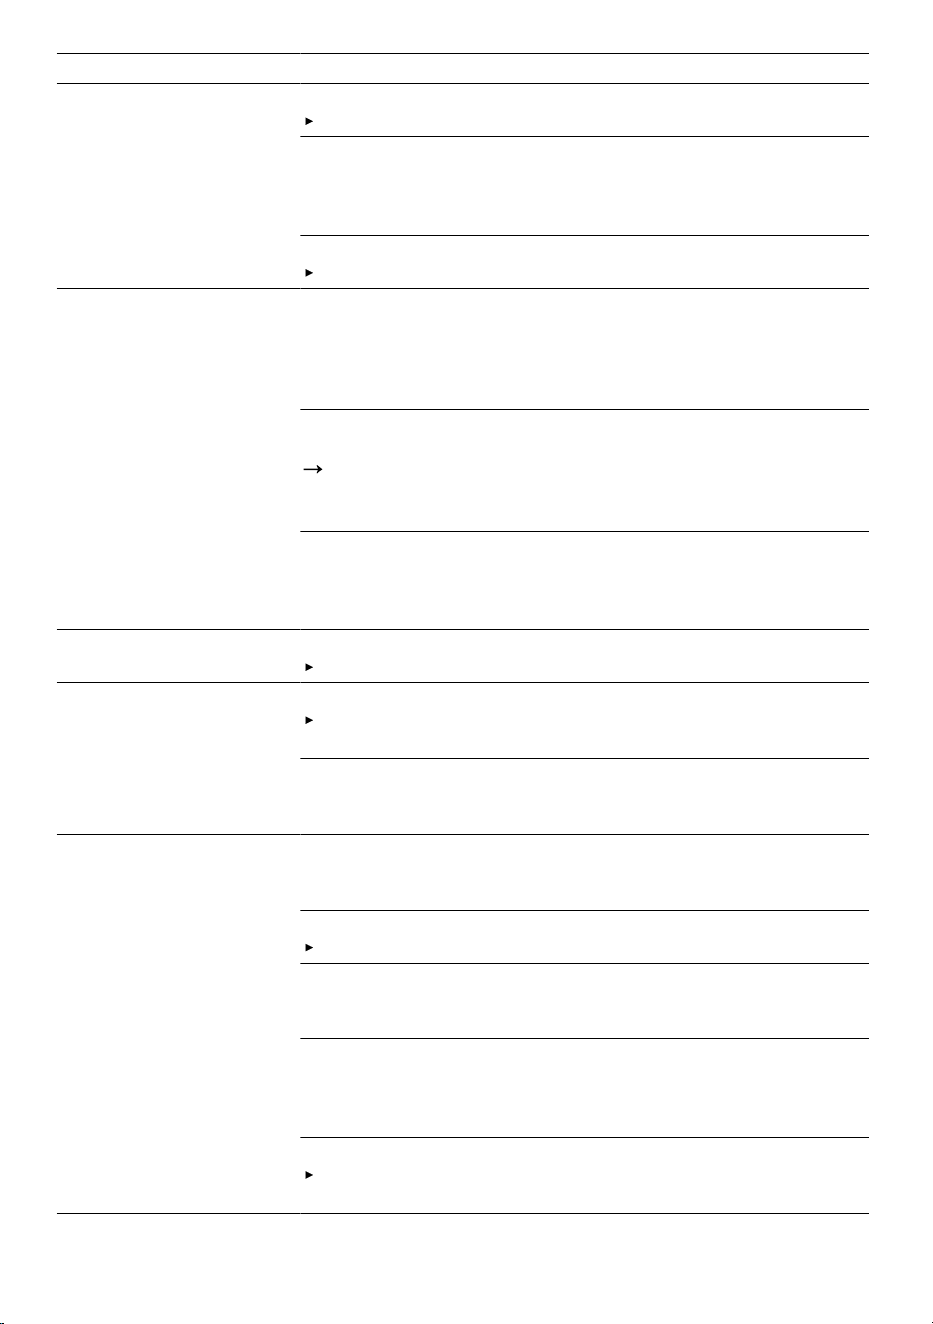
Fault Cause and troubleshooting
The appliance is not
working.
The battery has not been charged.
Charge the battery.
"Charging the battery", Page13
14
Troubleshooting en
Fault Cause and troubleshooting
Appliance is not char-
ging.
Battery status display is
off.
Battery status dis-
playflashes red.
Charging cable is faulty.
Check the charging cable.
Over-/under-temperature protection is activated.
1.
Switch off the appliance and disconnect the appliance from
the power supply.
2.
Wait until the appliance has reached room temperature.
Charging cable is not suitable or faulty.
Check the charging cable.
The appliance switches
off while operating.
Battery status dis-
playflashes red.
Floor nozzle is not connected to the appliance, or is not con-
nected correctly.
1.
Check the connection between the appliance housing and
the floor nozzle.
2.
If necessary, insert the housing into the floor nozzle.
Air inlet in the dust container blocked.
1.
Clean the dust container.
"Emptying the dust container and cleaning the filter unit",
Page14
2.
If necessary, remove any blockages at the air inlet.
Over-/under-temperature protection is activated.
1.
Switch off the appliance and disconnect the appliance from
the power supply.
2.
Wait until the appliance has reached room temperature.
Brush on the floor nozzle
does not turn.
Brush roller is soiled.
Clean the brush roller.
The dust container can-
not be inserted.
The filter unit or dust container is not positioned correctly.
Check whether the filter unit and dust container are inserted
correctly.
Locking mechanism on the dust container does not work.
1.
Check the locking mechanism of the dust container.
2.
Clean it and remove any blockages present.
Suction is reduced.
Dirt is not fully vacuumed
up.
Filter in the dust container is soiled.
1.
Switch off the appliance.
2.
Clean the filter in the dust container.
Brush roller is soiled.
Clean the brush roller.
Dust container is full
1.
Check the fill level of the dust container.
2.
Empty the dust container as needed.
Air flow in the floor nozzle or in the dust container is blocked.
1.
Switch off the appliance.
2.
Dismantle the appliance.
3.
Remove the blockage.
The filter unit is not complete.
Check whether the filter unit and dust container are inserted
correctly.
Dirt escapes from the ap-
pliance during operation.
Filter unit not inserted or faulty.
1.
Check the filter unit for damage.
15
en Carrying out maintenance
Fault Cause and troubleshooting
Dirt escapes from the ap-
pliance during operation.
2.
Assemble the filter unit correctly and insert it into the dust
container.
The filter unit or dust container is not positioned correctly.
Check whether the filter unit and dust container are inserted
correctly.
Carrying out maintenanceCarrying out maintenance
You can carry out simple maintenance
tasks on your appliance yourself, if neces-
sary.
Note: Ensure that you work carefully. No
foreign objects, especially conductive ob-
jects (e.g. screws), may enter the handheld
device while it is open.
Conductive objects can cause a short cir-
cuit and lead to damage or injury.
Replacing the exhaust filter
We recommend only replacing the exhaust
filter if there is visible soling or the suction
power decreases.
Notes
To avoid damage caused by frequent
disassembly, unscrew the rear cover
only if necessary.
You can order the exhaust filter as a
spare part at
www.bosch-home.com/
service
.
Requirement: The handheld device is re-
moved from the vacuum cleaner.
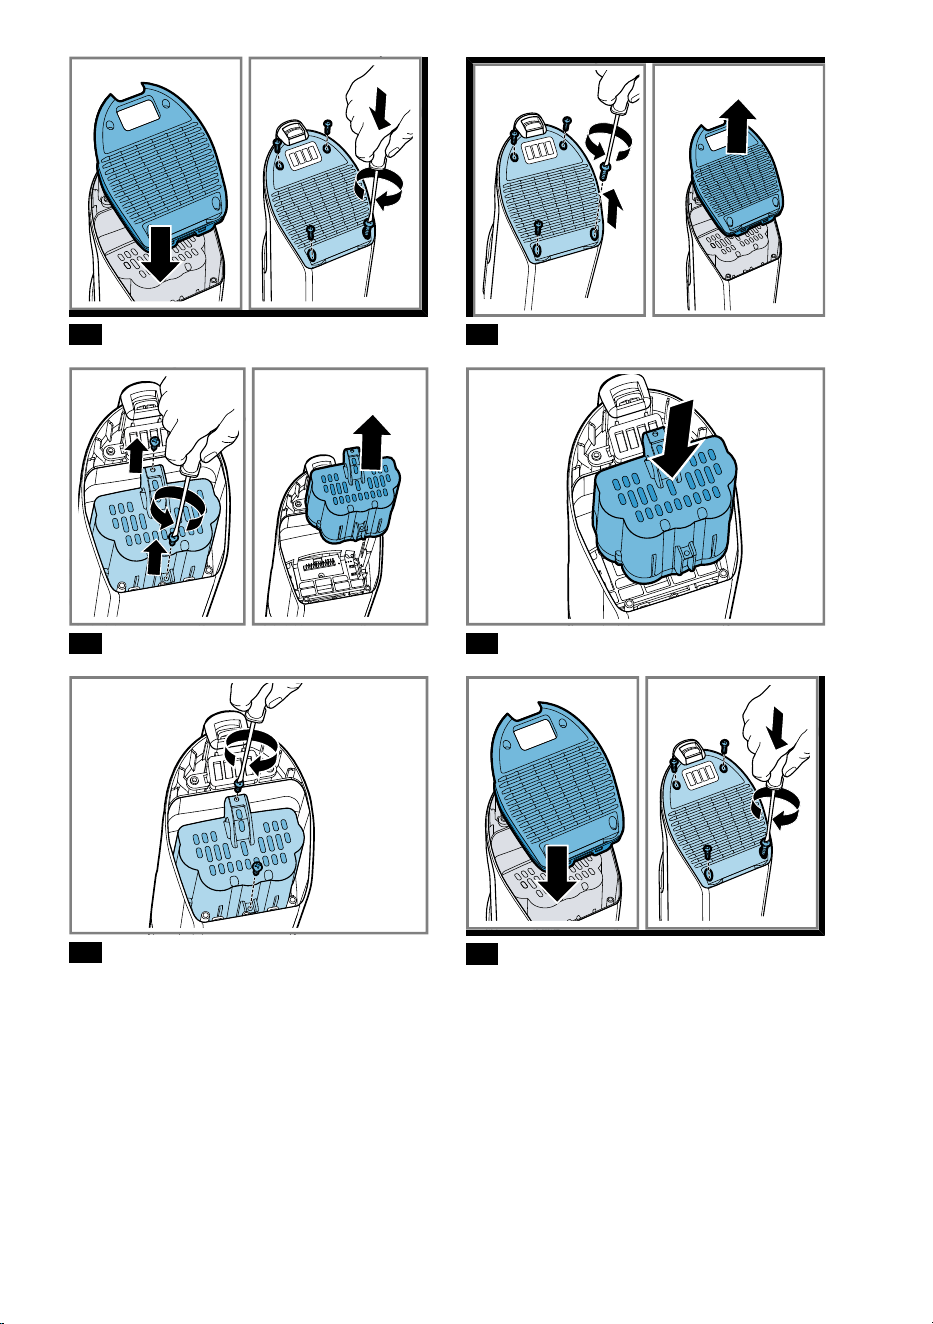
Fig.
36
-
41
Replacing the battery
Notes
Remove all conductive materials from
your body (e.g. jewellery) and from the
work area (e.g. screws) before replacing
the battery.
Conductive materials can cause a short
circuit in the battery and lead to damage
or injury.
You can order the battery as a spare part
at
www.bosch-home.com/service
.
Protect the battery against fire, heat and
constant sunlight.
Protect the battery against water and
penetrating moisture.
Never open the battery.
When not in use, keep the battery away
from metal objects, e.g. paper clips,
coins, keys, nails or screws.
Never charge the battery outside of the
appliance.
Only use original 928BPV252-01 batter-
ies.
Do not use non-rechargeable batteries.
Requirement: The handheld device is re-
moved from the vacuum cleaner.
Fig.
42
-
46
Disposing of old applianceDisposing of old appliance
Dispose of the appliance in an environ-
mentally friendly manner.
Information about current disposal meth-
ods are available from your specialist
dealer or local authority.
This appliance is labelled in
accordance with European
Directive 2012/19/EU con-
cerning used electrical and
electronic appliances (waste
electrical and electronic
equipment - WEEE).
The guideline determines the
framework for the return and
recycling of used appliances
as applicable throughout the
EU.
Disposing of batteriesDisposing of batteries
Batteries should be recycled in an environ-
mentally friendly manner. Do not dispose of
the batteries in the household rubbish.
Dispose of batteries in an environment-
ally friendly manner.
Customer ServiceCustomer Service
You can obtain function-relevant and stor-
able genuine spare parts from our Cus-
tomer Service for up to 10years from the
date on which your appliance was placed
on the market.
16

Customer Service en
For more information, please contact our
Customer Service team.
Detailed information about the warranty
period and the warranty conditions in your
country is available via the QR code on the
enclosed document on service contacts
and warranty conditions, from our customer
service or on our website.
You can find the contact details for our cus-
tomer service via the QR code on the en-
closed document on service contacts and
warranty conditions or on our website.
You can find the information required as
per Regulation (EU) 2023/826 online at
www.bosch-home.com
on the product and
service pages for your appliance, in the
area of user manuals and additional docu-
ments.
17

Many thanks for choosing a
Bosch home appliance!
Register your new appliance now on MyBosch and benefit directly from:
• Expert advice and tips to make the most of your appliance
• Options for warranty extension
• Discounts on spare parts and accessories
• Digital information for use and all appliance data to hand
• Easy access to Bosch Home Appliance Service
Simple to register, free of charge – including on mobile devices:
www.bosch-home.com/welcome
Need some help?
You can find it here.
Expert advice on your Bosch home appliances, help with problems or repairs by
professionals from Bosch.
Discover all the different ways Bosch can assist you:
www.bosch-home.com/service
The contact details of all countries are listed in the attached service directory.
BSH Hausgeräte GmbH
Carl-Wery-Straße 34
81739 München, GERMANY
www.bosch-home.com
A Bosch Company
Valid within Great Britain:
Imported to Great Britain by
BSH Home Appliances Ltd.
Grand Union House
Old Wolverton Road
Wolverton, Milton Keynes
MK12 5PT
United Kingdom
*8001372651*
8001372651 (060114)
en