L1
L2
COM
Ground
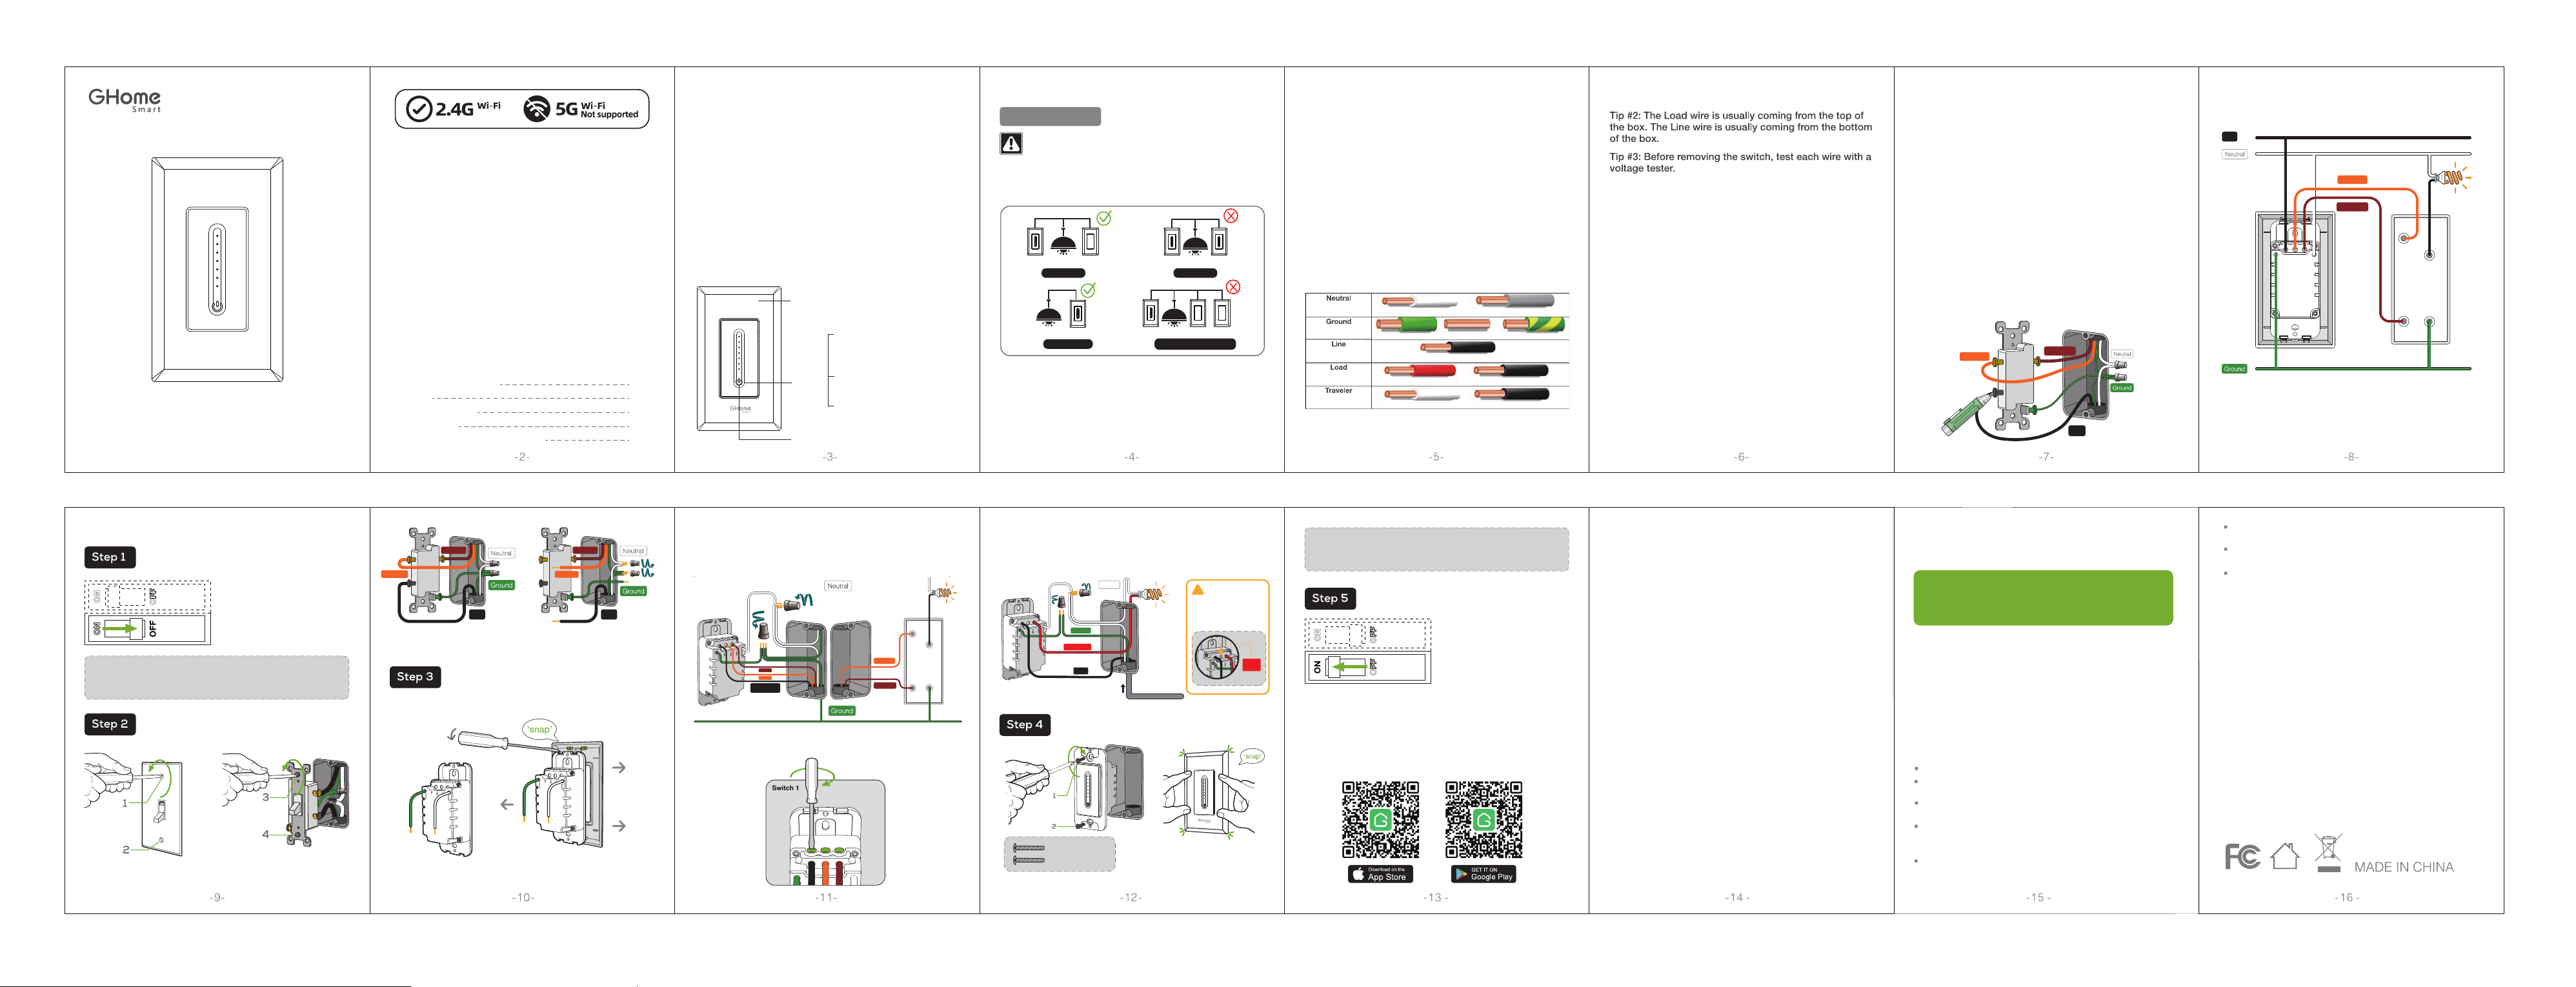
White or Grey
Green, Copper or
Green with Yellow Strip
Black
Red or Black
White or Black
Line Line
LINE
(Power Source)
Traditional 3-way switch
Only
4.02.000.1347 V3.0
Model: SW17 FCC ID:2APUZ-SW2
Input: 120V~ 50/60Hz
Max output: 150W LED, 150W CFL, 450W INC
Wi-Fi: 802.11/b/g/n, 2.4GHz (only)
Operating Temp: -10°C~40℃
Green light blinks slowly
Ready for AP Mode
connection
White light: power on or
low power consumption
The indicator light is off:
power off or no output
1. Open the app and create your account.
2. Turn on the switch and place it near the router
when pairing.
3. Hold the ON/OFF button for 5 seconds and release it
when the switch starts to blink slowly to enter the
network pairing mode.
Connect your phone to the Wi-Fi router, and click the
"+" at the top right corner of the homepage to add a
device.
You can add a device in two ways.
1) Bluetooth Auto-Discovery Mode (Recommended)
The app will suggest you turn on Bluetooth and Wi-Fi
on your phone, and then select the device you want to
add. Enter your Wi-Fi name and Wi-Fi password
(supports 2.4G Wi-Fi only), and it will automatically
connect to the network.
2) “Slow Flash” Mode (AP)
If Bluetooth networking fails, you can try AP network-
ing mode.
Select "SW17" under "Electrician", enter your Wi-Fi
name and Wi-Fi password (supports 2.4G Wi-Fi only),
choose "Slow Blink" to ensure the LED indicator blinks
slowly, connect your phone to the device hotspot:
"SmartLife-XXXX", then return to the app interface, it
will automatically connect to the router, completing
the configuration.
After binding the app, you can control the brightness and
brightness range of the bulb through the app.When the
brightness range is set, the brightness value can only be
controlled within the set brightness range.
Neutral
COM2
COM1
LIVE
SW17
Traditional 3-way switch
SW17
SW17 Traditional 3-way switch
How to Pair with the App
3 Way Sma Dimmer Switch
SW17
3 Way Dimmer SW17
Screws
Wiring terminals
User manual
Binding Voice Assistants Guide
x 1
x 7
x 2
x 1
x 1
Accessories Supplied Individually
Parameters
Product Oveiew
Before You Install
WARNING: SHOCK HAZARD
Before You Install
Identify Wires By Color
If Line and Load Are Both Black
For 3-Way connection: SW17 is only used
in pairs with the traditional 3-Way switch
3-Way Sma Dimmer Switch
How to Download the App
Since the device only supports 2.4G Wi-Fi
connection, please ensure that the
mobile phone and the device are connected
to 2.4G Wi-Fi simultaneously.
Removable Face Plate
On / Off Button (Reset Button )
Light
Status
Installation Tips!
Incorrect installation may be dangerous or illegal.
Multiple circuit breakers may need to be de-energized for safe
installation. If you are not familiar with electrical work,please call
a professional electrician.
Line Wire : A line wire is a wire carrying an electric current. If
you keep your tester here, it will show indication when power is
there.
Load Wire: The load wire connects your light switch to
your light fixture.It is usually attached to a brass terminal on the
previous switch. It is sometimes black or red.
(IF YOU INSTALLED THE DIMMER NEXT TO OTHER DIMMERS OR
SWITCHES, YOU'LL NEED TO INSTALL A WALLPLATE WITH THE CORRECT
SIZE/NUMBER OF OPENINGS TO ACCOMMODATE ALL THE DEVICES.)
Neutral Wire: A neutral wire which normally in white
color allows the switch to be powered while simultane-
ously allowing the lighting circuit connected to your
lights to be power off.
Ground Wire: Ground wire is a bare copper wire that
provides a conducting path to the earth.
If the wires in your switch wall box are different from the
ones listed below, we recommend consulting a qualified
electrician.
CAUTION: Risk of electric shock. Do NOT touch any
wires during this process.
Option 1: Search for our app in the APP Store or
Google Play.
Option 2: Scan the QR code below to enter the
download page.
Tip #1: An easy way to identify the wires in your
wall box is by looking at the color.
●After removing the face plate, turn the
breaker back on.
●Very carefully, press the voltage pen
against each wire.
●The pen will glow red when the wire is hot.
●The wire that causes the pen to glow red
is the hot wire; also known as the Line wire.
●The wire that does not cause the pen to
glow red is the Load wire.
CAUTION: Risk of electric shock. Before continuing
with the rest of the installation process, make sure to
turn the power breaker off.
Identify whether the switch is at the
input end ?
Turn on the power at the circuit breaker and turn off the
switch. (Attention: Do not touch the switch circuit or
screws with your hands)
Use a Voltage tester to check the black screw on the old
switch.
If the detection result is not the line wire, then this
position is the output end, the dimmer switch is not
suitable for this position. Please turn off the power,
reinstall the old switch back onto the wall, and then select
the switch on the other end for replacement.
Note: If one of the two traditional three-way switches
connected to the device malfunctions, you need to move
the traditional three-way switch originally connected to
the line wire to the position where the device is
connected, and replace the traditional three-way switch
connected to the line wire with a smart three-way switch.
Shut OFF the power at the circuit breaker for
the switch you are replacing.
Install the 3-way smart dimmer switch SW17. Insert
your wires to the terminal, then tighten the screw.
In case you need jumper wire, the switch comes
with extra jumper wires and caps.
You may need to shut OFF
more than one circuit
breaker/switch to make sure
the switch you're working onis
powered OFF.
IMPORTANT: USE A NON-CONTACT VOLTAGE
DETTECTOR OR FLIP YOUR LIGHT SWITCH A FEW TIMES
TO MAKE SURE THAT THE POWER IS OFF.
Remove the wallplate
from switch.
Remove the switch and pull it
away from the wall.
Be sure to find the old switch that the line wire
was connected to. Unscrew the old switch with
a screwdriver and pull it out of the wall.
Disconnect all wires from the switch. Please note: replace the
traditional 3-way switch which connected to the Line wire.
Use a flat-head screwdriver to pry open the panel.
Then close the top cover.
Mount the device using the provided screws.
Turn power on at circuit breaker.
L1
L2
COM
SW17SW17
SW17
4-way or Multi-way
Traditional 3-way switch
TRAVELER1
TRAVELER1
TRAVELER1
TRAVELER2 TRAVELER2
TRAVELER2
TRAVELER2
TRAVELER1
Or Single-Pole:
SW17 is also compatible with 1-way circuit, use one of the COM1 or
COM2 terminal of the switch as the load wire to connect light.
LINE
Power Source
Line
GROUND
SW17
To avoid electric shock,
touching the terminals of
the switch is not allowed
after power-on.
WARNING:
COM2 /LOAD
!
Neutral
TRAVELER1
TRAVELER1
TRAVELER2
TRAVELER2
NOTE: The Brightness Range only needs to increase the
minimum value when your bulb is flashing at lowest
brightness. Otherwise, please default the Range Value to
1% -100% for normal use.
Line
Line
Keep it out of the reach of children and pets.
Do not use this product in humid environments or
outdoors. It's for indoor use only.
Do not place this product near heating devices, such as
microwave ovens, stoves, or radiators.
Protect the product from extreme temperatures, directsunlight,
strong jolts, high humidity, moisture, flammable gases, vapors
and solvents.
Do not disassemble,modify, or repair your device, and
ask help from the authorized professionals for device
malfunction.
Manufacturer: Shenzhen Cuco Smart Technology
Co., Ltd.
Address: Room 201, 301, Building A, No.12 Difu Road,
Guxing Community, Xixiang Street, Bao'an District,
Shenzhen,518000,Guangdong, P. R. China
After-sale Tel: 1-844-394-5218
PST 9am - 5pm (Monday-Friday)
Email: [email protected]
Warnings and Precautions
Note: The image shown in the manual is indicative
only. If there is inconsistency between the image
and the actual product, the actual product shall
govern.
Contact Us
Reset
Turn on the power, hold the On/Off button (Reset
button) for 5 seconds and let it go when the Switch
starts to flash slowly, the reset is successful.
When the Switch is in a new network environment,
you need to restore the factory settings, and then
reconnect to the network.
Do not use the device when it is no longer working
properly or visibly damaged.
Do not store the device for extended periods in poor
ambient conditions.
Never use aggressive detergents such as rubbing
alcohol or other chemical solutions because these couuld
damage the casing or even impair the functioning of the
product.
Use the screws
provided.
SW17
Single-pole
3-way3-way
Line
Unused
COM
3-Way Smart Switch:
SW17 only used in pairs with the traditional 3-way switch, and the
Line wire must be connected to the port of smart switch SW17.
Tighten the incoming wires: