
Technical Support and E-Warranty Certificate www.vevor.com/support
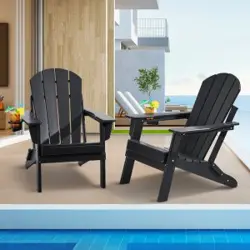
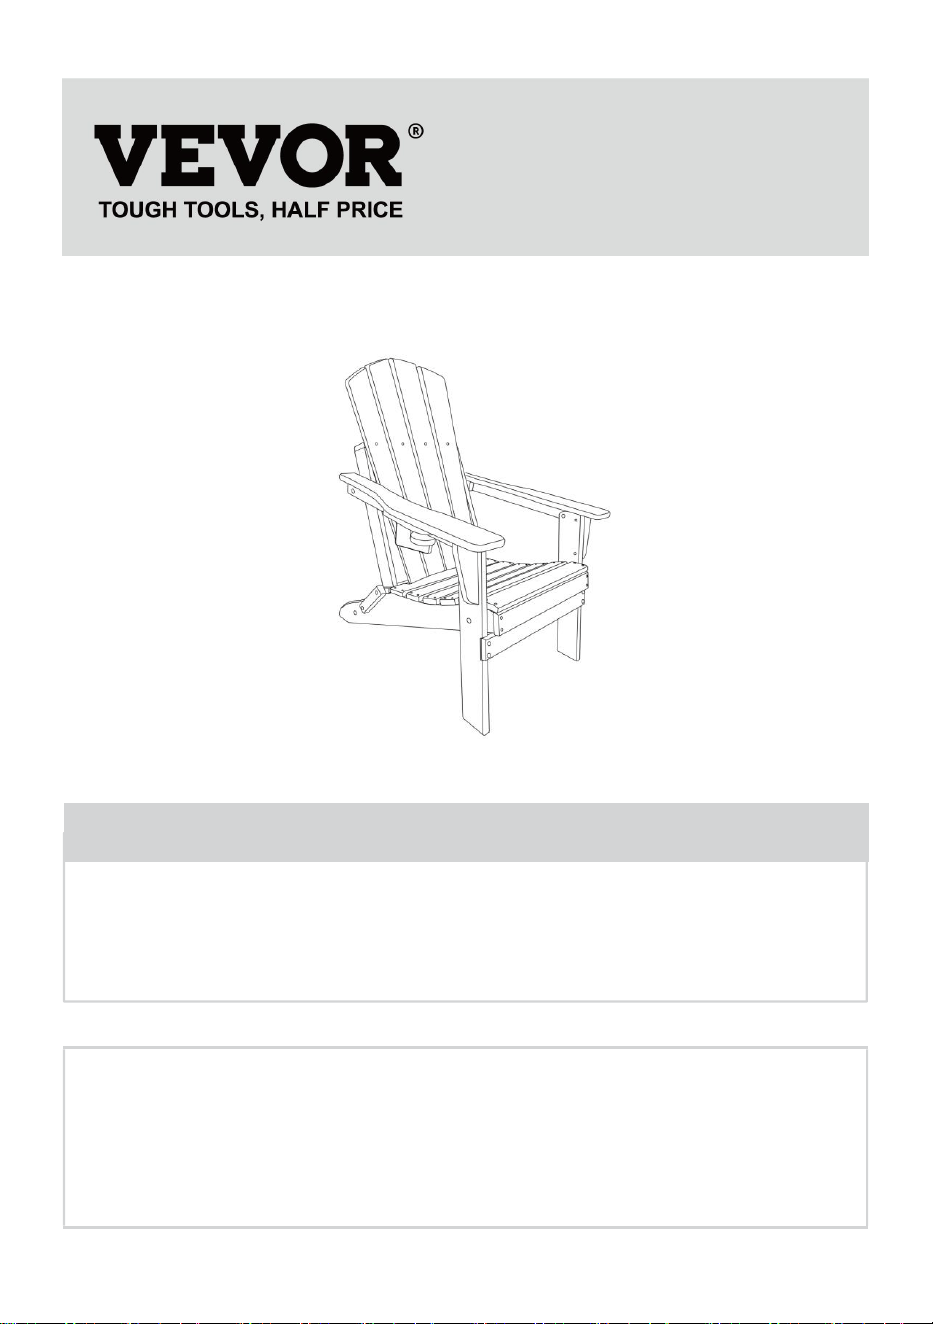
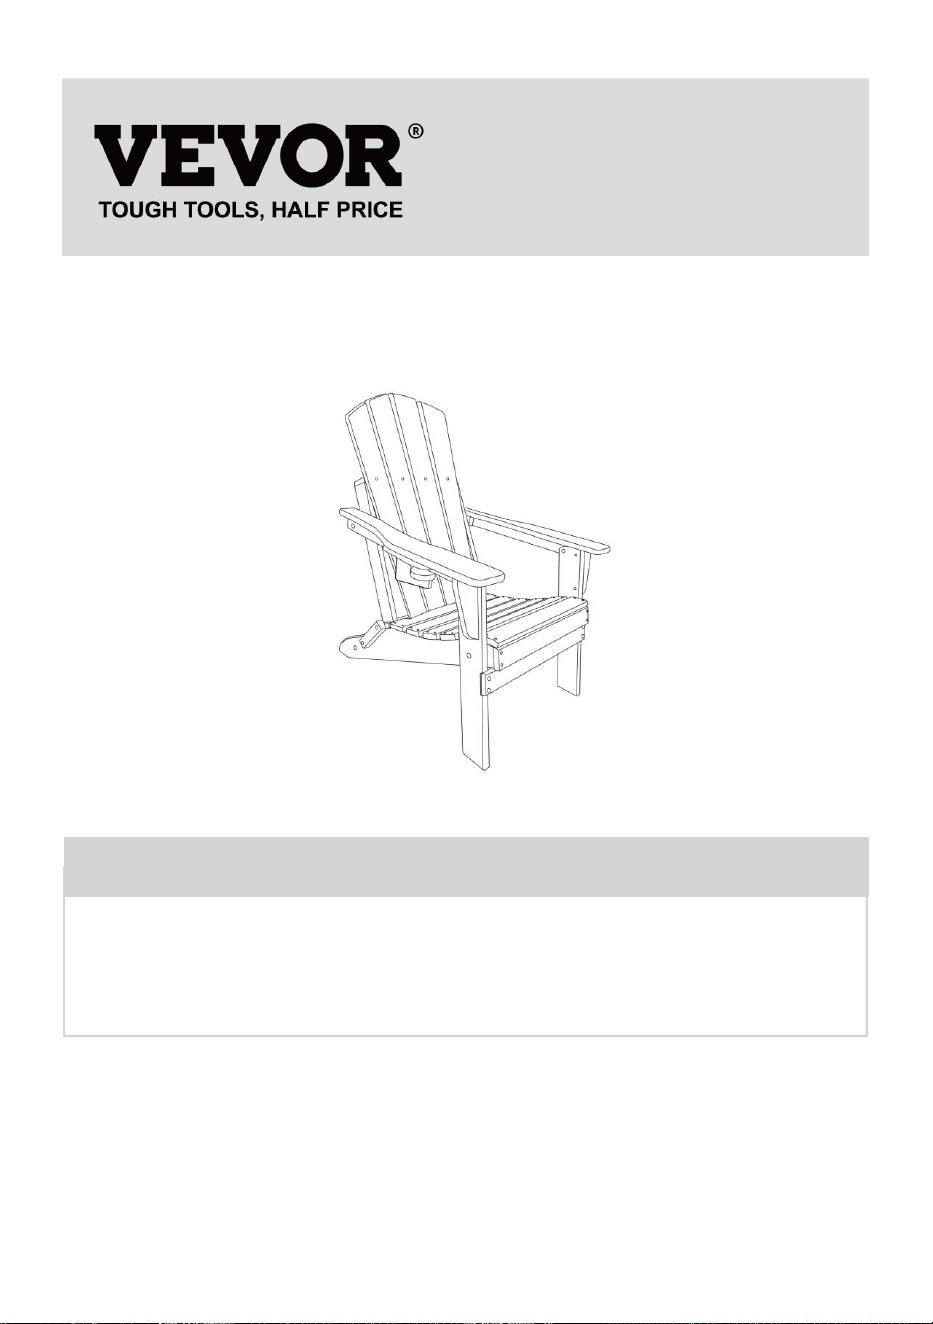
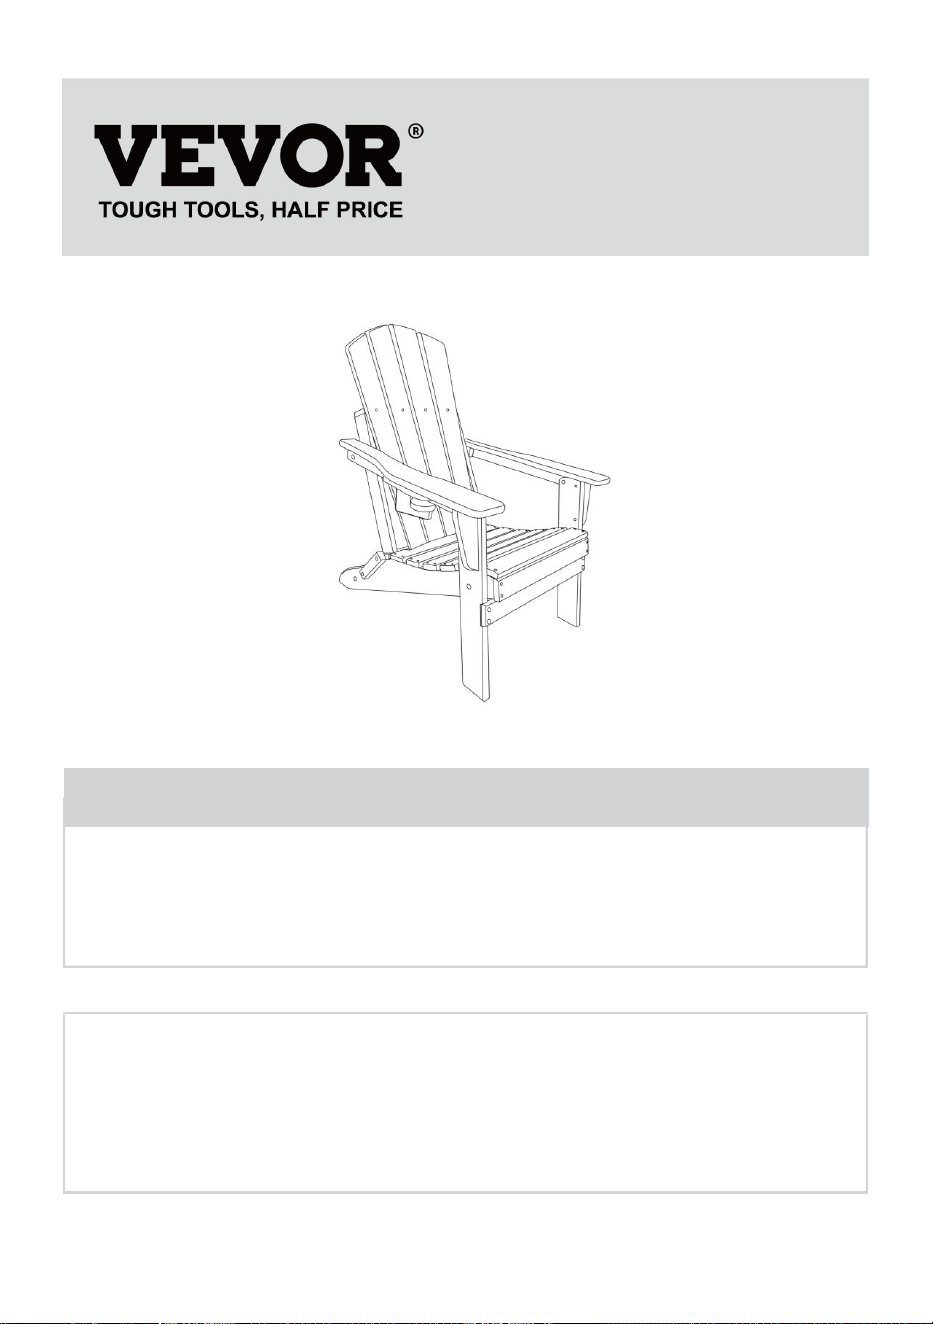
PLASTIC ADIRONDACK CHAIRS
User manual
We continue to be committed to provide you tools with competitive price.
"Save Half", "Half Price" or any other similar expressions used by us only represents an
estimate of savings you might benefit from buying certain tools with us compared to the major
top brands and does not necessarily mean to cover all categories of tools offered by us. You
are kindly reminded to verify carefully when you are placing an order with us if you are
actually saving half in comparison with the top major brands.

1
Model:SS401-BK-2P、SS401-GY-2P、SS401-WT-2P、SS401-BU-2P
Have product questions? Need technical support? Please feel free to
contact us:
Technical Support and E-Warranty Certificate
www.vevor.com/support
NEED HELP? CONTACT US!
This is the original instruction, please read all manual instructions
carefully before operating. VEVOR reserves a clear interpretation of our
user manual. The appearance of the product shall be subject to the
product you received. Please forgive us that we won't inform you again if
there are any technology or software updates on our product.
PLASTIC ADIRONDACK CHAIRS

2
INSTRUCTIONS
Thank you very much for choosing this product. Please read all of the
instructions before using it.The information will help you achieve the best
possible results.
PLEASE NOTE! Drawings in this manual are for illustration purposes only
and in some details may differ from the actual product.
ATTENTION! Read all safety warnings and all instructions. Failure to follow
the warnings and instructions may result in serious injury or even death.
The device or product used in the warning instructions is referred to Plastic
Adirondack Chairs .
This product is not a toy or a toy chest. Do not allow children to play with
this item. Use as intended only and Need to supervise the children to
understand step rules of use chair finally.
1.Please read the instructions and confirm that all the parts you need are
inside the carton before assembly.
2. Two people are required to assemble this product.
3.Select a a flat, sturdy, and debris-free flat to prevent tripping during
assemble the product.
4. Please secure all parts and bolts loosely, only when the frame is
complete should you fully tighten the screws.
5.If any instability occurs, loosen the screws, realign the components as
necessary and re-tighten the screws evenly.
6. This product is not a climbing frame or toy.
7. Do not allow children to fold or open the chair alone.Keep out of reach of
children.
8.Before using the product - if you have any questions regarding the proper
assembly or operation, contact you dealer or representative.
SAVE THESE INSTRUCTIONS
3
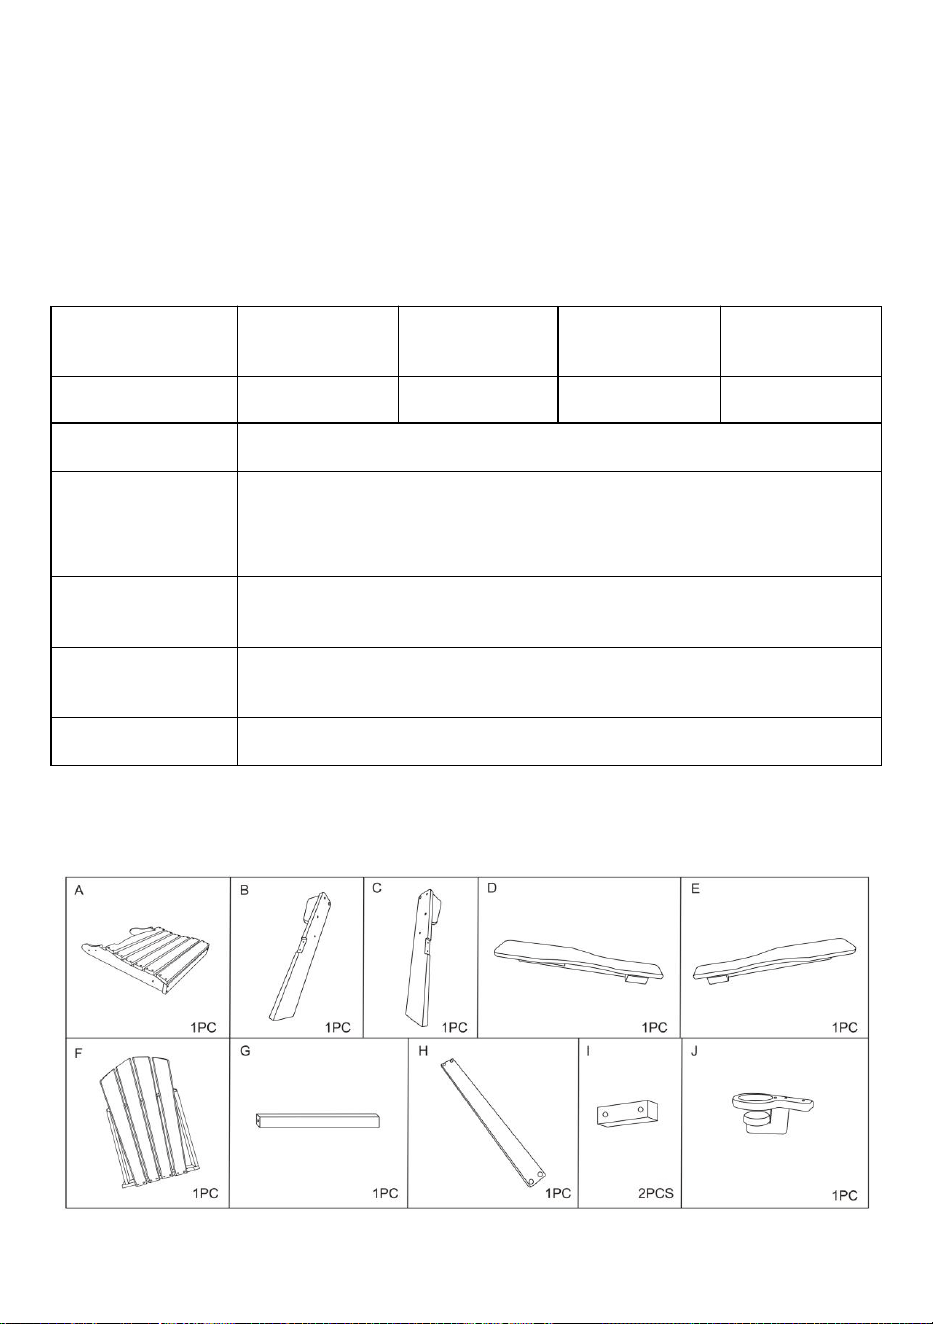
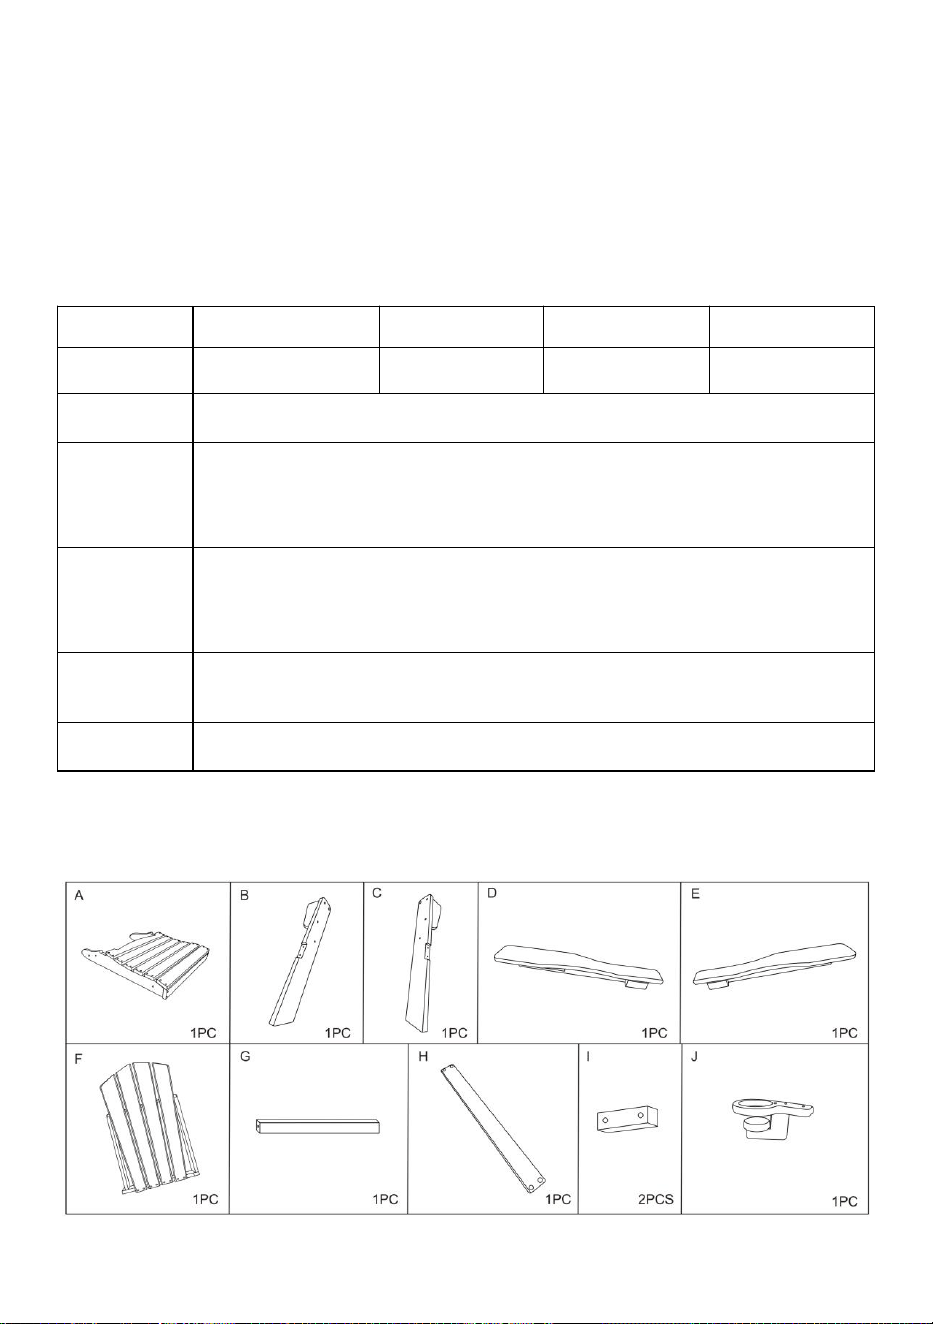
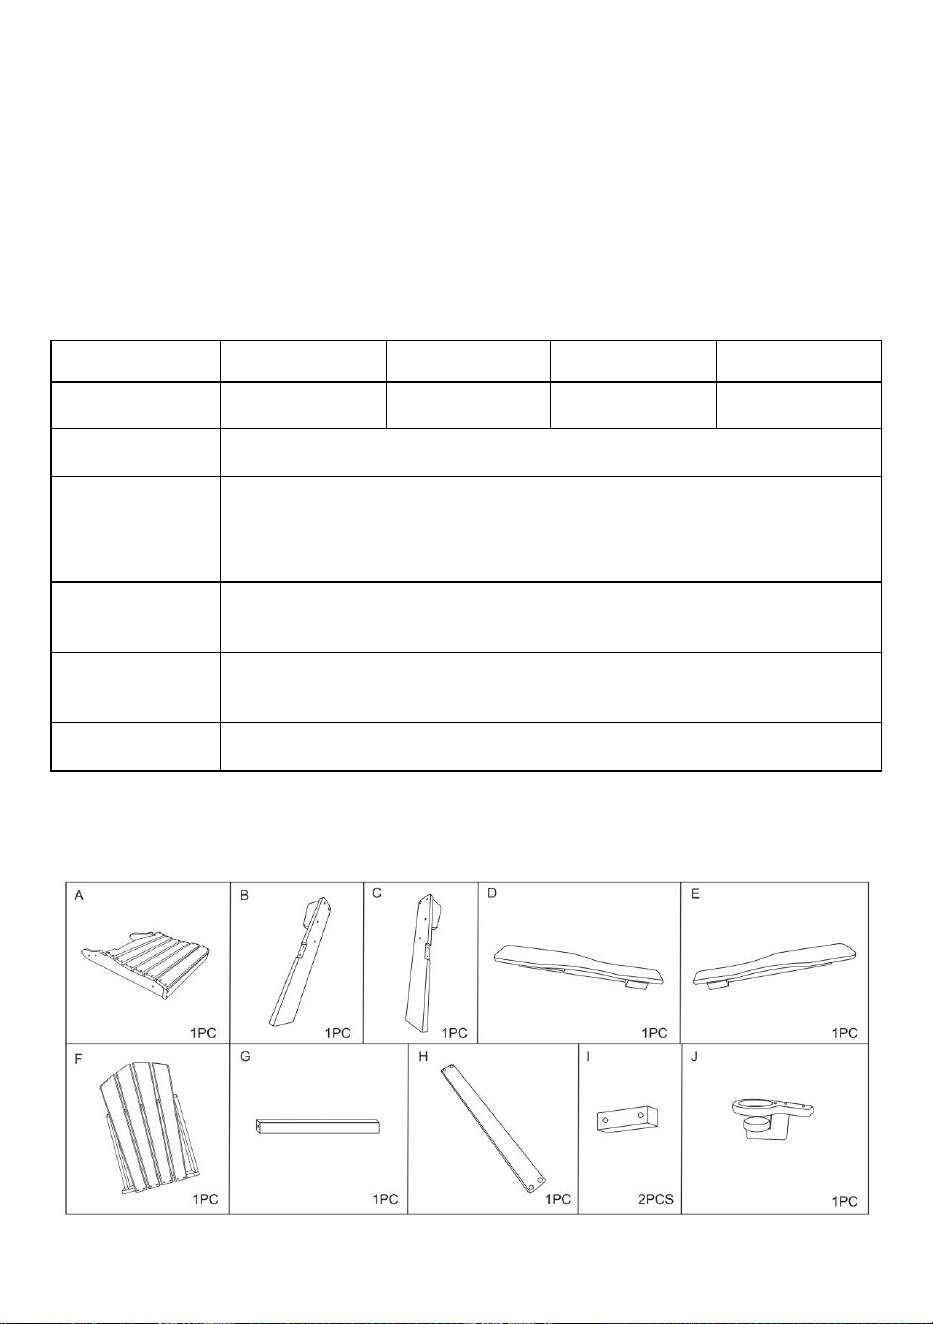
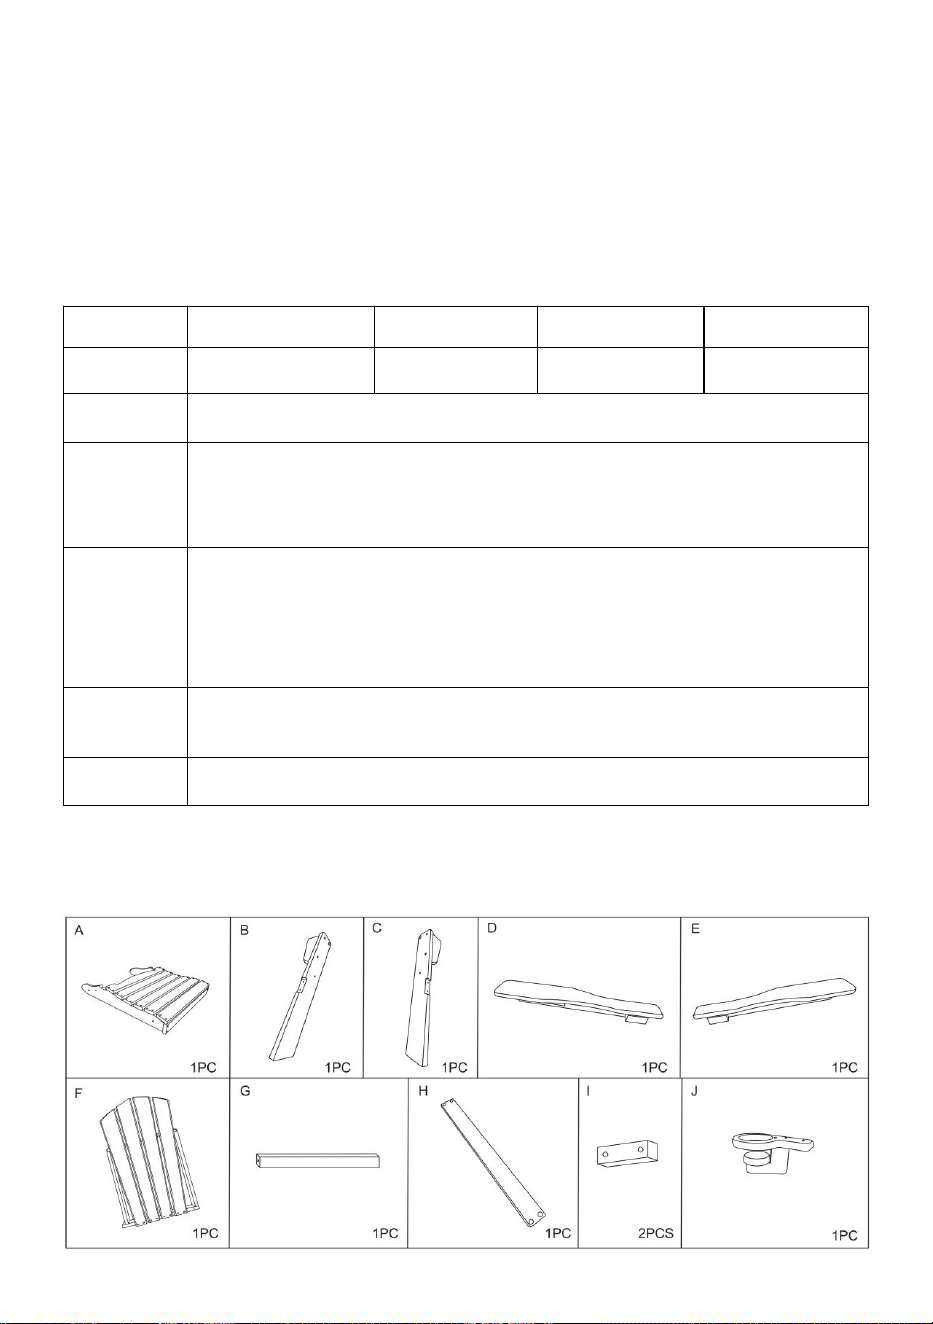
TECHNICAL PARAMETERS
Model
SS401-BK-2P
SS401-GY-2P
SS401-WT-2P
SS401-BU-2P
Color
Black
Grey
White
Blue
Material
HDPE
Maximum
load
bearing
(lbs.)
400
Product
size (mm)
800*755*915
Net
weight
(kg)
28.55
Packing
2 pcs/box
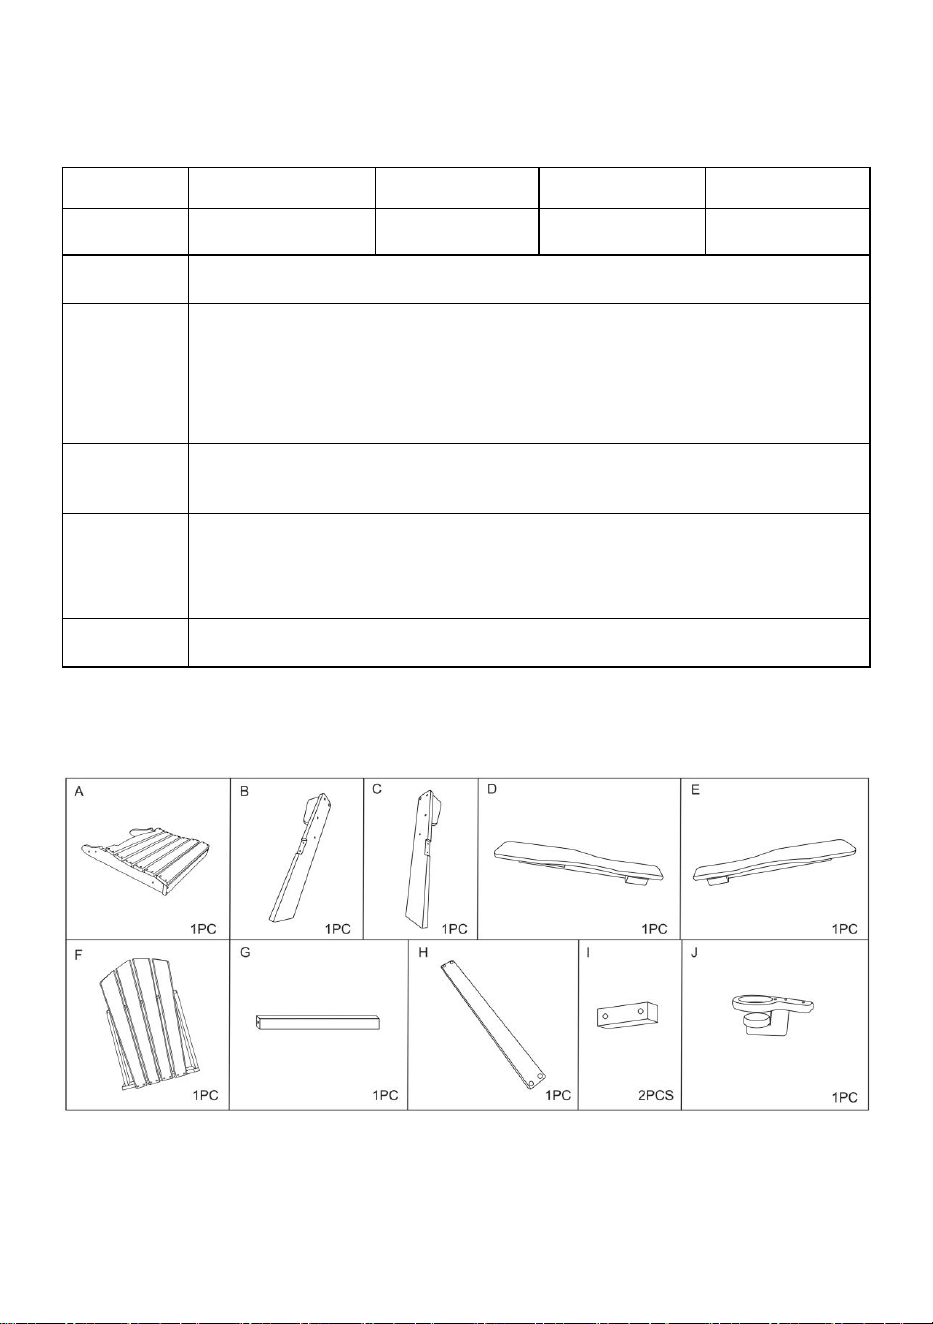
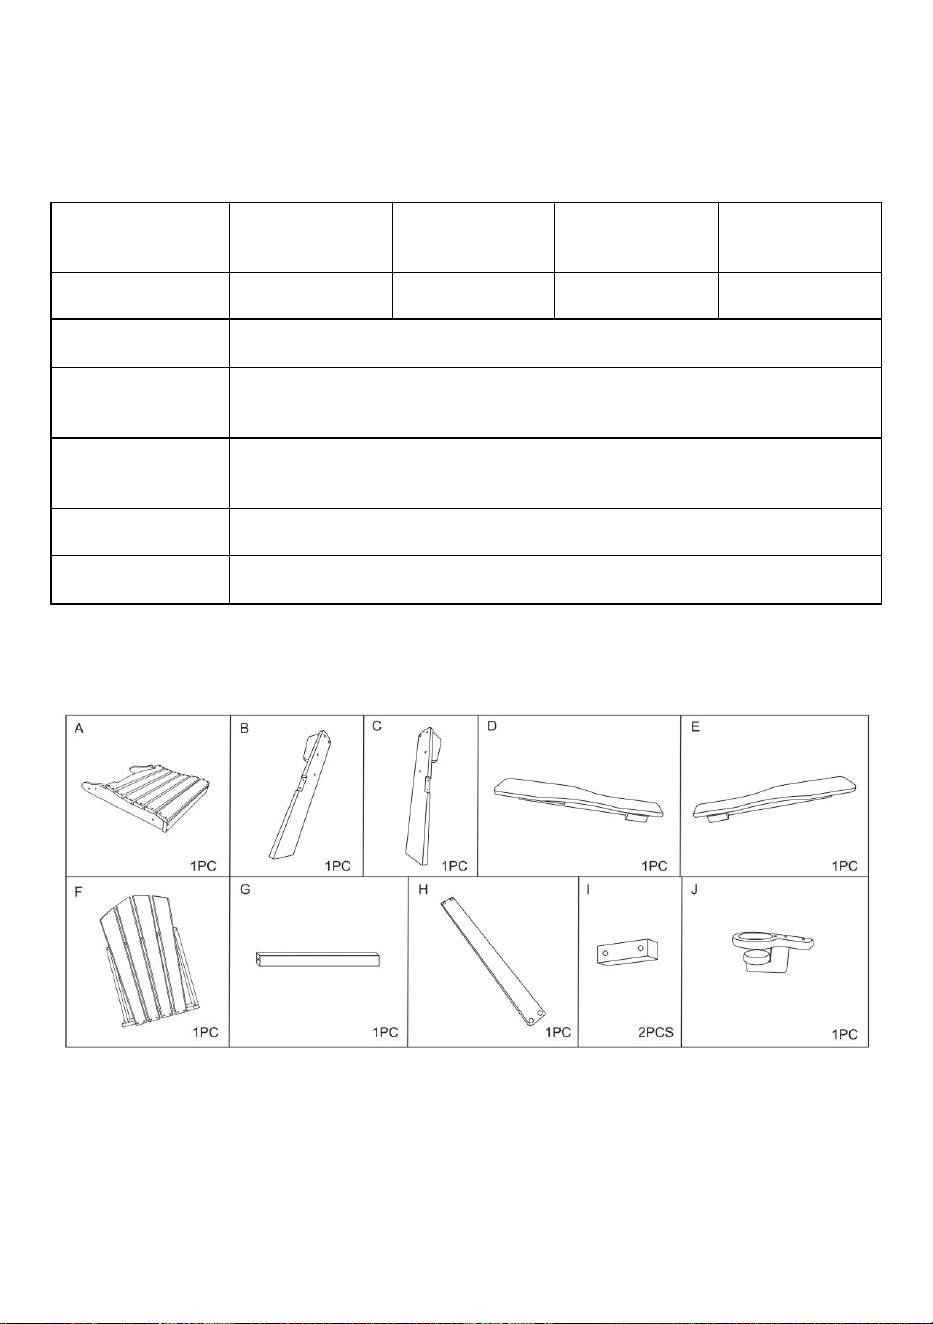
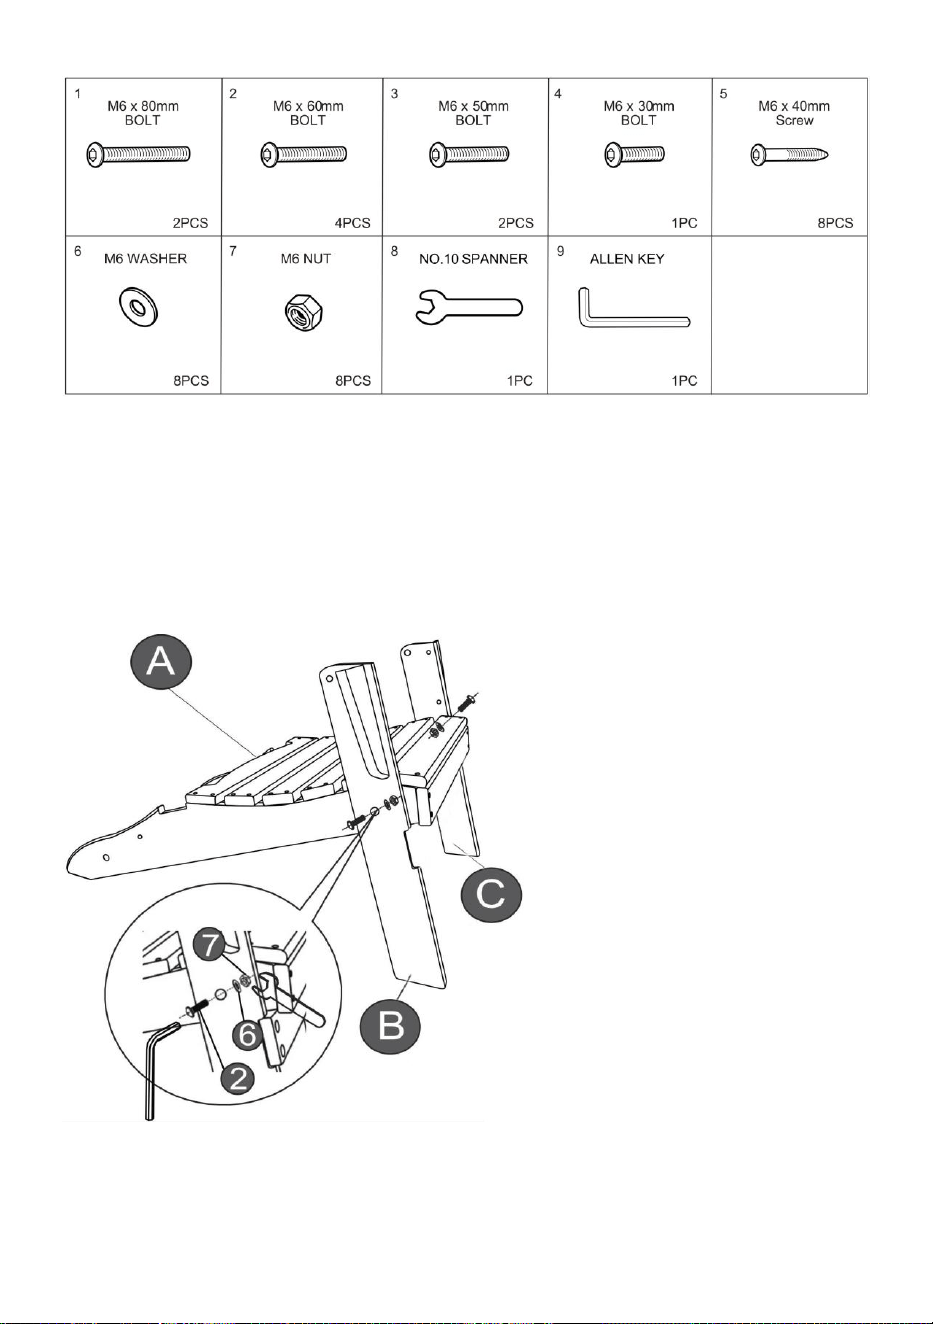
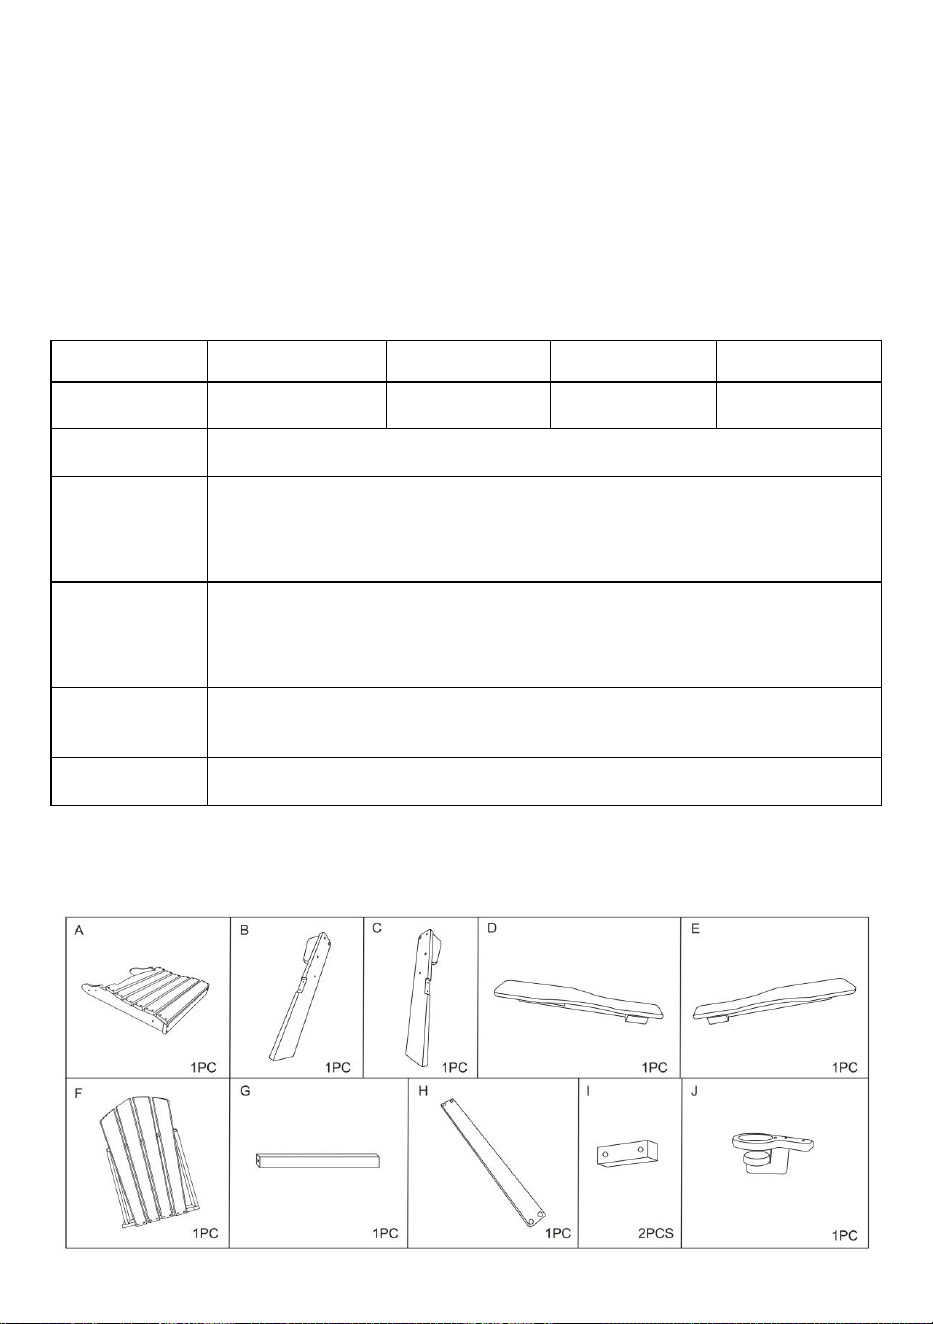
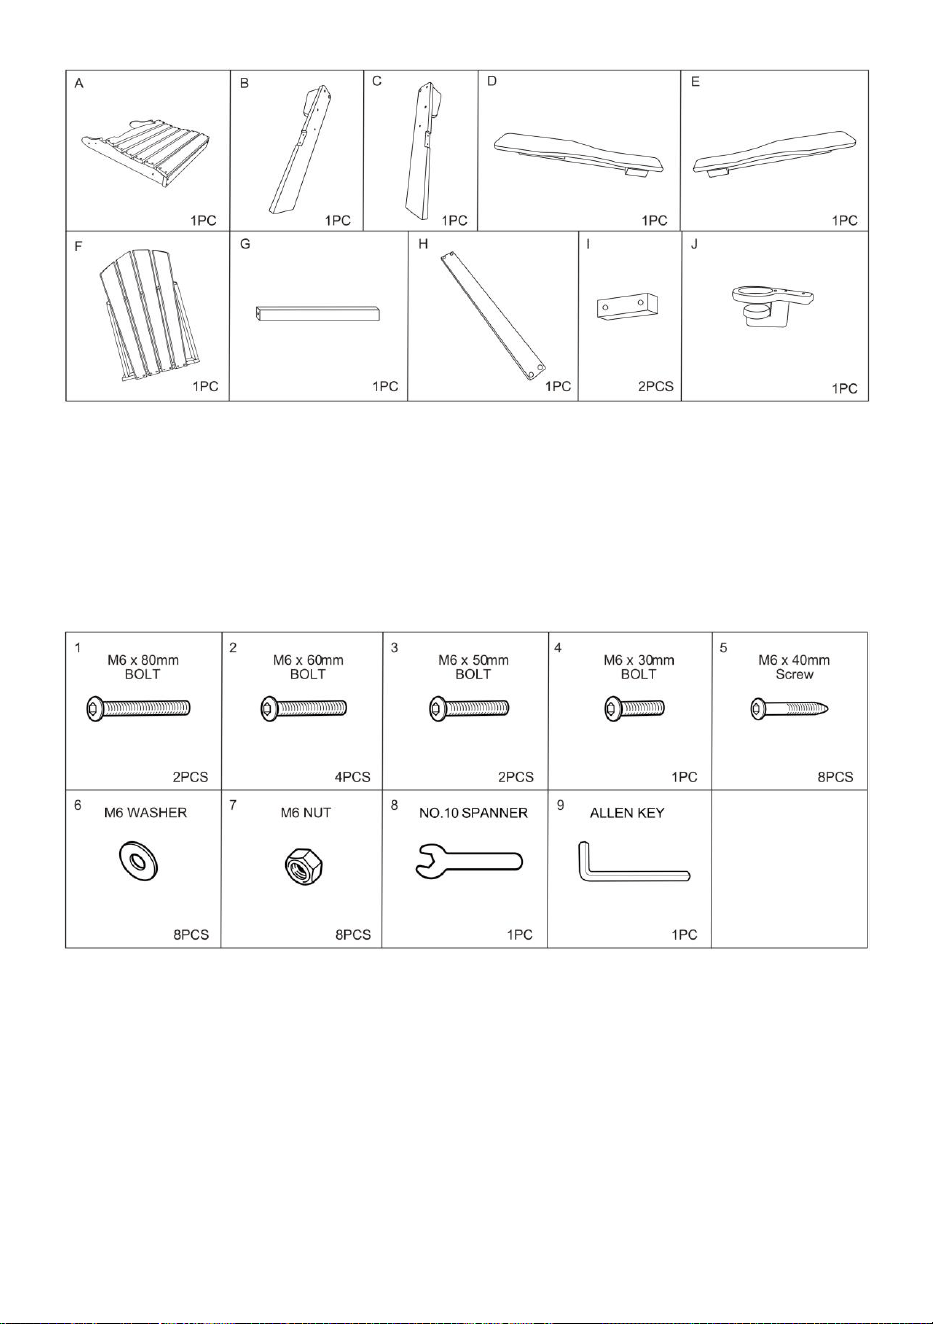
Part List
4
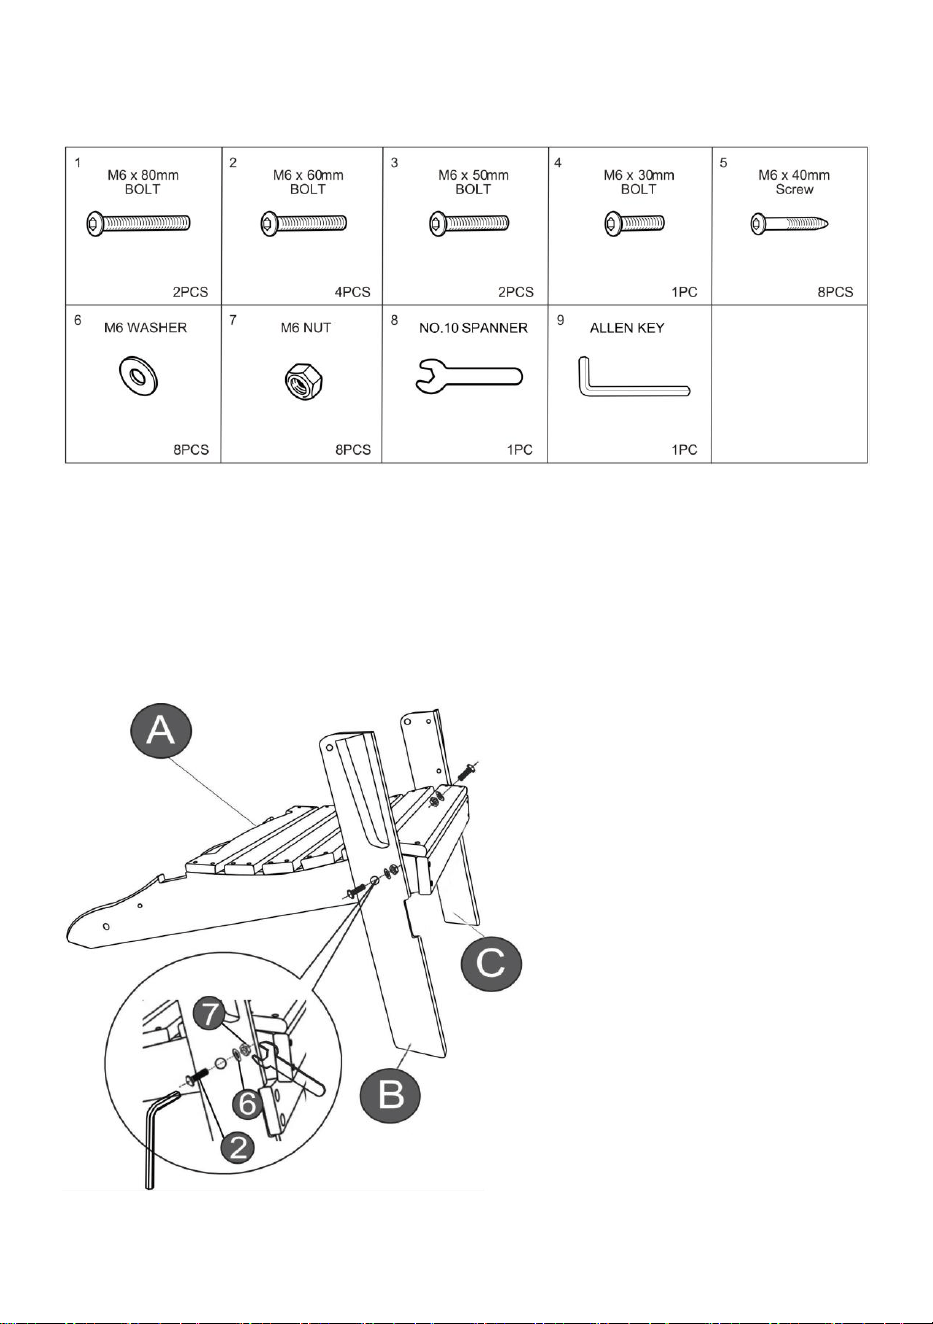
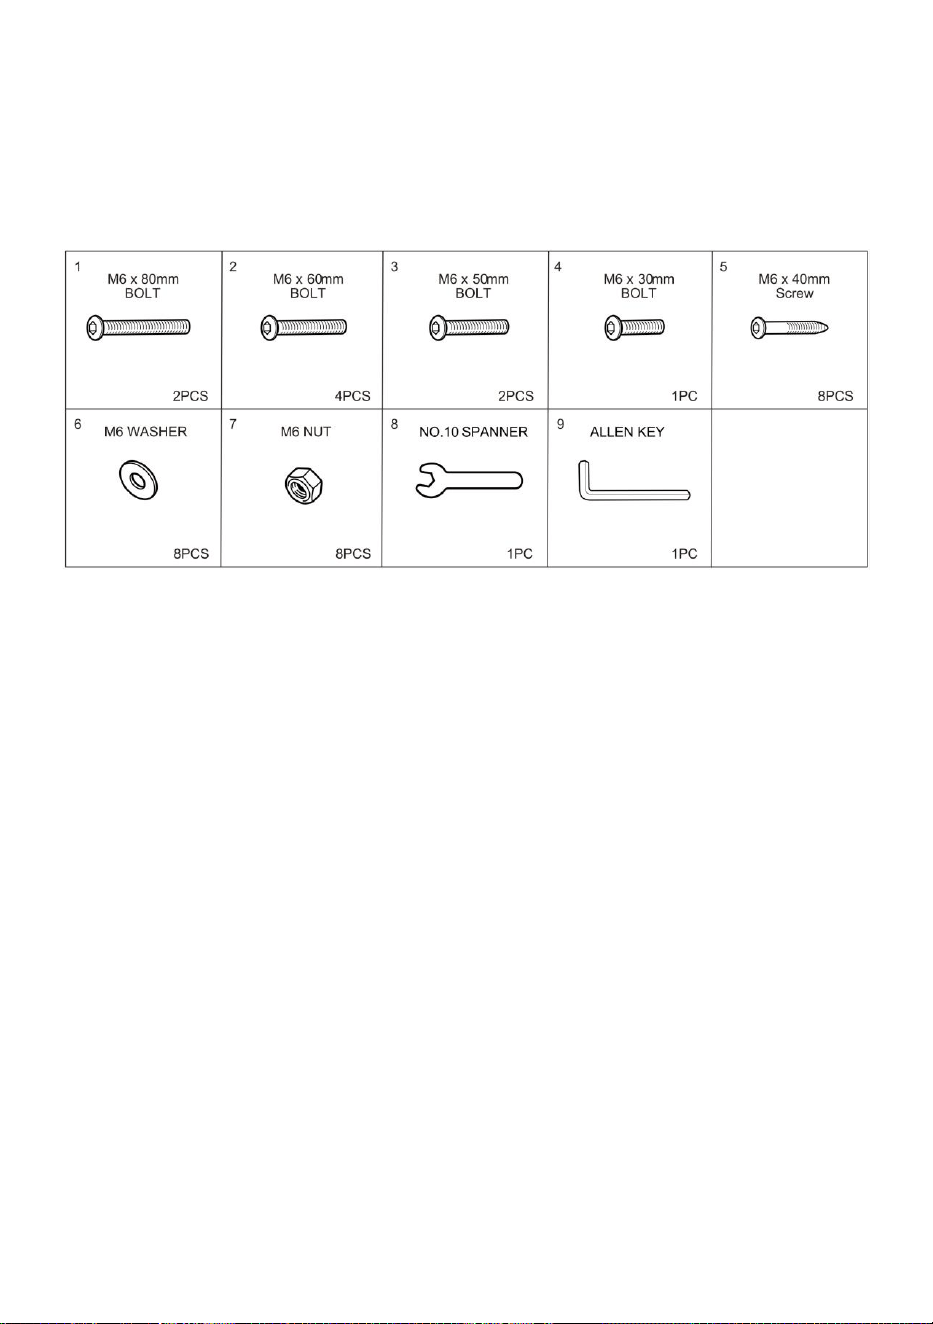
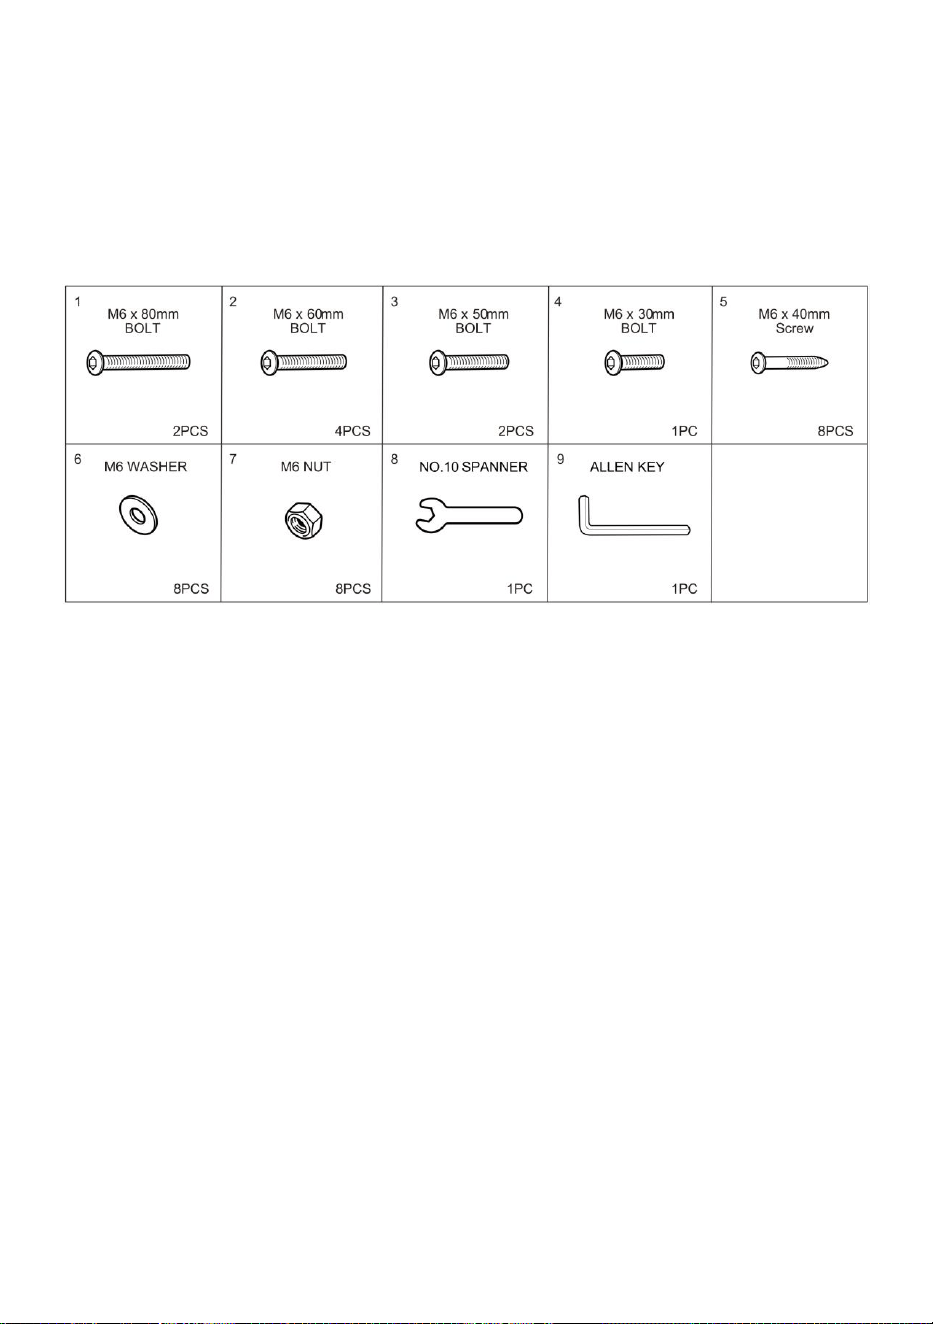
Hardware
List
Assembly
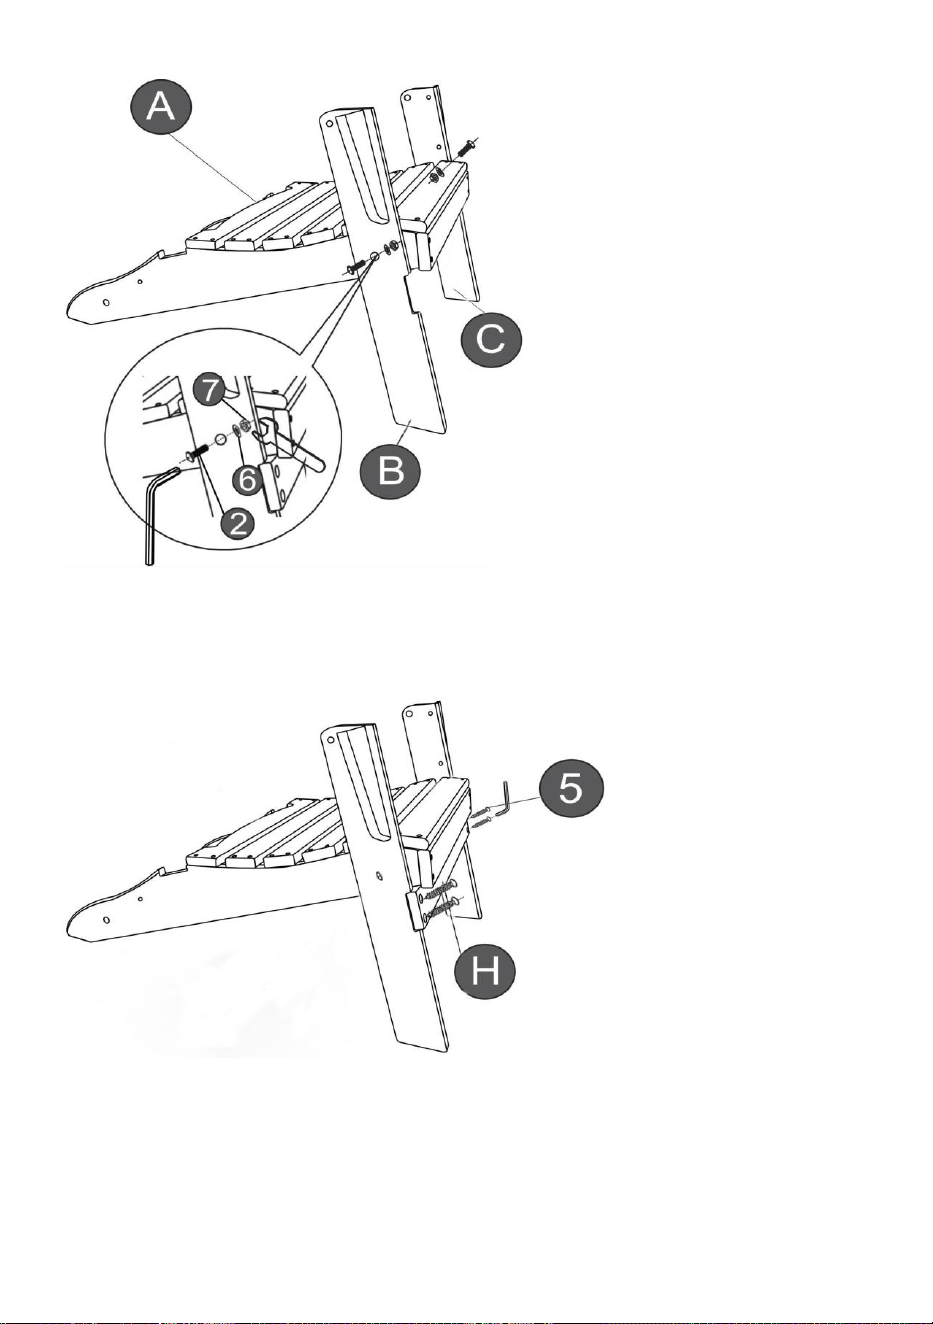
Step 1: Attach part B (right leg) & C (left leg) to the part A(seat panel)
using Hardware2(M6x60mm Bolt).Hardware6 (Washer) and
Hardware7 (M6 Nut).
5
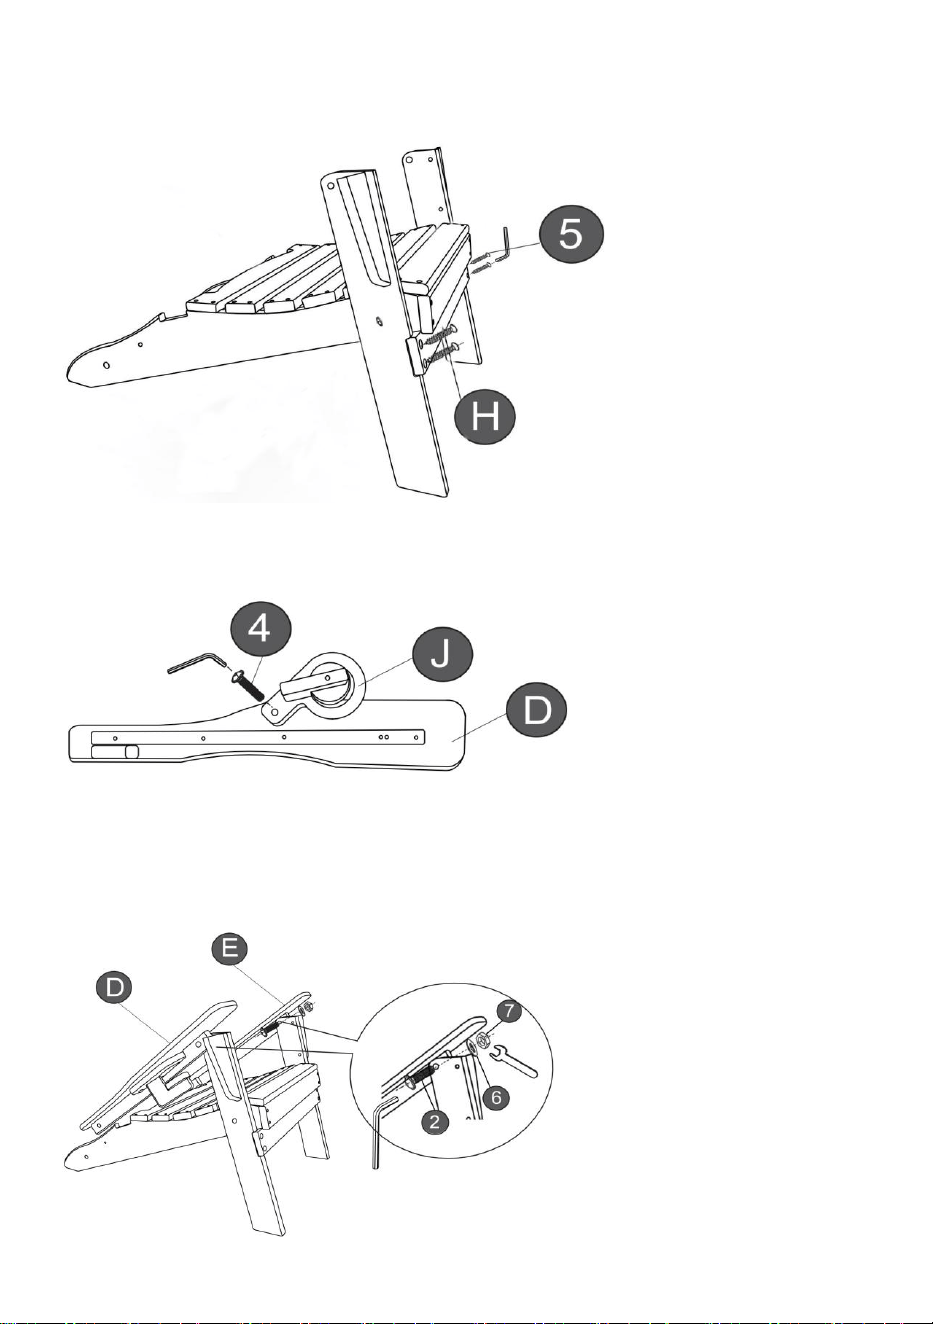
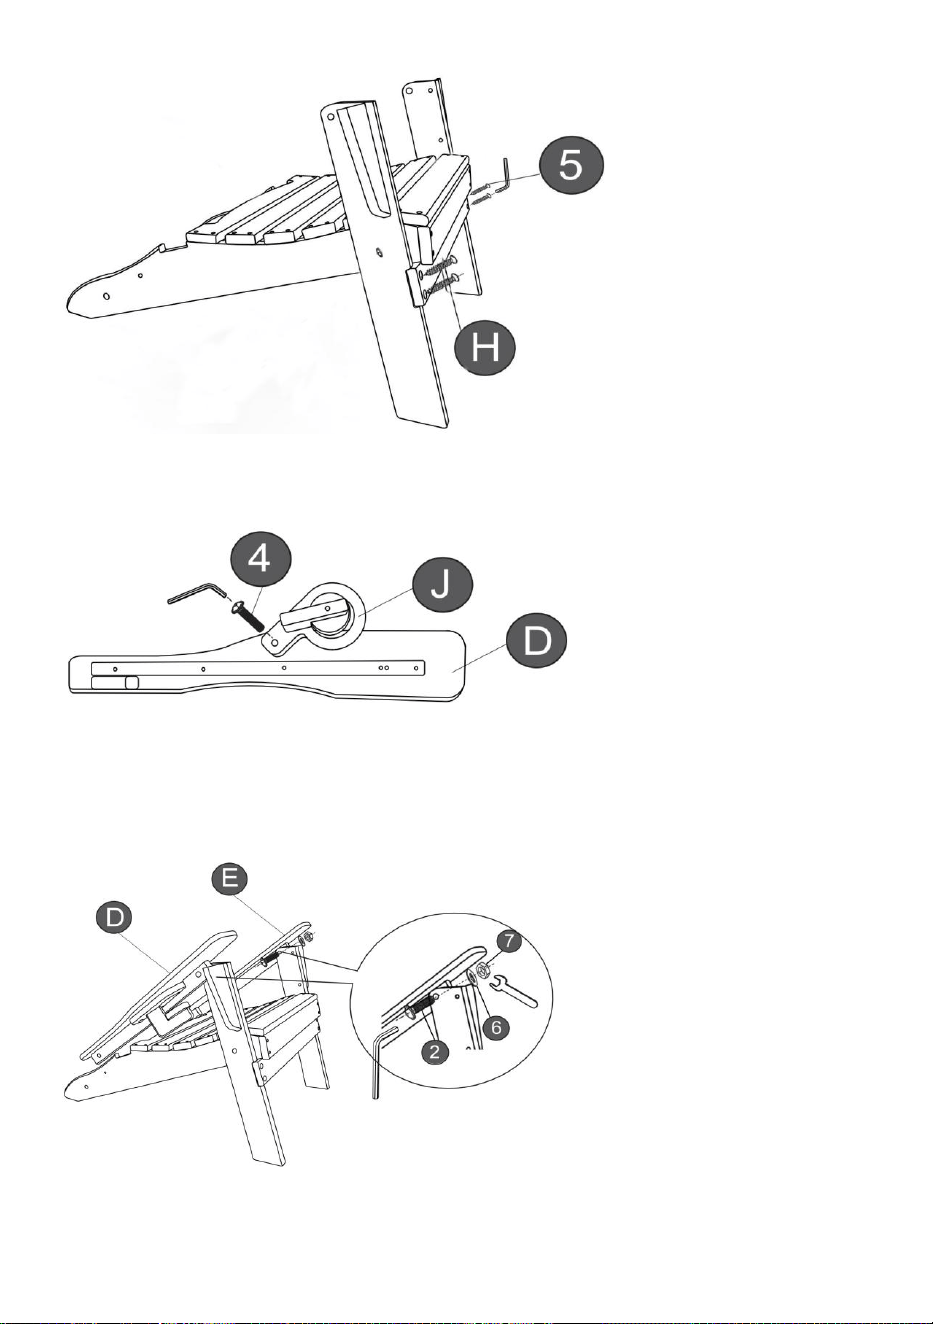
Step 2: Secure part H(front cross-piece) to the finished part in step
1.using Hardware5 (M6x40mm Screw).
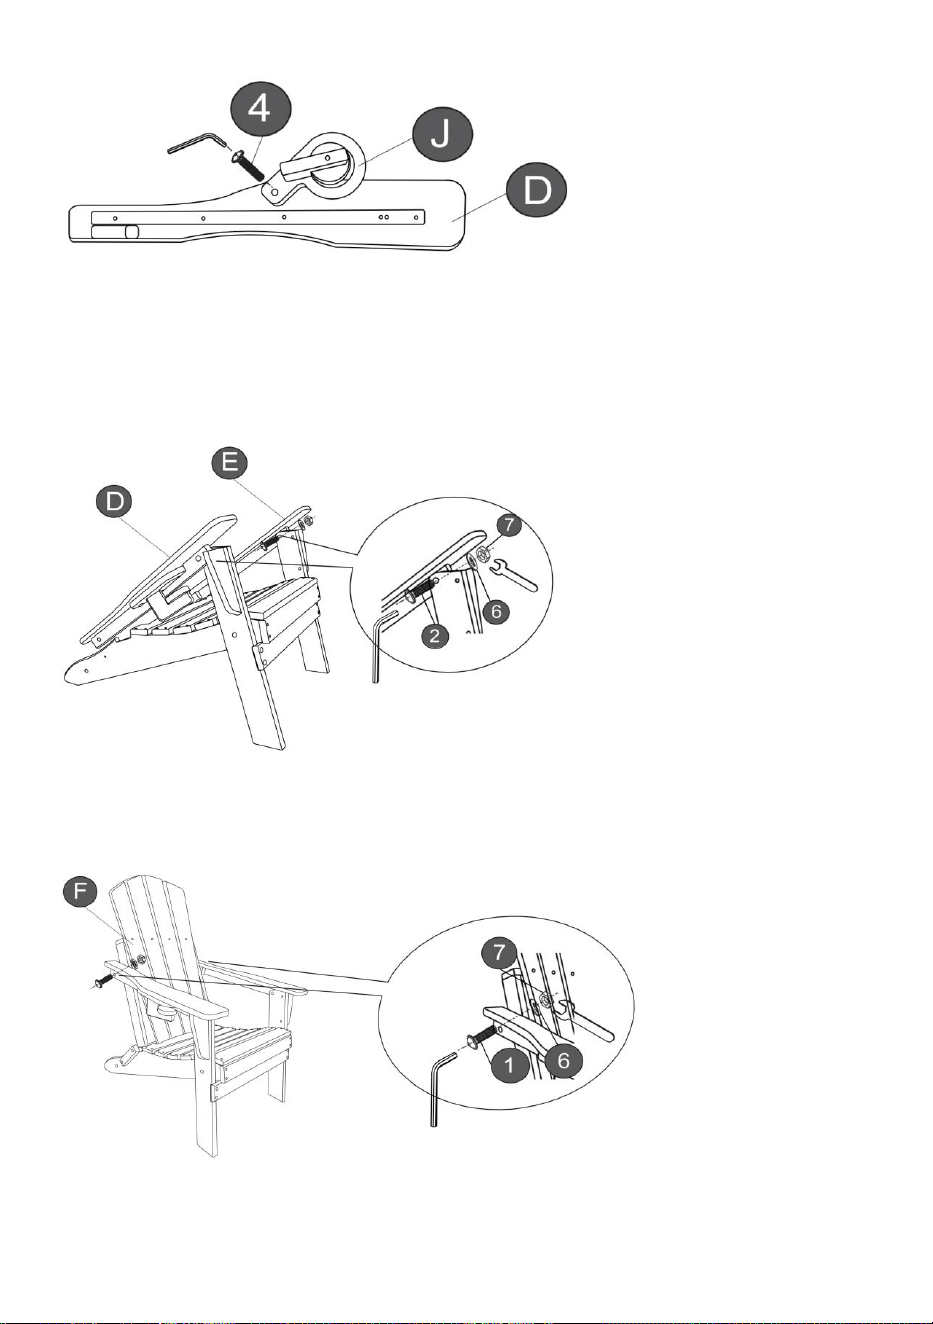
Step 3: Secure part J(cup holder) to D(right armrest) using Hardware4
(M6x30mm Bolt)
Step 4: Secure part D(right armrest) to the right leg, and attach part
E(left armrest) to the left leg using Hardware2 (M6x60mm Bolt),
Hardware6 (Washer) and Hardware7 (M6 Nut).
6
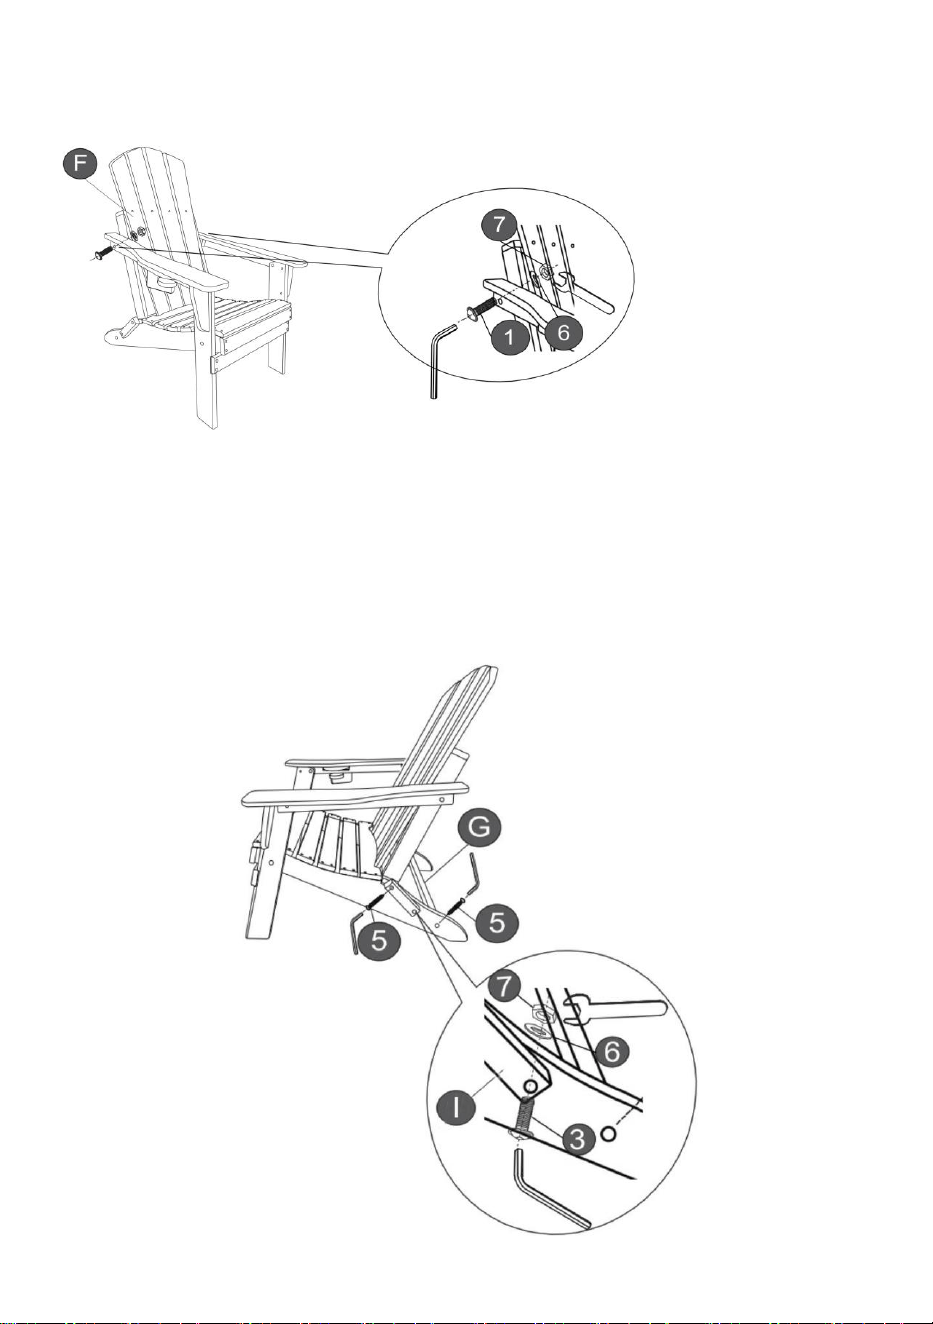
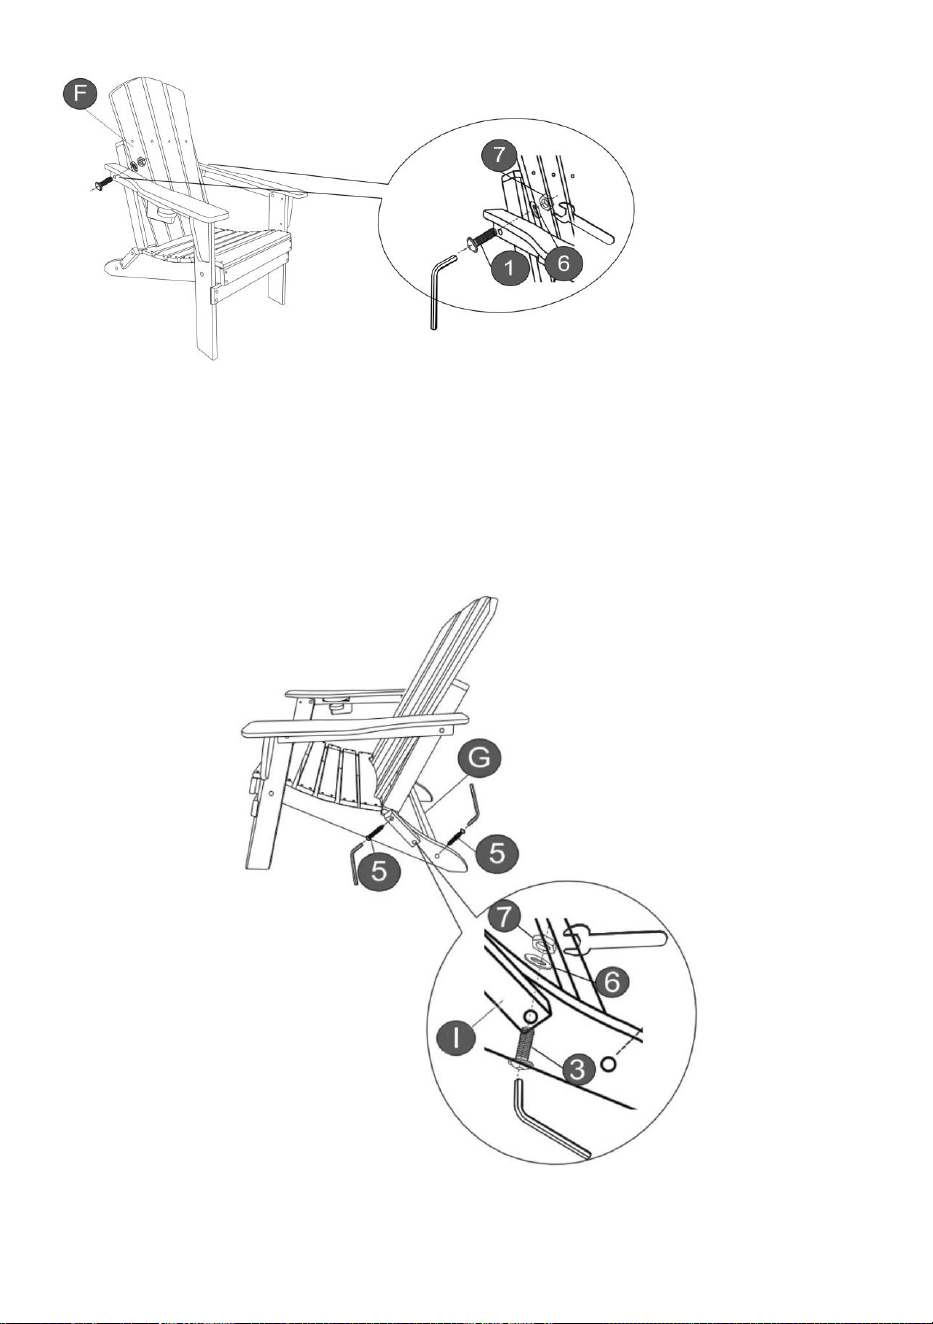
Step 5: Attach part F(back panel) to the armrests using Hardware1
(M6x80mm Bolt).Hardware6 (Washer) and Hardware7 (M6 Nut).
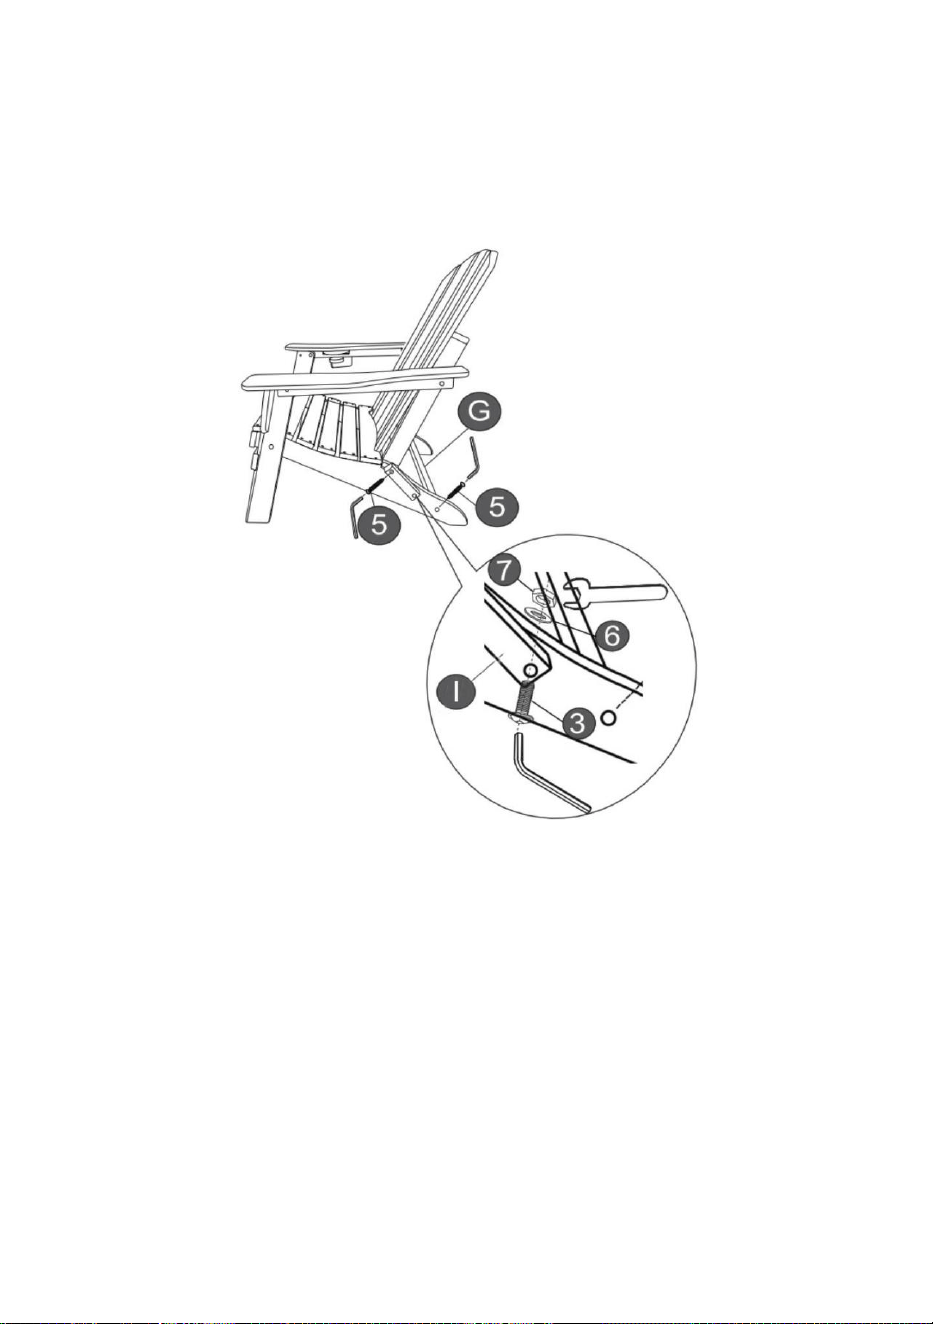
Step 6: Connet part G (back cross-piece) to the seat panel using
Hardware5 (M6x40mm Screw)Secure the upper hole of part | to the
back panel using Hardware5 (M6x40mm Screw).Secure the lower hole
of part l to the seat panel using Hardware3 (M6x50mm
Bolt).Hardware6 (Washer) and Hardware7 (M6 Nut). Repeat the part I
assembly on the other side. Assembly is complete.
7
Manufacturer:Shanghaimuxinmuyeyouxiangongsi
Address: Shuangchenglu 803nong11hao1602A-1609shi, baoshanqu, shanghai
200000 CN.
Imported to AUS: SIHAO PTY LTD. 1 ROKEVA STREETEASTWOOD NSW 2122
Australia
Imported to USA: Sanven Technology Ltd. Suite 250, 9166 Anaheim Place,
Rancho Cucamonga, CA 91730
REP
EC
E-CrossStu GmbH
Mainzer Landstr.69, 60329 Frankfurt am Main.
REP
UK
YH CONSULTING LIMITED.
C/O YH Consulting Limited Office 147, Centurion House,
London Road, Staines-upon-Thames, Surrey, TW18 4AX


Teknisk support och e-garanticertifikat www.vevor.com/support
ADIRONDACKSTOLAR i PLAST
Användarmanual
We continue to be committed to provide you tools with competitive price.
"Save Half", "Half Price" or any other similar expressions used by us only represents an
estimate of savings you might benefit from buying certain tools with us compared to the major
top brands and does not necessarily mean to cover all categories of tools offered by us. You
are kindly reminded to verify carefully when you are placing an order with us if you are
actually saving half in comparison with the top major brands.


1
Modell: SS401-BK-2P , SS401-GY-2P , SS401-WT-2P , SS401-BU-2P
Have product questions? Need technical support? Please feel free to
contact us:
Technical Support and E-Warranty Certificate
www.vevor.com/support
NEED HELP? CONTACT US!
This is the original instruction, please read all manual instructions
carefully before operating. VEVOR reserves a clear interpretation of our
user manual. The appearance of the product shall be subject to the
product you received. Please forgive us that we won't inform you again if
there are any technology or software updates on our product.
PLASTIC ADIRONDACK CHAIRS

2
INSTRUKTIONER
Tack så mycket för att du valde denna produkt . Läs alla instruktioner innan
du använder den. Informationen hjälper dig att uppnå bästa möjliga
resultat.
VÄNLIGEN NOTERA! Ritningar i denna handbok är till för endast i
illustrationssyfte och i vissa detaljer kan skiljer sig från den faktiska
produkten.
UPPMÄRKSAMHET! Läs alla säkerhetsvarningar och alla instruktioner.
Underlåtenhet att följa varningarna och instruktionerna kan leda till
allvarliga skador eller till och med dödsfall. Enheten eller produkten som
används i varningsinstruktionerna hänvisas till Plastic Adirondack Chairs.
Denna produkt är inte en leksak eller en leksakskrin. Tillåt inte barn att leka
med detta föremål. Använd endast som avsett och behöver övervaka
barnen för att förstå stegreglerna för användning stolen äntligen.
1. Läs instruktionerna och bekräfta att alla delar du behöver finns i
kartongen innan montering.
2. Två personer krävs för att montera denna produkt.
3.Välj en platt, robust och skräpfri plan för att förhindra att produkten
snubblar under monteringen .
4. Säkra endast alla delar och bultar löst när ramen är klar ska du dra åt
helt skruvarna.
5. Om någon instabilitet uppstår, lossa skruvarna, justera komponenterna
vid behov och dra åt igen skruvar jämnt.
6. Denna produkt är inte en klätterställning eller leksak.
7. Låt inte barn vika eller öppna stolen ensamma. Förvaras utom räckhåll
för barn.
8. Innan du använder produkten - om du har några frågor angående
korrekt montering eller användning, kontakta din återförsäljare eller
representant.
SPARA DESSA INSTRUKTIONER
3
TEKNISKA PARAMETRAR
Modell
SS401-BK-2
P
SS401-GY-2
P
SS401-WT-2
P
SS401-BU-2
P
Färg
Svart
Grå
Vit
Blå
Material
HDPE
Maximalt
bärande (lbs.)
400
Produktstorle
k (mm)
800 * 755 *91 5
Nettovikt (kg)
2 8 .5 5
Förpackning
2 st/kartong
Dellista
Hårdvarulista
4
hopsättning
Steg 1: Fäst del B ( höger ben) & C ( vänster ben) till del A (sätespanel)
använder sig av Hårdvara 2 (M6x60mm Bult).Hårdvara6 (bricka) och
hårdvara7 (M6 mutter).
Steg 2: Fäst del H (främre tvärstycket) på den färdiga delen i steg
1.använder hårdvara5 (M6x40mm skruv).
5
Steg 3: Fäst del J (mugghållare) till D (höger armstöd) med hjälp av
Hardware4 (M6x30mm Bolt)
Steg 4: Fäst del D (höger armstöd ) på det högra benet och fäst del E
(vänster armstöd) på det vänstra benet med hjälp av Hardware2
(M6x60mm Bolt), Hardware6 (Bricka) och Hardware7 (M6 Mutter ).
Steg 5: Fäst del F (bakpanelen) på armstöden med hjälp av Hardware1
(M6x80mm Bolt).Hårdvara6 (Bricka) och Hardware7 (M6 Mutter).
6
Steg 6: Anslut del G (tvärstycke bak) till sätespanelen med hjälp av
Hardware5 (M6x40mm skruv) Fäst det övre hålet på delen | till
bakpanelen med hjälp av Hardware5 (M6x40mm skruv). Fäst det
nedre hålet i del l till sätespanelen med Hardware3 (M6x50mm
Bolt).Hårdvara6 (Bricka) och Hardware7 (M6 Mutter). Upprepa
monteringen av del I på andra sidan . Monteringen är klar.
Tillverkare : Shanghaimuxinmuyeyouxiangongsi
Adress: Shuangchenglu 803nong11hao1602A-1609shi, baoshanqu, shanghai
7
200000 CN.
Importerad till AUS: SIHAO PTY LTD. 1 ROKEVA STREETEASTWOOD NSW
2122 Australien
Importerad till USA: Sanven Technology Ltd. Suite 250, 9166 Anaheim Place,
Rancho Cucamonga, CA 91730
REP
EC
E-CrossStu GmbH
Mainzer Landstr.69, 60329 Frankfurt am Main.
REP
UK
YH CONSULTING LIMITED.
C/O YH Consulting Limited Office 147, Centurion House,
London Road, Staines-upon-Thames, Surrey, TW18 4AX


Technische ondersteuning en e-garantiecertificaat www.vevor.com/support
KUNSTSTOF ADIRONDACK STOELEN
Handleiding
We continue to be committed to provide you tools with competitive price.
"Save Half", "Half Price" or any other similar expressions used by us only represents an
estimate of savings you might benefit from buying certain tools with us compared to the major
top brands and does not necessarily mean to cover all categories of tools offered by us. You
are kindly reminded to verify carefully when you are placing an order with us if you are
actually saving half in comparison with the top major brands.


1
Model: SS401-BK-2P , SS401-GY-2P , SS401-WT-2P , SS401-BU-2P
Have product questions? Need technical support? Please feel free to
contact us:
Technical Support and E-Warranty Certificate
www.vevor.com/support
NEED HELP? CONTACT US!
This is the original instruction, please read all manual instructions
carefully before operating. VEVOR reserves a clear interpretation of our
user manual. The appearance of the product shall be subject to the
product you received. Please forgive us that we won't inform you again if
there are any technology or software updates on our product.
PLASTIC ADIRONDACK CHAIRS

2
INSTRUCTIES
Hartelijk dank voor het kiezen van dit product . Lees alle instructies voordat
u het gebruikt. De informatie zal u helpen de best mogelijke resultaten te
bereiken.
HOUD ER REKENING MEE DAT! De tekeningen in deze handleiding zijn
bedoeld voor alleen ter illustratie en in sommige details mogelijk afwijken
van het daadwerkelijke product.
AANDACHT! Lees alle veiligheidswaarschuwingen en alle instructies. Het
niet opvolgen van de waarschuwingen en instructies kan leiden tot ernstig
letsel of zelfs de dood. Het apparaat of product dat in de
waarschuwingsinstructies wordt gebruikt, wordt verwezen naar Plastic
Adirondack-stoelen.
Dit product is geen speelgoed of speelgoedkist. Laat kinderen niet met dit
artikel spelen. Gebruik alleen zoals bedoeld en moet toezicht houden op
de kinderen om de stapregels voor het gebruik van de stoel eindelijk te
begrijpen.
1. Lees vóór de montage de instructies en controleer of alle benodigde
onderdelen in de doos zitten.
2. Er zijn twee mensen nodig om dit product te monteren.
3. Kies een plat, stevig en vuilvrij plat oppervlak om struikelen tijdens de
montage van het product te voorkomen .
4. Zet alle onderdelen en bouten alleen losjes vast als het frame compleet
is, moet u het volledig vastdraaien de schroeven.
5. Als er sprake is van instabiliteit, draait u de schroeven los, lijnt u de
componenten indien nodig opnieuw uit en draait u de schroeven weer vast.
gelijkmatig schroeven.
6. Dit product is geen speeltoestel of speelgoed.
7. Laat kinderen de stoel niet alleen inklappen of openen. Buiten bereik
van kinderen houden.
8. Voordat u het product gebruikt: als u vragen heeft over de juiste
montage of bediening, neem dan contact op met uw dealer of
vertegenwoordiger.
3
BEWAAR DEZE INSTRUCTIES
TECHNISCHE PARAMETERS
Model
SS401-BK-2
P
SS401-GY-2
P
SS401-WT-2
P
SS401-BU-2
P
Kleur
Zwart
Grijs
Wit
Blauw
Materiaal
HDPE
Maximaal
draagvermoge
n (pond.)
400
Productgrootte
(mm)
800 * 755 *91 5
Netto gewicht /
kg)
2 8,5 5
Inpakken
2 stuks/doos
Onderdelen lijst

4
Hardwarelijst
Montage
Stap 1: Bevestig onderdeel B ( rechter been) & C ( linkerbeen ) naar
deel A (zitpaneel) gebruik makend van Hardware2(M6x60mm
Bout).Hardware6 (sluitring) en hardware7 (M6 moer).

5
Stap 2: Bevestig onderdeel H (voorste dwarsstuk) aan het afgewerkte
onderdeel in stap 1. met behulp van Hardware5 (M6x40mm-schroef).
Stap 3: Bevestig onderdeel J (bekerhouder) aan D (rechts). armsteun)
met Hardware4 (M6x30mm bout)

6
Stap 4: Bevestig onderdeel D (rechterarmleuning ) aan het
rechterbeen en bevestig onderdeel E (linkerarmleuning) aan het
linkerbeen gebruik Hardware2 (M6x60mm bout), Hardware6 (sluitring)
en Hardware7 (M6 moer ).
Stap 5: Bevestig onderdeel F (achterpaneel) aan de armleuningen met
behulp van Hardware1 (M6x80mm bout), Hardware6 (sluitring) en
Hardware7 (M6 moer).
Stap 6: Bevestig onderdeel G (achterste dwarsstuk) aan het zitpaneel
met behulp van Hardware5 (M6x40mm schroef). Bevestig het

7
bovenste gat van onderdeel | aan het achterpaneel met behulp van
Hardware5 (M6x40mm schroef). Bevestig het onderste gat van
onderdeel l aan het zitpaneel met behulp van Hardware3 (M6x50mm
bout). Hardware6 (sluitring) en Hardware7 (M6 moer). Herhaal de
montage van deel I aan de andere kant . De montage is voltooid.
Fabrikant : Shanghaimuxinmuyeyouxiangongsi
Adres: Shuangchenglu 803nong11hao1602A-1609shi, baoshanqu, shanghai
200000 CN.
Geïmporteerd naar AUS: SIHAO PTY LTD. 1 ROKEVA STREETEASTWOOD
NSW 2122 Australië
Geïmporteerd naar de VS: Sanven Technology Ltd. Suite 250, 9166 Anaheim
Place, Rancho Cucamonga, CA 91730

8
REP
EC
E-CrossStu GmbH
Mainzer Landstr.69, 60329 Frankfurt am Main.
REP
UK
YH CONSULTING LIMITED.
C/O YH Consulting Limited Office 147, Centurion House,
London Road, Staines-upon-Thames, Surrey, TW18 4AX


Assistance technique et certificat de garantie électronique www.vevor.com/support
CHAISES ADIRONDACK EN PLASTIQUE
Manuel de l'Utilisateur
We continue to be committed to provide you tools with competitive price.
"Save Half", "Half Price" or any other similar expressions used by us only represents an
estimate of savings you might benefit from buying certain tools with us compared to the major
top brands and does not necessarily mean to cover all categories of tools offered by us. You
are kindly reminded to verify carefully when you are placing an order with us if you are
actually saving half in comparison with the top major brands.


1
Modèle : SS401-BK-2P , SS401-GY-2P , SS401-WT-2P , SS401-BU-2P
Have product questions? Need technical support? Please feel free to
contact us:
Technical Support and E-Warranty Certificate
www.vevor.com/support
NEED HELP? CONTACT US!
This is the original instruction, please read all manual instructions
carefully before operating. VEVOR reserves a clear interpretation of our
user manual. The appearance of the product shall be subject to the
product you received. Please forgive us that we won't inform you again if
there are any technology or software updates on our product.
PLASTIC ADIRONDACK CHAIRS

2
INSTRUCTIONS
Merci beaucoup d'avoir choisi ce produit . Veuillez lire toutes les
instructions avant de l'utiliser. Les informations vous aideront à obtenir les
meilleurs résultats possibles.
VEUILLEZ NOTER! Les dessins de ce manuel sont destinés à titre
d'illustration uniquement et dans certains détails, peut diffèrent du produit
réel.
ATTENTION! Lisez tous les avertissements de sécurité et toutes les
instructions. Le non-respect des avertissements et des instructions peut
entraîner des blessures graves, voire la mort. L'appareil ou le produit utilisé
dans les instructions d'avertissement fait référence aux chaises
Adirondack en plastique.
Ce produit n'est pas un jouet ni un coffre à jouets. Ne laissez pas les
enfants jouer avec cet article. Utiliser uniquement comme prévu et
nécessiter de superviser les enfants pour comprendre enfin les règles
d'utilisation de la chaise.
1. Veuillez lire les instructions et confirmer que toutes les pièces dont vous
avez besoin se trouvent dans le carton avant l'assemblage.
2. Deux personnes sont nécessaires pour assembler ce produit.
3. Sélectionnez un plat plat, robuste et sans débris pour éviter de trébucher
lors de l'assemblage du produit .
4. Veuillez fixer toutes les pièces et tous les boulons sans serrer,
uniquement lorsque le cadre est terminé, devez-vous serrer complètement
les vis.
5. En cas d'instabilité, desserrez les vis, réalignez les composants si
nécessaire et resserrez les vissez uniformément.
6. Ce produit n’est pas un portique d’escalade ou un jouet.
7. Ne laissez pas les enfants plier ou ouvrir la chaise seuls. Tenir hors de
portée des enfants.
8.Avant d'utiliser le produit - si vous avez des questions concernant
l'assemblage ou le fonctionnement correct, contactez votre revendeur ou
représentant.
3
CONSERVEZ CES INSTRUCTIONS
PARAMÈTRES TECHNIQUES
Modèle
SS401-BK-2P
SS401-GY-2P
SS401-WT-2P
SS401-BU-2P
Couleur
Noir
Gris
Blanc
Bleu
Matériel
PEHD
Charge
maximale
(Kg.)
400
Taille du
produit
(mm)
800 * 755 *91 5
Poids net /
kg)
2 8 ,5 5
Emballage
2 pièces/boîte
Liste des pièces
4
Liste
du matériel
Assemblée
Étape 1 : Fixez la partie B ( jambe droite ) & C ( jambe gauche ) à la
partie A (panneau de siège) en utilisant Matériel2 (M6x60mm
Boulon).Matériel6 (rondelle) et matériel7 (écrou M6).

5
Etape 2 : Fixer la pièce H (traverse avant) à la pièce finie à l'étape 1, à
l'aide du matériel 5 (vis M6x40 mm).
Étape 3 : Fixez la partie J (porte-gobelet) à D (droite accoudoir) à
l'aide du matériel 4 (boulon M6x30mm)

6
Étape 4 : Fixez la partie D (accoudoir droit ) à la jambe droite et fixez
la partie E (accoudoir gauche) à la jambe gauche. en utilisant le
matériel 2 (boulon M6x60 mm), le matériel 6 (rondelle) et le matériel 7
(écrou M6 ).
Étape 5 : Fixez la partie F (panneau arrière) aux accoudoirs à l'aide du
matériel 1 (boulon M6x80 mm), du matériel 6 (rondelle) et du matériel
7 (écrou M6).
Étape 6 : Connectez la pièce G (traverse arrière) au panneau de siège
à l'aide du matériel 5 (vis M6x40 mm). Fixez le trou supérieur de la

7
pièce | au panneau arrière à l'aide du matériel 5 (vis M6x40 mm). Fixez
le trou inférieur de la partie l au panneau de siège à l'aide du matériel
3 (boulon M6x50 mm). Matériel 6 (rondelle) et matériel 7 (écrou M6).
Répétez l'assemblage de la pièce I de l'autre côté . L'assemblage est
terminé.
Fabricant : Shanghaimuxinmuyeyouxiangongsi
Adresse : Shuangchenglu 803nong11hao1602A-1609shi, baoshanqu, Shanghai
200000 CN.
Importé en Australie : SIHAO PTY LTD. 1 ROKEVA STREETASTWOOD NSW
2122 Australie
Importé aux États-Unis : Sanven Technology Ltd. Suite 250, 9166 Anaheim
Place, Rancho Cucamonga, CA 91730

8
REP
EC
E-CrossStu GmbH
Mainzer Landstr.69, 60329 Frankfurt am Main.
REP
UK
YH CONSULTING LIMITED.
C/O YH Consulting Limited Office 147, Centurion House,
London Road, Staines-upon-Thames, Surrey, TW18 4AX


Technischer Support und E-Garantie-Zertifikat www.vevor.com/support
ADIRONDACK-STÜHLE AUS
KUNSTSTOFF
Benutzerhandbuch
We continue to be committed to provide you tools with competitive price.
"Save Half", "Half Price" or any other similar expressions used by us only represents an
estimate of savings you might benefit from buying certain tools with us compared to the major
top brands and does not necessarily mean to cover all categories of tools offered by us. You
are kindly reminded to verify carefully when you are placing an order with us if you are
actually saving half in comparison with the top major brands.


1
Modell: SS401-BK-2P , SS401-GY-2P , SS401-WT-2P , SS401-BU-2P
Have product questions? Need technical support? Please feel free to
contact us:
Technical Support and E-Warranty Certificate
www.vevor.com/support
NEED HELP? CONTACT US!
This is the original instruction, please read all manual instructions
carefully before operating. VEVOR reserves a clear interpretation of our
user manual. The appearance of the product shall be subject to the
product you received. Please forgive us that we won't inform you again if
there are any technology or software updates on our product.
PLASTIC ADIRONDACK CHAIRS

2
ANWEISUNGEN
Vielen Dank, dass Sie sich für dieses Produkt entschieden haben . Bitte
lesen Sie vor der Anwendung alle Hinweise sorgfältig durch. Die
Informationen helfen Ihnen, die bestmöglichen Ergebnisse zu erzielen.
BITTE BEACHTEN! Die Zeichnungen in diesem Handbuch dienen dienen
lediglich Illustrationszwecken und können in einigen vom tatsächlichen
Produkt abweichen.
ACHTUNG! Lesen Sie alle Sicherheitshinweise und Anweisungen. Die
Nichtbeachtung der Hinweise und Anweisungen kann zu schweren
Verletzungen oder sogar zum Tod führen. Das in den Warnhinweisen
verwendete Gerät oder Produkt bezieht sich auf Adirondack-Stühle aus
Kunststoff.
Dieses Produkt ist kein Spielzeug und auch keine Spielzeugkiste. Erlauben
Sie Kindern nicht, mit diesem Artikel zu spielen. Verwenden Sie es nur
bestimmungsgemäß und beaufsichtigen Sie Ihre Kinder, damit sie die
Nutzungsregeln für den Stuhl verstehen.
1. Bitte lesen Sie die Anleitung und vergewissern Sie sich vor dem
Zusammenbau, dass sich alle benötigten Teile im Karton befinden.
2. Für die Montage dieses Produkts sind zwei Personen erforderlich.
3. Wählen Sie eine flache, stabile und schmutzfreie Fläche, um
Stolperfallen beim Zusammenbau des Produkts zu vermeiden .
4. Bitte alle Teile und Schrauben nur locker anziehen, Wenn der Rahmen
fertig ist, sollten Sie ihn vollständig festziehen die Schrauben.
5. Wenn eine Instabilität auftritt, lösen Sie die Schrauben, richten Sie die
Komponenten bei Bedarf neu aus und ziehen Sie die Schrauben
gleichmäßig anziehen.
6. Dieses Produkt ist kein Klettergerüst oder Spielzeug.
7. Erlauben Sie Kindern nicht, den Stuhl alleine zusammen- oder
aufzuklappen. Außerhalb der Reichweite von Kindern aufbewahren.
8. Bevor Sie das Produkt verwenden – wenn Sie Fragen zur
ordnungsgemäßen Montage oder Bedienung haben, wenden Sie sich an
Ihren Händler oder Vertreter.
3
ANLEITUNG AUFBEWAHREN
TECHNISCHE PARAMETER
Modell
SS401-BK-2P
SS401-GY-2P
SS401-WT-2P
SS401-BU-2P
Farbe
Schwarz
Grau
Weiß
Blau
Material
HDPE
Maximale
Tragfähigkeit
(Pfund)
400
Produktgröße
(mm)
800 * 755 *91 5
Nettogewicht
/ kg)
2 8 ,5 5
Verpackung
2 Stück/Karton
Stückliste

4
Hardwareliste
Montage
Schritt 1: Teil B anbringen ( rechtes Bein) und C ( linkes Bein) zum
Teil A (Sitzteil) mit Hardware2(M6x60mm Schraube).Hardware6
(Unterlegscheibe) und Hardware7 (M6-Mutter).

5
Schritt 2: Befestigen Sie Teil H (vorderes Querstück) am fertigen Teil
in Schritt 1 mit Hardware5 (M6 x 40 mm Schraube).
Schritt 3: Befestigen Sie Teil J (Getränkehalter) an D (rechts Armlehne)
mit Hardware4 (M6x30mm Schraube)
6
Schritt 4: Befestigen Sie Teil D (rechte Armlehne ) am rechten Bein
und befestigen Sie Teil E (linke Armlehne) am linken Bein verwenden
Sie Hardware2 (M6 x 60 mm Schraube), Hardware6 (Unterlegscheibe)
und Hardware7 (M6 Mutter ).
Schritt 5: Befestigen Sie Teil F (Rückwand) mit Hardware1 (M6 x 80
mm Schraube), Hardware6 (Unterlegscheibe) und Hardware7 (M6
Mutter) an den Armlehnen.
Schritt 6: Verbinden Sie Teil G (Rückenquerträger) mit Hardware5 (M6
x 40 mm Schraube) mit der Sitzplatte. Befestigen Sie das obere Loch
7
von Teil | mit Hardware5 (M6 x 40 mm Schraube) an der Rückplatte.
Befestigen Sie das untere Loch von Teil l mit Hardware3 (M6 x 50 mm
Schraube), Hardware6 (Unterlegscheibe) und Hardware7 (M6 Mutter)
an der Sitzplatte. Wiederholen Sie die Montage von Teil I auf der
anderen Seite . Die Montage ist abgeschlossen.
Hersteller : Shanghaimuxinmuyeyouxiangongsi
Adresse: Shuangchenglu 803nong11hao1602A-1609shi, Baoshanqu, Shanghai
200000 CN.
Nach AUS importiert: SIHAO PTY LTD. 1 ROKEVA STREETEASTWOOD NSW
2122 Australien
Importiert in die USA: Sanven Technology Ltd. Suite 250, 9166 Anaheim Place,
Rancho Cucamonga, CA 91730

8
REP
EC
E-CrossStu GmbH
Mainzer Landstr.69, 60329 Frankfurt am Main.
REP
UK
YH CONSULTING LIMITED.
C/O YH Consulting Limited Office 147, Centurion House,
London Road, Staines-upon-Thames, Surrey, TW18 4AX


Wsparcie techniczne i certyfikat e-gwarancji www.vevor.com/support
PLASTIKOWE KRZESŁA ADIRONDACK
Instrukcja obsługi
We continue to be committed to provide you tools with competitive price.
"Save Half", "Half Price" or any other similar expressions used by us only represents an
estimate of savings you might benefit from buying certain tools with us compared to the major
top brands and does not necessarily mean to cover all categories of tools offered by us. You
are kindly reminded to verify carefully when you are placing an order with us if you are
actually saving half in comparison with the top major brands.


1
Model: SS401-BK-2P , SS401-GY-2P , SS401-WT-2P , SS401-BU-2P
Have product questions? Need technical support? Please feel free to
contact us:
Technical Support and E-Warranty Certificate
www.vevor.com/support
NEED HELP? CONTACT US!
This is the original instruction, please read all manual instructions
carefully before operating. VEVOR reserves a clear interpretation of our
user manual. The appearance of the product shall be subject to the
product you received. Please forgive us that we won't inform you again if
there are any technology or software updates on our product.
PLASTIC ADIRONDACK CHAIRS

2
INSTRUKCJE
Dziękuję bardzo za wybór tego produktu . Przed użyciem przeczytaj całą
instrukcję. Informacje te pomogą Ci osiągnąć najlepsze możliwe rezultaty.
PROSZĘ ZANOTOWAĆ! Rysunki w tej instrukcji służą do: wyłącznie w
celach ilustracyjnych i w niektórych szczegółach może różnią się od
rzeczywistego produktu.
UWAGA! Przeczytaj wszystkie ostrzeżenia dotyczące bezpieczeństwa i
wszystkie instrukcje. Niezastosowanie się do ostrzeżeń i instrukcji może
spowodować poważne obrażenia, a nawet śmierć. Urządzenie lub produkt
użyte w instrukcjach ostrzegawczych odnosi się do plastikowych krzeseł
Adirondack.
Ten produkt nie jest zabawką ani skrzynią na zabawki. Nie pozwalaj
dzieciom bawić się tym przedmiotem. Używaj wyłącznie zgodnie z
przeznaczeniem i musisz nadzorować dzieci, aby w końcu zrozumieć
zasady użytkowania krzesła.
1. Przed montażem przeczytaj instrukcję i upewnij się, że wszystkie
potrzebne części znajdują się w kartonie.
2. Do montażu tego produktu potrzebne są dwie osoby.
3. Wybierz płaskie, solidne i wolne od zanieczyszczeń mieszkanie, aby
zapobiec potknięciu się podczas montażu produktu .
4. Proszę zabezpieczyć wszystkie części i śruby tylko luźno gdy rama
będzie już gotowa, należy ją całkowicie dokręcić śruby.
5. Jeżeli wystąpi jakakolwiek niestabilność, poluzuj śruby, w razie potrzeby
wyreguluj elementy i ponownie dokręć śruby równomiernie.
6. Ten produkt nie jest platformą wspinaczkową ani zabawką.
7. Nie pozwalaj dzieciom samodzielnie składać lub otwierać krzesełka.
Przechowywać w miejscu niedostępnym dla dzieci.
8.Przed użyciem produktu - jeśli masz jakiekolwiek pytania dotyczące
prawidłowego montażu lub obsługi, skontaktuj się ze sprzedawcą lub
przedstawicielem.
3
ZACHOWAJ TE INSTRUKCJE
PARAMETRY TECHNICZNE
Model
SS401-BK-2P
SS401-GY-2P
SS401-WT-2P
SS401-BU-2P
Kolor
Czarny
Szary
Biały
Niebieski
Materiał
HDPE
Maksymalne
obciążenie
(funty)
400
Rozmiar
produktu
(mm)
800 * 755 *91 5
Masa netto
(kg)
2 8,5 5
Uszczelka
2 szt./opakowanie
Lista części

4
Lista
sprzętu
Montaż
Krok 1: Dołącz część B ( prawa noga) & C ( lewa noga) do części A
(panel siedzenia) za pomocą Sprzęt 2 (M6x60mm Śruba). Sprzęt 6
(podkładka) i sprzęt 7 (nakrętka M6).
5
Krok 2: Przymocuj część H (przednią poprzeczkę) do gotowej części
w kroku 1. przy użyciu sprzętu 5 (śruba M6x40mm).
Krok 3: Przymocuj część J (uchwyt na kubek) do D (po prawej
podłokietnik) przy użyciu osprzętu4 (śruba M6x30mm)

6
Krok 4: Przymocuj część D (prawy podłokietnik ) do prawej nogi i
przymocuj część E (lewy podłokietnik) do lewej nogi przy użyciu
sprzętu 2 (śruba M6x60 mm), sprzętu 6 (podkładka) i sprzętu 7
(nakrętka M6 ).
Krok 5: Przymocuj część F (panel tylny) do podłokietników za
pomocą osprzętu 1 (śruba M6x80 mm). osprzętu 6 (podkładka) i
osprzętu 7 (nakrętka M6).
Krok 6: Połącz część G (poprzeczkę tylną) z panelem siedziska za
pomocą osprzętu 5 (śruba M6x40mm) Zabezpiecz górny otwór części

7
| do panelu tylnego za pomocą osprzętu 5 (śruba M6x40 mm).
Przymocuj dolny otwór części l do panelu siedzenia za pomocą
osprzętu 3 (śruba M6x50 mm). osprzętu 6 (podkładka) i osprzętu 7
(nakrętka M6). Powtórz część I montażu po drugiej stronie . Montaż
został zakończony.
Producent : Shanghaimuxinmuyeyouxiangongsi
Adres: Shuangchenglu 803nong11hao1602A-1609shi, baoshanqu, szanghaj
200000 CN.
Import do AUS: SIHAO PTY LTD. 1 ROKEVA STREETEASTWOOD NSW 2122
Australia
Import do USA: Sanven Technology Ltd. Suite 250, 9166 Anaheim Place, Rancho
Cucamonga, CA 91730

8
REP
EC
E-CrossStu GmbH
Mainzer Landstr.69, 60329 Frankfurt am Main.
REP
UK
YH CONSULTING LIMITED.
C/O YH Consulting Limited Office 147, Centurion House,
London Road, Staines-upon-Thames, Surrey, TW18 4AX


Supporto tecnico e certificato di garanzia elettronica www.vevor.com/support
SEDIE ADIRONDACK IN PLASTICA
Manuale d'uso
We continue to be committed to provide you tools with competitive price.
"Save Half", "Half Price" or any other similar expressions used by us only represents an
estimate of savings you might benefit from buying certain tools with us compared to the major
top brands and does not necessarily mean to cover all categories of tools offered by us. You
are kindly reminded to verify carefully when you are placing an order with us if you are
actually saving half in comparison with the top major brands.

1
Modello: SS401-BK-2P 、 SS401-GY-2P 、 SS401-WT-2P 、
SS401-BU-2P
Have product questions? Need technical support? Please feel free to
contact us:
Technical Support and E-Warranty Certificate
www.vevor.com/support
NEED HELP? CONTACT US!
PLASTIC ADIRONDACK CHAIRS

2
This is the original instruction, please read all manual instructions
carefully before operating. VEVOR reserves a clear interpretation of our
user manual. The appearance of the product shall be subject to the
product you received. Please forgive us that we won't inform you again if
there are any technology or software updates on our product.
ISTRUZIONI
Grazie mille per aver scelto questo prodotto . Si prega di leggere tutte le
istruzioni prima di utilizzarlo. Le informazioni ti aiuteranno a ottenere i
migliori risultati possibili.
NOTARE CHE! I disegni contenuti in questo manuale servono solo a scopo
illustrativo e in alcuni dettagli differire dal prodotto reale.
ATTENZIONE! Leggere tutte le avvertenze di sicurezza e tutte le istruzioni.
La mancata osservanza delle avvertenze e delle istruzioni può provocare
lesioni gravi o addirittura la morte. Il dispositivo o prodotto utilizzato nelle
istruzioni di avvertenza si riferisce alle sedie Adirondack in plastica.
Questo prodotto non è un giocattolo o una cesta portagiochi. Non
permettere ai bambini di giocare con questo oggetto. Utilizzare solo come
previsto ed è necessario supervisionare i bambini per comprendere
finalmente le regole di utilizzo della sedia.
1. Prima del montaggio, leggere le istruzioni e verificare che tutte le parti
necessarie siano all'interno della scatola.
2. Per assemblare questo prodotto sono necessarie due persone.
3.Selezionare un oggetto piatto, robusto e privo di detriti per evitare di
inciampare durante l'assemblaggio del prodotto .
4. Fissare tutte le parti e i bulloni solo senza stringere quando il telaio è
completo dovresti stringere completamente le viti.
5. In caso di instabilità, allentare le viti, riallineare i componenti secondo
necessità e serrare nuovamente le viti in modo uniforme.
6. Questo prodotto non è una struttura per l'arrampicata o un giocattolo.
7. Non permettere ai bambini di piegare o aprire la sedia da soli. Tenere
fuori dalla portata dei bambini.
3
8.Prima di utilizzare il prodotto: in caso di domande relative al corretto
assemblaggio o funzionamento, contattare il rivenditore o il
rappresentante.
CONSERVA QUESTE ISTRUZIONI
PARAMETRI TECNICI
Modello
SS401-BK-2P
SS401-GY-2P
SS401-WT-2P
SS401-BU-2P
Colore
Nero
Grigio
Bianco
Blu
Materiale
HDPE
Portata
massima
(libbre)
400
Dimensioni
del
prodotto
(mm)
800 * 755 * 915
Peso netto
(kg)
2 8 .5 5
Imballaggio
2 pezzi/scatola
Elenco delle parti
4
Elenco
dell'hardware
Assemblea
Passaggio 1: collega la parte B ( gamba destra ) & C ( gamba sinistra )
alla parte A (pannello del sedile) utilizzando Ferramenta2 (M6x60mm
Bullone).Hardware6 (rondella) e Hardware7 (dado M6).

5
Fase 2: Fissare la parte H (traversa anteriore) alla parte finita al punto
1.utilizzando l'hardware5 (vite M6x40mm).
Passaggio 3: fissare la parte J (portabicchieri) a D (destra bracciolo)
utilizzando l'hardware4 (bullone M6x30mm)

6
Passaggio 4: fissare la parte D (bracciolo destro ) alla gamba destra e
collegare la parte E (bracciolo sinistro) alla gamba sinistra utilizzando
l'hardware2 (bullone M6x60mm), l'hardware6 (rondella) e l'hardware7
(dado M6 ).
Passaggio 5: fissare la parte F (pannello posteriore) ai braccioli
utilizzando l'hardware 1 (bullone M6x80 mm), l'hardware 6 (rondella) e
l'hardware 7 (dado M6).
Passo 6: Collegare la parte G (traversa posteriore) al pannello del
sedile utilizzando l'hardware5 (vite M6x40mm) Fissare il foro

7
superiore della parte | al pannello posteriore utilizzando l'hardware 5
(vite M6x40 mm). Fissare il foro inferiore della parte l al pannello del
sedile utilizzando l'hardware 3 (bullone M6x50 mm). Hardware 6
(rondella) e hardware 7 (dado M6). Ripetere l'assemblaggio della
parte I sull'altro lato . L'assemblaggio è completo.
Produttore : Shanghaimuxinmuyeyouxiangongsi
Indirizzo: Shuangchenglu 803nong11hao1602A-1609shi, baoshanqu, shanghai
200000 CN.
Importato in AUS: SIHAO PTY LTD. 1 ROKEVA STREETEASTWOOD NSW
2122 Australia
Importato negli Stati Uniti: Sanven Technology Ltd. Suite 250, 9166 Anaheim
Place, Rancho Cucamonga, CA 91730

8
REP
EC
E-CrossStu GmbH
Mainzer Landstr.69, 60329 Frankfurt am Main.
REP
UK
YH CONSULTING LIMITED.
C/O YH Consulting Limited Office 147, Centurion House,
London Road, Staines-upon-Thames, Surrey, TW18 4AX


Soporte técnico y certificado de garantía electrónica www.vevor.com/support
SILLAS ADIRONDACK DE PLÁSTICO
Manual de usuario
We continue to be committed to provide you tools with competitive price.
"Save Half", "Half Price" or any other similar expressions used by us only represents an
estimate of savings you might benefit from buying certain tools with us compared to the major
top brands and does not necessarily mean to cover all categories of tools offered by us. You
are kindly reminded to verify carefully when you are placing an order with us if you are
actually saving half in comparison with the top major brands.

1
Modelo: SS401-BK-2P , SS401-GY-2P , SS401-WT-2P , SS401-BU-2P
Have product questions? Need technical support? Please feel free to
contact us:
Technical Support and E-Warranty Certificate
www.vevor.com/support
NEED HELP? CONTACT US!
This is the original instruction, please read all manual instructions
carefully before operating. VEVOR reserves a clear interpretation of our
user manual. The appearance of the product shall be subject to the
product you received. Please forgive us that we won't inform you again if
there are any technology or software updates on our product.
PLASTIC ADIRONDACK CHAIRS

2
INSTRUCCIONES
Muchas gracias por elegir este producto . Lea todas las instrucciones
antes de usarlo. La información le ayudará a lograr los mejores resultados
posibles.
¡TENGA EN CUENTA! Los dibujos de este manual son para Sólo con fines
ilustrativos y en algunos detalles puede difieren del producto real.
¡ATENCIÓN! Lea todas las advertencias de seguridad y todas las
instrucciones. El incumplimiento de las advertencias e instrucciones puede
provocar lesiones graves o incluso la muerte. El dispositivo o producto
utilizado en las instrucciones de advertencia se refiere a Sillas plásticas
Adirondack.
Este producto no es un juguete ni un baúl de juguetes. No permita que los
niños jueguen con este artículo. Úselo únicamente según lo previsto y es
necesario supervisar a los niños para que finalmente comprendan las
reglas de uso de la silla.
1. Lea las instrucciones y confirme que todas las piezas que necesita
estén dentro de la caja antes del montaje.
2. Se necesitan dos personas para montar este producto.
3.Seleccione un piso plano, resistente y libre de residuos para evitar
tropiezos durante el montaje del producto .
4. Asegure todas las piezas y pernos sin apretar, sólo cuando el marco
esté completo, debe apretar completamente los tornillos.
5. Si se produce alguna inestabilidad, afloje los tornillos, realinee los
componentes según sea necesario y vuelva a apretar los tornillos
uniformemente.
6. Este producto no es un columpio ni un juguete.
7. No permita que los niños doblen o abran la silla solos. Manténgala fuera
del alcance de los niños.
8.Antes de usar el producto: si tiene alguna pregunta sobre el montaje o el
funcionamiento adecuado, comuníquese con su distribuidor o
representante.
3
GUARDA ESTAS INSTRUCCIONES
PARÁMETROS TÉCNICOS
Modelo
SS401-BK-2P
SS401-GY-2P
SS401-WT-2P
SS401-BU-2P
Color
Negro
Gris
Blanco
Azul
Material
PEAD
Carga
máxima
(libras)
400
Tamaño
del
producto
(mm)
800 * 755 * 91 5
Peso
neto / kg)
2 8 .5 5
Embalaje
2 unidades/caja
Lista de
4
Lista
de hardware
Asamblea
Paso 1: Adjunte la parte B ( pierna derecha ) & C ( pierna izquierda ) a
la parte A (panel del asiento) usando Hardware2 (M6x60mm Perno).
Hardware6 (Arandela) y Hardware7 (Tuerca M6).

5
Paso 2: Asegure la parte H (travesaño frontal) a la parte terminada en
el paso 1. Usando Hardware5 (Tornillo M6x40mm).
Paso 3: Asegure la parte J (portavasos) a D (derecha). apoyabrazos)
usando Hardware4 (Perno M6x30mm)

6
Paso 4: Asegure la parte D (reposabrazos derecho ) a la pierna
derecha y fije la parte E (reposabrazos izquierdo) a la pierna izquierda.
usando Hardware2 (Perno M6x60mm), Hardware6 (Arandela) y
Hardware7 (Tuerca M6 ).
Paso 5: Fije la parte F (panel trasero) a los reposabrazos usando el
Hardware1 (Perno M6x80mm), el Hardware6 (Arandela) y el
Hardware7 (Tuerca M6).
Paso 6: Conecte la pieza G (travesaño del respaldo) al panel del
asiento usando el Hardware 5 (tornillo M6x40 mm). Asegure el orificio

7
superior de la pieza | al panel trasero usando el Hardware5 (Tornillo
M6x40mm). Asegure el orificio inferior de la parte l al panel del
asiento usando el Hardware3 (Perno M6x50mm). Hardware6
(Arandela) y Hardware7 (Tuerca M6). Repita el montaje de la parte I en
el otro lado . El montaje está completo.
Fabricante : Shanghaimuxinmuyeyouxiangongsi
Dirección: Shuangchenglu 803nong11hao1602A-1609shi, baoshanqu, shanghai
200000 CN.
Importado a AUS: SIHAO PTY LTD. 1 ROKEVA STREETASTWOOD NSW 2122
Australia
Importado a EE. UU.: Sanven Technology Ltd. Suite 250, 9166 Anaheim Place,
Rancho Cucamonga, CA 91730

8
REP
EC
E-CrossStu GmbH
Mainzer Landstr.69, 60329 Frankfurt am Main.
REP
UK
YH CONSULTING LIMITED.
C/O YH Consulting Limited Office 147, Centurion House,
London Road, Staines-upon-Thames, Surrey, TW18 4AX


