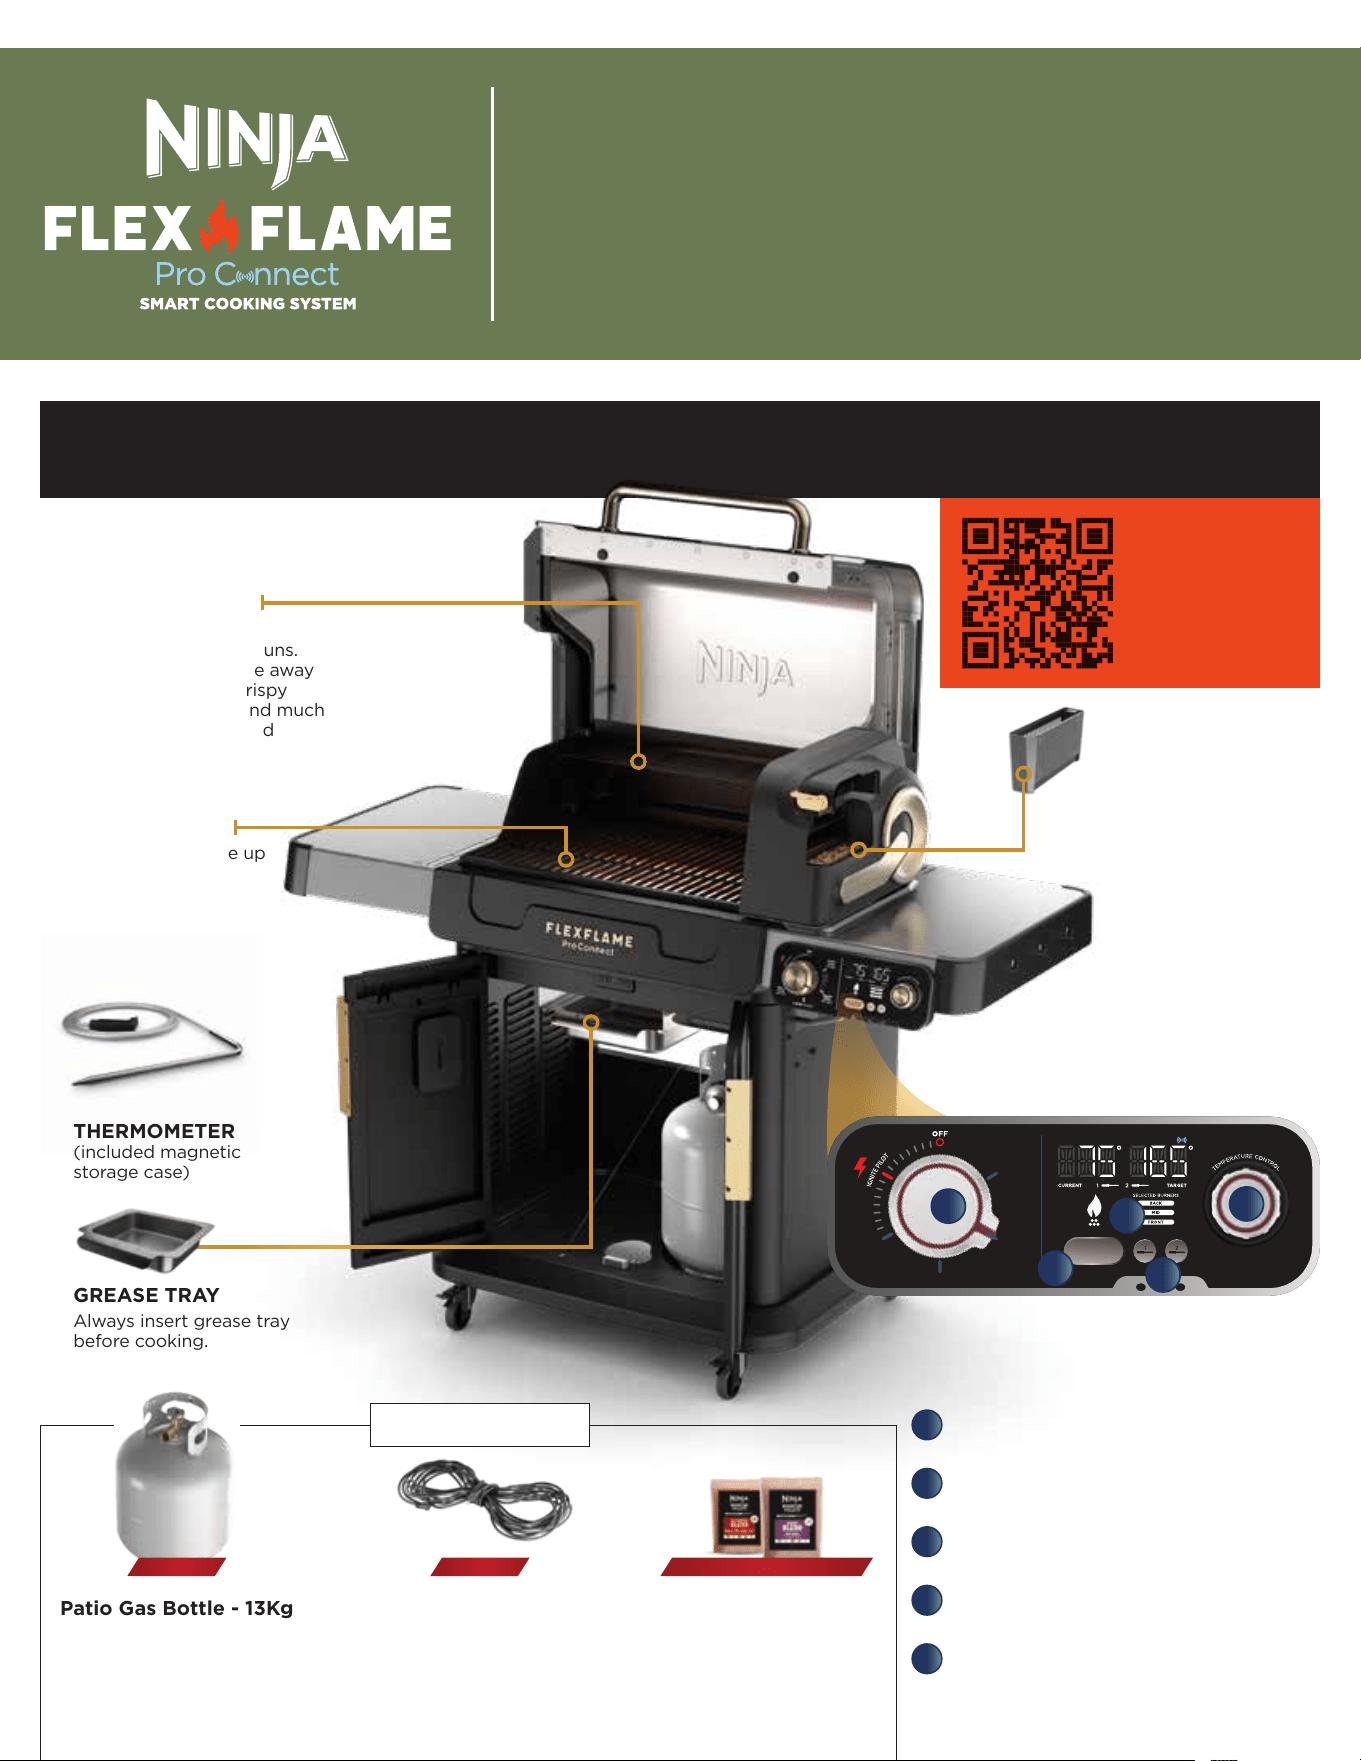
THERMOMETER
(included magnetic
storage case)
GET FAMILIAR WITH YOUR FLEXFLAME
GREASE TRAY
Always insert grease tray
before cooking.
PELLET BOX
Fill with pellets to top
FILL line before using
WOODFIRE FLAVOUR.
Patio Gas Bottle - 13Kg
See Owner’s Guide
for detailed tank
requirements.
NOT INCLUDED
NINJA WOODFIRE
PELLETS
Only use Ninja
Woodfire Pellets for
best performance.
OUTDOOR-RATED
EXTENSION CORD
Plug in using a 3-prong
extension cord, rated for
outdoor use.
PLUG AND POWER SWITCH
Plug in the unit and press Reset on the plug.
Then turn on the unit at the power switch
- located where the power cord enters
the back of the control panel.
PLEASE MAKE SURE TO READ THE ENCLOSED NINJA® OWNER’S GUIDE PRIOR TO USING YOUR UNIT
Getting set up, recipes, and cooking charts
Quick Start Guide
REQUIRED REQUIRED FOR WOODFIRE
REVERSIBLE
GRILL GRATES
Insert with flat side up
for full-contact searing
and charring, or with
the pointed side up for
traditional grill marks.
FOLDING ROAST
& SMOKE RACK
Not just for toasting buns.
Extend cooking space away
from the flame for crispy
meats, vegetables, and much
more with superheated
convection air.
REQUIRED
SCAN HERE
BEFORE YOU
GET STARTED
to download the
ProConnect App
BURNER DIAL
Used to ignite pilot and main burner and
for selecting a cook function.
SELECTED BURNERS LED
Shows which burners are active. Burners
automatically adjust based on selected function.
TEMPERATURE CONTROL DIAL
Use to select a precise temperature within
the selected function.
WOODFIRE FLAVOUR TECHNOLOGY
Add pellets for traditional smoking or use with any
cooking function to infuse smoky woodfire flavours.
THERMOMETER SELECTION
Select your thermometer to adjust its
target temperature. Thermometer jacks
are located underneath.
A
B
C
D
E
ROAST/
BAKE
150-230C
GRILL/
PIZZA
230-315C
WOODFIRE
FLAVOUR
2 ZONE 175-260C
LOW &
SLOW
95-150C
A
B
C
D
E
ROAST/
BAKE
150-230C
GRILL/
PIZZA
230-315C
WOODFIRE
FLAVOUR
2 ZONE 175-260C
LOW &
SLOW
95-150C
2 3Questions? ninjakitchen.co.uk
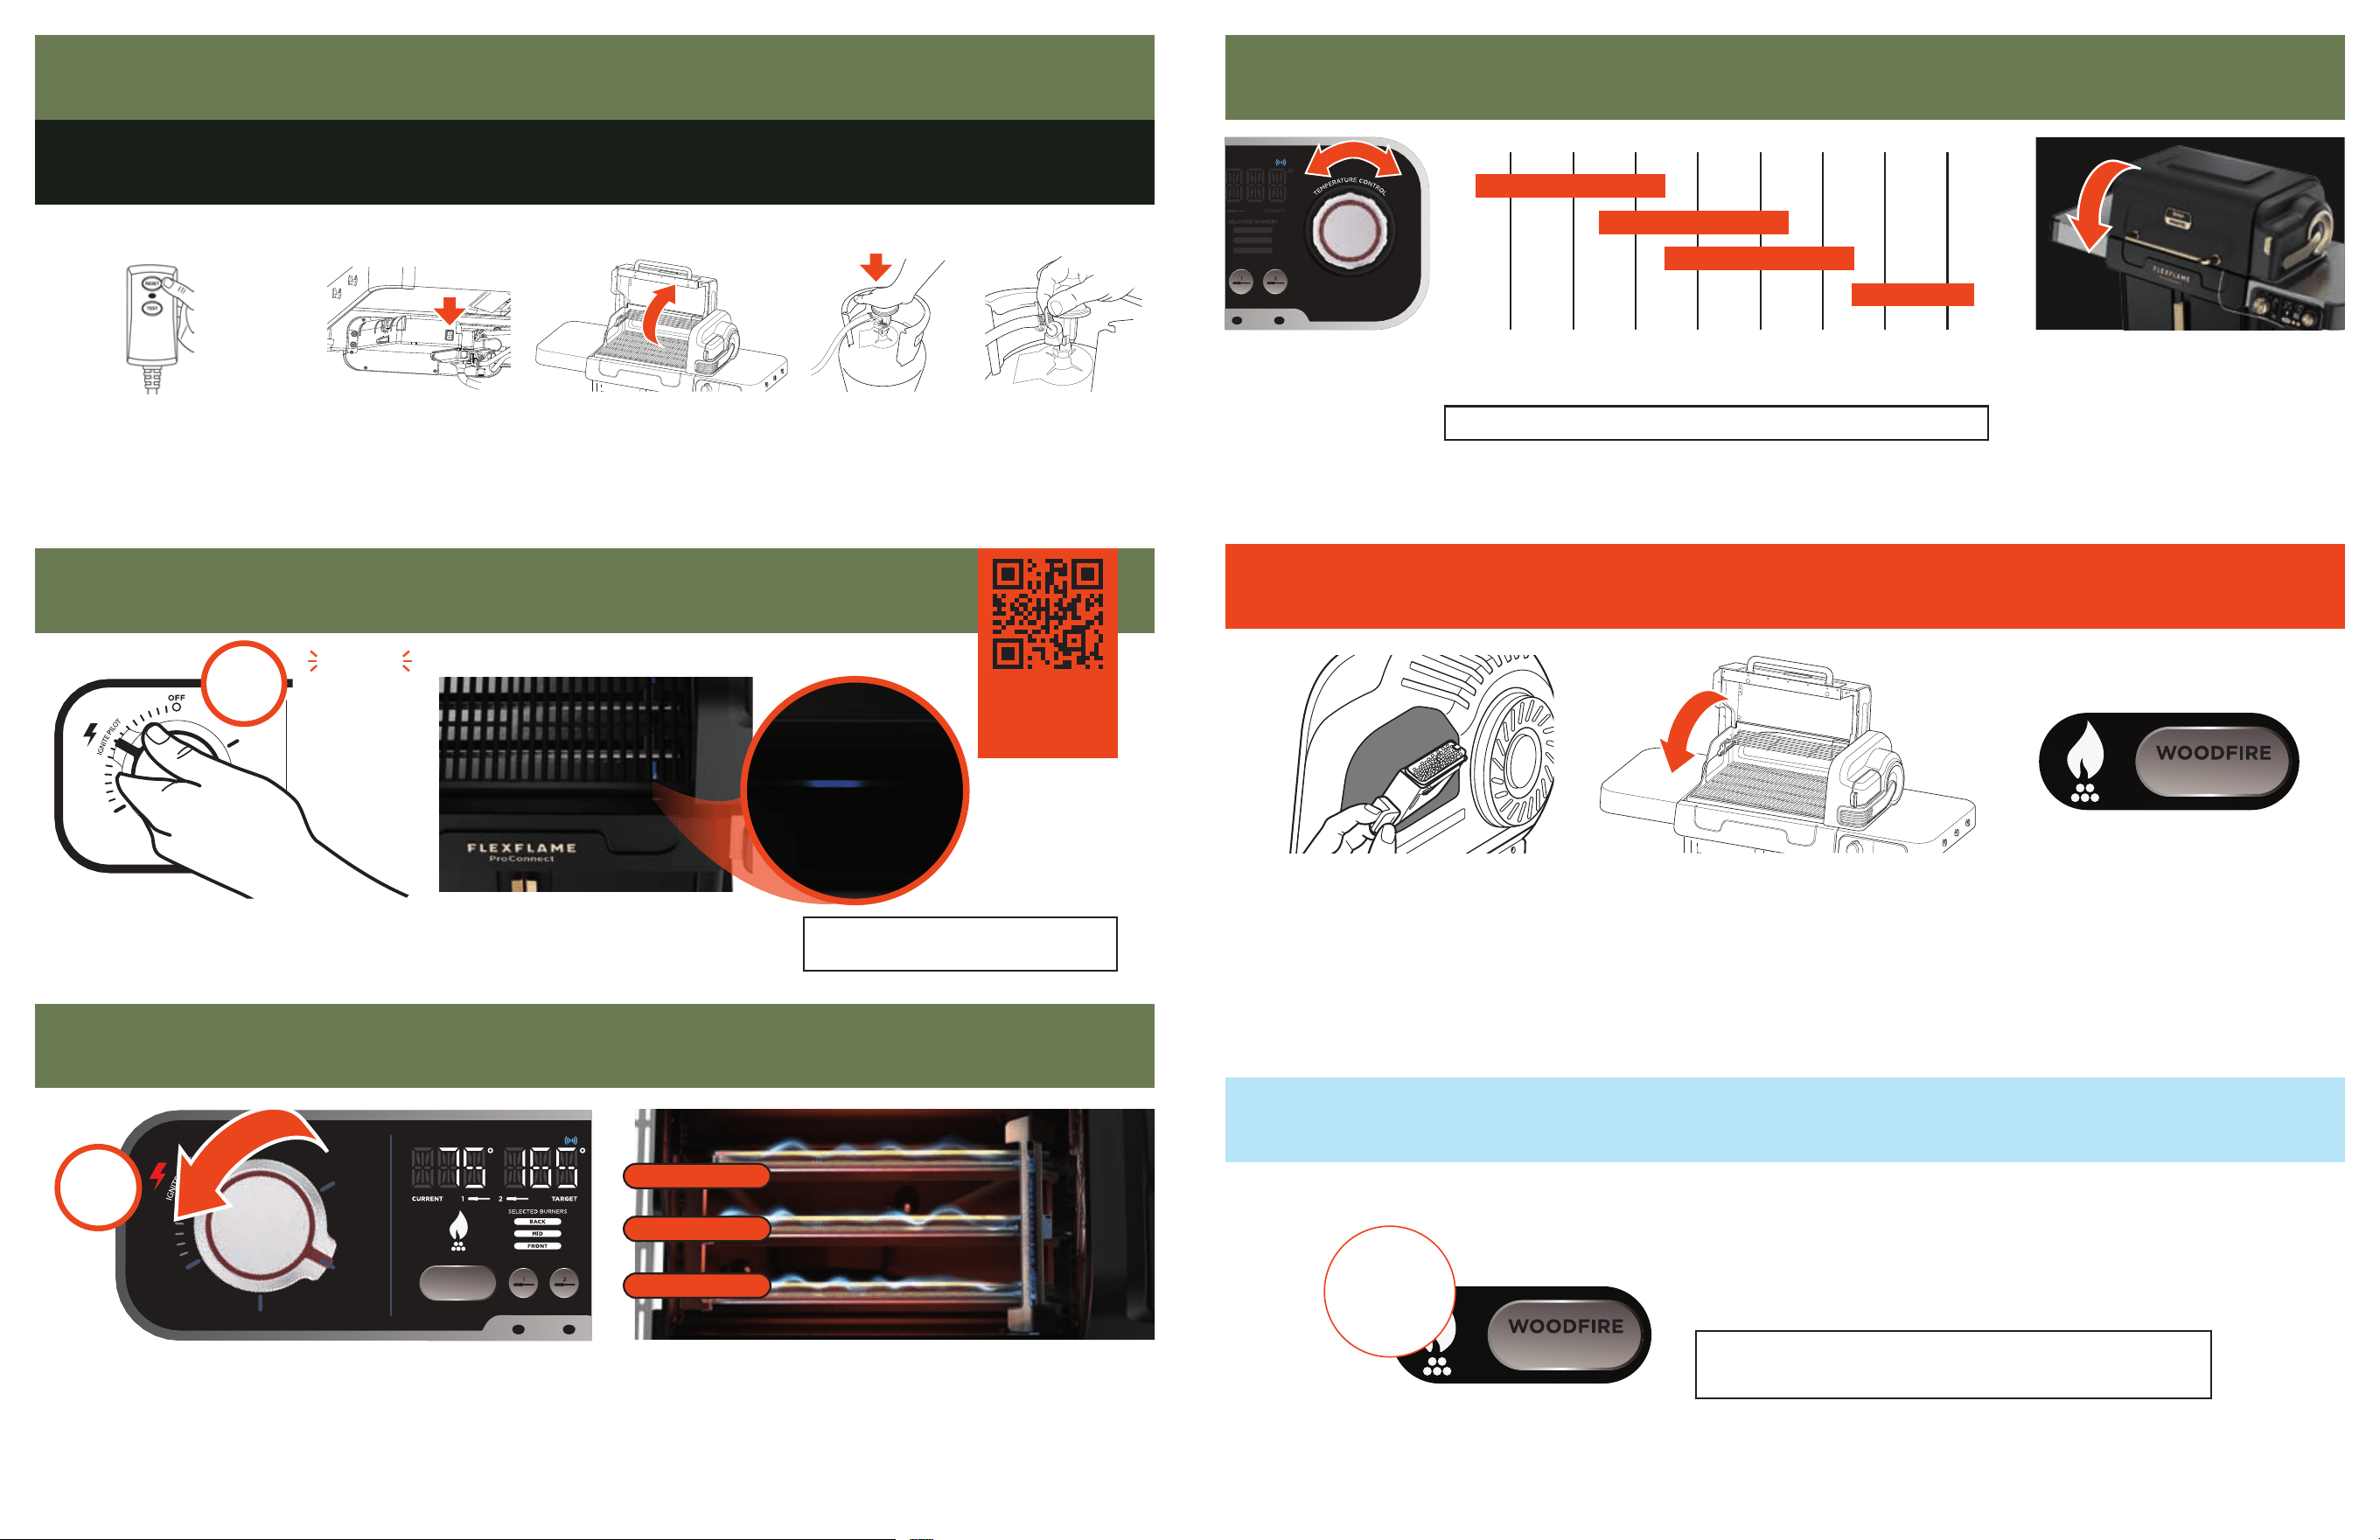
FOLLOW THESE STEPS BEFORE IGNITING BURNERS
PLUG IN
Plug in the device. Press
the 'RESET' button on the
plug. You should hear a click
indicating the device is ready.
SWITCH ON
Ensure the unit is turned
on (switch is located at
back of the control panel,
under the right side table).
STEP 1: GET SET UP
OPEN
GRILL LID
Lid must be open
to ignite.
OPTIONAL
ACTIVATING WOODFIRE FLAVOUR
OPTIONAL
QUIET MODE
ADD PELLETS
Pull out the pellet box, use the included
scoop to add Ninja Woodfire pellets until
it reaches the top of the pellet box.
Use only Ninja Woodfire Pellets for
best results, performance, and flavour.
CLOSE GRILL LID
To keep the smoke contained, the lid
needs to be closed before you activate
the Woodfire Flavour function.
Quiet Mode minimises the cyclonic fan speed for a quieter cook.
With the grill powered on, hold the WOODFIRE FLAVOUR
button for 5 seconds to enter. To exit Quiet Mode, repeat
the above step or restart your grill.
Note: Cook times and performance may be aected in
Quiet Mode.
IGNITE PELLETS
Press WOODFIRE FLAVOUR button.
Ignition will take approximately
10-12 minutes.
IGN and a progress bar will display on the
control panel, indicating pellets are igniting.
230-315C
90-150C
150-230C
175-260C
FLAVOUR
230-315C
90-150C
150-230C
175-260C
FLAVOUR
OPEN VALVE
When the valve is
vertical, it is open.
ATTACH VALVE
Push down until
you hear it click.
HOLD 5
SECONDS
Close grill led to begin preheat
heating. The LED display will
alternate between current and
target temperatures until target
is reached
STEP 4
ADJUST TEMPERATURE
Use the right dial to
adjust temperature.
LOW
200°F250°C300°C350°C450°C500°C550°C
HIGH
600°F
MEDIUM
400°C
GRILL/PIZZA
2-ZONE
ROAST/BAKE
LOW & SLOW
The range of possible temperatures depends on the
selected mode.
NOTE: See next page for guidance on when to use each mode.
Once pilot burner is lit, release dial and turn
counterclockwise to select a cooking function and turn on
the main burners.
Make sure dial is not placed in between two functions.
Push in BURNER dial
and turn to IGNITE PILOT.
Hold in for up to 10 seconds.
Once the pilot is fully ignited, release
the dial. If the pilot goes out, hold
the dial for longer before releasing.
BACK BURNER
MIDDLE BURNER
FRONT BURNER
RELEASE
DIAL
STEP 2
IGNITE PILOT BURNER
SCAN HERE
for step-by-
step ignition
video
STEP 3
SELECT FUNCTION
(IGNITE MAIN BURNERS)
NOTE: Pilot flame may be dicult
to see in direct sunlight.
Depending on the chosen mode, not all burners may be used.
To ignite all burners, select GRILL/PIZZA
ROA ST/
BAKE
150-230C
GRILL/
PIZZA
230-315C
WOODFIRE
FLAVOUR
2 ZONE 175-260C
LOW &
SLOW
95-150C
TICKING
10
SECONDS
UP TO
Get to know each function
& temperature range
LID DOWN
Enables the convection fan for
even, surround cooking, faster preheat
and temperature recovery.
Convection fan is only on when lid is down.
When using Woodfire Flavour, lid MUST be down.
VS
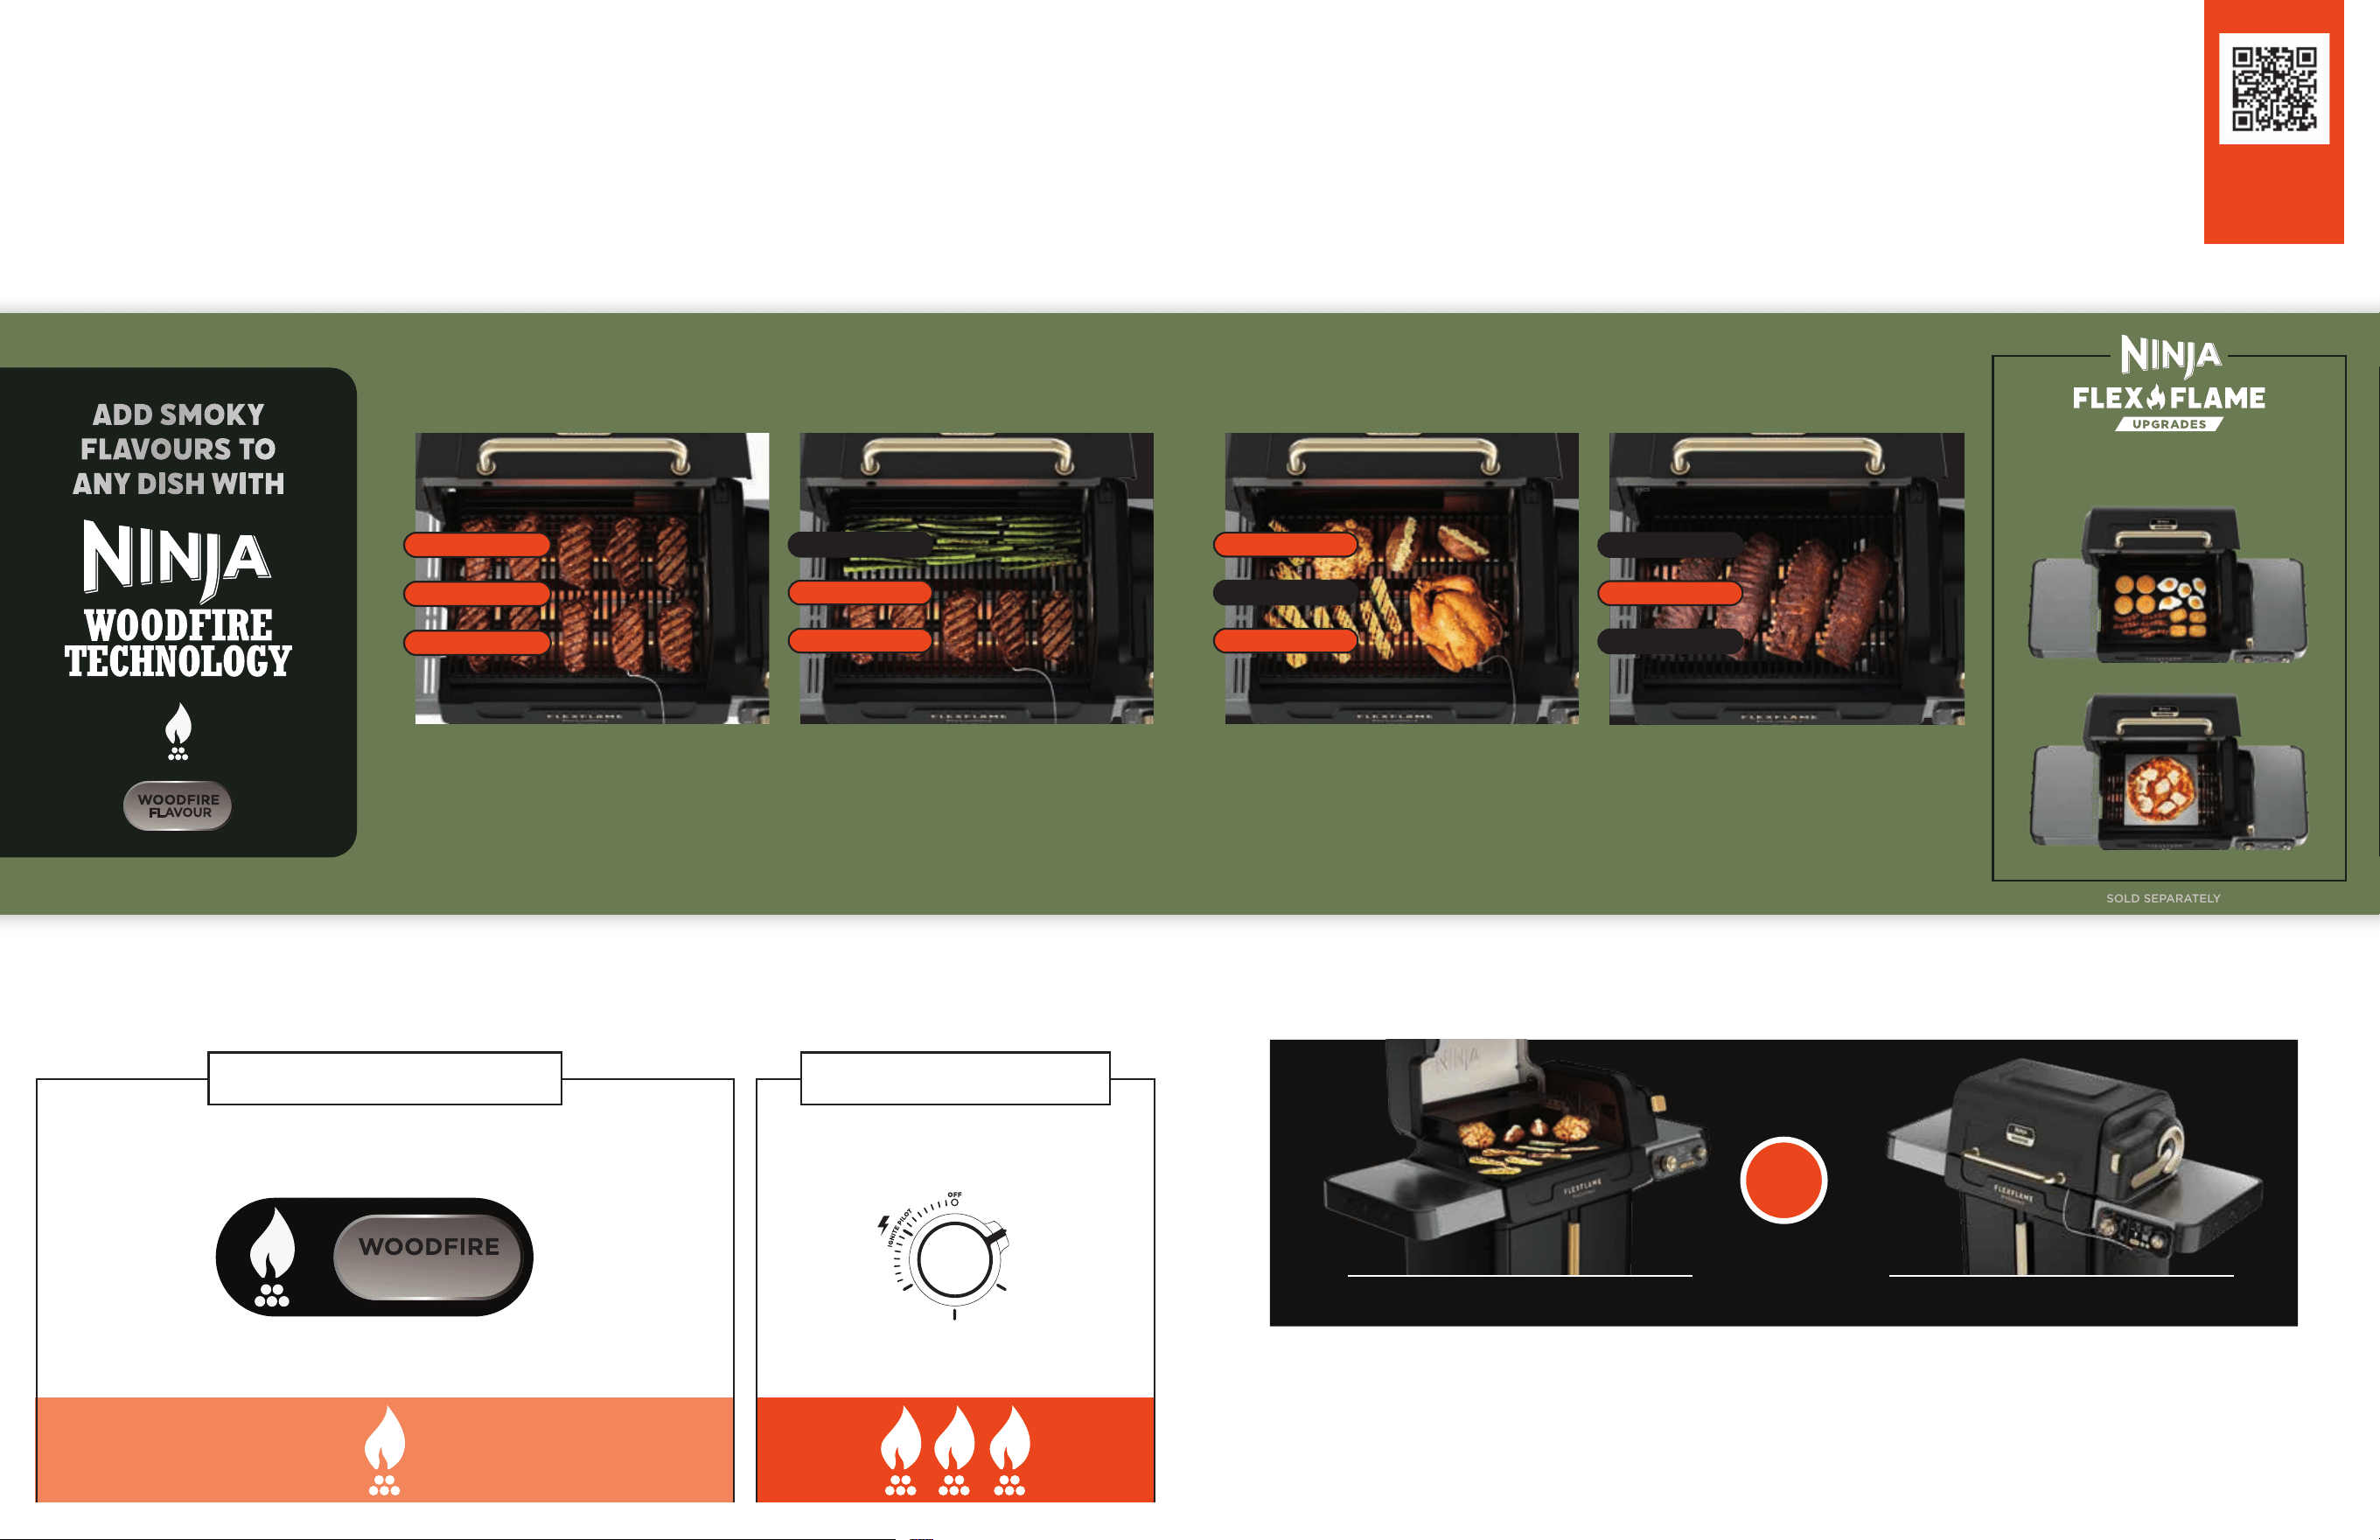
SCAN HERE
to shop
Ninja FlexFlame
Upgrades
WHEN TO COOK WITH THE LID UP OR DOWN
LID UP
Best for griddling and
shorter, more interactive cooks.
When grilling with lid up, you will not have the benefits of
the convection fan which may cause cook times to vary.
RED COLOUR IN GRILL IMAGERY FOR VISUAL REPRESENTATION ONLY, FLAME TAMERS WILL NOT GLOW 5
COMPLETE YOUR
COOKING SYSTEM
230°C - 315°C
High-heat searing and char-grilling
for steaks, burgers, and more.
Pizza Stone
*
150°C–230°C
Even, surround browning
and crisping on large proteins
and veggies. Bake your favourite
sweet treats, too.
GRILL/PIZZA 2-ZONE ROAST/BAKE
90°C–150°C
Low-and-slow smoking for BBQ
classics like ribs and pulled pork. Add
pellets and press the WOODFIRE
FLAVOUR button for smoky flavour.
LOW & SLOW
BACK BURNER
BACK BURNERBACK BURNER
MIDDLE BURNER
MIDDLE BURNERMIDDLE BURNER
FRONT BURNER
FRONT BURNERFRONT BURNER
175°C–260°C
Cook with direct heat on the 2 front
burners while using the back burner
to indirectly cook food using our
convection technology.
BACK BURNER
MIDDLE BURNER
FRONT BURNER
SOLD SEPARATELY
Full & Half Griddle
*
Questions? ninjakitchen.co.uk
ADD SMOKY
FLAVOURS TO
ANY DISH WITH
NINJA WOODFIRE FLAVOUR SCALE
Woodfire flavour is dependent on cooking time; shorter cooks (less than 45min) will have lighter flavour than longer cooks.
Press Woodfire flavour When
using functions above to add smoke.
Set your grill to low and slow
On the function dial.
Grill/Pizza 2-Zone Roast/Bake
Low & Slow
HINT OF SMOKY FLAVOUR BBQ SMOKY FLAVOUR
230-315C
90-150C
150-230C
175-260C
FLAVOUR
ROA ST/
BAKE
150-230C
GRILL/
PIZZA
230-315C
WOODFIRE
FLAVOUR
2 ZONE 175-260C
LOW &
SLOW
95-150C
ROA S T/
BAKE
150-230C
GRILL/
PIZZA
230-315C
WOODFIRE
FLAVOUR
2 ZONE 175-260C
LOW &
SLOW
95-150C
ROA S T/
BAKE
150-230C
GRILL/
PIZZA
230-315C
WOODFIRE
FLAVOUR
2 ZONE 175-260C
LOW &
SLOW
95-150C
Questions? ninjakitchen.co.uk 7
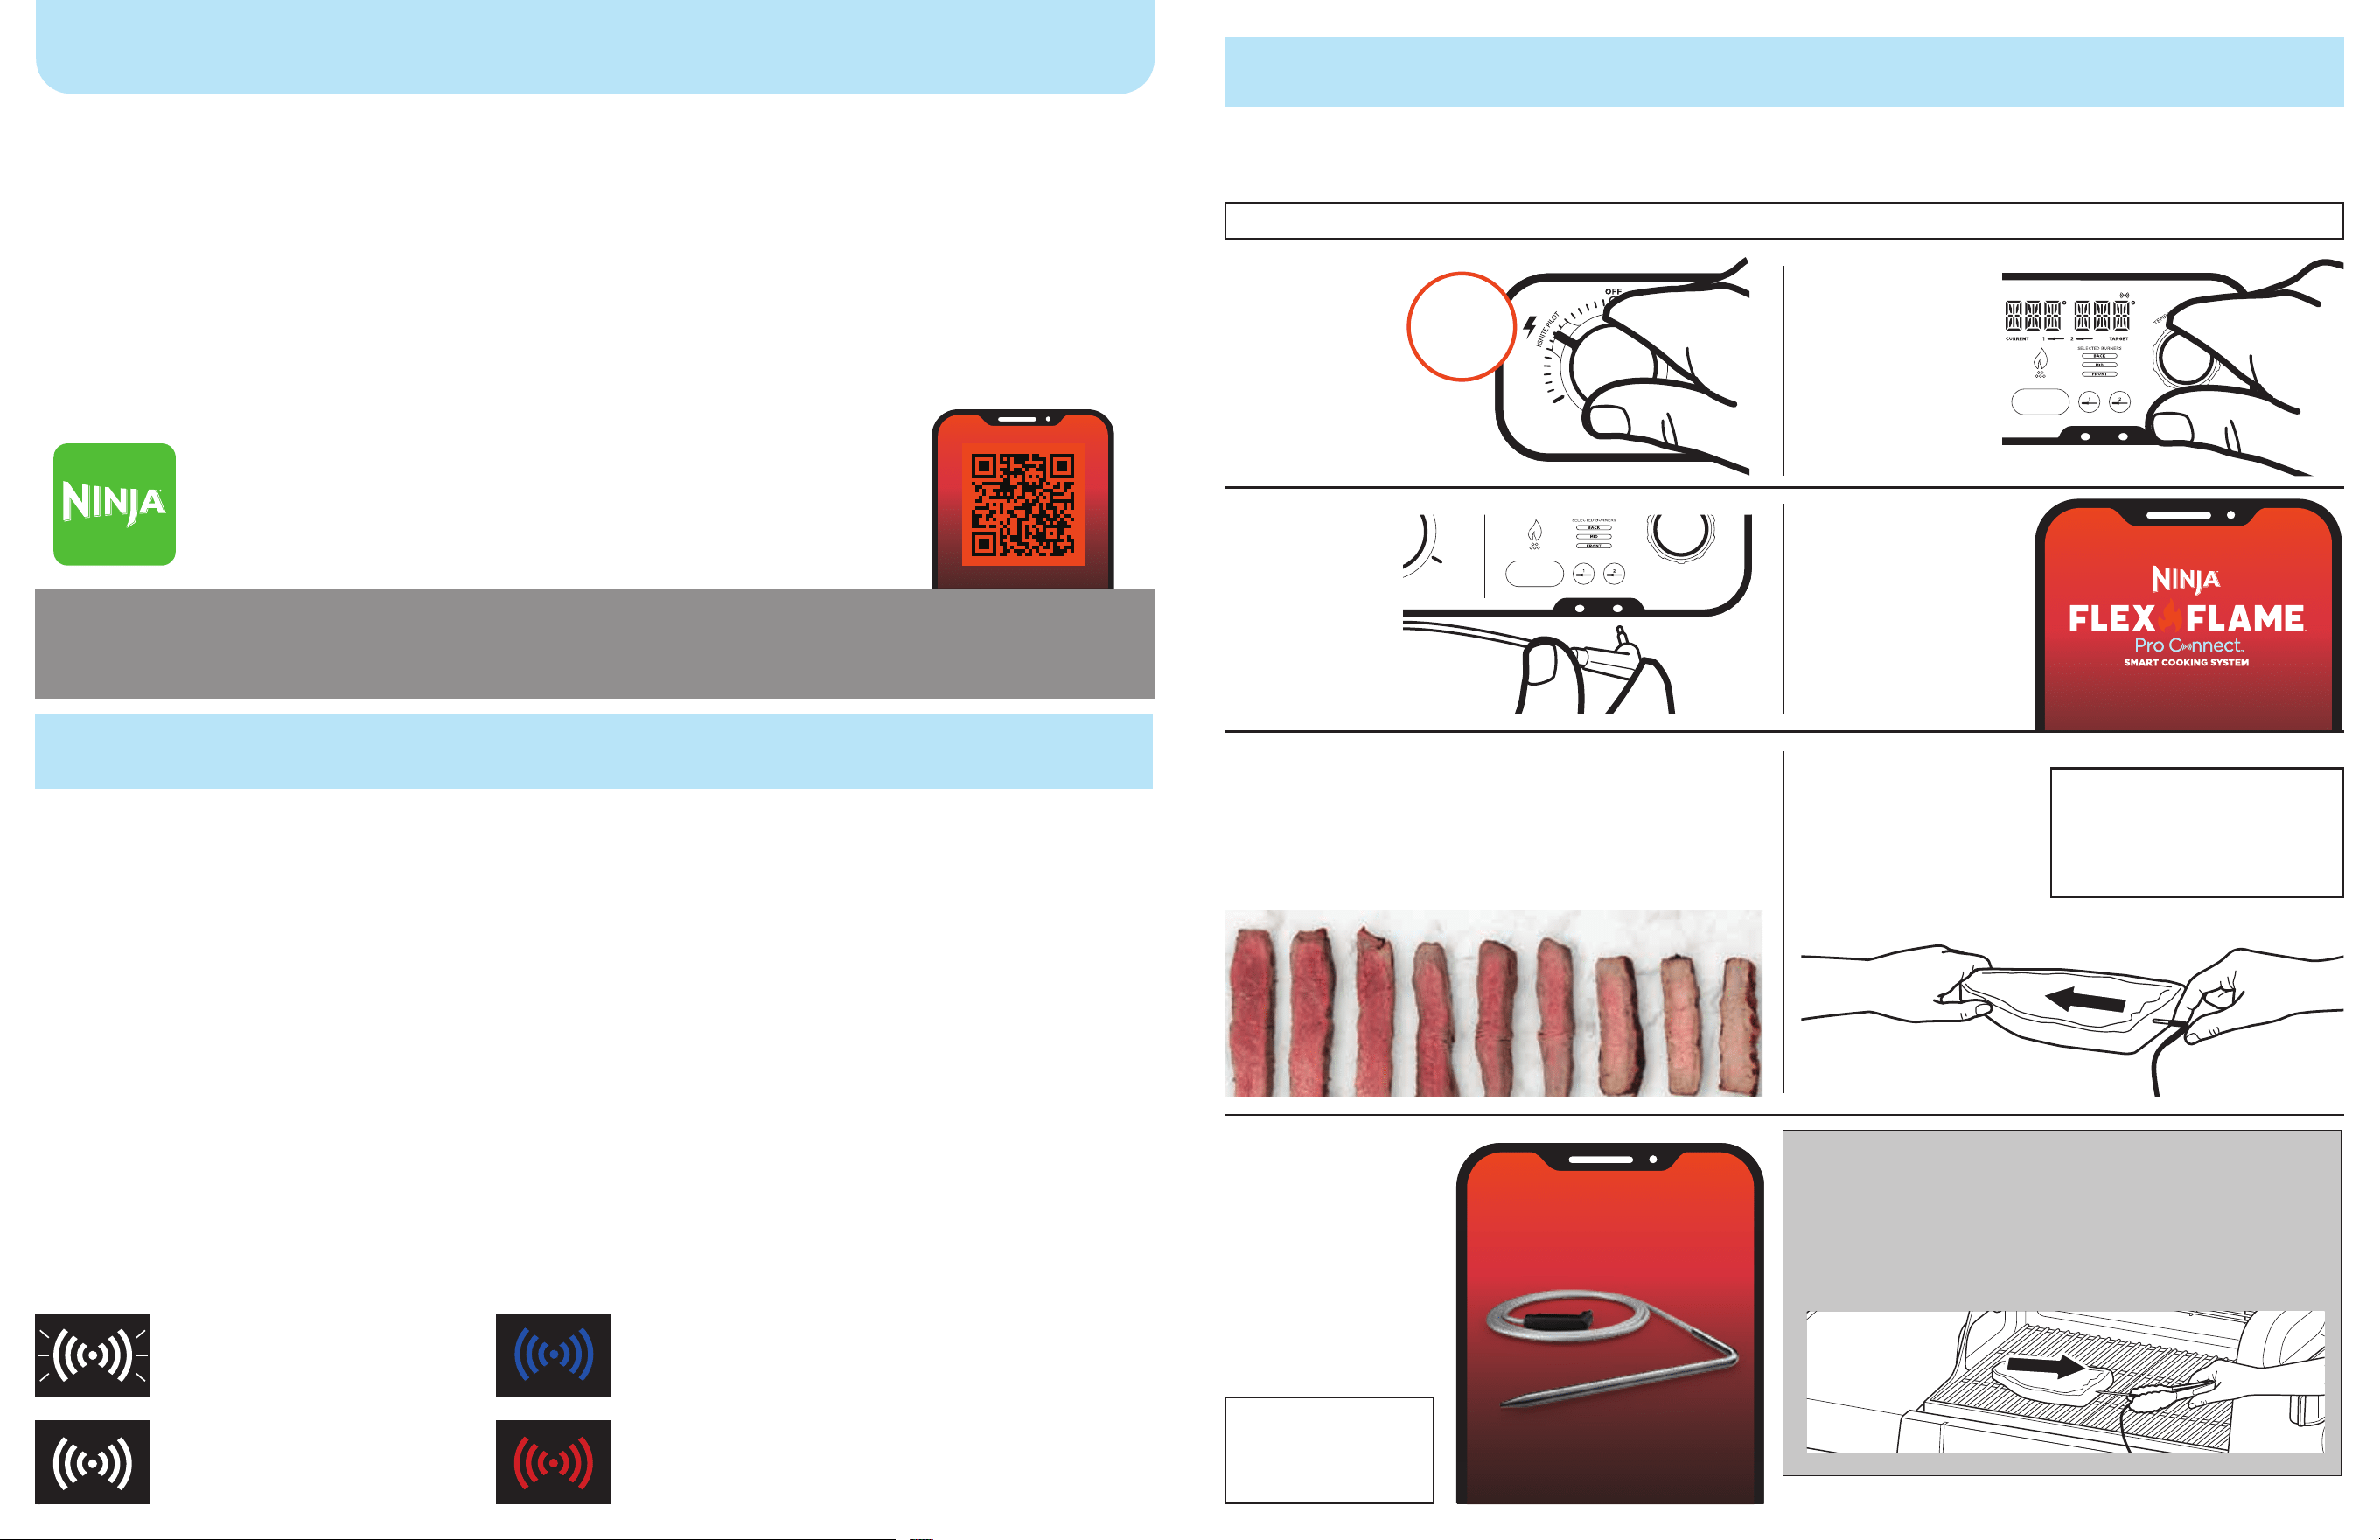
FULL APP FUNCTIONALITY REQUIRES A CONNECTED THERMOMETER
See instruction booklet for using thermometer without the Pro Connect
™
app.
STEP 1
Ignite your grill
and set your
desired cook
function.
UP TO 10
SECONDS
STEP 2
Set your cooking
temperature.
NOTE: See previous section on choosing the right function and temperature for your cook.
STEP 3
Plug
thermometer(s)
into the jack(s)
present on the
control panel
on the grill.
STEP 4
In the app, open the
Thermometer menu
from the Cook page.
STEP 5
From the Thermometer menu, select your food.
elect your food, cut and doneness (use custom to
select a specific target temperature if desired).
STEP 6
Insert the probe into
your food, making sure
to follow the guidance
on correct placement.
STEP 8
Click SET
THERMOMETER
in-app or on grill
UI to confirm your
choices, then place
the food on the
pre-heated grill.
NOTE: Incorrect
thermometer
placement can result in
undercooked food and
damage your probe.
IMPORTANT:
The thermometer cord is designed to remain safely
in place even when the firebox lid is closed. However,
after cooking, the probe and cord will be hot. Always
use oven mitts or tongs and remove the thermometer
with care.
NOTE: The probe
is designed to
be used with the
lid up or down.
Download the NINJA PRO CONNECT™ APP
and take the guesswork out of outdoor cooking
Ensure phone has Bluetooth® turned on and is connected to a 2.4-GHz
Wi-Fi network, not a 5-GHz network.
IMPORTANT
BEFORE PAIRING:
6
KEY FUNCTIONS
COOK
Monitor and adjust your grill’s temperature and
settings from anywhere.
SET UP WIRED THERMOMETERS
Set-up your thermometers for a connected cook.
Just pick your food, doneness and the app handles
the rest.
TIMERS
Set timers to track sides without leaving the app.
CHARTS
Browse a selection of cook charts developed
specifically for your grill.
Filter by ingredient, cook mode and cooking time to
quickly find the best recipe for any occasion.
HISTORY
Keep track of your best cooks, so you can recreate
them with ease.
GETTING STARTED WITH THE NINJA PRO CONNECT™ APP
FLASHING OR SOLID RED WI-FI ICON
Pairing has failed. Try pairing phone and grill again.
SOLID WHITE WI-FI ICON
Your phone and grill
are successfully paired.
FLASHING WHITE WI-FI ICON
Pairing is in progress.
TROUBLESHOOTING
GRILL ICONS AND ERROR MESSAGES
CAN’T PAIR WITH YOUR GRILL?
1 Make sure your phone Is connected to a
2.4-GHz WI-Fl network within range of the griil.
• Any 5-GHz network or out-of-range network will
not be recognized by the grill. Like most Wi-Fi
enabled home devices, Ninja Connected grills
only pair over 2.4-GHz networks, which cover
greater distances than 5-GHz networks.
• If you have both 2.4-GHz and 5-GHz network
options, make sure they don' have the same
name, as this can cause pairing issues. If you
are unable to separate your 2.4-GHz and 5-GHz
networks, consider purchasing an inexpensive,
dedicated 2.4-GHz router for your grill.
• If you're not sure which bands your network uses
or how to identify them, contact your internet
service provider.
2 Restart your phone.
• Turn o your phone. Wait a few minutes, then
turn it back on and reconnect to Wi-Fi.
3 Unplug your grill and restart grill.
• Unplug the grill from the outlet, then plug it
back in and turn the right-hand dial to turn it on.
4 Reboot your router.
• Unplug the router cable for 30 seconds, then
plug it back in. Allow several minutes for your
router to reboot completely.
FLASHING BLUE
Pairing with Bluetooth® is in progress. Please wait to
successfully connect Bluetooth® to the grill.
COOKING WITH THE PRO CONNECT™ APP
ROA S T/
BAKE
150-230C
GRILL/
PIZZA
230-315C
WOODFIRE
FLAVOUR
2 ZONE 175-260C
LOW &
SLOW
95-150C
8 9Questions? ninjakitchen.co.uk
FOOD TYPE PLACEMENT CORRECT INCORRECT
• Insert thermometer horizontally into the
thickest part of the food, centering top to
bottom and not at an angle.
• Ensure the thermometer is fully inserted
leaving no space to the handle bend.
• Ensure the thermometer is not hitting any
bones, fat, or gristle.
• The thermometer may be less eective on
meats that are thinner than 1 inch.
• Insert thermometer horizontally into the
thickest part of the breast, parallel to, but
not touching, the bone.
• Make sure the tip reaches the center of the
thickest part of the breast and doesn’t go all
the way through the breast into the cavity.
WHOLE CHICKEN
DO NOT use the thermometer with frozen protein or for cuts of meat thinner than 2 cm.
8 9
HOW TO PLACE THE THERMOMETER
IMPORTANT:
The center of your food may not be the
thickest part. Ensure you have identified
the thickest part before inserting
the thermometer.
Ensure your probe is fully inserted
to provide accuracy of the
thermometer reading.
CLEANING INSTRUCTIONS
Wash thermometer and cable with a warm, soapy water and
a soft cloth or sponge. Allow it to completely dry before use.
NOTE: DO NOT submerge
thermometer and wired cable in
water when hot. Doing so many
cause damage to the eciency
of the thermometer and risk
malfunction. Allow to fully cool
before washing.
STEAKS
PORK CHOPS
LAMB CHOPS
CHICKEN BREASTS
BURGERS*
TENDERLOINS
FISH FILLETS
*At least 1 inch thick
STORING
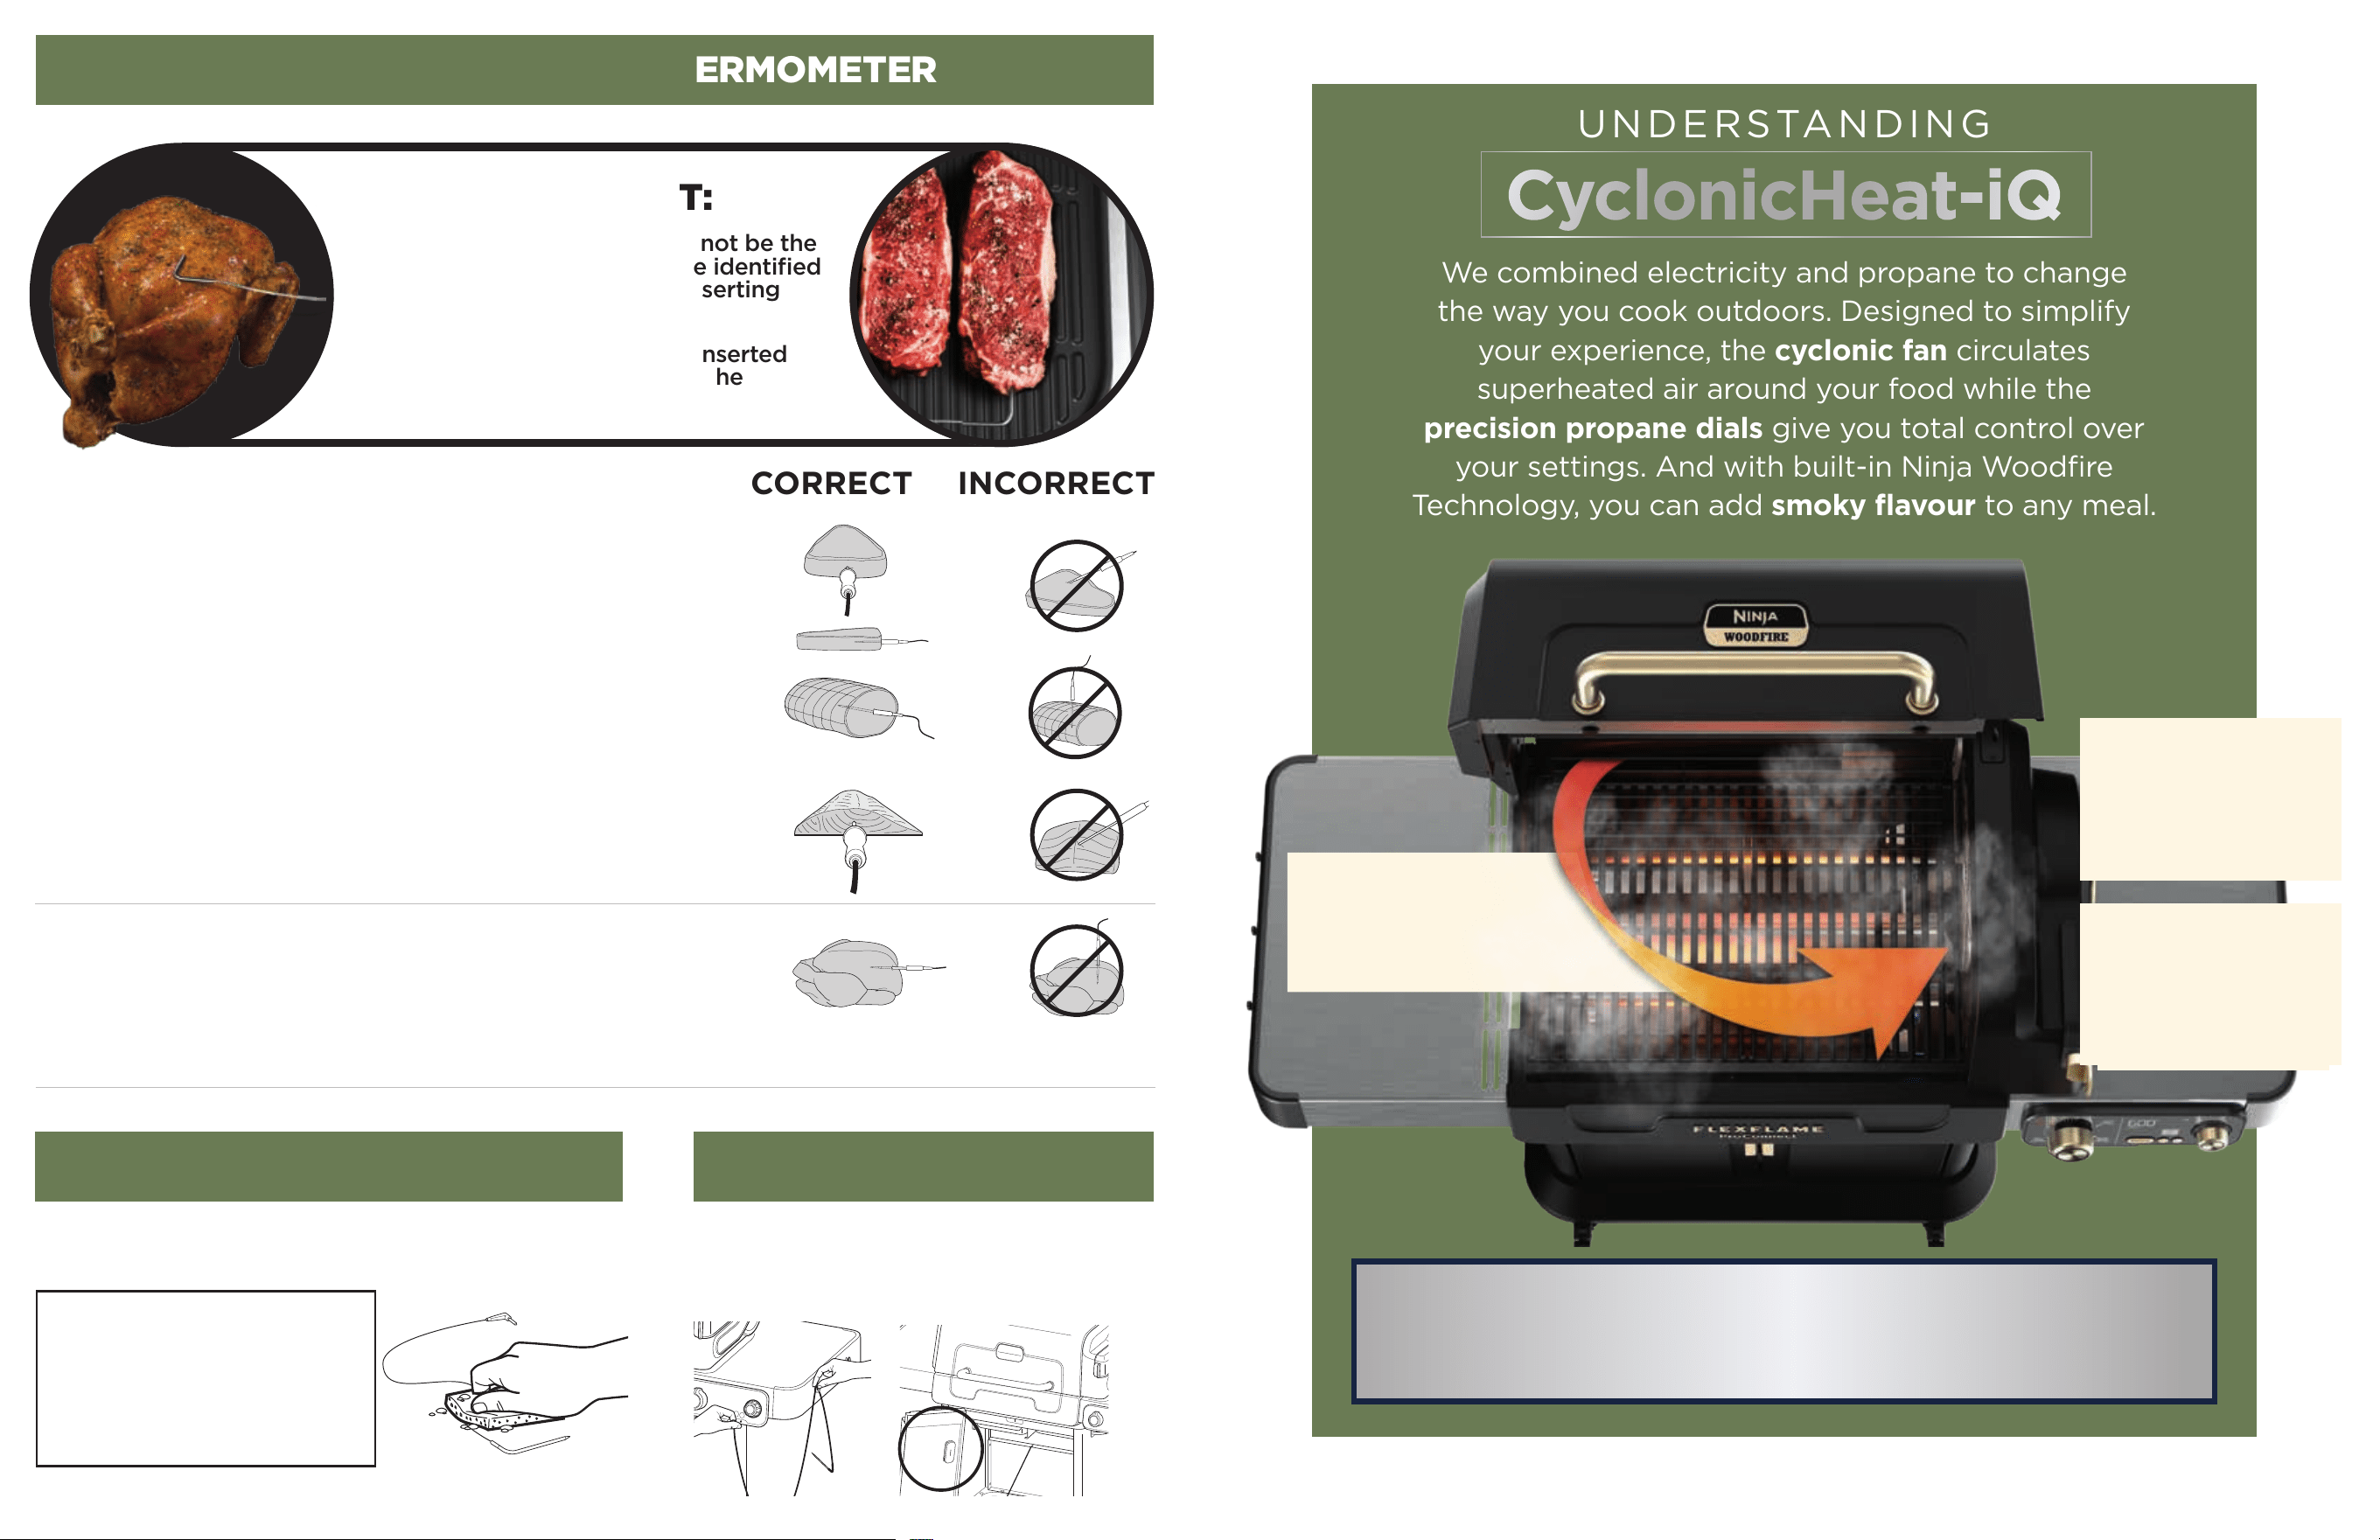
We combined electricity and propane to change
the way you cook outdoors. Designed to simplify
your experience, the cyclonic fan circulates
superheated air around your food while the
precision propane dials give you total control over
your settings. And with built-in Ninja Woodfire
Technology, you can add smoky flavour to any meal.
UNDERSTANDING
CyclonicHeat-iQ
REAL SMOKY
FLAVOUR
Create crisp BBQ bark
and an authentic smoke
ring with just 2 cups
of pellets.
PRECISION
PROPANE FLAMES
Burners auto-adjust
to maintain a set
temperature.
RED COLOUR IN GRILL IMAGERY FOR VISUAL REPRESENTATION ONLY, FLAME TAMERS WILL NOT GLOW
EVEN HEAT
AND FAST COOKING
Fast
*
charring, roasting, and
smoking with our cyclonic fan.
QUIET MODE - CYCLONIC HEAT. LESS NOISE.
Press and hold the WOODFIRE FLAVOUR button for 5 seconds (until you hear
a beep) to enter QUIET MODE.
Quiet Mode may increase your cook times and impact cook performance.
Use the side table hook to keep the probe out
of the way during prep. Store the probe in
the magnetic case inside the cabinet door to
protect from the elements when not in use.
STEP 1 STEP 2 STEP 3
SMOKING STEPS
FOOD PREPARATION TIPS
TIP: PROTEIN FIRST, FIRE SECOND
Add protein to the grill before starting
Woodfire Flavour ignition. This allows
food to warm gradually, keeping it low
and slow.
TIP: START COLD
Start with meat straight from the
fridge. This helps regulate internal grill
temperature, improves smoke adhesion
and promotes better bark formation.
Add food to the cold grill.
Ignite burners.
Select Low and Slow
and set temperature
using dial.
Press WOODFIRE FLAVOUR
to ignite pellets.
Pellet ignition will take 10-12 minutes.
ADDING MORE PELLETS
FOR SMOKIER FLAVOUR
• Top o pellets if there is still
a burning ember. DO NOT
re-ignite pellets.
• If first batch has fully burned,
refill pellet box and press
WOODFIRE FLAVOUR button
to ignite.
Fill pellet box
to top tab.
TIP: Adding fewer pellets
will not change smoke
intensity and may cause
ignition issues.
TIP: If using a water bath
(see tip below) prepare
and add to the left side
of the grill.
ADD SAUCE AFTER COOKING
For unwrapped proteins,
add the sauce after cooking.
If wrapped, add the sauce
before covering.
AVOID OILS
Using oils or sprays can
reduce smoke adhesion,
reducing the smokiness
of your food.
USE A BINDER WITH DRY RUBS
We recommend using non-oil based binder such as
apple cider vinegar or mustard to help adhesion. We
recommend using a non-oil based binder as apple
cider vinegar or mustard to help adhesion.
TIP
ADD A WATER BATH
Stabilizes the grill temperature for a more consistent
cook, keeps meat juicy during long smokes and boosts
smoke adhesion for deeper flavour.
Fill a heat-resistant tray (or a spare grease tray liner)
with approximately 6 cups water and place on the left
side of your grill when smoking, taking care not to spill.
NOTE: Make sure the bath doesn't run dry
on extended smoke sessions.
NOTE: Take extra care when low
temperature smoking on hot/sunny
days. Follow the above best practices
to avoid overheating or dehydrating
your protein.
PELLET DISPOSAL
Pellets will smoke for
approximately 45 minutes,
but embers will remain hot for
approximately 90 minutes.
Allow grill and pellet box
to completely cool, then remove
the pellet box and safely discard
contents after each use.
Use ash in your garden as an
excellent source of nutrients for
plants. Lightly scatter on the
soil, or add it to your existing
compost.
LOW AND SLOW
1-800-839-2130
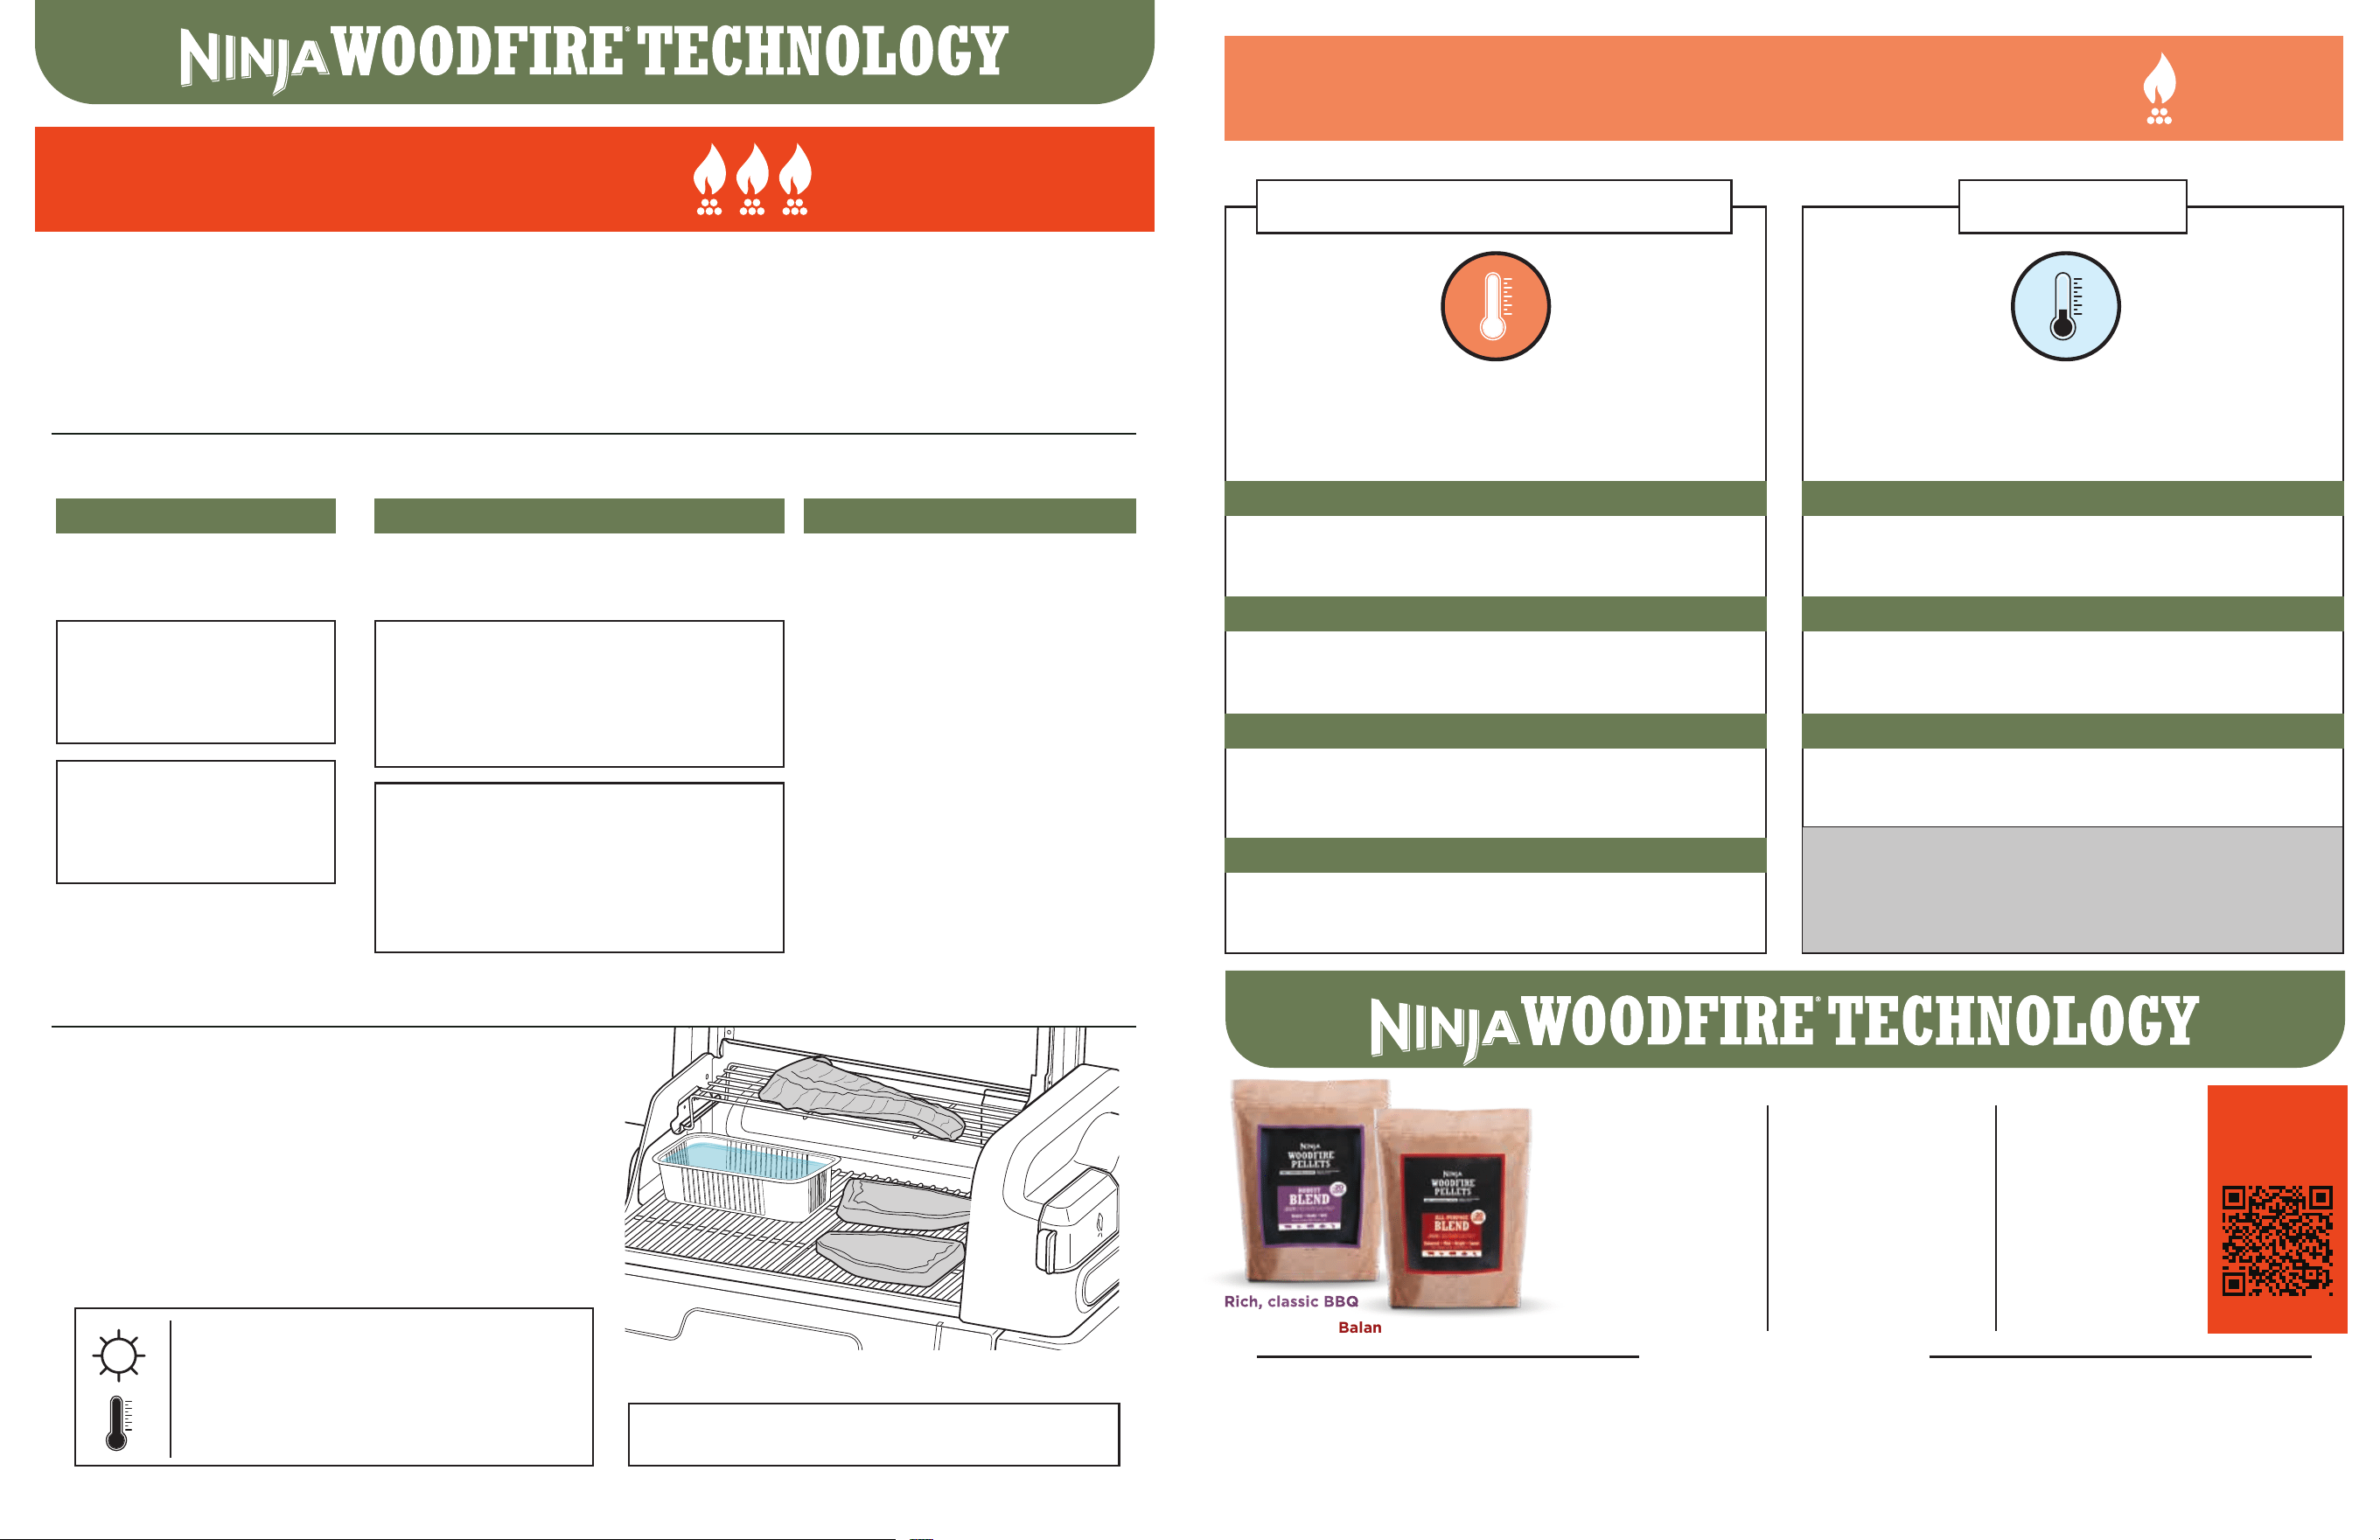
Balanced, mild, bright, sweet
Rich, classic BBQ
PURCHASE
PELLETS
100% REAL WOOD ,
NO FILLERS
Each pellet is a
combination of
premium hardwoods
at the perfect ratio for
optimal flavour.
PREMIUM QUALITY
FOR BEST SMOKE
Our wood pellets
are high density and
low moisture—the
perfect combo to
create professional-
grade smoke.
CONSISTENT
FLAVOUR
The size and
shape of our
pellets provide
optimal air flow
and consistent
smoky flavour.
OTHER WAYS TO ADD SMOKY FLAVOUR
BEST FOR INFUSING A HINT OF SMOKY FLAVOUR.
High cook temperatures with
fast cook times less than 30 min.
GRILL/PIZZA, 2-ZONE, ROAST/BAKE COLD SMOKING
ADD SMOKY FLAVOUR TO FOOD
WITHOUT COOKING IT.
Best used in cooler months or when temperature
conditions are below 85°F.
STEP 1
Select function to ignite burners, then set
temperature.
STEP2STEP2
Fill pellet box to the top FILL tab.
STEP 3
Press WOODFIRE FLAVOUR to ignite pellets.
Pellet ignition will take 10-12 minutes.
STEP 4
When preheat and pellet ignition are complete,
STEP 1
Add food to the cold grill.
STEP2STEP2
Fill pellet box to top FILL tab
STEP 3
Press WOODFIRE FLAVOUR to ignite pellets.
Pellet ignition will take 10-12 minutes.
IMPORTANT:
Once cold smoked If you smoked raw meats, either
refrigerate until use or cook immediately to bring to
safe internal temperature.
MAINTENANCE & CLEANING
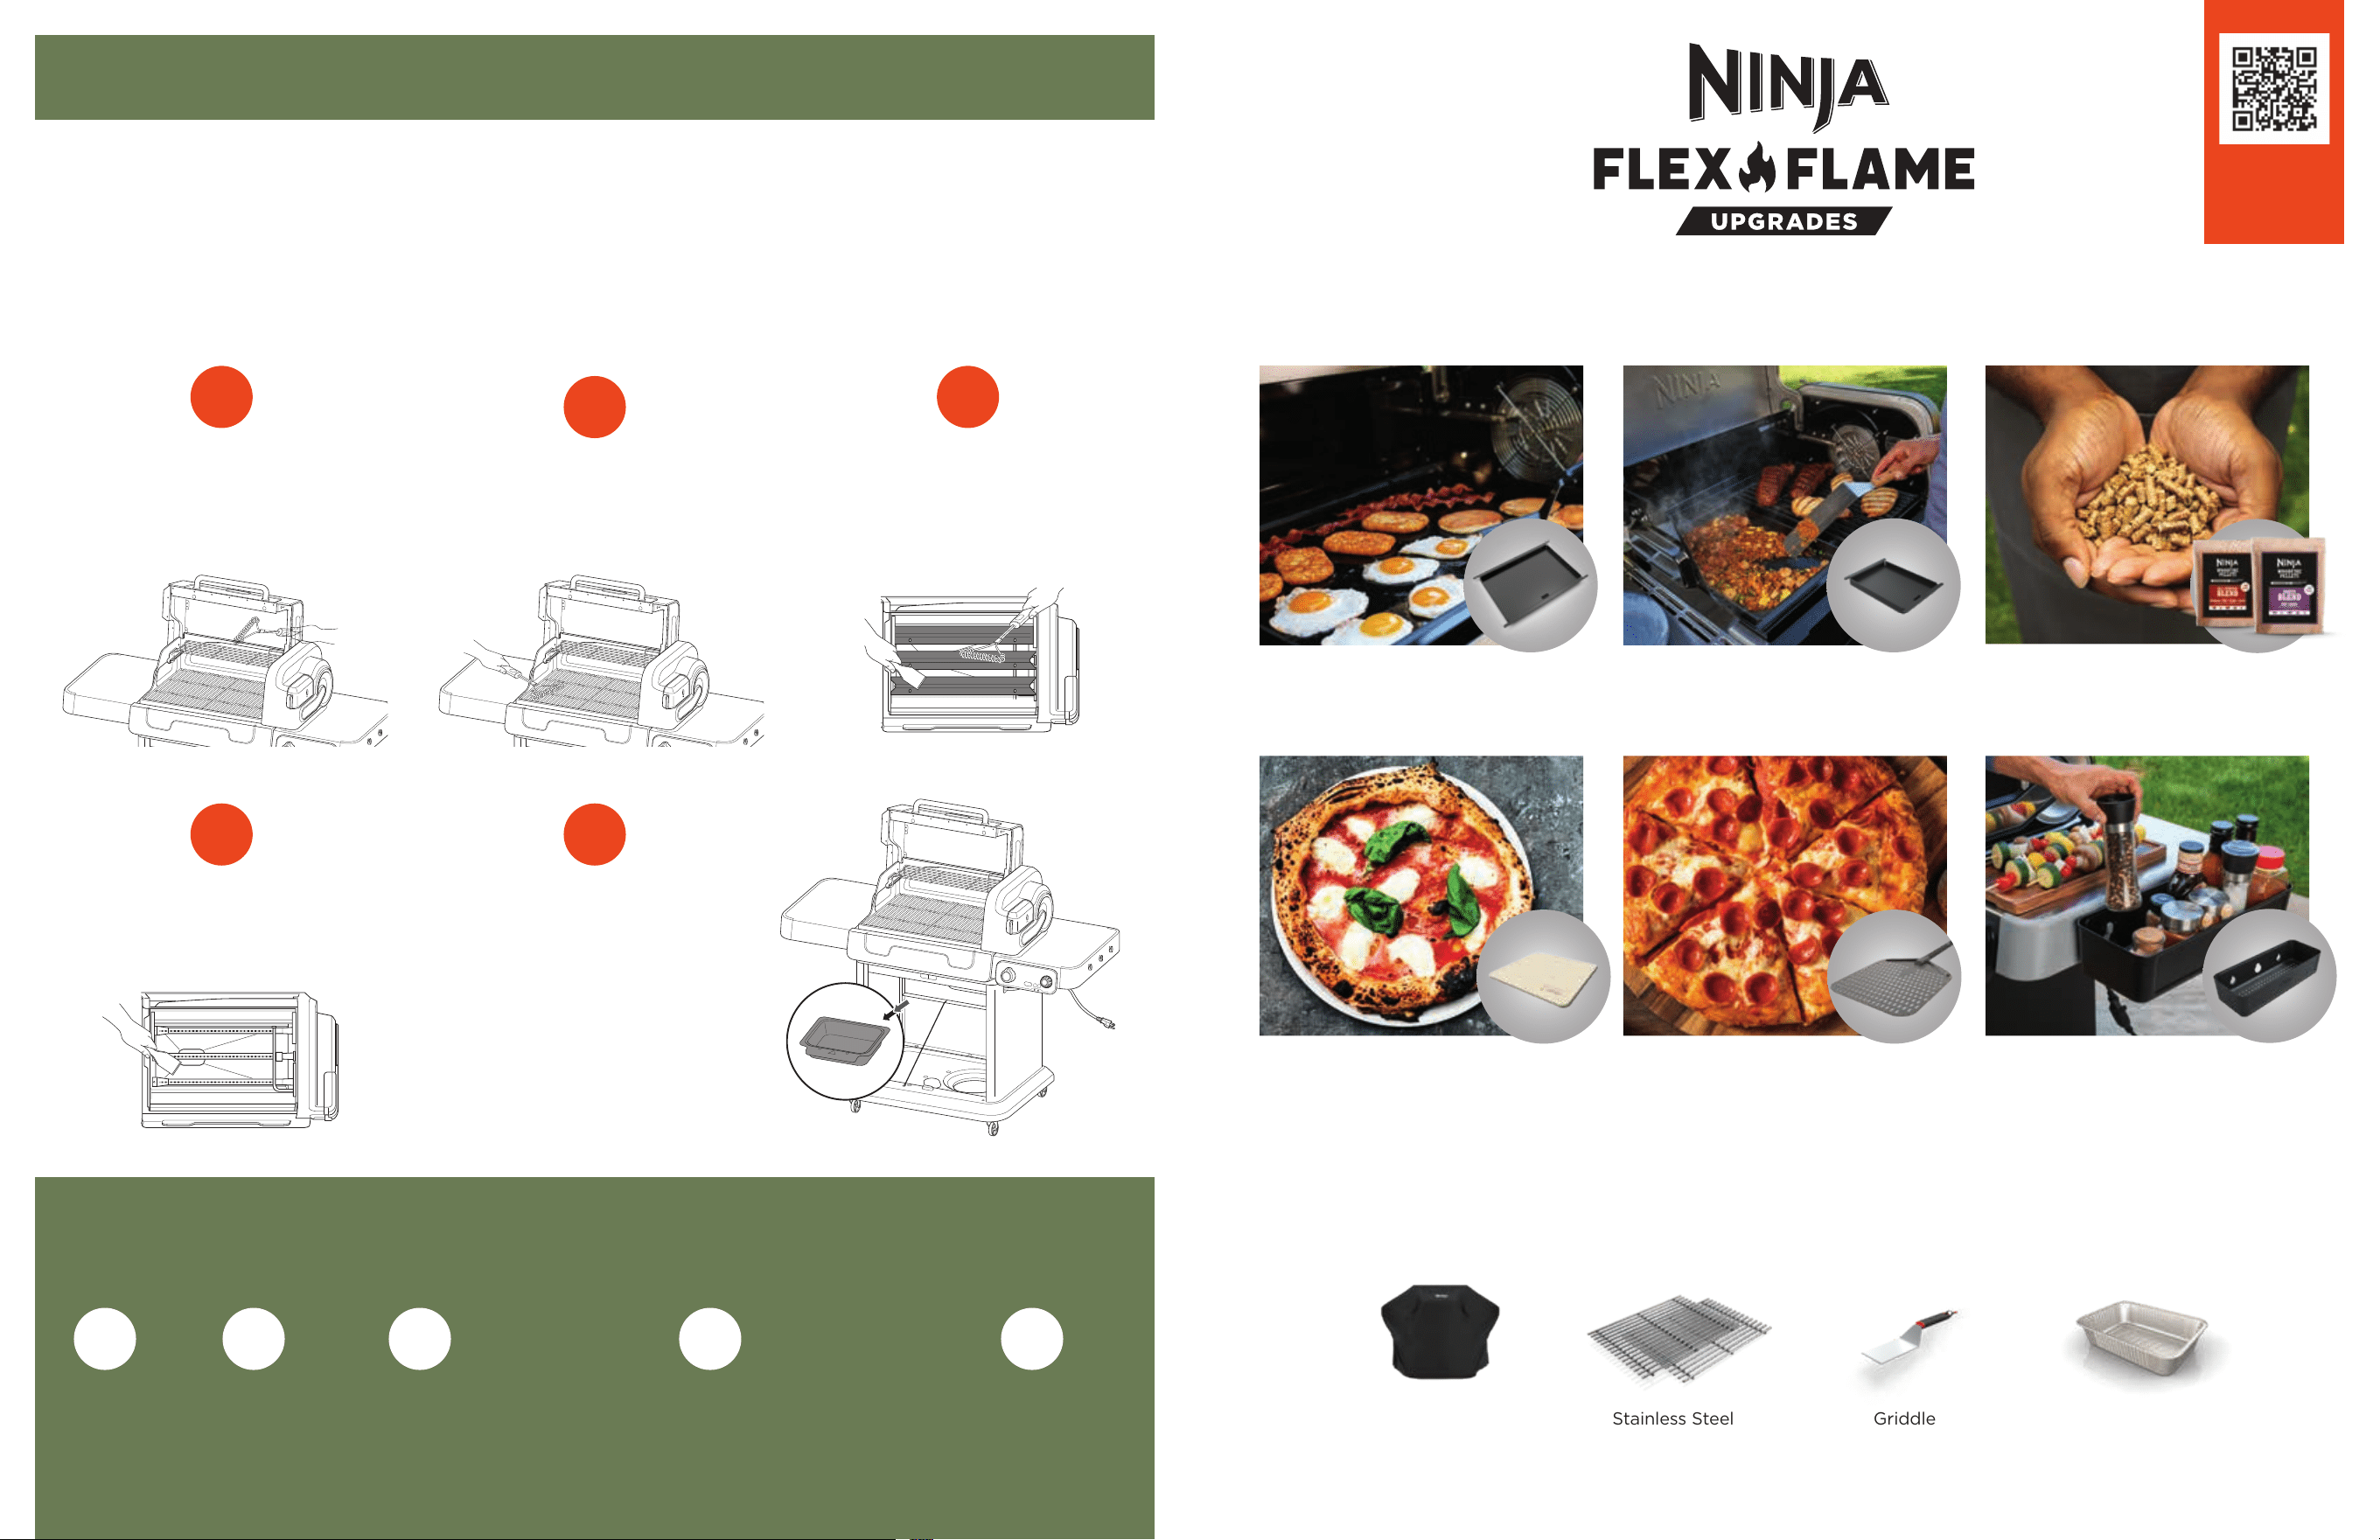
16" Artisan
Pizza Stone
16" Perforated
Pizza Peel
Ninja Woodfire
Pellets
ALL UPGRADES & ACCESSORIES SOLD SEPARATELY
SOLD SEPARATELY
COMPLETE YOUR SETUP WITH ACCESSORIES
Premium
Grill Cover
To help minimize flare-ups, we recommend that you thoroughly
clean the grill regularly, especially after every
20 hours of cooking, 12 cooks, or after completing a cook using
the Low & Slow or Bake/Roast functions
1
LID INTERIOR
Use a stainless steel grill brush to
carefully scrape away any coloured
flakes on the inside of the lid. Though
harmless, we recommend cleaning them
to avoid flakes falling into food.
.
2
GRILL GRATES
Leave the grates in place. Preheat the
grill, use a stainless-steel grill brush to
clean o any residue on the grates from
your previous cook.
3
FLAME TAMERS
Remove the grill grates and set aside.
Use a plastic scraper to clean any
residue/debris from the flame tamers.
If necessary, a stainless-steel grill brush
may also be used.
IF GREASE FIRE OCCURS,
DO NOT POUR WATER ON YOUR GRILL
1
TURN
BURNER
DIAL TO
OFF.
2
UNPLUG
GRILL.
3
LEAVE GRILL
LID CLOSED,
WAIT FOR THE
FIRE TO GO
OUT.
4
IF SAFE TO DO SO, SHUT OFF
GAS AT PROPANE TANK, MOVE
THE UNIT AWAY FROM ANY
STRUCTURES, AND DO NOT LEAVE
THE GRILL UNATTENDED.
5
IF THE FIRE IS
UNCONTROLLABLE,
IMMEDIATELY
CALL THE FIRE
BRIGADE.
COMPLETE YOUR COOKING SYSTEM
IMPORTANT: Always ensure gas flow is OFF, Burner dial is in OFF position, and grill is unplugged before cleaning
or maintenance. Always allow grill, accessories, and pellet box to cool before any cleaning or maintenance.
SCAN HERE
to shop
Ninja FlexFlame
Upgrades
Stainless Steel
Grill Grates
Grease Tray
Liners
Griddle
Spatula
13Questions? ninjakitchen.co.uk
Storage
Caddy
Premium
Full Griddle
Premium
Half Griddle
4
GREASE FUNNEL
Brush or scrape debris into the
grease tray with a stainless-steel grill
brush or scraper. Be careful not to
scratch the funnel.
5
GREASE TRAY
Carefully remove the grease tray after
it has cooled completely, and safely
discard contents after each use.
Hand-wash grease tray in warm, soapy
water. Grease tray liners are available
for purchase for hassle-free cleanup.
After rain or snow, always check the
grease tray and dump out any water
or other contents.
15Questions? ninjakitchen.co.uk14
DIRECTIONS
1 Liberally cover ribs on all sides with salt and barbecue seasoning, pressing
to stick and tapping to discard any excess.
2 Fill the smoke box with pellets up to the max fill line. Close box lid.
3 Lift the grill lid and place ribs meat side down in the centre of the grill
grate. Use a brush to gently dab the ribs with the vinegar (don't brush
as you'll knock off the rub), flip over and repeat. Insert the thermometer into
the thickest part of the ribs, centering top to bottom, then close the lid.
4 Follow ignition instructions on unit, then use the function dial to select
LOW/SLOW and the TEMPERATURE CONTROL dial to set temperature
to 120°C. Plug the thermometer into the unit, press the corresponding
probe button, and use the TEMPERATURE CONTROL dial to set the target
temperature to 95°C. Select WOODFIRE FLAVOUR and close the hood
to begin preheating (unit will flash current grill temperature and set grill
temperature until preheated). Unit is preheated when set temperature is
displayed and unit beeps (after approx. 15-20 minutes).
5 To prepare the coleslaw, combine all ingredients in a medium bowl and
set aside.
6 After 45 minutes, open the lid, baste the ribs with vinegar, flip and repeat.
Close lid, cook for another 45 minutes, then repeat the basting
process again.
7 Unit will beep and read DONE when set temperature has been reached,
remove probe, brush ribs with barbecue sauce and continue cooking on
LOW/SLOW at 120°C (please include degrees symbol) for 10 mins or until
the ribs are tender and the barbecue sauce has a glossy lacquered finish.
8 When cooking is complete, let ribs rest for 10 minutes before serving with
chilli-lime coleslaw.
INGREDIENTS
4 x 225g half rack pork "baby back" ribs
2 teaspoons fine sea salt
50g barbecue seasoning
100-200ml cider vinegar, for basting
150-200ml barbecue sauce
CHILLI-LIME COLESLAW
100ml full-fat yoghurt
50g mayonnaise
Juice of 1-2 limes
1 small bunch fresh coriander, finely chopped
2 green or red chillies, deseeded, finely chopped
1 x 600g head white or red cabbage (or a mixture),
cored, finely sliced
1 medium carrot, peeled, grated
4 spring onions, trimmed, finely sliced
Sea salt and ground black pepper, as desired
For best results, refer to the Tips and tricks section
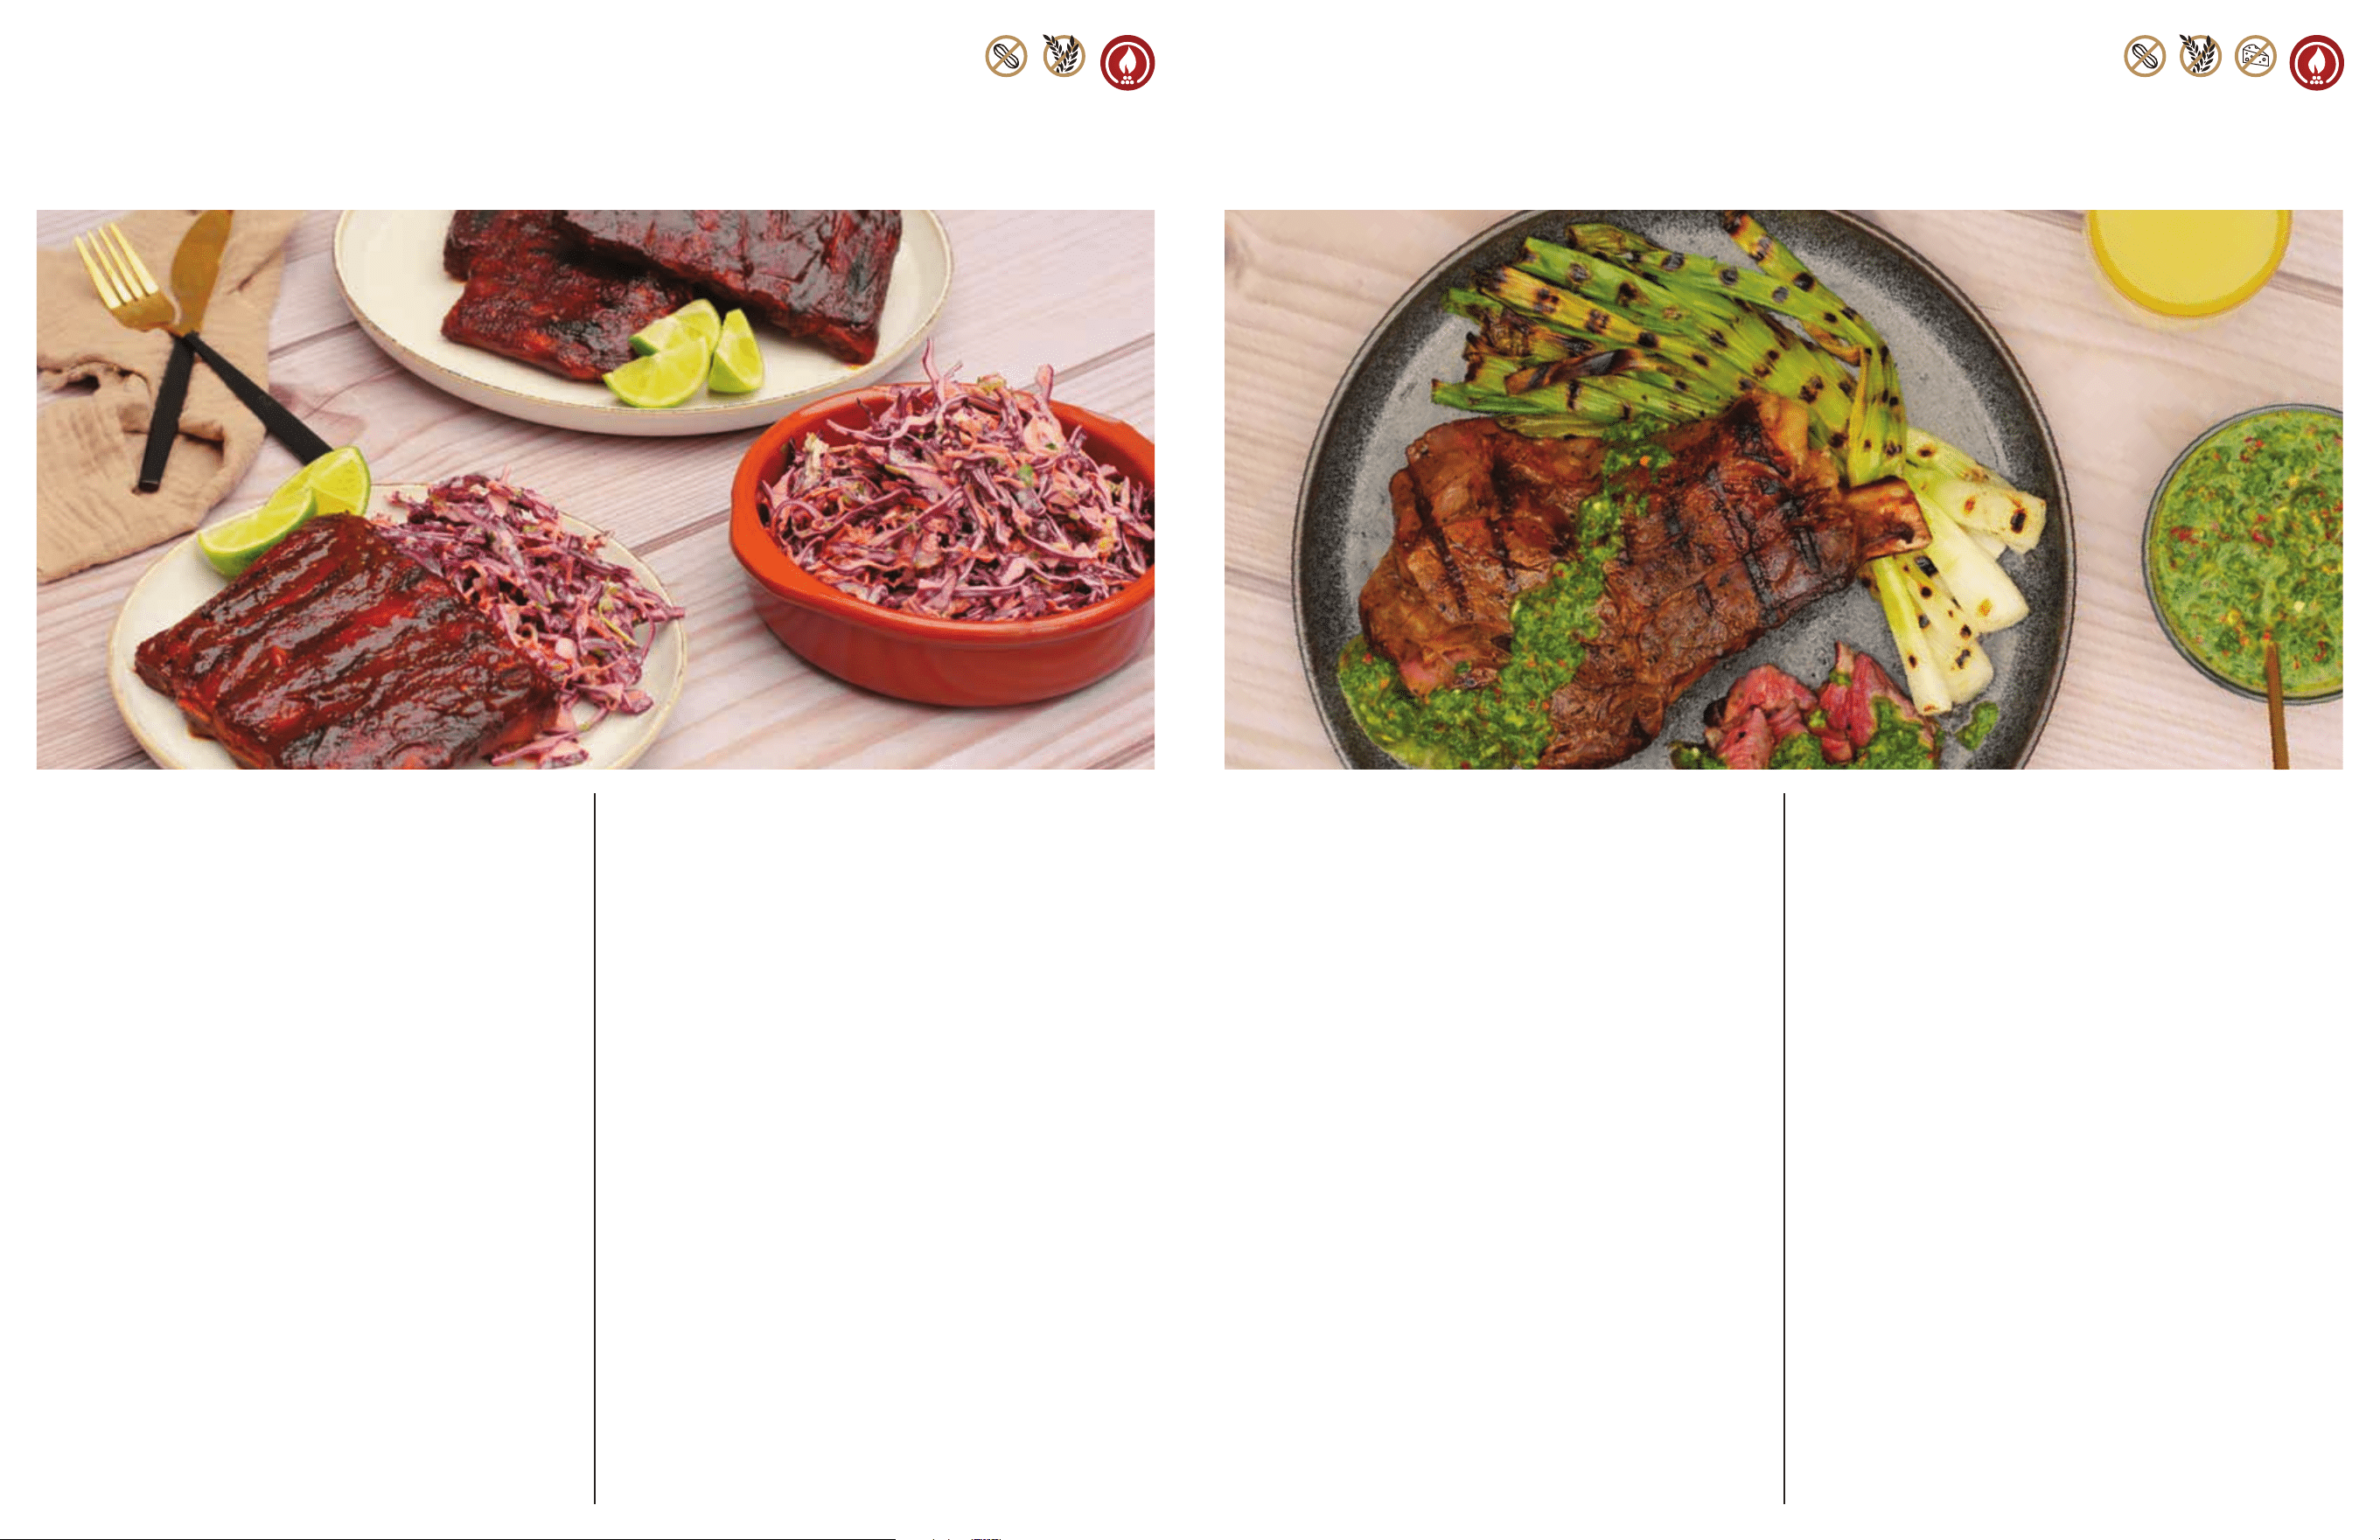
SMOKED BABY BACK RIBS
WITH CHILLI LIME COLESLAW
FUNCTION: LOW/SLOW | EQUIPMENT: GRILL GRATES
PREP: 20 MINUTES, PLUS 10 MINUTES RESTING | PREHEAT: APPROX. 15-20 MINUTES | COOK: 2 HOURS 10 MINUTES | MAKES: 4 SERVINGS
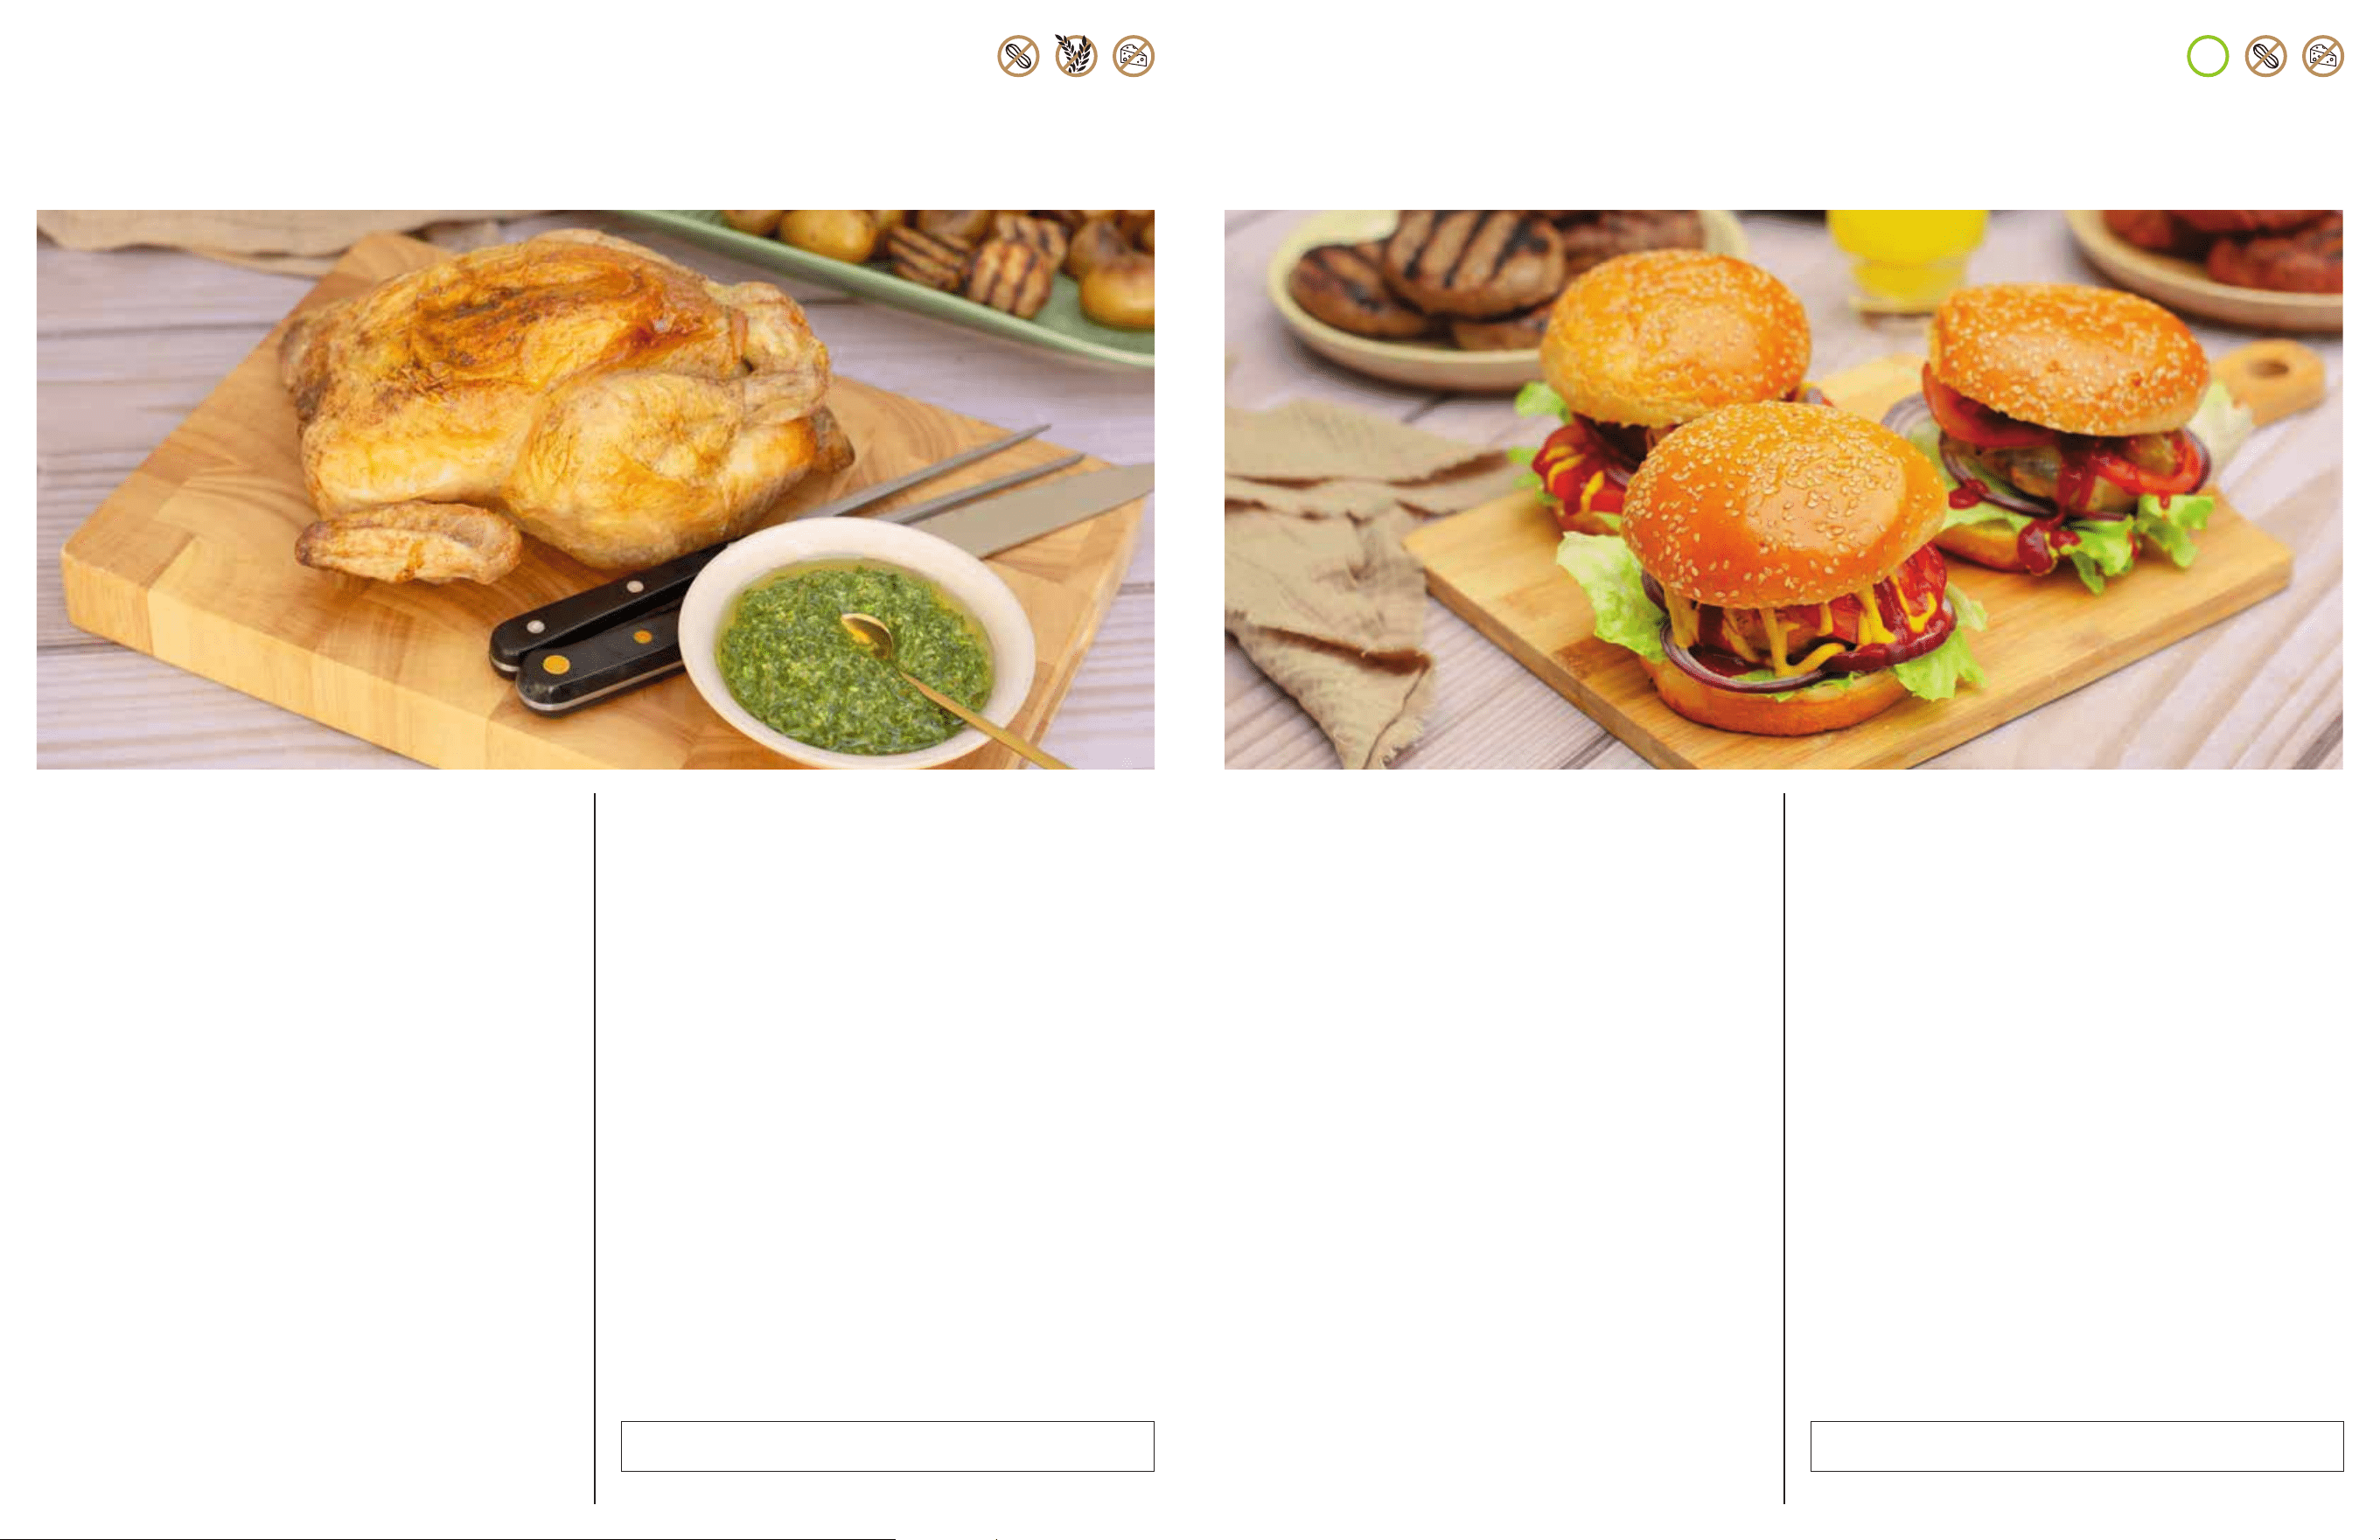
DIRECTIONS
1 Liberally season the côte de boeuf steak on all sides with salt and pepper,
as desired.
2 For the chimichurri sauce, add all ingredients into a medium bowl and mix
until combined. Loosen with 4-6 tablespoons water until a desired, spoonable
consistency is achieved.
3 Fill the smoke box with pellets up to the max fill line. Close the smoke box lid.
4 Follow ignition instructions on unit, then use the function dial to select
LOW/SLOW and the TEMPERATURE CONTROL dial to set temperature to
120°C. Select WOODFIRE FLAVOUR and close the lid to begin preheating
(unit will flash current grill temperature and set grill temperature until
preheated). Unit is preheated when set temperature is displayed and unit
beeps (after approx. 15-20 minutes).
5 When grill is preheated, lift lid and place the côte de boeuf steak on the grill
shelf. Plug the thermometer into the unit and press the corresponding probe
button. Use the TEMPERATURE CONTROL dial to set the target temperature
to 55°C (medium-rare). Insert the thermometer into the thickest part of the
steak, centering from top to bottom. Once the unit is preheated, the screen
will change to monitor the internal temperature the steak. Close the lid.
6 Cook the steaks for 4-5 minutes, the open lid, flip steaks, close lid and allow
to cook until the unit beeps and reads DONE. Remove steak and allow to rest.
7 While steak is resting, follow ignition instructions on unit, then use the function
dial to select GRILL/PIZZA and the TEMPERATURE CONTROL dial to set the
temperature to 315°C. Close the lid to begin preheating (until will flash the
current grill temperature and set grill temperature until preheated). Unit is
preheated when set temperature displays and (after approx. 10-15 minutes).
8 While unit is preheating, season spring onions with salt and pepper and coat
with 1 tablespoon olive oil. When the unit is preheated, lift lid and place the
côte de boeuf steak on the grill grates. Close the lid and cook for 2 minutes.
9 After 2 minutes, flip the côte de boeuf steak and add the spring onions to the
grill. Cook for 2-3 minutes more until the onions are softened and charred, and
the steak has a nice golden crust.
10 When cooking is complete, remove the côte de boeuf steak, slice it and serve
alongside the grilled onions, topping everything with chimichurri sauce.
INGREDIENTS:
800g - 1kg côte de boeuf steak (about 2-3cm thick)
1 bunch spring onions, trimmed and washed
1 tablespoon extra virgin olive oil
Sea salt and ground black pepper, as desired
CHIMICHURRI SAUCE:
1 large bunch flat leaf parsley, finely chopped
1 pack coriander, finely chopped
4 oregano sprigs, leaves picked, finely chopped
3 cloves garlic, finely minced
2 salad onions, trimmed and finely sliced
1 tablespoon crushed red chilli flakes
1 green chilli, finely chopped
6 tablespoons extra virgin oil olive
3 tablespoons white (or red) wine vinegar
1 teaspoon sea salt
DAIRY-FREE
SMOKEY REVERSE-SEARED STEAK WITH
CHIMICHURRI & GRILLED SPRING ONIONS
FUNCTION: LOW/SLOW | EQUIPMENT: GRILL GRATES (FLAT SIDE UP)
PREP: 25 MINUTES | PREHEAT: APPROX. 15-20 MINUTES | COOK: 50 MINUTES | MAKES: 4-6 SERVINGS
GLUTEN-FREE GLUTEN-FREENUT-FREE NUT-FREE
1716
DIRECTIONS
1 For the salsa verde, combine parsley, basil, mint, garlic, capers, red wine
vinegar, extra virgin olive oil and 1 teaspoons salt in medium bowl and stir
to combine. Cover and refrigerate until needed.
2 Follow ignition instructions on unit, then use the function dial to select
ROAST/BAKE and the TEMPERATURE CONTROL dial to set temperature
to 180°C. Close the lid to begin preheating (unit will flash current grill
temperature and set grill temperature until preheated). Unit is preheated
when set temperature is displayed and unit beeps (after approx. 10-15
minutes).
3 Coat the chicken with 2 tablespoons olive oil and then season liberally with
salt and pepper.
4 In a large bowl toss potatoes with the remaining olive oil and then season
with salt and pepper.
5 When grill is preheated, lift lid and place the chicken onto the center of the
grill grates.
6 Plug the thermometer into the grill and insert it into the thickest
part of the chicken breast, centering from top to bottom. Use the
TEMPERATURE CONTROL dial to set the tartget temperature to 75°C.
Close the lid to begin cooking.
7 After 50 minutes, add the potatoes to theupper grill grates. Close the lid
and allow to cook for remaining cook time.
8 When chicken has reached temperature, remove from grill and allow to rest
for 10-15 minutes before slicing and serving with roasted baby potatoes,
salsa verde.
INGREDIENTS
1 large bunch flat leaf parsley, finely chopped
1 large bunch basil, finely chopped
1 large bunch mint, finely chopped
2 cloves garlic, crushed
1 tablespoon capers in vinegar, finely chopped
2 tablespoons red wine vinegar
3 tablespoons extra virgin olive oil
1 teaspoon sea salt
1 whole chicken (about 1.5kg)
3 tablespoons olive oil, divided
Sea salt, as desired
Ground black pepper, as desired
1 kg baby potatoes
NOTE: If you prefer a spatchcocked chicken, decrease cook time by
10-20 minutes.
GLUTEN-FREENUT-FREE DAIRY-FREE
ROASTED CHICKEN WITH ROASTED
BABY POTATOES & SALSA VERDE
FUNCTION: ROAST/BAKE | EQUIPMENT: GRILL GRATES
PREP: 15 MINUTES | PRE HEAT: APPROX. 10-15 MINUTES | COOK: 1 HOUR 10 MINUTES | MAKES: 3-4 SERVINGS
DIRECTIONS
1 Follow ignition instructions on unit, then use the function dial to select
GRILL and the TEMPERATURE CONTROL dial to set temperature to
260°C. Close the lid to begin preheating (unit will flash the current grill
temperature and set grill temperature until preheated). Unit is preheated
when set temperature is displayed and unit beeps (after approx. 10-15
minutes).
2 Season burgers with salt and pepper on both sides.
3 When grill is preheated, lift lid and place the burgers on the grill grates.
Close lid and cook for 10 to 12 minutes, flipping halfway through. (You
will need to set an external timer to track cook time). Use an external
thermometer to ensure desired doneness is achieved. If certain burgers
have reached desired doneness before others, move them to the top rack
to keep warm. If desired, top burgers with cheese and place halved buns
directly on the grill grates. Close lid and let cheese melt and buns toast
for 1 to 2 minutes.
4 When cooking is complete, remove burgers and top as desired.
INGREDIENTS
4 x 113g premade fresh beef burgers,
1-2cm thick
4 x 113g premade fresh lamb
burgers, 1-2cm thick
Sea salt and ground black pepper,
as desired
4 x 113g fresh plant-based
burgers, 1-2cm thick
12 slices cheese of choice (optional)
12 burger buns
TOPPINGS (Optional)
Tomato, sliced
Red onion, peeled,
thinly sliced
Iceberg lettuce
Pickles
Ketchup, yellow mustard and/or
mayonnaise
TIP: Reduce servings as desired and keep an eye on burgers for desired
doneness.
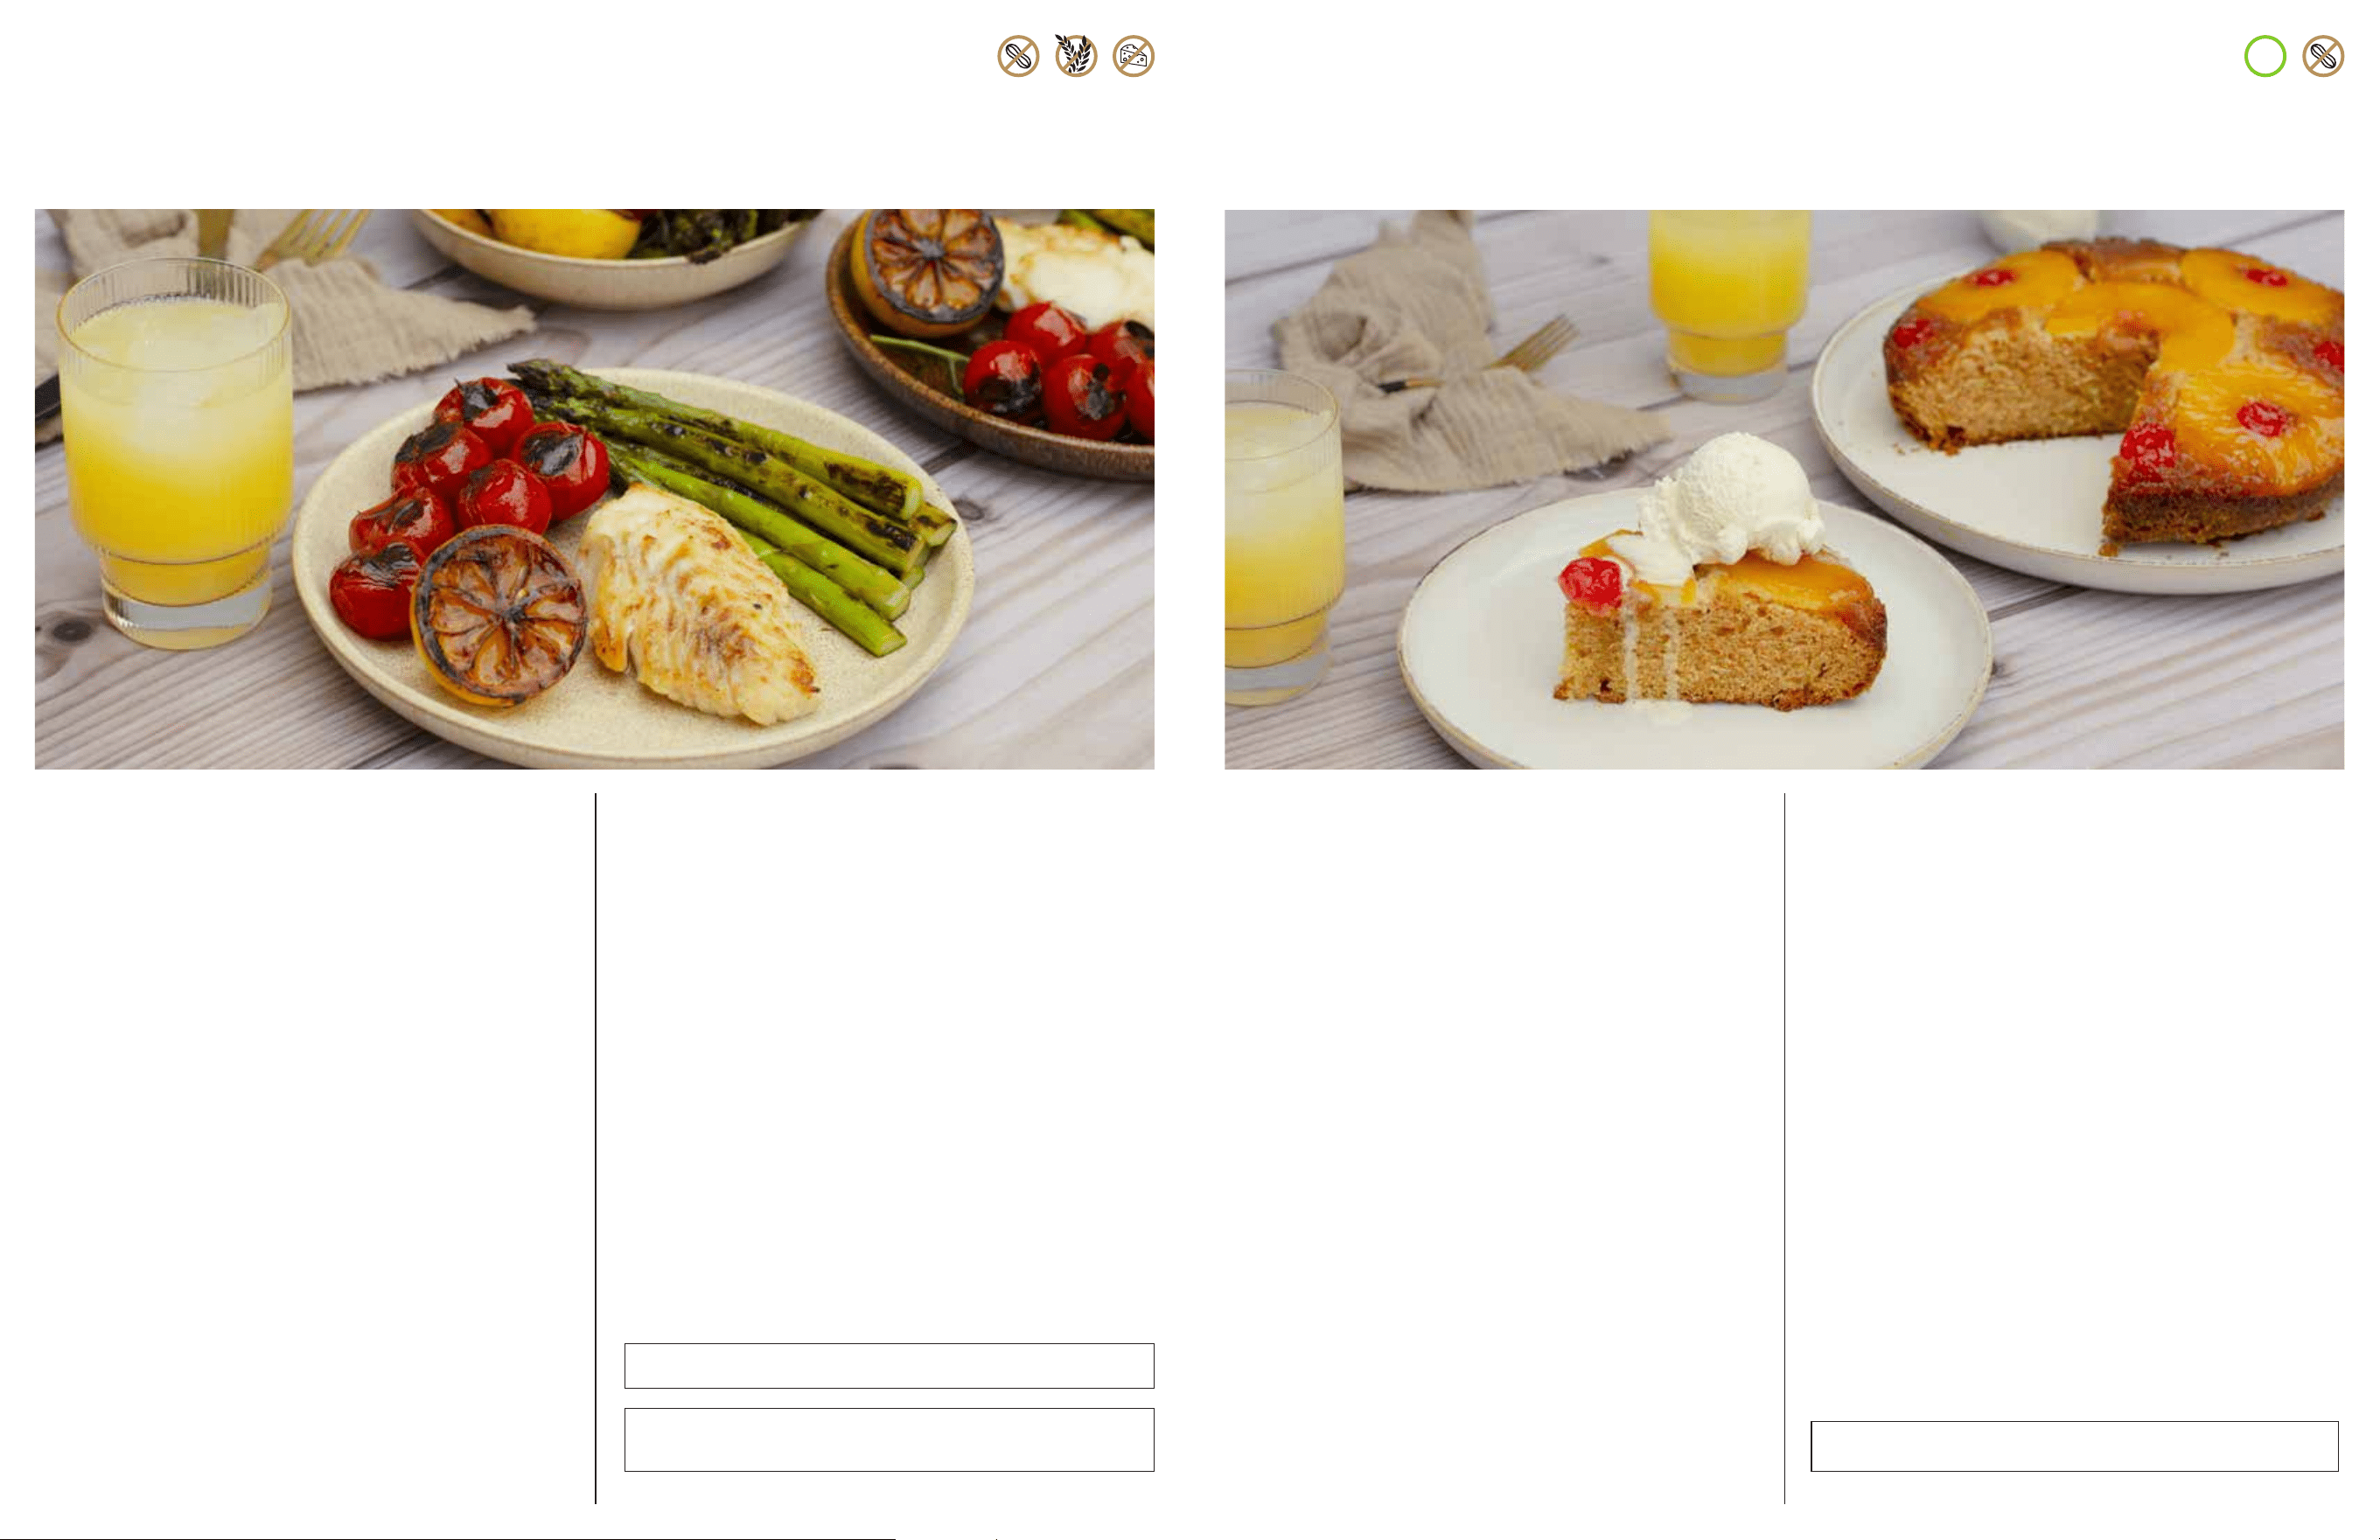
VEGETARIAN
V
DAIRY-FREE
GRILLED BURGER TRIO
FUNCTION: GRILL | EQUIPMENT: GRILL GRATES
PREP: 5 MINUTES | PREHEAT: APPROX. 10-15 MINUTES | PREHEAT: 10-15 MINUTES | COOK: APPROX 10-14 MINUTES | MAKES: 12 SERVINGS
NUT-FREE
Questions? ninjakitchen.co.uk
19Questions? ninjakitchen.co.uk18
DIRECTIONS
1 On a plate or in a shallow baking dish, combine 2 tablespoons olive oil,
garlic, lemon zest, salt and pepper and evenly coat cod fillets in the
mixture.
2 In a separate medium bowl, toss the asparagus and tomatoes with
remaining oil and season with salt and pepper.
3 Follow ignition instructions on unit, then use the function dial to select
2 ZONE GRILL and the TEMPERATURE CONTROL dial to set temperature
to 190°C. Close the lid to begin preheating (unit will flash the current grill
temperature and set grill temperature until preheated). Unit is preheated
when set temperature is displayed and unit beeps (after approx. 10-15
minutes).
4 When grill is preheated, lift the lid, and place the cod (skin-side down),
asparagus, and lemons flesh side down across the front two gill grates
and close the lid.
5 After 5 minutes, lift the lid and gently flip the fish. Place tomatoes on
front two grill grates, turn the asparagus and move to the back burner to
finish cooking. Flip lemons to see if they have desired level of char, allow
them to continue cooking on front burners or move to the back burner to
keep warm.
6 Close lid and allow fish and tomatoes to cook for another 5 minutes,
using an instead read thermometer check to see if fish has reached
desired level of doneness (cooking is complete when internal temperature
of fish is 65°C).
7 When cooking is complete remove cod, tomatoes and grilled asparagus,
squeezing the grilled lemon over top to serve.
INGREDIENTS
3 tablespoons olive oil, divided
2 teaspoons crushed garlic
2 teaspoons lemon zest
Sea salt and ground black pepper, as desired
4 fresh cod loin fillets, 130g each
300g cherry tomatoes, on the vine
500g asparagus, trimmed
2 lemons, cut in half
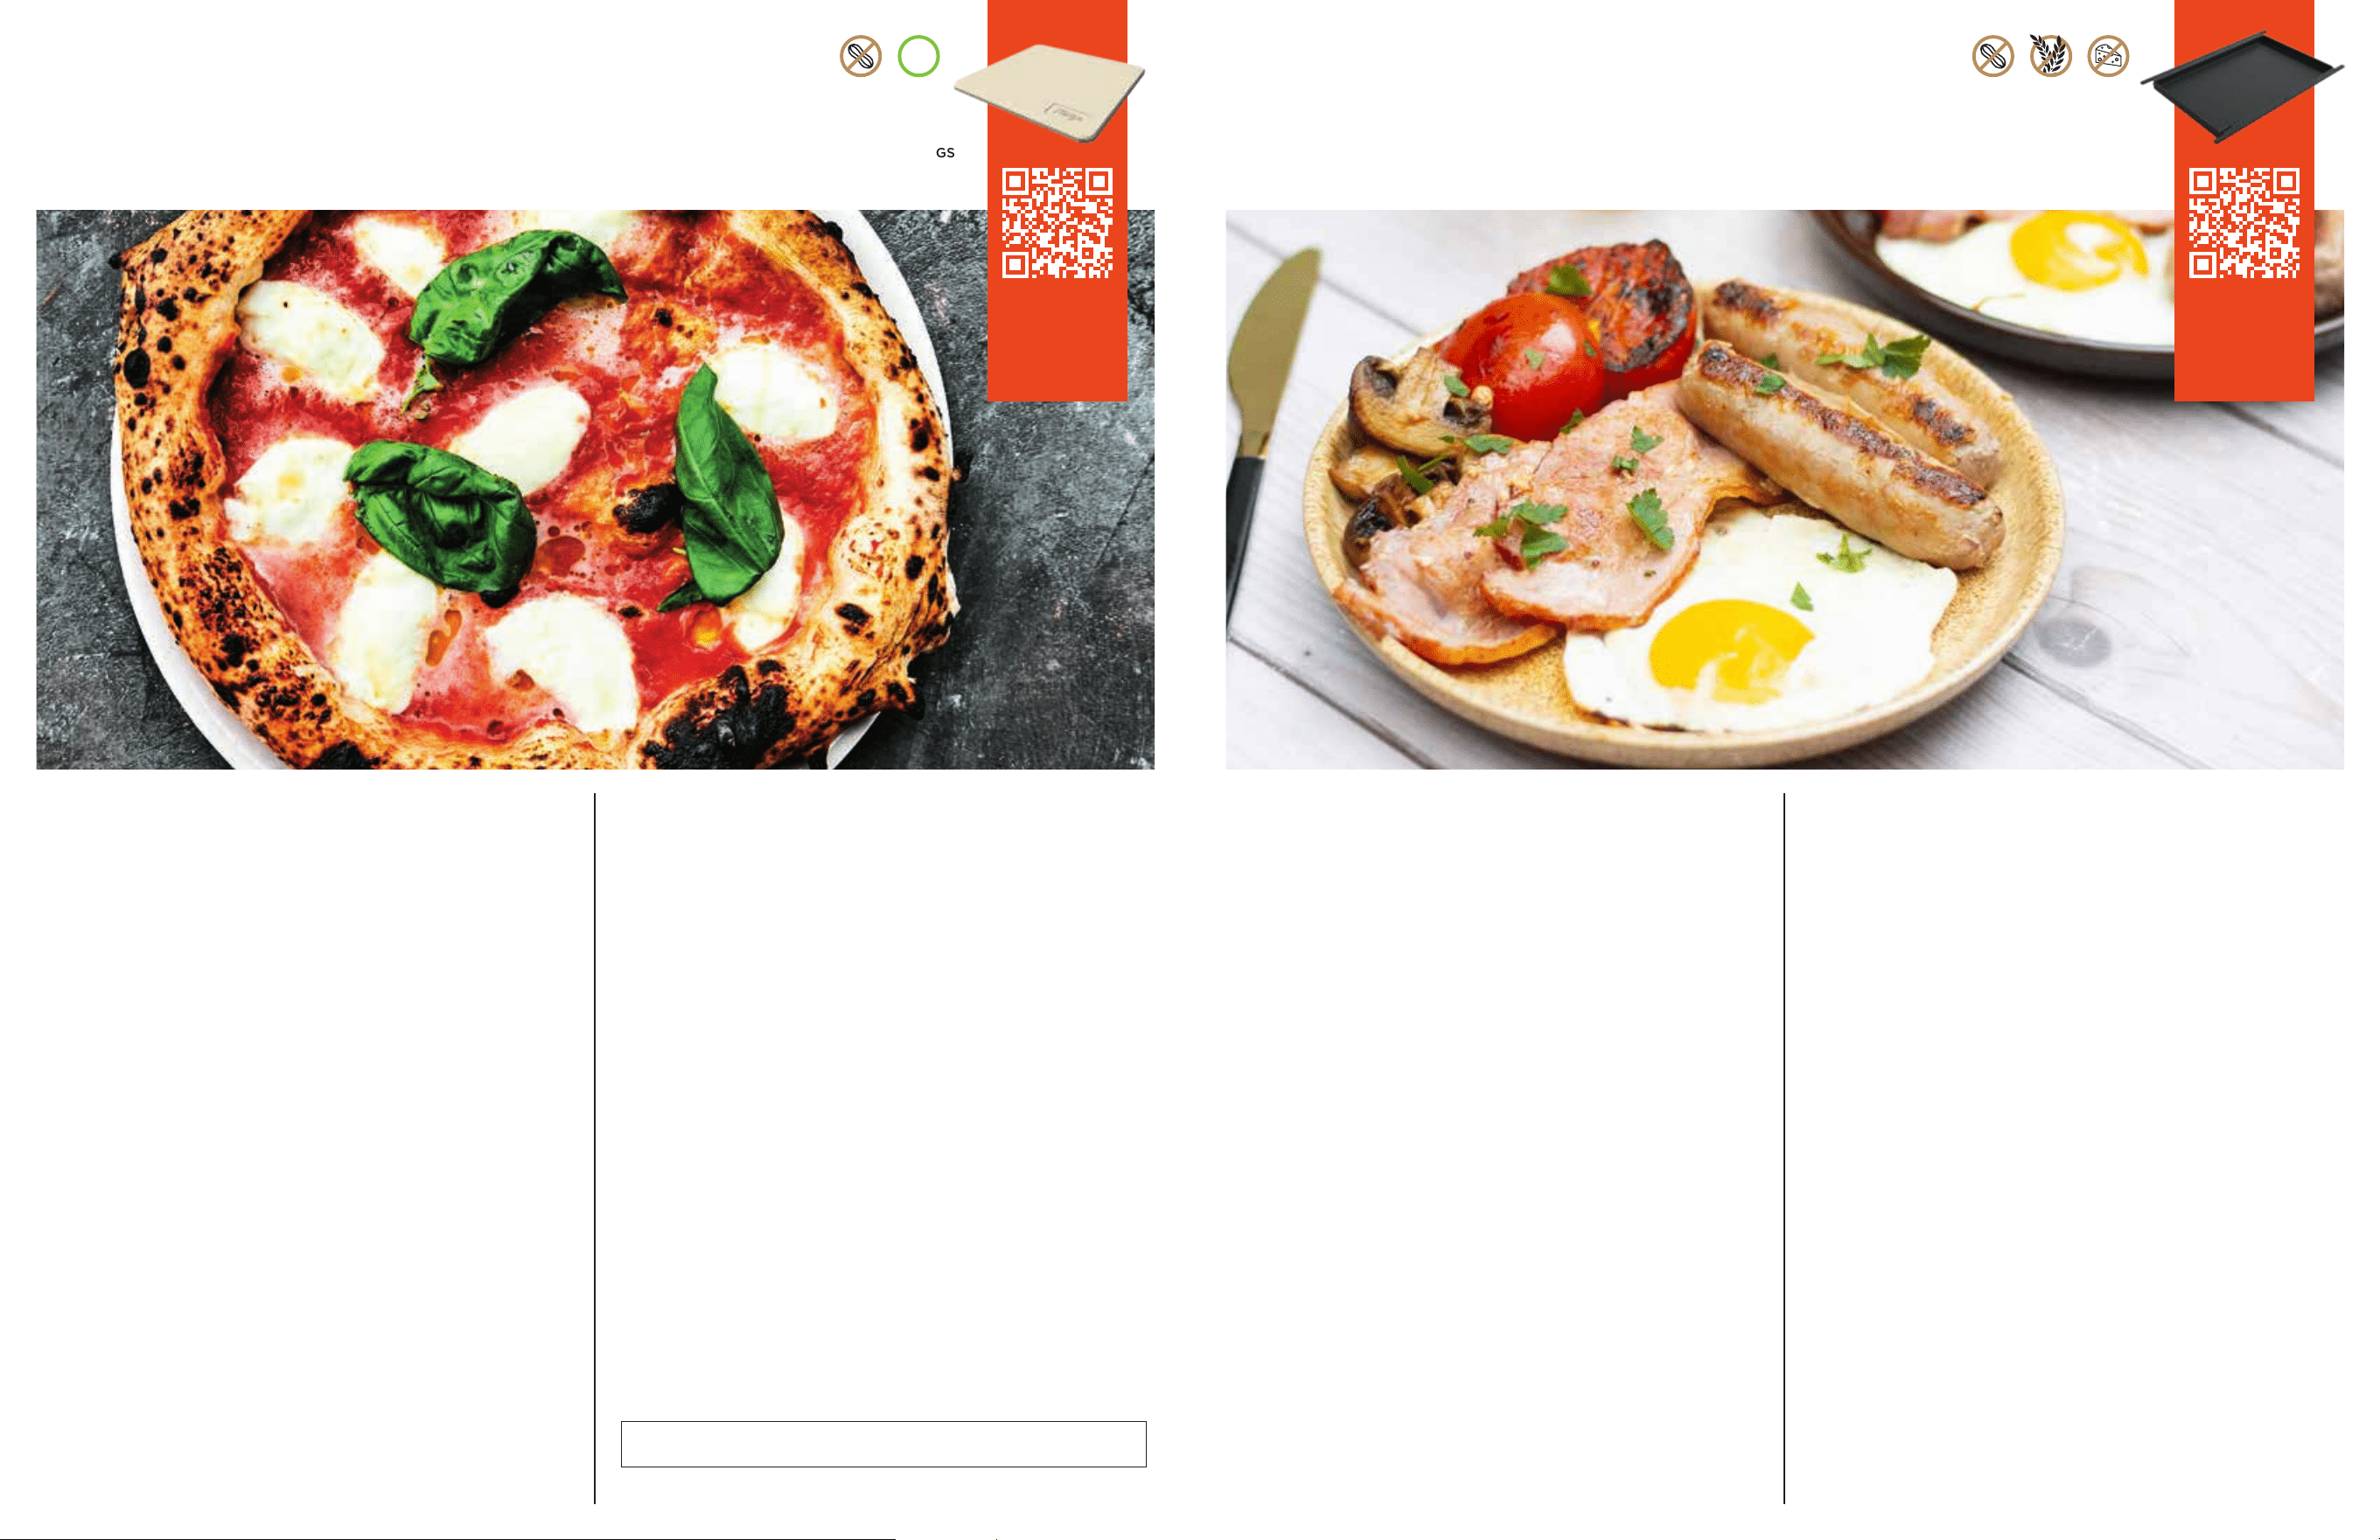
COD WITH CHERRY TOMATOES,
CHARRED CITRUS & ASPARAGUS
FUNCTION: 2 ZONE GRILL | EQUIPMENT: GRILL GRATES (FLAT SIDE UP)
PREP: 10 MINUTES | PREHEAT: APPROX. 10-15 MINUTES | COOK: 10 MINUTES | MAKES: 4 SERVINGS
NOTE: For best output use the flat side of the grill plate, and allow to
pre-heat for a minimum of 15 minutes. and use a flat fish slice to gently
turn the fish.
NOTE: If you are unable to find cod, or prefer a different fish, substitute for
another meatier fish such as halibut or salmon.
VEGETARIAN
V
INGREDIENTS
PINEAPPLE TOPPING
50g salted butter, softened,
room temperature, plus extra
for greasing
100g brown sugar
1 tablespoon golden syrup
300-400g fresh or tinned pineapple
chunks or rings, drained (juice
reserved)
8-10 maraschino cherries
(optional)
TO SERVE (Optional)
Warm custard, ice cream,
double cream, whipped cream
DIRECTIONS
1 To prepare the pineapple topping, grease a 20cm loose-bottomed cake
tin with butter and line the base with baking parchment paper. Evenly
coat the bottom and sides of the tin with brown sugar. Dot spoonfuls
of butter over the sugar, then evenly drizzle the golden syrup on top and
cover with pineapple chunks and cherries.
2 Follow ignition instructions on unit, then use the function dial
to select ROAST/BAKE and the TEMPERATURE CONTROL dial
to set temperature to 180°C. Close the lid to begin preheating
(unit will flash the current grill temperature and set grill temperature until
preheated). Unit is preheated when set temperature is displayed and unit
beeps (after approx. 10-15 minutes).
3 To prepare the cake mix, in a small bowl combine the flour, baking
powder and bicarbonate of soda. Using electric beaters, in a large bowl
cream the butter, caster sugar and brown sugar until light and fluffy,
about 3 to 4 minutes. One at a time, beat the eggs. If the mixture starts to
split, add a little flour. Mix in the pineapple juice (or milk), vanilla and the
rest of the dry ingredients until combined.
4 Pour the cake mix over the pineapple and smooth the top. Line a baking
tray with aluminium foil and place the cake tin on top.
5 When grill is preheated, lift lid and place the cake into the centre of the
grill. Close the lid and bake for 35 to 45 minutes. (You will need to set an
external timer to track cook time).
6 When baking is complete, remove cake tin and set aside to cool for 10
minutes before inverting onto a lipped cake stand or plate. Serve warm
with custard, ice cream or pouring cream or cooled with whipped cream.
CAKE MIX
150g plain flour
2 teaspoons baking powder
¼ teaspoon bicarbonate of soda
100g salted butter, softened,
room temperature
100g caster sugar
25g brown sugar
2 eggs
6 tablespoons reserved pineapple
juice or milk
1 teaspoon vanilla extract
NOTE: Be careful when inverting cake onto a plate or stand as the melted
sugar will be hot.
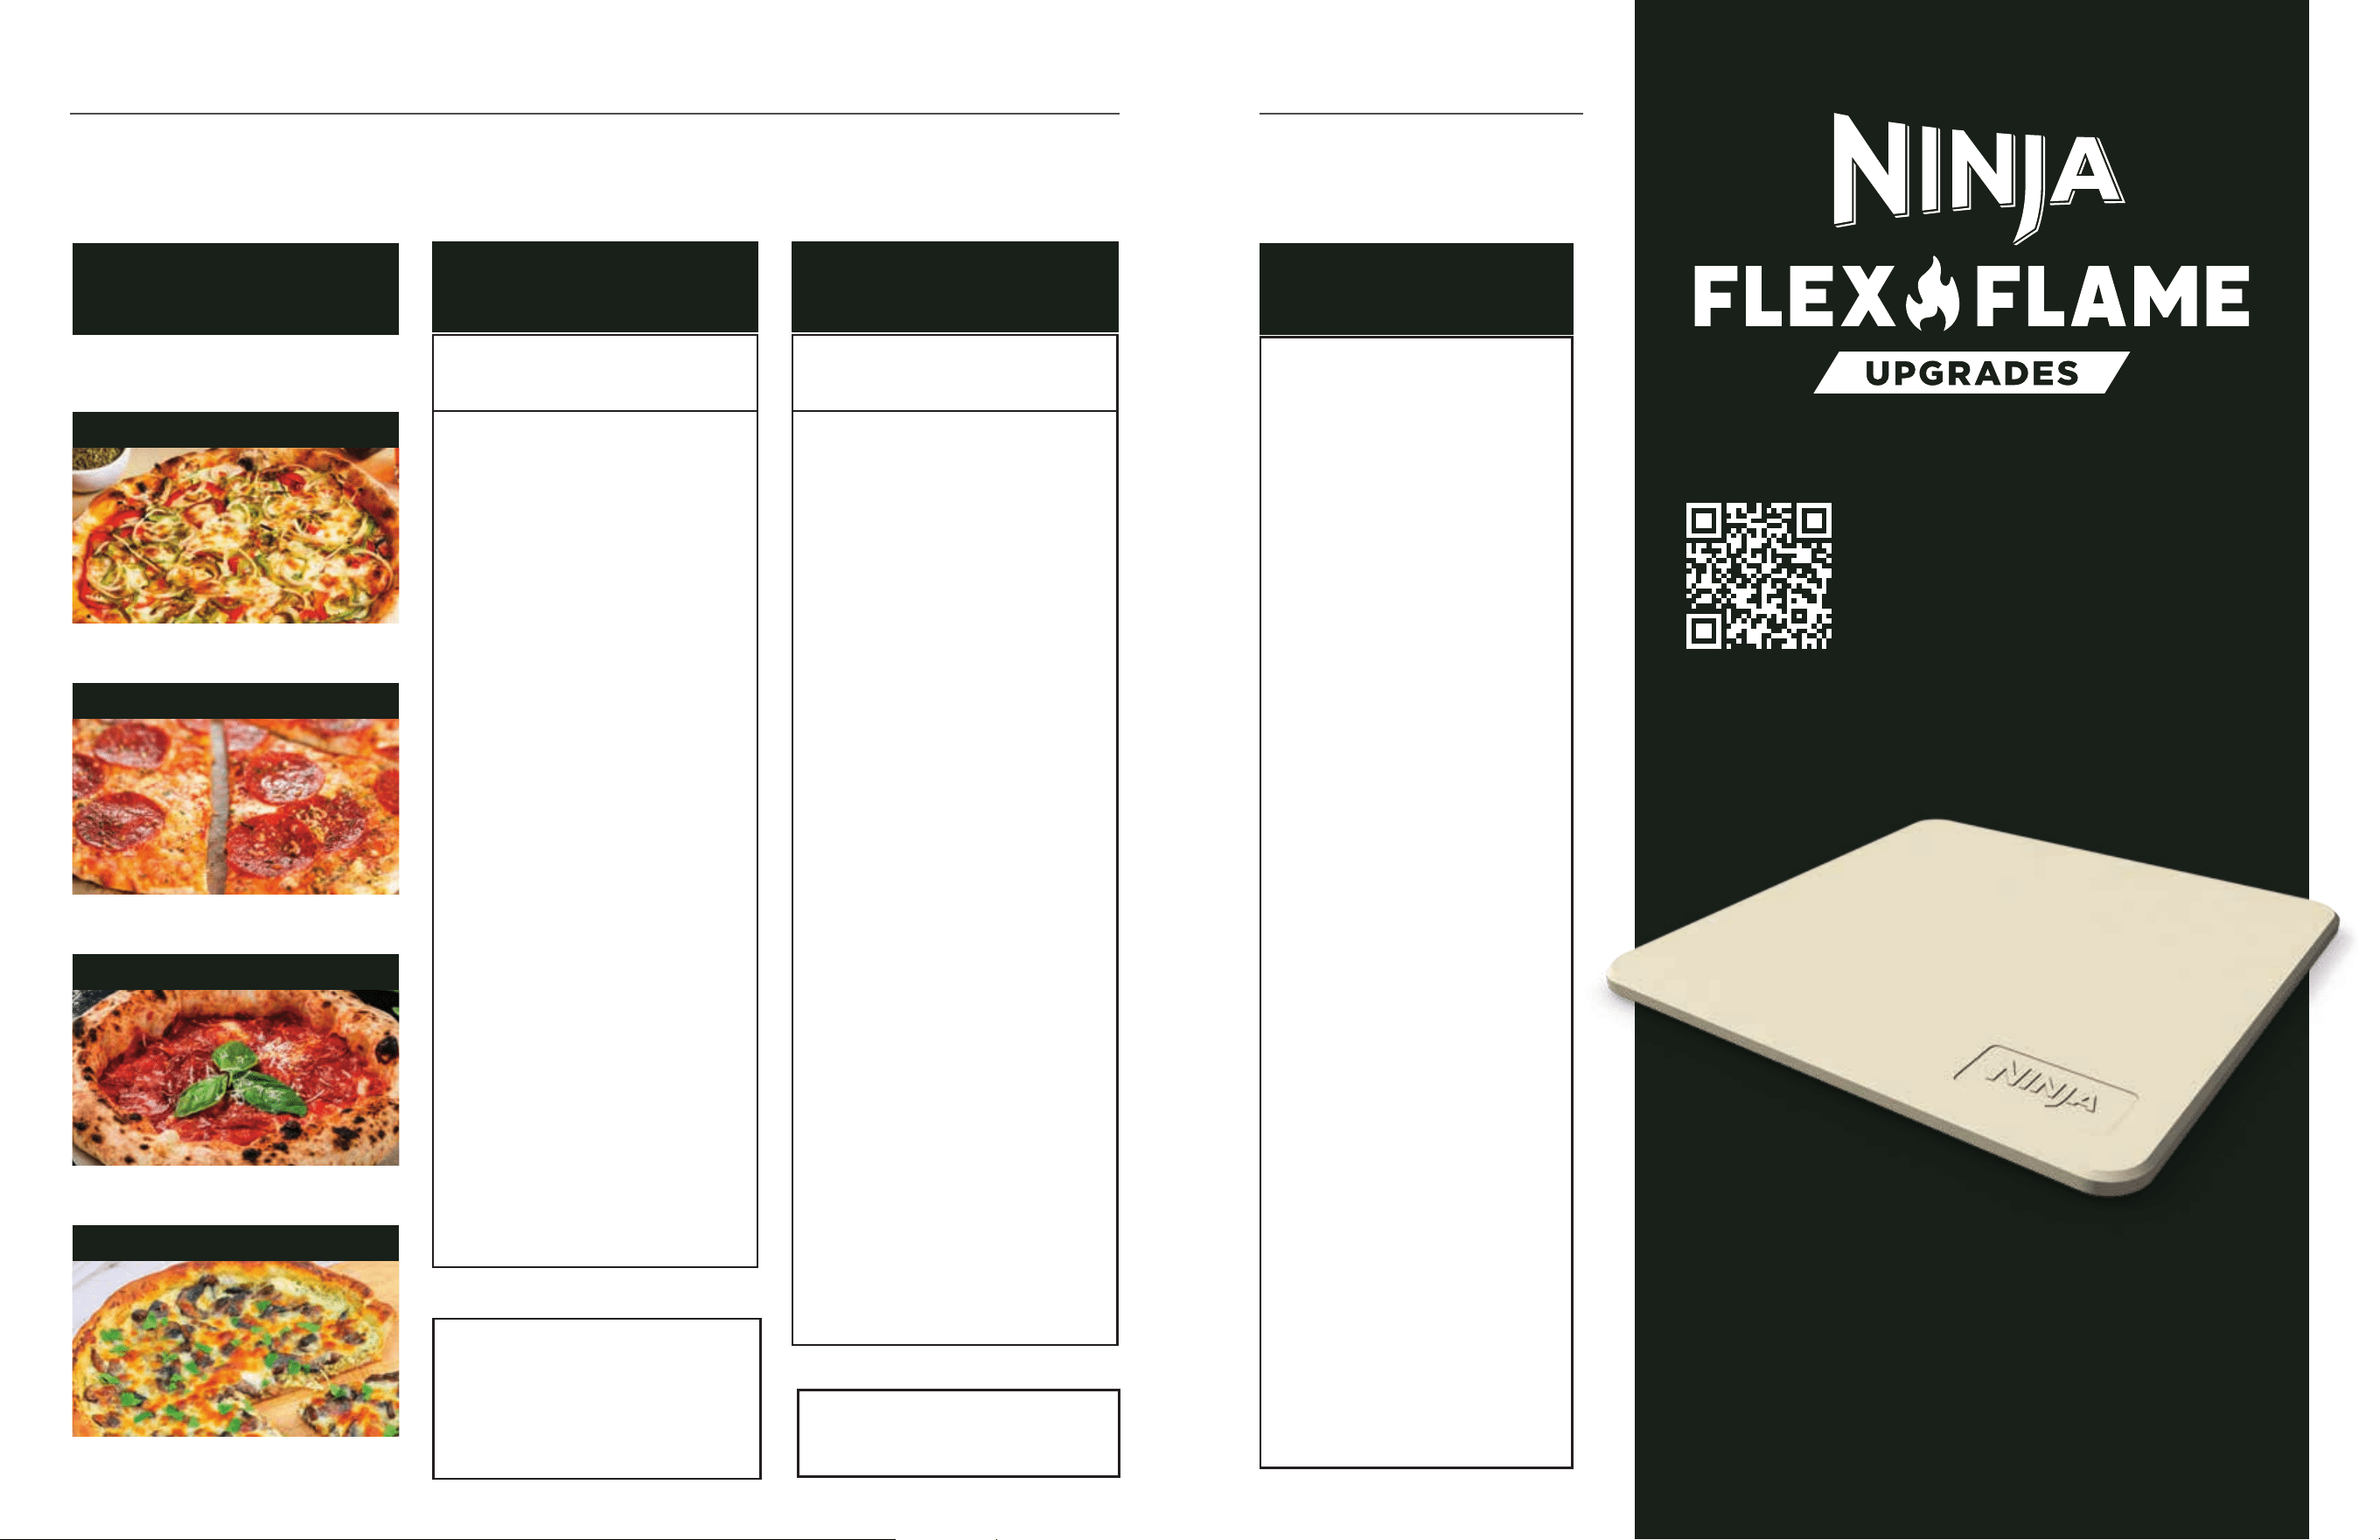
PINEAPPLE UPSIDE-DOWN CAKE
FUNCTION: ROAST/BAKE | EQUIPMENT: GRILL GRATES, 20CM CAKE TIN, PARCHMENT PAPER, BAKE TRAY, ALUMINIUM FOIL
PREP: 25 MINUTES, PLUS 10 MINUTES COOLING | PREHEAT: APPROX 10-15 MINUTES | COOK: 35-45 MINUTES | MAKES: 8-10 SERVINGS
NUT-FREEGLUTEN-FREENUT-FREE DAIRY-FREE
21Questions? ninjakitchen.co.uk20
DIRECTIONS
1 Place Pizza Stone on top of grill grates. Follow ignition instructions
on unit, then use the function dial to select GRILL/PIZZA and the
TEMPERATURE CONTROL dial to set the temperature to 315°C. Close lid
to begin preheating (unit will flash current grill temperature and set grill
temperature until preheated). Unit is preheated when set temperature
displays and unit beeps (after approx. 10–15 minutes).
2 When grill is preheated, keep lid closed and allow pizza stone to preheat
for an additional 10 minutes.
3 Meanwhile, on a lightly floured work surface, stretch dough and toss by
hand into a 35 ½cm circle.
4 Evenly cover dough with pizza sauce, leaving a 1 ½cm edge for the crust.
Evenly top with sliced mozzarella.
5 When pizza stone is preheated, slide a floured pizza peel under the pizza,
open lid, and slide pizza onto the stone. Close lid and cook for 5 to 8
minutes or until desired doneness is achieved.
6 When cooking is complete, remove pizza with peel and allow to rest for 5
minutes before topping with basil, slicing and serving.
DIRECTIONS
1 Install Flat Plate Griddle in unit. Follow ignition instructions on unit, then
use the function dial to select ROAST/BAKE and the TEMPERATURE
CONTROL dial to set the temperature to 220°C. Close lid to begin
preheating (unit will flash current grill temperature and set grill
temperature until preheated). Unit is preheated when set temperature
displays and unit beeps (after approx. 10–15 minutes).
2 When griddle is preheated, lift the lid, evenly add 1 tablespoon vegetable
oil to the griddle and evenly place the bacon and chipolatas evenly
spaced apart, then close the lid. Cook for 3 minutes, flip over, and cook
for a further 2-3 minutes. Transfer bacon to the upper rack to keep warm
and continue cooking the chipolatas for an additional 3-5 minutes, then
transfer to the rack with the bacon.
3 Brush both sides of the mushrooms and tomatoes with remaining
vegetable oil, and season with salt and pepper, as desired. Add the
vegetables to the griddle and cook for 6-8 minutes, flipping halfway
through. Then transfer to the rack to keep warm.
4 Place buttered bread onto griddle, and allow to cook for 3 minutes, flip
over and cook for a further 3 minutes. Remove and set aside.
5 Crack 4 large eggs on the griddle and allow to cook for 2-3 minutes
or until desired doneness is achieved, flip halfway through cooking if
desired.
6 When cooking is complete, breakfast is served.
INGREDIENTS
400g store-bought pizza dough, room temperature
60g pizza sauce
115g fresh mozzarella cheese, sliced
3–4 large fresh basil leaves, torn
INGREDIENTS
2 tablespoon vegetable oil, divided
8 slices of streaky bacon
8 chipolatas of choice
Sea salt and ground black pepper, as desired
4 large eggs
4 large Portobello mushrooms, stalk removed
4 large tomatoes, cut in half diagonally
4 large slices of bread, buttered on both sides
Ketchup and brown sauce, as desired
ARTISAN-STYLE MARGHERITA PIZZA
FUNCTION: GRILL/PIZZA | EQUIPMENT: GRILL GRATES, PIZZA STONE*
PREP: 10 MINUTES | PREHEAT: APPROX. 10-15 MINUTES | COOK: APPROX. 5-8 MINUTES | MAKES: 1 PIZZA, APPROX. 4 SERVINGS
PERFECT BREAKFAST
FUNCTION: ROAST/BAKE | EQUIPMENT: FULL FLAT PLATE GRIDDLE*
PREP: 5 MINUTES | PREHEAT: APPROX. 10-15 MINUTES | COOK: APPROX. 25 MINUTES | MAKES: 4 SERVINGS
SCAN HERE
to shop Pizza
Stone and other
Ninja FlexFlame
Upgrades
*
NOTE: See pages 30-31 for additional pizza toppings and styles.
SCAN HERE
to shop Flat
Plate Griddle
and other
Ninja FlexFlame
Upgrades
*
GLUTEN-FREENUT-FREENUT-FREE DAIRY-FREE
VEGETARIAN
V

23Questions? ninjakitchen.co.uk22
CHARTS | GRILL (LID DOWN)
NOTE: When cooking smaller or larger quantities of foods than what is specified in this chart, be mindful that the cook
time will need to be decreased or increased accordingly. Check food regularly with an external instant-read thermometer
and adjust the cook time to achieve desired doneness.
TIP: Want to add smoke? Reference the Ninja Woodfire
Flavour Technology interaction section.
INGREDIENT AMOUNT
PREPARATION
COOK TEMPERATURE APPROX. COOK TIME INTERACTION
POULTRY
Chicken breasts, boneless 2–8 (130-160g each) Season as desired 240°C 10–15 mins Flip halfway through cooking
Chicken drumsticks 2-10 (150g each) Season as desired 240°C 15–20 mins Flip halfway through cooking
Chicken leg 2–6 (250g each) Season as desired 240°C 20-30 mins Flip often
Chicken thighs, boneless 2–10 (120-140g each) Season as desired 240°C 10-15 mins Flip halfway through cooking
Chicken thighs, bone in, skin-on 2–10 (150-200g each) Season as desired 240°C 10-20 mins Flip halfway through cooking
Chicken wings 8–20 (approx. 500-1kg total) Season as desired 240°C 15-20 mins Flip halfway through cooking
BEEF
Burgers
2-12 burgers (approx. 113g each,
approx. 12cm in diameter)
Season as desired 260°C 6-15 mins Flip halfway through cooking
Cote de boeuf 2-4 800g-1kg Season as desired 260°C 25-40 mins Flip often
Fillet steak 2-8 (200-250g each) Season as desired 260°C 6-20 mins Flip halfway through cooking
Rump steak 2-6 (200-300g each) Season as desired 260°C 5-15 mins Flip halfway through cooking
Ribeye 2–6 (250-350g each) Season as desired 315°C 5-15 mins Flip halfway through cooking
Sirloin steak 2-6 (300-400g each) Season as desired 315°C 5–15 mins Flip halfway through cooking
Tomahawk 1-2 1.2-1.5kg Season as desired 260°C 25-40 mins Flip often
PORK/LAMB
Lamb rack 1-6 (400-500g each) Season as desired 240°C 20-35 mins Flip halfway through cooking
Lamb chops 4-12 (100-150g each) Season as desired 240°C 5-12 mins Flip halfway through cooking
Pork chops, boneless 2-8 (250-300g each) Season as desired 240°C 10–20 mins Flip halfway through cooking
Pork chops, bone in 2–8 (300-400g each) Season as desired 240°C 15-20 mins Flip halfway through cooking
Pork fillet 2-4 (400-500g each) Season as desired 240°C 15-25 mins Flip halfway through cooking
Pork loin chops, boneless 4-8 (120-150g each) Season as desired 240°C 5-10 mins Flip halfway through cooking
Pork ribs 3-4 racks (225-250g each) Season as desired 240°C 10-25 mins Flip often
Back/Streaky bacon 10-20 rashers N /A 240°C 3-6 mins Flip halfway through cooking
Hot dogs 25-35 N/A 315°C 3-5 mins
Cook on upper rack, flip halfway through cooking
Chipolatas 50-60 (30g each) N/A 230°C 5-10 mins Flip halfway through cooking
Sausages 4-24 (60g each) Season as desired 230°C 8-12 mins Flip halfway through cooking
NOTE: Cook times shown are based on cooking with LID DOWN. Cook
times with lid up will vary.

25Questions? ninjakitchen.co.uk24
CHARTS | GRILL (LID DOWN) – CONT'D
NOTE: When cooking smaller or larger quantities of foods than what is specified in this chart, be mindful that the cook
time will need to be decreased or increased accordingly. Check food regularly with an external instant-read thermometer
and adjust the cook time to achieve desired doneness.
INGREDIENT AMOUNT
PREPARATION
COOK TEMPERATURE APPROX. COOK TIME INTERACTION
SEAFOOD
White flaky fish 2–8 fillets (150g each)
Coat lightly with oil, season as desired
(skin-side down)
240°C 5–15 mins Flip halfway through cooking
Salmon, skin on 2–8 fillets (125g each)
Coat lightly with oil, season as desired
(skin-side down)
240°C 5-15 mins Flip halfway through cooking
Scallops 20/30 6–24 (500g-1kg total) Coat lightly with oil, season as desired 240°C 3-8 mins Flip halfway through cooking
Jumbo prawns 6–12 (approx. 500g-1kg total)
Coat lightly with oil, season as desired
(shell on)
240°C 3-4 mins Flip halfway through cooking
Tuna 2–8 (150g-200g each) Coat lightly with oil, season as desired 240°C 5-10 mins Flip halfway through cooking
VEGGIES
Asparagus 1–4 bunches
Trim ends, coat lightly with oil, season
as desired
315°C 3–10 mins Turn every 3 minutes
Peppers 2-8
Cored, cut in quarters, coat with oil,
season as desired
315°C 6-10 mins Flip halfway through cooking
Broccoli 1-4 heads, cut in quarters
Cut in quarters, coat lightly with oil,
season as desired
260°C 10-15 mins Turn every 3 minutes
Carrots 1–10
Peel, trim, coat lightly with oil, season
as desired
315°C 10-15 mins Flip halfway through cooking
Corn on the cob 1–8
Remove husks, coat lightly with oil,
season as desired
315°C 10–20 mins Turn every 3 minutes
Cauliflower 1-2 heads, cut in half Coat lightly with oil, season as desired 260°C 15-25 mins Flip halfway through cooking
Aubergine 1–4
Trim, peel, cut in 1.5cm slices, coat
lightly with oil, season as desired
260°C 10–20 mins Flip halfway through cooking
Onions, white or red 1–4
Trim, peel, cut in 1.5cm slices, coat
lightly with oil, season as desired
315°C 5-15 mins Flip halfway through cooking
Portabello mushrooms 2-10 Coat lightly with oil, season as desired 260°C 8-12 mins Flip halfway through cooking
Courgettes 1–6
Trim, peel, cut in
1
/2-inch slices, coat
lightly with oil, season as desired
315°C 5-12 mins Flip halfway through cooking
PLANT BASED PROTEIN / CHEESE
Halloumi 1-2kg Cut into 1cm pieces, coat lightly with oil 260°C 2-6 mins Flip halfway through cooking
Plant based burger 12-20 (113g each) Coat lightly with oil 260°C 6-10 mins Flip halfway through cooking
Plant based sausage 12-20 (113g each) Coat lightly with oil 260°C 4-6 mins Flip halfway through cooking
Tofu 1kg
Cut into 1 cm pieces, coat lightly with
oil, season as desired
260°C 5-10 mins Flip halfway through cooking
TIP: Want to add smoke? Reference the Ninja Woodfire
Flavour Technology interaction section.
NOTE: Cook times shown are based on cooking with LID DOWN. Cook
times with lid up will vary.

27Questions? ninjakitchen.co.uk26
CHARTS | LOW & SLOW (LID DOWN)
NOTE: When cooking smaller or larger quantities of foods than what is specified in this chart, be mindful that the cook
time will need to be decreased or increased accordingly. Check food regularly with an external instant-read thermometer
and adjust the cook time to achieve desired doneness.
NOTE: For optimal cooking results, keep lid closed while cooking and limit interaction to ensure grill temperature is
maintained.
NOTE: See page 9 for TIPS & TRICKS when smoking.
INGREDIENT AMOUNT
PREPARATION
COOK TEMPERATURE APPROX. COOK TIME TARGET INTERNAL TEMPERATURE
BEEF
Brisket 500g-3kg
Season as desired/flip
halfway through cooking
120⁰C 5–6 hrs 95⁰C
Short ribs, bone in 500g-2kg Season as desired 120⁰C 4–5 hrs 95⁰C
PORK
Ribs, baby back 1–6 racks (225-250g each) Season as desired 120⁰C 2–4 hrs 87-95⁰C
Pork belly 1-4kg Season as desired 120⁰C 2-4 hrs 95⁰C
Shoulder, boneless 1-4kg Season as desired 120⁰C 5-7 hrs 95⁰C
Pork fillet 2-4 400-500g Season as desired 120⁰C 30 mins–1½ hrs 95⁰C
POULTRY
Chicken thighs, boneless or bone in 2-10 (120-140g each) Season as desired 120⁰C 1–1½ hrs 75⁰C
Chicken, whole 3–4 (1.5-2kg each) Season as desired 120⁰C 3–4 hrs 95⁰C
Duck breasts 6–8 (170-200g each)
Season as desired, skin
side up
150⁰C 50 mins–1½ hrs 65⁰C
Duck legs 8–10 (220-250g each) Season as desired 150⁰C 30 mins–1 hr 75⁰C
Turkey legs 3-4 (700-800g each) Season as desired 120⁰C 3–4 hrs 75⁰C
LAMB/VEAL
Shoulder of lamb, boneless 1-3kg Season as desired 120⁰C 3-4 hrs 95⁰C
Shoulder of lamb, bone-in 1.5-2.5kg Season as desired 120⁰C 4-5 hrs 95⁰C
Lamb shank 2-4 400-550g Season as desired 120⁰C 3-4 hrs 95⁰C

29Questions? ninjakitchen.co.uk28
CHARTS | ROAST (LID DOWN)
NOTE: When cooking smaller or larger quantities of foods than what is specified in this chart, be mindful that the
cook time will need to be decreased or increased accordingly. Check food regularly with an external instant-read
thermometer and adjust the cook time to achieve desired doneness.
INGREDIENT AMOUNT
PREPARATION
COOK TEMPERATURE APPROX. COOK TIME TARGET INTERNAL TEMPERATURE
POULTRY
Whole chicken 2 (1.5-2kg each) Season as desired 180°C 45 mins-1½ hrs 75⁰C
Chicken breast 2-8 (approx. 150g each) Season as desired 175⁰C 20-35 mins 75⁰C
Chicken thighs, bone-in 2-10 (150-200g each) Season as desired 175⁰C 20-35 mins 75⁰C
Duck breast 2-6 (180-200g each) Season as desired 175⁰C 20-35 mins 75⁰C
Duck legs 8-10 (220-250g each) Season as desired 175⁰C 20-35 mins 75⁰C
BEEF
Beef rib roast, bone in 2.5-3kg Season as desired 200°C 2-2½ hrs 52-62°C
Beef short ribs 500g-4kg Season as desired 200°C 45 mins-2 hrs 52-62°C
Cote de bouef 2-4 800g-1kg Season as desired 200°C 25-35 mins 52-62°C
Top side beef 1-4kg Season as desired 200°C 50 mins-1½ hrs 52-62°C
PORK
Fillet 4-6 (400-450g each) Season as desired 175⁰C 20-30 mins 75⁰C
Loin, boneless 1-3kg Season as desired 175⁰C 45 mins-1 hr 75⁰C
Ribs 3-4 racks (225-500g each) Season as desired 200°C 45 mins-1½ 75⁰C
Pork belly 500g-800g Season as desired 175⁰C 1-1½ 75⁰C
LAMB
Leg of lamb 1.5-2kg Season as desired 175⁰C 1-2½ hrs 75⁰C
Lamb rack 2-6 (225-450g each) Season as desired 175⁰C 20-30 mins 75⁰C
FISH
Side of salmon 500g Season as desired 175⁰C 20-30 mins 65⁰C
NOTE: For optimal cooking results, keep lid closed while cooking and limit interaction to ensure grill temperature is
maintained.

31Questions? ninjakitchen.co.uk30
CHARTS | 2-ZONE (LID DOWN)
Create a complete, multi-textured meal using the power of direct and indirect heat with the 2-Zone
function (the front 2 burners will be on, while the back burner will be o, creating both direct and
indirect cooking zones).
IMPORTANT: Internal doneness will vary if cuts of meat are thicker/thinner or a dierent weight than recommended in
chart. Adjust time as needed, and use an external thermometer to check for desired doneness.
Coat with oil and season/marinate as desired.
STEP 1: PICK YOUR PROTEIN
Coat with oil and season/marinate as desired.
Preheat grill on 2-Zone function at recommended temperature noted above.
When grill is preheated, open lid and place desired proteins and vegetables on the front 2 burners (direct heat). Close
lid to cook, opening to flip as needed. Move food to the back burner (indirect heat) to keep warm and finish cooking to
desired doneness.
STEP 2: PICK YOUR VEGETABLES
STEP 3: PREHEAT GRILL
STEP 4: COOK AND SERVE
PROTEIN THICKNESS
AMOUNT (UP TO)
TEMPERATURE TIME
PORK
Boneless pork
chops
2.5-4cm
4 chops
(226g each)
260°C 10–15 mins
Sausages Standard 6 sausages 220°C 8-10 mins
BEEF
Fillet steak 2.5-4cm
2–4 steaks
(200-250g each)
260°C 6-20 mins
Rib eye 2.5-4cm
1 steak
(250-350g)
260°C
5-15 mins
(for med rare
to med)
Rump steak 2.5-4cm
1–2 steaks
(200-300g each)
260°C
6-20 mins
(for med rare
to med)
Sirloin steak 2.5-4cm
2 steaks
(300-400g each)
260°C
5-15 mins
(for med rare
to med)
T-bone/
tomahawk
1.3cm
2-4 steaks
(450-1kg each)
260°C
8–12 mins
(for med rare
to med)
FISH
Halibut/cod
fillet, skin on
5cm
2–4 fillets
(110-170g each)
260°C 5–15 mins
Salmon fillet,
skin on
2.5-4cm
2–4 fillets
(110-170g each)
260°C 5-20 mins
Scallops Standard 10-20 pieces 260°C 5-10 mins
POULTRY
Boneless
chicken breasts
2.5-4cm
2–4 breasts
(130-160g each)
230°C 10-15 mins
VEGETABLE
AMOUNT (UP TO)
PREPARATION TEMPERATURE TIME
Peppers 2–3 Whole 260°C 10–20 mins
Broccoli 1–2 heads Cut in half 260°C 15-25 mins
Cauliflower 1–2 heads Cut in half 260°C 15-25 mins
Corn 2–4 Husks removed 260°C 10–25 mins
Green beans 450g Whole 260°C 10–20 mins
Onions 2–3
Sliced in 1.5cm
rounds
260°C 10–20 mins
Portobello
mushrooms
4–6 Whole 260°C 10–20 mins
Potatoes 2–4 Whole 260°C 30–40 mins
Padron peppers 450g Whole 260°C 10–15 mins
Courgette 2–3
Cut in half
lengthwise
260°C 10–20 mins
3332
CHARTS | BUILD YOUR OWN PIZZA (LID DOWN)
USING THE GRILL/PIZZA FUNCTION, CREATE RESTAURANT STYLE PIZZAS AT HOME
WITH THE 16" PIZZA STONE ACCESSORY
NOTE: Put pizza stone in the
grill during preheat. After
grill alerts you it has come to
temperature, allow an additional
10 minutes for pizza stone to
thoroughly preheat.
NOTE: Avoid overloading the
pizza, which will make it dicult
to cook evenly.
Visit Questions? ninjakitchen.co.uk for dough recipes and
inspiration.
16" ARTISAN
PIZZA STONE
COMPLETE YOUR
COOKING SYSTEM FOR
THE BEST RESULTS
TIP: Use room-temperature
dough for easy stretching.
PICK YOUR PIZZA STYLE
& PREHEAT GRILL WITH
PIZZA STONE
PICK YOUR SAUCE PICK YOUR TOPPINGS
TIP: We recommend
55-100g for each pizza.
Tomato and basil sauce
Alfredo
Pesto
Barbecue
Tomato and chilli sauce
Sun-dried tomato sauce
Bechamel
TIP: We recommend approx.
100g total for each pizza.
Grated cheese
Fresh mozzarella
Ricotta cheese
Chicken
Sausage
Meatballs
Peppers
Onions
Broccoli
Pepperoni
Aubergine
Prosciutto
Ham
Olives
Spinach
Pineapple
COOK TIMES
(ADJUST TO
PREFERENCE)
New York Style
6 ½ mins
Thin Crust
5 mins
Artisan Style
5–8 mins
Pan Pizza (Deep Dish/
Chicago Style)
10–15 mins
Large, hand-tossed pizza with light
browning and a foldable, chewy crust.
NEW YORK
Large, hand-tossed pizza with light
browning and a foldable, chewy crust.
THIN CRUST
Large, hand-tossed pizza with light
browning and a foldable, chewy crust.
ARTISAN
Baked in a deep dish or pan with a thick, chewy
crust. Think Sicilian or Chicago Deep Dish.
PAN
Questions? ninjakitchen.co.uk

3534
PIZZA | PIZZA-MAKING TIPS & TRICKS
DOS AND DOUGH-N’TS
• Make sure the stone is in the unit while
preheating.
• While unit is preheating, flour a clean, dry, flat
surface (such as a countertop), then use your
hands or a rolling pin to stretch out the dough.
As you stretch or roll out the dough, add more
flour as needed to prevent sticking.
• Make sure dough is not stuck to the countertop.
If dough sticks, add more flour under it. Then
top it in this order: sauce (spread evenly, leaving
a border), cheese, meats and/or veggies (don’t
overdo it—use a moderate amount of toppings to
prevent a soggy, undercooked pizza).
• Flour the pizza peel, then gently slide it under the
pizza and give it a couple hearty shakes. Bring it
directly to the oven.
• Do not leave the dough on the peel for a long
time before cooking.
• The pizza peel, dough, and toppings should be
at room temperature. Dough is easiest to stretch
and slide o the peel when at room temperature.
• If the dough is too wet and sticky, add a
generous sprinkling of flour to both it and the
peel before stretching out the dough.
• Ensure there are no holes in the dough, as the
sauce can leak through and cause the pizza to
stick to the peel.
• If the dough sticks to the peel, use a quick
back-and-forth motion to release it. The pizza’s
momentum will help it move forward so you can
slide it o the peel onto the pizza stone.
DON’T GET STUCK
• When working with gluten-free dough, use
cornmeal to help prevent sticking to the counter
or pizza peel.
• If your dough is too crumbly, add about 1 Tbsp
water and work it into the dough until it comes
together.
• If your dough is too wet or batter-like,
add about 1 Tbsp flour until it turns into a
more workable dough.
• If cooking pizza below 260°C, bake the dough
separately for about 5 minutes, then add
toppings and finish baking.
• To enhance crust browning, brush the dough
lightly with olive oil before cooking.
GLUTEN-FREE PIZZA TIPS
PIZZA DIDN'T COME OUT AS EXPECTED?
Issues Possible Reason Solution
Base is over cooked
but the top is
undercooked
Pizza stone was
too hot.
Reduce the cook temperature if the dough is
thicker than recommended above.
Base is undercooked
Pizza stone wasn’t
hot enough.
Be sure to preheat the stone. If it isn’t preheated
to the correct temperature, the top of the pizza
can burn while the underside doesn’t fully cook.
Pizza is undercooked Dough was too thick.
Roll out the dough to an even thickness according
to the recommendations above.
Base was too wet
and undercooked
Too many toppings,
or the toppings were
too wet.
Use fewer toppings, make sure they’re as dry as
possible, and distribute them evenly.
Dough over-
browning
Dough had too much
sugar or oil in it.
Sugar burns more quickly than the rest of the
dough, and oil speeds up the baking process, so
use less—or none—of these additives to help avoid
burning.
Excessive smoking
when cooking pizza
Too much flour on
the Pizza stone
or dough.
Keep the stone clean, and use the Ninja Pizza Peel
when transferring uncooked pizza to the oven—the
perforations will allow excess flour to fall through
before cooking.
• When working with raw dough, lightly flour the
work surface to prevent sticking.
NOTE: If using a Ninja Pizza Peel, adding flour
to the peel will also help prevent sticking when
transferring your pizza to the stone.
• Make sure the stone is in the unit while
preheating.
• If storing premade, store-bought dough, place it
in an air-tight container or sealed bag and freeze
within one day. Be sure to bring the dough to
room temperature before using.
• If buying dough from your local pizzeria, make
sure to check the expiration date.
TIPS & TRICKS
Questions? ninjakitchen.co.uk

3736
CHARTS | FLAT PLATE GRIDDLE (LID UP COOKING)
NOTE: FLAT PLATE GRIDDLE ACCESSORY SOLD SEPARATELY
NOTE: When cooking smaller or larger quantities of foods than what is specified in this chart, be mindful that the
cook time will need to be decreased or increased accordingly. Check food regularly with an external instant-read
thermometer and adjust the cook time to achieve desired doneness.
INGREDIENT AMOUNT
PREPARATION
FUNCTION TEMPERATURE
APPROX. COOK
TIME
INTERACTION
FLAT PLATE CLASSICS
Bacon 4-16 strips None Roast/Bake 220⁰C 5–10 mins Flip at least once during cooking
Eggs 2-8 large eggs
As desired (fried, scrambled,
sunny side up, etc.), 1 Tbsp oil
on Flat Plate Griddle
Roast/Bake 220⁰C 3–4 mins (depends on preparation)
French toast 2-8 slices Dipped in egg batter Roast/Bake 200⁰C 8–10 mins Flip halfway through cooking
Toasted cheese sandwich 2-8 sandwiches As desired Roast/Bake 200⁰C 4 mins Flip halfway through cooking
Pancakes
4–8 (60ml batter each, approx.
10cm diameter)
Follow package's instructions Roast/Bake 220⁰C 4 mins Flip halfway through cooking
SEAFOOD
Scallops 6–24 (approx. 500g-1kg total) 1 Tbsp oil on Flat Plate Griddle Grill 230⁰C 3-8 mins Flip halfway through cooking
King prawns 6–24 (approx. 500g-1kg total) 1 Tbsp oil on Flat Plate Griddle Roast/Bake 200⁰C 3–5 mins Flip halfway through cooking
White flaky fish 2–8 fillets (approx. 500g-1kg total) 1 Tbsp oil on Flat Plate Griddle Roast/Bake 200⁰C 5-10 mins Flip halfway through cooking
POULTRY
Chicken breasts 2–8 (approx. 130-200g each)
1 Tbsp oil on Flat Plate Griddle,
season as desired
Roast/Bake 200⁰C 15-25 mins Flip halfway through cooking
Chicken/turkey burgers
2–8 burgers (approx. 113g each,
approx. 12cm in diameter)
None Roast/Bake 200⁰C 10–15 mins Flip halfway through cooking
Chicken/turkey, minced 500g-2kg total None Roast/Bake 200⁰C 5–10 mins Toss frequently during cooking
BEEF/PORK
Beef burgers
2–8 burgers (approx. 113g each,
approx. 12cm diameter)
None Roast/Bake 220⁰C 5-15 mins Flip halfway through cooking
Sausages 2–24 None Roast/Bake 200⁰C 20–25 mins Flip 2 or 3 times during cooking
Chipolatas 4–30 None Roast/Bake 200⁰C 15–20 mins Flip 2 or 3 times during cooking
Minced beef 500g-2kg total
1 Tbsp oil on Flat Plate Griddle,
season as desired
Roast/Bake 200⁰C 5–10 mins Toss frequently during cooking
Minced pork 500g-2kg total
1 Tbsp oil on Flat Plate Griddle,
season as desired
Roast/Bake 200⁰C 7–10 mins Toss frequently during cooking
Minced lamb 500g-2kg total
1 Tbsp oil on Flat Plate Griddle,
season as desired
Roast/Bake 200⁰C 5–10 mins Flip halfway through cooking
NOTE: Preheat unit based on recommended cook temperatures and allow for an additional 15 minutes to properly
preheat flat plate. Once preheated, cook with LID UP for best results. Cook times will vary with lid down cooking.
Questions? ninjakitchen.co.uk
39Questions? ninjakitchen.co.uk38
INGREDIENT AMOUNT
PREPARATION
FUNCTION TEMPERATURE
APPROX. COOK
TIME
INTERACTION
VEGETABLES
Asparagus 2–4 bunches
Trimmed, 1 Tbsp oil on
Flat Plate Griddle
Roast/Bake 200⁰C 15–20 mins Flip 2 or 3 times during cooking
Peppers 2–8
Core, slice, coat with oil, season as
desired
Roast/Bake 200⁰C 10–15 mins Toss frequently during cooking
Onions 2–8
Trim, peel, cut in 1.5cm slices, coat
lightly with oil, season as desired
Roast/Bake 200⁰C 6-15 mins Toss frequently during cooking
Fresh diced potatoes 550-2kg total
Cut in 1.5cm pieces, 2 Tbsp oil on
Flat Plate Griddle, season as desired
Roast/Bake 200⁰C 20–25 mins Toss frequently during cooking
Shredded potatoes, fresh 550-2kg total
Cut in 1.5cm pieces, 2 Tbsp oil on
Flat Plate Griddle, season as desired
Roast/Bake 200⁰C 20–25 mins Toss frequently during cooking
Sliced mushrooms 80-160g total
2 Tbsp oil or butter on
Flat Plate Griddle, season as desired
Roast/Bake 200⁰C 10-15 mins Toss frequently during cooking
Sweet potato, fresh, diced 550-2kg total
3 Tbsp oil or butter on
Flat Plate Griddle, season as desired
Roast/Bake 200⁰C 20–25 mins Toss frequently during cooking
Courgette 2–8
Trim ends, cut in 1.5cm slices, coat
lightly with oil, season as desired
Roast/Bake 200⁰C 10-20 mins Flip 2 or 3 times during cooking
PLANT BASED PROTEIN / CHEESE
Halloumi 1-2kg
Cut into 1cm pieces, coat lightly
with oil
Roast/Bake 260⁰C 2-4 mins Flip halfway through cooking
Plant based burger 12-20 (113g each) Coat lightly with oil Roast/Bake 260⁰C 6-10 mins Flip halfway through cooking
Plant based sausage 12-20 (113g each) Coat lightly with oil Roast/Bake 260⁰C 4-6 mins Flip halfway through cooking
Tofu 250g-1kg
Cut into 1 cm pieces, coat lightly with
oil, season as desired
Roast/Bake 260⁰C 5-10 mins Flip halfway through cooking
NOTE: When cooking smaller or larger quantities of foods than what is specified in this chart, be mindful that the
cook time will need to be decreased or increased accordingly. Check food regularly with an external instant-read
thermometer and adjust the cook time to achieve desired doneness.
CHARTS | FLAT PLATE GRIDDLE (LID UP COOKING) – CONT'D
NOTE: FLAT PLATE GRIDDLE ACCESSORY SOLD SEPARATELY
Always cook lid up with the
Flat Plate Griddle
Preheat the unit to the temperature given in the cook charts.
The CURRENT temperature reading gives the air temperature,
allow 15 more minutes for the Flat Plate Griddle to heat up.
Open the lid and begin cooking!
NOTE: Preheat unit based on recommended cook temperatures and allow for an additional 15 minutes to properly
preheat flat plate. Once preheated, cook with LID UP for best results. Cook times will vary with lid down cooking.

PG305UK_QSG_MP_Mv15
NINJA is a registered trademark in the United Kingdom of SharkNinja Operating LLC.
CyclonicHeat-IQ, FLEXFLAME, and NINJA WOODFIRE are trademarks in the United Kingdom of SharkNinja Operating LLC.
© 2025 SharkNinja Operating LLC.
