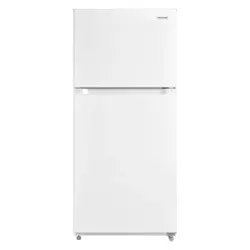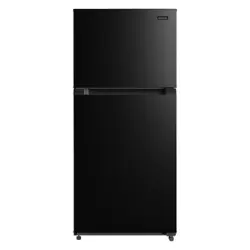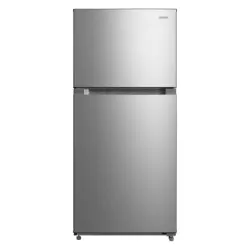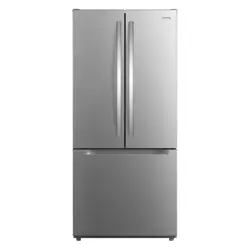
EN User Manual | Freezer
Welcome to our family
Thank you for bringing Frigidaire into your home! We see your purchase as the
beginning of a long relationship together.
This manual is your resource for the use and care of your product. Please read it
before using your appliance. Keep it handy for quick reference. If something doesn’t
seem right, the troubleshooting section will help you with common issues.
FAQ, helpful tips and videos, cleaning products, and kitchen and home accessories
are available at http://www.frigidaire.com.
We are here for you! Visit our website, chat with an agent, or call us if you need
help. We may be able to help you avoid a service visit. If you do need service, we
can get that started for you.
Let’s make it official! Be sure to register your product.
CONTENTS
1. IMPORTANT SAFETY INFORMATION................................................. 2
2. FEATURES............................................................................................ 5
3. INSTALLATION......................................................................................6
4. DOOR REVERSAL................................................................................ 7
5. DOOR HANDLE INSTALLATION.......................................................... 9
6. CONTROL PANEL: INTERNAL, CONVERTIBLE..................................9
7. CONTROL PANEL: EXTERNAL, CONVERTIBLE...............................11
8. CONTROL PANEL: EXTERNAL, REFRIGERATOR........................... 12
9. STORAGE FEATURES........................................................................13
10. STORING FOOD AND SAVING ENERGY........................................ 14
11. CARE AND CLEANING..................................................................... 14
12. TROUBLESHOOTING....................................................................... 16
13. LIMITED WARRANTY........................................................................18
14. QUEBEC RIGHT TO REPAIR............................................................19
1. IMPORTANT SAFETY
INFORMATION
1.1 Keep a record for
quick reference
Model number
..........................................................
Serial number
..........................................................
Purchase date
..........................................................
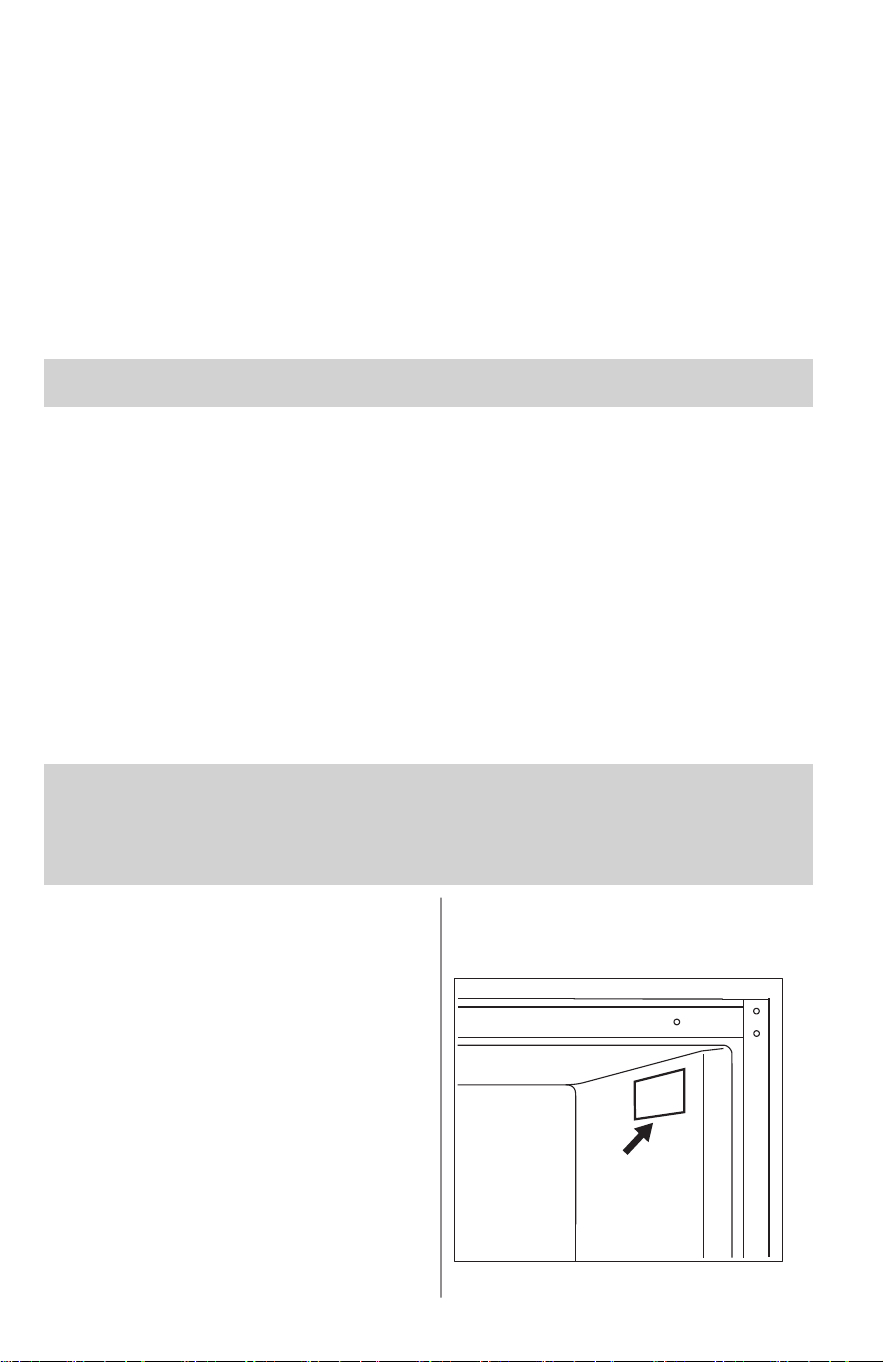
1.2 Serial number
location
2 ENGLISH
WARNING!
You must follow these guidelines to
ensure that your appliance’s safety
mechanisms are operating correctly.
1.3 Safety definitions
This is the safety alert symbol. It is
used to alert of potential personal
injury hazards. Obey all safety
messages that follow this symbol to
avoid possible injury or death.
DANGER
DANGER indicates an imminently
hazardous situation which, if not
avoided, will result in death or serious
injury.
WARNING!
WARNING indicates a potentially
hazardous situation which, if not
avoided, could result in death or
serious injury.
CAUTION!
CAUTION indicates a potentially
hazardous situation which, if not
avoided, may result in minor or
moderate injury.
IMPORTANT
IMPORTANT indicates installation,
operation or maintenance information
which is important but not hazard-
related.
1.4 Child safety
This appliance is not intended for
use by persons (including children)
with reduced physical, sensory or
mental capabilities, or lack of
experience and knowledge, unless
they have been given supervision or
instruction concerning use of the
appliance by a person responsible
for their safety.
Destroy or recycle the carton,
plastic bags, and any exterior
wrapping material immediately after
the appliance is unpacked. Children
should never use these items to
play. Cartons covered with rugs,
bedspreads, plastic sheets or
stretch wrap may become airtight
chambers, and can quickly cause
suffocation.
1.5 Important safety
instructions
DANGER
DANGER Risk of fire or
explosion. Flammable
refrigerant used. Do not use
mechanical devices to defrost
the appliance. Do not puncture
refrigerant tubing.
DANGER Risk of fire or
explosion. Flammable
refrigerant used. To be
repaired only by trained
service personnel. Use only
manufacturer-authorized
service parts. Any repair
equipment used must be
designed for flammable
refrigerants. Follow all
manufacturer repair
instructions. Do not puncture
refrigerant tubing.
CAUTION!
CAUTION Risk of fire or
explosion due to puncture of
refrigerant tubing. Follow
handling instructions carefully.
Flammable refrigerant used.
This appliance is for storage only
and should not be used for any
other purpose.
Do not store or use gasoline or
other flammable vapors and liquids
in the vicinity of this or any other
appliance.
ENGLISH 3
Do not store explosive substances
such as aerosol cans with a
flammable propellant in this
appliance.
Do not operate the appliance in the
presence of explosive fumes
Avoid contact with any moving parts
of automatic ice maker.
Remove all staples from the carton.
Staples can cause severe cuts, and
also destroy finishes if they come in
contact with other appliances or
furniture.
WARNING!
Do not use electrical appliances inside
the food storage compartments of the
appliance unless they are of the type
recommended by the manufacturer.
WARNING!
CALIFORNIA RESIDENTS ONLY
WARNING! Cancer and Reproductive
Harm http://www.P65Warnings.ca.gov
1.6 Proper disposal of
your appliance
CAUTION!
CAUTION Risk of fire or
explosion. Dispose of the
appliance properly in
accordance with the applicable
federal or local regulations.
Flammable refrigerant used.
Risk of child entrapment
Child entrapment and suffocation
are not problems of the past.
Junked or abandoned appliances
are still dangerous – even if they will
sit for “just a few days”. If you are
getting rid of your old appliance,
follow the instructions below to help
prevent accidents.
We strongly encourage responsible
appliance recycling/disposal
methods. Check with your utility
company or visit http://
www.energystar.gov/recycle for
more information on recycling your
old appliance.
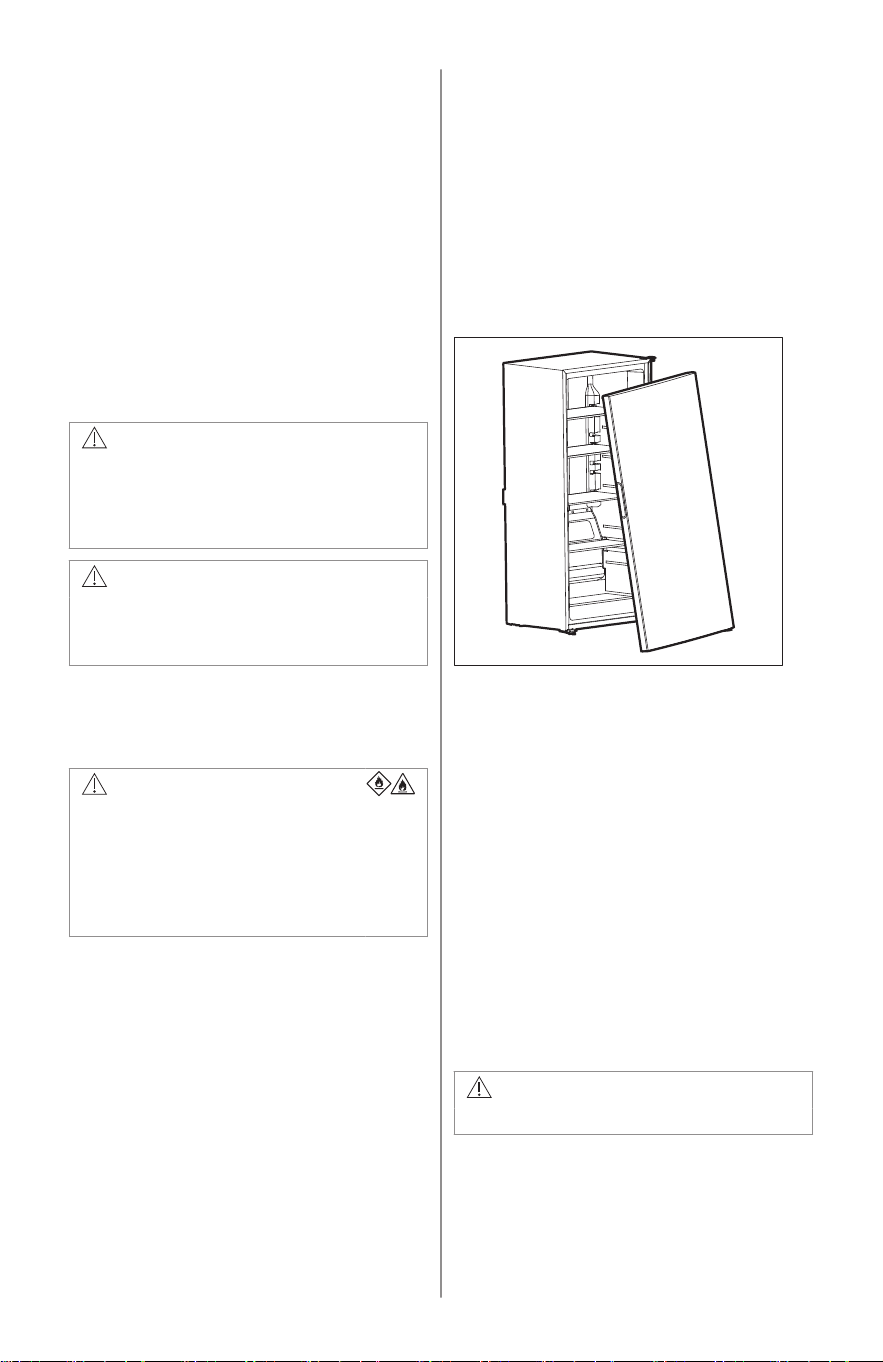
Before you throw away your old
appliance:
• Remove doors.
• Leave shelves in place so children may
not easily climb inside.
• Have it removed by a qualified service
technician.
1.7 Electrical
information
• The appliance must be plugged into its
own dedicated 115 Volt, 60 Hz., 15
Amp, AC only electrical outlet. The
power cord of the appliance is
equipped with a three-prong grounding
plug for your protection against
electrical shock hazards. It must be
plugged directly into a properly
grounded three-prong receptacle. The
receptacle must be installed in
accordance with local codes and
ordinances. Consult a qualified
electrician. Do not use an extension
cord or adapter plug.
WARNING!
Avoid fire hazard or electric shock.
• If the power cord is damaged, it should
be replaced by an authorized service
technician to prevent any risk.
• Never unplug the appliance by pulling
on the power cord. Always grip the plug
firmly, and pull straight out from the
4 ENGLISH
receptacle to prevent damaging the
power cord.
• Unplug the appliance before cleaning
and before replacing the AC LED light
bulb to avoid electrical shock.
• Performance may be affected if the
voltage varies by 10% or more.
Operating the appliance with
insufficient power can damage the
compressor. Such damage is not
covered under your warranty.
• Do not plug the unit into an electrical
outlet controlled by a wall switch or pull
cord to prevent the appliance from
being turned off accidentally.
• Do not pinch, knot, or bend the power
cord in any manner.
WARNING!
When positioning the appliance,
ensure the supply cord is not trapped
or damaged.
Do not locate multiple portable socket-
outlets or portable power supplies at
the rear of the appliance.
WARNING!
Do not, under any circumstances, cut,
remove, or bypass the grounding
prong (A). Always use the power cord
with a three-prong grounded plug and
grounding type wall receptacle.
2. FEATURES
Table title
.
IMPORTANT
Features may vary by model.
Accessories are available for your appliance and may be purchased at
Frigidaire.com or by calling toll-free 1-800-374-4432.
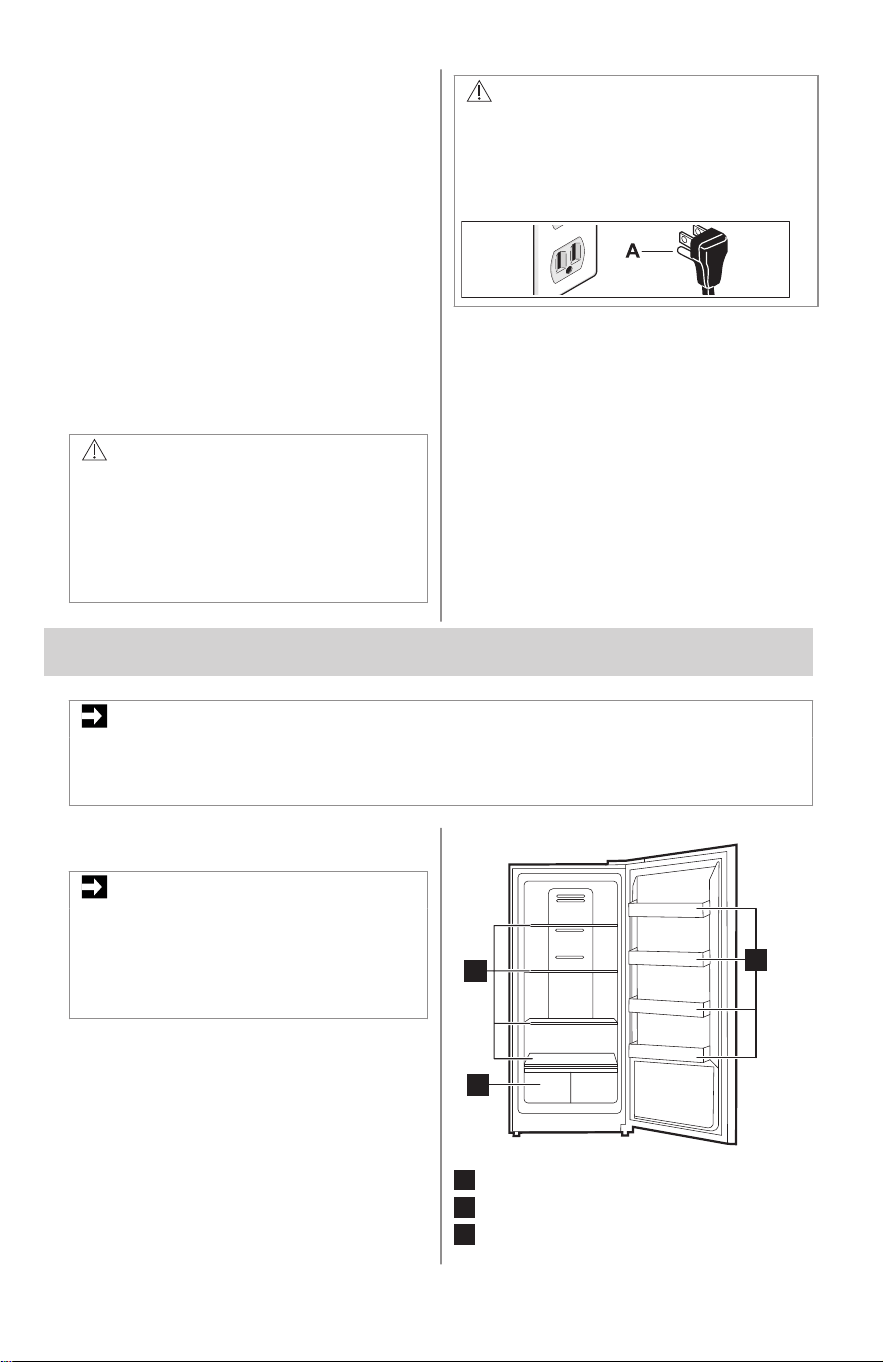
2.1 Product overview
IMPORTANT
Depending on the model, the
appliance can have either an internal
or an external control panel. Refer to
the Control Panel section to identify
your controls.
1
2
3
1
Drawer(s) - varies by model
2
Shelf
3
Door bin
ENGLISH 5
3. INSTALLATION
This User Manual provides general
installation and operating instructions for
your model. We recommend using a
service or kitchen contracting professional
to install your appliance. Use the
appliance only as instructed in this User
Manual. Before starting the appliance,
follow these important first steps.
3.1 Installation Checklist
Doors
❐ Handles are secure and tight
❐ Door seals completely the cabinet on
all sides
❐ Freezer door is level from side to side
across the top
Leveling
❐ Appliance is level side-to-side and
tilted 1/4" (6 mm) front-to-back
❐ Cabinet is setting solid on all corners
❐ Anti-tip bracket set in front on both
sides
Electrical Power
❐ House power is turned on
❐ Appliance is plugged in
Final Checks
❐ Shipping material is removed
❐ Registration card is sent in
3.2 Moving the appliance
IMPORTANT
The appliance is heavy. Always move
the appliance with two people. When
moving it for cleaning or service,
remove all food, unplug the appliance,
secure the power cord, and tape the
movable parts. Cover the floor with
cardboard or hardboard to prevent
damage. Always pull the appliance
straight out. Do not wiggle or "walk"
the appliance, because this can
damage the floor.
3.3 Connecting the appliance
After installation, wait at least 2 hours
before switching on the power. Switching
on the appliance too soon can reduce
cooling performance or cause damage.
IMPORTANT
Let the appliance run empty for 24
hours to cool the compartment to the
correct temperature.
3.4 Cleaning the appliance
IMPORTANT
Remove tape and glue residue from
surfaces before turning the appliance
on. Rub a small amount of liquid dish
soap over the adhesive with your
fingers. Rinse with warm water and
dry with a soft cloth.
Do not use sharp instruments, rubbing
alcohol, flammable fluids, or abrasive
cleaners to remove tape or glue.
These products can damage the
surface of the appliance.
After you remove all of the package
materials, clean the inside of the
appliance before using it. Refer to
Care and Cleaning.
See important information about
cleaning glass shelves and covers in
the Storage Features section.
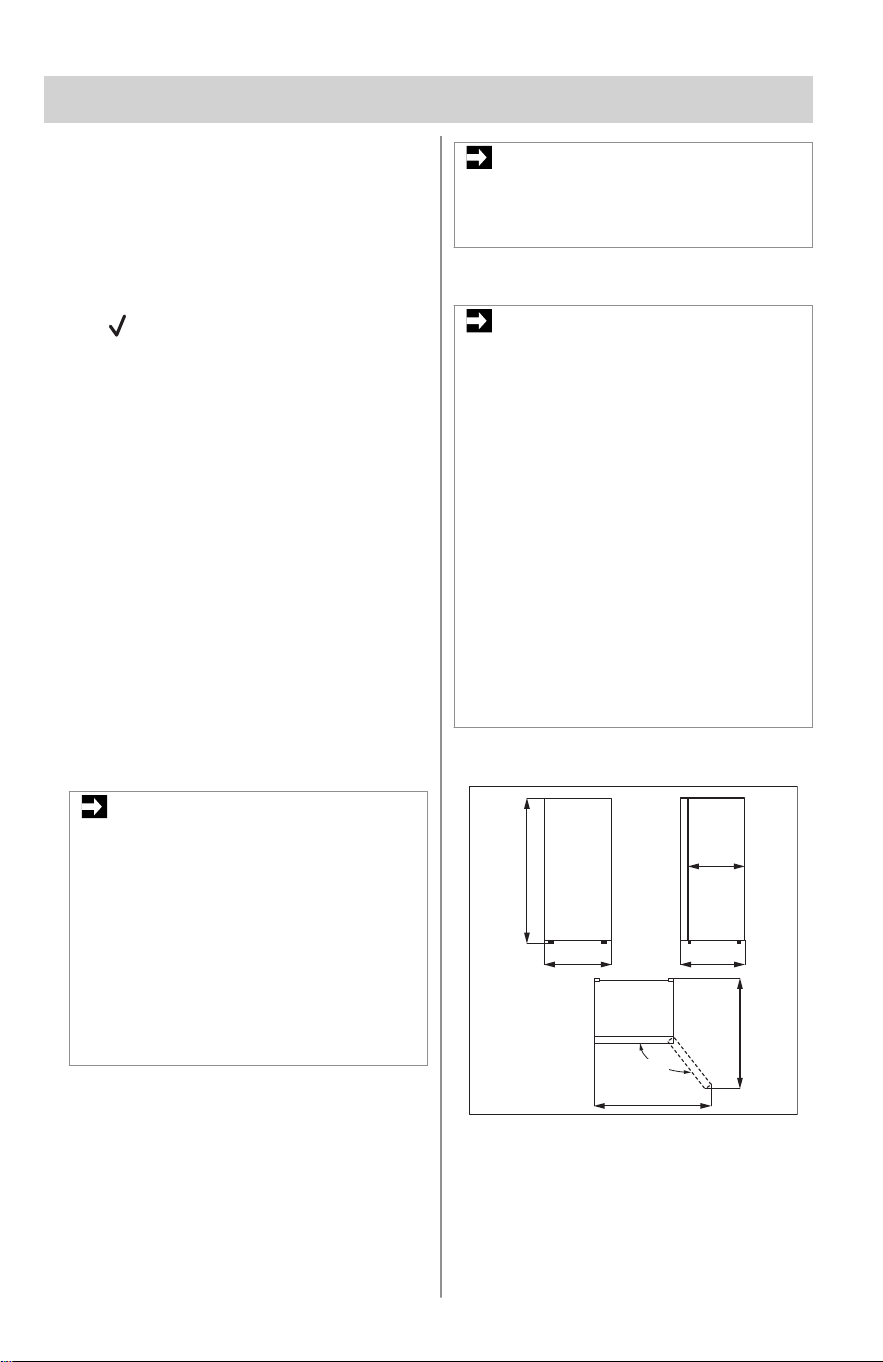
3.5 Dimensions
135°
B
F
A
E
C
D
A. Width: 2' 5.7" (755 mm)
B. Overall height: 5' 6.6" (1692 mm)
C. Depth: 2' 8.7" (830 mm)
D. Depth of the cabinet: 2' 4.9" (734 mm)
E. Width with door open at 135°: 4' 2.2"
(1275 mm)
6 ENGLISH
F. Depth with door open at 135°: 4' 6.9"
(1395 mm)
3.6 Location
• If possible, place the appliance out of
direct sunlight and away from the
range, dishwasher, or other heat
sources.
• The appliance must be installed on a
floor that is level and strong enough to
support a fully loaded appliance.
WARNING!
This appliance is intended for use in
residential household and similar
interior applications such as:
• Kitchen / kitchenette
• Pantry room
• Basement
• Enclosed garage
• Other interior residential type
environments
CAUTION!
Do not install the appliance where the
temperature will drop below 38°F
(3°C) or rise above 110 °F (43 °C).
The compressor will not be able to
maintain proper temperatures inside
the appliance.
CAUTION!
This appliance is convertible and can
operate as a refrigerator or a freezer.
Do not install the appliance where the
temperature drops below:
• Refrigerator: 110 °F (43 °C).
• Freezer: 38°F (3°C).
The compressor will not be able to
maintain proper temperatures inside
the appliance.
NOTE
Sufficient air circulation is essential for
the proper operation of the appliance.
WARNING!
Allow the following clearances for
ease of installation, proper air
circulation, plumbing, and electrical
connections:
• Top 3/8" (9.5 mm)
• Sides 3/8" (9.5 mm)
• Back 1" (25.4 mm)
NOTE
The exterior walls of the appliance
may become warm as the compressor
transfers heat from the inside. The
temperatures may be even 30°F
higher than the room temperature. In
hotter climates it is important to allow
enough space for air circulation
around the appliance.
NOTE
If you place the appliance with the
door hinge side against a wall, you
may have to allow additional space so
the door can be open wider.
3.7 Cabinet leveling and door
alignment
Guidelines for final positioning of
appliance:
• All 4 corners of the cabinet must rest
firmly on the floor.
• The cabinet should be level at the front
and rear.
• The door should be level.
3.8 Leveling
When positioning the appliance, ensure
that it is level, with all bottom corners
resting firmly on a solid floor. You can
adjust this using the two leveling feet
located at the front bottom of the
appliance. To lower the unit, turn the feet
clockwise. To raise the unit, turn the feet
counterclockwise.
NOTE
The front of the appliance should be
slightly higher than the rear to help the
doors close properly.
ENGLISH 7
4. DOOR REVERSAL
Some models only.
CAUTION!
To avoid injury or damage, have
someone assist you during the
procedure.
NOTE
Unplug and empty the appliance.
Keep all the removed parts to reuse
them later.
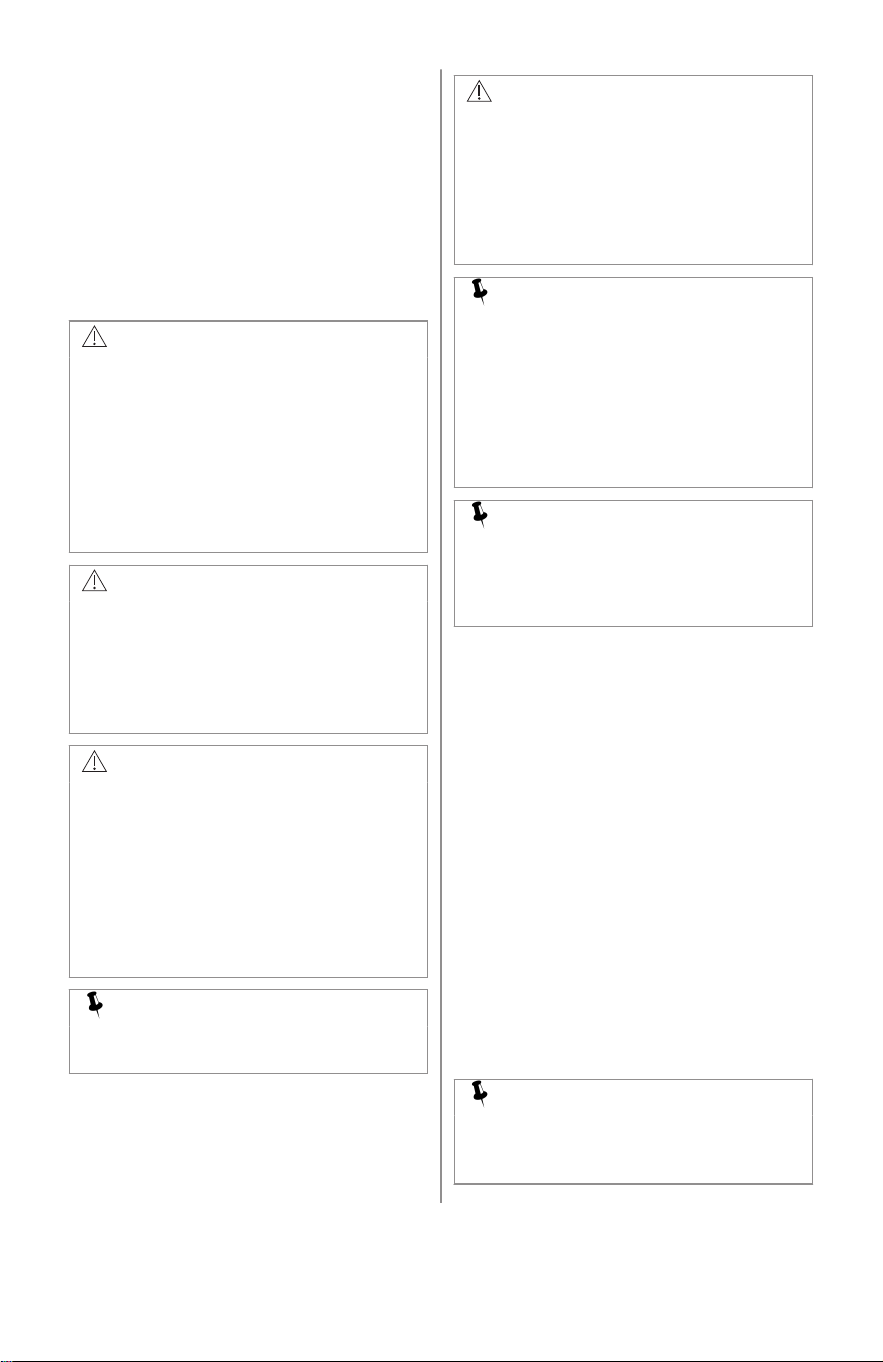
1. Dismantle the upper hinge cover,
screws and upper hinge. Remove the
hole cover from the other side of the
appliance and unplug the wiring
connector.
E
D
B
A
C
2. Lift the freezer door up and away from
the appliance.
3. Unscrew and remove the right middle
hinge and adjustable feet.
4. Remove the insert pin, screw cap and
screw. Install them on the opposite
side of the appliance.
5. Use the flathead screwdriver to move
the hinge shaft to the opposite side.
Reassemble the bottom hinge on the
right side.
6. Relocate the adjustable feet from the
left and right sides, swapping their
positions,
7.
Remove the stop block and shaft
sleeve and install them on the other
side of the door.
8. Place the door onto the hinge pin of
the bottom hinge.
9. Take the upper hinge cover from the
accessory bag. Remove the switch
from the right hinge cover and install it
onto the left hinge cover.
10. Connect the signal wire terminal C
with signal wire terminal D. Connect
the signal wire terminal E to the door
switch.
8 ENGLISH
C
E
D
B
A
11. Reassemble the left top hinge, hinge
cover and hole cover.
5. DOOR HANDLE INSTALLATION
IMPORTANT
Do not use a power tool to unscrew or
tighten parts.
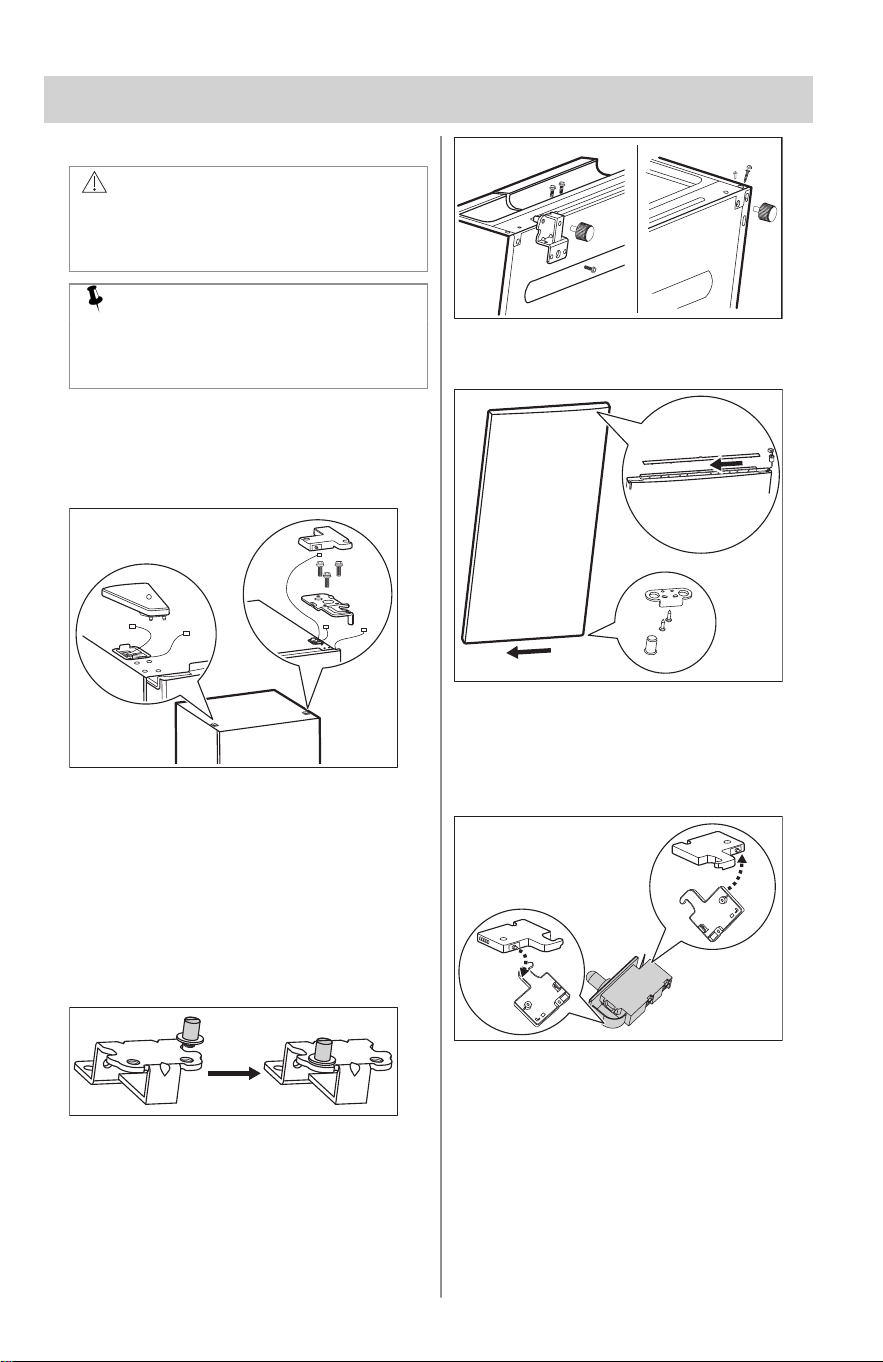
To install the door handle:
1. To install part A:
a. Locate the holes in the door where
part A should be installed.
b. With a #3 Phillips head
screwdriver install part A. Use firm
pressure during installation.
c. Ensure part A ends up flush
against the cabinet before
proceeding to install the handle.
2. Remove the handles and any other
protective packaging from the carton.
3. Position the handle end caps over
upper and lower pre-installed shoulder
bolts (A) that are fastened into door,
ensuring the holes for the set screws
are facing towards the opposite door.
4. While holding handle firmly against
door, fasten upper and lower Allen set
screws (B) with supplied Allen wrench.
5. Repeat the steps above to install the
opposite handle. Ensure the holes for
the set screws are facing towards the
opposite door.
A
B
A
B
A
B
A
B
NOTE
When tightening the Allen set screws,
apply force to the longer arm of the
Allen wrench supplied in the handle
packaging.
6. CONTROL PANEL: INTERNAL, CONVERTIBLE
Setting
Fridge
Freezer
1
2
3
4
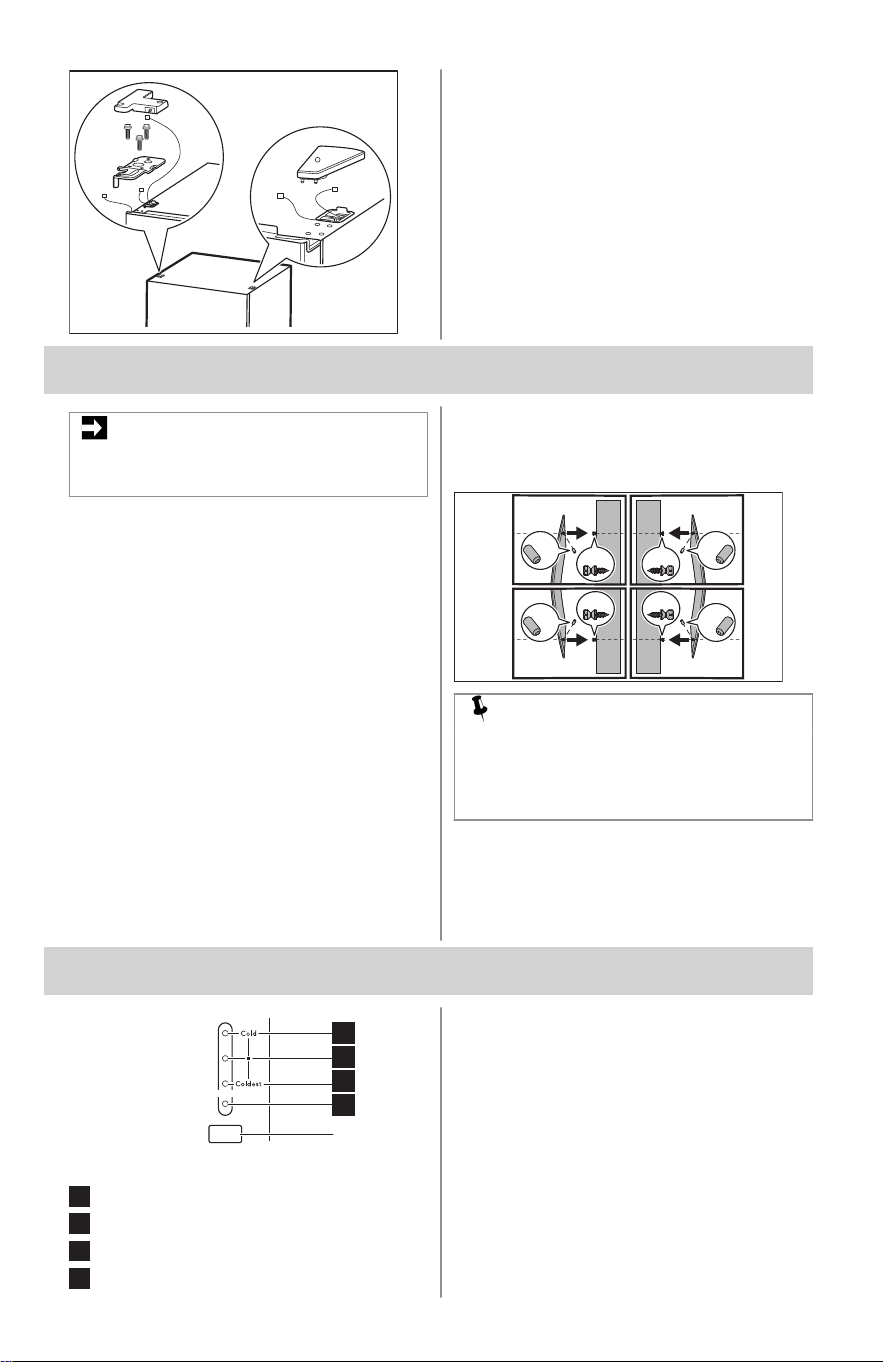
A
A. Setting button
1
LED 1; Fridge
2
LED 2; Coldest
3
LED 3; Recommended
4
LED 4; Cold
Press the Setting button to scroll through
the 4 settings. After the last setting, the
sequence starts again.
• For colder freezer temperature, press
the Setting button until the LED next to
Coldest lights up.
• For warmer freezer temperature, press
the Setting button until the LED next to
Cold lights up.
• To use the appliance as a refrigerator,
press the Setting button until the LED
next to Fridge lights up.
ENGLISH 9
NOTE
Before you change the freezer to
fridge mode, remove any food that
you want to keep frozen. Put the food
in another freezer to prevent it from
defrosting.
To maintain temperatures, a fan circulates
air in the refrigerator and freezer
compartments. For good circulation, do
not block cold air vents with food items.
6.1 Sabbath Mode
The Sabbath Mode disables parts of the
appliance and its controls to support
observance of the weekly Sabbath and
religious holidays in the Orthodox Jewish
community. The compressor and fan keep
working in normal mode. Their operation
does not change when the door opens or
closes.
NOTE
The temperature setting is not
affected by the Sabbath mode.
Sounds and alarms are off. If a fault
occurs, the appliance keeps working
in the preset fault mode, but it does
not show an error code or make a
sound.
1. To enter the Sabbath mode, press and
hold the Setting button for 5 seconds.
The LEDs 1 and 4 light up and stay on
when the Sabbath mode is active.
2. To exit the Sabbath mode, press and
hold the Setting button for 5 seconds.
The LEDs return to normal operation.
NOTE
While in Sabbath mode, the lights and
the control panel do not work until
Sabbath mode is deactivated. The
appliance stays in Sabbath mode after
power failure recovery. Deactivate it
with the appliance control.
Table title
.
For further assistance, guidelines for
proper use and a complete list of
models with the Sabbath feature,
please visit star-k.org.
6.2 Errors
The following error codes can appear on
the control panel to indicate a malfunction.
The appliance may operate despite the
following errors.
The LEDs are numbered from the bottom
to the top of the control panel:
• LED 1: next to the Fridge.
• LED 4: next to Cold.
Table title
Error Description
Flashing LED
1 / 2.
Temperature sensor failure.
Flashing LED
1 / 3.
Defrost temperature sensor fail
ure.
Flashing LED
1 / 4.
The ambient temperature sensor
failure.
Fault indication:
• Under normal conditions, the display
locks automatically after 15 seconds if
no buttons are pressed and the door
stays closed.
• The display turns on when the door is
open and turns off when the door is
closed.
• If a fault that shows a code occurs
while the door is open, the fault code
appears on the display.
10 ENGLISH
7. CONTROL PANEL: EXTERNAL, CONVERTIBLE
COLD
BOOST
HIGH
TEMP
1
2
3
4
5
6
7 8
9
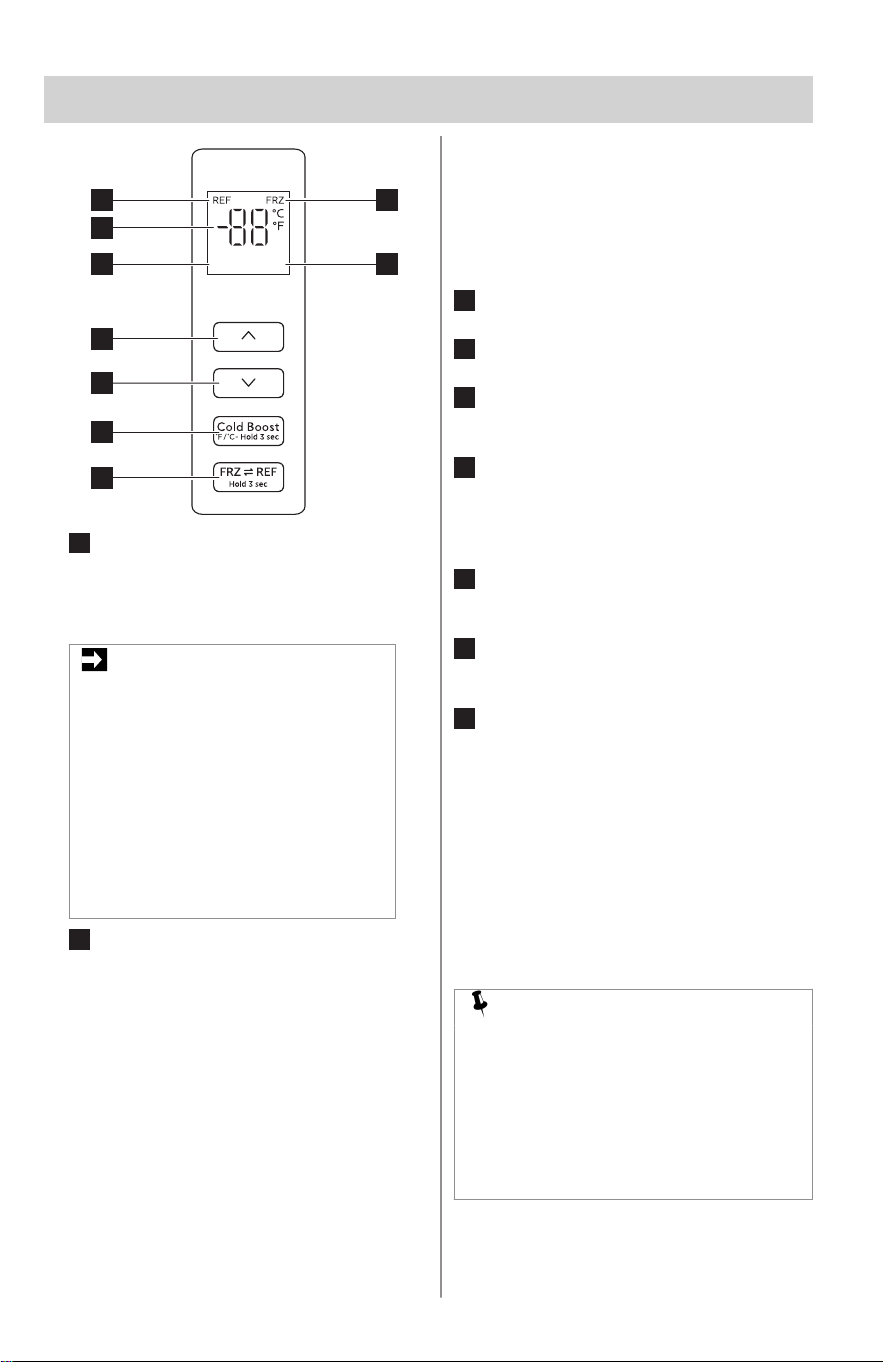
1
Refrigerator/Freezer Switch button
Press and hold for 3 seconds to set
the appliance to Refrigerator or
Freezer mode. The REF or FRZ
indicator appears on the display.
IMPORTANT
Before you change the mode:
• From freezer to refrigerator
- remove any food that you
want to keep frozen. Put it
in another freezer to
prevent it from defrosting.
• From refrigerator to freezer
- remove any food that you
want to keep fresh. Put it in
another refrigerator to
prevent it from freezing.
2
Cold Boost and °F/°C button
• When the appliance is in Freezer
mode, press the button to turn the
Cold Boost function on or off. The
appliance temperature sets to -11
°F (-24 °C) . The Cold Boost
indicator turns on when the function
is active. The function turns off
automatically after 40 hours and
the temperature returns to the
previous setting.
• When the appliance is in
Refrigerator mode, press the button
to turn the Cold Boost function on
or off. The appliance temperature
sets to 35 °F (2 °C). The Cold
Boost indicator turns on when the
function is active. The function
turns off automatically after 6 hours
and the temperature returns to the
previous setting.
• Press and hold the button for 3
seconds to change the temperature
unit.
3
Temperature increase button
Press to increase the temperature.
4
Temperature decrease button
Press to decrease the temperature.
5
Cold Boost indicator
It turns on when the Cold Boost
function is active.
6
Temperature indicator
Temperature range for refrigerator: 35
- 46°F (2 – 8 °C).
Temperature range for freezer: -11 –
10°F (-24 – -12°C).
7
REF Refrigerator indicator
It turns on when the appliance is in
Refrigerator mode.
8
FRZ Freezer indicator
It turns on when the appliance is in
Freezer mode.
9
High Temperature indicator
It turns on when the temperature in the
appliance is too high.
7.1 Sabbath Mode
The Sabbath Mode disables parts of the
appliance and its controls to support
observance of the weekly Sabbath and
religious holidays in the Orthodox Jewish
community. The compressor and fan keep
working in normal mode. Their operation
does not change when the door opens or
closes.
NOTE
The temperature setting is not
affected by the Sabbath mode.
Sounds and alarms are off, except for
the High Temperature alarm. If a fault
occurs, the appliance keeps working
in the preset fault mode, but it does
not show an error code or make a
sound.
1. To enter the Sabbath Mode, press and
hold the Refrigerator/Freezer Switch
ENGLISH 11
and Cold Boost buttons together for 5
seconds.
The display shows SB when the function
is active.
2. To exit the Sabbath Mode, press and
hold the Refrigerator/Freezer Switch
and Cold Boost buttons together for 5
seconds.
NOTE
While in Sabbath mode, the lights and
the control panel do not work until
Sabbath mode is deactivated. The
appliance stays in Sabbath mode after
power failure recovery. Deactivate it
with the appliance control.
Table title
.
For further assistance, guidelines for
proper use and a complete list of
models with the Sabbath feature,
please visit star-k.org.
7.2 Display Always-On Mode
To activate or deactivate the Display
Always-On mode:
Press and hold the Temperature
increase and Temperature decrease
buttons together for 4 seconds.
• When you activate the function, the
display shows ON for 3 seconds
and four rising beeps sound.
• When you deactivate the function,
the display shows OF for 3 seconds
and four falling beeps sound.
7.3 Door Open Alarm
If the door stays open for 3 minutes or
more, the alarm sounds. Close the door or
press any button to stop the alarm.
7.4 Errors
The following error codes might appear on
the display indicating the malfunction of
the appliance. The appliance may operate
despite the following errors.
Table title
Error Code Description
E1 Refrigerator temperature sensor
error.
E5 Defrost sensor error.
E6 Communication failure.
E7 Ambient temperature sensor er
ror.
8. CONTROL PANEL: EXTERNAL, REFRIGERATOR
Chill
Boost
CHILL
BOOST
1
2
3
4
6
5
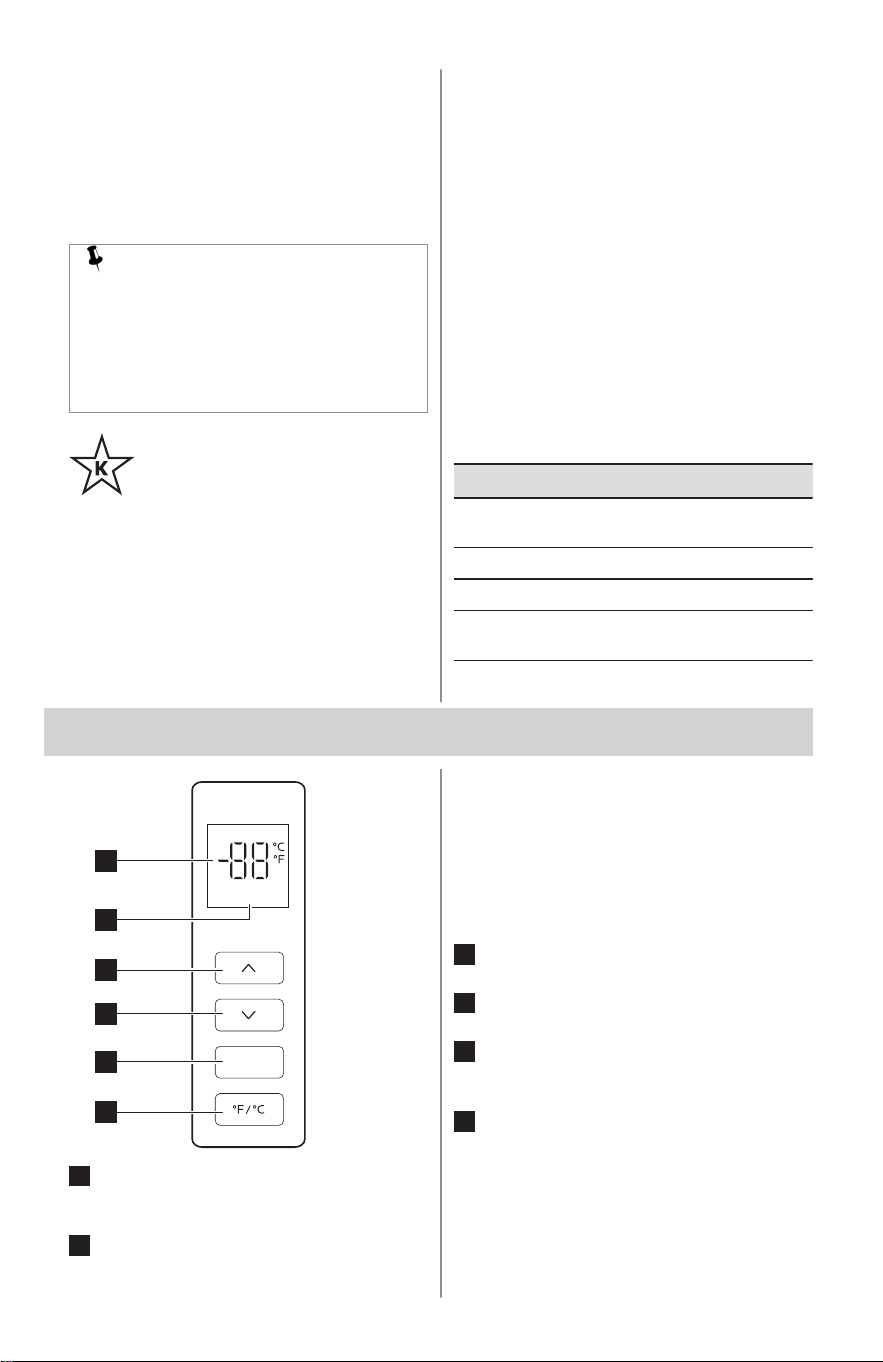
1
°F/°C button
Press and hold the button to change
the temperature unit.
2
Chill Boost button
Press the button to turn the Chill Boost
function on or off. The appliance
temperature sets to 35 °F (2 °C). The
Chill Boost indicator turns on when the
function is active. The function turns
off automatically after 6 hours and the
temperature returns to the previous
setting.
3
Temperature increase button
Press to increase the temperature.
4
Temperature decrease button
Press to decrease the temperature.
5
Chill Boost indicator
It turns on when the Chill Boost
function is active.
6
Temperature indicator
Temperature range: 35 - 46°F (2 – 8
°C).
8.1 Sabbath Mode
The Sabbath Mode disables parts of the
appliance and its controls to support
12 ENGLISH
observance of the weekly Sabbath and
religious holidays in the Orthodox Jewish
community. The compressor and fan keep
working in normal mode. Their operation
does not change when the door opens or
closes.
NOTE
The temperature setting is not
affected by the Sabbath mode.
Sounds and alarms are off. If a fault
occurs, the appliance keeps working
in the preset fault mode, but it does
not show an error code or make a
sound.
To enter Sabbath mode:
1. To enter the Sabbath mode, press and
hold the °F/°C button for 5 seconds.
The display shows SB when the function
is active.
2. To exit the Sabbath mode, press and
hold the °F/°C button for 5 seconds.
NOTE
While in Sabbath mode, the lights and
the control panel do not work until
Sabbath mode is deactivated. The
appliance stays in Sabbath mode after
power failure recovery. Deactivate it
with the appliance control.
Table title
.
For further assistance, guidelines for
proper use and a complete list of
models with the Sabbath feature,
please visit star-k.org.
8.2 Door Open Alarm
If the door stays open for 3 minutes or
more, the alarm sounds. Close the door or
press any button to stop the alarm.
8.3 Errors
The following error codes might appear on
the display indicating the malfunction of
the appliance. The appliance may operate
despite the following errors.
Table title
Error Code Description
E1 Refrigerator temperature sensor
error.
E5 Defrost sensor error.
E6 Communication failure.
E7 Ambient temperature sensor er
ror.
9. STORAGE FEATURES
Equipment varies by model.
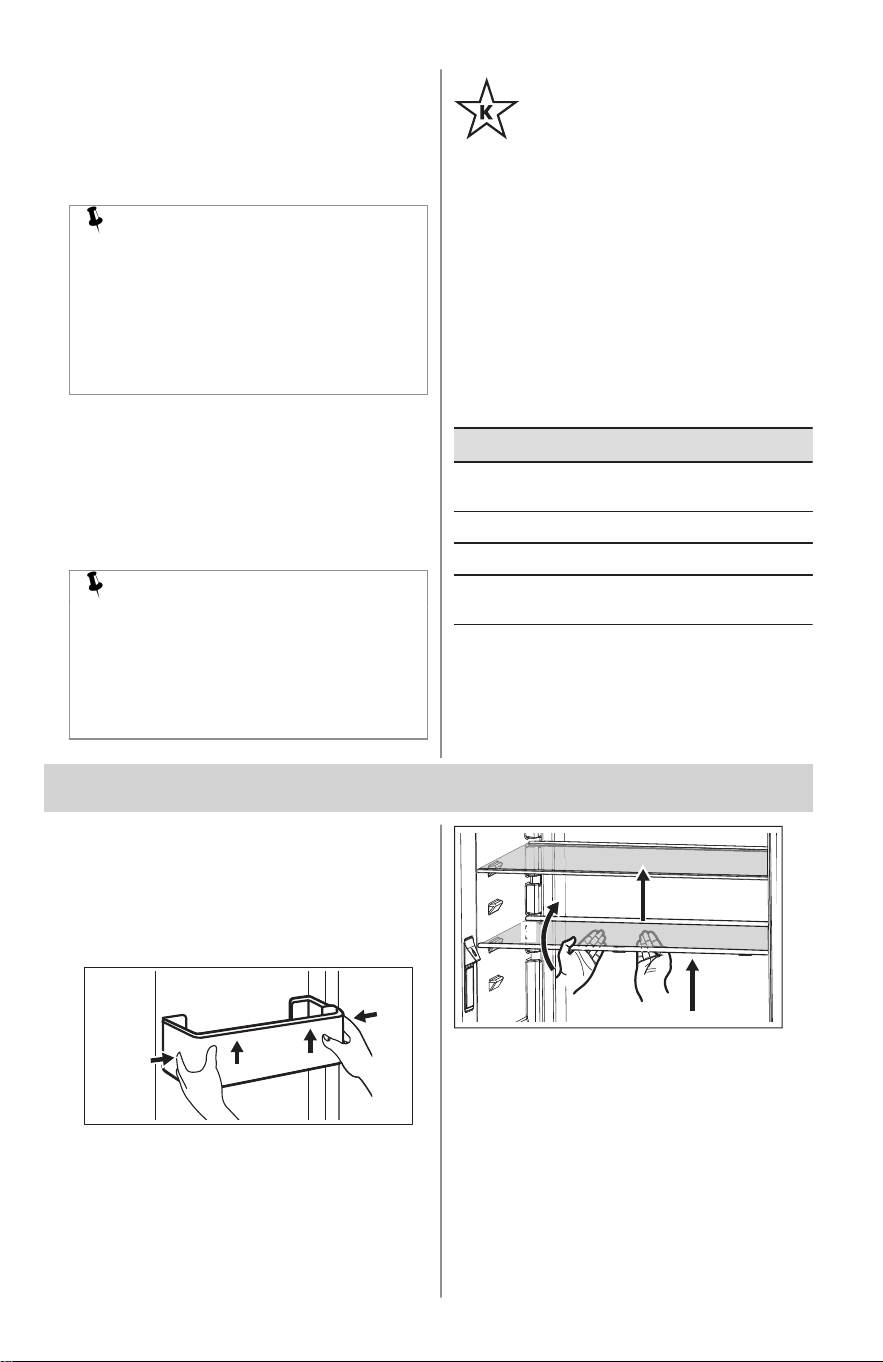
9.1 Door Bins
To remove the door bin:
1. Lift the bin up.
2. Pull it straight out.
9.2 Shelves
To remove the shelves:
1. Lift the shelf.
2. Pull it straight out.
1
2
3
9.3 Removing/Installing crisper
drawers
Use the crisper to keep produce fresh for
longer.
You can remove the drawer for cleaning.
To remove the drawer:
1. Pull the drawer out until it stops.
2. Lift the front slightly and remove the
drawer.
ENGLISH 13

To install the drawer, reverse the
procedure.
10. STORING FOOD AND SAVING ENERGY
10.1 Saving Energy
For optimal appliance performance and
food quality:
• Place the freezer in the coolest area of
the room, away from heat-producing
appliances, heating ducts, and direct
sunlight.
• Allow hot foods to cool to room
temperature before placing them in the
freezer. Overloading the freezer can
cause the freezer compressor to run
longer. Foods that freeze too slowly
may lose quality or spoil.
• Wrap foods properly and ensure
containers are dry before placing them
in the freezer to prevent frost buildup.
• Organize and label food to minimize lid
openings and search time. Take out all
needed items at once and close the lid
promptly.
10.2 Ideas for storing food
Fresh food storage
• Keep the fresh food compartment
between 34°F and 40°F, with an
optimum temperature of
37°F.
• Avoid overcrowding the refrigerator
shelves, which reduces air circulation
and causes uneven cooling.
• Avoid placing food in front of air ports.
Fruits and vegetables
• Store fruits and vegetables in crisper
drawers, where trapped moisture helps
preserve food quality for longer time
periods.
• Wash items and remove excess water.
• Wrap any items that have strong odors
or high moisture content.
Meat
• Wrap raw meat and poultry separately
and securely to prevent leaks and
contamination of other foods or
surfaces.
Frozen foods storage
• Keep the freezer compartment at 0°F
or lower.
• A freezer operates most efficiently
when it is at least 2/3 full.
Packaging foods for freezing
• To minimize food dehydration and
quality deterioration, use aluminum foil,
freezer wrap, freezer bags, or airtight
containers. Force as much air out of
the packages as possible and seal
them tightly. Trapped air can cause
food to dry out, change color, and
develop an off-flavor (freezer burn).
• Wrap fresh meats and poultry with
suitable freezer wrap prior to freezing.
• Do not refreeze meat that has
completely thawed.
Loading the freezer
• Avoid adding too much warm food to
the freezer at one time. This overloads
the freezer, slows the rate of freezing,
and can raise the temperature of frozen
foods.
• Leave a space between packages, so
cold air can circulate freely, allowing
food to freeze as quickly as possible.
11. CARE AND CLEANING
11.1 Protecting your investment
Keeping your appliance clean maintains its
appearance and prevents odor build-up.
Wipe up any spills immediately and clean
the appliance and fresh food
compartments at least twice a year. When
cleaning, take the following precautions:
• Never use chloride or cleaners with
bleach to clean stainless steel.
• Do not wash any removable parts in a
dishwasher.
• Always unplug the electrical power cord
from the wall outlet before cleaning.
• Do not remove the serial plate.
Removal of your serial plate voids your
warranty.
• Remove adhesive labels by hand. Do
not use razor blades or other sharp
14 ENGLISH
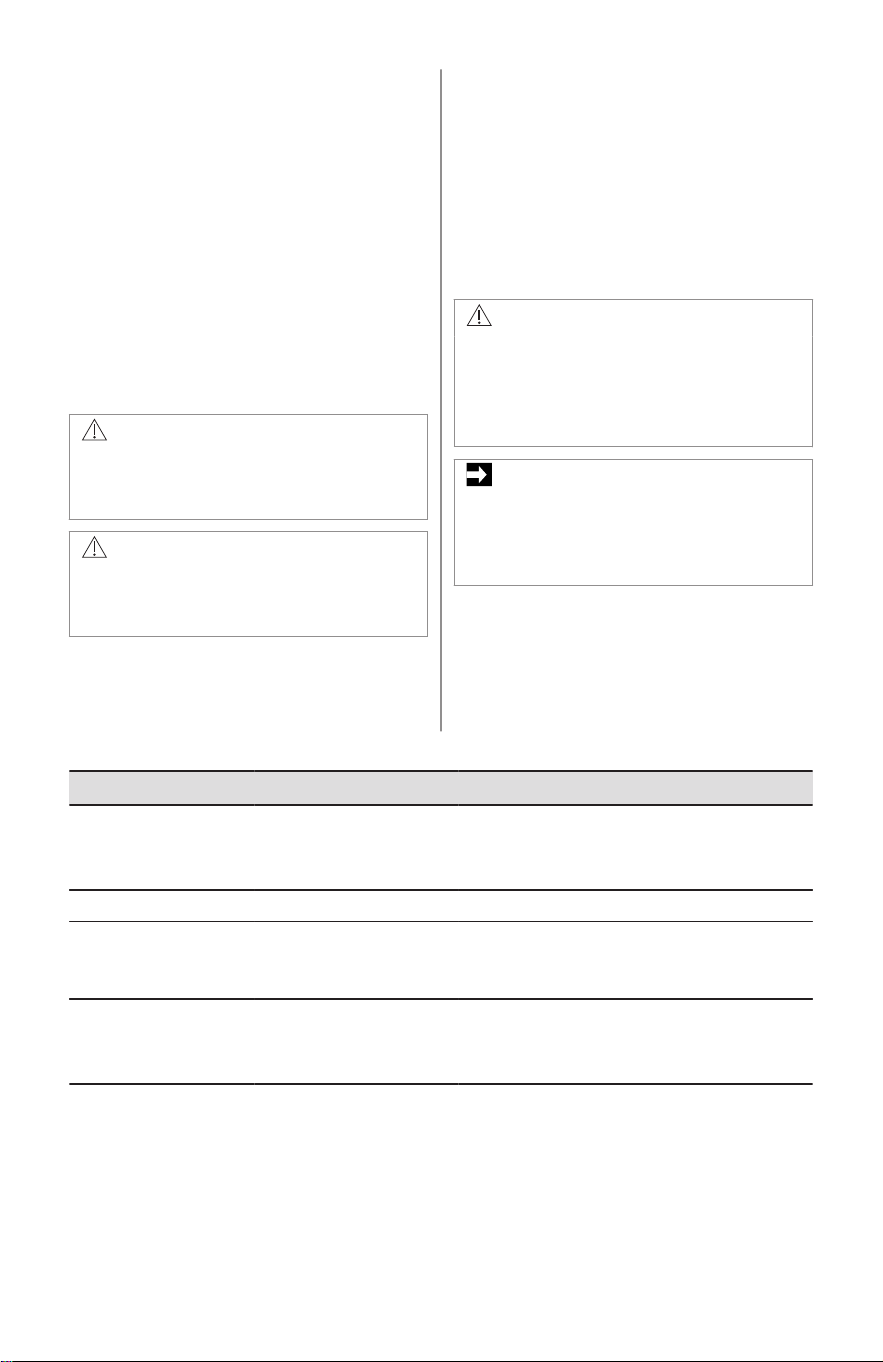
instruments which can scratch the
appliance surface.
Do not use abrasive cleaners such as
window sprays, scouring cleansers,
brushes, flammable fluids, cleaning
waxes, concentrated detergents, bleaches
or cleansers containing petroleum
products on plastic parts, interior doors,
gaskets or cabinet liners. Do not use
paper towels, metallic scouring pads, or
other abrasive cleaning materials or strong
alkaline solutions.
Refer to the guide below for more details
on caring and cleaning specific areas of
your appliance.
CAUTION!
Pull the appliance straight out to move
it. Shifting it from side to side may
damage flooring.
CAUTION!
Damp objects stick to cold metal
surfaces. Do not touch refrigerated
surfaces with wet or damp hands.
Some upright freezers are frost-free and
defrost automatically, but should be
cleaned occasionally.
11.2 Cleaning
Before cleaning remove food from the
appliance and store it well covered.
Clean the appliance interior and
accessories regularly with a cloth and
lukewarm water.
Do not use abrasive cleaners. After
cleaning rinse with fresh water and dry
thoroughly with a clean cloth.
CAUTION!
Unplug the appliance from the power
source before cleaning to avoid
electrical hazard. Never clean the
appliance with a steam cleaner. Allow
the appliance to dry before using it.
IMPORTANT
Do not use organic solvents, such as
lemon juice, juice from an orange
peel, butyric acid, or cleaners
containing acetic acid.
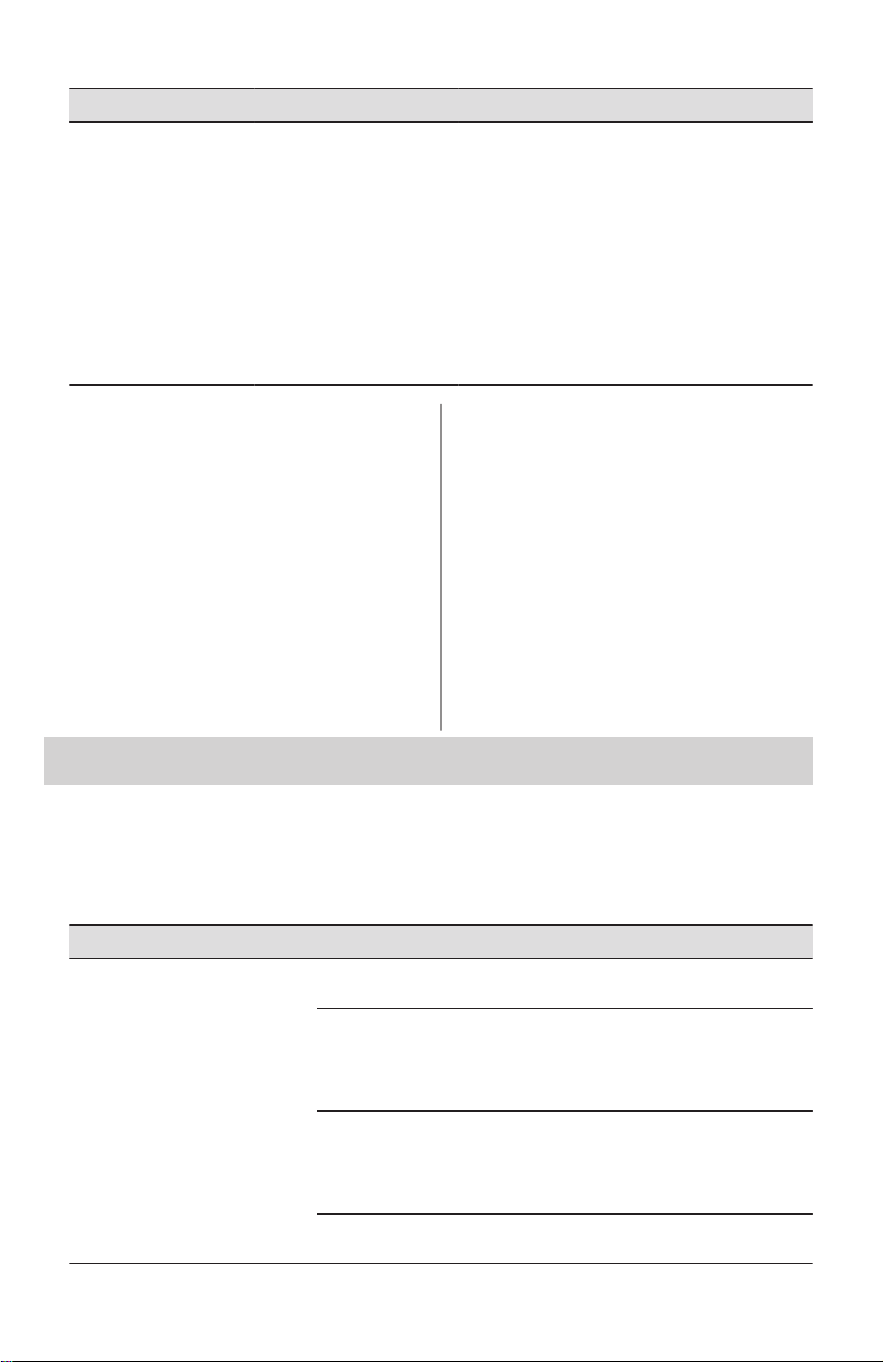
11.3 Care & Cleaning Tips
Table title
Part What to use Tips and precautions
Interior and door liners
• Soap and water
• Baking soda and water
Use 2 tablespoons of baking soda in 1 quart of
warm water. Be sure to wring excess water out of
sponge or cloth before cleaning around controls,
light bulb or any electrical part.
Door gaskets Soap and water Wipe gaskets with a clean soft cloth.
Glass shelves
• Soap and water
• Glass cleaner
• Mild liquid sprays
Allow glass to warm to room temperature before
immersing in warm water.
Exterior and handles
• Soap and water
• Non abrasive glass
cleaner
Do not use commercial household cleaners con
taining ammonia, bleach or alcohol to clean han
dles. Use a soft cloth to clean smooth handles.
Do not use a dry cloth to clean smooth doors.
ENGLISH 15
Part What to use Tips and precautions
Exterior and handles
(Stainless steel models
only)
• Soap and water
• Stainless steel cleaners
Never use chloride or cleaners with bleach to
clean stainless steel.
Clean stainless steel front and handles with non-
abrasive soapy water and a dishcloth. Rinse with
clean water and a soft cloth. Use a non-abrasive
stainless steel cleaner. These cleaners can be
purchased at most home improvement or major
department stores. Always follow manufacturer’s
instructions. Do not use household cleaners con
taining ammonia or bleach.
Always clean, wipe and dry with the grain to pre
vent scratching. Wash the rest of the cabinet with
warm water and mild liquid detergent. Rinse well,
and wipe dry with a clean soft cloth.
11.4 Vacation and moving tips
Short vacations
• Leave the appliance operating during
vacations of three weeks or less.
• Use all perishable items from the
appliance.
Long vacation
• Remove all food and ice if you will be
gone one month or more.
• Unplug the appliance.
• Clean interior thoroughly.
• Leave the appliance doors open to
prevent odors and mold from forming. If
necessary, block the doors open.
Moving
• Unplug the appliance
• Remove all food and ice.
• Recommend use of a handcart, load
from the side.
• Adjust rollers all the way up to protect
them during sliding or moving.
• Pad cabinet to avoid scratching
surface.
12. TROUBLESHOOTING
Table title
.
Let us help you troubleshoot your concern! This section will help you with common issues. If
you need us, visit our website, chat with an agent, or call us. We may be able to help you
avoid a service visit. If you do need service, we can get that started for you!
Visit Frigidaire.com or call toll-free 1-800-374-4432.
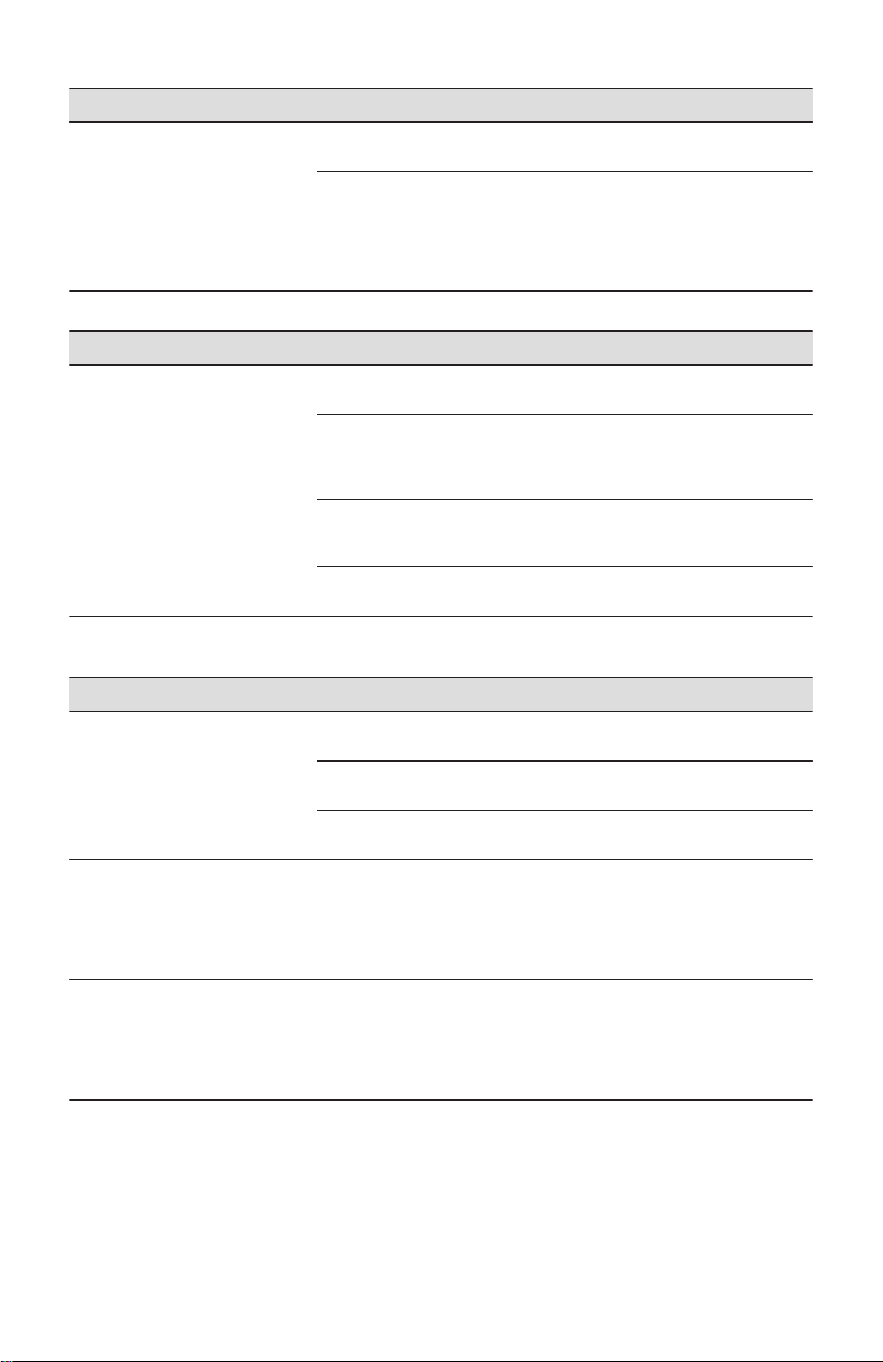
Opening/Closing of Doors/Drawers
Table title
Concern Potential cause Common solution
Door(s) does not close. Door was closed too hard, caus
ing other door to open slightly.
Close both doors gently.
Refrigerator is not level. It rocks
on the floor when moved slightly.
Ensure floor is level and solid,
and can adequately support the
refrigerator. Contact a carpenter
to correct a sagging or sloping
floor.
Refrigerator is touching a wall or
cabinet.
Ensure floor is level and solid,
and can adequately support the
refrigerator. Contact a carpenter
to correct a sagging or sloping
floor.
Food/packaging is obstructing the
door from closing.
Make sure there is no food/pack
aging blocking the doorway.
16 ENGLISH
Concern Potential cause Common solution
Drawers are difficult to move. Food is touching shelf on top of
drawer.
Remove top layer of items in
drawer.
Track that drawers slide on is
dirty.
• Ensure drawer is properly in
stalled on track.
• Clean drawer, rollers, and
track. Refer to Care and
Cleaning.
Running of appliance
Table title
Concern Potential cause Common solution
Compressor does not run. The appliance is unplugged. Ensure plug is tightly pushed into
outlet.
Refrigerator is in defrost cycle. This is normal for a fully automat
ic defrost refrigerator. The defrost
cycle occurs periodically, lasting
about 30 minutes.
House fuse blown or tripped cir
cuit breaker.
Check/replace fuse with a 15 amp
time-delay fuse.
Reset circuit breaker.
Power outage. Check house lights. Call local
electric company.
Water/Moisture/Frost Inside
Refrigerator
Table title
Concern Potential cause Common solution
Moisture collects on inside of re
frigerator walls.
Weather is hot and humid. The rate of frost buildup and inter
nal sweating increases.
Flipper mullion Adjust flipper mullion. Refer to
Flipper Mullion in Installation.
Door is slightly open. See the Opening/Closing of
Doors/Drawers section above.
Water collects on bottom side of
drawer cover.
Vegetables contain and give off
moisture.
• It is not unusual to have mois
ture on the bottom side of the
cover.
• Move humidity control (some
models) to lower setting.
Water collects in bottom of draw
er.
Washed vegetables and fruit
drain while in the drawer.
Water collecting in bottom of
drawer is normal. Dry items be
fore putting them in the drawer or
store produce in tightly sealed
bags to help reduce condensation
inside of the drawer.
ENGLISH 17

Water/Moisture/Frost Outside
Refrigerator
Table title
Concern Potential cause Common solution
Moisture collects on outside of re
frigerator or between doors.
Weather is humid. This is normal in humid weather.
When humidity is lower, the mois
ture should disappear.
Door is slightly open, causing
cold air from inside refrigerator to
meet warm air from outside.
See the Opening/Closing of
Doors/Drawers section above.
13. LIMITED WARRANTY
Your appliance is covered by a one year
limited warranty. For one year from your
date of delivery, Electrolux will pay all
costs for repairing or replacing any parts of
this appliance that prove to be defective in
materials or workmanship when such
appliance is installed, used and
maintained in accordance with the
provided instructions.
Exclusions
This warranty does not cover the following:
1. Products with original serial numbers
that have been removed, altered or
cannot be readily determined.
2. Product that has been transferred from
its original owner to another party or
removed outside the USA, Puerto
Rico, or Canada.
3. Rust on the interior or exterior of the
unit.
4. Products purchased “as-is” are not
covered by this warranty.
5. Food loss due to any refrigerator or
freezer failures.
6. Products used in a commercial setting.
7. Service calls which do not involve
malfunction or defects in materials or
workmanship, or for appliances not in
ordinary household use or used other
than in accordance with the provided
instructions.
8. Service calls to correct the installation
of your appliance or to instruct you
how to use your appliance.
9. Expenses for making the appliance
accessible for servicing, such as
removal of trim, cupboards, shelves,
etc., which are not a part of the
appliance when it is shipped from the
factory.
10. Service calls to repair or replace
appliance light bulbs, air filters, water
filters, other consumables, or knobs,
handles, or other cosmetic parts.
11. Surcharges including, but not limited
to, any after hour, weekend, or holiday
service calls, tolls, ferry trip charges,
or mileage expense for service calls to
remote areas, including the state of
Alaska.
12. Damages to the finish of appliance or
home incurred during transportation or
installation, including but not limited to
floors, cabinets, walls, etc.
13. Damages caused by: services
performed by unauthorized service
companies; use of parts other than
genuine Electrolux parts or parts
obtained from persons other than
authorized service companies; or
external causes such as abuse,
misuse, inadequate power supply,
accidents, fires, or acts of God.
DISCLAIMER OF IMPLIED
WARRANTIES; LIMITATION OF
REMEDIES
CUSTOMER’S SOLE AND EXCLUSIVE
REMEDY UNDER THIS LIMITED
WARRANTY SHALL BE PRODUCT
REPAIR OR REPLACEMENT AS
PROVIDED HEREIN. CLAIMS BASED
ON IMPLIED WARRANTIES, INCLUDING
WARRANTIES OF MERCHANTABILITY
OR FITNESS FOR A PARTICULAR
PURPOSE, ARE LIMITED TO ONE YEAR
OR THE SHORTEST PERIOD ALLOWED
BY LAW, BUT NOT LESS THAN ONE
YEAR. ELECTROLUX SHALL NOT BE
LIABLE FOR CONSEQUENTIAL OR
INCIDENTAL DAMAGES SUCH AS
PROPERTY DAMAGE AND INCIDENTAL
EXPENSES RESULTING FROM ANY
BREACH OF THIS WRITTEN LIMITED
WARRANTY OR ANY IMPLIED
WARRANTY. SOME STATES AND
18 ENGLISH
PROVINCES DO NOT ALLOW THE
EXCLUSION OR LIMITATION OF
INCIDENTAL OR CONSEQUENTIAL
DAMAGES, OR LIMITATIONS ON THE
DURATION OF IMPLIED WARRANTIES,
SO THESE LIMITATIONS OR
EXCLUSIONS MAY NOT APPLY TO
YOU. THIS WRITTEN WARRANTY
GIVES YOU SPECIFIC LEGAL RIGHTS.
YOU MAY ALSO HAVE OTHER RIGHTS
THAT VARY FROM STATE TO STATE.
If You Need Service
Keep your receipt, delivery slip, or some
other appropriate payment record to
establish the warranty period should
service be required. If service is
performed, it is in your best interest to
obtain and keep all receipts. Service under
this warranty must be obtained by
contacting Electrolux at the addresses or
phone numbers below.
This warranty only applies in the USA,
Puerto Rico and Canada. In the USA and
Puerto Rico, your appliance is warranted
by Electrolux Consumer Products, Inc. In
Canada, your appliance is warranted by
Electrolux Canada Corp. Electrolux
authorizes no person to change or add to
any obligations under this warranty.
Obligations for service and parts under
this warranty must be performed by
Electrolux or an authorized service
company. Product features or
specifications as described or illustrated
are subject to change without notice.
USA
1-800-374-4432
Electrolux Consumer Products, Inc.
10200 David Taylor Drive
Charlotte, NC 28262
Canada
1-800-265-8352
Electrolux Canada Corp.
5855 Terry Fox Way
Mississauga, Ontario, Canada L5V 3E4
14. QUEBEC RIGHT TO REPAIR
Though Frigidaire makes every effort to
make replacement parts, repair services
and information necessary to maintain or
repair our products available to
consumers, parts, service and information
are not guaranteed, pursuant to section 39
of the Consumer Protection Act, CQLR, c.
P-40.1 and sections 79.18 to 79.20 of the
Regulation respecting the application of
the Consumer Protection Act, CQLR, c
P-40.1, r. 3. If you need replacement
parts, you may call us at 1 (800) 265-8352
for service in French or English, or
purchase online at Frigidaire Parts |
Shop Frigidaire Replacement Parts &
Accessories - Frigidaire Appliance
Parts.
You may book repair services online at
https://www.frigidaire.ca/RIGHT-TO-
REPAIR/. Alternatively, our resource
library is available at Resource Library |
Frigidaire to help you diagnose and
resolve issues which may arise during the
lifetime of your appliance.
Though most parts are available for
purchase, subject to short-term availability
constraints, the following appliances and
parts are not serviceable.
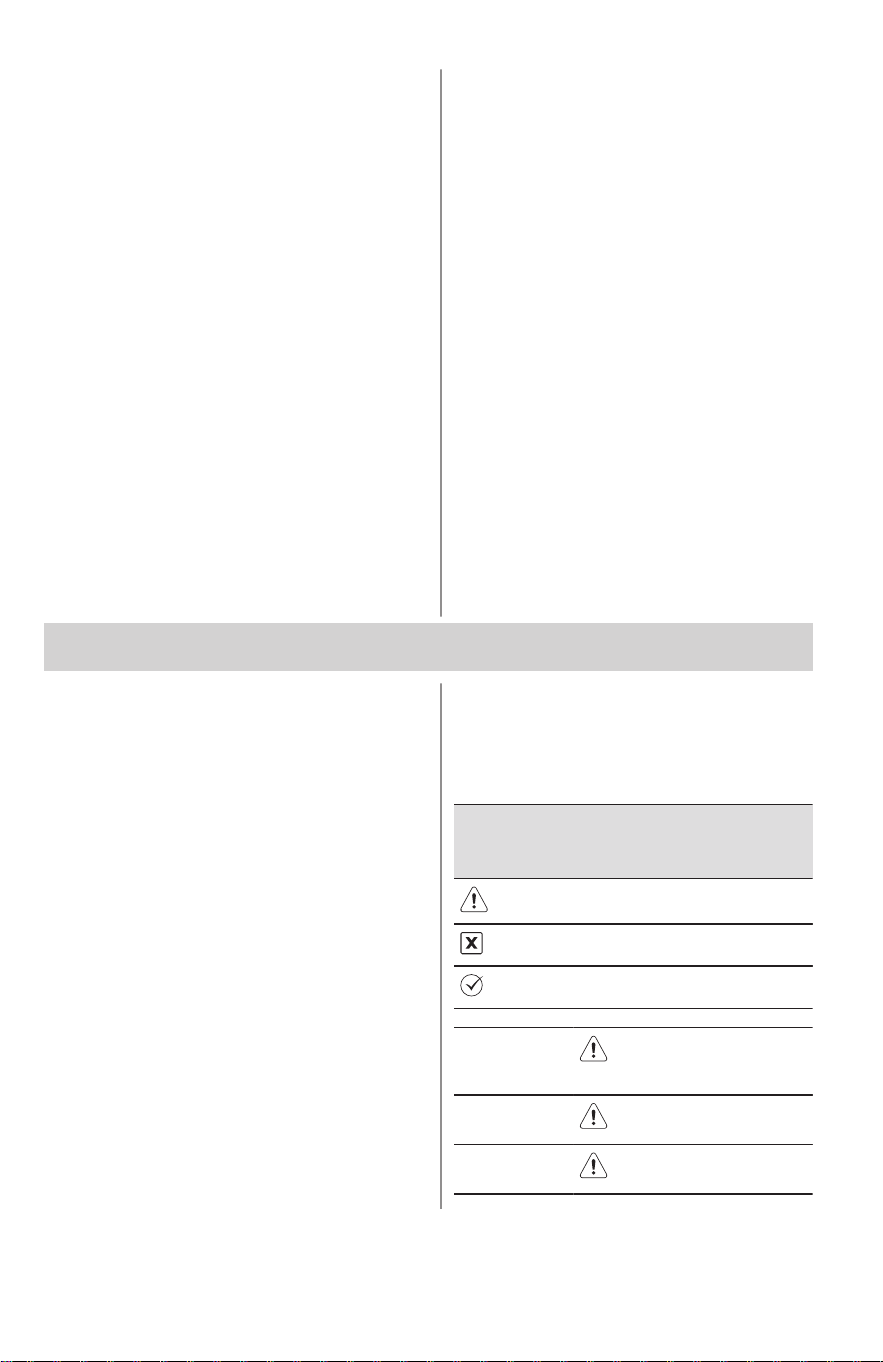
Legend
Availability of replacement parts, repair
services, and information for mainte
nance or repair.
Partially Available
Not Available
Available
Table title
.
Refrigerators Cabinet, 14cu ft and
less no sealed system
parts
Freezer 9 cu. ft and less no
sealed system parts.
Beverage
Centers
Only cosmetic parts
available
ENGLISH 19
*
A31522101 (February 2026)