QUICK START GUIDE
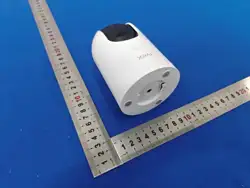
X3G Sma Camera
Before using the product, please read this guide carefully and keep it properly.
Manufacturer
ShenzhenXiaopaiTechnologyCo.,Ltd.
Address: UnitA8F806,Skywohbldg,GaoxinAve.1.S.,
NanshanDistrict,Shenzhen,China
Email: suppo@xpaihome.com
Website:https://xpaihome.com/pages/sma-help-center
Specication
1. Packing List
* A paial list is for reference only, please refer to the actual packing list.
Camera Screw SetSolar panel
① Lens
② MIC
③ PIR Sensor
④ Supplementa light
⑤ Status Indicator
⑥ Device Switch
⑦ TYPE-C Charging Po
⑧ Speaker
⑨ Reset Button
⑩ SIM Card Slot
TF Slot
④
⑦
⑥
⑧
⑨
⑤
③
②
①
2. PRODUCT OVERVIEW
*
*
Viual graph. The cable inteace of dierent devices may be dierent, and
the appearance of the product is subject to the physical object.
7. Camera Main Features
Warning
Impoant Notes Before Use
• Please use this product under the premise of complying with the electrical safety
regulationsof the count and applicable regions.
• Please make sure the product is rmly installed on the wall or ceiling
• lf the product does not work properly, please contact the seice center. Do not
disassembleor modify the product yourself.
• Keep the product away from electromagnetic inteerence sites to avoid damage
• Do not touch the heat dissipation pas of the product with your hands to avoid burns.
• Please keep the product away from liquid environment.
• The product needs to be stored in a d and non-corrosive gas environment.
• Please use this product in the specied temperature and humid environment.
• Do not point the lens directly at strong light, otherwise it will damage the image sensor.
• Please ventilate around the product to avoid heat buildup.
• Do not touch the image sensor directly. lf you need to clean it, please slightly dampen a
softclean cloth with alcohol and gently wipe o the dust.
• Products connected to the Internet may face network security issues, please strengthen
theprotection of personal information, When you nd that there are network security
risks in theproduct,please contact us in time.
• Please keep your username and password safe
• Please keep all the original packaging materials of the product, and you need to return
it tothe manufacturer for processing when there is a problem.
1. Despite eve eo to ensure the accuracy of this manual, slight dierences may occur
due to product updates.
2. Please inse or remove the SIM card only when the camera is powered o.
3. For stable network peormance, it is recommended to use the SIM card included with
the camera.
4. The included SIM card provides 100MB of free data. Please activate or purchase a data
plan in the APP after successfully adding the device.
5. To ensure continuous operation, please make sure the SIM card has sucient data
balance and renew the data plan in time.
6. To extend batte life, avoid pointing the camera directly at busy roads or high-trac
areas, as frequent motion detection may increase power consumption.
7. Please ensure the installation location has strong 4G signal coverage, otherwise the
camera may experience connection issues.
8. Fully charge the camera before rst use. Avoid charging in extreme temperatures to
protect batte peormance.
9. Install the solar panel in a location with direct sunlight exposure to ensure optimal
charging eciency.
10. Live view and playback functions may consume mobile data. Please monitor your data
usage to avoid unexpected charges.
Notes
WEEE Directive
Correct Disposal of this product. This marking indicates that this product
should not be disposed with other household wastes throughout the EU. To
prevent possible harm to the environment or human health from uncontrolled
waste disposal, recycle it responsibly to promote the sustainable reuse of
material resources. To return your used device, please use the return and
collection systems or contact the retailer where the product was purchased.
They can take this product for environmental safe recycling.
Warranty
(Reseed by the user, and not reissued if lost)
The host is guaranteed within 1 year from the purchase date:
1. In case of any failure caused by the product itself during the warranty period, please contact our
after-sales seice;
2.Please send back or fax the completed warranty card in time after purchase, so that you can enjoy
the repair and replacement for free, otherwise it will not be accepted;
3.The information on your warranty card will be used for repair, please ll it in carefully;
4.The following cases are covered by paid warranty:
- Failure caused by man-made reasons;
- Failure caused by improper use environment not meeting the requirements of the product;
- Product damage caused by force majeure;
- There is no product serial number or warranty card, or the product serial number and label is
indistinguishable or damaged;
- The warranty period has expired.
* Within the scope permitted by law, the interpretation right of the above terms belongs to Shenzhen XiaopaiTechnologyCo.,Ltd.
Name
Address
Tel
Postal Code
Model
Production Date
Purchase Price
Shop Name
SN
Purchase Date
Invoice No.
4. Download and install the APP
Registering a New Account
Open the mobile app store to search for "XPAI", or scan the QR code below,
download the app and complete the installation.
For a smooth setup, please allow the required permissions when prompted.
They are only used to connect your camera and deliver ales.
You can register using either an email address or a phone number; the email
registration inteace is displayed by default.
1. Register new account
2. Please enter your email address correctly and click "Send." You will receive a
notication stating, "Sent captcha successfully." Please check your email to
retrieve the verication code, then return to this screen to enter it. Read and
click to agree to the "User Seice Agreement" and "Privacy Policy", and nally,
click "Next."
3. Please create a login password for your account according to the password
requirements, and keep it in a safe place for future logins.
1. Cloud
View cloud recordings. A cloud storage plan is required to
access cloud video playback.
2. Local
Access and playback videos saved on the local storage (e.g., SD
card).
3. Call
Sta a two-way audio conversation through the camera.
4. Recording
Manually record the current live video.
5. Screenshot
Capture a snapshot of the current screen.
6. Adjust
Automatically adjust the camera angle for optimal viewing.
7. Preset
Set specic camera positions for quick access.
8. PTZ (Pan-Tilt-Zoom)
Manually control the camera’s movement (pan, tilt, zoom).
9. Location
View and manage saved preset positions.
10. Operation
Open the feature control panel for advanced settings.
11. 4G Plan
Top up data for the device to keep your camera online at all
times.
The above provides a basic introduction to the
product functions. For more detailed instructions,
please scan the QR code on the right to access
the XPAI ocial X3E video tutorials on YouTube,
where you can learn about camera setup, feature
usage, and other related content.
(Scan for video tutorials)
Note: Due to app updates, the inteace may dier slightly. Please refer to the
actual app display.
1. Camera cannot power on?
Answer:
• Please ensure the device is fully charged. Use a 5V power adapter and t
turning it on again.
• If it still does not power on or is damaged, please contact after-sales
suppo.
2. Unable to add the camera?
Answer:
• Please refer to Section 5 “ADD CAMERA” and t the operation again.
• Or contact customer seice for guidance.
3. No network connection after using for a period of time?
Answer:
• If using the SIM card included with the camera, it usually contains only a
small trial data package. Please check if the data has been used up.
• Check in the APP whether the data plan has been recharged or renewed.
• Verify whether the SIM card data seice is working properly.
• Ensure the 4G signal in your area is stable and free from inteerence.
4. Frequent disconnection or unstable connection?
Answer:
• Check if the surrounding 4G signal is stable and avoid metal or wall
obstruction.
• Ensure the SIM card is correctly inseed and not loose.
• Check whether the carrier network covers the installation area.
• It is recommended to use the SIM card provided or recommended with the
device.
1. Click "Add device". 2. Scan the QR code on device
5 Tap the play button
to view the live camera
feed.
Installation Height: 2–3 meters
PIR Detection Range: 2–10 meters
When installing the camera,Mount the
camera at a height of 2–3 meters (7–10
feet) above the ground. At this height,
the motion sensor detection range will
be maximized.
For optimal motion detection
peormance, install the camera at a
slight angle.
Note: If a moving object approaches the PIR sensor directly in a straight line,
the camera may not detect the motion eectively. PIR sensors are more
sensitive to lateral (crossing) movement than direct approaching movement.
3 Waiting to search for
and connect to the
device.
4. Device added
successfully; name
the device.
This device complies with pa 15 of the FCC Rules. Operation is subject to the following two
conditions:
(1) This device may not cause harmful inteerence, and (2) this device must accept any
inteerence received, including inteerence that may cause undesired operation.
This equipment has been tested and found to comply with the limits for a Class B digital device,
pursuant to pa 15 of the FCC Rules. These limits are designed to provide reasonable protection
against harmful inteerence in a residential installation. This equipment generates, uses and can
radiate radio frequency energy and, if not installed and used in accordance with the instructions,
may cause harmful inteerence to radio communications. However, there is no guarantee that
inteerence will not occur in a paicular installation. If this equipment does cause harmful
inteerence to radio or television reception, which can be determined by turning the equipment
o and on, the user is encouraged to t to correct the inteerence by one or more of the
following measures:
- Reorient or relocate the receiving antenna.
- Increase the separation between the equipment and receiver.
- Connect the equipment into an outlet on a circuit dierent from that to which the receiver is
connected.
- Consult the dealer or an experienced radio/TV technician for help.
Changes or modications not expressly approved by the pay responsible for compliance
could void the user's authority to operate the equipment.
This equipment complies with FCC RF radiation exposure limits set foh for an
uncontrolled environment. This equipment should be installed and operated with
minimum distance 20 cm (7.9 inches) between the radiator & your body. This transmitter
must not be
co‐located or operating in conjunction with any other antenna or transmitter.
Camera
Please remove the protective lm before use to ensure optimal peormance.
3. Charging Instructions
*
To ensure safety, do not charge the device in environments with extreme high or
low temperatures, or high humidity.
Batte Safety Instructions
If the batte is low, remove the camera and fully charge it indoors using a 5V
power adapter before reinstalling.
Do not puncture or damage the batte with sharp objects.
Keep the charging po d and clean. Seal it with the rubber cover after charging.
Please use a ceied, high-quality power adapter with a 5V output to charge the
device.
Do not charge, use, or place the device near heat sources or re.
Stop using or charging immediately if there is odor, overheating, or deformation.
• The device is paially charged upon delive. Before rst use, please open the
silicone plug and use the power cable and adapter to fully charge the device.
The batte is built-in; do not attempt to remove it.
• After charging, please rmly reseal the silicone plug into the power po to
prevent moisture or water from entering.
6. Install the camera
1. Take out the camera bracket. Check the orientation of the bracket thread, then
tighten the central knob.
2. Adhere the positioning sticker to the desired installation location. Drill holes at
the marked positions on the sticker.
3. Inse the plastic wall anchors into the drilled holes. Pass the screws through the
bracket's mounting holes and tighten them into the anchors.
4. Screw the camera onto the bracket thread to secure it.
Step 1: Install the Solar Panel Bracket
Use the solar panel bracket and screws included in the package to securely x the
solar panel bracket onto the wall.
Note: For optimal charging peormance, install the solar panel in a location with no
obstruction and sucient sunlight exposure. It is recommended to receive at least 4
hours of direct sunlight per day.
Step 2: Mount the solar panel onto the bracket.
Step 3:
Adjust the angle of the solar panel according to the installation environment,
ensuring the panel faces direct sunlight.
A tilt angle of approximately 45° is recommended for optimal peormance.
Step 4: Connect the Solar Charging Cable
Inse the solar charging cable through the waterproof opening and securely
connect it to the camera’s charging po.
After connection, ensure the po is properly sealed to prevent water or moisture
from entering.
Wall/Ceiling Mounting Steps
* Ensure the installation wall can bear 3 times the total weight of the camera
Precautions for Installation
5. Add camera
Inse the SIM Card
Open the waterproof cover on the bottom of the camera.
Inse the SIM card with the gold contacts facing down.
Note: Do not inse the SIM card in the wrong direction, or it may not be
recognized.
Inse MicroSD Card
Please power o the camera before installation. Locate the MicroSD card slot
on the side of the camera, and inse the MicroSD card with the metal contacts
facing into the slot.
Before adding the camera in the app, please inse the included SIM card into
the camera’s SIM card slot.
To store and play back recorded videos, you need to purchase a MicroSD card
separately and inse it into the camera’s MicroSD card slot. This device does
not include a MicroSD card. The camera suppos MicroSD cards with capacities
from 32GB to 512GB.
Note:
Always power o the camera before inseing or removing the MicroSD card or
SIM card to prevent malfunction or damage.
Power On the Camera
After inseing the SIM card, switch the power to ON.
Wait for the device to sta up. The status indicator will blink green.
When you hear the prompt conrming successful connection to the network
and seer, the camera is connected to the 4G network, and the indicator will
turn solid green.
Next, add the camera to the XPAI app.
5. Cannot receive alarm notications on phone?
Answer:
• Check whether APP notication permission is enabled in system settings.
• Make sure motion detection is enabled on the camera.
• T restaing your phone or clearing background apps.
• Check whether the camera is properly connected to the network.
• Verify whether the SIM card data plan is active (not expired or exhausted).
6. Motion detection is inaccurate?
Answer:
• Increase the motion detection sensitivity in settings.
• Avoid installing the camera facing areas with frequent movement (e.g.,
trees, roads).
• If there are many false ales from animals or vehicles, you may turn o “AI
Human Detection”.
7. Can the camera connect to Wi-Fi?
Answer:
• No. It only suppos 4G network.
8. What to do when the data plan expires?
Answer:
• If using the SIM card included: Go to the live view screen and tap “4G Data
Recharge” to top up data for the device.If you are unable to recharge,
please contact customer suppo.
• If using your own SIM card: please contact your carrier to renew or change
the plan.
9. What should I do if I cannot add the device by scanning the QR code?
Answer:
• If the QR code is damaged, blurred, or cannot be scanned clearly by the
phone camera, you can add the device by manually entering the SN code
8. FAQ (Frequently Asked Questions)
Answer:
• Please send the issue details and order information to: seice@xpai-
home.com
10. Still cannot solve the issue?
located under the QR code.
• The SN code is usually long and contains multiple digits. Please
double-check carefully when entering it to ensure accuracy and avoid errors
such as missing, extra, or incorrect digits.
Product Name Sma Camera
Model LC2520
Power Supply DC 5V 3A
Working Temperature -5℃~45℃ Humidity <90%
Storage Temperature -20℃~60℃ Humidity <95%
Bracket
4G SIM card Quick Sta Guide
Solar Panel Screw Set
Charging Cable Positioning Sticker Data Plan Recharge Guide
Indicator status
Red light keeps on: the camera stas.
Green light slow ashing: waiting for network distribution, WiFi disconnection.
Alternating red and green: connecting to WiFi.
Red light slow ashing: the device is offline.
Green light keeps on: the camera is online.
ON/OFF
Type-C
MicroSD Card
Nano
SIM Card
RESET
Ceiling Mounting Wall Mounting
⑩
If you choose to register an account using a phone number,
1. Click "Phone number" to register.
2. Click to select your address region and choose the corresponding count
code (e.g. U.S.A.).
3. Enter your phone number and tap “Send”. Please check the verication code
in your phone messages, enter it on this page, agree to the User Seice
Agreement and Privacy Policy, then tap “Next”.
4. Please create a login password for your account according to the password
requirements and keep it safe for future login.
1 2
3 4
11. Device Sharing
Share camera access or control with family or friends
for remote viewing.
12. Settings
View or adjust device settings, including product info,
alarm settings, night vision, and recording modes."
13. Patrol
Enable automatic patrol mode to scan designated areas.
14. Human Tracking
Automatically track detected human movement.
15. Human Tagging
Enable labels or markers for detected people.
16. Human Detection
Turn on human-only detection to reduce false ales.
17. Motion Detection
Enable general motion detection ales.
18. Face Enhancement
Sma lighting + AI for clearer faces, even in low light.
19. Manual Alarm
Trigger an alarm manually through the app.
0750-LCR5952Y-01
84mm
84mm
84
mm
84
mm