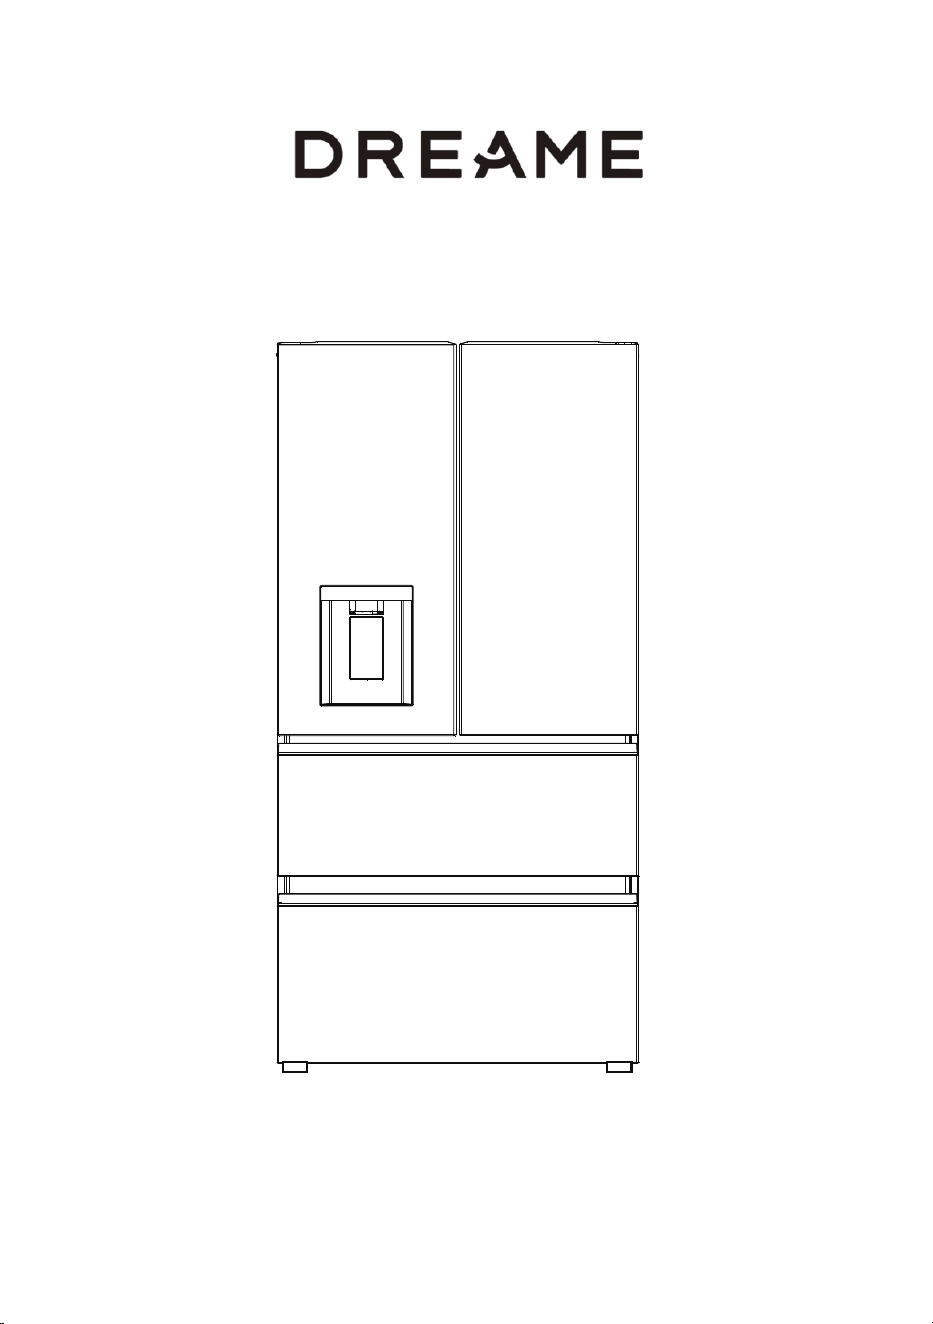
Instruction Manual
Please read this instruction manual before connecting
your refrigerator and keep it for future reference.
_
MODEL: DRF560WMXEEUP

Table of Contents
Warning ....................................................................................................................... - 1 -
Safety and Warning Information .............................................................................. - 3 -
Basic Safety Symbol................................................................................................................................................................... - 3 -
Appliance Connection ................................................................................................................................................................ - 3 -
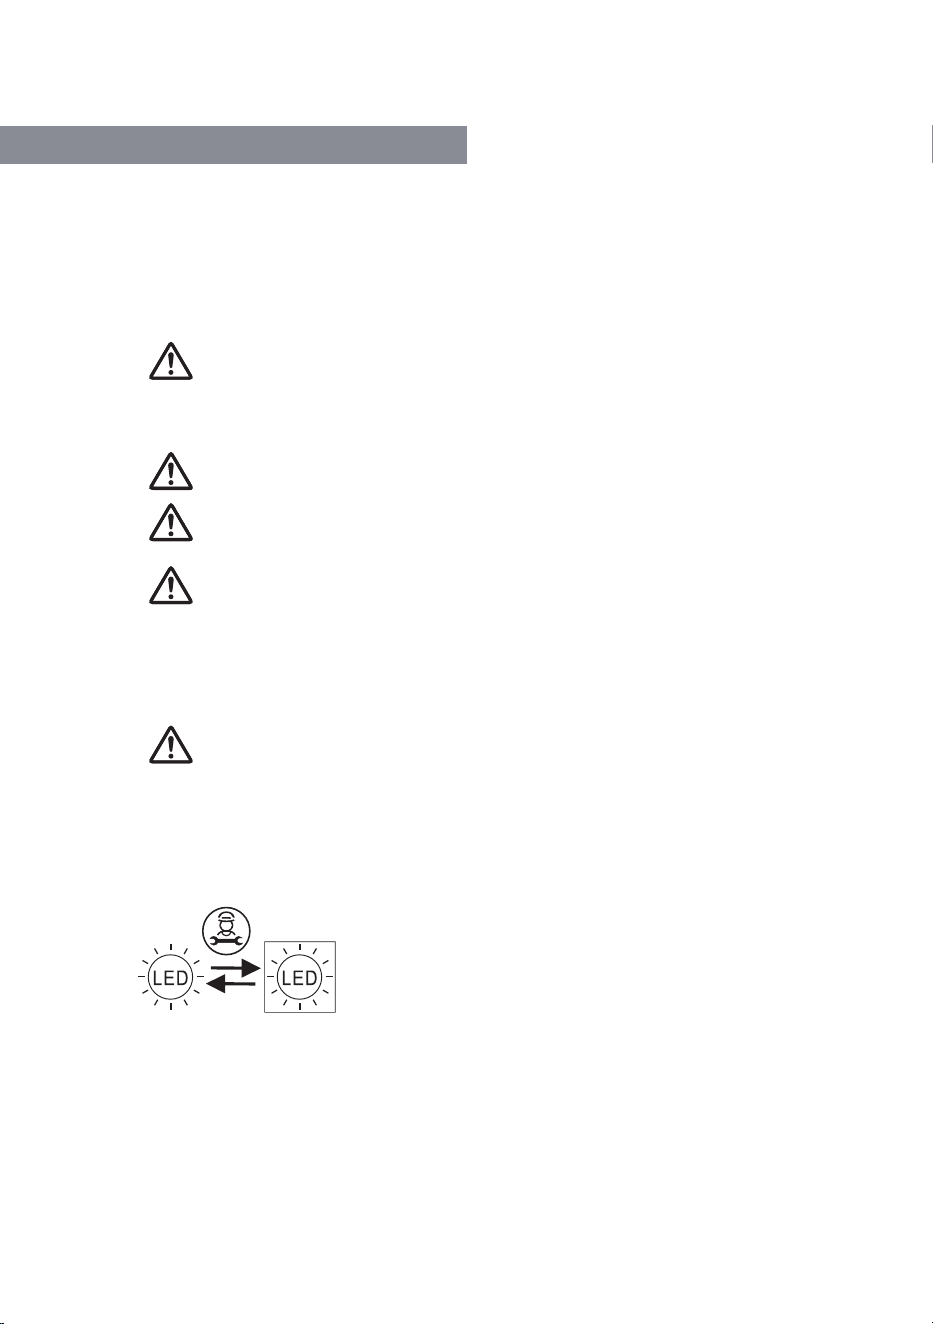
LED Light ....................................................................................................................................................................................... - 3 -
Safety and Warning Information ............................................................................................................................................ - 4 -
Product Overview ...................................................................................................... - 7 -
Product Features ......................................................................................................................................................................... - 7 -
Product Components ................................................................................................................................................................. - 8 -
Installation Dimensions .............................................................................................................................................................. - 9 -
Installation................................................................................................................. - 10 -
Transportation ............................................................................................................................................................................ - 10 -
Where to Install Your Unit ...................................................................................................................................................... - 1 0 -
Adjustable Plastic Feet ............................................................................................................................................................ - 10 -
Door Rack .................................................................................................................................................................................... - 1 0 -
Operation ...................................................................................................................- 11 -
Before Use .................................................................................................................................................................................... - 11 -
Beginning ...................................................................................................................................................................................... - 11 -
Automatic Ice Maker ................................................................................................................................................................. - 11 -
Control Panel .............................................................................................................................................................................. - 12 -
Fresh Flex Temp Setting......................................................................................................................................................... - 14 -
Mode Configuration.................................................................................................................................................................. - 14 -
Child Lock Feature.................................................................................................................................................................... - 16 -
Sparkling Water User Guide .................................................................................................................................................. - 17 -
Drain Mode.................................................................................................................................................................................. - 18 -
Pending Mode ............................................................................................................................................................................ - 19 -
Sparkling Water Maker – Initial Setup and Operating Instructions ......................................................................... - 20 -
CO
2
Cylinder Safety and Storage Guidelines ...................................................................................................................- 22 -
Sparkling Water Refrigerator Network Configuration Guide ..................................................................................... - 24 -
Refrigerator Compartment .................................................................................................................................................... - 25 -
Freezer Compartment............................................................................................................................................................. - 25 -
Instructions for Storing Food ............................................................................................................................................... - 26 -
Storage of Foods ...................................................................................................................................................................... - 26 -
Maintenance ..............................................................................................................- 溢溩 -
Defrosting ................................................................................................................................................................................... - 溢溩 -
Cleaning ...................................................................................................................................................................................... - 溢溩 -
General Information ................................................................................................................................................................. - 溢溩 -
Energy Saving Tips ................................................................................................................................................................... - 3溠 -
Normal Phenomena .................................................................................................................................................................. - 3溠 -
Troubleshooting ........................................................................................................................................................................ - 3溡 -
Important Disassembly Instructions ...................................................................... - 3溢 -
Door Racks and Glass Shelves Disassembly ................................................................................................................... - 3溢 -
After-Sales Service .................................................................................................. - 3溣 -
Warranty Period........................................................................................................................................................................ - 3溣 -
After-Sales Contact Information & Spare Parts Purchase Channels ....................................................................... - 3溣 -
- 1 -
Warning
Per the EN standard
•
This appliance can be used by children aged from 8 years and above and persons with reduced physical, sensory
or mental capabilities or lack of experience and knowledge if they have been given supervision or instruction
concerning use of the appliance in a safe way and understand the hazards involved. Children shall not play with the
appliance. Cleaning and user maintenance shall no
t be made by children without supervision.
•
Children aged from 3 to 8 years are allowed to load and unload refrigerating appliances.
Per the IEC standard
•
This appliance is not intended for use by persons (including children) with reduced physical, sensory or mental
capabilities, or lack of experience and knowledge, unless they have been given supervision or instruction
concerning use of the appliance by a pers
on responsible for their safety.
•
Children should be supervised to ensure that they do not play with the appliance.
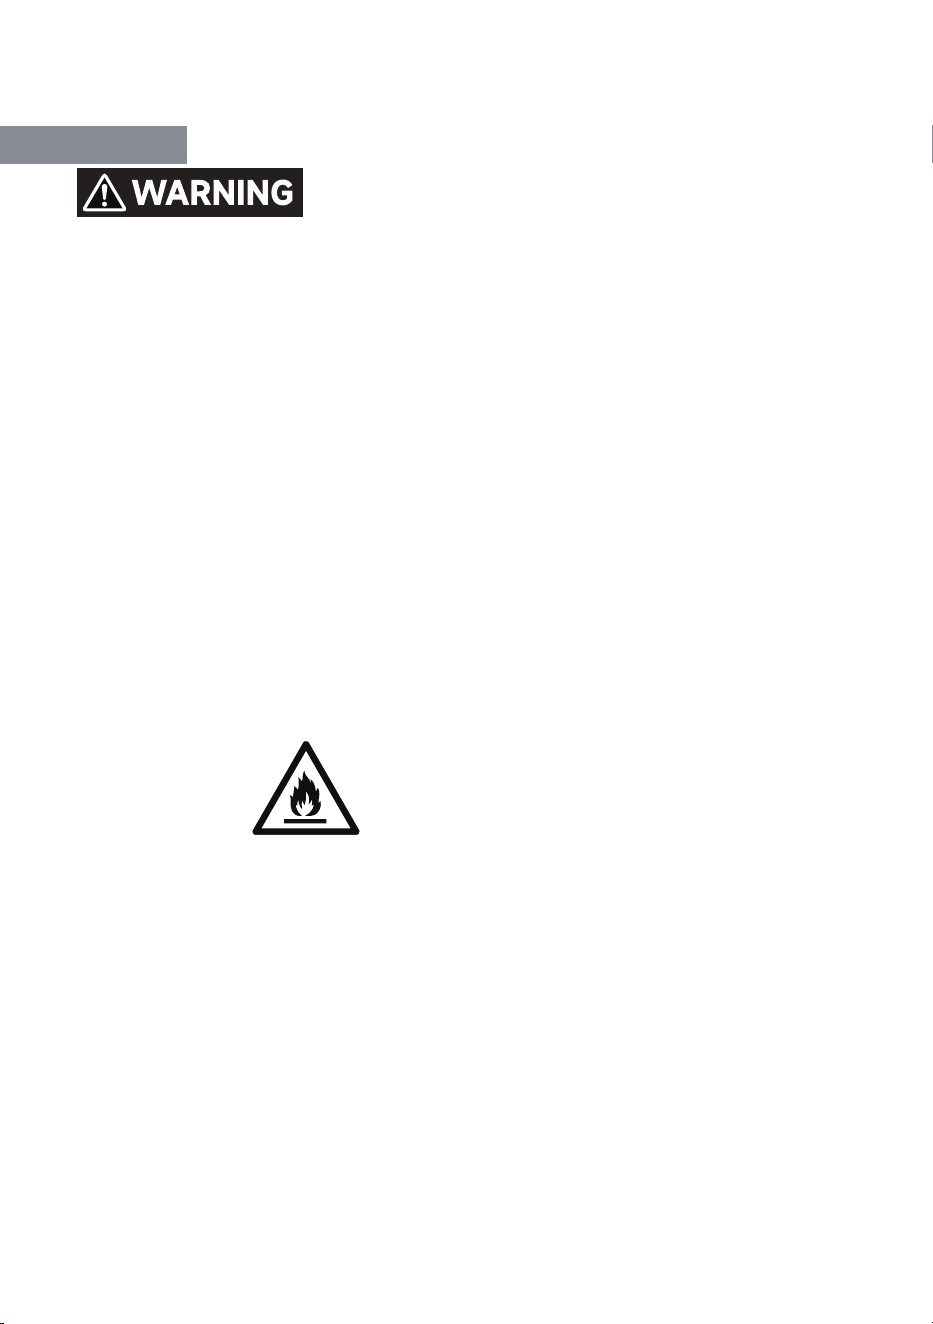
The refrigerant isobutane (R600a) is contained within the refrigerant circuit of the appliance, a natural gas with a
high level of environmental compatibility, with which is nevertheless flammable.
During transportation and installation of the appliance, ensure that none of the components of the refrig
erant
circuit becomes damaged.
The refrigerant (R600a) is flammable.
Symbol ISO 7010 W021 Warning;
Risk of fire/flammable materials!
WARNING: The appliance must be positioned so that the plug is accessible.
WARNING: If the supply cord is damaged, it must be replaced by the manufacturer, its service agent or similarly
qualified persons in order to avoid a hazard.
WARNING: Keep ventilation openings, in the appliance enclosure or in the built-in structure, clear of obstruction.
WARNIN
G: Do not use mechanical devices or other means to accelerate the defrosting process, other than those
recommended by the manufacturer.
WARNING: Do not damage the refrigerant circuit.
WARNING: Do not use electrical appliances inside the food storage compartments of the appliance, unless they
are of the type recommended by the manufacturer.
WARNING: This unit uses R600a as the refrigerant and cyclopentane as the foam
ing agent; both are highly
flammable. Keep the unit away from heat sources when disposing of it.
WARNING: To avoid electric shock, ensure the unit is properly grounded using the yellow-green grounding wire
before operation.
WARNING: Dispose of the refrigerator according to local laws and regulations.
- 2 -
WARNING: The refrigerant and insulation blowing gases are flammable. Disposing of the refrigerant must be done
at authorized waste disposal centers. Do not expose the refrigerant or insulation to heat or open flames.
WARNING: Do not store explosive materials such as aerosol cans containing flammable propellants in this
appliance.
WARNING: When positioning the appliance, ensure the supply cord is not trapped or
damaged.
WARNING: Do not locate multiple portable socket-outlets or portable power supplies at the rear of the appliance.
WARNING: To avoid contamination of food, please respect the following instructions:
•
Opening the door for long periods can cause a significant increase of the temperature in the compartments of
the appliance.
•
Clean regularly surfaces that can come in contact with food and accessible drainage systems.
•
Clean water tanks if they have not been used for 48 h; flush the water system connected to a water supply if
water has not been drawn for 5 days.
•
Store raw meat and fish in suitable containers in the refrigerator, so that it is not in contact with or drip onto
other food.
•
Two-star frozen-food compartments are suitable for storing pre-frozen food, storing or making icecream and
making ice cubes.
•
One-, two- and three-star compartments are not suitable for the freezing of fresh food.
•
If the refrigerating appliance is left empty for long periods, switch off, defrost, clean, dry, and leave the door
open to prevent mould developing within the appliance.
WARNING: Risk of child entrapment. Before disposing of your old refrigerator or freezer:
•
Remove the doors.
•
Keep the shelves in place to prevent children from easily climbing inside.
WARNING: Before performing any type of installation or cleaning, unplug the refrigerator and adjust the
temperature controls to the desired setting(s). When you're done, plug the refrigerator back into the power source
and adjust the temperature controls to the desired setting.
This appliance is intended to be used in household and similar applications such as澱
•
staff kitchen areas in shops, offices and other working environments;
•
farm houses and by clients in hotels, motels and other residential type environments;
•
bed and breakfast type environments;
•
catering and similar non-retail applications.
WARNING: fill with potable water only.
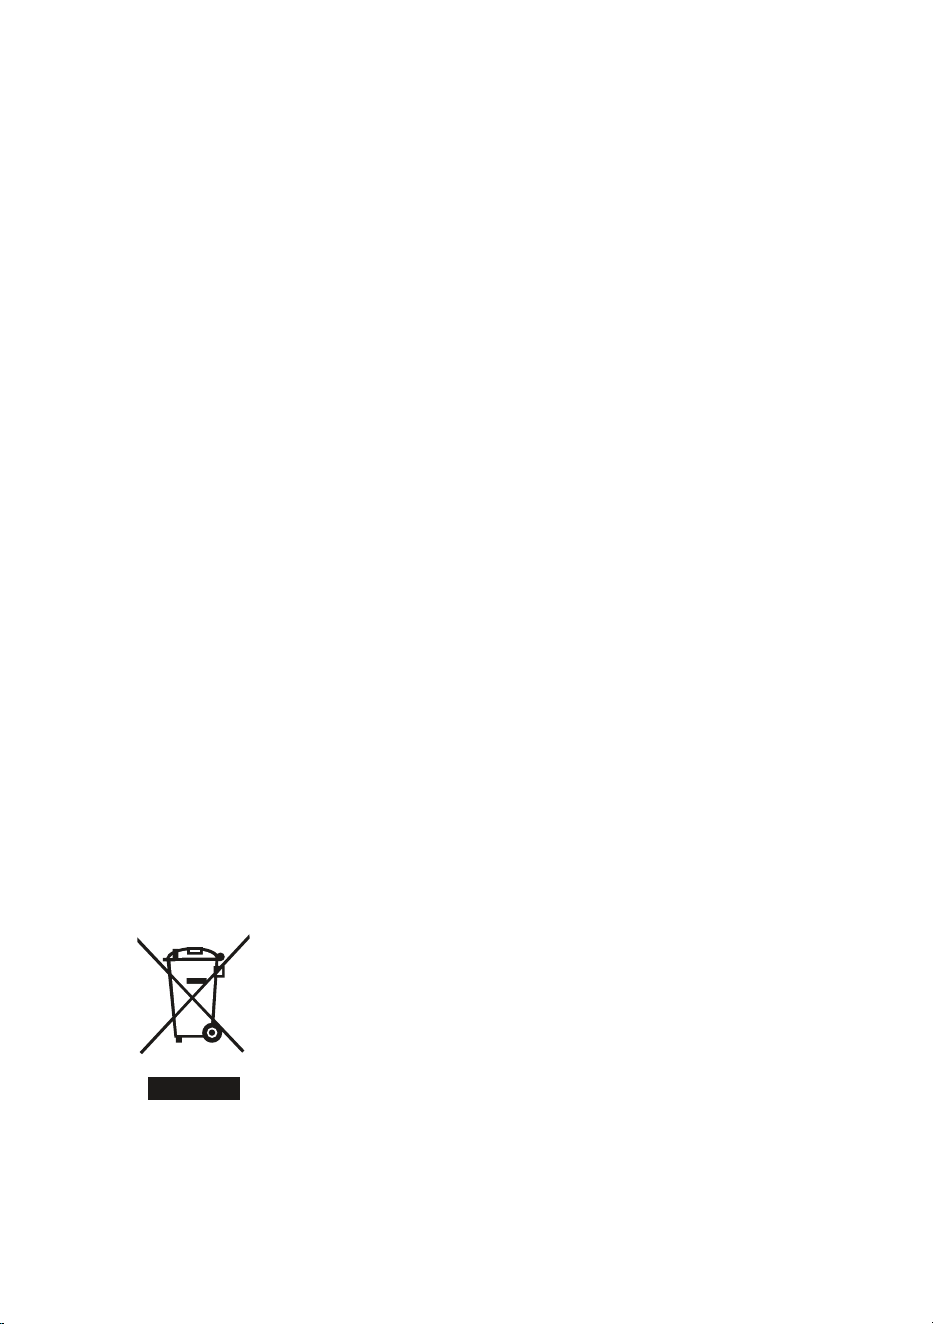
This marking indicates that the product should not be disposed of with other
household waste throughout the EU. To prevent potential harm to the
environment or human hea
lth caused by improper waste disposal, recycle
responsibly to support the sustainable reuse of material resources.
To return your used device, please utilize the return and collection systems or
contact the retailer where you purchased the product.
They can take this product for environmentally safe recycling.
- 3 -
Safety and Warning Information
Basic Safety Symbol
This guide includes numerous critical safety notices. Always read and
follow all safety instructions.
This is the safety alert symbol. It alerts you to warnings about potential
hazards that could cause injury or death.
These messages also help protect your unit from damage. All safety
messages are preceded by the safety alert symbol and the following
hazard
signal words: DANGER, WARNING, or CAUTION.
These words signify:
DANGER
Failure to follow these instructions could result in serious injury or
death.
WARNING
Failure to follow these instructions may result in serious injury or death.
CAUTION
Indicates an immediately hazardous situation that, if not avoided, could
result in minor to moderate injury or product damage.
Appliance Connection
CAUTION
This product is designed for use with 220-240V/50Hz power supply
only, with an allowable voltage fluctuation range of 187V to 242V. It
cannot be used if the voltage frequency is not 50Hz.
To ensure safety, the socket and its cable must be able to withstand
the current of above 10A.
LED Light
Replaceable (LED only) light source by a professional.
This product features light sources in the Fresh Food Compartment and
water dispenser area.
The top light in the Fresh Food Compartment is
EU energy efficiency grade F while other lights fall outside the scope of
(EU) 2019/2015 and (EU) 2019/2020 regulations (with a luminous flux
below <60lm)
- 4 -
Safety and Warning Information
To minimize the risk of fire, electric shock, or personal injury while using
your product, observe these basic safety precautions:
Read all instructions before using this appliance.
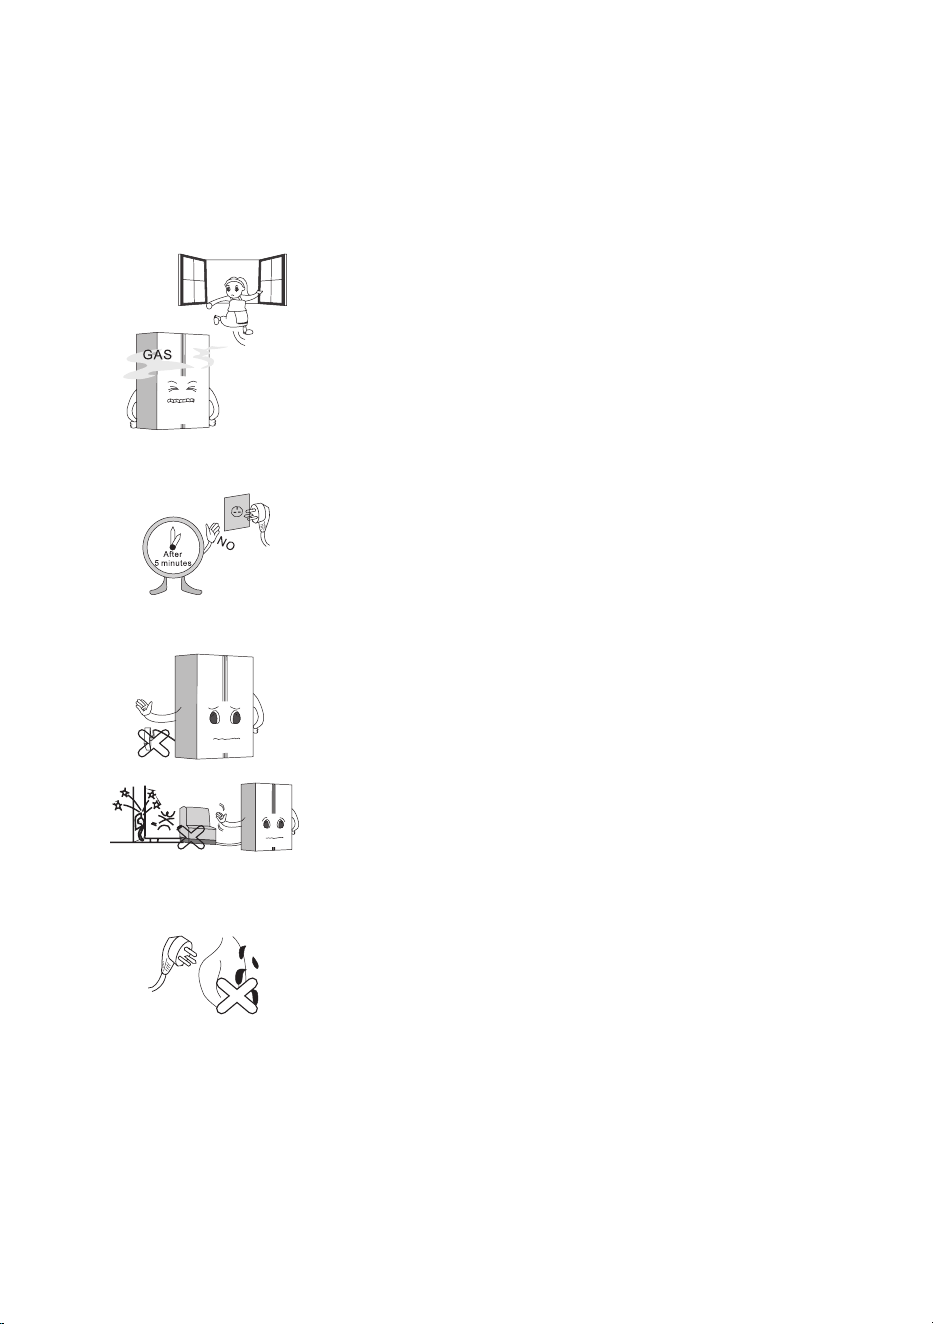
If you suspect a refrigerant leak, do not touch the unit or power outlet.
Ventilate the area immediately and, if possible, turn off the unit using
the circuit breaker. Contact the manufacturer immediately.
Refrigerant may cause serious injury upon contact with skin or eyes. If
this occurs, please seek medical a
ttention immediately.
Ensure the power outlet is properly grounded. Consult a qualified
electrician or service technician if the grounding instructions are not
fully understood, or if you have doubts on whether the appliance is
properly grounded.
Wait at least 5 minutes before reconnecting the power cord. Failure to
do so may cause the freezer to malfunction.
Improper grounding may result in equipment failure and
/or electric
shock.
A dedicated outlet should be used. Using multiple devices at a single
outlet may cause a fire.
Do not position the power plug facing upward or allow it to be pinched
behind the refrigerator. Water may flow into the device or the plug may
be damaged, which could cause a fire or injury.
Do not allow the power cord to be bent or crushed by heavy objects, as
this may cause damage.
Unplug the po
wer cord when cleaning or handling the interior lamp of
the refrigerator.
Failure to follow these instructions may result in electric shock or other
injuries.
Use a dry, clean cloth to remove water or dust from the power plug.
Avoid touching it with wet hands and ensure the pins are securely
connected when inserting.
- 5 -
Do not use the refrigerator for non-household purposes (such as
storing medicine, test materials, blood, or for marine use). This may
pose unexpected risks including fire, electric shock, deterioration of
stored items, or chemical reactions.
Do not use or store flammable materials such as ether, benzene,
alcohol, medicine, liquid propane gas, sprays, or cosmetics near or
inside the refrigerator. It ma
y cause an explosion or fire.
Do not place any glassware not designed for refrigerator or freezer
use inside. The glass may crack or break, potentially causing injury.
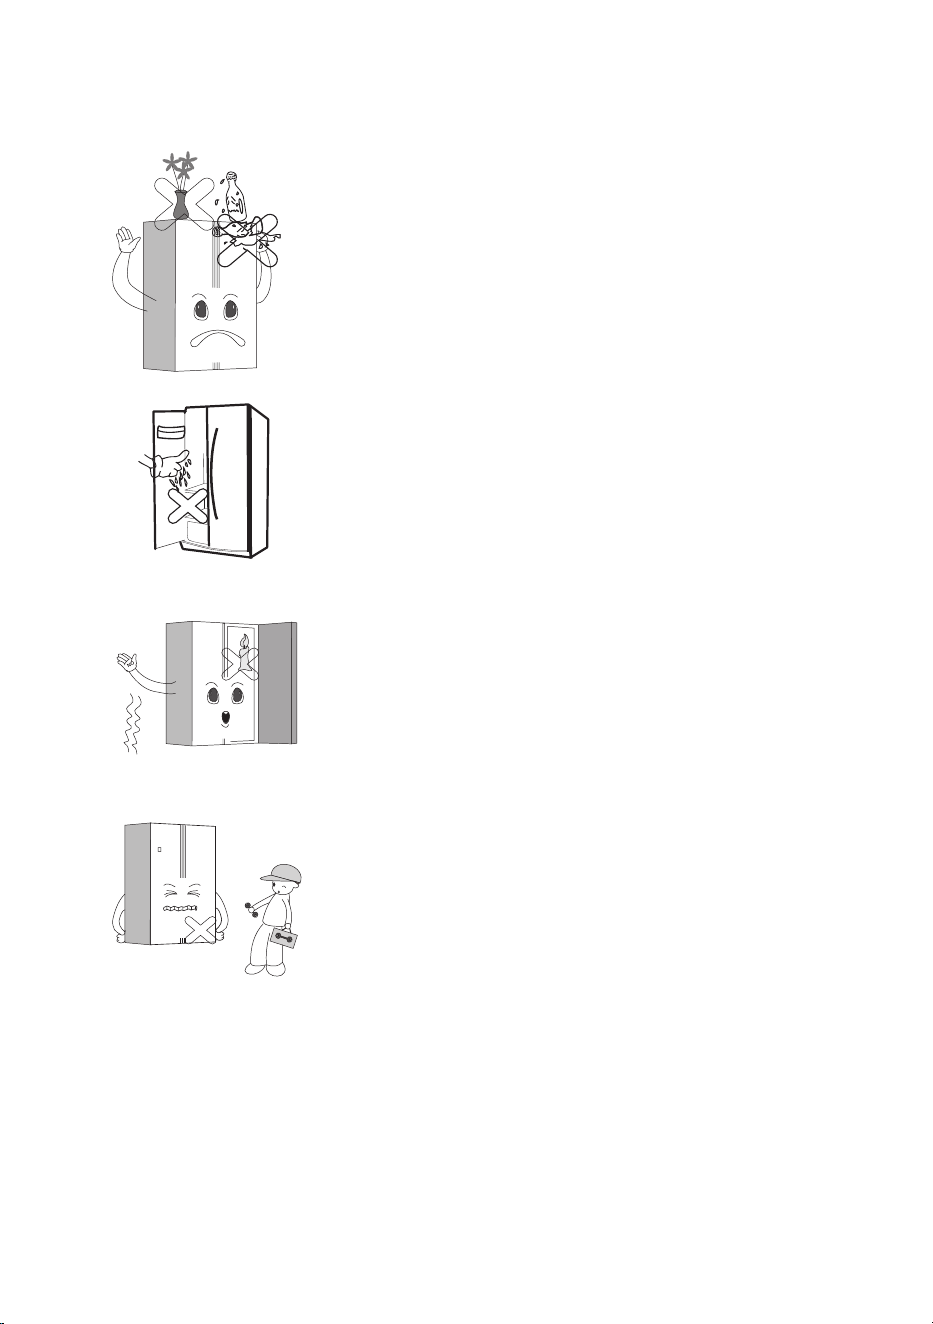
Do not place heavy or hazardous objects in the refrigerator, such as
cups, vases, cosmetics, medications, or any containers holding
liquids.
Opening or closing the door may cause it to fall, potentially resulting
in injury, fire, or electric sh
ock.
Do not touch food or containers in the freezer with wet hands. It
may cause frostbite.
Do not spray water on the exterior or interior of the refrigerator. Do
not clean it with benzene or thinner.
Do not clean the unit with acidic cleaners, abrasive brushes, sharp
tools, or any cleaner containing benzene.
Do not use a dryer to dry the inside of the unit, and do not light a
candle to remove odors. This m
ay cause an explosion or fire.
Do not hold onto the door or its trays. It could cause the refrigerator
to topple over, resulting in serious injuries or even death. Especially,
do not allow children to do the above.
Do not place ice in thin crystal glasses or ceramic dishes. It may
break cups or ceramic items, potentially causing injury.
Do not allow anyone except a qualified service technician to
disassemble, repair, or
modify the refrigerator. Unless directed by the
manufacturer. It may cause injury, electric shock, or fire.
- 6 -
Do not install the refrigerator in a damp or highly humid environment.
Failure to do so may result in premature deterioration, cause the unit
to operate more frequently, and potentially lead to electric shock.
Install the appliance in a dry, well-ventilated area.
The appliance should be positioned near the wall outlet for easy
power disconnection in case of an emergency.
Do not expose the unit to excessive heat or open flames.
Keep your unit in a well-ventilated area. If the unit
is built-in, ensure
there is adequate airflow around it.
Do not cover or obstruct the exhaust area on the back of your unit.
Failure to do so may cause electric shock or injury. It may cause
electric shock or injury.
WARNING
Before performing any installation or cleaning, unplug the refrigerator
from the power source. When you're done, plug the refrigerator back
into the power source and adjust the temperatur
e controls to the
desired setting.

- 7 -
Product Overview
Product Features
This unit features super freeze, energy-savings, noise reduction, and optimal refrigeration as preset options.
Frost-free eco-friendly refrigerator
The refrigerant R600a and the blowing agent are hydrocarbons that do not deplete the ozone layer and
have no impact on the greenhouse effect.
The freezer features automatic defrosting, eliminating the need for manual defrosting.
Energy saving and noise reduction
Integrating quick-freezing, energy-saving, noise-reduction and other technologies, the refrigeration system
has been optimized to maximize energy savings while minimizing noise levels.
Precise temperature control
The refrigerator and freezer compartments feature independently set, controlled, and displayed
temperatures, with the microprocessor control system ensuring precise te
mperature regulation.
LED display and touch buttons
The LED display shows the set temperature and operational status for both the refrigerator and freezer
compartments. The touch buttons are user-friendly and designed for long-term durability.
Tempered glass, safe and dependable
The tempered glass shelves are safe, aesthetically pleasing, and durable, with strong load-bearing capacity
and easy maintenance.
Removable door seal
Special detachable door seal, long-lasting, strong adhesion, easy to clean.
Automatic ice maker
The refrigerator features an automatic ice maker.
- 8 -
Product Components
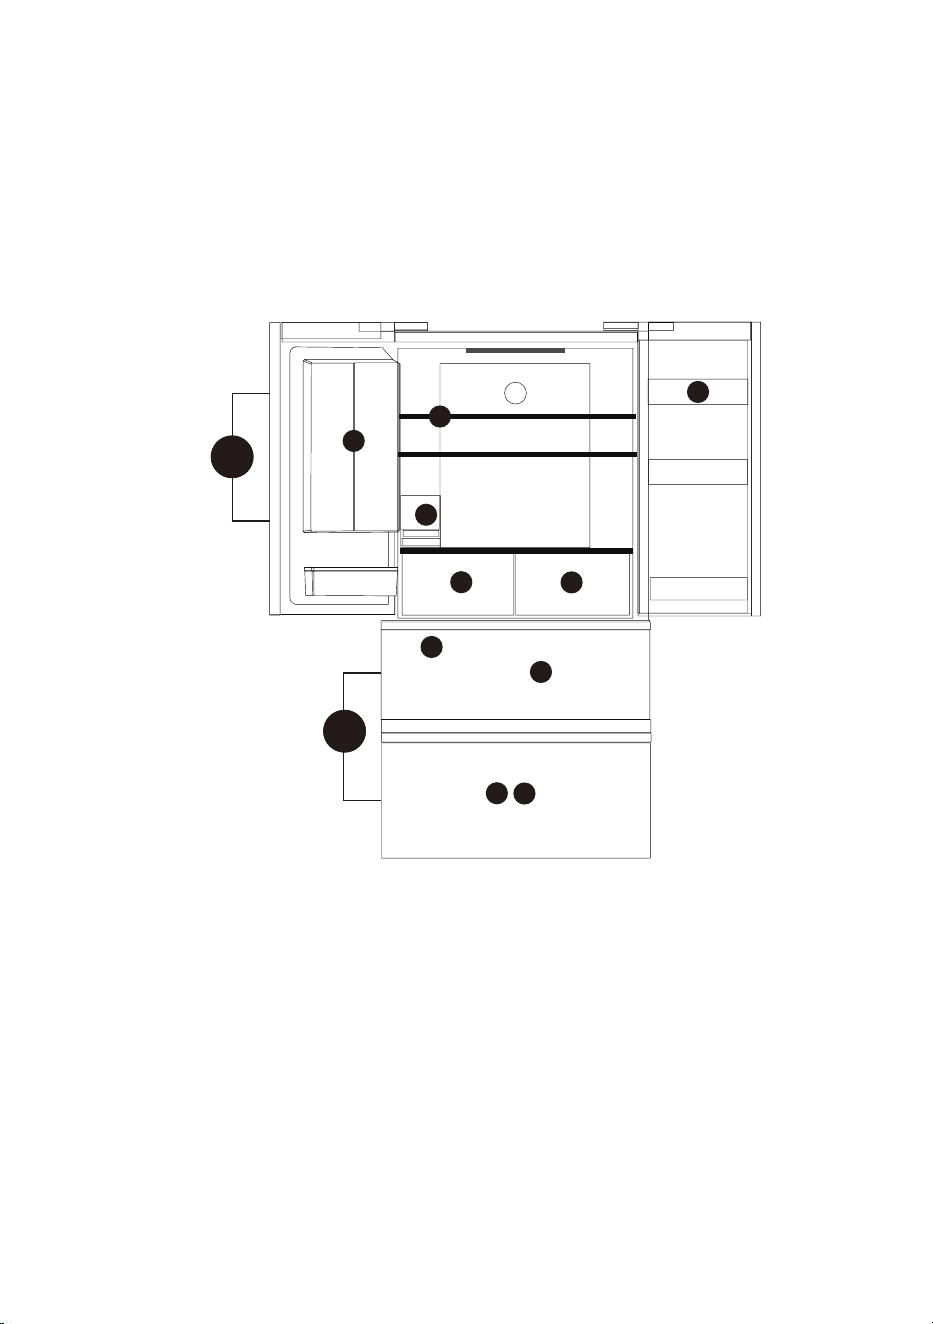
The layout of the items below is subject to change without notice and may not appear or be set up as
shown in the picture below.
The appearance and specifications of the actual product may vary by the model.
NOTE:
To get the best energy efficiency of this product, please place all shelves, drawers and baskets on their
original position as the illustration above.
A
2
1
3
5
4
6
7
8
8
9
B
A Refrigerator Compartment
1 Sparkling Water Module
2 Refrigerator Door Rack
3 Refrigerator Glass Shelves
4 Water Tank
5 HydroGuard Crisper
6 FreshFlex Multi-Mode Crisper
B Freezer Compartment
7 Ice Maker
8 Freezer Drawer
9 Freezer Drawer Tray
- 9 -
Installation Dimensions
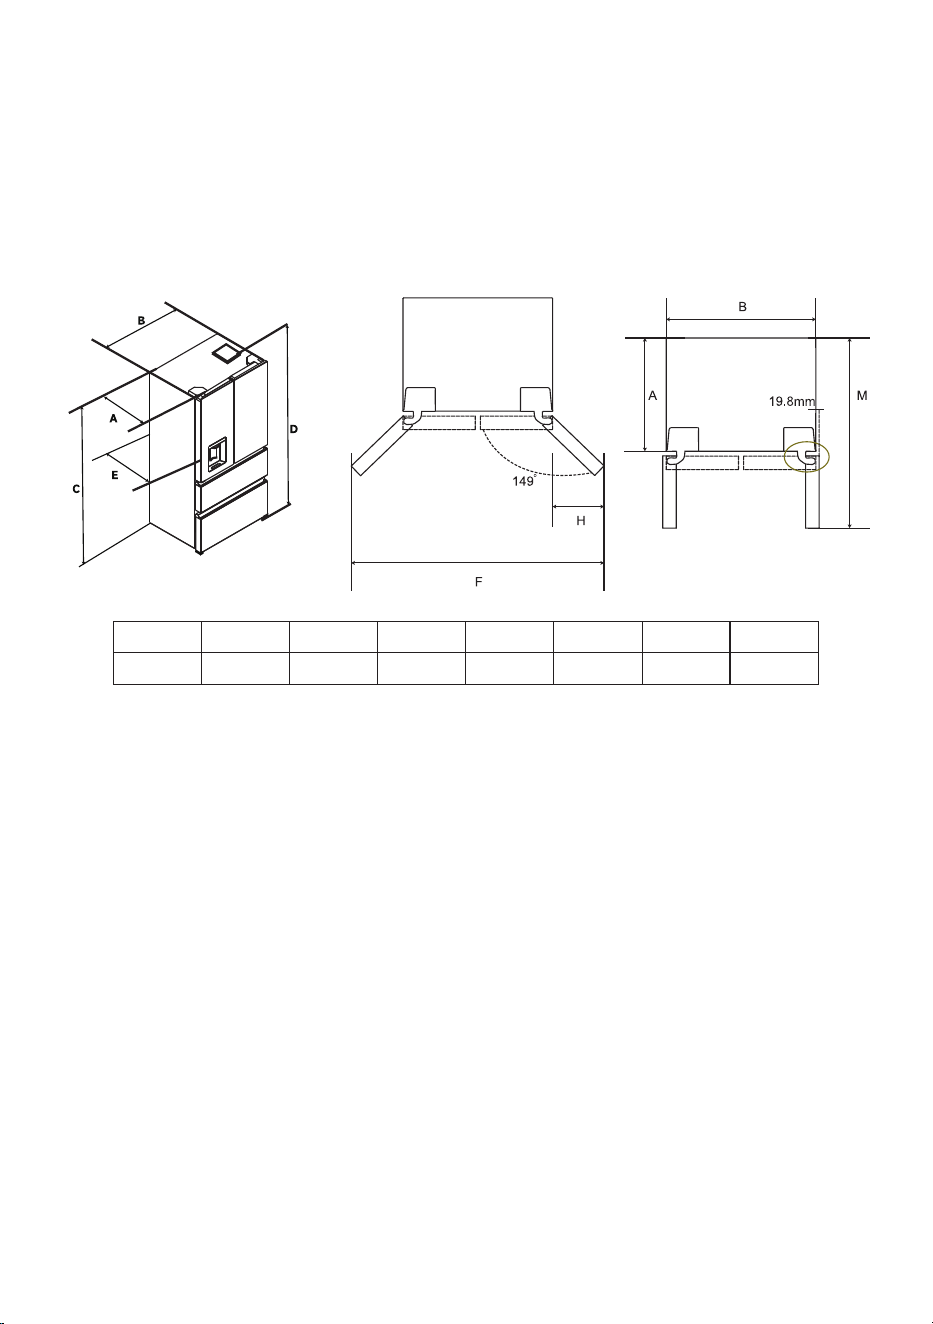
Choose a level and easily accessible location for your appliance.
Avoid placing the appliance near heat sources, in direct sunlight, or in damp areas.
A B C D E F H M
610 911 1774 1830 693 1661 393 1088
The dimensions shown above are provided as a general guide for installation. Actual dimensions of your
unit may vary slightly.
Maintain adequate clearance around the unit to ensure optimal operation.
- 10 -
Installation
Transportation
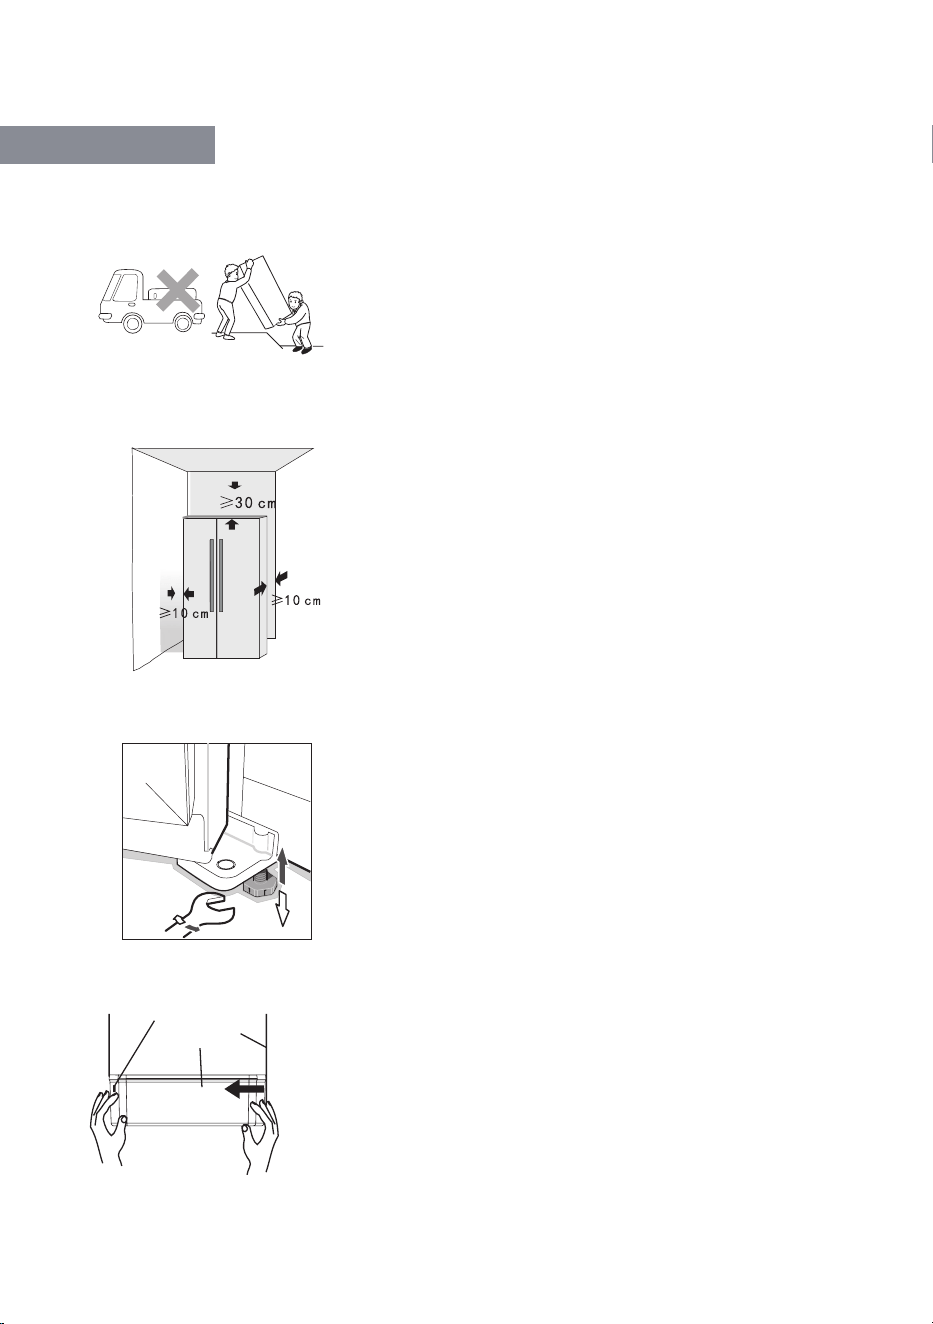
Always transport the refrigerator upright—never lay it on its side.
Do not lift the refrigerator by the door or handle. Always carry the
refrigerator by lifting from the bottom.
This unit should never be moved by one person. Two people are
required to safely lift or transport the unit.
Where to Install Your Unit
Place the refrigerator on a hard, flat surface.
If cushioning is needed, us
e stable, hard, non-flammable blocks.
DO NOT USE FOAM PACKAGING AS CUSHIONING BLOCKS!
The unit must be kept away from damp or wet locations. Wipe any
water or dirt off the unit immediately with a soft cloth to prevent rust
and maintain optimal performance.
Place the refrigerator in a well-ventilated area, ensuring adequate space
around and behind the unit. Do not cover or obstruct the air vent grille on
the re
ar compressor panel. Keep the refrigerator away from heat sources
and direct sunlight.
Adjustable Plastic Feet
When still in its packaging, the refrigerator’s plastic feet are tightened.
After unpacking, adjust the two front plastic feet to the proper height.
You can adjust these plastic feet using a wrench or by hand.
Ensure the plastic feet and rear rollers touch the ground to prevent
movement or noise.
When mov
ing the refrigerator, slightly raise the front feet by turning
counterclockwise, then gently slide the unit to reposition it.
Door Rack
Disassembly: Hold both sides of the door rack, then push the side
without the guide inward as shown in the diagram. Push until the edge
of the door rack separates from the groove of the liner.
Installation: Hold both sides of the door rack, First, install the guide side
buckle. Then
gently push the other side inward until the guide clicks into
place, securing the door rack in position. Please ensure it is properly
installed before use.
The following illustration shows the door shelf guide.
door liner
door rack

- 11 -
Operation
Before Use
This refrigerating appliance is not intended to be used as a built-in appliance.
Remove all packaging materials, including the foam base at the bottom of the unit and the securing tape
for interior shelves and door bins.
Position the refrigerator in an appropriate location and adjust the leveling feet to ensure it's properly
leveled. It is recommended to wipe your unit with a warm, soapy cl
oth and dry it thoroughly before use.
Place the refrigerator in position and level it. Clean the interior, allow the unit to stand for 4–6 hours, then
plug it in. This ensures that the compressor oil has properly settled, allowing your unit to operate normally.
Beginning
Connect the power cord and turn on the power switch.
Upon initial startup, the screen will display the respective set temperature values: the ref
rigerator section is
set to 5 °C, the freezer is set to -18 °C, and the flex temperature drawer will operate at 0 °C with the
Drink mode icon activated.
The default mode is energy-saving upon startup: The screen remains on for 20 seconds before turning off.
This mode helps conserve energy and extends the service life of LED lights.
Automatic Ice Maker
The ice maker and ice storage compartment are located in the upper section of the freezer. When using
the ice maker, ensure the ice maker switch is turned on and the water system is properly connected. The
ice maker will automatically produce ice. Once the ice storage bin is full, the ice-making process will
automatically stop.
The maximum ice production capacity of this ice maker is 2.5 kg per 24 hours.
When the freezer reaches the set temperature, the ice ma
ker can produce the first batch of ice in just a
few hours.
Note: All ice-making capacity data above is based on measurements conducted in the
Laboratory.
- 12 -
Control Panel
Temperature range setting:
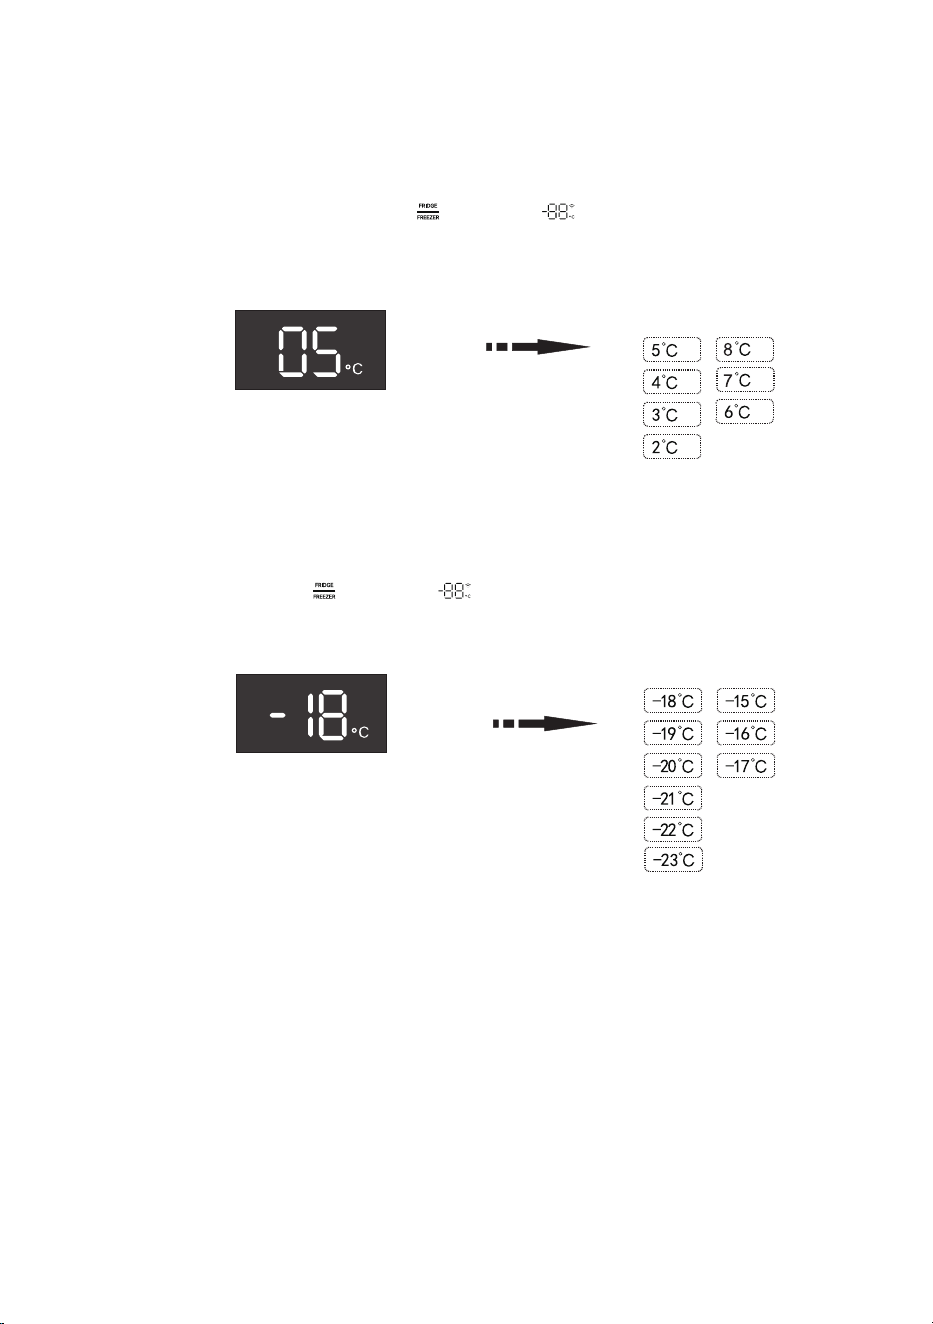
1. Refrigerator temperature range: 2–8 °C (default 5 °C).
2. Freezer temperature range: -23–-15 °C (default -18 °C).
Adjusting the Temperature Settings
•
When you first turn on the unit, it will begin operating at the factory-set default temperature of 5 °C for
the refrigerator compartment and -18 °C for the freezer compartment.
•
When you first turn on the unit, set the refrigerator compartment temperature to 3 °C and let it run for
at least 4 hours before placing any food inside. This ensures the freezer compartment is thoroughly chilled
and the refrigerator compartment is stabilized before placing food inside. Then adjust the temperature to
your preferred setting.
•
To adjust the temperature in each zone, press the corresponding zone button. The temperature will
adjust b
ased on the preset values outlined below.
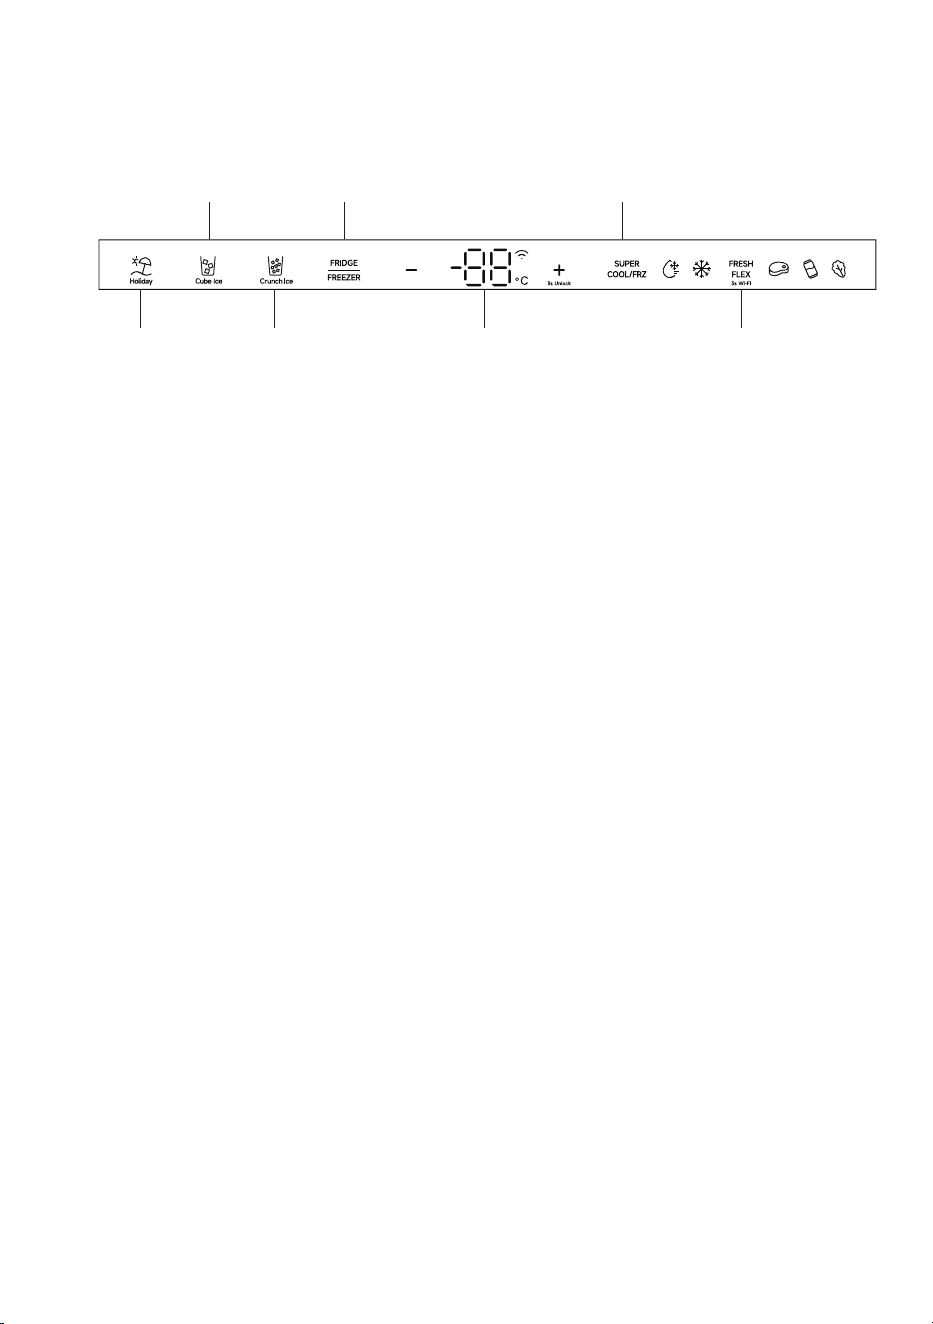
Holiday Mode Crunch Ice Mode Temperature Display Area Short press: FRESH FLEX Mode
Long press: Wi-Fi Mode
Cube Ice Mode
Super Cool / Super Freeze Mode
Refrigerator &
Freezer Control
- 13 -
Refrigerator Compartment Temperature Adjustment
The default temperature for the refrigerator compartment is 5 °C. Upon powering on, the appliance
automatically enters standby mode. Press the button once to display the current refrigerator
temperature. Press the +/- button to adjust the refrigerator temperature. The adjustable temperature range
is between 2 °C and 8 °C.
Freezer Compartment Temperature
Adjustment
The default temperature for the freezer compartment is -18 °C. Upon powering on, the unit automatically
enters standby mode. Press the button twice to display the current freezer temperature. Press the
+/- button to adjust the freezer temperature up or down. The adjustable temperature range is between -
15 °C and -23 °C.
CAUTION: Do not place fresh foods directly on frozen foods.
The refrigerator
features an automatic ice-making function.
The maximum ice production capacity of this ice maker is 2.5 kg per 24 hours.
When the freezer reaches the set temperature, the ice maker can produce the first batch of ice in just a
few hours.
CAUTION: When the ice maker is producing ice cubes, you may hear the beep from the water valve, the
sound of water flowing into the ice maker, and the sound of ice cube
s dropping.
Set Temperature
Set Temperature
- 14 -
Fresh Flex Temp Setting
This product features a flexible temperature drawer.
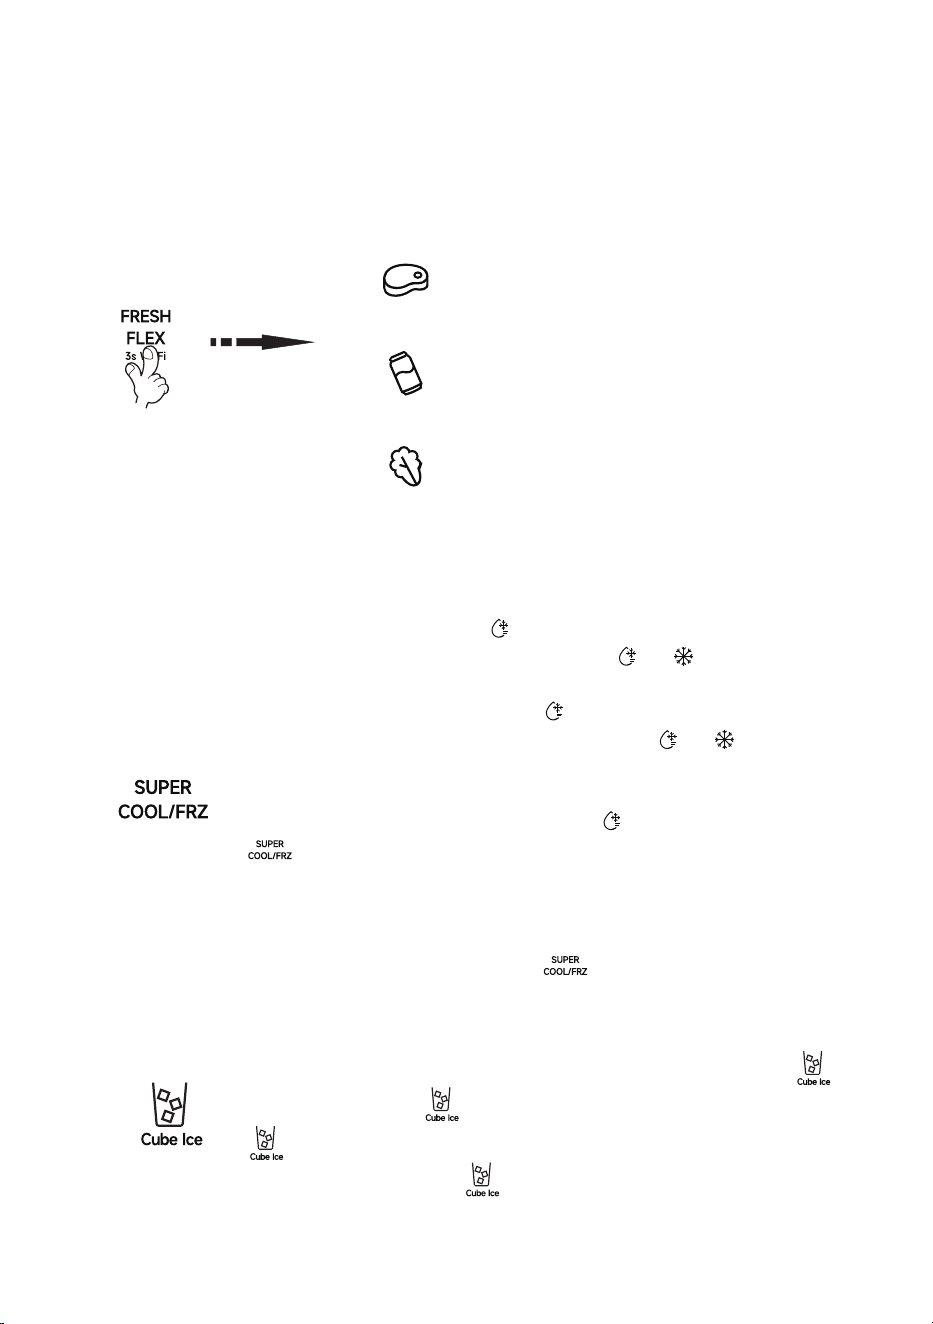
Power-on default "Fruit & Vegetable" mode, single tap to switch modes
Mode Configuration
Super Cool / Super Freeze Mode
The SUPER COOL/FRZ function defaults to OFF after power-on, with the indicator
icon remaining off. Touch operation logic:
Tap once: Super Cool mode ON: icon remains continuously lit.
Tap twice: Super Cool
+ Super Freeze modes ON, and icons remain
continuously lit.
Tap three times: Super Cool mode OFF, icon turns off.
Tap four times: Super Cool + Super Freeze modes OFF, and icons turn off.
Super Cool
When activated, the refrigerator compartment temperature is set to 2°C. The function
automatically deactivates after 2 hours, and the indicator turns off. Touch the
button again during operation to manuall
y deactivate the function.
Super Freeze
When activated, the freezer compartment temperature is set to -24°C. The function
automatically deactivates after 24 hours or once the freezer temperature reaches -
28°C, whichever occurs first. Touch the button again during operation to
manually deactivate the function.
Cube Ice Making Mode (Ice Maker Model: IME-2-01)
The Cube Ice function is OFF by default upon power-up, and the indicator icon
remains inactive. Touch button to activate the cube ice maker. The indicator
will light up and cube ice production will begin. Ice production operates
continuously in cycles. Touch button again to disable the function.
Soft Freeze Mode: The flex temperature drawer
will operate at -3炍1 °C
Beverage Mode: The flex temperature drawer
will operate at -1炍1 °C
Fruit & Vegetable Mode: The flex temperature
drawer will operate at 2炍4 °C
- 15 -
Crunch Ice Making Mode (Ice Maker Model: IME-2-01)
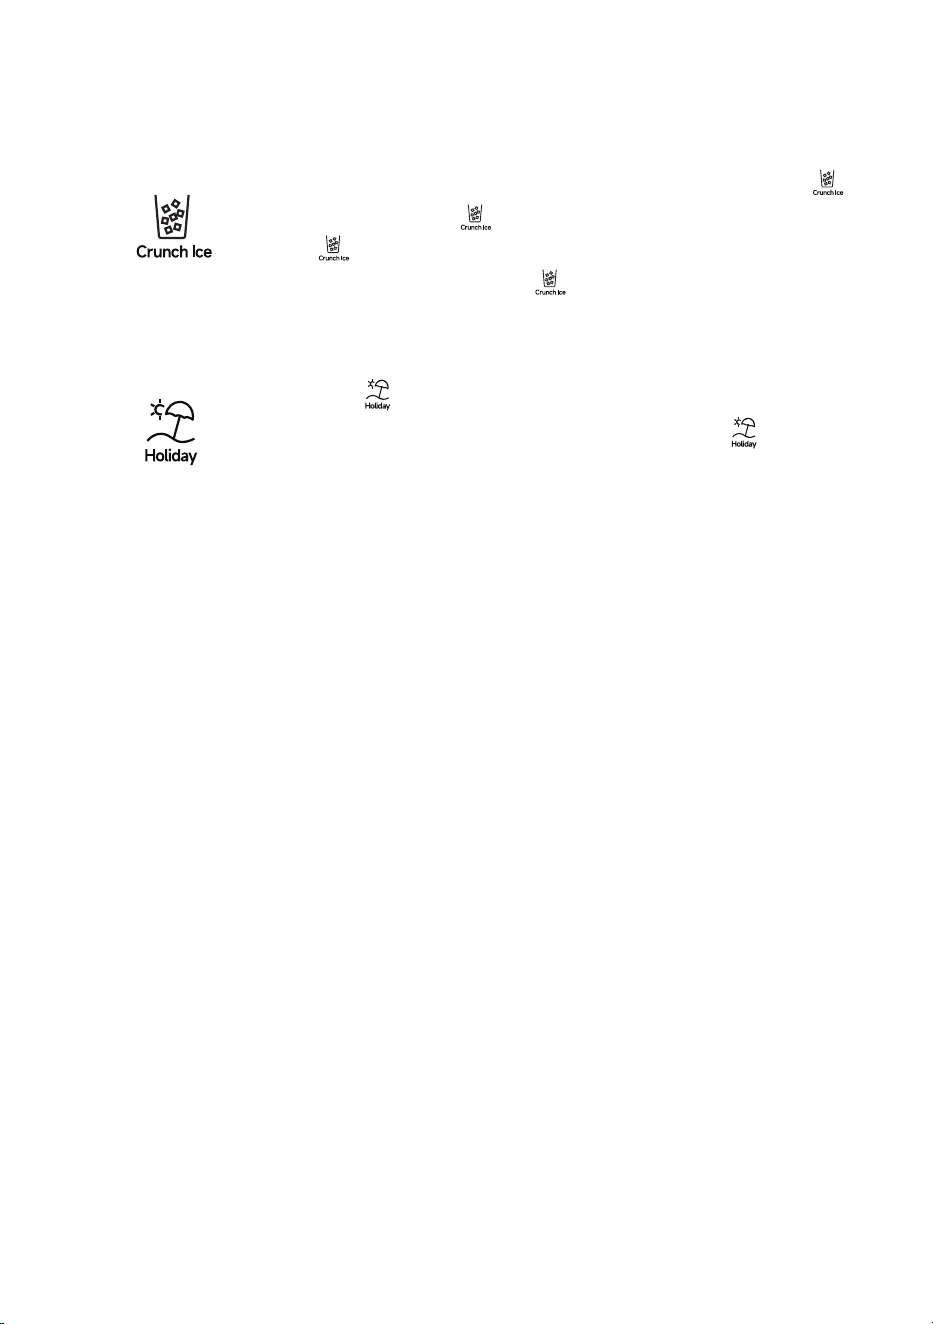
The Crunch Ice function is OFF by default upon power-up, and the indicator
icon remains inactive. Touch button to activate the chewable ice maker. The
indicator will light up and chewable ice production will begin. Ice production
operates continuously in cycles. Touch button again to disable the function.
Holiday Mode
The Holiday function is OFF by default after power-on, and the icon remains
inactive. Touch button to activate Holiday Mode. The refrigerator temperature
is set to 15°C, and the freezer temperature is set to -18°C. Touch button again
to exit Holiday Mode. The refrigerator and freezer compartments will revert to their
previous temperature settings. (Note: Enabling Holiday Mode will deactivate both
the ice-making and sparkling water func
tions.)
1. Night View (App Only)
Night View is a convenient lighting feature designed to enhance visual comfort when using the refrigerator
at night. When enabled, the refrigerator’s interior lighting dims to help your eyes adjust in low-light
conditions.
How to Enable/Disable
This feature can only be configured, enabled, or disabled through the DREAME app. To use this feature,
please download and install the
DREAME APP for operation.
Schedule
Night View supports scheduled operation. In the app, you can set a time window (e.g., 7:00 AM–10:00 PM)
and choose scheduling rules such as:
•
Every Day
•
Weekdays
•
Weekends
•
Once
Interior Refrigerator Lighting Level
You can choose your preferred interior lighting level in the app:
•
Moonlight
•
Comfort
•
Bright
2. Quiet Time (App Only)

- 16 -
Feature Overview
The Quiet Time feature enables you to schedule periods during which specific refrigerator functions will be
temporarily suspended to minimize operational noise. This is ideal for maintaining a peaceful environment
during nighttime hours, early mornings, or whenever minimal noise is preferred.
What Happens During Quiet Time
When Quiet Time is enabled, the following functions are temporarily disabled:
Ice-making
Auto-fill
Always Fresh
Note: The primary cooling and refrigeration functions continue to operate normally to maintain proper
food preservation. Only auxiliary, noise-generating functions are disabled during Quiet Time.
How to Set Up Quiet Time
To configure Quiet Time settings:
1. Open the DREAME app on your mobile device.
2. Go to the refrigerator settings menu
3. Select Quiet Time
4. Select your preferred scheduling option:
Every Day
Once
Weekends
Weekdays
5. Tap Add to save custom schedules if needed
Important Notes
When Quiet Time is active, deactivated functions will automatically resume once the scheduled period
ends.
You can edit or delete any custom schedules anytime using the app.
This feature does not compromise the refrigerator's primary cooling performance or food safety.
Child Lock Feature
Unlocking
Press and hold the temperature + button for 3 seconds to unlock the control panel. The buttons will then
function. If no activity is detected for 20 seconds, the control panel will automatically lock and the display
will turn off.
Locking
Press and hold the temperature + button for 3 seconds to lock the control panel. When the display is off,
press any button to activate the screen. Press any button again, and all icons will flash to indicate that the
control panel is locked.
- 17 -
Sparkling Water User Guide
Still Water Button
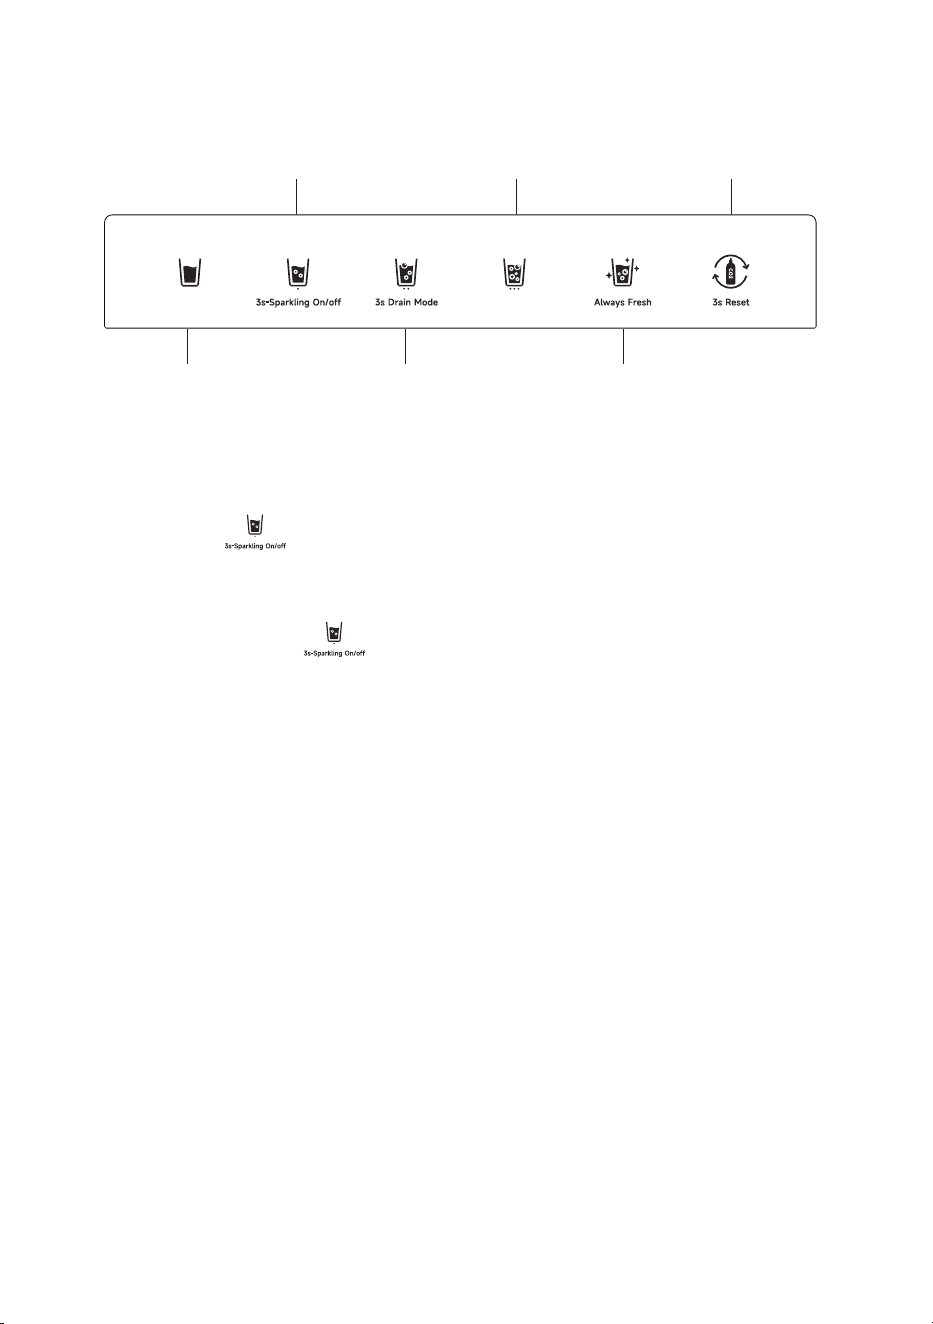
After powering on, the system defaults to Still Water mode, and the still water indicator illuminates. Press
and hold the water dispenser lever to initiate draining.
Unlock / Lock Button
Press and hold the button for 3 seconds to unlock the three sparkling water levels and the
Always Fresh function. Press and hold for 3 seconds again to lock and disable thes
e functions.
Level 1 Button (Light Button)
This button also works as the button. When unlocked, press the button and the indicator will
flash, signaling the start of Level 1 sparkling water production. Once production is complete, the Level 1
indicator remains illuminated. Press the water dispenser lever to release Level 1 sparkling water.
Level 2 Button (Classic Button)
When unlocked, press the button. The indicator will flash to begin producing Level 2 sparkling water. Once
production is complete, the Level 2 indicator remains illuminated. Press the water dispenser lever to
release Level 2 sparkling water.
Level 3 Button (Bold Button)
When unlocked, press the button. The indicator will flash to begin producing Level 3 sparkling water. Once
production is complete, the Level 3 indicator remains illuminated. Press the water
dispenser lever to
release Level 3 sparkling water.
Always Fresh Function Description
With the Always Fresh function activated, the refrigerator automatically carbonates the water every 4 hours
during the user-specified time frame. This ensures the sparkling water stays fresh, preserves its optimal
flavor, and minimizes the risk of bitterness or loss of carbonation over time.
The user can configure the start a
nd end times via the app, enabling the system to operate automatically
during the selected timeframe and deliver consistently high-quality sparkling water without requiring
manual intervention.
Still Water Level 2 (Classic) Always Fresh Mode
Level 1 (Light) / Lock, Unlock Level 3 (Bold) CO2 Cylinder Reset

- 18 -
3s Reset Button (CO
2
Cylinder Reset)
When the CO
2
cylinder is running low, the indicator light flashes. After replacing the CO
2
cylinder, press
and hold this button for 3 seconds until the indicator turns off, indicating that the reset is successful.
Auto Screen Off (20 Seconds of Inactivity)
To minimize power consumption and prevent unintended operation, the display features an Auto Screen
Off function.
If th
ere is no user interaction for 20 seconds, including:
no-touch operation, and no water dispensing activity, the display will turn off automatically, and the
refrigerator will enter Screen-Off Mode.
In Screen-Off Mode, the refrigerator maintains normal operation. To turn the display back on, touch the
control panel or dispense water. The display will revert to the previous screen.
One full 425g CO漐 cylinder can make approximately:
•
Level 1 (Carbonation: 焵焵焵然): About 110 cans of lightly sparkling water.
•
Level 2 (Carbonation: 焵焵焵焵): About 80 cans of medium sparkling water.
•
Level 3 (Carbonation: 焵焵焵焵焵): About 43 cans of highly carbonated sparkling water.
Drain Mode
Feature Description
The drain mode is used to manually remove residual liquid from the sparkling water system before
prolonged device inactivity, helpi
ng maintain optimal taste and hygiene conditions.
In drain mode, the device will only drain water when the water dispenser lever is continuously pressed.
Releasing the water dispenser lever immediately stops the draining.
When should the drain mode be used?
Recommended usage scenarios for the drain mode:
•
The equipment will be unused for an extended period (e.g., before travel or vacation).
•
Before performing any cleaning or maintenance on the equipment.
•
Used to clear residual liquid in the sparkling water system.
How to activate the drain mode
(1) Press and hold button for 3 seconds to enter drain mode. The buzzer will sound continuously,
and the indicators of all three levels will flash at the same time to confirm activation.
(2) Draining Execution Instructions:
•
In drain mode, press and hold the water dispenser lever to initiate draining.
•
During the draining process, releasing the water dispenser lever will immediately stop the draining.
•
When the sparkling water outflow significantly decreases or stops completely, the sparkling water
system is considered to be substantially drained.
•
During draining, releasing the water dispenser lever will immediately stop the draining process.

- 19 -
(3) Exit Drain Mode: When the sparkling water has been fully drained, the refrigerator will automatically
exit Drain Mode and turn off the sparkling water function.
If the sparkling water has not been completely drained, the user can press and hold the button for 3
seconds to manually exit Drain Mode.
Important Notes
•
When using Drain Mode, always place a suitable container under the outlet to collect the water and
prevent overflow. Monitor the process continuously.
•
The Drain Mode operation must be fully supervised by the user at all times. Do not leave the appliance
unattended. If the process is interrupted, the refrigerator will remain in Drain Mode. If you wish to stop the
draining process, please manually exit Drain Mode after confirming that the operation can be safely
stopped.
•
Drain Mode is intended solely for emptying liquid from the sparkling water system and should not be
activated frequently during normal daily use.
•
While in Drain Mode, automatic functions such as Pending Mode, Auto Fill, and Always Fresh will be
temporarily unavailable.
Pending Mode
Overview
If the system has finished carbonating at the current level but the sparkling water has not been fully
dispensed, selecting a different carbo
nation level will activate Pending Mode.
In Pending Mode, the indicator for the newly selected level will flash, indicating that the system has
queued the next carbonation level for the upcoming batch.
How It Works
Once all the current sparkling water has been used, the system will automatically prepare a new batch at
the pending (queued) carbonation level—no additional action is required.
This enables a smooth
transition between carbonation levels and supports continuous, uninterrupted use.
Cancel Pending Mode
You can cancel Pending Mode in either of the following ways:
•
Press the flashing level button.
•
Press the currently lit (active) level button.
Benefit
This function allows users to pre-select the next carbonation level without affecting the current dispensing
process, making operation more convenient and seamless.
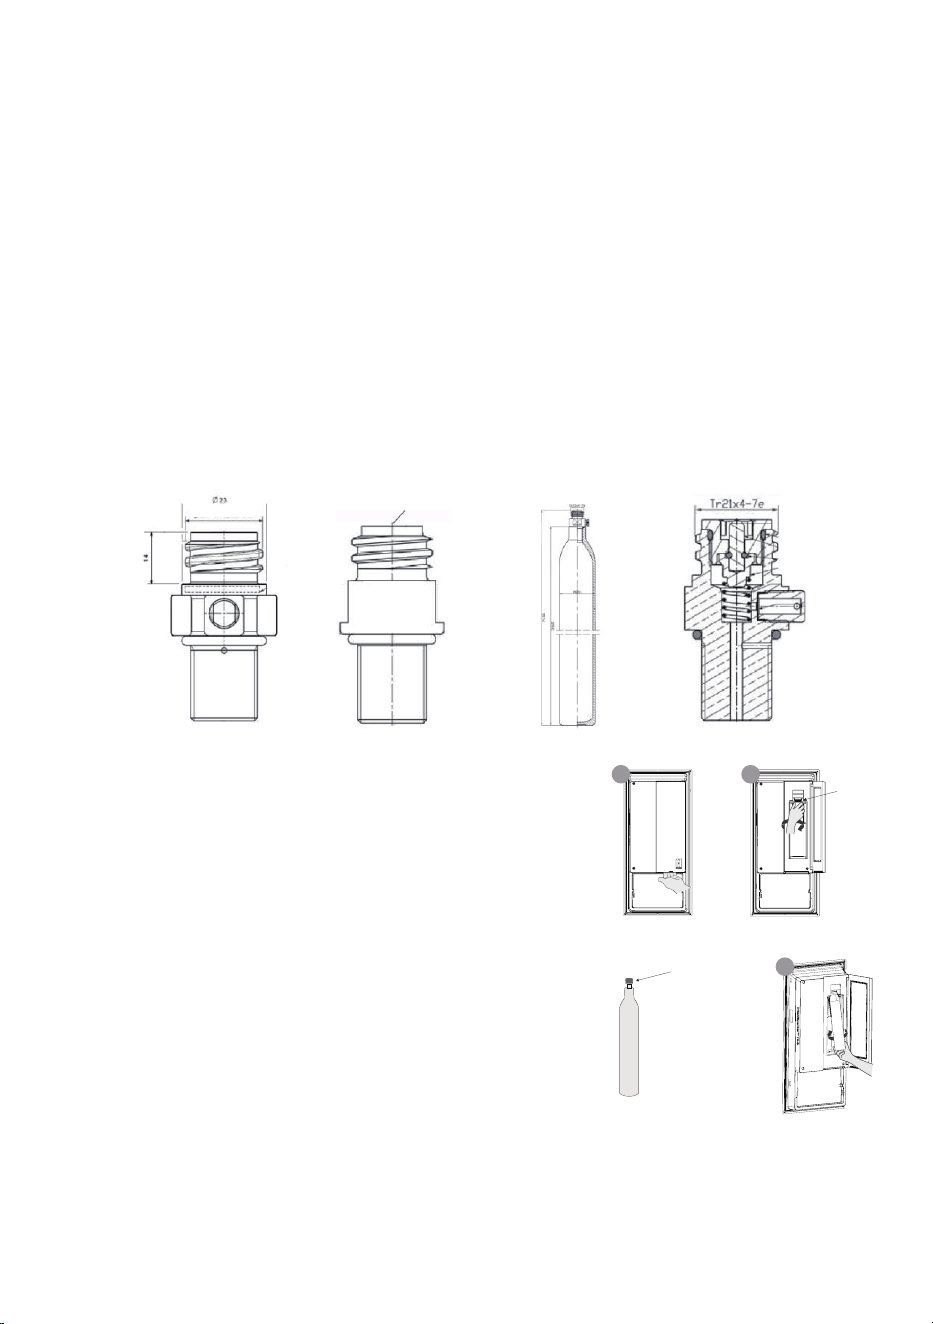
- 20 -
Sparkling Water Maker – Initial Setup and Operating Instructions
Important Notice
Before installing the CO
2
cylinder, remove the transportation safety lock. Failure to remove the lock may
impair the actuator rod's proper functioning. During installation, the device must be powered off to prevent
accidental activation of the carbonation function.
1. CO
2
Cylinder Inspection and Installation (Critical Steps)
(1) CO
2
Cylinder Inspection
Please review the following items:
•
The cylinder surface is free from cracks, deformations, or corrosion.
•
The valve exhibits no evidence of gas leakage.
•
The anti-shock ring and protective cap remain intact.
•
The cylinder is within the valid inspection period as indicated on its body.
(2) Installation and Removal of the CO漐 Cylinder
滦澱Open the refrigerator door, then ope
n the sparkling
water dispenser access panel to expose the cylinder
compartment. Pull out the cylinder holder.
滧澱Remove the plastic protective cap from the valve of the
cylinder.
滨澱Carefully insert the cylinder into the valve opening and
push it in gently. Turn the cylinder clockwise until it is fully
tightened and cannot be turned any further.
Replacing the Cylinder澱
Turn empty cylinder counterclockwise to remove it. Install
the new cylinder by following the installation steps above.
Note澱
Make sure the cylinder is securely tightened to prevent gas
leakage. Do not overtighten
, as this may damage the thread
s.
P
lastic
P
rotective
Cover
P
rotective
C
over
G
as
C
ylinder
Tightening torque: 10
lb-ft
ij21-6 Acme-6G
1 2
3
- 21 -
(3) Leak Test
After installation, connect the power supply without turning on the device. Apply a small amount of soapy
water around the cylinder connection and observe:
•
No bubbles: the seal is secure.
•
•
•
•
•
•
Bubbles appear: remove the cylinder by turning it counterclockwise and reinstall it, then test again.
If leakage continues, discontinue use of the device immediately and contact after-sales servi
ce.
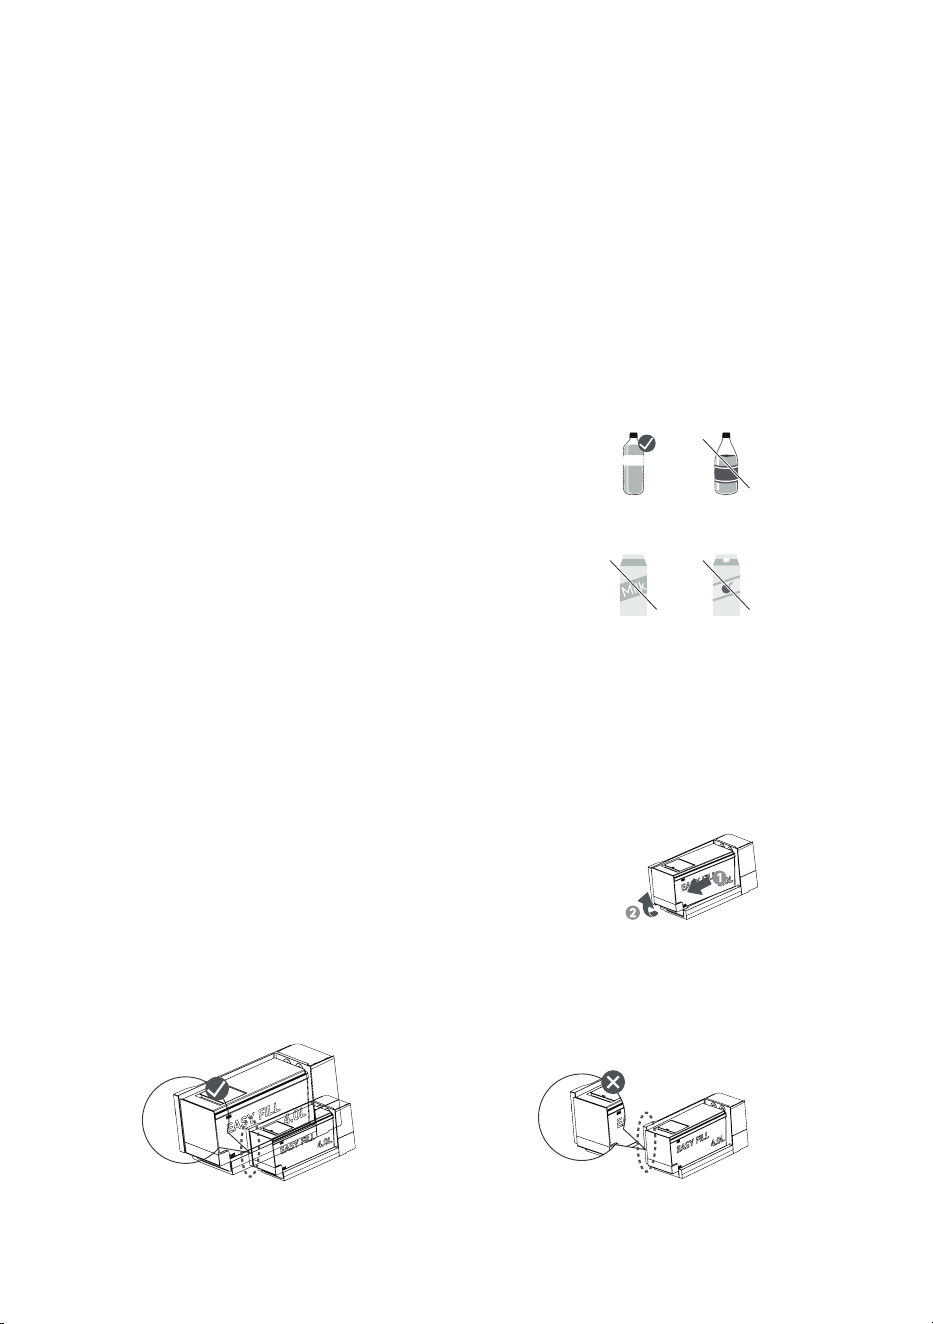
2. Drinking Water Treatment
(1) Water Filling
Do not add distilled water or RO-filtered water with a
TDS below 30 to the water tank.
Do not add juice, cola, milk, oily liquids, or any other
similar substances to the water tank.
Use tap water or mineral water at 50°C or below. Fill
the dedicated water tank with water, keeping the
water level between the "MAX" and "MIN" marks. Do
not overfill or underfill the tan
k.
For best carbonation results, set the refrigerator
temperature to 2–4°C. This helps achieve stronger,
longer-lasting bubbles.
If the water you add is warm and you want to enjoy
sparkling water right away, add a suitable amount of
ice to cool it before carbonating.
(2) Removal and Installation of the Water Tank
Gu
idelines for Removal and Installation of the Water Tank
P
ull the tank straight out until it is fully clear of the slot, then lift it
u
pward to remove it. For installation, follow the steps above in
r
everse order.
Correct Installation
The water tank should sit flush against the
bracket on the left side.
Incorrect Installation
If the water tank sticks out past the bracket on the
left side, it may on the left side such as the ice
maker or water dispenser not working properly.
Water
Cola
Milk
Juice

- 22 -
(3) Seal Inspection
Make sure the water tank is correctly installed, fully seated, and securely fitted without any looseness.
(4) Initial Rinse (Required)
For first-time use:
Select carbonation level 1.
After carbonation, dispense and discard the sparkling water.
Repeat this rinsing process three times.
This step eliminates any residual substances from the internal tubing and guarantees safe drinking water.
3. Important Safety Guidelines for Initial Use (Critical)
Prohibited Actions
(1) Operating without a CO
2
cylinder
Starting the device without a cylinder may cause abnormal extension or detachment of the actuator rod,
potentially damaging the drive mechanism.
(2) Using prohibited water sources or liquids
Do not use distilled water or RO-filtered water with a TDS below 30.
Do not use water hotter than 50 °C.
Do not carbonate liquids other than water (e.g., juice, milk).
These actions may cause blockage of the carbonation module, create safety hazards, and contaminate
internal pipelines.
(3) Disassembling or altering the device
Non-professionals must not disassemble the main unit, CO
2
cylinder, or drive components. Refilling the CO
2
cylinder is strictly prohibited.
(4) Unsupervised use by children
Children must not operate the device unsupervised. Adult supervision is required at all times to prevent
contact with the cylinder, power supply, or carbonation interface.
CO
2
Cylinder Safety and Storage Guidelines
Safe product usage:
The product must be handled in accordance with proper industrial safety and hygiene practices.
Only experienced and properly trained personnel should handle pressurized gases.
Do not inhale the fumes.
Avoid releasing the product into the work area.
Do not smoke while handling the product.
Use only equipment specifically designed for the product, pressure, and temperature requirements. If
you're unsure, contact your gas provider.
Tanks that contain or have contained flammable or explosive products must not be rendered inert using
liquid carbon dioxide.

- 23 -
The formation of solid CO
2
particles must be prevented.
The system must be properly grounded to prevent the risk of electrostatic discharge. Be aware of the
electrostatic discharge hazard when operating CO
2
fire extinguishers.
Do not use them in areas where flammable atmospheres may be present.
Avoid drawing water, acids, or alkalis into the appliance.
Ensure the entire gas distribution system has been (or is regularly) inspected for leaks prior to use.
Consider safety valves in gas installations.
Safe handling of the gas cylinder:
Do not allow gas to flow back into the container.
Open the valve gradually to prevent pressure surges.
Avoid drawing water into the container.
Protect containers from physical damage. Avoid dragging, rolling, sliding, or dropping them. When
moving containers, even for short distances, use appropriate handling equipment (trolleys, hand trucks, etc.)
designed for transporting such containers. Keep the valve caps on until the container is properly secured
to a wall, workbench, or placed in an appropriate stand and is ready for use.
If the operator experiences any difficulty while operating the valve, discontinue use and contact the
supplier.
Never attempt to repair or modify container valves or safety devices.
Damaged valves must be reported to the supplier immediately.
Keep container valves clean and free from contaminants, particularly oil and water. After disconnecting
the container from the equipment, immediately replace any supplied caps or valve covers on the containers
and valves.
Close the container valve after each use, even if it's empty or still connected to the equipment.
Never attempt to transfer gases from one container to another.
Do not use direct flame or electric heating to increase the internal pressure of the container.
Do not remove or obscure the supplier's labels identifying the container contents.
Conditions for safe storage:
Comply with local regulations and legislative requirements for container storage. The containers must not
be stored under conditions that promote corrosive phenomena.
The caps and/or plugs must be installed.
Containers must be stored upright and secured to prevent tipping. Containers in storage should be
inspected regularly for overall condition and potential leaks.
Store containers in a well-ventilated area at temperatures below 50 °C.
Store containers in areas free from fire hazards, away from heat sources and ignition points.
Keep away from flammable substances.
For more details on the safe storage of refrigerated carbon dioxide, please refer to the document
"Refrigerated CO
2
Storage at User Facilities" (EIGA Doc. 66), available at http://www.eiga.eu and consult
your supplier.
- 24 -
Sparkling Water Refrigerator Network Configuration Guide
APP Download, Installation, and Login
(1) Download and Install
Scan the QR code or search for "DREAME" in the App Store to download and install the app. iOS users can access
it through the Apple App Store.
(2) Registration and Login
On the app homepage, follow the instructions to complete account registration and login.
Device Network Configuration and Pairing
(1) Network Configuration Settings
Unlock: Press and hold "3s Unlock" for more than 3 seconds until you hear a beep.
Wi-Fi Mode: Press and hold the " " button for more than 3 seconds until you hear a beep and the Wi-Fi icon
starts flashing.
(2) Device Binding
•
Connect your phone to a 2.4GHz Wi-Fi hotspot.
•
Open the DREAME app and follow the prompts to add and bind your device.
•
Control: The device will appear in the app’s control list after successful binding.
•
Retry: If the binding fails, return to step 1.1 to rebind.
Important Notes and Specifications
•
This device only supports connecting to the 2.4GHz Wi-Fi network of your home router.
•
Due to DREAME APP upgrades and updates, the actual operation may vary from this description. Please follow
the instructions in the DREAME app.
•
This device contains a radio transmitter module with the following certification: CMIIT ID: 2021DP15933.
Wireless Network Module Model X-C13SG
Standard IEEE 802.11b/g/n
Antenna Type Printed circuit board (PCB) antenna
Frequency Band 2400-2483.5 MHz
Operating Temperature -40煓~82煓
Power Input DC2.7~3.6V
The Maximum RF Output EIRP Power Wireless Network: 18 dBm
BLE Not Applicable
Exposed network interfaces and services via network interfaces in factory default state UDP 67
Service: Enables automatic network address acquisition for the device during AP network configuration.
- 25 -
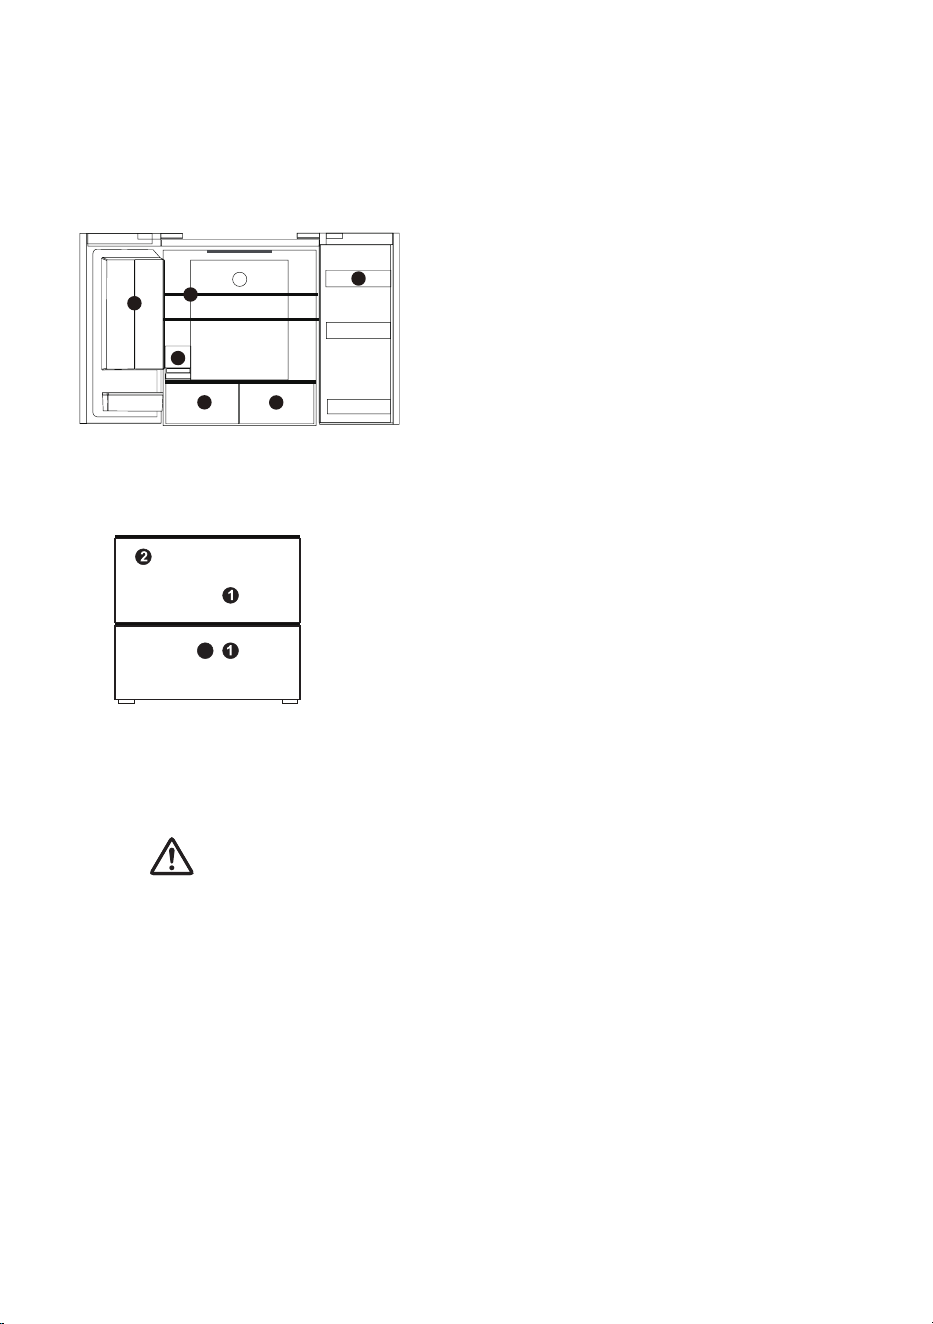
Refrigerator Compartment
The refrigerator compartment should primarily be used for storing food that will be consumed
within a short period.
Freezer Compartment
The freezer compartment is designed for freezing food, storing frozen items, and
making ice cubes. It can preserve food for extended periods.
CAUTION
When the ice maker is producing ice cubes, you may hear the beep from
the water valve, t
he sound of water flowing into the ice maker, and the
sound of ice cubes dropping.
The ice maker will automatically produce ice. When the ice storage bin is
full, the ice-making process will cease automatically.
The food, especially oily items stored in the refrigerator, should avoid
direct contact with the liner. When the interior is stained with oil or greas
y
food residue, it should be cleaned immediately to prevent prolonged
contact with the liner, which may cause corrosion and cracking.
•
Two-star (**) frozen-food compartments are ideal for storing pre-frozen foods, preserving ice cream, and
making ice cubes. One-star (*), two-star (**), and three-star (***) compartments are not suitable for
freezing fresh food.
•
If the refrigerator is left unused for extended periods, turn it off, defrost, clean, dry thoroughly, and leave
the door slightly open to prevent mold growth inside the appliance.
•
Refer to the actual product for details.
2
1
3
5
4
6
1 Sparkling Water Module
2 Refrigerator Door Rack
3 Refrigerator Glass Shelves
4 Water Tank
5 HydroGuard Crisper
6 FreshFlex Multi-Mode Crisper
1 Freezer Drawer
2 Ice Maker
3 Freezer Drawer Tray
3
- 26 -
Instructions for Storing Food
CAUTION
•
When storing frozen foods, place them toward the back of the freezer compartment, rather than on the bottle
rack.
•
Do not place bottled or canned foods in the freezer compartment to avoid frost damage and cracking.
•
Before placing hot foods in the refrigerator, allow them to cool to room temperature first. Otherwise, they will
increase power consumption.
•
Mark the freezing date on the packaging bag based on the different shelf lives of foods, to prevent them from
exceeding their storage time limits.
•
Divide foods into appropriate portions and package them separately to ensure thorough freezing and prevent
them from sticking together.
•
The packaging materials shall be odorless, airtight, watertight, and pollution-free to prevent packaged foods
from being tainted by other odors or experiencing quality degradation
•
Do not overload the freezer; keep quantities within its capacity.
•
Melted foods cannot be refrozen, unless they are prepared as cooked dishes. Otherwise, their quality will be
compromised
•
Do not place glass bottles or glass containers in the freezer compartment or near the air outlet of the
refrigerator duct, as they may shatter.
•
Do not block the air outlet with food, as this may disrupt proper air circulation.
Storage of Foods
Your appliance comes with the accessories shown in the "Structure Illustration" section. This instruction manual
provides proper food storage guidelines. The glass shelves and crisper can be removed to accommodate larger
food items when necessary.
Note: Food must not come into direct contact with any surfaces inside the appliance. It must be individually
wrapped in aluminum foil, cellophane sheets, or airtigh
t plastic containers.
Precautions for internal and external refrigerator cleaning:
•
Before cleaning, always turn off the power switch and unplug the power cord.
•
During cleaning, ensure no water enters the switch, control panel, door lamp, or top control box.
•
Clean the exterior of the refrigerator with a mild cleaner, then wipe it down with a clean, soft cloth and allow it
to air dry naturally.
•
When cleaning the door seal, always use clean water, wipe with a dry cloth and allow it to air dry naturally.
Dampen a soft cloth with warm water or a neutral cleaner to wipe down the refrigerator exterior, excluding the
door seal.
•
Do not rinse the refrigerator directly with water, as this may compromise its electrical insulation properties.
•
Do not clean the refrigerator with metal scrapers, wire brushes, harsh abrasive cleaners, strong alkaline
detergents, or flammable/toxic cleaning solutions.
- 27 -
Dairy foods and eggs:
Most pre-packaged dairy products feature a recommended "use by" or "best before" date printed on the packaging.
Store them in the refrigerator compartment and use within the recommended timeframe.
Butter can absorb strong odors from other foods, so it's best to store it in an airtight container. Eggs should be
stored in the refrigerator compartment.
Red meat
Place fresh red meat on a plate and loosely cover it with waxed paper, plastic wrap, or foil.
Store cooked and raw meat on separate plates. This will prevent any juices from the raw meat from contaminating
the cooked product.
Poultry
Fresh whole birds should be thoroughly rinsed inside and out under cold running water, then patted dry and placed
on a plate. Cover loosely with plastic wrap or foil.
Poultry pieces should also be stored this way. Whole poultry should only be stuffed immediately before cooking.
Doing so earlier may lead to food poisoning.
Fish and seafood
Whole fish and fillets should be used on the day of purchase. Refrigerate on a plate loosely covered with plastic
wrap until needed, waxed paper, or foil. If storing overnight or longer, take special care to select extremely fresh
fish.
Whole fish should be rinsed under cold water to remove loose scales and dirt, then patted dry with paper towels.
Place whole fish or fillets in a sealed plastic bag.
Keep shellfish refrigerated at all times. Use within 1-2 days.
Precooked foods and leftovers
These should be stored in covered containers to prevent the food from drying out.
Keep for only 1–2 days.
Reheat leftovers only once until they are steaming hot.
Vegetable container
The vegetable container is the optimal storage location for fresh fruits and vegetables.
Avoid storing the following items at temperatures below 6 °C for extended periods: Citrus fruits, melons, indigenous
varieties, pineapples, papayas, zucchini, passion fruits, cucumbers, peppers, tomatoes.
Undesirable changes may occur at low temperatures, including softening of the flesh, browning, and/or accelerated
decay
Do not refrigerate avocados (until they are ripe), bananas, or mangoes.
FOOD Location (Refrigerator compartment)
Butter, cheese Top door rack
Eggs Door rack
Fruits, vegetables, salad Crisper
Meat, sausage, cheese, milk Lower area (bottom shelf 1 crisper cover)
Dairy products, canned foods, tins Upper area or door rack
Drinks, bottles, tubes Door rack
- 28 -
FOOD Location (Freezer compartment)
Small frozen food Door rack
Packaged frozen foods Freezer drawer
Fish, meat, ice cream Lower area (bottom shelf or drawer)
Note: Food must not come into direct contact with any surfaces inside the appliance. It must be individually
wrapped in aluminum foil, cellophane, or airtight plastic containers.
Freezing and storing food in the freezer compartment
To store deep-frozen food.
To make ice cubes.
To freeze food.
Note: Make sure the freezer compartment door is properly closed.
Buying frozen food
The packaging must remain undamaged.
Use by the 'use by/best before/best by/' date.
If possible, transport deep-frozen food in an insulated bag and place it quickly in the freezer compartment.
Storing frozen food
Store at -18 °C or below. Avoid unnecessarily opening the freezer door.
Freezing fresh food
Freeze only fresh and undamaged food
To preserve the best possible nutritional value, flavor, and color, vegetables should be blanched before freezing.
Eggplants, bell peppers, zucchini, and asparagus do not require blanching.
The following foods are suitable for freezing:
Cakes and pastries, fish and seafood, meat, game, poultry, vegetables, fruit, herbs, shelled eggs, dairy products
including cheese and butter, prepared meals and leftovers such as soups, stews, cooked meats and fish, potato
dishes, soufflés and desserts.
The following foods are not suitable for freezing:
Types of vegetables typically consumed raw, such as lettuce or radishes, eggs in shells, grapes, whole apples,
pears, and peaches, hard-boiled eggs, yogurt, cultured milk, sour cream, and mayonnaise.
Recommended storage times for frozen food in the freezer compartment
These times vary depending on the type of food. The food you freeze can be preserved for 1 to 12 months
(minimum at -18 °C).
FOOD Storage time
Bacon, casseroles, milk 1 month
Bread, ice cream, sausages, pies, prepared shellfish, oily fish 2 months
Non-oily fish, shellfish, pizza, scones, and muffins 3 months
Ham, cakes, cookies, beef and lamb chops, poultry cuts 4 months
Butter, blanched vegetables, whole eggs and yolks, cooked crayfish, raw
minced meat, raw pork
6 months
Fruit (dried or in syrup), egg whites, beef (raw), whole chicken, lamb (raw), 12 months

- 29 -
Maintenance
Defrosting
This unit features an automatic defrost function, eliminating the need for manual operation.
Cleaning
Precautions for internal and external refrigerator cleaning:
•
Before cleaning, always turn off the power switch and unplug the power cord.
•
During cleaning, ensure that no water enters the switch, control panel, door lamp, or top control box.
•
Clean the exterior of the refrigerator with a mild cleaner, then wipe it down with a clean, soft cloth,
and allow the refrigerator to air dry naturally.
•
When cleaning the door seal, always use clean water, wipe with a dry cloth, and allow it to air dry
naturally. Dampen a soft cloth with warm water or a neutral cleaner to wipe down the refrigerator exterior,
excluding the door seal.
•
It is prohibited to rinse the refrigerator directly with water, as this may compromise its electrical
insulation properties.
•
Do not clean the refrigerator with: Wire brushes, coarse abrasive cleaners. Strong alkaline detergents.
Flammable or toxic cleaning agents
After cleaning, plug in the refrigerator and ensure the connection is secure.
General Information
On vacation
When planning to go on vacation, it's recommended to keep the refrigerator running continuously and
store only short-term perishable foods. To stop the refrigerator, remove all food items, unplug the power
cord, thoroughly clean the interior, and leave the door open to prevent unpleasant odors from developing.
During a power outage
Generally, a short-term power outage will not significantly affect the refrigerator's temperature. However, if
the power outage persists for an extended period, you should minimize how often you open the
refrigerator and avoid adding fresh food (to prevent accelerating the temperature rise inside the
refrigerator).
If you anticipate a power outage, you can activate the "Super Freezer" function beforehand to maintain the
refrigerator's temperature at its lowest setting.
Shutdown
Generally, it is not recommended to stop the refrigerator or turn off the power switch. Otherwise, the
refrigerator's lifespan may be reduced.

- 溣溠 -
Energy Saving Tips
Ensure the refrigerator is kept away from heat sources and direct sunlight.
Before storing hot foods, allow them to cool to room temperature.
Close the door promptly, minimize the frequency of opening, and reduce the duration it remains open.
When thawing frozen foods, you can place them in the refrigerator compartment, which helps maintain
proper refrigeration.
Ensure the temperature sensor is not obstructed or covered by food items.
Normal Phenomena
Button malfunction
Please check the control panel to see if the refrigerator is in lock mode. When in lock mode, all buttons are
disabled.
Low voltage prevents the compressor from starting
For appliances installed in larger areas, it's recommended to purchase a pressurizer with a capacity
exceeding 1000W, as this provides better protection for your refrigerator.
Long time to start up
When the ambient temperature is too high, the appliance may take longer to start.
The middle beams feel warm to the touch
The middle beams become warm after the appliance has been running for a period of time, which is a
normal occurrence.
Dewdrops
When external air flows into the cool inner surface of the refrigerator, dew drops may form. If the humidity
at the installation site is high or during rainy seasons, dew may form on the exterior surface of the
refrigerator. This is a natural phenomenon that occurs during humid weather. Wipe the water droplets with
a dry cloth.
Noise
When operating the refrigerator for the first time, it will run at maximum speed to rapidly cool down,
which may result in louder operating noise. When the internal temperature drops below a certain threshold,
the noise will diminish.
During compressor startup or shutdown, various components expand or contract, control devices operate,
and temperatures fluctuate. You may hear sounds, which are normal operational noises.
Compressor overheated
During operation, the exterior temperature of the compressor may exceed 80°C. Do not touch the
compressor, as this may cause serious injury.
Compressor running for an extended period
When the ambient temperature is too high or too much fresh food is placed in the refrigerator, it will take
a long time to cool down until the appliance reaches the set temperature.
- 溣溡 -
Troubleshooting
Before calling for service, review this list. This may help save time and reduce service costs. This list
includes common occurrences that are not caused by defective workmanship or materials in this appliance.
Fault Possible cause Corrective action
No display on the
panel
The appliance's power plug is not fully
inserted into the outlet.
Check if the power is on.
Alarm sound
Door is slightly open or not closed for
more than 2 minutes.
Close the door all the way.
The compressor
does not work.
It is in defrost mode.
Power is not properly connected.
It's normal during defrosting.
Check if the power is properly
connected.
The compressor
operates for an
excessively long
duration
The refrigerator was recently
disconnected for an extended period.
Placing excessive amounts of fresh or
hot food.
Doors are opened too frequently or
left open for extended periods.
It takes several hours for the
refrigerator to cool down completely.
Hot food will cause the refrigerator
to run longer until it reaches the
desired temperature.
Warm air entering the refrigerator
causes it to run longer.
Open the door less frequently.
Vibrating noise
Floor is uneven or unstable.
Items placed on top of the refrigerator
are vibrating.
The refrigerator is touching the wall or
cabinets.
Ensure the floor is level, solid, and
capable of adequately supporting the
refrigerator.
Remove items.
Move the refrigerator so it does not
touch the wall or cabinets.
Climate class:
This refrigerating appliance is intended to be used at ambient temperatures ranging from 10 °C to 43 °C.
Extended temperate (SN): This refrigerating appliance is designed for use in ambient temperatures ranging
from 10 °C to 32 °C.
Temperate (N): This refrigeration appliance is designed for operation within ambient temperatures ranging
from 16 °C to 32 °C.
Subtropical (ST): This refrigerating appliance is designed for use in ambient temperatures ranging from
16 °C to 38 °C.
Tropical (T): This refrigeration appliance is designed for operation within ambient temperatures ranging
from 16 °C to 43 °C.
- 溣溢 -
Important Disassembly Instructions
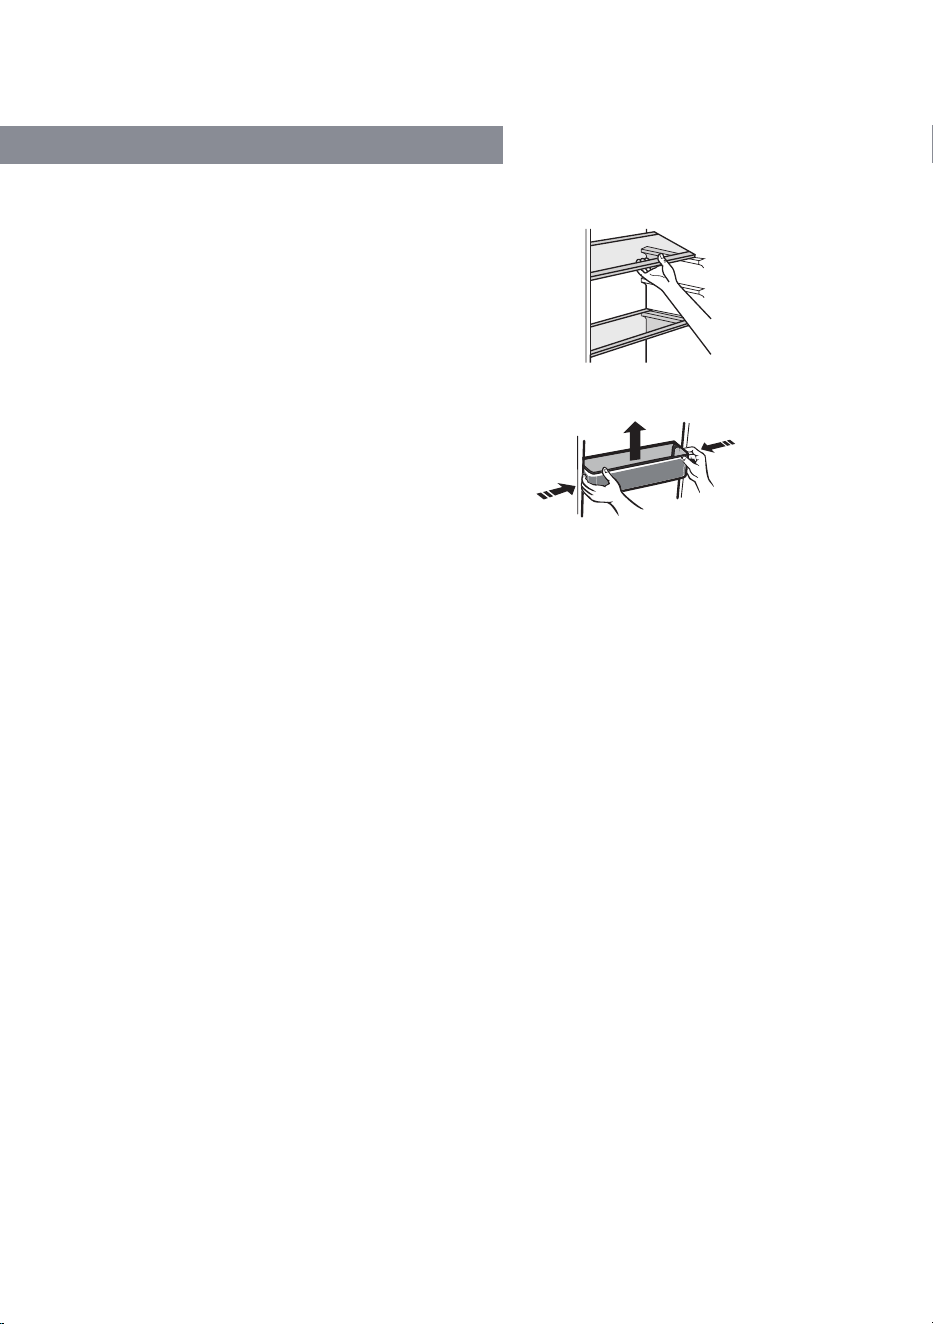
Door Racks and Glass Shelves Disassembly
Gently lift the back of the shelf and slide it
forward to detach.
To remove the door racks, grasp both sides
firmly and apply equal inward pressure toward
the center, then lift upward to detach.
- 溣溣 -
After-Sales Service
Warranty Period
The product is warranted for two years from the date of purchase. For products that malfunction outside the
warranty period, our company will continue to provide you with prompt, attentive, and high-quality service.
After-Sales Contact Information & Spare Parts Purchase Channels
Contact us
Please contact:
If you experience any issues during use, you may scan the QR code on the left to
obtain the customer service hotline number and call for assistance.
Exclusive for Europe:
The ordered parts listed in the table below are available through the following service channels.
Ordered Part Provided by
Minimum Time Required for
Provision
thermostats
Professional maintenance
personnel
At least 7 years after the last model
is introduced to the market
temperature sensors
printed circuit boards
light sources
door handles
Professional repairers and end
users
door hinges
trays
baskets
door gaskets
At least 10 years after the last model
is introduced to the market
The model information in the product database, as well as the model identity obtained through weblink
scanned by a QR code, if any, on the energy label of product.