
INSTRUCTION AND USER’S GUIDE
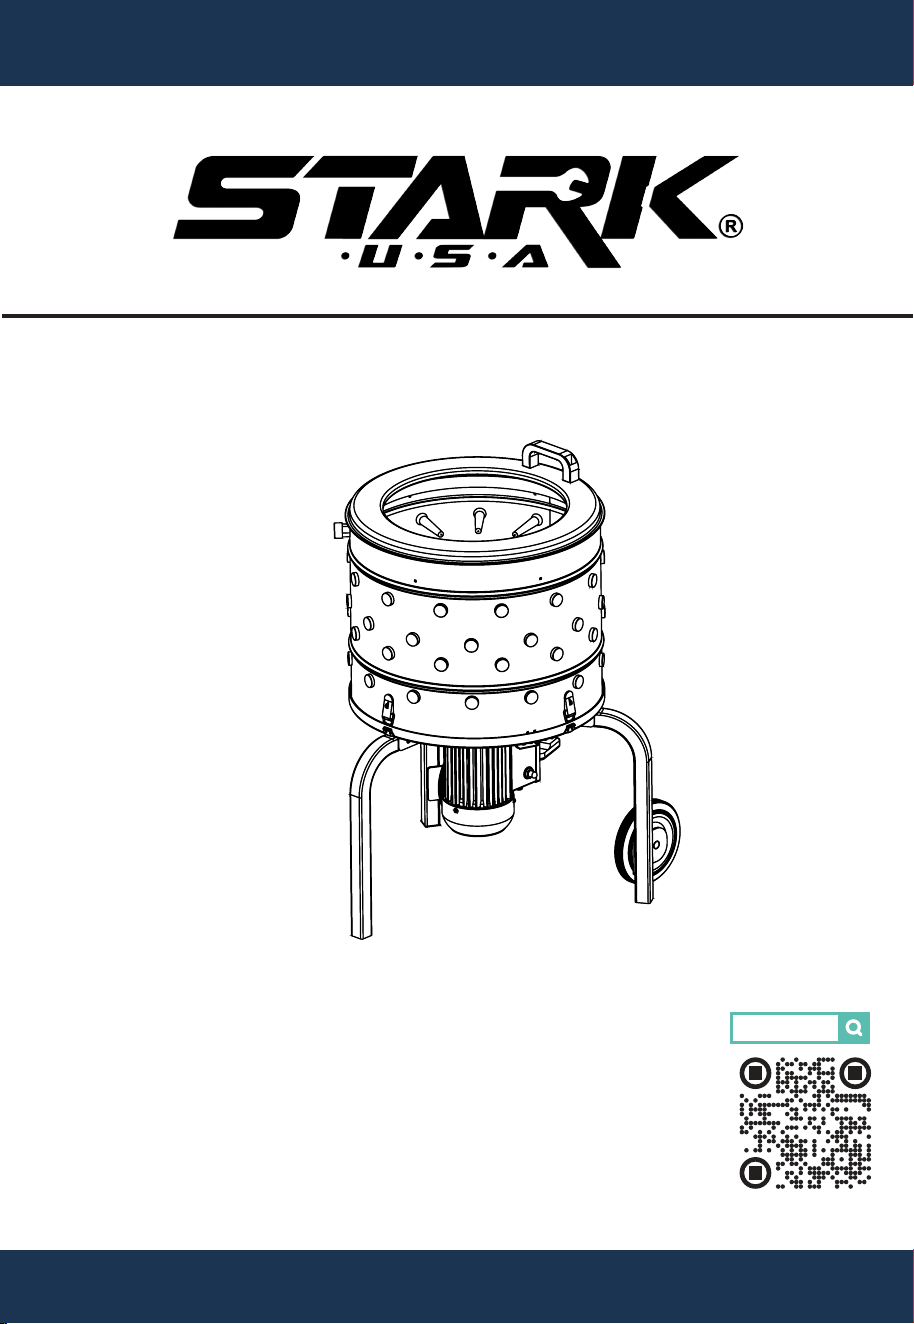
CHICKEN PLUCKER
20 INCH 750W
97065
IMPORTANT:
Please read and fully understand all INSTRUCTIONS before operating. Failure
to follow safety rules and basic precautions can lead to severe personal injury.
Retain these instructions in a secure and easily accessible location for future
reference and servicing.
SKU: 97065


1
TABLE OF CONTENT
TABLE OF CONTENTS
SAFETY
OVERVIEW (PRODUCT INFORMATION)
ASSEMBLY
OPERATION
1
2
3
5
7
REPLACEMENT PARTS
9
DISCLAIMER
12
CUSTOMER SERVICE
12
INTRODUCTION 3
SPECIFICATIONS
3
ASSEMBLY
5
PLUCKING INSTRUCTION
7
AFTER USE INSTRUCTION
7
PARTS DIAGRAM
9
PART INFORMATION
10

TABLE OF CONTENT
2
SAFETY
WARNING
This instruction manual's warnings, cautions, and instructions may not
encompass all potential conditions or situations that could arise. Operators
must recognize that common sense and caution, not inherent in this product,
must be exercised.
• Please follow the provided Operation Method and adhere to proper
operating procedures.
• Exercise caution during assembly and operation to avoid skin abrasions.
• Keep hands away from the paddles to prevent injuries.
• Carefully read the instruction manual before use.
• Ensure loose clothing is kept clear of moving parts when the plucker is in
operation.
• Keep fingers and hair away from moving parts during plucker use.
• Always turn off the plucker before unplugging it from the outlet.
• Unplug the plucker when changing parts on the unit.
• Disconnect the plucker from the outlet during assembly or disassembly.
• Supervise closely when using the appliance near children.
• Never attempt to remove parts while the unit is running.
• Do not disassemble or insert objects into the plucker while it is operating.
• Avoid using the plucker if the power cord is damaged; return it to the
customer service or the store of purchase.
• Prevent electrical shock by keeping specific parts away from water or other
liquids.
• Unplug the unit when not in use, when attaching or detaching parts, and
during cleaning.
• Do not operate the appliance if the cord or plug is damaged, or after a
malfunction, drop, or other damage; have it inspected, repaired, or adjusted
at an authorized service facility.
• Using attachments not recommended or sold by the manufacturer may
result in fire, electric shock, or injury.
• Avoid letting the cord hang over the edge of a table or counter.
• Retain these instructions for future reference and safety.

3
OVERVIEW (PRODUCT INFORMATION)
INTRODUCTION
The Stark USA chicken plucker comes equipped with essential components for
efficient and safe feather removal. It is highly recommended to read this manual
before proceeding with installation and operation to gain a better understanding.
Crafted from high-quality materials, this chicken plucker ensures long-lasting
performance in feather removal tasks. Proper care and operation will ensure
reliable service for many years to come.
Item Number
Power Type
Wheel Quantity
Rotational Speed (RPM)
Finger Quantity
Voltage (V) / Frequency (HZ)
Wattage (W)
Rated Current (A)
Gross Weight (LB)
Net Weight (LB)
Removable Tab
Drive Type
Finish
Primary Material
Hardware Material
Hardware Finish
Water Resistance
97065
Electric
2 PCS
275 RPM
92 PCS
AC 120 V / 60 (HZ)
750 W
6.5 A
72 LBS
68 LBS
Yes
Planetary Gears
Stainless Steel
Stainless Steel
Carbon Steel
Spray Paint
IP 54
SPECIFICATIONS
OVERVIEW (PRODUCT INFORMATION)

OVERVIEW (PRODUCT INFORMATION)
4
SPECIFICATIONS (CONTINUED)
Corrosion Resistance
UV Resistance
Auto Power Off Protection
Safety Stop Feature
Outdoor Use
Packaging Contents
Power
Motor Speed
Diameter Of Tub
Diameter Of Rotating Plate
Yes
Yes
Yes
Yes
Yes
Tub x 1
Feather plate x 1
Set Hardware x 1
Drive Assembly x 1
Leg x 3
Manual x 1
750 W
1750 RPM
20 INCH
17 INCH
OVERVIEW (PRODUCT INFORMATION)
OVERVIEW (PRODUCT INFORMATION) ASSEMBLY
5
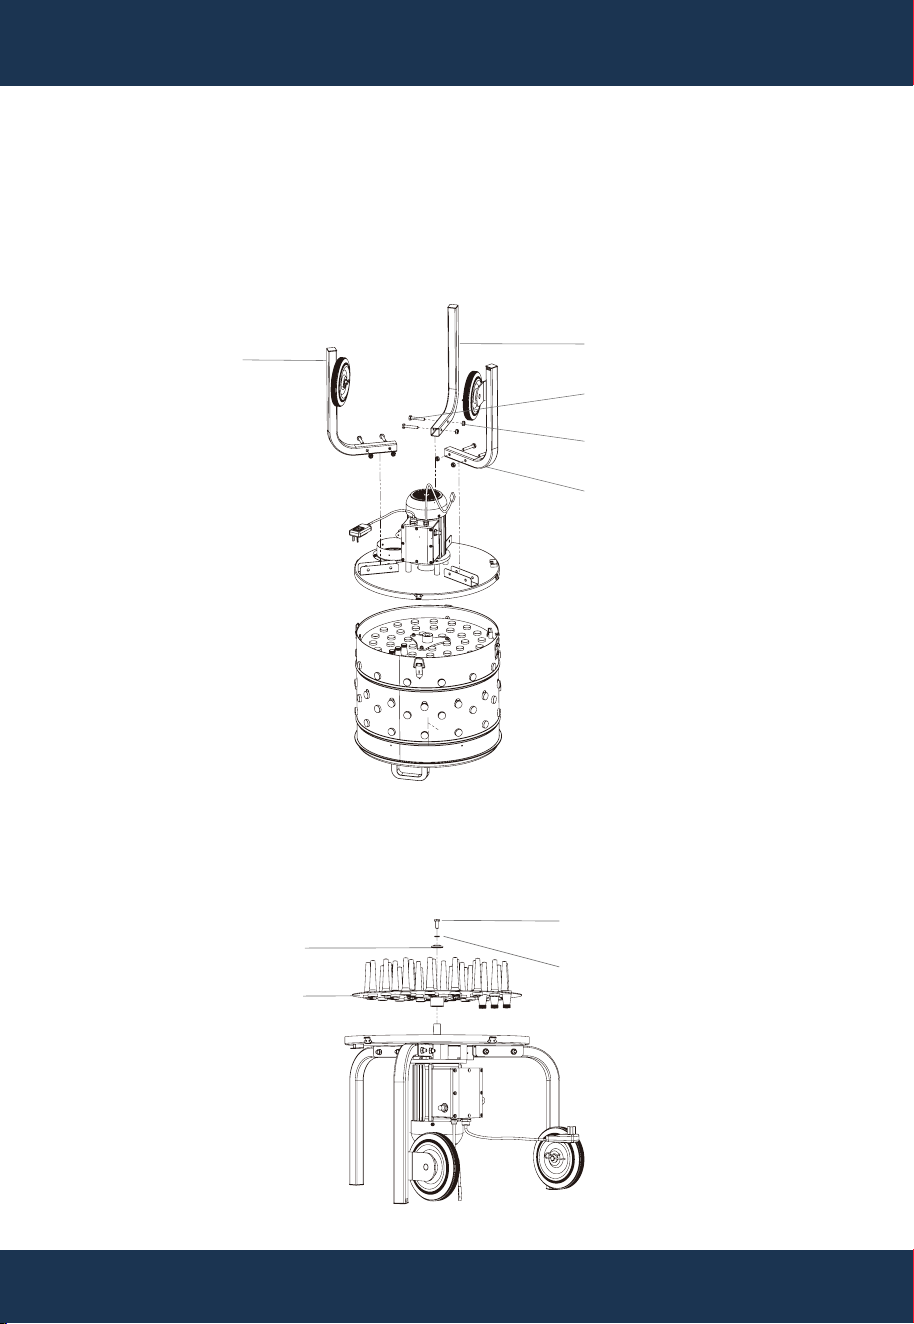
ASSEMBLY
• Install parts# 35, # 38, and # 43 as indicated by matching labels A, B, and
C. Secure with M8 bolts # 36 and # 37.
• Place the feather plate (part #30), and insert parts #24 and #27 into part
#28 to lock it.
Leg A (Part# 35)
Bolt M8 x 45 (Part# 36)
Leg B (Part# 38)
Nut M8 (Part# 37)
Leg C (Part# 38)
Spring Cushion 8 (Part# 27)
Bolt M8 × 20 (Part# 24)
Clamp Plate (Part# 28)
Turntable (Part# 30)
ASSEMBLY
ASSEMBLY
6
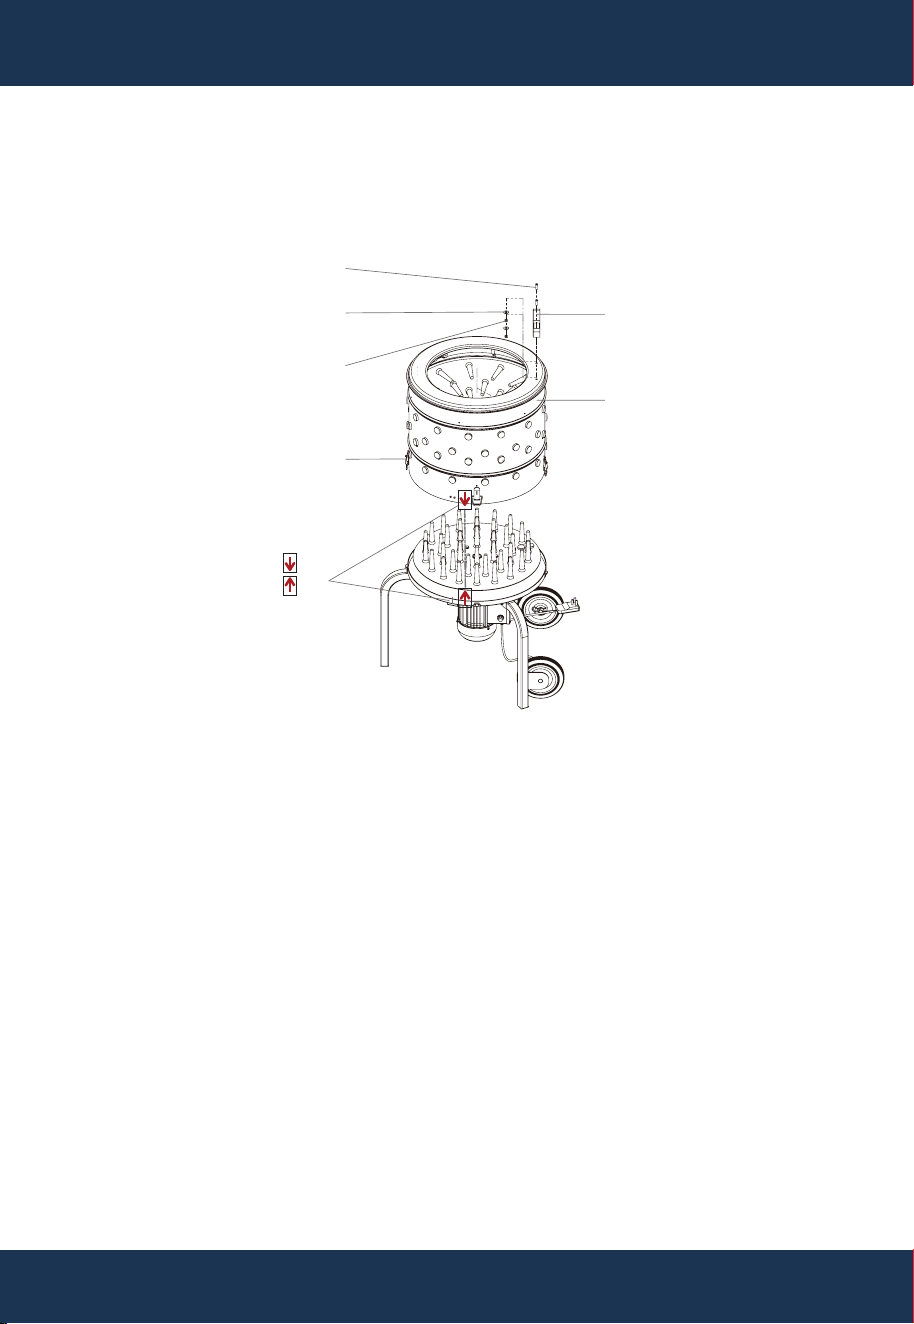
• Align the tub on the bottom plate, matching the direction of the arrows to
activate the proximity switch. Fasten with the gourd buckle.
ASSEMBLY
Flat Mat 6 (Part# 6)
Screw M6 × 20 (Part# 9)
Nut M6 (Part# 7)
Align Tub Arrows ( )
Hasp ( Part# 16)
Handgrip (Part# 10)
Drum (Part# 13)
ASSEMBLY (CONTINUED)

7
OPERATION
• Confirm safety features work, including the power and proximity switches.
• Tighten all nuts and bolts.
NOTE
OPERATION
PLUCKING INSTRUCTION
Before use, ensure all hardware is tight to prevent loosening from vibrations.
NOTE
Do not remove the bird until the machine has fully stopped.
• Position electrical connections away from water.
• Press the leakage protector's reset button upon each plug-in.
• Scald the bird at 140-150°F until primary feathers loosen (about 1 min).
• Recommend to add soap to scalding water for effective feather removal.
• Start the plucker, insert the bird, and wait for plucking (15-30 sec).
• Shut off the plucker and remove the bird after it stops.
• Turn off and unplug the machine before cleaning.
• Avoid putting hands near the feather chute.
• Disassemble and wash parts with soapy water.
• Remove all debris from the appliance.
• Avoid bleach; use mild cleaners to prevent discoloration.
• Protect non-stainless parts with food-grade spray or salad oil.
• Keep motor housing dry to prevent damage.
• Store the unit indoors or covered, away from water and sunlight.
AFTER USE INSTRUCTION

8
OPERATION
WARNING
To prevent injury, keep hands away from the feather chute. Never try to clear
feathers or debris while the unit is plugged in. Always unplug the unit before
cleaning or removing any foreign objects, including bird heads, from the
plucker.
OPERATION
AFTER USE INSTRUCTION (CONTINUED)
REPLACEMENT PARTS
9
OPERATION
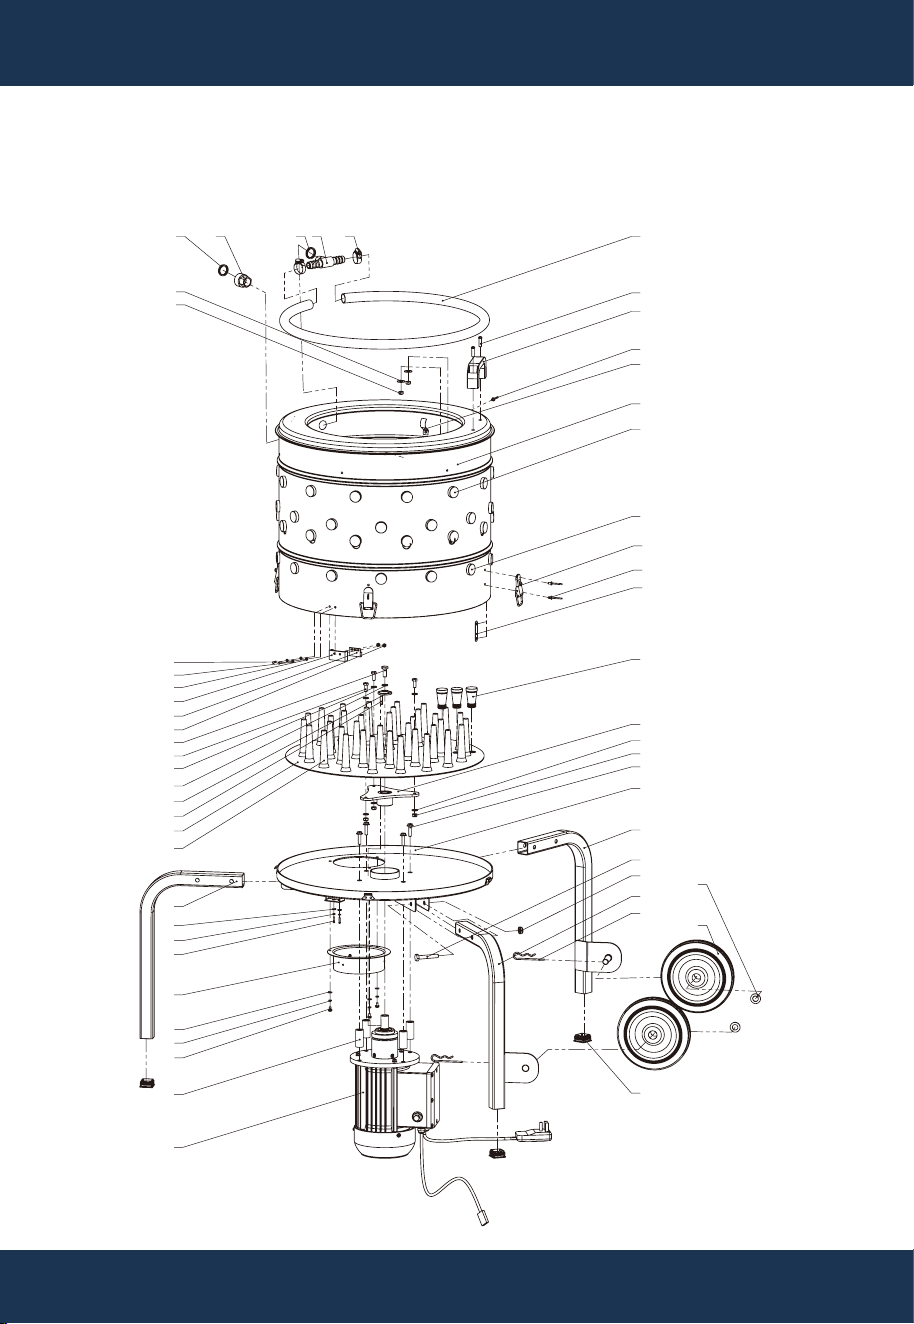
1 2 3 4 5
6
7
18
19
20
21
22
23
24
25
26
27
28
29
30
14
43
44
45
46
47
20
19
48
49
50
42
40
41
8
9
10
11
12
13
14
15
16
11
17
31
32
26
7
33
34
35
36
37
38
39
PARTS DIAGRAM
REPLACEMENT PARTS

REPLACEMENT PARTS REPLACEMENT PARTS
10
Item
1
2
3
4
5
6
7
8
9
10
11
12
13
14
15
16
17
18
19
20
21
22
23
24
25
Qty
1
1
1
1
2
2
5
1
2
1
13
5
1
76
13
4
4
2
5
5
1
1
2
1
3
Description
Rubber Washer
Copper Connector
Gasket
Tee Joint
Hoop
Large Flat Mat 6
Lock Nut M6
Water Pipe
Phillips Screw M6×20
Handgrip
Rivet Ф 4
Clasp
Mixing Drum Assembly
Long Finger
Short Finger
Hasp
Lining Plate
Phillips Screw M4x14
Spring Cushion 4
Flat Washer 4
Switch Retaining Plate
Proximity Switch
Flange Edge Nut M4
Outer Hexagon Bolt M8x20
Outer Hexagon Bolt M6x16
PARTS INFORMATION

11
Item
26
27
28
29
30
31
32
33
34
35
36
37
38
39
40
41
42
43
44
45
46
47
48
49
50
Qty
6
1
1
1
1
3
1
4
1
1
6
6
1
2
2
2
3
1
2
2
2
1
3
4
1
Description
Flat Washer 6
Spring Cushion 8
Clamp Plate
Flat Key
Turntable
Medium Finger
Connecting Plate Assembly
Flange Hexagon Bolt M10x55
Pallet Assembly
Leg A
Flange Hexagon Bolt M8x45
Flange Locking Nut M8
Leg B
Type R Pin 3x50
Large Flat Mat 13
Roller Ф 170
End Cap 30x30
Leg C
Flat Washer 3
Spring Cushion 3
Phillips Screw M3x8
Collecting Port
Phillips Screw M4×8
Locating Sleeve
Motor
PARTS INFORMATION (CONTINUED)
REPLACEMENT PARTS

12
DISCLAIMER
DISCLAIMER
PLEASE READ THE FOLLOWING CAREFULLY
The manufacturer and/or distributor have provided the parts list and assembly diagram in this manual
for reference purposes only. They do not make any representation or warranty to the buyer that they
are qualified to make repairs to the product or replace any parts of the product. In fact, the
manufacturer and/or distributor expressly state that all repairs and parts replacements should be
undertaken by certified and licensed technicians, and not by the buyer.
The buyer assumes all risk and liability arising from their repairs to the original product or replacement
parts or arising from their installation of replacement parts. It is strongly advised that qualified
professionals handle any repairs or replacements to ensure safety and proper functioning of the
product. Improper installation and operation may result in injury, property damage, or voiding of
warranty. The manufacturer and/or distributor shall not be held responsible for any accidents,
damages, or malfunctions resulting from the buyer's installation and operation of the product. It is
essential to follow all safety guidelines and recommendations provided in this manual and to seek
professional assistance if unsure about the installation or operation procedures.
CUSTOMER SERVICE
If you have any questions about ordering our pool pumps and replacement parts or pool products,
please feel free to contact us using the following contact information:
Customer Service and Technical Support
Phone: (909) 628-0880
Email: [email protected]
Hours of Operation: Monday – Friday, 9AM – 4PM (CST)
REPLACEMENT PARTS
