
USER MANUAL
pH METER PRO
HYDROPONIC TESTER


3
WELCOME
Thank you for choosing AC Infinity. We are committed to product quality and friendly customer
service. If you have any questions or suggestions, please don’t hesitate to contact us. Visit
www.acinfinity.com and click contact for our contact information.
EMAIL
support@acinfinity.com
WEB
www.acinfinity.com
LOCATION
Los Angeles, CA
4
MANUAL CODE PMP2305X1
NOTE
Water droplets are added during the production of this product to maintain the probe's
moisture. This is normal practice and is not indicative of a used product.
Do NOT use this product under freezing cold conditions. Wait until your space warms to
room temperature before using this product.
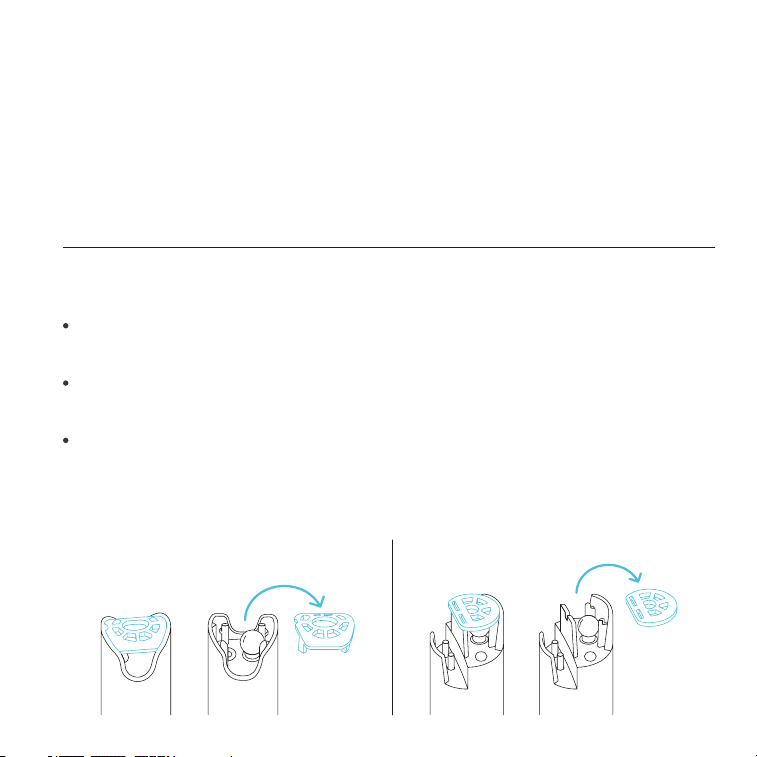
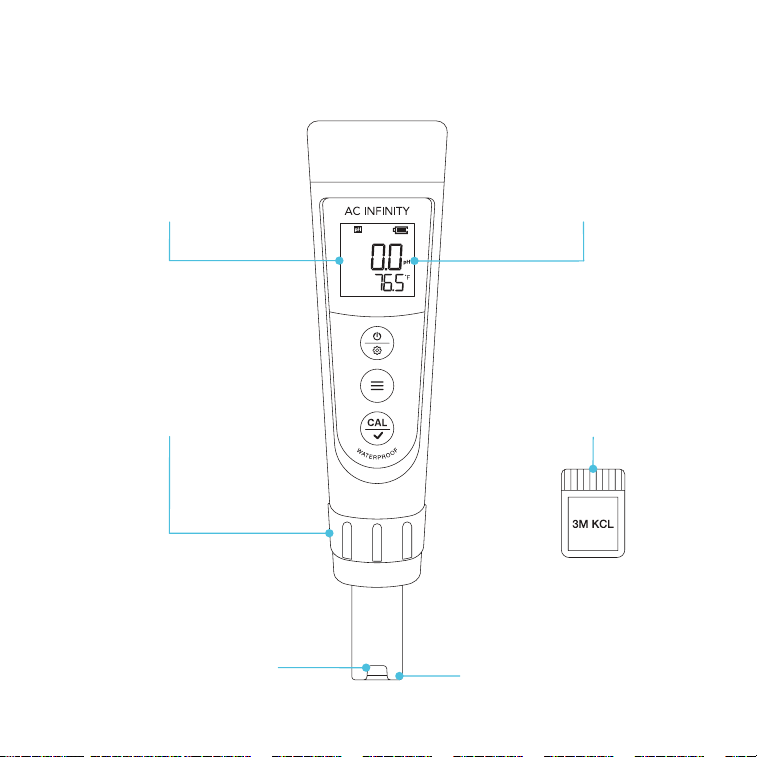
This testing device is equipped with a sensor shield that protects the glass bulb from
accidental collisions (see image below). You may remove this shield to clean the sensor and
put it back when you are finished.
AC-PHM7AC-PHM3 and AC-PHM5
PRODUCT
pH Meter
pH Meter PRO
Hydroponic Meter PRO
MODEL
AC-PHM3
AC-PHM5
AC-PHM7
UPC-A
819137024205
819137023987
819137024212

5
MANUAL INDEX
Manual Index .................................................................................
Product Warning ............................................................................
Key Features .................................................................................
Product Contents ...........................................................................
Powering and Setup ......................................................................
Programming .................................................................................
Other Settings ...............................................................................
Calibration Notes ...........................................................................
pH Readings ..................................................................................
Conductivity* ..................................................................................
Maintenance ..................................................................................
Troubleshooting Guide ...................................................................
FAQ ...............................................................................................
Other AC Infinity Products .............................................................
Warranty ........................................................................................
Page 5
Page 6
Page 7
Page 8
Page 9
Page 12
Page 13
Page 17
Page 18
Page 25
Page 33
Page 37
Page 38
Page 39
Page 40
*AC-PHM7 Only

6
Read all instructions before using this product.
Do not fully submerge this product underwater.
Do not remove the screw cap holding the sensor to this product when in use.
Do not operate this product while it is damaged, or if it malfunctions, has been dropped, or
is damaged in any manner.
Wash hands thoroughly after handling calibration powders.
Do not consume calibration powders. Seek medical attention and rinse mouth in case of
consumption. Keep powders out of reach from children and animals.
1.
2.
3.
4.
5.
6.
PRODUCT WARNING
TO REDUCE THE RISK OF FIRE, ELECTRIC SHOCK, OR INJURY TO PERSONS,
OBSERVE THE FOLLOWING:
7
EFFECTIVE CALIBRATION
Provided calibration
solutions assist in precise pH
measurements by regulating
the meter in between uses.
REPLACEABLE PROBES
Interchangeable probe allows
for the quick and efficient
replacement of the sensor to
prolong your meter's lifespan.
PREMIUM DISPLAY
Backlit LCD screen with battery
display and locking capabilities
provides a sharp layout for
convenient observation.
SECURE BUILD
Detachable sensor shield
protects the glass electrode
probe to handle heavy usage
and prevent risk of damage.
ENHANCED PRECISION
Lithium glass membrane
sensor delivers exceptionally
fast and precise pH readings
with ±0.01 accuracy.
EXTENDED LIFESPAN
Included 3M KCL solution
improves the pH meter’s
effectiveness by supplying ideal
storage conditions when not in use.
KEY FEATURES
*AC-PHM5 Shown
8
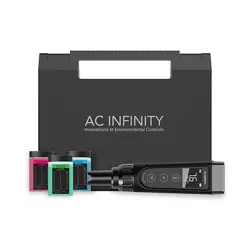
AC-PHM5
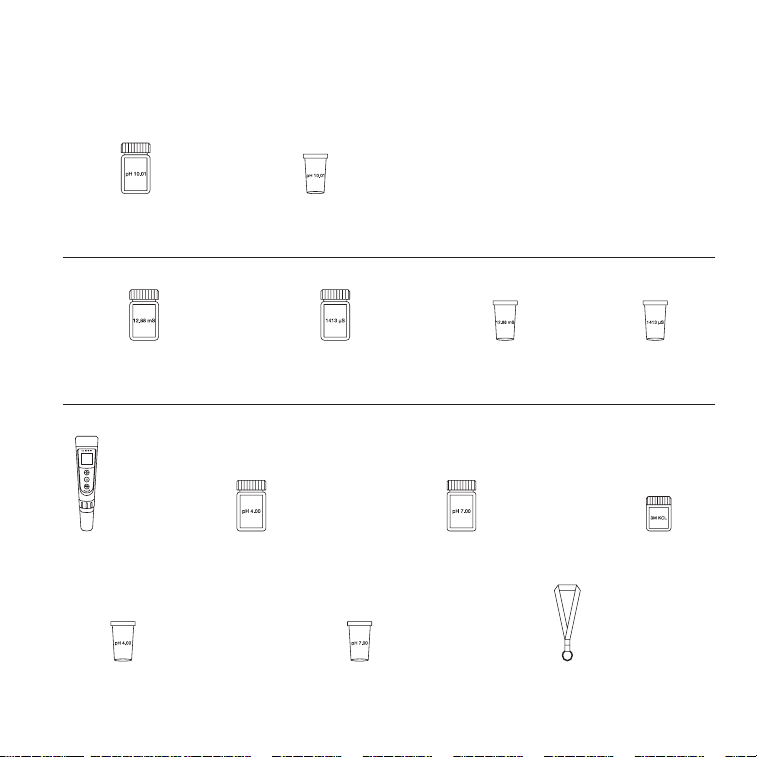
PRODUCT CONTENTS
AC-PHM7
TRAVEL
LANYARD
(x1)
pH 7.00
CALIBRATION VIAL
(x1)
pH 4.00
CALIBRATION VIAL
(x1)
pH 10.01 CALIBRATION
BUFFER SOLUTION
(x1)
pH 10.01
CALIBRATION VIAL
(x1)
AC-PHM5 & AC-PHM7
pH 4.00 CALIBRATION
BUFFER SOLUTION
(x1)
pH 7.00 CALIBRATION
BUFFER SOLUTION
(x1)
pH
METER
(x1)
3M KCL SOAKING
SOLUTION
(x1)
12.88 mS CONDUCTIVITY
CALIBRATION SOLUTION
(x1)
1413 µS CONDUCTIVITY
CALIBRATION SOLUTION
(x1)
1413 µS
CALIBRATION VIAL
(x1)
12.88 mS
CALIBRATION VIAL
(x1)
9
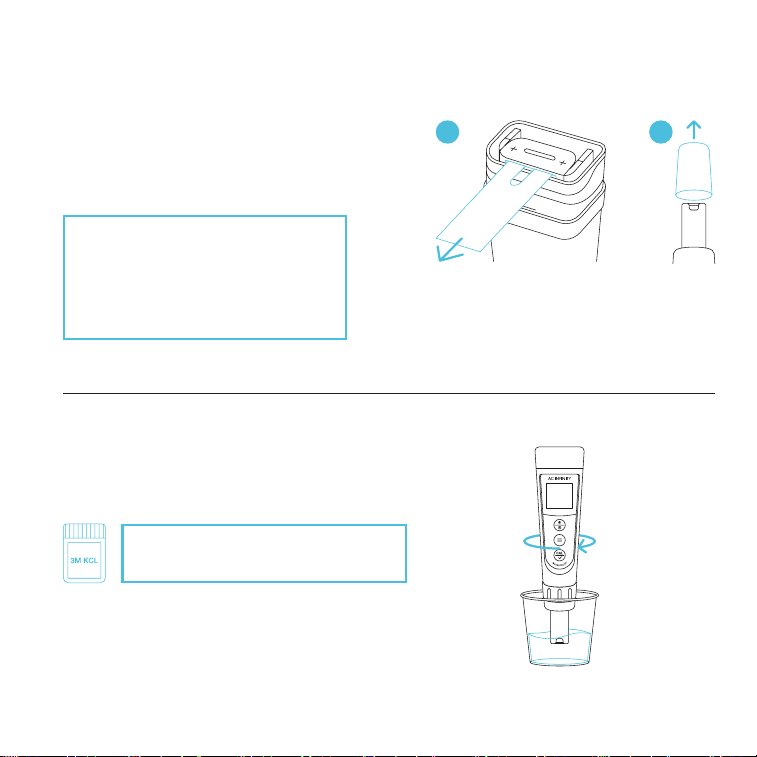
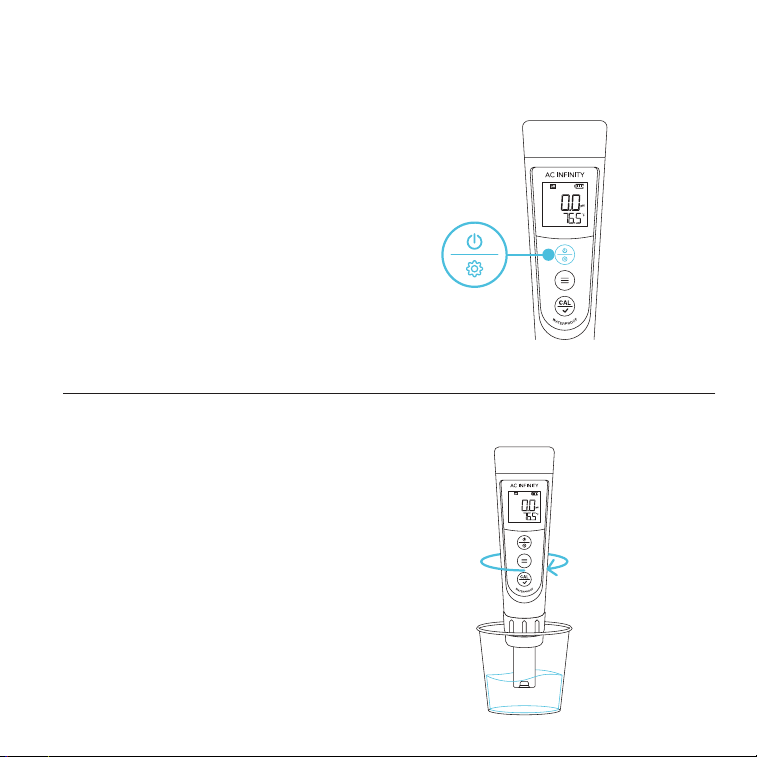
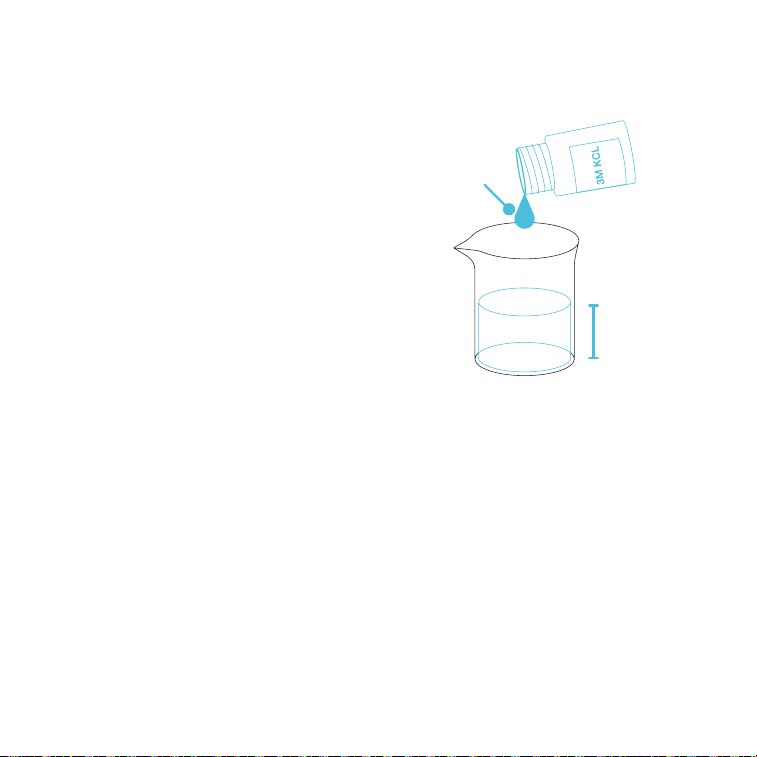
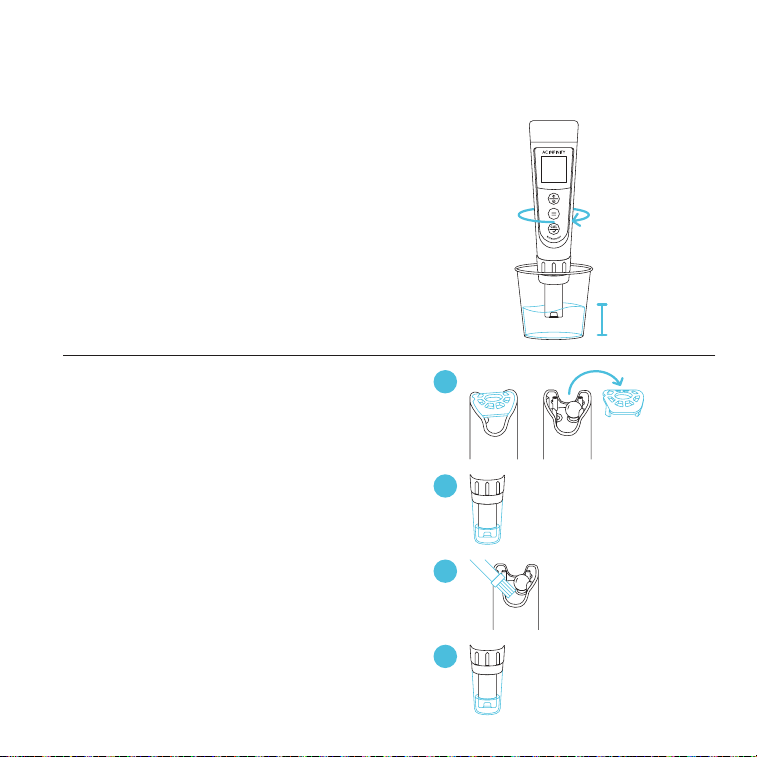
STEP 2
Fill a cup with 8-16 oz. of distilled or deionized
water for probe rinsing. Shake off excess water.
STEP 1
Pull off the battery insulation paper and remove
the probe cap.
FIRST TIME USE
POWERING AND SETUP
If unused for a month or longer, soak
in 3M KCL for 30 minutes before use.
A B
Your pH meter will come shipped
with 3M KCL droplets in the probe
cap. You may see this substance as
white sediment, which can be rinsed
off and will not affect its usability.
10
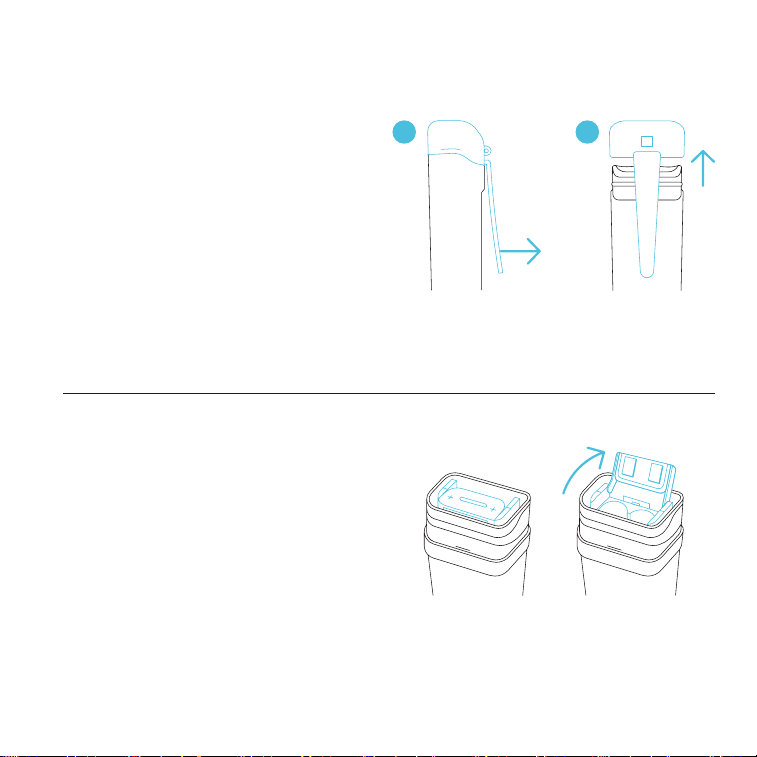
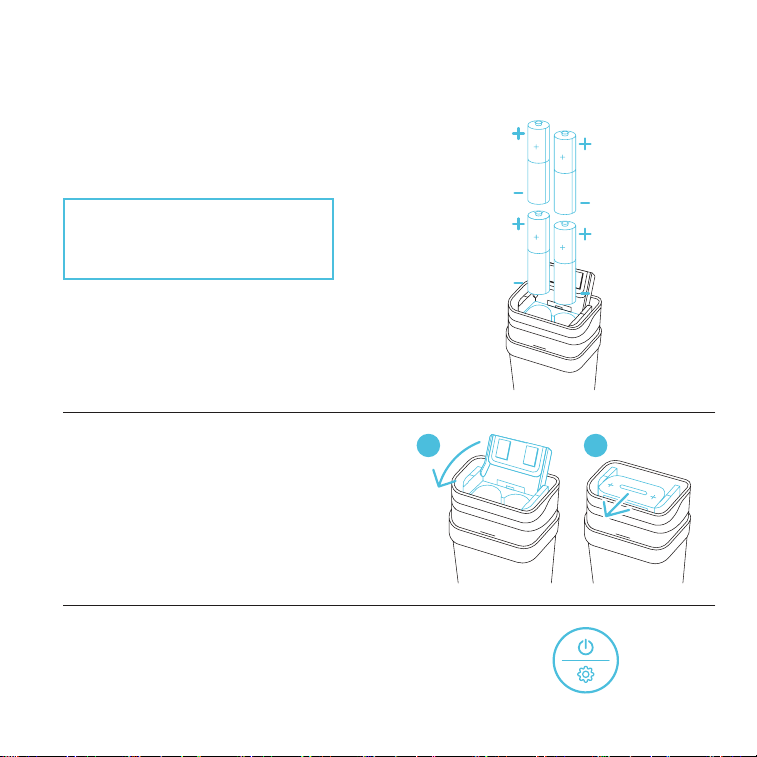
STEP 1
Remove the cap.
STEP 2
Pull the battery tab open.
POWERING AND SETUP
BATTERY REPLACEMENT
A B
11
STEP 3
Insert the batteries as shown. The positive end
(+) of each battery must face upwards.
CAUTION: Incorrectly inserted
batteries may damage your pH
meter and cause potential hazards.
BATTERY REPLACEMENT
POWERING AND SETUP
STEP 4
Push the battery tab down and forward
to lock it. Place the cap back on.
A B
STEP 5
Press the power/setting button to power it on.
PRESS
12
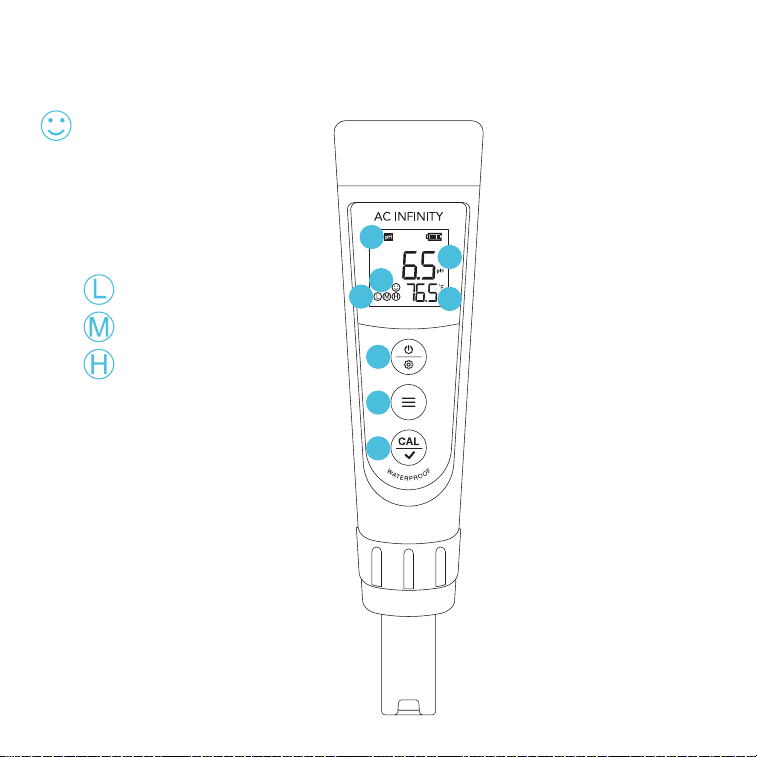
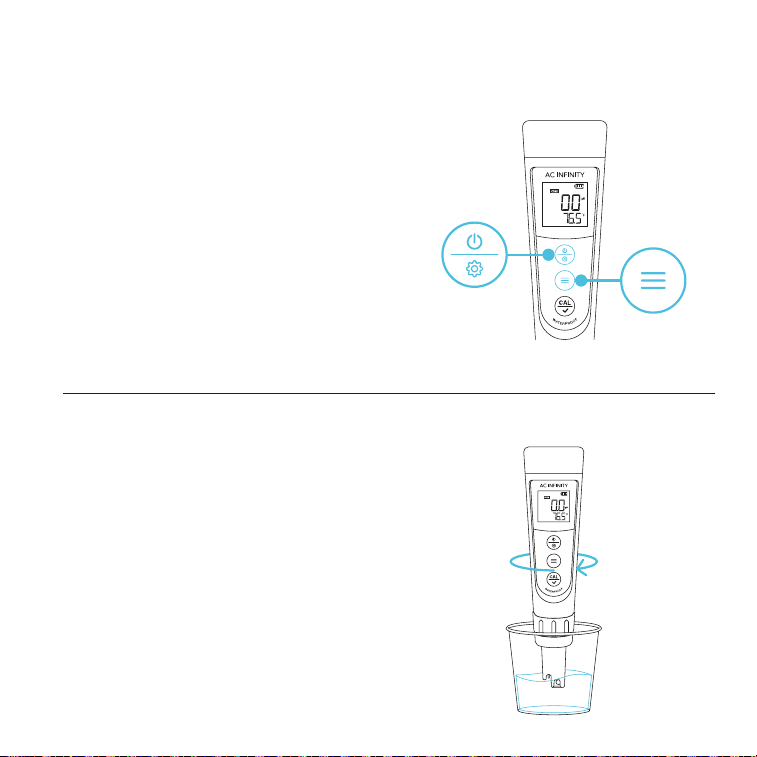
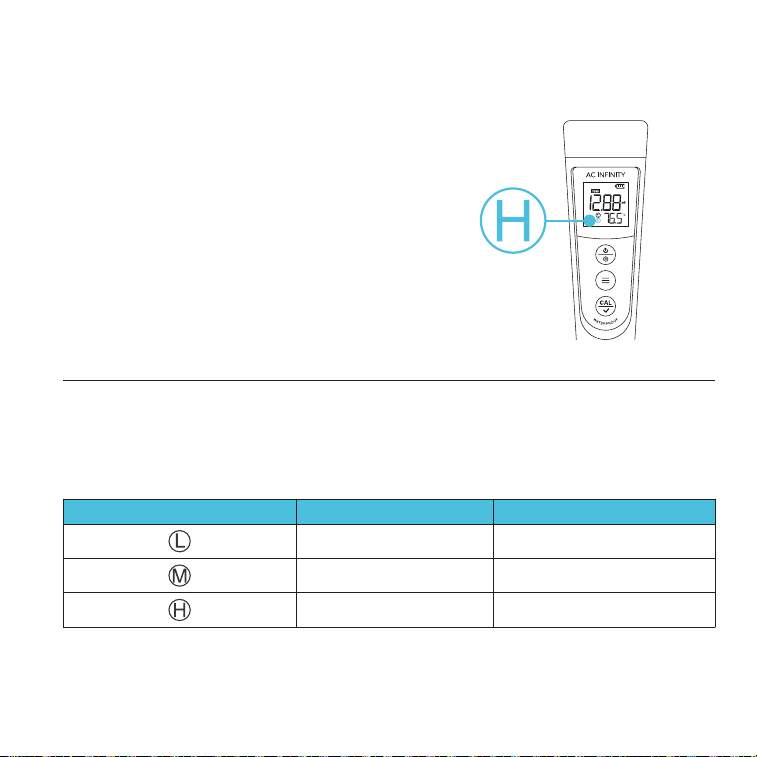
1. SMILE ICON
Indicates a stabilized
reading when staying
on the screen for 2
seconds or longer.
3. POWER/SETTING BUTTON
Powers your pH meter ON/OFF
or adjusts settings. Cancels
calibration in CALIBRATION
Mode. Enters Settings while
your pH meter is OFF.
4. MODE BUTTON
Switches between pH
and mV measurements in
MEASUREMENT Mode. Adjusts
parameters in SETTINGS.
2. CALIBRATION ICONS
= pH 4.00
= pH 7.00
= pH 10.01
6. MEASUREMENT MODE
Displays the
parameter indication.
5. CALIBRATION BUTTON
Enters CALIBRATION
Mode, initiates the
calibration, and
confirms changes.
PROGRAMMING
8. PROBE TEMPERATURE
Displays the current
temperature that the
probe is detecting.
7. PROBE MEASUREMENT
Displays the current pH, EC,
TDS, and salinity readings
the probe is detecting.
1
2
3
4
5
6
7
8
*AC-PHM5 Shown
13
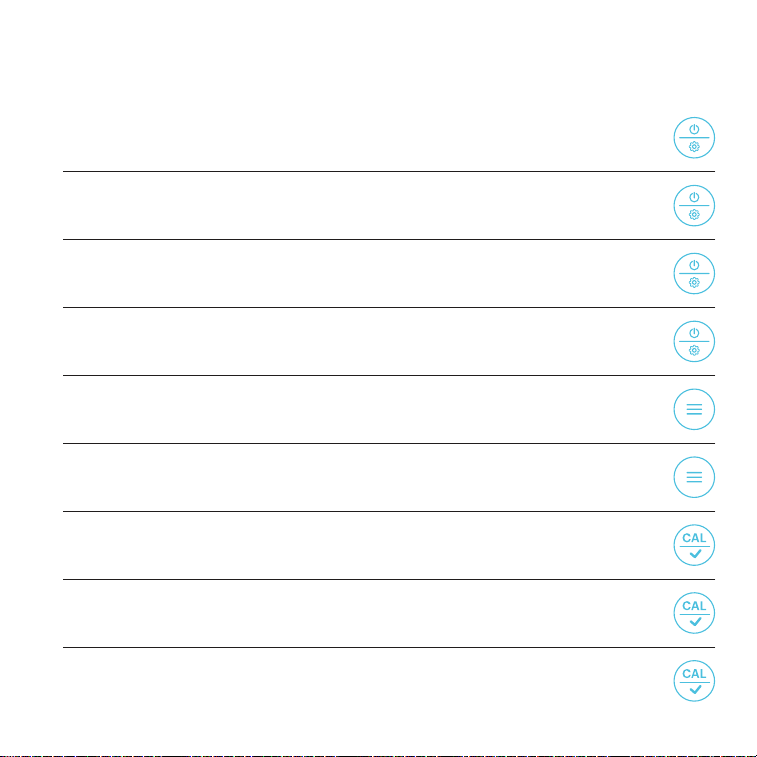
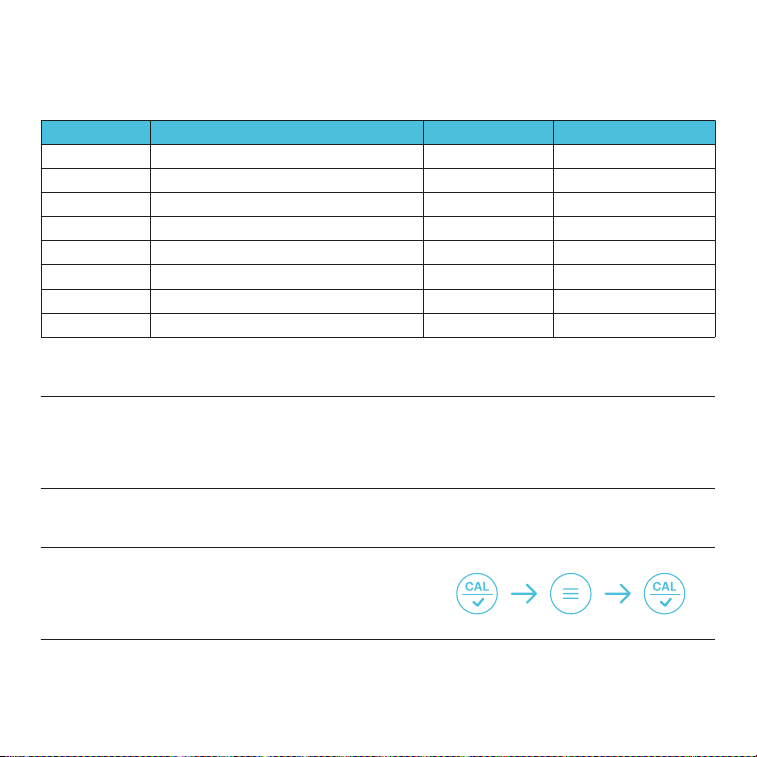
ACCESS CALIBRATION MODE
Hold the calibration button.
HOLD +
POWER ON
Press the power/settings button.
PRESS +
ACCESS SETTINGS
While off, hold the power/settings button to enter SETTINGS.
HOLD +
POWER OFF
Hold the power/settings button.
HOLD +
OTHER SETTINGS
BACKLIGHT ON
In MEASUREMENT, press the power/settings button.
PRESS +
SWITCH PARAMETER
In MEASUREMENT, press the mode button.
PRESS +
CHANGE PARAMETER
In PARAMETER, press the mode button.
PRESS +
PRESS +
FINISH CALIBRATION
In CALIBRATION mode, press the calibration button.
PRESS +
UNLOCK READING
In AUTO. HOLD, press the calibration button.
GENERAL SETTINGS

14
OTHER SETTINGS
ENTER SETTINGS
Holding the power/settings button will enter settings while your pH meter is off.
HOLD +
1.
CYCLE THROUGH SETTINGS
Pressing the mode button switches between P1-P2-P3, etc.
PRESS +
2.
UNLOCK SETTINGS
Pressing the calibration button will enable you to adjust your current setting
which will flash.
PRESS +
3.
ADJUST SETTINGS
Pressing the mode button adjusts settings.
Pressing the calibration button confirms the settings change.
PRESS +
PRESS +
4.
JUMP TO MEASUREMENT MODE
Holding the power/settings button returns you to the MEASUREMENT mode.
HOLD +
5.
PARAMETER SETTINGS
15
OTHER SETTINGS
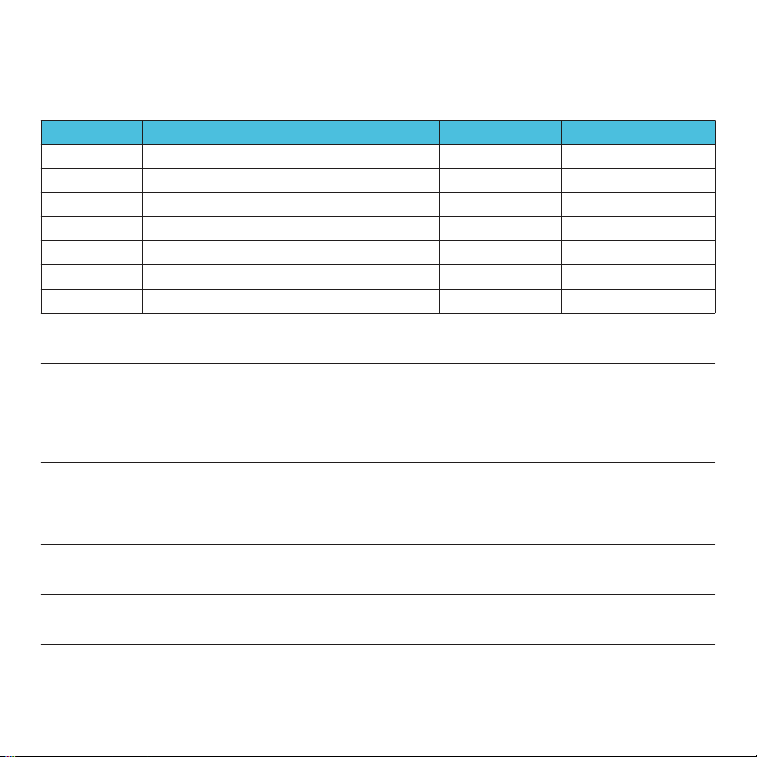
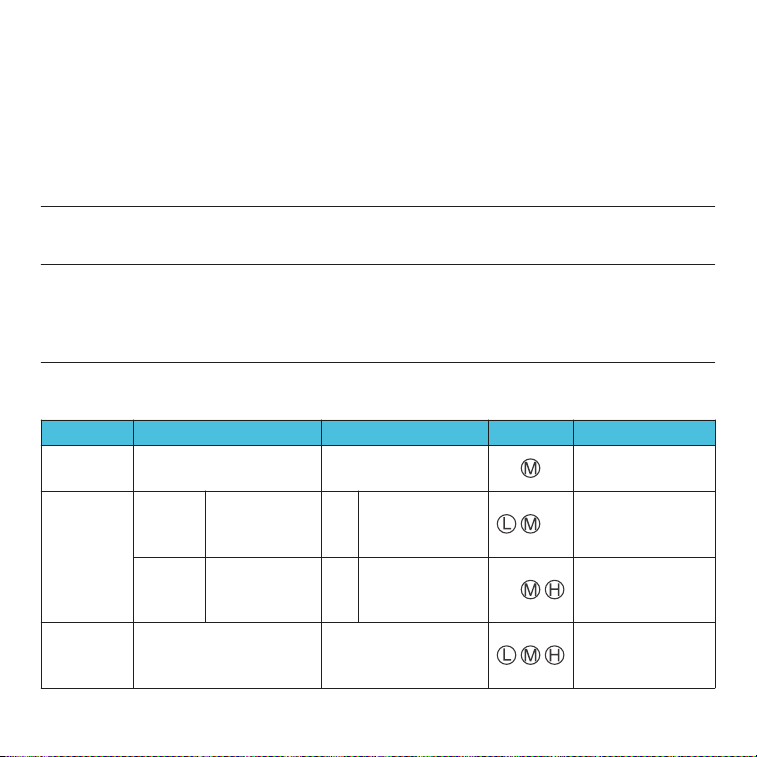
PARAMETER SETTINGS — AC-PHM5
Category
P1
P4
P5
P6
P7
P2
P3
Settings Adjustment
Selects pH Buffer Series
Automatic Hold
Sets Backlight Level
Selects Temperature Scale
Restores Factory Settings
Low Alarm Setting
High Alarm Setting
Settings
USA / NIST
OFF / ON
OFF / 1 / ON
°F / °C
No / Yes
0 - 14.00 pH
0 - 14.00 pH
Factory Settings
USA
OFF
1
°F
No
0
14.00
STANDARD pH BUFFER SOLUTION
Switches between the two standard buffer solution options: USA series and NIST series.
P1
AUTOMATIC HOLD
Select "ON" to activate the AUTO-HOLD function. When the reading is stable for more than 10 seconds, it will
automatically lock and the "HOLD" icon will appear. Press the calibration button to cancel the AUTO-HOLD
("HOLD" icon will go off).
P4
BACKLIGHT
"OFF" = turns off backlight; "ON" = turns on backlight; "1" = backlight lasts for 1 minute.
P5
DEFAULT SETTING
Select "YES" to restore your pH meter to its factory settings (erases all calibration records and sets all
parameter settings to their default values). Use this function if your pH meter's calibration or measurement is
not properly functioning. Calibrate your pH meter again after restoring its factory settings.
P7
TEMPERATURE SCALE
Toggles between C˚ and F˚ temperature scales.
P6
ALARM FUNCTION
Sets a low and/or high trigger point to let you know if the reading is outside your desired range. For example,
you set your low and high alarms to ≤ 3.20 pH (P2) or ≥ 8.60 pH (P3), respectively. The alarm will activate and
turn the screen red if the reading falls below or exceeds these trigger points. Low and high alarms may also
be set independently.
P2
P3
16
OTHER SETTINGS
STANDARD pH BUFFER SOLUTION
Switches between the two standard buffer solution options: USA series and NIST series.
P1
AUTOMATIC HOLD
Select "ON" to activate the AUTO-HOLD function. When the reading is stable for more than 10 seconds, it will
automatically lock and the "HOLD" icon will appear. Press the calibration button to cancel the AUTO-HOLD
("HOLD" icon will go off).
P2
BACKLIGHT
"OFF" = turns off backlight; "ON" = turns on backlight; "1" = backlight lasts for 1 minute.
P3
TDS FACTOR
Press the calibration button in P5, adjust the TDS factor to
your desired value by pressing or holding the mode button,
and press the calibration button again to confirm the change.
P5
DEFAULT SETTING
Select "YES" to restore your pH meter to its factory settings (erases all calibration records and sets all
parameter settings to their default values). Use this function if your pH meter's calibration or measurement is
not properly functioning. Calibrate your pH meter again after restoring its factory settings.
P8
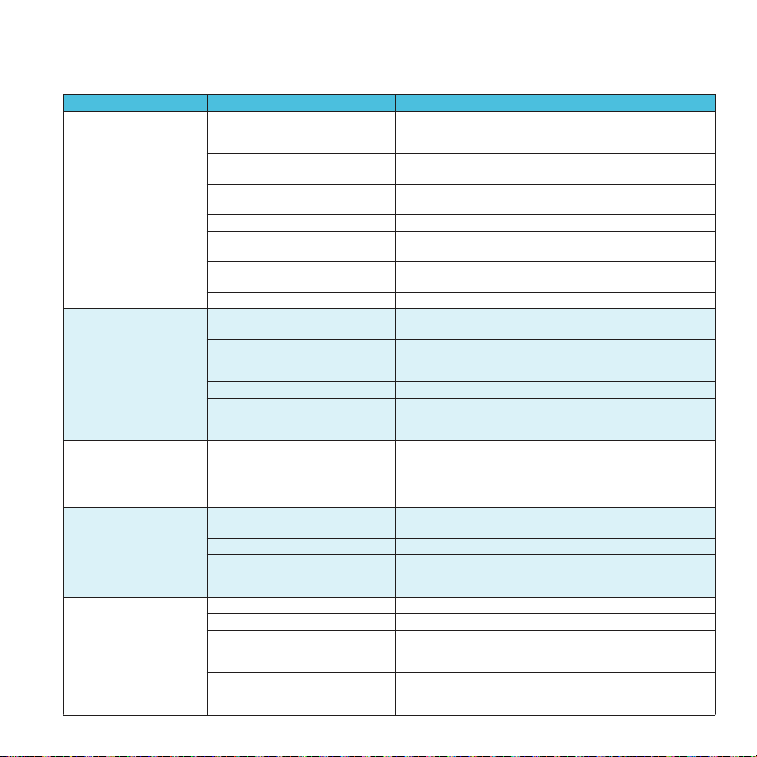
PARAMETER SETTINGS — AC-PHM7
Settings Adjustment Settings Factory SettingsCategory
Selects pH Buffer Series USA / NIST USAP1
Sets Backlight Level OFF / 1 / ON 1P3
Automatic Hold OFF / ON OFFP2
Temperature Compensation Factor 0.00 - 4.00% 2.00%P4
Salinity Unit ppt / mg/L pptP6
TDS Factor 0.40 - 1.00 0.71P5
Restores Factory Settings No / Yes NoP8
Selects Temperature Scale °F / °C °FP7
17
The 1
st
point calibration must be 7.00 pH. Perform the 2
nd
and 3
rd
point calibrations (4.00,
10.01, 1.68, or 12.45) after the 1
st
point calibration is complete. DO NOT turn off your pH
meter before your calibrate the 2
nd
and 3
rd
points. Otherwise you will need to restart the
calibration process with 7.00 pH first.
A.
Er2 will appear when the calibration button is pressed while the calibration process is
incomplete (smile icon does not appear on the screen).
B.
The included pH 4.00 and 7.00 buffer solutions can be used for up to 10 calibrations. After
use, tightly close the bottle and store it at room temperature. pH 10.01 can only be used for up
to 5 times as it will lose its accuracy much faster. Replace the solutions after their designated
uses to help keep your pH measurements reliable.
C.
This pH meter will automatically recognize the pH buffer solution it is in. For details, refer to
the following table:
D.
CALIBRATION NOTES
1
st
pt: 7.00 pH
2
nd
pt: 4.00 pH or 1.68 pH
3
rd
pt: 10.01 pH or 12.45 pH
1
st
pt: 6.86 pH
2
nd
pt: 4.01 pH or 1.68 pH
3
rd
pt: 9.18 pH or 12.45 pH
USA Series NIST Series*
1
st
pt: 7.00 pH
2
nd
pt: 10.01 pH
or 12.45 pH
1
st
pt: 7.00 pH
2
nd
pt: 4.00 pH
or 1.68 pH
Option B
Option A
B
A
1
st
pt: 6.86 pH
2
nd
pt: 9.18 pH
or 12.45 pH
1
st
pt: 6.86 pH
2
nd
pt: 4.01 pH
or 1.68 pH
7.00 pH
Range: 7.00 pH
Recommended
Range > 7.00 pH
Range < 7.00 pH
Required Accuracy
≥ 0.1 pH
2-Point
3-Point
Calibration
1-Point
6.86 pH
Indication
*NIST solutions sold separately
18
STEP 2
Rinse the probe in distilled water and
shake off excess moisture.
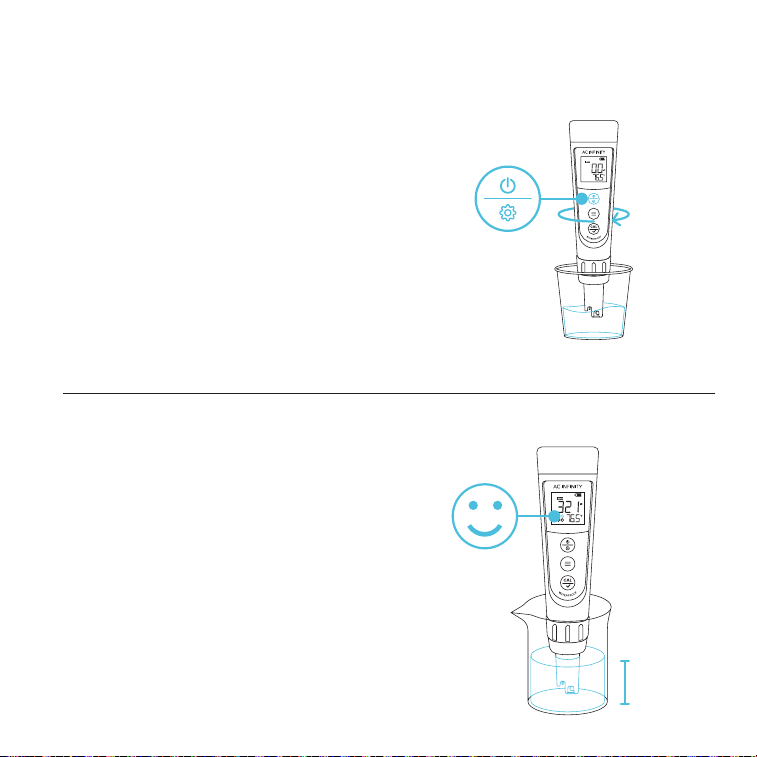
pH READINGS
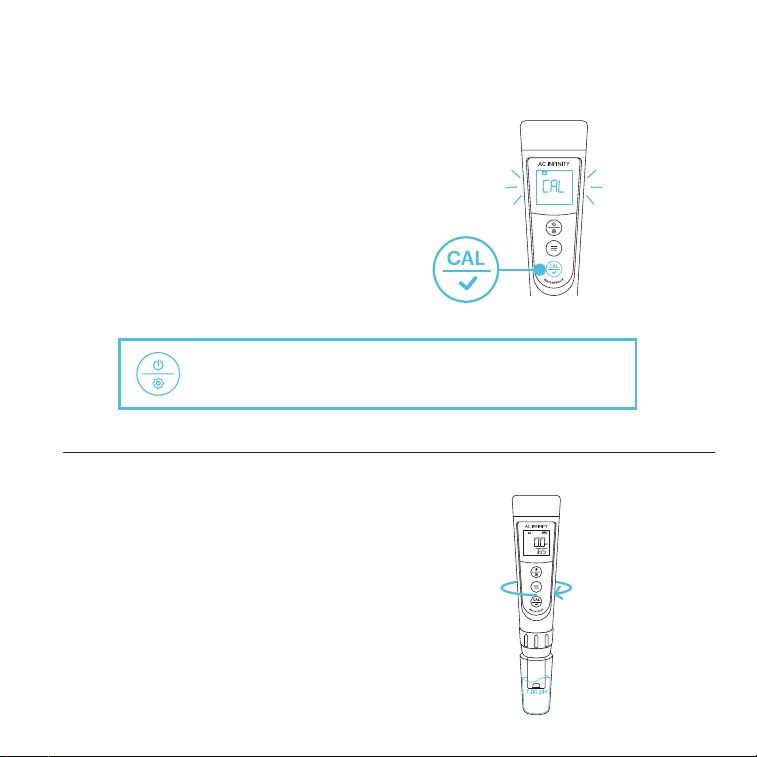
STEP 1
Press the power/settings button to turn
your pH meter on.
Prepare the pH buffer solutions in their
corresponding calibration vials to about
half its volume.
CALIBRATION
PRESS
19
STEP 4
Rapidly stir the probe in the 7.00 pH buffer
solution, then hold it still.
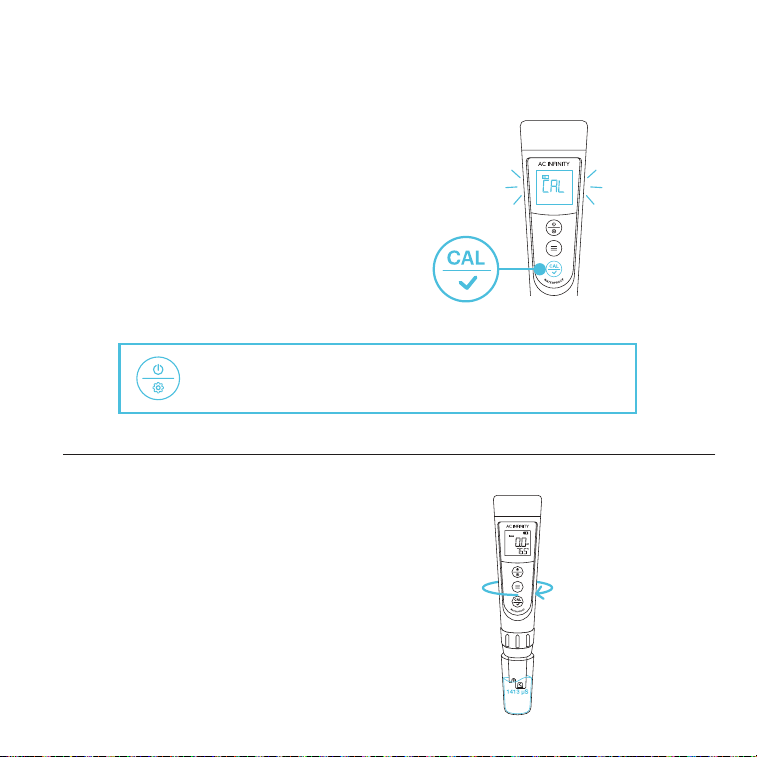
STEP 3
Press and hold the calibration button
to enter CALIBRATION mode.
The screen will turn green to signify
the calibration process has started.
pH READINGS
CALIBRATION
You may cancel the calibration and return to
MEASUREMENT Mode by pressing the power/setting button.
HOLD
20
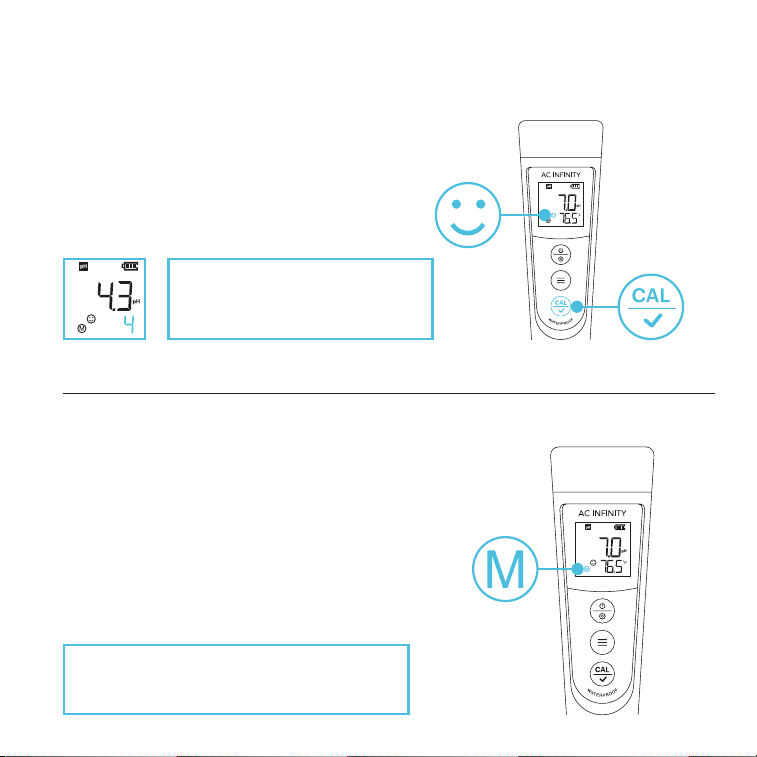
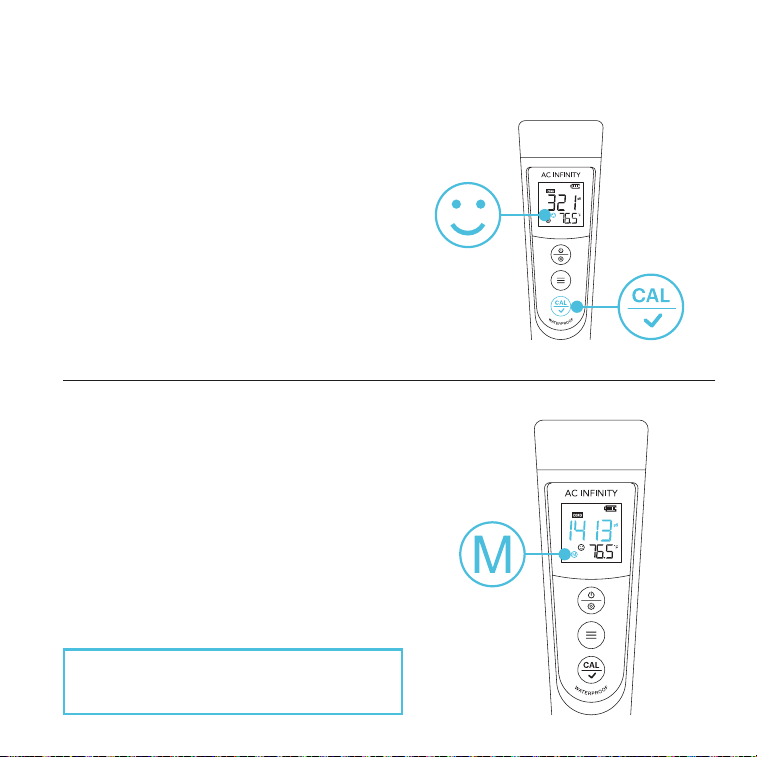
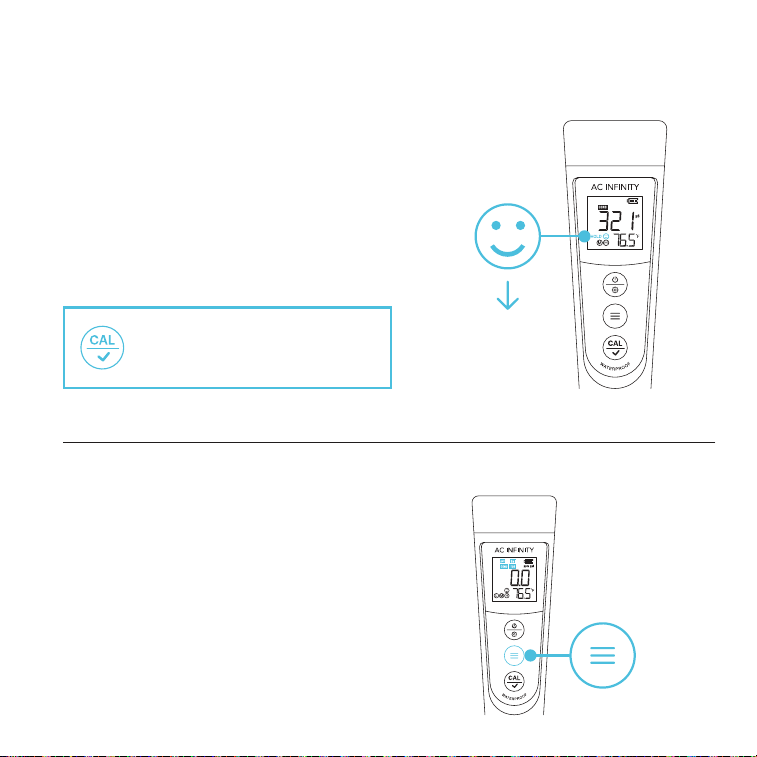
STEP 5
Wait for the smile icon to appear, then press the
calibration button to finish the 1
st
point calibration.
STEP 6
Your pH meter will return to MEASUREMENT
mode once the calibration process is complete.
"M" will display on the lower left corner, indicating
a successful 1
st
point calibration (the middle point).
pH READINGS
CALIBRATION
PRESS
To continue calibration, DO NOT turn off your
pH meter after you finish each calibration.
Once the calibration is confirmed,
the next solution will be indicated
at the bottom right of the screen.
21
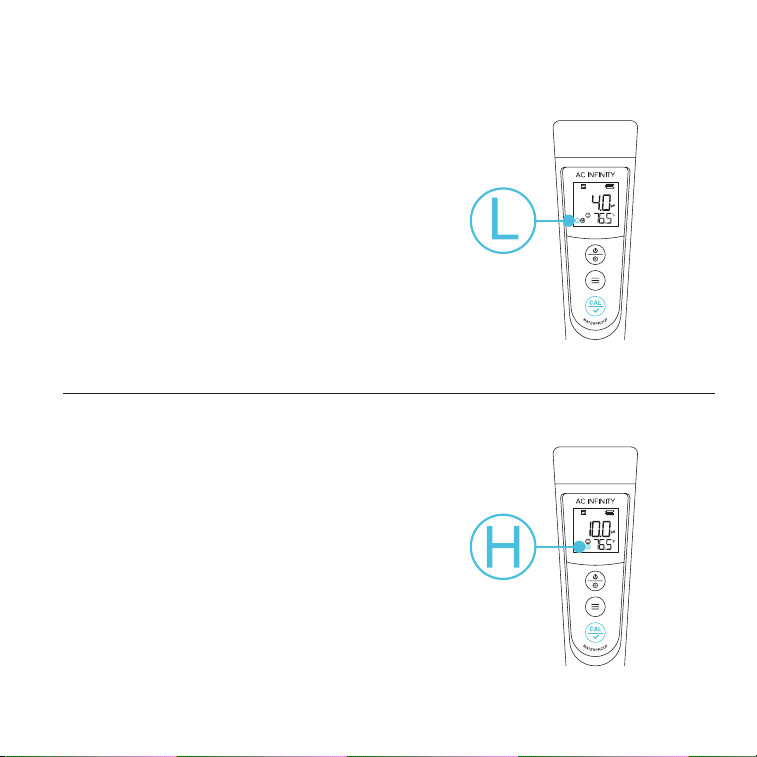
STEP 7
Repeat steps 2-5 to calibrate the 2
nd
point,
using the 4.00 pH buffer solution instead.
"L" will display next to "M," indicating a
successful 2
nd
point calibration (low and
middle points).
pH READINGS
STEP 8
Repeat steps 2-5 to calibrate the 3
rd
point, using
the 10.01 pH buffer solution instead.
"H" will display next to "L" and "M," indicating a
successful 3
rd
point calibration (high, low, and
middle points).
CALIBRATION
22
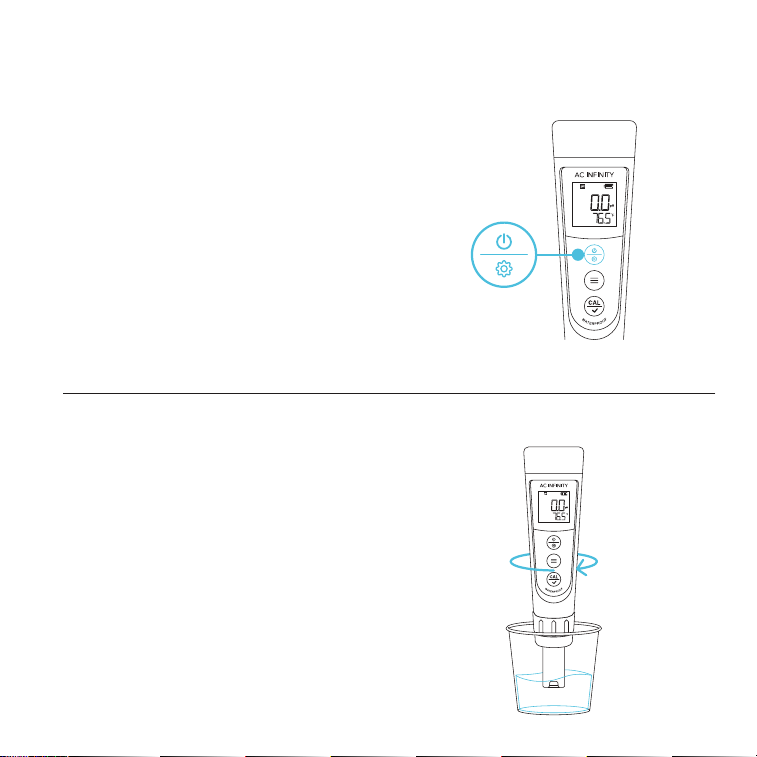
STEP 1
Press the power/settings button to power your
pH meter on.
STEP 2
Rinse the probe in distilled water and shake off
excess moisture.
pH READINGS
MEASUREMENT
PRESS
23
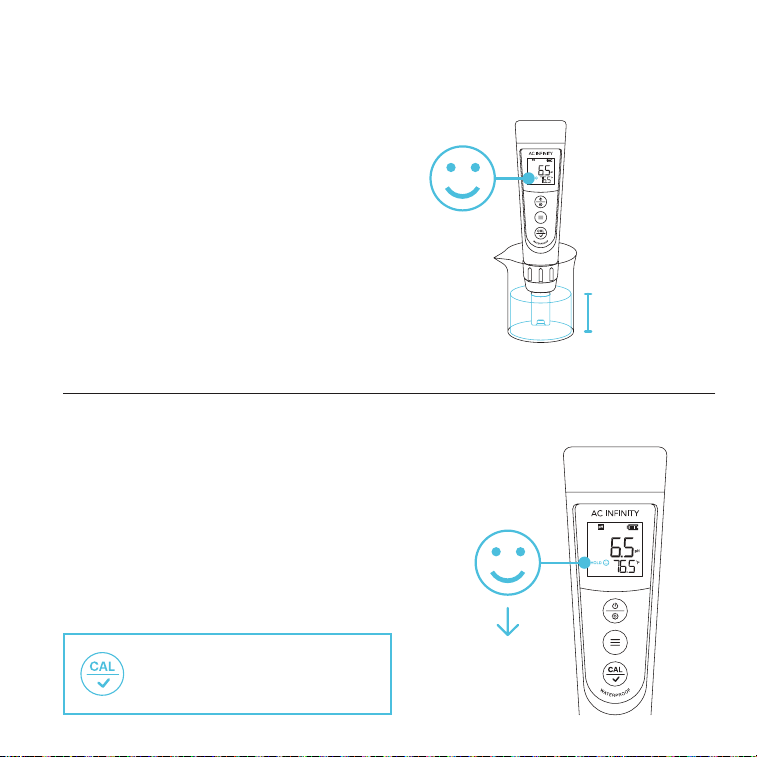
STEP 3 — STANDARD
Submerge the probe at least 1 in. deep
into your sample solution, then hold it still.
Record the readings after the reading is
stabilized, indicated by the smile icon on
the screen.
pH READINGS
MEASUREMENT
STEP 3 — AUTO-HOLD
Submerge the probe at least 1 in. deep into your
sample solution, then hold it still.
The reading will automatically lock when it's stable
for more than 10 seconds while the AUTO-HOLD
function is on. Refer to the "Parameter Settings"
section for more information.
10 SECONDS
"HOLD"
You may cancel AUTO-HOLD and
return to MEASUREMENT Mode
by pressing the calibration button.
1 in.
24
PURE WATER MEASUREMENT
Readings will take longer to fully stabilize (~1-5
min.) when testing pure water like drinking water,
RO water, and distilled water.
If your readings are not stabilizing, add a 1:1000
ratio of 3M KCL solution to your pure water (e.g.
1 ml KCL to 1000 ml water) to accelerate the
stabilization while minimizing pH change.
1 ml
1000 ml
pH READINGS
MEASUREMENT
25
CONDUCTIVITY
CALIBRATION — AC-PHM7
STEP 1
Prepare the conductivity buffer solutions in
their corresponding calibration vials to about
half its volume.
Press the power/settings button to turn your
pH meter on.
Press the mode button to switch to
conductivity (COND) measurement mode.
STEP 2
Rinse the probe in distilled water and shake off
excess moisture.
PRESS
PRESS
26
CONDUCTIVITY
STEP 3
Hold the calibration button to enter
CALIBRATION mode.
The screen will turn green to signify
the calibration process has started.
CALIBRATION — AC-PHM7
STEP 4
Rapidly stir the probe in the 1413 µS
conductivity solution, then hold it still.
You may cancel the calibration and return to
MEASUREMENT Mode by pressing the power/setting button.
HOLD
27
CONDUCTIVITY
CALIBRATION — AC-PHM7
STEP 6
Your pH meter will return to MEASUREMENT
mode once the calibration process is complete.
"M" will display on the lower left corner,
indicating a successful 1
st
point calibration (the
middle point).
The solution will be displayed in the middle of
the screen when it is detected.
STEP 5
Wait for the smile icon to appear, then press the
calibration button to finish the 1
st
point calibration.
PRESS
To continue calibration, DO NOT turn off your
pH meter after you finish each calibration.
28
CONDUCTIVITY
CALIBRATION — AC-PHM7
STEP 7
If your estimated sample conductivity level is
greater than 2 mS or 2000 µS, you may optionally
repeat steps 2-5 to calibrate the 2
nd
point using the
12.88 mS conductivity solution instead.
"H" will appear next to "M," indicating a successful
2
nd
point calibration (low and middle points).
CONDUCTIVITY CALIBRATION NOTES
This pH meter can calibrate with 84 µS, 1413 µS, and 12.88 mS conductivity calibration
solutions. You may select the following calibration points:
We recommend replacing the solutions after their designated uses to help keep your
conductivity measurements reliable. DO NOT pour the used calibration solutions back into the
solution bottles to prevent contamination.
Calibration Indication Icon Calibration Standards
83 µS
1413 µS
12.88 mS
Measuring Range
0-200 µS
200-2000 µS
2-20 mS (2000-20,000 µS)
29
CONDUCTIVITY
MEASUREMENT — AC-PHM7
STEP 1
Press the power/settings button to power your
pH meter on.
Rinse the probe in distilled water and shake off
excess moisture.
STEP 2 — STANDARD
Submerge the probe into your sample solution,
then hold it still.
Record the readings after the reading is stabilized,
indicated by the smile icon on the screen.
PRESS
1 in.
30
CONDUCTIVITY
MEASUREMENT — AC-PHM7
SWITCH PARAMETER
Press the mode button to switch from
conductivity to TDS, salinity, or pH.
STEP 2 — AUTO-HOLD
Submerge the probe into your sample solution,
then hold it still.
The reading will automatically lock when it's stable
for more than 10 seconds while the AUTO-HOLD
function is on. Refer to the "Parameter Settings"
section for more information.
PRESS
10 SECONDS
"HOLD"
You may cancel AUTO-HOLD and
return to MEASUREMENT Mode
by pressing the calibration button.

31
CONDUCTIVITY
MEASUREMENT — AC-PHM7
1000 µS/cm = 1 mS/cm = 1 EC (In CONDUCTIVITY mode, the unit will automatically turn
from µS to mS if the reading is greater than 1999 µS, meaning you will only see 2.XX mS
instead of 2XXX µS).
A.
1000 ppm = 1ppt (in TDS mode, the unit will automatically turn from ppm to ppt if the reading
is greater than 999 ppm, meaning you will only see 1.XX ppt instead of 1XXX ppm).
B.
The TDS values are converted from the conductivity values via a conversion factor, which
ranges from 0.40 to 1.00. Adjust the factor in parameter setting P5 based on the requirements
in different industries. The factory default setting is 0.71.
C.
Salinity and conductivity are linearly related. The conversion factor is 0.5.
D.
Calibrating conductivity will also automatically calibrate TDS and salinity.
E.
Conversion example: if the conductivity measurement is 1000 µS/cm, then the default
TDS measurement will be 710 ppm (under the default 0.71 conversion factor), and the
salinity measurement will be 0.5 ppt. If the TDS conversion rate is changed to 0.5, then
the TDS measurement will be 500 ppm.
F.
UNIT CONVERSION
32
CONDUCTIVITY
MEASUREMENT — AC-PHM7
TEMPERATURE COMPENSATION FACTOR
The default setting of the temp. compensation factor is 2.0% / °C. You can adjust this factor
based on test solution and experimental data in parameter setting P4. Refer to the "Parameter
Settings" section for more information.
The following table lists some common examples of setting up the temp. compensation factor.
Temperature Compensation Factor
2.12% / °C
1.72% / °C
1.88% / °C
1.32% / °C
0.96% / °C
Solution
NaCl
5% NaOH
Dilute ammonia
10% Hydrochloric acid
5% Sulfuric acid
33
RINSING THE PROBE
Thoroughly rinse off the probe with 8-16 oz.
of distilled or deionized water before and after
each test to ensure accurate readings.
REMOVING TOUGH CONTAMINANTS
Detach the sensor shield and soak the probe in
a cleaning solution or detergent water for about
30 minutes.
Use a soft brush to remove the contaminants.
Soak the probe in 3M KCL solution for at least
1 hour. Rinse it off, then recalibrate your pH
meter before using it.
*AC-PHM5 probe shown
MAINTENANCE
PROBE CLEANING
8-16 oz.
1
3
2
CLEANING
SOLUTION
~30 min.
4
3M KCL
SOLUTION
≥1 hr.

34
MAINTENANCE
PROBE STORAGE
REGULAR USAGE (DAILY OR WEEKLY)
Make sure the probe cap stays moist by closing
the probe when not in use.
LONG-TERM STORAGE
Add 3M KCL solution or pH 4.00 buffer solution
up to one quarter of the probe cap. Close the
probe cap tightly to store the probe in it.
If the probe is dried out, or if the probe's
response is much slower than usual, soak
the probe in 3M KCL soaking solution for
about 2 hours to restore its sensitivity.
35
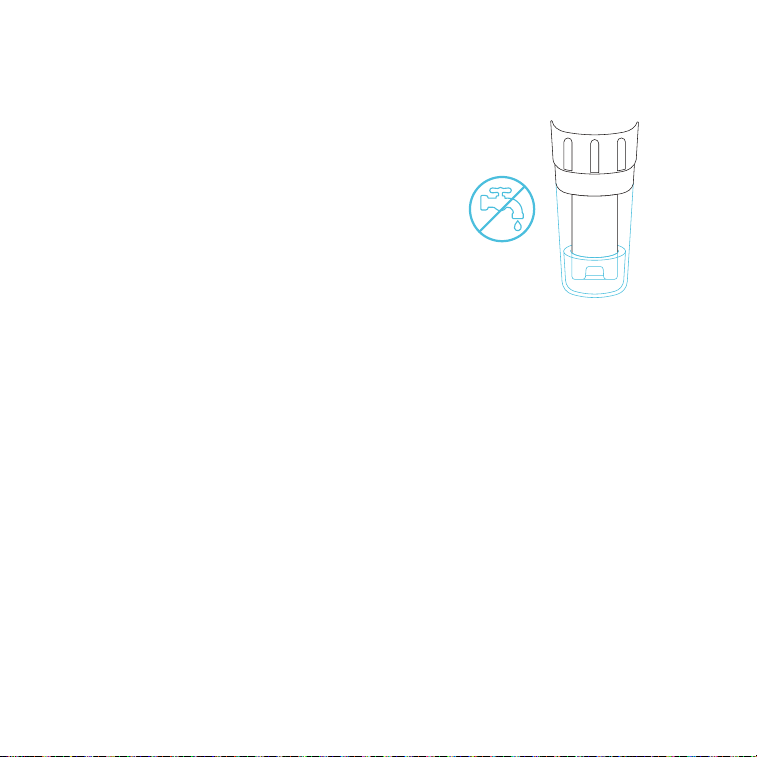
PROPER STORAGE
NEVER store the probe in pure water like tap,
RO, distilled, or deionized water. Doing so may
damage the probe.
If stored in this matter, immediately soak the
probe in 3M KCL solution overnight, then re-
calibrate it before using your pH meter.
Pure water must only be used to rinse the probe.
MAINTENANCE
PROBE STORAGE
36
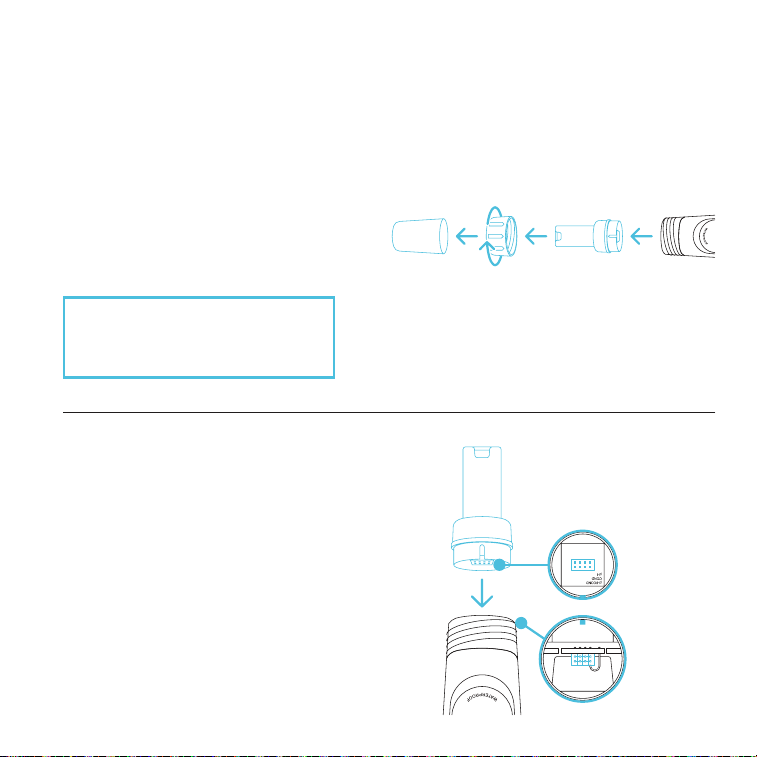
MAINTENANCE
REPLACING THE PROBE
PRODUCT LIFESPAN
The lifespan of your pH meter's probe is 1-3 years. This will depend on how often it is used and
how well-maintained it is. If you need to replace your probe, follow the directions below.
STEP 1
Remove the cap and probe ring before
unplugging the probe.
STEP 2
Replace the probe and probe ring, making
sure the pins and port properly align.
Soak the probe in 3M KCL at the fill line in
the cap for 5-15 minutes.
Perform a calibration before use.
CAUTION: DO NOT twist the
probe off. Doing so may bend the
pins that plug into the probe base.
37
Cannot
Calibrate
Reading is always
slowly changing,
won't stabilize
Reading keeps
jumping
Calibration is
successful, but
reading is not
accurate
ISSUE
Displays similar
readings in any
solution or always
displays 7.0 pH
TROUBLESHOOTING GUIDE
REASON
Poor quality standard solutions
Contaminated sensor
Incorrect calibration order
Dried-out probe
Broken probe
Probe is not properly connected
or the pin connector is broken.
Comparison with other testers,
test strips, or drop tests
Air bubbles around the sensor
Clogged junction
Testing pH of low iconic
strength solutions like tap/
drinking/RO/distilled water
Probe is not fully
submerged solution
Aged probe
Contaminated sensor
Aged probe
Probe is not fully
submerged solution
Air bubbles around the sensor
Aged probe
Air bubbles around the sensor
Clogged junction
HOW TO FIX
Replace with clean standard calibration solutions
made by reputable manufacturers.
Use a soft brush to clean the probe with
probe cleaning solution or detergent water.
Power on your pH meter, calibrate pH 7 first,
then pH 4. After pH 4, if you want to calibrate
pH 7 again, reboot your pH meter.
Soak the probe in the 3M KCL soaking
solution for at least 15 minutes.
If you don't see any damage to the probe,
contact AC Infinity customer support. If there is
visible damage, replace your pH meter.
Check the probe's connector, make sure it's connected and
not broken. Align the probe correctly before plugging in. Do
not force it. Ensure that the connector is not exposed.
To compare with other pH meters, make sure to calibrate all
testers in the same pH 7 solution, then test pH 4. Test strips
or drop tests' accuracy is not comparable to pH meters.
Stir in the solution to remove bubbles.
Use a soft brush to clean the probe with
cleaning solution or detergent water, then soak
it in 3M KCL soaking solution overnight.
Wait 1-5 minutes to reach a fully stabilized
reading. if still not stabilizing, then soak in
3M KCL soaking solution overnight.
Make sure the probe is fully immersed
at least 1 in. deep into the solution.
Replace the probe.
Use a soft brush to clean the probe with
probe cleaning solution or detergent water.
Replace the probe.
Make sure the probe is fully immersed
at least 1 in. deep into the solution.
Stir in the solution to remove bubbles.
Replace the probe.
Stir in the solution to remove bubbles.
Use a soft brush to clean the probe with
cleaning solution or detergent water, then soak
it in 3M KCL soaking solution overnight.

38
FAQ
Why is moisture in my new pH meter?
New pH meters are stored in a special solution to maintain the integrity of the electrode and
its glass membrane. This glass membrane must be kept moist in order for the pH meter to
function properly.
Q:
A:
How often should I calibrate the pH/conductivity?
Your meter's accuracy depends on several factors like the environment it's used in and how
often it is used. We recommend calibrating your pH meter once a month, after testing a
series of samples, or if readings don't appear accurate.
Q:
A:
What is the difference between conductivity, TDS, and salinity?
Conductivity is a measure of a solution's ability to conduct electricity, while TDS (total
dissolved solids) and salinity are measures of a solution's concentration of dissolved solids
and salt, respectively.
Q:
A:
What is the difference between USA and NIST in the settings?
The USA and NIST settings differ in the buffer solutions used for calibration. The USA
settings use three buffer solutions with pH values of 4.00, 7.00, and 10.00 while NIST uses
the pH values of 4.01, 6.86, and 9.18.
Q:
A:
Why did my pH meter turn off?
Your pH meter will automatically turn off after 8 minutes of inactivity.
Q:
A:
39
Discover the latest innovations in environmental controls at acinfinity.com
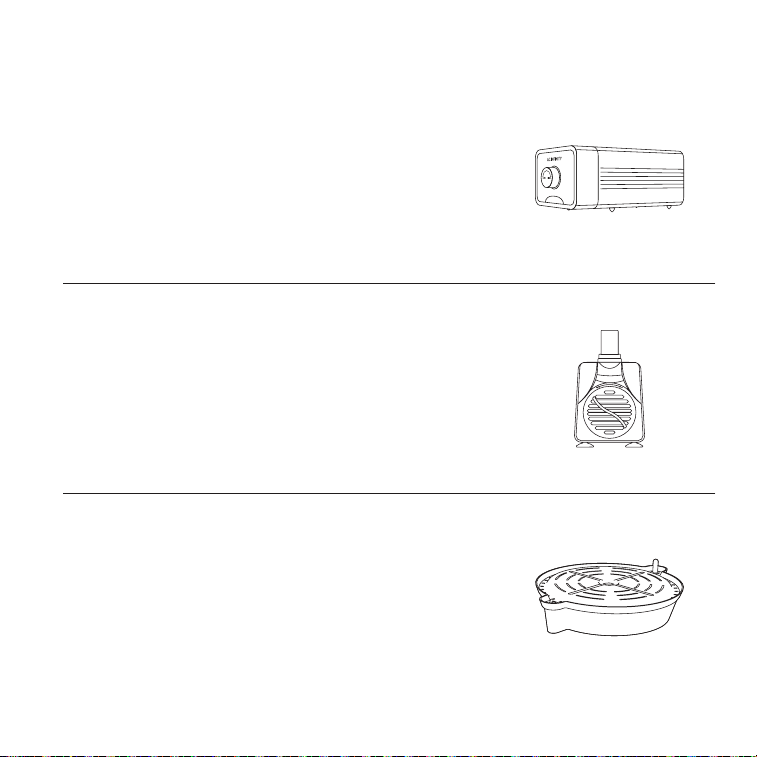
AC INFINITY PRODUCTS
Water Pump
A submersible pump designed to circulate and deliver water to
plant roots for enhanced yields in hydroponic settings. Featuring
a high-performance motor and interchangeable nozzles, this
water pump is capable of quietly and efficiently enhancing water
flow for multiple irrigation systems.
Self-Watering Fabric Pot Base
A set of potted plant stands designed to eliminate the need for
active irrigation by automatically drawing water to fabric pots
through adjustable wick lines. Features a heavy-duty drip tray to
capture runoff water and support planters up to 100 pounds as
well as a water gauge to display hydration levels.
Air Pump
An adjustable air pumping system designed to benefit
hydroponic systems by enrichening oxygen levels for enhanced
plant growth. Built with a durable shell and multi-layered internal
muffler, this air pump securely delivers one way-oxygenation
while remaining ultra-quiet with minimal vibration.
40
This warranty program is our commitment to you, the product sold by AC Infinity will be free
from defects in manufacturing for a period of two years from the date of purchase. If a product
is found to have a defect in material or workmanship, we will take the appropriate actions
defined in this warranty to resolve any issues.
The warranty program applies to any order, purchase, receipt, or use of any products sold
by AC Infinity or our authorized dealerships. The program covers products that have become
defective, malfunctioned, or expressively if the product becomes unusable. The warranty
program goes into effect on the date of purchase. The program will expire two years from the
date of purchase. If your product becomes defective during that period, AC Infinity will replace
your product with a new one or issue you a full refund.
The warranty program does not cover abuse or misuse. This includes physical damage,
submersion of the product in water, incorrect Installation such as wrong voltage input,
and misuse for any reason other than intended purposes. AC Infinity is not responsible for
consequential loss or incidental damages of any nature caused by the product. We will not
warrant damage from normal wear such as scratches and dings.
Contact our dealers department at dealers@acinfinity.com or (626) 838-4656 for more
information about our dealers and distributors program. Contact our customer service
department at support@acinfinity.com or 626-923-6399 for product and warranty assistance.
Our business hours are Monday through Friday, 9:00 am to 5:00 pm PST.
If you have any issues with this product, contact us and
we’ll happily resolve your problem or issue a full refund!
WARRANTY

COPYRIGHT © 2023 AC INFINITY INC. ALL RIGHTS RESERVED
No part of the materials including graphics or logos available in this booklet may be copied,
photocopied, reproduced, translated or reduced to any electronic medium or machine readable
form, in whole or in part, without specific permission from AC Infinity Inc.


www.acinnity.com