
Voyager Pro4
User's Guide Help
Hello Adventurer!
Trail Tech brings funconality and life to your motor vehicle with high quality
and innovaon. To ensure long and trouble-free operaon, this embedded
user's guide contains valuable informaon about how to operate and maintain
your digital gauge properly.
Please read this manual carefully.
Tap the ? in the top corner of menu screens to get useful ps and informaon.
Use the links below to navigate.
Thanks for riding with Trail Tech!
Table of Contents Help
Below is an overview of available help screens.

Contents
Voyager Pro4 ................................................................................................................................................... 1
User's Guide Help ........................................................................................................................................... 1
Hello Adventurer! ....................................................................................................................................... 1
Thanks for riding with Trail Tech! ................................................................................................................ 1
Table of Contents Help .................................................................................................................................... 1
Precauons Help ......................................................................................................................................... 8
FAQ Help ......................................................................................................................................................... 9
How do I take a screenshot? ....................................................................................................................... 9
How long does the internal baery take to charge fully? .......................................................................... 9
How does sleep mode work? ..................................................................................................................... 9
How do I get the best GPS recepon? ........................................................................................................ 9
How do I mount Voyager Pro4 to my machine? ....................................................................................... 10
What kind of power does Voyager Pro4 need for proper operaon? ...................................................... 10
Voyager Pro4 kits include physical sensors, magnets, and other cables. Why, if it's a GPS? ................... 10
My other GPS unit gets along just ne without a wheel sensor. Do I really need one? ........................... 11
Can Voyager Pro4 use GPX les? .............................................................................................................. 12
Can Voyager Pro4 be turned on and o manually? .................................................................................. 12
How do I run Voyager Pro4 without connecng it to a vehicle? .............................................................. 12
Physical Features Help .................................................................................................................................. 12
Buons Help ................................................................................................................................................. 14
Touch Screen ............................................................................................................................................. 14
Menu Buon ............................................................................................................................................. 14
Back Buon ............................................................................................................................................... 15
Up and Down Buons ............................................................................................................................... 15
Dock Help ...................................................................................................................................................... 15
The Dock ................................................................................................................................................... 15
The Dock's Buon ..................................................................................................................................... 15
The Dock's Wires ...................................................................................................................................... 16
The Dock's Antenna Ports ......................................................................................................................... 16
Locking the Dock ....................................................................................................................................... 17

Antennas Help .............................................................................................................................................. 17
Internal GPS Antenna ............................................................................................................................... 17
Antenna Ports ........................................................................................................................................... 17
1. External Plasc Radio Antenna ............................................................................................................. 18
Mounng Help .............................................................................................................................................. 18
RAM Mounts ............................................................................................................................................. 18
Bar Mounng ............................................................................................................................................ 19
Surface Mounng ..................................................................................................................................... 19
MicroSD Card Help ........................................................................................................................................ 20
Vehicle Sensors Help ..................................................................................................................................... 20
Power Wire ............................................................................................................................................... 21
Engine Temperature ................................................................................................................................. 21
Tach Sensor ............................................................................................................................................... 21
Wheel Sensor ............................................................................................................................................ 22
Vehicle Power Help ....................................................................................................................................... 22
Vehicle Power ........................................................................................................................................... 22
DC power required. .................................................................................................................................. 22
FOR USE ON 12V DC SYSTEMS ONLY! ....................................................................................................... 23
Vehicles with DC Power: ........................................................................................................................... 23
Vehicles with AC Power: ........................................................................................................................... 23
AC Adapter Wall Charger .......................................................................................................................... 23
Vehicle Accessory Socket .......................................................................................................................... 24
Ignion Sensor Help ...................................................................................................................................... 24
Temperature Sensors Help ............................................................................................................................ 25
Radiator Fin Sensor ................................................................................................................................... 25
Cylinder Header Sensor ............................................................................................................................ 26
Radiator Hose Sensor ............................................................................................................................... 26
Wheel Sensors Help ...................................................................................................................................... 26
Wheel Size ................................................................................................................................................ 27
Measure Wheel Size Help ............................................................................................................................. 28
Method 1: Ruler ........................................................................................................................................ 28

Method 2: Rolling ..................................................................................................................................... 29
Input Wheel Size ....................................................................................................................................... 29
Screens Help ................................................................................................................................................. 30
There are several Main Screens ................................................................................................................ 30
Basic Controls ........................................................................................................................................... 31
Nocaon Bar Help ................................................................................................................................ 31
Cluster Screen Help................................................................................................................................... 32
Tach Screen Help....................................................................................................................................... 33
Map Screen Help........................................................................................................................................... 34
Track Recording ......................................................................................................................................... 34
Buddy Tracking .......................................................................................................................................... 34
Track Arrows ............................................................................................................................................. 35
Map Screen Gauges .................................................................................................................................. 35
Map Waypoints ......................................................................................................................................... 35
Zooming Help ............................................................................................................................................ 36
Center Lock/Pan Lock/Buddy Lock Help ................................................................................................... 36
Pan Lock .................................................................................................................................................... 37
Center Lock ............................................................................................................................................... 37
Buddy Lock ................................................................................................................................................ 37
Map Mini-Menu Help ............................................................................................................................... 37
Tracks Help .................................................................................................................................................... 38
Recording Tracks ....................................................................................................................................... 39
New Logging Track .................................................................................................................................... 39
GPX Files ................................................................................................................................................... 39
Clear GPX .................................................................................................................................................. 39
Load GPX Help .......................................................................................................................................... 39
Save GPX Help ........................................................................................................................................... 40
Waypoints Help ............................................................................................................................................. 40
Place Waypoint at Current Posion: ......................................................................................................... 42
Create Custom Waypoint: ......................................................................................................................... 42
Show/Hide Waypoints: ............................................................................................................................. 42

Clear Loaded GPX: .................................................................................................................................... 42
Waypoint Colors: ...................................................................................................................................... 42
Hide a Waypoint Help ............................................................................................................................... 42
Waypoint Edit Help ................................................................................................................................... 43
Set Desnaon Waypoint Help ................................................................................................................. 43
GPX Display Opons Help ......................................................................................................................... 44
Buddy Tracking Help ..................................................................................................................................... 45
Enable Buddy Tracking .............................................................................................................................. 45
Buddy Beacon ........................................................................................................................................... 45
Ride Command Group Ride Compability ................................................................................................ 46
Buddy Regions .......................................................................................................................................... 46
Buddy Tails Help ........................................................................................................................................ 47
Buddy Display Name Help ........................................................................................................................ 47
Join Buddy Group Help ............................................................................................................................. 48
Create Buddy Group Help ......................................................................................................................... 48
Buddy Beacon Help ....................................................................................................................................... 49
Route to Buddy Beacon Help .................................................................................................................... 49
Buddy Regions Help ...................................................................................................................................... 50
Buddy Regions .......................................................................................................................................... 50
Map Opons Help ......................................................................................................................................... 51
Manage Map Storage Help ....................................................................................................................... 52
Note: ......................................................................................................................................................... 52
Map Colors Help ........................................................................................................................................... 52
Recorded Tracks ........................................................................................................................................ 53
GPX Tracks ................................................................................................................................................. 53
GPX Routes ............................................................................................................................................... 53
Waypoint Colors ....................................................................................................................................... 53
Color Picker Help........................................................................................................................................... 53
User Screen Help .......................................................................................................................................... 54
Choose Gauges Help ..................................................................................................................................... 55
Media Screen Help ........................................................................................................................................ 55

Music Source Help ........................................................................................................................................ 56
Driver Contacts Help ..................................................................................................................................... 57
Call History Help ........................................................................................................................................... 58
Dialer Help .................................................................................................................................................... 58
Messages Help .............................................................................................................................................. 59
Stop Watch Screen Help ............................................................................................................................... 59
Satellite Screen Help ..................................................................................................................................... 60
Sengs Help ................................................................................................................................................. 60
Enable Screens Help ..................................................................................................................................... 61
Display Setup Help ........................................................................................................................................ 62
Themes Help ................................................................................................................................................. 63
Sleep Help ..................................................................................................................................................... 63
Vehicle Prole Help ....................................................................................................................................... 64
Wake Detecon Help .................................................................................................................................... 65
Speed Source Help ........................................................................................................................................ 66
Wheel Size Help ............................................................................................................................................ 67
PPR Help ....................................................................................................................................................... 68
Tach Sensivity Help ..................................................................................................................................... 68
Tach Graph Max Scale Help........................................................................................................................... 69
Charge Mode Help ........................................................................................................................................ 70
Units Setup Help ........................................................................................................................................... 70
Speed & Distance Units Help ........................................................................................................................ 71
Elevaon Units Help...................................................................................................................................... 71
Temperature Units Help ................................................................................................................................ 72
Date & Time Help .......................................................................................................................................... 72
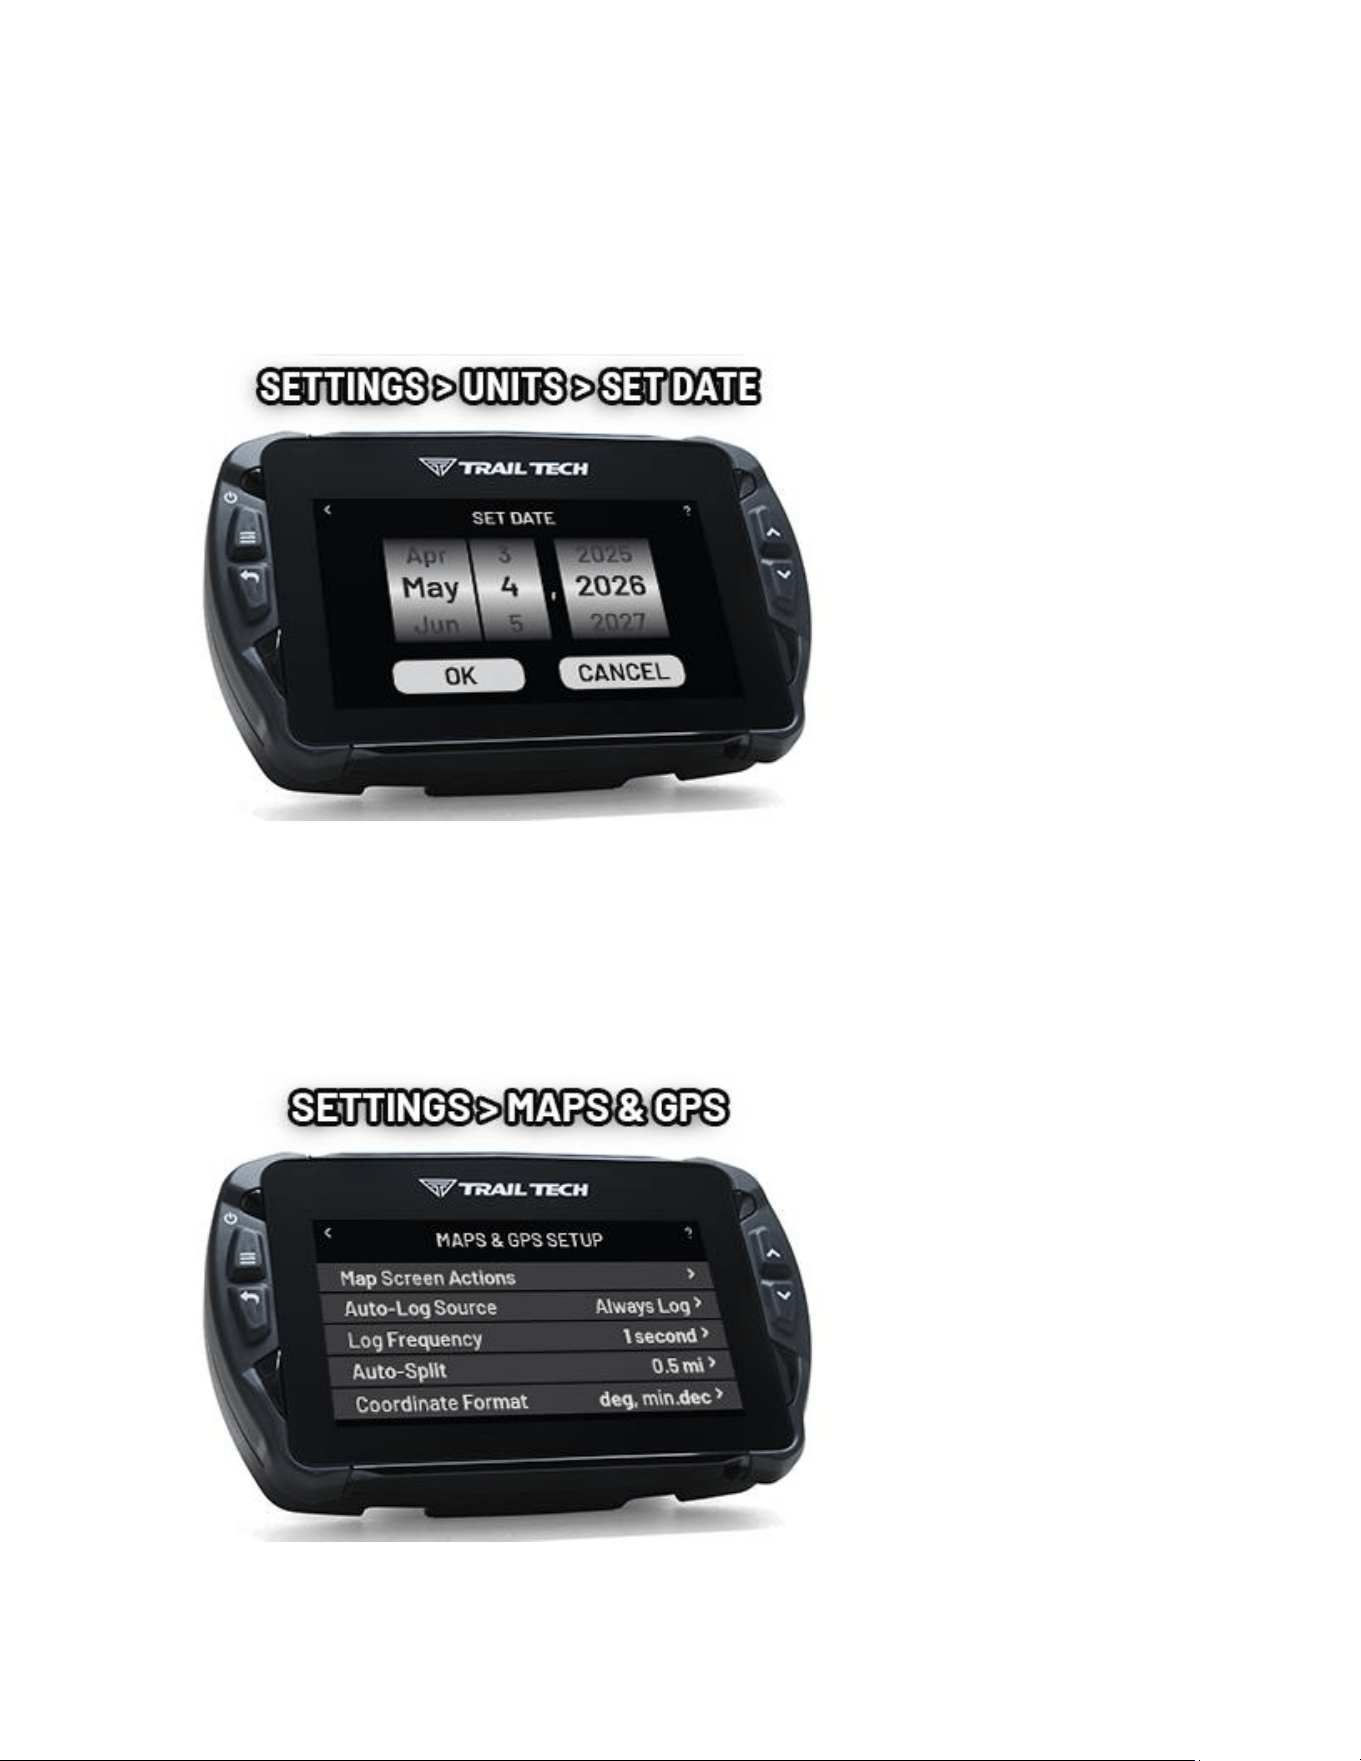
Set Time of Day Help .................................................................................................................................... 73
Set Date Help ................................................................................................................................................ 74
Maps & GPS Setup Help ................................................................................................................................ 74
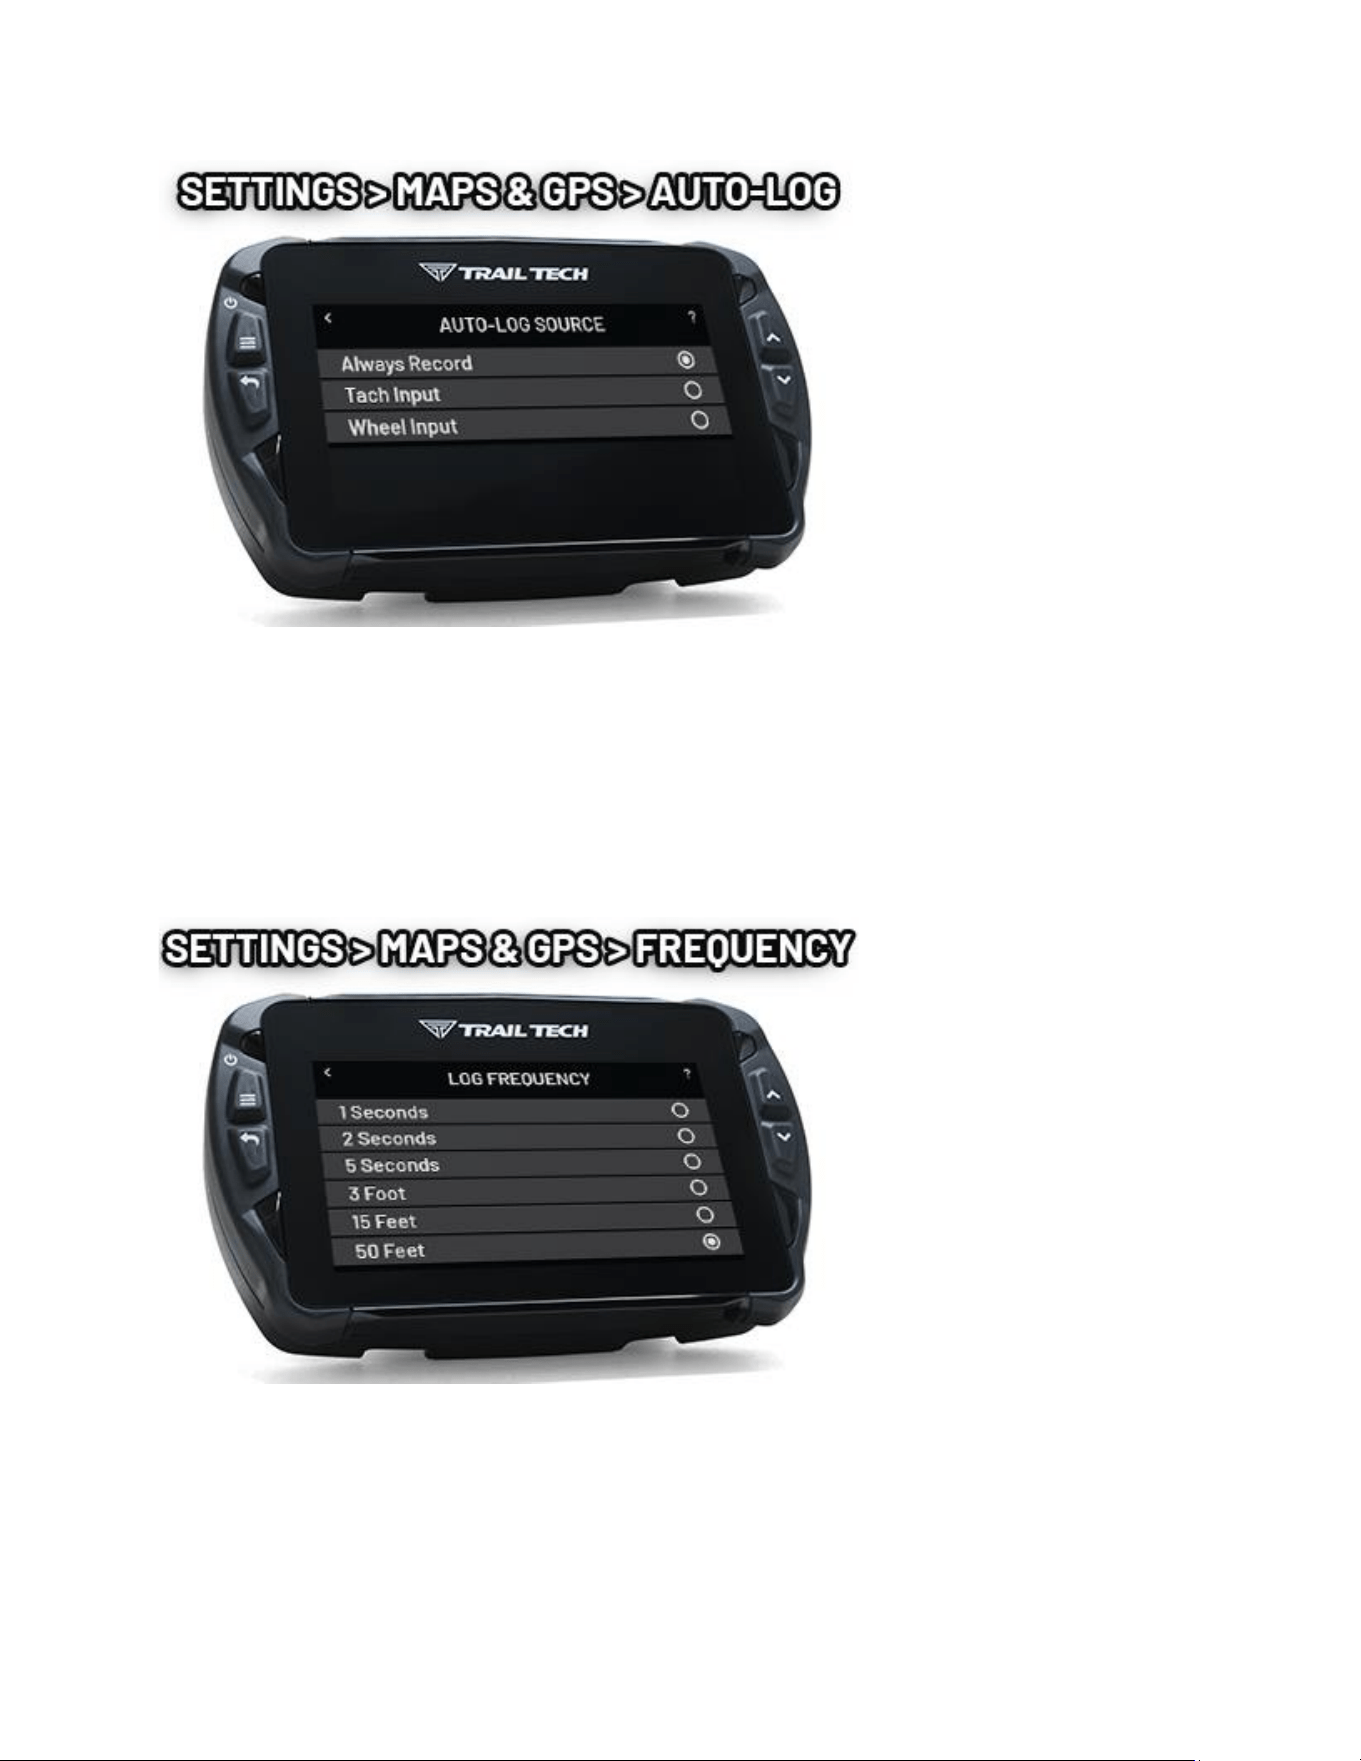
Autolog Source Help ..................................................................................................................................... 75
Log Frequency Help ...................................................................................................................................... 76
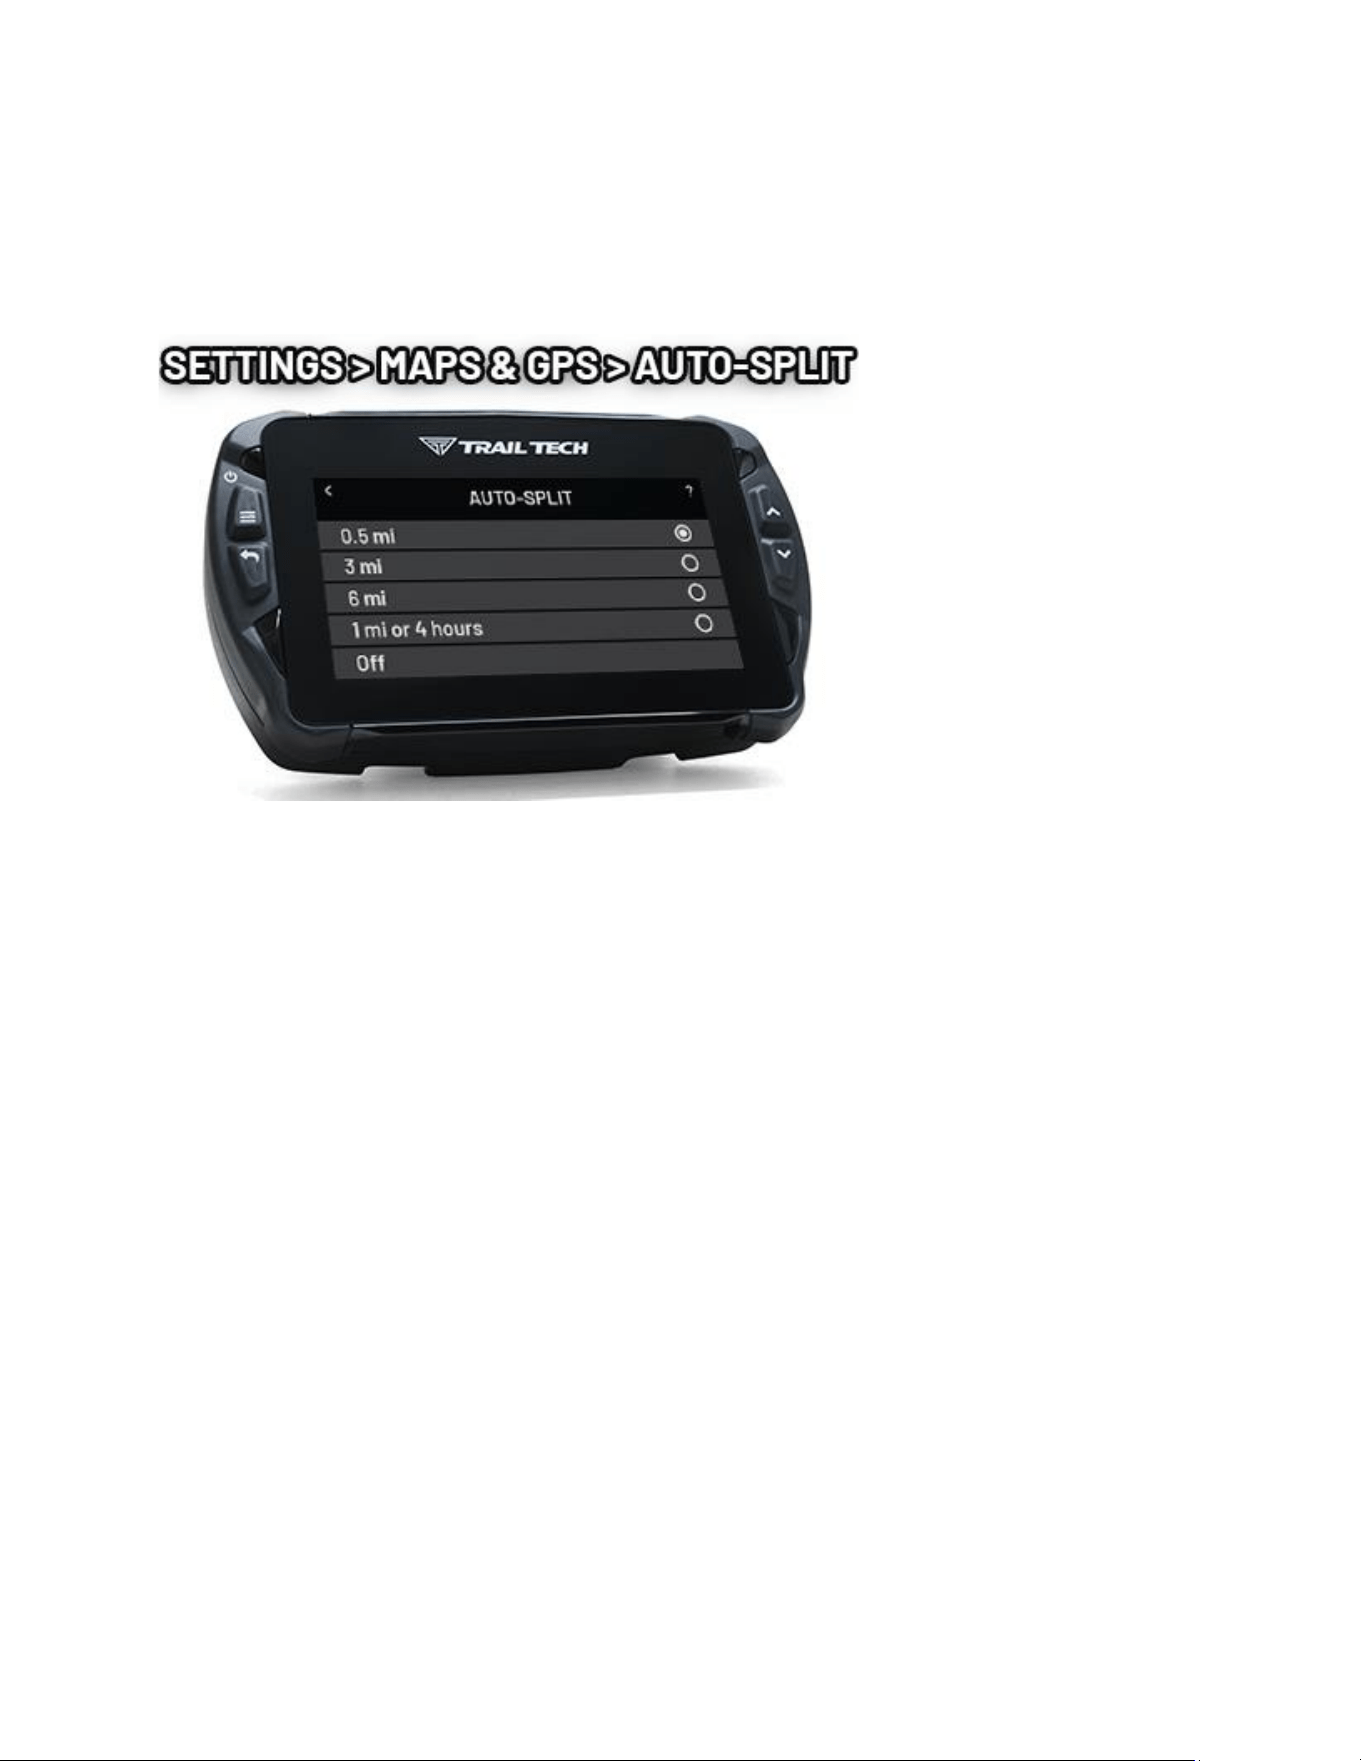
Auto Split Help .............................................................................................................................................. 77

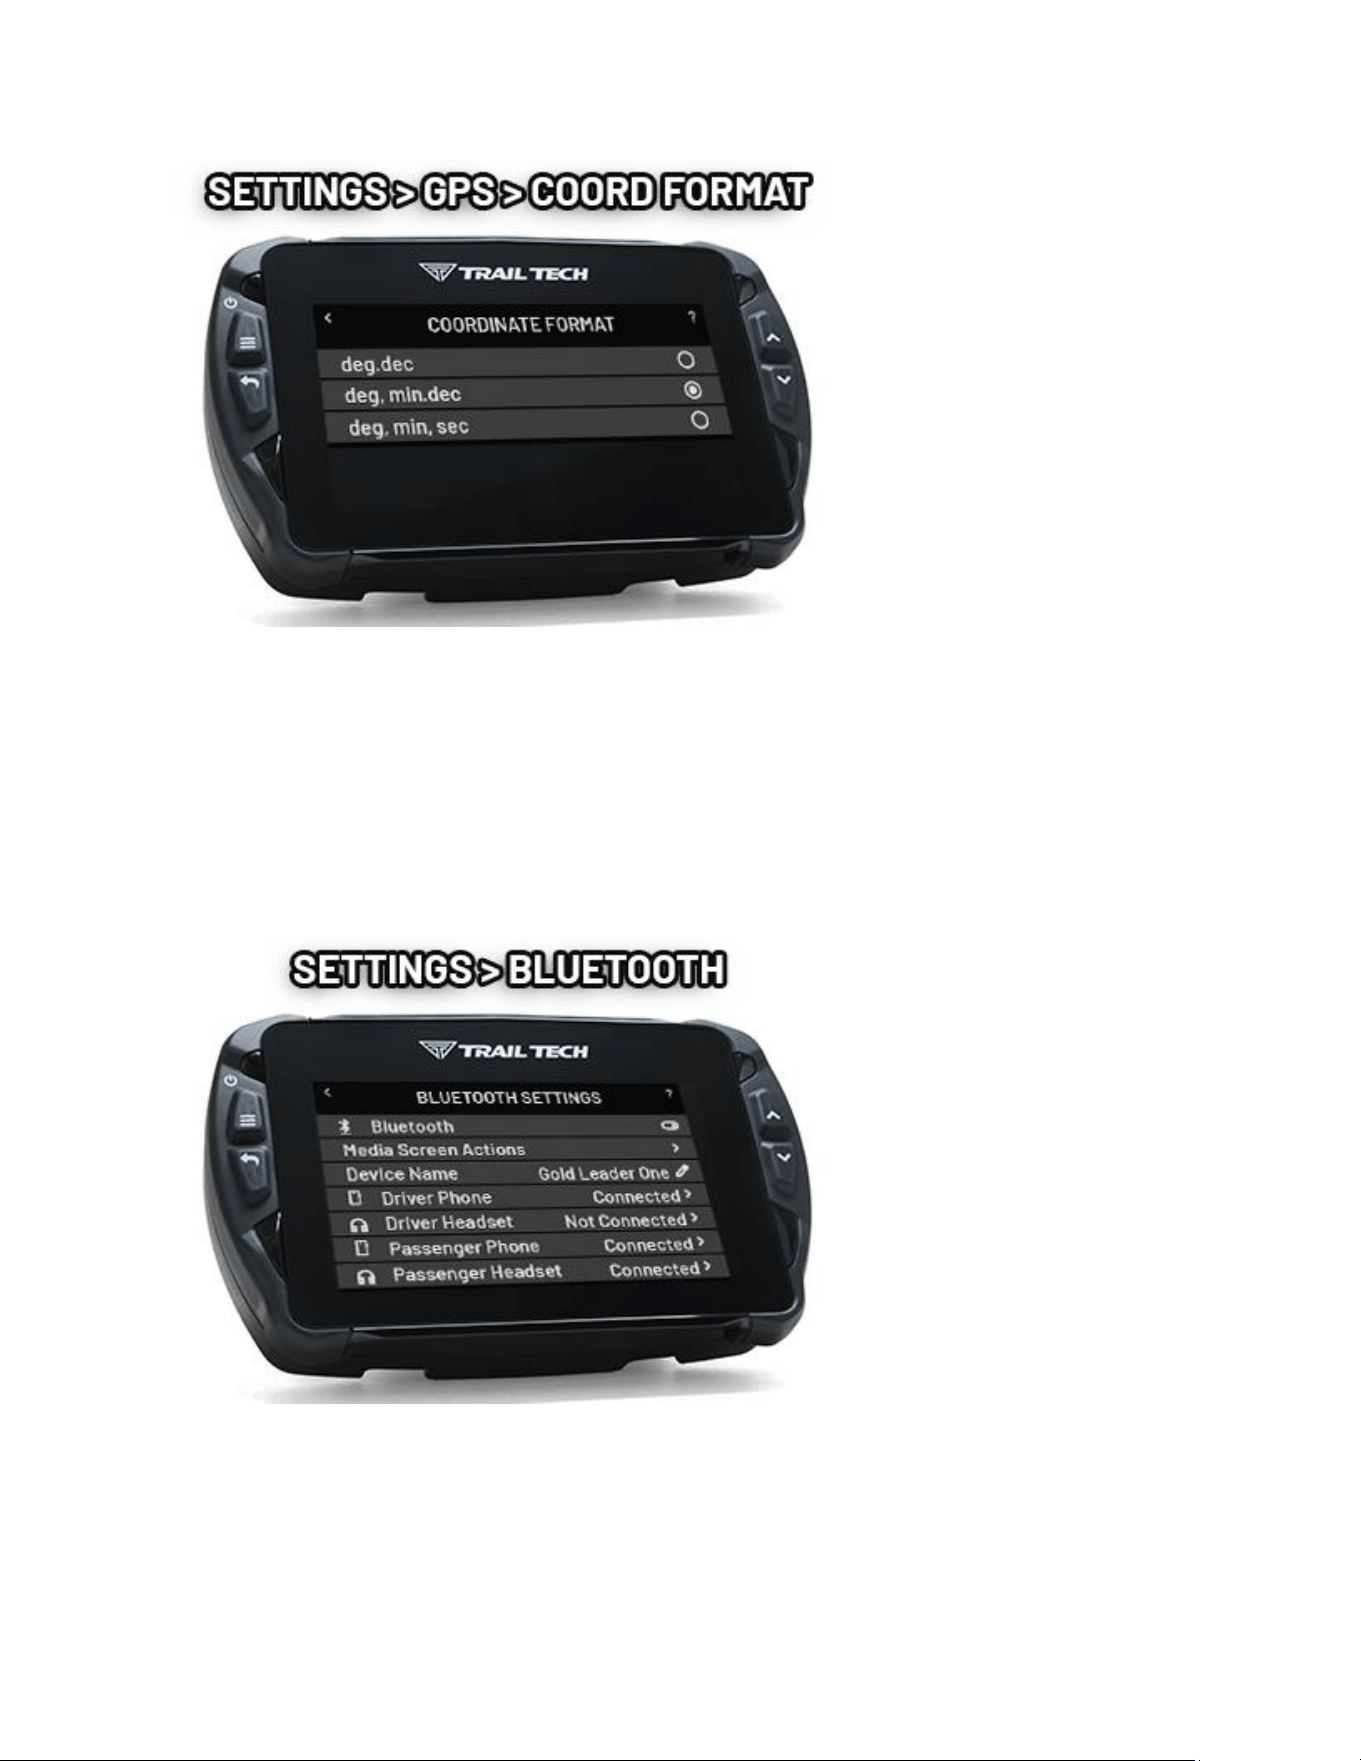
Coordinate Format Help ............................................................................................................................... 77
Examples: .................................................................................................................................................. 77
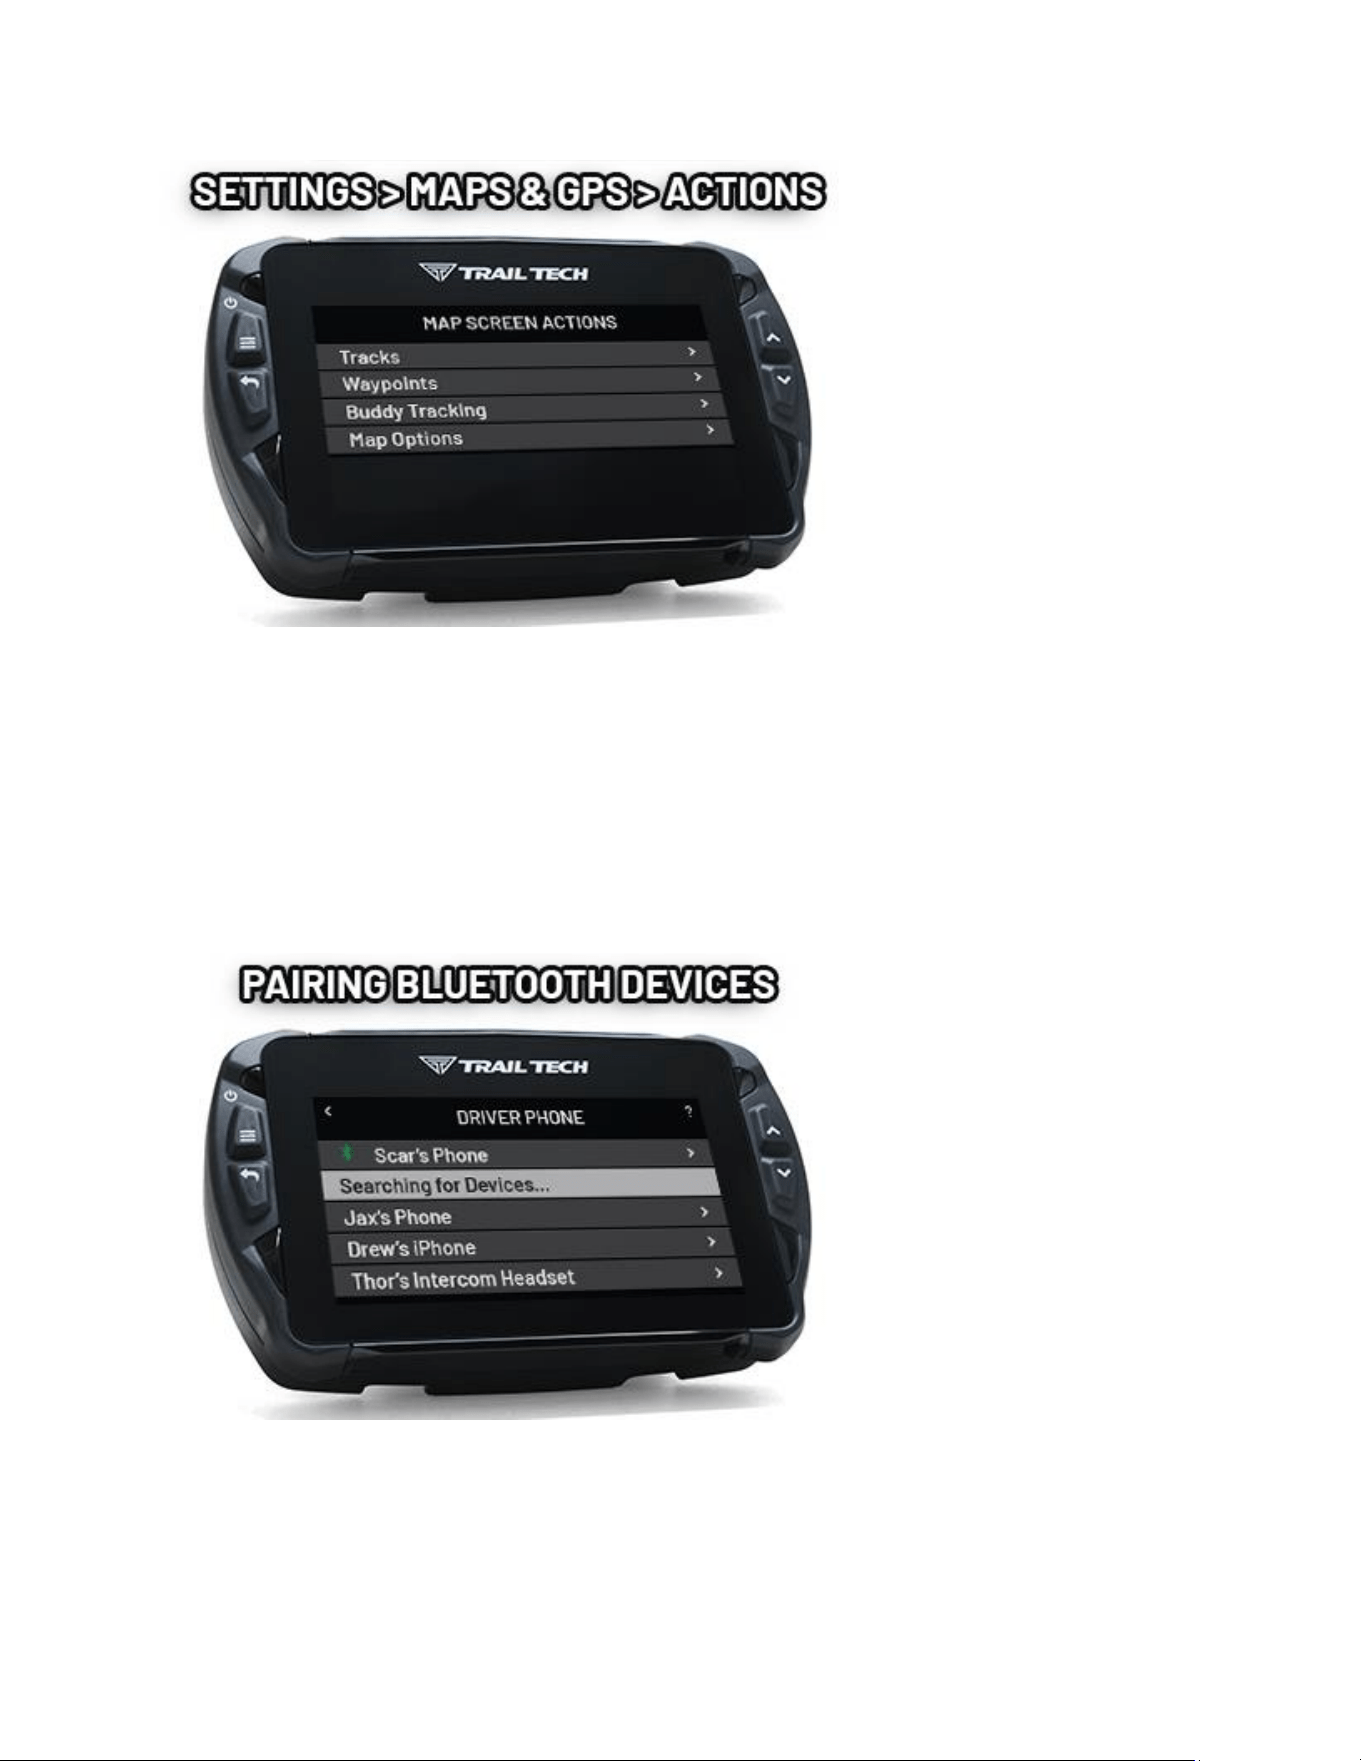
Bluetooth Sengs Help ................................................................................................................................ 78
Bluetooth Devices Help ................................................................................................................................ 79
Bluetooth Connecon Help .......................................................................................................................... 80
Ulies Help ................................................................................................................................................. 80
File Browser Help .......................................................................................................................................... 81
Custom Maps Help ........................................................................................................................................ 82
Soware Update Help................................................................................................................................... 82
System Informaon Help .............................................................................................................................. 83
Technician Area Help .................................................................................................................................... 84
Contact Trail Tech Help ................................................................................................................................. 84
Online instrucons: .................................................................................................................................. 85
Phone: ....................................................................................................................................................... 85
Email: ........................................................................................................................................................ 85
Instagram and Facebook ........................................................................................................................... 85
Warranty and FCC Help ................................................................................................................................. 85
Keep Your Info ........................................................................................................................................... 85
Warranty ................................................................................................................................................... 86
FCC Noce / FCC Compliance Statement.................................................................................................. 86
Canadian Compliance Statement: ............................................................................................................ 87
Declaraon of Conformity: ....................................................................................................................... 88
Precautions Help
1. To charge Voyager Pro4 using a wall outlet, a Trail Tech approved wall charger
is required (not provided in kits.) Aempng to charge Voyager Pro4 directly o
an outlet will result in failure of your device.
2. Read all instrucons before using Voyager Pro4.
3. Avoid contact with gasoline, degreasers or other chemical cleaners.
4. Do not wash with pressure washer.
5. When installing Voyager Pro4, disconnect the vehicle baery.
6. When installing radiator hose temperature sensors, make sure it ts BEFORE
cung the radiator hose.
7. Check gap between wheel sensor and magnet periodically to ensure correct
measurements and reading on Voyager Pro4.
8. Do not bend, twist, kink or abuse the sensor cables.
9. Do not disassemble Voyager Pro4 or its accessories.
10. Do not operate Voyager Pro4 while driving/riding.
11. Do not rely on Voyager Pro4 for operaons requiring precise measurements
of distance or direcon. All GPS devices inherently contain some amount of
error. Use the wheel sensor for the most precise data.
12. Introducing a fuse into the circuit before electronics is always a good idea.
Use a 2 amp fuse with Voyager Pro4 (not provided.)
13. PAY ATTENTION TO THE TRAIL!
FAQ Help
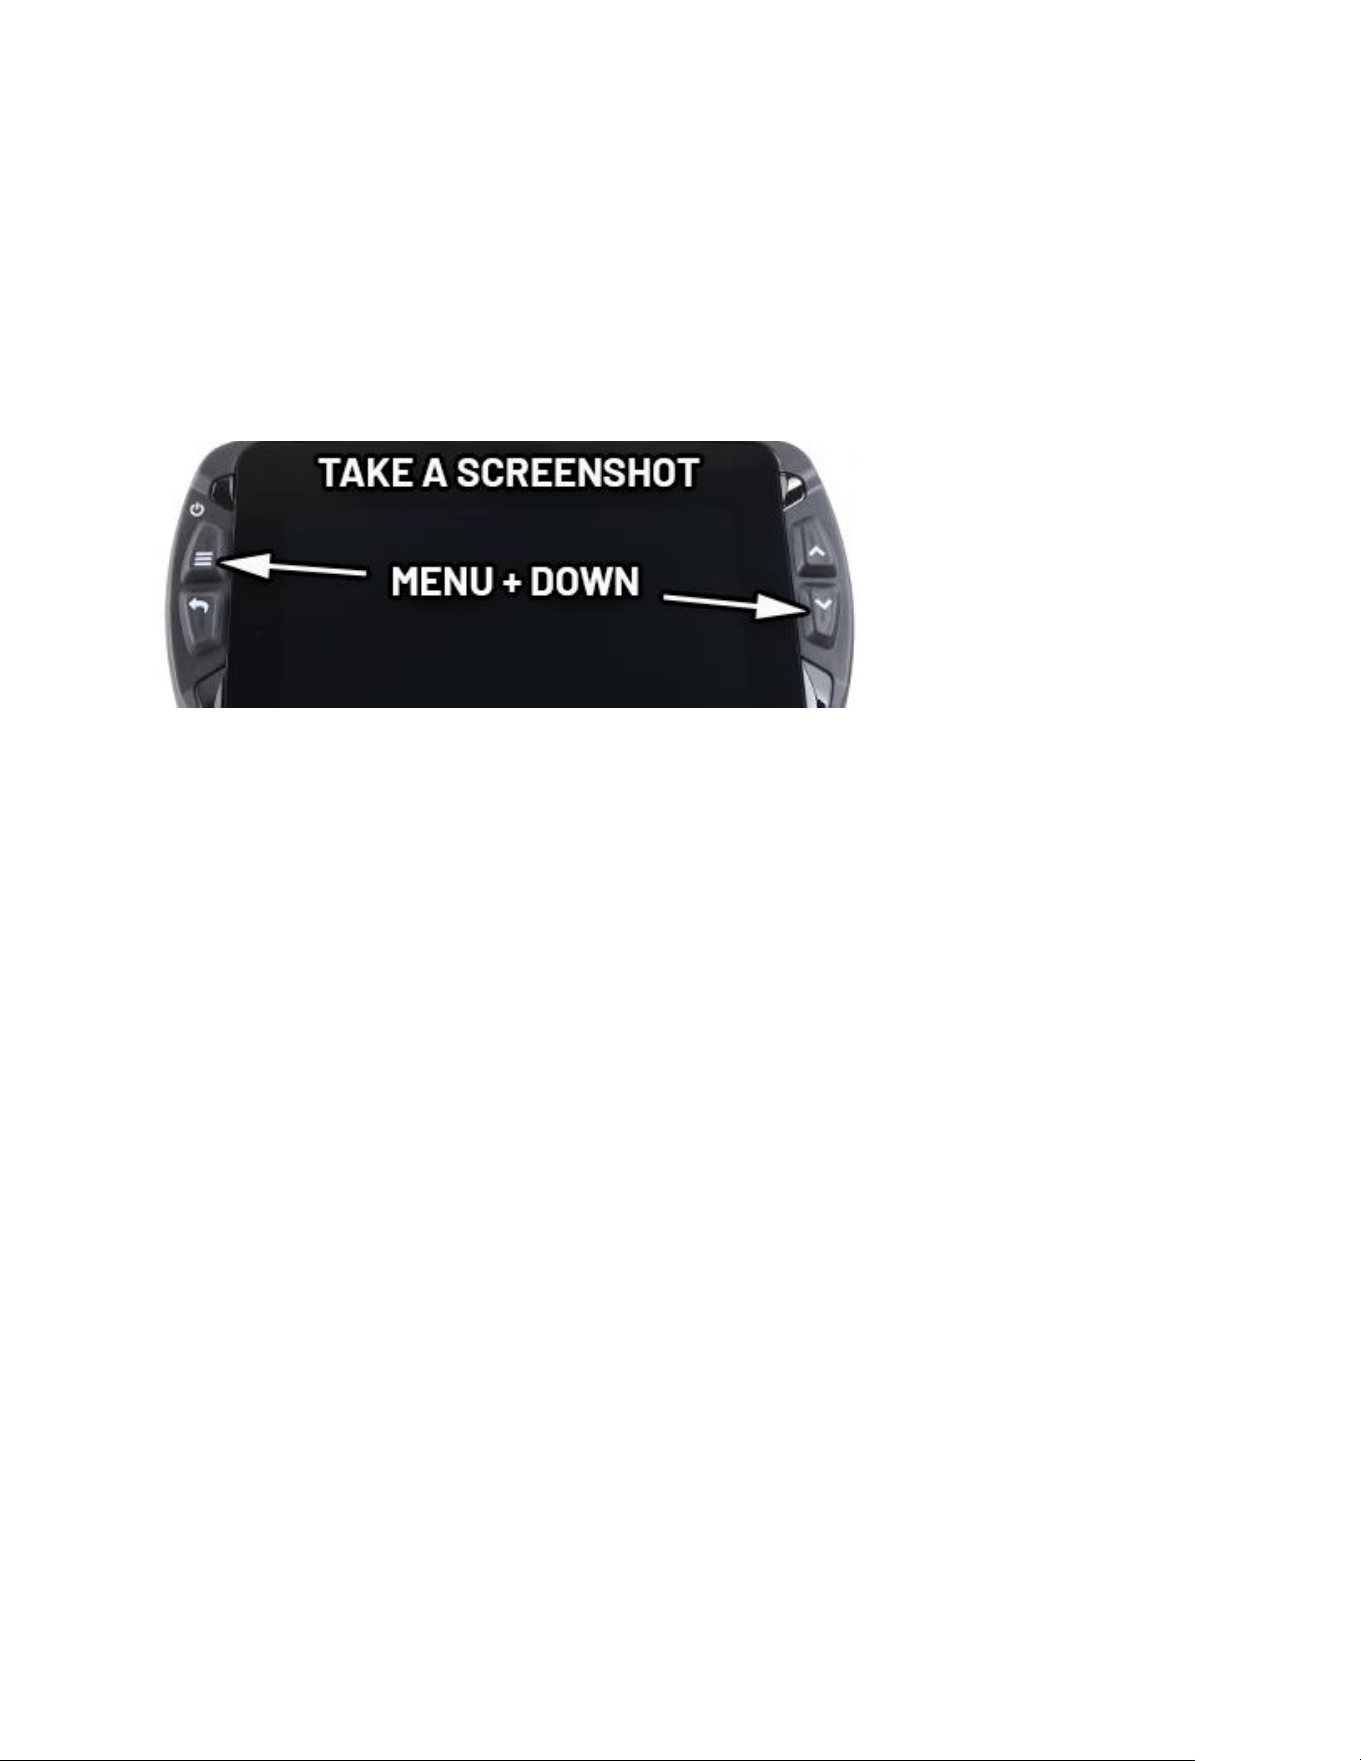
How do I take a screenshot?
Press the Menu buon and the Down buon at the same me. A JPG image le
will be saved to the MicroSD card. If you share it on social media, tag us
#ridetrailtech.
How long does the internal battery take to charge fully?
Voyager Pro4 takes 3-8 hours to fully charge depending on charge mode. You do
not need to pre-charge it; connect and ride. Voyager Pro4 only charges when
turned on to avoid drawing down the vehicle baery. In handheld mode, charge
should last 40 minutes or more depending on features in use.
How does sleep mode work?
Aer a short period of inacvity, Voyager Pro4 will enter sleep mode. Adjust the
sleep mode seng to change the meout period. Vehicle sensors can keep
Voyager Pro4 awake using the wake-detecon seng while the vehicle is
moving. Aer 15 minutes in sleep mode, Voyager Pro4 shuts down completely
to protect the vehicle baery. A buon press is required to wake Voyager Pro4
aer shutdown.
How do I get the best GPS reception?
The internal antenna is designed for opmum recepon. If Voyager Pro4 is
mounted where metal blocks the internal antenna, consider an external GPS
antenna for beer posioning.
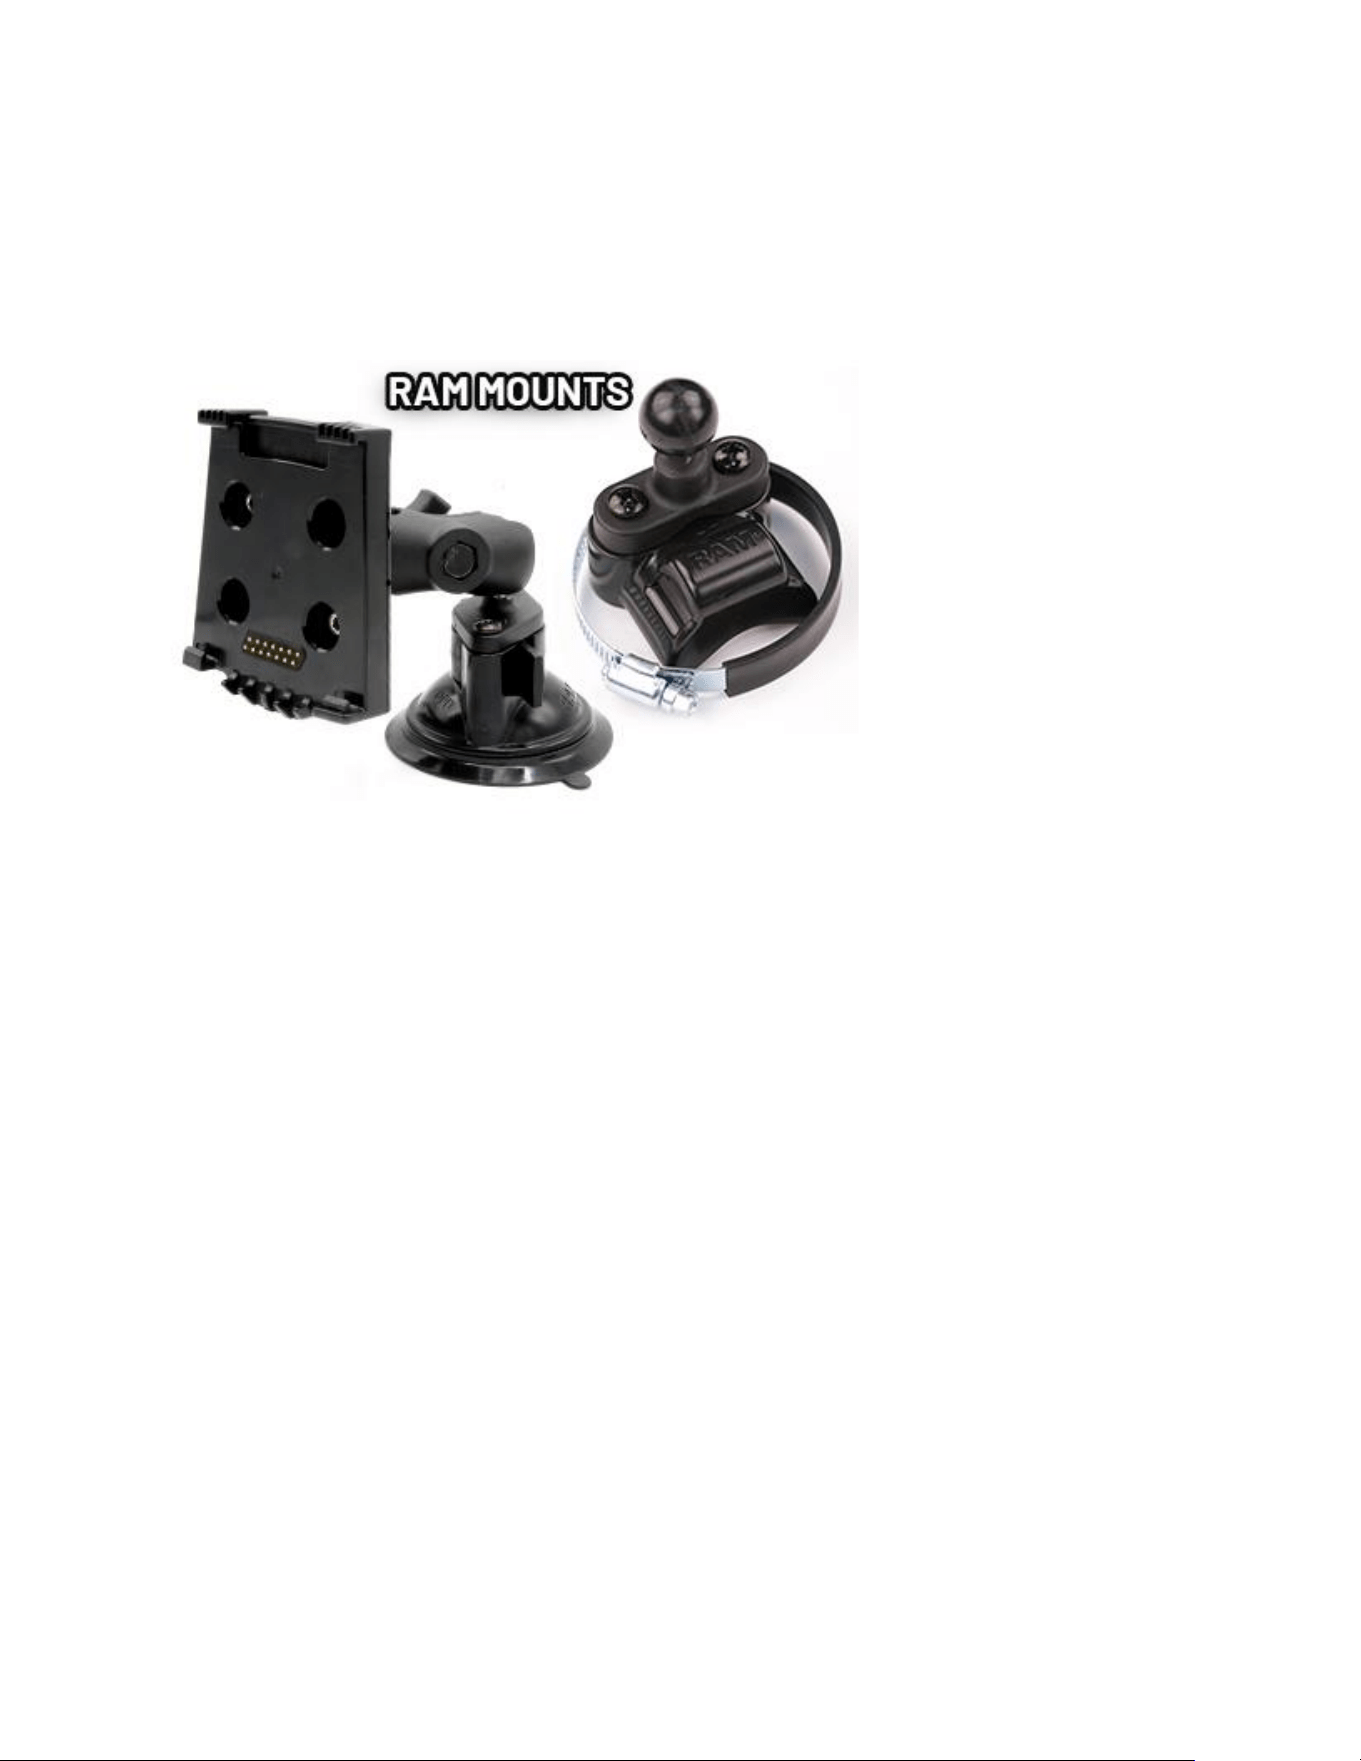
How do I mount Voyager Pro4 to my machine?
Voyager Pro4 is compable with RAM mounts. Vehicles with handlebars can use
the included handlebar mounng hardware. Protecve accessory mounts are
also available, or use the dock's four mounng holes for dashboard mounng.
What kind of power does Voyager Pro4 need for proper operation?
Voyager Pro4 requires DC power to funcon and charge correctly. DC power
systems with a failing vehicle baery may produce too low a system voltage
(<11.5V) for proper operaon. For applicaons where DC power is not available,
Trail Tech oers an AC wall charger for Voyager Pro4 to charge the internal
baery.
Voyager Pro4 kits include physical sensors, magnets, and other
cables. Why, if it's a GPS?
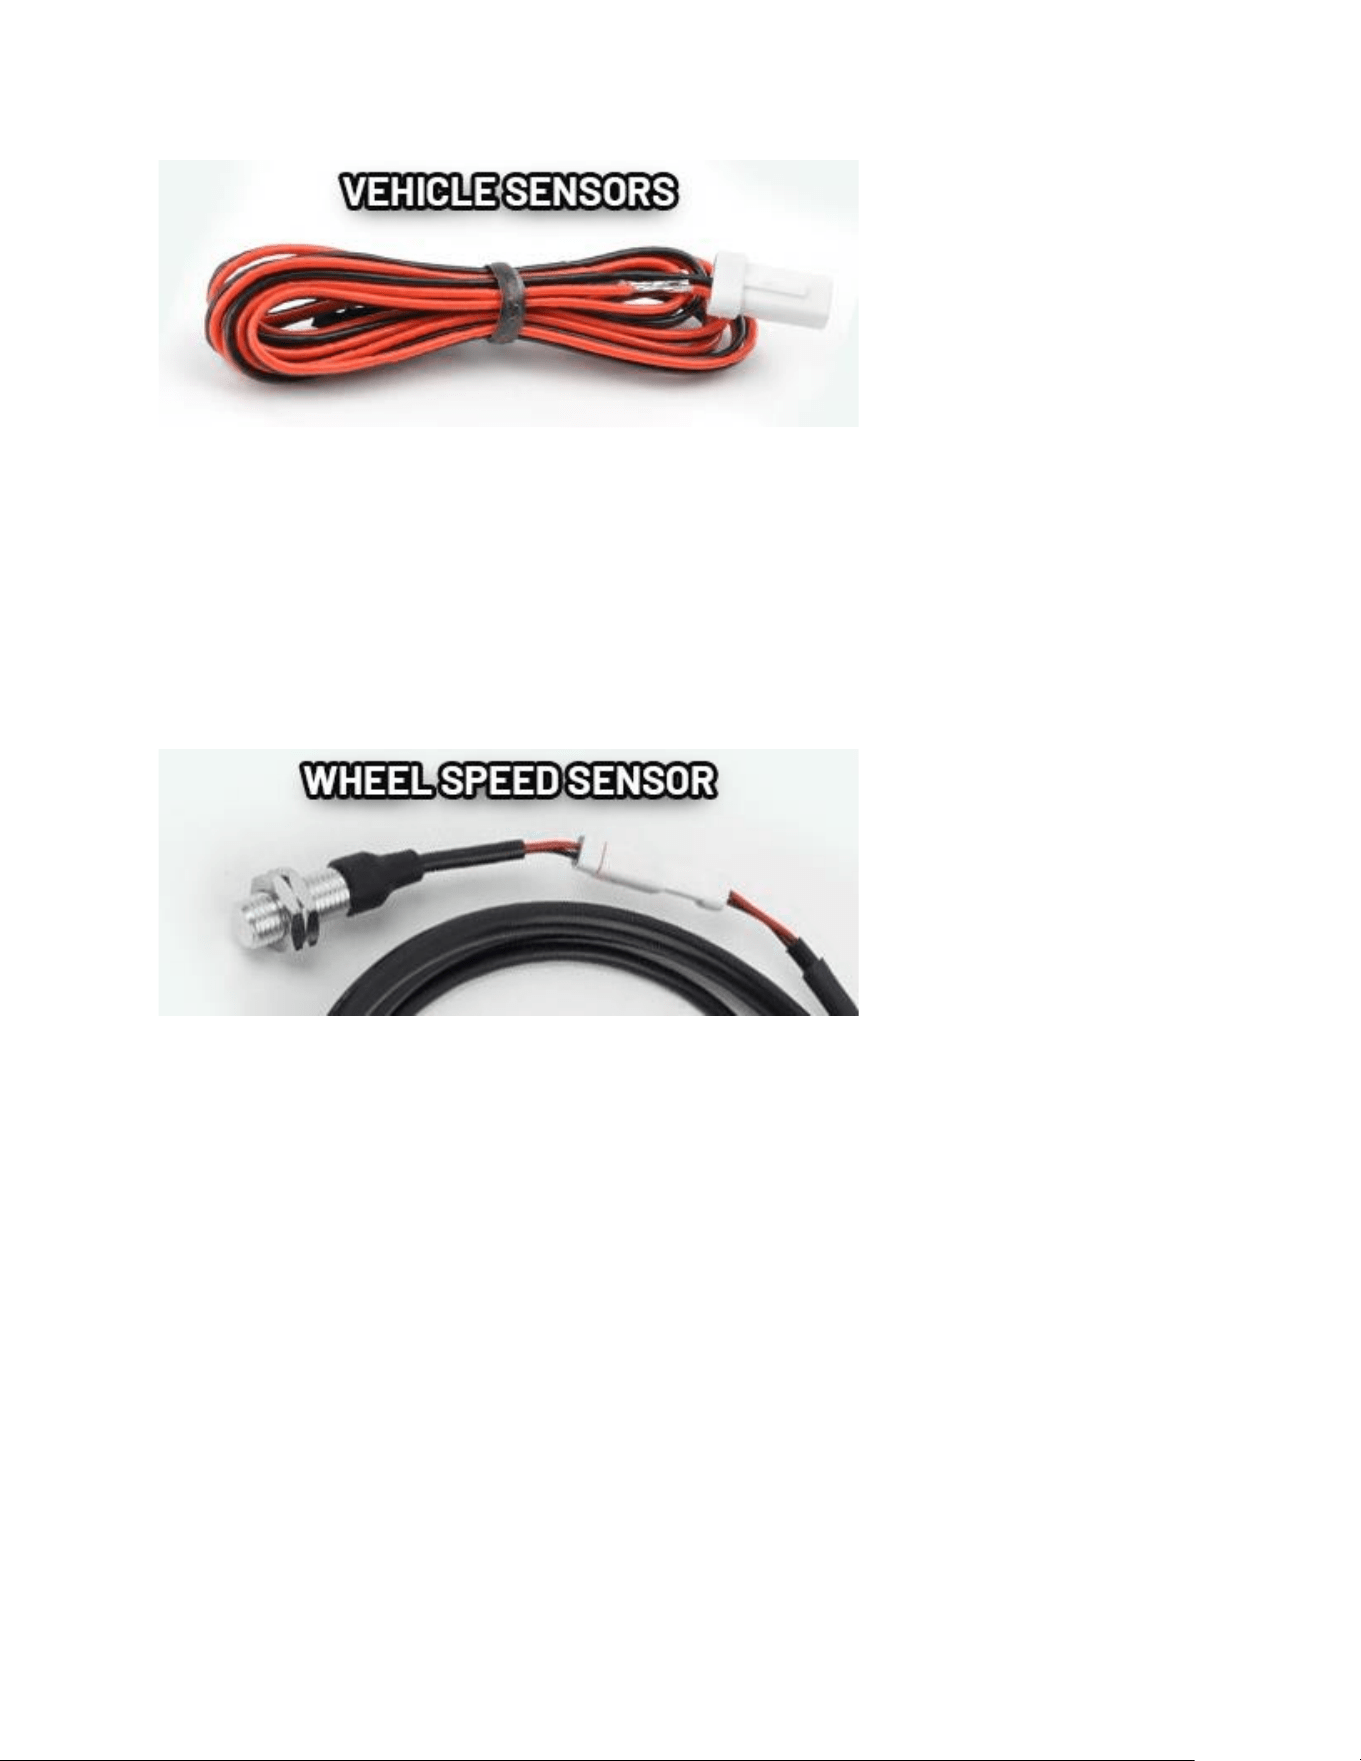
You can use Voyager Pro4 without any sensors connected. However, connecng
the vehicle sensors enables several features, including addional gauges, higher
precision, and baery charging.
My other GPS unit gets along just fine without a wheel sensor. Do I
really need one?
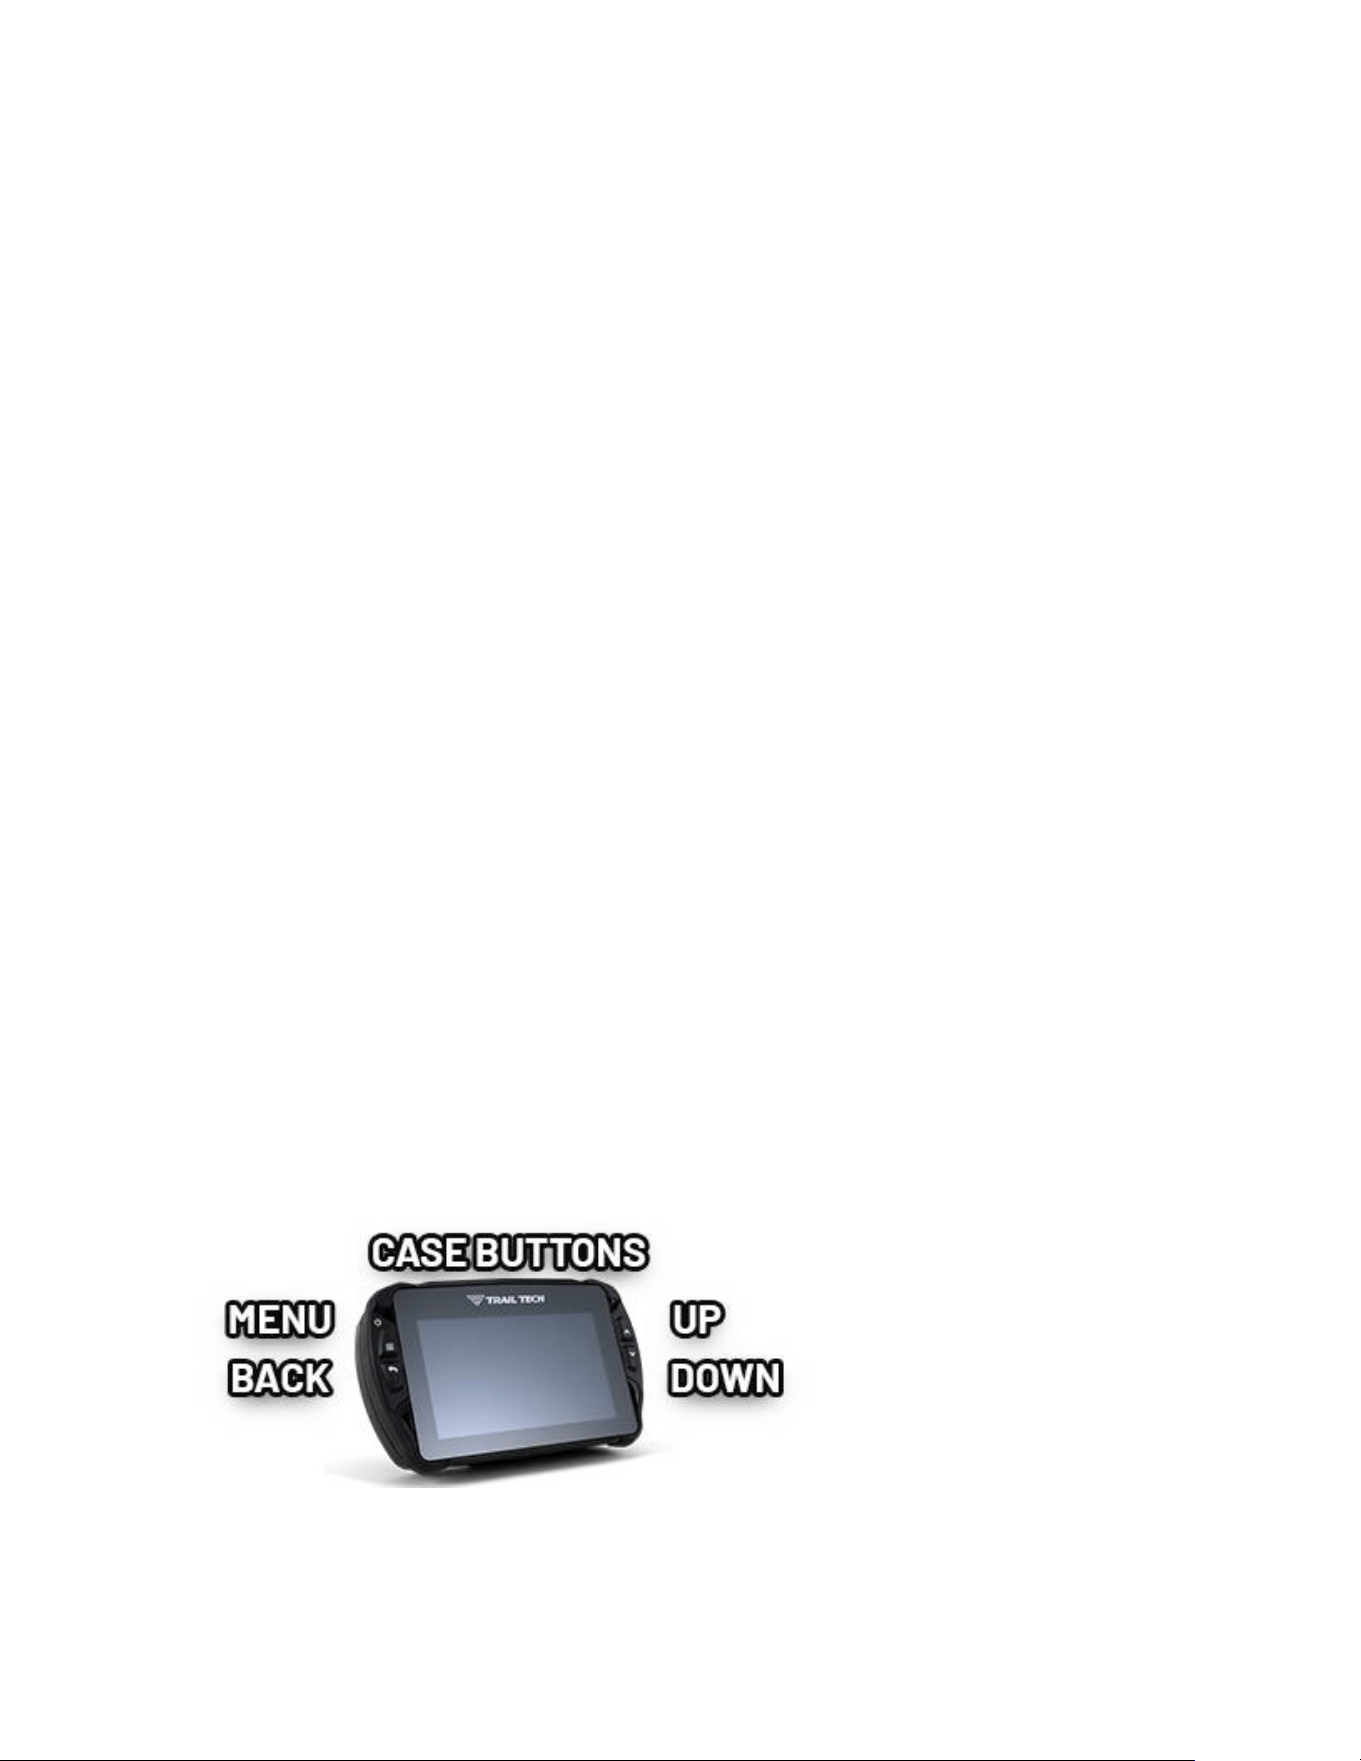
All speed and distance data can be gathered from either GPS or the wheel
sensor.
Trail Tech believes an accurate odometer and hour meter are crical features.
To maintain this accuracy, a wheel sensor is recommended.
1. When using a wheel sensor, Voyager Pro4 knows to stop logging when the
vehicle stops moving. When you start rolling again, Voyager Pro4 knows to
resume logging without GPS-induced lag.
2. The wheel sensor will track distance even when the GPS signal is out of
range.
3. GPS cannot tell the dierence between a motorcycle moving under its own
power or riding in the back of a truck.
4. The GPS signal can be lost, especially around metal structures or in tunnels.
With no signal, speed and distance accuracy are reduced.
5. GPS cannot see small changes in elevaon, such as whoops and ruts. Over
me this creates odometer error.
6. GPS is most accurate while traveling in straight lines at constant velocity.
Tight, fast corners can cause the GPS to skip part of your path and contribute to
odometer error.
Can Voyager Pro4 use GPX files?
GPX (GPS Exchange Format) is Voyager Pro4's nave track format. Import and
export recorded tracks between the MicroSD card and dozens of soware
programs and web services.
Can Voyager Pro4 be turned on and off manually?
Yes. Hold down the upper-le buon to power Voyager Pro4 o.
How do I run Voyager Pro4 without connecting it to a vehicle?
Voyager Pro4 provides an easy way to change unit sengs for a wide variety of
uses. There are a few menu opons to change when Voyager Pro4 is used
without external power:
1. Vehicle Prole > Wake Detecon, Speed Source, and Charge Mode
2. Maps and GPS Setup > AutoLog Source
Physical Features Help
There are a few things to know about the outside of Voyager Pro4:
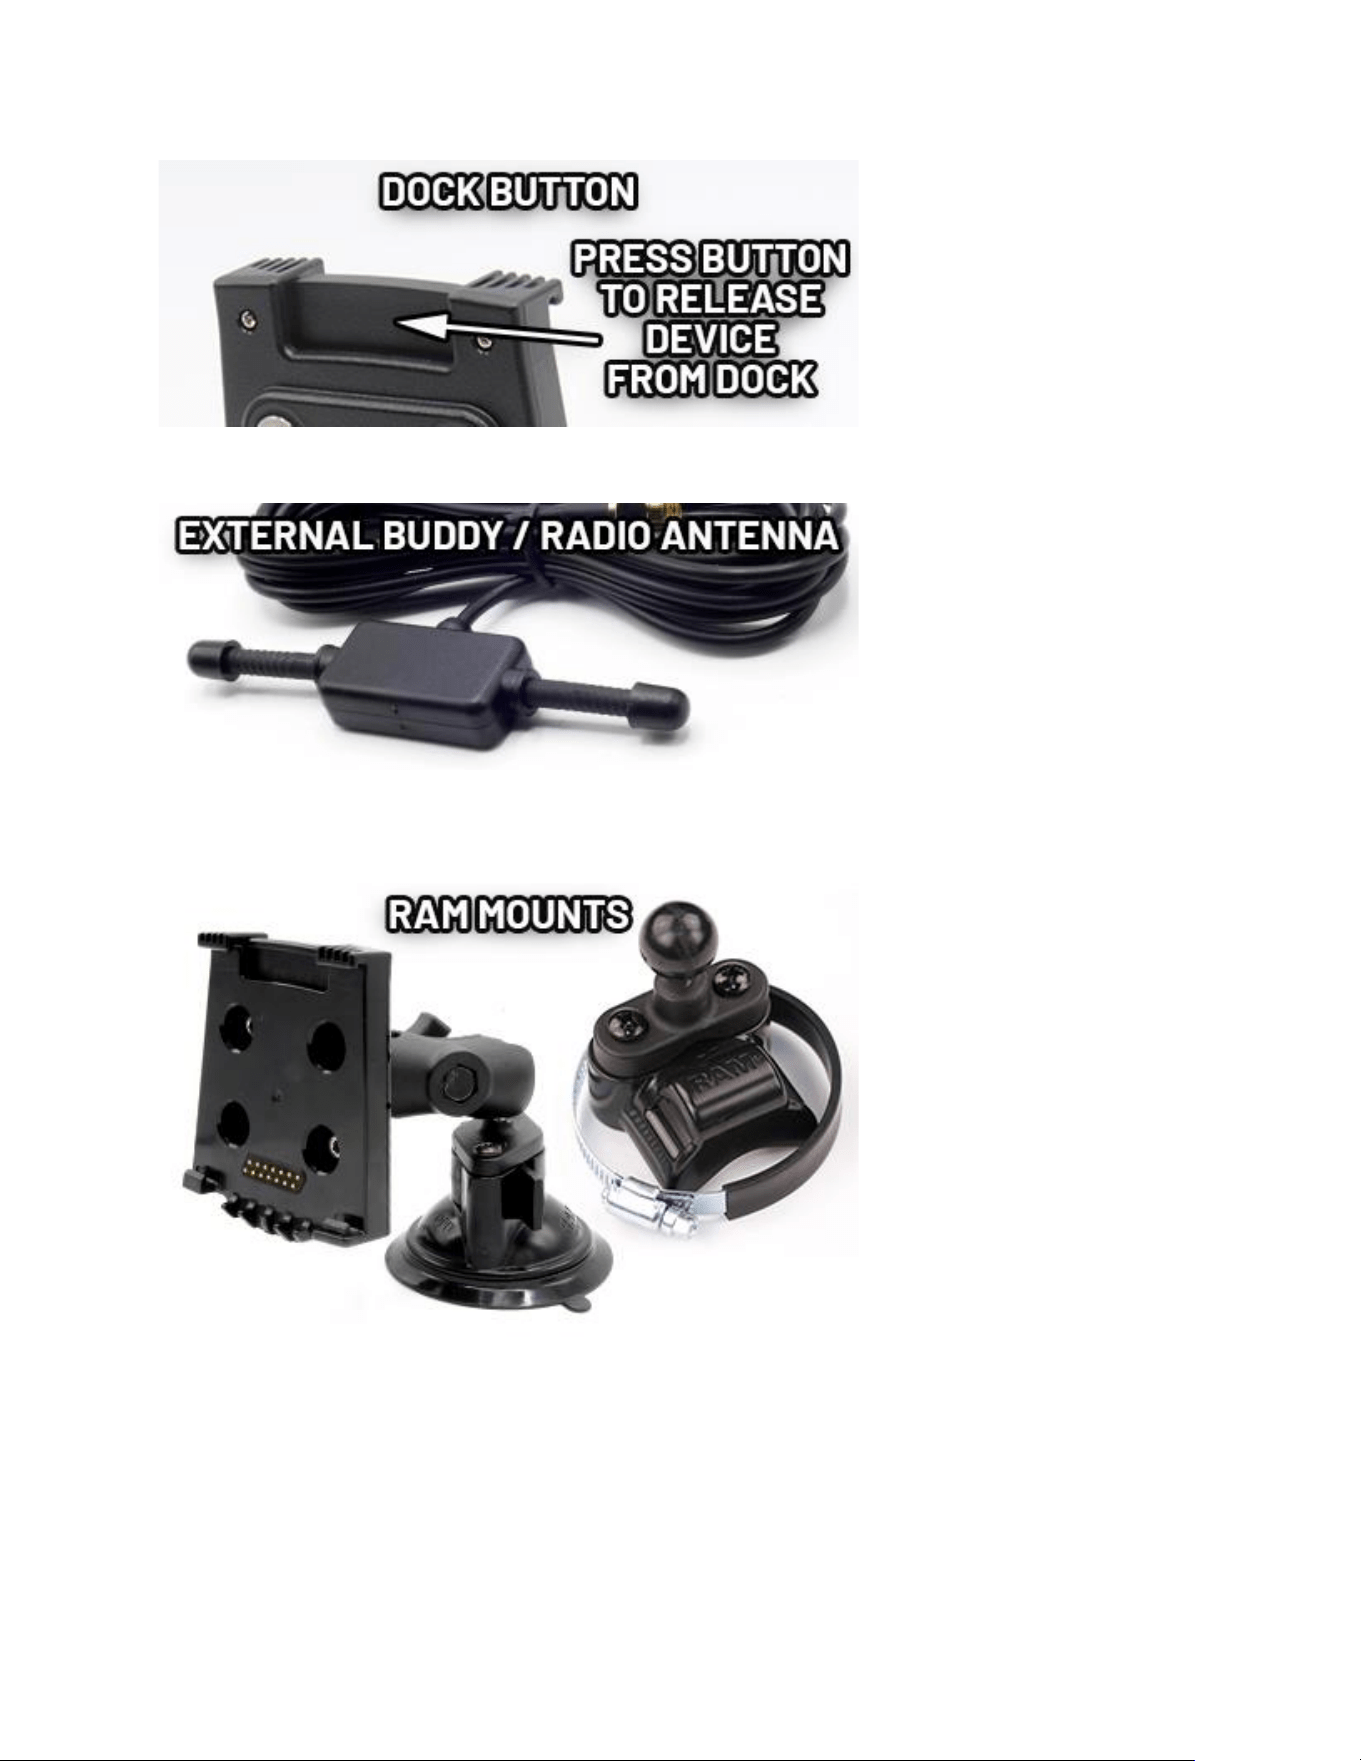
1. The four buons on the case are for Menu/Power/Conrm, Back, Up and
Down.
2. The large buon at the top of the dock releases Voyager Pro4. The dock
should be mounted securely and wired in.
3. External antennas extend the range of Voyager Pro4's features.
4. Voyager Pro4 is compable with the popular RAM mounts. Kits may include
handlebar, sucon cup, or steering column mounts.
5. The MicroSD card is the primary way to transfer data les to and from
Voyager Pro4. (MicroSD card not included in kits.)
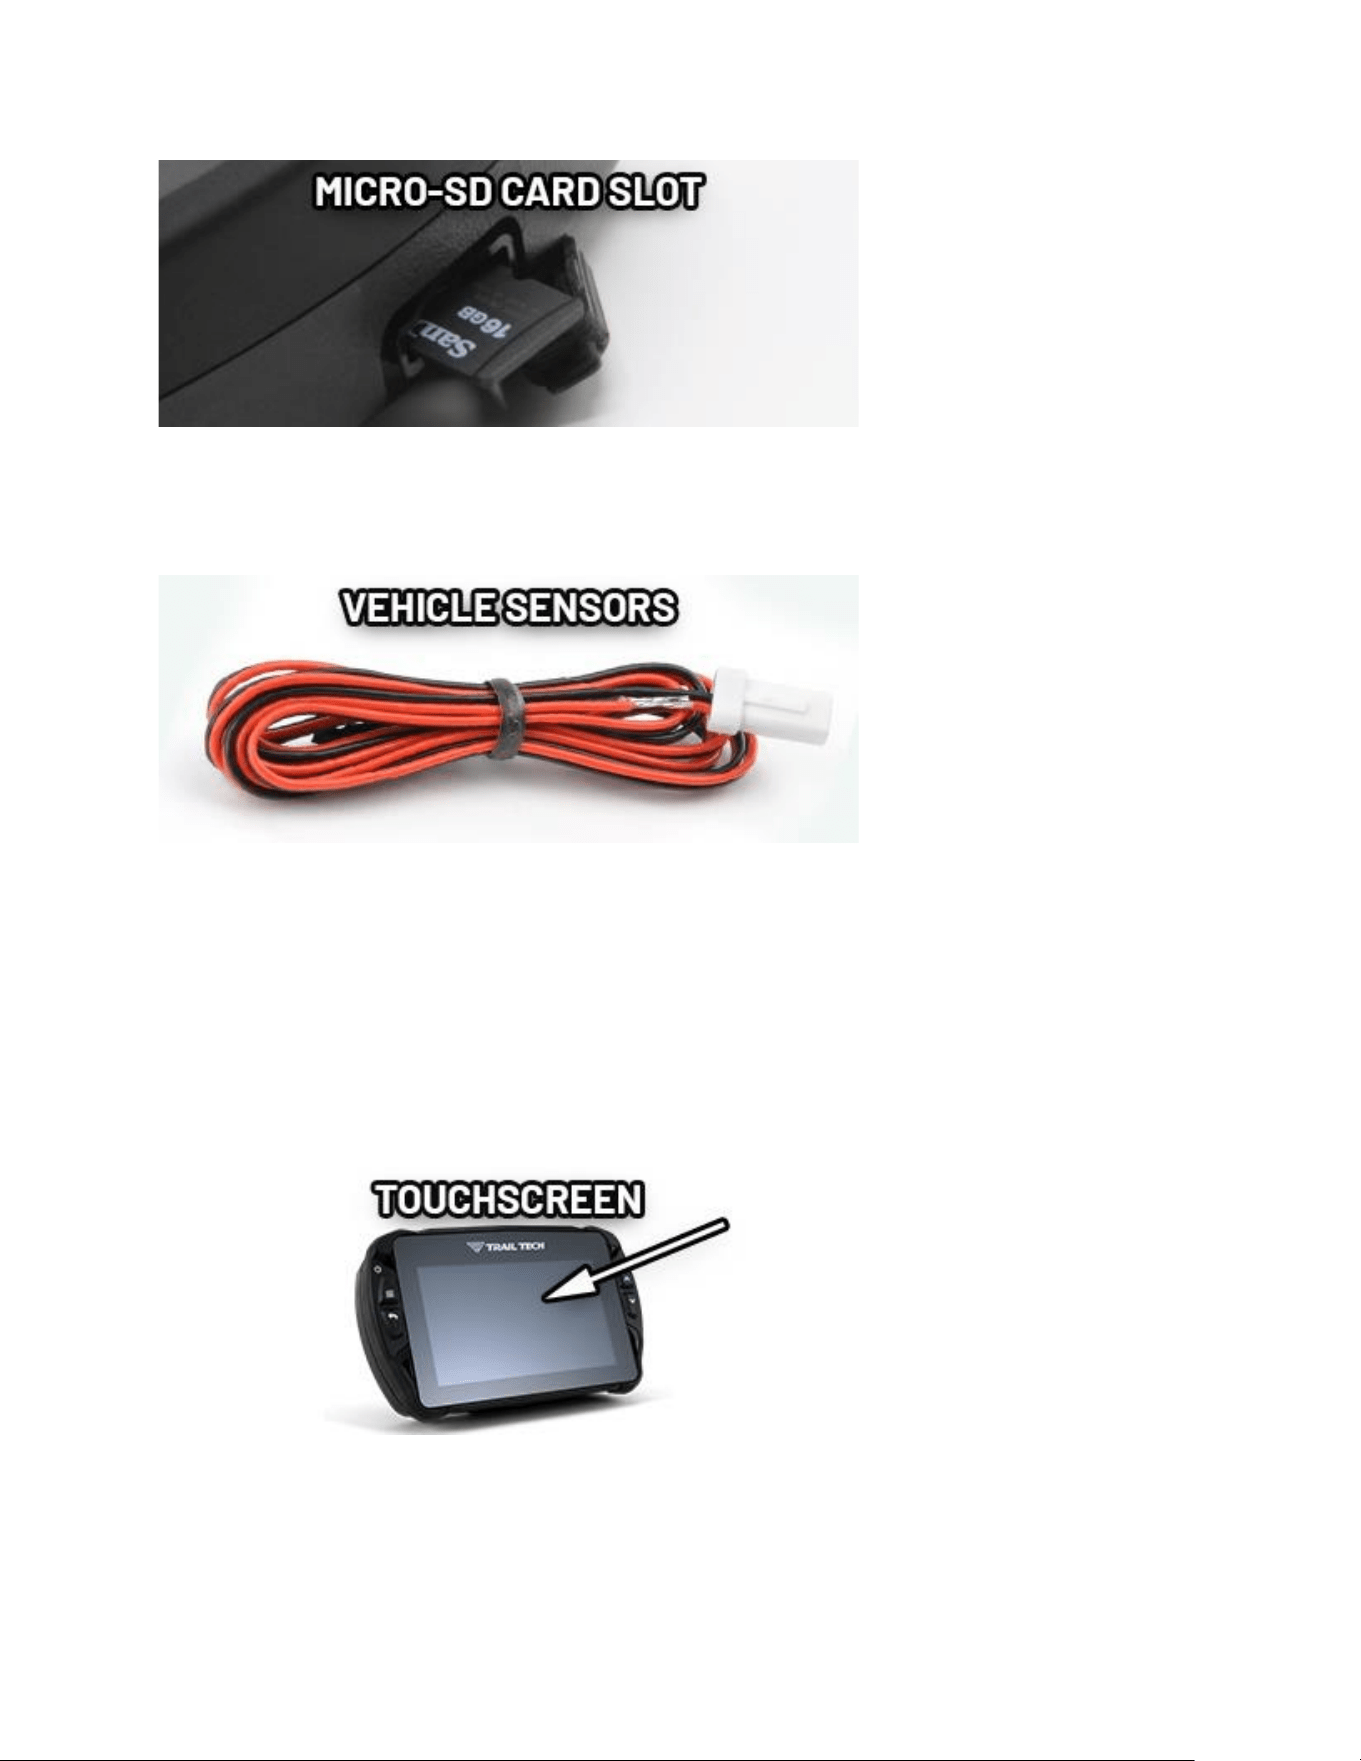
6. Installing all the vehicle sensors isn't required, Voyager Pro4 will do its best to
use GPS data. However, each installed sensor unlocks new features of Voyager
Pro4.
Buttons Help
Touch Screen
Control Voyager Pro4 maps and menus by tapping and swiping the touch
screen.
Menu Button
Conrm selecons and open the sengs menu. Hold the Menu buon to
power Voyager Pro4 o. Hold it longer to perform a hard shutdown.
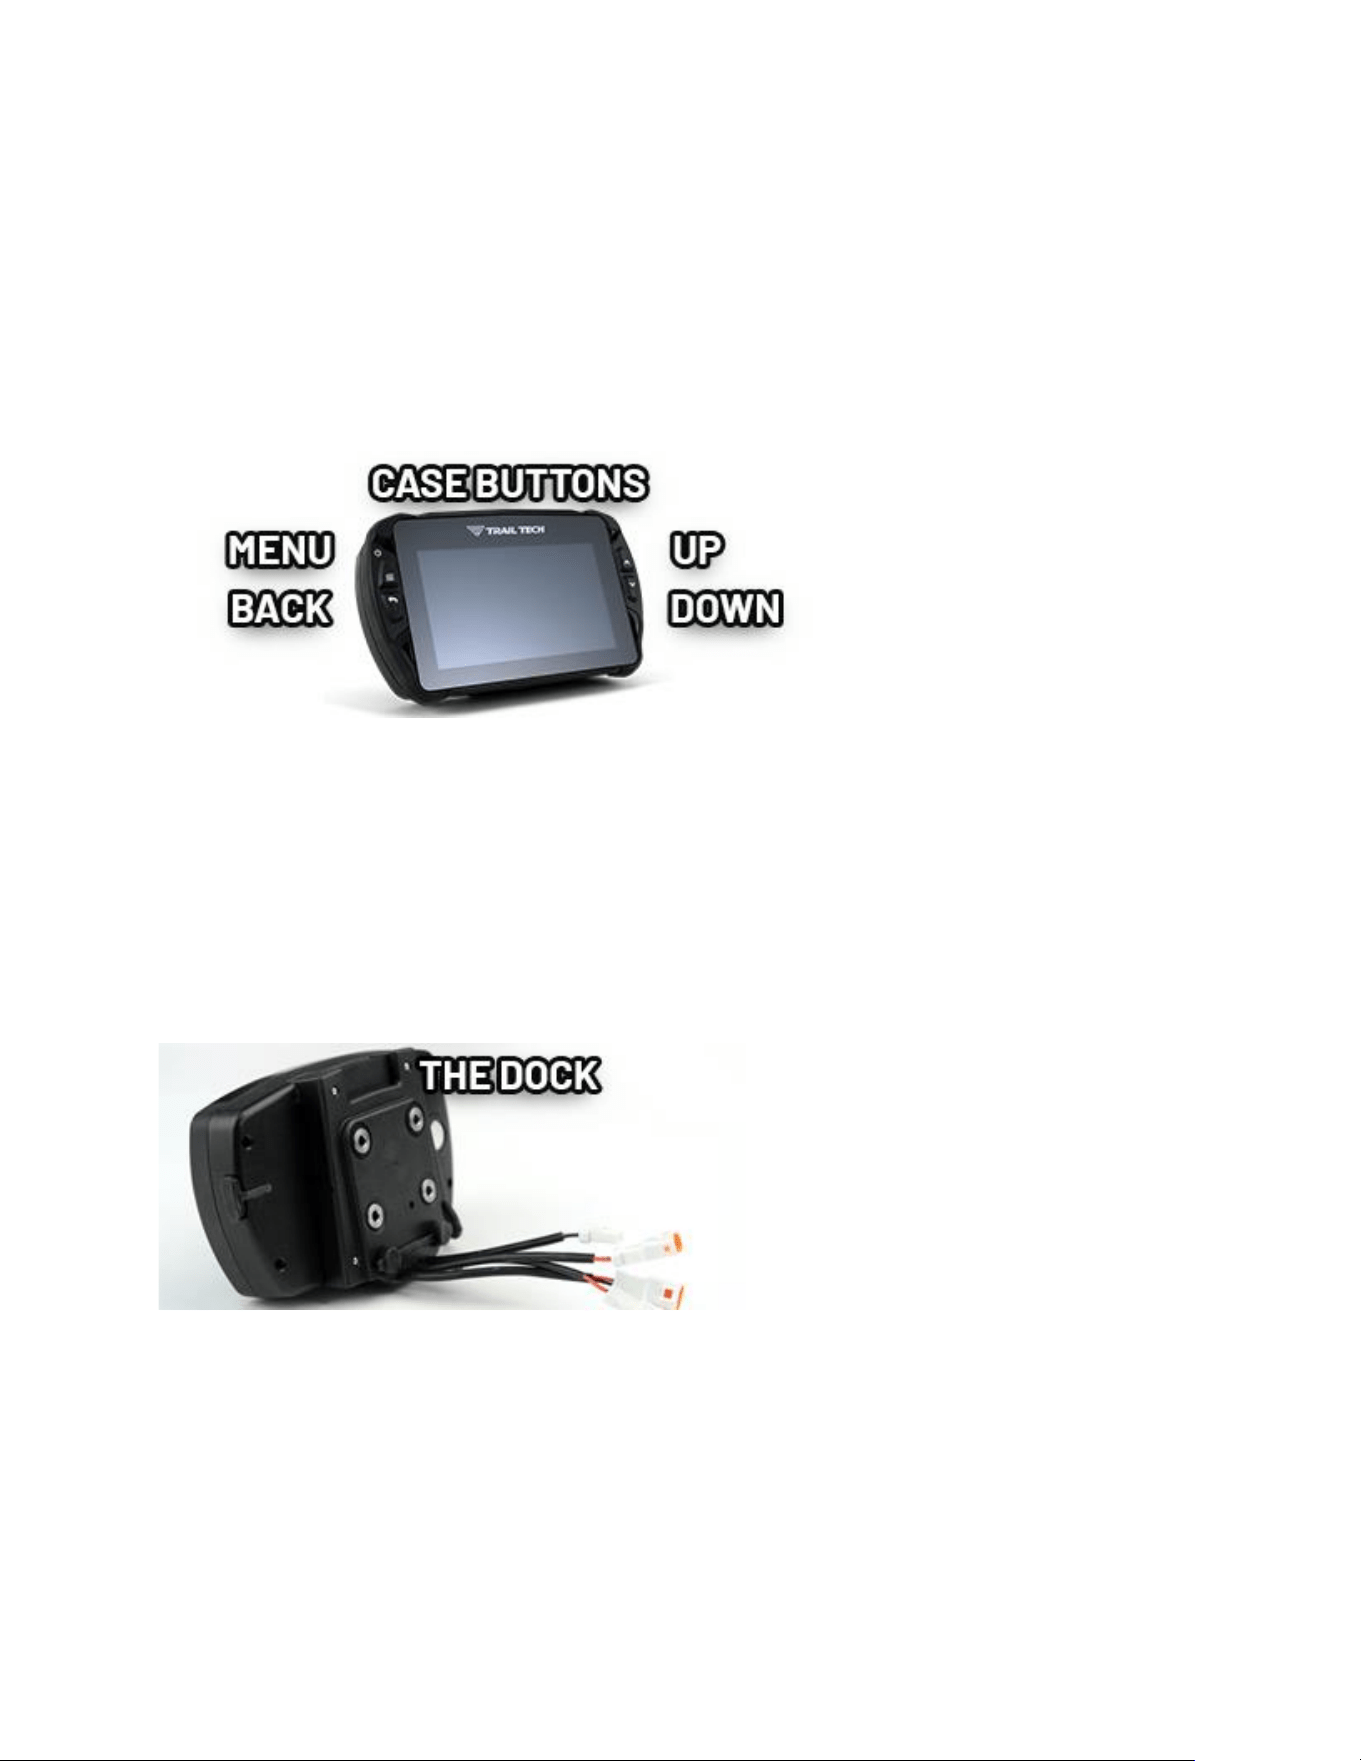
Back Button
Back out of the current screen or menu. On main screens, the Back buon
opens that screen's mini-menu when one is available.
Up and Down Buttons
Scroll between main screens and navigate menu opons.
Dock Help
The Dock
The dock should be secured to the vehicle and wired in. The quick-release dock
allows for swapping Voyager Pro4 between several vehicles.
The Dock's Button
Press the large buon at the top of the dock to release Voyager Pro4 from the
dock.
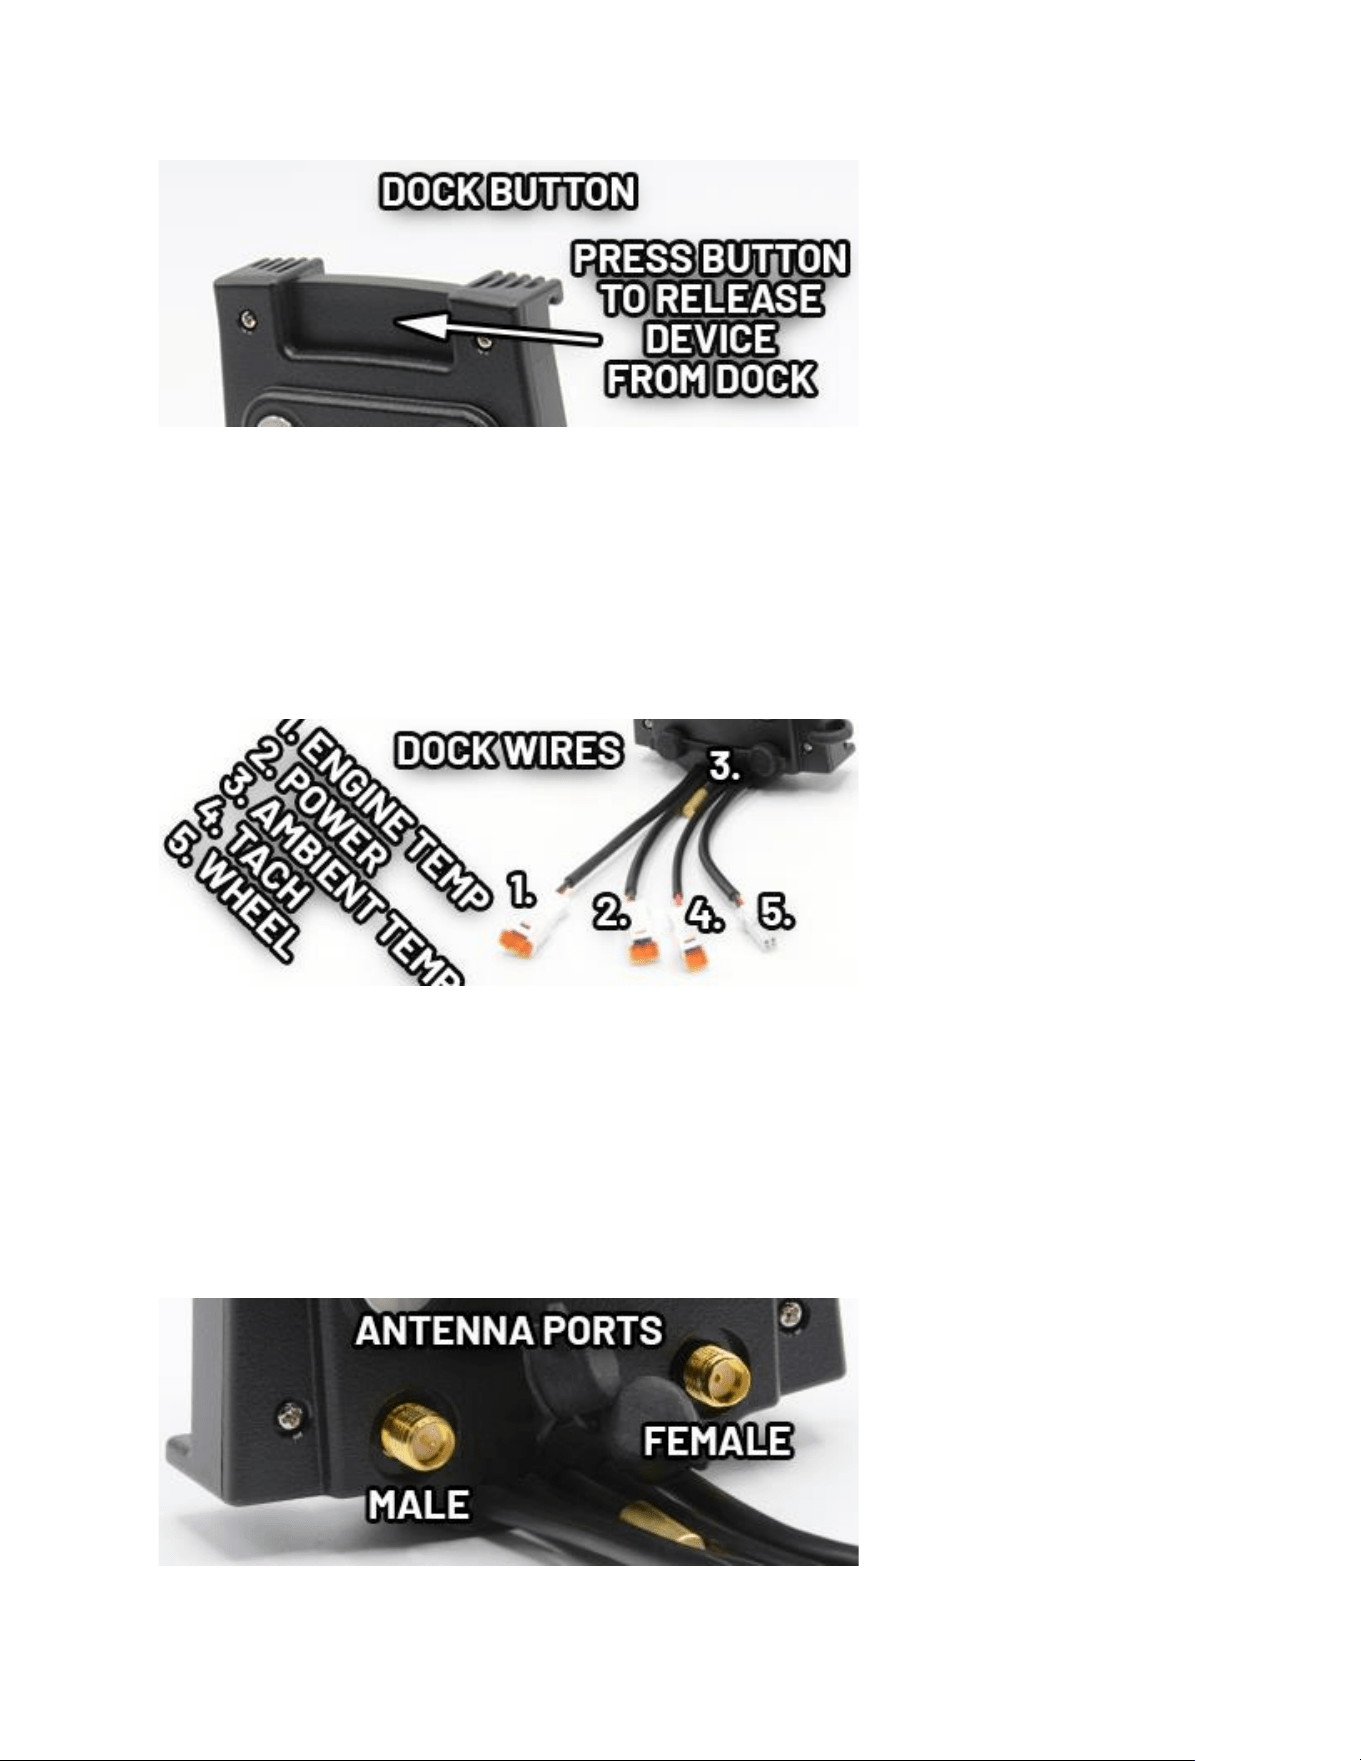
The Dock's Wires
The dock's wires connect to the vehicle sensors. Wheel sensor for speed, spark
sensor for tach, baery connecon for power and voltage, and thermometer
for temperature. Voyager Pro4 will operate without any vehicle sensors
aached by using GPS data, but you should at least install the power wire to
keep the internal baery charged up.
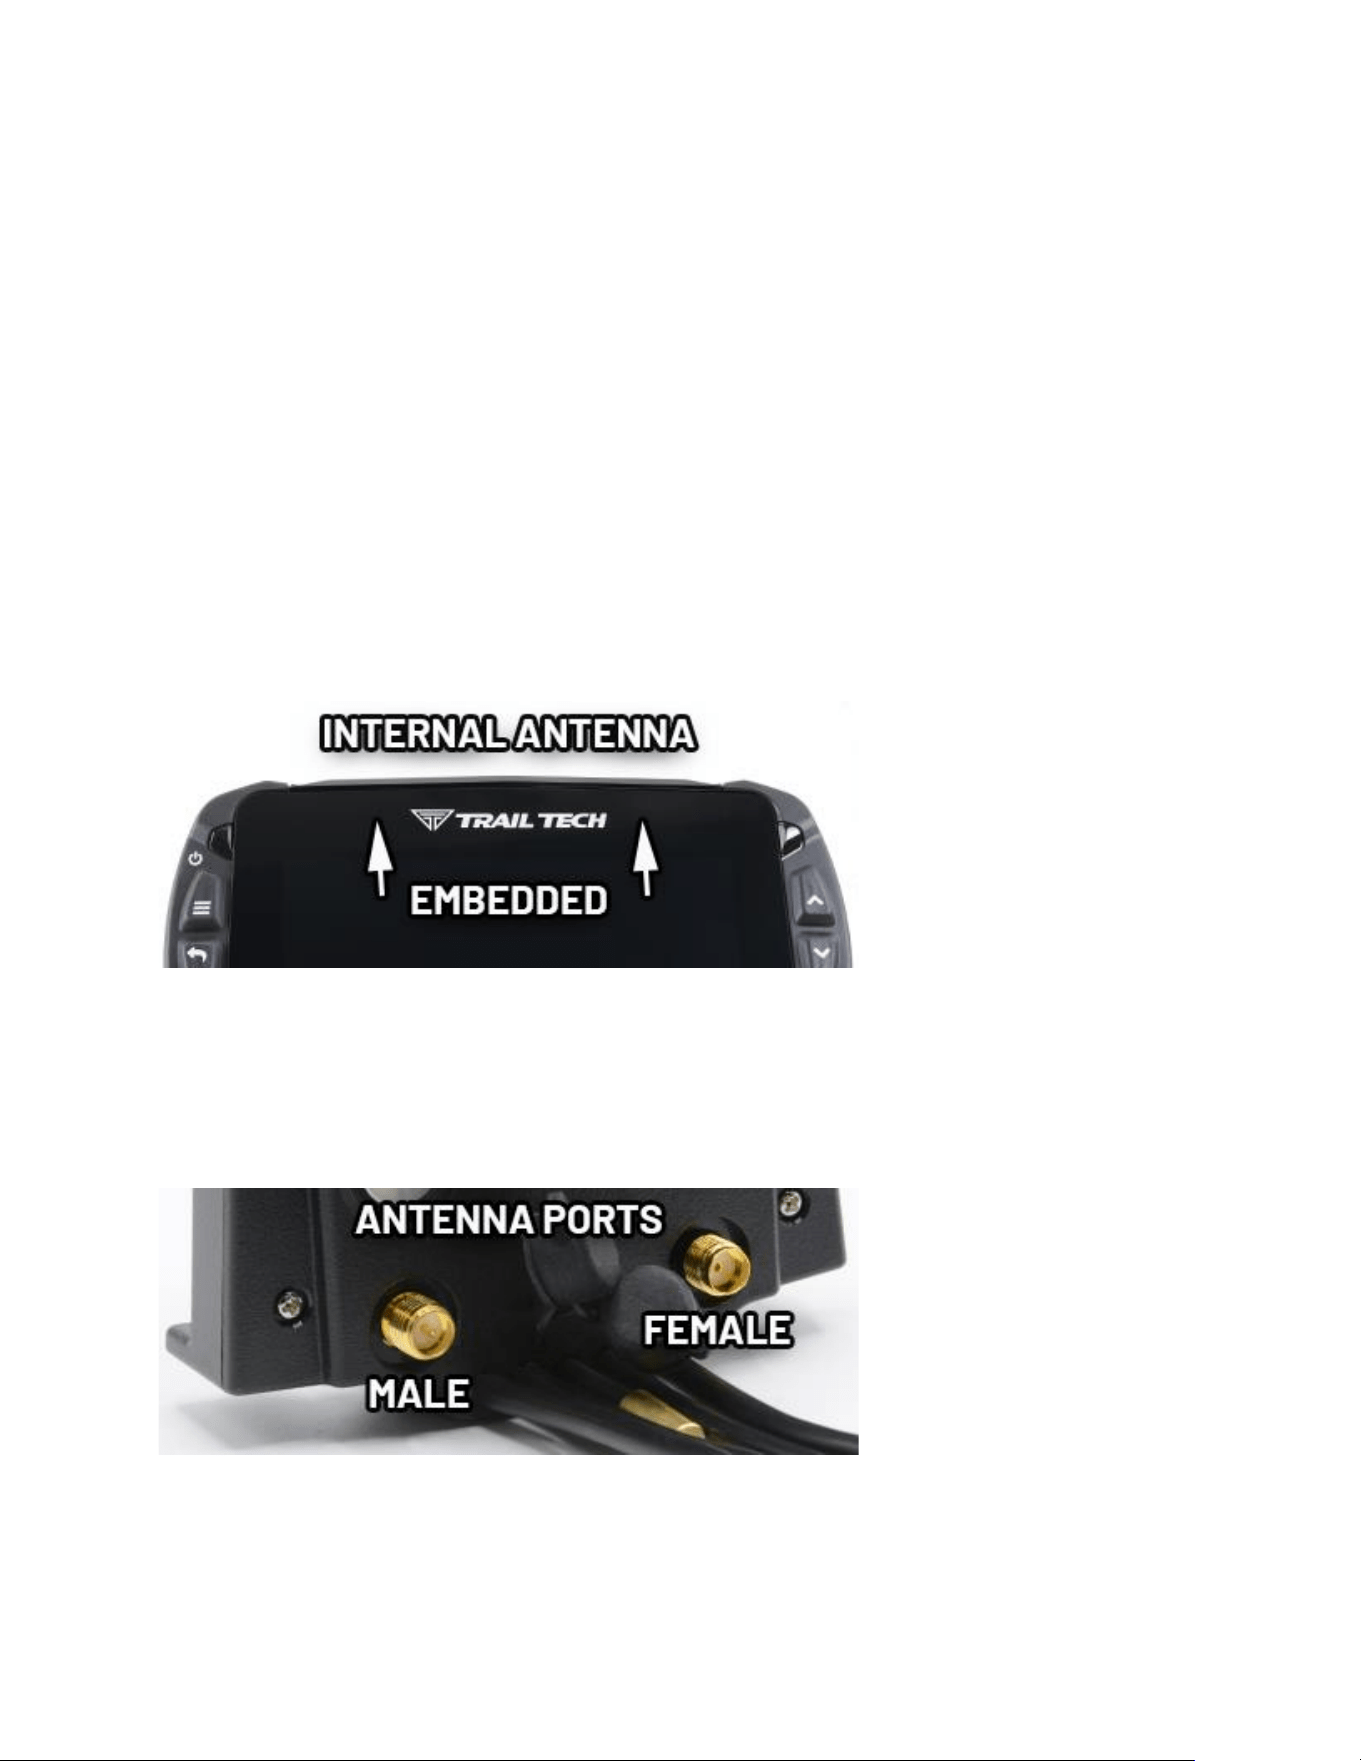
The Dock's Antenna Ports
Two threaded brass ports on the back of the dock are for connecng external
antennas. An external antenna is REQUIRED for buddy tracking and could
improve GPS signal strength in rough terrain.
Radio antennas plug into the male port, and GPS antennas plug into the female
port.
Locking the Dock
A small Allen wrench can be used to lock Voyager Pro4 to the dock for added
security. Turn the small Allen screw inside 6 mes to lock or unlock.
Antennas Help
Internal GPS Antenna
The internal GPS antenna is great for normal use. If there is excessive metal
around the mounng locaon it could interfere with recepon. An external GPS
antenna can be installed into the dock's GPS antenna port in order to achieve a
beer antenna mounng posion.
Antenna Ports
Two brass antenna ports are found on the dock next to the sensor wires. The
le dock is female and accepts external GPS antennas. The other port is male
and only accepts radio antennas.
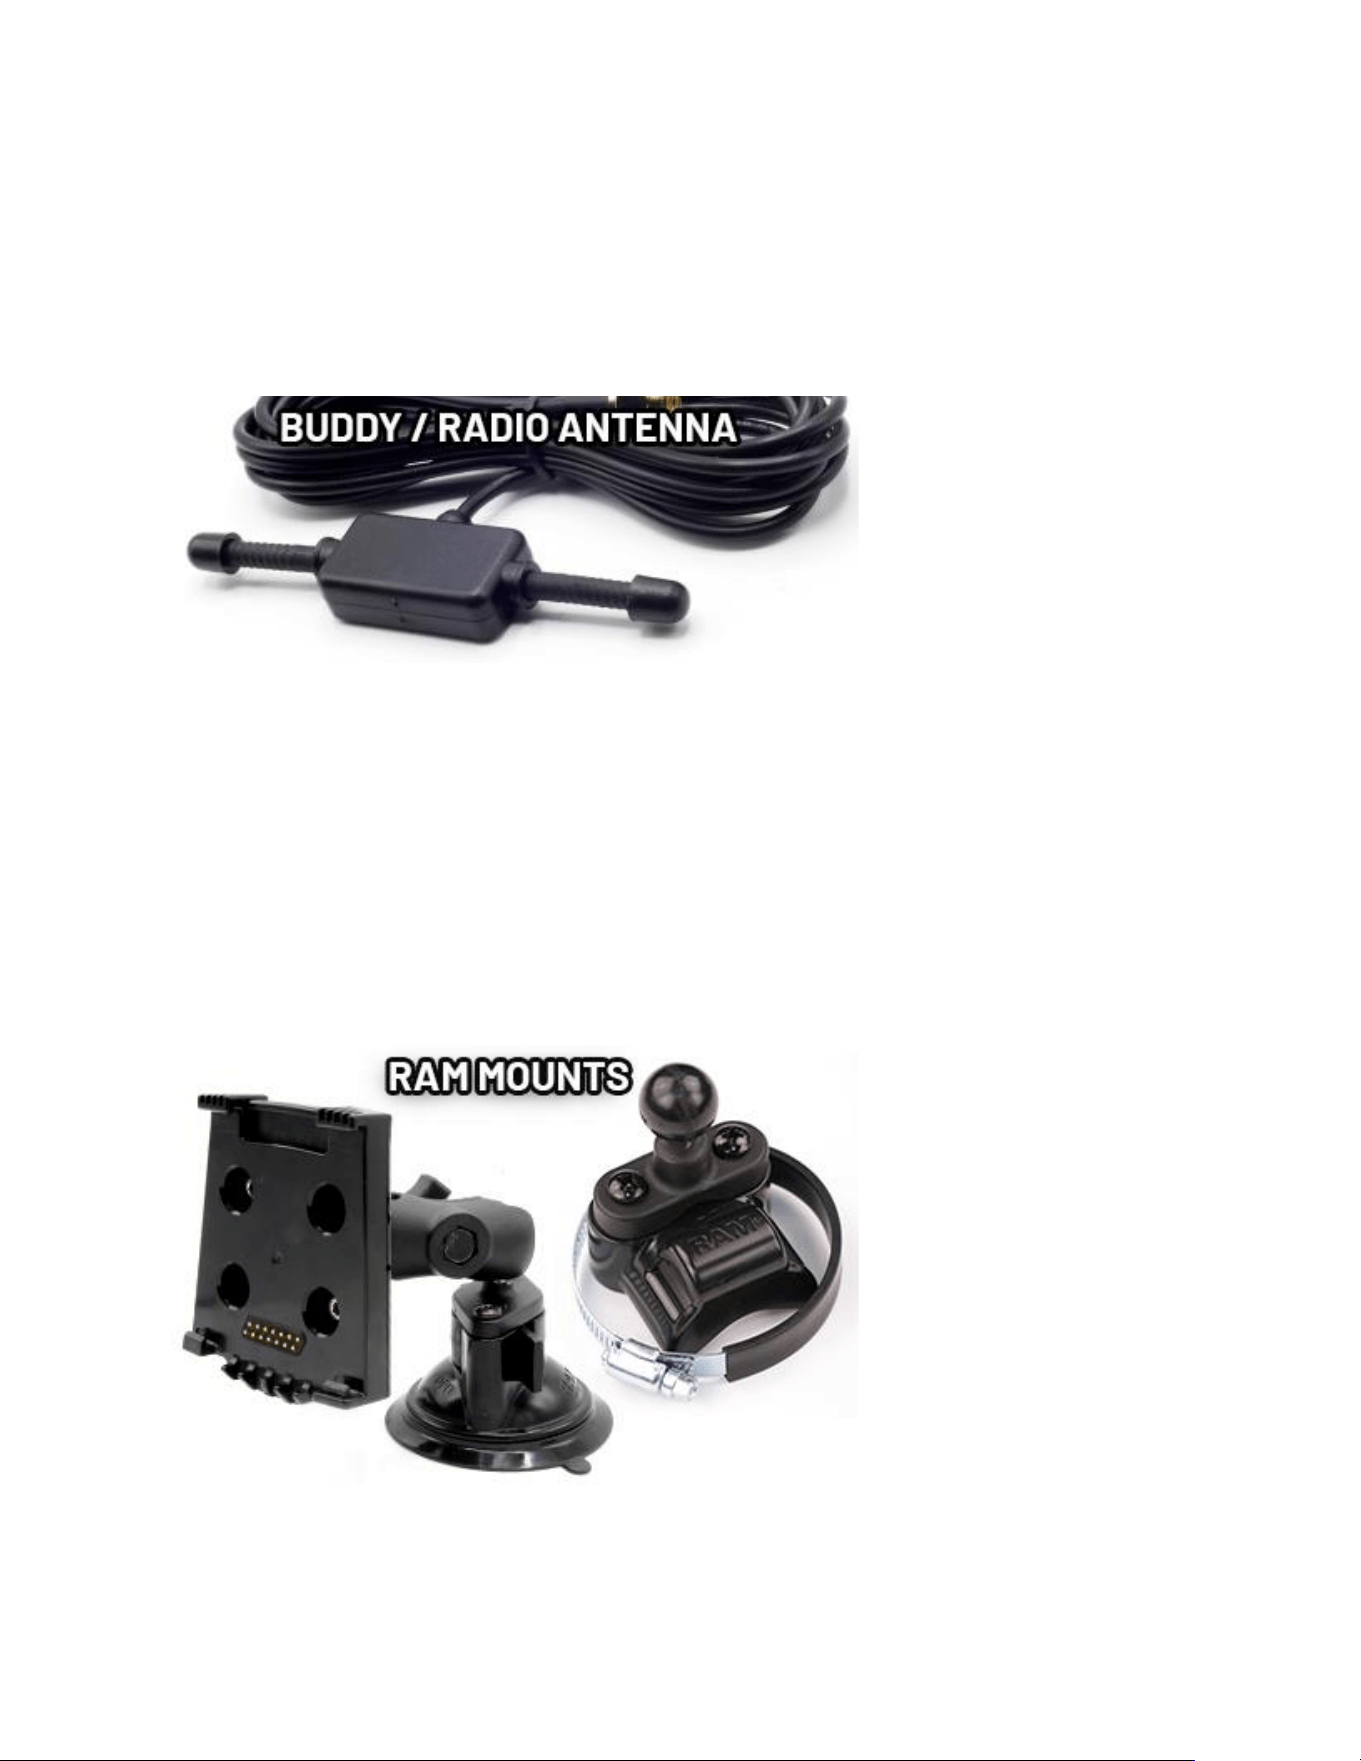
1. External Plastic Radio Antenna
The external plasc radio antenna is designed to be mounted to plasc, like a
number plate. It should be mounted vercally (up and down.) This antenna
works well for most applicaons and is included in most Voyager Pro4 kits.
Installing it enables buddy tracking features.
Mounting Help
Voyager Pro4's dock is ready for mounng with the AMPs hole paern.
RAM Mounts
RAM brand mounts are recommended. Voyager Pro4 can be mounted
anywhere using the wide array of RAM mounts.
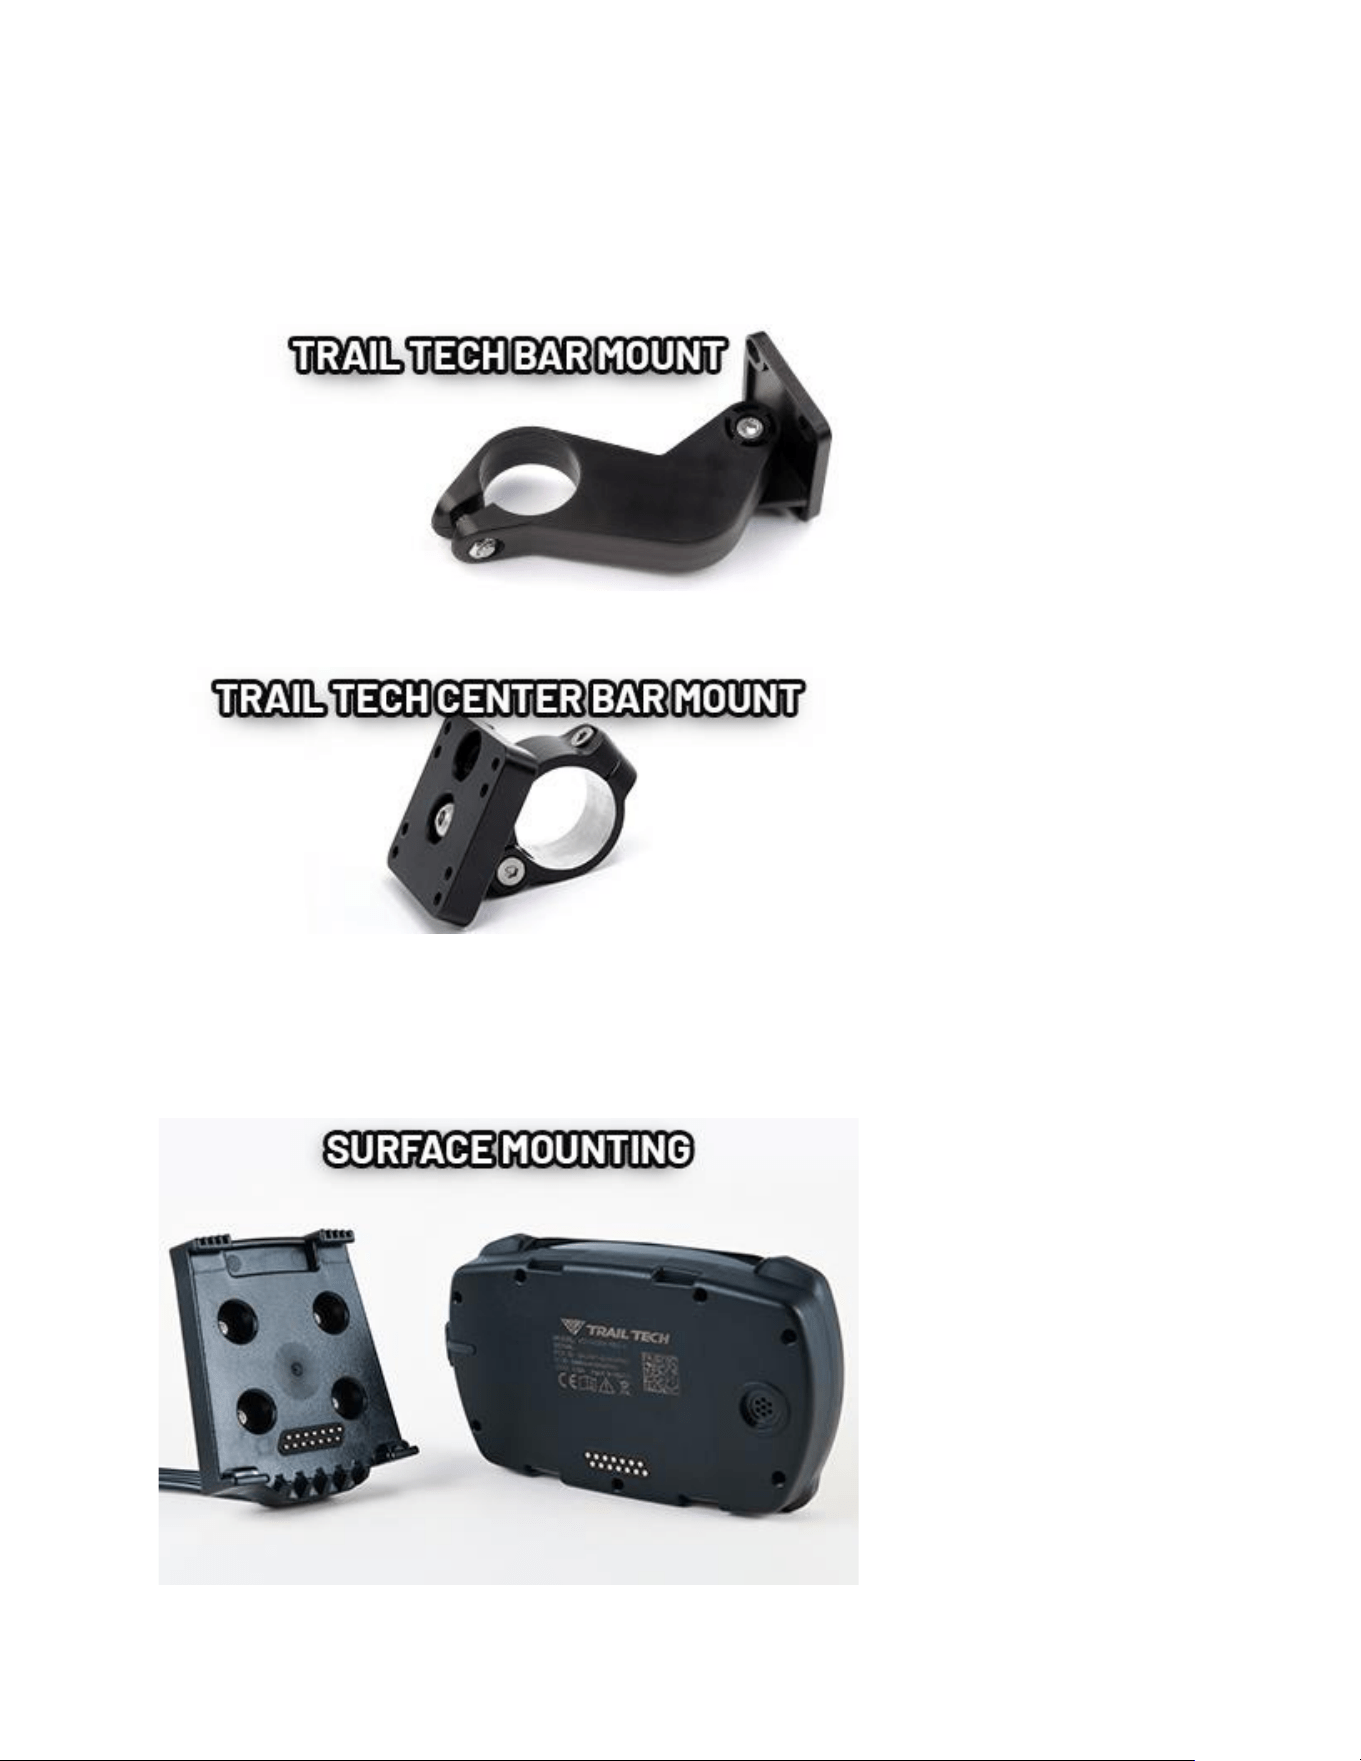
Bar Mounting
Kits intended for motorcycles include bar clamps for 7/8" through 1-1/8"
handlebars.
An aluminum center mount is available from Trail Tech for 1-1/8" handlebars.
Surface Mounting
The dock can be mounted to any at surface, like a UTV dashboard. Drill the
holes using the AMPs hole paern and secure with bolts.
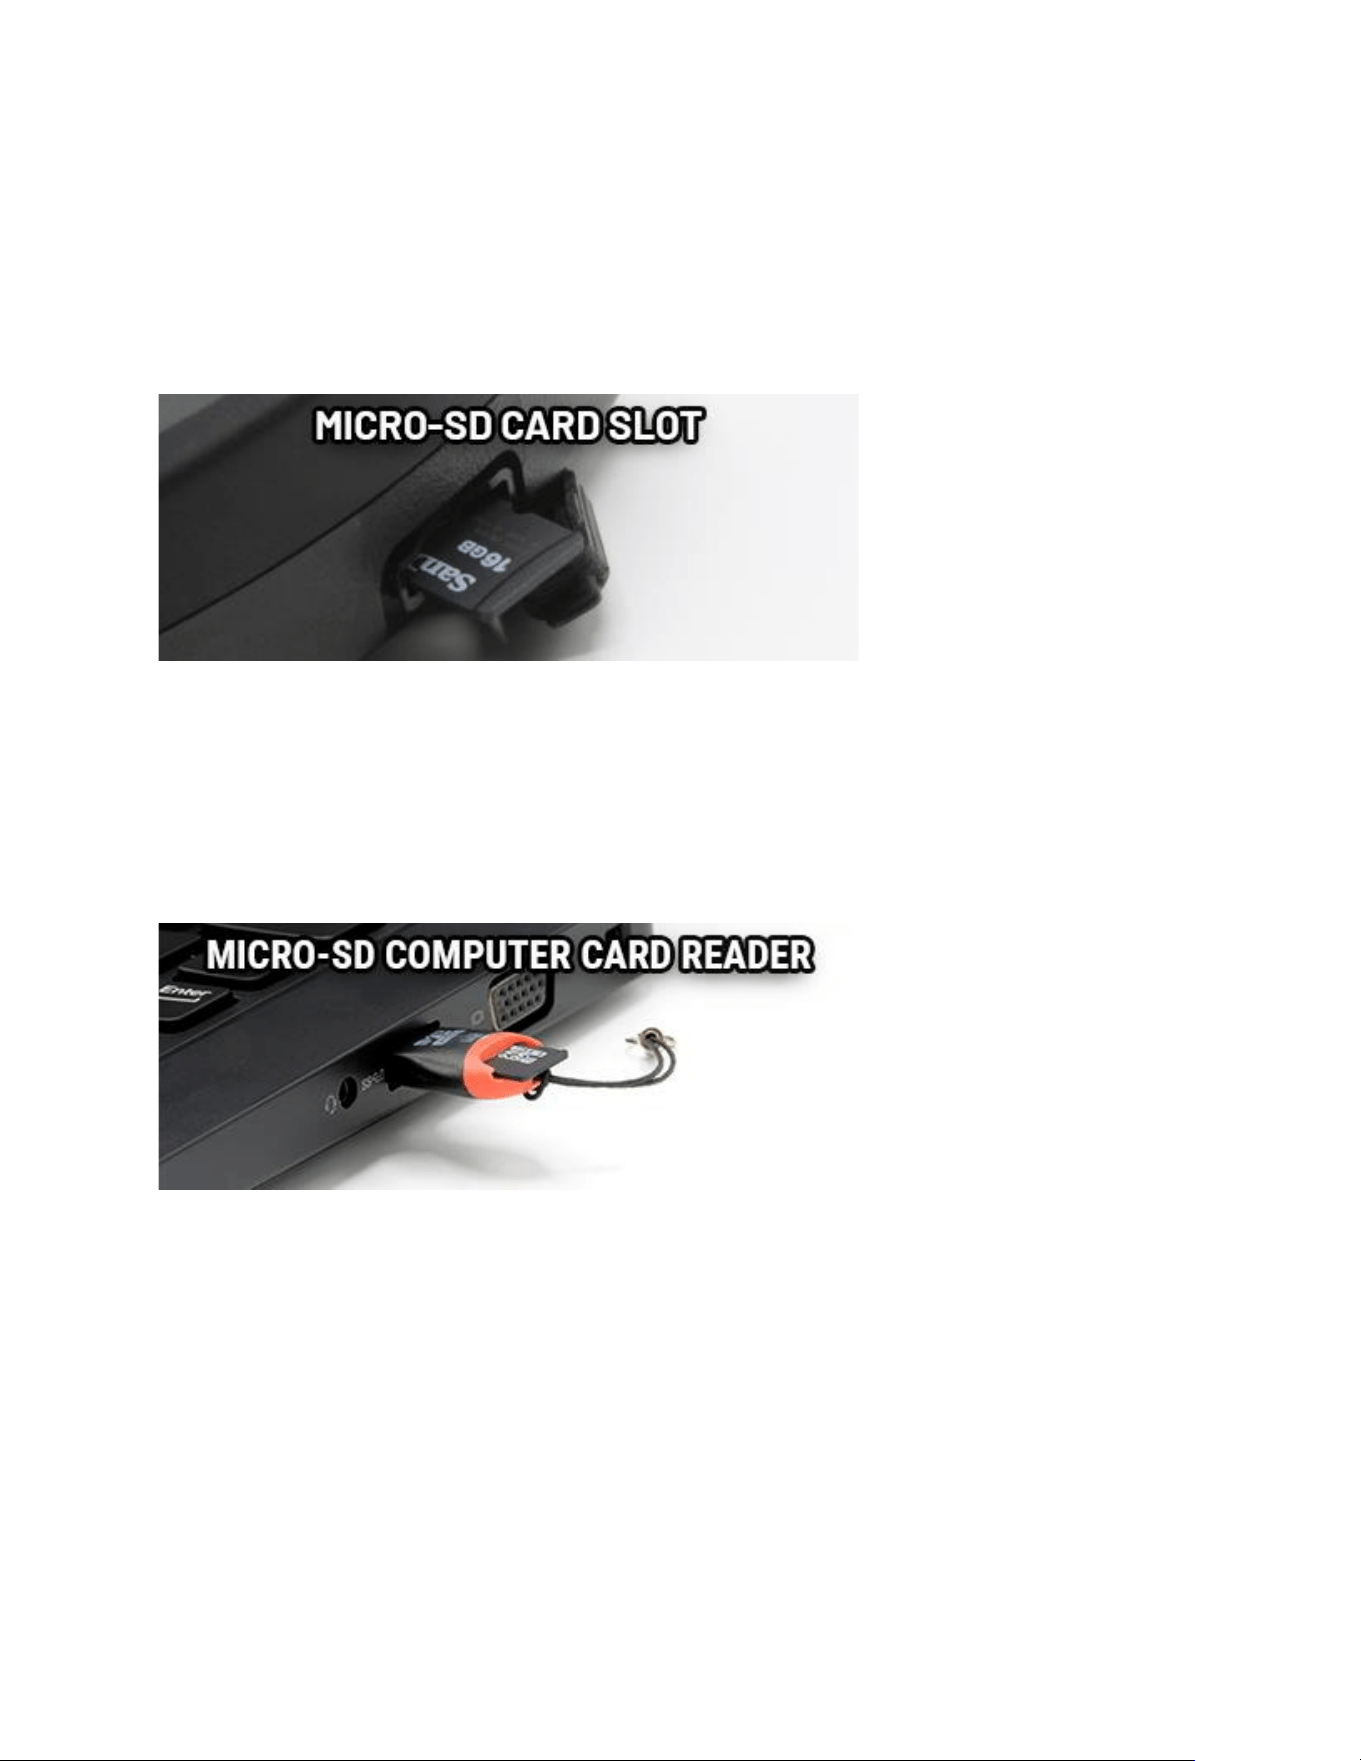
MicroSD Card Help
Insert any MicroSD card into the side of Voyager Pro4. Make sure the card slot
cover is properly seated to keep debris out.
An installed MicroSD card enables track import and export, plus import of
supported custom map les.
Aer exporng a track to the MicroSD card, insert it into your computer's card
reader to save the track or view it in a mapping applicaon like Rideleader.com.
Use the exFAT type if you format your MicroSD card on a PC.
Tracks saved on your computer can be placed on the MicroSD card, then
imported onto Voyager Pro4 for viewing and route following. This is a great way
to share tracks with friends or to pre-plan your own trips.
Vehicle Sensors Help
Each installed vehicle sensor unlocks new features of Voyager Pro4:
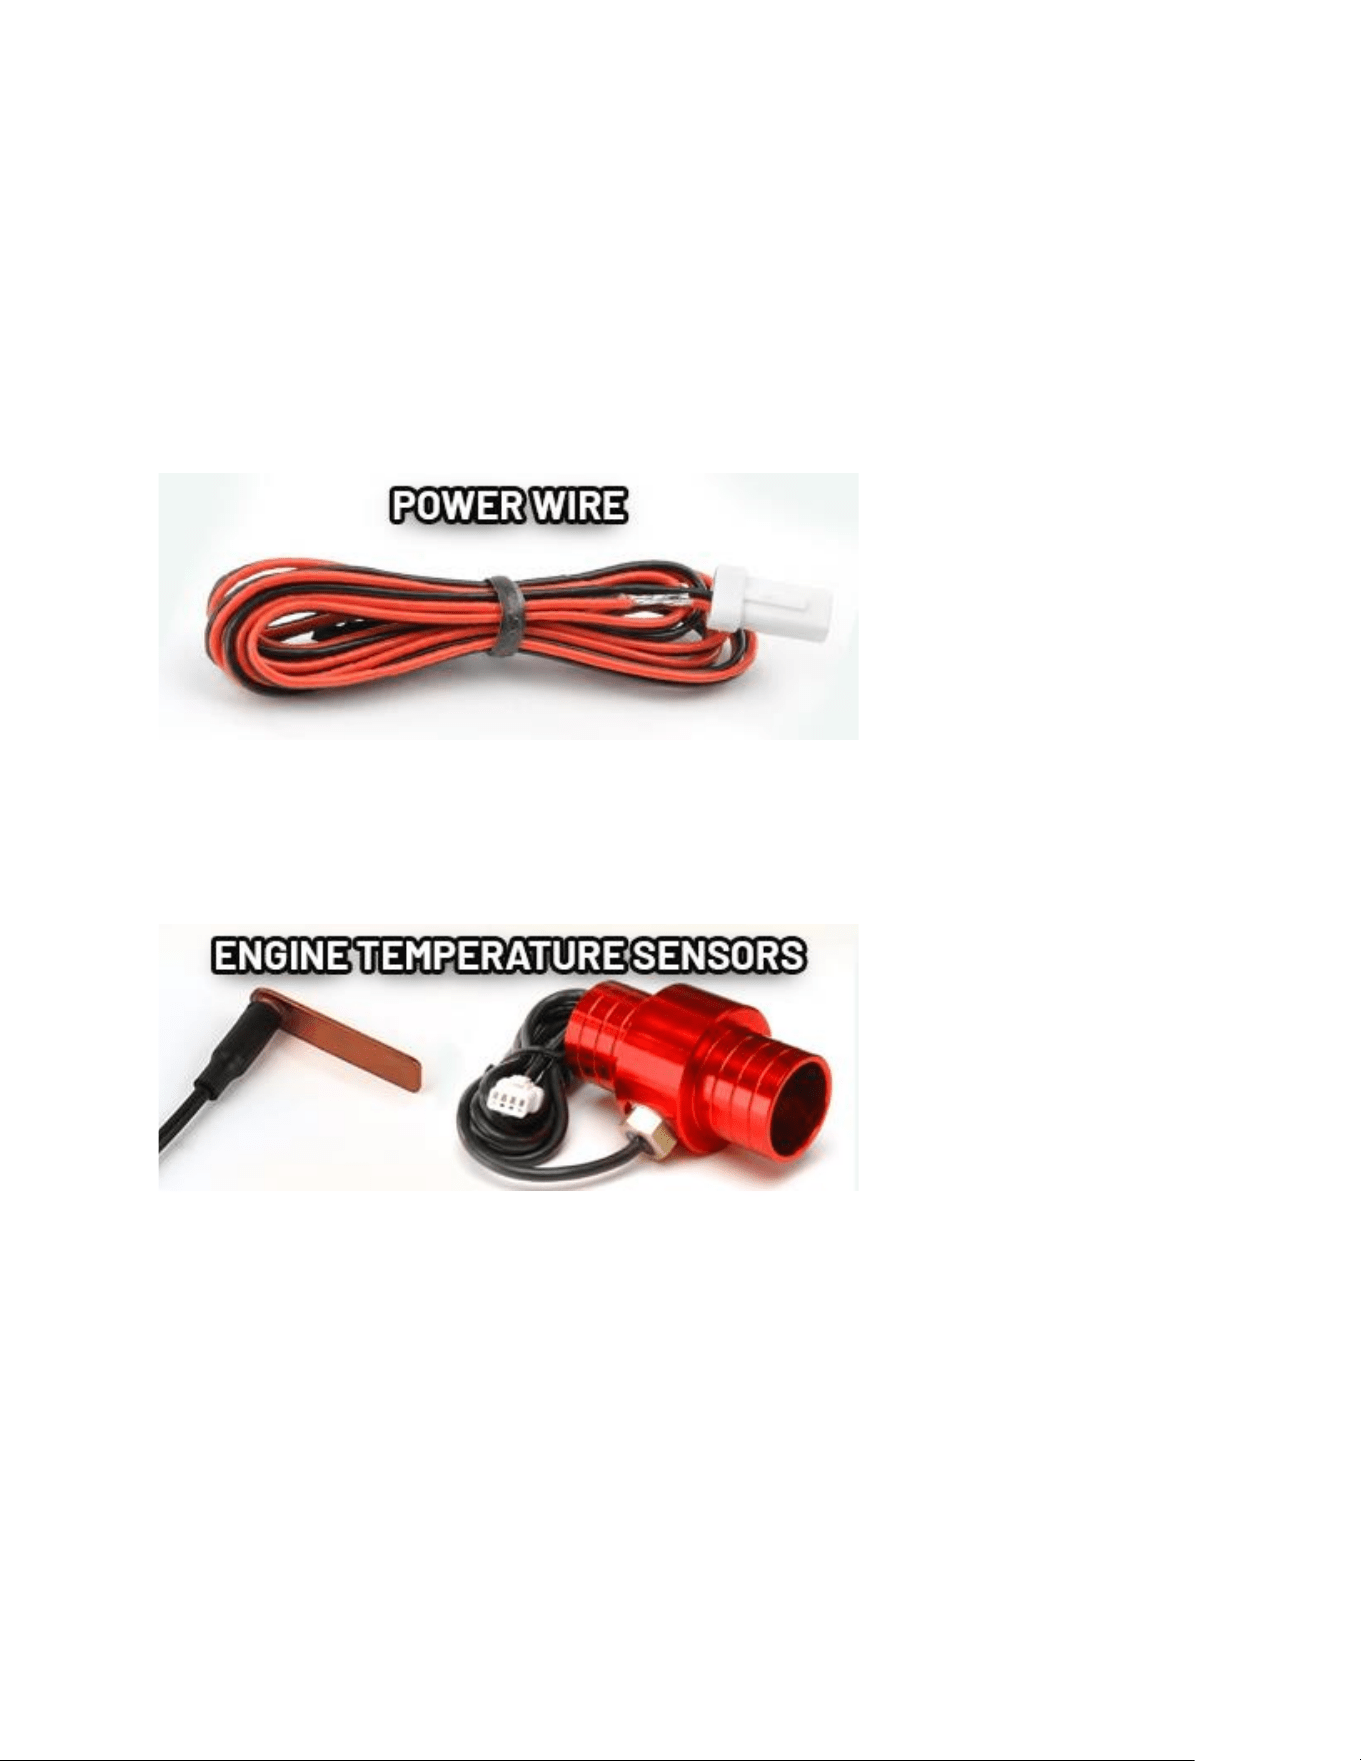
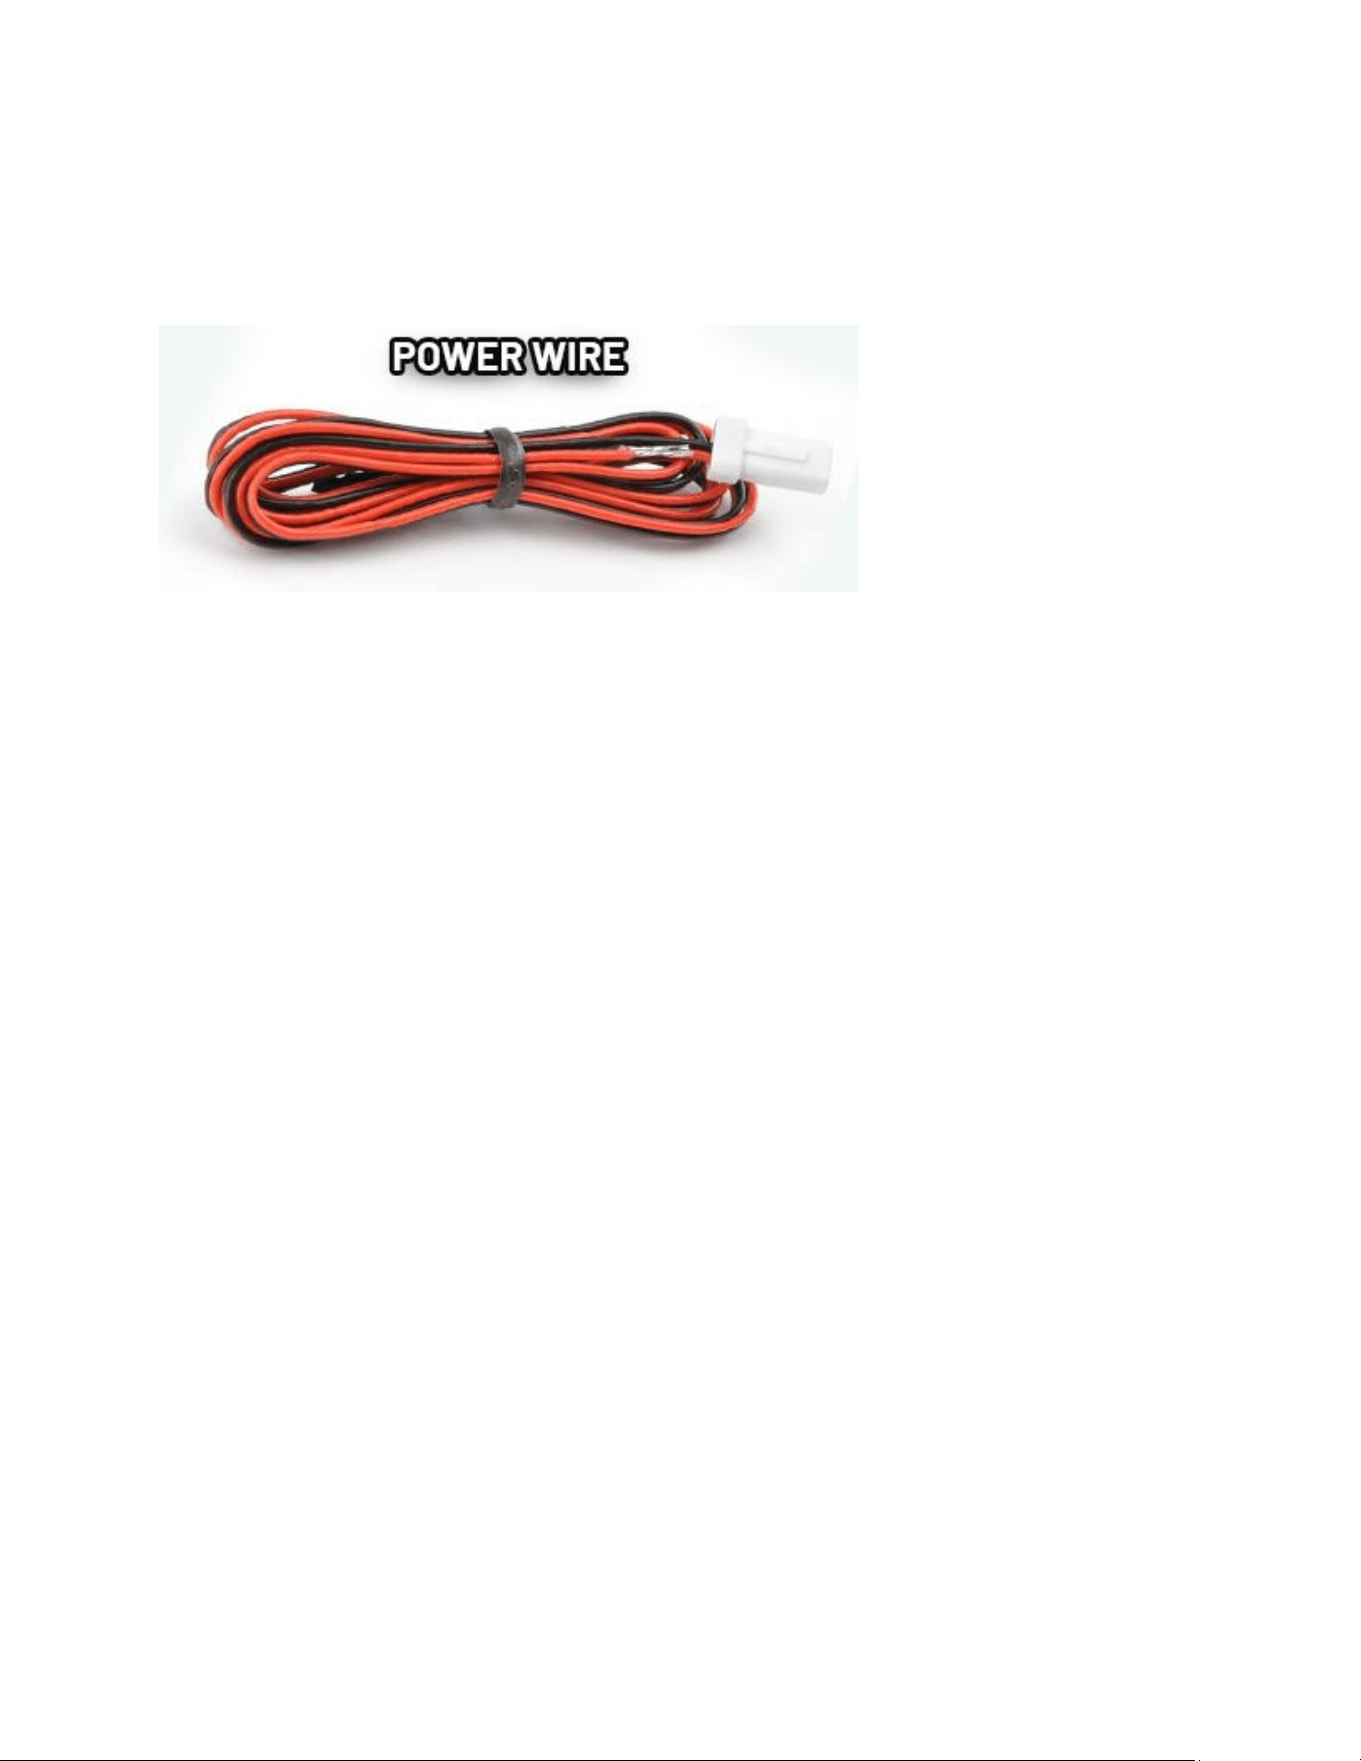
Power Wire
Installing the power wire enables smart wake-detecon and constant charging.
If you only install one sensor, this is the one.
Introducing a fuse into the circuit before electronics is always a good idea. Use a
2 amp fuse with Voyager Pro4 (not provided.)
See #vehicle-power for important informaon about power and Voyager Pro4.
Engine Temperature
The engine temp sensor enables gauge screen temperature readouts and over-
temp warning lights.
Tach Sensor
The ignion sensor enables the tach bargraph screen and over-RPM warning
lights. The tach signal can pause track recording while the engine is turned o.
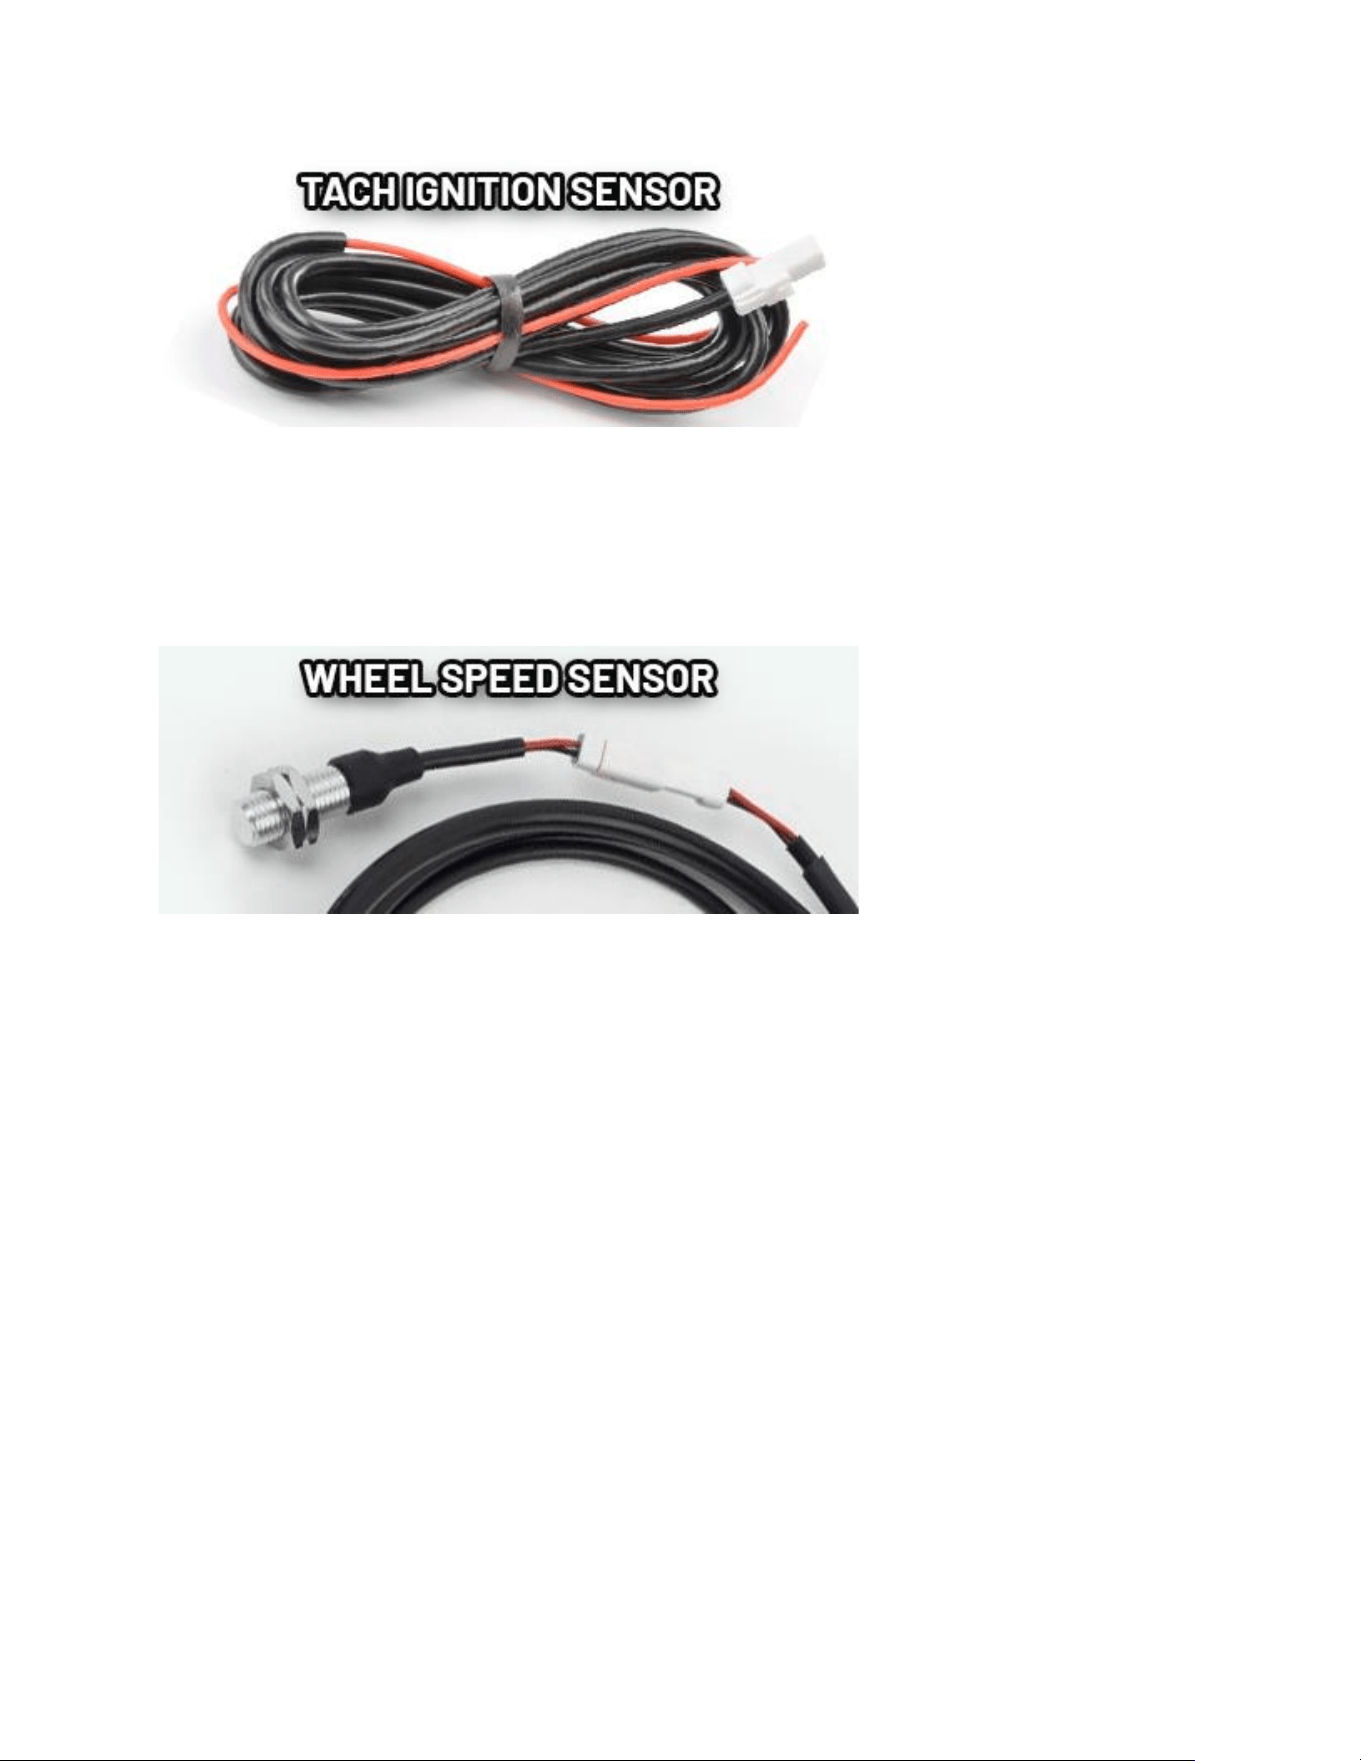
Wheel Sensor
The wheel sensor provides slightly more accurate speed and distance than GPS.
The speed signal can pause track recording while no vehicle movement is
sensed (the most accurate method).
Vehicle Power Help
Vehicle Power
Installing the power wire enables smart wake-detecon and constant charging.
If you only install one sensor, this is the one.
DC power required. Do not connect Voyager Pro4 to AC power except
when using the AC wall charger. Connect to a switched 12V DC power source so
that power to Voyager Pro4 is cut when the vehicle is turned o. When
connected to the vehicle baery, charging will begin immediately and Voyager
Pro4 should have full funconality. On some bikes, erratic tach
readings can be fixed by wiring the power directly to the
battery instead of behind the key switch.
There are a few menu opons to change when Voyager Pro4 is used without a
connecon to vehicle power:
1. Vehicle Prole > Wake Detecon, Speed Source, Charge Mode
2. Maps and GPS Setup > AutoLog Source
FOR USE ON 12V DC SYSTEMS ONLY!
Vehicles with DC Power: Voyager Pro4 requires DC power. Vehicles with a
baery or capacitor and regulator/recer produce DC power. Connect the
power wire directly to the vehicle’s 12V baery. Connect the red wire to the
posive(+) baery terminal and the black wire to the negave(-) baery
terminal.
Vehicles with AC Power: Use the Voyager Pro4 AC wall charger, or
upgrade to a DC electrical system. Most carburated MX bikes put out AC power,
but Voyager Pro4 requires DC power.
A 2-amp fuse (not provided) can be used when wired directly to the vehicle
baery. The primary benet is to avoid overheang the power wire if it
becomes signicantly kinked or pinched.
Voyager Pro4 can be set to charge always, or to only charge when the engine is
running. In any case, charging only occurs when Voyager Pro4 is turned on, to
avoid drawing down the vehicle baery.
A buon press is required to wake Voyager Pro4 aer shung down. Complete
shutdown happens 15 minutes aer going into sleep mode, to avoid drawing
down the vehicle baery. Wake-detecon operates during sleep mode, but not
aer shutdown.
AC Adapter Wall Charger
A Trail Tech wall charger can be used to power Voyager Pro4 indoors.
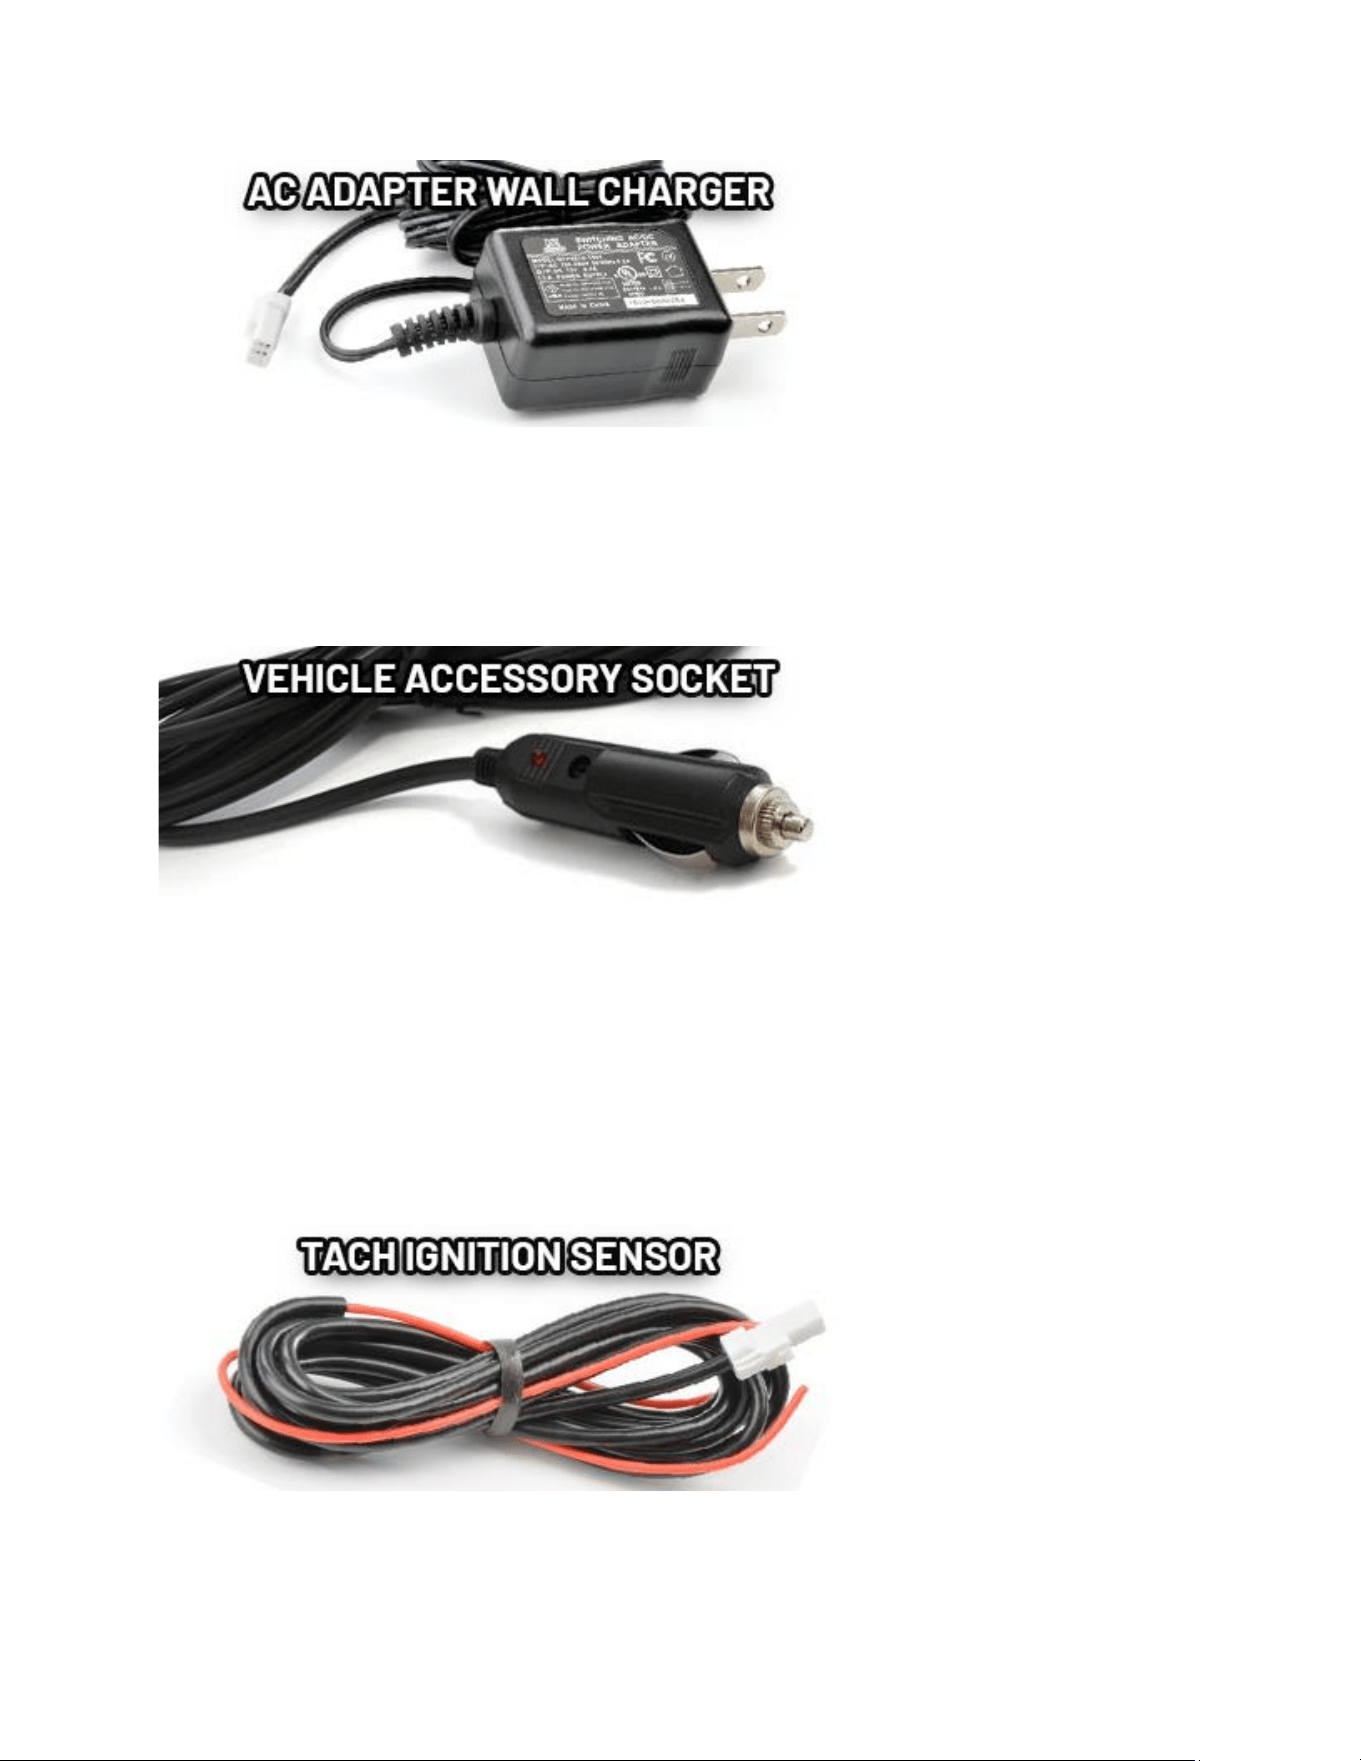
Vehicle Accessory Socket
If Voyager Pro4 is mounted inside a vehicle using the sucon cup or steering
column mounts, it may make more sense to draw power from the vehicle's
accessory power socket.
Ignition Sensor Help
The ignion sensor detects the on/o status of the engine. When the engine is
shut o, Voyager will go to sleep for power conservaon.
The ignion sensor enables the tach bar on the tach graph screen.
To install the tach ignion sensor, wrap the sensor wire around the vehicle's
spark plug wire. The sensor detects a pulse every me the spark plug res.
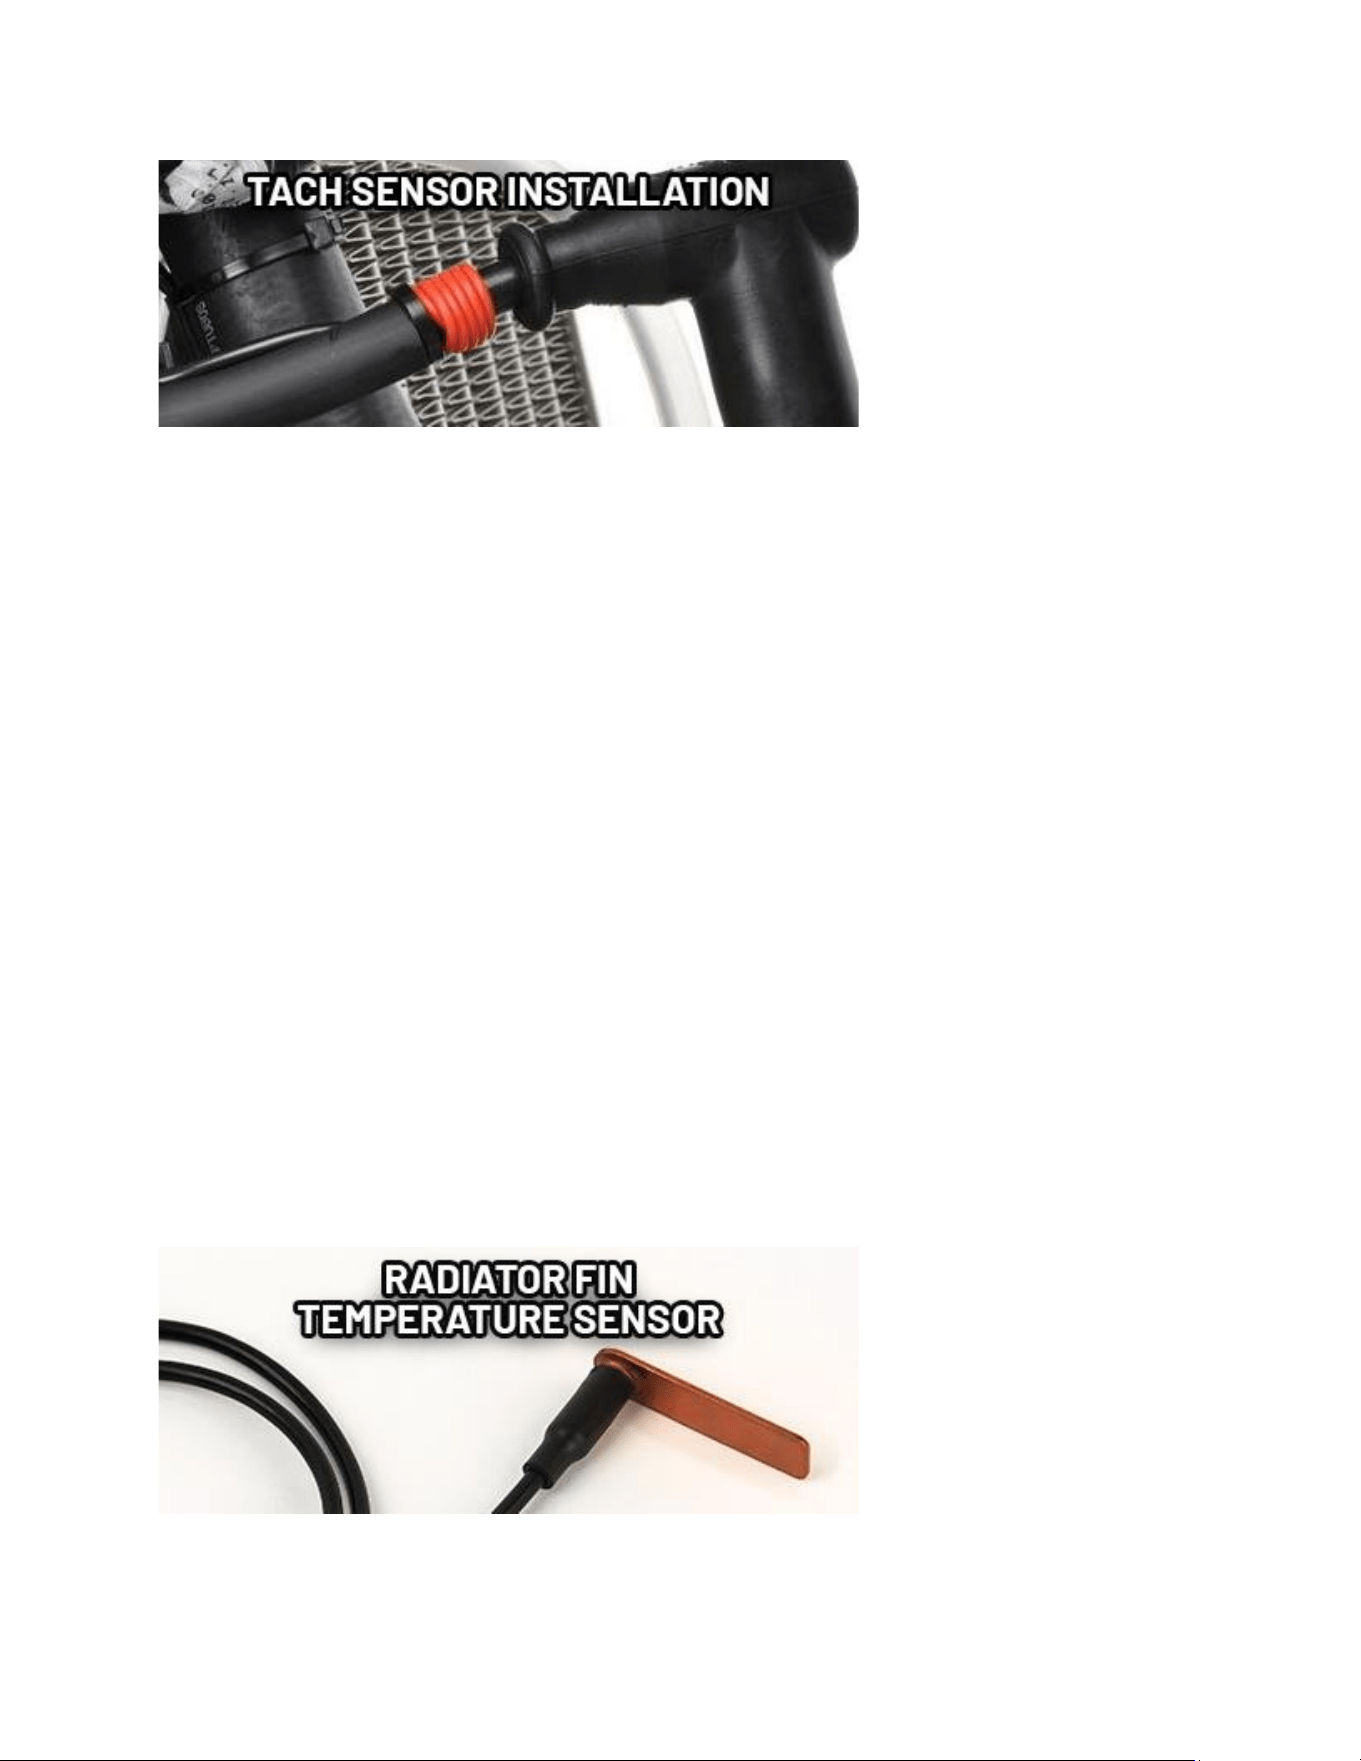
If tach readings are errac, there may be electrical stac. Try using more or less
sensor wraps and avoid running the sensor wire along other heavily charged
wires. Adding an inline resistor can help with errac tach but is not normally
needed. Wiring the power wire directly to the baery instead of behind the key
switch may also help with errac tach.
If tach readings are way o, check your PPR (pulses per revoluon) seng. Also
try adjusng the tach sensivity seng, use more or less wraps, and do not
route the wire along other wires that carry an electrical charge.
Temperature Sensors Help
A temperature sensor tells you how hot your vehicle is geng. Installing one
enables engine temp readouts on the gauge screens.
Radiator Fin Sensor
For water-cooled machines. Fin sensors are a very easy install: press the sensor
into the radiator ns. Use a dab of conducng grease to increase the sensivity.
Do not force a n sensor that is too large at risk of damage to the radiator.
Available in 3 sizes.
Cylinder Header Sensor
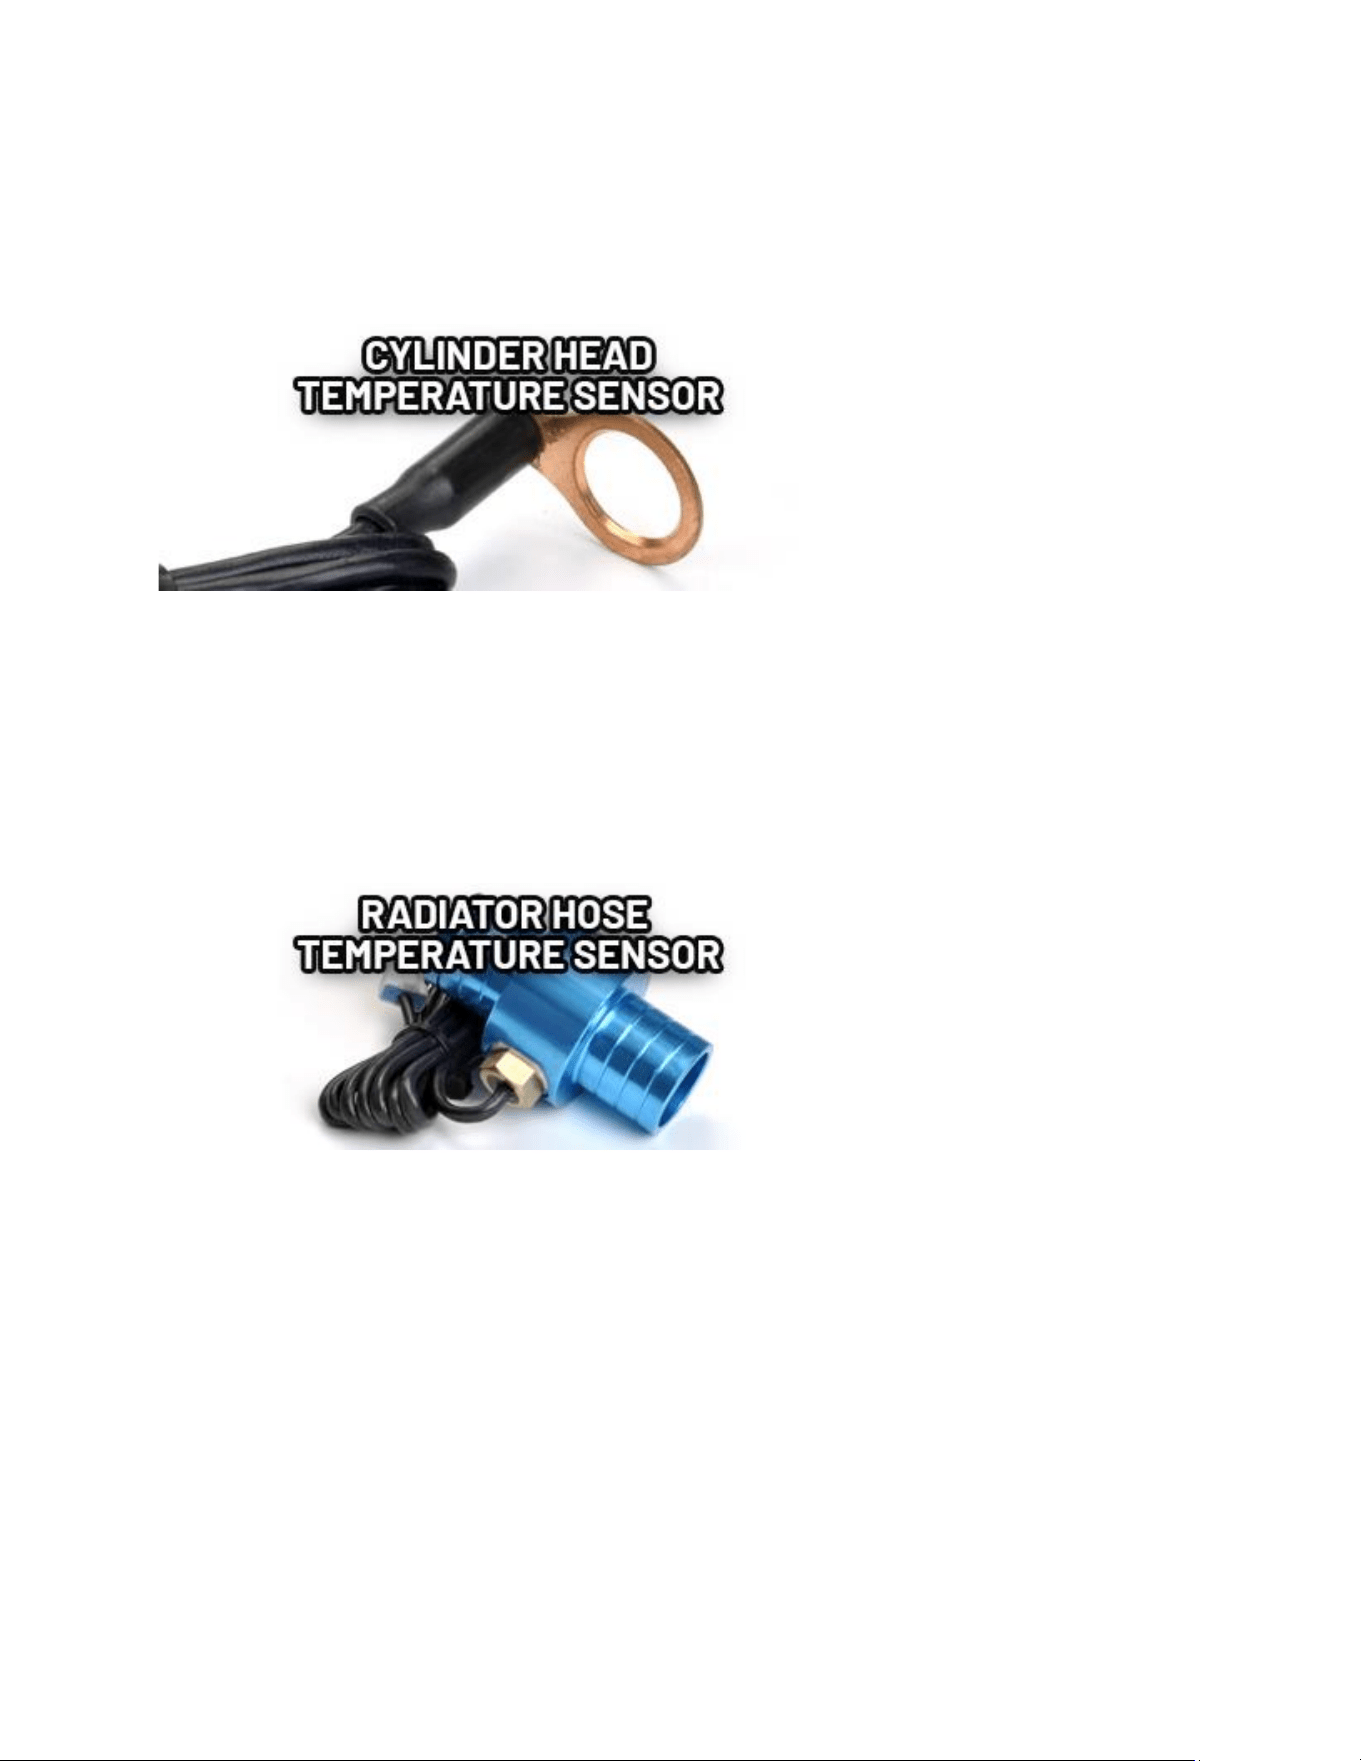
For air-cooled machines. CHT sensors act as a crush washer between a spark
plug and the engine's cylinder head. Available in 3 sizes.
Radiator Hose Sensor
For water-cooled machines. Hose sensors are the most accurate because they
directly take the coolant temperature as it leaves the radiator and enters the
engine. Installaon requires cung the radiator hose. Be sure to measure the
inner diameter of the hose to make sure you have the right sensor BEFORE
CUTTING THE HOSE. Available in a variety of sizes.
Wheel Sensors Help
While not required, using the wheel sensor is recommended. It will collect more
accurate speed and distance data than GPS. Due to limitaons in GPS
technology, physical sensors perform with more precision. GPS somemes loses
track of your movements, while the wheel sensor always knows when you are
moving.
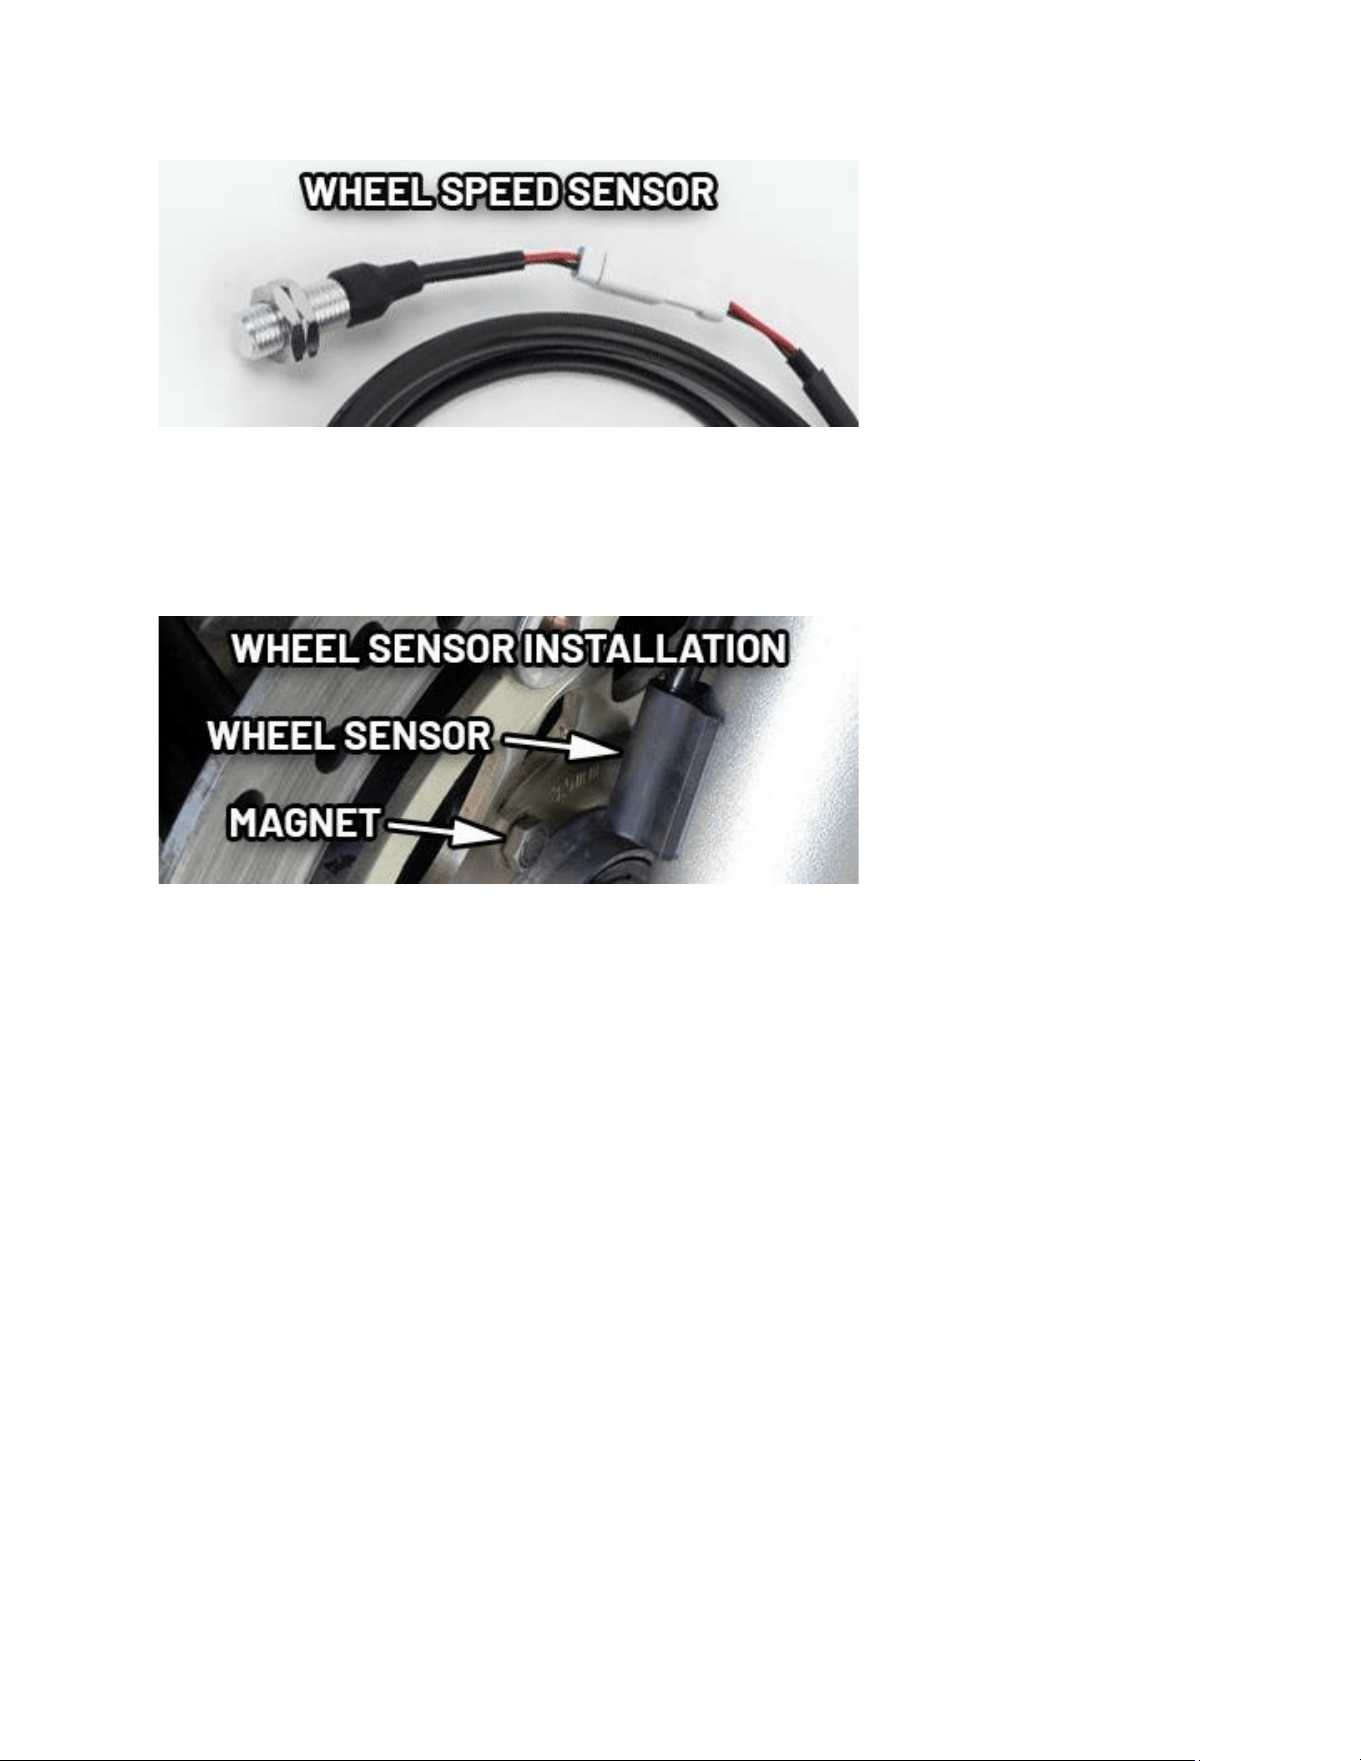
Two halves are required for the wheel sensor to funcon:
1. A magnet, on the spinning part of the wheel.
2. A speed sensor, on the non-spinning part of the wheel.
The magnet spins around tripping the sensor switch each me--giving speed,
distance and me data to compare with the GPS data.
The magnet is installed on the brake rotor because it spins with the wheel. The
provided magnec bolt replaces a stock rotor bolt. If that will not work, glue the
spare magnet in a hole on the brake rotor. (JB Weld or a similar slow-cure epoxy
works well.)
Aer the magnet is in, the sensor is placed on a non-spinning part the wheel,
rotor shield, or bracket.
Many Motorcycles and ATVs have special installaon procedures. Refer to the
online model-specic instrucons for more informaon.
Wheel Size
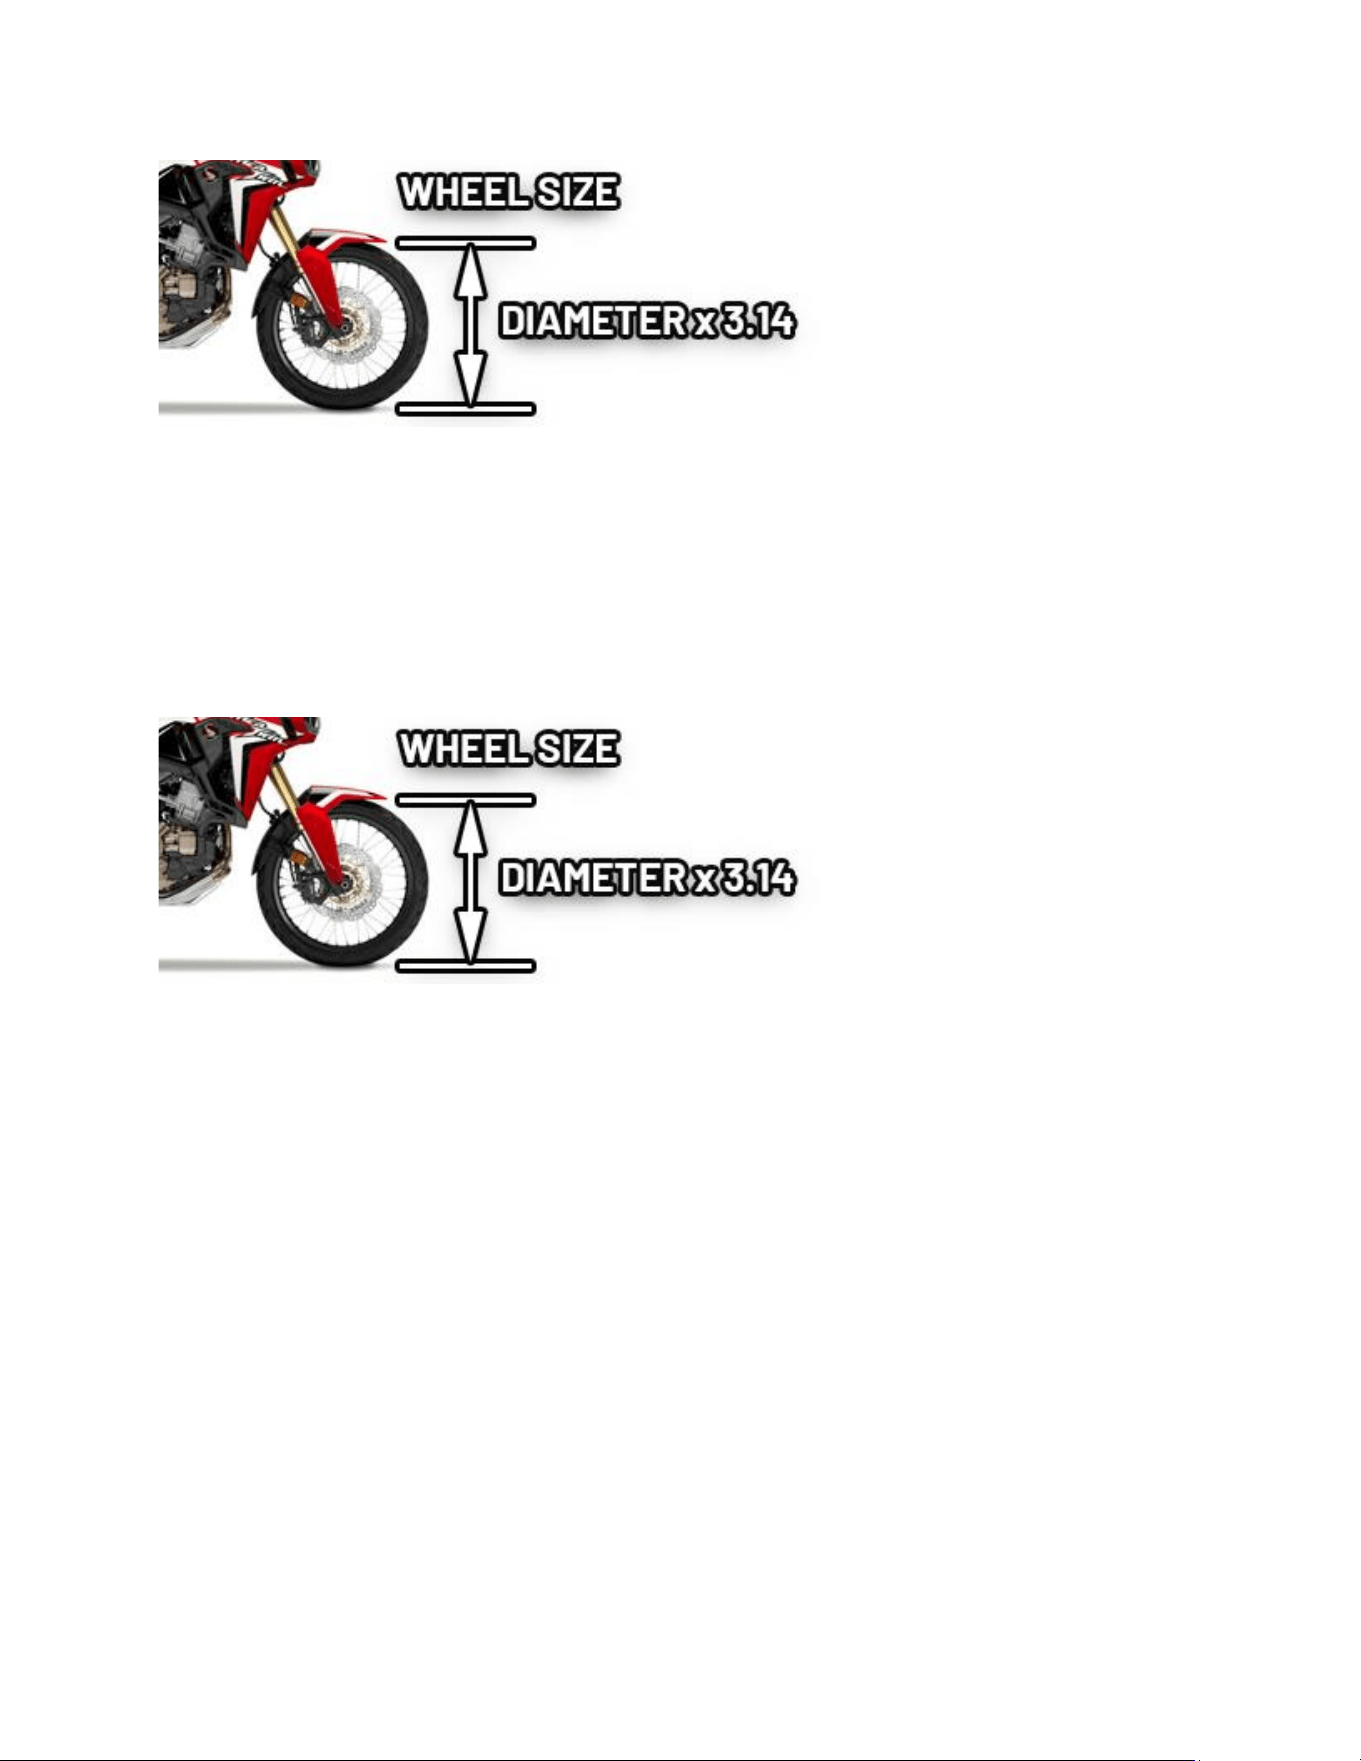
Knowing your exact wheel size is crical for the wheel sensor to calculate
correct speed and distance data. The more accurate the wheel size, the beer
Voyager Pro4 performs.
Measure Wheel Size Help
Knowing your exact wheel size is crical for the wheel sensor to calculate
correct speed and distance data. The more accurate the wheel size, the beer
Voyager Pro4 performs.
When comparing calibraon to GPS data, use a long straight secon of road.
GPS has trouble with ght fast corners and small vercal movements (causing
comparison inaccuracy.)
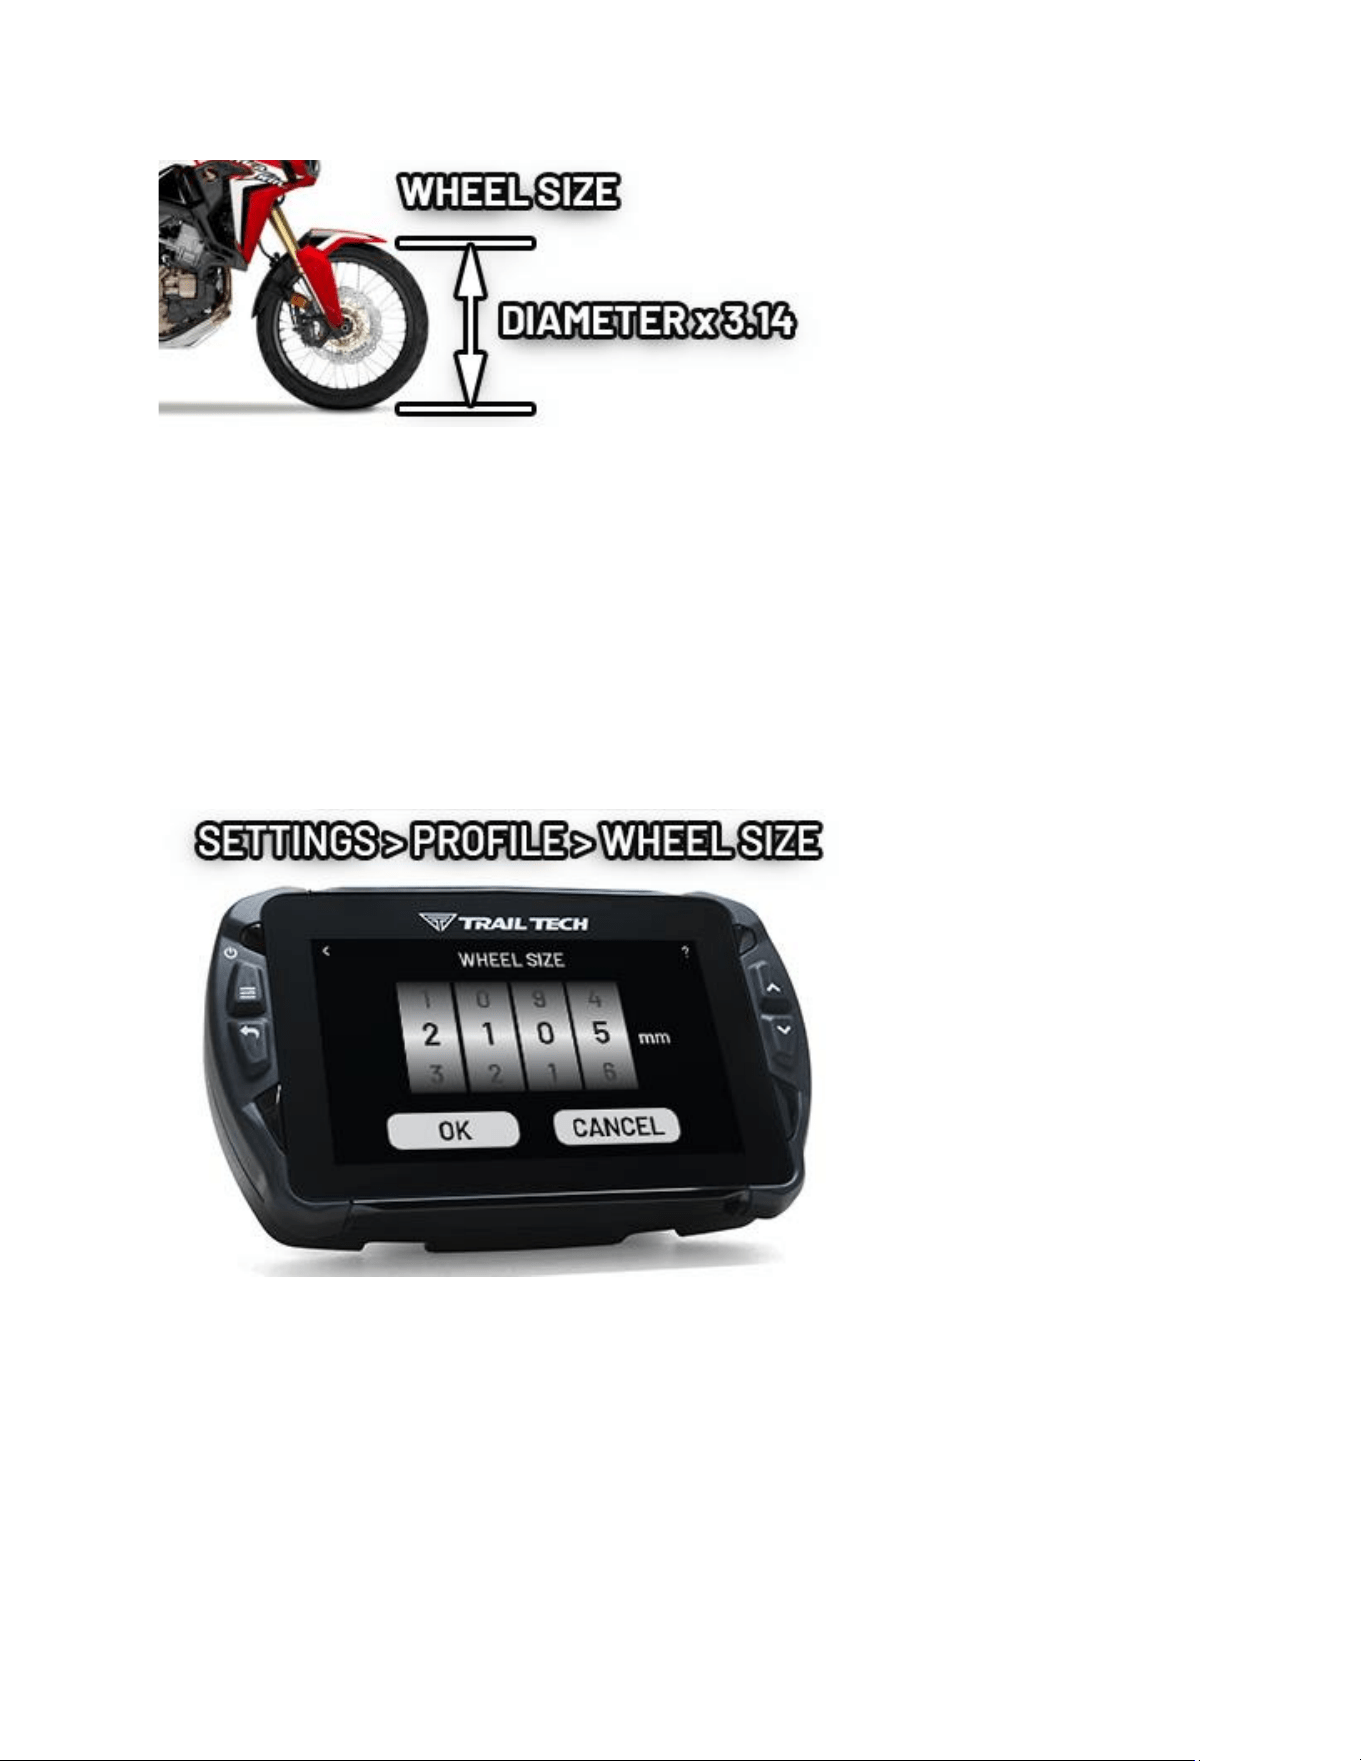
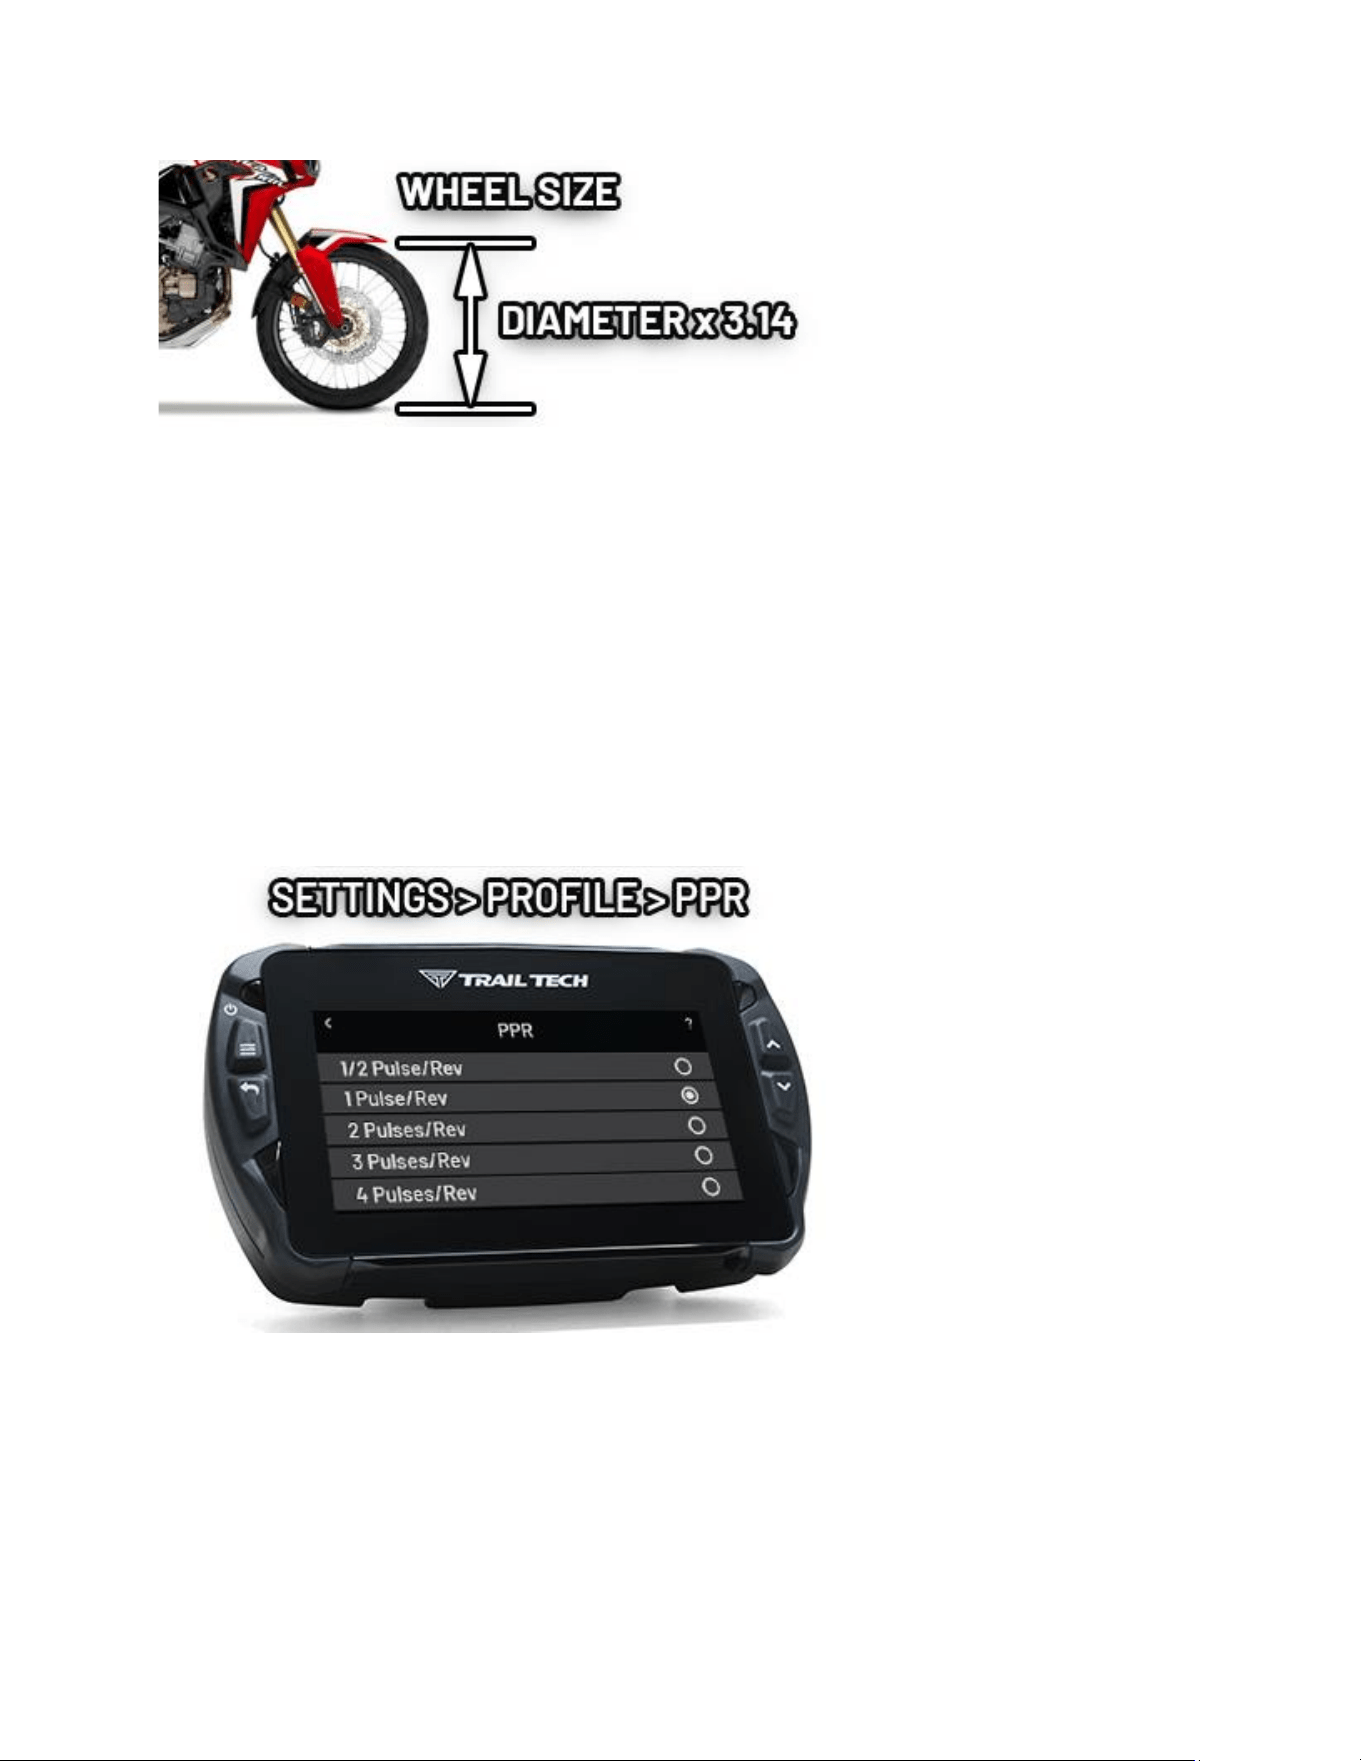
Method 1: Ruler
Find the circumference of front wheel by measuring its diameter in millimeters.
Mulply the wheel diameter by 3.14. The result is your wheel size.
Method 2: Rolling
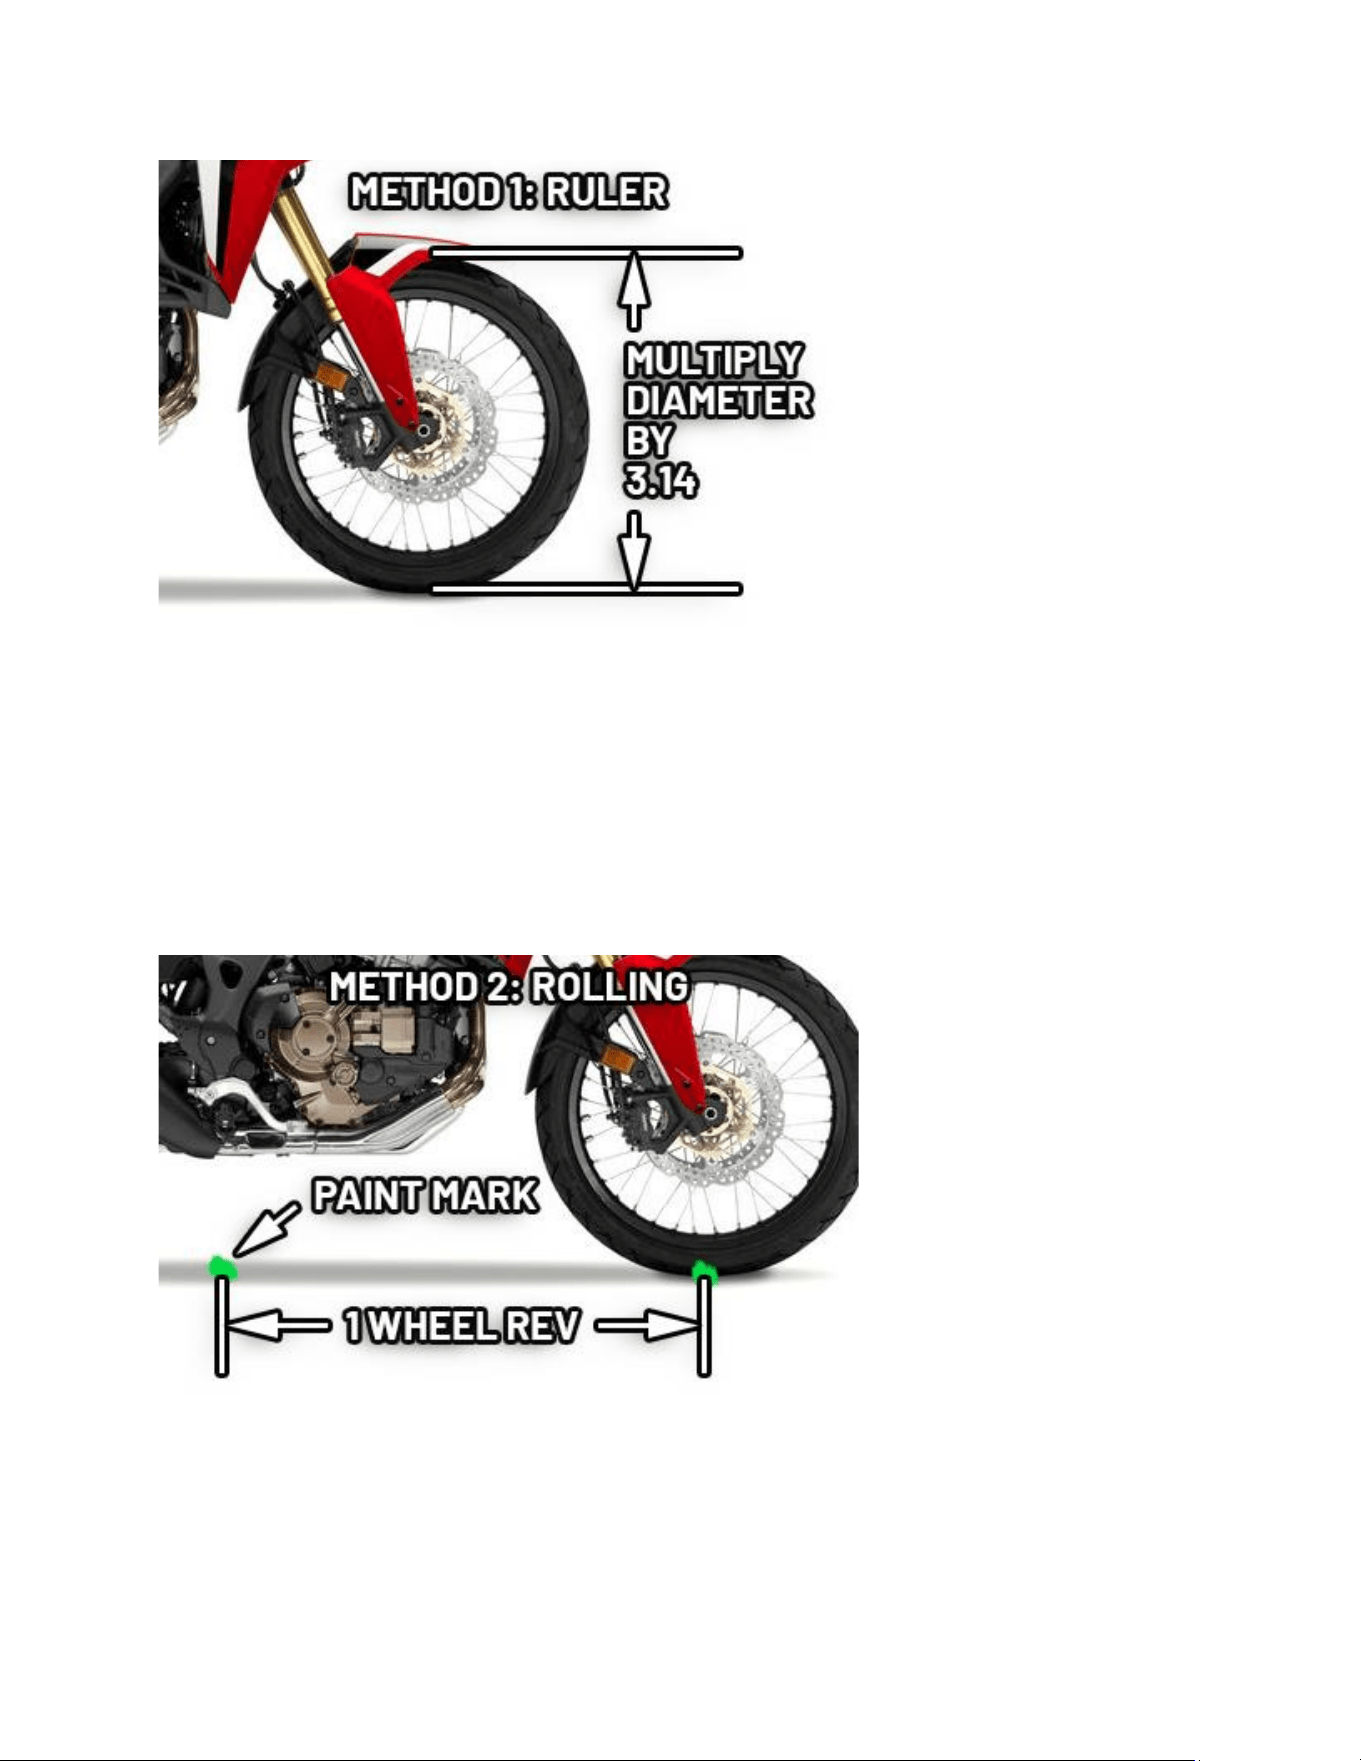
On a at surface, mark the re sidewall and the ground with a marking pen. Roll
the wheel unl the mark on the re completes one revoluon and is back on
the ground. Mark the ground at this locaon. Measure the distance between
the marks on the ground in millimeters (mulply inches by 25.4 to convert to
mm). Use this number for your wheel size. For accuracy, the rider's weight
should be on the bike when making the measurement.
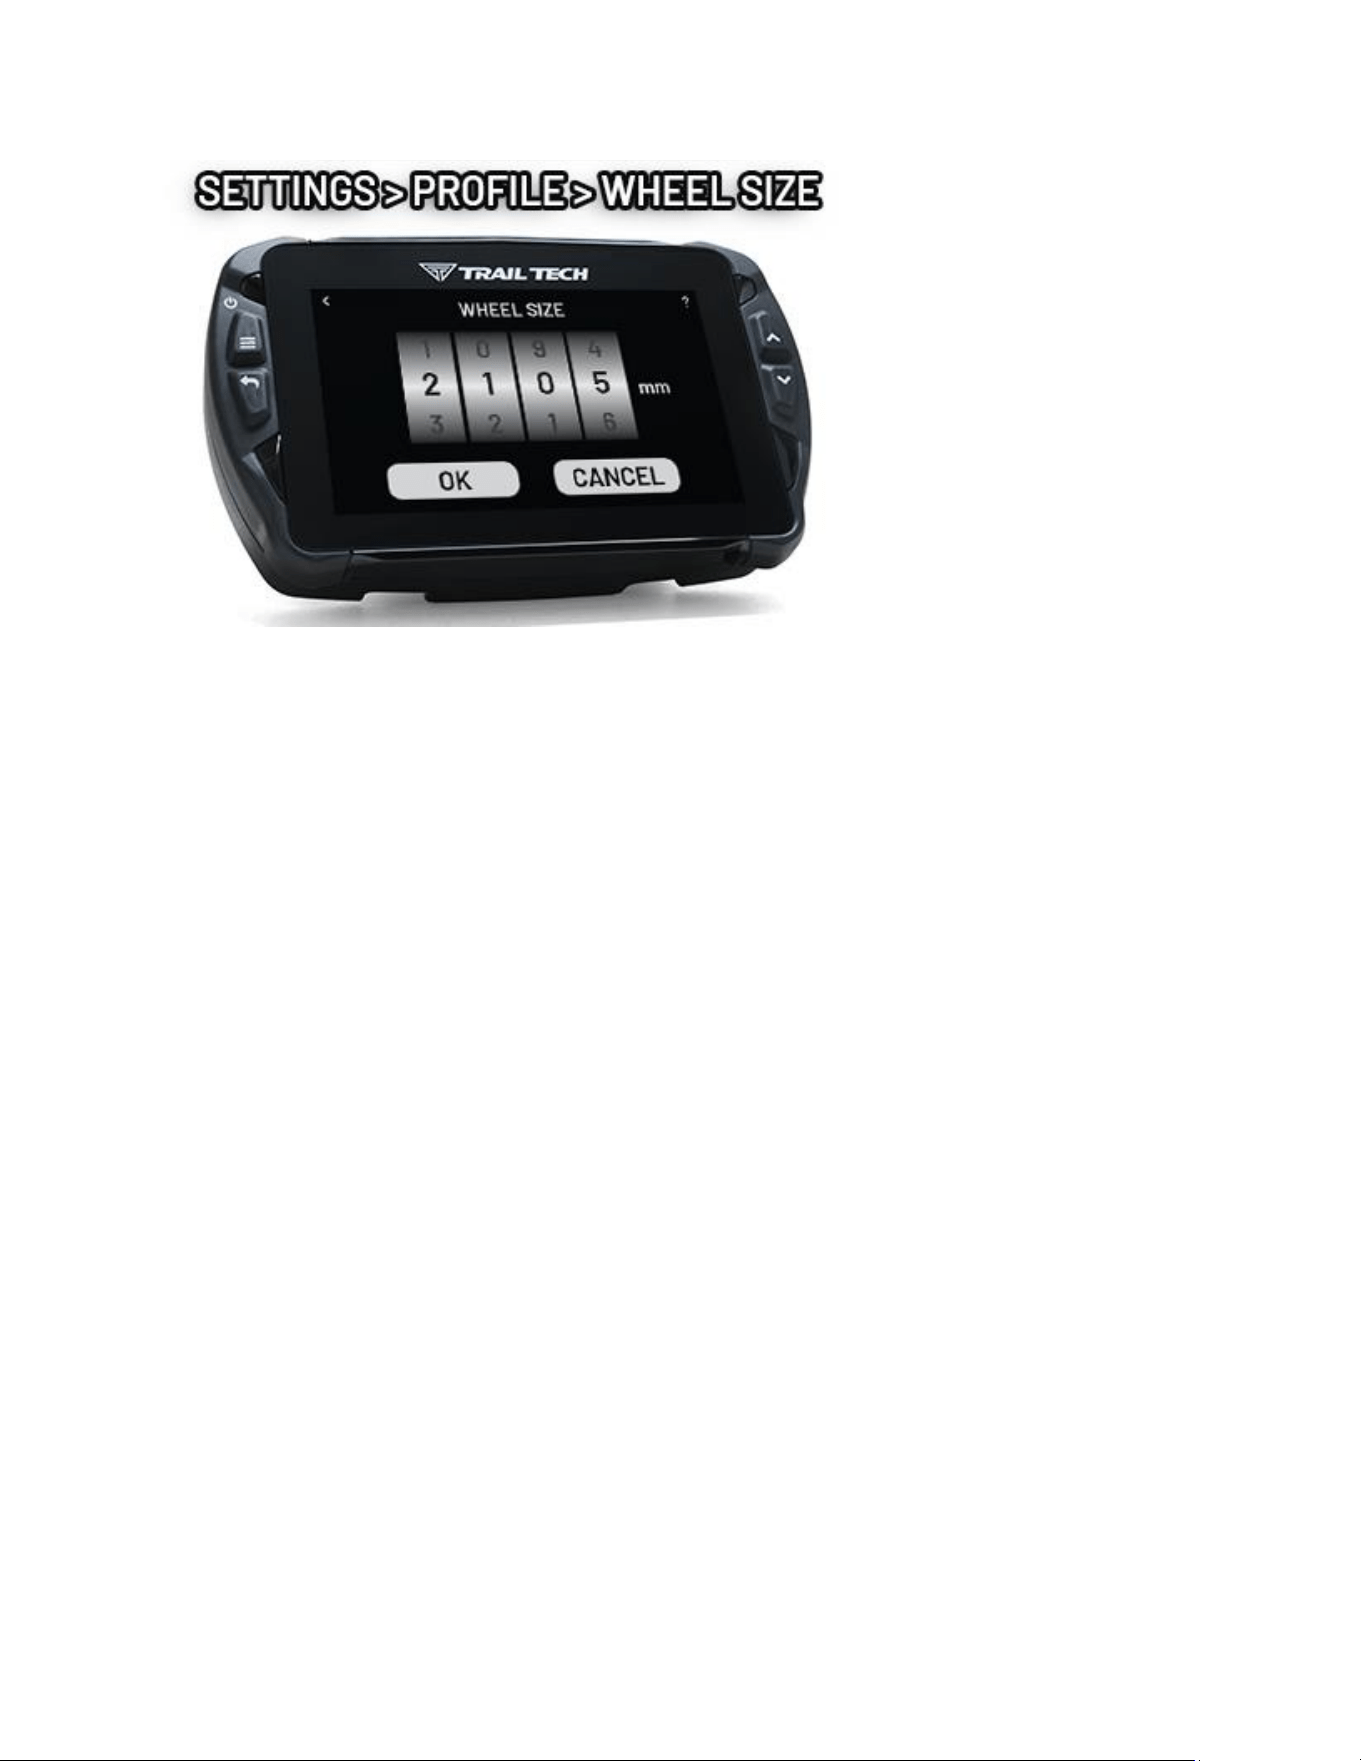
Input Wheel Size
Aer measuring, update the wheel size seng.
Screens Help
There are several Main Screens
Voyager Pro4 has a series of main informaon screens: the gauge cluster screen
with a large speedometer, the tach screen with an animated tach graph, the
map screen, the user denable screen, the stop watch screen, and the GPS
satellites screen.
By default, the stop watch and satellite screens are hidden. Power users can
streamline the interface by only showing screens they nd useful.
Screens can be enabled/disabled in the sengs menu.
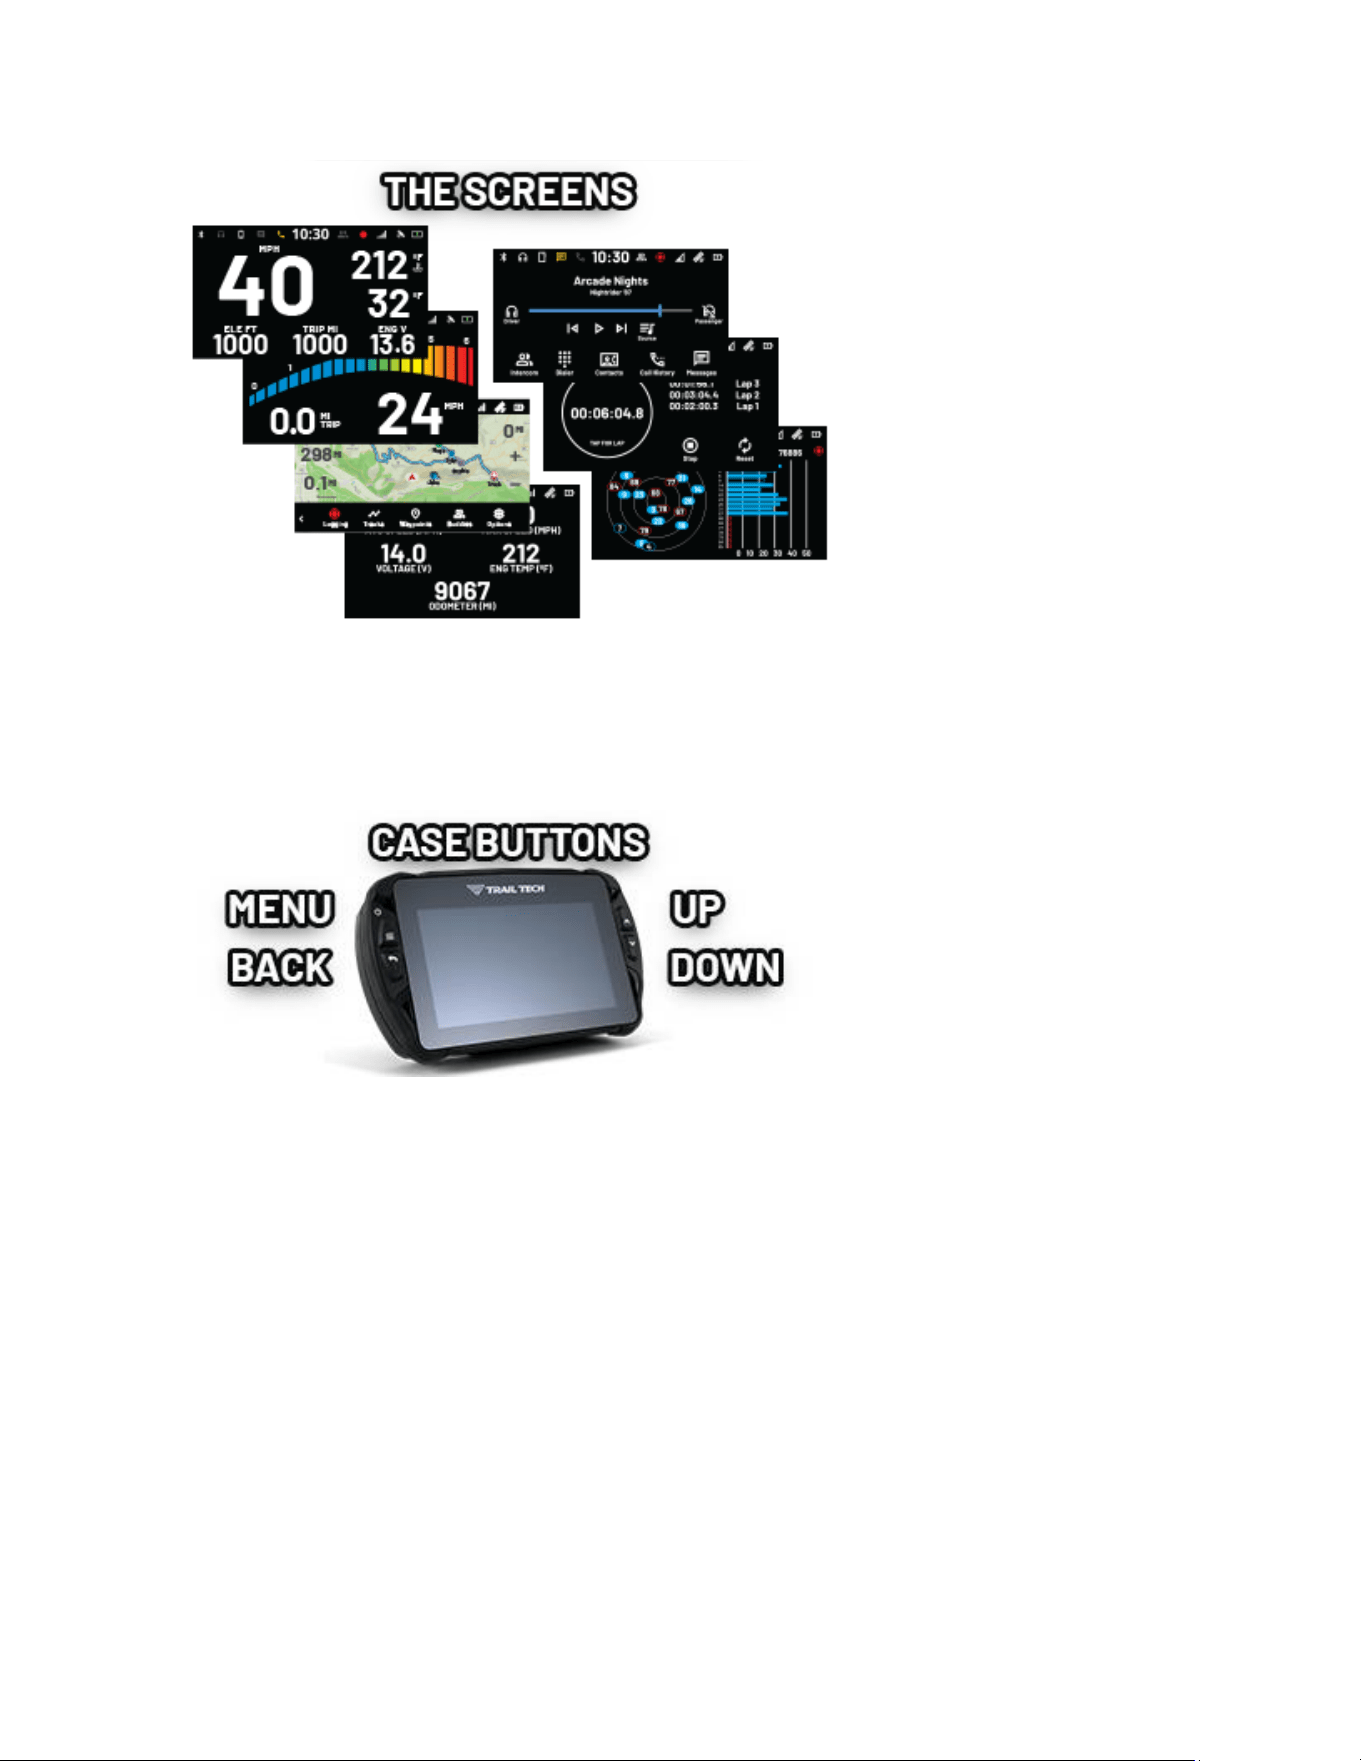
Basic Controls
Switch screens using the up and down buons. If a menu is open, cancel it
using the back buon to return to the main screens.
Notification Bar Help
The bar across the top of the main screens shows the me of day and a variety
of helpful icons.
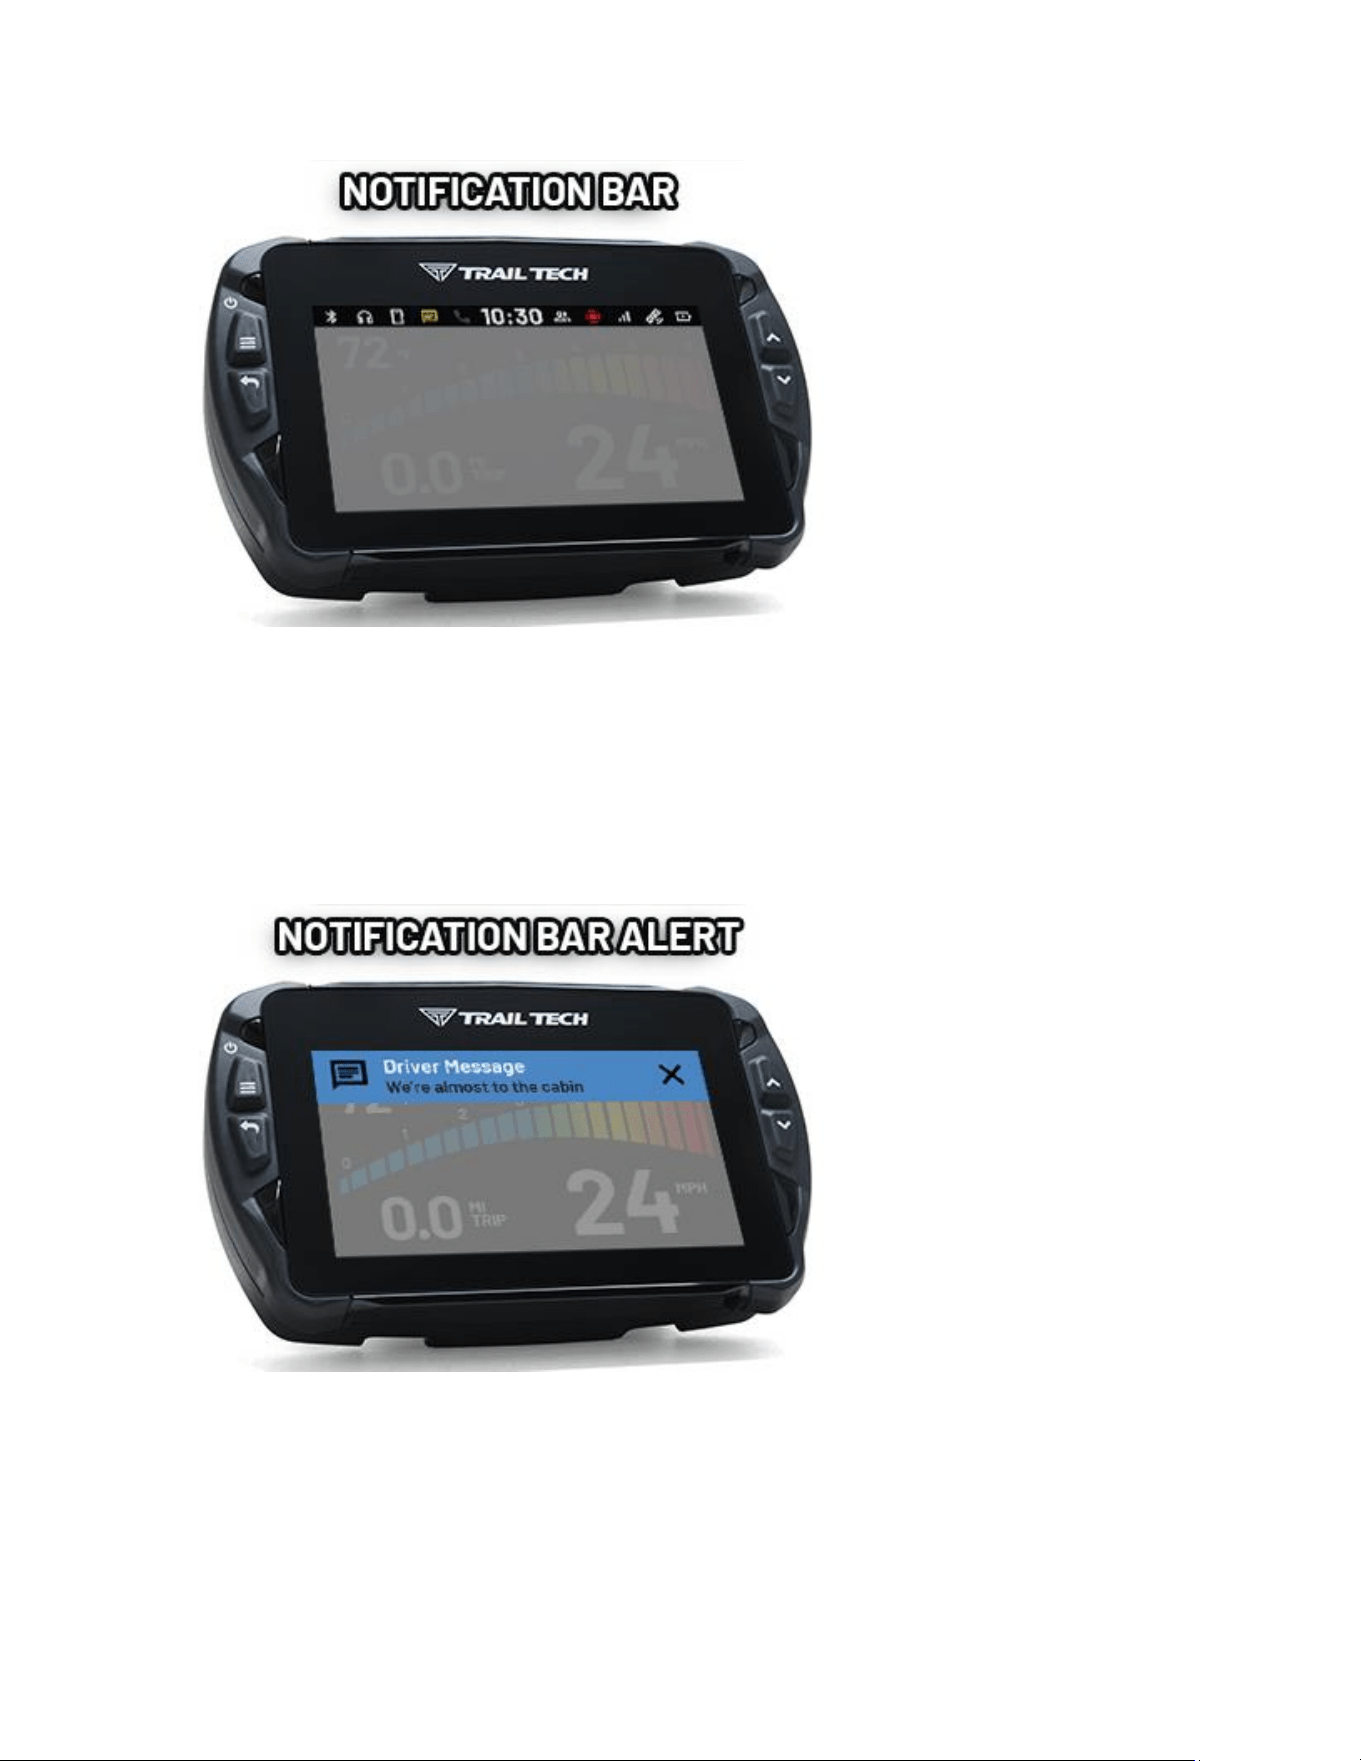
It displays color-coded icons for Bluetooth connecon, cellphone connecon,
headset connecon, phone message nocaon, incoming call nocaon,
buddy tracking status, track logging status, cell signal strength, GPS status, and
internal baery level and charging status.
When a message or incoming call nocaon occurs, an alert bar will drop
down from the top of the screen.
Cluster Screen Help
The main gauge screen displays speed and other data from the sensors.
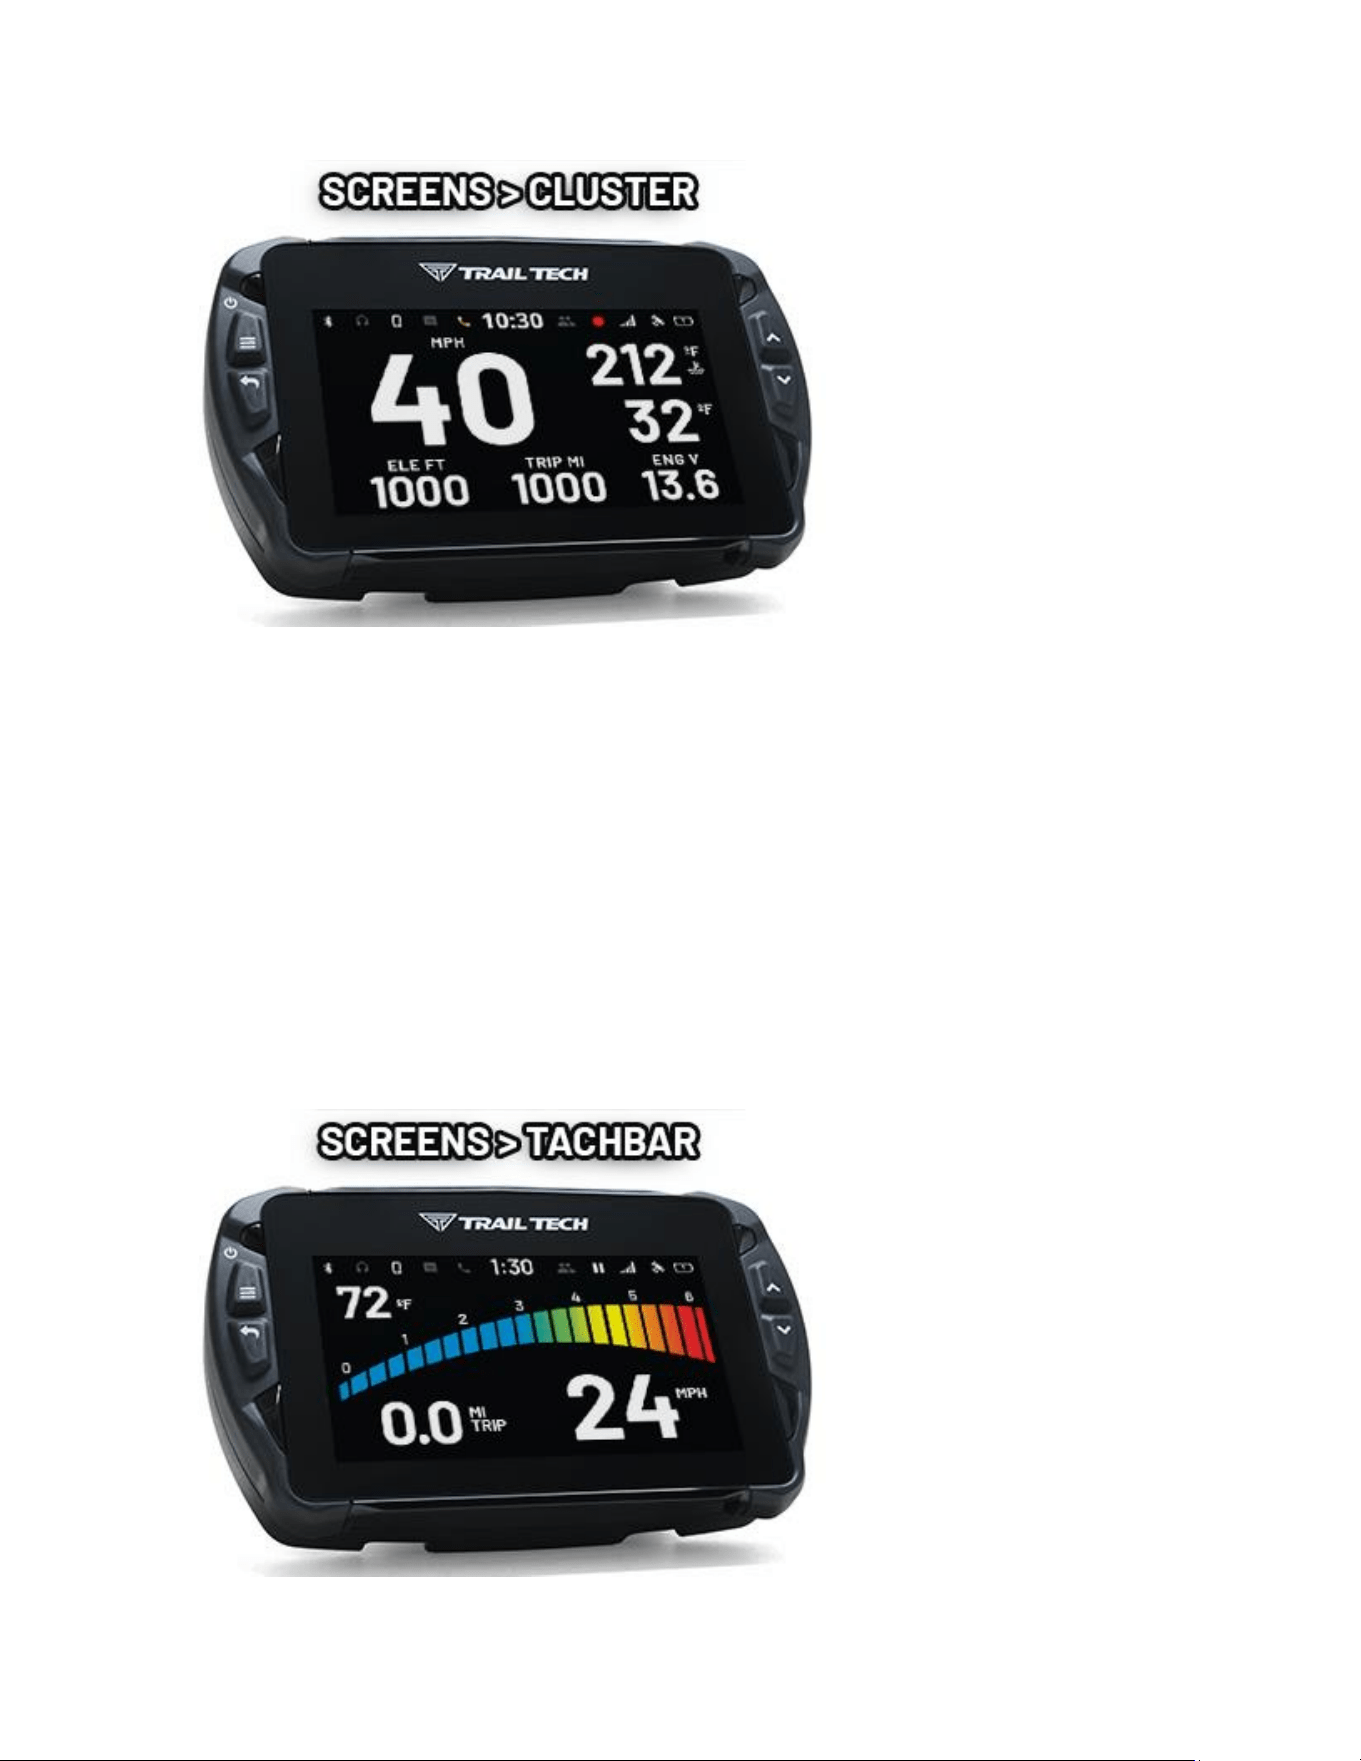
It displays current speed, elevaon, engine temperature, ambient temperature,
trip distance, and engine voltage.
To reset the trip distance, press and hold the trip gauge and then tap the Ok
buon.
Engine temperature features require a temperature sensor is installed.
Voltage readouts require the power wire is installed.
Tach Screen Help
The tach screen is dominated by a large animated tachometer bar graph. It also
displays ambient temperature, trip distance and current speed.
You can adjust the maximum value of the tach graph in Sengs>Vehicle Prole:
PPR and tach graph max scale.
To reset the trip distance, press and hold the trip gauge and then tap the OK
buon.
RPM features only work if an ignion sensor is installed.
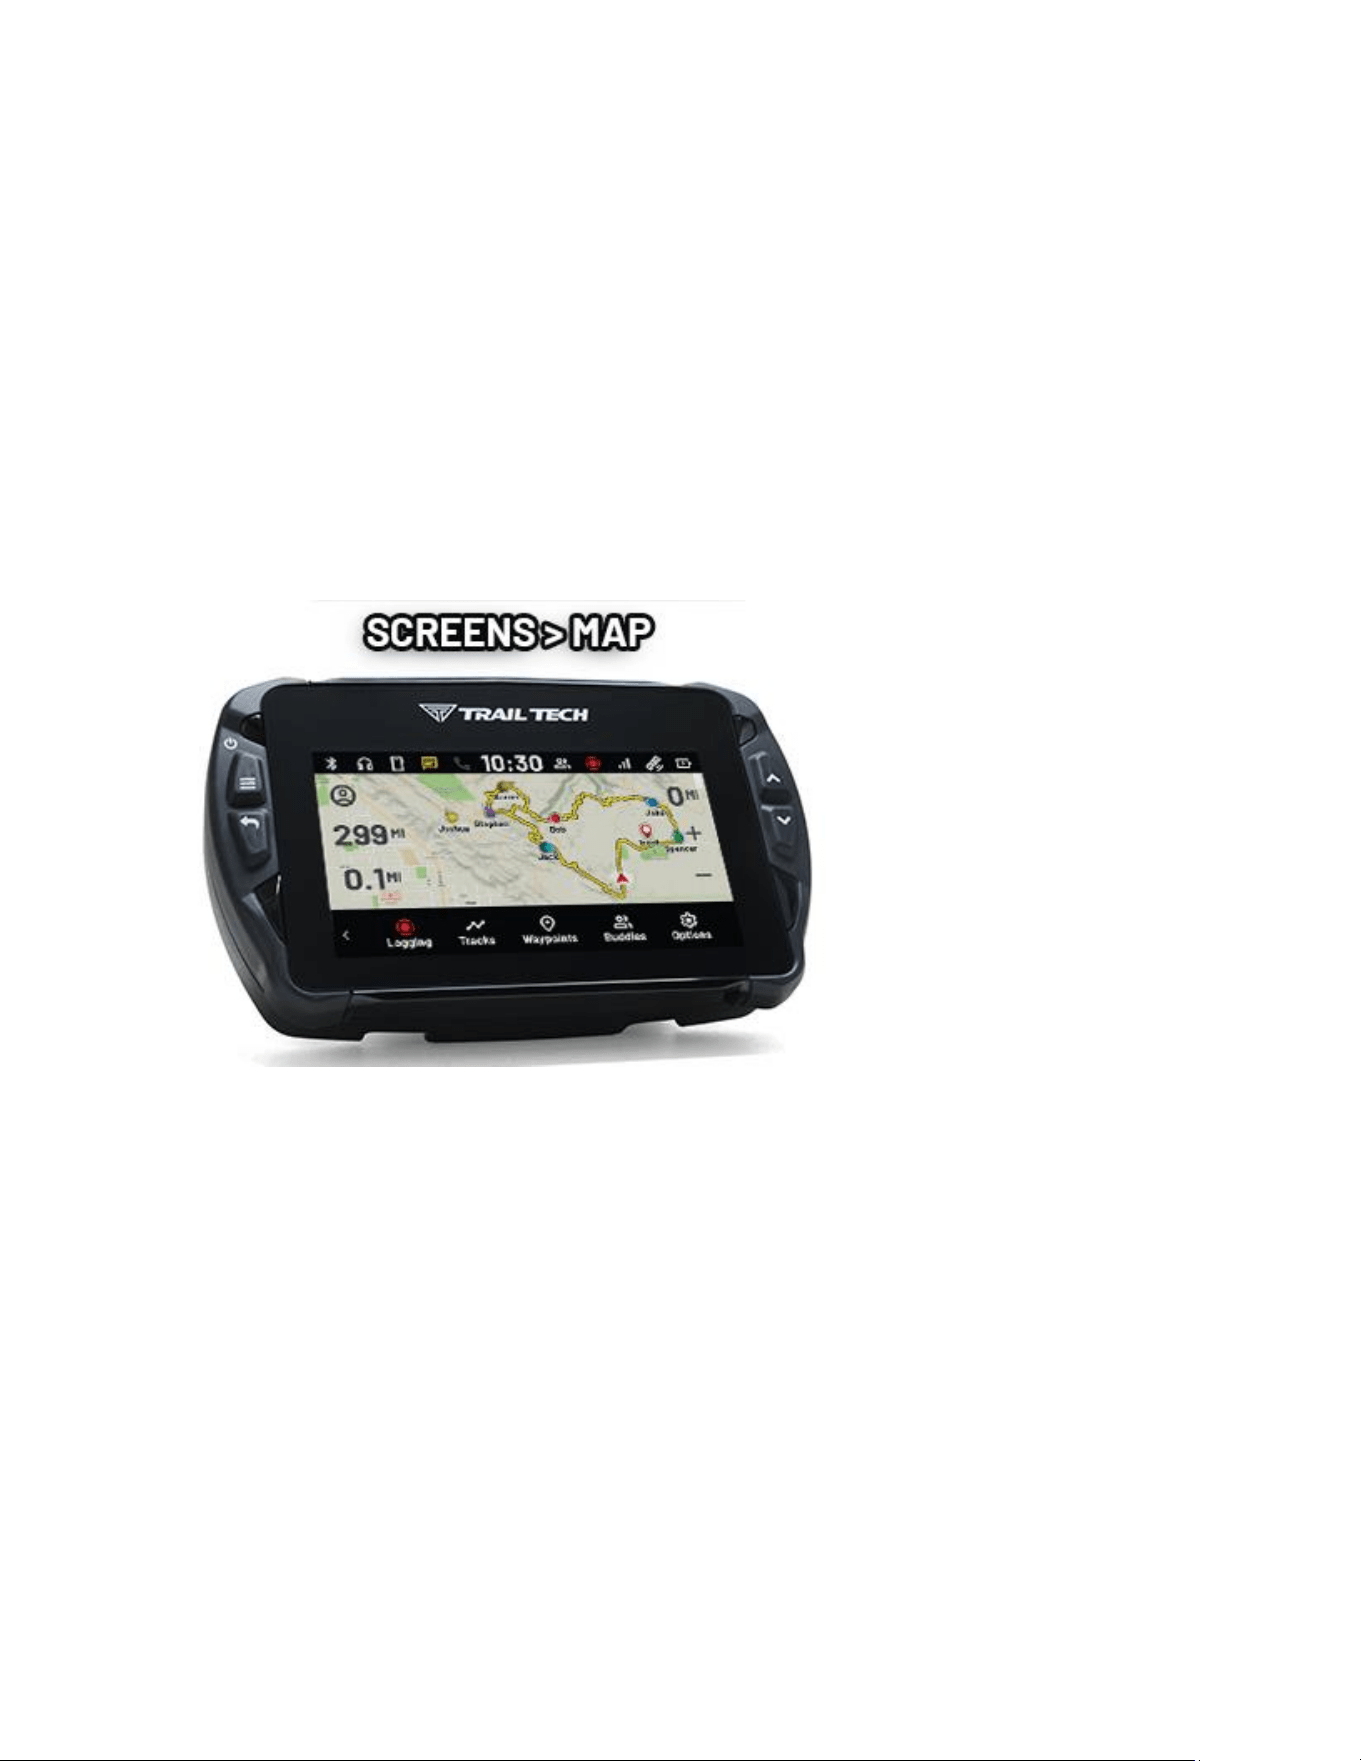
Map Screen Help
The map screen shows your current GPS posion.
Track Recording
When track recording is enabled, Voyager Pro4 draws a track behind you as you
travel. You can also place waypoints to mark important locaons. Tracks and
waypoints can be saved to, or loaded from, the MicroSD card as GPX les.
Buddy Tracking
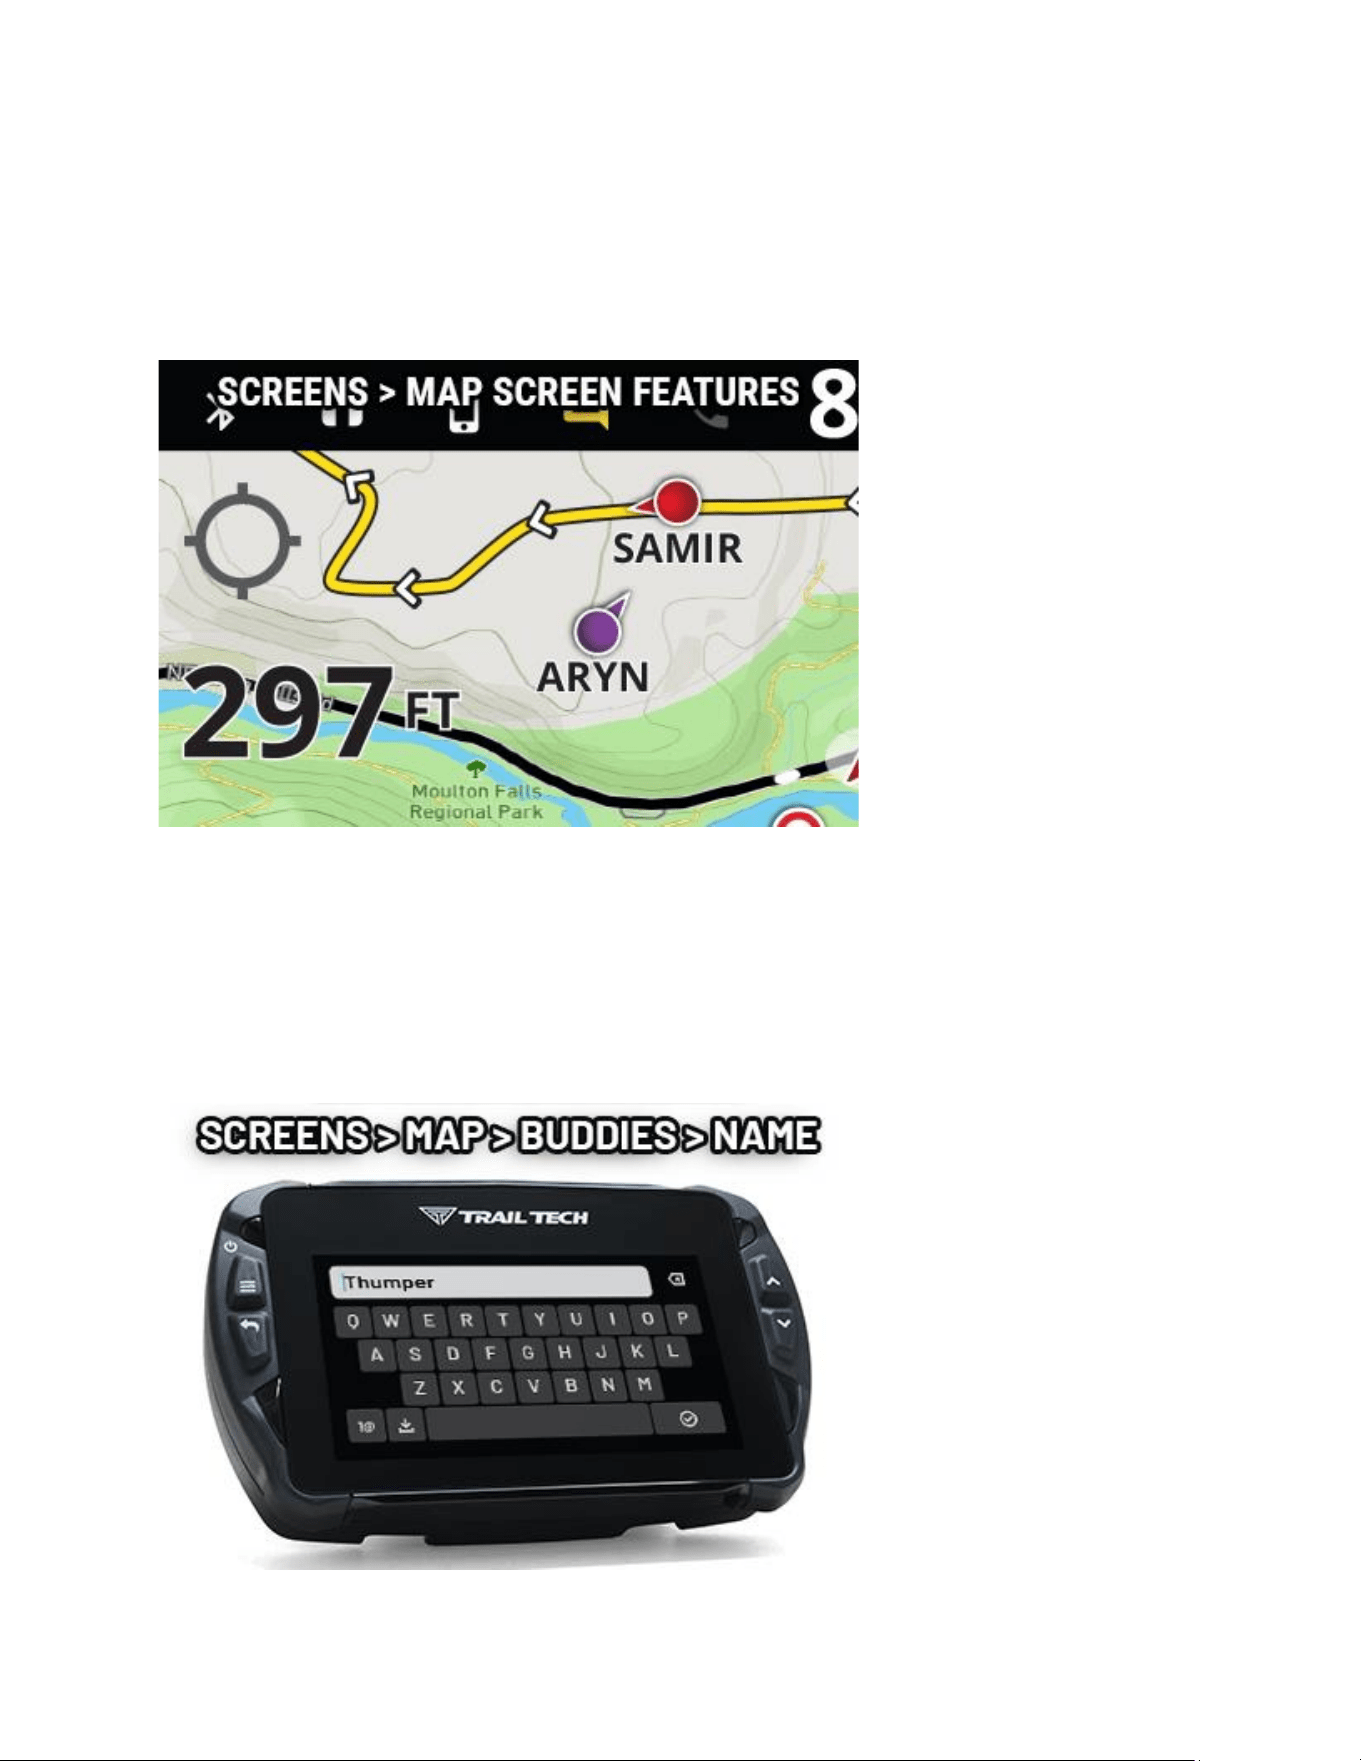
If you are in a buddy group, group members appear on the map as colored
icons with names and direcon arrows. Depending on your map sengs, Buddy
Tails can also show each rider's recent movement.
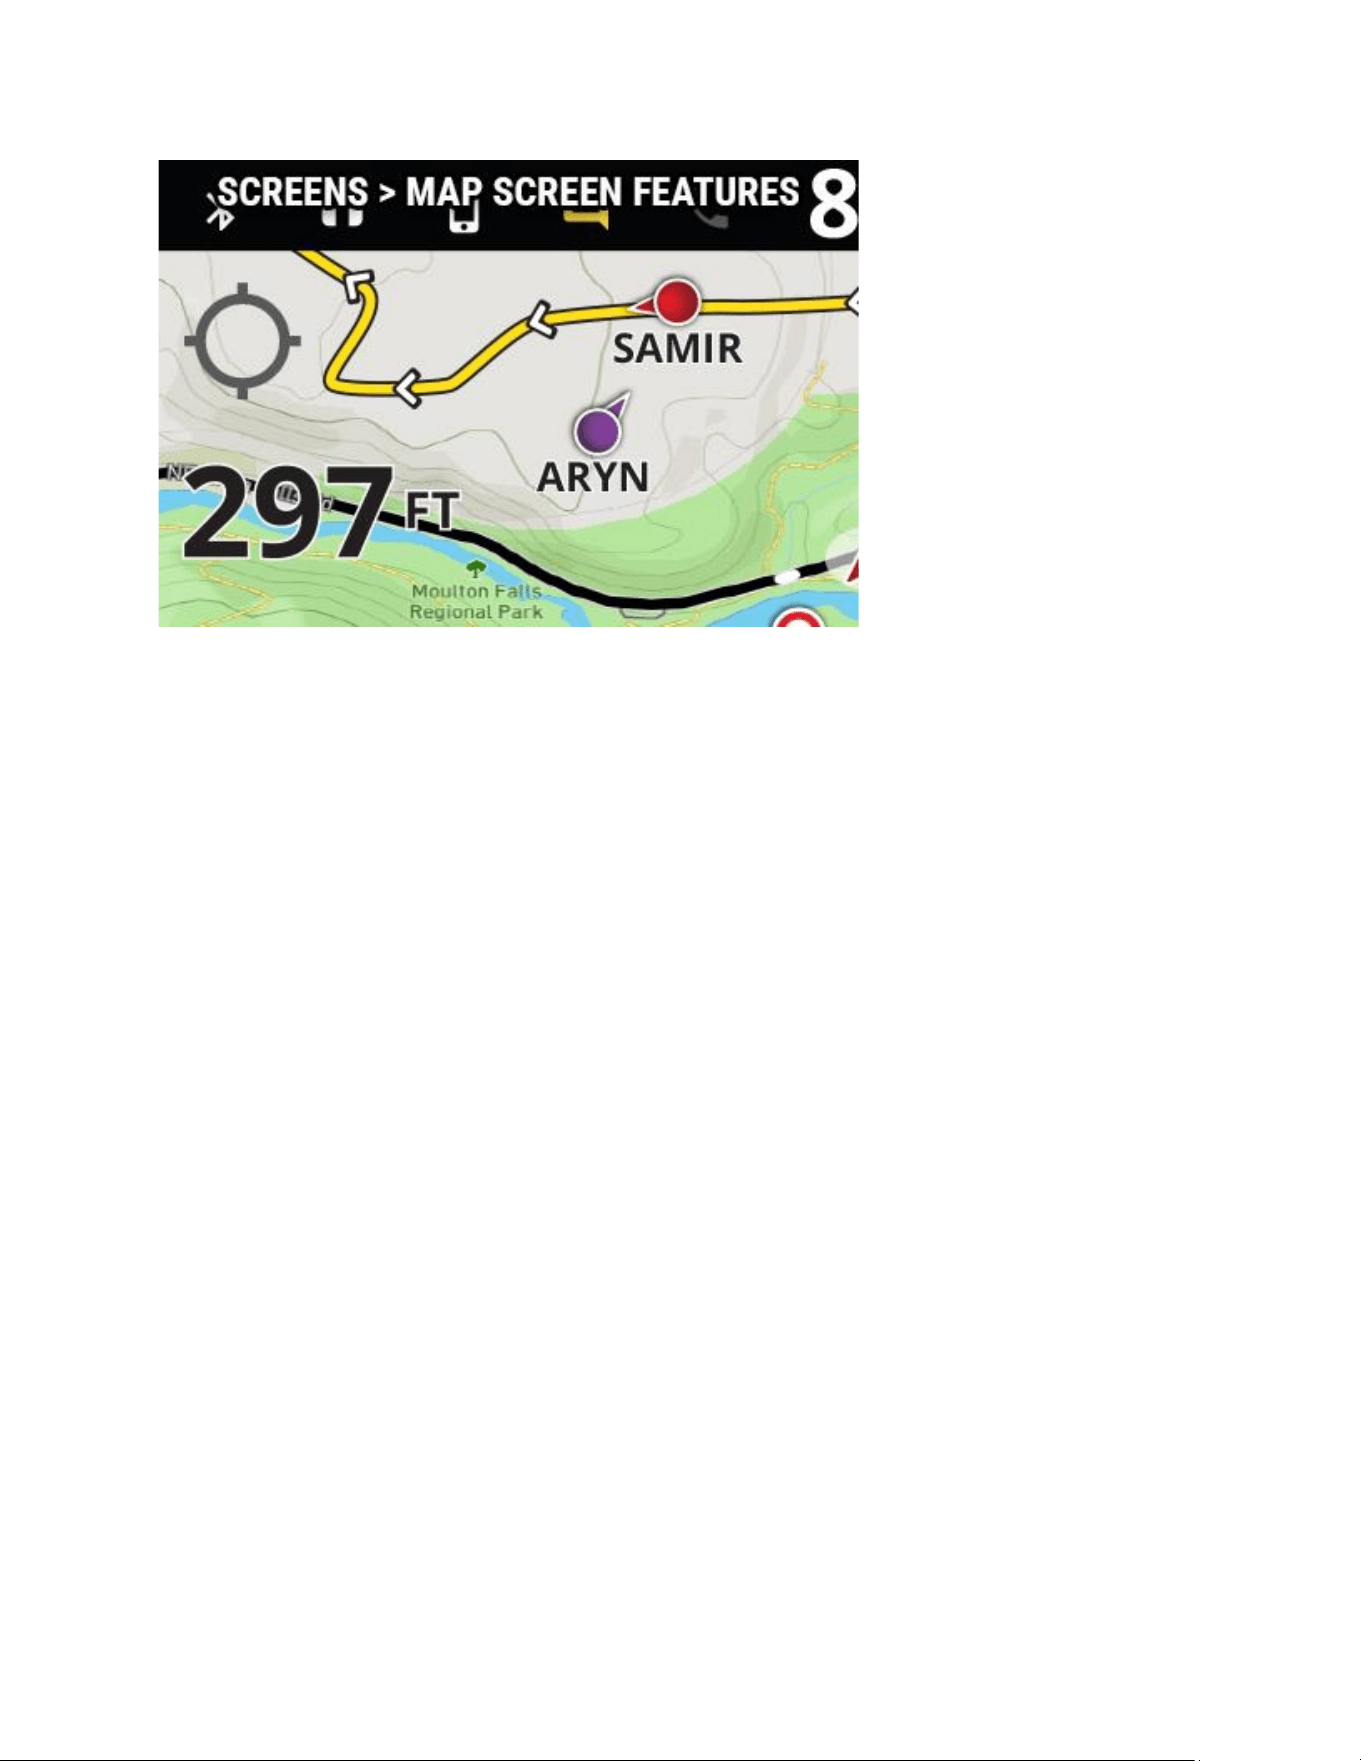
Track Arrows
Direcon arrows can be shown on loaded GPX tracks to indicate travel direcon.
Hide them or reverse their direcon in map bar opons.
Map Screen Gauges
Three vehicle gauges are available on the map screen. To choose which gauges
to display, press and hold the upper-right gauge or select MAP GAUGES in the
map bar opons. Select NONE to hide them.
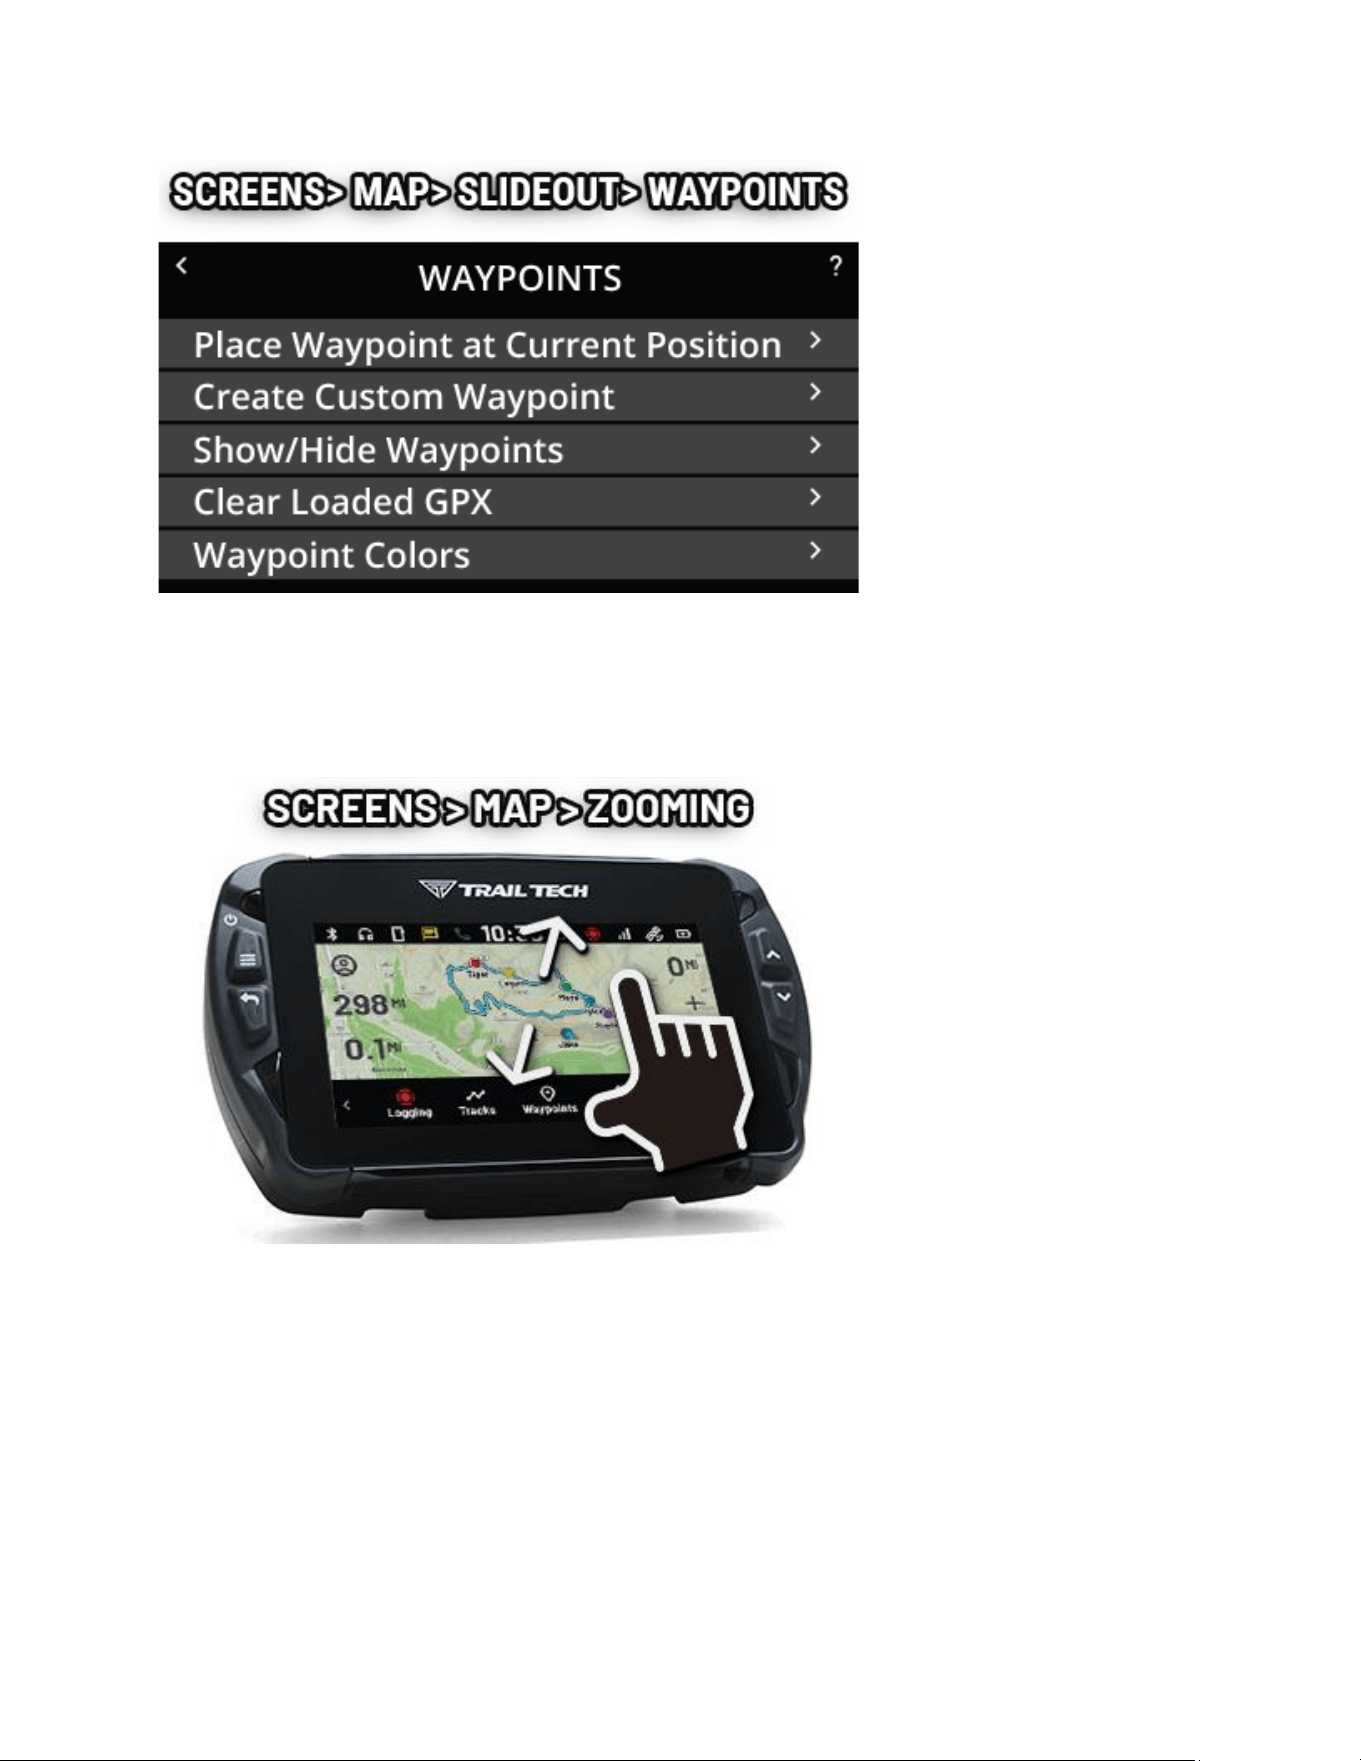
Map Waypoints
Add a waypoint at your current locaon by pressing and holding the Waypoints
icon in the map screen slideout menu. Tap the icon to access addional
waypoint opons, including creang a waypoint directly from latude and
longitude. Once a waypoint is on the map, press and hold it to open the detail
popup.
Zooming Help
Zoom the map by tapping the + and - buons, or use a pinch gesture to zoom in
and out.
Zoom level is displayed as the map scale in the boom right corner.
Center Lock/Pan Lock/Buddy Lock Help
The top le buon on the map screen will change the centering behavior. You
can touch and drag on the map to pan.
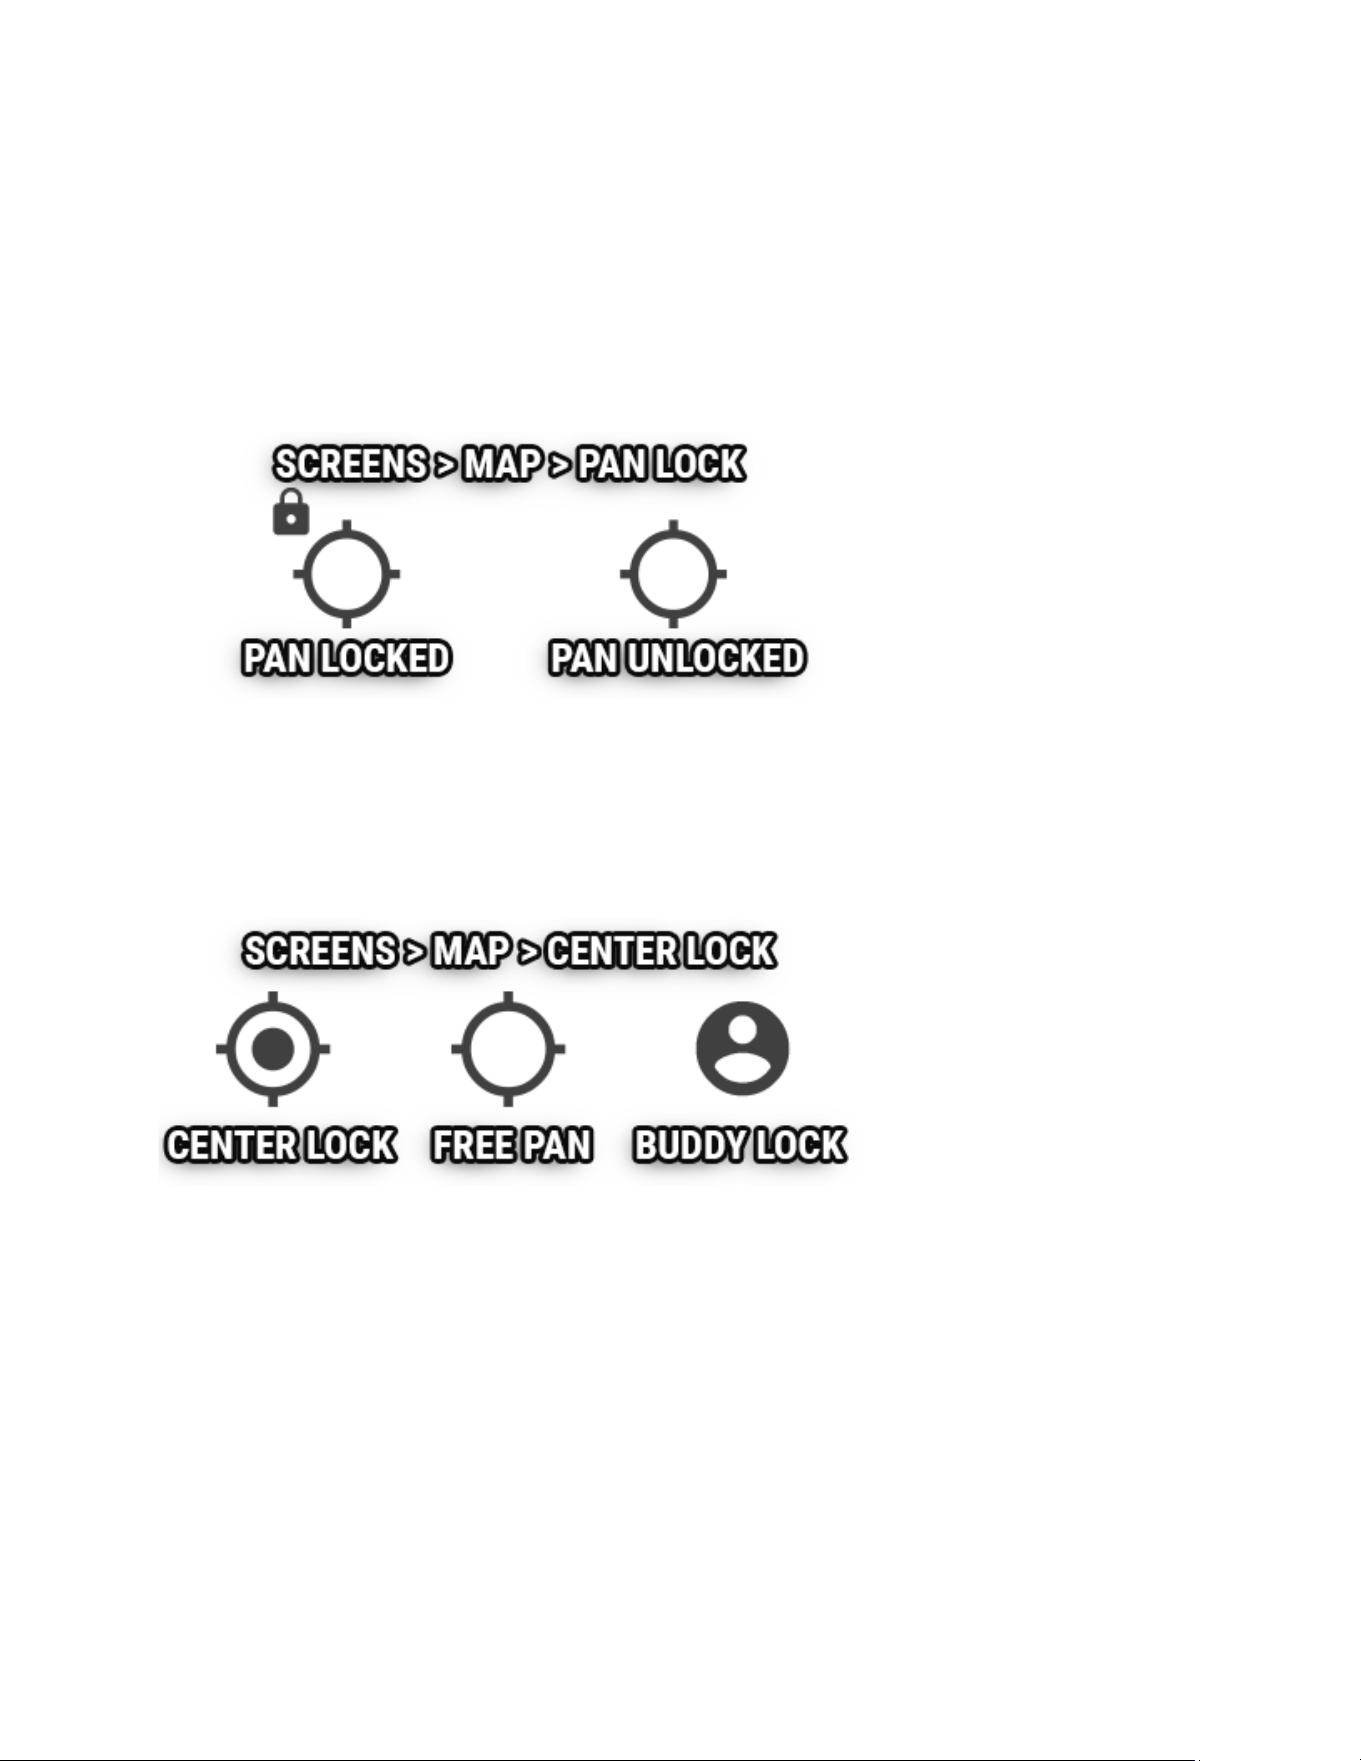
Pan Lock
Press and hold the center lock icon to turn on pan lock. A small locked icon will
appear next to the center lock icon. When pan lock is enabled, panning and
pinch-to-zoom will be disabled, but you can sll use the + and - onscreen
buons to zoom with. This mode is useful for wiping the screen clean on dusty
trails, or to manually lock the map onto the bounds of a riding area.
Center Lock
When panned o-center, the top le icon will appear as an empty crosshair.
Tapping this buon will center and lock the map on your current locaon, and
keep the map centered on your locaon as you travel.
Buddy Lock
When buddy tracking is acve, pressing the center lock icon will switch
between center lock and buddy zoom. Buddy zoom will automacally zoom and
pan the map to keep your enre riding group visible.
Map Mini-Menu Help
The map screen mini-menu provides quick access to frequently used map
features.
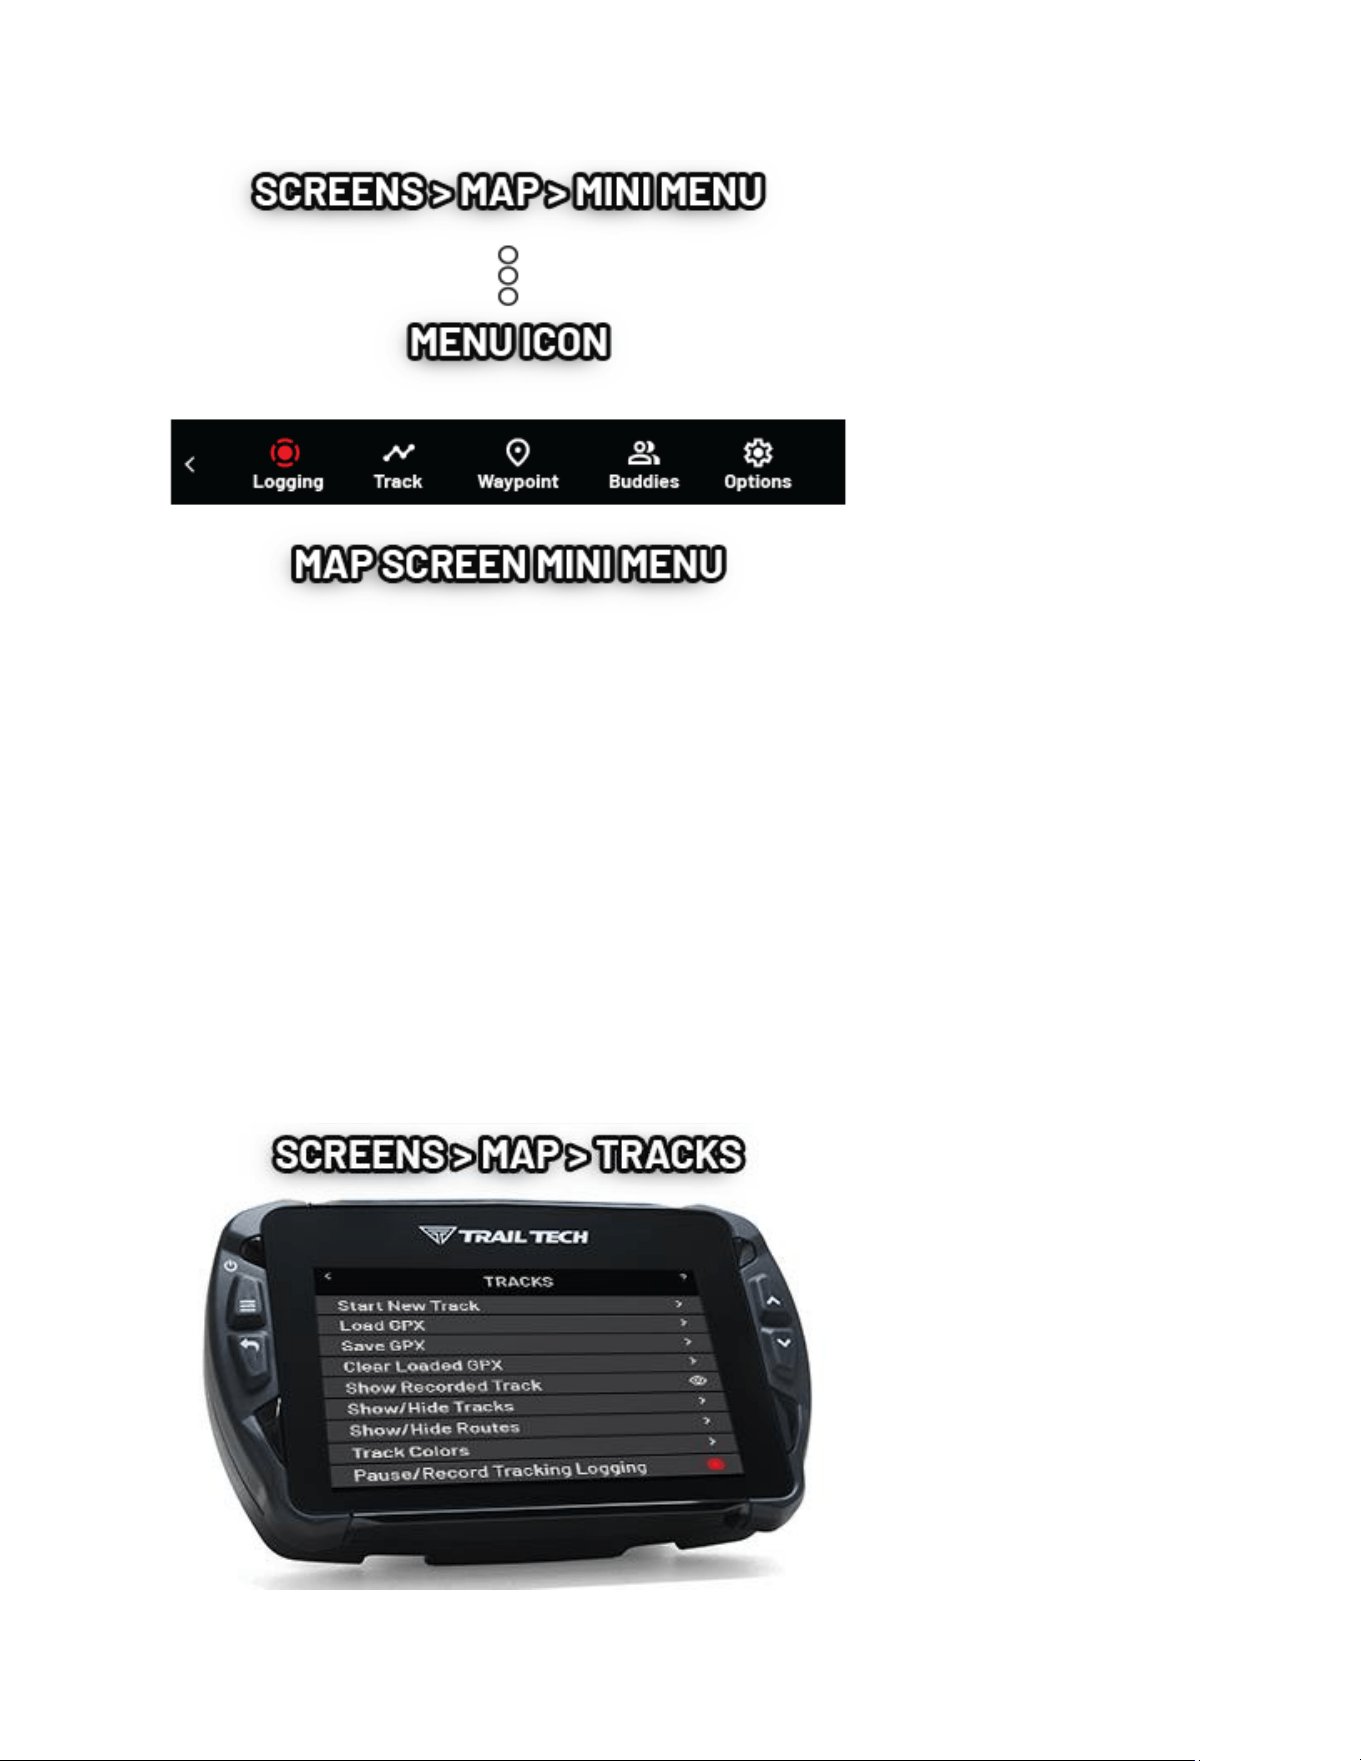
While on the map screen, press the Back buon or tap the 3-dots icon in the
lower-le corner to open the menu bar across the boom of the screen.
From here you can pause or resume track logging, create a waypoint, toggle
map layers, set up or join a buddy group, and save or load tracks from the
MicroSD card.
If preferred, the boom menu bar can be set to auto-hide unl it is needed.
Tracks Help
The track menu is opened from the map's mini-menu.

Recording Tracks
When recording, a track is drawn behind your locaon arrow as you move. The
red recording icon in the top nocaon bar will blink to show recording is
acve. A white circle means that recording is on, but the vehicle is not moving.
A pause icon will show when recording is disabled.
New Logging Track
When starng a new logging track, the previous logging track will no longer
record but will sll be displayed on the map.
GPX Files
A GPX le is a way to store a set of waypoints, tracks, and routes in a small le.
The GPX le can be created by Voyager Pro4's track recording abilies, by other
GPS devices, or by a desktop computer app or website. When loading a GPX le
from the MicroSD card, Voyager Pro4 will scan it for all the waypoints, tracks
and routes and add them to the map.
Clear GPX
The clear GPX opon removes tracks loaded via GPX les, and stored logging
tracks. Clear GPX does not aect the current track logging session or les stored
on the MicroSD card.
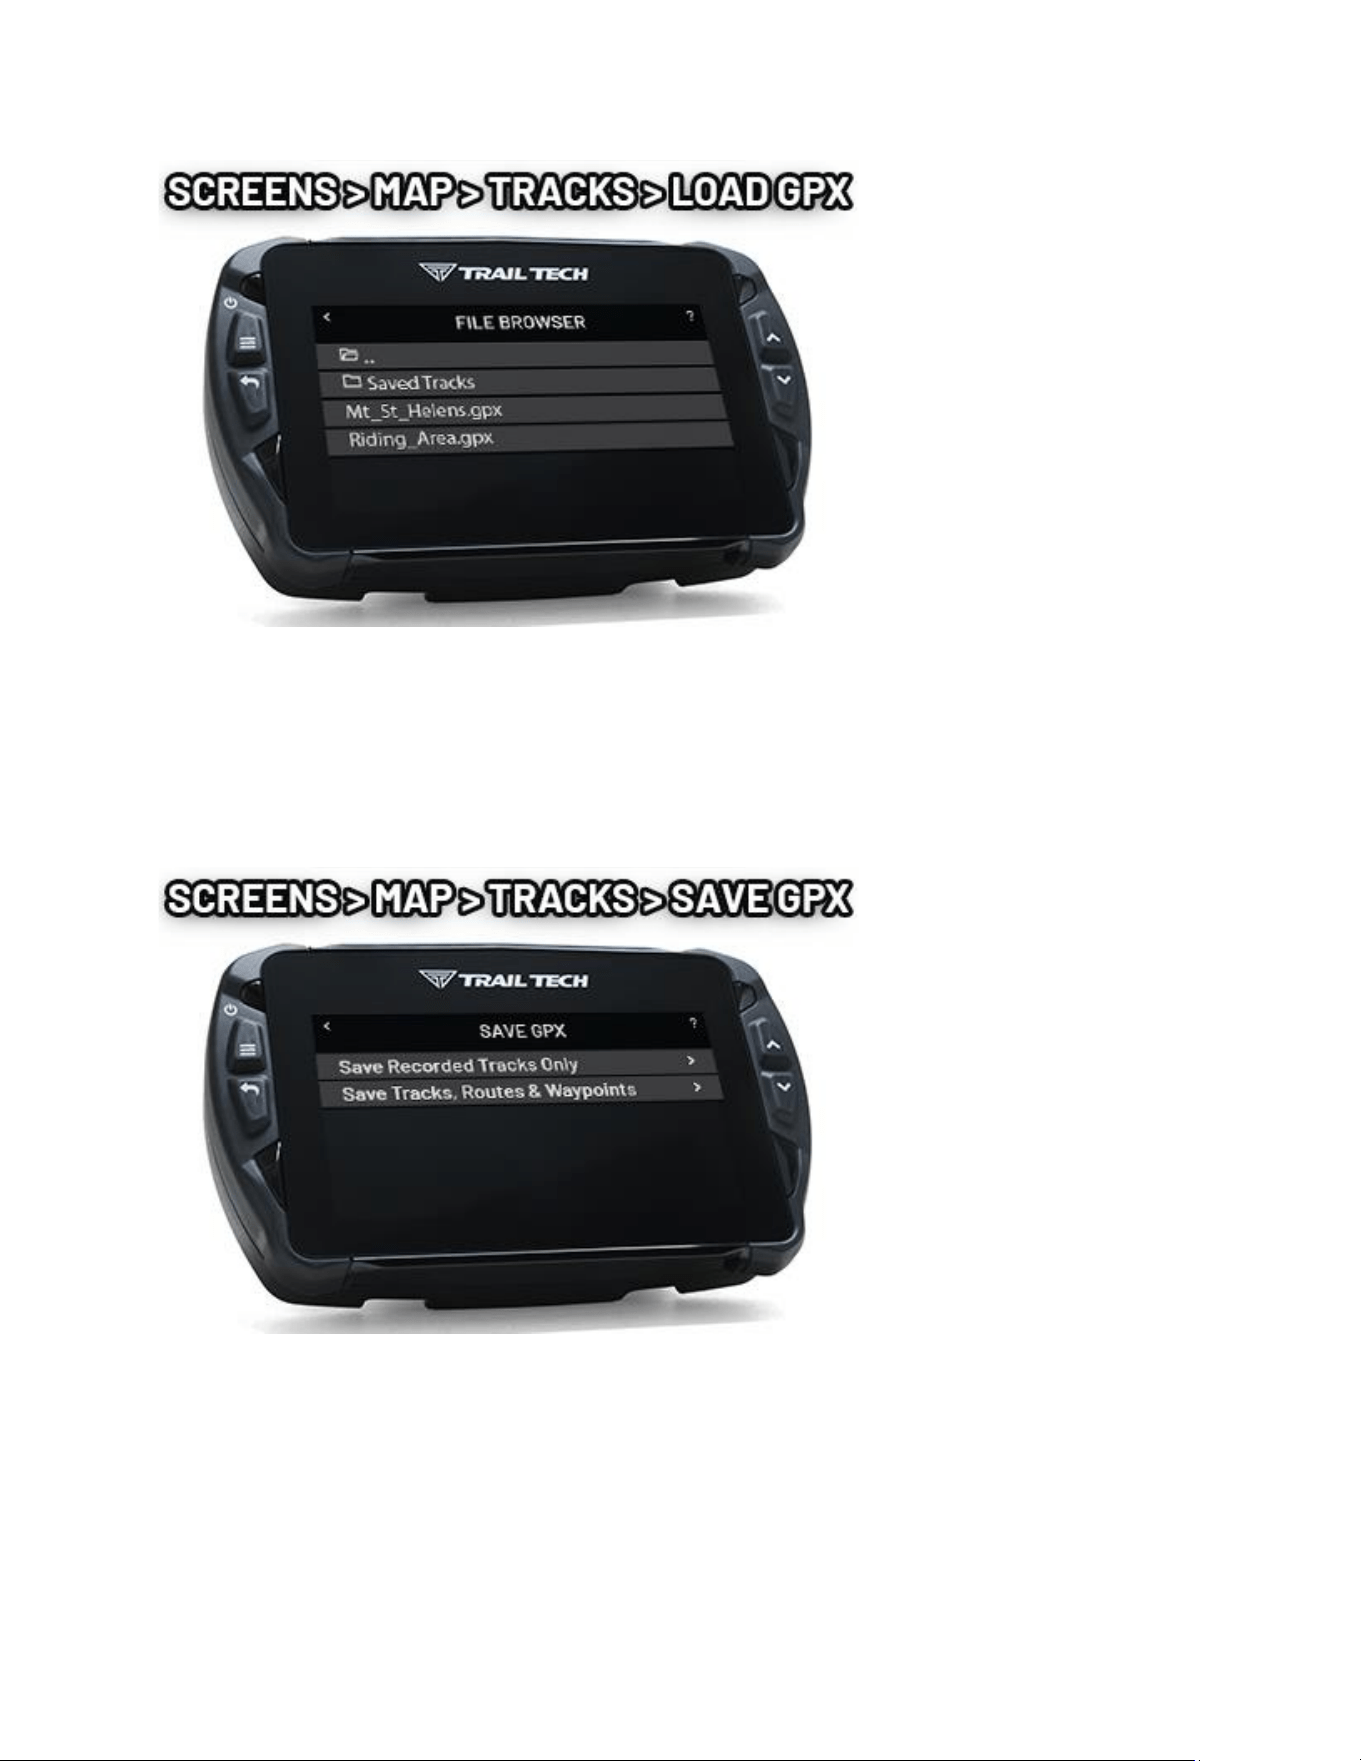
Load GPX Help
Select a GPX le to load. Loading GPX adds tracks/routes/waypoints from the
GPX le to the map.
Save GPX Help
Save the stored list of tracks as a GPX le. The le will be saved on the MicroSD
card.
In the save le, you can save just tracks or also include routes and waypoints.
Waypoints Help
Use waypoints to mark important locaons, such as a parked vehicle, camp,
staging area, or meeng point.
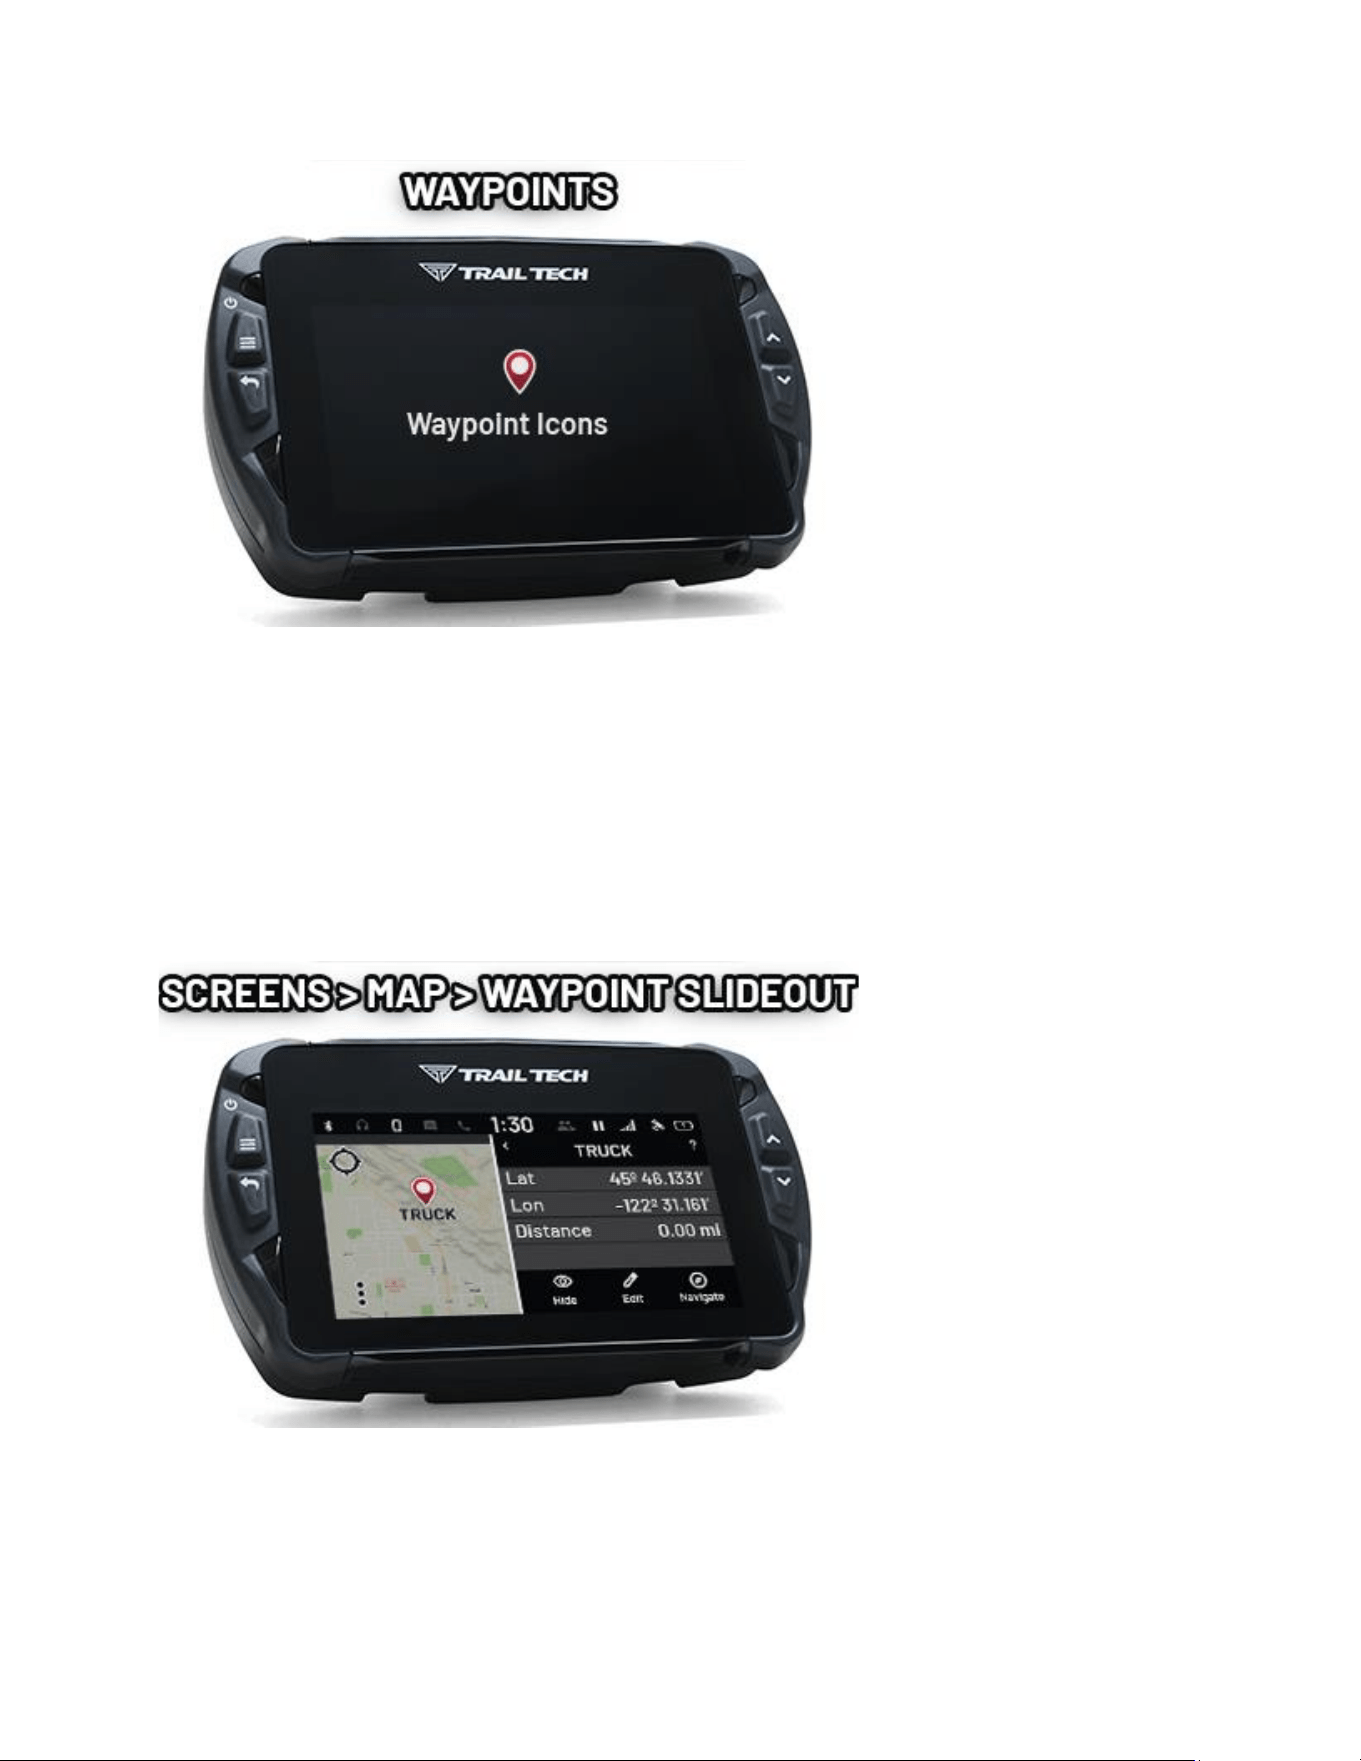
Add a waypoint at your current locaon using the Waypoints icon on the map
mini-menu.
Press and hold on the map screen to drop a waypoint at that locaon.
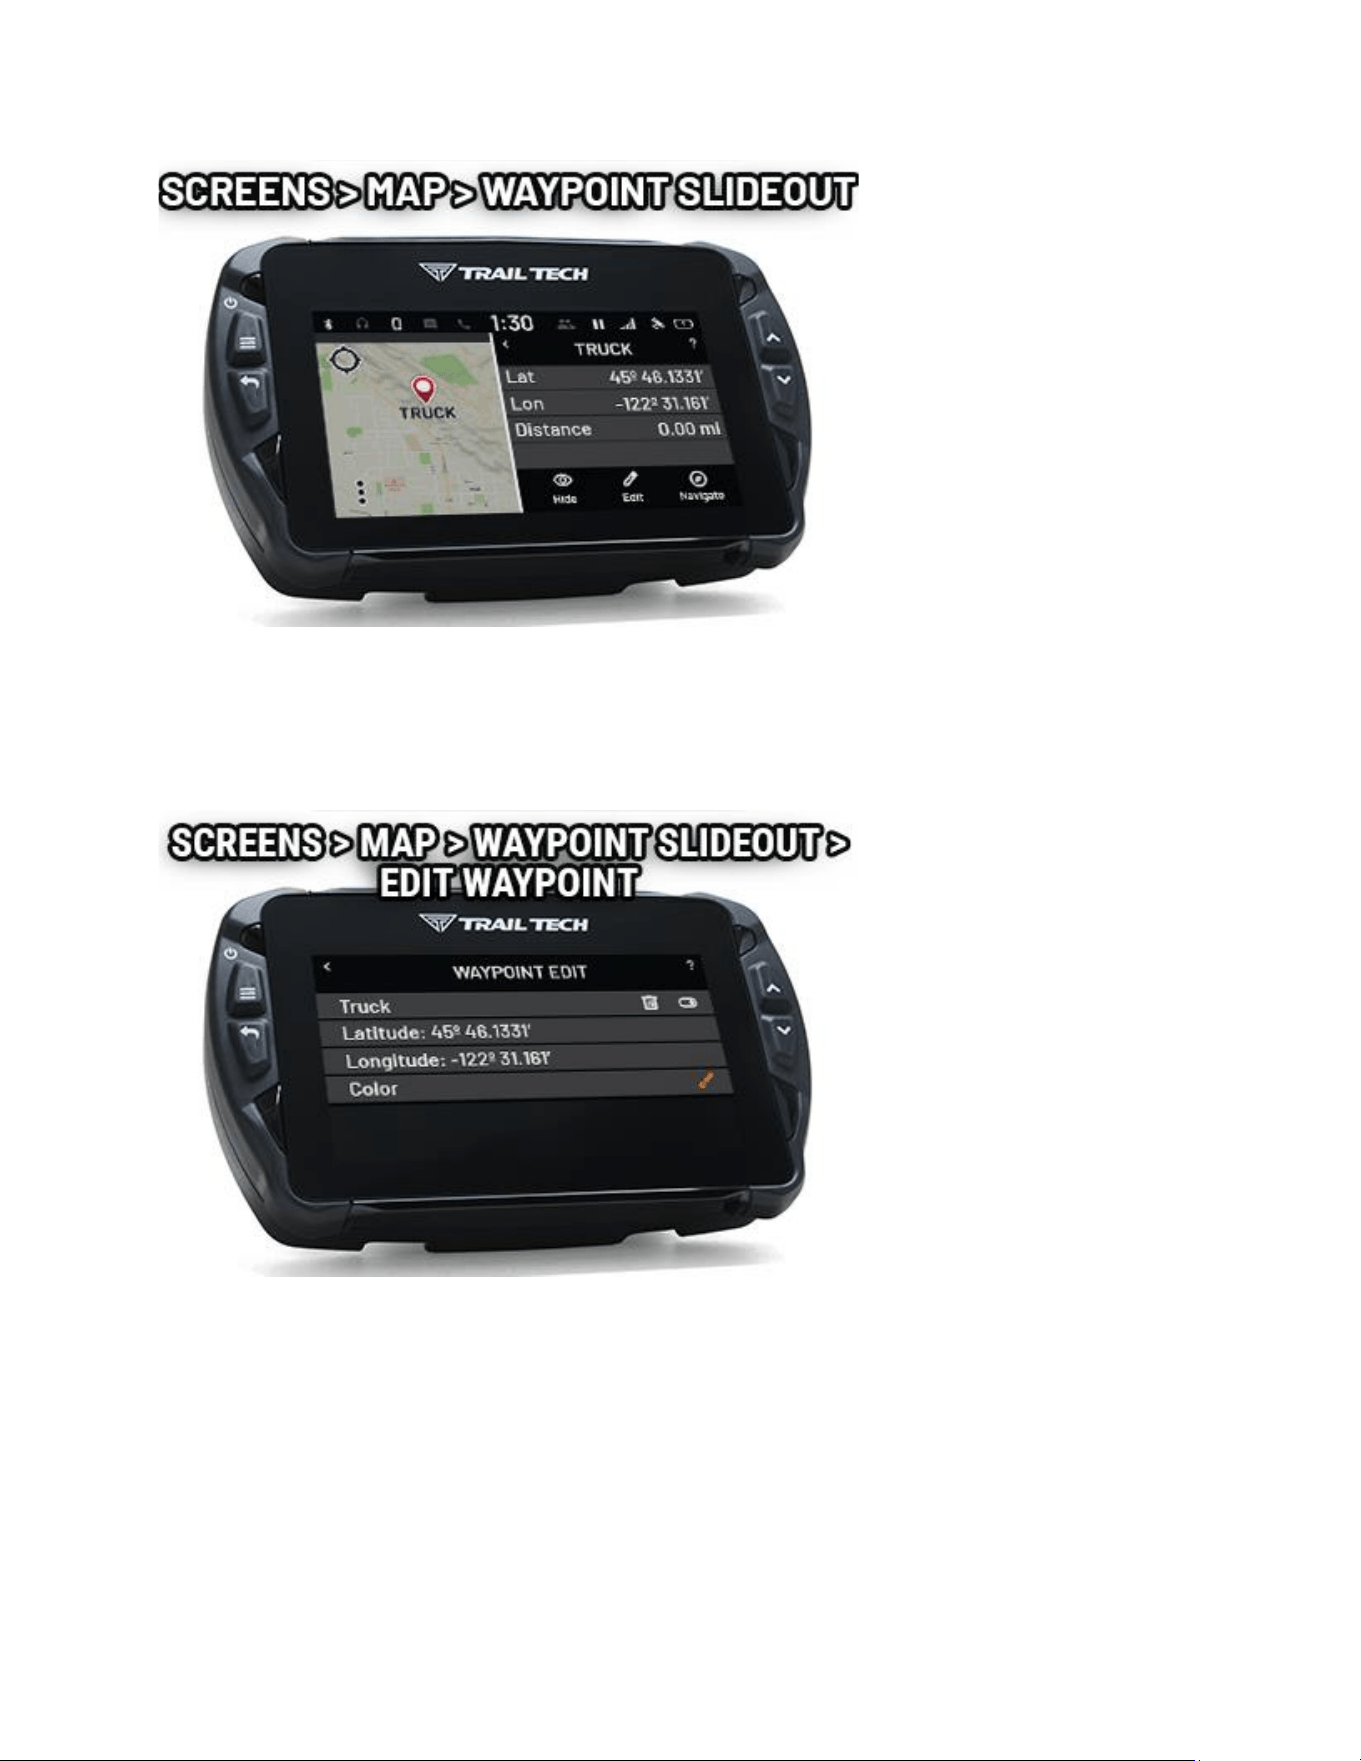
Press and hold a waypoint to open a slideout with more informaon. The
slideout shows the posion and distance from your current locaon. Icons at
the boom let you hide or edit the waypoint, or set it as the desnaon
waypoint.
Tap the 3-dots icon on the map screen to open the mini-menu, then tap
Waypoints to open the waypoint opons menu:
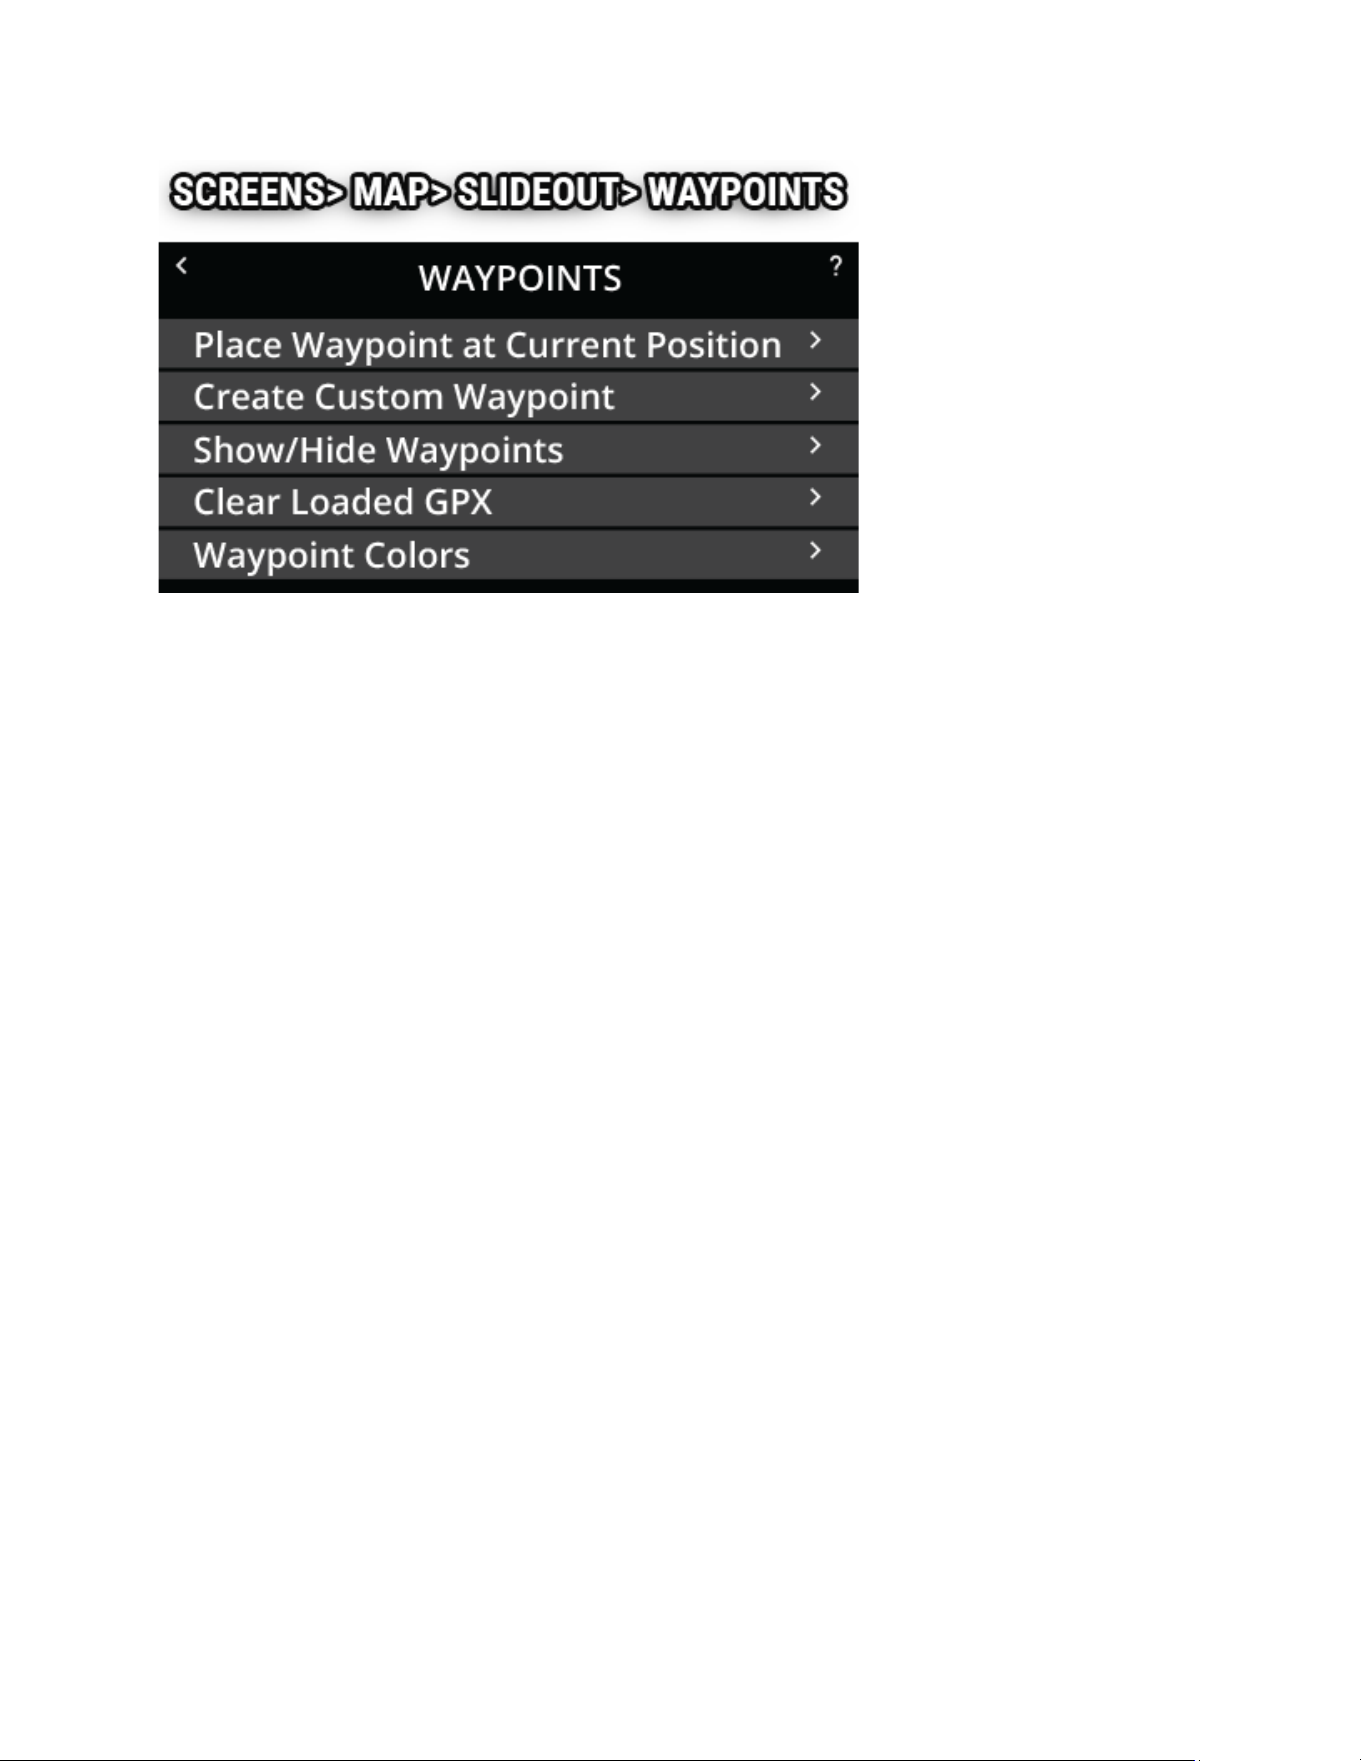
Place Waypoint at Current Position:
Create a waypoint at your current GPS locaon.
Create Custom Waypoint:
Create a waypoint by entering latude and longitude. Enter both values with
the onscreen keypad, then conrm to create the waypoint. Use the coordinate
format selected in Maps & GPS Setup.
Show/Hide Waypoints:
Show or hide waypoints individually or all at once.
Clear Loaded GPX:
Clear loaded waypoints and tracks from memory.
Waypoint Colors:
Change the color of all waypoints at once. To change a single waypoint, press
and hold it on the map screen.
Hide a Waypoint Help
Tap on a waypoint to open its slideout menu, then tap the eye icon to hide the
waypoint so that it no longer appears on the map.
Unhide hidden waypoints by tapping the Layers icon in the map mini-menu.
Waypoint Edit Help
Tap on a waypoint to open its slideout menu, then tap the edit icon where you
can change the waypoint's name, delete it, or change the marker color.
Set Destination Waypoint Help
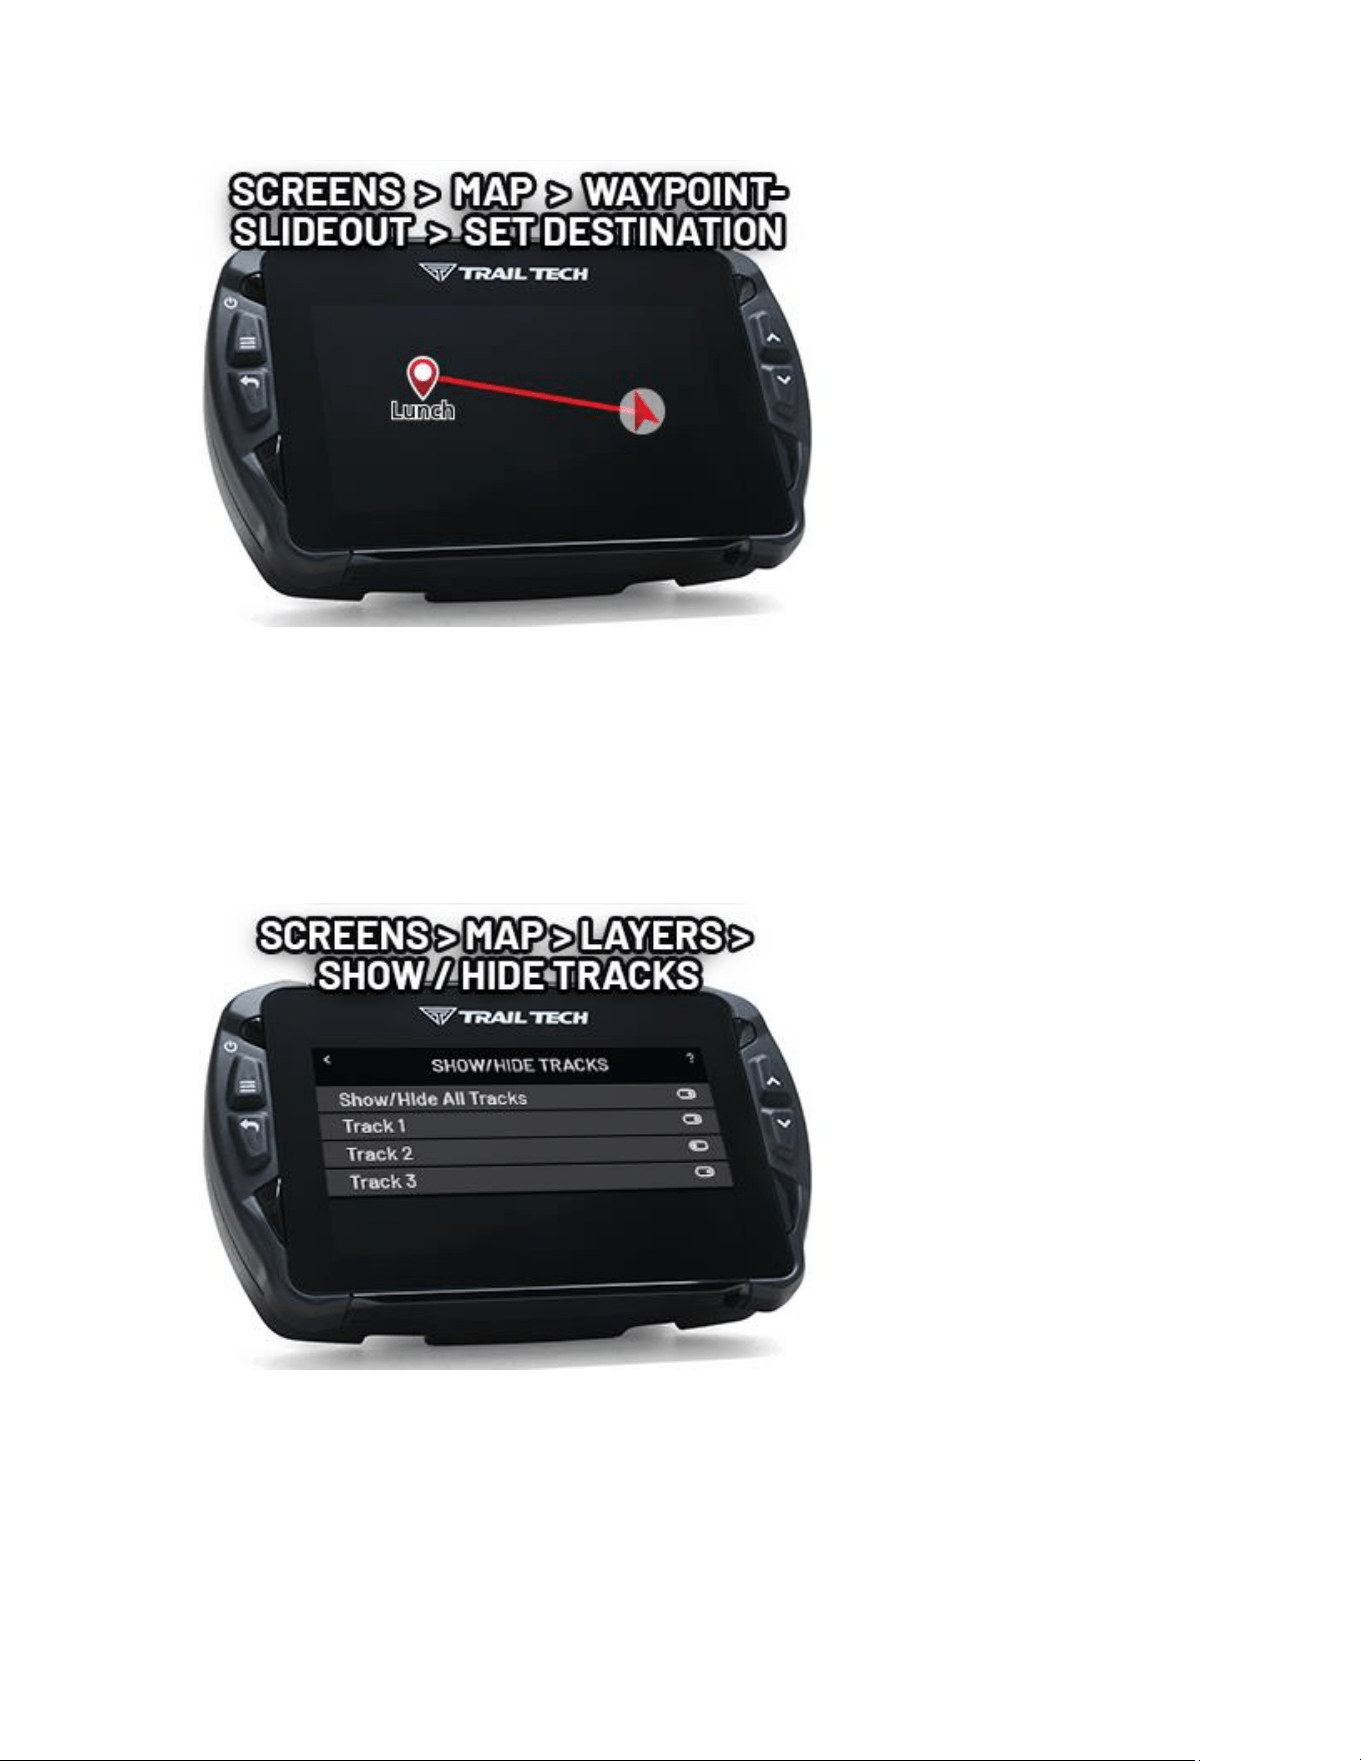
Tap on a waypoint to open its slideout menu, then tap the set desnaon icon.
When enabled, a line will be drawn on the map between your locaon arrow
and the desnaon waypoint marker. The distance to the waypoint will be
shown at the boom of the map. Tap the red "X" next to the distance to cancel
the desnaon.
GPX Display Options Help
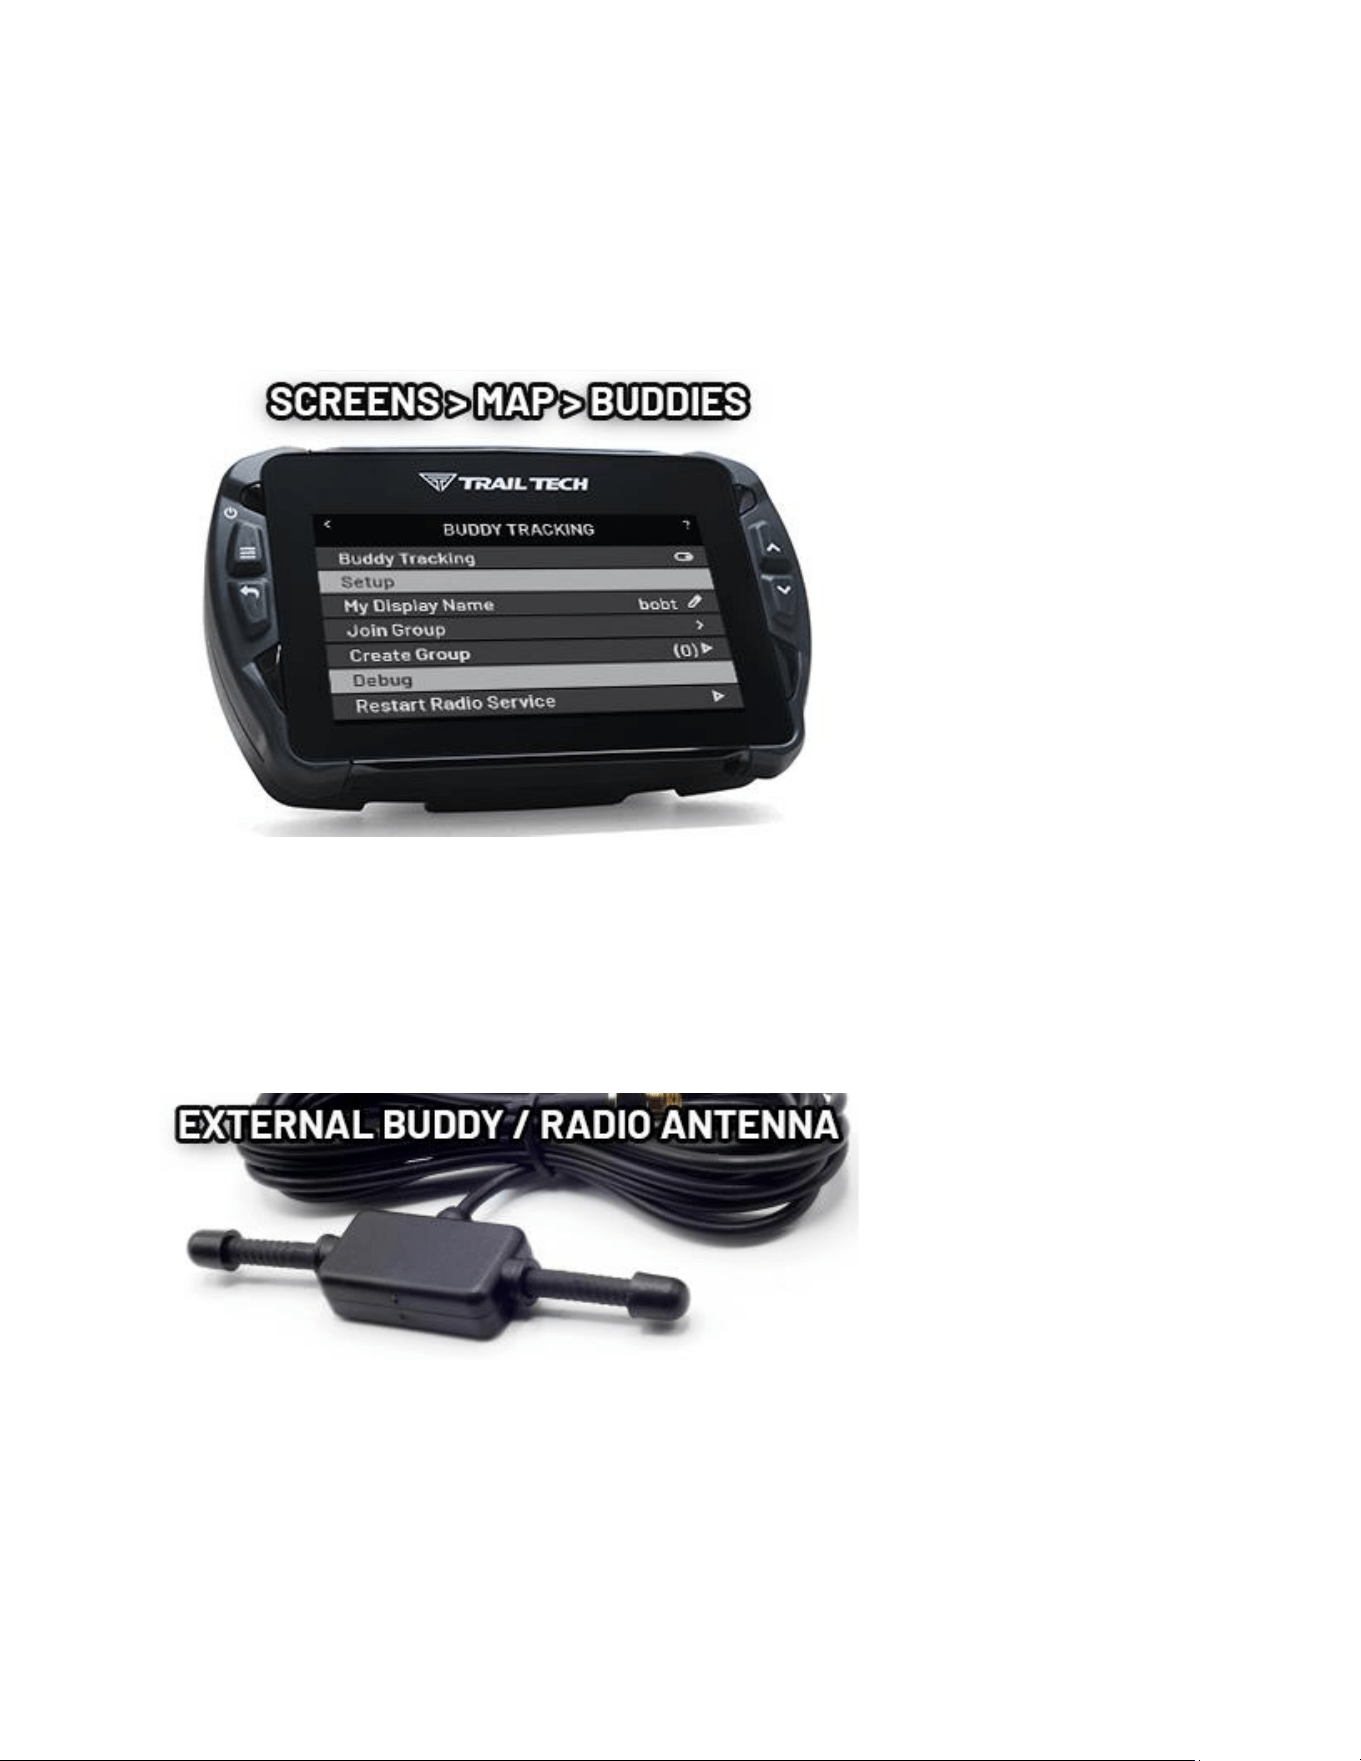
When you import a GPX le, it can load tracks, routes, and waypoints. Show or
hide them individually or as a group.
Routes and tracks also include Select All and Deselect All shortcuts, which are
useful when working with large imported les or mulple rides.
Buddy Tracking Help
Buddy Tracking connects mulple Voyager Pro4 units to a private locaon-
tracking network. Once connected to a buddy group, the map shows the name
and locaon of each group member.
Enable Buddy Tracking
Buddy Tracking uses sub-gigahertz radio signals together with GPS. Best range
occurs with clear line of sight. Terrain, vegetaon, buildings, and vehicle
structure will reduce range. A Trail Tech external radio antenna is required for
buddy tracking features.
Buddy Beacon
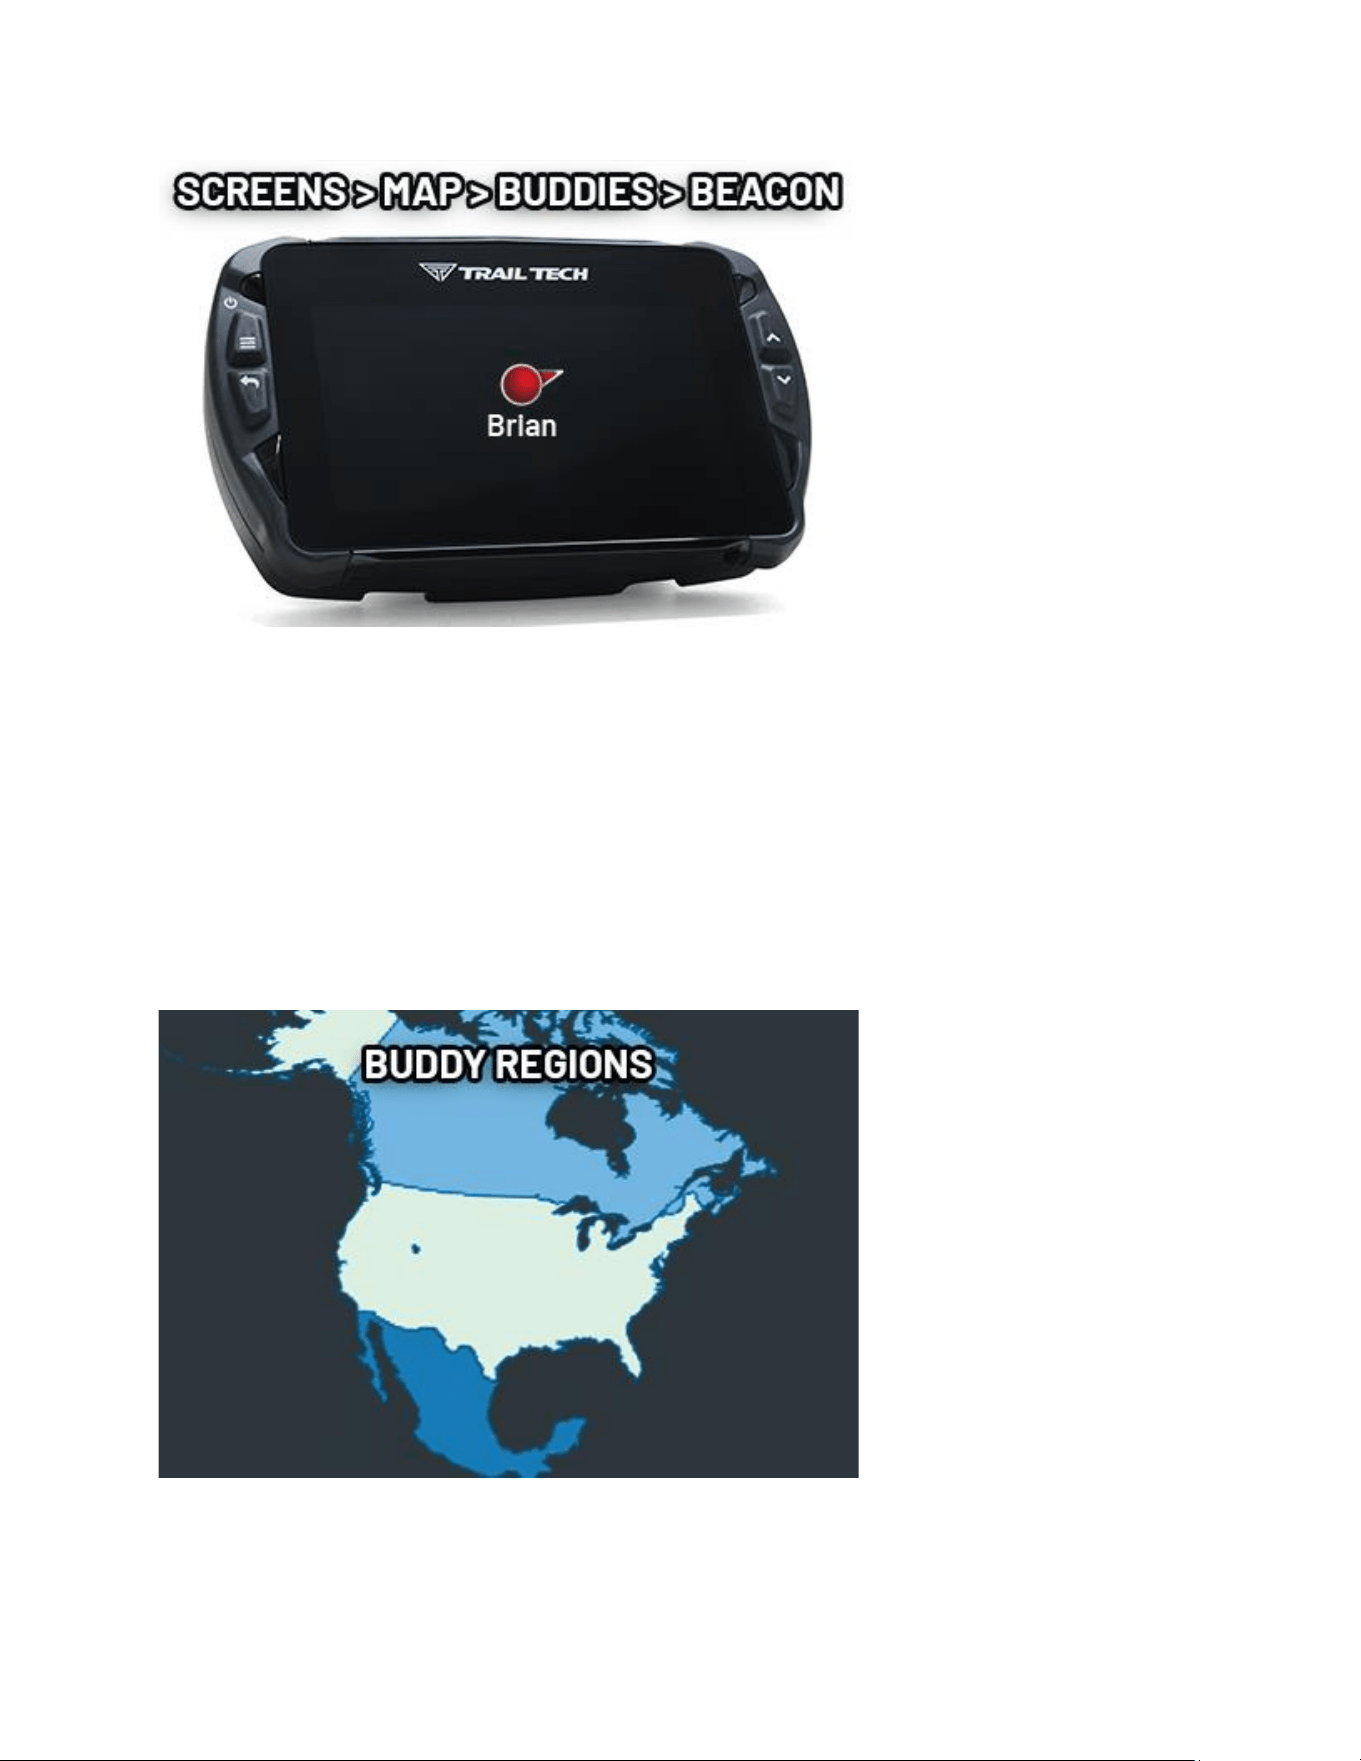
When you acvate Buddy Beacon, your marker ashes red on other riders'
screens to draw aenon to your locaon. Buddy Beacon is not an emergency
service and does not contact emergency responders.
Ride Command Group Ride Compatibility
In supported regions, Voyager Pro4 Buddy Tracking can share locaons with
compable Polaris Ride Command Group Ride systems.
Buddy Regions
Buddy Tracking radio frequencies are currently restricted from operang in
Europe. Voyager Pro4 will funcon normally, except buddy tracking will be
disabled when in that region. See the map below for acve regions.
Buddy Tails Help
Buddy Tails shows a short recent trail behind each buddy marker on the map.
This makes it easier to understand rider direcon and recent movement at a
glance.
Current soware improves the reliability and accuracy of Buddy Tail history. If
the map becomes crowded, adjust map layers or zoom level for a cleaner view.
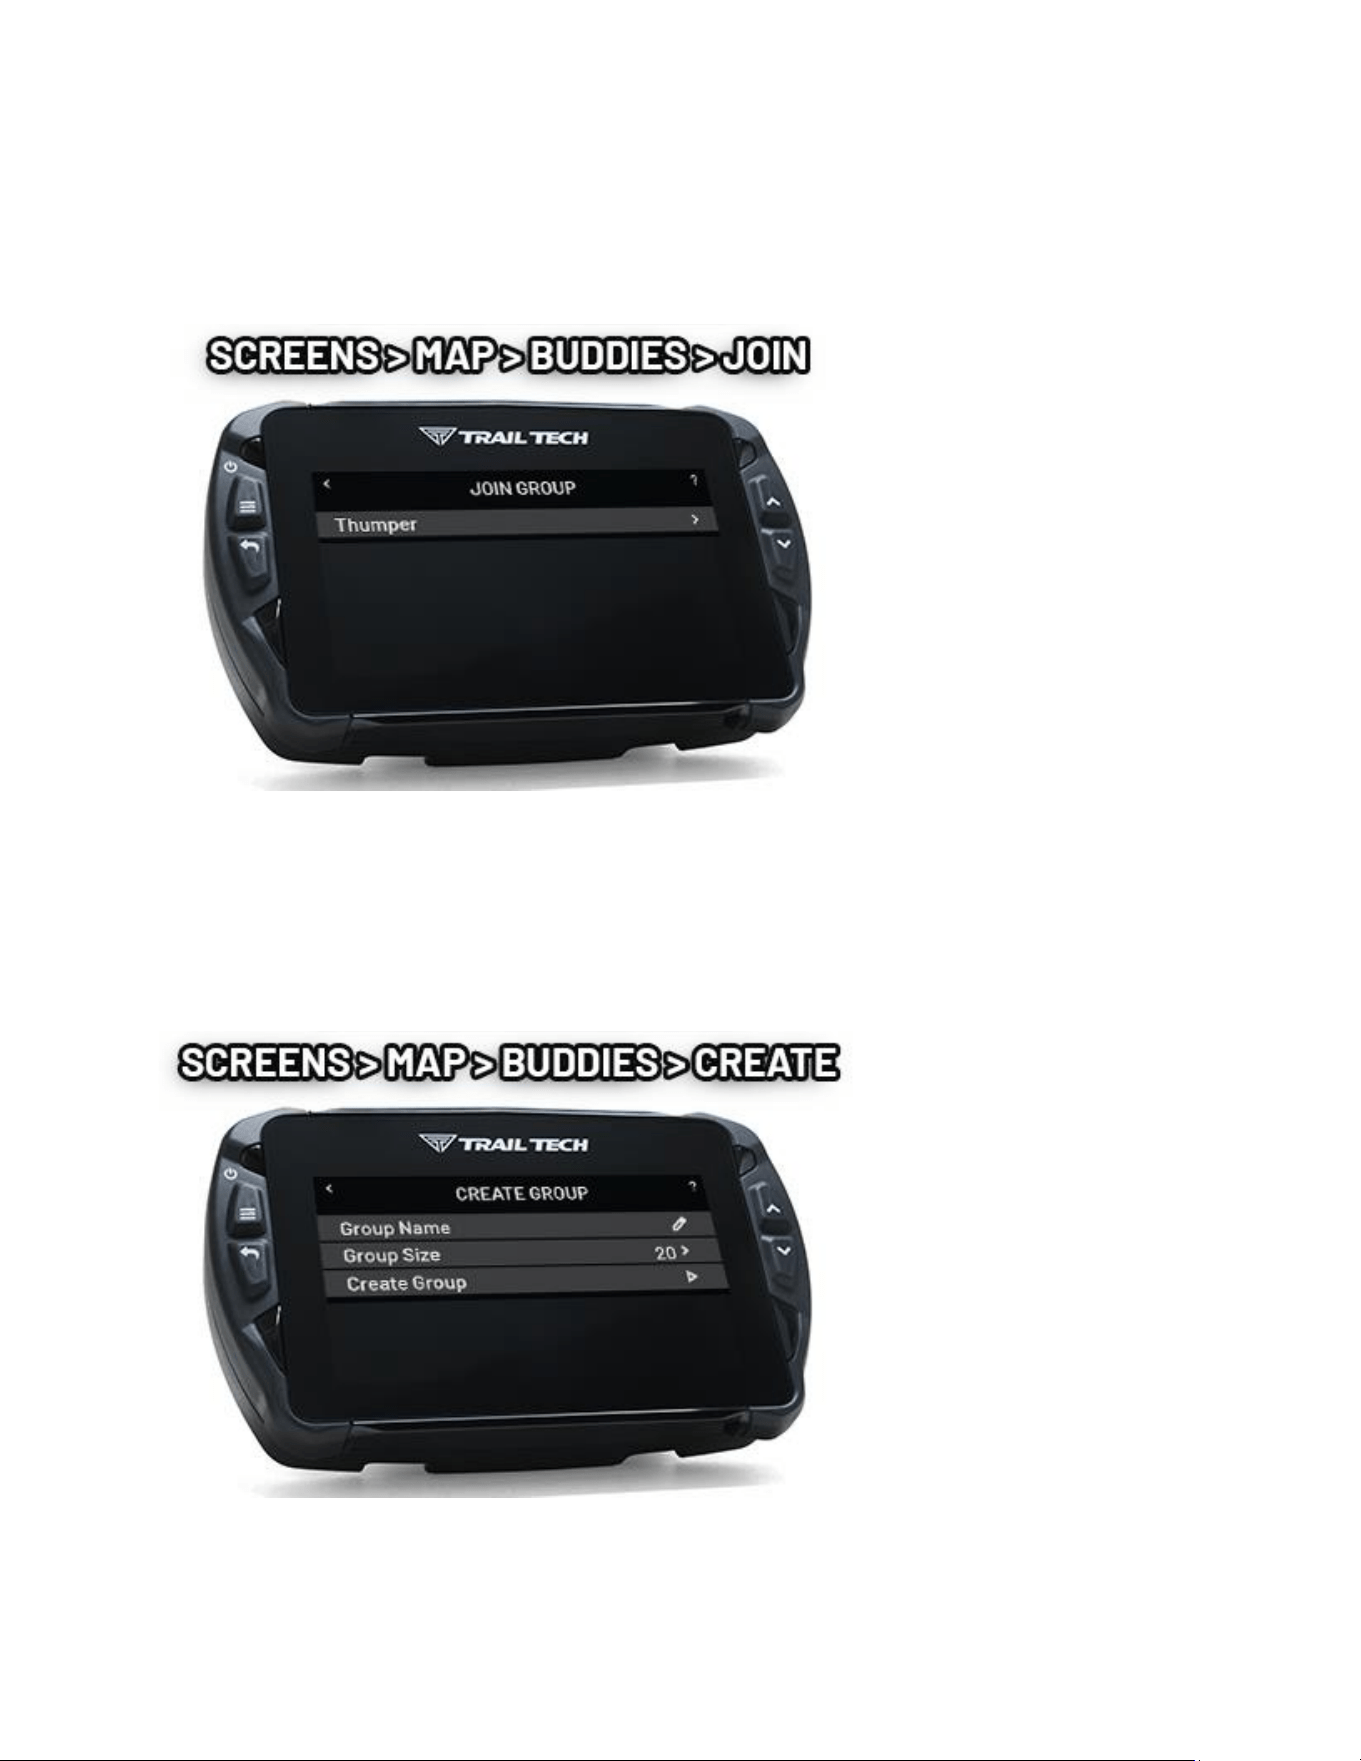
Buddy Display Name Help
Your Buddy Tracking display name appears below your marker on other riders'
screens. Choose a short, recognizable name for easier group idencaon.
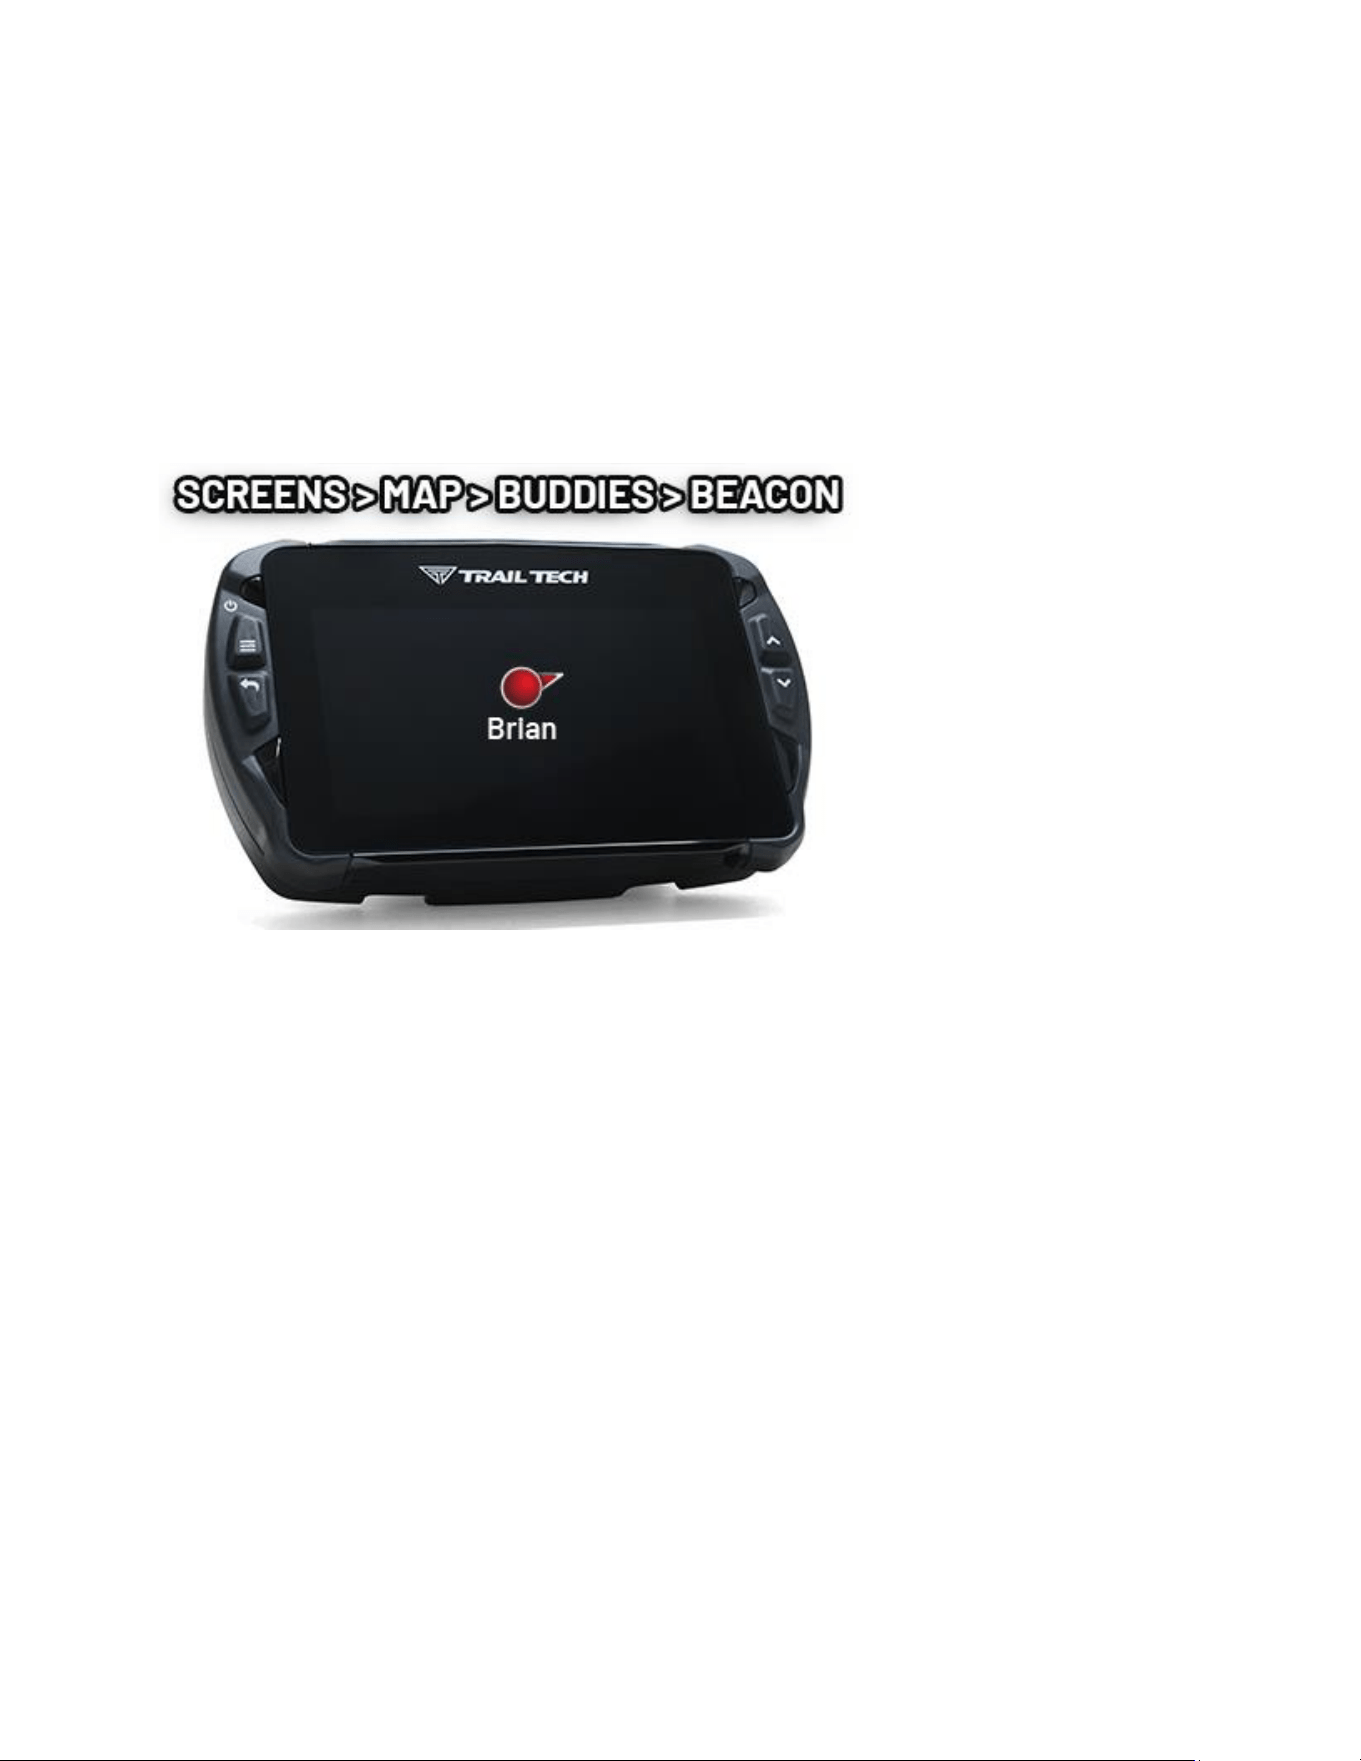
Join Buddy Group Help
Voyager Pro4 scans the area for available buddy groups. If a group appears in
the list, tap it to join.
Create Buddy Group Help
If no group exists, create one by entering a group name, selecng the group
size, and tapping Create Group.
Smaller group sizes allow faster screen updates.
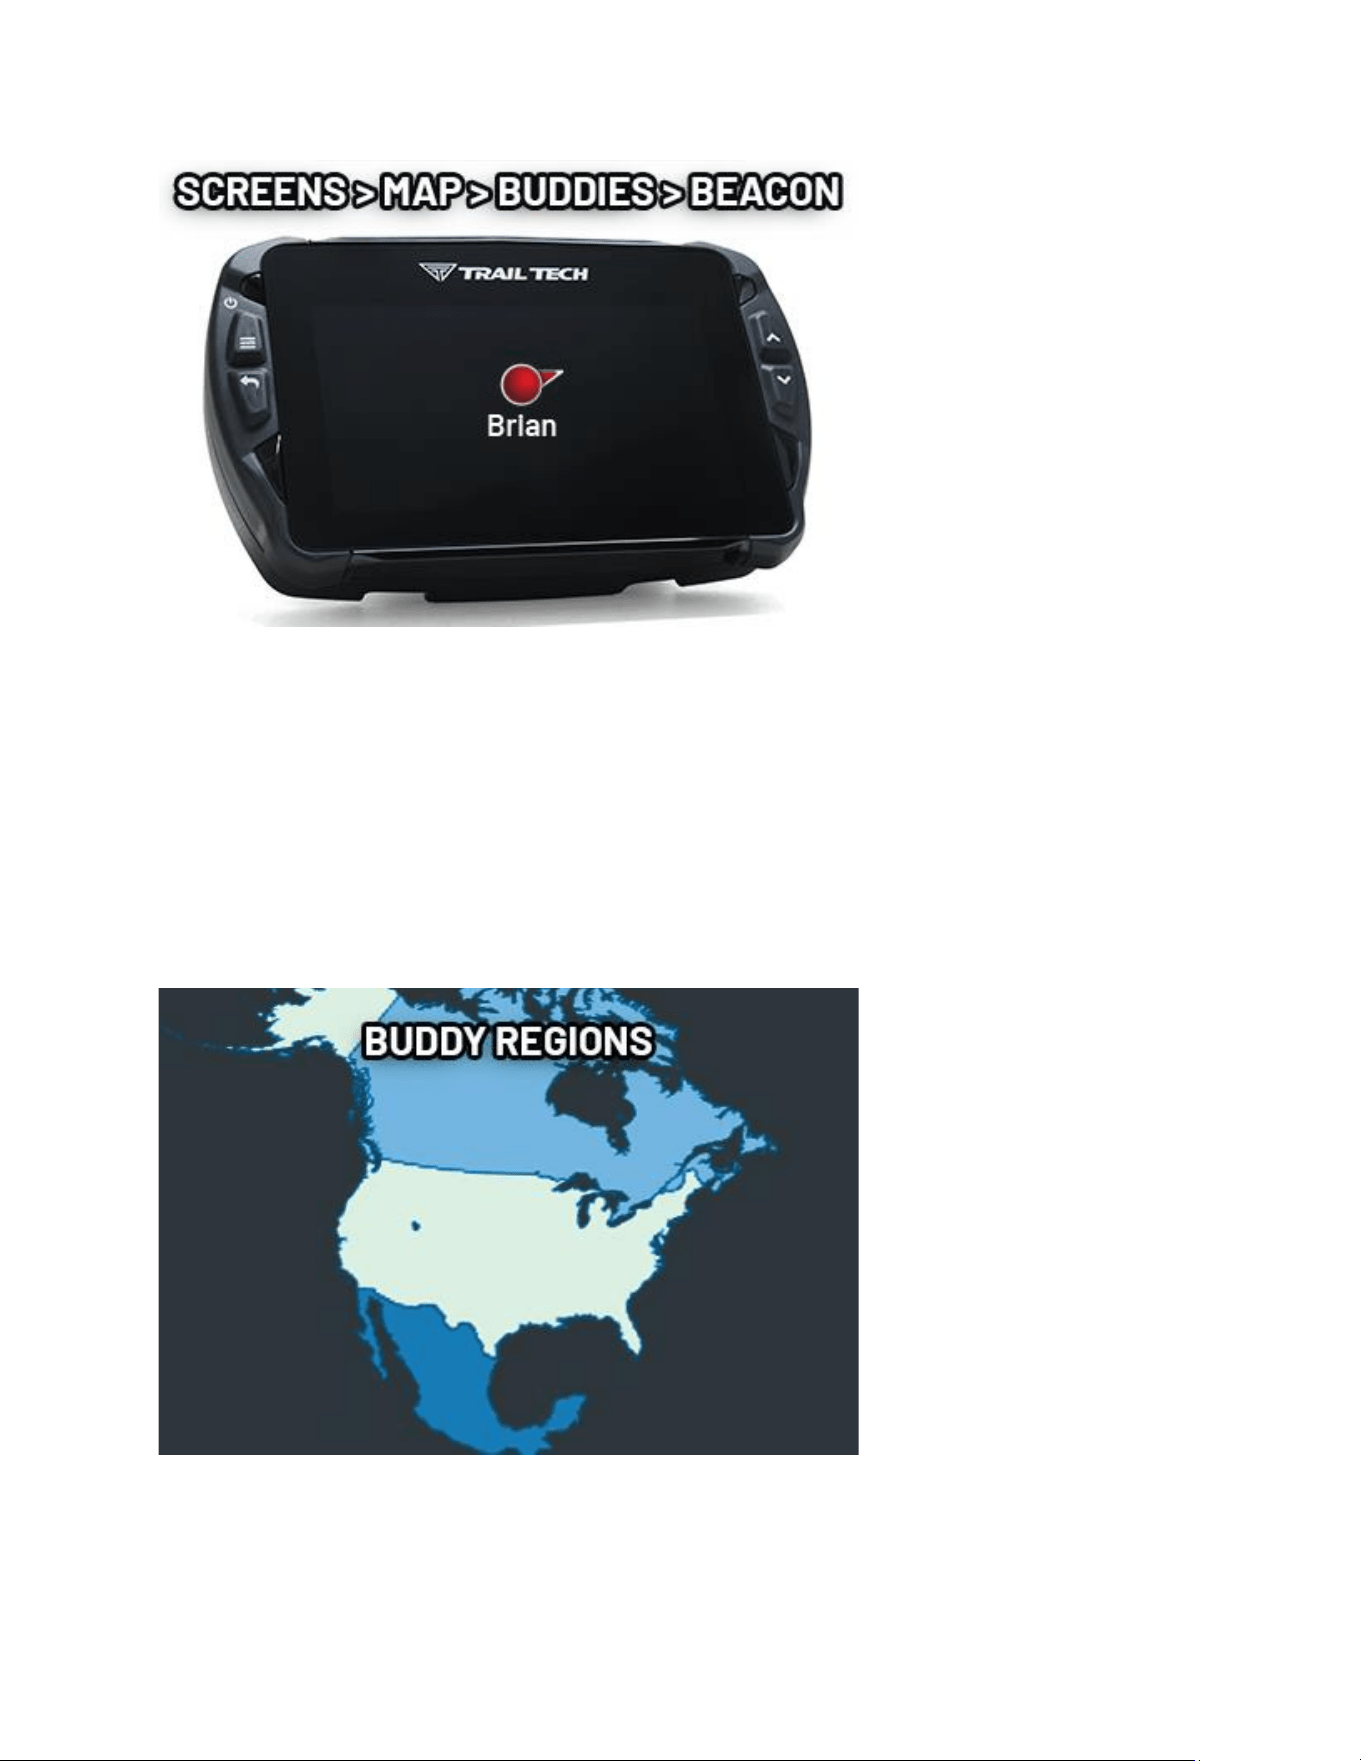
Buddy Beacon Help
When you acvate Buddy Beacon, your marker ashes red on other riders'
screens. Use it to draw immediate aenon to your locaon within the group.
If a rider is out of V2V radio range, the beacon cannot update on that rider's
screen unl signal returns. Their display will connue to show your last known
locaon unl a new posion is received.
Route to Buddy Beacon Help
When a rider has an acve Buddy Beacon, you can set that rider as a
desnaon and navigate toward the reported locaon. This provides a quick
way to regroup or reach a stopped rider.
The displayed desnaon is based on the rider's latest reported posion and
will update as new buddy data is received.
Buddy Regions Help
Buddy Regions
Buddy Tracking radio frequencies are currently restricted from operang in
Europe. Voyager Pro4 will funcon normally, except buddy tracking will be
disabled when in that region. See the map below for acve regions.
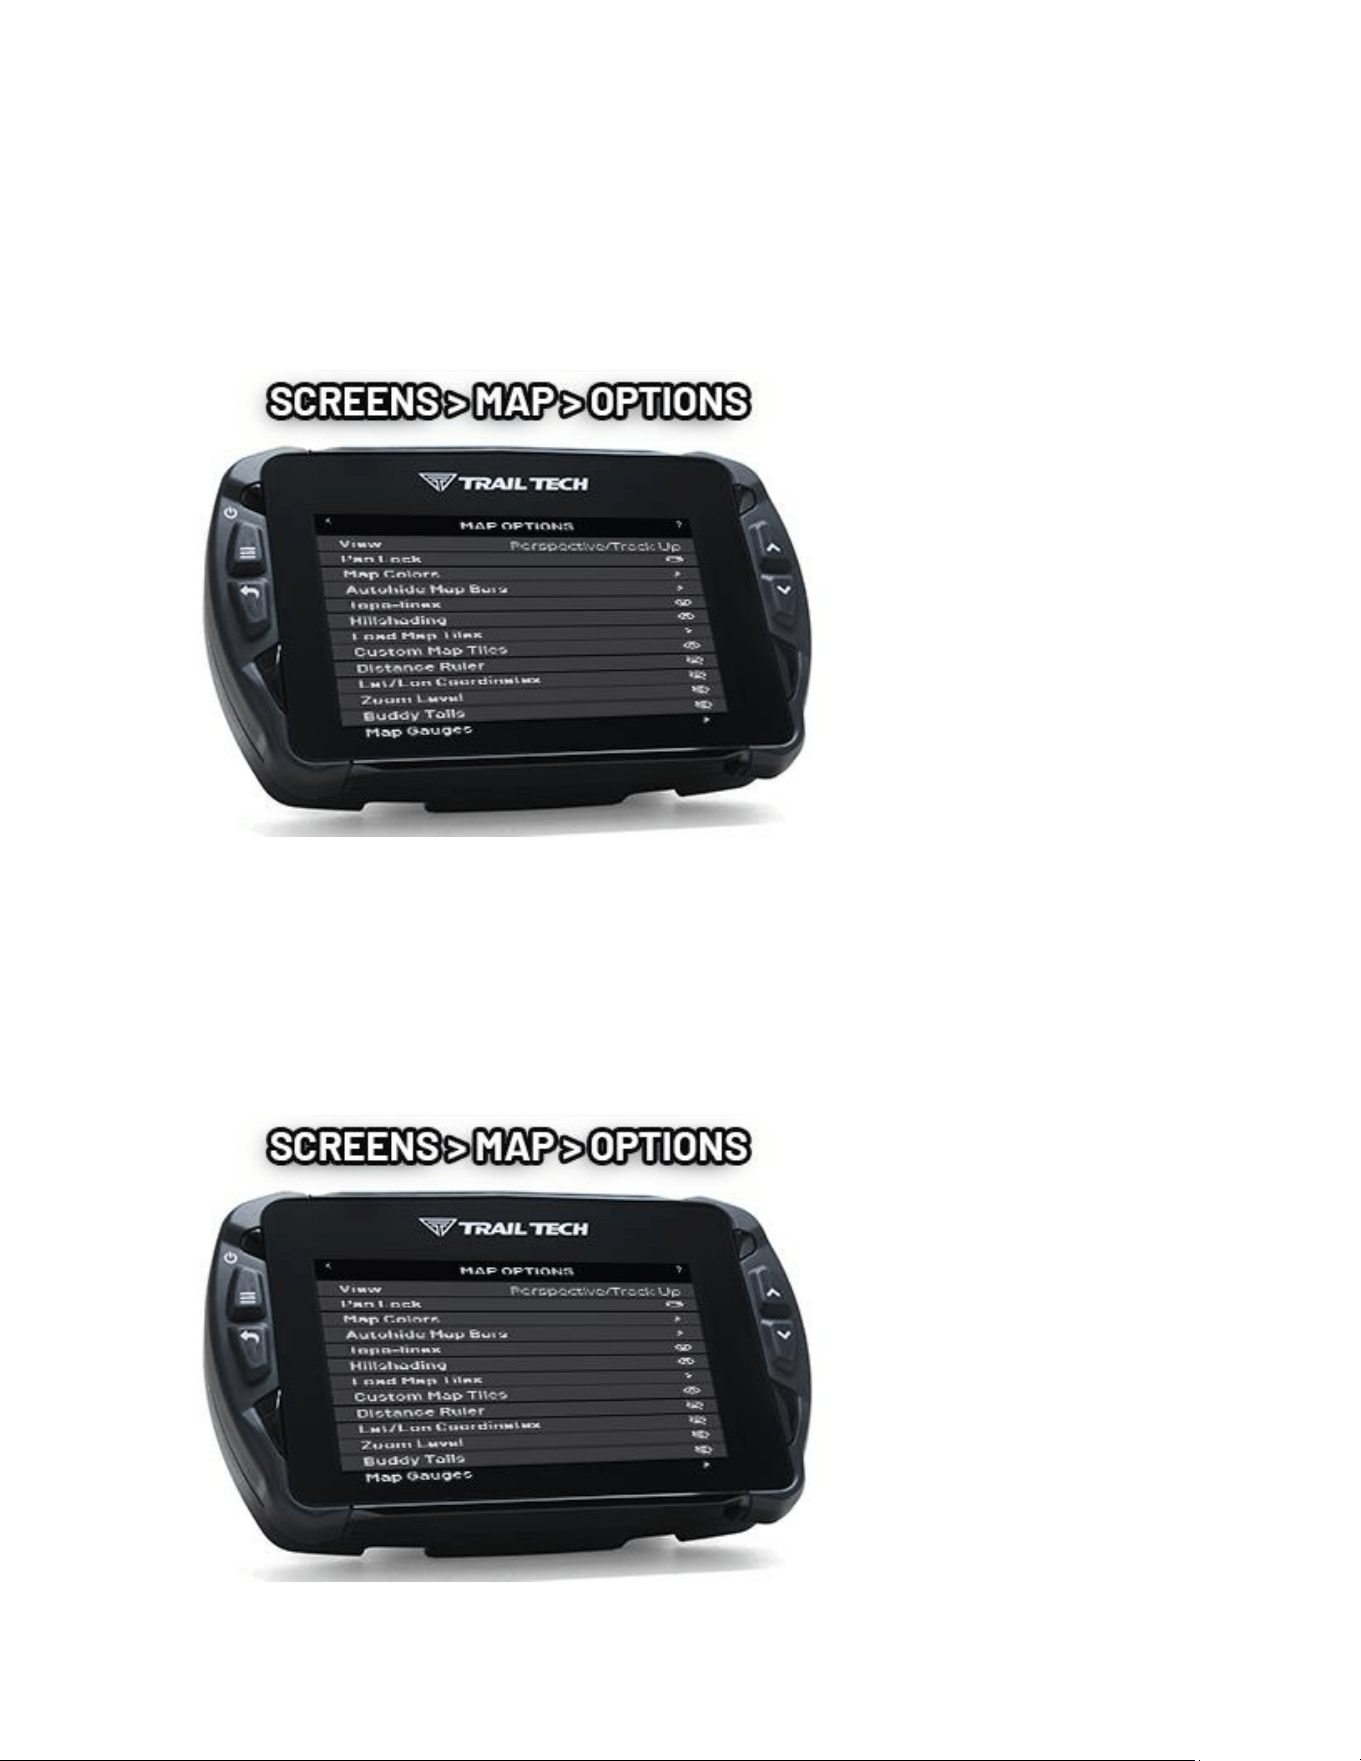
Map Options Help
In the map mini-menu, tap the Opons icon to open map opons. This menu
includes Custom Maps for imporng and managing map les, and Manage
Storage for removing custom maps or base, topo, and hillshade data.
View modes include Perspecve, Flat, North Up, Track Up, and Track-Up / Flat
Oset. Track-Up / Flat Oset places your posion lower on the screen to show
more of the map ahead.
Display controls include Pan Lock, Map Colors, and an auto-hide opon for the
boom menu bar. Points of Interest categories such as food, lodging, gas, and
parking can be shown or hidden.

Addional toggles control topo lines, hill shading, distance ruler,
latude/longitude coordinates, zoom level, and Buddy Tails.
Map Gauges lets you select which two instruments are displayed overlaid on
the map screen.
Manage Map Storage Help
The Manage Map Storage screen shows available storage memory and how it is
being used. Each map type displays its le size and includes a trash can icon for
removal.
The following map types are listed:
- Base Maps : Core map data used for navigaon.
- Topo Maps : Elevaon contour data.
- Hillshading Maps : Shaded relief layers for terrain detail.
- Custom Maps : Imported GeoPDF and MBTiles les.
Tap the trash can icon next to a map type to delete that data and free up
storage space.
Note: Deleted maps are permanently removed from the device. To restore
base, topo, or hillshading maps, download the map pack from trailtech.net and
import it using a MicroSD card.
Map Colors Help
Customize the colors of tracks, routes and waypoints for the map screen.
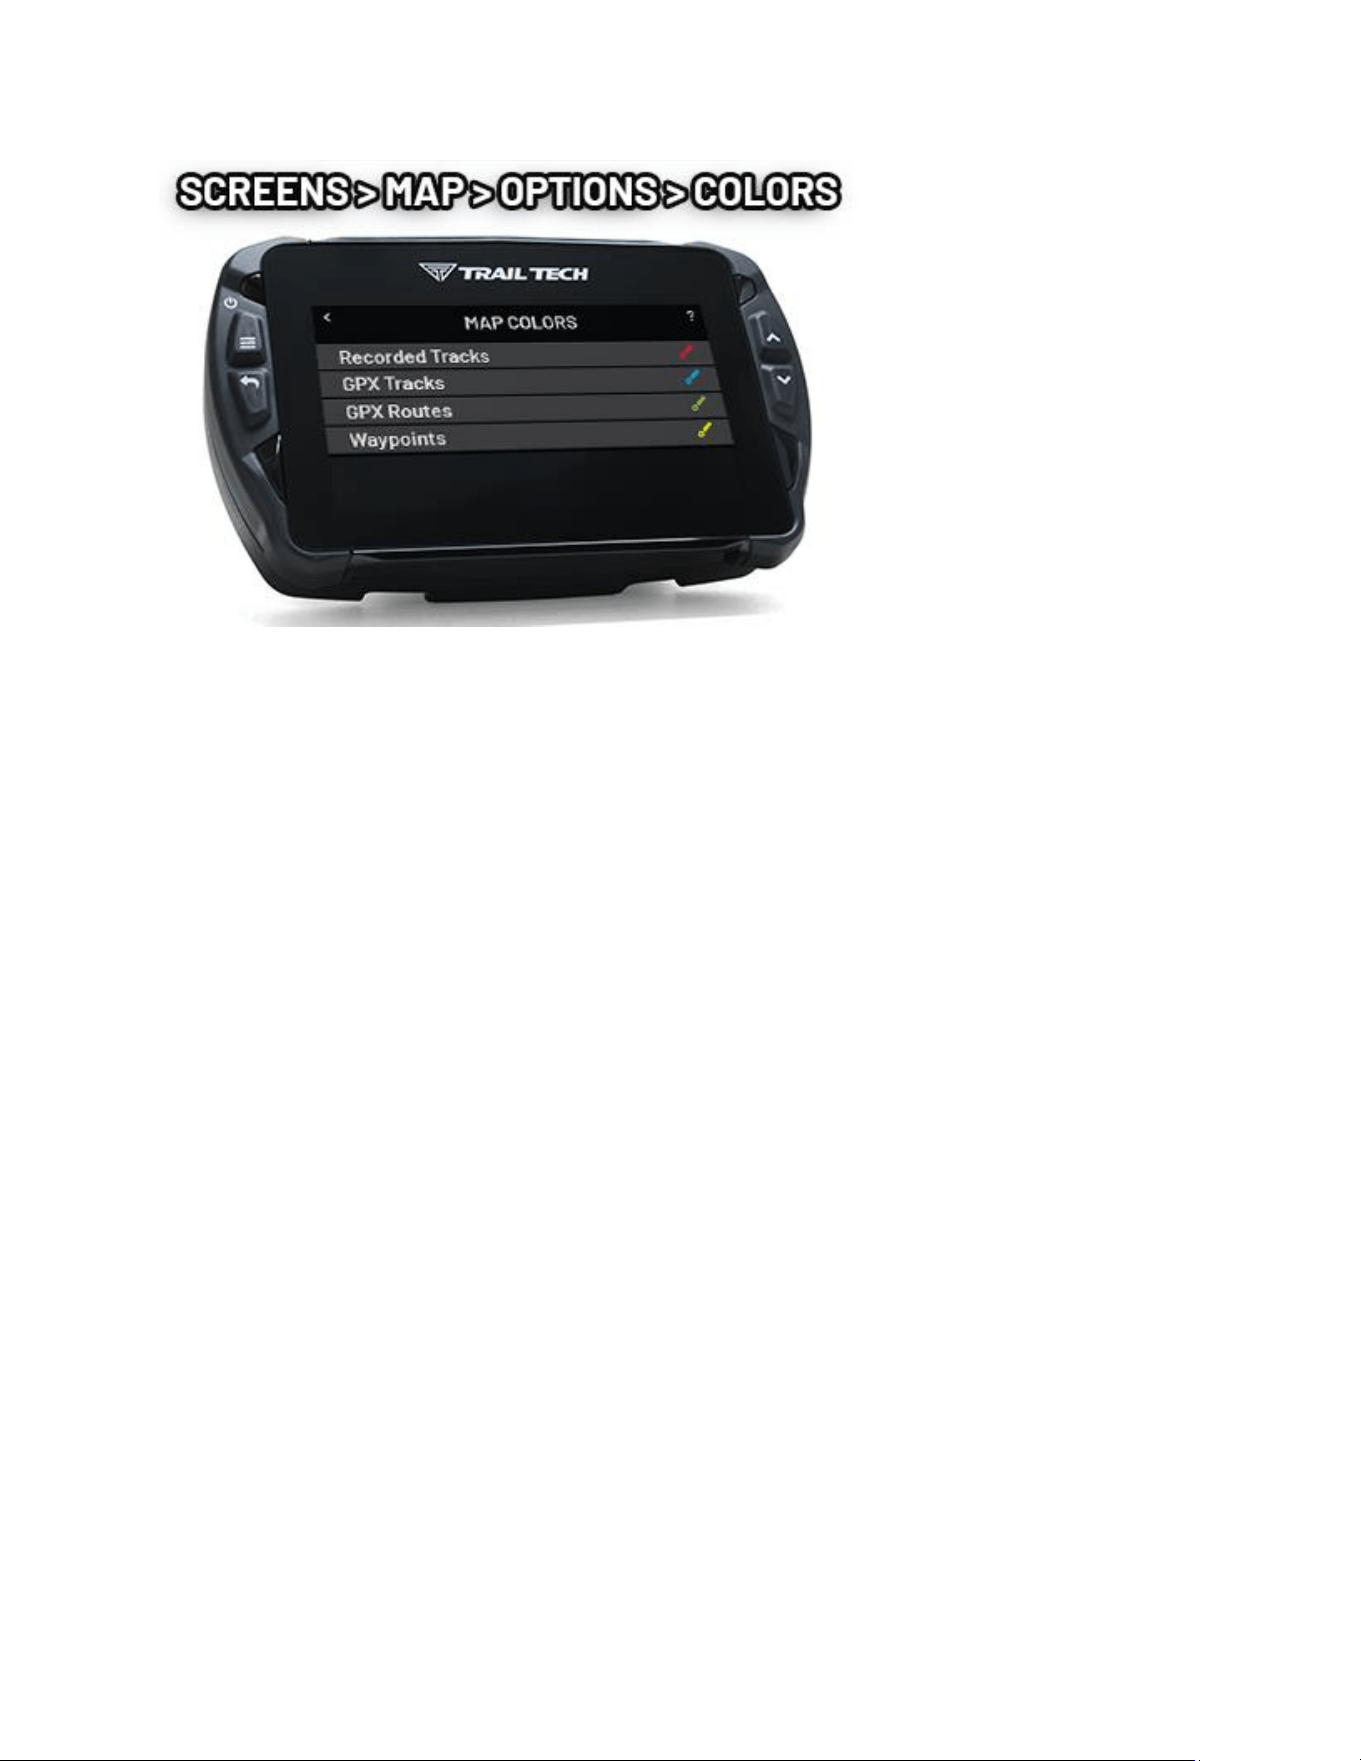
Recorded Tracks
Recorded Tracks are the current tracks being recorded using the track logging
features.
GPX Tracks
GPX Tracks are tracks that have been loaded into internal memory by loading a
GPX le.
GPX Routes
GPX Routes are like GPX Tracks. They are called Routes to disnguish them from
Tracks for ride planning. Simply put, you haven't ridden a Route yet, but you
have ridden all the Tracks.
Waypoint Colors
Finally, you can change the default marker color for new waypoints. Later you
can change waypoint colors individually by tapping it on the map screen to
open the waypoint slideout menu.
Color Picker Help
Tap a swatch to select a new color. Press the back buon to cancel.
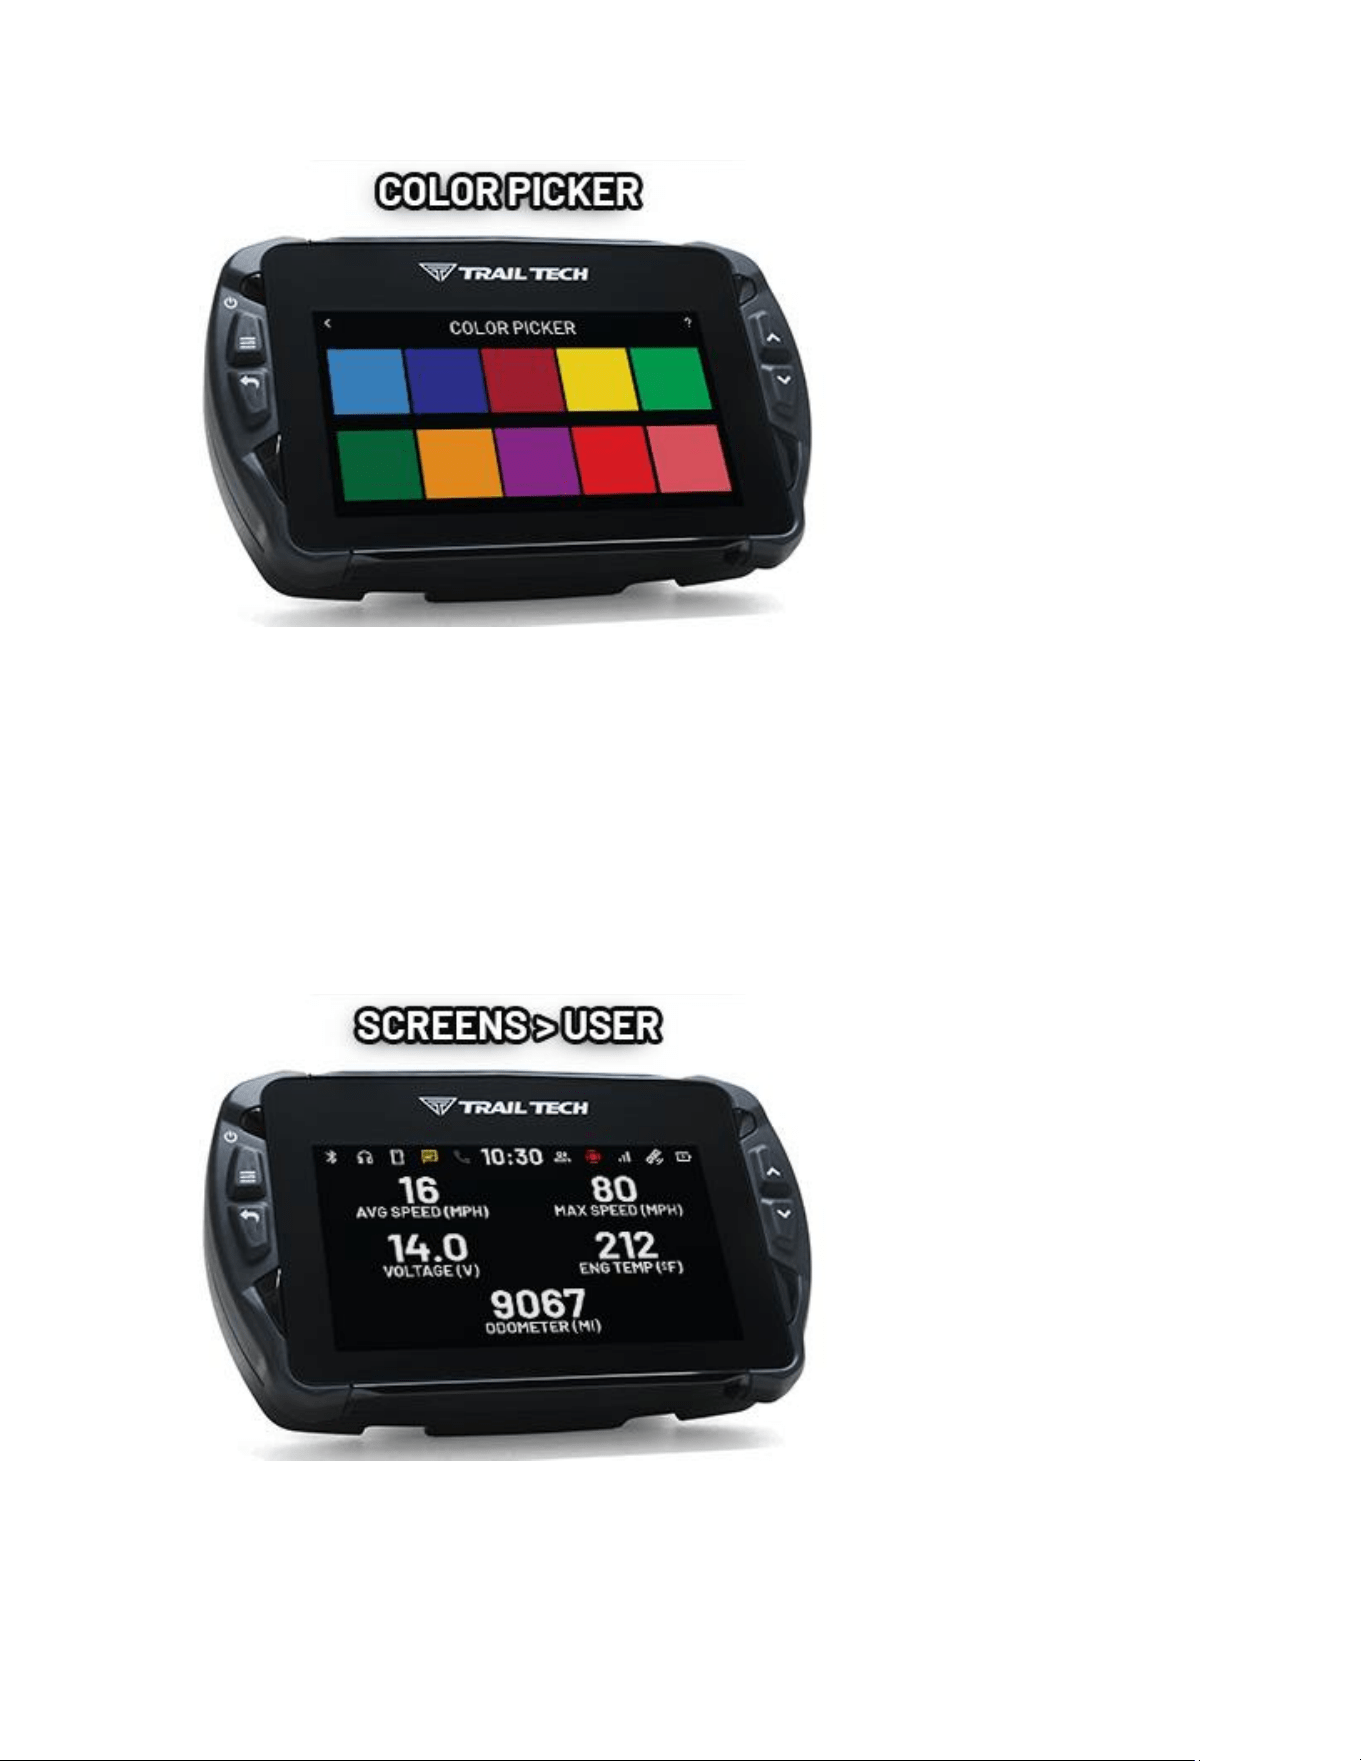
User Screen Help
The user screen is customizable. You can choose 1-6 gauges from a long list of
available readouts. Select fewer gauges to make the remaining ones larger.
While on the user screen, press the back buon to choose dierent gauges.
Long-press a gauge to reset it, if applicable.
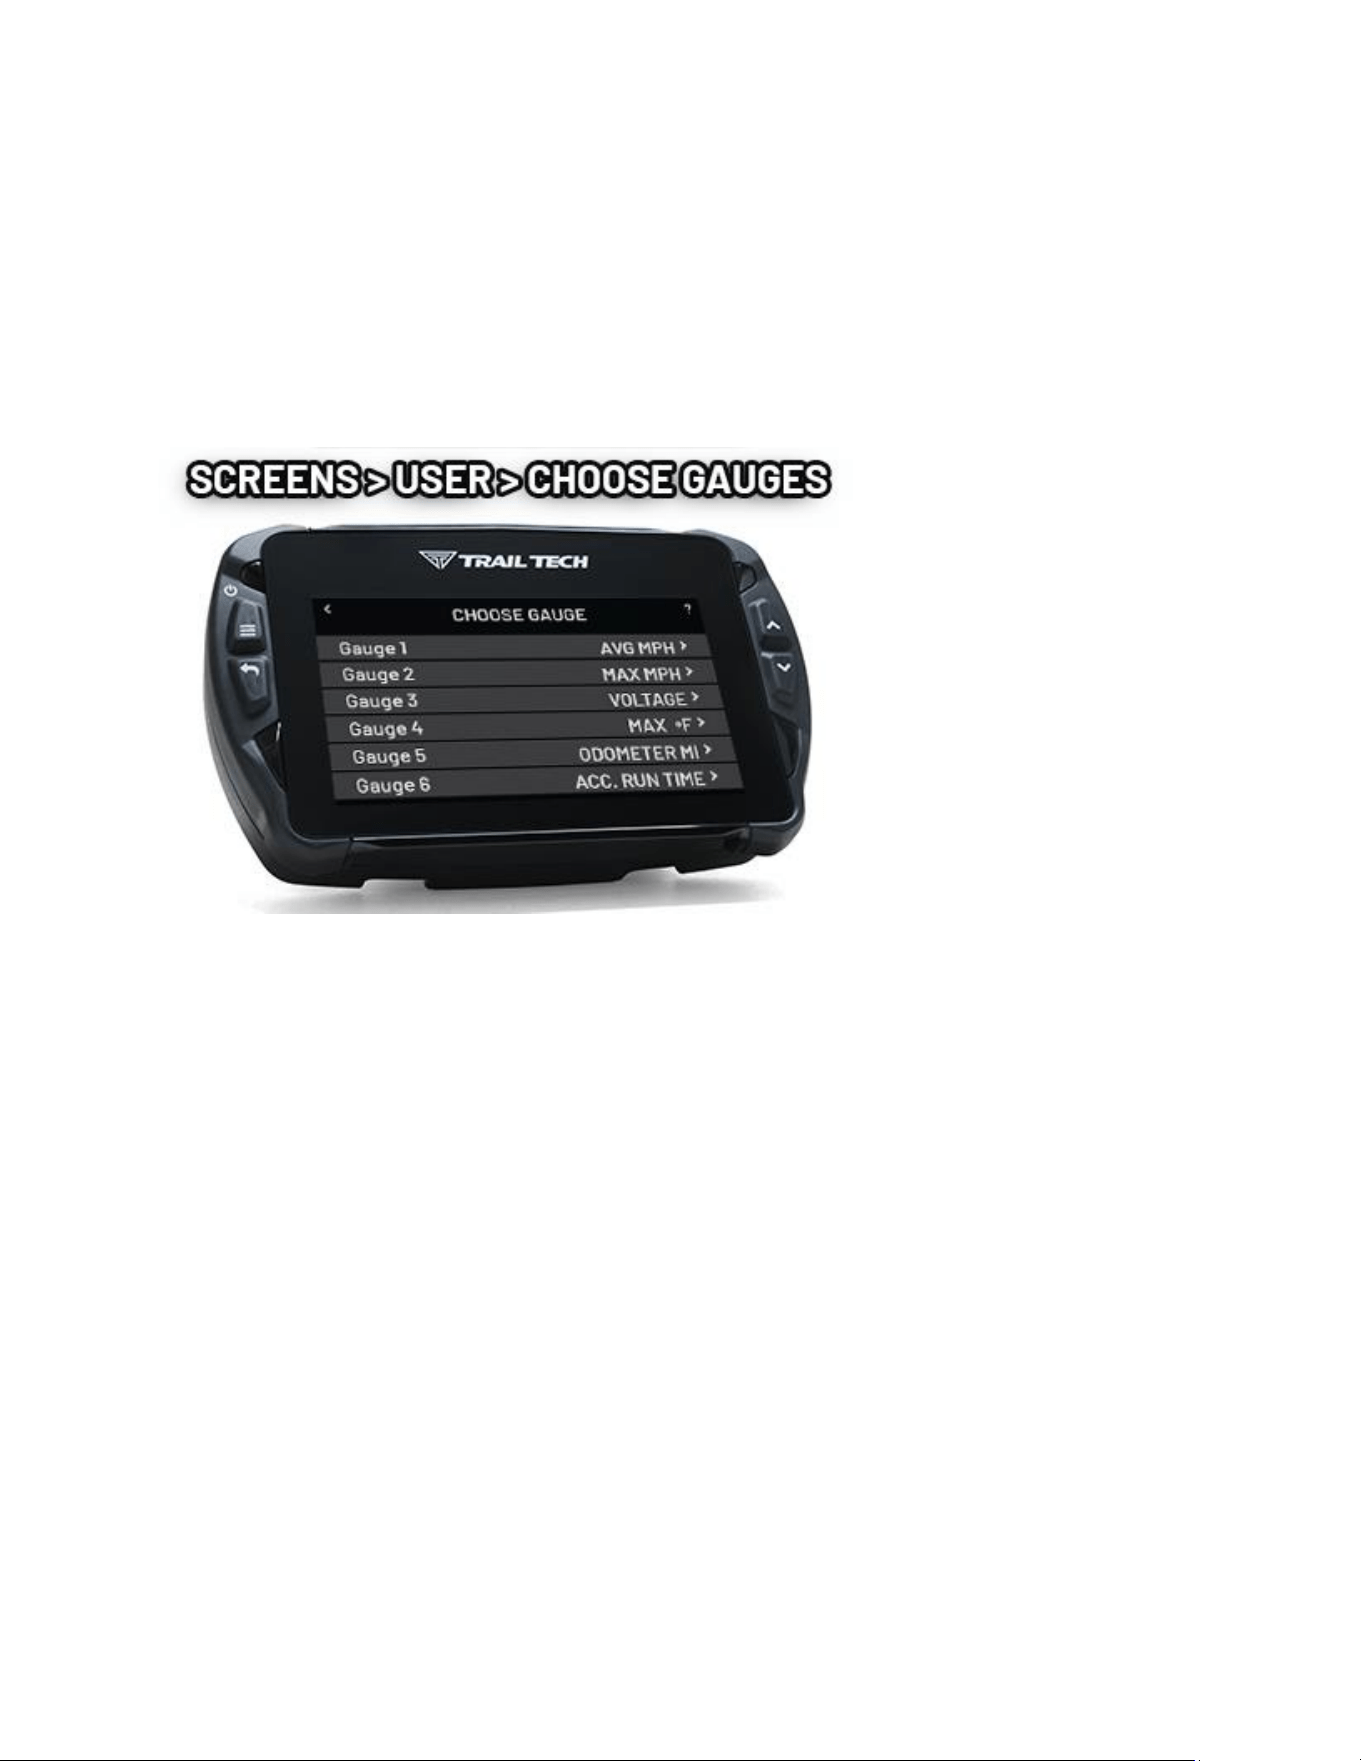
Choose Gauges Help
Tap each gauge posion to bring up the list of available selecons.
The top opon is 'None.' Selecng nothing for a posion will cause the other
readouts to increase in size on the user screen.
To open this menu, navigate to the user screen and press the back buon.
Media Screen Help
The media screen is the center for phone and headset interacon.
You can control the song playing on your phone, change headset volume levels,
change the music source, and access phone dialing, call history and messaging
features. The headset can control music pausing and can answer incoming calls.
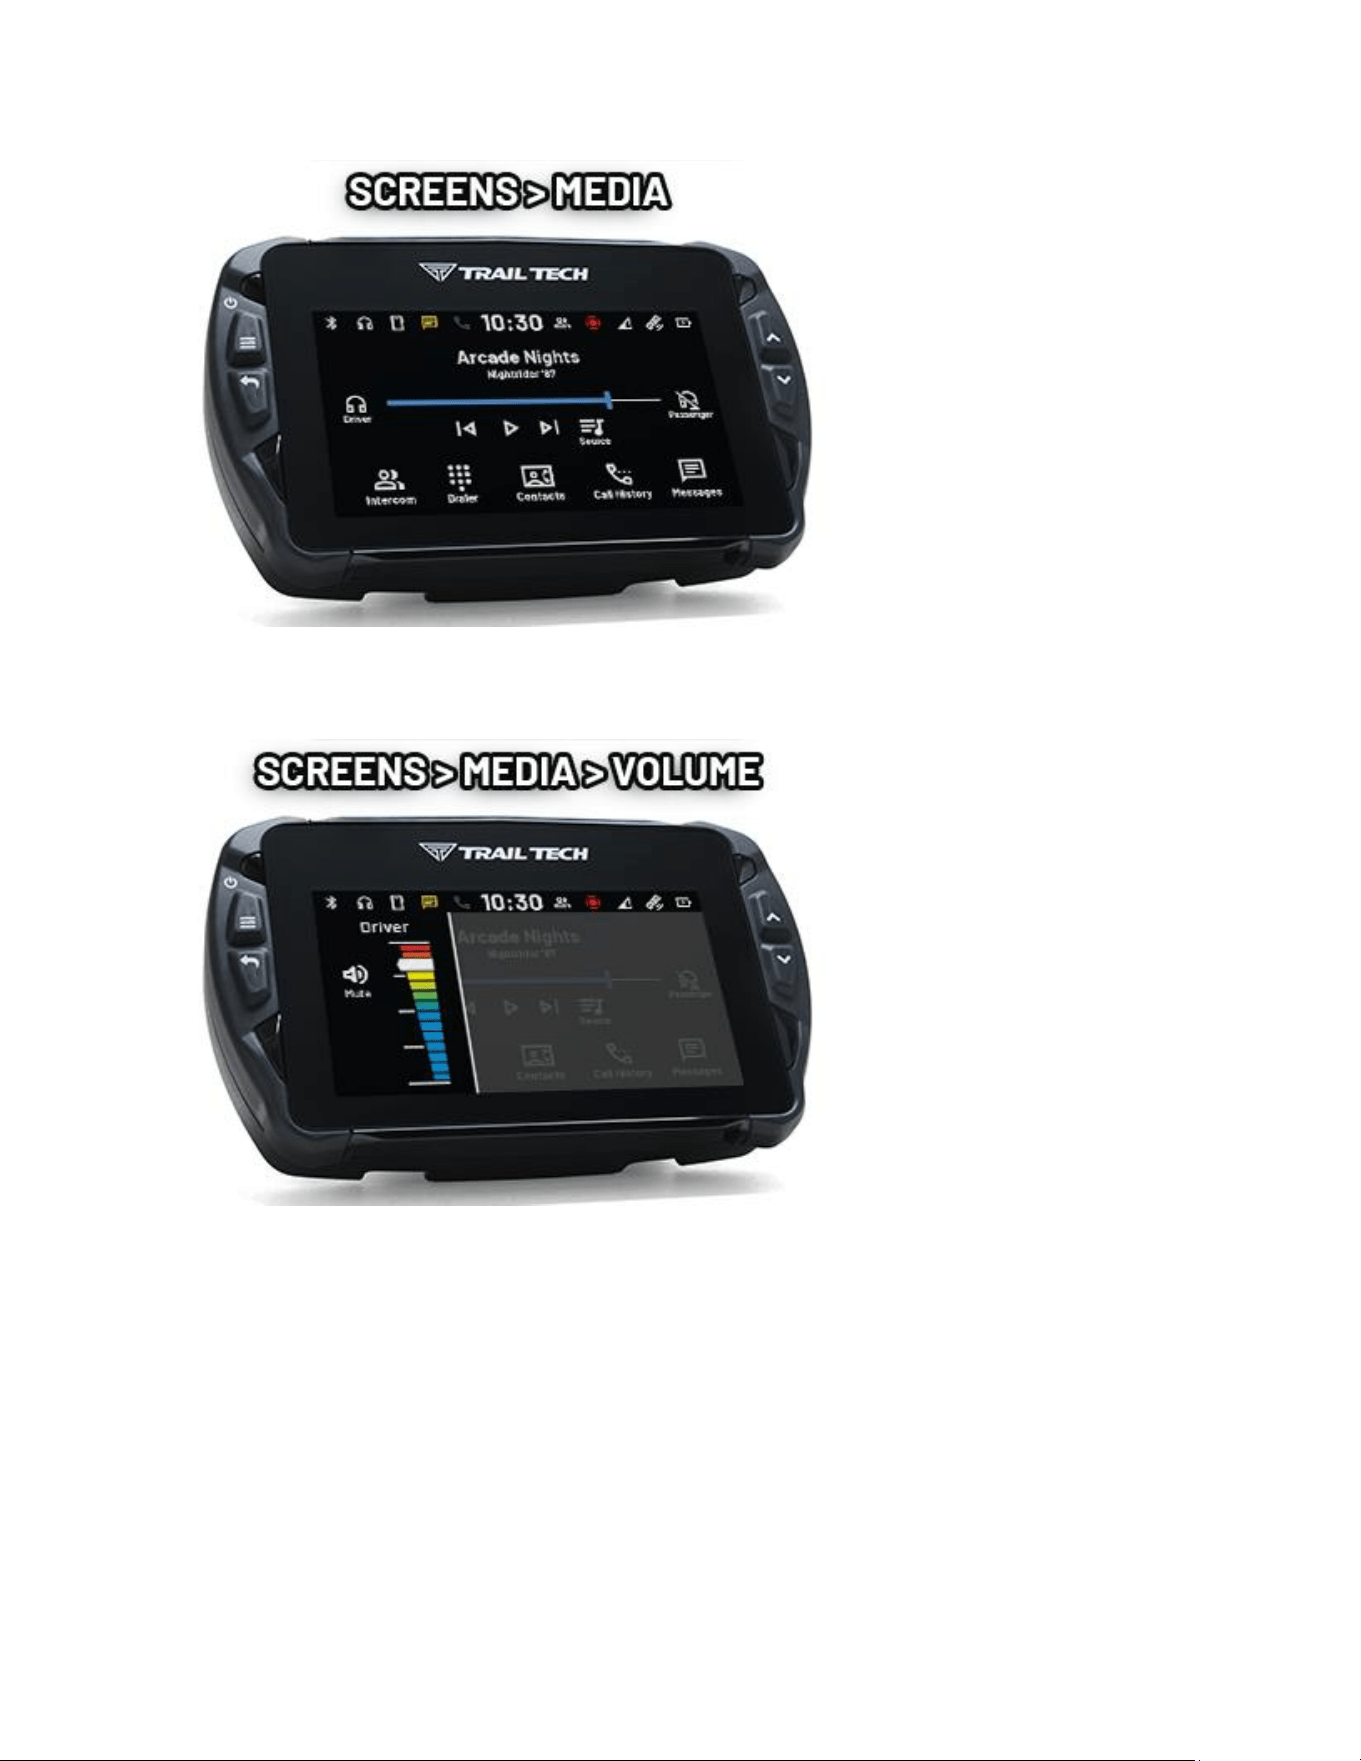
Tap the Driver or Passenger headphone icon to mute the sound to that device.
Press and hold the icon to open up a volume slider.
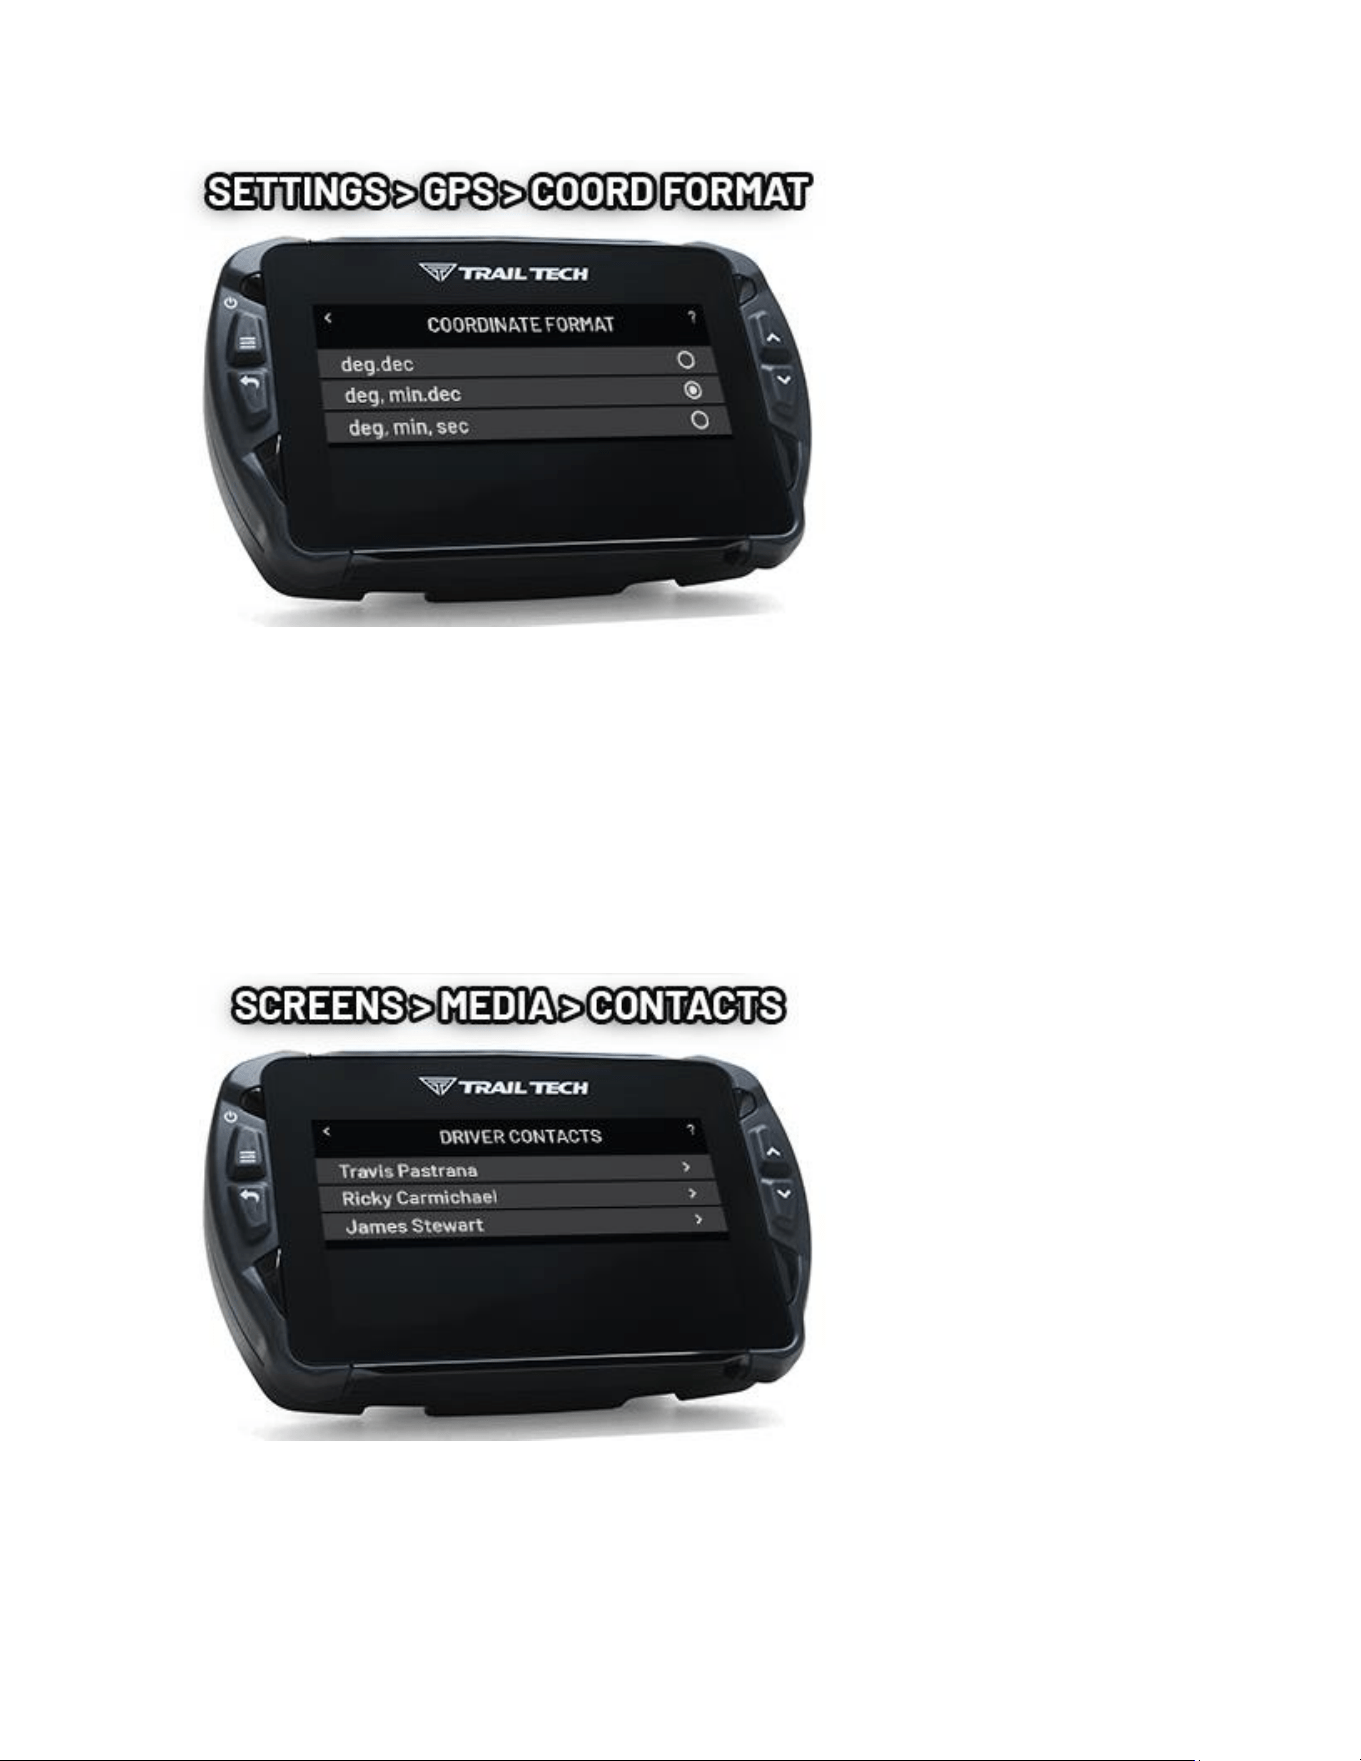
Music Source Help
Voyager Pro4 controls music playback, but it must know where to load the
music from.
Open the music source menu by pressing the back buon while on the media
screen, or by tapping the media source icon on the media screen.
Choose between loading music from the phone or from the MicroSD card.
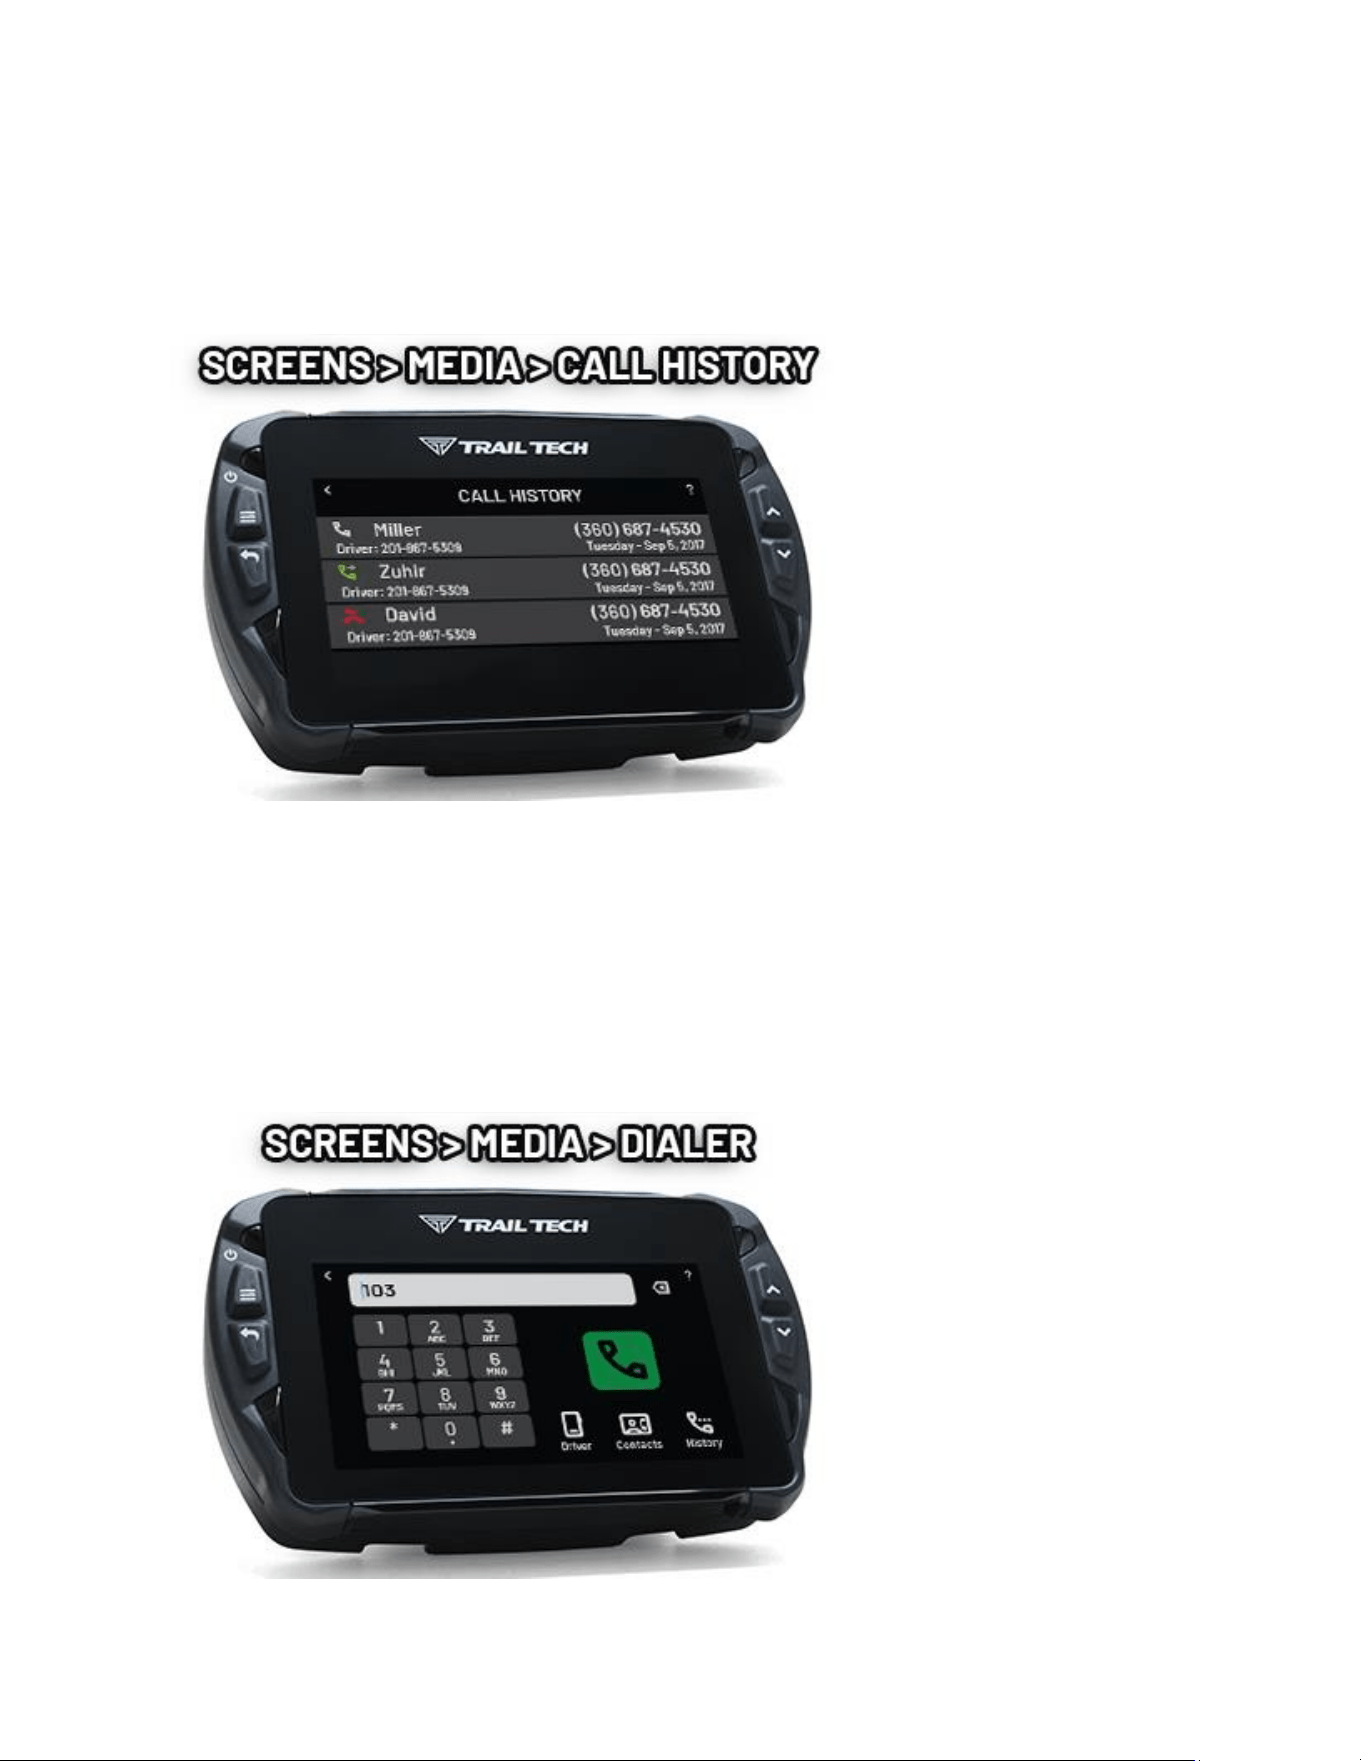
Driver Contacts Help
When a phone is paired to Voyager Pro4 as the "Driver's Phone," the contact list
can be accessed.
To open the contact list for the driver's phone, tap the Contacts icon on the
media screen.
Call History Help
When a phone is paired to Voyager Pro4 as the "Driver's Phone," the call history
list can be accessed.
Dialer Help
When a phone is paired to Voyager Pro4 as the "Driver's Phone," calls can be
placed using Voyager Pro4's onboard dial pad.
Open the dialer by tapping the Dialer icon the media screen.
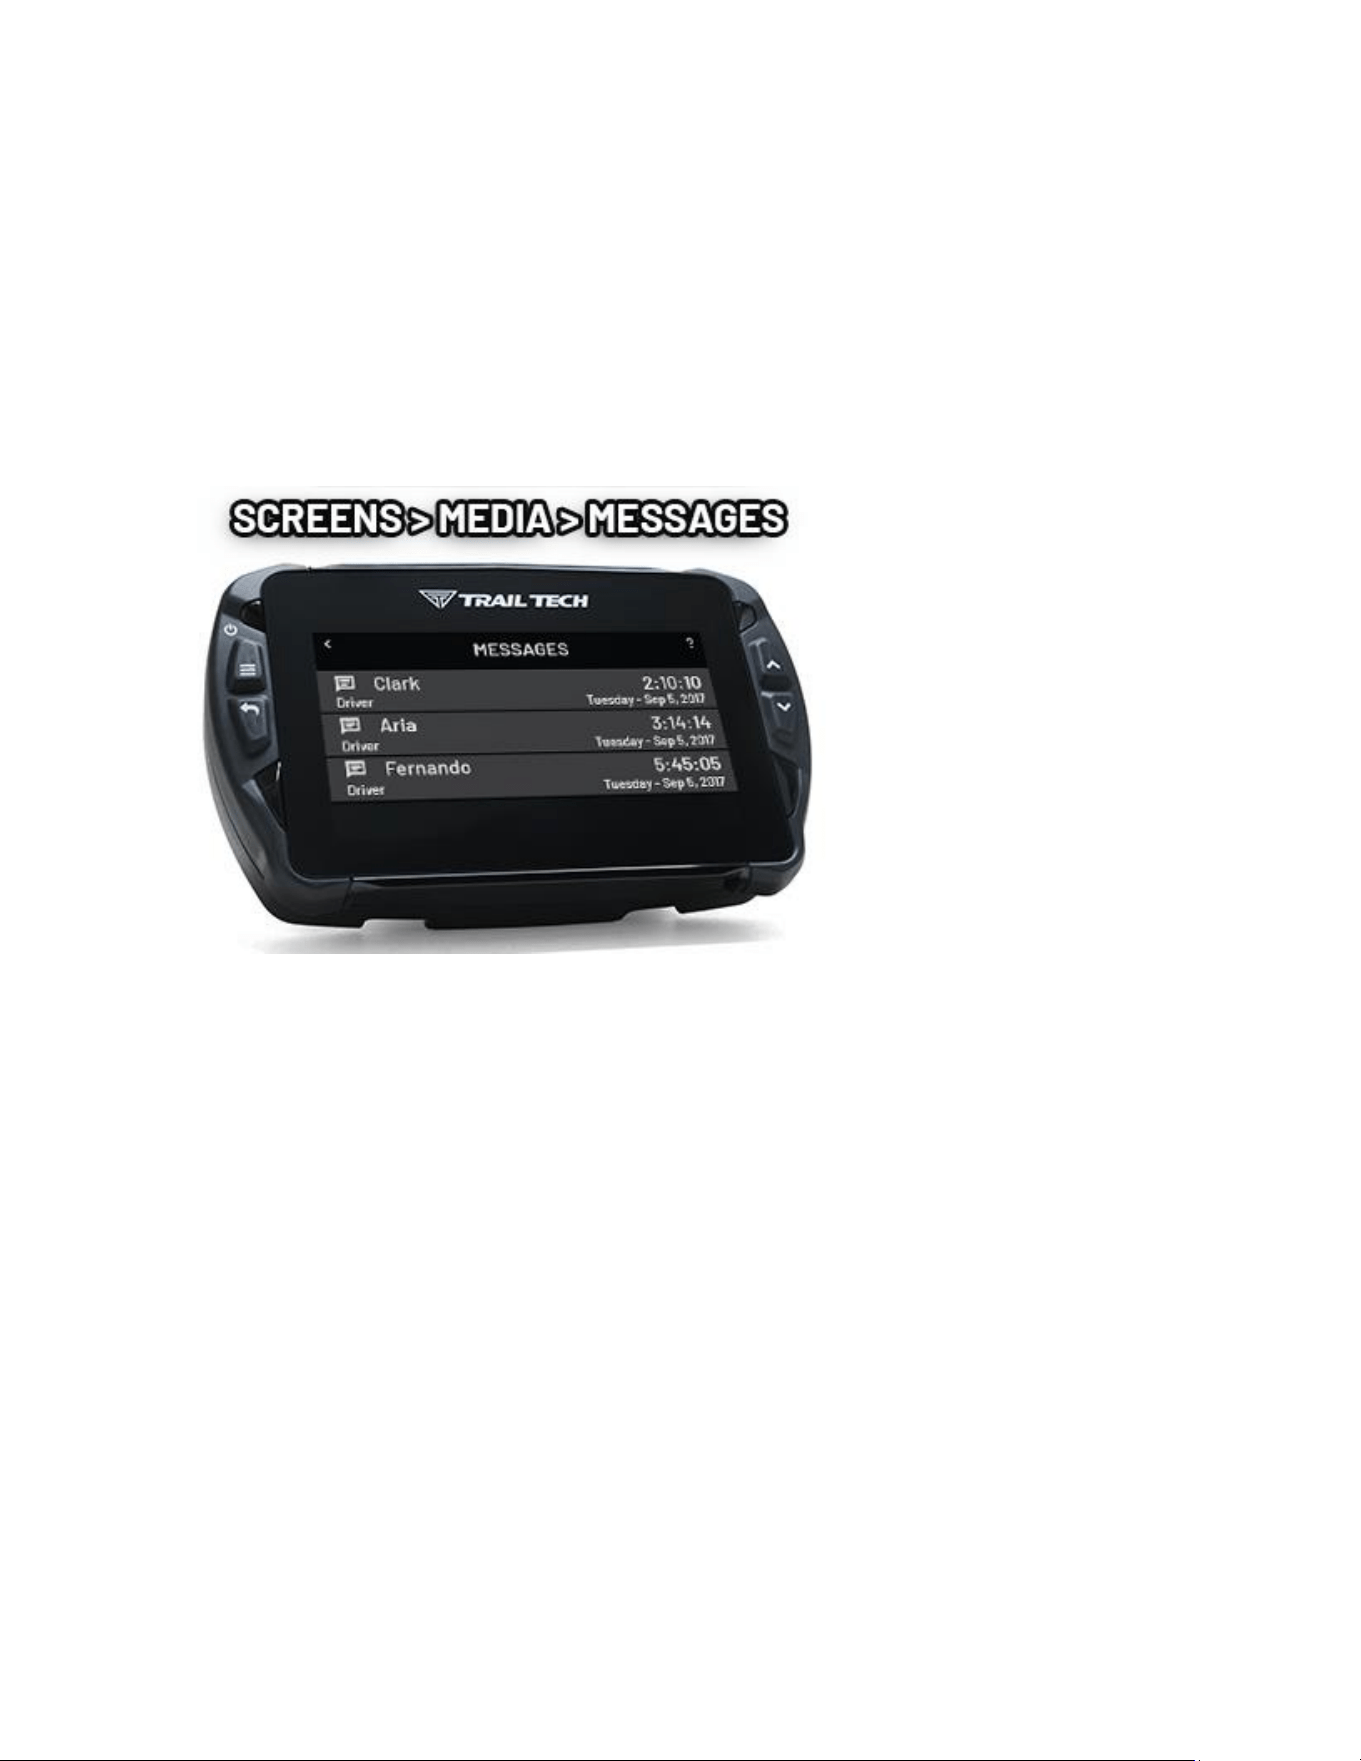
Messages Help
When a phone is paired to Voyager Pro4 as the "Driver's Phone," the messages
list can be accessed. For privacy, only messages that have occurred since pairing
the phone will appear.
Open the messages list by pressing the Messages icon on the media screen.
Stop Watch Screen Help
The stop watch screen is a tool used as a simple mer, or as a lap mer.
Tap the large circle to begin counng. Tap it again to take note of the rst lap o
to the side and start ming a new lap.
Icons at the boom can pause, resume, and reset the mer.
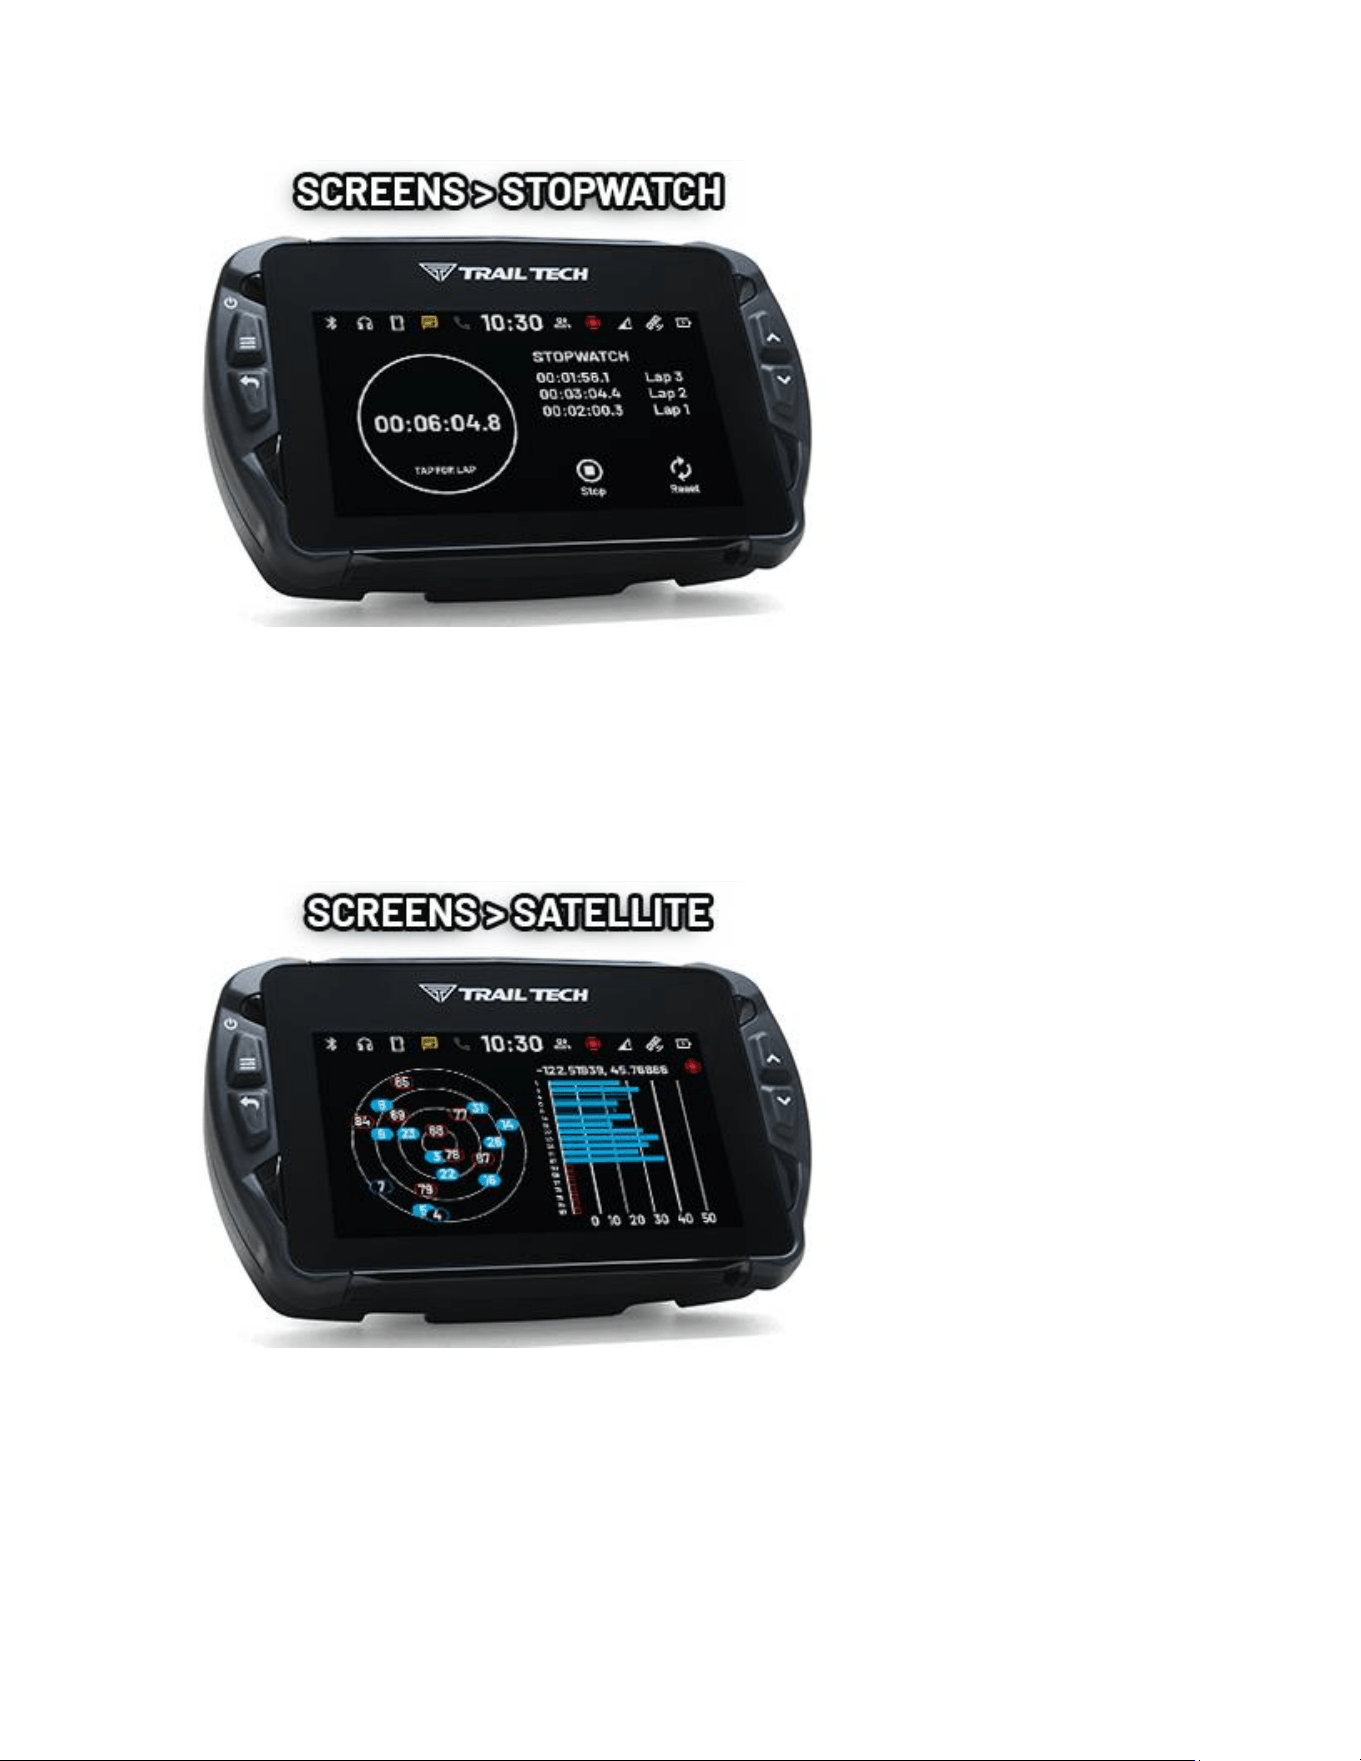
Satellite Screen Help
The satellite screen displays a graph of the sky and visible GPS satellites in orbit.
The graph to the side shows the relave signal strength of each satellite.
Settings Help
The Sengs Menu is where Voyager Pro4 is customized to your needs. You can
access the sengs menu from the main screens by pressing the menu buon.
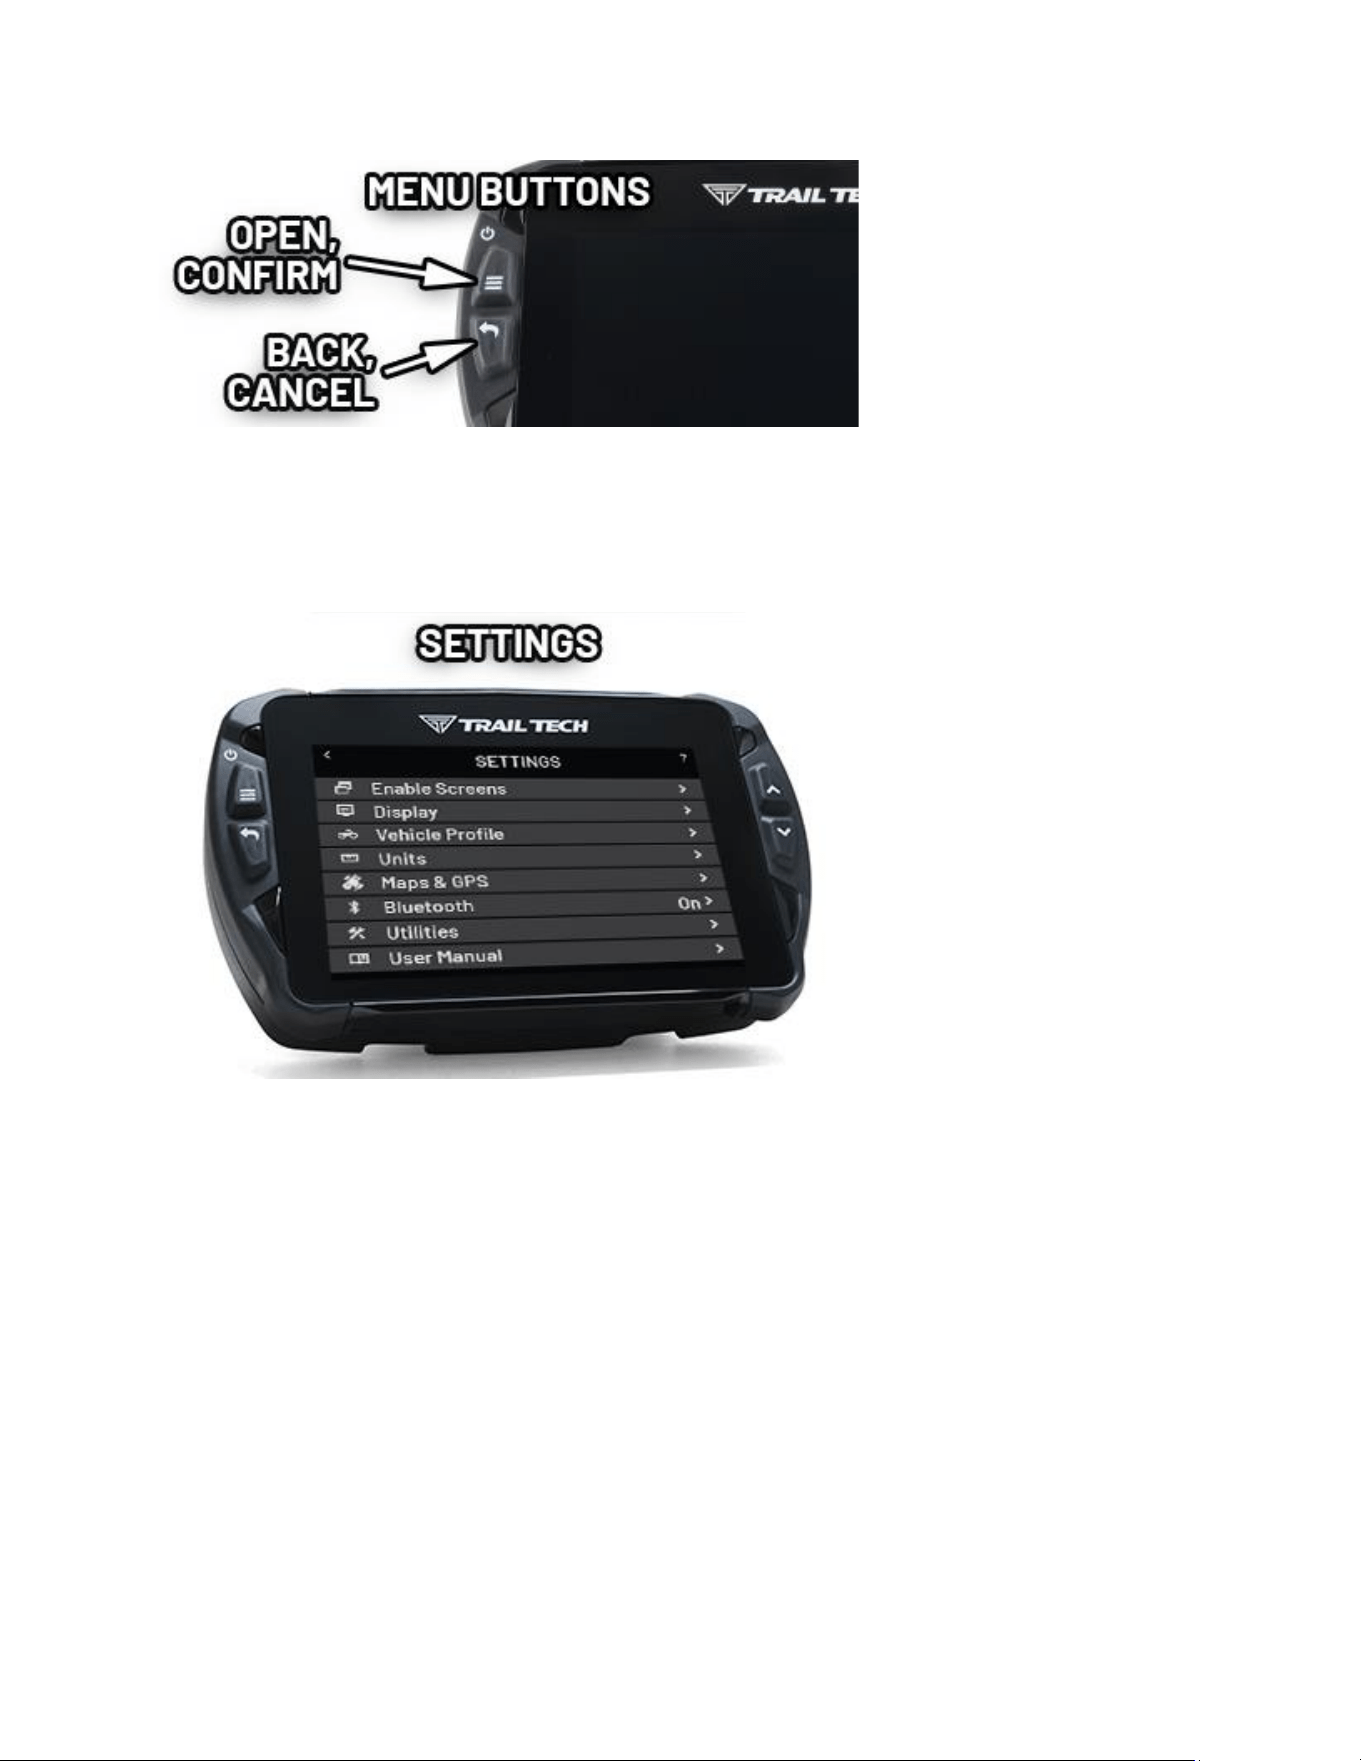
In the sengs menu you can hide main screens, adjust the display sleep mers,
customize the speed source, wheel size and alert thresholds, select dierent
measurement units, connect Bluetooth devices, use the le and data ulies,
and more.
Enable Screens Help
The main screens include Cluster, TachBar, Map, User, Media, Stopwatch, and
GPS Satellites screens. Toggle to disable an individual screen from appearing in
the scroll rotaon. Customize the gauges shown on the User Screen in the
Choose User Screen Gauges menu item.
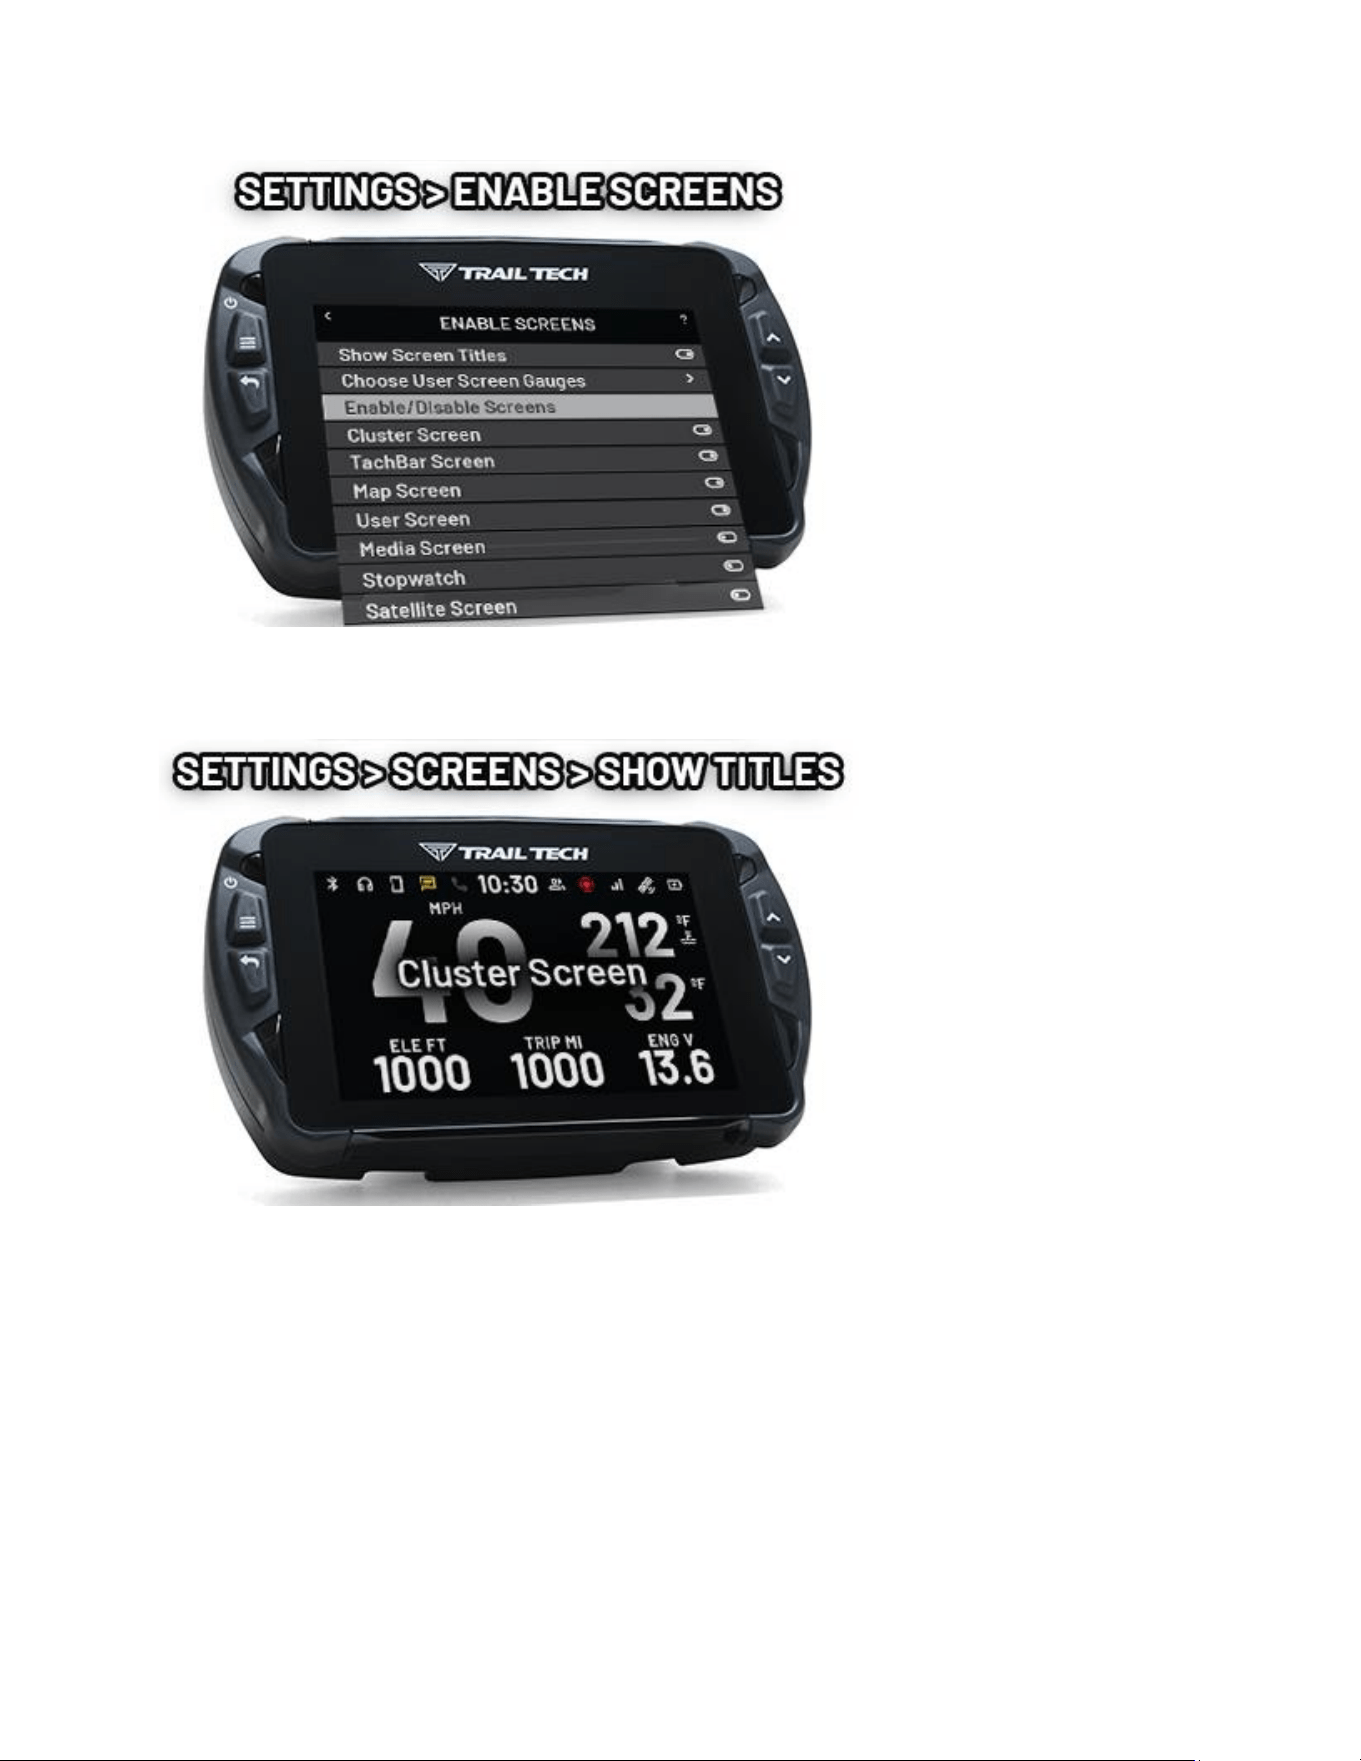
When scrolling through screens, the screen name appears to signal the change.
To disable the show screen tle feature, toggle it.
Display Setup Help
The display setup screen controls the screen's backlight levels, the night mode
theme, and the sleep mer.
Voyager Pro4 has an ambient light sensor. When it gets dark outside, night
mode switches the map screen to a style that is easier to read at night.
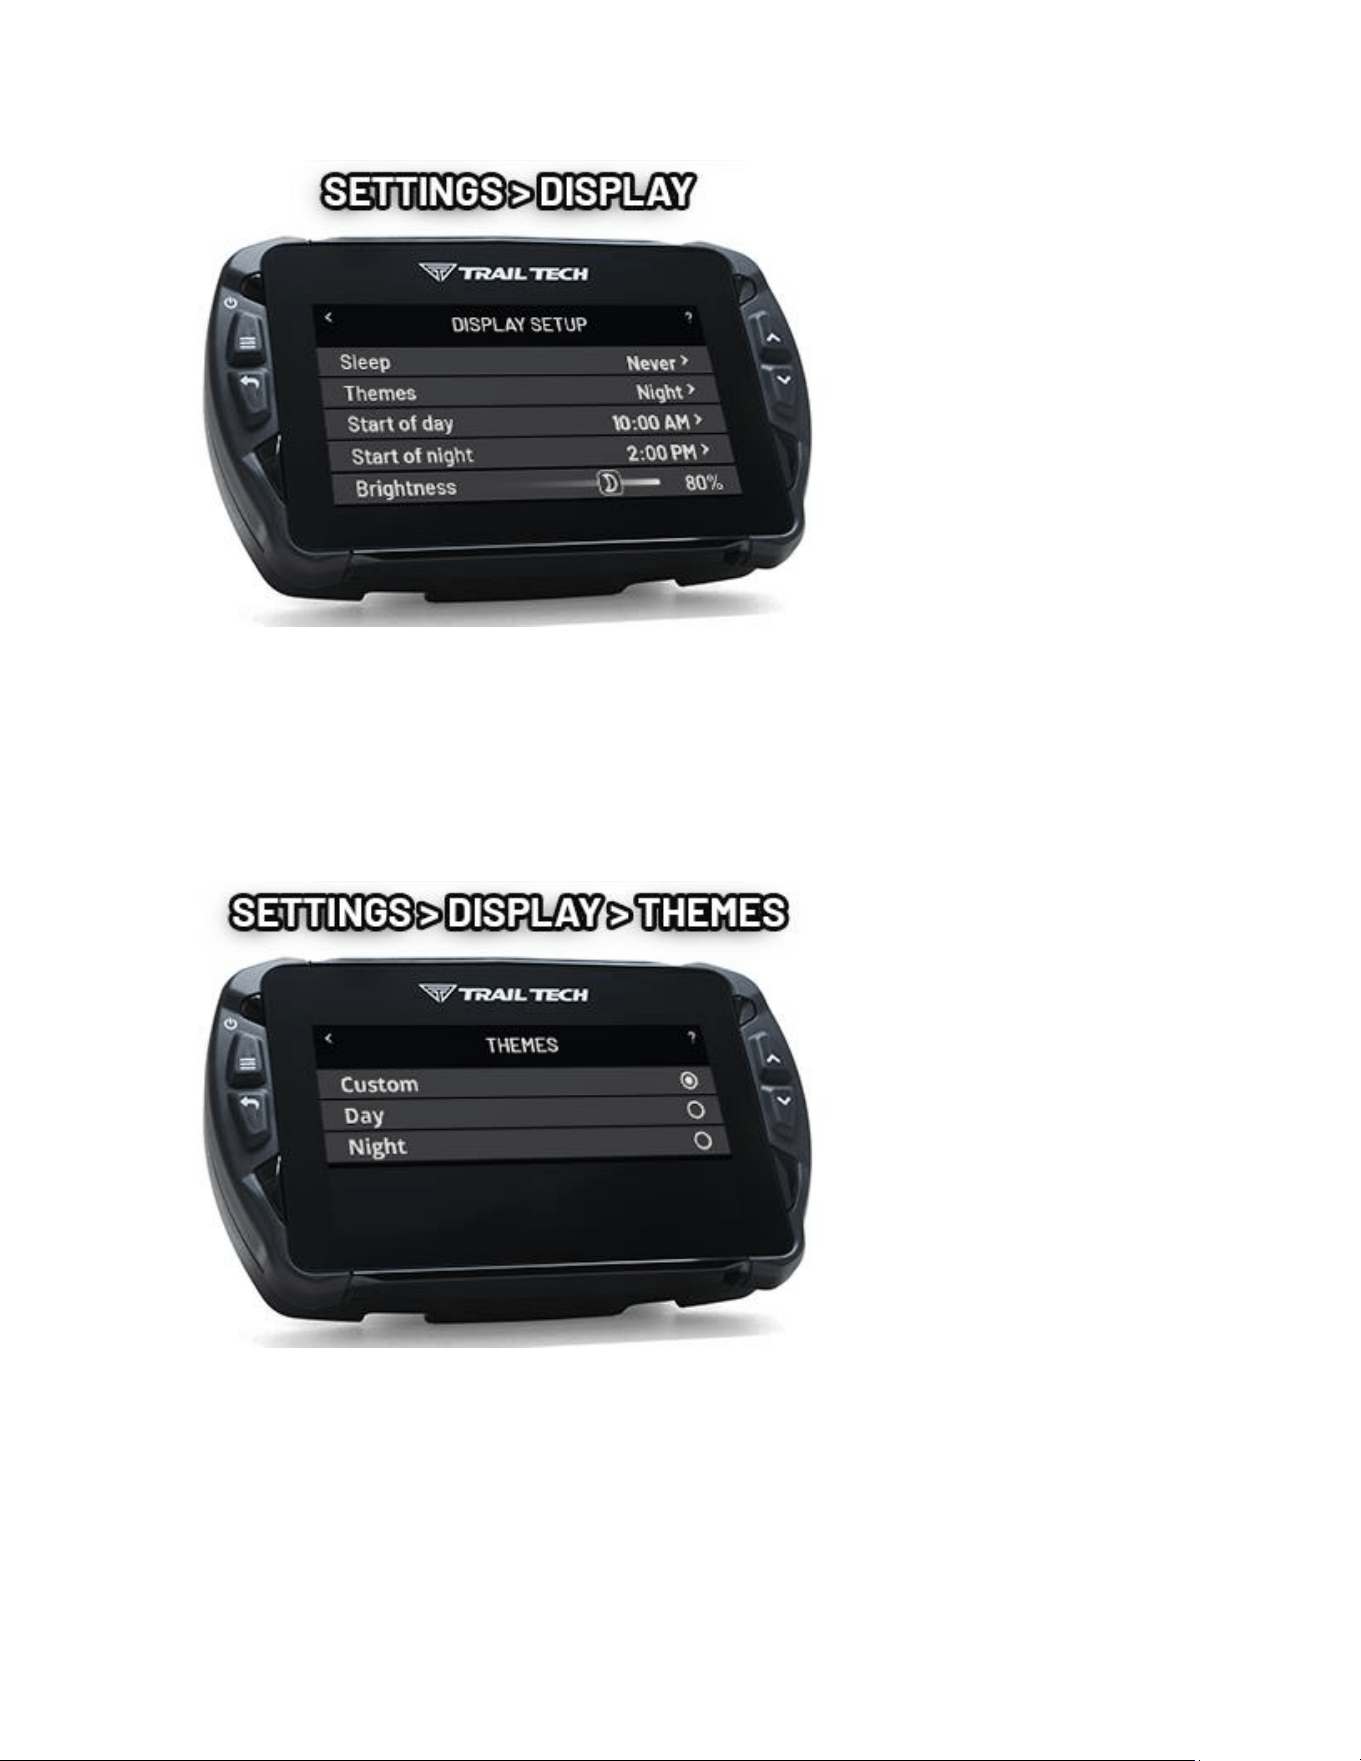
Themes Help
Automacally switch between day-mode and night-mode map styles depending
on how bright out it is. Or, manually choose a style and sck with it.
Sleep Help
Voyager Pro4 remains awake while connected to power, either from a vehicle or
AC wall adapter.
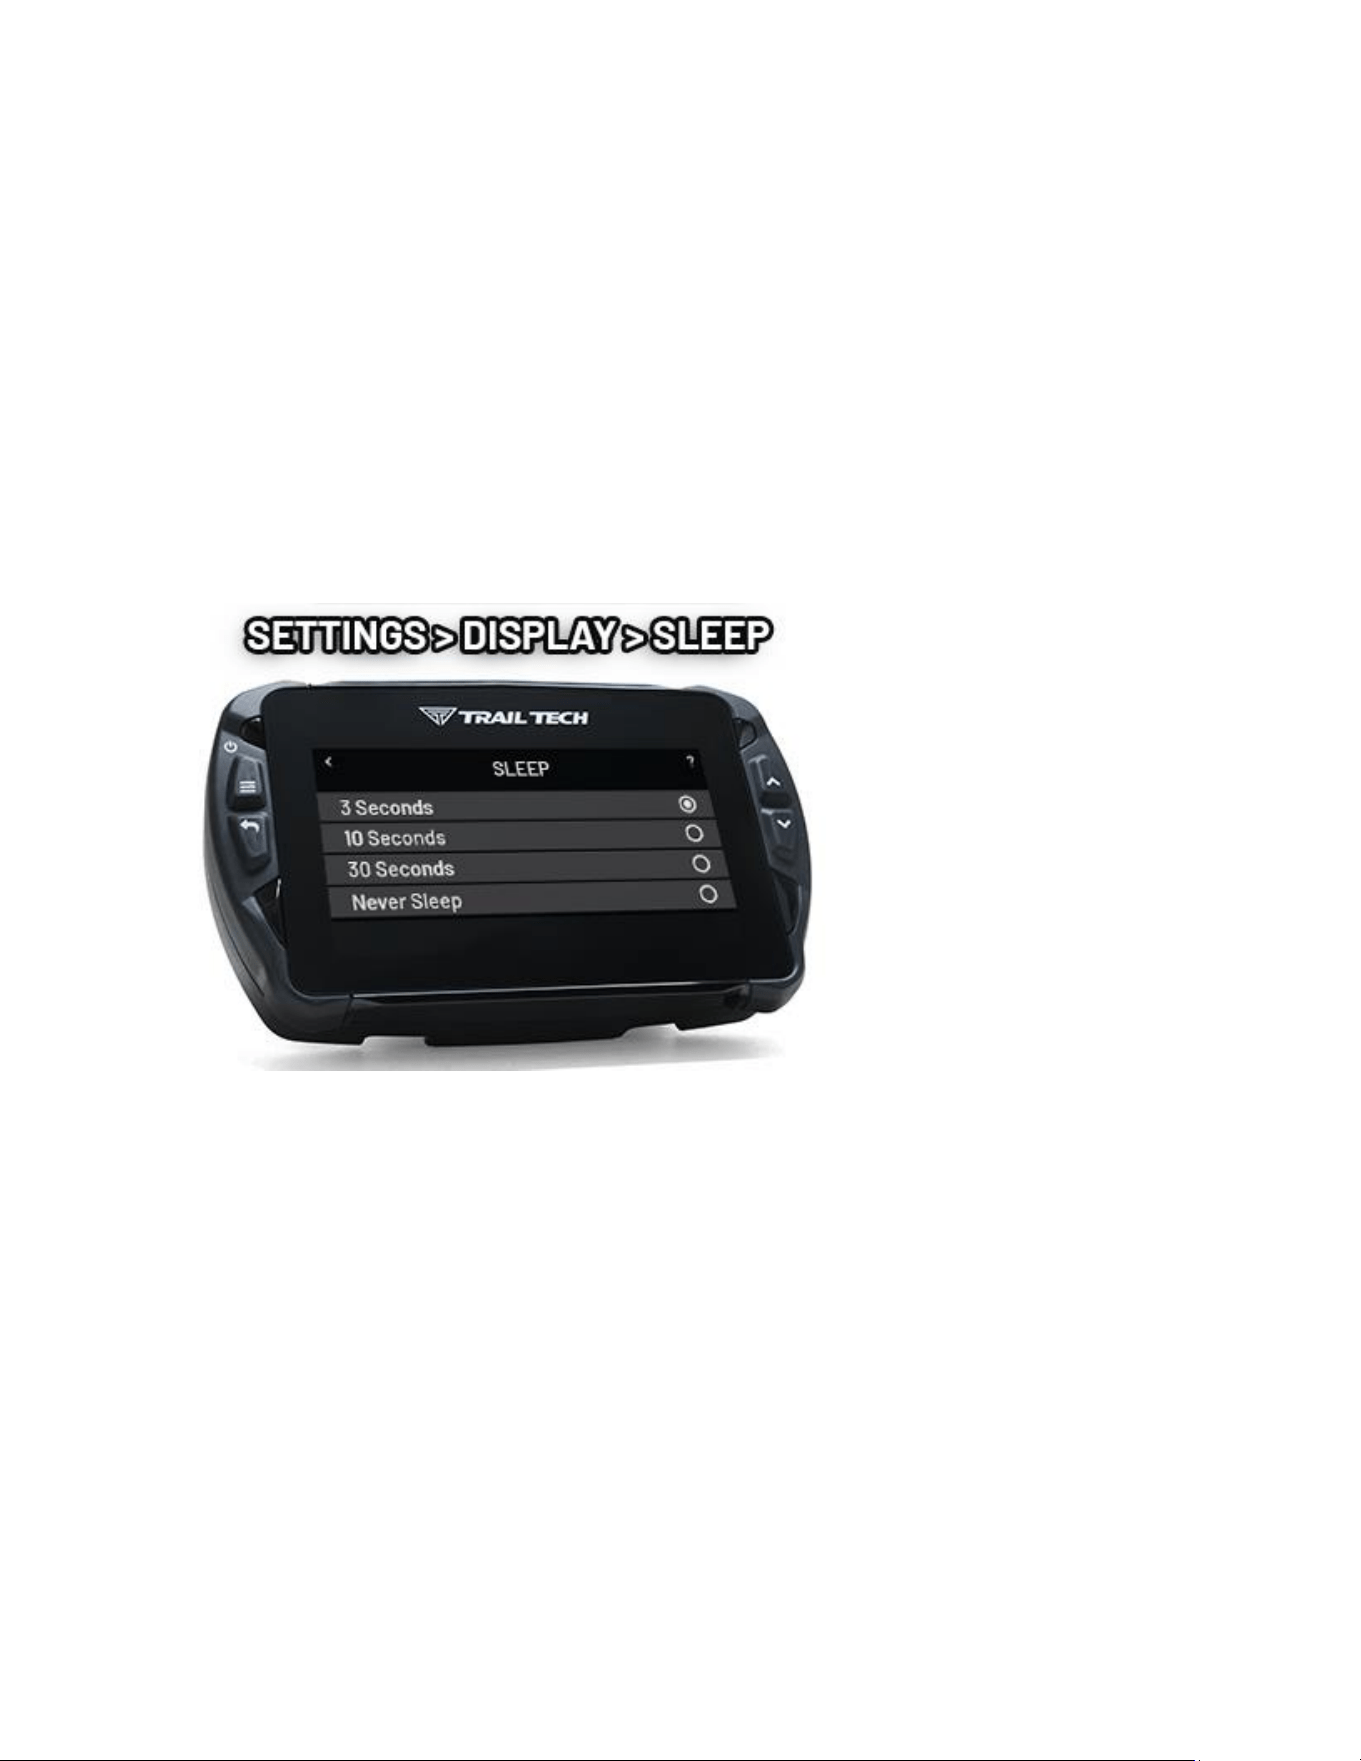
The sleep and wake-detecon sengs can congure Voyager Pro4 to enter
sleep mode when no tach signal or wheel sensor movement is detected.
If the wheel speed sensor is being used for wake-detecon, Voyager Pro4 will
wait an addional 3 minutes aer stopping before entering sleep mode. This is
to accommodate short pauses in movement, such as at a trac light.
When in sleep mode, Voyager Pro4 will wake up as soon as it senses movement
based on the wake-detecon seng.
15 minutes aer going into sleep mode, Voyager Pro4 will shut down
completely to avoid drawing down the vehicle baery. Aer shutdown, press
the power buon to wake Voyager Pro4 again.
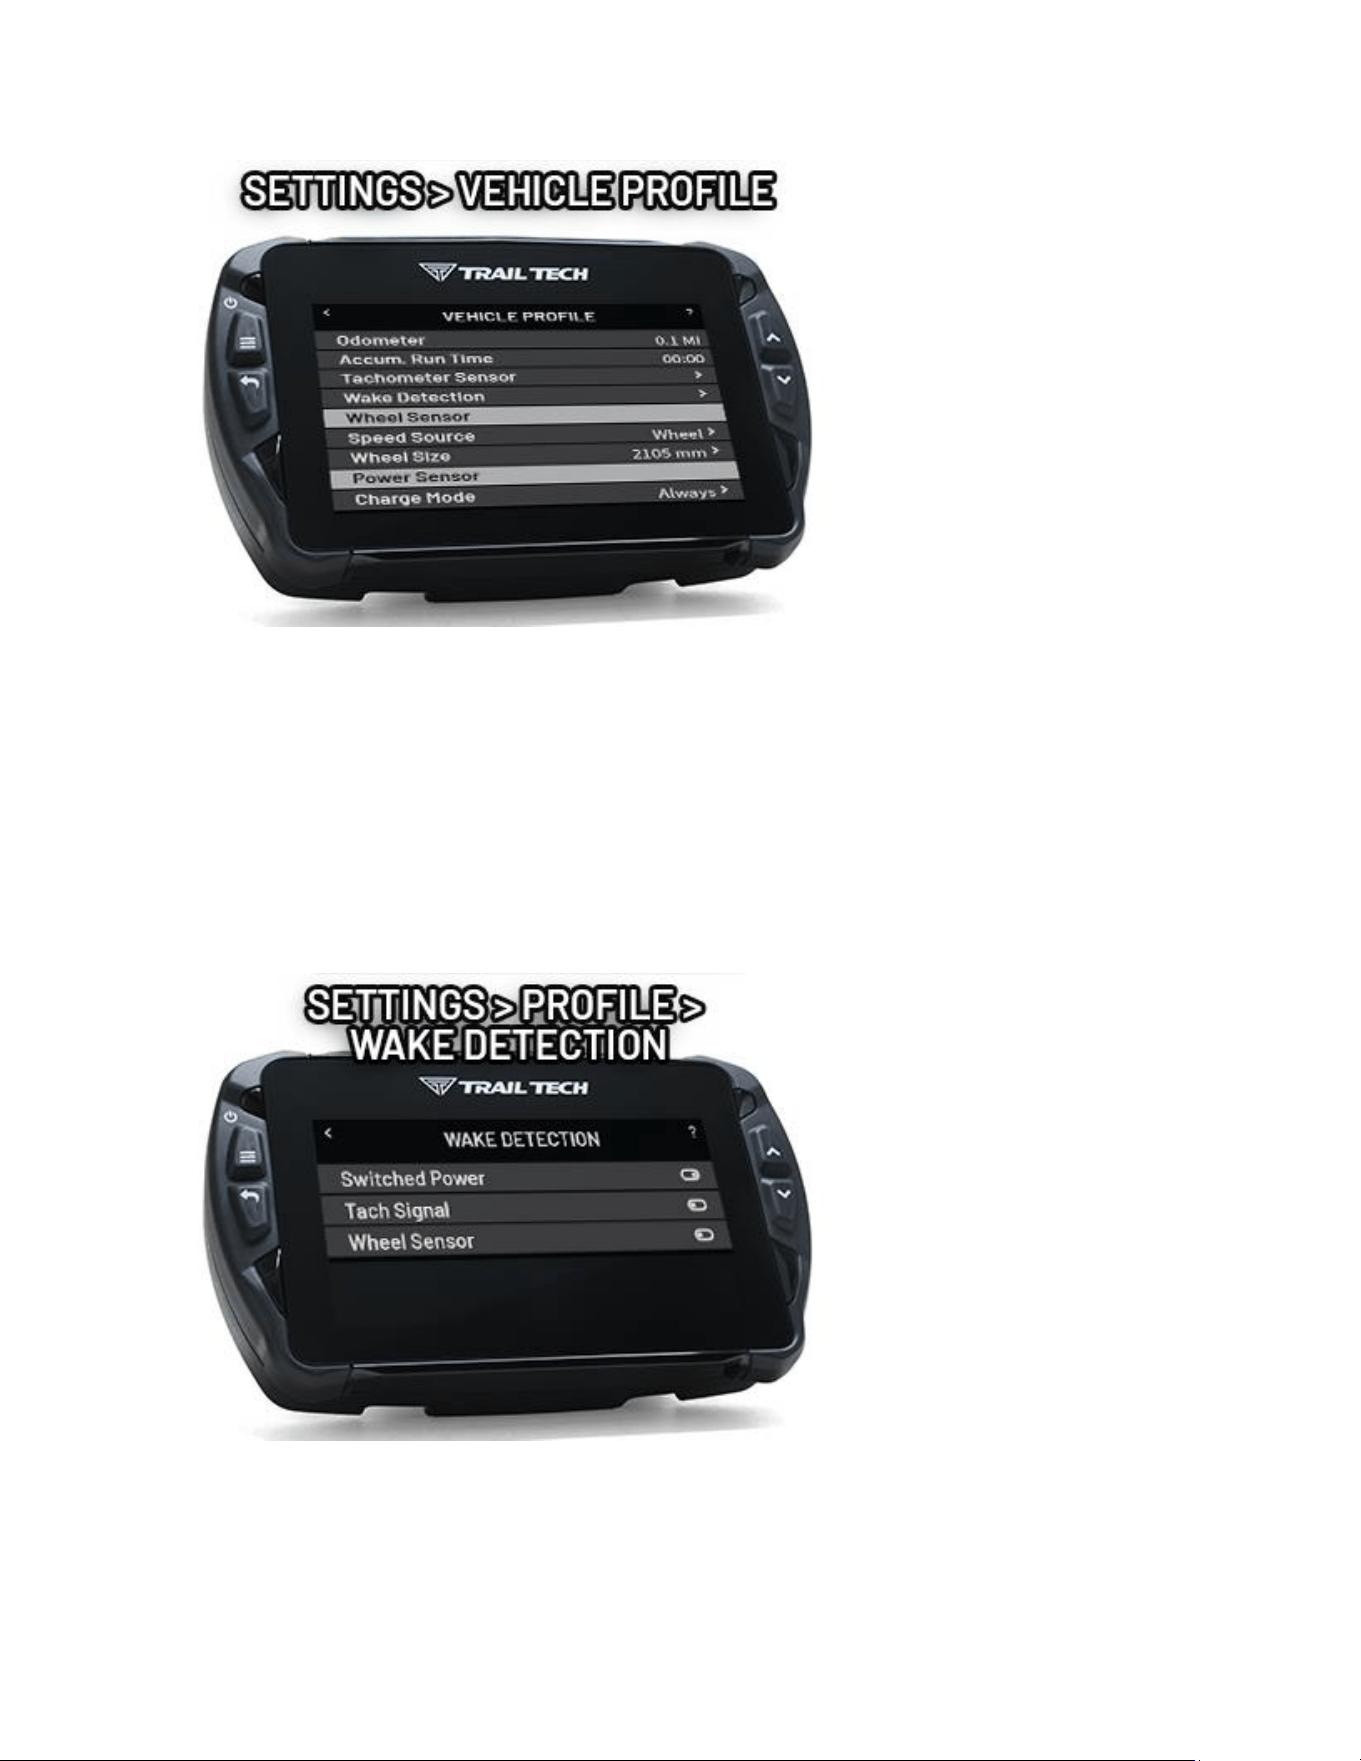
Vehicle Profile Help
Use the vehicle prole menu to customize Voyager Pro4 to the vehicle it is
mounted on.
Set up the odometer and engine hours, and values to congure the wheel
sensor, engine temperature sensor, tachometer sensor, and power sensor.
Wake Detection Help
When in sleep mode, Voyager Pro4 waits for a sign to wake up.
15 minutes aer entering sleep mode, Voyager Pro4 will shut down completely;
aer a complete shut down, press the power buon to wake up. When shut
down Voyager Pro4 uses no power to preserve baery power.
1. If wired behind key switch power, Voyager Pro4 can wake from sleep mode
whenever the vehicle is switched on.
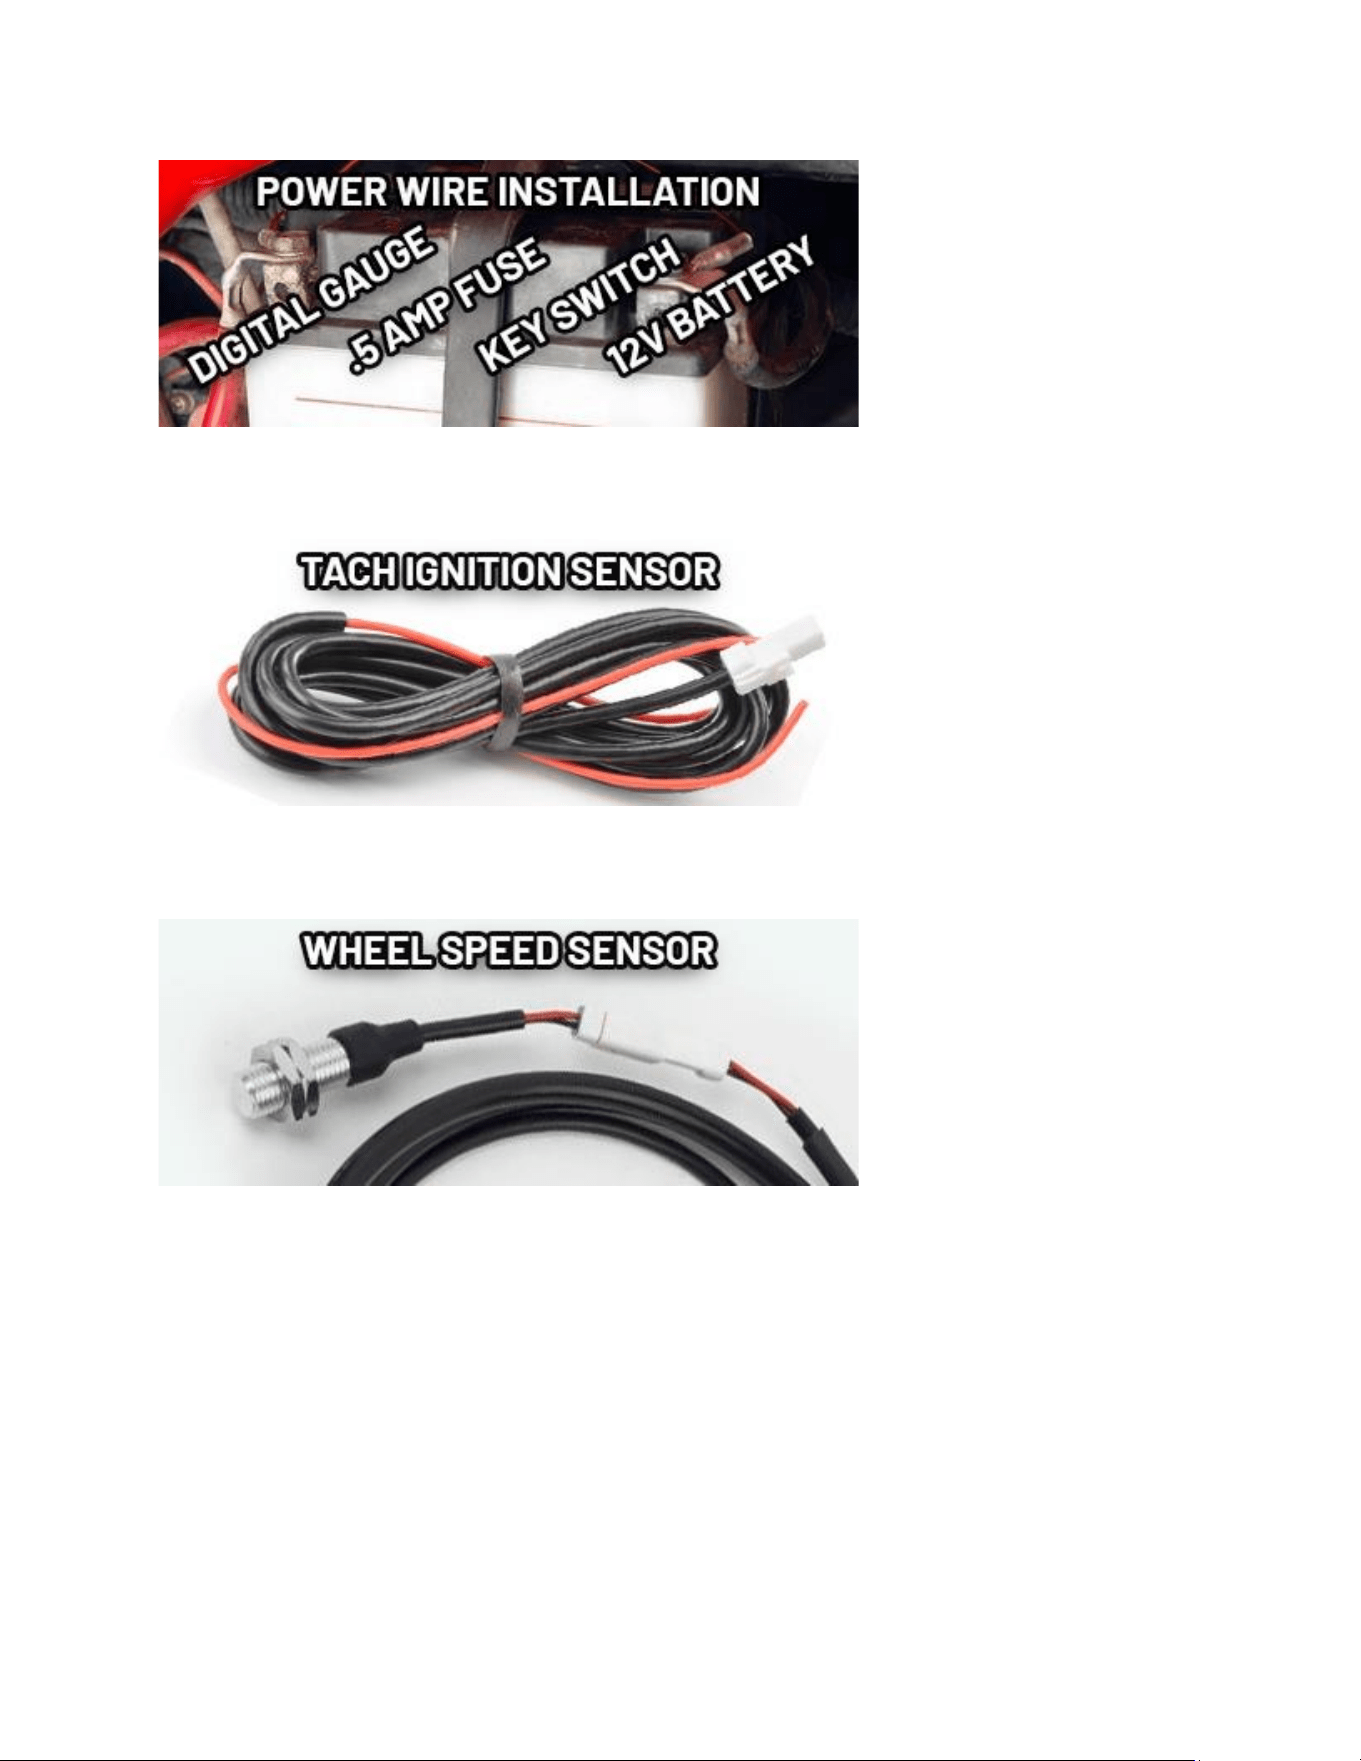
2. If the ignion sensor is installed, Voyager Pro4 can wake from sleep mode
when the spark plugs start ring.
3. If the wheel sensor is installed, Voyager Pro4 can wake from sleep mode as
the wheel starts spinning.
Speed Source Help
Choose which sensor to pull speed data from:
1. Installing a Trail Tech magnec wheel sensor will return precision speed data.
2. GPS speed does not require an installed sensor, but may wander a lile at
slow speeds and in ght corners.
Remember to input an accurate wheel size for the speed gauges to be correct.
A speed readout is displayed on most of the main screens.
Wheel Size Help
Voyager Pro4 needs to know your wheel size to do precise speed
measurements. (I.e. the magnec wheel sensor reports how many mes the
wheel spins, but wheel size is needed to calculate how far the wheel travels per
rotaon.)
Do not panic. For more informaon on obtaining your wheel size, see
#measure-wheel-size.
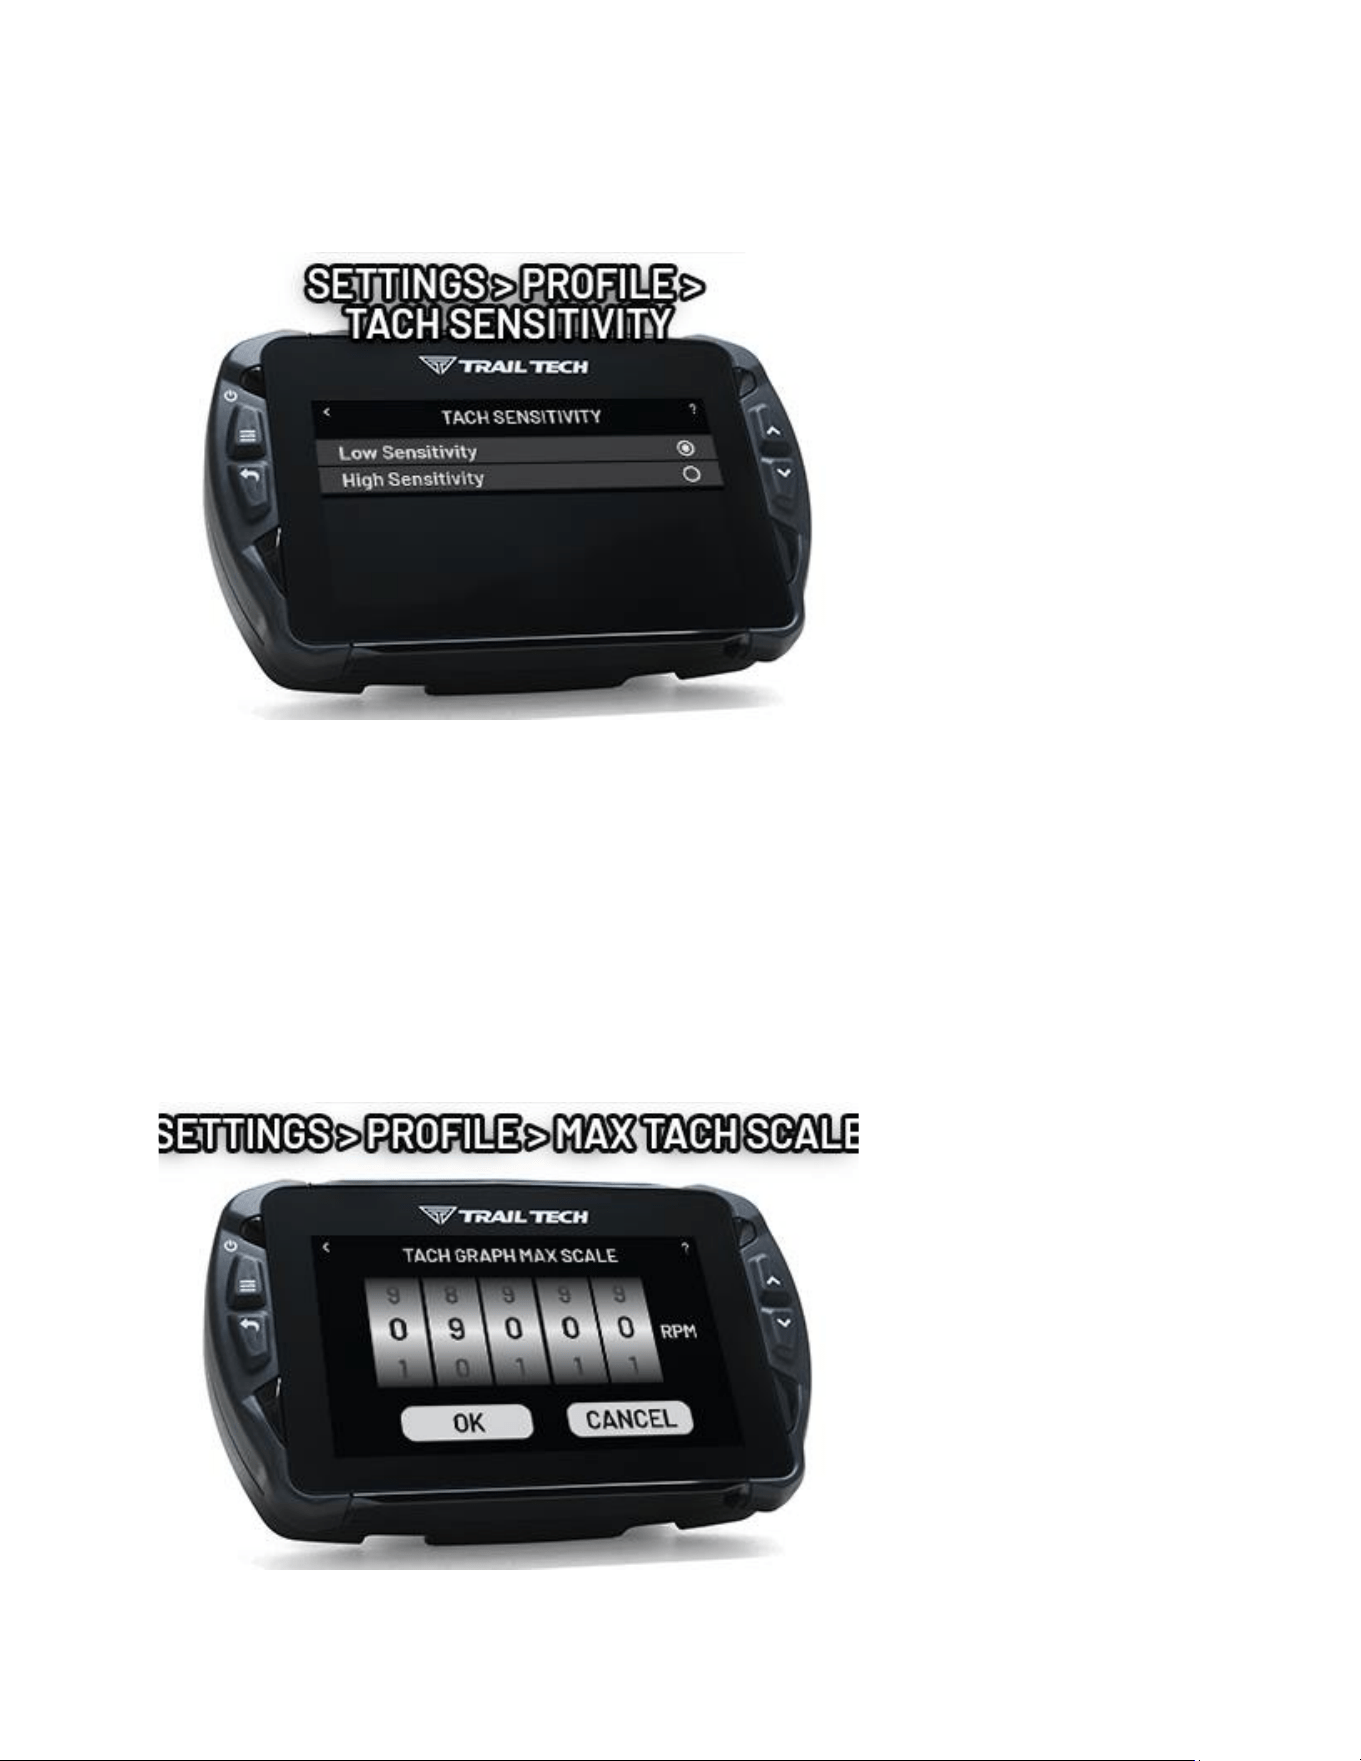
PPR Help
PPR stands for "Pulses Per Revoluon." (I.e. the number of mes the spark plug
sparks each me the engine revolves.)
PPR controls the tachometer readout. If it seems like the tach is displaying a
number either twice or half as fast as actual, then likely the PPR needs to be
adjusted.
Most modern fuel-injected dirt bikes are 0.5 PPR.
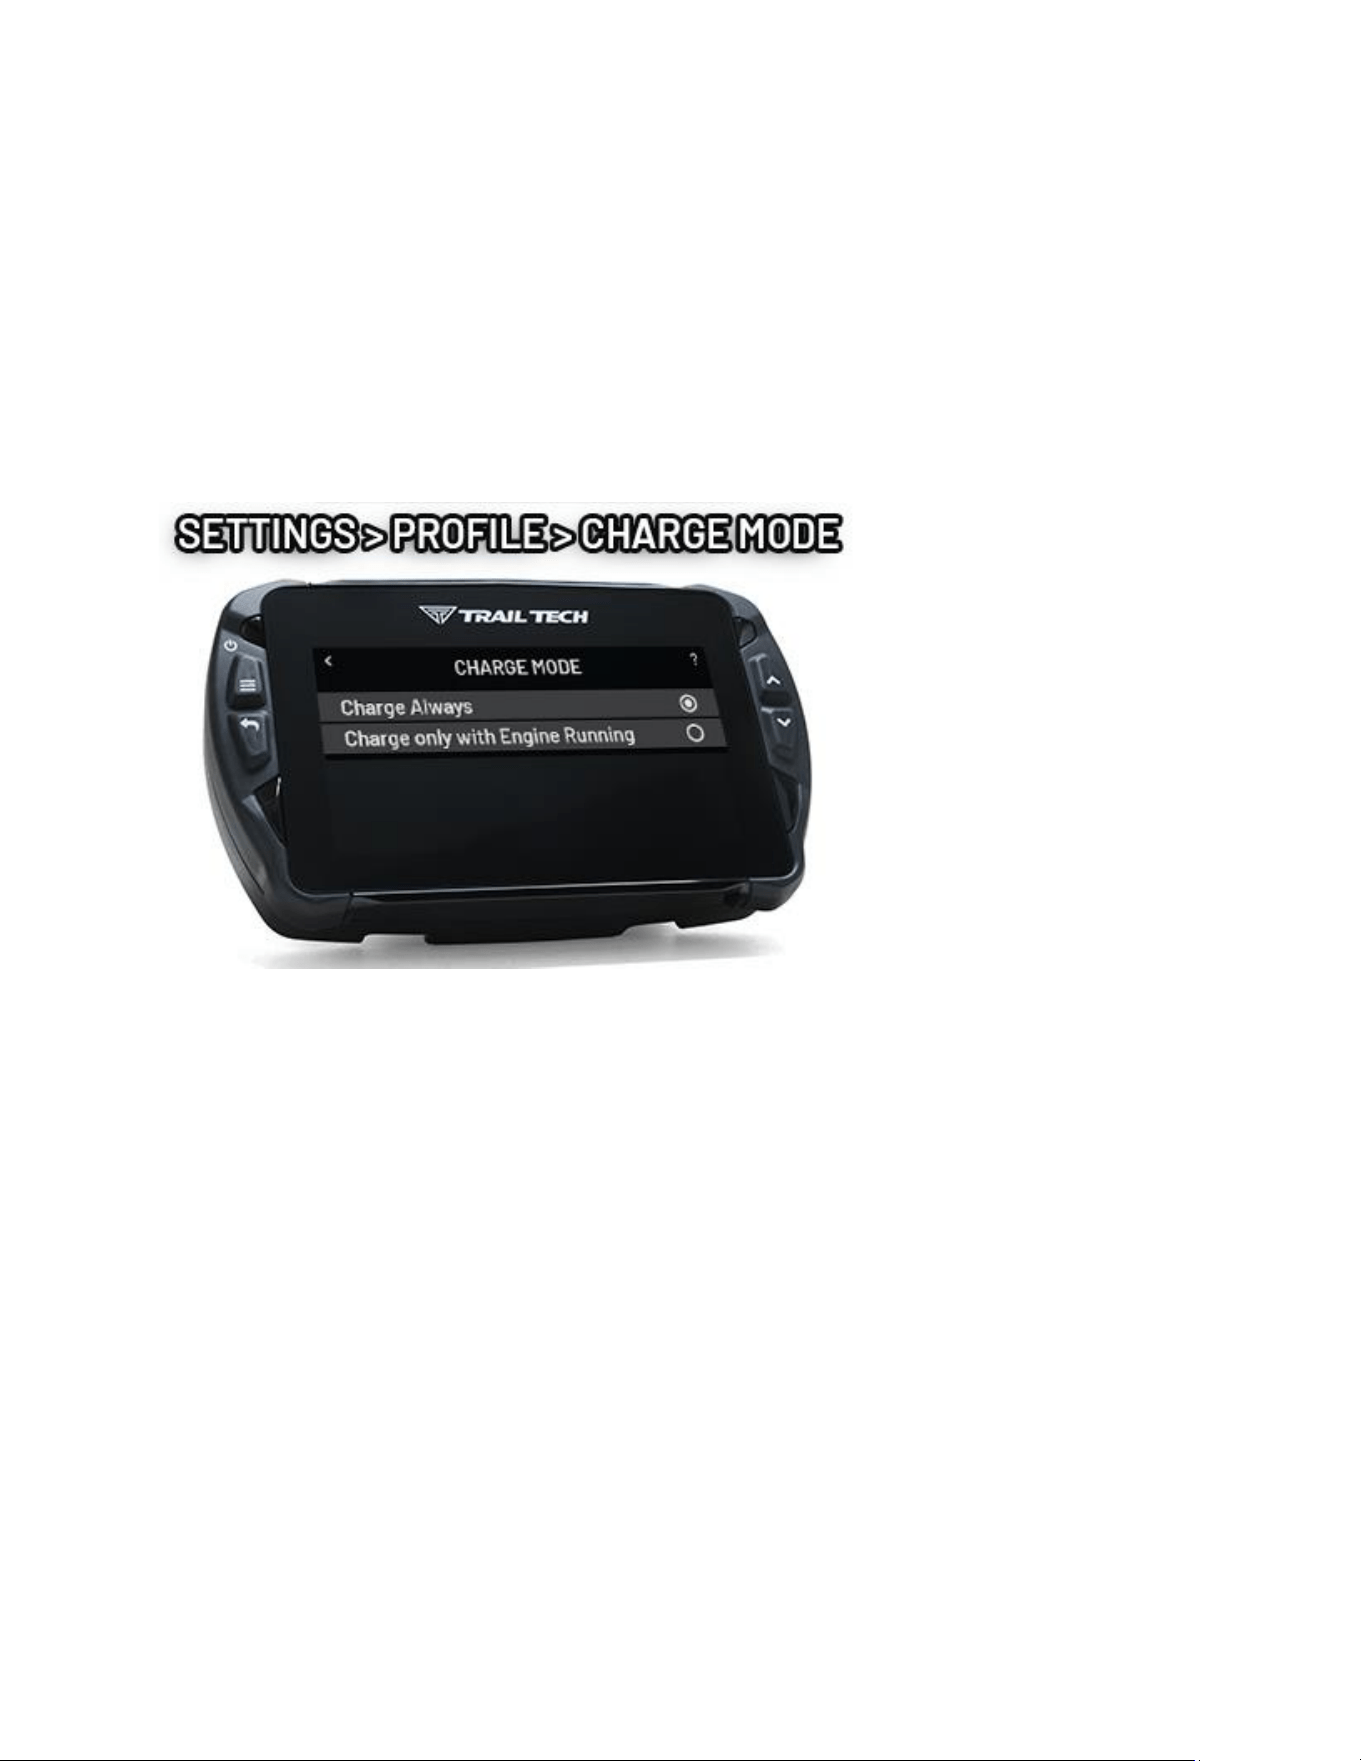
Tach Sensitivity Help
The tach sensivity seng changes the threshold that Voyager Pro4 recognizes
tach pulses. Changing the sensivity on some vehicles can help cut through
ambient electrical noise.
If the tach signal is sll errac aer adjusng sensivity, during installaon wrap
the sensor more or less mes, and avoid roung it along other electrical wires.
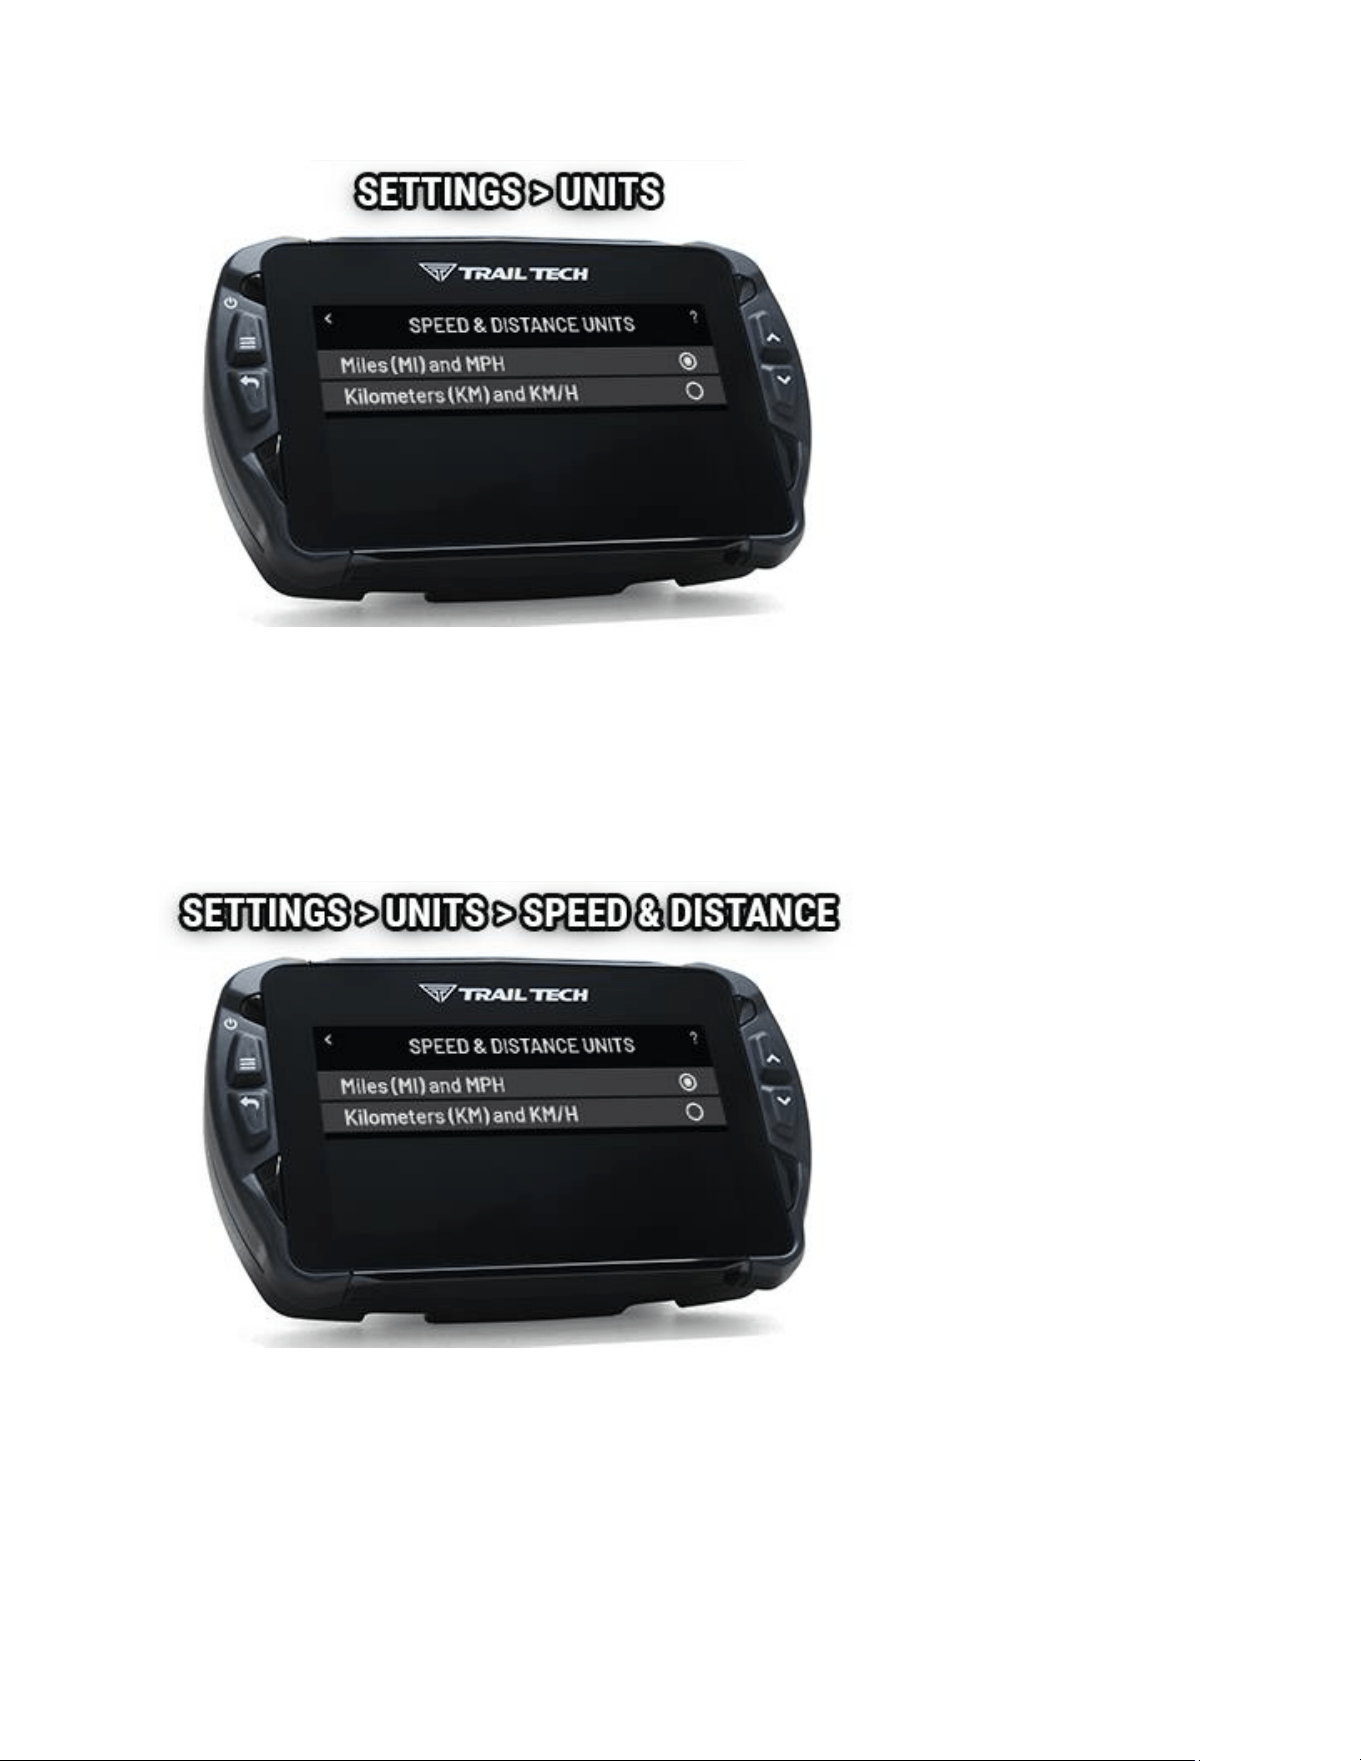
Tach Graph Max Scale Help
The tach graph screen and a big animated bar graph. The graph defaults to max
out at 9000 RPM, but you should customize it to match the maximum RPM of
your vehicle. This way you can get the full range of graph moon.
Use the tumblers to select the max value for the graph, then tap Ok to save the
choice.
Charge Mode Help
Voyager Pro4 usually charges up its internal baery whenever it is connected to
power. However, if Voyager Pro4 is wired directly to the vehicle baery (instead
of behind a key switch) then the vehicle baery may be drained. In that case to
avoid draining the vehicle baery, set Voyager Pro4 to only charge when the
engine is running (i.e. a tach signal is acve.)
Units Setup Help
Customize the measurement units displayed on the gauge screens. Choose
between standard or metric readouts.
Speed & Distance Units Help
Choose to display speed in miles or kilometers per hour. This choice will take
eect in all places where speed is displayed.
Elevation Units Help
Choose to display elevaon in feet or meters. This choice will aect all elevaon
readouts.
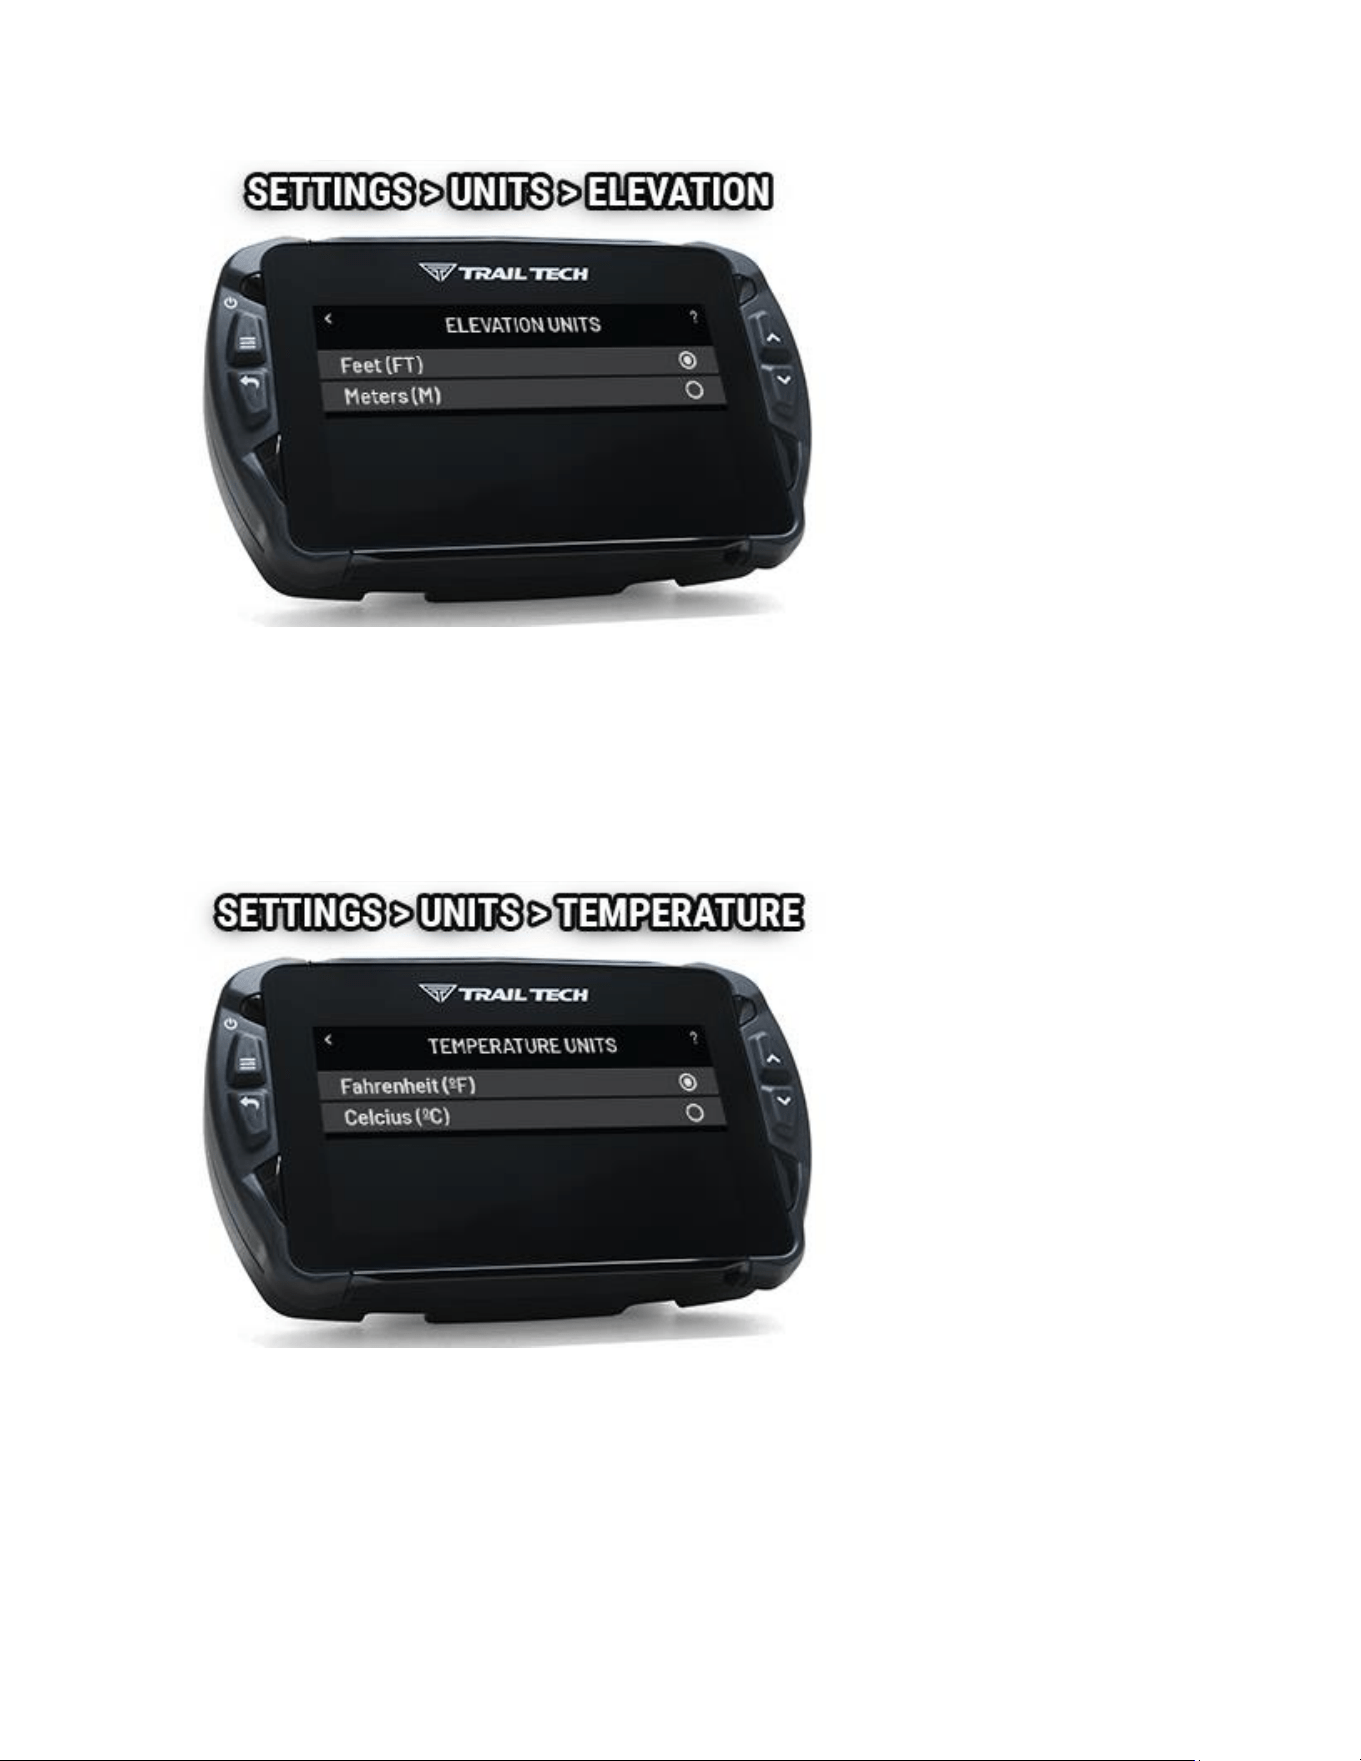
Temperature Units Help
Choose to display temperature in Fahrenheit or Celsius. This choice will take
eect in all temperature displays.
Date & Time Help
Set Voyager Pro4's internal clock to your local me.
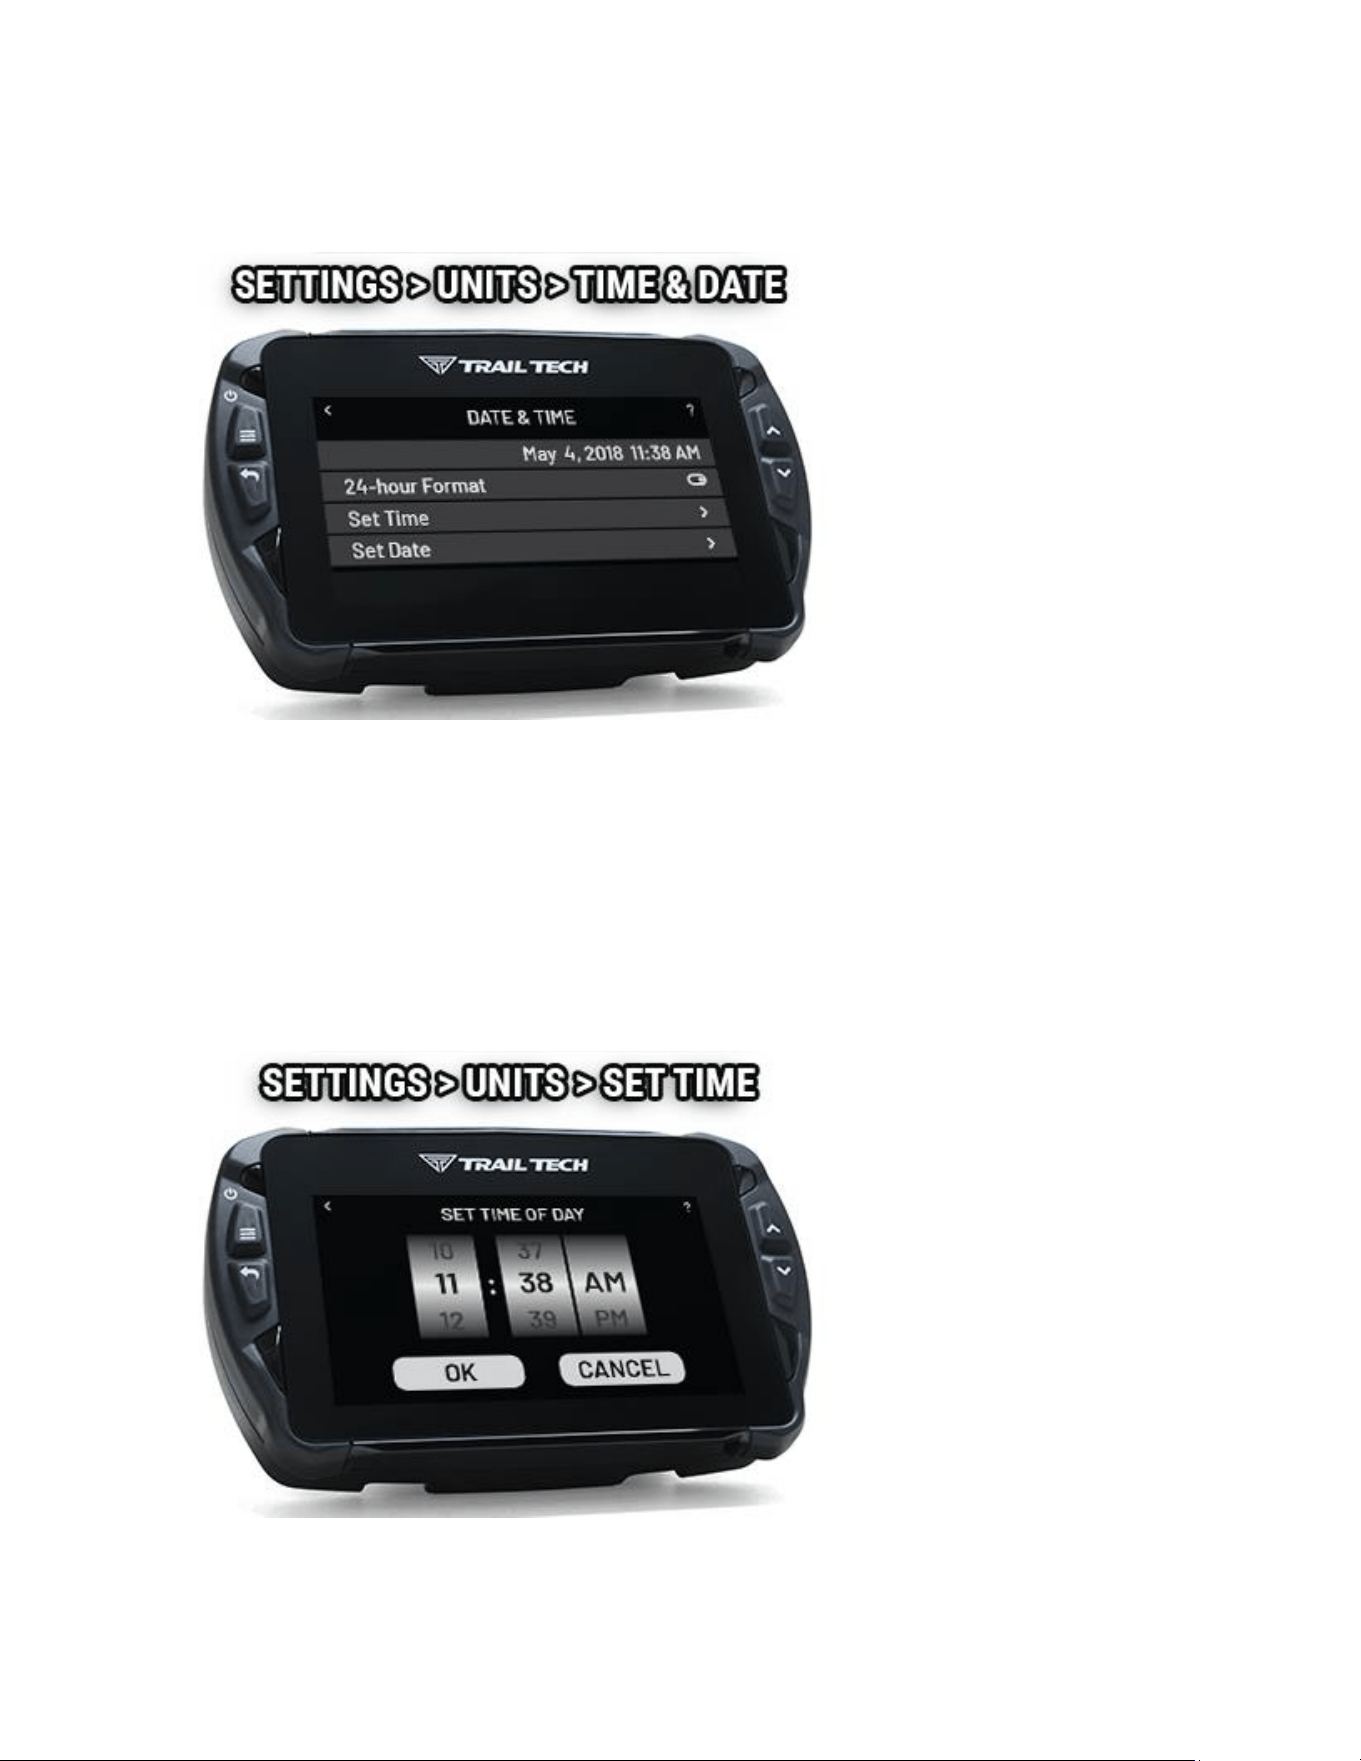
The me does not automacally adjust itself if you travel to another me zone
or for 'daylight saving me'.
Set Time of Day Help
Use the touchscreen tumblers to select your local me.
The me does not automacally change for daylight savings or for me zones.
To save the selecon tap ok, or press the back buon to cancel without saving.
Set Date Help
Use the touchscreen tumblers to select today's date.
To save the selecon tap ok, or press the back buon to cancel without saving.
Maps & GPS Setup Help
The maps and GPS setup menu lets you customize details of how track
recording works.
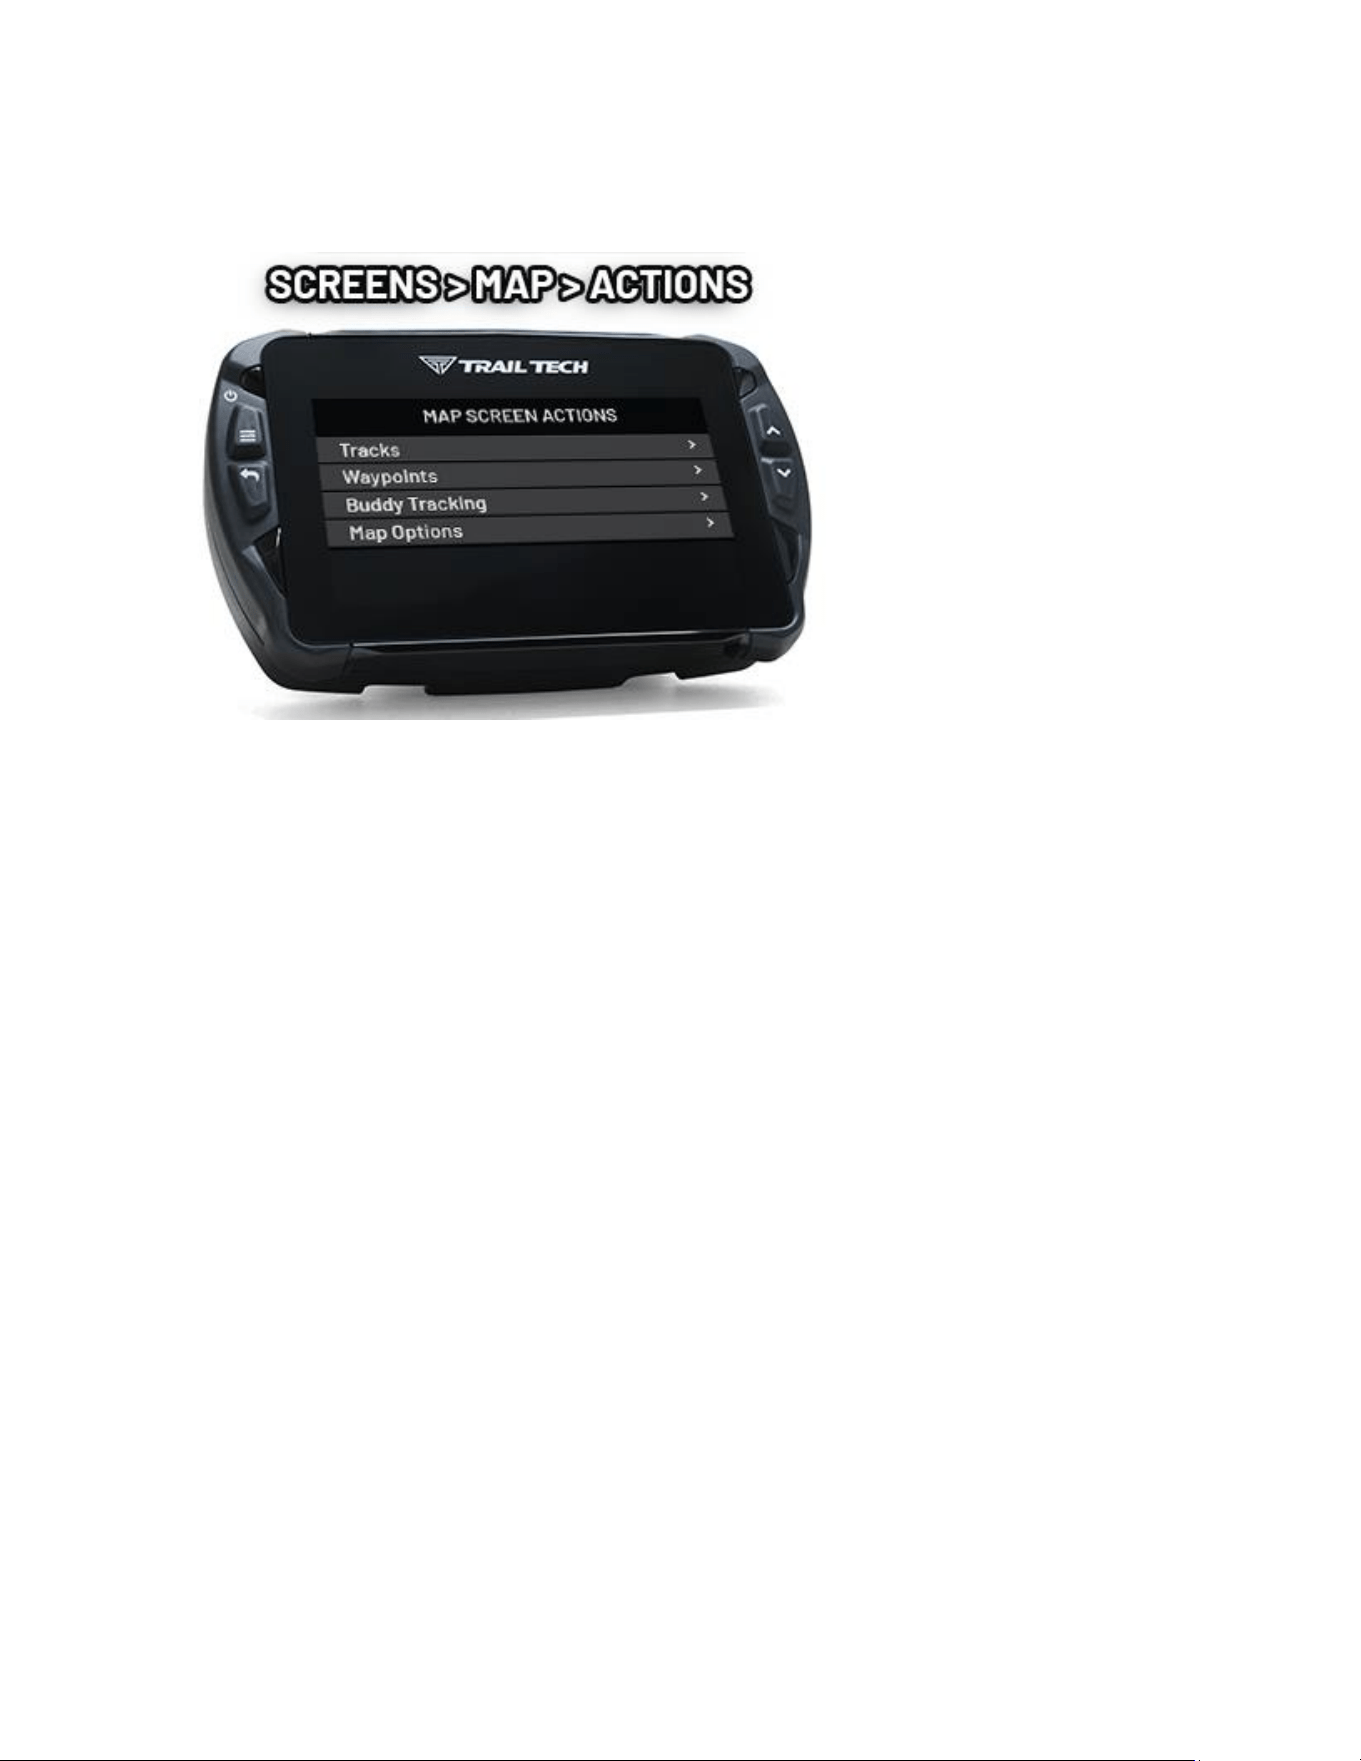
Map Screen Acons are similar to the menu items found on the map screen's
slideout bar.
The Autolog Source can pause track logging if the vehicle isn't moving.
Log frequency determines how oen a new track point is logged to memory.
Auto-split will create a new track segment when there is a big gap between two
points in the track (instead of drawing a long line between them.)
Autolog Source Help
The Autolog Source can pause track logging if the vehicle isn't moving. For
instance, you don't want it to record when the bike is in the back of the truck,
or parked at camp. Install a tach or wheel sensor so Voyager Pro4 knows exactly
when the bike is in moon.
Log Frequency Help
Log frequency determines how oen a new track point is logged to memory.
You can choose me based or distance based. The largest values are ne for
most needs and keep the le sizes smaller.
Auto Split Help
Auto-split will create a new track segment when there is a big gap between two
points in the track (instead of drawing a long line between them.)
Coordinate Format Help
Coordinate values can be displayed in a few dierent formats. The default is
deg, min.dec.
Examples:
Degrees in decimal (deg.dec):
40.446° N
79.982° W
Degrees decimal minutes (deg, min.dec):
40° 26.767' N
79° 58.933' W
Degrees minutes seconds (deg, min, sec):
40° 26' 46" N
79° 58' 56" W
Bluetooth Settings Help
In Bluetooth sengs, enable or disable Bluetooth altogether, change Voyager
Pro4's public name, and then connect phones and headsets.
Two phones and two headsets can be connected.
Media Screen Acons opens menu opons similar to the Media Screen's
embedded opons.
Bluetooth Devices Help
On the device pairing screens, Voyager Pro4 scans for nearby Bluetooth devices
to connect with. Aer Voyager Pro4 nds the phone or headset, tap its name to
pair them. Remember to put the phone or headset in pairing mode so that it
will be visible to the scans.
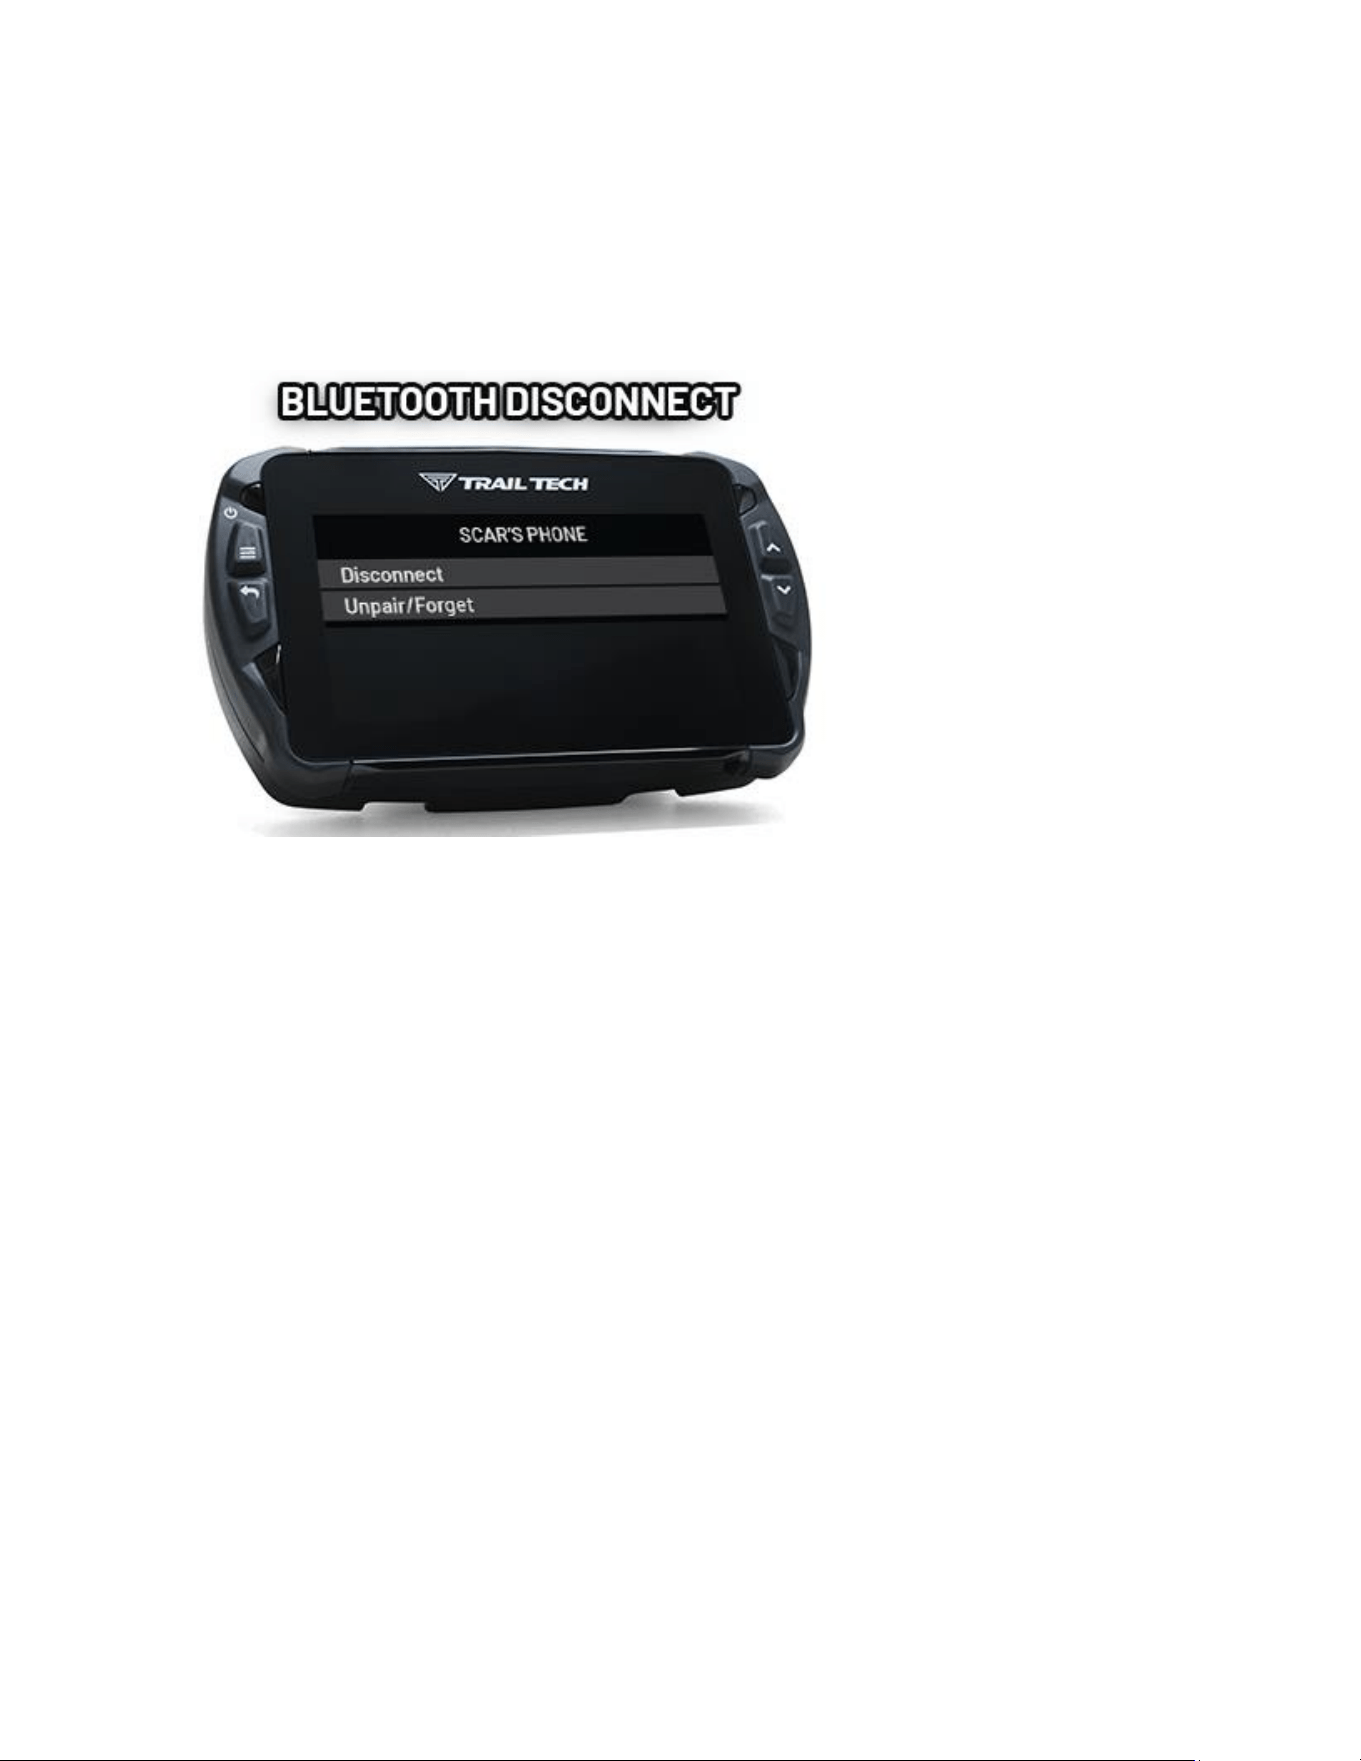
Bluetooth Connection Help
A successfully paired device can be temporarily disconnected, or
unpaired/forgoen enrely. A forgoen device takes longer to connect with
next me than a device that was just disconnected.
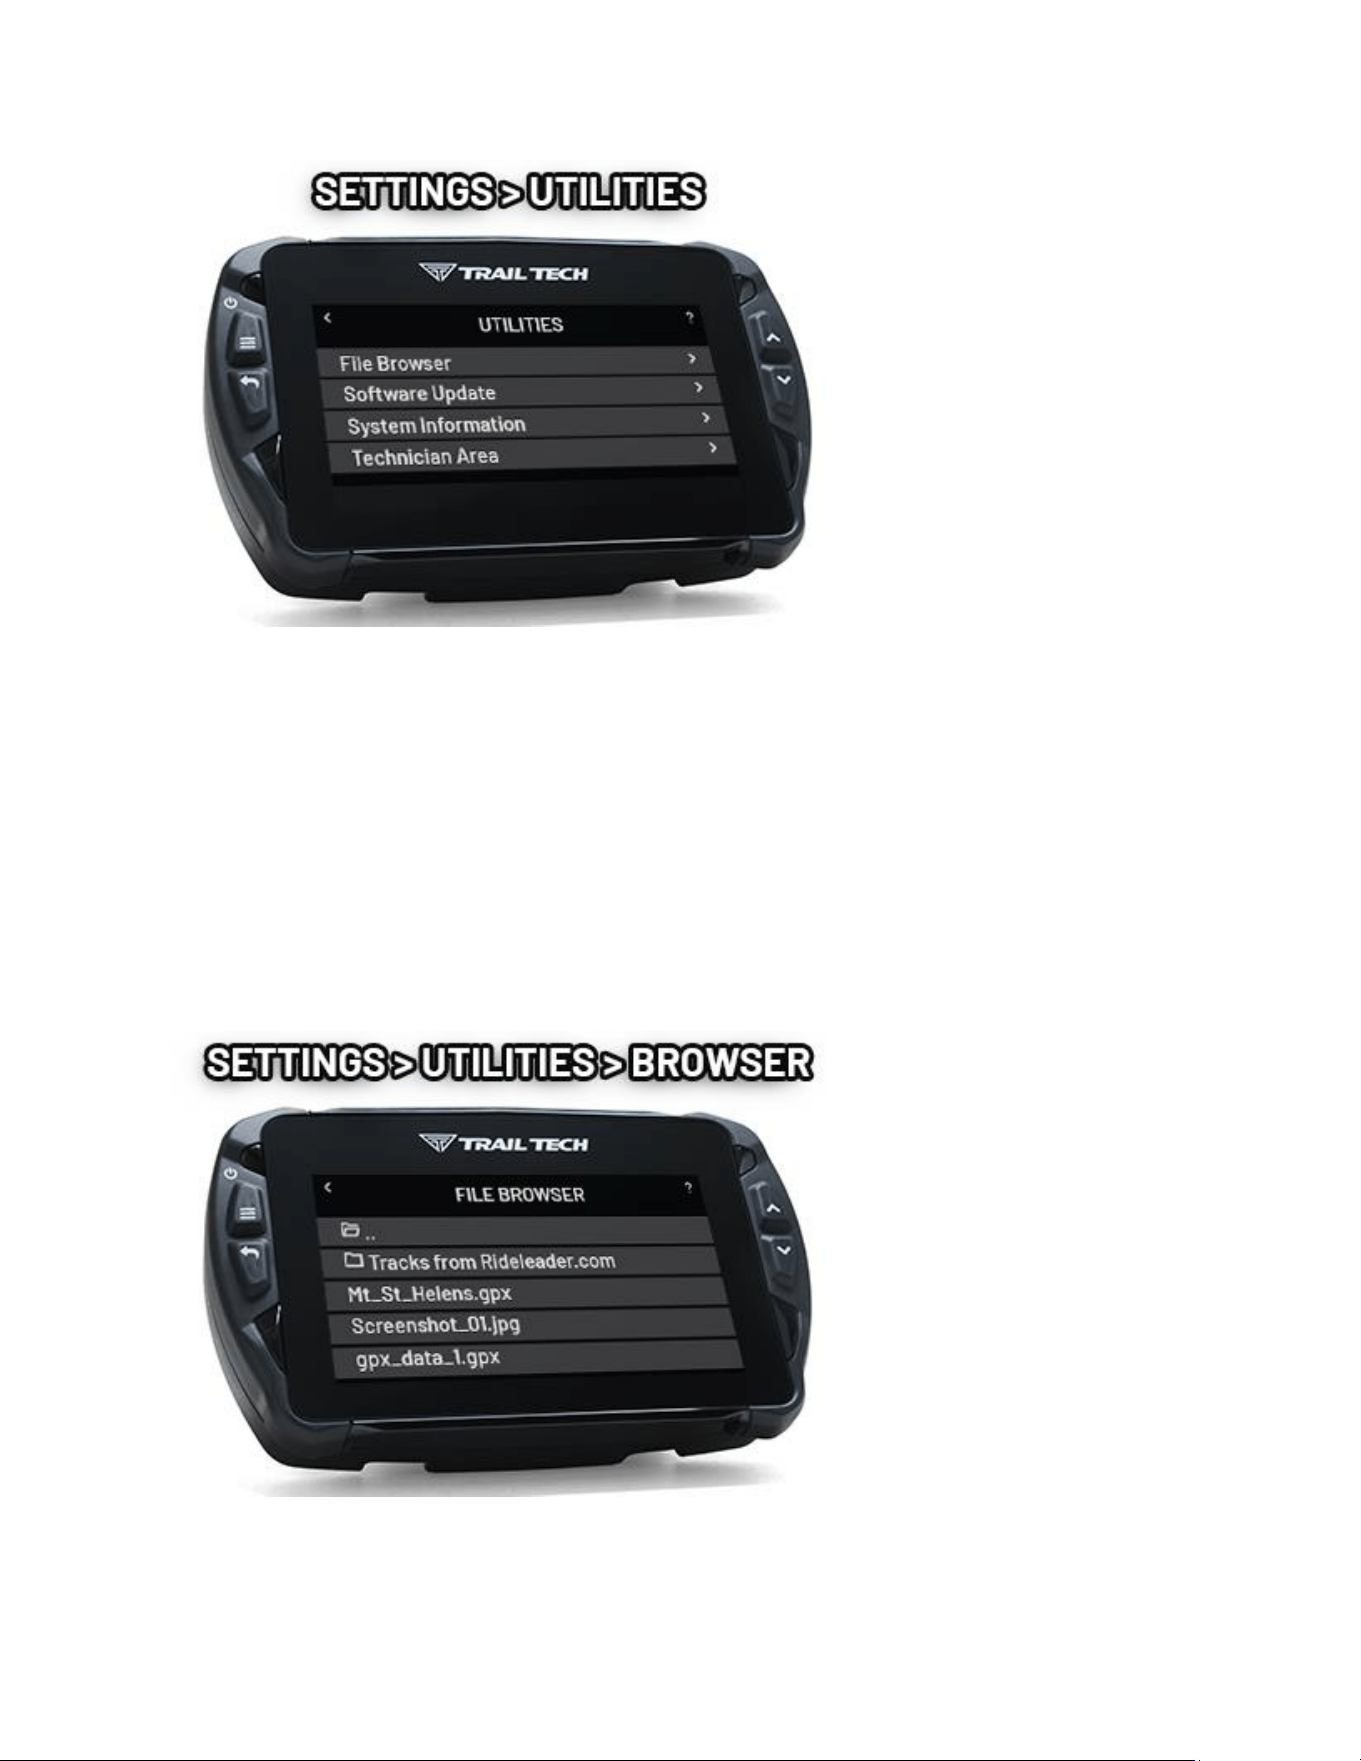
Utilities Help
The File Browser lets you view the contents of the MicroSD card and import
supported les.
The Soware Update tool lets you choose an update le from the MicroSD card
to update onboard soware, maps, and themes.
System Informaon shows soware versions plus internal voltage and core
temperature readouts.
The Technician Area is intended for factory and service diagnoscs.
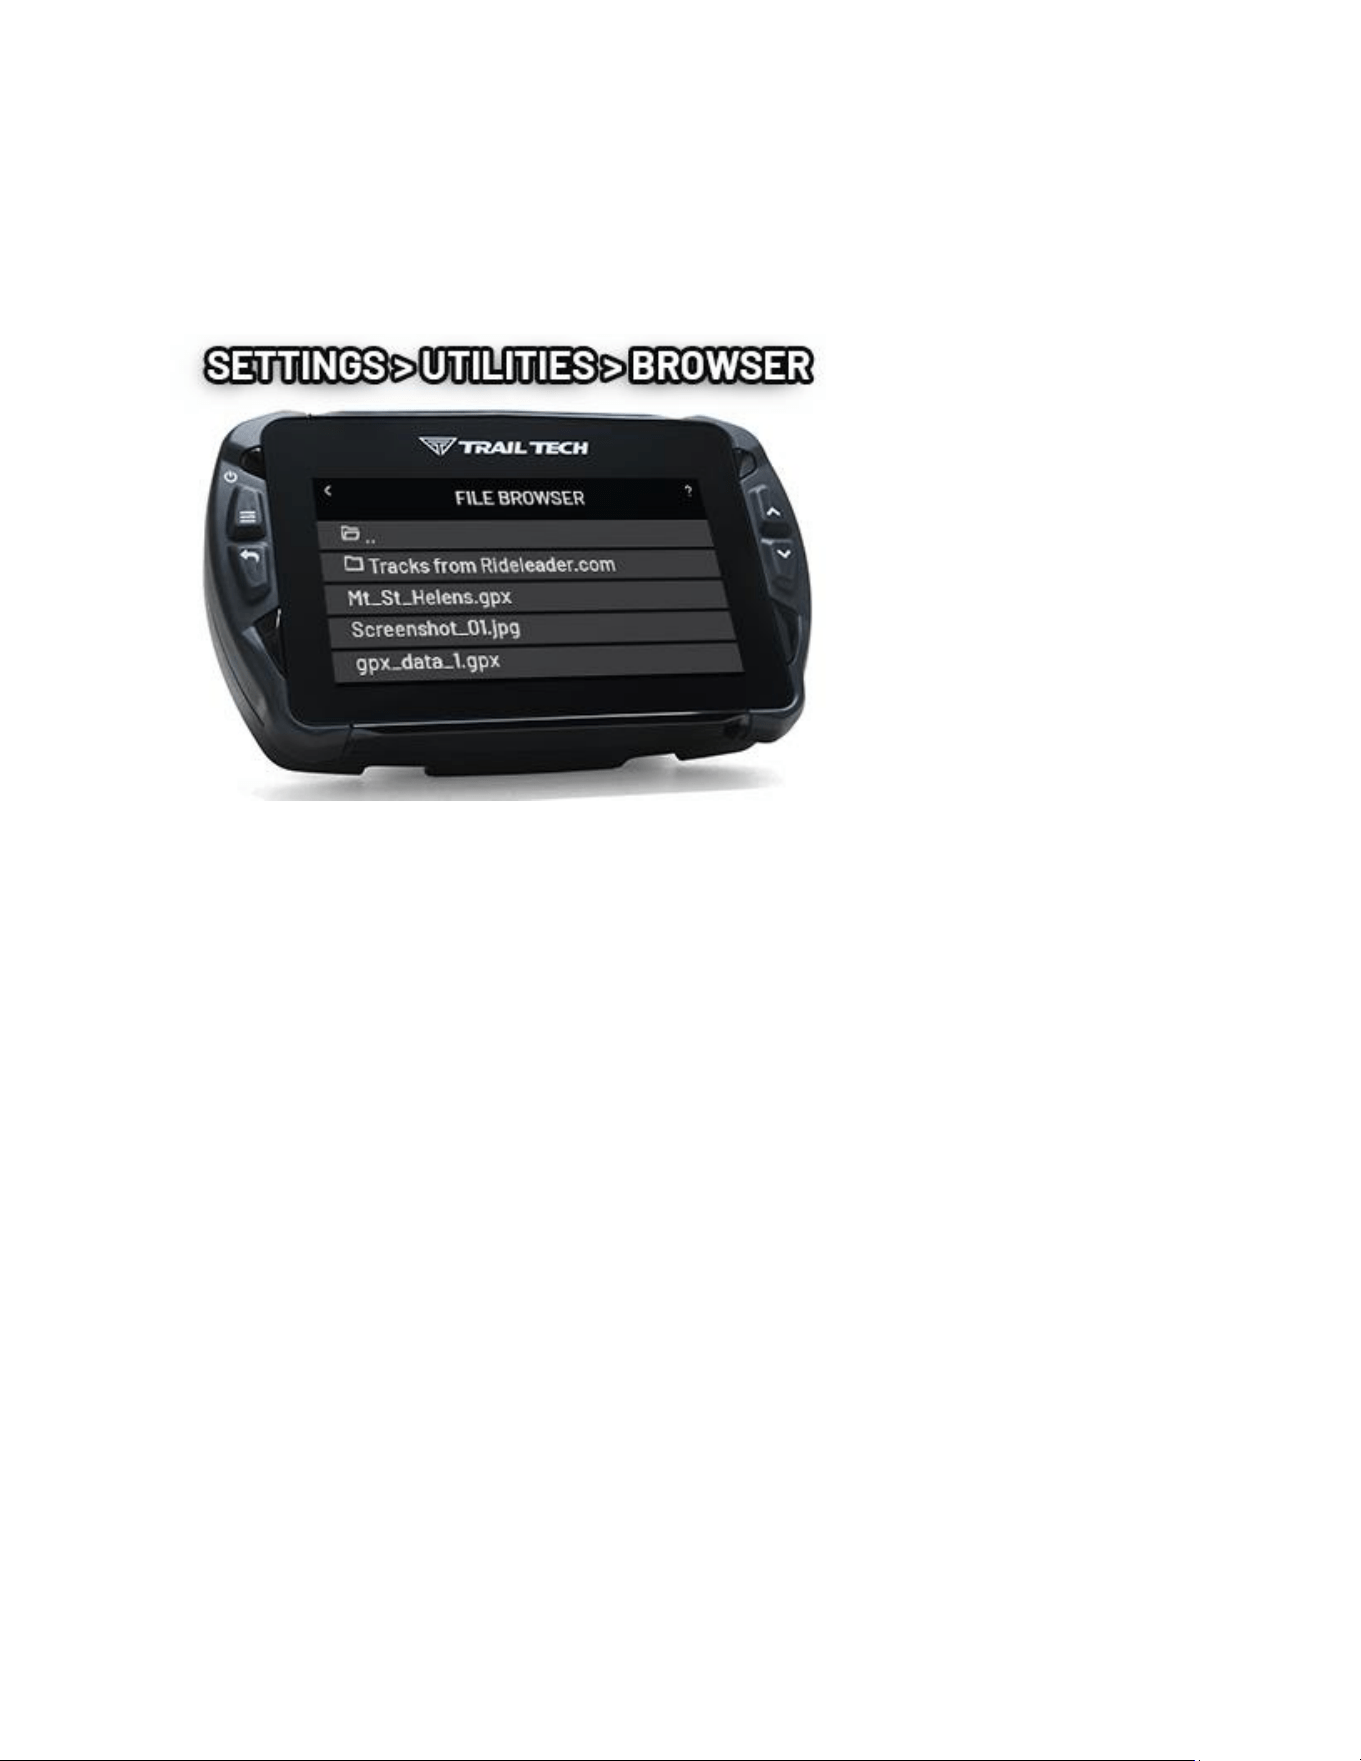
File Browser Help
Using the le browser, you can view the contents of the MicroSD card.
Tap a JPG le to open the image viewer, then swipe or use the Up and Down
buons to move through images.
Import supported les directly from the MicroSD card, including GPX data and
supported custom map formats such as GeoPDF and MBTiles.
Custom Maps Help
Voyager Pro4 can import supported custom map les directly from the MicroSD
card, including GeoPDF and Raster MBTiles formats.
Custom maps are useful for event maps, land-use overlays, trail systems, and
other specialized map sheets that are not part of the base map.
Mulple imported map sheets can be stored on the device. Enable only the les
you need to keep the map screen clear and responsive.
Use short, descripve le names on the MicroSD card to make selecon easier
in the le browser.
Software Update Help
Voyager Pro4 can update its own rmware, map data, and map styles from the
MicroSD card.
A rmware update refreshes the user interface and operang soware.
Updates can add new features, improve compability, and correct issues.
A map data update installs maps for dierent regions or parts of the world.
Maps are large and detailed, so the enre world cannot be loaded at once. Map
data can include specialized layers such as hill shading, topo lines, POIs, and
satellite imagery.
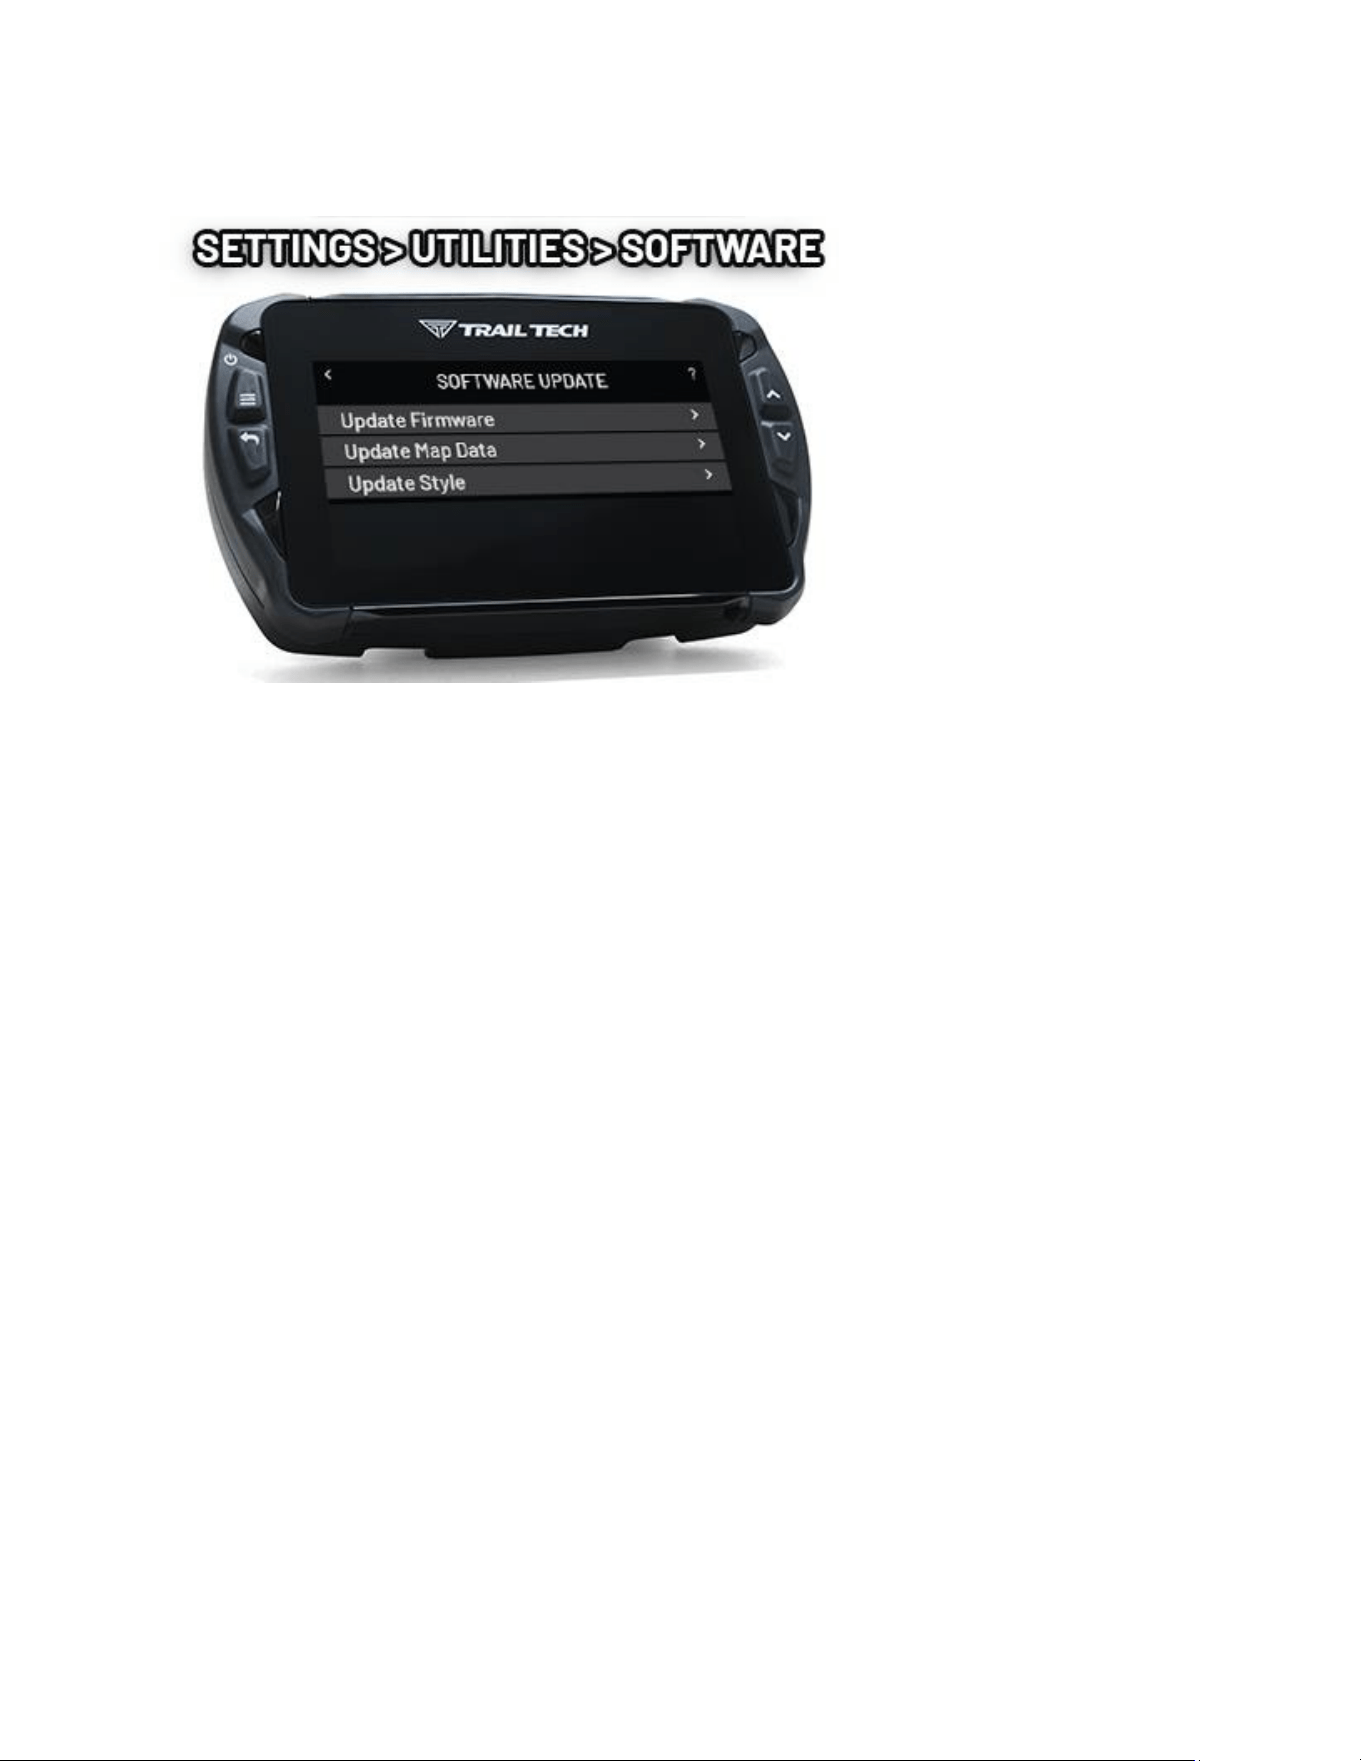
A map style update changes the appearance of the map screen.
Aer loading new map styles or map data, acvate them from the map screen
opons.
Soware updates are available at trailtech.net and are transferred to Voyager
Pro4 by MicroSD card. The internal baery must be at least 50% charged before
a soware update can begin.
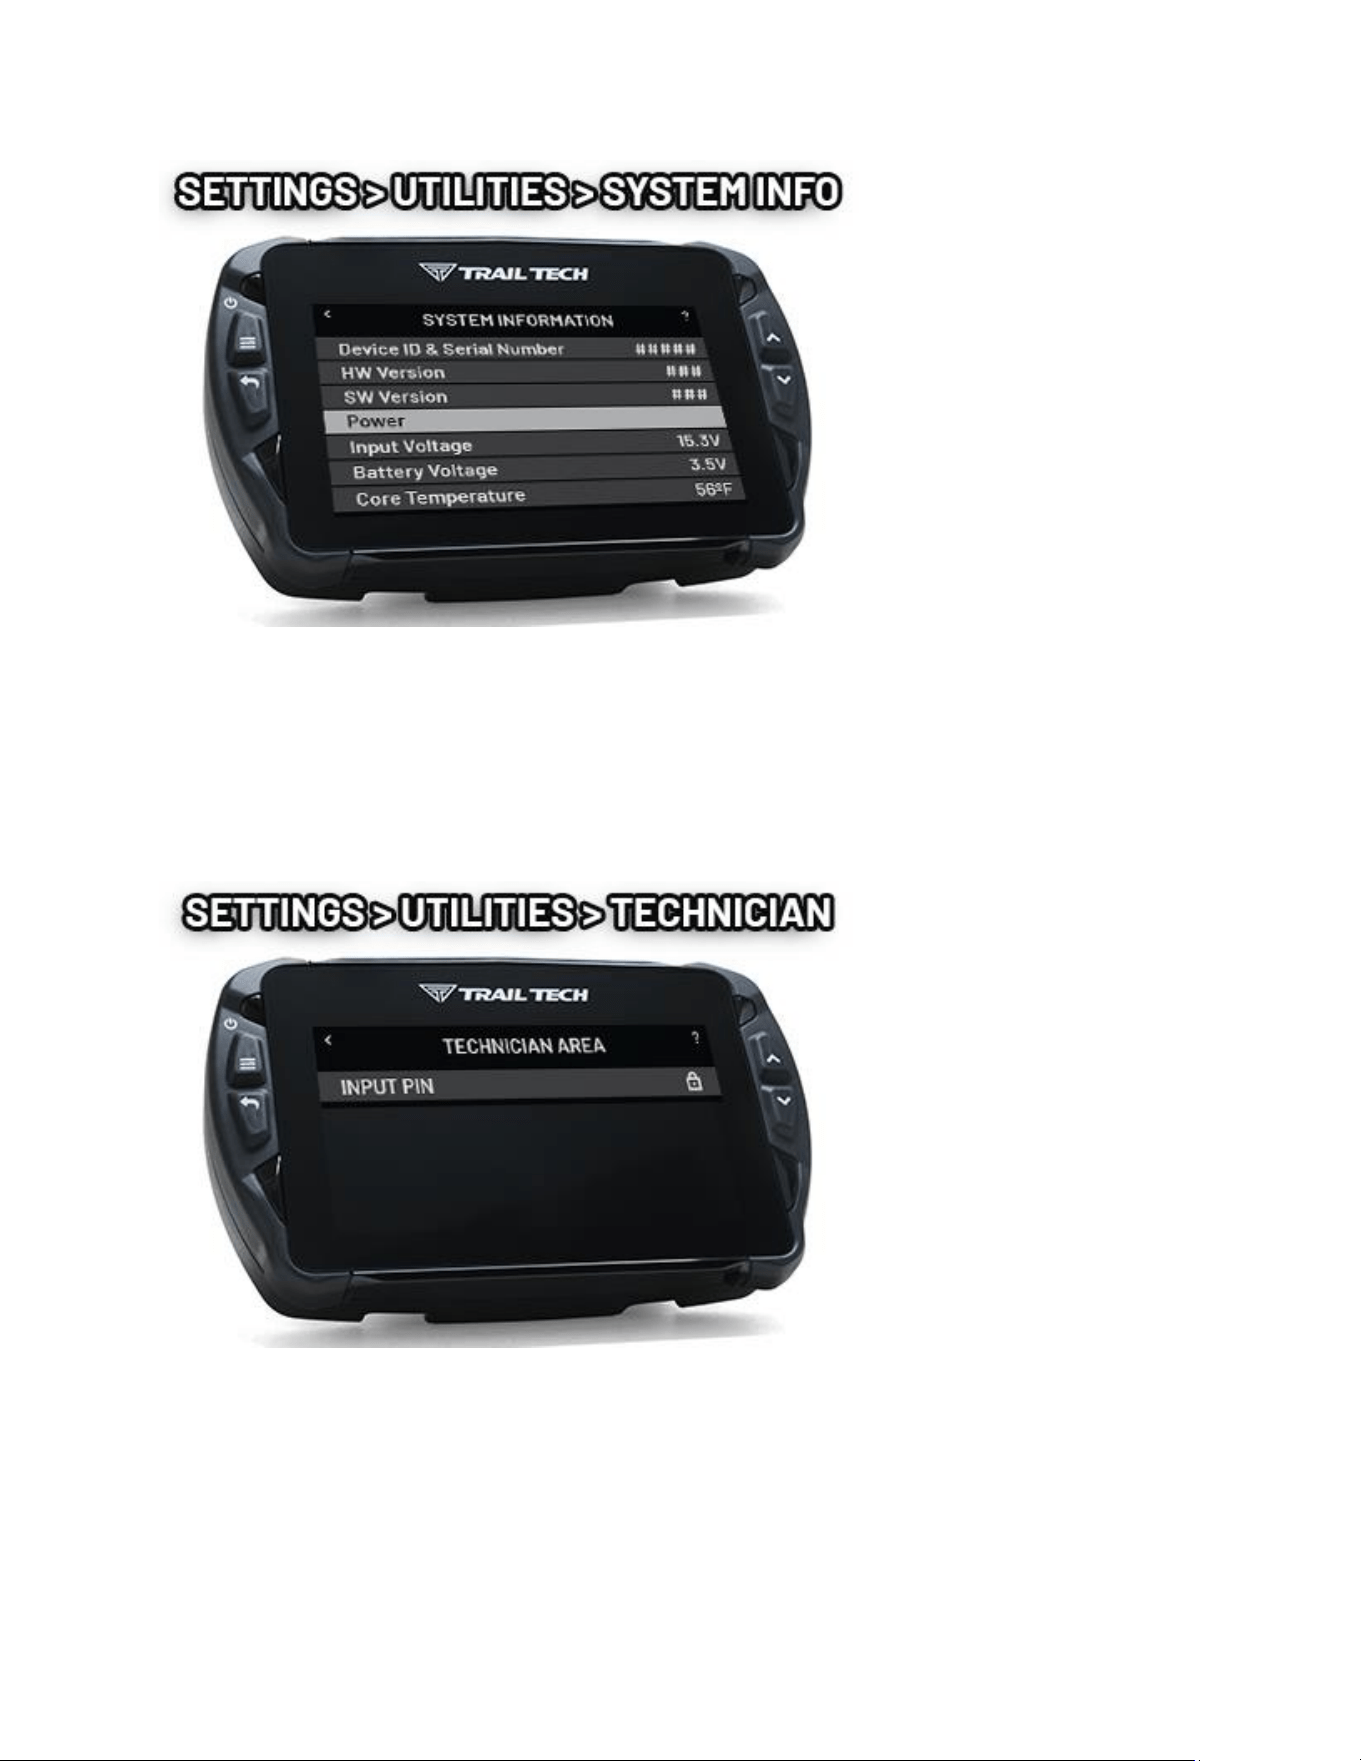
System Information Help
Included in the system informaon is a unique device producon serial number
and the running hardware and soware versions.
The voltage and temperature reports should be used during installaon and
troubleshoong to assure that power is arriving to Voyager Pro4 as expected.
Technician Area Help
The Technician Area contains factory and service diagnosc tools and is not
required for normal operaon.
Contact Trail Tech Help
Sll confused? You can contact Trail Tech support and we'll do our best to walk
you through it.

Online instructions:
trailtech.net/instrucons
Phone:
(844) 378-8143
Email:
technicalservice@apexproductgroup.com
Instagram and Facebook
On Instagram, get inspired by daily photographs about the powersports lifestyle
from the Trail Tech library of riding adventures. Follow #ridetrailtech.
Warranty and FCC Help
Keep Your Info
If you call to request service for your digital gauge, you need the date of
purchase, dealer's name, address, and telephone number. Warranty service
requires proof of purchase.
Call before shipping to get an RMA (return merchandise authorizaon) number.

Warranty
Within one year from the date of original purchase, Trail Tech will repair or
replace, at its opon, any Trail Tech powersport computer which is deemed
defecve in workmanship or materials. Please contact Trail Tech or the dealer
where the item was purchased for assistance.
Damage or injuries resulng from negligence or misuse are not covered by this
warranty. Incidental or consequenal damages are specically excluded.
*This warranty gives you specic legal rights. You may also have other rights
which vary from state to state.
*Because some states do not allow the exclusion of incidental or consequenal
damages, this exclusion may not apply to you.
FCC Notice / FCC Compliance Statement
This device complies with part 15 of the FCC Rules. Operaon is subject to the
following two condions:
(1) this device may not cause harmful interference, and (2) this device must
accept any interference received, including interference that may cause
undesired operaon.
CAUTION: The grantee is not responsible for any changes or modicaons not
expressly approved by the party responsible for compliance. Such modicaons
could void the user’s authority to operate the equipment.
NOTE: This equipment has been tested and found to comply with the limits for
a Class B digital device, pursuant to part 15 of the FCC Rules. These limits are
designed to provide reasonable protecon against harmful interference in a
residenal installaon. This equipment generates, uses, and can radiate radio
frequency energy, and if not installed and used in accordance with the
instrucons, may cause harmful interference to radio communicaons.
However, there is no guarantee that interference will not occur in a parcular
installaon. If this equipment does cause harmful interference to radio or
television recepon, which can be determined by turning the equipment o
and on, the user is encouraged to try to correct the interference by one or more
of the following measures:
– Reorient or relocate the receiving antenna.
– Increase the separaon between the equipment and receiver.
– Connect the equipment into an outlet on a circuit dierent from that to which

the receiver is connected.
– Consult the dealer or an experienced radio/TV technician for help.
RF exposure statement:
This equipment complies with the FCC RF radiaon exposure limits set forth for
an uncontrolled environment. This equipment should be installed and operated
with a minimum distance of 23cm between the radiator and any part of your
body.
The Voyager Pro allows system integrators to choose an appropriate antenna for
their applicaon. The Voyager pro exposes one RP-SMA connector for connecng
an external antenna.
The Voyager Pro is authorized for use with a 900MHz antenna with a stated gain
of up to 5 dBi. System integrators are responsible for ensuring that the gain of
the selected antenna, in all direcons, does not exceed those limits
Canadian Compliance Statement:
This device contains license-exempt transmier(s)/receiver(s) that comply with
Innovaon, Science and Economic Development Canada license-exempt RSS(s).
Operaon is subject to the following two condions:
(1) This device may not cause interference.
(2) This device must accept any interference, including interference that may
cause undesired operaon of the device.
L'émeeur/récepteur exempt de licencecontenudans le
présentappareilestconformeaux CNRd'Innovaon, Sciences et
Développementéconomique Canada applicables aux appareils radio exempts de
licence. L'exploitaonestautorisée aux deux condions suivantes :
1) L'appareil ne doit pas produire de brouillage;
2) L'appareildoitaccepter toutbrouillageradioélectriquesubi, mêmesi le
brouillageest suscepble d'encompromere le fonconnement.
RF exposure statement:
This equipment meets the exempon from the roune evaluaon limits in
secon 6 of RSS-102. It should be installed and operated with a minimum
distance of 23cm between the radiator and any part of your body.
Cetéquipementestconforme à l'exempon des limitesd'évaluaonhabituelle de
la secon 6 de la norme RSS-102. Il doitêtreinstallé et ulisé à une distance
minimale de 23 cm entre le radiateur et toutepare de votre corps.

Declaration of Conformity:
Supplier's Declaraon of Conformity:
- 47 CFR § 2.1077 Compliance Informaon
Product Name:
- Voyager Pro4
Product Model:
- Voyager Pro4
Manufacturer:
- POLARIS INDUSTRIES INC
- 2100 Highway 55
- Medina, Minnesota 55340
- www.polaris.com
Modular Components Used:
- NAME : WiFi, Bluetooth, LE Module
- MODEL : WL1831MODGBMOCR
- FCC ID : Z64-WL18SBMOD
This device complies with part 15 of the FCC Rules. Operaon is subject to the
following two condions: (1) This device may not cause harmful interference,
and (2) this device must accept any interference received, including
interference that may cause undesired operaon.