PORTABLE PROPANE HEATER
FOR RECREATIONAL USE
FOR US SALE EXCEPT
MASSACHUSETTS
This is an unvented gas-fired portable heater. It uses air (oxygen) from the area in which it is used. Adequate
combustion and ventilation air must be provided. Refer to page 3.
OPERATING INSTRUCTIONS AND OWNER’S MANUAL
www.mrheater.com
800-251-0001
LANGUAGES INCLUDED:
• ENGLISH
• SPANISH
WARNING:
If the information in this manual is not followed exactly, a fire or
explosion may result causing property damage, personal injury or loss
of life.
Do not store or use gasoline or other flammable vapors and liquids in the vicinity of this or any other
appliance.
WHAT TO DO IF YOU SMELL GAS
• Do not try to light appliance.
• Do not touch any electrical switch; do not use any phone in your building.
• Immediatelycallyourgassupplierfromaneighbor’sphone.Followthegassupplier’sinstructions.
• If you cannot reach your gas supplier, call the fire department or a qualified service agency.
Installation and service must be performed by a qualified installer, service agency or the gas supplier.
NEVER LEAVE THE HEATER UNATTENDED WHILE BURNING!NEVER LEAVE THE HEATER UNATTENDED WHILE BURNING!NEVER LEAVE THE HEATER UNATTENDED WHILE BURNING!
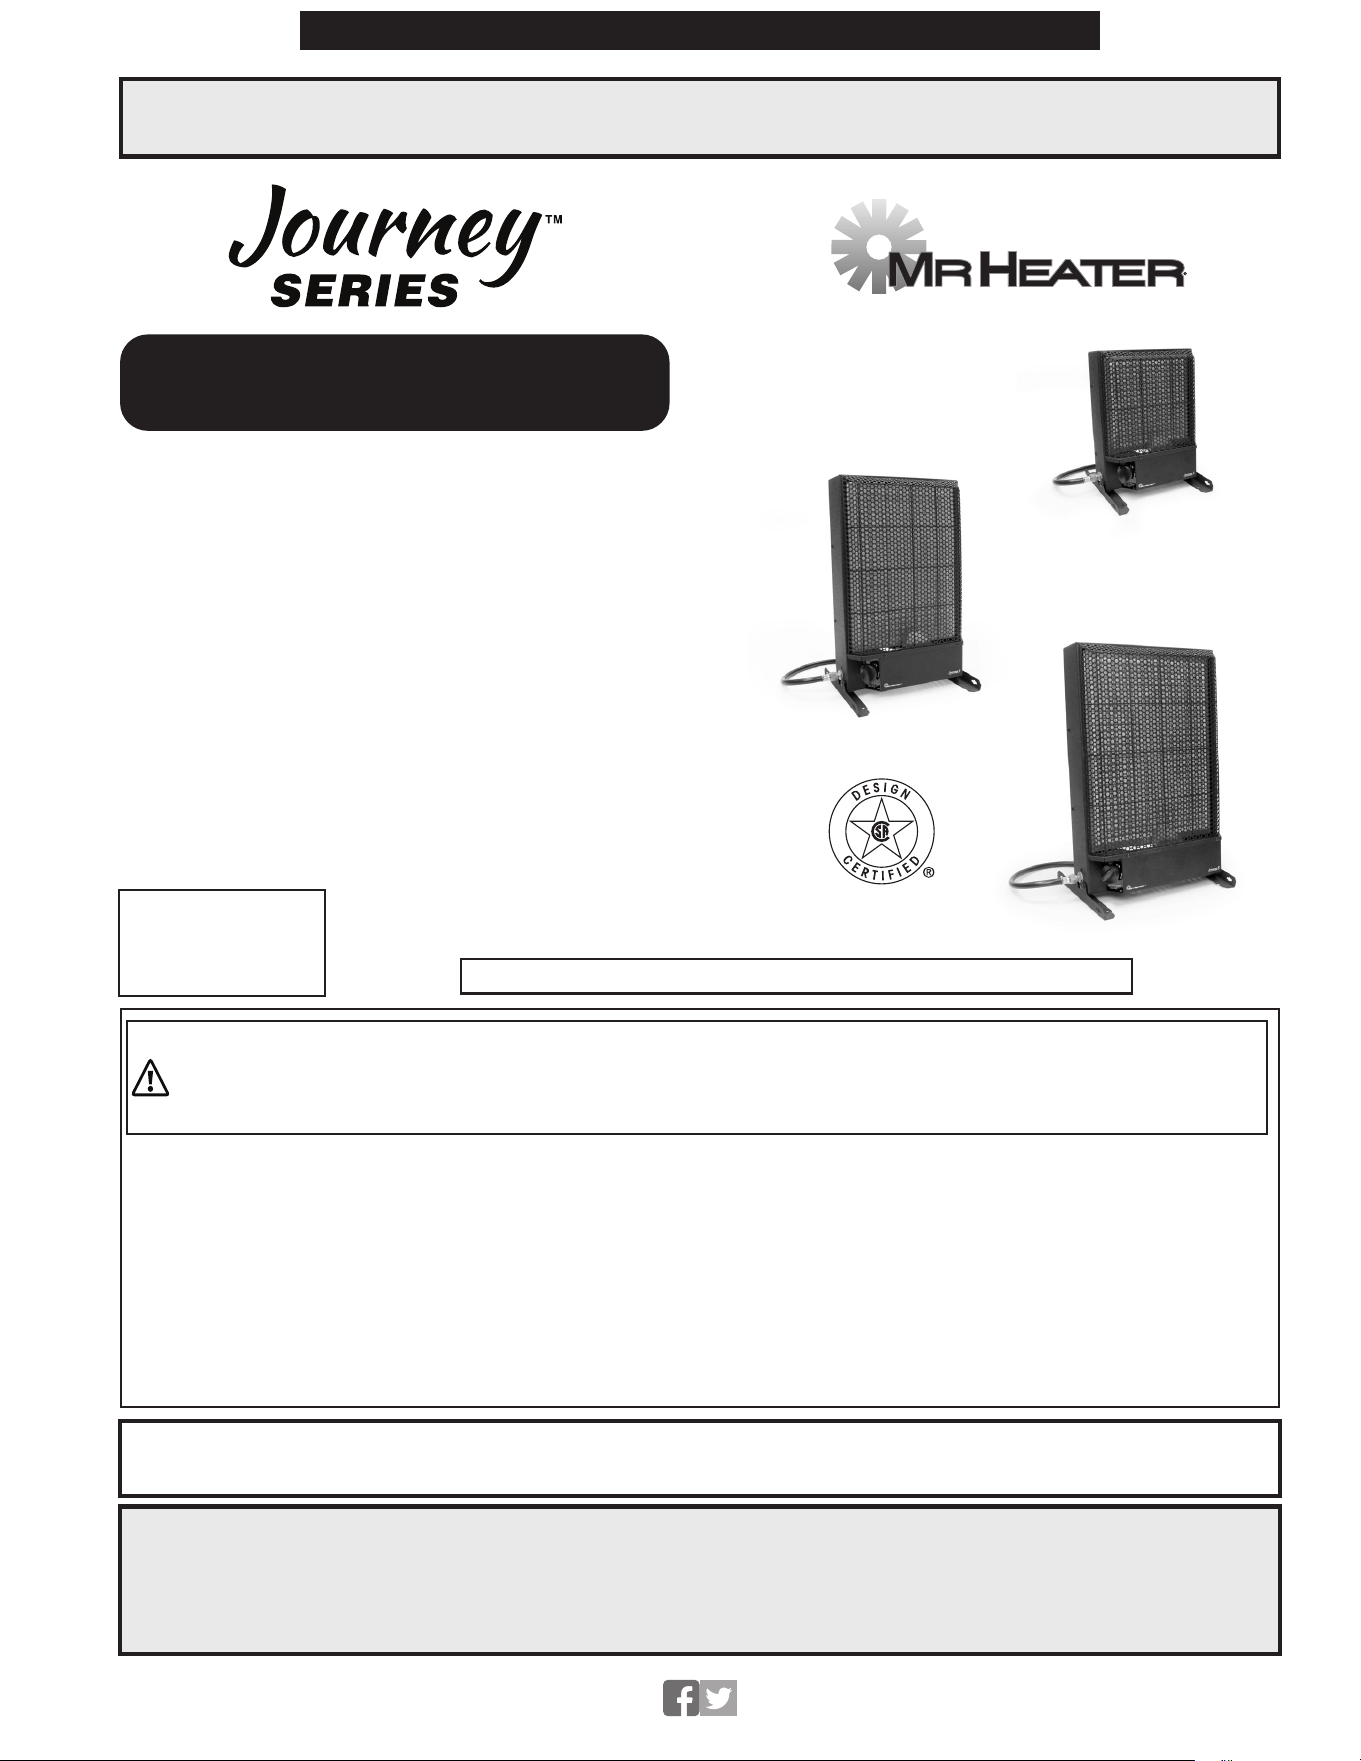
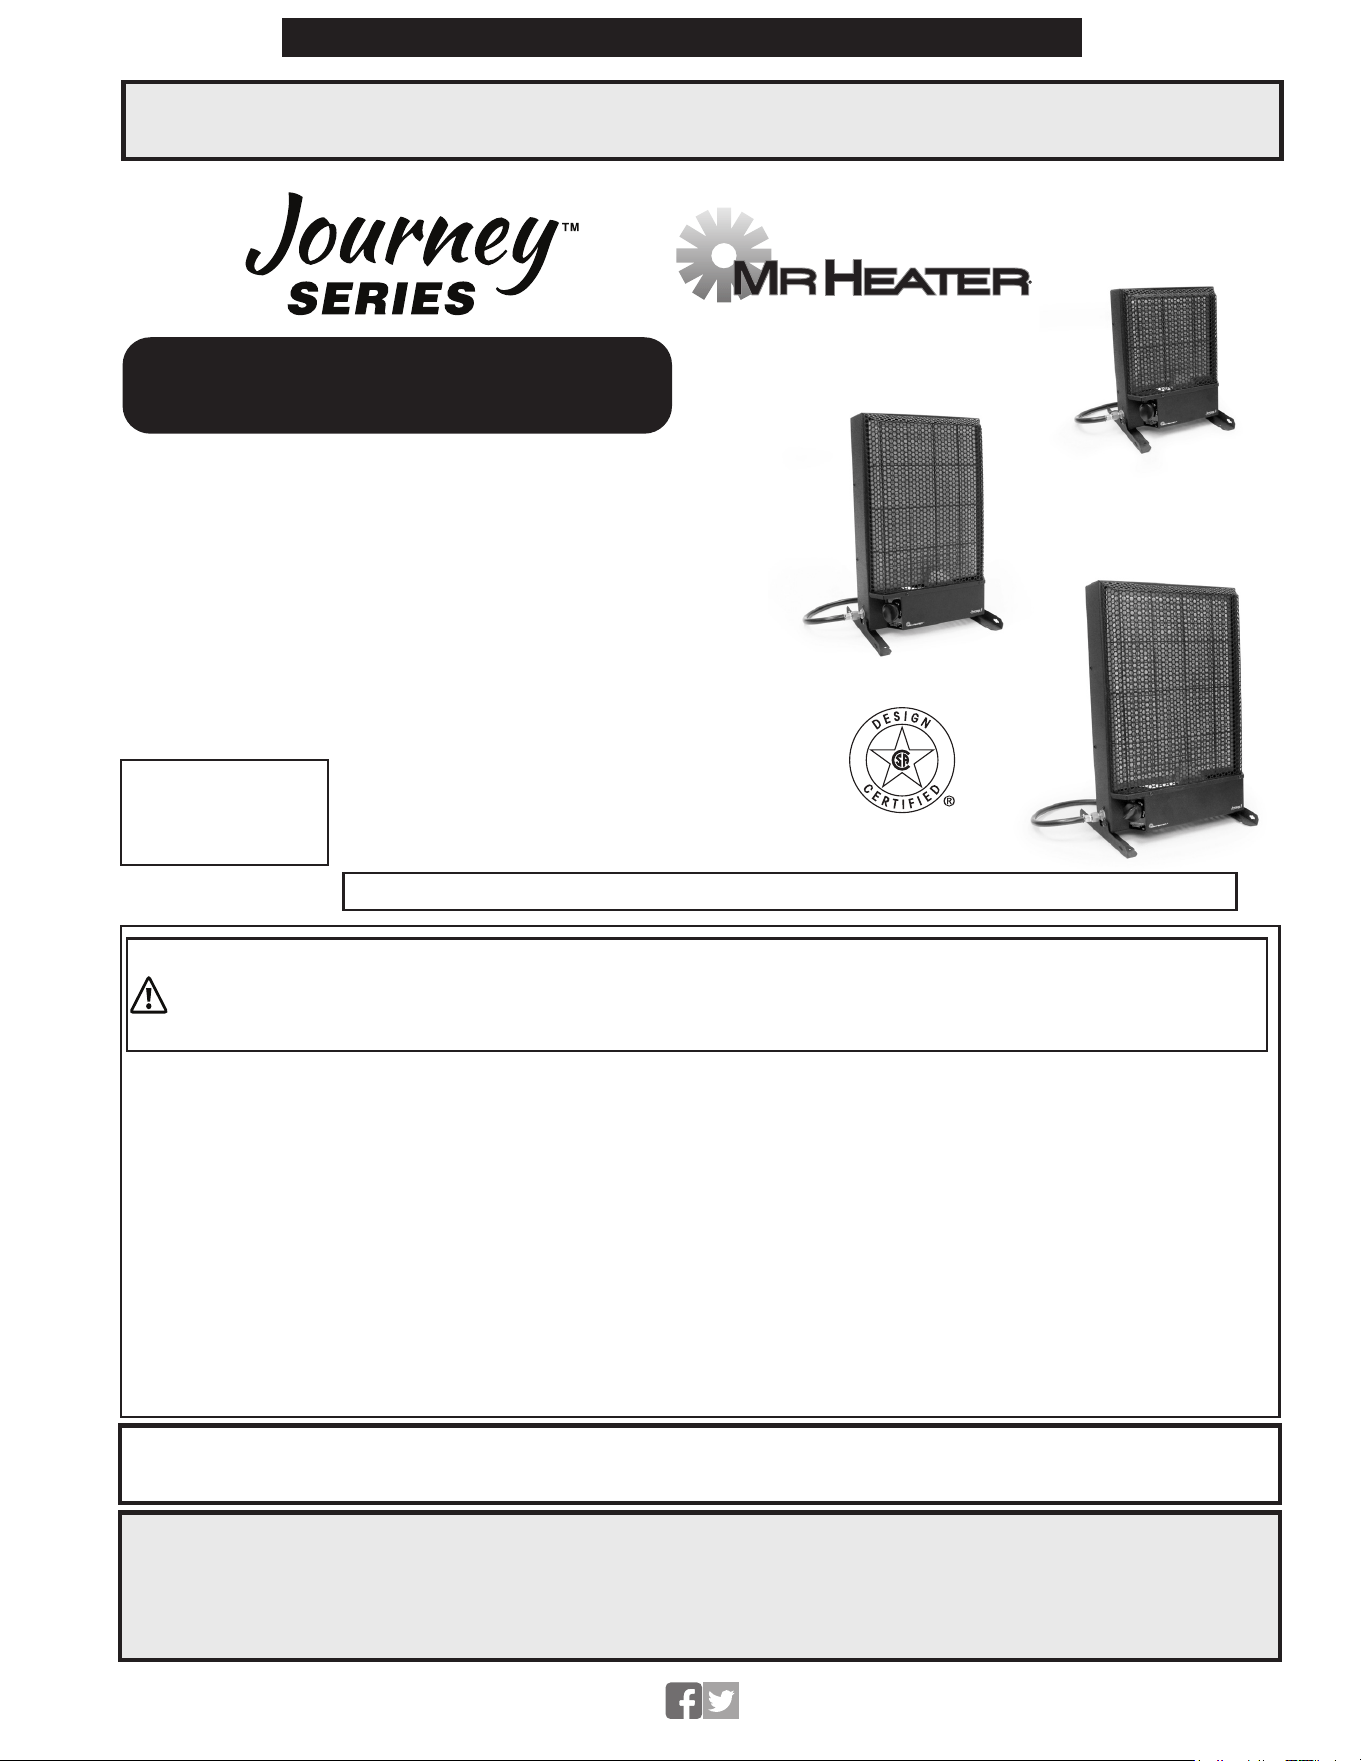
CATALYTIC HEATER
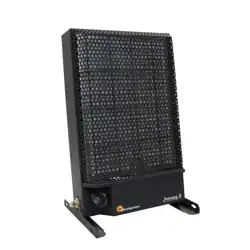
Model # MHCAT3LP • MHCAT6LP • MHCAT8LP
DO NOT OPERATE HEATER WITH DUST SHIELD IN PLACE
36881
READ INSTRUCTIONS CAREFULLY: YOUR SAFETY IS IMPORTANT TO YOU AND TO
OTHERS. Read and follow all instructions. Place instructions in a safe place for future
reference. Do not allow anyone who has not read these instructions to assemble, light,
adjust or operate the heater.
2
Mr. Heater | Catalytic Heater OperatingInstructionsandOwner’sManual
NEVER LEAVE THE HEATER UNATTENDED WHILE BURNING!NEVER LEAVE THE HEATER UNATTENDED WHILE BURNING!NEVER LEAVE THE HEATER UNATTENDED WHILE BURNING!
WARNING:
This product can expose you to
chemicals including lead and
lead compounds, which are
known to the State of California
to cause cancer and birth defects
or other reproductive harm. For
more information visit www.
P65Warnings.ca.gov
WARNING:
Any changes to this heater or its
controls can be dangerous.
WARNING:
Every time hose or tank is
connected to unit, connection
must be checked for leaks in one
or more ways: Apply soapy water
to connection, look for bubbles,
listen for hiss of escaping gas,
feel for extreme cold, smell for
rotten egg odor. Do not use if
leaking!
WARNING:
Early signs of carbon monoxide
poisoning resemble the flu,
with headache, dizziness and/
or nausea. If you have these
signs, heater may not be working
properly. Get fresh air at once!
Have heater serviced.
WARNING:
Fuels used in liquefied propane
gas appliances, and the products
of combustion of such fuel,
can expose you to chemicals
including benzene, which is
known to the state of California
to cause cancer and cause birth
defects or other reproductive
harm, for more information go
to www.P65Warnings.ca.gov
WARNING:
If the recreational enclosure
does not have a window or roof
vent, DO NOT USE THIS HEATER
INSIDE.
NOTICE:
Notforuseina“dwellinghome”
in California.
WARNING:
FIRE OR EXPLOSION HAZARD
If you smell gas:
1. Do not attempt to light
appliance.
2. Extinguish any open
flame.
3. Disconnect fuel supply.
4. Leave the area
immediately.
5. Allow gas to dissipate 5
minutes before relighting
the appliance.
Do not store or use gasoline
or other flammable vapors
and liquids in the vicinity of
this or any other appliance.
Failure to follow these
instructions could result
in fire or explosion, which
could cause property
damage, personal injury, or
death.
WARNING:
ASPHYXIATION HAZARD
• Do not use in unventilated
areas.
• The flow of combustion and
ventilation air must not be
obstructed.
• Proper ventilation air must
be provided to support the
combustion air requirements
of the heater being used.
• Lack of proper ventilation
air will lead to improper
combustion.
• Improper combustion can
lead to carbon monoxide
poisoning leading to serious
injury or death. Symptoms of
carbon monoxide poisoning
can include headaches,
dizziness and difficulty in
breathing.
• Refer to GENERAL SAFETY
INSTRUCTIONS for more
specific requirements
regarding adequate
combustion and ventilation
air (page 3).
WARNING:
CARBON MONOXIDE
POISONING MAY CAUSE
DEATH OR INJURY
When used without
adequate combustion and
ventilation air, heater may
give off excessive CARBON
MONOXIDE, an odorless,
poisonous gas.
This is an unvented gas-
fired heater. The heater
uses air (oxygen) from the
area in which the heater is
used. Adequate combustion
and ventilation air must be
provided. Refer to GENERAL
SAFETY INSTRUCTIONS for
more specific requirements
regarding adequate
combustion and ventilation
air (page 3).
This heater is equipped with a
SAFETY SYSTEM designed to
turn off the heater if not enough
fresh air is available.
WARNING:
DO NOT TAMPER WITH THE
SAFETY SYSTEM!
If heater shuts off, do not relight
until you provide fresh air. If
heater keeps shutting off, have
the heater serviced. Keep burner
and control compartment clean.
WARNINGS
3
OperatingInstructionsandOwner’sManualMr. Heater | Catalytic Heater
CONTENTS
2 Warnings
3 General Safety Instructions
4 Odor Fade Warning
4 General Information
6 Installation
Fuel
Locations
Air Supply
Gas Connection
Wall Installation
Feet Installation
7 Operation
Lighting
Relighting
Cleaning
8 Service
Burner and Pilot Flame
ODS and Valve Components
Replacing Feet
Catalytic Pad
Off Season
11 Troubleshooting
12 Parts List
14 Ordering Parts/Warranty
NEVER LEAVE THE HEATER UNATTENDED WHILE BURNING!NEVER LEAVE THE HEATER UNATTENDED WHILE BURNING!NEVER LEAVE THE HEATER UNATTENDED WHILE BURNING!
GENERAL SAFETY
INSTRUCTIONS
THIS IS A HEATING APPLIANCE.
DO NOT OPERATE THIS APPLIANCE
WITHOUT THE FRONT GRILL
INSTALLED. DO NOT ATTEMPT TO
WARM OR COOK FOOD ON THIS
HEATER.
• Do not use non-approved attachments
on this heater.
• Due to high temperatures, the
appliance should be located out of
traffic and away from combustible
materials. (See Clearance to
Combustibles in table below)
• Children and adults should be
alerted to the hazard of high surface
temperatures and should stay away to
avoid burns or clothing ignition.
• Do not leave this heater unattended
while it is in operation. Keep children
and pets away from the heater at all
time.
• Do not place clothing or other
flammable material on or near the
appliance.
• Do not operate heater in any moving
vehicle.
• This heater can be used in a
recreational enclosure only if the
enclosure has a window or roof vent.
WARNING: If the recreational
enclosure does not have a window or
roof vent, DO NOT USE THIS HEATER
inside.
• This heater requires a minimum vent
area of 8 square inches, 6 square
inches, and 3 square inches for the
8,000 BTU/HR, 6,000 BTU/HR, and
3,000 BTU/HR heaters, respectively
(example4”x2”opening,3”x
2”opening,and3”x1”opening,
respectively) at the ceiling and at floor
level for adequate ventilation during
operation. Do not use other fuel
burning appliances inside.
• GAS PRESSURE AT HEATER IS
REGULATEDANDFIXEDAT11”W.C.
THIS HEATER DOES NOT CONTAIN AN
INTERNAL REGULATOR!
• If the protective grill is removed for
servicing, it must be replaced prior to
operating the heater.
• The appliance should be inspected
before each use. Frequent cleaning
may be required. The control
compartments, burner and circulating
air passageways of the appliance must
be kept clean, see MAINTENANCE. Do
not attempt to clean the catalytic pad.
If the catalytic pad becomes damaged,
replace entire burner assembly
immediately.
• DO NOT use this heater if any part
has been under water. Immediately
call a qualified service technician to
inspect the heater and to replace any
part of the control system and any
gas control, which has been under
water. If the catalytic pad becomes
wet, replace entire burner assembly
immediately.
WARNING: Early signs of carbon
monoxide poisoning resemble the
flu, with headache, dizziness, and/or
nausea. If you have these signs, the
heater may not be working properly.
Get fresh air at once! Have heater
serviced.
Some people - pregnant women,
persons with heart or lung disease,
anemia, those under the influence of
alcohol, those at high altitudes - are
more affected by carbon monoxide
than others.
• When heater is placed on the ground,
make sure the ground is level and keep
any objects at least 18 inches from the
front of the heater.
• THIS HEATER IS EQUIPPED WITH A
TIP OVER SWITCH THAT WILL SHUT
THE HEATER OFF IF THE HEATER TIPS
OVER.
Specifications
Model No. MHCAT3LP MHCAT6LP MHCAT8LP
Input (Btu/Hr) 2,700 / 3,000 4,000 / 6,000 5,000 / 8,000
Gas Type Propane (LP) Propane (LP) Propane (LP)
Clearance To Combustibles
Top 12 ” 12 ” 12 ”
Front 18” 18” 18”
Sides 2” 2” 2”
Rear 0” 0” 0”
Floor (Wall Mount) 2” 2” 2”
Floor (With Feet) N/A N/A N/A
SAFETY INSTRUCTIONS

4
Mr. Heater | Catalytic Heater OperatingInstructionsandOwner’sManual
NEVER LEAVE THE HEATER UNATTENDED WHILE BURNING!NEVER LEAVE THE HEATER UNATTENDED WHILE BURNING!NEVER LEAVE THE HEATER UNATTENDED WHILE BURNING!
FUEL GAS ODOR
Propane (LP) gas and natural gas
have man-made odorants added
specifically for detection of fuel gas
leaks.
If a gas leak occurs you should be
able to smell the fuel gas. Since
propane (LP) gas is heavier than
air you should smell for the gas
odor low to the floor. ANY GAS
ODOR IS YOUR SIGNAL TO GO INTO
IMMEDIATE ACTION!
• Do not take any action that could
ignite the fuel gas. Do not operate
any electrical switches. Do not pull any
power supply or extension cords. Do
not light matches or any other source
of flame. Do not use your telephone.
• Get everyone out of the building and
away from the area immediately.
• Close all propane (LP) gas tank or
cylinder fuel supply valves.
• Propane (LP) gas is heavier than air
and may settle in low areas. When you
have reason to suspect a propane (LP)
gas leak, keep out of all low areas.
• Call your fuel gas supplier and your fire
department.
• Stay out of the building and away
from the area until declared safe by
the firefighters and your fuel gas
supplier.
• FINALLY, let the fuel gas service person
and the firefighters check for escaped
gas. Have them air out the building
and area before you return. Properly
trained service people must repair any
leaks, check for further leakages, and
then relight the appliance for you.
ODOR FADE WARNING
ODOR FADING - NO ODOR
DETECTED
• Some people cannot smell well. Some
people cannot smell the odor of the
man-made chemical added to propane
(LP) gas. You must determine if you
can smell the odorant in these fuel
gases.
• Learn to recognize the odor of
propane (LP) gas. Local propane (LP)
gas dealers will be more than happy to
give you a scratch and sniff pamphlet.
Use it to become familiar with the fuel
gas odor.
• Smoking can decrease your ability
to smell. Being around an odor for
a period of time can affect your
sensitivity to that particular odor.
Odors present in animal confinement
buildings can mask fuel gas odor.
• The odorant in propane (LP) gas
is colorless and the intensity of
its odor can fade under some
circumstances.
• If there is an underground leak, the
movement of gas through the soil can
filter the odorant.
• Propane (LP) gas odor may differ
in intensity at different levels. Since
propane (LP) gas is heavier than air,
there may be more odor at lower
levels.
• Always be sensitive to the slightest
gas odor. If you continue to detect
any gas odor, no matter how small,
treat it as a serious leak. Immediately
go into action as discussed previously.
ATTENTION - CRITICAL
POINTS TO REMEMBER!
• Propane (LP) gas has a distinctive
odor. Learn to recognize these odors.
(Reference Fuel Gas Odor and Odor
Fading sections above.
• Even If you are not property trained in
the service and repair of the heater,
ALWAYS be consciously aware of the
odors of propane (LP) gas.
• If you have not been properly trained
in repair and service of propane (LP)
gas then do not attempt to light
heater, perform service or repairs, or
make any adjustments to the heater
on the propane (LP) gas fuel system.
• A periodic sniff test around the heater
orattheheater’sjoints;i.e.hose,
connections, etc., is a good safety
practice under any conditions.
GENERAL INFORMATION
• This heater is safe for indoor use in
small recreational enclosures having
means for providing combustion air
and ventilation, such as enclosed
porches, cabins, fishing huts, trailers,
tent trailers, tents, truck caps,vans,
and RVs.
IMPORTANT: NEVER Bring a Refillable
LP-Gas Cylinder Indoors. A Fire or
Explosion can Occur Causing Property
Damage, Serious Injury, or Death. Refer
to GENERAL SAFETY INSTRUCTIONS for
more specific requirements regarding
adequate combustion and ventilation air.
Note: Use caution when using this
heater outdoors, as rain and small
pieces of debris can damage the fragile
surface of the catalytic pad.
• When the heater is cold or at room
temperature, it will take a few
minutes for the catalytic pad to
illuminate.
IMPORTANT: Upon initial starting, a
light flame may also be evident at the
heater face - this is normal. If flame
continues, shut off heater and have it
serviced.
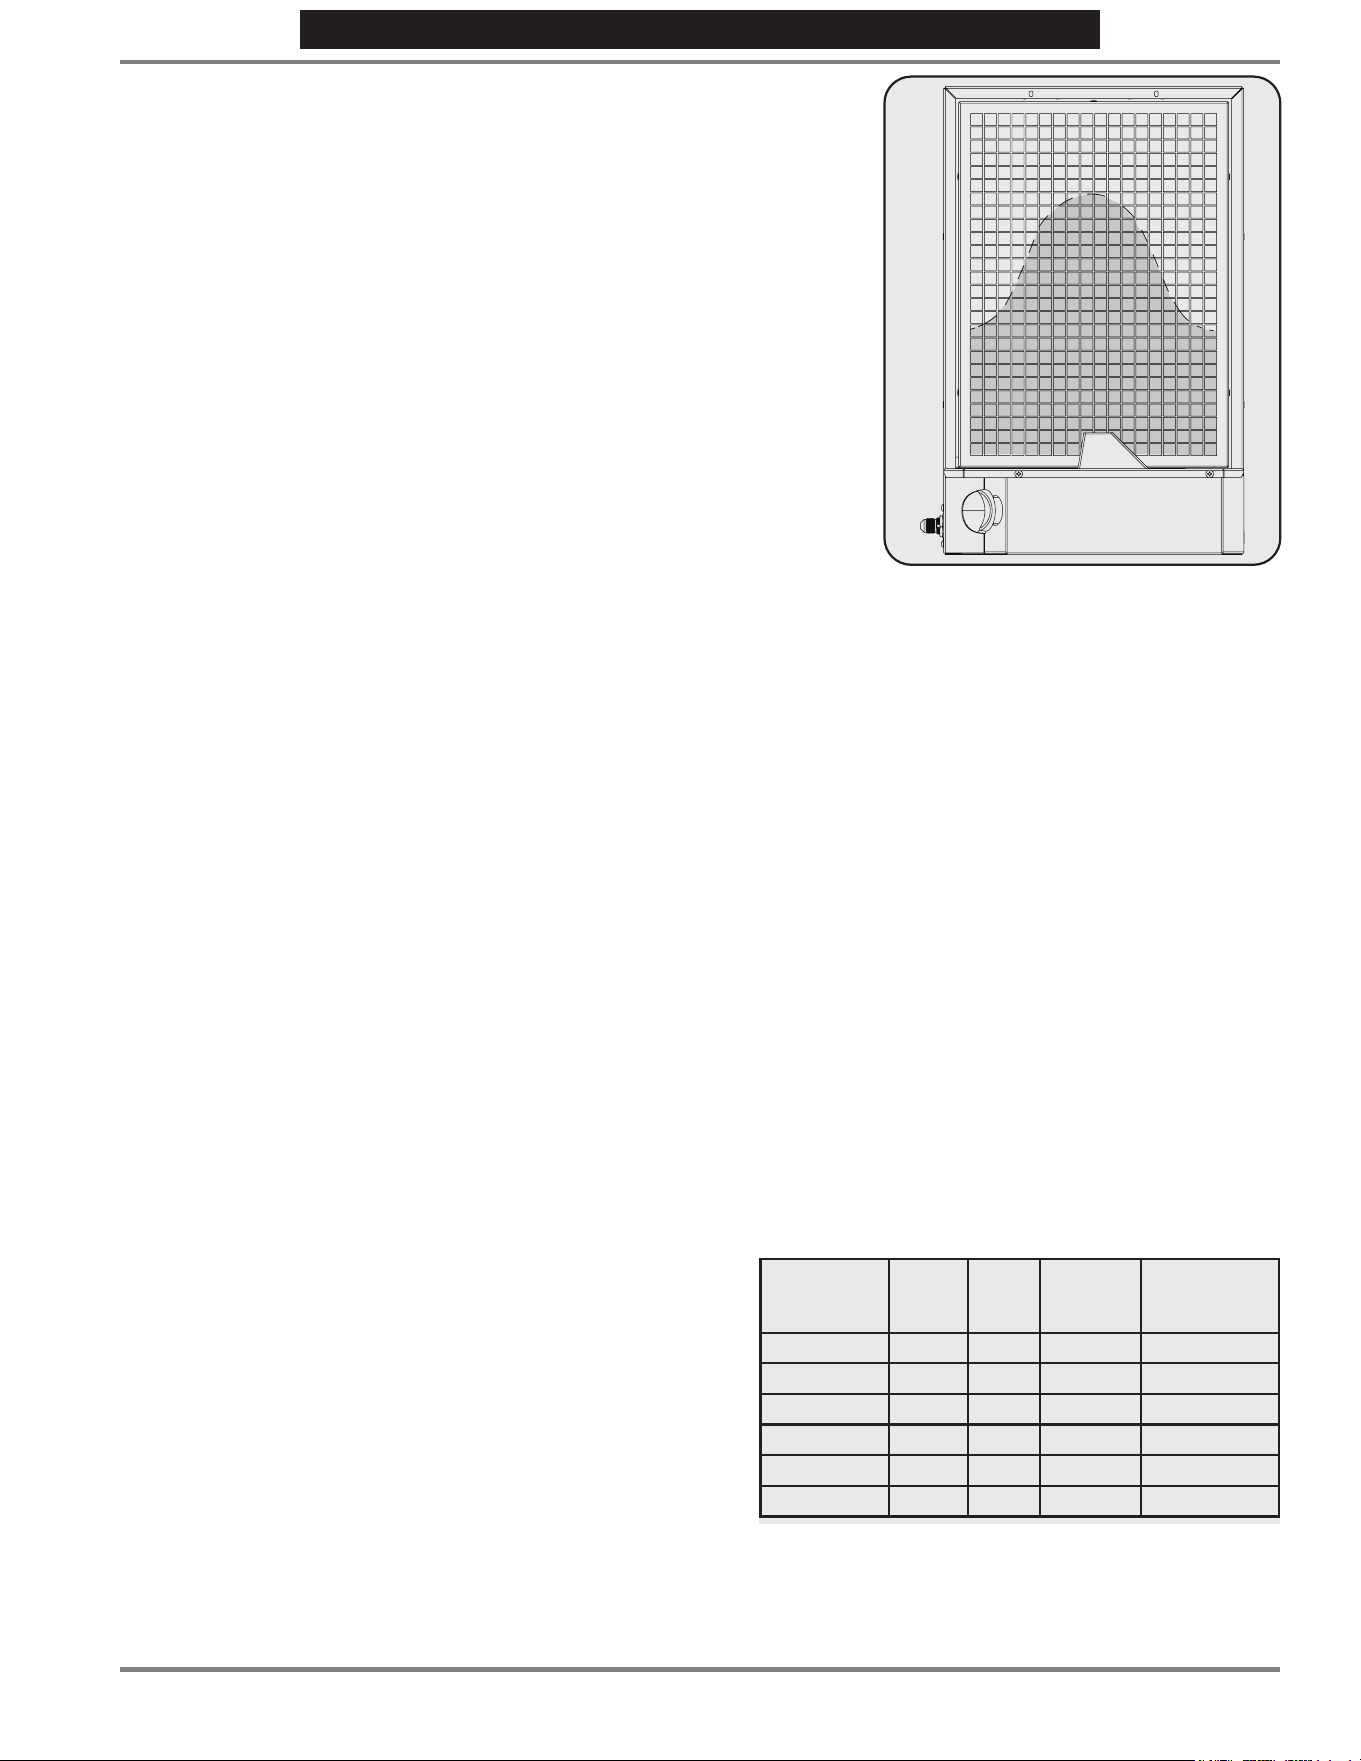
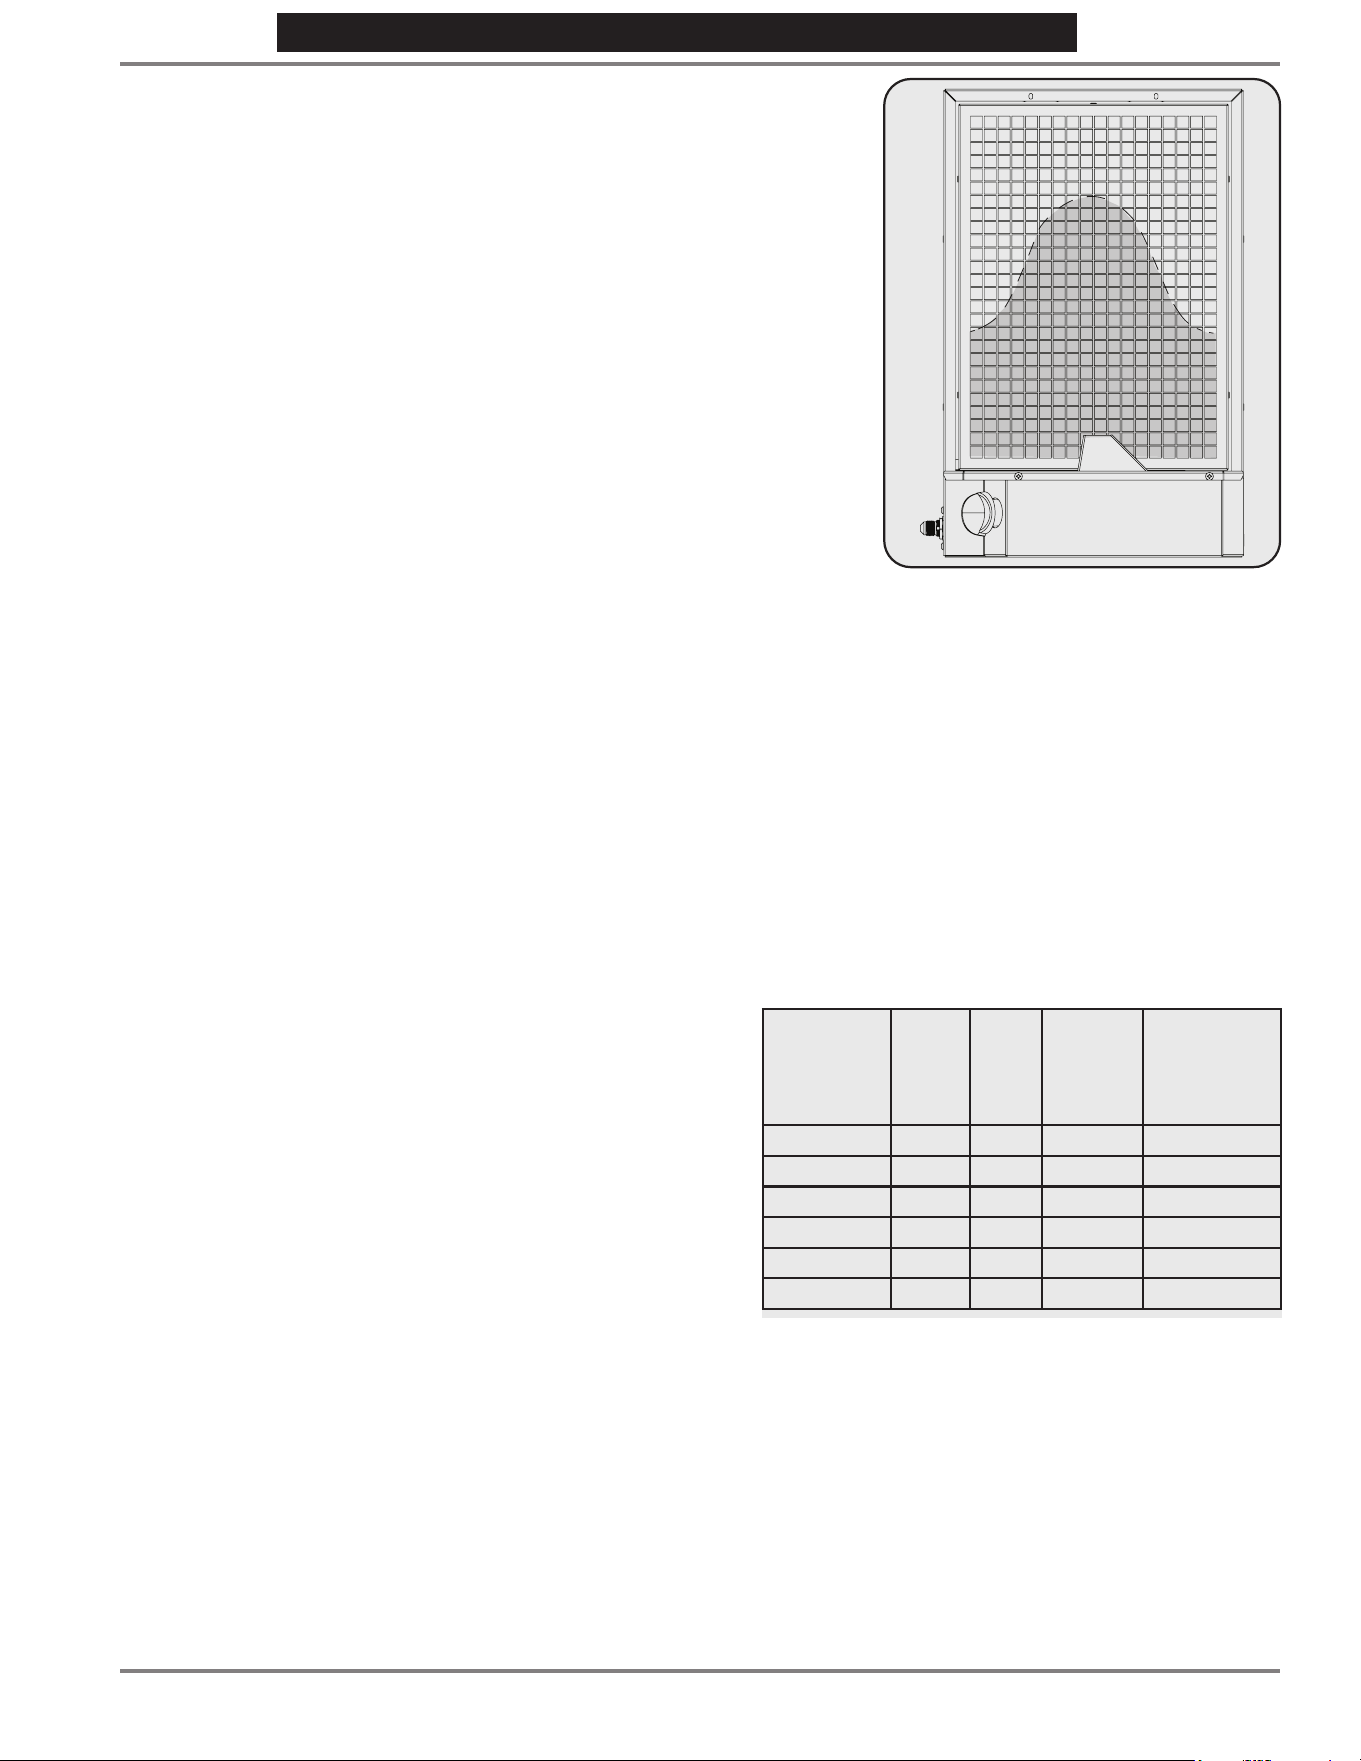
When the unit is fully lit, you should
see the burn pattern shown in
Figure 1.
NOTE: The glowing phenomenon
diminishes over the life span of the
catalytic pad.
• When operating the heater for the
first time, the catalytic pad will change
from a tan color to a whitish color.
This is also normal and is no reason for
concern.
• Operating time will vary depending on
the heater setting and the supply tank
size. Refer to Table 1 on Page 5 for
operating times by tank size for each
model.
• When moving heater when lit or
bumping heater setting it down, the
tip over switch may shut off heater. If
this happens, re-light.
SAFETY INSTRUCTIONS
5
OperatingInstructionsandOwner’sManualMr. Heater | Catalytic Heater
NEVER LEAVE THE HEATER UNATTENDED WHILE BURNING!NEVER LEAVE THE HEATER UNATTENDED WHILE BURNING!NEVER LEAVE THE HEATER UNATTENDED WHILE BURNING!
GAS SUPPLY
• The LP-gas cylinder(s) used must
be constructed and marked in
accordance with the specifications
for LP-gas cylinders of the U.S.
Department of Transportation
(DOT).
• Use only VAPOR WITHDRAWAL
propane supply. If there is any
question about vapor withdrawal,
ask your propane dealer.
• The installation of the heater must
conform to local codes or, in the
absence of local codes, with the
National Fuel Gas Code, ANSI
Z223.1.
• This heater is designed to operate
with an inlet pressure of 11 W.C.
(.40 PSIG, 2.8 kPA). Do not install
directly to a propane (LP) gas tank
or cylinder.
• The supply line must be equipped
at the cylinder with a listed
low pressure propane (LP) gas
regulator set to deliver the
specified pressure. The high
pressure propane (LP) gas line
between the propane (LP) gas
supply source and the regulator
must be equipped with an excess
flow valve to limit the escape of
fuel in case of a break in the line.
Observe these operating
precautions:
• Due to high temperatures, the
heater should be located out of
traffic and away from furniture and
draperies.
• Children and adults should be
alerted to the hazard of high
surface temperature and should
stay away to avoid burns or
clothing ignition.
• Young children should be carefully
supervised when they are in the
same room with the heater.
• Do not place clothing or other
flammable material on or near the
heater.
• Installation and repair should be
done by a qualified service person.
The heater should be inspected
before use and at least annually by
a professional service person.
• WARNING: Any change to this
heater or its controls or attempts
to clean the catalytic pad can be
dangerous.
• The safety grill, if removed for
servicing, must be replaced prior
to operating the heater. DO NOT
OPERATE WITH DUST SHIELD
COVER IN PLACE!
• IMPORTANT: The operation of
the heater is such that, on initial
lighting from cold start, a slight
odor of gas may be noticed for
ashortperiodoftime—thisis
normal. If odor persists, shut off
heater and have it serviced.
• IMPORTANT: REMOVE DUST
SHIELD BEFORE USE.
• Do not attempt to clean catalytic
pad. Follow cleaning instructions
accompanying heater.
Fuel
• This heater is designed for use with
HD-5 propane (LP) gas only. Do not
attempt to convert it to use with other
gases or liquid fuels. Use of any gases
other than HD-5 propane (LP) gas may
cause damage to the catalytic heating
element.
Locations
• Refer to Specifications table on page 3 for
minimum clearances from combustibles.
IMPORTANT: When heater is installed
using the feet directly on carpeting, tile,
or other combustible material other
than wood flooring, the heater must
be installed on a metal or wood panel
extending the full width and depth of
the heater.
• This Heater may be used in a
recreational enclosure or temporary
construction work enclosure with a
remote refillable propane (LP) gas
cylinder ONLY when the cylinder
is located outdoors and the heater
is used with Mr. Heater Hose No.
F271161, F271161-60, and F271161-144.
Model
Tank
Weight
(lbs)
Setting
Heater
Rate
(BTU/HR)
Maximum Oper-
ating Time with
Full Tank (hrs)
MHCAT3LP 20 HI 3000 143
MHCAT3LP 20 LO 2700 159
MHCAT6LP 20 HI 6000 72
MHCAT6LP 20 LO 4000 107
MHCAT8LP 20 HI 8000 54
MHCAT8LP 20 LO 5000 86
Figure 1
Table 1
SAFETY INSTRUCTIONS
6
Mr. Heater | Catalytic Heater OperatingInstructionsandOwner’sManual
NEVER LEAVE THE HEATER UNATTENDED WHILE BURNING!NEVER LEAVE THE HEATER UNATTENDED WHILE BURNING!NEVER LEAVE THE HEATER UNATTENDED WHILE BURNING!
• Inspect the hose before each use
of the heater. If there is excessive
abrasion or wear, or the hose is cut,
replace prior to using the heater with
oneoftheMr.HeaterHoseNo’s.
shown above.
• Heater must be in an upright position
during operation.
• Installation should be done by a
qualified service person familiar with
non-vented gas space heaters.
• The heater should also be inspected
before use and at least annually by
a professional service person. More
frequent cleaning may be required
due to excessive lint from carpeting,
bedding material, etc.
• If you have any questions regarding
the location of your heater, please call
Technical Service at 800-251-0001.
Air Supply
• This heater consumes oxygen from the
room in which it is installed. To assure
complete combustion, an adequate
fresh air supply to the room, See
General Safety Instructions, Page 3.
NOTE: Provide additional ventilation of
at least 2 square inches for every 1000
BTUs per hour of input for any additional
fuel burning appliances used at the
same time.
Gas Connection
IMPORTANT: The 3/8” male and
female SAE flare connectors must be
checked and cleaned before assembly
and wrenched tightly for a gas-tight
connection. Be sure to tighten with a
wrench by turning it in the clockwise
direction.
Connect female flare end of the hose
to the heater and connect the other
end of hose into the propane (LP) gas
supply cylinder valve or connection
point. Tighten all hose connections. DO
NOT use thread sealant on any of these
connections.
IMPORTANT: Check all hose connections
for leaks with soapy water at the threaded
connection on the side of the heater.
DO NOT USE ANY EXPOSED FLAME
TO CHECK FOR LEAKS. DO NOT
OVERTIGHTEN.
Wall Installation
Your heater may be installed in a variety
of fixed locations and is supplied with
the necessary fasteners for mounting
your heater on a wall.
NOTE: Heater must be oriented vertically
(not sideways) when the heater is
mounted.
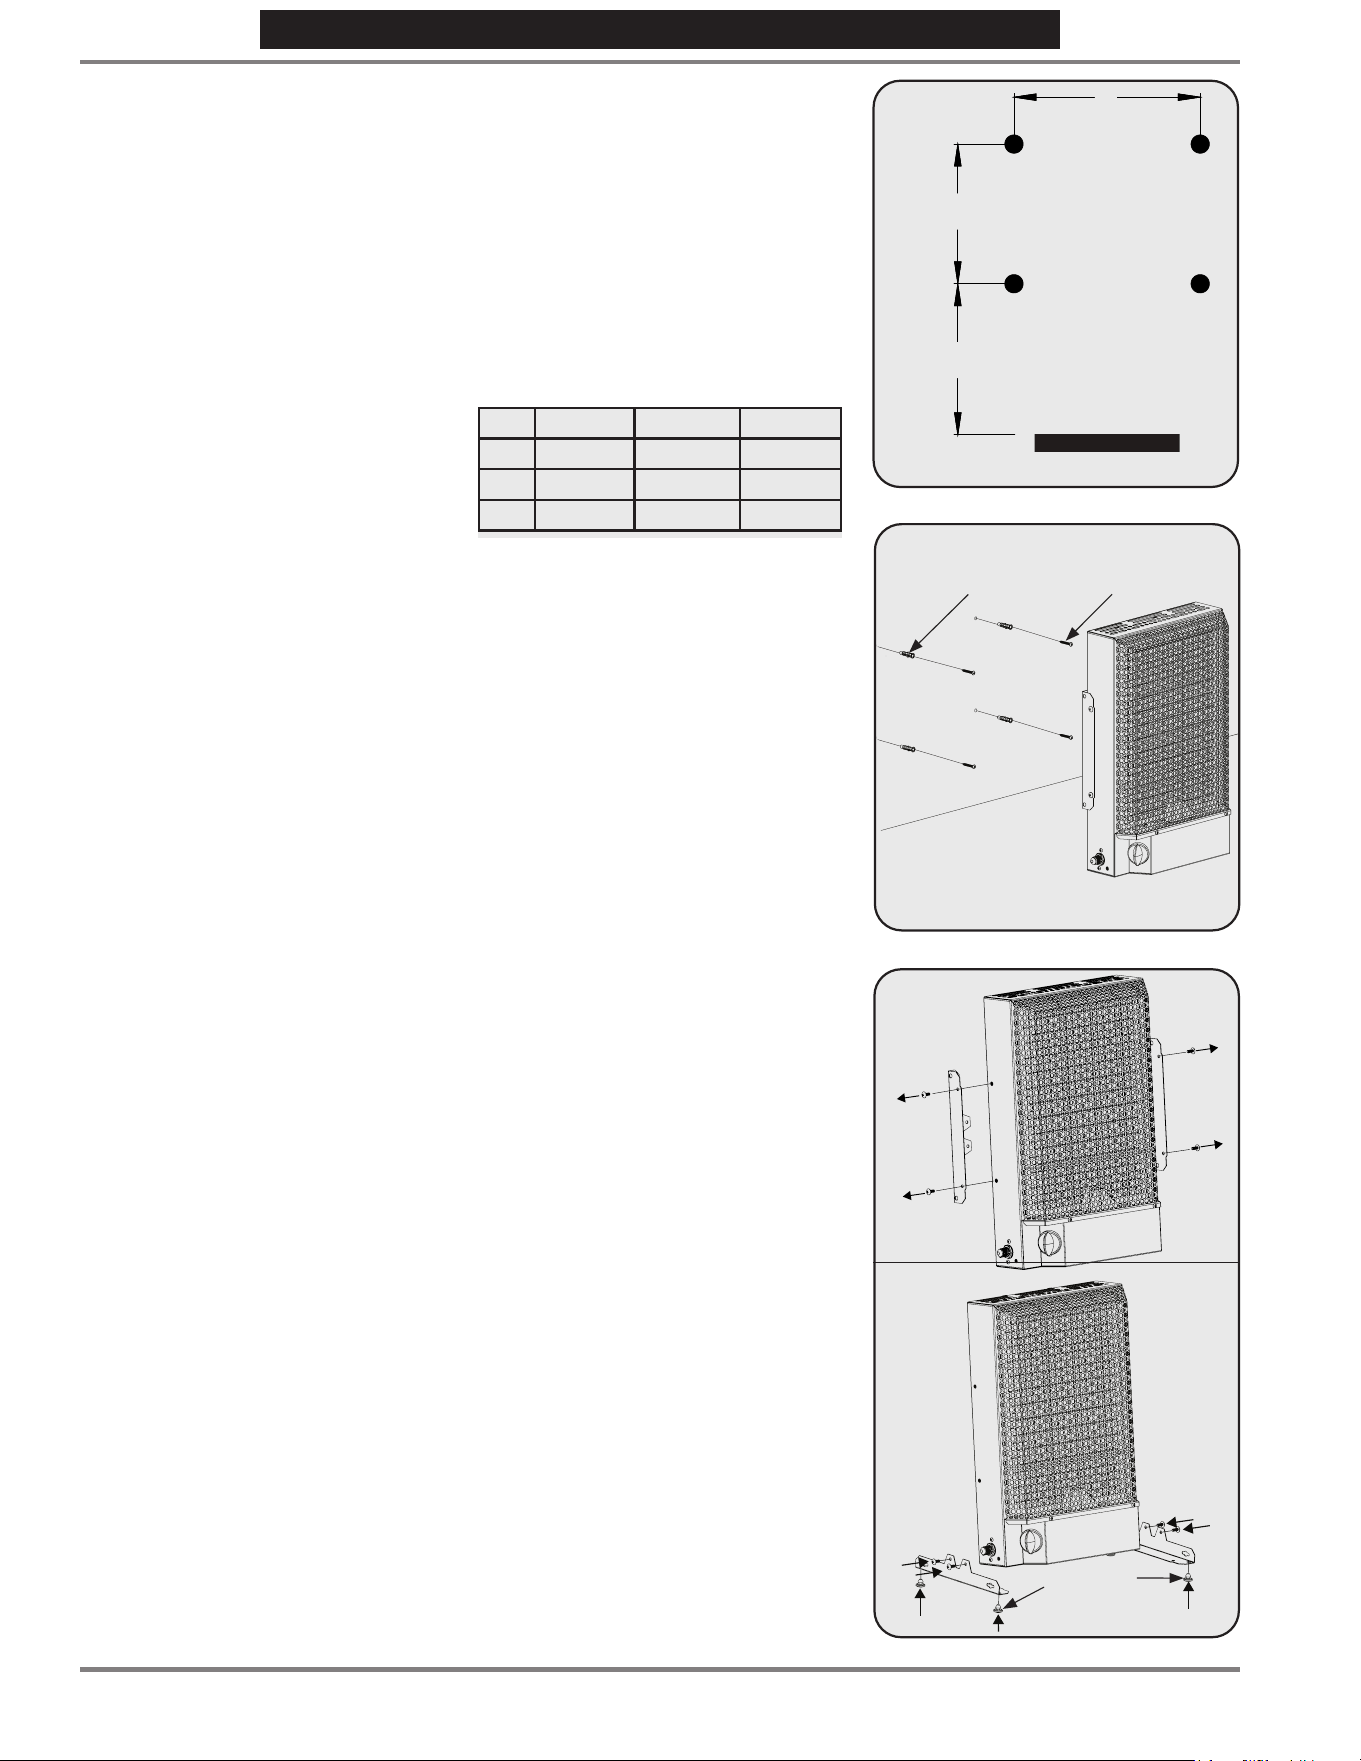
1. Select a firm, structurally sound wall
that provides the necessary clearances.
(Refer to table on page 3)
2. Locate mounting hardware found in
the accessories bag packaged with the
heater.
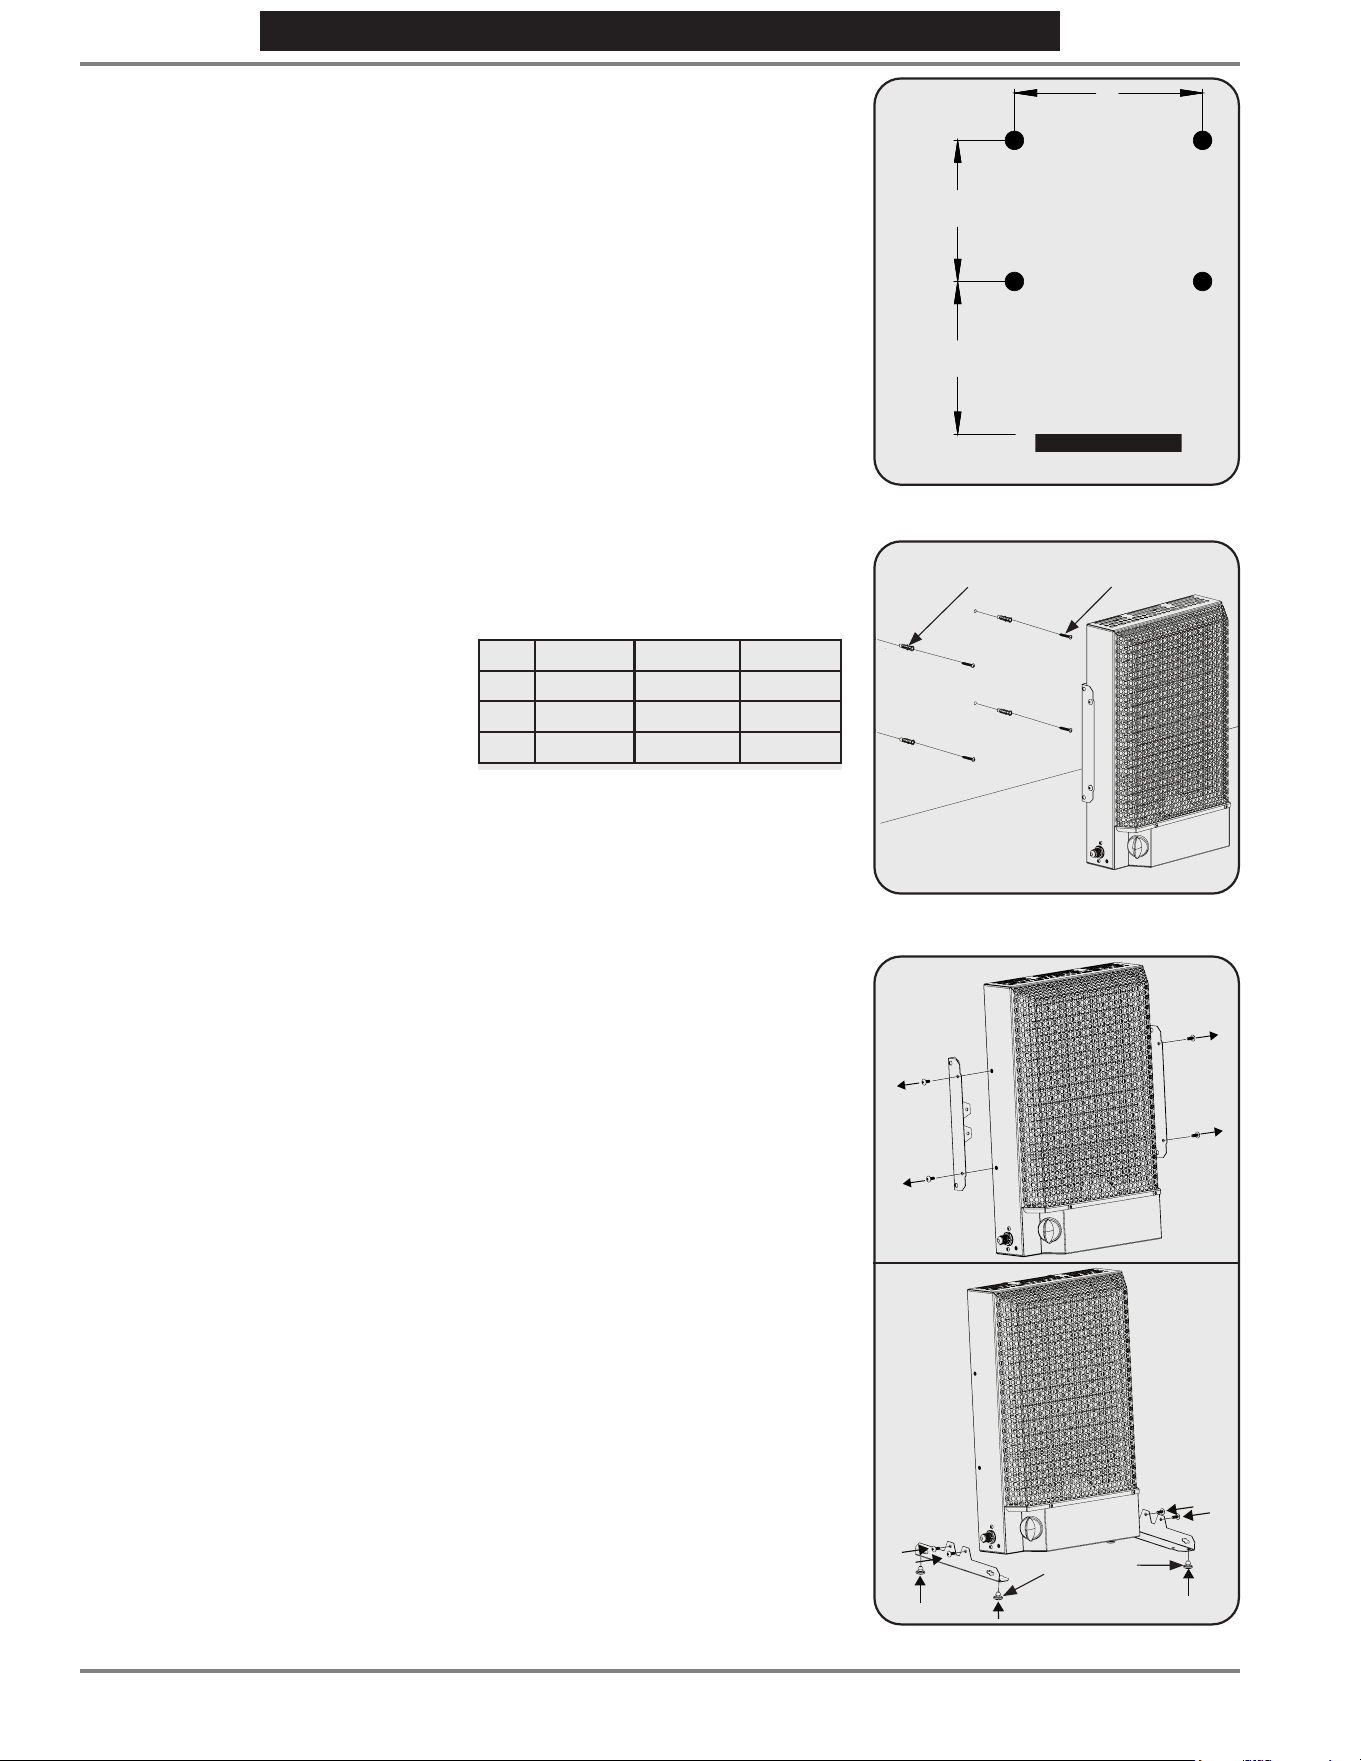
3. Use Figure 2 and Table 2 below for
hole spacing and minimum floor
clearance spacing for each heater.
4. Ifusinganchors,drilla3/8”hole
into the wall at each mounting hole
position.
5. Push the plastic anchors into each hole
and thread the screws into them. Refer
to Figure 3.
6. Hang the heater on the screws,
allowing it to slide into place.
7. Check for clearances and make
adjustments as necessary by removing
heater and loosening or tightening
screws until it is firmly mounted.
NOTE: Screw head should be
approximately5/16”fromwalltoensure
secure installation.
8. Connect heater to gas supply. The unit
should be positioned so that the gas
supply shut-off valve at the heater is
easily accessible and the drip leg is as
close to the heater as possible.
Feet Installation
The brackets used to hang the heater
on a wall may also be used as feet to
stand the unit on a floor. Follow the
steps below to convert the hanger
brackets to feet.
1. Remove the four screws (two on each
side) that hold the bracket to the
heater. See Figure 4A.
2. Using the screws just removed, attach
the feet to the heater as shown in
Figure 4B.
3. Complete assembly by attaching the
footpads found in the accessories bag.
See Figure 4B.
Anchor
Screw
A
B
C (MIN)
FLOOR
A
B
C (MIN)
B
A
Footpads
Figure 2
Figure 3
Figure 4
INSTALLATION
Table 2
MHCAT3LP MHCAT6LP MHCAT8LP
A 97/8” 115/8” 135/16”
B 71/2” 71/2” 71/2”
C 51/8” 8” 9”
7
OperatingInstructionsandOwner’sManualMr. Heater | Catalytic Heater
NEVER LEAVE THE HEATER UNATTENDED WHILE BURNING!NEVER LEAVE THE HEATER UNATTENDED WHILE BURNING!NEVER LEAVE THE HEATER UNATTENDED WHILE BURNING!
Lighting Instructions
IMPORTANT: The heater must not be
exposed to flammable vapors or liquids
during lighting.
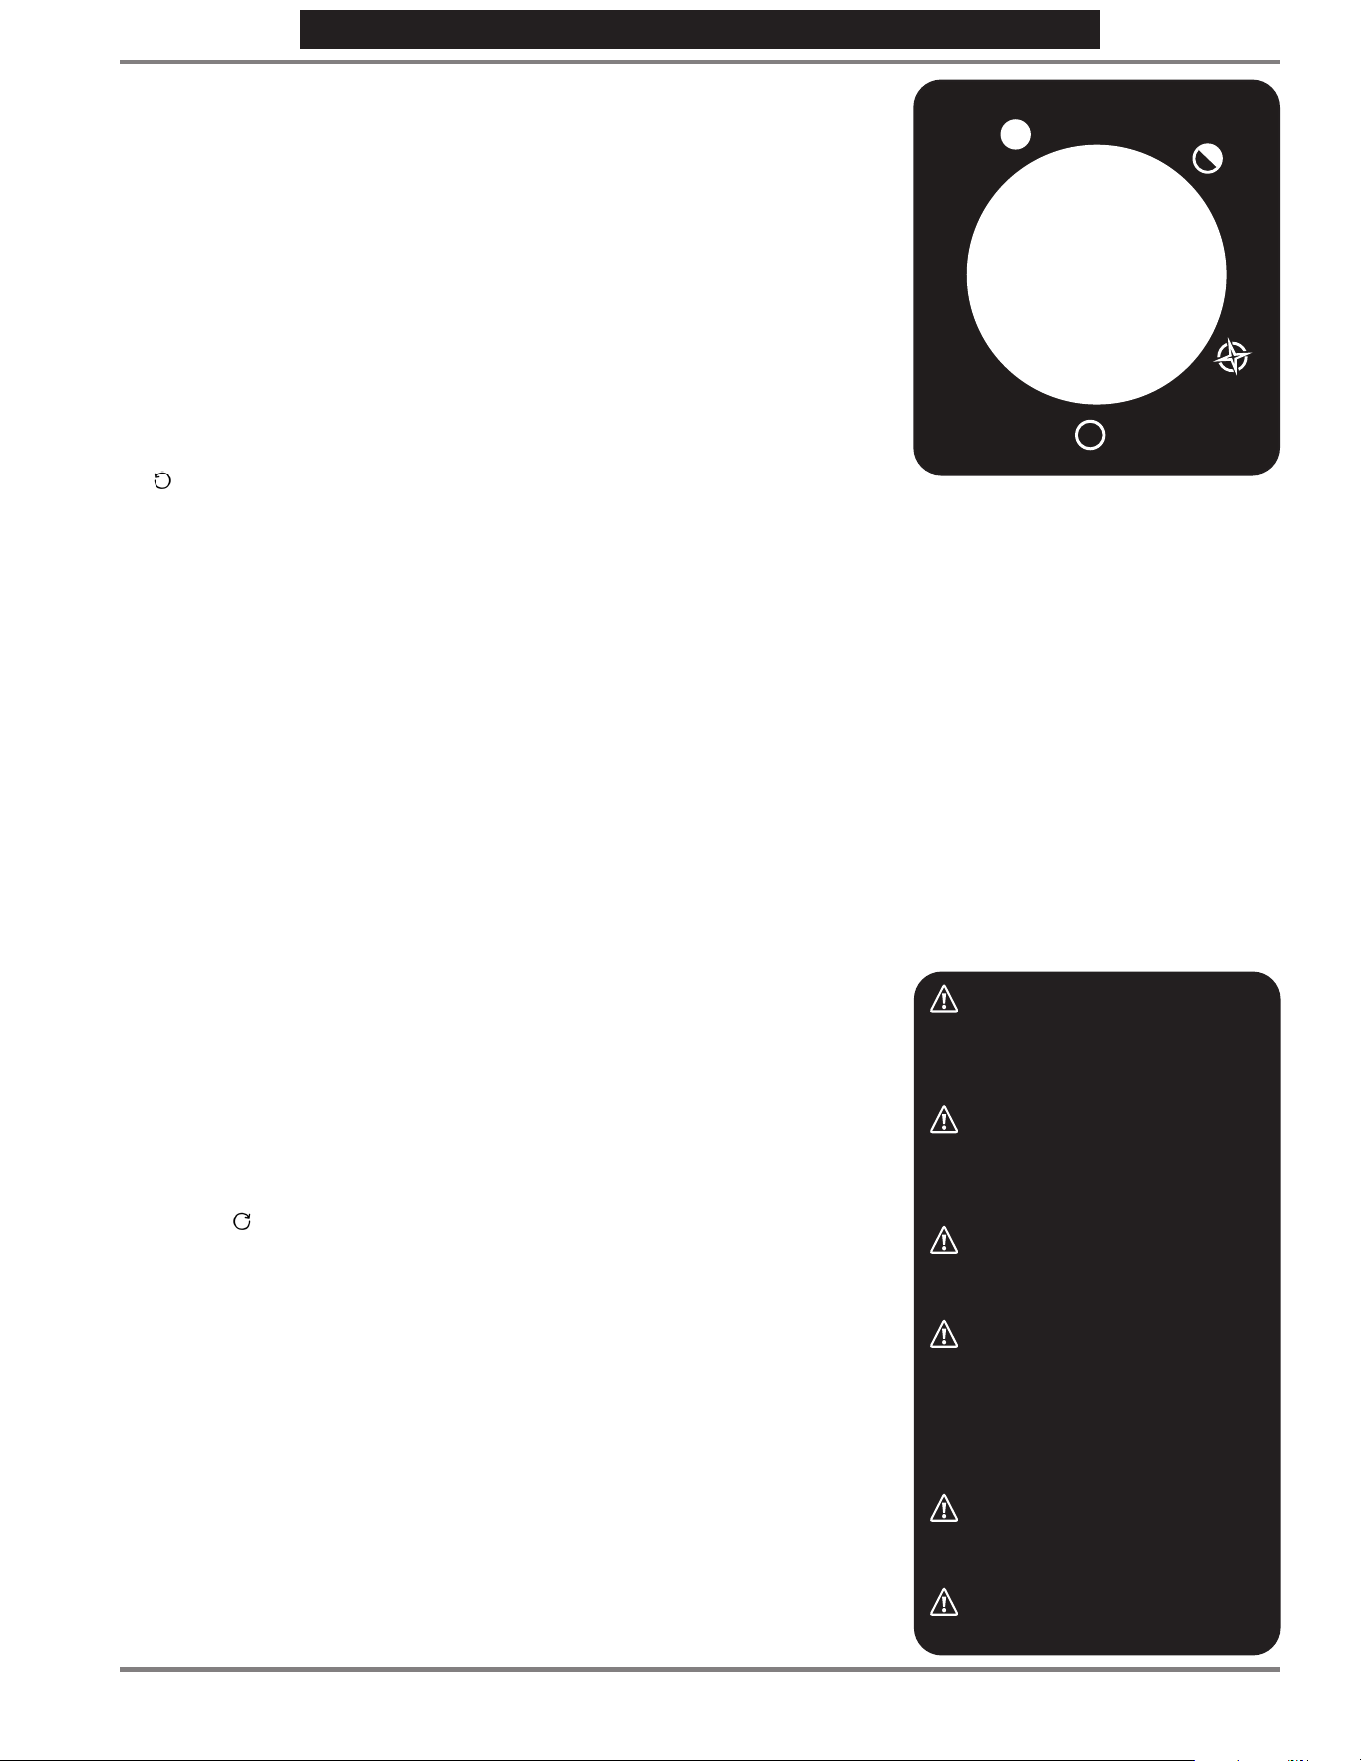
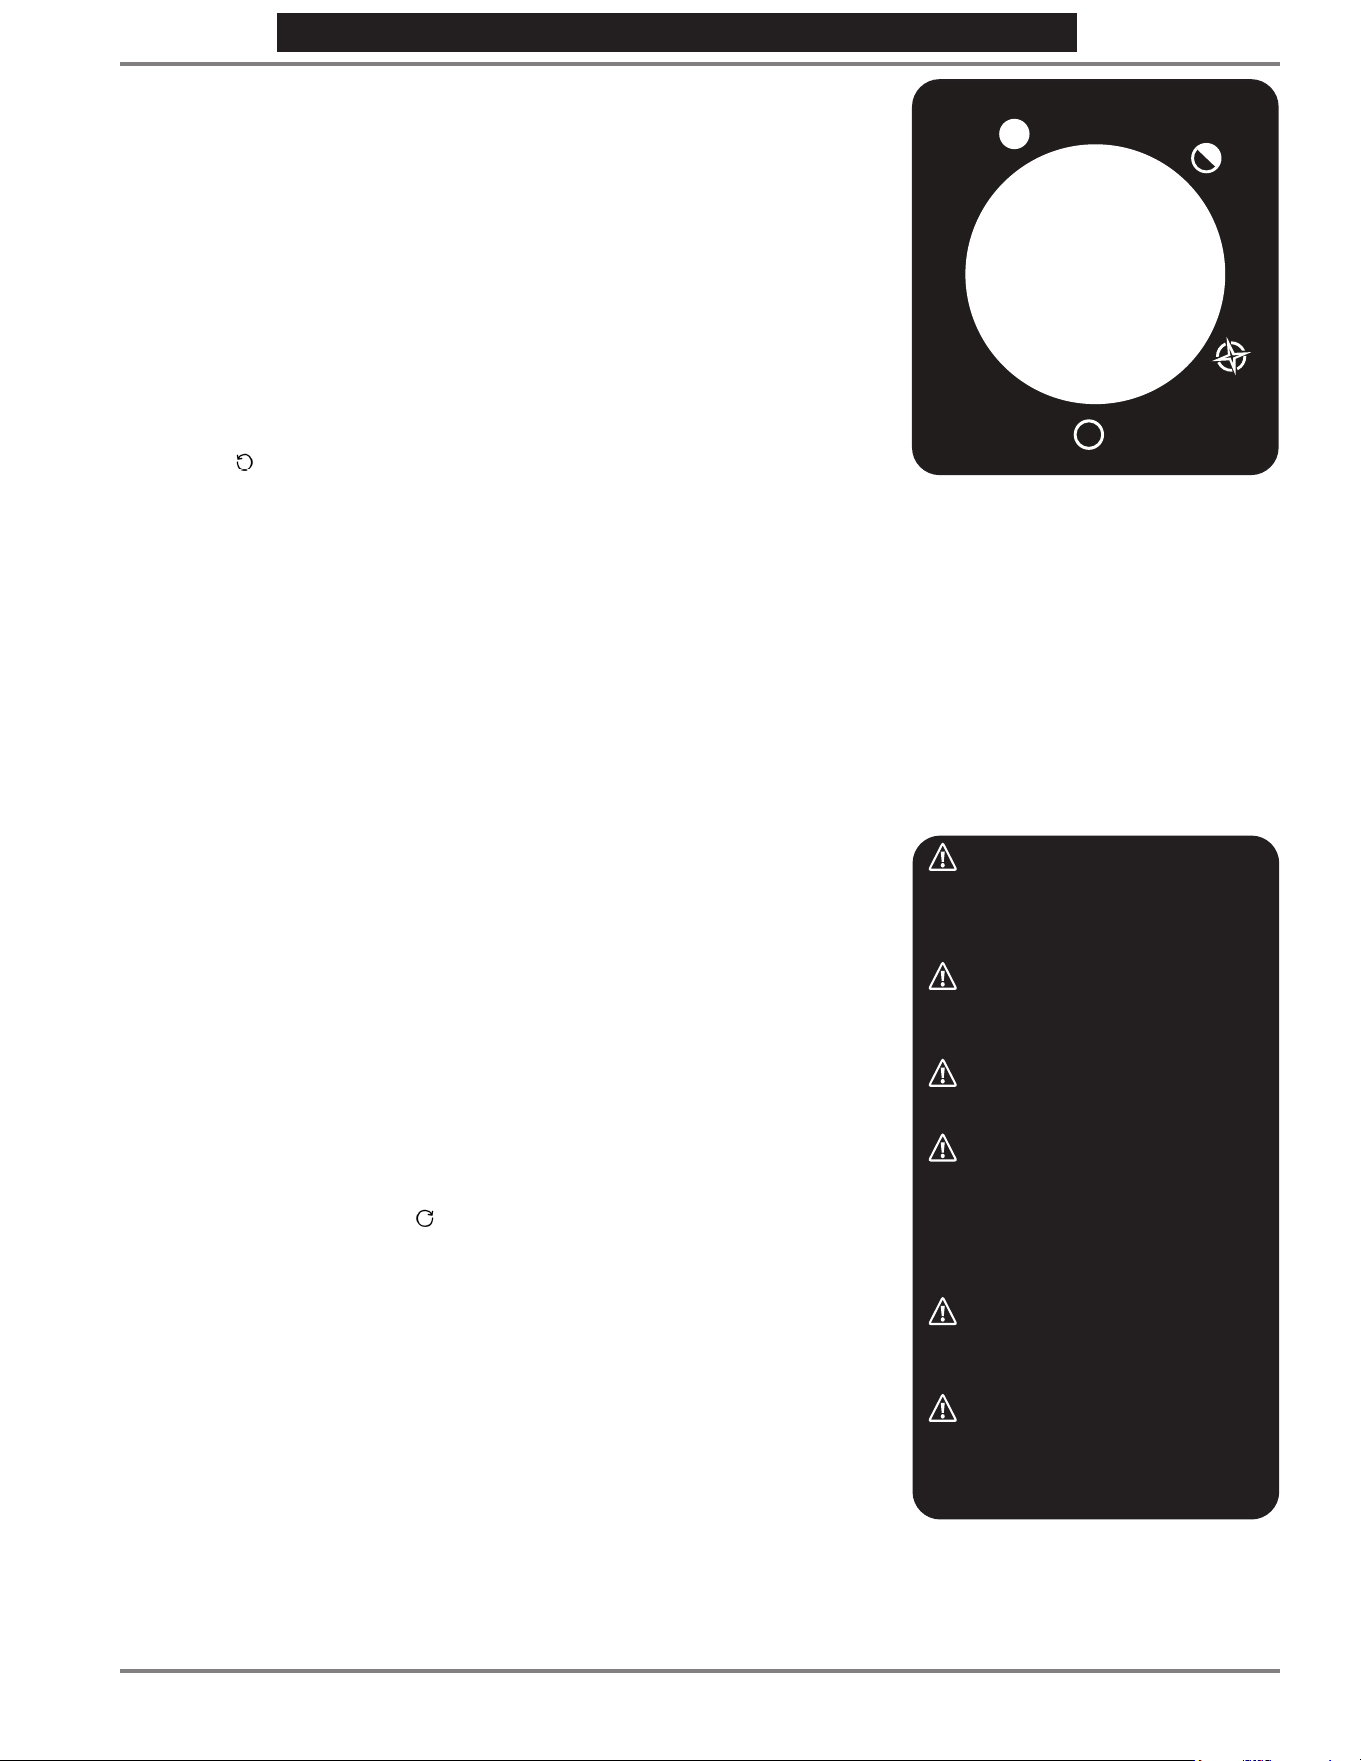
1. Make sure four-position Control Knob
isin“OFF”position.SeeFigure5.
2. Open valve at propane (LP) gas supply
cylinder.
IMPORTANT: Check all hose
connections for leaks with soapy water
at the threaded connection on the side
of the heater. SEE WARNING! ON THE
BACK OF THE HEATER.
3. Turn Control Knob counterclockwise
to“PILOT”positionanddepressto
light. Refer to Figure 5.
4. If heater does not light, hold down
for approximately 30 seconds, release,
and depress again. Repeat until pilot
lights.
5. After pilot lights, hold down for 30 -
60 seconds and then release knob.
Knob should return to fully extended
position.
6. To operate the heater, slightly depress
the knob and gently turn to lock in the
“HI”positiontolightburner.Leaveon
“HI”positionuntilthecatalyticpadhas
illuminated.
7. After the catalytic pad has illuminated,
adjust heat output by turning Control
Knobtodesiredposition(“LO”or“HI”
setting - NEVER BETWEEN LOCKED
POSITIONS!).
Shutdown Instructions
1. To turn off the heater, shut off the
propane (LP) gas at the supply tank
or shut-off valve inside, allowing the
heater to use up the propane (LP) gas
in the supply line, then slightly push
the Control Knob down and turn
clockwise tothe“OFF”position.
IMPORTANT: When not in use, the
propane (LPs must be turned off at the
propane (LP) gas supply cylinder. As
stated before, allow heater to use up
propane (LP) gas in the supply line until
heater shuts off.
Relighting Instructions
IF HEATER GOES OUT DURING
NORMAL OPERATION, DO NOT
ATTEMPT TO RELIGHT UNTIL:
1. The reason the heater stopped
operating has been determined.
An empty propane (LP) gas supply,
propane (LP) gas line blockage,
propane (LP) gas leak, lack of sufficient
air, regulator failure, heater mechanical
failure, or catalytic pad deterioration
are all possible causes.
2. The heater has been allowed time to
cool down completely.
3. It has been determined that there
is no leaked or otherwise unburned
propane (LP) gas present in the
surrounding atmosphere.
Cleaning
• Always keep the heater area clear
and free from combustible materials,
gasoline and other flammable vapors
and liquids.
• Keep the vent areas (slots in the
bottom and the top of heater) clear at
all times.
IMPORTANT: The heater and its
surroundings should be kept clean and
free of dust.
• The heater must be kept covered with
the supplied dust shield when heater is
not in use.
IMPORTANT: Failure to use dust shield
when heater is not in use will void the
warranty.
• The exterior of the heater can be
cleaned with a damp cloth. Avoid the
direct use of any aerosol or spray-on
cleaners. Do not use abrasive materials
or cleaners on the decals or control
knob. Be careful to NOT get moisture,
cleaners, or solvents on the catalytic
element surface.
• Never touch, vacuum, or wash off the
catalytic pad. This may destroy the
active catalytic platinum surface and
make the pad inoperable.
IMPORTANT: The gas supply system to
the heater should be checked periodically
by a qualified propane (LP) gas service
technician. If the heater will not light,
stay lit, or does not put out the normal
amount of heat, the very first thing to
do is check the gas supply. Find out if
the gas is available at the heater and
check the propane (LP) gas regulator
for correct manifold pressure.
H
I
L
O
T
O
L
I
P
F
F
O
Figure 5
WARNING: If the information in this
manual is not followed exactly, a fire or
explosion may result causing property
damage, personal injury, or loss of life.
DANGER: NEVER bring a refillable
propane cylinder indoors. A fire or
explosion can occur causing property
damage, serious injury, or death!
CAUTION: Do not try to adjust
heating levels by using the propane tank
shut off valve.
WARNING: Do not operate heater
unless control knob is locked in a
positionmarked“Hi”,“Lo”,or“Pilot”.
Never set control knob between locked
positions. Poor combustion and higher
levels of carbon monoxide may result.
CAUTION: After turning heater off,
protective grill will remain hot. Allow to
thoroughly cool before storing.
CAUTION: Do not cover the heater
while it is hot.
OPERATION
8
Mr. Heater | Catalytic Heater OperatingInstructionsandOwner’sManual
NEVER LEAVE THE HEATER UNATTENDED WHILE BURNING!NEVER LEAVE THE HEATER UNATTENDED WHILE BURNING!NEVER LEAVE THE HEATER UNATTENDED WHILE BURNING!
7. Usea9/16”(or14mm)wrench
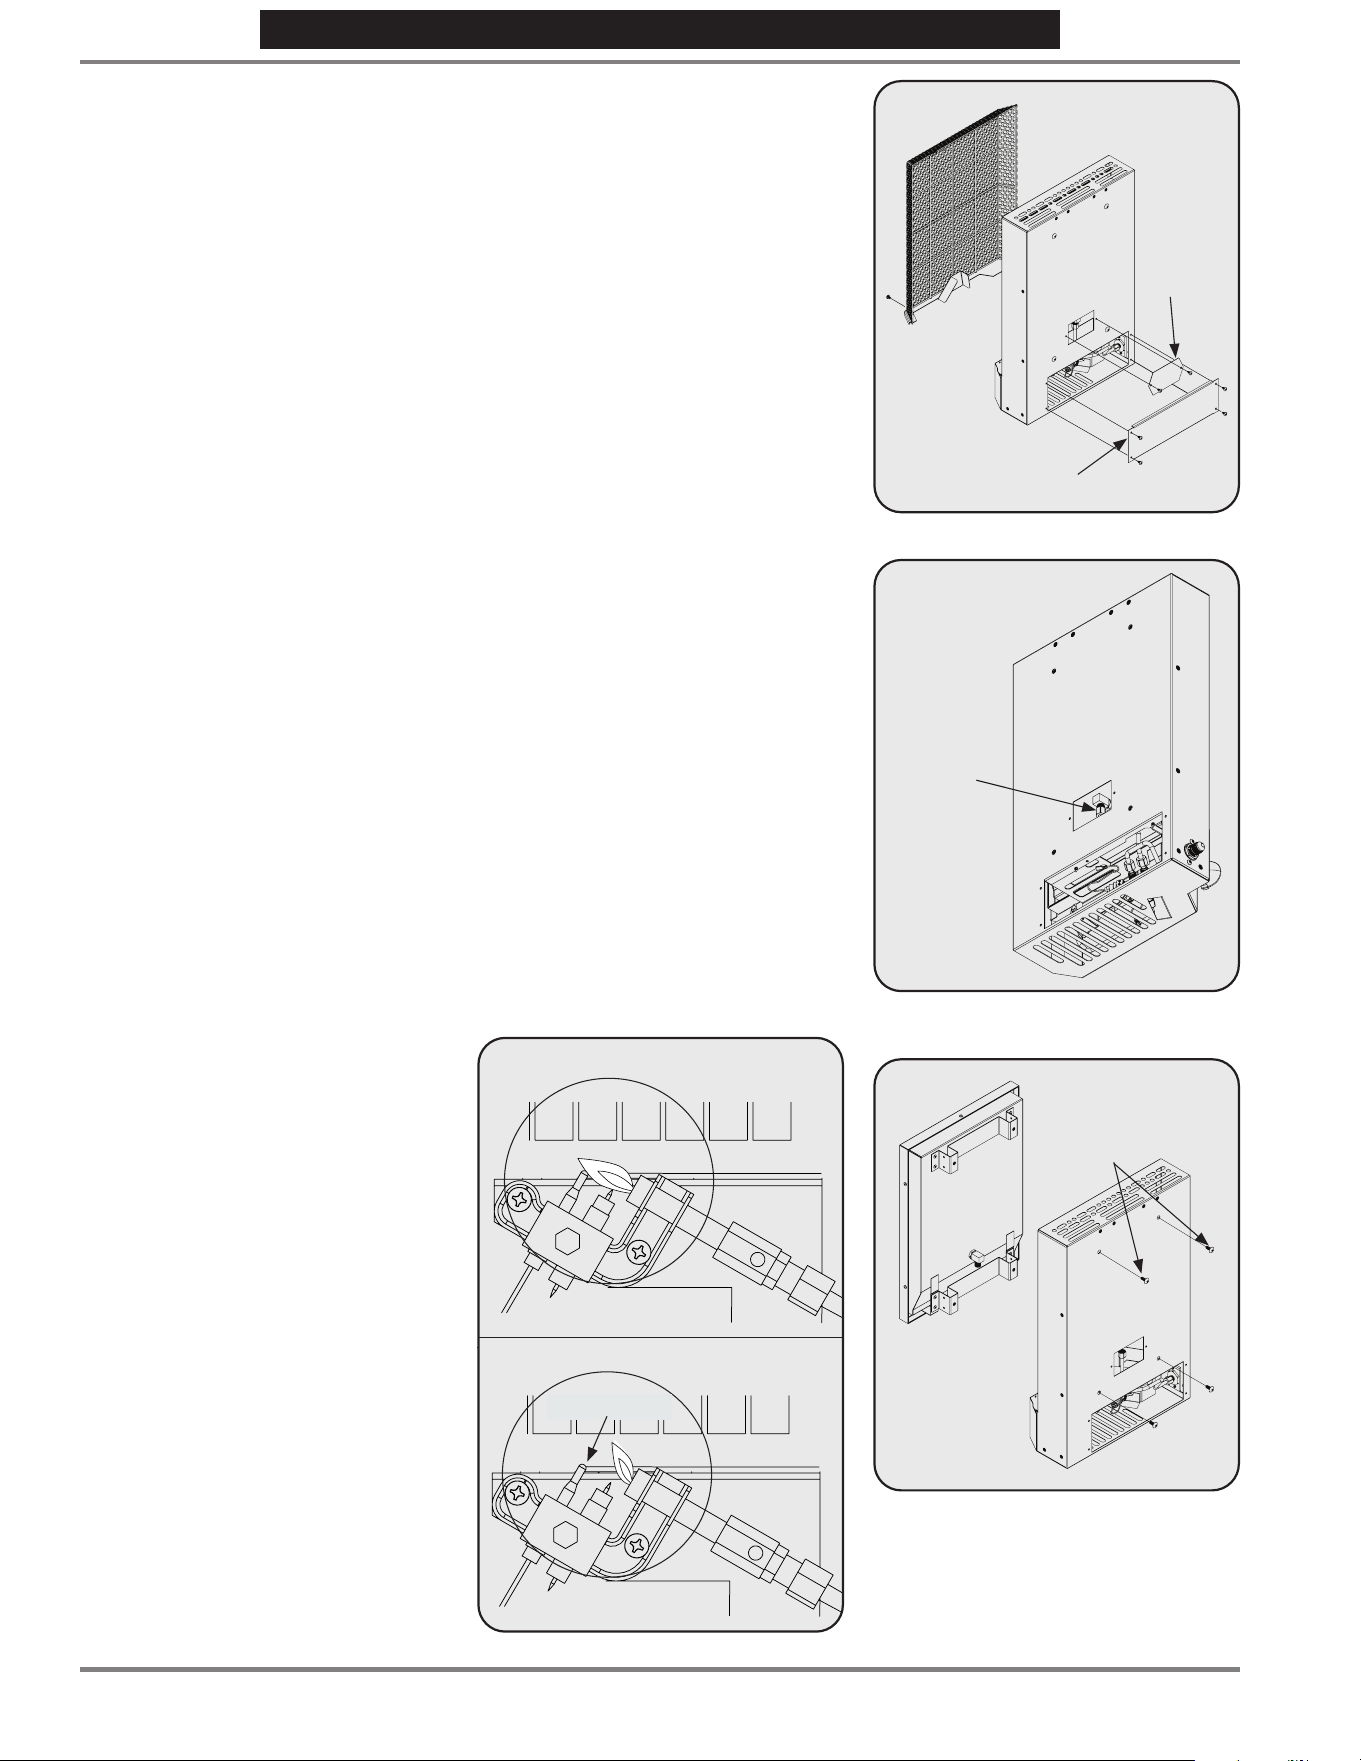
to remove the compression nut
connecting the burner gas tube to the
brass elbow. See Figure 8. Be sure to
usea½”wrenchtoholdtheelbowin
place so that the torque on the elbow
does not damage the back of the
main burner assembly.
8. Remove the (4) four screws connecting
the burner to the back of the heater.
See Figure 9.
9. Gently tilt heater forward to remove
burner panel. Be careful to not let
anything enter the holes in the panel.
10. Inspect the burner assembly. If any
foreign debris is on the surface,
attempt to manually remove. Do not
use any cleaning agents, vacuum
cleaner, or pressurized air to clean the
surface of the pad.
IMPORTANT: If catalytic pad
deterioration is known or suspected,
take the heater out of service and
replace the burner assembly (see
Service Parts section on page 12).
11. Inspect and clean pilot (mounted to
bracket) by using a vacuum or apply air
pressure through the holes in the pilot.
NOTE: Burner should be removed as
described in Steps 1-10 above before
cleaning pilot due to the fragility of the
catalytic pad.
Burner and Pilot Flame
Visually inspect the burner and pilot
flame (by looking vertically down inside
the pilot guard) periodically during
use. The pilot flame should be blue
in color (not yellow) and will extend
beyond the thermocouple. The flame
will surround the thermocouple just
below the tip. Figure 6 shows a correct
pilot flame pattern and also shows
an incorrect pilot flame pattern. The
incorrect pilot flame pattern is not
touching thermocouple. This will cause
the thermocouple to cool. When the
thermocouple cools, the heater will
shut down.
If the pilot flame pattern is incorrect
or the pilot is yellow, cleaning may be
required.
It is also necessary to periodically clean
the interior casing of the heater behind
the burner for any foreign debris that
could cause a fire. Before performing
any cleaning action on the heater, the
burner must first be removed. Use the
following procedure to remove the
burner assembly.
1. Allow heater to thoroughly cool before
performing any maintenance.
2. Turn OFF gas supply at remote cylinder
valve, and disconnect hose from
heater.
3. If wall mounted, remove from the wall
by lifting up and then away from the
wall.
4. Remove the access panel at the lower
back of the heater by removing the
(4) access panel screws. See Figure 7.
Remove the burner access panel by
removing the (2) burner access panel
screws.
5. Remove the (2) two screws at the
bottom of the grill that secure the grill
bracket to the main enclosure of
the heater. See Figure 7.
6. Pull grill bracket away from the heater
by pivoting the grill out and upward.
Be sure that the hooks on the top part
of the grill do not impact the fragile
catalytic pad causing it to puncture. If
the pad does become punctured, the
burner assembly must be replaced.
SERVICE
Figure 6
Compression
Nut
Grill
Burner
Access
Panel
Lower Access Panel
Figure 7
Figure 9
Figure 8
Screws
Incorrect Pilot Flame
Thermocouple
Correct Pilot Flame
9
OperatingInstructionsandOwner’sManualMr. Heater | Catalytic Heater
NEVER LEAVE THE HEATER UNATTENDED WHILE BURNING!NEVER LEAVE THE HEATER UNATTENDED WHILE BURNING!NEVER LEAVE THE HEATER UNATTENDED WHILE BURNING!
12. Inspect interior of casing of the heater
for accumulation of dust, lint, spider
webs, or other foreign debris that
may cause a fire. If necessary, clean
interior of casing assembly with a
vacuum cleaner or apply air pressure.
Do not damage any components
within casing assembly when you are
cleaning.
13. Repeat steps 5-10 in reverse order.
Make sure to securely tighten gas
connections. Upon lighting the heater,
check for leaks by spraying with a mild
soap/water solution. Reattach panels
removed in Step 4.
ODS (Oxygen Depletion
Sensor) and Valve
Components
It may also be necessary to replace the
ODS and valve components. In order
to do this, the control bracket assembly
must be removed. To do this complete
the above steps 1-10 to remove the
main burner assembly and then refer to
the following steps:
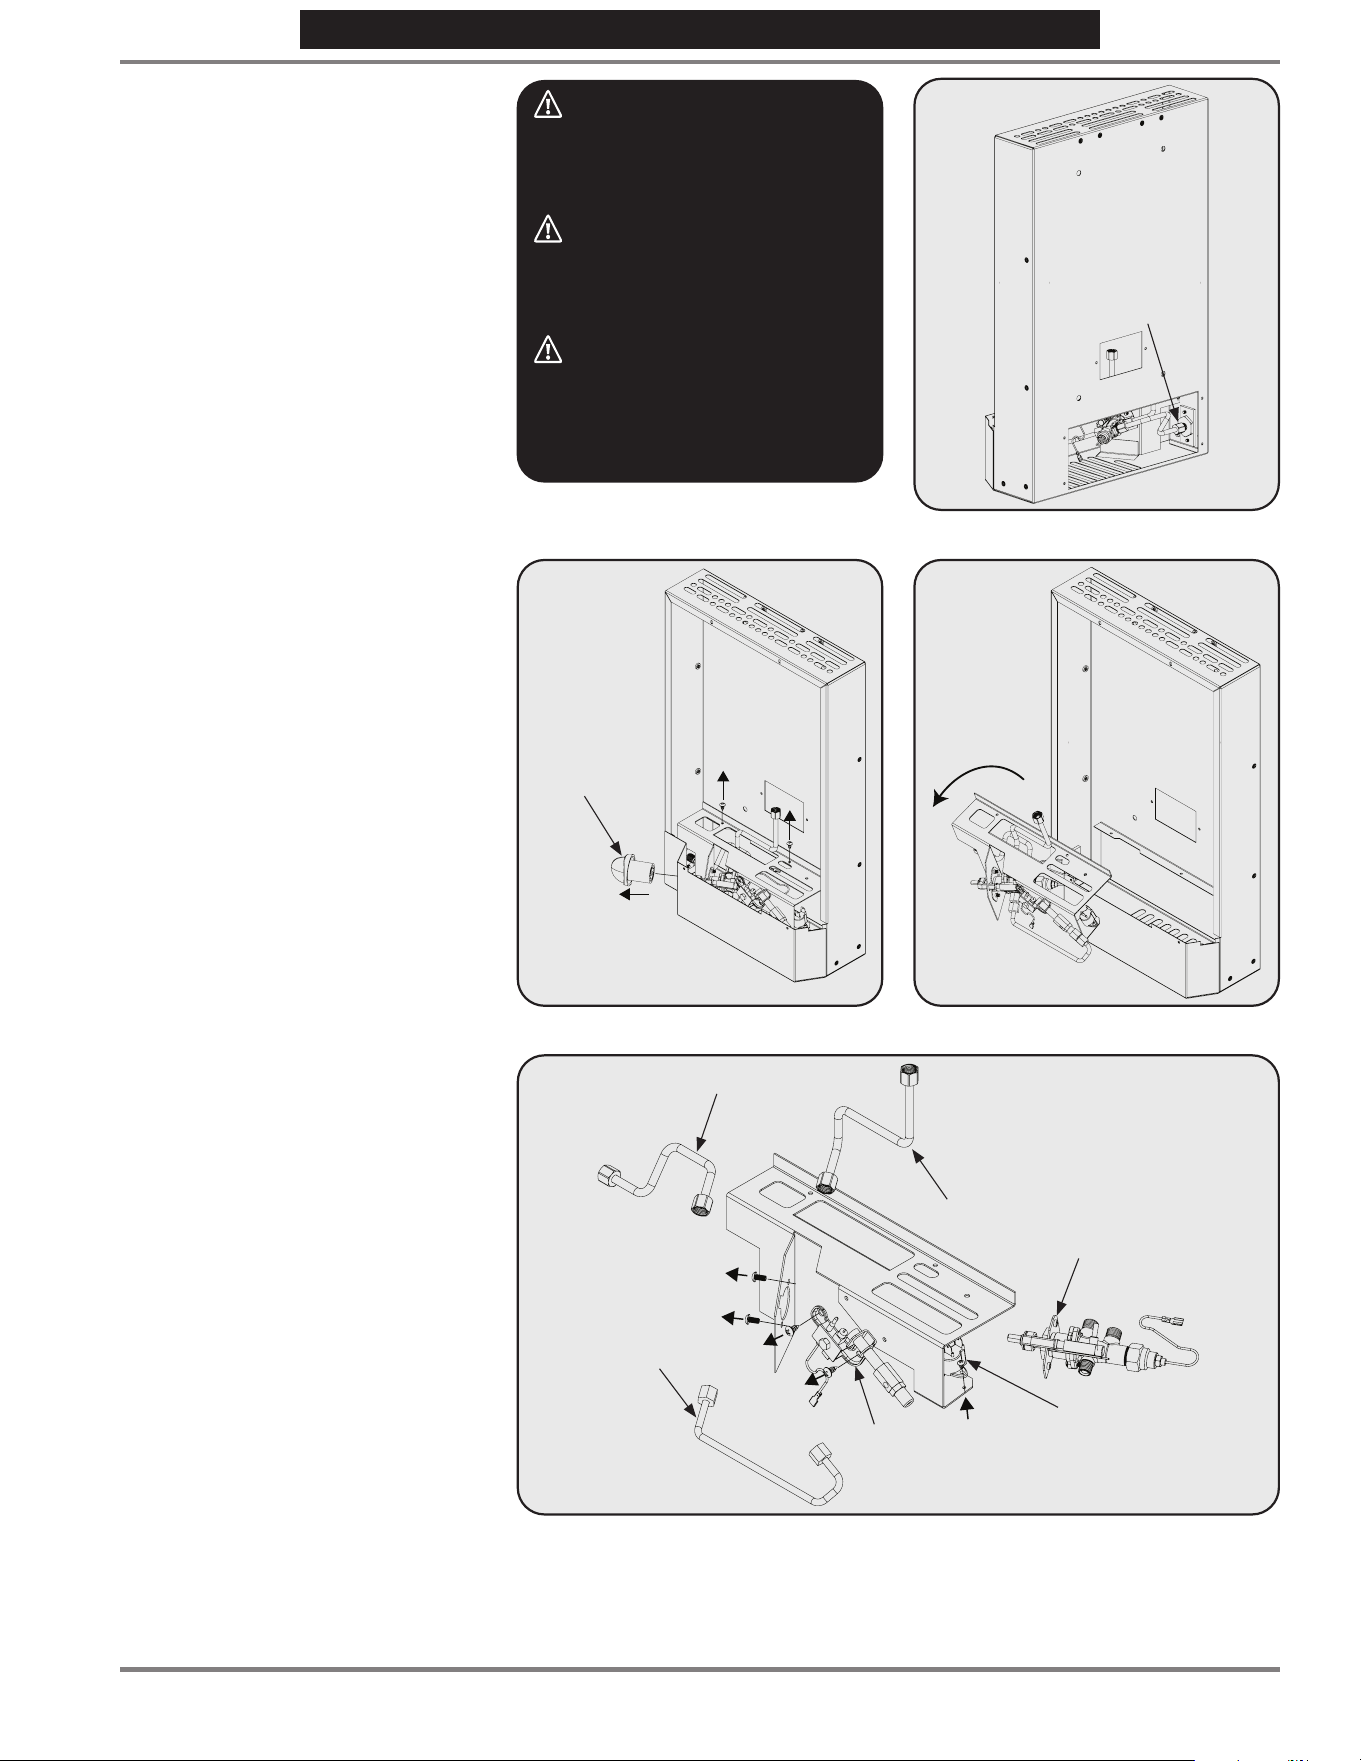
1. Remove (2) screws connecting the
control bracket to the main body of
the heater. See Figure 10.
2. Remove the valve knob by pulling it
away from the heater.
3. Usea9/16”(or14mm)wrench
to remove the compression nut
connecting the inlet gas tube to the
enclosure. See Figure 11.
4. Lift up on the control bracket assembly
to remove it from the heater. See
Figure 12.
5. Complete the following steps where
necessary to replace the various
components on the control bracket
sub-assembly (Refer to Figure 13):
• To remove the pilot gas tube, unscrew
thecompressionnutswitha7/16”(or
12 mm) wrench.
• To remove the burner gas tube or the
inletgastube,usea9/16”(or14mm)
wrench.
• To remove the Valve, ODS, or Tip
Switch, remove the screws connecting
them to the control bracket. Remove
thermocouple and ignition wires
where necessary.
6. Replace components as needed and
reassemble. Be sure to check gas
connections with a mild soap water
solution upon lighting.
7. Repeat Steps 1-4 in reverse order to
install the control bracket assembly.
SERVICE
CAUTION: Do not attempt to
service or clean heater while it is hot.
Failure to follow this instruction can
result in painful burns.
WARNING: Any change to this
heater or its controls or attempts
to clean the catalytic pad can be
dangerous.
WARNING: Never use needles,
wires or similar cylindrical objects to
clean the pilot to avoid damaging the
calibrated orifice that controls the gas
flow.
Valve Knob
Figure 10
Compression Nut
Figure 11
Figure 12
Pilot Gas
Tube
Inlet Gas Tube
Tip Switch
Valve
ODS
Burner Gas Tube
Figure 13

10
Mr. Heater | Catalytic Heater OperatingInstructionsandOwner’sManual
NEVER LEAVE THE HEATER UNATTENDED WHILE BURNING!NEVER LEAVE THE HEATER UNATTENDED WHILE BURNING!NEVER LEAVE THE HEATER UNATTENDED WHILE BURNING!
Catalytic Pad
The heater has a high efficiency as
long as the catalytic material is intact.
If partially or completely blocked,
the catalytic process does not work.
It usually can be noticed by reduced
heat, propane (LP) gas odor, difficulty
in lighting, or inability of the heater to
light partially or completely.
IMPORTANT: Do not attempt to
operate the heater with a damaged or
deteriorated catalytic pad.
After several years of use, even
under good operating conditions,
some catalytic pads may be rendered
inoperable because trace contaminants
almost always are present in the gas
and in the air. If lowered heat output is
noticed, it is possibly time to have the
catalytic pad replaced.
Catalytic pad deterioration can cause
lowered heat output and release of
unburned or partially burned gas.
It is recommended that the catalytic
burner assembly be replaced every 7
years, or sooner if abnormal operation
of the pad is noticed.
Follow the steps for Replacing Burner
Assembly to replace the catalytic pad.
Replacing Feet
Refer to Figure 4 in the Installation
section on page 6 to replace the feet.
OFFSEASON
• Iftheheateristoleft“OFF”fora
considerable period of time, the
propane (LP) gas supply to the heater
should be turned off as close to the
gas source as possible. In the case
of portable use, the gas should be
turned off at the propane (LP) gas
supply cylinder.
• The heater must be kept covered with
the supplied dust shield when heater is
not in use.
IMPORTANT: Failure to use dust shield
when heater is not in use will void the
warranty.
WARNING: Never attempt to use
a catalytic pad with a damaged or
perforated surface.
SERVICE
• Operation of the heater should be
checked by a qualified propane (LP)
gas service technician when the
heater has been out of service for
a considerable period (intermittent
operation) and in any event, at least
once a year.
• If the heater is put into storage, make
sure to disconnect the propane (LP)
gas cylinder.
• When the LP-gas cylinder is not
disconnected from the heater, the
heater and cylinder must be located
outdoors, in a well-ventilated space,
out of the reach of children, and must
not be stored in a building, garage, or
any other enclosed area.
• Storage of the heater indoors is
permissible only if the cylinder is
disconnected and removed from
the heater. Cylinders must be stored
outdoors, in a well-ventilated space,
out of the reach of children, and must
not be stored in a building, garage, or
any other enclosed area.

11
OperatingInstructionsandOwner’sManualMr. Heater | Catalytic Heater
NEVER LEAVE THE HEATER UNATTENDED WHILE BURNING!NEVER LEAVE THE HEATER UNATTENDED WHILE BURNING!NEVER LEAVE THE HEATER UNATTENDED WHILE BURNING!
TROUBLESHOOTING
SYMPTOM
• Spark electrode does not produce spark.
CAUSE
REMEDY
1. Spark electrode broken. 1. Replace ODS (Oxygen Depletion Sensor).
2. Igniter wire may not be attached to spark electrode, or
ground wire may not be attached to frame.
3. Attach igniter wire or ground wire.
3. Igniter wire damaged. 3. Replace igniter wire.
4. Piezo igniter is defective. 4. Replace gas valve assembly.
SYMPTOM
• Heater keeps shutting “OFF” during normal operation.
REMEDY
CAUSE
1. Pilot is blocked. 1. Clean pilot. See MAINTENANCE section.
2. Inadequate fresh air opening. 2. See General Safety Instructions for opening size.
3. Tip over switch activated from bumping heater. 3. Re-light.
4. Regulator is defective. 4. Replace hose/regulator assembly.
5. Internal valve contamination. 5. Replace control valve.
SYMPTOM
• Spark electrode produces spark but pilot does not light.
CAUSE
REMEDY
1. No gas to heater. 1. Connect hose to heater and turn on valve at remote
cylinder.
2. Improper pilot lighting. 2. Make sure that the control knob is completely depressed
inthe“PILOT”positionandheldlongenoughtopurgeair
from lines.
3. Pilot is blocked with foreign debris. 3. Clean pilot. See MAINTENANCE section.
SYMPTOM
• Pilot ame does not stay lit when knob is released.
CAUSE
REMEDY
1. Improper pilot lighting. 1. Make sure that the control knob is completely depressed
inthe“PILOT”positionandheldlongenoughtopurge
air from lines and to heat up thermocouple once the pilot
flame appears.
2. Pilot flame not surrounding thermocouple. 2. Clean pilot, see MAINTENANCE.
3. Pilot Assembly is defective. 3. Replace Pilot Assembly.
4. Tip switch wires are disconnected. 4. Connect tip switch wires.
SYMPTOM
• Main burner does not ignite or produces roll off ames for more than 1 minute.
CAUSE
REMEDY
1. Catalytic Pad is dirty or damaged. 1. Replace burner assembly.
•For additional assistance or information, please call Technical services.
12
Mr. Heater | Catalytic Heater OperatingInstructionsandOwner’sManual
NEVER LEAVE THE HEATER UNATTENDED WHILE BURNING!NEVER LEAVE THE HEATER UNATTENDED WHILE BURNING!NEVER LEAVE THE HEATER UNATTENDED WHILE BURNING!
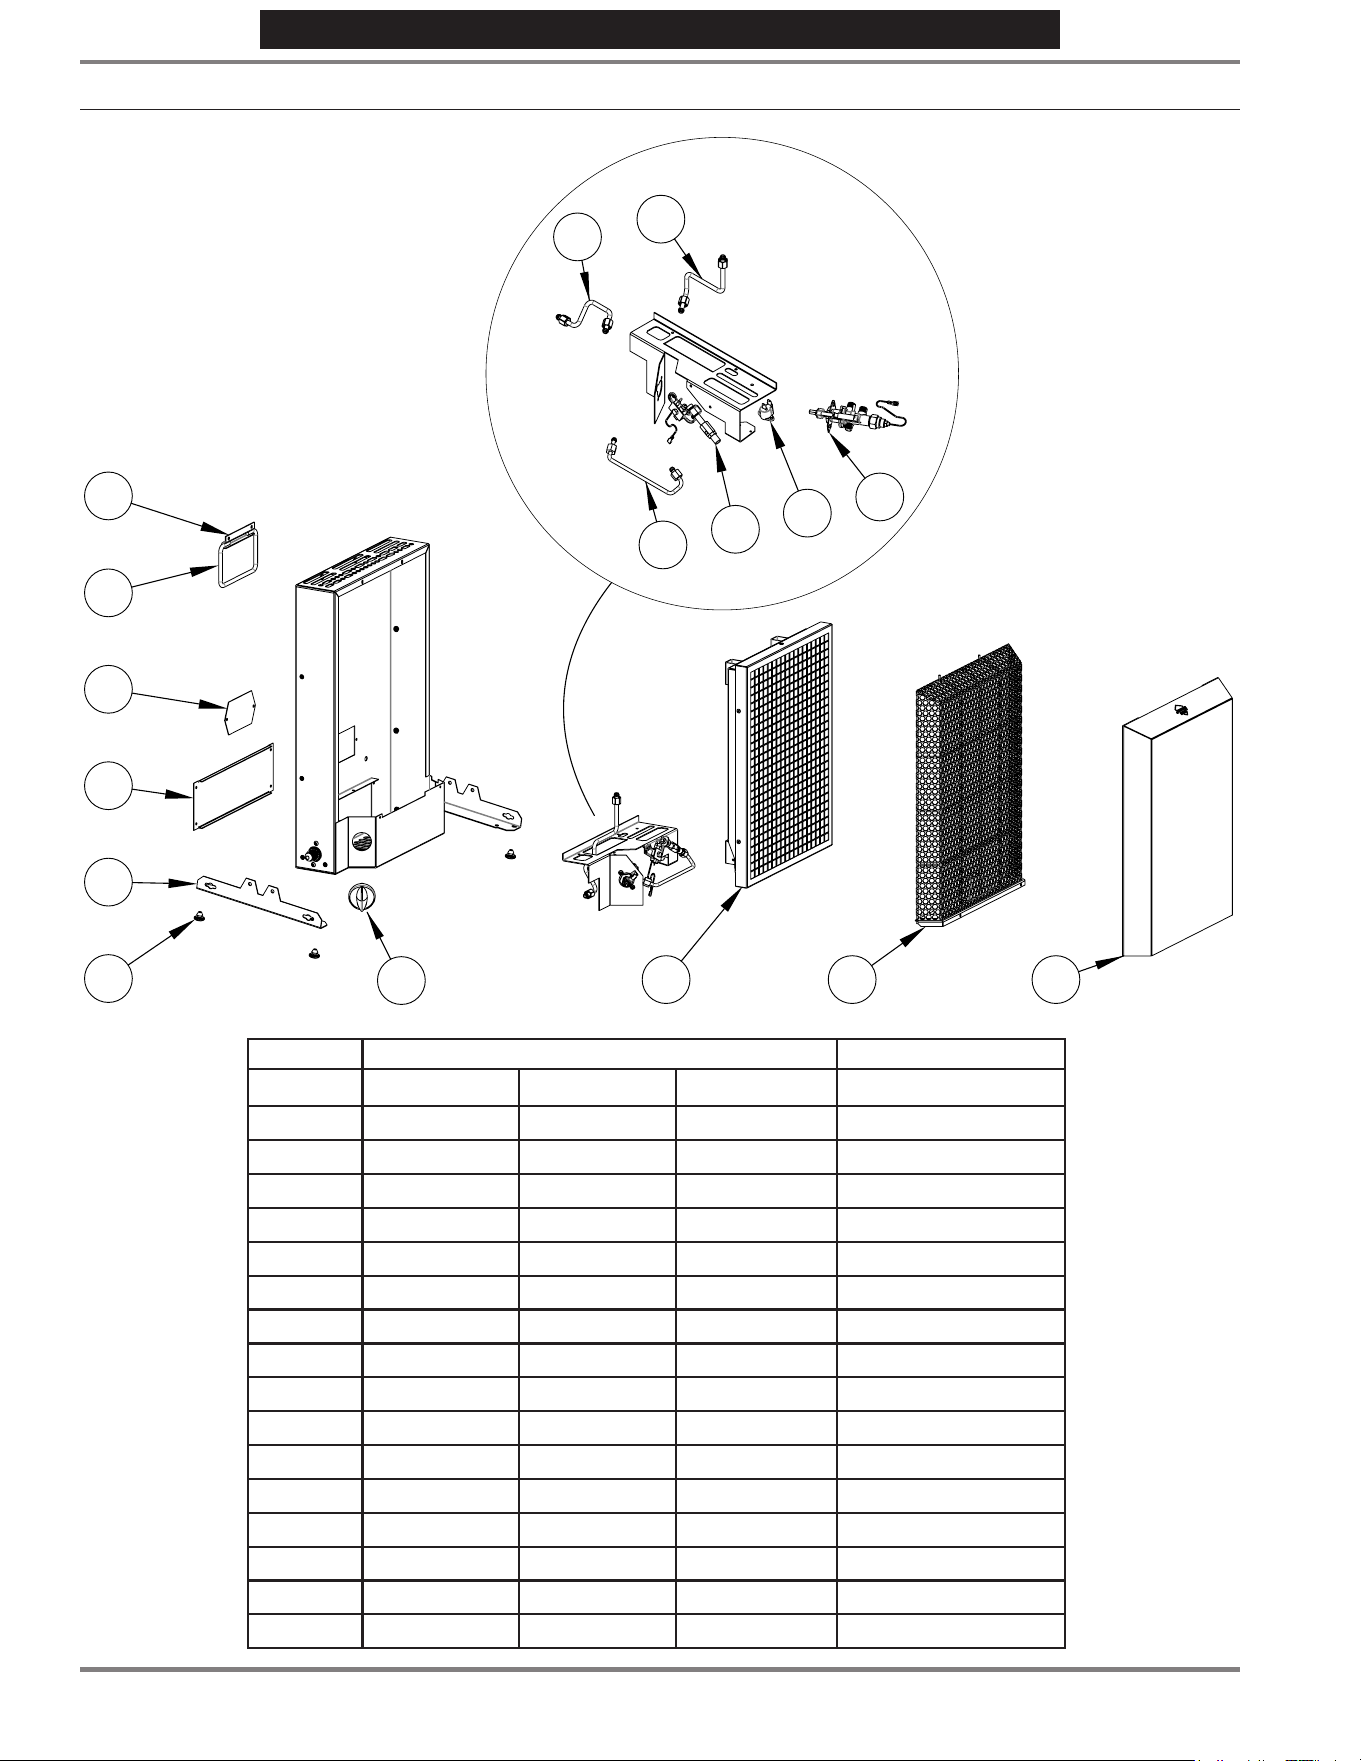
Mr.Heater•CatalyticHeater•Model#MHCAT3LP,MHCAT6LP,MHCAT8LP
PARTS LIST
Item No. Part No. Description
MHCAT3LP MHCAT6LP MHCAT8LP
1a 36833 36833 36833 Handle (bracket)
1b 36834 36834 36834 Handle (grip)
2 36832 36832 36832 Burner Access Panel
3 36818 36818 36818 Lower Access Panel
4 36817 36817 36 817 Foot
5 78436 78436 78436 Foot Pad, Rubber
6 32123 32123 32123 Valve Knob
7 00835 00865 00885 Burner Panel Assembly
8 36 819 36820 36 821 Grill
9 36829 36830 36831 Dust Shield Cover
10 36856 36856 36856 Inlet Tubing
11 36853 36854 36855 Burner Tubing
12 36850 36 851 36852 Pilot Tubing
13 73404 73404 73404 ODS Pilot
14 73403 73403 73403 Tipover Switch
15 32054 32054 32054 Control Valve
2
3
4
5
6
7 8 9
1b
1a
11
15
10
12
13
14

13
OperatingInstructionsandOwner’sManualMr. Heater | Catalytic Heater
NEVER LEAVE THE HEATER UNATTENDED WHILE BURNING!NEVER LEAVE THE HEATER UNATTENDED WHILE BURNING!NEVER LEAVE THE HEATER UNATTENDED WHILE BURNING!
NOTES:
14
Mr. Heater | Catalytic Heater OperatingInstructionsandOwner’sManual
NEVER LEAVE THE HEATER UNATTENDED WHILE BURNING!NEVER LEAVE THE HEATER UNATTENDED WHILE BURNING!NEVER LEAVE THE HEATER UNATTENDED WHILE BURNING!
Mr. Heater, Inc. reserves the right to make changes at any time, without notice or obligation, in colors, specifications, accessories,
materials and models.
PRODUCT REGISTRATION: Thank you for your purchase.
Please log in to http://www.egiregistration.com to register your product.
This product is covered by one or more patents/patents pending. Please visit
http://www.enercogroupinc.com/patents for more information.
WARRANTY AND PARTS ORDERING
MR.HEATER,INC.,4560W.160THST.,CLEVELAND,OHIO44135•800-251-0001
Mr. Heater is a registered trademark of Enerco Group, Inc.
© 2020, Enerco/Mr. Heater. All rights reserved
Model # MHCAT3LP • MHCAT6LP • MHCAT8LP
PARTS ORDERING INFORMATION
PURCHASING: Accessories may be purchased at any Mr. Heater local dealer or direct from the factory
FOR INFORMATION REGARDING SERVICE
Please call Toll-Free 800-251-0001
Or visit www.mrheater.com
Ourofficehoursare8:00AM–5:00PM,EST,MondaythroughFriday.
Please include the model number, date of purchase, and description of problem in all communication.
LIMITED WARRANTY
Mr. Heater, Inc. warrants its heaters and accessories to be free from defects in material and workmanship for a period of 1 year
from date of purchase. Mr. Heater, Inc. will repair or replace this product free of charge if it has been proven to be defective
within the 1-year period, and is returned at customer expense with proof of purchase to Mr. Heater, Inc. within the warranty
period. DISCLAIMER: This warranty does not cover any product that: a) has been subject to misuse or neglect; b) has been used
inamannerinconsistentwiththewarningsandinstructionscontainedintheowner’smanual,includingbutnotlimitedtousing
a heater for the cooking or warming of foods; or c) has been used with hand-made or third party accessories or attachments.
This warranty gives you specific legal rights, and you may also have other rights which vary from state to state.
WARNING:
USE ONLY MANUFACTURER’S REPLACEMENT PARTS.USE OF ANY OTHER PARTSCOULD CAUSE INJURY ORDEATH.
REPLACEMENT PARTS ARE ONLY AVAILABLE DIRECT FROM THE FACTORY AND MUST BE INSTALLED BY A QUALIFIED SERVICE
AGENCY. MR. HEATER HOSES F 271161 , F271161-60 AND F271161-144 ARE SPECIFICALLY DESIGNED FOR USE WITH THIS
HEATER ALONG WITH F273699. USE OF OTHER HOSES MAY CAUSE THE HEATER TO BECOME INOPERABLE.
WARNING:
THISPRODUCTISAHEATER.ITISCERTIFIEDTOANSISTANDARDZ21.103,“UNVENTED PORTABLE TYPE GAS CAMP HEATERS
FOR INDOOR AND OUTDOOR USE.” THIS PRODUCT IS NEVER TO BE USED FOR THE COOKING OR WARMING OF FOODS
AS DOING SO CAN INTERFERE WITH THE SAFETY SYSTEMS OF THE HEATER, WHICH MAY RESULT IN A FIRE, EXPLOSION,
THEPRODUCTIONOFDEADLYCARBONMONOXIDE,ANDPERSONALINJURYORDEATHTOYOUOROTHERS.NEVER USE
HAND-MADE OR THIRD PARTY ACCESSORIES OR ATTACHMENTS WITH THIS HEATER; THIS IS EXTREMELY DANGEROUS AND
MAYRESULTINPERSONALINJURYORDEATHTOYOUOROTHERS.
CATALYTIC HEATER
CALEFACTOR PORTÁTIL A PROPANO
PARA USO RECREACIONAL
PARA VENTA EN LOS EE.UU.
EXCEPTO EN MASSACHUSETTS
Este calefactor portátil a gas no tiene una fuente propia de ventilación. Utiliza el aire (oxígeno) del área en la
cual se emplea. Debe suministrarse el aire necesario para la ventilación y la combustión. Ver página 3.
INSTRUCCIONES DE USO Y MANUAL DEL USUARIO
LEA CUIDADOSAMENTE LAS INSTRUCCIONES: SU SEGURIDAD ES IMPORTANTE
PARAUSTEDYPARALOSDEMÁS.Leaysigatodaslasinstrucciones.Conserveestas
instrucciones en un lugar seguro para futura referencia. No permita que nadie que no
haya leído estas instrucciones arme, encienda, ajuste o use el calefactor.
www.mrheater.com 800-251-0001
IDIOMAS INCLUIDOS:
• INGLÉS
• ESPAÑOL
ADVERTENCIA:
Si no se siguen al pie de la letra las instrucciones de este
manual, podría producirse un incendio o una explosión que
provocaría daños materiales, lesiones o muertes.
No almacene ni utilice gasolina ni ningún otro vapor ni líquido inflamable cerca de este ni de ningún otro
artefacto.
QUÉ HACER SI DETECTA OLOR A GAS
• No intente encender el artefacto.
• No toque ningún interruptor eléctrico; no use ningún teléfono en el edificio.
• Llame inmediatamente a la compañía de gas desde el teléfono de un vecino. Siga las instrucciones de
la compañía de gas.
• Si no se puede comunicar con la compañía de gas, llame a los bomberos o a una empresa de
servicios calificada.
La instalación y la reparación deben ser realizadas por un instalador calificado, agencia de reparaciones o la
compañía de gas.
CALEFACTOR CATALÍTICO
Modelo MHCAT3LP • MHCAT6LP • MHCAT8LP
36881
NEVER LEAVE THE HEATER UNATTENDED WHILE BURNING!
¡NUNCADEJEELCALEFACTORDESATENDIDOMIENTRASESTÉENCENDIDO!
NO USE EL CALEFACTOR CON EL PROTECTOR CONTRA POLVO COLOCADO
2S-
Mr. Heater | Calefactor catalítico Instrucciones de uso y manual del usuario
NEVER LEAVE THE HEATER UNATTENDED WHILE BURNING!
¡NUNCA DEJE EL CALEFACTOR DESATENDIDO MIENTRAS ESTÉ ENCENDIDO!
ADVERTENCIA:
Este producto puede exponerlo a
productos químicos, incluyendo
plomo y compuestos de plomo,
que de acuerdo con el Estado
de California producen cáncer
y defectos de nacimiento u
otros daños reproductivos. Por
mayor información, visite www.
P65Warnings.ca.gov
ADVERTENCIA:
Cualquier cambio realizado a este
calefactor o a sus controles puede
ser peligroso.
ADVERTENCIA:
Cada vez que se conecte la
manguera o el tanque a la unidad,
hay que verificar que hayan fugas
de una o más formas: Colocando
agua jabonosa en la conexión y
buscando burbujas, escuchando
el silbido que produce el escape
de gas, detectando frío extremo,
sintiendo olor a huevo podrido.
¡Nolousesitienefugas!
ADVERTENCIA:
Los signos iniciales del
envenenamiento con monóxido
de carbono pueden parecer una
gripe, con dolor de cabeza, mareos
y/o nausea. Si presenta alguno
de estos síntomas, puede ser que
el calefactor no esté funcionando
correctamente.¡Obtengaairefresco
inmediatamente! Repare el calefactor.
ADVERTENCIA:
Los combustibles utilizados en los
artefactos a gas licuado de propano
y los productos de la combustión de
dicho combustible pueden exponerlo
a sustancias químicas, incluido el
benceno, que según el estado de
California puede provocar cáncer
y causar defectos de nacimiento u
otros daños reproductivos. Visite
www.P65Warnings.ca.gov por
mayor información.
ADVERTENCIA:
Si el recinto recreativo no tiene
una ventana o una ventilación
en el techo, NO USE ESTE
CALEFACTOR EN SU INTERIOR.
AVISO:
Noaptoparausarenuna“casade
vivienda”enCalifornia.
ADVERTENCIA:
PELIGRO DE INCENDIO Y
EXPLOSIÓN
Si siente olor a gas:
1. No intente encender el
artefacto.
2. Apague todas las llamas
expuestas.
3. Desconecte el suministro
de combustible.
4. Abandone inmediatamente
el área.
5. Permita que el gas se
disipe durante 5 minutos
antes de volver a encender
el artefacto.
No almacene ni utilice gasolina
ni ningún otro vapor ni líquido
inflamable cerca de este ni de
ningún otro artefacto.
El no seguir estas instrucciones
puede causar una explosión
o incendio que podría causar
daños materiales, heridas
graves o la muerte.
ADVERTENCIA:
PELIGRO DE ASFIXIA
• No lo utilice en áreas sin
ventilación.
• No obstruya el flujo de aire
necesario para la combustión y
la ventilación.
• Deberá suministrar la ventilación
adecuada para garantizar que el
calefactor disponga del aire que
necesita para la combustión.
• Si la ventilación no es la
adecuada, la combustión no se
llevará a cabo correctamente.
• Una combustión inadecuada
puede producir envenenamiento
con monóxido de carbono con
graves daños para la salud, o
causar la muerte. Los síntomas
de envenenamiento con
monóxido de carbono incluyen
dolores de cabeza, mareos y
dificultad al respirar.
• Consulte las INSTRUCCIONES
GENERALES DE SEGURIDAD por
requisitos más específicos con
respecto al aire de combustión
y a la ventilación adecuados
(página 3).
ADVERTENCIA:
EL ENVENENAMIENTO POR
MONÓXIDODECARBONO
PUEDE CAUSAR LA MUERTE
O LESIONES
Si se utiliza sin suficiente aire
de combustión y de ventilación,
el calefactor puede producir
MONÓXIDODECARBONO
excesivo, un gas venenoso
e inodoro.
Este es un calefactor a gas que
no tiene una fuente propia
de ventilación. El calefactor
utiliza el aire (oxígeno) del
área en la cual se emplea.
Debe suministrarse el aire
necesario para la ventilación
y la combustión. Consulte las
INSTRUCCIONES GENERALES DE
SEGURIDAD por requisitos más
específicos con respecto al aire
de combustión y a la ventilación
adecuados (página 3).
Este calefactor está equipado con un
SISTEMA DE SEGURIDAD diseñado
para apagar el calefactor si no
cuenta con suficiente aire fresco.
ADVERTENCIA:
¡NOALTEREELSISTEMADE
SEGURIDAD!
Si el calefactor se apaga, no vuelva
a encenderlo antes de dejar entrar
aire fresco. Si el calefactor sigue
apagándose, hágalo reparar.
Mantenga el quemador y los
componentes de control limpios.
ADVERTENCIAS
3S-
Instrucciones de uso y manual del usuarioMr. Heater | Calefactor catalítico
NEVER LEAVE THE HEATER UNATTENDED WHILE BURNING!
¡NUNCA DEJE EL CALEFACTOR DESATENDIDO MIENTRAS ESTÉ ENCENDIDO!
CONTENIDO
2 Advertencias
3 Instrucciones generales de
seguridad
4 Advertencia de disipación del olor
4 Información general
6 Instalación
Combustible
Ubicaciones
Fuente de Aire
Conexión de gas
Instalación de pared
Instalación con patas
7 Funcionamiento
Encendido
Re-encendido
Limpieza
8 Reparación
Quemador y llama piloto
ODS y componentes de la
válvula
Reemplazo de las patas
Almohadilla catalítica
Fuera de temporada
11 Diagnóstico de fallas
12 Lista de partes
14 Ordenar partes/Garantía
Especificaciones
No. de modelo MHCAT3LP MHCAT6LP MHCAT8LP
Entrada (BTU/h) 2.700 / 3.000 4.000 / 6.000 5.000 / 8.000
Tipo de gas Propano (LP) Propano (LP) Propano (LP)
Distancia a combustibles
Parte superior 12 ” 12 ” 12 ”
Frente 18” 18” 18”
Costados 2” 2” 2”
Parte posterior 0” 0” 0”
Piso (montaje en pared) 2” 2” 2”
Piso (con patas) N/D N/D N/D
INSTRUCCIONES GENERALES
DE SEGURIDAD
ESTE ES UN ARTEFACTO DE
CALEFACCIÓN.NOUSEESTE
ARTEFACTO SIN LA PARRILLA
DELANTERA INSTALADA. NO
INTENTE CALENTAR O COCINAR
ALIMENTOS EN ESTE CALEFACTOR.
• No utilice accesorios no aprobados en este
calefactor.
• Debido a las altas temperaturas, el
calefactor debe ubicarse fuera de las
áreas de tránsito y lejos de materiales
combustibles. (Ver Distancia a
combustibles en la tabla de abajo)
• Hay que alertar a los niños y adultos sobre
el peligro de las altas temperaturas de la
superficie, y deben mantenerse alejados
para evitar quemaduras o quemaduras en
la ropa.
• No deje el calefactor desatendido mientras
esté funcionando. Mantenga a los niños y
a las mascotas alejados del calefactor todo
el tiempo.
• No coloque ropa u otro material
combustible sobre o cerca de este
artefacto.
• No use el calefactor en ningún vehículo en
movimiento.
• Este calefactor puede usarse en un recinto
recreativo, solamente si el recinto tiene una
ventana o una ventilación de techo.
ADVERTENCIA: Si el recinto recreativo no tiene
una ventana o una ventilación de techo, NO USE
ESTE CALEFACTOR en su interior.
• Este calefactor requiere un área de
ventilación mínima de 8 pulgadas
cuadradas, 6 pulgadas cuadradas y 3
pulgadas cuadradas para los calefactores
de 8.000 BTU/H, 6.000 BTU/H y 3.000
BTU/H respectivamente, (por ejemplo,
unaaberturade4"x2",3”X2”y3”x1”
respectivamente) en el techo y al nivel
del piso, para una ventilación adecuada
durante su funcionamiento. No use
otros electrodomésticos que queman
combustible en el interior.
• LAPRESIÓNDEGASENELCALEFACTOR
ESTÁREGULADAYFIJAA11”DE
COLUMNADEAGUA¡ESTECALEFACTOR
NO TIENE UN REGULADOR INTERNO!
• Si se saca la rejilla de protección para
su mantenimiento, hay que volver a
colocarla antes de poner el calefactor en
funcionamiento.
• Hay que inspeccionar el artefacto antes de
cada uso. Puede ser necesario limpiarlo
con frecuencia. Los compartimientos de
control, el quemador y los conductos
de circulación de aire del artefacto
deben mantenerse limpios, consulte
MANTENIMIENTO. No intente limpiar la
almohadilla catalítica. Si la almohadilla
catalítica se daña, reemplace todo el
quemador inmediatamente.
• NO use este calefactor si alguna de
las piezas ha estado bajo el agua.
Contáctese de inmediato con un técnico
de mantenimiento calificado para que
inspeccione el calefactor y reemplace
cualquier pieza del sistema de control
y del control de gas que haya estado
bajo el agua. Si la almohadilla catalítica
se moja, reemplace todo el quemador
inmediatamente.
ADVERTENCIA: Los signos iniciales
de envenenamiento con monóxido de
carbono pueden parecer una gripe, con
dolor de cabeza, mareos y/o nausea. Si
presenta alguno de estos síntomas, puede
ser que el calefactor no esté funcionando
correctamente.¡Obtengaairefresco
inmediatamente! Haga que alguien
realice el servicio de mantenimiento en el
calefactor.
Algunas personas, como mujeres
embarazadas, personas con enfermedades
cardíacas o pulmonares, anemia, aquellas
bajo la influencia del alcohol o aquellas que
se encuentren a gran altitud, se ven más
afectadas por el monóxido de carbono que
otras.
• Cuando el calefactor se coloque en el suelo,
asegúrese de que el suelo esté nivelado y no
coloque ningún objeto a menos a 18 pulgadas
del frente del calefactor.
• ESTECALEFACTORESTÁEQUIPADOCON
UNINTERRUPTORCONTRACAÍDASQUE
APAGARÁELCALEFACTOR SI SE LLEGARA
A CAER.
OLOR A GAS COMBUSTIBLE
El gas propano (LP) y el gas natural
contienen sustancias aromáticas
artificiales añadidas específicamente para
facilitar la detección de fugas de gas.
Si se produjera una fuga de gas, usted
debe poder oler el gas combustible.
Dado que el gas propano (LP) es más
pesado que el aire, debe tratar de
detectar el olor lo más cerca posible del
piso.¡CUALQUIEROLORAGASSERÁ
LA SEÑAL PARA TOMAR MEDIDAS
INMEDIATAMENTE!
INSTRUCCIONES DE SEGURIDAD

4S-
Mr. Heater | Calefactor catalítico Instrucciones de uso y manual del usuario
NEVER LEAVE THE HEATER UNATTENDED WHILE BURNING!
¡NUNCA DEJE EL CALEFACTOR DESATENDIDO MIENTRAS ESTÉ ENCENDIDO!
• No haga nada que pudiera inflamar el gas
combustible. No active ningún interruptor
eléctrico. No desconecte ninguna toma
de corriente ni cables de extensión. No
encienda fósforos ni ninguna otra fuente
de llamas. No utilice su teléfono.
• Saque a todas las personas del edificio y
aléjelas del área inmediatamente.
• Cierre todas las válvulas de tanque de gas
propano (LP) o del cilindro de suministro
de combustible.
• El gas propano (LP) es más pesado que
el aire y puede asentarse en áreas bajas.
Cuando sospeche que puede haber una
fuga de gas propano (LP), manténgase
alejado de las áreas bajas.
• Llame a su proveedor de gas y a su
departamento de bomberos.
• Manténgase alejado del edificio y del área
hasta que los bomberos y su proveedor de
gas hayan declarado que no hay peligro.
• PORÚLTIMO,permitaquelapersonadel
servicio de gas y los bomberos revisen si
hay fugas de gas. Haga que ventilen el
edificio y el área antes de su regreso. Un
agente de servicios calificado debe reparar
cualquier fuga, revisar si hay otras fugas, y
volver a encender el artefacto por usted.
ADVERTENCIADEDISIPACIÓN
DEL OLOR: DISIPACIÓNDEL
OLOR–NOSEDETECTA
NINGÚNOLOR
• Algunas personas tienen problemas de
olfato. Algunos no pueden detectar el
olor del químico artificial añadido al gas
propano (LP). Usted debe determinar si es
capaz de reconocer la sustancia aromática
que contienen estos gases combustibles.
• Aprenda a reconocer el olor del gas
propano (LP). Los distribuidores locales
de propano (LP) le darán con gusto un
panfleto con muestras de olores. Utilícelo
para familiarizarse con el olor del gas
combustible.
• El hábito de fumar puede disminuir su
sentido del olfato. Exponerse a un olor
durante un período de tiempo puede
afectar su sensibilidad a ese olor específico.
Los olores presentes en instalaciones
donde se crían animales pueden
enmascarar el olor del gas combustible.
• La sustancia aromática presente
en el gas propano (LP) es
incolora y la intensidad de su olor
puede desvanecerse en algunas
circunstancias.
• Si hay una fuga subterránea, el recorrido
del gas a través del suelo filtrará esta
sustancia aromática.
• El aroma del gas propano (LP) puede variar
en intensidad a diferentes niveles. Dado
que el gas propano (LP) es más pesado
que el aire, el olor puede ser más intenso
en los niveles más bajos.
• Manténgase siempre alerta al
más mínimo olor a gas. Si continúa
percibiendo el olor a gas, no importa cuán
poco sea, proceda como si fuera una fuga
seria. Tome medidas inmediatamente
como se explicó anteriormente.
ATENCIÓN–¡PUNTOS
IMPORTANTES A
RECORDAR!
• El gas propano (LP) tiene un olor
característico. Aprenda a reconocer estos
olores. (Vea las secciones Olor a gas
combustible y Disipación del olor).
• Aunque usted no esté capacitado para
dar mantenimiento y reparar el calefactor,
SIEMPRE esté al tanto del olor del gas
propano (LP).
• Si no ha recibido capacitación para
reparar y dar mantenimiento a equipos
que emplean gas propano (LP), no
intente encender el calefactor, ni darle
mantenimiento o repararlo, ni haga
ningún ajuste al calefactor en el sistema de
combustible de gas propano.
• Una prueba olfativa periódica en las
proximidades del calefactor o en las
conexiones del calefactor, por ejemplo,
en la manguera, los acoples, etc., es una
buena medida de seguridad en todo
momento.
INFORMACIÓNGENERAL
• Este calefactor es seguro para usar en el
interior de recintos recreativos pequeños
que tengan medios para proporcionar
aire de combustión y de ventilación, como
porches cerrados, cabañas, chozas de
pesca, remolques, remolques tipo carpa,
carpas, camiones con capota, camionetas y
vehículos recreativos.
IMPORTANTE: NUNCA lleve un cilindro de
gas LP recargable al interior. Podría causar
un incendio o una explosión con daños
materiales, lesiones serias o la muerte.
Consulte las INSTRUCCIONES GENERALES DE
SEGURIDAD por requisitos más específicos
con respecto al aire de combustión y a la
ventilación adecuados.
Nota: Tenga cuidado al usar este calefactor
al aire libre, ya que la lluvia y pequeños
escombros podrían dañar la frágil superficie
de la almohadilla catalítica.
• Cuando el calefactor esté frío o a
temperatura ambiente, la almohadilla
catalítica tardará unos minutos en
encenderse.
IMPORTANTE: En el arranque inicial, una
llama leve también puede ser evidente en
la cara del calentador; esto es normal. Si
la llama continúa, apague el calentador y
haga que lo reparen.
Cuando la unidad está completamente
encendida, debería ver el patrón de
quemado que se muestra en la Figura 1.
NOTA: El brillo disminuye a lo largo de la vida
útil de la almohadilla catalítica.
• Al usar el calefactor por primera vez, la
almohadilla catalítica cambiará de un color
tostado a un color blanquecino. Esto es
normal y no es motivo para preocuparse.
• El tiempo de funcionamiento variará según
el ajuste del calefactor y el tamaño del
tanque de suministro. Consulte la Tabla 1
en la página 5 para conocer los tiempos
de funcionamiento por tamaño de tanque
para cada modelo.
• Al mover el calefactor o al golpearlo
cuando esté encendido, el Interruptor
contra caídas podría apagar el calefactor. Si
esto sucede, vuelva a encenderlo.
INSTRUCCIONES DE SEGURIDAD
5S-
Instrucciones de uso y manual del usuarioMr. Heater | Calefactor catalítico
NEVER LEAVE THE HEATER UNATTENDED WHILE BURNING!
¡NUNCA DEJE EL CALEFACTOR DESATENDIDO MIENTRAS ESTÉ ENCENDIDO!
SUMINISTRO DE GAS
• Los cilindros de gas LP utilizados
deben estar construidos y marcados de
acuerdo con las especificaciones para
cilindros de gas LP del Departamento
de Transporte de los Estados Unidos
(DOT).
• Utilice únicamente el suministro de
propano de RETIRO DE VAPOR. Si tiene
alguna pregunta sobre la extracción
de vapor, consulte a su distribuidor de
propano.
• La instalación del calefactor debe
cumplir con las normas locales o, en su
defecto, con la Norma Nacional de Gas
Combustible ANSI Z223.1.
• Este calefactor está diseñado para
funcionar con una presión de entrada
de11”deC.A.(0,40PSIG,2,8kPA).No
lo conecte directamente en un tanque
o cilindro de gas propano (LP).
• La línea de suministro debe estar
equipada con un regulador de gas
propano (LP) de baja presión en el
cilindro, ajustado para suministrar
la presión especificada. La línea de
gas propano (LP) de alta presión
entre la fuente de suministro de gas
propano (LP) y el regulador debe
estar equipada con una válvula de
exceso de flujo para limitar la fuga de
combustible en caso de una ruptura en
la línea.
Observe estas precauciones de
operación:
• Debido a las altas temperaturas, el
calefactor debe estar fuera de las áreas
de tránsito y alejado de muebles y
cortinas.
• Hay que alertar a los niños y
adultos sobre el peligro de las altas
temperaturas de la superficie, y deben
mantenerse alejados para evitar
quemaduras o quemaduras en la ropa.
• Los niños pequeños deben estar
vigilados cuidadosamente cuando
estén en la habitación en donde se
encuentre el calefactor.
• No coloque ropa u otro material
combustible sobre o cerca del
calefactor.
• La instalación y el mantenimiento
deben ser realizados por un técnico
calificado. Debe inspeccionar el
calefactor antes de usarlo y hacerlo
revisar por una persona calificada por
lo menos una vez por año.
• ADVERTENCIA: Cualquier cambio
realizado a este calefactor o a sus
controles, o intentar limpiar la
almohadilla catalítica puede ser
peligroso.
• Si saca la rejilla de protección para
su mantenimiento, hay que volver a
colocarla antes de poner el calefactor
en funcionamiento.¡NOLOUSECON
EL PROTECTOR CONTRA POLVO
COLOCADO!
• IMPORTANTE: El calefactor funciona
de manera que, en el encendido inicial
en frío, se puede notar un ligero olor a
gas durante un corto tiempo. Esto es
normal. Si el olor persiste, apague el
calefactor y hágalo reparar.
• IMPORTANTE: REMUEVA EL
PROTECTOR CONTRA POLVO
ANTES DE USARLO.
• No intente limpiar la almohadilla
catalítica. Siga las instrucciones de
limpieza que acompañan al calentador.
Combustible
• Este calefactor está diseñado para usar
únicamente con gas propano (LP) tipo HD-
5. No intente convertirlo para usar otros
combustibles gaseosos o líquidos. El uso
de cualquier otro gas que no sea propano
(LP) tipo HD-5 puede causar daños al
elemento catalítico de calefacción.
Modelo
Peso del
tanque
(Lb)
Ajuste
Calor
(BTU/h)
Tiempo máximo
de funciona-
miento con
tanque lleno
(horas)
MHCAT3LP 20 HI 3000 143
MHCAT3LP 20 LO 2700 159
MHCAT6LP 20 HI 6000 72
MHCAT6LP 20 LO 4000 107
MHCAT8LP 20 HI 8000 54
MHCAT8LP 20 LO 5000 86
Figura 1
Tabla 1
INSTRUCCIONES DE SEGURIDAD
6S-
Mr. Heater | Calefactor catalítico Instrucciones de uso y manual del usuario
NEVER LEAVE THE HEATER UNATTENDED WHILE BURNING!
¡NUNCA DEJE EL CALEFACTOR DESATENDIDO MIENTRAS ESTÉ ENCENDIDO!
Ubicaciones
• Consulte la tabla de especificaciones en la
página 3 por las distancias mínimas entre el
calefactor y materiales combustibles.
IMPORTANTE: Cuando el calefactor
se instale con las patas directamente
sobre alfombras, baldosas u otro material
combustible que no sea un piso de madera,
deberá instalarse sobre un panel de metal o
madera que se extienda por todo el ancho
y la profundidad del calefactor.
• El calefactor se puede utilizar en un
recinto recreativo o lugar de trabajo para
construcción temporaria con un cilindro
de propano (LP) recargable remoto
ÚNICAMENTEcuandoelcilindroestéen
el exterior y el calefactor se utilice con una
manguera Mr. Heater No. F271161, F271161-
60 y F271161-144.
• Inspeccione la manguera cada vez que
vaya a usar el calefactor. Si presenta
abrasión o desgaste excesivos, o si la
manguera está cortada, reemplácela
con una de las mangueras Mr. Heater
indicada anteriormente antes de utilizar el
calefactor.
• El calefactor siempre debe estar en
posición vertical mientras esté en uso.
• La instalación debe realizarla un técnico
calificado que esté familiarizado con
calefactores de gas sin ventilación.
• También debe inspeccionar el calefactor
antes de usarlo y hacerlo revisar por una
persona calificada por lo menos una vez
por año. Es posible que requiera una
limpieza más frecuente debido a la excesiva
pelusa de la alfombra, mantas, etc.
• Si tiene alguna pregunta con respecto a la
ubicación de su calefactor, comuníquese
con Servicio Técnico al 800-251-0001.
Fuente de Aire
• Este calefactor consume oxígeno de la
habitación en la que esté instalado. Para
asegurar una combustión completa y un
suministro adecuado de aire fresco a la
habitación, consulte las Instrucciones
generales de seguridad, página 3.
NOTA: Proporcione ventilación adicional de
al menos 2 pulgadas cuadradas por cada
1000 BTU por hora de entrada para cualquier
artefacto adicional que queme combustible
utilizado al mismo tiempo.
Conexión de gas
IMPORTANTE: Los conectores cónicos SAE
macho yhembrade3/8”deben revisarse
y limpiarse antes del armado, y apretarse
firmemente para una conexión hermética
al gas. Asegúrese de apretar con una llave
girándola en el sentido de las agujas del reloj.
Conecte el extremo cónico hembra de la
manguera al calefactor y conecte el otro
extremo de la manguera a la válvula del
cilindro de suministro de gas propano (LP)
o al punto de conexión. Apriete todas las
conexiones de la manguera. NO use sellador
de roscas en ninguna de estas conexiones.
IMPORTANTE: Verifique que todas las
conexiones de la manguera no tengan
fugas, usando agua jabonosa en la
conexión roscada del lado del calefactor.
NUNCA USE UNA LLAMA PARA BUSCAR
FUGAS.NOLASAJUSTEDEMÁS.
Instalación de pared
Su calefactor puede instalarse en una
variedad de ubicaciones fijas y viene con los
sujetadores necesarios para montarlo en la
pared.
NOTA: El calentador debe estar orientado
verticalmente (no de lado) cuando el
calentador está montado.
1. Seleccione una pared firme y
estructuralmente sólida que proporcione
los espacios libres necesarios. (Consulte la
tabla de la página 3).
2. Localice los accesorios de montaje que se
encuentran en la bolsa de accesorios que
viene con el calefactor.
3. Use la Figura 2 y la Tabla 2 a continuación
para espacio entre agujeros y piso mínimo
espacio libre para cada calentador.
4. Siusaanclajes,hagaunorificiode3/8”en
la pared, para cada posición de un orificio
de montaje.
5. Empuje los anclajes de plástico dentro de
cada orificio y coloque los tornillos en ellos.
Consulte la Figura 3.
6. Cuelgue el calefactor de los tornillos,
permitiendo que se deslice en su lugar.
7. Verifique las separaciones y realice los
ajustes necesarios removiendo el calefactor
y aflojando o ajustando los tornillos hasta
que quede firmemente montado.
NOTA: La cabeza del tornillo debe quedar
aproximadamentea5/16”delaparedpara
garantizar una instalación segura.
8. Conecte el calefactor al suministro de gas.
La unidad debe colocarse de modo que
la válvula de cierre del suministro de gas
en el calefactor sea fácilmente accesible y
la columna de condensación esté lo más
cerca posible del calefactor.
Instalación con patas
Los soportes utilizados para colgar el
calefactor de una pared también se pueden
usar como patas para colocar la unidad en
el piso. Siga los pasos a continuación para
convertir los soportes de pared en patas.
1. Remueva los cuatro tornillos (dos de cada
lado) que sujetan el soporte al calefactor.
Consulte la Figura 4A.
2. Usando los tornillos que acaba de remover,
fije las patas al calefactor como se muestra
en la Figura 4B.
3. Complete el montaje colocando las
almohadillas de las patas que vienen en la
bolsa de accesorios. Consulte la Figura 4B.
Anclaje
Tornillo
B
A
Almohadillas
para patas
Figura 3
Figura 4
INSTALACIÓN
A
B
C (MIN)
Suelo
A
B
C (MIN)
Figura 2
Tabla 2
MHCAT3LP MHCAT6LP MHCAT8LP
A 97/8” 115/8” 135/16”
B 71/2” 71/2” 71/2”
C 51/8” 8” 9”
7S-
Instrucciones de uso y manual del usuarioMr. Heater | Calefactor catalítico
NEVER LEAVE THE HEATER UNATTENDED WHILE BURNING!
¡NUNCA DEJE EL CALEFACTOR DESATENDIDO MIENTRAS ESTÉ ENCENDIDO!
Instrucciones de encendido
IMPORTANTE: El calefactor no debe
exponerse a vapores o líquidos inflamables
durante el encendido.
1. Verifique que la perilla de control de cuatro
posicionesestéenlaposición“OFF”.
Consulte la Figura 5.
2. Abra la válvula del cilindro de suministro de
gas propano (LP).
IMPORTANTE: Verifique que todas las
conexiones de la manguera no tengan
fugas, usando agua jabonosa en la conexión
roscadadel lado del calefactor. ¡VER LA
ADVERTENCIA!ENLAPARTEDEATRÁSDEL
CALEFACTOR.
3. Gire la perilla de control en sentido
antihorario hasta la posición "PILOT" y
presiónela para encenderlo. Consulte la
Figura 5.
4. Si el calefactor no se enciende, manténgala
presionada durante aproximadamente
30 segundos, suéltela y presiónela
nuevamente. Repita la operación hasta que
se encienda el piloto.
5. Luego de encender el piloto, mantenga
presionada la perilla durante 30 - 60
segundos y luego suéltela. La perilla
debería volver completamente hacia
afuera.
6. Para hacer funcionar el calefactor, presione
ligeramente la perilla y gírela suavemente
hasta que se trabe en la posición "HI"
para encender el quemador. Déjela en
la posición "HI" hasta que la almohadilla
catalítica se haya encendido.
7. Después de que la almohadilla catalítica
se haya encendido, ajuste la intensidad
del calor girando la perilla de control a la
posición deseada (posiciones "LO" o "HI"
- ¡NUNCAENTREPOSICIONESCON
TRABA!).
Instrucciones de apagado
1. Para apagar el calefactor, cierre el
gas propano (LP) desde el tanque de
suministro o con la válvula de cierre del
interior, permitiendo que el calefactor
consuma todo el gas propano (LP) de
la línea de suministro, luego presione
ligeramente la perilla de control hacia
adentro y gírela en sentido horario hasta
la posición "OFF".
IMPORTANTE: Cuando no lo use, debe
cerrar la llave de suministro de gas propano
(LP) del tanque de gas propano (LP). Como
se indicó anteriormente, permita que el
calefactor consuma el gas propano (LP) de
la línea de suministro hasta que se apague.
Instrucciones para volver a
encenderlo
SI EL CALEFACTOR SE APAGA DURANTE
LAOPERACIÓNNORMAL,NOINTENTE
ENCENDERLO HASTA QUE:
1. Se haya determinado la razón por la
cual el calefactor dejó de funcionar. Un
tanque de suministro de gas propano (LP)
vacío, bloqueo de la línea de gas propano
(LP), fuga de gas propano (LP), falta de
aire suficiente, falla del regulador, falla
mecánica del calefactor o deterioro de la
almohadilla catalítica hayan sido todas las
causas posibles.
2. Se haya permitido que el calefactor se
enfríe por completo.
3. Se haya determinado que no exista
gas propano (LP) filtrado o sin quemar
presente en el ambiente.
Limpieza
• Mantenga siempre el área del calefactor
limpia y libre de materiales combustibles,
gasolina y otros vapores y líquidos
inflamables.
• Mantenga las áreas de ventilación (ranuras
en la parte inferior y la parte superior del
calefactor) limpias en todo momento.
IMPORTANTE: El calefactor y sus alrededores
deben mantenerse limpios y libres de polvo.
• El calentador debe mantenerse cubierto
con el protector contra el polvo
suministrado cuando el calentador no esté
en uso.
• IMPORTANTE: Si no se usa el protector
contra el polvo cuando el calentador no
está en uso, se anulará la garantía.
• Puede limpiar el exterior del calefactor con
un trapo húmedo. Evite usar directamente
aerosoles o limpiadores en aerosol. No
use materiales abrasivos o limpiadores
en las etiquetas o en la perilla de control.
Tenga cuidado de NO dejar humedad,
limpiadores o solventes en la superficie del
elemento catalítico.
• Nunca toque, aspire o lave la almohadilla
catalítica. Esto podría destruir la superficie
catalítica activa de platino y hacer que la
almohadilla deje de funcionar.
IMPORTANTE: Un técnico calificado en
servicio de gas propano (LP) debe revisar
periódicamente el sistema de suministro
de gas al calefactor. Si el calefactor no se
enciende, permanece encendido o no
suministra la cantidad normal de calor,
lo primero que debe hacer es verificar el
suministro de gas. Averigüe si hay gas
disponible en el calefactor y verifique que
el regulador de gas propano (LP) tenga la
presión correcta en el múltiple.
H
I
L
O
T
O
L
I
P
F
F
O
Figura 5
ADVERTENCIA: Si no se siguen al
pie de la letra las instrucciones de este
manual, podría producirse un incendio o una
explosión que provocaría daños materiales,
lesiones o muertes.
PELIGRO: NUNCA lleve un cilindro de
propanorecargablealinterior.¡Podríacausar
un incendio o una explosión con daños
materiales, lesiones serias o la muerte!
CUIDADO: No trate de ajustar los niveles
de calor utilizando la válvula de paso del
tanque de propano.
ADVERTENCIA: No utilice el calefactor a
menos que la perilla de control esté trabada
en una posición marcada como "HI", "LO" o
"PILOTO". Nunca deje la perilla de control
entre las posiciones en las que se traba.
Podría causar una mala combustión y altos
niveles de monóxido de carbono.
CUIDADO: La rejilla de protección
permanecerá caliente luego de apagar
el calefactor. Permita que se enfríe
completamente antes de guardarlo.
CUIDADO: No cubra el calefactor
mientras esté caliente.
OPERACIÓN
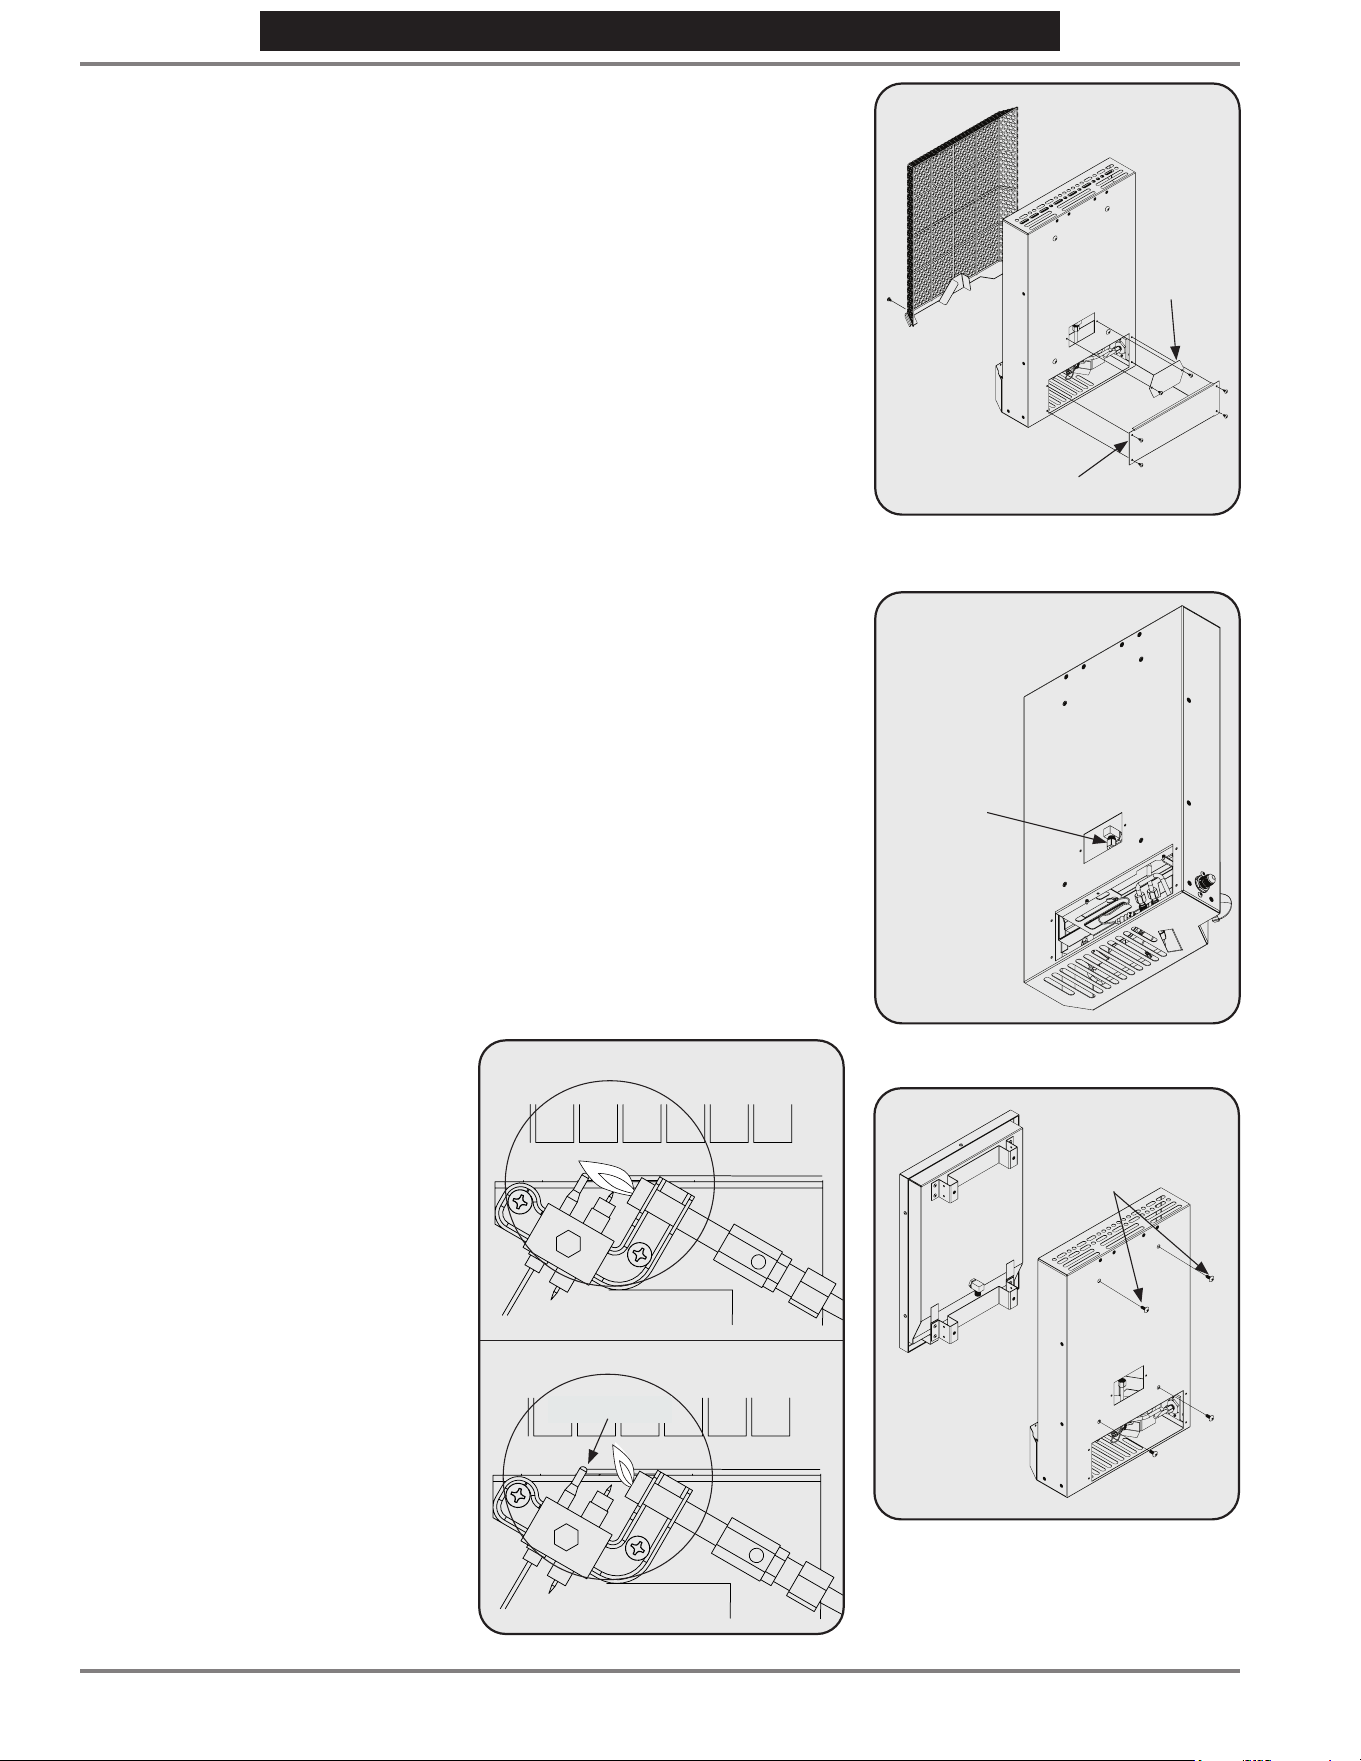
8S-
Mr. Heater | Calefactor catalítico Instrucciones de uso y manual del usuario
NEVER LEAVE THE HEATER UNATTENDED WHILE BURNING!
¡NUNCA DEJE EL CALEFACTOR DESATENDIDO MIENTRAS ESTÉ ENCENDIDO!
7. Useunallavede9/16”(ode14
mm) para remover la tuerca de
compresión que conecta el tubo de
gas del quemador al codo de bronce.
Consulte la Figura 8. Asegúrese de
usarunallavede½”paramantener
el codo en su lugar de manera que
el torque en el codo no dañe la parte
posterior del quemador principal.
8. Remueva los (4) cuatro tornillos que
conectan el quemador a la parte
posterior del calefactor. Consulte la
Figura 9.
9. Incline levemente el calefactor hacia
adelante para remover el panel del
quemador. Tenga cuidado para que
nada entre en los agujeros del panel.
10. Inspeccione el quemador. Si hay restos
extraños en la superficie, intente
eliminarlos manualmente. No utilice
productos de limpieza, una aspiradora
o aire a presión para limpiar la
superficie de la almohadilla.
IMPORTANTE: Si sospecha o sabe
que la almohadilla catalítica está
deteriorada, deje de usar el calefactor
y reemplace el quemador (consulte
la sección Partes de repuesto en la
página 12).
11. Inspeccione y limpie el piloto
(montado en el soporte) usando una
aspiradora o aire a presión a través de
los agujeros del piloto.
NOTA: El quemador debe removerse
como se describe en los pasos 1 a 10
anteriores antes de limpiar el piloto
debido a la fragilidad de la almohadilla
catalítica.
Quemador y llama piloto
Inspeccione visualmente el quemador y
la llama piloto (mirando verticalmente
hacia abajo dentro del protector del
piloto) periódicamente durante el
uso. La llama piloto debe ser de color
azul (no amarillo) y debe extenderse
más allá de la termocupla. La llama
rodeará la termocupla justo por debajo
de la punta. La Figura 6 muestra un
patrón de llama piloto correcto y
también muestra un patrón de llama
piloto incorrecto. El patrón de llama
piloto incorrecto no está tocando la
termocupla. Esto hará que se enfríe la
termocupla. Cuando la termocupla se
enfríe, el calefactor se apagará.
Si el patrón de llama piloto es
incorrecto o el piloto es amarillo, puede
necesitar una limpieza.
También es necesario limpiar
periódicamente la carcasa interior del
calefactor detrás del quemador para
remover restos extraños que puedan
provocar un incendio. Antes de realizar
cualquier limpieza en el calefactor,
primero deberá remover el quemador.
Siga este procedimiento para remover
el quemador.
1. Permita que el calefactor se enfríe
completamente antes de realizar
cualquier mantenimiento.
2. APAGUE el suministro de gas con
la válvula remota del cilindro y
desconecte la manguera del calefactor.
3. Si está montado en la pared,
remuévalo levantándolo y luego
alejándolo de la pared.
4. Saque el panel de acceso en la
parte inferior trasera del calefactor,
removiendo los (4) tornillos del panel
de acceso. Consulte la Figura 7. Saque
el panel de acceso al quemador
removiendo los (2) tornillos del panel
de acceso al quemador.
5. Remueva los (2) dos tornillos en la
parte inferior de la rejilla que aseguran
el soporte de la rejilla al gabinete
principal del calefactor. Consulte la
Figura 7.
6. Saque el soporte de la rejilla del
calefactor moviendo la rejilla hacia
afuera y hacia arriba. Asegúrese de
que los ganchos en la parte superior
de la rejilla no golpeen la frágil
almohadilla catalítica y la perforen.
Si la almohadilla se perfora, deberá
reemplazar todo el quemador.
REPARACIÓN
Figura 6
Rejilla
Panel de
acceso al
quemador
Panel de acceso
inferior
Figura 7
Figura 9
Figura 8
Tornillos
Llama piloto incorrecta
Termocupla
Llama piloto correcta
Tuerca de
compresión
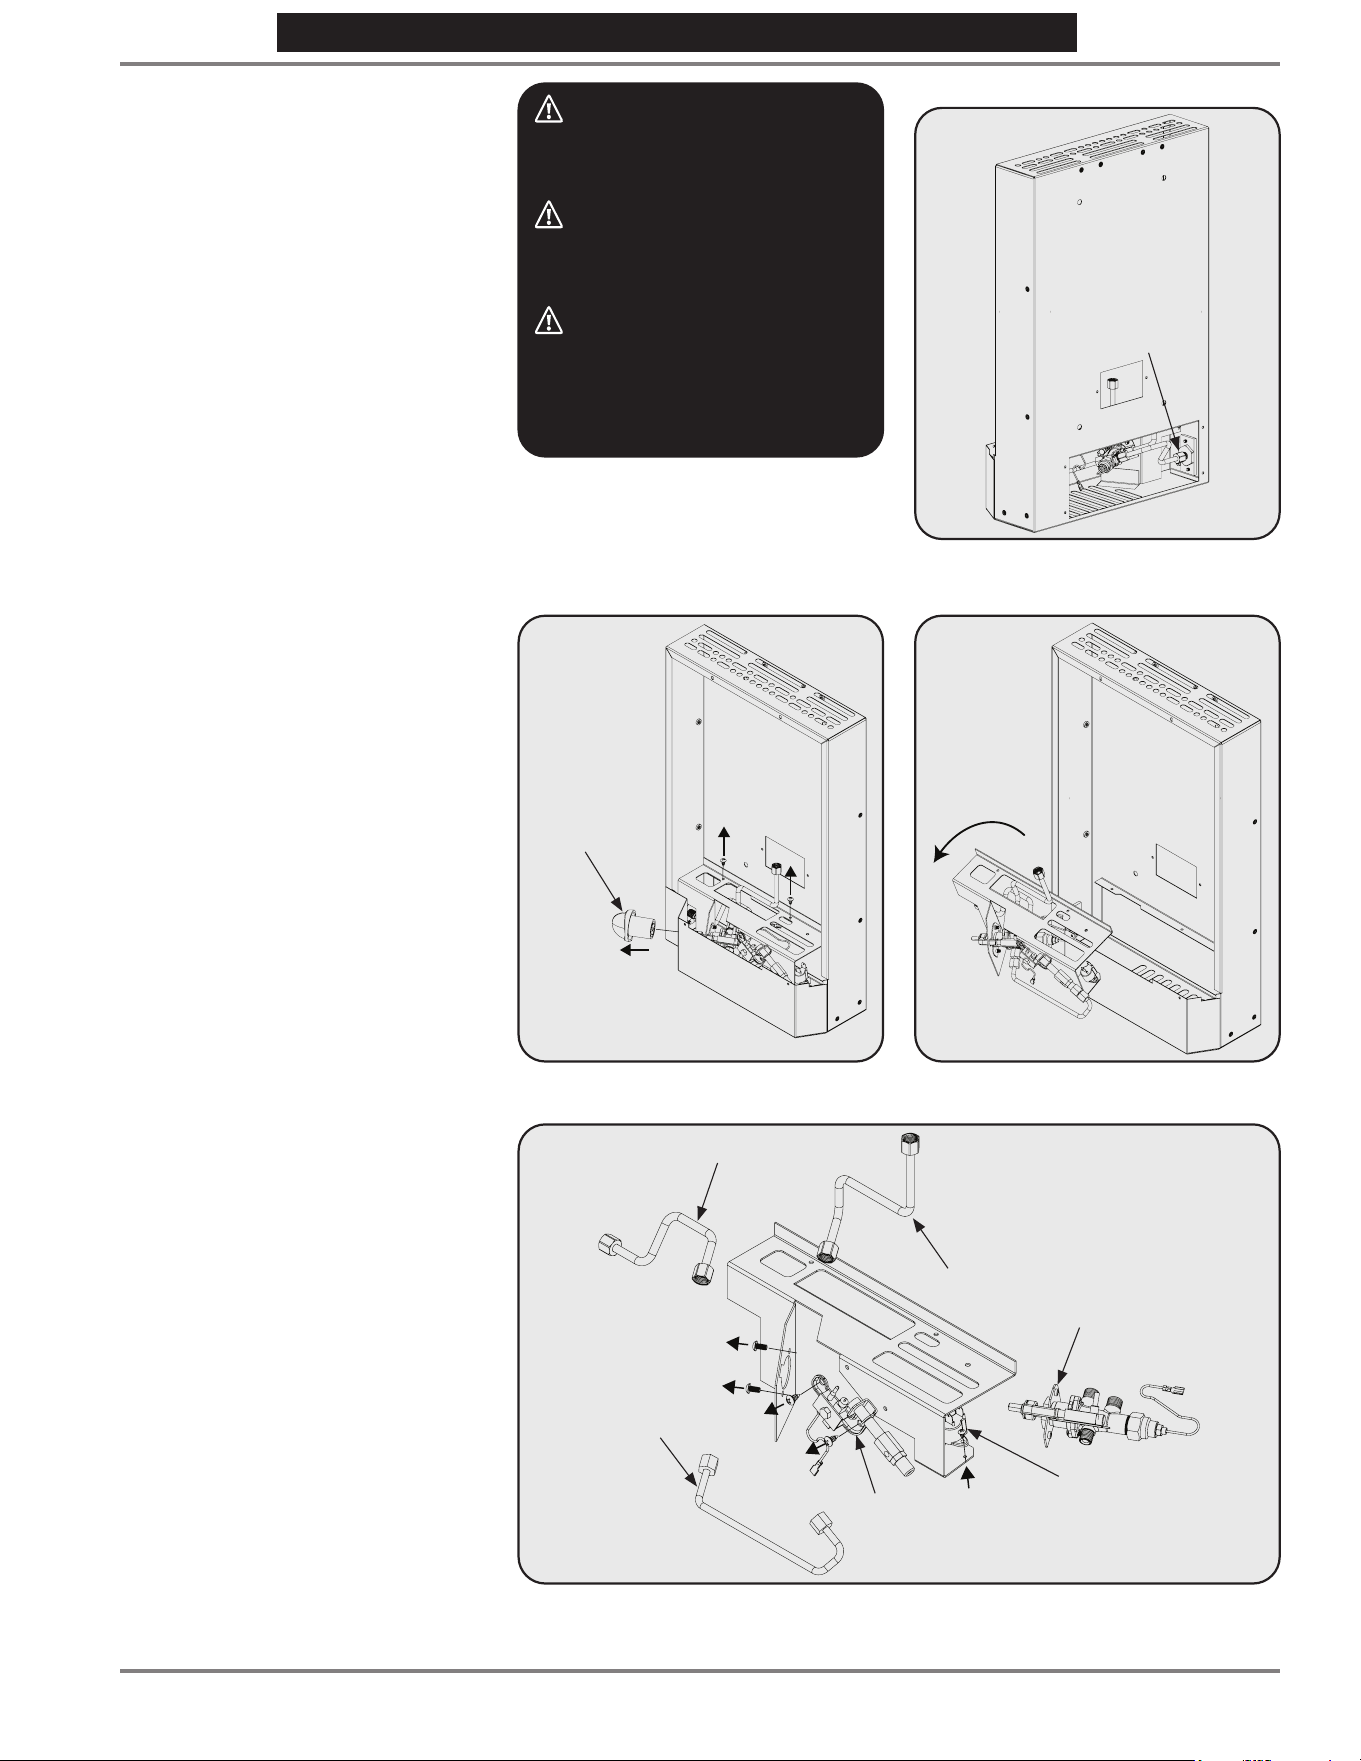
9S-
Instrucciones de uso y manual del usuarioMr. Heater | Calefactor catalítico
NEVER LEAVE THE HEATER UNATTENDED WHILE BURNING!
¡NUNCA DEJE EL CALEFACTOR DESATENDIDO MIENTRAS ESTÉ ENCENDIDO!
12. Inspeccione el interior de la carcasa del
calefactor por acumulación de polvo,
pelusa, telarañas u otros desechos
extraños que podrían provocar un
incendio. Si fuera necesario, limpie
el interior de la carcasa con una
aspiradora o con aire a presión. No
dañe ningún componente dentro de la
carcasa cuando la esté limpiando.
13. Repita los pasos 5-10 en orden inverso.
Asegúrese de apretar firmemente las
conexiones de gas. Al encender el
calefactor, verifique que no haya fugas
rociándolas con una solución de agua
y jabón suave. Vuelva a colocar los
paneles que removió en el Paso 4.
ODS (Sensor de agotamiento
de oxígeno) y componentes
de la válvula
También podría ser necesario
reemplazar el ODS y los componentes
de la válvula. Para hacer esto, deberá
remover el soporte de control. Para
hacerlo, siga los pasos 1-10 anteriores
para remover el quemador principal y
luego realice los siguientes pasos:
1. Remueva los (2) tornillos que conectan
el soporte de control al cuerpo
principal del calefactor. Consulte la
Figura 10.
2. Remueva la perilla de la válvula,
separándola del calefactor.
3. Useunallavede9/16”(ode14mm)
para remover la tuerca de compresión
que conecta el tubo de gas del
quemador al gabinete. Consulte la
Figura 11.
4. Levante el soporte de control para
sacarlo del calefactor. Consulte la
Figura 12.
5. Realice los siguientes pasos, cuando
sea necesario, para reemplazar los
diversos componentes del subconjunto
del soporte de control (consulte la
Figura 13):
• Para remover el tubo de gas del
piloto, desenrosque las tuercas de
compresiónconunallavede7/16”(o
de 12 mm).
• Para remover el tubo de gas del
quemador o de la entrada, use una
llavede9/16”(ode14mm).
• Para remover la válvula, el ODS o el
interruptor contra caídas, remueva los
tornillos que los conectan al soporte
de control. Remueva los cables de la
termocupla y del encendido cuando
sea necesario.
REPARACIÓN
CUIDADO: No intente reparar
o limpiar el calefactor mientras esté
caliente. El no seguir estas instrucciones
podría causar quemaduras graves.
ADVERTENCIA:Cualquier cambio
en este calentador o sus controles
o intentos de limpiar la almohadilla
catalítica puede ser peligroso.
ADVERTENCIA: Nunca use agujas,
alambres u objetos cilíndricos similares
para limpiar el piloto, para evitar dañar
el orificio calibrado que controla el flujo
de gas.
Perilla de la
válvula
Figura 10
Tuerca de compresión
Figura 11
Figura 12
Tubo de gas
del piloto
Tubo de entrada de gas
Interruptor
Válvula
ODS
Tubo de gas del quemador
Figura 13

10S-
Mr. Heater | Calefactor catalítico Instrucciones de uso y manual del usuario
NEVER LEAVE THE HEATER UNATTENDED WHILE BURNING!
¡NUNCA DEJE EL CALEFACTOR DESATENDIDO MIENTRAS ESTÉ ENCENDIDO!
6. Reemplace los componentes según
sea necesario y vuelva a armar la
unidad. Asegúrese de verificar las
conexiones de gas con una solución
de agua jabonosa suave antes de
encenderlo.
7. Repita los pasos 1-4 en orden inverso
para instalar el soporte de control.
Almohadilla catalítica
El calefactor tendrá una alta eficiencia
siempre que el material catalítico
esté intacto. Si se bloquea parcial o
completamente, el proceso catalítico
no funcionará. Por lo general, puede
notarse por una disminución del calor,
olor a gas propano (LP), dificultad para
encenderlo o no poder encender parcial
o completamente el calefactor.
IMPORTANTE: No intente usar el
calefactor con una almohadilla catalítica
dañada o deteriorada.
Después de varios años de uso,
incluso bajo buenas condiciones de
funcionamiento, algunas almohadillas
catalíticas pueden dejar de funcionar
porque casi siempre existen vestigios de
contaminantes en el gas y en el aire. Si
nota una disminución en la producción
de calor, posiblemente sea el momento
de reemplazar la almohadilla catalítica.
El deterioro de la almohadilla catalítica
puede disminuir la producción de calor
y liberar gas sin quemar o parcialmente
quemado.
Se recomienda reemplazar el quemador
catalítico cada 7 años, o antes, si nota
un funcionamiento anormal de la
almohadilla.
Siga los pasos para reemplazar
el quemador cuando tenga que
reemplazar la almohadilla catalítica.
Reemplazo de las patas
Consulte la Figura 4 en la sección
Instalación de la página 6 para
reemplazar las patas.
FUERA DE TEMPORADA
• Si el calefactor se deja "APAGADO"
durante un tiempo considerable,
hay que cerrar el suministro de gas
propano (LP) lo más cerca posible
de la fuente de gas. En el caso de
uso portátil, debe cerrar la llave de
suministro de gas propano (LP) en el
tanque de gas propano (LP).
• El calefactor también debe cubrirse
con una de nuestras cubiertas
contra polvo hechas a medida si no
se va a utilizar durante un tiempo
considerable.
• El funcionamiento del calefactor
debe ser verificado por un técnico
calificado en servicio de gas propano
(LP) cuando haya estado fuera de
servicio por un tiempo considerable
(funcionamiento intermitente) y, en
cualquier caso, al menos una vez al
año.
• Si el calefactor se almacena, asegúrese
de desconectar el cilindro de gas
propano (LP).
• Cuando el cilindro de gas LP no
esté desconectado del calefactor, el
calefactor y el cilindro deben ubicarse
al aire libre, en un espacio bien
ventilado, fuera del alcance de los
niños, y no deben almacenarse en un
edificio, garaje o cualquier otro lugar
cerrado.
ADVERTENCIA: Nunca intente
usar una almohadilla catalítica que
tenga la superficie dañada o perforada.
REPARACIÓN
• El almacenamiento del calefactor en
el interior está permitido solo si el
cilindro se desconecta y se remueve
del calefactor. Los cilindros deben
almacenarse al aire libre, en un espacio
bien ventilado, fuera del alcance de los
niños, y no deben almacenarse en un
edificio, garaje o cualquier otro lugar
cerrado.

11S-
Instrucciones de uso y manual del usuarioMr. Heater | Calefactor catalítico
NEVER LEAVE THE HEATER UNATTENDED WHILE BURNING!
¡NUNCA DEJE EL CALEFACTOR DESATENDIDO MIENTRAS ESTÉ ENCENDIDO!
SOLUCIÓN DE PROBLEMAS
SÍNTOMA
• El electrodo de encendido no produce chispa.
CAUSA
SOLUCIÓN
1. Electrodo de encendido roto. 1. Reemplace el ODS (sensor de disminución de oxígeno).
2. El cable del encendedor puede no estar conectado al electrodo
de encendido, o el cable a tierra puede no estar conectado al
bastidor.
3. Conecte el cable del encendedor o el cable a tierra.
3. Cable del encendedor dañado. 3. Reemplace el cable del encendedor.
4. El encendedor piezoeléctrico está roto. 4. Reemplace la válvula de gas.
SÍNTOMA
• El calefactor sigue apagándose durante el funcionamiento normal.
SOLUCIÓN
CAUSA
1. El piloto está bloqueado. 1. Limpie el piloto. Consulte la sección MANTENIMIENTO.
2. Entrada de aire fresco inadecuada. 2. Consulte las Instrucciones generales de seguridad por el tamaño
de la abertura.
3. Interruptor contra caídas activado por golpear el calefactor. 3. Vuelva a encenderlo.
4. El regulador está defectuoso. 4. Reemplace la manguera/regulador.
5. Contaminación de la válvula interna. 5. Reemplace la válvula de control.
SÍNTOMA
• El electrodo de encendido produce chispa pero el piloto no se enciende.
CAUSA
SOLUCIÓN
1. No llega gas al calefactor. 1. Conecte la manguera al calefactor y abra la válvula en el cilindro
remoto.
2. Encendido incorrecto del piloto. 2. Asegúrese de que la perilla de control esté completamente
presionada en la posición "PILOT" y que se mantenga el tiempo
suficiente como para purgar el aire de las líneas.
3. El piloto está bloqueado con residuos. 3. Limpie el piloto. Consulte la sección MANTENIMIENTO.
SÍNTOMA
• La llama del piloto no permanece encendida cuando se suelta la perilla.
CAUSA
SOLUCIÓN
1. Encendido incorrecto del piloto. 1. Asegúrese de que la perilla de control esté completamente
presionada en la posición "PILOT" y que se mantenga el tiempo
suficiente como para purgar el aire de las líneas y calentar la
termocupla una vez que aparezca la llama.
2. La llama del piloto no rodea la termocupla. 2. Limpie el piloto, consulte MANTENIMIENTO.
3. El mecanismo del piloto está defectuoso. 3. Reemplace el mecanismo del piloto.
4. Los cables del interruptor contra caídas están desconectados. 4. Conecte los cables del interruptor contra caídas.
SÍNTOMA
• El quemador principal no se enciende ni produce llamas por más de 1 minuto.
CAUSA
SOLUCIÓN
1. La almohadilla catalítica está sucia o dañada. 1. Reemplace el quemador.
•Por asistencia o información adicional, llame a Servicio Técnico.
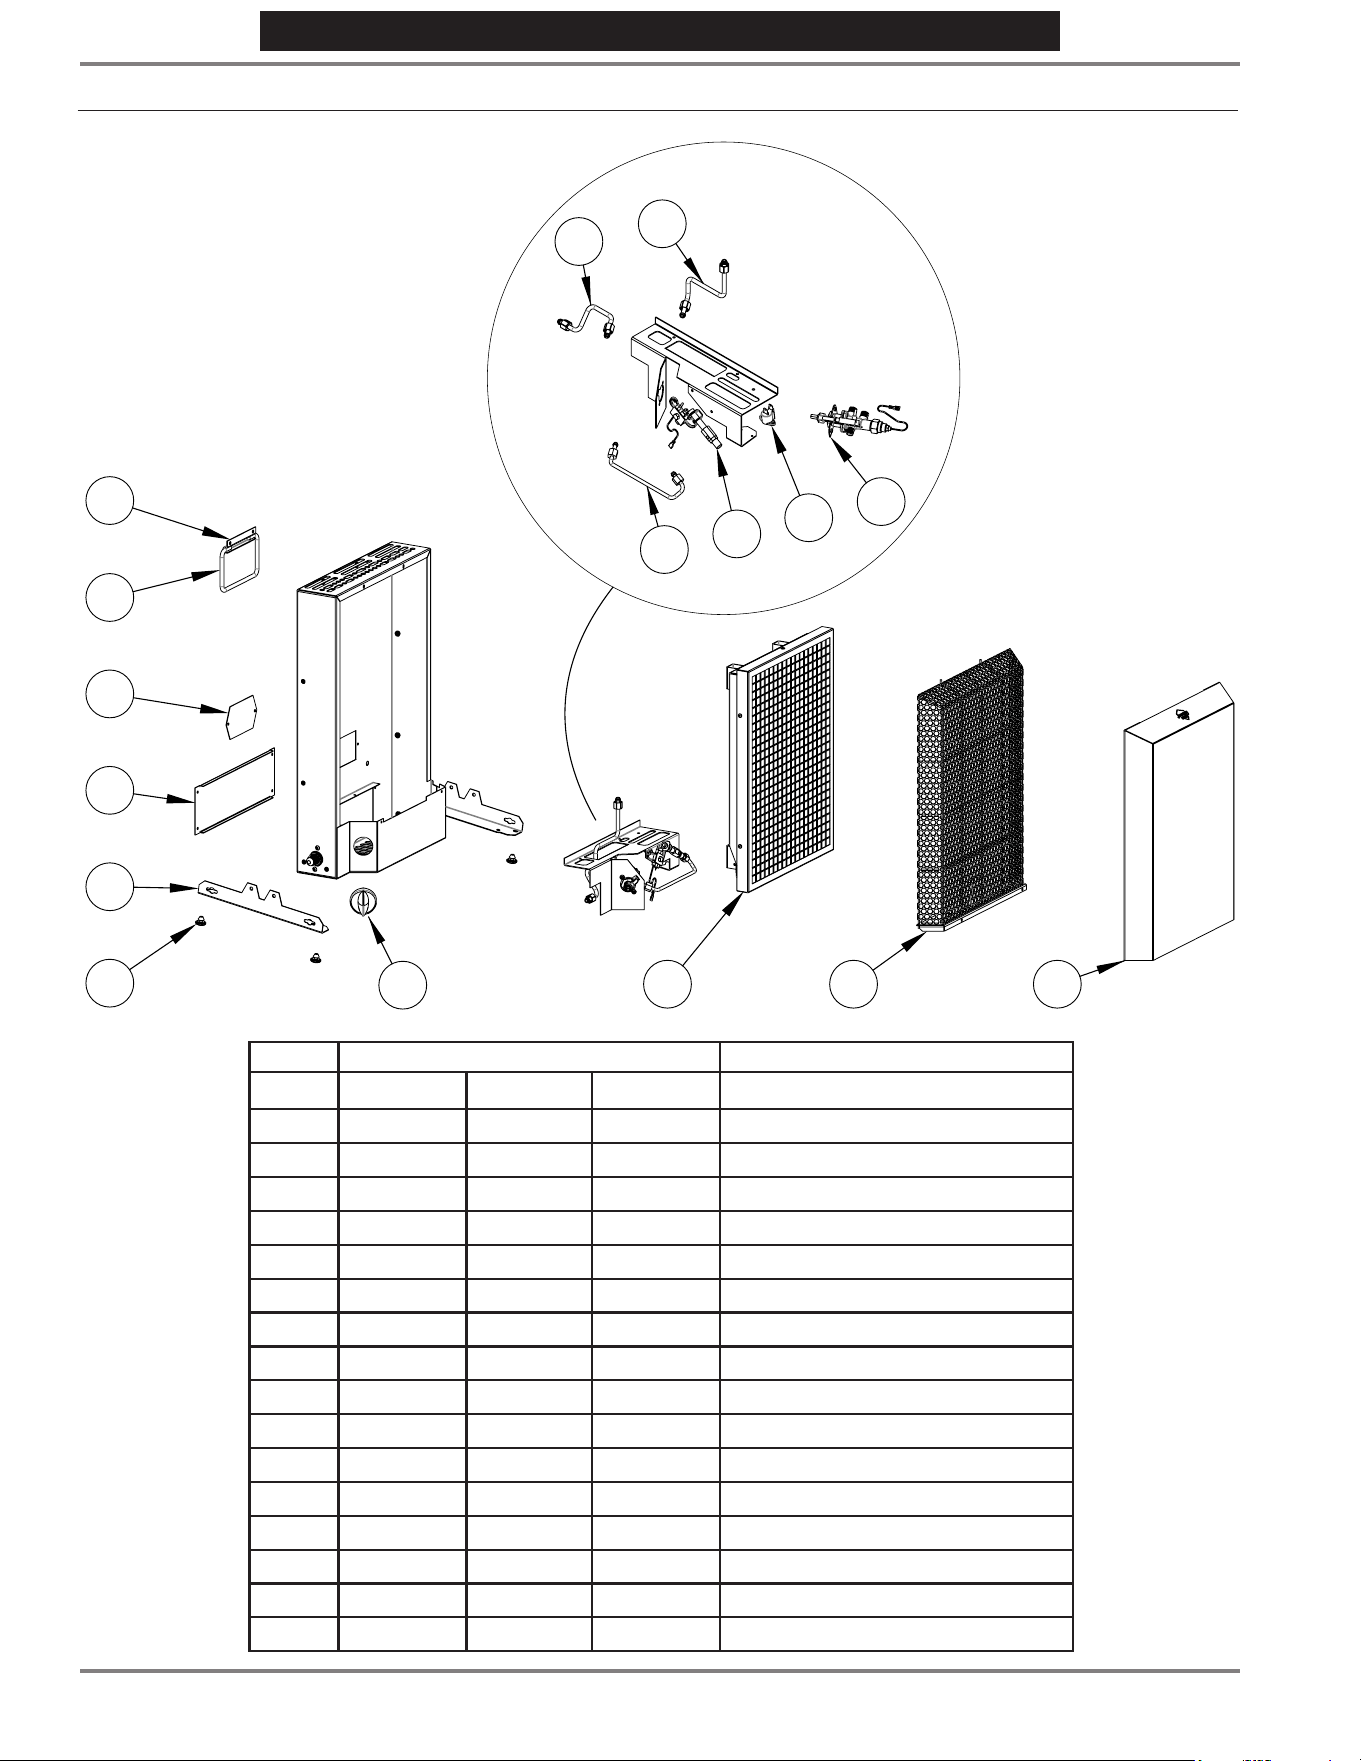
12S-
Mr. Heater | Calefactor catalítico Instrucciones de uso y manual del usuario
NEVER LEAVE THE HEATER UNATTENDED WHILE BURNING!
¡NUNCA DEJE EL CALEFACTOR DESATENDIDO MIENTRAS ESTÉ ENCENDIDO!
Mr.Heater•Calefactorcatalítico•ModeloMHCAT3LP,MHCAT6LP,MHCAT8LP
LISTA DE PARTES
2
3
4
5
6
7 8 9
1b
1a
11
15
10
12
13
14
No. PIEZA No. Descripción
MHCAT3LP MHCAT6LP MHCAT8LP
1a 36833 36833 36833 Manija (soporte)
1b 36834 36834 36834 Manija (mango)
2 36832 36832 36832 Panel de acceso al quemador
3 36818 36818 36818 Panel de acceso inferior
4 36817 36817 36817 Pata
5 78436 78436 78436 Almohadilla para pata, goma
6 32123 32123 32123 Perilla de la válvula
7 00835 00865 00885 Panel del quemador
8 36819 36820 36821 Rejilla
9 36829 36830 36831 Cubierta protectora contra el polvo
10 36856 36856 36856 Tubo de entrada
11 36853 36854 36855 Tubo de quemador
12 36850 36 851 36852 Tubo del piloto
13 73404 73404 73404 ODS, piloto
14 73403 73403 73403 Interruptor contra caídas
15 32054 32054 32054 Válvula de control

13S-
Instrucciones de uso y manual del usuarioMr. Heater | Calefactor catalítico
NEVER LEAVE THE HEATER UNATTENDED WHILE BURNING!
¡NUNCA DEJE EL CALEFACTOR DESATENDIDO MIENTRAS ESTÉ ENCENDIDO!
NOTAS:
14S-
Mr. Heater | Calefactor catalítico Instrucciones de uso y manual del usuario
NEVER LEAVE THE HEATER UNATTENDED WHILE BURNING!
¡NUNCA DEJE EL CALEFACTOR DESATENDIDO MIENTRAS ESTÉ ENCENDIDO!
Mr. Heater Inc. se reserva el derecho de hacer cambios en cualquier momento, sin previo aviso, en los colores, especificaciones,
accesorios, materiales y modelos.
REGISTRO DEL PRODUCTO: Gracias por su compra.
Ingrese a http://www.egiregistration.com para registrar su producto.
Este producto está cubierto por una o más patentes/patentes pendientes.
Visite http://www.enercogroupinc.com/patents para mayor información.
GARANTÍA Y COMPRA DE PIEZAS
MR.HEATER,INC.,4560W.160THST.,CLEVELAND,OHIO44135•800-251-0001
Mr. Heater es una marca registrada de Enerco Group, Inc.
© 2020, Enerco/Mr. Heater. Todos los derechos reservados.
Modelo MHCAT3LP • MHCAT6LP • MHCAT8LP
INFORMACIÓN PARA ORDENAR PARTES
COMPRAS: Puede comprar accesorios en cualquier distribuidor local de Mr. Heater o directamente de la fábrica.
PORINFORMACIÓNACERCADEREPARACIONES
Llame sin cargo al 800-251-0001
o visite www.mrheater.com
Nuestro horario de trabajo es de 08:00 AM a 5:00 PM, de lunes a viernes, hora del este.
Por favor, incluya el número de modelo, la fecha de compra y la descripción del problema en todas sus comunicaciones.
GARANTÍA LIMITADA
Mr. Heater, Inc. garantiza la calidad del material y la fabricación de sus calefactores y accesorios por un período de 1 año a partir
de la fecha de compra. Mr. Heater, Inc. reparará o reemplazará este producto sin cargo si presentara desperfectos dentro del
primer año tras realizada la compra, siempre y cuando el cliente costee la devolución y presente el comprobante de compra a
Mr. Heater Inc. dentro del período de garantía. DESCARGO DE RESPONSABILIDAD: Esta garantía no cubre ningún producto que:
a) haya estado sujeto a mal uso o negligencia; b) se haya utilizado de manera inconsistente con las advertencias e instrucciones
contenidas en el manual del propietario, incluyendo, entre otros, el uso de un calefactor para cocinar o calentar alimentos; o c)
se haya utilizado con accesorios hechos a mano o de terceros. Esta garantía le otorga derechos legales específicos, y usted puede
también tener otros derechos los que varían de un estado a otro.
ADVERTENCIA:
USESOLAMENTEPARTESDEREPUESTODELFABRICANTE.ELUSODECUALQUIEROTRAPARTEPODRÍACAUSARHERIDAS
OLAMUERTE.LASPARTESDEREPUESTOESTÁNDISPONIBLESÚNICAMENTEENLAFÁBRICAYDEBENSERINSTALADAS
POR UNA AGENCIA DE SERVICIO CALIFICADA. LAS MANGUERAS MR. HEATER F 271161 , F271161-60 Y F271161-144ESTÁN
DISEÑADASESPECÍFICAMENTEPARAUSARCONESTECALEFACTORJUNTOCONF273699. EL USO DE OTRAS MANGUERAS
PUEDEHACERQUEELCALEFACTORDEJEDEFUNCIONAR.
ADVERTENCIA:
ESTEPRODUCTOESUNCALEFACTOR.ESTÁCERTIFICADOPORLASNORMASANSIZ21.103,“CALEFACTORES A GASPORTÁTILES
PARA USO EN INTERIORES Y EXTERIORES.” ESTE PRODUCTO NUNCA DEBE UTILIZARSE PARA COCINAR O CALENTAR ALIMENTOS,
LOQUEPODRÍAINTERFERIRCONLOSSISTEMASDESEGURIDADDELCALEFACTOR,PUDIENDOCAUSARUNINCENDIO,EXPLOSIÓN,
PRODUCCIÓNDEMONÓXIDODECARBONOMORTALYLESIONESPERSONALESOLAMUERTEAUSTEDUOTRASPERSONAS.
NUNCA USE ACCESORIOS HECHOS A MANO O DE TERCEROS CON ESTE CALEFACTOR. ESO ES EXTREMADAMENTE PELIGROSO Y
PODRÍACAUSARLESIONESPERSONALESOLAMUERTEPARAUSTEDUOTRASPERSONAS.
CALEFACTOR CATALÍTICO