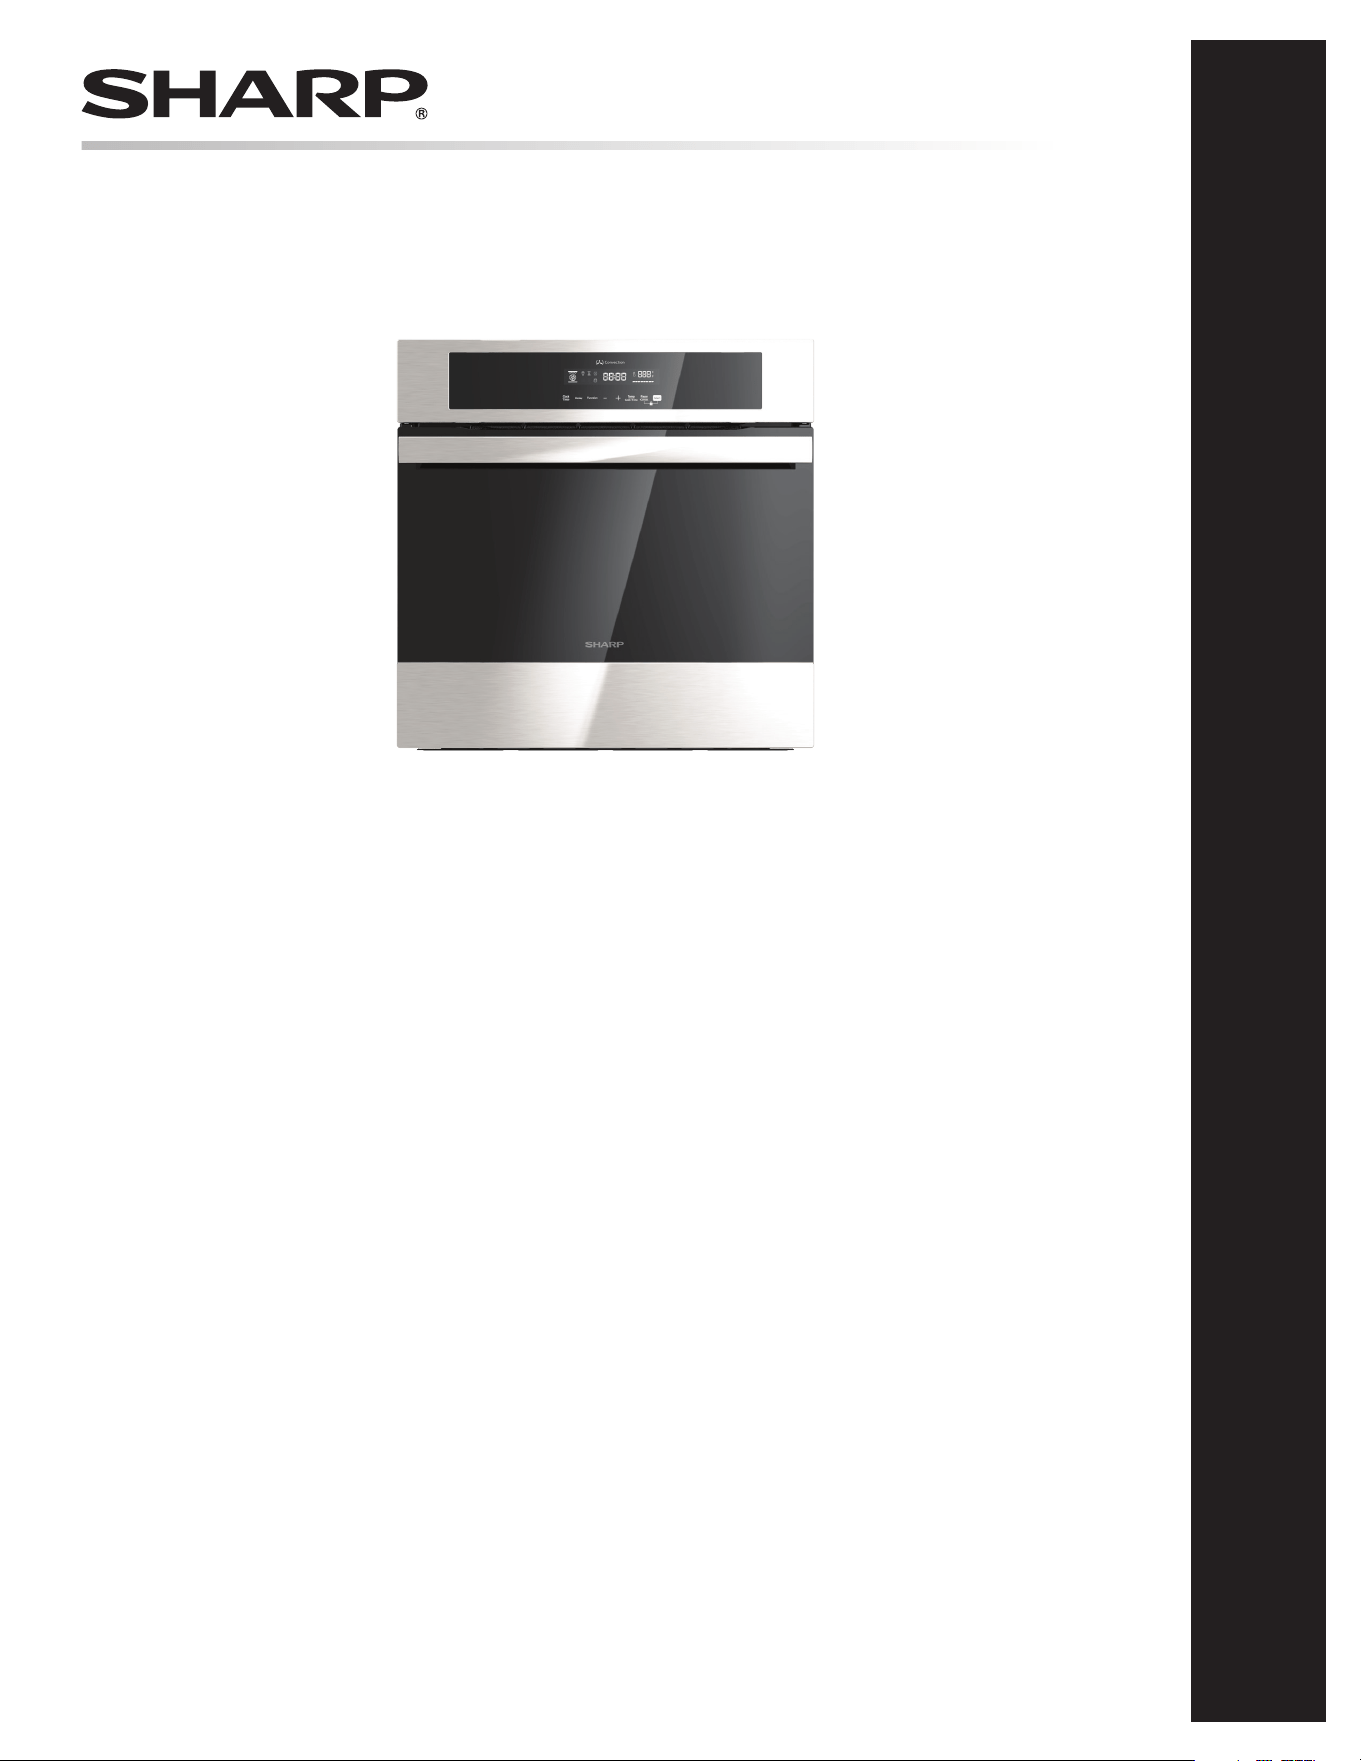
24" Single Convection Wall Oven: Model SWA2462SNS
OPERATION MANUAL
24" SINGLE CONVECTION WALL OVEN
MODEL : SWA2462SNS
CUSTOMER ASSISTANCE (UNITED STATES ONLY) .............. 2
US CONSUMER LIMITED WARRANTY ............................. 3
OVEN SAFETY ......................................................... 4
WARNINGS FOR ELECTRIC INSTALLATION ........................... 4
IMPORTANT SAFETY INSTRUCTIONS ............................5-6
FOOD SAFETY ......................................................................... 6
USDA RECOMMENDED TEMPERATURE ................................. 6
PARTS AND FEATURES............................................... 7
CONTROL PANEL .................................................. 8 - 9
BEFORE OPERATING ............................................................... 8
TO SET THE CLOCK ................................................................. 8
TO SET THE TIMER ................................................................. 8
SELECTING COOK MODE ....................................................... 8
TO PAUSE/CANCEL COOK MODE ....................................... 8
OVEN TEMPERATURE ............................................................. 8
TO CHANGE OVEN TEMPERATURE ..................................... 8
ACTIVE COOKING ................................................................... 9
TO SET DELAY START ............................................................ 9
OVEN LIGHT .......................................................................... 9
CONTROL LOCK ..................................................................... 9
TOUCHPAD SOUND ............................................................... 9
LANGUAGE ............................................................................ 9
OVEN USE ....................................................... 10 - 14
BEFORE USING THE OVEN ................................................... 10
PREHEATING THE OVEN ....................................................... 10
UTENSILS ............................................................................. 10
OVEN RACKS ........................................................................ 10
TO REMOVE LADDER RACK ............................................. 10
TO INSERT OVEN RACK .................................................... 10
COMPONENT COOLING FAN ................................................. 11
OVEN DOOR .......................................................................... 11
OVEN VENTS ......................................................................... 11
OVEN CONDENSATION AND TEMPERATURE ....................... 11
HIGH ALTITUDE BAKING ...................................................... 11
COOKING WITH TRUE EUROPEAN CONVECTION ................. 11
OVEN MODES ....................................................................... 12
ADVANTAGES OF CONVECTION COOKING............................ 13
COOKING TIPS ..................................................................... 13
OVEN PROBE ....................................................................... 14
OVEN CARE ..................................................... 15 - 16
STEAM CLEANING ................................................................ 15
GENERAL CLEANING ............................................................ 15
OVEN DOOR REMOVAL ........................................................ 16
REPLACING THE OVEN LIGHT .............................................. 16
TROUBLESHOOTING ........................................... 17 - 18
BAKING AND ROASTING TROUBLESHOOTING ..................... 17
OVEN OPERATION TROUBLESHOOTING ............................... 18
IMPORTANT SAFETY INSTRUCTIONS
Carefully read the important information regarding installation, safety and maintenance.
Keep these instructions for future reference.
CUSTOMER ASSISTANCE UNITED STATES ONLY
REGISTER YOUR PRODUCT
Registering your new product is easy and offers benets that help you get the most
out of your Sharp product including:
9 Convenience: If you ever need warranty support, your product information is already on le.
9 Communication:Stay up to date with important notications and special offers from SHARP.
9 Support: Quickly access support content including Owner’s Manuals, FAQ’s,
How-to Videos, and much more.
3 EASY WAYS TO REGISTER TODAY!
PRODUCT SUPPORT
If you have questions about the setup or operation of your product, please refer to
the corresponding section within this manual.
Additionally, visit https://support.sharpusa.com/s/ to access exclusive content about
your product including:
Æ FAQ’s and How-To Videos
Æ Find or Request Service
Æ Extended Warranty Options
Æ Downloads including the Installation Guide, Spec Sheet, and Owner’s Manual
CONTACT US
If at any time you have questions or comments concerning your SHARP product,
please contact the SHARP Customer Assistance Center. We are available to
assist you through multiple contact methods for your convenience:
Scan this QR Code on your mobile device Visit http://www.sharpusa.com/register
ONLINE
Visit our sites to
learn more about
your product at
sharpusa.com and
sbl.sharpusa.com
See the Contact Us section on our sites
U.S. | https://support.sharpusa.com/s/
Contact a Sharp Advisor on the phone
Contact a Sharp Advisor on the phone
CALL US
US 800-BE-SHARP
800-237-4277
Mon-Fri: 7am-7pm CST
Sat-Sun: 9am-7pm CST
CALL US
US 800-BE-SHARP
800-237-4277
Mon-Fri: 7am-7pm CST
Sat-Sun: 9am-7pm CST
EMAIL
Available 24/7
US: sharpusa.com
CHAT ONLINE
Mon-Fri: 7am-7pm CST
Sat-Sun: 9am-7pm CST
SCAN
Use the camera or
QR code scanning
application on your
mobile device
TGANEB010MRR2 Sep 24, 2025
2
E
E
E
REGISTER YOUR PRODUCT
3
E
E
E
E
US CONSUMER LIMITED WARRANTY
SHARP ELECTRONICS CORPORATION ("Sharp") warrants to the first consumer purchaser ("Purchaser") that this Sharp brand
product ("Product"), when shipped in its original container and sold or distributed in the United States by Sharp or an authorized
Sharp dealer or reseller, will be free from defective workmanship and materials, and agrees that it will, at its option, either repair
the defect or replace the defective Product or part thereof with a new or remanufactured equivalent at no charge to the Purchaser for
parts or labor for the period(s) set forth below.
This limited warranty does not apply to any appearance items of the Product nor to the additional excluded item(s) set forth below
nor to any Product the exterior of which has been damaged or defaced, which has been subjected to misuse, abnormal service or
handling, or which has been altered or modified in design or construction.
In order to enforce the rights under this limited warranty, the Purchaser should follow the steps set forth below and provide proof of
purchase to the servicer.
The limited warranty described herein is in addition to whatever implied warranties may be granted to Purchasers by law. ALL
IMPLIED WARRANTIES INCLUDING THE WARRANTIES OF MERCHANTABILITY AND FITNESS FOR USE ARE
LIMITED TO THE PERIOD(S) FROM THE DATE OF PURCHASE SET FORTH BELOW. Some states do not allow limitations
on how long an implied warranty lasts, so the above limitation may not apply to you.
Neither the sales personnel of the seller nor any other person is authorized to make any warranties other than those described herein,
or to extend the duration of any warranties beyond the time period described above on behalf of Sharp.
The warranties described herein shall be the sole and exclusive warranties granted by Sharp and shall be the sole and exclusive
remedy available to the Purchaser. Correction of defects, in the manner and for the period of time described herein, shall constitute
complete fulfillment of all liabilities and responsibilities of Sharp to the Purchaser with respect to the Product, and shall constitute
full satisfaction of all claims, whether based on contract, negligence, strict liability or otherwise. In no event shall Sharp be liable,
or in any way responsible, for any damages or defects in the Product which were caused by repairs or attempted repairs performed
by anyone other than an authorized servicer. Nor shall Sharp be liable or in any way responsible for any incident or consequential
economic or property damage. Some states do not allow the exclusion of incidental or consequential damages, so the above exclusion
may not apply to you.
THIS LIMITED WARRANTY IS VALID ONLY IN THE FIFTY (50) UNITED STATES, THE DISTRICT OF COLUMBIA AND
PUERTO RICO.
Your product model number &
description
Model # SWA2462SNS Home Use Wall Oven.
(Be sure to have this information available when you need service for your Product.)
Warranty period for this product:
One (1) year parts and labor including in-home service.
Product must be accessible to provide service.
Additional item(s) excluded from
warranty coverage (if any):
Non-functional accessories, service calls to your home to instruct how to use your Wall Oven
appliance, replace or repair house fuses or to correct house wiring, improper commercial
use, installation, or maintenance, damage to the product caused by lack of or improper
cleaning, delivery, accident, modifications, fire, floods or acts of God.
Where to obtain service:
From a Sharp Authorized Servicer located in the United States. To find the location of the near-
est Sharp Authorized Servicer, call Sharp toll free at 1-800-237-4277 (1-800-BE-SHARP).
What to do to obtain service: In-home service is provided for one year from date of purchase. In-home service can be
arranged by calling 1-800-BE-SHARP. Be sure to have Proof of Purchase available.
TO OBTAIN SUPPLY, ACCESSORY OR PRODUCT INFORMATION, CALL 1-800-BE-SHARP or visit www.sharpusa.com.
SAVE THE PROOF OF PURCHASE AS IT IS NEEDED SHOULD YOUR OVEN EVER REQUIRE WARRANTY SERVICE.
4
E
E
E
OVEN SAFETY
YOUR SAFETY AND THE SAFETY OF OTHERS ARE VERY IMPORTANT.
We have provided many important safety messages in this manual and on your appliance. Always read and obey all safety
messages.
This is the safety alert symbol.
This symbol alerts you to potential hazards that can kill or hurt you and others. All safety messages will follow
the safety alert symbol and either the word "DANGER," "WARNING" or "CAUTION."
DANGER
An immediately hazardous situation, which, if not avoided, may result in death or serious
bodily injury.
WARNING
A potentially hazardous situation which, if not avoided, could result in death or serious
bodi ly inju r y.
CAUTION
A potentially hazardous situation which, if not avoided, may result in moderate or minor
inju r y.
All safety messages will tell you what the potential hazard is, how to reduce the chance of injury and what can happen if the
instructions are not followed.
State of California Proposition 65 Warnings:
WARNING
This product contains one or more chemicals known to the State of California to cause cancer.
WARNING
This product contains one or more chemicals known to the State of California to cause birth defects or other
reproductive harm.
WARNINGS FOR ELECTRIC INSTALLATION
WARNING
ELECTRICAL SHOCK HAZARD
Installation and service must be performed by a qualied installer or service agency. The model is powered at 208/240V.
Always disconnect the power before servicing this unit. This appliance must be properly grounded. Failure to do so could result
in death or serious injury.
240V VS. 208V CONNECTION
Most oven installations will have a 240V connection. If your oven is installed with 208V, the preheat time may be slightly longer
than with 240V. The oven is designed to assure the same clean time at 208V.
WARNING
Remove all packing and foreign materials from the oven. Any material of this sort left inside may melt or burn when the appli-
ance is used. Failure to do so could result in death or re.

5
E
E
E
READ ALL INSTRUCTIONS BEFORE USING
WARNING
To reduce the risk of re, electrical shock,
injury to persons or damage when using the oven, follow basic
precautions, including the following:
PROPER INSTALLATION:
1 This appliance must be properly installed and
electrically grounded by a qualied technician. Connect
only to properly grounded outlet. See the Installation
Manual.
2 This appliance should be serviced only by a qualied
service technician. Contact 1-800-BE-SHARP for
the nearest service center for examination, repair or
adjustment.
3 Do not repair or replace any part of the oven unless
specically recommended. Call 1-800-BE-SHARP for
an authorized service center.
4 Do not operate this appliance if it is not working properly
or has been damaged until an authorized servicer has
examined and repaired it.
5 Install or locate this appliance only in accordance with
the Installation Manual.
6 Do not cover or block any openings on this appliance.
7 Use this appliance only for its intended use as described
in this manual. Do not use corrosive chemicals, vapors
or nonfood products in this appliance. This type of
oven is specically designed to heat or cook. It is not
designed for industrial or laboratory use. The use of
corrosive chemicals in heating or cleaning will damage
the appliance.
TO REDUCE THE RISK OF FIRE IN THE OVEN CAVITY:
1 Do not store ammable materials in or near the oven.
2 Do not use water on a grease re. Smother re or use a
dry chemical or foam-type extinguisher.
3 Keep a re extinguisher readily available and highly
visible next to any cooking appliance.
4 Do not overcook food. Carefully attend oven if paper,
plastic or other combustible materials are placed inside
the oven.
5 Do not use the cavity for storage purposes. Do not leave
paper products, cooking utensils or food in the cavity
when not being used.
6 If materials inside the oven ignite, keep oven door closed.
Turn oven off and disconnect the circuit at the circuit
breaker box.
7 Do not let grease accumulate in or near the oven, as it
could ignite.
8 Ensure the blower fan runs whenever the oven is in
operation. If the fan does not operate, do not use the
oven. Call 1-800-BE-SHARP for an authorized service
center.
9 Never use the oven to warm or heat a room.
IMPORTANT SAFETY INSTRUCTIONS

6
E
E
E
PERSONAL SAFETY:
1 Do not allow children to use this appliance unless closely
supervised by an adult. Children and pets should not be
left alone or unattended in the area where the appliance
is in use. Never allow children to sit or stand on any part
of the oven.
2 Do not store items of interest to children above the oven.
If children should climb onto the appliance to reach
these items, they could be seriously injured.
3 For personal safety, wear proper clothing. Loose tting
clothing or garments with hanging sleeves should never
be worn while using this appliance.
4 Tie long hair so it doesn’t hang loose.
5 Do not touch heating elements or interior surfaces of
oven.
6 The heating elements may be hot even though they are
dark in color. Interior surfaces of an oven become hot
enough to cause burns.
7 During and after use, do not touch or let clothing or
other ammable materials contact the heating elements
or the interior surfaces of the oven until they have had
sufcient time to cool.
8 The trim on the top and sides of the oven door may
become hot enough to cause burns.
9 Use care when opening the door. Open the door slightly
to let hot air or steam escape before removing or
replacing food.
10 Do not heat unopened food containers. Buildup of
pressure may cause the container to burst and cause
injur y.
11 Always place oven racks in desired position while oven
is cool. If a rack must be moved while oven is hot, do
not let potholder contact the hot heating elements.
12 Use only dry potholders. Moist or damp potholders on
hot surfaces may result in burns from steam. Do not let
potholder touch hot heating elements. Do not use a towel
or other bulky cloth.
13 Do not set any weight on the open oven door.
14 Do not impact or scratch glass on oven door or control
panel. Do not use oven if any glass surface is broken.
Doing so may result in personal injury, electrical shock
or re.
15 If the surface is cracked, switch off the oven to avoid
the possibility of electric shock.
IMPORTANT SAFETY INSTRUCTIONS
FOOD SAFETY
Cook foods to safe temperatures recommended by the United
States Department of Agriculture (USDA). To check
internal temperature of foods to determine doneness, insert
a temperature probe in a thick or dense area away from fat
or bone.
Do not let food sit in the oven more than one hour before
or after cooking. Doing so can result in food poisoning or
sickness.
USDA RECOMMENDED TEMPERATURE
FOOD MINIMUM INTERNAL
TEMPERATURE
beef, pork, veal and lamb steaks,
chops and roasts
145 °F (63 °C) and
allow to rest for at least
3 minutes
ground meats 160 °F (71 °C)
ground poultry 165 °F (74 °C)
ham, fresh or smoked (uncooked) 145 °F (63 °C) and
allow to rest for at least
3 minutes
ham (fully cooked, to reheat) 165 °F (74 °C)
poultry breasts, whole bird, legs,
thighs, wings, giblets and stufng
165 °F (74 °C)
eggs 160 °F (71 °C)
sh and shellsh 145 °F (63 °C)
leftovers 165 °F (74 °C)
casseroles 165 °F (74 °C)
NOTE: Select, store and handle food carefully to preserve its
high quality and minimize the spread of foodborne bacteria.
READ AND SAVE THESE INSTRUCTIONS
OPT 1
OPT 2
Updated Rack Line Art Work
7
E
E
E
PARTS AND FEATURES
4
13
6
9
10
7
8
5
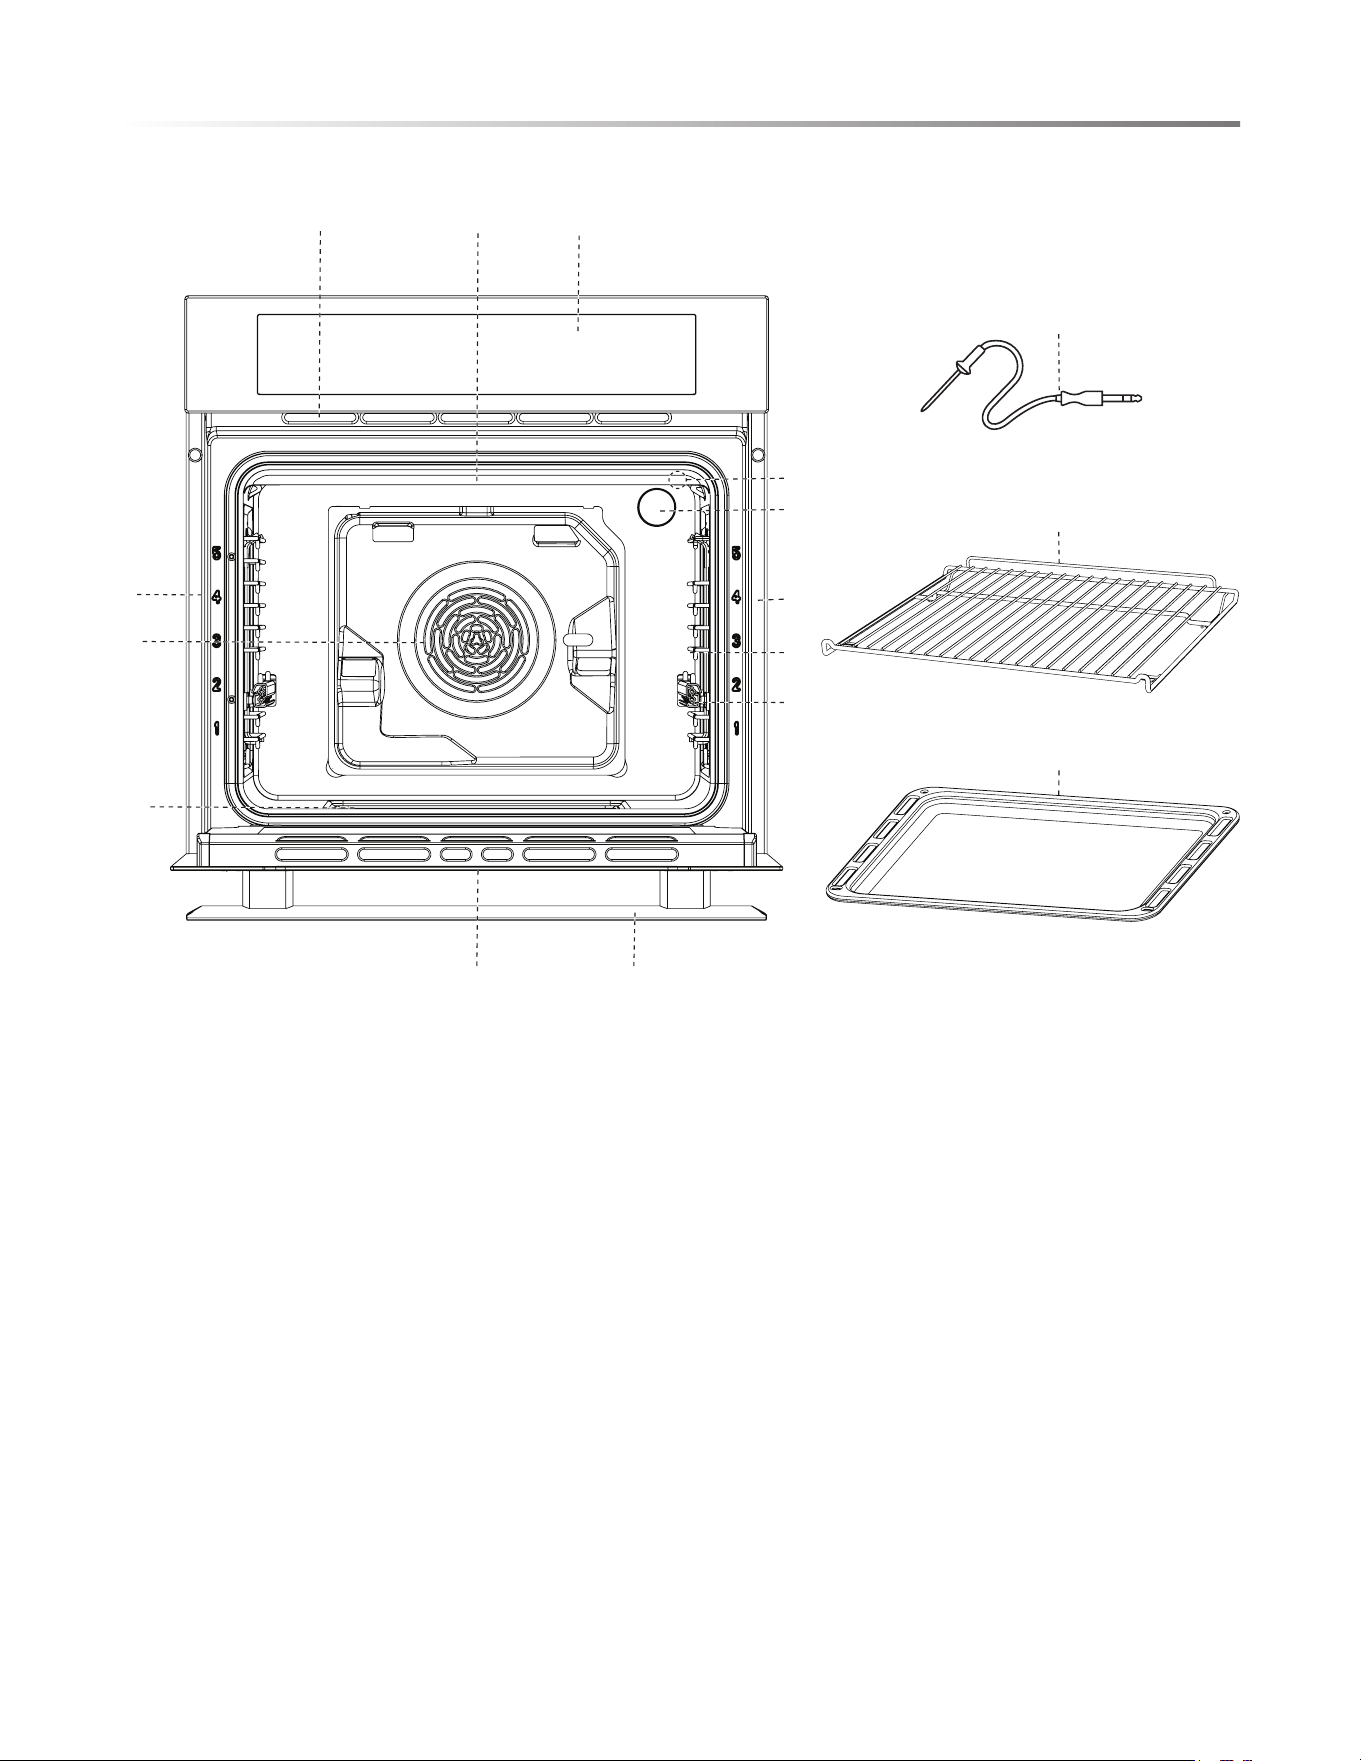
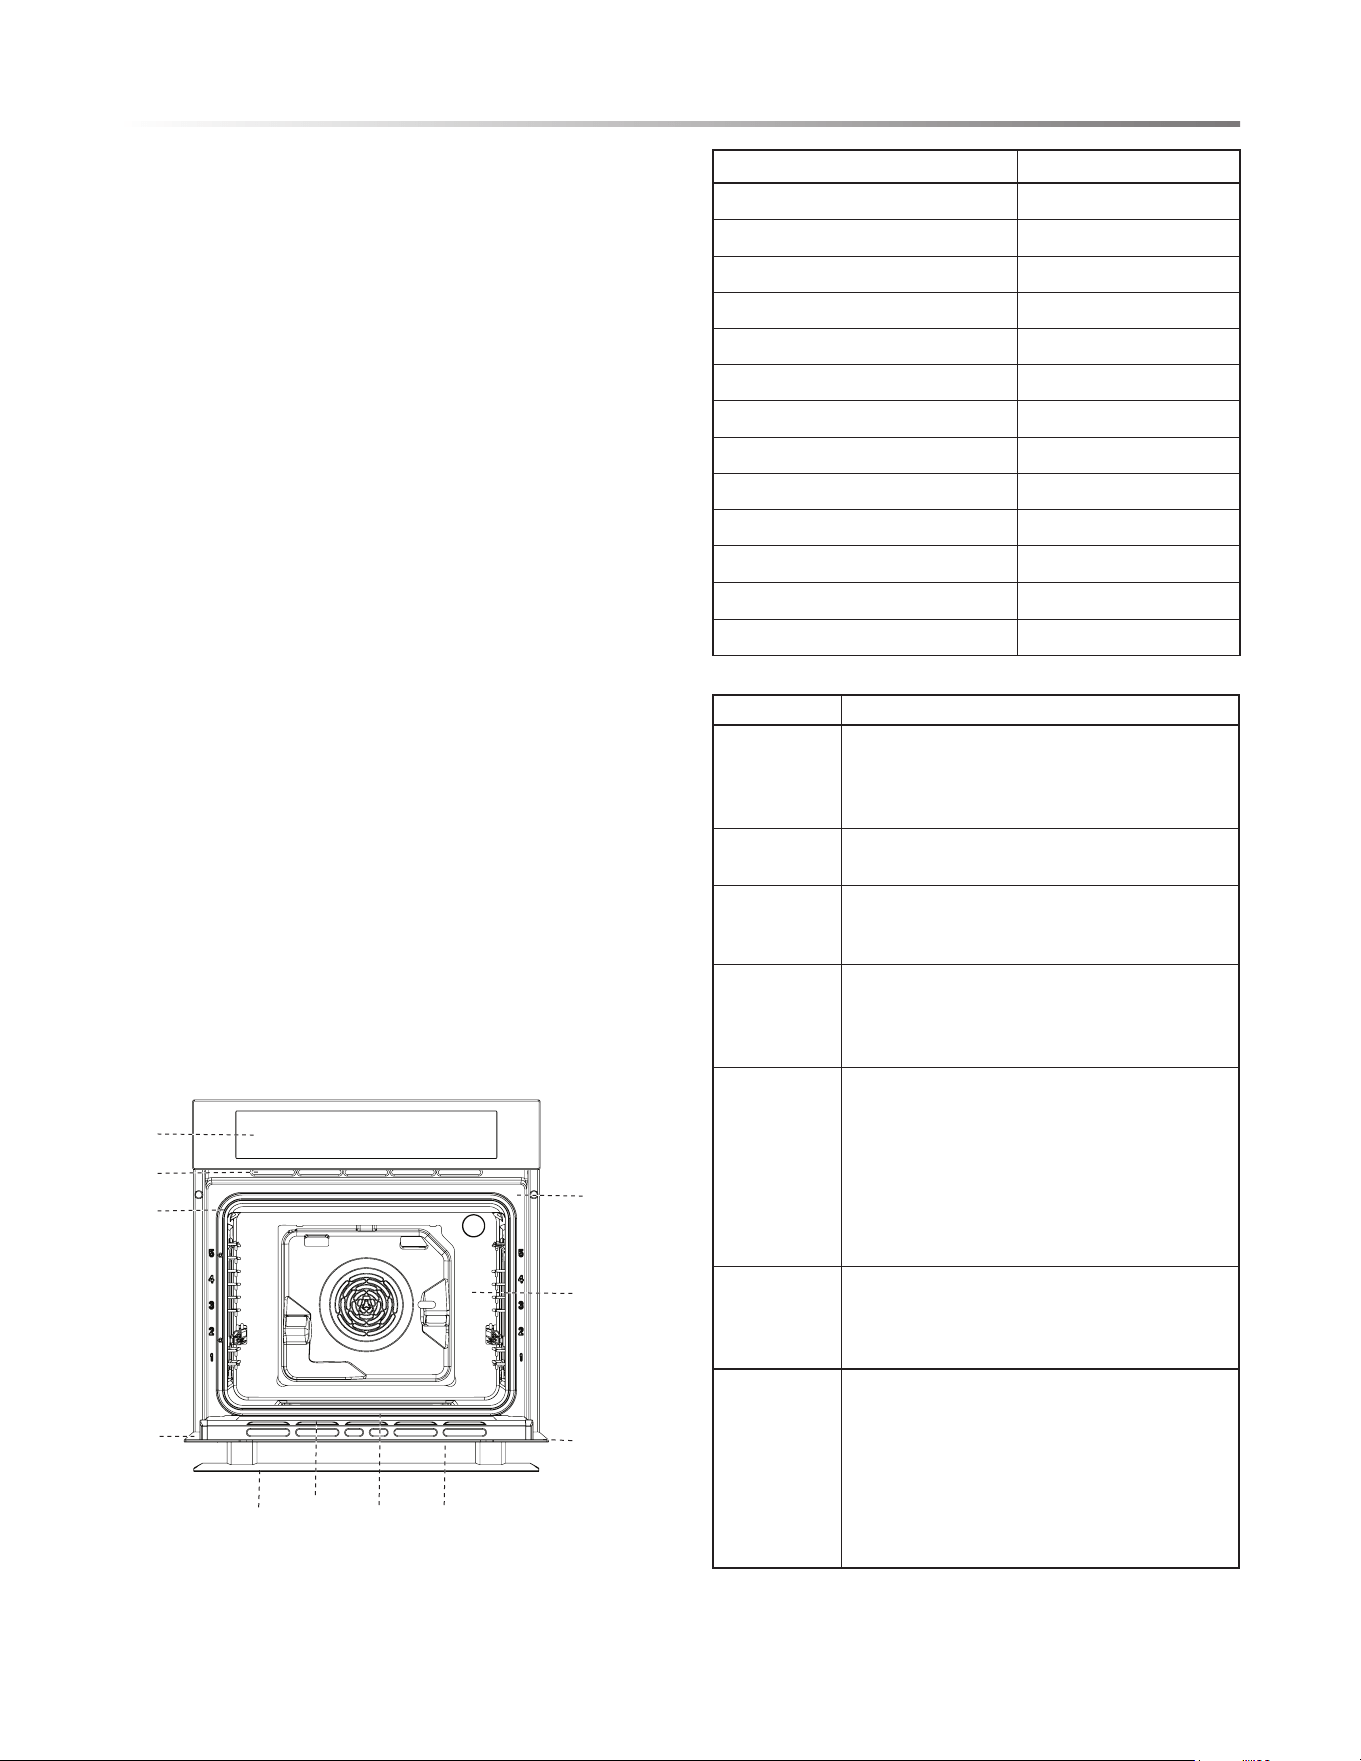
1 Oven Vents
2 Broil Element
3 Control Panel
4 Halogen Bulb
5 Door Gasket
6 Model and Serial # Plate
7 Ladder Rack
8 Glide Rails (attached to
Ladder Rack)
12
14
15
9 Convection Fan and Element
10 Bottom Element (not visible)
11 Lower Vents
12 Oven Probe
13 Probe Jack
14 Oven Rack (1 wire rack included)
15 Drip Pan (can be used for broiling)
16 Door Handle
1
3
11 16
2
8
E
E
E
CONTROL PANEL
BEFORE OPERATING
Before the oven can be used, follow these procedures:
1 Connect power to the oven, and close the door. 12:00 will
display.
2 Set the clock.
TO SET THE CLOCK
1 Touch the Clock pad. The hour digit will ash.
2 Touch and hold the - and + pads to select the hour.
3 Touch the Clock pad to conrm.
4 Repeat steps 2-3 to select the minutes.
5 Touch the Clock pad to conrm.
Note:
• This is a 12 hour clock.
• If the timer is set or a cooking cycle is active, touch the
Clock pad to check the current time.
TO SET THE TIMER
1 With the oven in standby mode, touch the Timer/Delay pad.
and "AL" will display.
2 Touch and hold the - and + pads to enter time.
3 Touch the Start pad to conrm.
4 When time has elapsed, beeps will sound. Touch the Pause/
Cancel pad to stop. Touch the Pause/Cancel pad to return
to standby mode.
Note:
• Setting the timer does not initiate heat in the oven.
• The timer can be set while a cooking cycle is active or
inactive. However, if the Pause/Cancel pad is touched
to cancel the timer, an active cooking cycle will also
be canceled.
• To check the timer during an active cooking cycle, touch
the Timer/Delay pad.
SELECTING COOK MODE
Select from Bake, Convection Bake, Heated Convection, Broil
Hi, Broil Lo, Convection Broil, Convection Roast, Air Fry, Keep
Warm, and Defrost.
1 Repeat touch the Function pad to select a cook mode. The
corresponding icon will display.
2 Touch and hold the - and + pads to adjust cooking time.
3 Touch the Temp/Cook Time pad to switch to temperature.
Use the - and + pads to adjust temperature.
4 Touch the Start pad to conrm. Cooking will start.
Note:
• If steps 2 and 3 are skipped, cooking time will be set for
9 hours, and the default temperature will display.
• Temperature cannot be adjusted for Defrost mode.
TO PAUSE/CANCEL COOK MODE
To pause an active cook mode, touch the Pause/Cancel pad
once. To cancel, touch twice.
OVEN TEMPERATURE
The cooking temperature may be changed before or during
preheating and cooking cycles.
TO CHANGE OVEN TEMPERATURE
1 Touch the Temp/Cook Time pad.
2 Use the - and + pads to adjust temperature.
3 Touch the Start pad to conrm.
Note:
• If the Start pad is not touched within 5 seconds, the oven
will not accept the new temperature.
• The oven temperature is measured and displayed in
degrees Fahrenheit.
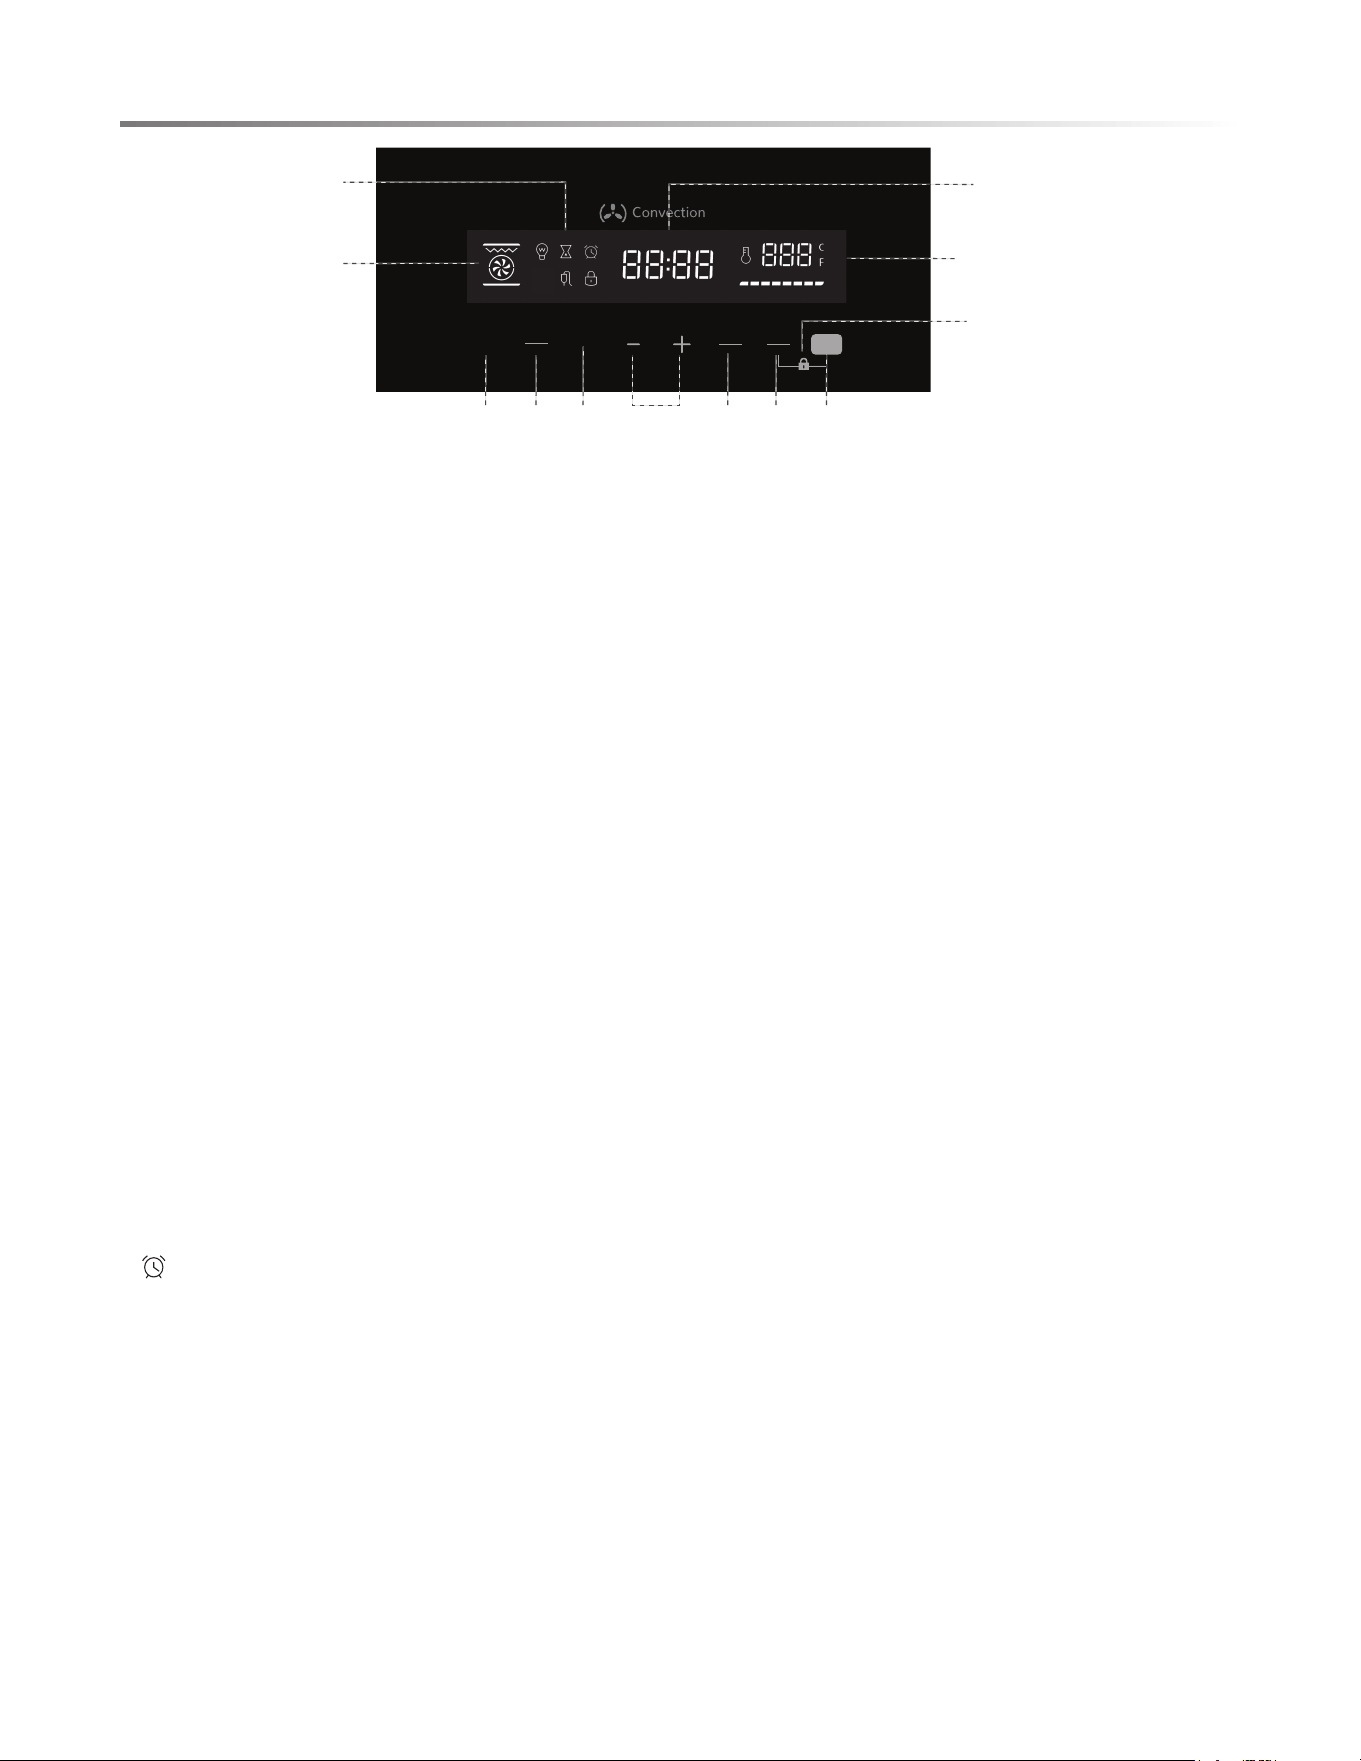
1 Clock Function
2 Timer/Delay Start
3 Oven Modes
4 Temperature, Time, and Clock Adjustment
5 Temperature and Cook Time Selection
6 Pause/Cancel Function
7 Start Function
8 Control Lock
9 Temperature and Active Cooking Display
10 Clock and Timer Display
11 Display Icons
12 Cook Mode Display
Start
Function
Temp
Cook Time
Pause
Cancel
Start
Start
Function
Clock
Temp
Cook Time
Pause
Cancel
Start
Delay
Timer
Clock
Delay
Timer
Start
Function
Clock
Temp
Cook Time
Pause
Cancel
Start
Delay
Timer
Start
Function
Clock
Temp
Cook Time
Pause
Cancel
Start
Delay
Timer
21 21 21 2121 21 21
26
38
163
593
117
36
222.80
MODEL # PART # ISSUE DATE VENDOR
SWA2462SNS
Koszylko
MADE BY APPRV. BY
09/15/25
REVISION
DATE BY NOTE
N/A
ISSUED
September 15, 2025
SMCA/DESIGN
SHARP MANUFACTURING COMPANY OF AMERICA
DESIGN CENTER - U.S.A.
Graphic Reference
BLACK
COOL GRAY 6C
4x R4
32
TITLE: - 24” Single Wall Oven Control Panel
4.2.26
KOSZYLKO
Updated Clock , Timer and Delay location
6 71 2 43 5
10
8
9
11
12

9
E
E
E
ACTIVE COOKING
During an active cooking cycle, will continuously display
below the temperature. This will indicate that the oven is in use.
Note: One audible signal will sound once the preheating has
completed. Signaling the end of preheating.
TO SET DELAY START
1 In standby mode, touch the Timer/Delay pad twice. and
"End" will display.
2 Touch the - and + pads to set the hour that cooking should end.
3 Touch the Timer/Delay pad again.
4 Touch the - and + pads to set the minute that cooking should
end.
5 Touch the Function pad to select a cooking function. Then,
set cooking time and temperature.
6 Touch the Start pad to conrm your selection.
Note:
• Subtract total cooking time from cooking end time to get
cooking start time.
• Once Delay Start is set, Cook Time cannot be adjusted.
• To change Cook Time, cancel Delay Start and reset.
• To check the delay setting in standby mode, touch the
Timer/Delay pad.
OVEN LIGHT
TO TURN LIGHT ON/OFF (ACTIVE COOKING)
The oven light will remain on once cooking starts. It will
automatically turn off 10 minutes after the end of a cooking
cycle.
1 To turn the light on/off, touch the Start pad.
TO TURN LIGHT ON/OFF (STANDBY MODE)
1 To turn the light on, touch the Function pad once. will
display.
2 Touch the Start pad to conrm. The light will turn on.
3 To turn the light off, touch the Pause/Cancel pad twice.
CONTROL LOCK
If the Lock is engaged, the appliance can no longer be in use.
TO ACTIVATE THE LOCK
1 Touch the Pause/Cancel and Start pads at the same time.
2 Hold both pads for 3 seconds. A beep will sound, and
will illuminate.
The lock is now activated.
TO DEACTIVATE THE LOCK
1 Touch the Pause/Cancel and Start pads at the same time.
2 Hold both pads for 3 seconds. A beep will sound.
The lock is now deactivated, and the oven is ready for use.
TOUCHPAD SOUND
Touchpad sound cannot be turned off or adjusted.
LANGUAGE
The default language for the oven is English.
TEMPERATURE UNIT SELECTION (°F / °C)
To switch between Celsius (°C) and Fahrenheit (°F), press
and hold the Temperature pad. The display will automatically
change to the alternate temperature unit. The selected unit will
be used for all temperature settings and displayed temperatures
until changed again.
BEFORE OPERATING
Before the oven can be used, follow these procedures:
1 Connect power to the oven, and close the door. 12:00 will
display.
2 Set the clock.
TO SET THE CLOCK
1 Touch the Clock pad. The hour digit will ash.
2 Touch and hold the - and + pads to select the hour.
3 Touch the Clock pad to conrm.
4 Repeat steps 2-3 to select the minutes.
5 Touch the Clock pad to conrm.
Note:
• This is a 12 hour clock.
• If the timer is set or a cooking cycle is active, touch the
Clock pad to check the current time.
TO SET THE TIMER
1 With the oven in standby mode, touch the Timer/Delay pad.
and "AL" will display.
2 Touch and hold the - and + pads to enter time.
3 Touch the Start pad to conrm.
4 When time has elapsed, beeps will sound. Touch the Pause/
Cancel pad to stop. Touch the Pause/Cancel pad to return
to standby mode.
Note:
• Setting the timer does not initiate heat in the oven.
• The timer can be set while a cooking cycle is active or
inactive. However, if the Pause/Cancel pad is touched
to cancel the timer, an active cooking cycle will also
be canceled.
• To check the timer during an active cooking cycle, touch
the Timer/Delay pad.
CONTROL PANEL
SELECTING COOK MODE
Select from Bake, Convection Bake, Heated Convection, Broil
Hi, Broil Lo, Convection Broil, Convection Roast, Air Fry, Keep
Warm, and Defrost.
1 Repeat touch the Function pad to select a cook mode. The
corresponding icon will display.
2 Touch and hold the - and + pads to adjust cooking time.
3 Touch the Temp/Cook Time pad to switch to temperature.
Use the - and + pads to adjust temperature.
4 Touch the Start pad to conrm. Cooking will start.
Note:
• If steps 2 and 3 are skipped, cooking time will be set for
9 hours, and the default temperature will display.
• Temperature cannot be adjusted for Defrost mode.
TO PAUSE/CANCEL COOK MODE
To pause an active cook mode, touch the Pause/Cancel pad
once. To cancel, touch twice.
OVEN TEMPERATURE
The cooking temperature may be changed before or during
preheating and cooking cycles.
TO CHANGE OVEN TEMPERATURE
1 Touch the Temp/Cook Time pad.
2 Use the - and + pads to adjust temperature.
3 Touch the Start pad to conrm.
Note:
• If the Start pad is not touched within 5 seconds, the oven
will not accept the new temperature.
• The oven temperature is measured and displayed in
degrees Fahrenheit.
10
E
E
E
OVEN USE
BEFORE USING THE OVEN
1 Ensure that the oven is correctly installed and remove all
packaging materials and accessories.
2 Clean the oven cavity and accessories with soapy water and
a soft cloth. Rinse and dry completely.
3 Turn oven on and select Bake mode.
4 Set temperature to 500˚F.
5 Allow the oven to operate for 30 minutes with the door closed
and no food in the cavity.
Note: Smoke and odor may occur. This is normal. Open
windows for ventilation, and wait for the smell to clear before
cooking.
6 Touch the Pause/Cancel pad twice to cancel Bake mode.
7 Open the oven door at a slight angle and allow to cool
completely.
IMPORTANT: Never set anything (including dishes, cookware,
and oven trays) on the bottom of the oven. Never use aluminum
foil to cover the oven racks or to line the oven.
PREHEATING THE OVEN
• Preheat the oven when using the Bake or Convection Bake
modes.
• Selecting a higher temperature for preheating does not shorten
the preheating time.
• Preheating is necessary for good results when baking cakes,
cookies, pastry and breads.
• Preheating will help to sear roasts and seal in meat juices.
• Place oven racks in their proper position before preheating.
• The selected cooking temperature is displayed during
preheating.
UTENSILS
• Glass baking dishes absorb heat. Reduce oven temperature
by 25°F (15°C) when using glass.
• Use pans that produce the desired browning. The type of nish
on the pan will affect the amount of browning that will occur.
- Shiny, smooth metal or light non-stick/anodized pans reect
heat, resulting in lighter, more delicate browning. Use this
type for cakes and cookies.
- Dark, rough or dull pans will absorb heat, resulting in a
browner, crisper crust. Use this type for pies.
• Do not cook with the empty broil pan in the oven, as this
could affect cooking performance. Store the broil pan outside
of the oven.
• Insulated baking pans may increase cooking time.
OVEN RACKS
IMPORTANT: To avoid permanent damage to the porcelain
nish, place food or bakeware on an oven rack. Do not force
racks into place.
• Do not cover oven racks with aluminum foil.
• The Ladder Rack should be secured to oven walls before
turning the oven on.
• Glide Rails are attached to the Ladder Rack and cannot be
moved.
• When using together, place the Drip Pan under the Oven Rack.
• Ensure the Drip Pan and Oven Rack are level before turning
on the oven.
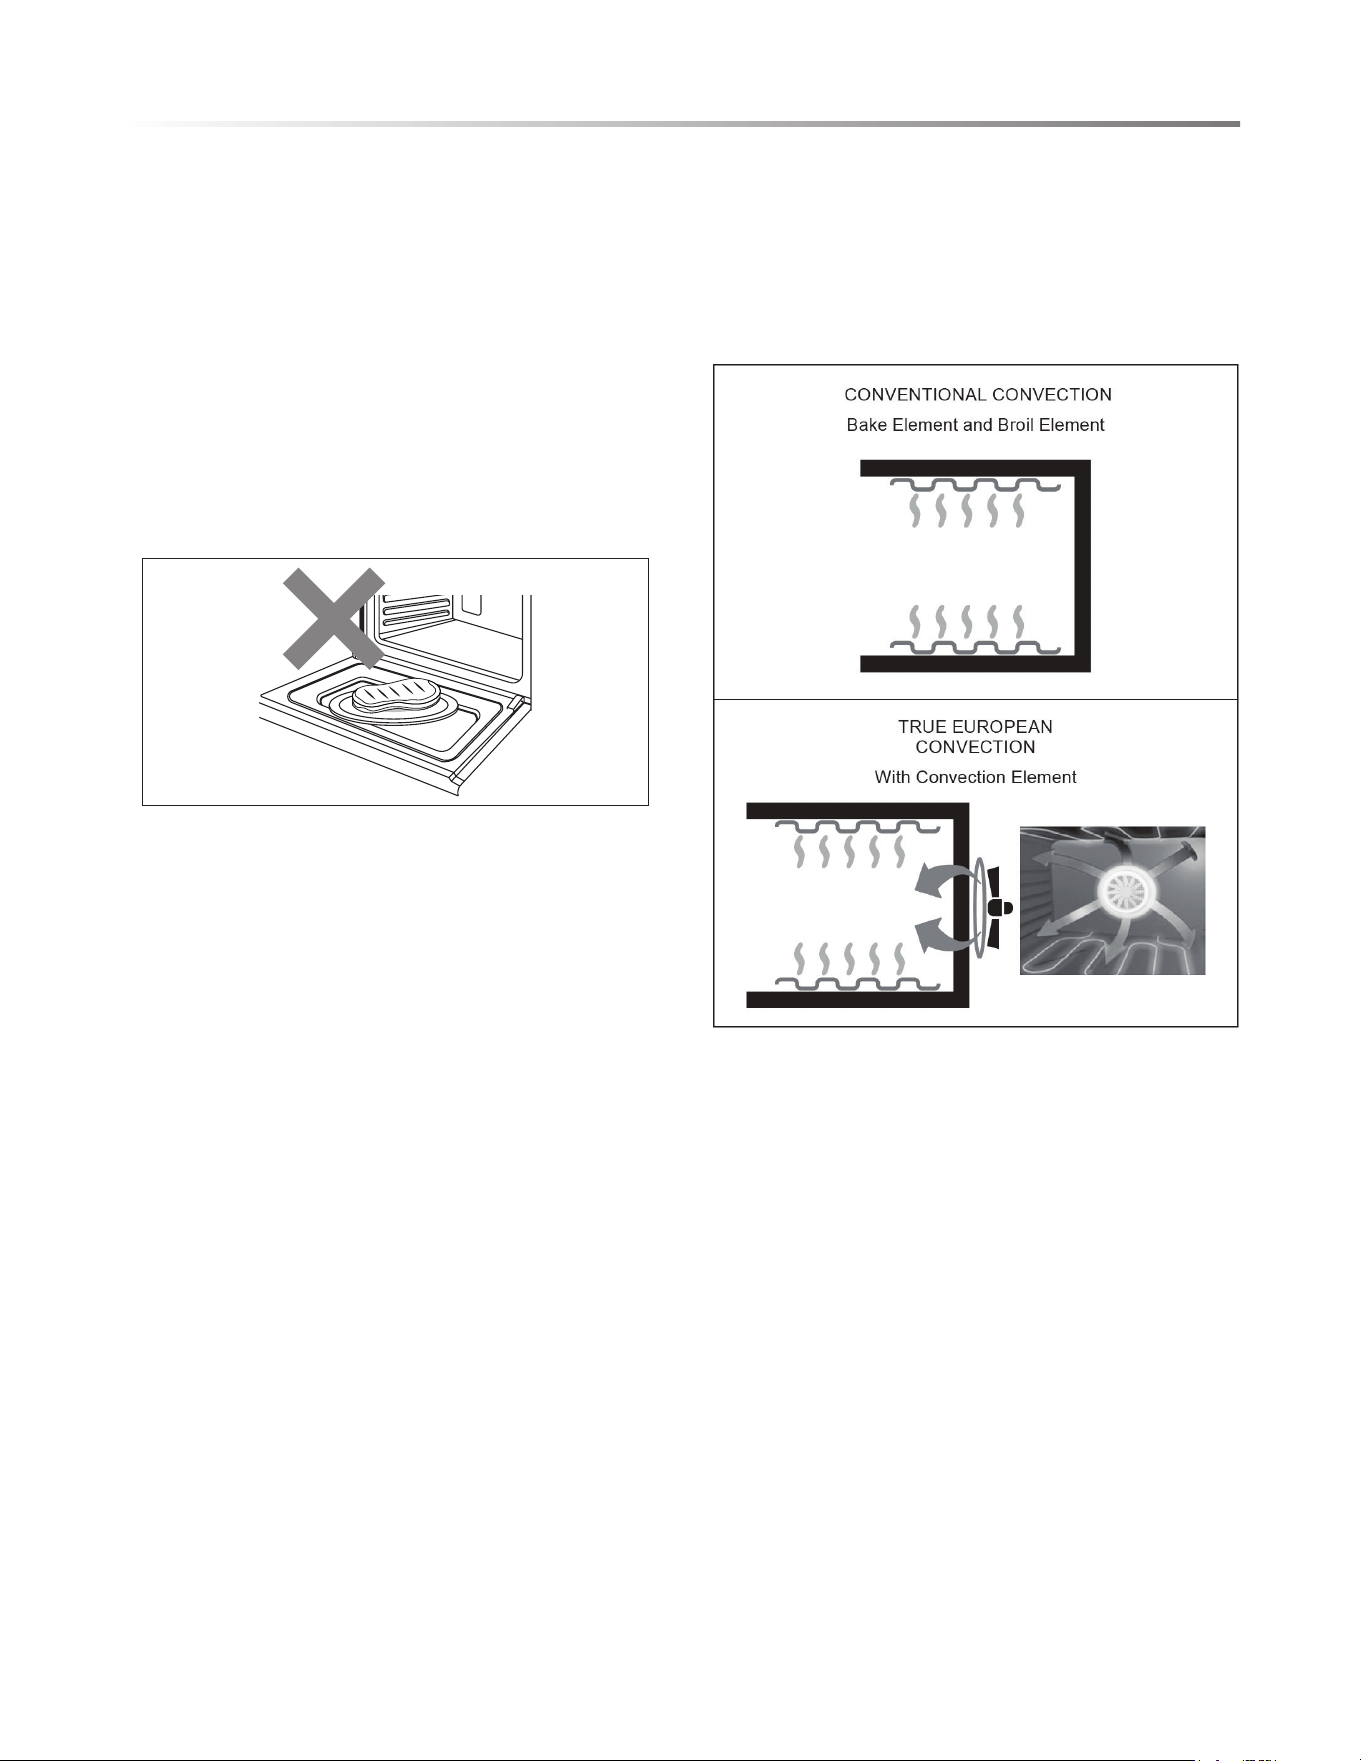
TO REMOVE LADDER RACK
1 Twist and remove screw. Set aside in a safe location.
2 Lift the Ladder Rack at a slight angle to remove from the
oven wall holes.
3 Replace the Ladder Rack by reversing the above steps.
Twist screw counterclockwise
to remove
Remove Ladder Rack from
oven wall holes
TO INSERT OVEN RACK
1 Hook the Oven Rack onto the Glide Rail peg.
2 Ensure that both sides are level. The Rack should now slide
freely.
OPT 1
OPT 2
Updated Rack Line Art Work
OPT 1
OPT 2
Updated Rack Line Art Work
Hook both sides of Rack onto Glide Rail peg
11
E
E
E
OVEN USE
COMPONENT COOLING FAN
The cooling fan activates during any cooking mode to cool
inner components and outer door surfaces. This air is exhausted
through the vent located above the oven door. It continues to
run until components have cooled sufciently. The cooling
fan operates at double speed (or RPM’s) whenever the inner
components' temperature becomes too high.
OVEN DOOR
To avoid oven door glass breakage:
• Do not close the oven door if the racks are not fully inserted
into the oven cavity or if bakeware extends past the front
edge of an oven rack.
• Do not set objects on the glass surface of the oven door.
• Do not hit glass surfaces with bakeware or other objects.
• Do not wipe down glass surfaces until the oven has completely
cooled.
OVEN VENTS
Blocking or covering the oven vents will cause poor air
circulation, affecting cooking, cleaning and cooling results.
• Both the upper and lower oven vents allow fresh air to enter
the cooling system.
• The lower oven vent also allows hot air to be expelled from
the cooling system.
OVEN CONDENSATION AND
TEMPERATURE
• It is normal for a certain amount of moisture to evaporate from
the food during any cooking process. The amount of moisture
depends on the moisture content of the food.
• The moisture may condense on any surface cooler than the
inside of the oven, such as the control panel.
• Your new oven has an electronic temperature sensor to help
maintain an accurate temperature. Your previous oven may
have had a mechanical thermostat that drifted gradually to
a higher temperature. You may need to adjust your favorite
recipes when cooking in a new oven.
HIGH ALTITUDE BAKING
When cooking at high altitude, extend cooking times.
COOKING WITH
TRUE EUROPEAN CONVECTION
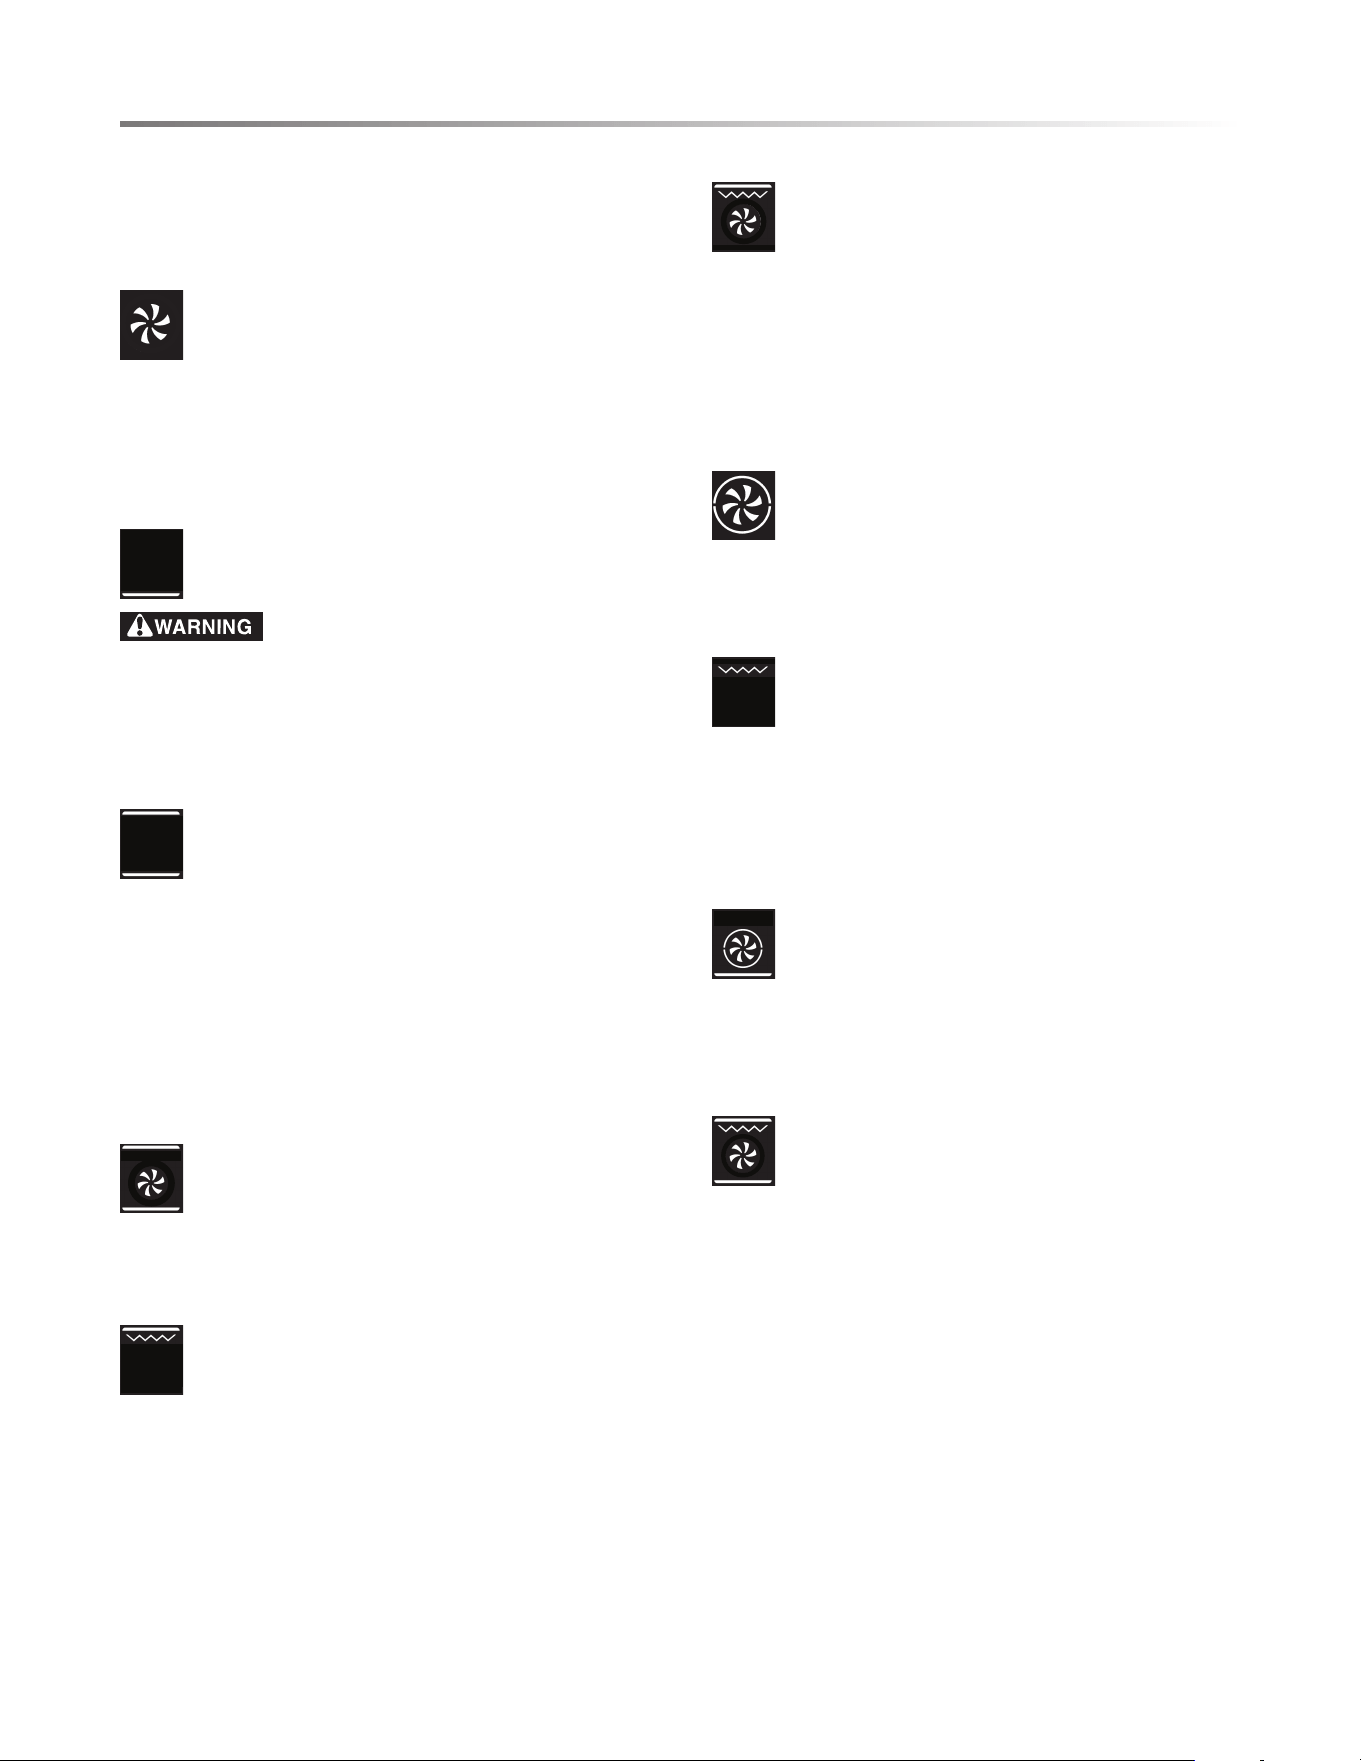
In a conventional oven, the heat sources cycle on and off to
maintain an average temperature in the oven cavity.
As the temperature gradually rises and falls, gentle air currents
are produced within the oven. This natural convection tends to
be inefcient because the currents are irregular and slow.
In this True Euro Convection system, the heat is conveyed by a
fan that provides continuous circulation of hot air. The system
provides state-of-the art engineering and advanced design to
create the nest convection oven. An additional heating element
is located around the convection fan that distributes heated air
through a venting panel in three dimensions: along the sides, the
top and the full depth of the oven cavity. This True Euro Convec-
tion system aids in maintaining a more even oven temperature
throughout the cavity. A standard convection oven has a single
fan, without an additional heating element, that circulates the
hot air around the food within the cavity.
The circulating air aids in speeding up the baking process and
cooks the food more evenly. By controlling the movement of
heated air, convection cooking produces evenly browned foods
that are crispy outside yet moist inside. Convection cooking
works best for breads and pastries. Airleavened foods like
angel food cakes, soufes and cream puffs rise higher than in
a conventional oven. Meats and poultry stay juicy and tender
while the outside is avorful and crisp.
Using True Euro Convection, foods can be cooked at lower
temperatures and with shorter cooking times.
12
E
E
E
CONVECTION BROIL: 150˚F-500˚F
The radiant and top heating elements work together
with the fan. This combination increases the
effectiveness of thermal radiation through forced
circulation of air throughout the oven. This helps
prevent food from burning on the surface, allowing heat to
penetrate the food. Convection Broil is recommended for meat
and vegetable kebabs, sausages, ribs, lamb chops, chicken, quail,
pork chops and sh steaks.
* Cook food in Convection Broil with the oven door closed.
HEATED CONVECTION: 150˚F-500˚F
The rear heating element and fan work together to
distribute delicate heat uniformly throughout the oven.
Heated Convection is ideal for baking and cooking
delicate food, especially cakes that need to rise and
foods that require even coloring.
BROIL LO: 150˚F-450˚F
The radiant heating element switches on and off to
maintain temperature. The lower direct temperature
makes it possible to cook foods until done without
drying out or charring. Broil Lo is recommended for
thicker cuts of meat, chicken breasts or vegetables that
may dry out or char in high heat. This mode can also be used
at the end of cooking to brown foods, such as casseroles with a
gratin nish or nachos.
CONVECTION BAKE: 150˚F-500˚F
The bottom and rear heating elements work together
with the fan. This combination rapidly heats the oven
with large amounts of power, resulting in considerable
heat coming prevalently from the bottom of the oven.
This mode is ideal for foods requiring high temperatures to
cook, like pizzas and large roasts. Only use one rack at a time.
AIR FRY: 150˚F-500˚F
The radiant, top, and bottom heating elements work
together with the fan. This combination keeps food
crispy outside and tender inside. With this mode, you
can cook various dishes simultaneously, as long as
their respective cooking temperatures are the same. Air Fry
is ideal for appetizers like french fries, chicken tenders, and
mozzarella sticks.
AQUA
AQUA is the oven's steam cleaning mode.
1 Add 100ml of water into the oven chamber, and close the door.
2 Repeat touch the Function pad to select AQUA mode.
3 Touch the Start pad to conrm.
OVEN USE
OVEN MODES
Each mode listed below can be accessed through the Function
pad and works within the indicated temperature range.
DEFROST
The fan circulates room temperature air around the
food, decreasing defrost time approximately by half.
This mode is recommended for defrosting all types
of food, including delicate foods which do not require
heat, such as ice cream cakes, cream or custard desserts, and
fruit cakes.
*Temperature cannot be adjusted for Defrost mode.
KEEP WARM: 150˚F-250˚F
Heating is provided through the bottom element. This
mode is ideal for keeping cooked foods warm. For best
results, do not use Keep Warm for more than 2 hours.
FOODBORNE ILLNESS HAZARD
Bacteria may grow in food at temperatures below 140 °F (60
°C). Do not attempt to cook food using the Keep Warm mode.
This mode is designed to keep cooked foods warm, not to heat
cold foods.
BAKE: 150˚F-500˚F
The top and bottom heating elements work together.
Baking is cooking with heated air. Both upper and
lower elements in the oven are used to heat the air, but
no fan is used to circulate the heat. Follow the recipe
or convenience food directions for baking temperature, time and
rack position. Baking time will vary with the temperature of
ingredients and the size, shape and nish of the bakeware. When
cooking in Bake mode, only use one rack at a time, otherwise
the heat distribution will be uneven. Using the different rack
heights available, balance the amount of heat between the top
and bottom of the oven.
CONVECTION ROAST: 150˚F-500˚F
The top and bottom heating elements work together
with the fan. This combination rapidly heats the oven
with large amounts of power, while the fan distributes
heat uniformly throughout the oven. Convection Roast
is recommended for cooking meats.
BROIL HI: 150˚F-500˚F
The radiant and top heating elements work together.
The extremely high and direct temperature of the
grill makes it possible to brown the surface of meats
and roasts while locking the juices in to keep meat
tender. Broil Hi is recommended for dishes that require a high
temperature on the surface, such as beef steaks, veal, rib steak,
lets, and hamburgers.
* Cook food in Broil Hi with the oven door slightly open.

13
E
E
E
OVEN USE
ADVANTAGES OF CONVECTION
COOKING
• Baking on multiple racks saves time and provides even
cooking results in food
• Prepares whole meals at once with no avor transfer
• Saves time and energy
• Convection broiling allows for grilling thicker cuts of food
COOKING TIPS
WARNING
BURN HAZARD
• Do not touch hot elements inside the oven. Always wear an
oven mitt when inserting and removing a meat thermometer
or bakeware.
BAKE TIPS
• For best results, bake food on a single rack with at least 1"–1½"
(2.5–3 cm) space between utensils and oven walls.
• Use one rack in Bake mode.
• Check for doneness at the minimum time.
• Use metal bakeware, heatproof glass, glass-ceramic, pottery
or other utensils suitable for the oven.
• When using heatproof glass, reduce temperature by 25°F
(15°C) from recommended temperature.
• Use baking sheets with or without sides or jelly roll pans.
• Dark metal pans or nonstick coatings will cook faster with
more browning.
• Insulated bakeware will slightly lengthen the cooking time
for most foods.
• Do not use aluminum foil or disposable aluminum trays to
line any part of the oven. Foil is an effective insulator, and
heat will be trapped beneath it. This will alter the cooking
performance and can damage the nish of the oven.
• See "Troubleshooting" on page 17 for Baking problems.
CONVECTION BAKE TIPS
• Reduce recipe baking temperatures by 25°F (15°C) and check
for doneness 25% sooner than the recipe states.
• Always preheat oven for Convection Baking.
• For best results, foods should be cooked uncovered in low-
sided pans to take advantage of the forced air circulation.
• Use shiny aluminum pans for best results unless otherwise
specied.
• Heatproof glass or ceramic can be used. Reduce temperature
by another 25°F (15°C) when using heatproof glass dishes for
a total reduction of 50°F (30°C).
• For best results, use shiny aluminum pans unless otherwise
specied. Dark metal pans can be used, but note that foods
may brown faster in dark metal bakeware.
• Most baked items cook well in convection. Do not
convert recipes such as custards, quiches, pumpkin pies
or cheesecakes, which do not benet from the convection-
heating process. Use the regular Bake mode for these foods.
• All ve rack positions can be used when cooking on multiple
racks. When cooking on two racks, use positions 1 and 3.
• When baking four cake layers at the same time, stagger pans
so that one pan is not directly above another.
CONVECTION CONVERSION
Most recipes are written for conventional cooking, so estimate
the correct temperature and cooking time for Convection by
reducing the temperature by 25°F and the cooking time by 25%.
For example, a recipe calling for 400°F for 20 minutes is
converted to 375°F for 15 minutes.
Note: This is just a guideline, and some recipes may require
trial and error to achieve a perfect result. Keep track of your
technique as you experiment.
Try recipes for these kinds of dishes:
• Biscuits, cookies and one-bite appetizers
• Coffee cakes and yeast breads
• Cream puffs and popovers
• Casseroles and one-dish meals
• Oven meals, using multiple dishes and racks
• Air-leavened foods, like soufes, meringue, angel food and
chiffon cakes
CONVECTION ROAST TIPS
• Do not preheat for Convection Roast.
• Roast in a low-sided, uncovered pan.
• When roasting whole chicken or turkey, tuck wings behind
back and loosely tie legs with kitchen string.
• Use the broil pan for roasting uncovered.
• Use a meat thermometer to determine the internal temperature.
Double-check temperature by inserting the thermometer into
another position.
• Large poultry may also need to be covered with foil (and
pan roasted) during a portion of the roasting time to prevent
over-browning.
• The minimum safe temperature for stufng in poultry is
165ºF (74ºC).
• After removing food from the oven, cover loosely with foil
for 10 to 15 minutes before carving, if necessary, to increase
the nal internal temperature by 5° to 10°F (3° to 6°C).
• See "Troubleshooting" on page 17 for Roasting problems.
BROIL TIPS
• Place rack in the required position before turning on the oven.
• Use Broil Hi with the oven door slightly open.
• Use Convection Broil with the oven door closed.
• Preheat for 5 minutes before cooking with Broil Hi or Broil
Lo. Do not preheat for Convection Broil.
• Use the broil pan.
• Turn meats halfway through the cooking time.
the Broil Hi and Convection Broil
modes
14
E
E
E
OVEN USE
OVEN PROBE
CAUTION
FOODBORNE ILLNESS HAZARD
• Consuming undercooked food can result in foodborne illness.
Use the Oven Probe only in accordance with the following
instructions to ensure all portions of the food reach minimum
safe cooking temperatures. Consult reputable government
sources (USDA, FDA or CDC) for recommended safe
minimum cooking temperatures.
WARNING
BURN HAZARD
• If the oven has preheated, the Oven Probe and Probe Jack
are hot and could cause burns. Use an oven mitt to open the
jack and insert probe.
The probe supplied with the appliance can monitor the internal
food temperature and turn off the oven when the food reaches
a set temperature. Some foods, particularly small or thin items,
are not suitable for cooking with the probe due to their size
and shape.
Note:
• To avoid damage to the probe, meat should be completely
defrosted prior to insertion.
• The probe function only works with the Bake, Broil Hi,
Convection Broil, Heated Convection, and Broil Lo modes.
• If the oven light is on, plugging in the probe will deactivate
the light. Once cooking starts, the light will reactivate. See
"Oven Light" on page 9 for more control options.
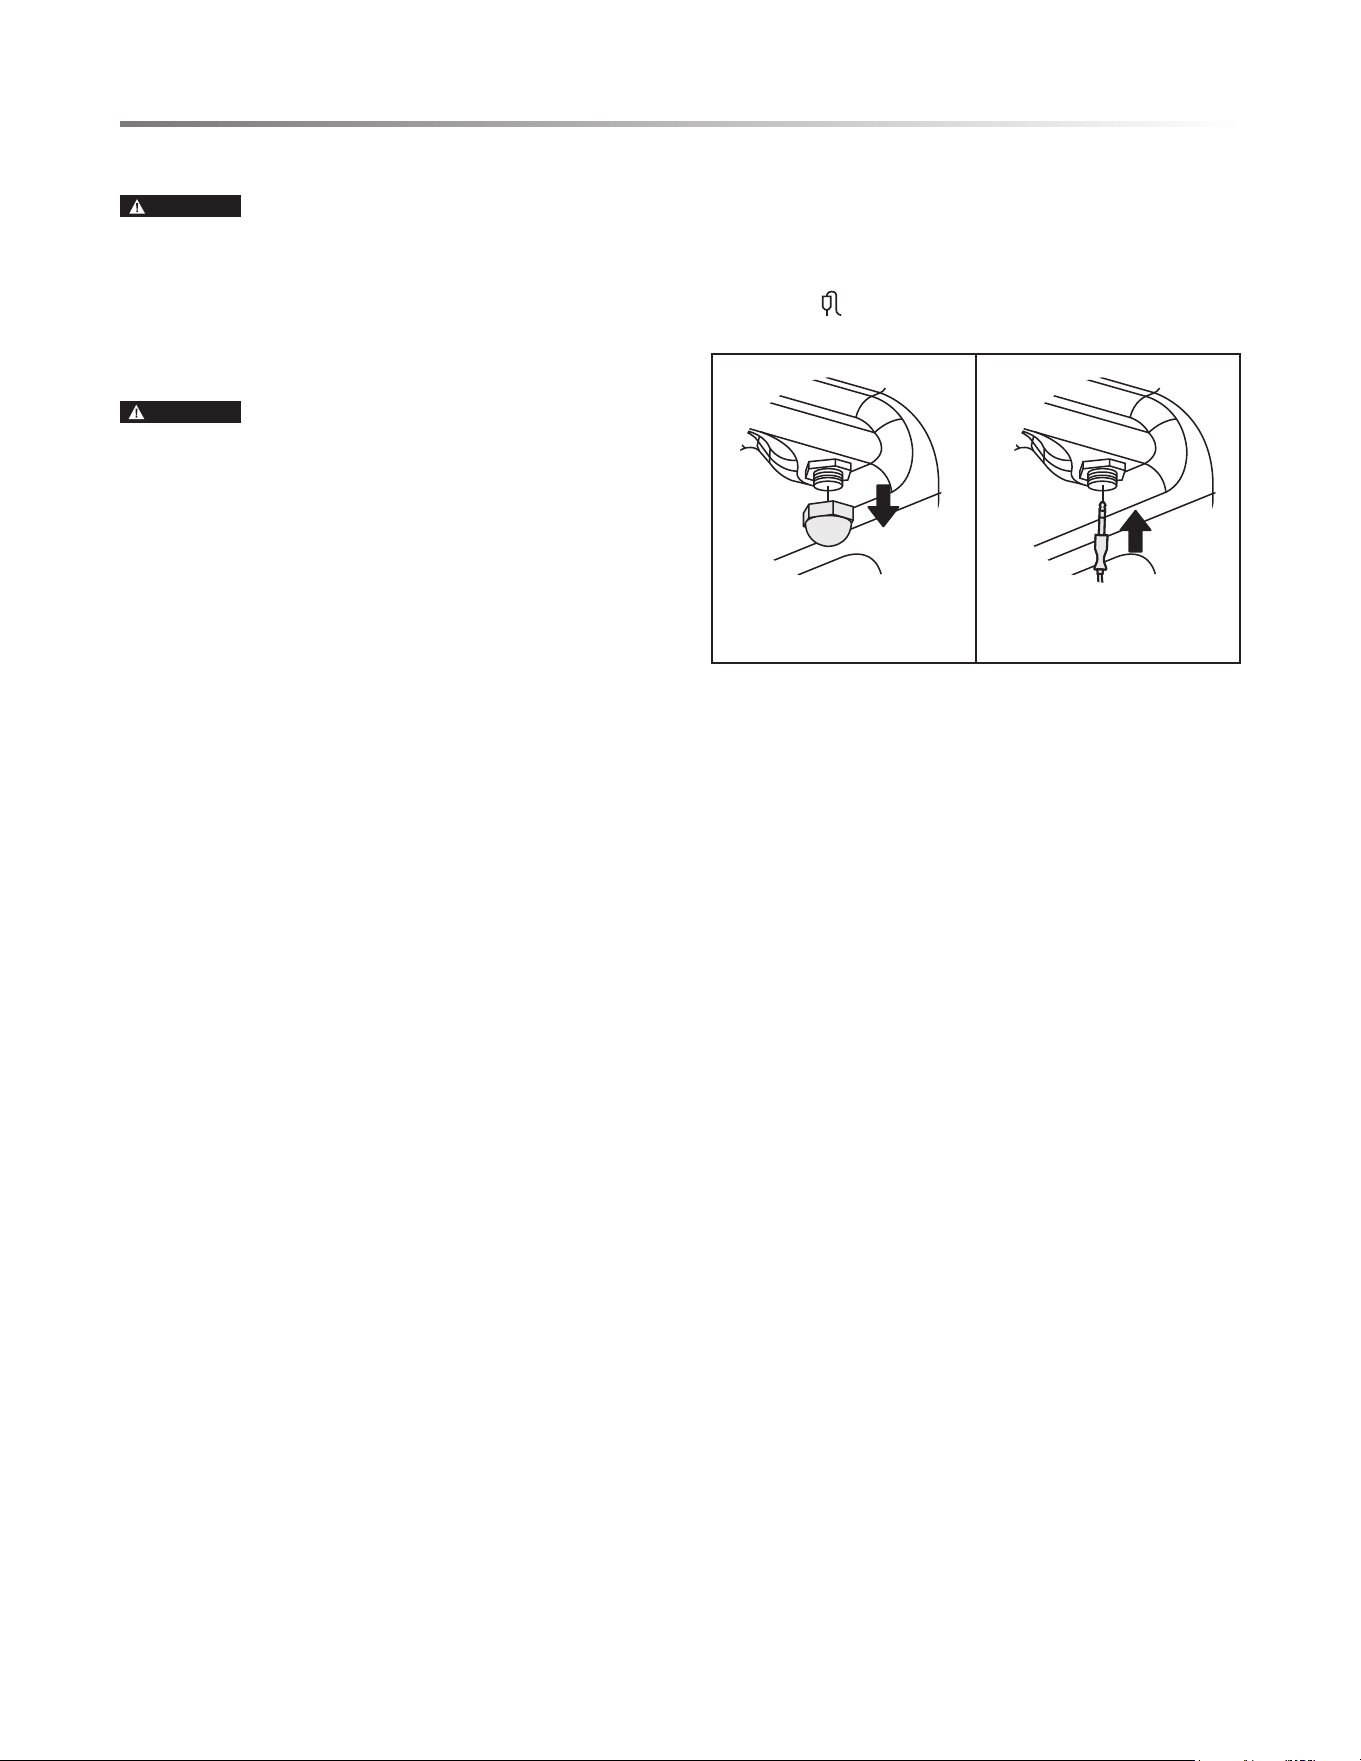
TO USE OVEN PROBE
1 Locate the Probe Jack (See "Parts and Features" on page 7).
Carefully twist counterclockwise to unscrew the cap, and set
aside in a safe location.
2 Insert the Oven Probe into the Probe Jack. A beep will sound.
“Prb”and will display.
3 Place food into the oven cavity. Insert the probe tip into food.
Close the oven door.
Note: For meats, the probe tip should be inserted into the
center of the thickest part of the meat. Ensure that the probe
tip is not inserted into fat or touching bone.
4 Use the Function pad to select a cook mode.
5 Use the - and + pads to adjust temperature. Touch the Start
pad to conrm. Cooking will start.
Note: When the set targeted internal temperature is reached,
beeps will sound and cooking will end automatically.
6 Allow oven to cool completely before removing the probe
and replacing the cap.
Note:
• To change the set targeted internal temperature during an
active probe cycle, use the - and + pads. Touch Start to
conrm new temperature.
• To pause an active probe cycle, touch the Pause/Cancel pad
once. To cancel, touch twice.
• If the Oven Probe is inserted during an active timer, delay
start, or cooking cycle, the active function will be canceled
and need to be reset.
• If the set targeted internal temperature is not reached, the
maximum operating time is 9 hours.
Twist to remove cap
Insert Oven Probe into
Probe Jack
15
E
E
E
STEAM CLEANING
This oven is equipped with a steam cleaning mode, which can
be accessed through the Function pad. For best use instructions,
see "Aqua" on page 12.
GENERAL CLEANING
IMPORTANT: Before cleaning, disconnect power at the main
power supply (fuse or breaker box). Ensure that the oven is
completely cool, and remove oven accessories. Always follow
instructions printed on the label of cleaning products.
The entire oven can be safely cleaned with a warm, soapy sponge.
After cleaning, rinse and dry. If stubborn soil remains, follow
the recommended cleaning methods below.
• Regularly check the oven chamber for food debris.
• Always use the mildest cleaner that will do the job, and avoid
using corrosive cleaning products.
• Use clean, soft cloths, sponges or paper towels. Avoid using
sharp tools or hard brushes.
• Rub metal nishes in the direction of the grain.
• Remove oven accessories before cleaning.
• Rinse thoroughly. Use a minimum amount of water to avoid
dripping into door slots.
• Dry to avoid water marks.
USING THE CLEANING CHARTS
1 Locate the number of the part to be cleaned in the following
illustration.
2 Find the part name in the chart.
3 Match the letter with the cleaning method on following chart.
Please refer to the following charts for Cleaning Method.
PART CLEANING METHOD
1 Control Panel C & G
2 Oven Vent E
3 Door Gasket B
4 Interior Door Frame D
5 Door Handle G
6 Door Vent D
7 Interior Door Window F
8 Door Front C & G
9 Door Trim D
10 Oven Cavity E
11 Interior Oven Frame E
*Glide Rails and Oven Rack A
*Drip Pan E
PART CLEANING METHOD
A Chrome
Plated
Clean with hot, sudsy water. Rinse thoroughly
and dry. Alternatively, gently rub with a mild
powder/cream cleaner or a soap-lled, steel wool
pad as directed.
B Fiberglass
Knit
DO NOT HAND CLEAN GASKET.
C Glass
Spray a mild glass cleaner onto a cloth and wipe
clean. Use a non-corrosive oven degreaser to
remove grease spatters.
D Painted
Clean with hot, sudsy water. Alternatively, apply
a non-corrosive oven degreaser to a clean sponge
or paper towel and wipe clean. Avoid using
powdered cleaners and steel wool pads.
E Porcelain
Immediately wipe up acidic spills like fruit juice,
milk and tomatoes with a dry towel. Do not use
a moistened sponge or towel on hot porcelain.
When cool, clean with hot, sudsy water, or a
mild powder/cream cleaner. Rinse and dry. For
stubborn stains, gently use a soap-lled, steel
wool pad. With age, porcelain glaze may crack
due to exposure from heat and food soil.
F Reective
Glass
Clean with a hot, sudsy sponge or plastic
scrubber. Rub stubborn stains with vin-
egar, ammonia, or a mild glass cleaner.
DO NOT USE HARSH ABRASIVES.
G Stainless
Steel
Always wipe or rub with the grain. Clean with a
soapy sponge and rinse dry, Alternatively, apply
a non-corrosive oven degreaser to a clean paper
towel and wipe clean. To polish use a protective/
polishing stainless steel cleaner and a soft cloth.
Remove water spots with a cloth dampened with
white vinegar. Use liquid stainless steel cleaner
to remove heat discoloration.
OVEN CARE
10
2
4
1
5 87
9
3
11
6
16
E
E
E
OVEN CARE
OVEN DOOR REMOVAL
For normal oven use, there is no need to remove the oven door.
However, should it become necessary to remove the door, follow
the instructions in this section.
IMPORTANT:
• Make sure oven is cool and that power to the oven has been
turned off before removing the door.
• The oven door is heavy and fragile, and the door front is
glass. To avoid oven door glass breakage, use both hands
and grasp only the sides of the oven door to remove. Do not
lift by the handle.
• Ensure both buckles are securely in place before removing
the door.
• Do not force the oven door to open or close.
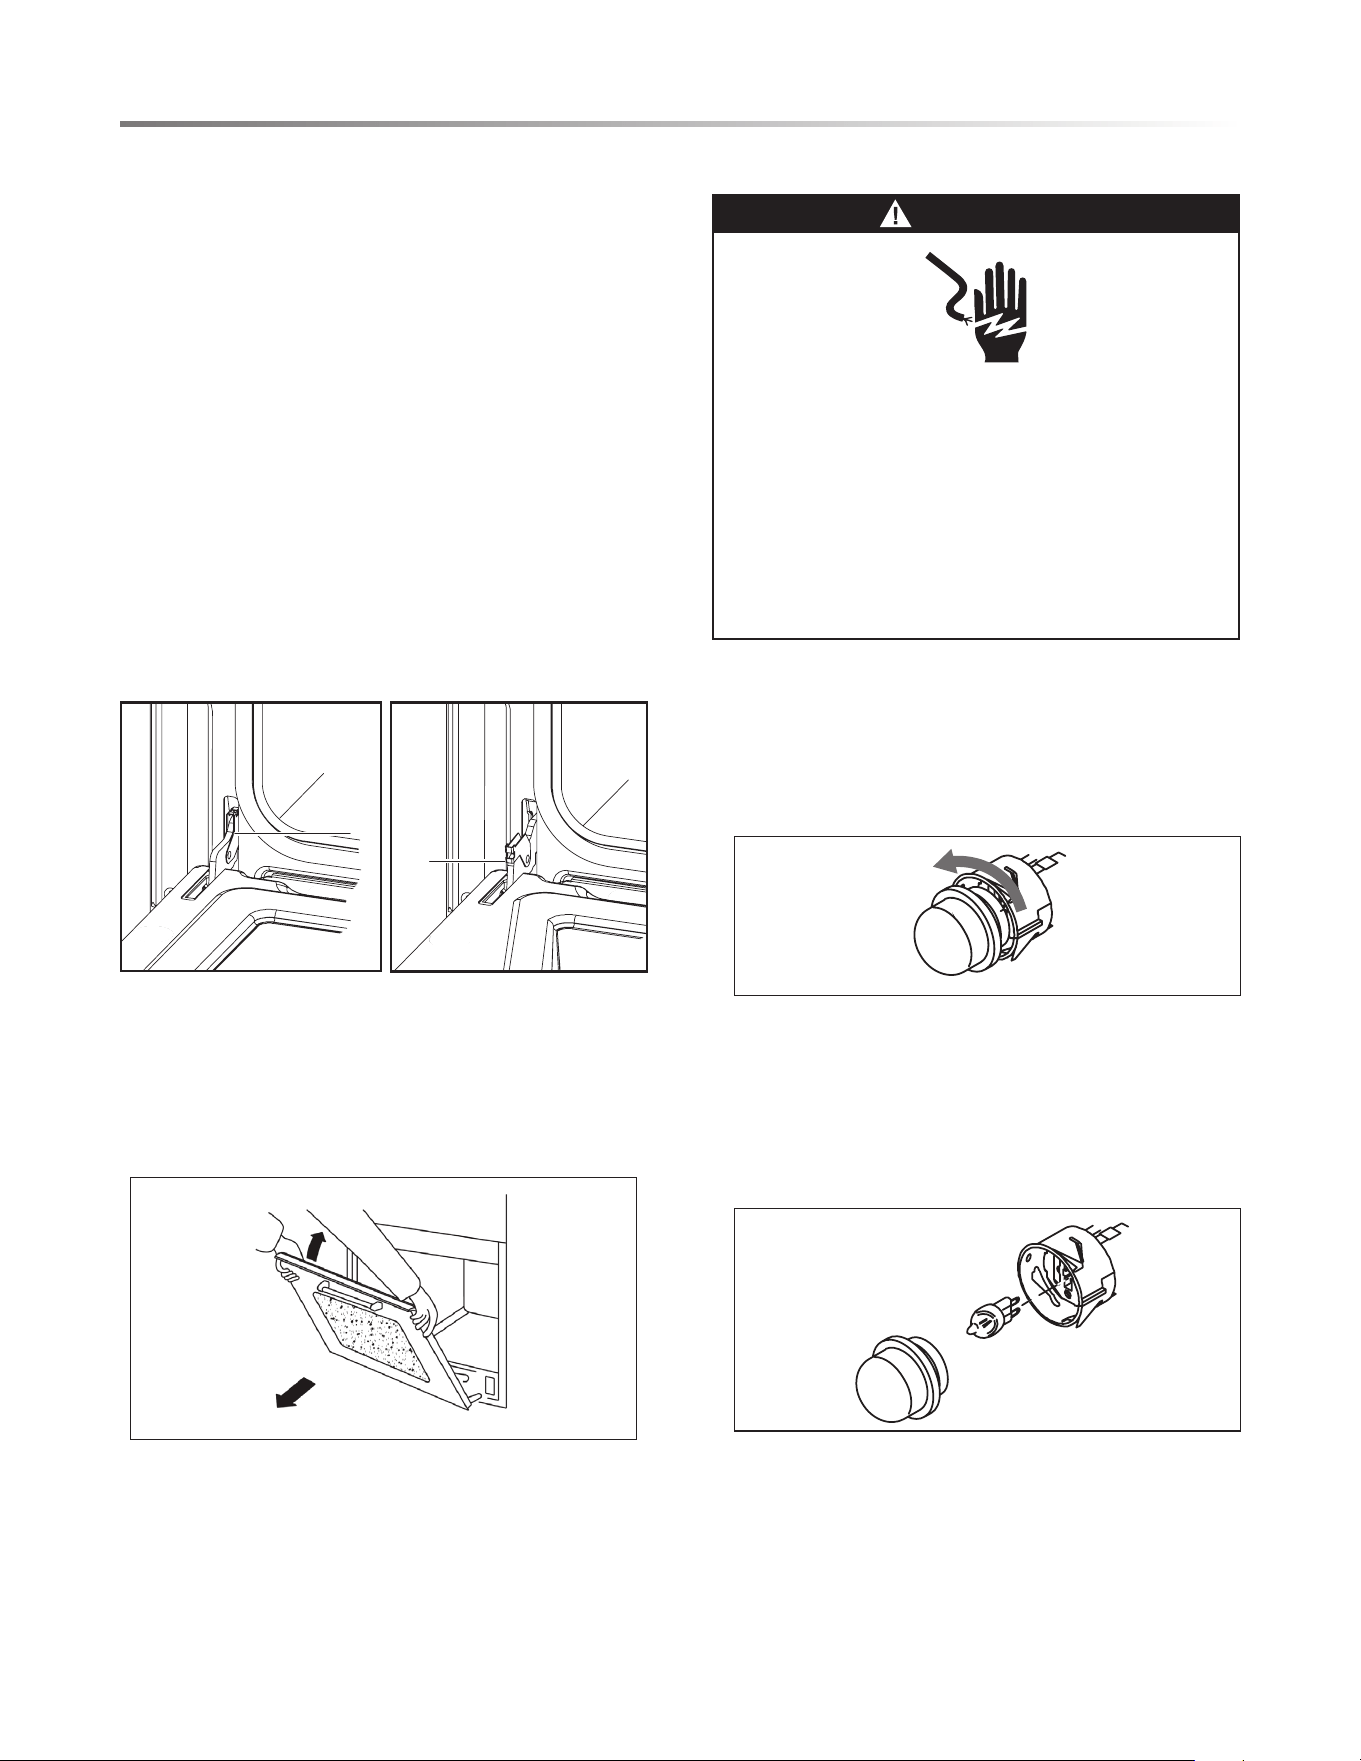
TO REMOVE THE OVEN DOOR:
1 Open the door completely.
2 Pull the buckles at the door hinges backward.
Note: The buckles may be stiff.
A
A
A - Hinge Bracket
3 Grasp the door by its two outer edges.
4 Close the door slowly but not completely, leaving it open
about 30 degrees.
5 Pull the door upward rst, then toward you, pulling it out
of its seat.
6 Set the door in a safe location.
7 Replace the door by reversing the above steps.
REPLACING THE OVEN LIGHT
WARNING
ELECTRICAL SHOCK HAZARD
Make sure the oven and lights are cool and power to the
oven has been turned off before replacing the light bulb(s).
The glass lens must be in place when using the oven. The
lens serves to protect the light bulb from breaking.
The lens is made of glass. Handle carefully
to avoid breakage.
Failure to do so could result in death, electric shock,
cuts or burns.
1 Disconnect power at the main power supply (fuse or breaker
box). Ensure that all internal parts are completely cool before
proceeding.
2 Remove the light bulb glass lens by twisting it counter
clockwise.
Note: The lens may be stiff.
3 Twist to remove the bulb and replace with a new one of the
same type. New bulbs must be resistant to 572°F.
• Halogen Bulb
• Voltage: 120V
• Wattage: 25W
• Type: G9
4 Replace the lens.
5 Turn power back on at the main power supply (fuse or breaker
box).
17
E
E
E
TROUBLESHOOTING
If you're having trouble, rst troubleshoot with these solutions
to avoid an unnecessary service call.
When baking or roasting, poor results may be caused by many
reasons besides appliance malfunction.
The best solution to many baking or roasting problems may
be replacing old baking utensils that have darkened or warped
with age and use. See the chart below for causes to common
baking problems.
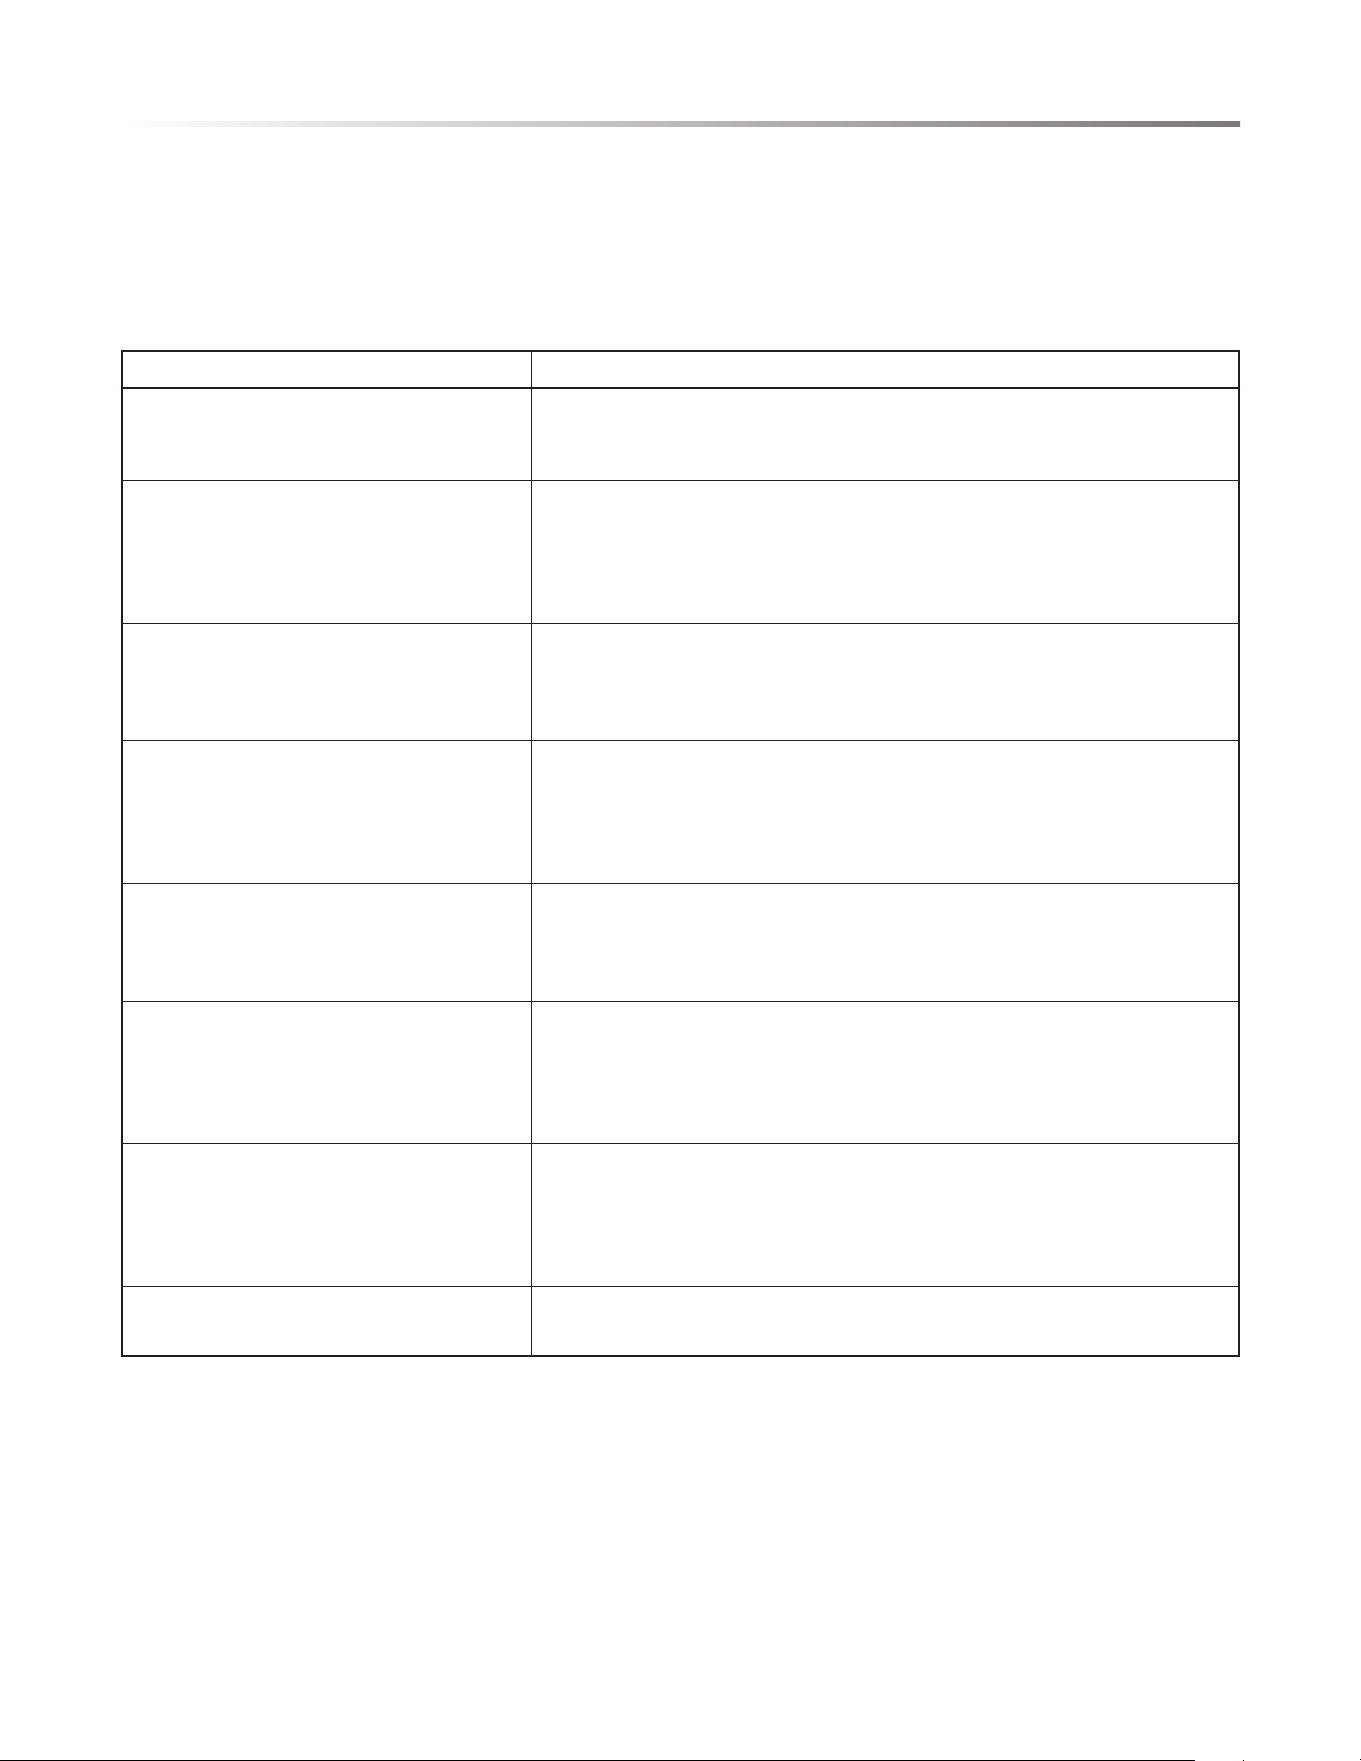
BAKING AND ROASTING TROUBLESHOOTING
BAKING PROBLEM POSSIBLE CAUSE
Food browns unevenly
• Oven not preheated
• Aluminum foil on oven rack or oven bottom (See "Oven Racks" on page 10)
• Pans touching each other or oven walls
Food is too brown on the bottom
• Oven not preheated
• Using glass bakeware (See "Utensils" on page 10)
• Using dark, dull metal pans (See "Utensils" on page 10)
• Incorrect rack position
• Pans touching each other or oven walls
Food is dry or shrunken
• Oven temperature too high
• Baking time too long
• Oven door opened frequently
• Pan size too large
Food is baking or roasting too slowly
• Oven temperature too low
• Oven not preheated
• Oven door opened frequently
• Dish tightly sealed with aluminum foil
• Pan size too small
Pie crusts do not brown on the bottom or
crust is soggy
• Oven temperature too low
• Baking time not long enough
• Using shiny, steel pans (See "Utensils" on page 10)
• Incorrect rack position
Cakes are pale, at and may not be done
inside
• Oven temperature too low
• Incorrect baking time
• Cake tested too soon
• Oven door opened too often
• Pan size too large
Cakes are high in the middle and cracked
on top
• Oven temperature too high
• Baking time too long
• Pans touching each other or oven walls
• Incorrect rack position
• Pan size too small
Pie crust edges are too brown
• Oven temperature too high
• Edges of crust too thin
18
E
E
E
TROUBLESHOOTING
OVEN OPERATION TROUBLESHOOTING
PROBLEM POSSIBLE CAUSE SOLUTION
ERROR In the event of an error, the display ashes and beeps continuously.
Disconnect appliance from the power supply and call 1-800-BE-SHARP.
Oven display does not
illuminate
Turn power off at the main power supply (fuse or breaker box). Turn
power back on. If condition persists, call 1-800-BE-SHARP.
Cooling fan continues to run
after oven is turned off
Oven components have
not cooled sufciently
The fan turns off automatically when the electronic components have
cooled sufciently.
Oven is not heating No power going to
oven
Turn power on at the main power supply (fuse or circuit breaker box). If
condition persists, call 1-800-BE-SHARP.
Cook Mode or
Temperature not
selected
See "Selecting Cook Mode" on page 8.
Oven is not cooking evenly Incorrect rack position Refer to recipes and reliable sources for recommended rack positions.
Temperature not
converted for
Convection Bake mode
When baking with Convection Bake, always reduce recipe temperature
by 25°F (15°C).
Oven light is not working
properly
Loose or defective light
bulb
Tighten the loose bulb or replace if defective. Touching the bulb with
your ngers may cause it to burn out.
Oven light stays on Oven door not closed
completely
Check for obstruction in oven door. Check for a bent hinge.
Cannot remove glass lens on
light
Dirty lens There may be soil built up around the lens. Wipe lens area with a clean,
dry towel before attempting to remove.
Clock and Timer are not
working properly
No power going to
oven
Turn power on at the main power supply (fuse or circuit breaker box). If
condition persists, call 1-800-BE-SHARP.
Clock or Timer not set
correctly
See "To Set The Clock" and " To Set The Timer" on page 8.
Excessive moisture Oven not properly
preheated
When using Bake mode, preheat the oven rst. The Convection Bake
and Convection Roast modes will eliminate any moisture in oven.

19
E
E
E

SHARP ELECTRONICS CORPORATION • 100 Paragon Drive • Montvale, New Jersey 07645 • USA
TINSEB821MRR0 JULY 07, 2026