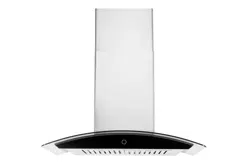
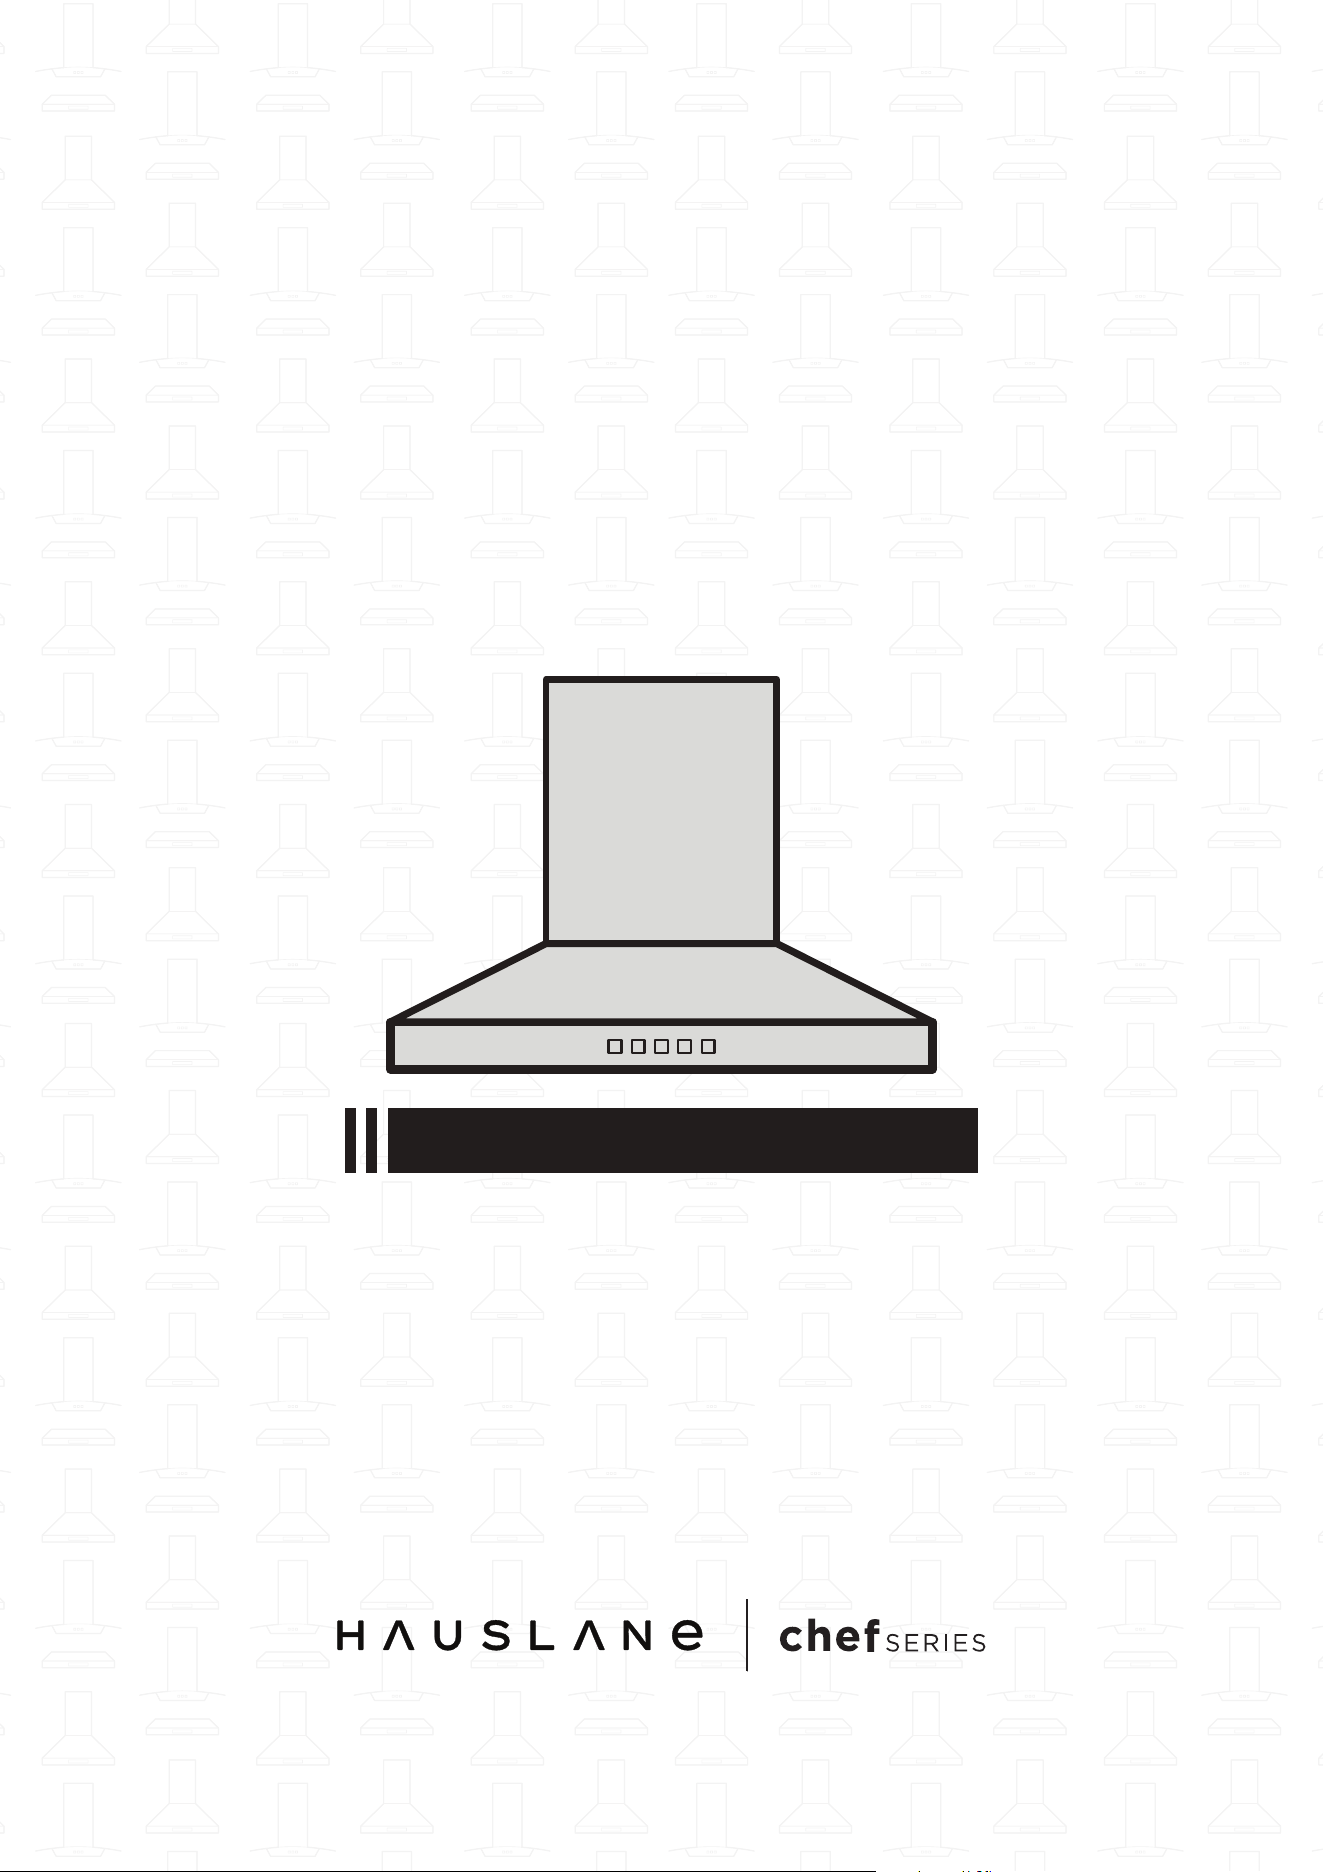
WM-540 Model Series
USER MANUAL

Safety Information
1.
2.
3.
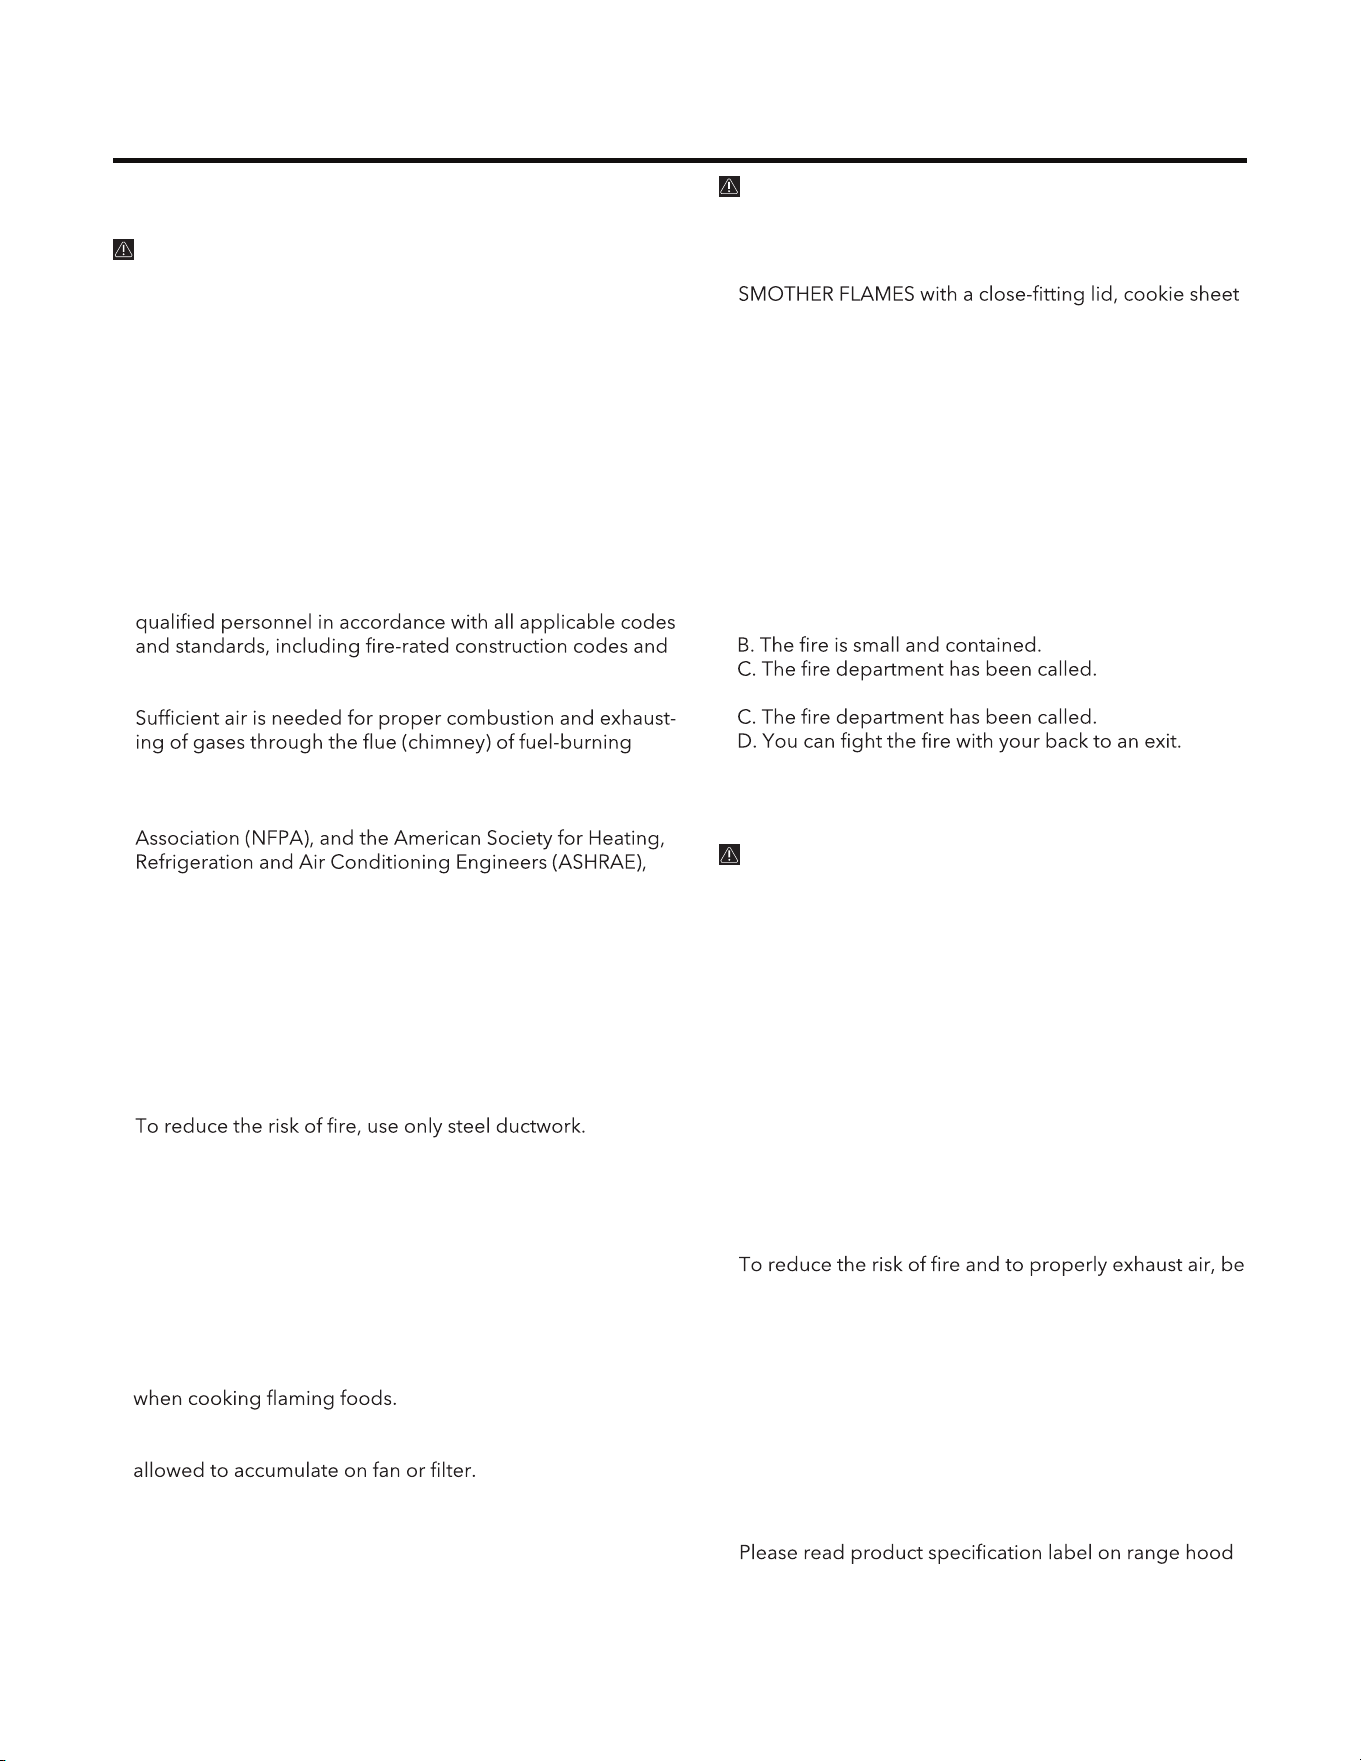
For general ventilating use only. Do not use to exhaust
hazardous or explosive materials and vapors.
To avoid damage and noisy and/or unbalanced impellers,
keep drywall/construction dust, etc. off power unit.
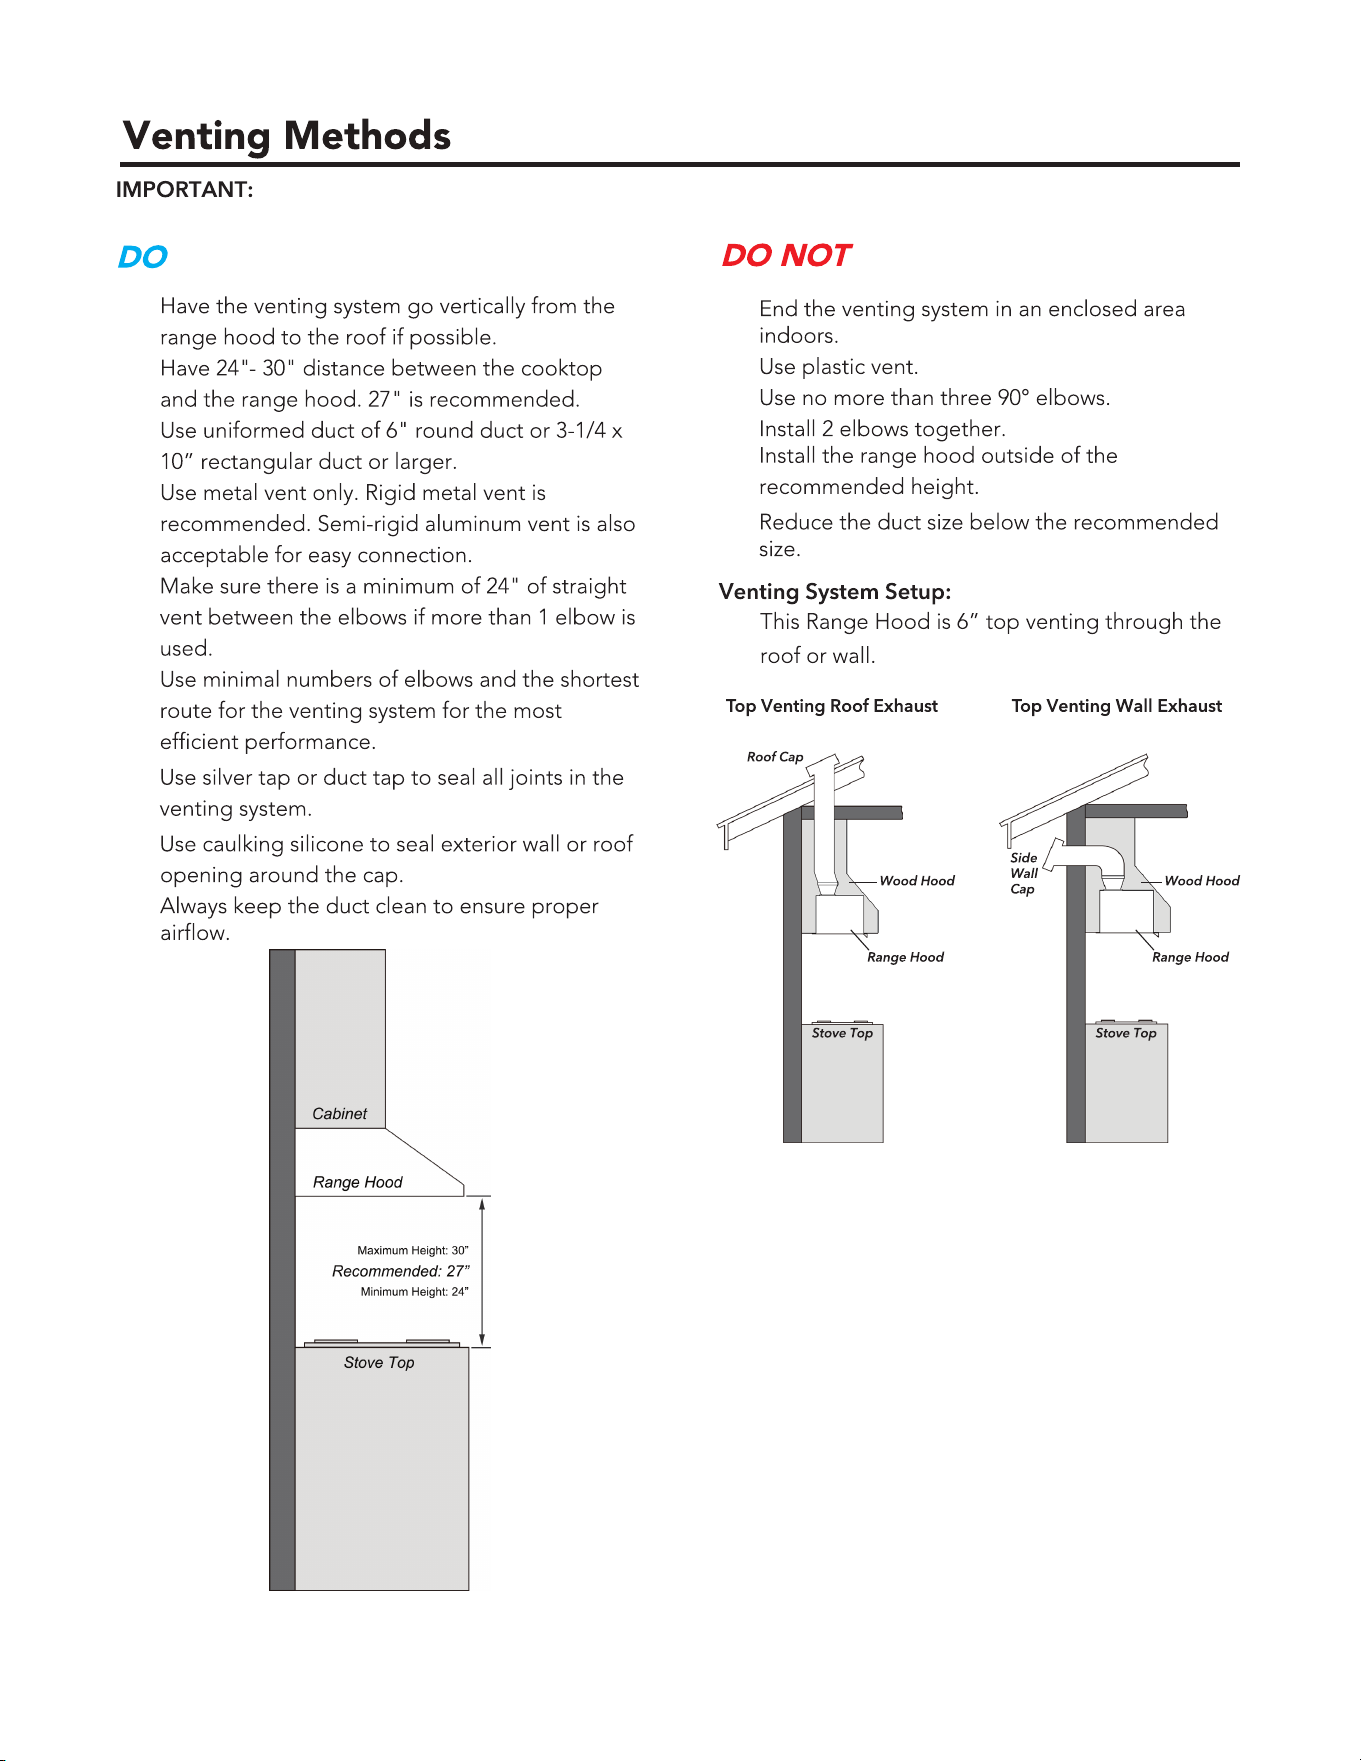
Mount your range hood so that the bottom of the hood is
24" to 30" above the cooking surface. The minimum hood
distance above cooktop must not be less than 24"; any
installation less than 24" may cause overheating and cause
damage to the range hood, HAUSLANE does not warrant
this improper installation.
4.
5.
6.
7.
8.
Two to three installers are recommended because of
the larger size and weight of this hood.
sure to duct air outside. Do not exhaust air into spaces
within walls and ceiling or into attics, crawl space or
garages.
Because of the high exhausting capacity of this hood,
you should make sure enough air is entering the house
to replace exhausted air by opening a window close to
or in the kitchen.
Use with approved cord-connection kit only.
for further information and requirements.
CAUTION
Before installing your range hood, read the entire instruction
manual. Installers, leave this manual with the homeowner.
Use this range hood only in the manner intended by the
manufacturer. If you have the questions, contact Chef Kitch
at 1-800-929-0168 or email at [email protected].
Before servicing or cleaning, switch power off at service
panel and lock service panel to prevent power from being
switched on accidentally. When the service disconnecting
means cannot be locked, securely fasten a prominent
warning device, such as a tag, to the service panel.
Installation work and electrical wiring must be done by
standards.
equipment to prevent back drafting. Follow the heating
equipment manufacturer's guidelines and safety standards
such as those published by the National Fire Protection
and the local code authorities.
When cutting or drilling into wall or ceiling, do not damage
electrical wiring and other hidden utilities.
Ducted fans must always be vented to the outdoors.
Do not use this unit with any solid-state speed control
device.
1.
2.
3.
4.
5.
6.
7.
8.
This unit must be grounded.9.
1.
2.
3.
4.
Never leave surface units unattended at high settings.
Boil overs cause smoking and greasy spillovers that
may ignite. Heat oils slowly on low or medium settings.
Always turn hood ON when cooking at high heat or
Clean ventilating fans frequently. Grease should not be
Use proper pan size. Always use cookware appropriate
for the size of the surface element.
WARNING
SUITABLE FOR USE IN HOUSEHOLD COOKING AREA
ONLY. TO REDUCE THE RISK OF FIRE, ELECTRICAL
SHOCK, OR INJURY, OBSERVE THE FOLLOWING:
TO REDUCE THE RISK OF A RANGE TOP GREASE
FIRE:
2.
3.
4.
NEVER PICK UP A FLAMING PAN as you may be
burned.
DO NOT USE WATER, including wet dishcloths or
towels. This could cause a violent steam explosion.
Use an extinguisher ONLY if:
A. You own a Class ABC extinguisher and you know
how to operate it.
*Based on "Kitchen Fire Safety Tips" published by
NFPA.
WM-540 USER MANUAL
2
WARNING
TO REDUCE THE RISK OF INJURY TO PERSONS IN THE
EVENT OF A RANGE TOP GREASE FIRE, OBSERVE THE
FOLLOWING*:
1.
or metal tray, then turn off the burner. BE CAREFUL TO
PREVENT BURNS. IF THE FLAMES DO NOT GO OUT
IMMEDIATELY, EVACUATE AND CALL THE FIRE
DEPARTMENT.
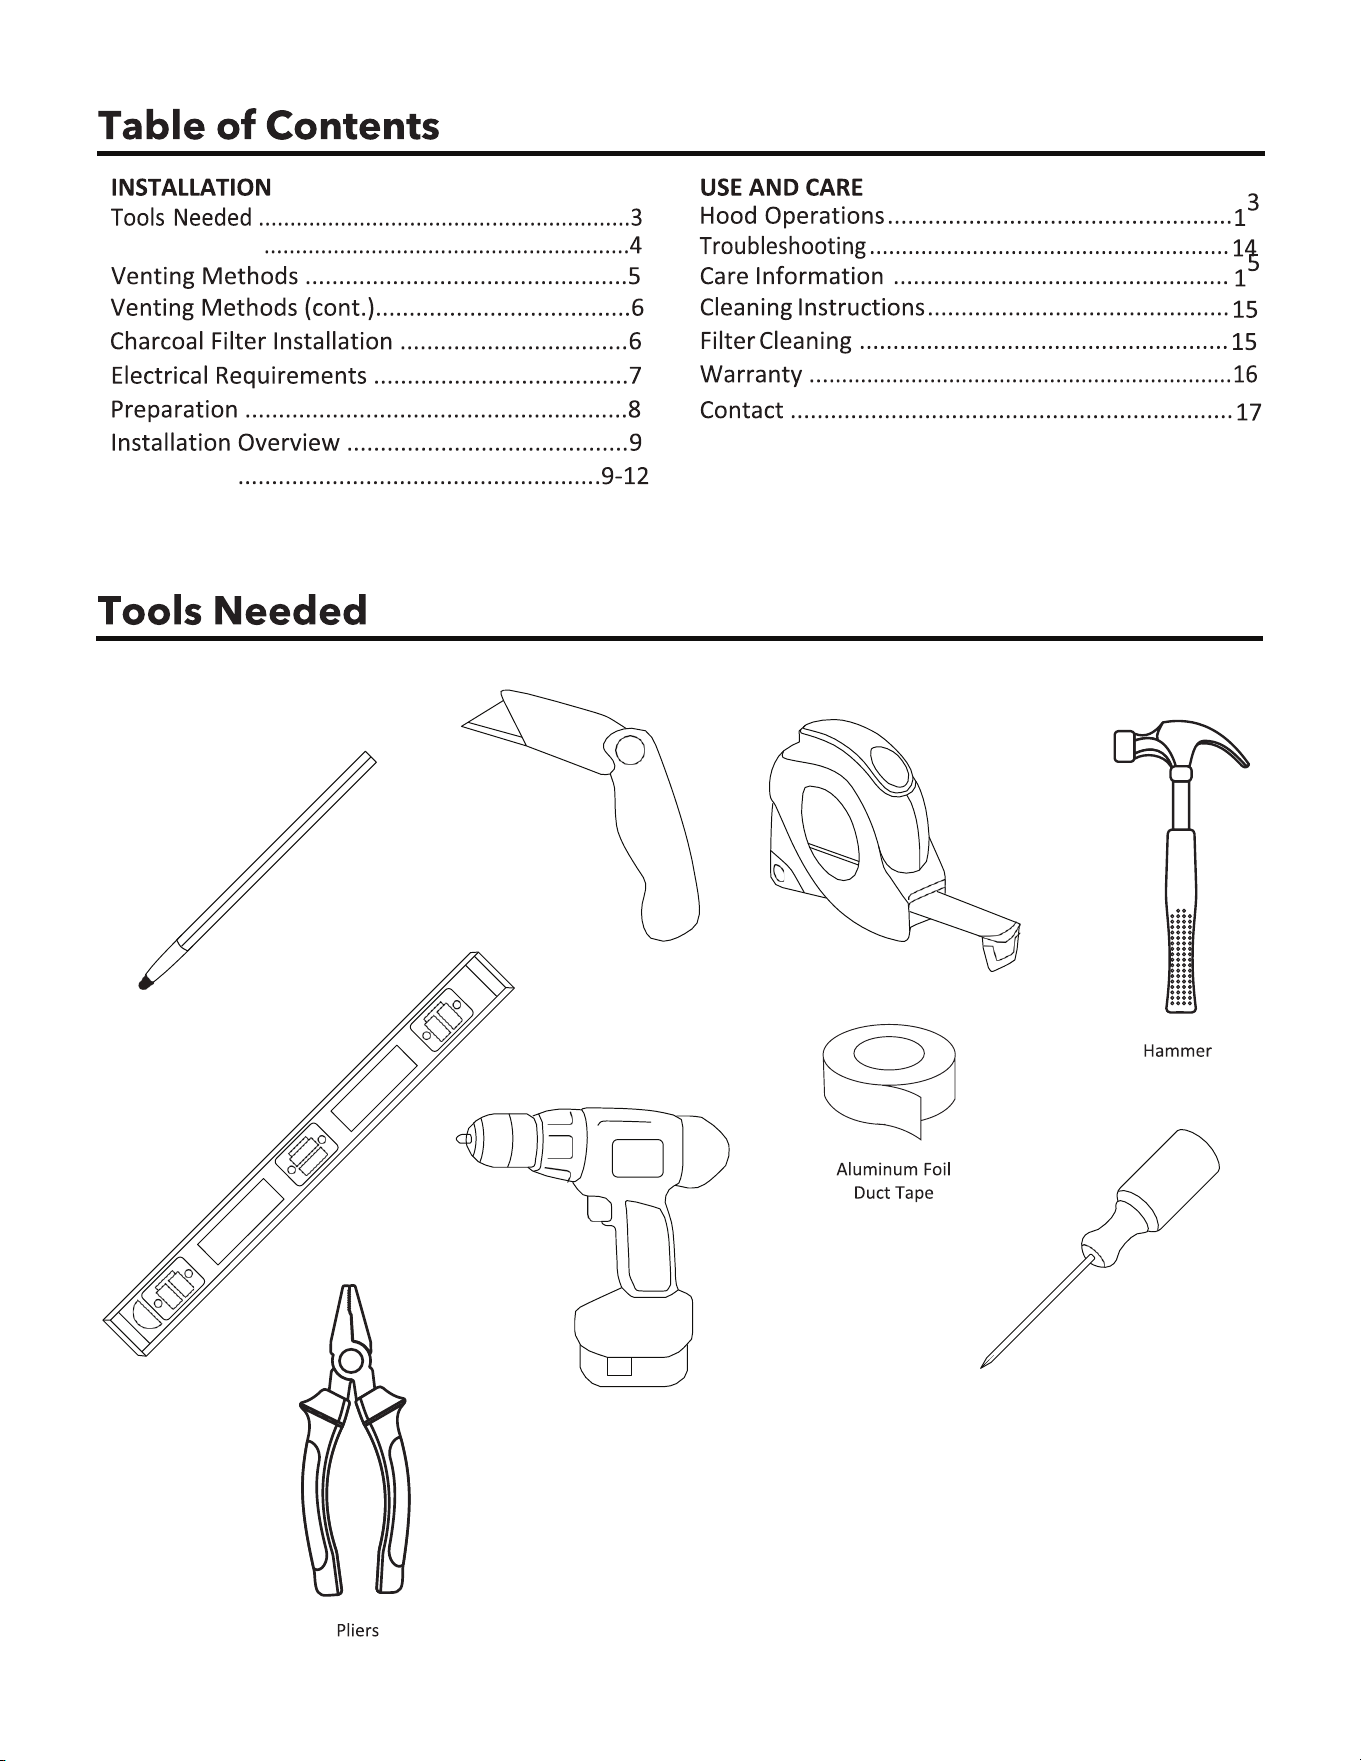
U�lity Knife
Measuring
Tape
Marker
or Pencil
Level
Powered
Drill
Flat & Phillips
Screwdrivers
Parts Supplied
Installa�on
WM-540 USER MANUAL
3
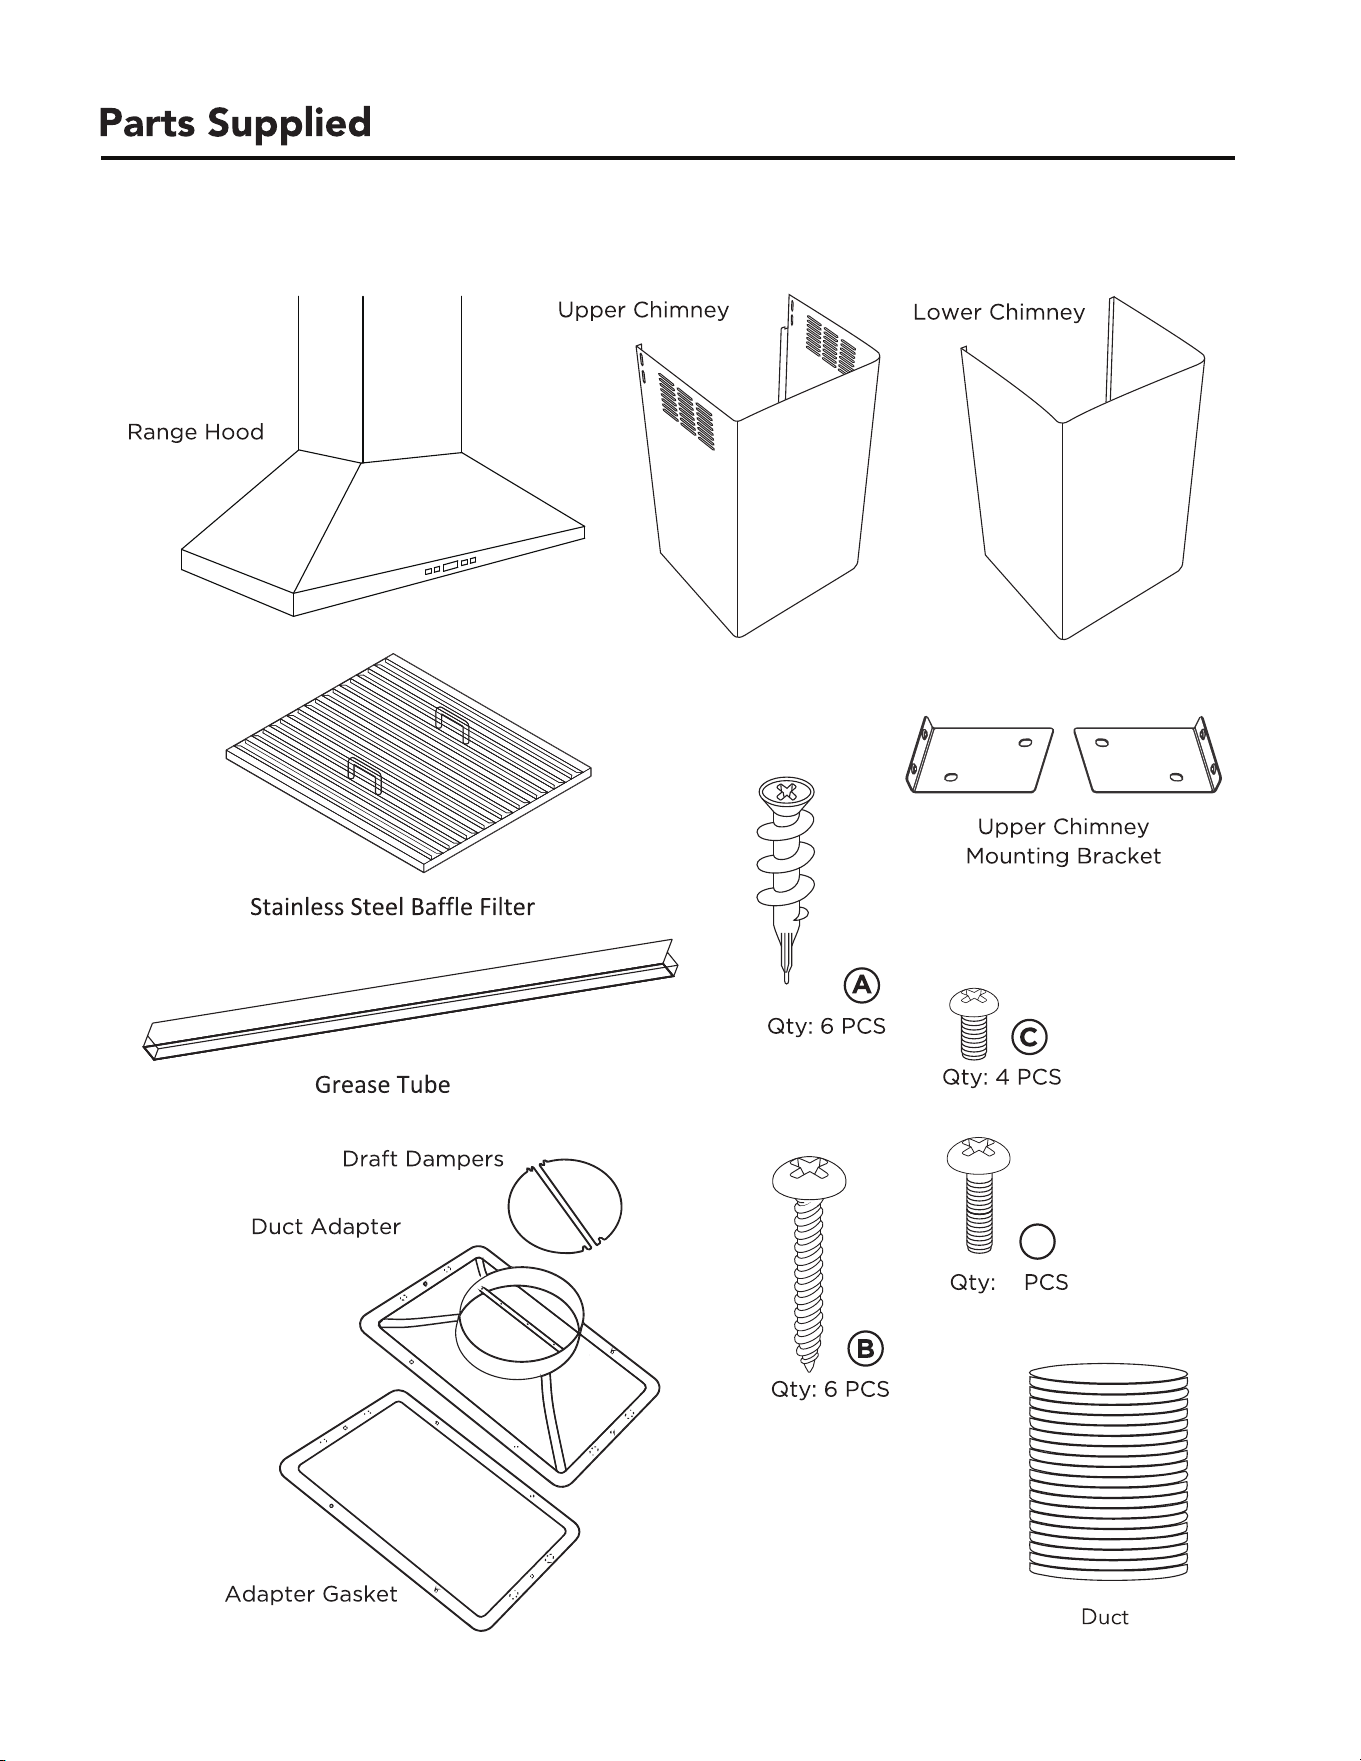
(For dry wall or
sheet rock only)
D
6
WM-540 USER MANUAL
4
•
•
•
•
•
•
•
•
•
•
•
•
•
•
•
•
WM-540 USER MANUAL
5
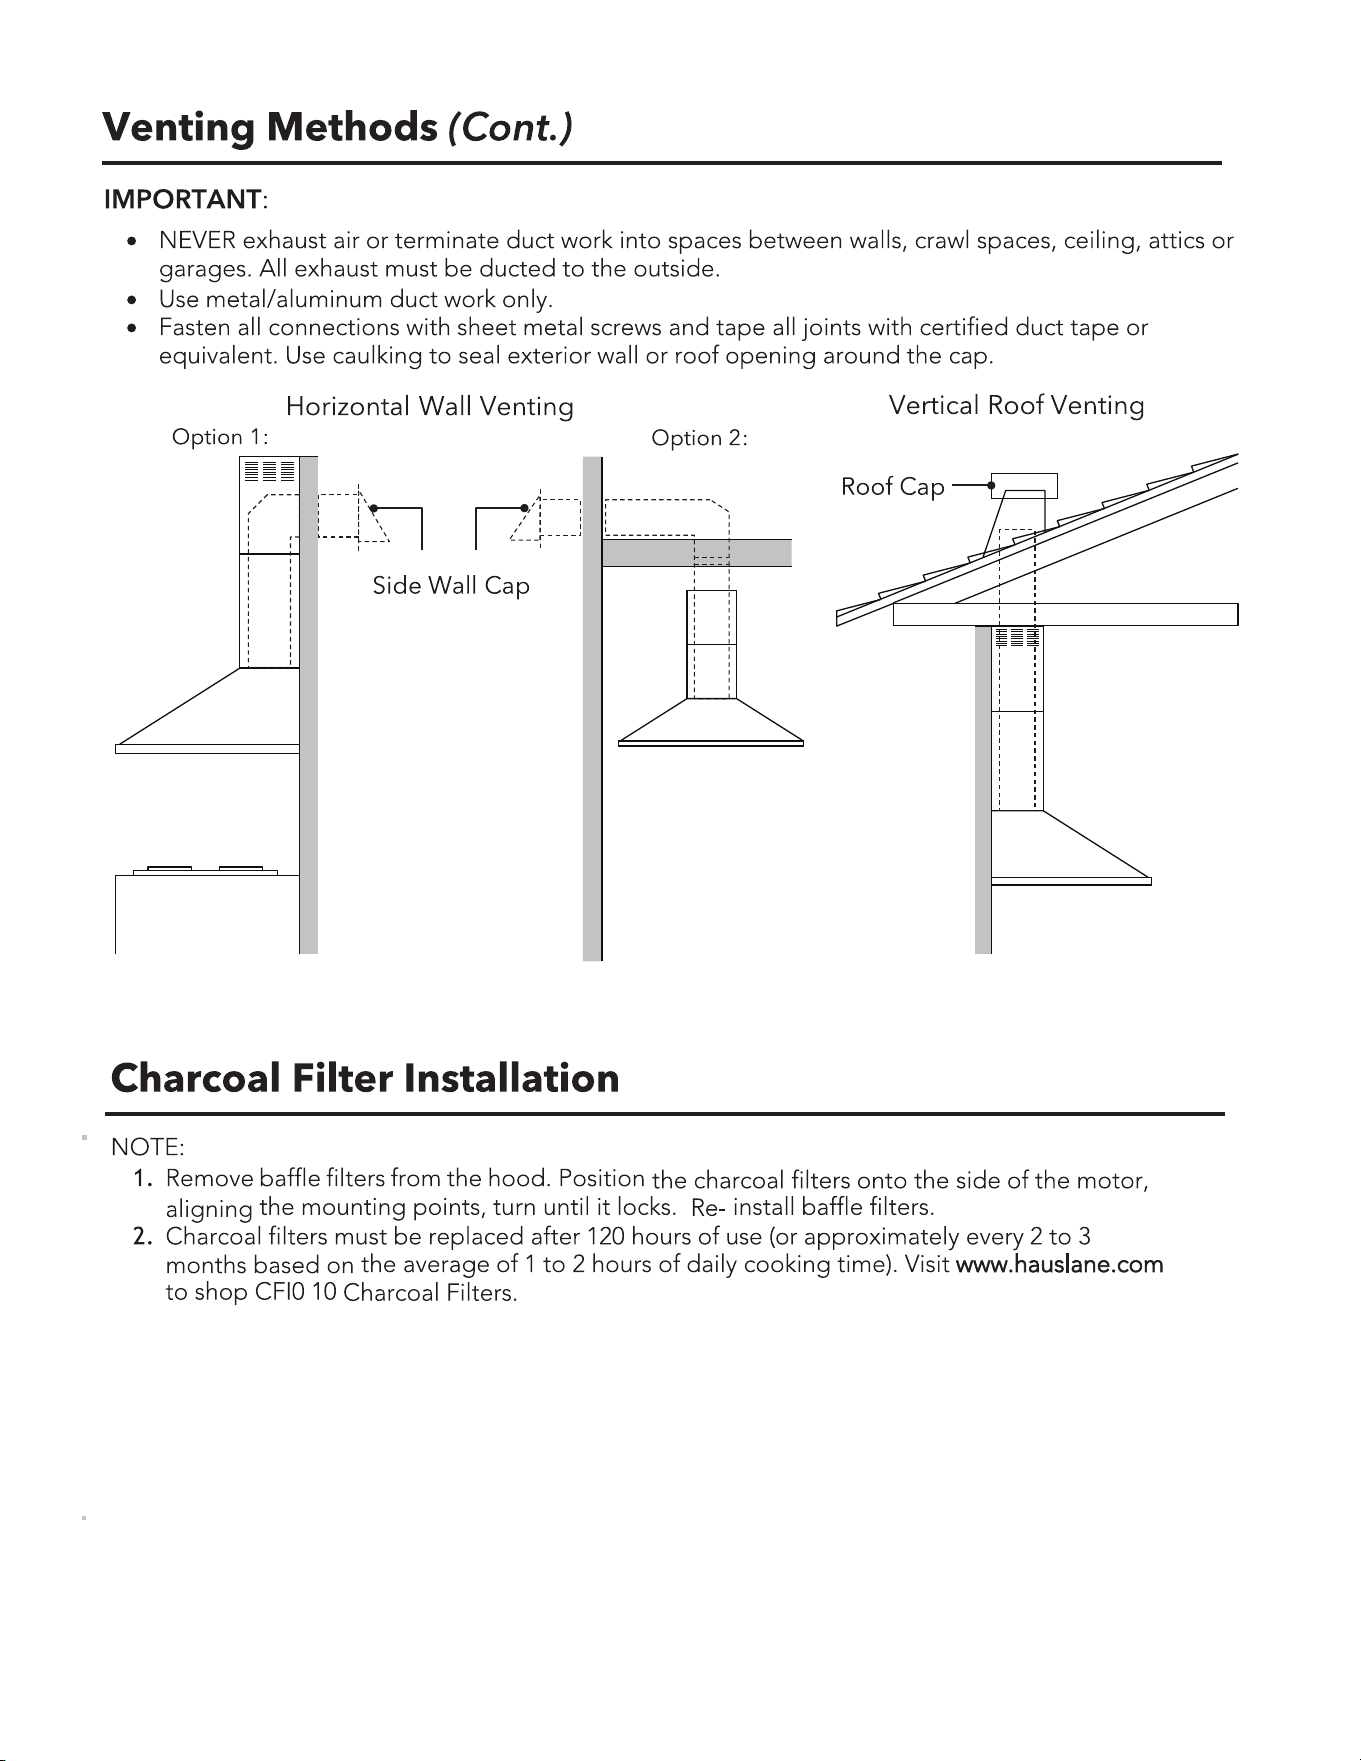
WM-540 USER MANUAL
6
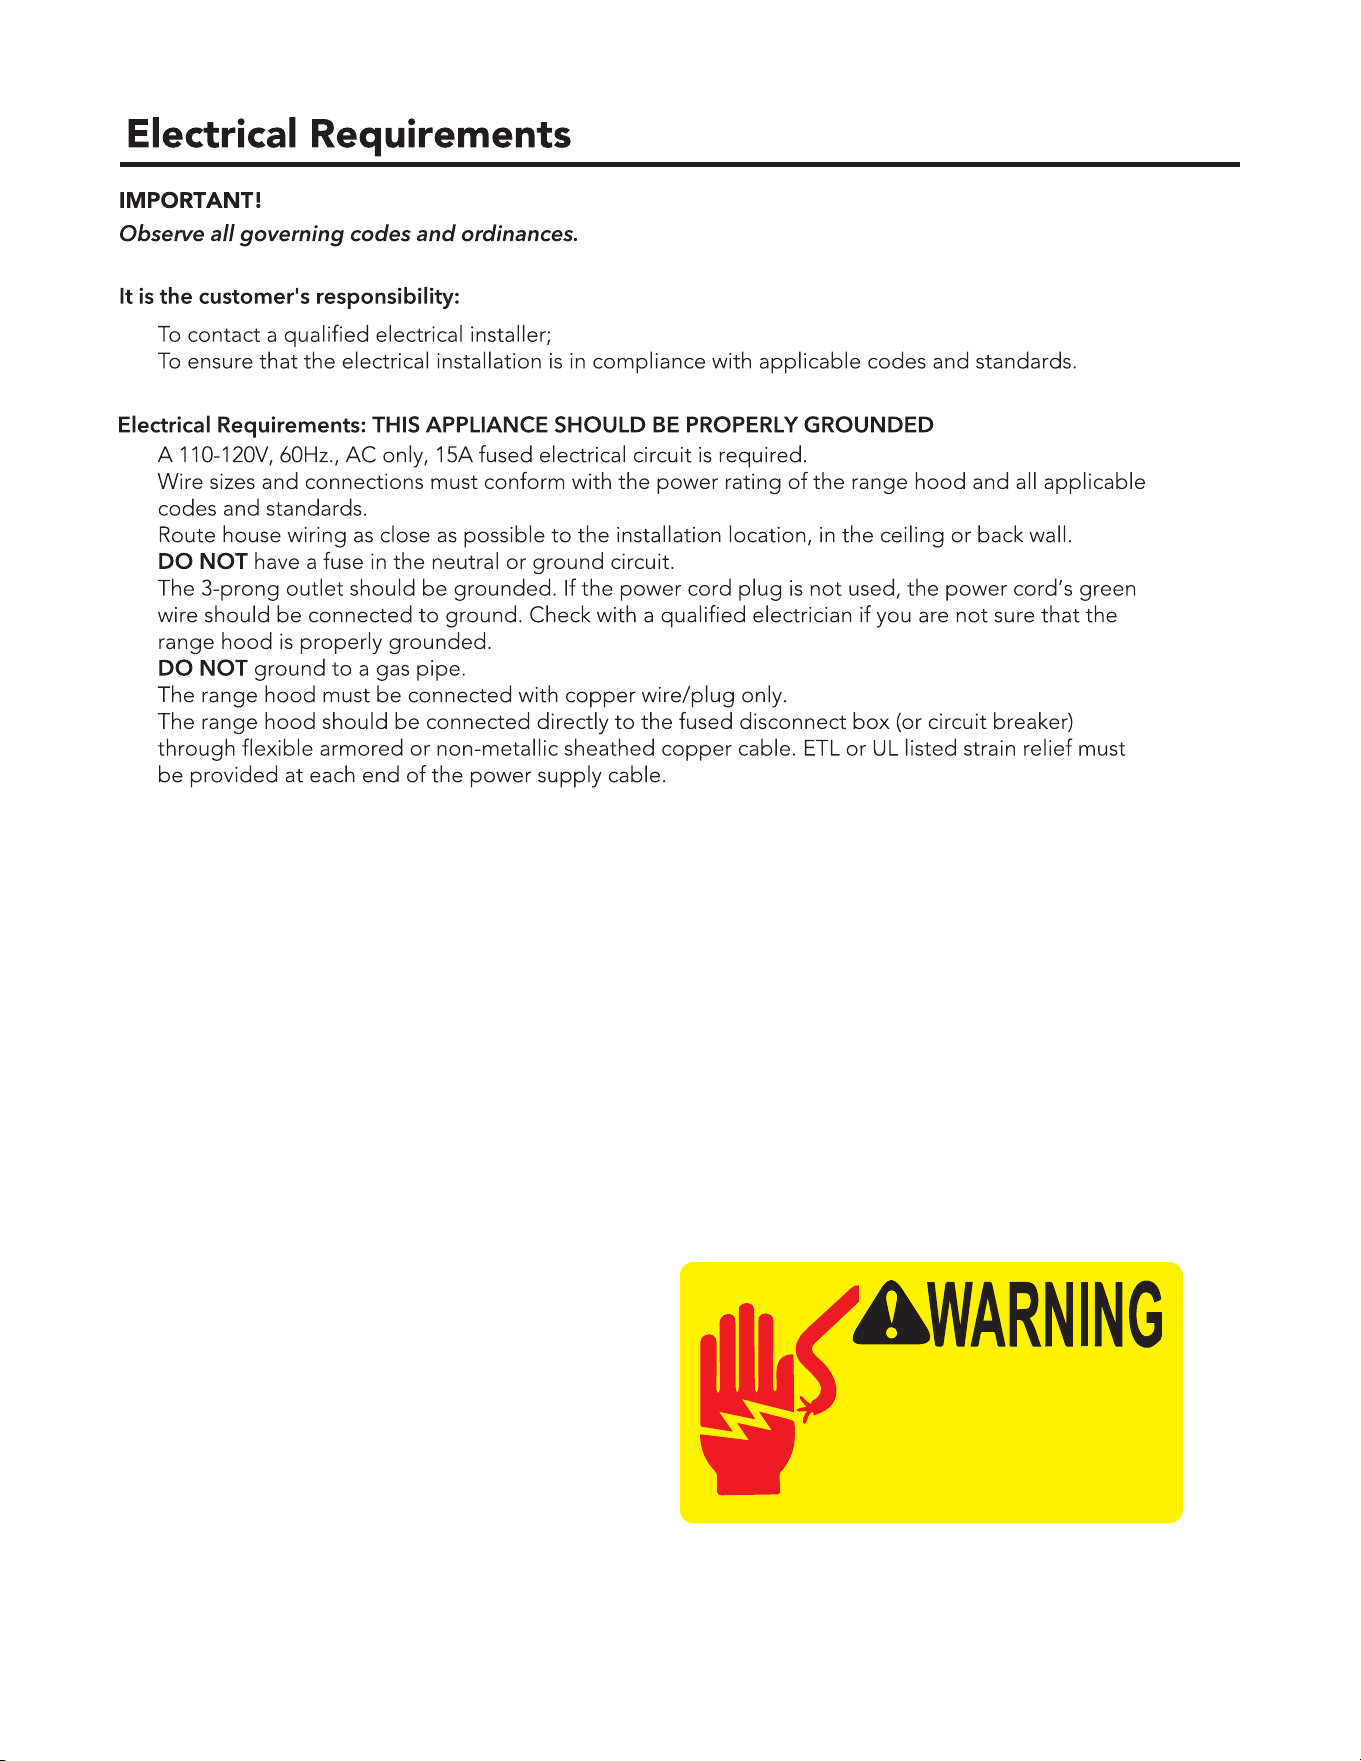
•
•
•
•
•
•
•
•
•
•
WM-540 USER MANUAL
7
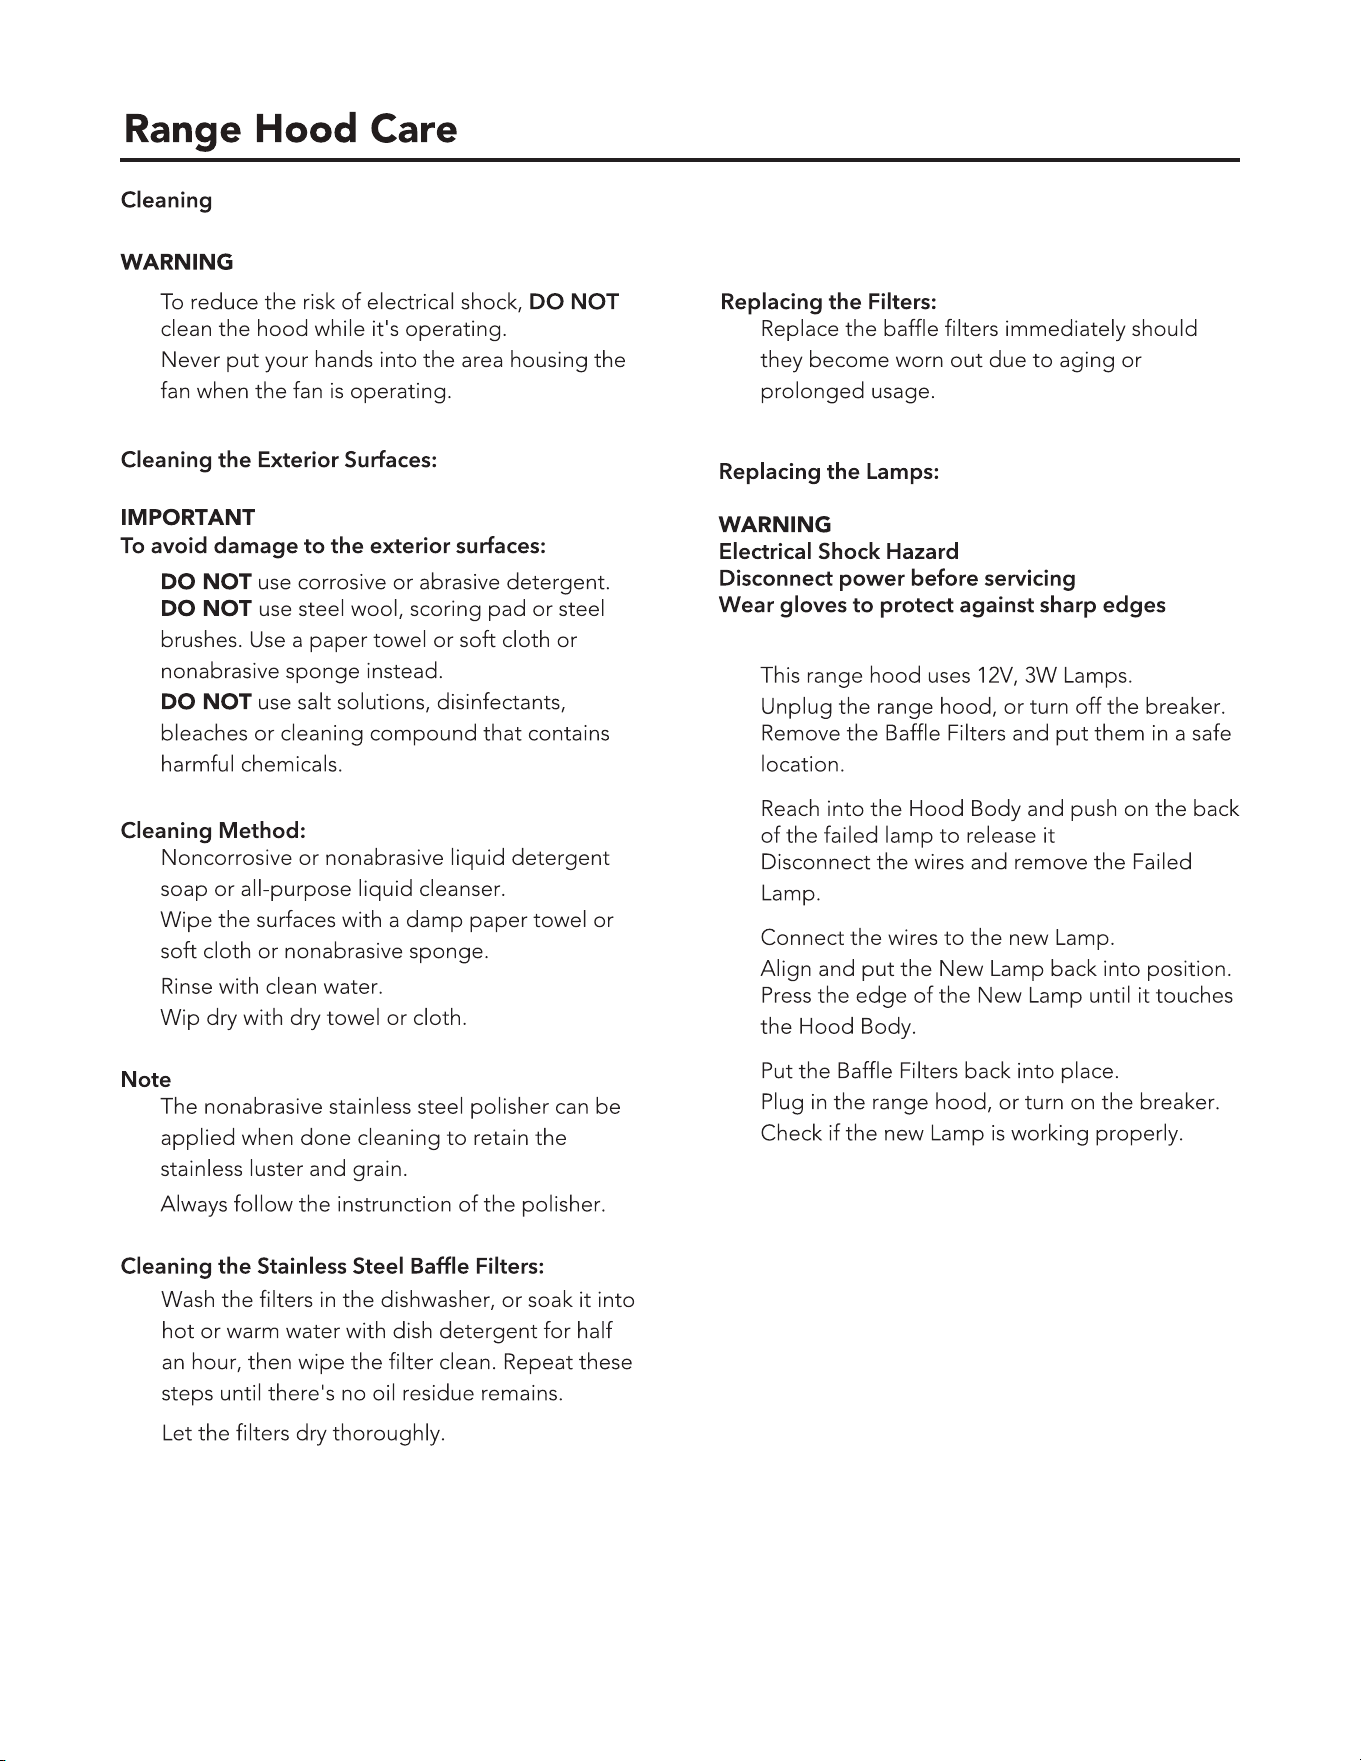
Hazard of electrical shock!
Do not perform service on an electrically live
system. Disconnect the main electrical supply
before servicing this device. Touching electrical
connectors or other exposed electrical circuitry
inside this range hood when they are energized
could result in death, serious bodily injury, or
property damage.
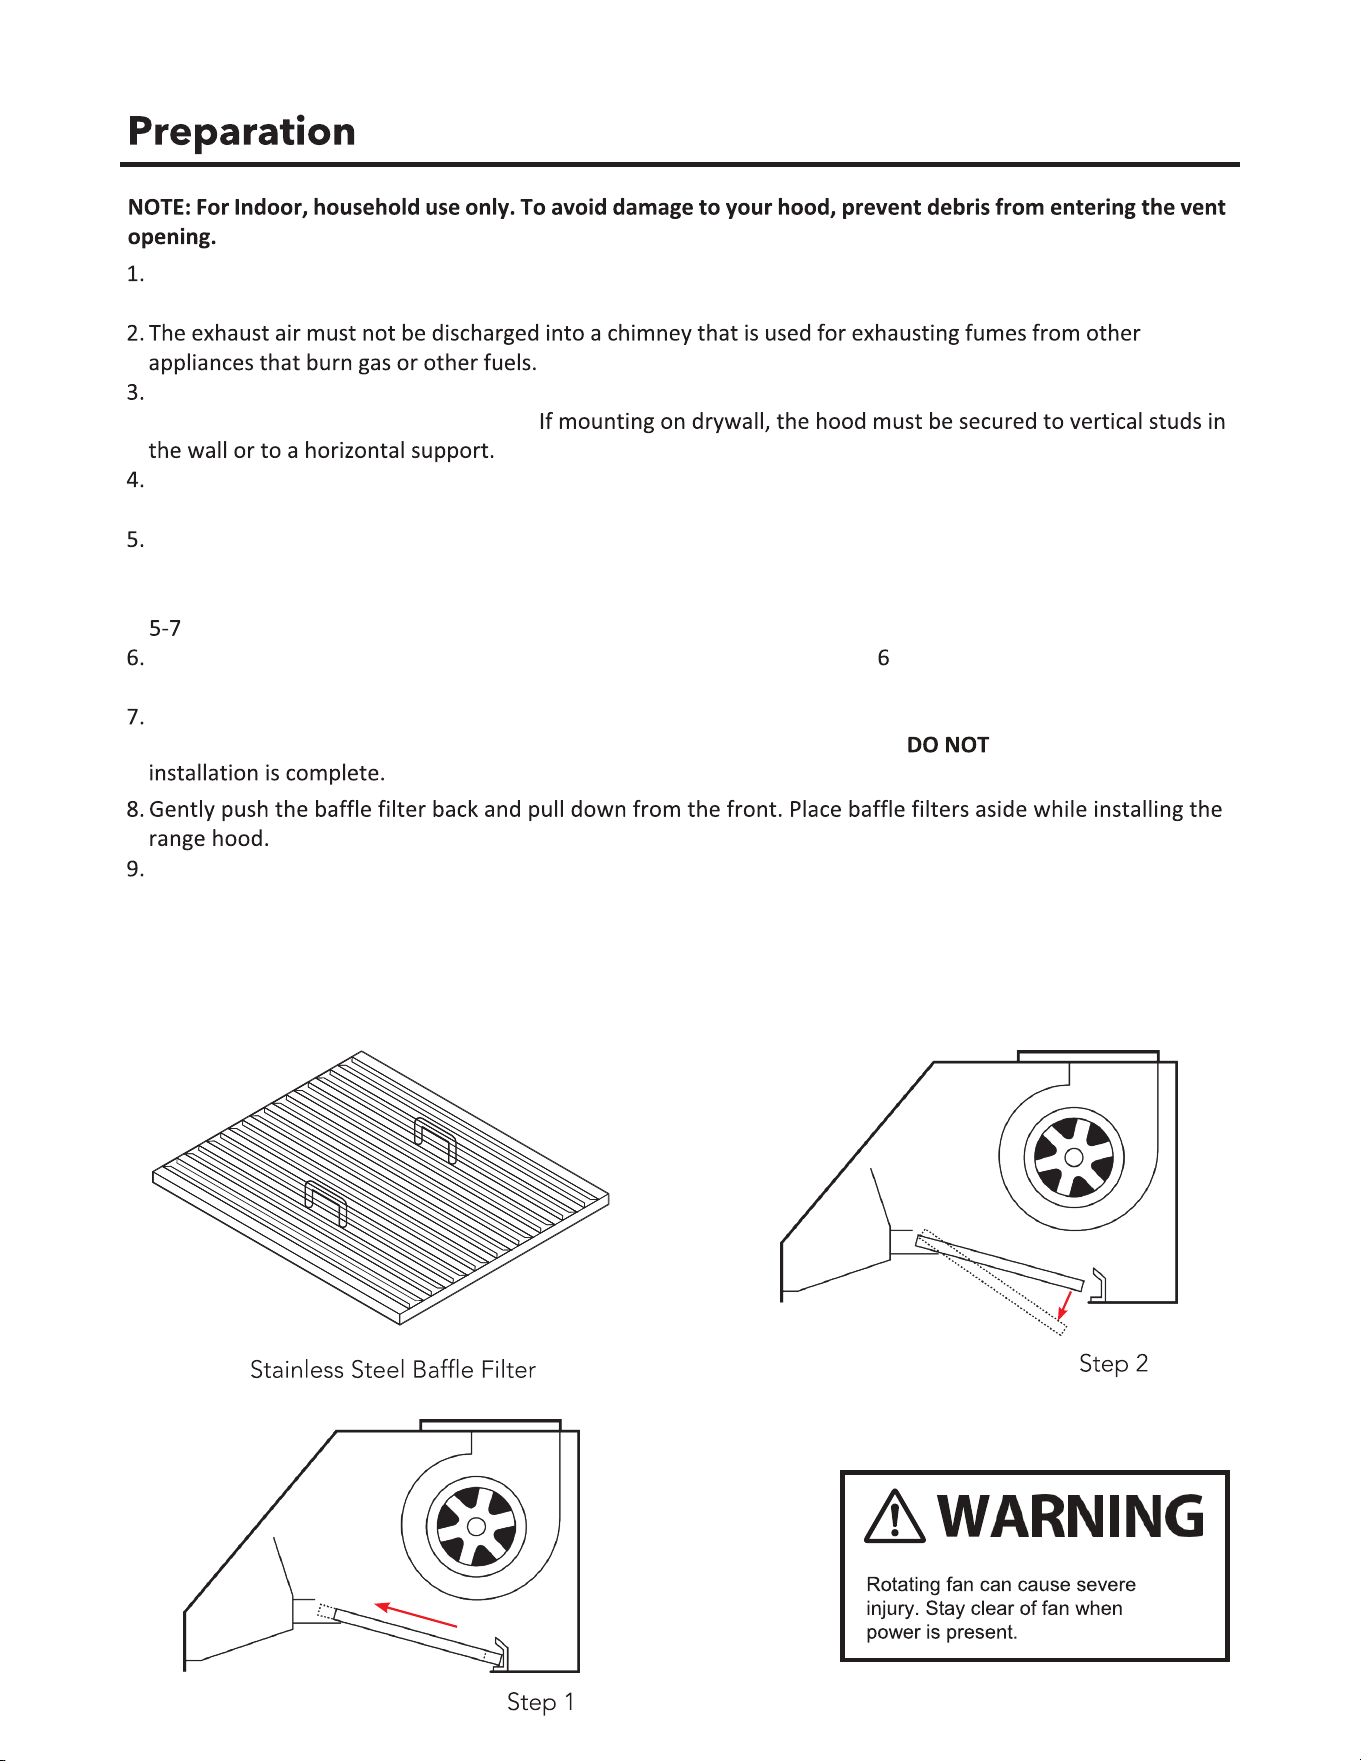
Determine and mark the center line on the wall where the range hood will be installed. Make sure there is
proper clearance within the ceiling or wall for exhaust vent.
Due to the weight and size of this unit, please make sure that the support system or framework being used is
stable and secure in the wall or ceiling.
Put a thick, protec�ve covering over counter top, cook top or range to protect from damage or dirt. Remove
any hazardous objects around the area when installing.
Mark the loca�ons of the support moun�ng bracket holes, duc�ng cutout (if used) and power supply cable
cutout on the wall or ceiling behind the chimney covers. Use drill and saber saw or keyhole saw to cut
openings for power supply cable and duc�ng (see Venng Requirements and Electrical Requirements, Pages
).
If ven�ng to the outside install vent system (see Venng Methods, Page ). Use caulking to seal exterior
wall or roof openings.
Disconnect main electrical supply, prepare and run electrical wiring through ceiling or wall.
Install a power outlet within reaching distance of the range hood assembly.
restore power un�l
Assemble the duct adapter onto the range hood body. Place the duct adapter gasket into the hollow
perimeter of the rectangular side of the duct adapter; place the rectangular side of the duct adapter over
the range hood duct, aligning the screw holes; fasten the duct adapter onto the range hood body using the
supplied hardware: “D” screws.
Severe Injury
WM-540 USER MANUAL
8
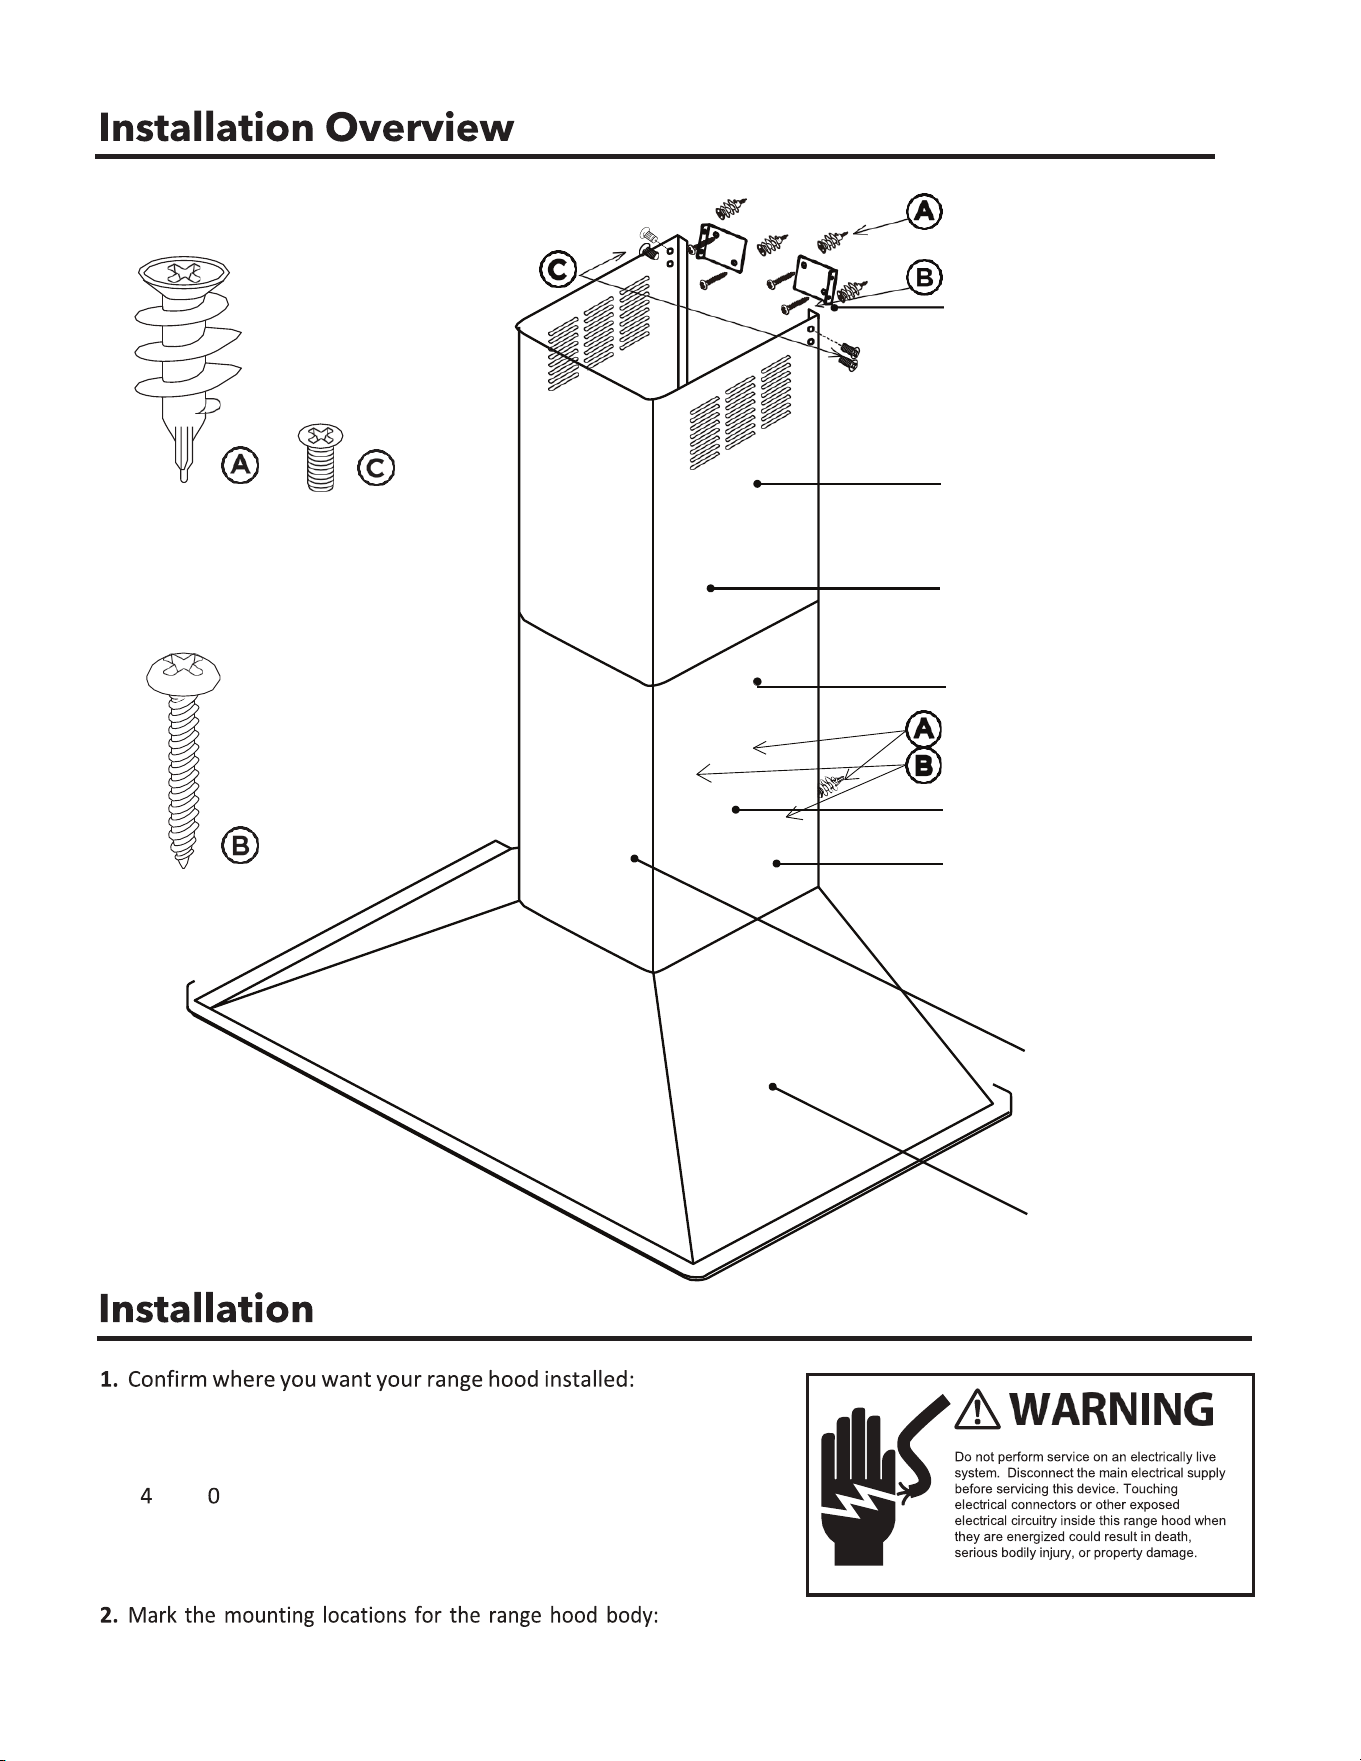
Upper Chimney
Moun�ng Bracket
Qty: 6 PCS
(For dry wall or
sheet rock only)
Qty: 4 PCS
Upper Chimney
Duct work and electric
wiring region
Lower Chimney
6” Round Duct (exhaust)
Qty: 6 PCS
Motor Housing
Electric Circuit Box
Note: Type “A” anchors are
designed for for dry wall or
sheet rock. Not to be used
with any other types of walls.
Wall Mount
Range Hood
Hazard of electrical shock!
Confirm your centerline and side measurements of each piece
of hardware. Measure the distance between stove top and the
bo�om of range hood and confirm a *recommended distance of
2
” to 3 ”.
*Due to different ceiling height configuraons,
recommended height may not be applicable. Use removable tape,
pencil or erasable marker to mark your ideal installaon.
Make sure the range hood is level, not �lted, and not colliding against other objects.
WM-540 USER MANUAL9
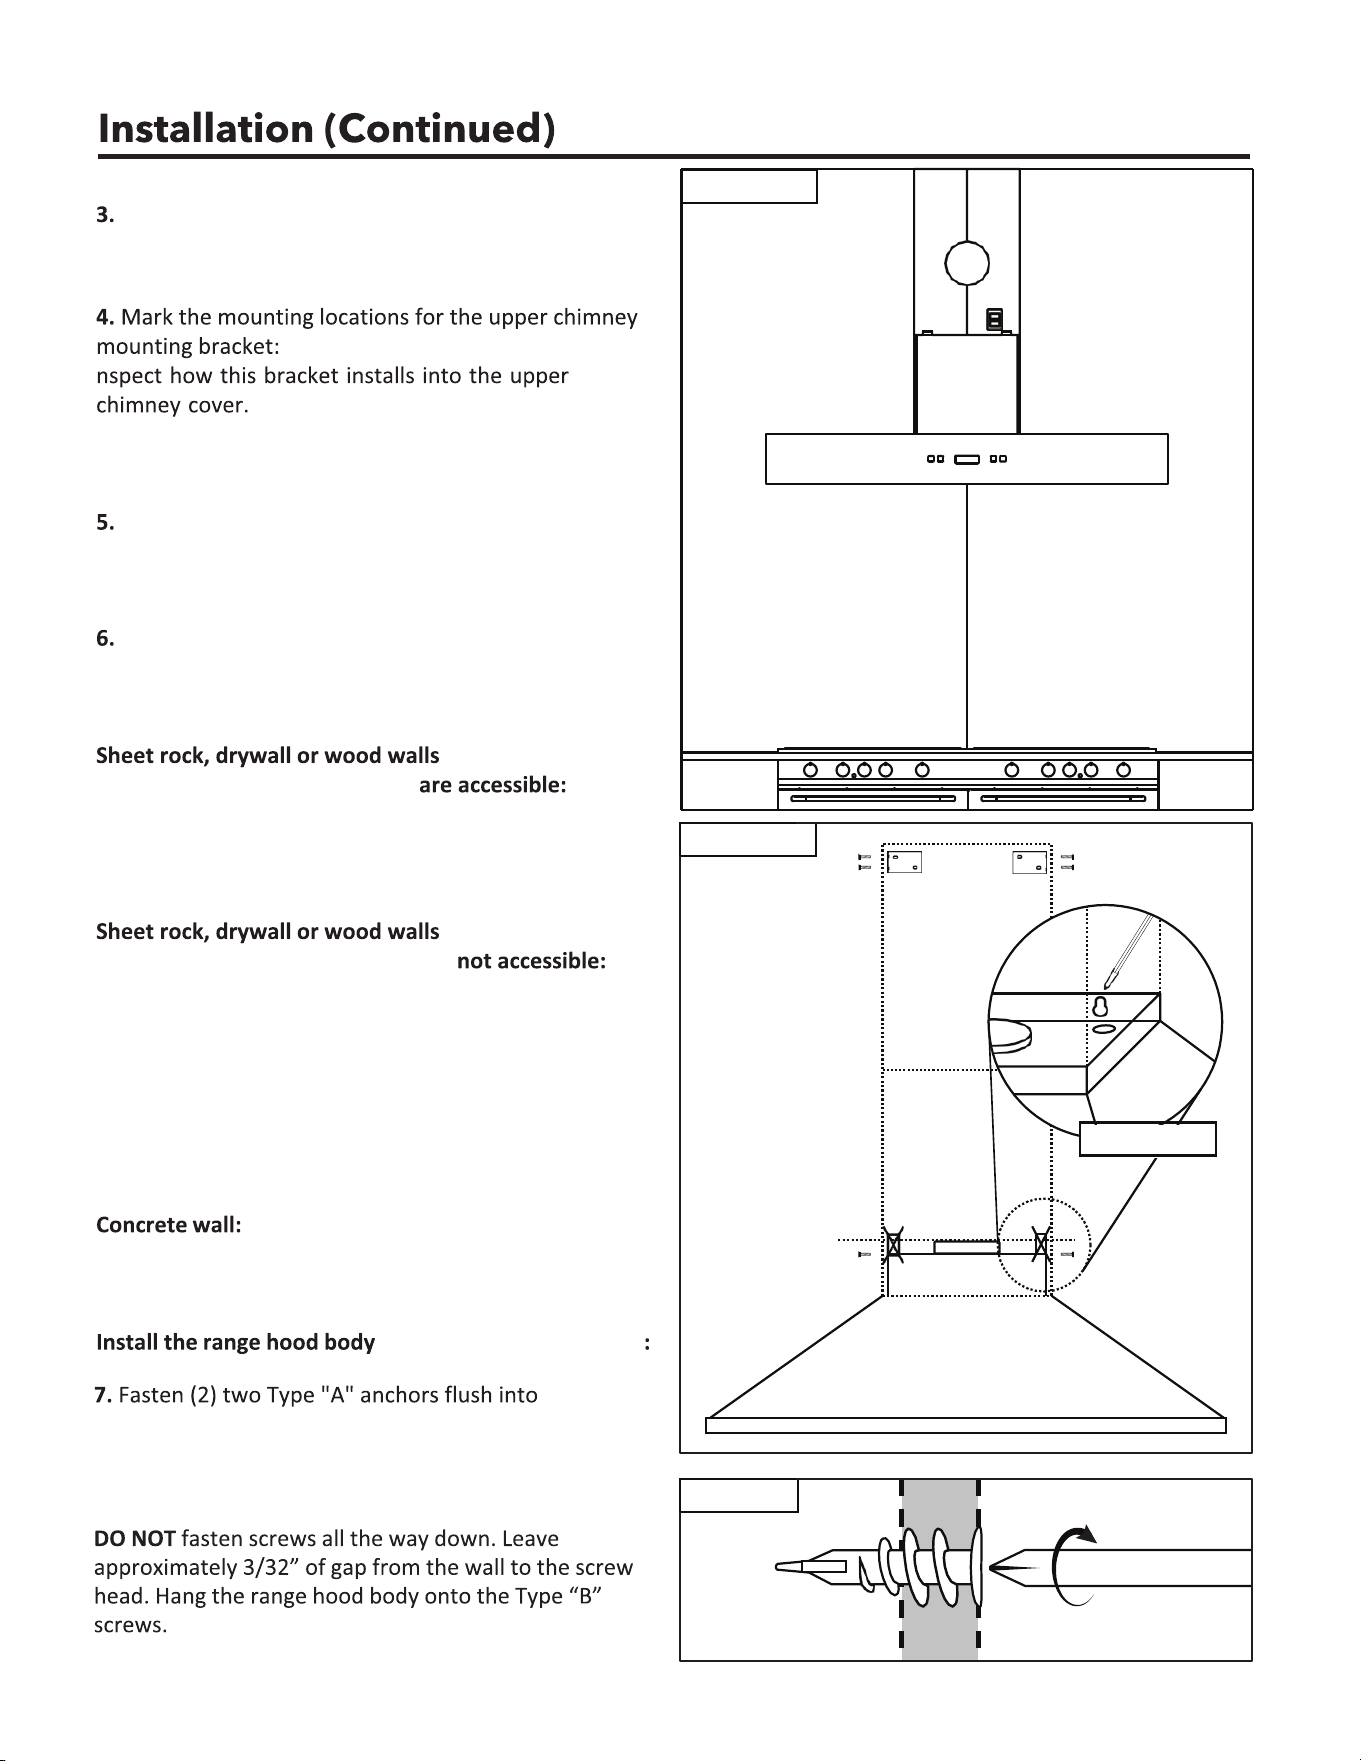
Figure 3A
Figure 3B
Figure 4
Mark the loca�ons of the keyhole shaped hanging
bracket holes onto the wall as shown in Figure 3A and
Figure 3B.
Figure 3
Use that as reference to where you
want your upper chimney installed and where the
bracket should be installed onto your wall.
Place the moun�ng bracket squarely above the range
hood, level it and mark the loca�ons of the moun�ng
bracket holes on the wall.
Safely place aside all equipment and review all marked
regions and drill holes. Review fastening hardware to be
used. Recommended for your type of wall:
where the structural
studs or solid structural support
screw
directly into the structural studs or structural support,
with hardware that meets are exceeds the factory
hardware, with at least 1” of thread engagement.
where the structural
studs or solid structural support are
Affixing the range hood to into structural studs is highly
recommended. If stud blockings are not available, it is
recommended to build a support structure behind the
sheet rock for the best weight support. If wall anchors
are used, ensure their hanging capacity exceeds the
weight of the range hood, hardware, and es�mated
usage load.
Use designated concrete screws and/or
anchors (not provided) that meet or exceed the factory
hardware specifica�ons. Ensure proper load ra�ngs.
Follow instruc�ons of concrete screw manufacture.
(if using factory hardware)
the wall (as
shown in Figure 4) over your previously marked loca�ons
for moun�ng the range hood body. Loosely fasten (2)
two Type “B” screws into the anchors.
Secure upper
support frame
WM-540 USER MANUAL
10
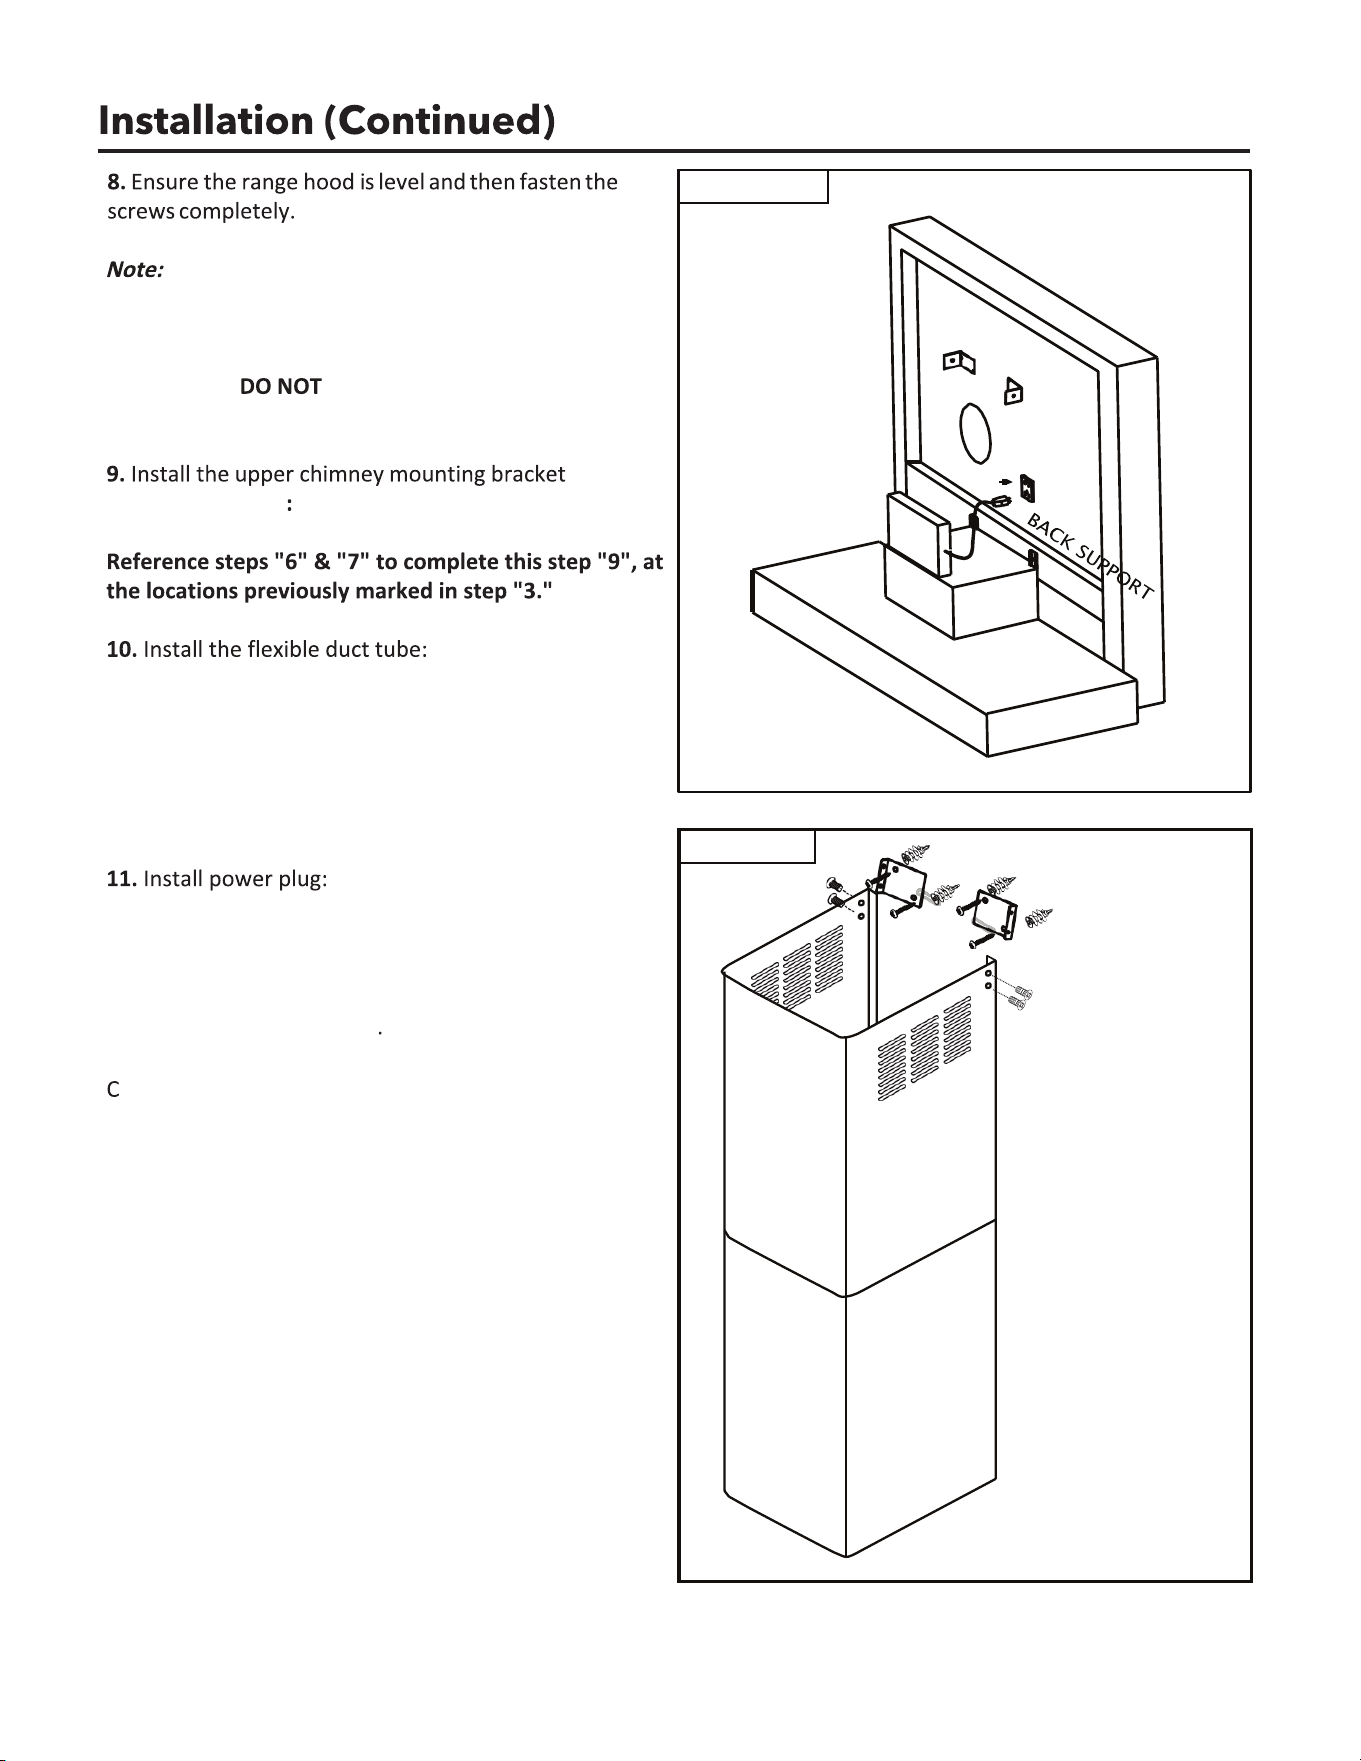
for wall mounted range hoods (not island
mounted), the rear panel of the range hood body
(against the installa�on wall) is plain sheet metal and
can be drilled and screwed into the wall for addi�onal
stabiliza�on.
drill into or screw through any
wires, any wire harnesses, or any cri�cal fixtures.
(if using
factory hardware)
First, install the flexible duct tube onto
your household duc�ng and then extend the duc�ng
downward, allowing about 6 inches of extra duc�ng.
Then, cut off excess duc�ng. Install the duc�ng onto the
range hood (body) duct adapter. Use cer�fied duc�ng
tape or fastening devices.
Plug in the power cord into your power socket.
DO NOT turn on main power supply un�l installa�on is
complete. If a func�on test is desired (should be done
before star�ng installa�on)
lear workspace and ensure workspace is safe. Then
temporarily supply power to unit and test func�ons.
Please ensure to completely SHUT OFF POWER SUPPLY
a�er tes�ng and before con�nuing installa�on.
Figure 4A
D
RYWALL
Figure 5
Fasten mounting
bracket
Slide up and secure
upper chimney to
mounting bracket
Hold in position and
secure lower chimney
to range hood
WM-540 USER MANUAL
11
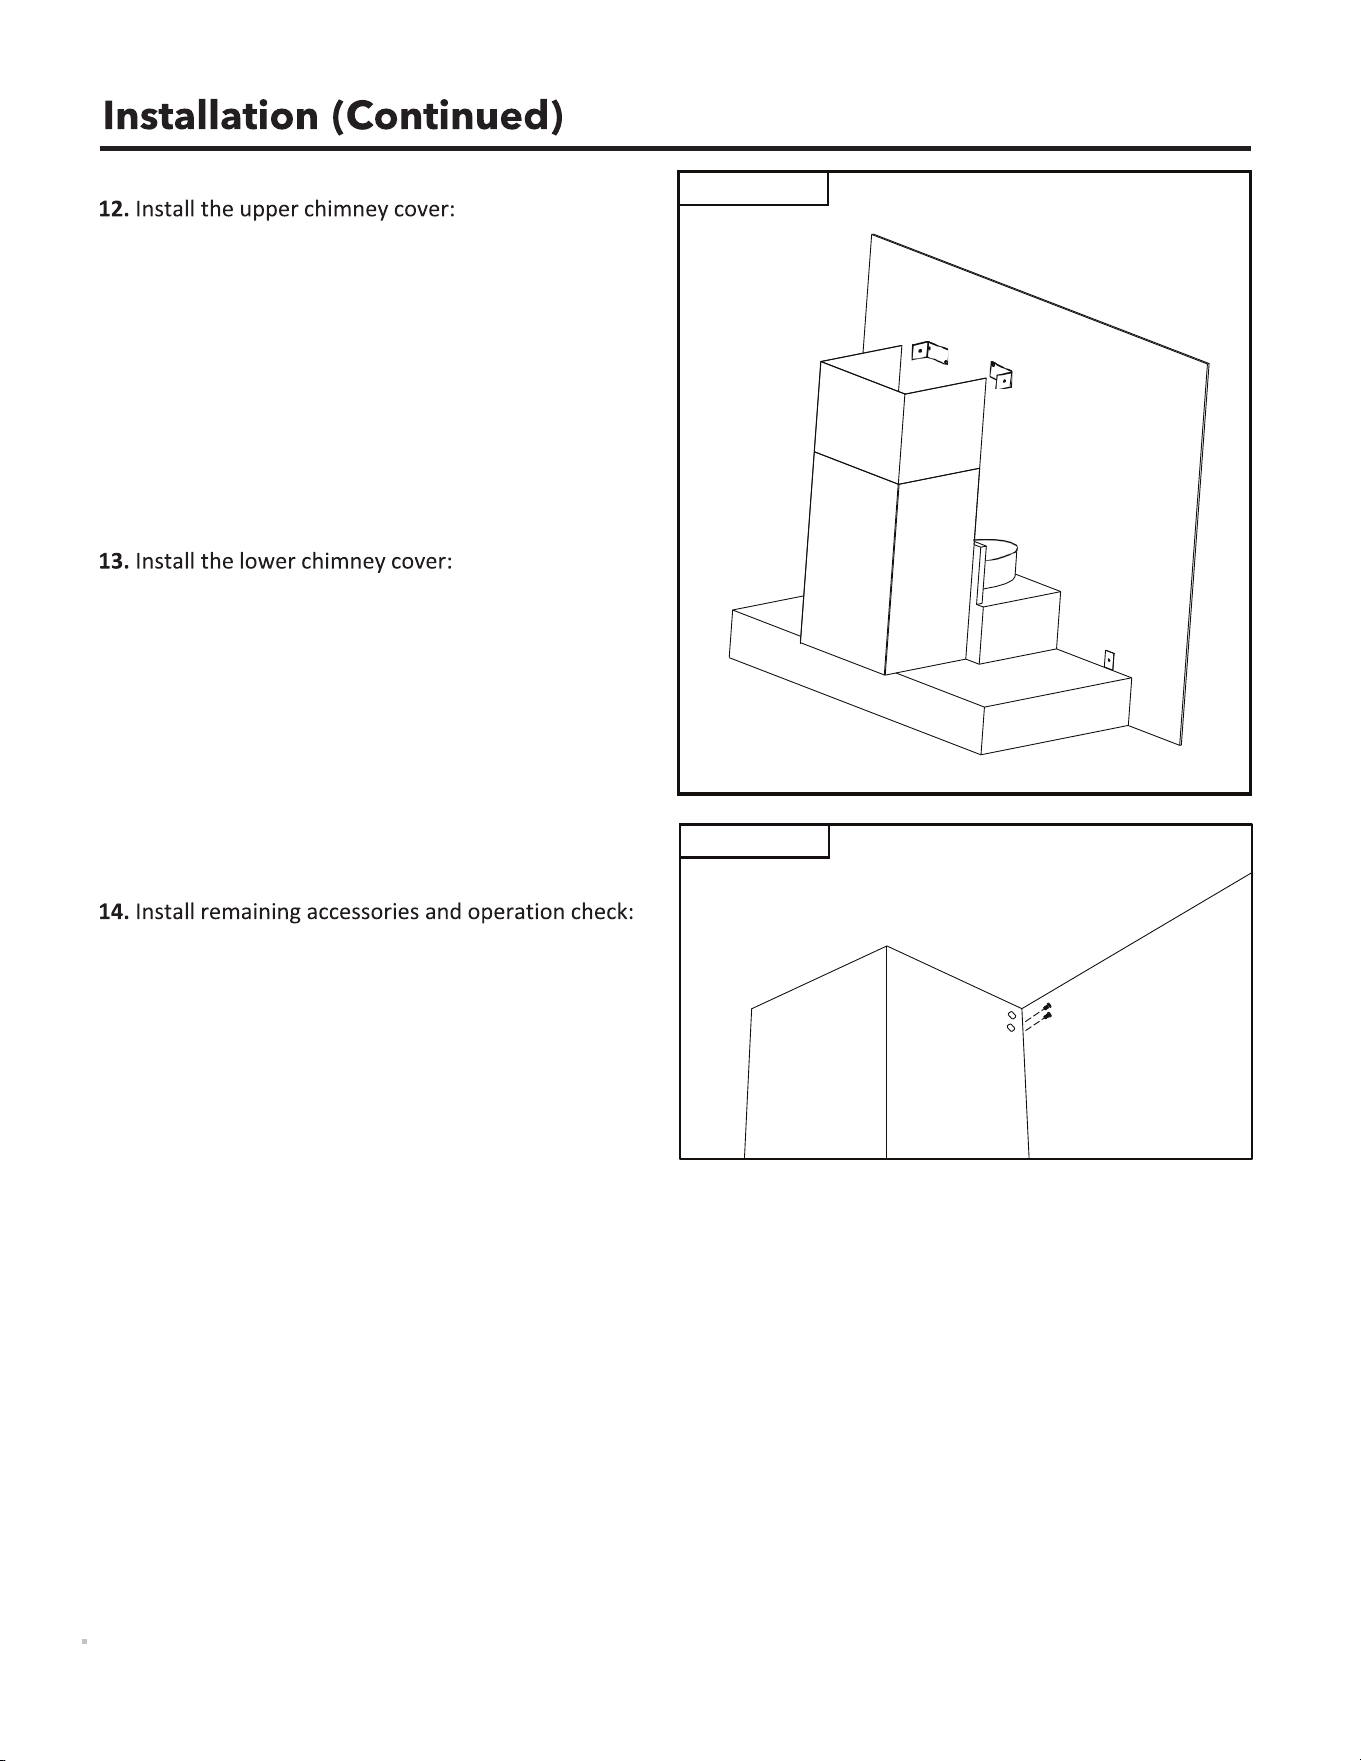
Figure 6
Figure 7
Having the installa�on hardware readily available, align
the upper chimney cover with the pre- installed (upper
chimney) moun�ng bracket and then screw the
hardware through the chimney into the moun�ng
bracket. Remove any finish protec�on wrapping.
To avoid any scratching, install one chimney piece at a
�me, star�ng with the upper chimney. Ensure the
chimney pieces are fully fastened before moving onto
any other step.
Confirm the orienta�on of the lower chimney cover.
Pull, stretch or flex the rear opening of the chimney so
it is temporarily larger than the upper chimney cover.
Carefully install or wrap the lower chimney over the
upper chimney cover and range hood body.
Screw in the moun�ng hardware through the lower
chimney cover into the range hood body. Remove any
finish protec�on wrapping.
Install aluminum filters (or op�onal stainless steel baffle
filters) then check the opera�on of the range hood.
Remove any other finish protec�on wrapping. Use
stainless steel cleaner to remove any finger prints or
marks.
WM-540 USER MANUAL
12
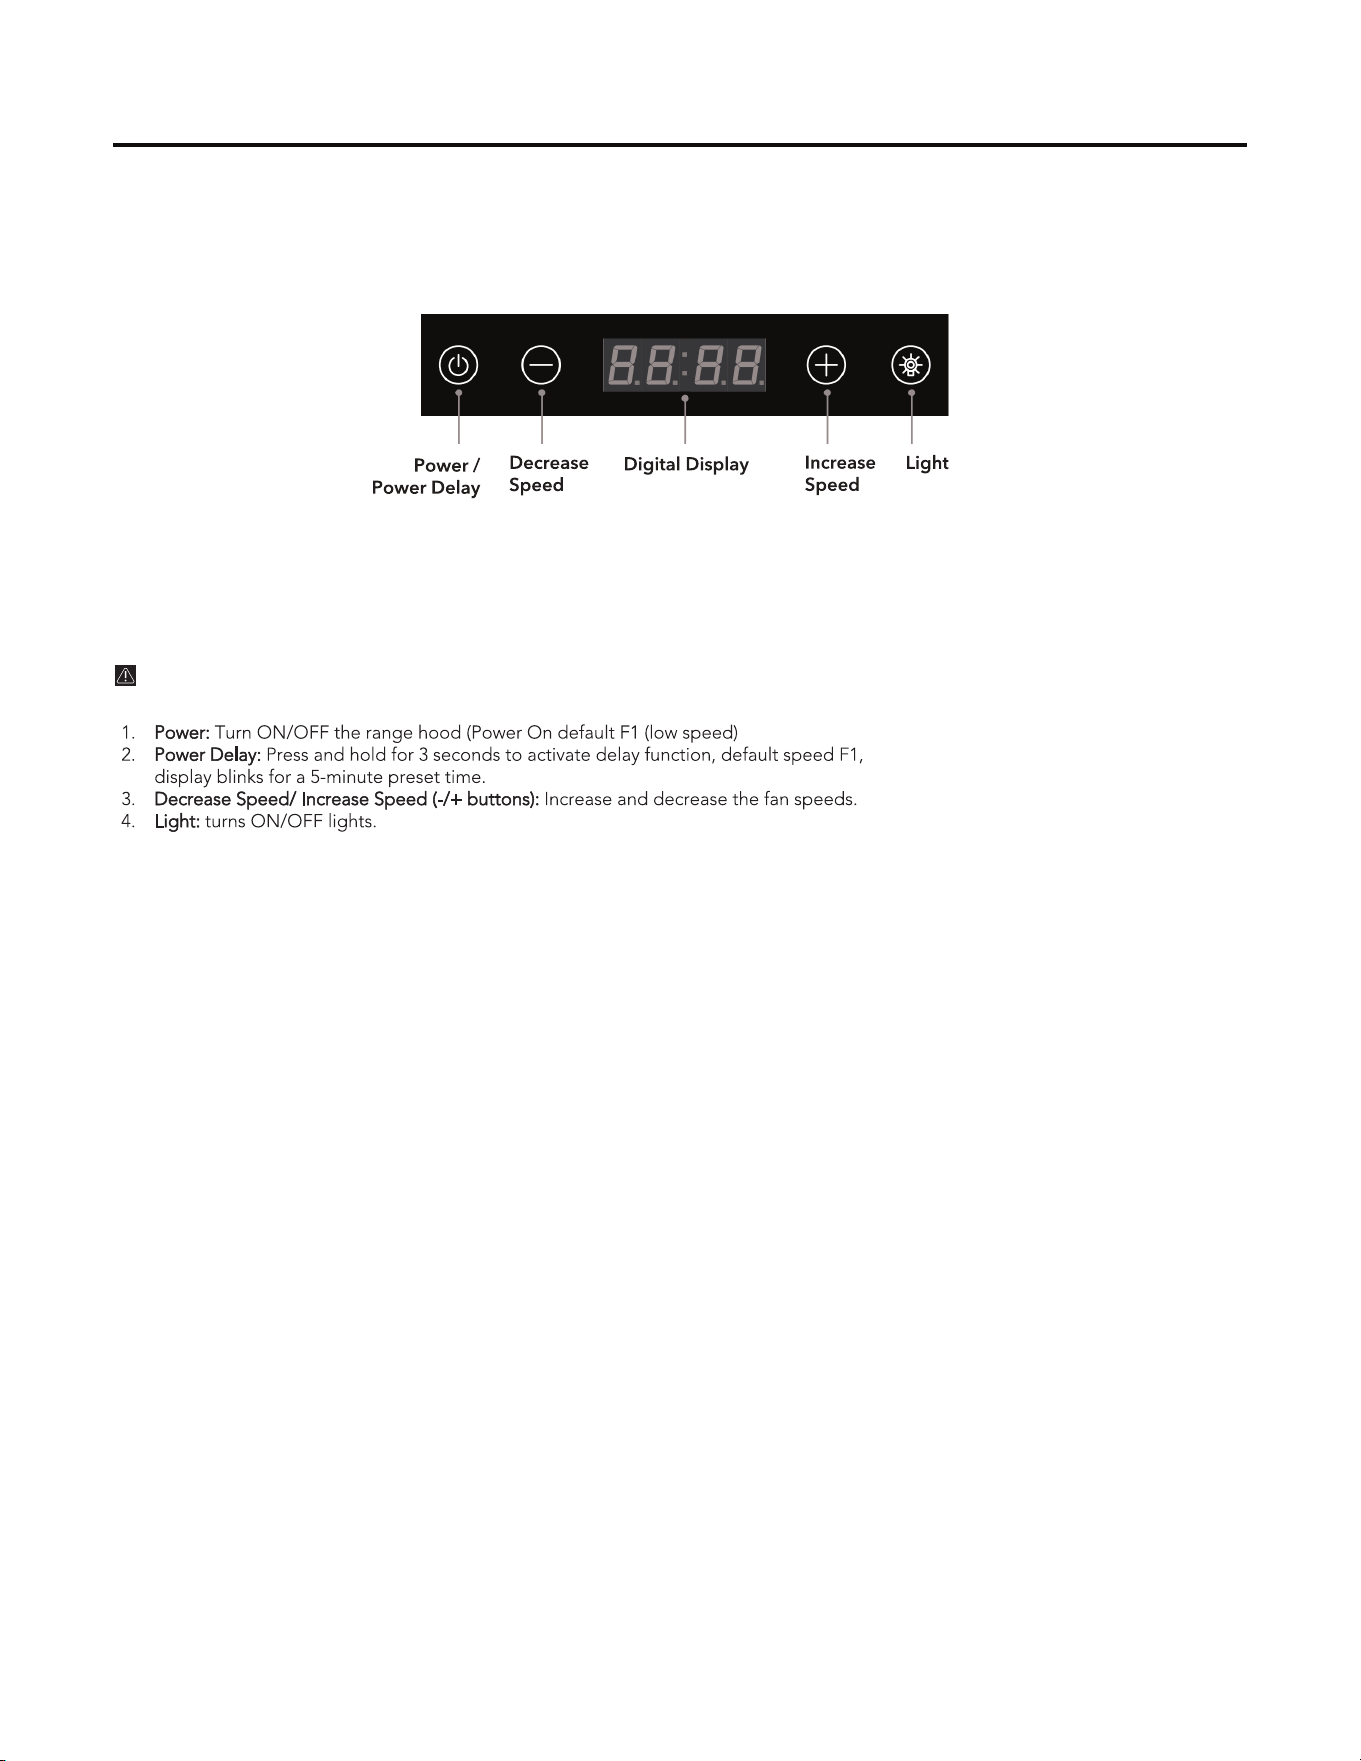
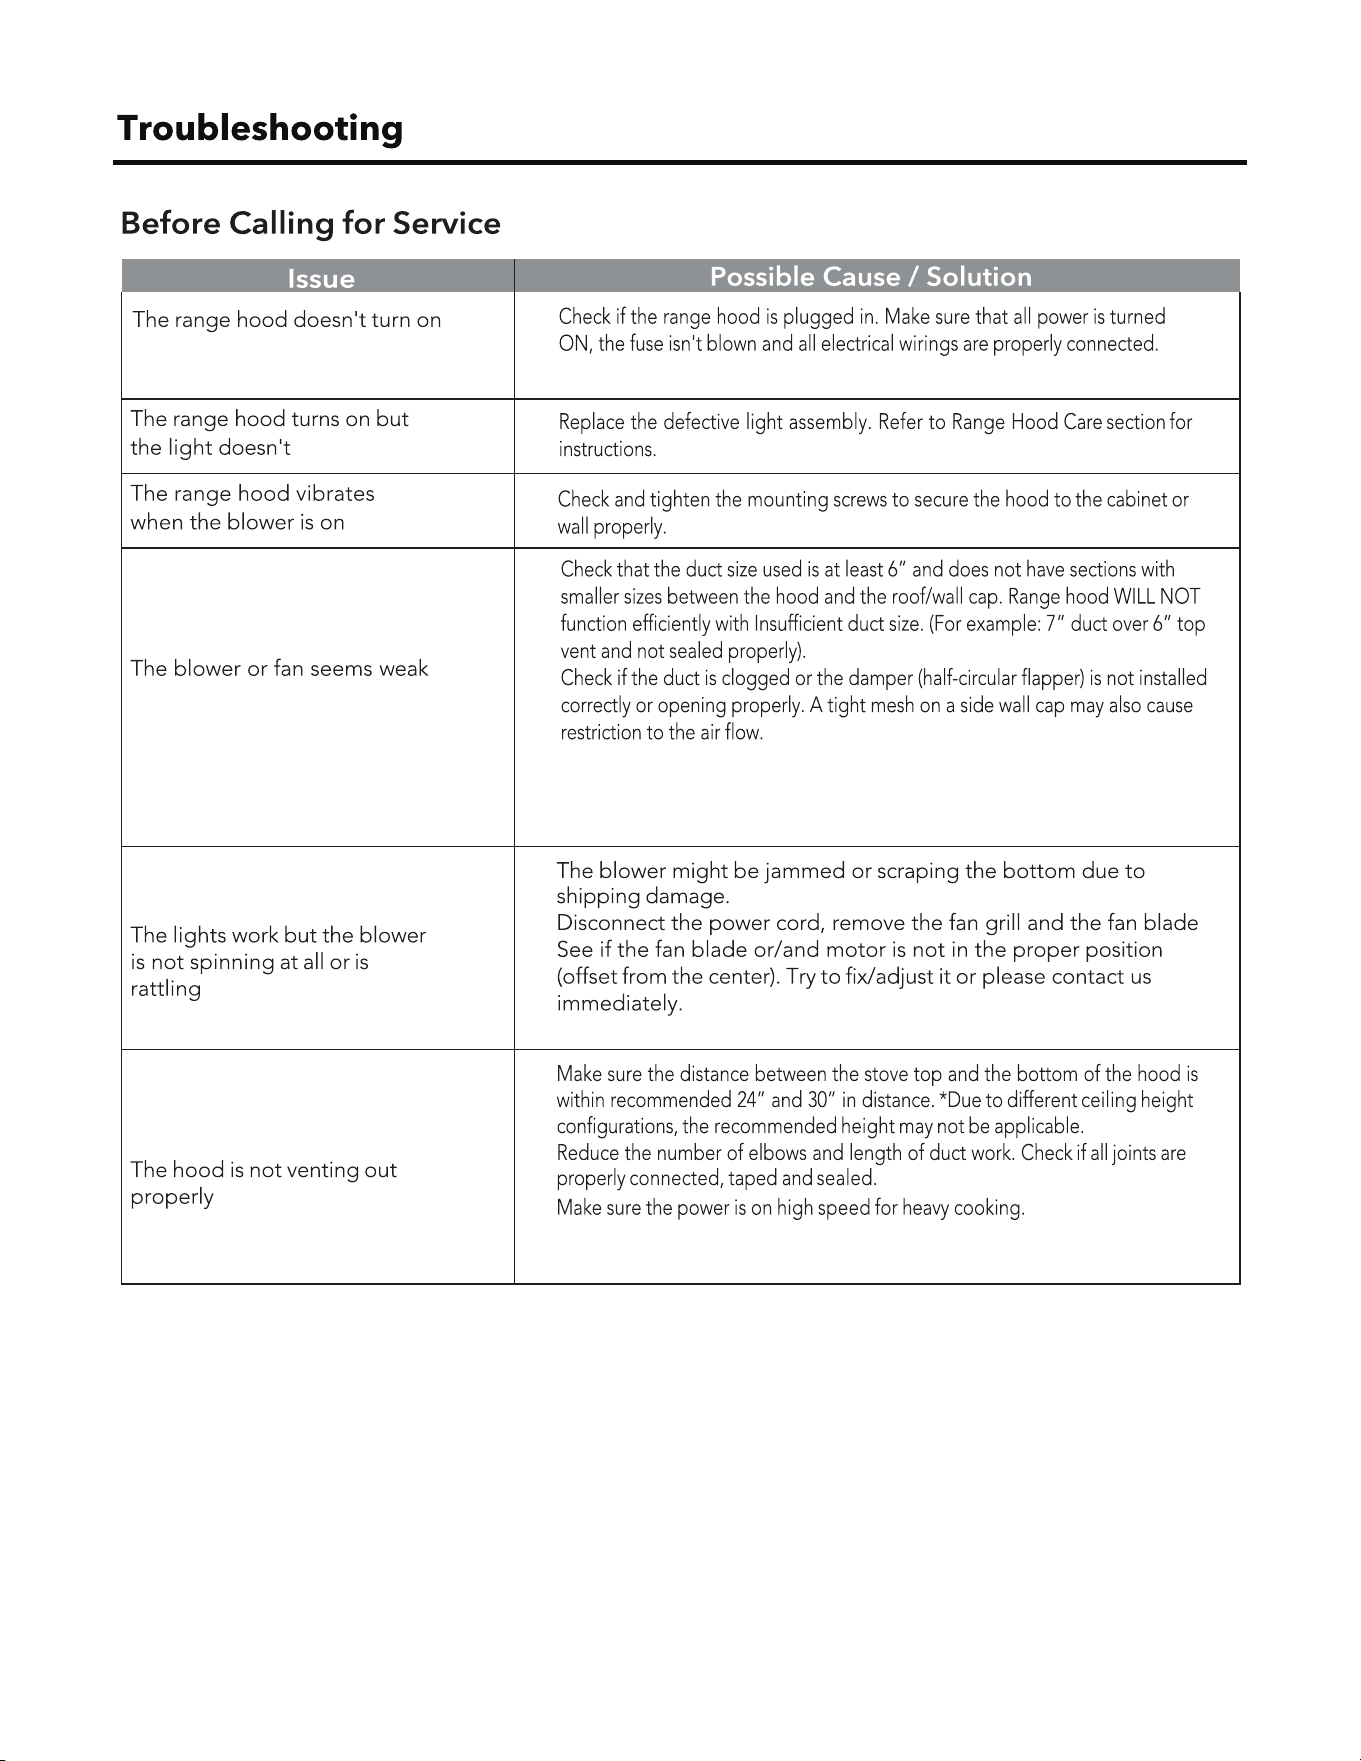
How to Use Your Range Hood
EASY ACCESS KNOB CONTROL
CAUTION: For halogen lamps never touch bulbs during
operation; they can get very hot.
Now that your range hood is installed, it’s time to learn how to
use it. It is very simple to use and is operated entirely using the
front control panel.
WM-540 USER MANUAL
13
•
•
•
•
•
•
•
•
•
•
WM-540 USER MANUAL
14
•
•
•
•
•
•
•
•
•
•
•
•
•
•
•
•
•
•
•
•
•
•
•
•
•
WM-540 USER MANUAL
15
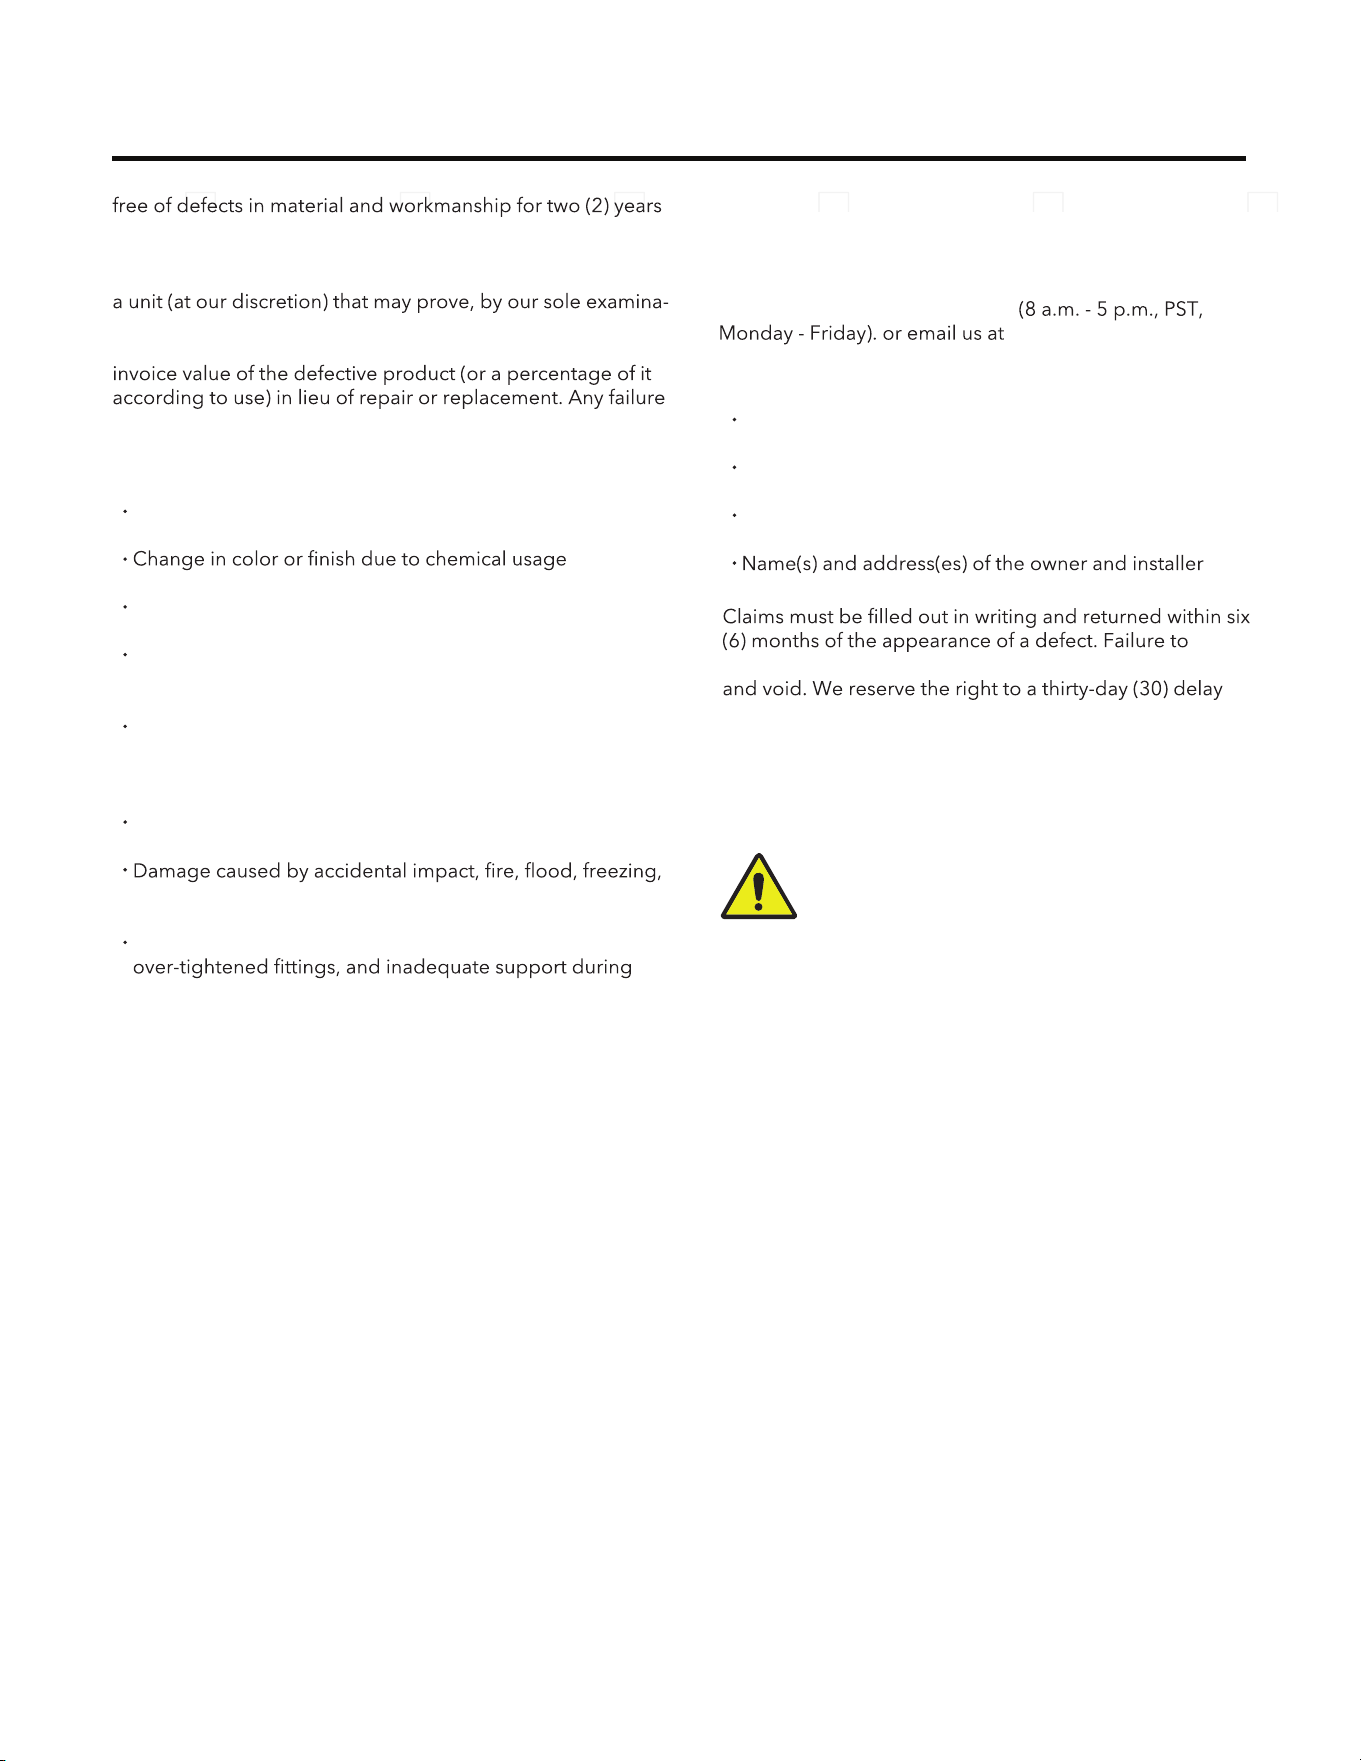
Any defects or damage to light bulbs
Improper installation not in accordance with the instructions
Dents, bumps, and scratches incurred during shipping,
handling, or installation
Damage caused by failure to follow care and cleaning
guidelines, including damage caused by the use of abrasive
cleaners
Alterations made to the unit by the purchaser or installer
and normal wear
Bends and warping caused by forced connections,
installation
This range hood is warranted to the original purchaser to be
from the date of purchase.
Our obligation shall be limited to the repair or replacement of
tion, to be defective under normal use and service during the
warranty period. We may issue credit in the amount of the
of this product that is not traceable to a defect in material or
workmanship is not covered by this warranty. These non-war-
rantable items include, but are not limited to:
A thorough inspection must be made before installation and
any damage must be promptly reported. We will not be liable
for failures or damage that could have been discovered or
avoided by proper inspection and testing prior to installation.
Incidental repairs that would involve a minimum of time and
effort on behalf of the purchaser will not be considered
warranty work and no compensation will be deemed forth
coming.
This warranty is non-transferable and shall be voided if the
unit is removed from its initial installation or if it is not installed
following the instructions.
Under no circumstance shall we be held liable for
personal injury or property damage resulting from
improper installation or use of this product. We will not
be held liable for inconvenience caused by loss of use of
this product, costs incurred for labor or materials, removal
and installation of replacement units, or any other
incidental or consequential damages. Costs relating to
obtaining access for repair or replacement are the
responsibility of the user.
Description of the range hood
Proof of sale
Details regarding the defect
comply with this stipulation will make this warranty null
following the receipt of a claim in which to inspect the
product. We assume no responsibility for labor costs,
removing or replacing a previously installed product,
transportation, or the return of a product.
Warranty Information
CALIFORNIA RESIDENTS ONLY
WARNING:
Cancer and Reproductive Harm
www.P65Warnings.ca.gov
WM-540 USER MANUAL 16
This warranty does not extend to commercial and
institutional installation or use.
Warranty Claim Procedure
If a claimable defect occurs, please contact our customer
service team at 1-800-929-0168
Before you make your claim call, please ensure that you
have:
Extended Warranties
If you are interested in an extended warranty, sign up on our website at www.hauslane.com
Parts and Accessories
If you need replacement parts or accessories, visit www.hauslane.com
Contact Us
We’d be happy to answer your questions or resolve any issues you may have.
Phone: 1-800-929-0168
Email: [email protected]
Find Us and Connect with Us
Contact Hauslane
WM-540 USER MANUAL
17