Heat Pump Dryer
Power supply: 120/240V~
Frequency: 60Hz
Capacity: 4.4 cu ft
Warning:
Before using this product, please
read this manual carefully and
keep it for future reference. The
design and specifications are
subject to change without prior
notice for product improvement.
Consult with your dealer or
manufacturer for details.
en
USER MANUAL &
INSTALLATION
INSTRUCTIONS
二
I 0
MODEL NUMBER
MLHE27H7BWW
MLHE27H7BCG
www.midea.com

01
SAFETY AND PRECAUTIONS
INTRODUCTION
WHAT YOU NEED TO KNOW ABOUT SAFETY INSTRUCTIONS
IMPORTANT SAFETY SYMBOLS AND PRECAUTIONS
IMPORTANT SAFETY INSTRUCTIONS
INSTALLATION REQUIREMENTS
IMPORTANT TO INSTALLER
BASIC REQUIREMENTS
LOCATION REQUIREMENTS
STACK KIT INSTALLATION INSTRUCTION
DRAIN SYSTEM
R
EQUIREMENTS
GROUNDING
REPLACEMENT PARTS AND ACCESSORIES
INSTALLATION INSTRUCTION
REMOVING FROM THE PACKAGE
PARTS IDENTIFICATION
TOOLS NEEDED IN INSTALLATION
INSTALLATION STEPS
OPERATING INSTRUCTION
CONTROL PANEL
DRYING A LOAD OF LAUNDRY
APP SETUP AND OPERATION
EMPTY THE WATER TANK
CLEAN THE HEAT EXCHANGER
SPECIAL LAUNDRY TIPS
Thank you for choosing Midea! Before using your new Midea product,
please read this manual thoroughly to ensure that you know how to
operate the features and functions that your new appliance oers in a safe
way.
THANK YOU LETTER
CONTENTS
01
06
06
06
06
10
13
14
16
16
17
17
17
18
18
22
22
25
29
31
31
32
33
03
03
03
THANK YOU LETTER
03
03
S
ELECTRICAL
S
S
S
CLEAN FILTER
MAINTENANCE
CARE AND MAINTENANCE
TROUBLESHOOTING INSTRUCTIONS
CHECK THESE SOLUTIONS IF YOUR
ERROR CODES
APPENDIX
34
34
35
35
37
38
39
40
02
CERTIFICATIONS
WARRANTY
DRYER...
Read all instructions and explanations before use.Follow the instructions carefully.
Keep the operation instructions handy for later use. If the appliance is sold or
passed on , ensure that the new owner always receives these operation
instructions.
SAFETY AND PRECAUTIONS
WARNING
INTRODUCTION
WARNING
CAUTION
This indicates that hazards or unsafe practices may cause
minor personal injury or property damage.
– Do not store or use gasoline or other flammable vapors and liquids in the
vicinity of this or any other appliance.
– Installation and service must be performed by a qualified installer
service
agency, or the gas supplier.
WARNING-To reduce the risk of fire, electric shock, or injury to persons when
using your appliance, follow basic precautions, including the following:
WHAT YOU NEED TO KNOW ABOUT SAFETY INSTRUCTIONS
IMPORTANT SAFETY INSTRUCTIONS
IMPORTANT SAFETY SYMBOLS AND PRECAUTIONS
03
Congratulations on the purchase of your new dryer.The dryer features the latest
design and functions and will provide reliable and trouble-free performance.
This manual contains important information on the installation, use, and care of your
appliance. Please read this manual carefully before installation and operation of this
machine to prevent injury and property damage. Warnings and Important Safety
Instructions in this manual DO NOT cover all possible conditions and situations that may
occur. It is your responsibility to use.
This indicates that hazards or unsafe practices may cause
serious personal injury or death.To reduce the risk of fire,
explosion, electric shock, or personal injury when using
your dryer, these basic safety precautions SHOULD be
followed.
For your safety,the information in this manual
must be followed to minimize the risk of fire or
explosion andto prevent property damage,
personal injury or death.
,
the
- Read all instructions before using the appliance.
- Use this appliance only for its intended purpose as described in this
Manual.
- Before use, the dryer must be properly installed as described in this manual.

SAFETY AND PRECAUTIONS
- ALWAYS follow the fabric care instructions supplied by the garment
manufacturer.
- R isk of Suffocation and Injury from Entrapment: Do not allow children to play
on or in the appliance. Close supervision of children is necessary when the
appliance is used near children.
- Before the appliance is removed from service or discarded, remove the lid of
the washing or door of the drying compartment.
- Do not reach into the appliance if the drum is moving.
- Do not install or store this appliance where it will be exposed to the weather or
freezing temperatures.
- Do not tamper with the controls.
-
Do not repair or replace any part of the appliance or attempt any servicing
unless it is specifically recommended in the user-maintenance instructions or
in published user-repair instructions that you understand and have the skills
to carry out.
- Packaging material can be dangerous for children. There is a risk of
suffocation! Keep all packaging from children.
- Always check the inside of the dryer for foreign objects before loading laundry.
Keep the door closed when not in use.
- Do not use fabric softeners or products to eliminate static unless
recommended by the manufacturer of the fabric softener or product.
- Clean the lint screen before or after each load.
- Keep the area around the exhaust opening and surrounding areas free from lint
,
dust, and dirt.
- The interior of the dryer and exhaust duct should be cleaned periodically by
qualified service personnel.
04
- This appliance must be grounded. See “Electrical equirements” and
” in the “ ” section.INSTALLATION REQUIREMENTS
- This appliance must be properly grounded. Never plug the power cord into a
receptacle that is not grounded adequately and in accordance with local and
-
Ensure pockets are free from small irregularly shaped hard objects and foreign
material, i.e. coins, knives, pins, etc. These objects could damage your dryer.
- Do not use replacement parts that have not been recommended by the
manufacturer (e.g. parts made at home using a 3D printer).
- Sharp Edges -To reduce the risk of injury, use care when cleaning the condenser
or evaporator coil fins.
SAVE THESE INSTRUCTIONS.
R
“Grounding r
equirements
more information.
“Grounding
” section
national codes. Refer to
” in the “INSTALLATION
EQUIRE
r
equirements
REQUIREMENTS
for
WARNING- Risk of fire or explosion
Do not dry items that have been previously cleaned, washed, soaked, or spotted
with gasoline, dry cleaning solvents, or other flammable or explosive substances, as
they emit vapors that could ignite or explode . Any material that has been in contact
with a cleaning solvent orflammable liquids or solids should not be placed in the
dryer until all traces of these flammable liquids or solids and their fumes have been
removed.
SAFETY AND PRECAUTIONS
There are many highly flammable items used in homes, such as acetone,
denatured alcohol, gasoline, kerosene, some liquid household cleaners, some
spot removers, turpentine, waxes, and wax emovers.
Do not dry items containing foam rubber (may be labeled latex foam) or
similarly textured rubber-like materials on a heat setting. Heated foam rubber
materials a under certain circumstances, produce fire by spontaneous
combustion.
CAUTION
- Do not sit on top of the dryer.
- Because of continuing product improvements, Midea America reserves the
right
c
hange specifications without notice. For complete details, see the
Installation Instructions packed with your product before selecting
cabinetry, making cutouts, or beginning installation.
- Do not dry clothing with large buckles, buttons, or other heavy metal or solid
things.
- Install and use in accordance with the manufacturer’s instructions.
- Do not place items in your dryer that have been spotted or soaked with
vegetable oil or cooking oil. Even after being washed, these items may
contain significant amounts of these oils.
Residual oil on clothing can ignite spontaneously. The potential for
spontaneous combustion increases when items containing vegetable oil or
cooking oil are exposed to hea
t. Heat source such as your dryer can warm
these items, allowing an oxidation reaction in the oil to occur.
Oxidation creates heat. If this heat cannot escape, the items can become hot
enough to catch fire. Piling, stacking, or storing these kinds of items may
prevent heat from escaping and can create a fire hazard.
- Take care that children’s fingers are not caught in door when closing it. This
may result in injury.
05
Do not dry articles that have been previously cleaned in, washed in,
soaked in
,
or spotted with gasoline, dry-cleaning solvents, other flammable or
ex
p
losive
substances as they give off vapors that could ignite or explode.
Do not use the dryer to dry clothes which have traces of any flammable
substance
, such as vegetable oil, cooking oil, machine oil, flammable chemicals,
thinner, etc.,or anything containing wax or chemicals, such as mops and
cleaning clothes. Flammable substances may cause the fabric to catch fire by
itself.
Do not store or use gasoline or other flammable vapors and liquids near this or
any other appliance.
Keep the area underneath and around your appliances free of combustible
materials
(lint, paper, rags, etc.), gasoline, chemicals and other flammable
vapors and liquids
.
Do not place items exposed to cooking oils in your dryer. Items contaminated
with cooking oils may contribute to a chemical reaction that could cause a load
to catch fire. o
reduce
the
risk
of
fire ,
T
(
cool down period). Avoid
stopping a tumble dryer before
the end
of the drying cycle unless all items are
quickly removed and spread out
so that any residual heat is dissipated.
without heat
the final part of a tumble dryer cycle occurs
Store all highly flammable items away from the dryer.
r
c n,
to

INSTALLATION REQUIREMENTS
CAUTION
Make sure you have everything necessary for the proper installation.
- A GROUNDED ELECTRICAL OUTLET is required. Refer to the “Electrical
Requirements” section for more information
.
- An electric dryer
POWER CORD
if using a U.S.model
IMPORTANT TO INSTALLER
Please read the following instructions carefully before installing the dryer.
These instructions should be kept for future reference.
The dryer is not suitable for installation in a mobile
home.
Remove the door from all discarded appliances to
avoid the danger of a child being trapped and
suffocating.
Install the
dryer according to the
manufacturer's
instructions and all applicable
local codes.
BASIC REQUIREMENTS
LOCATION REQUIREMENTS
- The dryer should be located that there is enough space at the front
for loading the dryer
clearance measurements.
- Make sure the room in which the dryer is located has enough fresh air.
The dryer must be located where there are no air-flow obstructions.
- The dryer must not be installed or stored in an area where it will be
exposed to water and/or weather. The dryer area must be kept clear
of combustible materials, gasoline, and other flammable vapors and
liquids
A d ryer produces combustible lint. The area around the dryer
should
b
e kept lint-free.
06
When discarding an appliance,unplug and cut
off the power cord.
is required and must be purchased separately
so
.
See the following pages for precise minimum
.
-
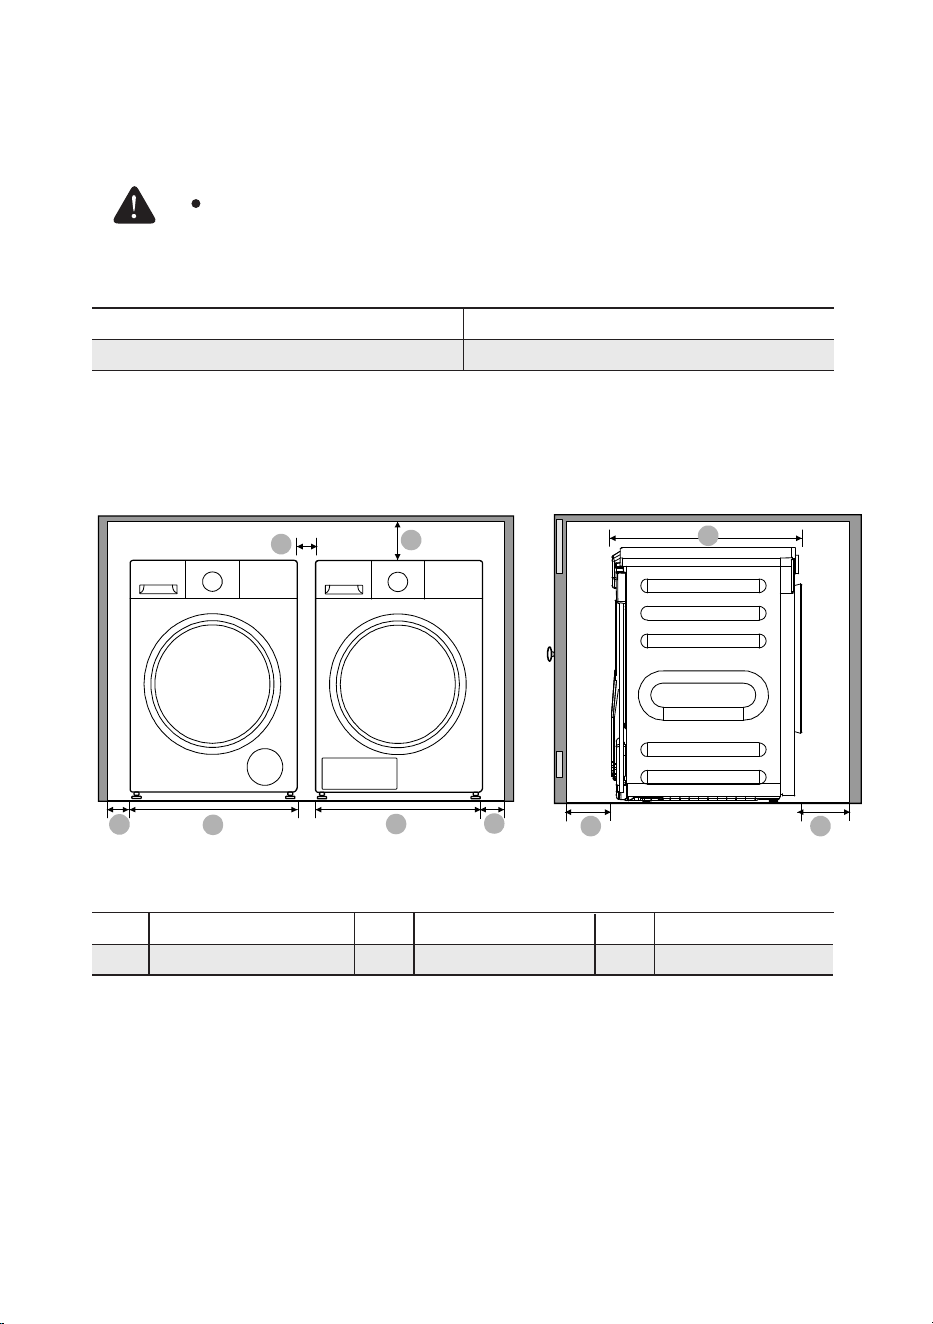
WARNING
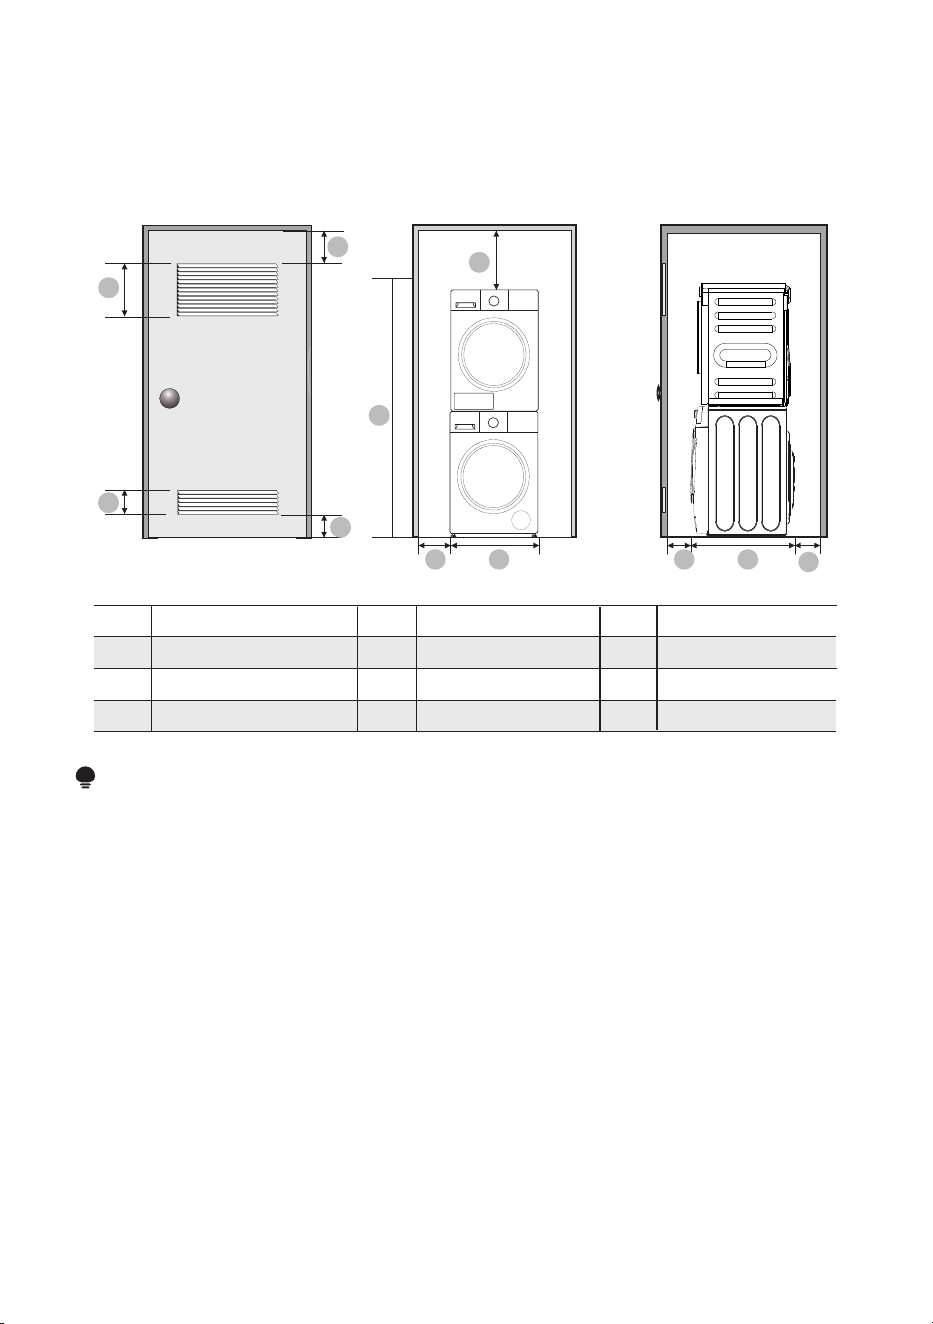
Minimum clearances between the dryer and adjacent walls or other surfaces :
No other fuel-burning appliance should be installed in the same closet
as the dryer.
INSTALLATION REQUIREMENTS
07
1 in. (25.4mm)
2 in. (50.8mm)
Sides
Top
Rear
2 in.(50.8mm)
Closet front
2 in. (50.8mm)
1 in. (25.4mm)
23.4 in. (595mm)
A
B
C
2 in.(50.8mm)
D
2 in. (51mm)
E
25.6 in.(650mm)
F
2 in. (50.8mm)
Alcove , closet or wall insert/recessed installations
A
A
A
B
B
C
D F
E
A
CB D
E
F
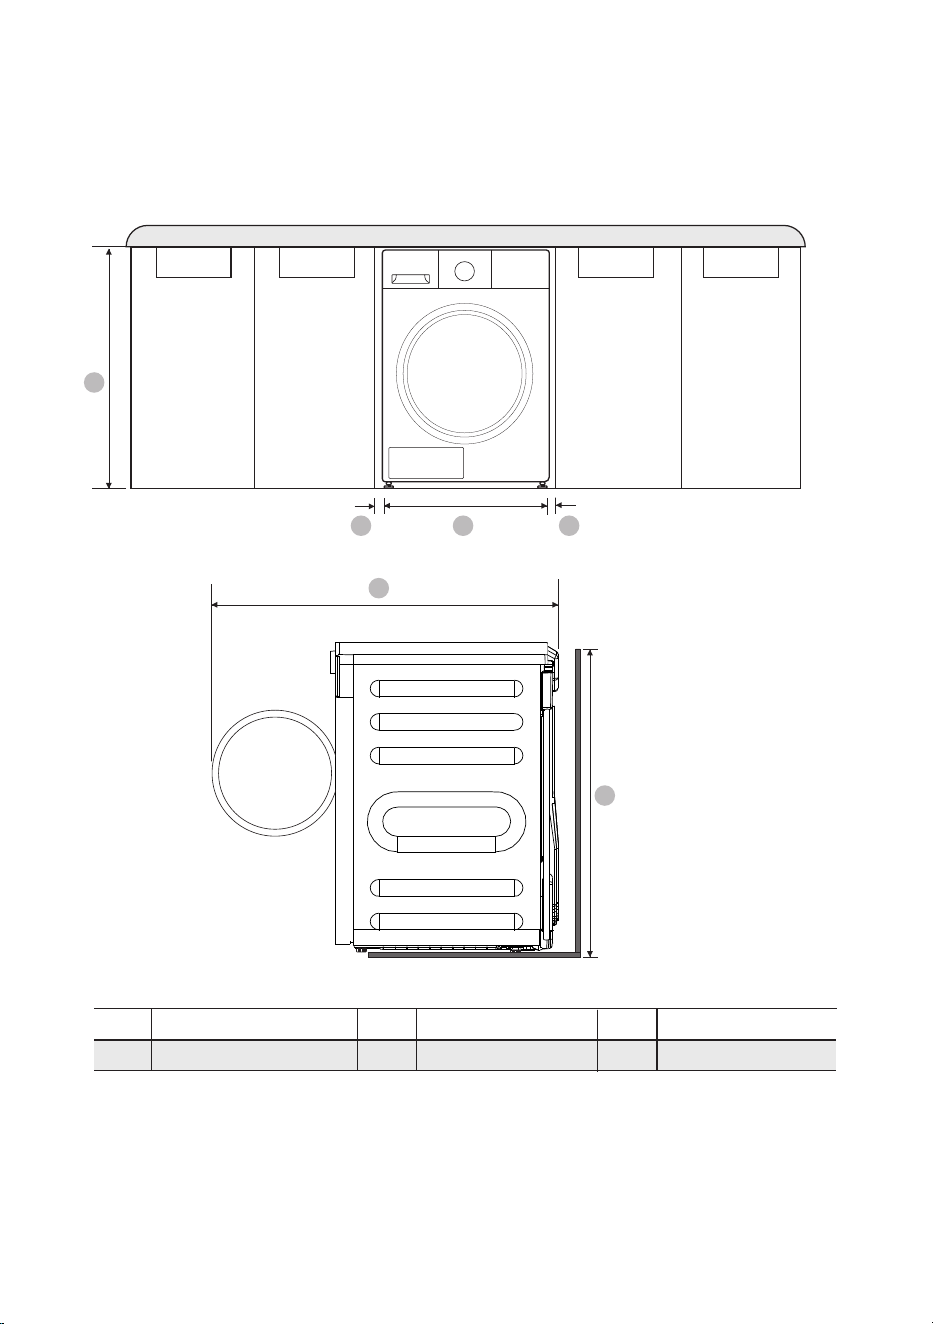
35.5in.(901mm)
23.4 in. (595mm)
42.2in.(1072mm)
INSTALLATION REQUIREMENTS
Undercounter installation
A
B
C
D
E
F
1 in. (25mm)
1 in. (25mm)
33.5in.(850mm)
08
A
B
C
D
E
F
G H I J
K
2in.(50.8mm)
INSTALLATION REQUIREMENTS
Installation with stacked washing machine and dryer
A
C
B
D
E
G
F
H
I
K
J
24in.(1550mm)
3in.(76mm)
3in.(76mm)
48in. (3100mm)
1in.(25.4mm)
23.4 in. (595mm)
/
2 in.(50.8mm)
3in.(76mm)
25.7 in.(653mm)
NOTE
• The front of the closet must have two unobstructed air openings for a
combined minimum total area of 72 sq.in. (465 sq.cm) with a minimum
clearance of 3 in. (76mm) at the top and bottom. A slatted door with
equivalent space clearance is acceptable.
09
10
INSTALLATION REQUIREMENTS
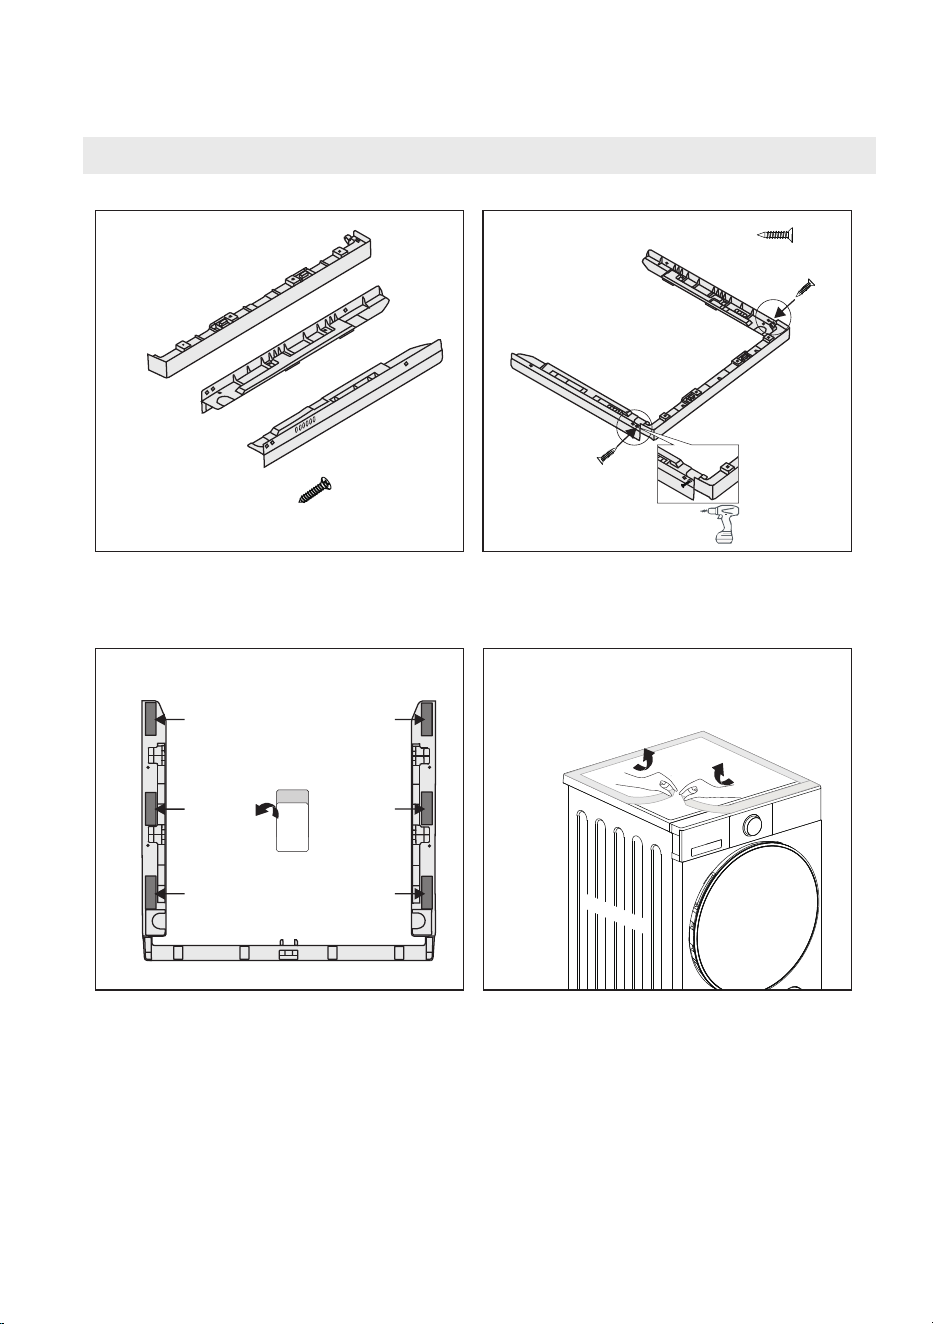
1
1×
1×
1×
6×
2 ×2
≈5 N·m
3M
3
4
WAS
H
ER
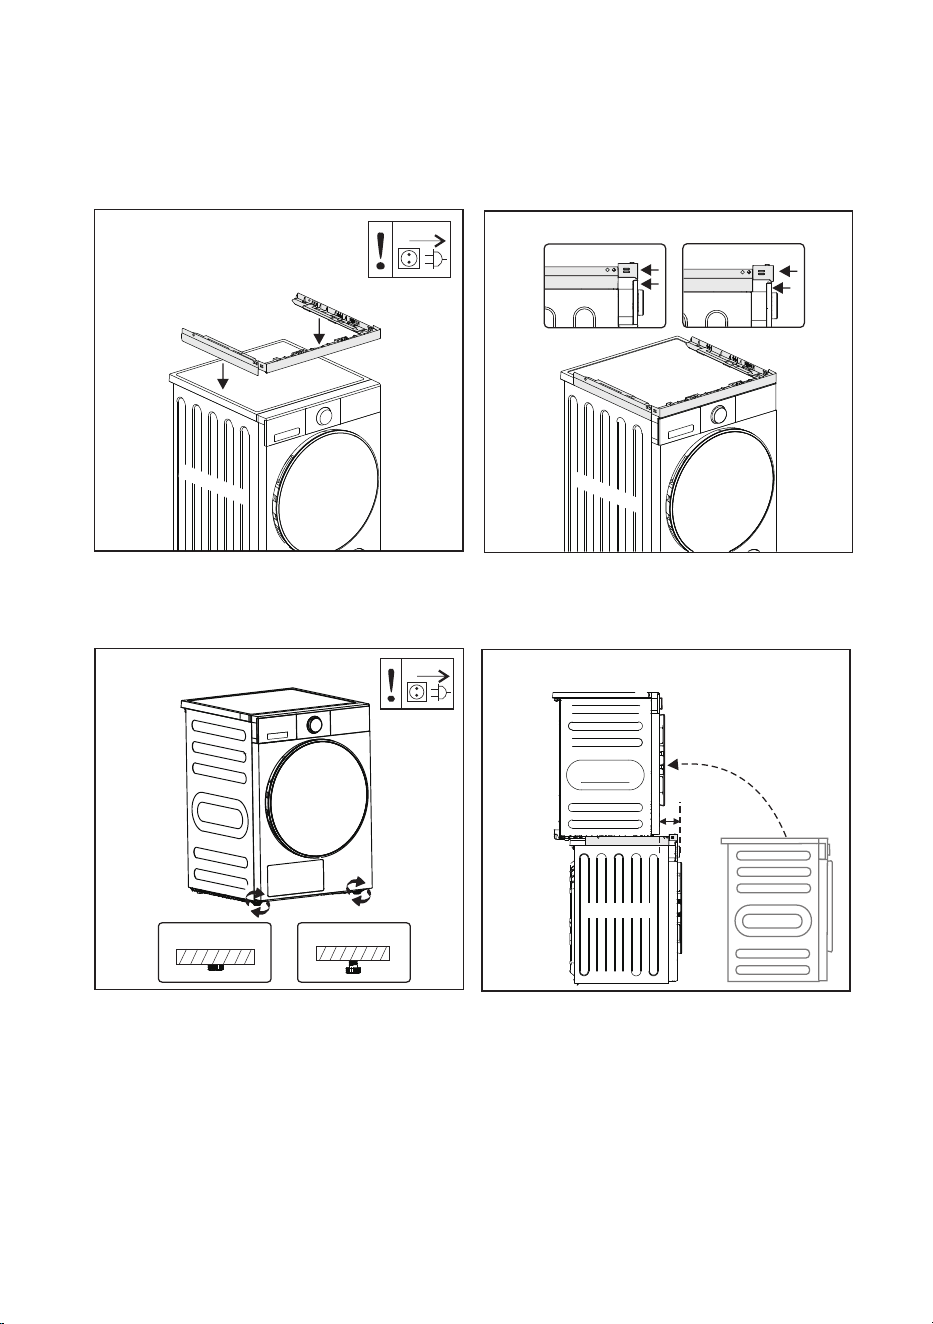
STACKING KIT INSTALLATION GUIDE
11
INSTALLATION REQUIREMENTS
√
×
7
DRYER
8
≥15cm
DRY ER
WAS HER
DRY ER
5
WAS HER
6
√
×
WA
SHER
12
INSTALLATION REQUIREMENTS
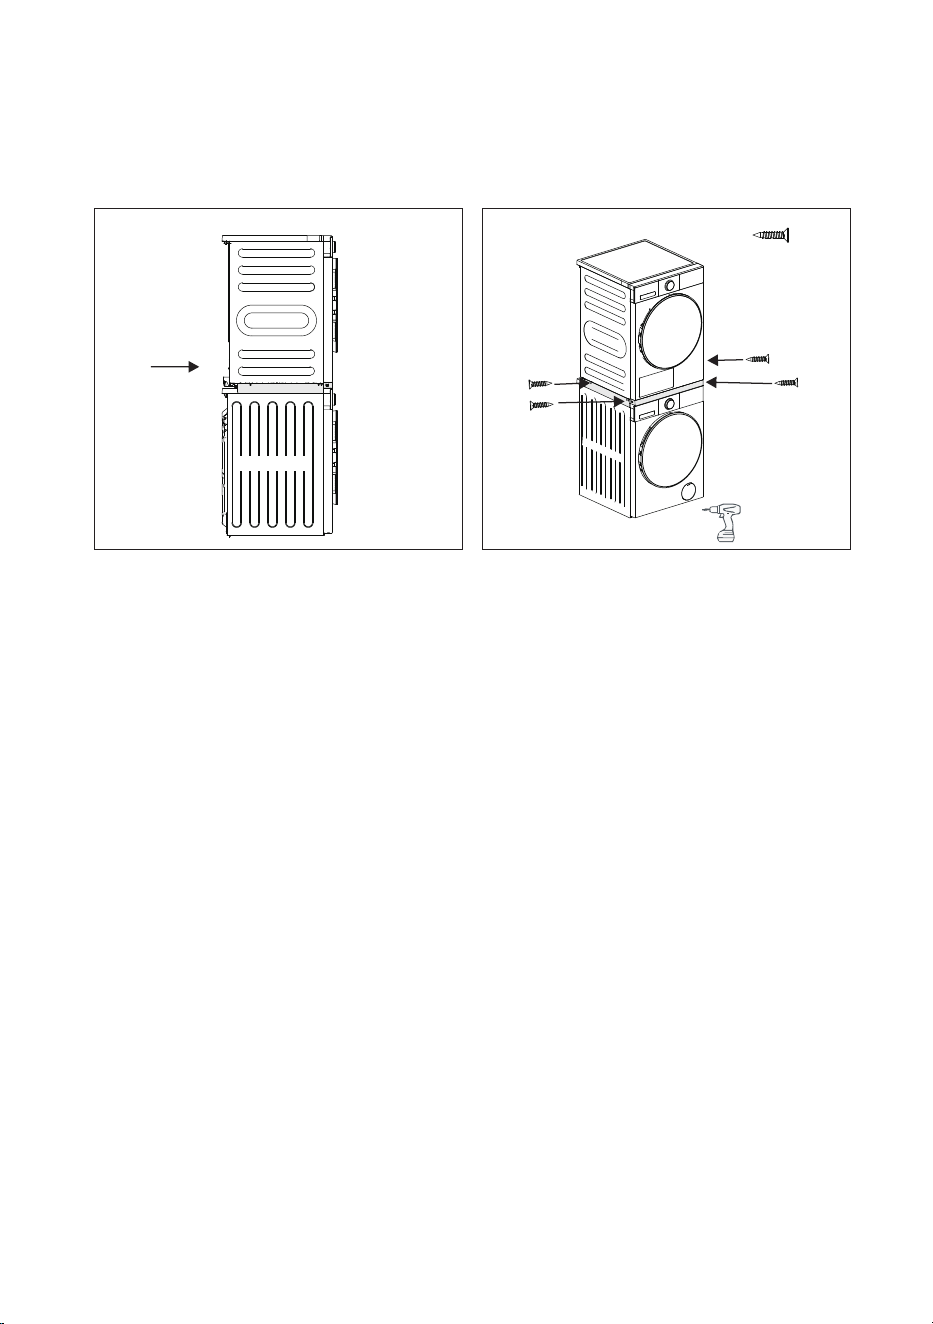
9
10
F
≈
5 N·m
×4
DRY ER
WAS HER
WAS
H
ER
DR YE R
13
INSTALLATION REQUIREMENTS
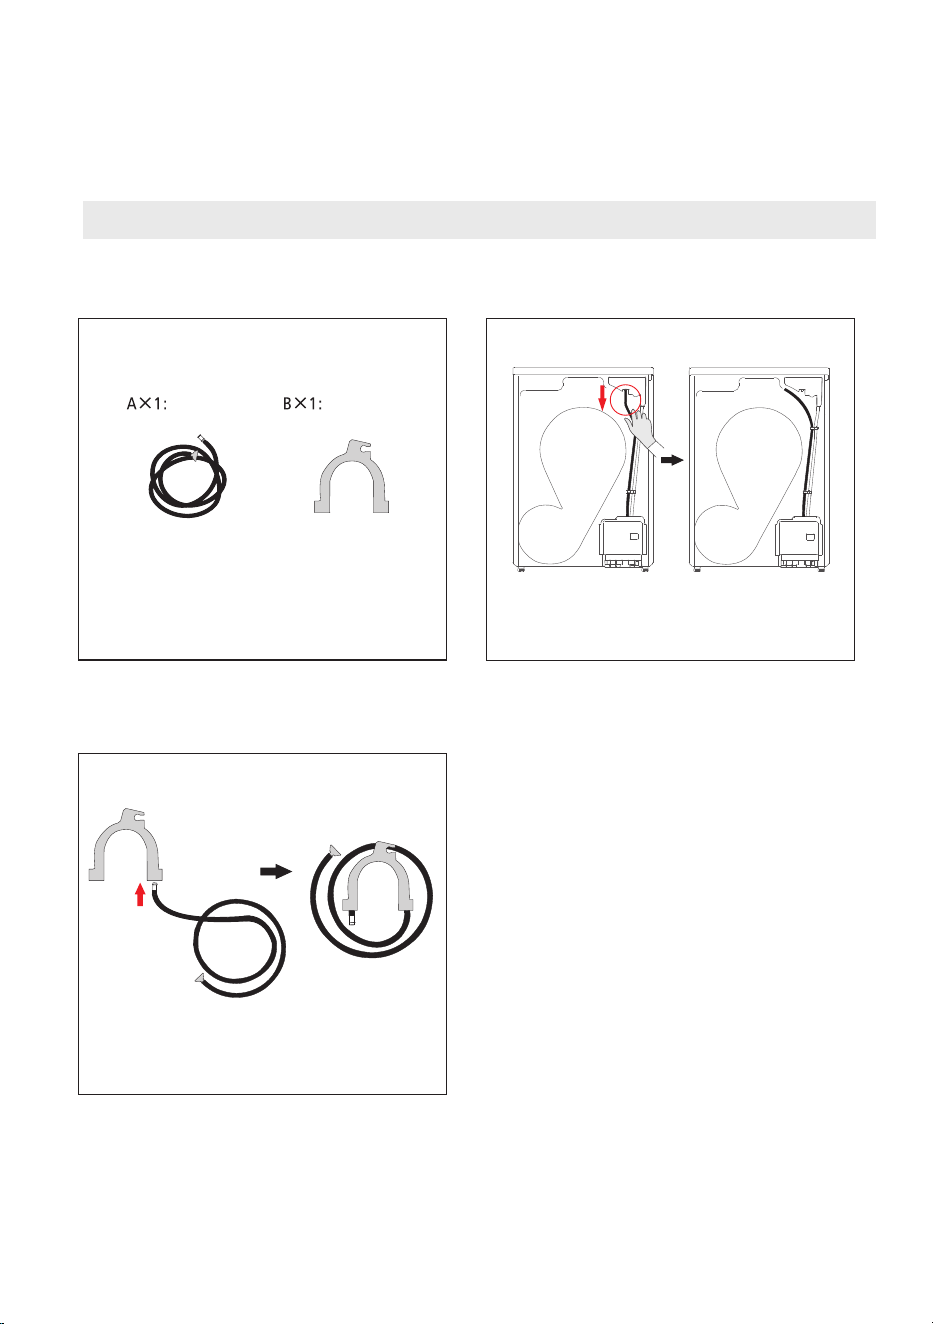
Use the drain hose extension to drain water without using the water tank.
DRAIN SYSTEM EXTENSION INSTALLATION GUIDE
1
2
3
There are two individual items included in the
accessory package in the dryer drum: the
drain hose and the drain hose holder.
Locate the drain hose on the rear of the dryer.
Twist to remove the hose from the water tank.
Pass the drain hose extension through the
drain hose holder.
,
The wiring diagram is located on the back board of the unit.
- The improper connection of the equipment grounding conductor can
result in the risk of electric shock. Check with a qualified electrician or
serviceman if you are in doubt as to whether your dryer is properly
grounded. Do not modify the plug provided with your dryer - if it doesn’t
fit the outlet, have a proper outlet installed by a qualified electrician.
- To prevent unnecessary risk of fire, electrical shock, or personal injury, all
wiring and grounding must be done in accordance with local codes, or in
the absence of local codes, with the National Electrical Code, ANSI/NFPA
No. 70 - Latest Revision (for the U.S.) or the Canadian Electrical Code CSA
C22.1 - Latest Revisions and local codes and ordinances. It is your
responsibility to provide adequate electrical services for your dryer.
- All gas installations must be done in accordance with the National Fuel
Code ANSI/Z2231 - Latest Revision (for the U.S.) or CAN/CGA - B149
Installation Codes - Latest Revision (for Canada) and local codes and
ordinances.
WARNING
INSTALLATION REQUIREMENTS
ELECTRICAL REQUIREMENTS
14
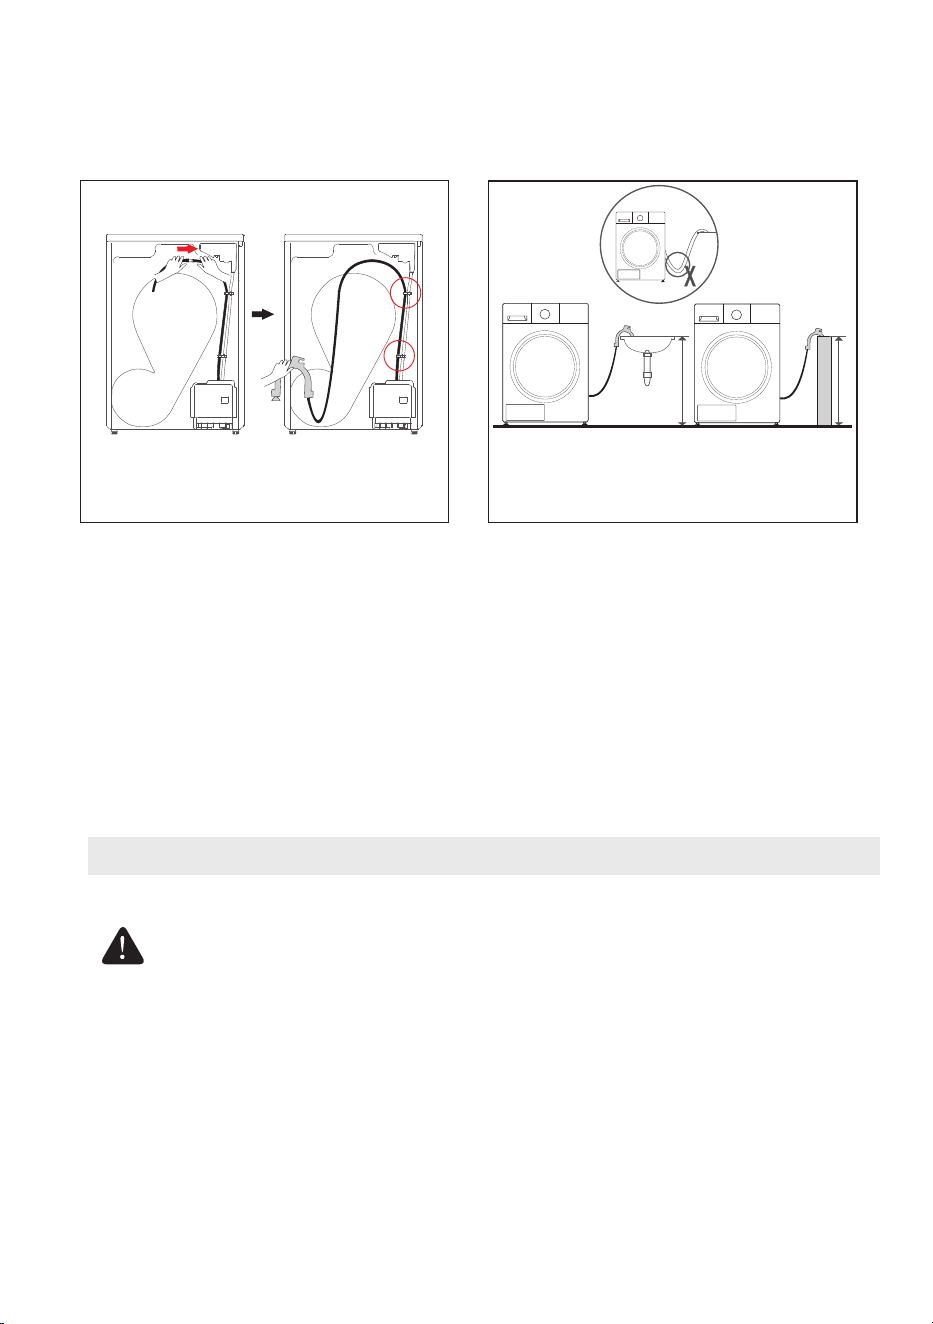
4
5
Connect the drain hose extension with the
dryer drain hose. Make sure both buckles are
closed to avoid poor drainage.
Hang the drain hose holder on the edge of a
basin or wall pipe. Make sure that the holder
is secure and that there are no excessive
bends or kinks in the hose.
Max.80cm
Max.80cm
- If a power cord is used, the cord should be plugged into a 30-ampere receptacle.
- The power cord is NOT provided with U.S. electric model dryers.
RISK OF ELECTRIC SHOCK:
WARNING
An individual branch (or separate) circuit serving only your dryer is recommended.
DO NOT USE AN EXTENSION CORD.
Electrical connections
- A 120/240 volt, 60Hz AC approved electrical service fused through a fuse or
circuit breaker on both sides of the line is required.
- All Canadian models are shipped with the power cord attached.
INSTALLATION REQUIREMENTS
Electric models - U.S. only
When local codes allow, the electrical supply of the dryer may be
connected by means of a new power supply cord kit, marked for use with a
dryer, that is UL listed and rated at a minimum of 120/240 volts, 30-ampere
with three No. 10 copper wire conductors terminated with closed loop
terminals, open-end spade lugs with turned up ends, or with tinned leads.
- Do not reuse a power supply cord from an old dryer. The power cord
electric supply wiring must be retained at the dryer cabinet with a
suitable UL-listed strain relief.
- Grounding through the neutral conductor is prohibited for (1) new
branch-circuit installations, (2) mobile homes, (3) recreational vehicles,
and (4) areas where local codes prohibit grounding through the neutral
conductor. (Use a 4-prong plug for 4 wire receptacles, NEMA type 14-
30R.)
Electric models - Canada only
NOTE
• A power cord is NOT provided with U.S. electric model dryers.
15
The dryers require a 120/240 volt, 60Hz AC approved electrical service.
The electric service requirements can be found on the data label located on the
back.
A 30-ampere fuse or circuit breaker on both sides of the line is required.

-
- For products sold in the U.S., your dryer has a optiona corsold separately
wi
t
h an equipment
grounding conductor and a grounding plug.
For products sold in Canada, your dryer is equipped with a cor that has an
equipment-grounding conductor and a grounding plug.
- The plug must be plugged into an appropriate outlet that is properly installed
and grounded in accordance with all local codes and ordinances.
- Do not modify the plug provided with the appliance: if it will not fit the outlet,
have a proper outlet installed by a qualified electrician.
- If a power cord is not used and the electric dryer is to be permanently wired,
t
his appliance must be connected to a grounded metal, permanent wiring system,
or an equipment-grounding conductor must be run with the circuit conductors
and connected to the equipment-grounding terminal or lead on the appliance
.
WARNING
- Improper connection of the equipment-grounding conductor can result in
a risk of electric shock. Check with a qualified electrician or service
representative or personnel if you are in doubt as to whether the appliance
is properly grounded.
If your dryer requires replacement parts or accessories, contact
the dealer where you purchased your dryer or
MIDEA customer
care center at 1866-646-4332.
Install the clothes dry according to manufacture’s instructions and local
codes.
INSTALLATION REQUIREMENTS
GROUNDING
REPLACEMENT PARTS AND ACCESSORIES
16
This appliance must be grounded. In the event of malfunction or breakdown,
grounding will reduce the risk of electric shock by providing a path of least
resistance for lectric current. his appliance should be used with a cord that
has an equipment grounding conductor and grounding plug.
Certain internal parts are intentionally not grounded and may present a
risk of electric shock only during servicing. Service Personnel – Do not
contact the following parts while the appliance is energized:Permanent
Magnet Synchronous Pump, Brushless DC Motor, Capacitor, Fan, Choke,
PCB.
-
ethe T
.
n
(
)
l
d
the
Packaging materials can be dangerous to children;
Keep all packaging material (plastic bags, polystyrene, etc.) well out of
children’s reach.
WARNING
INSTALLATION INSTRUCTION
REMOVING FROM THE PACKAGE
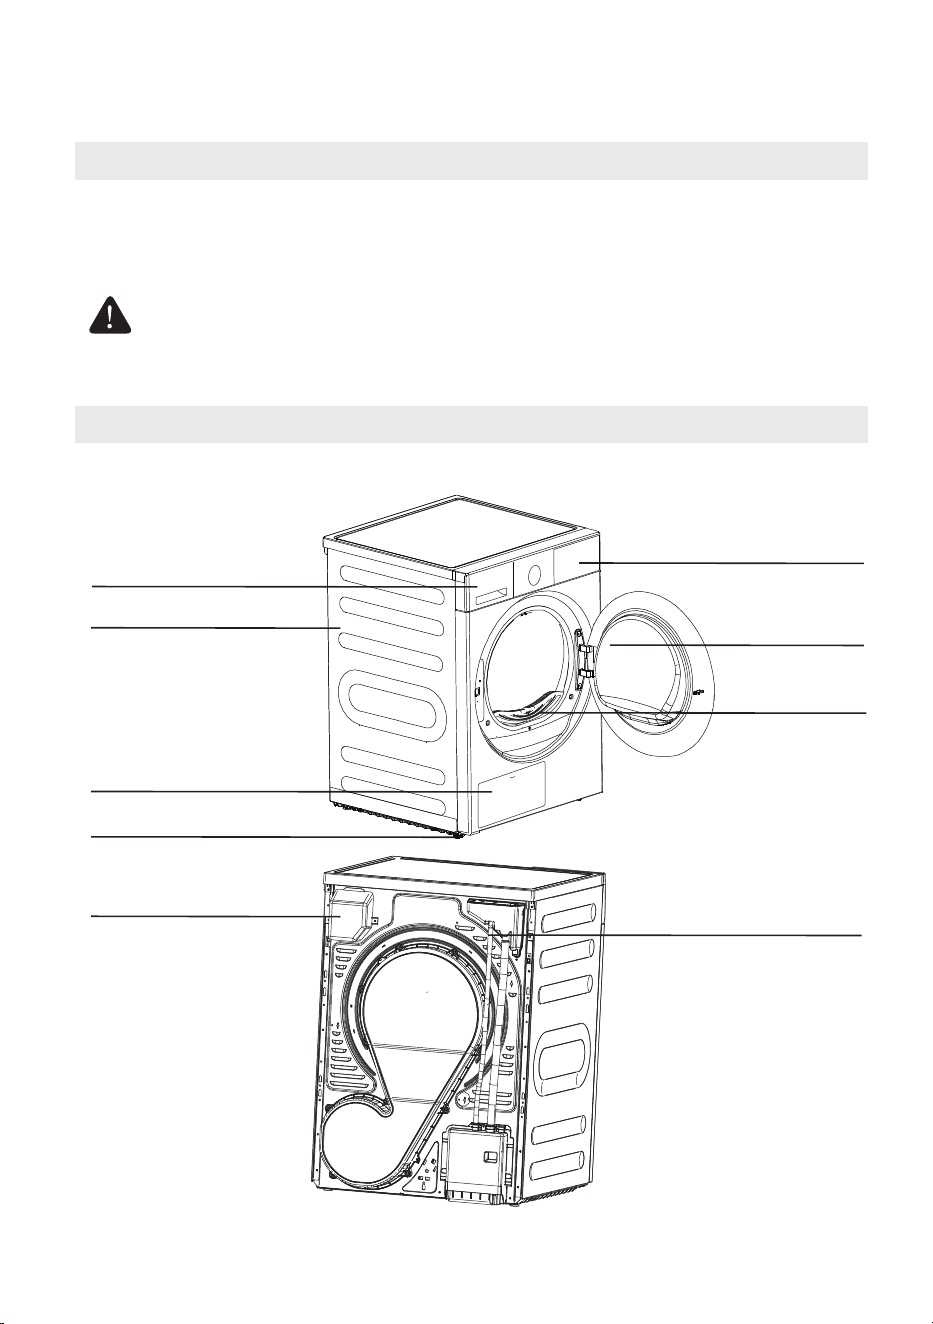
PARTS IDENTIFICATION
Water Tank
Side Plate
Maintenance Cover
Adjustable leg(Two legs)
Control Panel
Door
Filter
Wiring Box
Drain Hose
17
S
1. Unpack your dryer and inspect it for shipping damage. Make sure you have received
all the parts shown below and items listed in the Stacking Kit Installation Instuctions.
2. To prevent personal injury or strain, wear protective gloves whenever lifting or
carrying the unit.

Pliers
Flat screwdriver
Level
Cutting knife
Adjustable wrench
that opens to 1"
(25 mm)
Phillips screwdriver
Tools needed:
Tape measure
For the proper installation, we recommend that you hire a qualified installer.
Move your dryer to an appropriate location for the installation. Consider
installing the dryer and washer side-by-side, to allow access to the electrical.
STEP 1 Choose the proper location
STEP 2 Connect the electrical wiring
3-Wire
receptacle
(10-30R)
Three wire outlet
INSTALLATION INSTRUCTION
TOOLS NEEDED IN INSTALLATION
INSTALLATION STEPS
18
S
Use
a 3 -wire power supply cord with ring terminals and
UL listed strain relief. The 3-wire power supply cord, at least
4.92 ft. (1.5 m) long, must have 3 10-gauge solid copper wires
and match a 3-wire receptacle of NEMA Type 10-30R, rated
120/240V, min 30A.
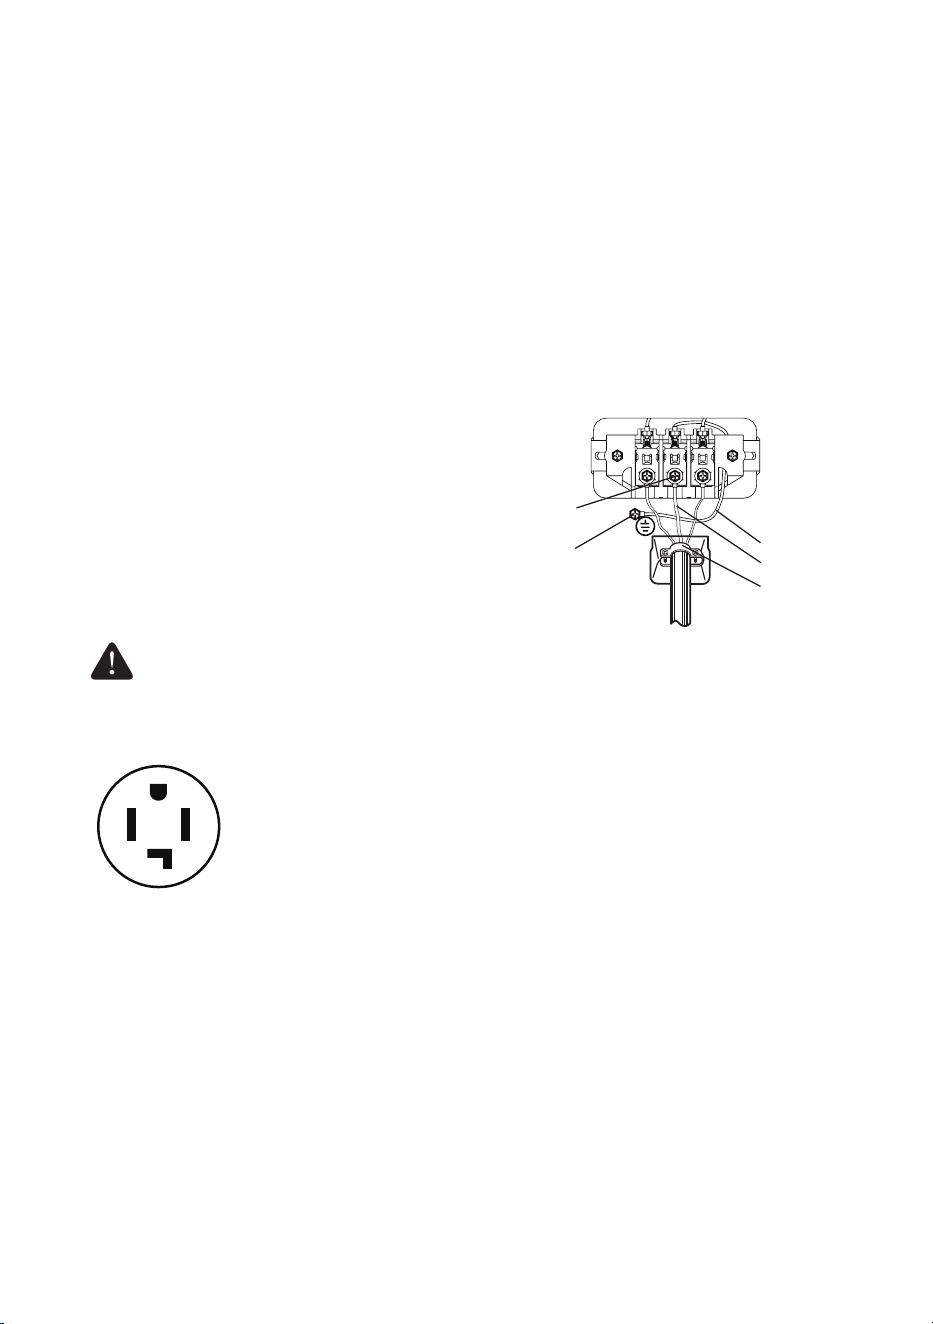
3-Wire system connections
1. Connect the grounding wire of the power cord to the external ground conductor
screw. I the power cord has no grounding wire, please remove th appliance
g
rounding
ir
from
enter terminal block scre
Remove the external ground
connector screw,connect the appliance grounding wire to the external ground connector,
then replace and tighten the screw.
2. Remove the two side terminal block screw and connect the other wires to the
outer terminal screws. Be sure to cross the screw through the terminal ring and
tighten the screw.
3. Tighten the strain relief screws.
4. Insert the tab of the terminal block cover into your dryer's rear panel slot. Secure
the cover with a screw.
- Ring-type terminals are recommended. If using strap terminals, make
sure they are tightened.
WARNING
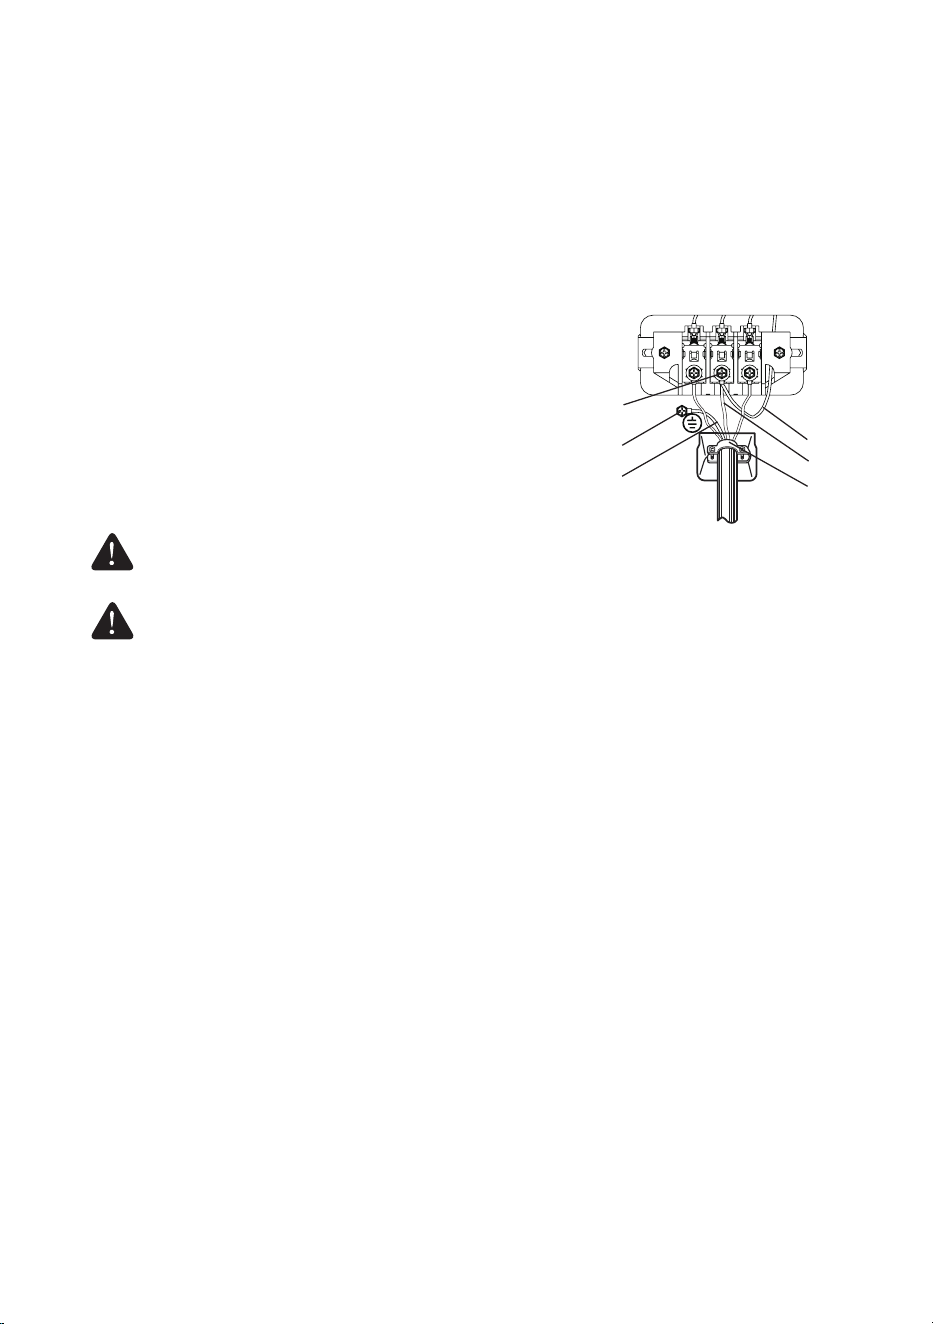
4-Wire
receptacle
(14-30R)
Four wire outlet
Use
a 4-wire power supply cord with ring terminals and
UL listed strain relief. The 4-wire power supply cord, at least
4.92 ft. (1.5 m) long, must have 4 10-gauge solid copper wires and
match a 4-wire receptacle of NEMA Type 14-30 R, rated 120/240V,
min 30A. The ground wire (ground conductor) may be either green
or bare.The neutral conductor must be identified by a white color.
4-Wire system connections
1. Remove the center terminal block screw.
2. Connect the ground wire (green or unwrapped) of the power cord to the
external ground conductor screw.
3. Connec
t the neu
tral wire (white or center wire) of the power cord and the
appliance rounding ire (white) under the center screw of the terminal block.
Be sure to cross the screw through the ring of the power cord terminal and
tighten the screw.
Connect the other wires to the outer terminal block screws. Be sure to cross the 4.
screw through the terminal ring and tighten the screw.
3-Wire system instructions:
A Center terminal block screw
B connector
C Neutral grounding wire (White)
D Neutral wire (white or center wire)
E /4" (1.9cm) UL-listed strain relief
A
B
C
D
E
INSTALLATION INSTRUCTION
19
the power cord has no grounding wire,
f e
w e
cwhite
(
)
the
w.
Grounding
3
w g
5. Tighten the strain relief screws.
6. Insert the tab of the terminal block cover into your dryer’s rear panel slot. Secure
the cover with a screw.
WARNING
Ring-type terminals are recommended. If using strap terminals, make sure they are
tightened.
U.S. Models:
Risk Of Electric Shock - All U.S. models are produced for a 3-WIRE
SYSTEM CONNECTION.
The dryer frame is grounded to the neutral conductor at the terminal block.
A 4-WIRE SYSTEM CONNECTION is required for new or remodeled
construction,
or if local codes do not permit grounding
through neutral conductor.
If the 4-wire system is used, the dryer frame cannot be grounded to the
neutral conductor at the terminal block. Refer to the “Electrical Requirements”
section on page 16 for 3-WIRE or 4-WIRE SYSTEM CONNECTIONS.
Remove the terminal block cover plate.
Insert the power cord with a UL-listed strain relief through the hose provided
in the cabinet near the terminal block.
- A strain relief must be used.
Do not loosen the nuts already installed on the terminal block. Be sure they
are tight.
Use a 3/8" (1cm) deep well socket.
STEP 3 Level the dryer
To ensure that the dryer provides the optimal drying performance, it must be leveled.
To minimize vibration, noise, and unwanted movement, the floor must be a perfectly
level, solid surface.
- Adjust the leveling feet only as much as necessary to level the dryer. Extending the
l
e
veling feet more than necessary can cause the dryer to vibrate.
4-Wire system instructions:
IMPORTANT: Ring-type terminals are recommended. If using strap terminals, make sure t
A Center terminal block screw
B External ground connector
C Green or bare copper wire of the
power cord
D Neutral grounding wire (White)
E Neutral wire (white or center wire)
F 3/4" (1.9cm) UL-listed strain relief
A
B
C
D
E
F
White
Black
Red
Green
INSTALLATION INSTRUCTION
hey are tightened.
WARNING
20
S
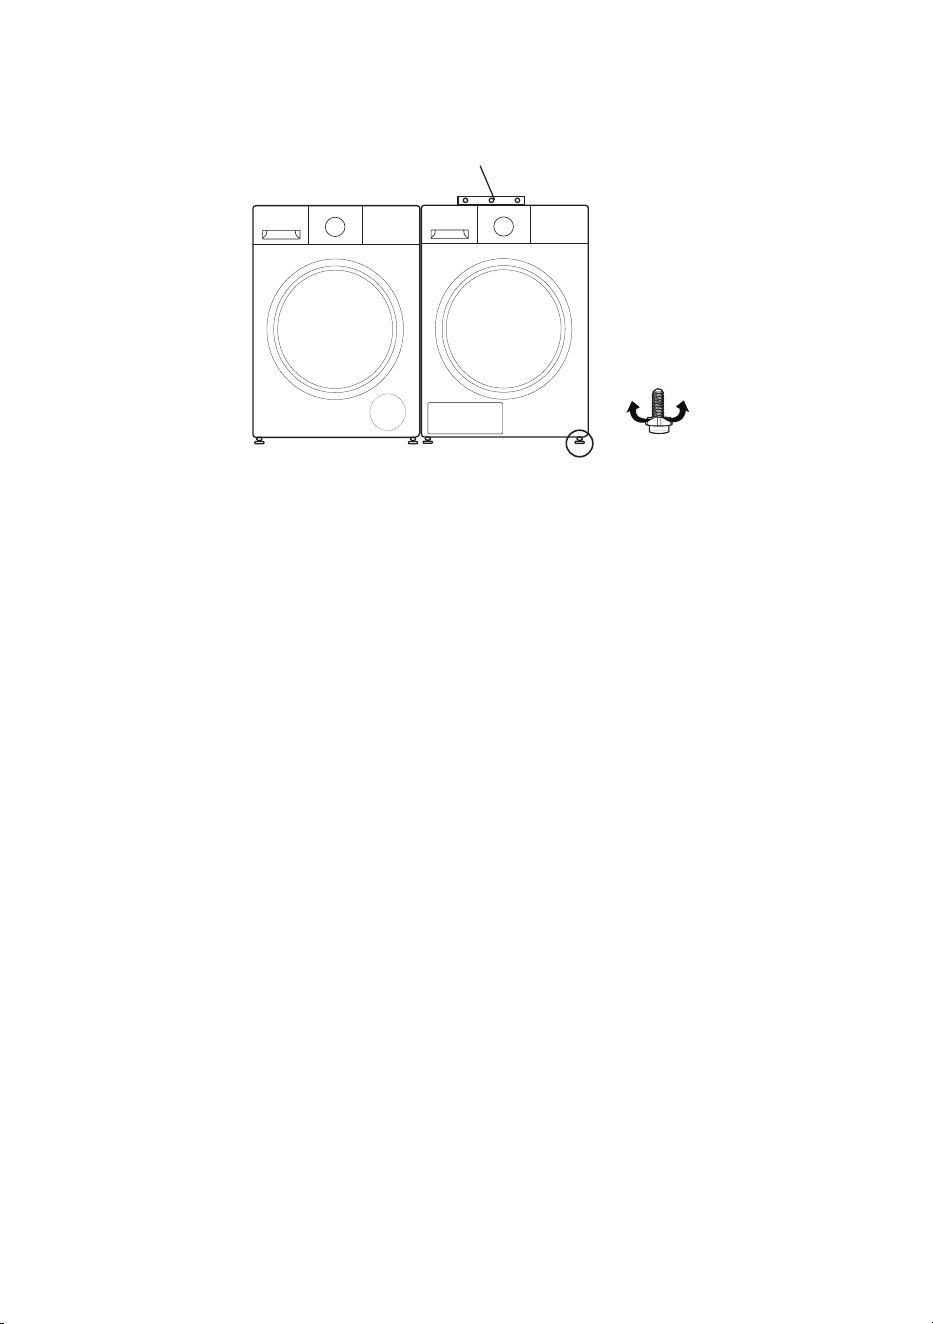
loosen lock
Adjustable legs
level
STEP 4 Power on
Make sure all electrical connections are complete. Plug in your dryer.
STEP 5 Final check
- Make sure the dryer is plugged into an electrical outlet and is properly grounded.
-
- Start your dryer to confirm that it runs, heats, and shuts off.
INSTALLATION INSTRUCTION
21
Make sure the dryer is leveled and is sitting firmly on the floor.
OPERATING INSTRUCTION
WARNING
To reduce the risk of fire, electric shock, or injury to persons, read
the IMPORTANT SAFETY INSTRUCTIONS before operating the
appliance.
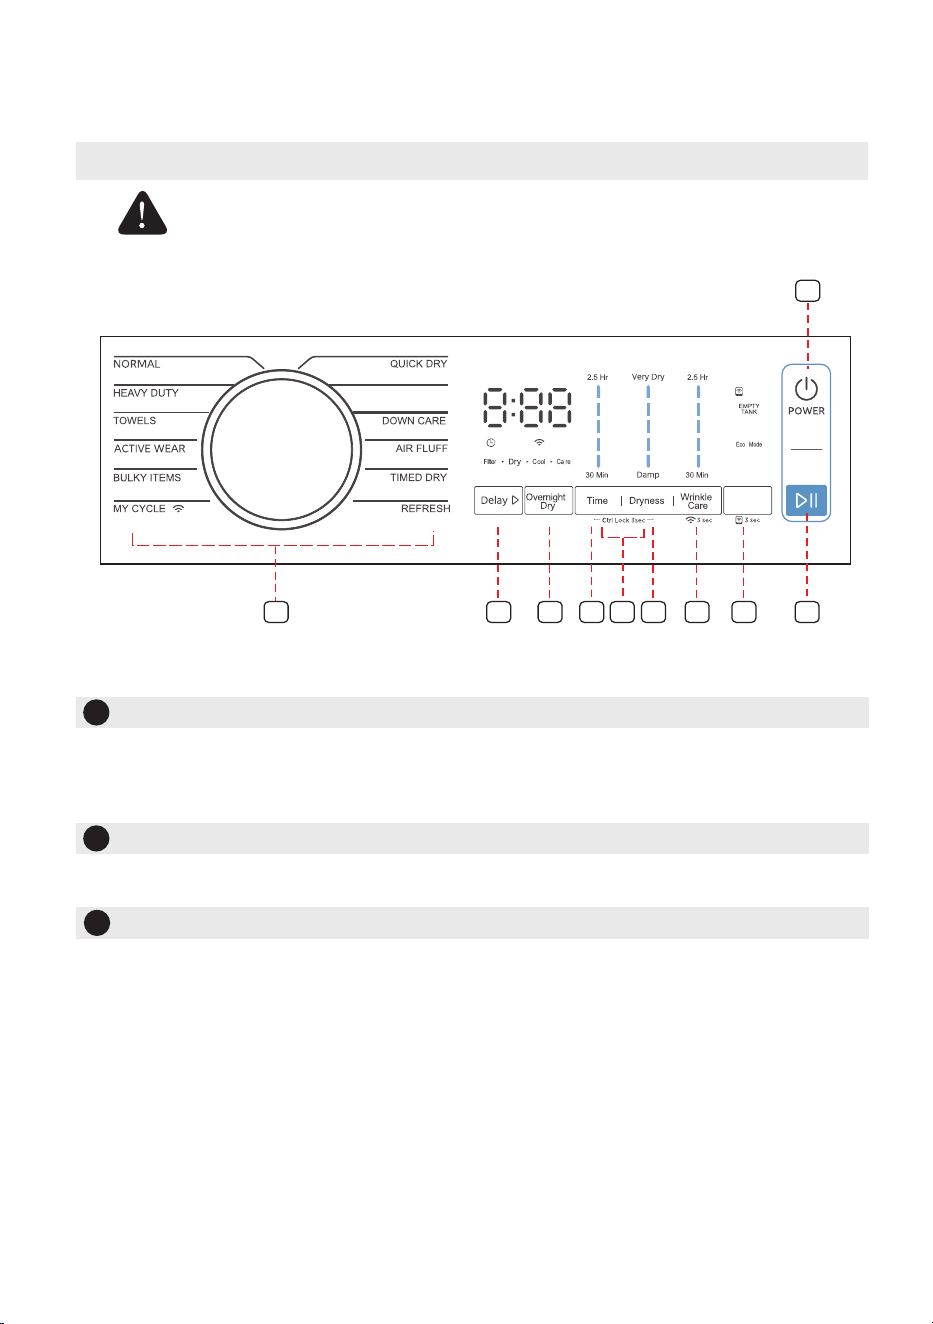
CONTROL PANEL
1
1
Power button
than 10 minutes without any buttons being pressed, it automatically
standby mode.
1
2
Start/Pause button
Press to start or pause the program.
1
3
Cycle selector
Turn the knob to select the appropriate cycle for your laundry load
The cycle you select determines the heat control for the cycle.
The NORMAL, DELICATES, DOWN CARE, DENIM, BULKY ITEMS, ACTIVE WEAR,
TOWELS, HEAVY DUTY, BLANKET REFRESH, OVERNIGHT DRY, SMALL LOAD,
are Sensor .
QUICK DRY, AIR FLUFF, TIMED DRY, REFRESH are Manual.
22
3
4
1
2
Damp Alert
Options
DELICATES
5
6 7 8 9
1 0
Smart
Control
Press to turn your dryer on or enter standby mode
.
If your dryer is on for more
returns to
EASY IRONING, PERM PRESS
and S
UPER DR
Y cycles
S

OPERATING INSTRUCTION
1
5
Overnight Dry
This function is suitable for drying clothes with low heat at night.
1
8
Dryness
Press the button to select th dryness level. The available options are Damp, Less,
will result in dierent drying times.
For clothes to be
ironed manually, a lower dr level should be selected.
1
9
Wrinkle care/Wireless Network
WW
iirreelleessss NNeettwwoorrkk
P
ress the “ ”button for 3
seconds
Please follow
instructions
to activate/
deactivate the network connection.
WW
rriinnkkllee ccaarree
Press once to add the wrinkle care into the Continue pressing
provides intermittent tumbling in unheated air at
the end of the cycle to reduce wrinkling.
The is already dry, and can be removed at any time during the wrinkle
care
cycle.
1
6
Time
The button is eective only for Manual cycles. Press the button to change the
drying tim
.
Each press of the button adjusts the drying time by 30
minutes .
1
7
Ctrl lock
Press
"Time"and "Dryness"
"ssenyrD" dna "emiT" dloh dna sserP
for another 3 seconds to deactivate the
function.
- When this function is activated, all
except the
“POWER” button and deactivat
functio
above.
- You can power on your unit,
set this functio
then power off. When you do
so, eve though the unit is powered on, you still cannot start it the Control
Lock function is deactivated.
- This function will not be cancelled automatically if your unit
as if it is unplugged, out of service, etc.). You must deactivate the function using
1
4
Delay
This function is used for delaying lothes drying time for up to 24 hours. he
delay
time means the programme will start after x hours. When the delay
p
rogramme
starts,
the time starts t count dow on the display and the delay
icon blinks.
23
T
o n
the c
e
simultaneously
simultaneously to activate the Control Lock function.
buttons will be deactivated
e
Control Lock
n described
n
and
n unless
loses power ( such
the "Time" and "Dryness" buttons.
e
Normal, More, and Very. Dierent dryness levels
yness
function dryer cycle.
multiple times to adjust the time or cancel the wrinkle care function.
When active, wrinkle prevention
laundry load
to configure or reset the wireless network.
in the App Setup and Operation section
S
OPERATING INSTRUCTION
1
10
Options/Smart Control
Options
Pressing this button can turn on or off the "Eco mode" or "Damp Alert" functions.
" DOWN CARE", "MY
CYCLE(Denim)", "BULKY ITEMS", "TOWELS", "HEAVY DUTY", and "BLANKET
REFRESH". " NORMAL",
"DELICATES", "MY CYCLE(Denim)", "ACTIVE WEAR", "TOWELS", "HEAVY
DUTY", "OVERNIGHT DRY", "SMALL LOAD", "PERM PRESS", and "SUPER DRY".
Smart Control
Press the "Options" button to switch to Smart Control and use your smartphone to control
1.
2
Note:
-If the door is opened at
will be disabled.
-
at the end of each cycle
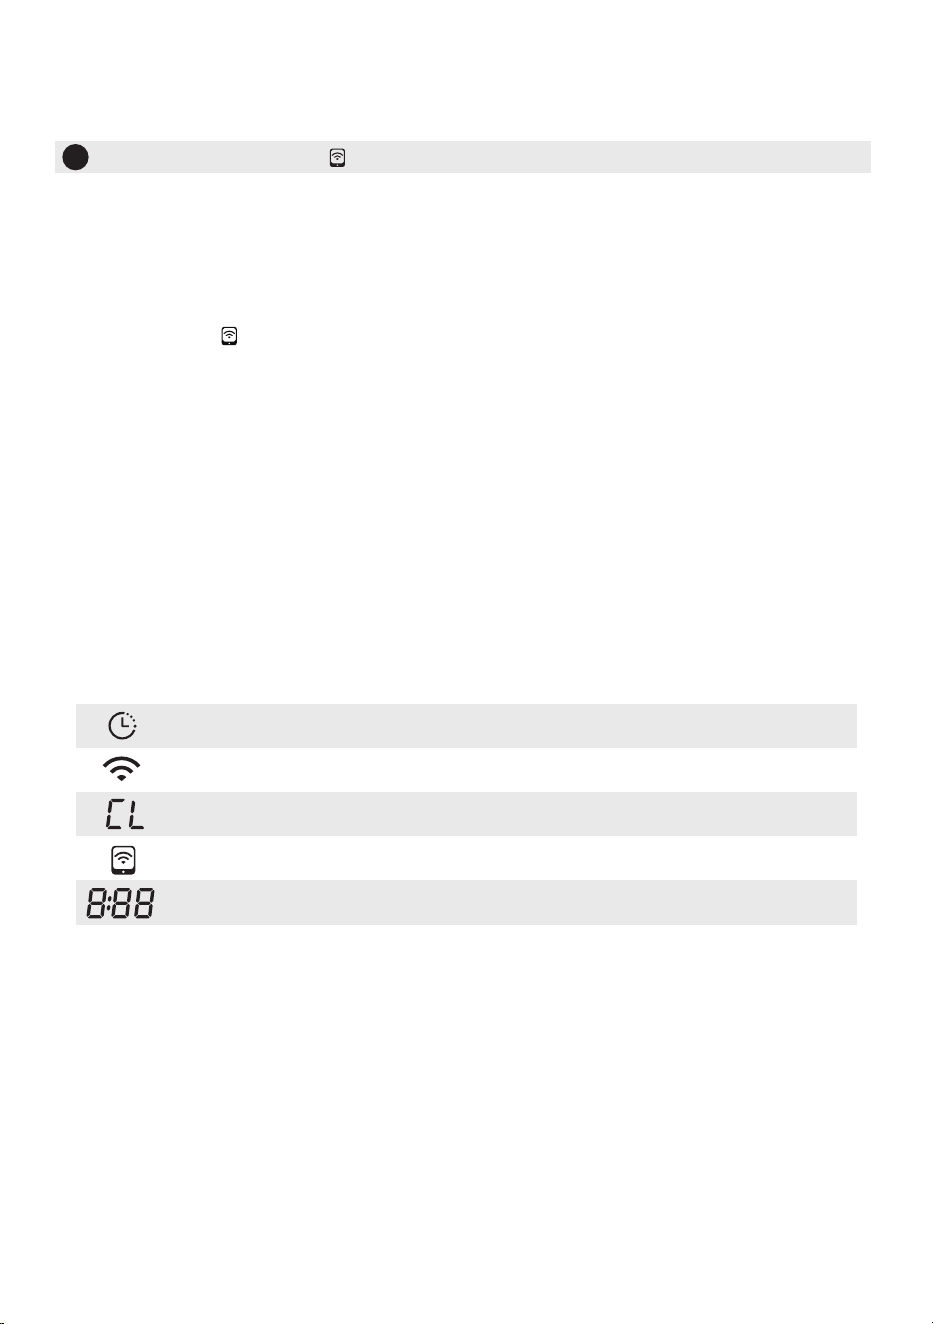
Remaining Tim Indicator /Erro
Message
Ctrl lock
Wireless Network
Smart Control
Delay
Symbols
24
Eco Mode can be selected for the following cycles:
Damp Alert can be selected for the following cycles:
the machine remotely.
To safely use Smart Control, make sure that:
The dryer is connected to the internet.
.
The dryer drum door is closed.
any time, Smart Control
Smart Control is automatically turned o
If you would like to use Smart Control again, you must reactivate it.
e r
S

OPERATING INSTRUCTION
DRYING A LOAD OF LAUNDRY
25
S
STEP 1: Power on your dryer
- Press the Power button to power your dryer on.
STEP 2: Load your dryer
- Place only one wash load in your dryer at a time.
- Mixed loads of heavy and lightweight fabrics will dry differently, which may
result in lightweight fabrics being dry while heavy fabrics remain damp at the
end of a drying cycle.
-
-
Add one or more similar items to your dryer when only one or two articles of
clothing need drying. This improves the tumbling action and drying efficiency.
Overloading restricts tumbling action, resulting in uneven drying as well as
eexcessive wrinkling of som
fabrics. Do not overload your dryer.
Select the appropriate optional functions by using the buttons on the control panel.
STEP 3: Select the appropriate cycle and options for the load
- Select the appropriate cycle
according to the cycle chart using the Cycle Selector.
-
STEP 4: Start your dryer
Pressing
the
S
tart/Pause button will start the selected cycle.
To pause the cycle ,
press the Start/Pause button, then open the door. To resume, close the door and then
press Start/Pause.
Opening the door during a cycle will immediately pause operation. Close the door
and press the Start/Pause button to resume.
NORMAL
TOWELS
ACTIVE
WEAR
BULKY
ITEMS
MY CYCLE
(Denim*)
QUICK DRY
DELICATES
DOWN CARE
AIR FLUFF
TIMED
DRY
REFRESH
BLANKET
REFRESH*
OVERNIGHT
DRY*
SMALL
LOAD*
EASY
IRONING*
Very
More
Normal
Less
Damp
N
Y
Y
Y
Y
Y
Y
Y
Y
Y
Y
Y
N
N
N
N
N
N
N
N
N
Y
N
Y
N
N
Y
Y
Y
Y
Y
Y
Y
Y
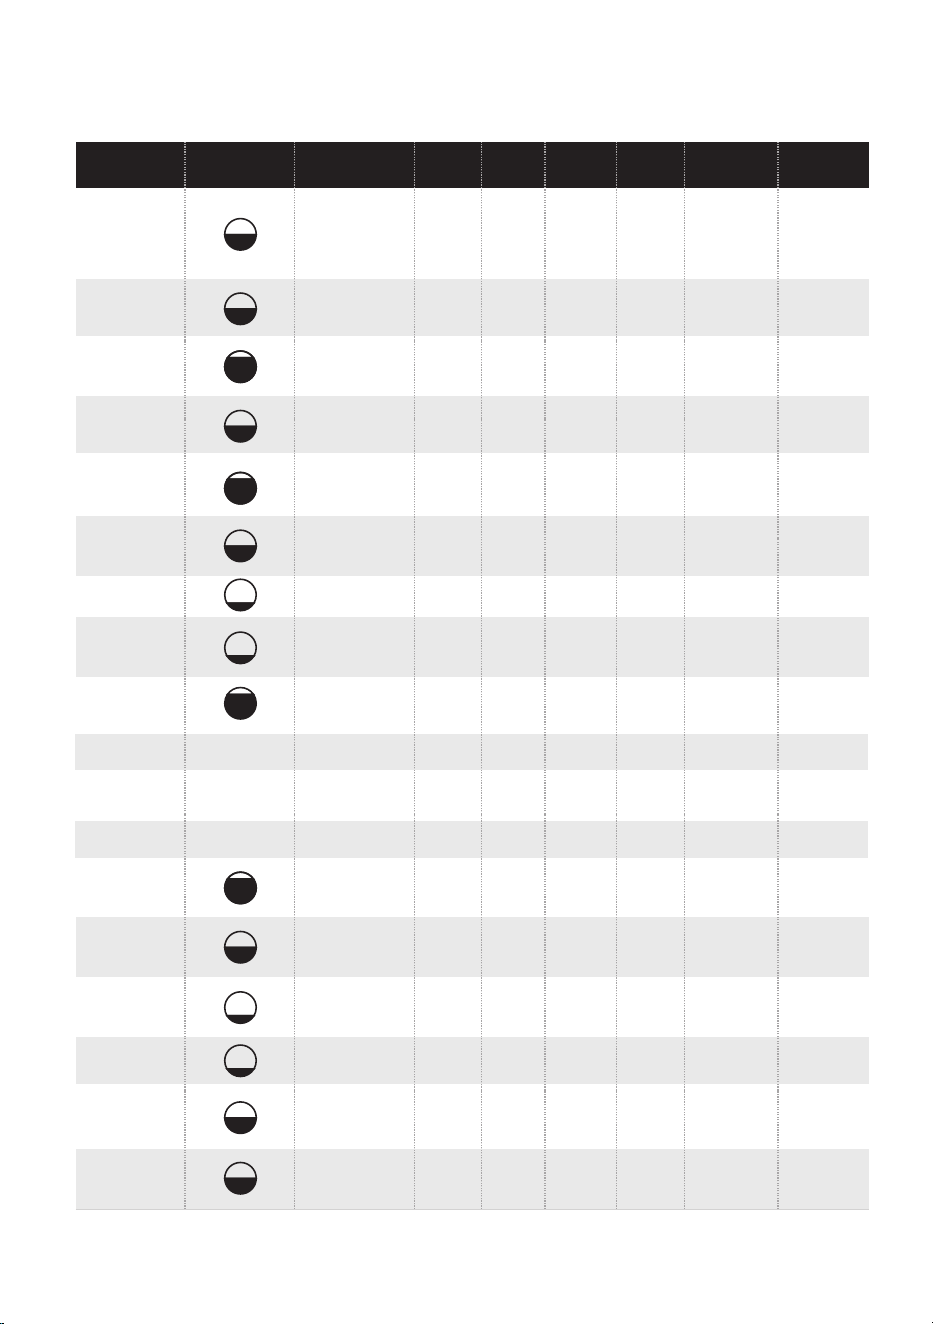
OPERATING INSTRUCTION
Cycle
Maxim um
Amount
Dryness
Delay
Damp
alert
Wrinkle
care
PERM
PRESS*
SUPER
DRY*
Overnight
Dry
Eco
Mode
Y
N
Y
YY
Y
N
Y
YN
YN Y Y
Y
Y
Y
Y
Y
Y
Y
N
Y
N N N
Y N N
N Y
N N N
/
N
Y
Y
N
N
Y
N
N
Y N N Y
Y N Y YN
YY N Y YN
Y Y YN N N
/
Y Y YN N N
/
Y N
Y
Y
N Y
HEAVY
DUTY
26
Very
More
Normal
Very
More
Normal
More
Normal
Less
Very
More
Normal
Very
More
Normal
Normal
Less
Very
More
Normal
Very
More
Normal
Very
More
Normal
Very
More
Normal
Damp
Very
More
Normal
Very
More
Normal
N
N
N
Time
S
* “Y”
means optional functions you can select.
Load Size Recommendations:
For best results, follow the wet load size
recommendations noted for each cycle.
Small load: Fill the dryer drum with
3-4 items, not more than 1/4 full.
Medium load: Fill the dryer drum up
to about 1/2 full.
Large load: Fill the dryer drum up to
about 3/4 full. Do not overload. Items
need to tumble freely.
OPERATING INSTRUCTION
27
S
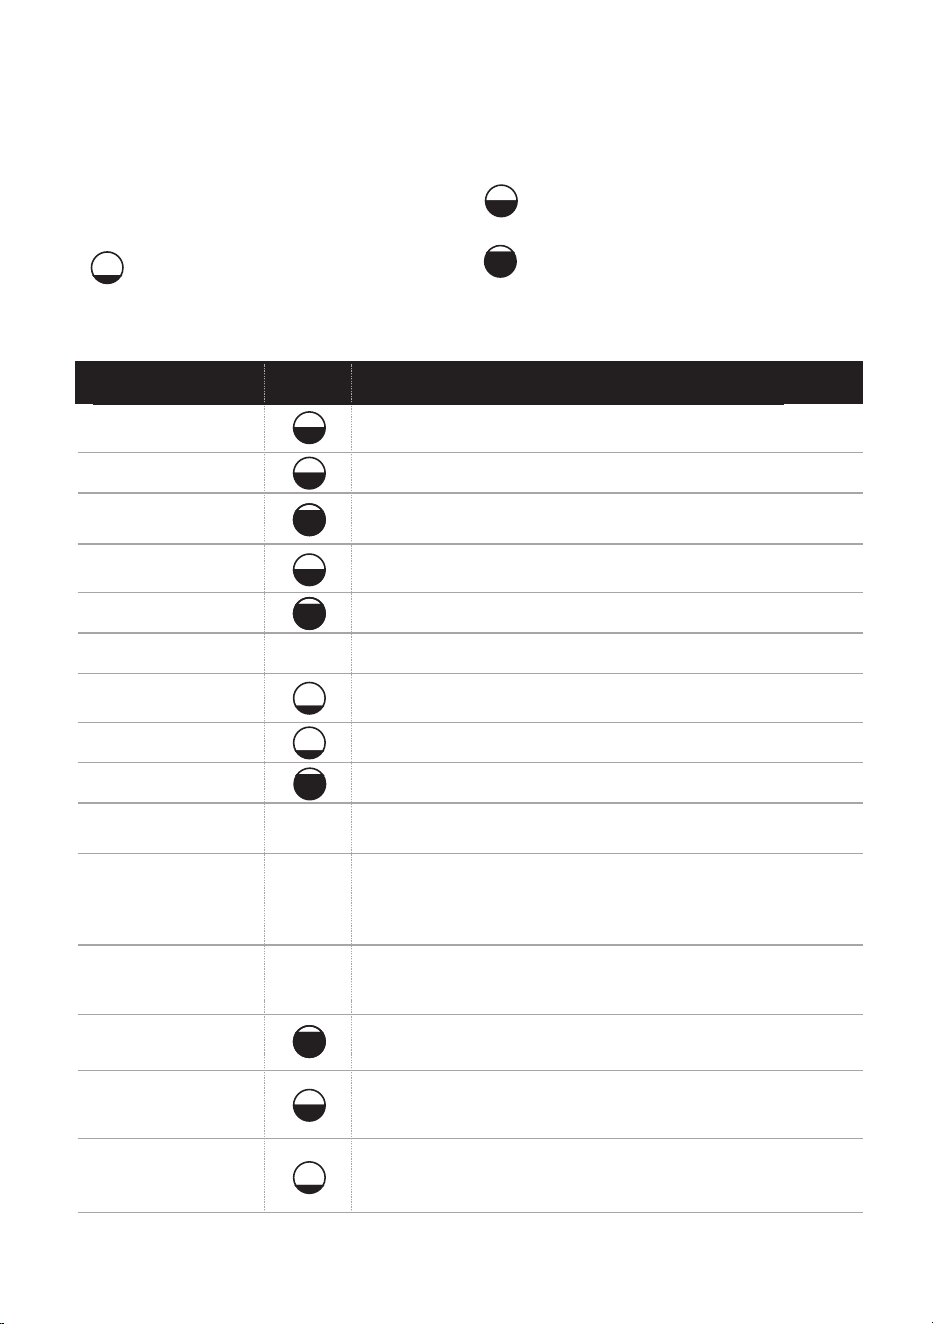
Please refer to the following table for the recommended load for each cycle.
Cycle
Load Size
Weight
Application/Properties
Dry sturdy and large items.
Dry down garments.
Dry delicate synthetic fabrics.
Dry bed linen,bedsheets or other bulky items
NORMAL
TOWELS
ACTIVE WEAR
BULKY ITEMS
MY CYCLE
QUICK DRY
DELICATES
DOWN CARE
AIR FLUFF
TIMED DRY
REFRESH
BLANKET REFRESH*
OVERNIGHTDRY*
SMALL LOAD*
HEAVY DUTY
Completely dry thick or multi-layer synthetic fabrics.
Dry sportswear and thin fabrics, such as polyester.
Adjust and
saveyourfavourite
cycle settings.
Dry 1
-3piecesofsyntheticfiber/thincotton
clothingwithlowmoisturecontent.
Tumble and air items without heating. The cycle time range
is 10-160 minutes (adjusted in 30-minute increments).
Dry individual items or finish drying multi-layer fabrics with
different drying needs, such as jackets. The cycle time range
is 20-170 minutes (adjusted in 30-minute increme
/
/
/
/
Completely dry single-layer or multi-layer cotton laundry
for direct storage.
Refresh clothes kept in storage for a long time and remove
odors. The cycle time range is 20-170 minutes (adjusted
in 30-minute increments).
Refresh and remove odors from blankets or other heavy
items kept in storage for a long time.
Dry at a low noise level, with all buttons muted. Ideal for
overnight drying.
Dry dryer-safe delicate laundry or laundry that is meant to
be hand-washed at a lower temperature.
OPERATING INSTRUCTION
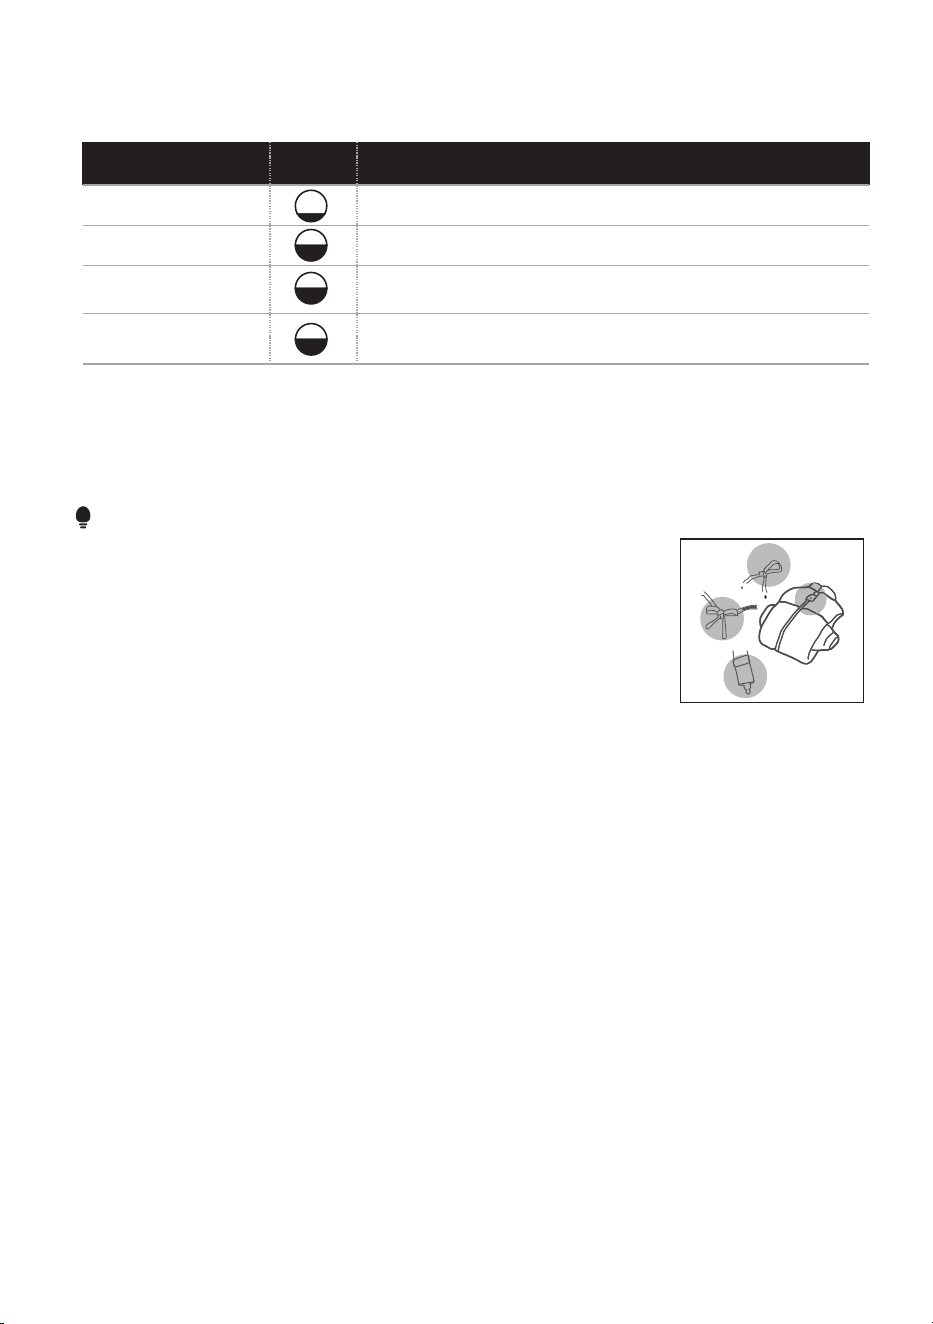
Cycle
Weight
Application/Properties
DENIM*
SUPER DRY*
EASY IRONING*
PERM PRESS*
Keep single-layer cotton laundry slightly damp for ironing.
Dry mixed-fiber (such as cotton and synthetic) fabrics.
Thoroughly dry single- and multi-layer cotton laundry.
Dry jeans or other denim clothes that are spun in the
STEP 5: Unloading your laundry
- The “Clean filter” will flash 10 sec. when your laundry load is powered on.
- The dryer will beep 6 time when the cycle is done.
- Clean the filter after every cycle once the laundry is unloaded.
NOTE
• Please put clothes that are worn, easily tangled, or small into
•
Knot long belts or ropes before drying.
• Button up clothes with small or decorative buttons before drying.
•
Zip up clothes with zippers and turn them inside out before drying.
28
Load Size
washing machine.
s
a laundry bag before drying.
S
OPERATING INSTRUCTION
1. Your smartphone is connected to you know the
network password.
2. You are near the home appliance.
3. The 2.4GHz band wireless signal is enabled on your wireless router.
Follow the below steps to enter the remote control
Before you start, make sure that:
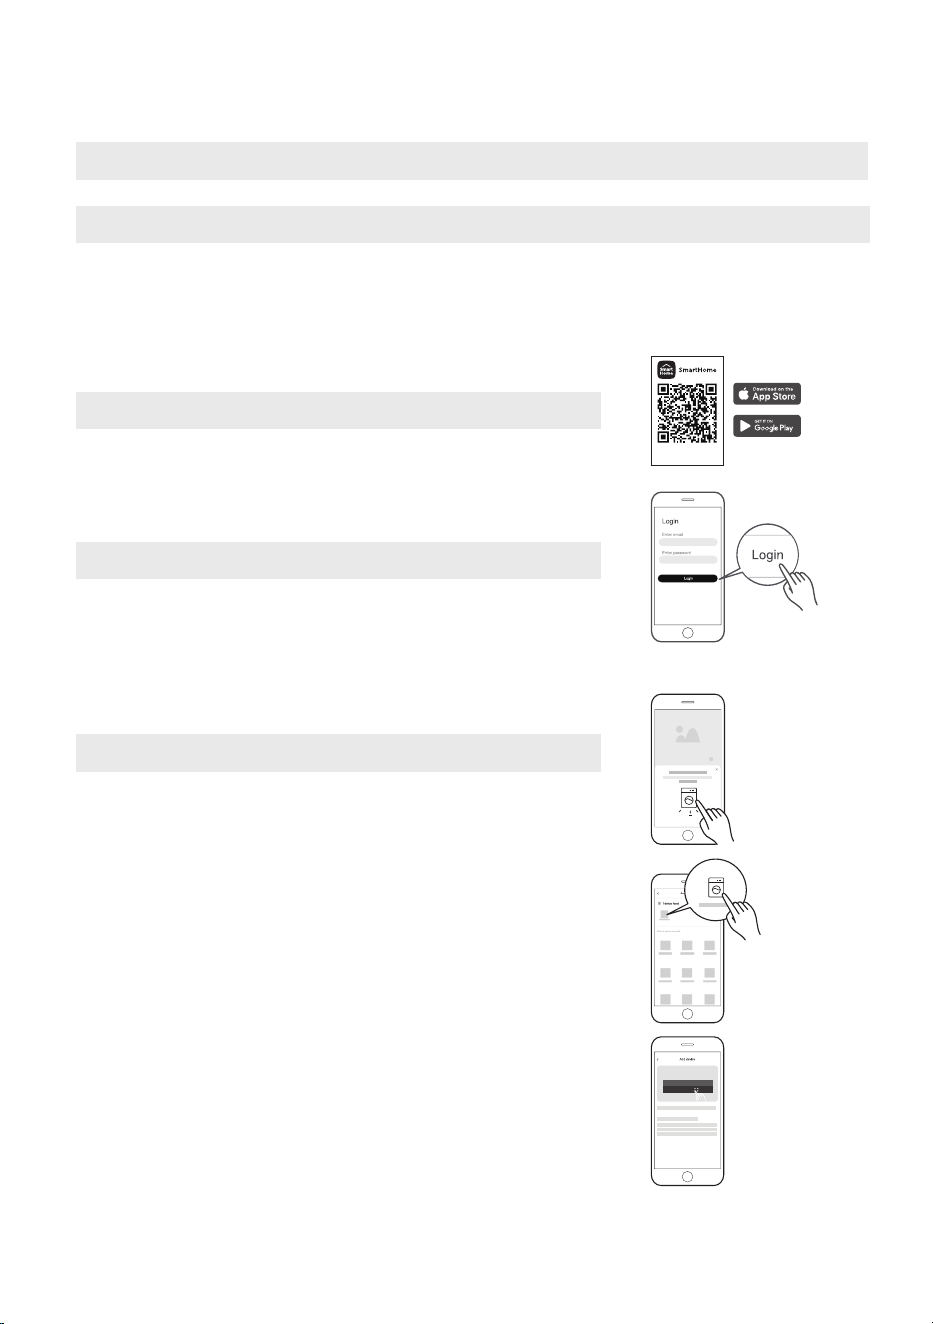
Use Your Appliance With the SmartHome App
Download the SmartHome App
Register and Log In
Open the SmartHome app, and create a new account to
start. You can also register through a third-party account.
If you already have an existing account, use the account
to log in.
Connect Your Devices to SmartHome
3.
app on y
our phone.
8: 88
Download the app
& activate product
APP SETUP AND OPERATION
29
your home wireless network and
state.
On an app market (Google Play Store, Apple App Store),
search for "SmartHome" and find the SmartHome app.
Download and install it on your phone. You can also
download the app by scanning the QR code.
1. Please make sure your mobile phone is connected to the
home wireless network. If it is not, go to Settings and
enable wireless networks and bluetooth.
2. Please power on your device.
Open the
SmartHome
4. If a message of "Smart devices discovered nearby"
appears, click to add.
5. If no message appears, select "+" on the page and
select your device in the list of nearby devices available.
If your device is not listed, please add your device
manually by the device category and device model.
6. Connect your device to the wireless network according
to the instructions on app. If the connection fails, please
follow the instructions provided by the app to
troubleshoot your connection..
S

OPERATING INSTRUCTION
Rotate the Cycle Selector knob to select a cycle, then press and hold
[ ]
until the remote control icon lights up on the display. Once it lights up, you can control
Start the Remote Control
Wireless Network Status Light
Slowly flashing
Waiting for connection
Quickly flashing
Connecting
Connected to your wireless router
NOTE
Ever bright
1. Make sure your devices are powered on.
2.Keep your mobile phone close enough to your device when you are connecting your
device to the network.
3.Connect your mobile phone to the wireless network at home, and make sure you
know the sword of the wireless network.
4.Check if your wireless router supports 2.4 GHz band and turn it on. If you are not
sure whether the router supports 2.4 GHz band, please contact the router
manufacturer.
5. The device cannot connect t wireless network that requires authentication,
usually appears in public areas such as hotels, restaurants, etc. Please connect
to a wireless network that does not require authentication.
6. Turn off the WLAN+ (Android) or WLAN Assistant (iOS) function of your mobile
phone when connecting your device to the network.
7. In the case that your device connected to a wireless network befor
needs to
please click "+" on the app Home page , and add your device again
by the
device category and model according to the ins
on the app
.
8. The Max RF Output Power: Bluetooth LE: 8dBm, 2.4GHz Wireless Network: 18dBm.
Frequency band of operation: 2400-2483.5MHz.
30
one of
the dryer remotely.
pas
ao
which
e but
reconnect now
tructions
S
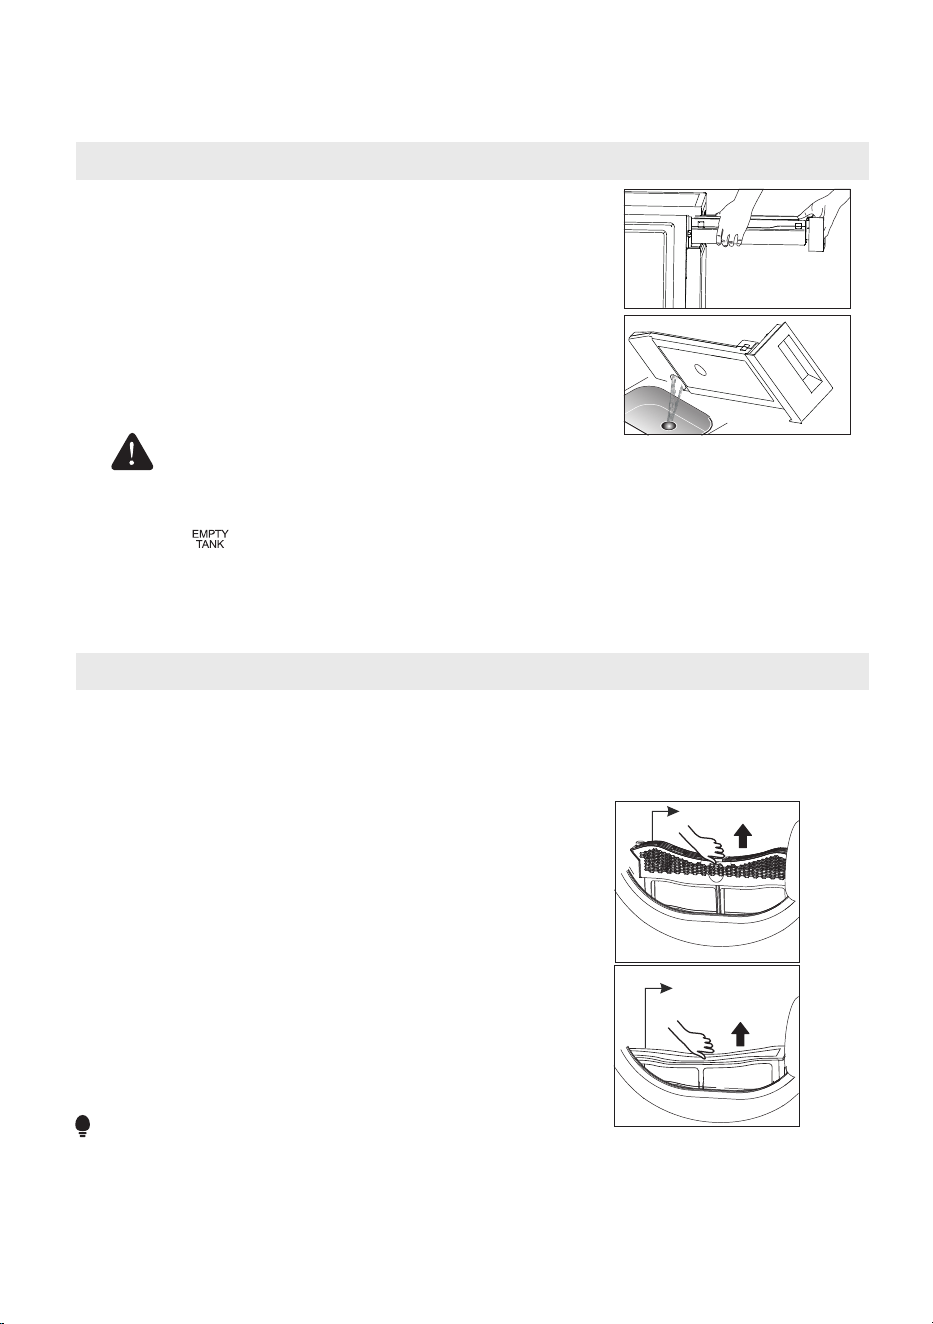
•
a nd the “ ” icon will flash. After the tank is emptied restart the dryer by
pressing Start/Pause button.
• Do not drink the condensate water.
• Do not use the dryer without the water tank.
OPERATING INSTRUCTION
EMPTY THE WATER TANK
3.
WARNING
CLEAN FILTERS
Clean the filt
er
This dryer has a double-layer door lint filter. Make sure y
lint
er after
•
Door outer filter
Door inner filter
1. Open the door.
2.
5. Dry the door filter thoroughly before
reinstalling.
3.
31
each cycle.
1. Use two hands to pull out the water tank.
2. Keep the water tank horizontal to avoid spills.
Tilt the water tank to pour out the condensate water
into a basin or drain.
4.Reinstall the water tank.
Empty the water tank after each use. Otherwise, the cycle will stop
paused
,
【
】
ou clean the
filt
lint
Take out the inner
filter.
T
ake out
the outer
filter.
4.
Open the filter (if applicable) and remove the lint.
You can rinse it under running water if needed.
NOTE
Make sure the filter orientation is correct before reinstalling.
S
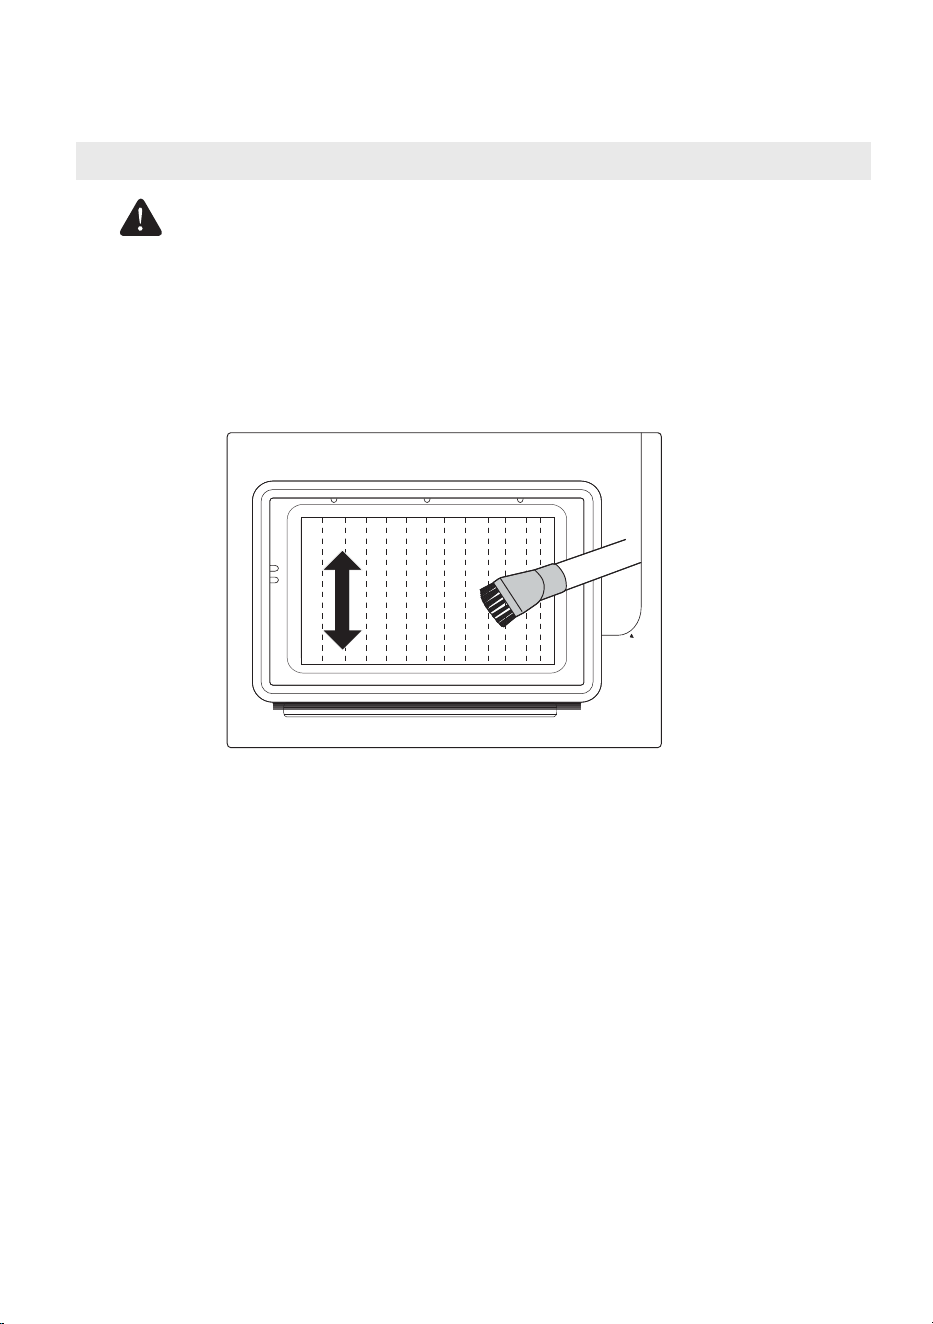
• As necessary, approx. once every 2 months, remove
lint
f
rom the heat
exchanger using a vacuum cleaner with a dusting brush attached.
• Clean the heat exchanger without applying any
the heat filter. The dryer will not dry if the heat exchanger cooling fins are
damaged or bent.
Do not touch the heat exchanger with your hand, as this may cause
injury.
OPERATING INSTRUCTION
CLEAN THE HEAT EXCHANGER
WARNING
32
pressure to avoid damaging
S

OPERATING INSTRUCTION
SPECIAL LAUNDRY TIPS
Items
Drying guide
Bedspreads &
Comforters
If you
• Press the [On/Off]button.
• Pull out�the main plug an
contact the service center.
- Follow the care label instructions or
use the
Bulky cycle.
- Make sure the item is thoroughly dry before using or
storing.
- May require repositioning to ensure even drying.
Blankets
- Use the Normal cycle and dry only one blanket at a
time for best tumbling action.
- Make sure the item is thoroughly dry before using
or storing.
- May require repositioning to ensure even drying.
Curtains & Drapery
- Use the Casual cycle and
the Less Dry setting
to hel
m
inimize
w
rinkling.
- Dry these in small loads for best results and remove
as soon as possible.
Cloth Diapers
- Use the Normal cycle.
Down-Filled Items
(jackets,sleeping bags,
comforters, etc.)
- Use the Normal cycle.
- Add a couple of dry towels to shorten drying time
and absorb moistur
e.
Foam Rubbe
r
(rug backs,stuffed
toys,shoulder pads,
etc.)
- DO NOT dry using heat . Use the Air Fluff cycle
(no heat).
WARNING: Drying a rubber item with heat may damage
it or create a fire hazard.
Pillows
- Use the Normal cycle.
- Add a couple of dry towels and a pair of clean sneakers
t assist with tumbling and fluff the pillows.
DO NOT dry kapok or foam pillows using heat . You can
only dry these items using the Air Fluff cycle.
Plastics (shower
curtains, outdoor
furniture covers,
etc.)
- Use the Air luff cycle (no heat).
WARNING
33
p
o
F
encounter issues that you require assistance with:
d
S

Control panel
- Clean with a soft, damp cloth. Do not use abrasive substances.
- Do not spray cleaners directly on the panel.
- The control panel finish may be damaged by some laundry pre-treatment soil
and stain remover products. Apply such products away from your dryer and
wipe up any spills or overspray immediately.
Stainless steel or anonized drum
- To clean the stainless steel or anonized drum, use a damp cloth with a mild, non-
abrasive cleaner suitable for stainless steel and anonized surfaces.
- Remove the cleaner residue and dry with a clean cloth.
Dryer exterior
- Clean with a soft, damp cloth. Do not use abrasive substances.
- Protect the surface from sharp objects.
- Do not place any heavy or sharp objects or a detergent box on the dryer. Store
them separately to avoid scratching or damaging the top cover of the dryer.
- Since the entire dryer has a high-gloss finish, the surface can be scratched or
damaged.
- Avoid scratching or damaging the surface when using the dryer.
MAINTENANCE
WARNING
CARE AND MAINTENANCE
34
Certain internal parts are intentionally not grounded and may
present a risk of electric shock only during servicing. Service
Personnel – Do not contact the following parts while the appliance
is energized:Permanent Magnet Synchronous Pump, Brushless DC
Motor, Capacitor, Fan, Choke, PCB.

If your dryer ha
any of the following problems, check the solutions
before making a service call. This will
help you save
time and money.
Dryer doesn't start
- Make sure the door is latched shut.
- Be sure the power cord is plugged into a live electrical
outlet.
- Check the home's circuit breaker and fuses.
- Press the Start/Pause button again if the door is opened
during the cycle.
Dryer doesn't heat
- Check the home's circuit breaker and fuses.
- Select a heat setting other than Air luff .
- Clean the lint filter .
- Dryer may have moved into the cool-down process of
the cycle.
Doesn't dry
- Check the all of the above , plus...
- Do not overload.
One dryer load should be equivalent to
- Sort heavy items from lightweight items.
- Large, bulky items like blankets or comforters may
require repositioning to ensure even drying.
- Load may be too small to tumble properly. Add a few
towels.
The unit is noisy
- Check the load for objects such as coins, loose buttons,
nails, broken zips, etc. Remove promptly.
- It is normal to hear the dryer gas valve or heating
element cycle on and off during the drying cycle.
- Be sure the dryer is leveled properly as outlined in the
Installation Instructions
-Sensor cycles will automatically estimate the dampness of clothes.
The dryer will adjust the remaining time during the cycle to account
The remaining time
changes abnormally
CHECK THESE SOLUTIONS IF YOUR
Problem Solution
TROUBLESHOOTING INSTRUCTIONS
35
DRYER...
s
listed below
F
one washer load.
for the amount, material, and dampness of the clothes. This is normal.

- Seams, pockets, and other similarly heavy areas may
not be completely dry when the rest of the load has
reached the selected dryness level. This is normal.
Select the
Time Dry setting or a higher dryness level in order
- If one heavy item is dried with a lightweight load, such
as one towel with sheets, it is possible that the heavy
item will not be completely dry when the rest of the
load has reached the selected dryness level. Sort
heavy items from lightweight items fo the est drying
results.
Clothes are unevenly
dried
Shuts off before
load is dry
- Household odors from painting, varnishing, strong
cleaners, etc. may enter the dryer with urrounding
room ir This is normal as the dryer draws the
- When these odors linger in the air, ventilate the room
completely before using the dryer.
Garments still wrinkled
after
- Small loads of 1 to 4 items work best.
- Load fewer garments. Load
Odors remain in clothing
after
Refresh Cycle
- Fabrics containing strong odors should be
appropriate
wash cycle.
Lint on clothes
-
Clean the lint filter before every cycle. With some clothes that
- Some fabrics are lint producers (for example, a fuzzy
white cotton towel and shoul be dried separately
from clothes that are lint trappers (for example, a pair
of black inen pants).
- Divide larger loads into smaller loads for drying.
- Check pockets thoroughly before washing and drying
clothes.
“ ”is flashing
- When “ ”
flashes, the dryer will beep for
5
se conds.
- Check the water container. If it's full, please pour out
the condensate water and restart the dryer.
- If the container is not full, please restart the dryer
directly.
- Ifthe “
“ icon is still flashing after you have
f
inishe
d the first two steps, please call
Problem Solution
“ ”is lighting
- Clean lint filter.
TROUBLESHOOTING INSTRUCTIONS
36
to ensure all areas are completely dry.
r b
sthe
a's . air from
its surroundings
using the
Wrinkle Care was
used
similar types of garments
together.
produce high amounts of lint, it is necessary to clean the filter
after the cycle as well.
) d
l
g up
the service center.
- Clean lint filter.
- Empty container.
- Check drain hose.
-
-
-
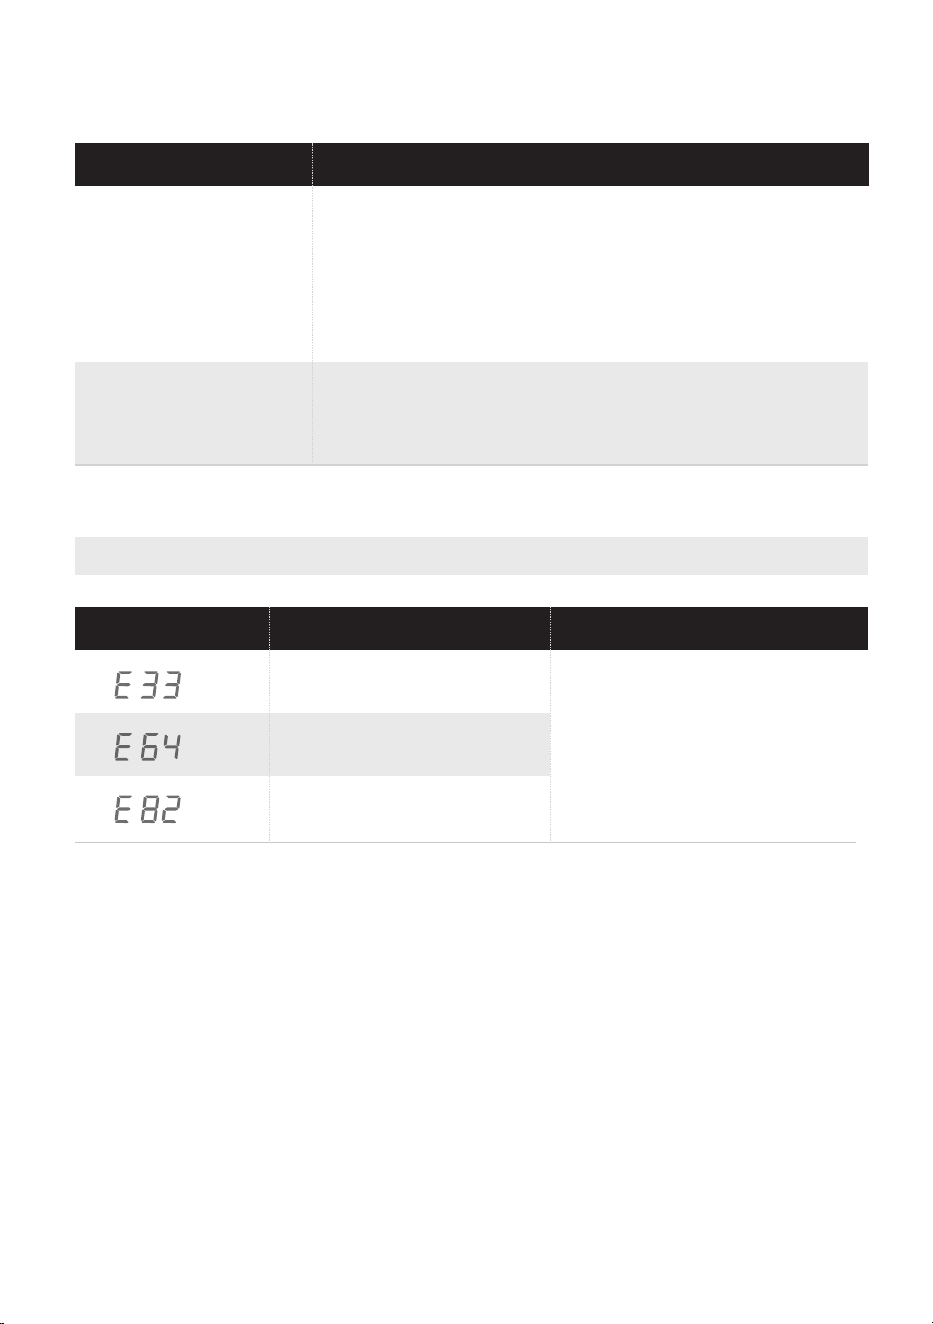
Please contact your
local service center
if the problem occurs.
Problem Solution
ERROR CODES
Error Code
Possible Cause
Solution
PCB communication
error
Motor communication
error
Temperature sensor
error
TROUBLESHOOTING INSTRUCTIONS
37
Selected dryness level
was not reached or took
too long
Check that the dryer installation location is not too restricted.
Clean the moisture sensors.
Clean the air inlet
Use higher dry level or longer time settings
The dryer does not shut
off instantly when remote
control pauses or stops
Cooling in progress — the dryer will shut off
automatically when cooled. This is a normal
operation, not a fault.
-
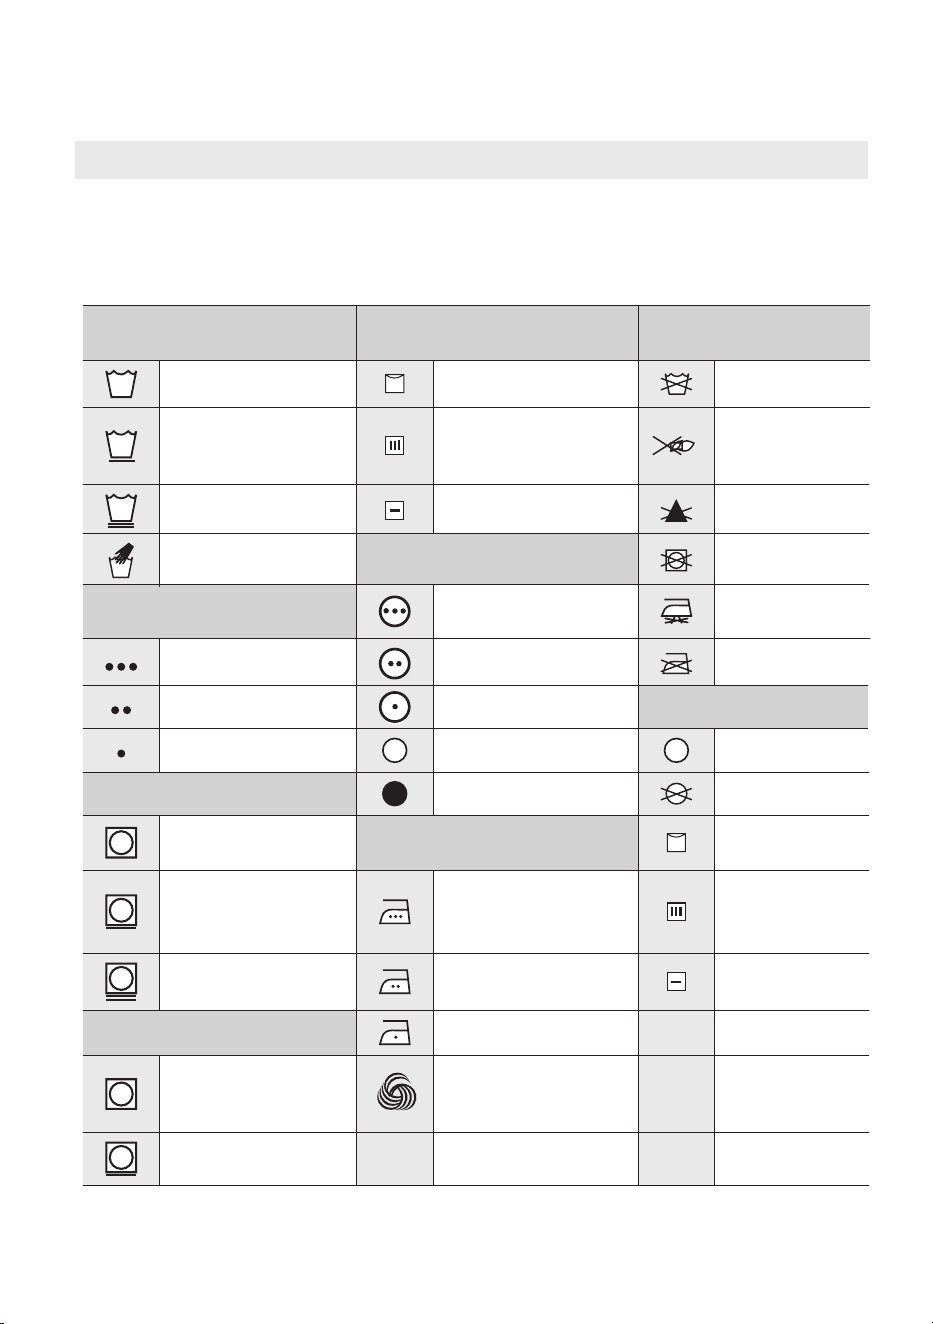
Fabric Care Chart
The followin symbol provid garment care direction.
Clothin care abels
include symbols for washing, bleaching, drying and ironing, or dry cleaning when
necessary. The use of symbols ensures consistency among garment manufacturers
of domestic and imported items. Follow care label directions to maximize garment
life and reduce laundering problems.
Wash Cycle Special Instructions
Normal Line Dry/ Hang to Dry
Permanent Press /
Wrinkle Resistant /
Wrinkle Control
Drip Dry
Gentle/Delicates Dry Flat
Hand Wash Heat Setting
Water Temperature**
High
Hot Medium
Warm Low
Cold Any Heat
Bleach
No Heat/Air
Any Bleach (when
needed)
Iron-Dry or Steam
Temperatures
Only Non-Chlorine
(color-safe)
Bleach (when needed)
High
Tumble Dr y Cycle Medium
Normal Low
Permanent Press/
Wrinkle Resistant/
Wrinkle Control
Gentle/ Delicates
Warning Symbols for
laundering
Do Not Wash
Do Not Wring
Do Not Bleach
Do Not Tumble
No Steam (added
to iron)
Do Not Iron
Dryclean
Dry Clean
Do Not Dry Clean
Line Dry/ Hang to
Drip Dry
Dry Flat
For machine-washable
wool. Loads should be
under 8 pounds.
Dry
** The number of dots represent appropriate wash water temperatures for various items. The
temperature range for Hot is 105 - 125 °F/ 41- 52 °C, for Warm 85- 105 °F/ 29- 41 °C and for Cold 60 -
85 °F / 16- 29 °C.
TROUBLESHOOTING INSTRUCTIONS
APPENDIX
Dry
38
l
g
esg

CERTIFICATIONS
Please note that changes or modifications of this product is not expressly approved by
the party responsible for compliance could void the user’s authority to operate the
equipment.This equipment complies with FCC’s RF radiation exposure limits set forth for
an uncontrolled environment.
The antenna(s) used for this transmitter must be installed and operated to provide a
separation distance of at least 20 cm from all persons and must not be collocated or
operating in conjunction with any other antenna or transmitter. Installers must ensure
that 20cm separation distance will be maintained between the device (excluding its
handset) and users.
Federal Communications Commission (FCC) Compliance Statement for USA
This device complies with part 15 of the FCC rules. Operation is subject to the following
two conditions:
(1) This device may not cause harmful interference, and (2) this device must accept any
interference received, including interference that may cause undesired operation.
Note: This equipment has been tested and found to comply with the limits for a Class B
digital device, pursuant to part 15 of the FCC Rules. These limits are designed to provide
reasonable protection against harmful interference in a residential installation. This
equipment generates, uses and can radiate radio frequency energy and, if not installed
and used in accordance with the instructions, may cause
harmful interference to radio communications. However, there is no guarantee that
interference will not occur in a particular installation. If this equipment does cause
harmful interference to radio or television reception, which can be determined by turning
the equipment off and on, the user is encouraged to try to correct the interference by
one or more of the following measures:
• Reorient or relocate the receiving antenna.
• Increase the separation between the equipment and receiver.
• Connect the equipment into an outlet on a circuit different from that to which the
receiver is connected.
• Consult the dealer or an experienced radio/TV technician for help
This equipment complies with FCC radiation exposure limits set forth for an uncontrolled
environment.
FCC Supplier’s Declaration of Conformity
Product Name: AutoTumbleDryer
Model number: MLHE27H7BWW/MLHE27H7BCG
Suppliers Name: Midea America Corp.
Suppliers Address (USA): 300 Kimball Dr. Parsippany, NJ 07054
Suppliers Website: http://midea.com/us
Contact Email/Telephone: 1-866-646-4332
Industry Canada (IC) Compliance Statement for Canada
This device complies with Industry Canada license-exempt RSS standard(s). Operation is
subject to the following two conditions: (1) this device may not cause interference, and
(2) this device must accept any interference, including interference that may cause
undesired operation of the device.
CAN ICES-003(B)/NMB-003(B)
Midea is not responsible for any changes or modifications not expressly approved by
Midea. Such modifications
could void the user’s authority to operate the equipment.
For model: MWB-S-WB01
FCC ID: 2ADQOMWB-SWB01
IC ID: 12575A-WB01
39

2 YEAR LIMITED WARRANTY
This warranty is provided to the original purchaser at retail (the “Purchaser” or “you”) by Midea America Corp.
(“Midea” or “we”), which warrants all parts of this Product, as described below. Midea warrants this Product to the
Purchaser for personal, family or household use. This warranty covers performance and quality issues in materials and
workmanship that appear under normal use and maintenance appearing within two years from the date of delivery.
This warranty gives you specific rights, and you may also have other rights that vary from state to state.
WARRANTY LIMITATIONS
This warranty is given only to the original purchaser at retail in either the United States or Canada and may not be
transferred to any subsequent buyer. This warranty does not apply to purchasers of our products for use or resale in a
business; a separate commercial warranty may protect those purchasers.
This warranty does not cover any Product failure caused by:
(a) Abuse, damage or use of the Product in violation of the Product instructions.
(b) Modification to any Product or part.
(c) Failure to maintain the Product or part as described in accordance with the Product instructions.
(d) Faulty installation or application.
(e) Use of parts or accessories not compatible with this Product.
(f) Floods, fires, winds, lightning, accidents, corrosive atmosphere, or other conditions beyond Midea’s control.
(g) Interruption in electrical service or inadequate electrical service.
(h) Replacement of fuses and replacement or resetting of circuit breakers.
(i) Frozen or broken water pipes, water damage, moisture intrusion, mold or other biological growth.
(j) The use, combination or linking of the Product to other products, processes or materials not provided by
Midea.
WARRANTY REMEDY
If any quality or performance issue covered by this warranty is discovered during the warranty period, we will, at our
option, repair or replace any such Product. This warranty is limited to Product repair or replacement by an
authorized Midea servicer or dealer and does not cover any shipping cost, labor cost, customs duties, inland
logistics cost, or cost of service, including any diagnostics, removal, transportation, or reinstallation costs. If we
ask, you must return the Product to us.
WARRANTY DISCLAIMER; EXCLUSION OF DAMAGES
This is the only express warranty to consumers that we offer on our Products. ANY IMPLIED WARRANTIES BY MIDEA,
INCLUDING BUT NOT LIMITED TO WARRANTIES OF MERCHANTABILITY AND FITNESS FOR PARTICULAR PURPOSE, ARE
LIMITED TO THE DURATION OF THIS EXPRESS WARRANTY. Some states and provinces do not allow the exclusion of
express warranties and/or limitations on how long an implied warranty lasts, so the above exclusion and/or limitation
may not apply to you.
THE REMEDY DESCRIBED ABOVE IS THE ONLY ONE THAT WE WILL PROVIDE, EITHER UNDER THIS WARRANTY OR
UNDER ANY WARRANTY ARISING BY OPERATION OF LAW. WE WILL NOT BE RESPONSIBLE FOR ANY CONSEQUENTIAL
OR INCIDENTAL DAMAGES ARISING FROM THE BREACH OF THIS WARRANTY OR ANY OTHER WARRANTY, WHETHER
EXPRESS OR IMPLIED, NEGLIGENCE OR OTHER TORT, OR ON ANY STRICT LIABILITY THEORY, INCLUDING BUT NOT
40

LIMITED TO LOST PROFITS. Some states do not allow the exclusion or limitation of incidental or consequential
damages, so the above exclusion may not apply to you.
WARRANTY CLAIMS PROCESS
For more information or to make a warranty claim, please visit:
https://www.midea.com/us/support
Or contact us at:
Telephone: 1-866-646-4332
You must have Your bill of sale, delivery slip, or appropriate proof of purchase to submit a warranty claim. The date
of delivery establishes the warranty period, should service be required.
DISPUTE RESOLUTION
ARBITRATION CLAUSE. IMPORTANT. PLEASE REVIEW THIS ARBITRATION CLAUSE. IT AFFECTS YOUR LEGAL RIGHTS.
(a) Parties: This arbitration clause (this “Arbitration Clause”) affects your rights against Midea and any of its
affiliates or employees or agents, successors, or assigns, all of whom together are referred to below as “we”
or “us” for ease of reference.
(b) ARBITRATION REQUIREMENT: EXCEPT AS STATED BELOW, ANY DISPUTE BETWEEN YOU AND ANY OF US
SHALL BE DECIDED BY NEUTRAL, BINDING ARBITRATION RATHER THAN IN COURT OR BY JURY TRIAL.
“Dispute” will be given the broadest possible meaning allowable by law. It includes any dispute, claim, or
controversy arising from or relating to your purchase of this Product, any warranty upon the Product, or the
Product’s condition. It also includes determination of the scope or applicability of this Arbitration Clause. The
arbitration requirement applies to claims in contract and tort, pursuant to statute, or otherwise.
(c) CLASS-ARBITRATION WAIVER: ARBITRATION IS HANDLED ON AN INDIVIDUAL BASIS. IF A DISPUTE IS
ARBITRATED, YOU AND WE EXPRESSLY WAIVE ANY RIGHT TO PARTICIPATE AS A CLASS REPRESENTATIVE OR
CLASS MEMBER ON ANY CLASS CLAIM YOU MAY HAVE AGAINST US OR WE AGAINST YOU, OR AS A PRIVATE
ATTORNEY GENERAL OR IN ANY OTHER REPRESENTATIVE CAPACITY, TO THE MAXIMUM EXTENT PERMITTED
BY LAW. YOU AND WE ALSO WAIVE ANY RIGHT TO CLASS ARBITRATION OR ANY CONSOLIDATION OF
INDIVIDUAL ARBITRATIONS.
(d) Discovery and Other Rights: Discovery and rights to appeal in arbitration are generally more limited than in a
lawsuit. This applies to both you and us. Other rights that you or we would have in court may not be available
in arbitration. Please read this Arbitration Clause and consult the rules of the arbitration organizations listed
below for more information.
(e) SMALL CLAIMS COURT OPTION: YOU MAY CHOOSE TO LITIGATE ANY DISPUTE BETWEEN YOU AND ANY OF
US IN SMALL CLAIMS COURT, RATHER THAN IN ARBITRATION, IF THE DISPUTE MEETS ALL REQUIREMENTS
TO BE HEARD IN SMALL CLAIMS COURT.
(f) Governing Law: For residents of the United States, the procedures and effect of the arbitration will be
governed by the Federal Arbitration Act (9 U.S.C. § 1 et seq.) rather than by state law concerning arbitration.
For residents of Canada, the procedures and effect of the arbitration will be governed by the applicable
arbitration law of the province in which you purchased your Product. The law governing your substantive
warranty rights and other claims will be the law of the state or province in which you purchased your Product.
Any court having jurisdiction may enter judgment on the arbitration award.
41

(g) Rules of the Arbitration: If the amount in controversy is less than $250,000, the arbitration will be decided by
a single arbitrator. If the amount in controversy is greater than or equal to $250,000, the arbitration will be
decided by a panel of three arbitrators. The arbitrator(s) will be chosen pursuant to the rules of the
administering arbitration organization. United States residents may choose JAMS (1920 Main Street, Ste. 300,
Irvine, CA 92614, www.jamsadr.com), or, subject to our approval, any other arbitration organization. In
addition, Canadian residents may choose the ADR Institute of Canada (234 Eglinton Ave. East, Suite 405,
Toronto, Ontario, M4P 1K5, www.amic.org). These organizations’ rules can be obtained by contacting the
organization or visiting its website. If the chosen arbitration organization’s rules conflict with this Arbitration
Clause, the provisions of this Arbitration Clause control. The award of the arbitrator(s) shall be final and
binding on all parties.
(h) Location of the Arbitration Hearing: Unless applicable law provides otherwise, the arbitration hearing for
United States residents will be conducted in the federal judicial district in which you reside (in your hometown
area) or, for Canadian residents, in the province in which you reside, and, if you choose, will be in-person.
(i) Costs of the Arbitration: Each party is responsible for its own attorney, expert, and other costs and fees unless
applicable law requires otherwise. Notwithstanding the preceding sentence, and unless applicable law
requires otherwise, if you are a consumer under the JAMS rules or the rules of another agreed upon arbitration
administrator, Midea will pay or reimburse you for all reasonable fees or costs to the extent required by law
or the applicable arbitration administrator’s rules. Whether or not required by law or such rules, if you prevail
at arbitration on any claim against Midea, Midea will reimburse you for any reasonable fees paid to the
arbitration administrator in connection with the arbitration proceedings. Under no circumstances will Midea
seek from you payment or reimbursement of any reasonable fees that Midea incurs in connection with the
arbitration. If you are required to advance any fees or costs to JAMS or other agreed upon arbitration
administrator, but you ask Midea to do so in your stead, Midea will consider and respond to your request.
(j) Survival and Enforceability of this Arbitration Clause: This Arbitration Clause shall survive the expiration or
termination, or any transfer, of the warranty on your Product. If any part of this Arbitration Clause, except
waivers of class-action rights, is found to be unenforceable for any reason, the remainder of this clause and
the warranty shall remain enforceable. If, in a case in which class-action allegations have been made, the
waiver of class-action rights under this warranty is found to be unenforceable with respect to any part of the
dispute, the parts of the dispute as to which the waiver of class-action rights have been found unenforceable
will be severed and will proceed in court without reference or application of this Arbitration Clause. Any
remaining parts will proceed in arbitration.
QUEBEC RESIDENTS
The arbitration provisions of this warranty shall not apply to residents of Quebec.
42

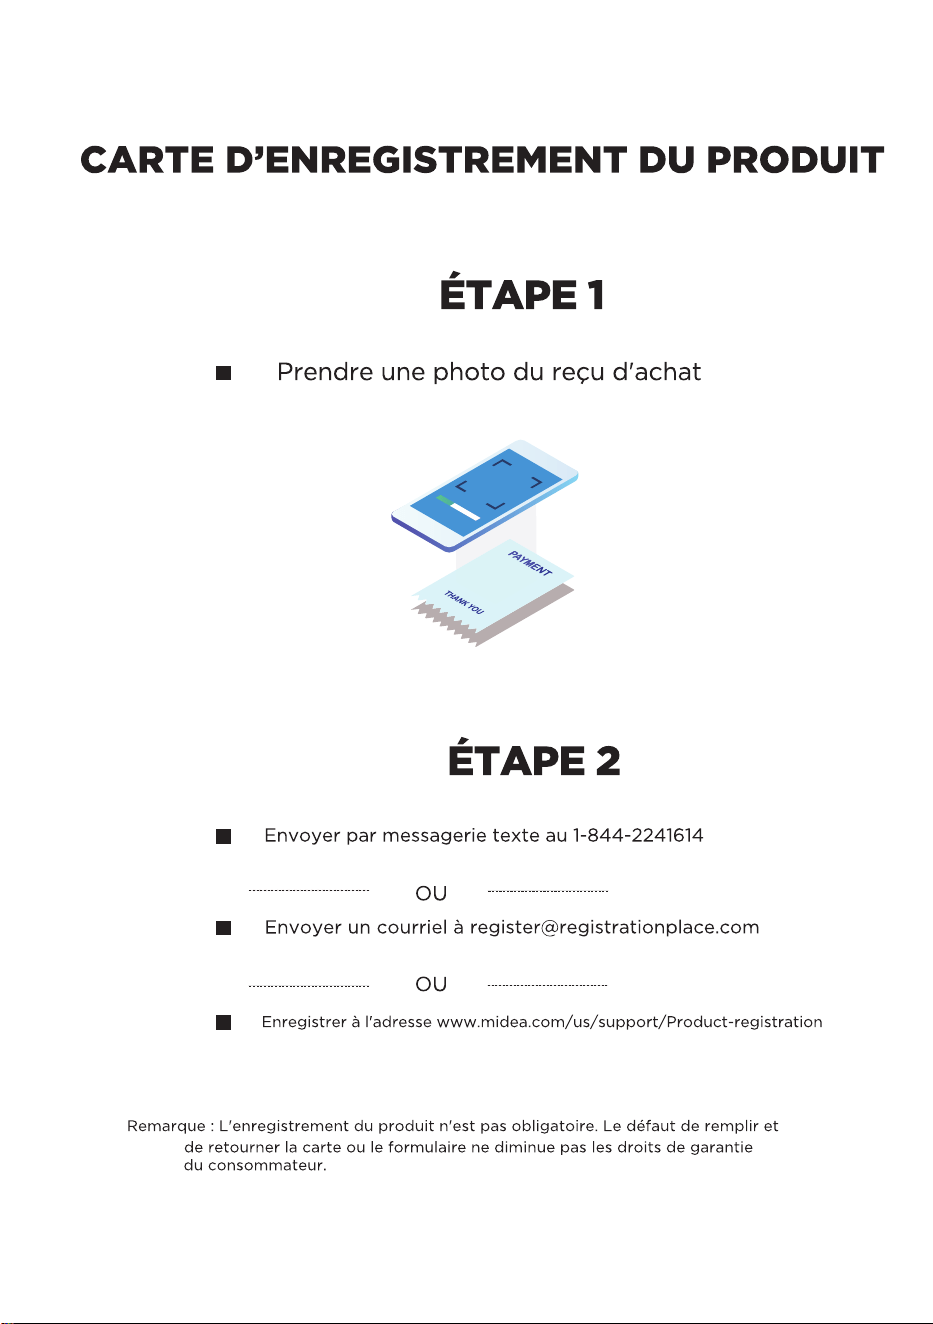
PRODUCT REGISTRATION CARD
STEP1
■
ke photo of purchase receipt
多
STEP2
■ Text to (844)224-1614
OR
■
Email to register@registrationplace.com
OR
■
Registration on www.midea.com/us/support/Product-registrat1on
Notice: Product registration is not mandatory. Failure to complete and return the card
or form does not diminish the consumer's warranty rights

r
、
�idea
尸少7哼召么
Secadora con
bomba de calor
Alimentación: 120/240 V~
Frecuencia: 60 Hz
Capacidad: 4.4 pies cúbicos
Advertencia:
Antes de utilizar este producto,
lea detenidamente este manual
y guárdelo para consulta futura.
El diseño y las especificaciones
están sujetos a cambio sin
previo aviso para la mejora
del producto. Consulte con su
distribuidor o fabricante para
obtener más información.
esp
MANUAL DEL USUARIO
E INSTRUCCIONES
DE INSTALACIÓN
二
I 0
NÚMERO DE MODELO
MLHE27H7BWW
MLHE27H7BCG
www.midea.com

01
CARTA DE AGRADECIMIENTO
¡Gracias por elegir Midea! Antes de usar su nuevo producto de Midea, lea detenidamente
este manual para asegurarse de que sabe cómo operar las características y funciones que
ofrece su nuevo aparato de manera segura.
CONTENIDOS
CARTA DE AGRADECIMIENTO ............................................................................................. 01
SEGURIDAD Y PRECAUCIONES .......................................................................................... 03
INTRODUCCIÓN .................................................................................. ................... 03
LO QUE NECESITA SABER SOBRE LAS INSTRUCCIONES DE SEGURIDAD ........ 03
SÍMBOLOS Y PRECAUCIONES DE SEGURIDAD IMPORTANTES ........................... 03
INSTRUCCIONES DE SEGURIDAD IMPORTANTES ................................................. 03
REQUISITOS DE INSTALACIÓN ............................................................................................ 06
IMPORTANTE PARA EL INSTALADOR ....................................................................... 06
REQUISITOS BÁSICOS ............................................................................................... 06
REQUISITOS DE UBICACIÓN ..................................................................................... 06
INSTRUCCIONES DE INSTALACIÓN DEL KIT DE PILA ............................................ 10
SISTEMA DE DRENAJE .............................................................................................. 13
REQUISITOS ELÉCTRICOS ....................................................................................... 14
CONEXIÓN A TIERRA ................................................................................................. 16
PIEZAS DE REPUESTO Y ACCESORIOS .................................................................. 16
INSTRUCCIONES DE INSTALACIÓN .................................................................................... 17
DESEMPAQUE ............................................................................................................. 17
IDENTIFICACIÓN DE LAS PIEZAS ............................................................................. 17
HERRAMIENTAS NECESARIAS PARA LA INSTALACIÓN ......................................... 18
PASOS DE INSTALACIÓN ........................................................................................... 18
INSTRUCCIONES DE FUNCIONAMIENTO ........................................................................... 22
PANEL DE CONTROL .................................................................................................. 22
SECADO DE UNA CARGA DE ROPA .......................................................................... 25
CONFIGURACIÓN Y FUNCIONAMIENTO DE LA APLICACIÓN ................................ 29
VACIADO DEL TANQUE DE AGUA ............................................................................. 31
LIMPIEZA DEL FILTRO ................................................................................................ 31
LIMPIEZA DEL INTERCAMBIADOR DE CALOR ......................................................... 32
CONSEJOS ESPECIALES PARA LAVADO DE ROPA .................................................33

02
MANTENIMIENTO ................................................................................................................... 34
CUIDADO Y MANTENIMIENTO ................................................................................... 34
INSTRUCCIONES PARA LA SOLUCIÓN DE PROBLEMAS .................................................. 35
CONSULTE ESTAS SOLUCIONES SI SU SECADORA............................................... 35
CÓDIGOS DE ERROR ................................................................................................. 37
APÉNDICE ................................................................................................................... 38
GARANTÍA .............................................................................................................................. 40
CERTIFICACIONES ................................................................................................................ 39
Lea todas las instrucciones y explicaciones antes de usar. Sígalas atentamente.
Conserve las instrucciones de funcionamiento a mano para su uso posterior. Si vende o
cede el aparato, asegúrese de que el nuevo propietario siempre reciba estas
instrucciones de funcionamiento.

SEGURIDAD Y PRECAUCIONES
03
INTRODUCCIÓN
Felicitaciones por la compra de su nueva secadora. Esta secadora cuenta con el diseño y
las funciones más avanzados y le brindará un rendimiento confiable y sin problemas.
LO QUE NECESITA SABER SOBRE LAS INSTRUCCIONES DE SEGURIDAD
Este manual contiene información importante sobre la instalación, el uso y el cuidado de su
electrodoméstico. Lea este manual detenidamente antes de instalar y operar esta máquina
para evitar lesiones y daños materiales. Las advertencias e instrucciones importantes de
seguridad de este manual NO cubren todas las posibles condiciones y situaciones que
puedan ocurrir. Es su responsabilidad usarlas.
SÍMBOLOS Y PRECAUCIONES DE SEGURIDAD IMPORTANTES
ADVERTENCIA
Esto indica que los peligros o las prácticas inseguras pueden causar
lesiones personales graves o la muerte. Para reducir el riesgo de
incendio, explosión, descarga eléctrica o lesiones personales al usar su
secadora, DEBEN seguirse estas precauciones básicas de seguridad.
PRECAUCIÓN
Esto indica que los peligros o las prácticas inseguras pueden causar
lesiones personales leves o daños materiales.
Para su seguridad, siga la información de este manual para
minimizar el riesgo de incendio o explosión y evitar daños
materiales, lesiones personales o la muerte.
ADVERTENCIA
– No almacene ni utilice gasolina ni otros vapores o líquidos inflamables cerca de este ni de ningún
otro electrodoméstico.
– La instalación y el mantenimiento deben ser realizados por un instalador cualificado, la agencia de
servicio técnico o el proveedor de gas.
INSTRUCCIONES DE SEGURIDAD IMPORTANTES
ADVERTENCIA – Para reducir el riesgo de incendio, descarga eléctrica o lesiones personales al utilizar este
electrodoméstico, siga las precauciones básicas, incluyendo las siguientes:
− Lea todas las instrucciones antes de utilizar el electrodoméstico.
− Utilice este electrodoméstico únicamente para el fin previsto, tal como se describe en este manual.
− Antes de su uso, la secadora debe estar correctamente instalada, tal como se describe en este
manual.
SEGURIDAD Y PRECAUCIONES
04
− Siga SIEMPRE las instrucciones de cuidado de las telas proporcionadas por el fabricante de la prenda.
− Riesgo de asfixia y lesiones por atrapamiento: No permita que los niños jueguen sobre o dentro del
electrodoméstico. Es necesaria una estrecha supervisión de los niños cuando el electrodoméstico se
utilice cerca de ellos.
− Antes de retirar el electrodoméstico de servicio o desecharlo, retire la tapa del compartimento de lavado
o la puerta del compartimento de secado.
− No introduzca las manos en el electrodoméstico si el tambor está en movimiento.
− No instale ni guarde este electrodoméstico en un lugar expuesto a la intemperie o a temperaturas
gélidas.
− No manipule los controles.
− No repare ni reemplace ninguna pieza del electrodoméstico ni intente realizar ningún mantenimiento a
menos que se recomiende específicamente en las instrucciones de mantenimiento del usuario o en las
instrucciones de reparación del usuario publicadas que usted comprenda y pueda realizar.
− El material de embalaje puede ser peligroso para los niños. ¡Existe riesgo de asfixia! Mantenga todo el
embalaje fuera del alcance de los niños.
− Revise siempre el interior de la secadora en busca de objetos extraños antes de cargar la ropa.
− Mantenga la puerta cerrada cuando no esté en uso.
− No utilice suavizantes ni productos para eliminar la estática a menos que lo recomiende el fabricante.
− Limpie el filtro de pelusas antes o después de cada carga.
− Mantenga el área alrededor de la abertura de escape y las zonas circundantes libres de pelusas, polvo y
suciedad.
− El interior de la secadora y el conducto de escape deben ser limpiados periódicamente por personal de
servicio cualificado.
− Este electrodoméstico debe estar conectado a tierra. Consulte “Requisitos eléctricos” y “Requisitos de
conexión a tierra” en la sección “REQUISITOS DE INSTALACIÓN”.
− Este electrodoméstico debe estar correctamente conectado a tierra. Nunca enchufe el cable de
alimentación en un tomacorriente que no esté correctamente conectado a tierra y que no cumpla con los
códigos locales y nacionales. Consulte “Requisitos de conexión a tierra” en la sección “REQUISITOS
DE INSTALACIÓN” para obtener más información.
− Asegúrese de que los bolsillos estén libres de pequeños objetos duros de forma irregular y materiales
extraños, como monedas, cuchillos, alfileres, etc. Estos objetos podrían dañar la secadora.
− No utilice piezas de repuesto no recomendadas por el fabricante (por ejemplo, piezas fabricadas en casa
con una impresora 3D).
− Bordes afilados: Para reducir el riesgo de lesiones, tenga cuidado al limpiar las aletas del condensador o
del serpentín del evaporador.
GUARDE ESTAS INSTRUCCIONES.
ADVERTENCIA - Riesgo de incendio o explosión
• No seque prendas que se hayan limpiado, lavado, remojado o salpicado previamente con gasolina,
disolventes de limpieza en seco u otras sustancias inflamables o explosivas, ya que emiten vapores que
podrían incendiarse o explotar. Cualquier material que haya estado en contacto con dichos líquidos o sólidos
inflamables debe colocarse en la secadora hasta después de haber eliminado todos los restos de estos
líquidos o sólidos inflamables y sus vapores.

SEGURIDAD Y PRECAUCIONES
05
• En los hogares se utilizan muchos productos altamente inflamables, como acetona, alcohol desnaturalizado,
gasolina, queroseno, algunos limpiadores domésticos líquidos, quitamanchas, aguarrás, ceras y quitaceras.
Guarde todos los productos altamente inflamables lejos de la secadora.
• No seque prendas que contengan gomaespuma (pueden estar etiquetadas como espuma de látex) ni
materiales con textura similar a la goma a alta temperatura. Los materiales de gomaespuma calientes pueden,
en determinadas circunstancias, producir fuego por combustión espontánea.
• No utilice la secadora para secar ropa que contenga restos de sustancias inflamables, como aceite vegetal,
aceite de cocina, aceite de máquina, productos químicos inflamables, disolventes, etc., ni nada que contenga
cera o productos químicos, como fregonas y trapeadores. Las sustancias inflamables pueden provocar que la
tela se incendie.
• No almacene ni utilice gasolina ni otros vapores o líquidos inflamables cerca de este ni de ningún otro
electrodoméstico. No seque prendas que hayan sido previamente limpiadas, lavadas, remojadas o
manchadas con gasolina, solventes de limpieza en seco u otras sustancias inflamables o explosivas, ya que
desprenden vapores que podrían incendiarse o explotar.
• Mantenga el área debajo y alrededor de sus electrodomésticos libre de materiales combustibles (pelusa,
papel, trapos, etc.), gasolina, productos químicos y otros vapores y líquidos inflamables.
• No coloque prendas expuestas a aceites de cocina en la secadora. Las prendas contaminadas con aceites de
cocina pueden contribuir a una reacción química que podría incendiar la carga. Para reducir el riesgo de
incendio, la parte final del ciclo de secado se realiza sin calor (periodo de enfriamiento). Evite detener la
secadora antes de que finalice el ciclo de secado, a menos que retire todas las prendas rápidamente y las
extienda para que se disipe el calor residual.
• El aceite residual en la ropa puede incendiarse espontáneamente. El riesgo de combustión espontánea
aumenta cuando las prendas que contienen aceite vegetal o de cocina se exponen al calor. Una fuente de
calor, como la secadora, puede calentar estas prendas, lo que provoca una reacción de oxidación en el aceite.
• La oxidación genera calor. Si este calor no puede escapar, las prendas pueden calentarse lo suficiente como
para incendiarse. Apilar, amontonar o almacenar este tipo de prendas puede impedir que el calor escape y
crear un peligro de incendio.
PRECAUCIÓN
• No se siente sobre la secadora.
• Debido a las continuas mejoras del producto, Midea America se reserva el derecho de cambiar las
especificaciones sin previo aviso. Para obtener más información, consulte las instrucciones de instalación
incluidas con el producto antes de seleccionar los gabinetes, realizar los cortes o comenzar la instalación.
• No seque prendas con hebillas grandes, botones u otros objetos metálicos o sólidos pesados.
• Instale y use la secadora de acuerdo con las instrucciones del fabricante.
• No coloque en la secadora prendas que puedan haber sido manchadas o empapadas con aceite vegetal o
de cocina. Incluso después del lavado, estas prendas pueden contener cantidades significativas de estos
aceites.
• Tenga cuidado de que los niños no queden atrapados en la puerta al cerrarla. Esto podría causar lesiones.

REQUISITOS DE INSTALACIÓN
06
IMPORTANTE PARA EL INSTALADOR
Lea atentamente las siguientes instrucciones antes de instalar la secadora. Conserve estas
instrucciones para futuras consultas.
PRECAUCIÓN
• La secadora no es apta para su instalación en casas móviles.
• Retire la puerta de todos los electrodomésticos desechados para evitar el peligro
de que un niño quede atrapado y se asfixie. Al desechar un electrodoméstico,
desenchufe y corte el cable de alimentación.
• Instale la secadora de acuerdo con las instrucciones del fabricante y todos los
códigos locales aplicables.
REQUISITOS BÁSICOS
Asegúrese de tener todo lo necesario para una instalación correcta.
− Se requiere una toma de corriente con conexión a tierra. Consulte la sección “Requisitos
eléctricos” para obtener más información.
− Se requiere UN CABLE DE ALIMENTACIÓN para la secadora eléctrica, que debe adquirirse por
separado si se utiliza un modelo estadounidense.
REQUISITOS DE UBICACIÓN
−
La secadora debe ubicarse de manera que haya suficiente espacio en la parte delantera para cargarla.
Consulte las páginas siguientes para obtener las medidas precisas del espacio libre mínimo.
− Asegúrese de que la habitación donde se ubica la secadora cuente con suficiente ventilación. La
secadora debe ubicarse en un lugar sin obstrucciones del flujo de aire.
− La secadora no debe instalarse ni almacenarse en un área expuesta al agua o a la intemperie. El área
de la secadora debe mantenerse libre de materiales combustibles, gasolina y otros vapores y líquidos
inflamables.
− Una secadora produce pelusa combustible. El área alrededor de la secadora debe mantenerse libre de
pelusa.
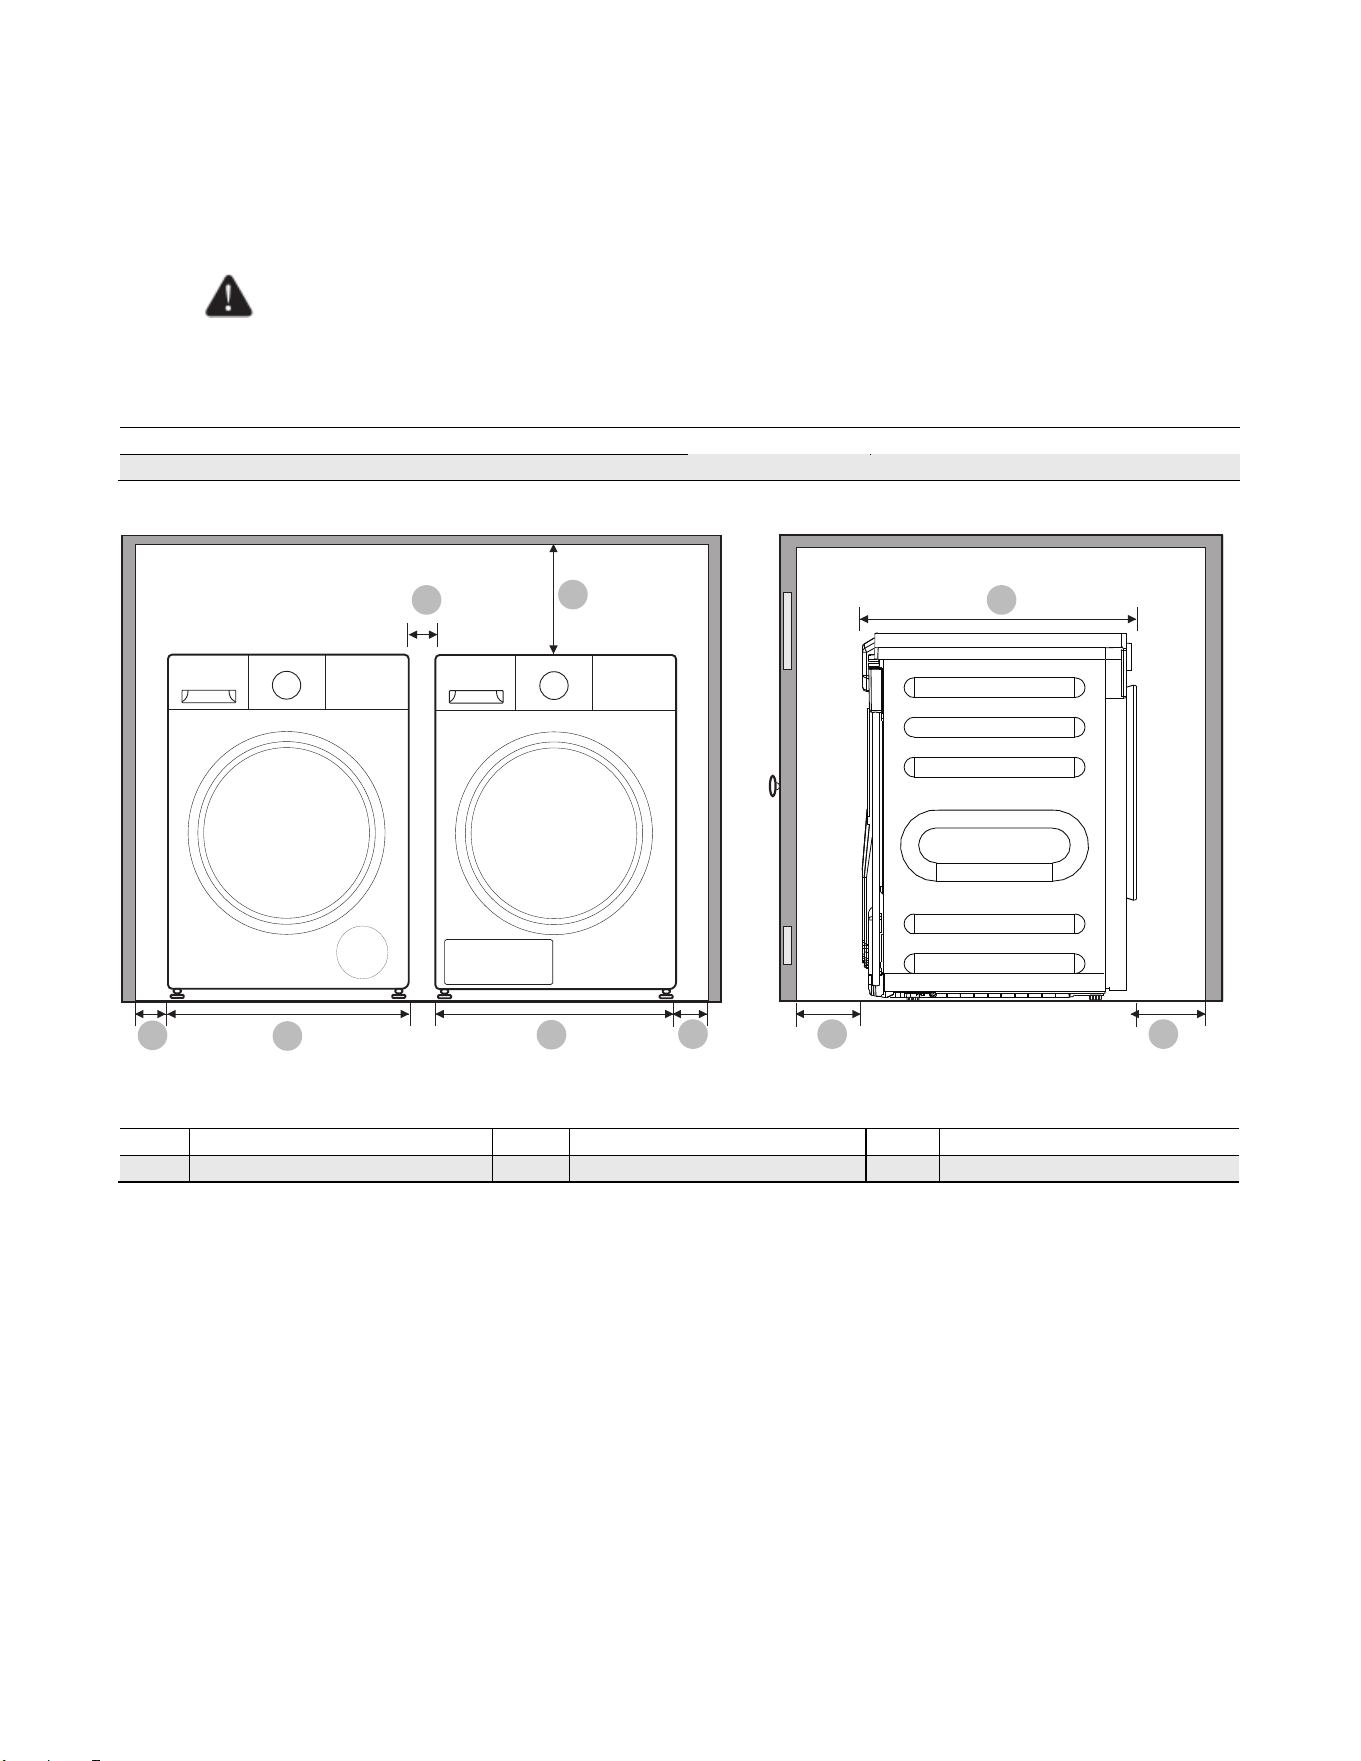
REQUISITOS DE INSTALACIÓN
07
Instalaciones en huecos, armarios o empotrados en la pared
ADVERTENCIA
• No se debe instalar ningún otro electrodoméstico que queme combustible en el mismo
armario que la secadora.
Distancias mínimas entre la secadora y las paredes adyacentes u otras superficies:
Laterales
1 pulgada (25.4 mm)
Parte trasera
2 pulgadas (50.8 mm)
Parte superior
2 pulgadas (50.8 mm)
Parte frontal
2 pulgadas (50.8 mm)
A 1 pulgada (25.4 mm) C 2 pulgadas (50.8 mm) E 25.6 pulgadas (650 mm)
B 23.4 pulgadas (595 mm) D 2 pulgadas (51 mm) F 2 pulgadas (50.8 mm)
A
A
A
B
B
C
E
D F
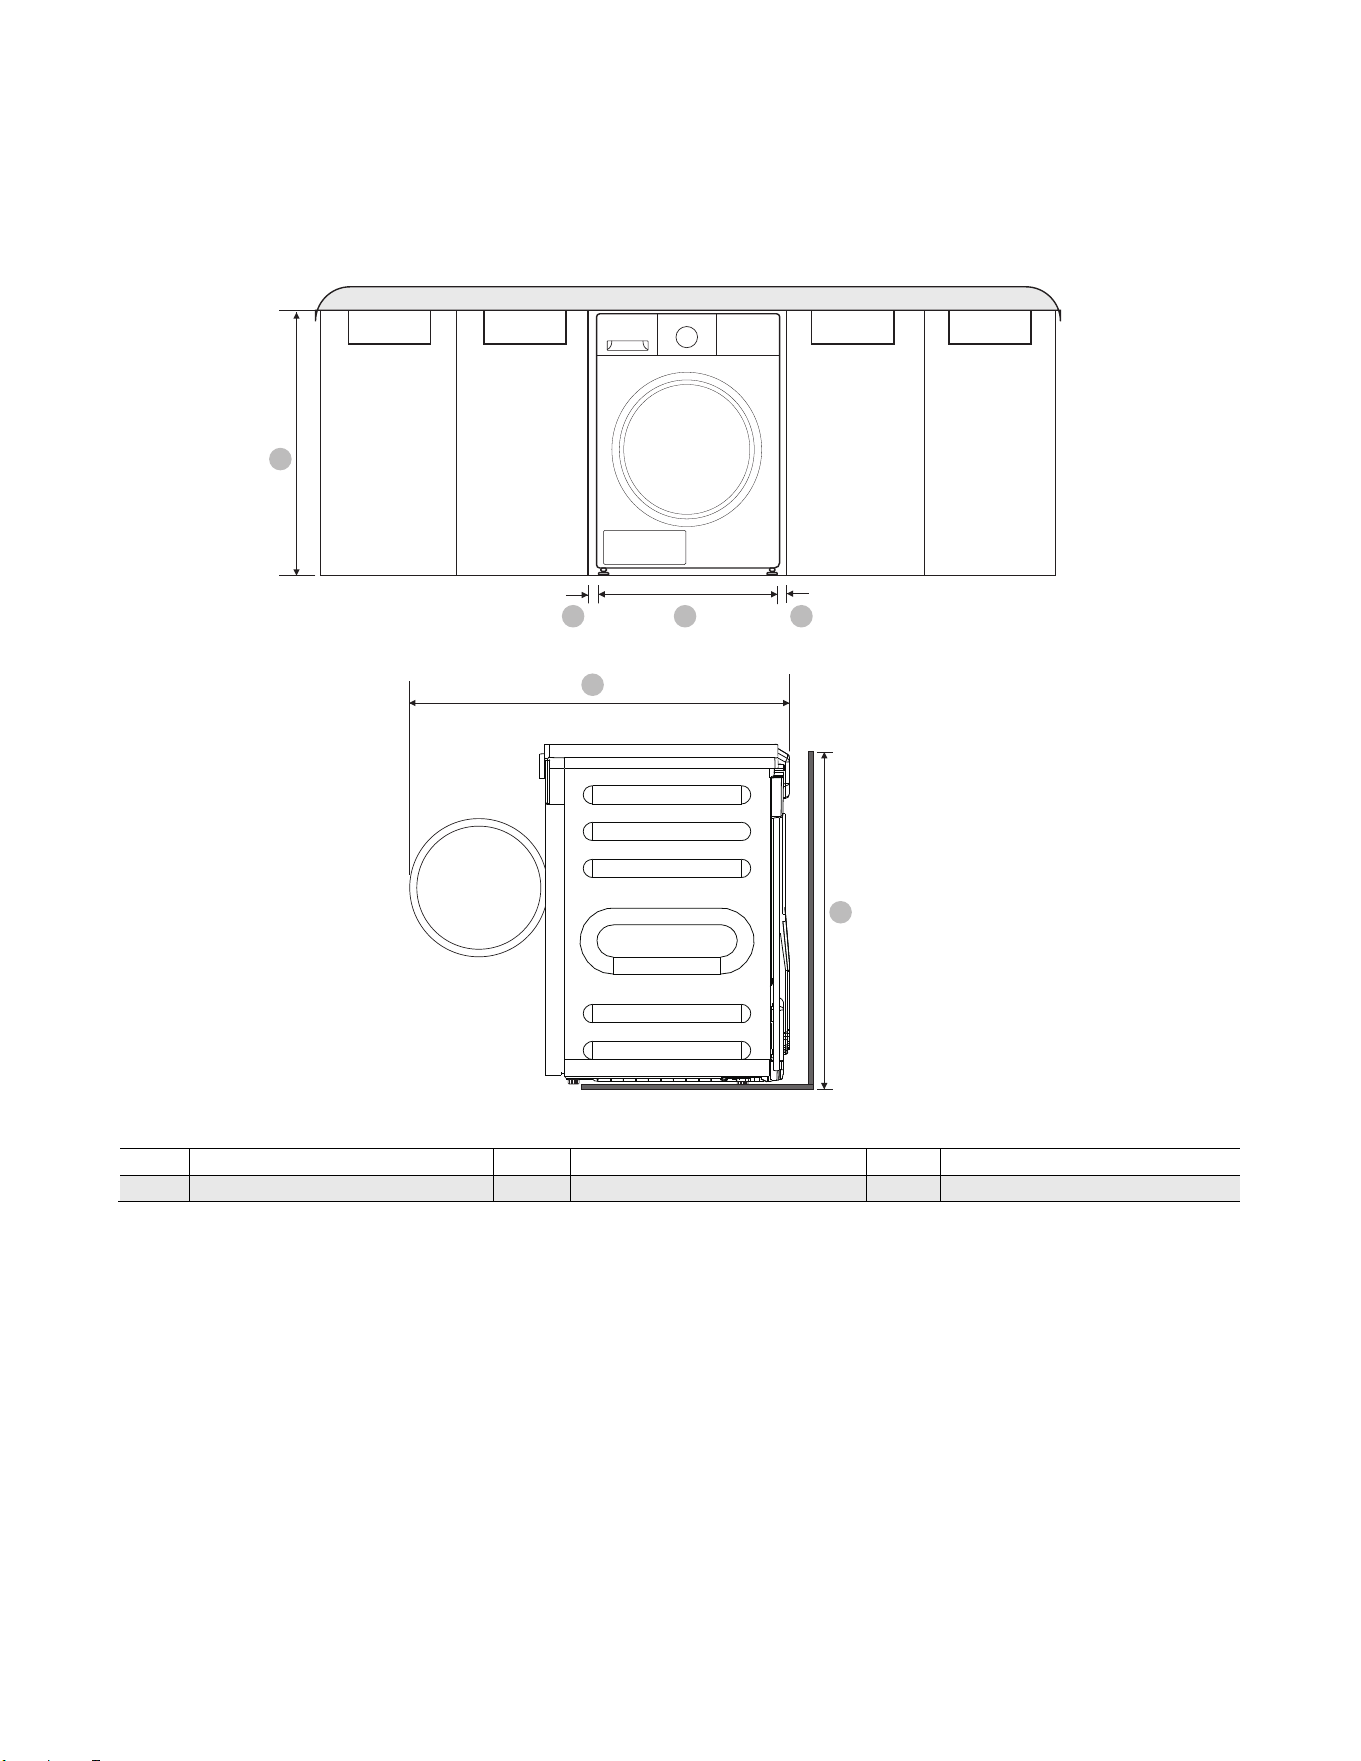
REQUISITOS DE INSTALACIÓN
08
Instalación bajo un mueble
A
35.5 pulgadas (901 mm)
C
23.4 pulgadas (595 mm)
E
42.2 pulgadas (1072 mm)
B
1 pulgada (25 mm)
D
1 pulgada (25 mm)
F
33.5 pulgadas (850 mm)
A
CB D
E
F
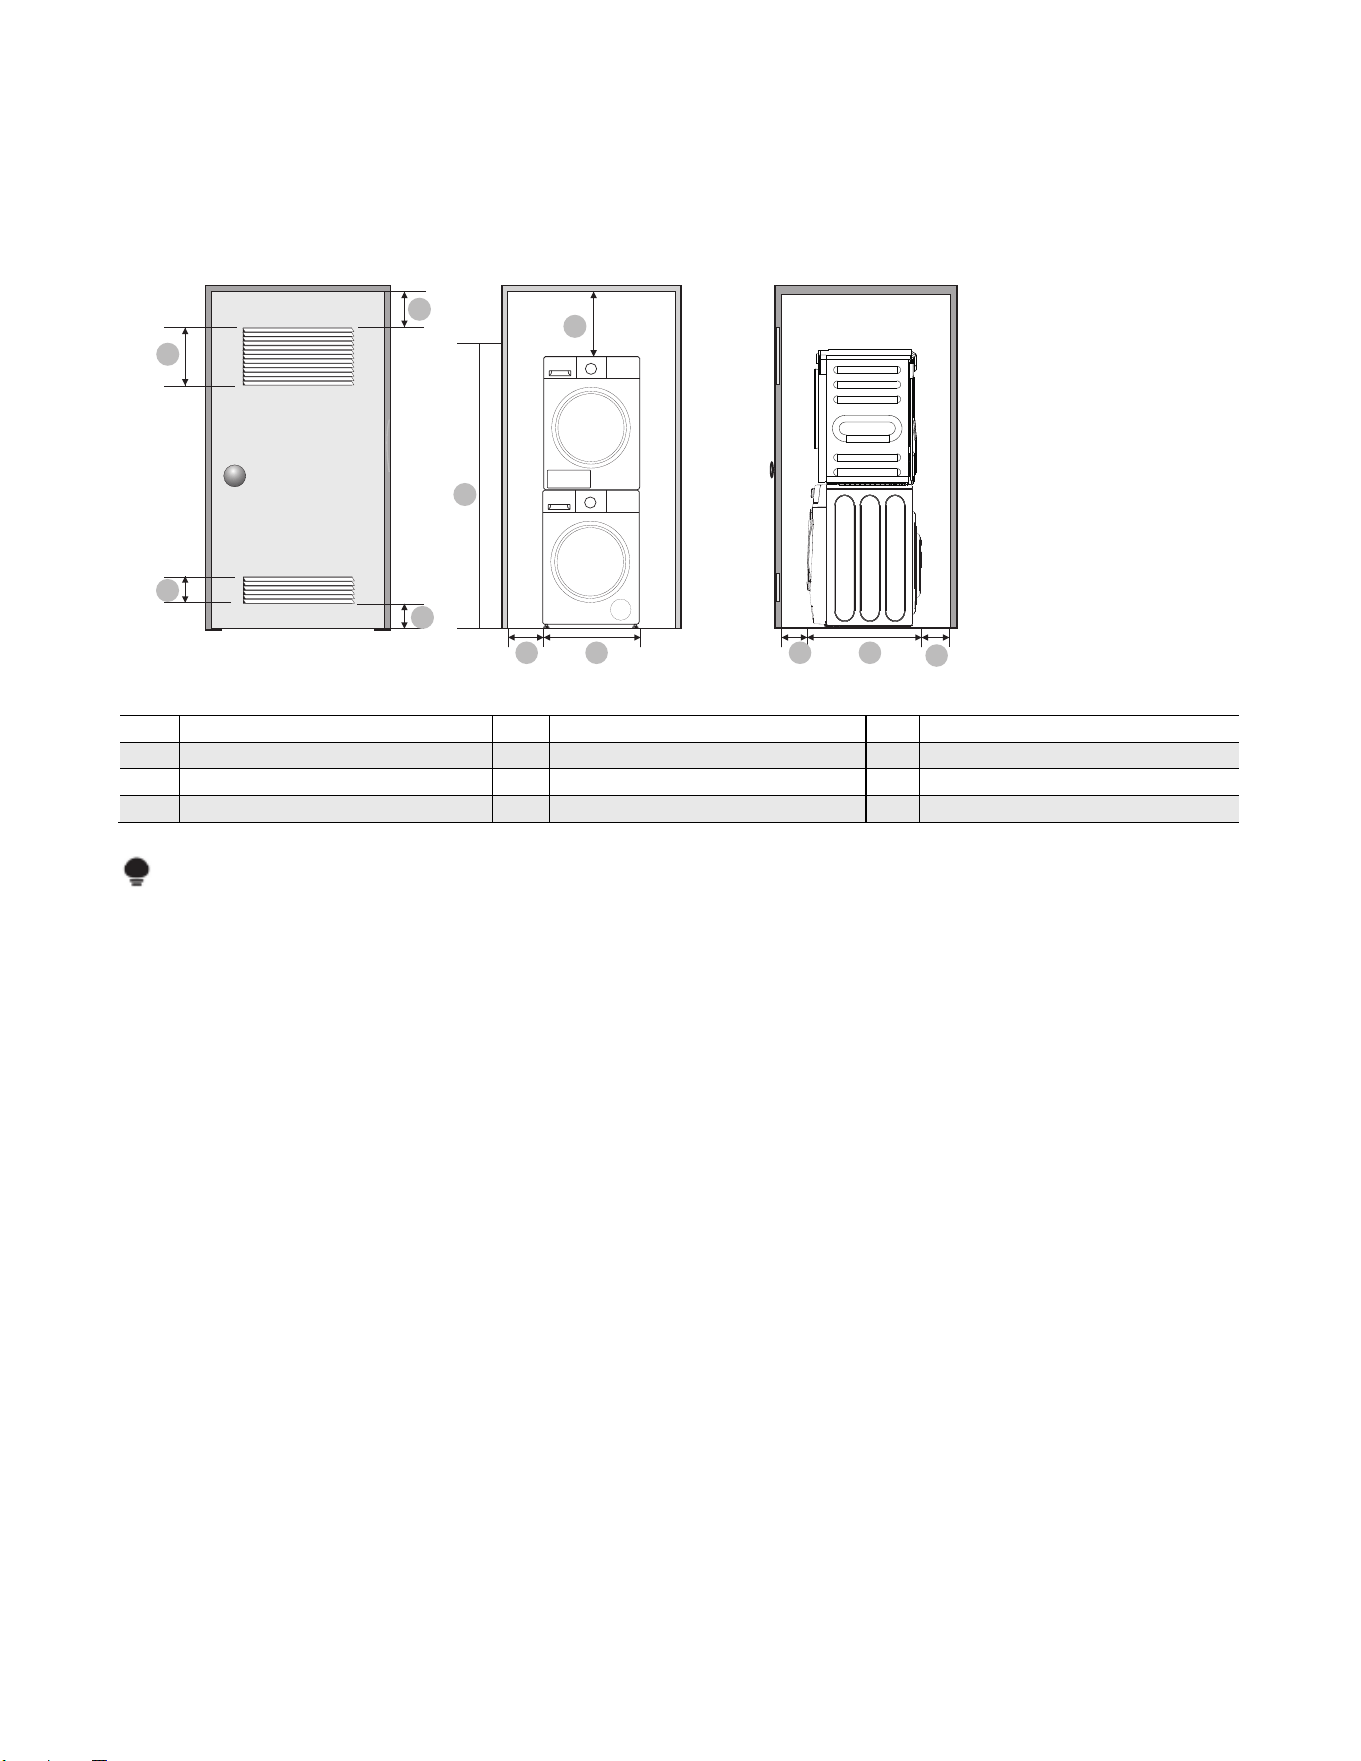
REQUISITOS DE INSTALACIÓN
09
Instalación con lavadora y secadora apiladas
A
3 pulgadas (76 mm)
E
2 pulgadas (50.8 mm)
I
3 pulgadas (76 mm)
B
48 pulgadas (3100 mm)
F
/
J
25.7 pulgadas (653 mm)
C
24 pulgadas (1550 mm)
G
1 pulgadas (25.4 mm)
K
2 pulgadas (50.8 mm)
D
3 pulgadas (76 mm)
H
23.4 pulgadas (595 mm)
NOTA
• La parte frontal del armario debe tener dos aberturas de ventilación sin obstrucciones para una superficie total
combinada mínima de 72 pulgadas cuadradas (465 cm² ), con un espacio libre mínimo de 3 pulgadas (76 mm) en
la parte superior e inferior. Se acepta una puerta de rejilla con un espacio libre equivalente.
A
B
C
D
E
F
G H I J
K
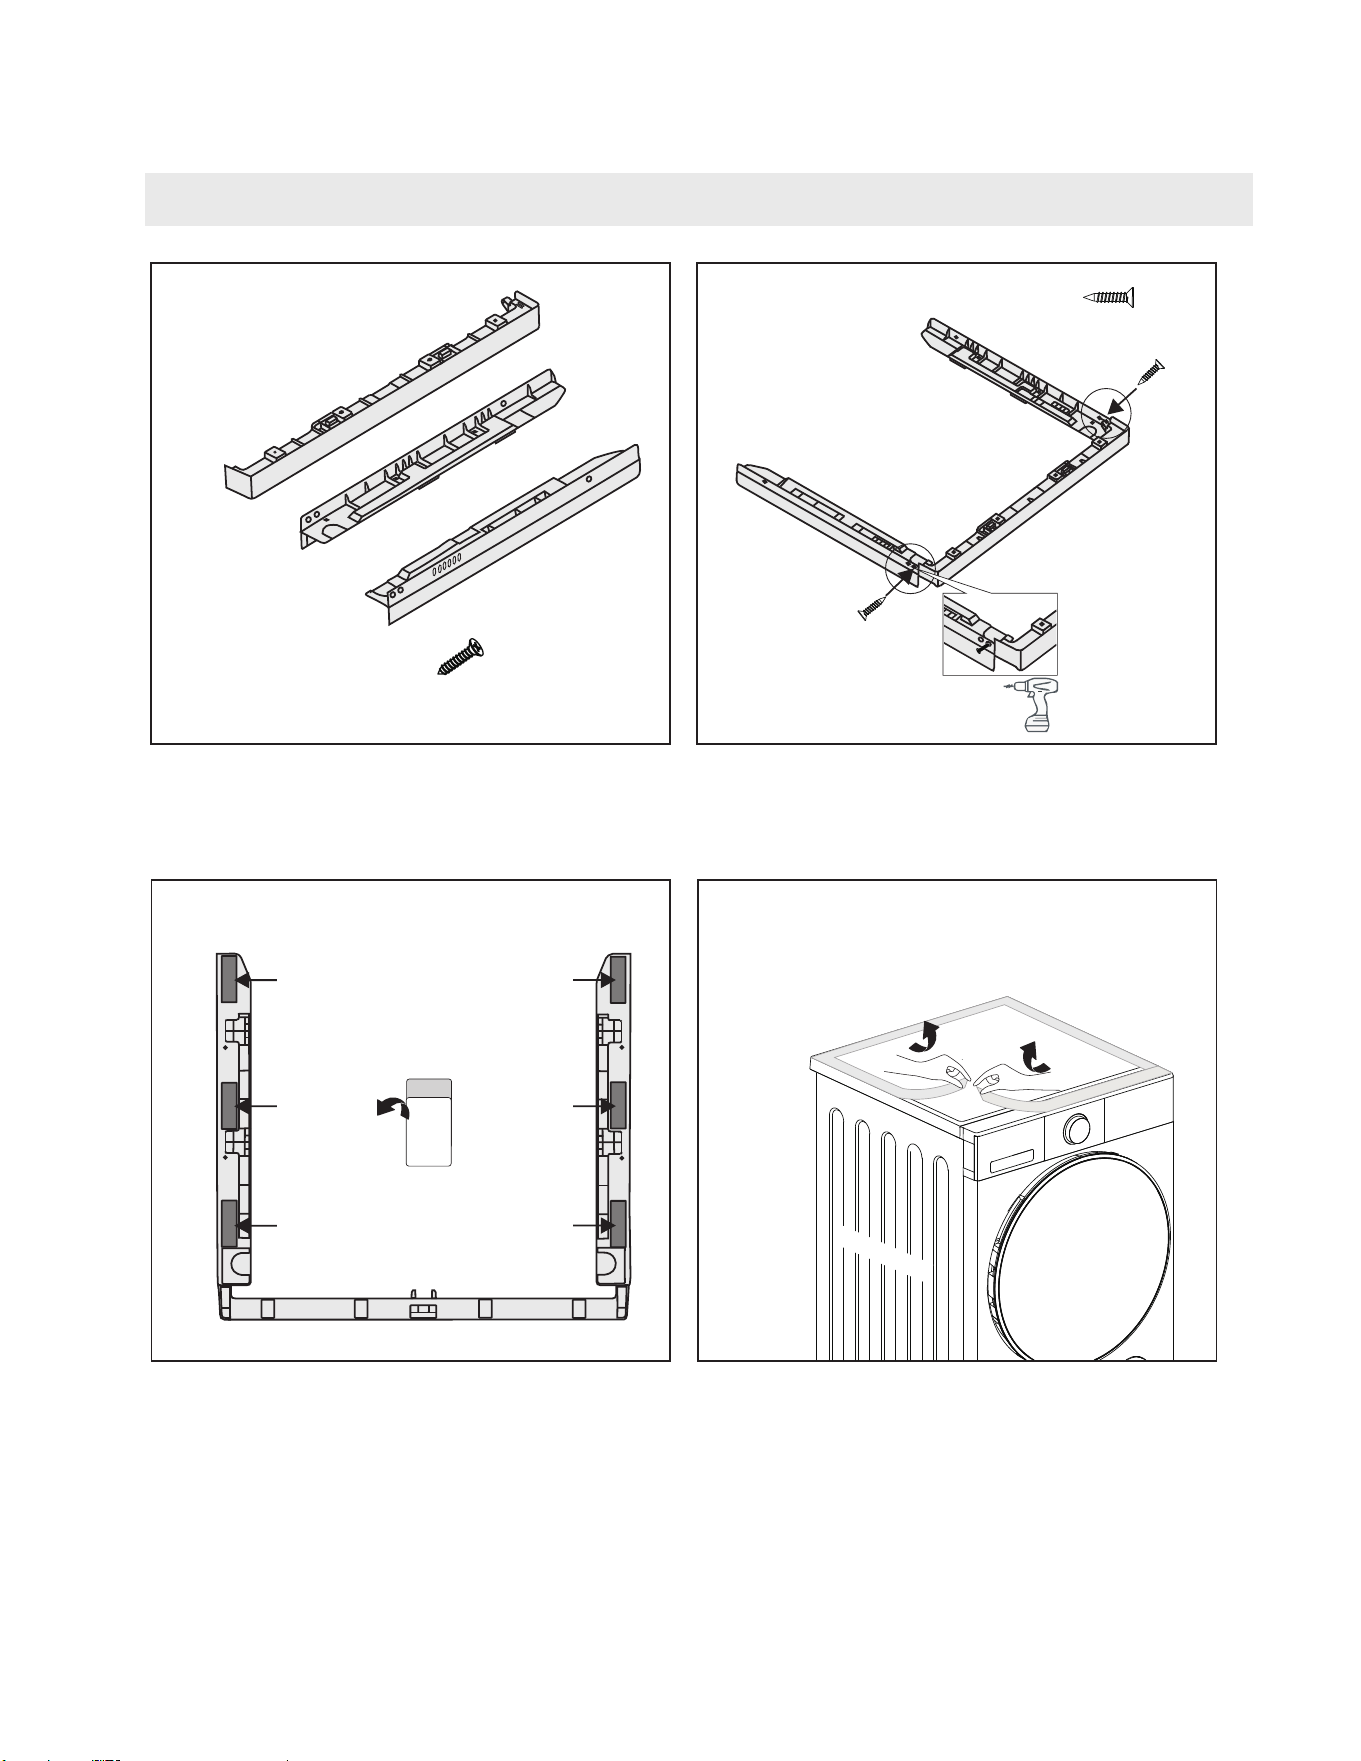
REQUISITOS DE INSTALACIÓN
10
1
1×
1×
1×
6×
2
×2
≈5 N·m
3M
3
4
WASHER
INSTALACIÓN DE KITS DE APILAMIENTO GULDE
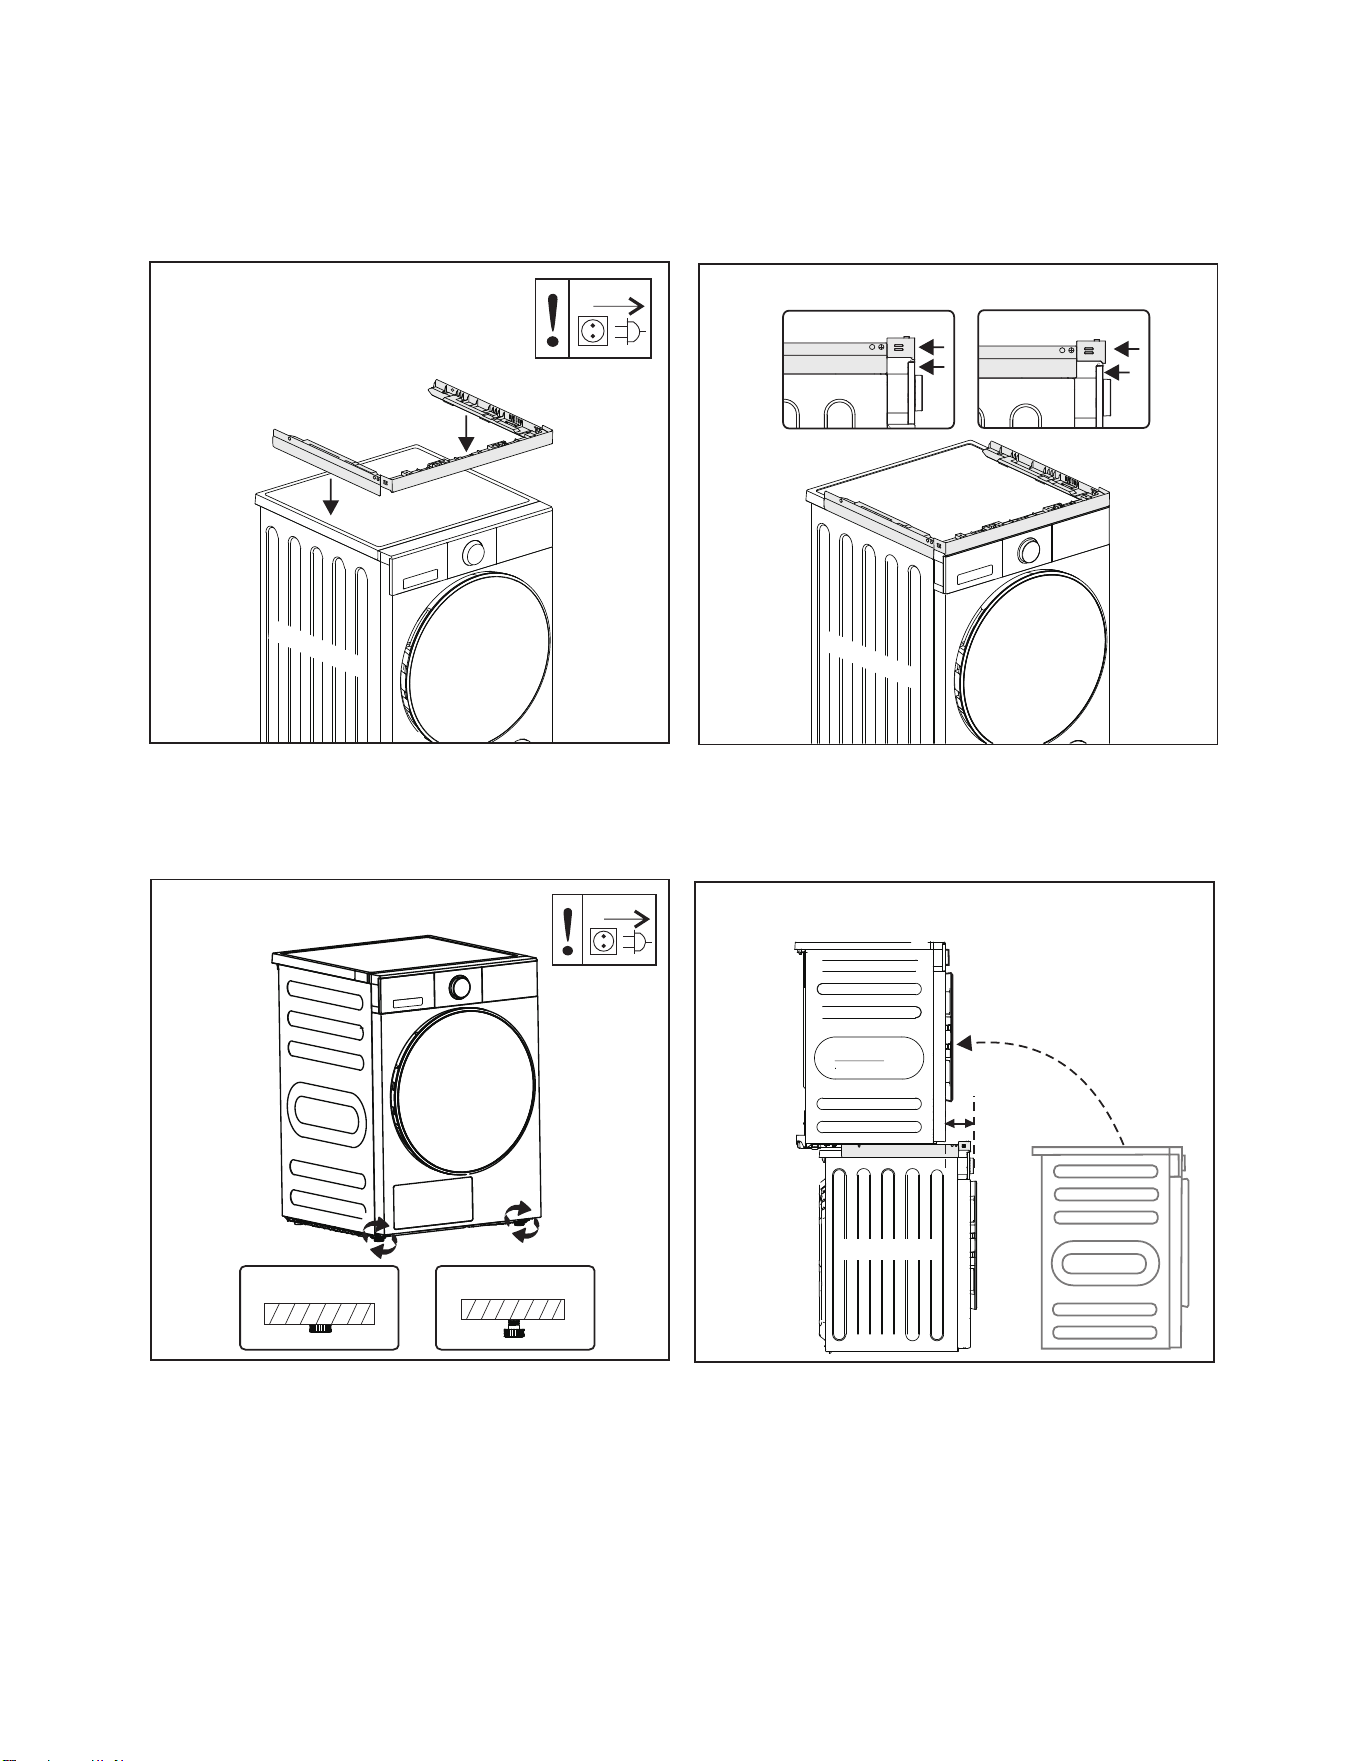
REQUISITOS DE INSTALACIÓN
11
√ ×
7
DRYER
8
≥
15cm
DRYER
WASHER
DRYER
5
WASHER
6
√ ×
WASHER
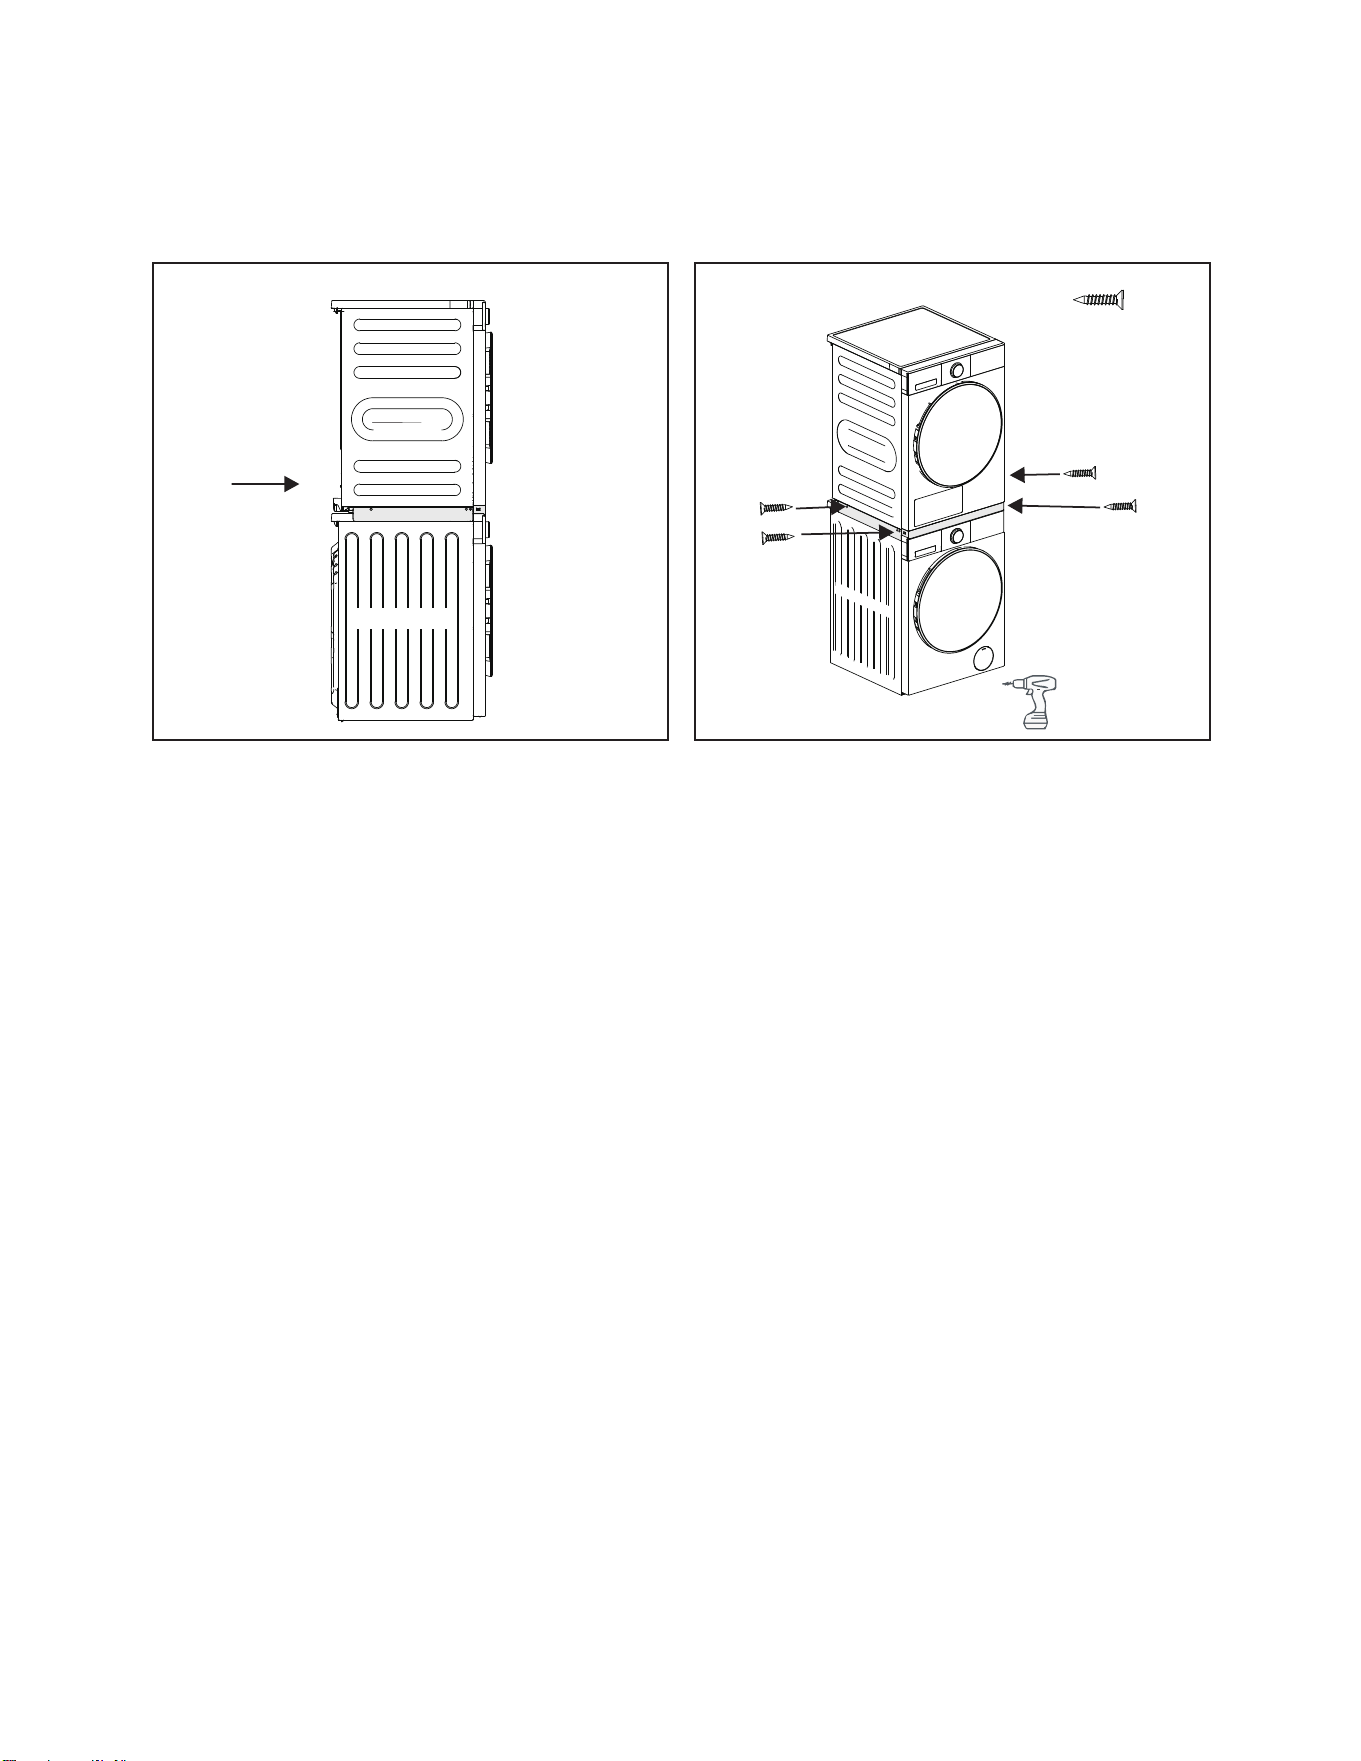
REQUISITOS DE INSTALACIÓN
12
9
10
F
≈5 N·m
×4
DRYER
WASHER
WASHER
DRYER

REQUISITOS DE INSTALACIÓN
13
Utilice la extensión de la manguera de desagüe para drenar el agua sin usar el depósito de agua.
Guía de instalación de la extensión de la manguera de desagüe
1
2
3
Hay dos elementos individuales incluidos en el paquete
de accesorios dentro del tambor de la secadora la
manguera de desagüe y el soporte de la manguera de
desagüe.
Localice la manguera de desagüe en la parte trasera de
la secadora. Gire para quitar la manguera del depósito
de agua.
Pase la extensión de la manguera de desagüe a través
del soporte de la manguera de desagüe.
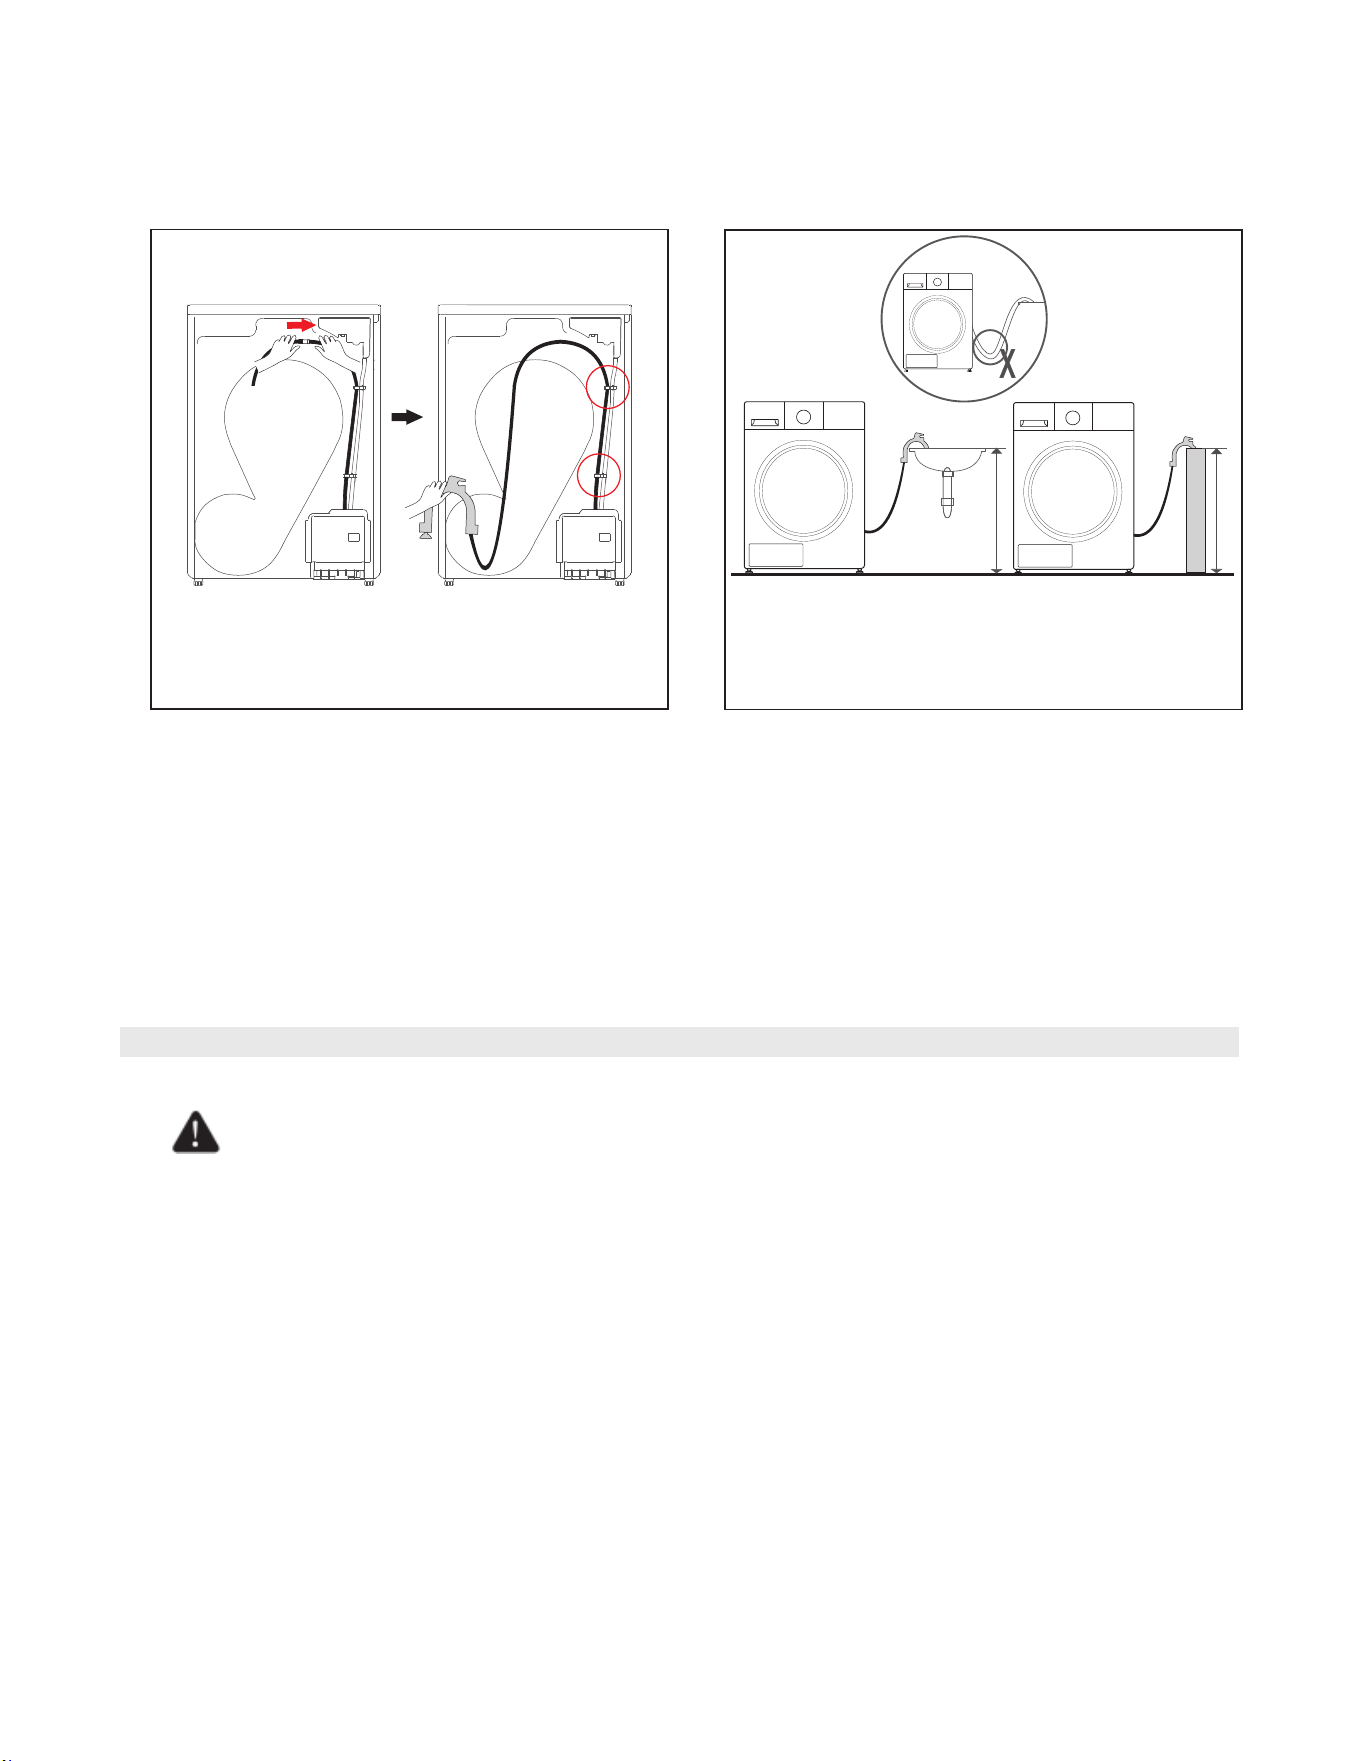
REQUISITOS DE INSTALACIÓN
14
REQUISITOS ELÉCTRICOS
El diagrama de cableado se encuentra en la placa posterior de la unidad.
ADVERTENCIA
− La conexión incorrecta del conductor de tierra del equipo puede provocar riesgo de
descarga eléctrica. Consulte con un electricista o técnico cualificado si tiene dudas sobre la
correcta conexión a tierra de su secadora. No modifique el enchufe incluido con su
secadora; si no encaja en la toma de corriente, solicite a un electricista cualificado que
instale una toma de corriente adecuada.
− Para evitar riesgos innecesarios de incendio, descarga eléctrica o lesiones personales,
todo el cableado y la conexión a tierra deben realizarse de acuerdo con los códigos locales
o, en su ausencia, con el Código Eléctrico Nacional, ANSI/NFPA núm. 70 última revisión
(para EE. UU.) o el Código Eléctrico Canadiense CSA C22.1, últimas revisiones, y los
códigos y ordenanzas locales. Es su responsabilidad proporcionar un servicio eléctrico
adecuado a su secadora.
− Todas las instalaciones de gas deben realizarse de acuerdo con el Código Nacional de
Combustibles, ANSI/Z2231 última revisión (para EE. UU.) o los Códigos de Instalación
CAN/CGA B149 última revisión (para Canadá), y los códigos y ordenanzas locales.
4
5
Conecte la extensión de la manguera de desagüe con
la manguera de desagüe de la secadora. Asegúrese de
que ambos cierres estén cerrados para evitar un mal
drenaje.
Cuelgue el soporte de la manguera de desagüe en el
borde de un lavabo o tubo de pared. Asegúrese de que
el soporte esté seguro y que no haya dobleces ni
torceduras excesivas en la manguera.
Max.80cm
Max.80cm

REQUISITOS DE INSTALACIÓN
15
Conexiones eléctricas
Se recomienda un circuito derivado individual (o independiente) que alimente únicamente a su secadora.
NO UTILICE UN CABLE DE EXTENSIÓN.
Modelos eléctricos (solo para EE. UU.)
Las secadoras requieren un servicio eléctrico aprobado de 120/240 voltios, 60 Hz CA.
Los requisitos del servicio eléctrico se encuentran en la etiqueta de datos de la secadora.
Se requiere un fusible o disyuntor de 30 amperios en ambos lados de la línea.
− Si se utiliza un cable de alimentación, este debe enchufarse a un tomacorriente de 30 amperios.
− El cable de alimentación NO se incluye con las secadoras eléctricas de EE. UU.
ADVERTENCIA
RIESGO DE DESCARGA ELÉCTRICA:
Cuando los códigos locales lo permitan, la alimentación eléctrica de la secadora puede
conectarse mediante un nuevo kit de cable de alimentación, marcado para su uso con una
secadora, homologado por UL y con una clasificación mínima de 120/240 voltios y 30
amperios, con tres conductores de cable de cobre No. 10 terminados con terminales de bucle
cerrado, terminales de horquilla de extremo abierto con extremos vueltos hacia arriba o con
cables estañados.
• No reutilice el cable de alimentación de una secadora antigua. El cableado eléctrico del cable
de alimentación debe fijarse en el gabinete de la secadora con un protector de cables
homologado por UL.
• Se prohíbe la conexión a tierra a través del conductor neutro en (1) nuevas instalaciones de
circuitos derivados, (2) casas móviles, (3) vehículos recreativos y (4) áreas donde los códigos
locales prohíben la conexión a tierra a través del conductor neutro. (Use un enchufe de 4
clavijas para tomacorrientes de 4 cables, tipo NEMA 14-30R).
Modelos eléctricos: solo para Canadá
• Se requiere un suministro eléctrico aprobado de 120/240 voltios, 60 Hz CA, que se utiliza mediante un fusible
o disyuntor en ambos lados de la línea.
• Todos los modelos canadienses se envían con el cable de alimentación incluido.
NOTA
• Los modelos eléctricos de secadora de EE. UU. NO incluyen cable de alimentación.

REQUISITOS DE INSTALACIÓN
16
Coloque la secadora según las instrucciones del fabricante y los códigos locales.
CONEXIÓN A TIERRA
− Este electrodoméstico debe estar conectado a tierra. En caso de mal funcionamiento o avería, la conexión
a tierra reduce el riesgo de descarga eléctrica al proporcionar una ruta de menor resistencia para la
corriente eléctrica. Este electrodoméstico debe utilizarse con un cable con conductor y enchufe de
conexión a tierra.
− Para los productos vendidos en EE. UU., su secadora cuenta con un cable opcional (se vende por
separado) con conductor y enchufe de conexión a tierra.
Para los productos vendidos en Canadá, su secadora está equipada con un cable con conductor y enchufe
de conexión a tierra.
− El enchufe debe conectarse a una toma de corriente adecuada, correctamente instalada y conectada a
tierra, de acuerdo con todos los códigos y ordenanzas locales.
− No modifique el enchufe incluido con el electrodoméstico: si no encaja en la toma, solicite a un electricista
cualificado que instale una toma adecuada.
− Si no se utiliza un cable de alimentación y la secadora eléctrica se va a conectar permanentemente, este
electrodoméstico debe conectarse a un sistema de cableado permanente metálico con conexión a tierra, o
bien, se debe tender un conductor de conexión a tierra junto con los conductores del circuito y conectarlo
al terminal o cable de conexión a tierra del electrodoméstico.
ADVERTENCIA
- La conexión incorrecta del conductor de conexión a tierra puede provocar un riesgo de
descarga eléctrica. Consulte con un electricista cualificado, un representante de servicio
técnico o personal si tiene dudas sobre la correcta conexión a tierra del electrodoméstico.
- Ciertas piezas internas no están conectadas a tierra intencionalmente y pueden presentar
riesgo de descarga eléctrica solo durante el mantenimiento. Personal de servicio: No toque las
siguientes piezas mientras el electrodoméstico esté energizado: Bomba síncrona de imán
permanente, motor de CC sin escobillas, condensador, ventilador, estrangulador, PCB.
REPUESTOS Y ACCESORIOS
Si su secadora requiere repuestos o accesorios, comuníquese con el distribuidor donde la
adquirió o con el centro de atención al cliente de MIDEA al 1866-646-4332.

INSTRUCCIONES DE INSTALACIÓN
17
DESEMPAQUE
1
2
Desempaque la secadora e inspecciónela para detectar daños durante el envío. Asegúrese de haber
recibido todas las piezas que se muestran a continuación y los artículos enumerados en las instrucciones
de instalación del kit de apilamiento.
Para evitar lesiones personales o distensiones, use guantes protectores al levantar o transportar la unidad.
ADVERTENCIA
Los materiales de embalaje pueden ser peligrosos para los niños:
Mantenga todo el material de embalaje (bolsas de plástico, poliestireno, etc.) fuera del alcance
de los niños.
IDENTIFICACIÓN DE LAS PIEZAS
Tanque de agua
Panel de control
Placa lateral
Puerta
Filtro
Cubierta de mantenimiento
Pata ajustable (dos patas)
Caja de cableado
Manguera de drenaje

INSTRUCCIONES DE INSTALACIÓN
18
HERRAMIENTAS NECESARIAS PARA LA INSTALACIÓN
Herramientas necesarias:
PASOS DE INSTALACIÓN
Para una instalación correcta, le recomendamos contratar a un instalador cualificado.
PASO 1: Elija la ubicación adecuada
Traslade la secadora a un lugar adecuado para la instalación. Considere instalar la secadora y la lavadora una
al lado de la otra para facilitar el acceso a la instalación eléctrica.
PASO 2: Conecte el cableado eléctrico
Cable de alimentación
de tres hilos
Tomacorriente de 3 hilos
(10-30R)
Utilice un cable de alimentación de tres hilos con terminales de anillo y un protector
contra tirones homologado por UL. El cable de alimentación de tres hilos, de al
menos 4.92 pies (1.5 m) de largo, debe tener 3 hilos de cobre sólido de calibre 10 y
ser compatible con un receptáculo de 3 hilos NEMA tipo 10-30R, con clasificación
de 120/240 V. Mínimo 30 A.
Destornillador
Phillips
Destornillador
Plano
Nivel
Pinzas
Pinza ajustable a
una apertura de una
pulgada (25 mm)
Navaja
Flexómetro
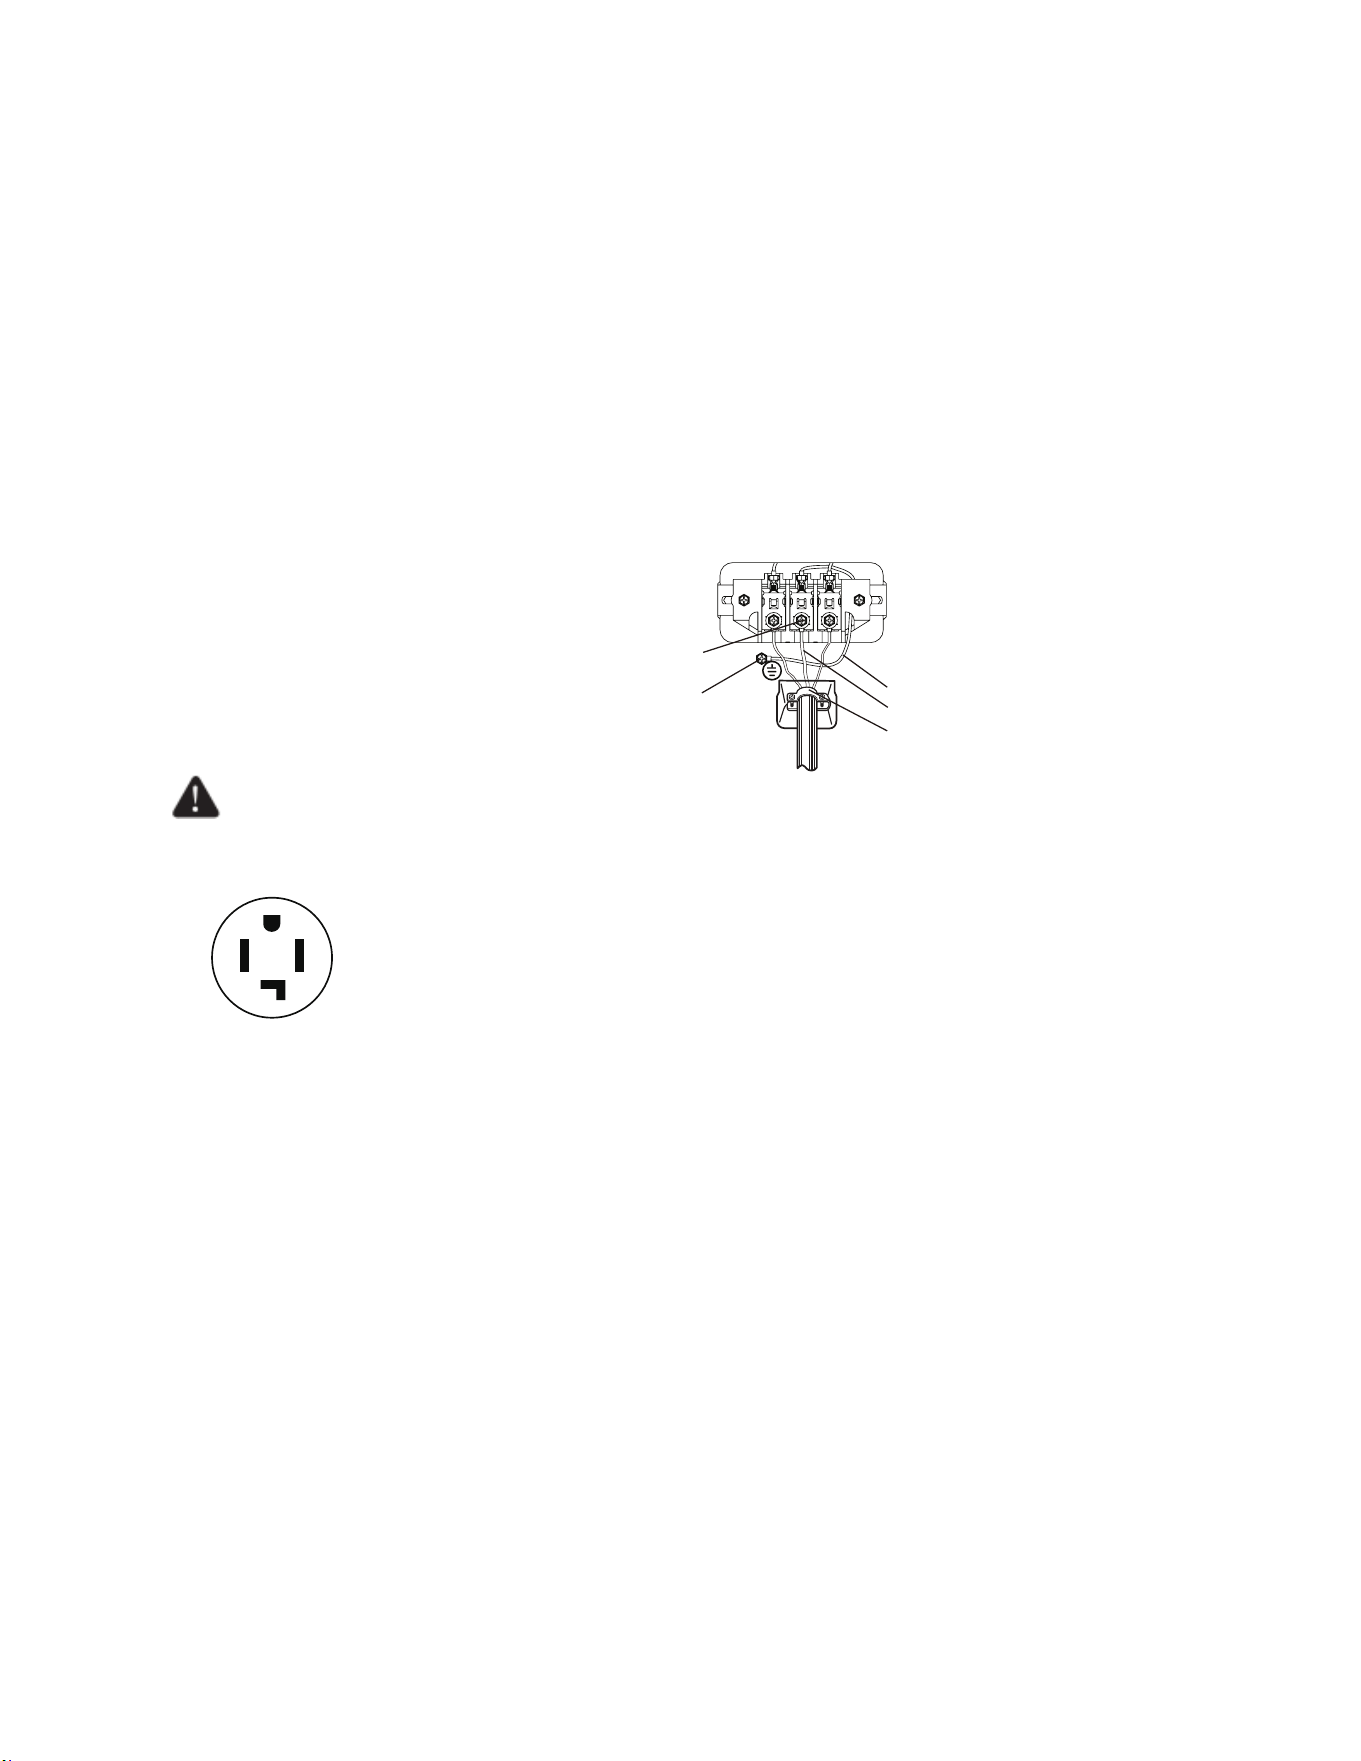
INSTRUCCIONES DE INSTALACIÓN
19
Conexiones del sistema de 3 cables el cable de alimentación no tiene cable de tierra
1
2
3
4
Conecte el cable de tierra del cable de alimentación al tornillo conductor de tierra externo. Si el cable de
alimentación no tiene cable de tierra, retire el cable de tierra del aparato (blanco) del tornillo central del
bloque de terminales. Retire el tornillo conductor de tierra externo, conecte el cable de tierra del aparato al
conector de tierra externo y, a continuación, vuelva a colocar el tornillo y apriételo.
Retire los dos tornillos laterales del bloque de terminales y conecte los demás cables a los tornillos
exteriores del terminal. Asegúrese de cruzar el tornillo a través del anillo del terminal y apriételo.
Apriete los tornillos del protector contra tirones.
Inserte la pestaña de la tapa del bloque de terminales en la ranura del panel trasero de la secadora. Fije
la tapa con un tornillo.
Instrucciones para el sistema de 3 hilos
A – Tornillo central del bloque de terminales
B – Conector de tierra
C – Cable neutro de tierra (blanco)
D – Cable neutro (blanco o central)
E – Protector de cables de 1,9 cm (3/4”) con
certificación UL
ADVERTENCIA
- Se recomiendan terminales de anillo. Si utiliza terminales de correa, asegúrese de que estén
bien apretados.
Cable de 4 hilos
Receptáculo de 4 hilos (14-
30R)
Utilice un cable de alimentación de 4 hilos con terminales de anillo y protector
de cables con certificación UL. El cable de alimentación de 4 hilos, de al menos
4,92 pies (1.5 m) de longitud, debe tener 4 hilos de cobre sólido de calibre 10 y
ser compatible con un receptáculo de 4 hilos NEMA Tipo 14-30 R, con
clasificación de 120/240 V y un mínimo de 30 A. El cable de tierra (conductor de
tierra) puede ser verde o desnudo. El conductor neutro debe ser blanco.
Conexiones del sistema de 4 hilos
1 Retire el tornillo central del bloque de terminales.
2 Conecte el cable de tierra (verde o sin envolver) del cable de alimentación al tornillo del conductor de tierra
externo.
3 Conecte el cable neutro (blanco o central) del cable de alimentación y el cable de tierra del aparato
(blanco) debajo del tornillo central del bloque de terminales. Asegúrese de pasar el tornillo por el anillo del
terminal del cable de alimentación y apretarlo.
4 Conecte los demás cables a los tornillos externos del bloque de terminales. Asegúrese de pasar el tornillo
por el anillo del terminal y apretarlo.
A
B
C
D
E
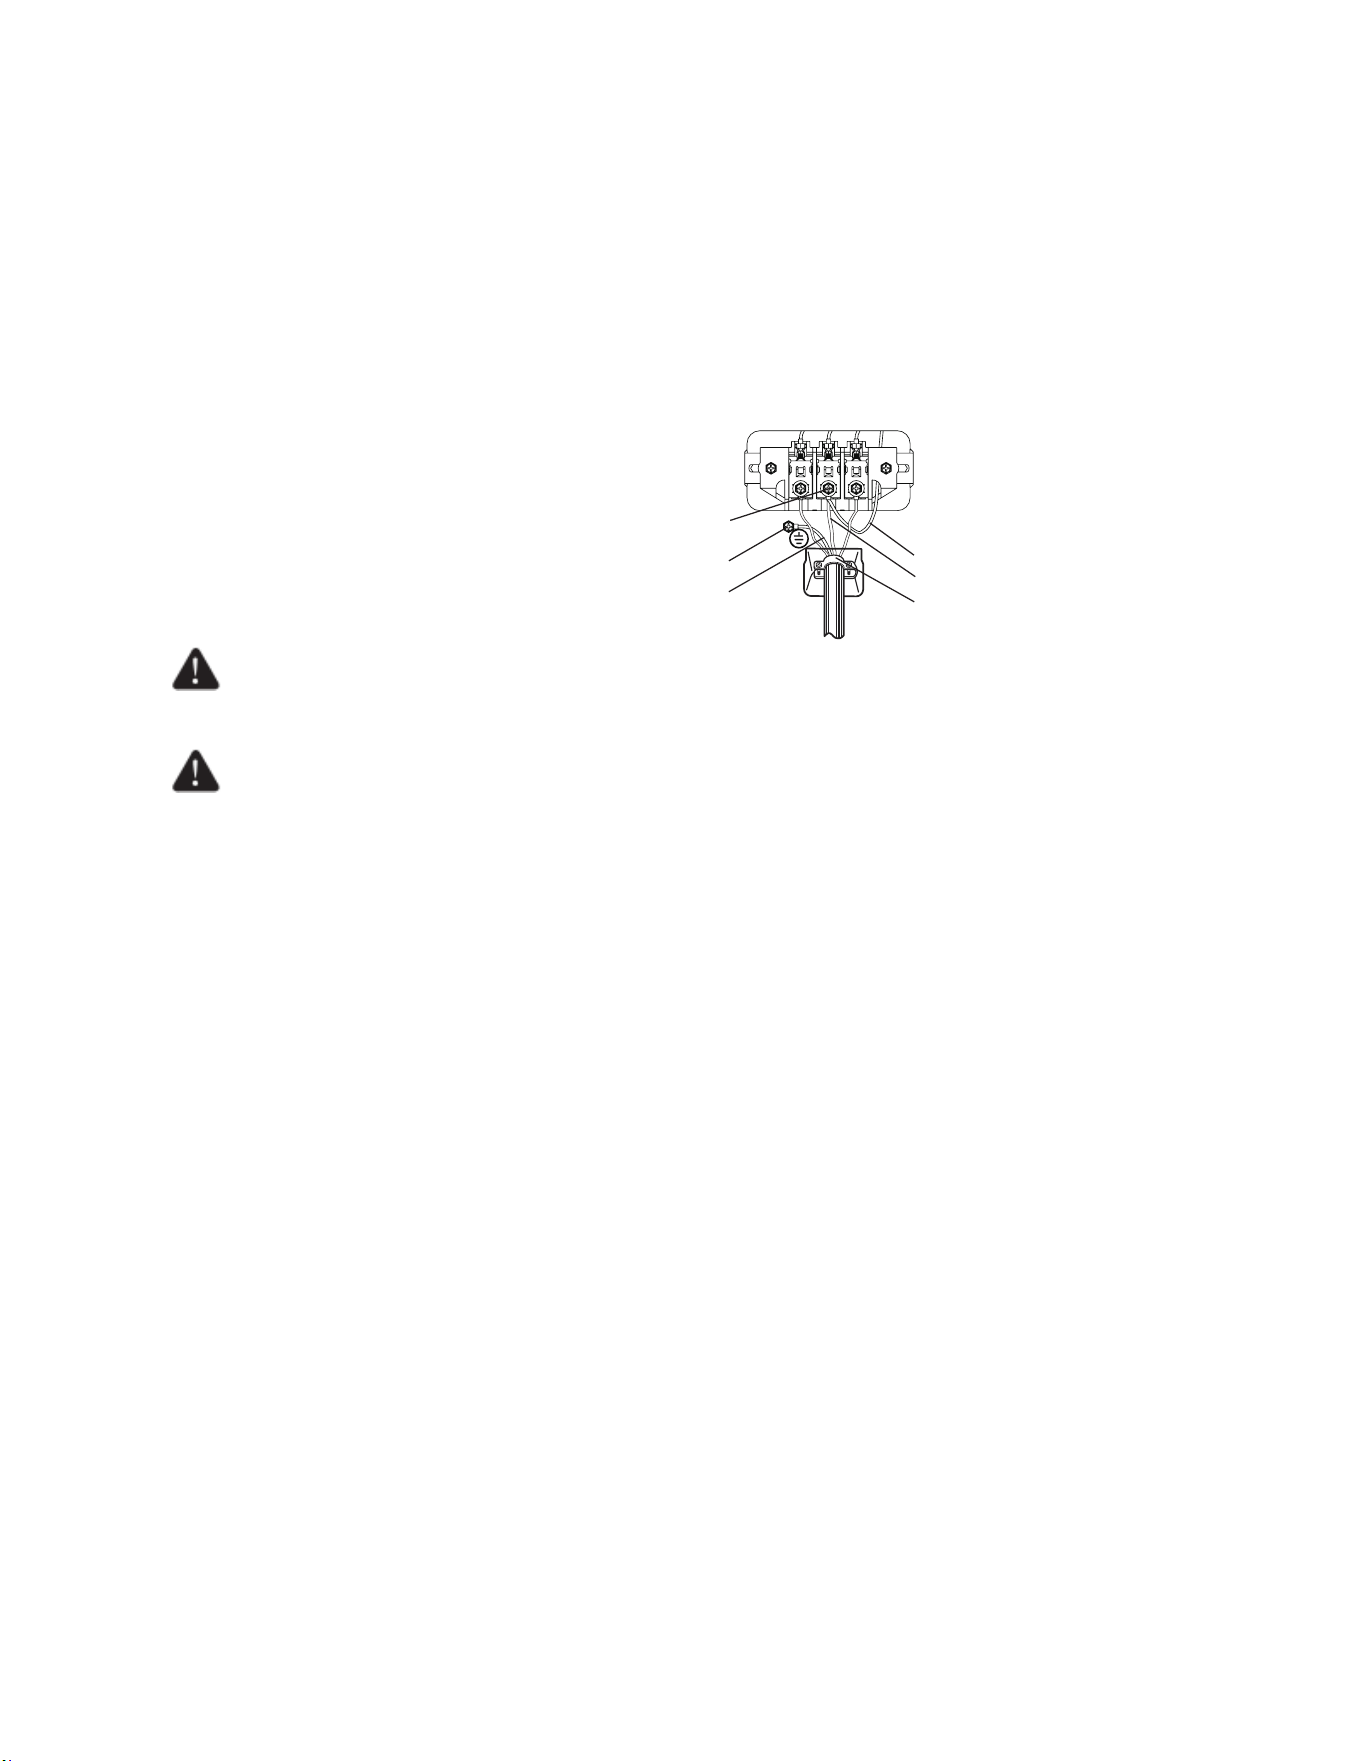
INSTRUCCIONES DE INSTALACIÓN
20
5 Apriete los tornillos del protector de cables.
6 Inserte la pestaña de la tapa del bloque de terminales en la ranura del panel trasero de la secadora. Fije la
tapa con un tornillo.
Instrucciones para el sistema de 4 hilos:
IMPORTANTE: Se recomiendan terminales de tipo anillo. Si se utilizan terminales de correa, asegúrese de
que estén bien apretados.
A – Tornillo central del bloque de terminales
B – Conector de tierra externo
C – Cable de cobre verde o desnudo del cable de
alimentación
D – Cable neutro de tierra (blanco)
E – Cable neutro (blanco o central)
F – Protector de cables de 3/4” (1.9 cm) homologado
por UL
ADVERTENCIA
ADVERTENCIA
Se recomiendan terminales de anillo. Si utiliza terminales de correa, asegúrese de que estén
bien apretados.
Modelos de EE. UU.:
Riesgo de descarga eléctrica: Todos los modelos de EE. UU. se fabrican para una
CONEXIÓN DE SISTEMA DE 3 HILOS.
El marco de la secadora está conectado a tierra mediante el conductor neutro en el bloque de
terminales.
Se requiere una CONEXIÓN DE SISTEMA DE 4 HILOS para construcciones nuevas o
remodeladas, o si los códigos locales no permiten la conexión a tierra mediante el conductor
neutro.
Si se utiliza el sistema de 4 hilos, el marco de la secadora no se puede conectar a tierra
mediante el conductor neutro en el bloque de terminales. Consulte la sección “Requisitos
eléctricos” en la página 16 para SISTEMAS DE 3 O 4 HILOS. CONEXIONES.
Retire la placa de cubierta del bloque de terminales.
Inserte el cable de alimentación con un protector de cables homologado por UL a través del
orificio provisto en el gabinete, cerca del bloque de terminales.
- Es imprescindible utilizar un protector de cables.
No afloje las tuercas ya instaladas en el bloque de terminales. Asegúrese de que estén bien
apretadas.
Utilice una llave de vaso de 3/8” (1 cm) de profundidad.
PASO 3 Nivele la secadora
Para garantizar un rendimiento de secado óptimo, la secadora debe estar nivelada. Para minimizar la
vibración, el ruido y los movimientos no deseados, el suelo debe ser una superficie perfectamente nivelada y
sólida.
Ajuste las patas niveladoras solo lo necesario para nivelar la secadora. Extender las patas niveladoras más de
lo necesario puede provocar vibraciones.
A
B
C
D
E
F
White
Black
Red
Green
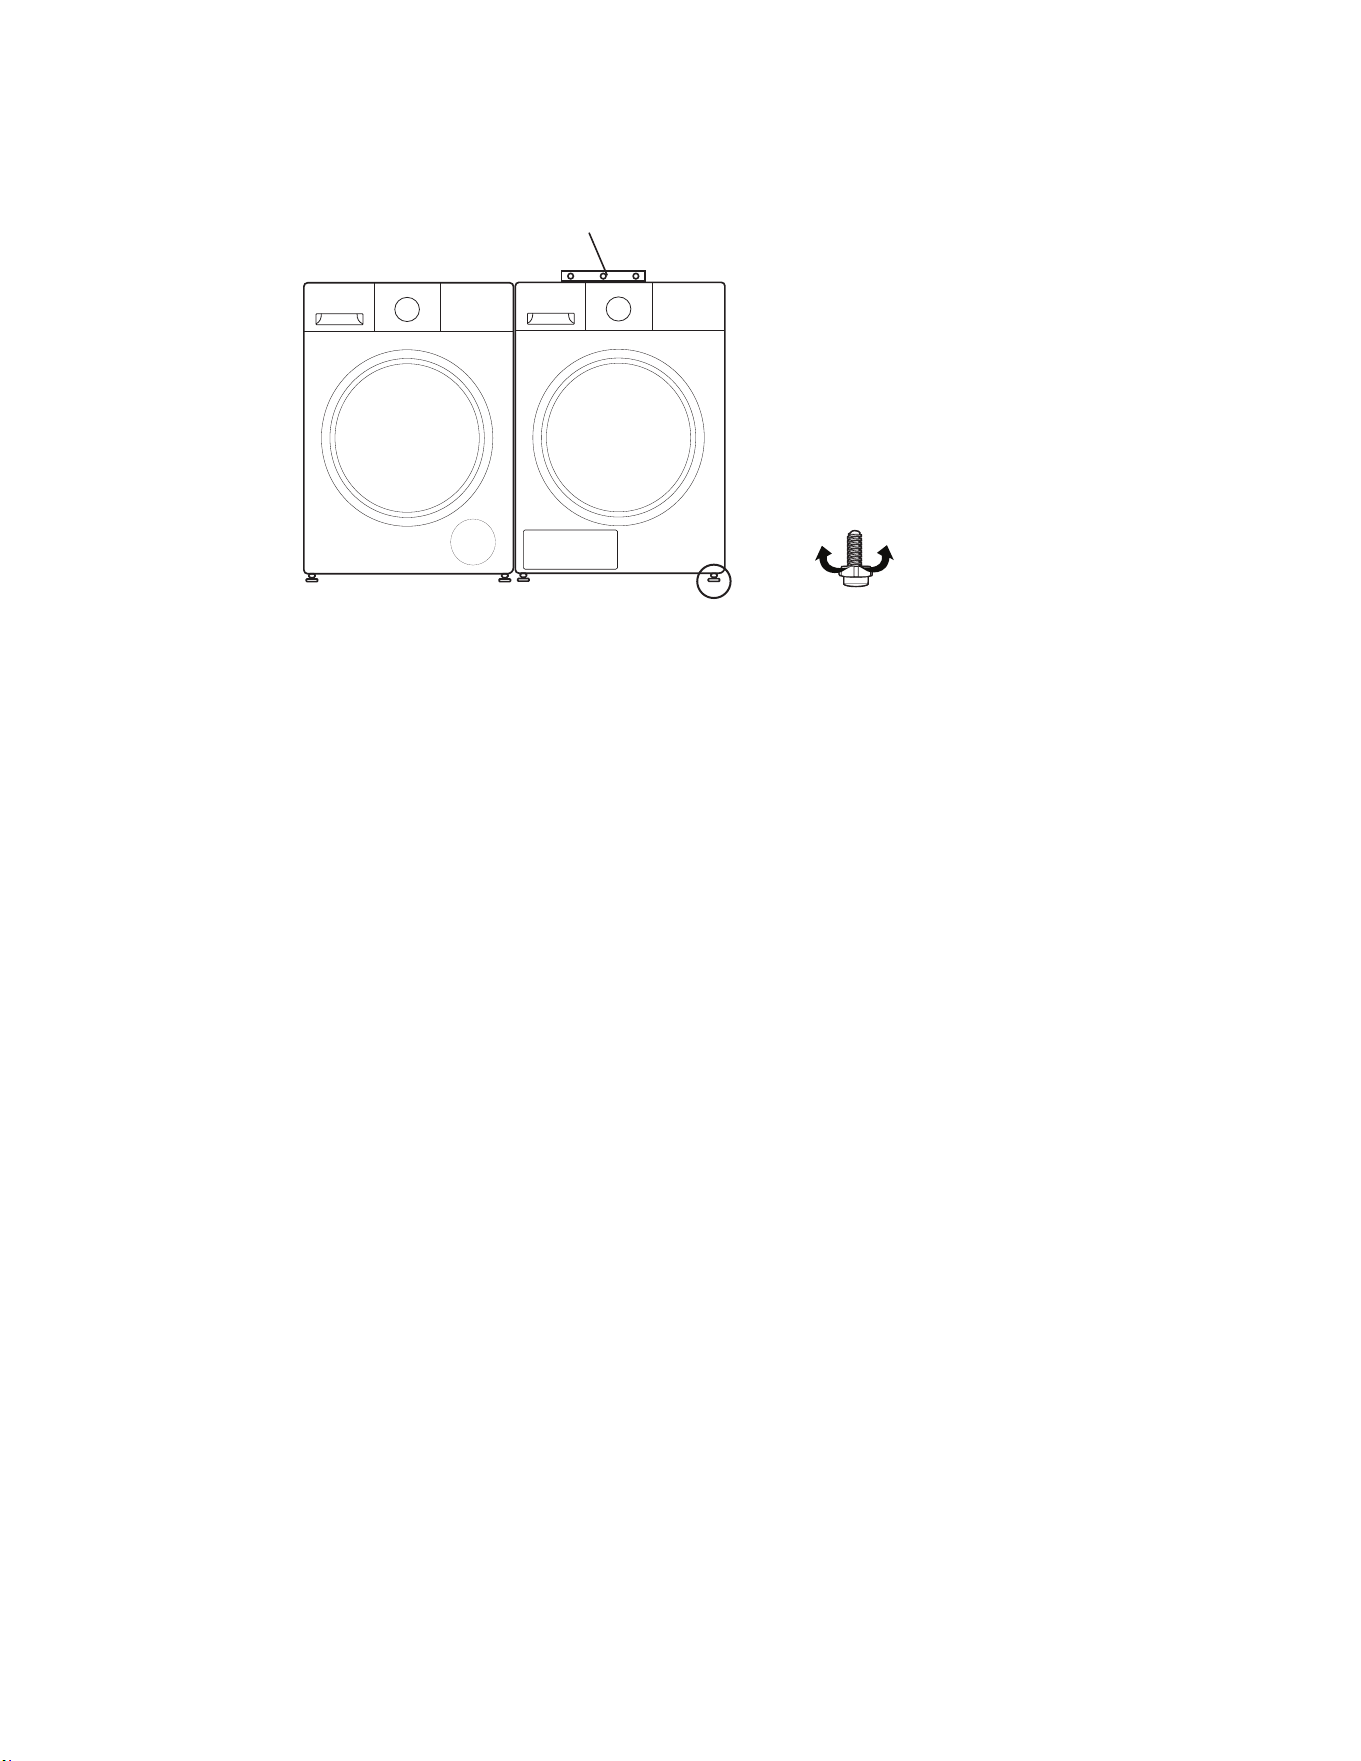
INSTRUCCIONES DE INSTALACIÓN
21
PASO 4 Encender
Asegúrese de que todas las conexiones eléctricas estén completas. Enchufe la secadora.
PASO 5 Revisión final
- Asegúrese de que la secadora esté enchufada a una toma de corriente y tenga una conexión a tierra
adecuada.
- Asegúrese de que la secadora esté nivelada y firmemente apoyada en el suelo.
- Encienda la secadora para confirmar que funciona, calienta y se apaga.
Nivel
Apretar
Patas ajustables
Aflojar
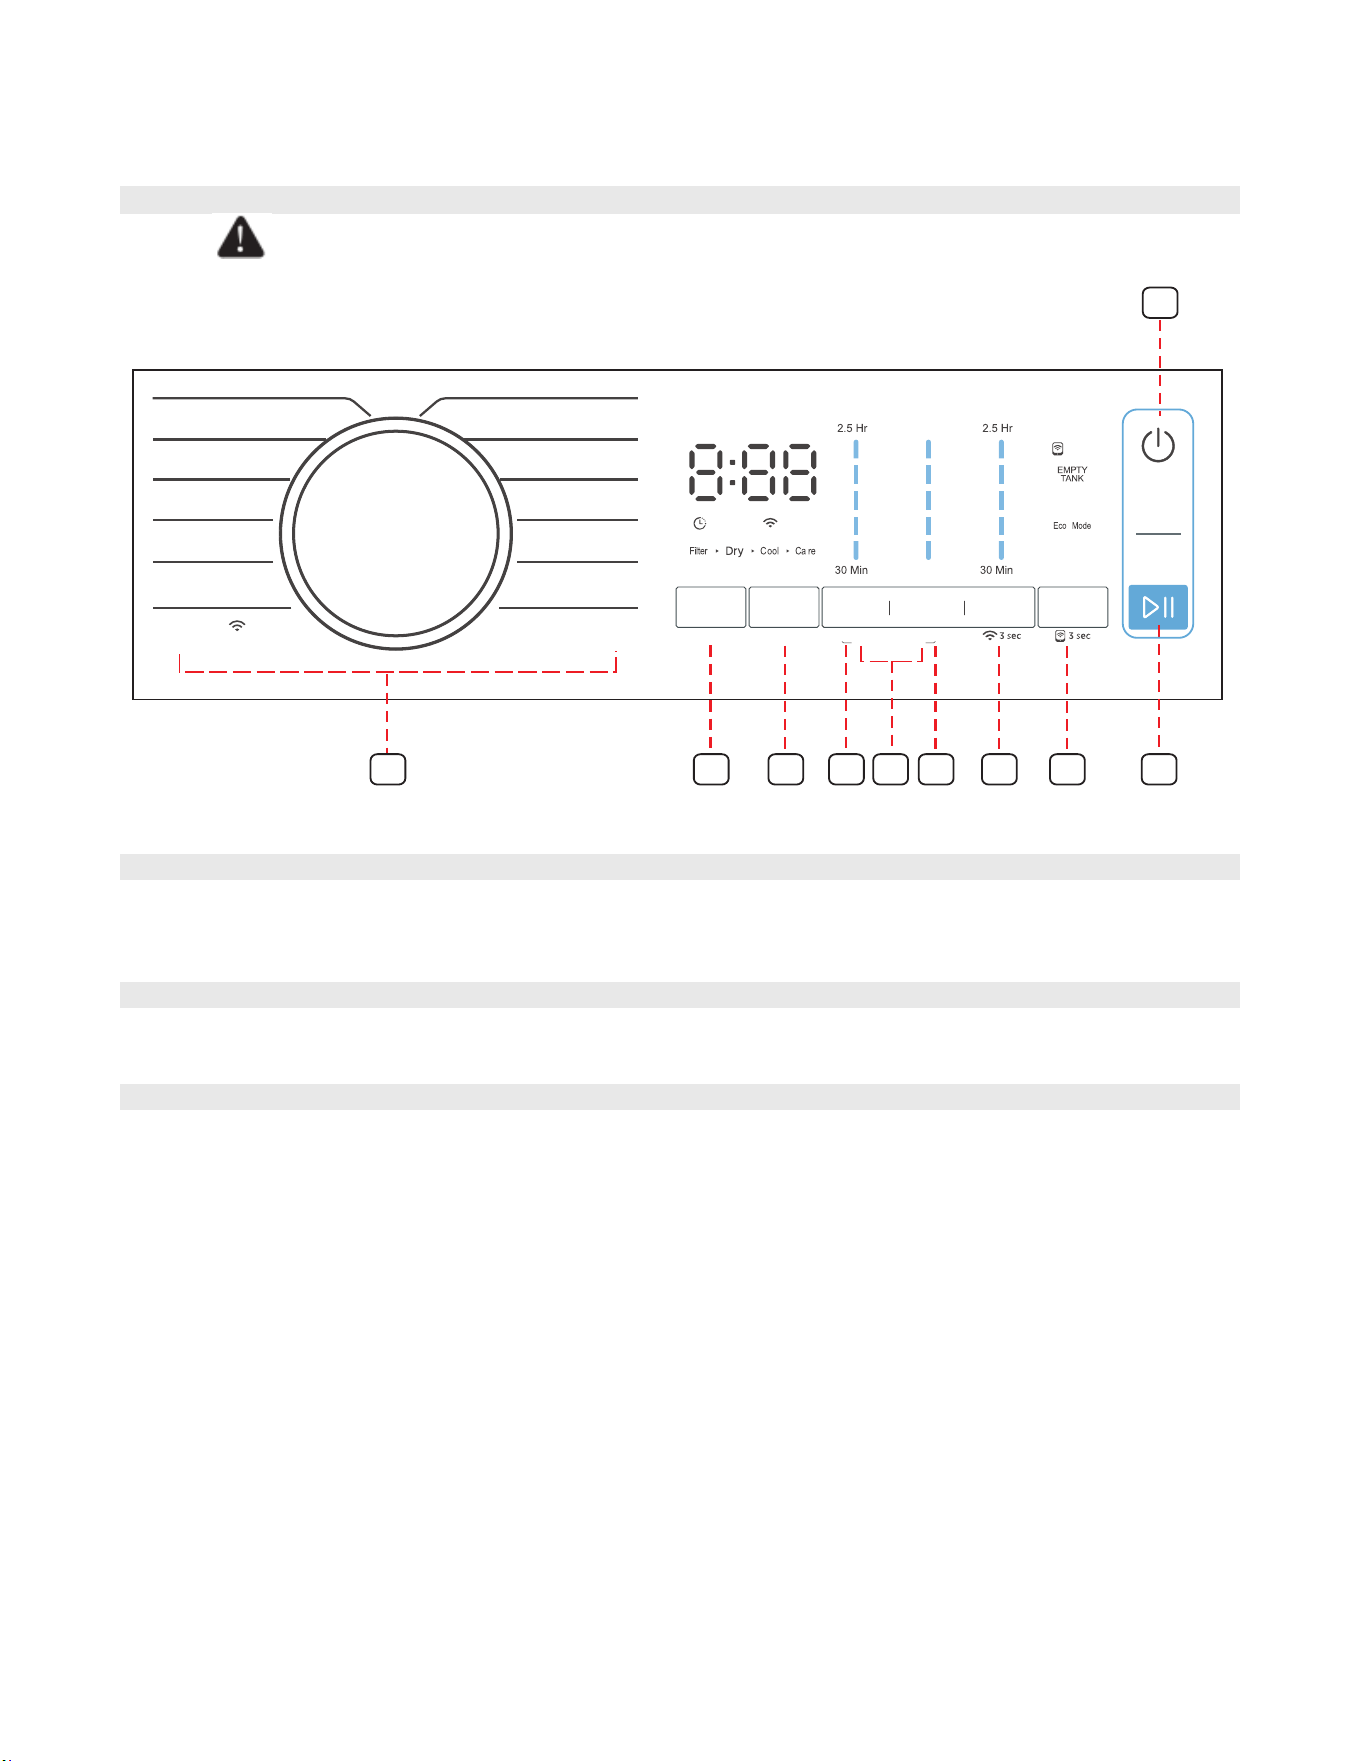
INSTRUCCIONES DE USO
22
PANEL DE CONTROL
ADVERTENCIA
Para reducir el riesgo de incendio, descarga eléctrica o lesiones personales, lea las
INSTRUCCIONES IMPORTANTES DE SEGURIDAD antes de utilizar el aparato.
1 Botón de encendido
Presione para encender la secadora o ponerla en modo de espera. Si la secadora permanece encendida
durante más de 10 minutos sin presionar ningún botón, regresa automáticamente al modo de espera.
2 Botón de inicio/pausa
Presione para iniciar o pausar el programa.
3 Selector de ciclo
Gire la perilla para seleccionar el ciclo adecuado para su carga de ropa.
El ciclo que seleccione determinará el control de temperatura.
Los ciclos NORMAL, DELICADOS, CUIDADO DE PLUMÓN, MEZCLILLA, PRENDAS VOLUMINOSAS, ROPA
DEPORTIVA, TOALLAS, USO RUDO, REFRESCAR COBIJA, SECADO NOCTURNO, CARGA PEQUEÑA,
PLANCHADO FÁCIL, PLANCHADO PERMANENTE y SUPERSECO son con sensor.
SECADO RÁPIDO, ESPONJAMIENTO AL AIRE, SECADO TEMPORIZADO y REFRESCAR son manuales.
NORMAL
USO RUDO
TOALLAS
DEPORTIVA
VOLUMINOS
MI CICLO
SECADO RÁPIDO
DELICADOS
PLUMÓN
ESPONJAMIENTO
TEMPORIZADO
REFRESCAR
Muy Seco
Húmedo
PODER
Retraso
Nocturno
Tiempo
Secado
Antiarru
gas
Opciones
Bloqueo de control
3
4
1
2
5
6 7 8 9
10
Damp Alert
Smart
Control
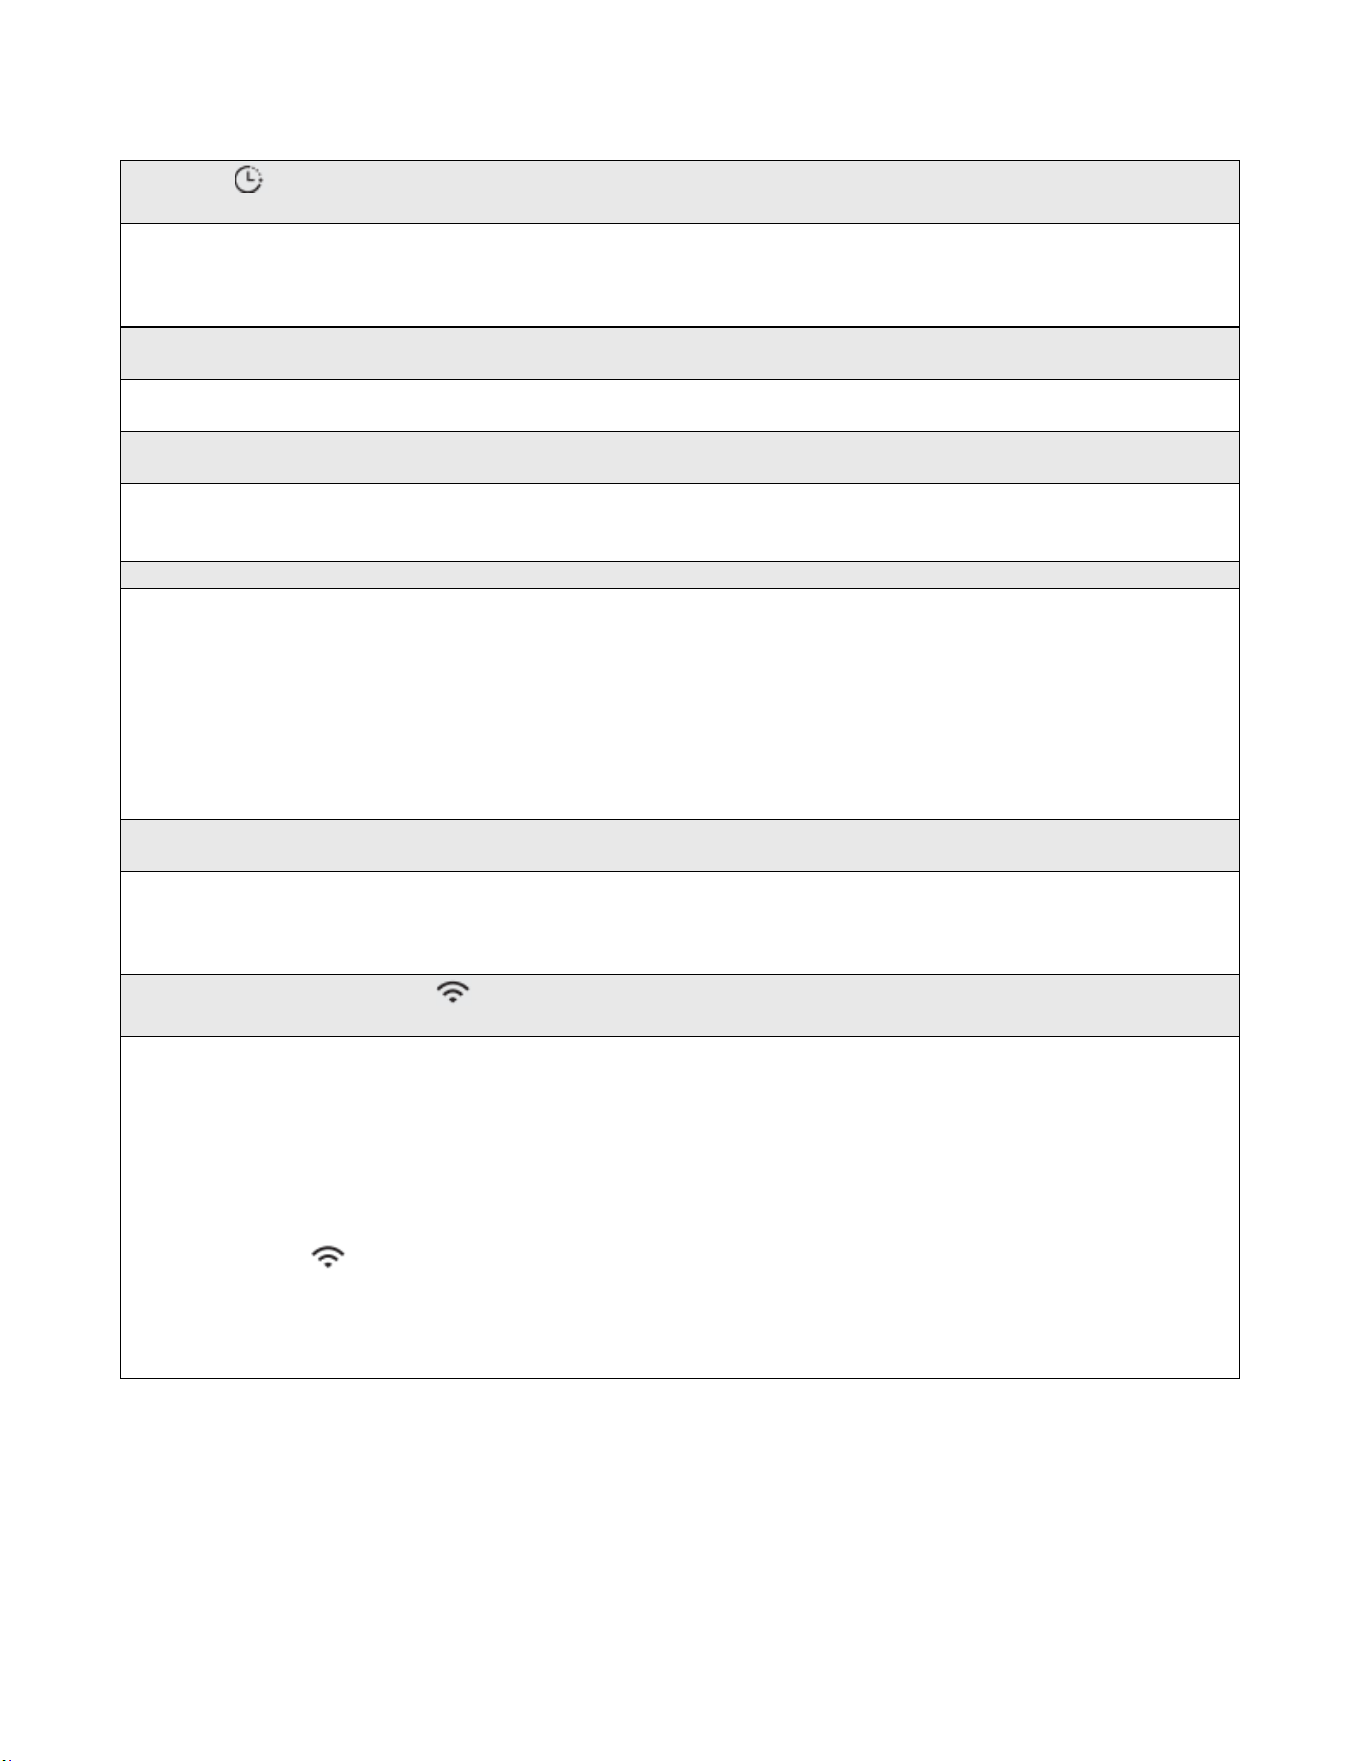
INSTRUCCIONES DE USO
23
4 Retraso
Esta función permite retrasar el secado de la ropa hasta 24 horas. El retraso significa que el programa
comenzará después de x horas. Al iniciarse el programa, el tiempo empieza a contar regresivamente en la
pantalla y el icono de retraso parpadea.
5 Secado Nocturno
Esta función es adecuada para secar la ropa a baja temperatura durante la noche.
6 Tiempo
Este botón solo funciona en ciclos manuales. Pulse el botón para cambiar el tiempo de secado. Cada
pulsación ajusta el tiempo de secado en 30 minutos.
7 Bloqueo de control simultáneamente
Pulse “Tiempo” y “Secado” simultáneamente para activar la función de Bloqueo de Control. Mantenga
pulsados “Tiempo” y “Secado” durante 3 segundos más para desactivar la función.
- Cuando esta función está activada, todos los botones se desactivan excepto el botón “ENCENDIDO” y
se desactiva la función de Bloqueo de Control descrita anteriormente.
- Puede encender la unidad, configurar esta función y luego apagarla. Al hacerlo, aunque la unidad esté
encendida, no podrá iniciarla a menos que la función de Bloqueo de Control esté desactivada.
- Esta función no se cancelará automáticamente si la unidad se queda sin energía (por ejemplo, si se
desenchufa, queda fuera de servicio, etc.). Debe desactivarla con los botones “Tiempo” y “Secado”.
8 Secado
Presione el botón para seleccionar el nivel de secado. Las opciones disponibles son Húmedo, Menos, Normal,
Más y Muy. Los diferentes niveles de secado resultarán en tiempos de secado diferentes. Para planchar la
ropa manualmente, debe seleccionar un nivel de secado más bajo.
9 Antiarrugas/Red inalámbrica
Antiarrugas
Presione una vez para agregar la función antiarrugas al ciclo de secado. Continúe presionando varias veces
para ajustar el tiempo o cancelar la función.
Cuando está activa, la función antiarrugas proporciona un secado intermitente con aire sin calentar al final del
ciclo para reducir las arrugas.
La ropa ya está seca y se puede retirar en cualquier momento durante el ciclo de cuidado antiarrugas.
Red inalámbrica
Presione el botón “Cuidado antiarrugas” durante 3 segundos para configurar o restablecer la red inalámbrica.
Siga las instrucciones de la sección “Configuración y funcionamiento de la aplicación” para activar o desactivar
la conexión de red.
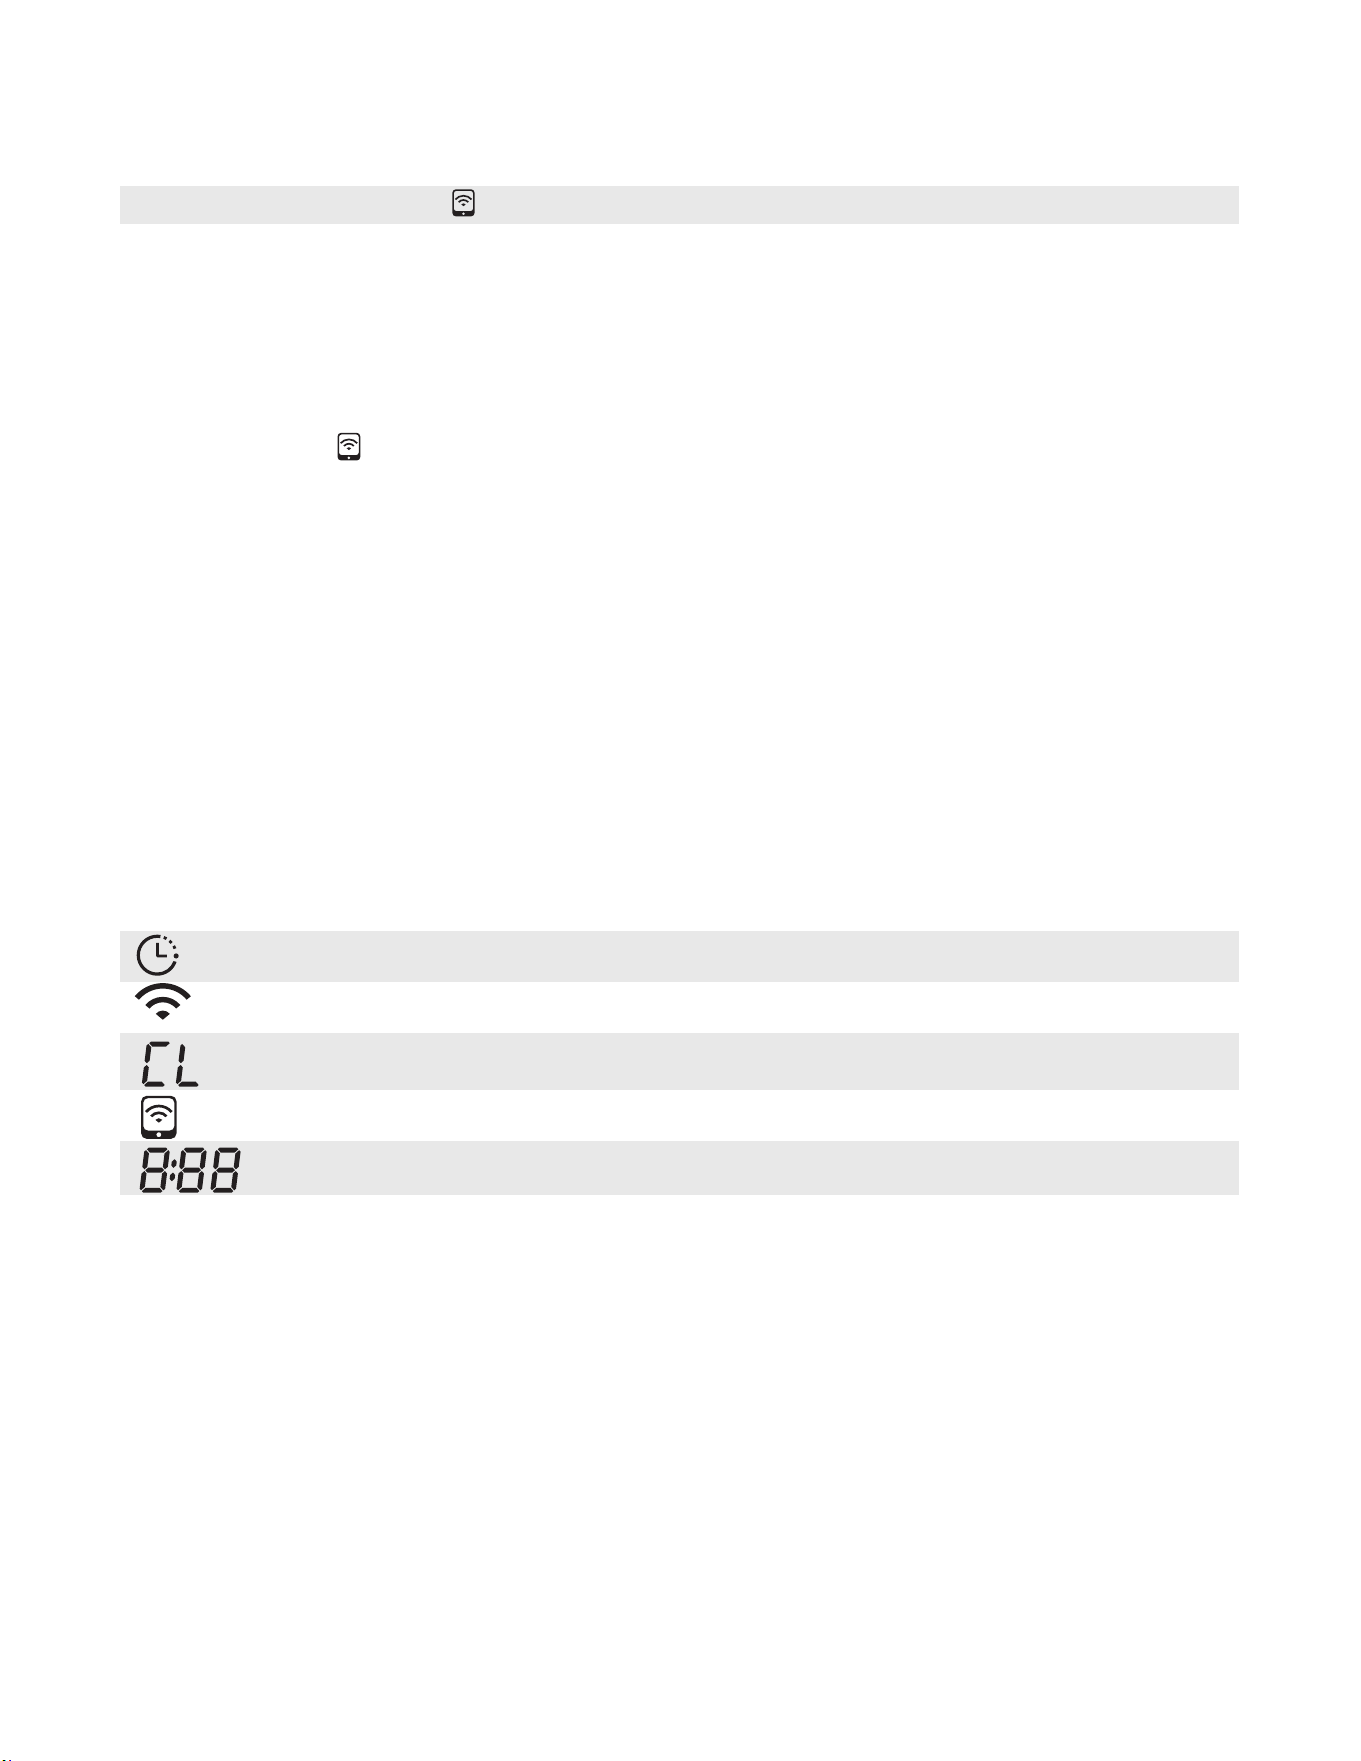
INSTRUCCIONES DE USO
24
10 Opciones/Control Inteligente
Opciones
Al pulsar este botón se activan o desactivan las funciones “Modo Eco” o “Alerta de Humedad”.
El Modo Eco se puede seleccionar para los siguientes ciclos: “CUIDADO DE PLUMÓN”, “Mi Ciclo (Mezclilla)”,
“Ropa Voluminosa”, “Toallas”, “Uso Intensivo” y “Refrescar Mantas”.
La Alerta de Humedad se puede seleccionar para los siguientes ciclos: “Normal”, “Delicado”, “Mi Ciclo
(Mezclilla)”, “Ropa Deportiva”, “Toallas”, “Uso Intensivo”, “Secado Nocturno”, “Carga Pequeña”, “Planchado
Permanente” y “Superseco”.
Control Inteligente
Pulse el botón “Opciones” para cambiar al Control Inteligente y usar su smartphone para controlar la lavadora
de forma remota.
Para usar el Control Inteligente de forma segura, asegúrese de que:
1 La secadora esté conectada a internet.
2 La puerta del tambor de la secadora esté cerrada.
Nota:
Si se abre la puerta en cualquier momento, el Control Inteligente se desactivará.
El Control Inteligente se desactiva automáticamente al final de cada ciclo.
Si desea volver a usar el Control Inteligente, debe reactivarlo.
Símbolos
Retraso
Red inalámbrica
Bloqueo de control
Control Inteligente
Indicador de tiempo restante / Mensaje de error

INSTRUCCIONES DE USO
25
SECADO DE UNA CARGA DE ROPA
PASO 1: Encienda la secadora
- Presione el botón de encendido para encender la secadora.
PASO 2: Cargue la secadora
- Coloque solo una carga de ropa a la vez.
- Las cargas mixtas de telas pesadas y ligeras se secarán de forma diferente, lo que puede provocar
que las telas ligeras queden secas mientras que las pesadas permanezcan húmedas al final del ciclo
de secado.
- Agregue una o más prendas similares a la secadora cuando solo necesite secar una o dos prendas.
Esto mejora el centrifugado y la eficiencia del secado.
- La sobrecarga restringe el centrifugado, lo que resulta en un secado desigual y arrugas excesivas en
algunas telas. No sobrecargue la secadora.
PASO 3: Seleccione el ciclo y las opciones adecuados para la carga
- Seleccione el ciclo adecuado según la tabla de ciclos con el Selector de Ciclos.
- Seleccione las funciones opcionales correspondientes con los botones del panel de control.
PASO 4: Encienda la secadora
Al presionar el botón de Inicio/Pausa, se iniciará el ciclo seleccionado. Para pausarlo, presione el botón de
Inicio/Pausa y abra la puerta. Para reanudarlo, cierre la puerta y presione Inicio/Pausa.
Al abrir la puerta durante un ciclo, el ciclo se pausará inmediatamente. Cierre la puerta y presione el botón de
Inicio/Pausa para reanudarlo.
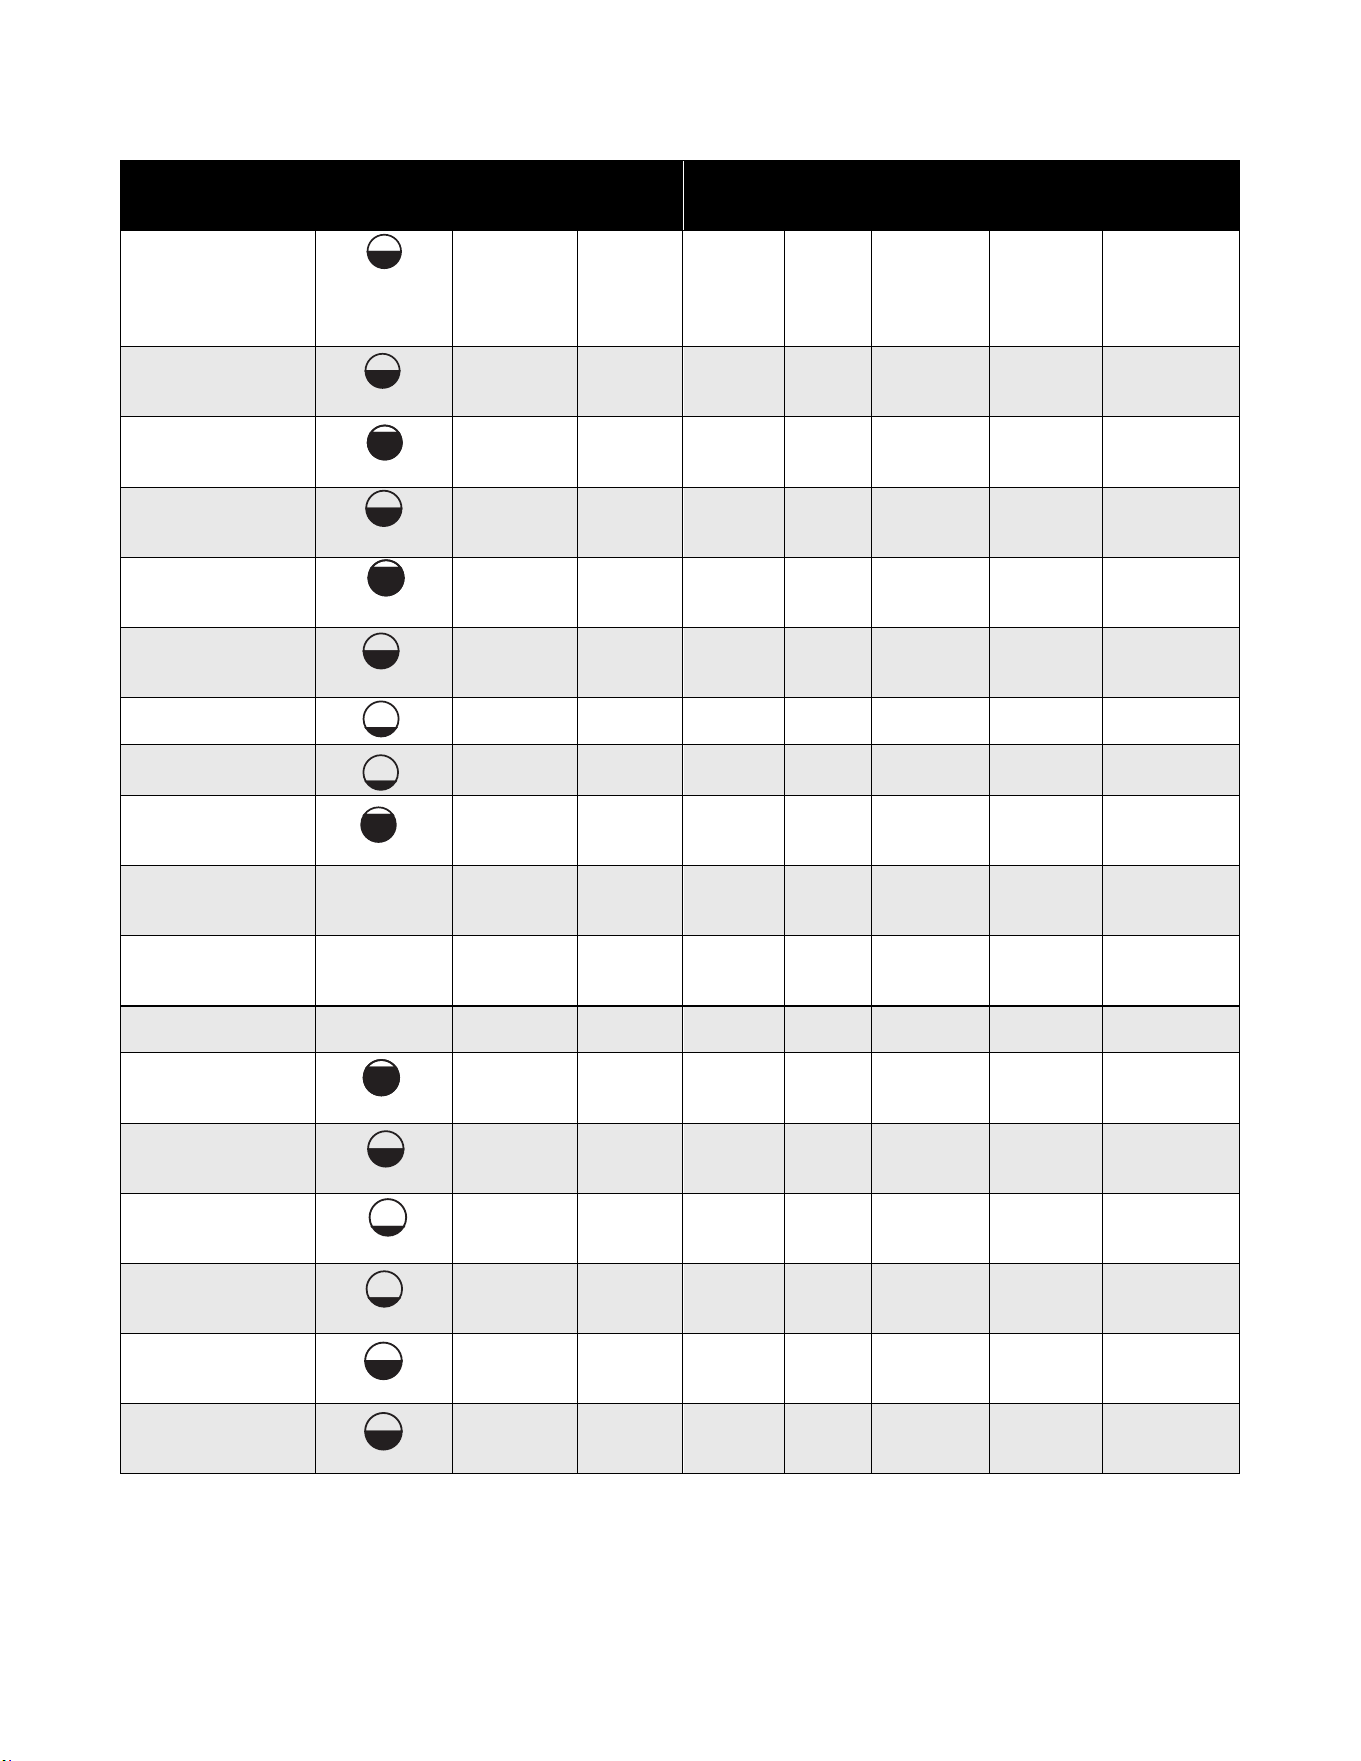
INSTRUCCIONES DE USO
26
Ciclo
Cantidad
máxima
Sequedad
Retraso
Tiempo
Modo
Eco
Alerta de
humedad
Secado
nocturno
Antiarrugas
NORMAL
Muy
Más
Normal
Menos
Húmedo
S
N
N
S
S
S
USO RUDO
Muy
Más
Normal
S
N
S
S
N
S
TOALLAS
Muy
Más
Normal
S
N
S
S
S
S
ROPA
DEPORTIVA
Más
Normal
Menos
S
N
N
S
S
S
PRENDAS
VOLUMINOSAS
Muy
Más
Normal
S
N
S
N
N
S
MI CICLO
(Mezclilla*)
Muy
Más
Normal
S
N
S
S
S
S
SECADO RÁPIDO
N
S
N
N
N
N
S
DELICADO
Normal
Menos
S
N
N
S
N
S
CIUDADO DE
PLUMÓN
Muy
Más
Normal
S
N
S
N
S
S
ESPONJAMIENTO
AL AIRE
/
N
S
S
N
N
N
S
SECADO
PROGRAMADO
/
N
S
S
N
N
N
S
REFRESCAR
/
N
S
S
N
N
N
S
REFRESCAR
COBIJA*
Muy
Más
Normal
S
N
S
N
N
S
SECADO
NOCTURNO*
Muy
Más
Normal
S
N
N
S
N
S
CARGA
PEQUEÑA*
Muy
Más
Normal
S
N
N
S
S
S
PLANCHADO
FÁCIL*
Húmedo
S
N
N
N
S
N
PLANCHADO
PERMANENTE*
Muy
Más
Normal
S
N
N
S
S
S
SUPERSECO*
Muy
Más
Normal
S
N
N
S
S
S
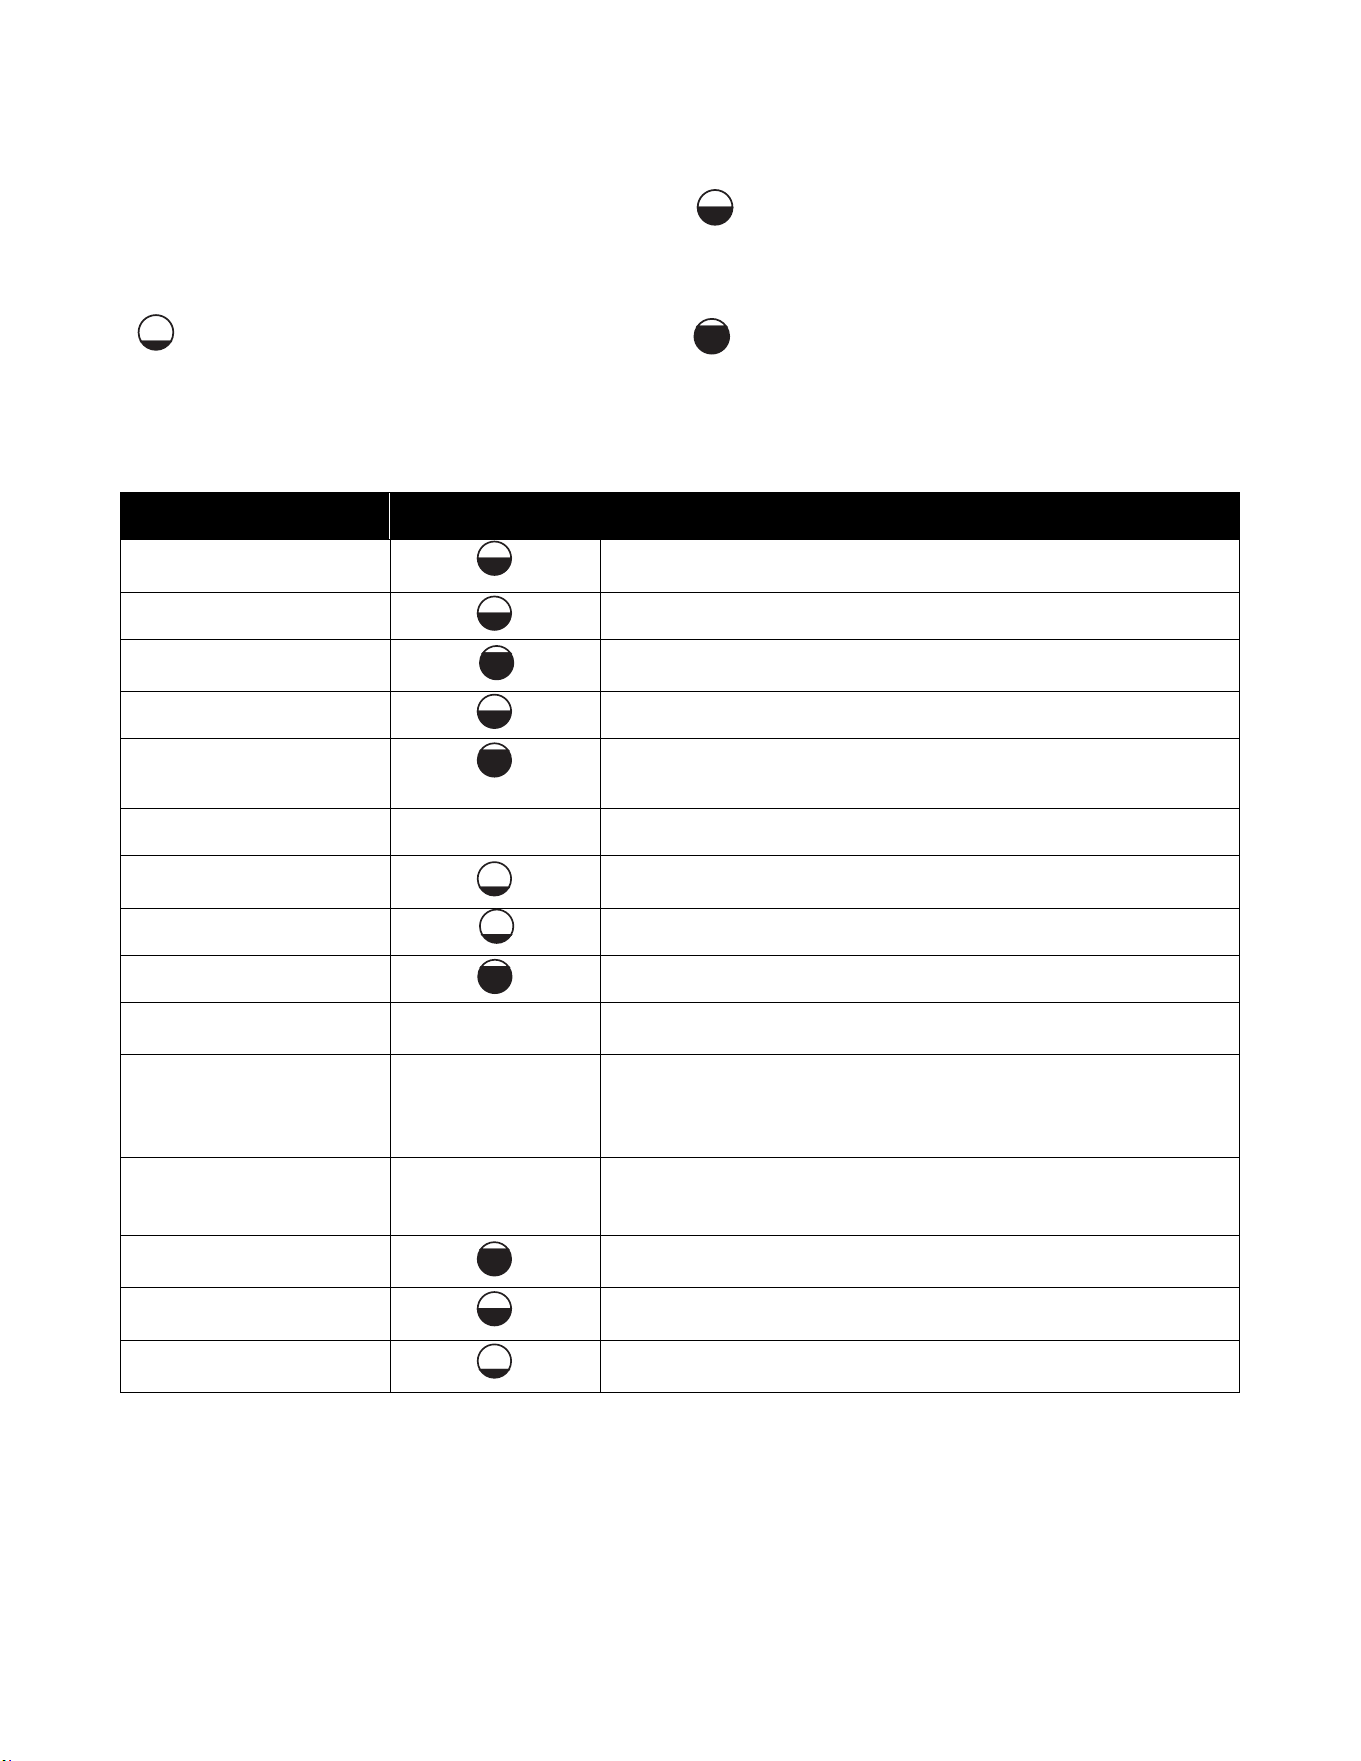
INSTRUCCIONES DE USO
27
* “S” significa que puede seleccionar funciones opcionales.
Recomendaciones de tamaño de carga:
Para obtener mejores resultados, siga las
recomendaciones de tamaño de carga húmeda
indicadas para cada ciclo.
Carga media: Llene el tambor de la secadora
hasta aproximadamente la mitad de su
capacidad.
Carga pequeña: Llene el tambor de la
secadora con 3 o 4 prendas, no más de 1/4 de
su capacidad.
Carga grande: Llene el tambor de la secadora
hasta aproximadamente 3/4 de su capacidad.
No sobrecargue. Las prendas deben girar
libremente.
Consulte la siguiente tabla para ver la carga recomendada para cada ciclo.
Ciclo
Tamaño de la carga
Peso
Aplicación/Propiedades
NORMAL
Seca completamente ropa de algodón de una o varias capas
para guardarla directamente.
USO RUDO
Seca prendas resistentes y grandes.
TOALLAS
Seca completamente telas sintéticas gruesas o de varias
capas.
ROPA DEPORTIVA
Seca ropa deportiva y telas finas, como el poliéster.
ARTÍCULOS
VOLUMINOSOS
Seca ropa de cama, sábanas u otras prendas voluminosas.
MI CICLO
/
Ajusta y guarda tus ajustes de ciclo favoritos.
SECADO RÁPIDO
Seca de 1 a 3 prendas de fibra sintética/algodón fino con bajo
contenido de humedad.
ROPA DELICADA
Seca telas sintéticas delicadas.
CUIDADO DE PLUMÓN
Seca prendas de plumón.
ESPONJAMIENTO AL
AIRE
/
Seca y airea las prendas sin calentar. El tiempo del ciclo es de
10 a 160 minutos (ajustable en incrementos de 30 minutos).
SECADO PROGRAMADO
/
Seca prendas individuales o termina de secar telas de varias
capas con diferentes necesidades de secado, como
chaquetas. El tiempo del ciclo es de 20 a 170 minutos
(ajustable en incrementos de 30 minutos).
REFRESCAR
/
Refresca la ropa guardada durante mucho tiempo y elimina
olores. El tiempo del ciclo es de 20 a 170 minutos (ajustable
en incrementos de 30 minutos).
REFRESCAR COBIJA*
Refresca y elimina olores de mantas u otras prendas pesadas
guardadas durante mucho tiempo.
SECADO NOCTURNO*
Seca con un nivel de ruido bajo, con todos los botones
silenciados, ideal para secar durante la noche.
CARGA PEQUEÑA*
Seca prendas delicadas aptas para secadora o prendas que
se lavan a mano a baja temperatura.
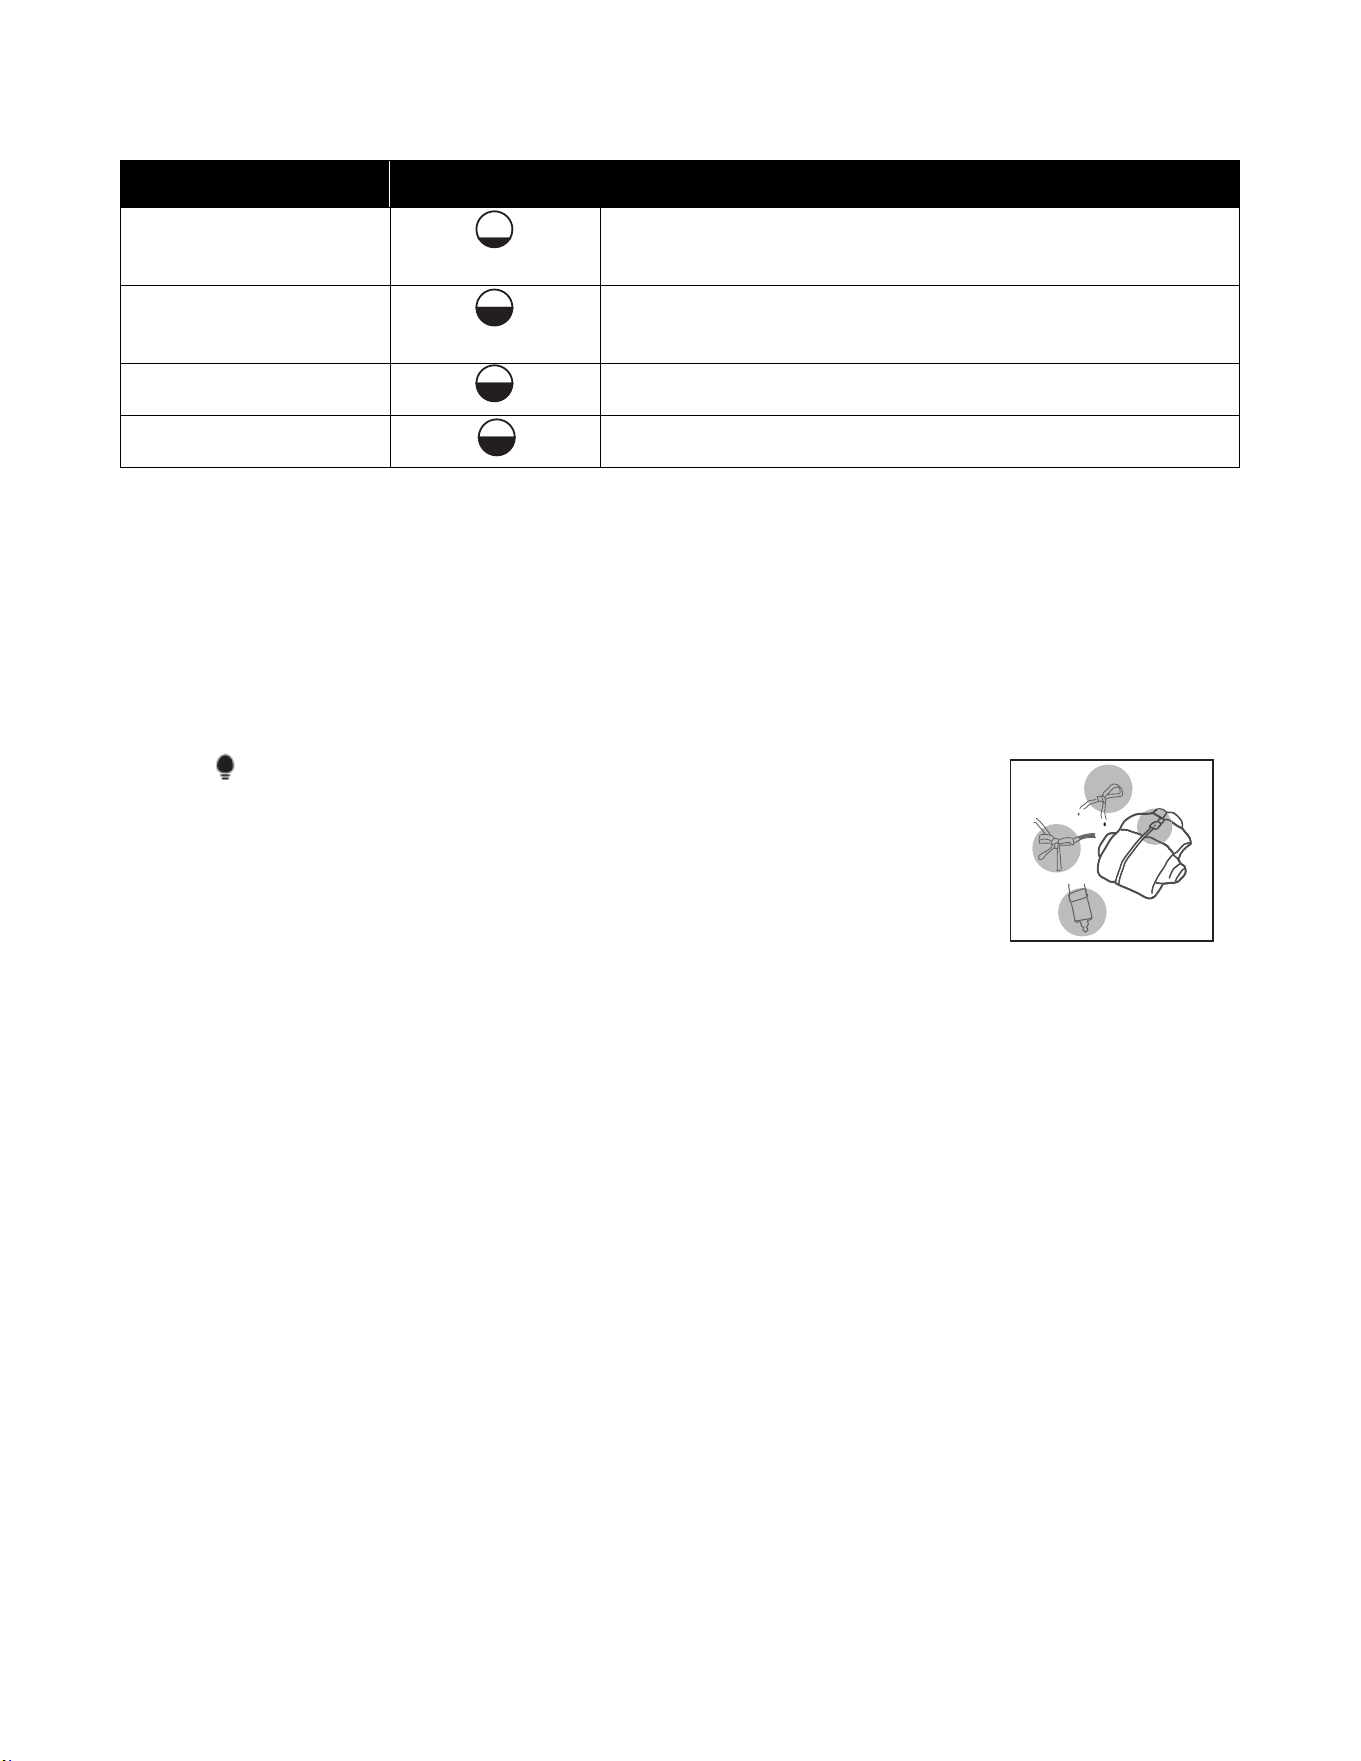
INSTRUCCIONES DE USO
28
Ciclo
Tamaño de la carga
Peso
Aplicación/Propiedades
PLANCHADO FÁCIL *
Mantenga la ropa de algodón de una sola capa ligeramente
húmeda para plancharla.
PLANCHADO
PERMANENTE*
Seque las telas de fibras mixtas (como algodón y sintéticas).
SUPERSECO*
Seque bien la ropa de algodón de una o varias capas.
MEZCLILLA*
Seque los jeans u otras prendas de mezclilla que se
centrifugan en la lavadora.
PASO 5: Cómo descargar la ropa
- El indicador “Limpiar filtro” parpadeará durante 10 segundos al encender la lavadora.
- La secadora emitirá 6 pitidos al finalizar el ciclo.
- Limpie el filtro después de cada ciclo, una vez que haya descargado la ropa.
.
• NOTA
• Coloque la ropa desgastada, que se enrede fácilmente o que sea pequeña
en una bolsa de lavandería antes de secarla.
• No anude cinturones ni cuerdas largas antes de secarla.
• Abotone la ropa con botones pequeños o decorativos antes de secarla.
• Cierre las cremalleras y dele la vuelta a la ropa antes de secarla
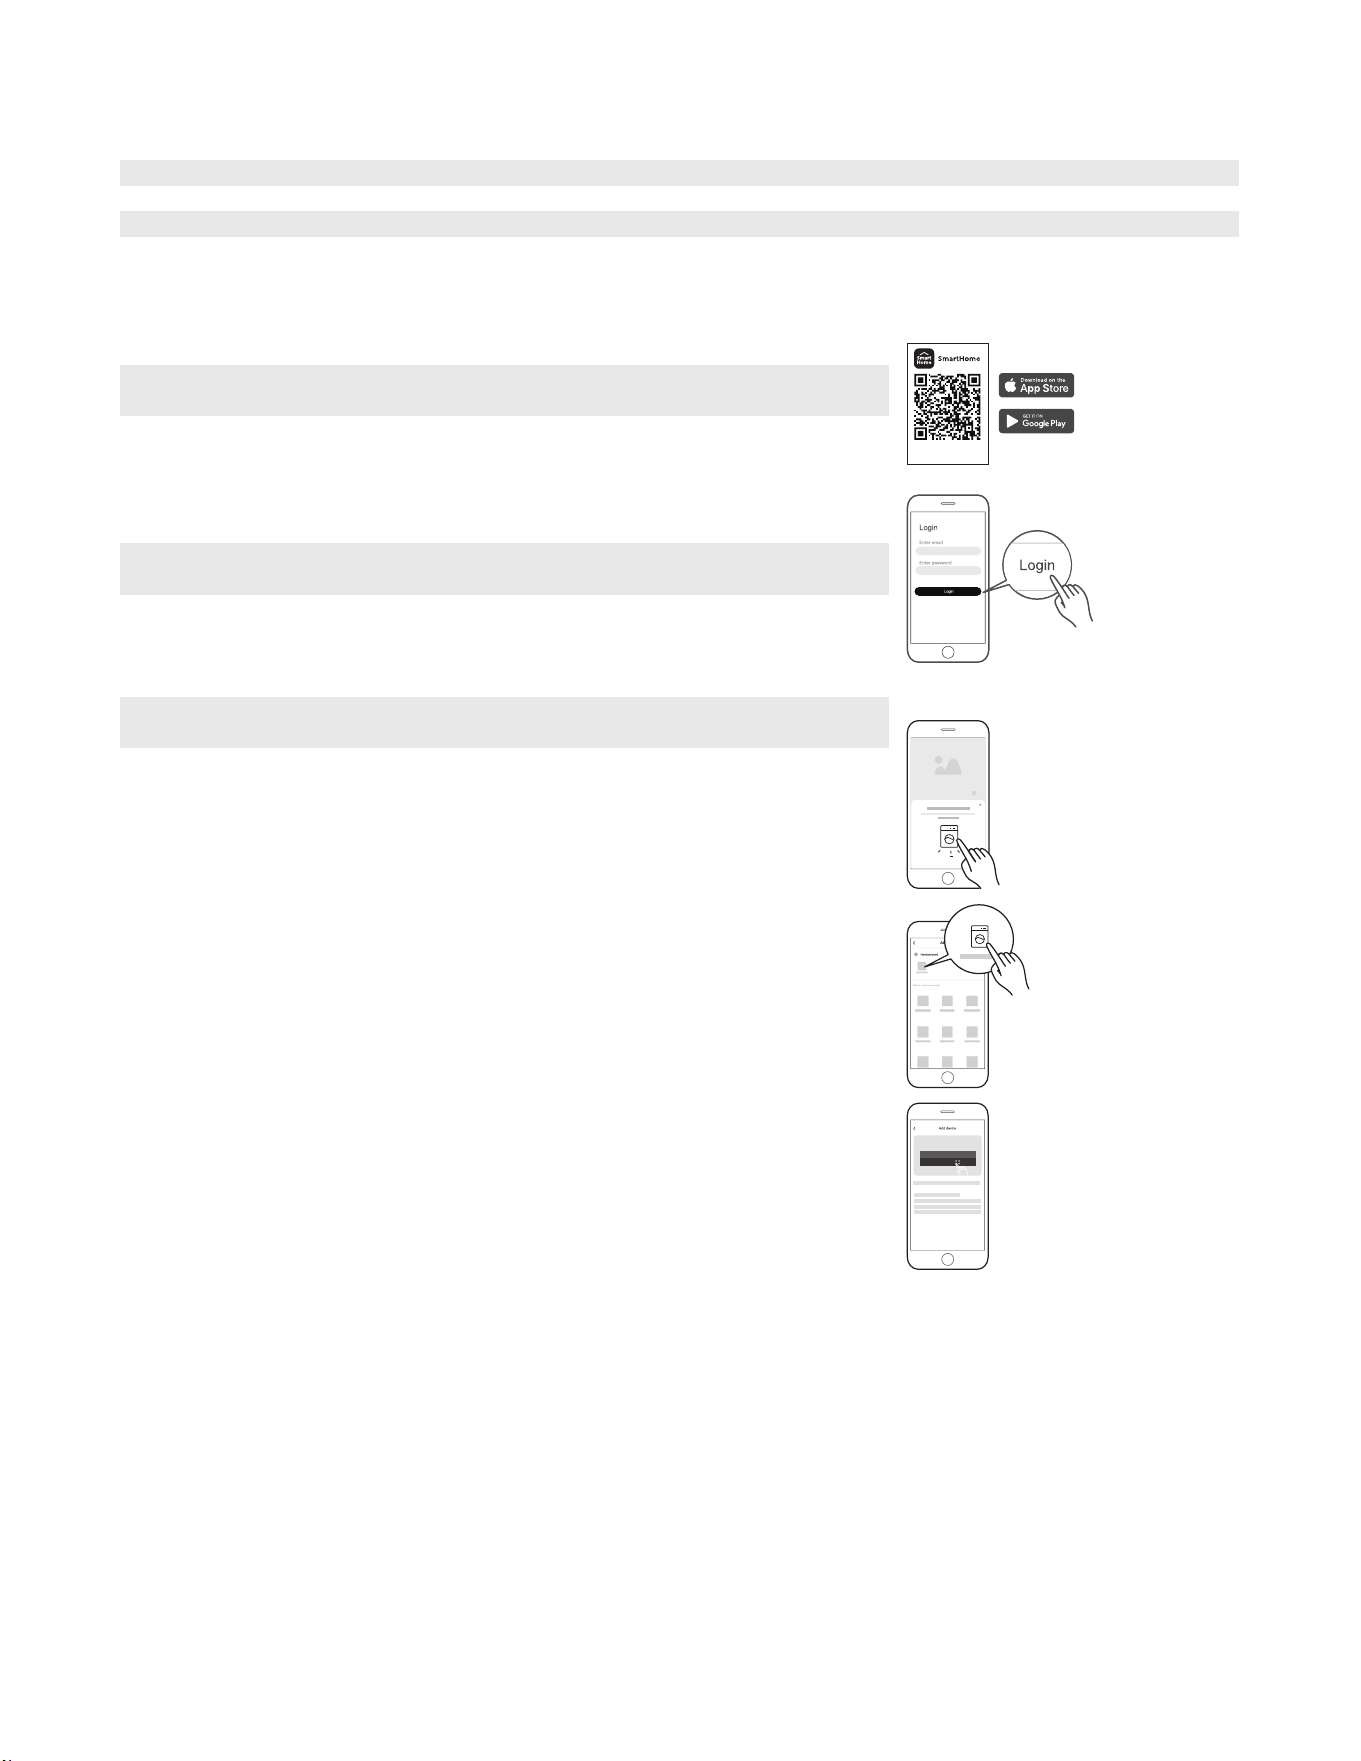
INSTRUCCIONES DE USO
29
CONFIGURACIÓN Y FUNCIONAMIENTO DE LA APLICACIÓN
Use su electrodoméstico con la aplicación SmartHome
Antes de comenzar, asegúrese de lo siguiente:
1. Su teléfono inteligente esté conectado a la red inalámbrica doméstica y conozca la contraseña de la red.
2. Esté cerca del electrodoméstico.
3. La señal inalámbrica de 2,4 GHz esté activada en su enrutador inalámbrico.
Siga los pasos a continuación para acceder al modo de control remoto.
Descargue la app SmartHome
En una tienda de aplicaciones (Google Play Store, Apple App Store),
busque “SmartHome” y encuentre la app SmartHome. Descárguela e
instálela en su teléfono. También puede descargarla escaneando el código
QR.
Regístrese e inicie sesión
Abra la aplicación SmartHome y cree una cuenta nueva para comenzar.
También puede registrarse a través de una cuenta de terceros.
Si ya tiene una cuenta, úsela para iniciar sesión.
Conecte sus dispositivos a SmartHome
Asegúrese de que su teléfono móvil esté conectado a la red inalámbrica
doméstica. Si no lo está, vaya a Ajustes y active las redes inalámbricas y el
Bluetooth.
Encienda su dispositivo.
Abre la aplicación SmartHome en su teléfono.
Si aparece el mensaje “Dispositivos inteligentes detectados cerca”, haga
clic para añadirlo.
Si no aparece ningún mensaje, seleccione “+” en la página y seleccione tu
dispositivo en la lista de dispositivos cercanos disponibles. Si su dispositivo
no aparece en la lista, añádalo manualmente por categoría y modelo.
Conecte su dispositivo a la red inalámbrica según las instrucciones de la
aplicación. Si la conexión falla, siga las instrucciones de la aplicación para
solucionar el problema.
8: 88
Download the app
& activate product

INSTRUCCIONES DE USO
30
Activar el control remoto
Gire la perilla de selección de ciclos para seleccionar uno y mantenga presionado [ ] hasta que el ícono del
control remoto se ilumine en la pantalla. Una vez que se ilumine, podrá controlar la secadora a distancia.
Luz de estado de la red inalámbrica
Parpadeo lento
Esperando conexión
Parpadeo rápido
Conectando
Brillante:
Conectado a su enrutador inalámbrico
NOTA
1. Asegúrese de que sus dispositivos estén encendidos.
2. Mantenga su teléfono móvil cerca de su dispositivo cuando lo conecte a la red.
3. Conecte su teléfono móvil a la red inalámbrica de su casa y asegúrese de conocer la contraseña.
4. Compruebe si su enrutador inalámbrico es compatible con la banda de 2.4 GHz y enciéndalo. Si no está
seguro de si el enrutador es compatible con la banda de 2.4 GHz, comuníquese con el fabricante del
enrutador.
5. El dispositivo no se puede conectar a una red inalámbrica que requiera autenticación, que suele
aparecer en áreas públicas como hoteles, restaurantes, etc. Conéctese a una red inalámbrica que no
requiera autenticación.
6. Desactive la función WLAN+ (Android) o el Asistente WLAN (iOS) de su teléfono móvil al conectarlo a la
red.
7. Si su dispositivo se conectó a una red inalámbrica pero necesita volver a conectarse, haga clic en “+” en
la página de inicio de la aplicación y vuelva a agregarlo por categoría y modelo, según las instrucciones
de la aplicación.
8. Potencia máxima de salida de RF: Bluetooth LE: 8 dBm; red inalámbrica de 2,4 GHz: 18 dBm. Banda de
frecuencia de operación: 2400–2483,5 MHz.
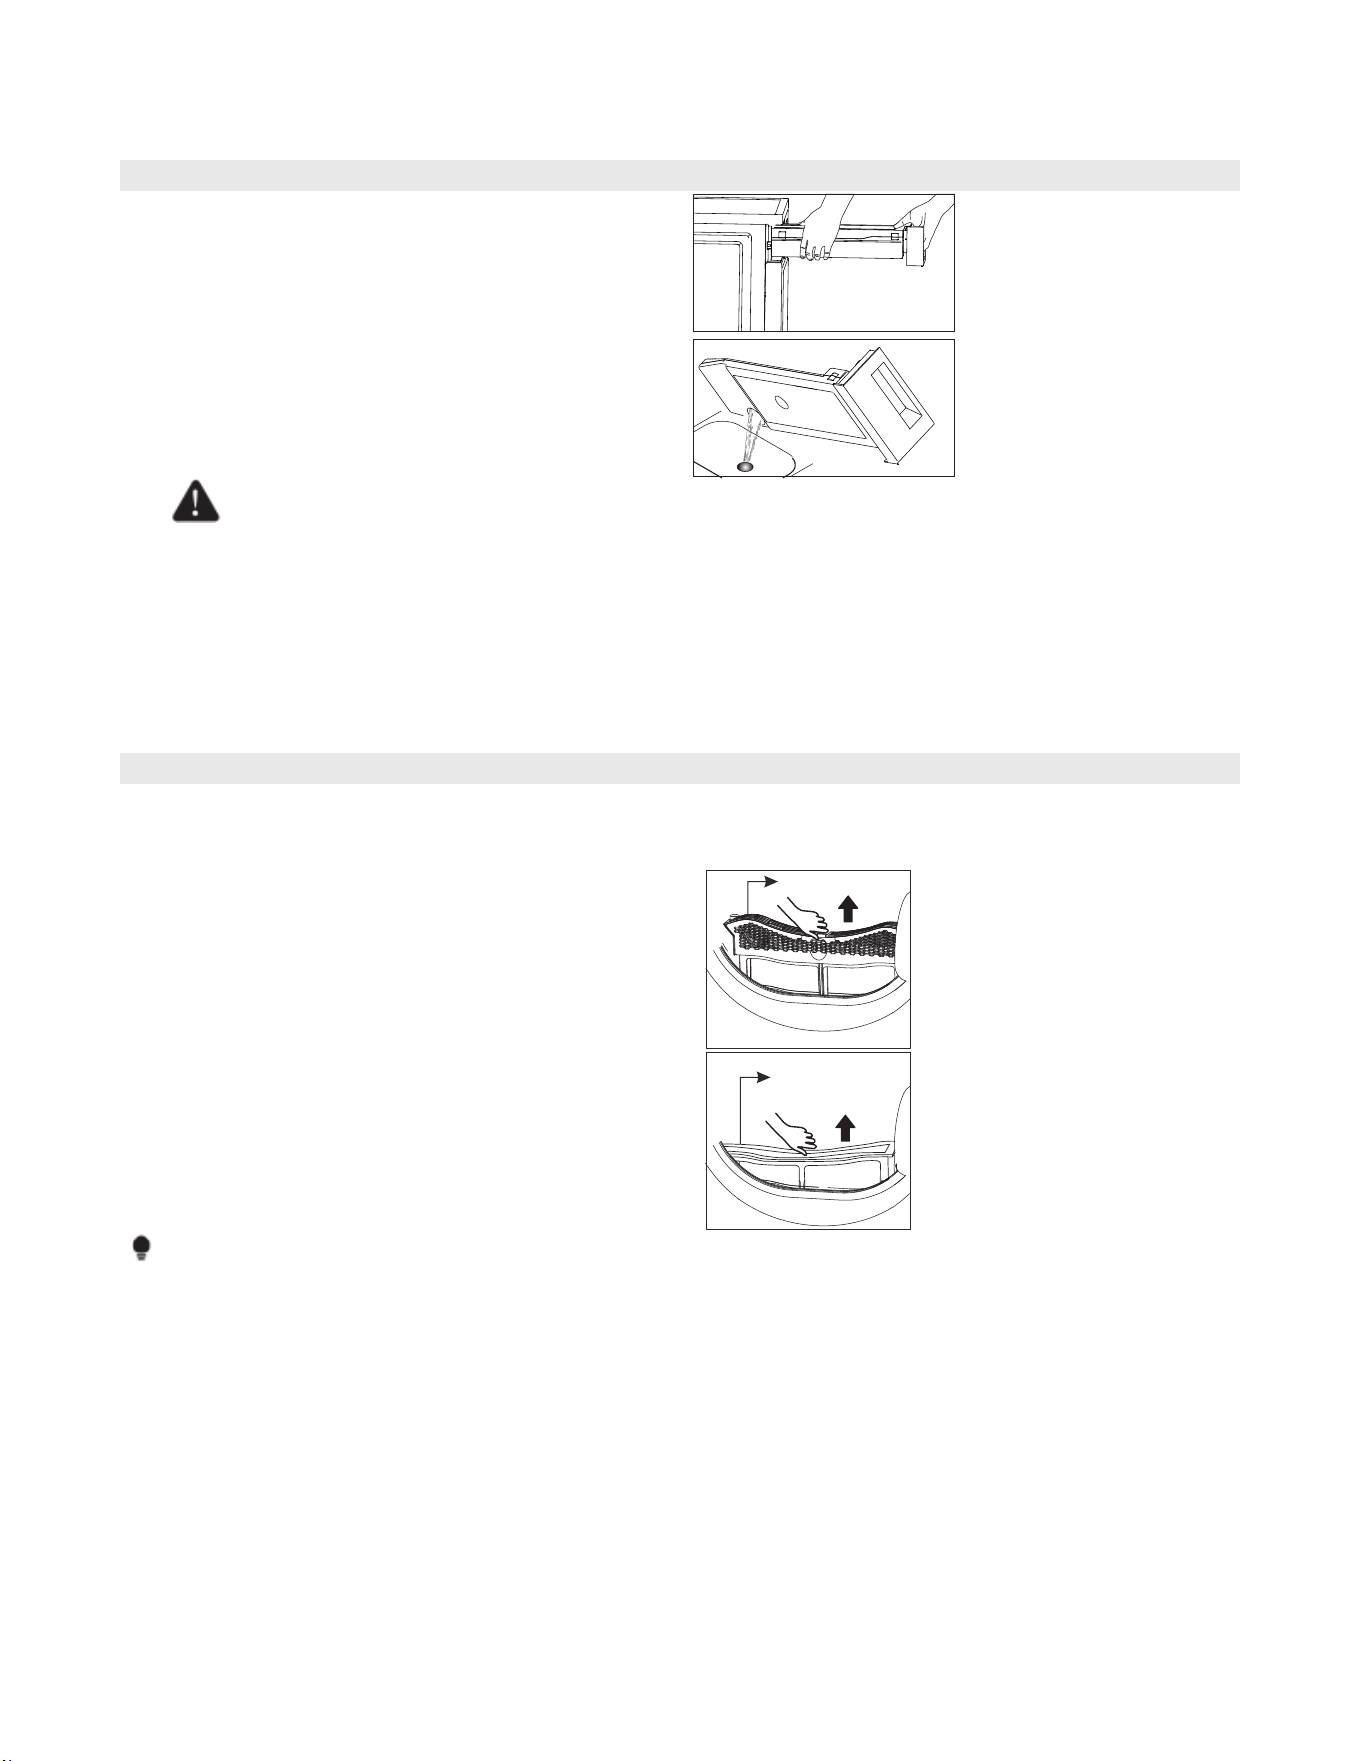
INSTRUCCIONES DE USO
31
VACÍE EL DEPÓSITO DE AGUA
1. Extraiga el depósito de agua con las dos
manos.
2. Mantenga el depósito de agua en posición
horizontal para evitar derrames.
3. Incline el depósito de agua para vaciar el
agua condensada en un recipiente o desagüe.
4. Vuelva a colocar el depósito de agua.
ADVERTENCIA
• Vacíe el depósito de agua después de cada uso. De lo contrario, el ciclo se detendrá y el icono
“VACIAR TANQUE” parpadeará. Una vez vaciado el depósito, reinicie la secadora pulsando el botón
[Inicio/Pausa].
• No beba el agua condensada.
• No utilice la secadora sin el depósito de agua.
LIMPIE LOS FILTROS
Esta secadora cuenta con un filtro de pelusas de doble capa en la puerta. Asegúrese de limpiar el filtro de
pelusas después de cada ciclo.
Limpie el filtro de pelusas
1. Abra la puerta.
2. Extraiga el filtro interior.
3. Extraiga el filtro exterior.
4. Abra el filtro (si corresponde) y retire la
pelusa. Puede enjuagarlo con agua corriente
si es necesario.
5. Seque bien el filtro de la puerta antes de
volver a instalarlo
NOTA
• Asegúrese de que la orientación del filtro sea correcta antes de volver a instalarlo.
Filtro interno de
puerta
Filtro externo de
puerta
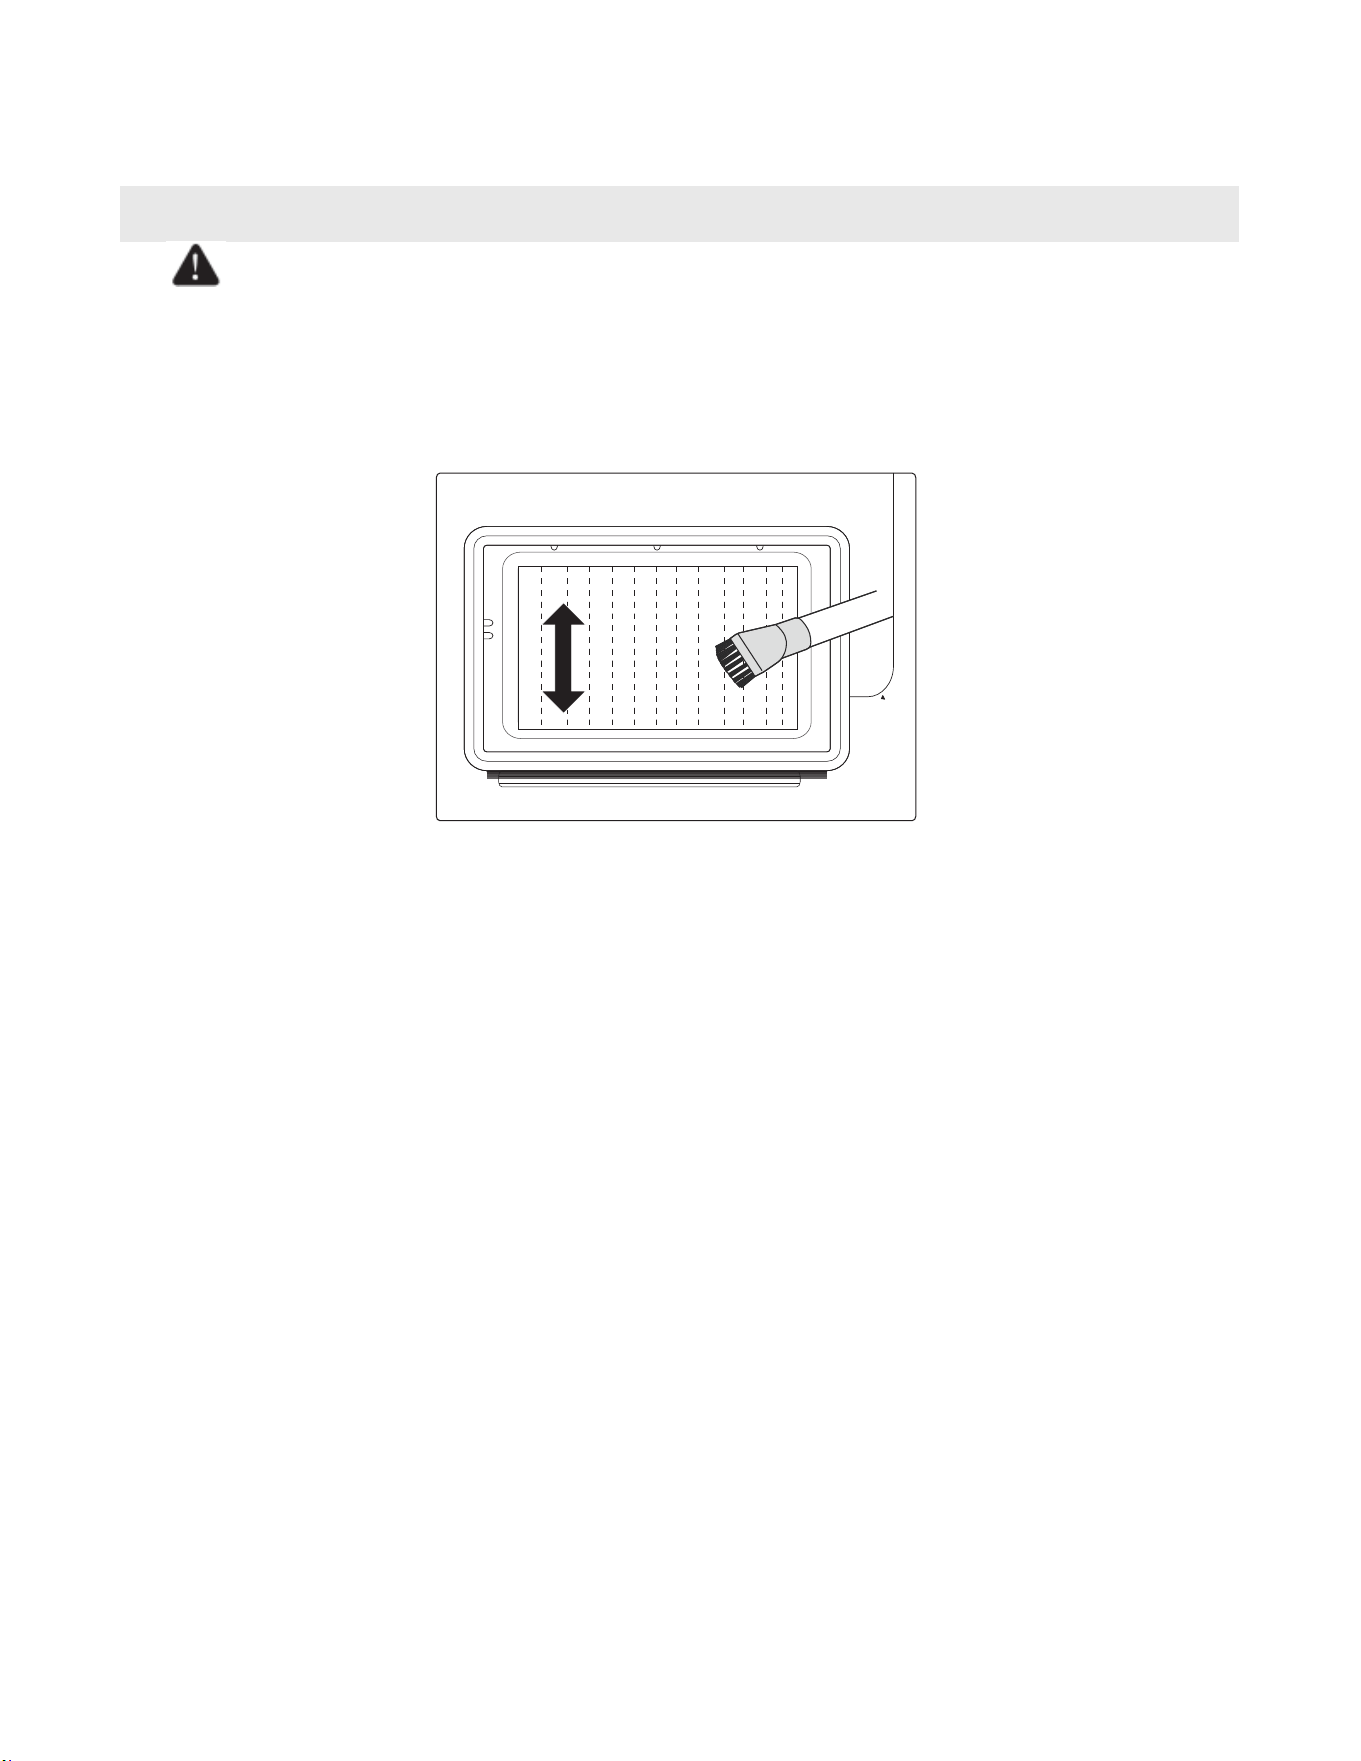
INSTRUCCIONES DE USO
32
LIMPIEZA DEL INTERCAMBIADOR DE CALOR
ADVERTENCIA
No toque el intercambiador de calor con la mano, ya que podría lesionarse.
• Según sea necesario, aproximadamente una vez cada dos meses, elimine la pelusa del intercambiador
de calor con una aspiradora con cepillo.
• Limpie el intercambiador de calor sin ejercer presión para evitar dañar el filtro de calor. La secadora no
secará si las aletas de refrigeración del intercambiador de calor están dañadas o dobladas.
INSTRUCCIONES DE USO
33
CONSEJOS ESPECIALES PARA LAVADO
Prendas
Guía de secado
Colchas y edredones
- siga las instrucciones de la etiqueta o utilice el ciclo para prendas
voluminosas.
- Asegúrese de que la prenda esté completamente seca antes de
usarla o guardarla.
- Puede ser necesario volver a colocarla para asegurar un secado
uniforme.
Cobijas
- utilice el ciclo Normal y seque solo una cobija a la vez para un
secado óptimo.
- Asegúrese de que la prenda esté completamente seca antes de
usarla o guardarla.
- Puede ser necesario volver a colocarla para asegurar un secado
uniforme.
Cortinas y tapicerías
- utilice el ciclo Casual y la configuración “Menos seco” para
minimizar las arrugas.
- Séquelas en cargas pequeñas para obtener mejores resultados y
retirar la ropa lo antes posible.
Pañales de tela
- utilice el ciclo Normal.
Prendas con relleno de plumón
(chaquetas, sacos de dormir,
edredones, etc.)
- utilice el ciclo Normal.
- Añada un par de toallas secas para acortar el tiempo de secado
y absorber la humedad.
Gomaespuma (respaldos de
alfombras, peluches, hombreras,
etc.)
- NO secar con calor. Usar el ciclo esponjamiento al aire (sin
calor).
- ADVERTENCIA: Secar artículos de goma con calor puede
dañarlos o provocar un incendio.
Almohadas
- Usar el ciclo Normal.
- Agregue un par de toallas secas y un par de zapatillas limpias
para facilitar el secado y esponjar las almohadas.
- NO secar almohadas de kapok ni de espuma con calor. Estos
artículos solo se pueden secar con el ciclo esponjamiento al aire.
Plásticos (cortinas de ducha,
fundas para muebles de exterior,
etc.)
- Usar el ciclo esponjamiento al aire (sin calor).
ADVERTENCIA
Si tiene algún problema y necesita ayuda:
• Pulse el botón [Encendido/Apagado].
• Desenchufe el aparato y póngase en contacto con el servicio técnico.

MANTENIMIENTO
34
ADVERTENCIA
Ciertas piezas internas no están conectadas a tierra intencionalmente y pueden presentar
riesgo de descarga eléctrica solo durante el mantenimiento. Personal de servicio: No toque las
siguientes piezas mientras el electrodoméstico esté energizado: Bomba síncrona de imán
permanente, motor de CC sin escobillas, condensador, ventilador, estrangulador, PCB.
CUIDADO Y MANTENIMIENTO
Panel de control
- Limpie con un paño suave y húmedo. No utilice sustancias abrasivas.
- No rocíe limpiadores directamente sobre el panel.
- El acabado del panel de control puede dañarse con algunos productos quitamanchas y de
pretratamiento de ropa. Aplique estos productos lejos de la secadora y limpie cualquier derrame o
exceso de rociado inmediatamente.
Tambor de acero inoxidable o anodizado
- Para limpiar el tambor de acero inoxidable o anodizado, utilice un paño húmedo con un limpiador
suave, no abrasivo, apto para superficies de acero inoxidable y anodizado.
- Elimine los residuos del limpiador y séquelo con un paño limpio.
Exterior de la secadora
- Limpie con un paño suave y húmedo. No utilice sustancias abrasivas.
- Proteja la superficie de objetos afilados.
- No coloque objetos pesados o afilados ni un depósito de detergente sobre la secadora. Guárdelos por
separado para evitar rayar o dañar la cubierta superior.
- Dado que toda la secadora tiene un acabado de alto brillo, la superficie puede rayarse o dañarse.
- Evite rayar o dañar la superficie al usar la secadora.

INSTRUCCIONES PARA LA SOLUCIÓN DE PROBLEMAS
35
CONSULTE ESTAS SOLUCIONES SI SU SECADORA…
Si su secadora presenta alguno de los siguientes problemas, revise las soluciones que se indican a
continuación antes de llamar al servicio técnico. Esto le ayudará a ahorrar tiempo y dinero.
Problema
Solución
La secadora no arranca
- asegúrese de que la puerta esté bien cerrada.
- asegúrese de que el cable de alimentación esté enchufado a una
toma de corriente con corriente.
- revise el disyuntor y los fusibles de la casa.
- presione el botón de Inicio/Pausa de nuevo si la puerta se abre
durante el ciclo.
La secadora no calienta
- revise el disyuntor y los fusibles de la casa.
- seleccione una configuración de calor que no sea “Air Fluff”.
- limpie el filtro de pelusas.
- es posible que la secadora haya entrado en el proceso de
enfriamiento del ciclo.
No seca
- verifique todo lo anterior y además…
- no sobrecargue la secadora. Una carga de secadora debe ser
equivalente a una carga de lavadora.
- separe las prendas pesadas de las ligeras.
- Las prendas grandes y voluminosas, como mantas o edredones,
podrían requerir reubicación para asegurar un secado uniforme.
- La carga podría ser demasiado pequeña para un secado correcto.
Añada algunas toallas.
La unidad hace ruido
- Revise la carga para ver si hay objetos como monedas, botones
sueltos, clavos, cremalleras rotas, etc. Retírelos inmediatamente.
- Es normal oír el encendido y apagado de la válvula de gas o del
elemento calefactor de la secadora durante el ciclo de secado.
- Asegúrese de que la secadora esté correctamente nivelada, como
se indica en las instrucciones de instalación.
El tiempo restante cambia de
forma anormal.
- Los ciclos con sensor calcularán automáticamente la humedad de
la ropa. La secadora ajustará el tiempo restante del ciclo según la
cantidad, el material y la humedad de la ropa. Esto es normal.

INSTRUCCIONES PARA LA SOLUCIÓN DE PROBLEMAS
36
Problema
Solución
La ropa se seca de forma desigual
- las costuras, los bolsillos y otras zonas con cargas similares
podrían no secarse completamente cuando el resto de la
carga alcance el nivel de secado seleccionado. Esto es
normal. Seleccione la opción de Secado Temporizado o un
nivel de secado más alto para garantizar que todas las zonas
estén completamente secas.
- Si se seca una prenda pesada con una carga ligera, como
una toalla con sábanas, es posible que la prenda pesada no
se seque completamente cuando el resto de la carga alcance
el nivel de secado seleccionado. Separe las prendas pesadas
de las ligeras para obtener los mejores resultados de secado.
Se apaga antes de que la carga se
seque
- los olores domésticos de pintura, barniz, limpiadores fuertes,
etc., pueden entrar en la secadora con el aire de la
habitación. Esto es normal, ya que la secadora absorbe el
aire de su entorno.
- Si estos olores persisten, ventile la habitación
completamente antes de usar la secadora
Persisten olores en la ropa después
del ciclo de lavado para refrescar
- las telas con olores fuertes deben lavarse con el ciclo
adecuado.
Prendas que siguen arrugadas
después de usar el cuidado de arrugas
- las cargas pequeñas de 1 a 4 prendas funcionan mejor.
- Cargue menos prendas. Cargue prendas similares juntas.
Pelusa en la ropa:
- limpie el filtro de pelusas antes de cada ciclo. Con algunas
prendas que producen mucha pelusa, también es necesario
limpiar el filtro después del ciclo.
- Algunas telas producen pelusa (por ejemplo, una toalla
blanca de algodón con pelusa) y deben secarse por
separado de las prendas que atrapan pelusa (por ejemplo,
un pantalón de lino negro).
- Divida las cargas más grandes en cargas más pequeñas
para secarlas.
- Revise bien los bolsillos antes de lavar y secar la ropa.
“Filtro” se ilumina:
- limpie el filtro de pelusas.
“TANQUE VACÍO” parpadea:
- cuando “TANQUE VACÍO” parpadea, la secadora emitirá un
pitido durante 5 segundos.
- Revise el depósito de agua. Si está lleno, vacíe el agua
condensada y reinicie la secadora.
- Si el depósito no está lleno, reinicie la secadora
directamente.
- Si el icono de “TANQUE VACÍO” sigue parpadeando
después de haber completado los dos primeros pasos, llame
al centro de servicio.
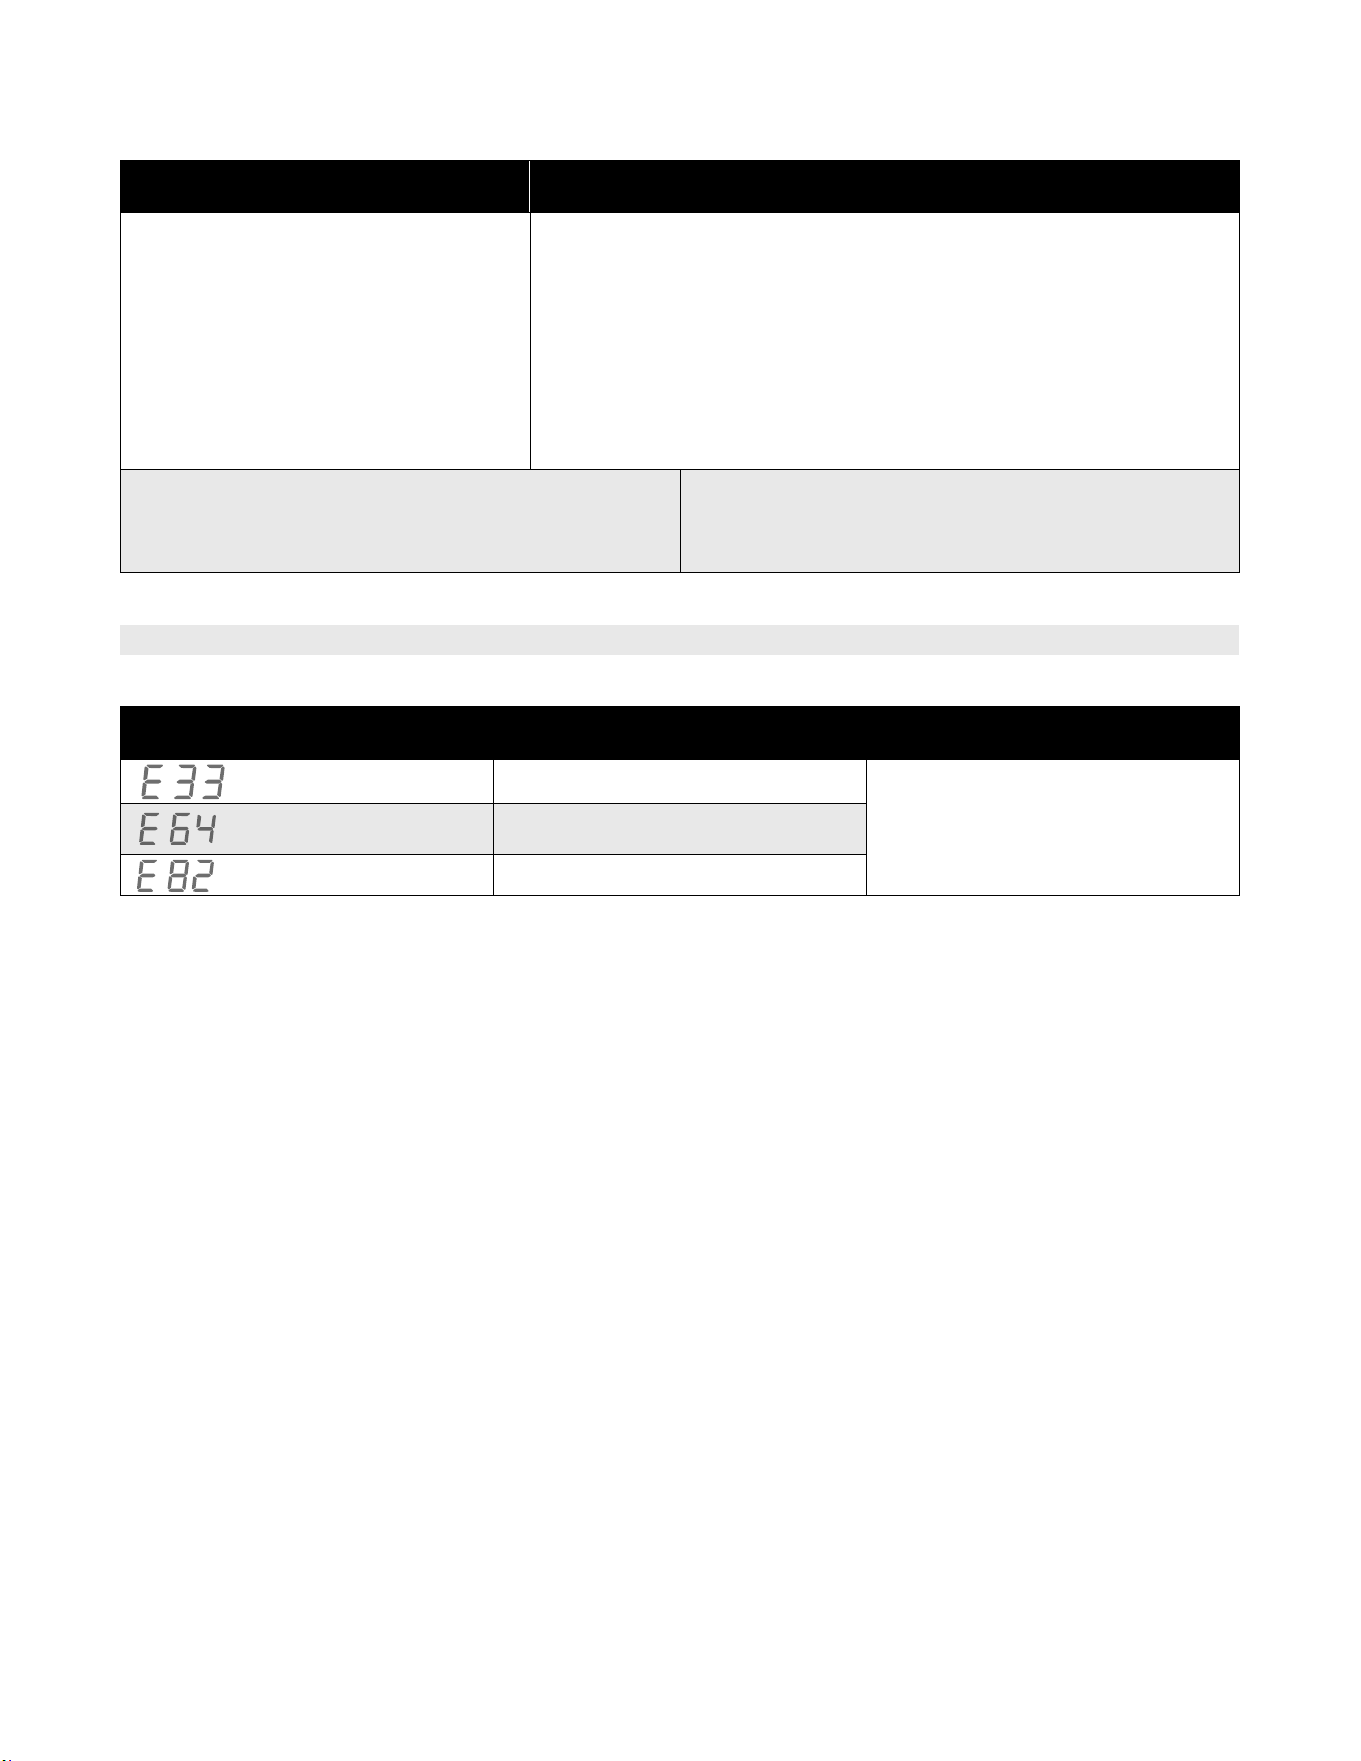
INSTRUCCIONES PARA LA SOLUCIÓN DE PROBLEMAS
37
Problema
Solución
No se alcanzó el nivel de secado
seleccionado o tardó demasiado.
- Limpie el filtro de pelusas.
- Vacíe el recipiente.
- Revise la manguera de drenaje.
- Compruebe que la ubicación de instalación de la secadora
no esté demasiado restringida.
- Limpie los sensores de humedad.
- Limpie la entrada de aire.
- Use un nivel de secado más alto o ajustes de tiempo más
largos.
La secadora no se apaga instantáneamente cuando
el control remoto se pausa o se detiene.
Enfriamiento en curso: la secadora se apagará
automáticamente al enfriarse. Esto es normal, no una
falla.
CÓDIGOS DE ERROR
Código de error
Posible causa
Solución
Error del sensor de temperatura.
Comuníquese con su centro de
servicio local si ocurre el problema.
Error de comunicación del motor.
Error de comunicación de la PCB.
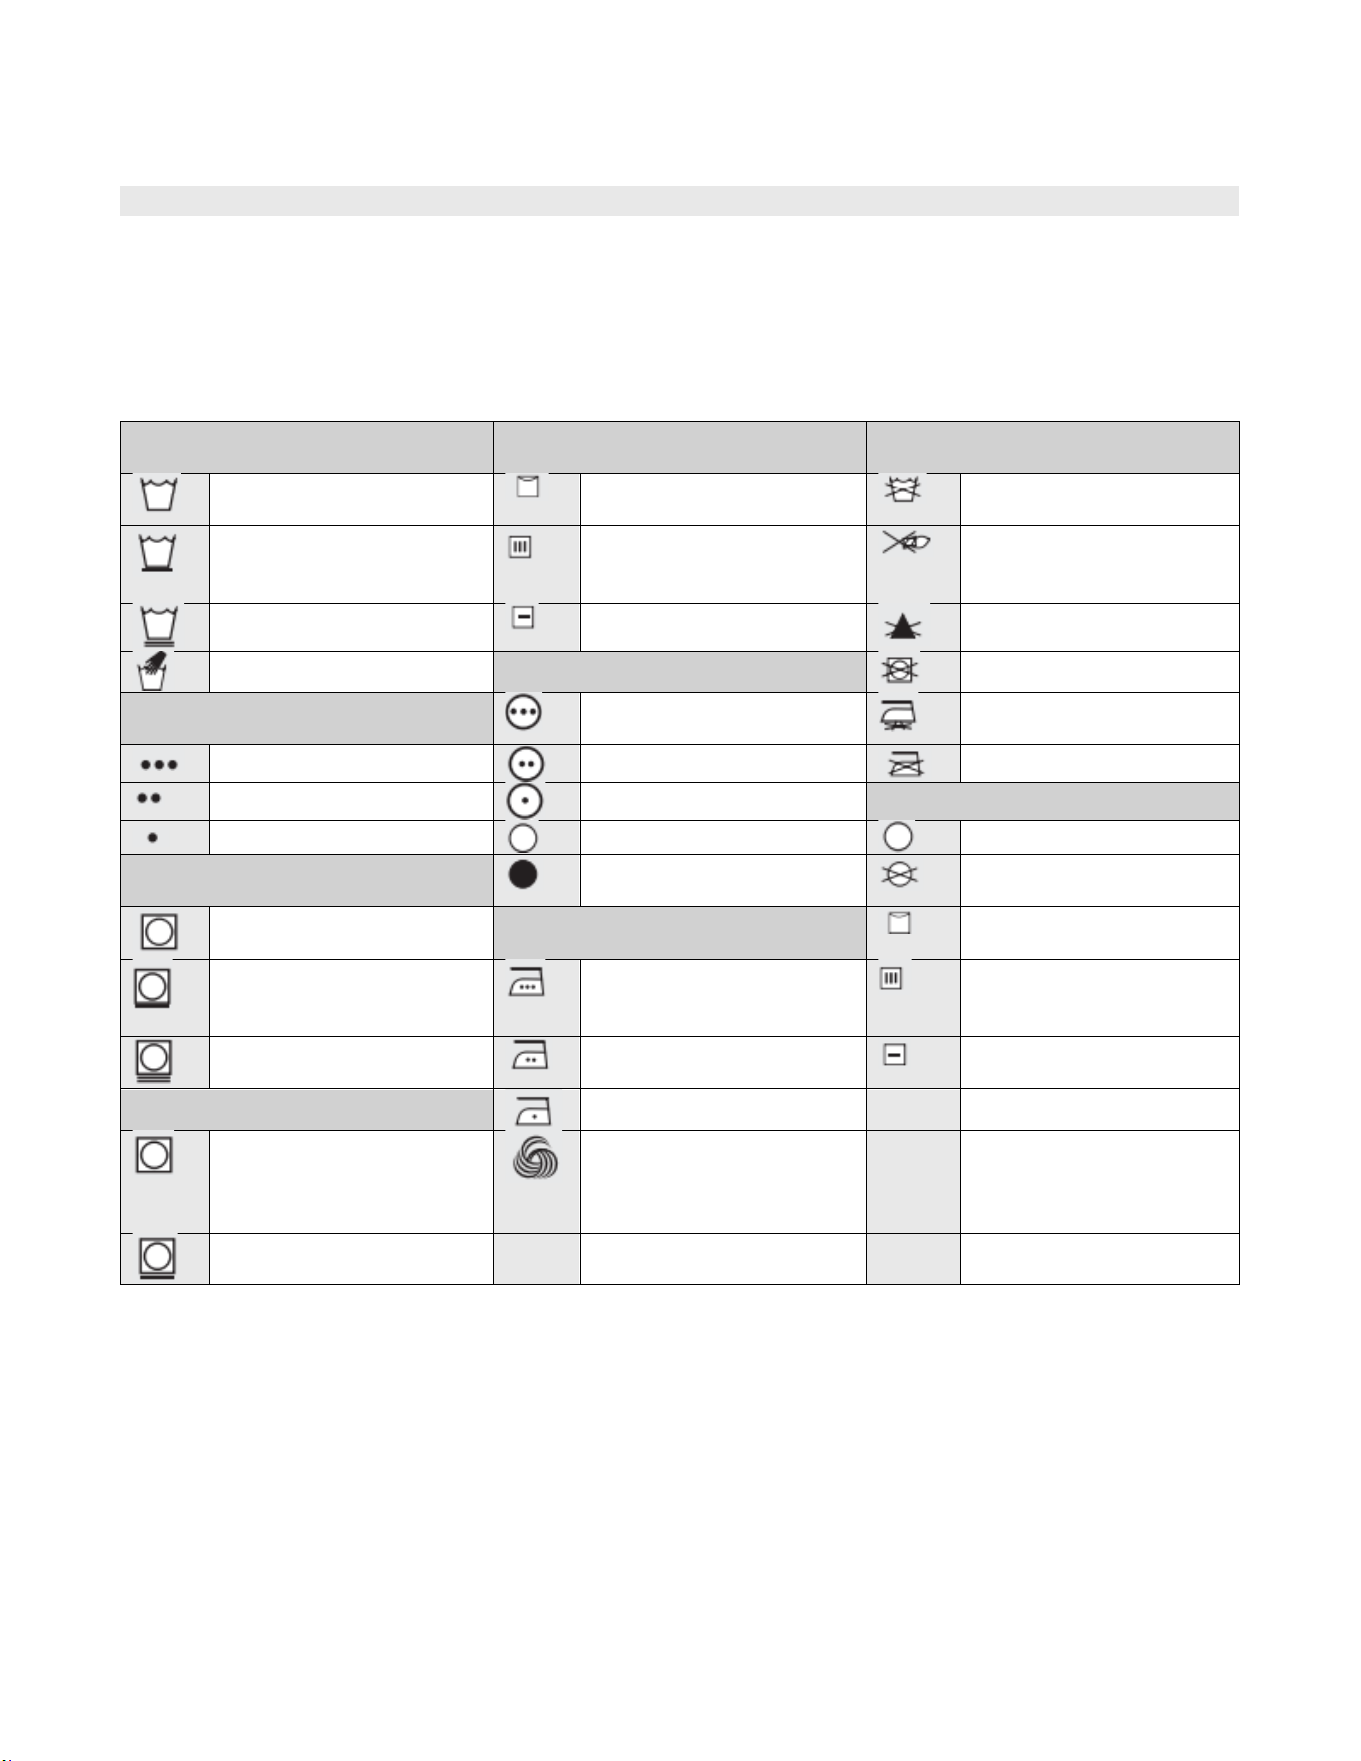
INSTRUCCIONES PARA LA SOLUCIÓN DE PROBLEMAS
38
APÉNDICE
Tabla de Cuidado de Telas
Los siguientes símbolos proporcionan instrucciones para el cuidado de las prendas. Las etiquetas de cuidado
de la ropa incluyen símbolos para lavado, blanqueado, secado y planchado, o limpieza en seco cuando sea
necesario. El uso de símbolos garantiza la uniformidad entre los fabricantes de prendas nacionales e
importadas. Siga las instrucciones de la etiqueta de cuidado para prolongar la vida útil de la prenda y reducir
los problemas de lavado.
Ciclo de lavado
Instrucciones especiales
Símbolos de advertencia para el
lavado
Normal –
Secar al aire libre / Colgar
para secar
No lavar
Planchado permanente /
Resistente a las arrugas /
Control de arrugas
Escurrir
No escurrir
Suave / Delicado
Secar en superficie plana
No usar blanqueador
Lavar a mano–
Temperatura alta
No usar secadora
Temperatura del agua
Alta
Sin vapor (añadir vapor al
planchar)
Caliente
Media
No planchar
Tibio
Baja
Limpieza en seco
Frío
Cualquier temperatura
Limpieza en seco
Blanqueador
Sin calor / Aire
No limpiar en seco
Cualquier blanqueador
(cuando sea necesario)
Secar con plancha o vapor
Secar al aire libre /
Colgar para secar
Solo blanqueador sin
cloro (protección de color)
(cuando sea necesario) –
Alta
Escurrir
Ciclo de secado en
secadora
Media
Secar en superficie plana
Normal
Baja
Planchado permanente /
Resistente a las arrugas /
Control de arrugas
Para lana lavable a
máquina. Las cargas
deben pesar menos de
3.6 kg (8 libras).
Delicado
La cantidad de puntos representa la temperatura adecuada del agua de lavado para diferentes prendas.
El rango de temperatura para agua caliente es de 41 °C a 52 °C (105 °F a 125 °F), para agua tibia, de 29 °C a 41
°C (85 °F a 105 °F) y para agua fría, de 16 °C a 29 °C (60 °F a 85 °F).

CERTIFICACIONES
Tenga en cuenta que cualquier cambio o modificación de este producto que no esté expresamente aprobado por la parte
responsable del cumplimiento podría anular la autorización del usuario para operar el equipo. Este equipo cumple con los
límites de exposición a la radiación de radiofrecuencia (RF) de la FCC establecidos para entornos no controlados.
La(s) antena(s) utilizada(s) para este transmisor debe(n) instalarse y operarse a una distancia mínima de 20 cm de todas
las personas y no debe(n) colocarse ni operarse junto con ninguna otra antena o transmisor. Los instaladores deben
garantizar que se mantenga una distancia de 20 cm entre el dispositivo (excluyendo el auricular) y los usuarios.
Declaración de Cumplimiento de la Comisión Federal de Comunicaciones (FCC) para EE. UU.
Este dispositivo cumple con la parte 15 de las normas de la FCC. Su funcionamiento está sujeto a las dos condiciones
siguientes:
(1) Este dispositivo no puede causar interferencias perjudiciales y
(2) Este dispositivo debe aceptar cualquier interferencia recibida, incluidas las que puedan causar un funcionamiento no
deseado.
Nota: Este equipo ha sido probado y cumple con los límites para dispositivos digitales de Clase B, de conformidad con la
parte 15 de las normas de la FCC. Estos límites están diseñados para proporcionar una protección razonable contra
interferencias perjudiciales en una instalación residencial. Este equipo genera, utiliza y puede radiar energía de
radiofrecuencia y, si no se instala y utiliza de acuerdo con las instrucciones, puede causar interferencias perjudiciales en
las comunicaciones por radio. Sin embargo, no se garantiza que no se produzcan interferencias en una instalación
específica. Si este equipo causa interferencias perjudiciales en la recepción de radio o televisión, lo cual puede
determinarse encendiéndolo y apagándolo, se recomienda al usuario que intente corregir la interferencia mediante una o
más de las siguientes medidas:
• Reorientar o reubicar la antena receptora.
• Aumentar la distancia entre el equipo y el receptor.
• Conectar el equipo a una toma de corriente de un circuito diferente al del receptor.
• Consultar al distribuidor o a un técnico de radio/TV con experiencia para obtener ayuda.
Este equipo cumple con los límites de exposición a la radiación de la FCC establecidos para un entorno no controlado.
Declaración de Conformidad del Proveedor de la FCC
Nombre del producto: Secadora automática
Número de modelo: MLHE27H7BWW/MLHE27H7BCG
Nombre del proveedor: Midea America Corp.
Dirección del proveedor (EE. UU.): 300 Kimball Dr. Parsippany, NJ 07054
Sitio web del proveedor: http://midea.com/us
Correo electrónico/teléfono de contacto: 1-866-646-4332
Declaración de conformidad de Industry Canada (IC) para Canadá
Este dispositivo cumple con las normas RSS exentas de licencia de Industry Canada. Su funcionamiento está sujeto a las
dos condiciones siguientes:
(1) Este dispositivo no puede causar interferencias y
(2) Este dispositivo debe aceptar cualquier interferencia, incluidas las que puedan causar un funcionamiento no deseado.
CAN ICES-003(B)/NMB-003(B)
Midea no se responsabiliza de ningún cambio o modificación que no esté expresamente aprobado por Midea. Dichas
modificaciones podrían invalidar la autorización del usuario para operar el equipo.
Para el modelo: MWB-S-WB01
ID FCC: 2ADQOMWB-SWB01
ID IC: 12575A-WB01
39
40
42