
Cordless Portable Power Cleaner EN
Nettoyant électrique portable sans l F
Lavador a presión portátil inalámbrico ES
WG647 WG647.X
P09
P18
P27
18
*
19
*
20
*
16
*
17
*
9
11
12
13
15
1
2
3
4
5
6
7
8
10
1
1
2
2
2
1
D2 E1
E2
F
H1
G
2
1
H/L
C
D
A3
A2
A1
B
D
D1
1
1
2
2
2
1
D2 E1
E2
F
H1
G
2
1
H/L
C
D
A3
A2
A1
B
D
D1
2
1
3
Refer to accessory chart if applicable.
Consultez le tableau des accessoires.
Consultar table de accesorios si aplica.
Refer to accessory chart if applicable.
Consultez le tableau des accessoires.
Consultar table de accesorios si aplica.
Refer to accessory chart if applicable.
Consultez le tableau des accessoires.
Consultar table de accesorios si aplica.
Refer to accessory chart if applicable.
Consultez le tableau des accessoires.
Consultar table de accesorios si aplica.
Refer to accessory chart if applicable.
Consultez le tableau des accessoires.
Consultar table de accesorios si aplica.
1
2
1
2
2
1
1
2
K*
I1
D
J
I2 I3
H2
L *
D
M1*
M2*
D
N1*
N2*
N3*
2
1
Clean regularly.
Nettoyez régulièrement.
Limpiar regularmente.
Clean regularly.
Nettoyez régulièrement.
Limpiar regularmente.
Refer to accessory chart if applicable.
Consultez le tableau des accessoires.
Consultar table de accesorios si aplica.
Refer to accessory chart if applicable.
Consultez le tableau des accessoires.
Consultar table de accesorios si aplica.
Refer to accessory chart if applicable.
Consultez le tableau des accessoires.
Consultar table de accesorios si aplica.
O2
*
O1*
O3*
D
P2*
P1*
Q1
Q2
R
D
N4*
18

Cordless Portable Power Cleaner EN
9
TABLE OF CONTENTS
1. PRODUCT SAFETY
2. COMPONENT LIST
3. TECHNICAL DATA
4. OPERATING INSTRUCTIONS
5. ATTACHMENT OF ACCESSORIES
5. MAINTENANCE
7. CLEANING/STORAGE
8. TROUBLESHOOTING
1. PRODUCT SAFETY
WARNING: Read all safety warnings and all
instructions. Failure to follow the
warnings and instructions may result in electric
shock, re and/or serious injury.
Save all warnings and instructions for future
reference.
WARNING: This product can expose you to
chemicals including lead and Di(2-
ethylhexyl)phthalate (DEHP) which are known to
the State of California to cause cancer and birth
defects or other reproductive harm. For more
information go to www.P65Warnings.ca.gov.
IMPORTANT SAFETY INSTRUCTIONS
WARNING: When using this product basic
precautions should always be followed,
including the following:
1. Read all the instructions before using the
product.
2. To reduce the risk of injury, close supervision
is necessary when a product is used near
children.
3. Know how to stop the product and bleed
pressures quickly. Be thoroughly familiar with
the controls.
4. Stay alert – watch what you are doing.
5. Do not operate the product when fatigued or
under the inuence of alcohol or drugs.
6. Keep operating area clear of all persons
7. Do not overreach or stand on unstable support.
Keep good footing and balance at all times.
8. Follow the maintenance instructions specied
in the manual.
9. WARNING – Risk of injection or injury– do
not direct discharge stream at persons.
10. Do not spray electrical apparatus and wiring.
SAVE THESE INSTRUCTIONS
FOR ALL BATTERY –
OPERATED OUTDOOR
PRODUCTS
:
1. Prevent unintentional starting. Ensure the
switch is in the off-position before connecting
to battery pack, picking up or carrying the
product. Carrying the product with your nger
on the switch or energizing product that have
the switch on invites accidents.
2. Disconnect the battery pack from the product
before making any adjustments, changing
accessories, or storing product. Such
preventive safety measures reduce the risk of
starting the product accidentally.
3. Recharge only with the charger specied by the
manufacturer .A charger that is suitable for one
type of battery pack may create a risk of re
when used with another battery pack.
4. Use products only with specically designated
battery packs. Use of any other battery packs
may create a risk of injury and re.
5. When battery pack is not in use, keep it away
from other metal objects, like paper clips, coins,
keys, nails, screws or other small metal objects,
that can make a connection from one terminal
to another. Shorting the battery terminals
together may cause burns or a re.
6. Under abusive conditions, liquid may be ejected
from the battery; avoid contact. If contact
accidentally occurs, ush with water. If liquid
contacts eyes, additionally seek medical help.
Liquid ejected from the battery may cause
irritation or burns.
7. Do not use a battery pack or product that is
damaged or modied. Damaged or modied
batteries may exhibit unpredictable behavior
resulting in re, explosion or risk of injury.
8. Do not expose a battery pack or product to re
or excessive temperature. Exposure to re or
temperature above 130°C may cause explosion.
9. Follow all charging instructions and do not
charge the battery pack or product outside
of the temperature range specied in the
instructions. Charging improperly or at
temperatures outside of the specied range
may damage the battery and increase the risk
of re.
10. Have servicing performed by a qualied repair
person using only identical replacement parts.
This will ensure that the safety of the product is
maintained.
11. Do not modify or attempt to repair the product
or the battery pack (as applicable) except as
indicated in the instructions for use and care.
Cordless Portable Power Cleaner EN
10
SAFETY WARNINGS FOR
BATTERY PACK
a) Do not dismantle, open or shred battery pack.
b) Do not expose battery pack to heat or re. Avoid
storage in direct sunlight.
c) Do not short-circuit a battery pack. Do not store
battery packs haphazardly in a box or drawer
where they may short-circuit each other or be
short-circuited by other metal objects. When
battery pack is not in use, keep it away from other
metal objects, like paper clips, coins, keys, nails,
screws or other small metal objects, that can
make a connection from one terminal to another.
Shorting the battery terminals together may cause
burns or re.
d) Do not subject battery pack to mechanical shock.
e) In the event of battery leaking, do not allow the
liquid to come in contact with the skin or eyes. If
contact has been made, wash the affected area
with copious amounts of water and seek medical
advice.
f) Do not use any battery pack which is not
designed for use with the equipment.
g) Keep battery pack out of the reach of children.
h) Always purchase the battery pack recommended
by the device manufacturer for the equipment.
i) Keep battery pack clean and dry.
j) Wipe the battery pack terminals with a clean dry
cloth if they become dirty.
k) Battery pack needs to be charged before use.
Always use the correct charger and refer to the
manufacturer’s instructions or equipment manual
for proper charging instructions.
l) Do not leave battery pack on prolonged charge
when not in use.
m) After extended periods of storage, it may
be necessary to charge and discharge the
battery pack several times to obtain maximum
performance.
n) Recharge only with the charger specied by
Worx. Do not use any charger other than that
specically provided for use with the equipment.
o) Retain the original product literature for future
reference.
p) Use only the battery pack in the application for
which it was intended.
q) Remove the battery pack from the equipment
when not in use.
r) Dispose of properly.
s) Do not mix cells of different manufacture,
capacity, size or type within a device.
t) Keep the battery away from microwaves and
high pressure.
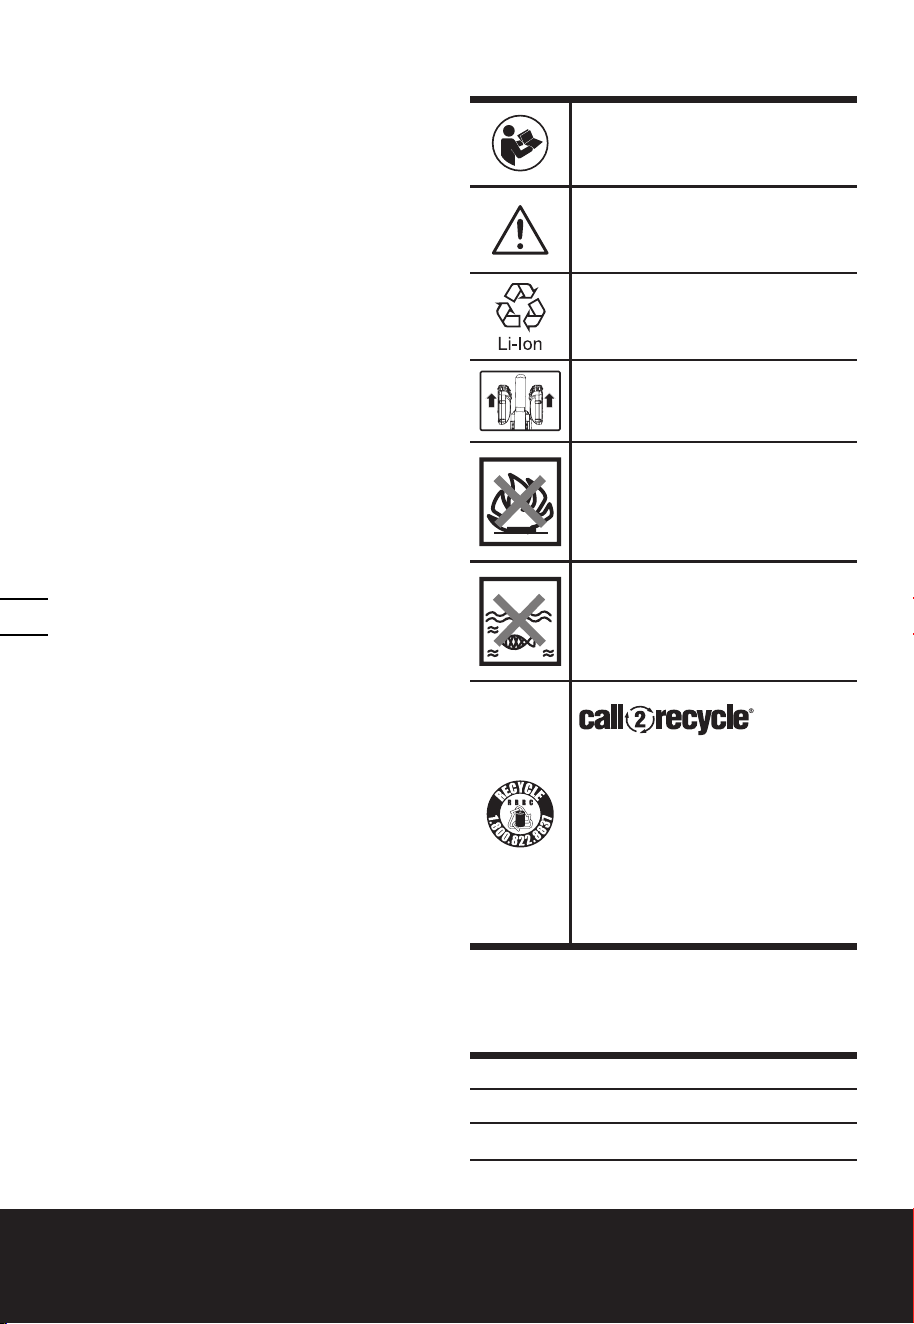
SYMBOLS
To reduce the risk of injury, user
must read instruction manual
Warning
Li-Ion battery, battery must be
recycled
Remove battery from the socket
before carrying out any adjustment,
servicing or maintenance.
Do not burn
Batteries may enter water cycle if
disposed improperly, which can
be hazardous for ecosystem. Do
not dispose of waste batteries as
unsorted municipal waste.
POSITEC Inc. has established a
partnership with the RBRC Corpora-
tion to recycle any Positec batteries
with the RBRC-call2recycle seal. For
environmental protection, please do
not discard batteries in the trash. Af-
ter the batteries’ life cycle is ended,
then please call 1-800-822-8837
for a free service that will properly
dispose of the battery.
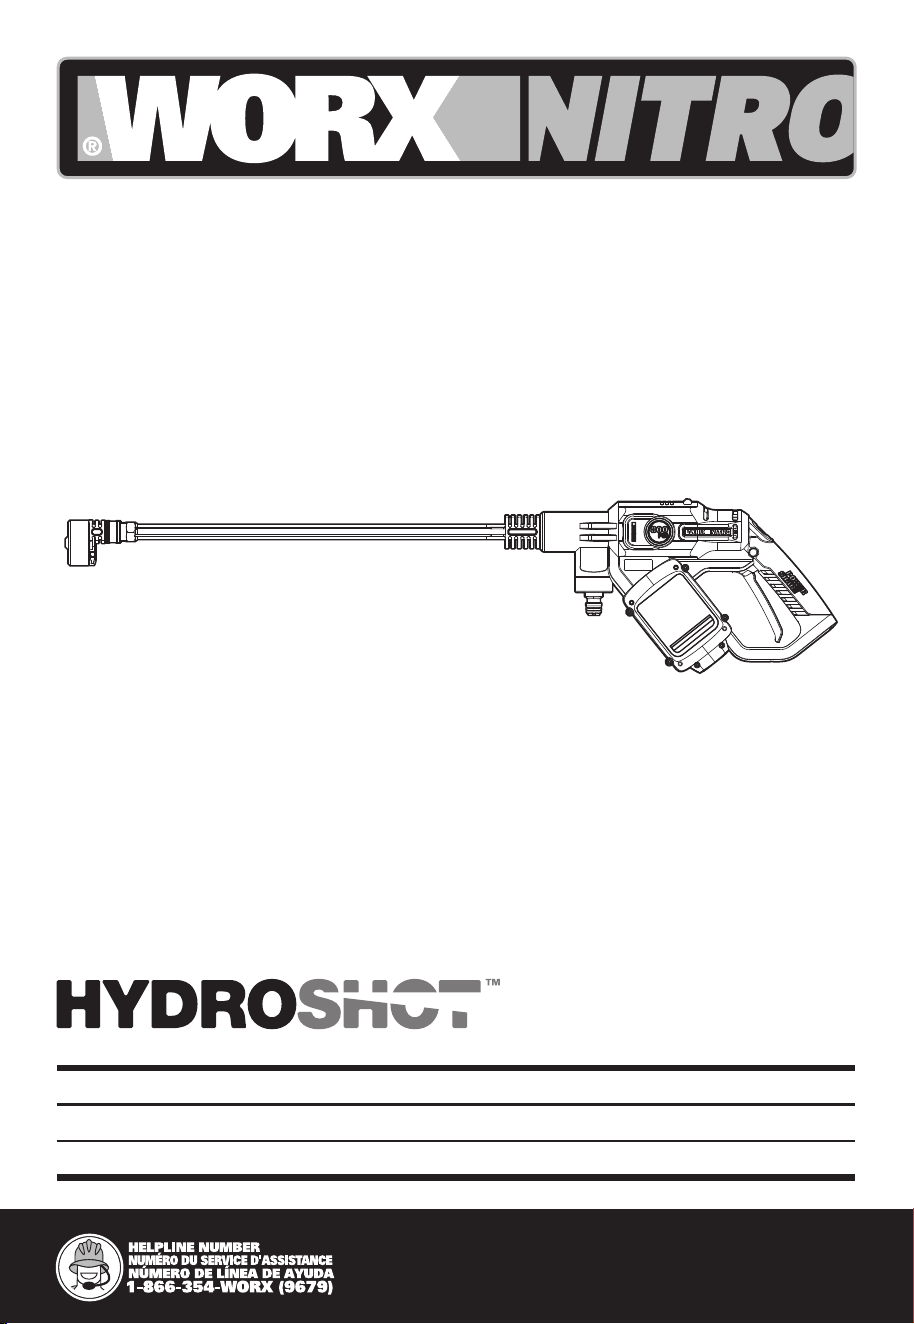
2. COMPONENT LIST
1.
HI/LO PRESSURE-SETTING BUTTON
2.
LOCK-OFF SWITCH
3.
ON/OFF TRIGGER
Cordless Portable Power Cleaner EN
11
4. BATTERY PACK *
5. HOSE QUICK-CONNECT ADAPTER
6.
PRESSURE CLEANING LANCE
7.
MULTI-SPRAY NOZZLE
8.
BATTERY POWER INDICATOR
9.
DRAW-HOSE QUICK-CONNECT ADAPTER
10.
DRAW-HOSE WATER FILTER
11.
FLOATER
12.
DRAW HOSE
13.
HOSE CLIP
14.
WATER FILTER (SEE FIG. R)
15.
QUICK CONNECT ADAPTER
16. SOAP BOTTLE*
17. BRUSH*
18. SQUEEGEE *
19. TURBO NOZZLE*
20. WATER BOTTLE ADAPTER*
* Not all the accessories illustrated or described
are included in standard delivery. Visit worx.com
to learn more about these available accessory
options.
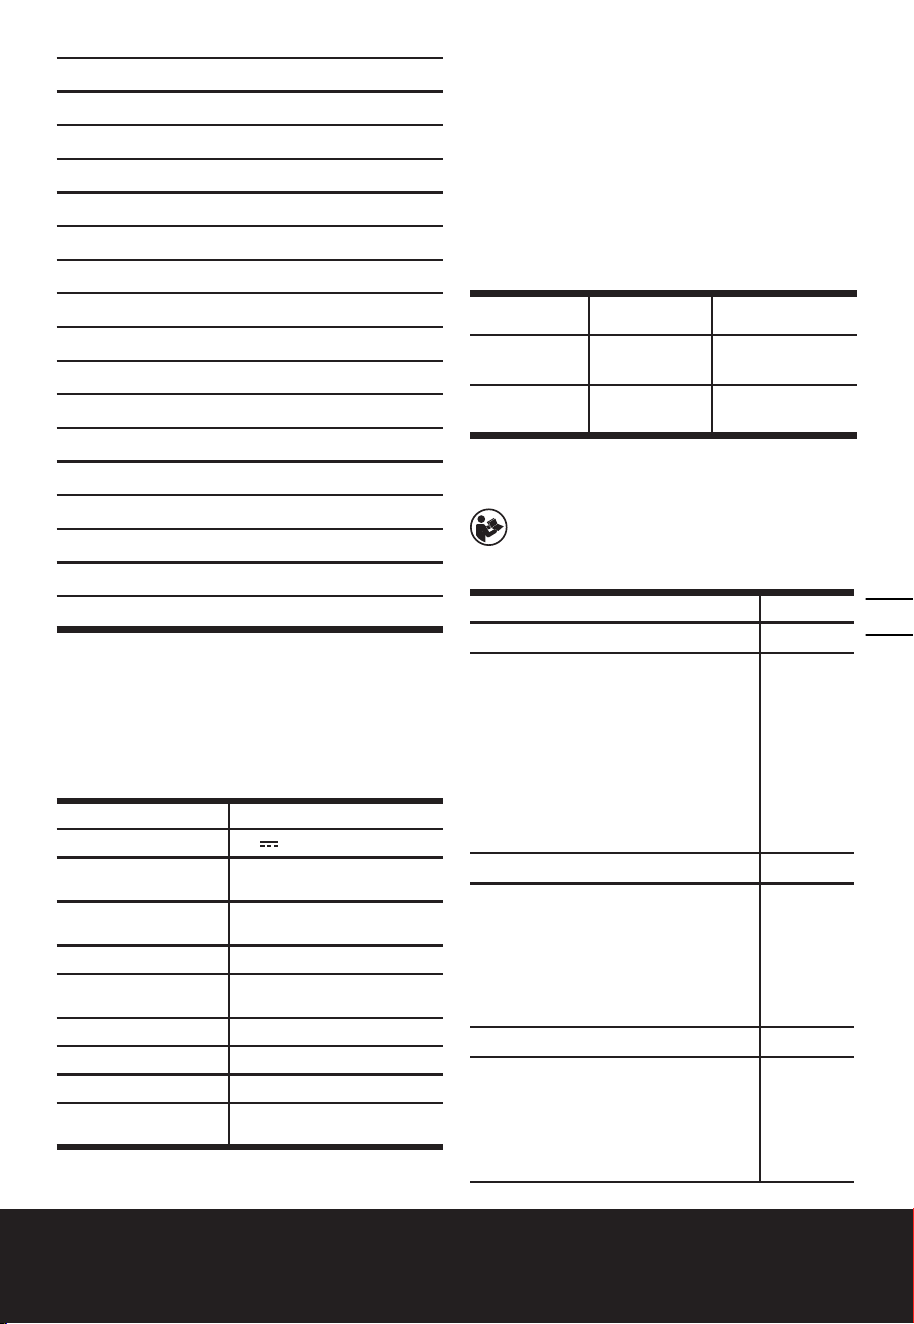
3.TECHNICAL DATA
WG647 WG647.X **
Voltage 40V Max. (2x20V Max.)***
High / Low (based on
garden hose connected)
Rated pressure
550psi(Allowable pressure
max 800psi)
Max. water ow rate 0.9gpm (1.0 MAX gpm)
Max. inlet water
pressure
87psi (0.6MPa)
Water suction height max. 5ft.
Water temperature max. 104
o
Fahrenheit
Battery type Lithium-ion
Machine Weight (bare
tool)
2.65lbs(1.2 kg)
** “The “X” noted at the end of the model number is
a placeholder that represents a variation to the origi-
nal model (kit contents or packaging change). “X”
may be replaced with any number from “1” to “999”
or English letter “A” to “Z” or “M1” to” M9”.”.
*** Voltage measured without workload. Initial bat-
tery voltage reaches maximum of 20 volts. Nominal
voltage is 18 volts
SUGGESTED BATTERIES
AND CHARGERS
Category Type Capacity
20V Battery WA3575 2.0 Ah
20V Charger WA3770 2.0A
4.
OPERATING INSTRUCTIONS
NOTE: Before using the tool, read the
instruction book carefully.
ASSEMBLY & OPERATION
ACTION FIGURE
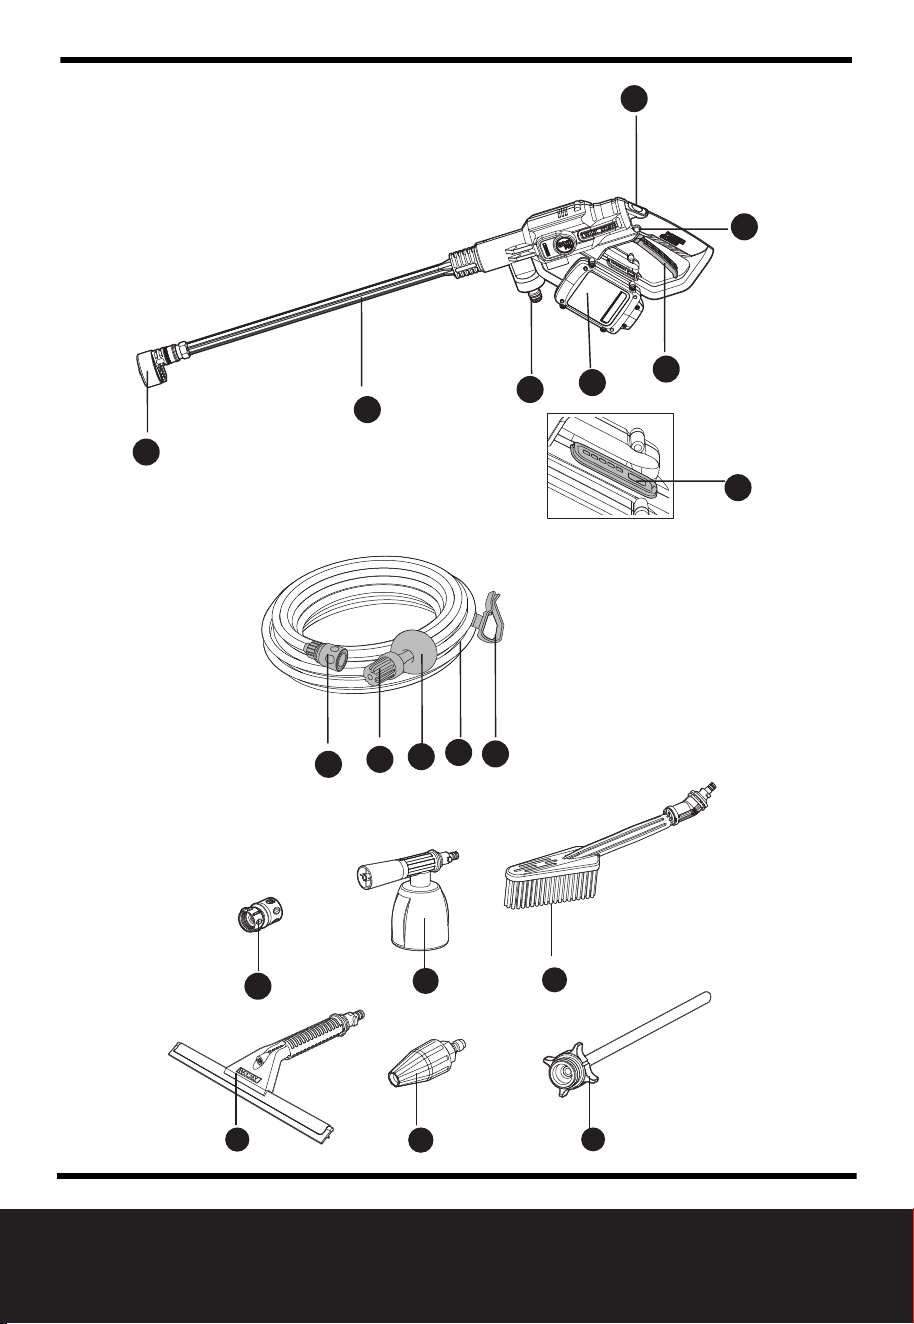
BEFORE OPERATION
Installing the battery pack
NOTE: This machine will only run
when 2 batteries are installed. It is
recommended to use the same two
batteries and charge the two batteries
at the same time.
Using two batteries with different amp
hour capacity, the machine will
only run to the lower common
denominator.
See Fig.
A1
Removing the battery pack See Fig. A2
Charging the battery pack
NOTE: The batteries are shipped
uncharged. Each battery must be fully
charged before the rst use.
Always fully charge the two batteries at
same time. More details can be found
in charger’s manual.
See Fig. A3
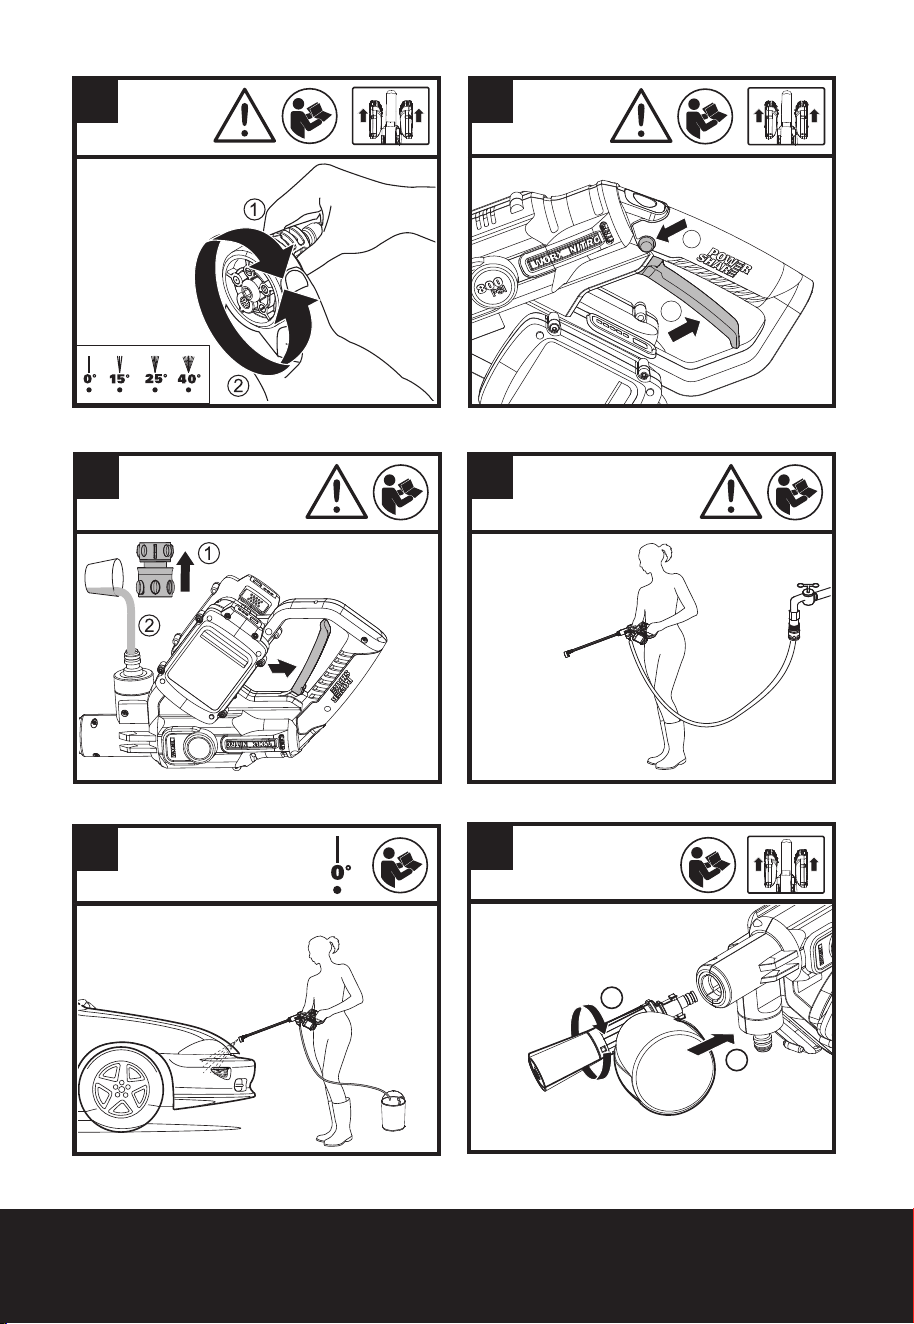
ASSEMBLY
Attaching pressure cleaning lance to
the Hydroshot.
NOTE: When attaching, align the
two projections on the lance with
the grooves on the front-end of the
Hydroshot in Fig. B.
See Fig. B
Cordless Portable Power Cleaner EN
12
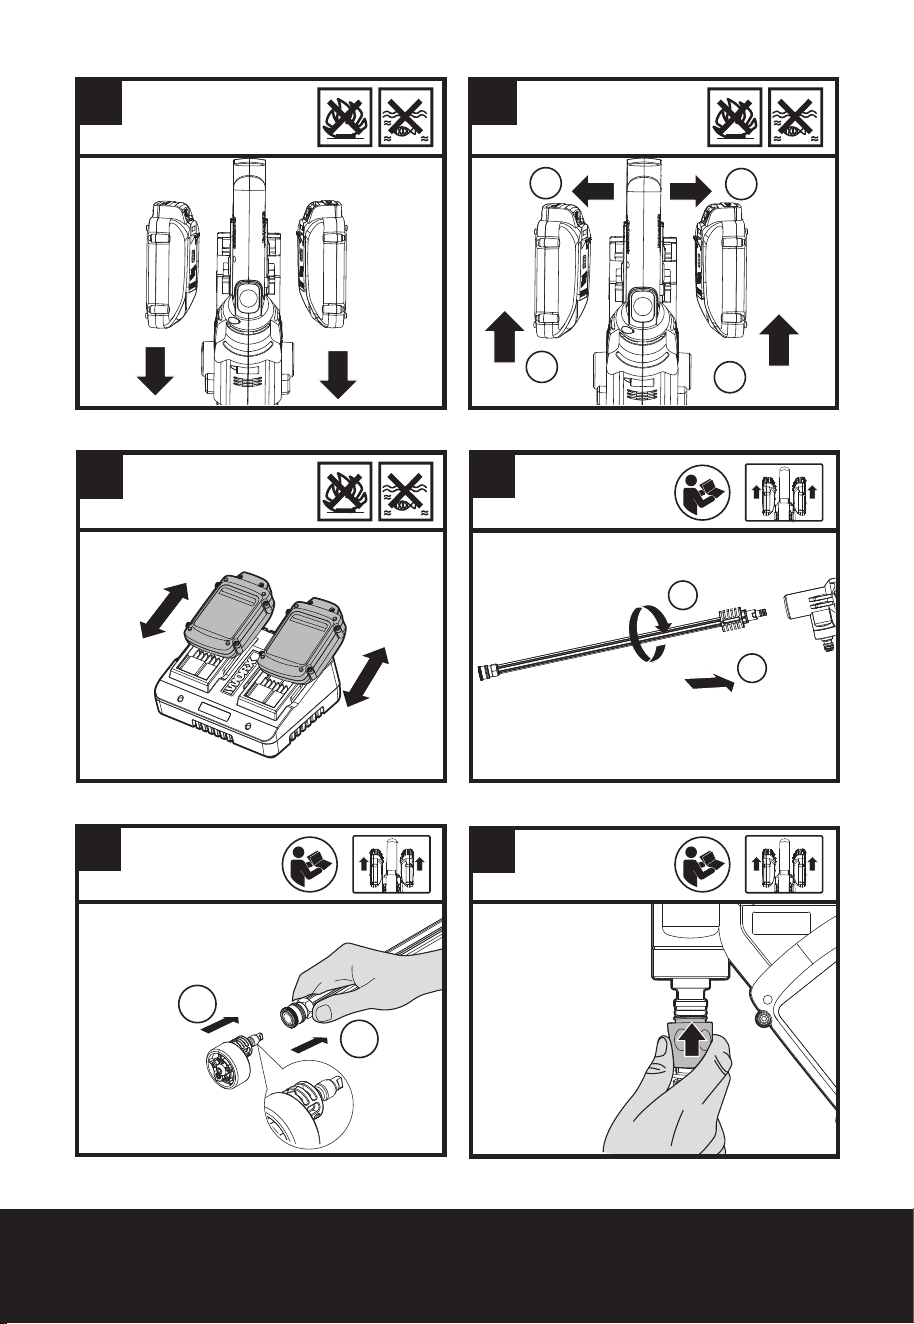
Attaching the multi-spray nozzle
NOTE: After attaching, try gently pulling
the nozzle to make sure it is locked into
position securely.
See Fig. C
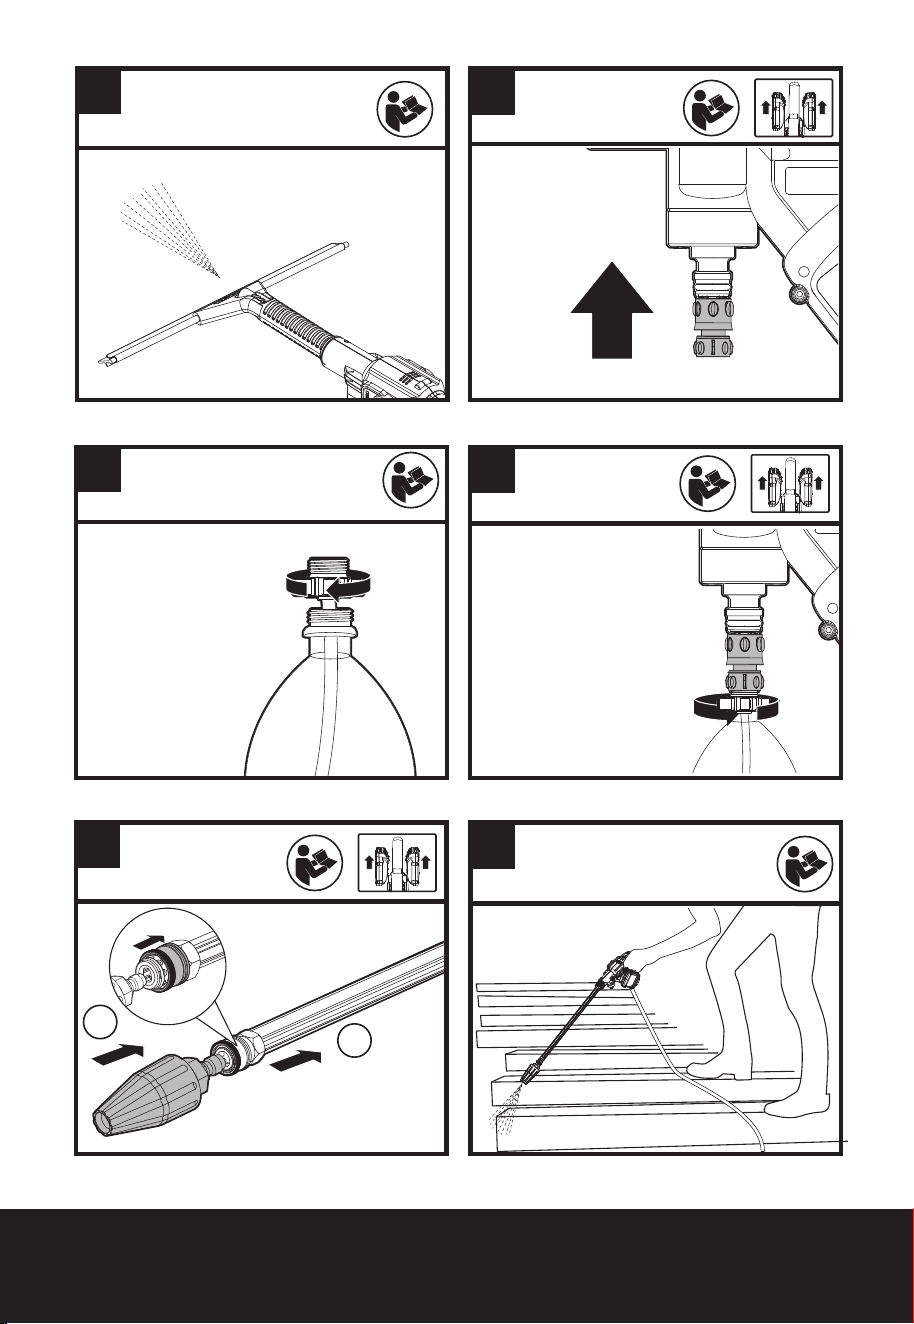
Attaching the draw hose to the
Hydroshot
NOTE: After the draw hose is attached,
check the connection by gently pulling
upon the draw hose to ensure it is
locked into position securely.
See Fig.
D1
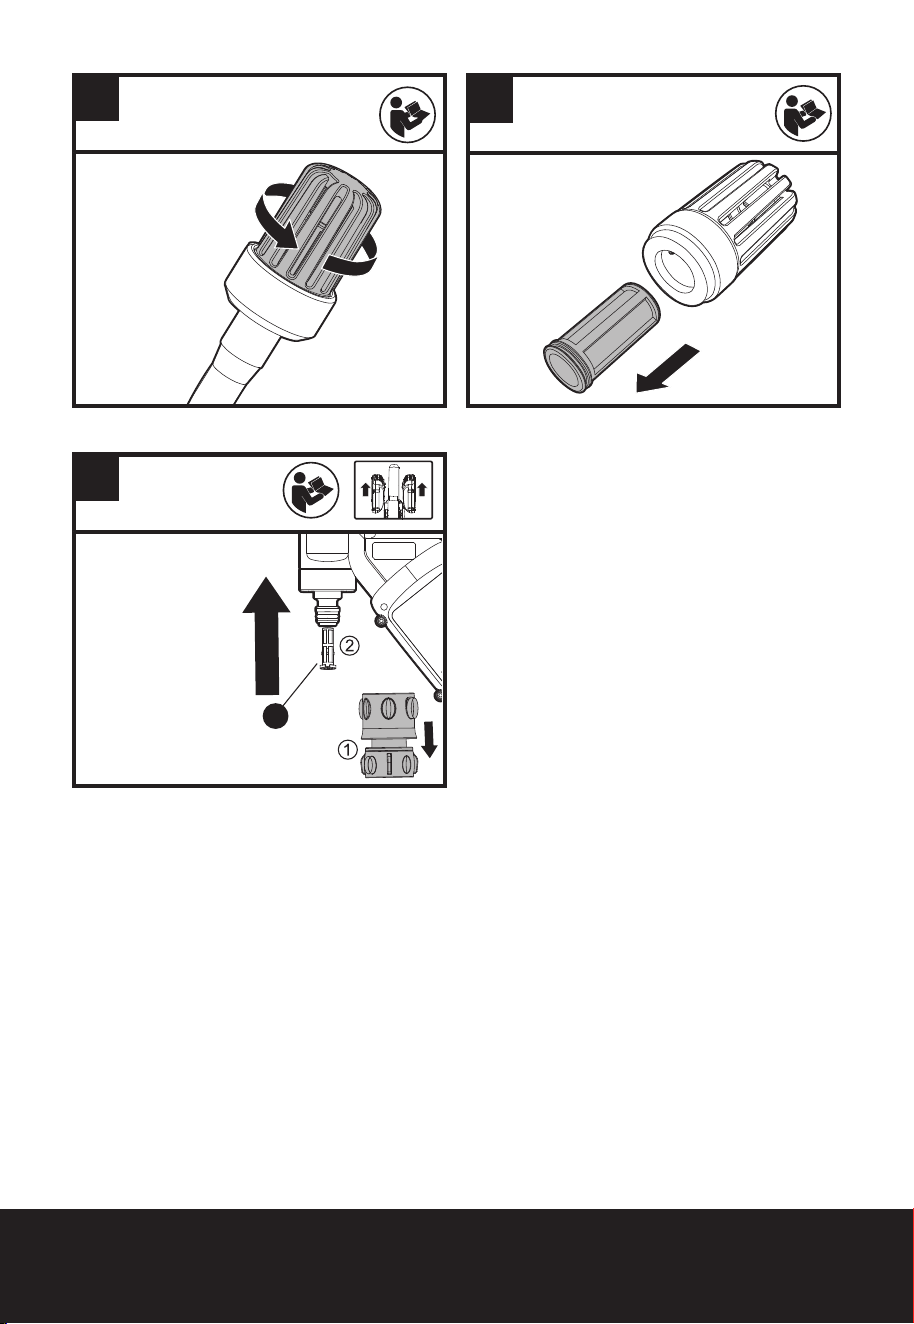
Detaching the draw hose
See Fig.
D2
Attaching your own water hose
(optional)
1. Attach the quick-connect adapter to
the garden hose.
2. Connect the hydroshot and garden
hose quick-connect adapters together.
3. To connect a garden hose without
any adapters, remove the quick-
connect adapter from the Hydroshot
and connect directly to the garden
hose (See Fig. R)
NOTE: Check whether the lter is
missing before retightening the hose
adapter. (Fig. R) When retightening the
hose adapter, please tighten securely.
Otherwise, it may not draw any water
for proper operation.
WARNING: It is not recommended
to connect the provided draw
hose to your garden hose or your home
spigot.
See Fig.
E1, E2
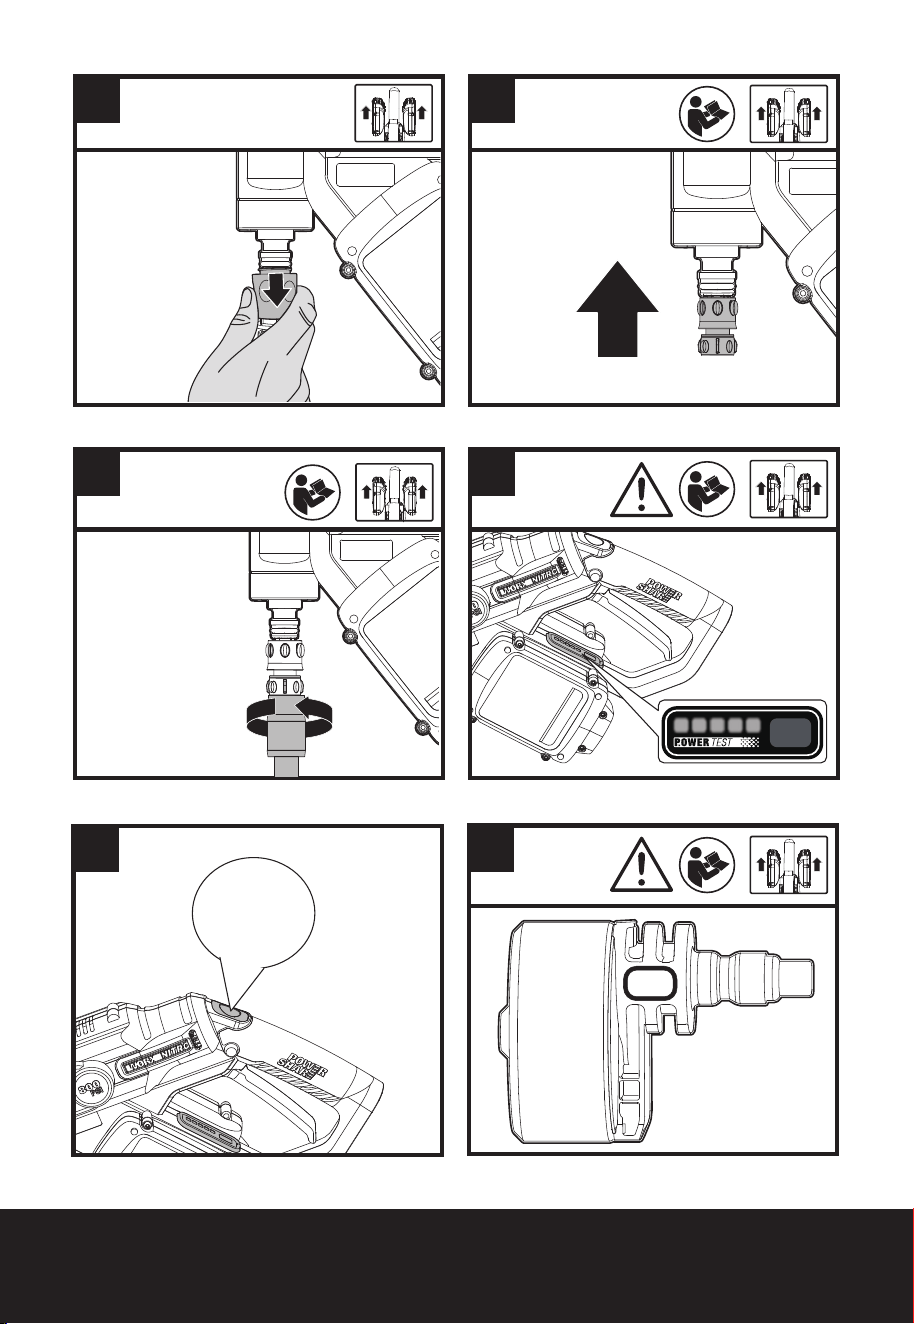
OPERATION
Battery power indicator on the machine
See details in BATTERY STATUS part
See Fig. F
Pressure setting
Your Hydroshot has two pressure modes,
High and Low, delivering different pressure
settings per mode.
See Fig. G
Selecting the nozzle pattern
NOTE: Choose a suitable nozzle pattern
according to your work. Spray
patterns 0
o
, 15
o
, 25
o
and 40
o
are
applicable for cleaning.
WARNING: Do not shift the nozzle
pattern when the tool is powered
on due to potential temporary water
leakage.
Make sure the nozzle pattern symbol
aligns with the indicator mark on tool,
otherwise the nozzle will leak and there
will be no sucient working pressure.
See Fig.
H1, H2
Start
NOTE: At the rst use or after long-
term storage, it is recommended to
use a garden hose to attach directly to
a water spigot or inject water into the
Hydroshot with the machine turned
on, so as to empty the air. Do not start
working until the water goes up along
the hose and sprays out.
NOTE: If air builds up within the hose
or pump, the water pressure will drop.
First, restart the machine, then air will
be released through the multi-spray
nozzle along with any excess water.
See Fig.
I1,I2,I3
Cleaning
WARNING: Do not connect the
machine to water supplies that
are dirty, rusty, muddy, or corrosive.
(Including window cleaning liquids,
plant foods, or fertilizers etc.)
NOTE: It is recommended to use the
high pressure mode for cleaning.
Not recommended for use with salt
water, immediately rinse with fresh
water for proper maintenance.
See Fig. J
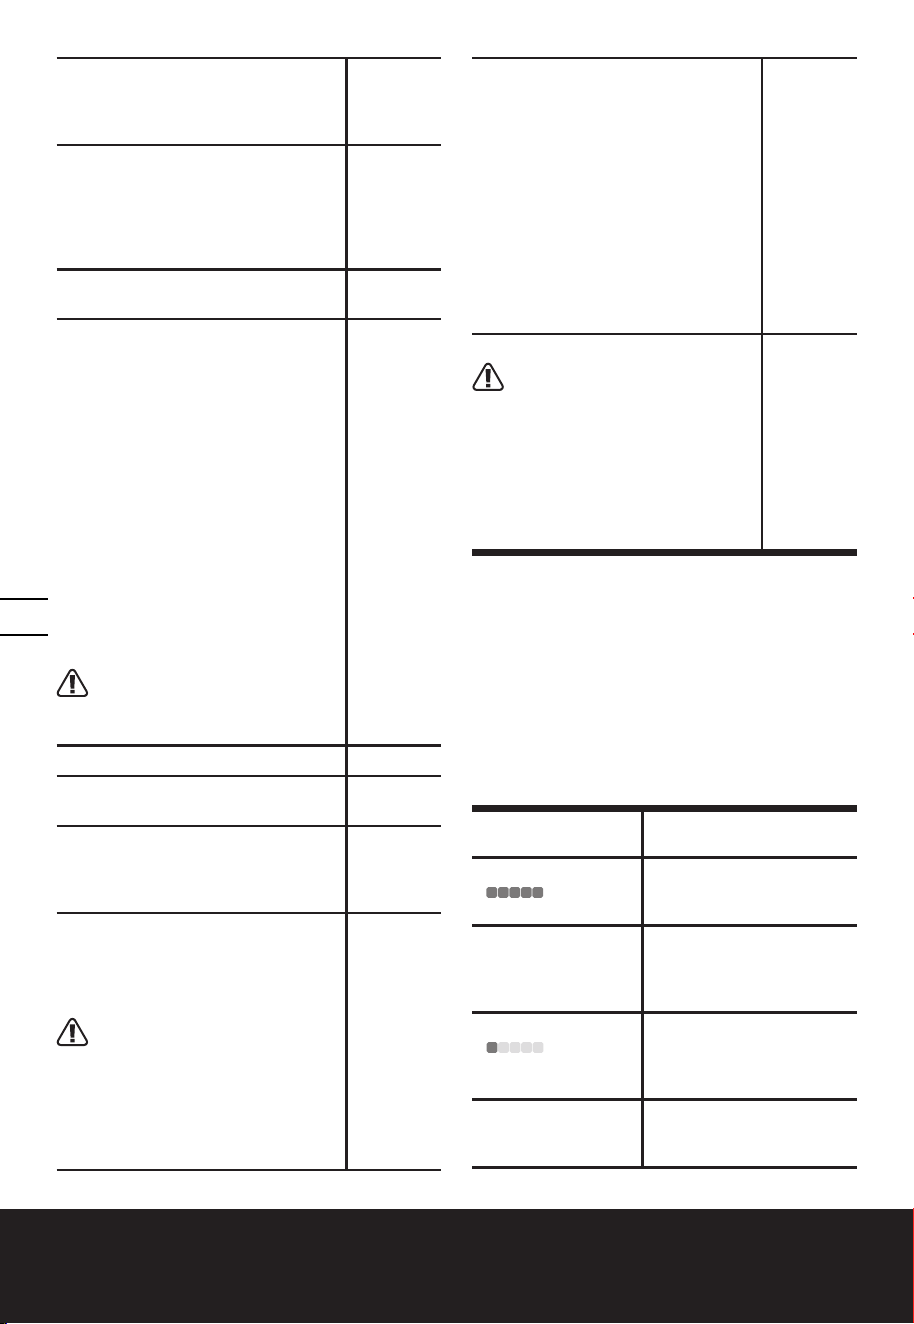
BATTERY STATUS (See Fig. F)
Before starting or after use, press the button beside
the power indicator light on the machine to check
the battery capacity. During operation, the battery
capacity will be indicated automatically by the
battery power indicator.
The indicator constantly senses and displays the
battery condition as follows.
For a machine with 2 battery packs with different
power levels, the power indicator light displays the
battery condition with the lower power level of the
two batteries.
Battery power
indicator status
Battery condition
Five green lights
( ) are
illuminated.
The two batteries are in a
highly charged condition.
Two, three or four
green lights are
illuminated.
The two batteries have
a remaining charge. The
more lights are illuminated,
the more battery capacity.
Only one green light
( ) is
illuminated.
The battery level of at least
one battery pack is very
low. Please check and
charge the battery pack.
No light is
illuminated.
At least one battery is not
fully installed or battery
may be defective.

Cordless Portable Power Cleaner EN
13
Only one light is
ashing twice per
cycle.
At least one battery is
over discharged (please
refer to the battery charge
condition), please recharge
the two batteries at once
before use again or storage.
Only one light is
ashing three times
per cycle.
At least one battery is hot,
wait for them cool down
before start again.
Only one light is
ashing four times
per cycle.
The machine is over load.
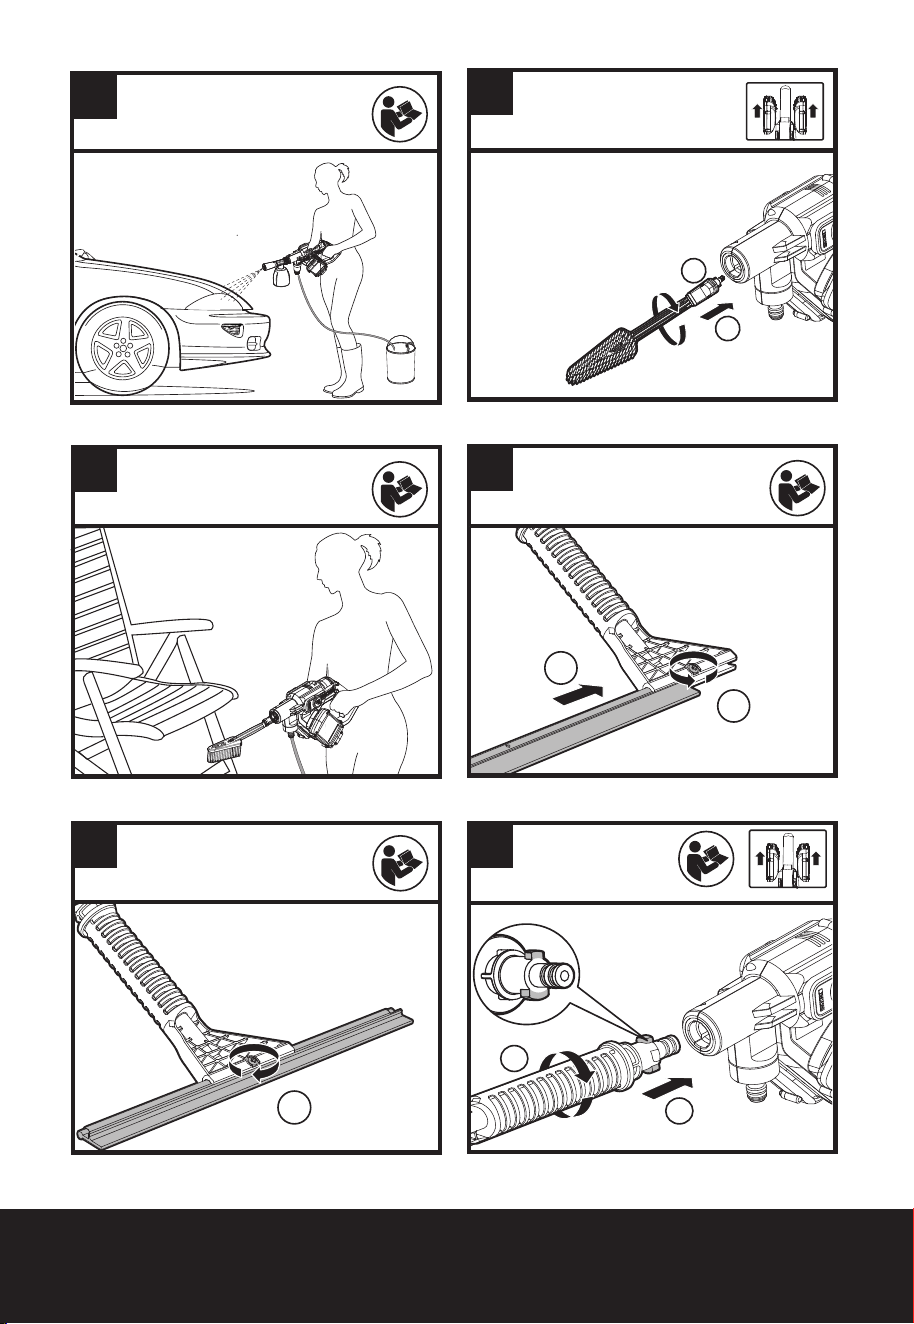
5. ATTACHMENT OF
ACCESSORIES
A number of accessories have been supplied with
this product and are required for use in different
applications. Do not attempt to use the cleaner with
no lance or accessories attached.
1. Soap bottle (WA4036, sold separately)
Soap bottle provides detergent suds for deeper
cleaning of dirt. It is used in conjunction with
Hydroshot or extension lance (WA4012). (See Fig.
K, L)
NOTE: Make sure the machine is connected to the
water source before using the soap bottle.
2. Brush (WA4048, sold separately)
Brush is for cleaning cars, boats, motorcycles etc. It
is used in conjunction with Hydroshot or extension
lance (WA4012). (See Fig. M1, M2)
3. Squeegee (WA4050, sold separately)
The window squeegees quick connection easily
snaps into the tool to spray water or wipe off
water from glass or tiled surfaces. Suitable for the
HYDROSHOT
TM
power cleaner or extension lance
(WA4012). (See Fig. N1-N4)
4. Water Bottle Adapter (WA4038, sold separately)
The bottle cap connector accessory allows the
tool to directly connect with most 2 Liter bottles
with approximately 1” openings. (NOTE: May not t
all consumable soda and water bottles) (See Fig.
O1-O3)
WARNING: Do not install the water bottle
adapter accessory until it is ready to be used.
The accessories vents will leak liquid, if a bottle is
installed, with the machine lying on a surface.
5. Turbo nozzle (WA4037, sold separately)
The turbo nozzle delivers 360° of rotating water,
which cleans a larger area than the 0° water
pattern during the same time period. Suitable
with the pressure cleaning lance installed on the
HYDROSHOT
TM
. Recommend to use it with high
pressure setting. (See Fig. P1, P2)
6. MAINTENANCE
Remove the battery pack from the tool before
carrying out any adjustment, servicing or
maintenance.
Inspect the product for damaged or worn parts
before each use. Do not operate it if you nd
damaged or worn parts. Contact your supplier or the
manufacturer for replacement parts.
Hose lter maintenance
Unscrew the hose lter from the hose and remove
the strainer. Rinse the parts with clean water before
reassembling. (See Fig. Q1, Q2)
Filter maintenance (See Fig. R)
Rinse it with clean water before reassembling.
NOTE: When retightening the hose adapter, please
tighten securely. Otherwise, it may not draw any
water for proper operation.
WARNING: Any other servicing should be
performed by an authorized service
representative.
7. CLEANING/STORAGE
Before storage, completely drain all the water from
the machine and hose.
Clean the moulded plastic housing of the machine
using a soft brush and clean cloth. Do not use water,
solvents or polishes. Store in a secure and dry place
out of the reach of children. Do not place other
objects on the product.
Store the machine and the accessories in a frost free
place.

Cordless Portable Power Cleaner EN
14
8. TROUBLESHOOTING
Symptom
Possible causes
Solution
Machine turns on but
it does not draw any
water or there is not
sucient pressure.
Hydroshot is being held too high
from the water source.
NOTE: The higher the Hydroshot is
held in the air, the harder the pump
needs to work to draw water (up)
against gravity.
Hold the Hydroshot lower to the ground (less
than 5’ off of the ground) to improve water ow.
Hose lter is blocked.
Take out the hose lter and rinse the parts with
clean water. (See Fig. Q1, Q2)
The users garden hose is not well
connected to the machine.
Check and reattach the garden hose tightly. (See
Fig. E2)
Hose Quick-Connect Adapter gets
loose.
Tighten the hose adapter securely with a wrench.
The lter is missing. (See Fig. R) Contact customer service to request a
replacement part.
The lter screen is blocked. (See
Fig. R)
Clean the lter screen regularly.
Pump, hose, or other parts
are frozen due to outside
temperatures.
Wait for the pump, hose or other parts to thaw.
Hose kinks. Straighten out the hose.
An excessive amount of air can be
in the hose and Hydroshot.
If air builds up within the hose or pump, the
water pressure will drop. 1) Hold the Hydroshot
lower to the ground (less than 5’ off of the
ground) to improve water ow.
2) “Pre-ll the draw-hose” completely with water
to ensure all air is removed.
3) Operate the hydroshot without the lance or
nozzle attached to allow a higher volume of
water to quickly and easily ow throw the unit.
Once all air pockets appear to be removed,
reinstall the lance and nozzle.
3) Connect directly to a water spigot with garden
hose to clear all air from the system. Refer to
gures I1, I2, I3.
Multi-spray nozzle
leaks.
The nozzle pattern does not spray
correctly.
Make sure the nozzle pattern symbol aligns with
the indicator mark on tool.
Air built up within the hose or
pump.
Continue to operate the machine for a few
moments until leakage stops. Refer to
comments from above to remove air pockets.
Outlet pressure
increases suddenly.
Multi-spray nozzle is blocked.
Clear any visible debris with a small object such
as a paper clip. Replace with a new multi-spray
nozzle.
Machine drains out
water after stopping.
There is water remaining in the
lance and pump after stopping.
Remove batteries and hoses. Press trigger and
rotate the Hydroshot in various directions to
allow all water to drain.
Soap accessory
cannot spray out any
detergent.
Blockage in the soap bottle. Clean it with fresh water.
The machine is not connected to
the water source.
Connect to the water source before turning on
the machine.

Cordless Portable Power Cleaner EN
15
Machine does not start.
The battery pack is not attached
well.
Reinstall the battery pack.
Battery pack charge has been
depleted.
Replace with a new battery pack or recharge the
battery pack.
Defective battery. Replace with a new battery pack.
Machine pressure is
not consistent.
Additional air could be sucked into
the machine.
Check connection between the hose adapter
and the draw hose.
It is at low pressure setting. No action need.
Machine stops
automatically.
Battery pack charge has been
depleted.
Replace with a new battery pack or recharge the
battery pack.
The multi-spray nozzle is blocked.
The current protection is activated.
Remove the multi-spray nozzle and turn on the
machine. If the machine works normally, replace
with a new multi-spray nozzle.
The end of the draw
hose will not stay
submerged.
There is air remaining in the
draw hose and/or the oat is not
adjusted properly.
Ensure all air is removed from draw hose.
Adjust oat location on draw hose to allow lter
to sit well below water’s surface, yet just above
water source’s bottom where lter may quickly
ll with debris.
Machine does not draw
any water after long
time storage.
Additional air could be sucked into
the machine.
1) Hold the Hydroshot lower to the ground (less
than 5’ off of the ground) to improve water ow.
2) “Pre-ll the draw-hose” completely with water
to ensure all air is removed.
3) Operate the hydroshot without the lance or
nozzle attached to allow a higher volume of
water to quickly and easily ow throw the unit.
Once all air pockets appear to be removed,
reinstall the lance and nozzle.
3) Connect directly to a water spigot with garden
hose to clear all air from the system. Refer to
gures I1, I2, I3.
