1
Quick Start Guide

2
Content
1. Introduction .................................................................................................. 3
1.1. Acknowledgements ............................................................................. 3
1.2. Precautions .........................................................................................3
1.3 Safety instructions ............................................................................... 4
1.4 Abbreviations/Terms .............................................................................4
2. Introduction to MID .......................................................................................5
2.1. MID accessories introduction ..............................................................5
2.2 MID use and preparation ..................................................................... 5
2.3. MID status and notification ..................................................................5
3. Quick Start ................................................................................................... 6
3.1. Power on and off .................................................................................6
3.2. Use skills .............................................................................................6
4. Basic settings ............................................................................................... 6
4.1. Wireless and network ..........................................................................6
4.2. Bluetooth .............................................................................................7
4.3. Display ................................................................................................ 8
4.4. Manage applications ........................................................................... 8
4.5. SD card and MID storage ................................................................... 9
4.6. About Tablet ...................................................................................... 10
4.7. Timer switch ...................................................................................... 10
4.8. Security Settings ............................................................................... 10
5. Internet .......................................................................................................12
5.1. Browser .............................................................................................12
6. Other applications ...................................................................................... 12
6.1. File Manager ..................................................................................... 12
6.2. Recorder ........................................................................................... 14
7. Installation of the program ..........................................................................15
7.1. Installation .........................................................................................15
7.2. Uninstall ............................................................................................ 15
7.3. Update path ...................................................................................... 15
8. Troubleshooting ..........................................................................................15
safety information ...........................................................................................16
User warranty card .........................................................................................18

3
1. Introduction
1.1. Acknowledgements
Thank you very much for choosing our products. The company mainly develops and produces
high-end tablet computers based on the Android 8.0 operating system or above, which can easily
expand third-party applications.
The product's built-in WIFI, BT, and other functions, easily realize wireless communication and
wireless network functions, surf the Internet anywhere; built-in multiple sensors provide a
brand-new control and entertainment experience; and built-in video and photography lead
electronic consumption into a new era of handheld Internet entertainment.
This manual systematically introduces the various functions, skills and precautions of the MID.
Please read this manual carefully before using MID.v
1.2. Precautions
Maintenance
Please keep the equipment dry. Do not expose the device, battery, or charger to water or vapor,
or operate the device or charger with wet hands. Otherwise, it may cause a short circuit of the
device, malfunction due to corrosion, and electric shock to personnel.
Do not subject the device, battery, and charger to strong shocks or vibrations, otherwise it may
cause the device, battery, and charger to malfunction.
Do not place the device, battery, and charger in areas with high or low temperature, otherwise it
may cause the device, battery, and charger to malfunction.
Do not hit, throw, or needle the MID, otherwise it may cause the MID to fall, squeeze, or bend.
Do not disassemble the equipment and accessories without authorization, otherwise the
equipment and accessories will not be covered by our company's warranty.
4
1.3 Safety instructions
Before using MID, please read the information on this hanger, and tell your child this information in
detail. For more detailed information, please refer to the safety instructions and precautions.
Do not use MID when driving a car, otherwise it may hinder safe driving.
In medical places, please abide by relevant rules or regulations. In areas close to medical
equipment, please turn off MID. Please turn off the MID or turn on the airplane mode when
boarding, otherwise the wireless signal may interfere with the airplane control signal.
Please turn off the MID near high-precision electronic equipment, otherwise it may cause the
electronic equipment to malfunction.
Do not disassemble the MID and accessories without authorization, only authorized
organizations can repair the MIDO
Please keep the MID away from magnetic equipment, the radiation of MID will erase the
information stored on the magnetic equipment.
Do not use MID in places with high temperature and flammable gas (such as near gas stations)
Please keep the MID and accessories out of the reach of children, and do not allow children to
use the MID without supervision.
When using this MID, please abide by relevant laws and regulations, and respect the privacy
and legal rights of others.
When using the USB data cable, please strictly follow the relevant instructions in this manual,
otherwise the MID or personal computer may be damaged.
Do not use this MID in a humid environment such as a bathroom, otherwise it may cause the
MID to be soaked or washed with liquid.
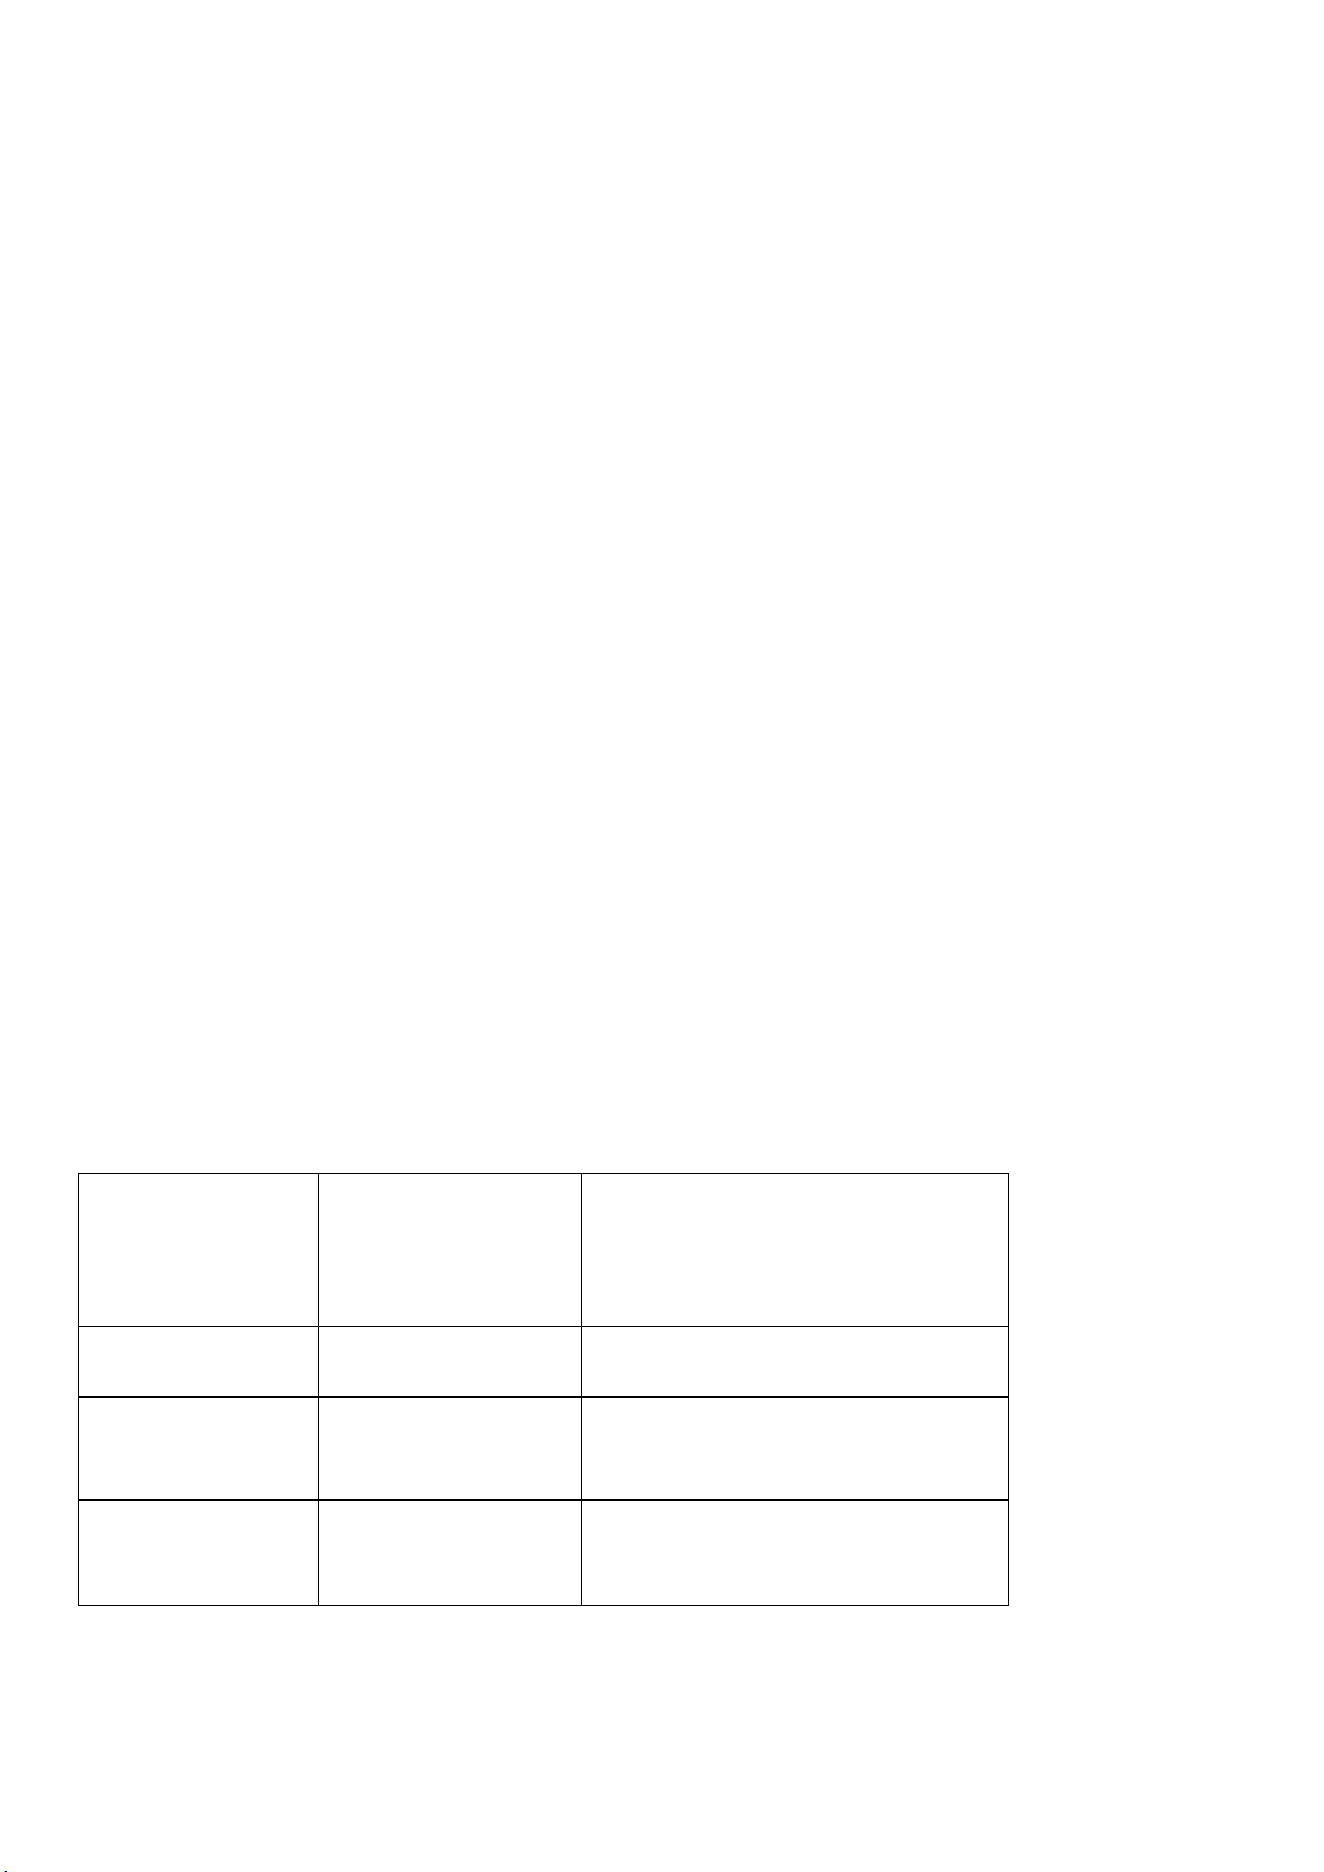
1.4 Abbreviations/Terms
Abbreviations/Term
s
Full Name
Description
MID
MobileIntemeiDevic
e
Mobile internet terminal
WIFI
WirelessFidelity
IEEE802.11b standard-bsed
wireless local area network
TF
TransFlash
Also known as MicroSD.
Ultra-small memory card
5
2. Introduction to MID
2.1. MID accessories introduction
Packing List
The MID box includes the following items:
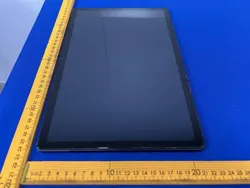
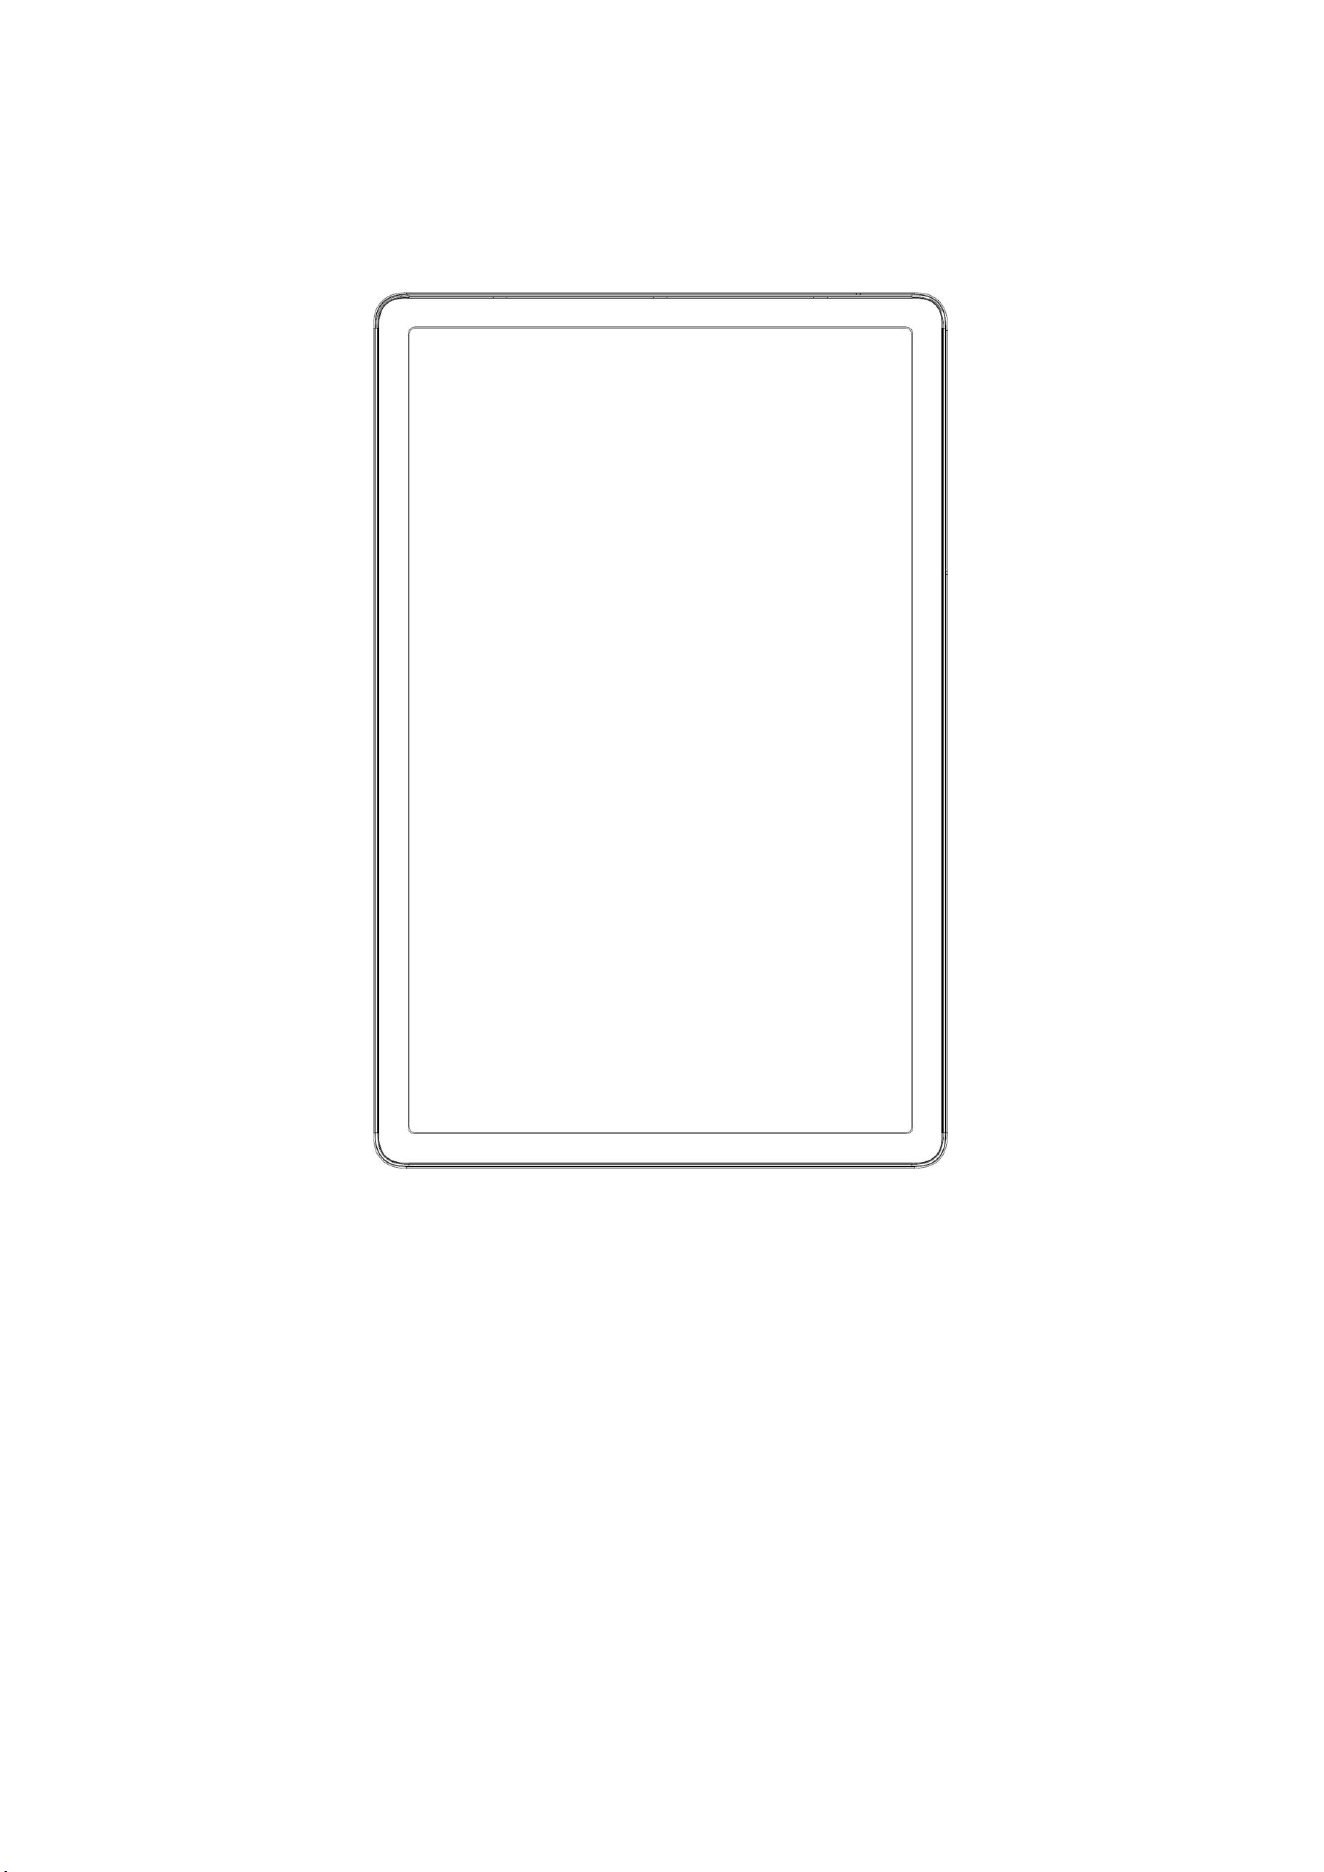
MID machine
USB cable
User manual
Three Guarantees Certificate
Product certification
2.2 MID use and preparation
Charging batteries
Before using the MID for the first time, charge the battery.
A. Use the power adapter to charge the MID.
2.3. MID status and notification
Notification icon
When a prompt appears on your notification panel, click on the column box and swipe on the
screen to open the notification list. Click the options you want to view to view the details. Then click
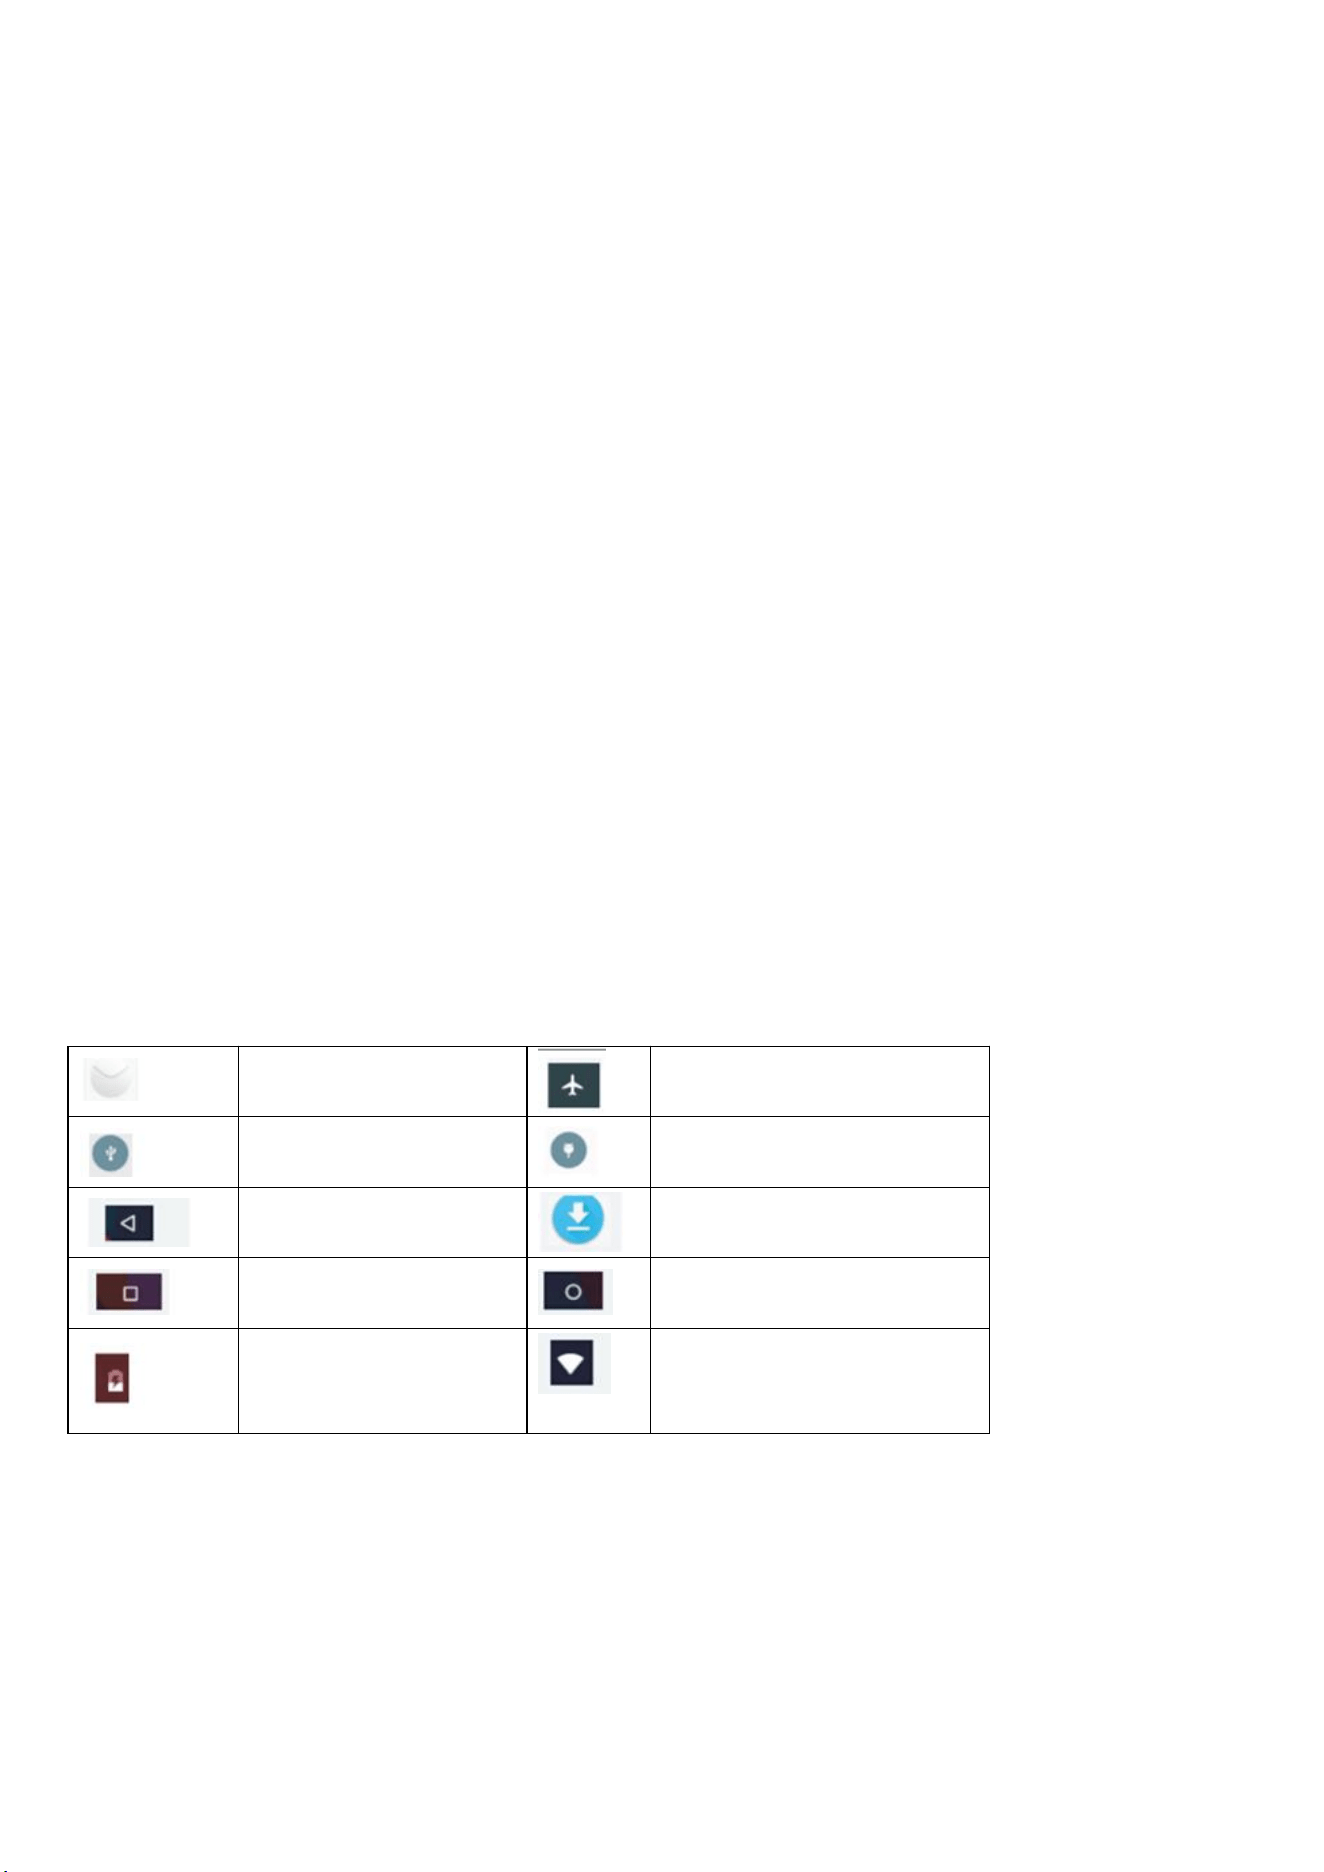
the information box to swipe up to close the information window. The following is an illustration of
the status bar icon:
New mail
Flight mode
USB connected
USB debugging
connected
return button
Downloading
Short press to view
usage history
Home button
Power supply
WIFI service is connected,
the network is available
Notification Panel
The notification will report the receipt of a new email, the opening of WIFI and the activities that are
in progress. You can open the notification panel to view the specific information.
Open the notification panel.
When a new notification icon appears in the notification bar, please click on the notification bar to
open the notification panel.
6
3. Quick Start
3.1. Power on and off
Power on
Long press the POWER button for 3 seconds to see the boot screen. After the system is turned on,
the screen is locked. Please unlock it.
Power off
A. Long press the power button to bring up the shutdown option.
B. Shutdown options include airplane mode, restart and shutdown, etc. Just click Shut down.
3.2. Use skills
Create application shortcut icons on the desktop
In the application or widget interface, long press any icon to automatically switch to the desktop,
drag and hold the icon to place it anywhere on the desktop.
4. Basic settings
4.1. Wireless and network
Establish WIFI connection
A. Select the setup application in the main menu interface
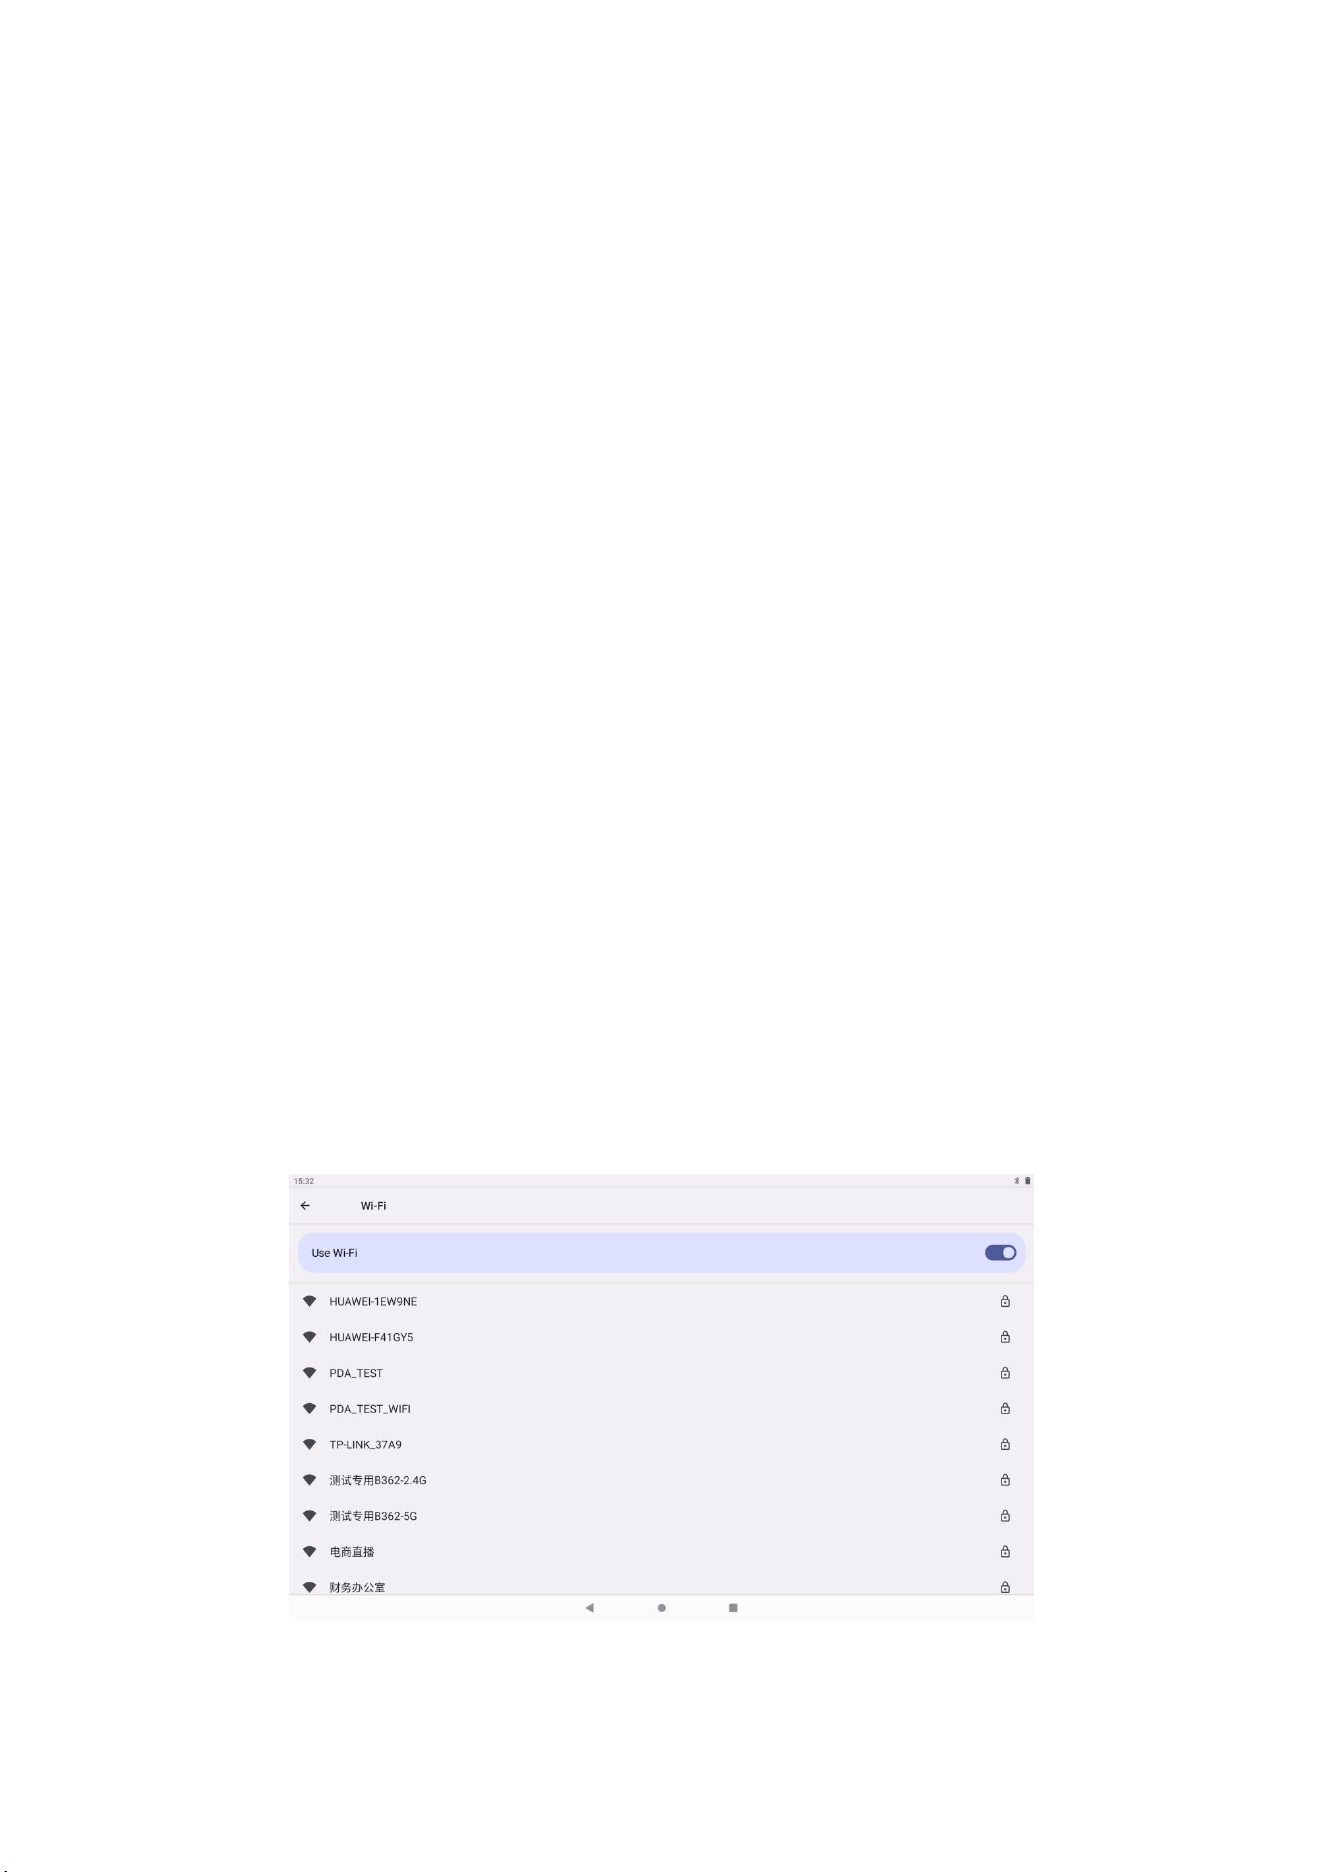
B. Click WLAN, turn on WIFI, MID will automatically scan for available Wi-Fi wireless networks. As
shown in Fig. 4.1.1
C. Select the target Wi-Fi network. If there is encryption, a password input window will pop up, enter
the corresponding password, and click to link.
Fig. 4.1.1
7
4.2. Bluetooth
Bluetooth function application
A. Select the setup application in the main menu interface
B. Click Bluetooth, turn on Bluetooth
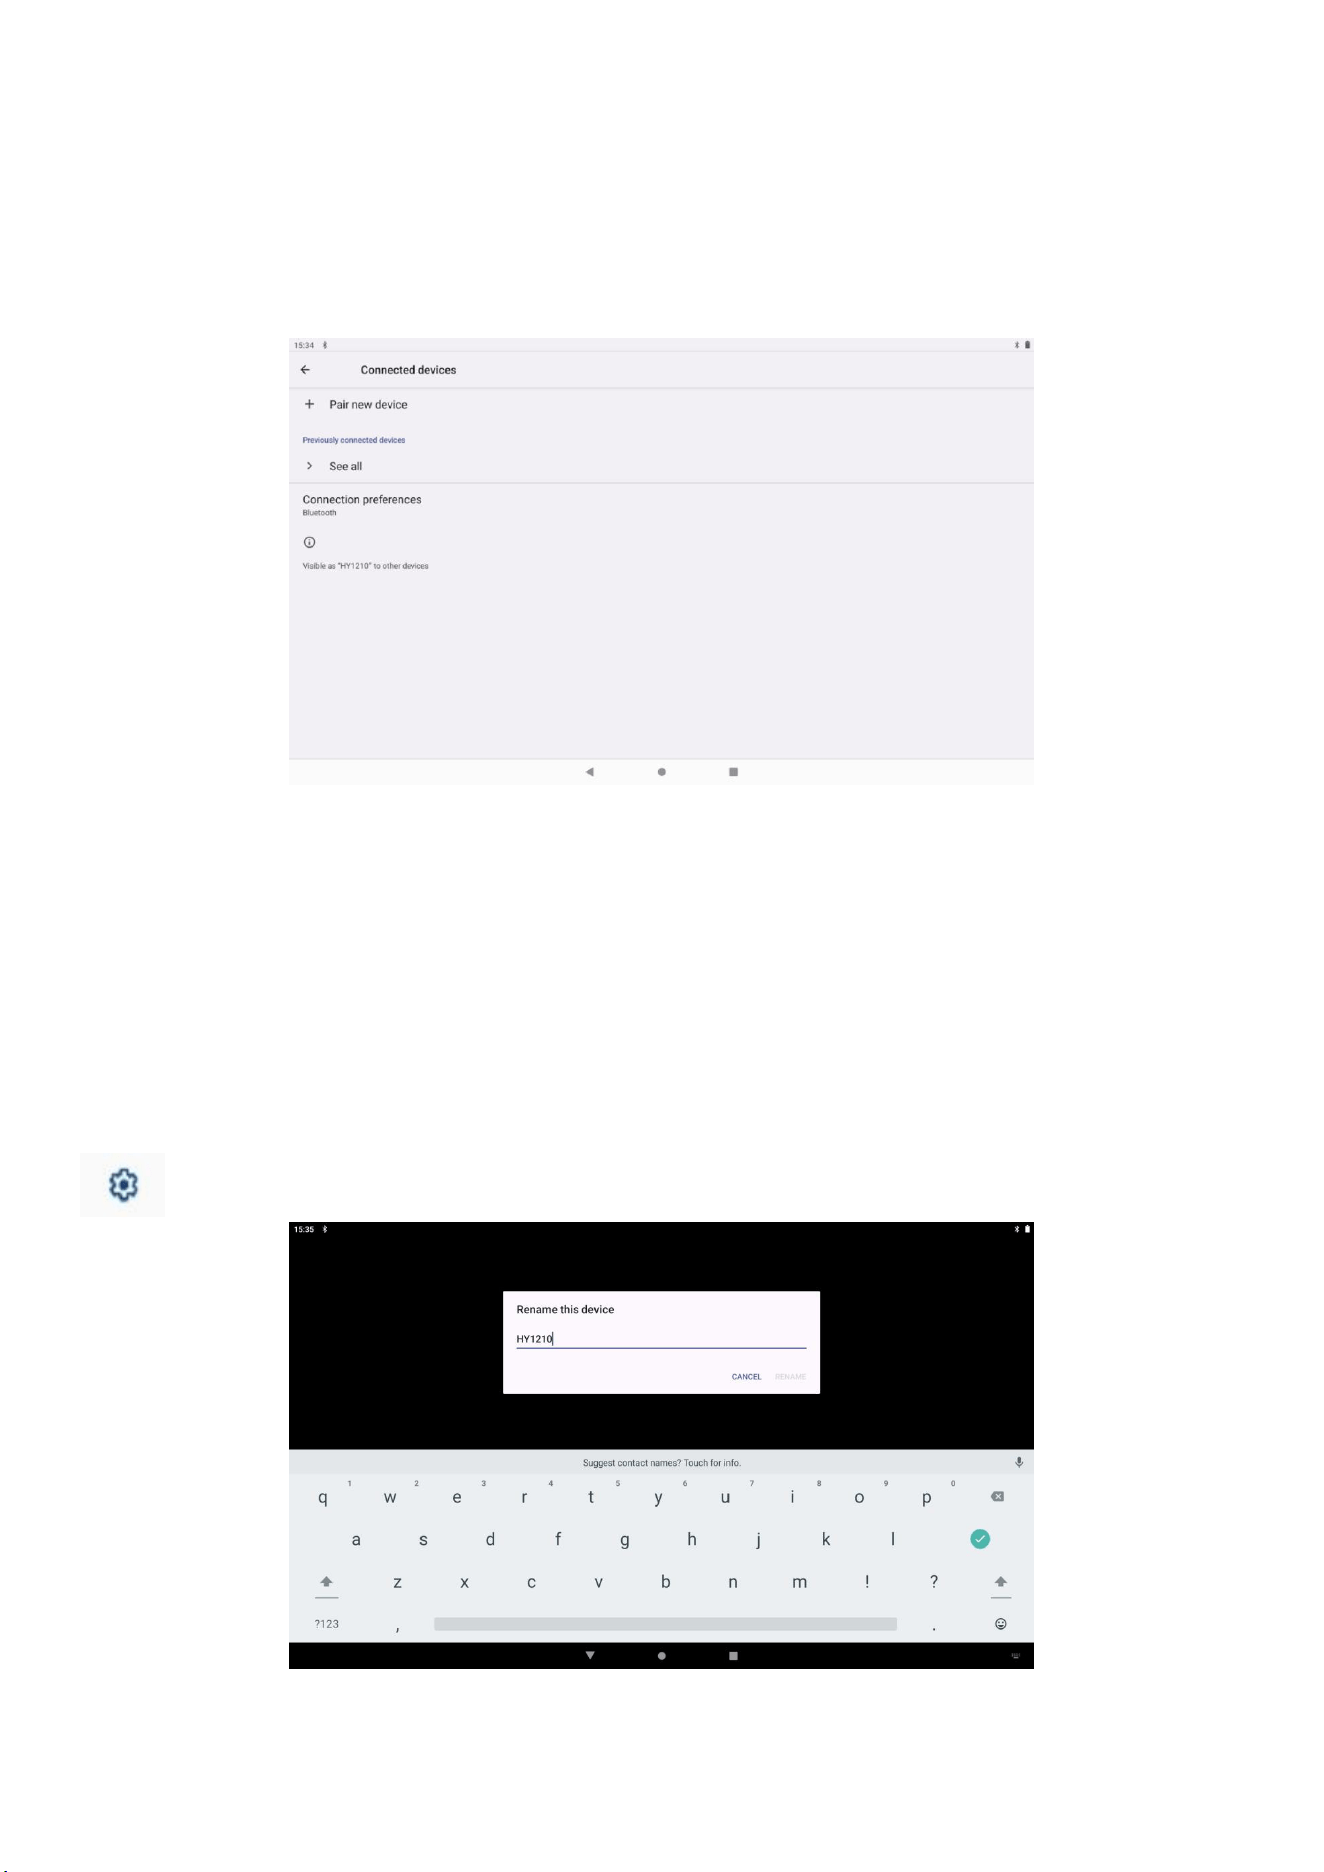
C. When someone nearby turns on Bluetooth, tap the search device in the upper right corner, and
MID will automatically search for nearby Bluetooth devices. As shown in Fig. 4.2
Fig. 4.2
D. Click the searched Bluetooth device to automatically pop up the pairing request window, enter
the corresponding password, and the pairing can be successful as long as the other party performs
the corresponding matching.
E. After the pairing is successful, find the number of the machine you want to operate in the paired
devices, click the icon to enter the interface, as shown in Figure 4.3, and perform
corresponding operations on it.
Fig. 4.3
8
4.3. Display
Adjust screen brightness
A. Click to set up the application
B. Tap display, tap brightness.
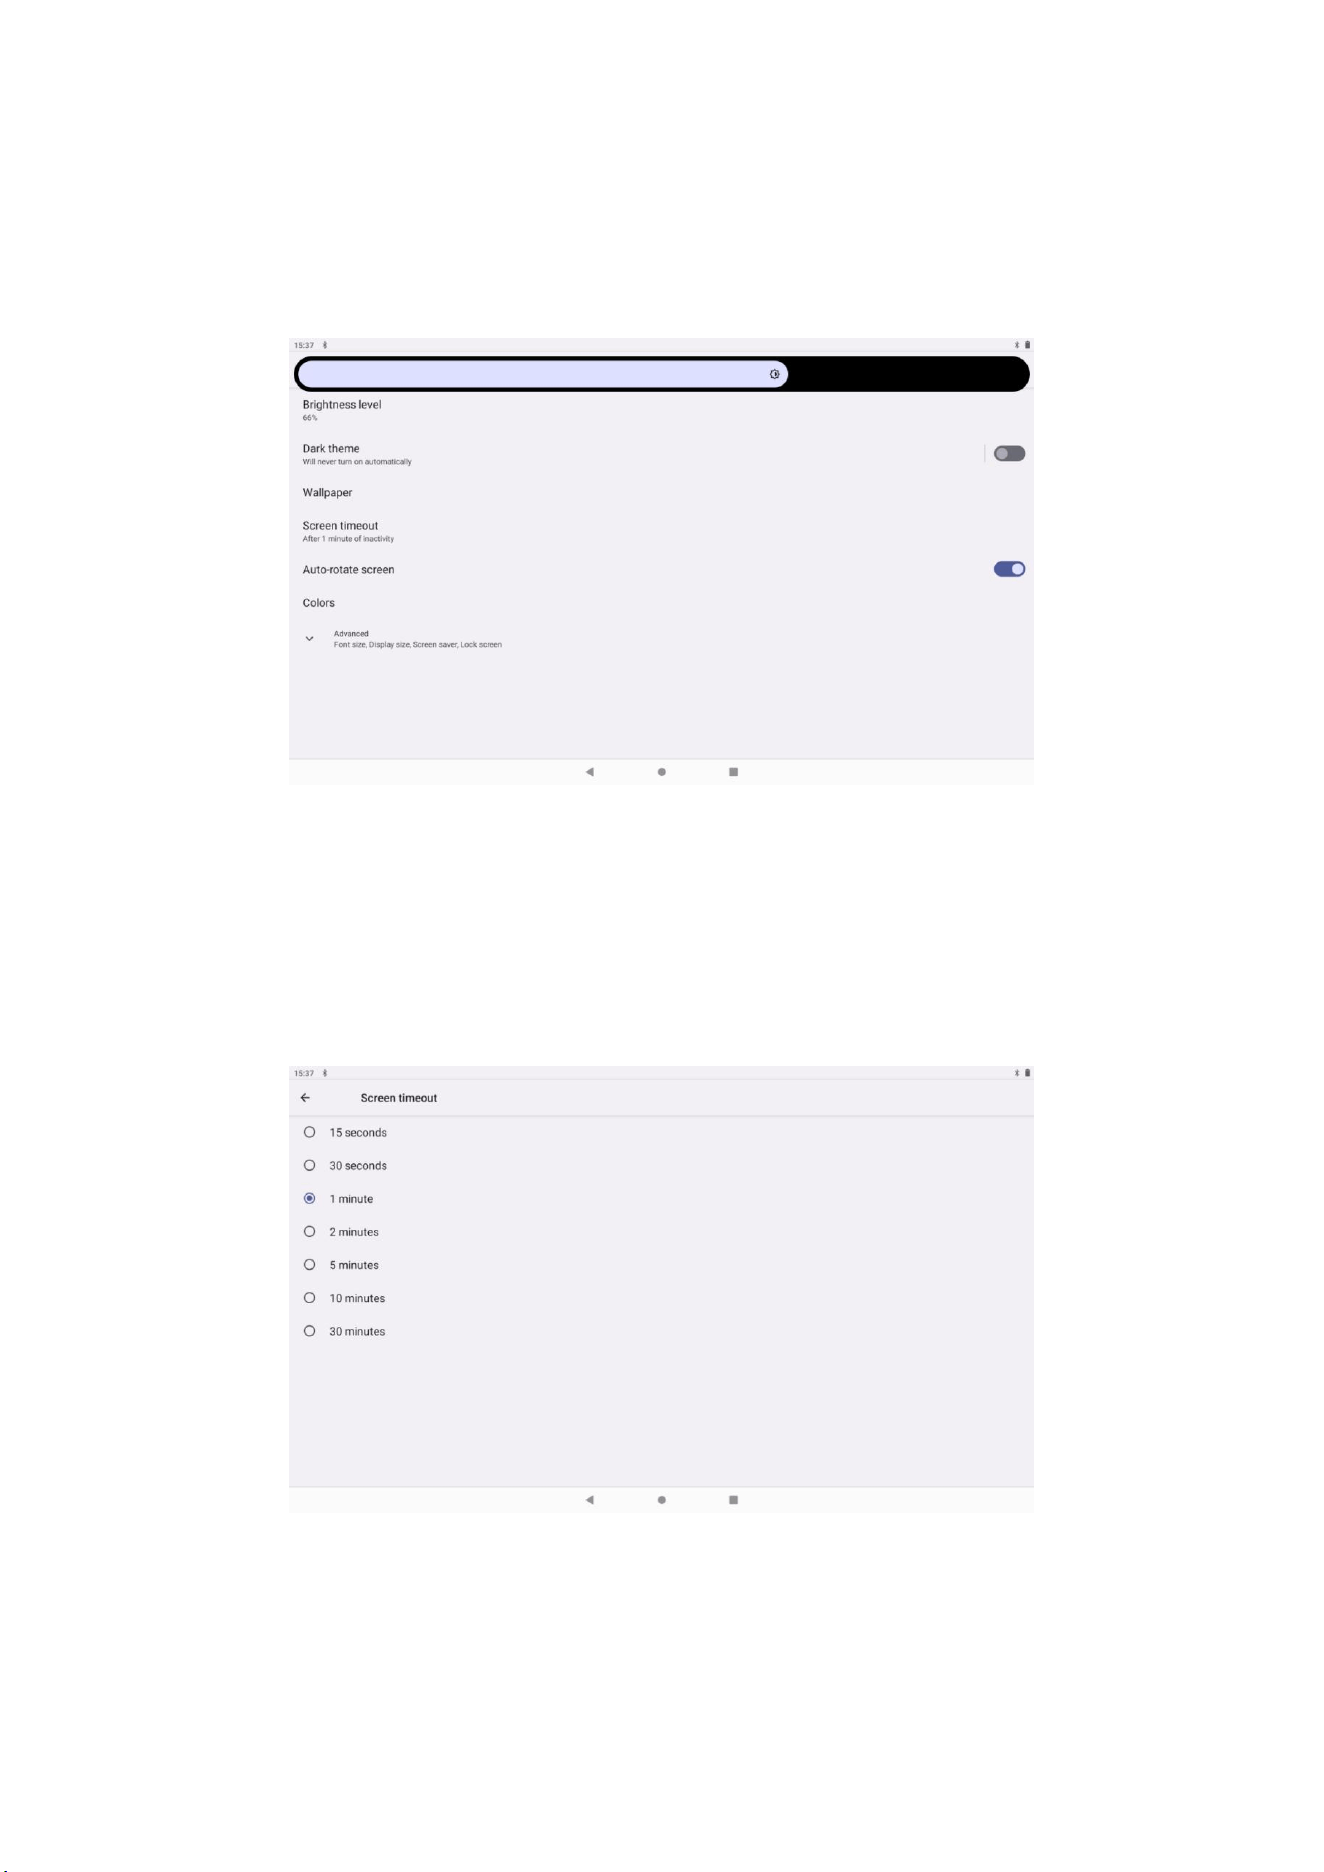
C. Pop up the brightness setting panel, drag the brightness slider left and right to adjust the
brightness level. As shown in Fig. 4.4.
Fig. 4.4
D. After adjusting the brightness, click OK to adjust the screen standby time.
a. Click to set the application.
b. Click to display.
c. Click "Screen Delay".
d. Pop up the screen to set the standby time, select the desired standby time. As shown in Fig. 4.5.
Fig. 4.5
4.4. Manage applications
A. Select the setup program in the application list
B. Select the application item, and then enter to manage and delete the installed application (Fig.
9
4.6)
Fig. 4.6
4.5. SD card and MID storage
Check SD card and MID storage available space
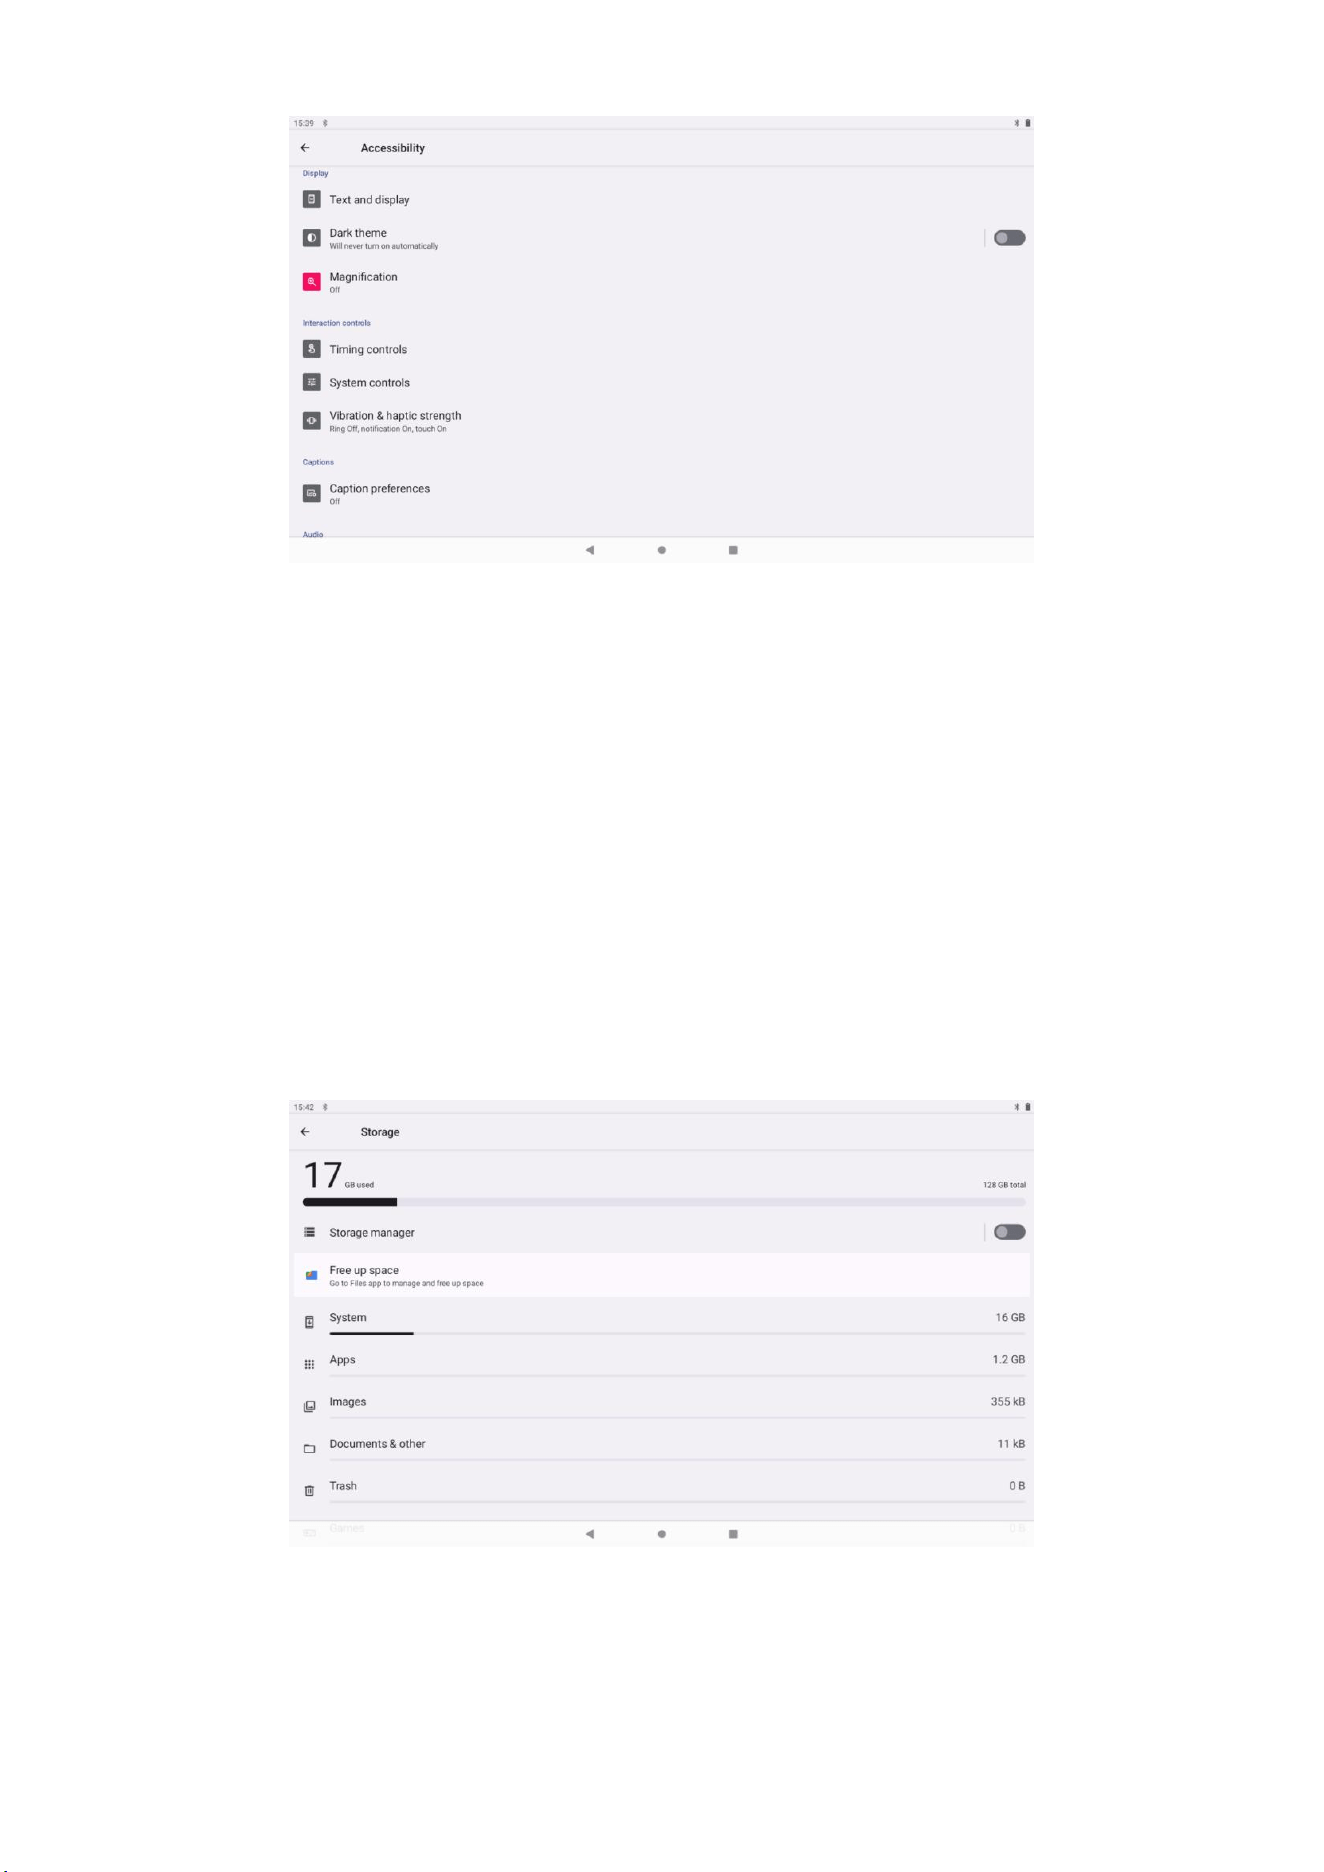
A. Enter the settings application.
B. Click to save
C. Check the available space of the SD card.
D. Check the internal storage space of the MID. Safely remove SD card
Safely remove SD card
A. Click to set the application.
B. Click Save.
C. Click to uninstall the SD card.
D. At this time, the SD card can be safely removed.
Fig. 4.7
Note: Safely removing the SD card can effectively protect the SD card and increase the lifespan of
the SD card.
10
4.6. About Tablet
View MID status
A. Enter the settings application.
B. Click on the tablet computer to view the status message, model, version number and other
information.
System update
A. Enter the settings application.
B. Click on the tablet.
C. Click system upgrade and follow the steps to upgrade (please confirm that the TF card with the
new version is in the device before installation)
View system version
A. Enter the settings application.
B. Click on the tablet computer.
C. Check the model, power usage and internal version, etc.
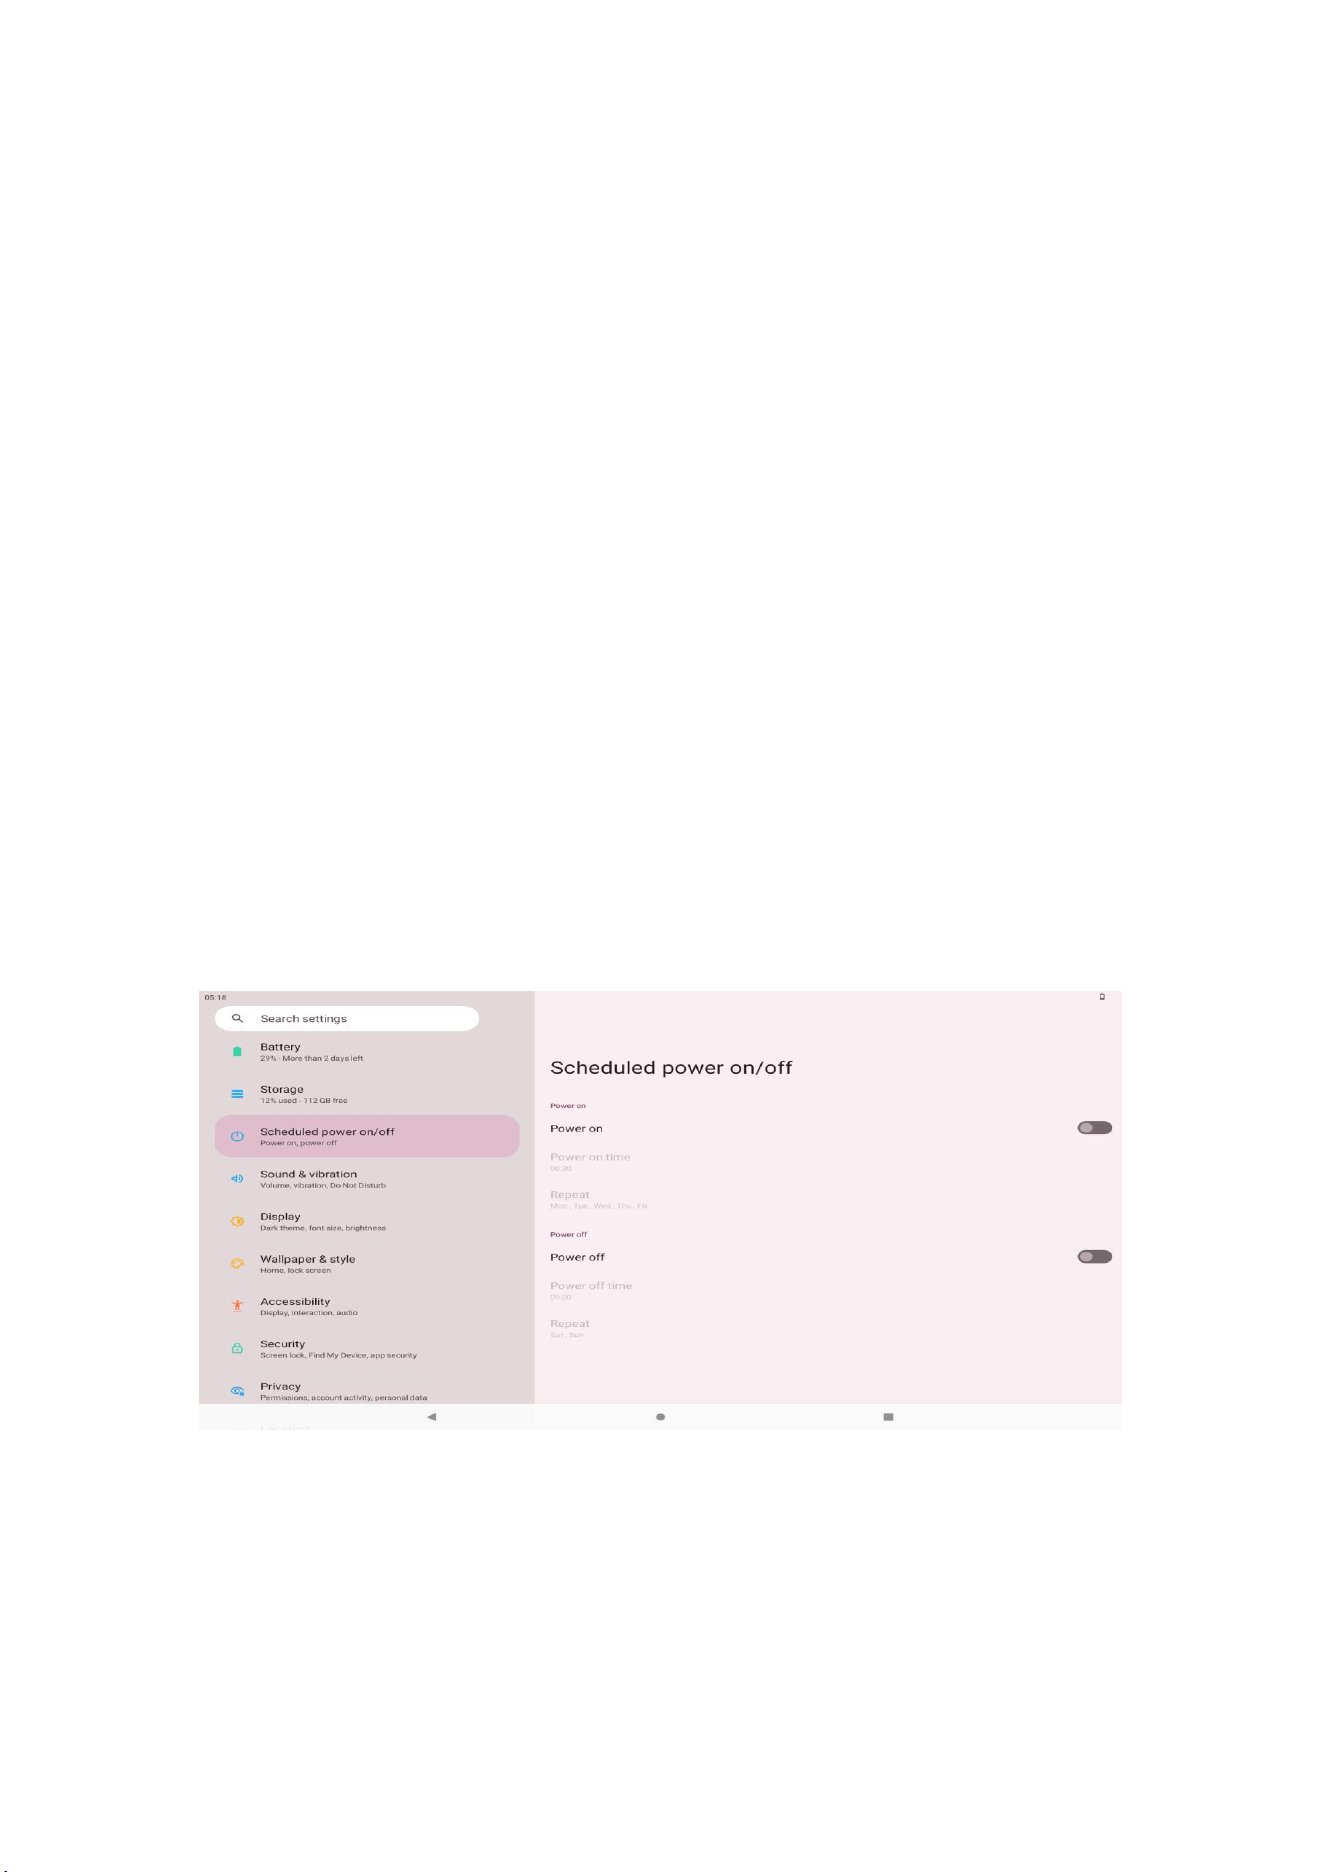
4.7. Timer switch
A. Enter the settings application
B. Click the power on/off option when selected
C. The operation is shown in Fig. 4.8
Fig. 4.8
4.8. Security Settings
Set up screen lock
Use unlock pattern or password to lock the touch screen to protect MID privacy
Note: After setting the screen lock, it is required to enter the unlock code every time you turn on
or unlock the touch screen.
11
Set unlock pattern
A. On the homepage interface, click the settings application.
B. Click Security.
C. Tap the screen lock.
D. Select the pattern in the pop-up text setting area
E. Follow the prompts to choose the next step.
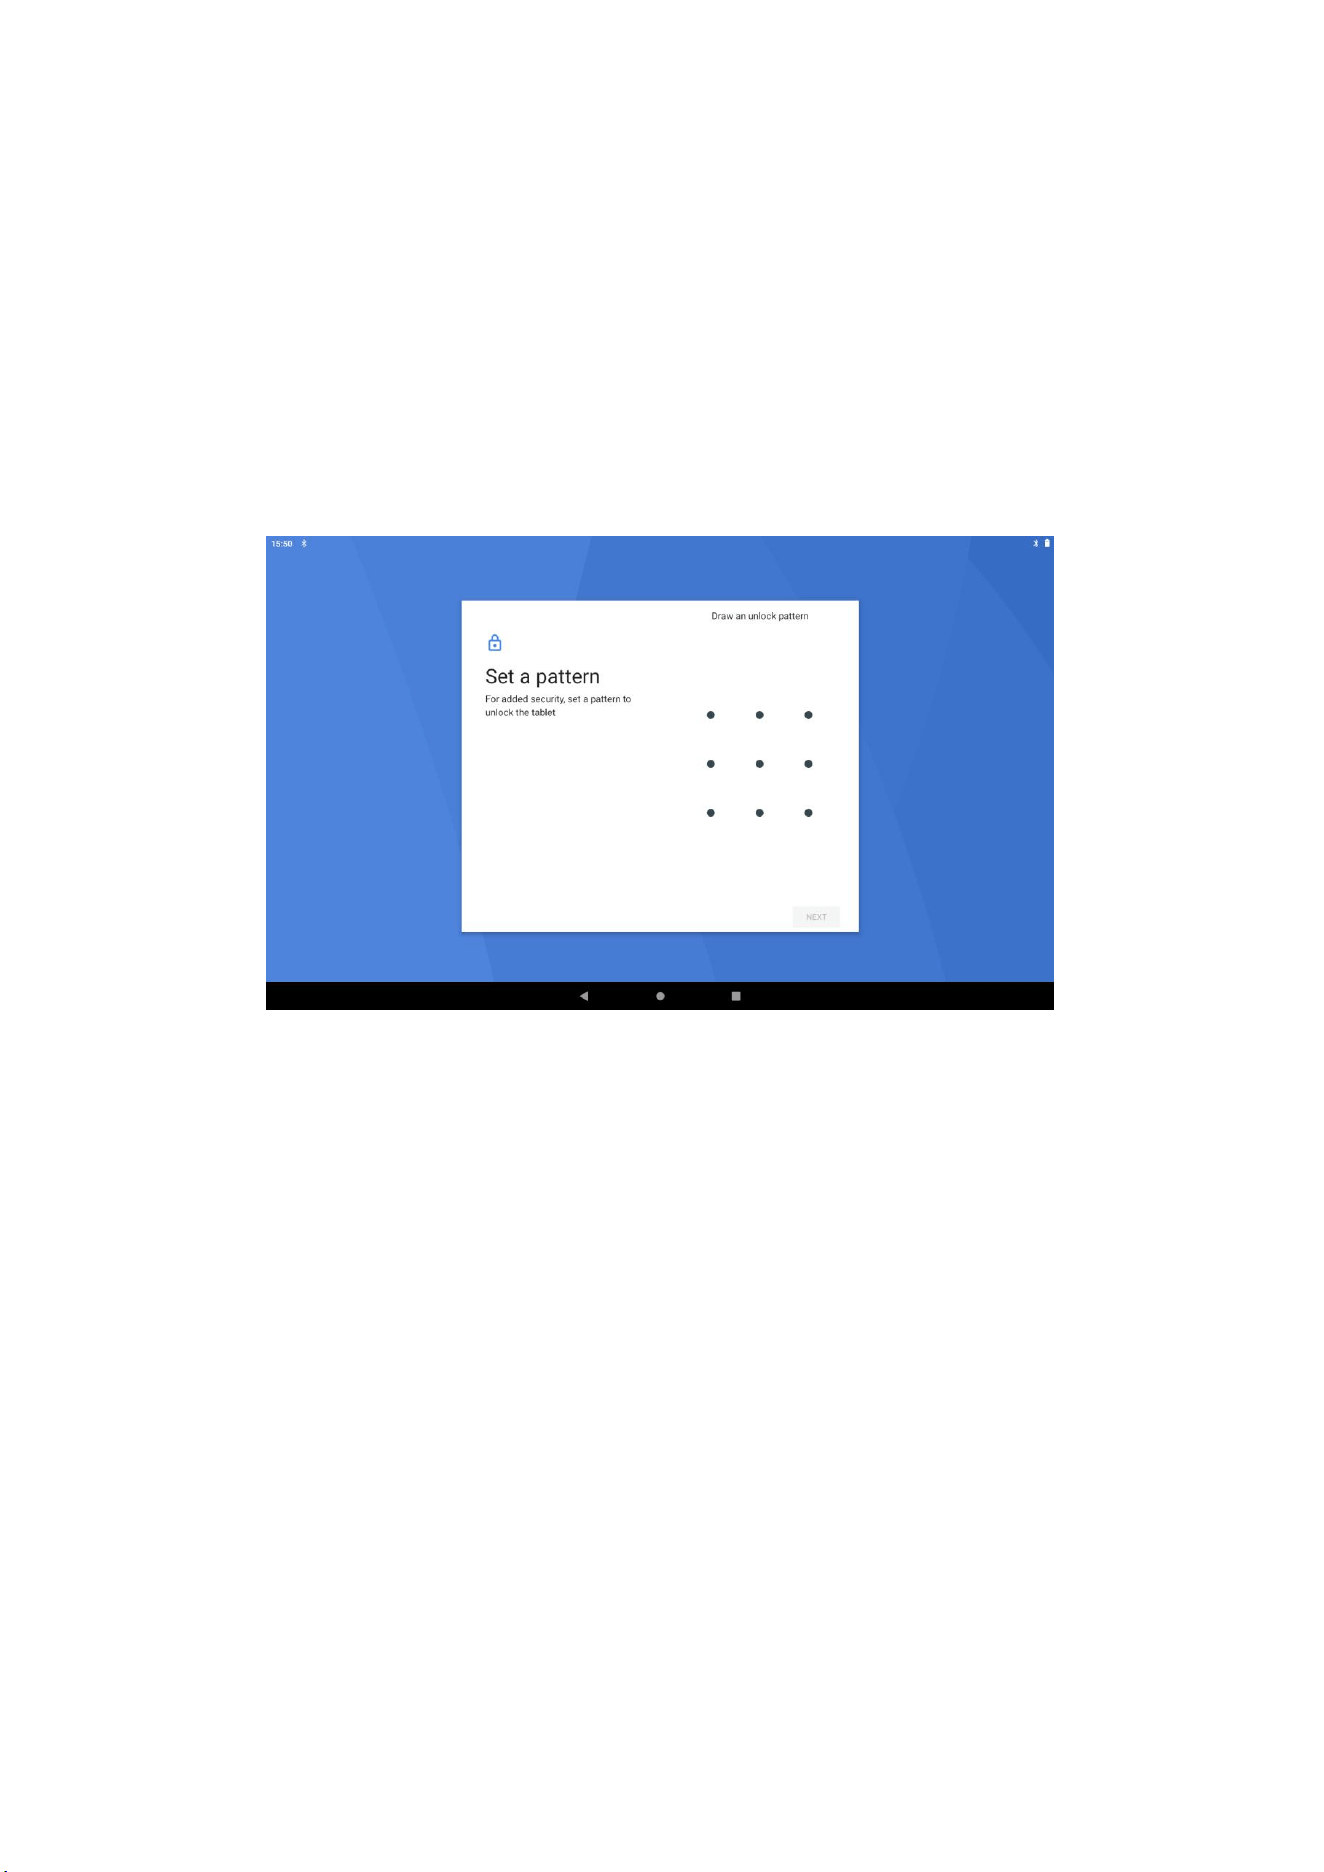
F. The unlock pattern panel pops up, the pattern has 9 contacts. Connect at least 4 points vertically,
horizontally or diagonally. As shown in Figure 4.10. When finished, take your finger off the screen
and the system will record the pattern you set.
G. Click to continue.
H. Draw the screen unlock pattern again when the prompt appears, click OK.
Fig. 4.10
Set unlock PIN code
A. Click the settings application on the main interface.
B. Click Security.
C. Tap the screen lock.
D. Select PIN in the pop-up text setting area.
E. Enter the new PIN code (number) and select Continue.
F. Enter the new PIN code again and select OK.
Set unlock password
A. Click the settings application on the main interface.
B. Click Security.
C. Tap the screen lock.
D. Select the password in the pop-up text setting area.
E. Set a new password (alphanumeric) and choose Continue.
12
5. Internet
5.1. Browser
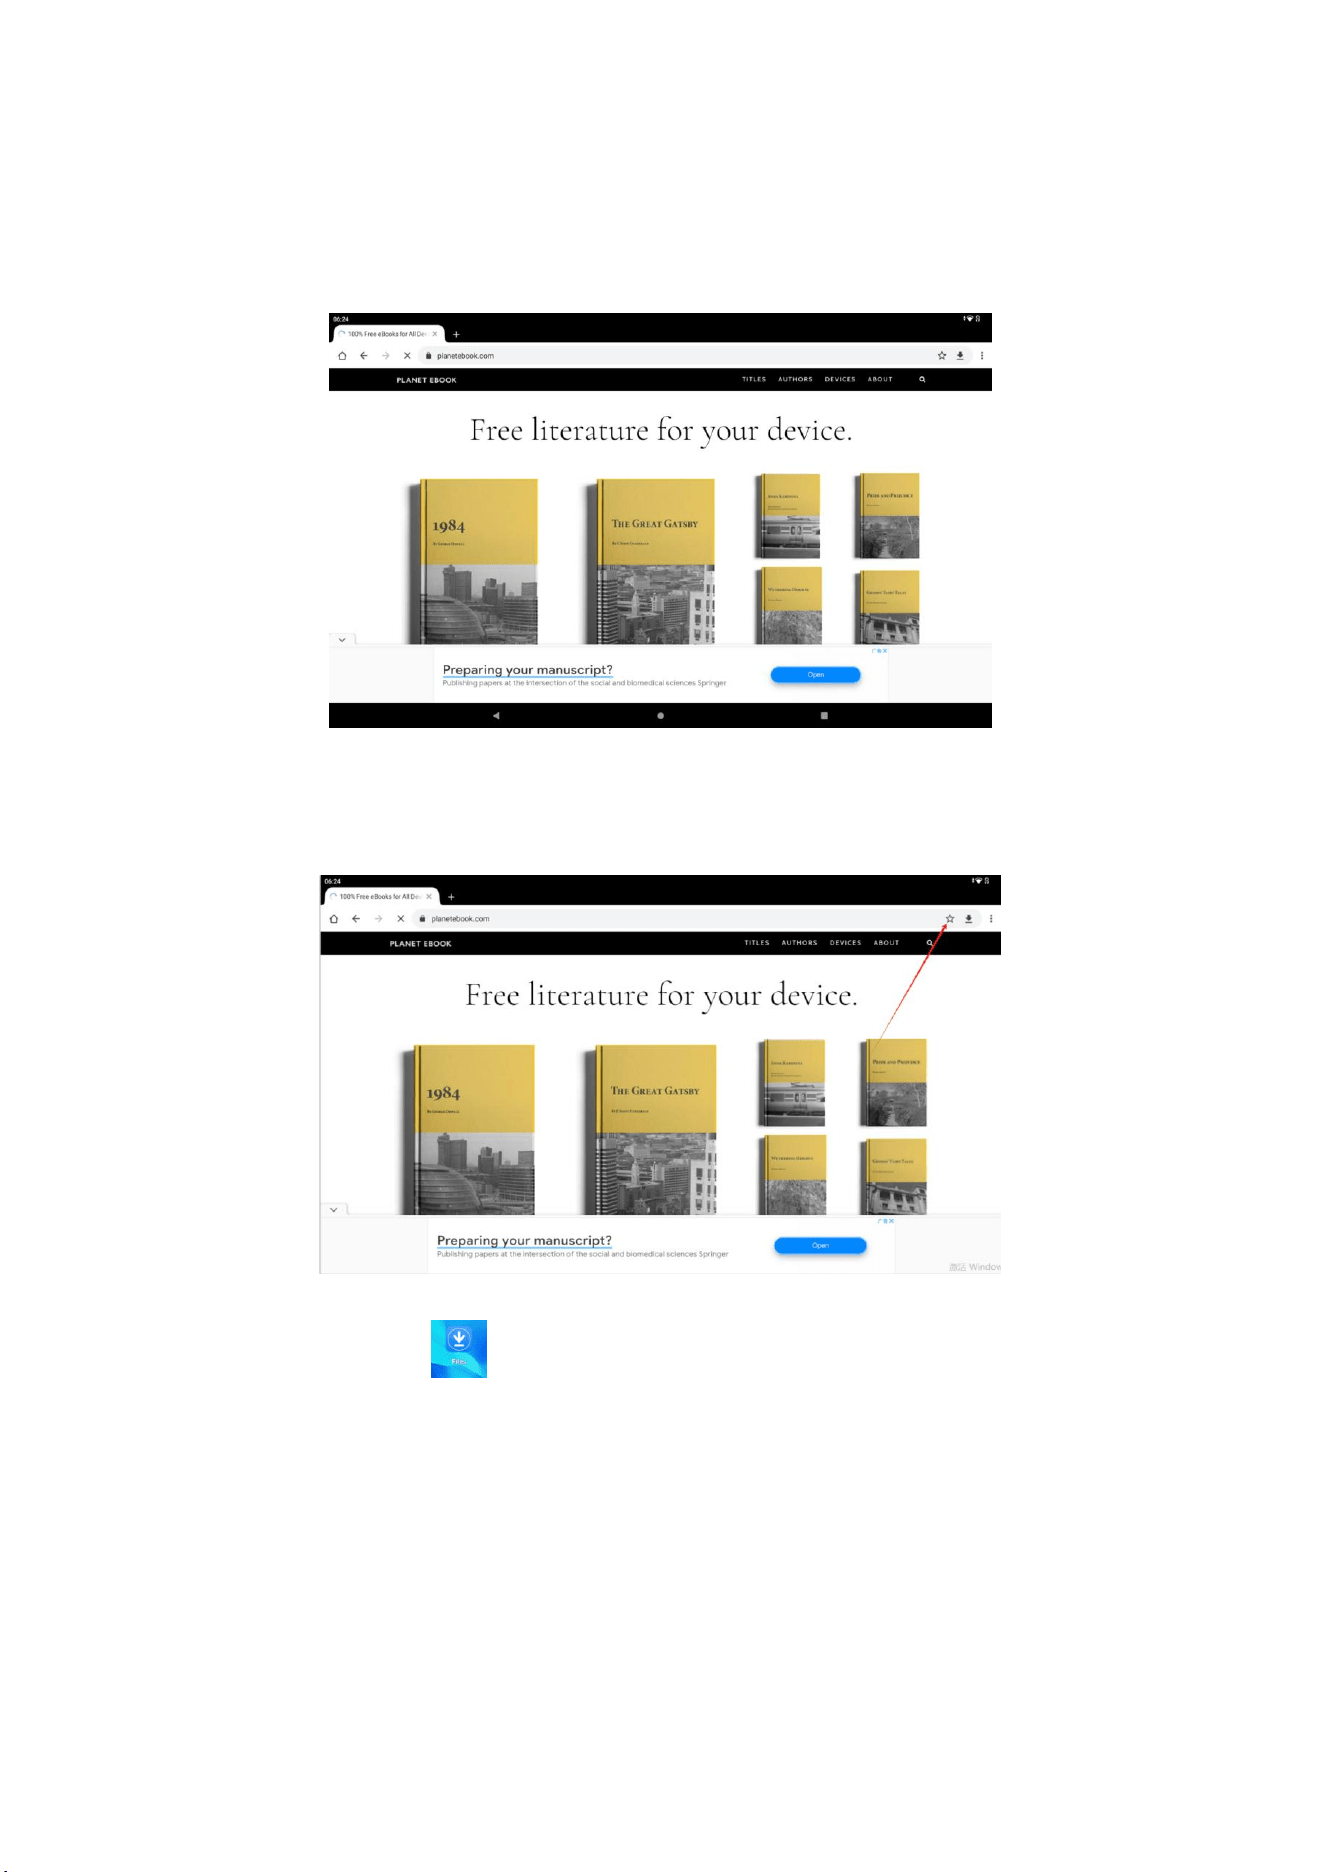
Click the main menu or the desktop browser to enter the IE interface when the wifi is normally
connected (for details, see Chapter 4.1 Wireless and Network Settings), as shown in Fig. 5.1.
Fig. 5.1
Click the address bar, enter the URL, and click Start to enter the corresponding webpage and
browse the corresponding website information, as shown in Fig. 5.2.
Fig. 5.2
6. Other applications
6.1. File Manager
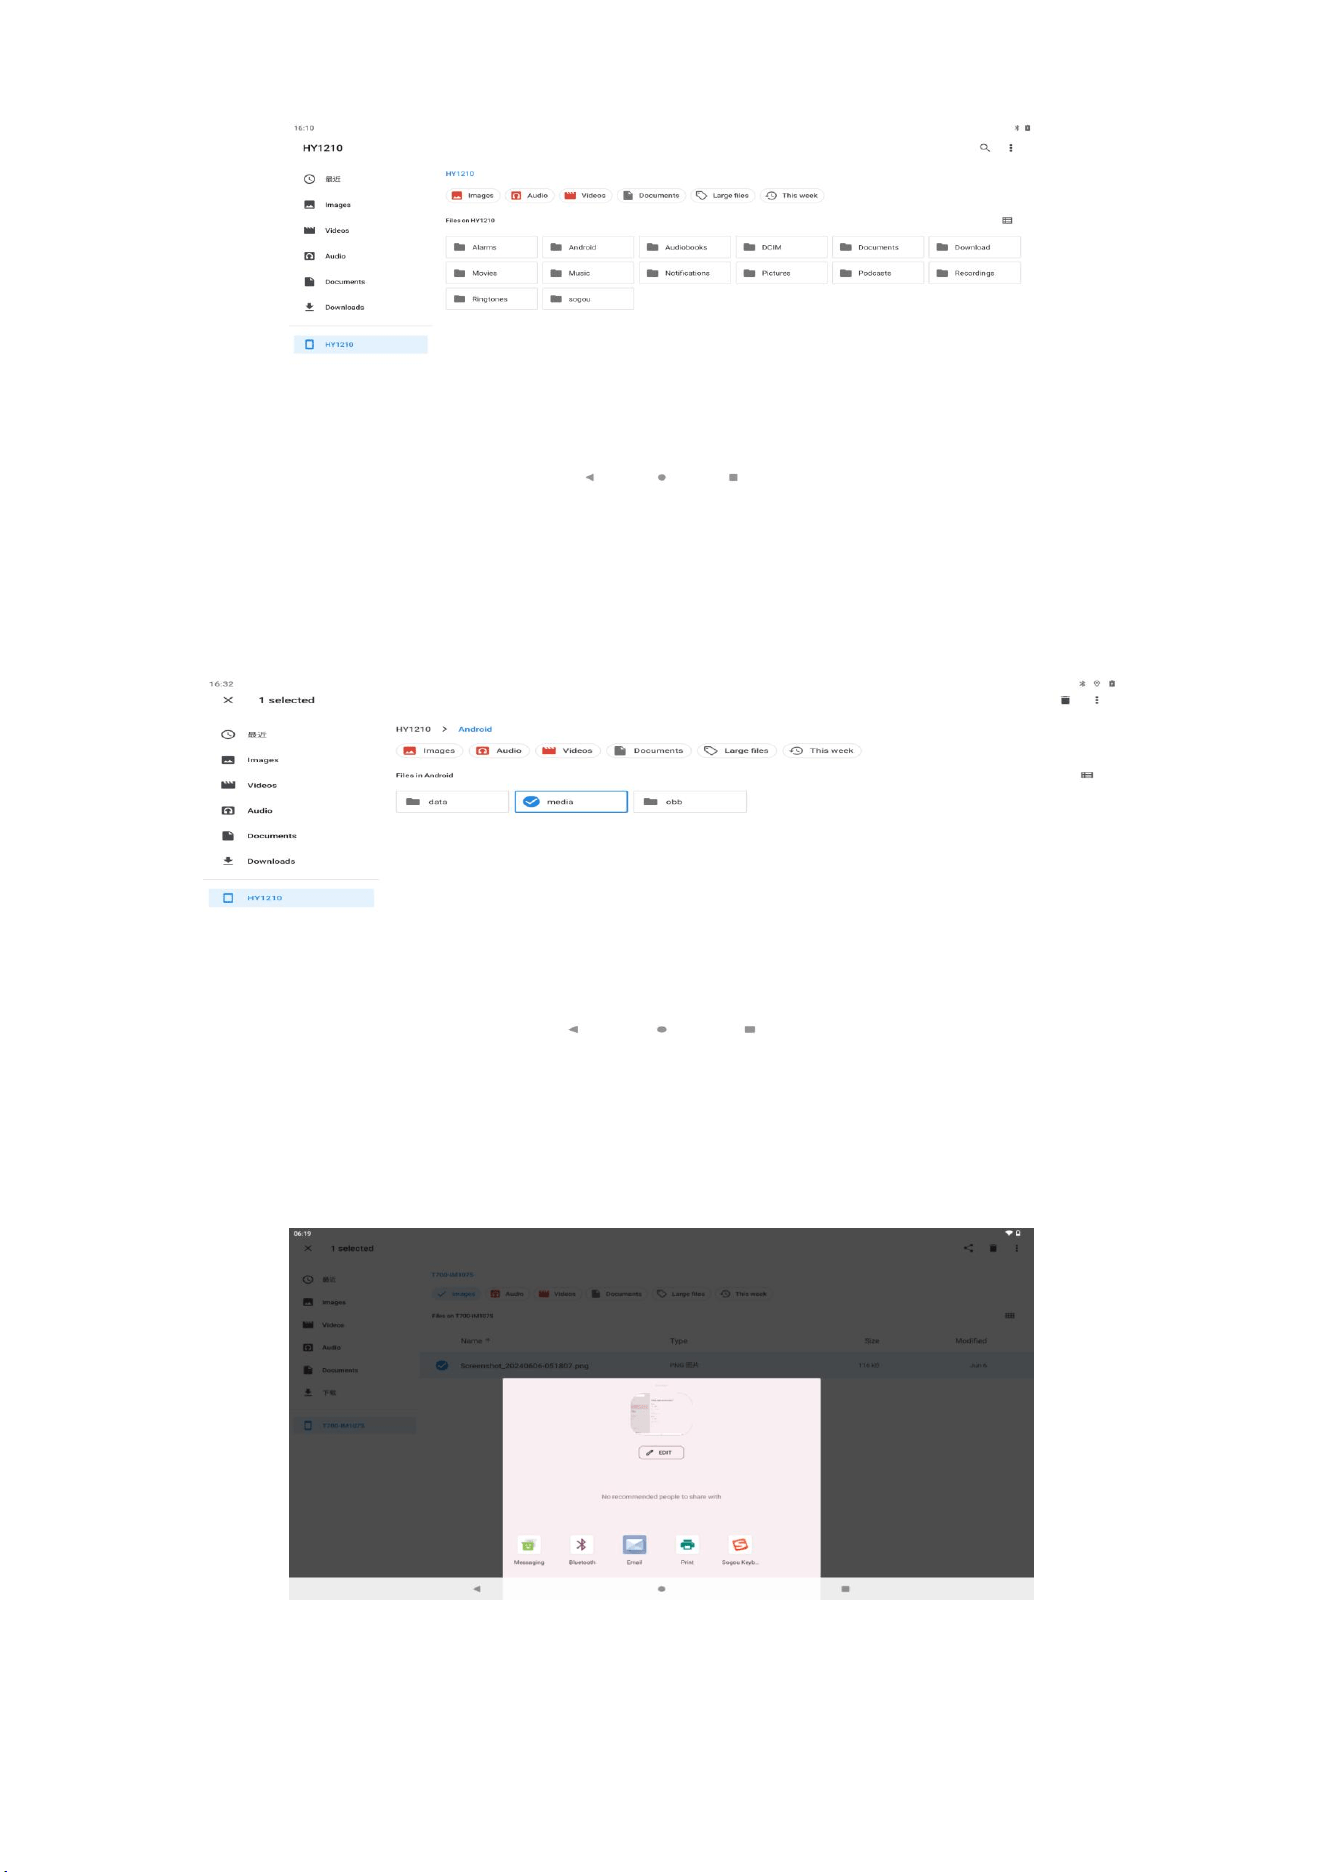
The file manager can be used to copy, cut, delete, rename files or folders on the TF card, and can
also be used to share files, install apk, etc.
In the main menu or on the desktop, click the file management icon to enter the file
manager
13
Fig. 6.1
A. Copy, cut, delete, rename, etc. a folder or file: select a folder or file, press and hold the folder or
file to enter the Fig. 6.2 interface to perform related operations on the file or folder.
Fig. 6.2
B. Share a file: select a file, long press the file, and select the "share" item in the pop-up list to
choose the way you want to share according to the pop-up list.
Fig. 6.3
14
C. Install the apk file: select the file with the suffix .apk in the file manager, the installer will pop up
and follow the prompts to install third-party software
D. New folder: select the directory of the target new folder, click the upper right button, select new
folder, follow the prompts to complete the new folder
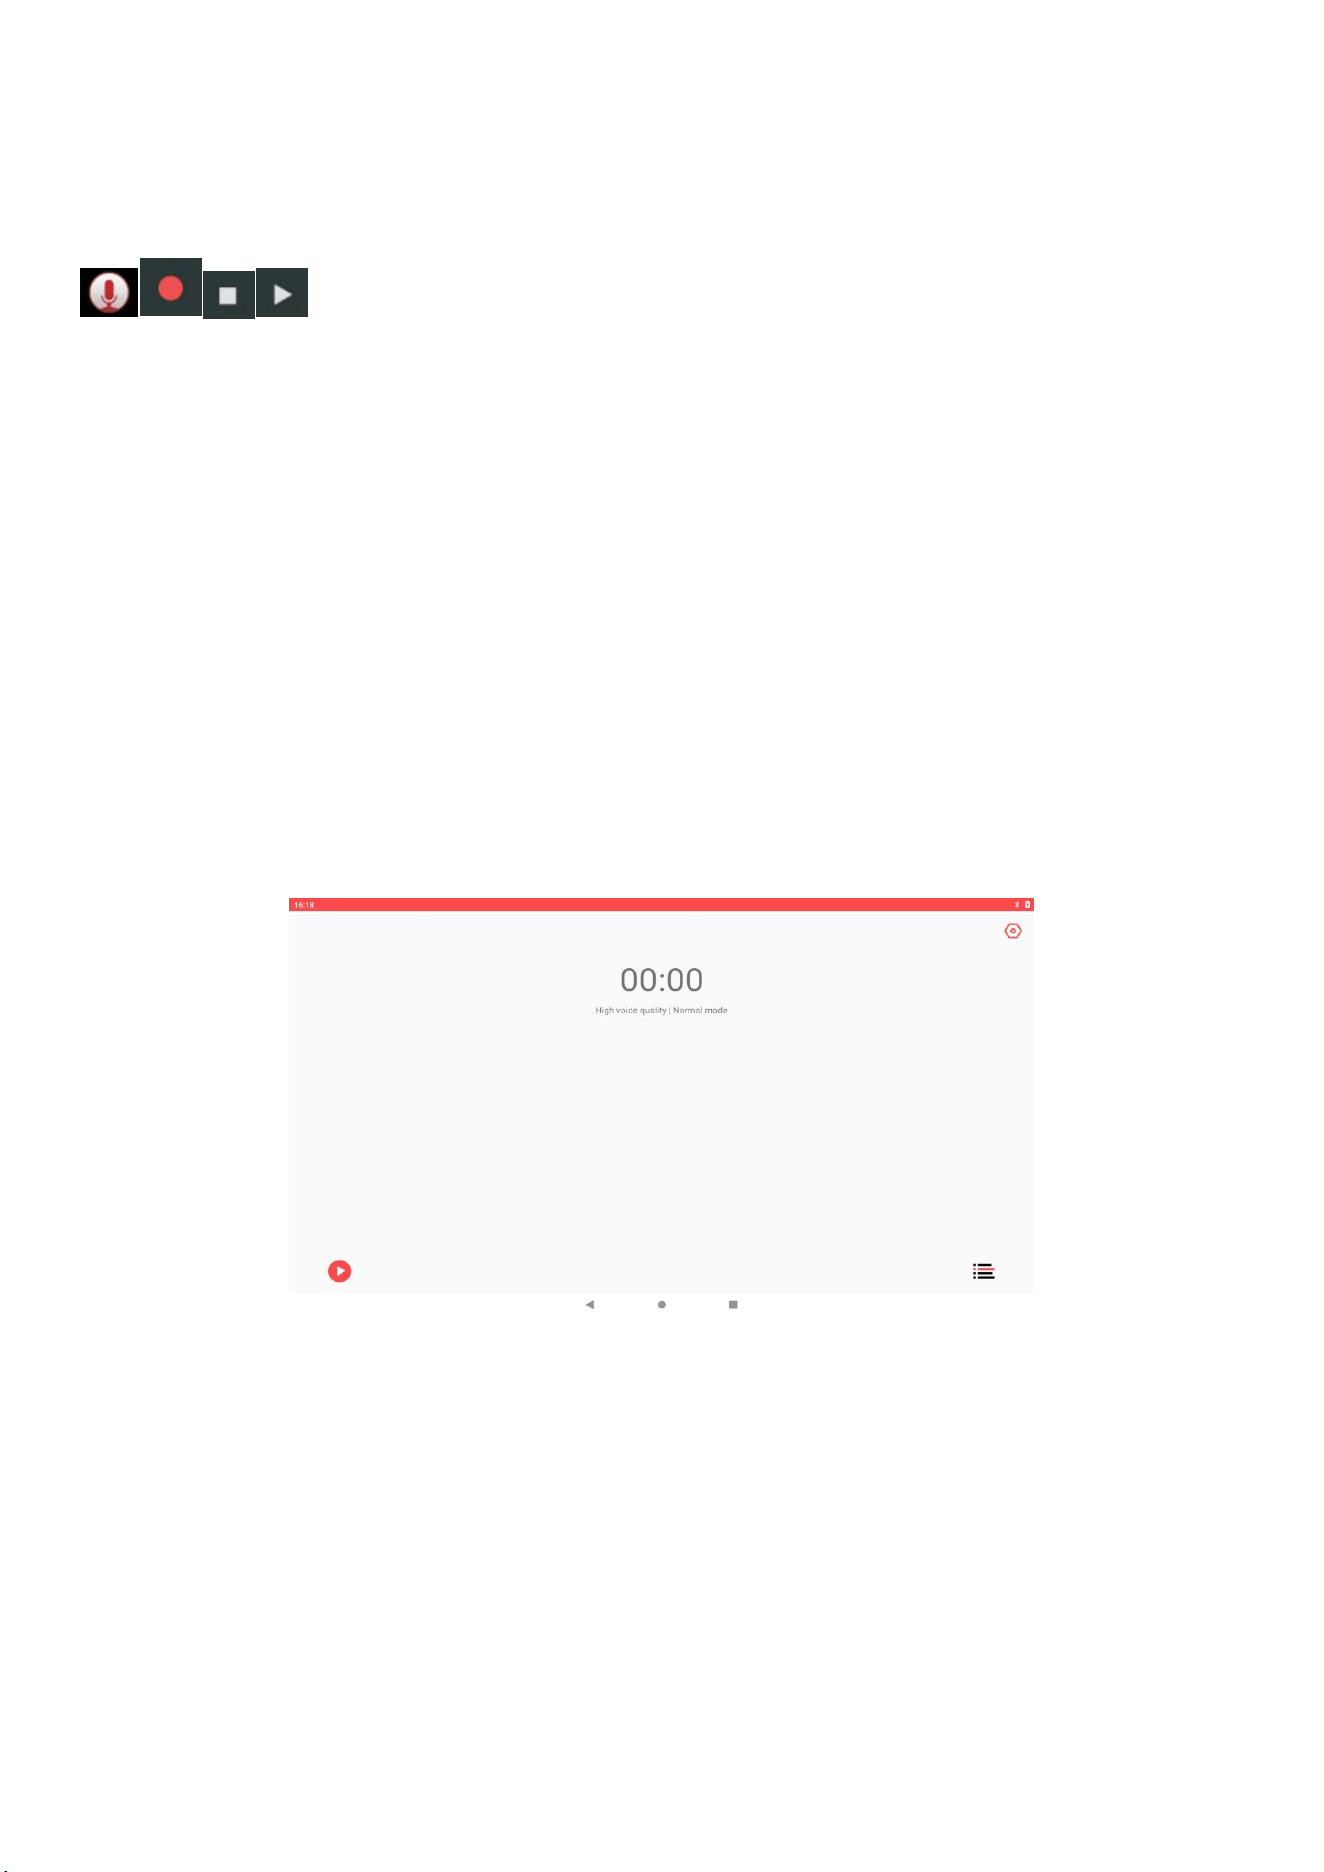
6.4. Recorder
In the main menu or on the desktop, click the recording icon to enter the recording interface,
and click the recording button to start recording. Click the stop button to stop
recording. Click the play button to play the recording just now. The system automatically
prompts to use this recording or to give up, please select manually.
Play recording: Choose to use audio player to play recording. First, select the recording file
according to the root directory in the explorer, and click to play.
Fig. 6.4

15
7. Installation of the program
7.1. Installation
Install third-party applications
The Internet provides third-party applications suitable for the Android system, and they can be
installed and used on the MID according to the renewal period. Copy the application to the SD card
and insert it into the MID.
A. Click the "File Manager" application to select the application that needs to be installed.
B. Press and hold the application to be installed.
C. The installation option pops up, click to install apk.
D. It can be run after the completion of the installation wizard.
Note: When searching for third-party programs used in this system on the Internet, all files with the
suffix of •apk.
7.2. Uninstall
Uninstall application
A. Click to set bitmap on the homepage interface.
B. Click on the application to list all the applications installed in the system.
C. Click the APK you want to uninstall, and click Uninstall.
D. Click OK to complete the uninstallation.
7.3. Update path
Update the application of Android system
Download the latest application from the designated website.
Download through the Android system related software forum on the Internet
8. Troubleshooting
A. MID is slow to boot for the first time
When the MID system is upgraded for the first time, the pre-installed application software needs to
be installed. The time is about 2-3 minutes, after which the opportunity will be opened relatively
quickly.
B. MID cannot connect to WIFI
16
Make sure that the wireless router that provides network services is working properly.
Make sure to keep a certain distance between the MID and the wireless router, and there is no
wall or other obstacles between them.
Make sure to enter the username and password correctly.
C. Feel MID fever
When using multiple applications at once or when the screen is turned on to the brightest and the
elbow is charging, heating is possible and it is a normal phenomenon.
D. Unable to set up email or register app
Make sure that the network connection is normal and the Internet is available.
Make sure the email setup method is correct.
Ensure that the system time is consistent with the local time.
E. Abnormal conditions of the system cannot operate normally
When installing some third-party applications, it may cause the system to fail to operate normally.
Press the reset button (next to the power connector) to reset the system.
F. Unable to open the webpage
Please keep the distance between the router and the MID within the effective distance
Please restart WIFI and try again
G. MID sometimes runs slowly
This is a normal phenomenon. At the end of the advanced task management, uninstall the apps
that you don’t need and some third-party apps to free up more system resources
safety information
Read the following brief instructions carefully and follow these rules carefully to avoid creating a
hazard or breaking the law.
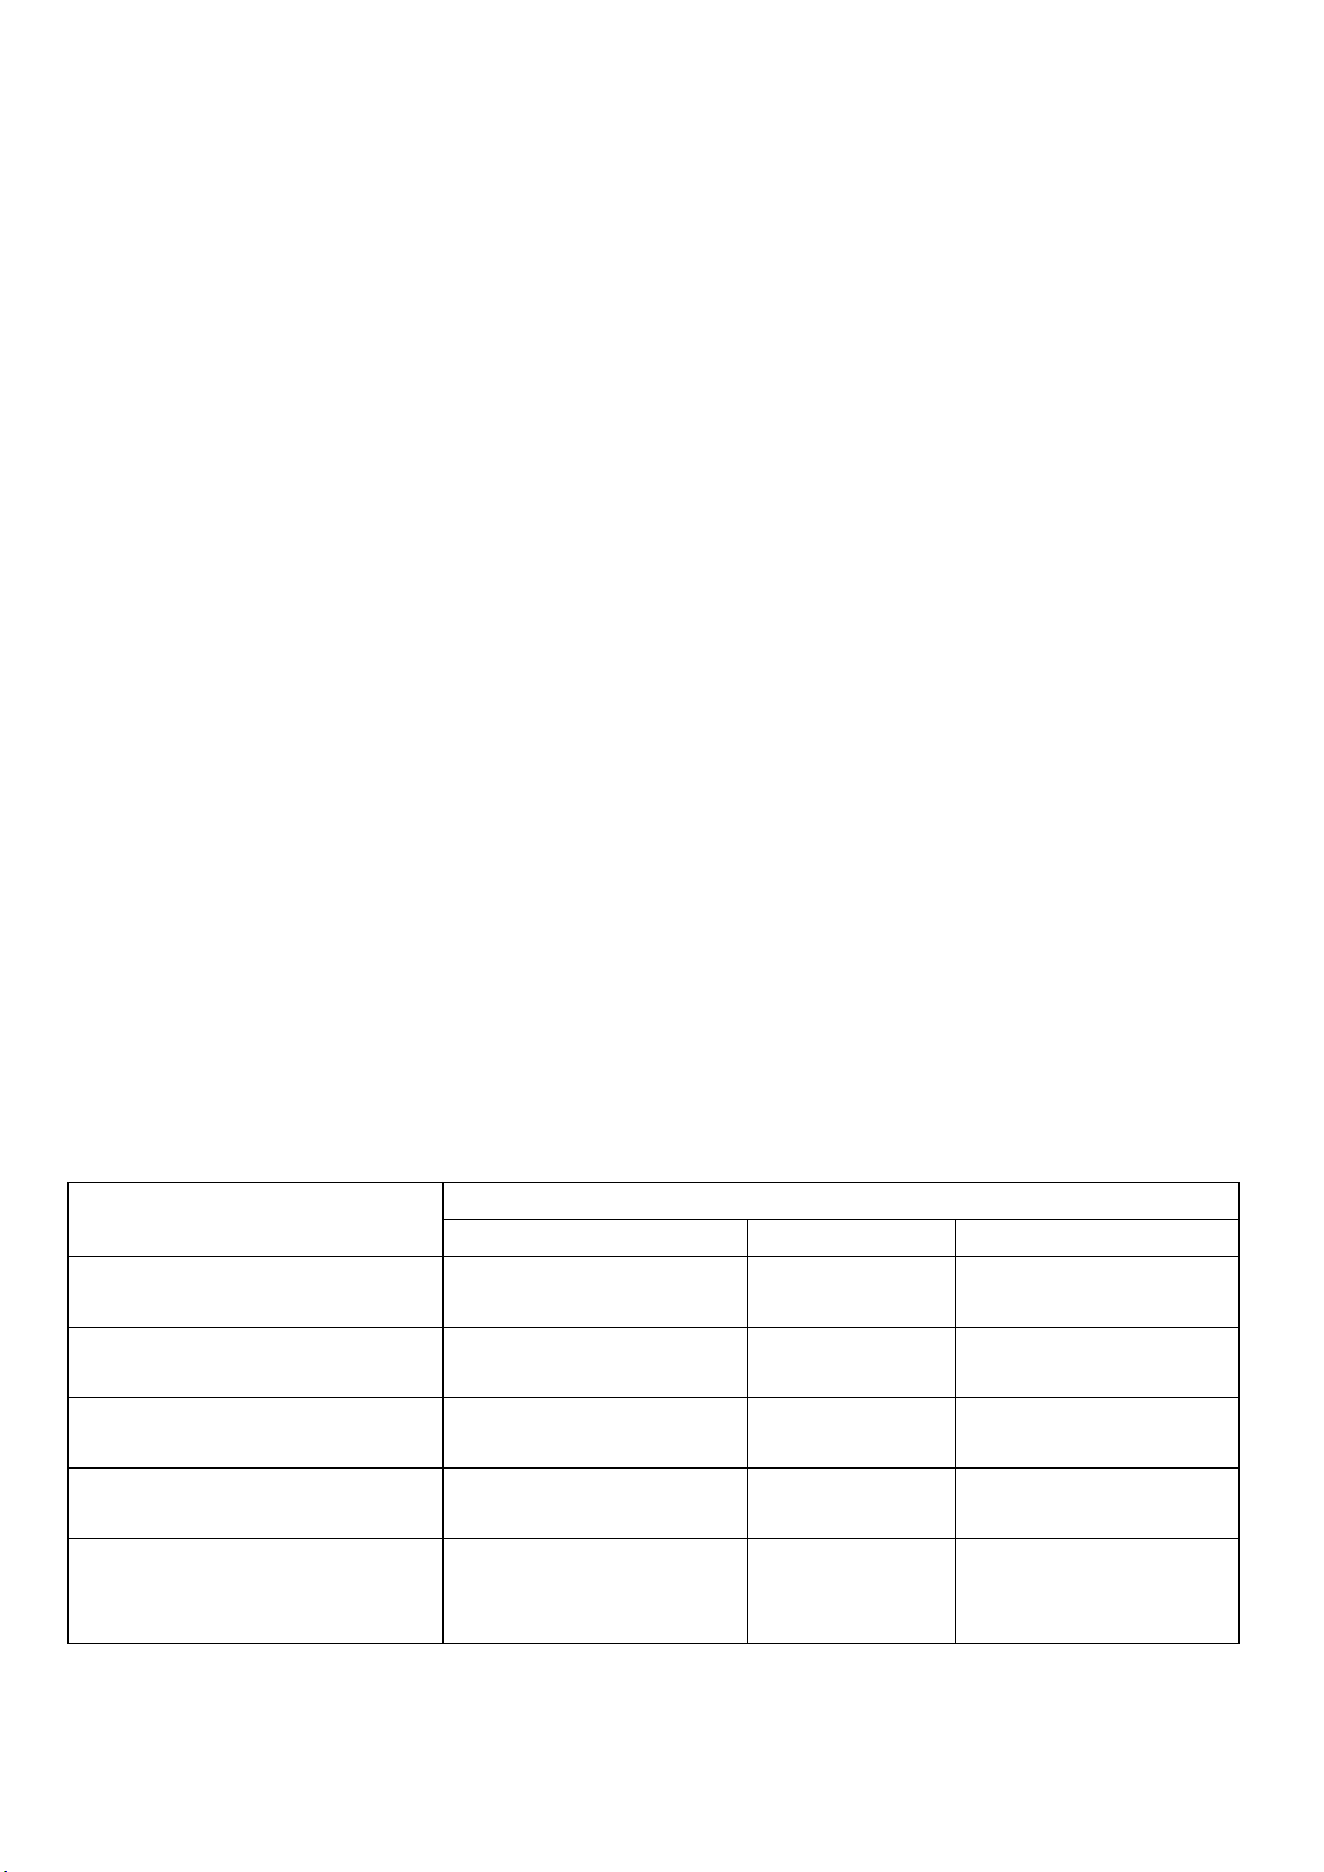
List of toxic and hazardous substances or elements
Toxic or hazardous
Substances and Elements
Part name
Computer
Bettery
Accessories
Lead(Pb)
Mercury(Hg)
Cadmium(Cd)
Hexavalent chromiu(Cr6
)
Polybrominated biphenyls
(PBB)

17
Polybrominated diphenyl
ether(PBDE)
:Indicates that the content of the toxic and hazardous substances in all homogeneous materials
of the component is below the limit requirements stipulated in the SJ/T11363-2006 standard.
:Indicates that the content of the toxic and hazardous substance in at least one homogeneous
material of the component exceeds the limit requirements specified in the SJ/T11363-2006
standard.
Note: This product has " " because: there is no alternative technology or component available at
this stage.
specific absorption rate(SAR)
This model of mobile device complies with international norms regarding radio wave radiation.
Your mobile device is a radio transmitter and receiver. It has been designed so that it does not
exceed the limits of radio wave radiation recommended by international norms (ICNRP). These
norms have been developed by an independent scientific organisation, ICNIRP, and include certain
safety margins to ensure the safety of people of all ages and health conditions.
The unit of measurement used for radiation standards for mobile devices is known as the Specific
Absorption Rate (SAR). The SAR limit specified in the ICNIRP Code is 2.0 watts per kilogram
(W/kg) averaged over 10 grams of body tissue. Specific Absorption Rate measurements are made
in the standard operating position and the device is validated at its highest level of transmit power
in all frequency bands measured. Since this equipment is designed to use only the power level
required to connect to the network, the actual specific absorption rate of the equipment in operation
may be lower than the maximum value. The actual specific absorption rate varies with many factors,
such as the distance between you and the network base station.
According to the ICNIRP specification, the maximum specific absorption rate value for this device is
1.36 W/kg when used at ear level.
The use of device accessories may result in different specific absorption rate values. Specific
Absorption Rate values may vary depending on reporting requirements, testing requirements and
network frequency bands in different countries or regions.
The maximum value of Specific Absorption Rate (SAR) of electromagnetic radiation for this product
is 1.36W/kg, which is in accordance with the requirements of the national standard GB
21288-2007.

18
User warranty card
User warranty card Dear user, thank you for choosing this product, in order to protect your legal
rightsand better serve you, provide you with three guarantees, product warranty instructions are as
follows:
A.From the date of purchase, under normal circumstances, product failures caused by poor
electrical performance can receive one-year warranty service, man-made damage (such as
self-disassembly, handling damage, collision damage, water ingress, improper input current and
voltage, etc.) And damage caused by force majeure disasters (such as fire, flood, earthquake,
rodent damage, etc.) are not covered by this warranty.
B.Please fill in the columns listed in this warranty card truthfully and stamp them with the seal of the
dealership to be considered valid.
C.Once this warranty card is lost, it will not be reissued, so please keep it in a safe place.
D.This warranty card is valid only within the territory of the People's Republic of China.

FCC Statement
This equipment has been tested and found to comply with the limits for a Class B digital device,
pursuant to part 15 of the FCC Rules. These limits are designed to provide reasonable protection
against harmful interference in a residential installation. This equipment generates, uses and can
radiate radio frequency energy and, if not installed and used in accordance with the instructions,
may cause harmful interference to radio communications. However, there is no guarantee that
interference will not occur in a particular installation. If this equipment does cause harmful
interference to radio or television reception, which can be determined by turning the equipment
off and on, the user is encouraged to try to correct the interference by one or more of the
following measures:
•Reorient or relocate the receiving antenna.
•Increase the separation between the equipment and receiver.
•Connect the equipment into an outlet on a circuit different from that to which the receiver is
connected.
•Consult the dealer or an experienced radio/TV technician for help.
Caution: Any changes or modifications to this device not explicitly approved by manufacturer
could void your authority to operate this equipment.
This device complies with part 15 of the FCC Rules. Operation is subject to the following two
conditions: (1) This device may not cause harmful interference, and (2) this device must accept
any interference received, including interference that may cause undesired operation.
Specific Absorption Rate (SAR) information:
This device meets the government's requirements for exposure to radio
waves. The guidelines are based on standards that were developed by independent
scientific organizations through periodic and thorough evaluation of scientific studies.
The standards include a substantial safety margin designed to assure the safety of all
persons regardless of age or health. FCC RF Exposure Information and Statement
the SAR limit of USA (FCC) is 1.6 W/kg averaged over one gram of tissue. Device
types: device has also been tested against this SAR limit. This device
was tested for typical body-worn operations with the back of the device kept 0mm
from the body. To maintain compliance with FCC RF exposure requirements, use
accessories that maintain an 0mm separation distance between the user's body and
the back of the device. The use of belt clips, holsters and similar accessories should
not contain metallic components in its assembly. The use of accessories that do not
satisfy these requirements may not comply with FCC RF exposure requirements, and
should be avoided.
19

