User Manual
用户手册

1
Statement
Please read this manual carefully before using the
product and strictly operate & store it in accordance
with the instructions. Please save the manual for your
future reference. If you need further assistance than the
user manual, please consult your retailer for help or
email us: [email protected].
Safety Guidelines
Please read thoroughly and obey the safety guidelines
and the user manual before using this product, and
then operate correctly. This product is not suitable for
children to use. By using this product, you hereby signify
that you have read and accepted all the terms and
conditions associated with the product. You agree to
be responsible for the potential consequences of using
the product. Saramonic will assume no liability for any
damage, injury or any legal responsibility incurred from
improper operations by the user. Please abide by the
following safety practices:
• Do not monitor at excessive volumes as it can cause
permanent hearing damage.
• Do not store for an extended period when the battery
has been completely discharged, which may cause
irreparable damage.
• Do not dismantle or pierce the battery in any way,
otherwise a leak of electrolytes, or even a fire or
explosion may occur.
• Do not strike, crush or drop the product. Do not place
heavy objects on the product.
• Do not use near stoves and heaters, or store in your
car in hot weather.
• If the product is on fire, please immediately put out it
by water, water mist, sand, a fire blanket, a dry powder
or a carbon dioxide fire extinguisher.
General Introduction
The WiTalk9 SE system, a full-duplex wireless intercom
headset system, operates in the 2.4 GHz band and
provides a reliable transmission range up to 350 m.
This system delivers a better hands-free coordinating
experience, maximizing your team productivity and
fostering team interaction. It builds a 5-person intercom
system (1 master headset with 4 remote headset
connection), ideal for small and medium-sized event
scenes, such as wedding ceremonies, shooting short films,
advertisements, interviews or conferences.
Each headset is powered by a rechargeable and
replaceable battery that can be placed into the charging
case for charging. When the master headset is connected
to 4 remote headsets, each headset supports a 24-hour
runtime on a single charge. Additionally, each headset
boasts a USB-C port for charging. If the headset is charged
via its USB-C port in shutdown mode, a full charge takes
about 3.5 hours.
Features
• 5-person full-duplex system. No HUB design. Ready to
use. Scalable to 9 users with 2 sets connected via wired
cascading.
• Cross-location Communication: Any headset can
access online meetings via a wired connection.
• Decentralized for More Flexibility: Every headset can
be a Master. A malfunctioning, broken, or lost Master
will not affect the overall use.
• Dual-Antenna Design: Automatic Frequency Hopping
(AFH) for team talks to remain consistent within 350m.
• ClearTalk™: The original three-microphone array noise
cancellation algorithm with 360° coverage, optional with
Light / Strong mode for clear team talks.
• AGC Algorithm and High Volume: Keep calls clear
even if the SPL is 120 dB in the surroundings. Coupled
with the protein leather cushion, the noise isolation is
only elevated.
• Saramonic App, Master Control: Essential functions
in large icons for intuitive navigation. AFH activation for
seamless global use.
• 10+ Optional Accessories: Ear cushions, batteries,
charging dock, etc.
2
Available Packages
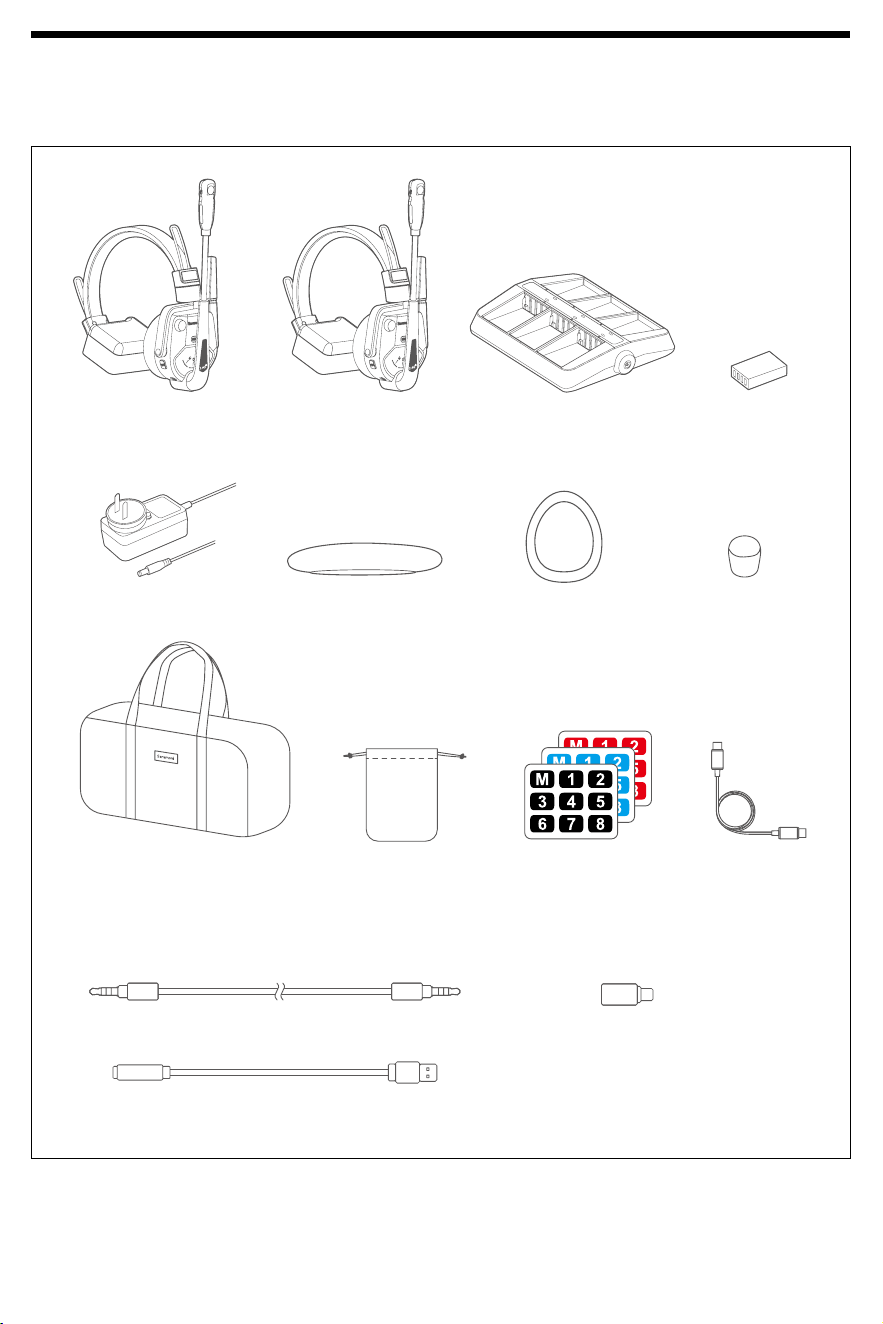
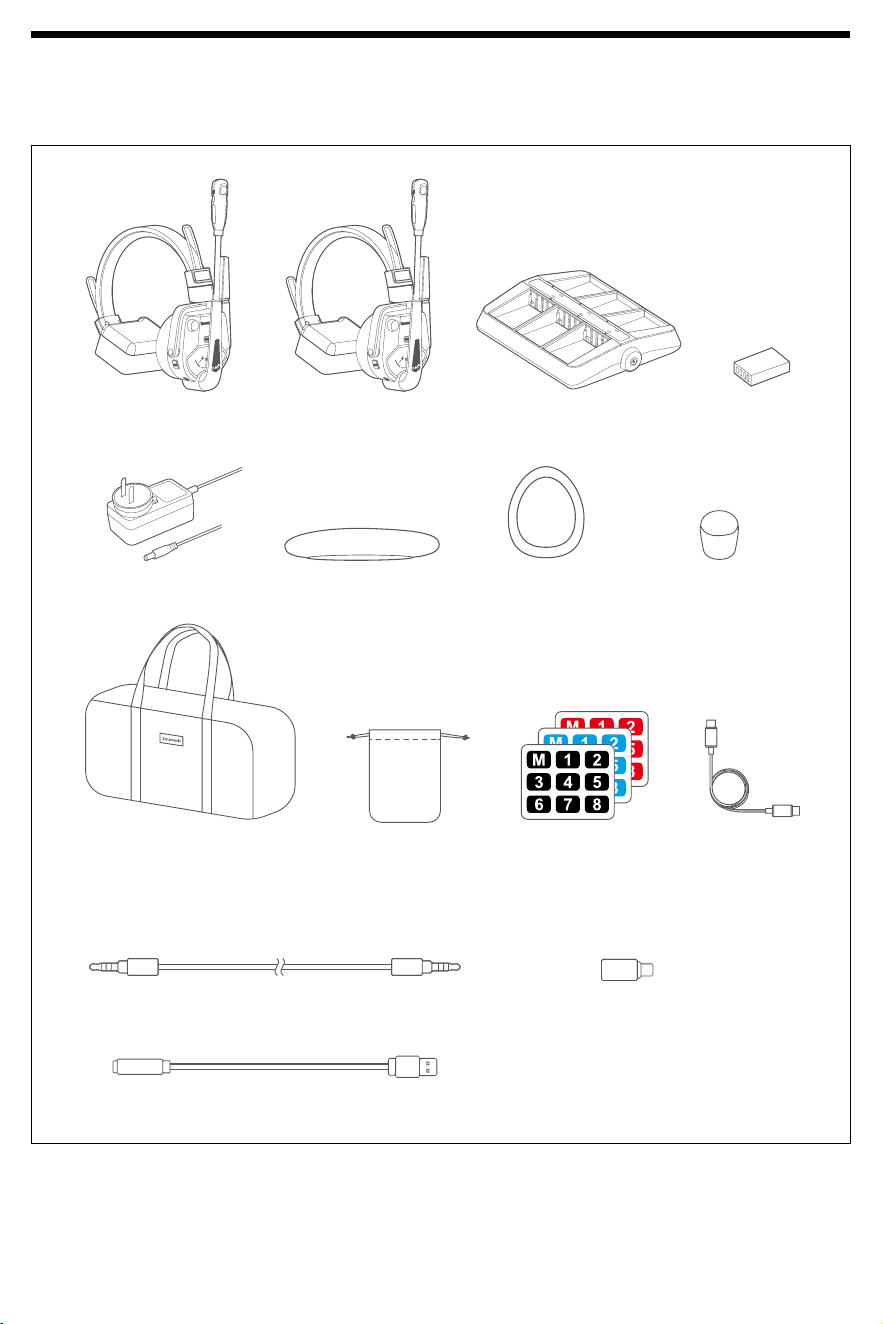
The WiTalk9 SE system comes with various configurations for you to choose from depending on your team size. This
manual is for all WiTalk9 SE packages. The contents of each package are described below.
WiTalk9 SE SMH Single-ear
Master Headset
WiTalk9 SE SRH Single-ear
Remote Headset
6-Slot Charging Case Replaceable Battery
Carrying Bag
3.5 mm TRRS to TRRS Audio Cable USB-A to USB-C Adapter
3.5 mm TRRS Female to USB-A Sound Card
Over-Ear Protein-leather
Cushion
Foam Windscreen Charger for Charging Case
Number Sticker Sheet
Drawstring Pouch USB-C to USB-C
Data Cable
Sold Separately
Link cable kit for cascade connection
On-Ear Foam Cushion
3
WiTalk9 SE-2S
WiTalk9 SE SMH Single-ear Master Headset (1)
WiTalk9 SE SRH Single-ear Remote Headset (1)
Replaceable Battery (2)
6-Slot Charging Case (1)
Charger for Charging Case (1)
USB-C to USB-C Data Cable (1)
On-Ear Foam Cushion (2)
Over-Ear Protein-leather Cushion (2)
Velcro Headset Pad (2)
Foam Windscreen for Microphone (2)
Number Sticker Sheet for Headset (3)
Drawstring Pouch for Headset (2)
Carrying Bag (1)
WiTalk9 SE-3S
WiTalk9 SE SMH Single-ear Master Headset (1)
WiTalk9 SE SRH Single-ear Remote Headset (2)
Replaceable Battery (3)
6-Slot Charging Case (1)
Charger for Charging Case (1)
USB-C to USB-C Data Cable (1)
On-Ear Foam Cushion (3)
Over-Ear Protein-leather Cushion (3)
Velcro Headset Pad (3)
Foam Windscreen for Microphone (3)
Number Sticker Sheet for Headset (3)
Drawstring Pouch for Headset (3)
Carrying Bag (1)
WiTalk9 SE-4S
WiTalk9 SE SMH Single-ear Master Headset (1)
WiTalk9 SE SRH Single-ear Remote Headset (3)
Replaceable Battery (4)
6-Slot Charging Case (1)
Charger for Charging Case (1)
USB-C to USB-C Data Cable (1)
On-Ear Foam Cushion (4)
Over-Ear Protein-leather Cushion (4)
Velcro Headset Pad (4)
Foam Windscreen for Microphone (4)
Number Sticker Sheet for Headset (3)
Drawstring Pouch for Headset (4)
Carrying Bag (1)
WiTalk9 SE-5S
WiTalk9 SE SMH Single-ear Master Headset (1)
WiTalk9 SE SRH Single-ear Remote Headset (4)
Replaceable Battery (5)
6-Slot Charging Case (1)
Charger for Charging Case (1)
USB-C to USB-C Data Cable (1)
On-Ear Foam Cushion (5)
Over-Ear Protein-leather Cushion(5)
Velcro Headset Pad (5)
Foam Windscreen for Microphone (5)
Number Sticker Sheet for Headset (3)
Drawstring Pouch for Headset (5)
Carrying Bag (1)
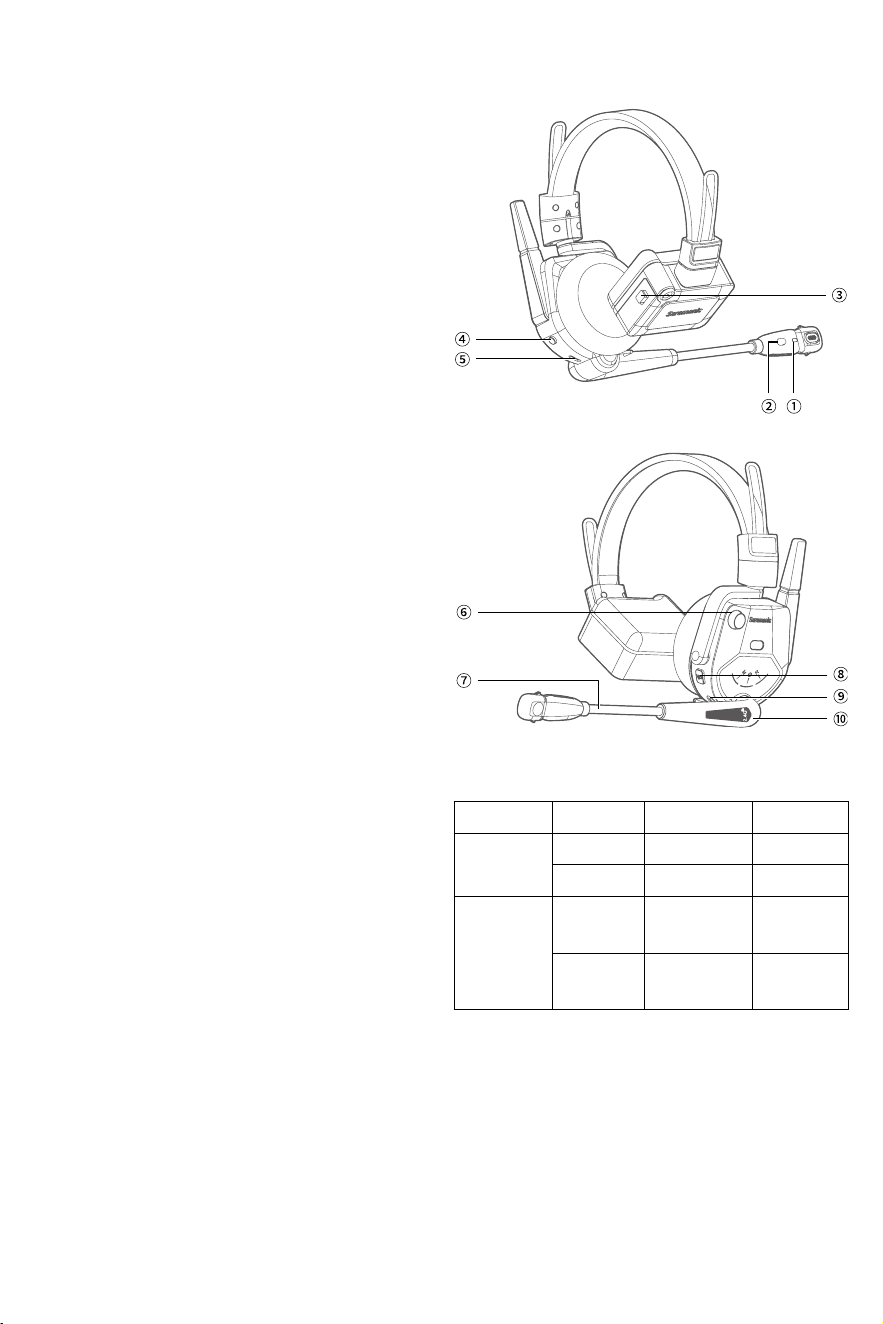
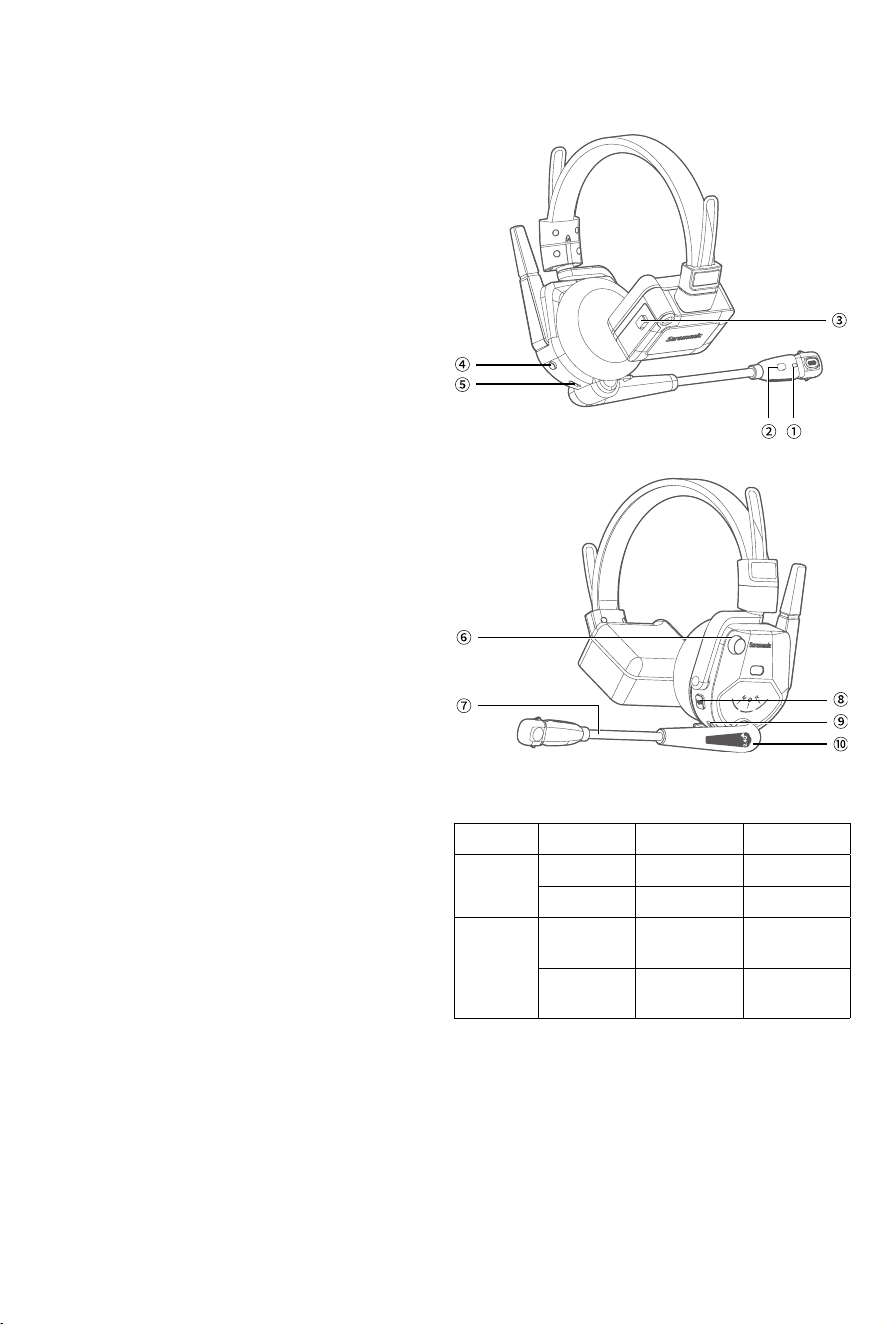
Product Structure
WiTalk9 SE SMH Single-ear Master Headset /
SRH Single-ear Remote Headset
①
Mic Indicator
②
Environmental Noise Cancellation (ENC) Button
Operation Status Mic Indicator Voice Prompt
Press once
Strong ENC Static green Strong
Weak ENC Static blue Weak
Press and hold
for 3 seconds
Cascade
connection
enabled
Static purple No
Cascade
connection
disabled
Back to previous
status
No
• The headset defaults to weak noise cancellation mode.
• The cascade connection feature is turned off by
default. For more details, please refer to “
⑨
TRRS Jack
for Wired Link ”.
③
Battery Compartment Switch
Slide down the battery compartment switch to open its
cover, then remove the battery for charging or insert the
battery for use.
④
Power Button
Press and hold for 2 seconds to power on or off. There
is a voice prompt of “Power on” if turned on, or a voice
prompt of “Power off” if turned off.
4
⑤
USB-C Charging Port (5 V/1 A)
Plug in the USB-C to USB-C data cable to charge
or connect to Saramonic app on your phone or
computer for firmware updates and adjustment. (Audio
transferring is not available)
Note: If you connect the headset to Saramonic app on
your phone or computer via the USB-C to USB-C data
cable, the headset cannot be charged via this cable.
⑥
Volume Control / Announce Button (master headset)
/ PTT Button (remote headset)
Operation Function Voice prompt
Rotate clockwise Increase volume No
Rotate counter
clockwise
Decrease volume No
Press and hold Enable Announce or PTT Du
• If you are using the remote headset, and you do not
want all your voice to be captured by the microphone
when you have less frequent contact with your team,
it is recommended to enable the PTT function. Once
activated, press the volume control to talk, and then
release to mute. You can unmute yourself by pressing
the mute button once or folding down the boom.
• By activating the Announce feature on the master
headset, the system will mute all paired remote
headsets and their mic indicators will blink red slowly,
allowing the whole team to hear the direct instructions
or commands from the master headset.
• If the master headset is switched to remote mode via
the mute button, its Announce feature will automatically
switch to the PTT feature, and vice versa.
⑦
Boom
Operation Function Mic Indicator Voice Prompt
Flip up Mute on Static red Du
Fold down Mute off Static blue / green Du
⑧
Mute Button
Operation Function Mic Indicator Voice Prompt
Press once
Mute on Static red Du
Mute off Static blue / green Du
⑨
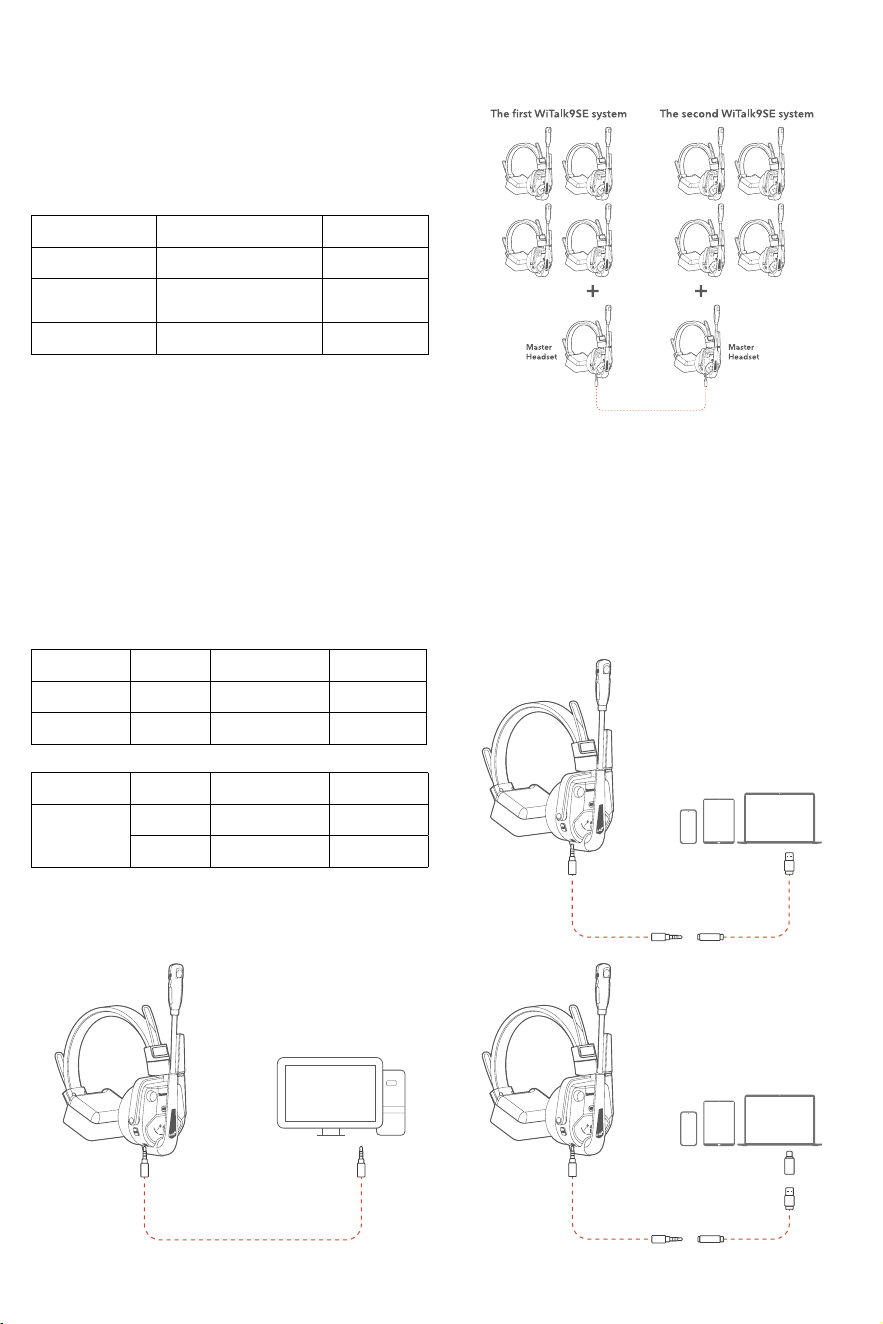
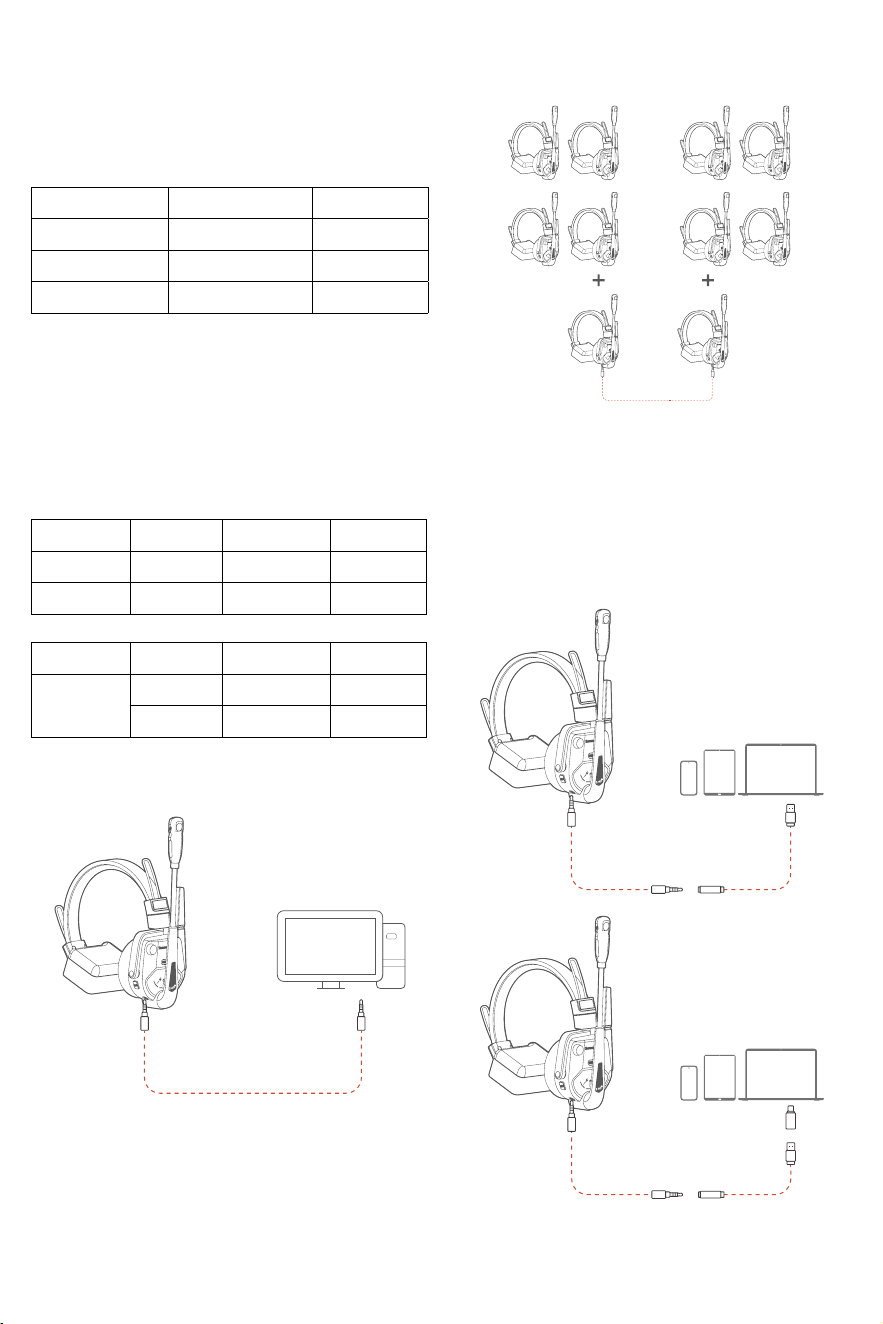
TRRS Jack for Wired Link
• Plug in the link cable kit for cascade connection (sold
separately) to connect the headset to a device with a
TRRS jack, achieving audio monitoring at site.
• Plug in the link cable kit to interconnect the second
WiTalk9 SE system, accommodating expanded
communication needs. It can be cascaded with up to 2
systems.
• Plug in the link cable kit to connect your phone or
computer. With your phone or computer connected,
the headset can attend any cloud conference anytime
running on ZOOM, Tencent Meeting or other meeting
applications on your phone or computer, bringing your
remote and in-person teams together.
Note: You need to press and hold the ENC button for
3 seconds to turn the cascade connection on, allowing
these two teams to communicate with each other.
In view of the compatibility of different smart phones,
Saramonic suggests to use the USB-C adapter of the
link cable kit with your smart phone.
5
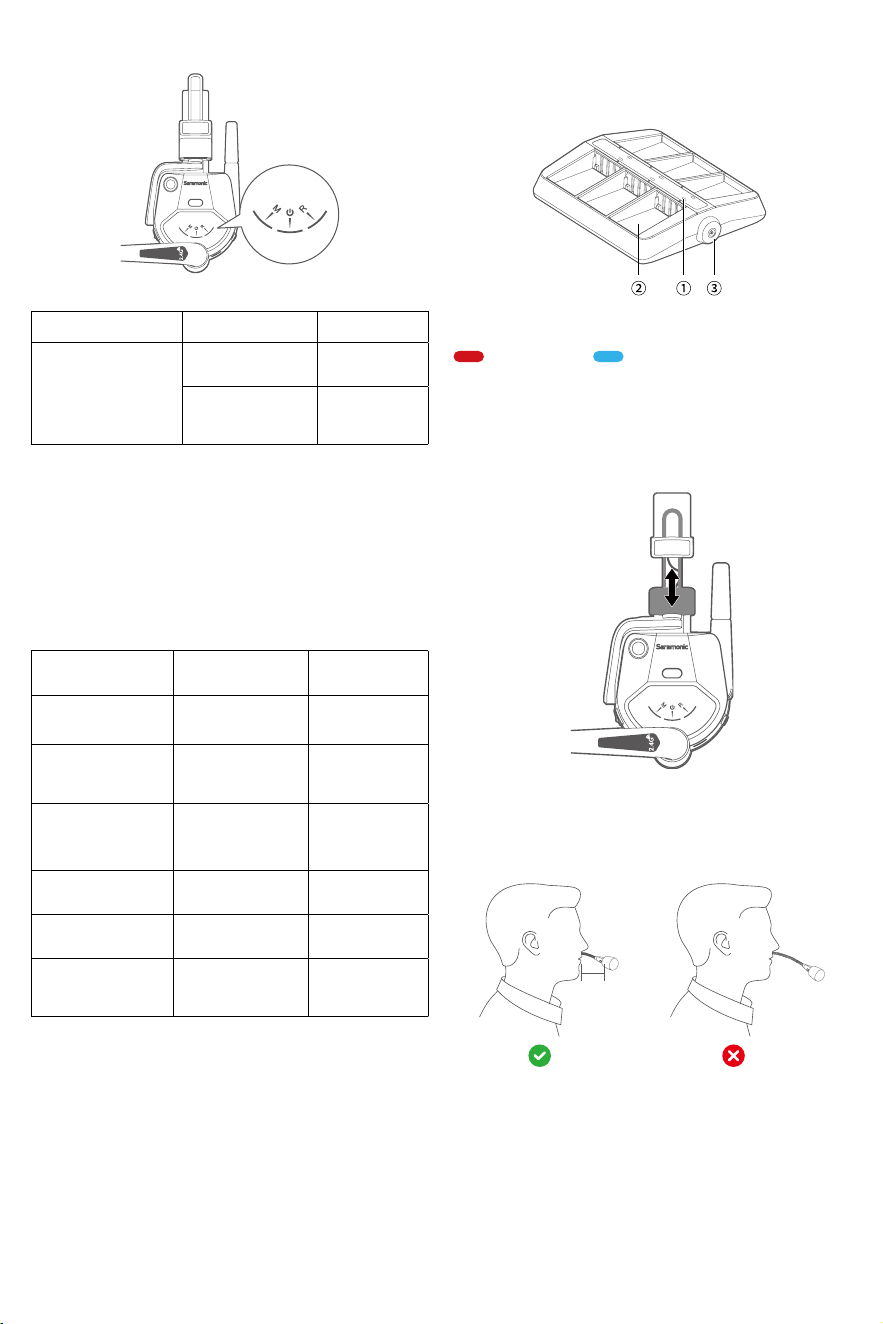
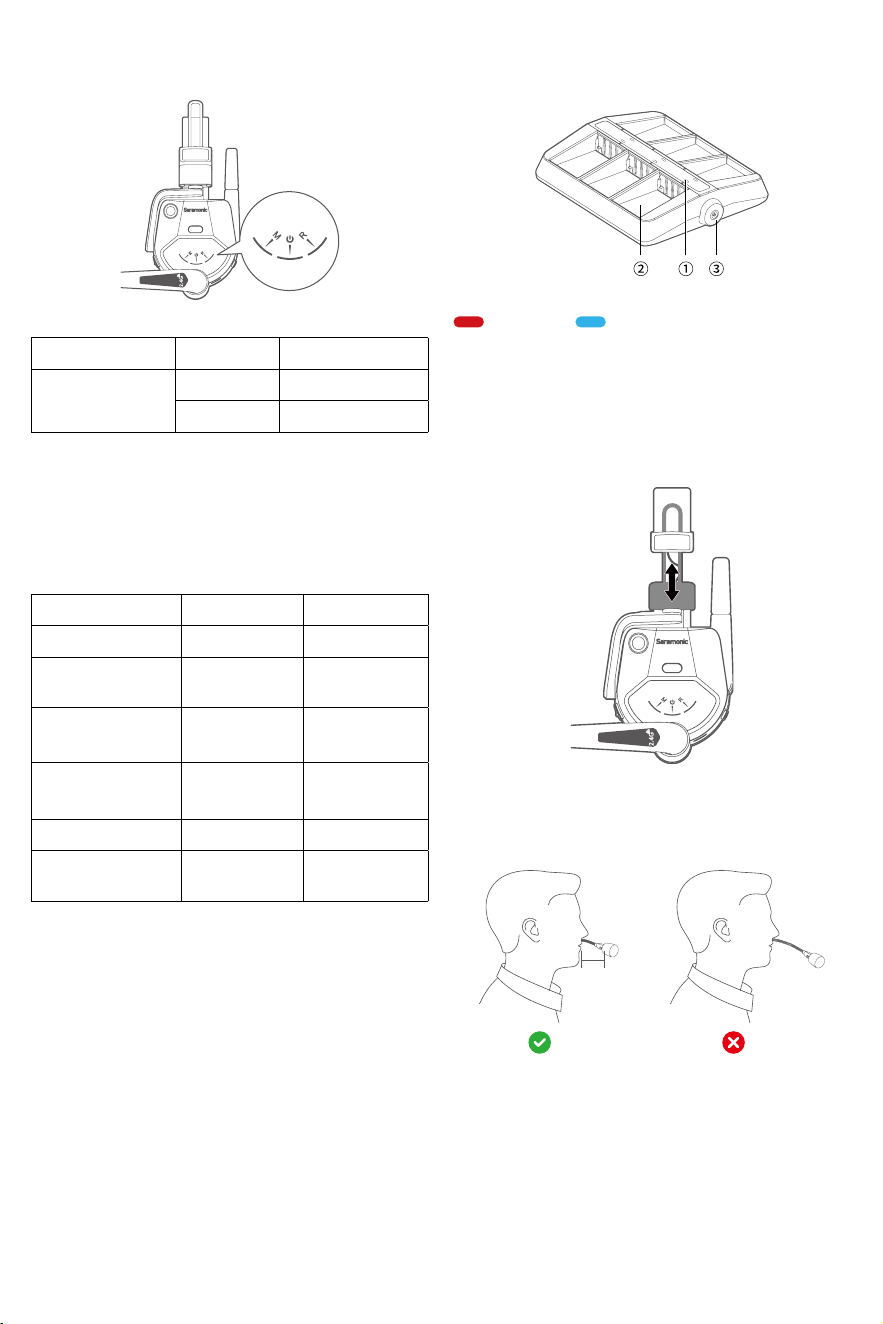
Panel on Master / Remote Headset
M / R Indicator:
Operation Mode M / R Indicator
Press and hold the
mute button for 5
seconds
Master headset
M indicator
glows static blue
Remote headset
R indicator glows
static blue
• There is a default master headset in the WiTalk9 SE
system. Any remote headset can be set as a master
headset if the previous master headset shuts down due
to low battery level or if the previous one is damaged.
• If the package you purchased contains more than
two headsets, you can set up two master headsets to
establish two independent communication groups.
Note: In this case, these two groups cannot
communicate with each other.
Power Indicator:
Status Power Indicator Voice Prompt
Unpaired or not
reconnected
Blinking blue slowly No
Disconnected
(beyond operating
range)
Blinking blue slowly
Disconnected
(from remote
headsets)
Successfully paired or
reconnected
Static blue
Connected
(from remote
headsets)
Charging via USB-C
port
Static red No
Fully charged Static blue No
Low battery (≤10%) Blinking red rapidly
Battery level low
(per 10 minutes)
Note:
• Remote headsets cannot communicate with each
other if the master headset is powered off.
• The master headset will automatically power off if
unpaired for 30 minutes.
• The remote headset will automatically power off if
unpaired for 10 minutes.
• With the master or remote headset on, you can plug in
the USB-C to USB-C data cable for charging while using.
Charging Case for Battery
When the charging case is connected to power, place
batteries into it for charging.
6
-
s
l
ot
c
h
a
rg
in
g
c
a
s
e
①
Charging Indicator
Charging Fully charged
②
Slot for Battery
③
DC Jack with A Screw Nut
Operation Guide
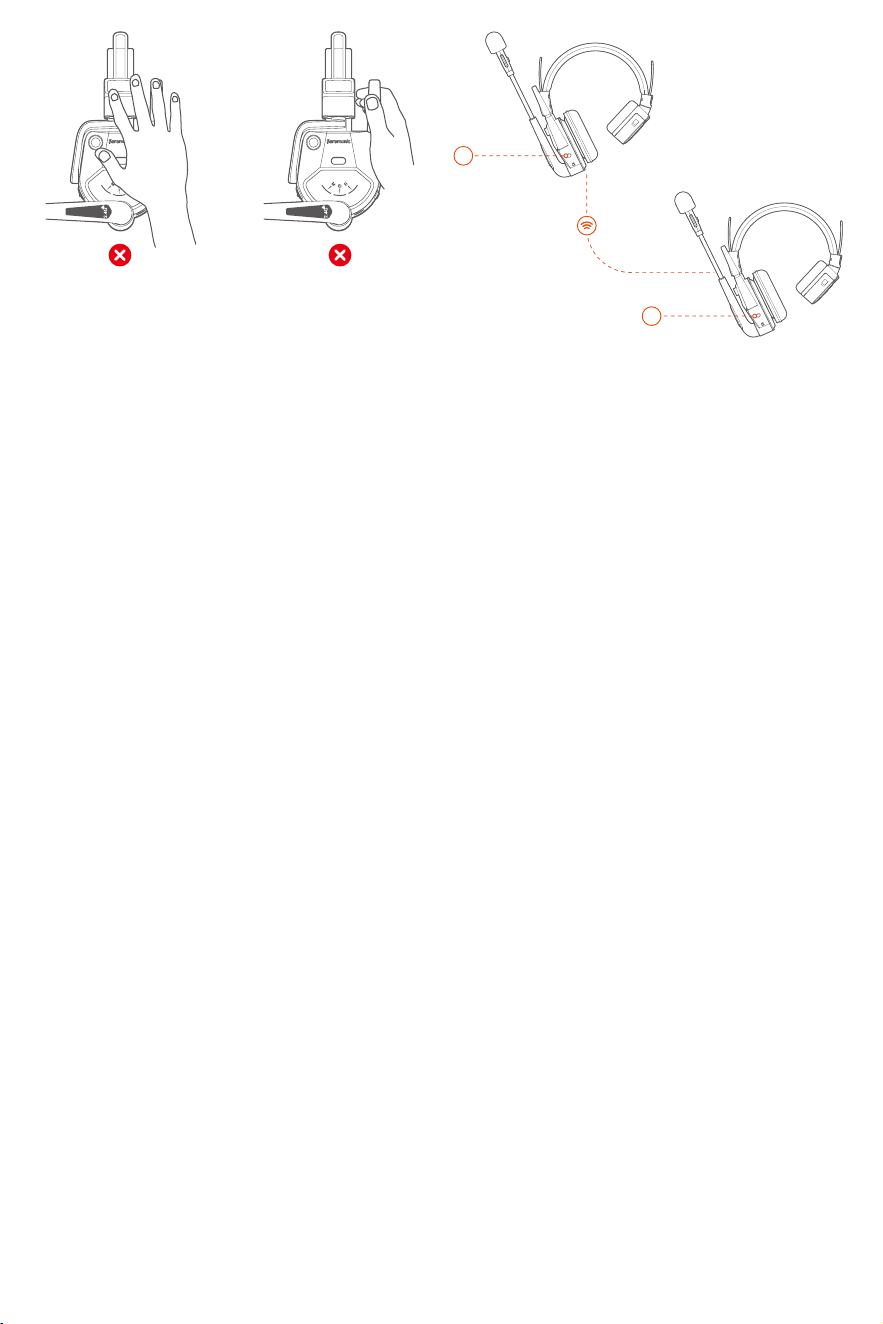
How to Wear
1.Adjust the headband for a comfortable fit according
to your head size.
2.Flexible boom with 270-degree pivot range for left- or
right-side wear.
2-3cm
3.Position the microphone approximately 2 ~ 3 cm away
from the edge of your mouth to avoid "popping" or
other breath noise, and do not place it directly in front
of your mouth.
6
4.While using, please do not cover the antenna area
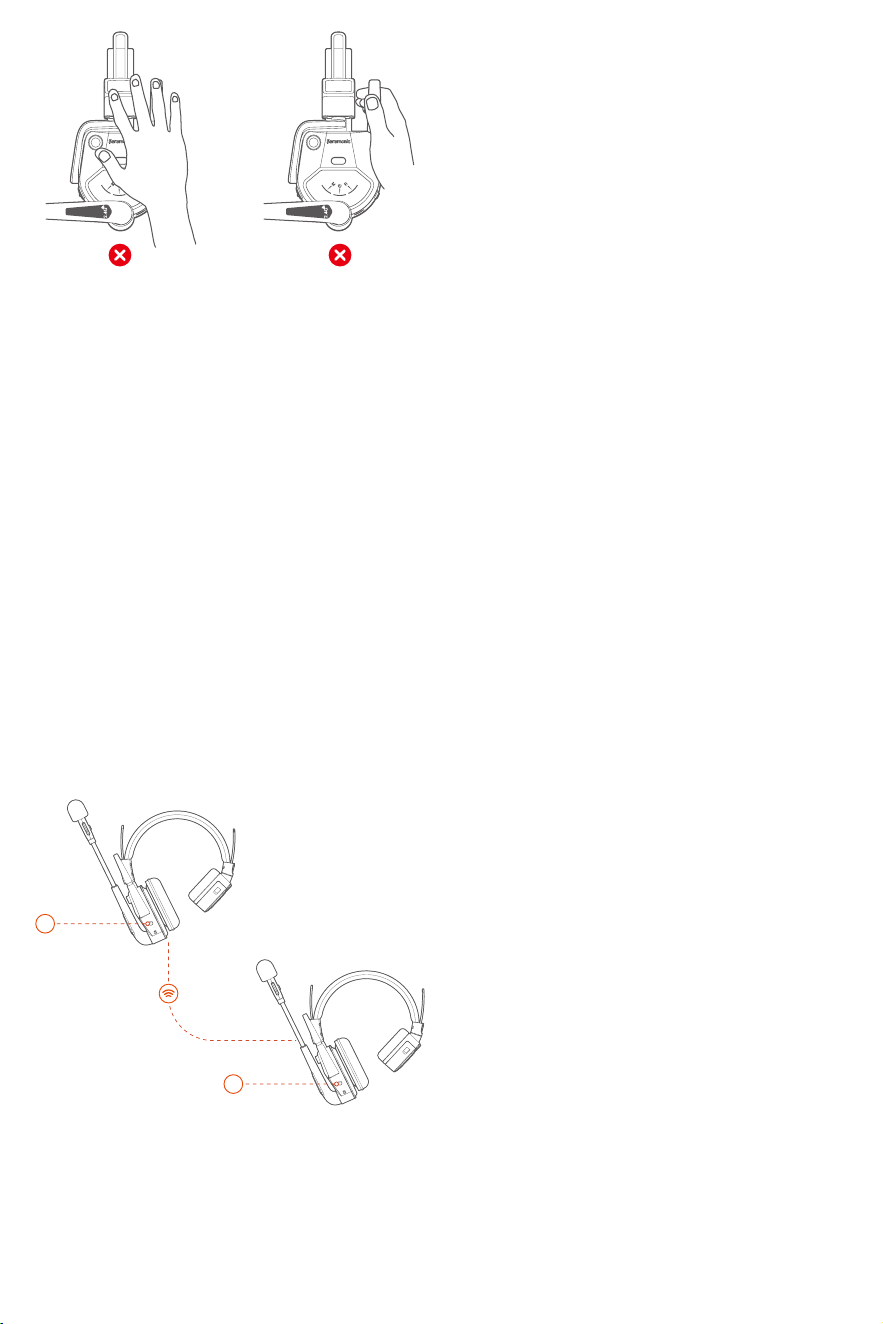
shown in the figure above to avoid signal interference,
and do not handle the antenna to avoid damage.
How to Use
The WiTalk9 SE system automatically pairs up right out
of the box. Press and hold the power button for two
seconds to turn on each headset to get used.
Set the master headset and remote headset as required
There is a default master headset (M indicator glows
static blue) in the WiTalk9 SE system, but any remote
headset ( R indicator glows static blue) can be set to a
master headset. Press and hold the mute button for 5
seconds to set the master or remote headset.
Note: You need to pair up the system again after you set
a remote headset to a master headset or set a master
headset to a remote headset.
How to pair
Note: To ensure successful pairing, it is recommended
to operate the master headset to forget paired headsets
before manual pairing. For more details, please refer to
“How to forget paired headsets” below.
(1)With the master headset off, press and hold its power
button for 8 seconds until its power indicator blinks blue
rapidly and music plays. The master headset will then
enter pairing mode.
(2)With the remote headset (1#) off, press and hold its
power button for 8 seconds until its power indicator
blinks blue rapidly and music plays. The remote headset
(1#) will then enter pairing mode. Follow this step to
operate all remote headsets (2/3/4#) to enter pairing
mode.
(3)If you hear a voice prompt “Connected” from
the remote headset (1#), the connection between
this remote headset (1#) and the master headset is
established. All remote headsets (2/3/4#) will pair with
the master headset in sequence.
8s
8s
How to exit pairing mode
You will be ready to communicate with your team
after the master headset exits pairing mode. Its power
indicator will glow static blue if the master headset exits
pairing mode. You can operate the master headset to
exit pairing mode in any of the following ways:
(1) The master headset will automatically exit pairing if it
is fully paired (with 4 remote headsets).
(2) If the master headset is not fully paired, press its
power button once to exit pairing mode.
How to forget paired headsets
With the master headset off, simultaneously press and
hold its power button and mute button for 3 seconds
until its power indicator blinks blue and red alternately,
then it will forget all paired remote headsets. The master
headset will automatically shut down after successful
forgetting.
Note: If the master headset forgets paired headsets,
all paired remote headsets will be forgotten and you
do not need to operate remote headsets to forget the
paired master headset.
Other Functions
Sidetone
Simultaneously press the volume control and mute
button once to enable or disable the sidetone function,
and a voice prompt of “du” will appear.
• Once this function is activated, you can hear yourself
when you are speaking. There will be a hearing delay,
which is normal.
• Make sure the headset is worn on your head once
you activate this function, otherwise howling noise will
appear.
• This function can NOT be enabled when the headset
is muted.

7
Reset
With the master headset or remote headset off, press
and hold the power button and volume control at the
same time for 8 seconds to reset the headset. All its
indicators will glow static blue while resetting. The
master headset or remote headset will shut down and
all its indicators will turn off after successful resetting.
App Control
Supports real-time monitoring of the current battery
level of the master or remote headset, connection
status, and their names; Supports customized names,
firmware updates for the device; Supports the master
headset pairing, the master headset forgetting paired
headsets, the master headset’s Announce feature,
manually muting the remote headset, and a separate 1
v 1 communication.
Step1: Download Saramonic app on your phone or
computer and launch it.
Step2: Connect the included USB-C to USB-C data
cable to the USB-C charging port on the master headset
and to the charging port on your phone or computer. If
you are using an iPhone, iPad or other Lightning device,
you should purchase a third-party USB-C to Lightning
adapter for connection.
Step 3: After Saramonic app recognizes the WiTalk9 SE
system, a control menu will be displayed.
Troubleshooting
If you encounter any problems while using the unit,
please refer to the following first. If the problem still
persists, please contact the dealer's after-sales services
department.
• No sound from the remote headset after pairing with
the master headset
With the master headset and remote headset off, press
and hold their power buttons for 8 seconds until the
music plays to enter pairing status. If you hear a voice
prompt of “Connected” from the remote headset (#1),
they are paired up successfully. At this time, the master
headset is waiting for other remote headsets (#2/3/4) to
pair with. You need to press the master headset’s power
button once to exit pairing mode, then you will be ready
to communicate with your team.
• The pairing between the master headset and remote
headset is unsuccessful
(1) Check whether the master headset is fully paired
(with 4 remote headsets). If so, the master headset is
unable to enter pairing mode to pair with other remote
headsets. You need to operate the master headset to
forget paired headsets and pair it with the new remote
headset again.
(2) Check if both of them are set to master headsets. If
so, you will need to set one of these two headsets as
a remote headset via pressing and holding the mute
button for 5 seconds, then pair again.
• No sound from the headset
(1) Make sure the master headset and the remote
headset are paired up successfully.
(2) Make sure your headset is not muted. Its mic
indicator glows red when muted. You can unmute it via
pressing the mute button or folding down the boom.
(3) Make sure the headset is not muted by Saramonic
app. If it is muted by this app, you need to unmute it by
this app.
• Failed to power on
Make sure the battery level of the headset is not low.
• Voice change or noise issues
(1) The 2.4 GHz wireless frequency can be easily
attenuated or interfered. Please keep the system away
from high-power Wi-Fi antennas, radios, etc. If that can not
be avoided, you may need to find the right distance and
angle, or change your working site.
(2) Make sure the cable is plugged in properly. Try
unplugging it and plugging it back in.
(3) If the remote headset is at the edge of the operating
range, there will be a voice change. This is a normal
phenomenon.
• Failed to charge the battery when placed into the
charging case
(1) Check whether the charging case connects to power
or not.
(2) Wipe the charging contacts on the battery and
charging case with a clean and soft cloth. Make sure
there is no dirt covering them.
(3) If the touch points are not firmly connected due to
a lack of magnetic force, please contact our after-sales
support.
• The headset automatically shuts down
When not paired or reconnected, the master headset
will automatically shut down after 30 minutes and the
remote headset will automatically shut down after 10
minutes.
Specifications
WiTalk9 SE SMH Single-ear Master Headset /
SRH Single-ear Remote Headset
Transmission Range
≥ 350 m (without obstacles)
≥ 60 m (with obstacles)
Modulation Mode 2.4 GHz
Sampling Rate
16 kHz / 16-bit (with 4 remote
headsets connection)
Voice Delay
≤ 140 ms (with 4 remote
headsets connection)
Receiving Sensitivity < -93 dB
Noise Cancellation Depth 50 dB
Frequency Response 150 Hz - 8 kHz
Signal-to-Noise Ratio > 65 dB
Distortion < 1%@94 dB SPL, 1 kHz

8
Microphone Type Electret
Input SPL > 100 dB SPL
Output SPL 128 dB
Replaceable Battery
Capacity
1450 mAh
Power Requirements
Powered by a replaceable
battery / USB-C charging port
Runtime
Master headset: ≥ 24h (with 4
remote headsets connection)
Remote headset: ≥ 24 h
Charging Time
≤ 3.5 h (charging via USB-C port
in shutdown mode)
Weight
226.5 g (on-ear foam cushion
and battery included)
Working Temperature -10
℃
~ 50
℃
Storage Temperature -20
℃
~ 55
℃
6-Slot Charging Case
Interface DC jack
Dimensions 153×127×31 mm
Weight 192.5 g
Charging Power < 20 W
Power Supply Range 12 V±10%
Current < 1.6 A
Charging Time ≤ 3.5 h
Working Temperature 0
℃
~ 50
℃
Storage Temperature -10
℃
~ 60
℃

9
声明
请在使用前仔细阅读本手册,并严格按照说明进行操作和
存储。请妥善保存好说明书以供将来参考。如果用户手册
不能帮助您解决某些问题,请向零售商寻求帮助或给我们
发送电子邮件:[email protected]
安全指引
使用本产品前,请您仔细阅读并遵守安全指引和用户手册。
一旦使用本产品,即视为您已经阅读和接受与本产品相关
的全部条款。您承诺对使用本产品以及可能带来的后果负
责。本产品不适合儿童使用。由于您的使用对本产品造成
损坏或人身伤害以及任何法律责任,枫笛不予负责。为避
免可能的损失和伤害,请务必遵守以下各项:
•
请勿长时间在高音量时使用耳机,以免造成听力损伤。
•
切勿将电池彻底放完电后长时间存储,以避免电池进入
过放状态而造成电芯损坏,将无法恢复使用。
•
禁止以任何方式拆解产品。若拆解过程中刺破电池,将
会导致电池内部电解液泄露,甚至引发起火、爆炸等。
•
禁止机械撞击、碾压或抛掷产品。请勿在产品上放置重物。
•
禁止将产品靠近热源 ( 火炉或加热器等 ),或置于炎热天
气的汽车内。
•
若产品发生起火 , 请立即使用水、水雾、沙、灭火毯、干粉、
二氧化碳灭火器灭火。请根据实际情况按以上推荐顺序选
择灭火方式。
概述
WiTalk9 SE 是一款全双工无线内通耳机系统 ,使用 2.4
GHz 频段,无线传输距离可达 350 米。头戴一体式无线通
话系统的设计,使用时无需按钮操作,真正做到解放双手,
想说就说,有效提升工作效率。单耳机系统支持一拖四连
接(共 5 人通话),适用于婚礼活动、短剧拍摄、广告拍摄、
采访 / 会议导播等中小型的活动场景。
耳机采用可拆卸锂电池供电,电池可取出放入充电座内充
电。在一拖四的情况下,主、从机单次续航可达 24 小时。
主、从机还可以通过耳机 USB-C 端口充电,关机状态下约
3.5 小时充满。
特点
•
5 人全双工通话系统,无需 HUB 主站,开机即用,通过
两套有线级联即可扩展至 9 人规模。
•
任意耳机通过有线连接会议系统,两团队可实现异地全
双工通话,不受地域限制。
•
主从耳机可切换,支持自定义主机,主机故障、损坏或
遗失,不影响整套系统使用,去中心化的分组设计也为团
队协作带来更高灵活度。
•
内外双天线设计,自适应跳频技术,350 米范围稳定通话,
适合干扰源较少的中小型应用场景。
•
ClearTalk
™
by Saramonic,自研三麦克风阵列降噪算法,
实现 360 度全向降噪,轻 / 强降噪模式可选,有效隔绝噪
音干扰,确保通话更清晰。
•
基于自研 AGC 算法 + 大音量设计,即使身处 120dB 大
声压环境也能保证清晰音质,搭配蛋白皮防护耳套,隔绝
部分环境噪音带来的干扰。
•
Saramonic APP,通过有线连接进入 APP,这里集纳最
需要、最常用功能,大图标按钮操作,同时支持自动频段
调整,无缝漫游,全球通用。
•
丰富的配件拓展系统,提供可更换耳罩、头垫、电池、
充电坞等 10 余种配件,为团队工作保驾护航。
10
可选套装
WiTalk9 SE 预设多种配置版本,可根据团队人数按需选择。本手册适用于 WiTalk9 SE 所有的套装。每个套装包含的内容
如下 :
WiTalk9 SE SMH
单耳主机
6 口充电座 可拆卸电池
拉链防护包
3.5 mm TRRS 转 TRRS 音频线 USB-A 转 USB-C 转接头
3.5 mm TRRS 母座转 USB-A 声卡
蛋白皮包耳耳套 麦克风防风海绵充电座电源适配器
耳机数字贴纸
耳机收纳袋
WiTalk9 SE SRH
单耳从机
单独出售(级联线套件)
压耳耳套
USB-C 转 USB-C
数据线
11
产品结构
WiTalk9 SE SMH 单耳主机 /WiTalk9 SE SRH 单
耳从机
① 麦克风指示灯
② 降噪键
操作 功能 麦克风指示灯 提示音
单击
强降噪 绿灯常亮 Strong
轻降噪 蓝灯常亮 Weak
长按 3 秒
级联功能
开启
紫灯常亮 无
级联功能
关闭
恢复之前状态
指示
无
•
出厂默认轻降噪模式。
•
级联功能默认关闭,详情请参考“ ⑨ TRRS 有线 Link 孔”。
③ 电池盖开关
向下滑动电池盖开关,电池盖弹开后可安装 / 取出电池。
④ 电源键
长按 2 秒开关机。开机会出现“Power on”的提示音,关
机会出现“Power off”的提示音。
WiTalk9 SE-2S
WiTalk9 SE SMH 单耳主机 (1)
WiTalk9 SE SRH 单耳从机 (1)
可拆卸电池 (2)
6 口充电座 (1)
充电座电源适配器 (1)
USB-C 转 USB-C 数据线 (1)
压耳耳套 (2)
WiTalk9 SE-3S
WiTalk9 SE SMH 单耳主机 (1)
WiTalk9 SE SRH 单耳从机 (2)
可拆卸电池 (3)
6 口充电座 (1)
充电座电源适配器 (1)
USB-C 转 USB-C 数据线 (1)
压耳耳套 (3)
WiTalk9 SE-4S
WiTalk9 SE SMH 单耳主机 (1)
WiTalk9 SE SRH 单耳从机 (3)
可拆卸电池 (4)
6 口充电座 (1)
充电座电源适配器 (1)
USB-C 转 USB-C 数据线 (1)
压耳耳套 (4)
WiTalk9 SE-5S
WiTalk9 SE SMH 单耳主机 (1)
WiTalk9 SE SRH 单耳从机 (4)
可拆卸电池 (5)
6 口充电座 (1)
充电座电源适配器 (1)
USB-C 转 USB-C 数据线 (1)
压耳耳套 (5)
蛋白皮包耳耳套 (2)
魔术贴海绵垫 (2)
麦克风防风海绵 (2)
耳机数字贴纸 (3)
耳机收纳袋 (2)
拉链防护包 (1)
蛋白皮包耳耳套 (3)
魔术贴海绵垫 (3)
麦克风防风海绵 (3)
耳机数字贴纸 (3)
耳机收纳袋 (3)
拉链防护包 (1)
蛋白皮包耳耳套 (4)
魔术贴海绵垫 (4)
麦克风防风海绵 (4)
耳机数字贴纸 (3)
耳机收纳袋 (4)
拉链防护包 (1)
蛋白皮包耳耳套 (5)
魔术贴海绵垫 (5)
麦克风防风海绵 (5)
耳机数字贴纸 (3)
耳机收纳袋 (5)
拉链防护包 (1)
12
⑤ USB-C 充电口(5 V/1 A)
可接入 USB-C 转 USB-C 数据线给耳机充电,或者连接手
机 / 电脑上下载的 Saramonic App, 支持升级和调试等功
能。(不支持音频传输功能)
注:通过 USB-C 转 USB-C 数据线与手机 / 电脑上的
Saramonic App 连接后,不支持给耳机充电。
⑥ 音量旋钮 / 一键广播(主机)/PTT 功能键(从机)
操作 功能 提示音
顺时针旋转 增大音量 无
逆时针旋转 减小音量 无
长按不松手 开启一键广播 / PTT 嘟
•
若使用过程中不希望无关声音被拾取,同时又有频繁短暂
的沟通需求,从机可使用 PTT 功能,松手自动进入静音状态。
(可通过单击静音键或者拨动麦克风杆恢复)
•
若使用过程中,主机临时需要跟所有从机发布命令,可长
按音量键,开启一键广播功能。此时所有连接的从机被禁止
说话,只能听主机说话,从机麦克风指示灯呈红灯慢闪。
•
手动将主机切换成从机或者将从机切换成主机后,一键广
播功能和 PTT 功能会跟随切换。
⑦ 麦克风杆
操作 功能 麦克风指示灯 提示音
上翻 静音开启 红灯常亮 嘟
下翻 静音关闭 蓝 / 绿灯常亮 嘟
⑧ 静音键
操作 功能 麦克风指示灯 提示音
单击
静音开启 红灯常亮 嘟
静音关闭 蓝 / 绿灯常亮 嘟
⑨ TRRS 有线 Link 孔
•
支持选配的级联线套件连接 TRRS 接口的设备,实现本
地监听。
•
支持选配的级联线套件连接两套 WiTalk9 SE 实现扩展通
话数量(最大支持 2 套)。
第一套WiTalk9SE系统 第二套WiTalk9SE系统
主机 主机
•
支持选配的级联线套件连接手机、电脑等设备参与远程
会议,实现异地沟通。
注:级联功能开启,需要通过 3.5 mm TRRS 转 TRRS 音
频线连接,然后长按降噪键 3 秒开启才能生效。
由 于 不 同 型 号 手 机 的 耳 机 孔 可 能 存 在 兼 容 性 问 题,
Saramonic 官方建议通过级联线套件的 USB 接口连接到
手机进行级联。
13
WiTalk9 SE SMH 单耳 主机 /WiTalk9 SE SRH 单
耳从机面板
M / R
指示灯:
状态 主从模式 M / R 指示灯
长按静音键 5 秒
主机 M 指示灯蓝灯常亮
从机 R 指示灯蓝灯常亮
•
WiTalk9 SE 系统有默认的主机,若使用过程中原主机电
量不足关机或损坏,可将系统中任意一从机变成主机。
•
若您购买的套装内含 2 副以上的耳机,可设立两个主机,
从而搭建两个独立通话小组。
注:去中心化分组的情况下,组与组之间无法沟通。
电源指示灯:
状态 电源指示灯 提示音
未连接 / 未回连 蓝灯慢闪 无
超距离断连 蓝灯慢闪
Disconnected
(仅从机)
连接成功 / 自动回连 蓝灯常亮
Connected(仅
从机)
充电中(USB-C 充
电口)
红灯常亮 无
充满电 蓝灯常亮 无
电量≤ 10% 红灯快闪
Battery level low
(10 分钟 / 次)
• 主机关机后,从机之间无法通话。
• 若主机没有与任何从机连接,30 分钟后将自动关机。
• 若从机与主机未连接或未回连成功,10 分钟后将自动关机。
• 主、从机在开机状态下,支持外接充电线边充边用。
电池充电座
电池充电座通电状态下,将耳机电池放入充电座内即可为
电池充电。
6口充电座
① 充电指示灯
充电中 充满电
② 充电槽
③ 带锁直流电源插孔
操作指南
耳机佩戴
1. 根据自己的头型调整如图所示调整至舒适位置。
2. 麦克风杆可旋转 270°,耳机左右两侧佩戴均可。
2-3cm
3. 调整麦克风的角度,麦克风咪头放在嘴角前约 2 ~ 3 cm
处。请勿将麦克风直接放在嘴的正前方,避免出现“噗”
声或其它呼吸噪声。
14
4. 使用时,请不要用手遮挡天线区域,避免信号干扰;请
不要用手拎着天线,避免天线损坏。
如何使用
开箱即用,依次长按各耳机电源键 2 秒开机后即可通话。
按需设置主、从机
WiTalk9 SE 系统有默认的主机(M 指示灯蓝灯常亮),但
该系统中的任一从机(R指示灯蓝灯常亮)都可以变成主机,
长按静音键 5 秒即可切换主 / 从机模式。
注:切换主从机模式后需要重新对码。
如何对码
注:为保证配对成功,每次配对前请对主机进行清码操作,
详情请参考下面的“如何清除对码”。
(1)关机状态下,长按主机电源键 8 秒 , 待主机电源指示
灯呈蓝色快闪且背景音乐响起后松手,即进入对码状态。
(2)关机状态下,长按从机(1#)电源键 8 秒,待从机(1#)
电源指示灯呈蓝色快闪且背景音乐响起后松手,即进入对
码状态。从机(2/3/4#)依次进行此操作,所有从机进入
对码状态。
(3)若从机(1#)听到“Connected”提示音,则从机(1#)
与主机对码成功。从机(2/3/4#)将依次与主机对码成功。
8s
8s
如何退出对码
对码成功后主机需退出对码状态,主、从机之间才可通话。
退出对码后,主机电源指示灯由蓝灯快闪转为蓝灯常亮,
可通过以下方式退出对码状态:
(1) 主机一拖四对满后自动退出对码状态。
(2) 若主机未对满,短按一次电源键即可退出对码状态。
如何清除对码
关机状态下,同时长按主机电源键和静音键 3 秒,待主机
电源指示灯呈红蓝交替快闪后松手,此时设备进入清码状
态。清码成功后会自动关机。
注:主机一键清码会将所有与主机对码的从机全部清码。
主机清码完成后,从机会自动清码,不需要单独清码。
其他功能
侧音功能
同时单击音量旋钮和静音键开启 / 关闭侧音功能,
会出现“嘟”的提示音。
•
侧音功能开启后,通话时能听到自己说话的声音。
会存在听感延时,此为正常现象。
•
侧音功能开启后,耳机必须要戴在头上,否则会
出现啸叫。
•
耳机处于静音状态时,侧音功能将无法开启。
恢复出厂设置
主、从机在关机状态下,同时长按电源键和音量旋
钮 8 秒即可恢复出厂设置。恢复出厂设置时,耳机
所有的指示灯皆呈蓝灯常亮。恢复出厂设置成功后,
所有指示灯熄灭,产品自动关机。
App 控制
支持实时监看主 / 从机当前电量、连接状态、名称;
支持对设备进行自定义名称、固件升级 ; 支持主机
一键对码、主机一键清码、主机一键广播功能、手
动静音从机、1v1 通话等功能。
步骤一:在 App 应用市场下载“Saramonic”,打
开 App。
步骤二:通过标配的 USB-C 转 USB-C 数据线,将
WiTalk9 SE 的主机充电口与手机接口有线连接。苹
果闪电接口的手机用户,需要购买第三方的 USB-C
转 Lightning 接口数据线连接。
步骤三:App 识别到 WiTalk9 SE 设备后,会弹出
WiTalk9 SE 的控制页面。

15
故障排除
在使用过程中出现任何问题,请参照以下方法解决。
如果问题仍然存在,请联系经销商售后服务。
•
从机与主机对码后没有声音
确保在关机状态下,长按主、从机电源键 8 秒进入
对码状态,此时配对音乐响起,若从机(#1)听到
“Connected”提示音,则从机(#1)与主机对码
成功。此时主机还在等待其他从机(#2/3/4)进行
配对,如果此时不需要等待,需要手动单击主机电
源键退出对码状态,此时才能正常通话。
•
主机与从机无法连接
(1)先确认主机与从机当前是否已经配满,配满
状态下,主机是无法进入对码状态的。需要先将主
机清码,再与新的从机进行对码。
(2)由于 WiTalk9 SE 版本的主从机可以切换,需
要确认当前配对的是主机还是从机,耳机 M 指示灯
常亮表示主机模式,R 指示灯常亮表示从机模式。
若两个耳机都是主机则无法配对,需长按静音键 5
秒将其中一个主机切换成从机模式,再对码。
•
麦克风无声音
(1)确保主、从机已配对成功。若未配对,需进
行对码操作。
(2)确保耳机没有被静音,静音时麦克风指示灯
为红灯常亮。可通过单击静音键或者拨动麦克风杆
取消静音。
(3)在 App 上检查是否将对应的从机静音,需要
在 App 上手动解除。
•
无法开机
检查耳机电池电量是否过低,可将电池取出更换后
正常开机使用。
•
出现变音、噪音
(1)在 2.4 GHz 频谱下,信号很容易受干扰,请
远离大功率无线路由器或无线设备。若无法避免,
建议找到合适的距离和角度或者更换使用场景。
(2)查看连接线是否插到位,可将连接线材拔出
后重新插入。
(3)当距离到产品临界点时,会出现变音的情况,
此为正常现象。
•
电池放入充电座无法充电
(1)检查电池充电座是否接入电源。
(2)用干净的软布擦拭产品电池和充电座的触点,
避免由灰尘引起的接触不良导致。
(3)检查电池和充电座触点是否接触,如未接触
需联系售后。
•
耳机自动关机
从机与主机未对码或未成功回连状态下,从机 10
分钟后自动关机,主机 30 分钟后自动关机。因此主、
从机重新开机后对码成功即可正常使用。
参数
WiTalk9 SE SMH 单耳主机 /WiTalk9 SE SRH 单
耳从机
传输距离
≥ 350 米 ( 无障碍无干扰环境 )
≥ 60 米 ( 有障碍有干扰环境 )
信号调制 2.4 GHz
通话采样率 16 kHz / 16-bit(一拖四)
延迟 ≤ 140 ms(一拖四)
接收灵敏度 < -93 dB
通话灭噪深度 50 dB
频率响应 150 Hz - 8 kHz
信噪比 > 65 dB
失真 < 1%@94 dB SPL,1 kHz
麦克风类型 驻极体
输入声压级 > 100 dB SPL
输出声压级 128 dB
可拆卸电池容量 1450 mAh
供电方式
可拆卸电池供电 / USB-C 充电口
充电
续航时长
主耳机:≥ 24 h(一拖四)
从耳机:≥ 24 h
充电时长
≤ 3.5 h(关机状态下 USB-C 充电
口充电)
重量 226.5 g(含电池和压耳耳套)
工作温度 -10℃ ~ 50℃
存储温度 -20℃ ~ 55℃

16
6 口充电座
接口 DC 插孔
尺寸 153 x 127 x 31 mm
重量 192.5 g
充电功率 <20 W
供电范围 12 V±10%
充电电流 <1.6 A
充电时间 ≤3.5 h
工作温度 0℃ ~ 50℃
储存温度 -10℃ ~ 60℃

17

18
ShenzhenJiayzPhotoIndustrial.,Ltd
深圳市长丰影像器材有限公司
A16Building,IntelligentTerminalIndustrialParkofSiliconValley
Power,Guanlan,LonghuaDistrict,Shenzhen,China
深圳市龙华区观澜街道大富工业区硅谷动力智能终端产业园A16栋
400-613-1096
www.saramonic.com
For better recording experience, the application
Saramonicis recommended.
为获得更好的录制体验,推荐使用枫笛Saramonic
自主研发应用软件Saramonic。