*FRONT *BACK
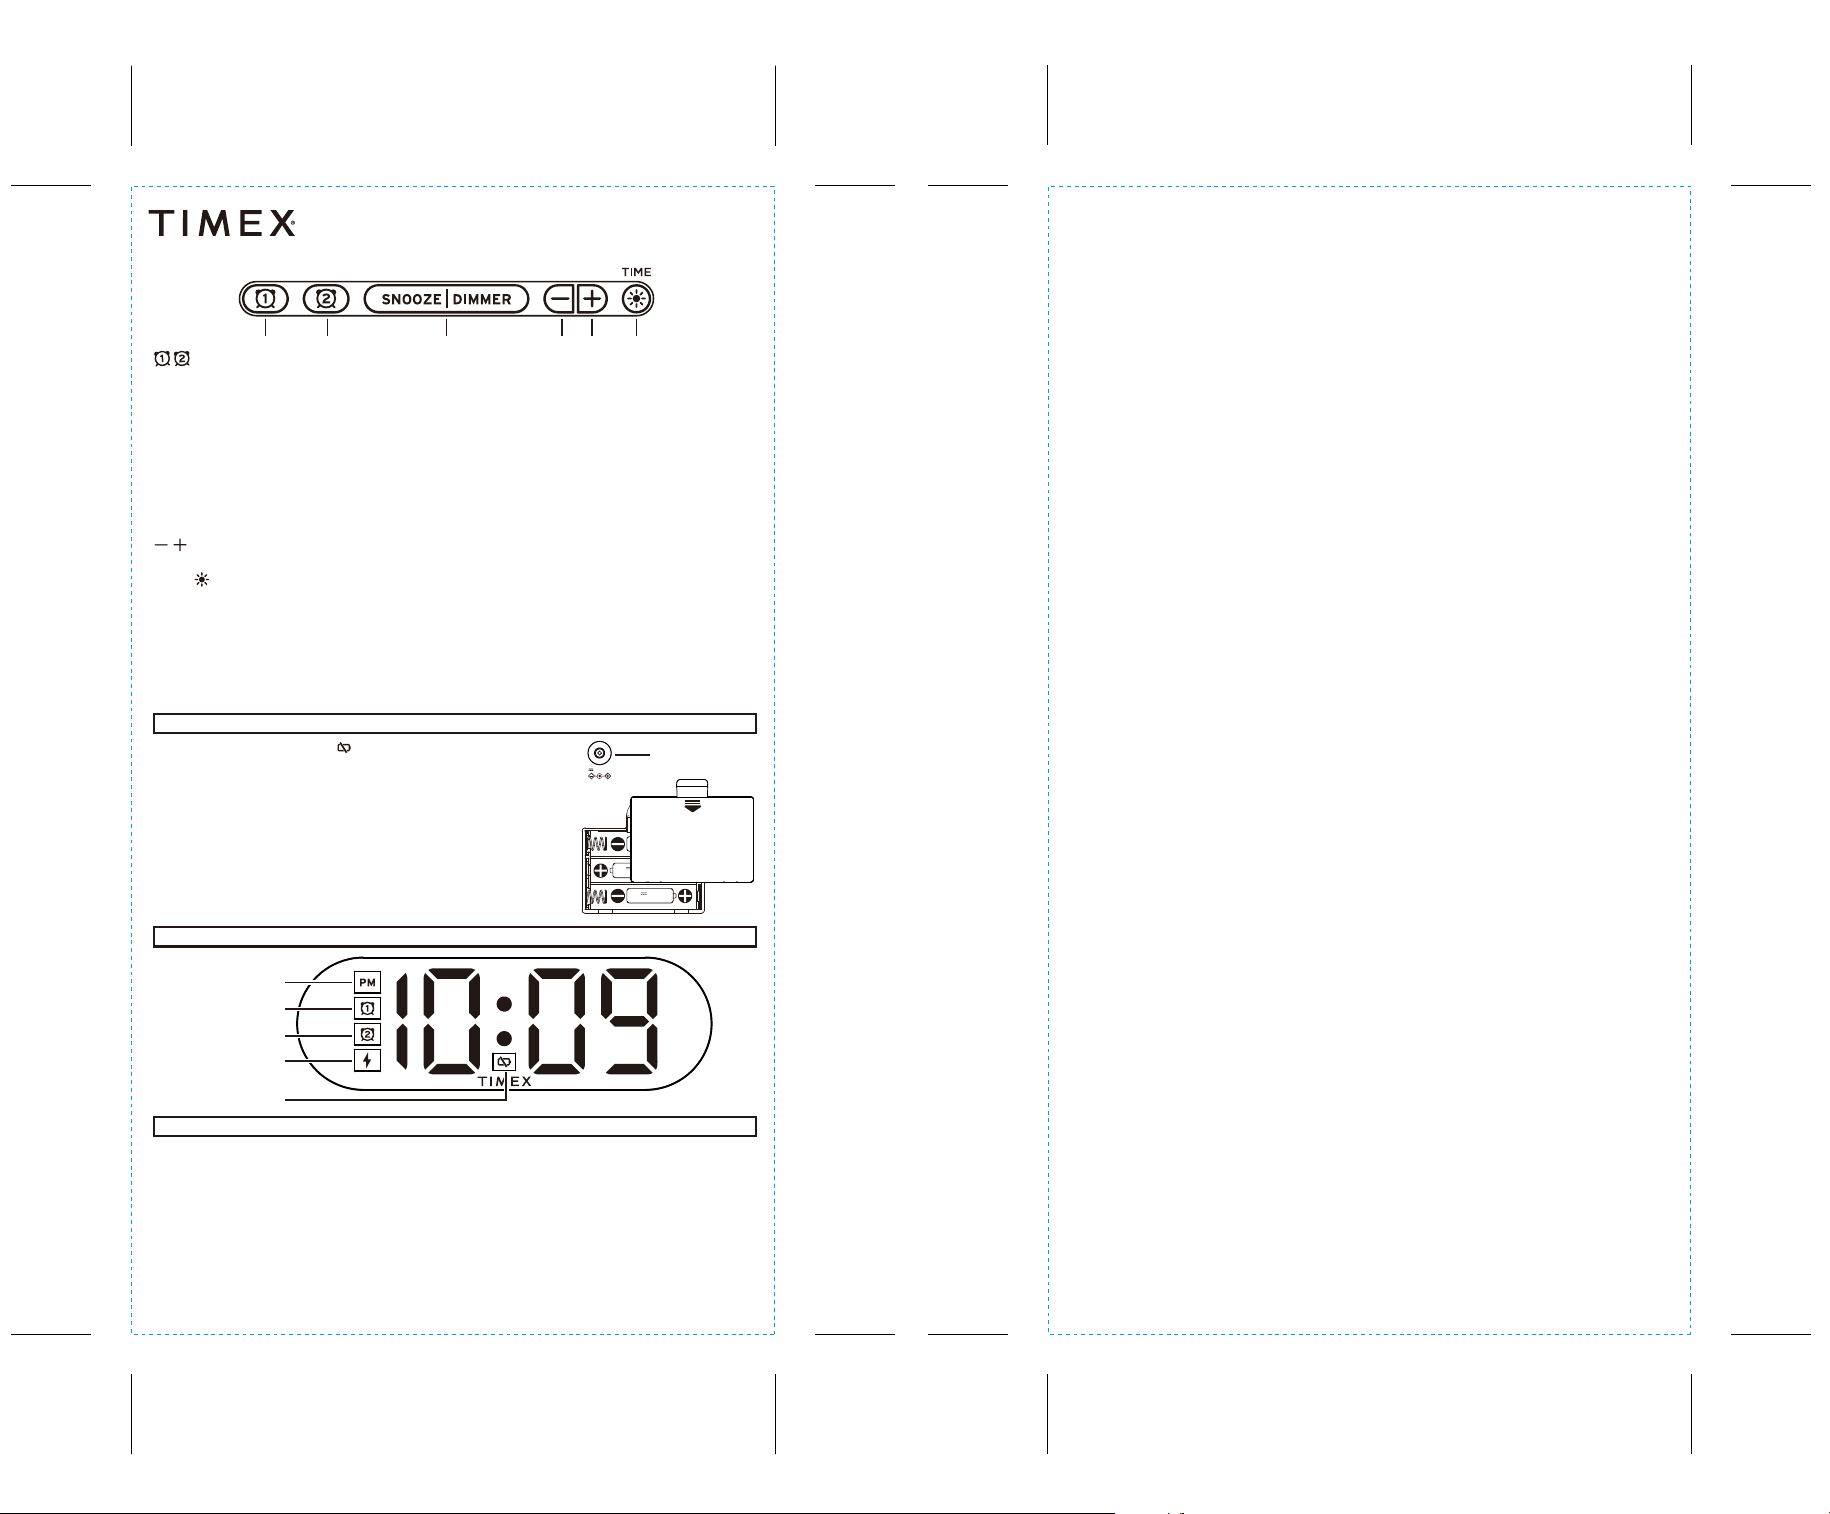
SNOOZE/DIMMER
- Press to Snooze Alarm when alarm is sounding
- Press to Adjust Display Brightness: cycle through Hi, Med, Lo and OFF
- Long press Snooze button can adjust snooze time (1-30mins) and press Snooze button to confirm
Installing the Batteries
- Press in and pull the battery door to open
and remove the battery door.
- Install 3 new “AAA” batteries, matching the
(+/-) markings in the battery compartment.
- Replace the door.
Model: TW502
DISPLAY ICONS
WIRELESS CHARGING
REAR / BOTTOM PANEL
Dual Alarm Clock
Alarm Clock with Nightlight and Fast Wireless Charging
TW502-IS-020926-A
Printed in China
Maintenance
• Place the unit on a level surface away from sources of direct sunlight or excessive heat.
• Protect your furniture when placing your unit on a natural wood and lacquered finish. A cloth or other protective material
should be placed between it and the furniture.
IMPORTANT SAFETY INSTRUCTIONS
Please heed all warnings, read and follow all instructions and keep these instructions handy for future reference.
1. Do not use this product near water.
2.
Unplug unit
and clean only with damp cloth. Stronger cleaning agents, such as Benzene, thinner or similar materials can damage the
surface of the unit.
3. Do not block any ventilation openings. Install in accordance with the manufacturer’s instructions.
4. Heat – This product should be situated away from heat sources such as radiators, heat registers, stoves or other appliances (including
amplifiers) that produce heat.
5. Only use attachments/accessories specified by the manufacturer.
6. Damage Requiring Service – This product should be serviced by qualified service personnel when:
- Objects have fallen into or liquid has been spilled into the enclosure.
- The unit has been exposed to rain. The unit has been dropped or the enclosure damaged.
- The unit exhibits a marked change in performance or does not operate normally.
7. No naked flame sources, such as lighted candles, should be placed on this product.
8. Attention should be drawn to the environmental aspects of battery disposal. Many electronics retailers now recycle batteries and other
electronic components at no charge. To find a drop-o location near you, visit www.call2recycle.com
9. This product is suitable for use in tropical and/or moderate climates.
WARNING:
- To reduce the risk of fire or electric shock, do not expose this product to rain or moisture.
- Do not dispose of batteries in the household trash or fire.
Battery Cautions and Tips - Keep new and used batteries away from children.
• Caution – Risk of explosion if the battery is replaced by an incorrect type.
• Only use the recommended/supplied batteries or equivalent.
• Use alkaline batteries for longer life.
• Do not mix old and new batteries, and do not mix alkaline, carbon-zinc or rechargeable nickel-cadmium batteries.
• Insert batteries with proper polarity (+/–) as indicated.
• Remove exhausted batteries from product.
• Recharge rechargeable batteries under adult supervision.
• Rechargeable batteries are to be removed from the device before being charged.
• Do not attempt to recharge non-rechargeable batteries.
• Do not open batteries or heat them beyond normal ambient temperatures.
• To prevent battery leakage or damage remove batteries from a product if it will not be used for a month or longer.
• Use extreme caution handling leaking batteries (avoid direct contact with eyes and skin). If battery leakage comes into contact with
eyes, IMMEDIATELY flush the eyes with lukewarm and gently flowing water for at least 30 minutes. If skin contact occurs, wash skin
with clean water for at least 15 minutes. Seek medical attention if any symptoms occur.
• Do not dispose of batteries in the household trash or fire; batteries may leak or explode.
• Follow applicable laws and local regulations for the disposal and transportation of batteries.
• Store in cool, dry, ventilated area away from hazardous or combustible material.
• The supply terminals are not to be short-circuited.
FCC Information
This equipment complies with FCC RF radiation exposure limits set forth for an uncontrolled environment.
This equipment should be installed and operated with minimum distance 20cm between the radiator & your body.
This device complies with Part 15 of the FCC Rules, operation is subject to the following two conditions:
(1) This device may not cause harmful interference, and (2) this device must accept any interference received, including interference that
may cause undesired operation.
• Warning: Changes or modifications to this unit not expressly approved by the party responsible for compliance could void the user’s
authority to operate the equipment.
• NOTE: This equipment has been tested and found to comply with the limits for a Class B digital device, pursuant to Part 15 of the FCC Rules.
These limits are designed to provide reasonable protection against harmful interference in a residential installation. This equipment
generates, uses and can radiate radio frequency energy and, if not installed and used in accordance with the instructions, may cause
harmful interference to radio communications.
However, there is no guarantee that interference will not occur in a particular installation. If this equipment does cause harmful interference
to radio or television reception, which can be determined by turning the equipment o and on, the user is encouraged to try to correct
the interference by one or more of the following measures:
• Reorient or relocate the receiving antenna.
• Increase the separation between the equipment and receiver.
• Connect the equipment into an outlet on a circuit dierent from that to which the receiver is connected.
• Consult the dealer or an experienced radio/TV technician for help.
ISED Information
This equipment complies with IC RSS-102 radiation exposure limits set forth for an uncontrolled environment.
The device comply with ISED RF exposure requirement, users can obtain Canadian information on RF exposure and compliance.
This device contains licence-exempt transmitter(s)/receiver(s) that comply with Innovation, Science and Economic Development Canada’s
licence-exempt RSS(s). Operation is subject to the following two conditions:
(1) This device may not cause interference.
(2) This device must accept any interference, including interference that may cause undesired operation of the device.
Any Changes or modifications not expressly approved by the party responsible for compliance could void the user’s authority to operate
the equipment.
Cet équipement est conforme aux limites d'exposition aux radiations IC CNR-102 établies pour un environnement non contrôlé.
L'appareil est conforme aux exigences d'exposition RF ISED, les utilisateurs peuvent obtenir des informations canadiennes sur l'exposition
aux RF et la conformité.
L’émetteur/récepteur exempt de licence contenu dans le présent appareil est conforme aux CNR d’Innovation, Sciences et Développement
économique Canada applicables aux appareils radio exempts de licence. L’exploitation est autorisée aux deux conditions suivantes :
(1) L’appareil ne doit pas produire de brouillage;
(2) L’appareil doit accepter tout brouillage radioélectrique subi, même si le brouillage est susceptible d’en compromettre le fonctionnement.
Tout changement ou modification non expressément approuvé par la partie responsable de la conformité peut annuler l'autorité de
l'utilisateur à utiliser l'équipement.
CAN ICES-3 (B) / NMB-3(B)
TW502 - Instruction Sheet - English
Color: Black text on white paper (1C + 1C)
Size: 102 x 182 mm
Material: 85 gsm wood free paper
Feb. 9, 2026
- Press & Hold Alarm 1/2 button to Set Alarm
- Use +/- to select hour and press Alarm button to confirm
- Use +/- to select minute and press Alarm button to confirm
- Press the Alarm button to confirm the alarm time setting. The alarm schedule will flash: 7 (every day),
5 (weekdays) or 2 (weekend only). Press the +/- buttons to select the desired alarm schedule.
- Press and release Alarm button to arm/disarm alarm
- When alarm is sounding, press Alarm button to disarm and reset for next day
NOTE: The PM indicator will light on the display when the hour is set for PM. There is no AM indicator.
- Press to decrease/increase settings
*Remove protective film in the front of display by peeling it o.
© 2026 SDI Technologies, Inc. All rights reserved
Questions? Visit www.timexaudio.com
TIMEX trademark owned by Timex Group USA, Inc. in the US and other countries
Down UpSnooze/Dimmer Time Set
/Brightness
Alarm 1 Alarm 2
TIME /
- Press to adjust nightlight brightness: cycle through Hi, Med, Lo and OFF
- Press and hold Time Set button to set Clock
- Use +/- to set Hour and press Time Set button to confirm
- Use +/- to set Minute and press Time Set button to confirm
- Use +/- to set Year and press Time Set button to confirm
- Use +/- to set Month and press Time Set button to confirm
- Use +/- to set Day and press Time Set button to confirm
- Use +/- to set DST on/o and press Time Set button to confirm
NOTE: The PM indicator will light on the display when the hour is set for PM. There is no AM indicator.
When the Low Battery icon appears on the
display, please replace with 3 new "AAA" batteries.
Note: The alarm will sound during power outage.
Note: While in backup battery mode (no adapter
connected) pressing the snooze/dimmer button
will cause the display to appear momentarily.
Wireless Charging Works With: iPhone XS and iPhone 11 series / Samsung Galaxy S7 and
newer wireless charging phones / Also works with wireless charging case for AirPods and
other wireless charging devices.
Place device face up on the charging rest. The Charging Indicator will show charging status:
Steady Glow: Device is charging
Fast Blinking: Device is misaligned, or foreign object detected on charging pad
Icon OFF: Device is fully charged(some devices do not support this feature).
WARNING: If your phone has a metal protective case, remove it before charging. Do not
place magnetic or metal objects on charger during charging. Qi compatible phones with
metallic looking finishes will charge normally.
DC JACK (9V/2.22A)
(for power supply)
DC 9V, 2.22A
DC 1.5V UM-4
"AAA"(R03) SIZE
DC 1.5V UM-4
"AAA"(R03) SIZE
DC 1.5V UM-4
"AAA"(R03) SIZE
OPEN
PM Indicator
Wireless
Charging Status
Low Battery
Alarm 1
Alarm 2