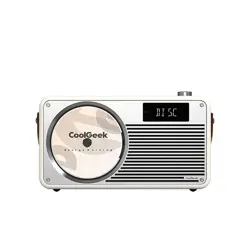
VS-02
Portable CD Player

EN 1
Content
Important ..................................................... 12
Accessories ................................................. 13
Install of Portable Strap .............................. 13
Product Overview ........................................ 14
Power operation .......................................... 15
Connecting the AC/DC adaptor .............. 15
Built-in battery ........................................15
To recharge the built-in battery ............... 15
Turning the power on and o.................. 15
Automatically turn o the unit ................ 15
Disc Operation ............................................. 16
Disc Playing............................................16
Change the Disc .....................................16
To Skip and Play.....................................16
To search and Play .................................16
Playing Repeatedly ................................16
Random Play ..........................................16
FM radio operation ...................................... 17
Tuning in to a Station ............................. 17
Program radio stations ...........................17
Tune to preset radio stations .................. 17
Play from Bluetooth device .......................... 18
Specications .............................................. 18
Troubleshooting ........................................... 19

EN 2
- Batteries (battery packs or combination
batteries) shall not be exposed to excessive
heat such as sunshine, re or the like.
Warning
- Never remove the casing of this unit.
- Never lubricate any part of this unit.
- Never place this unit on other electrical
equipment.
Laser Product
This product is equipped with low power laser
equipment inside, for using safely, don’t take
apart any covers or try to take apart the prod-
uct inside. Please contact the qualied person-
nel for repairing.
Important
Safety
- Read all instructions.
- Heed all warnings.
- Follow all instructions.
- Ensure that the power supply voltage
matches the voltage on the back or bottom
of the unit.
- Do not use this device near water.
- Clean only with dry cloth.
- Do not block any ventilation openings.
Install in accordance with the
manufacturer's instructions.
- Do not install near any heat sources such
as radiators, heat registers, stoves, or other
devices (including ampliers) that produce
heat.
- Make sure the unit or the unit stand is not
resting on top of the mains adaptor cable,
as the weight of the unit may damage the
cable and create a safety hazard.
- Only use attachments/accessories specied
by the manufacturer.
- Unplug this device during lightning storms
or when unused for long periods of time.
- Refer all servicing to qualied service
personnel. Servicing is required when the
device has been damaged in any way, such
as power-supply cord or plug is damaged,
liquid has been spilled or objects have
fallen into the device, the device has been
exposed to rain or moisture, does not
operate normally, or has been dropped.
- Devices shall not be exposed to dripping or
splashing.
- Do not place any sources of danger on the
device (e.g. liquid lled objects, lighted
candles).
- The direct plug-in adaptor is used as
disconnect device, the disconnect device
shall remain readily operable.
EN 3
Accessories
- Main unit ................................................. 1
- AC/DC Adaptor ....................................... 1
- Portable strap ......................................... 1
- Instruction manual .................................. 1
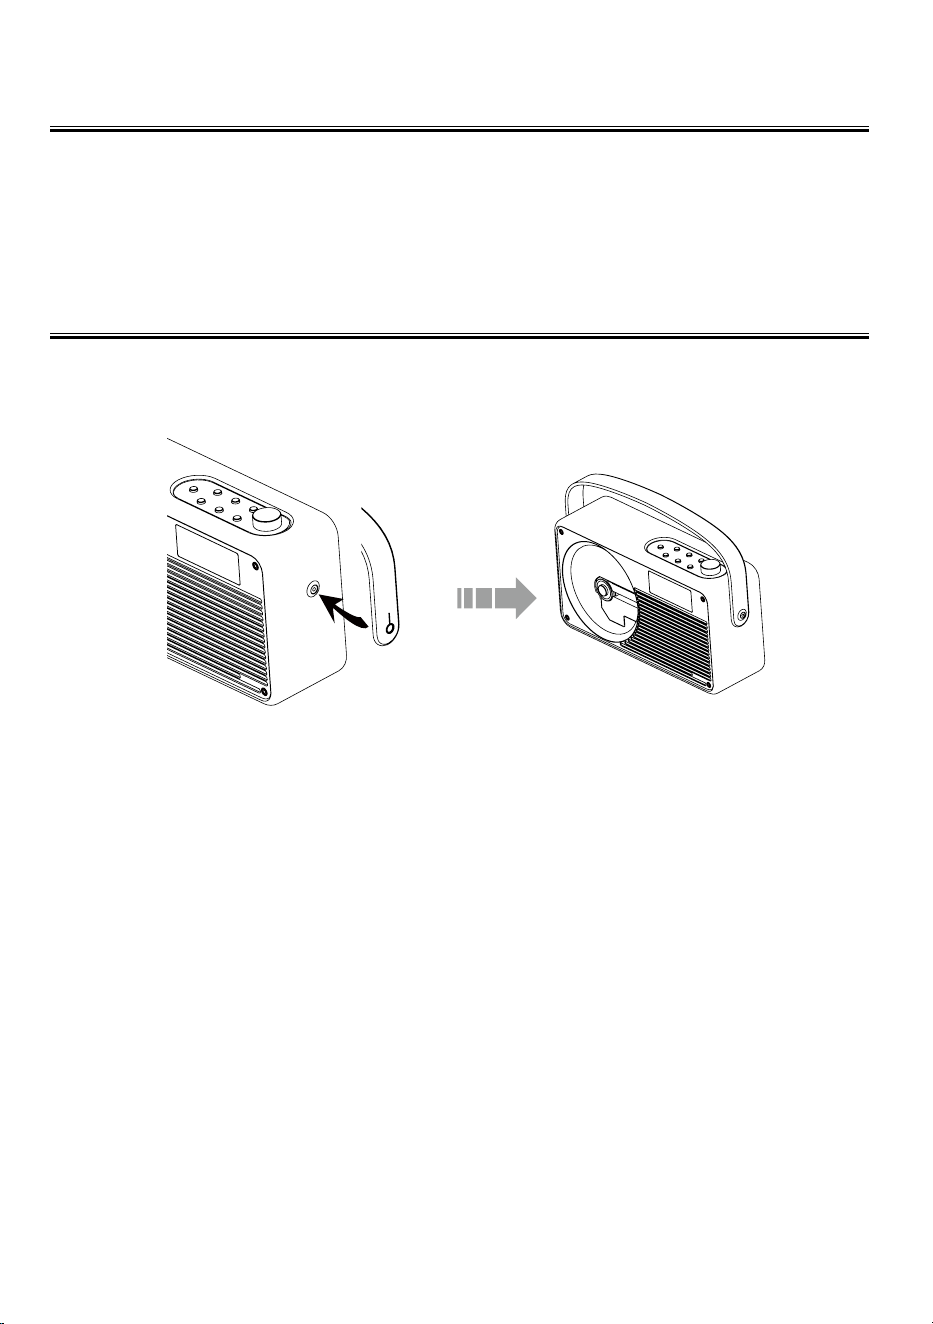
Install of Portable Strap
Tear o the protective cover of the portable strap, buckle the portable strap onto the portable strap
studs on both sides of the unit.
EN 4
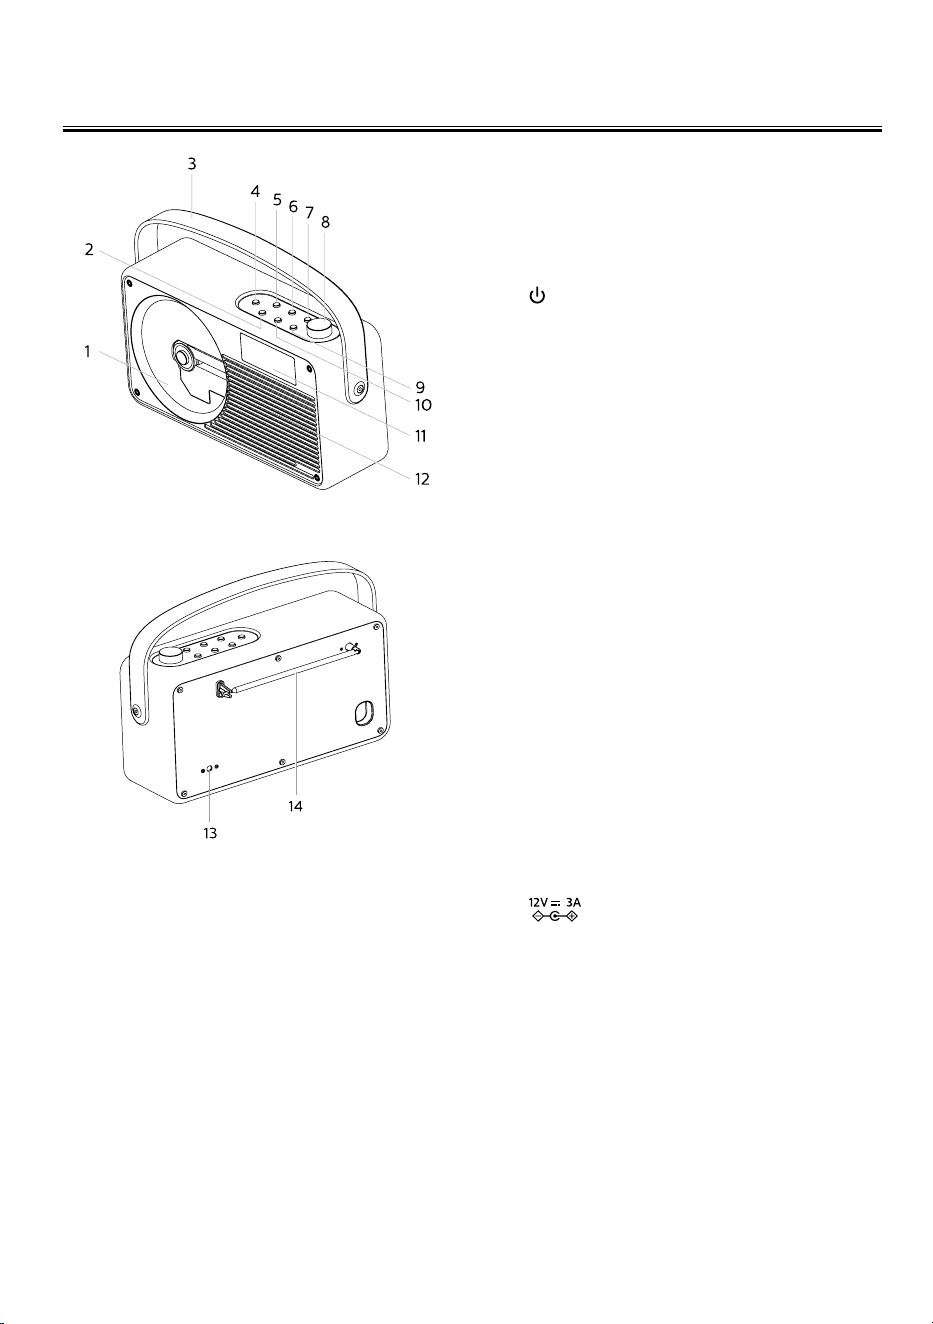
Product Overview
1. Disc compartment
2. PROG
- Play tracks randomly
- Program radio stations
3. Portable strap
4.
/SOURCE
- Turn on the unit/switch to standby mode
- Select a source
5. REPEAT
- Select a repeat play mode
6.
K
/TUNING -
- Stop playing/reading the disc
- Tune to a radio station
7.
BF
/TUNING +
- Start or pause play
- Tune to a radio station
8. - VOL +
- Adjust volume
9.
G
/PRESET +
- Skip to the next track
- Fast forward within a track or disc
- Select a preset radio station
10.
H
/PRESET -
- Skip to the previous track
- Fast reverse within a track or disc
- Select a preset radio station
11. Display panel
- Show current status
12. Horn
13.
- Connect the AC/DC adaptor
14. Telescopic antenna
EN 5
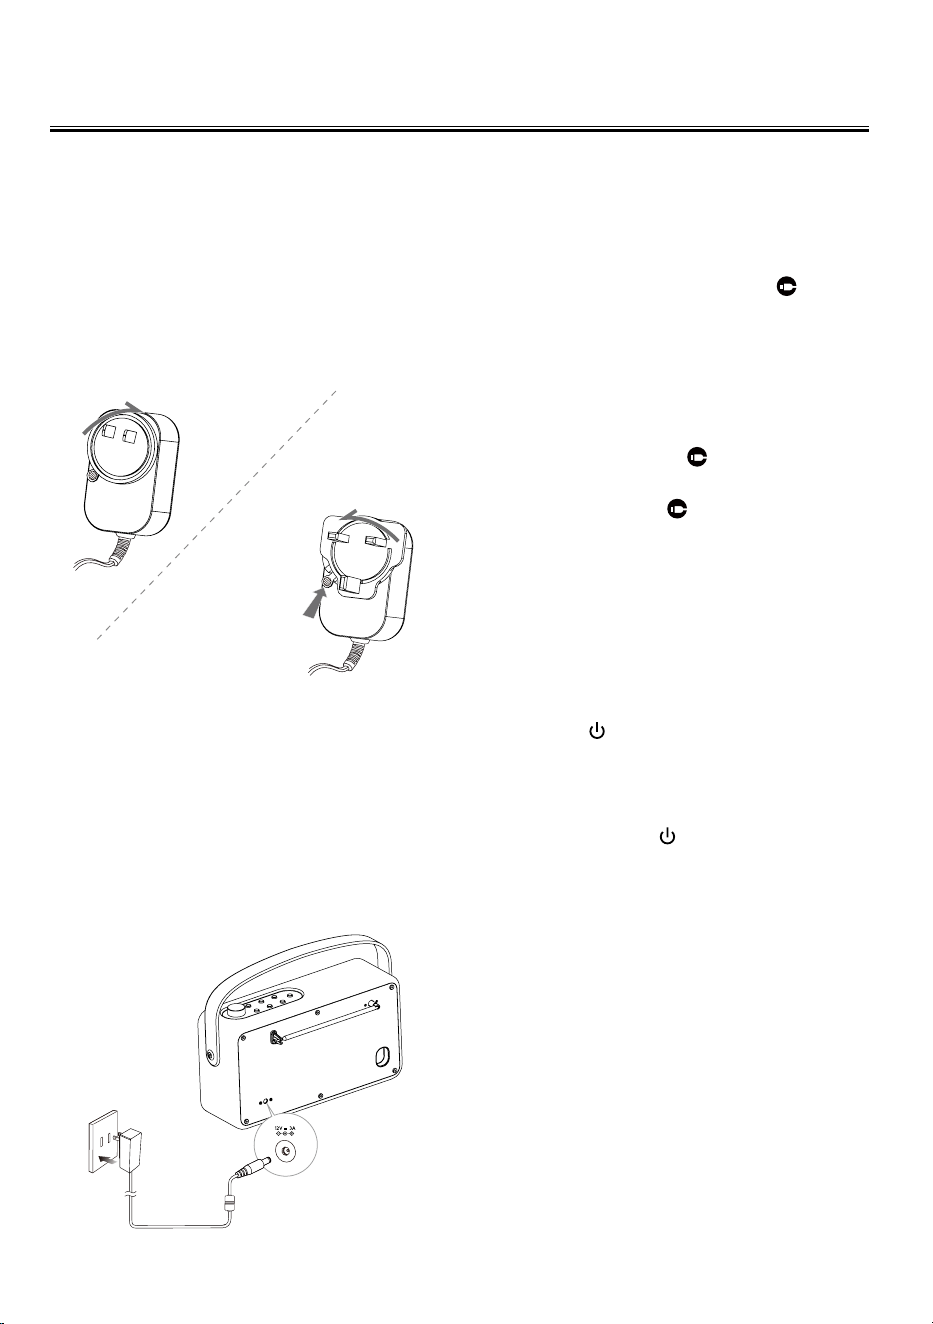
Connecting the AC/DC adaptor
Before connecting the AC/DC adaptor, please
select an AC plug that matches the local area
and install it to the AC/DC adaptor.
- Install and release plug methods are as
follows:
Insert the supplied AC/DC adaptor's DC plug
into the unit, then insert one side of AC power
cord into a wall outlet, and your system is at
your command!
Caution: Be sure to unplug the AC/DC
adaptor plug from the outlet when
going out or when the unit is not in
use for an extended period of time.
Built-in battery
This unit can be operates through a built-in
battery.
- When the unit turn on, the battery power
drops below a certain level, the "
" symbol
will blink quickly.
To recharge the built-in battery
Connect the unit to a home power outlet
though a AC/DC adaptor.
- During charging, the "
" symbol will blink
slowly.
- Fully charged, the "
" symbol will remains
illuminated when the unit turned on; The
display screen turns o when the unit
turned o.
Note: Use only the supplied AC/DC adaptor to
charge the battery.
Turning the power on and o
- Press the button to switch the unit on,
the unit will switch to the last selected
source (rst turn on the unit will switch to
DISC mode).
- Long pressing the
button to switch the
unit back to o, "POW OFF" display a few
minutes.
Automatically turn o the unit
The unit is turn off automatically in the
following:
- Bluetooth mode: Bluetooth device not
connected for more than 15 minutes or
connected but not playing.
- DISC mode: The disc is not playing for
more than 15 minutes.
Power operation
Lock
Release
Press and hold
this button
Install plug
Release plug

EN 6
Disc Operation
The supported disc formats as below:
- CD
- MP3: Maximum sampling rate 48KHz, bit rate 320kbps
- WMA: Maximum sampling rate 48KHz, bit rate 192kbps
Disc Playing
1.
Repeatedly press the SOURCE
button to
select DISC source.
2. Gently press the center of the disc, clip
the disc into the disc compartment (with the
printed side facing outward).
- If display "READING", the unit will read
the disc and play it automatically.
- If display "NO DISC", please press the
K
button
twice
, the unit will read the disc
and play it automatically.
3. Press the
BF
button to temporarily stop
the playing, press the button again, it will
continue to play.
4. Press the
K
button to stop the disc playing,
press the button again, the unit will read the
disc and play it.
Change the Disc
1. In disc playing mode, press the
K
button to
stop the disc playing, the "OPEN" display.
2. Gently press the center of the disc, clip
the disc into the disc compartment (with the
printed side facing outward).
3. Press the
K
button, the "READING"
display, the unit will read the disc and play
it automatically.
To Skip and Play
Press the
H
/
G
button once or more to
skip previous/forward one or more tracks on
the disc.
To search and Play
During play, press and hold the
H
/
G
button to search for the position that you
intend to start playing. Release to resume
normal play.
Playing Repeatedly
To select a repeat play mode by pressing the
REPEAT
button.
For audio CDs
- REP : To repeat the same track.
- REP ALL : To repeat playing all tracks
on a disc.
- To cancel the repeat playing.
For MP3/WMA Discs
- REP : To repeat the same track.
- REP ALB : To repeat playing album.
- REP ALL : To repeat playing all tracks
on a disc.
- To cancel the repeat playing.
Random Play
All tracks are played in a random sequence
by pressing the P
ROG
button, “SHUF” display.
Press this button again to return to normal
play.

EN 7
Tuning in to a Station
1. R
epeatedly press the SOURCE button to
select the FM source.
2. Repeatedly press the TUNING +/- button to
change the frequency until you nd the sta
tion you want.
Press and hold the TUNING +/- button for
one second or more, the frequency chang-
es down or up automatically until a station
is found.
Program radio stations
You can program a maximum of 20 FM radio
stations.
Automatically
Press and hold the PROG button for 2 sec-
ond or more to activate automatic program
mode.
* All available stations are programmed.
* The rst programmed radio station is
broadcast automatically.
Manually
1. Tune to a radio station.
2. Press the PROG button to activate program
mode.
* The preset number will blink.
3. Repeatedly press the PRESET +/- button
to allocate a number to this radio station.
Note: If you select more than 20, the preset
number will be changed to “1”
automatically.
4. Press the
PROG
button again to store the
station.
5. Repeat above steps 1 to 4 for each station
you want to store in memory with a preset
number.
Tune to preset radio stations
Repeatedly press the PRESET +/- button to
select the desired preset number. Its band and
frequency are displayed on the front panel.
Note: When listening to a preset stored radio
station, press the PROG button to delete the
current preset stored radio station number.
FM radio operation
Caution: Make sure that you have correctly connected and fully extended the antenna.

EN 8
Play from Bluetooth
device
Note:
- The unit has a Bluetooth function that can
receive a signal within 10 metres.
- Compatibility with all Bluetooth devices is
not guaranteed.
1. R
epeatedly press the SOURCE button to
select
the bluetooth source
.
2. Activate the Bluetooth function in your
Bluetooth device (see the device user
manual).
3. Select "CoolGeek VS-02" on your device
for pairing.
- For elder devices, you need to input
“0000” as pairing password.
4. Start music play on your Bluetooth device,
you can use this unit to control the function
to your Bluetooth device.
- To increase or decrease the volume,
rotate - VOL+.
- To pause/resume play, press
BF
.
- To skip to a track, press
H
/
G
.
5. Press and hold the
K
button for 3 seconds
or more to disable the Bluetooth function
from your Bluetooth device.
Specications
General information
Power requirement ..........................12V 3A
Lithium battery (built-in) ...................................
................................................11.1V/2200mAh
FM Frequency range .................87.5-108 MHz
Output Power............................................15W
Speaker Impedance ....................................4
Ω
Speaker Input Power ................................ 25W
Dimensions (W x H x D) ..................................
......................................... 295 x 173 x 110 mm
Bluetooth
Bluetooth version ........................................ 5.0
Frequency range ..................2402 - 2480 MHz
Maximum communication range......................
..................................................... approx. 10m
Compatible Bluetooth proles................. A2DP
Note:
Design and specifications are subject to
change without prior notice.

EN 9
Poor radio reception
- Fully extend and adjust the FM antenna.
Music playback is unavailable on
this unit even after successful
Bluetooth connection.
- The device cannot be used to play music
through this unit wirelessly.
The audio quality is poor after
connection with a Bluetooth-
enabled device.
- The Bluetooth reception is poor. Move the
device closer to this unit or remove any
obstacle between them.
Cannot connect with this unit.
- The device does not support the profiles
required for this unit.
- The Bluetooth function of the device is not
enabled. Refer to the user manual of the
device to nd out how to enable the
function.
- This unit is not in pairing mode.
- This unit is already connected with another
Bluetooth-enabled device.
Disconnect that device and then try again.
Troubleshooting
If you are having a problem with your unit, check this list for a possible solution before calling for
service.
If you cannot solve the problem from the hints given here, or the unit has been physically dam-
aged, call a qualied person, such as your dealer, for service.
No power
- Ensure that the AC/DC adaptor plug of the
unit is connected properly.
- Ensure that there is power at the AC outlet.
- To save power, the unit switches to standby
automatically 15 minutes after a play
reaches the end and no control is operated.
No disc detected
- Place a disc.
- Check if the disc is placed with the print
side facing outward.
- Wait until the moisture condensation at the
lens has cleared.
- Replace or clean the disc.
- Use a nalized CD or correct format disc.
No sound or poor sound
- Adjust the volume.
- Check if in pause.
Disc does not play
- Place a readable disc and ensure that the
print side facing outward.
- Check for any scratches or smudges on the
disc.
- Moisture has condensed inside the system.
Remove the disc and leave the system
turned on for about an hour.
Disconnect and reconnect the AC/DC
adaptor plug, and then turn on the system
again.
- As a power-saving feature, the system
turns o automatically 15 minutes after
disc play reaches the end and no control is
operated.

FCC Statement
This device complies with part 15 of the FCC Rules. Operation is
subject to the following two
conditions: (1) This device may not cause harmful interference, and (2
) this device must accept any interference received, including
interference that may cause undesired operation. This equipment has
been tested and found to comply with the limits for a Class B digital
device, pursuant to part 15 of the FCC Rules. These limits are
designed to provide reasonable protection against harmful
interference in a residential installation. This equipment generates,
uses and can radiate radio frequency energy and, if not installed and
used in accordance with the instructions, may cause harmful
interference to radio communications. However, there is no guarantee
that interference will not occur in a particular installation. If this
equipment does cause harmful interference to radio or television
reception, which can be determined by turning the equipment off and
on, the user is encouraged to try to correct the interference by one or
more of the following measures:
•Reorient or relocate the receiving antenna.
•Increase the separation between the equipment and receiver.
•Connect the equipment into an outlet on a circuit different from that to
which the receiver is connected.
•Consult the dealer or an experienced radio/TV technician for help.
Caution: Any changes or modifications to this device not explicitly
approved by manufacturer could void your authority to operate this
equipment.
RF Exposure Information
The device has been evaluated to meet general RF exposure
requirement. The device can be used in portable exposure condition
without restriction.