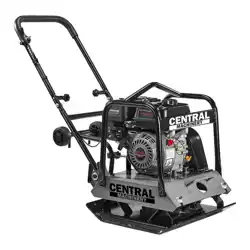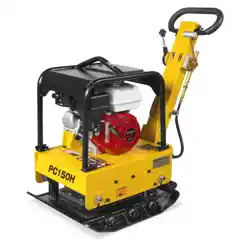
PC80H/PC80Z
PC90H/ PC90Z
PC150H/ PC150Z
PC180H/ PC180Z
Model:


TABLE OF CONTENTS
TABLE OF CONTENTS 1
SPECIFICATIONS 2
SAFETY LABELS 6
MECHANICAL HAZARDS
13
FIRE & EXPLOSION HAZARDS
13
ENGINE SAFETY
12
SHUTDOWN
12
CHEMICAL HAZARDS
13
LABEL LOCATIONS
6
SAFETY LABELS
6
OPERATING LABELS
8
NOISE HAZARDS
14
PROTECTIVE CLOTHING
14
ADDITIONAL HAZARDS
14
9
11
INTRODUCTION
APPLICATIONS
9
STRUCTURE 10
10
FUNCTIONS AND CONTROLS
FOR SAFETY OPERATION
13
HAZARDS AND RISKS
GENERAL OPERATION
15
PRIOR TO OPERATION
15
STARTING
16
OPERATION
17
TRANSPORTATION
18
SHUTDOWN
18
DAILY SERVICE
19
WEEKLY SERVICE
19
URETHANE FOAM ELEMENT
19
URETHANE FOAM DUAL STRUCTURE
19
CARE AND PREVENTIVE MAINTENANCE
20
SERVICE
20
BEARINGS
20
FINISH
20
15
OPERATION
19
SERVICE & STORAGE
21
TROUBLESHOOTING
22
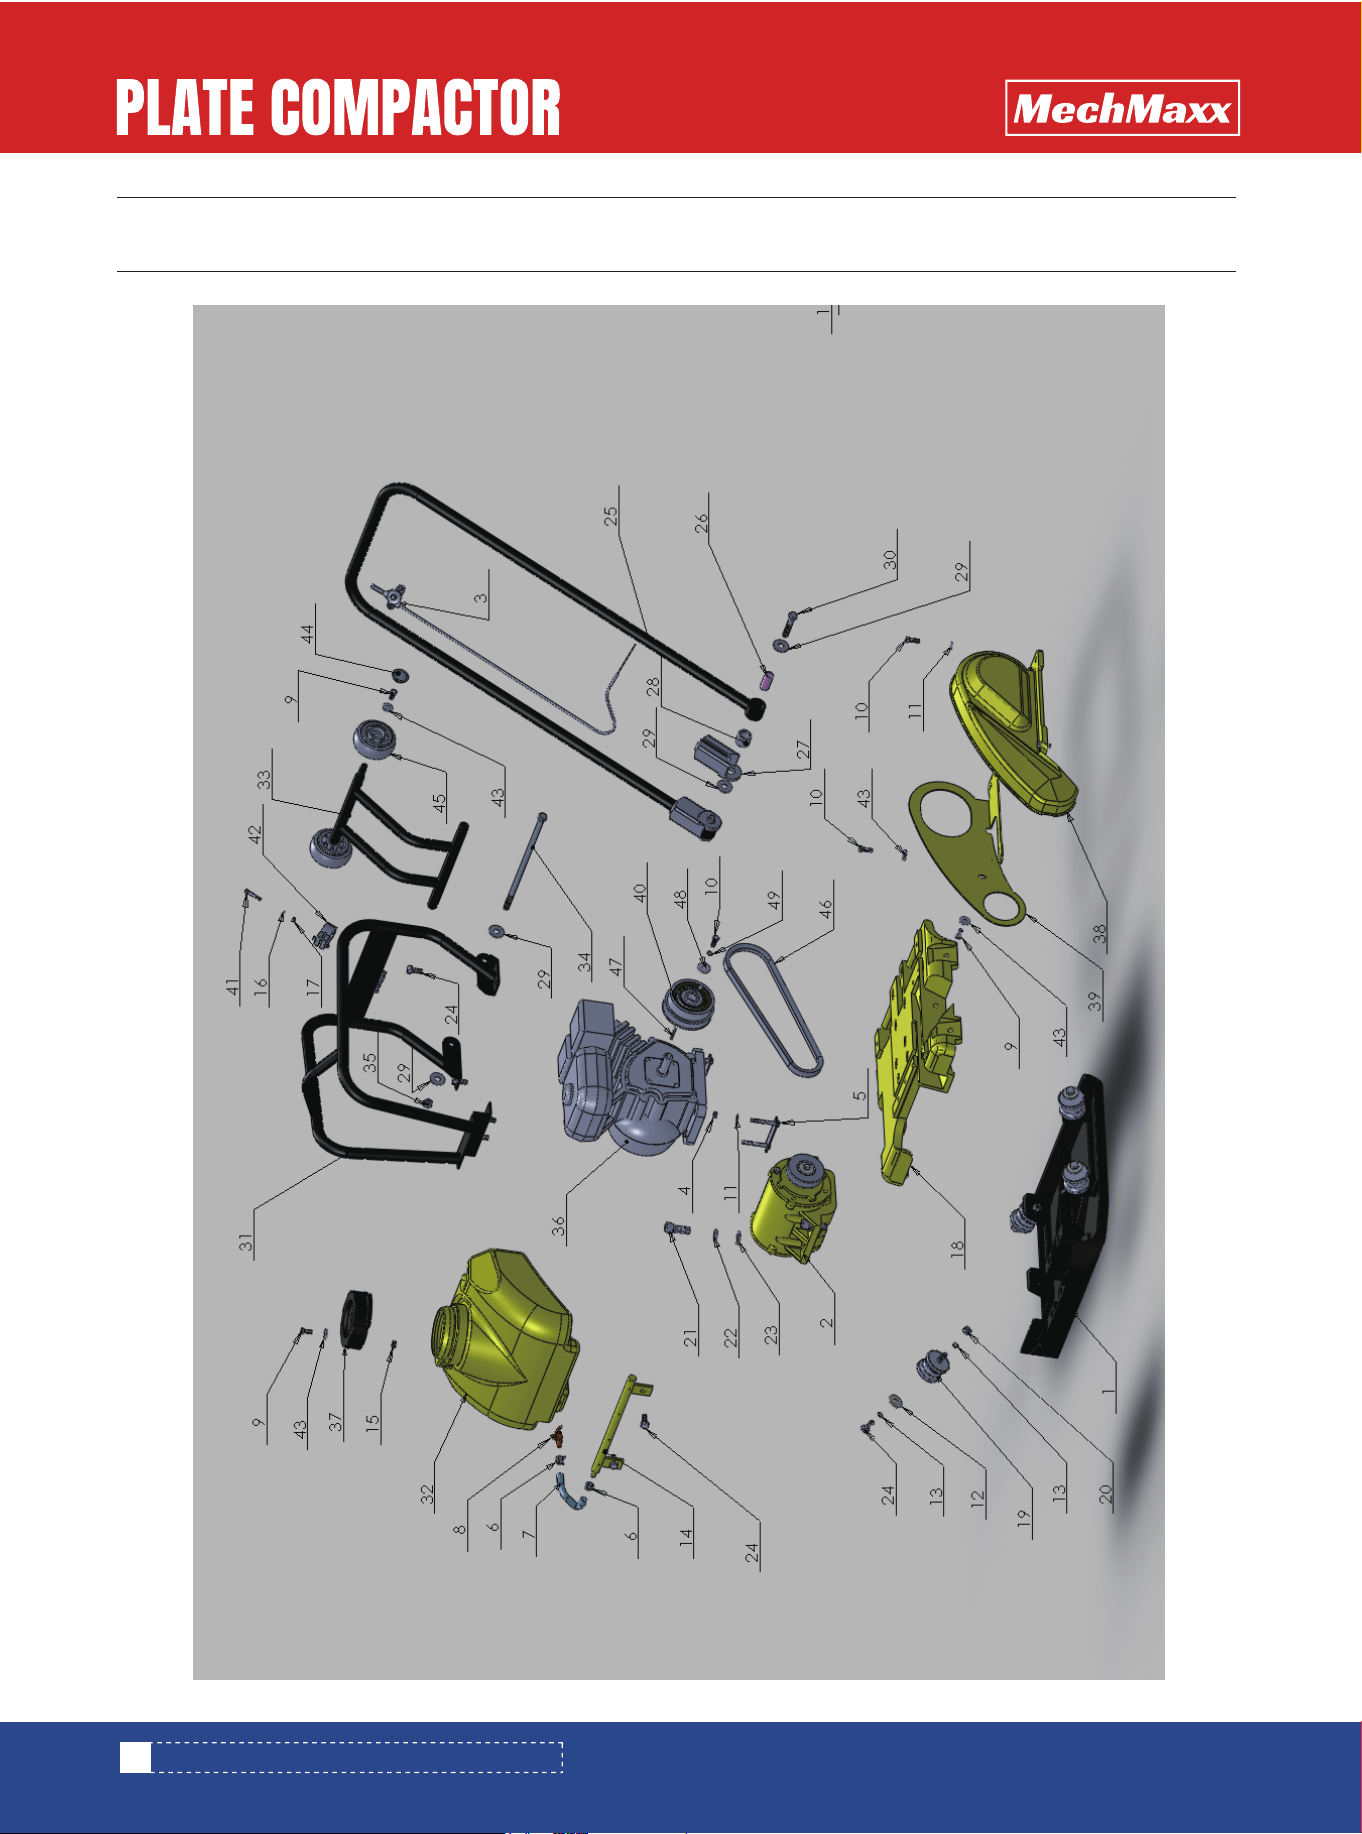
PARTS DIAGRAM (PC80H,PC80Z GENERAL ASSEMBLY)
23
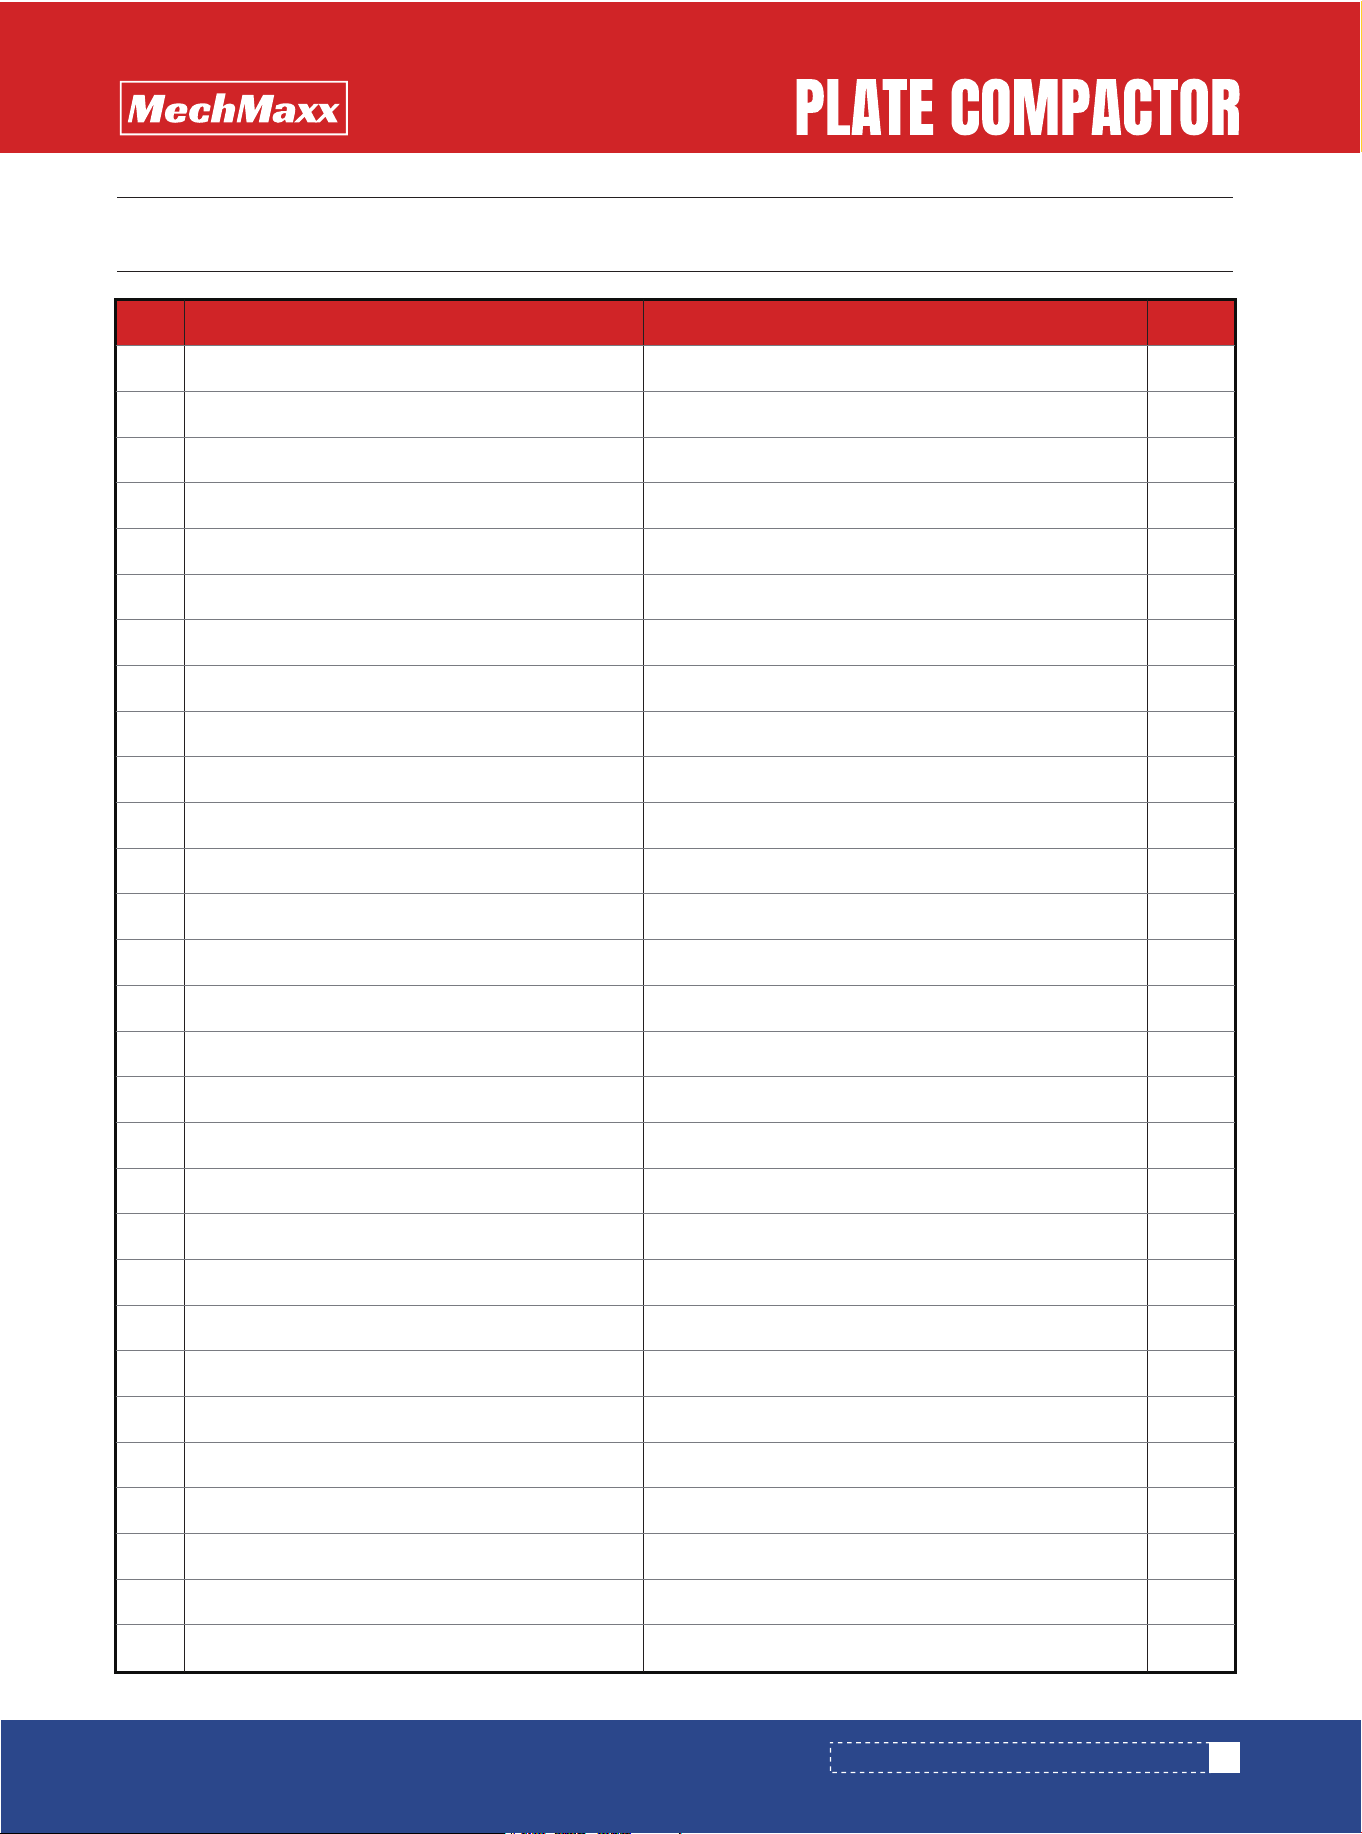
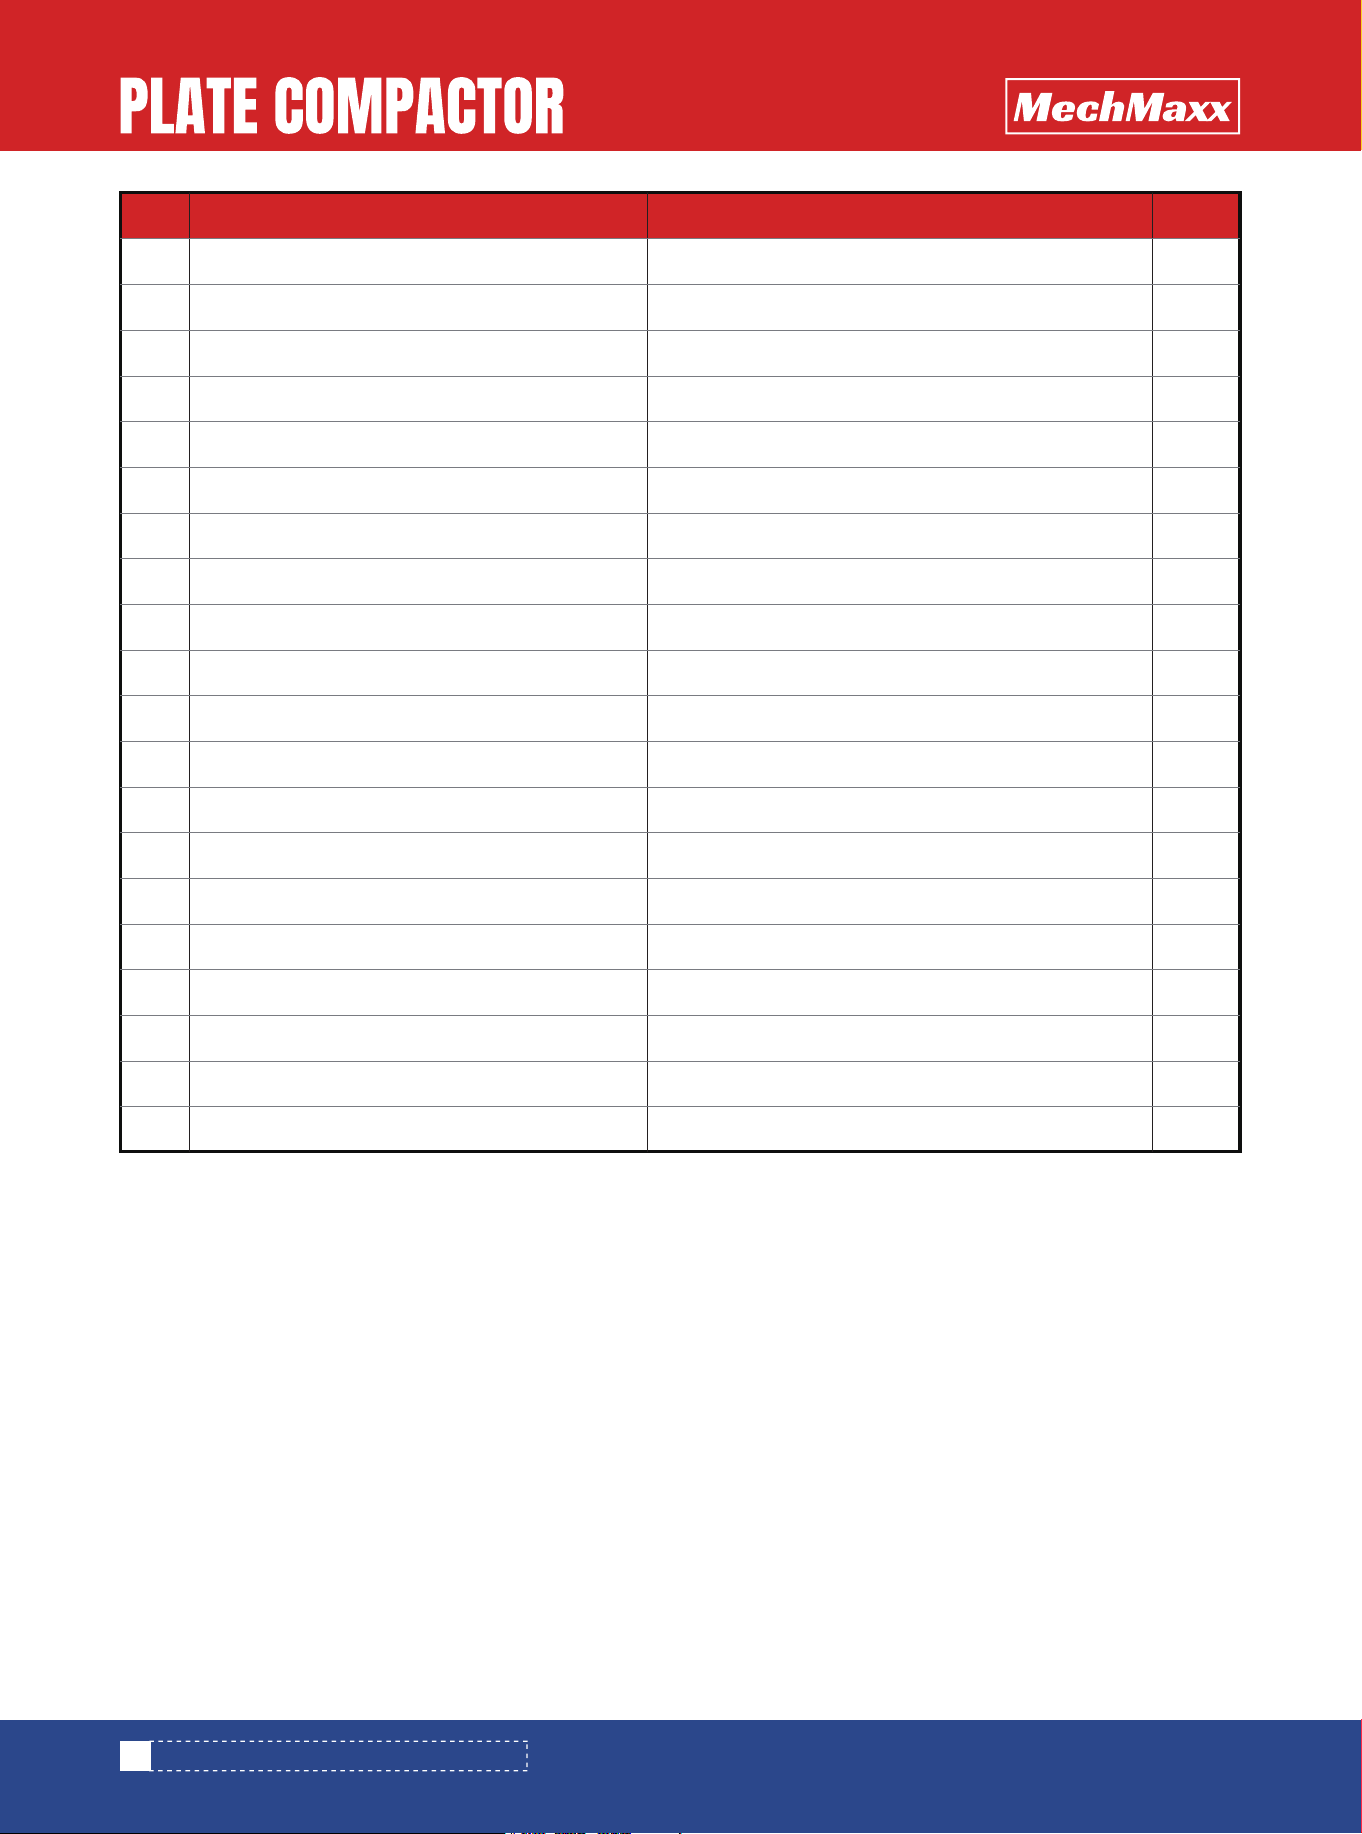
PARTS LIST (PC80H,PC80Z GENERAL ASSEMBLY)
25
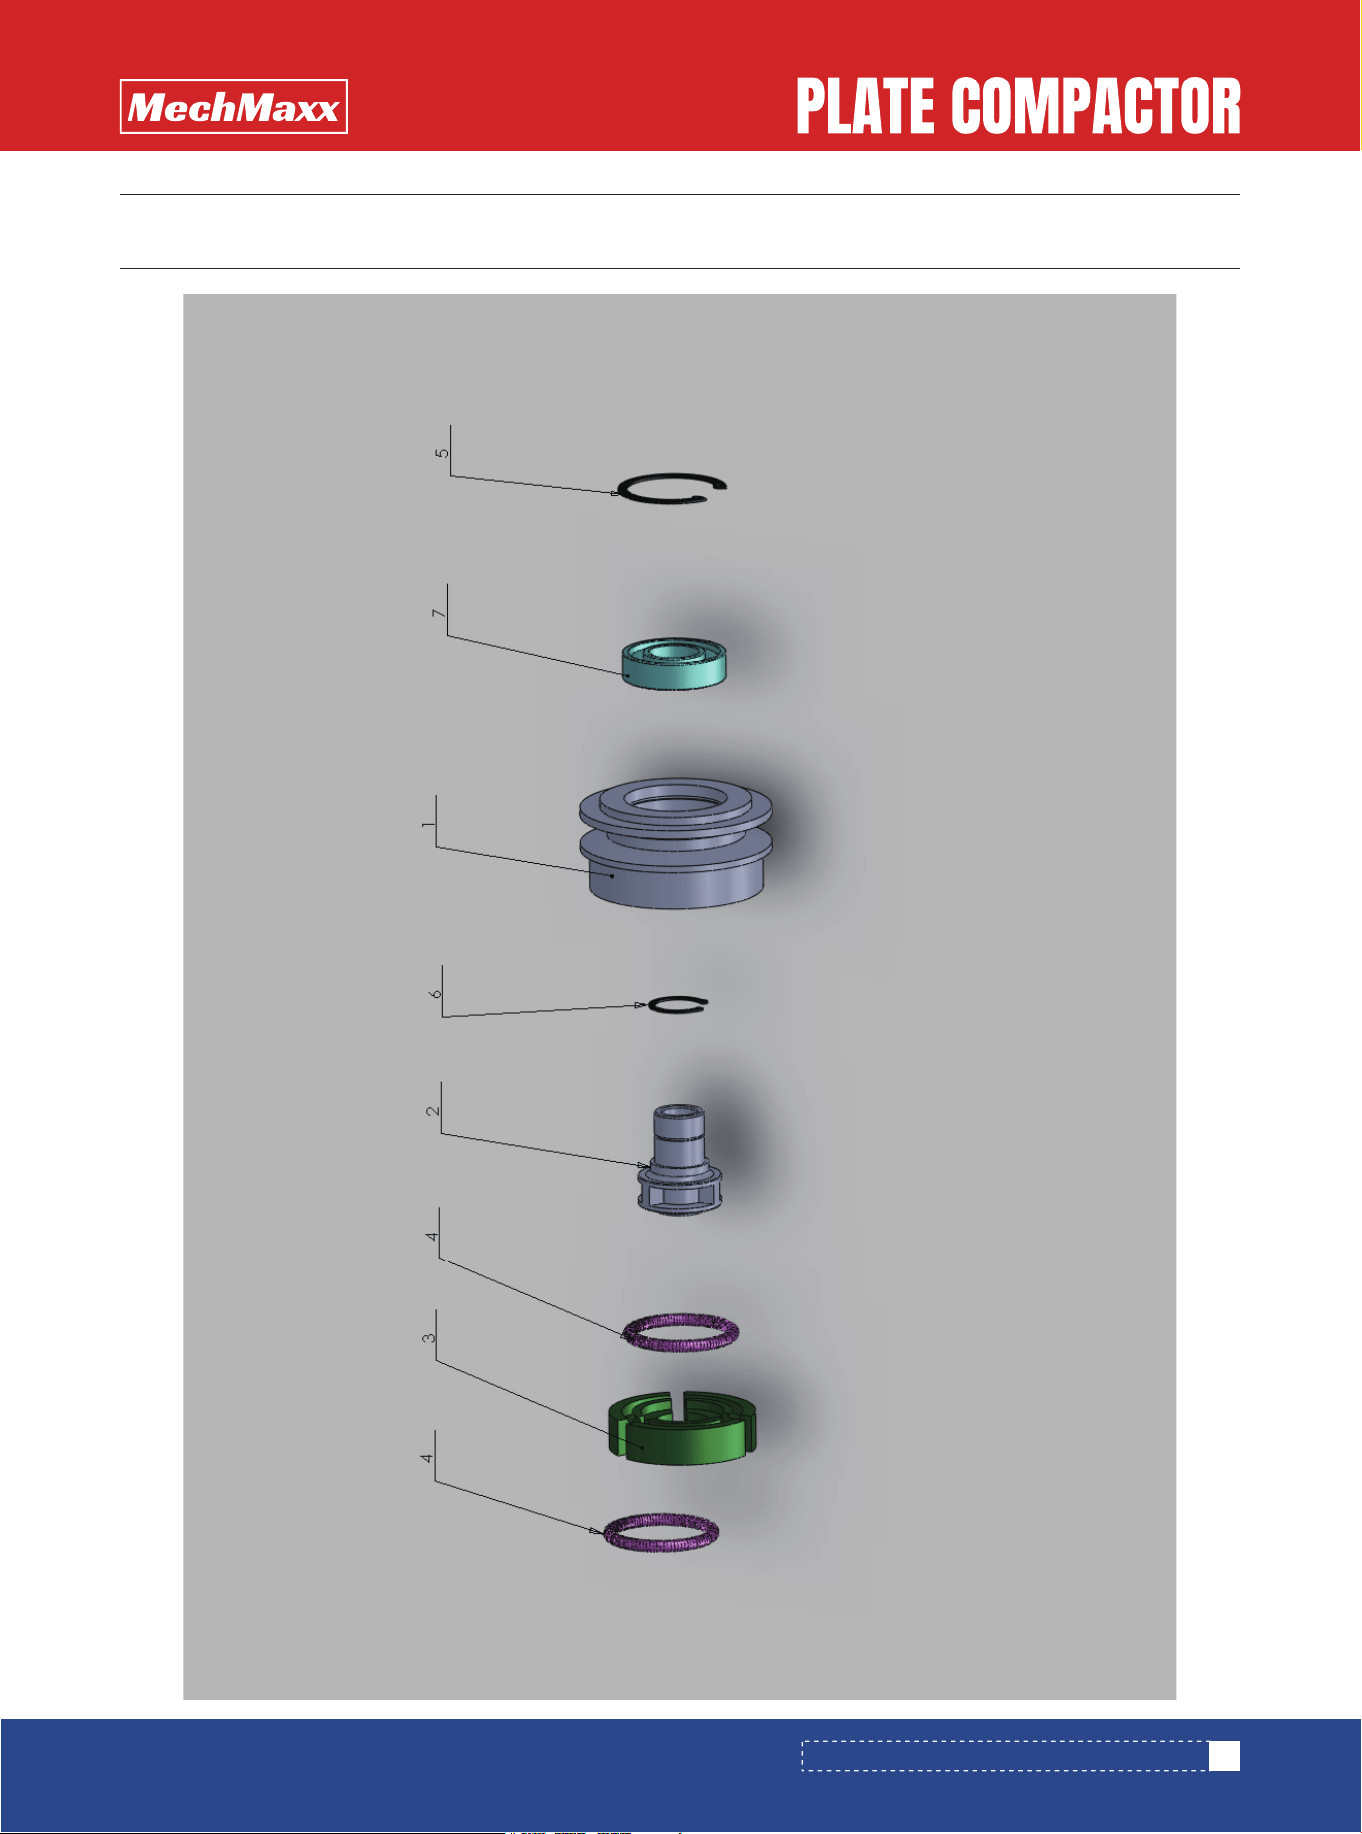
PARTS DIAGRAM (PC80H,PC80Z CLUTCH ASSEMBLY)
26
PARTS LIST (PC80H,PC80Z CLUTCH ASSEMBLY)
27
PARTS DIAGRAM (PC80H,PC80Z EXCITER SPARE)
28
PARTS LIST (PC80H,PC80Z EXCITER SPARE)
29
PARTS DIAGRAM (PC90H,PC90Z GENERAL ASSEMBLY)
30
PARTS LIST (PC90H,PC90Z GENERAL ASSEMBLY)
32
PARTS DIAGRAM (PC90H,PC90Z EXCITER)
33
PARTS LIST (PC90H,PC90Z EXCITER)
34
PARTS DIAGRAM (PC150H,PC150Z,PC180H,PC180Z GENERAL ASSEMBLY)
35
PARTS LIST (PC150H,PC150Z,PC180H,PC180Z GENERAL ASSEMBLY)
37
PARTS DIAGRAM (PC150H,PC150Z,PC180H,PC180Z EXCITER)
38
PARTS LIST (PC150H,PC150Z,PC180H,PC180Z EXCITER)
1
www.mechmaxx.com
TABLE OF CONTENTS
SPECIFICATIONS
2
www.mechmaxx.com
Model PC80H PC80Z
Engine
Engine Type
Engine Displacement
Horsepower
Start System
Fuel Tank Capacity
Engine Oil Capacity
Centrifugal Force
Vibration Frequency
Compact Depth
Max Travel Speed
Plate Size
Water Tank Capacity
Exciter Oil
Overall Dimension (LxWxH)
Weight
Honda GX160
Single-Cylinder, 4-Stroke, Air-Cooled, OHV Gasoline Engine
163 cc
4.8 HP (3.6kW) @ 3600 RPM
Recoil
3.3 US qt (3.1L)
0.61 US qt (0.6L)
3150 lbf (14kN)
4930 VPM
12 in
69 ft/min
21 x 20 in
3.2 US gal
0.15L SAE 10W-30
31 x 20 x 23 in
187 lbs
Zonsen GB210
208 cc
5.8 HP (4.3kW) @ 3600 RPM
2.8 US qt (2.6L)
20 x 19 in
168 lbs
SPECIFICATIONS
3
www.mechmaxx.com
Model PC90H PC90Z
Engine
Engine Type
Engine Displacement
Horsepower
Start System
Fuel Tank Capacity
Engine Oil Capacity
Centrifugal Force
Vibration Frequency
Compact Depth
Max Travel Speed
Plate Size
Water Tank Capacity
Exciter Oil
Overall Dimension (LxWxH)
Weight
Honda GX160
Single-Cylinder, 4-Stroke, Air-Cooled, OHV Gasoline Engine
163 cc
4.8 HP (3.6kW) @ 3600 RPM
Recoil
3.3 US qt (3.1L)
0.61 US qt (0.6L)
3600 lbf (16kN)
4750 VPM
12 in
72 ft/min
21 x 18 in
/
0.18L SAE 10W-30
25 x 18 x 26 in
198 lbs
Zonsen GB210
208 cc
5.8 HP (4.3kW) @ 3600 RPM
2.8 US qt (2.6L)
201 lbs
SPECIFICATIONS
4
www.mechmaxx.com
Model PC150H PC150Z
Engine
Engine Type
Engine Displacement
Horsepower
Start System
Fuel Tank Capacity
Engine Oil Capacity
Centrifugal Force
Vibration Frequency
Compact Depth
Max Travel Speed
Plate Size
Exciter Oil
Overall Dimension (LxWxH)
Weight
Honda GX160
Single-Cylinder, 4-Stroke, Air-Cooled, OHV Gasoline Engine
163 cc
4.8 HP (3.6kW) @ 3600 RPM
Recoil
3.3 US qt (3.1L)
0.61 US qt (0.6L)
5625 lbf (25kN)
4600 VPM
22 in
66 ft/min
26 x 20 in (with Extension Plate)
0.3L SAE 10W-30
30 x 20 x 37 in
320 lbs
Zonsen GB210
208 cc
5.8 HP (4.3kW) @ 3600 RPM
2.8 US qt (2.6L)
SPECIFICATIONS
5
www.mechmaxx.com
Specifications are subject to change without notice.
Engine specifications may vary by configuration. Refer to the engine manufacturer’s manual for engine-specific service
information.
Model PC180H PC180Z
Engine
Engine Type
Engine Displacement
Horsepower
Start System
Fuel Tank Capacity
Engine Oil Capacity
Centrifugal Force
Vibration Frequency
Compact Depth
Max Travel Speed
Plate Size
Exciter Oil
Overall Dimension (LxWxH)
Weight
Honda GX270
Single-Cylinder, 4-Stroke, Air-Cooled, OHV Gasoline Engine
269 cc
8.5 HP (6.3kW) @ 3600 RPM
Recoil
5.6 US qt (5.3 L)
1.16 US qt (1.1 L)
6750 lbf (30kN)
4500 VPM
24 in
66 ft/min
28 x 25 in (with Extension Plate)
0.3L SAE 10W-30
31 x 18 x 37 in
375 lbs
Loncin G300FA
302 cc
9 HP (6.8kW) @ 3600 RPM
6.3 US qt (6 L)
1.04 US qt (0.95 L)
SPECIFICATIONS
6
www.mechmaxx.com
SAFETY LABELS
SAFETY LABELS
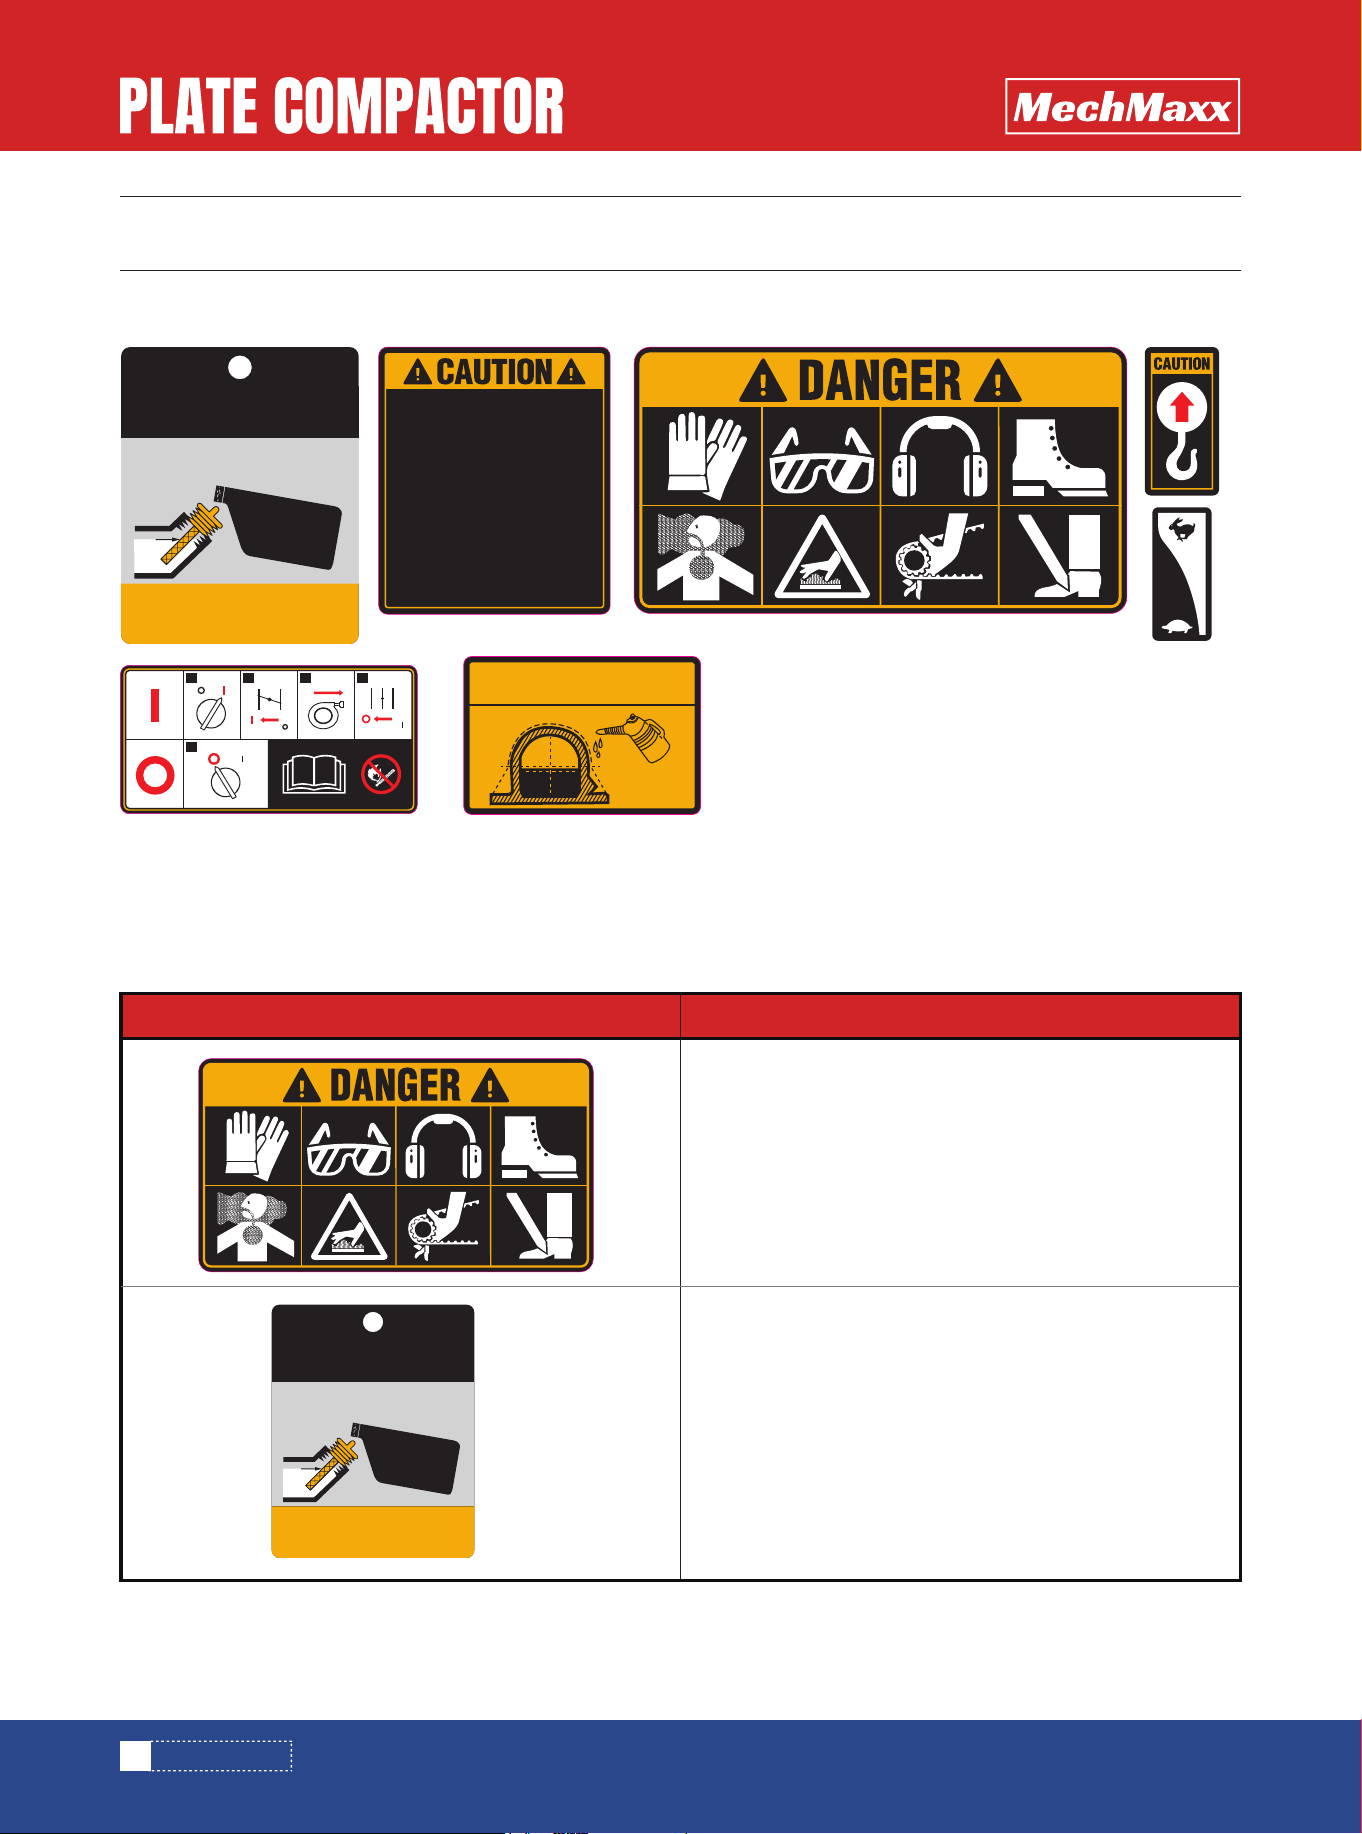
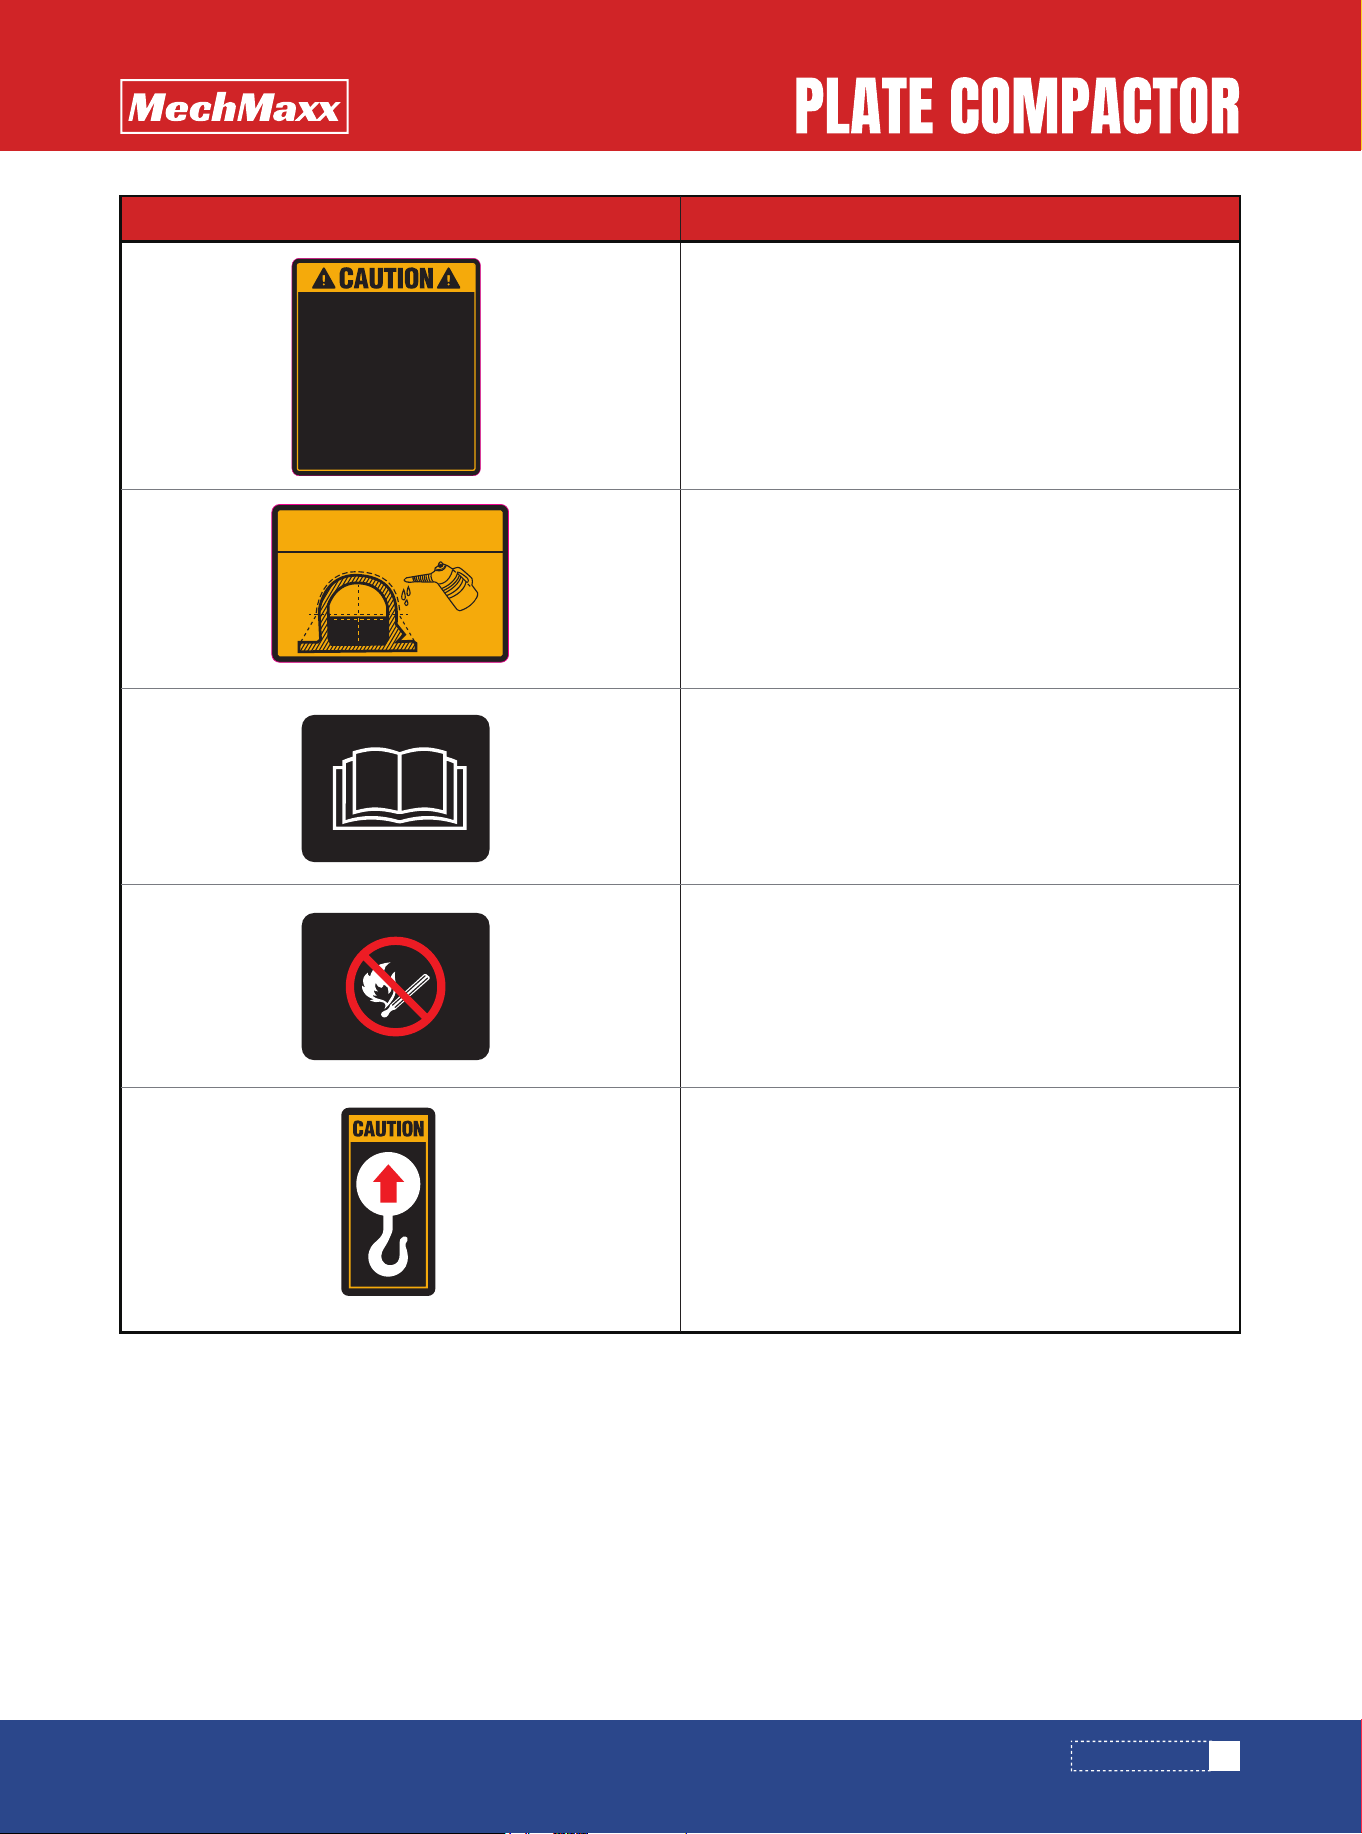
The machines use international pictorial labels where needed. These labels are described below:
NOTE:
These molded-in label contains important safety and operating information. If the label becomes illegible,
replace it immediately. Contact MechMaxx or an authorized service dealer for replacement labels.
DANGER!
Wear appropriate PPE including gloves, eye
protection, hearing protection, and safety footwear.
Do not touch the engine or muffler during or immediately
after operation—hot surfaces may cause burns.
Keep hands and feet away from moving parts.
Operate only in well-ventilated areas to avoid carbon
monoxide exposure.
WARNING!
Before use, fill the fuel tank with gasoline
and add engine oil to the proper level.
Operating the engine with low or no oil will cause
permanent engine damage and may void the warranty.
Refer to the engine manual for detailed instructions.
LABEL LOCATIONS
SAFETY LABELS
Label Meaning
BEFORE USE
• REFER TO THE ENGINE MANUAL FOR DETAILS.
• OPERATING WITH LOW OR NO ENGINE OIL
WILL CAUSE PERMANENT DAMAGE AND VOID
WARRANTY.
1. FILL GASOLINE.
2. ADD ENGINE OIL.
OIL
FULL
LOW
BEFORE USE
• REFER TO THE ENGINE MANUAL FOR DETAILS.
• OPERATING WITH LOW OR NO ENGINE OIL WILL
CAUSE PERMANENT DAMAGE AND VOID
WARRANTY.
1. FILL GASOLINE.
2. ADD ENGINE OIL.
OIL
FULL
LOW
• READ PRODUCT MANUAL BEFORE
OPERATING OR SERVICING THIS MACHINE.
• TRANSPORT THIS MACHINE IN THE UPRIGHT
POSITION. DO NOT TIP OVER THE MACHINE
AT ANY TIME. IMPROPER HANDLING MAY
CAUSE DAMAGE.
• ALWAYS KEEP UNAUTHORIZED,
INEXPERIENCED, UNTRAINED PEOPLE AWAY
FROM THIS MACHINE.
• MAKE SURE ALL SAFETY DEVICES ARE
OPERATIONAL BEFORE THIS MACHINE IS
STARTED. MAKE SURE ENGINE IS TURNED
OFF AND SPARK PLUG WIRE
DISCONNECTED BEFORE SERVISING THE
MACHINE OR COMING IN CONTACT WITH
ANY MOVING PART.
• NEVER LEAVE MACHINE UNATTENDED
WHEN OPERATING. ALWAYS STOP ENGINE
AND ALLOW ENGINE TO COOL BEFORE
ADDING FUEL OR OIL.
1
1
2 3 4
CHECK OIL LEVEL!
7
www.mechmaxx.com
SAFETY LABELS
• READ PRODUCT MANUAL BEFORE
OPERATING OR SERVICING THIS MACHINE.
• TRANSPORT THIS MACHINE IN THE
UPRIGHT POSITION. DO NOT TIP OVER THE
MACHINE AT ANY TIME. IMPROPER
HANDLING MAY CAUSE DAMAGE.
• ALWAYS KEEP UNAUTHORIZED,
INEXPERIENCED, UNTRAINED PEOPLE
AWAY FROM THIS MACHINE.
• MAKE SURE ALL SAFETY DEVICES ARE
OPERATIONAL BEFORE THIS MACHINE IS
STARTED. MAKE SURE ENGINE IS TURNED
OFF AND SPARK PLUG WIRE
DISCONNECTED BEFORE SERVISING THE
MACHINE OR COMING IN CONTACT WITH
ANY MOVING PART.
• NEVER LEAVE MACHINE UNATTENDED
WHEN OPERATING. ALWAYS STOP ENGINE
AND ALLOW ENGINE TO COOL BEFORE
ADDING FUEL OR OIL.
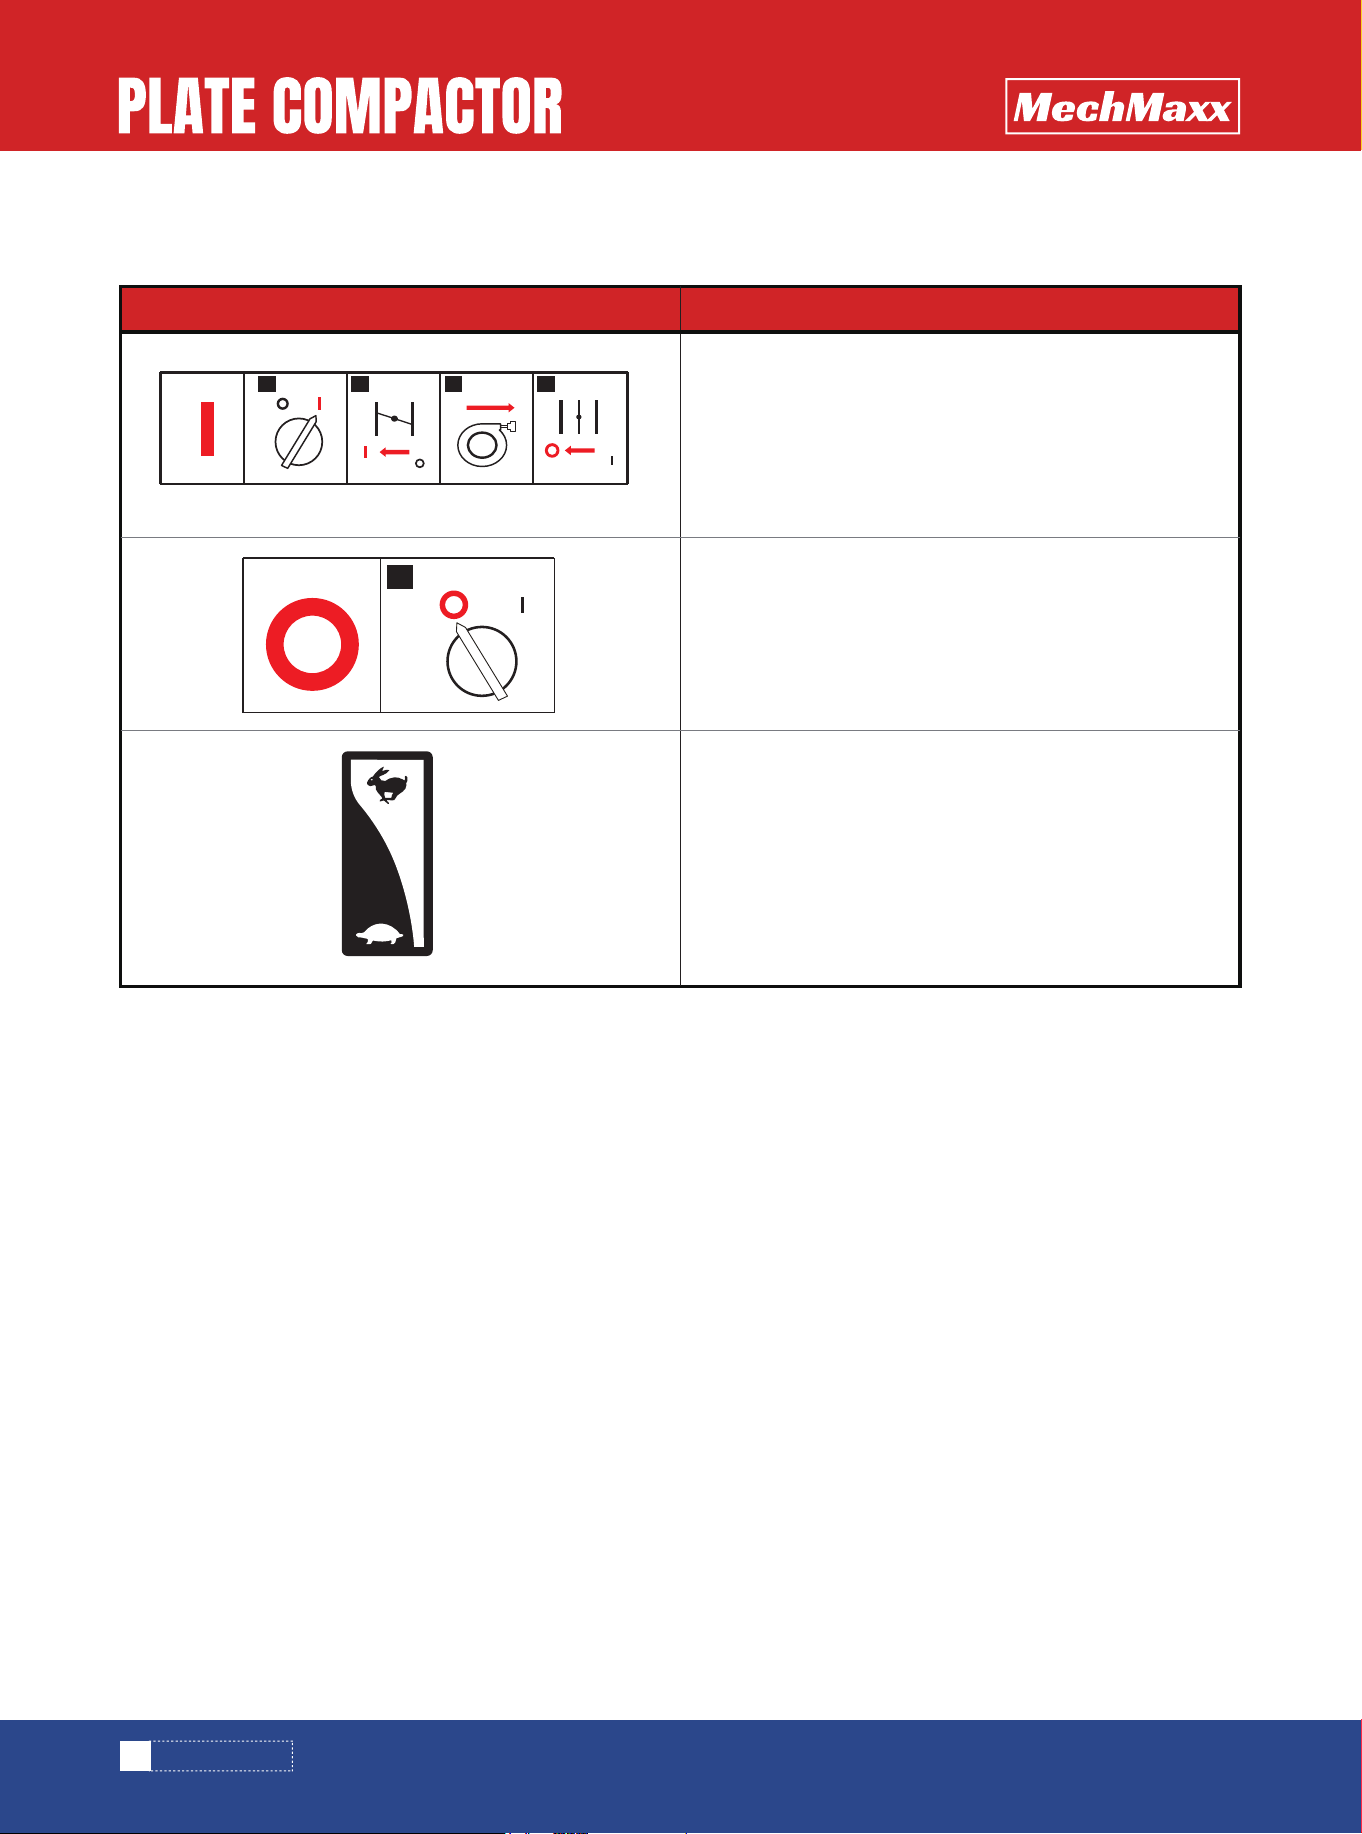
CAUTION!
Read the operator’s manual before operating
the machine. Transport only in the upright position. Keep
unauthorized persons away from the equipment. Ensure
all safety devices are in place before starting the engine.
Stop the engine and allow it to cool before servicing or
refueling. Never leave the machine running unattended.
CAUTION!
Check the exciter oil level before operation.
Add the recommended oil if the level is low. Operating
the machine with insufficient oil may cause damage to
the exciter assembly.
CAUTION!
Read the operator's manual for machine
information.
DANGER!
Keep sparks, flames, and hot materials away
from the machine.
CAUTION!
Lifting point.
Label Meaning
CHECK OIL LEVEL!
8
www.mechmaxx.com
SAFETY LABELS
The machines use international pictorial labels where needed. These labels are described below:
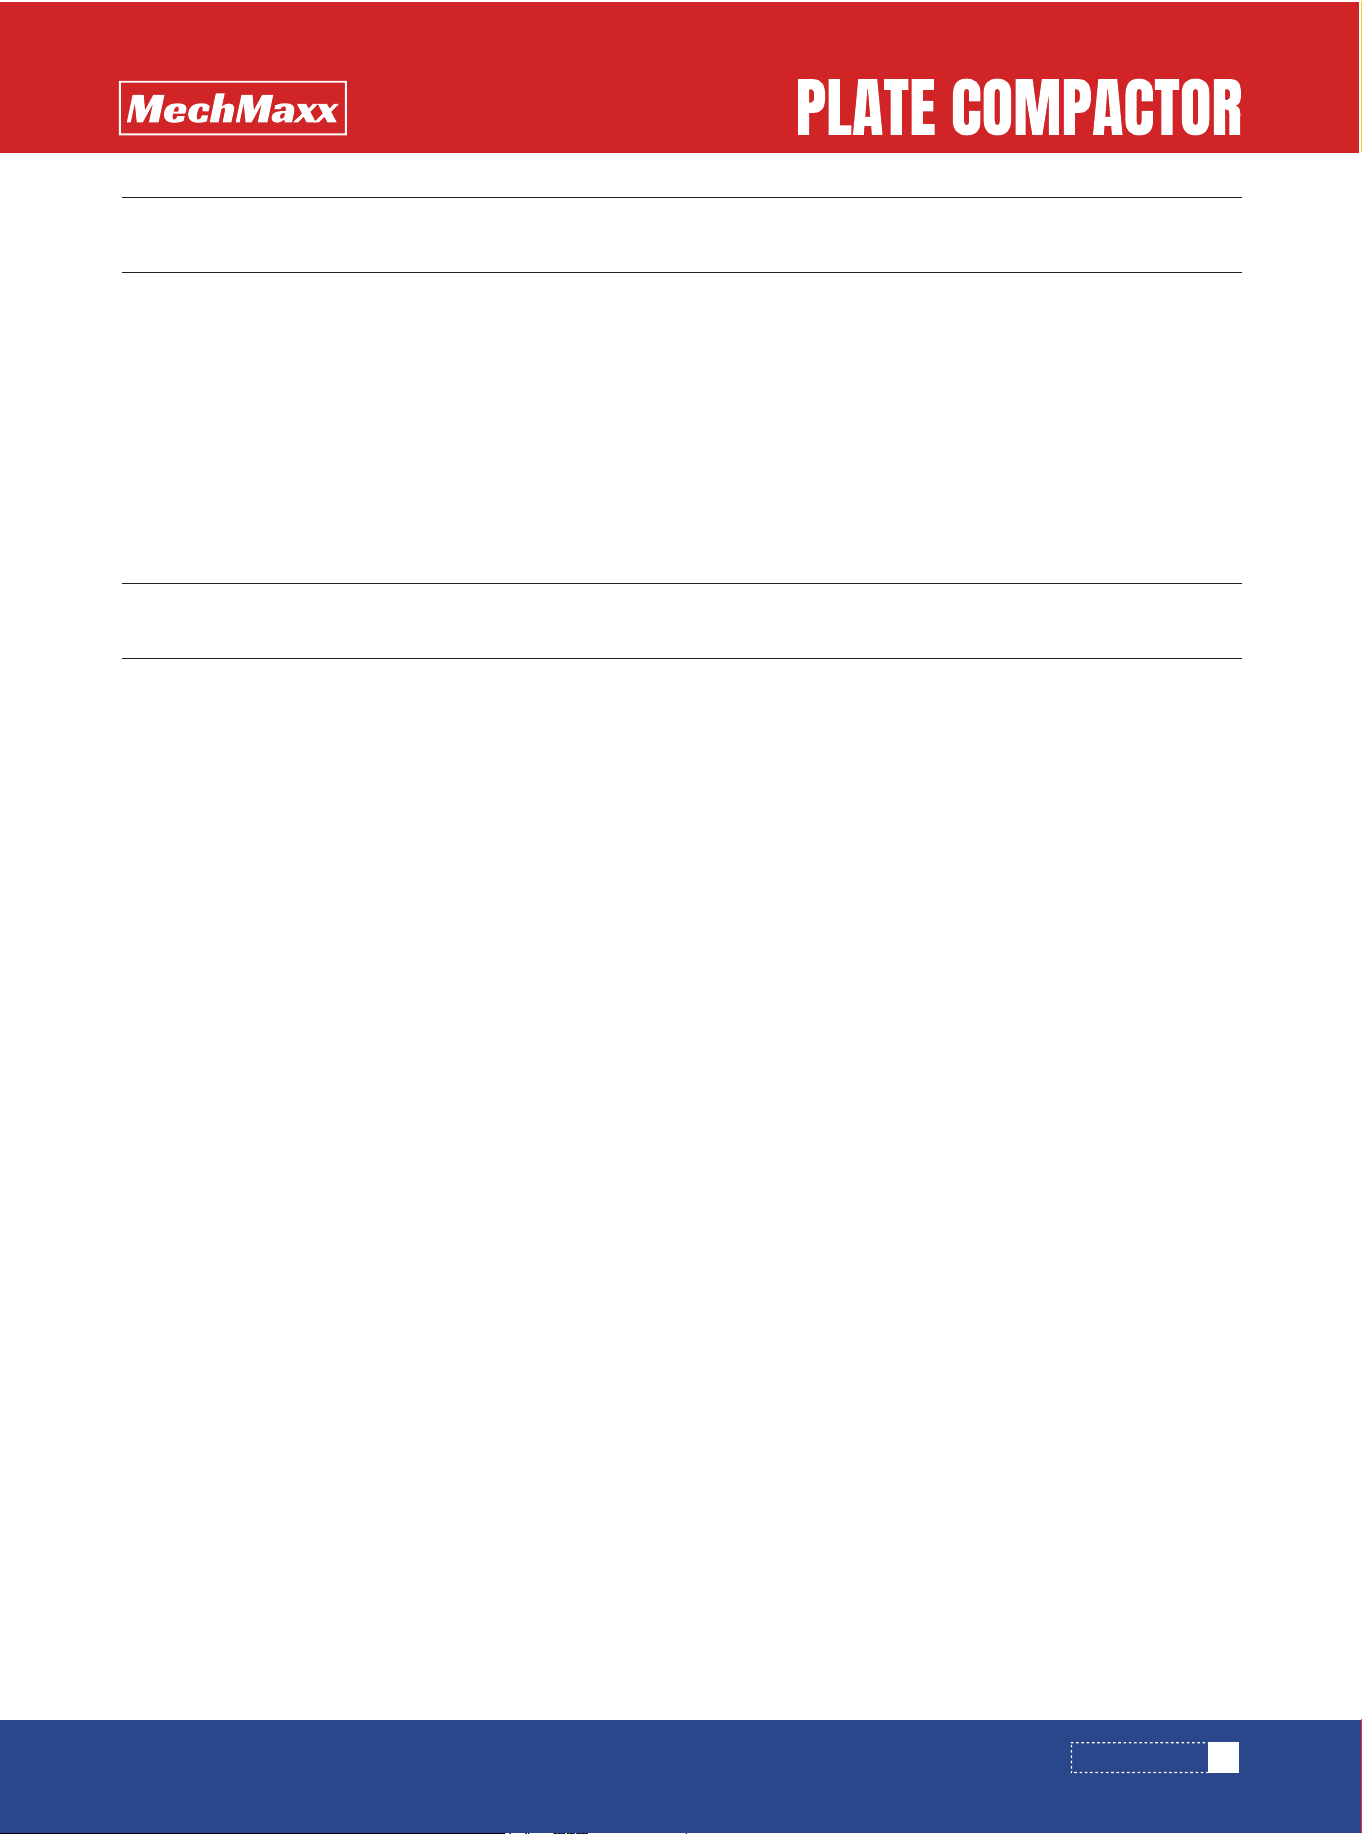
OPERATING LABELS
1
1 2 3 4
START THE ENGINE
1. Turn the engine switch to the ON position
2. Close the choke
3. Pull the recoil starter
4. Open the choke.
Stop the engine:
Turn the engine switch to OFF position.
Throttle control lever:
Turtle = ldle or Slow
Rabbit = Full or Fast
Label Meaning
9
www.mechmaxx.com
Thank you for selecting MechMaxx equipment.
This manual provides information for the safe operation and maintenance of this machine. Read this manual carefully
before operating the equipment. Proper operation and routine maintenance will help ensure long service life, dependable
performance, and safe use.
Keep this manual with the machine at all times. If this manual is lost or damaged, contact MechMaxx for a replacement
copy.
MechMaxx is not responsible for damage or injury resulting from improper operation, misuse, or failure to follow the
instructions in this manual.
Plate compactor is the machine that compacts the ground and it intends to make the surface smooth, by transmitting
vibration through vibrating plate, which power generated from single engine in vibrator case
This machine is suitable for making the ground surface smooth, such as leveling the soil and beaching, finishing the
asphalt paving. Applications as followings:
Trench compaction Earth works
Road maintenance Landscaping
Brickpaving Driveway toppings
! WARNING FOR INCORRECT APPLICATION AND ABUSE
This machine is hard to move forward on a soil with much water (especially clay soil).It is not suitable for such applica-
tion. This machine is difficult to level a ground include big stones due to insufficient compacting force. Plate compactor
is mainly applied for compacting surface smooth and it is nor effective for jobs that requires heavy compaction. In case
of compacting ground deeply into lower layer, it is recommended to use. Tamping Rammer, Vibro Compactor and Vibration
Roller which compacting force is rather effective.Please use this compactor for compacting surface on soil, sediment,
sand , beaching and asphalt. It is not recommended for use this machine for the other applications.
INTRODUCTION
INTRODUCTION
APPLICATIONS
10
www.mechmaxx.com
The upper part is made up of Power Source, Handle ,Belt Cover and Guard Hook which are fixed by Engine base. The Engine
base is fixed on Vibrating Plate by Shock Absorbing Ruber.The lower part is made up of Vibrating Plate and Vibrator unit
that has an Eccentric rotary shaft built in. The power source is transmitted from the centrifugal clutch on engine output
shaft to the eccentric rotary shaft via V-belt.
POWER TRANSFER
Air-cooled single cylinder engine is amounted as power source and Centrifugal Clutch is fixed on engine output shaft.
Centrifugal Clutch engages by running up the engine and engine is reduced o suitable number for compacting. The rotation
of engine is transmitted from V-pulley integrated with Clutch drum to Vibrator pulley through V-belt. Vibrator Pulley
rotates Eccentric rotor shaft that is contained in Vibrator case. The generated vibration created from eccentric rotor is
transmitted to Compaction with the weight of the machine makes the compaction of the ground possible.
MOTOR
The engine is controlled by an ON/OFF switch or push button which is mounted on the engine below the fuel tank.
The engine speed is controlled by a remote throttle lever which is mounted on the machine handle.
DRIVE BELT
Tension of the drive belt is adjustable. Loosen the four nuts on the bolts which secure the engine to the baseplate, Adjust
the set screws which bear against the engine crankcase to achieve the required belt tension .Ensure that the four nuts
and the set screw locknuts are tightened after adjustment.
STRUCTURE
STRUCTURE
FUNCTIONS AND CONTROLS
STARTING SAFETY:
SERVICING SAFETY:
11
www.mechmaxx.com
FOREWORD:
It is important to read this manual carefully so that you will fully understand the operational characteristics and perfor-
mance of the plate compactor, Proper mainternance procedures will insure long life and top performance of the unit.
SAFETY:
This section outlines basic safety procedures that apply to the operation,maintenance and adjustment of the plate
compactor. This unit is designed as a powerful, productive machine that should be operated with respect and caution.
Misuse or carelessness can result in serious injury or property damage. Or both. Safety precautions must be observed at
all times.
Operator Qualifications:
Before operating this equipment, an individual should read this manual. Whenever possible, he should be shown how to
operate the unit by an experienced operator. Inexperience is hazardous in operating any machine or attachment. Trial and
error is not the way to become familiar with a piece of equipment. This is expensive, cuts equipment life and can create
machine should not be left unattended when operating.
GENERAL SAFETY:
FOR SAFETY OPERATION
FOR SAFETY OPERATION
This safety alert symbol identifies important safety messages throughout this manual and on the
machine.
When you see this symbol, carefully read the message that follows. Your safety is at stake!
! CAUTION
Protection required. Wear hard hat, shatterproof glassed, steel toed boots and other protective devic-
es required by job conditions. Avoid jewelry or loose clothing. These many catch on controls or in
moving parts and cause serious injury.
! CAUTION
Poisonous fumes. Start and operate only in well ventilated area. Breathing exhaust gases can result in
sickness or death.
! CAUTION
Flammable liquid. Stop engine and do not smoke or allow work in immediate area when refueling. Fire
or explosion could result from flames or sparks.
Moving parts. Shutdown engine before performing. Service or maintenanace. Contact with moving
parts can cause serious injury.
Fligh temperature. Alow machine and engine to cool before performing service or maintenance. Contact
with hot components can cause serious bums.

12
www.mechmaxx.com
SHUTDOWN
ENGINE SAFETY
Refer to the engine manufacturer's manual for engine-specific operation and maintenance instructions.
- Operate the machine only in well-ventilated areas.
- Never run the engine in enclosed spaces.
- Stop the engine before refueling.
- Allow the engine and muffler to cool before servicing.
- Do not touch hot engine or exhaust components during or immediately after operation.
Emergency Shutdown
Move the throttle lever to the OFF or IDLE position and switch the engine OFF immediately.
Normal Shutdown
Reduce engine speed to idle, allow the engine to run for 2-3 minutes to cool, then switch the engine OFF and close the
fuel valve.
FOR SAFETY OPERATION

13
www.mechmaxx.com
MECHANICAL HAZARDS
FIRE & EXPLOSION HAZARDS
NEVER allow any person to operate the machine without adequate instruction .
ENSURE all operators read,understand and follow the operating instructions
SERIOUS INJURY could result from improper or careless use of this machine
Plate compactors are heavy units and should be positioned by two people of appropriate strength. Using the lifting
handles provided on the machine, along with correct lifting techniques.
DO NOT operate the machine unless all protective guards are in place.
KEEP hands and feet clear of rotating and moving parts as they will cause injury if contacted.
ENSURE that the engine operation switch is in the OFF position and the spark plug ignition lead is disconnected before
removing the guards or making adjustments.
ENSURE both the machine and the operator are stable by setting up on level terrain and the machine will not tip over, slide
or fall while in operation or unatrttended.
DO NOT leave the machine in operation while it is unattended.
ENSURE that the walls of a trench are stable and will not collapse due to the action of the vibration ,prior to commencing
compaction.
ENSURE that the area to be compacted does not contain any “live” electrical cables, gas, water or communication
services which may be damaged by the action of the vibration.
EXERCISE CARE when operating unit. Exposure to vibration or repetitive work actions may be harmful to hands and arms.
NEVER stand on the unit while it is operating.
DO NOT increase the governed no-load engine speed above 3600 r/min. Any increase may result in personal injury and
damage to the machine.
BE CAREFUL not to come in contact with muffier when the engine is hot, since it can cause severe burns.
ENSURE that repairs to the engine and machine are carried out by personnel.
PETROL is extremely falmmable and explosive under certain conditions.
ENSURE that gasoline is only stored in an approved storage container.
DO NOT refuel the engine while it is in operation or hot.
DO NOT refuel the engine in the vicinity of sparks, a naked flame or a person smoking.
DO NOT over fill the fuel tank and avoid spilling gasoline when refueling. Spilled gasoline or gasoline vapour may ignite. If
spillage occurs,ensure that the area is dry before starting the engine.
ENSURE theat the fuel tank cap is securely fitted after refueling.
CHEMICAL HAZARDS
DO NOT operate or refuel a gasoline engine in a confined area without adequate ventilation.
CARBON MONOXIDE exhaust gases from internal combustion engine driven units can cause death in confined spaces.
HAZARDS AND RISKS
HAZARDS AND RISKS

14
www.mechmaxx.com
NOISE HAZARDS
EXCESSIVE NOISE can lead to temporary or permanent loss of hearing.
WEAR an approved hearing protection device to limit noise exposure. As required by Occupational Health and Safety
regulations.
WEAR an approved hearing protection device to limit noise exposure. As requrede by Occupational Health and Safety
regulations.
PROTECTIVE CLOTHING
ALWAYS wear approved hearing protection when working in a confined work space. Protective goggles and a dust mask
should be worn when working in a dusty environment. Protective clothing and footwear may also be desirable wheh work-
ing with hot mix bitumen.
ADDITIONAL HAZARDS
Slip/Trip/Fall is a major cause of serious injury or death. Beware of uneven or slippery work surfaces.
Exercise care when working in the vicinity of unprotected holes or excavations.
HAZARDS AND RISKS
15
www.mechmaxx.com
The machine is best suited to the compaction of bituminous and granular materials e.g. granular soils, gravels and sands
or mixtures of both. Cohesive soils such as silt and clay are best compacted using the impact force produced by a vibrat-
ing rammer.
Where possible the site should be graded and leveled before commencing compaction.
Correct moistrure content in soil is vital to proper compaction.Water acts as a lubricant to help slide soil particles togeth-
er. Too little moisture means inadequate compaction; too much moisture leaves water-filled voids that weaken the soil’s
load bearing ability.
Use unleaded grade gasoline and ensure that the fuel is free from contamination.
The vibratory motion provides a self propelling action. Position the handle at the opposite end of the machine to the vibra-
tor.
Start the engine using the recoil starter. ( If the engine is fitted with an on/off switch this must first be turned to ON
before starting. )
For more information of starting and correct operating procedures of the engine, refer to the engine operation manual
supplied with the unit.
Increase the engine sped to the maximum setting using the hand throttle lever, before commencing compacting.
The machine should be controlled by grasping the handle with both hands and applying restraint to control the for ward
notion. If forward or reverse travel is not operating properly, inspect and adjust the travel control linkage and related
fasteners as required.
ALWAYS maintain good footing so that you do not slip and loose control when starting or operating the machine.
1. Make sure that all dirt, nut, etc., are thoroughly
removed from the unit prior to operation. Special effort
should be given to the button face of the vibrating plate
and those areas adjacent to the cooling air inlet of engine,
carburetor, and air cleaner.
2. Check all bolts and screws for tightness and make sure
all bolts and screws are securely tightened. Loose bolts
and screws may cause damage to the unit.
3. Check the V-belt for tightness. The normal slack should
be approximately 10-15 mm (1/2’’) when the belts are
forcibly depressed in the middle position between the
two sheaves. If there is excess belt play. There could be
a decrease in the impact force or erratic vibration, caus-
ing machine damage.
4. Check the engine oil level and if the engine oil lever is
low, it should be refilled. Use the proper engine oil as
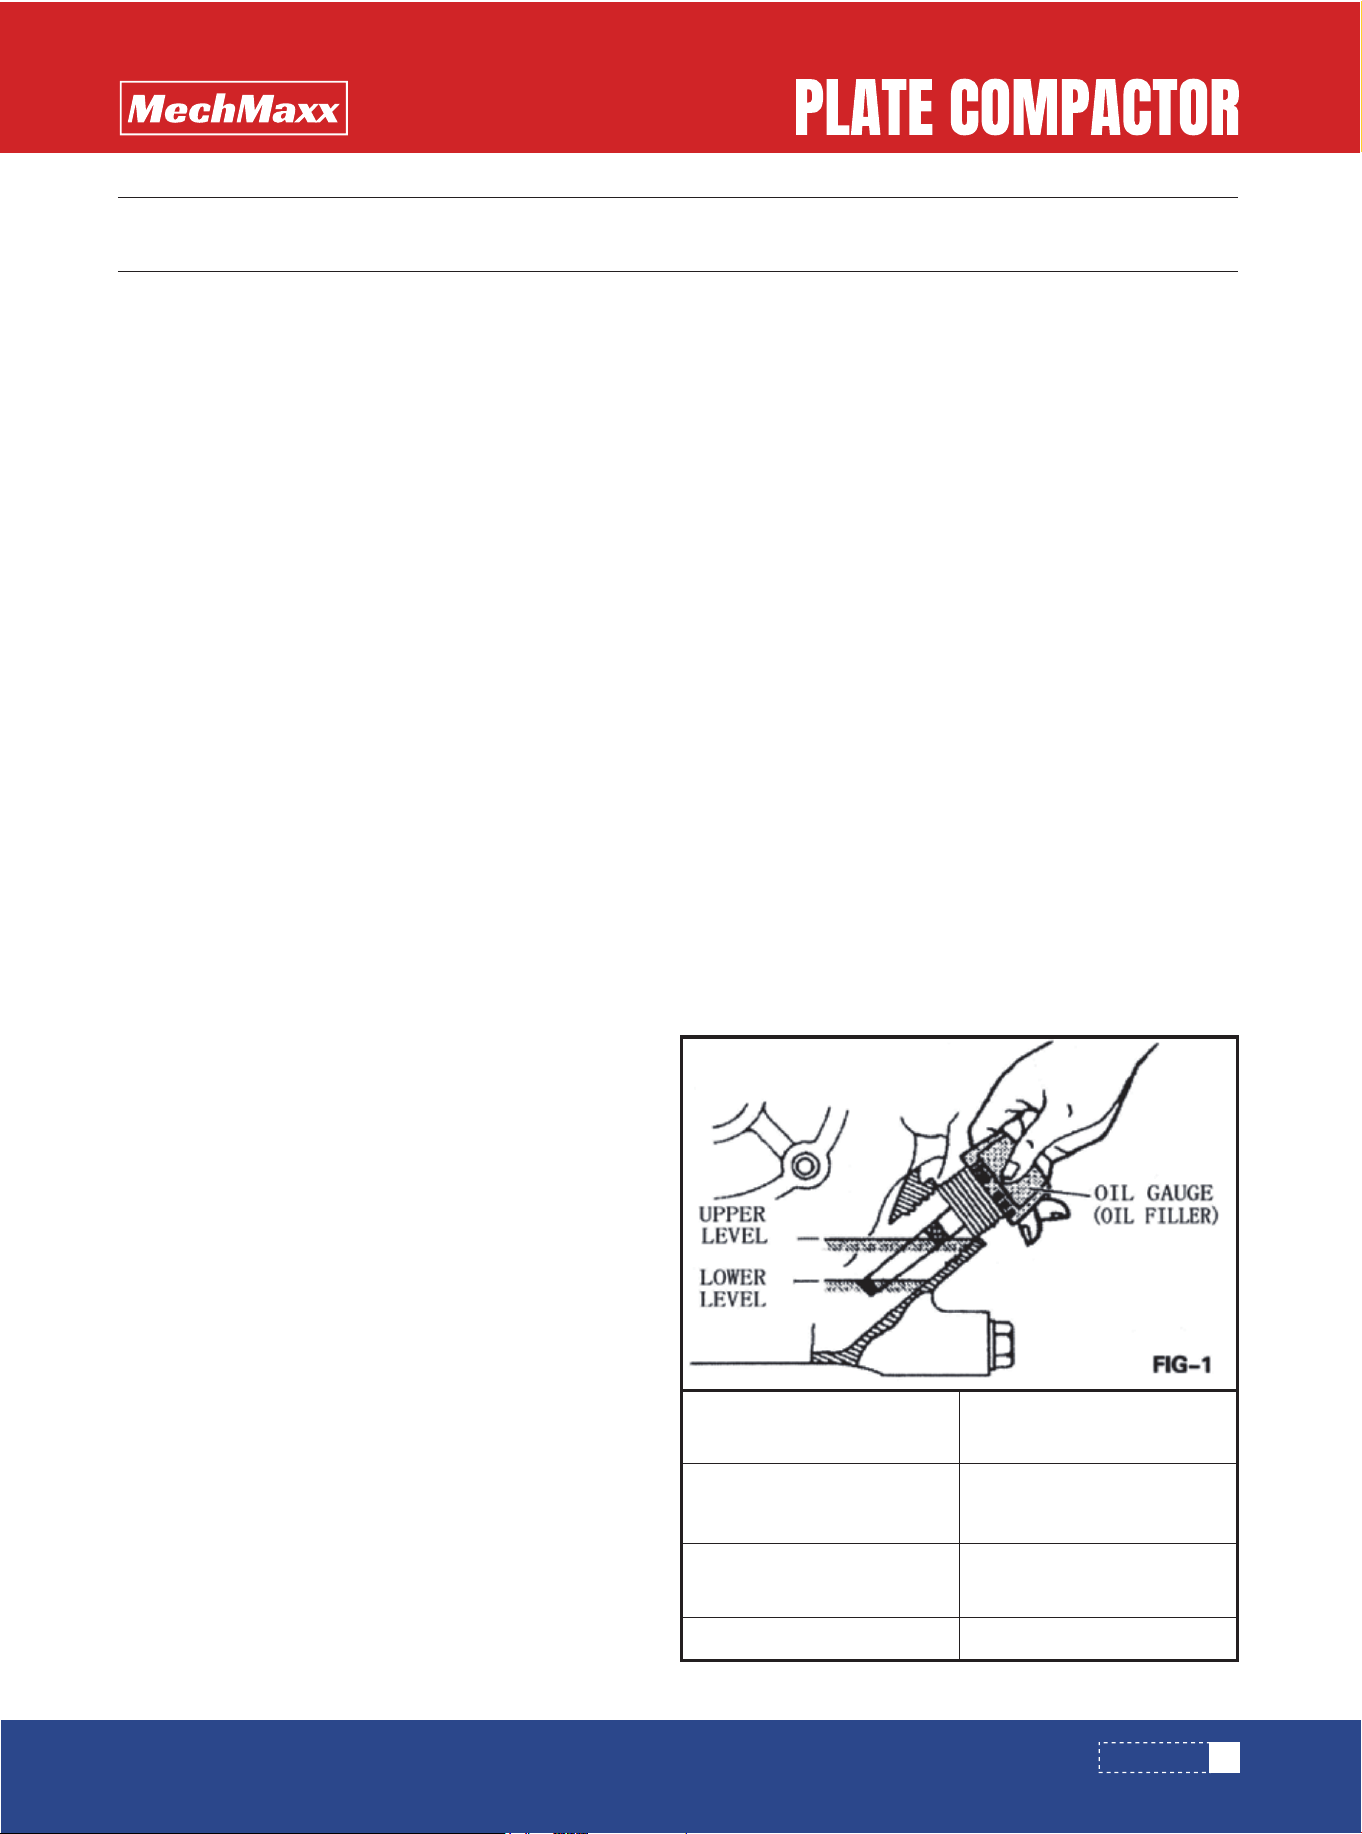
suggested in the table below. (Fig-1)
5. Remove the oil plug in the vibrator assembly and check
the oil level. Make sure the compactor is level when
checking. The oil level should be up to the oil plug. Every
month or every 200 hours of operation, replace the oil.
GENERAL OPERATION
PRIOR TO OPERATION
Season Temperature
Spring Summer or Autumn
+120°F to +40°F
Winter
+40°F to +15°F
Below +15°F
SAE 30
SAE 20
SAE 10W-30
Grad of Motor oil
(higher than MS class)
OPERATION
OPERATION
16
www.mechmaxx.com
6. A regular grade gasoline should be used in the engine. When filling the fuel tank, make sure the fuel filter is used.
Gasoline Engine
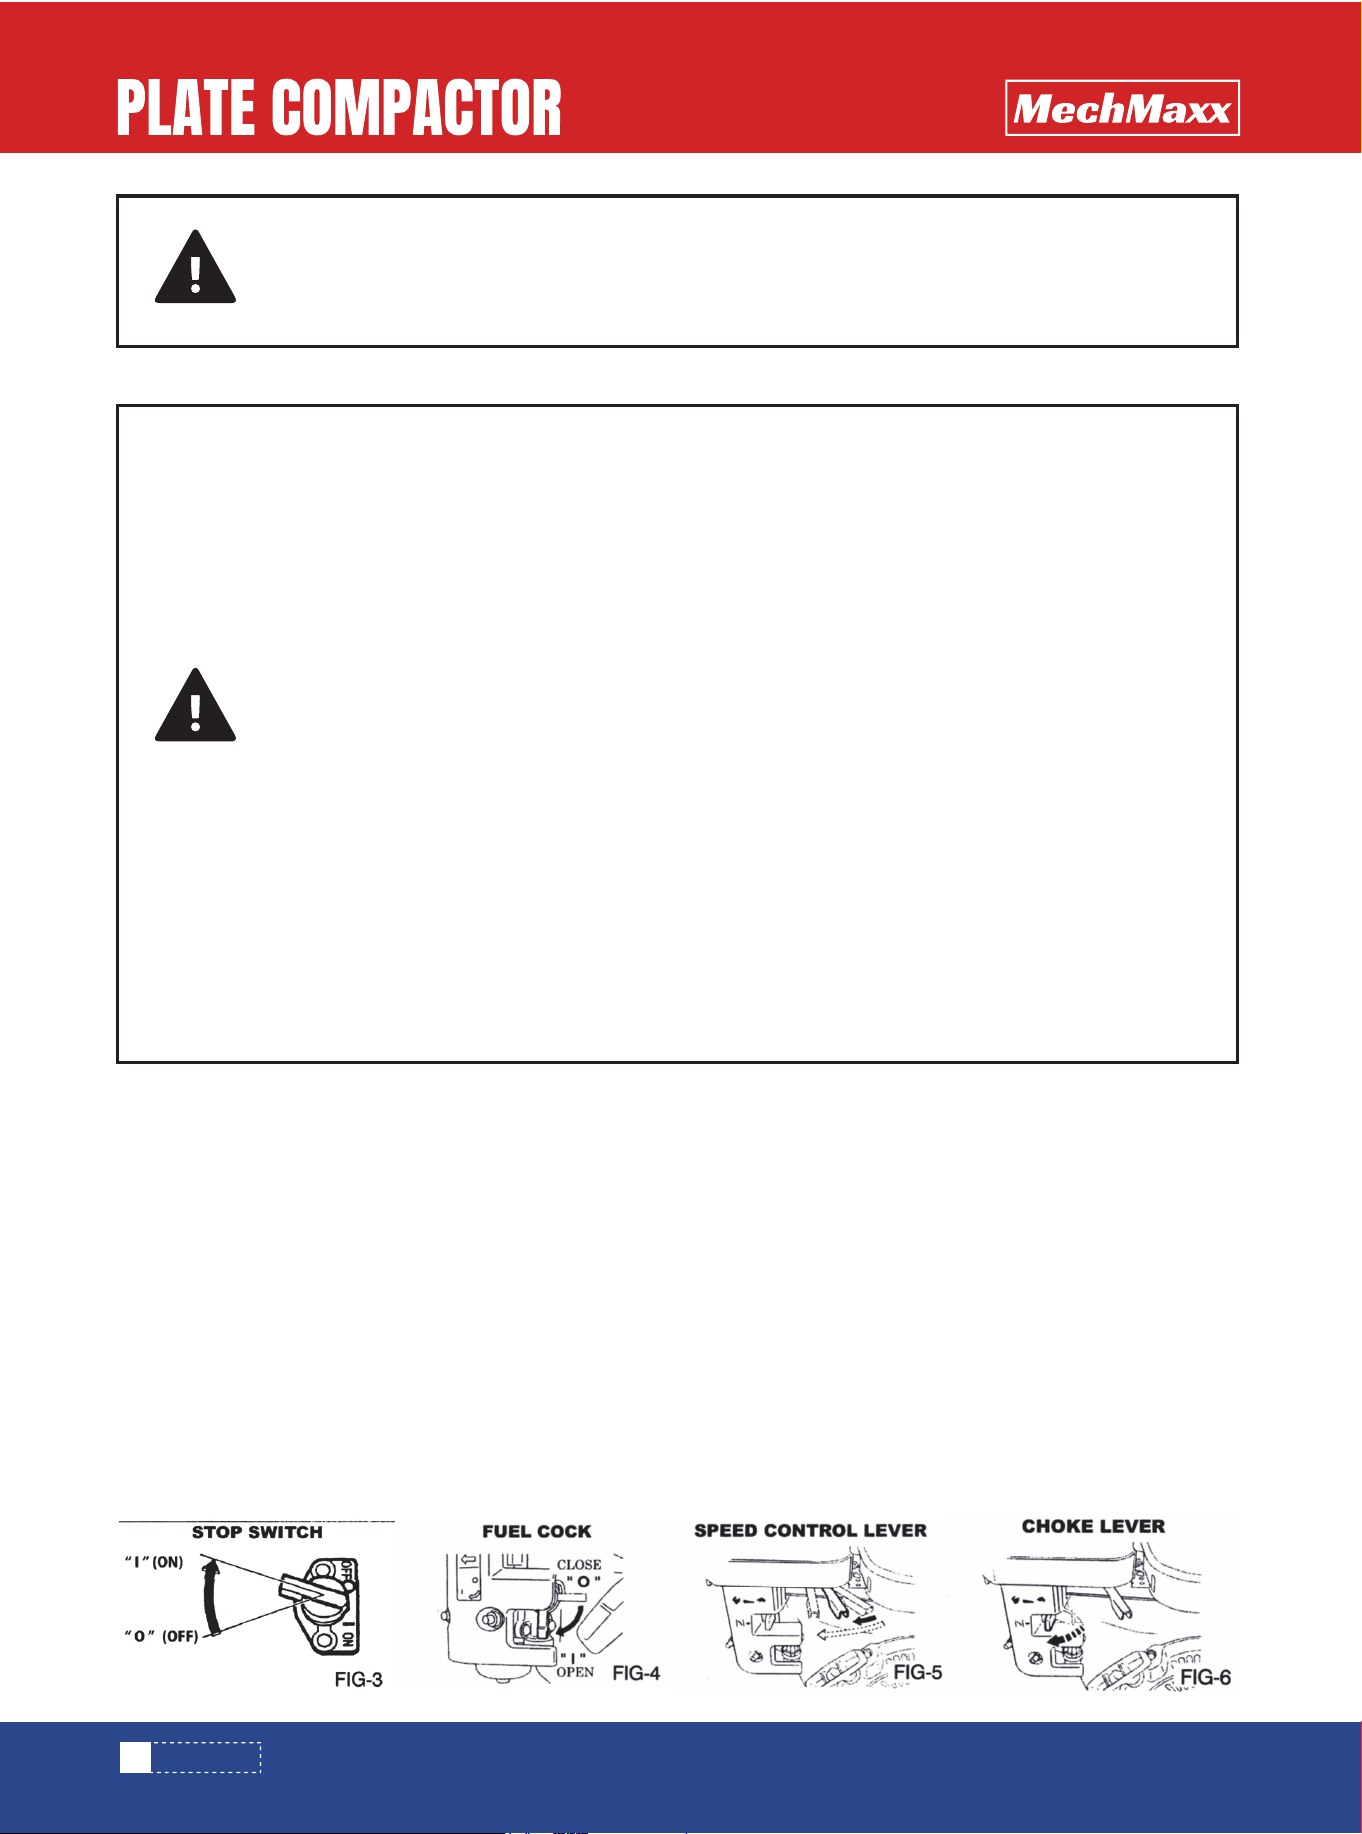
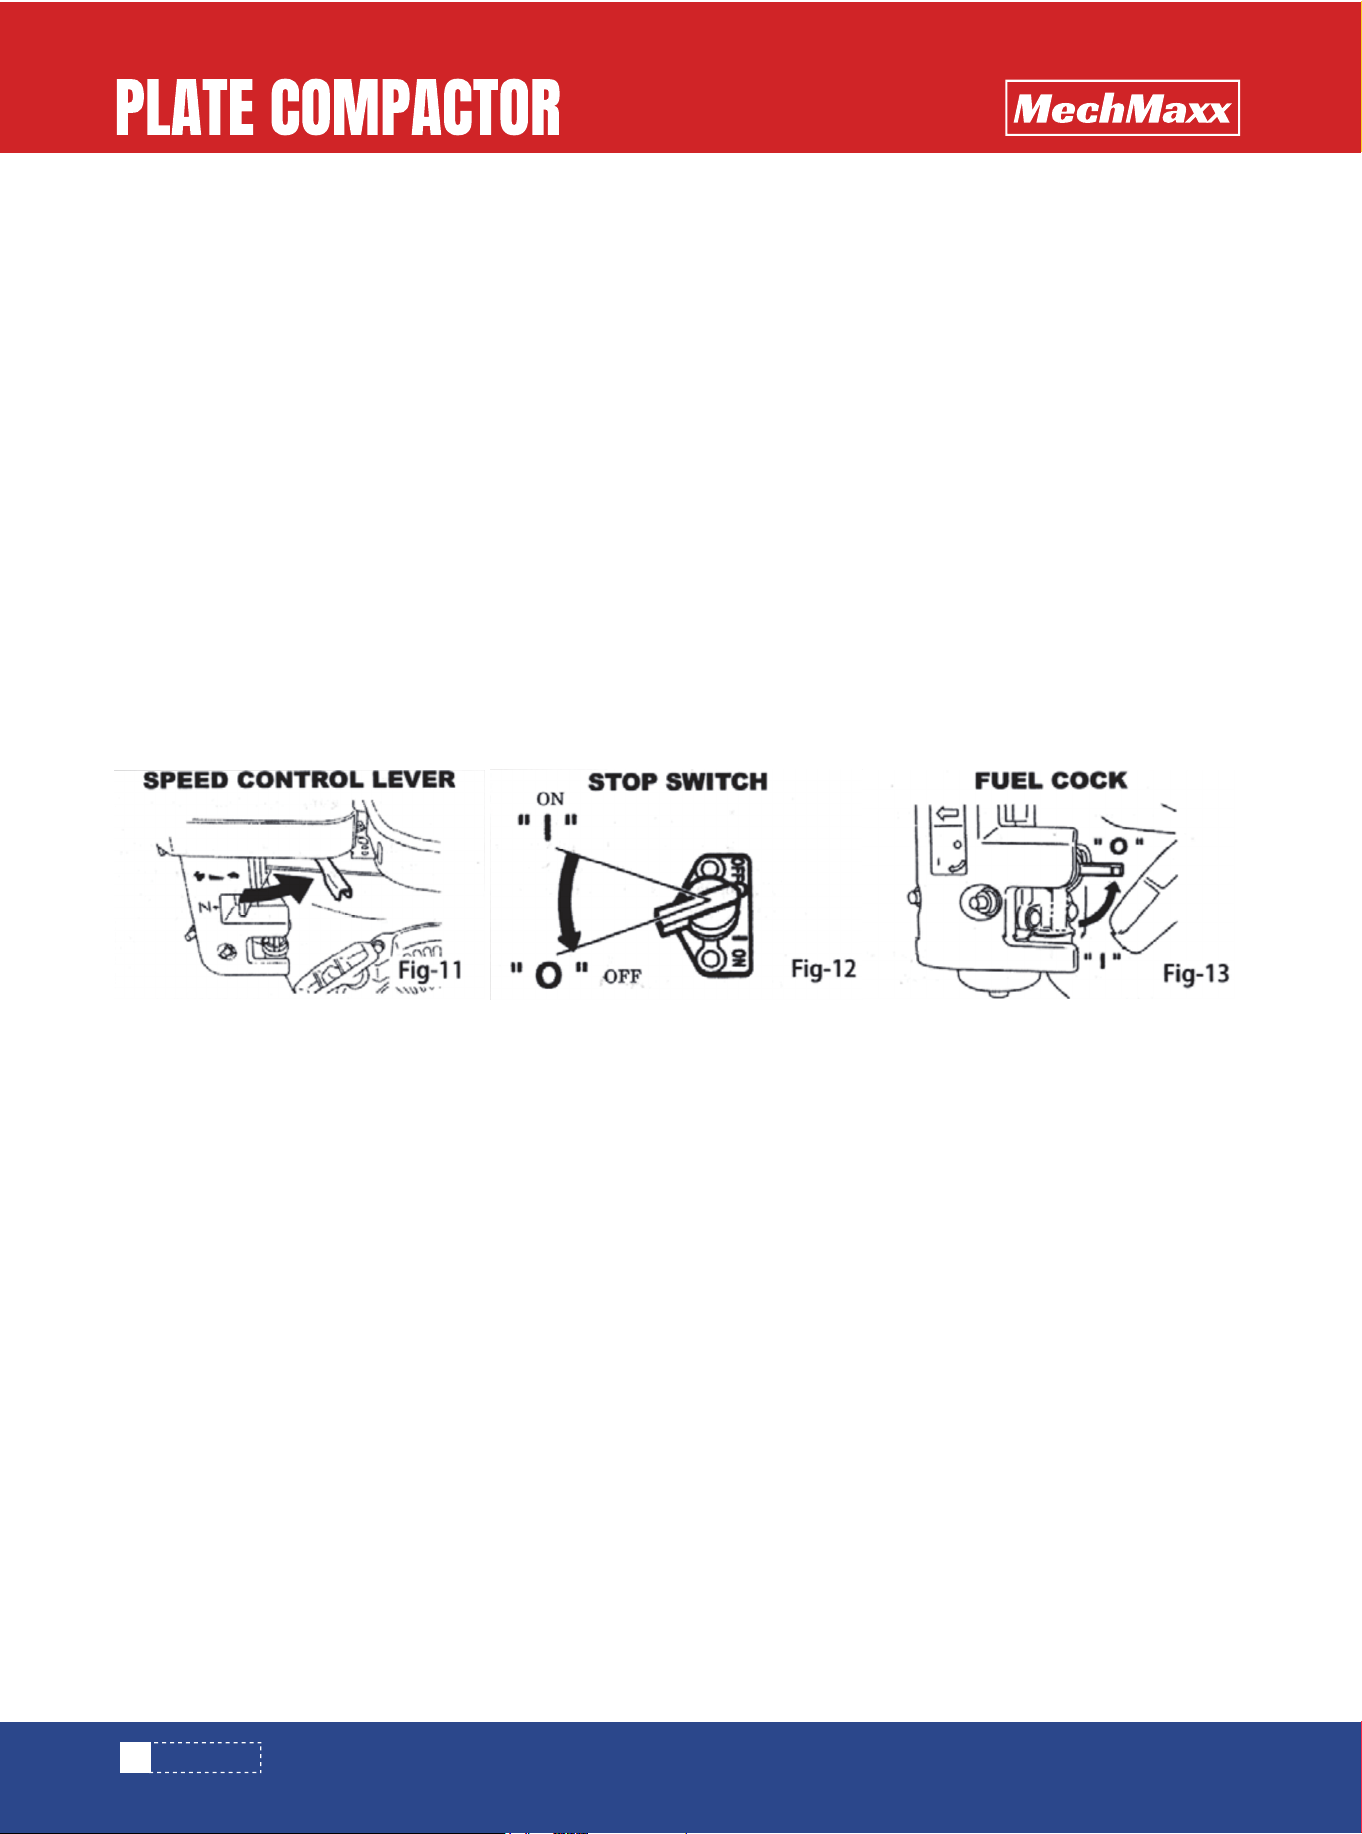
1. Turn the STOP SWITCH clock-wise to the position “I” (ON). Fig-3.
2.Open the fuel cock. Fig-4.
3. Set the speed control lever 1/3 to 1/2 of the way towards the high speed position. Fig-5.
4. Close the choke lever.
If the engine is warm or the ambient temperature is high, open the choke lever half-way, or keep it fully open.
If the engine is cold or the ambient temperature is low, close the choke lever fully. Fig-6
5. Pull the starter handle slowly until resistance is felt. This is the “compression” point. Return the handle to its original
position and pull swiftly.
Do not pull out the rope all the way.
After strater the engine, allow the starter handle to return to its original position while still holding the handle.
STARTING
! IMPORTANT
Use the engine oil SAE
When changing the oil, the old oil can be drained by tipping the unit. The oil will drain easily while it is
hot.
! CAUTION
1. Be careful with the operating place and ventilation.
Avoid operating the machine in a closed room, tunnel, or other badly ventilated places, since its
exhaust contains deadly poisonous carbon monoxide. If the machine is employed unavoidable
operated in such a place, discharge the exhaust out the room by a suitable means.
2. Be careful with the hot members.
Mufflers and other hot members are dangerous.
Do not touch them with unprepared hand.
3, Observe with the following cautions when transporting.
Clamp fuel tank cap securely, and turn the fuel have OFF at the source during Drain gasoline from fuel
tank before transporting over a long distance or on rough roads.
4. Stop engine without fail before replenishing fuel tank.
Never replenish gasoline while the engine is running or remains hot otherwise spilled or evaporated
fuel is liable to catch fire from engine sparks or muffler heat.
Wipe off spilled fuel, if any, before starting engine. Be careful not to spill fuel.
5. Keep inflammables way from the vicinity of the exhaust port.
Be careful with gasoline match, straw and other inflammables, since the exhaust port is subjected
to a high temperature.
OPERATION
17
www.mechmaxx.com
ENGINE
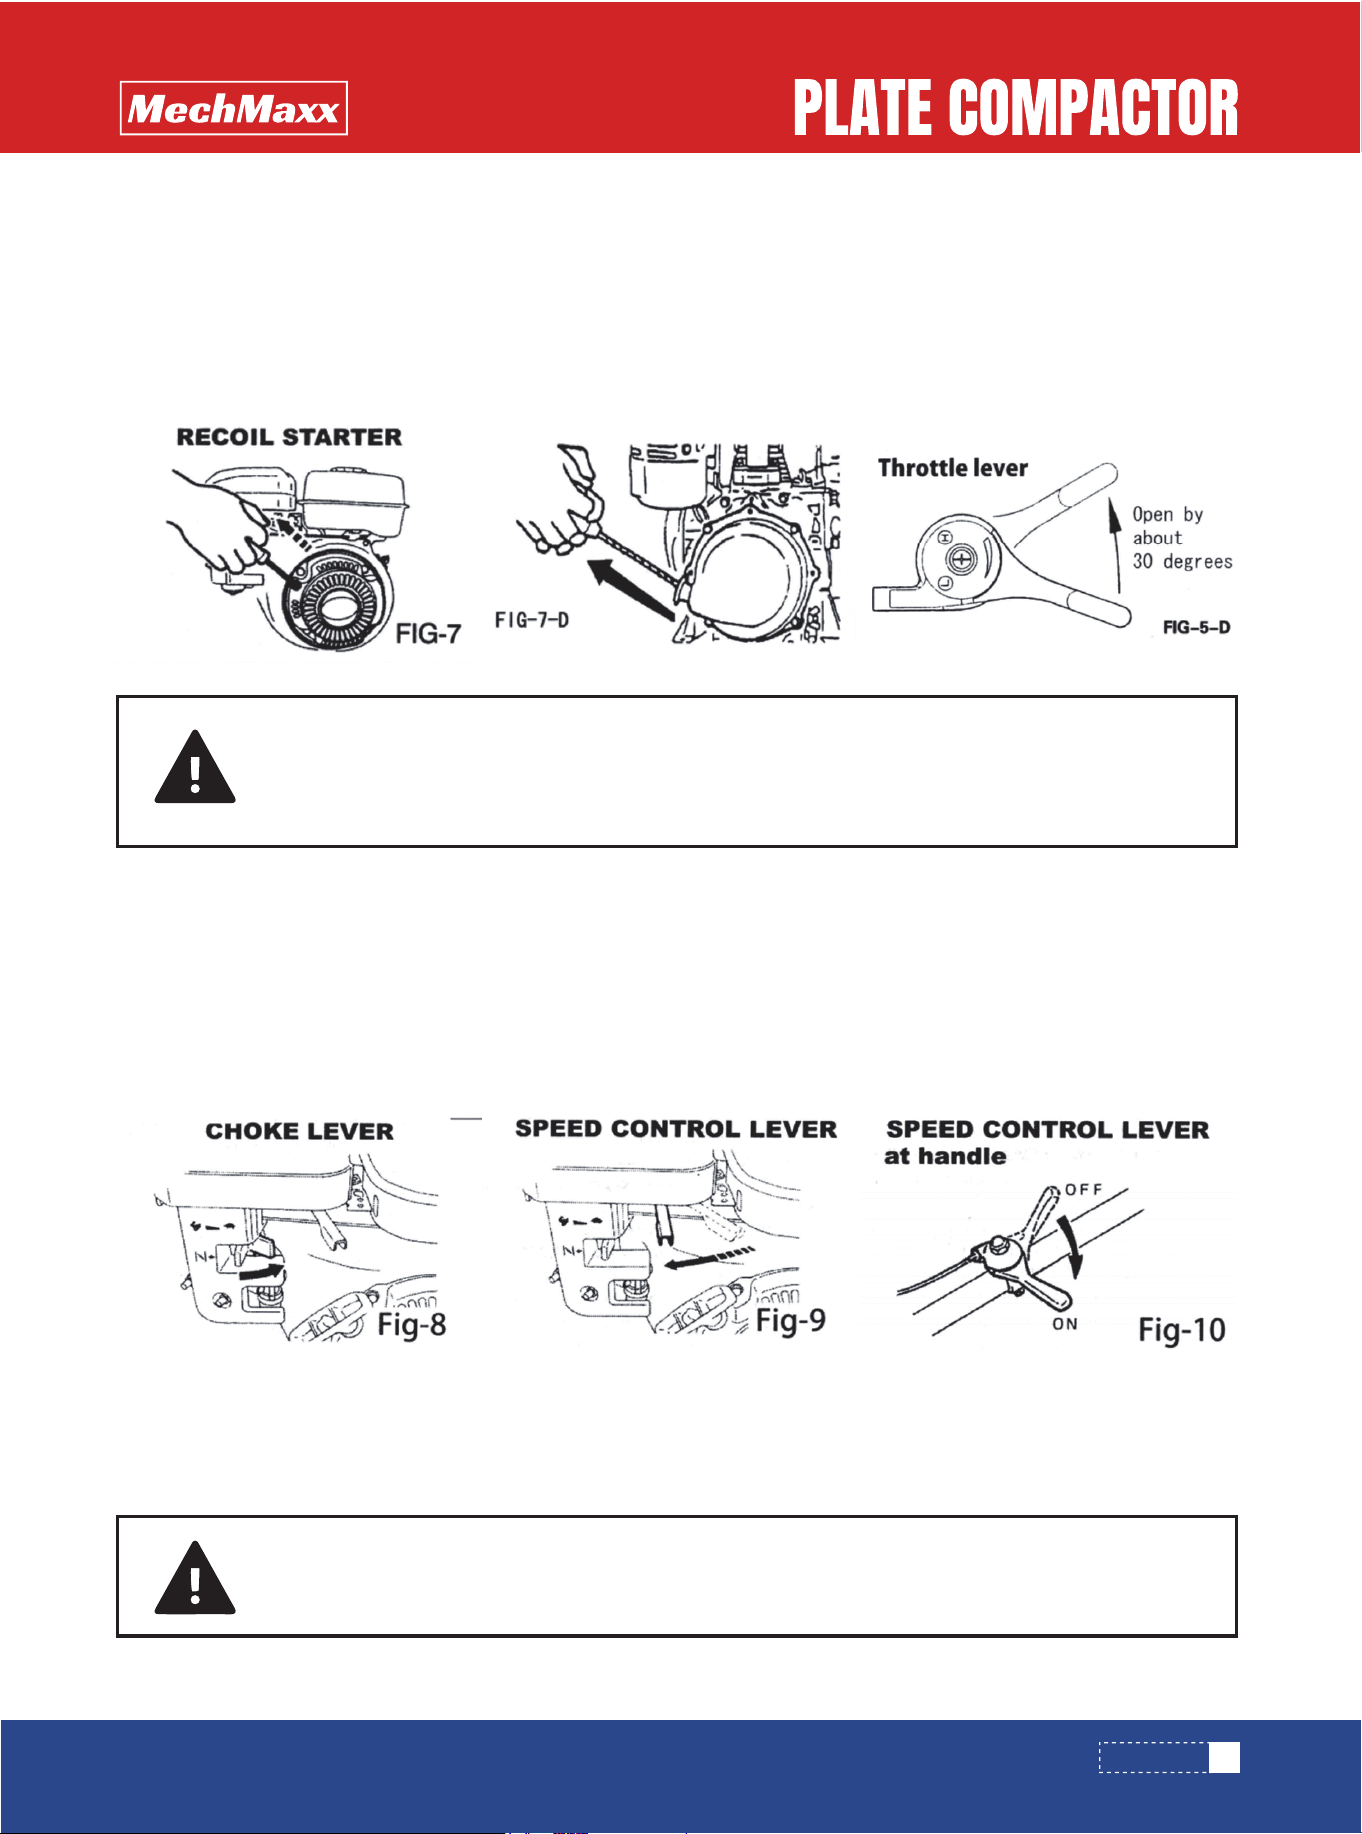
6. Turn the throttle lever to START position (open by about 30 degrees) Fig-5-D
7. Operate Starter
In case of recoil starter
By pulling the starter knob slowly, you will reach such point where resistance become strong (compression point). By
pulling it further, you will find a point where resistance is reduced. Return the knob, but slowly return it original.Fig-7-D
8. After starting up the engine, be sure to perform a warm up the engine, be sure to perform a warm up run for 2 to 3
minutes. This should be performed without fail, particularly during winter season.
1. As the engine warms up, gradually move the choke lever to the OPEN position Fig-8
2. Move the speed control lever from the LOW to the HIGH position. When the engine speed reaches approximately
2300-2600 PRM, the centrifugal clutch engages. If the engine speed increased very slowly, it is possible that the clutch
can slip. Do not operate the speed control lever slowly. Fig-9.10.
The Oil Alert Aystem is designed to prevent engine damage caused by an insufficient amount of oil in the crankcase.
Before the oil level in the crankcase can fall below a safe limit, the Oil Alert System will automatically stop the engine
(the engine switch will remain in the ON position).
OPERATION
OIL ALERT SYSTEM
! CAUTION
Do not pull the rope all the way and do not take you hand off the pulled knob but slowly return it
original position.
! NOTICE
If the engine stops and will not restart, check the engine oil level.
OPERATION
3. When compacting asphalt, apply an approved release agent to the bottom face of the vibrating plate to reduce sticking.
4. When shutting off the vibrator, turn the speed control lever from the HIGH to LOW position. Do not move the speed
control lever slowly.
1. Be sure to stop the engine while transporting.
2. Screw up the fuel tank cap securely and close the fuel valve to avoid fuel leaking.
3. In transportation by car, fix machine securely not to move nor to fall down.
In case of driving for long distance or at off-road, take out fuel from tank.
To stop the engine in an emergency, turn the stop switch to the OFF position.
Under normal conditions, use the following procedure:
1. Set the speed control lever at the low speed position and allow the engine to run at low speed for 2 or 3 minutes before
stopping.
2.Tum the stop switch to the OFF position. Fig-12
3.Close the fuel cock. Fig-13
TRANSPORTATION
SHUTDOWN
18
www.mechmaxx.com
OPERATION
A. Remove mud, dirt, ect, from the unit.
B. Clean bottom face of the vibrating plate.
C. Check the air cleaner element and clean if necessary.
D. Check all nuts, bolts, and screws for tightness and retighten as necessary.
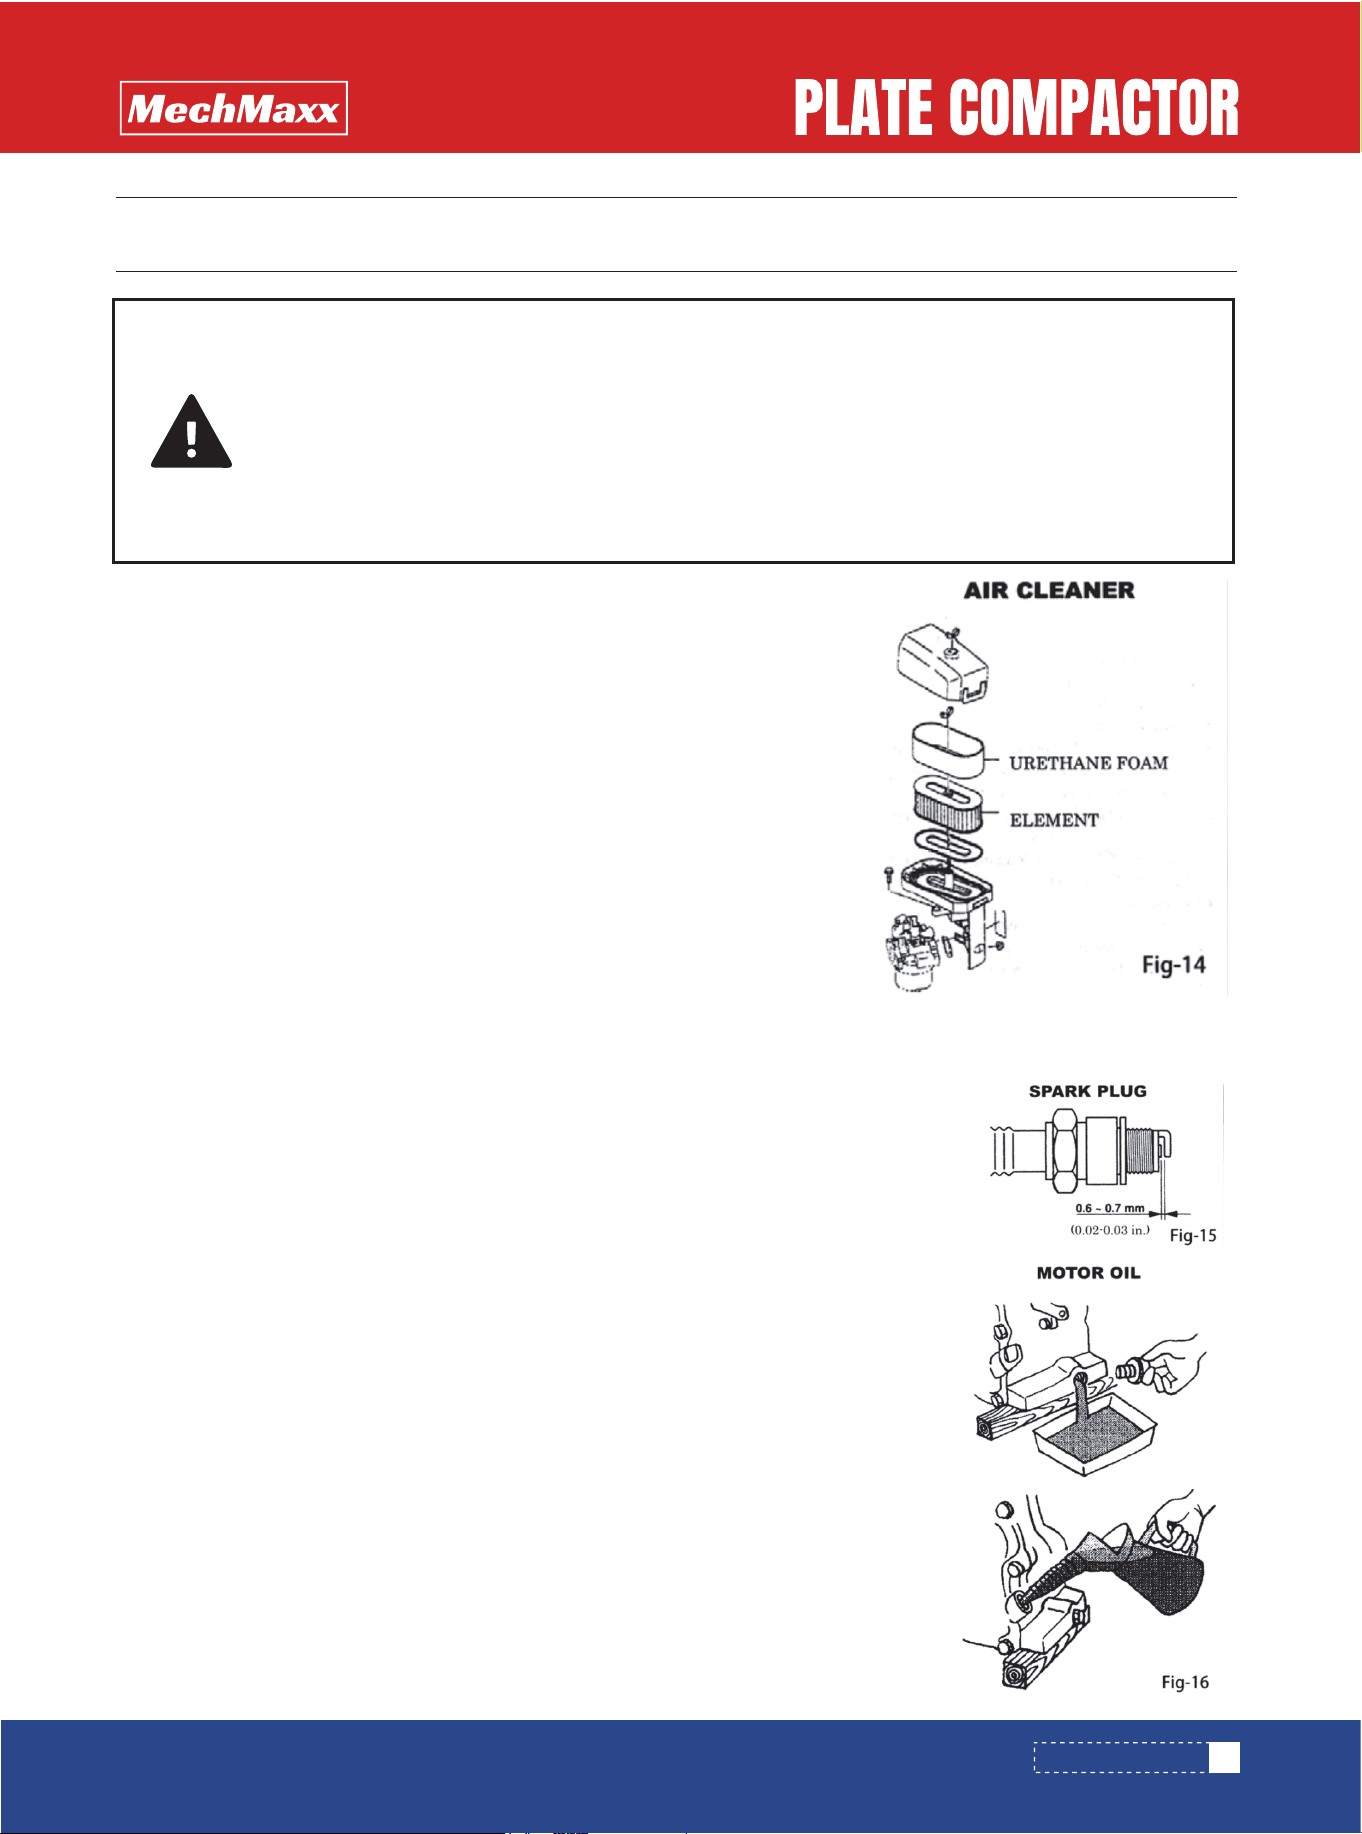
AIR CLEANER SERVICE Fig-14
Dirty air cleaner element will cause starting difficulty, power loss, engine
malfunctions, and shorten engine life extremely.
Keep the air cleaner element clean.
Clean the foam element using mild detergent or an approved non-flammable solvent.
Allow it to dry completely. Lightly coat the element with clean engine oil, then squeeze
out excess oil before reinstalling.
A. Remove spark plug, clean and adjust the spark plug gap to 0.6-0.7mm(0.02-0.03 in.).
Fig-15
B. Drain the engine oil of the engine and replace with new specified oil. Fig-16
! NOTE:
When the engine is new, the first oil change must be made after 20 hours of
operation and replenish the oil tank before operating.
1. Monthly Service
Change the oil in the vibrator assembly.
2. Storage
When storing the compactor for long periods after operation.
A. Thoroughly drain the fuel from the fuel tank fuel pipe and carburetor.
B. Pour a few drops of engine oil into the cylinder by removing the spark plug. Rotate the
engine several times by hand so that the cylinder interior is covered with oil.
C. Clean the outer surface of the machine with an oil moistened cloth. Cover the unit and
store in a humidity-free area.
DAILY SERVICE
WEEKLY SERVICE
URETHANE FOAM ELEMENT
SERVICE & STORAGE
! CAUTION
Flammable liquid: Stop engine and to not smoke or allow work in immediate area when refueling. Fire
or explosion could result from flames or sparks.
Moving parts: Shutdown engine before performing service or
maintenance. Contact with moving parts can cause serious injury.
High temperature: Allow machine and engine to cool before performing service or maintenance.
Contact with hot components can cause serious burn.
19
www.mechmaxx.com
SERVICE & STORAGE
Check the oil level in the engine crankcase daily.
Check the vibrator oil level weekly. Inspect the rubber anti vibration mounts for wear or deterioration. Clean the underside
of the plate regularly to prevent a build up of material.
CARE AND PREVENTIVE MAINTENANCE
Change the oil in the engine crankcase regularly to minimize wear. Inspect, clean and / or replace the engine air cleaner
regularly, particularly when operating in a dusty environment. Inspect, clean and / or replace the spark plug regularly Check
all fasteners for tightness as the machine is subiect to vibration.
Check V-belt tension, wear and that it is running true. Adjust or replace as required.
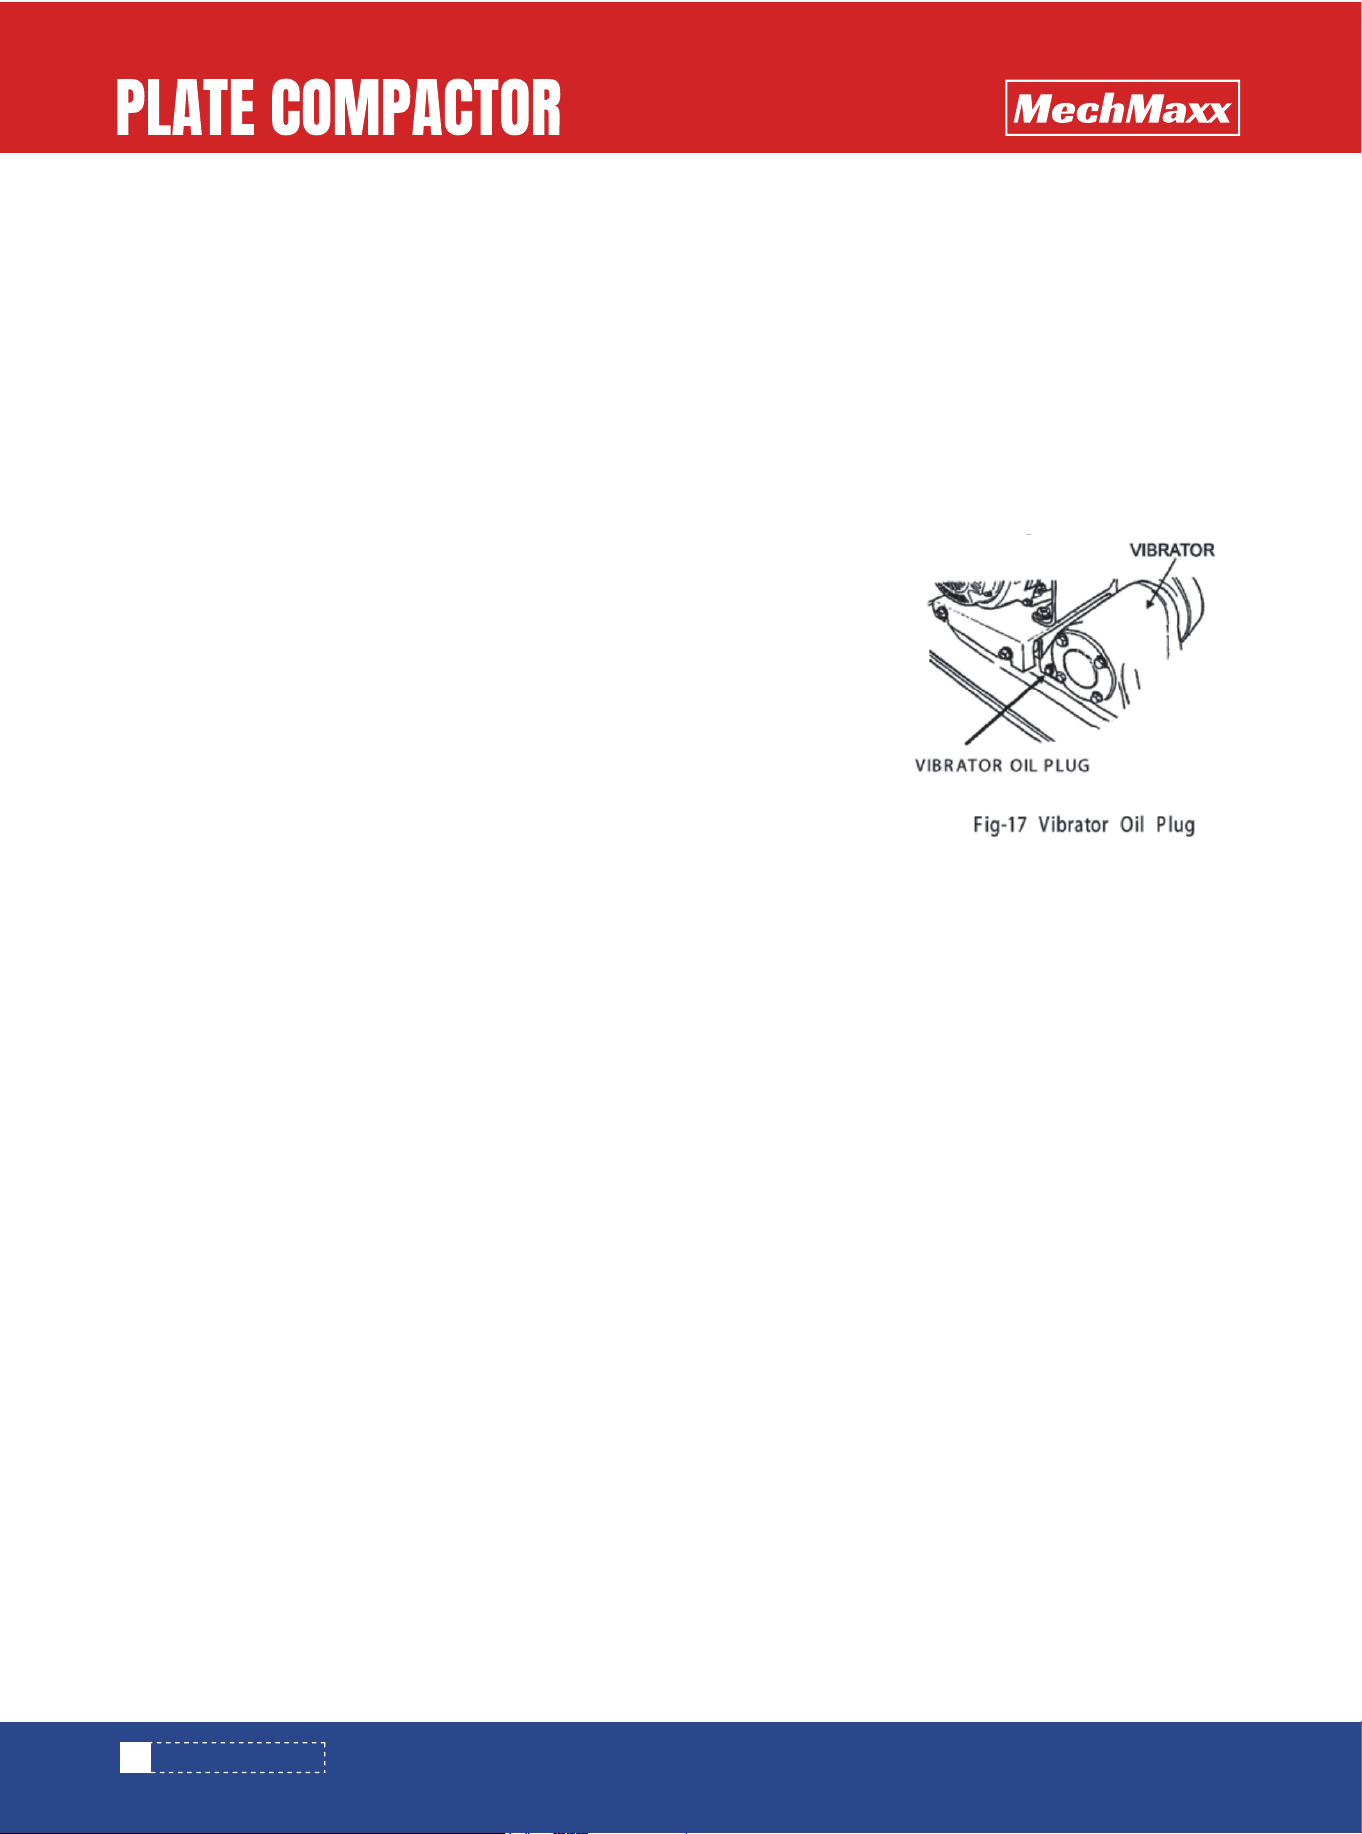
VIBRATOR OIL CHECK
1. Place the plate compactor horizontally on a flat surface. Make sure the compactor
is level when checking the oil in the vibrator assembly.
2. Check vibrator oil level by removing the plug (vibrator oil gauge) as shown in
Fig-17.
The oil level should be up to the pil plug. If oil is required, replace using SAE engine
oil, as suggested in the table Fig-1.
3. When changing the vibrator oil, remove the drain plug(Fig-17), and simply tip the
compactor to drain the oil. Note that the oil will drain more easily while it is hot.
SERVICE
20
www.mechmaxx.com
SERVICE & STORAGE
SYMPTOM POSSIBLE CAUSES AND CORRECTION
Engine will not start - Check that the engine switch is ON.
- Check the fuel supply.
- Check engine oil level.
- Check the spark plug.
- Check the air cleaner.
- Check that the fuel valve is open.
- Check the air cleaner.
- Check the spark plug.
- Check fuel quality.
- Check the fuel supply.
- Check the fuel valve.
- Check engine oil level.
- Check the air cleaner.
Engine stops during operation
Engine lacks power
- Check for a slipping or damaged V-belt.
- Check engine speed.
- Check the exciter assembly.
Insufficient vibration
- Clean the underside of the plate.
- Check for material buildup.
- Check handle control and linkage.
Machine does not travel smoothly
TROUBLESHOOTING
21
www.mechmaxx.com
TROUBLESHOOTING
22
www.mechmaxx.com
PARTS DIAGRAM (PC80H,PC80Z GENERAL ASSEMBLY)
PARTS DIAGRAM (PC80H,PC80Z GENERAL ASSEMBLY)
23
www.mechmaxx.com
PARTS LIST (PC80H,PC80Z GENERAL ASSEMBLY)
PARTS LIST (PC80H,PC80Z GENERAL ASSEMBLY)
No. Description Qty.Specification
1
2
3
4
5
6
7
8
9
10
11
12
13
14
15
16
17
18
19
20
21
22
23
24
25
26
27
28
29
Including Pulley
M8
M8*20
M8*25
Ø8
Ø10*35
Ø10
M8
Ø6
M6
M10
M16*40
Ø16
Ø16
M10*25
Ø12*35
Bottom Plate(Cast Iron)
Exciter
Throttle Line Assembly
Locked Nut
Clamp Plate
Clip
Flexible Hose
Cock
External hexagon bolt
External hexagon bolt
Flat Gasket
Enlarged Flat Gasket
Spring Gasket
Water-Leaking Hose
Anti-slide Nut
Flat Gasket
Locked Nut
Engine Support Plate(Cast Iron)
Shock absorber
Nut
Inner Hexagon bolt
Spring Gasket
Flat Gasket
External hexagon bolt
Straight Handle
Handle Iron shaft
Handle Protection Mat
Handle glues heat
Enlarged Flat Gasket
1
1
1
4
2
2
1
1
4
5
7
4
8
1
1
4
4
1
4
4
4
3
6
10
1
2
2
2
6
24
www.mechmaxx.com
No. Description Qty.Specification
30
31
32
33
34
35
36
37
38
39
40
41
42
43
44
45
46
47
48
49
M12*75
M12*320
M12
M6*35
Ø8*24
B-813
5*40
Ø8*30
Ø8
External hexagon bolt
Protective Frame
Water Tank
Wheel Frame
Long Bolt
Locked Nut
Engine
Water Tank Cap
Belt Cover
Dust-prevent plate
Clutch Assembly
Inner Hexagon bolt
Wheel Holder
Flat Gasket
Wheel Cover
Wheel
Belt
Key
Conical Gasket
Spring Gasket
2
1
1
1
1
1
1
1
1
1
1
4
2
3
2
2
4
1
1
1
PARTS LIST (PC80H,PC80Z GENERAL ASSEMBLY)
25
www.mechmaxx.com
PARTS DIAGRAM (PC80H,PC80Z CLUTCH ASSEMBLY)
PARTS DIAGRAM (PC80H,PC80Z CLUTCH ASSEMBLY)
26
www.mechmaxx.com
PARTS LIST (PC80H,PC80Z CLUTCH ASSEMBLY)
PARTS LIST (PC80H,PC80Z CLUTCH ASSEMBLY)
No. Description Qty.Specification
1
2
3
4
5
6
7
7*58
Ø62
Ø30
6206-2RS
Pulley for Clutch
Shaft Connector
Centrifugal Block
Spring Ring
Clip
Clip
Bearing
1
1
3
2
1
1
1
27
www.mechmaxx.com
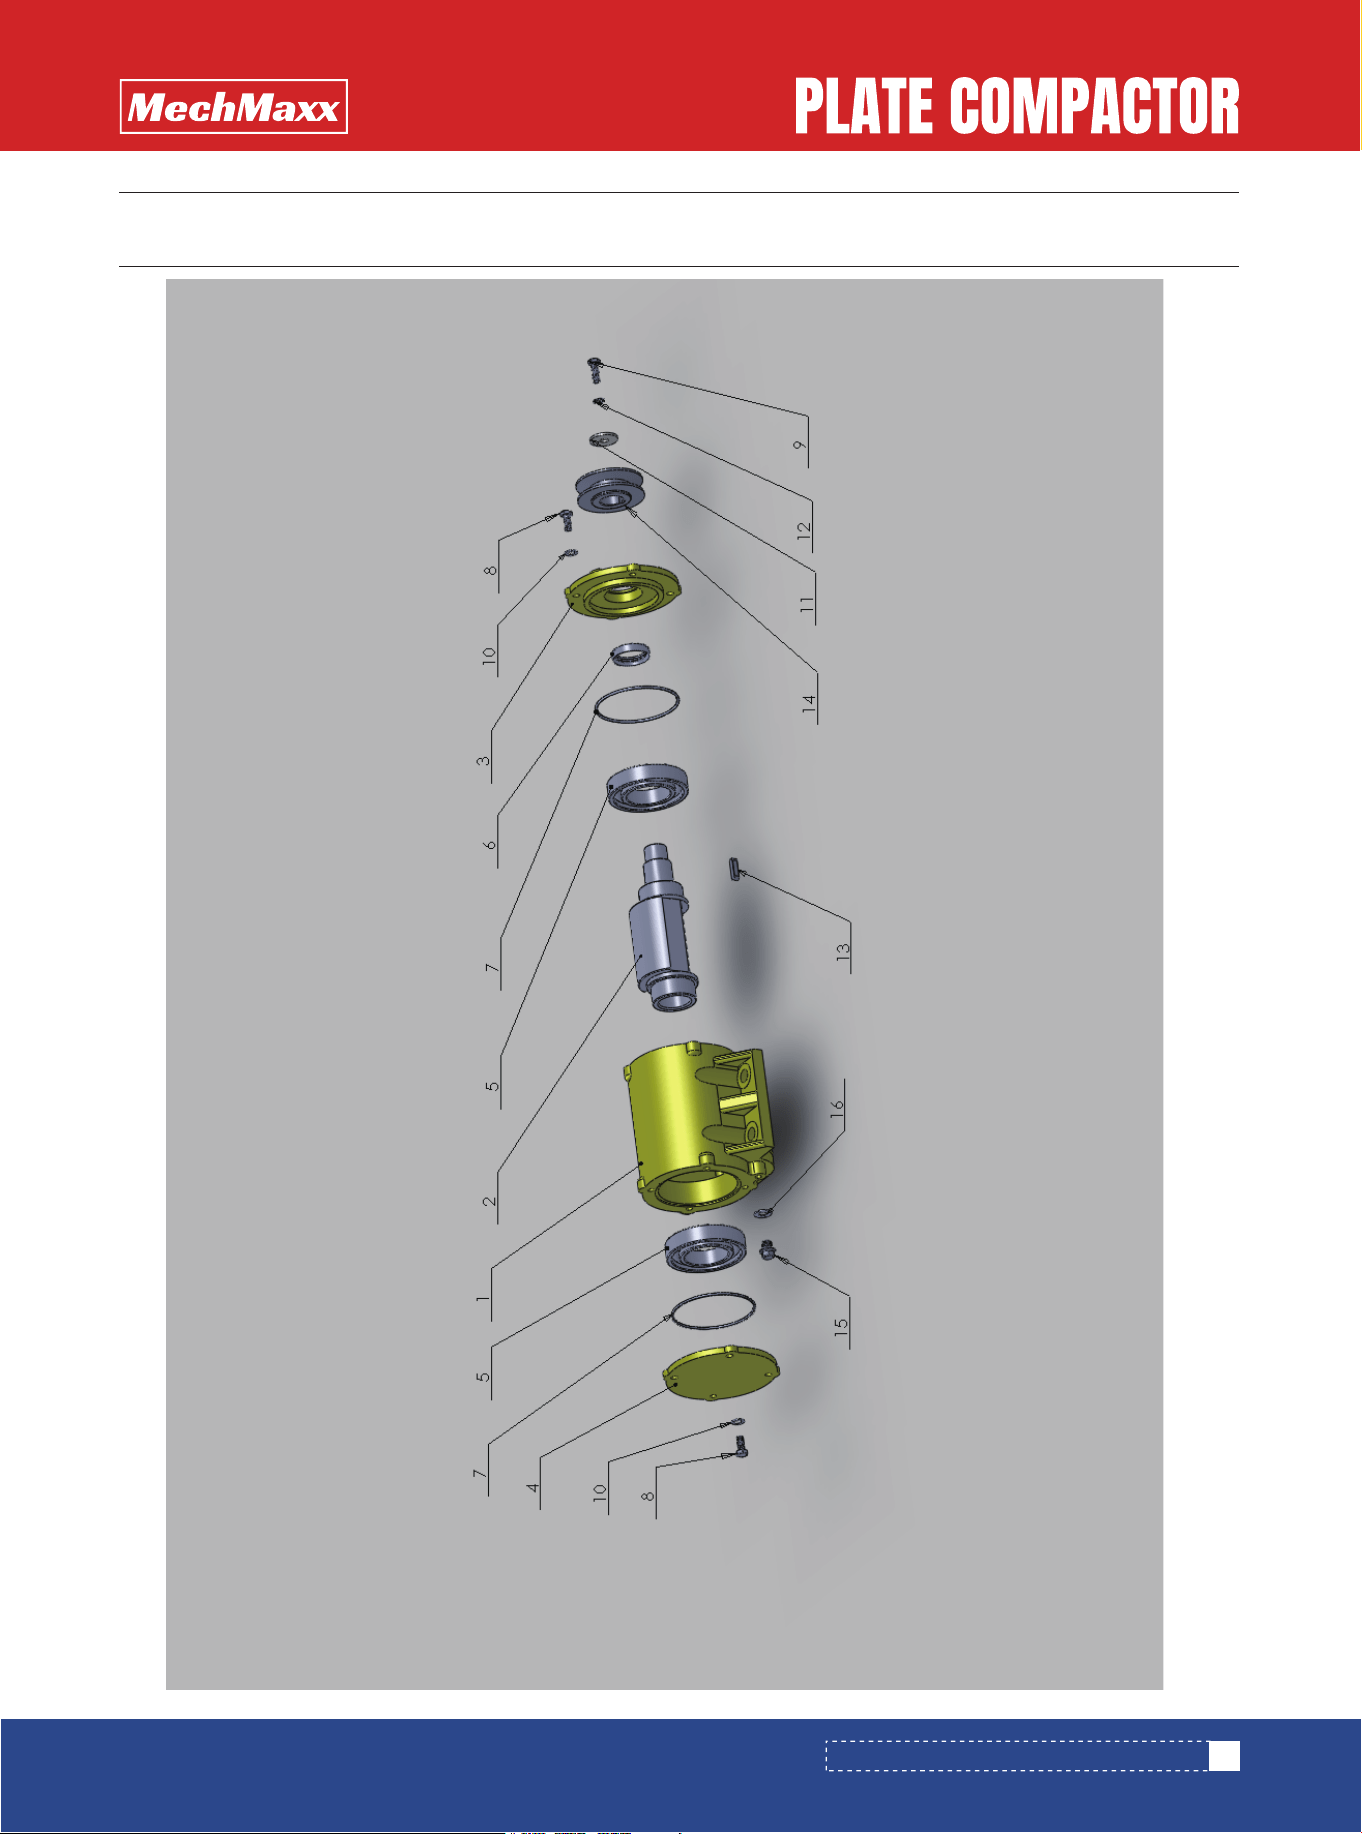
PARTS DIAGRAM (PC80H,PC80Z EXCITER SPARE)
PARTS DIAGRAM (PC80H,PC80Z EXCITER SPARE)
28
www.mechmaxx.com
PARTS LIST (PC80H,PC80Z EXCITER SPARE)
PARTS LIST (PC80H,PC80Z EXCITER SPARE)
No. Description Qty.Specification
1
2
3
4
5
6
7
8
9
10
11
12
13
14
15
16
Vibrating Case
Eccentric Shaft
Case Cover(Pulley)
Case Cover(shut-off)
Bearing
Oil Seal
"O" Ring
Inner Hexagon bolt
Inner Hole Bolt
Flat Gasket
Enlarged Flat Gasket
Spring Washer
Key
Pulley for Exciter
Oil Drainage Bolt
Copper Gasket
6211
35*48*10
100*3.1
M8*20
M10*25
Ø8
Ø10*35
Ø10
8*20
M12(thin)
Ø12
1
1
1
1
2
1
2
8
1
8
1
1
1
1
1
1
29
www.mechmaxx.com
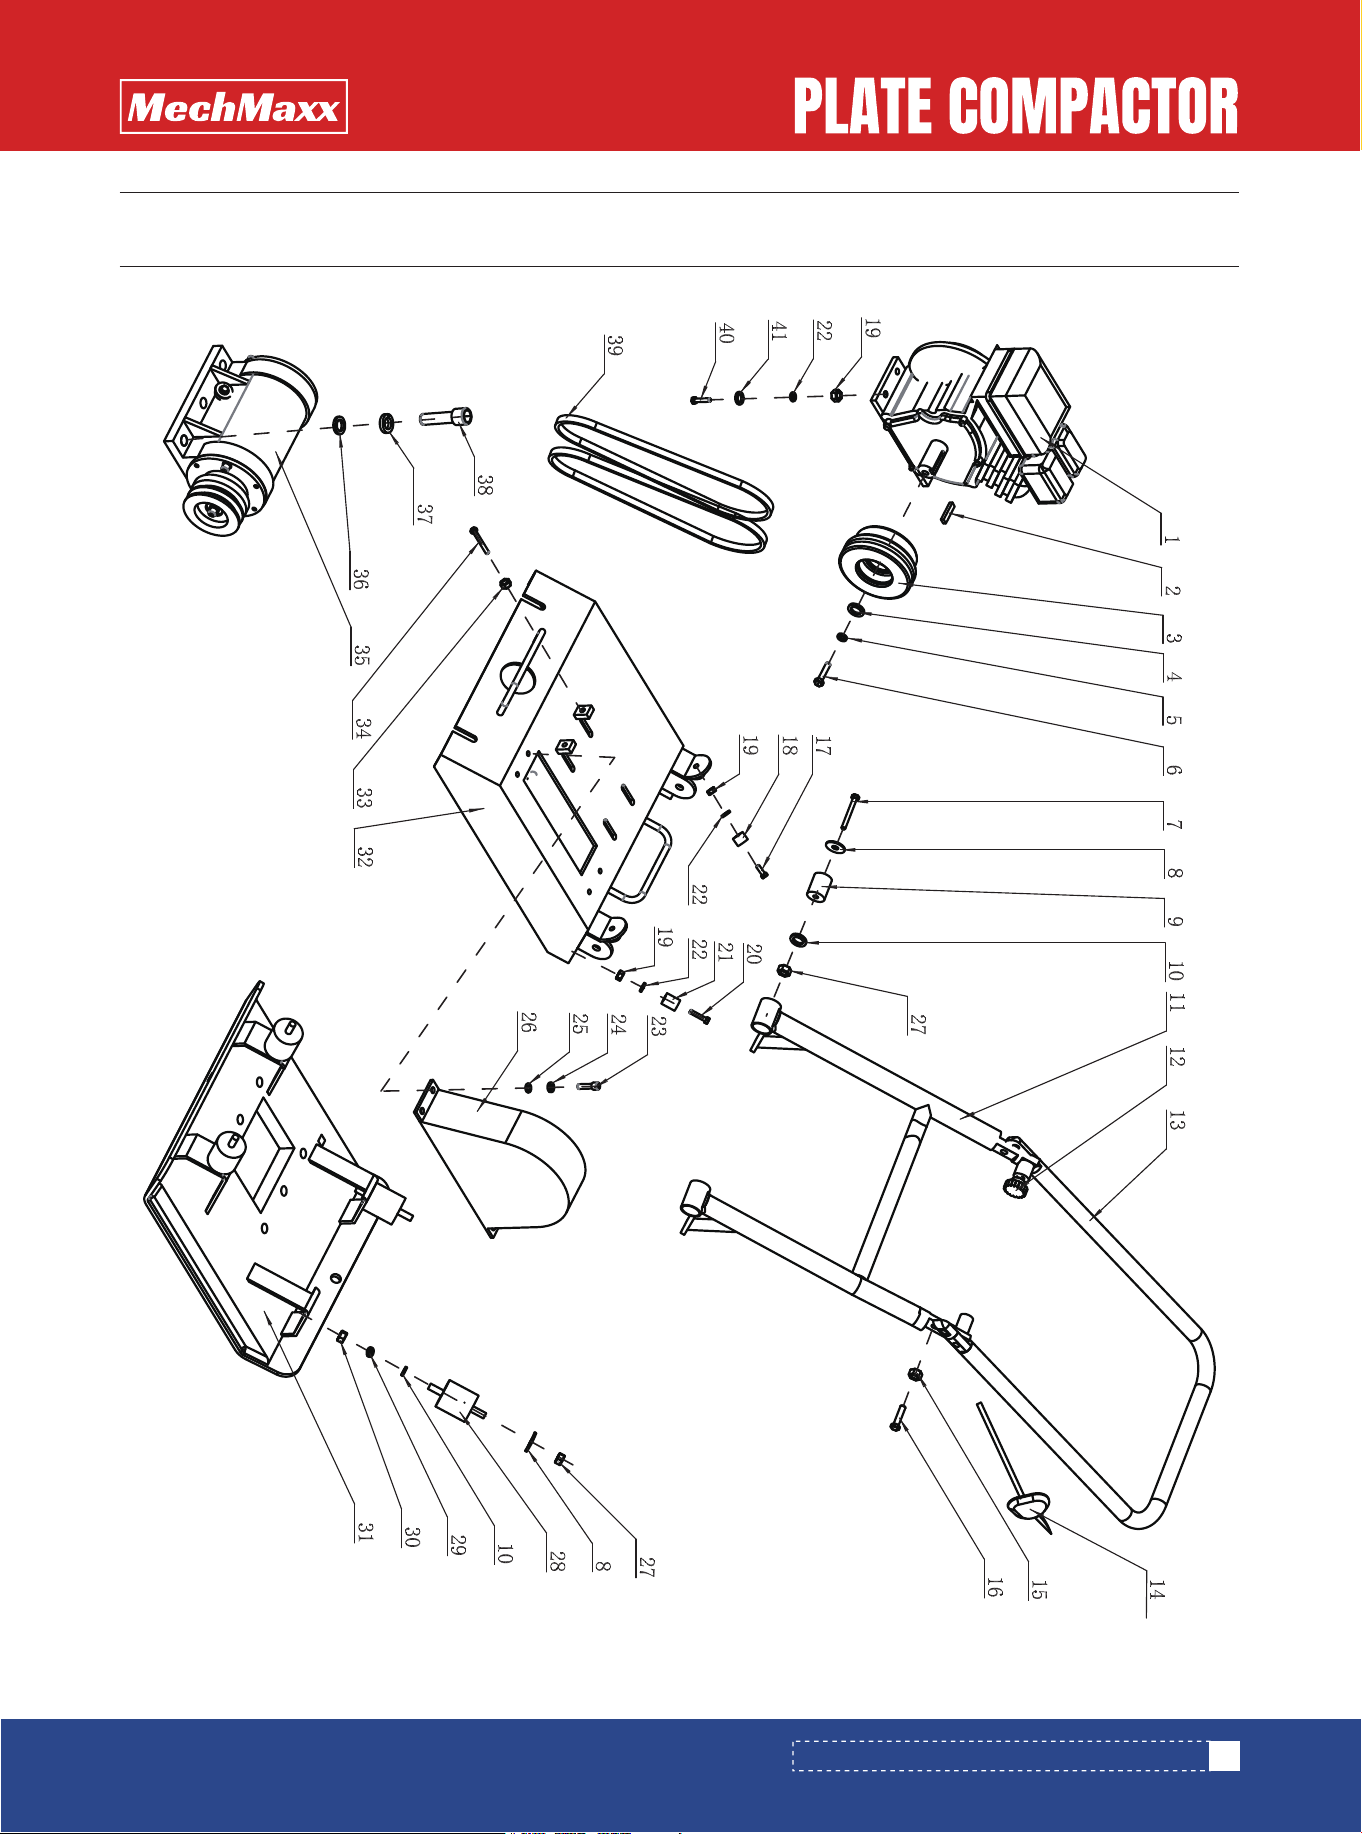
PARTS DIAGRAM (PC90H,PC90Z GENERAL ASSEMBLY)
PARTS DIAGRAM (PC90H,PC90Z GENERAL ASSEMBLY)
30
www.mechmaxx.com
No. Description Qty.Specification
1
2
3
4
5
6
7
8
9
10
11
12
13
14
15
16
17
18
19
20
21
22
23
24
25
26
27
28
29
Engine
Key
Clutch Assembly
Conical Flat Gasket
Spring Gasket
External hexagon bolt
External hexagon bolt
Enlarged Flat Gasket
Handle Glue sheath
Flat Gasket
Lower handle
Locked Pin Assembly
Upper handle
Throttle Line Assembly
Locked Nut
Flange Bolt
Flat Cross Bolt
Handle Damper
Locked Nut
External hexagon bolt
Handle lower Damper
Flat Gasket
External hexagon bolt
Spring Gasket
Medium Flat Gasket
Belt Cover
Locked Nut
Shock Absorber
Spring Gasket
5*40
8×30×6
Ø 8
M8*30
M12*70
12*35
Ø 12
M10
M10*35
M8*25
35*15
M8
M8*35
Ø8
M8*20
Ø8
8*24
M12
Ø12
1
1
1
1
1
1
2
6
2
2
1
2
1
1
2
2
4
2
8
2
2
8
2
2
2
1
6
4
4
PARTS LIST (PC90H,PC90Z GENERAL ASSEMBLY)
PARTS LIST (PC90H,PC90Z GENERAL ASSEMBLY)
31
www.mechmaxx.com
4
1
1
2
2
1
6
6
6
2
4
4
No. Description Qty.Specification
30
31
32
33
34
35
36
37
38
39
40
41
Nut
Bottom Plate
Engine Support Plate
Nut
External hexagon bolt
Exciter
Flat Gasket
Spring Gasket
Inner Hexagon bolt
Belt
External hexagon bolt
Enlarged Flat Gasket
M12
M8
M8*40
Ø16
Ø16
M16*40
A-737
M8*45
8*30
PARTS LIST (PC90H,PC90Z GENERAL ASSEMBLY)
32
www.mechmaxx.com
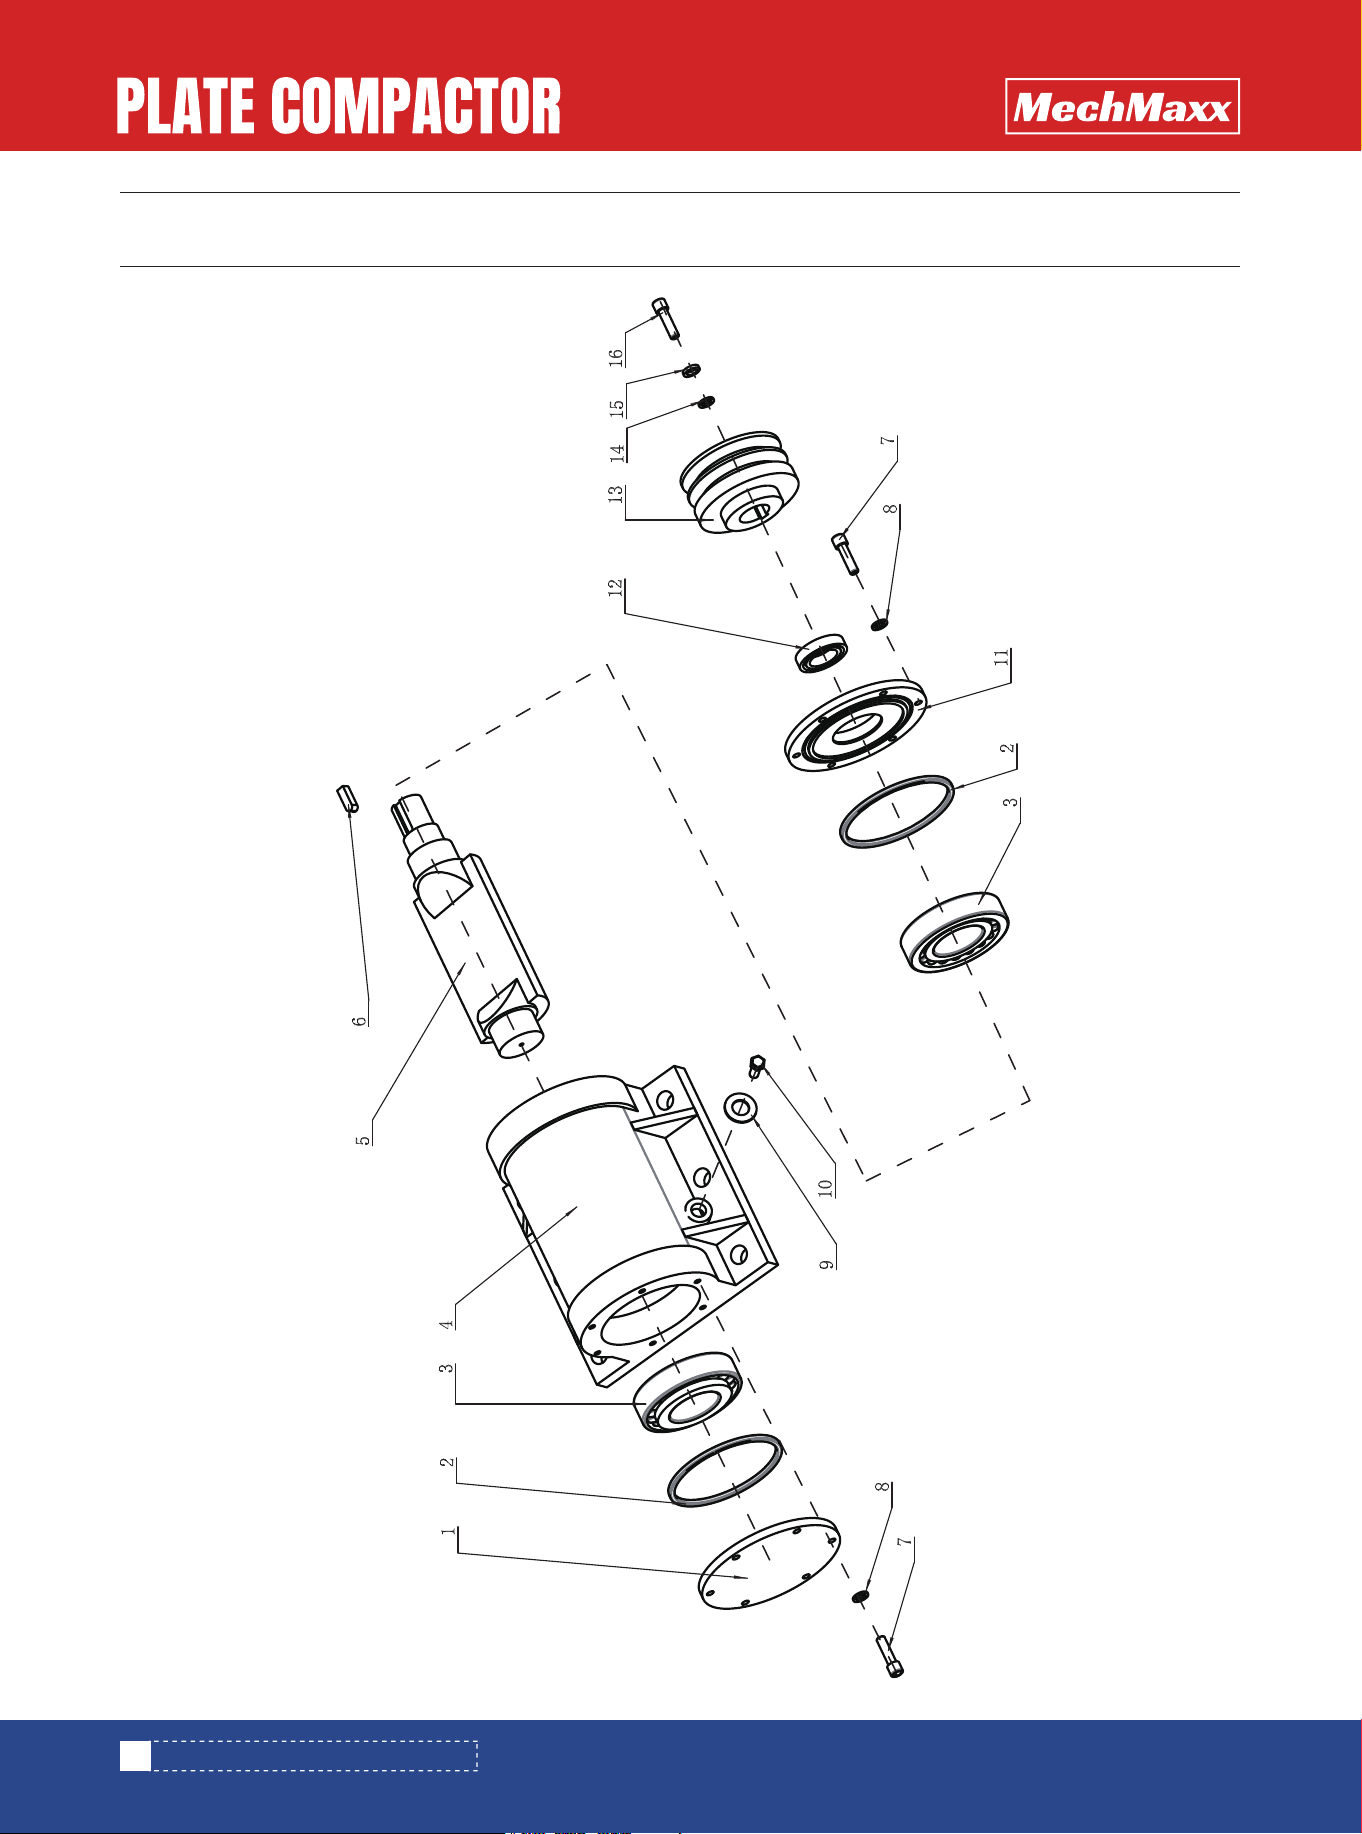
PARTS DIAGRAM (PC90H,PC90Z EXCITER)
PARTS DIAGRAM (PC90H,PC90Z EXCITER)
33
www.mechmaxx.com
No. Description Qty.Specification
1
2
3
4
5
6
7
8
9
10
11
12
13
14
15
16
Case Cover(shut-off)
"O" Ring
Bearing
Vibrating Case
Eccentric Shaft
Key
Inner Hexagon bolt
Flat Gasket
Copper Gasket
Oil Drainage Bolt
Case Cover(Pulley)
Oil Seal
Pulley
Spring Gasket
Enlarged Flat Gasket
Inner Hexagon bolt
110*3.1
6309
8*30
M6*20
Ø6
Ø14
M14*1.5
35*52*7
10*35
M10*25
1
1
2
1
1
1
12
12
1
1
1
1
1
1
1
1
PARTS LIST (PC90H,PC90Z EXCITER)
PARTS LIST (PC90H,PC90Z EXCITER)
34
www.mechmaxx.com
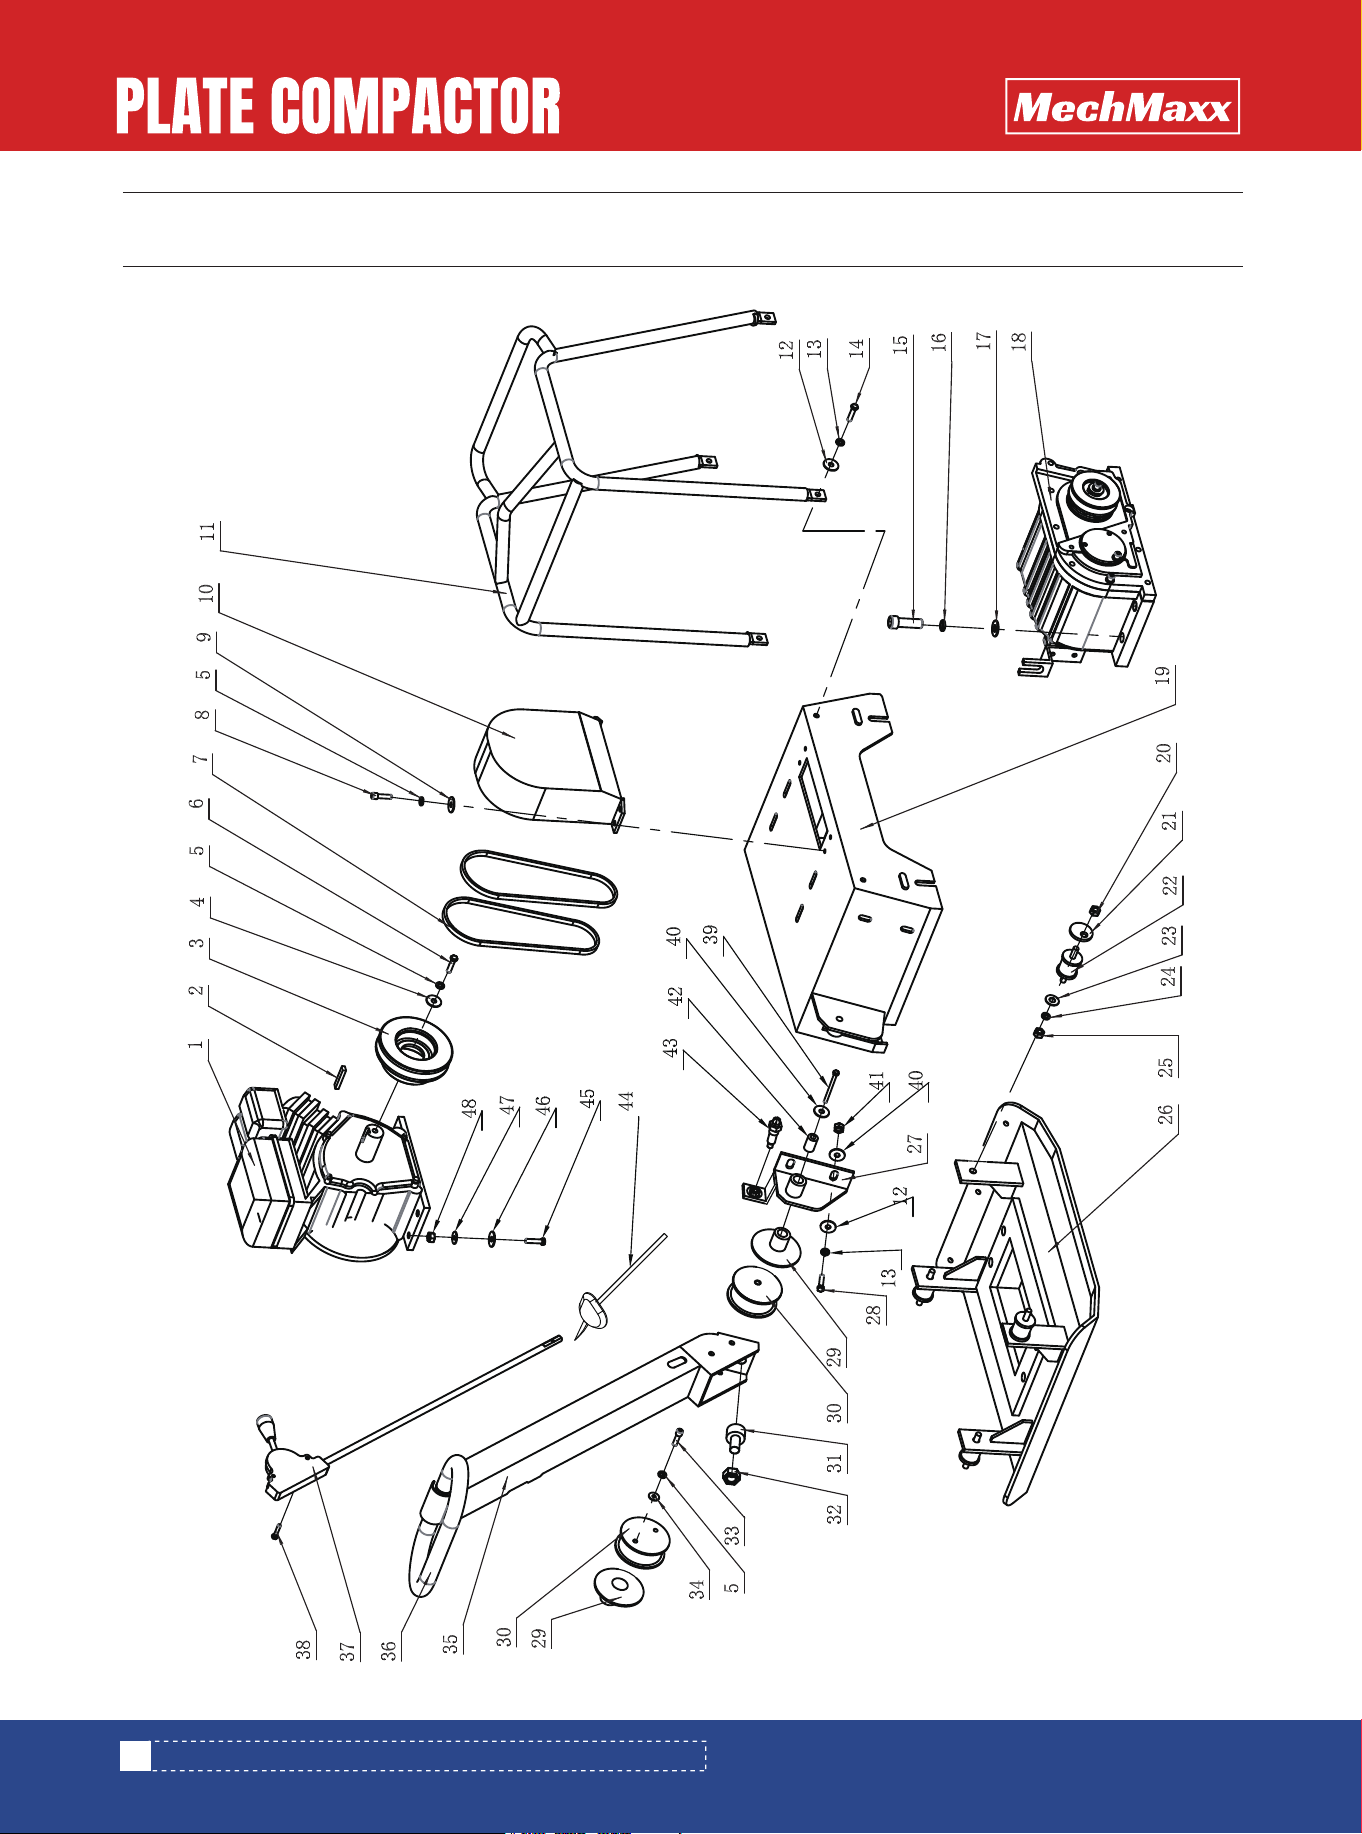
PARTS DIAGRAM (PC150H,PC150Z,PC180H,PC180Z GENERAL ASSEMBLY)
PARTS DIAGRAM (PC150H,PC150Z,PC180H,PC180Z GENERAL ASSEMBLY)
35
www.mechmaxx.com
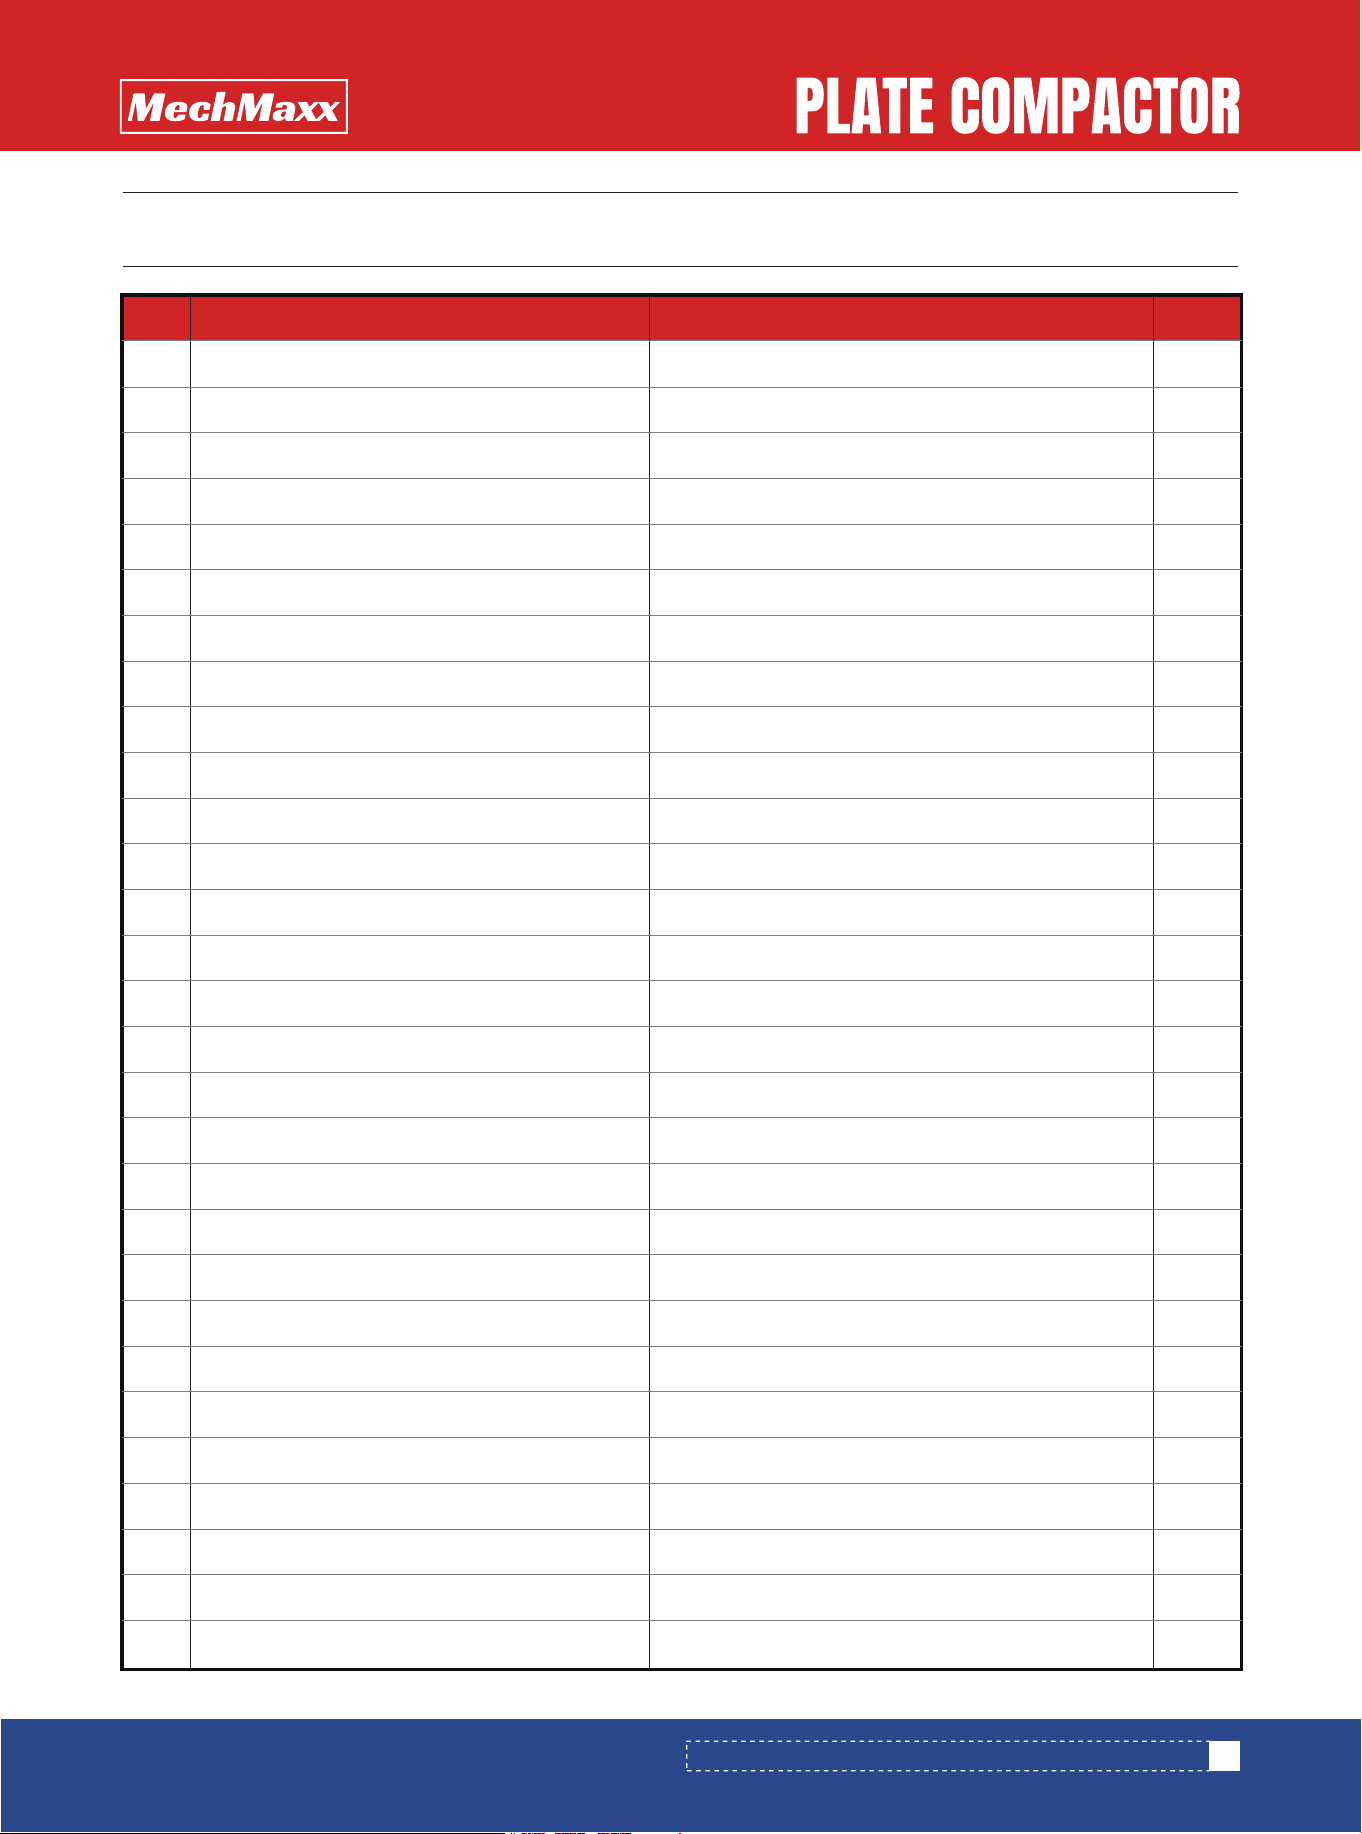
No. Description Qty.Specification
1
2
3
4
5
6
7
8
9
10
11
12
13
14
15
16
17
18
19
20
21
22
23
24
25
26
27
28
29
Engine
Key
Clutch Assembly
Conical Flat Gasket
Spring Gasket
Extemal hexagon bolt
Belt
Extemal hexagon bolt
Medium Flat Gasket
Belt Cover
Protective Frame
Flat Gasket
Spring Gasket
Extemal hexagon bolt
Inner hexagon bolt
Spring Gasket
Flat Gasket
Exciter
Engine Support Plate
Locked Nut
Eccentric Gasket
Shock absorber
Flat Gasket
Spring Gasket
Nut
Bottom Plate
Handle Joint Plate
Extemal hexagon bolt
Handle glue sheath
7*50
8×30×6
Ø 8
M8*30
B-940
8*20
8*24
Ø 12
M12*35
M18*50
Ø18
Ø18
M14
Ø14
Ø14
M14
M12*35
Nylon
1
1
1
1
1
1
2
2
2
1
1
8
6
4
4
4
4
1
1
4
4
4
4
4
4
1
1
2
2
PARTS LIST (PC150H,PC150Z,PC180H,PC180Z GENERAL ASSEMBLY)
PARTS LIST (PC150H,PC150Z,PC180H,PC180Z GENERAL ASSEMBLY)
2
1
1
4
4
1
1
1
3
2
4
2
2
1
1
4
4
4
4
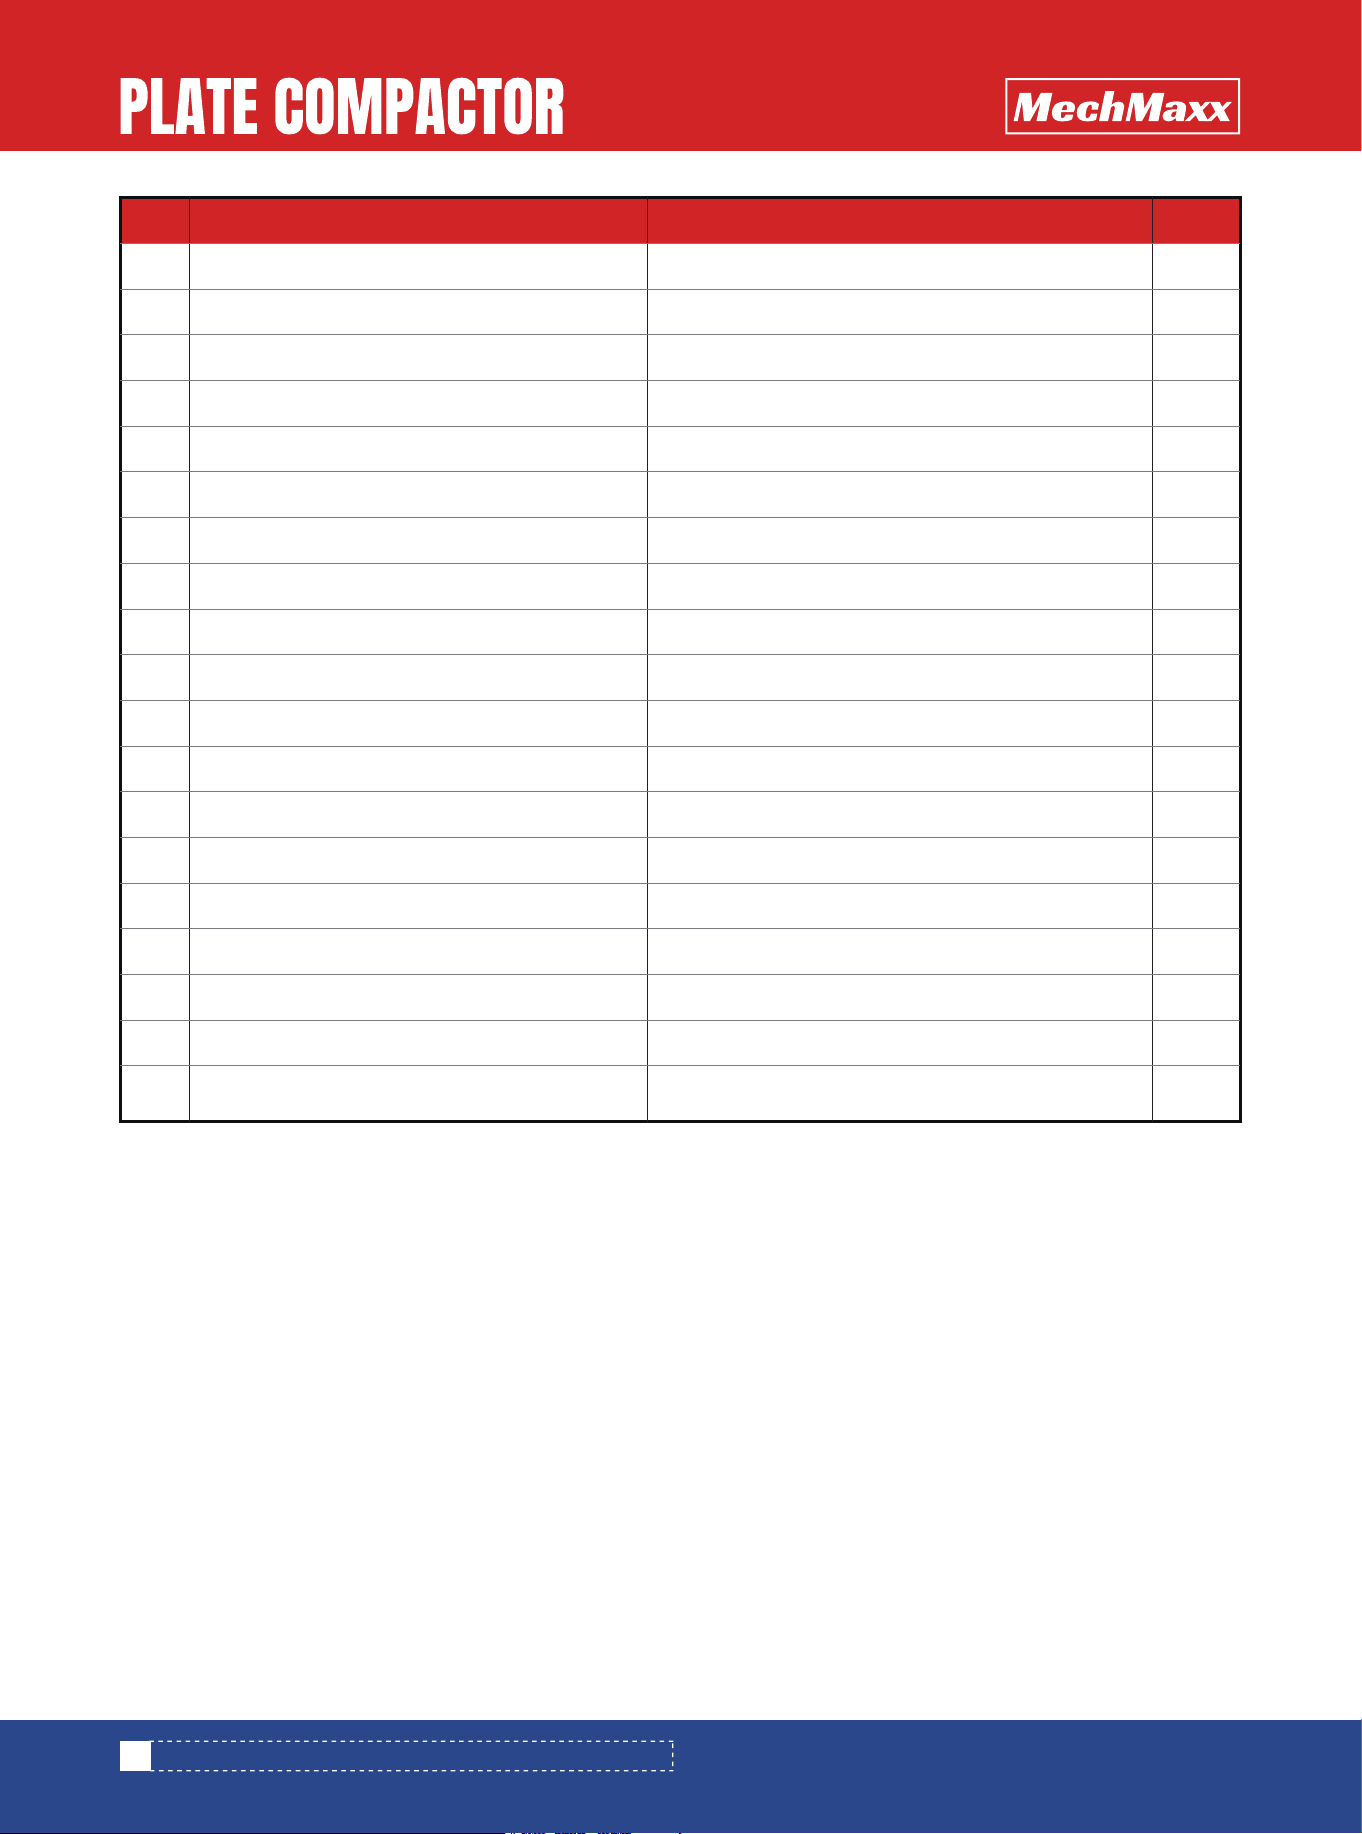
No. Description Qty.Specification
30
31
32
33
34
35
36
37
38
39
40
41
42
43
44
45
46
47
48
Handle Damper
Handle Bottom Damper
Nut
Inner hexagon bolt
Flat Gasket
Main Handle
Grip
Forward-Reversible Control
Inner hexagon bolt
Extemal hexagon bolt
Enlarged Flat Gasket
Nut
Handle Liner tube
Locked Pin Assembly
Throttle Assembly
Extemal hexagon bolt
Enlarged Flat Gasket
Flat Gasket
Locked Nut
M16
M8*12
Ø8
M6*50
M12*60
12*35
M12
M10*50
10*35
Ø 10
M10
36
www.mechmaxx.com
PARTS LIST (PC150H,PC150Z,PC180H,PC180Z GENERAL ASSEMBLY)
37
www.mechmaxx.com
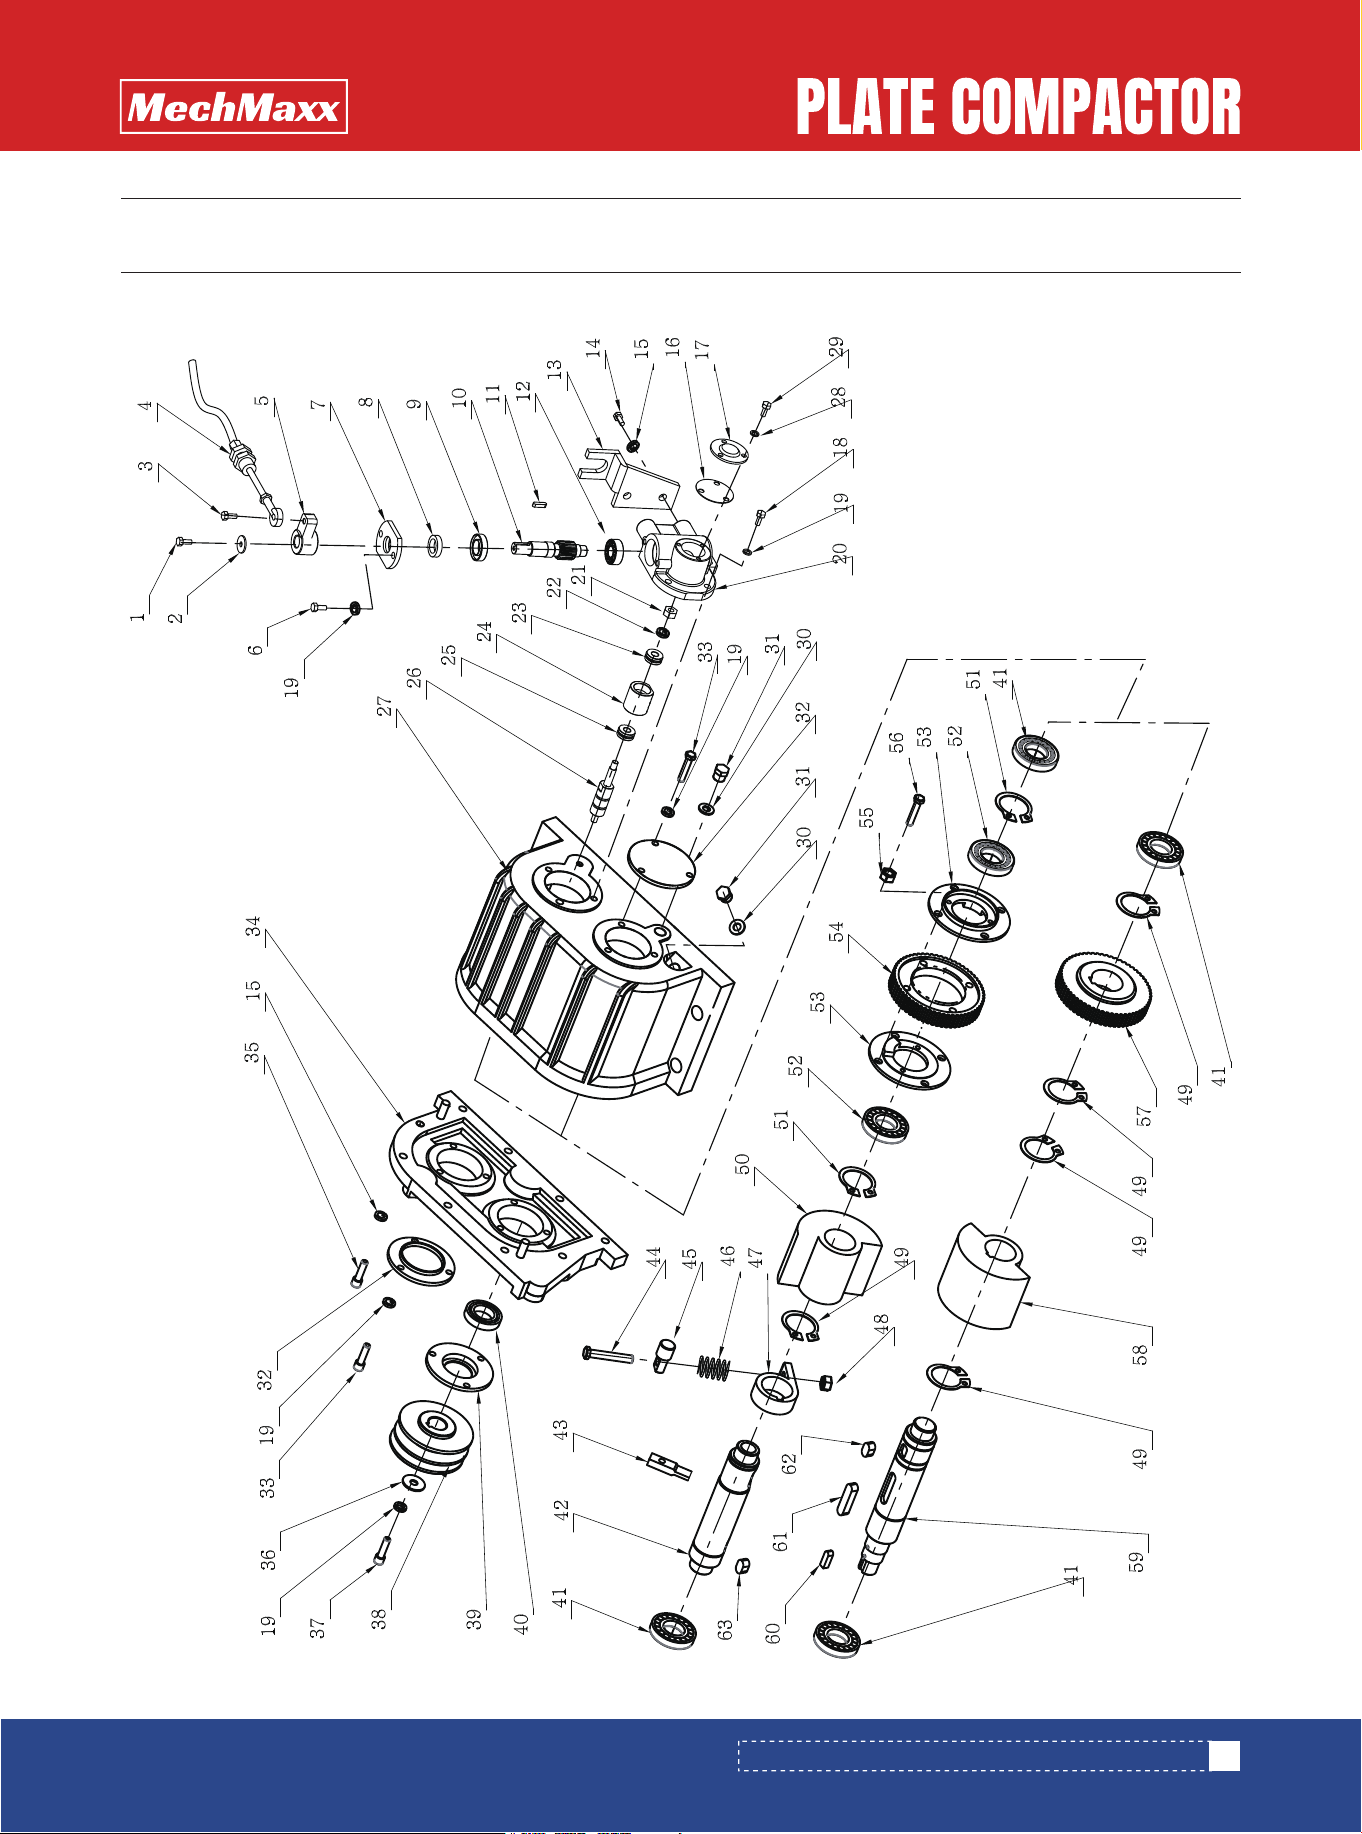
PARTS DIAGRAM (PC150H,PC150Z,PC180H,PC180Z EXCITER)
PARTS DIAGRAM (PC150H,PC150Z,PC180H,PC180Z EXCITER)
No. Description Qty.Specification
1
2
3
4
5
6
7
8
9
10
11
12
13
14
15
16
17
18
18+
19
20
21
22
23
24
25
26
27
28
Inner Hexagon bolt
Enlarged Flat Gasket
Inner Hexagon bolt
Dragline
Dragline Joint Sleeve
Inner Hexagon bolt
Cover(Packing)
Oil Seal
Bearing
Output Gear Shaft
Key
Bearing
Dragline Fixed Plate
Inner Hexagon bolt
Spring Gasket
End Cover paper gasket
Control Seat Cover
Inner Hexagon bolt
Inner Hexagon bolt
Spring Gasket
Control Seat
Nut
Flat Gasket
Bearing
Gear Coupling
Bearing
Small Shaft
Exciter Case
Spring Gasket
M6*20
6*22
M8*25
M8*20
20*30*7
61904
5*20
30202
M10*25
ф10
M8*25
M8*50
ф8
M8
ф8
1024
1024
Ф6
1
1
1
1
1
2
1
1
1
1
1
1
1
2
2
1
1
3
1
16
1
1
1
1
1
1
1
1
3
PARTS LIST (PC150H,PC150Z,PC180H,PC180Z EXCITER)
38
www.mechmaxx.com
PARTS LIST (PC150H,PC150Z,PC180H,PC180Z EXCITER)
3
2
2
2
9
1
9
1
1
1
1
1
4
1
1
1
1
1
1
1
4
1
2
2
2
1
4
4
1
1
1
No. Description Qty.Specification
M6*16
Ф12
M12*1.25
M8*20
M10*30
8*30*6
M8*22
28*50*10
NJ206
M10*60
M20*30
M10
ф42
ф40
16008
M8
M8*30
29
30
31
32
33
34
35
36
37
38
39
40
41
42
43
44
45
46
47
48
49
50
51
52
53
54
55
56
57
58
59
Inner Hexagon bolt
Copper Gasket
Hexagon Oil Drainage Plug
Case Cover(shut-off)
Inner Hexagon bolt
Case Cover
Inner Hexagon bolt
Conical Gasket
Inner Hexagon bolt
Pulley
Case Cover(Pulley)
Oil Seal
Bearing
Eccentric Rotary Shaft(Driven)
Fork
External Hexagon bolt
Bolt
Buffering Spring
Buffering Ring
Locked Nut
Clip
Eccentric Rotator(Driven)
Clip
Bearing
Clutch Assembly Plate
Gear
Nut
External Hexagon bolt
Gear
Eccentric Rotator(Drive)
Eccentric Rotary Shaft(Drive)
39
www.mechmaxx.com
PARTS LIST (PC150H,PC150Z,PC180H,PC180Z EXCITER)
1
1
1
1
No. Description Qty.Specification
8*30
12*50
12*20
10*20
60
61
62
63
Key
Key
Key
Key
40
www.mechmaxx.com
PARTS LIST (PC150H,PC150Z,PC180H,PC180Z EXCITER)