USE + CARE
MANUAL
REV.022026
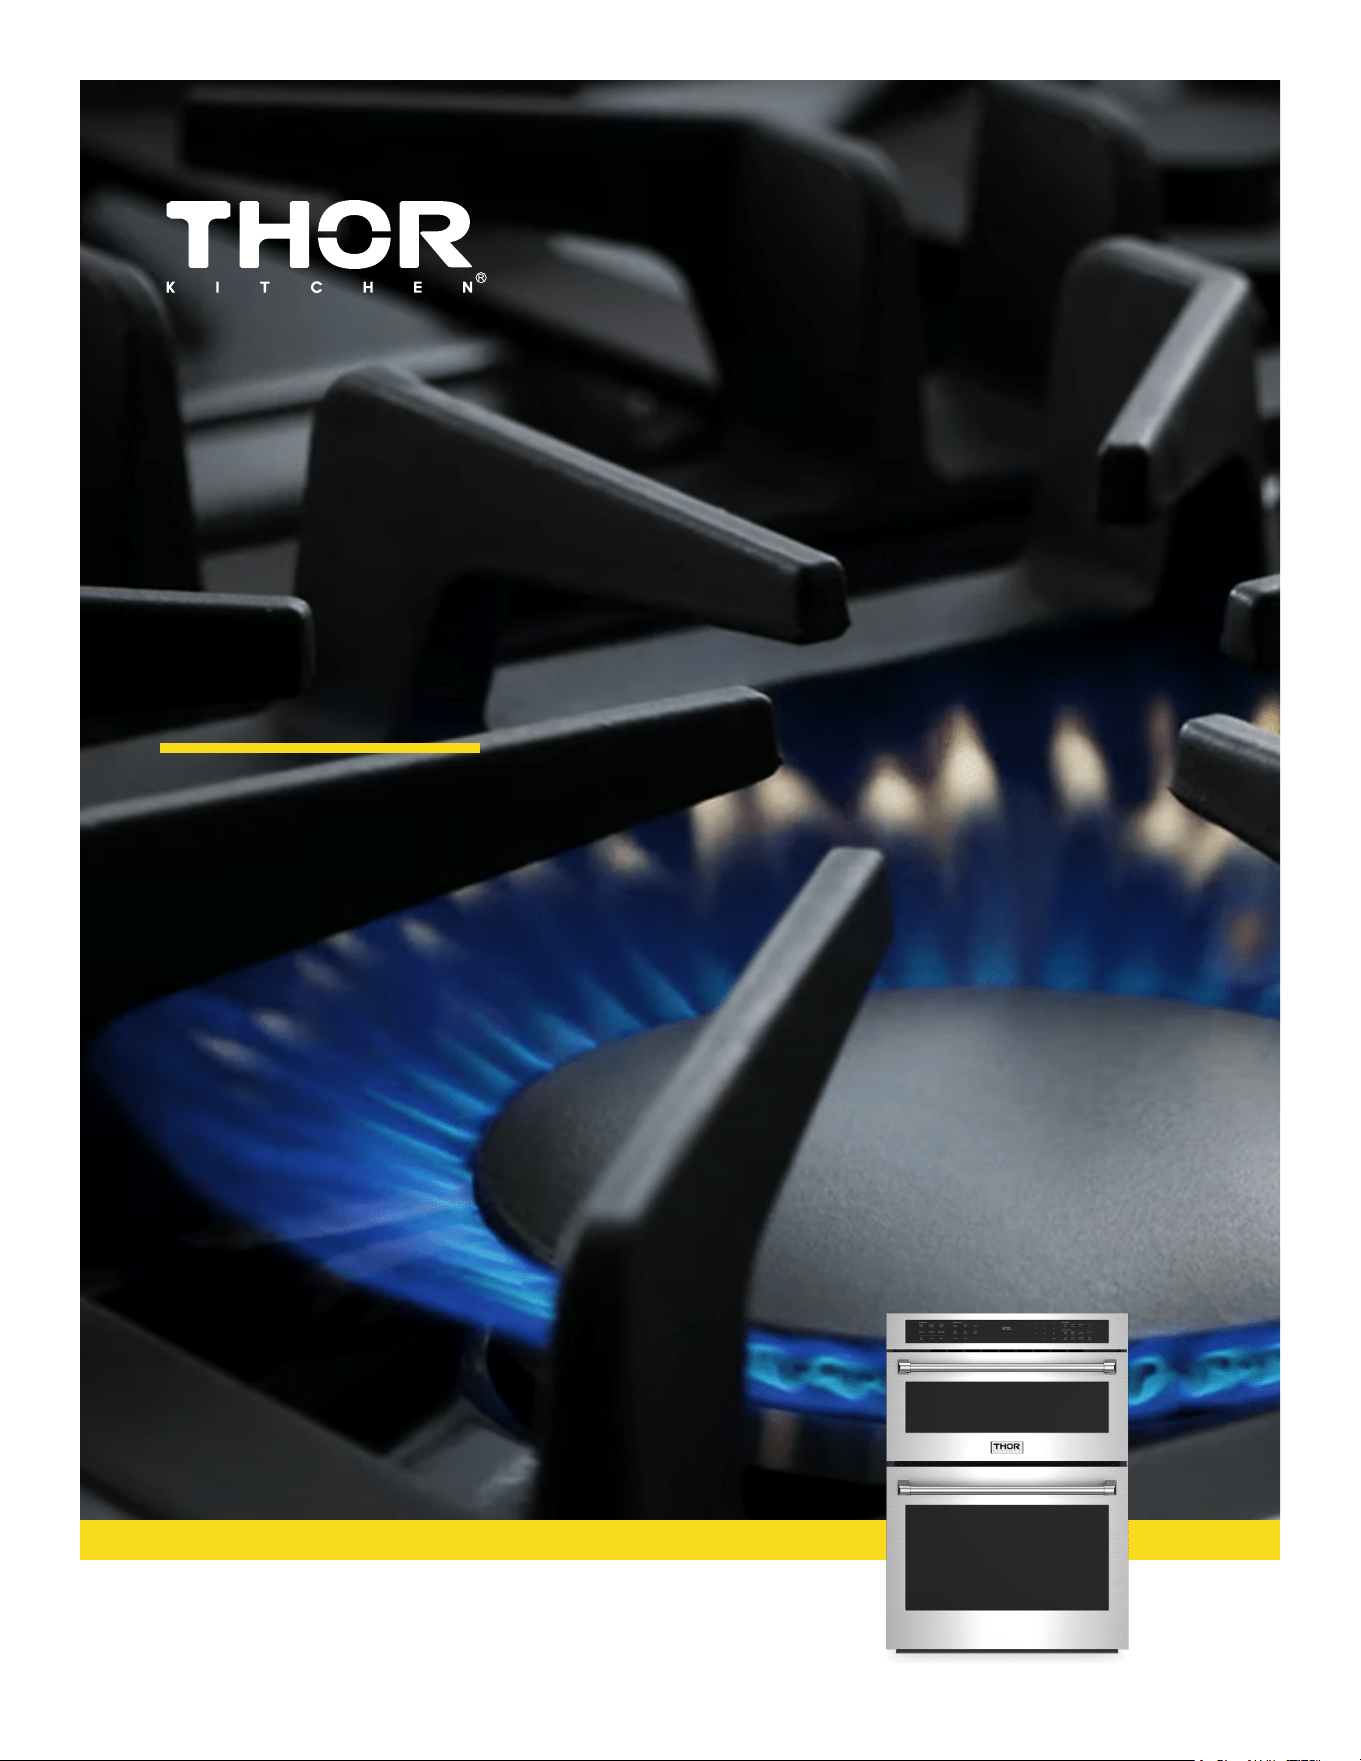
30 INCH PROFESSIONAL
MICROWAVE AND OVEN COMBO
TMW30ED

USE & CARE MANUAL
30-INCH PROFESSIONAL
MICROWAVE AND OVEN
COMBO
TMW30ED

3
TABLE OF CONTENTS
SAFETY AND WARNINGS. . . . . . . . . . . . . . . . . . . . . . . . . . . . . . . . . . . . . . . . . . . . . . . . . . . . . . . . . . . . . . . . . . . . . . . . . . . . . . . . . . 5
READ ALL INSTRUCTIONS BEFORE USE. . . . . . . . . . . . . . . . . . . . . . . . . . . . . . . . . . . . . . . . . . . . . . . . . . . . . . . .5
Precautionsto Avoid Possible Exposure to Excessive MicrowaveEnergy . . . . . . . . . . . . . . . . . . . . . . . . . . . . . . . . . . . . . . . 5
Safety Definitions . . . . . . . . . . . . . . . . . . . . . . . . . . . . . . . . . . . . . . . . . . . . . . . . . . . . . . . . . . . . . . . . . . . . . . . . . . 5
WARNING. . . . . . . . . . . . . . . . . . . . . . . . . . . . . . . . . . . . . . . . . . . . . . . . . . . . . . . . . . . . . . . . . . . . . . . . . . . . .5
Technical Safety. . . . . . . . . . . . . . . . . . . . . . . . . . . . . . . . . . . . . . . . . . . . . . . . . . . . . . . . . . . . . . . . . . . . . . 6
Installation. . . . . . . . . . . . . . . . . . . . . . . . . . . . . . . . . . . . . . . . . . . . . . . . . . . . . . . . . . . . . . . . . . . . . . . . . . . .7
Operation. . . . . . . . . . . . . . . . . . . . . . . . . . . . . . . . . . . . . . . . . . . . . . . . . . . . . . . . . . . . . . . . . . . . . . . . . . 8
Maintenance. . . . . . . . . . . . . . . . . . . . . . . . . . . . . . . . . . . . . . . . . . . . . . . . . . . . . . . . . . . . . . . . . . . . . . . . . . . . . . . . 9
Risk of Fire and Flammable Materials. . . . . . . . . . . . . . . . . . . . . . . . . . . . . . .. . . . . . . . . . . . . . . . . . . . . . . . . . . . . . . 9
Microwave Oven— Maintenance & Safe Operation. . . . . . . . . . . . . . . . . . . . . . . . . . . . . . . . . . . . . . . . . . . . . . . . . . . . . . . .10
CAUTION. . . . . . . . . . . . . . . . . . . . . . . . . . . . . . . . . . . . . . . . . . . . . . . . . . . . . . . . . . . . . . . . . . . . . . . . 10
Operation. . . . . . . . . . . . . . . . . . . . . . . . . . . . . . . . . . . . . . . . . . . . . . . . . . . . . . . . . . . . . . . . . . . . . . . 10
Maintenance. . . . . . . . . . . . . . . . . . . . . . . . . . . . . . . . . . . . . . . . . . . . . . . . . . . . . . . . . . . . . . . . . . . . . . . . 11
PRODUCT OVERVIEW. . . . . . . . . . . . . . . . . . . . . . . . . . . . . . . . . . . . . . . . . . . . . . . . . . . . . . . . . . . . . . . . . . . 12
Product Features. .. . . . . . . . . . . . . . . . . . . . . . . . . . . . . . . . . . . . . . . . . . . . . . . . . . . . . . . . . . . . . . . . . . . 12
Exterior / Interior. . . . . . . . . . . . . . . . . . . . . . . . . . . . . . . . . . . . . . . . . . . . . . . . . . . . . . . . . . . . . . . . . . . . . . . . 12
Accessories. . . . . . . . . . . . . . . . . . . . . . . . . . . . . . . . . . . . . . . . . . . . . . . . . . . . . . . . . . . . . . . . . . . . . . . . 12
OPERATION . . . . . . . . . . . . . . . . . . . . . . . . . . . . . . . . . . . . . . . . . . . . . . . . . . . . . . . . . 14
Operating Control Panel. . . . . . . . . . . . . . . . . . . . . . . . . . . . . . . . . . . . . . . . . . . . . . . . . . . . . . . . . . . . . . . . . . . . 14
Parameter Adjustment . . . . . . . . . . . . . . . . . . . . . . . . . . . . . . . . . . . . . . . . . . . . . . . . . . . . . . . . . . . . . . . . . . 15
Cooling Fan . . . . . . . . . . . . . . . . . . . . . . . . . . . . . . . . . . . . . . . . . . . . . . . . . . . . . . . . . . . . . . . . . . 15
Energy Saving Tips . . . . . . . . . . . . . . . . . . . . . . . . . . . . . . . . . . . . . . . . . . . . . . . . . . . . . . . . . . . . . . . . . . 15
Setting The Clock . . . . . . . . . . .. . . . . . . . . . . . . . . . . . . . . . . . . . . . . . . . . . . 15
Heating up the oven. . . . . . . . . . . . . . . . . . . . . . . . . . . . . . . . . . . . . . . . . . . . . . . . . . . . . . . . . . . . . . . . 15
Setting The Oven. . . . . . . . . . . . . . . . . . . . . . . . . . . . . . . . . . . . . . . . . . . . . . . . . . . . . . . . . . . . . . . . 16
Operating the Upper Microwave Oven. . . . . . . . . . . . . . . . . . . . . . . . . . . . . . . . . . . . . . . . . . . . . . . . . . . . . . . . . . . . . . . . 18
Microwave Cookware Guide. . . . . . . . . . . . . . . . . . . . . . . . . . . . . . . . . . . .. . . . . . . . . . . . . . . . . . . . . . . . . . . . . . . . . . . . .18
Cooking Tips. . . . . . . . . . . . . . . . . . . . . . . . . . . . . . . . . . . . . . . . . . . . . . . . . . . . . . . . . . . . . . . . 19
Cooking M ode. . . . . . . . . . . . . . . . . . . . . . . . . . . . . . . . . . . . . . . . . . . . . . . . . . . . . . . . . . . 21
Soften/Melt. . . . . . . . . . . . . . . . . . . . . . .. . . . . . . . . . . . . . . . . . . . . . . . . . . 21
Sensor Cook. . . . . . . . . . . . . . . . . . . . . . . . . . . . . . . . . . . . . . . . . . . . . . . . . . . . . . . . . . . . . . . . 22
Sensor Reheat. . . . . . . . . . . . . . . . . . . . . . . . . . . . . . . . . . . . . . . . . . . . . . . . . . . . . . . . . . . . . . . . 22
Defrost. . . . . . . . . . . . . . . . . . . . . . . . . . . . . . . . . . . . . . . . . . . . . . . . . . . . . . . . . . . . . . . . 23
Popcorn. . . . . . . . . .. . . . . . . . . . . . . . . . . . . . . . . . . . . . . . . . . . . . . . . . . . . . . . . . . . . 25
Beverage Center. . . . . . . . . . . . . . . . . . . . . . . . . . . . . . . . . . . . . . . . . . . . . . . . . . . . . . . . . . . . . . . . 26
Conv Mode. . . . . . . . . . . . . . . . . . . . . . . . . . . . . . . . . . . . . . . . . . . . . . . . . . . . . . . . . . . . . . . . 26
Air Fry. . . . . . . . . . . . . . . . . . . . . . . . . . . . . . . . . . . . . . . . . . . . . . . . . . . . . . . . . . . . . . . . 27
Broil. . . . . . . . . . . . . . . . . . . . . . . . . . . . . . . . . . . . . . . . . . . . . . . . . . . . . . . . . . . . . . . . 27
Other Settings. . . . . . . . . . . . . . . . . . . . . . . . . . . . . . . . . . . . . . . . . . . . . . . . . . . . . . . . . . . . . . . . 28
Power Levels. . . . . . . . . . . . . . . . . . . . . . . . . . . . . . . . . . . . . . . . . . . . . . . . . . . . . . . . . . . . . . . . 28

4
TABLE OF CONTENTS
Cook Time. . . . . . . . . . . . . . . . . . . . . . . . . . . . . . . . . . . . . . . . . . . . . . . . . . . . . . . . . . . . . . . . 29
START/+30 sec.. . . . . . . . . . . . . . . . . . . . . . . . . . . . . . . . . . . . . . . . . . . . . . . . . . . . . . . . . . . . . . . . 29
Update Temperature . . . . . . . . . . . . . . . . . . . . . . . . . . . . . . . . . . . . . . . . . . . . . . . . . . . . . . . . . 30
Update Cooking Time. . . . . . . . . . . . . . . . . . . . . . . . . . . . . . . . . . . . . . . . . . . . . . . . . . . . . . . . . 30
Heating Food. . . . . . . . . . . . . . . . . . . . . . . . . . . . . . . . . . . . . . . . . . . . . . . . . . . . . . . . . 30
Operating the Lower Oven. . . . . . . . . . . . . . . . . . . . . . . . . . . . . . . . . . . . . . . . . . . . . . . . . . . . . . . . . 31
General 0peration Logic(Applies to Most Functions). . . . . . . . . . . . . . . . . . . . . . . . . . . . . . . . . . . . . . . . . . . . . . . . . . 31
Specific Functions (Key Details Only).. . . . . . . . . . . . . . . . . . . . . . . . . . . . . . . . . . . . . . . . . . . . . . . . . . . . . . . . 31
Bake. . . . . . . . . . . . . . . . . . . . . . . . . . . . . . . . . . . . . . . . . . . . . . . . . . . . . . . 31
Conv Bake (Convection Bake). . . . . . . . . . . . . . . . . . . . . . . . . . . . . . . . . . . . . . . . . . . . . . . . . . . . . . . . . 31
Conv Roast. . . . . . . . . . . . . . . . . . . . . . . . . . . . . . . . . . . . . . . . . . . . . . . . . . . . . . . . . 31
Pizza. . . . . . . . . . . . . . . . . . . . . . . . . . . . . . . . . . . . . . . . . . . . . . . . . . . . . . . . . 31
Air Fry. . . . . . . . . . . . . . . . . . . . . . . . . . . . . . . . . . . . . . . . . . . . . . . . . . . . . . . . . 32
Broil. . . . . . . . . . . . . . . . . . . . . . . . . . . . . . . . . . . . . . . . . . . . . . . . . . . . . . . . . 32
Keep Warm. . . . . . . . . . . . . . . . . . . . . . . . . . . . . . . . . . . . . . . . . . . . . . . . . . . . . . . . . 32
Proof (Dough Fermentation). . . . . . . . . . . . . . . . . . . . . . . . . . . . . . . . . . . . . . . . . . . . . . . . . . . . . . . . . 33
Delay start (scheduled Cooking). . . . . . . . . . . . . . . . . . . . . . . . . . . . . . . . . . . . . . . . . . . . . . . . . . . . . . . . . 33
Oven Food Probe (Only for Bake/Conv Bake/Conv Roast). . . . . . . . . . . . . . . . . . . . . . . . . . . . . . . . . . . . . . . . . 33
Self Clean . . . . . . . . . . . . . . . . . . . . . . . . . . . . . . . . . . . . . . . . . . . . . . . . . . .. . . . . . . . . . . . . . . . . . . . . . . . . . . . . 34
MAINTENANCE. . . . . . . . . . . . . . . . . . . . . . . . . . . . . . . . . . . . . . . . . . . . . . . . . . . . . . . . 35
Care And Cleaning. . . . . . . . . . . . . . . . . . . . . . . . . . . . . . . . . . . . . . . . . . . . . . . . . . . . . . . . . . . 35
Cleaning Agents. . . . . . . . . . . . . . . . . . . . . . . . . . . . . . . . . . . . . . . . . . 35
Cleaning And Maintenance. . . . . . . . . . . . . . . . . . . . . . . . . . . . . . . . . . . . . . . . . . 36
Cleaning Guide. . . . . . . . . . . . . . . . . . . . . . . . . . . . . . . . . . . . . . . . . . 36
Replacing Oven Cavity Light Bulb. . . . . . . . . . . . . . . . . . . . . . . . . . . . . . . . . . . . . . . . . . 37
TROUBLESHOOTING. . . . . . . . . . . . . . . . . . . . . . . . . . . . . . . . . . . . . . . . . . . . . . . . . . . . . . 38
FAQs. . . .. . . . . . . . . . . . . . . . . . . . . . . . . . . . . . . . . . . . . . . . . . . . . . . . . . . . . 38
Upper Oven Error Code. . . .. . . . . . . . . . . . . . . . . . . . . . . . . . . . . . . . . . . . . . . . . . . . . . . . . . . . . 41
Lower Oven Error Code. . . .. . . . . . . . . . . . . . . . . . . . . . . . . . . . . . . . . . . . . . . . . . . . . . . . . . . . . 42
WARRANTY&SERVICE. . . .. . . . . . . . . . . . . . . . . . . . . . . . . . . . . . . . . . . . . . . . . . . . . . . . . . . . . 43
5
SAFETY AND WARNINGS
• To reduce the risk of explosion, fire, death, electric shock, injury or scalding to persons when using this
product, follow basic precautions, including the following:
READ ALL INSTRUCTIONS BEFORE USE
Precautions to Avoid Possible Exposure to Excessive Microwave Energy
(a) Do not attempt to operate this microwave with the door open. Operating with the door open can result in
harmful exposure to microwave energy. Never attempt to disable, defeat, or tamper with the safety interlock
system.
(b) Keep the door sealing surfaces clean and unobstructed. Do not place any object between the front face of the
microwave and the door. Ensure that grease, food residue, or cleaning materials do not accumulate on the
sealing surfaces.
(c) Do not operate the microwave if it is damaged. It is particularly important that the door closes properly and
that there is no damage to the following components: (1) door (bent or warped), (2) hinges and latches (broken
or loosened), (3) door seals and sealing surfaces.
(d) Do not attempt to adjust or repair this microwave yourself. Servicing should only be performed by qualified
service personnel authorized by the manufacturer.
Safety Definitions
Your safety and the safety of others are very important.
We have provided many important safety messages in this manual and on your appliance. Always read and
follow all safety messages.
All safety messages will tell you what the potential hazard is, tell you how to reduce the chance of injury,
and tell you what may happen if the instructions are not followed.
This is the safety alert symbol.
This symbol alerts you to potential hazards that can kill or injure you and others. All
safety messages will follow the safety alert symbol and either the word WARNING or
CAUTION.
These words mean:
WARNING
You may be killed or seriously injured if you do not follow instructions.
CAUTION
You may be injured or cause damage to the product if you do not follow instructions.
WARNING

6
SAFETY AND WARNINGS
Technical Safety
• To reduce the risk of burns, electric shock, fire, injury to persons or exposure to excessive microwave
energy when using the microwave oven, read all instructions before using the appliance.
• This appliance is not intended for use by persons (including children) with reduced physical, sensory or
mental capabilities, or lack of experience and knowledge, unless they have been given supervision or
instruction concerning use of the appliance by a person responsible for their safety. Children should be
supervised to ensure that they do not play with the appliance.
• Children must not be allowed to play with accessories or hang down from the door or any part of the
oven. Doing so can cause serious injury and damage. As with any appliance, close supervision is
necessary when used by children.
• Read and follow the Precautions to Avoid Possible Exposure to Excessive Microwave Energy.
• This appliance must be grounded. Connect only to a properly grounded outlet. See the Electrical
Requirements section.
• Install or locate this appliance only in accordance with the provided installation instructions.
• Some products such as whole eggs and sealed containers – for example, closed glass jars – can explode
and should not be heated in this oven.
• Use this appliance only for its intended use as described in the manual. Do not use corrosive chemicals
or vapors, such as sulfide and chloride, in this appliance. This type of oven is specifically designed to
heat, cook, or dry food. It is not designed for industrial or laboratory use.
• This appliance should be serviced only by qualified service personnel. Contact the nearest authorized
service facility for examination, repair, or adjustment.
• Do not cover or block any openings on the appliance.
• Do not store this appliance outdoors. Do not use this product near water - for example, near a kitchen
sink, in a wet basement, near a swimming pool, or similar location.
• To avoid electric shock:
- Do not operate this appliance if it has a damaged cord or plug, if it is not working properly or if it has
been damaged or dropped.
- Do not immerse the electrical cord or plug in water. Keep cord away from heated surfaces.
- Do not let cord hang over edge of table or counter.
• When cleaning surfaces of door and oven that come together on closing the door, use only mild,
nonabrasive soaps or detergents applied with a sponge or soft cloth.
• DO NOT TOUCH HEATING ELEMENTS OR INTERIOR SURFACES OF MICROWAVE OVEN. During and
after use or cleaning the Interior, do not touch other flammable materials contact heating elements or
interior surfaces of microwave oven until they have had sufficient time to cool. Other surfaces, such as
windows of microwave oven door, oven lamp, also get hot and may cause burns if not allowed to cool.
• To reduce the risk of fire in the oven cavity:
- Do not overcook food. Carefully attend to the microwave oven when paper, plastic or other
combustible materials are placed inside the oven to facilitate cooking.
7
SAFETY AND WARNINGS
- Do not use the cavity for storage purposes. Do not leave paper products, cooking utensils or food in
the cavity when not in use.
- Remove wire twist-ties from paper or plastic bags before placing bags in oven.
• If materials inside the oven ignite:
- Keep oven door closed and turn the oven off.
- Disconnect the power cord or shut off power at the fuse or circuit breaker panel.
• Liquids, such as water, coffee, or tea can be overheated beyond the boiling point without appearing to
be boiling due to surface tension of the liquid. Visible bubbling or boiling when the container is removed
from the microwave oven is not always present.
• THIS COULD RESULT IN VERY HOT LIQUIDS SUDDENLY BOILING OVER WHEN THE CONTAINER IS
DISTURBED OR A SPOON OR OTHER UTENSIL IS INSERTED INTO THE LIQUID.
To reduce the risk of injury to persons:
- Do not overheat the liquid. Stir the liquid both before and halfway through heating it.
- Do not use straight-sided containers with narrow necks. Use extreme care when inserting a spoon or
other utensil into the container.
- After heating, allow the container to stand in the microwave oven for a short time before removing the
container.
• Do not mount unit over or near any portion of a heating or cooking appliance.
• Do not mount over a sink.
• Do not store anything directly on top of the appliance surface when the appliance is in operation.
Installation
• Never allow anyone to climb, sit, stand or hang on the oven door. Injury might result from contact with
hot food or the oven itself.
• Do not line the oven walls, racks, bottom, or any other part of the oven with aluminum foil or any other
material. Doing so will disrupt heat distribution, produce poor baking results and cause permanent
damage to the oven interior. (Aluminum foil will melt on the interior surface of the oven.)
• Do not use aluminum foil or any other material to line the oven bottom. Improper installation of oven
liners may result in a risk of electric shock or fire.
• Make sure your appliance is properly installed and grounded by a qualified installer, according to the
installation instructions. Any adjustment and service should be performed only by qualified installers or
service technicians.
• Be certain that all packing materials are removed from the appliance before operating. Keep plastic,
clothes, paper, and other flammable materials away from parts of the appliance that may become hot.
• The electrical power must be shut off while the electrical connections are being made.
• Improper connection of aluminum house wiring to copper leads can result in an electrical hazard or fire.
Use only connectors designed for joining copper to aluminum and follow the manufacturer’s recommended
procedure closely.
• Important – Save for the local electrical inspector's use
8
SAFETY AND WARNINGS
Operation
• DO NOT TOUCH HEATING ELEMENTS OR INTERIOR SURFACES OF OVEN. Heating elements may be hot
even though they are dark in color. Interior surfaces of an oven become hot enough to cause burns. During and
after use, do not touch or let clothing or other flammable materials contact heating elements or interior
surfaces of oven until they have had sufficient time to cool. Other surfaces, such as oven vent openings and
surfaces near these openings, oven doors, and windows of oven doors, also get hot and may cause burns if not
allowed to cool.
• Use care when opening door. The hot air and steam that escape can cause burns to hands, face and eyes.
Let hot air or steam escape from the oven before removing or replacing food in the oven.
• Do not use plastic to cover food. Use foil or oven-safe lids only.
• Never attempt to dry a pet in the oven.
• Never use your appliance for warming or heating the room.
• Always use pot holders or oven mitts when removing food from an oven or cooktop. Cookware will be hot.
Use only dry pot holders. Moist or damp pot holders on hot surfaces may result in burns from steam. Do not
let the pot holder touch hot heating elements. Do not use a towel or other bulky cloth to remove food.
• Do not heat unopened food containers. Pressure in the containers may cause them to burst which may
result in injury.
• Do not allow aluminum foil or the temperature probe to contact heating elements.
• Do not touch the oven racks while they are hot.
• Only arrange oven racks when the oven is cool. If a rack must be moved while the oven is hot, do not let
the pot holder contact the hot heating element in the oven.
• Pull the oven rack to the stop-lock position when loading and unloading food from the oven. This helps
prevent burns caused by touching hot surfaces of the door and oven walls.
• Do not use the oven if a heating element develops a glowing spot during use or shows other signs of
damage. A glowing spot indicates the heating element may fail and present a potential burn, fire, or shock
hazard. Turn the oven off immediately and have the heating element replaced by a qualified service technician.
• Do not leave children alone or unsupervised near the appliance when it is in use or is still hot. Children
should never be allowed to sit or stand on any part of the appliance as they could be injured or burned.
• DO NOT block the oven vent during operation. This can damage the electric parts of the oven. Air must
be able to move freely. The bottom vent trim should be properly assembled on the front bottom of oven
before installing the oven door.
• Do not put large, heavy items such as whole turkeys on the open oven door.
• Take care when the door is open to avoid injury.
• If the door or door seals are damaged, the oven must not be operated until it has been repaired by a
competent person.
• Do not allow children to crawl into the oven.
• Do not put your hand under the controller or between the door and bottom vent trim during operation.
The outside of the oven can become very hot to the touch.

9
SAFETY AND WARNINGS
Maintenance
• Allow cookware and utensils to cool on an appropriate heat-resistant surface, away from children’s reach.
• If the door glass, surface panels, or internal heating elements show cracks, deformation or damage—do not
operate the appliance. Contact a qualified technician for inspection and repair.
• Before servicing the appliance, disconnect all electrical power (shut off at main fuse or circuit breaker
panel).
• When replacing the oven light, first switch off power at the main panel and ensure zero voltage at the
appliance.
• Never pour cold water into or onto a hot oven interior, door glass or heating element. Thermal shock may
cause glass breakage or structural damage.
• Do not insert oversized metal cookware or food items into the appliance unless clearly permitted by the
manufacturer. Items that protrude or nest dangerously may create fire, electric-shock or tip-over hazards.
• Do not clean the interior or components using metal scouring pads. Metal fragments can detach, lodge in
electrical parts and lead to arcing or shock.
• When not in use, do not store combustible materials, cookware not specified by the manufacturer, or foreign
objects in the oven cavity.
• Do not cover oven racks, interior surfaces, or the bottom of the cavity with metal foil or other non-approved
barriers. Improper coverage may impair airflow, cause overheating or fire.
• If the self-cleaning function malfunctions, or an audible alarm triggers during self-cleaning, immediately
turn off and disconnect the appliance from power. Arrange service by a qualified technician.
• If the oven has significant grease or oil deposits, initiate a self-cleaning cycle before use. Excess oil
accumulation may ignite under self-cleaning temperatures.
• In the event of a fire during the self-clean mode: turn the appliance OFF, allow the fire to extinguish, and do
not open the oven door. Introduction of fresh air during high-temperature cleaning may cause flame surge
or explosion risk.
• If the appliance is dropped, struck, or experiences mechanical damage, the unit must be thoroughly
examined by a qualified service technician prior to further use.
Risk of Fire and Flammable Materials
• Do not store or use flammable material in or near the oven. Flammable materials include paper, plastic,
pot holders, linens, wall coverings, curtains, and gasoline or other flammable vapors and liquids such as
grease or cooking oil. These materials can be ignited when the oven is in use.
• Use extreme caution when moving or disposing of hot grease.
• Wear proper apparel. Do not wear loose-fitting or hanging garments, which may ignite if they contact
hot surfaces, and cause severe burns.
• Do not use the oven for drying clothes. Only use the oven for its intended purpose.
10
SAFETY AND WARNINGS
• If cabinet storage is provided directly above the oven, use it to store items that are not frequently used
and can be safely stored in an area subjected to heat. Temperatures may be unsafe for volatile items
such as flammable liquids, cleaners or aerosol sprays.
• Do not use water on grease fires. Should an oven fire occur, leave the oven door closed and turn the
oven off. If the fire continues, throw baking soda on the fire or use a fire extinguisher. Do not put water
or flour on the fire. Flour may be explosive and water can spread a grease fire and cause personal injury.
Microwave Oven — Maintenance & Safe Operation
• The appliance must be installed in accordance with the manufacturer’s installation instructions to maintain
proper grounding and ventilation.
• Secure the power cord above and away from heated surfaces to prevent damage or fire hazards.
• Protect the oven floor/turntable:
- Do not operate the microwave with no load or with cookware that excessively heats the floor.
- Do not place food directly on the microwave oven floor or turntable. Always use microwave-safe cookware
or ceramic tray provided.
• Do not heat baby bottles or baby food directly in the microwave cavity. Uneven heating may cause burns or
eruptive boiling leading to personal injury.
• Do not deep-fat fry in the microwave. Oil may overheat rapidly and ignite.
• Do not attempt home canning in the microwave oven.
• Do not use narrow or cylindrical containers that may cause delayed boiling or eruptive splattering.
• For liquids: stir before heating. Allow standing time after heating and stir again to reduce risk of scalding
from eruptive boiling.
• Place food only on trays or cookware intended for microwave use and follow any on-screen prompts or
accessory instructions.
• Do not operate the appliance empty. Absence of load may cause component failure or fire.
• Metal trim, ties, or utensils can cause arcing. Use only materials marked microwave-safe.
• If smoke or fire occurs:
– Turn the appliance OFF and keep the door closed.
– Disconnect power when safe to do so.
– Have the appliance inspected by a qualified service technician before reuse.
• To reduce the risk of minor injury to persons, malfunction, or damage to the product or property when
using this product, follow basic precautions, including the following:
Operation
• Always heat fat slowly, and watch as it heats.
• If frying combinations of oils and fats, stir them together before heating.
• Use a deep fat thermometer, if possible, to prevent overheating fat beyond the smoking point.
• Use the least possible amount of fat for effective shallow or deep-fat frying. Filling the pan with too much
fat can cause spillovers when food is added.
• Accessible parts may become hot when the grill is in use.
CAUTION

11
SAFETY AND WARNINGS
• Do not place food or cookware on the bottom of the oven cavity. Doing so will cause permanent damage
• to the oven bottom finish.
• When using cooking or roasting bags in the oven, follow the manufacturer’s directions.
• To protect against food-borne illnesses, cook meat and poultry thoroughly. The USDA has indicated the
following as safe minimum internal temperatures for consumption:
- Ground beef: 160 °F (71 ℃)
- Poultry: 165 °F (74 ℃)
- Beef, veal, pork, or lamb: 145 °F (63 ℃)
- Fish/seafood: 145 °F (63 ℃)
• Do not use this oven for commercial purposes. It is made for household use only.
• The door or the outer surface may get hot when the appliance is operating.
• Do not use this oven for purposes other than cooking.
• Use caution if opening the door when the oven is operating. Hot surfaces can cause serious burns.
Maintenance
• Do not repair or replace any part of the appliance unless specifically recommended in the manual. All
other servicing should be performed by a qualified technician.
• Do not use harsh, etching, abrasive cleaners or sharp metal scrapers to clean the oven door glass since
they can scratch the surface. Scratches may cause the glass to shatter.
• Make sure oven lights are cool before cleaning.
• Do not clean the door gasket. The door gasket is essential for a good seal. Care should be taken not to
rub, damage, or move the gasket.
• Never keep pet birds in the kitchen. The health of birds is extremely sensitive to the fumes released
during an oven self-clean cycle. Fumes may be harmful or fatal to birds. Move birds to a well-ventilated
room.
• Do not rinse trays and racks by placing them in water just after cooking. This may cause breakage or
damage.
• The oven should be cleaned regularly and any food deposits should be removed. Failure to maintain the
oven in a clean condition could lead to deterioration of the surface that could shorten the life of the
appliance and possibly result in a hazardous situation.
• Clean in the self-clean cycle only parts listed in this manual. Before self-cleaning the oven, remove the
broiler pan, all oven racks and any utensils or food from the oven.
• Do not store items of interest to children on the back guard or in cabinets above a cooking appliance.
Children climbing on the oven to reach items could be seriously injured.
SAVE THESE INSTRUCTIONS
12
PRODUCT OVERVIEW
Product Features
The appearance and specifications listed in this manual may vary due to constant product improvements.
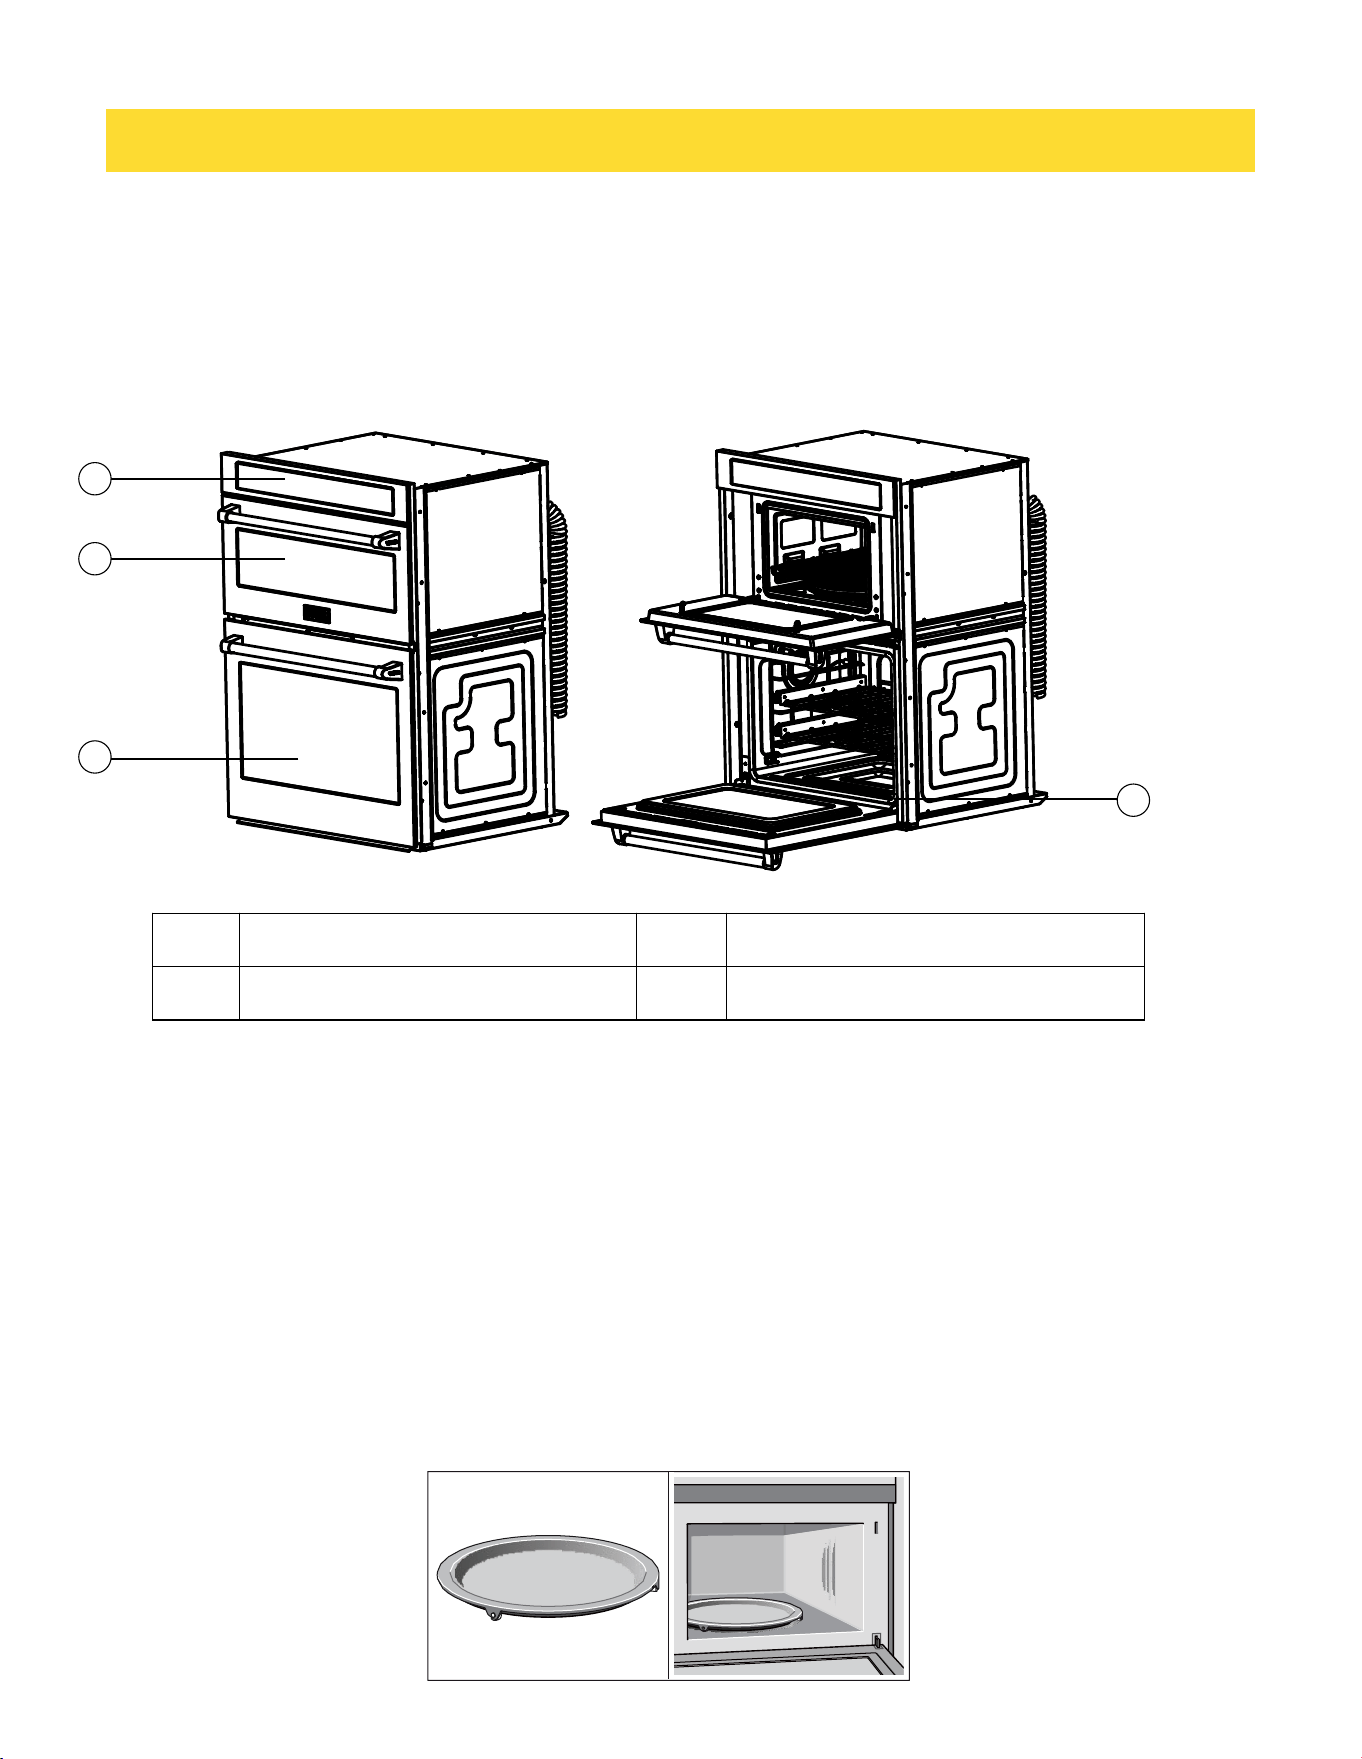
Exterior / Interior
Accessories
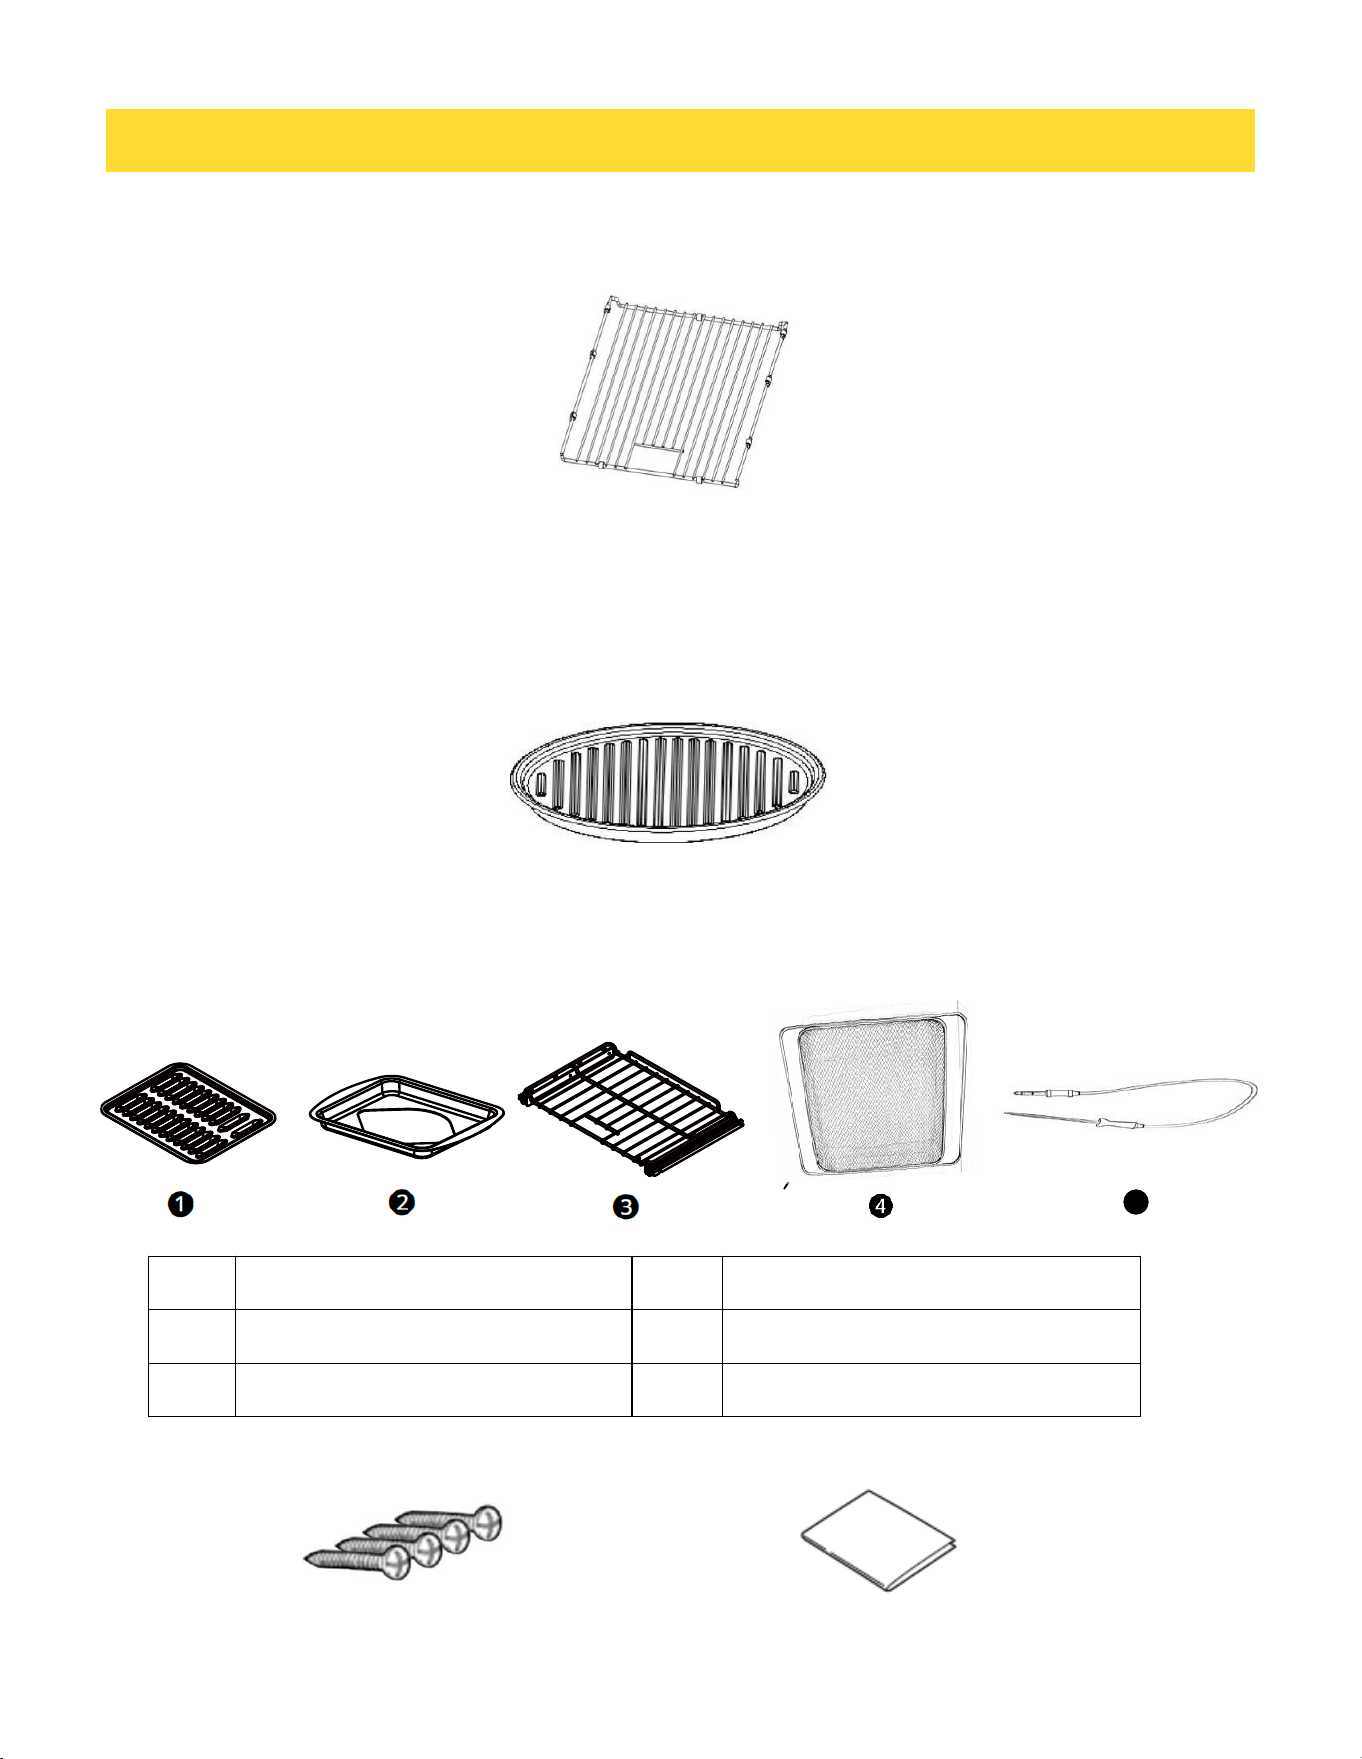
Accessories for Upper Microwave Oven
Turntable
Turntable rotates in both directions to help food cook more evenly.
Food which particularly requires a lot of heat from underneath can be prepared directly on the turntable. The
turntable can turn clockwise or anti-clockwise.
Place the turntable on the drive in the center of the cooking compartment. Ensure that it is properly fitted.
• Never use the microwave without the turntable.
• The turntable can withstand max. 5 kg.
• The turntable must turn when using all types of heating.
PRODUCT OVERVIEW
1
Oven Controller
3
Lower Oven Door
2
Microwave Oven Door
4
Gasket
1
2
3
4
13
Baking rack
For grilling, e.g. steaks, sausages and for toasting bread. We recommend using the rack together with the baking
tray when cooking items on the rack which might drip.
Ceramic Tray
For microwave cooking and convectional cooking. You can place food, like a popcorn bag, potatoes, microwave
pizza or defrost, directly on the ceramic tray. The ceramic tray will get hot during the convection cooking. Place
the ceramic tray on the top of the metal tray turntable. The ceramic tray can remain in the oven for all cooking
modes, unless "Bake on Metal Tray" is required.
Accessories for Lower Oven
PRODUCT OVERVIEW
1
Grid (1 ea)
3
Gliding Rack (2 ea)
2
Broiler Pan (1 ea)
4
Air Fry Tray (1 ea)
5
Meat Probe (1 ea)
ST4.2*20 countersunk self-tapping screws (4 ea)
Manual (1 ea)
5
14
OPERATION
OPERATION
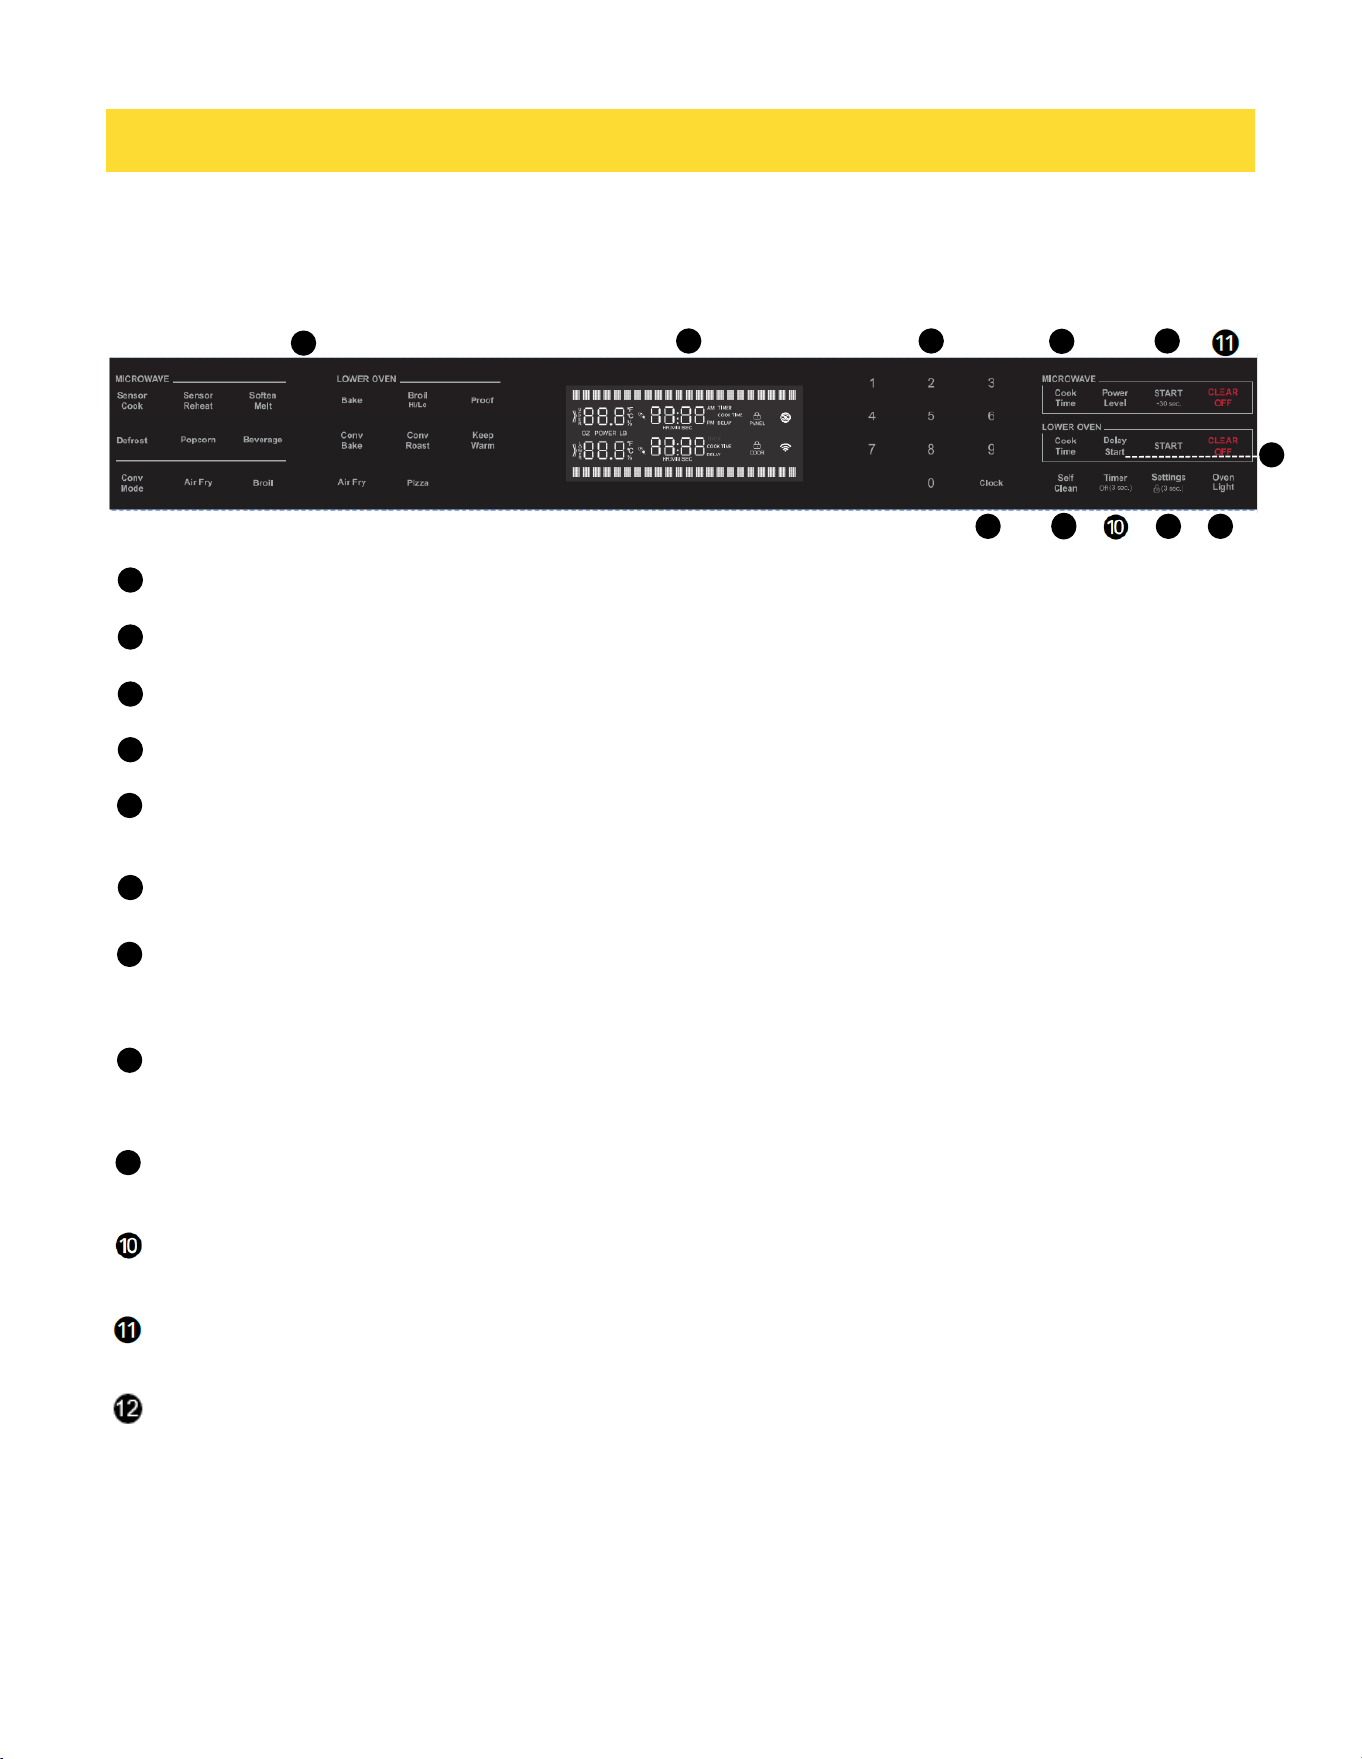
Operating Control Panel
Control Panel Features
Oven Functions
Select various functions of the upper microwave oven and bottom oven. See Operating the Oven.
Display
Oven operation and settings appear in the display.
START
Use to start all functions.
Upper / Lower Light
Use to turn the oven lights of the upper or lower oven on and off.
S e t t i n g s
Press to select and adjust oven settings.
Press and hold the Settings button for three seconds to activate/deactivate Control Lock.
Clock
Use to set the time of day.
Cook Time
Press the button to set the desired amount of time for food to cook. The oven shuts off when the set cooking time
runs out.
Number Pads
Use to set any function requiring numbers such as the time of day on the clock, the timer, the oven temperature, the
start time, and the length of operation for timed baking, etc.
Delay Start
Press the button to set the delayed time cook. The oven starts at the set time.
Upper / Lower Timer Off
Use to set or cancel the timer of the upper or lower oven.
Upper / Lower CLEAR/OFF
Use to stop cooking or cancel settings of the upper or lower oven.
Self Clean
Use to set self clean of the upper or lower oven.
1
2
3
456
7
8
9
1
2
3
4
5
6
7
8
9
12
15
Parameter Adjustment
Use the adjusting keys to set the parameters.
Cooling Fan
Your appliance has a cooling fan. The cooling fan switches on during operation. The hot air escapes above the
door. The cooling fan continues to run for a certain time after operation.
CAUTION
Do not cover the ventilation slots. Otherwise, the appliance will overheat.
• The appliance remains cool during microwave operation. The cooling fan will still switch on. The fan may run
on even when microwave operation has ended.
• Condensation may appear on the door window, interior walls and floor. This is normal and does not adversely
affect microwave operation. Wipe away the condensation after cooking.
OPERATION
Energy Saving Tips
• Multiple-rack cooking saves time and energy. Whenever possible, cook foods requiring the same cooking
temperature together in one oven.
• For optimal performance and energy savings, follow the guides for proper rack and pan placement.
• Reduce energy use by cleaning light oven soil.
• Avoid opening the oven door more than necessary during use. This helps the oven
Setting The Clock
The clock must be set to the correct time of day in order for the automatic oven timing functions to work properly.
How to set the clock:
1Touch START to set clock or touch Clock.
2Select 12 or 24 hours system: 1 : 12hr, 2 : 24hr
3Enter the correct time using the number keys. Example: To set the clock to 12:30 type in 1 2 3 0.
4 Touch START to confirm is complete setting.
Heating up the oven
To remove the new oven smell, heat up the appliance when it is empty and closed. One hour with Convection at 350℉
[180 ℃) is ideal. Ensure that no packaging remnants have been left in the oven cavity.
NOTE
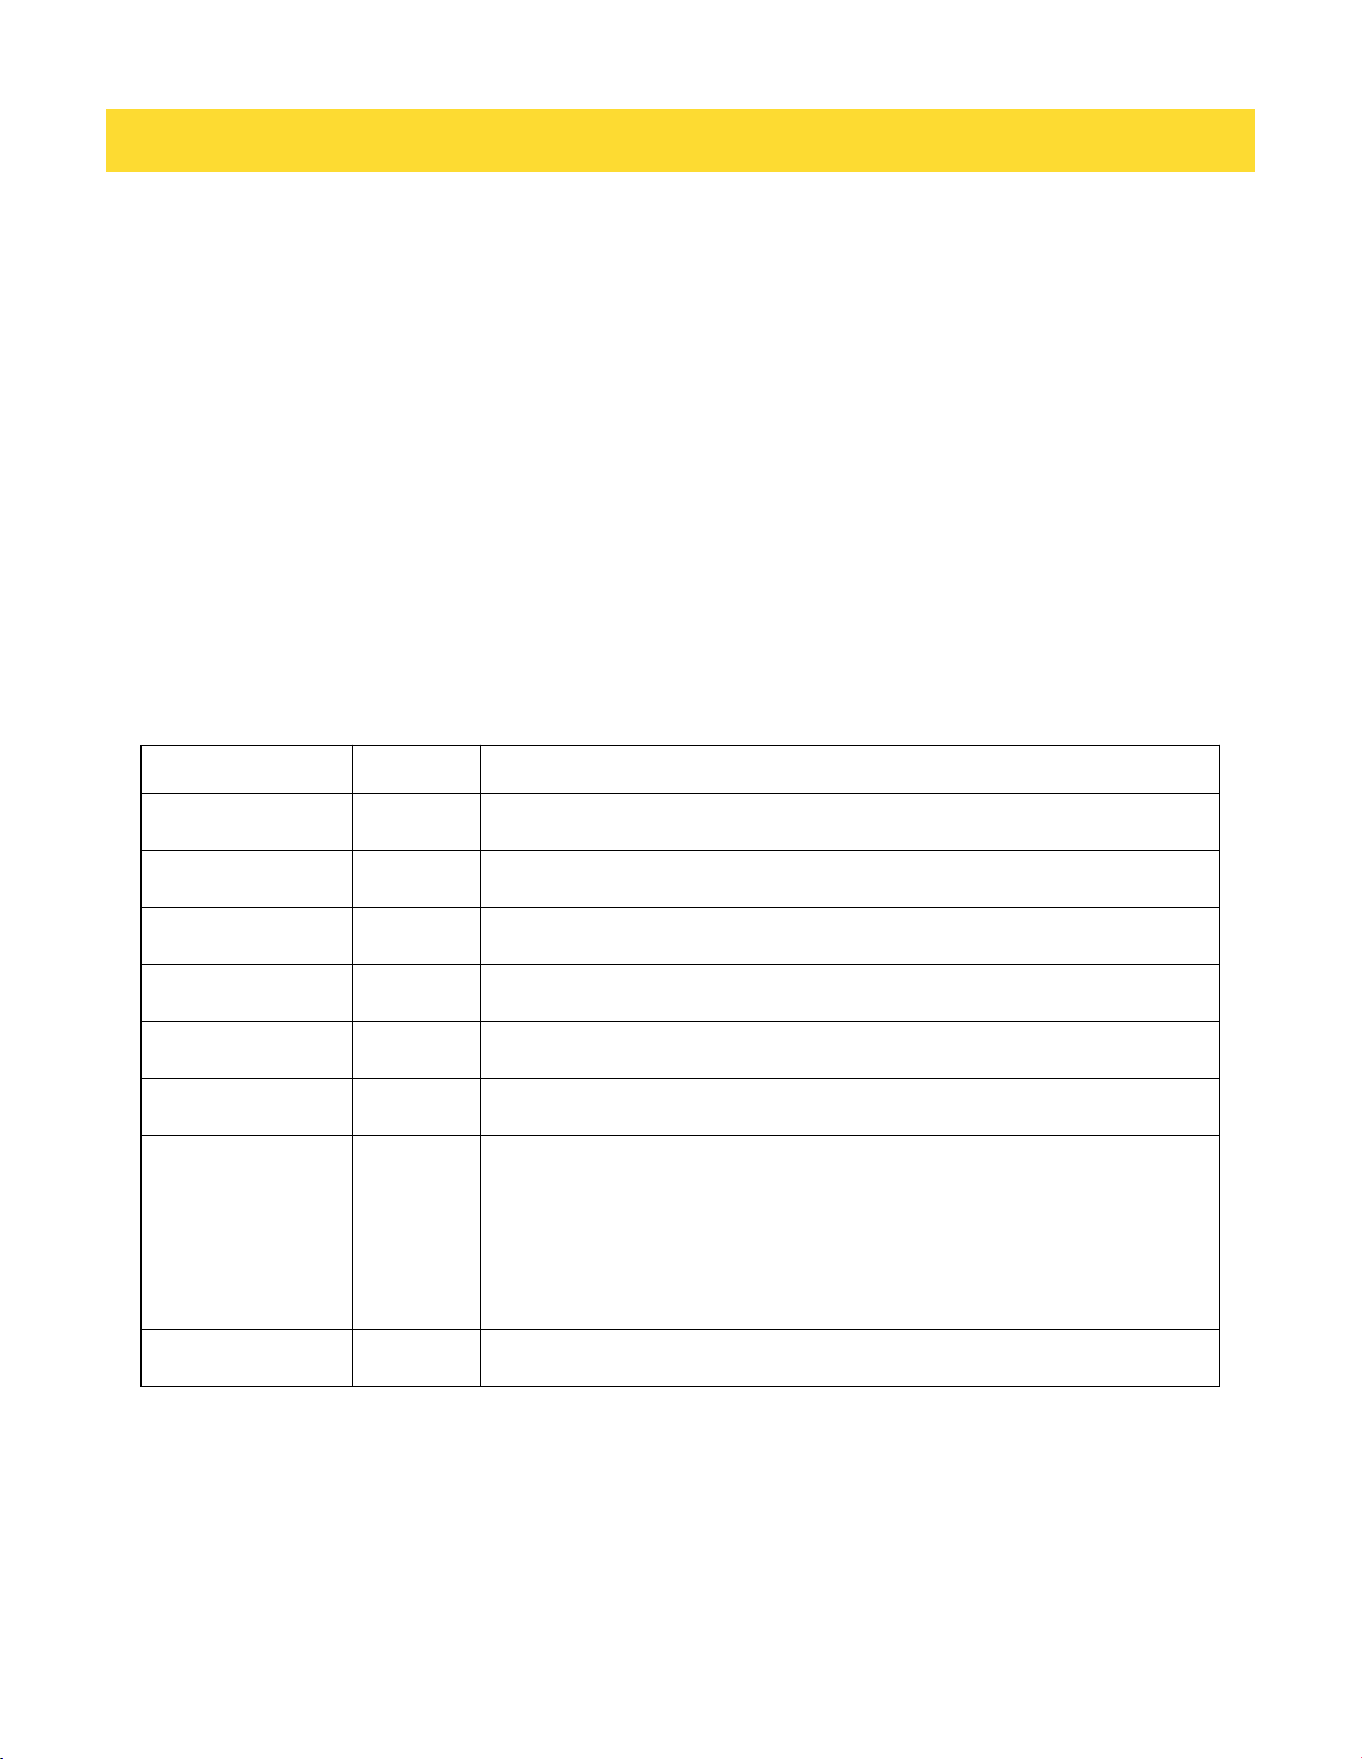
Parameter Function
Power Level
Set the microwave power level.
Cook Time
Set the time of cooking.
16
1 Touch Conv Mode and then enter the numbers to select Baked goods ,according to the prompts.
2 Enter the numbers 3 5 0 with the number keys, and then press START to confirm temperature is complete
setting.
3 Enter the cooking time numbers 6 0 with the number keys,
4 Touch START to start cooking.
The oven light turns on and the appliance starts heating..
Setting The Oven
Settings
The oven has additional settings which can be accessed and adjusted using the settings button. They remain in
the control's memory until changed.
How to use:
1. Touch Settings. The oven display will scroll through the various options.
2. Touch the number keypad for the specific option to toggle the function setup. Use a following chart as a guide.
OPERATION
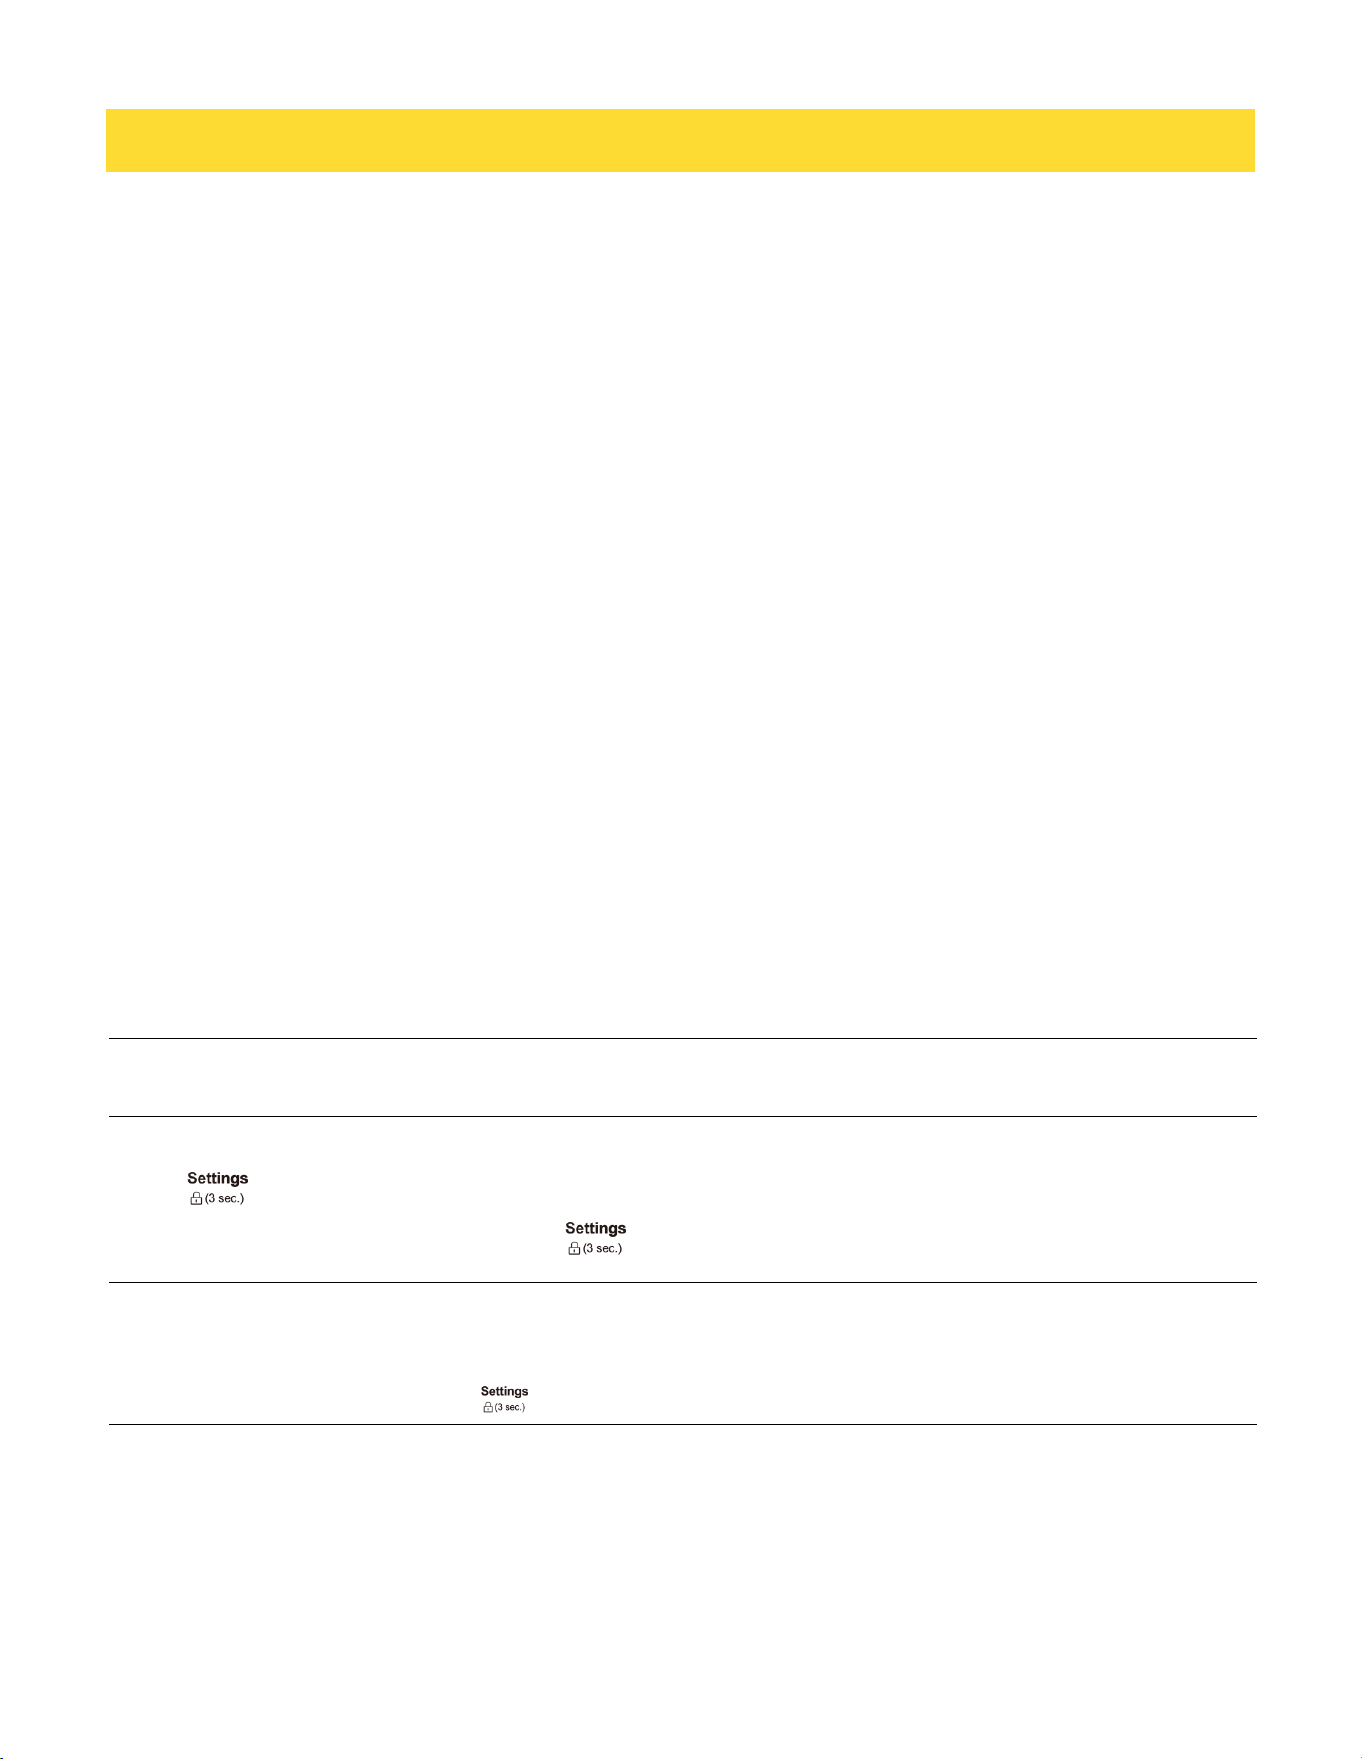
Option Code Function Description
Temp Units 1 Set temperature unit
Sound 2 Key sound switch
Error Code 3 Query for error codes that have occurred
Version 4 Version information query
DEMO Mode 5 Set oven demo mode
Compensation 6
±35° (±19°C) (retained after power loss)
Sabbath 7
Set sabbath mode. (The cooking time can be set within 74 hours)
Sabbath mode disables the oven lights (the oven light will not turn on
when the door is opened), all sounds (the control will not beep when the
screen is pressed). Sabbath mode can only be used with traditional
Bake. This feature conforms to Jewish Sabbath requirements.
Factory Reset 8 Restore factory setting
17
4 Touch Timer.
The oven display will count down the timer. If the timer remaining time is not in the display, recall the remaining
time by pressing Timer once. If both cooking time and timer are set, only display the time of the cooking. If
enabled, end-of-cycle tones will sound, it ends automatically in one minute or hold Timer/0ff(3sec.) for 3 seconds
to clear the display and stop the reminder tones.
To cancel the Timer:
Press and hold Timer for 3 seconds. The display returns to the time of day. Pressing CLEAR/OFF will not cancel
the current timer, but will cancel any oven cooking modes in progress.
The Timer does not start or stop the oven.
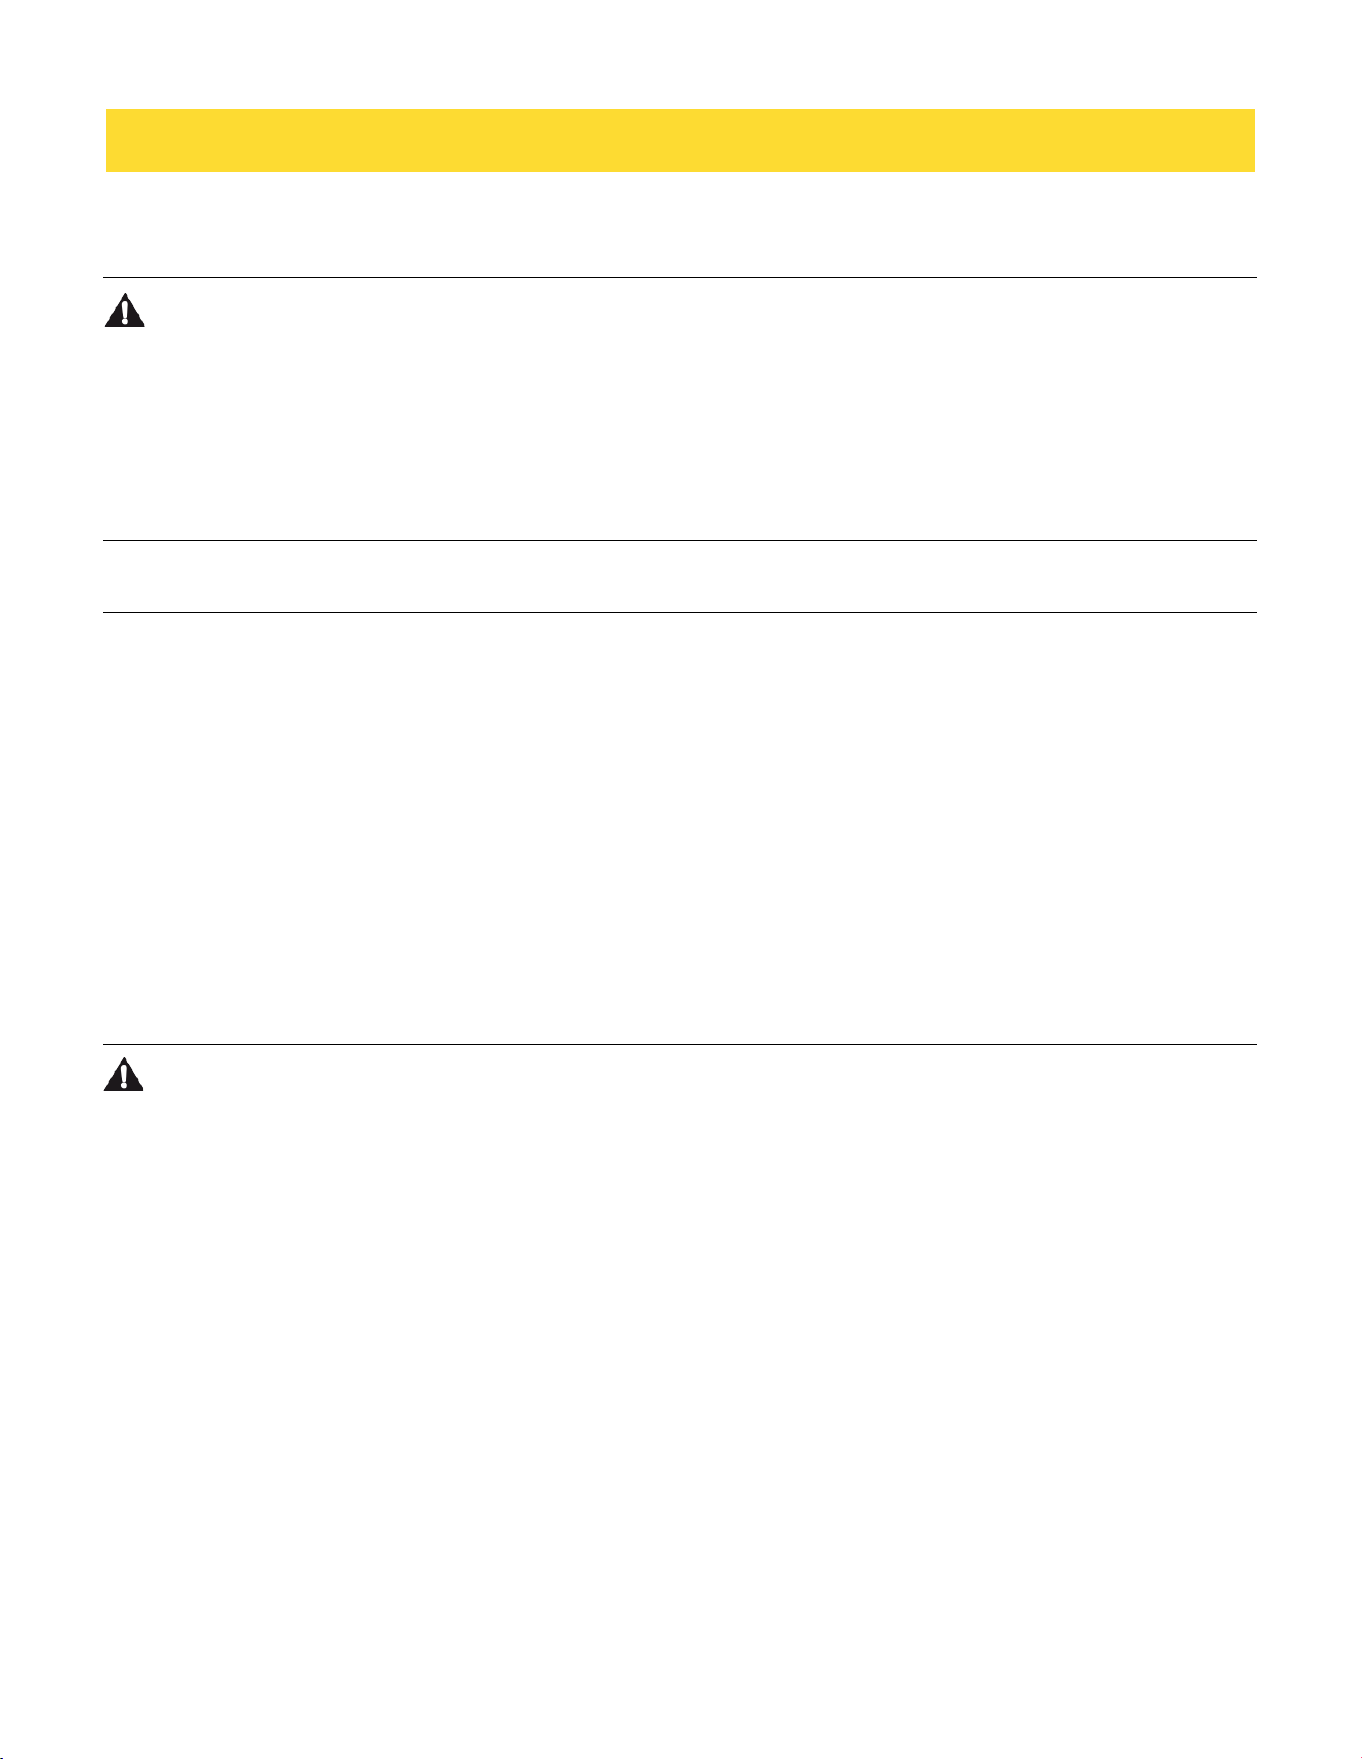
Using the Control Lock:
Touch to activate the Control Lock feature. The panel lock icon appears in the display.
To deactivate the Control Lock feature, touch for 3 seconds, 3-2-1 appears in the display, the panel lock
icon disappears in the display and the controls unlock.
The Control Lock shuts down the control panel keypads to avoid unintended use of the oven. The Control Lock will
remain set after a power failure, if set before the power failure occurs.
When the control is locked, only the keypads will function.
OPERATION
NOTE
NOTE
Sabbath Mode
Sabbath Mode can be set both upper and lower oven. How to set Sabbath Mode:
1 Touch Settings.
2 Touch 7.
3 Select the oven to be used for Sabbath Mode:1 : Upper Oven 2 : Lower Oven 3 : Upper / Lower Ovens
4 Set the desired temperature.
If both ovens are selected, the upper oven temperature must be set first. After setting the temperature for
the upper oven, press START. Then set the temperature for the lower oven and press START again.
To cancel Sabbath Mode, press CLEAR OFF. If both ovens are in Sabbath Mode, each oven must be turned off
separately by pressing CLEAR OFF for each one.
Timer/off l3 sec.)
The Timer can be set in minutes and seconds or hours and minutes and counts down the set time.
How to set timer:
1 Touch Timer/0ff(3 sec).
2 Touch number keypad "1" to select HR:MIN or "2" to select MIN:SEC.
3 Touch number keypads to set a length of the timer.
18
Operating the Microwave Oven
Before Using
• To avoid risk of personal injury or property damage, do not use stoneware, metal cookware, or metal rimmed
cookware in the oven.
• Do not use your microwave oven to cook eggs in the shell. Pressure can build up inside the shell, causing it to
burst.
• Never operate the oven when it is empty. Food or water should always be in the oven during operation to absorb
the microwave energy.
• Do not use the oven to dry newspapers or clothes. They may catch fire.
• To program the oven, press the center of each button firmly. When a button is pressed correctly, a beep sounds
and the oven is activated. Do not press several buttons at once.
• Do not strike the control panel with silverware, cookware, etc. It may be damaged or broken.
• Always be careful when taking cookware out of the oven. Some dishes absorb heat from the cooked food and
may be hot. See the Cookware Guide section for more information.
• To avoid breakage, allow cookware to cool before rinsing or submerging in water. Always allow the turntable to
cool before removing it from the oven.
• Use thermometers that have been approved for microwave oven cooking.
• The turntable must always be in place when you operate the oven.
Microwave Cookware Guide
Microwave-Safe Cookware
Use microwavable cookware.
• Do not permit children to use plastic cookware without complete supervision.
• Ovenproof Glass
- Ovenproof glassware that is treated for high intensity heat so it is heat-resistant is microwave-safe.
- Use utility dishes, loaf dishes, pie plates, cake plates, liquid measuring cups, casseroles and bowls without
metal rims.
- Do not use delicate glassware, such as tumblers or wine glasses, as these might shatter when heated.
• China
- Use bowls, cups, serving plates, pottery, stoneware, ceramics, and platters without metal rims or handles.
Many containers made of these materials are microwave-safe, but test them before use.
• Plastic
- Plastic Storage Containers: Use plastic dishes, cups, semi-rigid freezer containers and plastic bags only for
short cooking times. Do not use them when cooking food for long periods or at high power levels, as the hot food
will eventually warp or melt the plastic.
- Plastic wrap (as a cover): Lay the plastic wrap loosely over the dish and press it to the sides. Vent plastic
wrap by turning back one edge slightly to allow excess steam to escape. The dish should be deep enough so that
the plastic wrap will not touch the food. As the food heats it may melt the plastic wrap wherever the wrap touches
the food.
- Plastic Cooking Bags: Provided they are specially made for cooking, cooking bags are microwave safe.
Remember to make a slit in the bag so that steam can escape. Never use ordinary plastic bags for cooking in the
microwave oven, as they will melt and rupture.
OPERATION
WARNING
NOTE
WARNING
19
- Plastic Microwave Cookware: A variety of shapes and sizes of microwave cookware are available. You may be
able to use items you already have on hand rather than investing in new kitchen equipment.
Paper
- Use paper towels, waxed paper, paper napkins, and paper plates with no metal rims or design. Look for the
manufacturer’s label for use in the microwave oven.
- Paper plates and containers are convenient and safe to use in the microwave oven, provided that the cooking
time is short and foods to be cooked are low in fat and moisture. Paper towels are also very useful for wrapping
foods and for lining baking trays in which greasy foods such as bacon are cooked.
- Avoid colored paper products as the color may run. Do not use recycled paper products in the microwave oven.
They may contain impurities which could cause arcing or fires when used in the microwave.
• Tableware
- Do not put plates with painted decoration in the oven, as the paint may contain metal and cause arcing.
Microwave-Unsafe Cookware
• Metal Containers/Metal Decoration
- Never use metal or metal-rimmed cookware in the microwave oven.
- Microwaves cannot penetrate metal. They will bounce off any metal object in the oven and cause arcing, an
alarming phenomenon that resembles lightning.
- Metal shields the food from microwave energy and produces uneven cooking. Also avoid metal skewers,
thermometers, foil trays, metal-rimmed or metal-banded dinnerware, casserole dishes, etc. The metal rim
interferes with normal cooking and may damage the oven.
• Aluminum Foil
- Avoid large sheets of aluminum foil because they hinder cooking and may cause harmful arcing.
- Use small pieces of foil to shield poultry legs and wings.
- Keep ALL aluminum foil at least 1" (2.54 cm) from the side walls and door of the oven.
• Wood
- Wood bowls and boards will dry out and may split or crack when you use them in the microwave oven.
- Baskets react in the same way.
• Tightly Covered Cookware
- Be sure to leave openings for steam to escape from covered containers.
- Pierce plastic pouches of vegetables or other food items before cooking.
- Tightly closed pouches could explode.
• Brown Paper
- Avoid using brown paper bags.
- They absorb too much heat and could burn.
• Flawed or Chipped Cookware:
- Any container that is cracked, flawed, or chipped may break in the oven.
• Metal Twist Ties
- Remove metal twist ties from plastic or paper bags.
- They become hot and could cause a fire.
Cooking Tips
Carefully monitor the food in the microwave oven while it is cooking. Directions given in recipes to elevate, stir, etc.,
are the minimum steps recommended. If food is overcooked (dry), undercooked, or unevenly cooked, make
adjustments before or during cooking to correct the problem.
• Overcooked or Dry Food
- Sprinkling: Sprinkle low-moisture foods such as roasts and vegetables with water before cooking, or cover
them to retain moisture.
- Density: Light, porous food such as cakes and breads cook more quickly than heavy, dense foods such as
roasts and casseroles.
- Shielding: Cover the corners of square dishes with small strips of aluminum foil to prevent overcooking.
Don’t use too much foil, and secure the foil to the dish. Foil can cause arcing if it gets too close to the oven walls
during cooking.
OPERATION

20
OPERATION
- Bones and Fat: Bones conduct heat, and fat cooks more quickly than meat. Take care with bony or fatty cuts
of meat.
• Undercooked Food
- Covering: Cover food with a microwave-safe lid, parchment paper (not waxed paper), or plastic wrap to trap
heat and steam and cook food more quickly.
- Standing Time: Let food stand for several minutes after it is removed from the oven to allow it to finish
cooking and help flavors blend and develop.
- Quantity: The more food you place in the oven, the longer the required cooking time.
- Temperature: Ice-cold ingredients take much longer to cook than room temperature ingredients.
• Unevenly Cooked Food
- Stirring: Stir food from the outside toward the center during cooking, as food at the outside
of the dish heats more quickly.
- Arranging: Turn food over several times during cooking. The upper portions of thick foods cook more quickly
than the lower portions. Thick or dense foods can be elevated so that microwaves can be absorbed by the
underside and center of the foods.
- Shaping: Place the thickest portions of foods like meat, poultry or fish toward the outside of the cookware to
help them cook more evenly. If possible, shape foods into thin rounds or rings.
• Foods with Skin, Shell or Membrane
- Skin or Membrane: Pierce the outsides of foods like potatoes, sausages, or egg whites or
yolks before cooking.
- Shell: Pierce or remove the shells from eggs, clams, oysters, or other shelled foods before cooking.
• Testing if Cooked
- Microwaves cook food quickly, so test food for doneness frequently. Some foods are left in the microwave
until completely cooked, but most foods, including meats and poultry, should be removed from the oven while still
slightly undercooked and allowed to finish cooking during standing time. The internal temperature of foods will
rise between 5 ° F (3° C) and 15 ° F (8 ° C) during standing time.
• Defrosting Tips
- Remove fish, shellfish, meat, and poultry from their original wrapping paper or plastic package. Otherwise,
the wrap close to the food will hold steam and heat, which can cause the outer surface of the food to be cooked.
- Remove any metal twist ties.
- Always slit or pierce plastic pouches or packaging.
- Open containers such as cartons before they are placed in the oven.
- If food is foil wrapped, remove the foil and place the food in a suitable container.
- The length of defrosting time varies depending on the shape of the food and on how solidly the food is frozen.
- As food begins to defrost, separate the food into pieces so that they can defrost more easily.
- Turn over food during defrosting or standing time. Separate into pieces and remove food as required.
- Let food stand after defrosting. Food should still be somewhat icy in the center when removed from the oven.
- When using Defrost, the weight to be entered is the net weight in pounds and tenths of pounds (the weight of
the food minus the container).
- Slit the skins of frozen food such as sausage.
- Bend plastic pouches of food to ensure even defrosting.
- Place food in a shallow container or in a microwave roasting dish to catch the drippings.
- Always underestimate defrosting time. Food should still be somewhat icy in the center when removed from
the oven. If defrosted food is still frozen solid in the center, return it to the upper oven for more defrosting.
- Depending on the shape of the food, some areas may defrost more quickly than others.
- The shape of the package affects how quickly food will defrost. Shallow packages will defrost more quickly
than a deep block.
- For best results, shape ground meat into the form of a doughnut before freezing. When defrosting, scrape off
thawed meat when the beep sounds and continue defrosting.
- Use small pieces of aluminum foil to shield parts of food such as chicken wings, leg tips, fish tails, or areas
that start to get warm. Make sure the foil does not touch the sides, top, or bottom of the oven. The foil can damage
the oven lining.
21
OPERATION
Cooking Mode
There are various ways in which you can set your oven. Here we will explain how you can select the desired type of
heating and temperature or grill setting. You can also select the oven cooking time for your dish. Please refer to
the section on Setting the time-setting options.
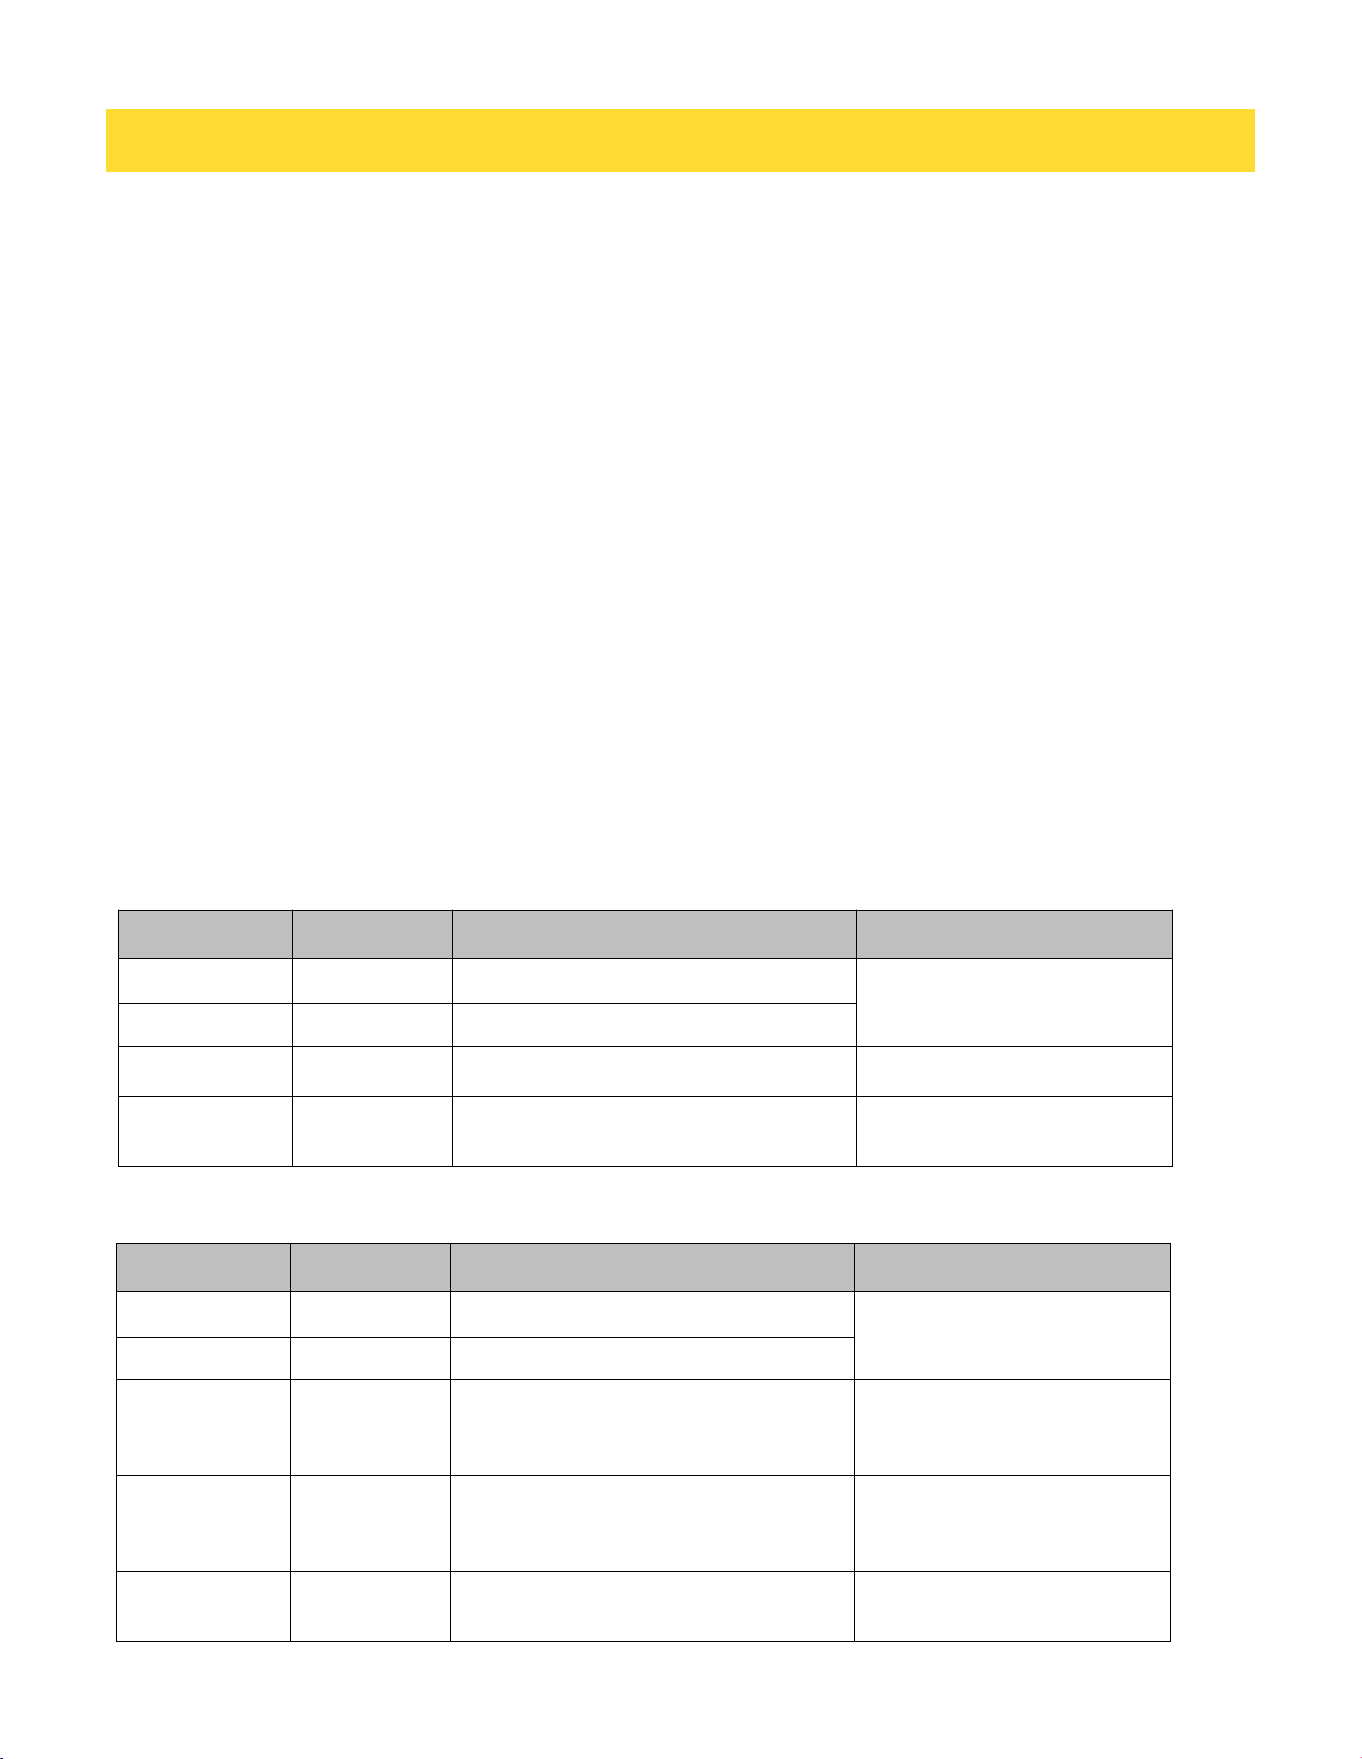
Soften/Melt
Soften and Melt functions may be used to soften or melt your food. Times and cooking powers have been preset for
a number of food types.
How to use Soften and Melt:
1 Touch Soften/Melt. The oven display will scroll through the various options.
2 Touch number keypad "1" to select soften function or "2" to select melt function.
3 Touch number keypad to select food type from the Soften Chart or Melt Chart.
4 Touch number keypads to enter quantity (weight or sticks).
5 Touch START to start cooking.
The oven display will count down the soften or melt time.
When the stop time is reached, the oven will shut off automatically and "Soften complete" or "Melt complete" will
appear in the display.
If enabled, end-of-cycle tones will sound, it ends automatically in one minute, or touch CLEAR OFF or open the
door to clear the display and stop the reminder tones.
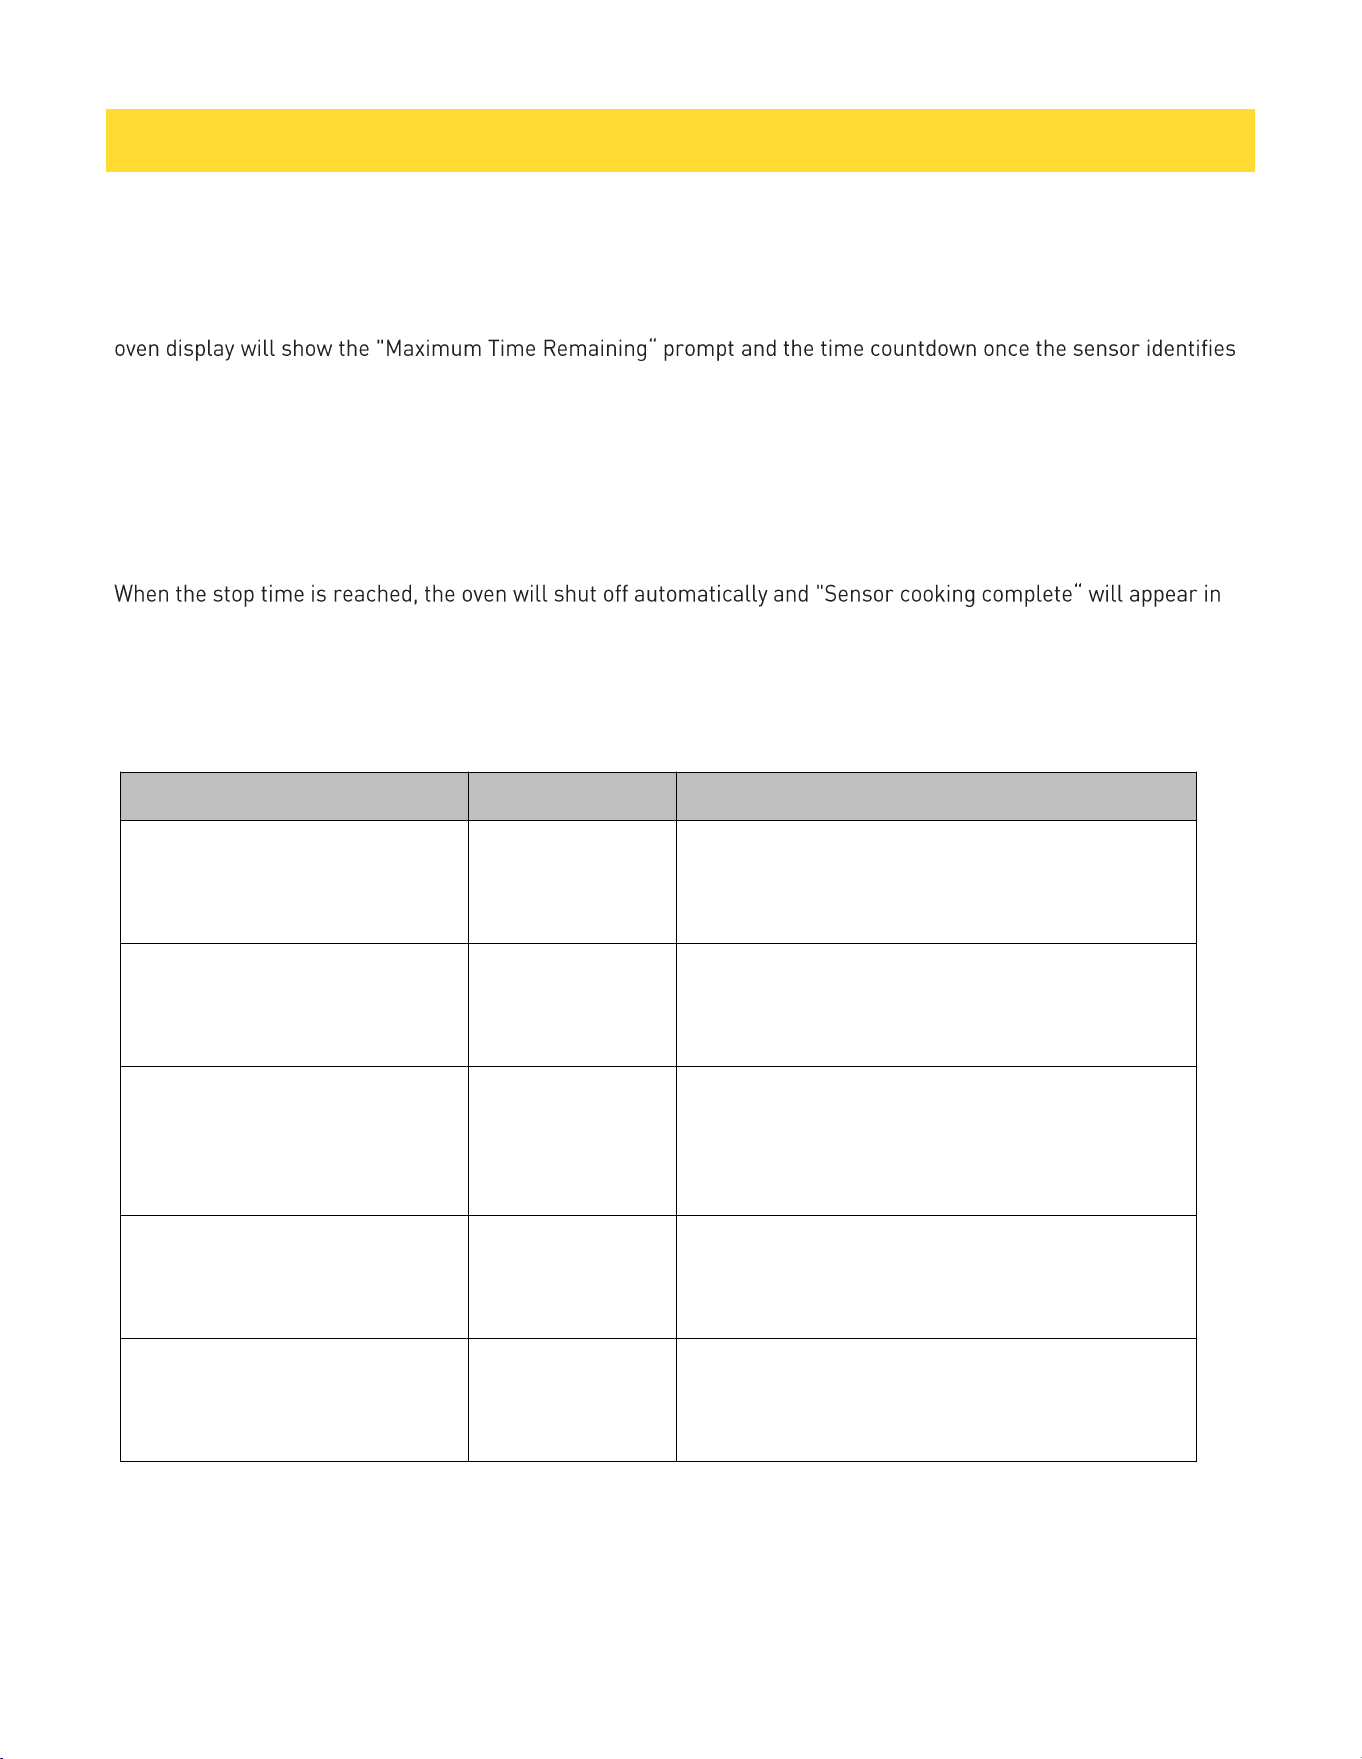
The oven uses low power to soften foods such as butter, cream cheese, and ice cream. Refer to the information
below to set the desired menu item and portion size.
Soften Chart
Melt Chart
Food Code Quantity Preparation
Butter
1 0.5-2 Sticks
Unwrap and place in
microwave-safe container.
Margarine
2 0.5-2 Sticks
Ice cream
3 16,32,64 oz (454, 907 g, or 1.8 kg)
Cream Cheese
4 3 or 8 oz (85 g or 227 g)
Unwrap and place in
microwave-safe container.
Food Code Quantity Preparation
Butter
1 0.5-2 Sticks
Unwrap and place in
microwave-safe container.
Margarine
2 0.5-2 Sticks
Chocolate
3 2,4, 6, 8 oz [57, 113, 170,227 g)
Cut squares into small
pieces or use chips. Place in
microwave-safe container.
Cheese
4 8 or 16 oz [227 or 454 g)
Cut into small pieces and
place in microwave-safe
container.
Marshmallows
5 5 or 10 oz [142 or 283 g)
Place in microwave-safe
container.
22
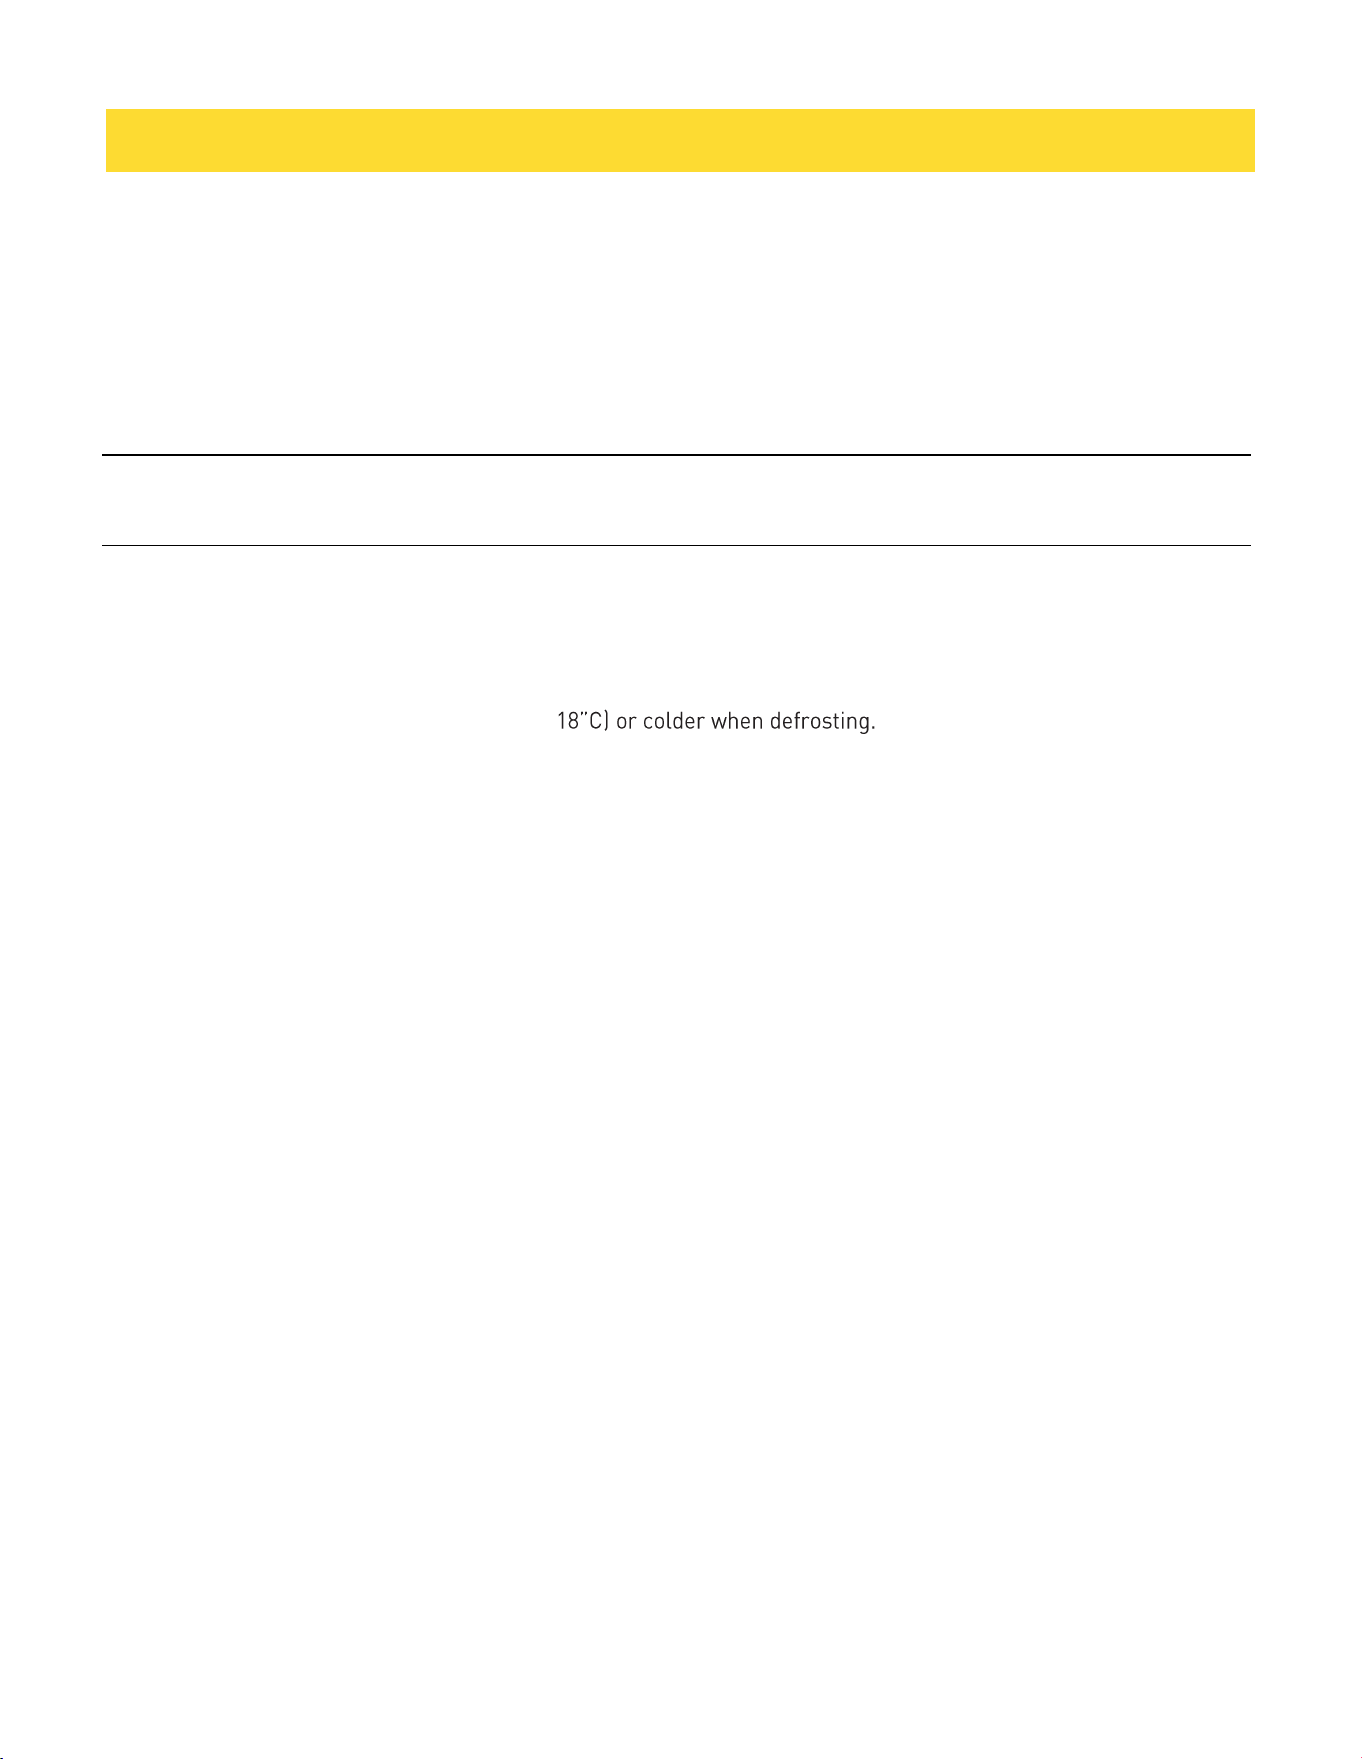
Sensor Cook
You can select two sensor cooking modes. Sensor cooking allows you to cook many of your favorite foods without
selecting cooking times and power levels. The microwave oven automatically determines the required cooking time
for each food item.
During the Sensor Cook function a sensor automatically adjusts for the cook time and power level. The microwave
oven display will show the "Maximum Time Remaining“ prompt and the time countdown once the sensor identifies
the cooking duration.
If the microwave oven door is opened during a sensor function, the microwave oven will turn off, and any additional
operations will be canceled.
How to use Sensor Cook:
1Touch Sensor Cook. The oven display will scroll through the various options.
2Touch number keypad to select food type from the Sensor Cook Chart.
3Touch START to start cooking.
When the stop time is reached, the oven will shut off automatically and "Sensor cooking complete“ will appear in
the display.
If enable, end-of-cycle tones will sound, it ends automatically in one minute, or touch CLEAR OFF or open the door
to clear the display and stop the reminder tones.
Sensor Cook Chart
OPERATION
Food Code Quantity
Baked Potato
Pierce skin with a fork. Do not
cover. After cooking, allow to
stand wrapped in foil for 5 minutes.
1 1-4 potatoes (8-32 oz)
Ground Meat
After cooking, allow to stand,
covered, for 3-4 minutes.
2 8-24 oz (0.5-1.5 lbs)
Vegetable
No water is needed if vegetables
have just been washed. Add 2
tablespoons of water per 8 ounces
of fresh vegetables.
3 4-16 oz (0.25-1 lbs)
Fish/Seafood
Roll thin edges underneath.
Arrange in a ring around a
microwaveable dish.
4 8-20 oz (0.5-1.25 lbs)
Frozen Entree
Follow the package instructions for
venting, cutting plastic film, etc.
5 10-20 oz
23
OPERATION
Sensor Reheat
How to use Sensor Reheat:
1Touch Sensor Reheat.
2 Touch START to start cooking.
The oven display will count down the Reheat time.
When the stop time is reached, the oven will shut off automatically and "Reheat complete" will appear in the
display.
If enable, end-of-cycle tones will sound, it ends automatically in one minute, or touch CLEAR OFF or open the
door to clear the display and stop the reminder tones.
• Cover with vented plastic wrap or wax paper.
• Reheat food on a microwaveable dinner plate.
Defrost
• The Defrost feature can be used, or the microwave oven can be manually set to defrost by using 30% cook
power.
• For optimal results, food should be 0* F[-18”C) or colder when defrosting.
• For optimal results, food should be 0° F (-18° C) or colder when defrosting.
• Shallow packages will defrost more quickly than deep blocks.
• Separate food pieces as soon as possible during or at the end of the cycle for more even defrosting.
• Foods left outside the freezer for more than 20 minutes or frozen ready-made food should not be defrosted
using the Defrost feature, but should be defrosted manually.
• Use small pieces of aluminum foil to shield parts of food such as chicken wings, leg tips, and fish
• tails.
• Times and cooking powers have been preset for defrosting a number of food types.
• Manual Defrost requires that a cook time and power level be entered if using other than 30% cook power.
How to use Defrost:
1Touch Defrost ,The oven display will scroll through the various options.
2Touch number keypad to select food type from the Defrost Chart(Except Manual Defrost).
3Touch number keypads to set the weight.
4Touch START to start cooking.
The oven display will count down the Defrost time. For better results, a preset standing time is included in the
defrosting time, This may make the defrosting time seem longer than expected. When the stop time is reached,
the oven will shut off automatically and "Defrost complete" will appear in the display.
If enable, end-of-cycle tones will sound, it ends automatically in one minute, or touch CLEAR OFF or open the
door to clear the display and stop the reminder tones.
NOTE
24
OPERATION
How to use Defrost manually:
1Touch Defrost. The oven display will scroll through the various options
2Touch number keypad "6" to select Manual Defrost.
3Touch number keypads to set a length of time to defrost. Time can be set up to 99 minutes and 99seconds.
4The default power level is 30%, To change power level, touch Power Level and then enter the desired power
level, See the Power Level Chart.
5Touch START to start cooking.
The oven display will count down the Defrost time. For better results, a preset standing time is included in the
defrosting time.
When the stop time is reached, the oven will shut off automatically and "Defrost complete" will appear in the
display.
If enable, end-of-cycle tones will sound, it ends automatically in one minute, or touch CLEAR OFF or open the
door to clear the display and stop the reminder tones.
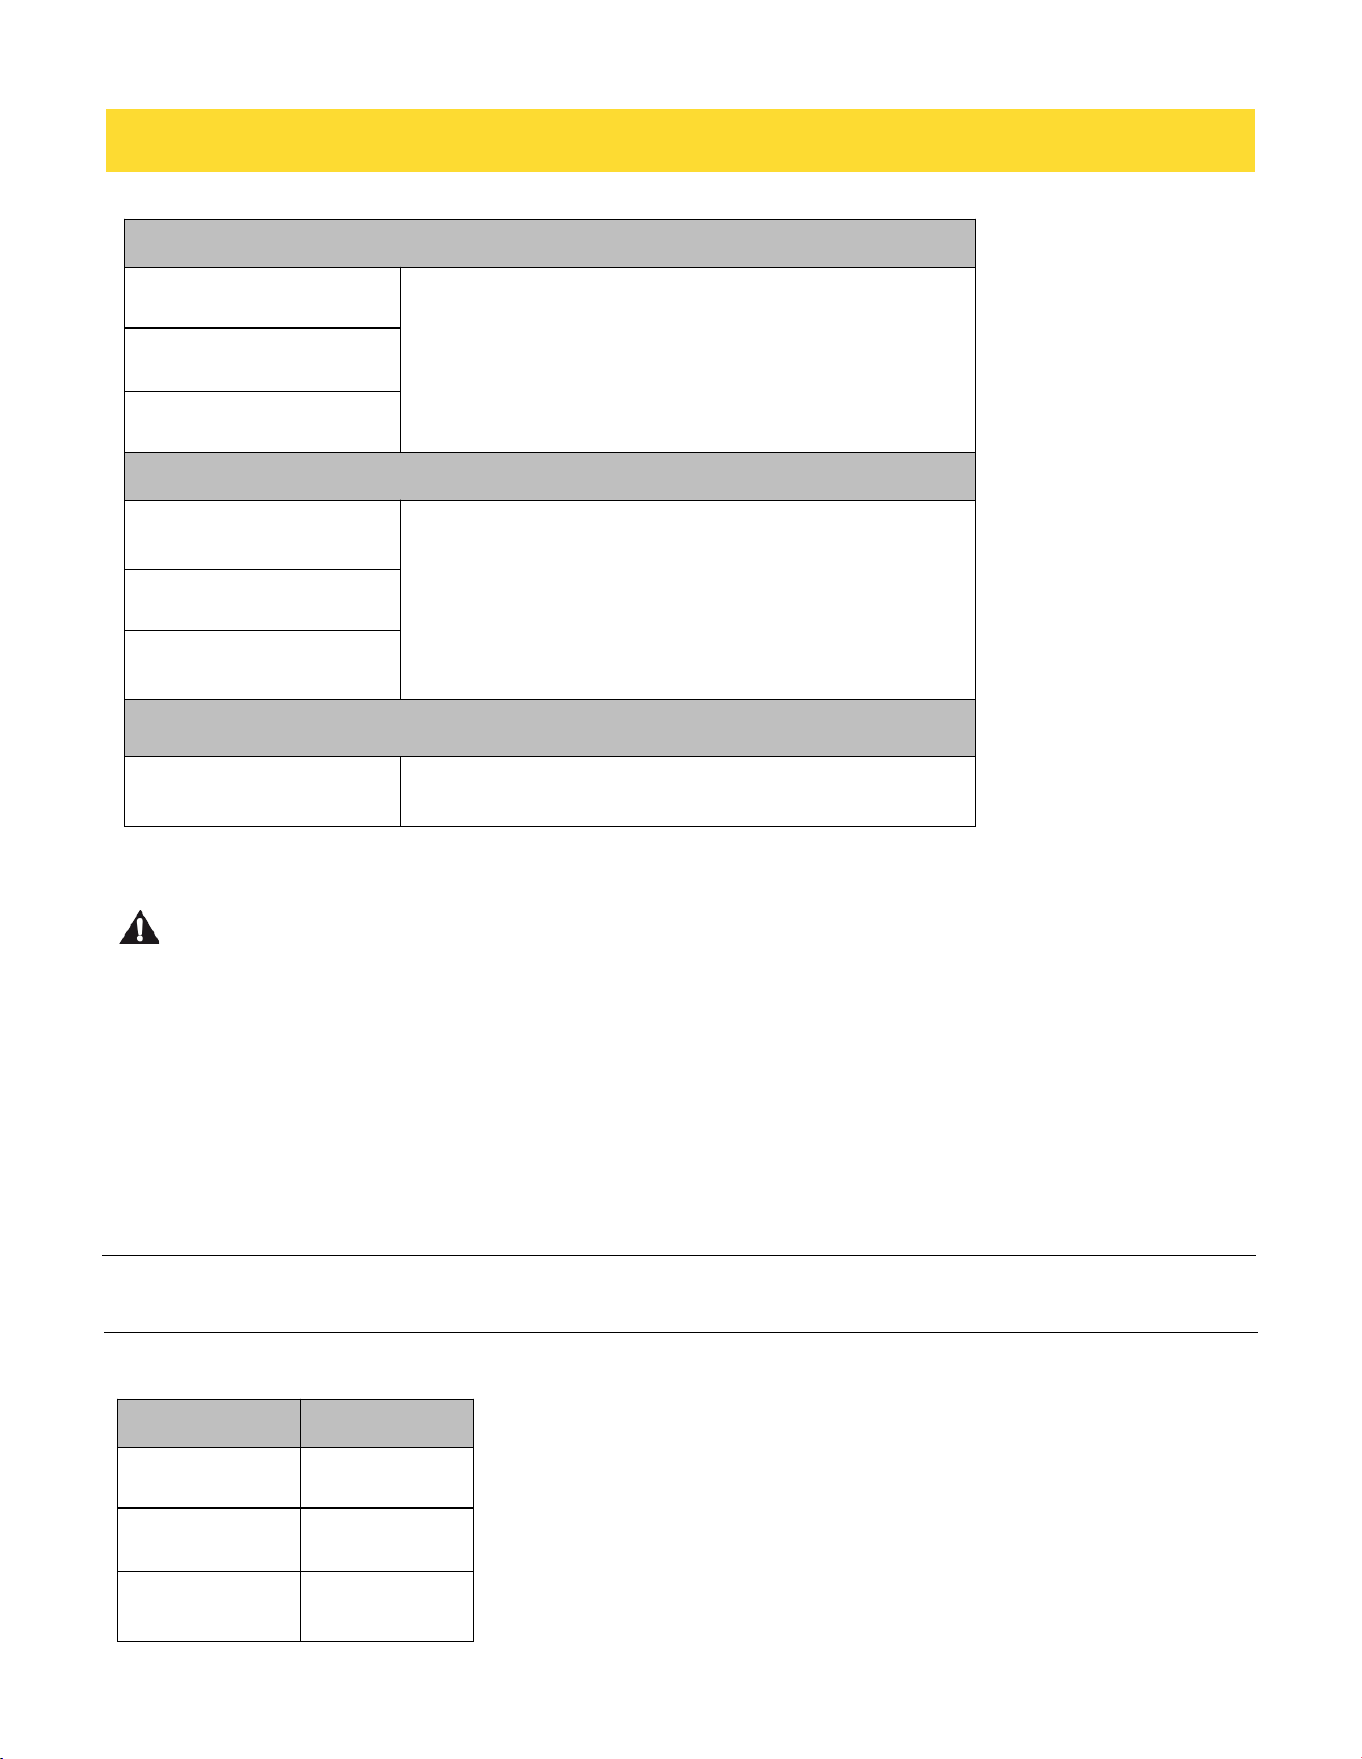
Defrost Chart
*See the Defrost Preparation Chart at end of "Defrost · section for cuts, sizes, and instructions.
Food Code Weight
Poultry*
1 0.1-6.6 lbs [45 g-3 kg)
Meats*
2
0.1-6.6 lbs [45 g- 3 kg)
Fish*
3
0.1-6.6 lbs [45 g- 3 kg)
Bread
4
0.1-2.0 lbs [45 g-907 g)
Juice
5
6, 12, or 16 oz (177, 355, or
473 ml]
Manual
6 Default power level (30%)
25
OPERATION
Defrost Preparation Chart
Popcorn
Do not leave oven unattended while popping corn. Popcorn may ignite and cause fire.
How to use popcorn mode:
1Touch Popcorn. The oven display will scroll through the various options.
2Touch number keypads to select the weight code from popcorn chart.
3Touch START to start cooking.
The oven display will count down the popcorn time.
When the stop time is reached, the oven will shut off automatically and "Popcorn complete" will appear in the
display.
If enable, end-of-cycle tones will sound, it ends automatically in one minute, or touch CLEAR OFF or open the
door to clear the display and stop the reminder tones.
Follow the instructions provided by the microwave popcorn manufacturer.
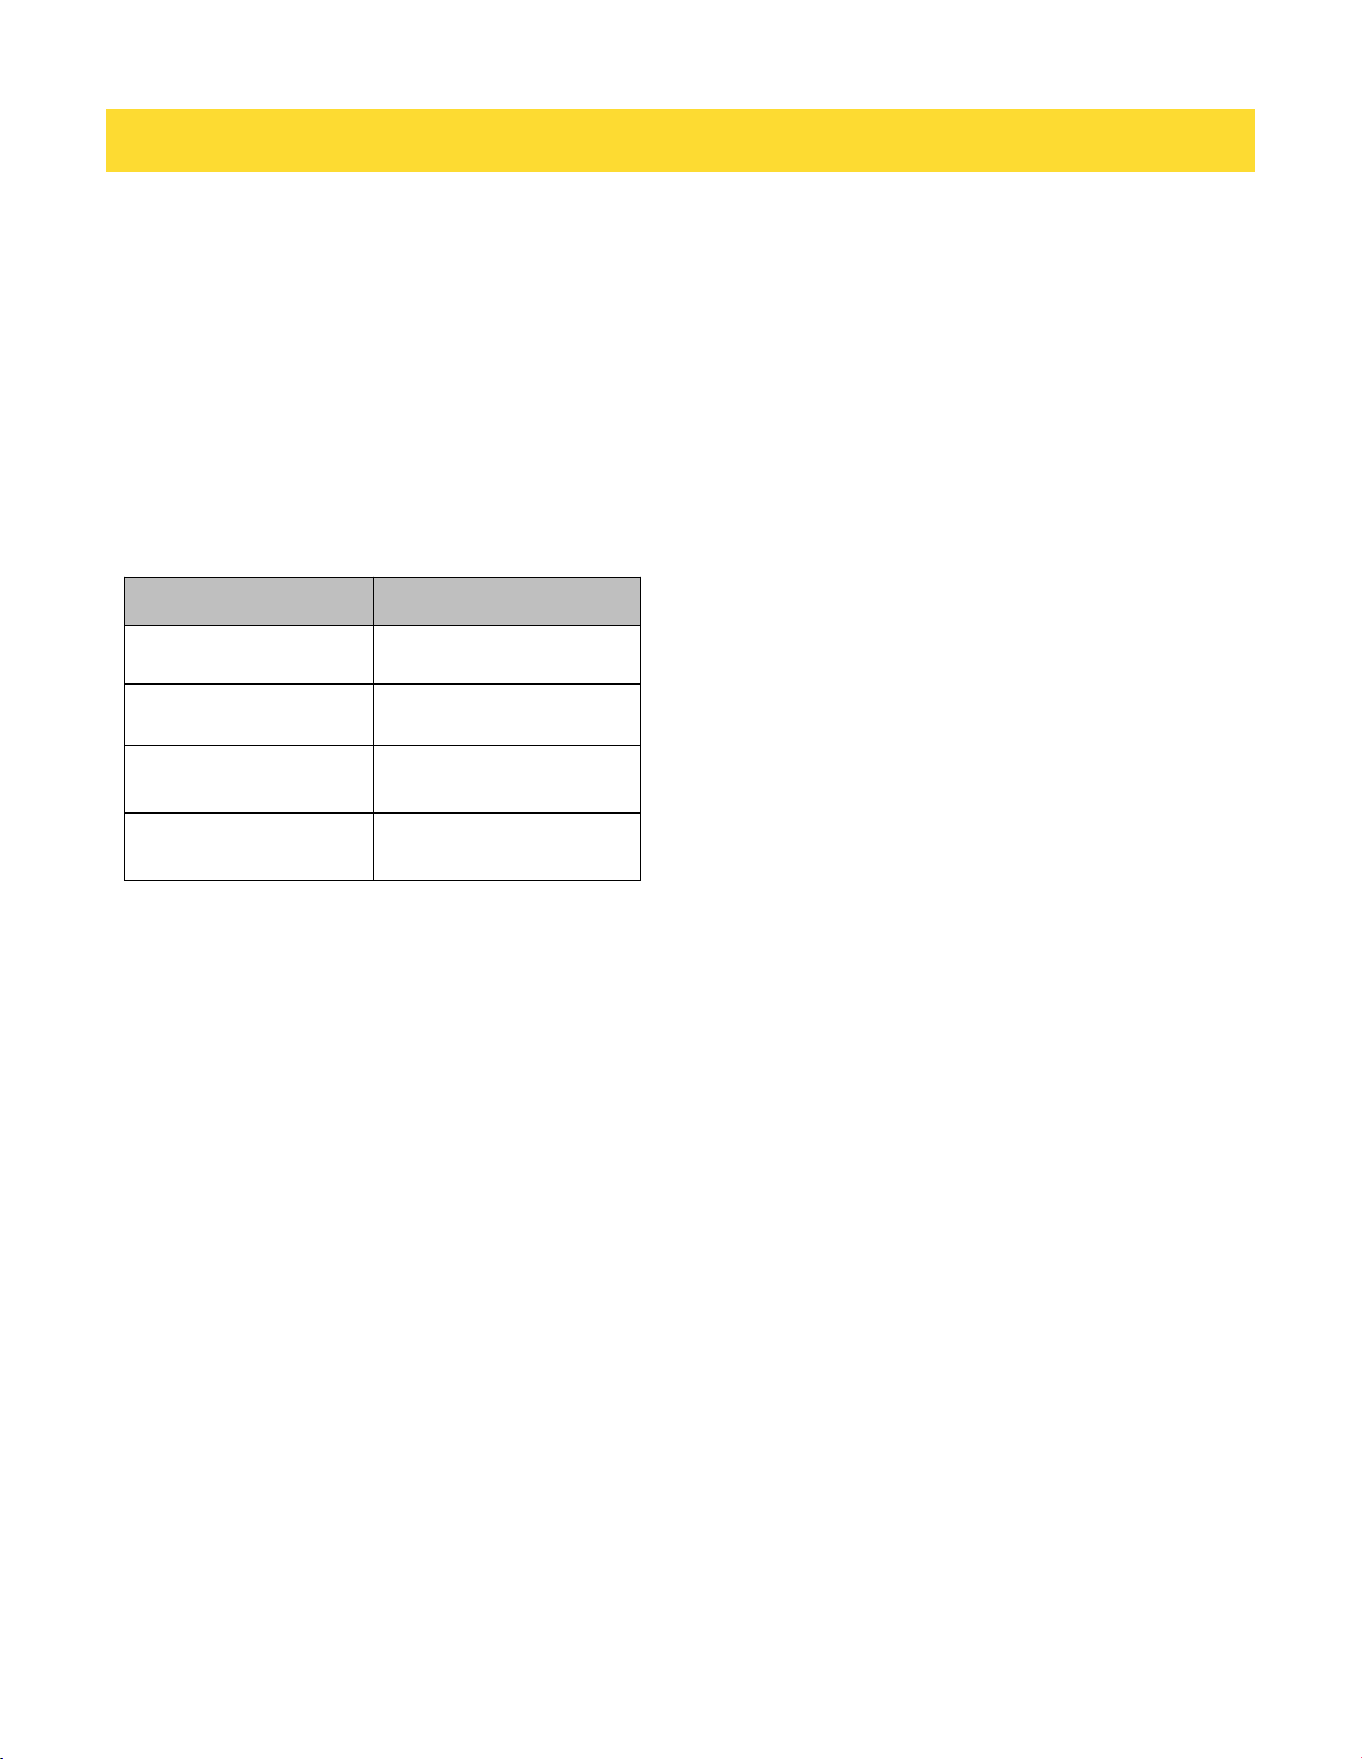
Popcorn Chart
CAUTION
NOTE
Poultry
Chicken: whole and cut up
Place in a microwave-
safe dish, chicken breast side up.
Remove giblets from the whole chicken.
Cornish hens
Turkey: breast
Bread
Beef: ground, steaks, roast,
stew
The narrow or fatty areas of irregular shaped cuts
should be shielded with foil before defrosting. Do not
defrost less than ¼ lbs (113 g) or two 4 oz (113 g)
patties. Place all meats in microwave-safe baking dish.
Lamb: stew and chops
Pork: chops, ribs, roasts,
sausage
Fish
Fillets, Steaks. Whole,
Shellfish
Place in a microwave-safe dish.
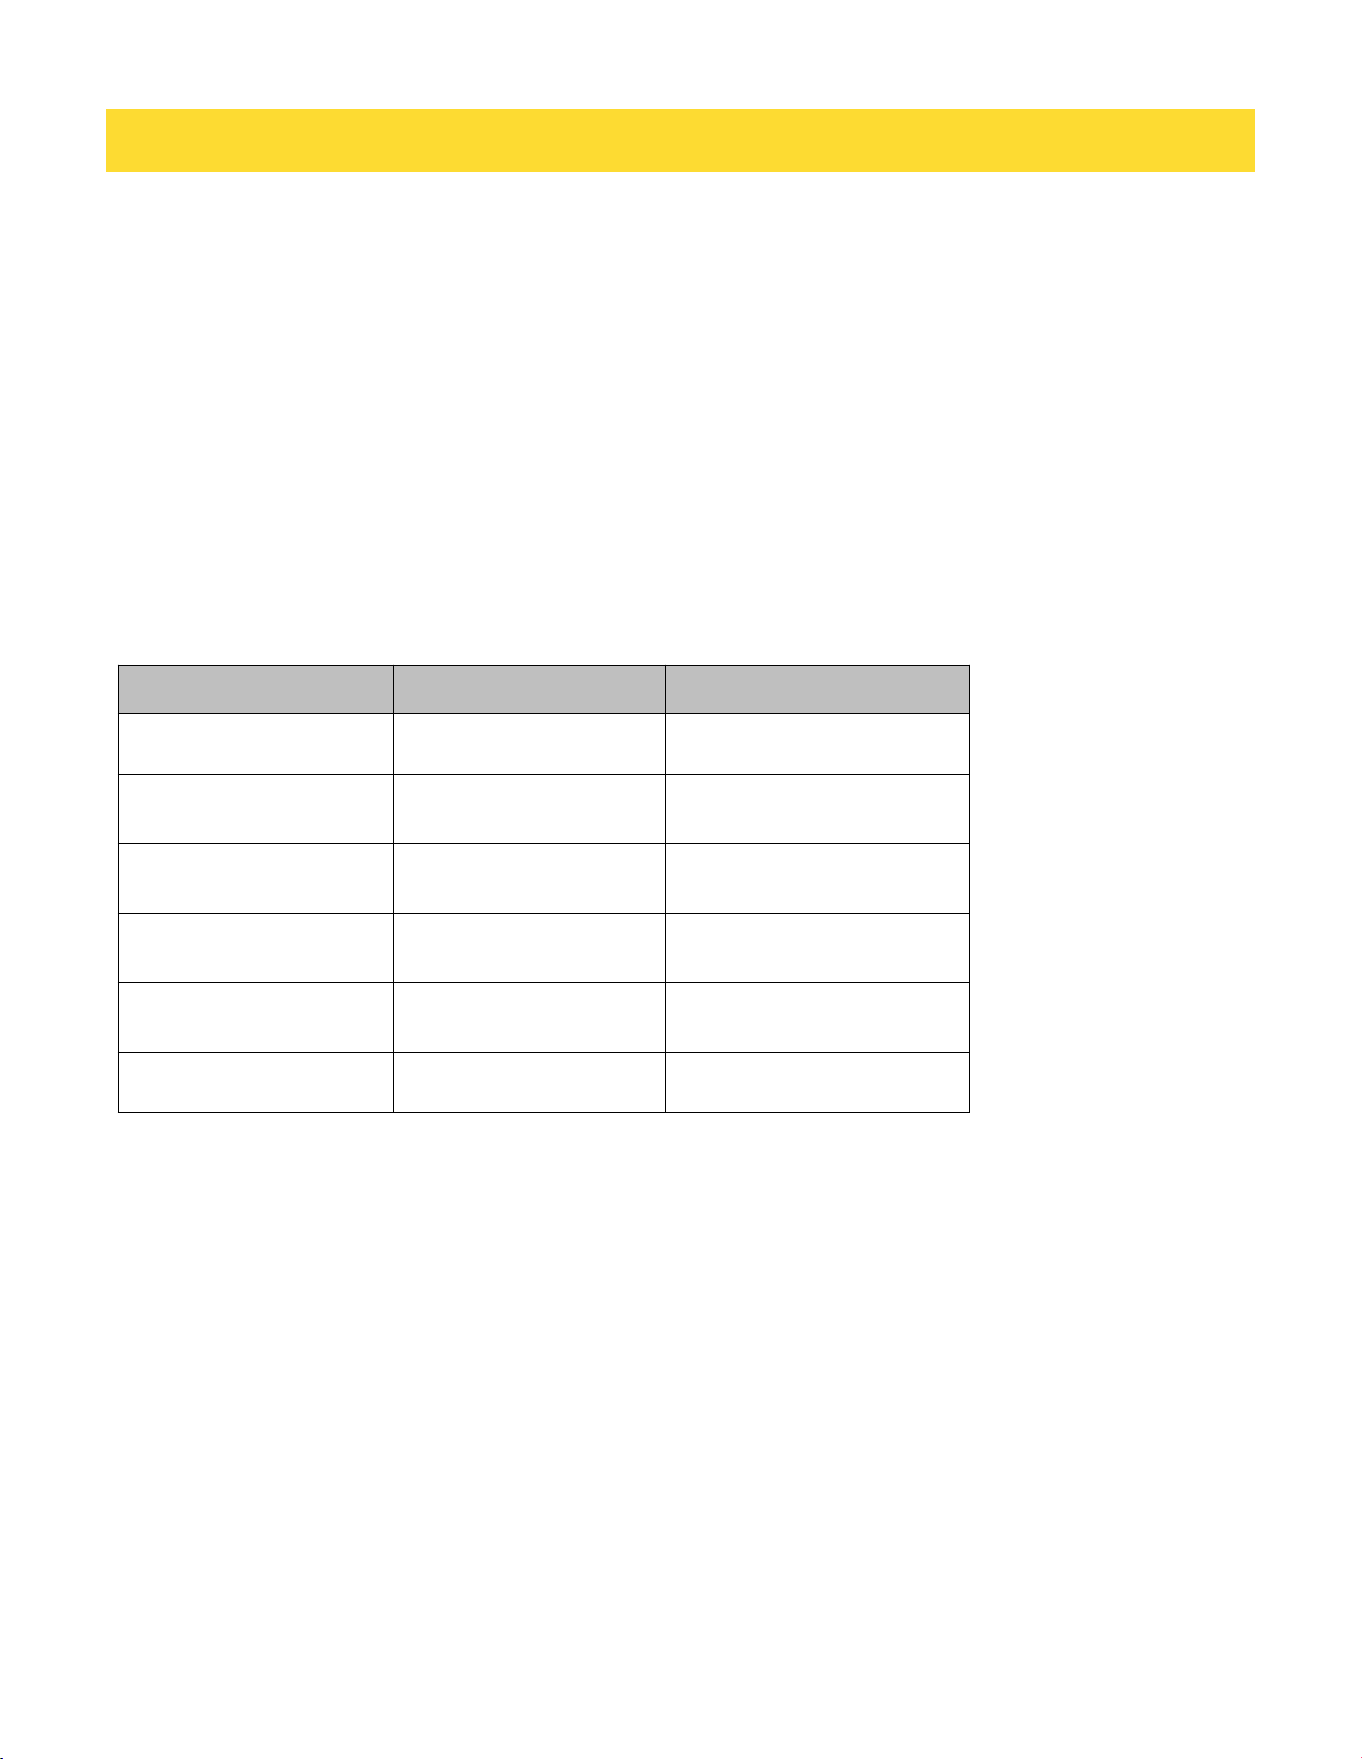
Code Weight
1 1.5 oz
2 2.5 oz
3 3.5 oz
26
Beverage Center
The beverage feature heats 0.5 to 2 cups of a beverage.
How to use Beverage Center:
1 Touch Beverage. The oven display will scroll through the various options.
2Touch number keypads to select the weight code from beverage center chart.
3Touch START to start cooking.
The oven display will count down the Beverage Center time.
When the stop time is reached, the oven will shut off automatically and "Cooking complete" will appear in the
display.
If enable, end-of-cycle tones will sound, it ends automatically in one minute, or touch CLEAR OFF or open the
door to clear the display and stop the reminder tones.
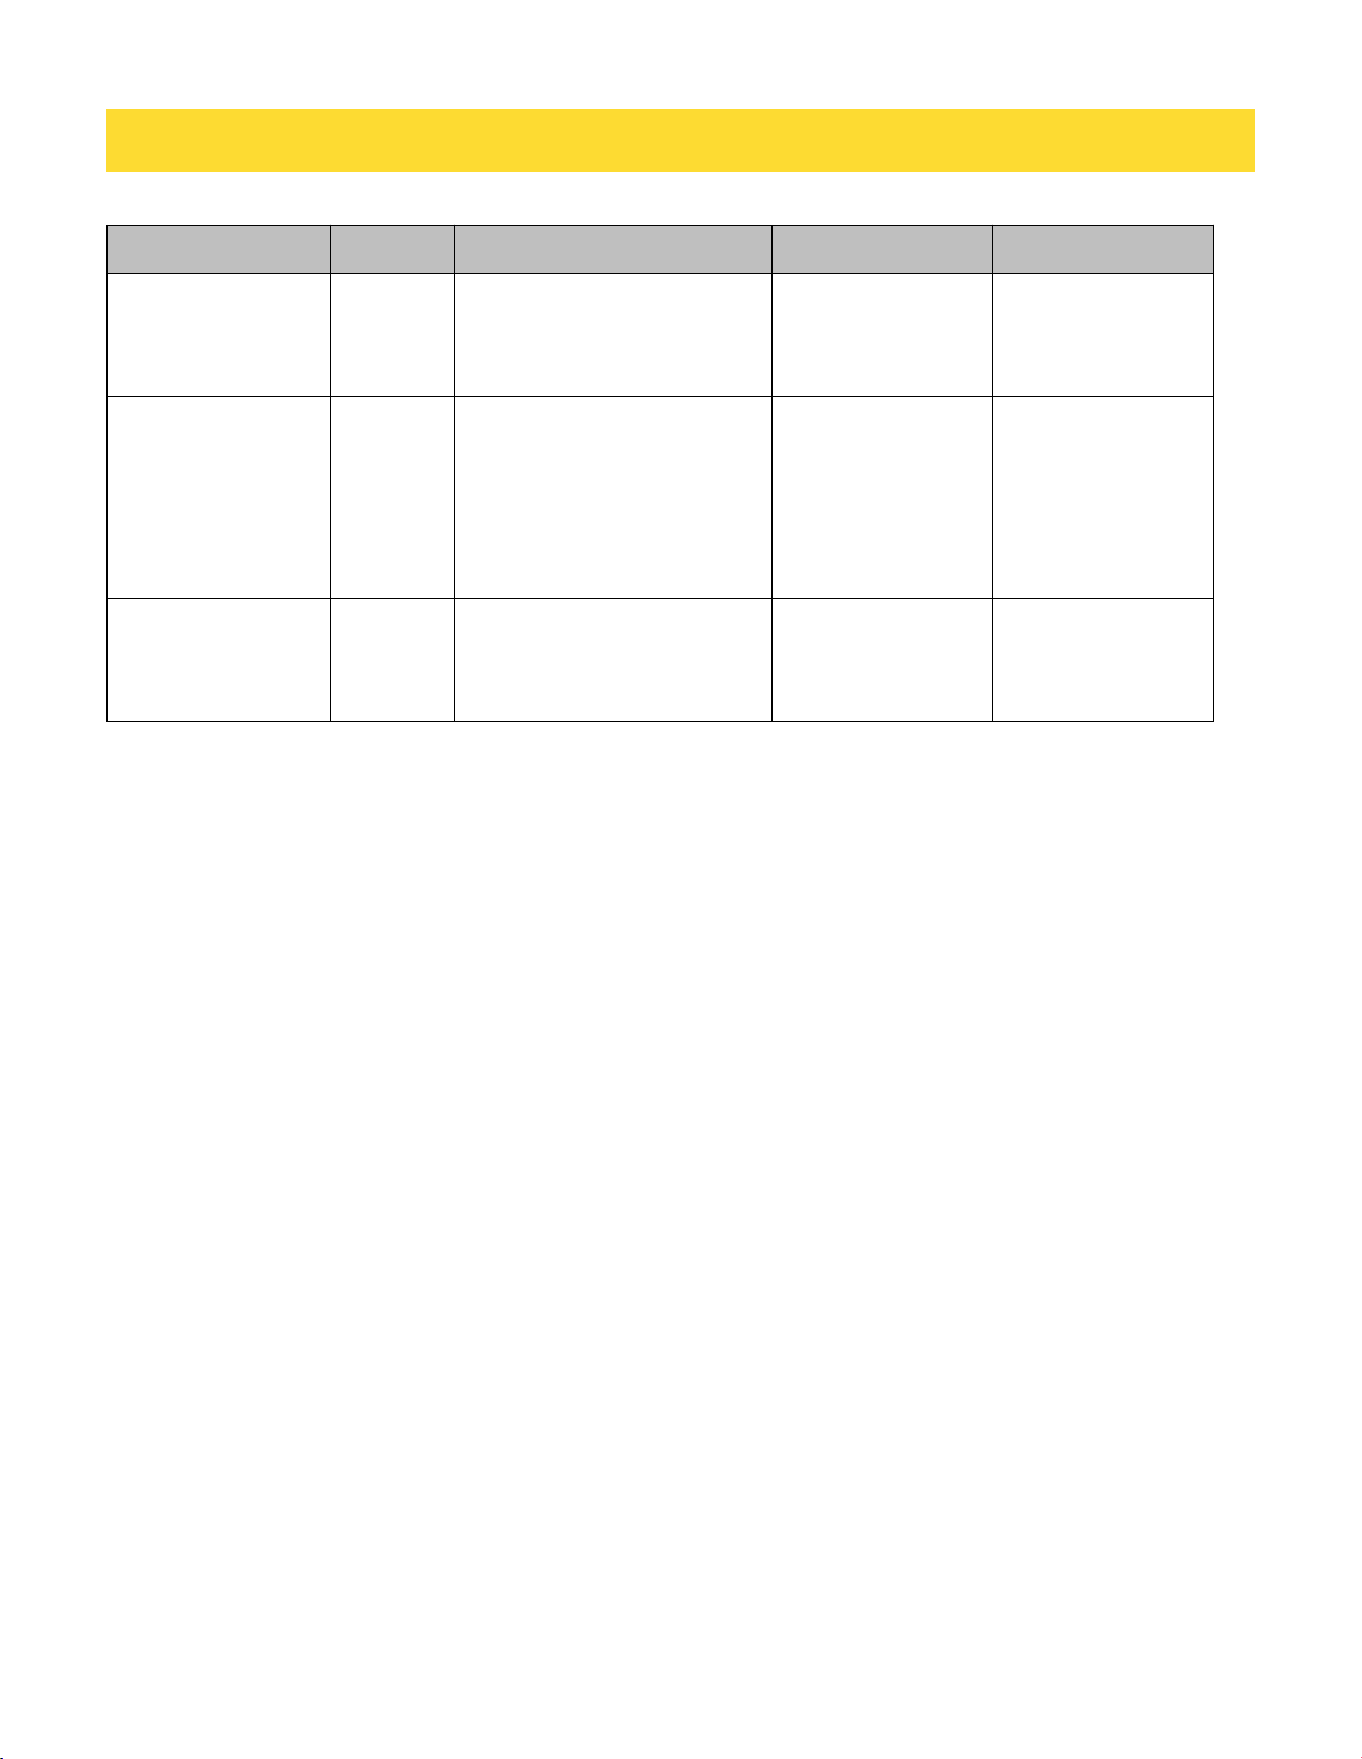
Beverage Center Chart
Conv Mode
Convection cooking uses the convection element, the broil element and the fan. Hot air is circulated through out
the oven cavity by the fan. The constantly moving air surrounds the food to heat the outer portion quickly.
• The convection function may be used to cook small amounts of food on a single rack.
• Always use the oven rack placed on a turntable or baking tray.
• Do not cover turntable or convection grid or baking tray with aluminum foil.
• Do not use light plastic containers, plastic wrap, or paper products. All heatproof cookware or metal utensils
can be used in convection cooking. Round pizza pans are excellent for convection cooking.
• Use convection cooking for items such as souffles, breads, cookies, angel food cakes, pizza, and most meats
and fish.
• All Convection Mode functions require preheating before use. Place food in microwave oven after preheating
is complete.
How to use Convection Mode:
1Touch Conv. Mode. The oven display will scroll through the various options.
2 Touch number keypad to select food type from the Convection Mode Chart.
3 Touch number keypads to enter temperature.
4Touch COOK TIME and then select numbers to set the cooking time.
5Touch START to start cooking.
The oven start to preheat until preheat complete, a beep will sound and the oven display will countdown the
Convection Mode time.
When the stop time is reached, the oven will shut off automatically and "Cooking complete" will appear in the
display.
If enable, end-of-cycle tones will sound, it ends automatically in one minute, or touch CLEAR OFF or open the
door to clear the display and stop the reminder tones.
Tips: You can touch START directly without enter the time of cooking, after setting the cooking temperature. The
oven will work for the maximum safe time, at which time the cooking time not be display.
OPERATION
Code Weight
1 0.5 Cups
2 1.0 Cups
3 1.5 Cups
4 2.0 Cups
27
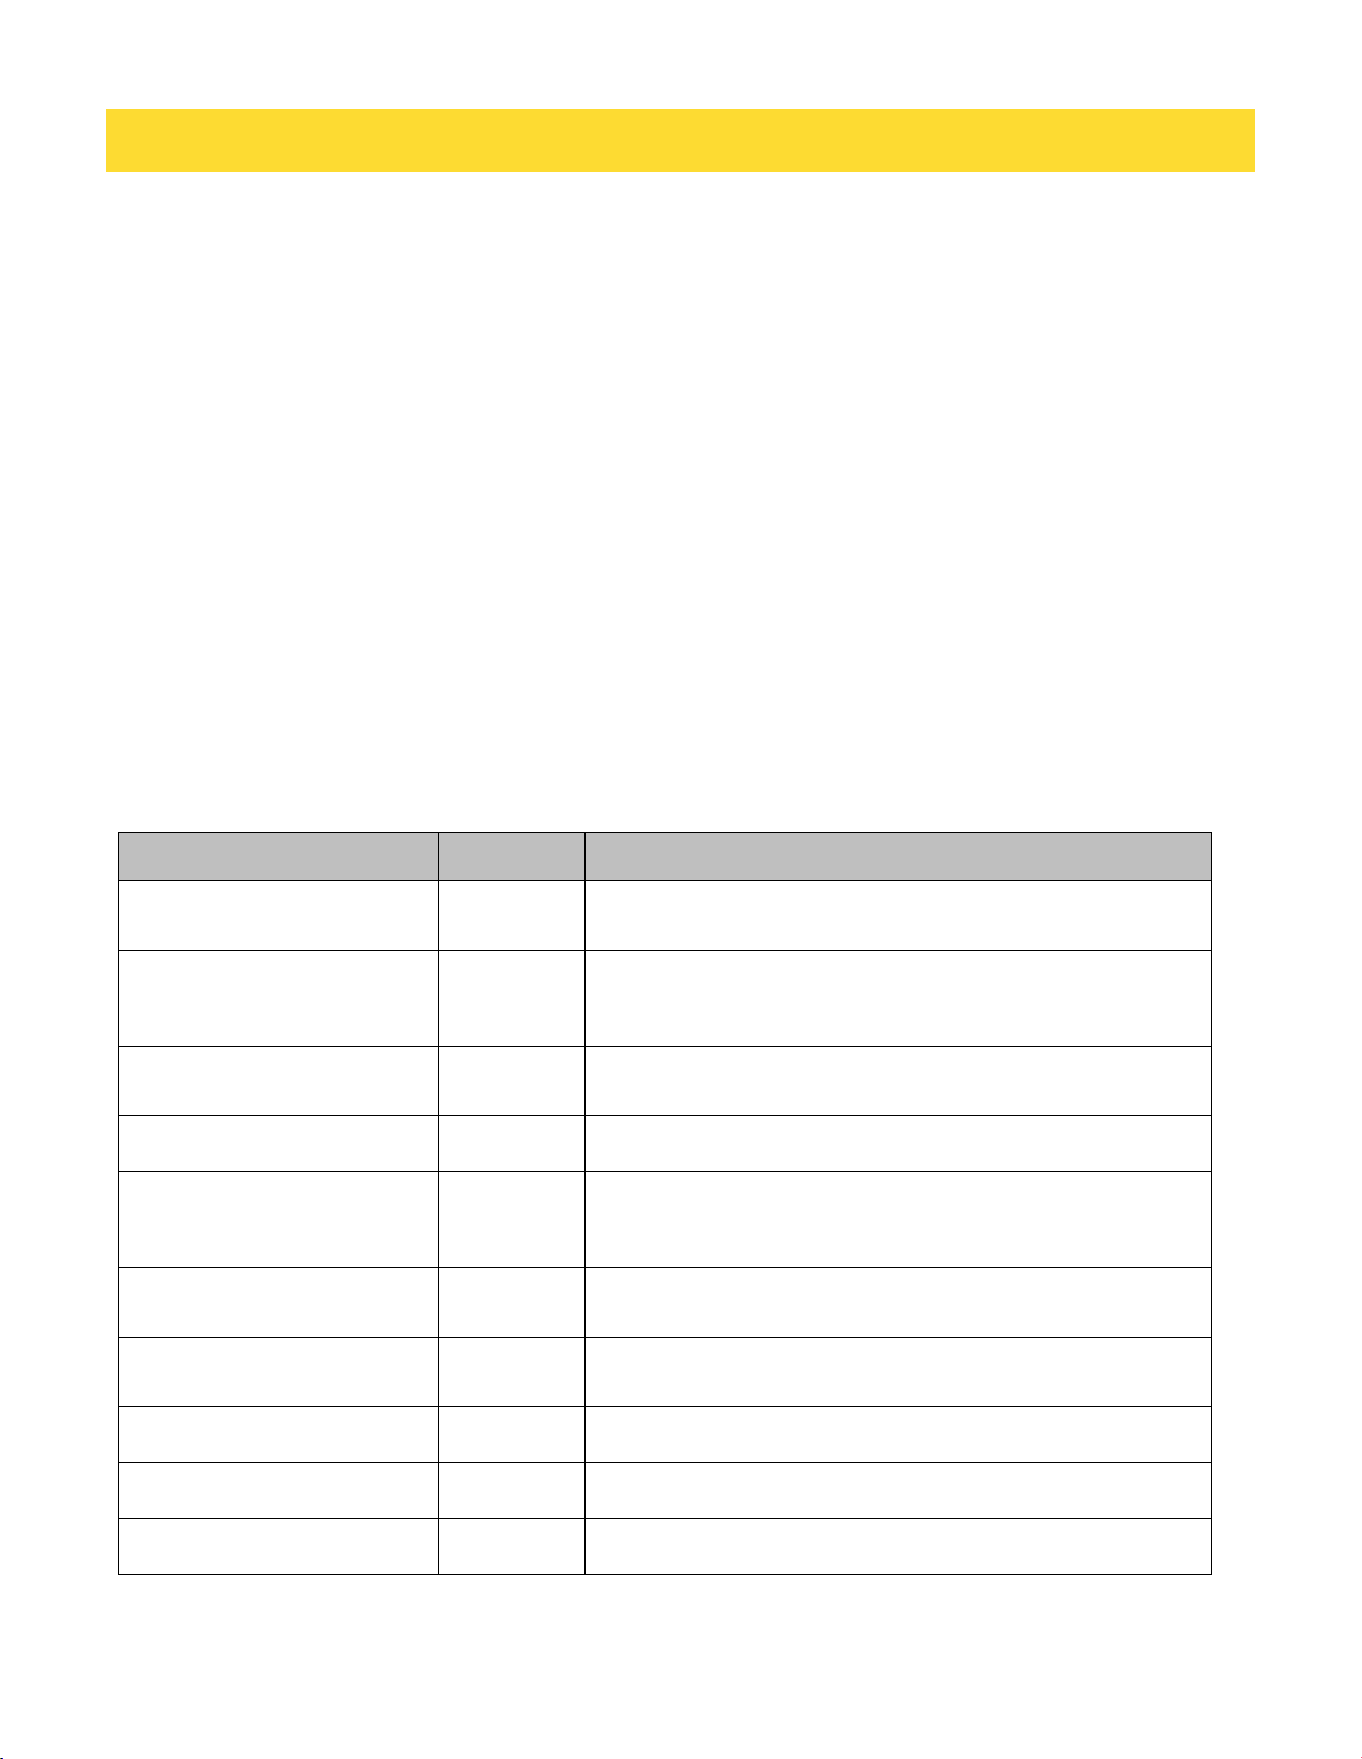
Convection Mode Chart
Air Fry
Air Fry is a special, no-preheat, cooking mode that is designed to produce foods with a crispier exterior than
traditional oven cooking.
• Only use broil safe cookware when using Air Fry mode.
• A dark sheet pan is recommended. A dark pan promotes better browning and crisping.
• Oven baking baskets and baking grids can also be used. A sheet pan should be placed on the rack below the foods
to catch any drippings when using a baking basket.
How to use Air Fry:
1Touch Air Fry.
2Touch number keypads to enter temperature. The temperature can be set between 175 ° F and 450° F.
3Touch Cook Time, set a length of time to Air fry. Time can be set up to 1 minutes and 10 hours.
4 Touch START to start cooking.
The oven display will count down the Air Fry time.
When the stop time is reached, the oven will shut off automatically and "Cooking complete" will appear in the display.
If enable, end-of-cycle tones will sound, it ends automatically in one minute, or touch CLEAR OFF or open the door to
clear the display and stop the reminder tones.
Tips:
• You can touch START directly without enter the time of cooking ,after setting the cooking temperature. The oven
will work for the maximum safe time, at which time the cooking time not be displayed.
• For cooking fresh or home-made foods, spread the oil over a larger area more evenly, crisping up the food more
effectively.
Broil
When the crisper pan is used with microwaves, it is like a frying pan or griddle, ideal for French toast, burgers, eggs,
stir- frying, and sauté ing. The default temperature is 400℉,the default cooking time is 3 hours. The oven temperature
and cook time can not be set.
How to use Broil:
1Touch Broil.
2Touch START to start cooking.
The oven display will count down the Broil time, but not display.
When the stop time is reached, the oven will shut off automatically and "Cooking complete" will appear in the display.
OPERATION
Option Code Food Cook Time Oven Temp
Baked goods 1
Biscuits, Breads: quick and
yeast, Cakes and Cookies
Casseroles: including frozen
entré es and soufflé s Fish
0:01-10:00 hr 175-450℉
Meats 2
Baked potatoes
Chicken: whole and pieces,
Meat loaf, Roasts: pork, beef,
and ham
*Turkey and large poultry
are not included because
their cook times vary.
0:01-10:00 hr 175-450℉
Other foods 3
Convenience foods: French
fries, nuggets, fish sticks,
pizza
Pies: fruit and custard
0:01-10:00 hr 175-450℉
28
If enable, end-of-cycle tones will sound, it ends automatically in one minute, or touch CLEAR OFF or open the door to
clear the display and stop the reminder tones.
Other Settings
Power Level
Many recipes for microwave cooking specify which cooking power to use by percent, name, or number. For example.
70%=7=Medium-High.
Use the following chart as a general guide for the suggested cooking power of specific foods.
How to use Power Level:
1Touch Power Level.
2 Touch number keypads to enter power level from microwave cooking power chart.
3Touch COOK TIME and then select numbers to set the cooking time.Time can be set up to 1 seconds to 99 minutes
and 59 seconds.
4Touch START to start cooking.
The oven display will count down the Microwave cooking time.
When the stop time is reached, the oven will shut off automatically and "Cooking complete" will appear in the display.
If enable, end-of-cycle tones will sound, it ends automatically in one minute, or touch CLEAR OFF or open the door to
clear the display and stop the reminder tones.
Microwave Cooking Power Chart
OPERATION
Percent Number Use
100%,High Default Setting 10
Quick heating convenience foods and foods with high water
content, such as soups, beverages, and most vegetables.
90% 9
Heating rice, pasta, or casseroles. Cooking and heating
foods that need a cook power lower than high. For example,
whole fish and meat loaf.
80% 8
Cooking small, tender pieces of meat, ground meat, poultry
pieces, and fish fillets. Heating cream soups.
70%, Medium-High 7 Reheating a single serving of food.
60% 6
Cooking sensitive foods such as cheese and egg dishes,
pudding, and custards. Cooking non-stirable casseroles,
such as lasagna.
50%, Medium 5
Cooking ham, whole poultry, and pot roasts. Simmering
stews.
40% 4
Melting chocolate.
Heating bread, rolls, and pastries.
30% 3 Defrosting bread, fish, meats, poultry, and precooked foods.
20% 2 Softening butter, cheese, and ice cream.
10%, Low 1 Taking chill out of fruit.
29
Cook Time
How to use Cook Time:
1Touch Cook Time. The default power level is 100%. If you need other power level, you can touch Power Level to
set.
2Touch number keypads to set a length of time to microwave cooking. Time can be set up to 1 seconds and 99
minutes.
3Touch START to start cooking.
The oven display will count down the Microwave cooking time.
When the stop time is reached, the oven will shut off automatically and "Cooking complete" will appear in the display.
If enable, end-of-cycle tones will sound, it ends automatically in one minute, or touch CLEAR OFF or open the door
to clear the display and stop the reminder tones.
START/+30 sec.
The START/+ 30 sec. keypad controls 2 separate functions for the built-in microwave: Start and Add 30 seconds.
Touching START/+ 30 sec. when the microwave oven is off will start 30 seconds of cook time at 100% power.
Touching START/+ 30 sec, while the microwave oven is operating will add cook time to the current cycle by 30
seconds. Multiple seconds can be added by repeatedly touching START/ 30sec.
After enough data has been entered and the door is closed, “Press START to confirm " will appear on the oven
display as a reminder. If the Start keypad is not touched within 30 seconds after touching another keypad, the oven
display will return to the inactive mode and the programmed function will be canceled.
If cooking is interrupted by opening the door, touching START/+ 30 sec. after the door is closed again will resume
the preset cycle.
OPERATION
30
Update Temperature
1Touch number keypad to update temperature.
2Touch START to start cooking with the new settings.
Update Cooking Time
1Touch Cook Time.
2Touch number keypad to update the time of cooking
3. Touch START to start cooking with the new settings.
Heating Food
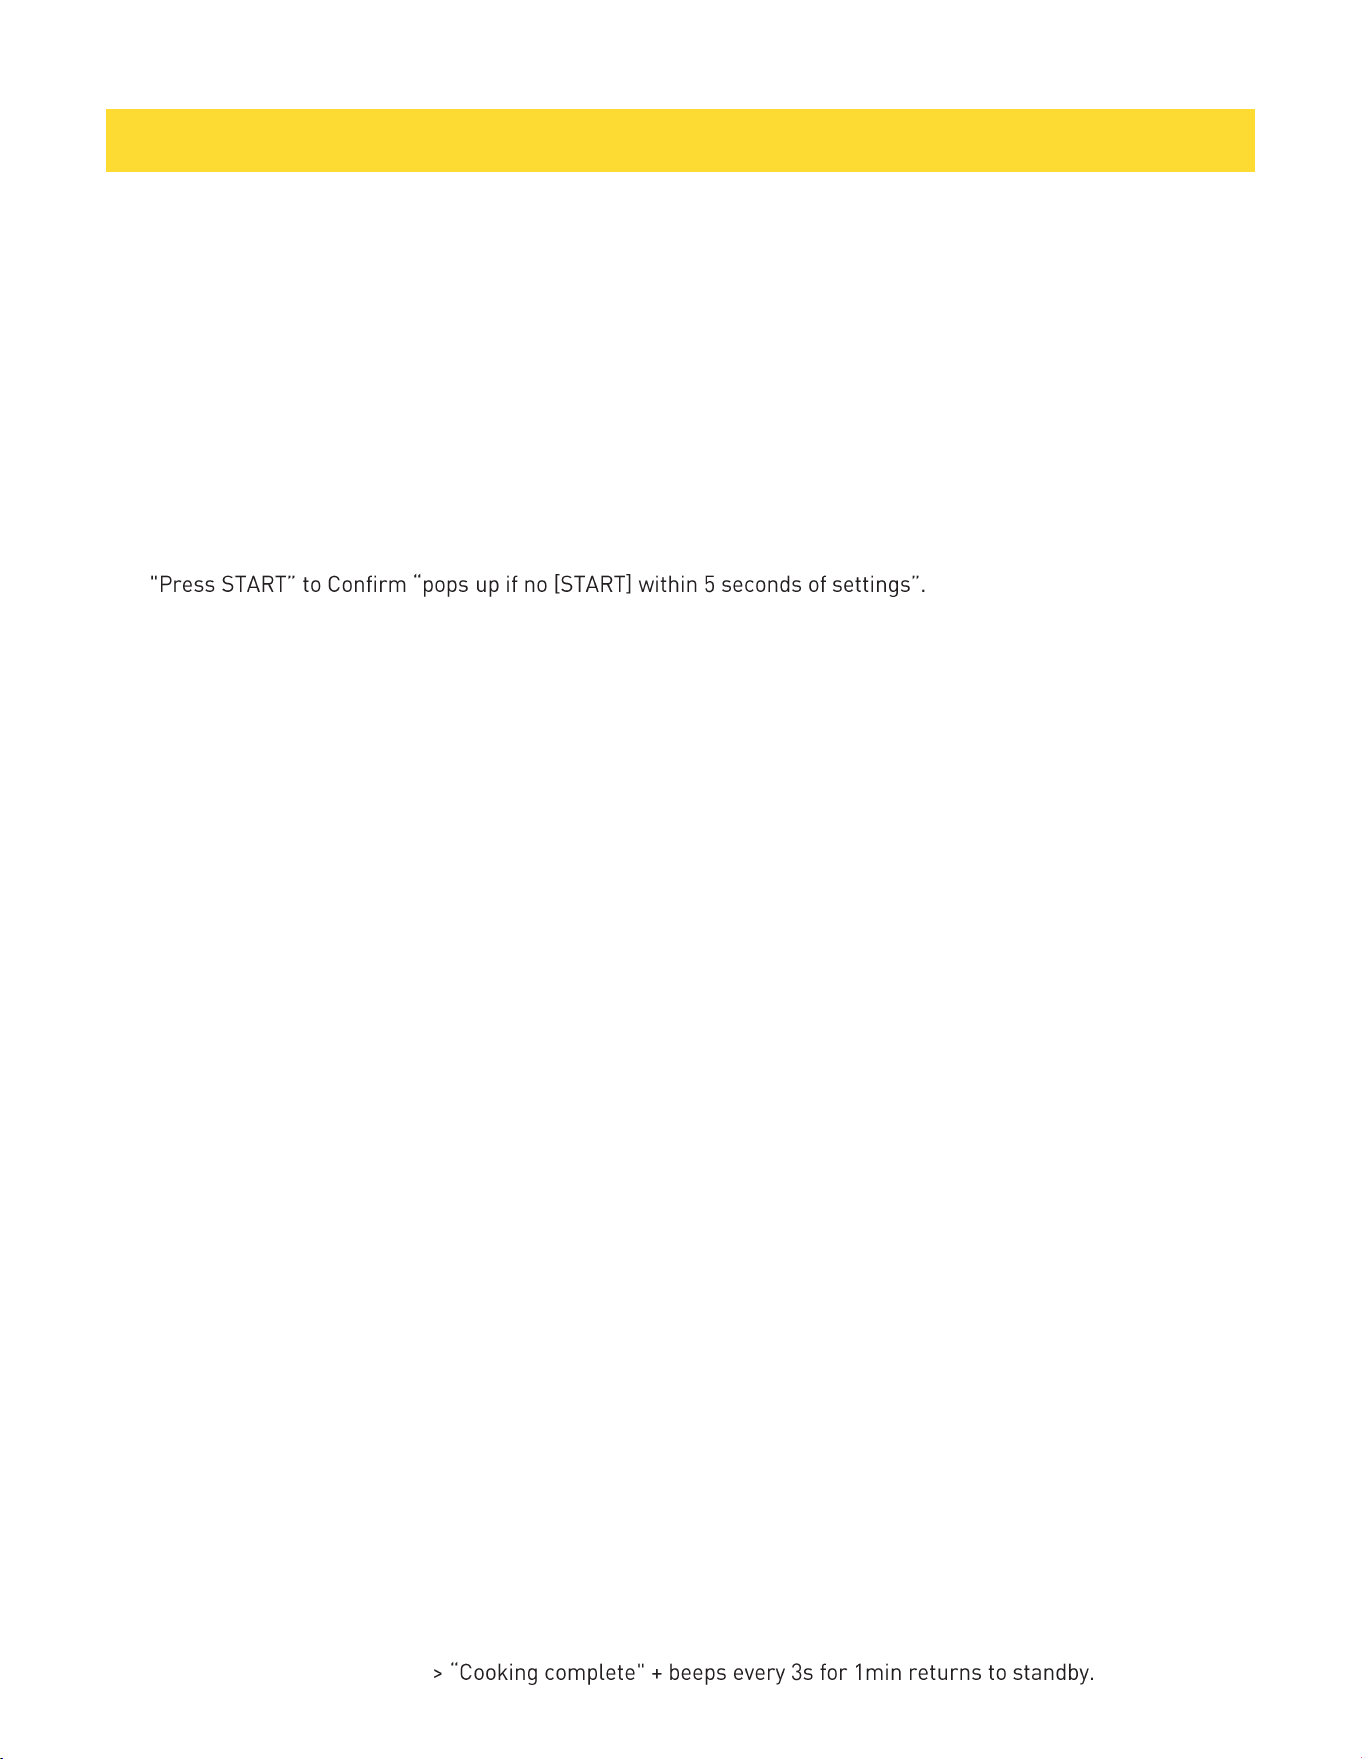
Risk of scalding!
There is a possibility of delayed boiling when a liquid is heated. This means that the liquid reaches boiling
temperature without the usual steam bubbles rising to the surface. Even if the container only moves a little, the
hot liquid can suddenly boil over and spatter. When heating liquids, always place a spoon in the container. This
will prevent delayed boiling.(lower oven only)
OPERATION
31
Operating the Lower Oven
General 0peration Logic(Applies to Most Functions)
1.Activate Function: Press the function button (e.g., [Bake]) when the oven is in standby.
2.Set Temperature/Time:
• Temperature: Use number keys (default temp varies by function, see below).
• Time (Optional): Press [Cook Time] -> use number keys (default: 10hrs if not set; no time display if using
default).
3.Start:Press [START] on the lower oven.
4.Adjust During Cooking:
• Temperature: Use number keys -> Press [START] to confirm (oven keeps old temp until confirmed).
• Time: Press [Cook Time] -> number keys -> [START].
5.Confirmation Rules:
• "Press START” to Confirm “pops up if no [START] within 5 seconds of settings”.
• Returns to standby if no action for 30 seconds (unless temperature is already set/confirmed).
6.End of Cooking:
• Auto-stops when countdown ends.
• Displays "Cooking complete"+ beeps every 3 seconds for 1 minute -> auto -> returns to standby after1 minute.
Specific Functions (Key Details Only)
Bake
• Default Settings: Temp=350° F(177° C) (flashes); Time=10hrs.
• How to use Bake:
1Touch Bake.
2 Touch number keypads to enter the temperature.
3 Touch COOK TIME and then touch number keypads to set the cook time.
4Touch START to start cooking.
Conv Bake (Convection Bake)
• Default Settings: Temp=325° F(163° C) (flashes);Time=10hrs.
• How to use Conv Bake:
1Touch Conv Bake.
2 Touch number keypads to enter the temperature.
3 Touch COOK TIME and then touch number keypads to set the cook time.
4Touch START to start cooking.
Conv Roast
• Default Settings: Temp=325℉(163℃) (flashes); Time= 10hrs (no time display initially).
• How to use Conv Roast:
1Touch Conv Roast.
2 Touch number keypads to enter the temperature.
3 Touch COOK TIME and then touch number keypads to set the cook time.
4Touch START to start cooking.
• Adjust During Cooking:
· Temperature: Enter new temp press [START] to confirm (keeps old temp until confirmed; reverts to old temp
after 30s of no action).
· Time: Press [Cook Time] ,enter new time, press [START] to confirm (reverts to old time after 30s of no action).
• End of Cooking: Auto-stops -> “Cooking complete" + beeps every 3s for 1min returns to standby.
OPERATION

32
Pizza
• Check pizza before minimum time, pizza may cook faster compared to a traditional oven.
• For fresh pizza use a pizza paddle for sliding the pizza on and from the metal turntable.
• If using a pizza paddle, sprinkle the paddle liberally with cornmeal for ease in transferring the dough to the
metal turntable.
• Maximum size is 12 inches for fresh and frozen pizzas.
• Avoid using a pizza stone as it can damage the oven.
• The metal turntable can be used for cutting pizza into slices. Remove the turntable from the oven after the pizza
is baked.
• Default Settings: Temp=425° F(219° C)(flashes);Time=10hrs(suggest 10-15 mins for pizza).
• How to use Pizza:
1 Touch Pizza.
2 Touch number keypads to enter temperature. The temperature can be set between 175 ° F and 450° F.
3 Touch COOK TIME and then touch number keypads set the cook time. Time can be set up to 1 minutes and
10hours.
4 Touch START to start cooking.
The oven starts to preheat until preheat complete, a beep will sound and the oven display will countdown the Pizza
time if you set.
When the stop time is reached, the oven will shut off automatically and "Cooking complete" will appear in the
display. If enable, end-of-cycle tones will sound, it ends automatically in one minute or touch CLEAR OFF or open
the door to clear the display and stop the reminder tones.
Tips: You can touch START directly without entering the time of cooking, after setting the cooking temperature.
The oven will work for the maximum safe time, at which time the cooking time will not be displayed.
Air Fry
• Default Settings: Temp=425° F(219° C)(flashes); Time = 10hrs (e.g., 15 mins for French fries)
• Critical Note: NO preheating -> press [START] to directly enter "Cooking" mode.
• How to use Air Fry:
1Touch Air Fry.
2Touch number keypads to enter temperature. The temperature can be set between 350 ° F and 550° F.
3Touch COOK TIME and then touch number keypads to set the cook time. Time can be set up to 1 minutes and 10
hours.
4 Touch START to start cooking.
The oven display will count down the Air Fry time.
When the stop time is reached, the oven will shut off automatically and "Cooking complete" will appear in the
display.
If enable, end-of-cycle tones will sound, it ends automatically in one minute, or touch CLEAR OFF or open the door
to clear the display and stop the reminder tones.
Broil
• Default Settings: Heat level = Hi (flashes); Time = 3hrs (no time display).
• How to use Broil:
1Touch Broil.
2Select Hi or Low mode: 1: Hi, 2: Lo
3Touch START to start cooking.
Keep Warm
• Default Settings: Temp=175° F(79° C)(NOT adjustable); Time = 3hrs (if [START] pressed without setting time).
• How to use Keep Warm:
1Touch Keep Warm.
2Touch COOK TIME and then touch number keypads to set the cook time.
OPERATION
33
3Touch START to start cooking.
Proof (Dough Fermentation)
• Default Time: 10hrs (set time via [Cook Time]+ number keys if needed).
• How to use Proof:
1Touch Proof.
2 Set the temperature.
· F mode: Press "1"for 85° F, "2" for 95° F(default =85° F).
· C mode: Press "1"for 30° C, "2“ for 35 ° C(default=30° C).
3Touch COOK TIME and then touch number keypads to set the cook time.
4 Touch START to start cooking.
Delay start (scheduled Cooking)
• Set the oven to turn on automatically after a specific time of day using this function. With both Delay Start and
Cook Time set, the oven automatically turns on and off at the time you select. This feature can only be used
with the Bake, Conv Bake, Conv Roast, Air Fry, and Pizza modes in the lower oven.
• How to use Delay Start:
For example, to Bake at 350° F for 30 minutes and delay the start of baking by 1 hour, first set the clock for the
correct time of day.
1 Press Bake (lower oven). "BAKE" appears and default temperature flashes in the display.
2 Set the temperature: press 3, 5, and 0.
3 Press Cook Time (lower oven). "COOK TIME" appears in the display.
4 Set the cooking time: press 3 and 0 (for 30 minutes).
5Press Delay Start. "DELAY " appears in the display.
6 Set the length of time to delay the start time: press 1, 0, and 0 (for 1 hour).
7 Press START (lower oven).
The oven will turn on automatically at the set start time, cook for the set amount of time, and then turn off
automatically. When the cooking time has elapsed:
• "Cooking Complete" shows in the display.
• The cook end indicator tone sounds for 1 minute or until the oven door is opened or CLEAR/OFF (lower
oven) is pressed.
Oven Food Probe (Only for Bake/Conv Bake/Conv Roast)
• How to use Oven Food Probe:
1 Insert Probe: Plug into oven port (probe icon lights up) -> do this in standby or after preheating.
2 Set Probe Temp:
-Press [Bake]/[Conv Bake]/[Conv Roast] -> display shows "PROBE"+ prompts "Enter temperature".
-Default probe temp=150° F(65° C) -> use number keys to adjust -> press [START].
3 Set Oven Temp:
• Display switches to function name (e.g., "BAKE") -> default temp: 350° F[177° C) for Bake;325° F(163° C) for Conv
Bake/Conv Roast.
• Use number keys to adjust (max temp=482° F/250° C)
4 Touch START to start cooking.
Time (Optional): Press [Cook Time] -> number keys [START] (default =10hrs).
• End Condition: Auto-stops when countdown ends OR food reaches probe temp.
• Note: Remove probe during cooking -> oven continues in original function.
OPERATION

34
Self Clean
• How to use Self Clean:
1 Press Self Clean.
2 Select Self Clean time: 1: 3hr, 2: 5hr
3 Touch START to start Self Clean.
• Note:
1. When the temperature of the lower oven chamber drops below 550℉, the door lock opens, and it returns to
standby mode.
2. After the self-cleaning function of the lower oven is turned on, the heating function of the upper oven cannot
be operated. During the heating process of the upper oven, the lower oven cannot operate the self-cleaning
function.
3. During operation, only TIMER and CLEAR OFF are operable; other keys are invalid.
OPERATION
35
Care And Cleaning
With careful care and cleaning your microwave oven will retain its looks and remain in good order. We will explain
here how you should care for and clean your appliance correctly.
Risk of electric shock!
Penetrating moisture may cause an electric shock. Do not use any high-pressure cleaners or steam cleaners.
Risk of burns!
Never clean the appliance immediately after switching off. Let the appliance cool down.
Risk of serious damage to health!
Microwave energy may escape if the cooking compartment door or the door seal is damaged. Never use the
appliance if the cooking compartment door or the door seal is damaged. Contact the after-sales service.
• Slight differences in colour on the front of the appliance are caused by the use of different materials, such as
glass, plastic and metal.
• Shadows on the door panel which look like streaks, are caused by reflections made by the oven light.
• Unpleasant odours, e.g. after fish has been prepared, can be removed very easily. Add a few drops of lemon
juice to a cup of water, place a spoon into the container as well, to prevent delayed boiling. Heat the water for 1
to 2 minutes at maximum microwave power.
Cleaning agents
To ensure that the different surfaces are not damaged by using the wrong cleaning agent, observe the information
in the table. Do not use
• sharp or abrasive cleaning agents,
• metal or glass scrapers to clean the glass in the appliance door.
• metal or glass scrapers to clean the door seal,
• hard scouring pads and sponges,
• cleaning agents with high concentrations of alcohol.
Wash new sponge cloths thoroughly before use.
Allow all surfaces to dry thoroughly before using the appliance again.
MAINTENANCE
NOTE
Area Cleaning Agents
Appliance front
Hot soapy water: Clean with a dishcloth and dry with a soft
cloth. Do not use glass cleaners or metal or glass scrapers
for cleaning.
Appliance front with stainless steel
Hot soapy water: Clean with a dishcloth and dry with a soft
cloth. Remove flecks of limescale, grease, starch and
albumin (e.g. egg white) immediately. Corrosion can form
under such residues. Special stainless steel cleaning agents
can be obtained from the after-sales service or from
specialist shops. Do not use glass cleaners or metal or glass
scrapers for cleaning.
Cooking compartment
Hot soapy water or a vinegar solution: Clean with a dish
cloth and dry with a soft cloth. If the oven is very dirty, do not
use oven spray or other aggressive oven cleaners or
abrasive materials. Scouring pads, rough sponges and pan
cleaners are also unsuitable. These items scratch the
surface. Allow the interior surfaces to dry thoroughly
36
Cleaning And Maintenance
Be sure the entire appliance has cooled and grease has solidified before attempting to clean any part of the
appliance.
Cleaning Guide
• For best performance and for safety reasons, keep the oven clean inside and outside. Take special care to keep
the inner door panel and oven front frame free of food and grease build-up.
• Never use abrasive scouring powder or pads on the microwave. Wipe the microwave oven inside and out with a
soft cloth and warm (not hot) mild detergent solution. Then rinse and wipe completely dry.
• Wipe spatters immediately with a wet paper towel, especially after cooking greasy foods like chicken or bacon.
• Clean your microwave oven weekly or more often, if needed.
• Never operate the microwave oven without food in the oven cavity, unless pre-heating with Convection, Pizza,
Frozen Foods and Keep Warm mode; this can damage the magnetron tube or ceramic tray. You may wish to
leave a cup of water standing inside the oven when it is not in use to prevent damage if the oven is accidentally
turned on.
WARNING
MAINTENANCE
Area Cleaning Agents
Recess in cooking compartment
Damp cloth: Ensure that no water seeps through the
turntable drive into the appliance interior.
Wire racks
Hot soapy water: Clean using a stainless steel cleaning
agent or in the dishwasher.
Door panels
Glass cleaner: Clean with a dish cloth. Do not use a glass
scraper.
Seal
Hot soapy water: Clean with a dishcloth, do not scour. Do not
use a metal or glass scraper for cleaning.
Part Recommendations
Oven cavity
Keep inside (cavity} of the oven clean. Food particles and
spilled liquids can stick to the oven walls, causing the oven
to work less efficiently. Wipe up spills immediately. Use a
damp, clean cloth and mild soap. DO NOT use harsh
detergents or abrasive cleaners. To help loosen baked-on
food particles or liquids, heat 2 cups of water (add the juice
of 1 lemon if you desire to keep the oven fresh smelling) in a
4-cup measuring glass at High power for 5 minutes or until
boiling. Let stand in oven cavity for 1 or 2minutes. For
baked-on grease spatters, wash with hot, soapy water, rinse
and dry.
Wire racks
Wash with soapy water. Rinse thoroughly and dry, or gently
rub with cleansing powder or soap-filled pads as directed.
The wire rack can also be washed in the dishwasher.
Metal turntable tray
Remove metal turntable tray from the oven when cleaning
the oven cavity and tray. Wash the metal turntable tray in
warm sudsy water or in the dishwasher.
Ceramic tray Wipe with damp cloth.
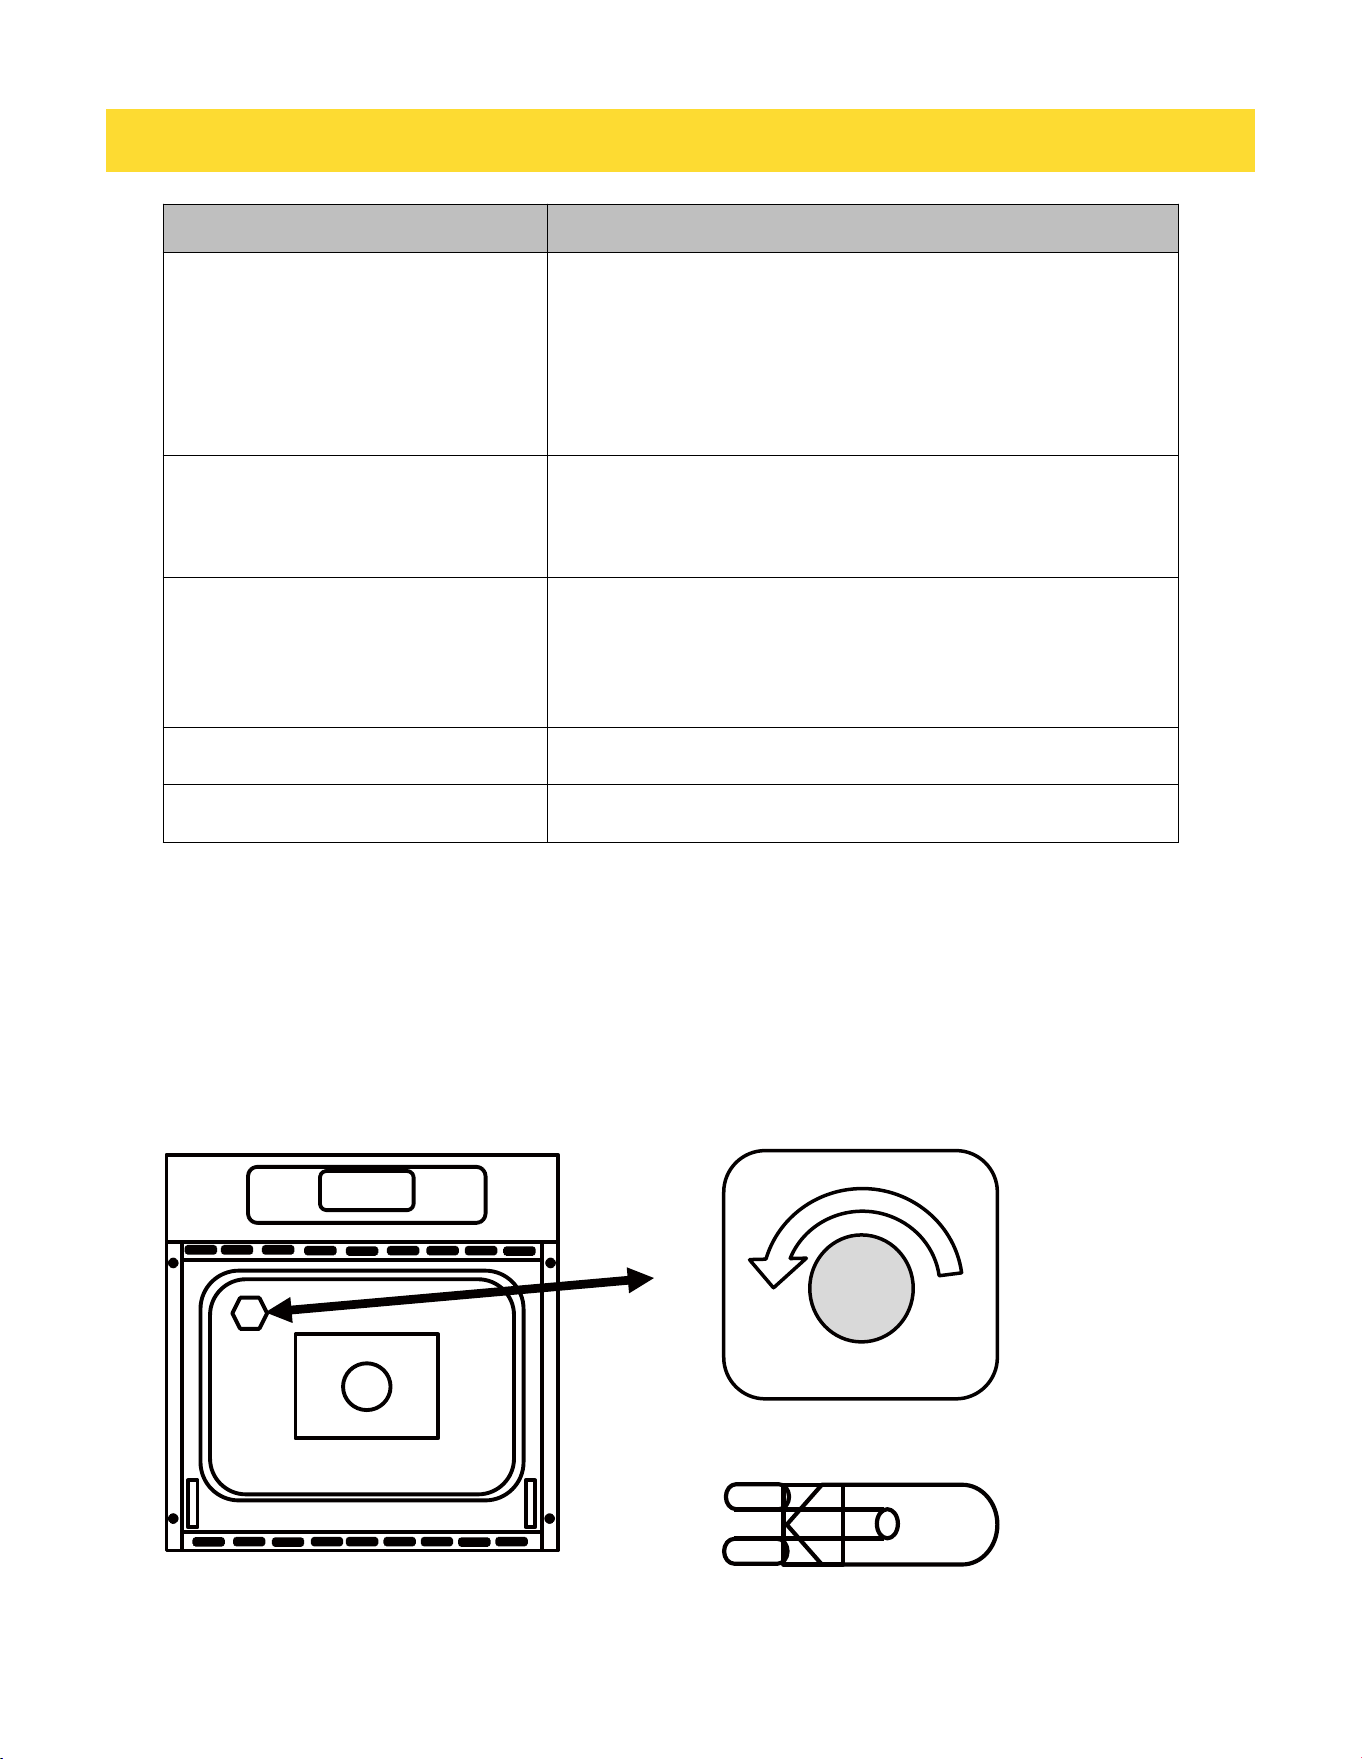
37
MAINTENANCE
Area Cleaning Agents
Door glass
Wash with soap and water or glass cleaner. Apply
Fantastik® or Formula 409® to a clean sponge or paper
towel and wipe clean. Avoid using powder cleaning agents,
steel wool pads and oven cleaners. If steam accumulates
inside or outside the oven door, wipe with a soft cloth. Steam
can accumulate when operating the oven in high humidity
and in no way indicates microwave leakage.
Painted surfaces
Clean with hot soapy water or apply Fantastik® or
Formula409® to a clean sponge or paper towel and wipe
clean. Avoid using powder cleaning agents, steel wool pads
and oven cleaners.
Stainless steel sur-faces/exterior
sur-faces
Always wipe or rub in the direction of the grain. Clean with a
soapy sponge, then rinse and dry, or wipe with Fantastik® or
Formula 409® spray on a paper towel. Protect and polish
with Stainless Steel Magic® and a soft cloth. Remove water
spots with a cloth dampened with white vinegar.
Plastic & Controls When cool, clean with soapy water, rinse and dry.
Printed areas(words &numbers) Do not use abrasive cleaners or petroleum based solvents.
Replacing Oven Cavity Light Bulb
• Turn off power to the oven at the circuit breaker.
• Make sure the oven cavity is cool to the touch, do not attempt to change light bulb when the oven is hot.
• Grasp oven light lens cover and unscrew the light lens by turning it Counter clock wise direction.
• Remove the light lens an set aside.
• Remove light bulb from the socket by pulling the light bulb towards front of the oven.
• Replace the oven light bulb with a 120Vac 40watt G9 base Halogen light bulb.
• Do not handle the halogen bulb with bare hand, use a cloth or glove when removing and inserting bulb.
• Screw light lens back on by turning clockwise.
Replace light bulb with 120Vac 40 watt G9 base halogen bulb.
Turn oven light lens counterclockwise to unscrew.

38
TROUBLESHOOTING
FAQs
Frequently Asked Questions
About the Upper Oven
Q: Can I use a rack in my upper oven to reheat or cook on two levels at once?
A: Only use the rack that is supplied with your upper oven. Use of any other rack can result in poor cooking
performance and/or arcing and may damage your oven.
Q: Will the upper oven be damaged if it operates while empty?
A: Yes. Never operate the oven while it is empty or without the glass tray.
Q: Does microwave energy pass through the viewing screen in the door?
A: No. The metal screen bounces the energy back to the oven cavity. The holes (or ports) allow only light to pass
through. They do not let microwave energy pass through.
Q: Why do I see a light reflection around the outer case?
A: This light is from the upper oven light which is located between the oven cavity and the outer wall of the oven.
Q: What are the various sounds I hear when the upper oven is operating?
A: The clicking sound is caused by a mechanical switch turning the microwave oven's magnetron ON and OFF.
The heavy hum and clunk is from the change in power the magnetron draws as it is turned ON and OFF by a
mechanical switch. The change in blower speed is from the change in line voltage caused by the magnetron being
turned ON and OFF.
Q: Can my upper oven be damaged if food is cooked for too long?
A: Like any other cooking appliance, it is possible to overcook food to the point that the food creates smoke and
even possibly fire, and damages the inside of the oven. It is always best to be near the oven while you are cooking.
Q: Why is a standing time recommended after microwave cooking time is over?
A: Standing time allows foods to continue cooking evenly for a few minutes after the actual microwave oven
cooking cycle. The amount of standing time depends upon the density of the foods.
Q: Why is additional time required for cooking food stored in the refrigerator?
A: As in conventional cooking, the initial temperature of food affects total cooking time. You need more time to
cook food taken out of a refrigerator than for food at room temperature.
Q: Can I use either metal or aluminum pans in my upper oven?
A: Usable metal includes aluminum foil for shielding (use small, flat pieces), and shallow foil trays (if tray is ¾
inch deep and filled with food to absorb microwave energy). Never allow metal to touch walls or door.
Q: Sometimes the door of my upper oven appears wavy. Is this normal?
A: This appearance is normal and does not affect the operation of your oven.
TROUBLESHOOTING
39
Q: Why does the dish become hot when I microwave food in it? I thought that this should not happen.
A: As the food becomes hot it will conduct the heat to the dish. Use hot pads to remove food after
cooking.
Q: What does standing time mean?
A: Standing time means that food should be taken out of the oven and covered for additional time after cooking.
This process allows the cooking to finish, saves energy, and frees the oven for other purposes.
Q: Can I pop popcorn in my upper oven? How do I get the best results?
A: Yes. Pop packaged microwave popcorn following manufacturer’s guidelines or use the preprogrammed
Popcorn button.
Do not use regular paper bags. Use the listening test by stopping the oven as soon as the popping slows to a pop
every one or two seconds. Do not try to repop unpopped kernels. You can also use special microwave poppers.
When using a popper, be sure to follow manufacturer’s directions. Do not pop popcorn in glass utensils.
Q: Why does steam come out of the air exhaust vent?
A: Steam is normally produced during cooking. The upper oven has been designed to vent steam out of the top
vent.
About the Lower Oven
Q: My new oven doesn’t cook like my old one. Is there something wrong with the temperature settings?
A: No. Your oven has been factory tested and calibrated. For the first few uses, follow your recipe times and
temperatures carefully. If you still think your new oven is too hot or too cold, you can adjust the oven temperature
yourself to meet your specific cooking needs. Refer to the Changing Settings section in this manual for easy
instructions on how to adjust your thermostat.
Q: Is it normal to hear a clicking noise coming from the back of my oven when I am using it?
A: Your new appliance is designed to maintain a tighter control over your oven’s temperature. You may
hear your oven’s heating elements click on and off more frequently on your new oven. This is NORMAL.
Q: Why is the time flashing?
A: This means that the product has just been plugged in, or that it has experienced a power interruption. To clear
the flashing time, touch any button and reset the clock if needed.
Q: During convection cooking the fan stops when I open the door. Is that normal?
A: Yes, this is normal. When the door is opened, the convection fan will stop until the door is closed.
Q: Can I use aluminum foil to catch drippings in my oven cavity?
A: Never use aluminum foil to line the bottom or sides of the oven. The foil will melt and stick to the bottom
surface of the oven and will not be removable. Use a foil-lined sheet pan placed on a lower oven rack to catch
drippings instead. (If foil has already melted onto the bottom of the oven, it will not interfere with the oven’s
performance.)
Q: Can I use aluminum foil on the racks?
A: Do not cover racks with aluminum foil. Covering entire racks with foil restricts air flow, leading to poor cooking
results. Use a sheet pan lined with foil under fruit pies or other acidic or sugary foods to prevent spillovers from
damaging the oven finish.
Foil may be used to wrap food in the oven, but do not allow the foil to come into contact with the exposed
heating/broiling elements in the oven. The foil could melt or ignite, causing smoke, fire, or injury.
CAUTION
TROUBLESHOOTING
40
Q: What should I do if my racks are sticky and have become hard to slide in and out?
A: Over time, the racks may become hard to slide in and out. Apply a small amount of olive oil to the sides of the
racks. This will work as a lubricant for easier gliding.
Q: Why aren't the function buttons working?
A: Make sure that the appliance is not in Control Lock mode. The lock k will show in the display if Control Lock is
activated. To deactivate Control Lock, refer to the Control Lock Feature section. The unlock melody sounds and
Loc appears in the display until the controls are unlocked.
Q: Are there any tricks to getting some of the stubborn soils out?
A: Scraping the soils with a plastic scraper before and during hand-cleaning is recommended. Fully saturating
soils with water is also recommended.
Q: How can I help keep children safe around the appliance?
A: Children should be supervised around the appliance whenever it is in use, and after use until surfaces
have cooled. You can also use the Control Lock feature to help prevent children from accidentally turning on the
oven. The Control Lock feature disables most control panel buttons. Consult the Control Lock Feature section of
your owner’s manual for details.
THOR Kitchen works hard to ensure that you don't have problems with your new eclectic wall oven. If you run into
unexpected trouble, look first for a solution in the tables below. If you’re still having trouble after trying the
suggested solution, call THOR Kitchen at 1-877-288-8099.
TROUBLESHOOTING
Problem Possible Solution
Oven control beeps and displays ℉
and number
• The electronic control has detected a fault
• Press the CLEAR OFF key to clear display
• Reprogram cycle and try again, If error continues turn off power to
the oven for 5 min via the circuit breaker . After 5min turn power on
and retry.
• If error continues contact qualified service technician
No power / No display
• Power outage, Check other items in the house such as lights.
• Check house circuit breaker. Turn off the circuit breaker to the oven
and reset back to the on position.
Oven cavity light doesn't
turn on
Replace oven cavity light bulb.
Food is not baking or roasting
properly
• Oven control was not set correctly - go to the Operating the oven
section of the user manual.
• Rack position being used is not correct - Go to the Operation the
oven section of the user manual.
• Incorrect cookware or cookware of improper size being used- Go to
the operating the oven section of user manual.
• Temperature adjustment needed. See Operating the oven manual
temp adjustment section.
Food is not broiling correctly
Oven controls are improperly set.- Make sure Broil function is selected
Improper rack position is being used. See Operating the oven broiling
section.
Using cookware not suited for broiling, use the broil pan that came with
the oven
41
TROUBLESHOOTING
Problem Possible Solution
Oven smokes during broiling
• Food product is placed to close to broil element.
• Rack position is incorrect.
• Food product not properly prepared, Remove excess fat from cuts of
meats, Trim fatty edges to prevent curling.
• Incorrect cookware used, use the supplied broiler pan to allow the
grease to drip below the slots.
• Grease has build up on oven cavity surfaces. Regular cleaning is
required when doing heavy amounts of broiling due to grease
splatter.
Oven temp is too hot or too cold
• Oven temp sensor off set needs to be adjusted.
• See manual temp adjust, Oven Temp can be increased or decreased
by 35 deg.
Cracking / popping sounds
This is a normal sound, as metal heat and cool there is expansion and
contraction sounds during the heating process.
Oven is not clean after a self clean
• Oven control not set correctly or for long enough of a cleaning cycle
Heavy soil 5hr, Normal soil 3 hours.
• Soil level in oven is to high, self clean more frequently.
• Clean up heavy spill over before starting the clean cycle.
• Oven may need a second self clean cycle if heavy soil was present
during previous self clean.
Excessive smoking during self
clean cycle
• Excessive soil in oven cavity.
• Cancel cleaning cycle, Open windows and turn on exhaust hood to
remove smoke. Allow oven to cool and door to unlock. Clean up
excessive soil from cavity and restart self clean cycle.
Burning or oily odor emitting from
the oven and vents
This is normal for a new oven and will dissipate with use.
Run the oven prior to first use following the seasoning process outlined
in the BEFORE YOU BEGIN section of owner’s manual
Cooling fan run's after the oven is
turned off
This is normal, the cooling fan will continue to run until the oven has
cooled below 165°F, Once it has cooled below this temperature it will
automatically turn off.
Warm air is exhausting out below
the door
This is normal, the oven cooling fan will draw cool air in the oven door
and this air will be cycled over the top and back of the oven. The warm
air will be exhausted out the bottom vent of the oven into the kitchen.
Problem Error Description Fault Handling Remarks
F1E1
Display board and power board
communication failure
Restore
communication
between the display
board and power board
If this fault alarms during
operation, the microwave
oven should stop working
immediately
F1E4
Display board and left touchpad
communication failure
F1E5
Display board and right touchpad
communication failure
Upper Oven Error Code
42
TROUBLESHOOTING
Lower Oven Error Code
Problem Error Description Fault Handling Remarks
F1E1
Display board and power board
communication
failure
Stop heating, enter
standby mode, and
display the fault code
/
F1E2
Software version numbers of the
two power boards in the double -
layer oven are not synchronized
F3E1
Oven temperature
sensor open-circuit/short-circuit
F3E3 Oven overheating
F3E4
PCB temperature sensor
fault
F3E5 PCB board overheating
F3E6 Food probe fault
F3E7
Thermostat over -
temperature
F4E1 MCU self-check fault
F5E1 Door lock fault
F5E2 Door switch fault
F6E1
Heat dissipation/Hall
fault
Problem Error Description Fault Handling Remarks
F3E1(Alway
s on display
)
Open circuit fault of temperature
sensor
Eliminate the fault of the
temperature sensor in
the box
If this fault alarms during
operation, the microwave
oven should stop working
immediately
F3E1(blinki
ng display)
Short circuit fault of temperature
sensor
Eliminate the fault of the
temperature sensor in
the box
F3E8
Humidity sensor communication
failure
Restore communication
between the humidity
sensor module and the
power board
F3E9 Humidity sensor module failure
Remove the failure of the
humidity sensor module
F6E6
Safety protector disconnection
fault[Microwave or barbecue fault)
Eliminate the
malfunction of the safety
protector

43
Warranty&Service
This product has been manufactured by Thor International, 4651 E Airport Dr, Ontario, CA 91761
For Customer Service, please call (877) 288 - 8099
For the most up to date warranty and service policy, please refer to our website
WWW.THORKITCHEN.COM/WARRANTY-REGISTRATION
For in-warranty service requests, please visit our website at
WWW.THORKITCHEN.COM/SERVICE
Please Note: You must provide proof of purchase or installation date for any in- warranty service
requests
WARRANTY
Warranty Registration
Made Easy.
We Stand Behind
the Quality of Our
Appliances.
Reliability and customer satisfaction are our top priorities. We offer a
solid two-year warranty on both parts and labor. Enjoy professional-grade
performance with the condence that we’ve got you covered.
01
02
03
Scan the QR Code or visit thorkitchen.
com/register-your-product.
Input your purchase and product
information and select register.
That’s it. You’re all set.
Enjoy!
WARRANTY
PARTS
Questions: [email protected]