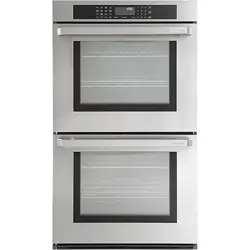

TEW30ED
30 IN. PROFESSIONAL ELECTRIC DOUBLE WALL OVEN

USE AND CARE MANUAL
30 INCH PROFESSIONAL
ELECTRIC DOUBLE
WALL OVEN
TEW30ED

Important Safety Tips .............................................................................................................. 1
Installation I nstructions ........................................................................................................... 5
Install Oven Handle ........................................................................................................................ 9
Introducing Your New Oven .......................................................................................................... 10
Before You Begin ........................................................................................................................... 11
Operating the Oven ............................................................................................................... 12
Maininting the O ven.............................................................................................................. 35
Troubleshooting ................................................................................................................... 37
Warranty ...................................................................................................................................... 41
TABLE OF CONTENTS

Read and follow all instructions before using your oven to prevent the risk of fire, electrical
shock, personal injury or damage when using the oven. This guide does not cover all possible
conditions that may occur. Always contact your service agent or manufacturer about problems
you do not understand.
SAFETY PRECAUTIONS
• Be sure your appliances is properly installed and grounded by a qualified technician.
• Do not repair or replace any part of this appliance unless specifically recommended in this
use and care manual.
• All servicing of this appliance should be carried out by a qualified technician.
• Always disconnect the power to the appliance before servicing by unplugging power cord,
removing fuse or switching off the circuit breaker.
DO NOT TOUCH HEATING ELEMENTS OR INTERIOR SURFACES OF OVEN WHEN IN USE
Heating elements may be hot to the touch even though they are dark in color and not glowing.
Interior surface of the oven become hot enough to cause burns. During and after use, do not
touch or let clothing or other flammable material contact heating elements or interior surfaces
of oven until they have had sufficient time to cool. Other surfaces of the appliance may become
hot enough to cause burns. Use caution around oven vent openings and surfaces near vent
opening, oven doors, and window of oven door.
USE CARE WHEN OPENING DOOR.
Let hot air or steam escape before you remove or place food in the oven.
DO NOT HEAT UNOPENED FOOD CONTAINERS.
There will be a build up of pressure in sealed food container when heated. This can lead to
container bursting and resulting in injury.
SAVE THESE INSTRUCTIONS
IMPORTANT SAFETY TIPS
1
• Use dry pot holders only.
Moist or damp pot holder on a hot surface may result in steam burns. Do not allow pot
holders or clothing contact heating elements. Do use towels or other bulky cloths to pick up
hot items. Use dry pot holder or equivalent .
• Wear appropriate apparel when operating appliance.
Loose fitting or hanging garments should never be worn while using the appliance.
• Be certain all packing materials are removed from the appliance before operating.
Keep all plastics, clothing , paper and other flammable products away from parts of the oven
that become hot.
• DO NOT Force the oven door open. This can damage the automatic door locking system.
Wait for the oven to fully cool before trying to open the door. When opening the door after Self
Clean stand to the side of the door and allow hot air and steam to escape, the oven may still
be very hot.
• DO NOT use steel wool pads. Steel wool will scratch the stainless steel surfaces as well as
rack and oven interior.
• DO NOT use harsh etching, abrasive cleaner or sharp metal scraper to clean the oven surfaces
or glass. Damage will result to the product.
• Use caution when removing the oven door. Oven door is HEAVY. DO NOT lift the oven door by
the handle or carry the door by the handle.
SAVE THESE INSTRUCTIONS
Safety PRECAUTIONS (Cont.)
• Keep oven vent / ducts unobstructed
The oven vent becomes hot during oven use. Never block
this vent and never place plastic or heat sensitive items
on or near the oven vent .
Oven vent opening
Note:
For proper operation vent trim must be installed below the oven door to correctly channel
cooling air flow for oven.
WARNING
• NEVER use this appliance for warming or heating the room.
• DO NOT use water on grease fires.
Should an oven fire occur, DO NOT open the oven door. Turn off the oven. Once the fire has
consumed all oxygen in the oven the fire will go out on its own. If it does not use an ABC
type Fire extinguisher.
IMPORTANT SAFETY TIPS
2
• DO NOT place aluminum foil directly on the oven bottom.
• DO NOT line the oven walls, racks, bottom, or any other part of the oven with Aluminum
foil or any other material. Doing so will result in poor cooking results. The foil will disrupt
the heat distribution and result in permanent damage to the oven.
• Before replacing the oven light bulb switch off the electrical power to the oven at the
circuit breaker panel. Failure to do so can result in severe personal injury , death or electrical
shock.
SAFETY DURING USE
• Oven racks. Always place the oven rack in the desired position while the oven is cool.
• Always use pot holder or oven mitts. When removing food from the oven or handling the
oven rack to slide in and out. Hot cookware and racks can cause burns.
• Use caution with TIMED COOKING or DELAY TIME COOKING features. Use the automatic
time features when cooking cured or frozen meats and most fruits and vegetables. Foods
that can easily spoil, such ingredients as milk, eggs, fish, red meats and poultry should be
chilled in the refrigerator first. Even when chilled they should not stand in the oven for
more than 1 hour prior to cooking starting.They should be removed promptly once cooking is
complete. Eating spoiled foods can result in foodborne illness.
• Should an oven fire occur , leave the oven door closed, turn off the oven. If the fire continues
use an ABC fire extinguisher.
• DO NOT use water to put out a fire.
• DO NOT use the broiler pan with out the grid in place.DO NOT cover the Grid with Aluminum
foil.
SAVE THESE INSTRUCTIONS
ELECTRICAL SAFETY
• Protective Liners. DO NOT use aluminum foil or any other material to line the oven bottom.
This include silicone liners. Doing so will cause permanent damage to the oven interior.
IMPORTANT SAFETY TIPS
3

CHILD SAFETY
• Children should be kept away from the oven.
• Children should not be left alone or unattended in the area where the oven is in use.
• DO NOT leave small children unattended near the appliance , During the self cleaning cycle ,
the outside of the oven can become very hot to the touch.
SAFETY WHEN CLEANING
• Do not clean the door gasket. The door gasket is essential for a good seal between the oven
body and the door. Do not use cleaners or push or rub on the door gasket.
• Do Not use oven cleaners. No commercial oven cleaner or oven liner protective coatings of
any kind should be used in or around any part of the oven.
• Before self-cleaning the oven, remove the broiler pan, all oven racks, meat probe, and any other
utensils from the oven cavity..
• Never keep pet birds in the kitchen.The health of birds is extremely sensitive to the fumes
released during an oven self clean cycle. Fumes may be harmful or fatal to birds. Move
birds to a well ventilated room.
• Important instructions. In the event of a failure during the self clean cycle an "F" and
number error code will be displayed.Record this number for the service technician. Shut
down the
power to the oven. Contact a qualified service technician.
• Make sure oven light lens and any interior surface is cool prior to cleaning or wiping down
interior surfaces to prevent thermal shock.
• DO NOT block the oven vent during operation. Blocking of the oven vents can cause the oven
to over heat and trip safety thermal protectors on the oven. Air flow should never be blocked
from exhausting out the bottom of the wall oven.
SAVE THESE INSTRUCTIONS
IMPORTANT SAFETY TIPS
4
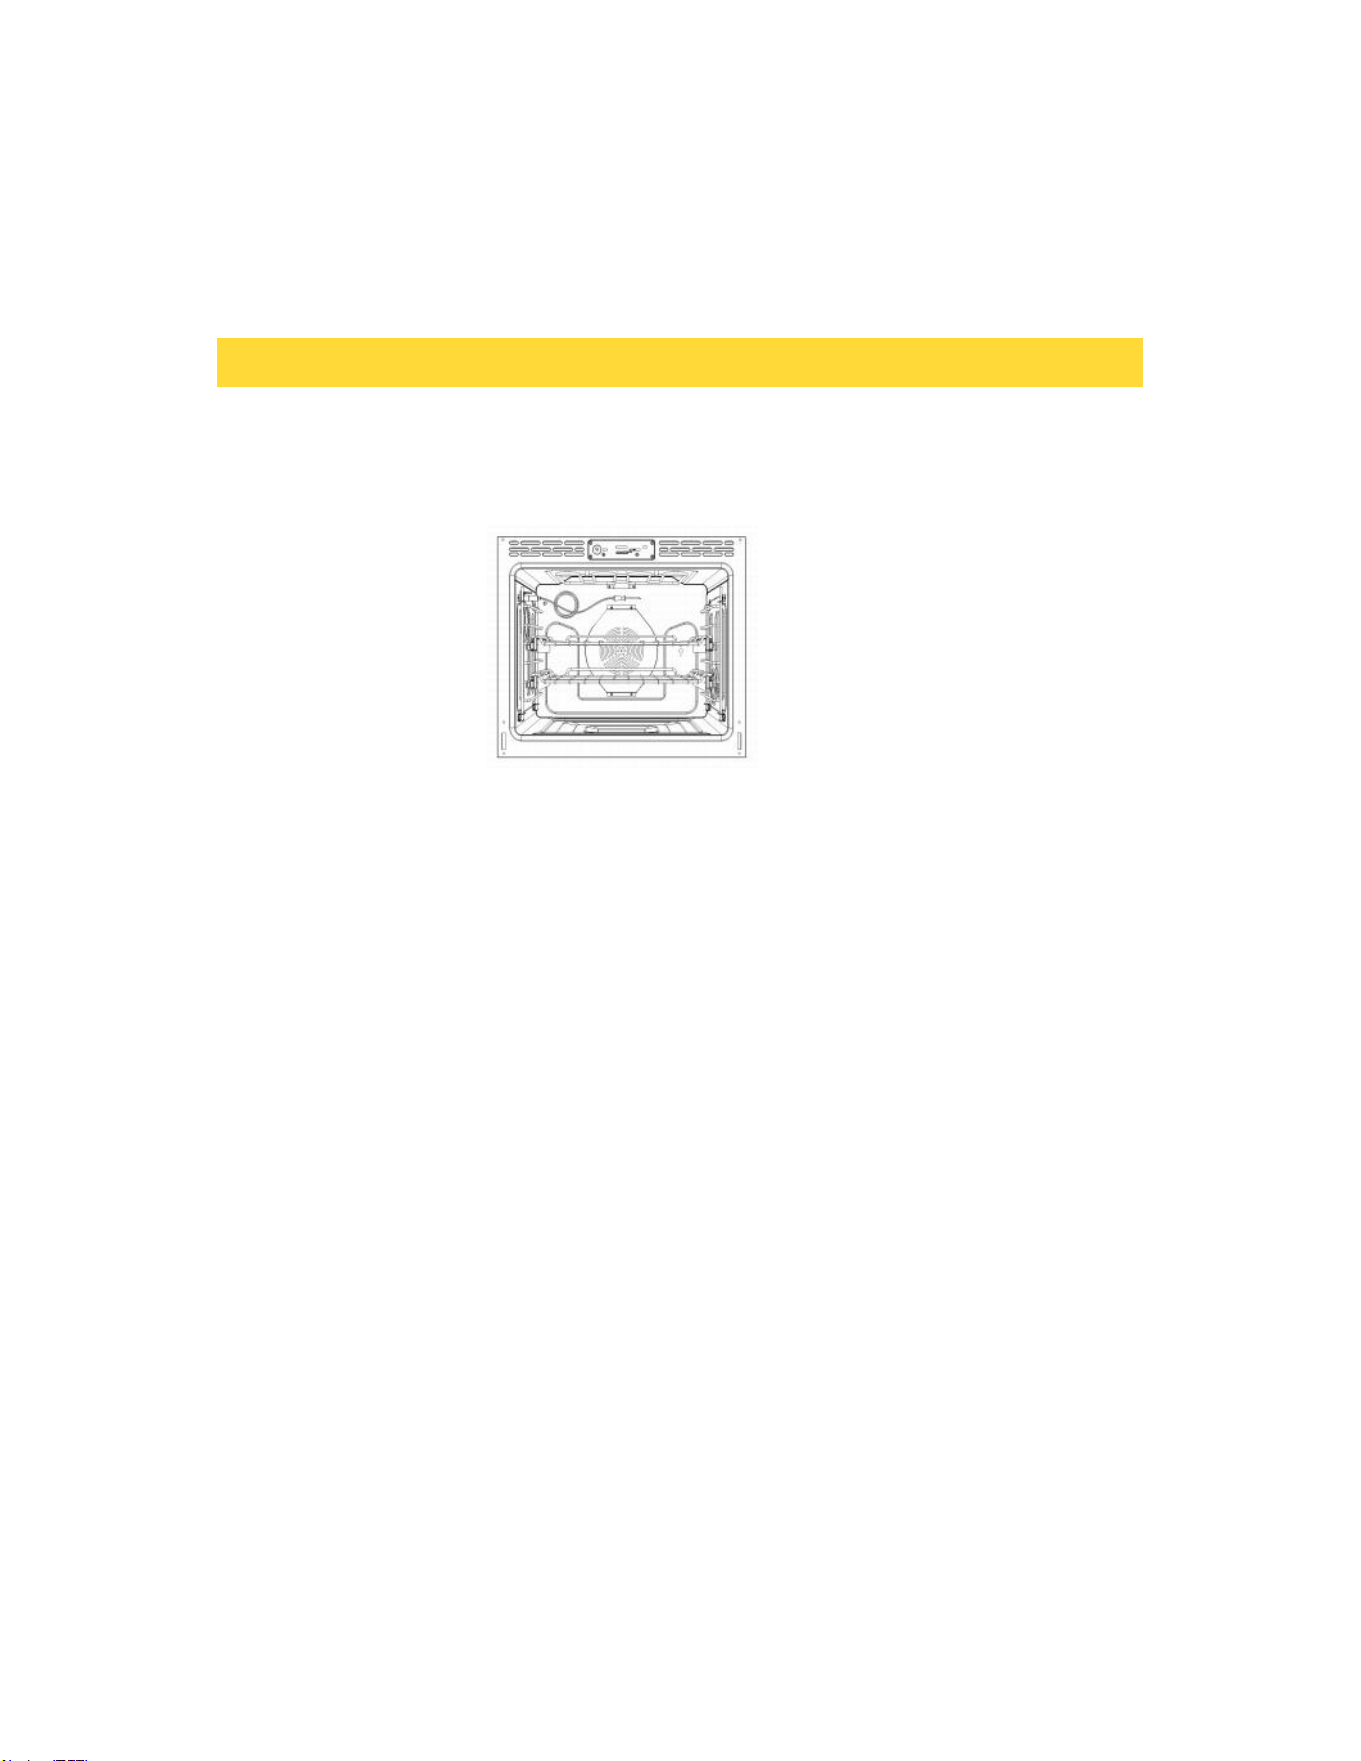
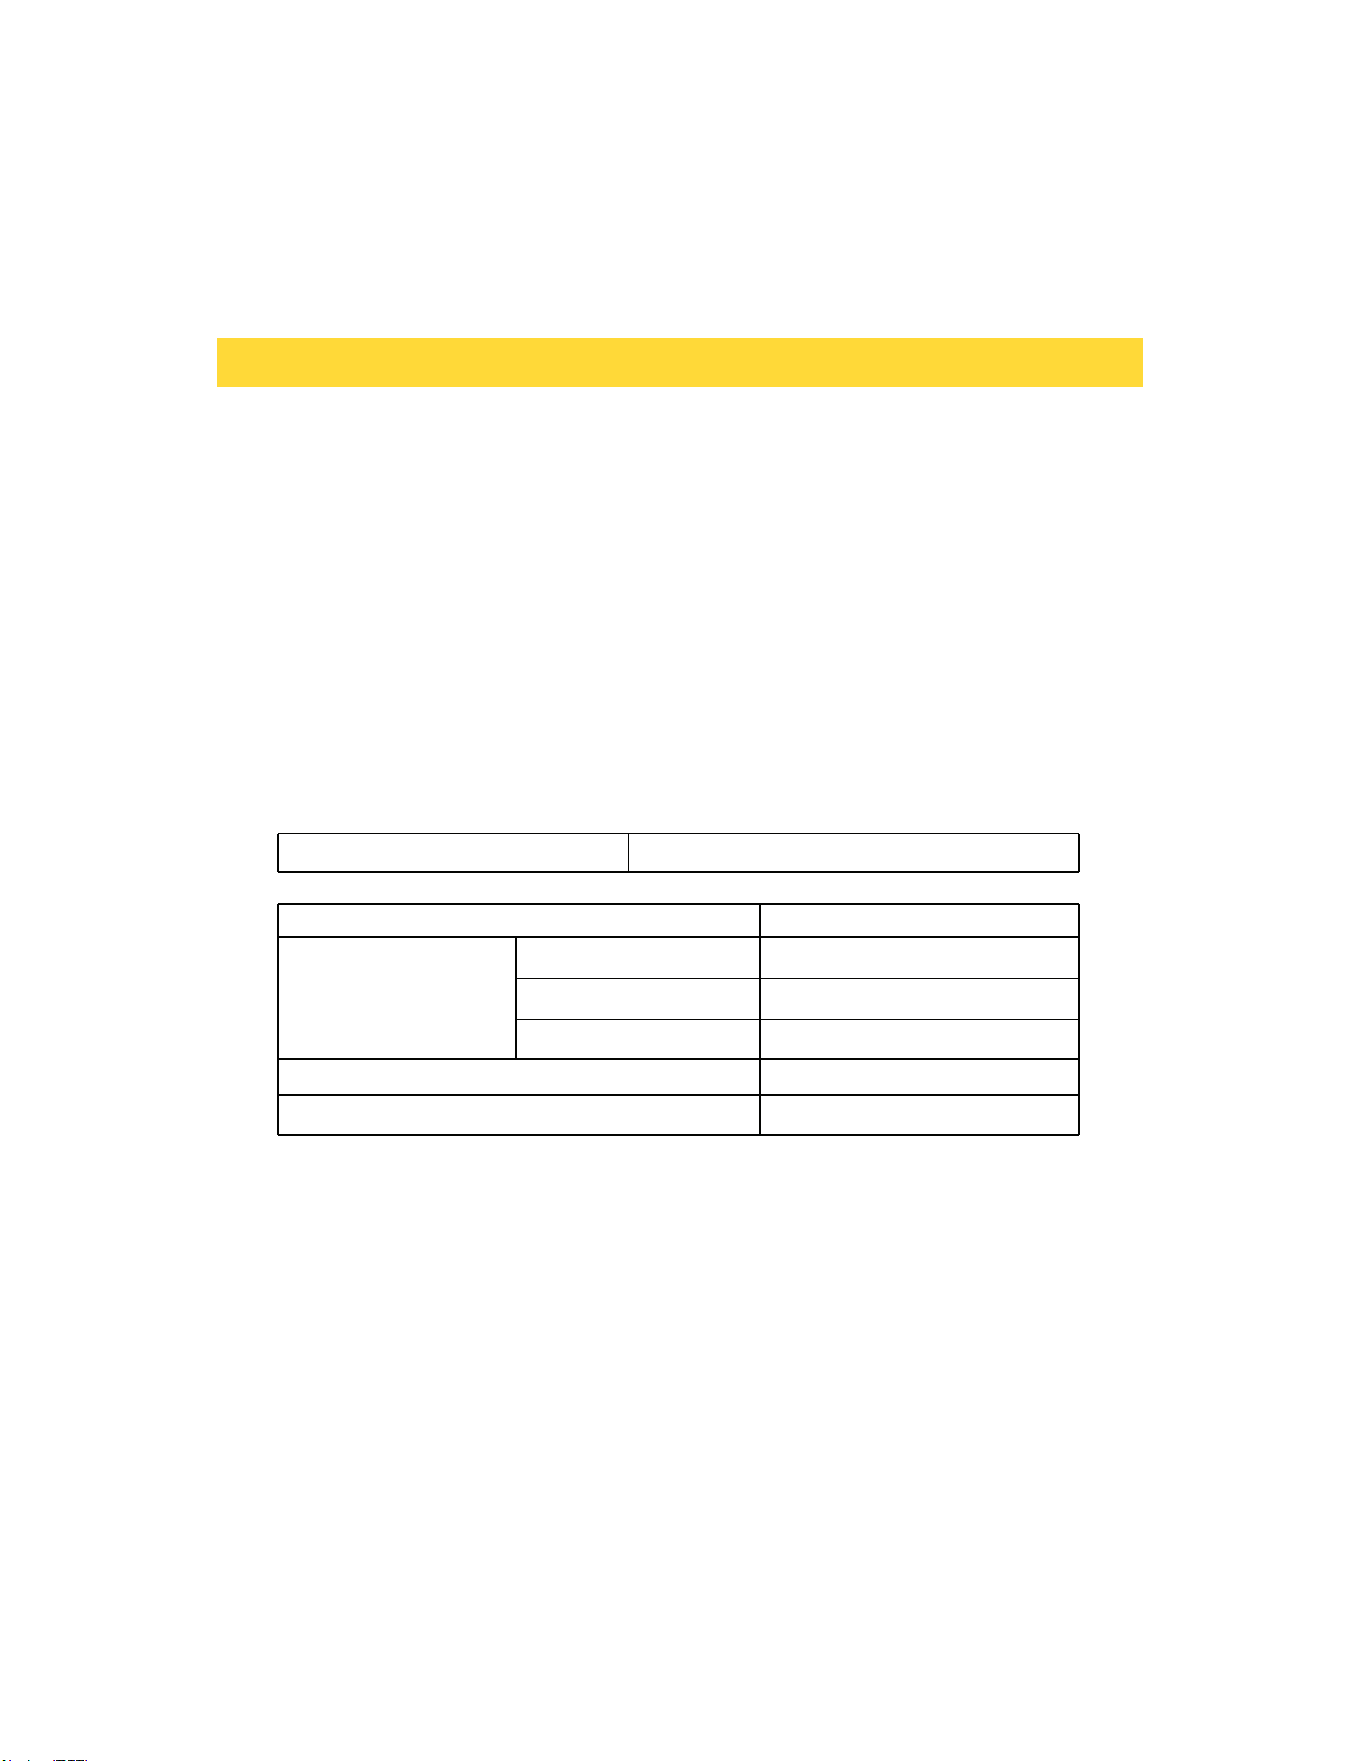
Description 30” double
Cut out width
28 1/2” Min
28 5/8” Max
Cut out height
49 3/5” Min
50 3/5” Max
Clearance from
cutout-top
1”
Clearance from
cutout-bottom
1”
Clearance from
cutout-side edges
1”
Junction box location
9 1/2” from
right side
INSTALLATION INSTRUCTIONS
• Platform must support min 220lbs.
5
IMPORTANT NOTE
This installation must be completed by a qualified installer or technician. Proper installation is
the responsibility of the installer and product failure due to improper installation is NOT cover-
ed by manufacturer warranty.
1. Before beginning.
Remove all packing material from the oven exterior and interior. This includes any tape, bags,
zip ties and polystyrene packing materials.
2. Installation requirements
Measure the existing cabinet opening and compare them to the cutout dimensions below. If
cabinet dimension meet below specs then little to no cabinet work is required. If cabinet cut
outs do not fall with specification below then cabinet work will be required prior to installation.
• Cabinet base must be able to support 400Lbs for double wall ovens, and level.
• Junction box for electrical connections must be mounted flush to rear wall for proper
clearances.
• Kitchen cabinets in contact with the oven must be heat resistant up to 194°F (90°C). Front and
surrounding cabinets heat resistant a min of 158°F (70°C).
• Front frame of cabinet should be at least ¾” thick to support mounting screws for oven.
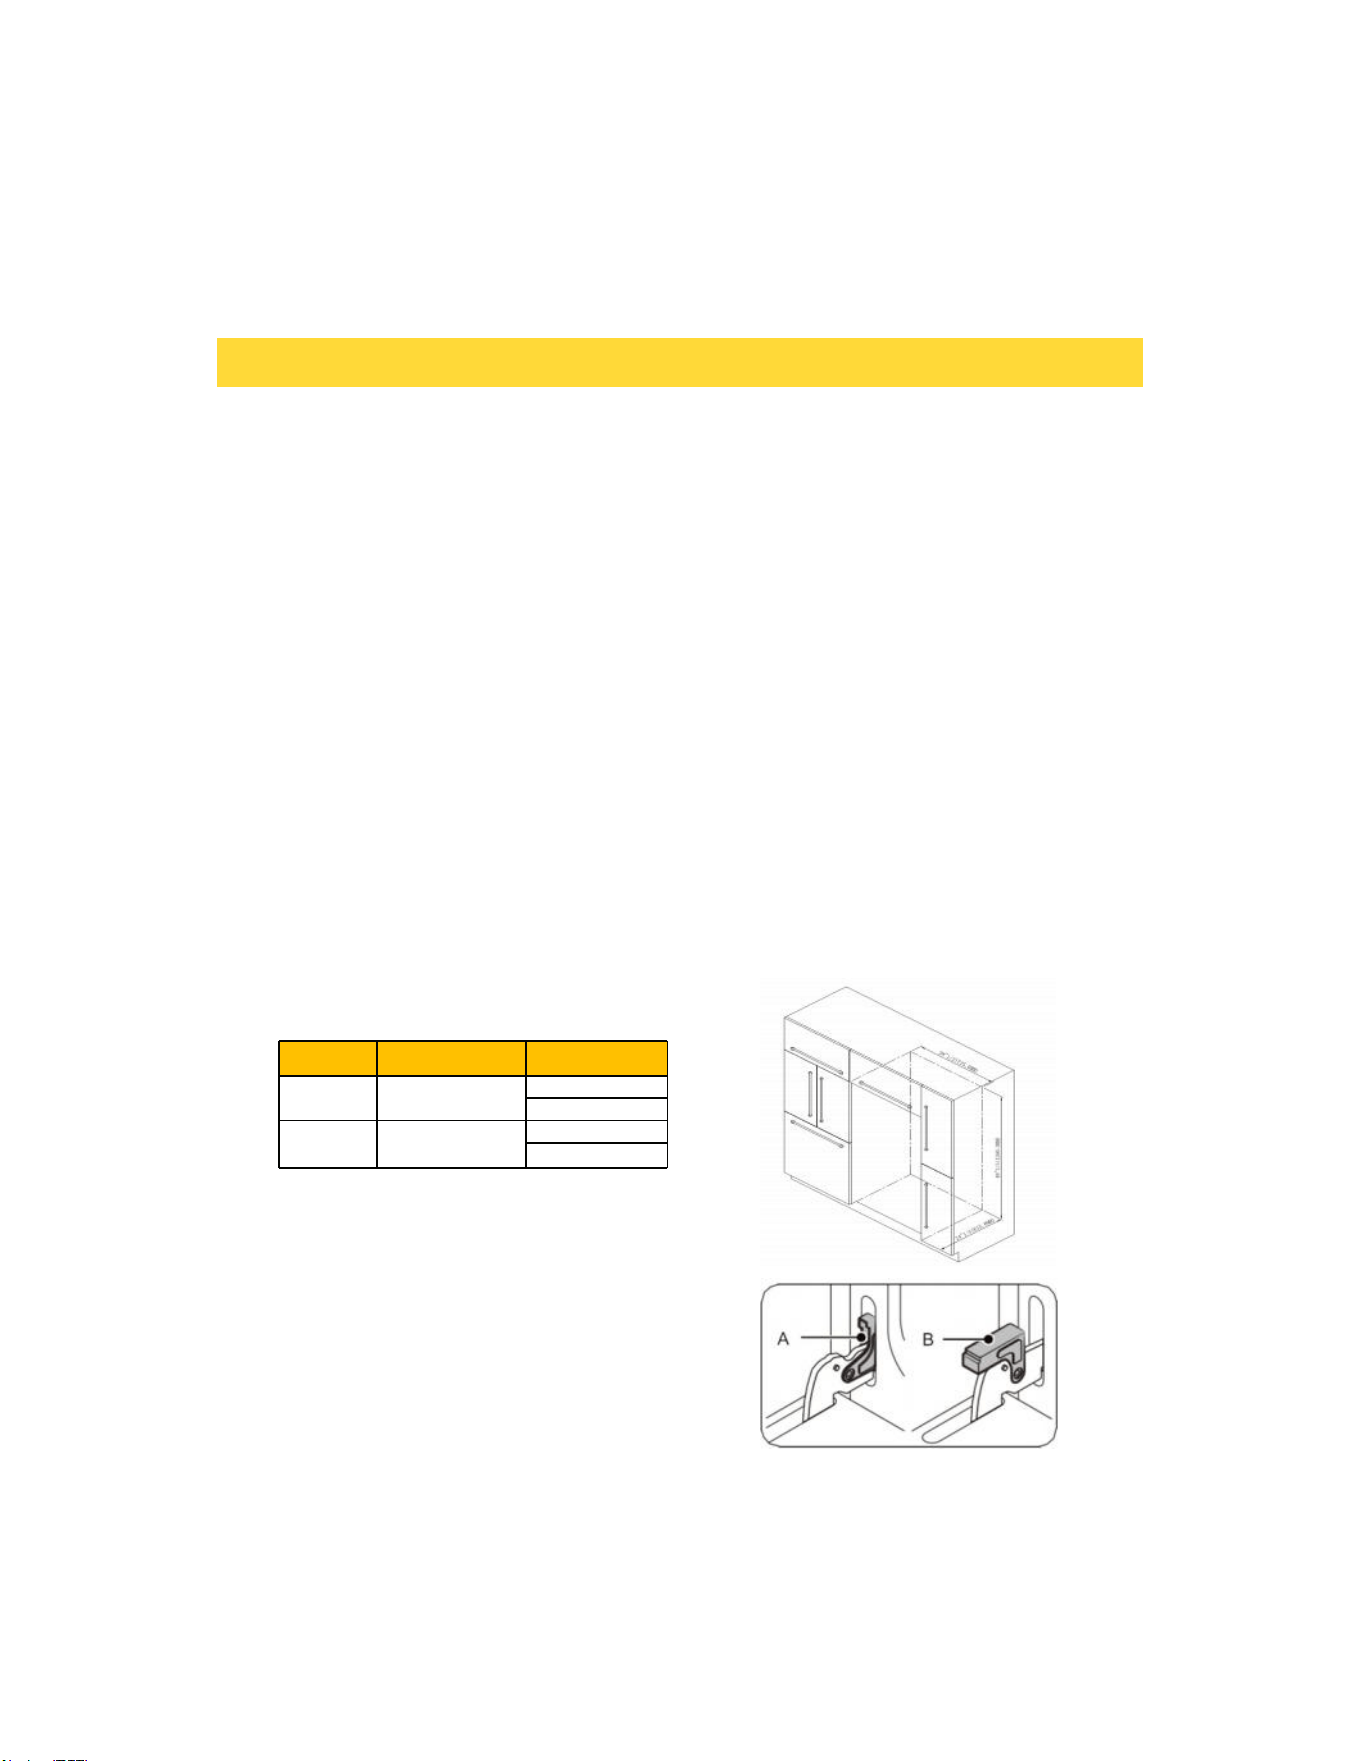
3. Remove oven door and racks from oven.
• Open door fully.
• Flip hinge locks towards door, Move from position
A to Position B on both hinges.
• Close the door until it is resting on hinge locks.
• Grasp the door on both sides (do not lift by the
handle). Lift the oven door upward until the hinges
are free and clear of the hinge receptacles. Store
the door in a safe location.
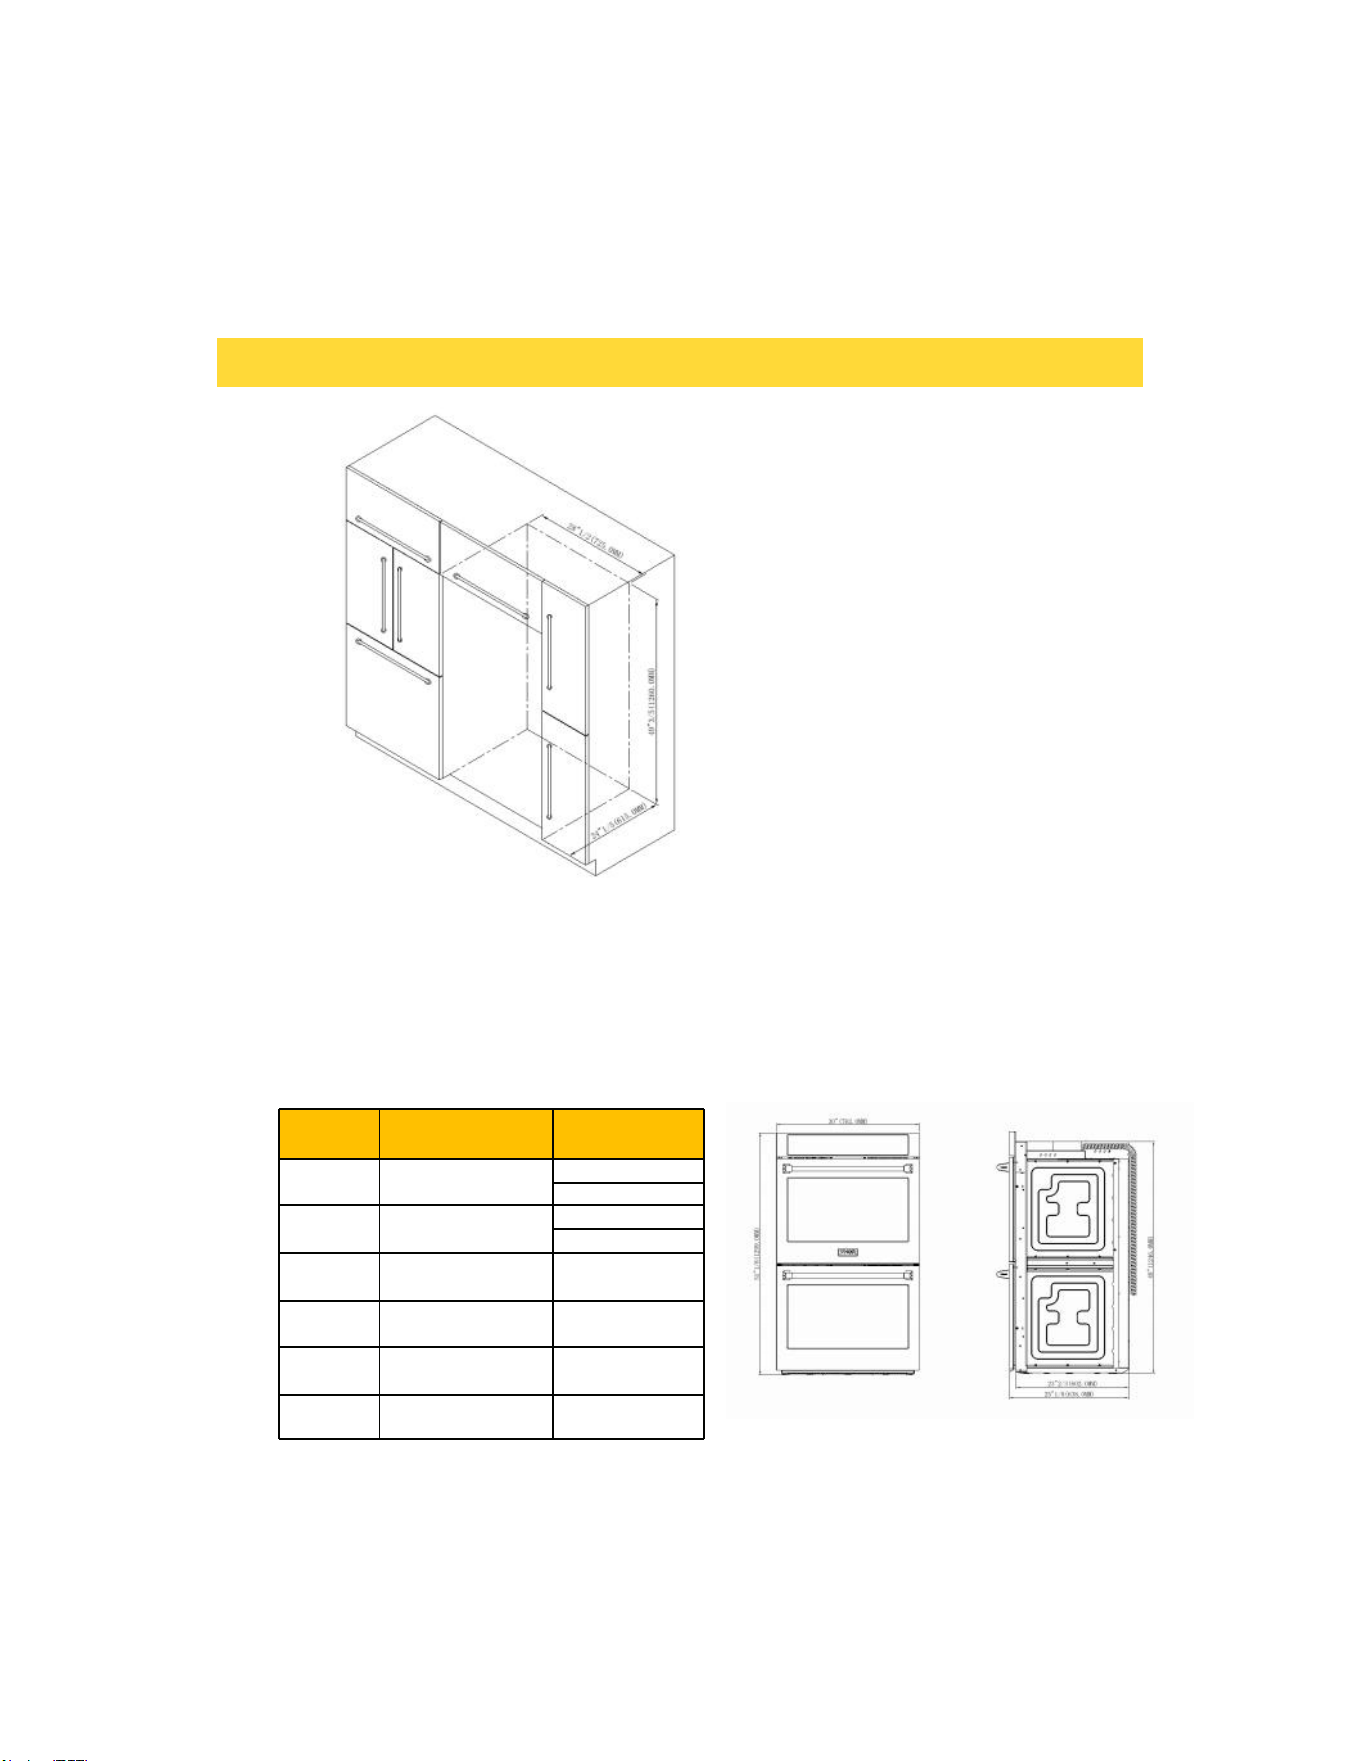
Dimension Description
30” Double
A
Cut Out Width
28 1/2” Min.
28 5/8” Max.
B
Cut Out Height
49 3/5” Min.
50 3/5” Max.
INSTALLATION INSTRUCTIONS
6
4. Move oven close enough to the opening so electrical connections can be made.
IMPORTANT NOTE
The wall oven must be hardwired (direct wired) to an approved junction box. A plug and
receptacle is NOT PERMITTED. DO NOT shorten the flexible conduit. Conduit must be
securely connected directly to a junction box with cable connector. You will need to purchase
an appropriate conduit connector to complete the connection to the junction box.
Wire connections should be made by an electrician or qualified technician only following all
local codes.
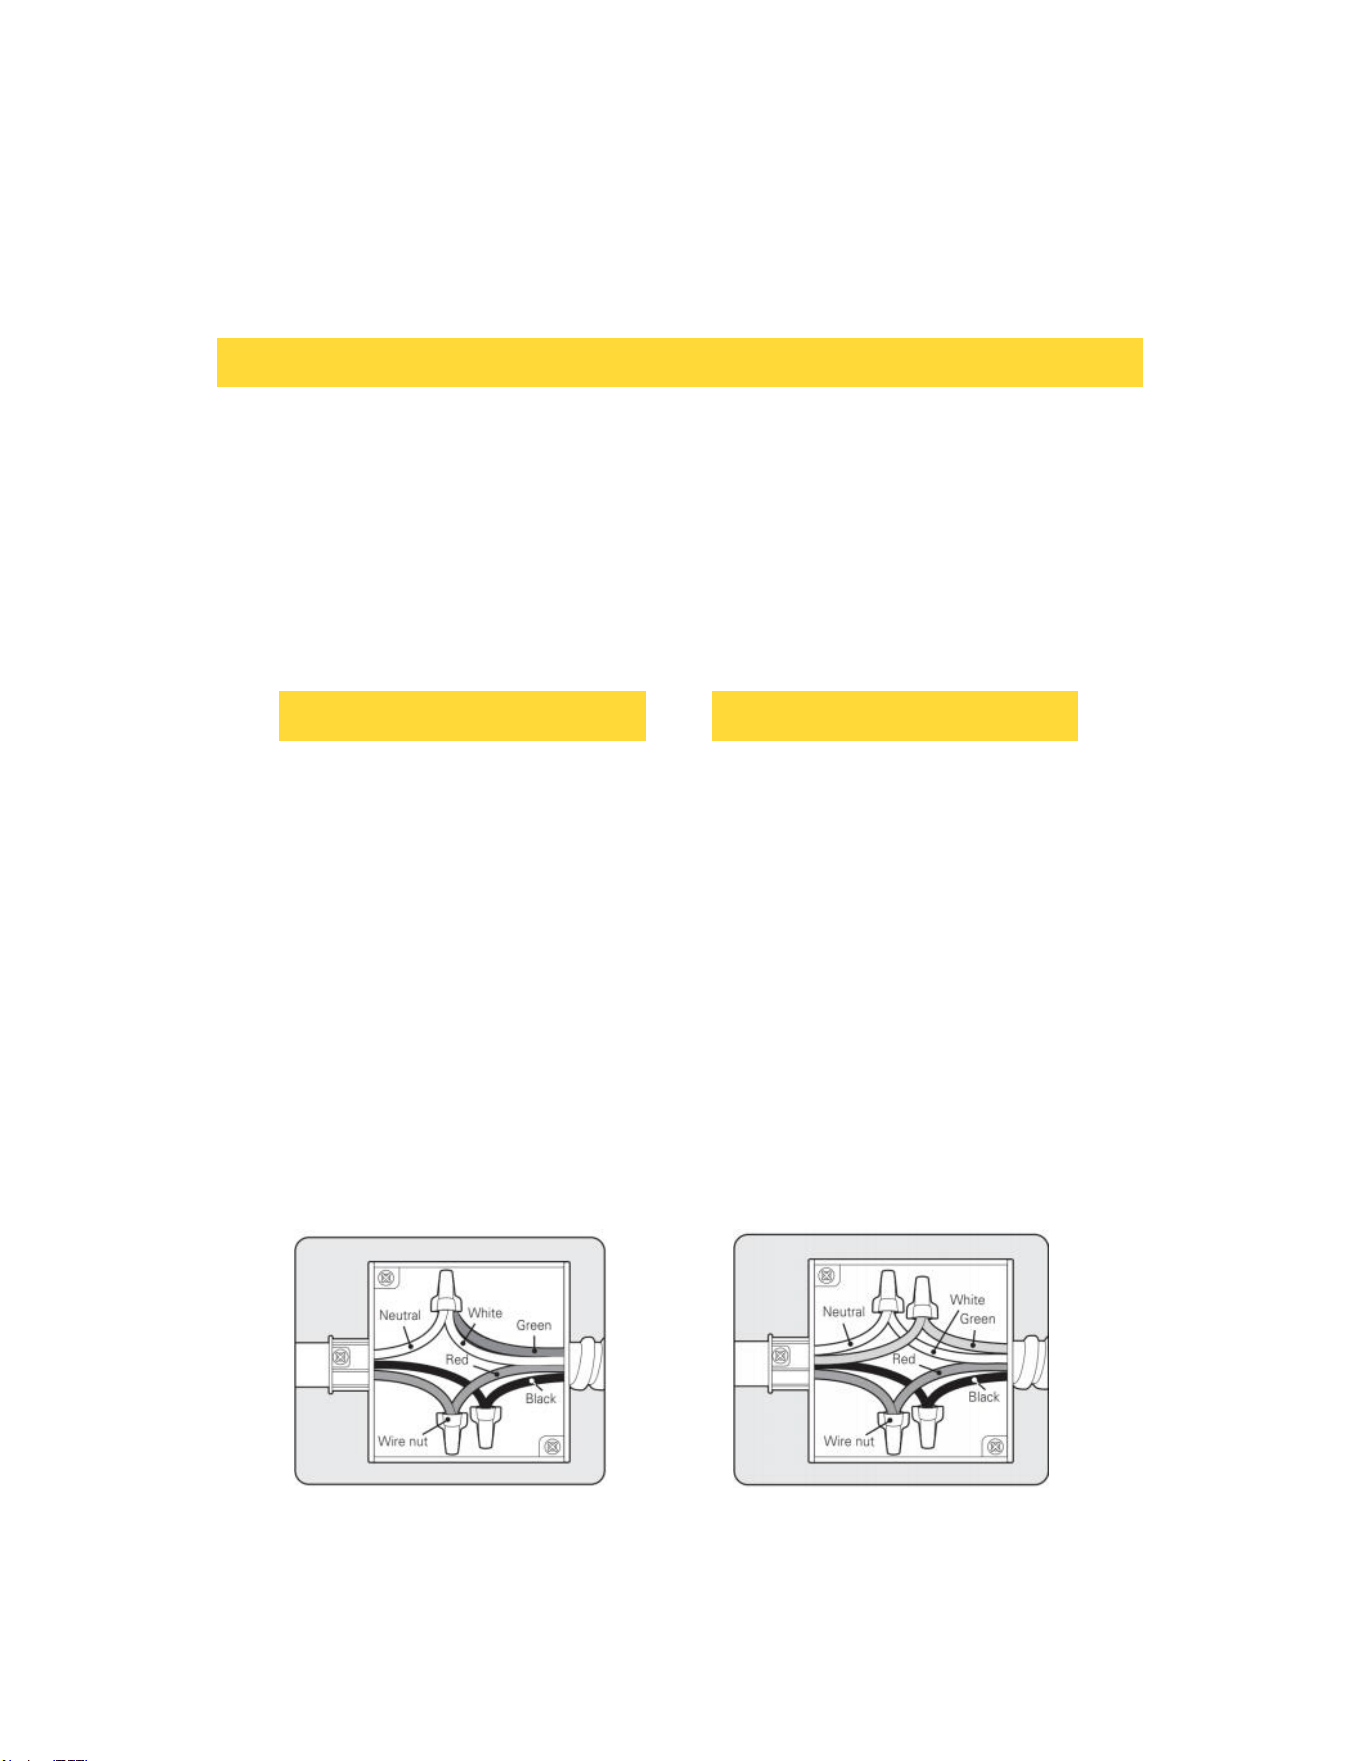
To connect to a Four wire circuit follow
below steps.
1. Separate the oven Ground and (white)
Neutral wire.
2. Connect the oven ground (Green or
bare copper wire) wire to the home
branch circuit Ground (Green or bare
copper) wire, using a UL approved
wire nut appropriate for wire gauge.
3. Connect the oven (White) wire to the
branch circuit White (Neutral) wire
using an approved UL wire nut.
4. Connect the oven Black wire to the
branch circuit Black (L1) using a UL
approved wire nut.
5. Connect the oven Red wire to the
branch circuit Red (L2) wire using a
UL approved Wire nut.
6. Install junction box cover.
To connect to a three wire circuit follow
below steps.
1. Connect the oven ground (Green or
bare copper wire) and Neutral (white)
wire to the home branch circuit
neutral (white) wire, using a UL
approved wire nut appropriate for
wire gauge.
2. Connect the oven Red wire to the
branch circuit Red (L2) wire using an
approved UL wire nut appropriate for
wire gauge.
3. Connect the oven Black wire to the
branch circuit Black (L1) using a UL
approved wire nut appropriate for the
wire gauge.
4. Install junction box cover.
INSTALLATION INSTRUCTIONS
3-Wire circuit connection 4-Wire circuit connection
7

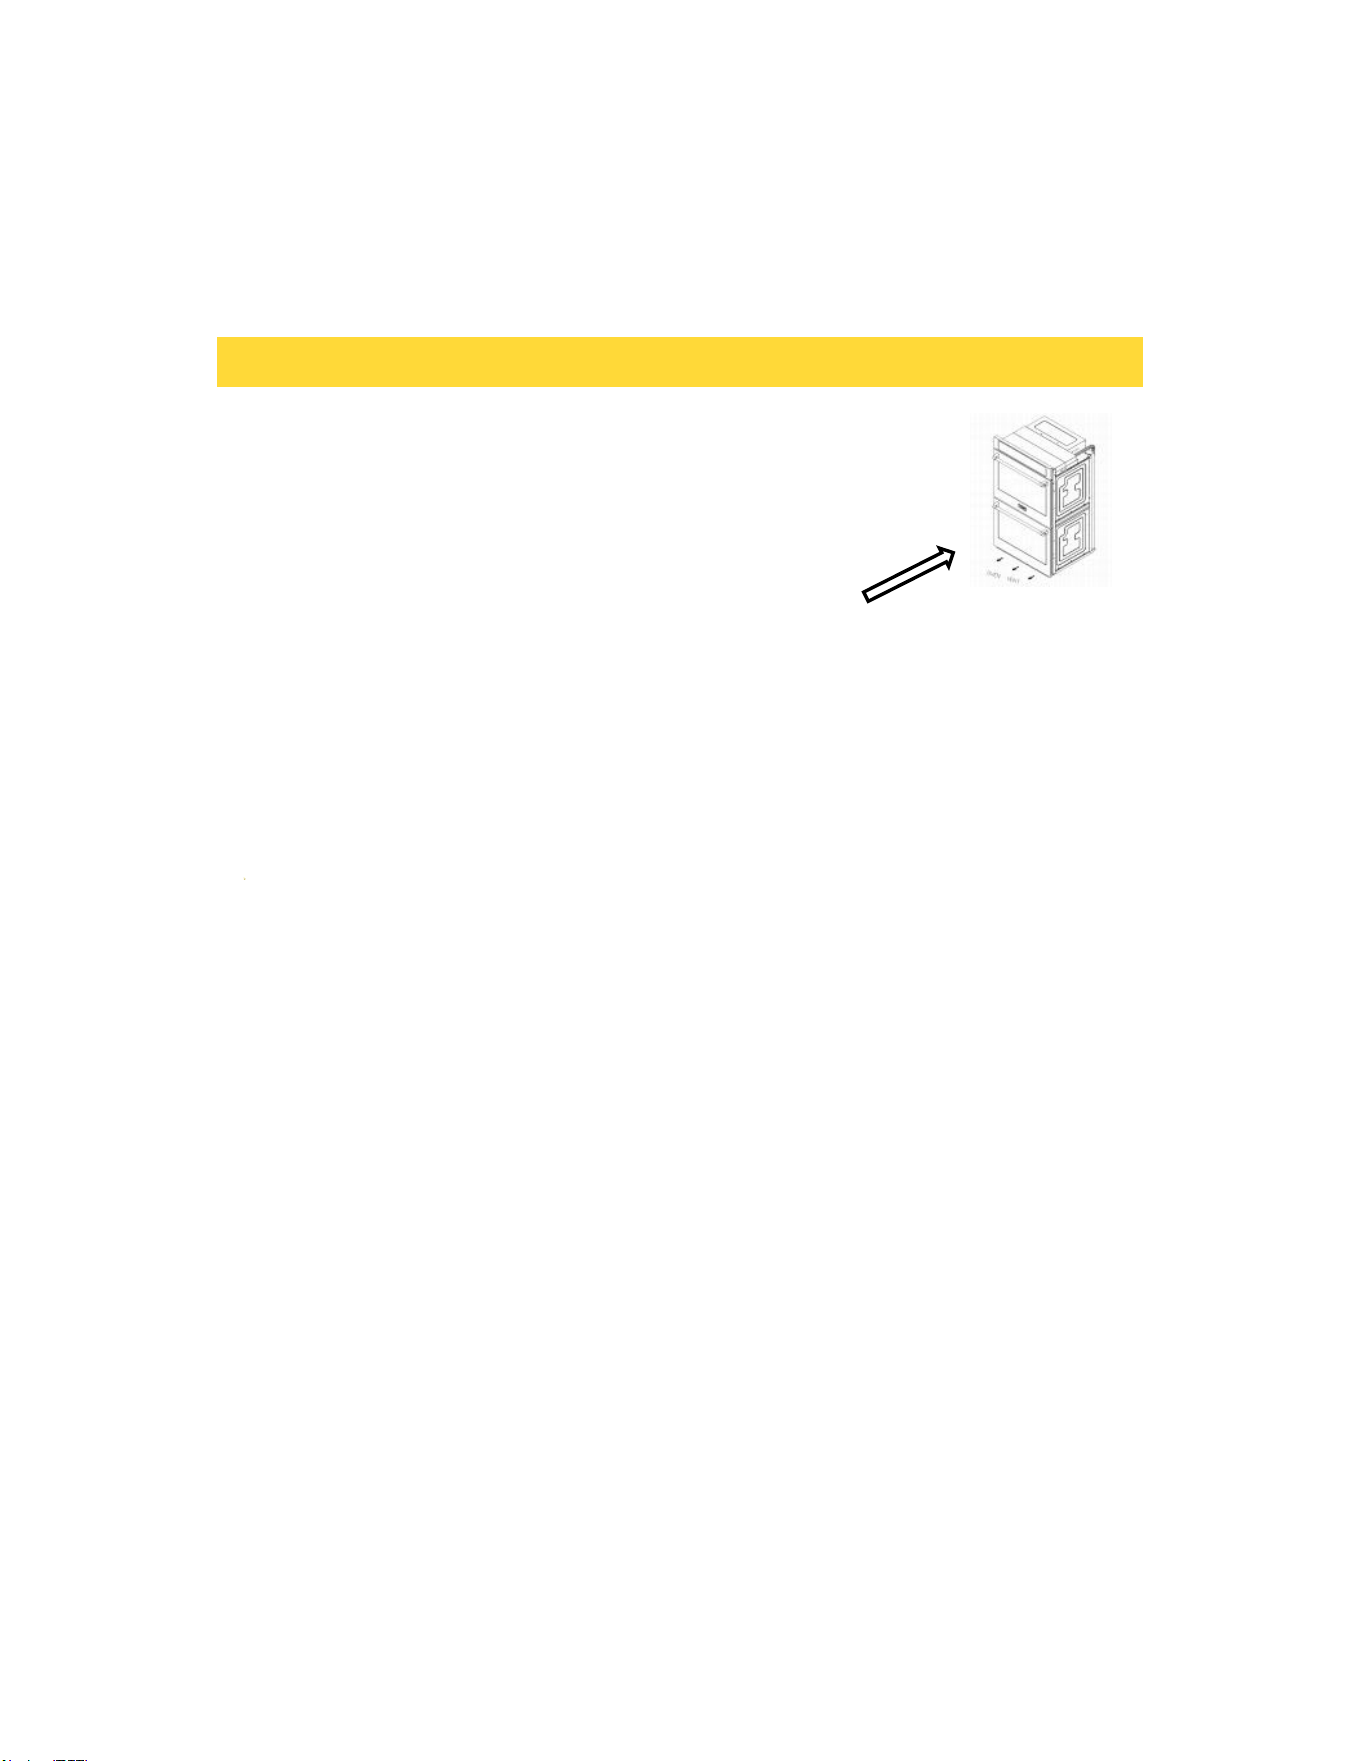
6. Check operation
• Power on oven.
• Set the oven to Broil and let it run for a few minutes; heat should be felt at the top of the oven.
• Set the oven to Bake and let it run for a few minutes; heat should be felt from the bottom of the
oven.
• Set the oven to Conv. Bake, and the convection fan should be visible turning on the back of the
oven wall.
NOTE
It is normal for a small amount of smoke and odor to be present during the intimal break in of the
oven.
5. Install oven into the cabinet.
• With the assistance of a helper, lift the oven into place and slide it into the cabinet.When sliding
the oven in push by the door frame and not by the Stainless steel side trims.
• Align the oven so it is centered in the opening.
• Use the mounting holes on the oven's side trim as a guide to pre-drill pilot holes for the
provided screws.
• Using the 4 provided mounting screws secure the oven to the cabinet.
• Reinstall the oven door.
• Turn on power to oven.
INSTALLATION INSTRUCTIONS
8
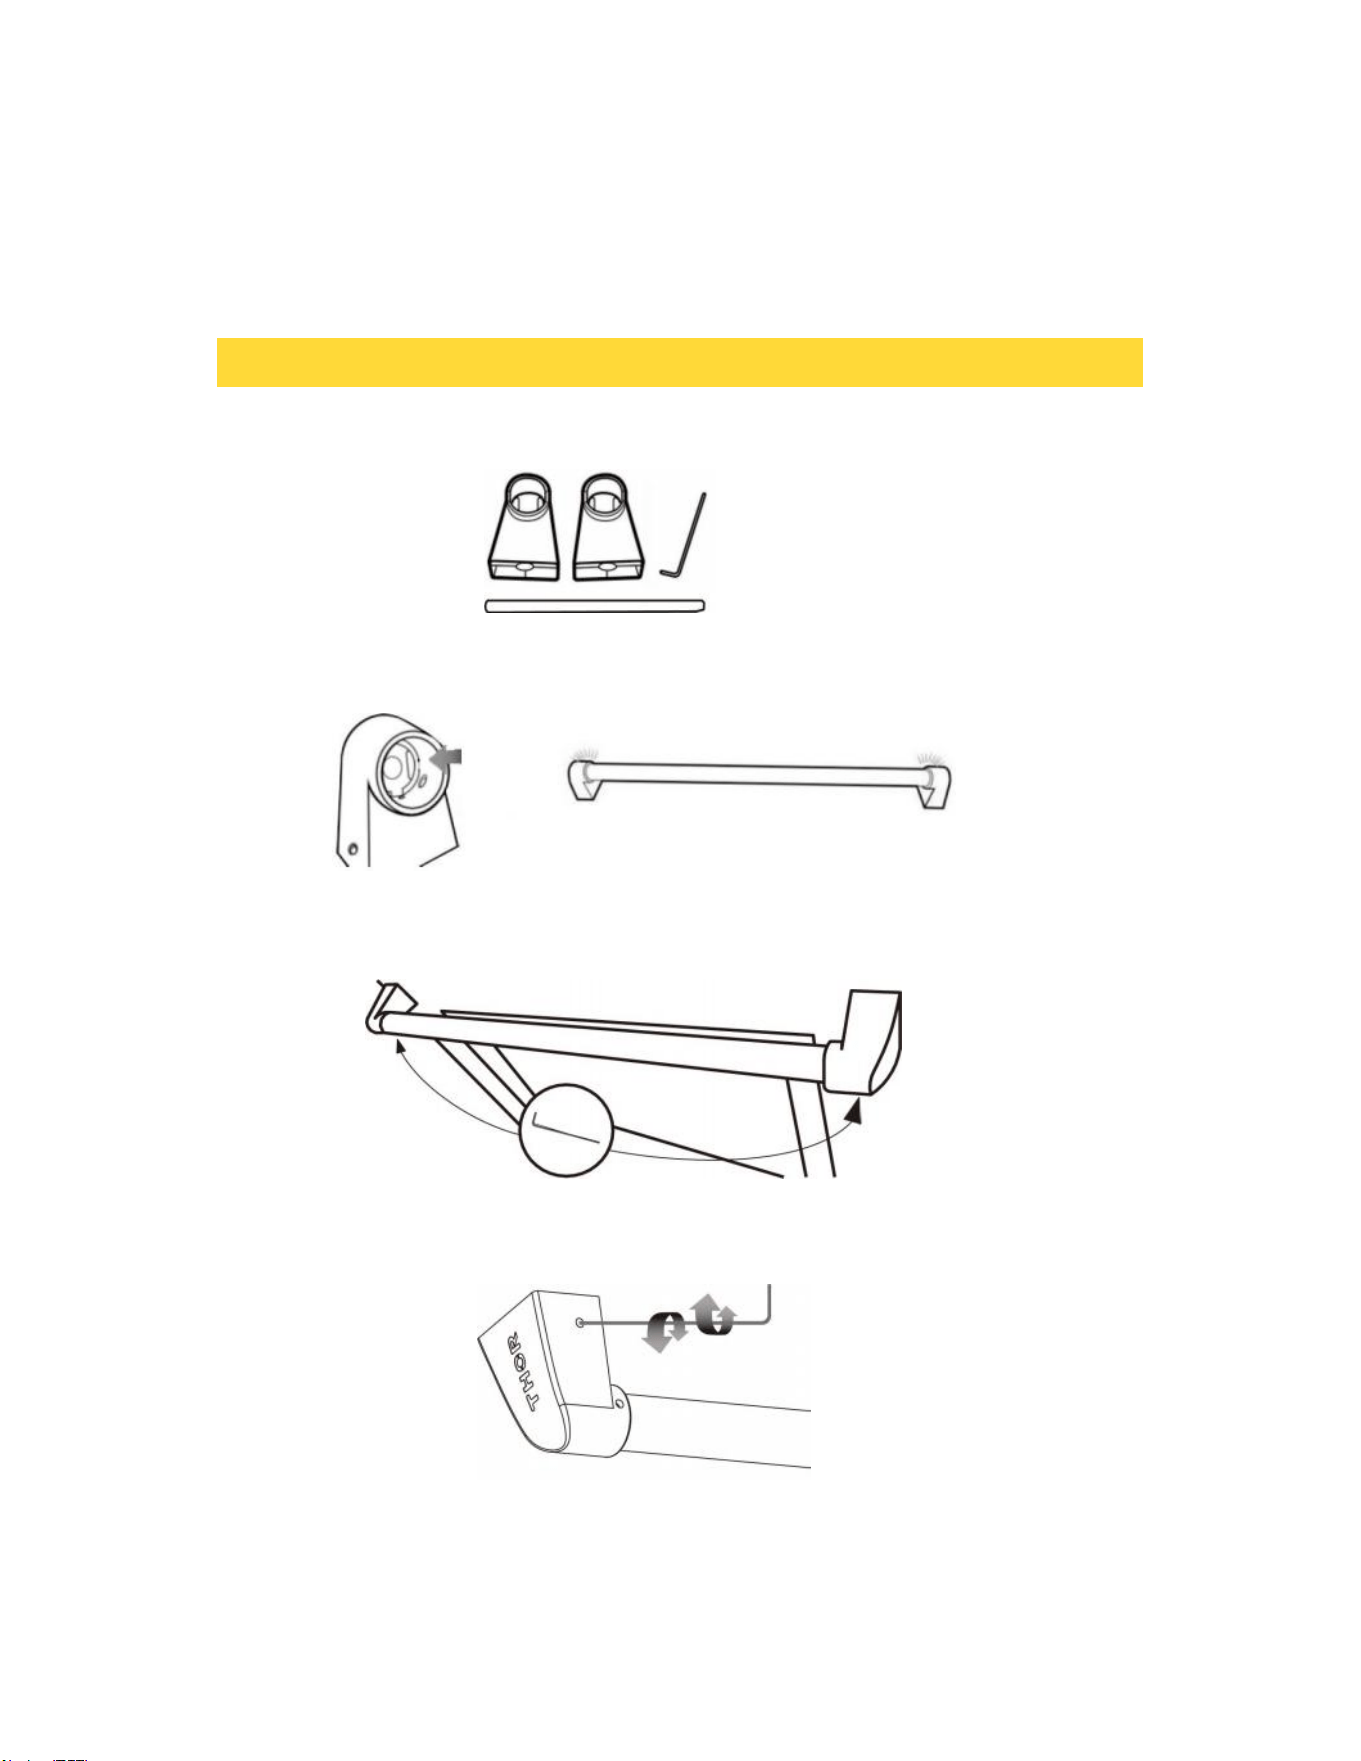
INSTALLATION INSTRUCTIONS
2. While holding the two handle end caps in place on the tubular handle, align the
handle end cap opening up with the studs on the door. Slide handle holders on to
the door studs.
While holding the door handle assembly in place on the door studs use the sup-
plied Allen wrench to tighten the set screws on the under side of each handle
holder.
Door Handle parts
1. Insert the tubular handle in to the handle holder end caps.
Mounting Handle
9

1*Broil Pan Cover 1*Broil Pan 4*Slide Racks 2*Temp probe
INTRODUCING YOUR NEW OVEN
What's included with your oven
Overview
10

Remove all rack accessories. Make sure there is no packing material remaining in the oven.
Clean the oven thoroughly before using it for the first time. Then set the oven to Bake, set
temperature for 400 °F and run for 1 hour. Then set unit to broil and run for an additional 30
min on Broil. There will be a distinctive odor. This is normal. You may see a light smoke from
oven vent area and inside the oven as the manufacturing and protective coating oils are
burned off. Ensure your kitchen is well ventilated during this conditioning period.
Energy saving tips
• During cooking, the oven door should remain closed except when you turn food over.
Do not open the door frequently during cooking to maintain the oven temperature and to save
energy.
• If cooking time is more than 30 minutes, you can switch the oven off 5-10 minutes before the
end of the cooking time to save energy. The residual heat will complete the cooking process.
• To save energy and reduce the time needed for reheating the oven, plan oven use to avoid
turning the oven off between cooking one item and the next.
• Whenever possible, cook more than one item at a time.
BEFORE YOU BEGIN
11
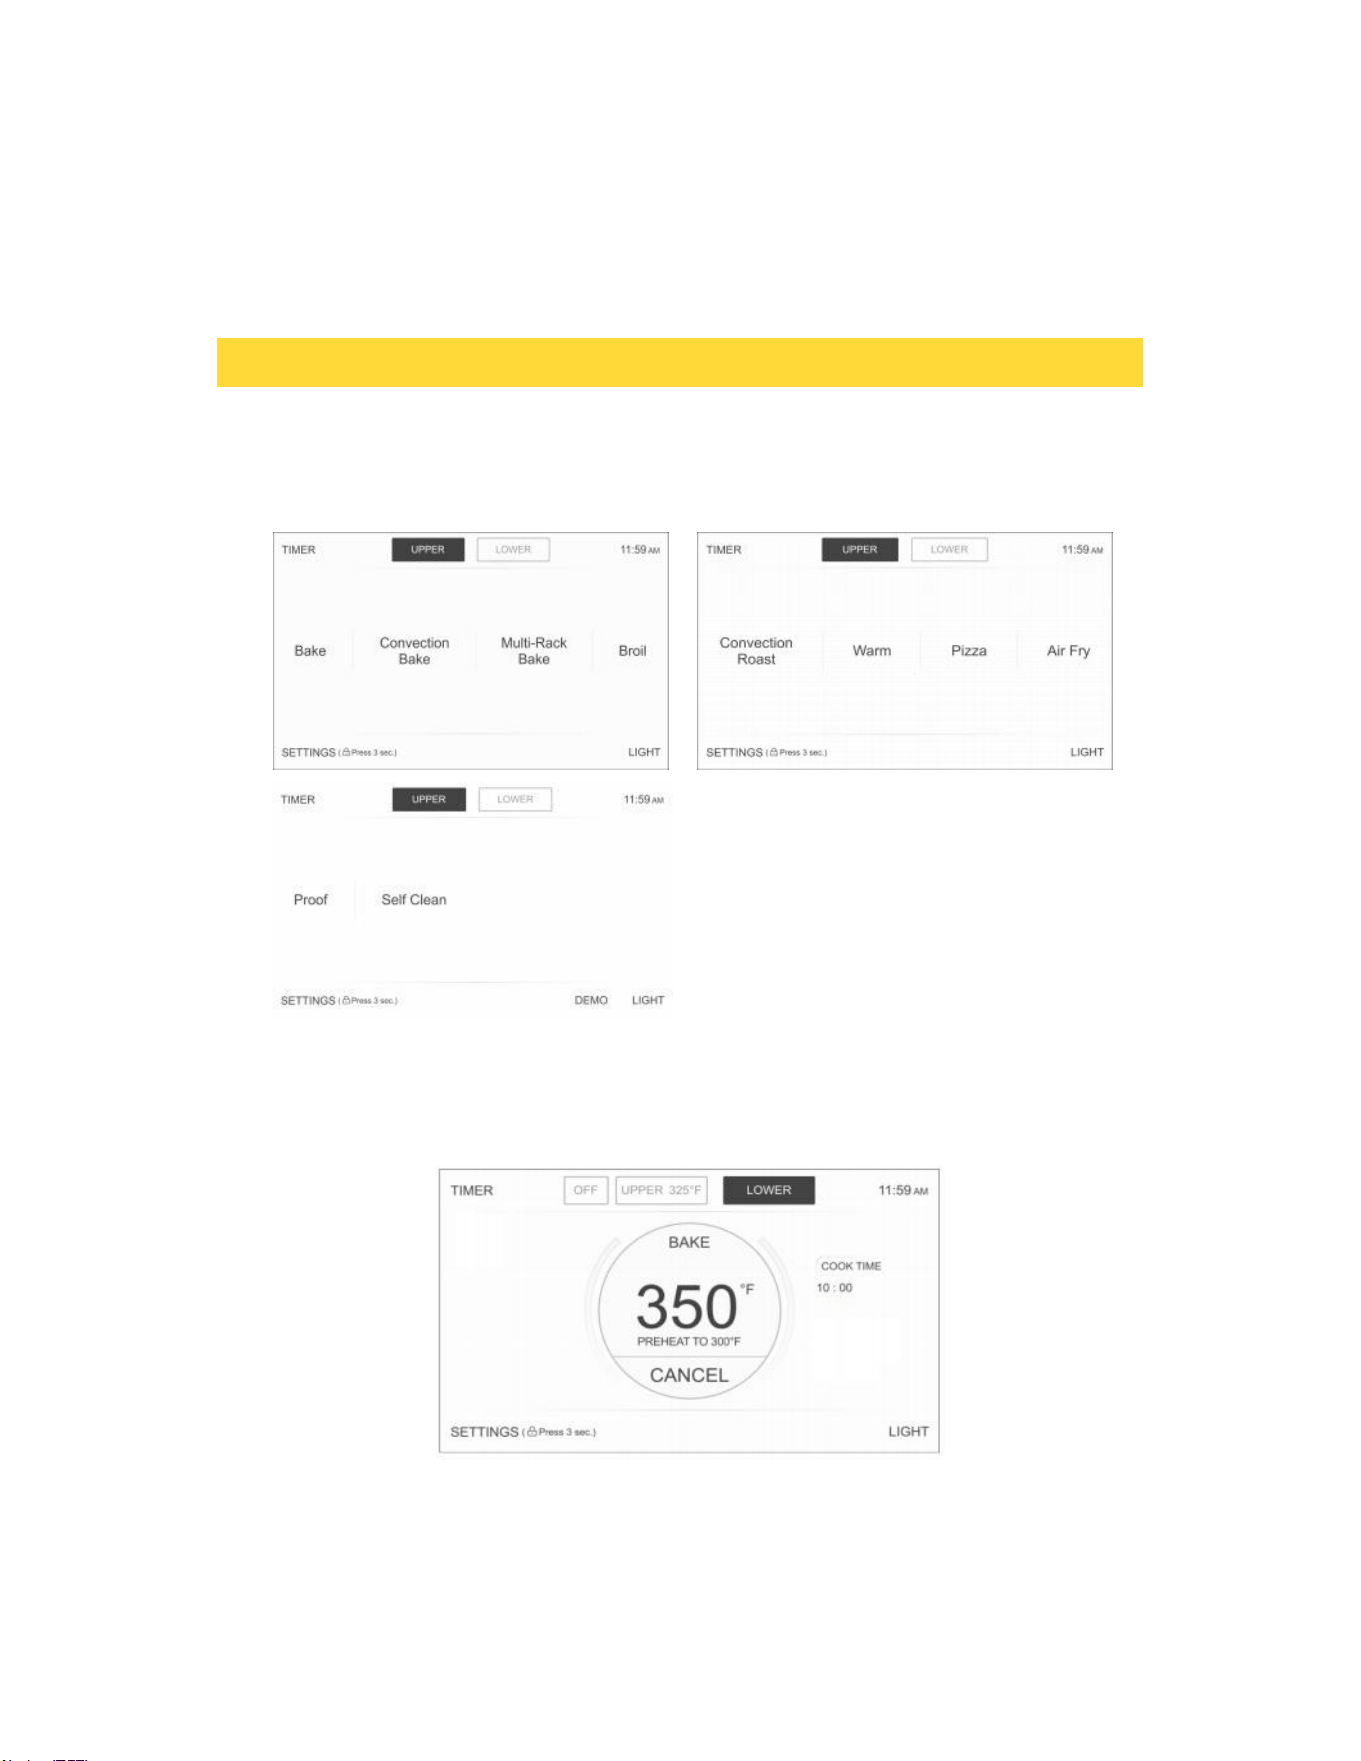
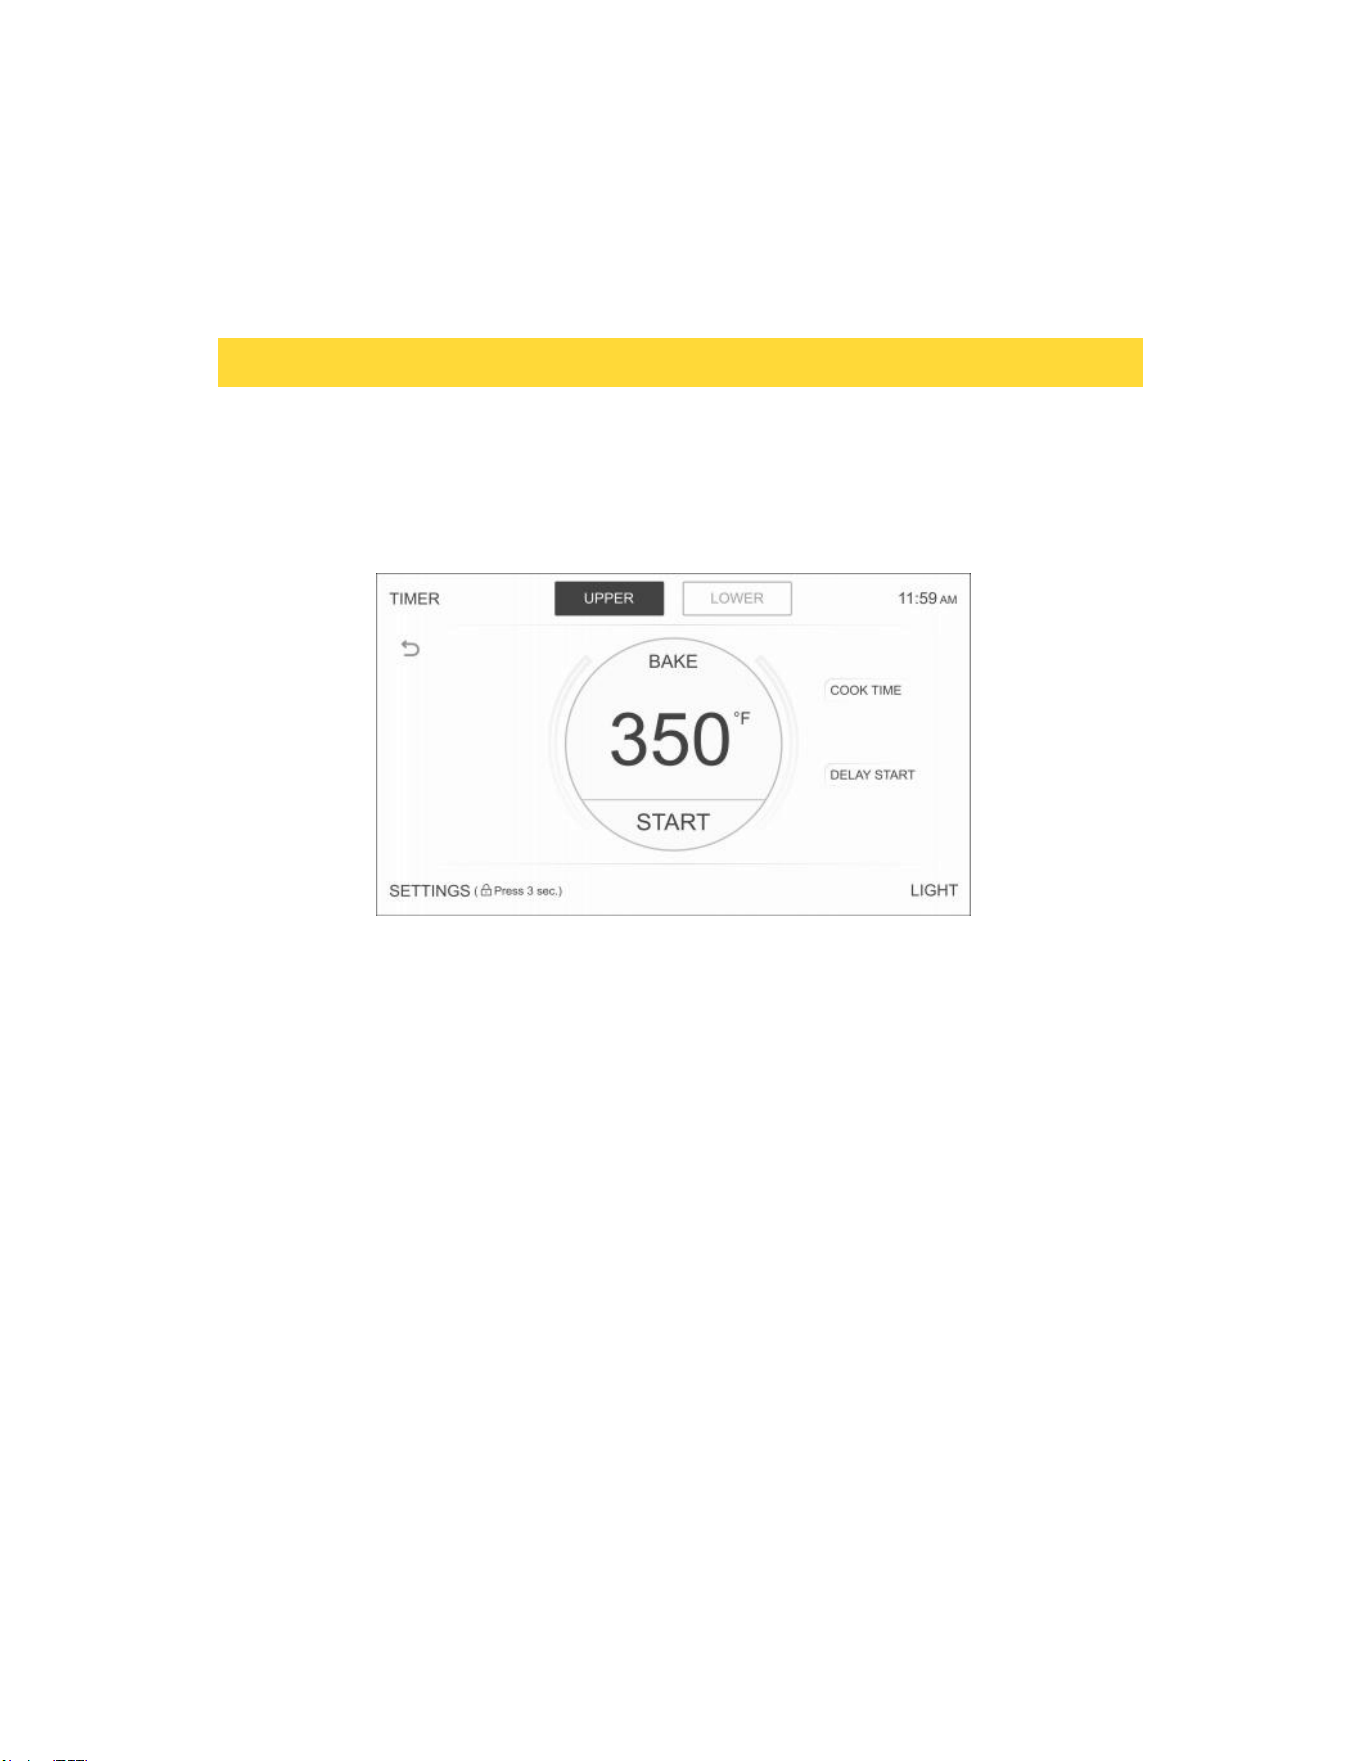
Double Wall Oven Main Menus
When using both cavities to cook, the control will allow you to switch back and forth between the
upper and lower oven to review the cycle selection for each. When viewing the cooking mode
screen you can access the alternate cavity by pressing on the button at the top of the screen.
READ THE INSTRUCTIONS CAREFULLY BEFORE USING THE OVEN.
For satisfactory use of your oven, become familiar with the various features and functions of
the oven as described below. Detailed instructions for each feature and function follow later in
this user manual.
OPERATING THE OVEN
• When using both cavities to cook,you can press OFF to turn off another oven.
12

Upper Oven and Lower Oven
You can set separate modes in each oven. The selected oven will appear above the cooking modes.
Bake
This option allows the user to access the traditional bake mode.
Convection Bake
Circulates the oven heat evenly and continuously for faster cooking of some foods.
Multi-Rack Bake
Multi-rack cooking in a convection oven is most beneficial around the holidays. With a convection
oven, it's easy to utilize and great for cooking your food faster.
Broil
Broil can be selected to access Broil Low and Broil High. See the Cooking Modes section for more
information.
Convection Roast
Uses a convection fan to gently brown meats and poultry and seal in the juices.
Keep Warm
Keep Warm will keep cooked food warm for serving up to 3 hours after cooking has finished.
Pizza
Pizza is specially designed to cook the perfect pizza.
Air Fry
Uses hot air for great tasting crispy results without all the oil.
Proof
Create the perfect oven environment for activating yeast in homemade bread.
Self Clean
This self-cleaning oven uses high temperatures (well above cooking temperatures) to burn off leftover
grease and residue completely or reduce them to a finely powdered ash that you can wipe away with a damp
cloth.
Child Lock
Press and hold SETTINGS for three seconds to turn off the control panel to prevent the oven from
accidentally being turned on.Panel stay locked until you turn this function off.
SETTINGS
Press the SETTINGS to access the Settings. See the Settings section for more information.
Oven Light
To turn on or off the LIGHT on the right bottom of panel, press the Oven light.Both cavity lights will
be illuminated.
TIMER
Set or cancel the TIMER on the right bottom of panel.
Clock
You can press the clock display in the top of the right panel to set the clock.
OPERATING THE OVEN
13
Setting the clock
The Clock must be set to the correct time of day for the automatic oven cooking functions to work properly.
• The time of day cannot be changed during timed cooking, delay-timed cooking, or a self-cleaning cycle.
How to set the clock
1. Touch SETTINGS ,then touch Clock to set the clock.
2. You can choose between a 12-hour or 24-hour display. The default is 12-hour.
3. Select AM or PM. (Skip this step if you are setting the clock to 24 hour display mode.)
4. Touch the number to set the current time of day.
5. Touch OK to save the changes.
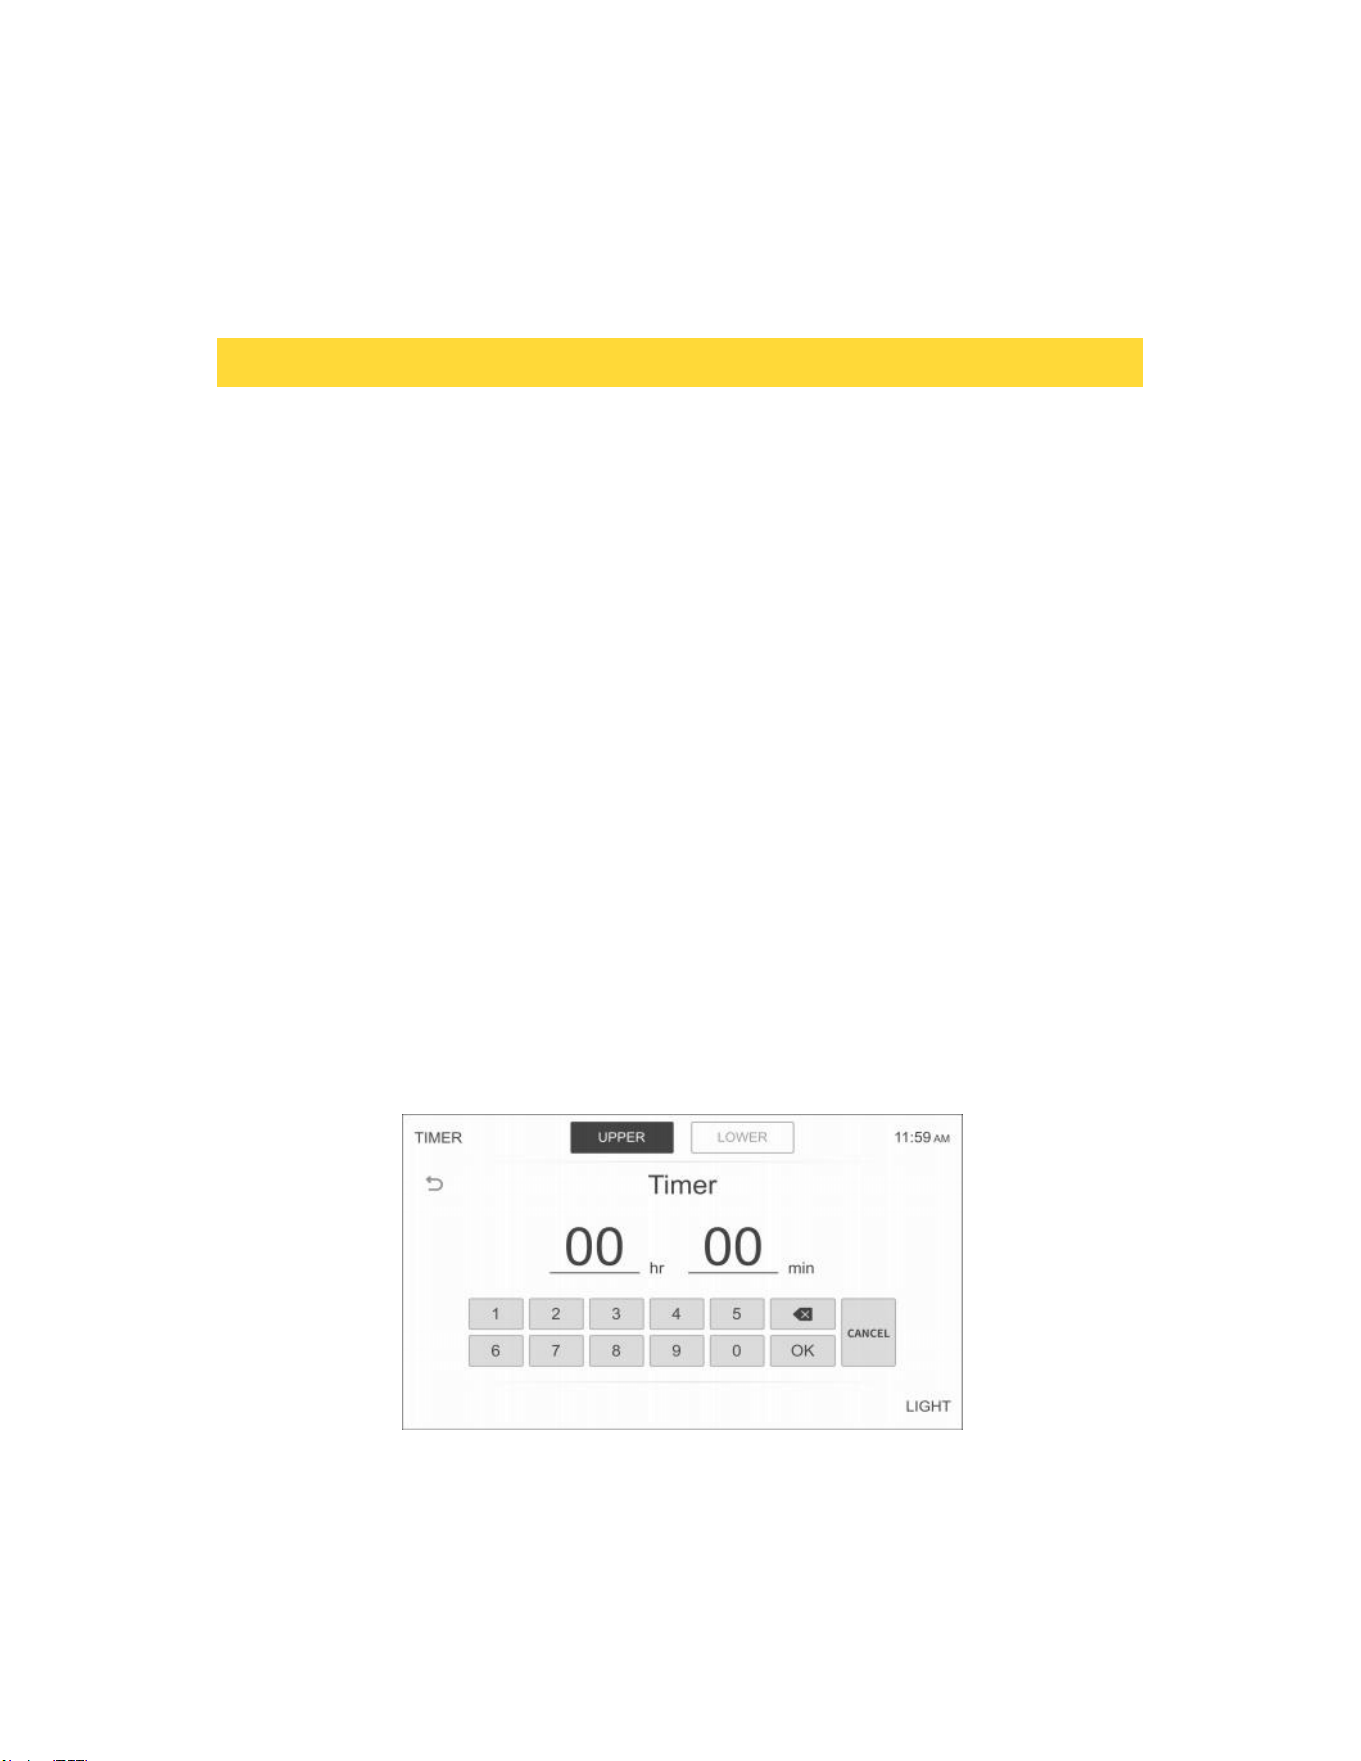
Setting the kitchen timer
The kitchen timer serves as an extra timer that will beep when the set time has elapsed. It does not start
or stop cooking functions. You can use the kitchen timer with any of the other oven functions.
How to set the timer
1. Touch TIMER .
2. Touch number keys to set the hours and minutes. The timer can be set for any amount of time from 1
minute to 24 hours. If you make a mistake, touch delete , and then enter the amount of time again.
3. Touch OK to complete the setup.
4. When the set time has elapsed, the oven will beep and the display will show End until you touch Timer
to clear setting. You can cancel the timer at any time by touching.
OPERATING THE OVEN
14
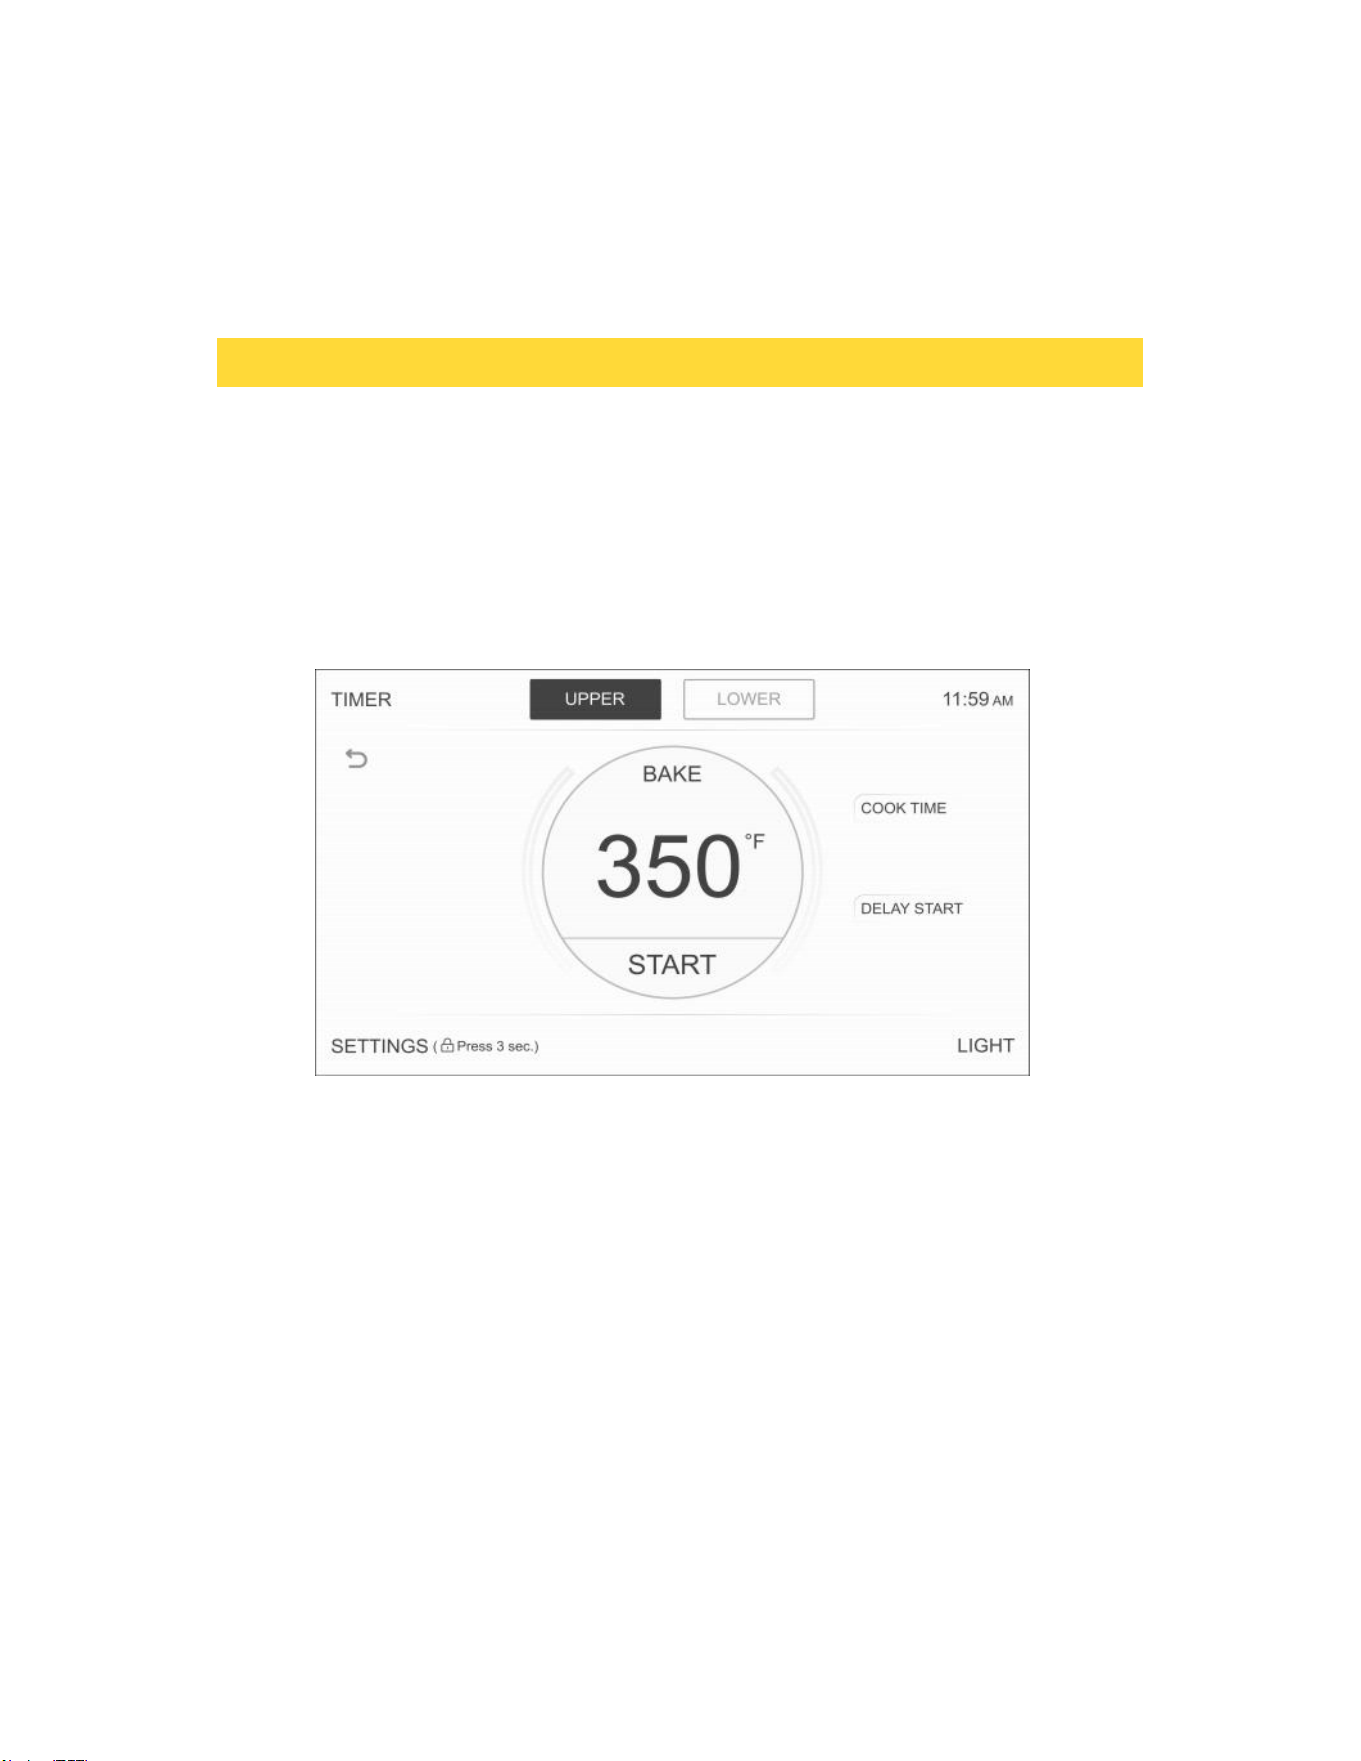
Cook Time
In Timed Cooking mode, the oven turns on immidiately and cooks for the length of time you select. At the end
of the cooking time, the oven turns off automatically.
• You can use the timed Cooking only with another cooking operation.
How to set the oven for Timed Cooking
1. Select the preferred cooking operation , e.g. Bake. Enter the temperature desired, for example, 400 °F,
using the number pad (The default temperature is 350 °F).
2. Touch COOK TIME on the right top of cooking panel. Using the number pad enter hours/minutes you
want the oven to cook for.You can set the cooking time for a minimum of 1 minutes up to a maximum of 10
hours.
3. Tough START to begin preheating. The temperature display will start to change once the oven temperature
reaches 100 °F until to the set temperature,then the buzzer sounds six times to indicate that the preheating
is complete.(Cooking time does not include preheating time.)
• When timed Cooking is done, the oven will stop working and the buzzer will sound,and pop-up window
indicates that cooking is complete.
Control Lockout
Control Lockout lets you lock the buttons on the touch pad so they cannot be activated accidently. You can
only activate Control Lockout when the oven is in stand by mode.
How to activate the Control Lockout
1. Cancel or turn off all other functions.
2. Touch and hold SETTINGS for three seconds on the bottom of control panel.
The padlock icon along with the current time will be displayed.
• All other functions must be canceled before you activate Control Lockout.
How to unlock the controls
Press and hold the Lock icon for three seconds.The padlock icon will clear from the display.
OPERATING THE OVEN
15

CAUTION
Use caution with the Time Cooking or Delay Start features. You can use these features to cook cured or frozen
meats and most fruits and vegetables. For food that can easily spoil such as milk, eggs, and unfrozen or fresh
fish, meat, or poultry, chill them in the refrigerator first. Even when chilled, they should not stand in the oven
for more than 1 hour before cooking begins, and should be removed promptly when cooking is completed .
Eating poiled food can result in sickness from food poisoning.
Delay Start
With Delay Start, the oven’s timer turns the oven on at a preset time.
How to set the oven for Delay Start
1. Position the oven racks and place the food in the oven cavity.
2. Select the desired cooking function, e.g.Bake.
3. Enter the desired cook temperature using the numeric key.
4. Enter the cooking time using the numeric key.
5. Touch the DELAY START on the right bottom of cooking panel. Use the numeric key to enter the hours and
min of delayed time before starting. Example if the current time is 3pm and you want the oven to turn on at
5pm the delay time would be set for 2 hours.
6. Touch START. The oven will automatic turn on after the Delay Start time has elapsed.
Turning the light on and off
• The oven light turns on automatically when the door is opened.
• You can turn the oven light on and off manually by touching the light button on top of the control panel.
• The oven light turns off automatically when the door is closed.
OPERATING THE OVEN
16
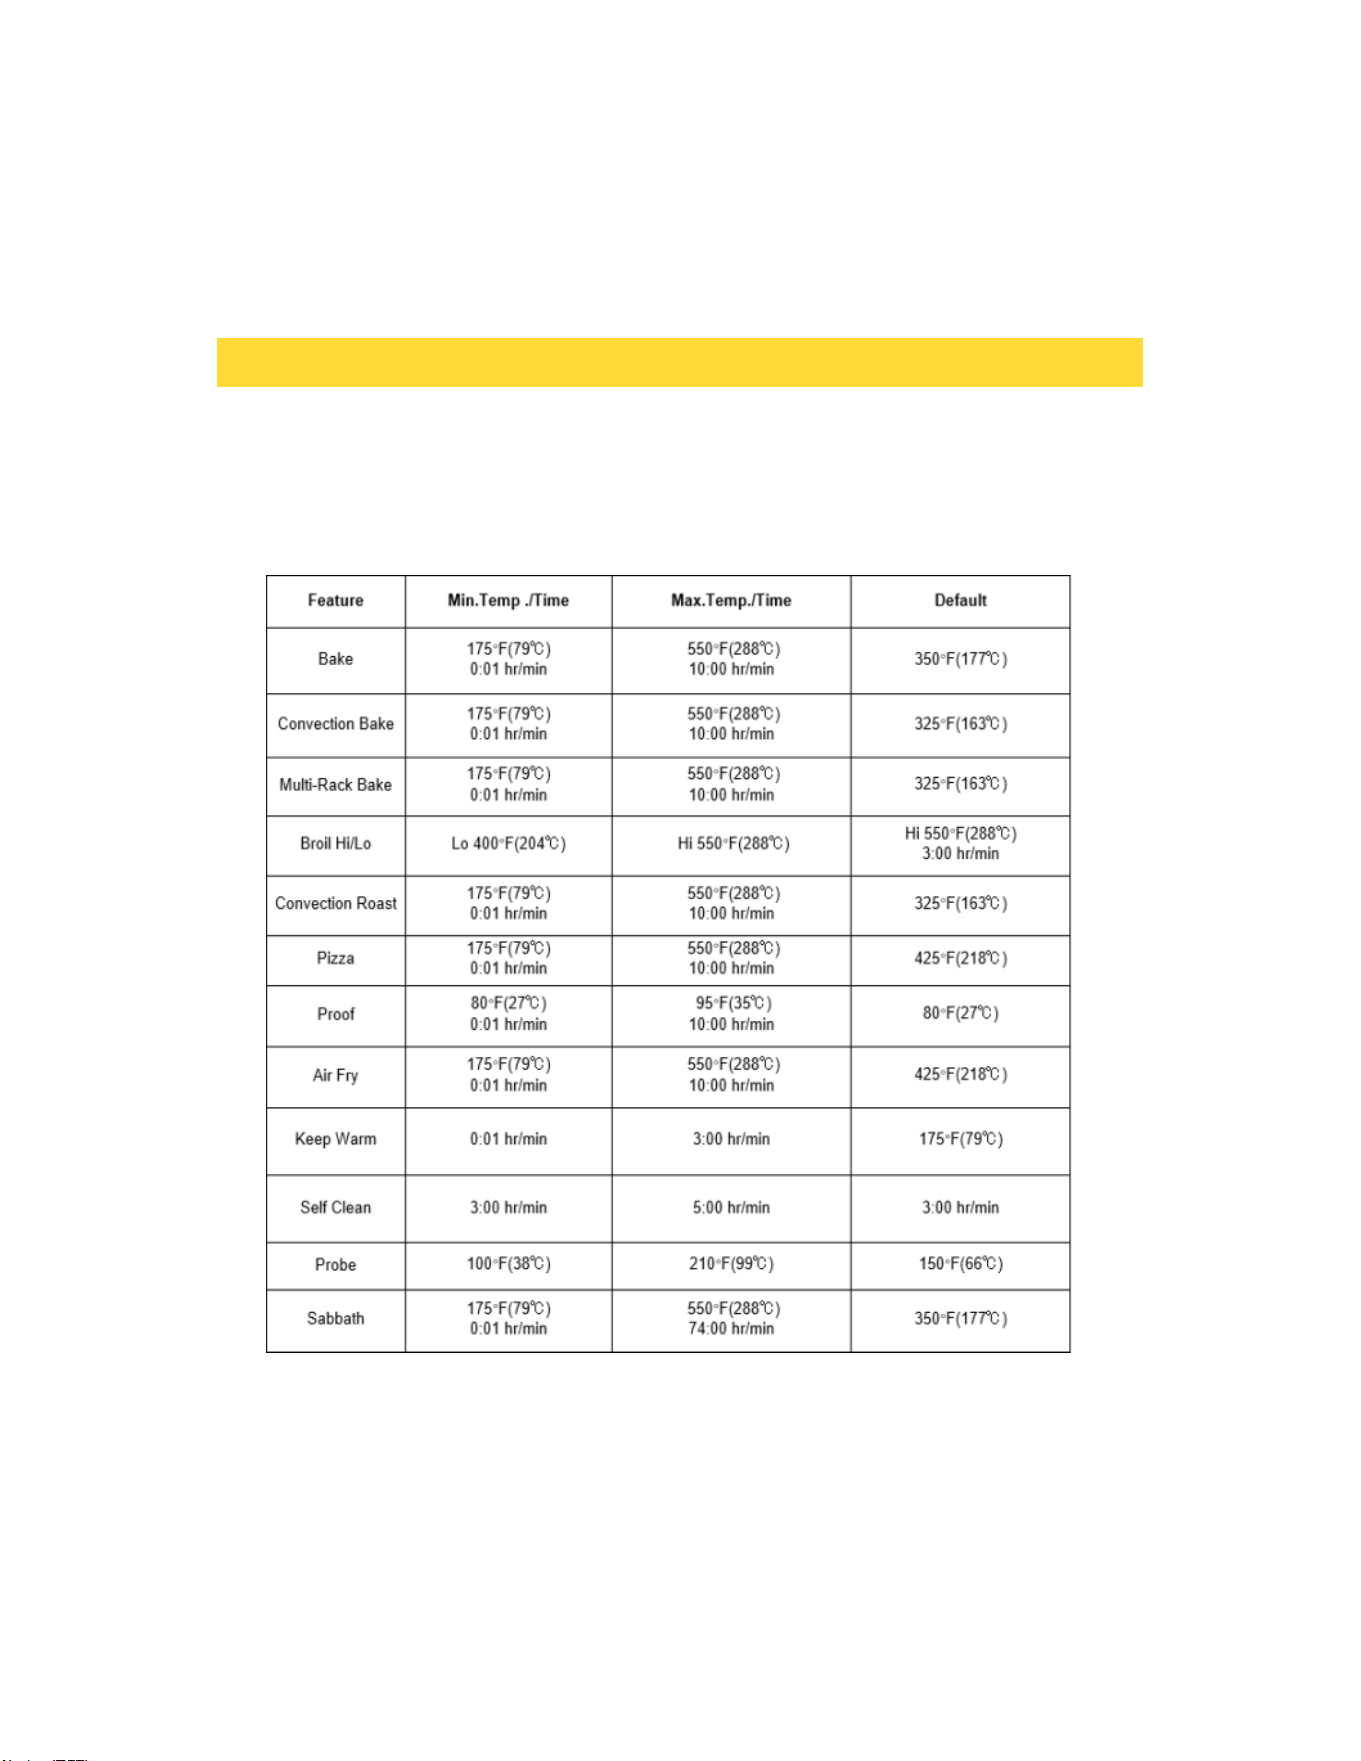
Minimum and maximum settings
All the features listed in the table below have minimum and maximum time or temperature
settings. A beep will sound each time a pad on the control panel is pressed and the entry is ac-
cepted. An error tone will sound in the form of a long beep if the entered temperature or time
is below the minimum or above the maximum setting for the feature.
OPERATING THE OVEN
17
Type of Food
Rack Position
Broiling of Hamburgers.
6
Broiling meats or small cuts of
poultry and fish.
3 to 5
Bundt Cakes, Pound Cakes,
Frozen Pies, and Casseroles.
4 or 3
Angel Food Cakes, Small Roast
2
Turkey, large Roast, Hams
Fresh Pizza
1
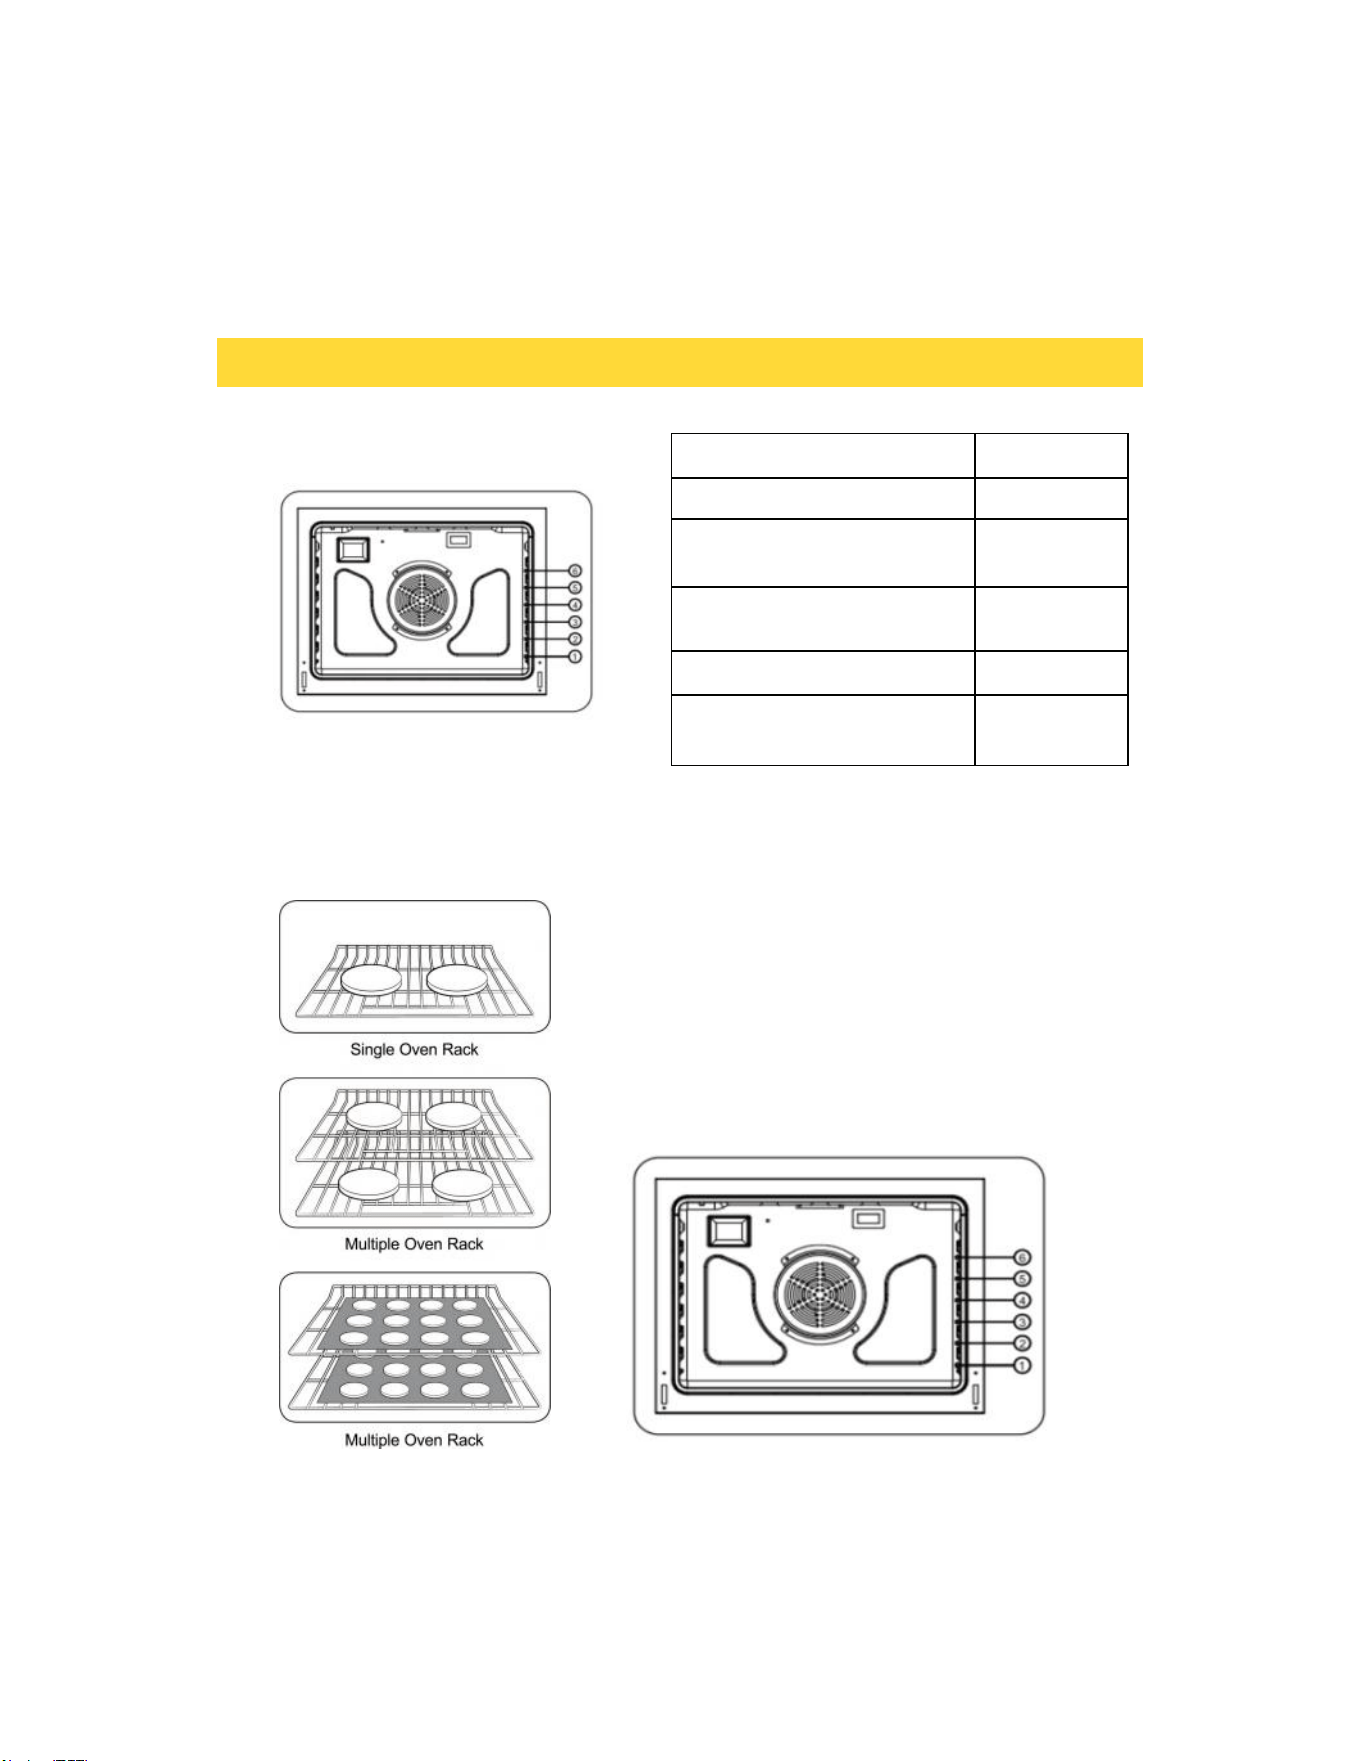
Centering baking pans in the oven as much as possible
will produce better results. If baking with more than
one pan, place the pans so each has at least 1" to 2” of
air space around it. When baking on a single oven rack,
place the oven rack in position 3 or 4.
When baking cakes and cookies on multiple racks,
place the oven racks in position 3 and 5. Using Multiple
Oven Racks. Using the convection fan will provide best
air movement with multi level rack cooking.
OPERATING THE OVEN
Rack and Pan Placement
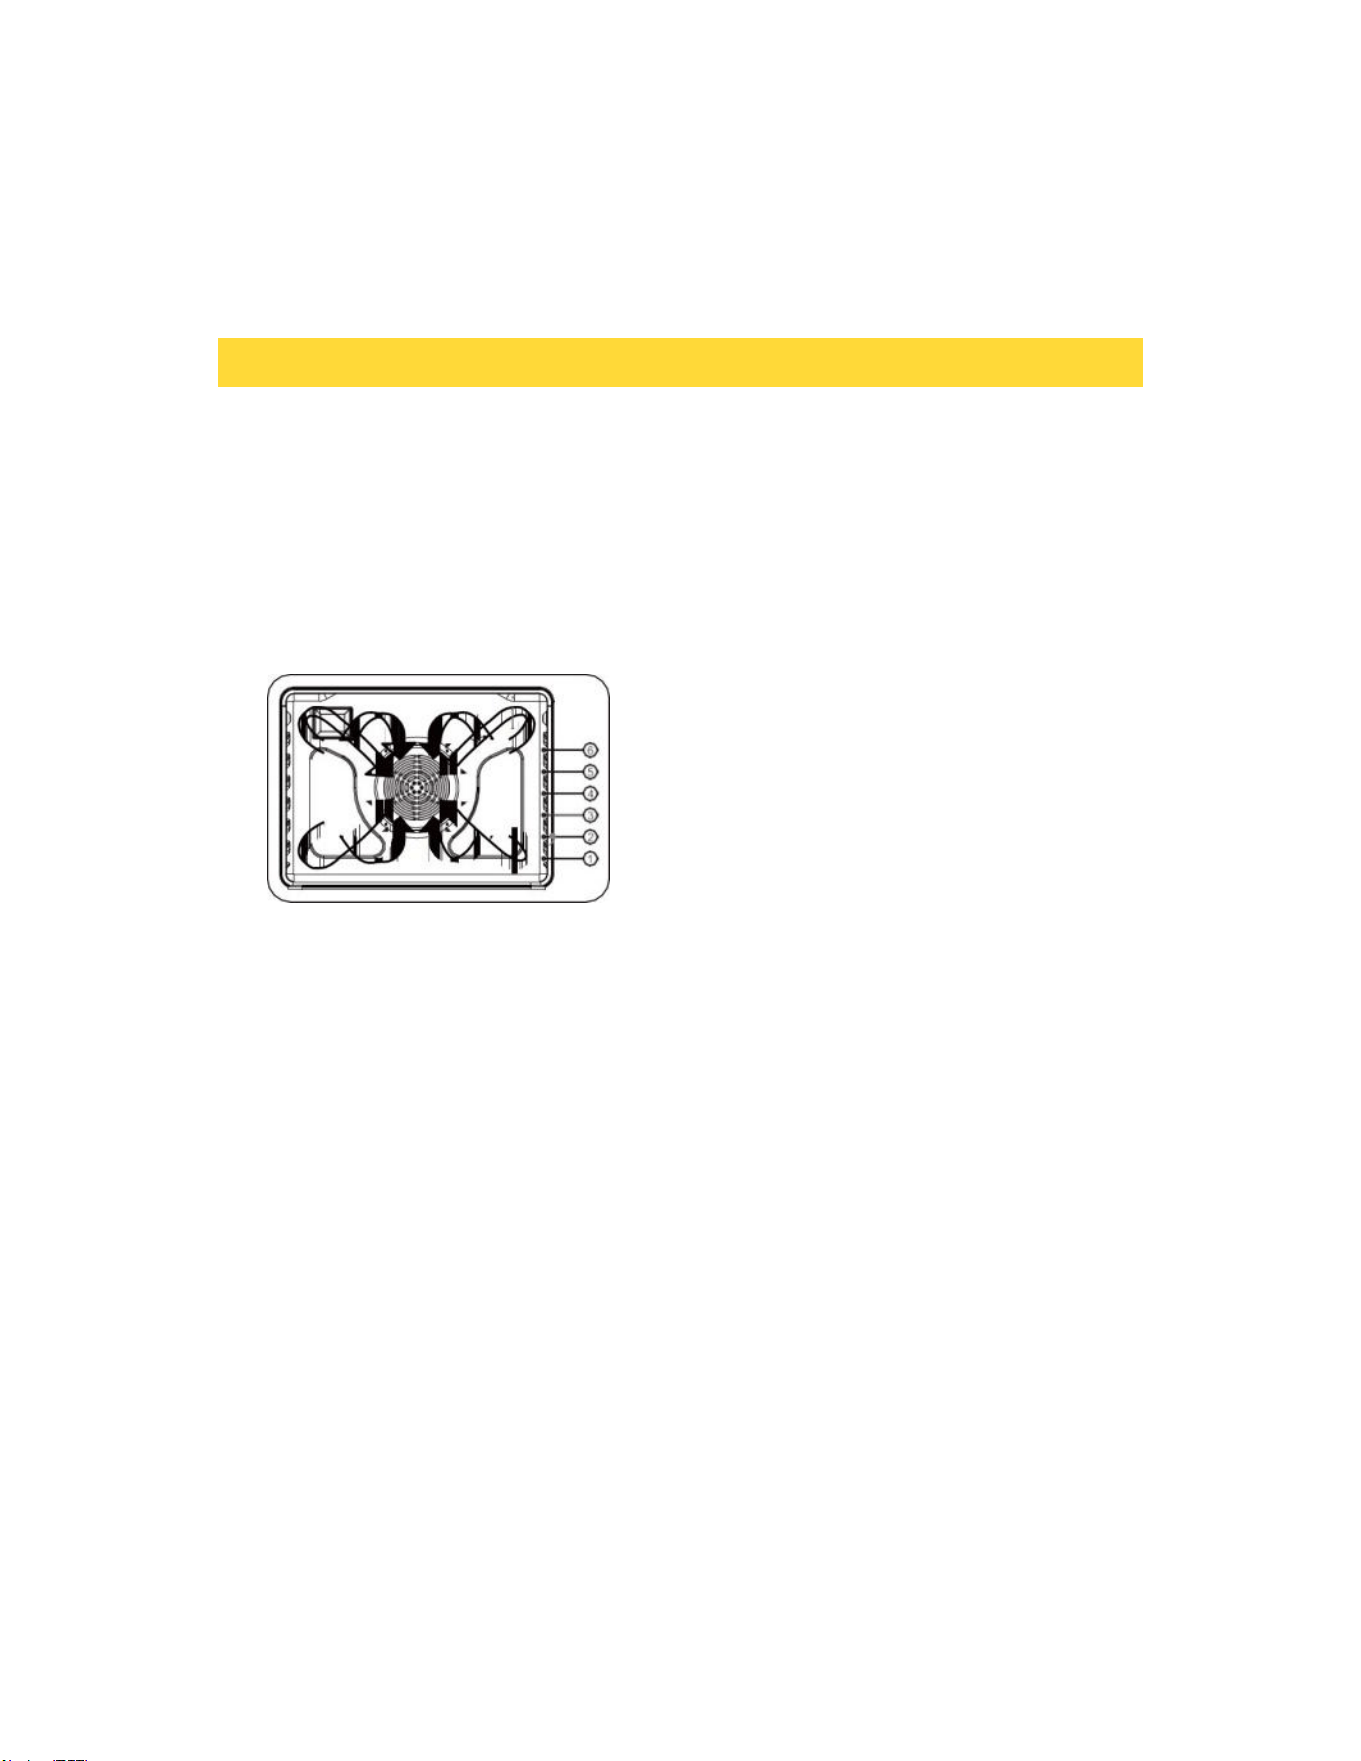
Oven Rack Positions
18

Before using the racks
Each rack has stops that need to be placed correctly on the supports. These stops will keep the
rack from coming completely out.
REMOVING THE RACKS
1. Pull the rack straight out until it stops.
2. Lift up the front of the rack, and then pull it out.
REPLACING THE RACKS
1. Place the end of the rack on the support.
2. Place the front end up and push the rack in.
CAUTION
• Do not cover a rack with aluminum foil
or place aluminum foil on the oven
bottom. This will hamper heat circulation,
resulting in poor baking, and may damage
the oven bottom.
• Arrange the oven racks only when the
oven is cool.
OPERATING THE OVEN
19
How to set the oven for baking:
1. Touch Bake.
2. Enter the temperature you want using the number key, eg. 3, 5, 0.
3. Press START to begin preheating. The temperature display will update as the oven temperature reaches
100°F and continues to rise to the set temperature. When preheating is complete, the buzzer will sound six
times. To cancel baking at any time, press CANCEL.
4. When the cooking time ends, the oven will stop operating, the buzzer will sound, and a pop-up window will
indicate that cooking is complete. (Note: Cooking time does not include preheating.)
• To change the cooking temperature, touch the temperature value in the center of the display screen to
update it, then press START. The oven will operate with the new new settings.
• To change the cooking temperature, touch the temperature value in the center of the display screen to
update it, then press START. The oven will operate with the new new settings.
• If oven door is left open for more than one min the heating elements will turn off.
Baking
The oven can be programmed to bake at any temperature from 175 °F to 550 °F. Baking temperature and
time will vary depending on the ingredients and the size and shape of the baking pan used. Dark or nonstick
coatings may cook faster with more browning.
OPERATING THE OVEN
20
Tips for convection baking
The amount of time you save will vary depending on the amount and type of food you are cooking.
When baking cookies or biscuits, you should use pans with no sides or very low sides to allow the
heated air to circulate around the food. Using a pan with a dark finish will produce faster cooking
times.
When using convection baking with a single rack, place the oven rack in position 3 or 4. If
cooking on multiple racks, place the oven racks in position 3 and 5. When baking a cake, using the
bake mode (not the convection bake mode) will produce better results.
How to set oven to Convection bake:
1. Touch Convection Bake . Default temp is 325°F.
2. Enter the desired cooking temperature using the numeric keys. (Note: When using a standard
baking recipe in Convection Bake mode, reduce the cooking temperature by 25°F while keeping the
cooking time unchanged.) For example, if a standard recipe specifies 350°F with a 12 to 15-minute bake
time, set the convection oven temperature to 325°F and maintain the 12 to 15-minute cook time.
By using the Convection Bake, you will be able
to cook faster. Convection baking uses a fan to
circulate the oven's heat evenly and continuously
within the oven. This improved heat distribution
allows for even cooking and excellent results while
using multiple racks at the same time. Foods
cooked on a single oven rack will generally cook
faster and more evenly with convection baking.
Multiple oven rack cooking may have slightly
increased cooking times for some foods, but the
overall result is time saved. Breads and pastries
brown more evenly. You can program the oven for
convection baking at any temperature between 175 °F
and 550 °F.
• Place food in the oven after preheating if the recipe calls for it. Preheating is very important for good results
when baking cakes, cookies, pastry and breads. After the oven has reached he desired temperature, the
buzzer will sound.
• If you are using an oven thermometer inside the oven cavity, the temperature shown on the thermometer may
differ from the actual set oven temperature. Mechanical hanging thermometers respond slowly and may take up to
45 minutes to match the digital display reading. This is normal.
OPERATING THE OVEN
Convection Baking
21

3. Press START to begin preheating. The temperature display will update as the oven temperature
reaches 100°F and continues to rise to the set temperature. Once preheating is complete, the buzzer
will sound six times. To cancel cooking at any time, press CANCEL..
4. When the cooking time ends, the oven will stop operating, a buzzer will sound, and a pop-up
window will indicate that cooking is complete. (Note: Preheating time is not included in the
cooking time.)
• To adjust the cooking temperature, tap the temperature value in the center of the display
screen to update it, then press START. The oven will operate with the updated settings.
• To adjust the cooking time, tap COOK TIME on the right side of the display screen to update it, then
press START. The oven will operate with the updated settings.
• The convection fan turns off when the oven door is opened to minimize heat loss. If the oven door
remains open for more than one minute, the heating elements will shut off.
Convection roasting
Convection roasting is good for cooking large tender cuts of meat uncovered. Heat comes from
the top heating element. The convection fan circulates the heated air evenly over and around
the food. Meat and poultry are browned on all sides as if they were cooked on a rotisserie. The
heated air seals in juices quickly for moist and tender results while, at the same time, creating
a rich golden-brown exterior.
How to set the oven for convection roasting:
1. Touch Convection Roast . Enter the temperature you want, eg. 400 °F, using the number
key.
2. Press START to begin preheating. The temperature display will update as the oven temperature
reaches 100°F and continues to rise to the set temperature. Once preheating is complete, the buzzer
will sound six times. To cancel cooking, press CANCEL.
3. When the cooking time ends, the oven will stop operating, a buzzer will sound, and a pop-up
window will indicate that cooking is complete. (Preheating time is not included in the cooking
time.)
OPERATING THE OVEN
22

• To change the cooking temperature, tap the temperature value in the center of the display
screen to update it, then press START. The oven will operate with the new settings.
• To adjust the cooking time, tap COOK TIME on the right side of the display screen to update it,
then press START. The oven will operate with the updated settings.
• The convection fan turns off when the oven door is opened to minimize heat loss. If the oven door
remains open for more than one minute, the heating elements will shut off.
Broiling
Broiling is a method of cooking tender cuts of meat by direct heat under the broil element of
the oven. The high heat cooks quickly and gives a rich, brown outer appearance. Broil mode is
best for meats, fish, and poultry up to 1" thick.
Always preheat the oven for 5-10 minutes before broiling.Cooking time cannot be set in Broil
mode, and the default maximum working time is 3 hours.
How to set the oven for broiling:
1. Tap Broil to display "BROIL HIGH." Tap "HIGH" to switch to "LOW."
2. Press START to begin broiling. Broil one side until the food is browned, then turn it over and
broil the other side.
3. Press CANCEL to stop cooking.
Note: If oven door is left open for more than one min the heating elements will turn off.
OPERATING THE OVEN
CAUTION !
Always broil with the oven door closed. Use
care when opening the door. Let hot air from
steam escape before you remove food.
23

Using Warm
Warm will keep cooked food warm for serving up to 3 hours after cooking has finished.After 3 hours,
the feature will shut off automatically. You can use the Warm feature without any other cooking oper
- ations or you can set it to activate after a timed or delay timed cooking operation.The cooking temp-
er ature is 175 °F by defualt and cannot be set.
You should not use this feature to reheat coId food.
How to use Warm:
1. Touch Warm.
2. Touch START.
3. Touch CANCEL to cancel at any time to turn the feature off.
How to set the oven to activate Warm after Time Cooking
1. Set the oven for Time Cooking (refer to Timed Cooking section).
2. Tap Warm before pressing START to begin cooking.
3. To cancel the feature at any time, press CANCEL.
•To adjust the cooking time, tap COOK TIME on the right side of the display screen to update it, then
press START.
• If the oven door is left open for more than one minute, the heating elements will turn off.
Pizza Cooking
The Pizza function is specially designed for cooking pizza. It heats from both the top and bottom to
brown food more evenly. This system is designed to give the optimal cooking performance for pizza
by automatically selecting a combination of the broil and bake heating systems.
OPERATING THE OVEN
24

How to use Pizza:
1. Touch Pizza . Default temp is 425°F
2. Enter the desired cooking temperature using the numeric key.
3. Touch START.The oven is starting to preheat,and the temperature display will start to
change once the oven temperature reach 100 °F until to the set temperature,then the buzzer
sounds six times to indicate that the preheating is complete. If you want to cancel cooking,
touch CANCEL to cancel cooking.
4. When the cooking time arrives,the oven will stop working and the buzzer will sound ,and pop -up
window indicates that cooking is complete.(Cooking time does not include preheating time.)
• If you want to change the cooking temperature,you need touch the temperature
value in the middle of the display screen to update,then touch START,The oven to work with new
settings.
• If you want to change the cooking time,you need touch COOK TIME in the right of the
display screen to update,then touch START,The oven to work with new settings.
• If oven door is left open for more than one min the heating elements will turn off.
Proof
Bread Proof provides an optimal temperature for the bread proofing process and up to 10 hours.
How to use proofing:
1. Touch Proof. Default temp is 80°F.Touch 80°F for 95°F.
2. Touch START to proofing.
3. Touch CANCEL to cancel cooking.
OPERATING THE OVEN
25

• If you want to change the cooking time,you need touch COOK TIME in the right of the
display screen to update,then touch START,The oven to work with new settings.
• If oven door is left open for more than one min the heating elements will turn off.
NOTE: Use rack position 4 for Bread Proof. If the oven temperature is above 125°F(52°C), Proof will
not work properly. Do not use Proof to warm food. The proofing temp cannot keep food warm.
Air fry
The Air Fry feature uses hot air for crispier and healthier frozen or fresh foods without any (or less
than normal) oil compared to convection modes.
The Air Fry feature works best for single rack baking with packaged and convenience foods. Make
sure that you remove the packaging from food before cooking it. You can program for temperatures
between 350° F and 550° F. Leave the oven light off when baking.
1. Arrange the food on the rack.
2. Touch Air Fry. The default temperature is 425° F. If the default temperature is the temperature
you want, skip to step 4.
3. (Optional) Press the numbers for the temperature you want.
4. Touch START to cooking. If you want to cancel cooking, touch CANCEL to cancel cooking.
5. When the cooking time arrives,the oven will stop working and the buzzer will sound ,and pop-up
window indicates that cooking is complete.
• If you want to change the cooking temperature,you need touch the temperature
value in the middle of the display screen to update,then touch START,The oven to work with
new settings.
• If you want to change the cooking time,you need touch COOK TIME in the right of the
display screen to update,then touch START,The oven to work with new settings.
• If oven door is left open for more than one min the heating elements will turn off.
OPERATING THE OVEN
26
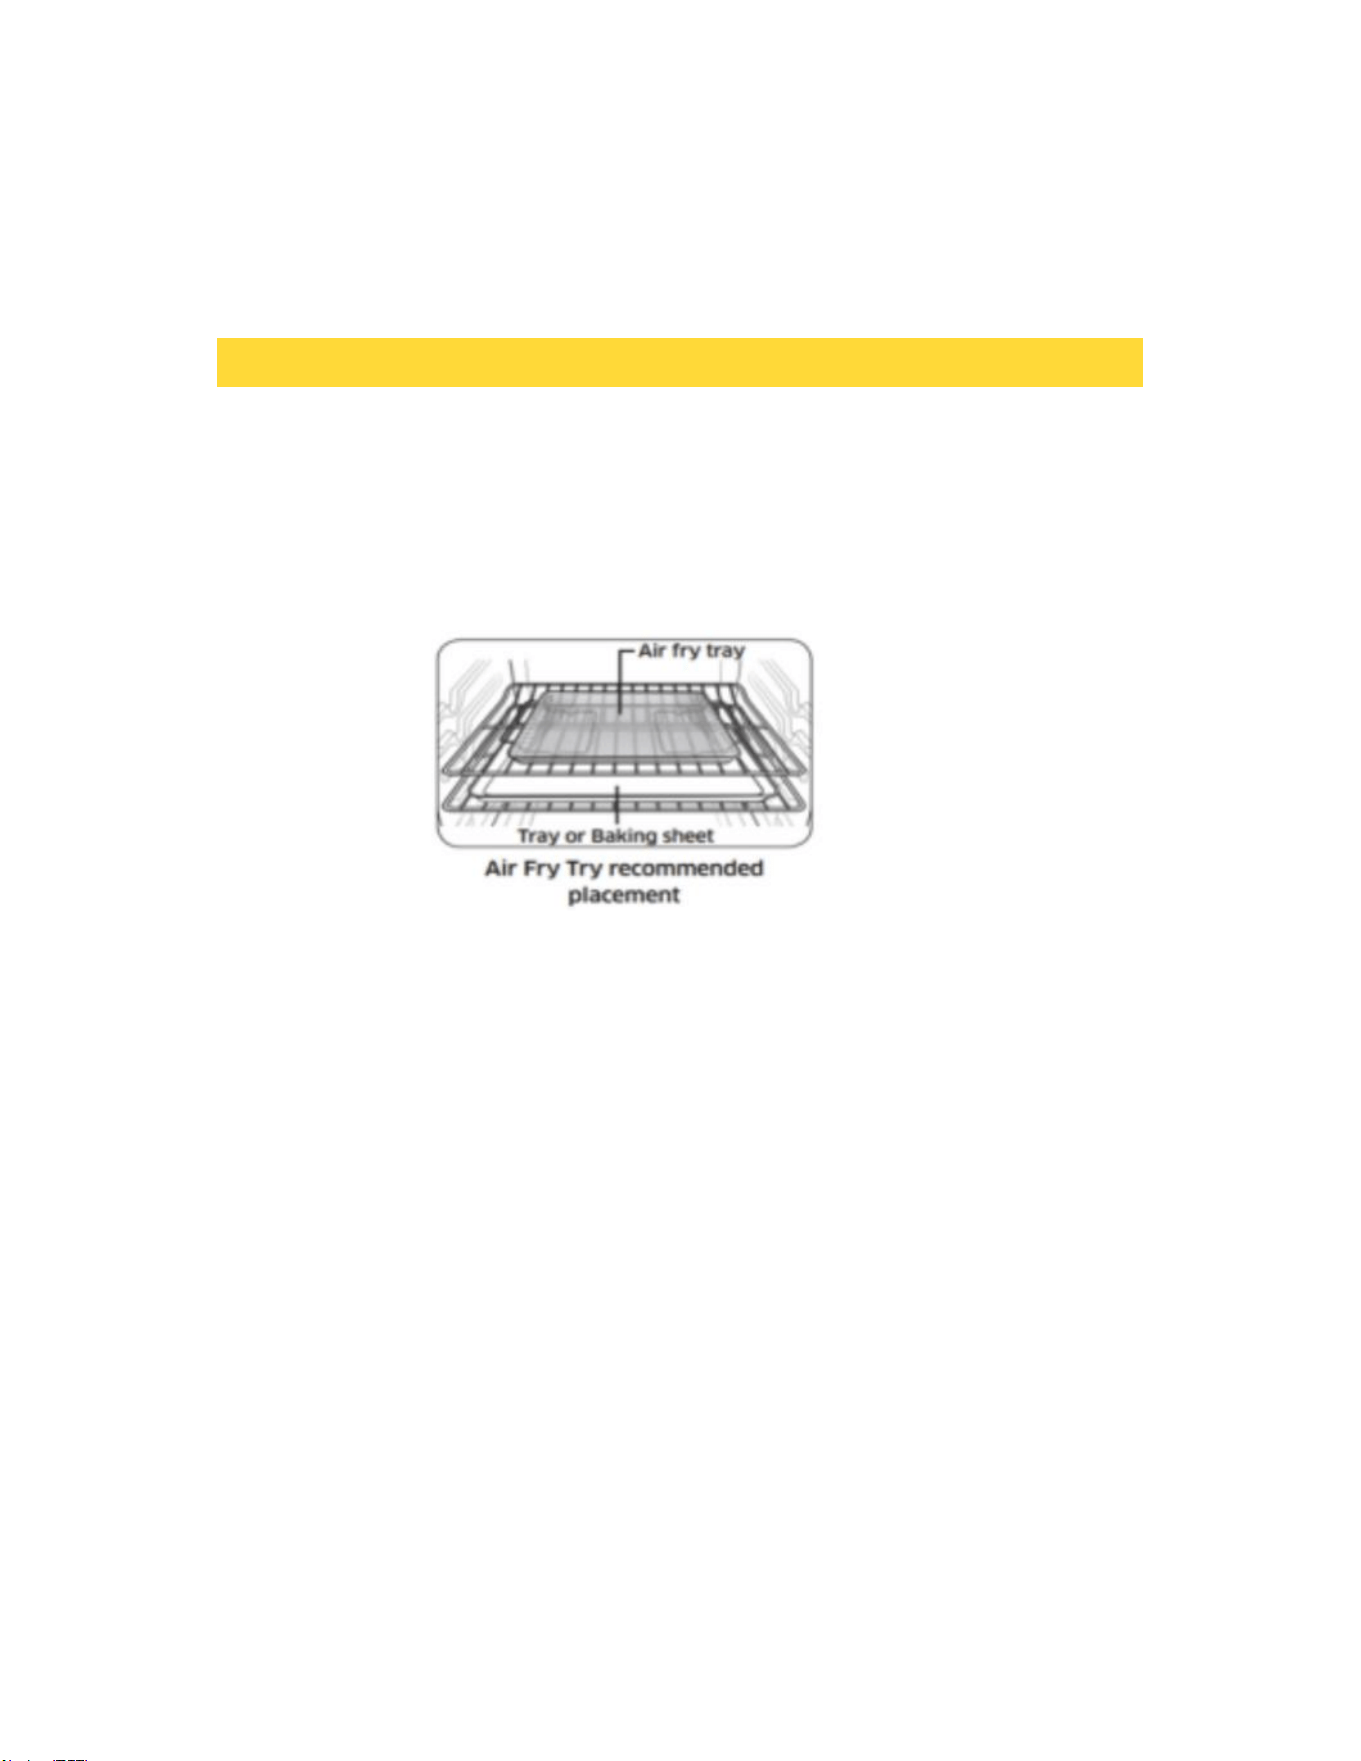
Note:
• Place a baking sheet or tray on the rack below the Air fry tray for getting any drippings. This
will help to reduce splatter and smoke.
• Before using a baking sheet, check the maximum allow able temperature of baking sheet.
• Air fry is designed for a single oven rack. Place food on rack position 3 for best results.
• For cooking fresh or home made foods spread the oil over a larger area more evenly, crisping up the
food more effectively.
OPERATING THE OVEN
27

Using the Temp Probe
For many foods, especially roasts and poultry (beef, chicken, turkey, pork, lamb, etc), measur-
ing the internal temperature is the best way to determine if the food is properly cooked.
The Temp Probe lets you cook meat to the exact internal temperature you want, taking the
guess work out of determining whether a piece of meat is done or not.
This function can be used with Bake, Convection Bake or Convection Roast.
After the internal temperature of the food reaches 75°F, the increasing internal temperature
will be shown in the display.
How to use the Temp Probe:
1. Preheat the oven to desired oven temperature in the desired mode.
2. Insert the probe into the thickest area of food. When making bread, cook for approximately
10 minutes before inserting the probe.
3. When preheat is complete, insert the probe into the probe receptacle. Close the oven door.
OPERATING THE OVEN
28
4. Enter the temperature of the probe according to the pop-up prompt.
5. Touch START to cooking. If you want to cancel cooking,you can touch CANCEL to cancel
cooking.
6. When the probe temp arrives,the oven will stop working and the buzzer will sound ,and pop
-up window indicates that cooking is complete.
• If you want to change the probe or cooking temperature,you need touch the temperature
value in the middle of the display screen to update,then touch START,The oven to work with
new settings.
• If oven door is left open for more than one min the heating elements will turn off.
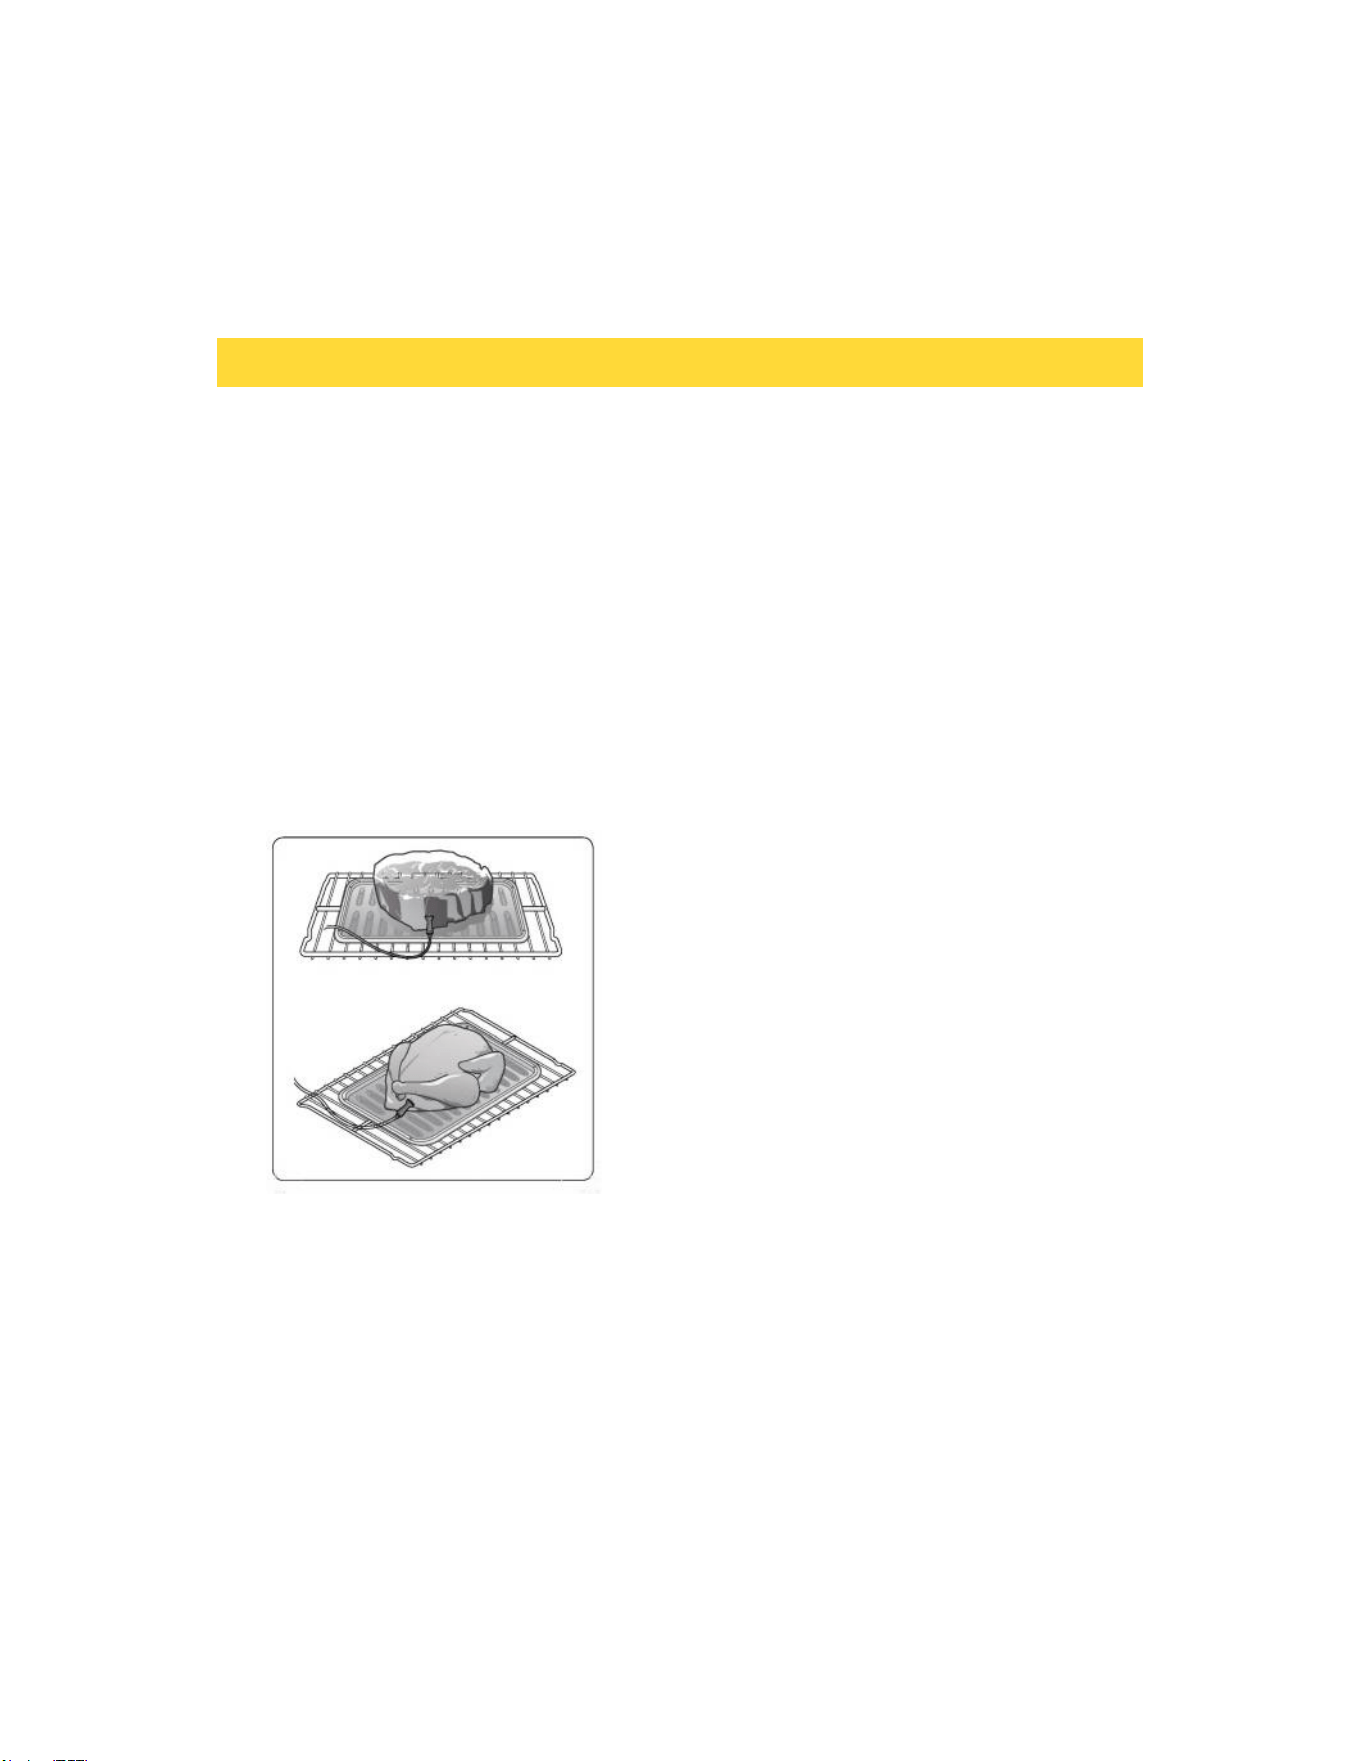
How to use the temp probe into the meat:
CAUTION
To protect the Temp Probe’s tip, be careful not to insert the probe so that the tip protrudes
through the surface of the meat. Make sure that the tip is in or near the center of the meat.
CAUTION
• Do not store the probe in the oven.
Insert the probe completely into the meat as
shown in the illustrations. It should not touch
bone, fat, or gristle.
If you do not fully insert the probe into the meat,
the Temp Probe function will not work correctly
because the probe will sense the oven tempera-
ture, not the temperature of the meat.
For bone-in meats, insert the probe into the cen-
ter of the lowest and thickest portion of the piece.
For whole poultry (turkey, large chickens, etc.),
insert the probe into the thickest part of the inner
thigh, parallel to the leg.
OPERATING THE OVEN
29
• Do not leave the probe inside the oven during a self clean or broiling cycle you can perma-
nently damage the probe and it will no longer work.
• To avoid breaking the probe’s tip, defrost your food oompletely.
• Do not use tongs when inserting or removing the probe. Tongs can damage the probe.
• Use the Temp Probe for Temp. Probe function cooking only. Do not use the Temp Probe for
any other purpose.
• If you remove the Temp Probe while the Temp. Probe function is operating or insert the Temp
Probe while baking or cooking normally, cooking will stop after 1 minute.
• If you use the probe to cook frozen food, there are times when it cannot be detected.
Temp Probe table
Type of Food Internal Temperature
Beef / Lamb
Rare
120°
Medium
130°
Well Done
140°
Pork 160°
Poultry
165°
Note: If you cover meat with foil and allow to rest for 10 minutes after cooking , the internal
temperature will rise a additional 5 to 10 ° degrees.
Removing the Temp Probe
Remove the temp probe plug from the socket.
CAUTION
After cooking, the Temp Probe is hot enough to cause burns.
OPERATING THE OVEN
Available Temperatures
100 to 200 °F
30
Sabbath Feature
Sabbath mode disables the oven lights (the oven light will not turn on when the door is opened), all
sounds (the control will not beep when the screen is pressed),Convection modes,Broil modes,Warm,
Proof,and all time functions.Sabbath mode can only beused with traditional Bake.This feature confor
-ms to Jewish Sabbath requirements.
How to use Sabbath mode:
1. Touch SETTINGS , swipe to Sabbath mode. You can select Upper Oven or Lower Oven.Set Cook
temperature,Cook time and Delay start time with selected Oven.
2. Touch START.
3. The oven will continue to cook at the preset temp and time.The oven can stay in this mode for a max of
74 hours.
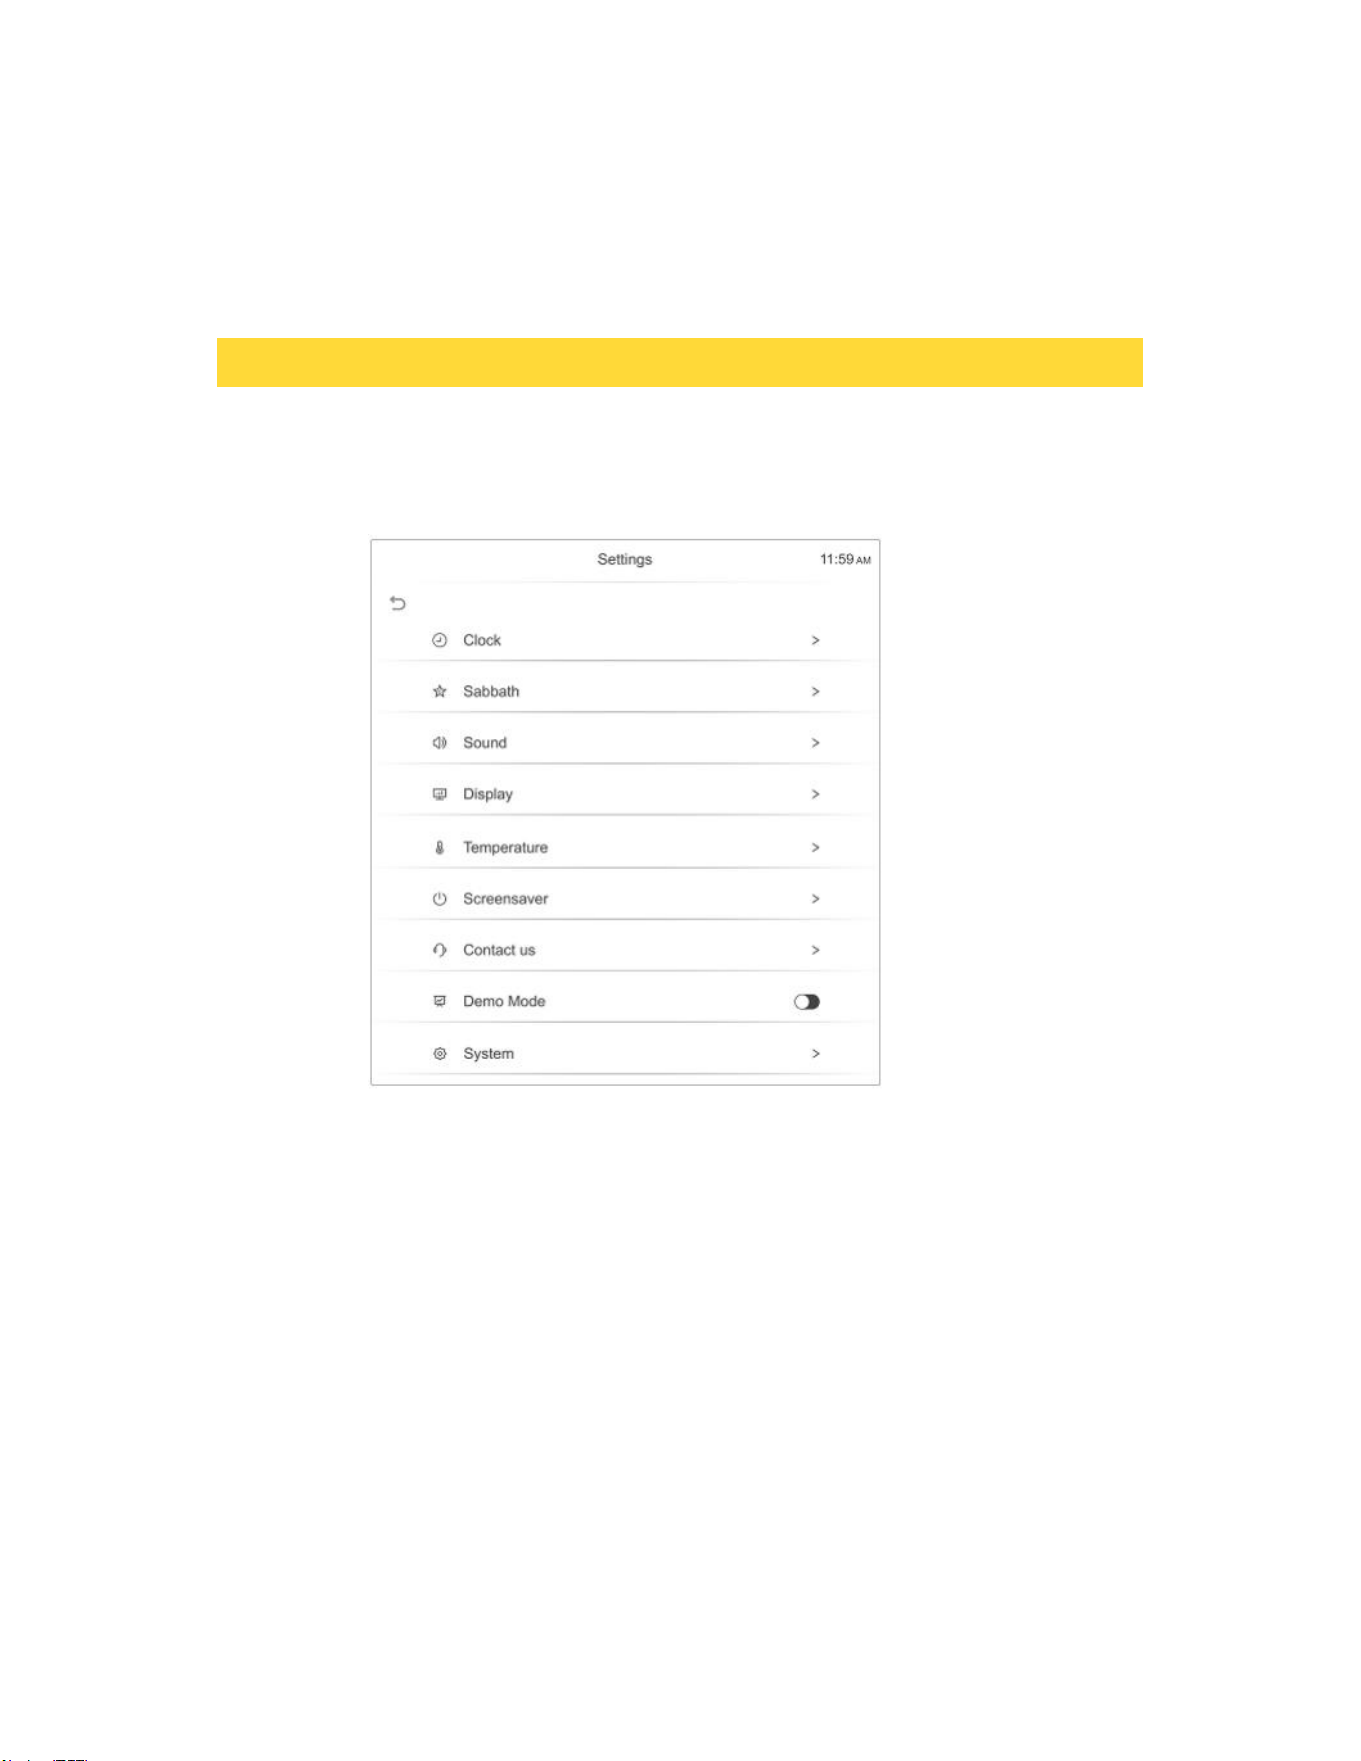
Settings
There are numerous settings that are accessed by pressing SETTINGS in the bottom left corner of the main
OPERATING THE OVEN
screen.
31

4. The oven can be turned off at any time by pressing the CANCEL key one time.
NOTE
• If a power outage occurs during when the oven is in Sabbath Mode, the unit will return to Sabbath
Mode when power is restored.
• The cooking temperature and cooking time cannot be updated during Shabbat.
Sound
Adjust the volume of the oven controls.
1. Touch SETTINGS in standby swipe to Sound .
2. Toouch Mute to turn off the sound,or touch + and - to adjust the sound.
Display
Adjust the brigthness of the display.
1. Touch SETTINGS in standby swipe to Display.
2. Touch + and - to adjust display brightness level.
Manual temperature calibration
The temperature in the oven has been calibrated at the factory. When first using the oven, be sure to fol
-low recipe times and temperatures. If you think the oven is too hot or too cool, you can correct the te-
mperat ure in the oven. Before correcting, test a recipe by using a temperature setting that is higher or
lower tha n the recommended temperature. The baking results should help you to decide how much of
an adjustment is needed.
Oven temp can be adjusted up or down by 30°F from factory default setting.
1. In standby mode touch the SETTINGS, swipe to Temperature.
2. Enter the adjustment you want by repeatedly press + or - in the Adjust Temperature option.
OPERATING THE OVEN
32

NOTE
This adjustment will not affect the broiling or the self-cleaning temperatures.
The adjustment will be retained in memory after a power failure.
Change temperature display from Fahrenheit to Celsius
The oven has been preset at the factory to display in Fahrenheit.
1. Touch SETTINGS in stand by mode, swipe to Temperature.
2. Touch (Fahrenheit) or (Celsius) as you need in the Temperature Unit.
Screensaver
Set the length of time before the display sleeps.
1. Touch SETTINGS in standby swipe to Screensaver mode.
2. Adjust the timing for the screen saver.
Demo Mode
1. Touch SETTINGS in standby swipe to Demo Mode.
2. Click the demo mode switch to turn on the demo mode,then DEMO
will display in the bottom left of the display screen.
• This option is for use by retail establishments for display purposes only.
(The heating element does not operate).
Restore factory
This function returns all settings to the factory defaults.
Caution: All stored data will be deleted.
1. Touch SETTINGS in standby,swipe to System,then touchRestore factory.
2. If you want to reset data to the factory defaults, touch Restore then touch YES key to restone factory.
OPERATING THE OVEN
33

SELF CLEANING THE OVEN
This self cleaning oven uses high temperatures to burn off left over grease and cooking residue
and completely reduce them to a fine powdered ash that can be wiped away with a damp cloth
after cycle has completed and oven has cooled.
How to run a self clean cycle:
1. Select the Self Clean option, enter can select a 3 hour normal clean, a 5 hour heavy clean .
2. Make sure oven racks have been removed, Self cleaning oven rack will do nonreversible
damage to the chrome coating and will not be covered un MFG warranty.
3. Touch START to start self cleaning.
Delayed self clean cycle
1. Select Self Clean option, 3 or 5 hour cycle see above.
2. Select DELAY START.
3. Enter the hours and min of desired delay using the number key. Example if you wish to
delay the start 2hrs 30min then enter 2:30 in key.
4. Touch START. The door will automatically lock .
5. The Self clean will start automatically after the preset time has elapsed.
NOTE:
• If one oven is used in any mode, the other oven can not enter self-clean mode.
• Its is recommended to have kitchen windows open or to run a ventilation hood fan during the
self clean cycle.
• All racks and broil pan and any cookware must be removed from the oven prior to running
clean cycle.
• Wipe up debris from the oven floor and remove any large spills.
• Self clean cycle will only clean areas where the heat can reach, Areas along the door frame,
gasket area and inner door will have to be cleaned by hand after cleaning cycle has finished.
• During self-clean, exterior surfaces may get hotter than usual, so children should be kept away.
If canceled, the door stays locked until the unit cools to a safe temperature level.
Turning a unit off during self-clean is discouraged. Damage can occur if self-clean does not
complete.
• During self-clean,the other oven cannot be used.
• After self clean complete,the oven door will keep lock and stay locked until the clean cycle
ends and oven temperature has cooled below 500°F (260°C)。
OPERATING THE OVEN
34
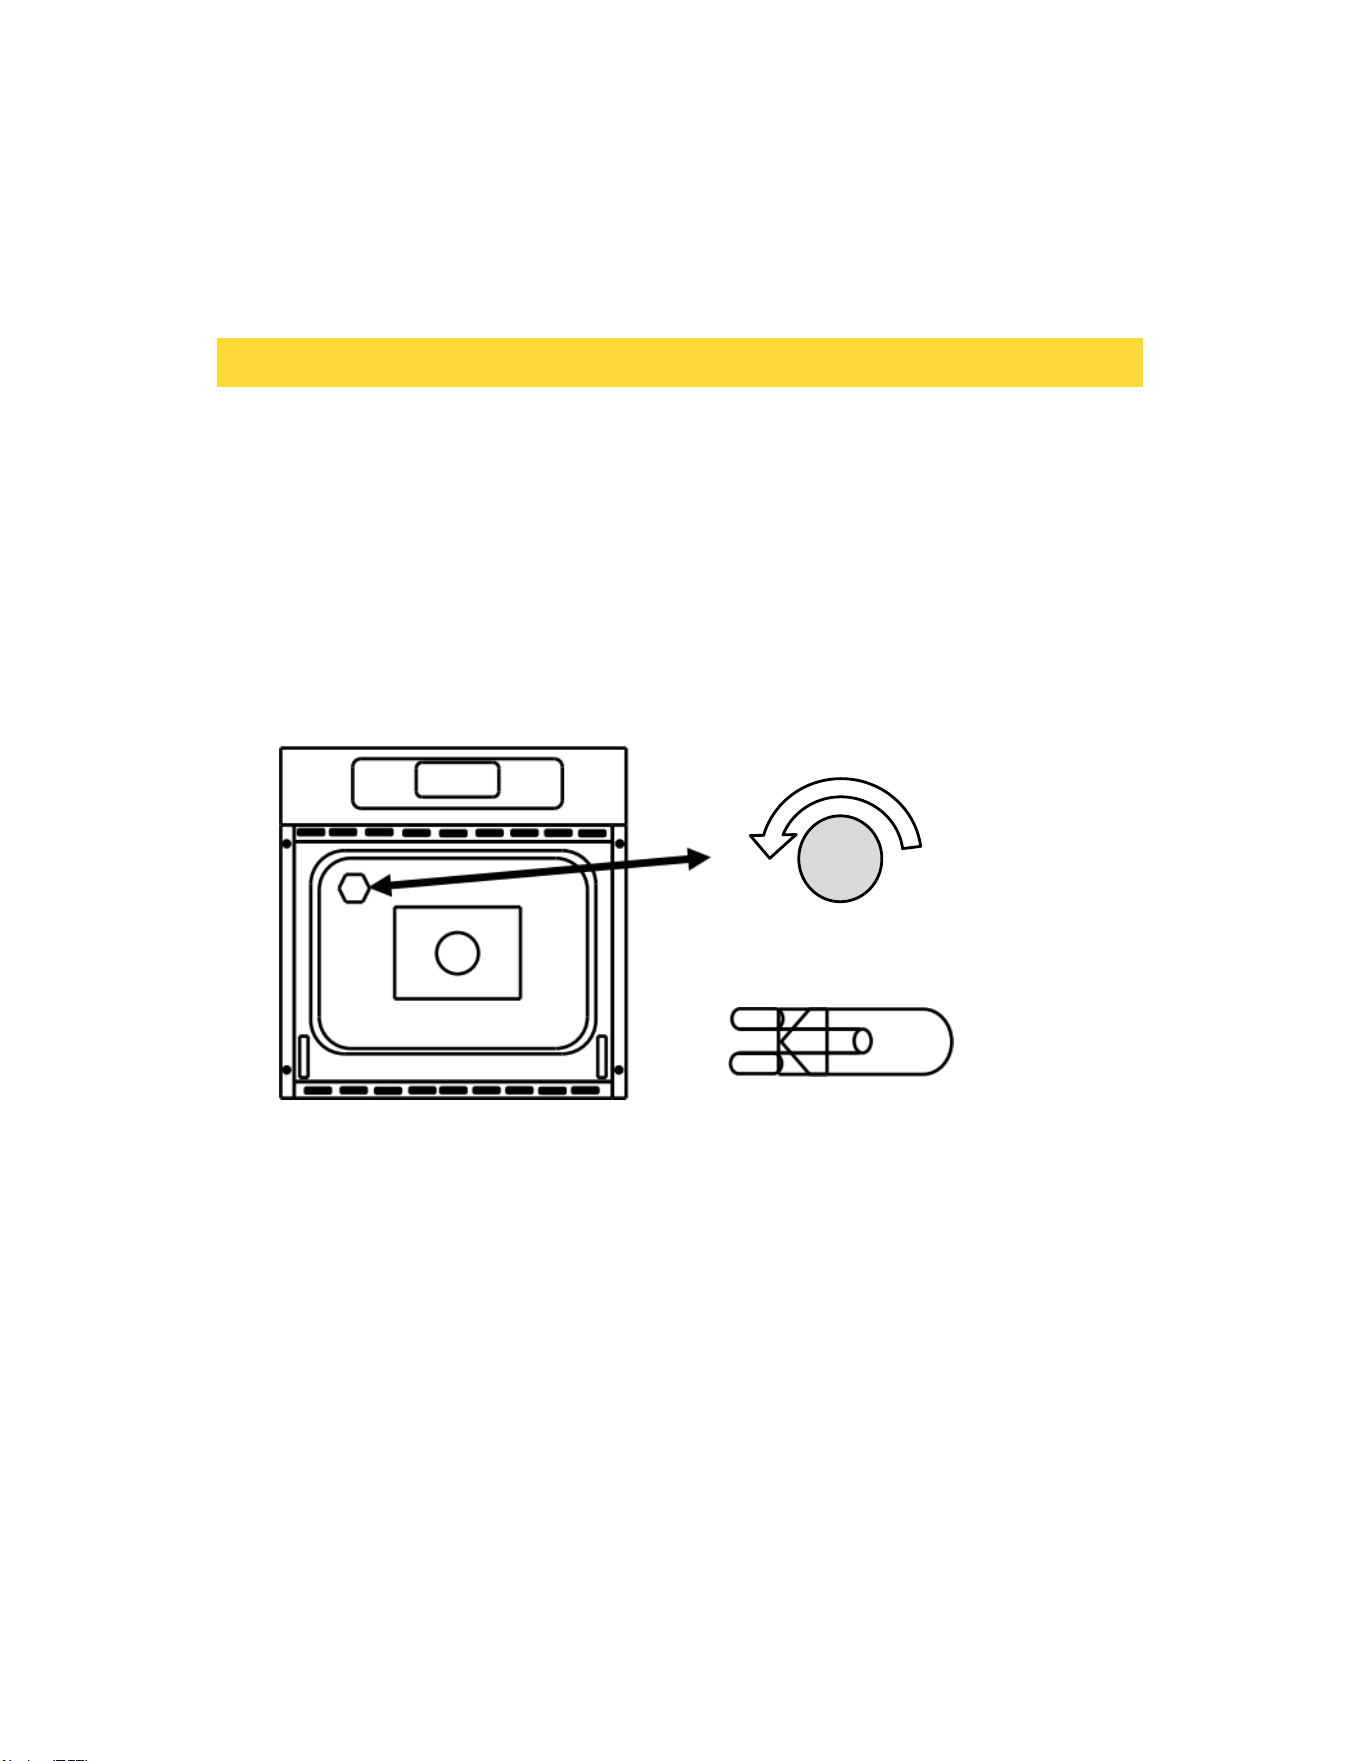
REPLACING OVEN CAVITY LIGHT BULB
• Turn off power to the oven at the circuit breaker.
• Make sure the oven cavity is cool to the touch, do not attempt to change light bulb when the
oven is hot.
• Grasp oven light lens cover and unscrew the light lens by turning it Counter clock wise
direction.
• Remove the light lens an set aside.
• Remove light bulb from the socket by pulling the light bulb towards front of the oven.
• Replace the oven light bulb with a 120Vac 40watt G9 base Halogen light bulb. Do not handle
the halogen bulb with bare hand, use a cloth or glove when removing and inserting bulb.
• Screw light lens back on by turning clockwise.
CLEANING THE OVEN EXTERIOR
For general cleaning, use a soft cloth with hot soapy water. For more difficult soils and built up
grease apply liquid detergent directly onto the soil. Let detergent sit for 30 to 60 min and then
rinse with a damp cloth. Do not use abrasive cleaners as they can scratch oven surfaces.
MAINTAINING THE OVEN
Replace light bulb with 120Vac
40 watt G9 base halogen bulb.
Turn oven light lens counter
clockwise to unscrew.
35

CLEANING STAINLESS STEEL SURFACES
• DO NOT use steel wool or any other abrasive type material to clean the stainless steel
surfaces it will cause scratching to the surface.
• Use a stainless steel cleaner or stainless steel polish cleaner with a soft cloth.
• Clean the stainless steel by moving the cloth in the direction of the grain of the Stainless
steel panel being cleaned. Note do not clean using swirling motions or going across the
grain.
• After cleaner has dried buff with a soft dry micro fiber towel moving the towel with the grain
of the stainless steel.
CLEANING THE BROILER PAN AND GRID
• Broil pan and grid can be cleaned by washing in hot soapy water, For burnt on material
allow pan and grid to soak in hot water to soften material.
CLEANING THE OVEN DOOR
• Use soap and water with a dish cloth to thoroughly clean.
• Glass cleaner can be used on the exterior glass only
• Do not spray or allow water near the oven vents at the top and bottom of the door, Doing so
will allow liquid between the layer of the glass inside the door. This will cause streaking and
spotting on the inside of the glass.
• Do not clean the oven door gasket, doing so will cause damage to the gasket.
MAINTAINING THE OVEN
36

Problem Possible solution
Oven control beeps and
displays F and number
• The electronic control has detected a fault .
• Press the Cancel key to clear display.
• Reprogram cycle and try again, If error continues turn off
power to the oven for 5 min via the circuit breaker. After 5min turn
power on and retry.
• If error continues contact qualified service technician
No power / No display
• Power outage, Check other items in the house such as lights.
• Check house circuit breaker,Turn off the circuit breaker to the
oven and reset back to the on position.
Oven cavity light doesn't
turn on
• Replace oven cavity light bulb.
Food is not baking or
roasting properly
• Oven control was not set correctly - go to the Operating the
oven section of the user manual.
• Rack position being used is not correct - Go to the Operation
the oven section of the user manual .
• Incorrect cookware or cookware of improper size being used-
Go to the operating the oven section of user manual.
• Temperature adjustment needed. See Operating the oven
manual temp adjustment section.
food is not Broiling
correctly
• Oven controls improperly set.- Make sure Broil function is
selected.
• Improper rack position being used.See Operating the oven
broiling section.
• Using cook ware not suited for broiling.Use the broil pan that
came with the oven
Troubleshooting
THOR Kitchen works hard to ensure that you don’t have problems with your new eclectic wall
oven. If you run into unexpected trouble, look first for a solution in the tables below. If you’re
still having trouble after trying the suggested solution, call THOR Kitchen at 1-877-288-8099.
TROUBLESHOOTING
37

Problem Possible solution
Oven smokes during
broiling
• Food product is placed to close to broil element.
• Rack position is incorrect.
• Food product not properly prepared, Remove excess fat from
cuts of meats, Trim fatty edges to prevent curling.
• Incorrect cookware used, use the supplied broiler pan to allow
the grease to drip below the slots.
• Grease has build up on oven cavity surfaces. Regular cleaning
isrequired when doing heavy amounts of broiling due to grease
splatter.
Oven temp is to hot or
too cold
• Oven temp sensor off set needs to be adjusted.
• See manual temp adjust.Oven Temp can be increased or
decreased by 35 deg.
Cracking / popping
sounds
• This is a normal sound, as metal heat and cool there is
expansion and contraction sounds during the heating process.
Oven is not clean after a
self clean
• Oven control not set correctly or for long enough of a cleaning
cycle. Heavy soil 5hr , Normal soil 3 hours.
• Soil level in oven is to high, Self clean more frequently.
• Clean up heavy spill over before starting the clean cycle.
• Oven may need a second self clean cycle if heavily soil was
present during previous self clean.
Excessive smoking
during self clean cycle
• Excessive soil in oven cavity.
• Cancel cleaning cycle, Open windows and turn on exhaust
hood to remove smoke. Allow oven to cool and door to unlock.
Clean up excessive soil from cavity and restart self clean cycle.
Burning or oily odor
emitting from the oven
and vents
• This is normal for a new oven and will dissipate with use.
• Run the oven prior to first use following the seasoning process
outlined in the BEFORE YOU BEGIN section of owners manual
TROUBLESHOOTING
38
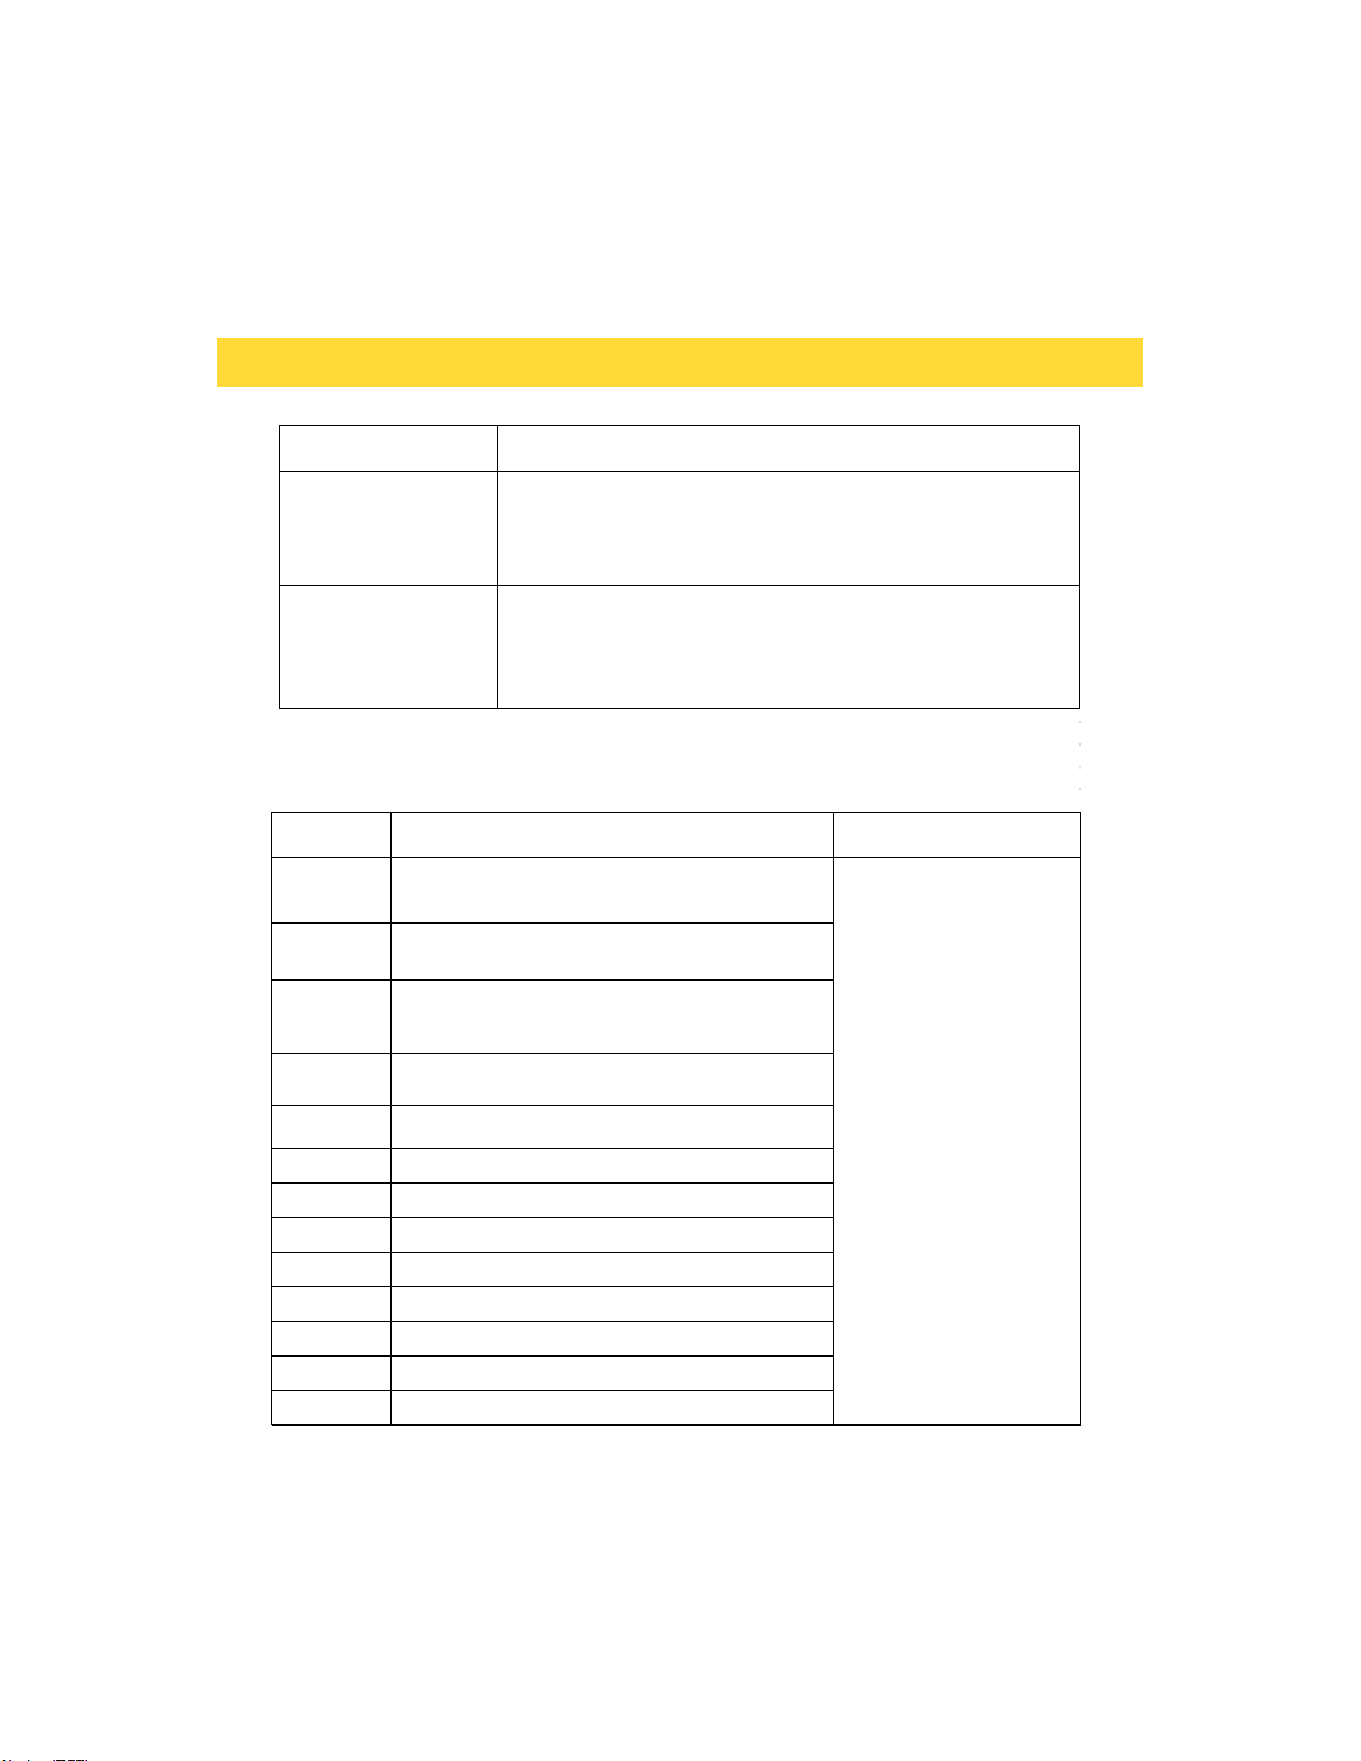
Error Code
Error Description
Solutions
F1E1
Communication failure between display board and
main control board
Restart the oven,If the
problem persists,
disconnectall power to your
oven for at
least 30 seconds,then
reconnect the power.If this
does not solve the
problem,call for service.
F1E2
The softwave version is inconsistent between the
two main control boards of the double wall oven
F3E1
An open or short circuit fault occurs on the oven
temperature sensor
F3E2
The oven temperature rises failure when the oven is
heated
F3E3 The oven temperature overheat
F3E4
The PCB board temperature sensor is faulty
F3E5
The PCB board temperature overheat
F3E6
Food probe failure
F3E7 The thermostat overheats
F4E1
The MCU self-test fails
F5E1 Oven door lock failure
F5E2 Oven door switch detection failure
F6E1 The Hall of the heat dissipation fan is faulty
Problem Possible solution
Cooling fan run's after
the oven is turned
off
• This is normal, the cooling fan will continue to run until the
oven has cooled below 165°F. Once it has cooled below this
temperature it will automatily turn off.
Warm air is
exhausting out
below the door
• This is normal, the oven cooling fan will draw cool air in thru
the oven door and this air will be cycled over the top and back of
the oven.The warm air will be exhausted out the bottom vent of
the oven into the kitchen.
TROUBLESHOOTING
Error Code
39

Warrant & Service
This product has been manufactured by Thor, 4651 E Airport Drive, Ontario, CA 91761.
For Customer Service, please call (877) 288 - 8099
For the most up to date warranty and service policy, please refer to our website WWW.THOR
Kitchen.COM/WARRANTY-REGISTRATION
For in-warranty service requests, please visit our website at WWW.THOR Kitchen.COM/
SERVICE
Please Note: You must provide proof of purchase or installation date for any in warranty service
requests.
WARRANTY AND SERVICE
40
WELCOME
TO THE CLUB
You chose THOR Kitchen to enhance your culinary journey and
we’re stoked to have you in the club. Think of it as a secret
society of really savvy people, such as yourself, choosing
professional power and performance at an affordable price.
Register your product by following the steps below.
WARRANTY REGISTRATION
WARRANTY NEED PARTS?
Scan theQR code or visit
thorkitchen.com/warranty
Input your product info
and select register
You’re done.
Let’s get cookin’ .