•
Please read this instrucon manual carefully before
using, and keep it for future reference.
• Funcons and features are subject to change
without further noce.
Baby Monitor with Bluetooth,
Wi-Fi and SRD function
V1.1.1

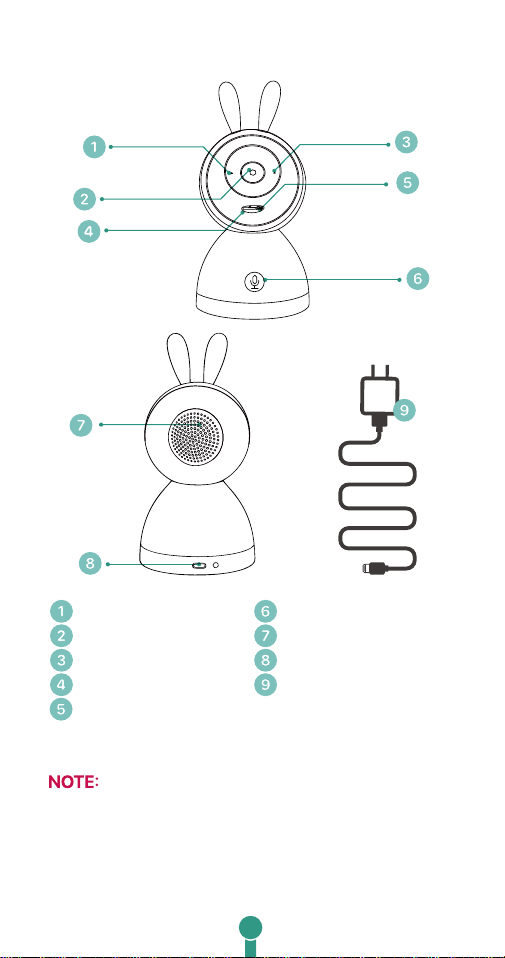
1. Meet the camera
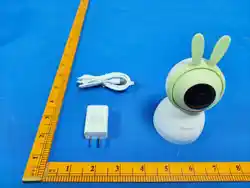
• The camera needs to be plugged in to a power
source before it can be used.
• Please use the original AC adapter and power
cord to power on the camera.
Status LED indicator
Camera lens
Microphone
SD card slot
Reset hole
Call/Pair buon
Speaker
USB Type-C power port
Power adapter & cable
1
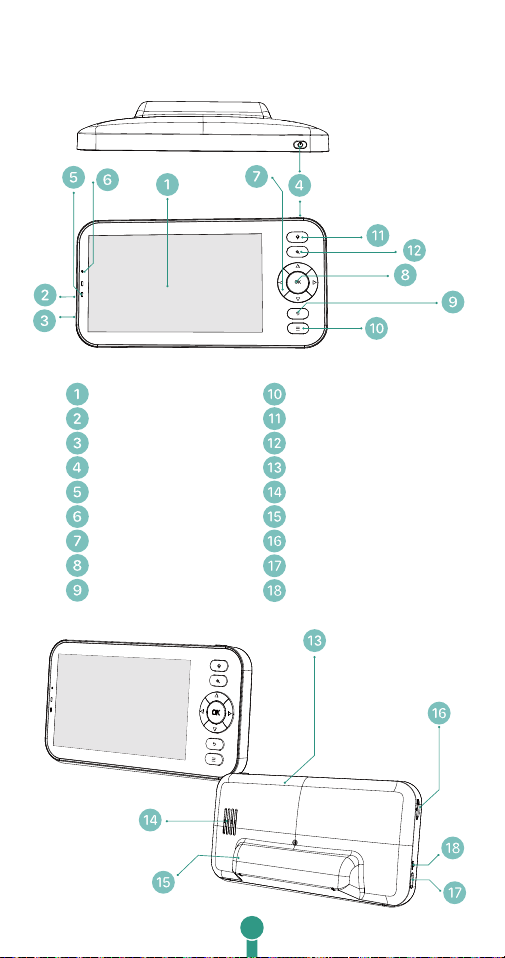
2. Meet the monitor
5-inch LCD display
Reset key
Type-C charging port
On/off switch
Status indicator
Microphone
Direcon keys
OK
Return
Menu
Intercom
Zoom
Internal antenna
Speaker
Foldable stand
Memory card slot
Type-C charging port
Reset key
2
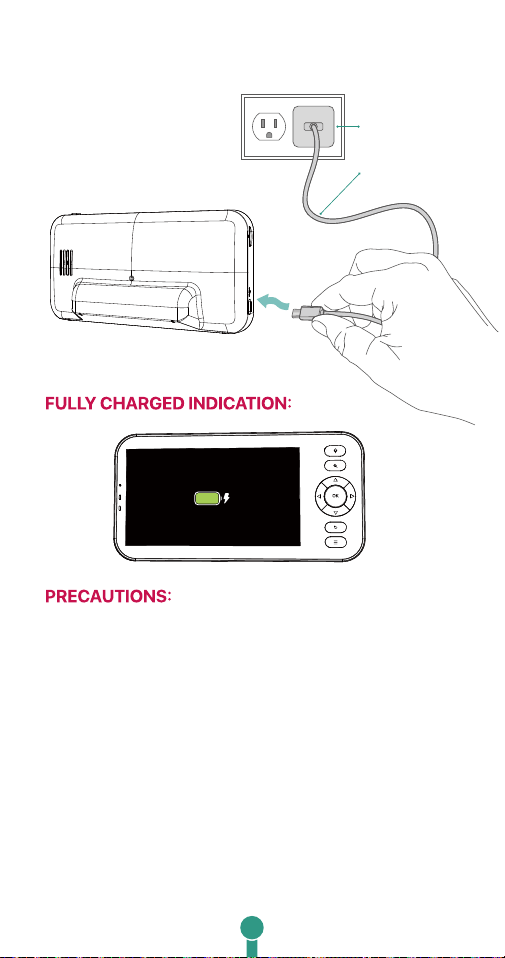
3. Charge Your Monitor
1. The monitor comes with a built-in battery that can
last up to 6 hours of continuous use after a full charge.
When the battery is low, it will pop-up low power alert.
2. Please use the original AC adapter and power
cord(1M) for battery recharge. It takes about 5 hours to
fully charge the monitor.
3. Do not use this product on a sloping or unstable
surface, keep it away from heat sources to avoid
possible damage, and do not place it near or on any
electrical appliances.
4. Do not allow children to use this product as a toy
without supervision.
1.5 meter
Power Cable
AC Adapter
3
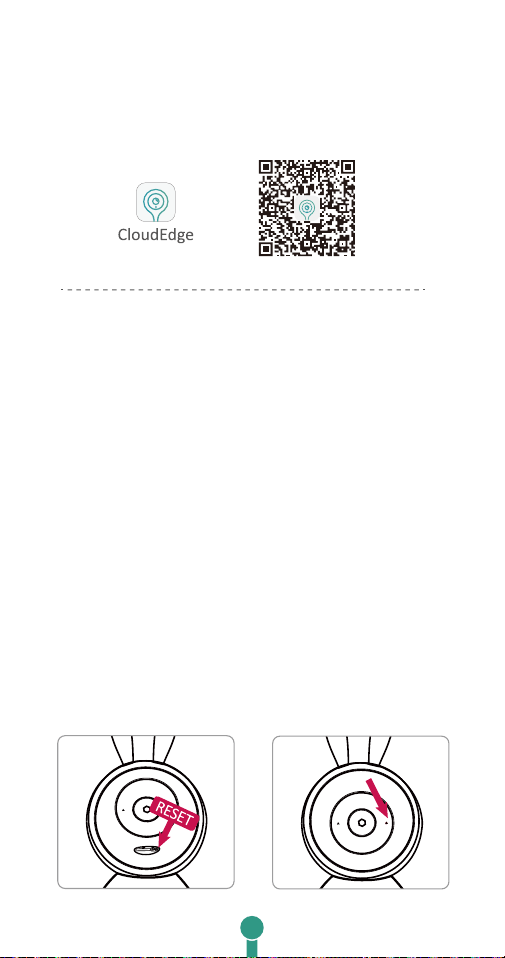
4. App Download
Search 'CloudEdge' in the App stores or
scanbelow QR codes to download the App.
5. Connect the Camera to the APP
The camera can be connected both to the monitor and
the App.Generally, it is connected to the monitor by
default.
Follow the steps below to connect the camera to
the App.
1. Make sure the Wi-Fi network is a 2.4/5GHz network.
2. Download the 'CloudEdge' App on your phone. Register
a new account to log in or log in directly.
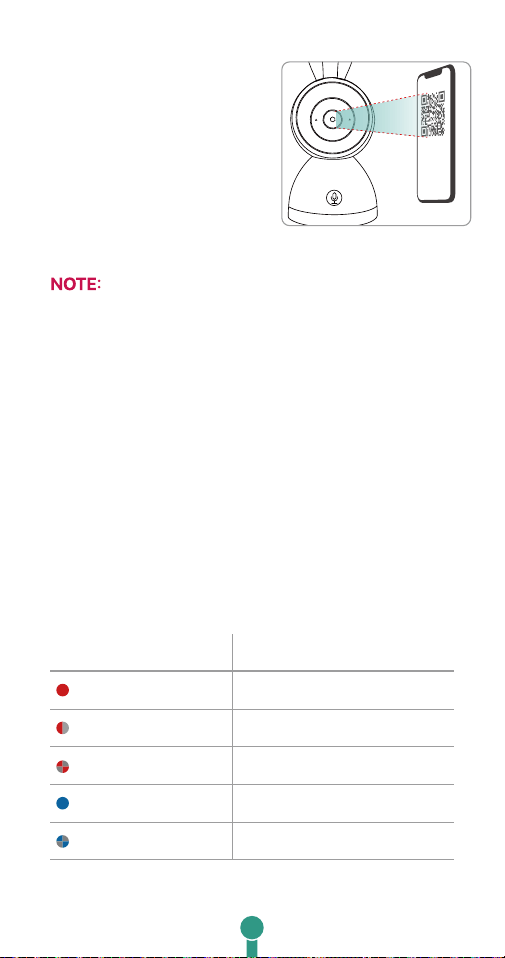
3. Press the Reset buon for five seconds unl you hear the
"BOOGU" which means the camera has been reset, aer
10-20 seconds, you will hear another beep and the red light
of the camera blinks slowly.
4
Most routers typically have a 2.4GHz Wi-Fi network,
with some routers also having a 5GHz Wi-Fi network.
When connectingto the app, please make sure you are
connected to the 2.4GHz Wi-Fi network to ensure
stable signal transmission.
4. Follow the step instrucons
on your smart phone to add
the camera, and scan the QR
code with your camera.
LED STATUS INDICATION
Device is abnormal.Solid red
Ready for Wi-Fi configuraon.
Connecng to Wi-Fi
Device is onlineSolid blue
Firmware upgradingFlash blue (twice/sec)
Flash red (once/sec)
Flash red (twice/sec)
• Make sure your phone's Bluetooth is turned on.
• Make sure your phone is connecting to a 2.4GHz Wi-Fi
.
• Open
'CloudEdge'
, reset the camera, click "+" in the upper
right corner, select Add Device, "Device Found" will pop
up at the bottom of the page, click to enter, select 2.4GHz
Wi-Fi network andenter the password to connect.
5
6. Installation
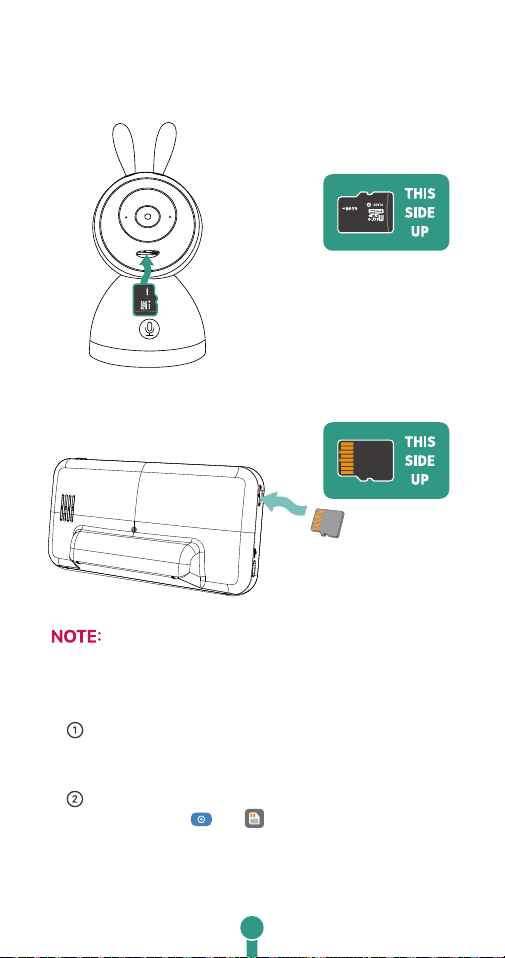
6.1. Insert memory card for camera (not included).
6.2. Insert memory card for monitor (not included).
• The memory cards are sold separately.
• Check SD card status:
For camera: In the CloudEdge App, tap the
Recording Management in the Settings to check
the SD card status.
For monitor, check the memrory card status in
monitor Settings
-->
SD card.
• If the memory card status displays as Uninitialized,
tap to format the SD card.
6
7. Pair with Monitor
The camera is pre-paired with its monitor to work
as a system. The transmission range is limited by
distance. Make sure the distance between them is
within 200m (656 ft).
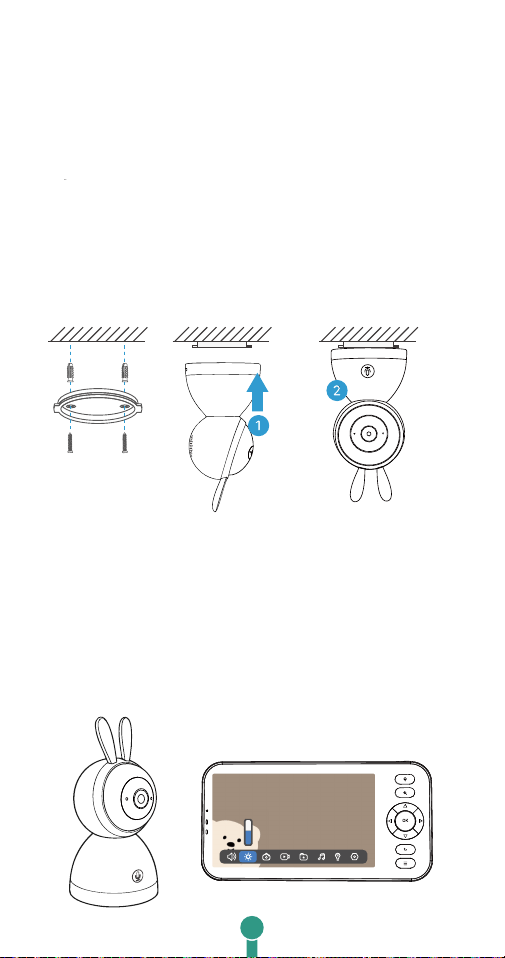
6.3. Mount your camera (Optional)
The camera can be placed horizontally or mounted
on the ceiling. Here we take ceiling mounting as an
example.
• Make sure the ceiling is strong enough to
withstand three mes the weight of the camera.
• Avoid posioning the camera to strong light source.
• (For cement wall/ceiling only) Drill screw holes
accordingly and insert three anchors.
• Screw in the metal screws to fix the camera mount.
Mount the camera to the base, and turn it clockwise
until it is fixed.
7
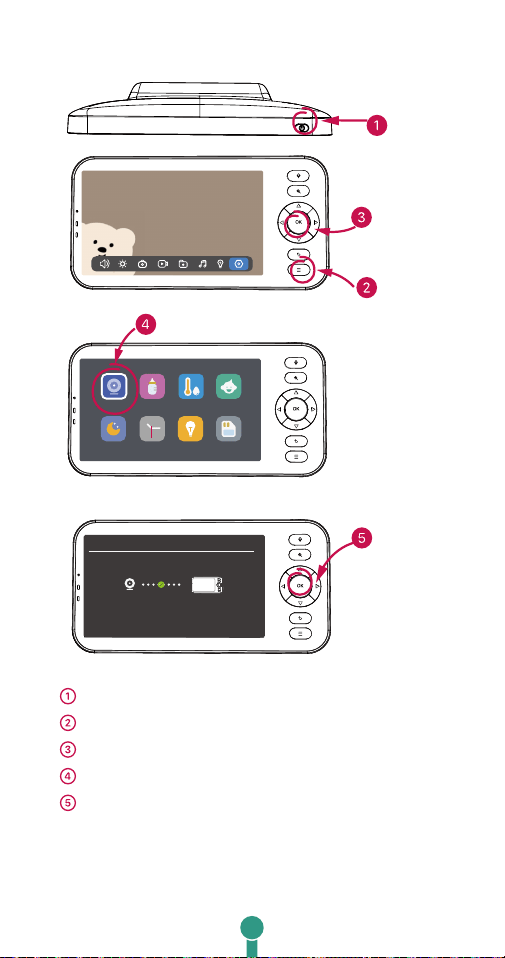
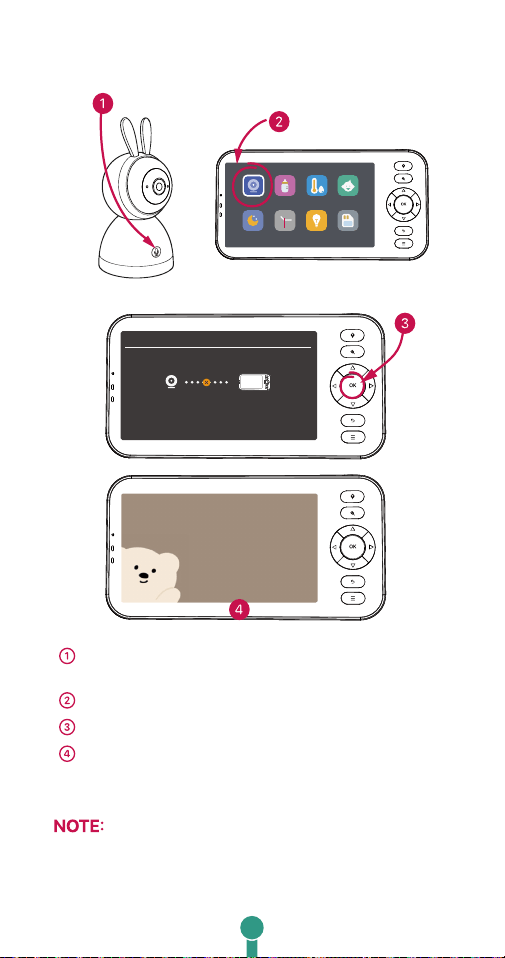
7.1. Steps to unpair the camera:
Press power key to light up screen.
Press menu button.
Select Settings, and press OK.
Select Camera and press OK.
Press and hold OK to unpair your camera.
Camera Successfully Paired
Press and hold OK to unpair your camera.
Camera managem ent
Power
Menu
Sengs
Camera
Sleep Mode Date and Time
Camera Light
SD Card
Feeding
Reminder
Temperature
and humiduty
Smart Care
Camera
OK
8
Camera
Sleep Mode Date and Time
Camera Light
SD Card
Feeding
Reminder
Temperature
and humiduty
Smart Care
7.2. Steps to reconnect your camera to monitor:
The monitor support adding 2 cameras, follow suit to
add another camera to your monitor.
Press and hold the PAIR button on the camera
till you hear a prompt tone.
Select Camera in monitor settings, click OK.
Click OK button to start pairing.
Pairing succeeds.
Pair
Camera
OK
Camera management
Camera Not Paired
1. Press and hold the pairing button on the camera untill you
hear the tone.
2. Press the OK button on the monitor to finalize pairing your
camera.
3. Binding is expected to take 20 seconds
9
Camera
Sleep Mode Date and Time
Camera Light
SD Card
Feeding
Reminder
Temperature
and humiduty
Smart Care
Wallpaper
Language
Safty
Protection
Factory Reset
Device Infor
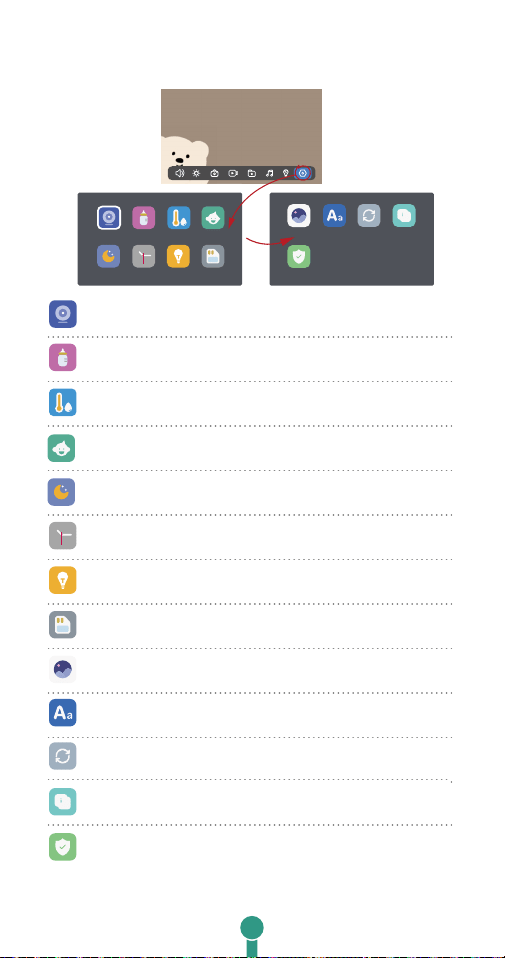
8.Monitor Setting Menu
Camera:
To pair or unpair a camera.
Feeding Reminder:
Make feeding schedules and get alert alarms.
Smart Care:
Set moon detecon and noise detecon alarm.
Sleep Mode:
Customize screen meout sengs.
Date & Time:
Set system date and me.
Camera Light:
To turn on/off camera indicator light.
SD Card:
Check the memory card status.
Wallpaper:
Customize your wallpaper on your monitor.
Language:
Operang language seng.
Factory Reset:
To restore factory defaults.
Device informaon:
Check camera and monitor informaon here.
Safety Protecon:
➊ Choose to cut off Wi-Fi, and block the remote
view access.
➋ Remote access history will be listed here.
Temperature and humiduty:
Ambient temperature detecon
10

FCC Warning
.Reorient or relocate the receiving antenna.
.Increase the separation between the equipment and receiver.
.Connect the equipment into an outlet on a circuit different
from that to which the receiver is connected.
.Consult the dealer or an experienced radio/TV technician for
help.
Responsible for compliance could void the user's authority to
operate this equipment. (Example- use only shielded interface
cables when connecting to computer or peripheral devices).
Any changes or modifications not expressly approved by the
party responsible for compliance could void the user's authority
to operate the equipment.
This equipment complies with Part 15 of the FCC Rules.
Operation is subject to the following two conditions:
.This device may not cause harmful interference,
.This device must accept any interference received, including
interference that may cause undesired operation.
This equipment has been tested and found to comply with
the limits for a Class B digital device, pursuant to port 15 of
the FCC rules. These limits are designed to provide reasonable
protection against harmful interference in a residential
installation. This equipment generates, uses and can radiate
radio frequency energy and, if not installed and used in
accordance with the instructions, may cause harmful
interference to radio communications. However, there is no
guarantee that interference will not occur in a particular
installation. If this equipment does cause harmful interference
to radio or television reception, which can be determined
by turning the equipment off and on, the user is encouraged
to try to correct the interference by one or more of the following
measures:
11

FCC Radiation Exposure Statement:
.The equipment complies with FCC Radiation exposure limits
set forth for uncontrolled environment.
.This equipment should be installed and operated with
minimum distance 20cm between the radiator and your body.
12
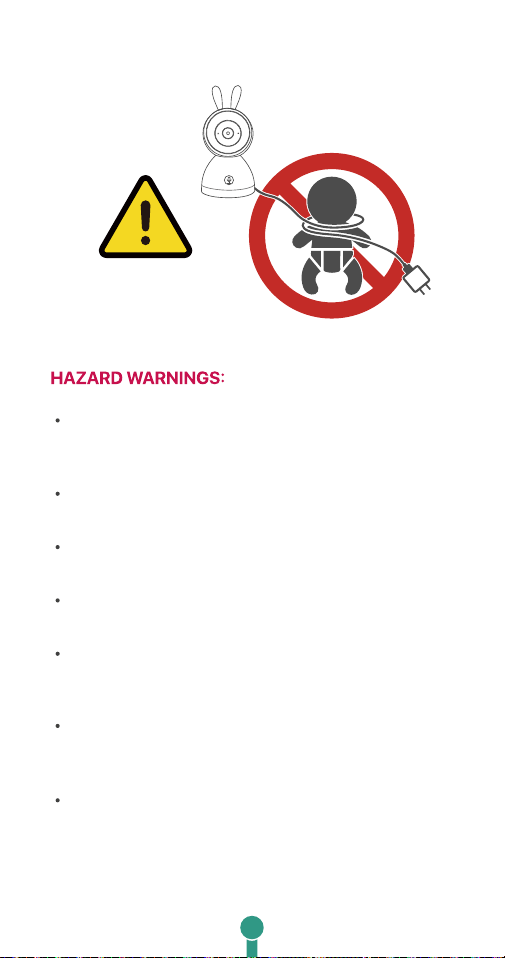
Potential Risk of Strangulation
Please be aware that children are at risk of
strangulation and suffocation accidents caused by
rope entanglement
.
Please keep power cords away from children;
maintain a distance of at least 3.5 feet (1m)
.
Do not allow children to use this product as a toy
without supervision.
Please do not leave the camera in the baby cot or
safety fence
.
This baby monitor kit is a monitoring aid and
cannot replace the functions and responsibilities
of an adult supervision
.
Do not leave your infant unattended or alone at
home. Infants need the constant care and attention
of an adult.
Do not use this product in an environment that
could potentially leak flammable gas, or expose the
product to rain or humid conditions.
Safety Instructions and Warnings
Potential Risk of
Strangulation
13