www.klarstein.com
www.klarstein.com
VEROSTEEL
Dunstabzugshaube
Range Hood
Campana extractora
Hotte aspirante
Cappa aspirante
10047433 10047434


3
DE
Sehr geehrter Kunde,
wir gratulieren Ihnen zum Erwerb Ihres Gerätes. Lesen Sie
die folgenden Hinweise sorgfältig durch und befolgen Sie
diese, um möglichen Schäden vorzubeugen. Für Schäden,
die durch Missachtung der Hinweise und unsachgemäßen
Gebrauch entstehen, übernehmen wir keine Haftung.
Scannen Sie den folgenden QR-Code, um Zugriff auf die
aktuellste Bedienungsanleitung und weitere Informationen
rund um das Produkt zu erhalten.
INHALTSVERZEICHNIS
TECHNISCHE DATEN
Artikelnummer 10047433, 10047434
Stromversorgung 220-240 V ~ 50/60 Hz
English 23
Français 41
Italiano 59
Español 77
Sicherheitshinweise 4
Lieferumfang 6
Installation 7
Installationsanleitung 8
Bedienung 16
Reinigung und Pege 17
Fehlerbehebung 19
Hinweise zum Umweltschutz 20
Hinweise zur Entsorgung 20
Hersteller 20
Spezielle Entsorgungshinweise für Verbraucher in Deutschland 21

4
DE
SICHERHEITSHINWEISE
• Lesen Sie sich alle Hinweise vor der Benutzung sorgfältig durch und bewahren
Sie die Bedienungsanleitung zum späteren Nachschlagen gut auf.
• Die Montagearbeiten dürfen nur von einer Elektrofachkraft oder einer
qualizierten Person durchgeführt werden. Bevor Sie die Dunstabzugshaube
verwenden, stellen Sie sicher, dass die Spannung (V) und die auf der
Dunstabzugshaube angegebene Frequenz (Hz) der Spannung und Frequenz
der Stromversorgung in Ihrem Haushalt entsprechen.
• Für Schäden, die durch unsachgemäßen Gebrauch und unsachgemäße
Installation entstehen, übernehmen wir keine Haftung.
• Kinder unter 8 Jahren dürfen die Dunstabzugshaube nicht benutzen.
• Das Gerät ist nicht für den kommerziellen Gebrauch, sondern nur für
Gebrauch im Haushalt und in ähnlichen Umgebungen vorgesehen.
• Reinigen Sie das Gerät und den Filter regelmäßig, damit das Gerät immer
ezient arbeitet.
• Ziehen Sie vor der Reinigung immer den Stecker aus der Steckdose.
• Reinigen Sie das Gerät genau wie in der Bedienungsanleitung angegeben.
• Verwenden Sie unter der Abzugshaube kein offenes Feuer.
• Falls das Gerät nicht normal funktioniert, wenden Sie sich an den Hersteller
oder einen Fachbetrieb.
• Kinder ab 8 Jahren, psychisch, sensorisch und körperlich eingeschränkte
Menschen dürfen das Gerät nur benutzen, wenn sie vorher von einer für
sie verantwortlichen Aufsichtsperson ausführlich mit den Funktionen und
den Sicherheitsvorkehrungen vertraut gemacht wurden und die damit
verbundenen Risiken verstehen.
• Falls das Netzkabel oder der Stecker beschädigt sind, müssen sie vom
Hersteller, einem autorisierten Fachbetrieb oder einer ähnlich qualizierten
Person ersetzt werden.
• Wenn die Dunstabzugshaube mit Herden verwendet wird, die Gas oder
andere Brennstoffe verbrennen, muss eine ausreichende Belüftung des
Raumes vorhanden sein.
• Flambieren Sie nicht unter der Abzugshaube.
• Achtung: Die Geräteoberäche kann während des Betriebs heiß werden.
Wichtige Hinweise zur Installation
• Die Luft darf nicht in einen Abzug abgeleitet werden, der zum Absaugen von
Rauchgasen von Gas- oder anderen Brennstoffen verwendet wird (gilt nicht
für Geräte, die nur die Luft in den Raum zurückführen).
• Beachten Sie alle regionalen Vorschriften zum Einbau von Entlüftungsanlagen.

5
DE
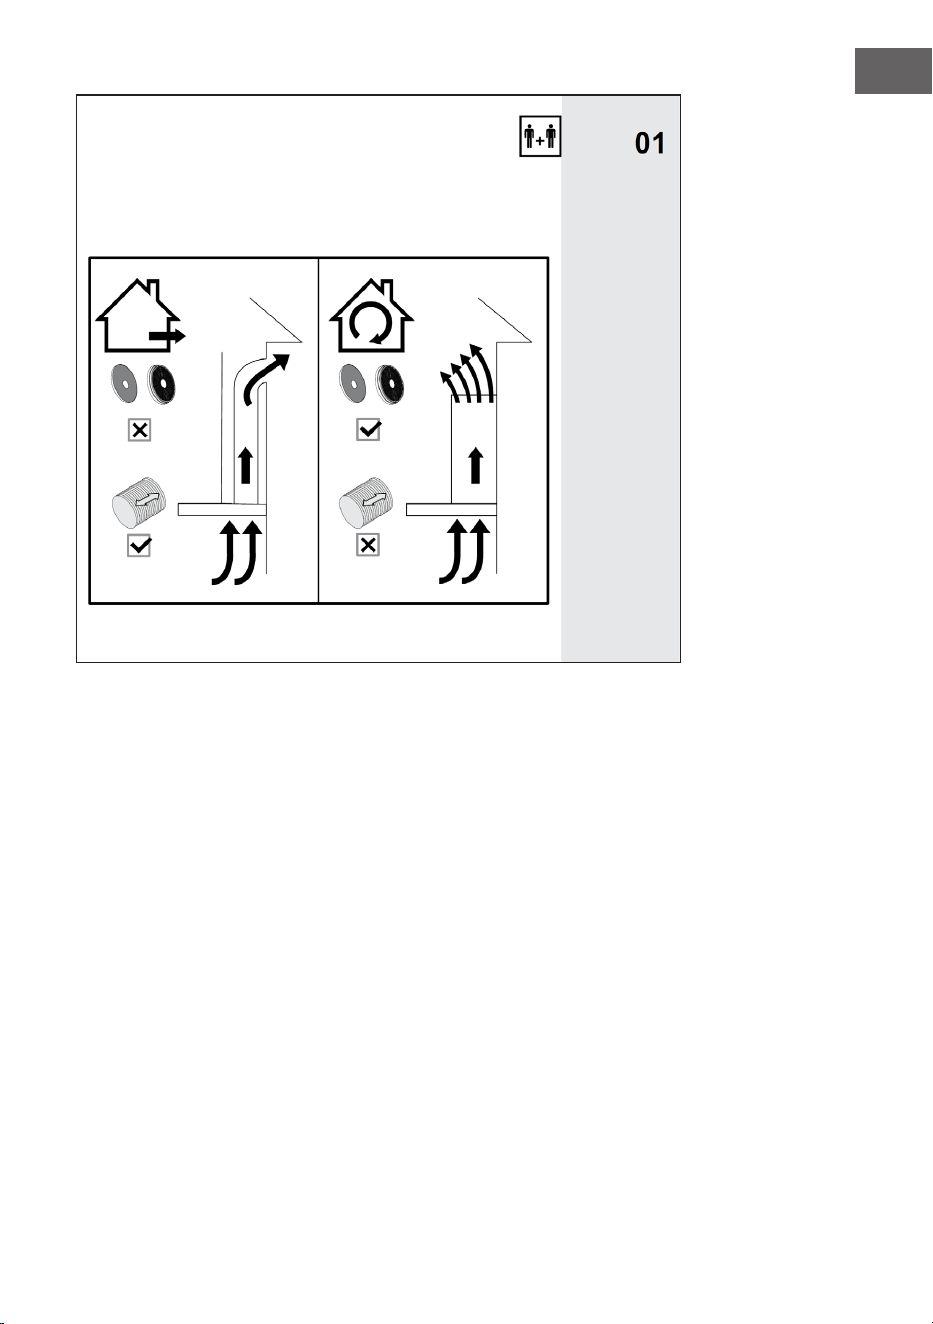
Wichtige Hinweise zum Abluftbetrieb
WARNUNG
Vergiftungsgefahr durch zurückgesaugte Abgase! Betreiben Sie
das Gerät nicht im Abluftbetrieb, wenn es zusammen mit einer
raumluftabhängigen Feuerstätte betrieben wird und keine
ausreichende Luftzirkulation garantiert wird.
Raumluftabhängige Feuerstätten wie Gas-, Öl-, Holz- oder Kohleheizungen, Boiler
oder Durchlauferhitzer beziehen die Luft aus dem Raum und führen sie durch
ein Abluftrohr oder einen Kamin ins Freie. Im Abluftbetrieb wird der Küche und
den benachbarten Räumen Luft entzogen. Ohne ausreichende Zuluft entsteht
ein Unterdruck. Giftige Gase aus dem Kamin oder Abluftrohr können dabei in die
Wohnräume zurückgesaugt werden.
• Achten Sie darauf, dass ausreichend Frischluftzufuhr garantiert ist und die
Luft zirkulieren kann.
• Ein Zuluft-/Abluftmauerkasten reicht nicht aus, um die Einhaltung des
Grenzwertes sicherzustellen.
Ein gefahrloser Betrieb ist nur dann möglich, wenn der Unterdruck am
Standort der Feuerstätte 4 Pa (0,04 mbar) nicht überschreitet. Das erreichen
Sie, wenn durch nicht-verschließbare Öffnungen in Türen und Fenstern in
Verbindung mit einem Zuluft- / Abluftmauerkasten die zur Verbrennung
benötigte Luft nachströmen kann. Lassen Sie sich in jedem Fall von einem
Schornsteinfegermeister beraten und den gesamten Lüftungsverbund des Hauses
beurteilen. Er kann ihnen gegebenenfalls die nötigen Maßnahme zur Belüftung
nennen.
Wird die Dunstabzugshaube ausschließlich im Umluftbetrieb eingesetzt, ist der
Betrieb ohne Einschränkung möglich.
Wichtige Hinweis zur Demontage des Geräts
• Die Demontage gleicht der Installation/Montage in umgekehrter Reihenfolge.
• Nehmen Sie sich bei der Demontage eine zweite Person zu Hilfe, um
Verletzungen zu vermeiden.
6
DE
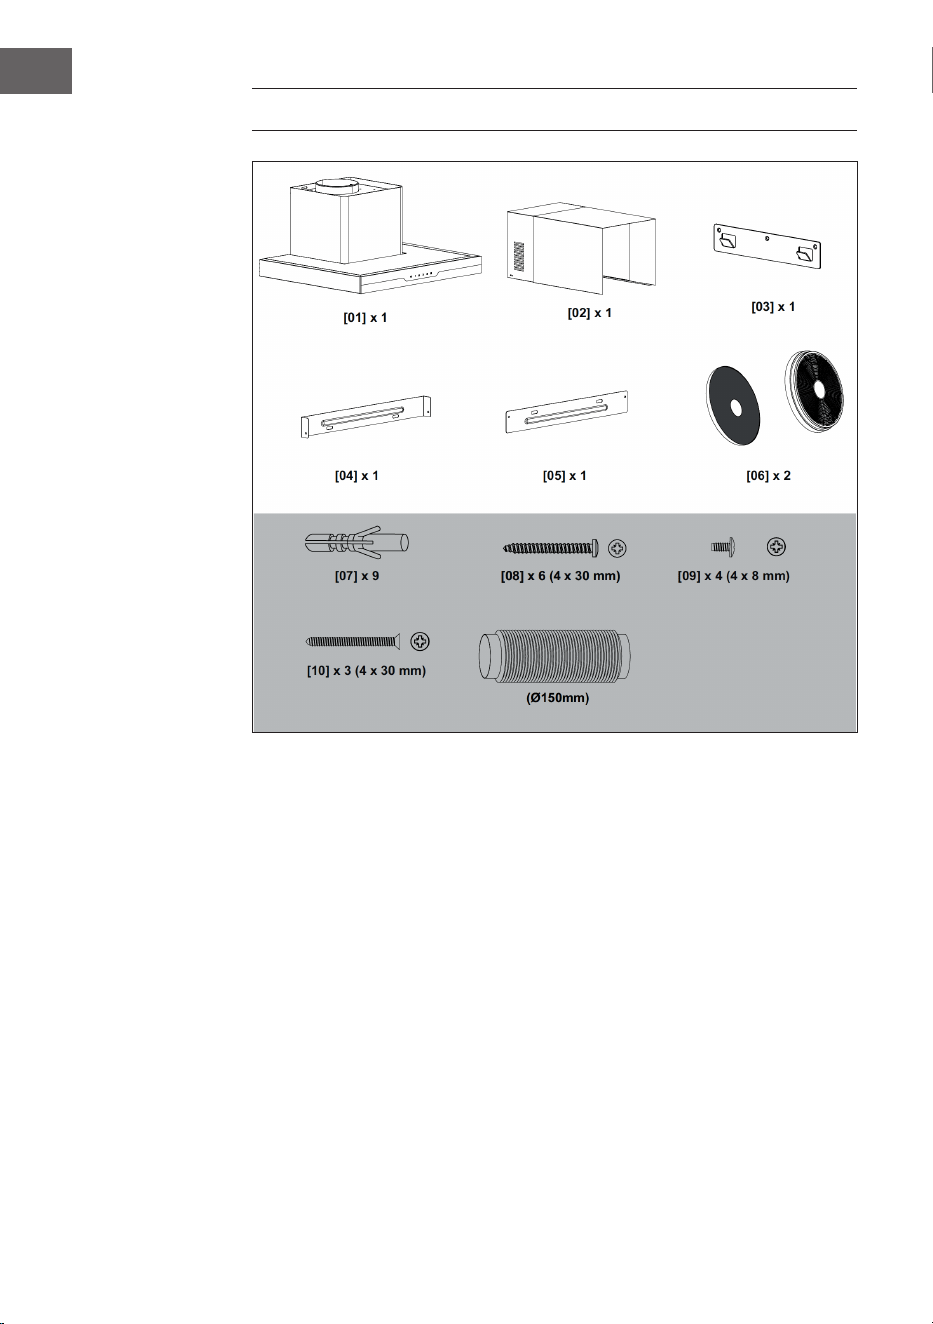
LIEFERUMFANG

7
DE
INSTALLATION
Vor der Installation
• Um die Risiken zu vermeiden, die bei Verwendung eines elektrischen Gerätes
auftreten, ist es wichtig, dass dieses Gerät korrekt installiert wird und dass Sie
die Sicherheitshinweise sorgfältig durchlesen, um Missbrauch und Gefahren
zu vermeiden. Bitte bewahren Sie diese Anleitung zur späteren Verwendung
auf und geben Sie sie an zukünftige Besitzer weiter. Achten Sie darauf, dass
das Gerät nach dem Auspacken nicht beschädigt ist.
• Überprüfen Sie das Paket und vergewissern Sie sich, dass alle Teile
mitgeliefert wurden.
• Suchen Sie einen geeigneten Ort für Installation der Abzugshaube.
• Wenn dieses Produkt Glas enthält, achten Sie bei der Montage oder
Handhabung darauf, dass es nicht zu Verletzungen oder Schäden am Produkt
kommt.
• Wenn Sie das Gerät verkaufen oder bei einem Umzug zurücklassen, geben
Sie diese Bedienungsanleitung weiter, damit sich der neue Besitzer mit dem
Gerät und den Sicherheitshinweisen vertraut machen kann.
• Dieses Gerät muss von einer qualizierten Person entsprechend den
Anweisungen des Herstellers ordnungsgemäß installiert werden. Zur
Installation sind 2 Personen erforderlich.
• Achtung Stromschlaggefahr! Die Stromversorgung des Gerätes muss vor der
Installation komplett ausgeschaltet und der Anschluss vom Netz getrennt
werden.

8
DE
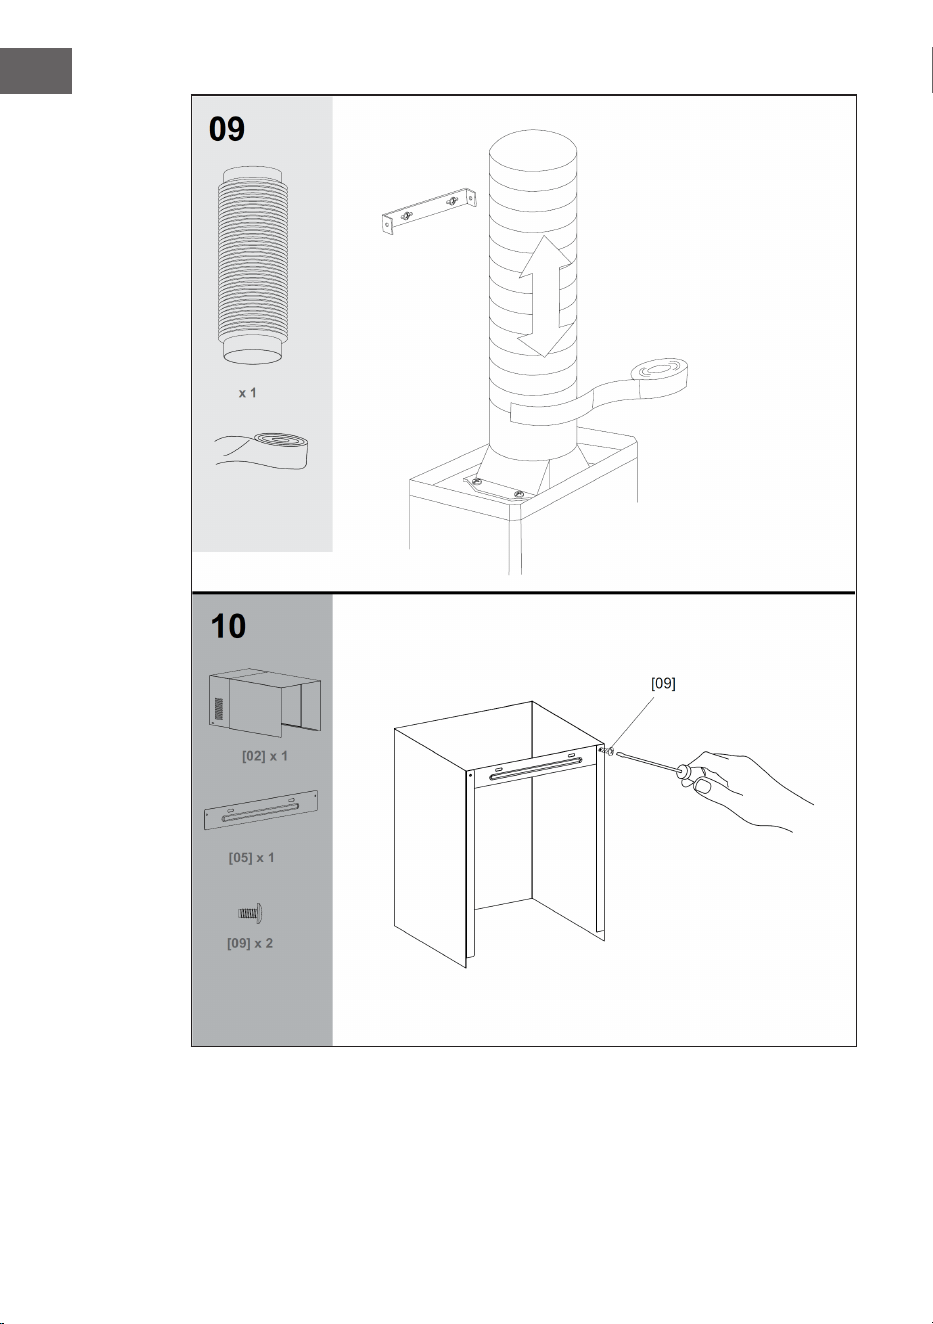
INSTALLATIONSANLEITUNG
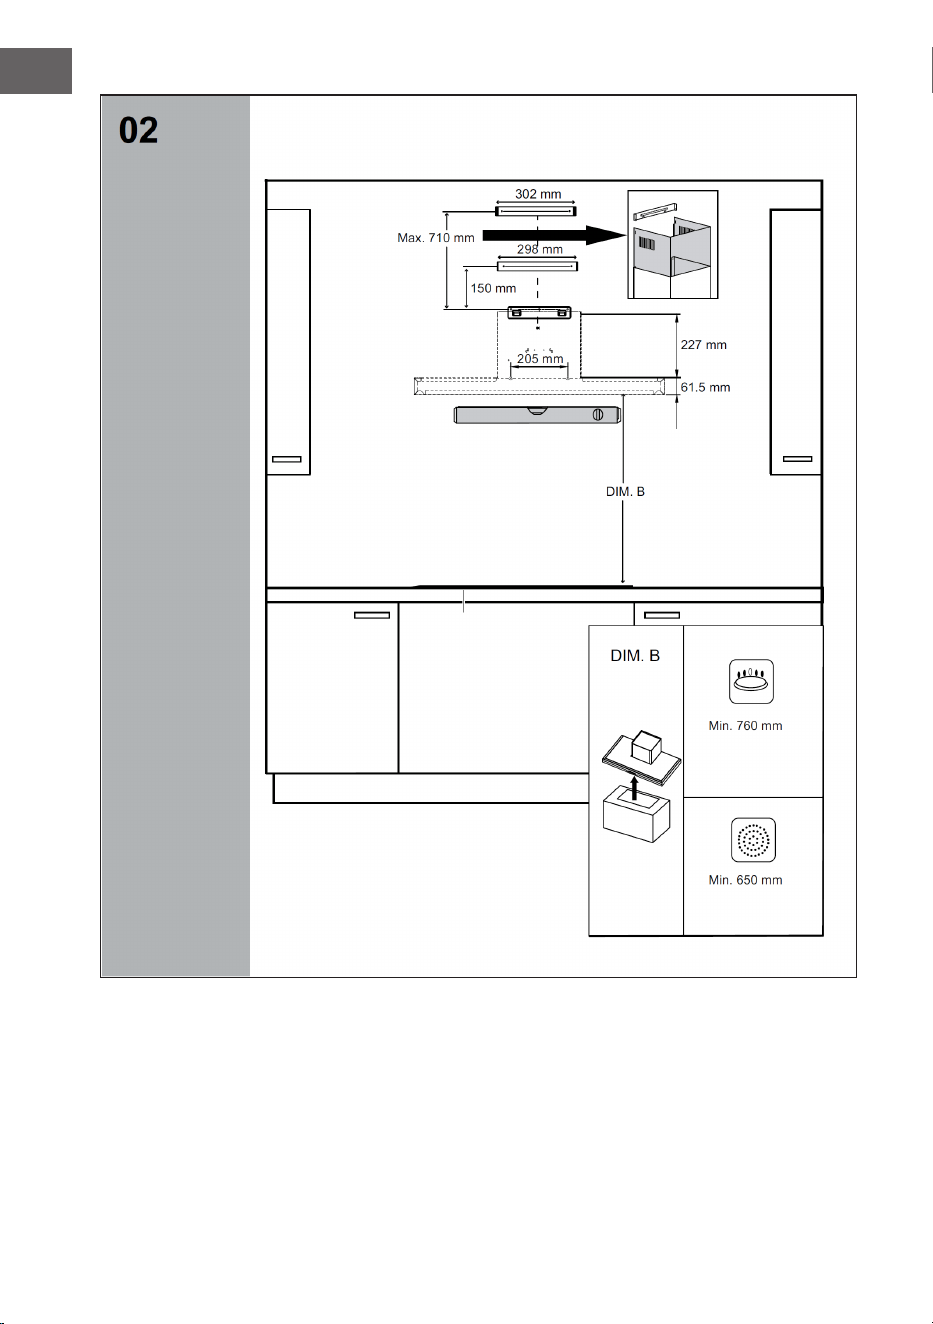
1. Wählen Sie die Art der Installation aus: Abluftfunktion oder Umwälzfunktion.
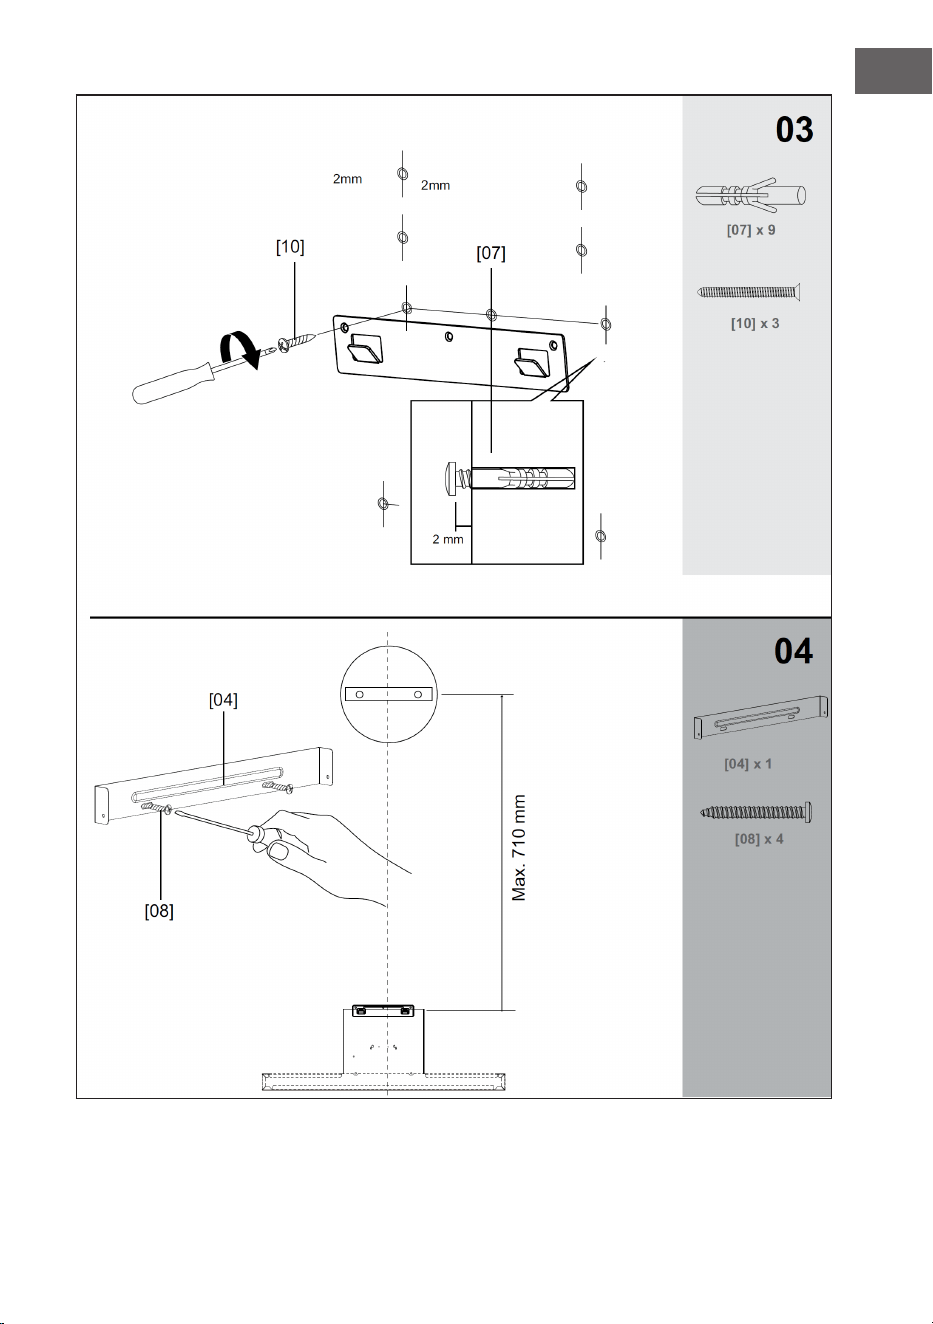
2. Markieren Sie die 6 Loch-Positionen an der Wand (siehe
Installationsdiagramm 1). Der maximale Abstand zwischen den 2 oberen
Löchern und den 2 mittleren Löchern sollte, abhängig von der Deckenhöhe,
nicht mehr als 735 mm betragen.
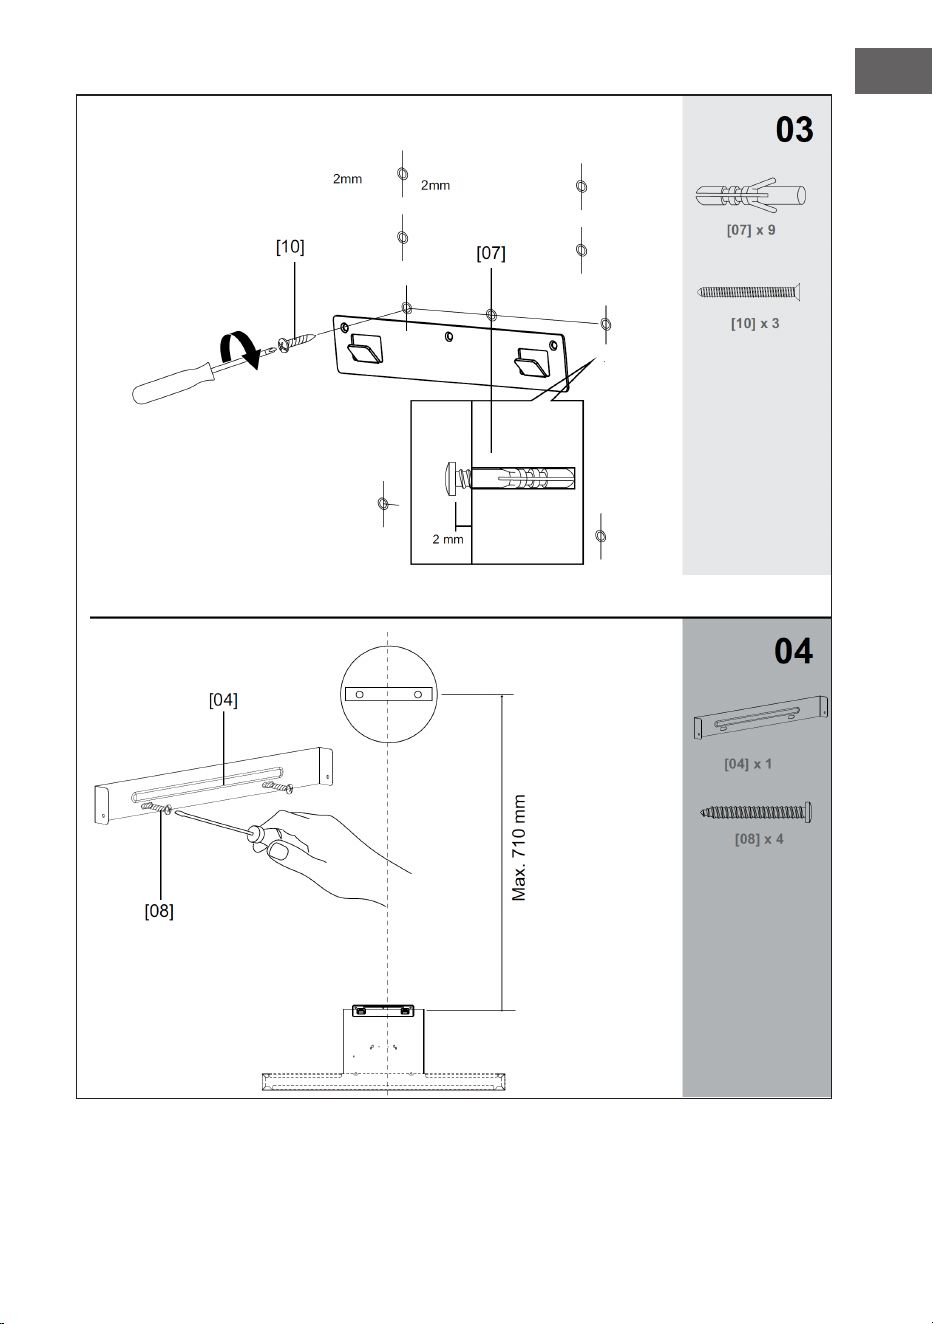
3. Bohren Sie die Löcher, und schieben Sie dann die Dübel in alle Löcher.
Die mitgelieferten Dübel sind nur für massive Wände geeignet. Bei der
Befestigung an anderen Wandtypen verwenden Sie geeignete alternative
Befestigungen. Befestigen Sie die Aufhängung mit 3 lange Schrauben an den
unteren Löchern (Installationsdiagramm 3). Schrauben Sie als nächstes 2
lange Schrauben in die mittleren Löcher.
4. Verwenden Sie 2 lange Schrauben, um die Halterung an den oberen Löchern
zu befestigen (Installationsdiagramm 4).
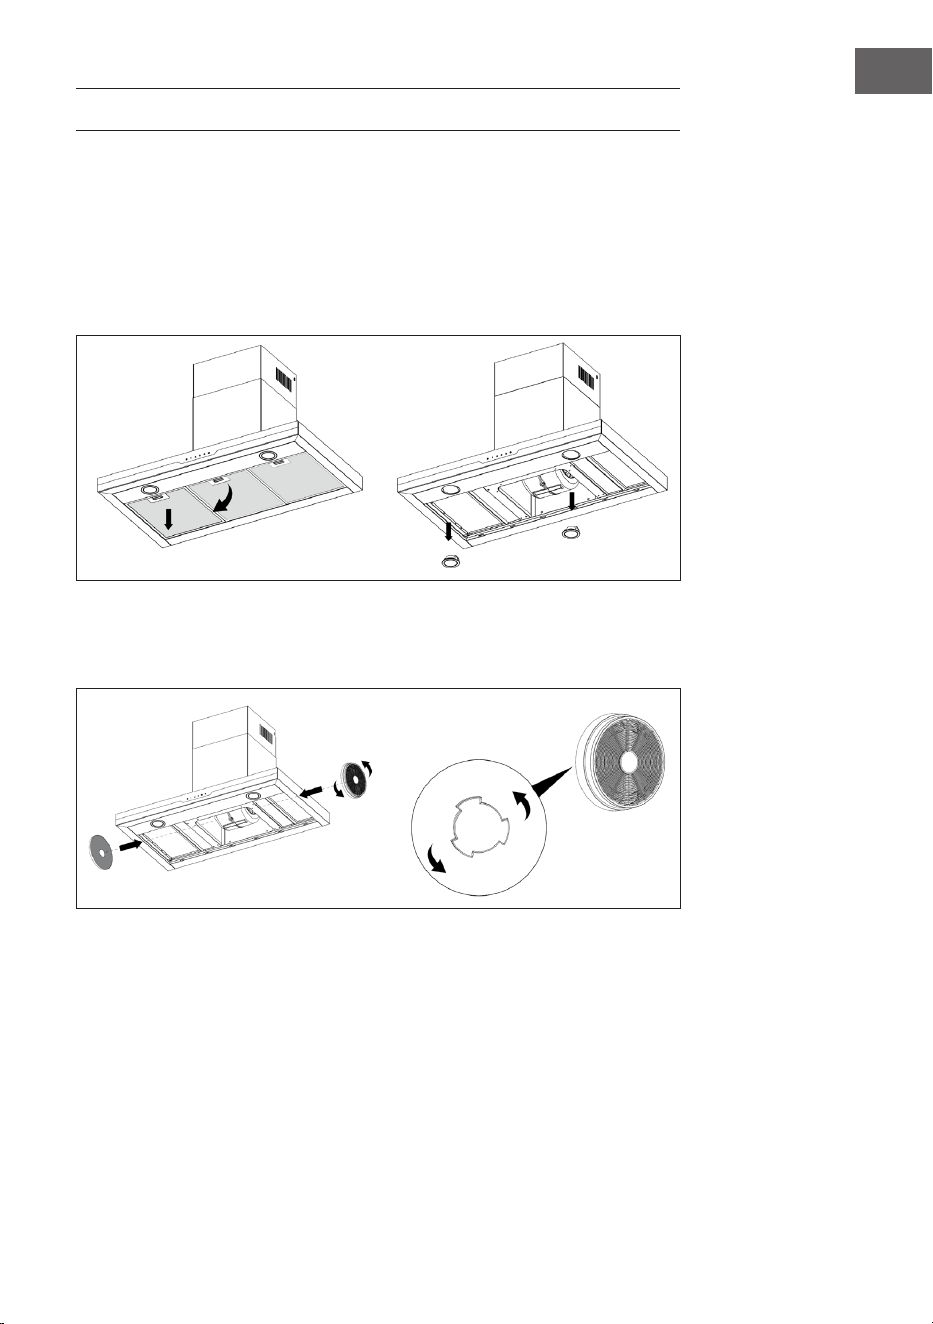
5. Bauen Sie das Hauptgerät und Glaseinheit mit 4 Schrauben und
Unterlegscheiben zusammen. Ziehen Sie die 2 Schrauben mit dem
Sechskantschlüssel fest. Entfernen Sie dann die Aluminiumlter von der
Haube.
6. Stellen Sie die Haube auf die 2 mittleren Schrauben und lassen Sie die Haube
nach unten gleiten, bis sie vollständig auf den Schrauben sitzt. Fixieren Sie
dann die Schrauben.
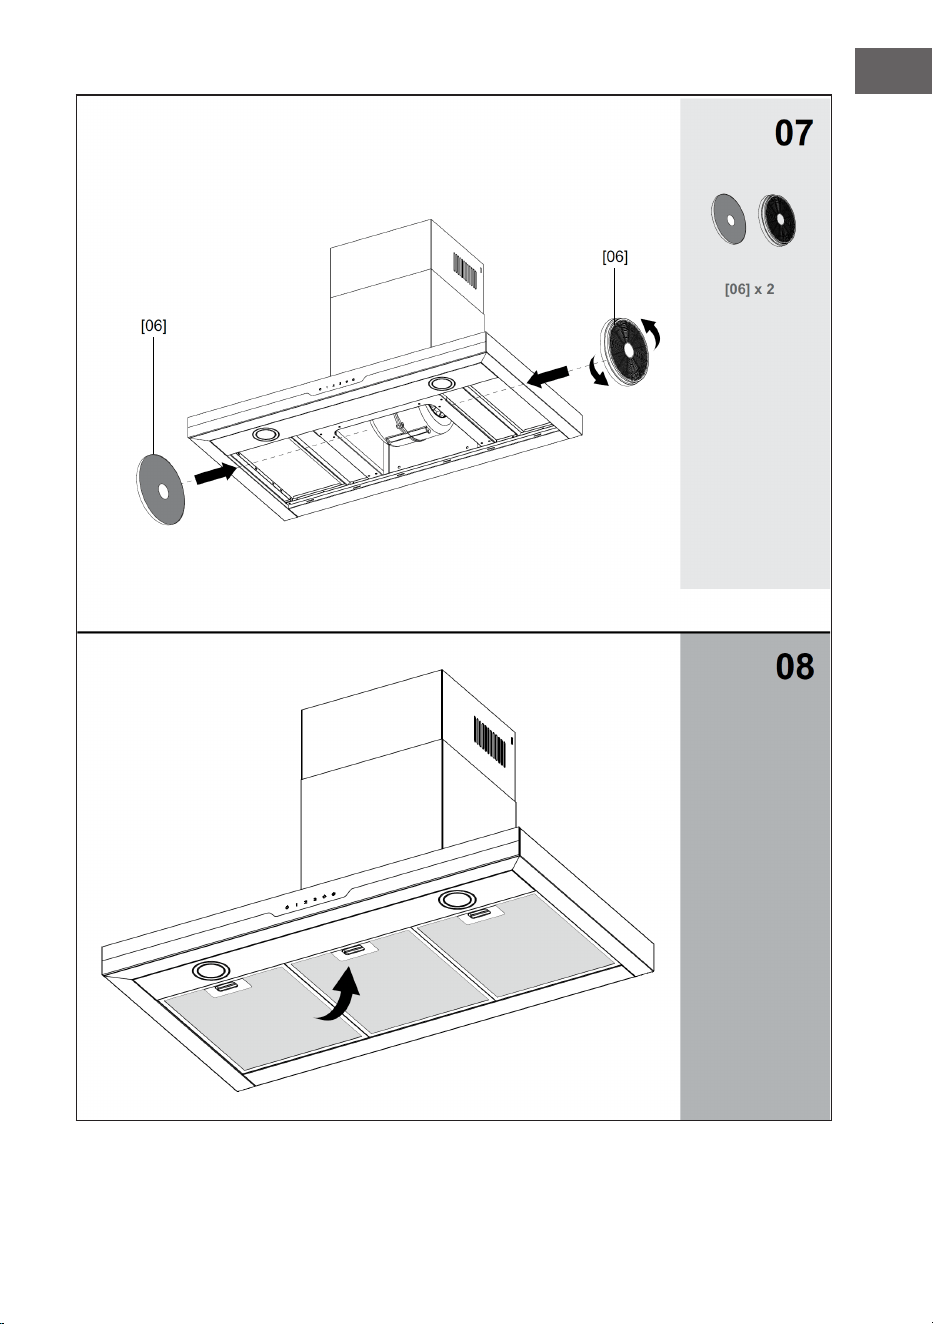
7. Falls Sie die Umwälzfunktion verwenden, bauen Sie die 2 Kohlelter ein.
8. Befestigen Sie die Aluminiumlter wieder an der Haube.
9. Fixieren Sie den Abluftschlauch (nur bei Abluftfunktion erforderlich) mit
selbstklebendem Aluminium-Tape und sichern Sie ihn mit 2 kurzen Schrauben
an der Haube.
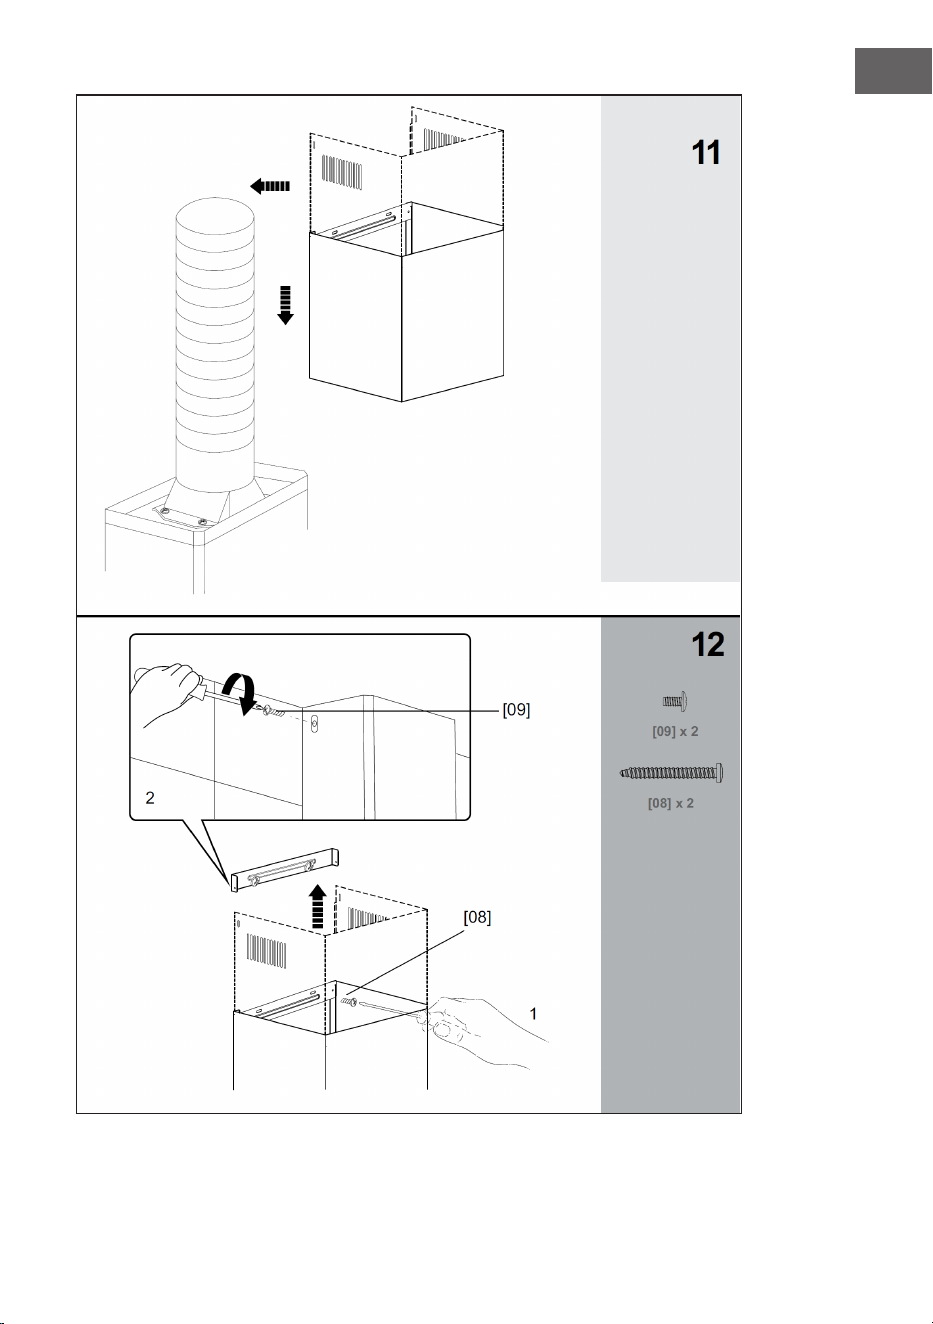
10. Verlängern Sie den Schornstein auf die richtige Länge und befestigen Sie ihn
an der Haube. Befestigen Sie die Halterung mit zwei kurzen Schrauben am
Schornstein.
11. Verbinden Sie die Oberseite des Abluftkanals mit Ihrem Abzug, gemäß den
Anweisungen des Herstellers. Setzen Sie dann den Schornstein auf die Haube.
12. Fixieren Sie den Schornstein an der Wand, indem sie die mittlere Halterung an
die Wand schrauben und den ausgezogenen Kamin mit kurzen Schrauben an
der oberen Wandhalterung befestigen.

9
DE
Abluftfunktion Umwälzfunktion

10
DE
11
DE

12
DE

13
DE

14
DE
14

15
DE

16
DE
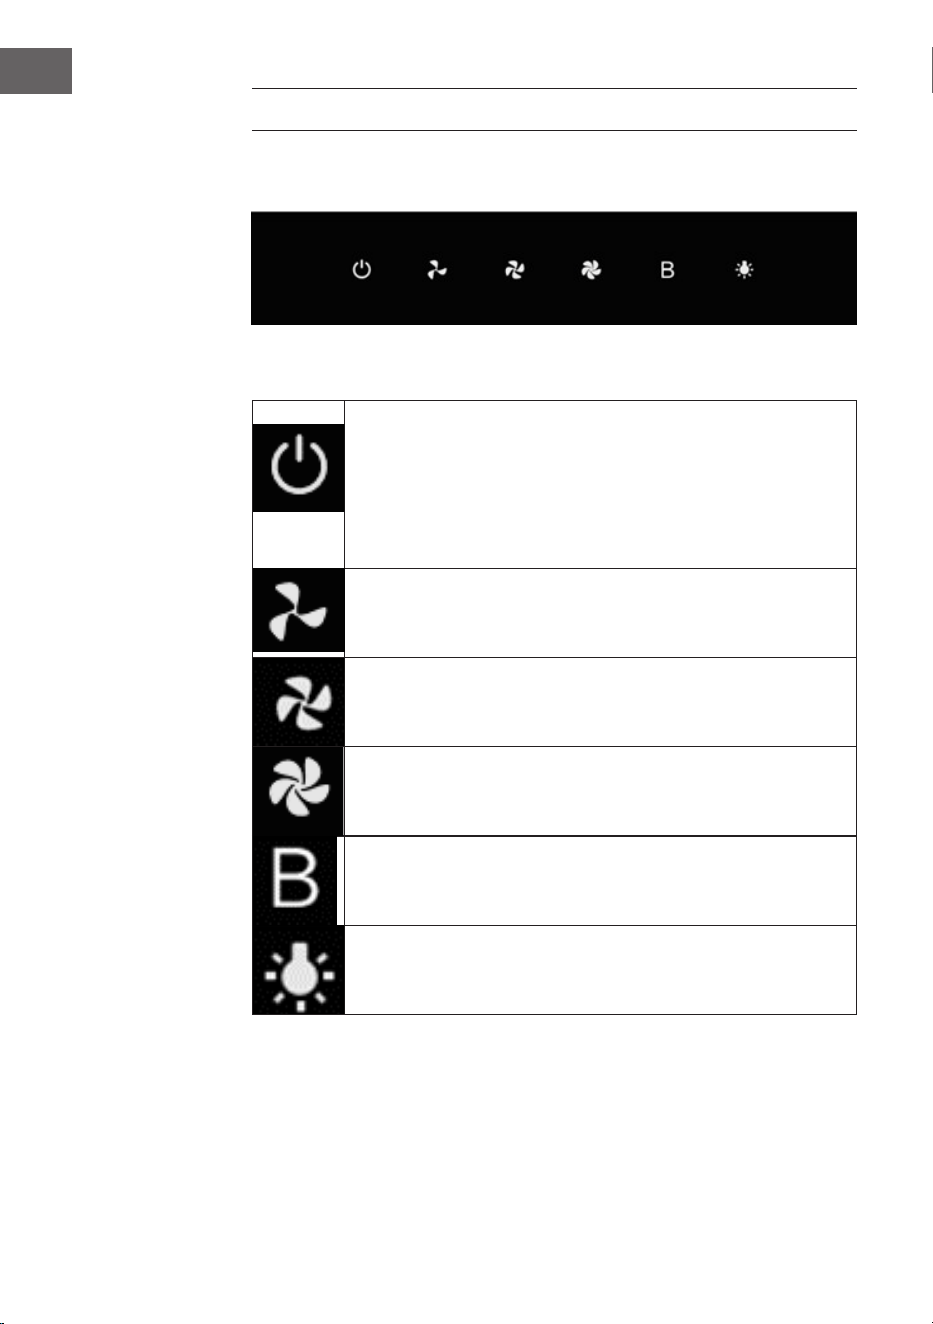
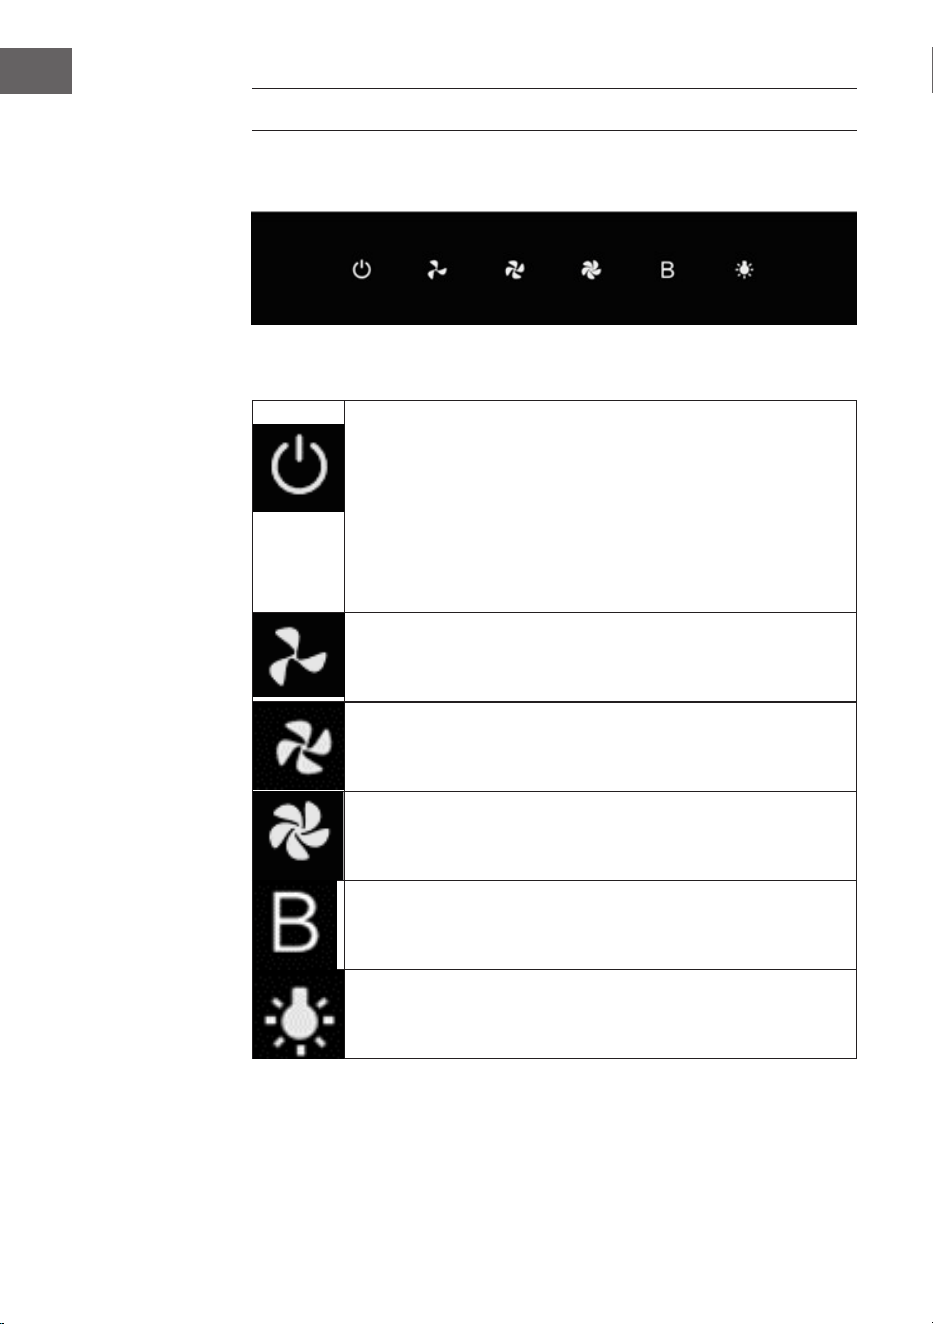
BEDIENUNG
Bedienfeld
Tasten
1 Ein/Aus
2 Niedrige
Geschwindigkeit
3 Mittlere
Geschwindigkeit
4 Hohe
Geschwindigkeit
5 Boost-Modus
6 Licht
1 2
Ein/Aus und Ausschaltverzögerungstaste: 3 Sekunden lang
drücken, alle Tasten leuchten auf und zeigen an, dass sich die
Dunstabzugshaube im Standby-Modus bendet. Wenn Sie die
Power-Taste berühren, während die Dunstabzugshaube in einer
beliebigen Geschwindigkeit läuft, blinkt diese Taste und die
Dunstabzugshaube schaltet sich nach 3 Minuten aus . Wenn Sie
die Einschalttaste erneut berühren, leuchtet die Kontrollleuchte
wieder rot und die Kontrollleuchten der Funktionstasten erlöschen,
was bedeutet, dass die Dunstabzugshaube ausgeschaltet ist.
Berühren Sie diese Taste, läuft die Dunstabzugshaube auf Stufe 1.
Berühren Sie diese Taste, läuft die Dunstabzugshaube auf Stufe 2.
Berühren Sie diese Taste, läuft die Dunstabzugshaube auf Stufe 3.
Wenn Sie diese Taste berühren, läuft die Dunstabzugshaube
mit erhöhter Geschwindigkeit und geht nach 5 Minuten auf die
Geschwindigkeit 3 zurück.
Beleuchtungstaste: Drücken Sie die Beleuchtungstaste, schaltet
sich das Licht ein. Drücken Sie die Taste erneut, um das Licht
auszuschalten.
17
DE
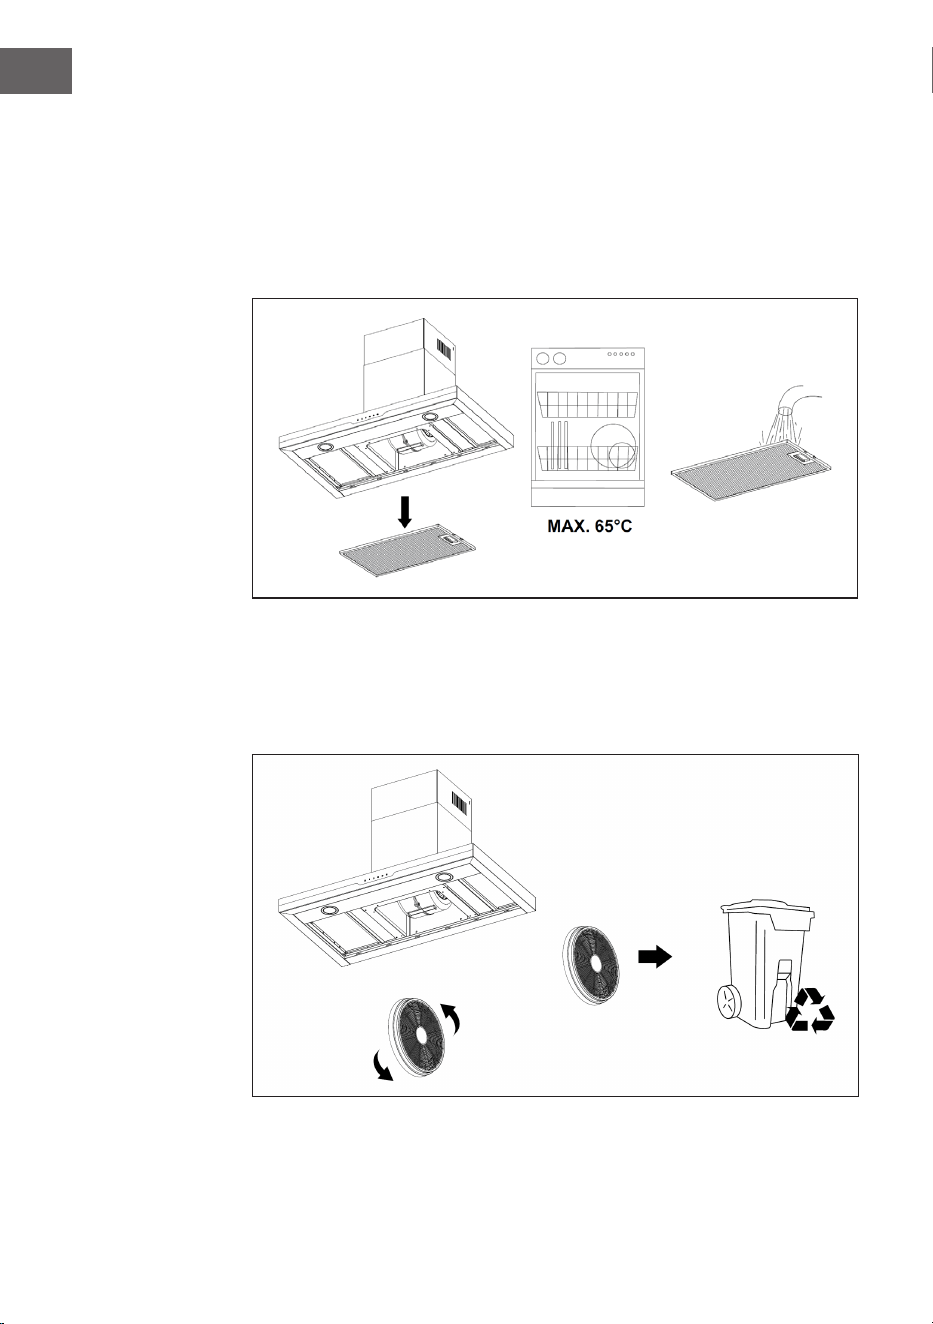
REINIGUNG UND PFLEGE
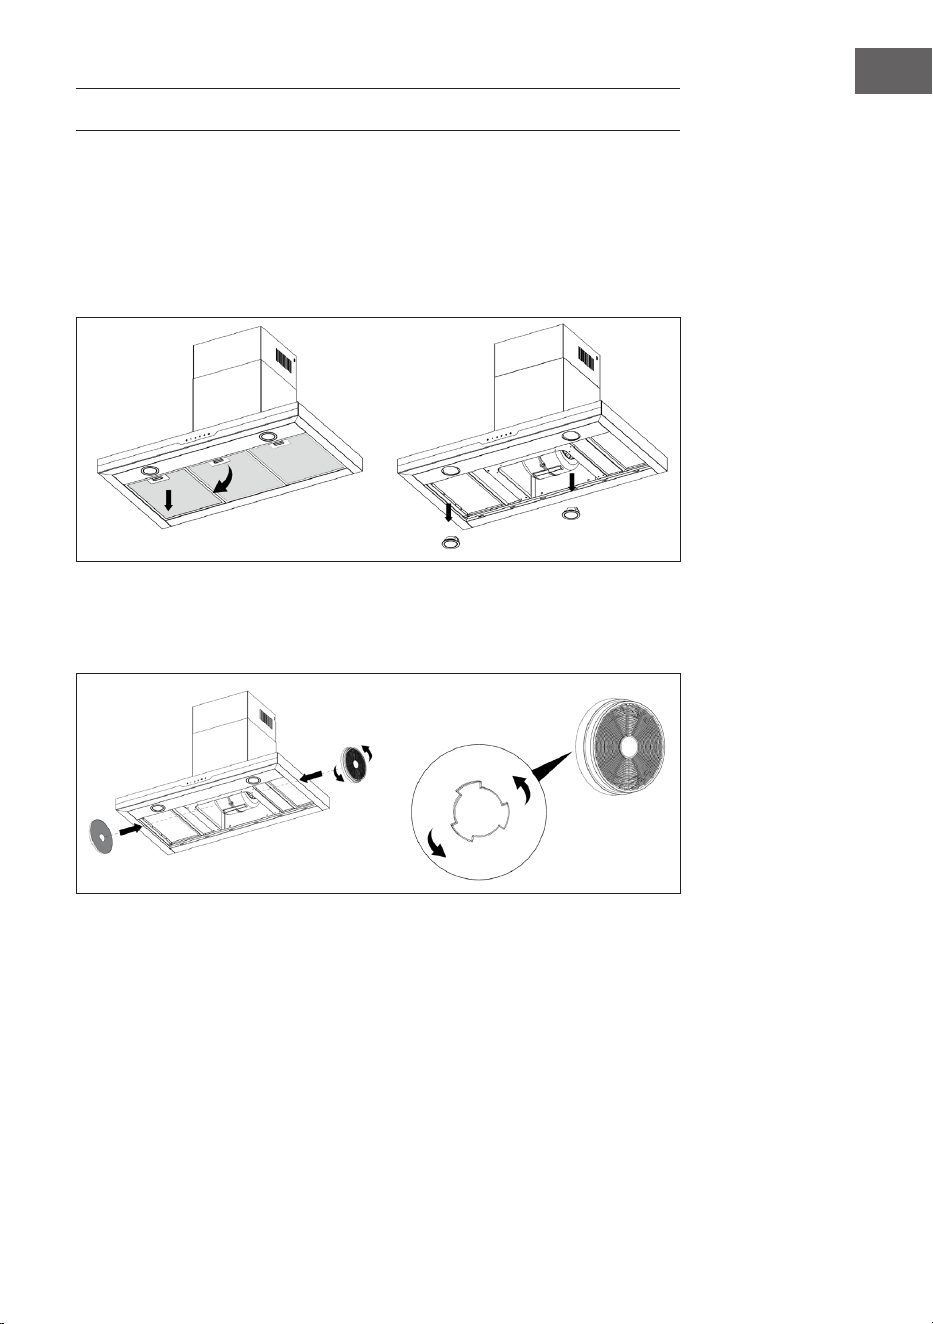
Lampen austauschen
• Entfernen Sie die Aluminiumlter.
• Die LED-Lampen benden sich auf der Unterseite.
• Drehen Sie an den Lampen, um sie entfernen. Entsorgen Sie alte Lampen
fachgerecht.
• Installieren Sie ein neue LED-Lampen des selben Typs.
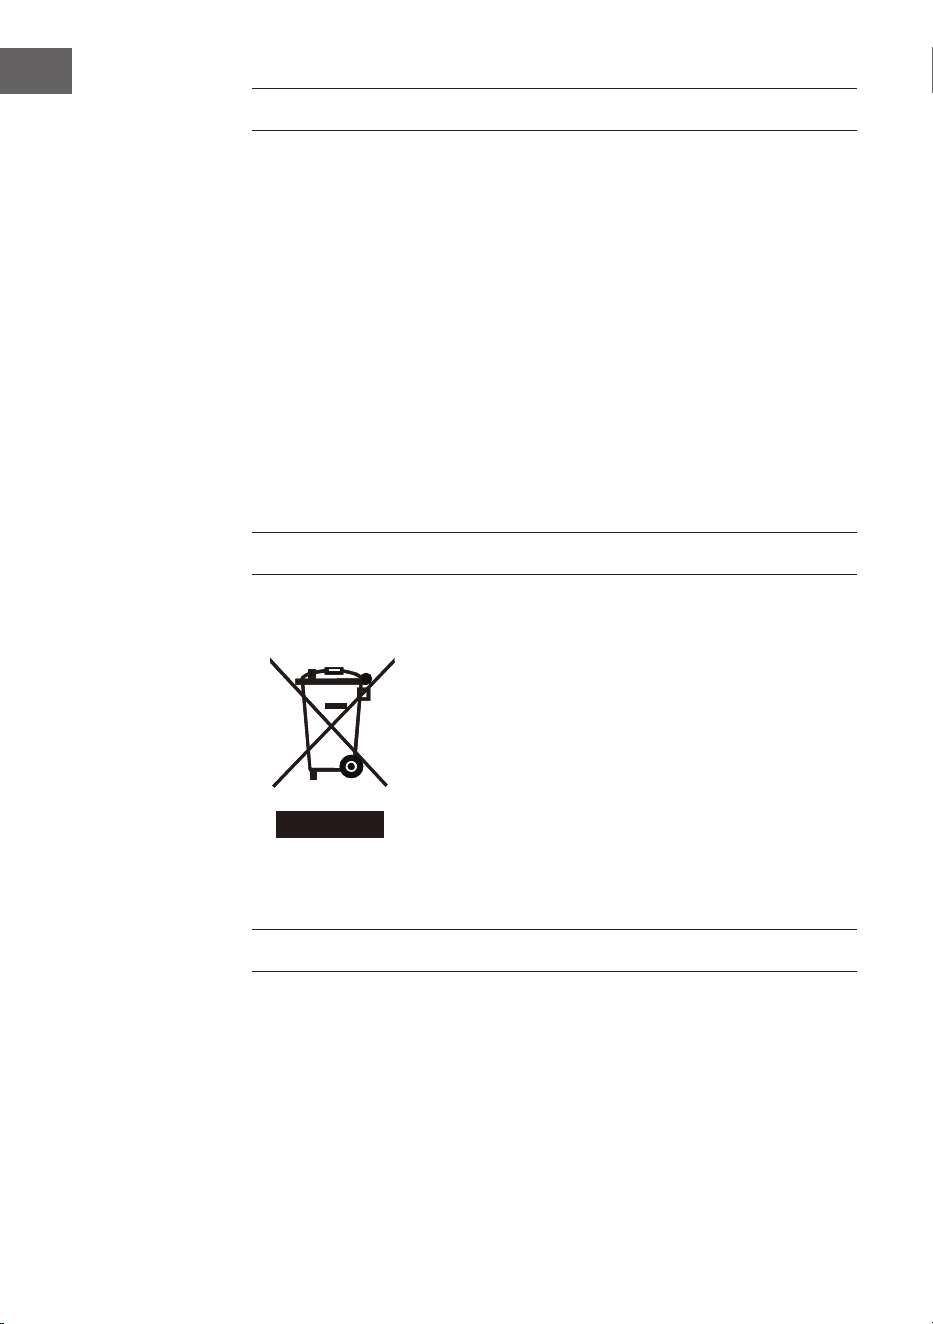
Aktivkohlelter austauschen
Ersetzen Sie die Filter durch Aktivkohlelter des selben Typs (10030983).
18
DE
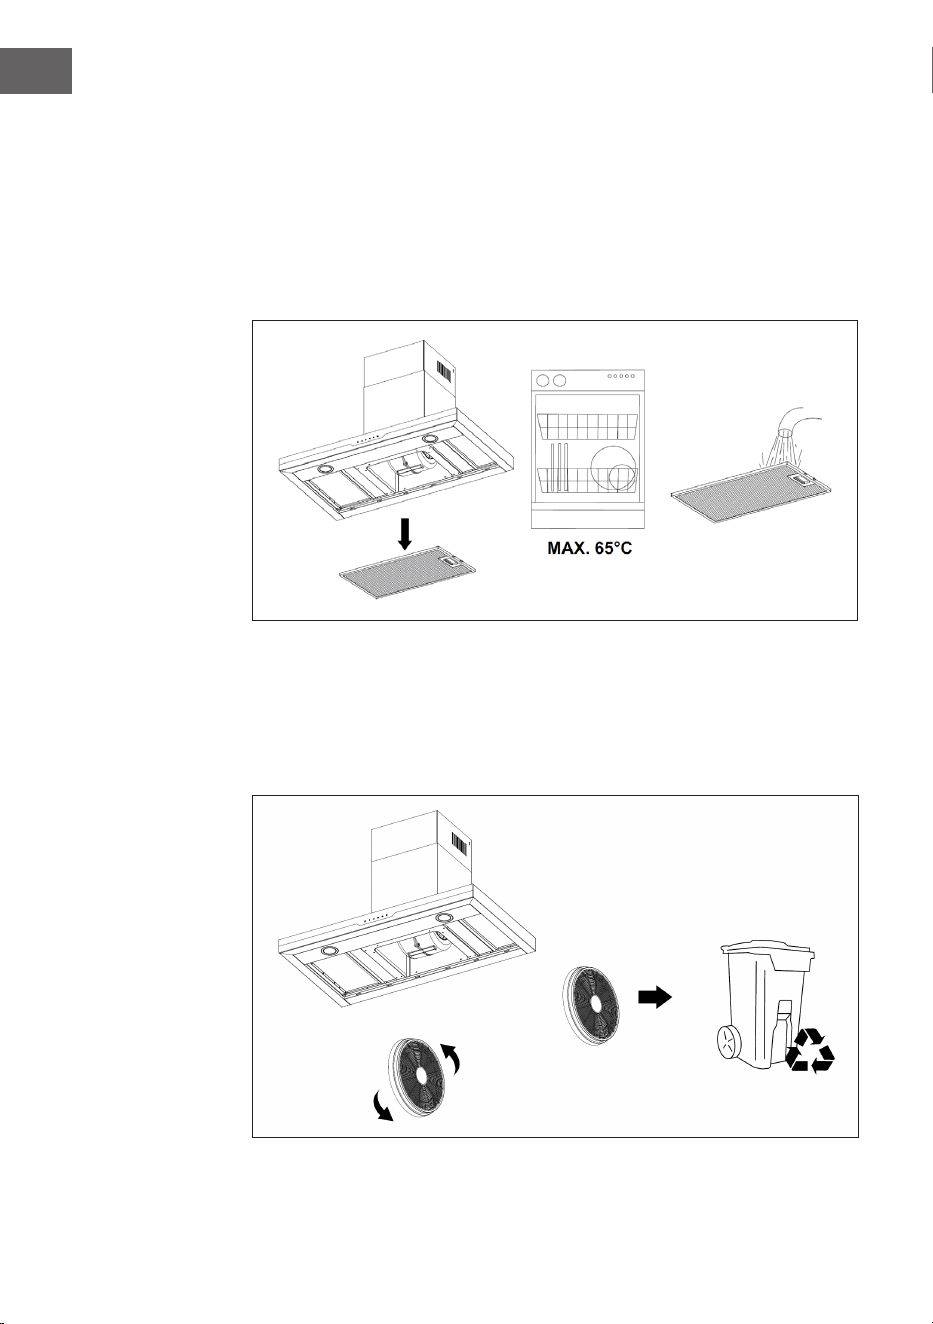
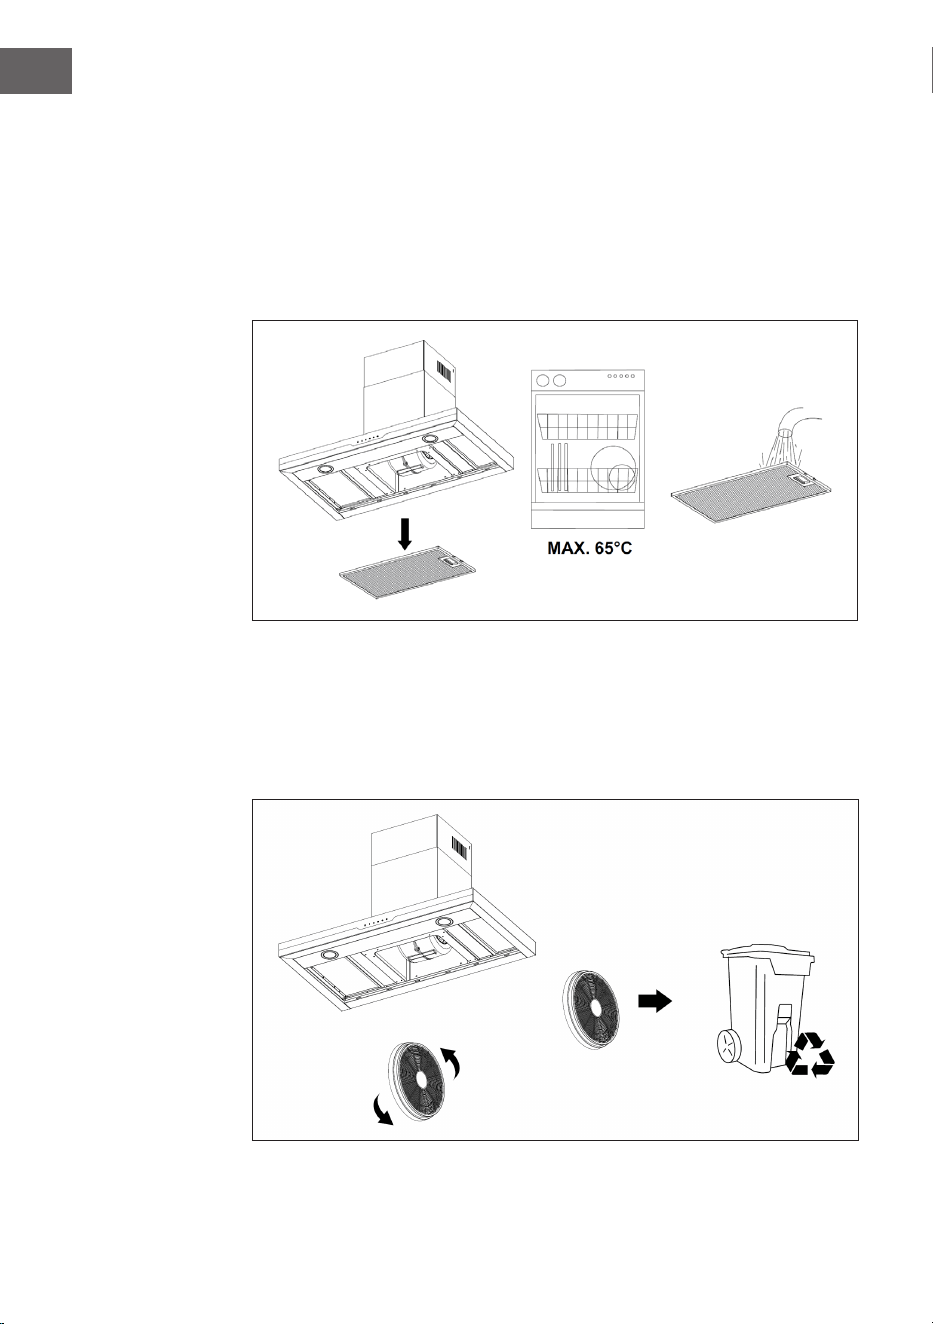
Aluminiumlter reinigen
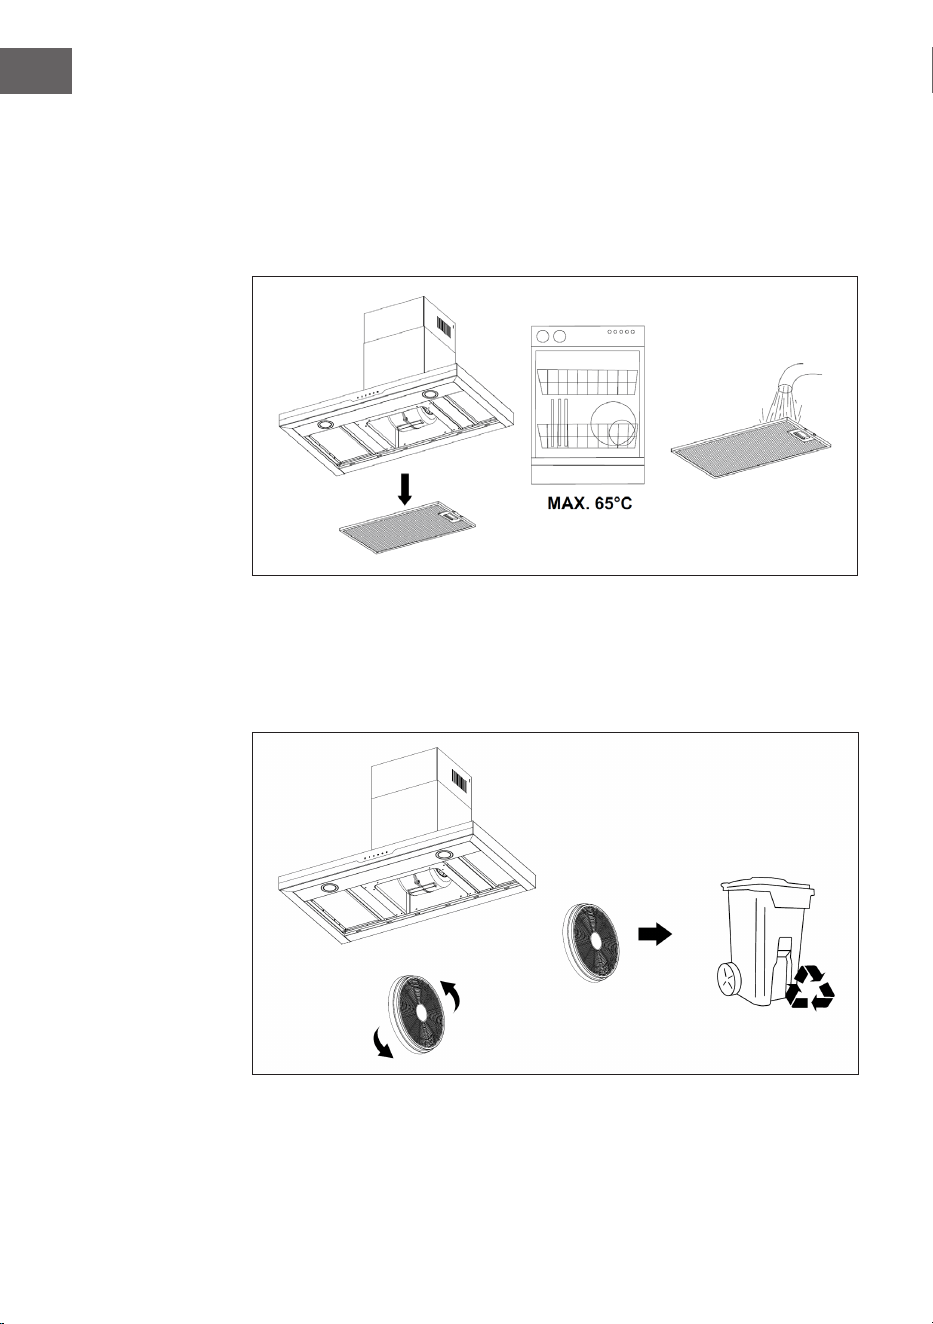
1. Um Brände zu vermeiden, reinigen Sie die Filter mindestens einmal im Monat
gründlich.
2. Entfernen Sie dazu die Aluminiumlter und weichen Sie sie in heißem Wasser
mit etwas Spülmittel (max. 65 ° C) eine Stunde lang ein.
3. Wenn Sie einen Geschirrspüler zur Reinigung verwenden, stellen Sie die
Aluminiumlter senkrecht in den Geschirrspüler, um den Reinigungsprozess
zu verbessern.
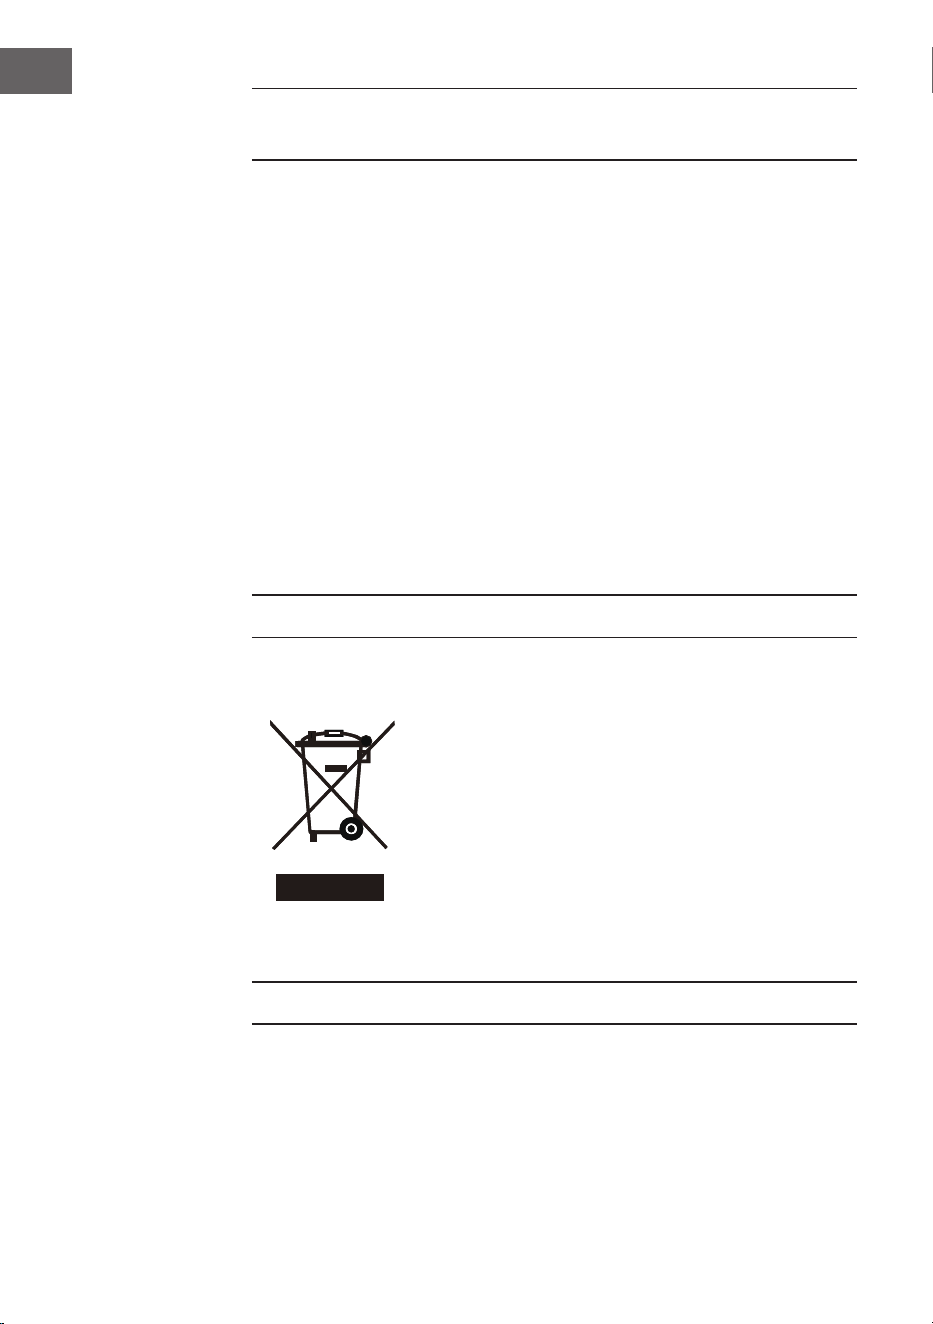
Kohlelter austauschen und entsorgen
Tauschen Sie die Kohlelter alle 3 Monate aus und entsorgen Sie sie
ordnungsgemäß. Wichtig: Erhöhen Sie die Filterreinigung/Austauschfrequenz,
wenn Sie die Haube mehr als 2 Stunden pro Tag verwenden. Verwenden Sie für
den Austausch stets Originallter.

19
DE
FEHLERBEHEBUNG
Fehler Mögliche Ursache Lösung
Das Licht ist an, aber der
Motor läuft nicht.
Die Lüftung ist blockiert. Entfernen Sie die
Blockade.
Der Kondensator ist
kaputt.
Lassen Sie den
Kondensator ersetzen.
Der Motor ist kaputt. Lassen Sie den Motor
ersetzen.
Der Motor riecht
merkwürdig.
Lassen Sie den Motor
ersetzen.
Das Licht ist aus und der
Motor läuft nicht.
Das Licht ist kaputt. Lassen Sie das Licht
ersetzen.
Der Stecker ist lose. Stecken Sie den Stecker
fest in die Steckdose.
Das Gehäuse vibriert. Das Rotorblatt des
Lüfters ist beschädigt.
Ersetzen Sie das Blatt.
Der Motor sitzt nicht
fest.
Befestigen Sie den
Motor.
Das Gehäuse hängt lose. Befestigen Sie das
Gehäuse.
Die Luft wird nicht
richtig abgesaugt.
Der Abstand zwischen
Herd und Abzugshaube
ist zu groß.
Verringern Sie den
Anstand.
Zu starke Luftzirkulation
durch offene Fenster
und Türen.
Achten Sie darauf, dass
kein Durchzug entsteht.
20
DE
HINWEISE ZUM UMWELTSCHUTZ
• Achten Sie während des Kochens auf eine ausreichende Luftzufuhr, damit
die Dunstabzugshaube ezient und mit einem geringen Betriebsgeräusch
arbeiten kann.
• Passen Sie die Gebläsedrehzahl an die beim Kochen entstehende
Dampfmenge an. Verwenden Sie den Intensivmodus nur bei Bedarf. Je
niedriger die Gebläsedrehzahl ist, desto weniger Energie wird verbraucht.
• Wenn beim Garen große Mengen Dampf entstehen, wählen Sie rechtzeitig
eine höhere Gebläsedrehzahl. Wenn sich der Kochdampf bereits in der Küche
verteilt hat, muss die Dunstabzugshaube länger betrieben werden.
• Schalten Sie die Dunstabzugshaube aus, wenn Sie sie nicht mehr benötigen.
• Schalten Sie die Beleuchtung aus, wenn Sie diese nicht mehr benötigen.
• Reinigen Sie den Filter in regelmäßigen Abständen und tauschen Sie ihn ggf.
aus, um die Effektivität des Lüftungssystems zu erhöhen und Brandgefahr zu
vermeiden.
• Setzen Sie beim Kochen immer den Deckel auf, um Kochdampf und
Kondenswasser zu reduzieren.
HINWEISE ZUR ENTSORGUNG
Wenn es in Ihrem Land eine gesetzliche Regelung
zur Entsorgung von elektrischen und elektronischen
Geräten gibt, weist dieses Symbol auf dem Produkt oder
auf der Verpackung darauf hin, dass dieses Produkt
nicht im Hausmüll entsorgt werden darf. Stattdessen
muss es zu einer Sammelstelle für das Recycling von
elektrischen und elektronischen Geräten gebracht
werden. Durch regelkonforme Entsorgung schützen
Sie die Umwelt und die Gesundheit Ihrer Mitmenschen
vor negativen Konsequenzen. Informationen zum
Recycling und zur Entsorgung dieses Produkts,
erhalten Sie von Ihrer örtlichen Verwaltung oder Ihrem
Hausmüllentsorgungsdienst.
HERSTELLER
Chal-Tec GmbH, Mühlenstraße 25, 10243 Berlin, Deutschland.
Kontakt: [email protected]
Importeur für Großbritannien:
Berlin Brands Group UK Limited
35 Ballards Lane
London, N3 1XW
United Kingdom

21
DE
SPEZIELLE ENTSORGUNGSHINWEISE FÜR
VERBRAUCHER IN DEUTSCHLAND
Entsorgen Sie Ihre Altgeräte fachgerecht. Dadurch wird gewährleistet, dass die
Altgeräte umweltgerecht verwertet und negative Auswirkungen auf die Umwelt
und menschliche Gesundheit vermieden werden. Bei der Entsorgung sind
folgende Regeln zu beachten:
• Jeder Verbraucher ist gesetzlich verpichtet, Elektro- und
Elektronikaltgeräte (Altgeräte) sowie Batterien und Akkus
getrennt vom Hausmüll zu entsorgen. Sie erkennen die
entsprechenden Altgeräte durch folgendes Symbol der
durchgestrichenen Mülltonne (WEEE-Symbol).
• Sie haben Altbatterien und Altakkumulatoren, die nicht vom Altgerät
umschlossen sind, sowie Lampen, die zerstörungsfrei aus dem Altgerät
entnommen werden können, vor der Abgabe an einer Entsorgungsstelle vom
Altgerät zerstörungsfrei zu trennen.
• Bestimmte Lampen und Leuchtmittel fallen ebenso unter das Elektro- und
Elektronikgesetz und sind dementsprechend wie Altgeräte zu behandeln.
Ausgenommen sind Glühbirnen und Halogenlampen. Entsorgen Sie
Glühbirnen und Halogenlampen bitte über den Hausmüll, sofern sie nicht das
WEEE-Symbol tragen.
• Jeder Verbraucher ist für das Löschen von personenbezogenen Daten auf dem
Elektro- bzw. Elektronikgerät selbst verantwortlich.
Rücknahmepicht der Vertreiber
Vertreiber mit einer Verkaufsäche für Elektro- und Elektronikgeräte von
mindestens 400 Quadratmetern sowie Vertreiber von Lebensmitteln mit einer
Gesamtverkaufsäche von mindestens 800 Quadratmetern, die mehrmals im
Kalenderjahr oder dauerhaft Elektro- und Elektronikgeräte anbieten und auf dem
Markt bereitstellen, sind verpichtet,
1 bei der Abgabe eines neuen Elektro- oder Elektronikgerätes an einen Endnutzer
ein Altgerät des Endnutzers der gleichen Geräteart, das im Wesentlichen die
gleichen Funktionen wie das neue Gerät erfüllt, am Ort der Abgabe oder in
unmittelbarer Nähe hierzu unentgeltlich zurückzunehmen und
2 auf Verlangen des Endnutzers Altgeräte, die in keiner äußeren Abmessung
größer als 25 Zentimeter sind, im Einzelhandelsgeschäft oder in unmittelbarer
Nähe hierzu unentgeltlich zurückzunehmen; die Rücknahme darf nicht an den
Kauf eines Elektro- oder Elektronikgerätes geknüpft werden und ist auf drei
Altgeräte pro Geräteart beschränkt.

22
DE
• Bei einem Vertrieb unter Verwendung von Fernkommunikationsmitteln
ist die unentgeltliche Abholung am Ort der Abgabe auf Elektro- und
Elektronikgeräte der Kategorien 1, 2 und 4 gemäß § 2 Abs. 1 ElektroG, nämlich
„Wärmeüberträger“, „Bildschirmgeräte“ (Oberäche von mehr als 100 cm²)
oder „Großgeräte“ (letztere mit mindestens einer äußeren Abmessung
über 50 Zentimeter) beschränkt. Für andere Elektro- und Elektronikgeräte
(Kategorien 3, 5, 6) ist eine Rückgabemöglichkeit in zumutbarer Entfernung
zum jeweiligen Endnutzer zu gewährleisten.
• Altgeräte dürfen kostenlos auf dem lokalen Wertstoffhof oder in folgenden
Sammelstellen in Ihrer Nähe abgegeben werden: www.take-e-back.de
• Für Elektro- und Elektronikgeräte der Kategorien 1, 2 und 4 bieten wir auch die
Möglichkeit einer unentgeltlichen Abholung am Ort der Abgabe. Beim Kauf
eines Neugeräts haben Sie die Möglichkeit, eine Altgerätabholung über die
Webseite auszuwählen.
• Batterien können überall dort kostenfrei zurückgegeben werden, wo sie
verkauft werden (z. B. Super-, Bau-, Drogeriemarkt). Auch Wertstoff- und
Recyclinghöfe nehmen Batterien zurück. Sie können Batterien auch per Post
an uns zurücksenden. Altbatterien in haushaltsüblichen Mengen können Sie
direkt bei uns von Montag bis Freitag zwischen 08:00 und 16:00 Uhr unter der
folgenden Adresse unentgeltlich zurückgeben:
Chal-Tec Fulllment GmbH
Norddeutschlandstr. 3
47475 Kamp-Lintfort
• Wichtig zu beachten ist, dass Lithiumbatterien aus Sicherheitsgründen vor der
Rückgabe gegen Kurzschluss gesichert werden müssen (z. B. durch Abkleben
der Pole).
• Finden sich unter der durchgestrichenen Mülltonne auf der Batterie zusätzlich
die Zeichen Cd, Hg oder Pb ist das ein Hinweis darauf, dass die Batterie
gefährliche Schadstoffe enthält (»Cd« steht für Cadmium, »Pb« für Blei und
»Hg« für Quecksilber).
Hinweis zur Abfallvermeidung
Indem Sie die Lebensdauer Ihrer Altgeräte verlängern, tragen Sie dazu bei,
Ressourcen ezient zu nutzen und zusätzlichen Müll zu vermeiden. Die
Lebensdauer Ihrer Altgeräte können Sie verlängern, indem Sie defekte Altgeräte
reparieren lassen. Wenn sich Ihr Altgerät in gutem Zustand bendet, könnten Sie
es spenden, verschenken oder verkaufen.
23
EN
Dear Customer,
Congratulations on purchasing this device. Please read the
following instructions carefully and follow them to prevent
possible damages. We assume no liability for damage
caused by disregard of the instructions and improper use.
Scan the QR code to get access to the latest user manual
and more product information.
CONTENTS
TECHNICAL DATA
Item number 10047433, 10047434
Power supply 220-240 V ~ 50/60 Hz
Safety Instructions 24
Packing Content 26
Installation 27
Installation Instructions 28
Operation 36
Cleaning and Care 37
Troubleshooting 39
Notes on Environmental Protection 40
Disposal Considerations 40
Manufacturer & Importer (UK) 40

24
EN
SAFETY INSTRUCTIONS
• Thank you for purchasing this cooker hood. Please read the instruction
manual carefully before you use the cooker hood, and keep it in a safe place.
• The installation work must be carried out by a qualied electrician or
competent person. Before you use the cooker hood, make sure that the
voltage (V) and the frequency (Hz) indicated on the cooker hood are exactly
the same as the voltage and the frequency in your home.
• The manufacturer and the agent will not bear any responsibility for the
damage caused by inappropriate installation and usage.
• Children under the age of 8 must not use the cooker hood.
• The appliance is not intended for commercial use, but only for household and
similar environments.
• The cooker hood and its lter mesh should be cleaned regularly in order to
keep it in good working order.
• Before cleaning, switch the power off at the main supply.
• Clean the cooker hood according to the instruction manual and keep the
cooker hood from the danger of burning.
• Prohibit putting the cooker hood by re.
• If the appliance does not function normally, contact the manufacturer or a
specialist company.
• This device may be only used by children 8 years old or older and persons with
limited physical, sensory and mental capabilities and / or lack of experience
and knowledge, provided that they have been instructed in use of the device
by a responsible person who understands the associated risks.
• If the supply cord is damaged, it must be replaced by the manufacturer, its
service agent or similarly qualied persons in order to avoid a hazard.
• If the range hood is used at the same time as appliances burning gas or other
fuels, the room must be adequately ventilated.
• Do not ambé under the range hood. Accessible parts may become hot when
used with cooking appliances.
Important hints on installation
• The air must not be discharged into a ue that is used for exhausting fumes
from appliances burning gas or other fuels (not applicable to appliances that
only discharge the air back into the room).
• Regulations concerning the discharge of air have to be fullled.
25
EN
Important notes about the extraction mode
WARNING
Risk of poisoning from exhaust gases sucked back. Never
operate the device in extraction mode simultaneously with an
open ue appliance when there is not adequate airow
guaranteed.
Open ue combustion equipment (for example, gas, oil, wood or coal-red
heaters, tankless water heaters, water heaters) pulls combustion air from the
room and runs it through an exhaust pipe or chimney to the outside. In the
extraction mode, indoor air is removed from the kitchen and the adjacent rooms
- without sucient air intake this creates a vacuum. Toxic gases from the chimney
or extraction ue can thereby be sucked back into the living spaces.
• Always ensure that a sucient supply of fresh air is guaranteed and that the
air can circulate.
• An air supply / extractor box alone does not ensure compliance with the limit
value.
Safe operation is only possible when the negative pressure in the room where the
appliance is located does not exceed 4 Pa (0.04 mbar). This can be achieved when
the air required for combustion can ow through openings that are not closable,
for example in doors, windows, in conjunction with an air supply / extractor box or
through other technical measures. In any case, consult a qualied chimney sweep
who can assess the entire ventilation of your house and propose appropriate
measures for adequate ventilation.
If the hood is used exclusively in the recirculation mode, unrestricted operation is
possible.
Important note on disassembly of the device
• Disassembly is similar to installation/assembly in reverse order.
• Take a second person to help you during disassembly to avoid injuries.

26
EN
PACKING CONTENT

27
EN
INSTALLATION
Before Installation
• To avoid the risks that are always present when you use an electrical appliance
it is important that this appliance is installed correctly and that you read the
safety instructions carefully to avoid misuse and hazards. Please keep this
instruction booklet for future reference and pass it on to any future owners.
After unpacking the appliance please check that it is not damaged.
• Check the package and make sure you have all of the parts listed.
• Decide on the appropriate location for your product.
• If this product contains glass please take care when tting or handling to
prevent personal injury or damage to the product.
• If you sell the appliance, give it away, or leave it behind when you move house,
make sure you also pass on this manual so that the new owner can become
familiar with the appliance and its safety warnings.
• This appliance must be installed correctly by a qualied person, strictly
following the manufacturer’s inst- ructions.
• Warning! Danger of electric shock! The power supply to the appliance must
be cut off before the appliance is installed completely.

28
EN
INSTALLATION INSTRUCTIONS
1 Select the type of installation: Exhaust function or Circulation function.
2 Mark the 6 hole positions on the wall (see installation diagram 1). The
maximum distance between the 2 top holes and the 2 middle holes should not
exceed 735 mm, depending on the ceiling height.
3 Drill the holes, and then insert the dowels into all the holes. The supplied
dowels are only suitable for solid walls. When xing to other types of walls,
use suitable alternative xings. Attach the suspension to the bottom holes
using 3 long screws (Installati- on Diagram 3). Next, screw 2 long screws into
the middle holes.
4 Use 2 long screws to attach the suspension to the top holes (installation
diagram 4).
5 Assemble the main unit and glass unit using 4 screws and washers. Tighten
the 2 screws with the hexagonal wrench. Then remove the aluminum lters
from the hood.
6 Place the hood on the 2 center screws and slide the hood down until it is fully
seated on the screws. Then x the screws.
7 If you are using the recirculation function, install the 2 charcoal lters.
8 Reattach the aluminum lters to the hood.
9 Fix the exhaust hose (only required for exhaust function) with self-adhesive
aluminum tape and secure it to the hood with 2 short screws.
10 Extend the chimney to the correct length and secure it to the hood. Secure the
bracket to the chimney with two short screws.
11 Connect the top of the exhaust duct to your fume hood, following the
manufacturer‘s instructions. Then place the chimney on the hood.
12 Secure the chimney to the wall by screwing the middle bracket to the wall and
securing the extended chimney to the top wall bracket with short screws.
29
EN
Ducted Option Recirculation Option

30
EN

31
EN

32
EN

33
EN

34
EN
34
35
EN

36
EN
OPERATION
Control panel
Buttons
1 On/off
2 Low speed
3 Middle speed
4 High speed
5 Boost Mode
6 Light
1 2
On/off and delay off button: press 3seconds, all keys light up,
indicating that the range hood is in standby mode. Touching power
key while the cooker hood is running in any speed, this key will
ash and the range hood will turn off in 3mins. Upon touching the
power key again, the indicator light reverts to red, and the function
key indicator lights turn off, indicating that the range hood is
powered off.
Touch this key, the range hood will run at speed 1.
Touch this key, the range hood will run at speed 2.
Touch this key, the range hood will run at speed 3.
Touch this key,the range hood will run in boost speed, and will
drop down to speed 3 after 5 minutes.
Light button: press the light button,the light will turn on. Press
again,the light will turn off.
37
EN
CLEANING AND CARE
Bulb replacement
• Remove the aluminium lters.
• The LED light is situated on boffom panel.
• Turn to remove the LED light. Dispose of it safely and ecologically.
• Install a new LED light of the correct rating in place.
Carbon lter replacement
Carbon lter model number is: 10030983.
38
EN
Aluminium lter replacement
1. To avoid res, clean thoroughly once a month.
2. To do so, remove the aluminium lters and soak them in hot water (max.
65ºC) and detergent for an hour.
3. If using a dishwasher, position the aluminium lters vertically to improve the
cleaning process.
Disposal of carbon lter
Replace every 3 months and dispose of properly. Important: Increase the lter
cleaning/replacement fre- quency if the hood is used for Care and maintenance
more than 2 hours a day. Always use genuine lters from the manufacturer.
39
EN
TROUBLESHOOTING
Fault Possible Cause Solution
Light on, but motor does
not work.
The leaf blocked. Get rid of the blocking.
The capacitor damaged. Replace capacitor.
The motor jammed bear-
ing damaged.
Replace motor.
The internal with of
motor off or a bad smell
from the motor.
Replace motor.
Light does not work, mo-
tor does not work.
Light damaged. Replace lights.
Power cord looses. Connect the wires as per
the electric diagram.
Shake of the body. The leaf damaged and
causes shaking.
Replace the leaf.
The motor is not tightly
hanged.
Lock the motor tightly.
The body is not tightly
hanged.
Fixed the body tightly.
Insucient suction. The distance between
the body and the gas top
too long.
Readjust the distance.
Too much ventilation
from open doors or
windows.
Choose a new place and
resemble the machine.
40
EN
NOTES ON ENVIRONMENTAL PROTECTION
• During cooking, make sure that there is sucient air supply so that the cooker
hood can operate eciently and with low operating noise.
• Adjust the fan speed to the amount of steam produced during cooking. Use
the intensive mode only when necessary. The lower the fan speed, the less
energy is consumed.
• If large amounts of steam are produced during cooking, select a higher fan
speed in good time. If the cooking steam has already dispersed in the kitchen,
the cooker hood must be operated longer.
• Switch off the cooker hood when you no longer need it.
• Switch off the lighting when you no longer need it.
• Clean the lter at regular intervals and replace it if necessary to increase the
effectiveness of the ventilation system and prevent re hazards.
• Always put the lid on when cooking to reduce cooking steam and
condensation.
DISPOSAL CONSIDERATIONS
If there is a legal regulation for the disposal of electrical
and electronic devices in your country, this symbol on the
product or on the packaging indicates that this product
must not be disposed of with household waste. Instead,
it must be taken to a collection point for the recycling
of electrical and electronic equipment. By disposing of
it in accordance with the rules, you are protecting the
environment and the health of your fellow human beings
from negative consequences. For information about the
recycling and disposal of this product, please contact your
local authority or your household waste disposal service.
MANUFACTURER & IMPORTER (UK)
Manufacturer:
Chal-Tec GmbH, Mühlenstrasse 25, 10243 Berlin, Germany.
Importer for Great Britain:
Berlin Brands Group UK Limited
35 Ballards Lane
London, N3 1XW
United Kingdom
Contact: [email protected]

41
FR
Chère cliente, cher client,
Toutes nos félicitations pour l’acquisition de ce nouvel
appareil. Veuillez lire attentivement et respecter les
instructions de ce mode d’emploi an d’éviter d’éventuels
dommages. Nous ne saurions être tenus pour responsables
des dommages dus au non-respect des consignes et à la
mauvaise utilisation de l’appareil. Scannez le QR-Code
pour obtenir la dernière version du mode d‘emploi et des
informations supplémentaires concernant le produit.
SOMMAIRE
FICHE TECHNIQUE
Numéro d'article 10047433, 10047434
Source d'alimentation 220-240 V ~ 50/60 Hz
Consignes de sécurité 42
Contenu de la livraison 44
Installation 45
Instructions d’installation 46
Fonctionnement 54
Nettoyage et entretien 55
Résolution des problèmes 57
Informations sur la protection de l‘environnement 58
Informations sur le recyclage 58
Fabricant 58

42
FR
CONSIGNES DE SÉCURITÉ
• Lisez attentivement toutes les consignes avant d’utiliser l’appareil et
conservez ce mode d’emploi pour vous y référer ultérieurement.
• Les travaux de montage doivent être effectués uniquement par électricien
professionnel ou un spécialiste. Avant d‘utiliser la hotte aspirante, assurez-
vous que la tension (V) et la fréquence indiquée sur la hotte aspirante (Hz)
correspondent à la tension (V) et à la fréquence (Hz) de votre alimentation.
• Le fabricant ne saurait être tenu responsable des dégâts occasionnés par le
non-respect des consignes d‘utilisation et d‘installation.
• Les enfants de moins de 8 ne doivent pas utiliser la hotte aspirante.
• L’appareil n’est pas destiné à une utilisation commerciale mais au cadre
domestique et dans des conditions similaires.
• Nettoyez l‘appareil et le ltre régulièrement pour que l‘appareil fonctionne
toujours de manière ecace.
• Avant le nettoyage, débranche toujours la che de la prise.
• Nettoyez l‘appareil exactement comme il est indiqué dans le mode d‘emploi.
• N‘utilisez aucune amme libre sous la hotte aspirante.
• Si l‘appareil ne fonctionne pas normalement, adressez-vous au fabricant ou à
un spécialiste.
• Cet appareil peut être utilisé par des enfants de 8 ans ou plus et des
personnes ayant des capacités physiques, sensorielles et mentales limitées
et / ou dénuées d‘expérience et de connaissances, à condition d‘avoir été
instruits au fonctionnement de l‘appareil par une personne responsable et
d‘en comprendre les risques associés.
• Si le câble secteur ou la che sont endommagés, faites-les remplacer par le
fabricant un service professionnel agréé ou une personne de qualication
équivalente.
• Si la hotte aspirante est utilisée avec une cuisinière à gaz ou utilisant d‘autres
combustibles, une ventilation susante de la pièce doit être assurée.
• Ne faites pas de ambée sous la hotte aspirante.
• Attention : la surface de l‘appareil peu devenir très chaude pendant le
fonctionnement.
Conseils importants pour l‘installation
• L‘air ne doit pas être dirigé vers une conduite déjà utilisée pour aspirer les
gaz de combustion provenant d‘une cuisinière à gaz ou utilisant d‘autres
combustibles (valable même pour les appareils qui ne renvoient pas l‘air dans
la pièce).
• Respectez les règlementations locales concernant l‘installation de dispositifs
d‘extraction d‘air.

43
FR
Remarques importantes concernant le mode d‘extraction
MISE EN GARDE
Danger de mort, risques d‘intoxication ! Par la ré-aspiration de
gaz de combustion. Ne jamais utiliser la fonction d’aspiration de
l’appareil en même temps qu’un foyer dépendant de l’air
ambiant si l’air frais est insusant.
Les foyers dépendants de l’air ambiant (par ex. les systèmes de chauffage au
gaz, au fuel, au bois ou au charbon, les chauffe-eaux électriques, les chaudières)
extraient l’air de combustion de la pièce où l’appareil est installé et rejettent les
gaz résiduaires à l’extérieur en les faisant passer par un conduit d’évacuation des
gaz (par ex. une cheminée). Lorsque la hotte aspirante est en marche, la cuisine et
les pièces adjacentes extraient l’air ambiant – une dépressurisation se produit si
le volume d’air frais n’est pas susant. Les gaz toxiques d’une cheminée ou d’un
foyer seront ré-aspirés dans la pièce d’habitation.
• Ainsi, il est toujours nécessaire de veiller à ce qu’il y ait une quantité susante
d’air frais.
• Un caisson mural d’aspiration/d’évacuation ne peut pas garantir à lui seul le
respect des valeurs limites.
Un fonctionnement sans risque est uniquement possible si la dépressurisation
de la pièce où est installé le foyer ne dépasse pas 4 Pa (0,04 mbar). Ceci n’est
possible que si l’air nécessaire à la combustion peut circuler par des ouvertures
permanentes, par ex. dans des portes, fenêtres associées à un caisson mural
d’aspiration/d’évacuation ou par d’autres dispositifs techniques. Dans tous les
cas, demander conseil auprès du ramoneur responsable de la circulation de l’air
pour l’ensemble du bâtiment, il sera à même de proposer les mesures à prendre
pour une aération appropriée.
Si la hotte aspirante est utilisée exclusivement en mode ventilation tournante, son
fonctionnement n’est soumis à aucune restriction.
Remarques importantes pour le démontage de l’appareil
• Pour le démontage, suivez les mêmes étapes que l’installation / montage
dans l’ordre inverse.
• Faites-vous aider par une deuxième personne lors du démontage pour éviter
les blessures.

44
FR
CONTENU DE LA LIVRAISON

45
FR
INSTALLATION
Avant l’installation
• Pour éviter les risques liés à l’utilisation d’un appareil électrique, il est
important que l’appareil soit installé correctement et que vous ayez lu
entièrement et avec attention les consignes de sécurité, pour éviter les
mauvaises utilisations et les dangers. Veuillez conserver ce mode d’emploi
pour une utilisation ultérieure et transmettez-la aux futurs propriétaires.
Vériez que l’appareil n’a pas subi de dommages après le déballage.
• Contrôlez le contenu du colis, et assurez-vous que toutes les pièces vous ont
bien été livrées
• Cherchez un emplacement approprié pour l’installation de la hotte aspirante.
• Si le produit contient du verre, faites attention de ne pas vous blesser avec
l‘appareil lors du montage ou de la manipulation.
• Si vous revendez l’appareil ou que vous le laissez sur place lors d’un
déménagement, transmettez ce mode d’emploi aux nouveaux propriétaires
pour qu’ils puissent être informés du fonctionnement et des consignes de
sécurité de l’appareil.
• Cet appareil doit être installé par une personne qualiée conformément aux
recommandations du fabricant. L’installation requiert deux personnes.
• Attention, risque d’électrocution ! L’alimentation de l’appareil doit être
entièrement coupée avant installation et la prise retirée du secteur.

46
FR
INSTRUCTIONS D’INSTALLATION
1. Choisissez votre mode d’installation : extraction ou ventilation.
2. Marquez la position des 6 trous sur le mur (voir le schéma d’installation 1).
L’écart maximal entre les 2 trous supérieurs et les 2 trous du milieu ne doit
pas dépasser 735 mm, suivant la hauteur de plafond.
3. Percez les trous, et enfoncez ensuite les chevilles dans tous les trous. Les
chevilles fournies conviennent uniquement aux murs pleins. Pour la xation
sur d’autres types de murs, utilisez les xations appropriées. Fixez le support
avec 3 longues vis aux trous inférieurs (schéma d’installation 3). Vissez ensuite
2 longues vis dans les trous du milieu.
4. Utilisez 2 vis longues, pour xer le support aux trous supérieurs (schéma
d’installation 4).
5. Assemblez l’appareil principal et la partie vitrée avec 4 vis et rondelles. Serrez
les 2 vis avec la clé Allen. Puis, retirez le ltre en aluminium de la hotte.
6. Posez la hotte sur les 2 vis du milieu et laissez-la glisser vers le bas, jusqu’à ce
qu’elle soit bien posée sur les vis. Serrez ensuite les vis.
7. Si vous utilisez la fonction ventilation, posez les 2 ltres à charbon.
8. Remontez le ltre en aluminium sur la hotte.
9. Fixez la cheminée (nécessaire en cas de fonction extraction seulement) avec
du ruban adhésif aluminium et xez-le à la hotte avec 2 vis courtes.
10. Tirez la cheminée pour la mettre à bonne longueur et xez-la à la hotte. Fixez
le support avec deux vis courtes à l‘évacuation.
11. Reliez le haut de la cheminée à votre évacuation, en respectant les indications
du fabricant. Posez main- tenant la cheminée sur la hotte.
12. Fixez la cheminée au mur, en vissant le support intermédiaire à la paroi et
xez la cheminée étirée avec des vis courtes sur le support supérieur.

47
FR
Fonction extraction Fonction ventilation

48
FR
49
FR

50
FR
51
FR

52
FR
52

53
FR

54
FR
FONCTIONNEMENT
Panneau de contrôle
Boutons
1 ON/OFF
2 Basse vitesse
3 Vitesse moyenne
4 Vitesse élevée
5 Mode Boost
6 Éclairage
1 2
Bouton marche/arrêt et bouton d'arrêt différé : appuyez sur 3
secondes, toutes les touches s'allument et indiquent que la hotte
est en mode veille. Si l'on touche la touche d'alimentation alors
que la hotte fonctionne à n'importe quelle vitesse, cette touche
clignote et la hotte s'éteint dans les 3 minutes qui suivent. Lorsque
vous appuyez à nouveau sur la touche marche/arrêt, le voyant
devient rouge et les voyants des touches de fonction s'éteignent,
ce qui indique que la hotte est hors tension.
Eeurez cette touche pour faire fonctionner la hotte à la vitesse 1.
Eeurez cette touche pour faire fonctionner la hotte à la vitesse 2.
Eeurez cette touche pour faire fonctionner la hotte à la vitesse 3.
Appuyez sur cette touche pour que la hotte fonctionne en vitesse
Boost, puis redescende à la vitesse 3 après 5 minutes.
Bouton d'éclairage : appuyez sur la touche d'éclairage, l'éclairage
s'allume. Appuyez à nouveau sur la touche, l'éclairage s'éteint.

55
FR
NETTOYAGE ET ENTRETIEN
Remplacer les ampoules
• Retirez le ltre en aluminium.
• Les ampoules LED se trouvent sur la face inférieure.
• Dévissez les ampoules pour les retirer. Jetez les ampoules usagées en
respectant l’environnement.
• Installez de nouvelles ampoules LED du même modèle.
Changement des ltres à charbon actif
Remplacez les ltres par des ltres à charbon actif de même modèle (10030983).
56
FR
Nettoyage des ltres aluminium
1. Pour éviter les incendies, nettoyez les ltres au moins une fois par mois et
entièrement.
2. Pour cela, démontez les ltres en aluminium et trempez-les dans l’eau chaude
avec un peu de liquide vais- selle pendant une heure (max. 65 ° C).
3. Si vous utilisez un lave-vaisselle pour le nettoyage, posez les ltres en
aluminium verticalement dans le lave-vaisselle, pour optimiser le processus de
nettoyage.
Changement des ltres à charbon et recyclage
Renouvelez vos ltres à charbon tous les 3 mois et jetez-les conformément
aux recommandations. Important : augmentez la fréquence de nettoyage/
remplacement des ltres, si vous utilisez la hotte plus de 2 heures par jour. Utilisez
toujours des ltres d’origine pour le remplacement.

57
FR
RÉSOLUTION DES PROBLÈMES
Problème Cause possible Solution
La lumière est allumée
mais le moteur ne fonc-
tionne pas.
La bouche d’aération est
bloquée.
Éliminer la source du
blocage.
Le condensateur est
cassé.
Faire remplacer le
condensateur.
Le moteur est cassé. Faire remplacer le
moteur.
Le moteur dégage une
mauvaise odeur.
Faire remplacer le
moteur.
La lumière est éteinte et
le moteur ne fonctionne
pas.
L’ampoule est cassée. Faire remplacer
l’ampoule.
La che n’est pas bien
enfoncée.
Rebrancher
correctement la che
dans la prise.
Le boîtier vibre. La pale de rotor
du ventilateur est
endommagée.
Remplacer la pale.
Le moteur n’est pas bien
xé.
Fixer le moteur.
Le boîtier pend de
manière lâche.
Fixer le boîtier.
L’air n’est pas
correctement aspiré.
L’écart entre la cuisinière
et la hotte aspirante est
trop élevée.
Réduire cet écart.
Trop forte circulation
d’air en raison de
fenêtres et de portes
ouvertes.
Veiller à éviter tout
courant d’air.
58
FR
INFORMATIONS SUR LA PROTECTION DE
L‘ENVIRONNEMENT
• Assurez-vous qu‘il y a une ventilation susante pendant la cuisson pour que
la hotte aspirante puisse fonctionner ecacement et avec un faible niveau
sonore.
• Ajustez la vitesse du ventilateur à la quantité de vapeur produite pendant la
cuisson. Utilisez le mode intensif uniquement lorsque cela est nécessaire.
Plus la vitesse du ventilateur est basse, moins la consommation d‘énergie est
réduite.
• Si de grandes quantités de vapeur sont produites pendant la cuisson,
sélectionnez une vitesse de ventilation plus élevée en temps utile. Si la
vapeur de cuisson est déjà répartie dans la cuisine, la hotte aspirante devra
fonctionner plus longtemps.
• Éteignez la hotte aspirante lorsque vous n‘en avez plus besoin.
• Éteignez l‘éclairage lorsque vous n‘en avez plus besoin.
• Nettoyez le ltre à intervalles réguliers et remplacez-le si nécessaire an
d‘augmenter l‘ecacité du système de ventilation et d‘éviter les risques
d‘incendie.
• Mettez toujours le couvercle pendant la cuisson pour réduire la vapeur et la
condensation.
INFORMATIONS SUR LE RECYCLAGE
S‘il existe une réglementation pour l‘élimination ou le
recyclage des appareils électriques et électroniques dans
votre pays, ce symbole sur le produit ou sur l‘emballage
indique que cet appareil ne doit pas être jeté avec les
ordures ménagères. Vous devez le déposer dans un point
de collecte pour le recyclage des équipements électriques
et électroniques. La mise au rebut conforme aux règles
protège l‘environnement et la santé de vos semblables
des conséquences négatives. Pour plus d‘informations
sur le recyclage et l‘élimination de ce produit, veuillez
contacter votre autorité locale ou votre service de
recyclage des déchets ménagers.
FABRICANT
Chal-Tec GmbH, Mühlenstraße 25, 10243 Berlin, Allemagne.
Contact : [email protected]
Importateur pour la Grande Bretagne :
Berlin Brands Group UK Limited
35 Ballards Lane
London, N3 1XW
United Kingdom

59
IT
Gentile cliente,
La ringraziamo per aver acquistato il dispositivo. La
preghiamo di leggere attentamente le seguenti istruzioni
per l’uso e di seguirle per evitare possibili danni. Non ci
assumiamo alcuna responsabilità per danni scaturiti da una
mancata osservazione delle avvertenze di sicurezza e da
un uso improprio del dispositivo. Scansionare il codice QR
seguente, per accedere al manuale d’uso più attuale e per
ricevere informazioni sul prodotto.
INDICE
DATI TECNICI
Numero di articolo 10047433, 10047434
Rete elettrica 220-240 V ~ 50/60 Hz
Avvertenze di sicurezza 60
Consegna 62
Installazione 63
Istruzioni per l‘installazione 64
Utilizzo 72
Pulizia e manutenzione 73
Risoluzione dei problemi 75
Indicazioni per la tutela dell’ambiente 76
Avviso di smaltimento 76
Produttore e importatore (UK) 76

60
IT
AVVERTENZE DI SICUREZZA
• Leggere attentamente tutte le istruzioni prima dell´uso e conservare il
manuale per consultazioni future.
• Il montaggio può essere eseguito solo da un tecnico qualicato. Prima di
utilizzare la cappa aspirante, accertarsi che la tensione (V) e la frequenza (Hz)
indicate corrispondano alla tensione (V) e alla frequenza (Hz) domestiche.
• Si declina ogni responsabilità per danni derivati da un utilizzo improprio e da
un´installazione errata della cappa aspirante.
• I bambini minori di 8 anni non possono utilizzare la cappa aspirante.
• La cappa aspirante non è per un uso commerciale bensì domestico e in
ambienti simili.
• Pulire regolarmente la cappa aspirante e il ltro per un corretto
funzionamento.
• Staccare la spina dalla presa prima di eseguire la pulizia.
• Pulire la cappa aspirante come indicato nel manuale di istruzioni. Non
utilizzare amme vive sotto la cappa aspirante.
• Se la cappa aspirante non funziona correttamente, rivolgersi al produttore o
ad un tecnico competente.
• Questo dispositivo può essere utilizzato da bambini a partire da 8 anni
e da persone con limitate capacità siche e psichiche o con conoscenza
ed esperienza limitate, solo se sono stati istruiti sulle modalità d’uso e
comprendono i rischi e i pericoli connessi.
• Se il cavo di alimentazione o la spina sono danneggiati, farli sostituire dal
produttore o da un tecnico qualicato.
• Se la cappa aspirante viene utilizzata insieme ad apparecchi che bruciano gas
o combustibili, è necessario che la stanza sia ben ventilata.
• Non cucinare alimenti alla amma (ambé) sotto la cappa aspirante.
• Attenzione: le superci della cappa aspirante possono diventare molto calde
durante l´uso.
Note importanti per l´installazione
• L´aria non deve essere condotta in uno scarico utilizzato per aspirare gas
di combustione o altri combustibili (ciò non si applica per dispositivi che
emettono solo aria nella stanza).
• Osservare tutte le disposizioni regionali relative all´incasso di dispositivi di
ventilazione.

61
IT
Note importanti circa la modalità di estrazione
AVVERTENZA
Pericolo di morte, pericolo di intossicazione da gas di scarico!
Non azionare l´apparecchio con funzione di scarico mentre è
attivo un impianto di riscaldamento che utilizza l´aria ambiente,
se l´areazione non è suciente.
Gli impianti di riscaldamento che sfruttano l´aria ambiente (ad es. stufe a gas, ad
gasolio, a legna o a carbone, scalda-acqua istantanei, scaldabagno), usano l´aria
ambiente per la combustione ed espellono all´esterno i gas di scarico attraverso
un sistema di scarico (ad es. camino). Con la cappa aspirante accesa viene
sottratta aria dalla cucina e dalle stanze adiacenti. Se l´areazione è insuciente si
forma una depressione. I gas tossici del camino vengono riaspirati negli ambienti
domestici.
• Pertanto è necessario che ci sia sempre un´areazione suciente.
• La cassetta a muro per areazione o sato da sola non garantisce un´areazione
suciente.
Un utilizzo sicuro è possibile solo se la depressione nella stanza dove è installato
l´impianto di riscaldamento non supera i 4 Pa (0,04 mbar). Ciò è possibile solo
se l´aria necessaria per la combustione può auire nella stanza attraverso
aperture permanenti come porte, nestre, in combinazione con una cassetta a
muro per areazione o sato o con altre misure tecniche. In ogni caso rivolgersi
ad un esperto di impianti di areazione il quale fornirà indicazioni sulle misure da
intraprendere per una corretta areazione.
Se la cappa aspirante viene impiegata esclusivamente con funzione di ricircolo
dell´aria, l´utilizzo è possibile senza limiti.
Informazioni importanti per smontare il dispositivo
• Lo smontaggio avviene seguendo i passaggi relativi a installazione/montaggio
in ordine inverso.
• Chiedere l’aiuto di una seconda persona per smontare il dispositivo, in modo
da evitare lesioni.

62
IT
CONSEGNA

63
IT
INSTALLAZIONE
Prima dell´installazione
• Per evitare i rischi che possono vericarsi quando si usa un dispositivo
elettrico, è importante installare cor- rettamente il dispositivo. Leggere
attentamente le istruzioni di sicurezza per evitare pericoli. Conservare il
manuale per consultazioni future. In caso di cessione a terzi del dispositivo,
cedere anche il presente manu- ale. Dopo aver disimballato il dispositivo,
assicurarsi che non sia danneggiato.
• Controllare la confezione e assicurarsi che tutti i componenti siano inclusi
nella consegna.
• Installare la cappa aspirante in un luogo idoneo.
• Se questo prodotto contiene vetro, prestare attenzione durante l‘installazione
a non farsi male e a non dan- neggiare il prodotto.
• In caso di vendita del dispositivo, cedere anche il manuale di istruzioni in
modo che il nuovo proprietario possa familiarizzare con il dispositivo e con le
avvertenze di sicurezza.
• Questo dispositivo deve essere installato correttamente da una persona
qualicata in conformità con le istruzioni del produttore. Per l´installazione
sono necessarie 2 persone.
• Attenzione: pericolo di scosse elettriche! Prima dell´installazione del
dispositivo staccare la corrente.

64
IT
ISTRUZIONI PER L‘INSTALLAZIONE
1. Scegliere il tipo di installazione: con funzione di scarico o con funzione di
ricircolo dell´aria.
2. Segnare le 6 posizioni dei fori sulla parete (vedere lo schema di installazione
1). La distanza massima tra i 2 fori superiori ed i 2 fori centrali non deve
superare i 735 mm in base all‘altezza del sotto.
3. Eseguire i fori e inserire i tasselli. I tasselli in dotazione sono adatti solo per
le pareti solide. In caso di s- saggio ad altri tipi di parete, utilizzare ssaggi
alternativi idonei. Fissare il gancio utilizzando 3 viti lunghe nei fori inferiori
(installazione schema 3). Ora avvitare nei fori centrali altre 2 viti lunghe.
4. Utilizzare due viti lunghe per ssare il supporto ai fori superiori (schema di
installazione 4).
5. Assemblare l’unità principale e l’unità in vetro utilizzando 4 viti e rondelle.
Serrare le viti utilizzando la chiave a brugola. Quindi rimuovere i ltri in
alluminio dalla cappa aspirante.
6. Mettere la cappa sulle 2 viti centrali e farla scivolare verso il basso no a
quando non è completamente ssata sulle viti. Poi serrare le viti.
7. Se si utilizza la funzione di ricircolo dell´aria, inserire 2 ltri a carbone attivo.
8. Fissare di nuovo i ltri in alluminio alla cappa aspirante.
9. Fissare il tubo di scarico (necessario solo con funzione di scarico) con nastro
adesivo in alluminio e ssarlo alla cappa aspirante utilizzando 2 viti corte.
10. Estendere il camino della lunghezza corretta e ssarlo alla cappa aspirante.
Fissare il supporto al camino utilizzando due viti corte.
11. Collegare la parte superiore del condotto di scarico ad uno scarico seguendo
le istruzioni del produttore. Quindi mettere il camino sulla cappa.
12. Fissare il camino alla parete avvitando il supporto centrale alla parete e ssare
il camino al supporto della parete superiore utilizzando le viti corte.

65
IT
Funzione di scarico Funzione ricircolo dell´aria

66
IT

67
IT
68
IT

69
IT

70
IT
70

71
IT
72
IT
UTILIZZO
Pannello di controllo
Tasti
1 On/off
2 Velocità bassa
3 Velocità media
4 Velocità alta
5 Modalità Boost
6 Luce
1
Tasto On/off e di spegnimento ritardato: premendo per 3 secondi,
tutti i tasti si illuminano, indicando che la cappa è in modalità
standby. Se si tocca il tasto di accensione mentre la cappa è in
funzione a qualsiasi velocità, questo tasto lampeggia e la cappa
si spegne dopo 3 minuti. Quando si tocca nuovamente il tasto
di accensione, la spia diventa rossa e le spie dei tasti funzione si
spengono, indicando che la cappa è spenta.
Se si preme questo tasto, la cappa funziona alla velocità 1.
Se si preme questo tasto, la cappa funziona alla velocità 2.
Se si preme questo tasto, la cappa funziona alla velocità 3.
Premendo questo tasto, la cappa funzionerà a velocità potenziata
(boost) e scenderà alla velocità 3 dopo 5 minuti.
Tasto della luce: quando si preme questo tasto, la luce si accende.
Premendolo di nuovo, la luce si spegne.

73
IT
PULIZIA E MANUTENZIONE
Cambiare le lampadine
• Rimuovere i ltri in alluminio.
• Le lampadine a LED sono situate sulla parte inferiore.
• Ruotare le lampadine per rimuoverle. Smaltire correttamente le vecchie
lampadine.
• Installare lampadine a LED dello stesso tipo.
Sostituire i ltri a carbone attivo
Sostituire i ltri con altri dello stesso tipo (10030983).

74
IT
Pulire i ltri in alluminio
1. Per evitare incendi, pulire i ltri almeno una volta al mese.
2. Rimuovere i ltri in alluminio e metterli in ammollo per un´ora in acqua calda
e aggiungere un po´ di deter- sivo (max. 65°C).
3. Se si utilizza la lavastoviglie, mettere i ltri in allumini in posizione verticale
nella lavastoviglie per migliorare il lavaggio.
Sostituire i ltri a carbone attivo e smaltirli
Sostituire i ltri a carbone attivo ogni 3 mesi e smaltirli correttamente. Importante:
aumentare la frequenza di pulizia dei ltri/di cambio dei ltri, se la cappa aspirante
viene utilizzata per più di 2 ore al giorno. Utilizzare solo ltri originali.

75
IT
RISOLUZIONE DEI PROBLEMI
Problema Causa possibile Soluzione
La luce è accesa ma il
motore non funziona.
L´areazione è bloccata. Rimuovere l´ostruzione.
Il condensatore è
guasto.
Sostituire il condensa-
tore.
Il motore è guasto. Sostituire il motore.
Il motore emette un
odore insolito.
Sostituire il motore.
La luce è spenta e il
motore non funziona.
La luce è guasta. Sostituire la luce.
La spina è allentata. Inserire correttamente la
spina nella presa.
L´alloggiamento vibra. La pala della ventola è
danneggiata.
Sostituire la pala.
Il motore non è ssato
correttamente.
Fissare il motore.
L´alloggiamento è
allentato.
Fissare l´alloggiamento.
L´aria non viene aspira-
ta correttamente.
La distanza tra i fornelli
e la cappa aspirante è
troppo grande.
Ridurre la distanza.
Circolazione dell´aria
troppo forte a causa di
porte e nestre.
Accertarsi che non ci
siano correnti d´aria.
76
IT
INDICAZIONI PER LA TUTELA DELL’AMBIENTE
• Mentre si cucina, assicurare un suciente usso d’aria, in modo che la cappa
aspirante possa funzionare in modo eciente e con bassa rumorosità operativa.
• Regolare la velocità della ventola in base alla quantità di vapore generato
durante la cottura. Utilizzare la modalità di funzionamento intenso solo se
necessario. Minore la velocità della ventola, minori i consumi energetici.
• Se durante la preparazione di grandi quantità di alimenti si forma molto
vapore, selezionare per tempo una velocità maggiore della ventola. Se il
vapore si è già diffuso nella cucina, sarà necessario lasciare in funzione più a
lungo la cappa aspirante.
• Spegnere la cappa quando non è più necessaria.
• Spegnere la luce quando non è più necessaria.
• Pulire il ltro a intervalli regolari e sostituirlo secondo necessità, in modo da
incrementare l’ecacia del sistema di ventilazione e da evitare il rischio di
incendi.
• Mettere sempre il coperchio sulle pentole quando si cucina, per ridurre vapore
e condensa.
AVVISO DI SMALTIMENTO
Se nel proprio paese si applicano le regolamentazioni
inerenti lo smaltimento di dispositivi elettrici ed
elettronici, questo simbolo sul prodotto o sulla confezione
segnala che questi prodotti non possono essere
smaltiti con i riuti normali e devono essere portati a
un punto di raccolta di dispositivi elettrici ed elettronici.
Grazie al corretto smaltimento dei vecchi dispositivi si
tutela il pianeta e la salute delle persone da possibili
conseguenze negative. Informazioni riguardanti il riciclo
e lo smaltimento di questi prodotti si ottengono presso
l’amministrazione locale oppure il servizio di gestione dei
riuti domestici.
PRODUTTORE E IMPORTATORE (UK)
Produttore:
Chal-Tec GmbH, Wallstraße 16, 10179 Berlino, Germania.
Importatore per la Gran Bretagna:
Berlin Brands Group UK Limited
PO Box 42
272 Kensington High Street
London, W8 6ND
United Kingdom
77
ES
Estimado cliente,
Le felicitamos por la adquisición de este producto. Lea
atentamente las siguientes instrucciones y sígalas para evitar
posibles daños. No asumimos ninguna responsabilidad
por los daños causados por el incumplimiento de las
instrucciones y el uso inadecuado. Escanee el siguiente
código QR para obtener acceso a la última guía del usuario
y más información sobre el producto.
ÍNDICE DE CONTENIDOS
Indicaciones de seguridad 46
Contenido del envío 48
Instalación 49
Instrucciones de instalación 50
Puesta en marcha y uso 58
Limpieza y cuidado 59
Solución de problemas 61
Ficha técnica del producto 62
Notas para cuidar del medio ambiente 64
Retirada del aparato 64
Fabricante e importador (Reino Unido) 64
DATOS TÉCNICOS
Número de artículo 10047433, 10047434
Fuente de alimentación 220-240 V ~ 50/60 Hz

78
ES
INDICACIONES DE SEGURIDAD
• Lea atentamente todas las indicaciones y conserve este manual para consultas
posteriores.
• Los trabajos de montaje deben ser realizados solamente por un electricista u
otro profesional. Antes de utilizar la campana extractora, asegúrese de que la
tensión (V) y la frecuencia indicada en la campana extractora (Hz) coinciden
con la tensión (V) y frecuencia (Hz) de su suministro eléctrico.
• La empresa no se responsabiliza de los daños ocasionados por un uso o
instalación indebida del producto.
• Los niños menores de 8 años no deben utilizar la campana extractora.
• Este aparato no ha sido concebido para un uso comercial, sino doméstico o
para entornos similares.
• Limpie el aparato y el ltro con regularidad para que el aparato funcione
siempre de manera eciente. Desconecte el enchufe antes de limpiar el
aparato.
• Limpie el aparato solamente según se describe en estas instrucciones.
• No utilice fuentes de ignición bajo la campana extractora.
• Si el aparato no funciona correctamente, contacte inmediatamente con el
fabricante.
• Este aparato puede ser utilizado por niños mayores de 8 años y personas con
discapacidades físicas, sensoriales y mentales y/o con falta de experiencia
y conocimientos, siempre y cuando hayan sido instruidos sobre el uso del
aparato y comprendan los peligros y riesgos asociados.
• Si el cable de alimentación o el enchufe están dañados, deberán ser
sustituidos por el fabricante, un servicio técnico autorizado o una persona
igualmente cualicada.
• Si utiliza la campana extractora con hornillos y entren en combustión el gas u
otras sustancias combustibles, deberá garantizar una buena ventilación de la
sala.
• No amee nada bajo la campana extractora.
• Advertencia: La supercie del aparato puede alcanzar temperaturas muy
elevadas durante el funcionamiento.
Indicaciones importantes de instalación
• El aire no puede desviarse a un tiro de salida que se emplee para evacuar
humos de gases u otras sustancias inamables (no se aplica para aparatos
que solo desvíen el aire a la sala).
• Siga todas las disposiciones locales para montar las instalaciones de
ventilación.
79
ES
Notas importantes acerca del modo de extracción
ADVERTENCIA
Peligro de muerte, riesgo de intoxicación provocado por gases en
combustión aspirados. Nunca ponga en funcionamiento la
función de extracción simultáneamente con un dispositivo que
genere calor en una estancia estanca si no se ha garantizado una
ventilación suciente.
Los dispositivos no estancos que generan calor (por ejemplo, radiadores que
funcionan con gas, aceite, madera o carbón, calentadores, calentadores de agua)
extraen el aire de combustión de la estancia correspondiente y canalizan el aire
de salida por medio de un tiro (por ejemplo una chimenea) hacia el exterior. Al
encender simultáneamente una campana extractora, el aire de la cocina y de
las estancias colindantes se extrae y sin suciente aire adicional se produce el
fenómeno de presión hipoatmosférica. Los gases nocivos de la chimenea o del
oricio de salida retornan a la estancia.
• Siempre debe proveer de suciente aire adicional a la estancia.
• Un conducto de ventilación y evacuación no garantiza en su totalidad que se
cumpla el valor límite.
Solo se garantizará un funcionamiento sin riesgos cuando presión hipoatmosférica
en la estancia del dispositivo generador de calor no supere los 4 Pa (0,04 mbar).
Esto podrá conseguirse cuando el aire necesario para la combustión pueda
circular por oricios sin cierre, como puertas o ventanas, junto con un conducto
de ventilación o evacuación o a través de otros medios técnicos. En cualquier caso,
siga el consejo del constructor de chimeneas autorizado que pueda evaluar la
conexión de ventilación general de su hogar y tomar las medidas necesarias.
Si pone en funcionamiento la campana extractora en modo circulación de aire,
puede utilizarla sin ninguna limitación.
Nota importante sobre el desmontaje del aparato
• El desmontaje es igual que el montaje pero en orden inverso.
• Al desmontar el aparato, pida ayuda a una segunda persona para evitar
lesiones.

80
ES
CONTENIDO DEL ENVÍO

81
ES
INSTALACIÓN
Antes de la instalación
• Para evitar riesgos que puedan surgir al utilizar un dispositivo eléctrico,
es importante que el aparato se instale correctamente y que se sigan las
indicaciones de seguridad para evitar un uso inadecuado. Conserve estas
instrucciones para un uso posterior y cédaselas al propietario posterior.
Asegúrese de que el aparato no se vea dañado tras desembalarlo.
• Compruebe el paquete y asegúrese de que contiene todos los componentes.
• Busque un lugar adecuado para la instalación de la campana.
• Si este producto contiene cristal, durante el montaje o manipulación tenga
cuidado para evitar lesiones o daños en el producto.
• Si vende el aparato o lo deja tras una mudanza, deje también el manual
de instrucciones para que el nuevo propietario pueda familiarizarse con el
aparato y sus indicaciones de seguridad,
• Este aparato debe ser instalado por una persona cualicada conforme a las
indicaciones del fabricante. Para la instalación se necesitan 2 personas.
• Riesgo de descarga eléctrica. El suministro eléctrico del aparato debe
apagarse completamente antes de la instalación y desconectar de la red
eléctrica.

82
ES
INSTRUCCIONES DE INSTALACIÓN
1. Seleccione un tipo de instalación: Función extractora o función de circulación
de aire.
2. Marque las 6 posiciones de los oricios en la pared (consulte diagrama de
instalación 1). La distancia máxi- ma entre los dos oricios superiores y los dos
centrales no debe ser superior a 735 mm dependiendo de la altura del techo.
3. Realice los oricios y a continuación introduzca los tacos en todos los oricios.
Los tacos incluidos solo son adecuados para paredes macizas. En la jación a
otro tipo de paredes, utilice jaciones alternativas ade- cuadas. Fije el soporte
con 3 tornillos largos a los oricios inferiores (diagrama de instalación 3).
Atornille después 2 tornillos largos en los oricios centrales.
4. Utilice dos tornillos largos para jar el soporte a los oricios superiores
(diagrama de instalación 4).
5. Monte el aparato principal y el cristal con 4 tornillos y arandelas. Apriete
los dos tornillos con la llave hexa- gonal. Retire el ltro de aluminio de la
campana.
6. Coloque la campana sobre los 2 tornillos medianos y deje que se mueva hacia
abajo hasta que se sostenga completamente en los tornillos. A continuación,
je los tornillos.
7. Si utiliza la función de circulación, monte dos ltros de carbón activo.
8. Fije de nuevo el ltro de aluminio a la campana.
9. Fije el conducto de evacuación (solo necesario para la función de extracción)
con cinta de aluminio adhe- siva y asegúrelo con 2 tornillos cortos a la
campana.
10. Extienda el conducto hasta la longitud necesaria y fíjelo a la campana. Fije el
soporte al conducto con dos tornillos cortos.
11. Conecte la parte superior del canal de extracción a su tiro de acuerdo con las
instrucciones del fabricante. Luego coloque la chimenea sobre la campana.
12. Fije la chimenea a la pared atornillando el soporte central a la pared y jando
la chimenea regulable con tornillos cortos al soporte de la pared.

83
ES
Función extractora función de circulación
84
ES

85
ES

86
ES

87
ES
88
ES
88

89
ES
90
ES
PUESTA EN FUNCIONAMIENTO
Panel de control
Botones
1 ON/OFF
2 Baja velocidad
3 Velocidad media
4 Alta velocidad
5 Modo Boost
6 Light (luz)
1 2 3 4
Botón de encendido/apagado y retraso de apagado: al pulsar 3
segundos, todas las teclas se iluminan, indicando que la campana
extractora está en modo de espera. Si toca la tecla de encendido
mientras la campana extractora está funcionando a cualquier
velocidad, esta tecla parpadeará y la campana extractora se
apagará en 3 min. Al tocar de nuevo la tecla de encendido, la luz
indicadora vuelve a ser roja y las luces indicadoras de las teclas
de función se apagan, indicando que la campana extractora está
apagada.
Al tocar esta tecla, la campana extractora se pondrá en marcha a la
velocidad 1.
Al tocar esta tecla, la campana extractora se pondrá en marcha a la
velocidad 2.
Al tocar esta tecla, la campana extractora se pondrá en marcha a la
velocidad 3.
Al tocar esta tecla, la campana extractora funcionará a velocidad de
refuerzo y bajará a velocidad 3 al cabo de 5 minutos.
Botón de luz: Si pulsa el botón de la luz, ésta se encenderá. Si pulsa
de nuevo, la luz se apagará.

91
ES
LIMPIEZA Y CUIDADO
Sustituir bombillas
• Retire el ltro de aluminio.
• Las luces LED se encuentran en la parte inferior.
• Gire la bombilla para extraerla. Deseche las bombillas usadas como
corresponda.
• Instale una bombilla LED nueva del mismo tipo.
Sustituir ltro de carbón activo
Sustituya el ltro de carbón activo por otro del mismo tipo (10030983).
92
ES
Limpiar el ltro de aluminio
1. Para evitar incendios, limpie el ltro al menos una vez al mes.
2. Además, retire el ltro de aluminio y póngalo a remojo en agua caliente con
un poco de lavavajillas (máx. 65
°C) durante una hora.
3. Si utiliza el lavavajillas para limpiarlo, coloque el ltro de aluminio
verticalmente para optimizar el proceso de limpieza.
Sustituir y desechar ltro de carbón activo.
Sustituya el ltro de carbón activo cada 3 meses y deséchelo como corresponda.
Importante: Aumente la limpieza del ltro o la frecuencia de sustitución si utiliza la
campana más de 2 horas al día. Utilice solo ltros originales como sustitución.

93
ES
SOLUCIÓN DE PROBLEMAS
Problema Posible causa Solución
La luz está encendi-
da pero el motor no
funciona.
La ventilación está
bloqueada.
Retire aquello que obs-
truye la ventilación.
El condensador está
averiado.
Sustituya el condensa-
dor.
El motor está averiado. Sustituya el motor.
El motor genera un olor
extraño.
Sustituya el motor.
La luz está apagada y el
motor no funciona.
La luz está fundida. Sustituya la luz.
El enchufe está suelto. Conecte el enchufe a la
toma de corriente.
La carcasa vibra. La hoja del rotor del
ventilador está dañada.
Sustituya la hoja.
El motor no está bien
colocado.
Fije el motor.
La carcasa está suelta. Fije la carcasa.
El aire no se extrae
completamente.
La distancia entre la
campana y la supercie
de cocción es demasiado
grande.
Reduzca la distancia.
Circulación de aire
demasiado fuerte a
causa de puertas y
ventanas abiertas.
Asegúrese de que no
se formen corrientes
de aire.

94
ES
NOTAS PARA CUIDAR DEL MEDIO AMBIENTE
• Durante la cocción, asegúrese de que haya un ujo de aire suciente para
que la campana extractora funcione ecazmente y con poco ruido de
funcionamiento.
• Ajuste la velocidad del ventilador a la cantidad de vapor producida durante la
cocción. Utilice el modo intensivo sólo cuando sea necesario. Cuanto menor
sea la velocidad del ventilador, menos energía consume.
• Si se producen grandes cantidades de vapor durante la cocción, seleccione una
velocidad de ventilador más alta. Si el vapor de la cocción ya se ha extendido
por toda la cocina, la campana extractora debe funcionar durante más tiempo.
• Apague la campana extractora cuando ya no la necesite.
• Apaga la iluminación cuando ya no la necesites.
• Limpie el ltro a intervalos regulares y sustitúyalo si es necesario, para aumentar
la ecacia del sistema de ventilación y prevenir los riesgos de incendio.
• Ponga siempre la tapa cuando cocine para reducir el vapor de la cocción y la
condensación.
INDICACIONES SOBRE LA RETIRADA DEL APARATO
Si en su país existe una disposición legal relativa a la
eliminación de aparatos eléctricos y electrónicos, este
símbolo estampado en el producto o en el embalaje
advierte que no debe eliminarse como residuo doméstico.
En lugar de ello, debe depositarse en un punto de
recogida de reciclaje de aparatos eléctricos y electrónicos.
Una gestión adecuada de estos residuos previene
consecuencias potencialmente negativas para el medio
ambiente y la salud de las personas. Puede consultar más
información sobre el reciclaje y la eliminación de este
producto contactando con su administración local o con
su servicio de recogida de residuos.
FABRICANTE
Chal-Tec GmbH, Mühlenstraße 25, 10243 Berlín, Alemania.
Contacto: [email protected]
Importador para Gran Bretaña:
Berlin Brands Group UK Limited
35 Ballards Lane
London, N3 1XW
United Kingdom